

Page 1

Hospitality Television
20/26/32HF5335D
15/20HF5234
- 1 -
Page 2

Installation of your Philips Hotel TV
1. Introduction
This addendum has been designed to help you install programmes on this Digital TV and activating the hotel
mode.
Use this addendum in conjunction with the User Manual of this television.
Please handle the TV with care and wipe with a soft cloth to ensure your TV keeps looking new.
2. The benefits of the Philips hotel TV
This TV is specially designed for hotels. The Philips hotel TV offers all kind of features to
Maximise the convenience for the hotel and meet the needs for the guest
Welcome message to give a friendly welcome to your guest when activating the tv
Remote control features like low battery detection and an anti-theft screw for preventing of theft for
batteries
Access to the user menu can be blocked. This prevents users (e.g. guests) from deleting or changing
program settings and/or modifying picture and sound settings. This ensures that TVs are always set up
correctly.
A
switch-on
specified program and volume level.
The maximum volume can be limited in order to prevent disturbance.
The television keys VOLUME +/- , PROGRAM +/- and MENU can be blocked.
Screen information can be suppressed.
Programmes can be blanked
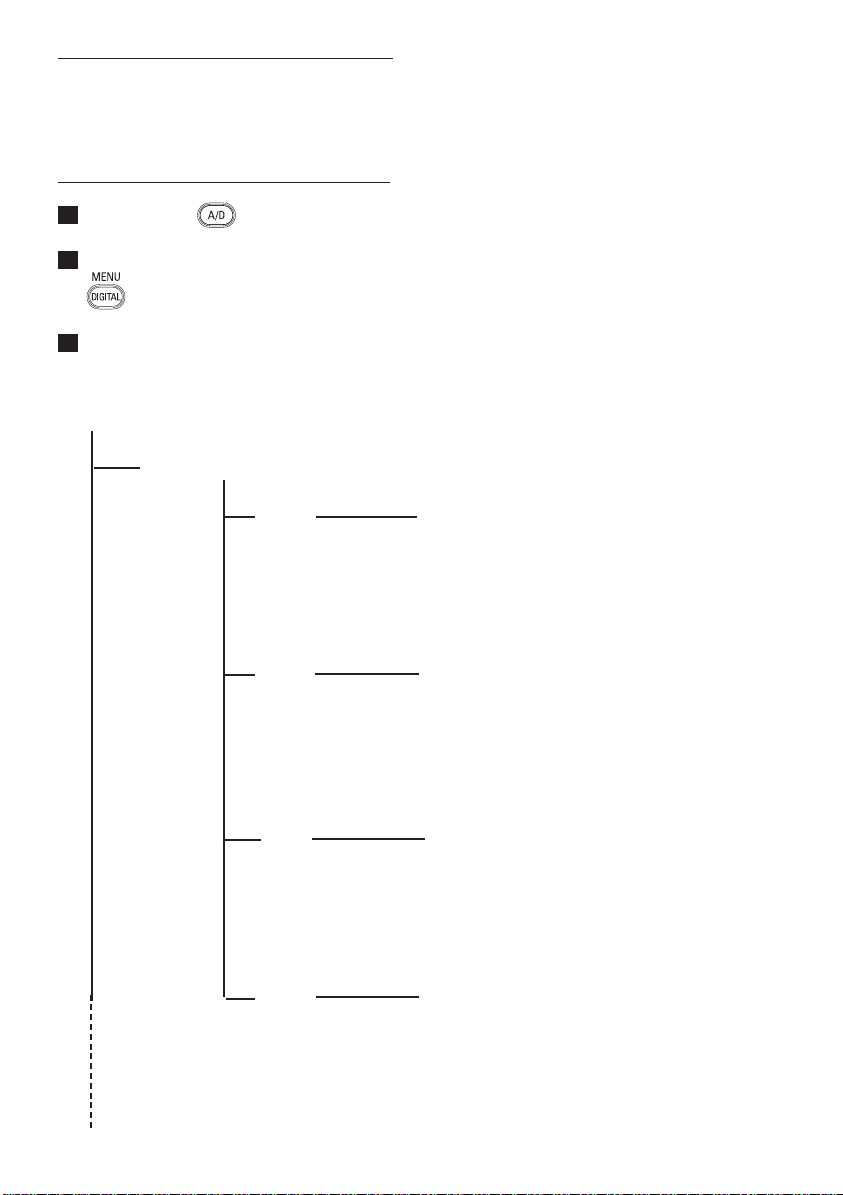
3. Installing the channels
Installing Digital Programs (only applicable for 20/26/32HF5335D)
Ensure the TV is in Digital mode. If it is in Analogue mode, press the A/D (Analogue/Digital) key on the
Remote Control to enter the Digital mode.
volume and programme can be selected. After switching on, the TV will always start on the
1. Press the
2. Press the Up/Down Arrow Key to scroll to the item called INSTALLATION and press the Right Arrow
Key
3. Press the Up/Down Arrow Key to scroll to the item called SERVICE SETUP and press the Right Arrow
Key
4. Press the Up/Down Arrow Key to scroll to the item called REINSTALL ALL SERVICES and press the Right
Arrow Key
5. Press the Up/Down Arrow Key to scroll to the item called SEARCH and press OK to start the scan.
(Menu Digital) key on the Remote Control
The
TV will now start to scan and install all available (Digital) TV channels and Radio stations automatically.
When the scan is completed, the TV menu will indicate the number of digital services found.
6. Press the OK key again to Store all the services that have been found.
- 2 -
Page 3
Installing Analogue Programs
Ensure the TV is in Analogue mode. If it is in Digital mode, press the A/D (Analogue/Digital) key on the
Remote Control to enter the Analogue mode.
1. Press the
2. Press the Up/Down Arrow Key to scroll to the item called INSTALL and press OK
3. Press the Up/Down Arrow Key to scroll to the item AUTO STORE and press OK
The TV will now start to scan and install all available (Analogue) TV channels automatically. This operation will
take a few minutes. The TV display will show the progress of the scan and the number of programmes found.
Refer to the chapter on
can also refer to the chapter on
preferred.
4. Activating the Hotel Mode Setup menu (BDS)
1. Switch on the television and select an analogue channel
2. On the Remote Control, press keys: [3, 1, 9, 7, 5, 3, MUTE]
3. The BDS HOTEL MODE SETUP MENU becomes visible
4. Use the cursor keys to select and change any of the following settings:
5. Select “STORE” and press [CURSOR RIGHT] to save the settings and exit BDS Hotel Mode
setup. Press [MENU] to exit without saving.
6. For BDS Hotel Mode settings to take effect, you must turn the TV set Off, then back On.
BDS Hotel Mode Functions
This paragraph describes the functionality of each item in the BDS Hotel Mode Setup menu.
BDS MODE
ON BDS Hotel Mode is ON:
The user menu is blocked.
All settings of the Hotel Mode Setup menu are in effect.
Automatic Tuning of Analogue Programmes
Function Possible selections
BDS MODE ON /OFF
SWITCH ON SETTINGS
SWITCH ON VOLUME 0-100, LAST STATUS
MAXIMUM VOLUME 0-100
SWITCH ON CHANNEL USER DEFINED, LAST STATUS
POWER ON ON/STANDBY/LAST STATUS
DISPLAY MESSAGE ON/OFF
WELCOME MESSAGE LINE 1/LINE 2/CLEAR
CONTROL SETTINGS
LOCAL KEYBOARD LOCK ON/OFF/ALL
REMOTE CONTROL LOCK ON/OFF
OSD DISPLAY ON/OFF
HIGH SECURITY MODE ON/OFF
AUTO SCART ON/OFF
MONITOR OUT ON/OFF
BLANK CHANNEL ON/OFF
STORE >
(Menu TV) key on the Remote Control
in the User Manual for more details. You
Manual Tuning of Analogue Programmes
in the User Manual if a manual scan is
- 3 -
Page 4

OFF BDS Hotel Mode is OFF:
The TV operates as a normal consumer TV
SWITCH ON VOL
When the user switches the TV ON, it will play at the specified volume level. There are 2 options:
LAST STATUS Upon start-up, the TV volume will be set to the level before the TV set was
USER DEFINED As specified by installer
Remark: “SWITCH ON VOL” cannot exceed the MAXIMUM VOL level. This is the volume level with which
the Hotel Mode Setup menu was entered.
MAXIMUM VOL
The TV Volume will not exceed the selected volume level.
SWITCH ON CHANNEL
When the user switches the TV ON, it will tune to the specified channel. There are 2 options:
LAST STATUS The TV will switch on to the last channel that was shown before the TV set
USER DEFINED Any analogue channel can be chosen to be the first channel to switch on
POWER ON
The Power On function allows the TV to enter a specific mode of operation (On or Standby) after the mains
power is activated.
ON When set, the TV will always turn ON after the mains power is enabled.
STANDBY When set, the TV will always turn to STANDBY after mains power is enabled
LAST STATUS When set, the TV will always turn to the last power status before the mains power was
DISPLAY MESSAGE
ON Enables display of the Welcome Message for 30 seconds after the TV set is turned on
OFF Disables the display of the Welcome Message.
If OSD DISPLAY is set to OFF, then the Welcome Message is automatically disabled.
WELCOME MESSAGE
The Welcome Message function allows the TV to show a customized greeting to the hotel guest whenever the
TV is switched on. This helps to personalize the hotel experience for guests.
The Welcome Message can consist of 2 lines of text, with each line containing a maximum of 20 alphanumeric
characters. Use the Remote Control arrow keys to create the Welcome Message.
To enable the display of the Welcome Message, the DISPLAY MESSAGE option must be ON
To clear the Welcome Message from the TV’s memory, select CLEAR
LOCAL KEYBOARD LOCK
ON The television keys VOLUME +/-, PROGRAM +/- and MENU are blocked.
OFF The television keys VOLUME +/-, PROGRAM +/- and MENU function normally
ALL The television keys VOLUME +/-, PROGRAM +/-, MENU and POWER are blocked.
REMOTE CONTROL LOCK
ON Standard Remote Control keys are disabled.
OFF All Remote Control keys will function normally.
OSD DISPLAY
ON Normal screen information is displayed (e.g. programme information)
OFF Screen information is suppressed.
last turned off.
was turned off
disabled.
- 4 -
Page 5

HIGH SECURITY MODE
ON Allows access to the BDS Hotel Mode Setup Menu via the special BDS Setup Remote only.
(RC2573/01)
OFF Allows access to the BDS Hotel Mode Setup Menu via BDS Setup Remote or via normal Remote
Control (using special key code sequence).
AUTO SCART
The Auto Scart function enables auto-detection of AV devices that are connected to the TV’s Scart connector.
ON Enables Auto Scart switching in BDS Hotel Mode.
OFF Disables Auto Scart switching in BDS Hotel Mode.
MONITOR OUT
ON Allows audio & video output from TV via relevant AV connectors (if available).
OFF Disables both Audio & Video output from the TV (to prevent illegal copying).
BLANK CHANNEL
The Blank Channel function disables the display of video on the TV, but does not affect the audio output. This
function can be used for audio applications (example: Off-air radio transmission, music channels, and so on),
which do not necessarily require the display of video.
ON The current programme is blanked
OFF The current programme is not blanked (normal visible; DEFAULT value)
BLANK CHANNEL can be set for every channel. Use [P+ / P-] to go through all the programmes and set the
desired status per channel. The programme number is visible in the top left corner.
Low Battery Check
This television set has a special feature which checks the battery power level of a TV Remote Control, and
indicates if the battery is low and requires changing.
(Note: The Low Battery Check function works only with certain models of Remote Controls. Please check
with the Philips sales representative if the Remote Control used with this TV supports this function)
To activate the Low Battery Check function, hold the TV Remote Control in front of the TV, and press and
hold the OK button on the Remote Control for at least 5 seconds. A message will appear on the TV screen to
indicate if the battery power level is OK, or if it is Low. If the message indicates that the battery level is low, it
is recommended to change the batteries of the Remote Control immediately.
5. Cloning of settings
Cloning of analogue TV channels and TV settings as described in the chapter
Hotel Mode Set-up menu
For 15/20HF5234
o Wireless cloning with the SmartLoader 22AV1120 or 22AV1135
o Cloning off all adjustable TV settings + analogue channel table
For 20/26/32HF5335D
o Wired cloning with the SmartLoader 22AV1135 using the wire packed with the SmartLoader
o Cloning off all adjustable TV settings + analogue channel table (digital channel table via automatic
installation)
Instruction for cloning of settings between TVs
Philips SmartLoader (22AV1135/00)
The Philips SmartLoader is an installation tool especially designed for easy and fast installation and copying of
TV settings on Philips Institutional TV’s.
- 5 -
Page 6

The Philips SmartLoader works in 2 modes – Wireless and Wired:
Wireless mode ---- through infrared sensor (15/20HF5234)
Switch the SmartLoader to “Wireless” mode by sliding the side-switch to the icon on the SmartLoader
device. Point the Wireless SmartLoader to the TV’s infrared receiver (optimal distance of 5-30cm) and proceed
with the Installation procedure listed below.
Wired mode ---- using the by-packed accessory cable(s) (20/26/32HF5335D)
Switch the SmartLoader to “Wired” mode by sliding the side-switch to the icon on the SmartLoader
device.
Examine the rear connectors of the TV set to determine if the 3-pin or 4-pin female connector wire (packed
with the Wireless SmartLoader) should be used. Plug in the correct connector wire to the corresponding
opening on the TV set (usually marked as SERV C), and then connect the RJ11 jack end of the accessory wire
to the RJ11 socket on the SmartLoader.
The Installation Procedure consists of three simple steps:
1. Choosing a Master TV
The Master TV is the TV set whose installation and configuration settings are to be copied into other TV’s (of
the same type only).
2. Programming the SmartLoader with the settings from the Master TV
Follow these steps to program the SmartLoader with the settings of the Master TV.
a) Wireless method
Set the SmartLoader to “Wireless” mode using the side switch.
Turn on the TV, and while holding the SmartLoader, point it in the direction of the
TV. Press the “MENU” Key on the SmartLoader.
b) Wired method
Connect the SmartLoader to the TV using the appropriate accessory cable.
Set the SmartLoader to “Wired” mode using the side switch.
Turn on the TV, and while holding the SmartLoader, point it in the direction of the
TV. Press the “MENU” Key on the SmartLoader.
The Master TV will show the following menu:
SMARTLOADER TO TV >
TV TO SMARTLOADER >
On the TV screen, highlight the menu option “TV TO SMARTLOADER”
Press the right arrow key on the SmartLoader to start the programming process
A number display (from 0~100) will be shown on screen, indicating the percentage of the programming
progress from the TV to the SmartLoader. When the programming is completed, “##” will show “100” and the
message “DONE” will appear.
TV TO SMARTLOADER ## (0-100)
The SmartLoader is programmed and can be used to install and configure other TVs.
Copying the settings of the Master TV to other TVs with the SmartLoader
Follow these steps to install and configure the settings of a Philips TV with the SmartLoader.
- 6 -
Page 7

a) Wireless method
Set the SmartLoader to “Wireless” mode using the side switch.
Turn on the TV, and while holding the SmartLoader, point it in the direction of the
TV. Press the “MENU” Key on the SmartLoader.
b) Wired method
Connect the SmartLoader to the TV using the appropriate accessory cable.
Set the SmartLoader to “Wired” mode using the side switch.
Turn on the TV, and while holding the SmartLoader, point it in the direction of the
TV. Press the “MENU” Key on the SmartLoader.
On the TV screen, highlight the menu option “SMARTLOADER TO TV”
Press the right arrow key on the SmartLoader to initiate the copying process
> A number display (from 0~100) will be shown on screen, indicating the percentage of the installation
progress from the SmartLoader to the TV. When the data transfer is completed, “##” will show “100” and
the message GOODBYE will appear.
SMARTLOADER TO TV ## (0-100)
> The TV will go to Standby mode. When the TV is next powered on, it will be configured with the settings
from the Master TV, and ready for use.
Problems and Solutions:
1.
The message “I2C ERROR” is displayed on the screen.
Bad connection of RJ11 wire or wrong data transmission has occurred. Try again.
2.
The message “WRONG VERSION” is displayed on the screen.
The program contained in the SmartLoader has a software code incompatible with the actual TV.
Reprogram the Wireless SmartLoader from a Master TV whose software code is compatible with the
actual TV.
3.
TV doesn’t respond to the SmartLoader.
Check if the LED on the SmartLoader lights up in green when pressing any button.
If the LED is red, it means that the batteries are low and should be replaced.
Bring the SmartLoader closer to the TV infrared receiver and try again.
Notes:
Make sure that the 3 R6/AA sized batteries are placed correctly in the bottom compartment of the
SmartLoader. The LED on the SmartLoader should light up in green when pressing any button, indicating
operational batteries. When the LED shows red, the batteries need to be replaced.
The SmartLoader can only copy the settings between 2 TVs of the same type. Once the
SmartLoader is programmed with the settings from a Master TV of a certain type or model,
then these settings can be installed on another TV of the same model only.
The SmartLoader cannot be used to copy the (digital) channel table of a Digital TV set.
If the SmartLoader is used with a DVB (European Digital) TV set, then the TV set must first
be switched to Analog mode.
- 7 -
Page 8

Y
T
Disposal of your old product.
our product is designed and manufactured with high quality materials and
components, which can be recycled and reused. When this crossed-out wheeled bin
symbol is attached to a product it means the product is covered by the European
Directive 22002/96/EC. Please find out more about the separate collection system for
electrical and electronic products in your local neighborhood.
2007© Koninklijke Philips Electronics N.V. all rights reserved
Specifications are subject to change without notice
Trademarks are property of Koninklijke Philips Electronics N.V. or their respective owners.
Please act according to your local rules and do not dispose of your old products with
your normal household waste. The correct disposal of your old product will help
prevent potential negative consequences for the environment and human health.
he packaging of this product is intended to be recycled. Apply to the
local authorities for correct disposal.
- 8 -
Page 9
www.philips.com/support
PT MANUAL DO UTILIZADOR
Page 10

Country Number Tariff
www.philips.com/support
Model
Serial
Austria 0820 901114 €0.20/min
Belgium 070 222 303 €0.17/min
Chech Rep 800142840 free
Denmark 3525 8759 local
Finland 09 2311 3415 local
France 08 9165 0005 €0.23/min
Germany 0180 5 356 767 €0.12/min
Greece 0 0800 3122 1280 free
Hungary 0680018189 free
Ireland 01 601 1777 local
Italy 199 404 041 €0.25/min
Luxemburg 40 6661 5644 local
Netherlands 0900 8407 €0.20/min
Norway 2270 8111 local
Poland 0223491504 local
Portugal 2 1359 1442 local
Slovakia 0800004537 free
Spain 902 888 784 €0.15/min
Sweden 08 5792 9100 local
Switzerland 0844 800 544 local
UK 0906 1010 016 £0.15/min
Page 11
Reciclagem
Informação sobre o produto
A embalagem deste produto pode ser
reciclada. Informe-se junto das autoridades
locais.
Reciclagem do aparelho usado
O seu aparelho de televisão utiliza materiais
de grande qualidade que podem ser
reciclados ou reutilizados. Quando este
símbolo do caixote de lixo barrado com uma
cruz surge no seu aparelho, significa que o
produto cumpre a Directiva Comunitária
2002/976/EC.
Por favor informe-se acerca do sistema
de recolha de produtos eléctricos e
electrónicos. Por favor proceda de acordo
com as regras regionais e não deposite os
seus aparelhos velhos com o resto do lixo. A
eliminação correcta do seu aparelho ajudará
a evitar possíveis consequências negativas no
ambiente e na saúde.
Eliminação das pilhas
As pilhas fornecidas não contém os metais
pesados mercúrio e cádmio. Por favor, verifique como eliminar pilhas gastas de acordo
com os regulamentos locais.
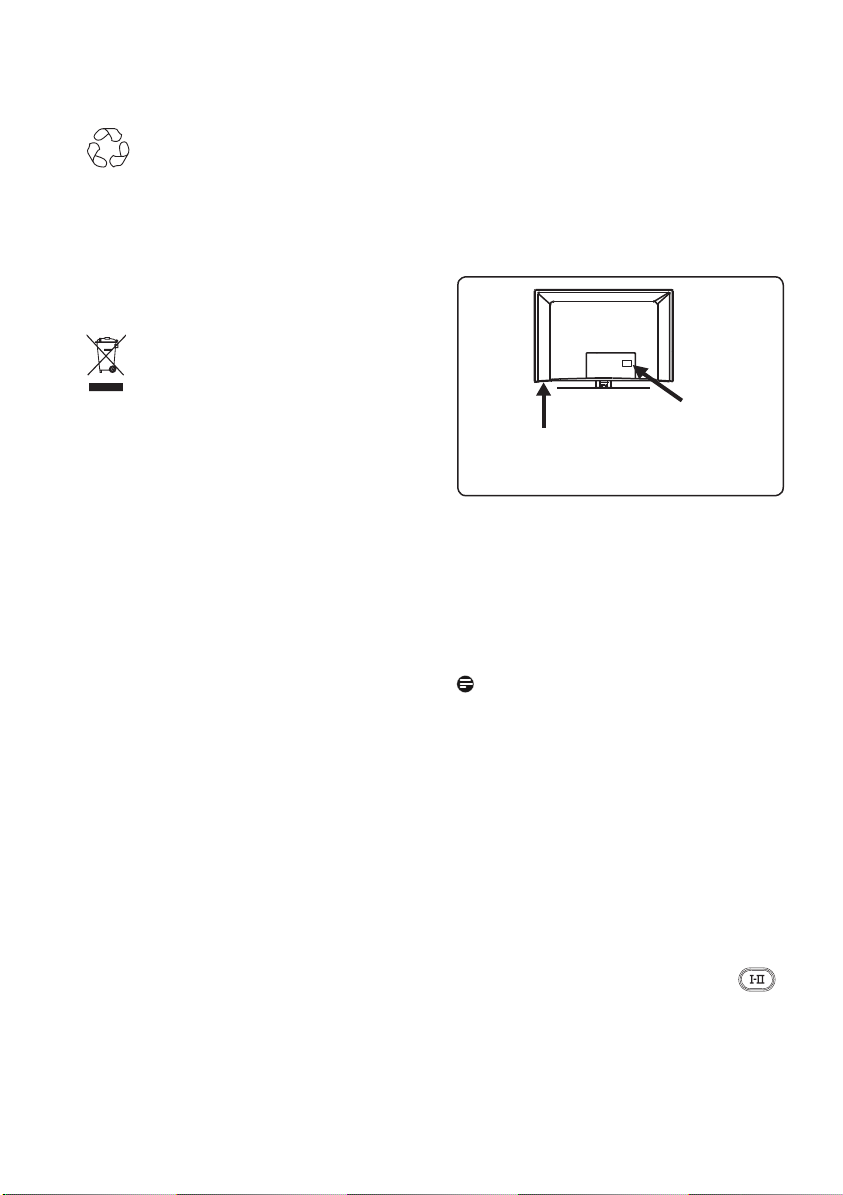
• O Modelo e o Número de série podem
ser encontrados na parte de trás e do
lado inferior esquerdo do seu aparelho de
televisão e na embalagem.
Parte posterior
Lateral inferior
da TV
esquerda da TV
• O consumo de energia no modo stand-by
(espera) deste aparelho é inferior a 1 W.
• O Consumo de energia do aparelho pode
ser encontrado na placa de características
na parte posterior da TV.
• Para mais especificações acerca do
produto, consulte o folheto do produto
em www.philips.com/support
Nota
As especificações e informações
estão sujeitas a alterações sem aviso
prévio.
• Se necessitar de mais assistência, por favor,
telefone para o serviço de apoio ao cliente
no seu país. Os endereços e números de
telefones correspondentes são dados no
folheto de garantia mundialmente
fornecido.
Importante
• Este aparelho não suporta AC3 (um
formato de áudio). Utilize a tecla de
no telecomando para seleccionar um
áudio alternativo.
• Algumas antenas de TV são alimentadas a
partir do aparelho de TV. Este aparelho
não suporta tal função.
Page 12

A tabela de conteúdo
Português
1 Apresentação............................ 3
1.1 Informação importante..................... 3
1.1.1 Imagens estáticas no ecrã de
televisão................................................. 3
1.1.2 Campos eléctricos, magnéticos
e electromagnéticos (“EMF”)...3
1.2 O que é a televisão digital?............... 4
1.3 Canais digitais ou analógicos?........... 4
2 Segurança ................................. 5
2.1 Geral...................................................... 5
2.2 Cuidados com o ecrã......................... 5
3 Vista geral dos botões e
conectores da televisão............ 6
3.1 Controlos laterais............................... 6
3.2 Conectores traseiros......................... 6
3.3 Conectores laterais............................ 6
4 Começar ................................... 7
4.1 Antes de começar............................... 7
4.2 Ligar a antena....................................... 7
4.3 Ligar as tomadas.................................. 7
4.4 Ligar a TV.............................................. 7
4.5 Utilizar o telecomando.......................7
9 Lista de serviços.
9.1 Reorganise os serviços........................... 15
9.2 Reorganise os serviços ou Ver
novos canais de TV............................. 15
10 Configura ção de serviços..........
.....................................................16
10.1
Adicionar novos serviços
10.2 Reinstalar todos os serviços................. 16
10.3 Serviços de instalação manual.......... 17
11 Teste de recepção..................... 18
12 Preferências............................... 19
13 Restrições de acesso.................20
14 Configurar a sua lista de
favoritos......................................21
15 Informação................................. 22
16 Utilizar o menu Opções........... 23
17 Guia da TV.................................24
18 Função de gravação.................. 25
.................. 16
5 Funções do telecomando......... 8
6 Visão geral do menu Digital e
sub-menus..................................10
7 Ligar a TV pela primeira vez.....
.................................................... 13
8 Entender as informações da
faixa............................................ 14
8.1 Descrição da faixa.............................. 14
8.2 Descrição dos símbolos.................... 14
19 Teletexto digital (MHEG).........27
20 Usar o Módulo de Acesso
Condicional (CAM) .................. 28
21 Sintonia automática dos
programas analógicos............... 29
22 Memorização manual dos
programas analógicos............... 30
23 Classificação dos canais.............31
24 Nomear Canais..........................32
25 Seleccionar os seus Programas
Favoritos.................................... 33
1
Page 13

2
26 Vários
26.1 Timer...................................................... 34
26.2 Bloqueio Pais........................................ 35
26.3 Bloq. Infantil.......................................... 36
26.4 Active control...................................... 36
27 Definições de Imagem e Som.. 37
28 Smart Picture e de Som........... 38
29 Formatos do ecrã...................... 39
30 Teletexto.....................................40
31 Usar a TV como um Monitor de
PC
31.1 Ligar o equipamento do PC.............. 42
31.2 Controlo das definições da TV
quando estiver ligado ao PC............. 42
32 Utilização em Modo HD (High
Definition – Alta Definição)
32.1 Ligar o equipamento HD................... 43
32.2 Controlar as definições da TV
enquanto em modo HD.................... 43
33 Ligar outros equipamentos
33.1 Visão geral das ligações...................... 45
33.2 Ligar um videogravador ou
gravador de DVD................................ 46
33.3 Ligar um descodificador e um
videogravador....................................... 46
33.4 Ligar dois videogravadores ou um
videogravador e um gravador de DVD
................................................................. 47
33.5 Ligar um receptor de satélite........... 47
33.6 Ligar um leitor de DVD, uma caixa de
cabo ou uma consola de jogos......... 48
33.7 Ligar um leitor de DVD, um
receptor de satélite ou uma caixa
de cabo.................................................. 48
33.8 Ligar a um computador..................... 49
33.9 Ligar a câmara, câmara de video ou
consola de jogos ................................. 50
33.9.1 Ligar auscultadores....................... 50
34 Resolução de problemas...........51
35 Glossário.................................... 53
Page 14

3
1 Introdução
Obrigado por adquirir este aparelho de
televisão. Este manual contém todas as
informações que precisará para instalar e
operar inicialmente a sua nova TV
Se este manual de instruções não lhe
oferecer uma resposta para o seu problema
ou se a página Resolução de Problemas
também não o fizer, poderá telefonar ao
seu Revendedor local ou para o Centro de
assistência da Philips. Consulte o folheto
de garantia mundialmente fornecido, para
mais detalhes. Por favor, antes de telefonar
para o serviço de apoio ao cliente da Philips,
tenha à mão o Modelo e o Número do
produto (que poderá encontrar na parte
inferior traseira do seu aparelho de televisão
ou na embalagem).
1.1 Informação importante
1.1.1 Imagens estáticas no ecrã de
televisão
Os ecrãs de plasma e LCD têm como
característica o facto de que quando é
apresentada a mesma imagem durante um
longo período, esta pode permanecer fixa no
ecrã. A isto chama-se queimadura de fósforo.
A utilização normal do televisor deve mostrar
imagens em constante movimento e alteração,
que preencham o ecrã.
Exemplos de imagens estáticas (não se trata
de uma lista completa, pode encontrar outras durante o visionamento):
• Menus do televisor e DVD: listas do
conteúdo do disco DVD;
• Barras pretas: quando são apresentadas
barras pretas à esquerda e direita do ecrã,
recomenda-se que mude para um formato
de ecrã em que a imagem preencha todo o
ecrã;
• Logótipo do canal de televisão: representa
um problema caso seja brilhante e estático.
Os gráficos em movimento ou de baixo
contraste provocam um envelhecimento
mais uniforme do ecrã;
• Indicadores do mercado bolsista:
apresentados no fundo do ecrã de
televisão;
• Os logótipos dos canais de compras e
gráficos de preços: brilhantes e
apresentados constante ou repetidamente
no mesmo local do ecrã da televisão. As
imagens estáticas também incluem
logótipos, imagens de computador,
indicadores das horas, teletexto e imagens
apresentadas no modo 4:3, imagens
estáticas ou caracteres, etc.
Sugestão:
Reduza o contraste e o brilho durante a
visualização.
1.1.2 Campos eléctricos, magnéticos
e electromagnéticos (“EMF”)
• A Philips Royal fabrica e vende muitos
produtos dirigidos para os consumidores,
os quais, tal como qualquer dispositivo
electrónico, têm a capacidade de emitir e
receber sinais magnéticos.
• Um dos Princípios Comerciais mais
importantes da Philips é o de tomar todas
as medidas necessárias de saúde e
segurança para os nossos produtos, agir
de acordo com todos os requisitos legais
aplicáveis e permanecer em conformidade
com os padrões EMF aplicáveis quando do
fabrico dos produtos.
• A Philips está empenhada em desenvolver,
produzir e comercializar produtos que não
tenham qualquer efeito negativo na saúde
das pessoas.
• A Philips confirma que os seus produtos
são concebidos de acordo com o fim a
que se destinam, e que a sua utilização é
segura de acordo com os testemunhos
científicos actualmente disponíveis.
• A Philips desempenha um papel activo no
desenvolvimento de padrões de segurança
e EMF internacionais, o que nos permite
antecipar futuros desenvolvimentos na
padronização para a integração nos seus
produtos.
Page 15

4
1.2 O que é a televisão digital?
Nota
A Televisão digital oferece uma gama
maior de visualização de TV, ausência das
interferências encontradas na TV analógica.
Ela promete transformar a visualização de
TV numa nova experiência. Existe uma
maior selecção de programação em ecrã
panorâmico. Muitos dos seus programas
favoritos são em ecrã panorâmico nos canais
digitais - algo que a TV analógico não pode
fazer correctamente.
Existe uma nova experiência de
interactividade na TV digital. Utilizando o
comando remoto, pode aceder a todos
os tipos de informação, como o texto
digital, que é muito mais claro do que o
sistema antigo de teletexto. A TV digital
proporciona-lhe um maior divertimento das
informações relacionadas com o programa
que está a visualizar. Também pode aceder a
um Guia Electrónico de Programas que lhe
dá uma maneira rápida e fácil para visualizar
ma lista completa de programas digitais, tal
como tem num jornal ou uma revista de TV.
• Os capítulos 6 a 20 contêm toda a
informação que precisa para funcionar
com a sua TV no modo Digital. Os
capítulos 21 a 30 contêm toda a
informação e as instruções que precisa
para funcionar com a sua TV no modo
Analógico.
1.3 Canais digitais ou analógicos?
Quando a televisão é ligada pela primeira
vez, fica sempre no modo DIGITAL.
Utilize a tecla o comando remoto para
alternar a TV entre o modo analógico
e digital. Utilize P + / – ou a
para seleccionar os canais.
Page 16
5
2 Segurança
X
X
X
X
X
X
Aviso: As ligações não têm ser feitas
antes de colocar a televisão no suporte,
mas os cabos devem ser introduzidos
nos conectores da TV.
2.1 Geral
1
Coloque ou prenda a TV onde
desejar, mas assegure-se de que o ar
possa circular livremente através dos
orifícios de ventilação.
2
Não instale a TV num espaço confinado,
tal como um armário ou unidade
semelhante.
3
Para evitar toda a situação de risco,
não devem ser colocadas fontes de
chamas vivas, tais como velas acesas,
próximo do seu aparelho de TV
4
Evite o calor, a luz solar directa e a
exposição à chuva ou à água.
5
Como medida de precaução, não toque
em qualquer parte da TV, no cabo de
alimentação ou da antena durante
trovoadas.
6
Puxe o cabo de alimentação pela ficha.
Não puxe pelo cabo de alimentação. Não
utilize uma tomada de corrente mal
encaixada. Introduza completamente a
ficha na tomada de alimentação. Se
estiver solta, pode causar curto-circuito
e provocar incêndio.
7
Tenha cuidado para não ligar muitos
equipamentos à mesma tomada de
alimentação, pois pode causar
sobrecarga provocando incêndio ou
choque eléctrico
8
Evite colocar recipientes com água em
cima ou próximo da TV. A
água derramada dentro do aparelho
pode provocar choque eléctrico.
Não funcione com o aparelho se tiver
sido derramada água dentro dele.
Retire imediatamente o cabo de
alimentação das tomadas de
e chame um técnico qualificado para
verificar o aparelho.
9
A instalação do aparelho de TV na
parede deve ser realizada por um
técnico qualificado. Uma instalação
incorrecta e inadequada tornar o
aparelho pouco seguro.
2.2 Cuidados com o ecrã
1
Não retire a película protectora até
que tenha terminado a colocação ou
instalação na parede e as ligações. Por
favor, manuseie com cuidado.
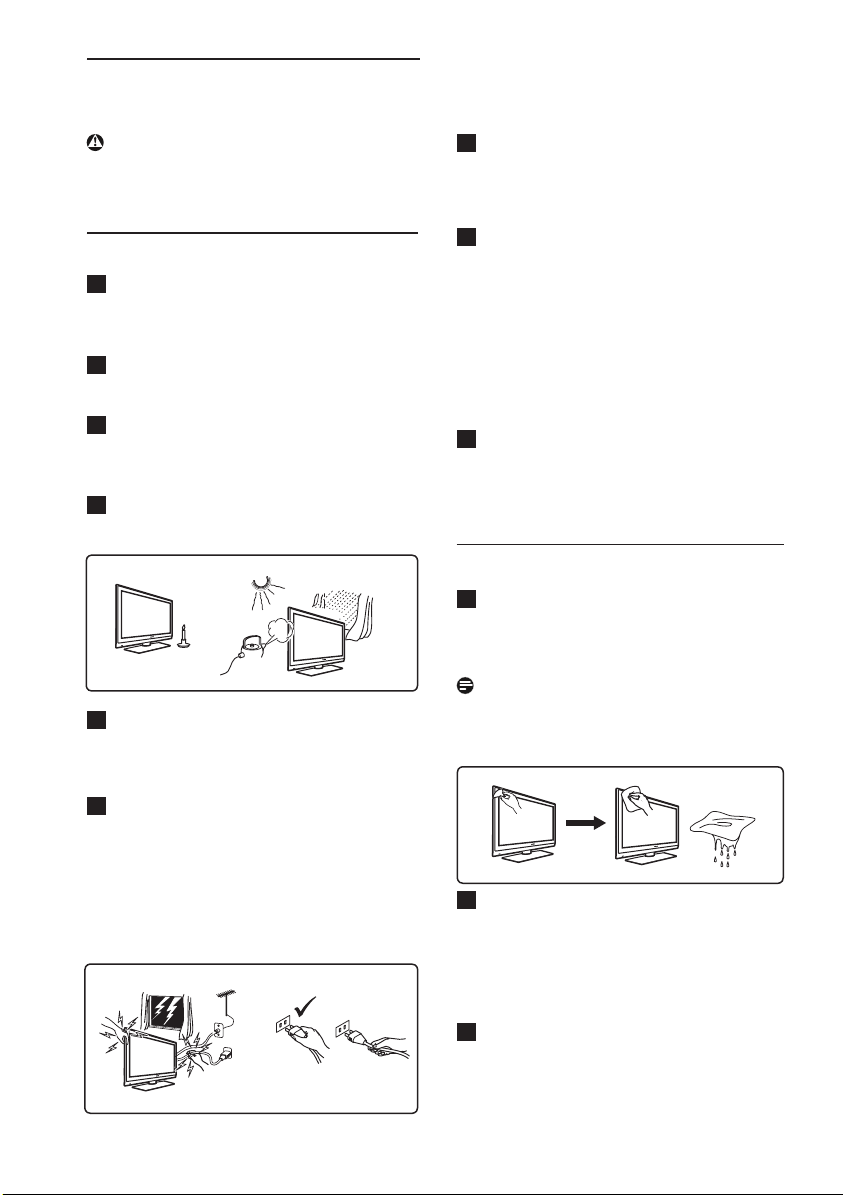
Nota
Utilize apenas o pano macio
fornecido para limpar a frente
brilhante da TV.
2
Não use um pano demasiado húmido,
que esteja a pingar água. Não utilize
acetona, tolueno ou álcool para limpar a
TV. Como uma medida de segurança,
retire o cabo de alimentação das
tomadas quando limpar o aparelho.
Não toque, empurre, esfregue ou bata
3
no ecrã com alguma coisa dura, porque
isso pode riscar, desfigurar ou danificar
permanentemente o ecrã.
alimentação
Page 17
6
3 Vista geral dos botões e
POWER
PROGRAM
MENU
VOLUME
conectores da televisão
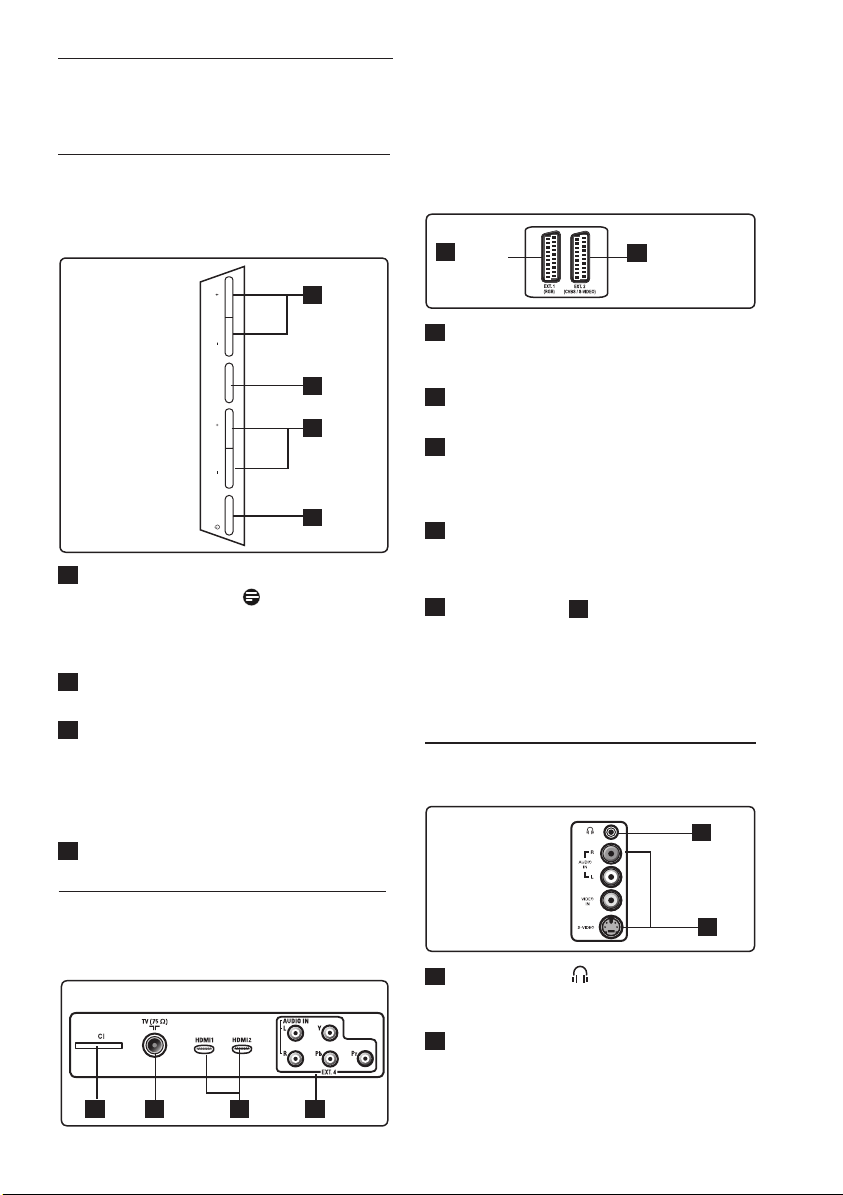
3.1 Controlos laterais
Os controlos laterais estão localizados no lado
esquerdo da TV
1
POWER (ALIMENTAÇÃO): para
ligar e desligar a TV. Nota: Para
consumo de energia nulo, é necessário
retirar os cabos principais da tomada de
alimentação.
2
VOLUME – / +: para alterar o som
para ser mais alto ou mais baixo.
MENU: para exibir ou fechar menus.
3
Os botões PROGRAM – / + podem ser
usados para seleccionar um item
do menu e os botões VOLUME – / +
para entrar no item do menu seleccio
nado e fazer ajustes.
4
PROGRAM – / +: para seleccionar
programas.
3.2 Conectores traseiros
Estes conectores estão situados na parte de trás
da TV e estão virados para baixo.
Estes conectores estão situados na parte de
trás da TV e estão virados para trás.
4
EXT 1
(RGB)
5
EXT 2
(CVBS /S-VIDEO)
2
1
Ranhura CI (interface comum): para
ligar um CAM (Módulo de Acesso
3
4
Condicional) e um cartão inteligente.
2
Tomada da antena da TV: Introduza a
ficha da antena na tomada de 75
HDMI 1 / HDMI 2: tpara ligar à set-top
3
Ω :.
box, gravador/leitor de DVD,
equipamento de Alta Definição ou
1
Computador Pessoal.
4
EXT4
: para ligar a equipamentos como
um DVD ou Descodificador que tenham
as mesmas tomadas.
5
EXT 1 (RGB) e 6
EXT 2 (CVBS/
S-VIDEO): ligar a equipamentos como um
gravador/leitor de DVD, VCR ou
Descodificador que tenham ligações
semelhantes (chamadas ‘ligações scart’).
3.3 Conectores laterais
Estes conectores estão localizados no lado da TV.
1
EXT 3
1
Auscultador : para desfrutar da
2
audição, ligue o jack de fono ao
conector do auscultador da TV.
2
Áudio Vídeo
: Para ligação a dispositivos
como câmara ou câmara de vídeo.
1 3 42
Page 18
7
4 Começar
POWER
PROGRA
M
MENU
VOLUME
AC in
4.1 Antes de começar
Aviso
As ligações não têm ser feitas antes
de colocar a televisão no suporte, mas
os cabos devem ser introduzidos nos
conectores da TV.
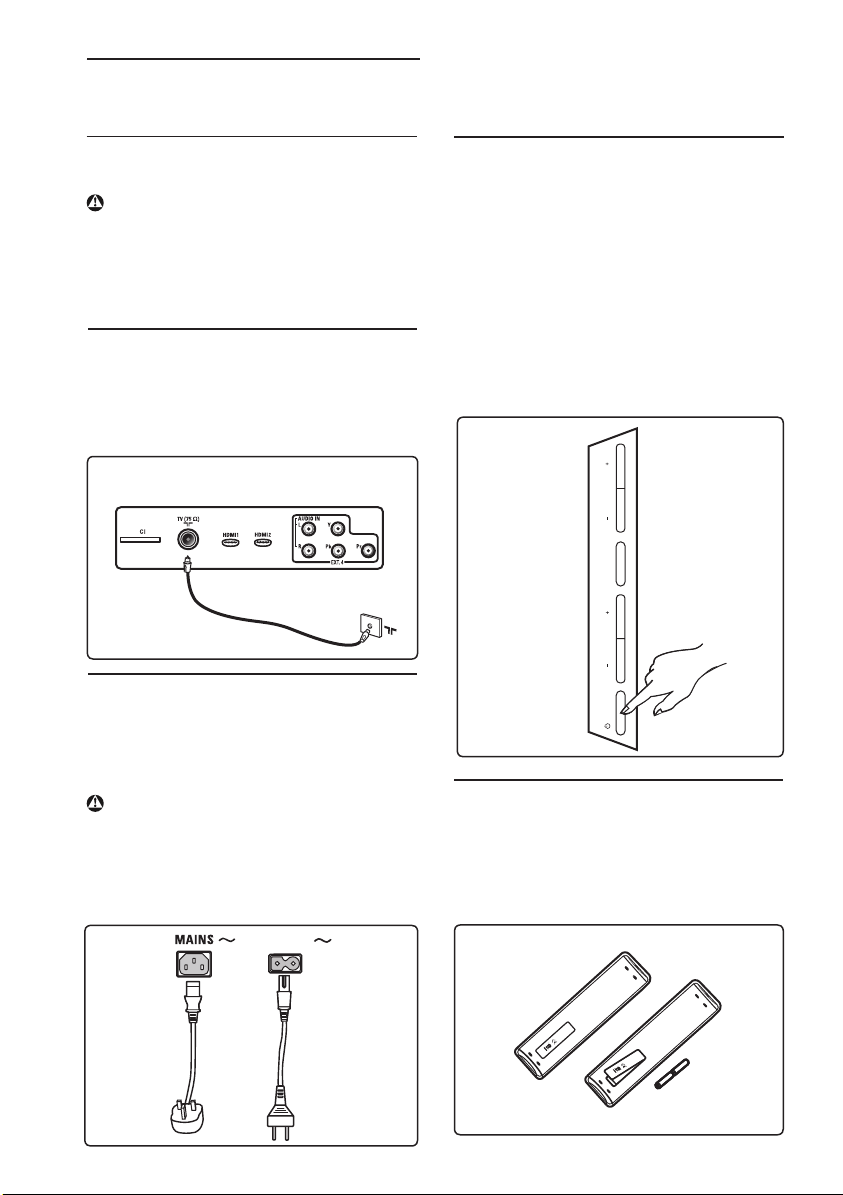
4.2 Ligar a antena
Introduza firmemente a ficha da antena na
tomada da antena 75 Ω : na parte inferior
da TV e na tomada de parede da antena.
Conectores na parte posterior
da TV (voltada para baixo)
4.3 Ligar as tomadas
Introduza o cabo principal (fornecido) na
tomada na parte de trás (voltadas para
baixo) da TV e na tomada de parede.
Aviso
Verifique se a voltagem da corrente eléctrica
da sua casa corresponde à voltagem indicada
no rótulo colado na parte de trás da TV.
4.4 Ligar a TV
• Para ligar a TV, carregue na tecla
no lado do aparelho. Um indicador azul
POWER
acenderá após alguns segundos, o ecrã
iluminará na parte inferior esquerda da
frente do aparelho.
• Se o aparelho de TV permanecer no modo
stand-by (indicador vermelho), carregue
no botão
PROGRAM – /
+ nos
controlos
laterais ou na tecla P – / + do telecomando.
Controlos
laterais da
TV
4.5 Utilizar o telecomando
Introduza as 2 pilhas fornecidas. Certifiquese de que as extremidades (+) e (-) das pilhas
estão alinhadas correctamente (conforme
marcado dentro do compartimento).
TV
Plasma
Para a tomada de
parede
LCD
TV
Para a
tomada de
parede
Page 19
8
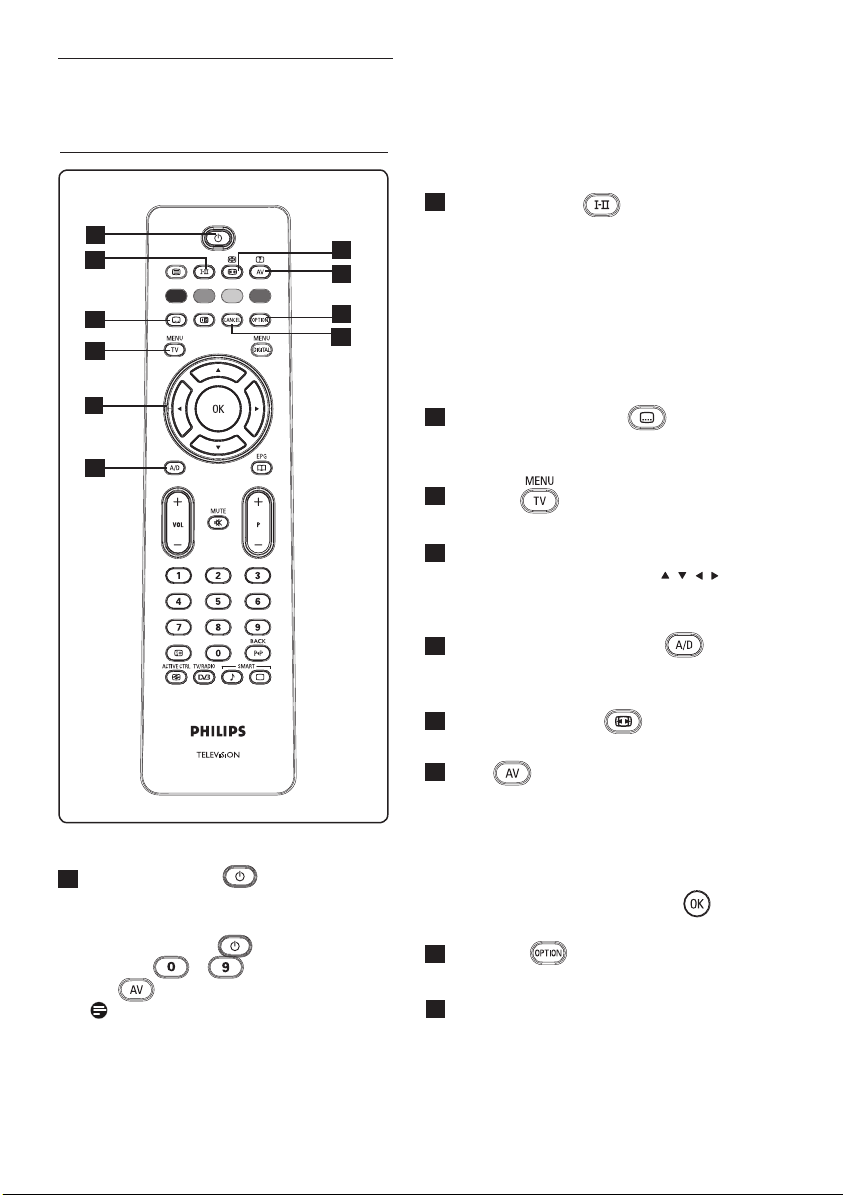
5 Funções do
telecomando
1
2
3
4
5
6
7
8
9
10
2
Modo de som
Usado para alterar programas em
Estéreo e Nicam Estéreo para
Mono. Para programas bilingues,
seleccione Dual å ou Dual »
(conforme indicado no ecrã durante
tais transmissões).
å-» exibe a lista de idiomas de áudio.
A indicação
vermelho quando na posição forçada.
3
Modo das legendas
No modo digital, esta tecla activa ou
desactiva o modo legenda.
4
MENU
Para entrar ou sair dos menus analógicos da
TV.
5
Cursores Para cima/Para baixo/Para
a esquerda/Para a direita ( )
Estas 4 teclas são usadas para a selecção e
ajuste dos itens do menu.
6
Modo analógico ou digital
Para comutar entre os modo analógico e
digital da televisão.
No modo digital,
Mono aparece em
1
Standby (espera)
Para definir a TV para o modo stand-by.
Para ligar novamente a TV, carregue
uma vez na tecla ou carregue na
tecla de a , em P + / – ou
em .
Nota: quando a TV é ligada, é
exibido o último modo visualizado.
7
Formatos do ecrã
(Consultar página 39).
8
AV
Para exibir a Lista de Fonte para
seleccionar TV (Analógica), TV Digital
ou equipamento periférico ligado (EXT 1,
EXT 2, EXT 3, EXT 4, HDMI 1 ou
HDMI 2) Utilize as teclas
seleccionar a fonte e a tecla Æ / para
confirmar a selecção.
9
Opções
(Consultar página 23)
10
Cancelar
No modo digital, esta tecla funciona
como uma tecla de saída para o teletexto
MHEG se não estiverem disponíveis
ligações com teclas coloridas para sair do
modo teletexto.
Î ï para
Page 20
9
11
12
13
20
14
21
15
16
17
18
22
23
19
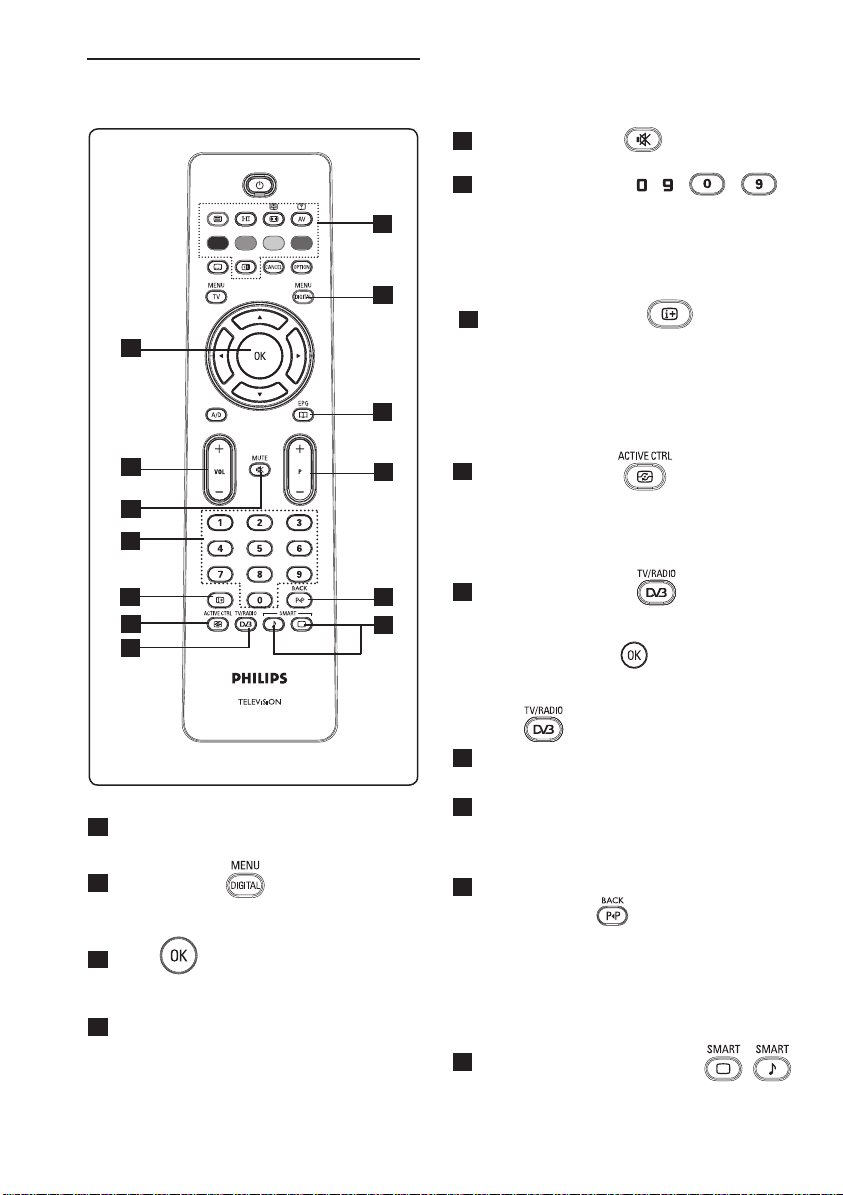
11
Teletexto
(Consultar página 40-41).
12
Menu digital
Para exibir/sair do menu digital (quando a
TV está no modo digital).
13
OK
Confirma a selecção. Também acede à
lista de programas no modo Digital.
14
Volume ( + VOL – )
Para aumentar ou diminuir o som.
15
Mute (Silêncio)
Desliga ou liga o som.
16
Teclas numéricas / /
Para acesso directo aos programas. Para
um número de programa com dois
dígitos, o 2º dígito deve ser introduzido
logo após o primeiro dígito, antes que o
traço desapareça.
17 Informação no ecrã
No modo digital exibe/sai da faixa de
informação (consultar página 14). No mo
analogue, exibe/remove o número
do programa, o modo de som, o relógio
e o tempo restante do temporizador
para desligar.
18
Controlo activo
Ajusta automaticamente a definição da
imagem para qualidade de imagem
óptima sob quaisquer condições de sinal.
(Consultar página 36).
19
TV/Rádio digital
No modo digital, esta tecla é usada para
aceder às estações de rádio digital.
Carregue na tecla para aceder à lista
de rádio. Nota : Para voltar ao modo
de vídeo digital, carregue novamente na
tecla .
20
Guia de Programa Electrónico
(EPG) da TV (Consultar página 24)
Programa ( + P – )
21
Selecciona o canal/fonte disponível
seguinte ou anterior (ou página no menu
digital).
22
Canal alternativo / Editar ou
‘backspace’
Nos modos Analógico/Digital, permite lhe alternar entre o programa visualizado
anteriormente e o programa actual. É
também usado como uma tecla de edição
ou ‘backspace’ quando atribui um nome
ao seu canal favorito.
23
Imagem/Som inteligente
Acede a uma série de imagens
predefinidas e definições de som
(consultar página 38)
Page 21
10
6 Visão geral do menu
Digital e sub-menus
1
Utilize a tecla do comando
remoto para seleccionar o modo Digital.
2
A partir do modo digital, prima a tecla
para obter o menu de configuração.
3
Utilize as teclas Î ï Í Æpara navegar,
seleccionar e ajustar os itens do menu.
Instalação
Favoritos
Lista 1
List 2
List 3
List 4
Nome
Seleccionar canais de TV.
Seleccionar estações de rádio
Adicionar todos os serviços
Remover todos os serviços
Nome
Seleccionar canais de TV.
Seleccionar estações de rádio
Adicionar todos os serviços
Remover todos os serviços
Nome
Seleccionar canais de TV.
Seleccionar estações de rádio
Adicionar todos os serviços
Remover todos os serviços
Nome
Seleccionar canais de TV.
Seleccionar estações de rádio
Adicionar todos os serviços
Remover todos os serviços
Page 22

11
Instalação
Preferências
Idioma
Áudio
Legenda / Teletexto
Alemāo, Basco, Catalān, Croata, Dinamarquês,
Eslovaco, Espanhol, Finlandês, Francês, Galego,
Galês, Gaélico, Grego, Holandês, Hungaro, Inglês,
Italiano, Norueguês, Polaco, Português,
República Checa, Russo, Sueco, Sérvio, Turco
Modo das legendas
Legendagem para deficientes
auditivos
Sistema
Local
Pais
Fuso Horáirio
Informação
Software do sistema
Versão de software actual
Acitar sempre software novo
Restrições de acesso
Configurar a protecção do
código pessoal
Escalões Etários
Canais de TV
Estações de radio
Mudar o código pessoa
Ligar, Desligar, Auto
Sim, Não
Cesky, Dansk, Deutsch, English, Español,
Français, Italiano, Magyar, Nederlands,
Norsk, Polski, Portugués, Suomi, Svenska
Cesky, Deutsch, English, Español, Français,
Italiano, Magyar, Norsk, Polski, Portugués
Suomi, Svenska
Sim, Não
Ligar, Desligar
Page 23

12
Instalação
Instalação
Lista de
serviços
Configura ção
de serviços
Reorganise os serviços
Ver novos canais de TV.
Ouvir novas estaçoes de rádio
Adicionar novas serviços
Busca
Canais de TV encontrados
Arquivar
Rejeitar
Reinstalar serviços
Busca
Canais de TV encontrados
Arquivar
Rejeitar
Estacoes de radios encontrados
Foram encontrados outros serviços
Estacoes de radios encontrados
Foram encontrados outros serviços
Teste de
recepção
Serviços de instalação manual
Frequência
Nome da vede
Qualidade do sinal
Serviços encontrados
Arquivar
Rejeitar
Frequência
Nome da rede
Qualidade do sinal
Potência do sinal
Page 24

13
7 Ligar a TV pela primeira
English
Español
Français
Italiano
Magyar
Language
Country
Time Zone
Service Scan
Setup
11:28
Select your preferred language
vez
Quando ligar a TV pela primeira vez,
aparecerá um menu no ecrã.
1
Carregue na tecla Æ para entrar no
modo Idioma e carregue nas tecla
Î ï para seleccionar o seu idioma
preferido.
2
Carregue na tecla para confirmar
a selecção.
3
Carregue nas teclas Î ï para
seleccionar Country (País) ou o Time
Zone (Fuso Horário) e carregue na
tecla Æ para entrar no modo Country
(País) ou Time Zone (Fuso Horário).
Cuidado
Se seleccionar um país errado, a numeração
do canal não estará de acordo com o padrão
para o seu país e pode não receber todos os
serviços ou nenhum deles.
Nota
O Idioma também pode ser seleccionado
independentemente do País.
4
Carregue nas teclas Î ï para
seleccionar o seu Country
Time Zone (Fuso Horário) preferido
e na tecla para confirmar a sua
selecção.
(País)
ou
5
Carregue na tecla ï para selecciona
Service Scan (Procurar serviço)
para procurar os canais analógicos e
digitais disponíveis.
6
Carregue na tecla para iniciar a
instalação.
Nota
Se não forem detectados quaisquer canais
digitais, carregue na tecla para
comutar para o modo analógico.
Nota
Se em algum momento quiser restabelecer
as definições predefinidas de fábrica,
carregue e mantenha apertada durante 5
segundos a tecla do MENU no lado do
aparelho de TV. Um menu aparecerá no
ecrã. Repita os passos de 1 a 5 como se
fosse a primeira vez que estivesse a ligar a
TV. Esta acção redefinirá quer para o modo
Analógico como para o Digital.
Page 25

14
8 Entender as
informações da faixa
Quando selecciona um programa digital, é
apresentada uma faixa de informações na
parte superior do ecrã durante alguns
segundos.
8.1 Descrição da faixa
Número
pré-definido
Nome do canal Título do programa
Hora de início
e de fim do
programa
2 11:06-11:09 11:46
BBC 2 Snooker Minutes left: 14
Símbolos
Tempo restante
do programa
Relógio
A faixa contém informações sobre o número
pré-definido, o nome do canal, a duração
do programa, o relógio da transmissão, o
título do programa e o tempo restante do
programa actual.
8.2 Descrição dos símbolos
TXT
Indica que o Teletexto analógico está
disponível no modo digital.
ù Estão disponíveis outros idiomas
e podem ser seleccionados no
menu de opções. Também pode
seleccionar outros idiomas,
carregando na tecla .
u A cor do símbolo (vermelho, verde,
amarelo ou azul) indica a lista de
Favoritos seleccionada.
Nota
Aparecerá um símbolo u branco se o
programa for guardado em uma ou
mais listas de favoritos, que não
estiverem actualmente activas.
i Estão disponíveis mais informações
sobre este programa: Prima uma vez
a tecla para as visualizar, e uma
segunda vez para as remover.
As legendas estão disponíveis: Se
pretender visualizá-las, prima a tecla
ou para aceder ao menu de
opções e seleccionar as legendas.
Page 26

15
9
Lista de serviços
.
9.1 Reorganise os serviços
Este menu permite-lhe alterar dos canais
digitais e das estações de rádio guardados.
1
A partir do modo digital, prima a tecla
2
para obter o menu de configuração.
Utilize a tecla ï para seleccionar
Instalação e prima duas vezes Æ para
seleccionar o menu
Instalação
Instalação
Lista de serviços
Configura ção de
serviços
Teste de recepção
Gerir listas de serviços
3
Utilize as teclas Î ï para seleccionar
Reorganise os serviços
Instalação
Instalação
Reorganise os serviços
Ver novos canais de TV.
Ouvir novas estaçoes de rádio
Mude a localização predefinida dos
4
Utilize as teclas Î ï para seleccionar o
Lista de serviços
11:26
Reorganise os serviços
Ver novos canais de TV.
Ouvir novas estaçoes de rádio
Fechar
e prima a tecla Æ
11:28
1 _
2 _
3 _
4 _
5 _
6 _
7 _
8 _
9 _
Fechar
canal que pretende alterar.
5
Carregue na tecla para activar.
Se pretender desinstalar o canal
seleccionado, prima a tecla vermelha.
6
Seleccione (Î ï) o número do novo
canal que pretende substituir.
7
Carregue na tecla para confirmar. A
troca está concluída.
8
Repita as operações 4 a 7 até todos
os canais estarem na ordem correcta.
9
Para regressar ao menu anterior, prima a
tecla Í.
10
Prima a tecla para sair do menu.
.
9.2 Reorganise os serviços ou Ver
novos canais de TV.
Este menu permite-lhe verificar a
disponibilidade dos novos canais de TV
ou das novas estações de rádio que foram
lançados pelo emissor após a instalação
inicial.
1
A partir do modo digital, prima a tecla
2
para obter o menu de configuração.
Utilize a tecla ï para seleccionar
Instalação e prima duas vezes Æ para
seleccionar o menu
3
Utilize as teclas Î ï para seleccionar
Lista de serviços
.
Reorganise os serviços ou Ver
novos canais de TV.
4
Se estiverem disponíveis novos serviços,
prima Æ para aceder à lista, e utilize as
teclas Î ï para se mover na lista.
5
Para regressar ao menu anterior, prima a
tecla Í.
6
Carregue na tecla para sair do
menu.
Page 27

16
10 Configuração de serviços
10.1
Adicionar novos serviços
Este menu permite-lhe procurar novos
canais de TV ou novas estações de rádio que
tenham sido lançados pelo emissor, após a
instalações inicial.
1
A partir do modo digital, prima a tecla
2
para obter o menu de configuração.
Utilize a tecla ï para seleccionar
Instalação e prima duas vezes Æ para
seleccionar o menu
3
Seleccione
Configura ção de serviços
Lista de serviços
.
(ï)
e prima a tecla Æ.
Instalação
Instalação
Lista de serviços
Configura ção de serviços
Teste de recepção
Instalação
4
e gestão de serviços
Carregue na tecla Æ para adicionar
Adicionar novas serviços
Reinstallar todos os serviços
Serviços de instalação manual
Fechar
11:26
novos serviços, e prima para activar
a instalação.
Instalação
Instalação >
Adicionar novas serviços
Reinstallar todos os serviços
Serviços de instalação manual
Procura novos serviços.
Configura ção de serviços
Busca
Canais de TV encontrados
Estacoes de radios encontrados
Foram encontrados outros serviços
Arquivar
Rejeitar
Fechar
11:26
A pesquisa começa e só os novos canais
serão guardados e adicionados ao menu
da lista
de canais.
É apresentada a percentagem da
instalação concluída e o número de canais
encontrados. (Quando a pesquisa estiver
concluída, prima
a tecla kpara aceitar os novos
serviços.)
5
Para regressar ao menu anterior, carregue
na tecla Í.
6
Carregue na tecla para sair do
menu.
10.2 Reinstalar todos os serviços
Este menu permite-lhe reinstalar todos os
canais digitais de TV e estações de rádio.
1
A partir do modo digital, prima a tecla
2
para obter o menu de configuração.
Utilize a tecla ï para seleccionar a
Instalação e prima Æ.
3
Seleccione Configura ção de serviços
(ï) e prima a tecla Æ.
4
Seleccione Reinstalar todos os
serviços (ï) e prima Æ.
Instalação
Instalação >
Adicionar novas serviços
Reinstalar todos os serviços
Serviços de instalação manual
A reinstalação eliminará todas as definições dos serviços.
Configura ção de serviços
Busca
Canais de TV encontrados
Estacoes de radios encontrados
Foram encontrados outros serviços
Arquivar
Rejeitar
Fechar
11:26
Page 28

17
5
Carregue na tecla para iniciar
a instalação. Uma pesquisa é então
efectuada para todos os serviços
digitais, que são então guardados
automaticamente.
Quando a busca estiver concluída, o
menu indicará o número de serviços
digitais encontrado.
6
Carregue na tecla para guardar os
serviços.
7
Para regressar ao menu anterior, prima a
tecla Í.
8
Carregue na tecla para sair do
menu.
10.3 Serviços de instalação manual
Este menu permite-lhe procurar
manualmente os serviços, ao manipular a
frequência do seu canal alvo.
1
A partir do modo digital, prima a tecla
para obter o menu de configuração.
5
Utilize a tecla a para intro
duzir a frequência do seu canal alvo e
carregue na tecla para iniciar a pes
quisa de canais. Quando a pesquisa
estiver completa, o menu indicará o
número de serviços digitais encontrados.
6
Carregue na tecla para guardar os
serviços.
7
Para regressar ao menu anterior, carregue
na tecla Í.
8
Carregue na tecla para sair do
menu.
2
Utilize a tecla ï para seleccionar a
Instalação e prima Æ.
3
Seleccione Configura ção de serviços
(ï) e prima a tecla Æ.
4
Seleccione serviços de instalação
Serviços de instalação manual
(ï) e carregue na tecla Æ .
Instalação
Instalação >
Adicionar novas serviços
Reinstallar todos os serviços
Serviços de instalação manual
Procura novos serviços.
Configura ção de serviços
Frequência
Nome da vede
Qualidade do sinal
Potência do sinal
Serviços encontrados
Arquivar
Rejeitar
Fechar
11:28
Page 29

18
11 Teste de recepção
Este menu permite-lhe verificar a intensidade
do sinal que está a receber através da
antena.
1
A partir do modo digital, prima a tecla
2
para obter o menu de configuração.
Utilize a tecla ï para seleccionar a
Instalação e prima Æ.
Instalação
Instalação
Lista de serviços
Configura ção de serviços
Teste de recepção
Testar qualidade do sinal
3
Utilize a tecla ï para seleccionar Teste de
Frequência
Nome da vede
Qualidade do sinal
Potência do sinal
11:28
Fechar
recepçã, e prima a tecla Æ. Obtém uma
indicação da frequência do programa
actual, do nome da rede e da qualidade
e potência do sinal.
5
Após introduzir a frequência, utilize a tecla
para sair da frequência.
6
Para regressar ao menu anterior, carregue
na teclaÍ.
7
Carregue na tecla para sair do
menu.
4
Utilize a tecla Æ para obter a frequência,
e as teclas a para obter a
frequência do canal digital que pretende
testar. Utilize a tecla Æ para se mover
para o espaço seguinte.
Se a recepção de teste indicar que o
sinal está realmente fraco, pode tentar
melhorá-lo, renovando, ajustando ou
actualizando a antena. Contudo, é
aconselhável contactar um instalador de
antenas especializado para poder obter
os melhores resultados.
Page 30

19
12 Preferências
Este menu permite-lhe seleccionar o idioma
preferido e efectuar alterações à localização
(país e fuso horário).
1
A partir do modo digital, prima a tecla
para obter o menu de
configuração.
2
Utilize a tecla ï para seleccionar
Preferências e prima Æ.
Instalação
Preferências
Idioma
Local
Audio Digital
Seleccionne o idioma preferido
3
Seleccione Idioma ou Local (ï) e
Áudio
Legenda / Teletexto
Modo das legendas
Legendagem para deficientes auditivos
Sistema
Fechar
11:28
carregue na tecla Æ.
4
Utilize as teclas Î ï para seleccionar uma
definição, e prima Æ para entrar no submenu. Efectue os seus ajustes e prima
ou Í para sair.
5
Para regressar ao menu anterior, carregue
na tecla Í.
• Legendagem para deficientes
auditivos: Para activar ou desactivar a
legenda específica para audição de fraca
qualidade (se disponível pelo emissor).
• Sistema: Para seleccionar o idioma do
menu.
Nota
Se por algum motivo seleccionou a língua
errada e não a entende, proceda da
seguinte forma para voltar à sua língua
preferida.
• Carregue na tecla
para sair do menu a
partir do ecrã.
•
Carregue novamente na tecla
para
visualizar o menu.
• Carregue na tecla para seleccionar o
segundo item do menu, e a tecla
para
entrar no nível seguinte do menu.
•
Carregue novamente na tecla
e utilize
para seleccionar o quinto item do menu.
• Carregue na tecla
para aceder ao nível
do menu seguinte.
• Carregue na tecla Î ï para seleccionar o
idioma correcto.
•
Carregue na tecla para confirmar a
selecção.
• Carregue na tecla
para retirar o menu
do ecrã.
6
Carregue na tecla para sair do
menu.
Definições padrão de idioma
• Áudio: Para seleccionar o idioma de som do
áudio.
• Legenda/Teletexto: Para seleccionar o
idioma do teletexto/legendas
• Modo das legendas: Desligado, ligado
ou auto (as legendas só são apresentadas
no caso da transmissão original de rádio).
Definições de localização
• Pais: Para seleccionar o país onde está
localizado.
CUIDADO: Se seleccionar um país
errado, a numeração de canais não
ficará de acordo com o padrão do seu
país, e pode não receber todos os
serviços ou mesmo nenhum. Note
que o Idioma pode ser seleccionado
independentemente do País.
• Fuso Horário: Para seleccionar o fuso
horário onde está localizado.
Page 31

20
13 Restrições de acesso
Este menu permite-lhe definir as restrições
de acesso para os canais digitais.
1
A partir do modo digital, prima a tecla
para visualizar o menu de
configuração.
2
Utilize a tecl ï para seleccionar
Restrições de acesso e prima Æ .
3
Carregue na tecla Æ para aceder ao menu
Configurar a protecção do código
pessoal.
Instalação
Restrições de acesso
Configurar a protecção do
Activar/desactivar a
4
código pessoal
Escloes Etários
Canais de TV
Estações de radio
Mudar o código pessoal
protecção do código pessoal
Utilize as teclas Í Æ para Ligar opção
Ligar Desligar
Fechar
11:28
Ligar e prima para sair. Pode, então,
aceder a outros ajustes :
Aviso: No momen to em que utilizar
qualquer tipo de restrição de acesso,
necessita de preencher o código pin
quando agendar um programa para
gravação.
5
Para regressar ao menu anterior, prima a
tecla Í .
6
Carregue na tecla para sair do
menu.
• Canais de TV: Seleccione o canal de TV
que pretende bloquear, e prima a tecla
.
• Estações de radio: Seleccione a estação
de rádio que pretende bloquear e prima
.
• Mudar o código pessoal: Prima a tecla
Æ para entrar no menu. Siga as instruções
apresentadas no ecrã para alterar o
código de acesso.
O código pin padrão é 1234. Se se tiver
esquecido do seu código pessoal, pode
redefinir o código pin padrão (1234),
introduzindo o código universal 0711.
Nota
A TV está equipada com uma ranhura CI
(Common Interface) (consulte a página
28). Um módulo de CI pode activar
serviços adicionais como, por exemplo,
Pay TV. O menu de restrições de acesso
apresentará as restrições de acesso de
CI quando está instalado um módulo de
CI. Este módulo é responsável pelas
mensagens e textos no ecrã. No caso de
alha ou comportamento estranho, deve
contactar o seu fornecedor de serviços de
CI.
• Escalões Etários: Seleccione a
classificação preferida para bloquear o
canal. A classificação de maturidade só
bloqueará certos programas se o emissor
fornecer dados com o programa.
Page 32

21
14 Configurar a sua lista de
favoritos
Este menu permite-lhe criar uma lista de
favoritos com os seus canais de TV e
estações de rádio preferidos. Por exemplo,
cada membro da sua família pode criar a sua
própria lista de favoritos.
1
A partir do modo digital, prima a tecla
para visualizar o menu de
configuração.
Instalação
Favoritos
Preferênces
Informação
Restrições de acesso
Fazer alteraçoes á lista de serviços favoritos.
2
Carregue na tecla Æ para entrar no menu
Instalação
Lista 1
Lista 2
Lista 3
Lista 4
11:28
Fechar
da lista de favoritos. Pode criar 4
diferentes listas de favoritos.
3
Utilize as teclas Î ï para seleccionar a
sua lista Favoritos: Lista 1, Lista 2,
Lista 3 ou Lista 4 e primas Æ.
• Seleccionar canais de TV: Utilize as
teclas Î ï para seleccionar os seus canais
de TV favoritos, e confirme com a tecla
. Carregue na tecla Í key para sair.
• Seleccionar estações de rádio: Utilize
as teclas Î ï para seleccionar a sua
estação de rádio favorita, e confirme com
a tecla . Carregue na tecla Í key
para sair.
•
Adicionar todos os serviços:
Carregue
na tecla se pretender adicionar todos
os serviços à sua lista de favoritos.
• Remover
todos os serviços
: Carregue
na tecla se pretender remover todos
os serviços a partir da sua lista de
favoritos.
5
Para regressar ao menu anterior, prima a
tecla Í .
6
Carregue na tecla para sair do
menu. A sua lista de favoritos pode ser
seleccionada através do menu de
opções (consulte a página seguinte).
4
Utilize as teclas Î ï para seleccionar
uma definição e prima Æ para entrar
num sub-menu.
• Nome: Utilize as teclas Í Æ para se
mover em redor da área de visualização
do nome (16 caracteres), e as teclas
P + / – para seleccionar os caracteres.
Para editar algum caracter, utilize a tecla
. Quando o nome tiver sido
alterado, prima para sair.
Page 33

22
15 Informação
Este menu fornece informações sobre a
versão do software e a instalação do novo
software.
1
A partir do modo digital, prima a tecla
para visualizar o menu de
configuração.
2
Utilize a tecla ï para seleccionar
Informação e prima duas vezes Æ .
Instalação
Favoritos
Preferênces
Informação
Restrições de acesso
Instalação
Fornece informacoes sobre problemas e instalacao de novo software
Software do sistema
Fechar
11:28
A versão do software é apresentada.
3
Utilize a tecla Æpara entrar no modo de
selecção.
4
Utilize as teclas Í Æ para seleccionar
o modo Sim ou Não. Pode activar o
menu para aceitar automaticamente
qualquer actualização ao software da sua
TV digital. Normalmente, o produto
detectará se existe alguma actualização
disponível enquanto estiver no modo de
espera. Da próxima vez que a TV for
ligada, aparecerá uma faixa na parte
inferior do ecrã indicando que está
disponível novo software. Ao seleccionar
activa o descarregamento do
software.
O menu de descarregamento do software dará
uma descrição do software, juntamente com a
data e hora do descarregamento. Este software
pode actualizar alguns menus, funções ou
adicionar novas funcionalidades, mas não
alterará o modo normal de funcionamento da
TV. Depois de aceite, o descarregamento será
efectuado na data e hora escolhidas.
Nota
A TV deve ser colocada em espera na
altura do descarregamento para que ele seja
efectuado.
Descarregamento do novo software
quando em espera
Sempre que estiver disponível novo
software, é aconselhável aceitar sempre e
descarregar o software.
•
No caso de estar disponível novo
software, verá uma mensagem ao ligar a
TV. Uma mensagem indicando a data e a
duração do descarregamento é
apresentada no menu. Prima a tecla
para continuar. Importante: Deixe a
TV em espera para que a actualização
possa ser efectuada. Não ligue o
interruptor principal.
•
Se tiver ocorrido algum problema
durante o descarregamento do novo
software, será informado do
descarregamento seguinte agendado.
Prima para continuar a utilizar
normalmente a TV.
• Se o descarregamento tiver sido bem
sucedido, será apresentada uma mensagem
congratulatória. Prima para aceitar.
O novo software e as instruções de
actualização podem ser obtidas a partir
do site
5
: www.philips.com/
Para regressar ao menu anterior, prima
Í .
6
Carregue na tecla para sair do
menu.
Page 34

23
16 Utilizar o menu Opções
Este menu dá-lhe acesso directo à lista de
favoritos, à selecção do idioma e a algumas
outras selecções.
1
A partir do modo digital, prima a tecla
para obter o menu de opções.
Opçoes
Favoritos
Idioma das legenda
Idioma de áudio
Seleccionar a lista de favoritos activa
2
Utilize as teclas Î ï para seleccionar
Modo
Nenhum
Lista 1
Lista 2
Lista 3
Lista 4
1128
Sair
uma definição e prima a tecla Æ para
entrar no sub-menu.
• Favoritos: Utilize as teclas Î ïpara
seleccionar a sua lista de favoritos, e
confirme com a tecla .
• Idioma de áudio: Para alterar
temporariamente o idioma do som de
áudio. Para alterar permanentemente o
idioma do áudio e das legendas, utilize o
menu Preferências (p. 18).
• Modo: Pode escolher ter apenas
estações de rádio, canais de TV ou
serviços sem áudio ou vídeo.
Observação: Apenas para o RU, a
lista de TV conterá estações de rádio e
canais de TV.
• Duração do banner: Para seleccionar a
duração em que o banner está visível.
3
Carregue na tecla de Opções
branca para sair do menu.
Nota
A opção “nenhum” desactiva qualquer
lista de favoritos. Para criar a sua própria
lista de favoritos, consulte a pág. 21.
• Idioma das legendas: Utilize as teclas
Î ï para alterar temporariamente o
idioma, e confirme com a tecla .
Page 35

24
17 Guia da TV
O guia da TV é um Guia Electrónico de
Programas que lhe fornece um modo rápido
e fácil para visualizar uma lista completa de
programas digitais, tal como tem num jornal
ou revista de TV. Pode navegar através da
lista de programas digitais e obter informações
detalhadas sobre os programas. Também pode
programar a TV para fornecer um canal
digital a ser gravado.
1
A partir do modo digital, prima a tecla
para visualizar o guia de TV.
1 17:28
BBC
Predefinição/ Agora Sequinte
Serviços
1 BBC See It Saw Microsoap
2
BBC TWO Snooker Ice Skating
3 ITC Channel 3 Trisha This morning
4 Channel 4 – –
5 ITV 2 Gmtv2 This afternoon
6 BBC CHOICE
Cima Fechar Opções
Agora/ Noje
Sequinte
Oakie Doke Bodger & Badger
É apresentada uma lista dos programas
digitais, na lista de favoritos actualmente
seleccionada.
• Cima (tecla amarela): Para ir directamente
para a parte superior da lista.
• Fechar (tecla azul): Para sair do guia da
TV.
• Opções (tecla branca ÆÆ ) : Com este
menu, pode seleccionar a sua lista de
favoritos, modo ou temas. Os temas são
áreas de interesse. Pode, por exemplo,
decidir visualizar apenas: Drama, notícias,
filme, ...
5
Carregue na tecla
se pretender
visualizar mais informações sobre o
programa seleccionado (se disponível).
6
Carregue na tecla para sair do
menu.
2
Utilize a tecla ï para obter a lista
Predefinição/Serviços, ou prima Æ para
aceder à lista Noje.
3
Utilize as teclas Í Æ para seleccionar
um programa.
4
As funcionalidades do guia de TV são
apresentadas na parte inferior do ecrã.
Utilize as teclas coloridas vermelha, verde,
amarela, azul ou branca para as activar.
Page 36

25
18 Função de gravação
(Não aplicável para este modelo)
Esta funcionalidade permite-lhe gravar um
canal digital enquanto a TV está no modo
de espera. Terá ainda que programar o
gravador de vídeo. Se pretende continuar
a ver outro canal digital após definir um
temporizador, pode fazê-lo alterando os
canais da forma habitual.
Importante : Não desligue a TV e a
alimentação eléctrica quando foi programada
uma gravação. A TV deve estar no modo
stand-by para que seja efectuada a gravação.
1
A partir do modo digital, prima a tecla
para obter o guia da TV.
2
Utilize a tecla ï para entrar na lista
Predefinição/Serviços, ou prima Æ
para aceder à lista Noje.
3
Carregue na tecla VERMELHA para
obter o menu Gravar.
2 BBC 2
Nome
Insira o código se estiver
Arquirar Cancelar Fecher
4
Utilize as teclas Î ï para seleccionar
Serviço
bloqueado
Dia e Més
Hora de inicio
Hora de fim
Idioma de áudio
See it saw
2 BBC 2
16/02
12:15
12:30
Português
ï
11:28
uma definição, e prima Æ para obter o
sub-menu. Efectue os seus ajustes e
carregue na tecla ou Í para sair.
• Nome: O programa seleccionado será
apresentado aqui.
• Serviço: Pode alterar o número do
programa que pretende gravar.
Carregue na tecla para confirmar.
Nota
Só é possível alterar para um número
que esteja na lista de favoritos
actualmente seleccionada.
•
Insira o código se estiver bloqueado
:
Introduza o seu código secreto apenas
se tiver activado a funcionalidade de
restrição do acesso (consulte a página
19). Carregue na tecla para
confirmar.
• Dia e Més: Introduza a data utilizando
as teclas P – / + keys. Carregue na
tecla para sair.
• Hora de inicio: Introduza a hora de
início.
• Hora de fim: Introduza a hora de fim.
• Idioma de áudio: Seleccione o seu
idioma e confirme com a tecla .
• Idioma das lagendas: Efectue a sua
selecção e confirme com a tecla .
• Idioma para deficientes auditivos:
Seleccione Sim ou Não, e confirme
com a teclah .
• Ocorrência: Seleccione Uma vez,
Diariamente ou Semanalmente e
confirme com a tecla .
Page 37

26
5
Prima a tecla VERMELHA para
guardar a sua gravação. O guia da TV
reaparecerá.
6
Se tiver terminado de ver a televisão,
deve deixá-la em espera para o
programa de gravação ser activado.
Importante
Não desligue a TV e a alimentação
eléctrica quando foi programada uma
gravação. A TV deve estar no modo
stand-by para que seja efectuada a
gravação.
7
Se estiver a assistir a outro canal digital
quando o temporizador deva começar,
soará o alarme do temporizador e ser lhe-á apresentada a opção de mudar
de canal ou continuar a assistir ao
canal actual. Se escolher mudar de
canal, a gravação não será efectuada.
Nota
A sua gravação futura pode ser
interrompida ou afectada se carregar
nas teclas ou imediatamente
após o aparelho activar a partir do modo
stand-by. A gravação futura também
pode ser interrompida ou afectada
quando uma das fontes EXT 1/ EXT 2
estiver ligada no momento do
aparelho activar a partir do modo
stand-by.
Para evitar a interrupção da sua gravação
futura, é recomendado que permaneça
no modo digital durante cerca de
um minuto, se uma gravação tiver sido
programada.
Page 38

27
19 Teletexto digital (MHEG)
Disponível apenas no R.U.
Os serviços de teletexto digital diferem
grandemente do teletexto analógico. Quando
alterna para um serviço de teletexto digital,
as imagens que vê contêm gráficos e texto
que são dispostos e controlados da forma
decidida pelo emissor. Alguns canais digitais,
que selecciona tal como qualquer outro canal,
oferecem serviços de teletexto dedicados.
Alguns canais digitais também oferecem
informações sobre o programa que está a ser
difundido (uma mensagem ou uma instrução
pode aparecer no ecrã.
Sob certas circunstâncias, o texto Digital ou
os serviços interactivos podem ter prioridade
sobre as legendas. Isto pode fazer com que
as legendas não reapareçam automaticamente
quando sair do texto Digital ou dos serviços
interactivos num canal que está a emitir
legendas. Neste caso, as legendas podem
ser iniciadas ao carregar a tecla no
telecomando ou mudando de canal.
1
Para utilizar o teletexto digital, siga as
instruções no ecrã.
3
Quando tiver terminado de ver o
teletexto, seleccione um canal diferente
com as teclas P– / +, ou siga as
instruções no ecrã para regressar à
imagem.
Quando alternar para um canal digital
com ligações a um serviço de teletexto, o
software é descarregado em segundo plano
para activar a função de teletexto. Deverá
aguardar um pouco antes de premir a tecla
para esperar que o descarregamento
seja concluído. Se premir a tecla antes
do descarregamento estar concluído, haverá
um pequeno atraso antes do ecrã de
teletexto ser apresentado.
Durante a navegação no teletexto digital,
existe um pequeno atraso enquanto a página
é descarregada. Por vezes, é visualizada uma
informação ou mensagem na página para lhe
mostrar a progressão.
Teletexto analógico no modo digital
Nota
Disponível em todos os países
2
Dependendo do serviço, pode-lhe ser
solicitado para utilizar Í Æ Î ï (teclas
de cursor), (teclas
coloridas),
ligado/desligado) e, por vezes,
as teclas numéricas / .
Nota
Se nenhuma ligação de tecla colorida
estiver disponível no Teletexto digital
para lhe permitir sair do modo de
teletexto, utilize a tecla no
comando remoto para sair do modo
de teletexto.
(tecla de Teletexto
• Se vir um ícone
sem serviços de teletexto digital, indica
que o Teletexto analógico está disponível
no modo Digital.
• Digital. Prima a tecla para aceder ao
teletexto analógico.
Nota
Se estiver seleccionado RU (UK)
como país durante a instalação, carregue e
mantenha a tecla
3 segundos.
• Para utilizar as funções do teletexto
analógico, consulte as páginas 40 e 41.
TXT
num canal digital
pelo menos durante
Page 39

28
20 Usar o Módulo de
Acesso Condicional
(CAM)
O menu do Módulo de Acesso
Condicional (CAM) dá acesso às funções
contidas no CAM. O módulo pode ser
introduzido na ranhura da Interface Comum
(CI) localizada na parte de trás (voltada para
baixo) da TV.
Nota
Este módulo de Interface Comum (CI) não
vem com o aparelho de TV. Pode apenas ser
obtido quando assinar com os provedores
do serviço tal como a Pay TV ou outros
provedores do serviço.
IMPORTANTE
Desligue sempre a TV antes de introduzir
ou remover o módulo.
Introduzir o CAM
1
Desligue a TV.
Ranhura de
Common
Interface
Conectores na
parte posterior da TV
(voltada para baixo)
2
Alguns módulos vêm com um cartão
de visualização. Quando utilizar este
tipo de módulo, primeiro introduza
o cartão de visualização no módulo.
Assegure-se de que a seta no cartão
de visualização esteja voltada para
a seta do módulo antes de introduzir
na ranhura do módulo.
3
IIntroduza o módulo na ranhura
da Interface Comum (CI) na TV.
4
Desligue a TV.
5
Carregue na tecla do para
exibir o menu de configuração.
6
Utilize a tecla ï para seleccionar
Restrição de acesso e carregue na
tecla Æ.
7
Carregue na tecla Æ para entrar no
menu Módulo de Acesso
Condicional (CAM).
8
Carregue no botão conforme
indicado no ecrã para aceder às
funções do CAM (consultar página 20).
IMPORTANTE
Se não estiver introduzido qualquer módulo,
ou se o módulo não estiver correctamente
introduzido, o menu do Módulo de
Acesso Condicional não será exibido. (Se
introduziu um modulo, verifique se está
completamente introduzido de maneira
correcta, conforme descrito no passo 3
acima).
Modulo
As funções que agora aparecem no ecrã são
dependentes dos conteúdos do Módulo de
Acesso Condicional seleccionado no seu
país. Consulte as instruções fornecidas com
o módulo ou contacte o vendedor.
Page 40

29
21 Sintonia automática dos
programas analógicos
Este menu permite-lhe pesquisar
automaticamente todos os programas
analógicos disponíveis na sua
região.
Antes de procurar automaticamente todos os
programas analógicos, certifique-se de que
a TV está no modo analógico. Se estiver no
modo digital, prima a tecla (Analógico/
Digital) para aceder ao modo analógico.
1
Carregue na tecla Menu TV. .
Menu Princip.
Imagem
Som
Vários
Instalação
2
Carregue repetidamente na tecla
Brilho
Cor
Contraste
Recorte
Intens.Cor
Contraste+
NR
Î / ï para seleccionar Instalação e na
tecla Æ / para entrar no menu
Instalação.
Procura Auto
Program 3
TV 196 MHz
IMPORTANTE
Para sair ou interromper a pesquisa antes dela
estar concluída, carregue na tecla e
interromper a busca durante a gravação
automática, nem todos os canais serão
gravados. Para todos os canais serem
gravados, necessita de fazer novamente uma
pesquisa automática.
Nota
Funcionalidade ACI (Automatic Channel
Installation)
Se o transmissor ou a rede de cabo enviar o
sinal de ordenação automática, os programas
serão numerados correctamente. Neste
caso, a instalação está completa. Se não for
o caso, pode utilizar o menu Ordenar para
numerar os programas da sua preferência.
Menu Princip.
Imagem
Som
Vários
Instalação
3
Carregue na tecla ï seleccione Procura
Procura Auto
Busca Manual
Reordenar
Nome
Program. Fav
Auto e a tecla Æ / para iniciar
automaticamente a procura dos canais.
Todos os programas de TV disponíveis
serão armazenados. Esta operação
demora alguns minutos. O ecrã mostra
a progressão da pesquisa e o número de
programas encontrados.
Funcionalidade ACI (Automatic Channel
Installation)
Se for detectado um sistema de cabo ou um
canal de TV que emita ACI, é apresentada
uma lista de programas. Sem a emissão de
ACI, os canais são numerados de acordo com
a selecção do idioma e país. Pode utilizar o
menu Ordenar para renumerar.
Nota
Não pode seleccionar Idioma ou Pais no
modo Analógico. Se pretender seleccionar
Idioma ou Pais, tem que sair do modo
analógico e entrar no modo Digital para
o fazer (consulte “Preferências de
localização e idioma” na página 18).
Page 41

30
22 Memorização manual dos
Europe
France
UK
West Europe
East Europe
Manual store
System
Search
Program No.
Fine Tune
Store
programas analógicos
Este menu permite memorizar os canais um
a um.
1
Carregue na tecla .
2
Carregue repetidamente na tecla
Î / ï para seleccionar Instalação e na
tecla Æ / para entrar no menu
Instalação.
Menu Princip.
Imagem
Som
Vários
Instalação
3
Carregue na tecla ï para seleccionar
Procura Auto
Busca Manual
Reordenar
Nome
Program. Fav
Busca Manual e a tecla Æ / OK para
entrar nesse menu.
Instalação
Procura Auto
Busca Manual
Reordenar
Nome
Program. Fa
Sistema
Procura
No. Prog
Ajust.Fino
Memorizar
5
Sistema:
Carregue as teclas
Î ï
para
seleccionar
Europa (detecção automática),
França (norma LL),
Reino Unido ((UK),
Europa Ocid (norma BG) ou
Europa Leste (norma BG).
Carregue na tecla Æ / para
confirmar o sistema seleccionado.
6
Procura:
Carregue na tecla Æ. A busca inicia-se.
A busca é interrompida logo que se
encontra um canal e o nome desse
canal aparece no visor (se estiver
disponível). Avance para o passo
seguinte. Se souber a frequência do
canal desejado, escreva directamente o
número com as teclas to .
7
No. Prog.:
Introduza o número desejado com as
teclas a ou Î ï.
8
Ajust.Fino:
Se a recepção não for satisfatória,
regule com as teclas Î ï.
4
Carregue as teclas
Î ï
para seleccionar
os itens do menu Busca Manual que
deseja ajustar ou activar.
9
Memorizar:
Para se certificar de que o programa
é memorizado, carregue na tecla
Æ / . O programa é memorizado.
10
Repita os passos 6 to 9 tantas
vezes quantos programas a memorizar.
11
Para voltar ao menu anterior, carregue
na tecla Í.
12
Para sair dos menus, carregue na tecla
.
Page 42

31
23 Classificação dos canais
A função de ordenação permite-lhe alterar
o número do programa para uma estação
particular.
1
Carregue na tecla .
2
Carregue repetidamente na tecla
Î / ï para seleccionar Instalação e na
tecla Æ / para entrar no menu
Instalação.
Instalação
Procura Auto
Busca Manual
Reordenar
Nome
Program. Fa
100
001
002
003
004
<
005
006
007
008
Menu Princip.
Imagem
Som
Vários
Instalação
3
Carregue na tecla ï para seleccionar
Procura Auto
Busca Manual
Reordenar
Nome
Program. Fav
Reordenar e a tecla Æ / para
entrar nesse menu.
Instalação
Procura Auto
Busca Manual
Reordenar
Nome
Program. Fa
4
Seleccione o canal que quer renumerar
100
001
002
003
004
005
006
007
008
com as teclas Î ï e a tecla Æ para
validar (A seta agora aponta para a
esquerda).
5
Carregue as teclas Î ï para seleccionar
um novo canal e valide com a tecla Í
(A seta aponta para a direita e a
reordenação está concluída).
Instalação
Procura Auto
Busca Manual
Reordenar
Nome
Program. Fa
6
Repita os passos 4 e 5 tantas vezes
100
001
002
>
003
004
005
006
007
008
quantos os canais a renumerar.
7
Para voltar ao menu anterior, carregue
na tecla Í.
8
Para sair dos menus, carregue na tecla
.
Page 43

32
24 Nomear Canais
Se preferir, pode atribuir um nome ao canal
de TV.
1
Carregue na tecla .
2
Carregue repetidamente na tecla
Î / ï para seleccionar Instalação e na
tecla Æ / para entrar no menu
Instalação.
Instalação
Procura Auto
Busca Manual
Reordenar
Nome
Program. Fav
100
001
002
003
004
>
z
005
006
007
008
Menu Princip.
Imagem
Som
Vários
Instalação
3
Carregue repetidamente na tecla ï para
Procura Auto
Busca Manual
Reordenar
Nome
Program. Fav
seleccionar Nome e a tecla Æ /
para entrar modo Nome.
Instalação
Procura Auto
Busca Manual
Reordenar
Nome
Program. Fav
4
Carregue na teclas Î ï para
100
001
002
003
004
005
006
007
008
seleccionar o canal cujo nome deseja
modificar
7
Carregue na tecla Æ / OK até
visualizar o nome no canto superior
esquerda
do ecrã da televisão. O nome
é memorizado.
8
Para voltar ao menu anterior, carregue
na tecla Í.
9
Para sair dos menus, carregue na tecla
.
5
Carregue na teclaÆ para mover a
área de visualização do nome
6
Carregue as teclas Î ïpara escolher
os caracteres (máximo de 5 caracteres)
e as teclas Í Æ para se mover na zona
de visualização do nome.
Page 44

33
25 Seleccionar os seus
Programas Favoritos
Esta característica permite-lhe saltar os
programas a que não assiste frequentemente
e manter apenas os seus programas
favoritos.
Nota: Quando um programa for saltado,
não poderá ter acesso a ele através da tecla P
– / +. Só poderá aceder ao programa através
das teclas digitais 0-9
1
Carregue na tecla .
2
Carregue repetidamente na tecla
Î / ï para seleccionar Instalação e na
tecla Æ / para entrar no menu
Instalação.
Menu Princip.
Imagem
Som
Vários
Instalação
3
Carregue na tecla ï para seleccionar
Procura Auto
Busca Manual
Reordenar
Nome
Program. Fav
Program Fav. e a tecla Æ /
para introduzir Fav. Lista de Programa.
5
Carregue na tecla Æ / para saltar o
programa. O sinal $ à direita do menu
desaparecerá indicando que o programa
foi saltado.
Instalação
Procura Auto
Busca Manual
Reordenar
Nome
Program. Fav
6
Para voltar ao menu anterior, carregue
001
002
003
004
005
006
007
008
100
$
$
$
$
$
$
$
na tecla Í.
7
Para sair dos menus, carregue na tecla
.
Nota
• Para adicionar novamente programas
saltados à sua lista de favoritos, repita os
passos de 1 a 3 .
4
Carregue repetidamente na tecla
Î / ï para seleccionar o programa que
pretende saltar.
Instalação
Procura Auto
Busca Manual
Reordenar
Nome
Program. Fav
001
002
003
004
005
006
007
008
100
$
$
$
$
$
$
$
$
• Carregue repetidamente na tecla Î / ï
para seleccionar o programa saltado que
pretende adicionar à sua lista de
programas favoritos.
• Carregue na tecla Æ / para anular o
salto de um programa. O sinal $
aparecerá indicando que o programa está
agora memorizado.
Page 45

34
26 Vários
26.1 Timer
A característica Temporizador permite-lhe
definir a TV para comutar para outro canal
numa determinada hora, enquanto está a
assistir a outro canal. Pode também utilizála como um alarme para ligar a TV numa
hora especificada, a partir do modo standby. Para que o temporizador funcione, o
aparelho não deve estar desligado. Uma vez
desligado, o temporizador fica desactivado.
1
Carregue na tecla .
2
Carregue repetidamente nas teclas Î ï
kpara seleccionar Vários e na tecla Æ/
para entrar no menu Vários.
Menu Princip.
Imagem
Som
Vários
Instalação
3
Carregue na tecla Æ / para aceder
Timer
Bloq.Infantil
Bloqueio Pais
Active Control
ao menu.
4
Carregue nas teclas Î ï para
seleccionar um item Timer.
Timer
Dormir
Horas
Hora Inacio
Hora Fim
No. Prog.
Activar
– – : – –
Dormir: para seleccionar um período de
tempo no qual o aparelho irá comutar para
o modo stand-by quando atingir o período
de tempo seleccionado.
Seleccione a opção Desl para desactivar a
característica.
Nota
Durante o último minuto de uma definição
de tempo Dormir, será exibida uma
contagem decrecente no ecrã. Pressione
qualquer botão no telecomando para
cancelar o desligar Dormir.
Hora: introduza a hora actual.
Hora Inacio: introduza a hora de início.
Hora Fim: introduza a hora de stand-by.
No. Prog.: introduza o número do canal
para o alarme de despertar.
Activar: as definições incluem:
– Uma Vez para um alarme único,
– Diário para cada dia,
– Desl para cancelar.
6
Carregue na tecla
no telecomando
para colocar o aparelho de TV no modo
stand-by. A TV ligará automaticamente na
hora programada. Se deixar a TV ligada, ela
apenas mudará de canal na
Hora Inacio e
irá para o modo stand-by na Hora Fim.
5
Para fazer ajustes na definição do
temporizador utilize as teclas Í, Æ, Î,
ï ou os Digitos 0-9.
Page 46

35
26.2 Bloqueio Pais
A característica Bloqueio Pais permite-lhe
bloquear canais para evitar que os seus filhos
assistam a certos programas.
1
Carregue na tecla .
2
Carregue repetidamente nas teclas Î ï
kpara seleccionar Vários e na tecla Æ/
para entrar no menu Vários.
Menu Princip.
Imagem
Som
Vários
Instalação
3
Carregue repetidamente nas teclas Î
Timer
Bloq.Infantil
Bloqueio Pais
Active Control
ï para seleccionar Bloqueio Pais e
carregue na tecla Æ / para entrar no
modo Bloqueio Pais.
Vários
Timer
Bloq.Infantil
Bloqueio Pais
Active Control
4
Digite o código de acesso 0711 através
* * * *
Código Acesso
das teclas de Dígitos 0-9. Aparecerá
uma mensagem de Incorrecto. Digite
novamente o código de acesso 0711.
5
Depois, a TV pedir-lhe-á que altere o
código. Digite o seu próprio código de
4 dígitos através das teclas de Digitos
0-9 e confirme o novo código. Uma vez
que o novo código esteja confirmado,
aparecerá o menu de Bloqueio Paisk .
Bloqueio Pais
Trancar Prog.
Mudar Codigo
Limpar Tudo
Trancar Tudo
001
002
003 +
004
005
006
007
008
No menu Bloqueio Pais, utilize as teclase
Î, ï, Í, Æ, Digit 0-9 e para aceder
e activar as funções de Bloqueio pais.
Descrição das definições
Trancar Prog.
Bloquear programa individual. Carregue
na tecla Æ para entrar no modo Trancar
Prog. e nas teclas Î ï para seleccionar
o programa a bloquear ou desbloquear.
Carregue nas teclas Í Æ para bloquear ou
desbloquear o programa seleccionado. Um
símbolo + de tecla bloqueada aparece junto
ao número do canal bloqueado. Para sair do
modo Trancar Prog. e voltar para o menu
Bloqueio Pais carregue na tecla .
Mudar Codigo
Digite o seu novo código de 4 dígitos usando
as teclas de Digitos 0-9 keys e confirme
digitando outra vez os novos 4 dígitos.
Limpar Tudo
Carregue na tecla Æ para desbloquear todos
os canais bloqueados.
Trancar Tudo
Press Æ key to lock all locked channels.
Nota
Se ligar o aparelho de TV e seleccionar
um programa que tenha sido bloqueado,
precisará digitar o Código de Acesso para
aceder ao canal bloqueado seleccionado.
Para desbloquear o canal, vá para Trancar
Prog. no menu Bloqueio Pais carregue
nas teclas Í Æ keys (o símbolo de tecla
bloqueada + desaparece).
Page 47

36
26.3 Bloq. Infantil
26.4 Active Control
Os controlos laterais da TV ficarão
bloqueados quando seleccionar a opção Lig
no menu Bloq. Infantil. Assim, precisará de
esconder o telecomando das suas crianças
para as impedir de assistir TV.
1
Carregue na tecla .
2
Carregue repetidamente nas teclas Î ï
para seleccionar Vários e na tecla Æ/
para entrar no menu Vários.
3
Carregue na tecla ï para seleccionar
Bloq. Infantil e carregue na tecla Æ /
para entrar no modo Bloq.Infantil .
Vários
Timer
Bloq.Infantil
Bloqueio Pais
Active Control
Desl
Lig
Ajusta automaticamente a imagem
de forma a obter sempre uma qualidade
de imagem óptima independentemente das
condições do sinal.
1
Carregue na tecla .
2
Carregue repetidamente nas teclas Î ï
para seleccionar Vários e na tecla Æ/
para entrar no menu Vários.
3
Carregue na tecla Î ï para seleccionar
Active Control e carregue na tecla
Æ / para entrar no modo Active
Control.
Vários
Timer
Bloq.Infantil
Bloqueio Pais
Active Control
Desl
Lig
4
Carregue nas teclas Î ïpara seleccionar
opção Lig or Desl..
5
Carregue na tecla Æ / para activar/
desactivar opção Lig ou Desl.
6
Para voltar ao menu anterior, carregue
na tecla Í.
7
Para sair dos menus, carregue na tecla
.
4
Carregue nas teclas Î ïpara seleccionar
opção Lig or Desl..
5
Carregue na tecla Æ / para activar/
desactivar opção Lig ou Desl.
6
Para voltar ao menu anterior, carregue
na tecla Í.
7
Para sair dos menus, carregue na tecla
.
Page 48

37
27 Definições de Imagem
e Som
Pode ajustar as definições de imagem e som
no menu Imagem ou Som.
1
Carregue na tecla .
2
Carregue nas teclas Î ï para
seleccionar Imagem ou Som.
3
Carregue na tecla Æ / para entrar no
menu Imagem ou Som.
Imagen
Brilho
Cor
Contraste
Recorte
Intens.Cor
Contraste+
NR
Som
Equalizador
Equilibrio
Lim.Volume
Incr. Surround
4
Carregue nas teclas Î ï para
100
63
0
120HZ
200HZ
500HZ
1200HZ
3KHZ
7500HZ
12KHZ
seleccionar uma definição de Imagem
ou Som.
5
Carregue na tecla Æ / para aceder à
definição Imagem ou Soundg.
6
Carregue nas teclas Î ïpara ajustar a
definição de Imagem ou Som.
7
Para voltar ao menu anterior, carregue
na tecla Í.
8
Para sair dos menus, carregue na tecla
.
Descrição das definições da Imagem
Brilho: altera o brilho da imagem.
Cor: altera a intensidade da cor.
Contraste: altera a diferença entre os tons
claros e escuros dentro da gama de contraste
da TV.
Recorte: aumenta ou diminui o nível de
nitidez para melhorar os detalhes na imagem.
Intens. Cor: altera a definição da cor: Fraco
(mais azul), Normal (equilibrada) ou Forte
(mais vermelha).
Contraste+: aumenta a gama de contraste
da TV Seleccione a opção Lig option para
activar a característica.
NR: melhora a imagem “ruidosa” (pequenos
pontos na imagem) devido a fraca transmissão
de sinal. Seleccione a opção Lig para activar
a característica.
Descrição das definições do Som
Equalizador: para ajustar o tom do som.
Equilibrio: equilibra o som nas colunas
esquerda e direita.
Lim.Volume: é usado para limitar aumentos
bruscos do som, especialmente na mudança
de programa ou intervalos publicitários.
Incr. Surround: selecciona entre Incredible
Surround e Estéreo na transmissão em
estéreo e entre Mono e Espacial na
transmissão Mono.
Page 49

38
28 Smart Picture e Som
A função Smart Picture oferece 5
resoluções: Saturado, Natural, Suave,
Multimédia e Pessoal.
Prima a tecla diversas vezes para
seleccionaras várias funções:
Natural
Sauve
ou
Rich
Nota
: A definição Pessoal é a definição
Multimédia
Pessoal
que define utilizando o menu de Imagem
no menu principal. Esta é a única definição
na definição Imagem Inteligente que pode
ser alterada. Todas as outras definições
são predefinidas de fábrica para a sua
conveniência.
A função Smart Sound oferece 4
regulações possíveis do som: Filme,
Música, Fala e Pessoal.
Prima a tecla diversas vezes para
seleccionaras várias funções
Definition of Picture Settings
Saturado : Regulação da imagem com
brilho e recortada,
adequada a um ambiente
luminoso e para utilização
em exposições de forma a
demonstrara qualidade do
televisor.
Natural : Modo de referência para
as condições de uma sala
e de um sinal médio.
Suave : Adequado para sinais de
má qualidade. Adequado
para a visualização numa
sala.
Multimédia : Também é o mais
adequado para aplicações
gráficas.
Pessoal : As definições são reguladas
de acordo com a sua
preferência.
Musica
ou
Fala
Filme
Nota
: A definição Pessoal é a definição
Pessoal
que define utilizando o menu de Som no
menu principal. Esta é a única definição
na definição Som Inteligente que pode
ser alterada. Todas as outras definições
são predefinidas de fábrica para a sua
conveniência.
Descrição das regulações do Som
Filme : Enfatiza a sensação e a
acção.
Musica : Enfatiza os tons baixos.
Fala :
Enfatiza tons altos.
Pessoal : As definições do som são
reguladas de acordo com a
sua preferência.
Page 50

39
29 Formatos do ecrã
As imagens que recebe podem ser
transmitidas no formato 16:9 (ecrã
panorâmico) ou no formato 4:3 (ecrã
convencional). As imagens 4:3 terão uma
faixa preta à esquerda e direita do ecrã. A
função de formatação do ecrã permite-lhe
optimizar a imagem exibida no ecrã.
Carregue repetidamente na tecla
percorrer os diferentes formatos de ecrã e
seleccione o seu formato preferido.
4:3
A imagem é reproduzida no formato 4:3 e
uma faixa preta é exibida em cada um dos
lados da imagem.
Exp. imagem
14:9 14:9
para
Zoom
Legenda
Este modo é usado para exibir as imagens
4:3 utilizando a superfície total do ecrã,
deixando visíveis as legendas. Parte do topo
da imagem está cortada.
Super Panor.
Este modo é usado para exibir as imagens
4:3 utilizando a superfície total do ecrã,
ampliando os lados da imagem.
Panoramico
A imagem é ampliada para o formato 14:9 e
uma faixa preta fina permanece em ambos
os lados da imagem. Algo na parte superior
e inferior da imagem está cortado.
Exp. imagem
16:9
A imagem é ampliada para o formato 16:9.
Este modo é recomendado na exibição
de imagens que possuem faixas pretas
em cima e em baixo (formato letterbox).
Neste modo, grandes partes inferiores e
superiores da imagem estão cortadas.
A imagem é exibida nas proporções originais
das imagens transmitidas no formato 16:9.
Nota
Se exibir uma imagem 4:3 neste modo, será
alargada horizontalmente.
Page 51

40
30 Teletexto
O teletexto é um sistema de informação
transmitido por certos canais que pode ser
consultado como um jornal. Também oferece
acesso às legendas para espectadores com
problemas de audição ou que não estão
familiarizados com o idioma de transmissão
do áudio (redes de cabo, canais por satélites,
etc.).
5
1
3
2
2
4
1
Ligar/Desligar o Teletexto
Carregue nesta tecla para activar o
visor do teletexto. Aparece uma página
índice com uma lista de itens que podem
ser acedidos. Cada item possui um
número de página correspondente de
3 dígitos. Se o canal seleccionado não
transmite o teletexto, a indicação 100
será exibida e o ecrã permanecerávazio.
Saia do teletexto pressionando
novamente a tecla .
2
Seleccionar uma página
Introduza o número da página requerida
usando as teclas de 0 a 9 ou as teclas
P –/+. Exemplo: página 120, introduzir
120. O número é exibido no canto
superior esquerdo do ecrã. Quando
a página é localizada, o contador pára a
pesquisa e a página é exibida. Repita
esta operação para visualizar outra
página. Se o contador continuar a
pesquisar, isto significa que a página não
é transmitida. Neste caso, seleccione
outro número.
3
Acesso directo aos itens
As áreas coloridas são exibidas na parte
inferior do ecrã. As 4 teclas coloridas
são utilizadas para aceder aos itens ou às
páginas correspondentes. As áreas
coloridas piscam enquanto o item ou a
página ainda não estiverem disponíveis.
4
Índice
Fá-lo regressar à página índice
(geralmente a página 100 ou o menu
‘hitlist’).
5
Fixador de página
Certas páginas contêm subpáginas que
são automaticamente exibidas de forma
sucessiva. Esta tecla é usada para deter
ou recomeçar a progressão da
ubpágina. A indicação aparece na
parte superior esquerda. Utilize as teclas
Í Æ para seleccionar a próxima
subpágina ou a anterior.
Page 52

41
9
9
9
9
9
6
Informação escondida
Para exibir ou esconder informações tais
como soluções para jogos ou enigmas.
7
Ampliar uma página
6
8
7
7
Permite-lhe exibir a parte superior ou
inferior da página. Carregando de novo
nela, voltará para o tamanho normal da
página.
8
Imagem/Teletextot
• Carregue na tecla .
• Carregue na tecla para exibir o
Teletexto à direita e a imagem à
esquerda do ecrã.
• Carregue na tecla para voltar a um
modo de teletexto completo.
• Carregue na tecla para voltar à
imagem total no ecrã.
9
Páginas favoritas
Nota: Apenas disponível em
Analógico RF.
Ao invés das áreas de cor padrão
exibidas na parte inferior do ecrã,
pode memorizar 4 páginas favoritas nos
primeiros 40 canais, que poderão depois
ser acedidos utilizando as teclas
coloridas (vermelha, verde, amarela,
azul). Uma vez definidas, estas páginas
favoritas tornar-se-ão predefinidas
sempre que o teletexto for
Para memorizar as páginas favoritas,
proceda da seguinte forma:
• Carregue na tecla para mudar para
o modo de página favorita.
• Utilize as teclas para aceder
à página do teletexto que deseja
memorizar como página favorita.
• Carregue e mantenha apertada a tecla
colorida da sua escolha durante cerca
de 5 segundos. A página está agora
memorizada.
• Repita os passos 2 a 3 com as outras
teclas coloridas.
• Para sair do modo de página favorita,
carregue na tecla Para sair do
modo de teletexto, carregue na tecla
key.
Nota
Para limpar as páginas favoritas, carregue
e mantenha apertada a tecla
durante cerca de 5 segundos.
seleccionado.
Page 53

42
31 Usar a TV como um
Monitor de PC
A sua TV também pode ser usada como um
monitor de computador.
ao PC está apenas disponível via conector
HDMI. A ligação VGA não é suportada.
31.1 Ligar o equipamento do PC
Importante
Para a TV funcionar como um monitor de
PC, proceda da seguinte forma.
1
Ligue a saída DVI do seu computador ao
conector HDMI 1 ou HDMI 2 da TV.
Use um cabo HDMI para DVI se for a
saída DVI a ser ligada.
2
Ligue o cabo de áudio ao jack de Áudio
do PC e aos jacks de Áudio L (E) / R (D)
(EXT3) da TV.
3
Carregue na tecla para exibir a
Lista Fonte e use a tecla Î ï para
seleccionar HDMI 1 ou HDMI 2.
Fonte
TV
EXT 1
EXT 2
EXT 3
EXT 4
HDMI 1
HDMI 2
Digital TV
4
Carregue na tecla Æ / para comutar
para a fonte seleccionada.
Nota:
ligação
3
Carregue na tecla Î ï para seleccionar
as definições e na teclae Í Æ para
seleccionar ou ajustar a definição.
4
Para voltar ao menu anterior, carregue
na tecla Í.
5
Para sair dos menus, carregue na tecla
.
Menu Imagem
• O menu da Imagem compreende as
características Brilho, Contraste,
Recorte, Intens. Cor, Contraste+,
Alinham. Horiz. e Ajuste Vertical.
• Excepto para as características Alinham.
Horiz. e Ajuste Vertical todas as outras
características funcionam exactamente do
mesmo modo que as características do
menu de Imagem da TV (consultar página
37).
• A característica Alinham. Horiz.
permite-lhe ajustar a posição horizontal da
imagem. A característica. Ajuste Vertical
permite-lhe ajustar a posição vertical da
imagem.
Menu Varios
• O menu de Características compreende as
aracterísticas Modo Selecção e
Formato.
• Quando ligar as resoluções de apoio do
PC de 480p e 720p, o item Modo
Selecção estará disponível no menu
Varios . Isto permitir-lhe-á seleccionar
entre o modo PC e HD.
• A característica Formato funciona
exactamente do mesmo modo que 39).
31.2 Controlo das definições da TV
quando estiver ligado ao PC
1
Carregue na tecla
para exibir o
menu principal.
2
Carregue nas teclas Î ï para
seleccionar Imagen, Som ou Varios
e na tecla Æ / para entrar no menu
do item seleccionado.
Nota :
ligar a sua TV ao PC, é possível que não
funcionem de maneira perfeita na primeira vez.
Frequentemente, isto é resolvido alterando a
resolução ou as características do dispositivo
ligado à TV. Em algumas situações, poderá ver
uma caixa de diálogo n
Quando utilizar HDMI para
Page 54

43
32 Utilização em Modo HD
(High Definition – Alta
Definição)
Usar a TV no modo HD (Alta Definição).
O modo HD (Alta Definição) permite-lhe
desfrutar de imagens mais claras e nítidas
se estiver a utilizar o equipamento HD
que possa produzir sinais de vídeo de alta
definição.
32.1 Ligar o equipamento HD
Importante: Para a TV funcionar no modo
HD, proceda da seguinte forma.
1
Ligue a saída HDMI ou DVI do seu
equipamento HD ao conector HDMI 1
ou HDMI 2 da TV. Use um cabo DVI
para HDMI se a saída DVI estiver ligada.
Também pode ligar as Saídas de Vídeo
Componente (Y, Pb, Pr) do equipamento
HD (se houver) para as Entradas de
Vídeo Componente (Ext 4) da TV.
2
Ligue o cabo de áudio ao jack de Áudio
do equipamento HD e aos jacks de áudio
L (E) / R (D) (EXT3) da TV.
3
Carregue na tecla para exibir a
Lista Fonte e use a tecla Î ï para
seleccionar HDMI 1 ou HDMI 2 (ou
EXT 4 se utilizar ligação YPbPr).
Fonte
TV
EXT 1
EXT 2
EXT 3
EXT 4
HDMI 1
HDMI 2
Digital TV
4
Carregue na tecla Æ / para comutar para
a fonte seleccionada.
32.2 Controlar as definições da TV
enquanto em modo HD
1
Carregue na tecla
menu principal.
2
Carregue nas teclas Î ï para
seleccionar Imagen, Som ou Varios e
na tecla Æ / para entrar no menu
do item seleccionado.
3
Carregue na tecla Î ï para seleccionar
as definições e na tecla Í Æ para
seleccionar ou ajustar a definição.
4
Para voltar ao menu anterior, carregue
na tecla Í.
5
Para sair dos menus, carregue na tecla
.
Menu Imagem
• O menu da Imagem compreende as
características Brilho, Contraste,
Recorte, Intens. Cor, Contraste+,
Alinham. Horiz. e Ajuste Vertical.
• Excepto para as características Alinham.
Horiz. e Ajuste Vertical todas as outras
características funcionam exactamente do
mesmo modo que as características do
menu de Imagem da TV (consultar página
37).
• A característica Alinham. Horiz.
permite-lhe ajustar a posição horizontal da
imagem. A característica. Ajuste Vertical
permite-lhe ajustar a posição vertical da
imagem.
Menu Som
• O menu de som compreende as funções:
Equalizador, Equilibrio, Lim.Volume e
Incredible Surround e funciona
exactamente do mesmo modo que o menu
de som da TV (consultar página 37).
para exibir o
Page 55

44
Menu Varios
• O menu de Características compreende
as características Timer, Bloq. Infantil
Bloqueio Pais, Modo Selecção e
Active Control (Controlo Activo).
Excepto para a característica de Modo
Selecção todas as outras funcionam
exactamente do mesmo modo que o
menu de som da TV (consultar página 34-
36).
• Quando ligar as resoluções de apoio do
PC de 480p e 720p, o item Modo
Selecção stará disponível no menu
Varios. Isto permitir-lhe-á seleccionar
entre o modo PC e HD.
32. 3 Formatos suportados
Formato HD
480p, 480i, 576p, 576i, 720p, 1080i
1080p (applicable to 47” LCD TV only).
Formato SD
480i, 576i
Nota
A sua TV Philips é compatível com HDMI. Se
não obtiver uma boa imagem, por favor, altere
o formato do vídeo no seu dispositivo (leitor
de DVD, set-top box do cabo, etc.) para um
formato padrão. Por exemplo: para leitor de
DVD seleccione 480p, 576p, 720p ou 1080i.
Por favor, note que isto não é um defeito
do aparelho de TV.
Page 56

45
HDMI 1 HDMI 2
AUDIO IN
L
R
Y
Pb
Pr
EXT 4
SERV C
33 Ligar outros
equipamentos
32.1 Visão geral das ligações
Satélite
Antena
Decoder
Cinema em casa
DVD
VCR
DVD
Decoder
VCR
DVD
Computer
Cinema em casa
DVD
VCR
Receptor de
satélite
Receptor
de satélite
Caixa de
distribuição
de cabos
Caixa de
distribuição
de cabos
Page 57

46
33.2 Ligar um videogravador ou
4
1
3
2
1
2
gravador de DVD
Com um eurocabo
1
Ligue os cabos de antena 1 e 2
como indicado.
Ligue o eurocabo 3 como indicado.
2
Carregue na tecla no telecomando
3
para exibir a lista Fonte.
Carregue repetidamente na tecla ï para
4
seleccionar EXT2 e carregue na tecla
Æ / para confirmar a selecção.
Conectores na
parte posterior da TV
(voltada para cima)
Conectores na
parte posterior da
Cable
TV (voltada para
baixo)
Recorder
Apenas com o cabo de antena
1
Ligue os cabos de antena 1 e
como indicado.
Sintonize o sinal de teste do gravador e
2
memorize o sinal de teste com o
número de programa 0.
Consulte Instalação manual, p. 30.
Consulte também o manual de in
struções do gravador.
Conectores na
parte posterior da
Cable
TV (voltada para
baixo)
Recorder
33.3 Ligar um descodificador e um
videogravador
Ligue um eurocabo 4 4ao descodificador
e ao euroconector especial do gravador.
Consulte também o manual de instruções
do gravador.
Aviso
Não coloque o gravador demasiado perto
do ecrã, uma vez que alguns gravadores
podem ser
susceptíveis a sinais provenientes do ecrã.
Mantenha uma distância mínima de 0,5 m
do ecrã.
2
Sugestão
Pode igualmente ligar directamente o
descodificador a EXT1 ou EXT2 com um
eurocabo.
Recorder
Descodificador
Page 58

47
33.4 Ligar dois videogravadores ou
1
5
4
2
3
2
1
3
um videogravador e um
gravador de DVD
Com eurocabos
1
Ligue os cabos de antena 1,
2
e 3 3como indicado.
Ligue os seus videogravadores ou
2
gravador DVD EXT1 e EXT2 com os
eurocabos 4 e 5 .
Carregue na tecla no telecomando
3
para exibir a lista Fonte.
Carregue repetidamente na tecla ï para
4
seleccionar EXT 1 ou EXT2 e
carregue na tecla Æ / para confirmar
a selecção.
Apenas com cabos de antena
1
Ligue os cabos de antena 1,
2
e 3 como indicado.
Sintonize o sinal de teste do gravador e
2
memorize o sinal de teste com o
número de programa 0. Consulte
Instalação manual, p. 30.
Consulte também o manual de in
struções do gravador.
Conectores na
parte posterior da TV
(voltada para cima)
33.5 Ligar um receptor de satélite
Com um eurocabo
1
Ligue os cabos de antena 1 e 2
como indicado.
Ligue o receptor de satélite a
2
EXT1 ou EXT2 com um eurocabo 3.
Carregue na tecla no telecomando
3
para exibir a lista Fonte.
Carregue repetidamente na tecla ï para
4
seleccionar EXT 1 ou EXT2 e
carregue na tecla Æ / para confirmar
a selecção.
Com conectores de Vídeo componente
Consulte Ligar um leitor de DVD, um
receptor de satélite ou uma caixa de cabo,
p. 48.
Conectores na
parte posterior da TV
(voltada para cima)
Conectores na
parte posterior da
TV (voltada para
baixo)
Conectores na
Cable
parte posterior da
TV (voltada para
baixo)
Recorder
Receptor de satélite / Cable box
Recorder
Page 59

48
33.6 Ligar um leitor de DVD, uma
1
2
2
3
4
1
caixa de cabo ou uma consola de
jogos
Com um conector HDMI
Carregue na tecla no telecoman
3
do para exibir a lista Fonte.
Carregue repetidamente na tecla ï
4
para seleccionar EXT 4 e carregue na
tecla Æ / para confirmar a selecção.
HDMI é o novo padrão para interligação de
vídeo e áudio digital.
1
Ligue o equipamento com o conector
HDMI.
2
Carregue na tecla no telecomando
para exibir a lista Fonte.
Carregue repetidamente na tecla ï para
3
seleccionar HDMI 1 ou HDMI e
carregue na tecla Æ / para confirmar
a selecção.
Conectores na parte posterior
da TV (voltada para baixo)
33.7 Ligar um leitor de DVD, um
receptor de satélite ou uma
caixa de cabo
No caso de uma caixa de cabo e/ou um
5
receptor de satélite, ligue igualmente o
cabo da televisão por cabo e/ou o
cabo da antena de satélite 3 e o cabo
de antena 4 .
Conectores na parte posterior
da TV (voltada para baixo)
DVD
Conectores na parte posterior
da TV (voltada para baixo)
Com Conectores de Vídeo
Componente
1
Ligue os três cabos de vídeo
componente separados 1 1às fichas
YPbPr do leitor de DVD e às fichas Y,
Pb e Pr de EXT4 do televisor.
Ligue o cabo de áudio aos jacks L (E) R
2
(D) de áudio do DVD e o jack de
AUDIO L/R da EXT4 2 .
Receptor de satélite / caixa de cabo
Page 60

49
1
2
Note
• Os cabos estão frequentemente codifica
dos por cores. Ligue o vermelho ao ver
melho, o branco ao branco, etc.;
• As etiquetas para as entradas de vídeo
componente podem ser diferentes conso
ante o leitor de DVD ligado. Embora as
abreviaturas possam variar, as letras B e R
significam respectivamente os sinais
componentes azul e vermelho, e Y indica
o sinal luminiscente. Consulte as
instruções de utilização do leitor de DVD
para obter mais informações sobre as
definições e ligações;
• Para obter uma visualização ideal, reco
menda-se que configure o seu equipa
mento para os modos gráficos suportados
mais elevados possível.
Conectores na
parte lateral
da TV
Conectores na
parte posterior da TV
(voltada para baixo)
Audio
L/R
HDMI
DVI
PC
PC equipado com um conector DVI
Aviso
Caso verifique a existência de imagens
instáveis, cores incorrectas ou sem cor, sem
imagem ou mesmo combinações destes
fenómenos no seu ecrã, verifique se as ligações estão correctamente efectuadas, e se
a resolução e a norma de sinal do equipamento ligado estão correctamente configuradas. Consulte o manual de instruções do
equipamentot.
33.8 Ligar um PC
Nota
• Apenas a saída digital do PC pode ser
ligada via DVI ao cabo HDMI.
VGA não é suportada.
• Antes de ligar o seu PC à TV, seleccione
as definições do monitor do seu PC para
uma frequência de actualização de 60 Hz.
Utilize um cabo DVI para HDMI para
1
ligar a um dos conectores HDMI da sua
TV 1.
Ligue o cabo de áudio ao jack de
2
ÁUDIO do PC e aos jacks de ÁUDIO L
(E) / R (D) da TV EXT3 2 .
Carregue na tecla no telecoman
3
do para exibir a lista Fonte.
Carregue repetidamente na tecla ï
4
para seleccionar HDMI 1 ou HDMI e
carregue na tecla Æ / para
confirmar a selecção.
Resoluções suportadas pelo PC
640 x 480, 60 Hz 800 x 600, 75 Hz
640 x 480, 72 Hz 800 x 600, 85 Hz
640 x 480, 75 Hz 1024 x 768, 60 Hz
640 x 480, 85 Hz 1024 x 768, 70 Hz
800 x 600, 60 Hz 1024 x 768, 75 Hz
800 x 600, 72 Hz 1024 x 768, 85 Hz
(Aplicável apenas para TV LCD)
1280 x 768, 60 Hz
1280 x 1024, 60 Hz
1360 x 768, 60 Hz
Page 61

50
33.9 Ligue a sua câmara, câmara de
3
2
1
vídeo ou consola de jogos.
Ligue o sua câmara, câmara de vídeo ou
1
consola de jogos.
33.9.1 Ligar auscultadores
Introduza a ficha na entrada de
1
auscultadores como indicado.
Para equipamento monofónico, ligue ao
2
VIDEO 2 e AUDIO L 3 (apenas).
Para equipamento estéreo, ligue tanto
AUDIO L como o AUDIO R 3 .
É conseguida a qualidade S-VHS com
uma câmara de vídeo S-VHS ao ligar os
cabos S-VHS à entrada 1 de S-VIDEO
e às entradas 3 de AUDIO L / R.
Aviso: dnão ligue o cabo 1 e 2
ao mesmo tempo.A imagem pode ficar
distorcida!
Carregue na tecla no telecoman
3
do para exibir a lista Fonte.
Carregue repetidamente na tecla ï
4
para seleccionar EXT 3 e carregue na
tecla Æ / para confirmar a selecção.
Conectores na parte
lateral da TV
A impedância dos auscultadores deve
2
estar entre 8 e 4000 Ohm.A entrada
dos auscultadores destina-se a fichas de
3,5 mm
Sugestão
Carregue no telecomando para
desligar os altifalantes do televisor.
Ligar som, carregue na tecla
outra vez.
Conectores na parte
lateral da TV
Page 62

51
34 Resolução de problemas
A seguir encontra-se uma lista de sintomas que pode encontrar na sua TV. Antes de
telefonar para a assistência, faça estas verificações simples
Sintoma Possíveis soluções
Sem visualização • Verifique se o cabo de alimentação está ligado correctamente
no ecrã nas tomadas e na sua TV. Se ainda não houver alimentação,
desligue a ficha. Aguarde 1 minuto e coloque novamente a
ficha. Ligue de novo a TV.
• Carregue na tecla
\
Tomada com fraca • Verifique a ligação da antena à TV e à tomada de parede da
recepção (ruído nevoso) antena.
•
Sem imagem • Verifique se os cabos fornecidos estão ligados correctamente
(o cabo da antena à TV, o outro da antena ao seu gravador,
os cabos de alimentação…).
• Verifique se seleccionou a fonte correcta.
• Verifique se o bloqueio para crianças foi desactivado.
Sem som em alguns •
canais (consultar página 30).
Sem som • Verifique se o volume não está no mínimo.
• Verifique se o modo mute ( ) não está activo. Se o mute
estiver activo, carregue na tecla para o desactivar.
• Verifique as ligações entre o equipamento adicional e a TV.
Interferência no som • Tente desligar todos os aparelhos electrónicos para evitar
interferências como por exemplo, secadores de cabelo,
aspiradores.
• Tente ajustar manualmente a sua imagem (consultar página 30)..
•
Escolheu o sistema correcto de TV? (consultar página 30).
Carregue na tecla
Verifique se está seleccionado o sistema de TV correcto
no telecomando.
para verificar a força do sinal.
Não compreende o •
idioma seleccionado
no ecrã para funcionar
com o aparelho no • Carregue na tecla
modo digital
• Carregue novamente na tecla e use a tecla para seleccionar o
quinto item do menu.
• Carregue na tecla
• Carregue na tecla
•
A TV não responde
ao telecomando
• Tente trocar as pilhas.
Carregue na tecla para tirar o menu do ecrã.
• Carregue novamente na tecla
para seleccionar o
e na tecla para aceder ao nível seguinte do menu.
para aceder ao nível seguinte do menu.
• Carregue nas teclas Î ï
para confirmar a selecção.
Carregue na tecla para sair do menu.
• Aproxime-se mais do receptor na frente da TV.
•
Verifique a colocação das pilhas..
para exibir o menu.
segundo item no menu
para seleccionar o idioma correcto.
Page 63

52
Sintoma Possíveis soluções
Sem canais digitais •
Um ou alguns pontos
minúsculos no ecrã que líquido é construído com uma tecnologia de alta precisão
não alteram a cor junto para lhe oferecer os detalhes mais ínfimos da imagem.
com a imagem de vídeo Ocasionalmente, alguns pixéis não activos podem aparecer
no ecrã como um ponto fixo vermelho, azul, verde ou
preto.
aparelho.
Imagem intermitente • Aparecerão os ruídos se o equipamento digital ligado, tais
ou cintilante no modo como leitor de DVD ou Set-Top box falharem. Verifique
HD o manual do utilizador sobre o equipamento digital que
está a ligar.
• Use um cabo padrão-compatível HDMI (alta-qualidade)
para DVI.
Sem som ou imagem mas a
luz vermelha do painel
frontal está acesa
Os modos PC não •
funcionam • Verifique se a fonte está seleccionada correctamente.
Carregue no tecla para entrar na lista Fonte e
seleccione a fonte correcta.
• Verifique se configurou o computador para uma resolução
de visualização compatível (consultar página 49).
• Verifique a definição da placa gráfica do PC.
As cores do S-Vídeo • Verifique se o cabo SVHS está ligado correctamente.
ficam esbatidas • Carregue na tecla P + no telecomando para subir um
canal e depois carregue na tecla P – para descer um canal.
Barra preta na parte • ltere a taxa de actualização do PC para 60 Hz.
superior e inferior do
ecrã no modo PC
AC3 não disponível • O AC3 não é suportado por este aparelho. Utilize a tecla
A antena da TV não pode • Algumas antenas de TV precisam ser alimentadas pelo
ser alimentada pelo aparelho
A mudança de um canal • Os canais da Pay TV são codificados pelo provedor do
para outro leva muito cabo e demoram mais tempo a descodificar. Este é um
tempo omportamento normal e não há nada a fazer.
Não se pode aceder • Verifique se a TV está no modo analógico. Se for o caso,
ao menu digital carregue na tecla
• Este sintoma não é um problema. O painel de cristal
Contacte o seu representante a respeito da disponibilidade
de sinal Terrestre de Transmissão de Vídeo Digital no seu país.
Nota :
• Carregue na tecla
Verifique se as ligações estão correctas. (consultar página 49).
no telecomando, para seleccionar um áudio alternativo.
aparelho. Este aparelho não suporta tal função.
isto não afecta o desempenho do
no telecomando.
para comutar para o modo digital.
Page 64

53
35 Glossário
DVI (Digital Visual Interface): Uma interface
digital standard criada pelo Digital Display
Working Gourp (DDWG) para converter
sinais analógicos em sinais digitais e, assim,
aceitar tanto monitores analógicos como
digitais.
Sinais RGB: Trata-se dos 3 sinais vídeo
– Vermelho, Verde, Azul – que compõem a
imagem. A utilização deste sinais permite
obter uma melhor qualidade da imagem.
Sinais S-VHS: Trata-se de 2 sinais vídeo Y/
C separados das normas de gravação S-VHS
e Hi-8. Os sinais de luminância Y (preto e
branco) crominância C (cor) são gravados
separadamente na banda. Isto permite uma
melhor qualidade da imagem em relação ao
vídeo padrão (VHS e 8 mm), em que os sinais
Y/C são combinados para fornecerem um
único sinal de vídeo.
16:9: Designa as proporções largura/
comprimento do ecrã. Os televisores com
o ecrã largo (panorâmico) possuem as
proporções de 16/9,
os ecrãs clássicos de 4/3.
MHEG (Multimedia and Hypermedia
Information Coding Expert Group): Fornece
padrões para a representação codificada
dos objectos de informação hipermédia
multimédia, intercambiáveis entre aplicações
e serviços utilizando uma variedade de
média. Os objectos definem a estrutura de
uma apresentação hipermédia multimédia.
HDMI (High-Definition Multimedia
Interface- Interface Multimédia de AltaDefinição): Interface descompactada
digital/vídeo que permite a transmissão entre
uma TV e qualquer componente equipado
com HDMI, tais como uma set-top box (tv
por cabo), leitor de DVD e receptor A/V.
A HDMI é compatível com vídeo de alta
definição ou de qualidade melhorada mais
dois canais digitais áudio.
Sistema: As imagens televisivas não são
transmitidas da mesma forma em todos os
países. Há diferentes padrões: BG, DK, I e
LL’. A regulação do sistema
(p. 8) permite seleccionar estes padrões
diferentes. Isto não deve ser confundido
com a codificação de cor PAL ou SECAM.
Pal é usado na maior parte dos países
europeus, SECAM em França, Rússia
e na maioria dos países africanos. Os EUA
e o Japão utilizam um sistema diferente
denominado NTSC.
MPEG (Moving Picture Experts Group)
é a alcunha dada a uma família de Padrões
Internacionais utilizados para codificar
informações áudio-visual, num formato
compactado digital.
Page 65

© 2006 Koninklijke Philips N.V.
All rights reserved
Document order number: 3139 125 37892
Page 66

Hospitality Television
20/26/32HF5335D
15/20HF5234
- 1 -
Page 67

Installation of your Philips Hotel TV
1. Introduction
This addendum has been designed to help you install programmes on this Digital TV and activating the hotel
mode.
Use this addendum in conjunction with the User Manual of this television.
Please handle the TV with care and wipe with a soft cloth to ensure your TV keeps looking new.
2. The benefits of the Philips hotel TV
This TV is specially designed for hotels. The Philips hotel TV offers all kind of features to
Maximise the convenience for the hotel and meet the needs for the guest
Welcome message to give a friendly welcome to your guest when activating the tv
Remote control features like low battery detection and an anti-theft screw for preventing of theft for
batteries
Access to the user menu can be blocked. This prevents users (e.g. guests) from deleting or changing
program settings and/or modifying picture and sound settings. This ensures that TVs are always set up
correctly.
A
switch-on
specified program and volume level.
The maximum volume can be limited in order to prevent disturbance.
The television keys VOLUME +/- , PROGRAM +/- and MENU can be blocked.
Screen information can be suppressed.
Programmes can be blanked
3. Installing the channels
Installing Digital Programs (only applicable for 20/26/32HF5335D)
Ensure the TV is in Digital mode. If it is in Analogue mode, press the A/D (Analogue/Digital) key on the
Remote Control to enter the Digital mode.
volume and programme can be selected. After switching on, the TV will always start on the
1. Press the
2. Press the Up/Down Arrow Key to scroll to the item called INSTALLATION and press the Right Arrow
Key
3. Press the Up/Down Arrow Key to scroll to the item called SERVICE SETUP and press the Right Arrow
Key
4. Press the Up/Down Arrow Key to scroll to the item called REINSTALL ALL SERVICES and press the Right
Arrow Key
5. Press the Up/Down Arrow Key to scroll to the item called SEARCH and press OK to start the scan.
(Menu Digital) key on the Remote Control
The
TV will now start to scan and install all available (Digital) TV channels and Radio stations automatically.
When the scan is completed, the TV menu will indicate the number of digital services found.
6. Press the OK key again to Store all the services that have been found.
- 2 -
Page 68

Installing Analogue Programs
Ensure the TV is in Analogue mode. If it is in Digital mode, press the A/D (Analogue/Digital) key on the
Remote Control to enter the Analogue mode.
1. Press the
2. Press the Up/Down Arrow Key to scroll to the item called INSTALL and press OK
3. Press the Up/Down Arrow Key to scroll to the item AUTO STORE and press OK
The TV will now start to scan and install all available (Analogue) TV channels automatically. This operation will
take a few minutes. The TV display will show the progress of the scan and the number of programmes found.
Refer to the chapter on
can also refer to the chapter on
preferred.
4. Activating the Hotel Mode Setup menu (BDS)
1. Switch on the television and select an analogue channel
2. On the Remote Control, press keys: [3, 1, 9, 7, 5, 3, MUTE]
3. The BDS HOTEL MODE SETUP MENU becomes visible
4. Use the cursor keys to select and change any of the following settings:
5. Select “STORE” and press [CURSOR RIGHT] to save the settings and exit BDS Hotel Mode
setup. Press [MENU] to exit without saving.
6. For BDS Hotel Mode settings to take effect, you must turn the TV set Off, then back On.
BDS Hotel Mode Functions
This paragraph describes the functionality of each item in the BDS Hotel Mode Setup menu.
BDS MODE
ON BDS Hotel Mode is ON:
The user menu is blocked.
All settings of the Hotel Mode Setup menu are in effect.
Automatic Tuning of Analogue Programmes
Function Possible selections
BDS MODE ON /OFF
SWITCH ON SETTINGS
SWITCH ON VOLUME 0-100, LAST STATUS
MAXIMUM VOLUME 0-100
SWITCH ON CHANNEL USER DEFINED, LAST STATUS
POWER ON ON/STANDBY/LAST STATUS
DISPLAY MESSAGE ON/OFF
WELCOME MESSAGE LINE 1/LINE 2/CLEAR
CONTROL SETTINGS
LOCAL KEYBOARD LOCK ON/OFF/ALL
REMOTE CONTROL LOCK ON/OFF
OSD DISPLAY ON/OFF
HIGH SECURITY MODE ON/OFF
AUTO SCART ON/OFF
MONITOR OUT ON/OFF
BLANK CHANNEL ON/OFF
STORE >
(Menu TV) key on the Remote Control
in the User Manual for more details. You
Manual Tuning of Analogue Programmes
in the User Manual if a manual scan is
- 3 -
Page 69

OFF BDS Hotel Mode is OFF:
The TV operates as a normal consumer TV
SWITCH ON VOL
When the user switches the TV ON, it will play at the specified volume level. There are 2 options:
LAST STATUS Upon start-up, the TV volume will be set to the level before the TV set was
USER DEFINED As specified by installer
Remark: “SWITCH ON VOL” cannot exceed the MAXIMUM VOL level. This is the volume level with which
the Hotel Mode Setup menu was entered.
MAXIMUM VOL
The TV Volume will not exceed the selected volume level.
SWITCH ON CHANNEL
When the user switches the TV ON, it will tune to the specified channel. There are 2 options:
LAST STATUS The TV will switch on to the last channel that was shown before the TV set
USER DEFINED Any analogue channel can be chosen to be the first channel to switch on
POWER ON
The Power On function allows the TV to enter a specific mode of operation (On or Standby) after the mains
power is activated.
ON When set, the TV will always turn ON after the mains power is enabled.
STANDBY When set, the TV will always turn to STANDBY after mains power is enabled
LAST STATUS When set, the TV will always turn to the last power status before the mains power was
DISPLAY MESSAGE
ON Enables display of the Welcome Message for 30 seconds after the TV set is turned on
OFF Disables the display of the Welcome Message.
If OSD DISPLAY is set to OFF, then the Welcome Message is automatically disabled.
WELCOME MESSAGE
The Welcome Message function allows the TV to show a customized greeting to the hotel guest whenever the
TV is switched on. This helps to personalize the hotel experience for guests.
The Welcome Message can consist of 2 lines of text, with each line containing a maximum of 20 alphanumeric
characters. Use the Remote Control arrow keys to create the Welcome Message.
To enable the display of the Welcome Message, the DISPLAY MESSAGE option must be ON
To clear the Welcome Message from the TV’s memory, select CLEAR
LOCAL KEYBOARD LOCK
ON The television keys VOLUME +/-, PROGRAM +/- and MENU are blocked.
OFF The television keys VOLUME +/-, PROGRAM +/- and MENU function normally
ALL The television keys VOLUME +/-, PROGRAM +/-, MENU and POWER are blocked.
REMOTE CONTROL LOCK
ON Standard Remote Control keys are disabled.
OFF All Remote Control keys will function normally.
OSD DISPLAY
ON Normal screen information is displayed (e.g. programme information)
OFF Screen information is suppressed.
last turned off.
was turned off
disabled.
- 4 -
Page 70

HIGH SECURITY MODE
ON Allows access to the BDS Hotel Mode Setup Menu via the special BDS Setup Remote only.
(RC2573/01)
OFF Allows access to the BDS Hotel Mode Setup Menu via BDS Setup Remote or via normal Remote
Control (using special key code sequence).
AUTO SCART
The Auto Scart function enables auto-detection of AV devices that are connected to the TV’s Scart connector.
ON Enables Auto Scart switching in BDS Hotel Mode.
OFF Disables Auto Scart switching in BDS Hotel Mode.
MONITOR OUT
ON Allows audio & video output from TV via relevant AV connectors (if available).
OFF Disables both Audio & Video output from the TV (to prevent illegal copying).
BLANK CHANNEL
The Blank Channel function disables the display of video on the TV, but does not affect the audio output. This
function can be used for audio applications (example: Off-air radio transmission, music channels, and so on),
which do not necessarily require the display of video.
ON The current programme is blanked
OFF The current programme is not blanked (normal visible; DEFAULT value)
BLANK CHANNEL can be set for every channel. Use [P+ / P-] to go through all the programmes and set the
desired status per channel. The programme number is visible in the top left corner.
Low Battery Check
This television set has a special feature which checks the battery power level of a TV Remote Control, and
indicates if the battery is low and requires changing.
(Note: The Low Battery Check function works only with certain models of Remote Controls. Please check
with the Philips sales representative if the Remote Control used with this TV supports this function)
To activate the Low Battery Check function, hold the TV Remote Control in front of the TV, and press and
hold the OK button on the Remote Control for at least 5 seconds. A message will appear on the TV screen to
indicate if the battery power level is OK, or if it is Low. If the message indicates that the battery level is low, it
is recommended to change the batteries of the Remote Control immediately.
5. Cloning of settings
Cloning of analogue TV channels and TV settings as described in the chapter
Hotel Mode Set-up menu
For 15/20HF5234
o Wireless cloning with the SmartLoader 22AV1120 or 22AV1135
o Cloning off all adjustable TV settings + analogue channel table
For 20/26/32HF5335D
o Wired cloning with the SmartLoader 22AV1135 using the wire packed with the SmartLoader
o Cloning off all adjustable TV settings + analogue channel table (digital channel table via automatic
installation)
Instruction for cloning of settings between TVs
Philips SmartLoader (22AV1135/00)
The Philips SmartLoader is an installation tool especially designed for easy and fast installation and copying of
TV settings on Philips Institutional TV’s.
- 5 -
Page 71

The Philips SmartLoader works in 2 modes – Wireless and Wired:
Wireless mode ---- through infrared sensor (15/20HF5234)
Switch the SmartLoader to “Wireless” mode by sliding the side-switch to the icon on the SmartLoader
device. Point the Wireless SmartLoader to the TV’s infrared receiver (optimal distance of 5-30cm) and proceed
with the Installation procedure listed below.
Wired mode ---- using the by-packed accessory cable(s) (20/26/32HF5335D)
Switch the SmartLoader to “Wired” mode by sliding the side-switch to the icon on the SmartLoader
device.
Examine the rear connectors of the TV set to determine if the 3-pin or 4-pin female connector wire (packed
with the Wireless SmartLoader) should be used. Plug in the correct connector wire to the corresponding
opening on the TV set (usually marked as SERV C), and then connect the RJ11 jack end of the accessory wire
to the RJ11 socket on the SmartLoader.
The Installation Procedure consists of three simple steps:
1. Choosing a Master TV
The Master TV is the TV set whose installation and configuration settings are to be copied into other TV’s (of
the same type only).
2. Programming the SmartLoader with the settings from the Master TV
Follow these steps to program the SmartLoader with the settings of the Master TV.
a) Wireless method
Set the SmartLoader to “Wireless” mode using the side switch.
Turn on the TV, and while holding the SmartLoader, point it in the direction of the
TV. Press the “MENU” Key on the SmartLoader.
b) Wired method
Connect the SmartLoader to the TV using the appropriate accessory cable.
Set the SmartLoader to “Wired” mode using the side switch.
Turn on the TV, and while holding the SmartLoader, point it in the direction of the
TV. Press the “MENU” Key on the SmartLoader.
The Master TV will show the following menu:
SMARTLOADER TO TV >
TV TO SMARTLOADER >
On the TV screen, highlight the menu option “TV TO SMARTLOADER”
Press the right arrow key on the SmartLoader to start the programming process
A number display (from 0~100) will be shown on screen, indicating the percentage of the programming
progress from the TV to the SmartLoader. When the programming is completed, “##” will show “100” and the
message “DONE” will appear.
TV TO SMARTLOADER ## (0-100)
The SmartLoader is programmed and can be used to install and configure other TVs.
Copying the settings of the Master TV to other TVs with the SmartLoader
Follow these steps to install and configure the settings of a Philips TV with the SmartLoader.
- 6 -
Page 72

a) Wireless method
Set the SmartLoader to “Wireless” mode using the side switch.
Turn on the TV, and while holding the SmartLoader, point it in the direction of the
TV. Press the “MENU” Key on the SmartLoader.
b) Wired method
Connect the SmartLoader to the TV using the appropriate accessory cable.
Set the SmartLoader to “Wired” mode using the side switch.
Turn on the TV, and while holding the SmartLoader, point it in the direction of the
TV. Press the “MENU” Key on the SmartLoader.
On the TV screen, highlight the menu option “SMARTLOADER TO TV”
Press the right arrow key on the SmartLoader to initiate the copying process
> A number display (from 0~100) will be shown on screen, indicating the percentage of the installation
progress from the SmartLoader to the TV. When the data transfer is completed, “##” will show “100” and
the message GOODBYE will appear.
SMARTLOADER TO TV ## (0-100)
> The TV will go to Standby mode. When the TV is next powered on, it will be configured with the settings
from the Master TV, and ready for use.
Problems and Solutions:
1.
The message “I2C ERROR” is displayed on the screen.
Bad connection of RJ11 wire or wrong data transmission has occurred. Try again.
2.
The message “WRONG VERSION” is displayed on the screen.
The program contained in the SmartLoader has a software code incompatible with the actual TV.
Reprogram the Wireless SmartLoader from a Master TV whose software code is compatible with the
actual TV.
3.
TV doesn’t respond to the SmartLoader.
Check if the LED on the SmartLoader lights up in green when pressing any button.
If the LED is red, it means that the batteries are low and should be replaced.
Bring the SmartLoader closer to the TV infrared receiver and try again.
Notes:
Make sure that the 3 R6/AA sized batteries are placed correctly in the bottom compartment of the
SmartLoader. The LED on the SmartLoader should light up in green when pressing any button, indicating
operational batteries. When the LED shows red, the batteries need to be replaced.
The SmartLoader can only copy the settings between 2 TVs of the same type. Once the
SmartLoader is programmed with the settings from a Master TV of a certain type or model,
then these settings can be installed on another TV of the same model only.
The SmartLoader cannot be used to copy the (digital) channel table of a Digital TV set.
If the SmartLoader is used with a DVB (European Digital) TV set, then the TV set must first
be switched to Analog mode.
- 7 -
Page 73

Y
T
Disposal of your old product.
our product is designed and manufactured with high quality materials and
components, which can be recycled and reused. When this crossed-out wheeled bin
symbol is attached to a product it means the product is covered by the European
Directive 22002/96/EC. Please find out more about the separate collection system for
electrical and electronic products in your local neighborhood.
2007© Koninklijke Philips Electronics N.V. all rights reserved
Specifications are subject to change without notice
Trademarks are property of Koninklijke Philips Electronics N.V. or their respective owners.
Please act according to your local rules and do not dispose of your old products with
your normal household waste. The correct disposal of your old product will help
prevent potential negative consequences for the environment and human health.
he packaging of this product is intended to be recycled. Apply to the
local authorities for correct disposal.
- 8 -
 Loading...