

Philips 32DW6559/05, 28DW6559/05 User Manual


ANALOGUE
1
Introduction
Ta b le of Contents
Thank you for purchasing this television set.
This handbook has been designed to help you install and operate your TV set.
We would strongly recommend that you read it thoroughly.
We hope this new television meets entirely with your satisfaction.
Installing your television set . . . . . . . . . . . . . . . . . . . . . . . . . . . . . . . . . . . . . . . . . .2
The keys on the TV set . . . . . . . . . . . . . . . . . . . . . . . . . . . . . . . . . . . . . . . . . . . . . .2
The remote control keys . . . . . . . . . . . . . . . . . . . . . . . . . . . . . . . . . . . . . . . . . . . .3
Digital or Analogue channels ? . . . . . . . . . . . . . . . . . . . . . . . . . . . . . . . . . . . . . . . . .3
Switching on for the first time . . . . . . . . . . . . . . . . . . . . . . . . . . . . . . . . . . . . . . . .4
Understanding the information on the banner . . . . . . . . . . . . . . . . . . . . . . . . . . .4
Rearrange services . . . . . . . . . . . . . . . . . . . . . . . . . . . . . . . . . . . . . . . . . . . . . . . . .5
View or Listen to new TV services . . . . . . . . . . . . . . . . . . . . . . . . . . . . . . . . . . . .5
Add new services . . . . . . . . . . . . . . . . . . . . . . . . . . . . . . . . . . . . . . . . . . . . . . . . . .5
Reinstall all services . . . . . . . . . . . . . . . . . . . . . . . . . . . . . . . . . . . . . . . . . . . . . . . .6
Test reception . . . . . . . . . . . . . . . . . . . . . . . . . . . . . . . . . . . . . . . . . . . . . . . . . . . . .6
Language and location preferences . . . . . . . . . . . . . . . . . . . . . . . . . . . . . . . . . . . .7
Access restrictions . . . . . . . . . . . . . . . . . . . . . . . . . . . . . . . . . . . . . . . . . . . . . . . . .7
Setting up your favourite list . . . . . . . . . . . . . . . . . . . . . . . . . . . . . . . . . . . . . . . . .8
Information menu . . . . . . . . . . . . . . . . . . . . . . . . . . . . . . . . . . . . . . . . . . . . . . . . . .8
Downloading new software . . . . . . . . . . . . . . . . . . . . . . . . . . . . . . . . . . . . . . . . . . .8
Using the Options menu . . . . . . . . . . . . . . . . . . . . . . . . . . . . . . . . . . . . . . . . . . . .9
TV guide . . . . . . . . . . . . . . . . . . . . . . . . . . . . . . . . . . . . . . . . . . . . . . . . . . . . . . . . .9
Recording function . . . . . . . . . . . . . . . . . . . . . . . . . . . . . . . . . . . . . . . . . . . . . . . .10
Automatic tuning of analogue programmes . . . . . . . . . . . . . . . . . . . . . . . . . . . . .11
Sorting analogue programmes . . . . . . . . . . . . . . . . . . . . . . . . . . . . . . . . . . . . . . .11
Manual tuning of analogue programmes . . . . . . . . . . . . . . . . . . . . . . . . . . . . . . . .12
Naming analogue programmes . . . . . . . . . . . . . . . . . . . . . . . . . . . . . . . . . . . . . . .12
Picture settings . . . . . . . . . . . . . . . . . . . . . . . . . . . . . . . . . . . . . . . . . . . . . . . . . . .13
Sound adjustments . . . . . . . . . . . . . . . . . . . . . . . . . . . . . . . . . . . . . . . . . . . . . . . .13
Feature settings . . . . . . . . . . . . . . . . . . . . . . . . . . . . . . . . . . . . . . . . . . . . . . . . . . .13
Analogue Teletext . . . . . . . . . . . . . . . . . . . . . . . . . . . . . . . . . . . . . . . . . . . . . . . . .14
Digital text . . . . . . . . . . . . . . . . . . . . . . . . . . . . . . . . . . . . . . . . . . . . . . . . . . . . . . .15
16:9 Formats . . . . . . . . . . . . . . . . . . . . . . . . . . . . . . . . . . . . . . . . . . . . . . . . . . . . .15
Connecting peripheral equipment . . . . . . . . . . . . . . . . . . . . . . . . . . . . . . . . . . . .16
To select connected equipment . . . . . . . . . . . . . . . . . . . . . . . . . . . . . . . . . . . . .16
VCR / DVD mode selector . . . . . . . . . . . . . . . . . . . . . . . . . . . . . . . . . . . . . . . . .17
Tips . . . . . . . . . . . . . . . . . . . . . . . . . . . . . . . . . . . . . . . . . . . . . . . . . . . . . . . . . . . .18
Centre Frequencies Table (in KHz) . . . . . . . . . . . . . . . . . . . . . . . . . . . . . . . . . . . .18
DIGITAL MENUS
°
Recycling
The materials used in your set are either reusable or can be recycled.
To minimise environmental waste, specialist companies collect used appliances
and dismantle them after retrieving any materials that can be used again (ask
your dealer for further details).
The digital menus
of this product
use the latest
Java
™
technology
from Sun
Microsystems Inc.

The television set has 4 keys which are
located on the front or the top of the set
depending on the model.
The VOLUME - + (-
” +) keys are used to
adjust sound levels.
The PROGRAM - + (- P +) keys are used to
select the required programmes.
To access the menus, simultaneously hold
down the
” - and ” + keys.The
PROGRAM - + keys may then be used to
select an adjustment and the -
” + keys to
make that adjustment.
To exit from the menus, hold down
the 2
” - and ” + keys.
PROGRAMVOLUME
--
++
2
&
Positioning the television set
Place your TV on a solid, stable surface, leaving
a space of at least 5 cm around the appliance.
To avoid accidents, do not put anything on the
set such as a cloth or cover, a container full of
liquid (vase) or a heat source (lamp).The set
must not be exposed to water.
é
Connections
• Insert the aerial plug into the : socket at
the rear of the set.
• Insert the mains plug into a wall socket (220-
240 V / 50 Hz).
“
Remote control
Insert the two R6-type batteries (supplied)
making sure that they are the right way round.
The batteries supplied with this appliance do not
contain mercury or nickel cadmium. If you have
access to a recycling facility,please use this facility
(if in doubt, consult your dealer).When the batteries
are replaced, use the same type.
‘
Switching on
To switch on the set, press the on/off key.
A red indicator comes on and the screen lights
up. Go straight to the chapter Switching on
for the first time, on page 4.
If the television remains in standby mode,
press P
# on the remote control.
The indicator will flash when you use the remote
control.
5 cm
5 cm
5 cm
Installing your television set
The keys on the TV set

3
The remote control keys
Screen information
In digital mode, press once to display the
information banner, a 2ndtime to get
more information on the programme
and a 3rd time to remove it (see p. 4).
In analogue mode, this displays /
removes the programme
informations(number, name, sound
mode). Hold down for 5 seconds to
permanently display the analogue
programme number on the screen.
TV guide
(see p.9).
Select EXT sockets
(see p.16).
Mode selector
To activate the remote control in
VCR or DVD mode (see p.17).
TV Menu
To display or exit from the analogues
menus
Select
In digital mode this displays / clears the
programme list.Use the
îÏ keys to
select a programme and
u to display it.
Volume
To adjust the sound level
16:9 formats (p.15)
Mute
To disable or enable the sound.
Picture and sound settings
Accesses a series of picture and
sound settings.
The position Personal corresponds to the
settings stored in the menus.
Standby
To set the TV to standby mode.To
switch the TV set on again, press b,
P @#or 09.
Options menu
(see p.9).
Teletext features (p.14)
and VCR/DVD keys (p.17).
Digital Menu
To display or exit from the digital
menus (when TV is in digital mode).
Analogue or Digital mode
To switch the television between
analogue and digital mode.
Cursor
These 4 keys are used to move
within the menus or to directly access
the 16:9 screen formats (p 15).
Previous programme
To access the previously viewed
programme.
Numerical keys
For direct access to programmes.For a
2 (3) digit programme number, the 2
nd
(3rd)digit must be entered before the
dash disappears.
The number, the name
(and the sound
mode, in analogue
mode) are displayed for a few seconds.
Sound mode
To switch from
Stereo to Mono or
to choose between different
languages (Dual I, Dual II, ...).
When the sound mode is switched to
Mono, the indication is displayed in red.
Surround sound
To activate / deactivate the Virtual
Dolby Surround * effect.In stereo,
you can obtain Dolby Surround
Pro Logic sound quality. In mono,a
stereo spatial effect is simulated.
*
Manufactured under license from Dolby
Laboratories. ”Dolby””Pro Logic” and the double-D
symbol are trademarks of Dolby Laboratories.
Programme selection
To access the next or previous
programme (or page in digital menus).
Subtitle mode
To activate/deactivate the subtitle mode
To receive TV channels, your television is equipped with 2 tuners. One is for digital channels, the other
is for analogue channels. Use the
v key of the remote control to switch the TV between analogue
and digital mode.Then use the
P @#or 09keys to select channels.
Digital or Analogue channels ?
MODE
VCR
DVD
Ø
.
¤Ÿ
OPTIONS
∫
¢
›Ó
CANCEL
Œ
·
MENU
TV
SELECT
OK
Ê Æ
∆
MENU
DIGITAL
Ë
A/D
++
†
P(age)
-
”
BACK
Á
[
∏ù
12
3
564
879
SMART
-
SMART
ª
0
4
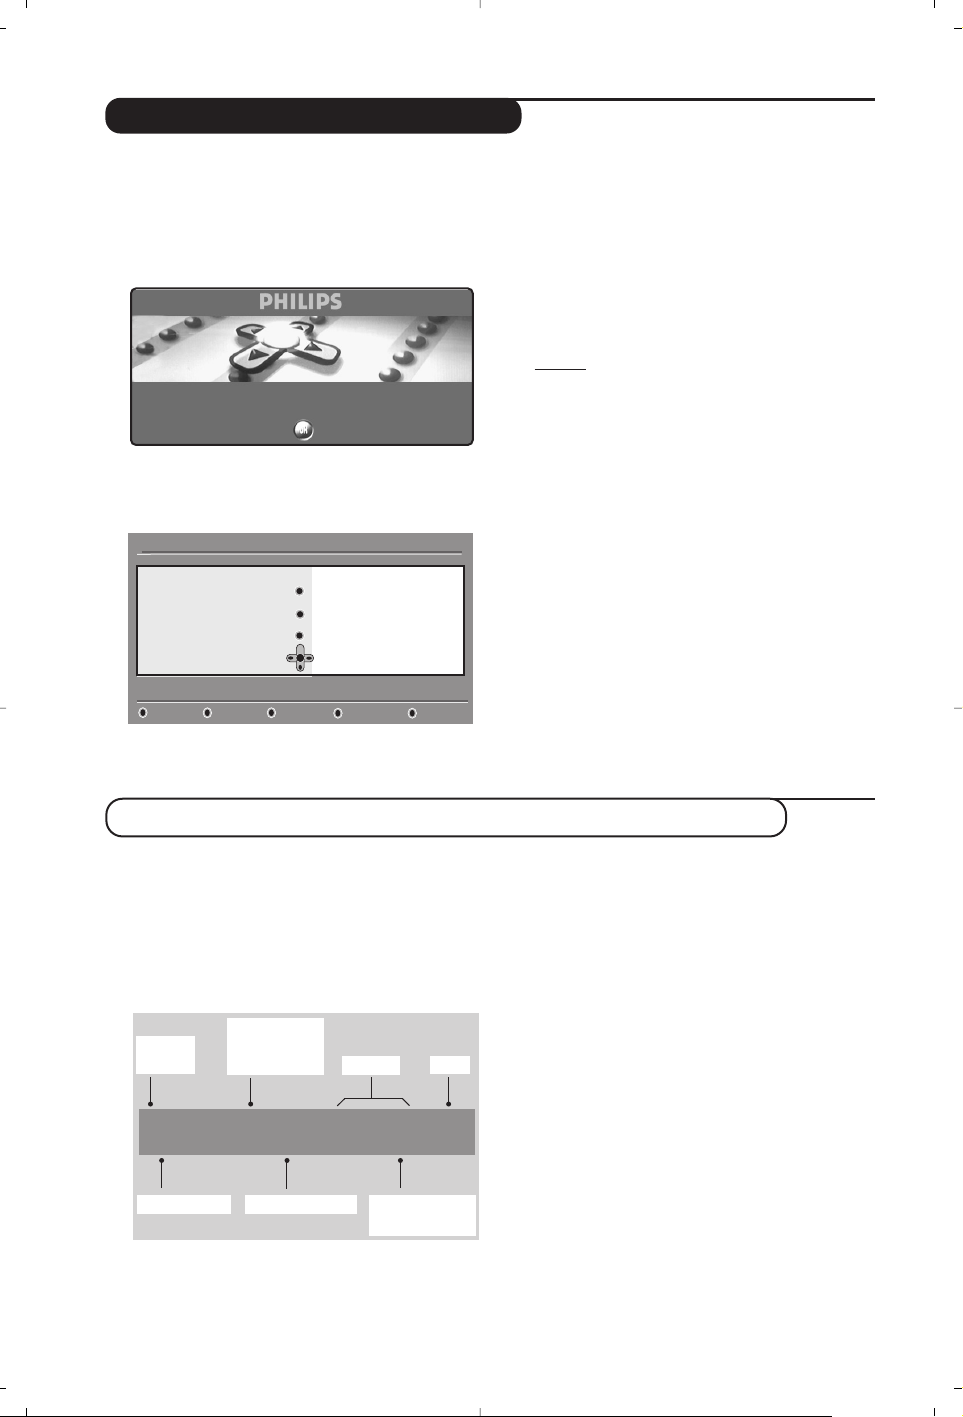
The first time the TV set is switched on, a
congratulation message will appear on screen.
The language of which changes every 5 seconds.
If the menu is not displayed, press and hold down
the
”- and ”+ keys on the TV set for 5
seconds to display the menu.
&
Press the u key on the remote control,the
moment your prefered language is visible
on the screen.The
Setup
menu is displayed :
é The language, corresponding country and time
zone
is now preselected according to the
opening screen. However, you can still change
your preferences before you start a service scan.
“ With the cursor keys, select
language, country
or Time zone and check if the adjustment is
according to your preferences. If necessary,
use the cursor keys to make your adjustment
and press
u to exit.
Caution: if you select a wrong country, the channel
numbering will not be according to the standard
for your country.
‘ Select
service scan from the menu and
press
u to start the installation.The service
scan
menu is displayed.
All the digital and analogue programmes are
searched for and stored automatically.When
the search is complete, the menu will indicate
the number of digital services and analogues
programmes found.
( Press the
u key twice to start watching TV.
The television then displays the current
programme.The installation is now complete.
When you select a digital programme, an
information banner is displayed for a few
seconds at the top of the screen.
You can also use the
∂ key of the remote control
to display this banner.A second press displays more
information about the programme (when available).
The banner contains information on the
preset number, channel name,programme
duration, transmission clock, programme title
and the time remaining of the current
programme.
Switch on for the first time
Understanding the information on the banner
Banner description:
Congratulations for selecting this Philips television.
Press OK to start enjoying your digital television.
Setup
Set options and start a service scan
Language
Country
Time Zone
Service Scan
11:46
English
United Kingdom
(GMT) Lisbon, London
Please press OK to start
2 11:06 - 11:09
BBC2 Snooker
11:46
Minutes left : 14
u
ù
i
ß
preset
number
symbols
clock
programme
start and end
time
remaining time
of programme
programme titlechannel name
Symbols description :
i
more information about this programme is available :
press the ∂key to display or remove it.
ß subtitling is available : if you want to display
them, press the ß key or the
OPTIONS key to
access the
options menu and select subtitles.
ù other audio languages are availables and can be
selected in the
options menu.
u the selected Favourite list is displayed in the
colour of the activated list.

5
Rearrange services
This menu allows you to change the order of
the stored digital channels and radio stations.
& From the digital mode, press the
‹ MENU
key
to display the setup menu.
é Use the
Ï key to select installation and press
¬ twice to select the Service lists menu.
“ Use the
îÏ keys to select Rearrange
services
and press ¬.
‘ Use the
îÏ keys to select the channel you
want to exchange.
( Press
u to activate.
If you want to uninstall the selected channel, press
the red key.
§ Select (
îÏ) the new channel number you
want to exchange it with.
è Press
u to confirm.The exchange is done.
! Repeat the operations ‘ to è until all the
channels are in the required order.
ç Press the
‹ MENU
key to leave the menu.
This menu allows you to check the availability
of new TV channels or new radio stations that
have been launched by the broadcaster after
the initial installation.
& From the digital mode, press the
‹ MENU
key
to display the setup menu.
é Use the
Ï key to select installation and press
¬ twice to select the Service lists menu.
“ Use the
îÏ keys to select View new TV
channels
or Listen to new Radio station.
‘ If new services are availables, press
¬ to
enter into the list and use the îÏ keys to
move through the list.
( Press the
‹ MENU
key to leave the menu.
View or Listen to new services
Setup
Installation
Manage service lists
Close
Service lists
Service setup
Test reception
11:46
Rearrange services
View new TV channels
Listen to new Radio stations
Add new services
This menu allows you to search for new TV
channels or radio stations that have been launched
by the broadcaster after the initial installation.
& From the digital mode, press the
‹ MENU
key
to display the setup menu.
é Use the
Ï key to select installation and press
¬.
“ Select
Service setup (Ï) and press ¬.
‘ Press
¬ to select Add new services and
press
u to activate the installation.
The search begins and only new channels will
be stored and added to the
channel list menu.
The percentage of the installation that has
been completed and the number of channels
found is displayed.
( When the search is complete, select store and
press
u to accept the new services.
§ Press the
‹ MENU
key to leave the menu.
Setup
Installation
Install and manage services
Close
Service lists
Service setup
Test reception
11:46
Add new services
Reinstall all services

6
This menu allows you to reinstall all the digital
TV channels and radio stations.
& From the digital mode, press the
‹ MENU
key
to display the setup menu.
é Use the
Ï key to select installation and press
¬.
“ Select
Service setup (Ï) and press ¬.
‘ Select
Reinstall all services (Ï) and press ¬.
( Press
u to start the installation.
A search is then made for all digital services
which are then stored automatically.
When the search is completed, the menu will
indicate the number of digital services found.
§ When the search is complete, press
u to
store the services.
è Press the
‹ MENU
key to leave the menu.
This menu allows you to check the strengh of
the signal you are receiving through your aerial.
& From the digital mode, press the
‹ MENU
key
to display the setup menu.
é Use the
Ï key to select installation and press
¬ to display the installation menu.
“ Use
Ï to select Test reception and press ¬.
You obtain an indication of the actual
programme frequency, the network name, the
signal quality and strength.
‘ You now have to enter the frequency of the
digital channel you want to test.
Your Tv magazine can provide the list of digital
channel numbers. Use the table on page 18 to get
the frequency.
( If the signal quality and strength is poor, a
message appears at the bottom of the menu
prompting you to enter the frequency between
the lower and the higher limit. If after keying
the frequency, the reception is still poor, you
can try improving, renewing,adjusting or
updating the aerial. It is however advisable to
contact a specialised aerial installer in order to
achieve best results.
Reinstall all services
Test reception
Setup
Installation
Test signal quality
Close
Service lists
Service setup
Test reception
11:46
Frequency
Network name
Signal quality
Signal strength
Setup
Installation
Install and manage services
Close
Service lists
Service setup
Test reception
11:46
Add new services
Reinstall all services
 Loading...