

Page 1

Directions for Use
Color TV
Important!
Return your
Warranty
Registration Card
within 10 days.
See why inside.
Need he/p?
Call us!
Philips representatives are ready to help you with any ques
tions about your new product We can guide you through
Connections, First-time Setup, or any of the Features.
We want you to start enjoying your new product right away!
CALL US BEFORE YOU CONSIDER
RETURNING THE PRODUCT.
I-800-531-0039
or
Visit us on the web at
www.philips.com
liik mh belled PHILIPS
3121 235 20691
Page 2

Return your Warranty Registration card today to ensure you
receive all the benefits you’re entitled to.
Once your PHILIPS purchase is registered, youVe eligible to receive all the privileges
of owning a PHILIPS product So complete and return the Warranty Registration
Card enclosed with your purchase at once. And take advantage of these important benefits.
Warranty
Verification
Registering your product within
10 days confirms your right to maxi
mum protection under the terms and
conditions of your PHILIPS warranty.
Congratulations on your purchase,
and welcome to the “family!”
Dear PHILIPS product owner:
Thank you for your confidence in PHILIPS. You’ve selected one of the best-built, best-backed products available
today. And we’ll do everything in our power to keep you happy with your purchase for many years to come.
As a member of the PHILIPS “family,” you’re entitled to protection by one of the most comprehensive war
ranties and outstanding service networks in the industry.
What’s more, your purchase guarantees you’ll receive all the information and special offers for which you quali
fy, plus easy access to accessories from our convenient home shopping network.
And most importandy you can count on our uncompromising commitment to your total sadsfection.
All of this is our way of saying welcome-and thanks for investing in a PHILIPS product
Sincerely,
Owner
Confirmation
Your completed Warranty
Registration Card serves as
verification of ownership in the
event of produa theft or loss.
PHILIPS
Model
Registration
Returning your Warranty Registration
Card right away guarantees you’ll
receive all the inforrriation and special:
offers which you qualify for as the
owner of your model. ’
Lawrence J. Blanford
President and Chief Executive Officer
Know these
S3.f0ty symbols
CAUTION
RIS K O F E LfC TffIC SHOC K
CM fT10№ TO REOUC e THE R ISK OF EL ECTRIC S HOCK. 00 N OT
INM OV E C OVER (OR BAC iq. NO US EIM ERVICEAB LE PARIS
mS IK, REF ER SEflVIC MG TO 0U AU F1E 0 S ER VIC E PBISONN EL
DO NO T O PEN
A
PHILIPS Visit our World Wide Web Site at http://www.philips.com
P.S. Remember, to get the most from your
PHILIPS product, you must return your
Warranty Registration Card within 10
days. So please mail it to us right now!
A This “bolt of lightning” indicates uninsuiated material within your unit may cause an eiec-
tricai shock. For the safety of everyone in your household; please do not remove product cov
ering.
Ak The “exciamation point” calis attention to features for .which you should read the
enclosed literature closeiy to prevent operating and maintenance probiems.
WARNING: TO PREVENT FIRE OR SHOCK HAZARD, DO NOT EXPOSE THIS EQUIP
MENT TO RAIN OR MOISTURE.
CAUTION: To prevent electric shock, match wide blade of plug to wide slot, and fiilly insert
ATTENTION: Pour éviter les chocs électriques, introduire la lame la plus large de la fiche dans
la borne correspondante de la prise et pousser jusqu’au fond.
Page 3

IMPORTANT SAFETY INSTRUCTIONS
Read before operating equipment
1.
Read these instmctions.
2.
Keep these instructions.
3.
Heed all warnings.
4.
Follow all instructions.
5.
Do not use this apparatus near water.
6.
Clean only with a dry cloth.
7.
Do not block any of the ventilation openings. Install in accordance
with the manufacturers instmctions.
Do not install near any heat sources such as radiators, heat regis
ters, stoves, or other apparatus (including amplifiers) that produce
heat.
9.
Do not defeat the safety purpose of the polarized or groundingtype plug. A polarized plug has two blades with one wider than
the other. A grounding type plug has two blades and third ground
ing prong. The wide blade or third prong are provided for your
safety. When the provided plug does not fit into your outlet, con
sult an electrician for replacement of the obsolete outlet.
10.
Protect the power cord from being walked on or pinched particu
larly at plugs, convenience receptacles, and the point where they
exit from the apparatus.
Only use attachments/accessories specified by the manufacturer.
Use only with a cart, stand, tripod, bracket, or table
specified by the manufacturer, or sold with the app
aratus. When a cart is used, use caution when moving
le cart7apparatus combination to avoid injury from tip-over.
Unplug this apparatus during lightning storms or when unused for
long periods of time.
14.
Refer all servicing to qualified service personnel. Servicing is
required when the apparatus has been damaged in any way, such
as power-supply coni or plug is damaged, liquid has been spilled
or objects have fallen into apparatus, the apparatus has been
exposed to rain or moisture, does not operate normally, or has
been dropped.
15.
This product may contain lead and mercuty. Disposal of these
materials may be regulated due to environmental considerations.
For disposal or recycling information, please contact your local
authorities or the Electronic Industries Alliance:
16.
Damage Requiring Service - The appliance should be serviced
by qualified service personnel when:
A, The power supply cord or the plug has been damaged; or
www.eiae.org
B. Objects have fallen, or liquid has been spilled into the appli
ance; or
C. The appliance has been exposed to rain; or
D. The appliance does not appear to operate normally or
exhibits a marked change in performance; or
E. The appliance has been dropped, or the enclosure damaged.
17. Tilt/Stability - All televisions must comply with recommended
international global safety standards for tilt and stability properties
of its cabinet design.
• Do not compromise these design standards by applying exces
sive pull force to the front, or top, of the cabinet which could ulti
mately overturn the product.
• Also, do not endanger yourself, or children, by placing electron
ic equipment/toys on the top of the cabinet. Such items could
unsuspectingly fall from the top of the set and cause product dam
age and/or personal injury.
18. Wall or Ceiling Mounting - The appliance should be mounted to
a wall or ceiling only as recommended by the manufacturer.
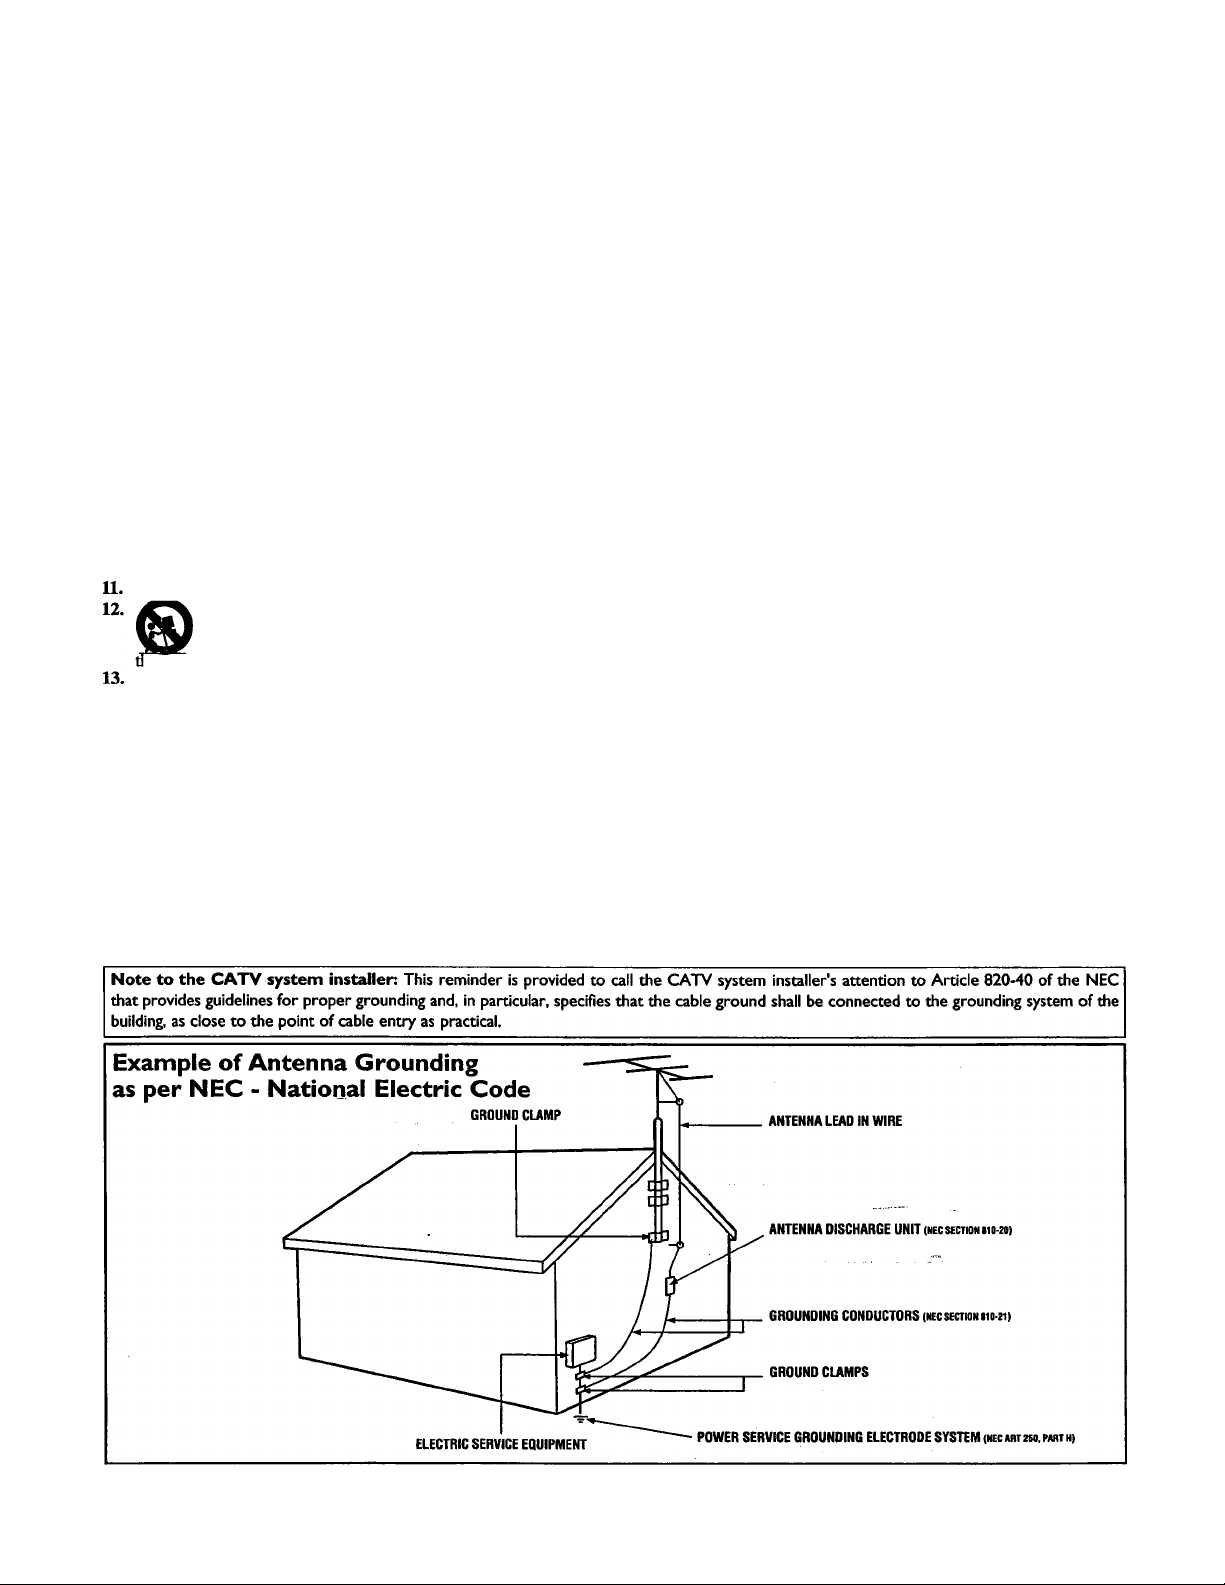
19. Power Lines - An outdoor antenna should be located away from
power lines.
20. Outdoor Antenna Grounding - If an outside antenna is connect
ed to the receiver, be sure the antenna system is grounded so as to
provide some protection against voltage surges and built up static
charges.
Section 810 of the National Electric Code, ANSI/NFPA No. 70-
1984, provides information with respect to proper grounding of
the mast and supporting structure, grounding of the lead-in wire to
an antenna discharge unit, size of grounding connectois, location
of antenna-discharge unit, connection to grounding electrodes, and
requirements for the grounding electrode. See Figure below.
21. Object and Liquid Entry - Care should be taken so that objects
do not fall and liquids are not spilled into the enclosure through
openings.
22. Battery Usage CAUTION - To prevent battery leakage that may
result in bodily injury, property damage, or damage to the unit:
• Install all batteries correctly, with + and - aligned as marked on
the unit.
• Do not mix batteries (old and new or carbon and alkaline, etc.).
• Remove batteries when the unit is not used for a long time.
Page 4

Contents
Introduction
Welcome/Registration of Your TV.........................................2
Safety Instructions
..................................................................
3
Table of Contents....................................................................4
Install Menu
^ How to use the Language Control
How to use the Tuner Mode Control.......................................6
How to Auto Program TV Channels
How to Add or Delete Channels ..............................................8
....................................
......................................
5
Picture Menu
How to use the Picture Adjustment Controls
.............
' Sound Menu
))
How to Use the Sound Adjustment Controls ............10
Features Menu
Using the Format (Expand 4:3) Control
Understanding the AutoLock’^^ Controls ...........................12
Setting up the AutoLock^“ Access Code
How to Block Channels........................................................14
How to Clear All Blocked Channels at the Same Time ... .15
How to Block All Channels at the Same Time
Blocking Programming Based on Movie Ratings
Blocking Programming Based on TV Ratings
Other AutoLock^*^ Blocking Options ................................19
How to Use the Active Control
Remote Control Use
(S-.
.............................................
Setting the Sleeptimer Control ................................21
How to use the Closed Captioning Control
Setting the AutoPicture™ Control
Setting the AutoSound™ Control
.......................................
.......................................
Using the QuadraSurFM Buttons (Alternate Channel).. .25-26
Remote Use with Accessory Devices (Direct Method)
Remote Use with Accessory Devices (Code Entry)
Remote Use with Accessory Devices (Search Method) ... .29
Remote Code Entry List
..................................................
Remote VCR Related Buttons..............................................33
...................
...............................
.....................
.................
......................
...........................
.........
...........
30-32
11
13
16
17
18
20
22
23
24
27
28
Here are a few of the features built into your new Television:
QuadraSurf™ A remote control feature that allows you to
store and view up to ten of your favorite channels per button (4
buttons - 40 channels total). Can be set to hold movie, sports,
news channels, etc., or add the audio/video channels for a quick
source function to swap between your external accessory
devices.
Active Control™ continuously measures and corrects all incom
ing signals to help provide the best picture quality. This feature
7
monitors and corrects both the sharpness control and noise reduc
tion control.
AutoLock™ feature allows you to block the viewing of cer
tain channels or external audio/video connections where you
might not want your children viewing inappropriate material.
9
Infrared Remote Control works your TV set and some
accessory devices which allows programming certain features
with the press of one button.
Standard broadcast (VHF/UHF) or Cable TV (CATV)
chaimel capability with stereo sound.
Closed Captioning allows the viewer to read TV program
dialogue or voice conversations as on-screen text.
Automatic Programming of Channels for quick and easy
selection of favorite stations available in your area.
On -screen Features (in either English or Spanish) show
helpful messages for setting of TV controls.
Audio/video Jackpanel located on the back and side of the
television for direct connections when using audio/video acces
sory devices, these Jacks can provide improved quality TV pic
ture and sound playback.
Expand 4:3 will allow you to expand the “letterbox” image
.produced by certain DVD players to fill the entire TV screen.
Sleeptimer automatically turns the TV OFF at preset times.
AutoPicture™ allows you to set the picture color, tint, con
trast, etc. for various types of programming such as Sports,
Movies, Personal, Weak Signals or Multi Media with the push
of one button.
AutoSound™ controls allow you to set the sound controls for
various types of listening programs such as Personal (sound
controls the way you set them). Theater, Music, or Voice with
the push of one button.
Treble Boost, Bass Boost, and Balance controls to
enhance the television’s sound.
General Information
Troubleshooting Tips................................................34
Cleaning and Care
Glossary of Terms ................................................................36
Index
...................................................................................
Factory Service Location
Warranty
NOTE: It is possible that this owner's manual may be used
with several different television models. Not all features
(and drawings) discussed in this manual will necessarily
match those found with your television system. This is nor
mal and does not require you contacting your dealer or
requesting service.
...............................................................................
...............................................................
...............................................
38-39
35
37
40
End-of-Life Disposal
Your new television and its packing contain materials that can
be recycled and reused. Specialized companies can recycle your
product to increase the amount of reusable materials and mini
mize the amounts that need to be properly disposed.
Your product also uses batteries that should not be thrown away
when depleted, but should be handed in and disposed of as
small chemical waste.
When you replace your existing equipment, please find out
about the local regulations regarding disposal of your old tele
vision, batteries, and packing materials.
Auto Lock, Auto Picture, Auto Sound, Active Control, QuadraSurf
are all registered trademarks of Philips Consumer Electronics Company.
Copyright © 2002 All rights reserved.
4
Page 5
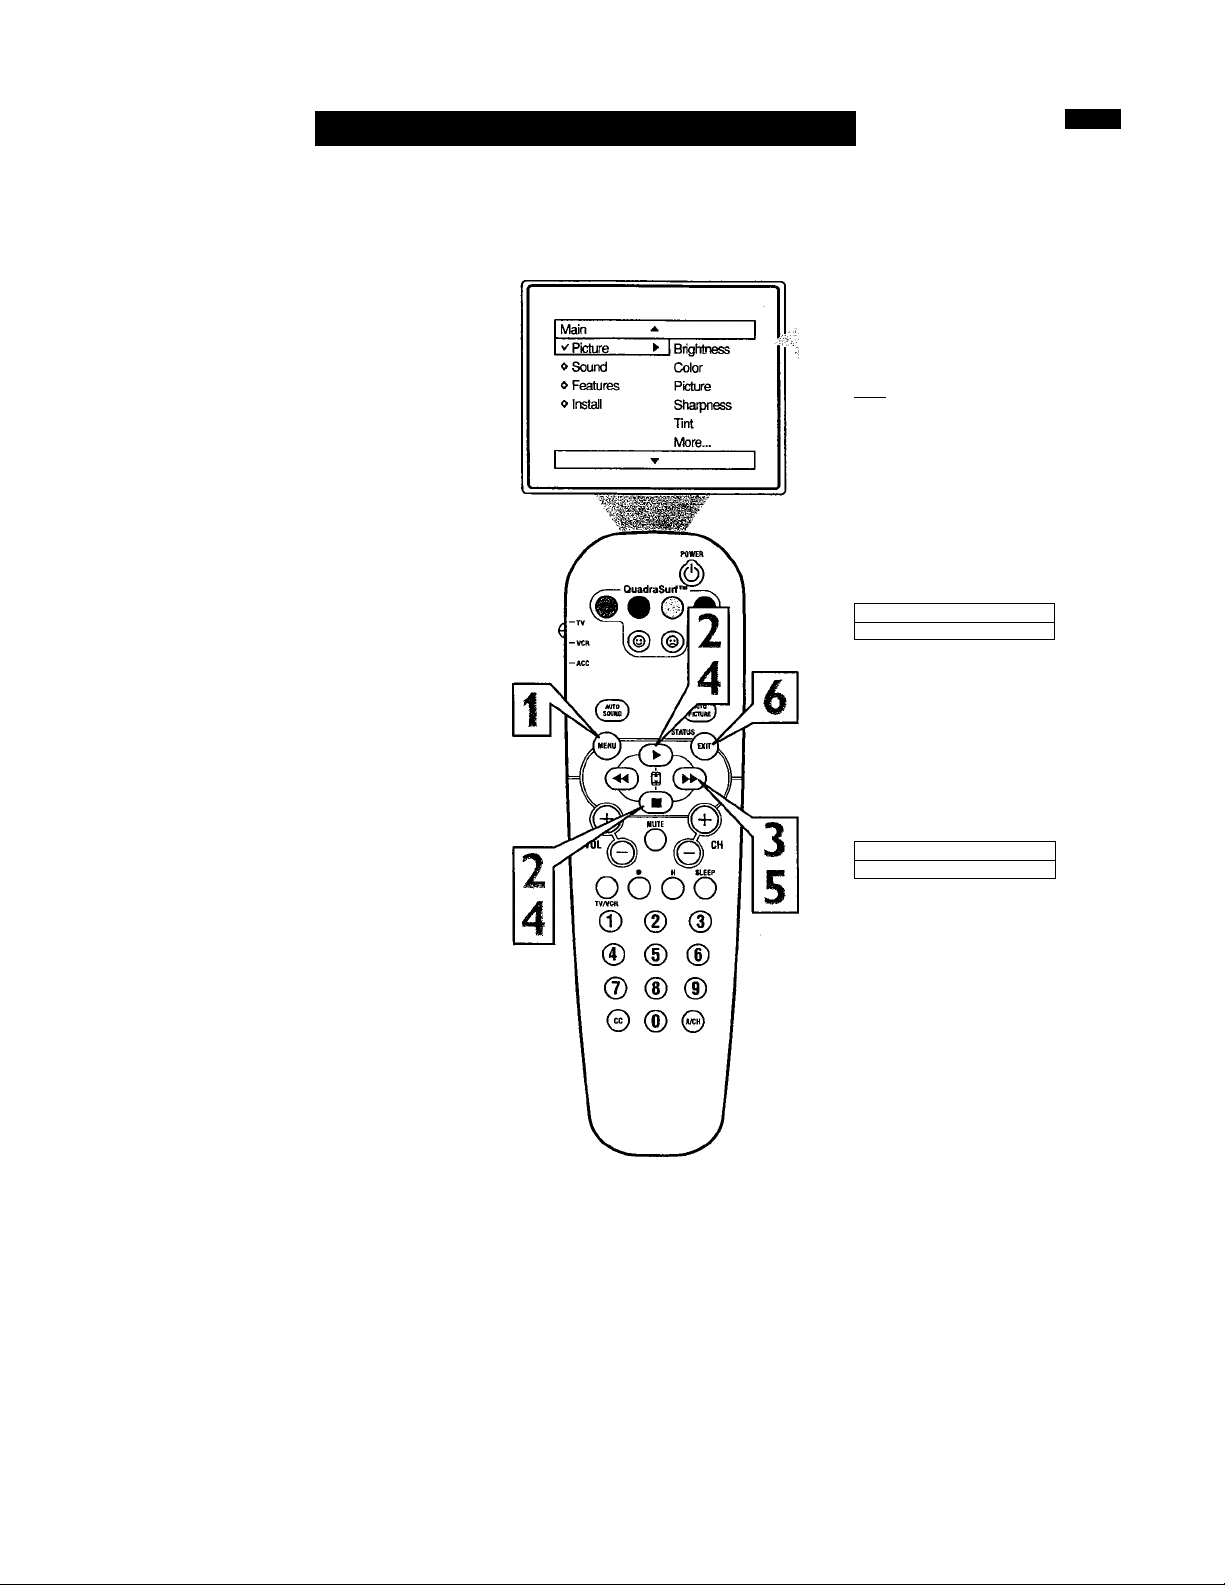
How TO Use the Language Control
TT^or our Spanish speaking TV owners an on-
i screen LANGUAGE option is present. With
the LANGUAGE control you can set the TV’s
on-screen menu to be shown in either English
or Spanish.
Press the MENU button on the
remote to show the on-screen menu.
1
Press the CURSOR UP ^ or DOWN
■ buttons to scroll through the on
2
screen menu until the word INSTALL
is highlighted.
Press the CURSOR RIGHT |
button to display the INSTALL menu
3
features.
I Main
^ Picture
oSound
«Features
V Install
Language
Tuner Mode
___
Auto Prxjgram
► I Channel Edit
J
Press CURSOR UP ^ or DOWN ■
buttons to scroll the Install features
4
until the word LANGUAGE is high
lighted.
Press the CURSOR RIGHT ^
button repeatedly to select ENG
5
LISH or ESPAÑOL (Spanish).
When fíníshed, press the STATUS
/EXIT button to remove the menu
6
from the TV’s screen.
Helpf ul Hint
The Language control only makes the TV’s
on-screen MENU items appear in English
or Spanish text.
It does not change the other on-screen text
features such as Closed Caption (CC) TV
shows.
Install ^
V Lanouaoe Enolish ►
«Tuner Mode
« Auto Program
« Channel Edit
OR
Instalar
''Idioma
« Sintonia
« Auto Programa
« Editar Canal
A
Esoaol *■
Page 6

How TO Use the Tuner Mode Control
'T'he TUNER MODE control allows you to
A. change the TV’s signal input to either
ANTENNA, CABLE or AUTO mode. It’s
important for the TV to know what type of
signal to look for. (From a Cable TV signal or
a normal Antenna signal.) In the AUTO
mode, when the AUTO PROGRAM feature is
activated, the TV will automatically choose
the correct mode.
Press the MENU button on the
remote to show the on-screen menu.
(
Press the CURSOR UP ^ or DOWN
■ buttons to scroll through the on
2
screen menu until the word INSTALL
is highlighted.
Press the CURSOR RIGHT ^
button to display the INSTALL menu
3
features.
Press CURSOR UP ^ or DOWN ■
buttons to scroll the Install features
4
until the words TUNER MODE is
highlighted.
Press the CURSOR RIGHT |
button to select either ANTENNA,
CABLE, or AUTO mode.
When finished, press the STATUS
/EXIT button to remove the on-screen
menu from the TV’s screen.
Helpf ul Hint
When CABLE is selected, channels 1-125
are available.
When ANTENNA is selected, channels 269 are available.
When AUTO is selected, the TV will auto
matically set itself to the correct mode
based on the type of signal it detects when
the AUTO PROGRAM feature is activated.
Page 7
Directions for Use
Need help?
Call us!
Philips representatives are ready to help you with any ques
tions about your new product We can guide you through
Connections, First-time Setup, or any of the Features.
We want you to start enjoying your new product right away!
Important!
Return your
Warranty
Registration Card
within 10 days.
See why inside.
CALL US BEFORE YOU CONSIDER
RETURNING THE PRODUCT.
1-800-531-0039
or
Visit us on the web at
Yiww.philips.com
3121 235 20691
Page 8

Return your Warranty Registration card today to ensure you
receive all the benefits youVe entitled to.
Once your PHILIPS purchase is registered, you’re eligible to receive all the privileges
of owning a PHILIPS product So complete and return the Warranty Registration
Card enclosed with your purchase at once. And take advantage of these important benefits.
Warranty
Verification
Registering your product within
10 days confirms your right to maxi
mum protection under the terms and
conditions of your PHILIPS warranty.
Congratulations on your purchase,
and welcome to the “family!”
Dear PHILIPS product owner:
Thank you for your confidence in PHILIPS. You’ve selected one of the best-built, best-backed products available
today. And we’ll do everything in our power to keep you happy with your purchase for many years to come.
As a member of the PHILIPS “family,” you’re entitled to protection by one of the most comprehensive war
ranties and outstanding service networks in the industry.
What’s more, your purchase guarantees you’ll receive all the information and special offers for which you quali
fy, plus easy access to accessories from our convenient home shopping network.
And most importantly you can count on our uncompromising commitment to your total satisfaction.
All of this is our way of saying welcome-and thanks for investing in a PHILIPS product
Sincerely,
Owner
Confirmation
Your completed Warranty
Registration Card serves as
verification of ownership in the
event of product theft or loss.
PHILIPS
Model
Registration
Returning your Warranty Registration
Card right away guarantees you’ll
receive all the information and special
offers which you qualify for as the
owner of your model.
0/
Lawrence J. Blanford
President and Chief Executive Officer
Know these
S3.f©ty symbols
RISK OF ELECntlC SHOCK
A
CAUTION: TO RCOUCE THE RISK OF ElfCnUC SHOCK. DO NOT
REMOVE COVER ion BACK!. N0 U8ER«EflVICEASl£ nuns
M8IDE. REFER SERVBMG TO flUAUREO SERVICE PERSONNEL
DO NOT OPEN
A
PHILIPS Visit our World Wide Web Site at http://www.philips.com
P.S. Remember, to get the most from your
PHILIPS product you must return your
Warranty Registration Card within 10
days. So please mail it to us right now!
A This “bolt of lightning” indicates uninsulated material within your unit may cause an elec
trical shock. For the safety of everyone in your household, please do not remove product cov
ering.
The “exclamation point” calis attention to features for which you should read the
enclosed literature cioseiy to prevent operating and maintenance problems.
WARNING: TO PREVENT FIRE OR SHOCK HAZARD, DO NOT EXPOSE THIS EQUIP
MENT TO RAIN OR MOISTURE.
CAUTION: To prevent electric shock, match wide blade of plug to wide slot, and fiilly insert
ATTENTION: Pour éviter les chocs électriques, introduire la lame la plus large de la fiche dans
la borne correspondante de la prise et pousser jusqu'au fond.
Page 9
IMPORTANT SAFETY INSTRUCTIONS
Read before operating equipment
1. Read these instructions.
2. Keep these instructions.
3. Heed all warnings.
4. Follow all instructions.
5. Do not use this apparatus near water.
6. Clean only with a dry cloth.
7. Do not block any of the ventilation openings. Install in accordance
with the manufacturers instructions.
8. Do not install near any heat sources such as radiators, heat regis
ters, stoves, or other apparatus (including amplifiers) that produce
heat.
9. Do not defeat the safety purpose of the polarized or grounding-
type plug. A polarized plug has two blades with one wider than
the other. A grounding type plug has two blades and third ground
ing prong. The wide blade or third prong are provided for your
safety. \^en the provided plug does not fit into your outlet, con
sult an electrician for replacement of the obsolete outlet.
10. Protect the power cord from being walked on or pinched particu
larly at plugs, convenience receptacles, and the point where they
exit from the apparatus.
Only use attachments/accessories specified by the manufacturer.
Use only with a cart, stand, tripod, bracket, or table
specified by the manufacturer, or sold with the app
aratus. When a cart is used, use caution when moving
le cart7apparatus combination to avoid injury firom tip-over.
Unplug this apparatus during lighuiing storms or when unused for
long periods of time.
14. Refer all servicing to qualified service personnel. Servicing is
required when the apparatus has been damaged in any way, such
as power-supply cord or plug is damaged, liquid has been spilled
or objects have fallen into apparatus, the apparatus has been
exposed to tain or moisture, does not operate normally, or has
been dropped.
15. This product may contain lead and mercury. Disposal of these
materials may be regulated due to environmental considerations.
For disposal or recycling information, please contact your local
authorities or the Electronic Industries Alliance:
16. Damage Requiring Service - The appliance should be serviced
by quidified service personnel when:
A. The power supply cord or the plug has been damaged; or
www.eiae.oig
B. Objects have fallen, or liquid has been spilled into the appli
ance; or
C. The appliance has been exposed to rain; or
D. The appliance does not appear to operate normally or
exhibits a marked change in performance; or
E. The appliance has been dropped, or the enclosure damaged.
17. Tilt/Stability - All televisions must comply with recommended
international global safety standards for tilt and stability properties
of its cabinet design.
• Do not compromise these design standards by applying exces
sive pull force to the front, or top, of the cabinet which could ulti
mately overturn the product
• Also, do not endanger yourself, or children, by placing electron
ic equipment/toys on the top of the cabinet. Such items could
unsuspectingly fall from the top of the set and cause product dam
age and/or personal injury.
18. Wall or Ceiling Mounting - The appliance should be mounted to
a wall or ceiling only as recommended by the manufacturer.
19. Power Lines - An outdoor antenna should be located away from
power lines.
20. Outdoor Antenna Grounding - If an outside antenna is connect
ed to the receiver, be sure the antenna system is grounded so as to
provide some protection against voltage surges and built up static
chaiges.
Section 810 of the National Electric Code, ANSI/NFPA No. 70-
1984, provides information with respect to proper grounding of
the mast and supporting structure, grounding of the lead-in wire to
an antenna discharge unit, size of grounding connectors, location
of antenna-discharge unit, connection to grounding electrodes, and
requirements for the grounding electrode. See Figure below.
21. Object and Liquid Entry - Care should be taken so that objects
do not fall and liquids are not spilled into the enclosure through
openings.
22. Battery Usage CAUTION - To prevent battery leakage that may
result in bodily injury, property damage, or damage to the unit:
• Install all batteries correctly, with + and - aligned as marked on
the unit.
• Do not mix batteries (old and new or carbon and alkaline, etc.).
• Remove batteries when the unit is not used for a long time.
Page 10

Contents
Introduction
Welcome/Registration of Your TV.........................................2
Safety Instructions
..................................................................
Table of Contents....................................................................4
Install Menu
_
How to use the Language Control
...............................
How to use the Tuner Mode Control........................................6
How to Auto Program TV Channels
.......................................
How to Add or Delete Channels .............................................8
Picture Menu
How to use the Picture Adjustment Controls
.............
Sound Menu
A How to Use the Sound Adjustment Controls ............10
Features Menu
Using the Format (Expand 4:3) Control
Understanding the AutoLock™ Controls ............................12
Setting up the AutoLock’^“ Access Code..............................13
How to Block Channels........................................................14
How to Clear All Blocked Channels at the Same Time ____15
How to Block All Channels at the Same Time
Blocking Programming Based on Movie Ratings..................17
Blocking Programming Based on TV Ratings ......................18
Other AutoLock^M B locking Options
How to Use the Active Control
Remote Control Use
(if,
................................
.............................................
Setting the Sleeptimer Control ................................21
How to use the Closed Captioning Control
Setting the AutoPicture™ Control
.......................................
Setting the AutoSound’'“ Control ........................................24
Using the QuadraSurF'** Buttons (Alternate Channel).. .25-26
Remote Use with Accessory Devices (Direct Method)
Remote Use with Accessory Devices (Code Entry)
Remote Use with Accessory Devices (Search Method) ... .29
Remote Code Entry List
..................................................
Remote VCR Related Buttons..............................................33
...................
.....................
...........................
.........
...........
30-32
23
28
General Information
Troubleshooting Tips................................................34
Cleaning and Care
Glossary of Terms ................................................................36
Index
....................................................................................
Factory Service Location
Warranty
NOTE: It is possible that this owner's manual may be used
with several different television models. Not all features
(and drawings) discussed in this manual will necessarily
match those found with your television system. This is nor
mal and does not require you contacting your dealer or
requesting service.
...............................................................................
...............................................................
...............................................
38-39
35
37
40
3
5
11
16
19
20
22
27
Here are a few of the features built into your new Television:
QuadraSurf™ A remote control feature that allows you to
store and view up to ten of your favorite channels per button (4
buttons - 40 channels total). Can be set to hold movie, sports,
news channels, etc., or add the audio/video channels for a quick
source function to swap between your external accessory
devices.
Active ControU“ continuously measures and corrects all incom
ing signals to help provide the best picture quality. This feature
monitors and corrects both the sharpness control and noise reduc
7
tion control.
AutoLock™ feature allows you to block the viewing of cer
tain channels or external audio/video connections where you
might not want your children viewing inappropriate material.
9
Infrared Remote Control works your TV set and some
accessory devices which allows programming certain features
with the press of one button.
Standard broadcast (VHF/UHF) or Cable TV (CATV)
channel capability with stereo sound.
Closed Captioning allows the viewer to read TV program
dialogue or voice conversations as on-screen text.
Automatic Programming of Channels for quick and easy
selection of favorite stations available in your area.
On-screen Features (in either English or Spanish) show
helpful messages for setting of TV controls.
Audio/Video Jackpanel located on the back and side of the
television for direct connections when using audio/video acces
sory devices, these Jacks can provide improved quality TV pic
ture and sound playback.
Expand 4:3 will allow you to expand the “letterbox” image
produced by certain DVD players to fill the entire TV screen.
Sleeptimer automatically turns the TV OFF at preset times.
AutoPicture™ allows you to set the picture color, tint, con
trast, etc. for various types of programming such as Sports,
Movies, Personal, Weak Signals or Multi Media with the push
of one button.
AutoSound™ controls allow you to set the sound controls for
various types of listening programs such as Personal (sound
controls the way you set them). Theater, Music, or Voice with
the push of one button.
Treble Boost, Bass Boost, and Balance controls to
enhance the television’s sound.
End-of-Life Disposal
Your new television and its packing contain materials that can
be recycled and reused. Specialized companies can recycle your
product to increase the amount of reusable materials and mini
mize the amounts that need to be properly disposed.
Your product also uses batteries that should not be thrown away
when depleted, but should be handed in and disposed of as
small chemical waste.
When you replace your existing equipment, please find out
about the local regulations regarding disposal of your old tele
vision, batteries, and packing materials.
Auto Lock, Auto Picture, Auto Sound, Active Control, QuadraSurf
are all registered trademarks of Philips Consumer Electronics Company.
Copyright © 2002 All rights reserved.
Page 11
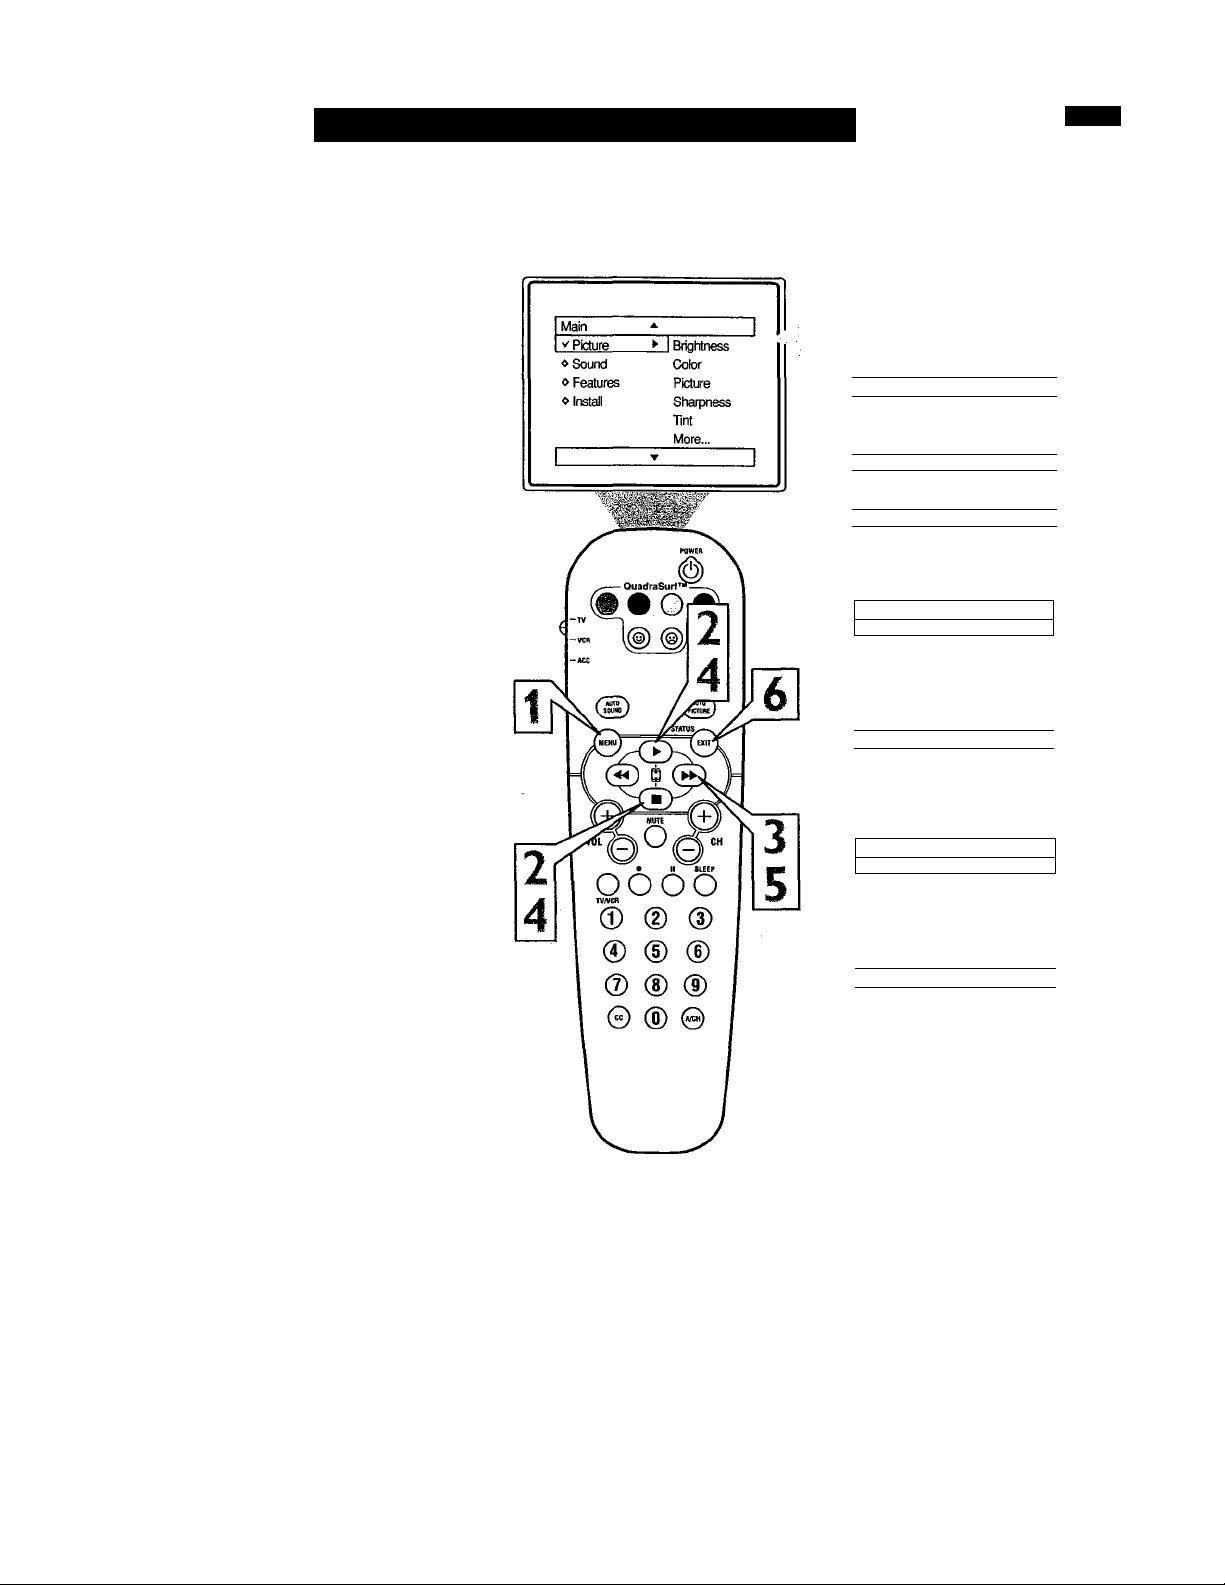
How TO Use the Language Control
TT'or our Spanish speaking TV owners an on-
X screen LANGUAGE option is present. With
the LANGUAGE control you can set the TV’s
on-screen menu to be shown in either English
or Spanish.
Press the MENU button on the
remote to show the on-screen menu.
1
Press the CURSOR UP ^ or DOWN
■ bnttons to scroll through the on
2
screen menu until the word INSTALL
is highlighted.
1 Main
^ Picture
«Soimd
❖ Features Auto Program
1 V Install
Language
Tuner Mode
> 1 Channel Edit
1
Press the CURSOR RIGHT
button to display the INSTALL menu
3
features.
Press CURSOR UP ^ or DOWN ■
buttons to scroll the Install features
4
until the word LANGUAGE is high
lighted.
Press the CURSOR RIGHT |
button repeatedly to select ENG
5
LISH or ESPAÑOL (Spanish).
When finished, press the STATUS
/EXIT button to remove the menu
6
from the TV’s screen.
Helpful Hint
The Language control only makes the TV’s
on-screen MENU items appear in English
or Spanish text.
It does not change the other on-screen text
features such as Closed Caption (CC) TV
shows.
1
___________I____________
Install *
V' Lanouaoe
❖ Tuner Mode
❖ Auto Program
❖ Channel Edit
Instalar
V Idioma
❖ Sintonia
❖ Auto Programa
❖ Editar Canal
English ►
-
OR
Esoaol >
-
1
Page 12
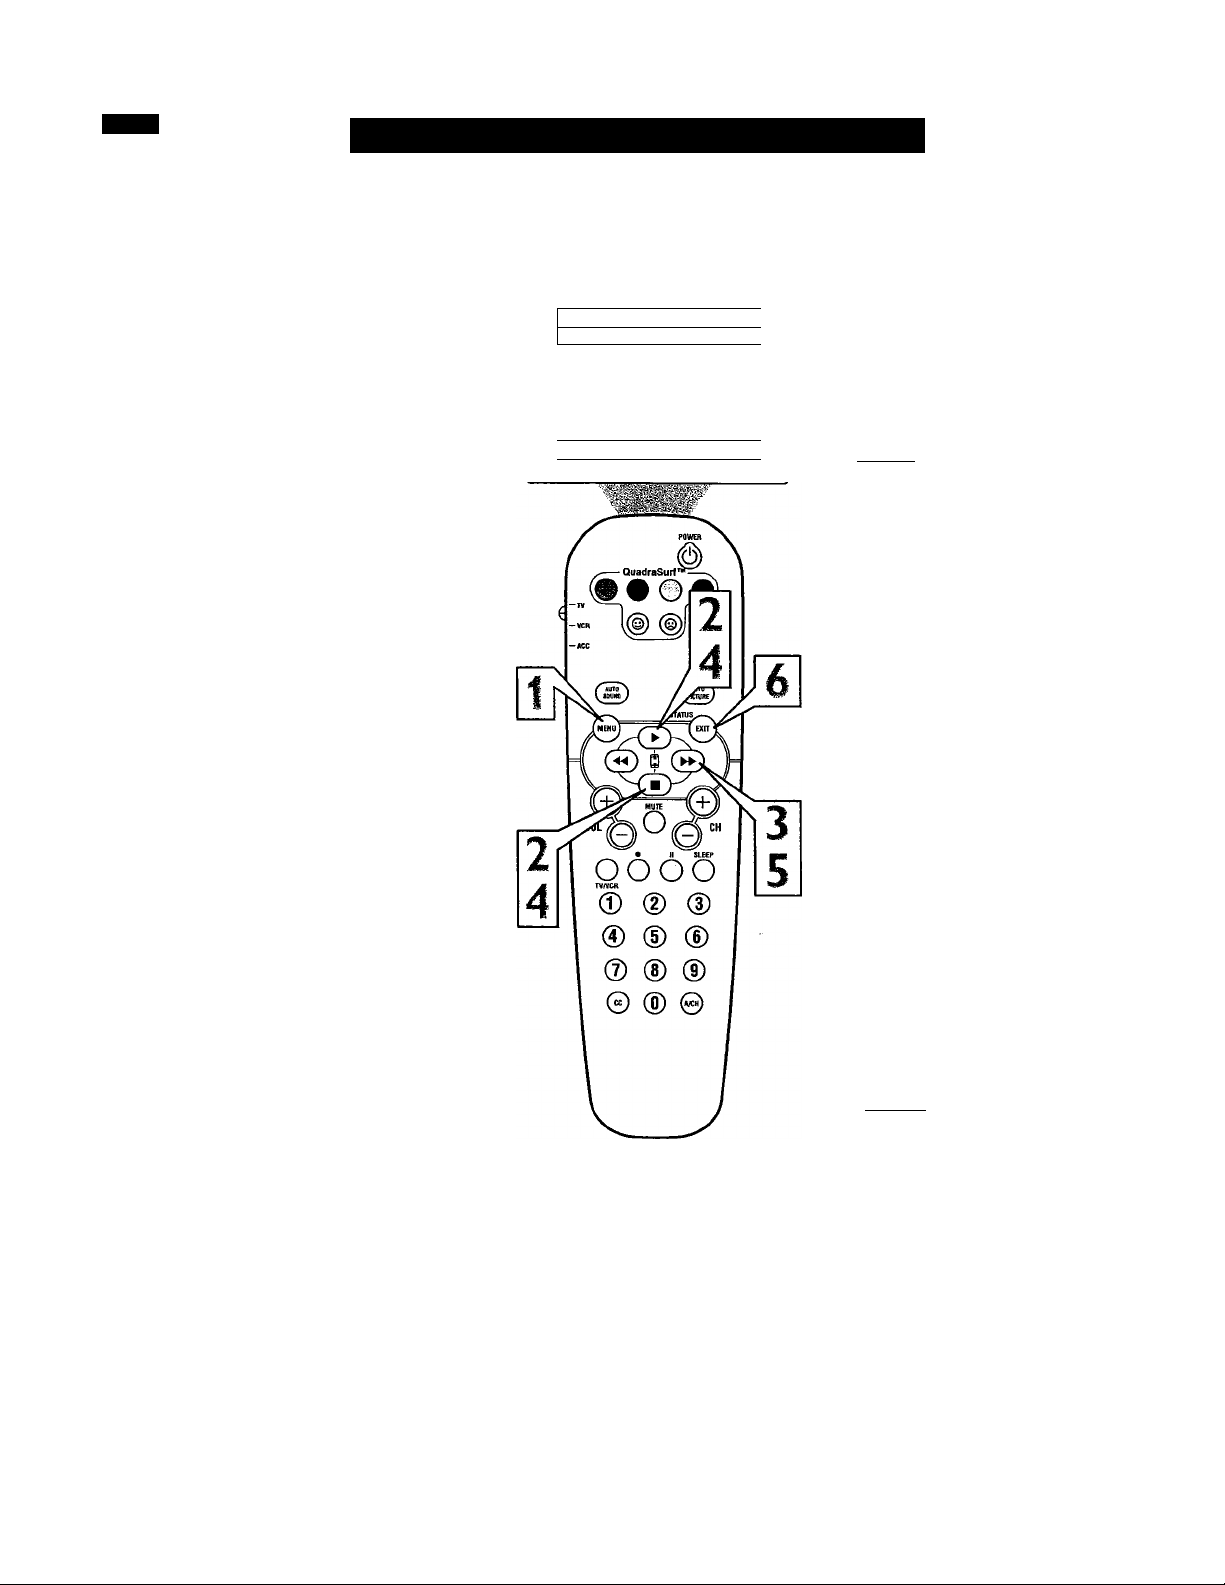
How TO Use the Tuner Mode Control
'I ’/le TUNER MODE control allows you to
J. change the TV’s signal input to either
ANTENNA, CABLE or AUTO mode. It’s
important for the TV to know what type of
signal to look for. (From a Cable TV signal or
a normal Antenna signal.) In the AUTO
mode, when the AUTO PROGRAM feature is
activated, the TV will automatically choose
the correct mode.
Press the MENU button on the
remote to show the on-screen menu.
1
Press the CURSOR UP^ or DOWN
■ buttons to scroll through the on
2
screen menu until the word INSTALL
is highlighted.
Main
V Picture
«Sound
« Features
«Install
- 1
► iBriohtness
Color
Picture
Sharpness
Tint
More...
-JT
_____________
Main
* Picture Language
» Sound Tuner Mode
1
o Features Auto Program
I V Install ► I Channel Edit
Press the CURSOR RIGHT |
button to display the INSTALL menu
3
features.
Press CURSOR UP ^ or DOWN ■
buttons to scroll the Install features
4
until the words TUNER MODE is
highlighted.
Press the CURSOR RIGHT ^
button to select either ANTENNA,
5
CABLE, or AUTO mode.
When finished, press the STATUS
/EXIT button to remove the on-screen
6
menu from the TV’s screen.
Helpful Hint
When CABLE is selected, channels 1-125
are available.
When ANTENNA is selected; channels 269 are available.
When AUTO is selected, the TV will auto
matically set itself to the correct mode
based on the type of signal it detects when
the AUTO PROGRAM feature is activated.
Install
«Language
I Tuner Mode Antenna ►
o Auto Program
« Channel Edit
OR
Install
« Language
V-Tuner Mode
o Auto Program
« Channel Edit
Install
«Language
V Tuner Mode
« Auto Program
« Channel Edit
Cable ^
OR
Auto ►
Page 13
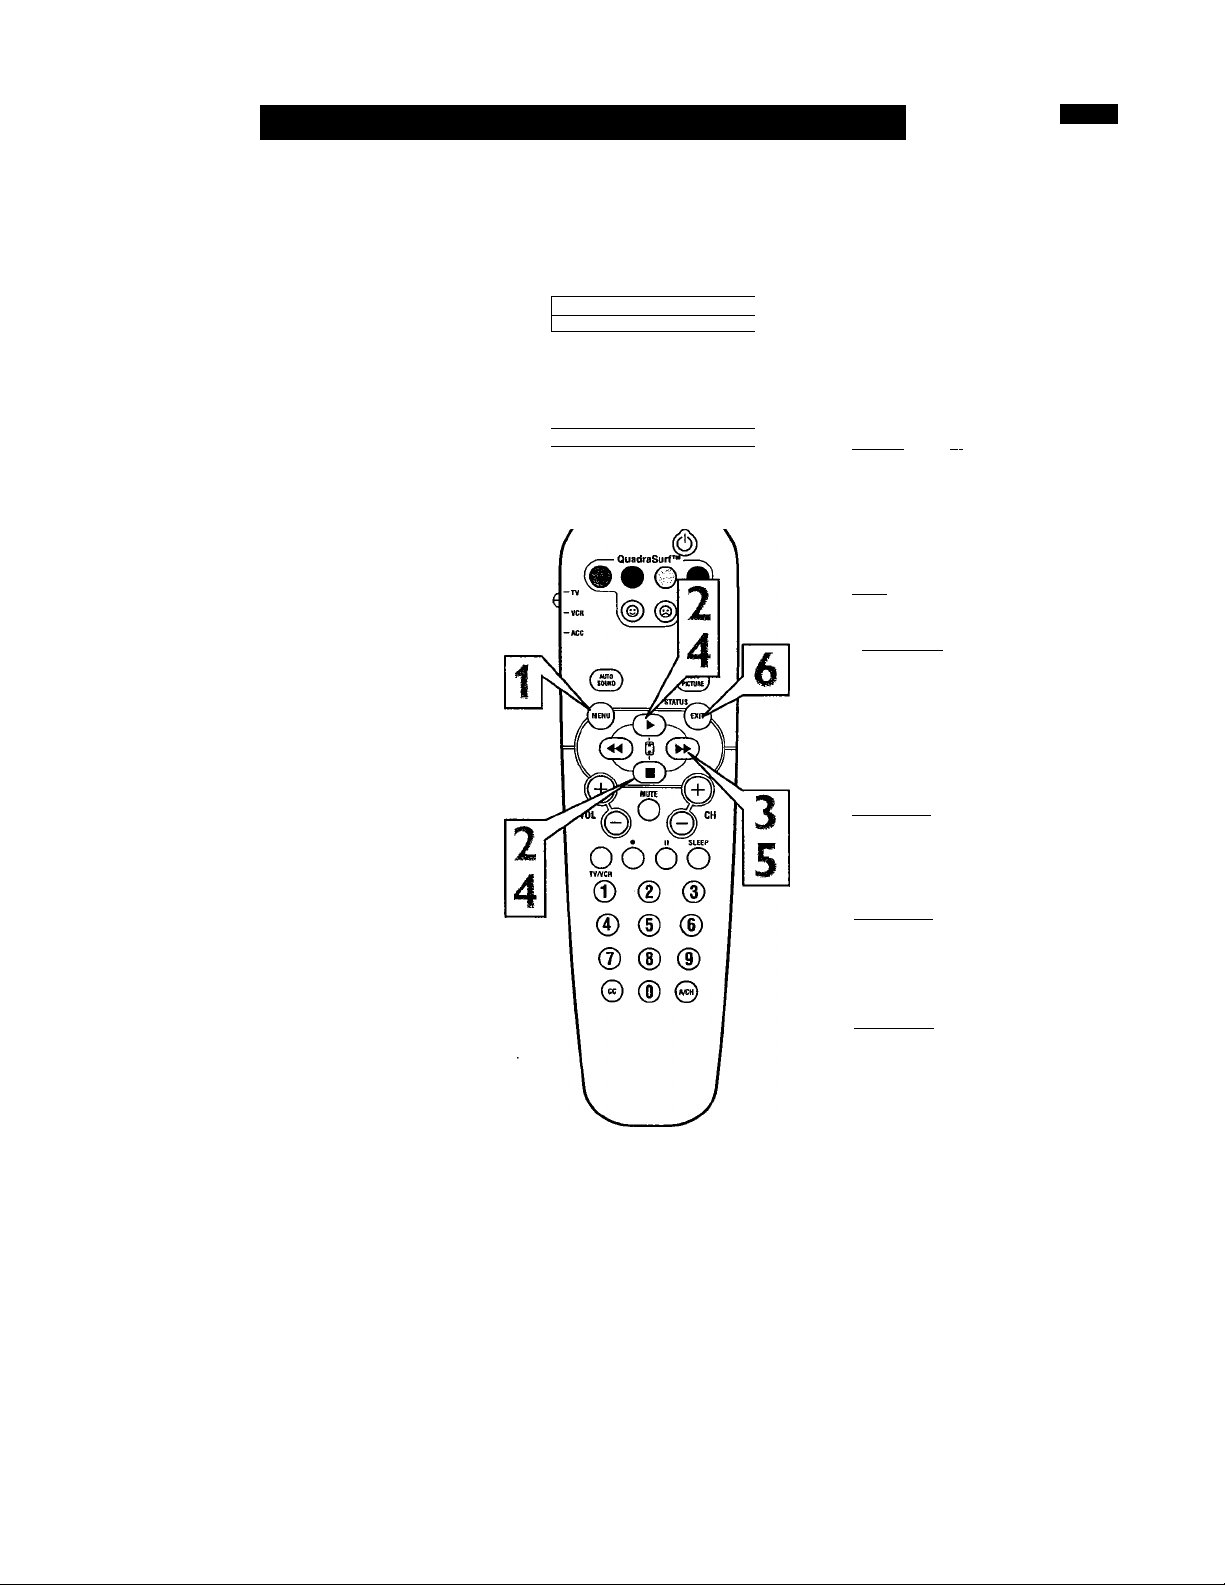
How TO Automatically Program Channels
our TV can automatically set itself for
local area (or Cable TV) channels. This
F
makes it easy for you to select only the TV
stations in your area when the CHANNEL
(+), (-) buttons are pressed.
Note: Make sure the antenna or cable signal
connection has been completed before AUTO
PROGRAM is activated.
Press the MENU button on the
remote to show the on-screen menu.
1
Press the CURSOR UP ^ or DOWN
■ buttons to scroll through the on
2
screen menu until the word INSTALL
is highlighted.
Press the CURSOR RIGHT |
button to display the INSTALL menu
3
features.
Press CURSOR UP^ or DOWN ■
buttons to scroll the Install features
4
until the words AUTO PROGRAM
are highlighted.
Press the CURSOR RIGHT |
button to start the Auto Program scan
ning of channels. Auto Programming
will store all available channels in the
TV’s memory then tune to the lowest
available channel when done.
When finished, press the STATUS
/EXIT button to remove the menu
from the TV’s screen.
Main
V Picture
«Sound
« Features
«Install
► 1 Brightness
Color
Picture
Sharpness
Tint
More...
____________
1
Main
« Picture
«Sound
Features
1
o
I V Install
I Install
«Language
«Tuner Mode
r Auto Program
« Channel Edit
I Auto Program
«Channel 12
« «««o««««««««o«o«oo««««
I Auto Program
«Channel 13
« «0««««««««««««««««««««
Language
Tuner Mode
Auto Program
► I Channel Edit
Helpful Hint
When CABLE is selected, channels 1-125
are available.
When ANTENNA is selected, channels 269 are available.
When AUTO is selected, the TV will auto
matically set itself to the correct mode
based on the type of signal it detects when
the AUTO PROGRAM feature is activated.
I Auto Program
« Channel 14
« <x>o»ooooo»o«o«««««««««
Page 14
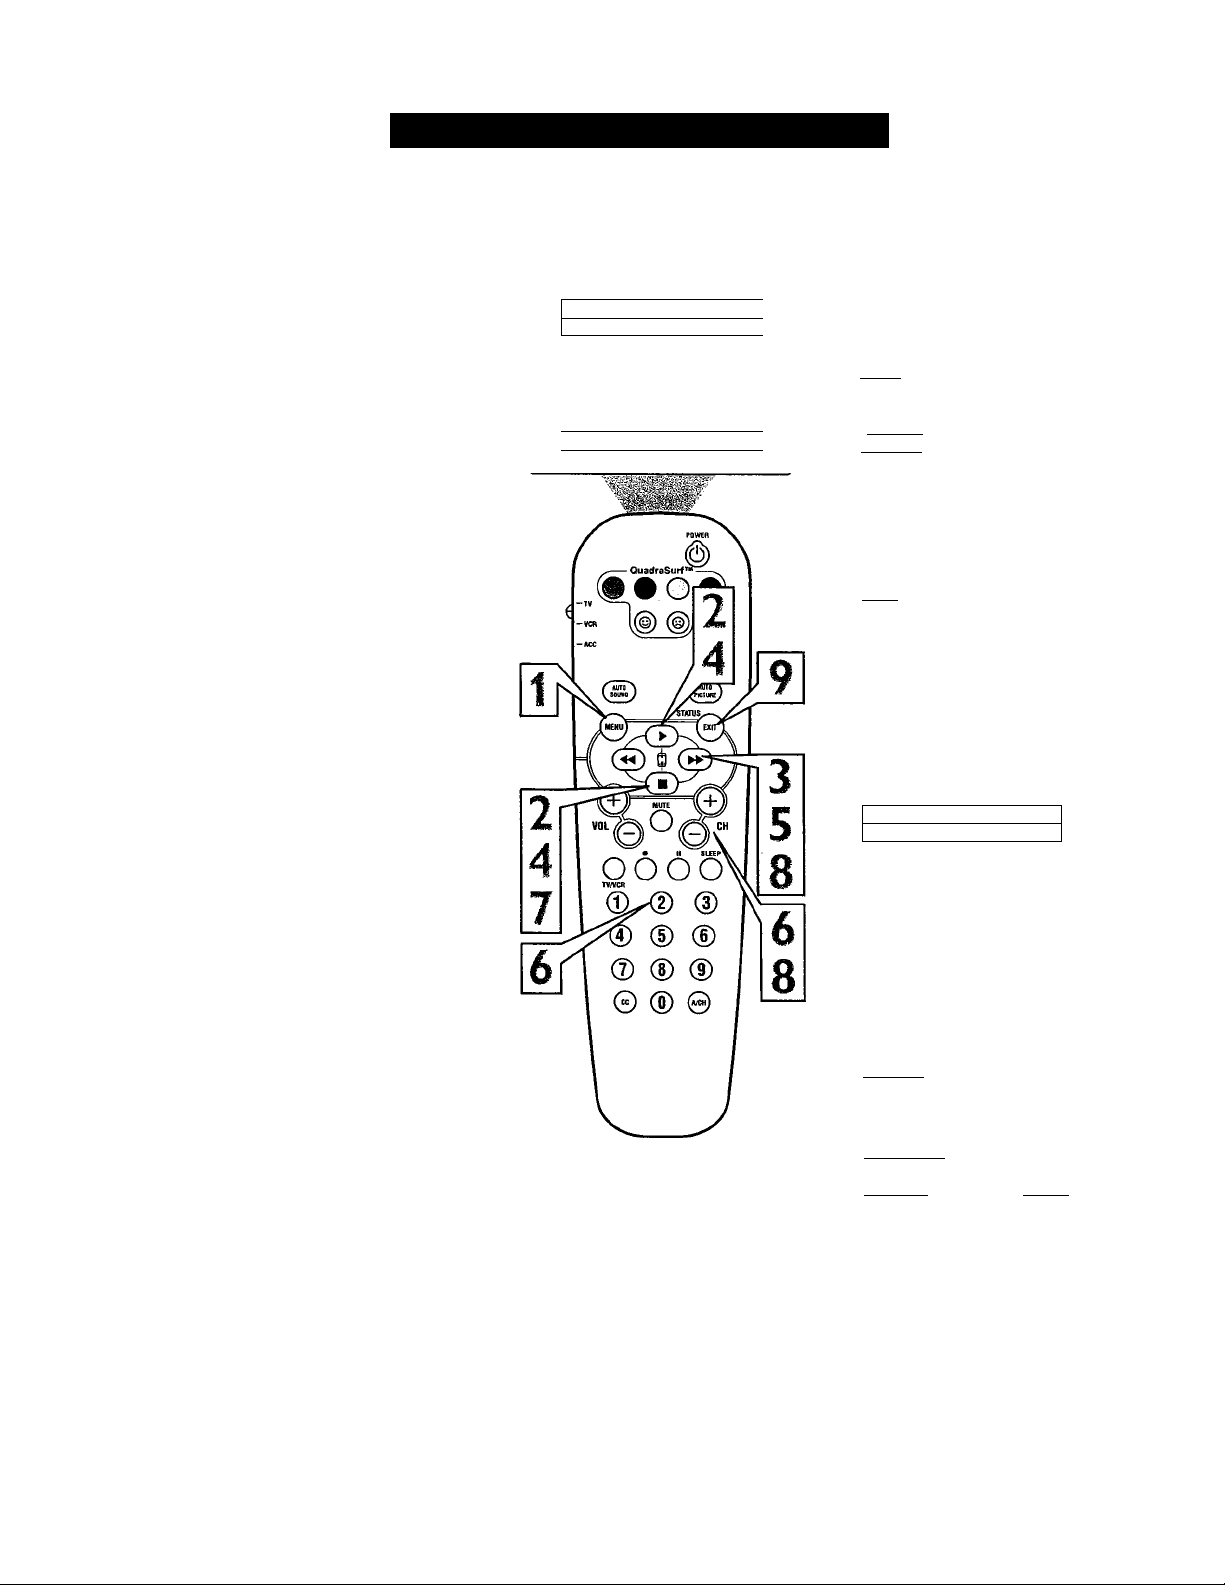
hannel Edit makes it easy for you to ADD
or DELETE channels from the list of
C
channels stored in the TV’s memory.
Press the MENU button on the
remote to show the on-screen menu.
1
Press the CURSOR UP ^ or DOWN
■ buttons to scroll through the on
2
screen menu until the word INSTALL
is highlighted.
Press the CURSOR RIGHT
button to display the INSTALL menu
3
features.
Press the CURSOR UP ^ or DOWN
■ buttons to scroll the Install features
4
until the words CHANNEL EDIT are
highlighted.
Press the CURSOR RIGHT ^
button to display the CHANNEL
5
EDIT options.
How TO Add or Delete Channels
Main
V Picture
«Sound
0 Features
o Install
* 1 Brightness
-T— 1
Color
Picture
Sharpness
Tint
More...
1
I Main
^ Picture Language
o Sound Tuner Mode
o Features
______
I V Install » I Channel Edit
I Install
o Language Channel No.
o Tuner Mode Skipped
« Auto Program
V Channel Edit ►
Auto Program
With the CHANNEL EDIT options
displayed, and CHANNEL NO. high
6
lighted; enter the channel number (with
the NUMBERED or the CH + or buttons) you wish to add (Skipped
OFF), or delete (Skipped ON) from the
TV’s memory.
Using the CURSOR DOWN ■ but
ton, scroll the menu to highlight the
7
word SKIPPED.
Now use the CURSOR RIGHT ^
button to toggle between ON or OFF.
8
If ON is selected the channel is
skipped when scrolling channels with
the CH + or - buttons. If OFF is
selected the channel is not skipped
when scrolling channels with the CH -i-
or - buttons.
When finished, press the STATUS
/EXIT button to remove the menu
from the TV’s screen.
Channel Edit
V Cfiannel No.
^Skipped
Channel Edit
o Channel No.
I V Skipped
I Channel Edit *
^ Channel No.
I v'Sk pped
12 ►
On ►
Oil >■ I
Page 15
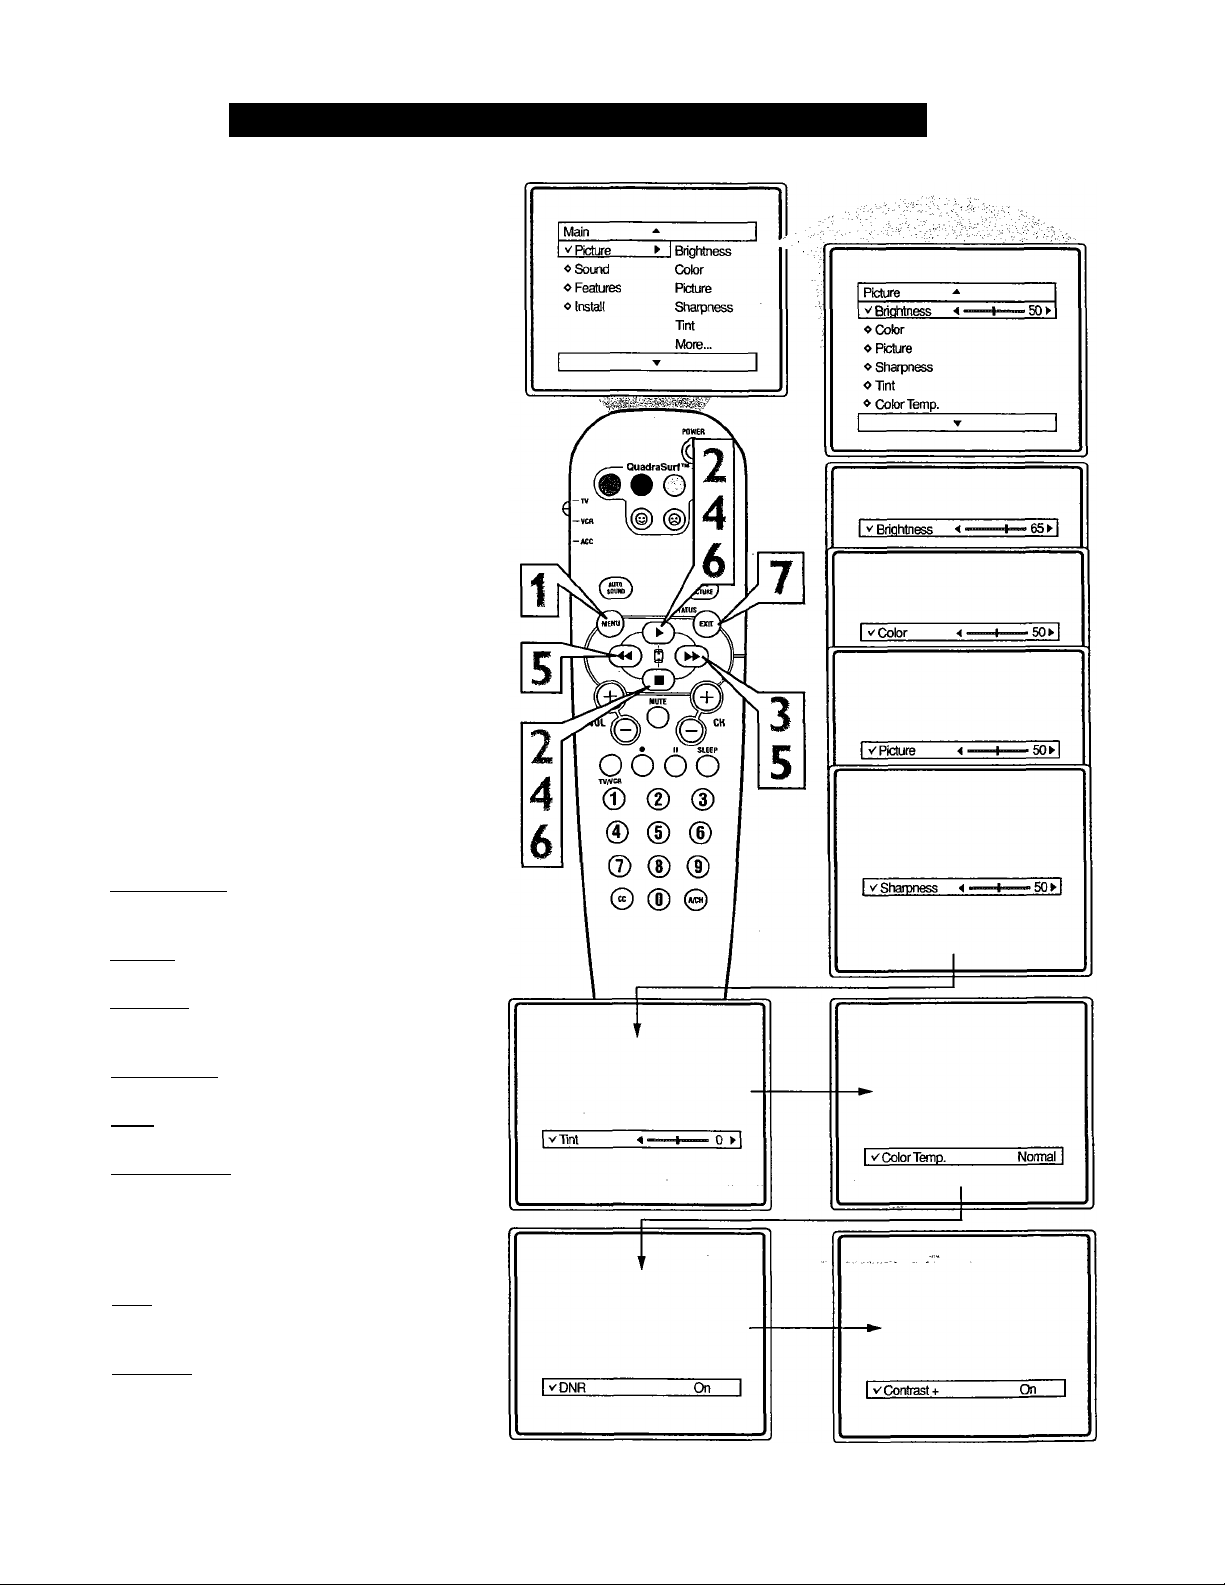
How TO Use the Picture Adjustment Controls
o adjust your TV picture controls, select a
channel and follow the steps shown below:
r,
Press the MENU button on the
remote to display the on-screen menu.
1
Press the CURSOR UP ► or DOWN
■ buttons until the word PICTURE is
2
highlighted.
Press the CURSOR RIGHT ^
button to display the PICTURE menu
3
features.
Press CURSOR UP ^ or DOWN ■
buttons to scroll the Picture features
4
and highlight the control you wish to
adjust (Brightness, Color, Picture,
Sharpness, Tint, Color Temp., DNR, or
Contrast +).
Press the CURSOR RIGHT or
the CURSOR LEFT buttons to
5
adjust the selected control or to make
selections for the chosen control.
Press the CURSOR UP ^ or DOWN
■ buttons to select and adjust other
6
Picture Menu controls.
When finished, press the STATUS
/EXIT button to remove the menu
7
from the TV’s screen.
Helpful Hint
BRIGHTNESS: Press the ►► or
buttons until darkest parts of the picture are
as bright as you prefer.
COLOR: Press the ►► orbuttons to
add or eliminate color.
PICTURE: Press the ►► orbuttons
until lightest parts of the picture show good
detail.
SHARPNESS: Press the orbut
tons to improve detail in the picture.
TINT: Press the or buttons to
obtain natural skin tones.
COLOR TEMP: Press the ^ or
buttons to select NORMAL, COOL, or
WARM picture preferences. (NORMAL will
keep the whites, white; COOL will make the
whites, bluish; and WARM will make the
whites, reddish.)
DNR: Press the or buttons to turn
DNR ON or OFF. Dynamic Noise Reduction
helps to eliminate “noise” from the picture.
Contrast +: Press the or buttons
to turn Contrast + ON or OFF. When ON,
this control will optimize the picture contrast
for improved picture clarity.
Page 16
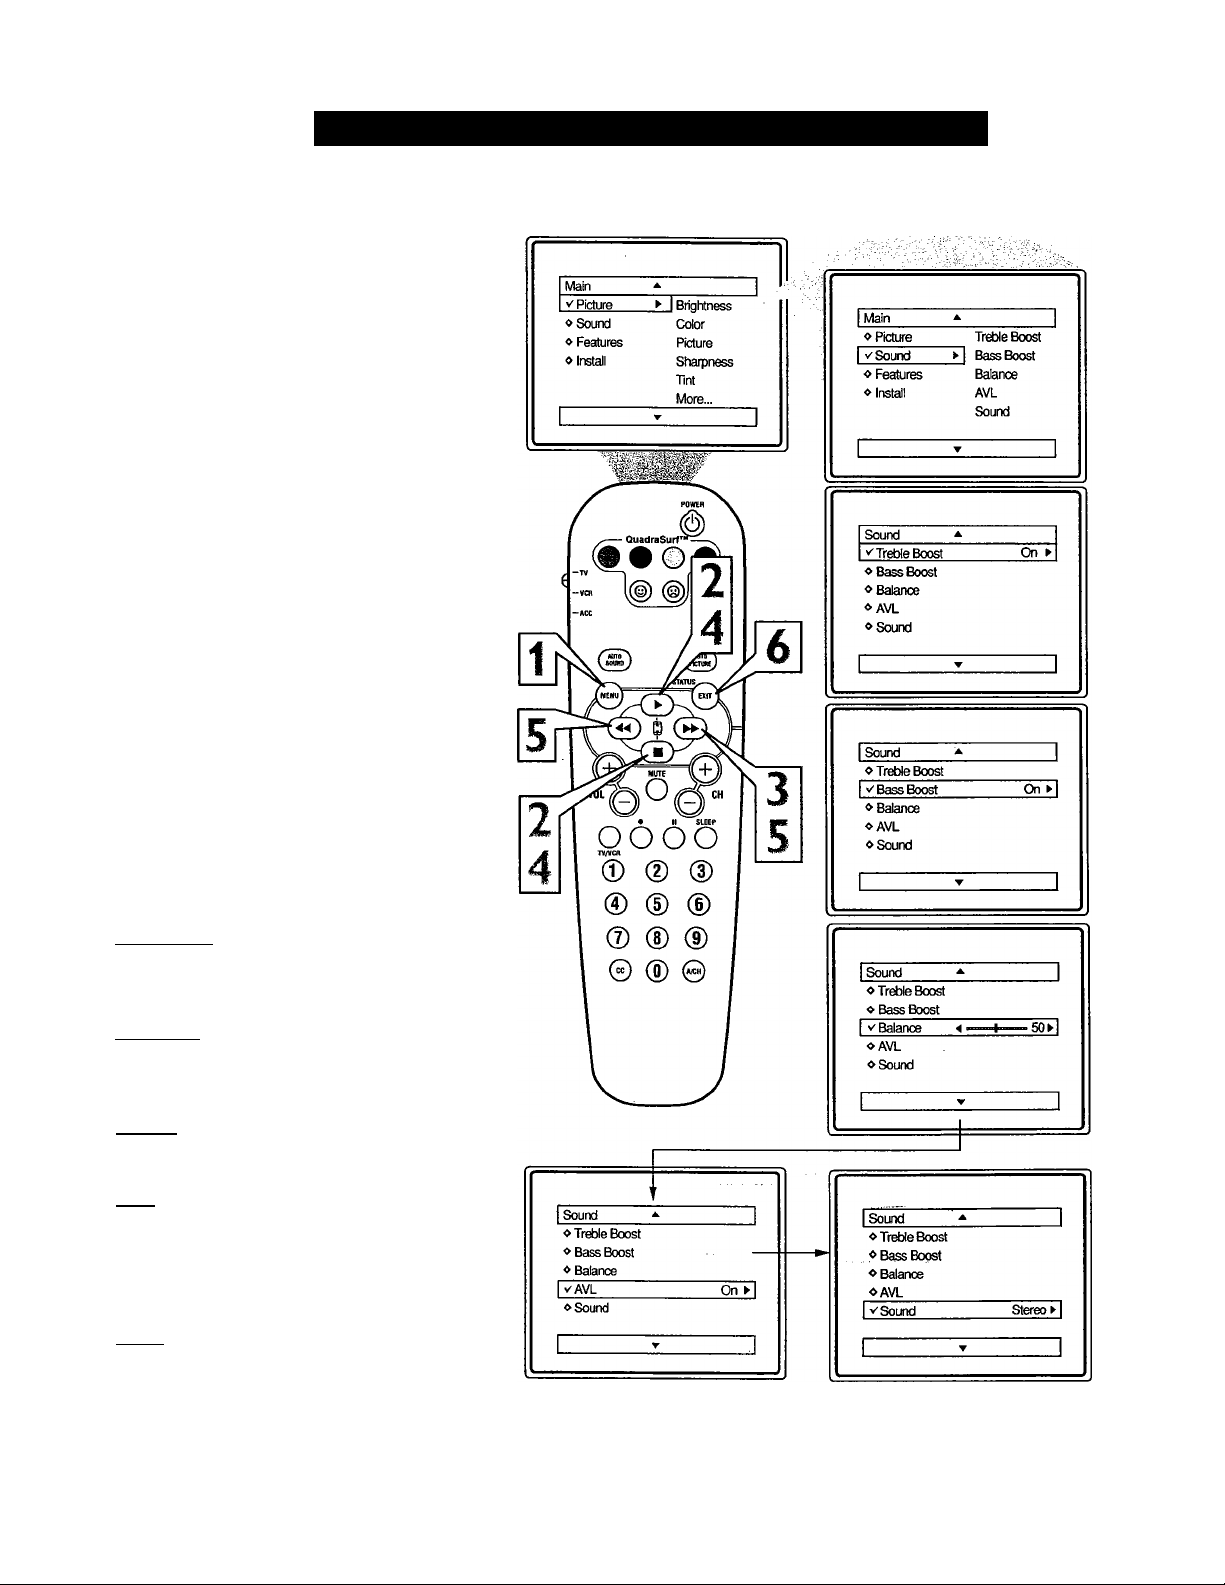
How TO Use the Sound Adjustment Controls
T)esides the normal volume level control,
your TV also has Treble Boost, Bass
Boost, Balance, AVL (automatic volume level-
er), and Sound (StereolMono) controls.
Press the MENU button on the remote
to display the on-screen menu.
1
Press the CURSOR UP ^ or CUR
SOR DOWN ■ button until the word
2
SOUND is highlighted.
Press the CURSOR RIGHT
button to display the SOUND menu
3
features.
Press the CURSOR UP ► or CUR
SOR DOWN ■ button to scroll the
4
Sound menu features until the control
you wish to change is highlighted
(TVeble Boost, Bass Boost, Balance,
AVL, or Sound).
Press the CURSOR RIGHT or
LEFT button to turn the adjust
5
or turn the control On or Off.
When finished, press the STATUS
/EXIT button to remove the menu
6
from the TV’s screen.
Helpful Hint
Treble Boost: Press the or but
tons to turn the control On or Off. When On,
the control will enhance the high frequency
sounds.
Bass Boost: Press the ►► or but
tons to turn the control On or Off. When On,
the control will enhance the low frequency
sounds.
Balance: Press the P^ or buttons to
adjust the level of sound coming from the
left and right speakers.
AVL: (Auto Volume Leveler) Press the
or buttons to turn the control On
or Off. When On, AVL will level out the
sound being heard when sudden changes in
volume occur during commercial breaks or
channel changes.
Sound; Press the or buttons to
select between Stereo or Mono settings.
Note: If Stereo is not present on a selected
show and the TV is placed in the Stereo
mode, the sound coming from the TV will
remain in the Mono mode.
10
Page 17
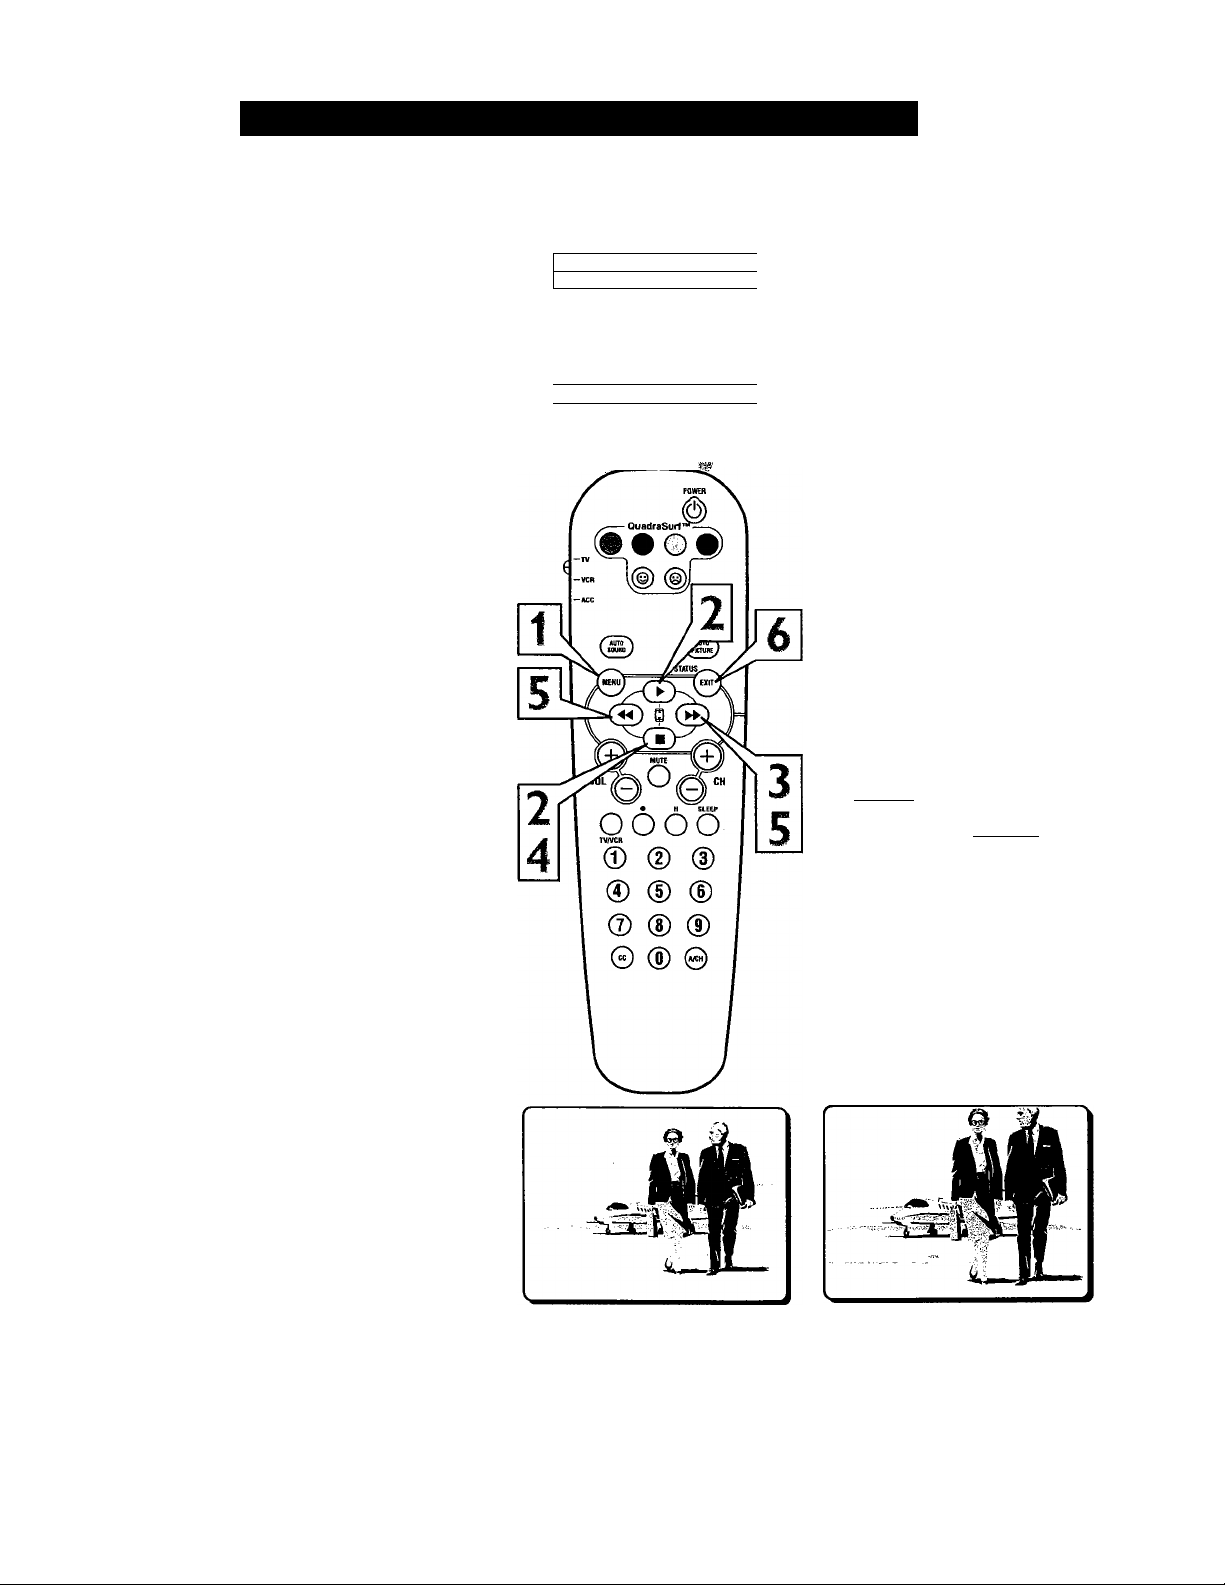
How TO Use the Format Control (Expand 4:3)
any times while watching movies from a
DVD player the image is shown in “let
M
ter box" format. This is the format that is
shown in movie theaters, when shown on a
TV screen, the image will have areas of black
on top and bottom of the screen. The FOR
MAT Control can help to display the image as
close as possible to its original aspect ratio.
Press the MENU button on the
remote to display the on-screen menu.
1
Main
✓ Picture
«Sound
« Features
«Install
► iBriohtness
Cotor
Picture
Sharpness
Tint
More...
I
Main
o Picture AutoLock
o Sound Format
I
I V Features ► | Active Control
^ Install
Press the CURSOR DOWN ▼ but
ton until the word FEATURES is
2
highlighted.
Press the CURSOR RIGHT ^ but
ton to display the FEATURES menu
3
options (AutoLock or Format).
Press the CURSOR DOWN T but
ton until the word FORMAT is high
4
lighted.
Press the CURSOR RIGHT ^ or
CURSOR LEFT buttons to select
5
one of the two options 4:3 or Expand
4:3.
4:3 - Standard format for the TV.
Expand 4:3 - Enlarges the picture to
fill out the entire screen area, eliminat
ing the “letter box” effect.
When finished, press the STATUS
/EXIT button to remove the menu
from the TV’s screen.
Note: The Expand 4:3 format can also be
activated using the CURSOR UP or
DOWN buttons when the onscreen
menu is not being displayed. Pressing
these buttons will toggle the standard
4:3 format and the Expand 4:3 format.
_________
Features
«AutoLock
✓ Format
« Active Control
OR
I Features'
«AutoLock
✓ Format Expand 43 k
« Active Control
43»
11
4:3
Expand 4:3
Page 18

Understanding the AutoLock™ Controls
nn he AutoLock™ feature is an integrat-
JL ed circuit that receives and processes
data sent by broadcasters, or other pro
gram providers, that contain program con
tent advisories. When programmed by the
viewer, a TV with AutoLock™ can respond
to the content advisories and block pro
gram content that may be found objection
able (such as offensive language, violence,
sexual situations, etc.). This is a great fea
ture to censor the type of viewing children
may watch.
Over the next few pages you’ll learn how
to block channels and certain rated pro
gramming. Below is a brief explanation of
some terms and ratings you will find in the
A utoLock feature.
AutoLock^“ oiTers various BLOCKING
controls from which to choose:
Access Code: An Access Code must be set
to prevent children from unblocking ques
tionable programming.
Channel Block: Individual channels
including the PfiW inputs can be blocked.
Clear All: Allows you clear all channels
being blocked from your viewing set with
the Channel Block Control.
Block All: Allows you to block ALL chan
nels and AfW inputs at one time.
Movie Ratings: Block programming
based on ratings patterned by the Motion
Pictures Association of America.
TV Ratings: Block programming based
on standard TV ratings set by TV broad
casters.
To learn more about the Motion Picture
Ratings and the TV Ratings, refer to the
definitions listed on the columns to the
right.
Press the STATUS/EXIT button twice to
display the AutoLock review screen.
This screen shows what is activated within
the AutoLock settings.
Movie Ratina TV Ratina
G TV-Y
PG
PG-13
No Rating
Unrated
TV-Y7
TV-G
On
Off
Movie Rating
vG On
oPG
oPG-13
«R
oNC-17
ox
[
Movie Ratings
(Motion Picttrk Association ok Amiìkica)
G: General Audience - All ages admit
ted. Most parents would find this pro
gram suitable for all ages. This type of
programming contains little or no vio
lence, no strong language, and little or
no sexual dialogue or situations.
PG: Parental Guidance Suggested -
This programming contains material that
parents may find unsuitable for younger
children.) It may contain one or more of
the following: Moderate violence, some
sexual situations, infrequent coarse lan
guage, or some suggestive dialogue.
PG-13; Parents Strongly Cautioned -
This programming contains material that
parents may find unsuitable for children
under the age of 13. It contains one or
more of the following: violence, sexual sit
uations, coarse language, or suggestive
dialogue.
R: Restricted -This is programming is
specifically designed for adults. Anyone
under the age of 17 should only view this
programming with an accompanying par
ent or adult guardian. It contains one or
more of the following: intense violence,
intense sexual situations, strong coarse
language, or intensely suggestive dialogue.
NC-I7: No one under the age of 17 will
be admitted. - This type of programming
should be viewed by adults only. It con
tains graphic violence, explicit sex, or
crude indecent language.
X: Adults Only - This type of program
ming contains one or more of the follow
ing: very graphic violence, very graphic
and explicit or indecent sexual acts, very
coarse and intensely suggestive language.
12
TV Rating
vfV-Y On
▲
«TV-Y7
oTV-G
oTV-PG
o TV-14
^TV-MA
TV Parental Guidelines
(TV HUOAIK’ASIIiKS)
T3 TV-Y - (All children - This pro
gram is designed to be appropriate
for all children.) Designed for a
very young audience, including children
ages 2-6. This type of programming is not
expected to frighten younger children.
TV-Y7 - (Directed to Older
Children — This program is
designed for children age 7 and
above.) It may be more appropriate for
children who have acquired the develop
ment skills needed to distinguish between
make-believe and reality. This program
ming may include mild fantasy and comic
violence (FV).
fl TV-G - (General Audience — Most
\ parents would find this program
r
suitable for all ages.) Iliis type of
programming contains little or no vio
lence, no strong language, and little or no
sexual dialogue or situations.
TV-PG - (Parental Guidance
Suggested - This program con
tains material that parents may
find unsuitable for younger children.) This
type of programming contains one or more
of the following: Moderate violence (V),
some sexual situations (S), infrequent
coarse language (L), or some suggestive
dialogue (D).
TV~14 - (Parents Strongly
Cautioned — This program con
tains some material that many par
ents would find unsuitable for children
under 14-years of age.) This type of pro
gramming contains one or more of the fol
lowing: intense violence (V), intense sexu
al situations (S), strong coarse language
(L), or intensely suggestive dialogue (D).
TV-MA - (Mature Audience Only
— This program is specifically
designed to be viewed by adults
and therefore may be unsuitable for chil
dren under 17.)
contains one or more of the following:
graphic violence (V), explicit sexual situa
tions (S), or crude indecent language (L).
This type of programming
Page 19
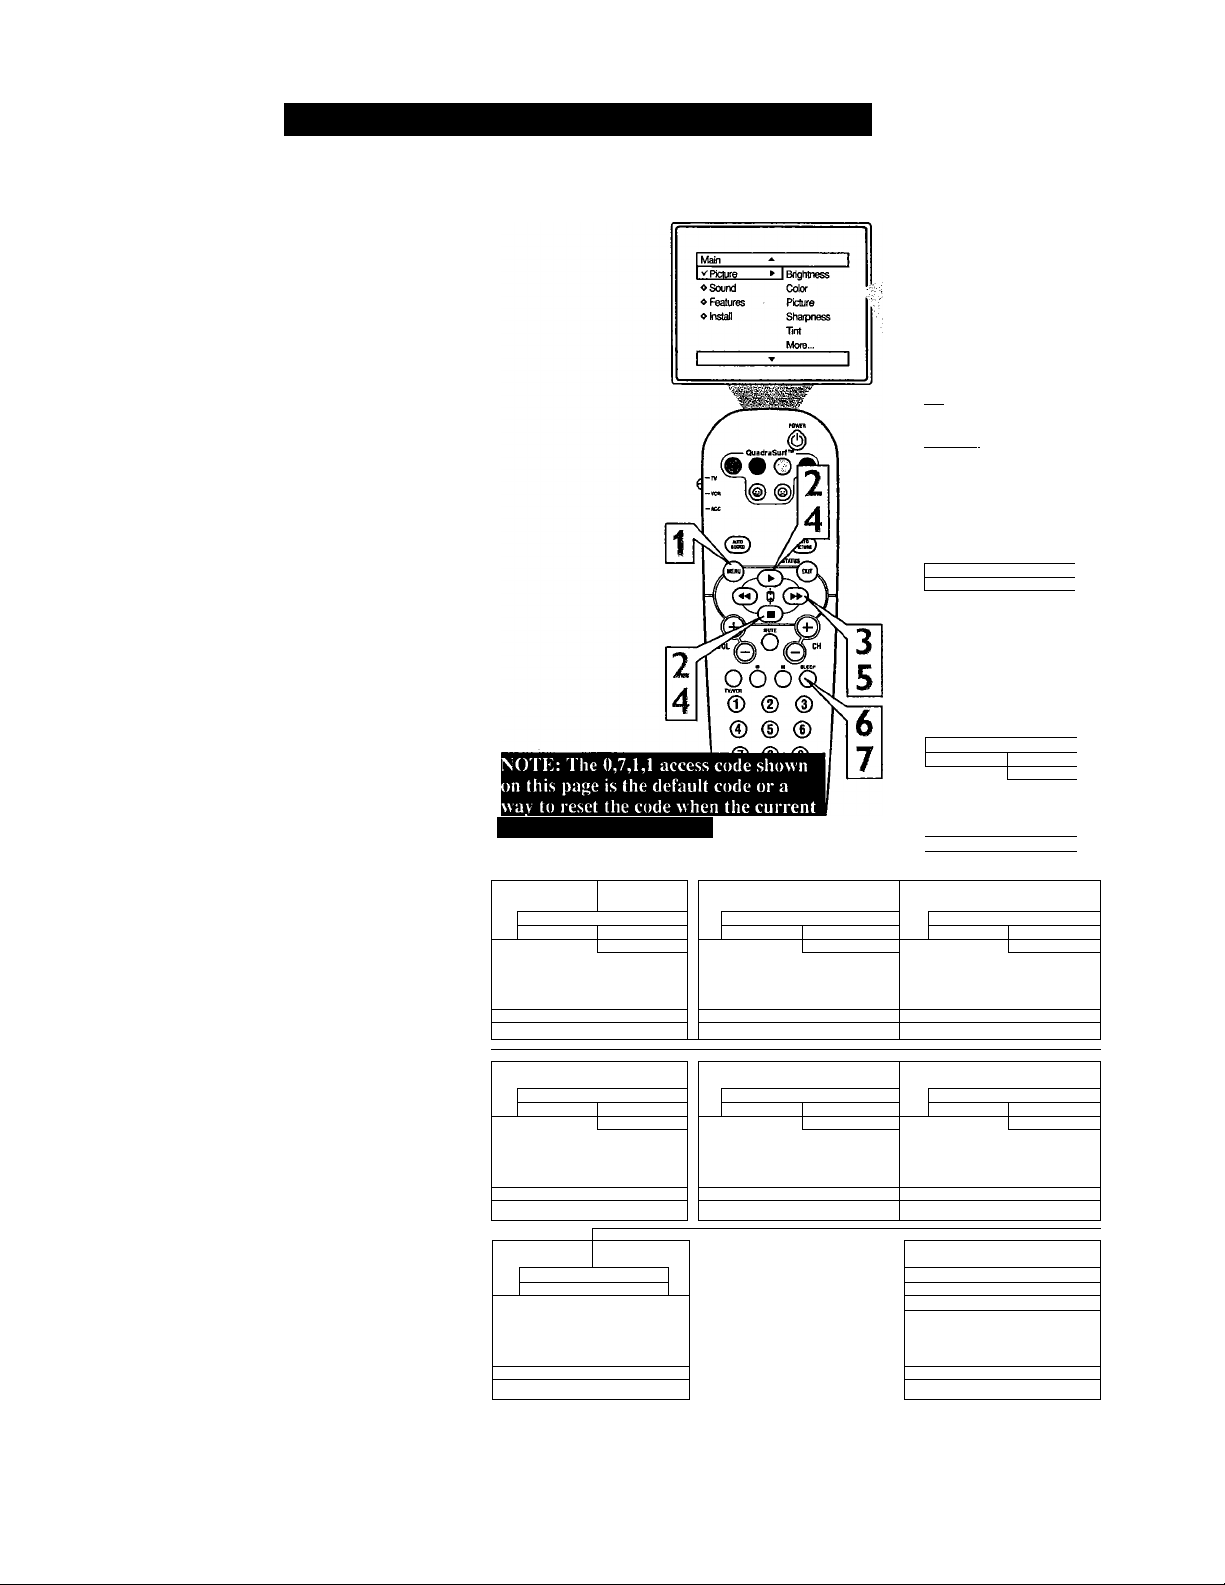
Setting Up an AutoLock™ Access Code
ver the next few pages you’ll learn how
to block channels and get a better under
O
standing of the rating terms for certain pro
gramming.
First, let's start by learning how to set a per
sonal access code:
Press the MENU button on the remote
to display the on-screen menu.
1
Press the CURSOR UP ^ or DOWN
■ button until the word FEATURES is
2
highlighted.
Press the CURSOR RIGHT ^
button to display the FEATURES
3
menu options.
Press the CURSOR UP ^ or DOWN
■ button until the words AUTOLOCK
4
are highlighted.
Press the CURSOR RIGHT
button. The screen will read,
5
“ACCESS CODE
Using the NUMBERED buttons,
enter 0,7,1,1. “XXXX” appears on
6
the Access Code screen as you press
the numbered buttons.
“INCORRECT CODE” will appear
on the screen, and you will need to
enter 0,7,1,1 again.
The screen will ask you to enter a
“New Code.” Enter a “new” 4 digit
code using the NUMBERED buttons.
The screen will then ask you to CON
FIRM the code you just entered. Enter
your new code again. “XXXX” will
appear when you enter your new code
and then display the AutoLock menu
options.
-------
access code is not known.
Features * I
''AutoLock ►
♦ Format
♦ Active Control
I I I
Features ^ I
«'AutoLock >
♦ Format
♦ Active Control
Access Code vAutoLock ►
XXXX I
r
New Code «'AutoLock ►
I
Features ^ 1
♦ Format
♦ Active Control
------------ --------^---------------------
Features ^ 1
♦ Format
♦ Active Control
Access Code
XXXX 1
Incorrect
New Code
'Wr. 1 ♦ Format
1 1
---- ----- ----- ----- --------1-
t
------------ ----------------
fMain
I VFeatures ► {ActiveControl
♦ Picture
^ Sound
Features
«'AutoLock
♦ Formal
Features ^
«'AutoLock ► Access Code
♦ Format
♦ Active Control
Features ^ 1
''AutoLock ► Access Code
♦ Fbneat
♦ Active Control
Features ^ 1
«'AutoLock ►
♦ Active Control
*
► I
-
h
AutoLock
Format
....
Confirm Code
XX-- 1
1
XXXX 1
Proceed to the next page to learn more...
Helpful Hint
Parents - it isn’t possible for your child to
unblock a channel without knowing your
access code or changing it to a new one. If
your code changes, and you didn’t change
it, then you know it’s been altered by some
one else and blocked channels have been
viewed.
I i 1 1 1
AutoLock lAutoLcxk * 1
V Stock Channels Off
♦ Setup Code
♦ Clear A)[
♦ BkxkAI
♦ Movie Rating
♦ TV Rating ♦ TV Rating
1
' 1
♦ Block Channel
[vSetupCode
♦ Clear All
♦ Block All
♦ Movie Rating
1 - 1
13
:
--------------
1
L
Page 20
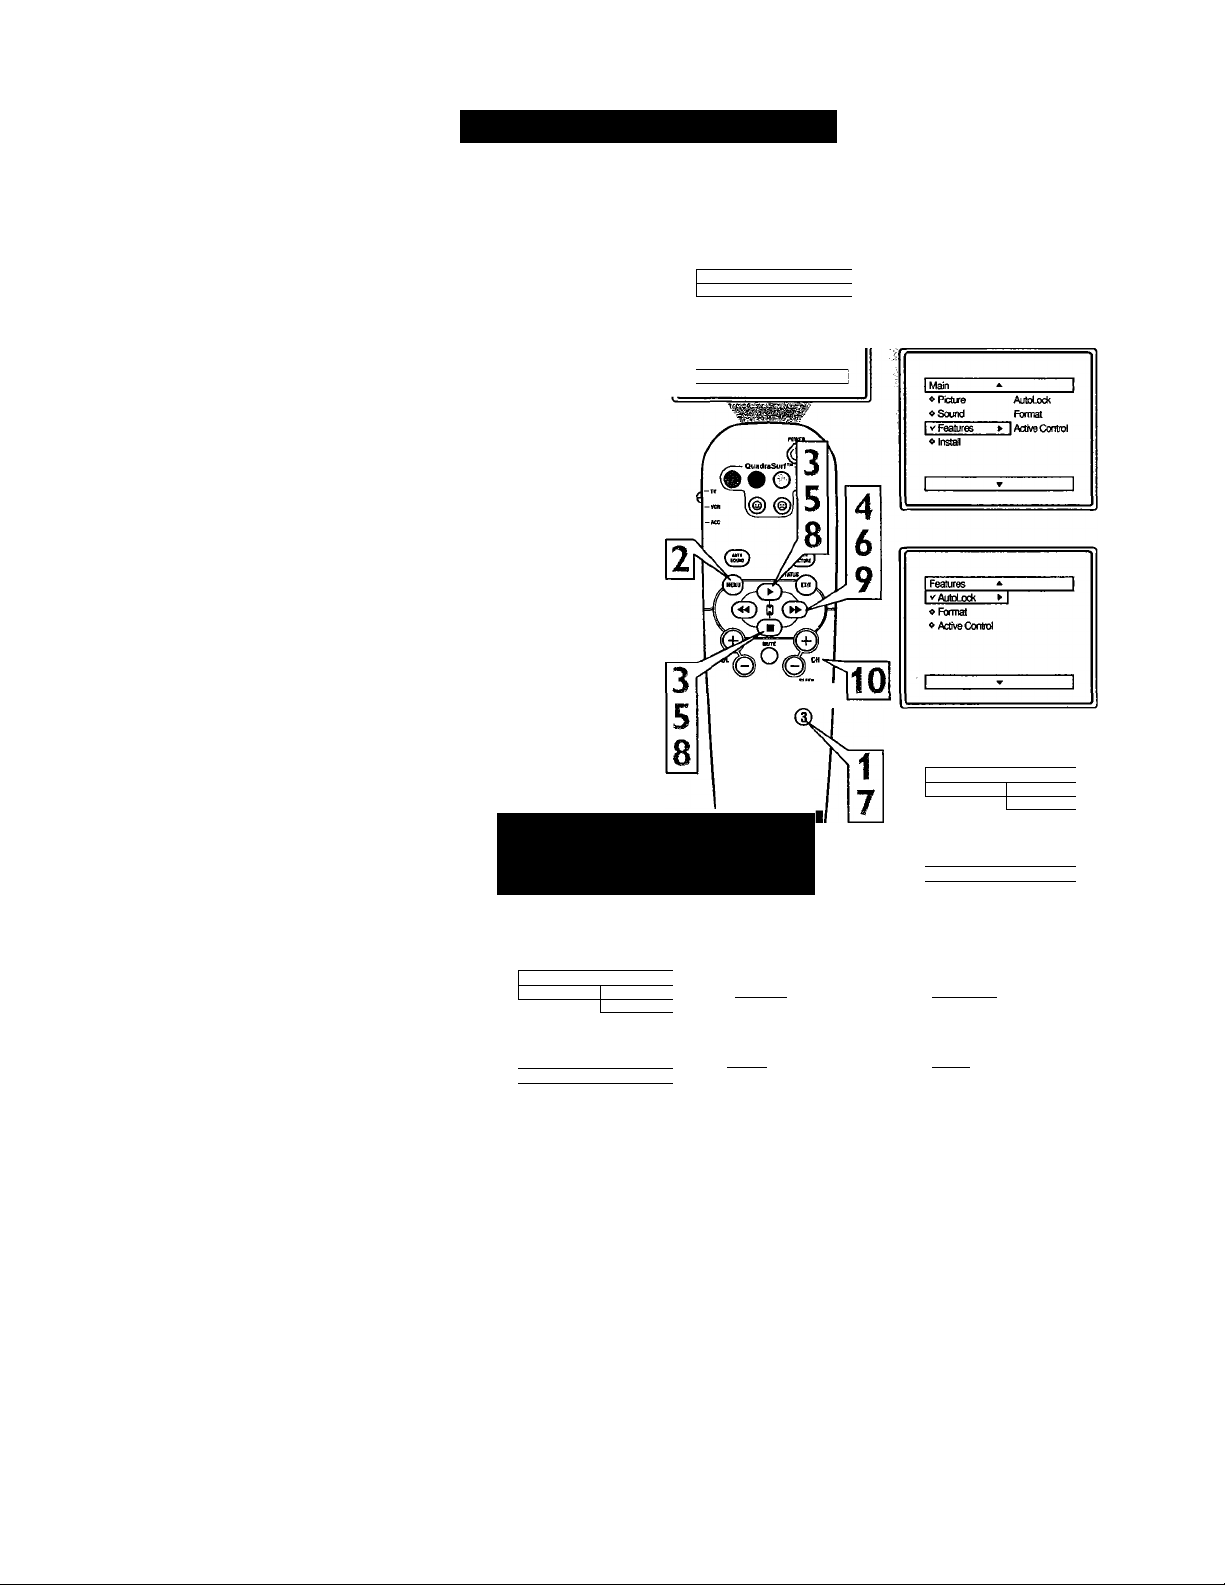
A fter your personal access code has been
l\set (see previous page), you are now
ready to select the channels you want to
block out or censor.
Press the NUMBERED (or CH +, -)
buttons to tune the channel you wish
1
to block or censor.
Press the MENU button on the
remote to show the on-screen menu.
2
Press the CURSOR UP ^ or
DOWN ■ button until the word
3
FEATURES is highlighted.
Press the CURSOR RIGHT ^
button to display the FEATURES
4
menu options.
Press the CURSOR UP ^ or
DOWN ■ button until the words
5
AutoLock are highlighted.
Press the CURSOR RIGHT ^
button. “ACCESS CODE” will
6
appear on the screen.
Enter the correct access code num
ber. “XXXX” shows on the Access
7
Code display as you press the NUM
BERED buttons. AutoLock menu
options will be displayed.
How TO Block Channels
Main
V Pirtiire
«Sound
«Features Picture
«Instan
NOTE: The 0,7,1,1 access code shown
on this page is the default code or a
way to reset the code when the current
access code is not known.
‘ 1
► iBriohlness
Color
Shaipness
Tmt
More...
_______
QOOo
© ®
© (D (D
@ © ©
© © ©
1
Features ^
''AutoLock ►
«Format
« Active Control
Access Code
....
Press the CURSOR UP ^ or
DOWN ■ buttons until the words
8
BLOCK CHANNELS are highlight
ed.
Press the CURSOR RIGHT
button to turn blocking ON or OFF
for that channel. When ON is selected
the channel will be blocked.
Press the CH + or - button to select
10
other channels you wish to block.
Repeat step 9 to block the new chan
nel.
Helpful Hint
If you tune to a blocked channel and enter
your Access Code to view the channel, ALL
blocked channels will be viewable until the
TV has been turned off. When the TV is
powered back ON, the previously blocked
channels will be blocked again.
Features ^ I
''AutoLock ►
«Format
« Active Control
Channel 12
Blocked By AutoLock
Channel Blocking
Access Code
”)000< 1
14
AutoLock
Block Channel Off
^SetLpCode
«Clear All
«Block All
«Movie Rating
1
«TV Rating
AutoLock
vBkxkChannel On
«SetipCode
«Clear Al
« Block Al
« Movie Rating
«TVRating
Enter your Access Code to
view a tuned channel that is
blocked with Block Channel.
Page 21
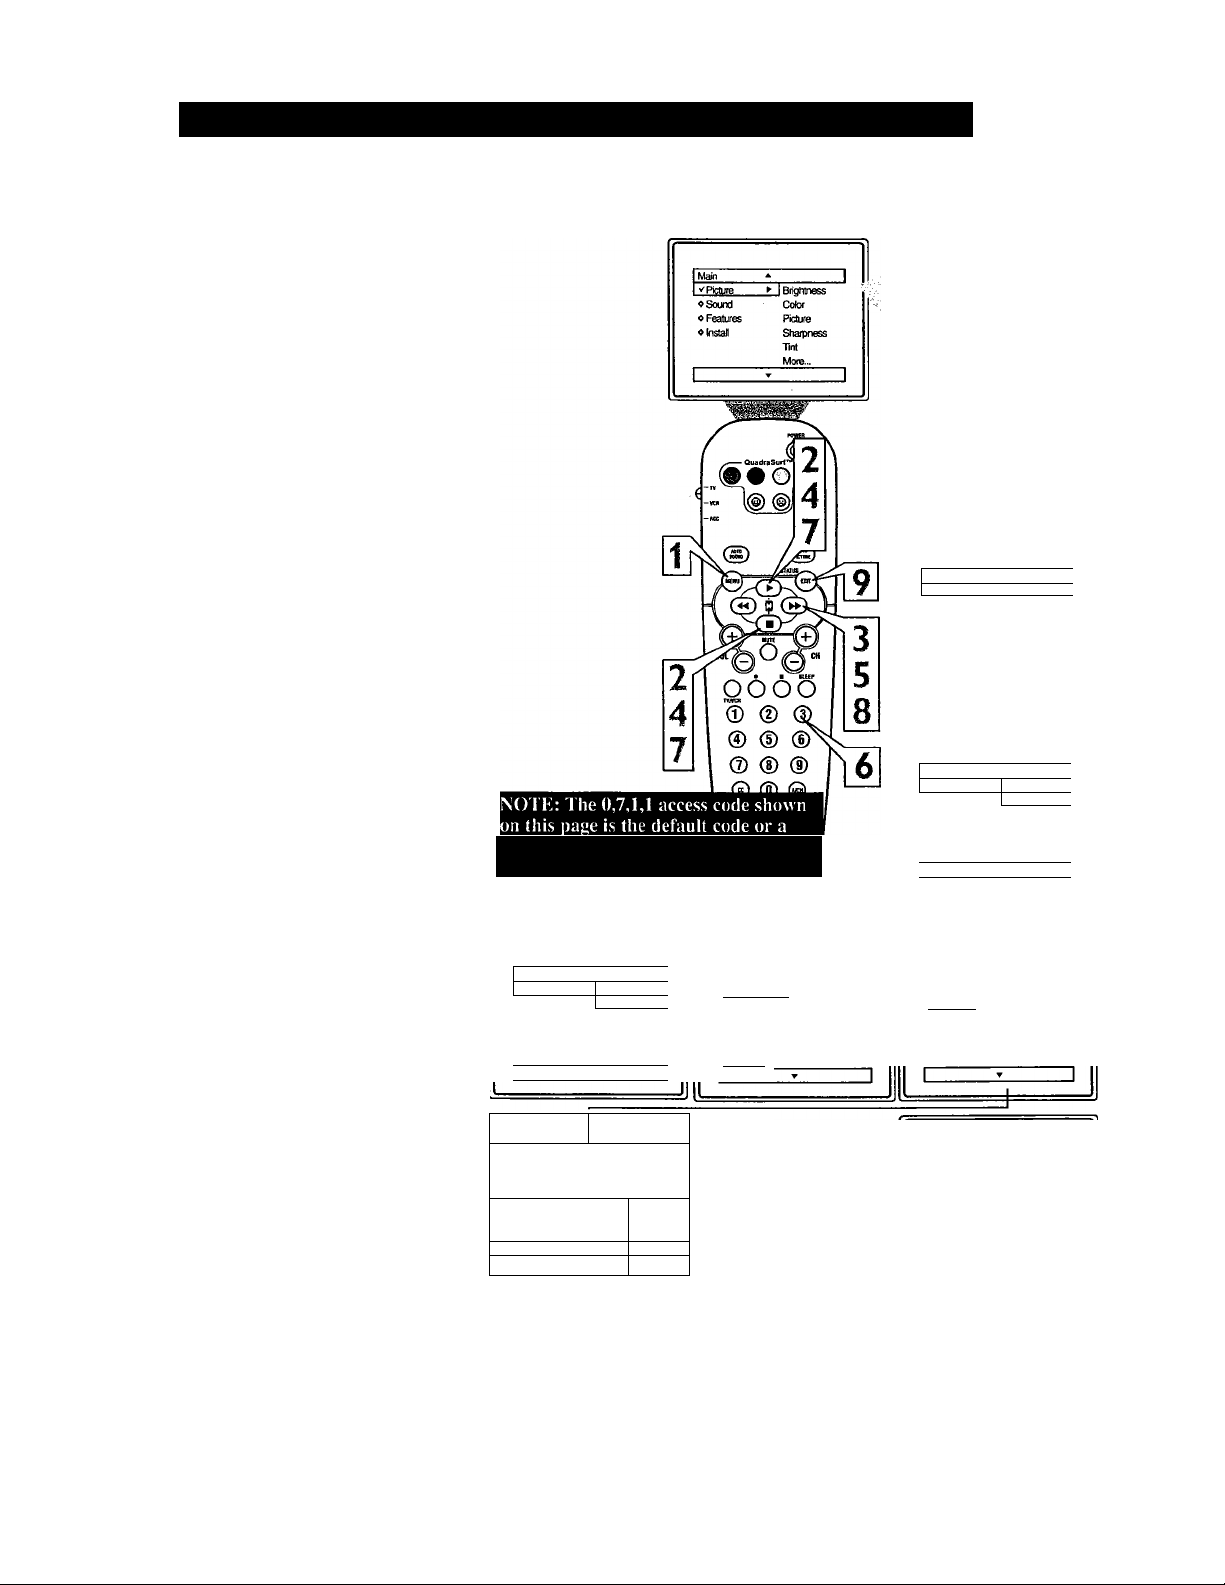
How TO Clear All Blocked Channels at the Same Time
fter blocking specific channels there may
come a time when you want to clear all
A
the channels so they can be viewed. The fol
lowing steps explain how to CLEAR ALL
blocked channels.
Press the MENU button on the
remote to show the on-screen menu.
1
Press the CURSOR UP^ or DOWN
■ button until the word FEATURES
2
is highlighted.
Press the CURSOR RIGHT |
button to display the FEATURES
3
menu options.
Press the CURSOR UP ^ or DOWN
■ button until the words AutoLock are
4
highlighted.
Press the CURSOR RIGHT
button.
5
Enter the correct access code num
ber. “XXXX” shows on the Access
6
Code display as you press the NUM
BERED buttons. AutoLock menu
options will be displayed.
Press the CURSOR UP ^ or DOWN
■ button until the words CLEAR
7
ALL are highlighted.
Press the CURSOR RIGHT »
button to clear all blocked channels.
8
The Clear All option will read,
“Cleared.”
When flnished, press the STATUS
/EXIT button to remove the menu
from the TV’s screen. -
way to reset the code when the current
access code is not known.
Features * I
vAutoLock ► Access Code
♦ Formal looo< 1
♦Active Control
____________
T___________ __
AutoLock
vBlockChannel Off
♦ SetLpCode
♦ dear All
♦ Block All
♦ Movie Rating
♦ TVRating
o Picture
♦ Sound
Features
vAutoLock
♦ Rxmat
♦ Active Control
Features
'^AutoLock ► Access Code
♦ Format
♦ Active Conbol
♦ Block diarmel
♦ SetitoCode
AutoLock
Fotmat
1 Active Control
*
....
-
Helpful Hint
If you tune to a blocked channel and enter
your Access Code to view the channel, ALL
blocked channels will be viewable until the
TV is powered OFF and then turned back
ON. When the TV is powered baek ON, the
previously blocked channels will be blocked
again.
CLEAR ALL will not work with the Movie
and TV Ratings. These options must be
reset individually.
i AutoLock *■ 1
♦ Block Channel
♦ SelupCode
|v Clear AH Cleared 1
♦ Block AH
♦ Movie Rating •
♦ TVRatinq
1 1
1
The Clear All option when activated
will unblock ALL blocked channels. It
will not affect programming blocked
by the Movie or TV Rating options.
15
Channel 12
Blocked ^AutoLock
Channel Blocking
Or, enter your Access
Code to view a tuned
channel that is blocked
with Block Channel.
Page 22
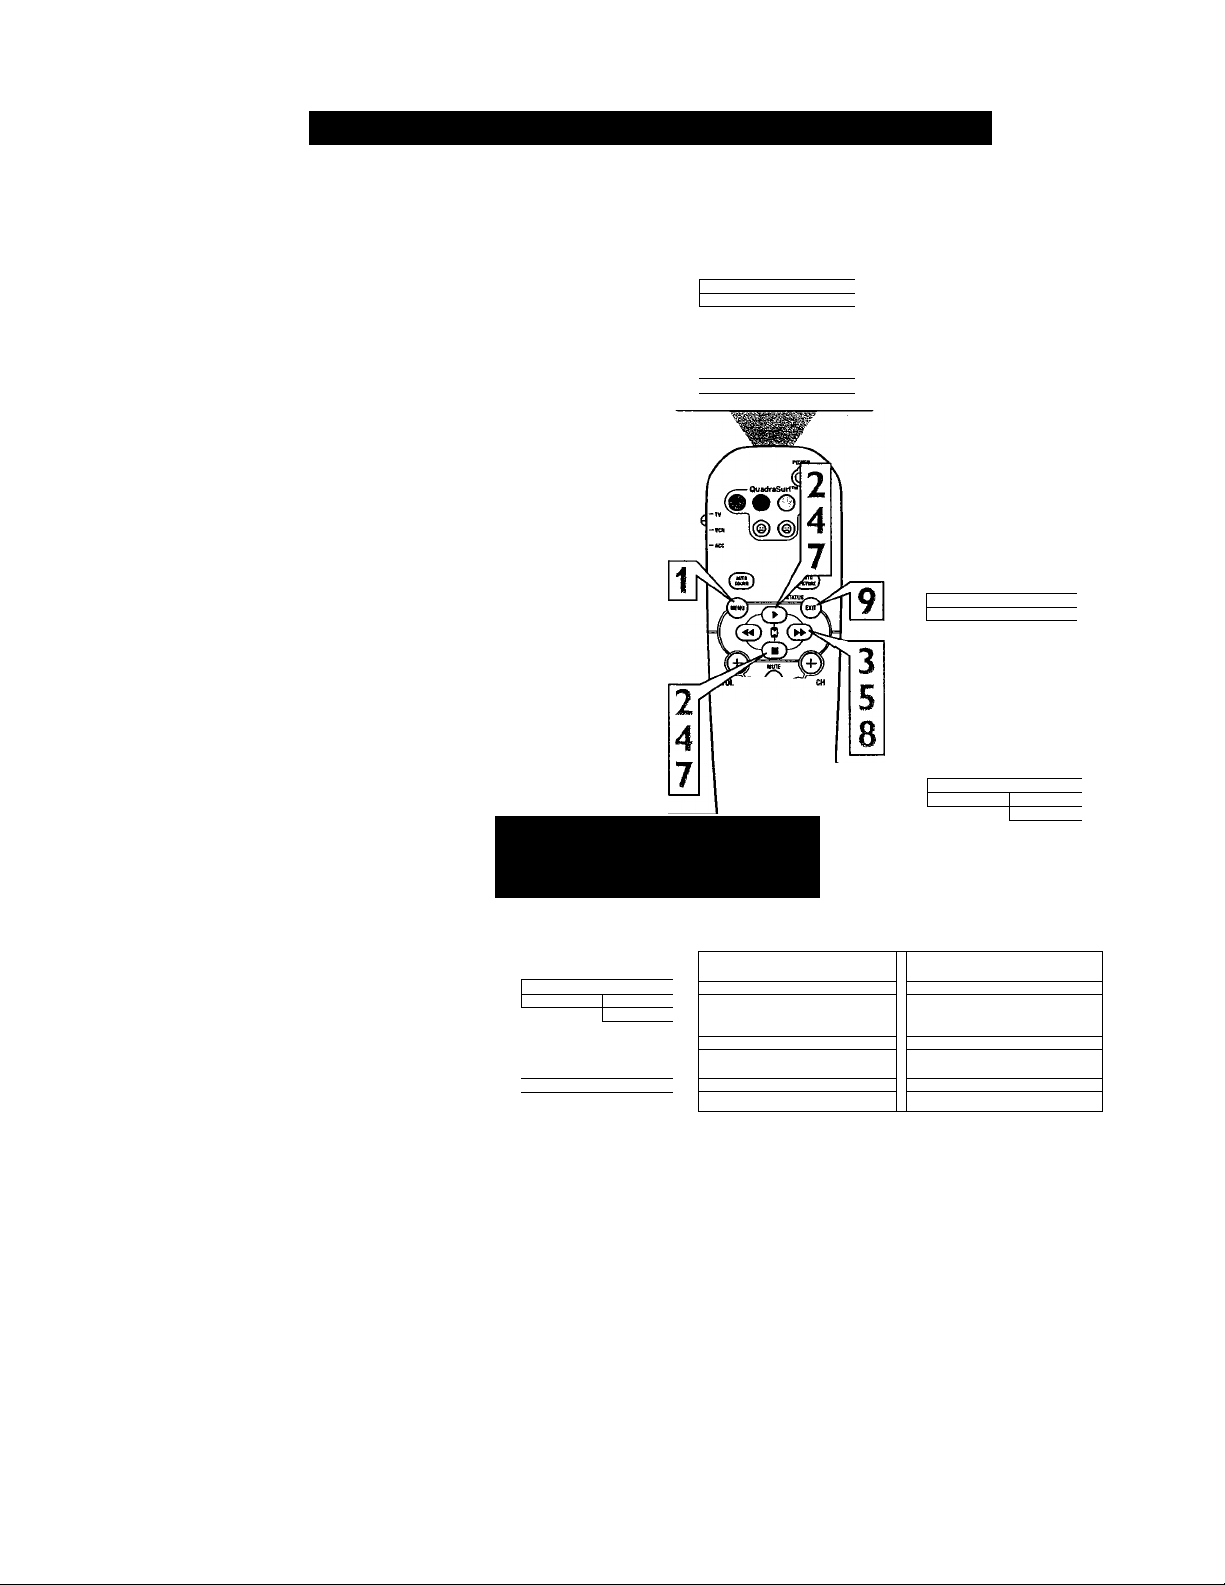
How TO Block All Channels at the Same Time
'I 'here may come a time when you want to
J. Block All the television’s channels. Maybe
you don't want your children to watch TV for
a given time. With the Block All control, ALL
available channels (including the AIV Inputs)
can be set to block at the same time.
Press the MENU button on the
remote to show the on-screen menu.
1
Press the CURSOR UP ^ or DOWN
■ button until the word FEATURES
2
is highlighted.
Press the CURSOR RIGHT |
button to display the FEATURES
3
menu options.
Main
v'Pirture
^Sound
o Features
o InstaB
* 1
► iBriohlness
Color
Rcture
Shapness
Tint
More...
____ _______ __1
« Picture
PSound
AutoLock
Format
n Active Control
Press the CURSOR UP ^ or DOWN
■ button until the words AutoLock are
4
highlighted.
Press the CURSOR RIGHT
button.
5
Enter the correct access code num
ber. “XXXX” shows on the Access
6
Code display as you press the NUM
BERED buttons. AutoLock menu
options will be displayed.
Press the CURSOR UP ^ or DOWN
■ button until the words BLOCK
7
ALL are highlighted.
Press the CURSOR RIGHT |
button to turn Block All ON or OFF.
8
When ON is selected, ALL available
channels will be blocked.
When finished, press the
STATUS/EXIT button to remove the
menu from the screen.
0^0
• ■ HI.
Qooo
® ® ®
® ® ® h 6
NOTE: The 0,7,1,1 access code shown
on this page is the default code or a
way to reset the code when the current
access code is not known.
Features *
vAutoLock ►
«Format XXXX
♦ Active Control
Access Code
-
{AutoLo ck A i 1 AutoL ock « 1
«Block Channel «Block C hannel
«Se tup Code
«Clear All «Clear All
«Movie Rating
«TV Ratinq
1 - 1
Features
V AutoLock
♦ Format
Features
'^AutoLock
«Format
«Se tup Code
UBkxiiA II 0« I K Blo ck A il O n 1
«Movie Rating
« TV Rating
1 - 1
*
A
¥ Access Code
....-1
---------------------------------
_______
1
1
Helpful Hint
If you tune to a blocked channel and enter
your Access Code to view the channel, ALL
blocked channels will be viewable until the
TV has been turned off. When the TV is
powered back ON, the previously blocked
channels will be blocked again.
Channel 12
Blocked By AutoLock
Channel Blocking
16
Enter your Access Code to
view a tuned channel that is
blocked with Block Channel.
Page 23
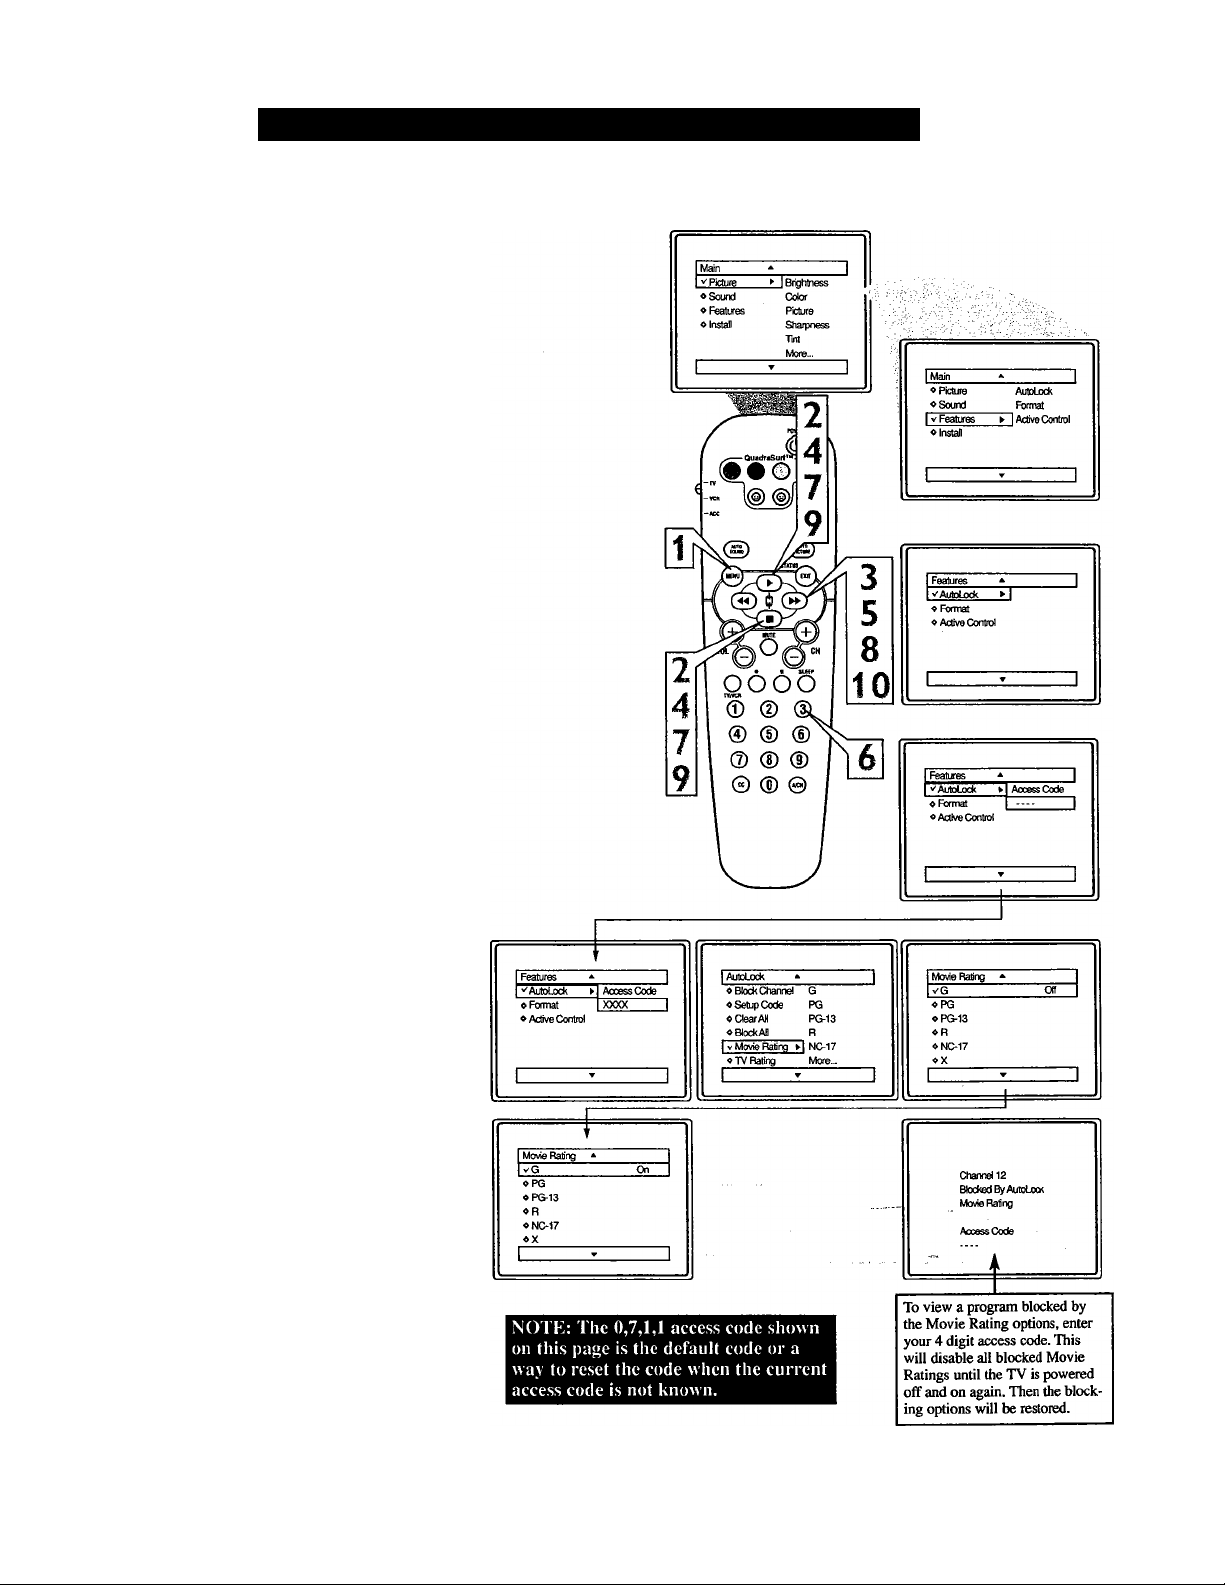
Blocking Programs Based on Movie Ratings
'here are two types of program ratings
within the AutoLock™ feature. One is
T
based on the Movie Industry ratings while the
other is based on the TV Industry ratings. Both
can be used to block or censor programming
that has been rated in either manner.
Let’s first look at the Movie Rating options of
AutoLock™:
Press the MENU button on the remote
to display the on-screen menu.
1
Press the CURSOR UP ^ or DOWN
■ button until the word FEATURES is
2
highlighted.
Press the CURSOR RIGHT » but
ton to display the FEATURES menu
3
options.
Press the CURSOR UP ^ or DOWN
■ button until AutoLock is highlighted.
4
Press the CURSOR RIGHT ^ but
ton. The screen will prompt you for
5
your Access Code.
Using the NUMBERED buttons on
the remote, enter your 4 digit Access
6
Code. The AutoLock menu options will
be displayed.
Press the CURSOR UP ^ or DOWN
■ button to highlight the words
7
MOVIE RATINGS.
Press the CURSOR RIGHT ^ but
ton to display the MOVIE RATINGS
8
options (G, PG, PG-13, R, NC17, or X).
Press the CURSOR UP ^ or DOWN
■ button to highlight any of the Movie
9
Ratings options. When highlighted, all
these options can be turned ON
will allow blocking) or OFF (which will
allow viewing).
Use the CURSOR RIGHT » but-
ton on the remote to turn the rating
option ON or OFF.
Helpful Hint
When a rating is set to block, all higher rat
ings will be automatically blocked as well.
(Example: If the the PG-13 rating is set to
block, the R, NC-17, and X ratings will also
be blocked.
(which
17
Page 24
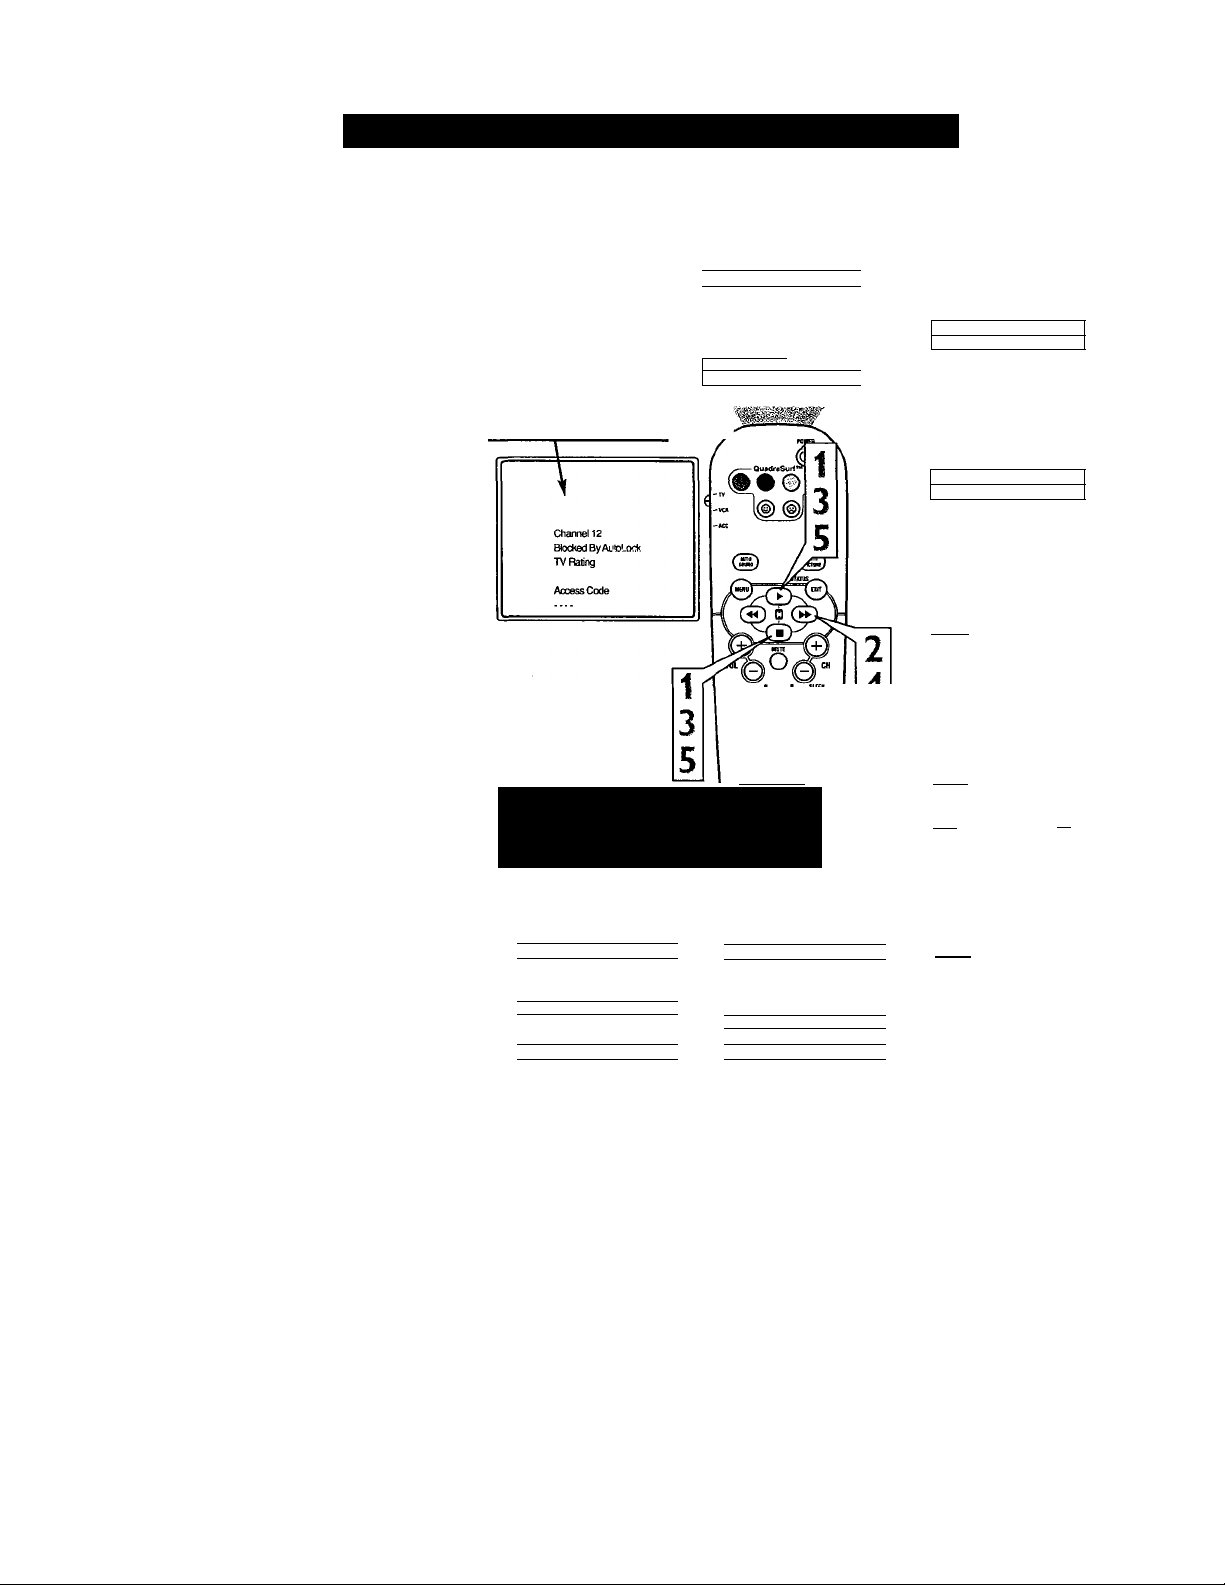
Blocking Programs Based on TV Ratings
'his portion of the AutoLock™ features
cover program ratings based on the TV
T
Industry rating system. This is known as TV
Ratings within AutolAJck™.
After selecting the Autolock™ feature and
entering your personal access code, the
AutoLock™ options screen appears;
Scroll the menu using the CURSOR
UP ^ or DOWN ■ buttons until the
1
words TV RATINGS are highlighted.
Press the CURSOR RIGHT » but
ton to display the TV Ratings (TV-Y,
2
TV-Y7, TV-G, TV-PG, TV-14, or TVMA). When highlighted, the TV-Y and
TV-G can be turned ON (which will
allow blocking) or OFF (which will
allow viewing), of these rated pro
grams.
The ratings of TV-Y7, TV-PG, TV-14,
TV-MA can be customi2ed to block V
(violence), FV (fantasy violence), S
(sexual situations), L (coarse lan
guage), or D (suggestive dialogue).
Press the CURSOR UP^ or DOWN
■ button to highlight the desired rat
3
ing.
Press the CURSOR RIGHT |
button on the remote to turn the TV-Y
4
or TV-G rating ON or OFF. Or, press
the CURSOR RIGHT » button to
enter the sub-menus for the TV-Y7,
TV-PG, TV-14 or TV-MA ratings.
If the TV-Y7, TV-PG, TV-14 or TV-
MA sub-menu is accessed, press the
CURSOR UP ► or CURSOR
DOWN ■ button to select one of the
options (Block All, V, S, L, D, or FV).
Press the CURSOR RIGHT |
button on the remote to turn the option
ON or OFF.
To view a program
blocked by the TV
Rating options, enter
your 4 digit access
code. This will dis
able all blocked TV
Ratings until the TV
is powered off and
on again. Then the
AutoLock A 1
♦ Block Channel
♦ Setup (^ode TV-Y7
♦ Clear All TV-G
♦ Block All
♦ Movie Rating TV-14
vn/Ratina ►
blocking options will
be restored.
oooo
(I) (D (D
© (D ®
© © ©
NOTH: The 0,7,1,1 acce.ss code shown
on this page is the default code or a
way to reset the code when the current
access code is not known.
1 TV Rating
♦ TV-Y
♦ TV-Y7
♦ TV-G S
|v TV-PG
♦ TV-14
♦ TV-MA
1
____________I_____________
►1 L
Block All
V
D
1 TV Rating
1
♦ TV-Y Block All
♦ TV-Y7 V
♦ TV-G S
♦ TV-PG
1 V TV-14
♦ TV-MA
1
____________I________ ______
TV Ratings and
Rating Sub-Menus
When a TV Rating is selected to block,
ALL higher ratings will be blocked also.
TV-Y
TV-PG
TV-MA
►J 0
TV Rating
vTV-Y Oft
OVJ-Y7
1
L
oVsf-Q
o TV-PG
^ TV-14
♦ TV-MA
TV Rating
vTV-Y
♦ TV-Y7
♦ TV-G
♦ TV-TO
♦ TV-14
♦ TV-MA
|TV Rating
♦ TV-Y
vTV-Y7
♦ TVG
♦ TV-PG
♦ TV-14
♦ TV-MA
iTVRafing
♦ TV-Y
♦ TV-Y7
tvTVG
♦ TV-PG
♦ TV-14
♦ TV-MA
|lVR
1
♦ TV-Y
♦ TV-Y7
♦ TV-G
♦ TV-PG
♦ TV-14
1
♦ TV-MA
A
A
Block An
FV
V
S
L
On
Off I
TV-Y - (All children - This program is designed to be appropriate for all children.) Designed for a very young audience, including children ages 2-6. This type
of programming is not expected to frighten younger children.
TV-Y7 - (Directed to Older Children - This program is designed for children age 7 and above.) It may be more appropriate for children who have acquired the
development skills needed to distinguish between make-believe and reality. This programming may include mild fantasy and comic violence (FV).
TV-G - (General Audience - Most parents would find this program suitable for alt ages.) This type of programming contains little or no violence, no strong
language and little or no sexual dialogue or situations.
TV-PG - (Parental Guidance Suggested - This program contains material that parents may find unsuitable for younger children)Vd\s type of programming
contains one or more of the following; some suggestive dialogue (D), infrequent coarse language (L), some sexual situations (S), or moderate violence (V).
TV-14 - (Parents Strongly Cautioned - This program contains some material that many parents would find unsuitable for children under 14 years of age.) This
type of programming contains one or more of the following: intensely suggestive dialogue (D), strong coarse language (L), intense sexual situations (S), or
intense violence (V).
TV-MA - (Mature Audience Only - This program is specifically designed to be viewed by adults and therefore may be unsuitable for children under 17.) This
type of programming contains one or more of the following: crude indecent language (L), explicit sexual situations (S), or graphic violence (V).
18
Page 25
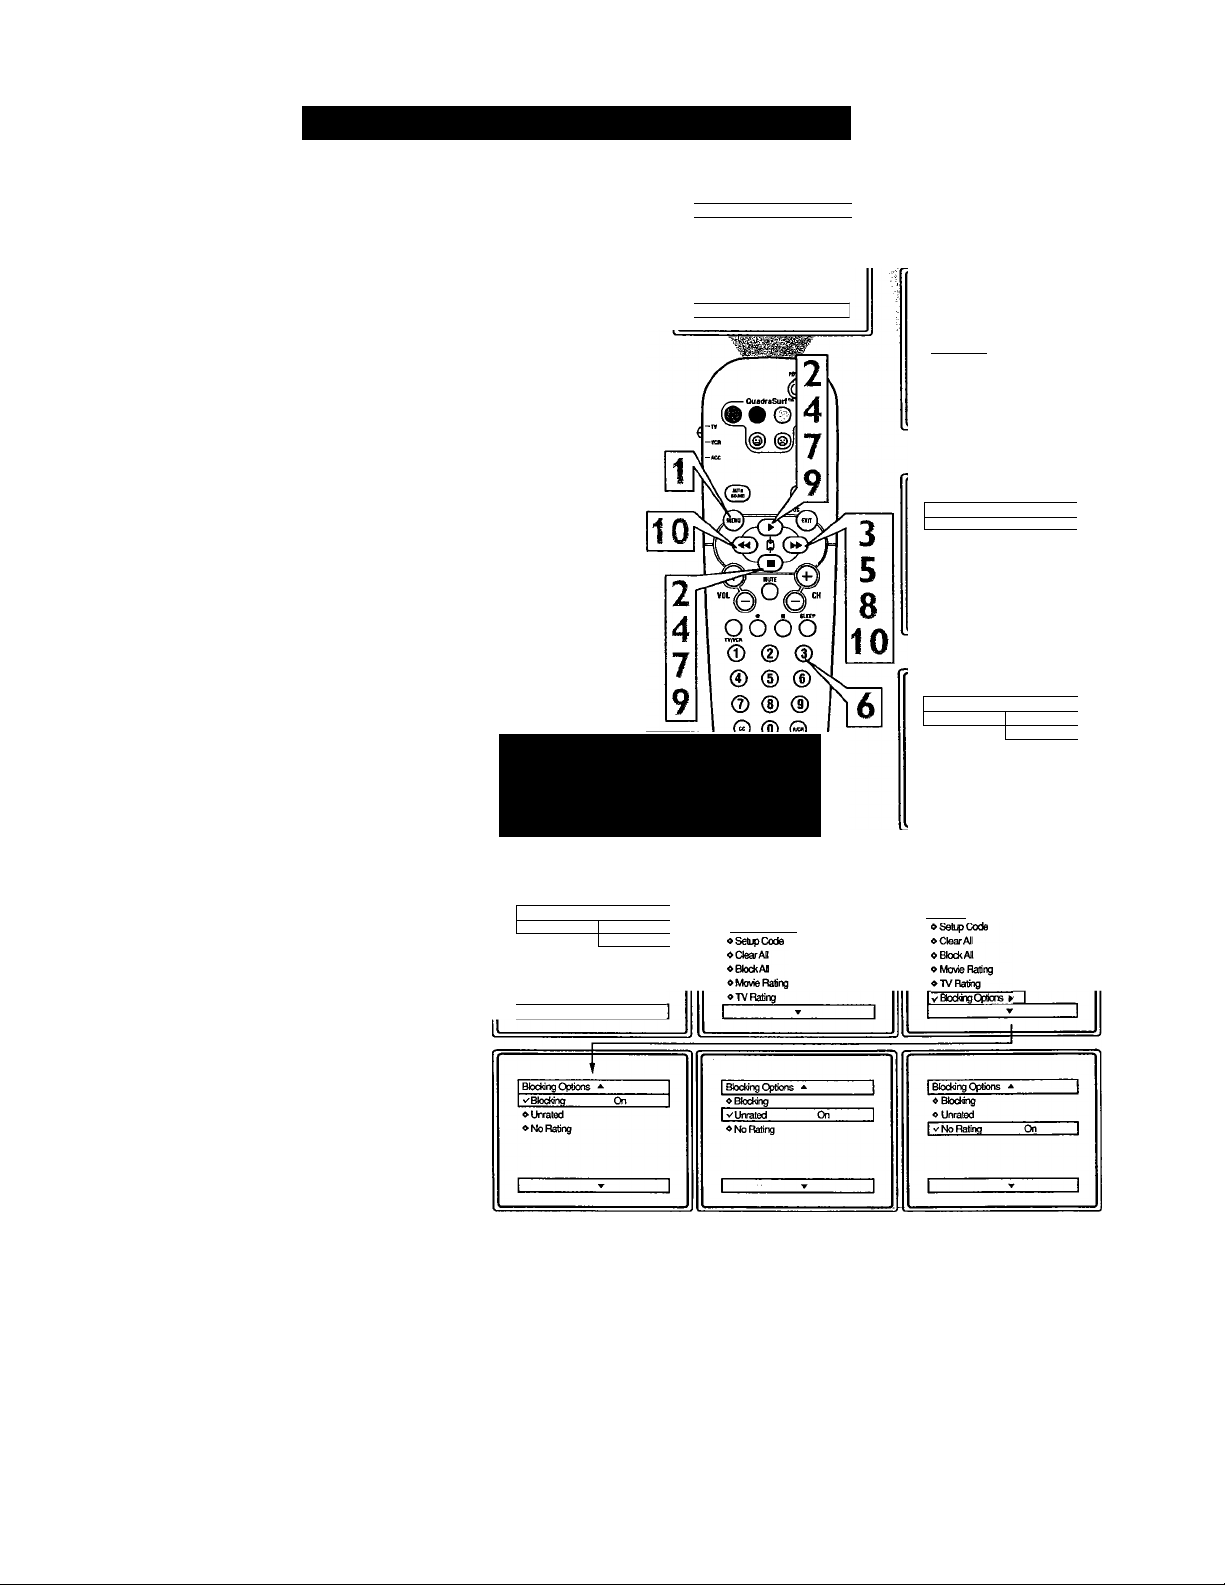
Other AutoLock™ Blocking Options
utoLock™ offers the viewer other block
ing features as well. With these Blocking
A
Options, the censoring can be turned ON or
OFF.
Press the MENU button on the
remote to show the on-screen menu.
1
Press the CURSOR UP ^ or DOWN
■ button until the word FEATURES
2
is highlighted.
Press the CURSOR RIGHT ^
button to display the FEATURES
3
menu options.
I Main
Li Picture ► I Brightness
♦ Sound
♦ Features Picture
♦ Instail
I
Color
Sharpness
Tint
More...
_______
I
I
♦ Pidure
♦ Sound
»^ Features ► | Active Control
AutoLock
Formal
4
5
6
7
8
9
10
Press the CURSOR UP ^ or DOWN
■ button until the words AutoLock
are highlighted.
Press the CURSOR RIGHT ^
button.
Enter the correct access code num
ber. “XXXX” shows on the Access
Code display as you press the NUM
BERED buttons. AutoLock menu
options will be displayed.
Press the CURSOR UP ^ or DOWN
■ buttons until the words BLOCK
ING OPTIONS are highlighted.
Press the CURSOR RIGHT |
button to display the Blocking
Options (BLOCKING, UNRATED,
or NO RATING) menu.
Press the CURSOR UP or DOWN
■ buttons to highlight the desired fea
ture.
When highlighted, each feature can be
turned ON or OFF using the CUR
SOR RIGHT or LEFT <4^ but
tons on the remote.
NOTE: Remember, if you ever forget
your Access Code, the 0,7,1,1 acce.ss
code is the default code or a way to
reset the code when the current acce.ss
code is not kno\Mi.
Features ^
'^AutoLock ► Access (^ode
♦ Format XXXX
♦ Active Control
-
r Block Channel Off
Features
vAiJtnl.nrk
♦ Format
♦ AdiveControI
Features
vAutoLock ► Access Code
♦ Format
0 Active Control
I AutoLock"
*
►j
A
I
I
BLOCKING OPTIONS:
BLOCKING: This is what might be called the “master switch” for AutoLockTM. When in the ON position, ALL blocking/censoring
will take place. When in the OFF position, ALL blocking is disabled.
UNRATED: ALL unrated programs based on the Movie Ratings or Parental (TV) Guidelines can be blocked if this feature is set to
ON and the BLOCKING feature is set to OFF.
NO RATING: ALL programming with NO content advisory data can be blocked if this feature is set to ON and the BLOCKING fea
ture is set to OFF.
19
Page 26
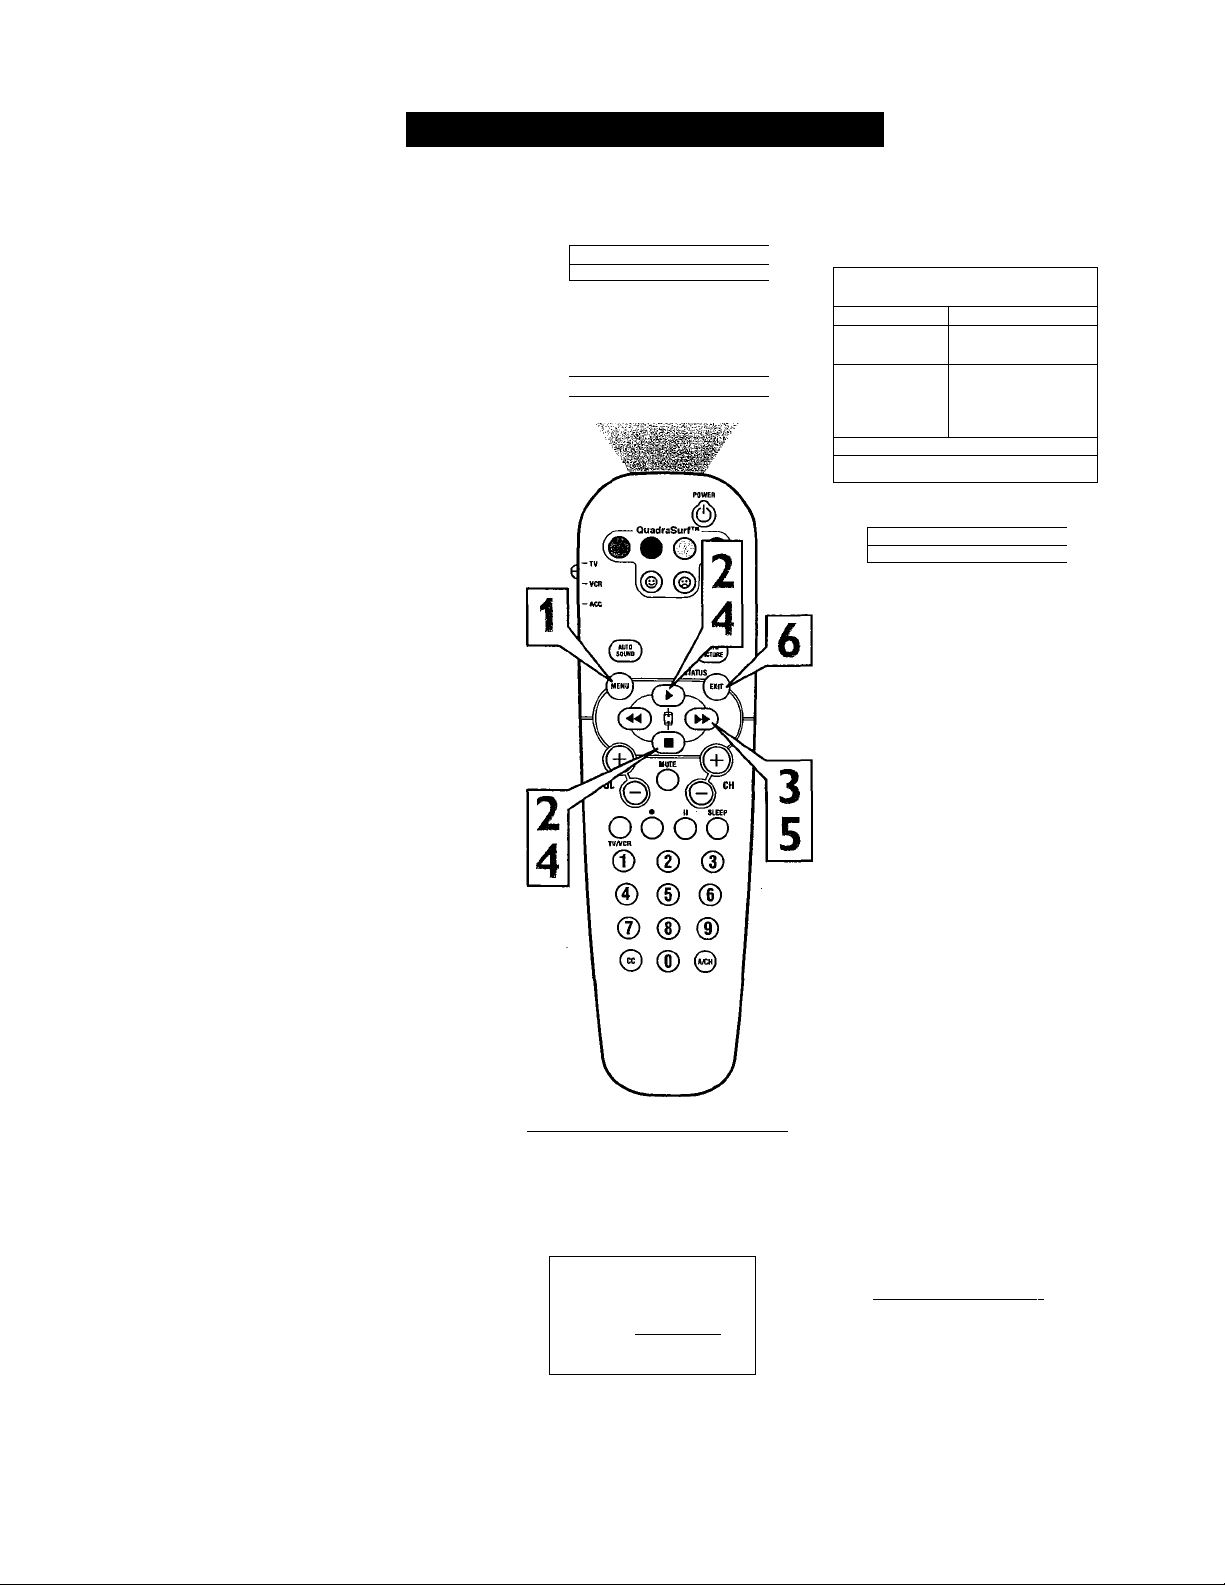
How TO Use the Acitve Control
'# 'he Active Control monitors and adjusts
J. incoming video signals to help provide the
best picture quality.
When you choose to turn the Active Control
ON, the picture Brightness, Picture,
Sharpness, Contrast + and DNR (dynamic
noise reduction) features are controlled auto
matically. Active Control adjusts these picture
settings continuously and autorruxtically.
Press the MENU button on the
remote to show the on-screen menu.
1
Press the CURSOR UP ^ or DOWN
■ button until the word FEATURES
2
is highlighted.
Press the CURSOR RIGHT ^
button to display the FEATURES
3
menu options.
Press the CURSOR UP>- or DOWN
■ button until the words Active
4
Control are highlighted.
Main
V Pictiire
«Sound
«Features
«Install
*
► 1 Briqhtness
Color
Picture
Sharpness
Tint
More...
-
1 Main
« Picture
«Sound
1 V Features
« Install
Features
V'AutoLock
« Fomiat
* Active Control
- 1
AutoLock
Format
> 1 Active Control
*
•J
1 - 1
Press the CURSOR RIGHT
button to set the Active Control to Off,
5
On, or Display ON.
Display On - When selected, an Active
Control monitoring screen will be
shown for a few seconds whenever a
channel change is made. Within this
menu, you can actually see the controls
changing to give the best possible pic
ture quality.
On - When selected, the Active
Control will work to give the viewer
the best possible picture, but will not
display the monitoring screen when
channels are changed.
Off - the Active control' will not be
activated.
When finished, press the STATUS
/EXIT button to remove the menu
6
from the TV’s screen.
Active Control Monitoring Screen
Will appear when the Active Control
is set to “Display On.”.
IE
Active Control
Brightness
Picture
Sharpness
Contrast +
DNR On
.........D..........
.............
..........0.........
On
STEREO
-a—
■ 43
■ 73
Features
^ AuloLock
oFomiat
V Active Control ► Off
OR
I Features
o AutoLock
« Format
I V Active Control » On
OR
Features
«AutoLock
« Format
I V Active Control ► Display On I
20
Page 27
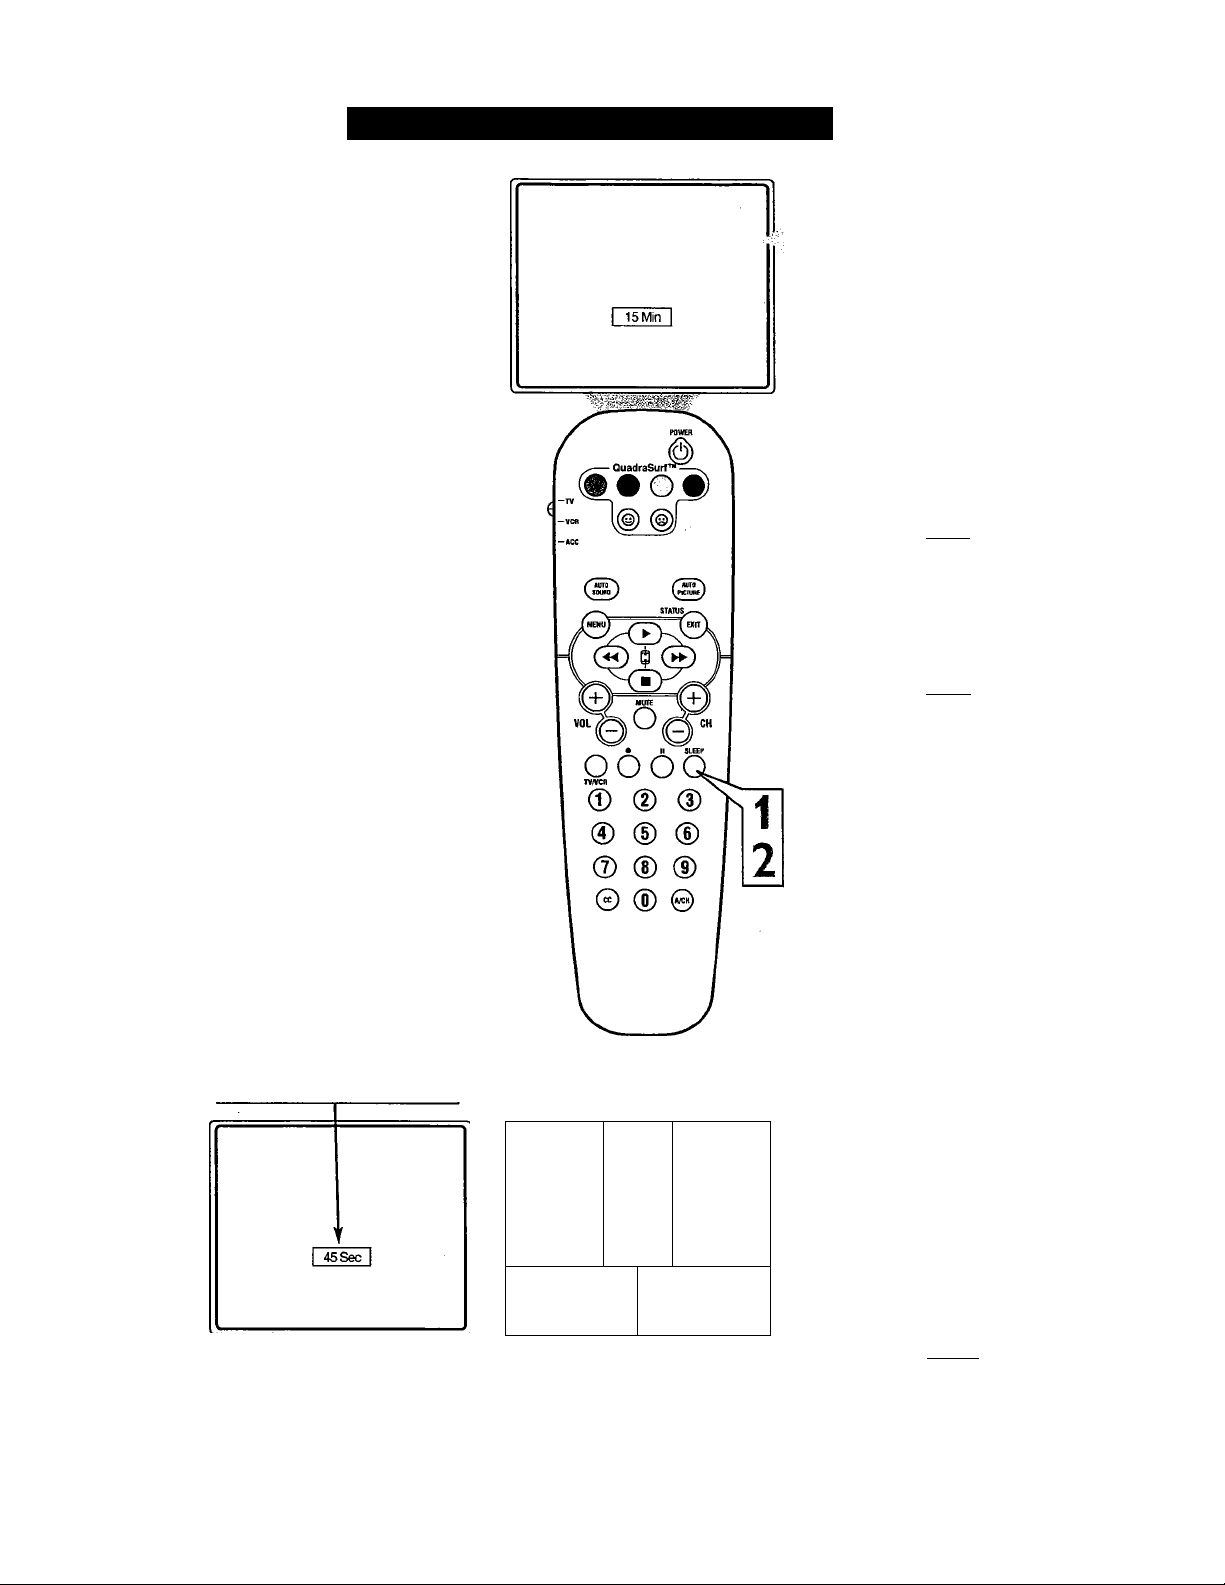
Setting the Sleeptimer Control
ave you ever fallen asleep in front of the
TV only to have it wake you up at two in
Я
the morning with a test pattern screeching in
your ears? Well, your TV can save you all
that trouble by automatically turning itself off.
Press the SLEEP button on the
remote control and the SLEEP timer
1
display will appear on the screen.
Press the SLEEP button repeatedly to
pick the amount of time (15, 30,45,
2
60, 90, 120, 180 or 240 minutes)
before the TV will turn itself off.
An on-screen count down will appear
during the last minute before the TV
shuts itself off.
Helpful Hint
The on-screen menu will time out and dis
appear from the screen when you finish, or
you can press the STATUS/EXIT button to
clear the menu from the screen.
W,
30 Min
45 Min I
60 Min I
During the last minute of a
Sleeptimer setting, an on
screen count down will be dis
played. Pressing any button
during the last minute will
cancel the Sleeptimer.
go Min
120 Min
180 Min
Good Bye
9Sec
i
240 Min I
During the last 10 seconds of
a Sleeptimer setting, an on
screen display will read
GOOD BYE.
21
Page 28
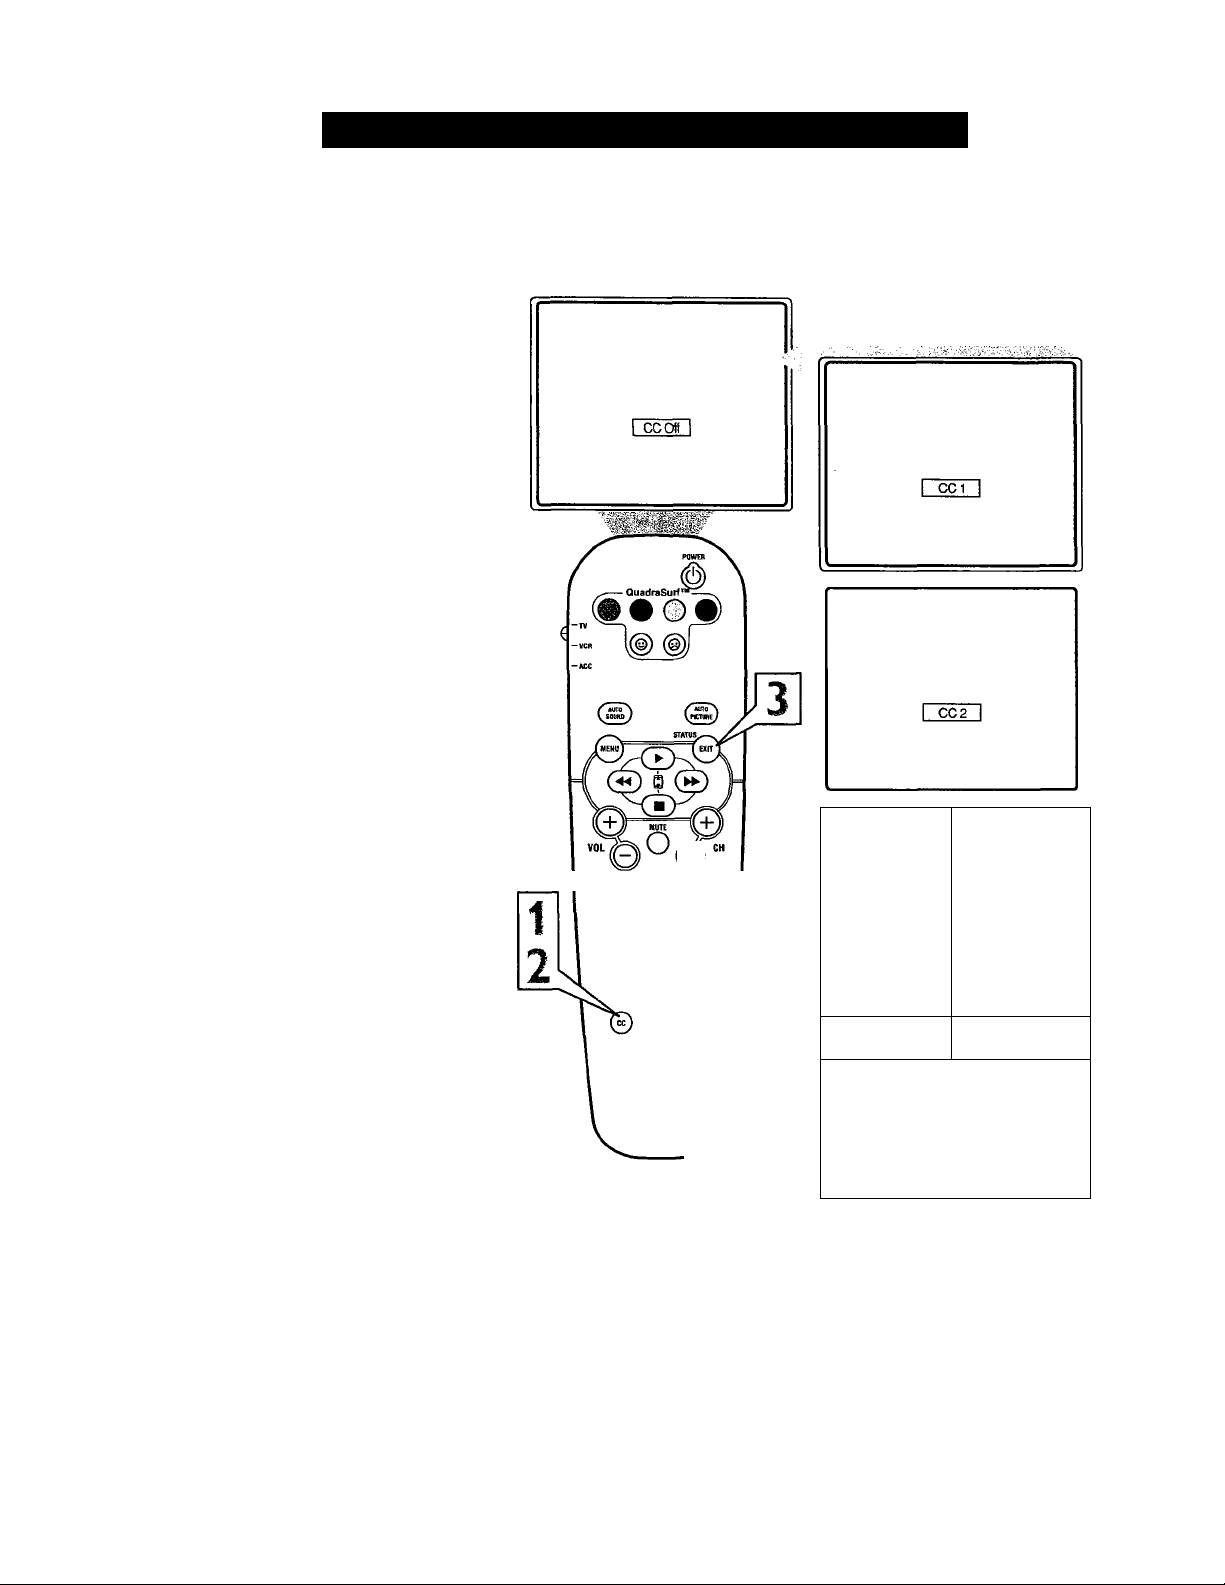
<tf,
losed Captioning (CC) allows you to
read the voice content of television pro
C
grams on the TV screen. Designed to help the
hearing impaired, this feature uses on-screen
“text boxes" to show dialogue and conversa
tions while the TV program is in progress.
Press the CC button on the remote to
display the current Closed Caption set
1
ting.
Press the CC button repeatedly (o
choose from the four Closed Caption
2
options (CC Off, CC 1, CC 2, CC
Mute). Dialogue (and descriptions) for
the action on the captioned TV program
will appear on-screen if the tuned pro
gram is broadcasting CC information.
When finished, press the STATUS
/EXIT button to remove the menu from
the TV’s screen or let the option time out
and disappear from the TV screen.
How TO USE THE Closed Captioning Control
Helpful Hint
Not all TV programs and product com
mercials are made with Closed Caption
(CC) information included. Neither are all
Closed Caption modes (CCl, or CC2) nec
essarily being used during the transmission
of a closed caption program. Refer to your
area's TV program listings for the stations
and times of Closed Caption shows.
e
.J SI
________
oooo
“V/VCR
® (2) (D
® (D ®
Q) ® ®
® ©
Mutel
1
NOTE: The CC MUTE option
can be used to set the TV to
turn the Closed Caption mode
“ON” whenever the MUTE but
ton on the remote is pressed.
This activates the CCl option.
22
Page 29
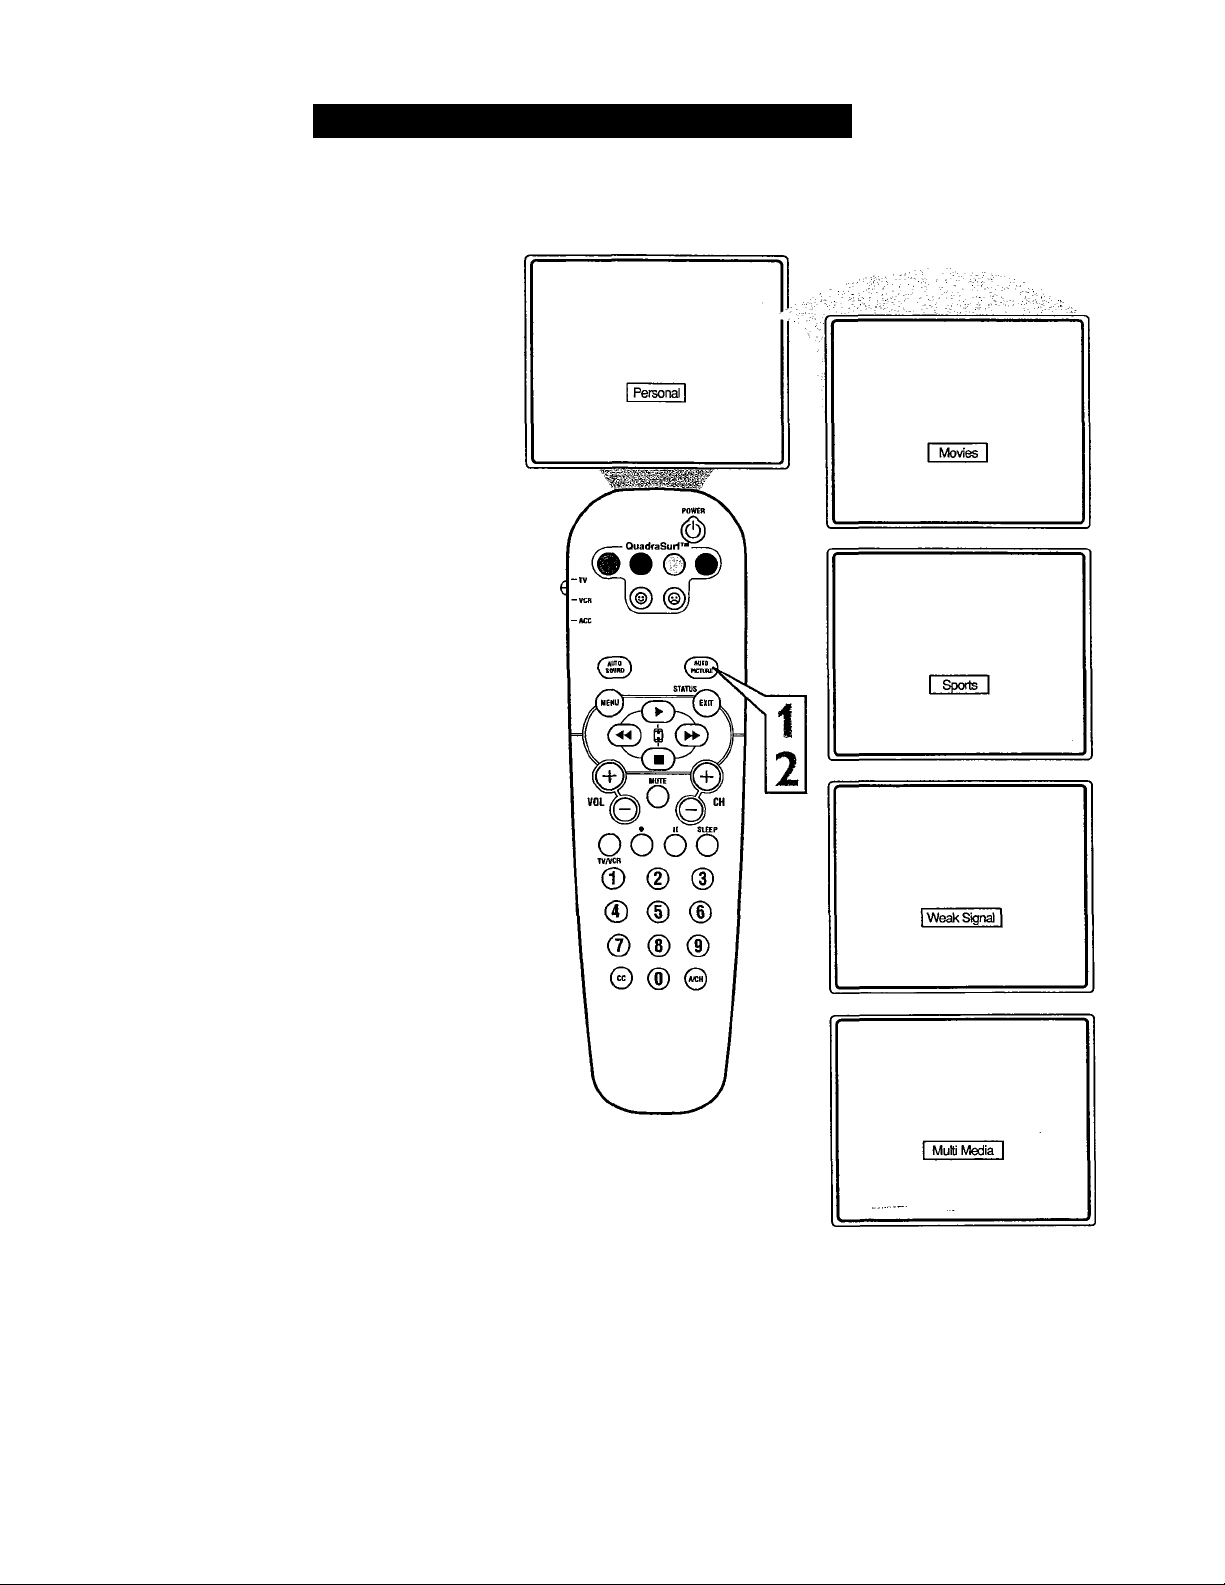
Setting the AutoPicture™ Control
hether you’re watching a movie or a
sporting event, your TV has automatic
W
video control settings matched for your cur
rent program source or content. The
AutoPicture'^^ feature quickly resets your
TV’s video controls for a number of different
types of programs and viewing conditions you
may have in your home. Each AutoPicture'^^
setting is preset at the factory to automatical
ly adjust the TV’s Brightness, Color, Picture,
Sharpness, Tint, Color Temperature, DNR and
Contrast+ levels.
Press the AUTO PICTURE button on
the remote control. The current Auto
i
Picture setting will appear in the middle
of the screen.
Press the AUTO PICTURE button
repeatedly to select either PERSON
2
AL, MOVffiS, SPORTS, WEAK SIG
NAL, or MULTI MEDIA picture set
tings.
W.
Note: The PERSONAL setting is the setting
that you setup using the PICTURE options
within the on-screen menu. This is the only
Auto Picture setting that can be changed. All
other settings are setup at the factory during
the time of production.
MOVIES - Preset picture options for watch
ing Video Tapes, or DVDs.
SPORTS - Preset picture options for watch
ing sporting events.
WEAK SIGNAL - Preset picture options for
watching programs where the reception is not
at its best.
MULTI MEDIA - Preset picture options for
use with video gaming.
23
Page 30
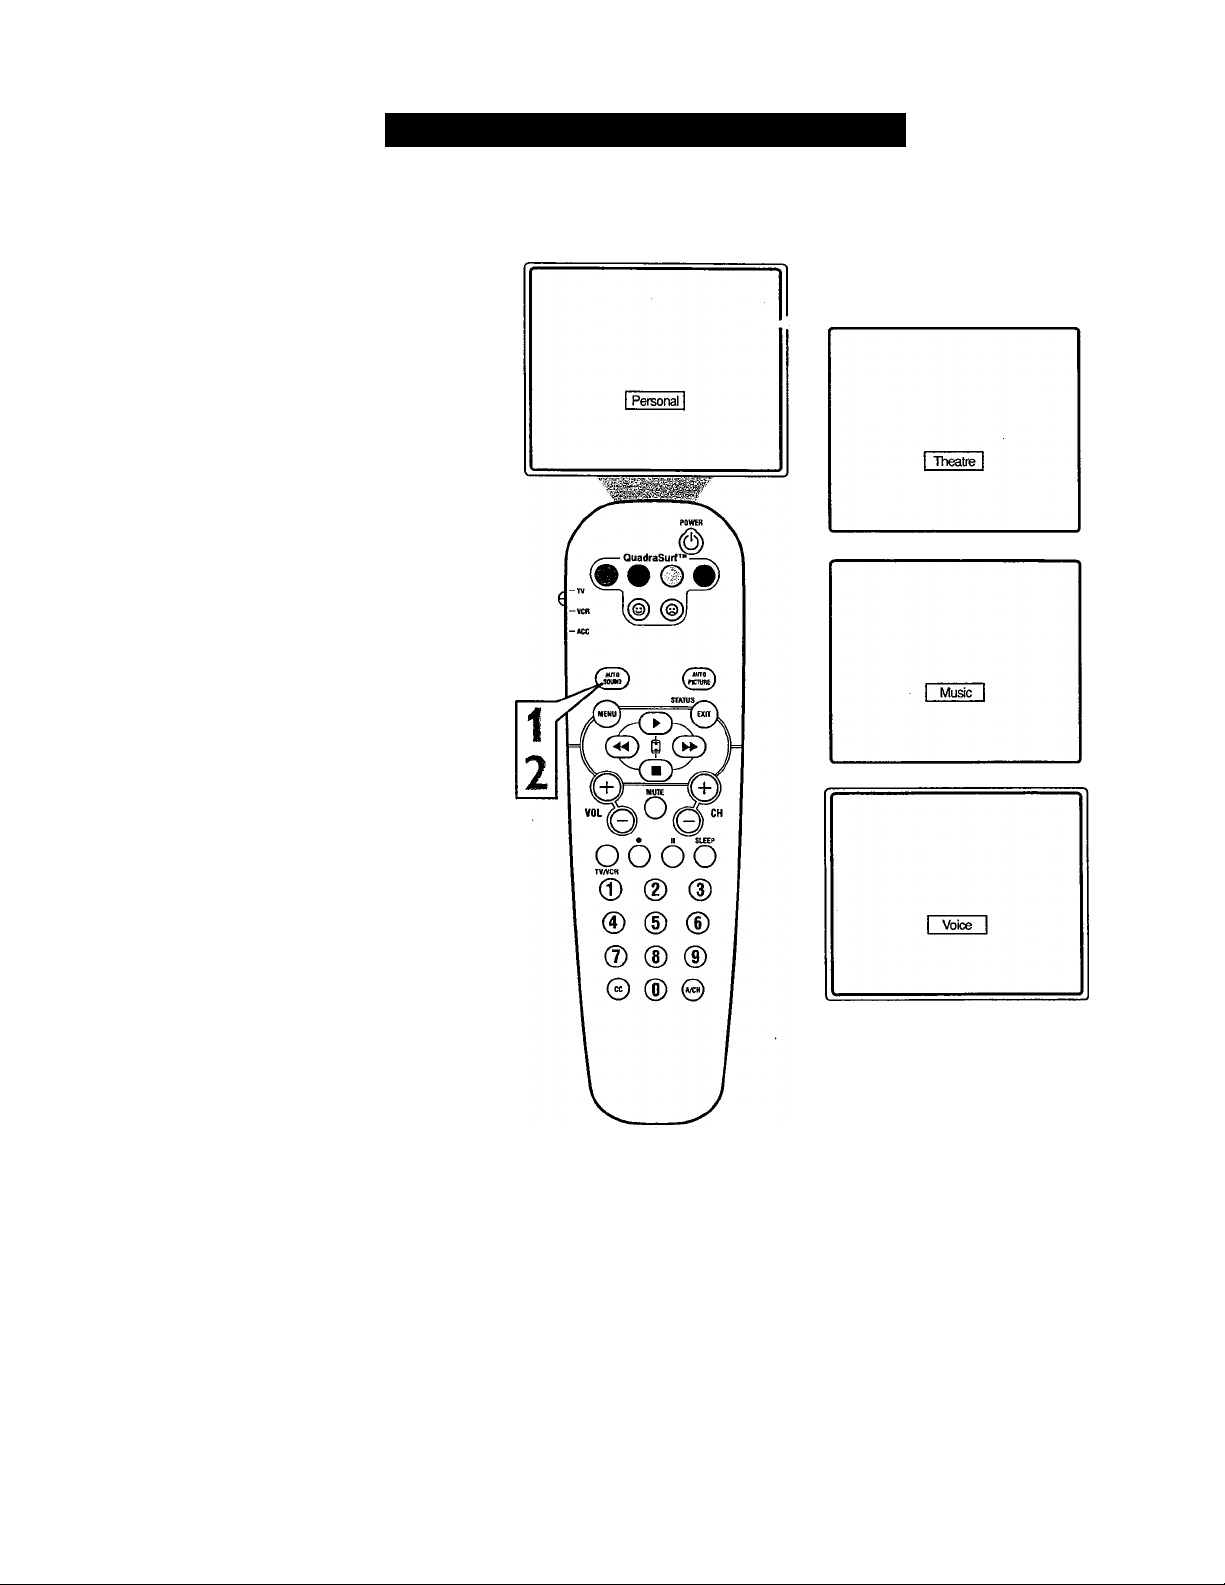
Setting the AutoSound™ Control
'I 'heAutoSouruF^feature allows the listen-
JL er to select between four different factory
set sound options. Personal (which can be set
by the user), Theatre (for movie viewing),
Music (for musical type programming) and
Voice (when the program is mainly dialogue).
These setting affect the Sound menu’s Bass,
Treble, AVL, and Incredible Surround controls
To select any of the options follow the direc
tions below.
Press the AUTO SOUND button on
the remote control. The current Auto
I
Sound setting will appear in the middle
of the screen.
Press the AUTO SOUND button
repeatedly to toggle between the four
2
settings.
Note: Only the PERSONAL control can be
changed by the viewer. This changes the set
tings in the main on-screen menu's sound con
trols.
THEATRE - Preset sound options for watch
ing movies.
MUSIC - Preset sound options for musical
programming where there is little dialogue.
VOICE - Preset sound options for program
ming where heavy dialogue is present.
24
Page 31
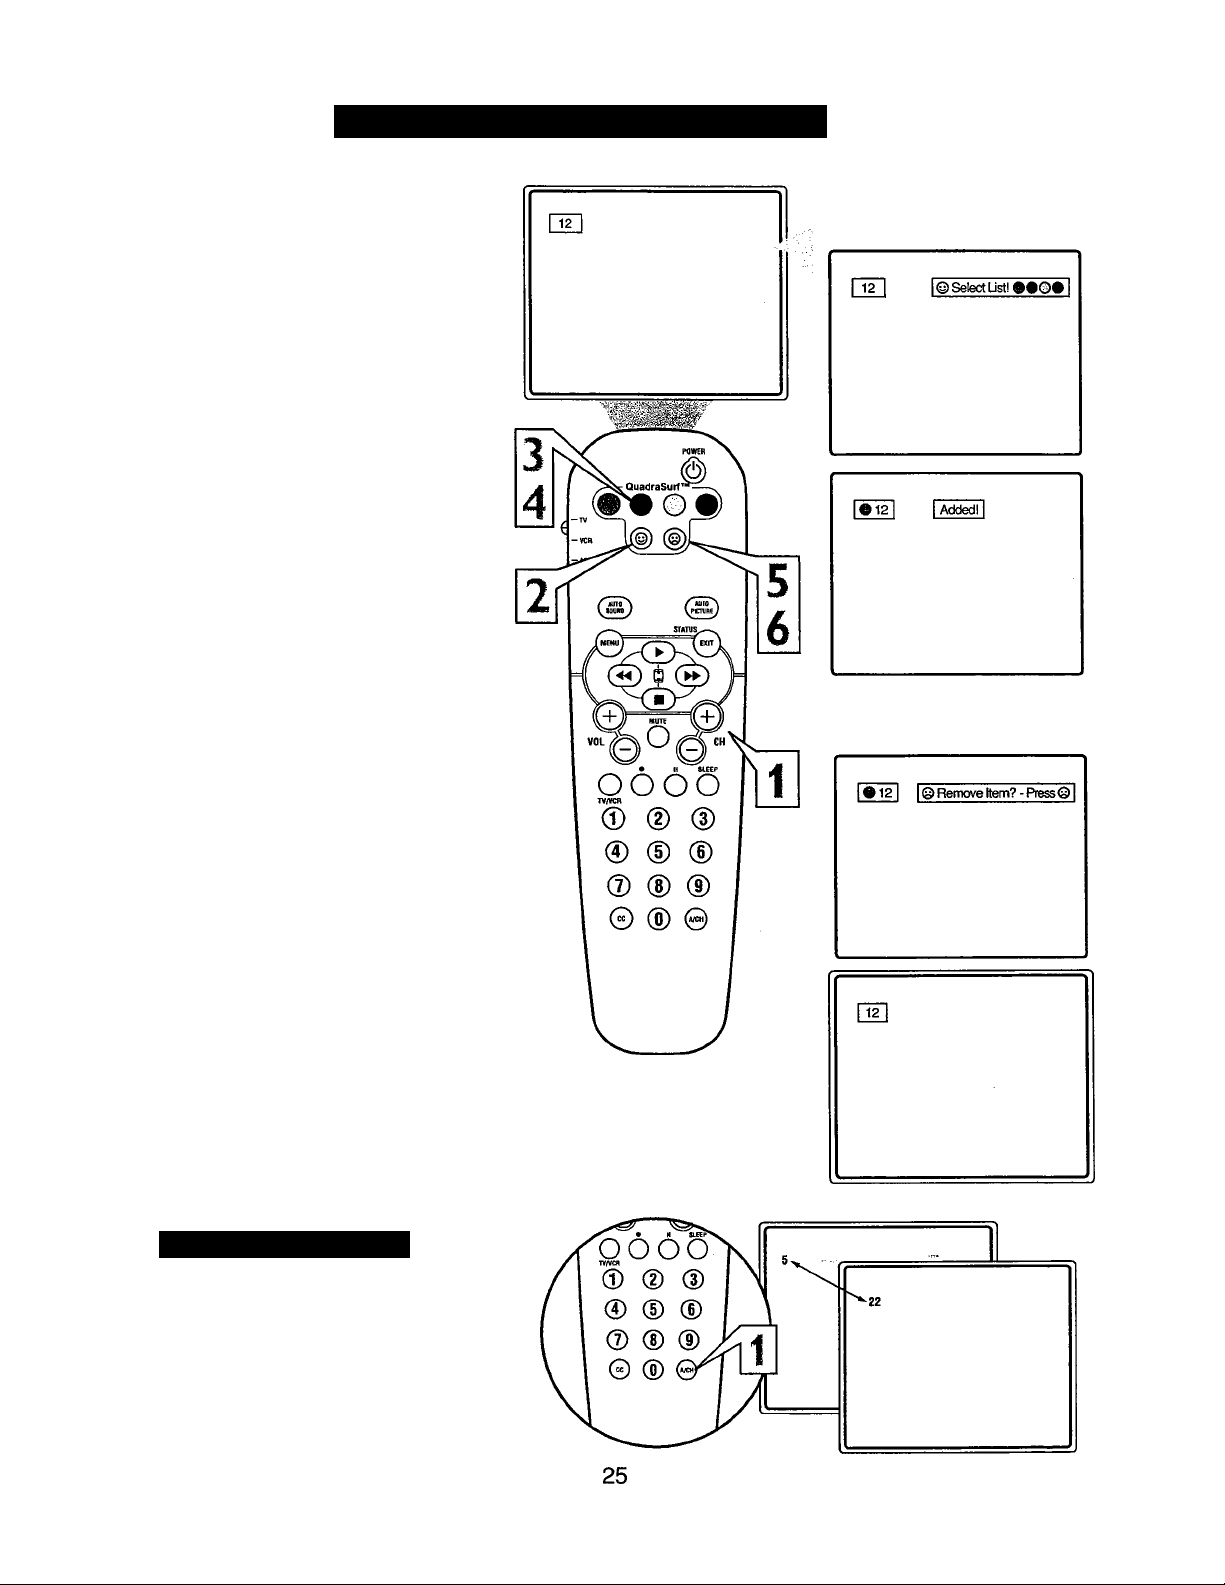
Using the QuadraSurf™ Buttons
“list" or series of previously viewed
channels can be selected with the
A
QuadraSurf^^ (colored) buttons on your
remote control. With this feature you can easi
ly switch between different TV programs that
currently interest you. The QuadraSurf^ con
trol allows you set up four different personal
Surf lists using the colored buttons (on the
remote control), each holding up to ten chan
nels in its quick viewing"list."
Press the CHANNEL (+) or (-) but
tons (or the NUMBER buttons) to
1
select a channel to add to one of the
SURF lists.
Press the SMILEY © button on the
remote control to ADD the channel to
2
one of the SURF lists.
Press the corresponding COLORED
(Red, Green, Yellow or Blue) button
3
to add the channel to that button’s Surf
list. (Up to ten channels per button can
be stored.)
Repeat steps 1 through 3 to add additional
channels (up to 10) to each of the the SURF
lists.
To remove a channel from one of the SURF
lists;
Press the COLORED QuadraSurF”
button until the desired channel
4
appears. The screen will display the
channel number with a colored
“Smiley” face to indicate the Colored
button it relates to.
While the “Smiley” face channel
indicator is displayed, press the
5
FROWNIE © face button. The
screen will read, “Remove item? Press © .”
Press the FROWNIE © face button
again to confirm your decision to
6
remove the channel from the Surf list.
Repeat steps 4-6 to remove other channels
from Surf lists.
Alternate Channel
Your remote also has an A/CH (Alternate
Channel) button. Pressing this button will tog
gle between the Current and one previously
selected channel.
Page 32
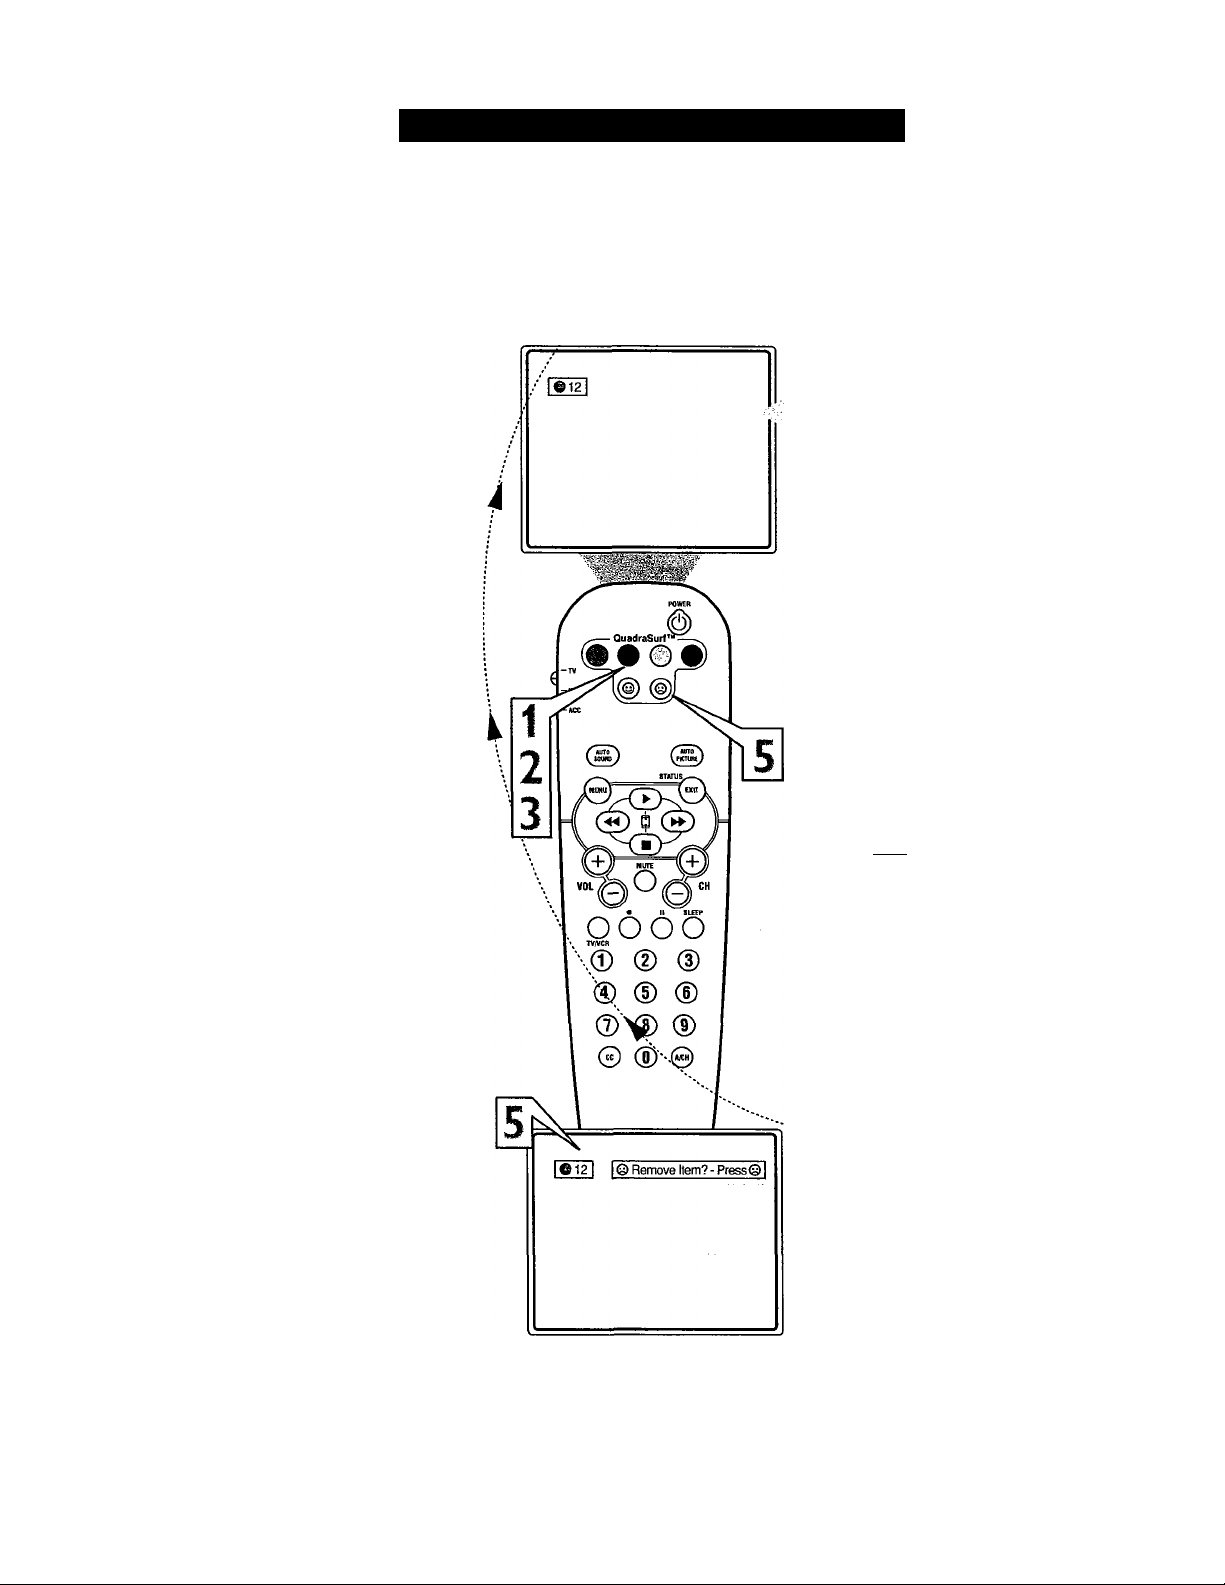
(te,
'The QuadraSurf^ buttons on your remote
A. control allow you to store up to 10 chan
nels per button (40 total). This is a great fea
ture if you want to store all your favorite
Sports channels. Movie channels, or News
channels in one surf list. Family members can
have there own favorite list of channels. You
can even program the external AIV Input
jacks (Front channel) for one of the buttons
making it a “source" button for your external
accessory devices.
Assuming channels have now been added to
the four QuadraSurf^ lists (the four colored
buttons on the remote, see the previous page),
let’s review how the feature works.
Press one of the pre-programmed
COLORED buttons on the remote
(
(Red, Green, Yellow or Blue). The
screen will display a smiley face with the
first programmed channel for that surf
list.
Using the QuadraSurf™ Buttons
|g12|
r©18
1
► 28
While the colored “smiley” face still
appears on the screen, press the same
2
COLORED button on the remote to
tune the second channel programmed for
that specific surf list.
Repeatedly pressing the same COL
ORED button while the “smiley” face
3
appears will tune all the programmed
channels for that specific surf list After
the last channel is tuned, pressing the
COLORED button again will return you
to the first channel in the list
If the “smiley” face disappears fi'om the
screen and the same COLORED button
is pressed, the surf channels will be dis
played starting with the FIRST pro
grammed channel again.
Repeat steps 1-3 for the other three
COLORED buttons (Surf lists) if
4
desired.
Any time the “smiley” face appears
with the channel number, pressing the
5
“frownie” face button will allow you
to remove it from the list (see the pre
vious page for more details).
®35
I ©41 I
[•M]
[m
26
Page 33
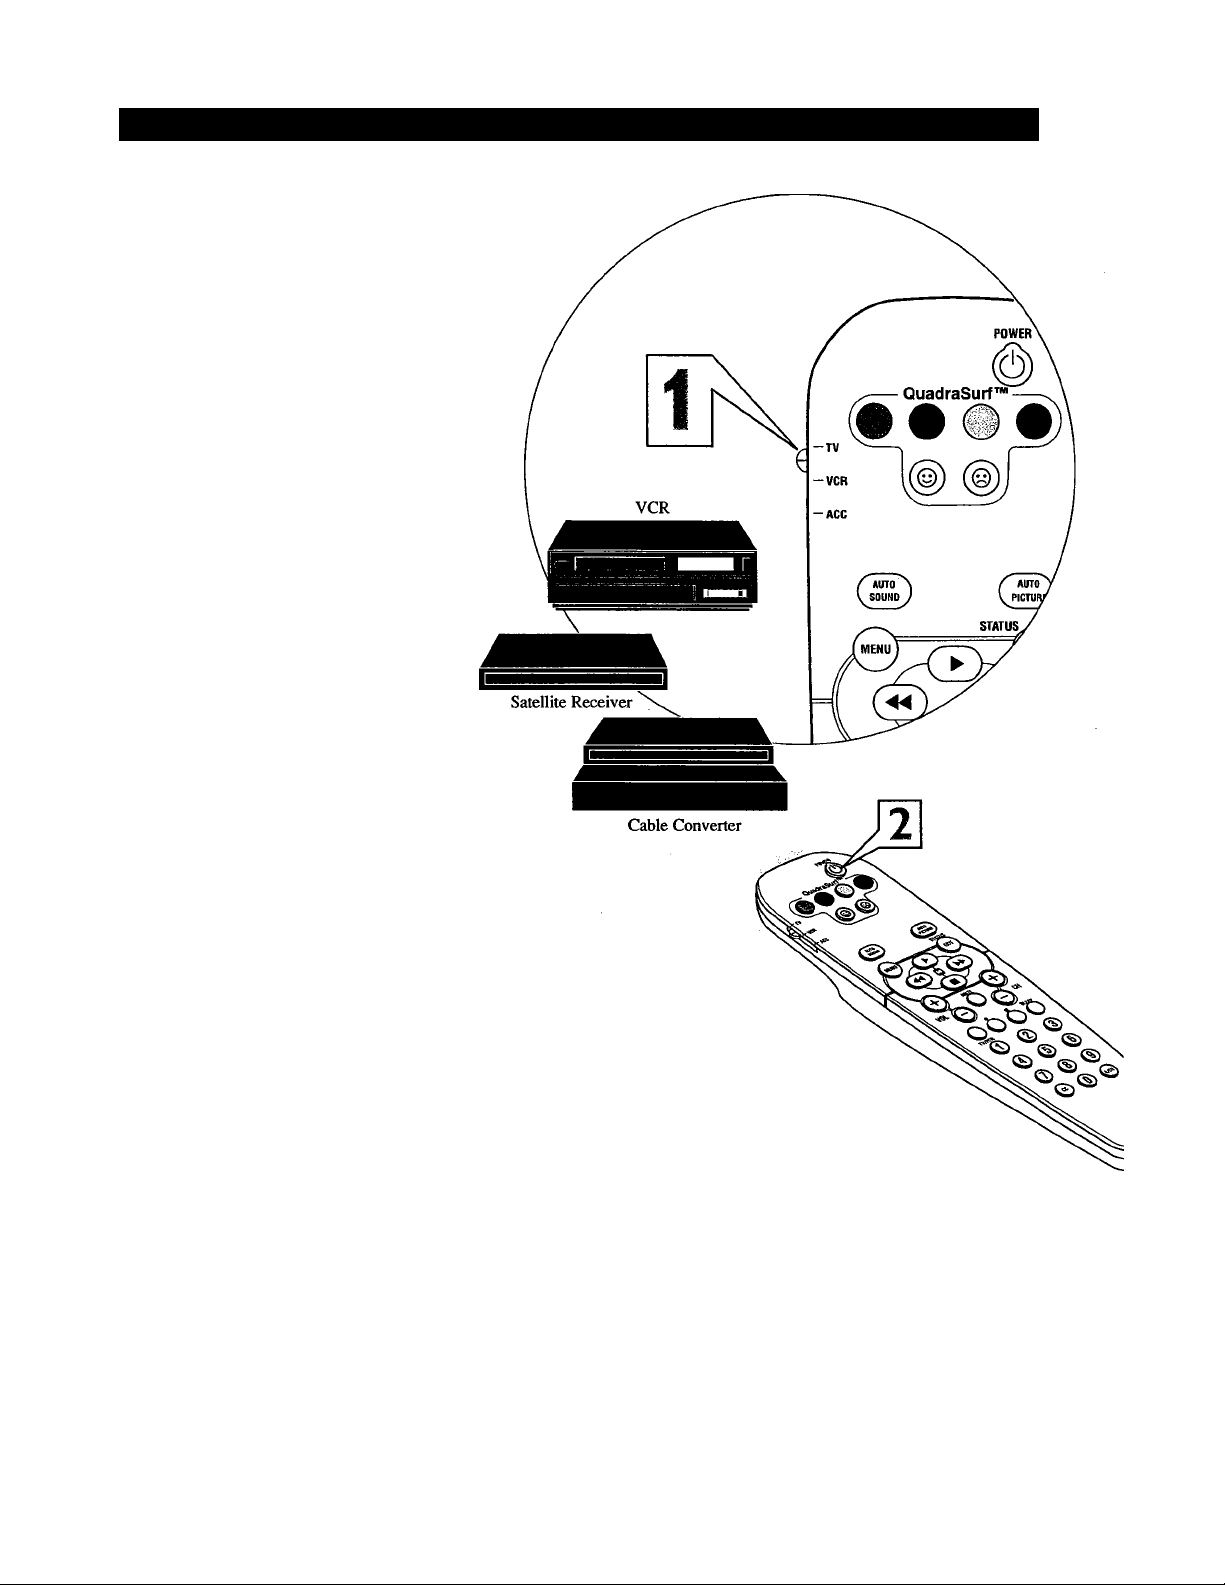
Remote Control Use with Accessory Devices - Direct Method
our remote control is set to work your TV
and many infrared remote (IR) control
F
VCRs, Cable Boxes, Satellite Systems, DBS,
DVD, etc. However, an easy onetime step may
be necessary before the remote will work your
VCR.
Try this initial Direct Access Method to see if
going on to the following section is necessary.
Place the TV/VCR/ACC Mode
Switch in the proper position.
i
Point the remote control at the device
and press the POWER button.
2
Does the remote turn the device ON?
If YES, stop and try other function buttons on
the remote. If they also work the device, then
the remote is ready and no further steps are
needed.
If NO, continue...
First look up a THREE-DIGIT remote
control number for your brand of
3
Device before going through the simple
steps on the following page.
Find your Three-Digit Code on
pages 29-31.
Helpful Hint
If more than one number is listed, you may
have to try more than the first Three-Digit code
given in order to locate your Device’s remote
code.
NOTE: Setting up the remote is for use with
external accessory devices only and not for use
with other television brands.
27
Page 34
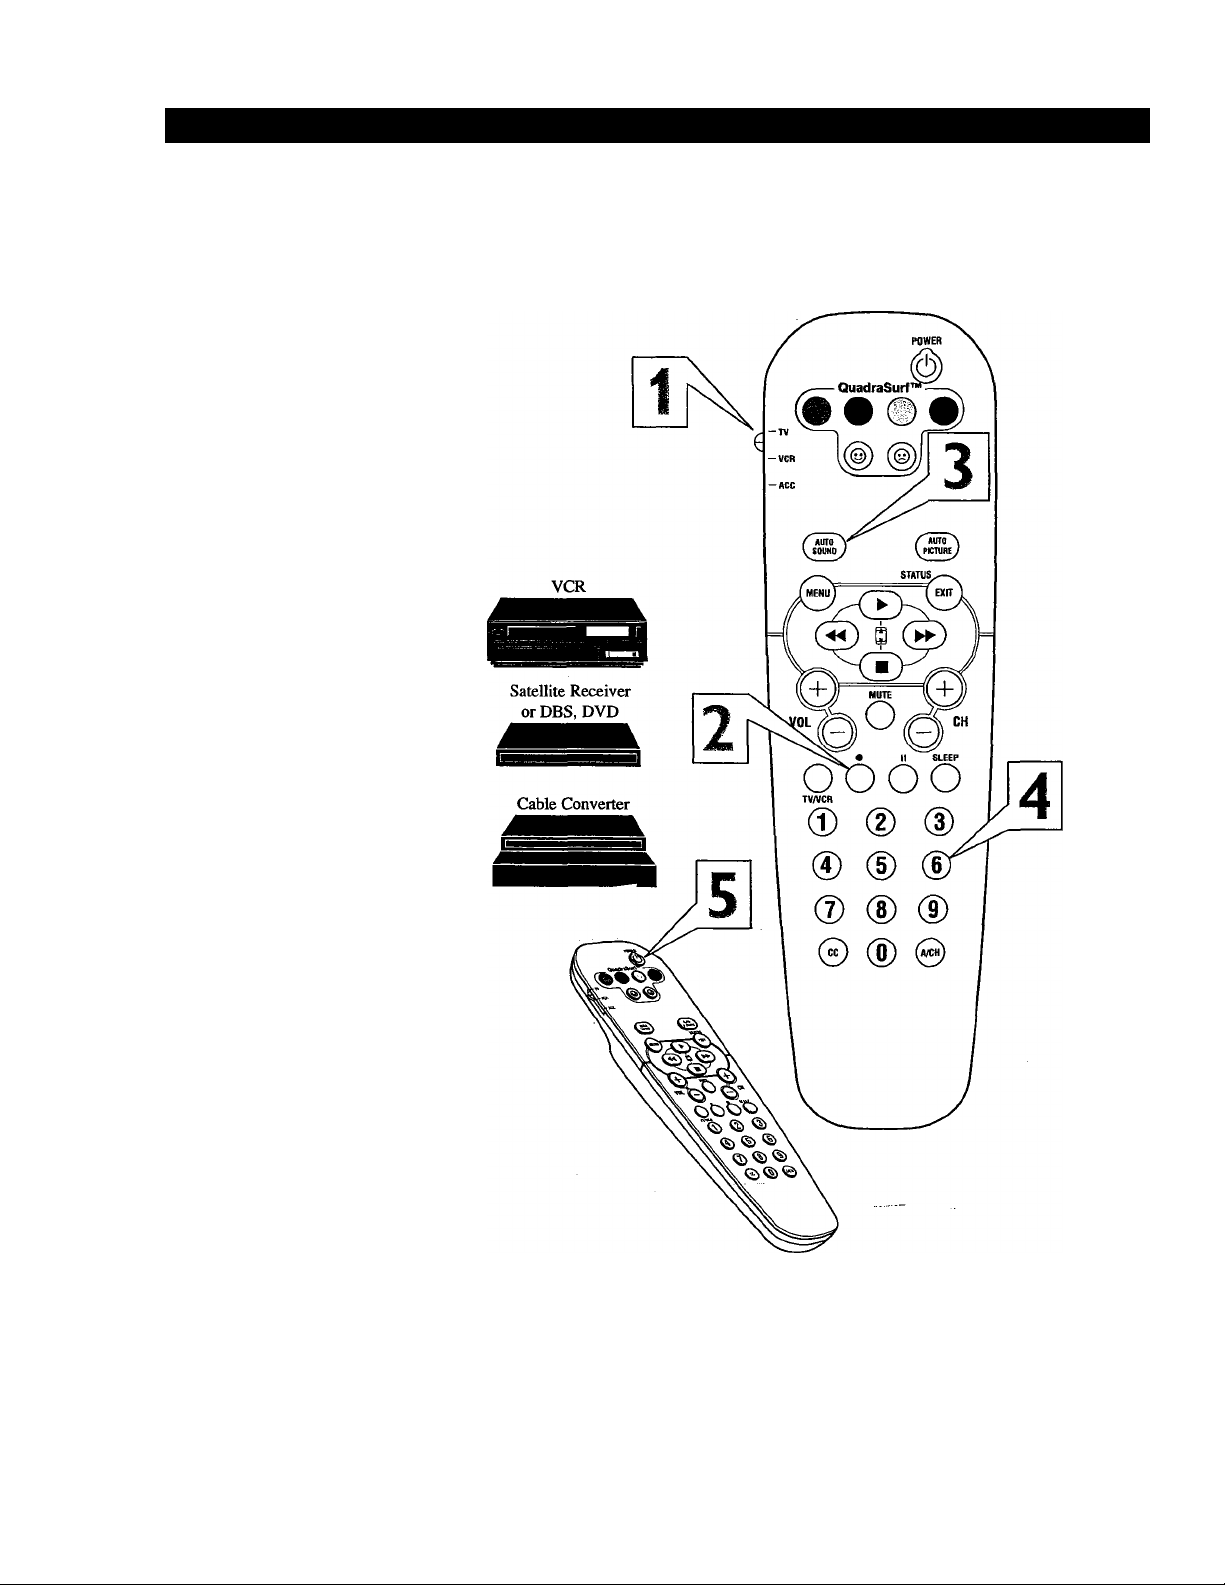
Remote Control Use with Accessory Devices - Code Entry Method
A Tow that you have looked up the three-
1 V digit Remote Code Number for your
brand of device, you are ready to follow the
four simple steps below.
Please read through steps 1-4 before begin
ning.
Place the TV/VCR/ACC Mode
Switch in the proper position.
I
Press the VCR • RECORD button on
the remote control and release.
2
Press the AUTO SOUND button on
the remote within 30 seconds, then
3
release.
Enter the THREE-DIGIT REMOTE
CODE NUMBER (page 29-31) for
4
your desired device. The remote is now
ready to send commands to the unit.
Point the remote at the Device. Press
the POWER button on the remote to
turn the unit ON.
Helpful Hint
Remember, if this doesn’t work the first time,
repeat the steps using a different remote code
number.
After a second try and the remote does not
operate your device, see if there is another
three-digit code number (pages 29-31) listed
for your device and repeat the steps above
using the new number.
If after repeated attempts the code number
method does not work you device, try the
SEARCH METHOD on the next page.
NOTE; Setting up the remote is for use with
external accessory devices only and not for use
with other television brands.
28
Page 35
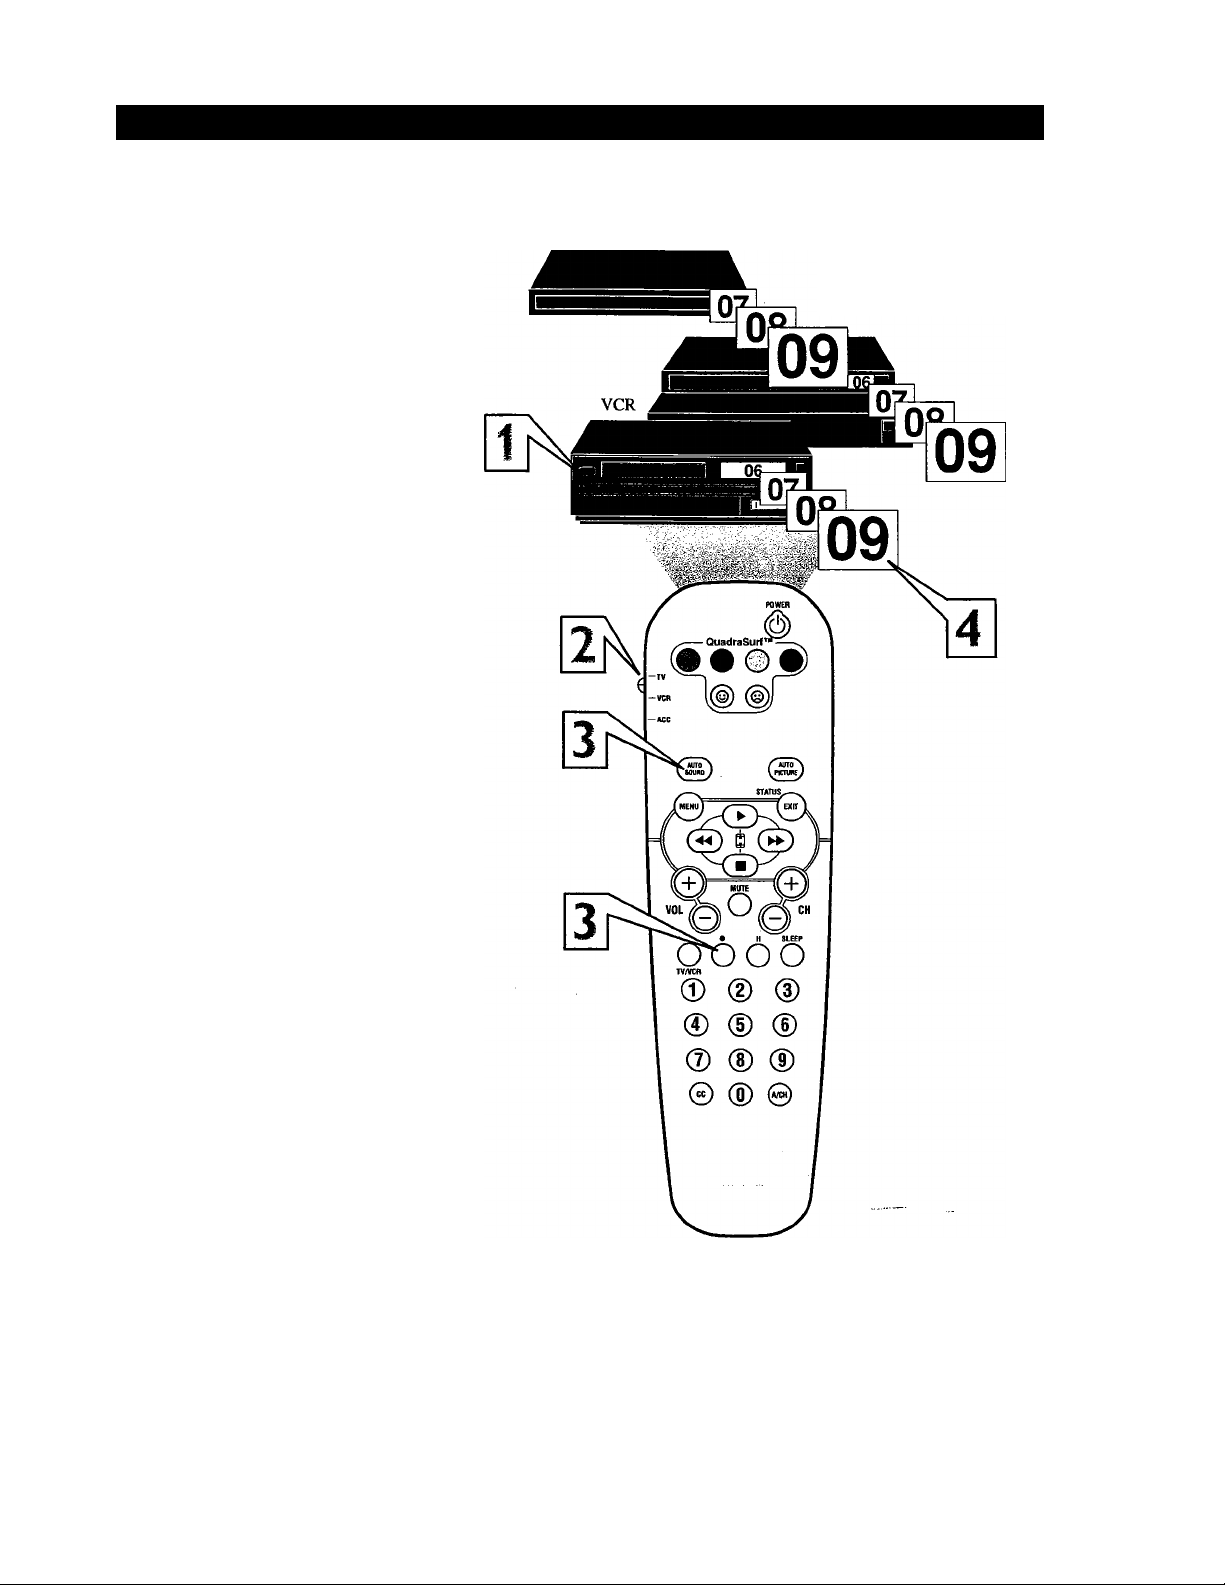
Remote Control Use with Accessory Devices - Search Method
our TV remote can be set to work various
external devices such as VCRs, Cable
F
Boxes, Satellite Receivers, DBS, DVD, etc. by
what is called the search method of remote
control programming.
Satellite Receiver
If the “Remote Code” number method shown
on the previous page did not set your remote
to work your external device, then follow the
easy steps listed below.
Please read steps 1-4 before beginning.
Press the POWER button on the
device your are attempting to program
i
to turn it ON.
Place the TV/VCR/ACC Mode
Switch in the proper position.
2
Press the VCR • RECORD and the
AUTO SOUND buttons simultane
3
ously and hold them down.
The device will begin to change chan
nels after the remote identifies the cor
4
rect code. When the channels start to
change release the VCR • RECORD
and AUTO SOUND buttons. The
remote should be ready to operate the
device.
Cable Converter
Helpful Hint
This method can take up to two minutes to
perform.
Don’t let the device scan up more than five
channels. If you do the remote may pass up
the right code and another two minute search
cycle will have to be repeated.
If no channel change happens within two
minutes, repeat steps 1-4. Should a channel
change still not occur, the remote will not
work the desired device.
NOTE: Setting up the remote is for use with
external accessory devices only and not for use
with other television brands.
29
Page 36

w,
Admiral
Adventura .......................................2001
Aiko
Aiwa ....2001,2017,2062,2070,2072
Akai...........2021, 2029, 2038, 2060, 2063
Akiba
Alba
Ambassador ....................................2011
American Action
American High
Amstrad
Anam
Anam National
Anitech
Asa .........................................2017,2035
Asha
Asuka...............................................2017
Audiovox
Baird
Basic Line
Beaumark
Bell & Howell
Blaupunkt
Brandt
Brandt Electronic
Broksonic 2002, 2040, 2046, 2052, 2078
Bush
Calix
Canon
Capehart
Carver
Catron .............................................2011
CCE
CGE ................................................2001
Cimline
Cineral
Citizen
Clatronic .........................................2011
Colt
Combitech
Condor .......................................... 2011
Craig ... .2017, 2026, 2034, 2057, 2058
Crown
Curtis Mathes . .2015, 2021, 2032, 2042
Cybemex .........................................2057
Cyrus
Daewoo ..2011,2024,2025,2059,2083
Dansai .............................................2034
Daytron ...........................................2011
DeGraaf
Decca
Denon
Dual ................................................2021
Dumont .........................2001,2035,2037
Dynatech
Elbe .................................................2018
Elcatech
Electrohome
..................................
................................................
..............................................
.............................
....................................
...............
...........................
..........................
...........................................
................................................
........................................
..................
....................
........................................
................................
..........
... .2041, 2042, 2048, 2054, 2055, 2075
...........................
...................
...............................................
..............................................
..........................................
.............................................
.......................................
...........................................
............................................
...................................
.................................................
......................................
...........................
..............................................
.................................
....................................
.............................................
........................................
..........................................
....................................
2011,2034,2052,
2059, 2063, 2072
............................
...............................
2001,2059,2067,2068
2017,2042,2054,
2057, 2059, 2082, 2084
.............
2042, 2054, 2087
2001, 2021, 2037, 2039
2011, 2034, 2059
2003, 2005, 2010, 2014,
2047,2064,2065
............................
2034, 2052, 2059, 2072
2011,2034,2059
Remote Control Direct entry Codes
2027, 2052
2059
2034
2059
2015
2034
2057
2017
2057
2037
2021
2017
2015
2011
2035
2034,2059
2034
2059
2017,2059
2034
2072
2035
2022,2043
2001, 2035
2022
2001
2034
2017
VCR CODES
Electrophonic...................................2017
Emerex.............................................2012
Emerson
..........................
ESC ........................................2057,2059
Ferguson
Fidelity.............................................2001
Finlandia
Finlux
Firstline . .2017, 2023, 2024, 2034, 2052
Fisher............................2025, 2026, 2030, 2037
Frontech ..........................................2011
Fuji ..................................................2015
Funai ...............................................2001
Garrard.............................................2001
GE
GEC
General
Go Video
Goldhand .........................................2034
Goldstar ..............2017, 2018, 2053, 2079
Goodmans 2001, 2017, 2034, 2059, 2075
Gradiente ................................2001, 2008
Graetz
Granada .........................2025,2035,2037
Grandin
Grundig
..........................
Hanseatic
Harley Davidson
Harman/Kardon
Harwood
HCM
Headquarter
Hinari
Hi-Q ................................................2026
Hitachi
Hughes Network Systems
Hypson.............................................2034
Imperial
Ingersol
Interfunk
nr .........................2005,2021,2025,2037,
ITV .........................................2017,2059
Jensen
JVC
Kaisui............................................ .2034
KEC
Kendo .....................................2038,2052
Kenwood
KLH
Kodak
Korpel
Layco
Lenco
LG ...................................................2079
..............
....................................
...........
................................
..................
......................
................................................
...........................................
.................
.........................
.............
..........................
.........................................
..............................................
.................
.........................
....................................
..........................................
...........................................
.........................................
....................................
.............................................
...............................
....................................
.......................................
................................................
....................................
.............................................
..............................................
..............................................
2001,2002,2017,2023,
2040, 2046, 2051, 2052,
2059, 2078, 2083
'2021, 2039, 2064, 2065
2001,2022,2035,2037
2015, 2027, 2032, 2057
...............................
2005, 2021, 2037, 2057
2001,2017,2034
2003, 2005, 2007, 2010,
2034, 2035, 2048, 2050,
2054, 2069, 2071, 2075
........................................
............................
.....................
....................................
2004, 2034, 2057, 2072
2001,2004,2021,
2022, 2043, 2057
2038, 2057, 2074
2008, 2021, 2033, 2049,
2050, 2074, 2080
......................
2018,2021,2033
2035,2037
2077,2081
2018, 2035
..............
2017,2059
2015,2017
2035
2011
2017
2001
2034
2034
2025
2022
2001
2004
2035
2021
2034
2034
2034
2059
Lloyd's ....................................2001,2051
Loewe
..................
Logik
............................
Luxor ... .2023, 2025, 2027, 2037, 2038
LXl ..................................................2017
M Electronic .....................................2001
Magnasonic .....................................2059
Magnavox
Magnin.............................................2057
Manesth
Marantz
Marta ...............................................2017
Matsui ..........................2004,2016,2036,
Matsushita
Mei...................................................2015
Melectronic .....................................2018
Memorex
................
Memphis
Metz .............................2003,2005,2017,
MGA ......................................2023,2057
MGN Technology
Minerva
Minerva
Minolta ............................................2022
Mitsubishi 2023, 2027, 2033, 2035, 2045
Motorola
MTC
Multitech ................................2001, 2034
Murphy
NAD
National
NEC...........2018,2020,2021,2033,2037
Neckermann.....................................2035
Nesco
Nikko
Nikon
Noblex
Nokia
Nokia ... .2021, 2025, 2037, 2038, 2057
Nordmende
Oceanic
Okano
Olympus
Optimus
Orion
Osaki .............................2001,2017,2034
Otto Versand ...................................2035
Palladium .... .2005, 2017, 2021, 2034
Panasonic .....................2015, 2042, 2053,
Pathe Cinema...................................2016
Pathe Marconi
Penny
.................................
..............
....................................
...........
................
.........................................
..........................
..........................................
........................
................................
......................................
...........................................
...............................................
..........................................
..............................................
..............................................
..............................................
............................................
..................
...............................................2065, 2074
...................................
.....................................
.................................
............
..........
;. .2042, 2077, 2086, 2087, 2088
.................
................
.....................................2054, 2055, 2087
...........................
.....................................2020, 2022, 2057
2004,2005,2017,2035
2004,2034,2057
..........
2001,2015,2019, 2035
2024,2034
2003, 2005, 2015, 2035
2052, 2070, 2072
....................
2025, 2026, 2027, 2037, 2052,
2057, 2062, 2085, 2087, 2088
..................
2046,-2052, 2070, 2072, 2078
................................
2015,2042, 2055
2001, 2015, 2017, 2019,
2034
2042, 2048, 2055, 2069
..........................
2005,2010,2048
2025, 2037, 2038, 2057
2021, 2061, 2064,
2017, 2027, 2031, 2037,
2002, 2004, 2016, 2036,
2015,2017,2018,
2057
2048
2015,2027
2001,2057
2001
2031
2054
2034
2017
2014
2057
2001, 2021
2063, 2070
2015, 2054
2021
30
Page 37

Remote Control Direct entry Codes
Pentax
.............................................
Perdio.................................................2001
Philco
.................
Philips . .2015, 2035 (DEFAULT VCR),
..............................................
Phonola
Pilot .................................................2017
Pioneer
Portland
Profex ..............................................2066
Profitronic .......................................2057
Proline
ProScan ...
Protec
Pulsar
Pye
Quarter ............................................2025
Quartz
Quasar ...........................2015,2042,2087
Quelle
Radio Shack ...........................2001,2085
Radiola.............................................2035
Radix ...............................................2017
RCA 2015, 2022, 2027, 2032, 2038, 2057
Realistic
REX
RET .................................................2075
Ricoh ...............................................2014
Roadstar
Runco...............................................2019
Saba
Saisho
Salora.............................2023,2025,2038
Samsung
...........................................
..........................
..........................................
............................................
..............................................
..............................................
..................................................
.............................................
.............................................
.......................
..........................
.......................................
.............
...................
......................................
................
2015, 2018, 2052, 2078
2031, 2033, 2035
......................................
2001,2015,2017,
2025, 2026, 2027, 2037
2017, 2034, 2057, 2059
2021,2049,2050,2061,2
064, 2065, 2074
2004, 2016, 2036, 2052
............
2024, 2057, 2076, 2077
2022
2074, 2075
2035
2011
2001
2032
2034
2019
2035
2025
2035
2021,2074
VCR CODES (continued)
Sanky
.....................................
Sansui
..........................
....................................
Sanyo
...................
Saville
.............................................
SBR 2035
Schaub Lorenz . .2001, 2005, 2021, 2037
Schneider.......................2001, 2034, 2035
Scott
...................
Sears .............................2001,2015,2017,
.
..........................
SEG ........................................2057,2066
SEI
........................................
Seleco
.............................................
Semp
...............................................
Sentra ..............................................2011
Sharp ......................................2027,2073
Shintom
Shogun
Shorai...............................................2004
Silva
Singer
Sinudyne .................................2004, 2035
Solavox ...........................................2011
Sonolor ............................................2025
Sontec
Sony ... .2001, 2012, 2013, 2014, 2015
STS ..................................................2022
Sunkai
Sunstar
Suntronic
Sylvania
Symhonic ........................................2001
Tashiko
Tatung
Teac
..................................
............................................
................................................
.....................................
.............................................
.............................................
............................................
........................................
...............
...........................................
...........................
.......................................
2025, 2026, 2037, 2057
2023, 2024, 2040, 2046
2022, 2025, 2026, 2037
2001, 2015, 2023, 2035
2019,2027
2001,2021,2033,
2052, 2058, 2078
2072
2004,2035
2021
2024
2034, 2037
2057
2017
2024, 2034
2017
2070
2001
2001
2001
2001,2021,2035
2001,2021
TEC .................................................2011
Technics
Teknika ..............2001, 2015,2007, 2017
Teleavia
Telefunken 2021, 2047, 2058, 2064, 2074
Tenosal.............................................2034
Tensai................................................2001, 2066
Thomas
Thomson
Thom .............................2016,2021,2037
TMK
Toshiba . .2021, 2023, 2024, 2035, 2074
Totelevision
Towada ............................................2066
Uher
Unitech ............................................2057
Universum
................
Vector
Vector Research......................2018,2020
Victor
Video Concepts
Videosonic
Wards ..................2001,2015,2022,2026,
................
White Westinghouse
XR-1000
XR-1001
XR-1002 ..........................................2034
Yamaha ...........................................2018
Yamishi ...........................................2034
Yokan...............................................2034
Yoko
Zenith .. .2001, 2014, 2019, 2052, 2078
.......................
..........................................
...........................................
.......................
......................................
............................
................................................
____
2035, 2038, 2048,2057, 2067
........
......................................
.............................
......................................
2027, 2032, 2034, 2035, 2057
.........................................
.........................................
.......................................
2015, 2042, 2054
2021,2064,2074
2051,2057
2017, 2057
2001, 2006, 2010, 2017,
2008,2021,2033
......................
..............
2020, 2024
2052, 2059
2011,2057
2021
2001
2057
2024
2057
2001
2015
Akai
................................................
Harman/Kardon
JVC ........................................5311,5318
Kenwood
Magnavox
Mitsubishi .......................................5303
Onkyo
...........................
ABC ... .3002, 3003, 3004, 3006, 3008
Andover
Bell & Howell
Birgmingham Cable Communication ...
.......................................................3020
British Telecom
Cabletime
Clyde
..............................................
Contec .............................................3009
Cryptovision
Daehan ............................................3043
Daeryung
..............................
........................................
.....................................
5302,5317,5319
..........................................
................................
.....................
...........
3016, 3019, 3025, 3029
...................................
.......................................
5316
5314
5307
5302
3037
3006
3002, 3012
3011
3038
3003
Panasonic ................................5301, 5322
Philips .. .5302, 5308 (DEFAULT DVD)
Pioneer...........................5305,5312,5321
ProScan
RCA
Samsung
Sharp
...........................................
................................................
.........................................
...............................................
5304
5304
5313
5320
CABLE CODES
Decsat
.............................................
Everquesst .......................................3007
Filmnet.......................................... .3028
France Telecom
GEC
................................................
Gemini
Jasco ................................................3007
............................................
General Instrument ................3004, 3020,
..............................................3031,3046
Goldstar
Grundig ...........................................3035
Hitachi .............................................3004
..............................
.................................
3027
3030
3011
3007
3014,3047
31
Sony
................................................
Technics ..........................................5301
Theta Digital
Thomson
Toshiba ............................................5302
Yamaha
Jerrold . . . .'... .3002, 3004, 3005, 3006,
..........................
LG Alps ..... -
Memorex
Mnet
Now
................................................
Oak ..................................................3009
Pacific
Panasonic
Paragon ...........................................3001
Pioneer
Pulsar
...................................
.........................................
..................................
3007, 3020, 3031, 3046
..............................
........................................
.......................................
.............................................
...............................
....................................
..............................................
5306
5312
5310
5301,5309
3044
3001
3009, 3028
3041
3039
3001,3013
3014, 3036
3001
Page 38

(ff.
PVP Stereo Visual Matrix
Quasar
............................................
Radio Shack.....................................3007
Rembrandt
Runco
Salora ..............................................3026
Samsung .................................3014, 3040
Satbox .............................................3024
Scientific
Scientific Atlanta
Seawoo
......................................
..............................................
......................
..........
...........................................
..............
3003, 3032, 3049
3003,3008,3021
Remote Control Direct entry Codes
3002
3001
3004
3001
3045
CABLE CODES (continued)
Signal ..............................................3007
Signature .........................................3004
Starcom
Stargate
Starquest
STS
Taihan
Tele+1
Teleservice
Tocom
Tongkook 3
..................................
...........................................
.........................................
.................................................
.............................................
.............................................
......................................
.............................................
..............................
3002, 3007
042, 3048
3007
3007
3015
3043
3028
3022
3005
Toshiba
Tudi .................................................3023
Tusa .................................................3007
United Cable
Videoway ........................................3017
Yisicable+ .......................................3033
Westminster
Wolsey Gene
Zenith ......................................3001, 3034
...........................................
...................................
....................................
..................................
3001
3002
3012
3037
Absat ...............................................4006
Alba
..................
Aides ...............................................4019
Amstrad .......................4003, 4016, 4025,
....................................
Ankard..................4013,4019,4030,4044
Anttron
Armstrong
AST
Astra
Astro .............................4008,4039,4045
Avalon ..............................................4031
Axis
Веко.................................................4010
Best .................................................4030
Blaupunkt
Boca........................................4015,4043
Brain Wave .....................................4022
British Sky Broadcasting
ВТ ...................................................4053
Bush ................................................4002
Cambridge
Canal Satellite
Canal+
Channel Master
CNT ................................................4045
Comlink ..........................................4019
Connexions
Crown ........................................... 4015
Cyrus
D-Box
DDC
DNT
EchoStar .......................4031,4036,4061
Emanon ...........................................4034
Ferguson ......4002,4009,4010,4023
Fidelity.............................................4016
...................................
................................................
...............................................
.......................................
............................................
....................................^..........
.............................................
................................................
......................................
Finlux
...............
Fracarro
Freecom
FTE Humax
Fube ..............................4030,4031,4034
Galaxis.............4019,4057,4060
General Instrument .........................4012
Gold Box
Gooding ..........................................4048
Goodmans .......................................4010
4029, 4034, 4037, 4052
4038, 4039,4042
4009, 4034
......................................
4030,4046
.......................................
................
......................................
................................
..............................
....................................
4011,4031
4005, 4024, 4032, 4037
..........................................
..........................................
....................................
........................................
4015
4027
4005
4008
4058
4024
4059
4059
4029
4031
4011
4054
4029
4061
4034
4060
4059
Grundig
G-sat ................................................4009
Hinari ..............................................4009
Hirschimann
Hitachi
Houston ...........................................4053
Huth
Intervision
Invideo ............................................4061
nr .....................................................4005
Johansson.........................................4022
JVC
Kathrein
Kreiselmeyer....................................4008
Kyostar ............................................4034
La Sat .....................................4043,4045
Lenco ..............................................
Lennox
Lupus
Luxor
Manhattan
Marantz ...........................................4011
Maspro..............................................4004, 4023
Matsui .....................................4024, 4048
Mediamarkt
Mediasat ..........................................4059
Minerva ...........................................4048
Morgan's .................................4015, 4043
Navex ..............................................4022
Neuhaus
Neusat
Newhaus
Nokia
Nordmende
Orbitech
Oxford .............................................4024
Pace
Palladium
Palsat ...............................................4039
Panda
Philips
Phonotrend
........................
...............
..............................................
............................................
...................
.......................................
.................................................
......................
....................................
............................................
..............................................
......................................
....................
....................................
..........................................
.............................................
...
....................................
...........................
....................................
.....................................
......................................
..................
....................................
........................................
..............................................
..........................
....................................
.............................
4008, 4010, 4048
4008, 4032, 4039,
4013, 4015, 4019, 4026
4004,4006, 4008,
4011,4035, 4041
4037, 4045, 4050
4005,4032,4037,
4049, 4054, 4063
4002, 4009, 4014, 4023,
4037, 4055, 4058
4007,4011,4020,
4037, 4048, 4059
4040, 4049
4037
4050
4048
4034
4050
4030
4005, 4049
4015
4039
4057
..4013
4029
.4039
4048
4037
4019, 4050
Pioneer
....................................
Planet ...............................................4061
Promax.............................................4037
Prosat
..............................................
Quadral
Radiola
Radix ......................................4031,4064
RFT ...............................4011,4013,4019
Saba
Sabre ...............................................4037
Sagem
Salora ..............................................4005
SAT ........................................4027,4038
Satcom
Satec ................................................4009
Satmaster
Satpartner
Schwaiger
Seemann
SEG ........................................4030,4034
Siemens ...........................................4008
Skymaster
Sony .......................................4017,4018
Strong ..............................................4062
Sunstar
Tantee
Techniland
Technisat .................................4001, 4039
Telefunken
Teleka
Telesat .............................................4051
Thomson
Tonna
TPS ..................................................4056
Triad .......................................... .4027
Triasat
Unitor...............................................4022
Universum ... ".
Ventana ...........................................4011
Voltee ..............................................4034
Vtech ...............................................4027
Winersat ..........................................4022
Wisi .....................
Xcom Multimedia ...........................4065
Xsat ........................................4006,4065
Zehnder
..................................
............................................
.......................................
............................................
....................................
........................................
...........
4022,4034,4040,4045
...............................
.................................
.....................
............................................
.....................................
......................................
......................................
.....................................
.................................
......................................
.............................................
.....
..................4008,4049
4008,4027,4031,4037
...................................
4021,4059
4019
4029,4044
4011
4023,4045
4056
4026, 4051
4026
4009,4041
4031,4046
4019,4044,4051
4043
4023,4037
4026
4034
4015, 4052
4037, 4059
4026,4053
4040
4033, 4045
32
Page 39
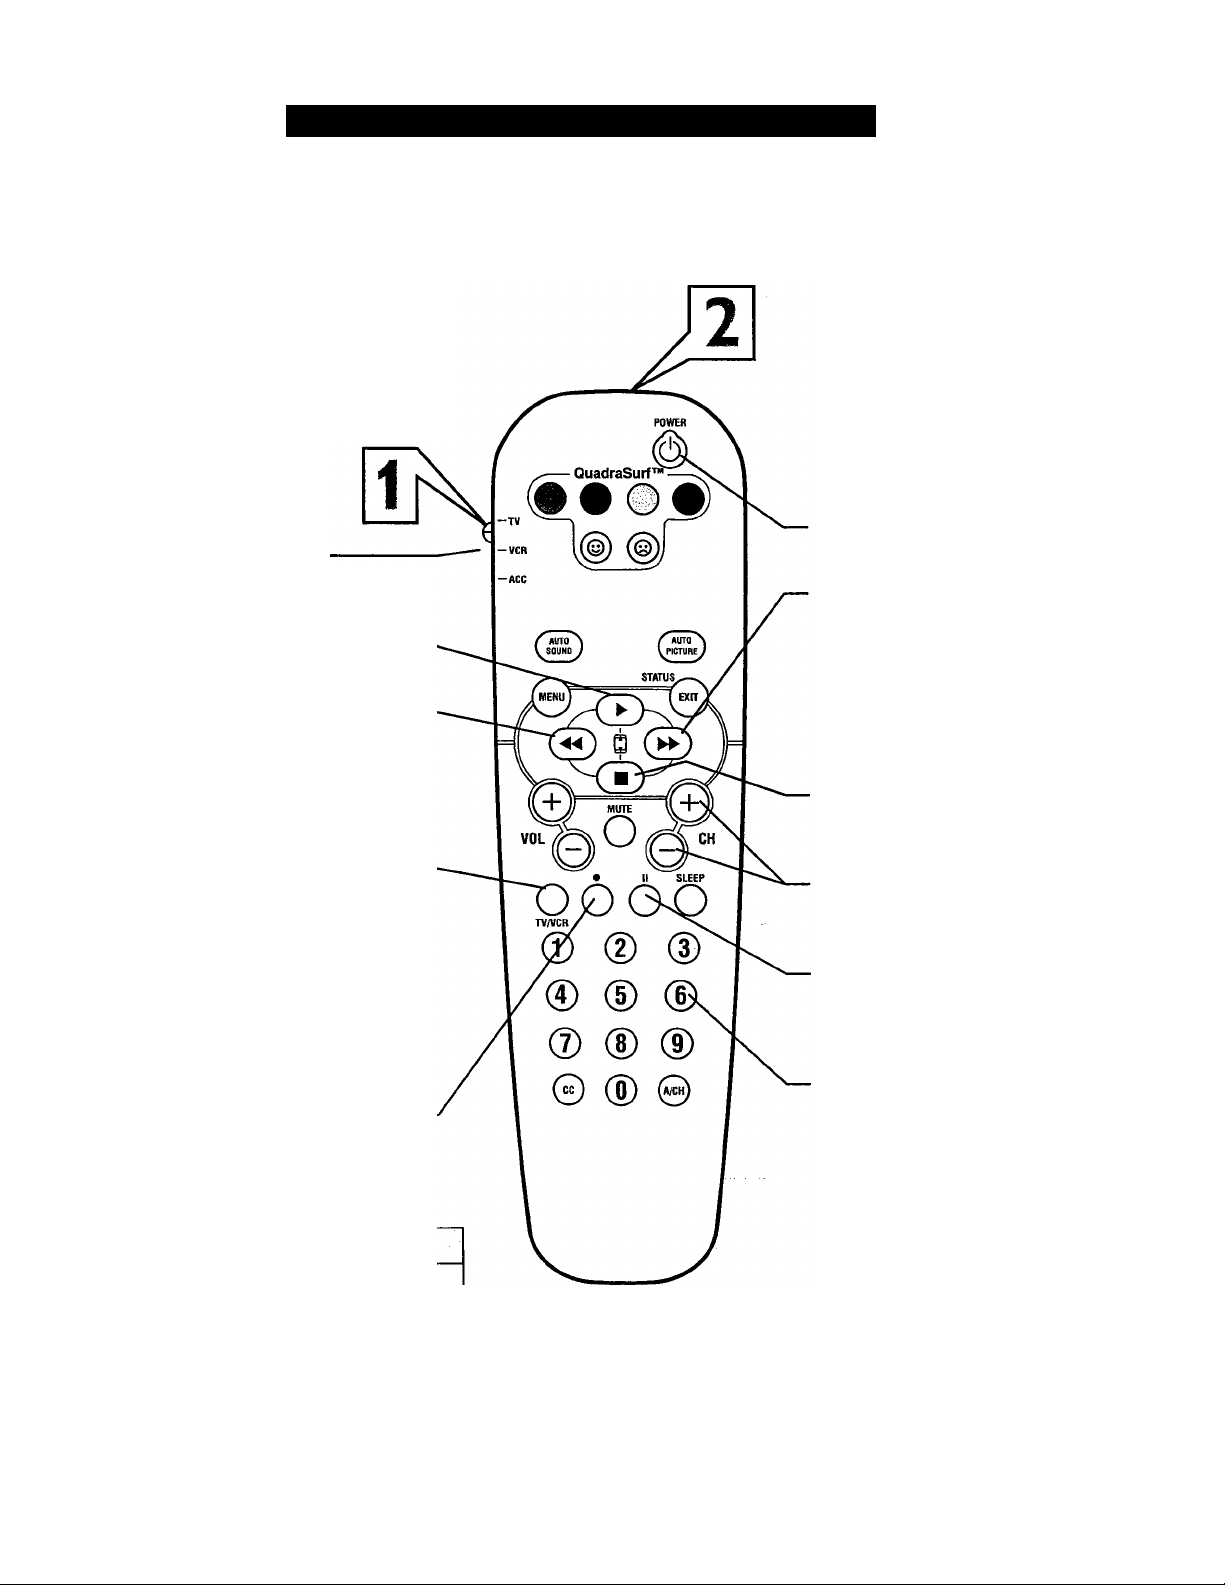
Remote Control VCR Related Buttons
hen using the TV remote with a VCR,
first make certain it is set to control
W
your VCR (by the REMOTE CODE or
SEARCH method).
Set the TV/VCR/ACC mode switch
to VCR on the remote.
Point the top of the remote toward
the front of the VCR (remote sensor
window) when pressing the buttons.
VCR SYSTEM SWITCH
Set in the VCR position to send remote
commands to the VCR.
PLAY BUTTON ^
Press to begin playback of a video tape.
REWIND BUTTON
Press to rewind tapes. For some VCR’s
the STOP button may have to be
pressed first, then REWIND. In play
back mode hold down the button to
view picture moving rapidly in reverse.
(Clock) TV/VCR BUTTON
Press while in the VCR mode (VCR indi
cator on the front of the unit will light) to
view the playback of a tape. Press again to
place in the TV position (VCR indicator
light will go off) to view one program
while recording another program.
When used in the TV mode, the
CLOCK/TVA^CR button will access the
TV's Clock menu options.
RECORD • BUTTON
Hold the VCR • RECORD button down to
begin a VCR recording.
-----------------------------
-------------------------
W.
POWER BUTTON
Press to turn the VCR ON and OFF.
FAST FORWARD BUTTON ^
Press to rapidly advance the tape. For
some VCR’s you may need to press
the STOP button first, then the FAST
FORWARD button. In playback mode
hold the button down to view the pic
ture moving rapidly in the forward
direction.
STOP BUTTON ■
Press to stop the motion of a tape in
playback, rewind, fast forward, etc.
CHANNEL + &- BUTTONS
Press to scan up or down through the
VCR channel numbers.
PAUSE BUTTON II
Press to temporarily stop the tape dur
ing a playback or recording. Press
again to release Pause.
NUMBER BUTTON
Press buttons for direct VCR channel
selections.
Helpful Hint
The VCR buttons on the remote will not oper
ate your VCR if those features are not found on
your VCR remote control.
Note: All VCR functions (particularly Search,
Rewind, Fast Forward, etc.) will operate the
same as with the original VCR remote control
provided with the VCR.
33
Page 40

T ROUBLESHOOTING
No Power
• Check the TV power cord. Unplug the TV, wait 10 seconds,
then reinsert the plug into the outlet and push the POWER
button again.
• Check that the outlet is not on a wall switch.
• Be sure the fuse is not blown on the AC power strip, if one is
being used.
No Picture
• Check antenna connections. Are they properly secured to the
TV's ANT 75Q plug?
• Check the TUNER MODE control for the correct tuner set
ting.
• Try running the Auto Program feature to find all available
channels.
• Press the AV button on the remote to make sure the correct
signal source is selected (FRONT or Current Channel).
No Sound
• Check the VOLUME buttons.
• Check the MUTE button on the remote control.
• If you’re attempting to hook up auxiliary equipment, check
the audio jack connections located on the front of the TV.
TV Only Produces MONO Sound
• If using a cable box with RE only type connections, the signal
coming from the cable box will be produced in MONO only.
• Check Sound control setting. Change setting to Stereo.
Remote Does Not Work
• Check the batteries. If necessary, replace them with AA
Heavy Duty (Zinc Chloride) or Alkaline batteries.
• Clean the remote control and the remote control sensor win
dow on the TV.
• Check the TV power cord. Unplug the TV, wait 10 seconds,
then reinsert the plug into the outlet and push the POWER
button again.
• Be sure the fuse is not blown on the AC power strip, if one is
being used.
• Check to be sure the TV outlet is not on a wall switch.
TV Displays Wrong Channel or No Channels Above 13
• Repeat channel selection.
• Add the desired channel numbers (using the CHANNEL
EDIT control) into the TV’s memory.
• Check to be sure the TUNER MODES are set to the CABLE
option and run the Auto Program feature to find all available
channels.
34
Page 41

Care and Cleaning
WARNING Concerning Stationary Images on the TV
Screen:
Do not leave stationary or letterbox images on screen
for extended periods of time. This can cause uneven
picture-tube aging.
Normal use of the TV should involve the showing of pictures
that contain constantly moving and changing images that fill the
screen. Be careful not to leave nonmoving images on screen for
extended periods of time, or to display the same images on
screen too frequently, because subtle ghost images can be left
on the picture tubes. Sources of stationary images may be DVD
disks, laser disks, video games, CD-i disks, videotapes, digital
television boxes, broadcast channels, cable channels, satellite
channels, and others. Here are some examples of stationary
images (this is not an all-inclusive list; you may encounter
others in your viewing):
• DVD menus—listings of DVD disk content
• Letterbox black bars—shown at the top and bottom of the
TV screen when a wide screen (16:9) movie is viewed on a
TV with standard (4:3) aspect ratio.
• Video-game images and scoreboards
• Television station logos—^present a problem if they are
bright and stationary; moving or low-contrast graphics are
less likely to cause uneven aging of the picture tube
• Stock-market tickers—presented at the bottom of the TV
screen
• Shopping channel logos and pricing displays—bright
and shown constantly or repeatedly in the same location on
the TV screen.
Placement of the TV
• To avoid cabinet warping, cabinet color changes, and
increased chance of set failure, do not place the TV where
temperatures can become excessively hot; for example, in
direct sunlight or near a heating appliance.
• Be sure to allow a free flow of air to and from the perforated
back cover of the set.
Cleaning
• To avoid possible shock ha2ard, be sure the TV is unplugged
from the electrical outlet before cleaning.
• Regularly dust the TV with a dry, nonscratching duster to
keep the TV clean.
• When cleaning the TV, take care not to scratch or damage the
screen surface. Avoid wearing jewelry or using anything
abrasive. Do not use household cleaners. Wipe the front
screen with a clean cloth dampened with water. Use even,
easy, vertical strokes when cleaning.
• Gently wipe the cabinet surfaces with a clean cloth or sponge
dampened in a solution of cool, clear water and a mild soap
or detergent. Use a clean, dry cloth to dry the wiped surfaces.
• Occasionally vacuum the ventilation holes or slots in the back
cover of the set.
• Never use thinners, insecticide sprays, or other chemicals on
or near the cabinet, as they might cause permanent marring
of the cabinet finish.
35
Page 42

Glossary of Terms
Auto Programming • The procedure of adding or deleting
channel numbers into the Television’s memory circuits. In this
way the Television “remembers” only the locally available or
desired channel numbers and skips over any unwanted channel
numbers.
Coaxial Cable • A single solid antenna wire normally matched
with a metal plug (F-type) end connector that screws (or pushes)
directly onto a 75 Ohm input found on the Television or VCR.
Closed Caption • Broadcast standard which allows you to
read the voice content of television programs on the TV screen.
Designed to help the hearing impaired this feature uses on
screen "text boxes" to show dialogue and conversations while
the TV program is in progress.
Side Audio/Video Inputs • Located on the side of the TV
these connectors (phono type plug) are used for the input of
audio and video signals. Designed for easy use with VCRs or
cameras.
On Screen Displays (OSD) • Refers to the wording or mes
sages generated by the television (or VCR) to help the user with
specific feature controls (color adjustment, programming, etc.).
Menu • An on-screen listing of feature controls shown on the
Television screen that are made available for user adjustments.
Quadra Surf • The feature that allows the programming of
four separate Surf lists holding up to 10 channels each.
Remote Sensor Window • A window or opening found on
the Television control panel through which infrared remote con
trol command signals are received.
Status/Exit • Allows the user to quickly confirm what channel
number is currently being viewed. Status can also be used to
clear the Television of on screen displays or information (rather
than waiting for the displays to “time out” or automatically dis
appear from the screen).
Surf • The action of scanning specific channel in a limited
channel list.
Twin Lead Wire • The more commonly used name for the
two strand 300 Ohm antenna wire used with many indoor and
outdoor antenna systems. In many cases this type of antenna
wire requires an additional adapter (or balun) in order to con
nect to the 75 Ohm Input terminals designed into the more
recent Televisions and VCRs.
Tuner Mode • Feature control settings made by the TV.
Designed for first time set up and use. Settings for signal con
nections (antenna or cable TV), plus channel program memory
are held in the TV's memory (even if the set is unplugged and
moved to a new location.)
36
Page 43

Active Control .........................................................................20
Factory Service Information...............................................38-39
Alternate Channel....................................................................25
Auto Lock
Access Code
Block All Control ................................................................16
Block Channels Control
Blocking Options .................................................................19
Clear All Control..................................................................15
Explanation of Auto Lock....................................................12
Movie Rating Control...........................................................17
TV Rating Control................................................................18
Auto Picture Control ...............................................................23
Auto Program Control
Auto Sound Control.................................................................24
AVL Control............................................................................10
Balance Control
Bass Boost Control
........................................................................
......................................................
..............................................................
......................................................................
..................................................................
13
14
10
10
Format (Expand 4:3) Control
Glossary of Terms....................................................................36
Index........................................................................................ 37
Language Control.......................................................................5
Picture Control
Remote Control Buttons.............................................................6
Remote Control Operation (Basic)
Remote Control Programming
Code Entry Method .............................................................. 28
Direct Access Method
Remote Code List
7
Search Method
VCR Remote Buttons
Safety Instructions
Sharpness Control
Sleeptimer Control...................................................................21
...........................................................................
.............................................................
.......................................................................
....................................................................
......................................................................
..................................................
............................................
..........................................................
............................................................
11
9
5
27
30-32
29
33
3
9
Brightness Control ....................................................................9
Care and Cleaning
Channel Edit Control (Add and Delete Channels)
Closed Caption Control
Color Control ............................................................................9
Color Temperature Control
Contrast + Control
Dynamic Noise Reduction (DNR) Control
..................................................................
....................
..........................................................
.......................................................
....................................................................
..............................
35
22
Surf/Quadra Surf Controls .................................................25-26
Table of Contents
8
Tint Control ...............................................................................9
Troubleshooting Tips ..............................................................
Treble Boost Control ...............................................................10
9
Tuner Mode Control...................................................................6
9
Limited Warranty ....................................................................40
9
Welcome/Registration Information ...........................................2
.......................................................................
4
34
37
Page 44
•k Indicates In-Home Service Only
Milwaukee: call Chicago
Cincinnati and Columbus: call Cleveland
Nashville and Chattanooga: call Knoxville
Washington/Baltimore: call Philadelphia
Chariotte: call Atlanta
All Florida locations; call Tampa
* Indicates In-Home/Carry-ln Service
Toll-free numbers provided on the next page
Factory Service Locations
Tampa/W Fiorida
k Ft. Myers/SW Florida
' Miami/SE Florida
Philadelphia/S New Jersey
t^rWash/Bait
NOTE: If you reside in one of our Philips Factory Service Branch areas (see directory on back), you can contact the nearest Service Branch to obtain
efficient and expedient repair for your product. If your product is In-Warranty, you should have proof-of-purchase to ensure No Charge Service. For
Out-of-Warranty service, call the location nearest you.
NOTA: Si vous résidez dans une des régions desservies par une succursale de service après vente du fabricant Phiiips (voir liste ci-dessous), vous
pourrez contacter la branche de service après vente la plus près de chez vous pour obtenir un service après vente rapide et efficace. Si le produit est
sous garantie, il suffira de présenter une preuve d'achat pour bénéficier d'un service sans frais. Pour les produits non couverts par la garantie, con
tactez ie centre le plus près de chez vous.
NOTA: Si Ud. reside en una de nuestras zonas para sucursales Philips de servicio al de fábrica (ver directorio más abajo), Ud. puede comunicarse con
ia sucursai de servicio más cercana para obtener una reparación oportuna y eficaz de su producto. Si su producto está todavía bajo garantía, Ud.
debe presentar comprobante de compra para no ocasionar ningunos cargos por servicio. Para servicio después del vencimiento de la garantía, llame
al lugar más cercano de los abajo indicados.
In Canada
How you can obtain efficient and expedient carry-in, mail-in, or in-home service for your product
Piease contact Philips at 1 -800-661-6162 (French speaking)
1-800-531-0039 (English or Spanish speaking)
Au Canada
Comment obtenir le service après-vente pour les produits apportés ou envoyés par la poste à notre centre de service ou le service à domicile
Veuillez contacter philips á: 1 -800-661 -6162 (Francophone)
1-800-531-0039 (Anglais ou Espagnol) .
En el Canadá
Cómo recibir servicio efficiente para su producto, en persona, por correo o a domicilio
Favor de comunicarse con Philips al: 1-800-661-6162 (francòfono)
1-800-531-0039 (Inglés o Español))
Rev. GG - 11/20/2002
38
Page 45

Factory Service Locations
Quality service is as close as your telephone! Simply look over the ust below for the number of a Factory Service Center
NEAR YOU. Your product will receive efficient and expedient carry-in, mail-in, or in-home service, and you will receive peace of mind,
KNOWING YOUR PRODUCT IS BEING GIVEN THE EXPERT AHENTION OF PHILIPS’ FACTORY SERVICE.
COMMENT OBTENIR NOTRE SERVICE APRÈS VENTE RAPIDE ET EFFICACE SOIT PAR COURRIER, A DOMICILE, OU EN SE PRÉSENTANT À UN CENTRE DE SERVICE PHILIPS. PLUS DE BOO CENTRES DE
RÉCEPTION DE PRODUITS A RÉPARER A TRAVERS LE PAYS: CONTACTER LE CENTRE DE SERVICE AUX CONSOMMATEURS LE PLUS PROCHE POUR SAVOIR L’EMPLACEMENT DE CES DÉPÔTS DANS
CÓMO OBTENER UN SERVICIO OPORTUNO Y EFICIENTE POR CORREO, EN CASA O EN PERSONA PARA SU PRODUCTO A TRAVÉS DE UN CENTRO PHILIPS DE SERVICIO. MAS DE 600 SITIOS POR
TODO EL PAIS PARA LA RECEPCION DE PRODUCTOS NECESITADOS DE REPARACIONES: COMUNICARSE CON EL CENTRO DE SERVICIO DE FABRICA MAS CERCANO PARA ESTOS LUGARES DENTRO
ATLANTA CLEVELANO CHICAGO
Philips Factory Service Philips Factory Service
550 Franklin Road., Suite F 950 Keynote Circle
Marietta, GA 30067
800-273-1501
TAMPA
Philips Factory Service Philips Factory Service
1911 US Highway 301 North, Suite 100
Tampa, FL 33619
800-442-2027
SAN FRANCISCO DALLAS
Philips Factory Service
681 East Brokaw Rd.
San Jose, CA 95112
800-300-9013
HOUSTON
Philips Factory Service
1110 N. Post Oak Rd., Suite 100 20930 Bonita, Ste. V
Houston, TX 77055 Carson, CA 90746
800-952-3254 800-300-9013
UN RAYON DE 50 A 75 MILES (80 KM A120 KM) DU CENTRE DE SERVICE LOCAL.
DE UN RADIO DE 80 A120 KM (50 A 75 MILUS) DEL CENTRO DE SERVICIO LOCAL.
Philips Factory Service
1279 W. Hamilton Pkwy.
Brooklyn Heights, OH 44131 Itasca, IL 60143
800-331-7037 800-531-2922
DETROIT
25173 Dequindre
Madison Heights, Ml 48071 Knoxville, TN 37914
800-438-1398
KNOXVILLE
Philips Factory Service
One Philips Drive
800-821-1767
PHILADELPHIA
Philips Factory Service
415 N. Main Street, #107 352 Dunks Ferry Rd.
Euless, TX 76040
800-952-3254
Philips Factory Service
Bensalem, PA 19020
800-847-9320
LOS ANGELES
Philips Factory Service
39
Page 46

Limited Warranty
COLOR TELEVISION
90 Days Free Labor
One Year Free Replacement of Parts (Two Years Free Replacement on Color Picture Tube)
This product can be repaired in home.
WHO IS COVERED?
You must have proof of purchase to receive warranty service. A sales
receipt or other document showing that you purchased the product is
considered proof of purchase.
WHAT IS COVERED?
Warranty coverage begins the day you buy your product For 90 days
thereafter, all parts will be repaired or replaced free, and labor is free.
From 90 days to one year from the day of purchase, all parts will be
repaired or replaced free, but you pay for all labor charges. From one
to two years from the day of purchase, you pay for the replacement
or repair of all parts except the picture tube, and for all labor charges.
After two years from the day of purchase, you pay for the replacement
or repair of all parts, and for all labor charges.
All parts, including repaired and replaced parts, are covered only for
the original warranty period. When the warranty on the product
expires, the warranty on all replaced and repaired parts also expires.
WHAT IS EXCLUDED?
Your warranty does not cover
* labor charges for installation or setup of the product, adjustment of
customer controls on the product, and installation or repair of
antenna systems outside of the product
* product repair and/or part replacement because of misuse, acci
dent unauthorized repair or other cause not within the control of
Philips Consumer Electronics Company.
* reception problems caused by signal conditions or cable or antenna
systems outside the unit
« a product that requires modification or adaptation to enable it to
operate in any country other than the country for which it was
designed, manufactured, approved and/or authorized, or repair of
products damaged by these modifications.
* incidental or consequential damages resulting from the product
(Some states do not allow the exclusion of incidental or consequen
tial damages, so the above exclusion may not apply to you. This
includes, but is not limited to, prerecorded material, whether copy
righted or not copyrighted.)
* a product used for commercial or institutional purposes.
WHERE IS SERVICE AVAILABLE?
Warranty service is available in all countries where the product is officiaily distributed by Philips Consumer Electronics Company. In coun
tries where Philips Consumer Electronics Company does not distribute
the product, the local Philips service organization will attempt to pro
vide service (although there may be a delay if the appropriate spare
parts and technical manual(s) are not readily available).
MAKE SURE YOU KEEP...
Please keep your sales receipt or other document showing proof of
purchase. Attach it to this owner's manual and keep both nearby.
Also keep the original box and packing material in case you need to
return your product.
BEFORE REQUESTING SERVICE...
Please check your owner’s manual before requesting service.
Adjustments of the controis discussed there may save you a service
call.
TO GET WARRANTY SERVICE IN U.S.A.,
PUERTO RICO OR U.S. VIRGIN ISLANDS...
Contact a Philips factory service center (see enclosed list) or author
ized service center to arrange repair.
(In U.SA., Puerto Rico and U.S. Virgin Islands, all implied warranties,
including implied warranties of merchantability and fitness for a partic
ular purpose, are limited in duration to the duration of this express
warranty. But, because some states do not aliow limitations on how
long an implied warranty may last, this limitation may not apply to
you.)
TO GET WARRANTY SERVICE IN CANADA...
Please contact Philips at:
I -800-661-6162 if calling from Canada (French speaking)
I -800-531 -0039 (English or Spanish speaking)
(In Canada, this warranty is given in lieu of all other warranties. No
other warranties are expressed or implied, including any impiied war
ranties of merchantability or fitness for a particular purpose. Philips is
not liable under any circumstances for any direct, indirect, special, inci
dental or consequential damages, howsoever incurred, even if notified
of the possibility of such damages.)
REMEMBER...
Please record the model and serial numbers found on the product
below. Also, please fill out and mail your warranty registration card
promptly. It will be easier for us to notify you if necessary.
MODEL#
SERIAL#
, .. ,^ ThtS‘WarranfY gives you speafic legal rights. You may have other rights Mdiidi vary,fromistatelproyirKe to state/province. ~ " i
Philips, P.O. Box 520890, Miami, FL 33152, (402)536-4171
Printed in U.S.A.
40
 Loading...