

Philips 3222 623 87461 User guide [ml]

3222 623 87461
www.philips.com/support
LED inspection lamp
with docking station
EN LED inspection lamp with docking station
DE LED-Inspektionslampe mit Dockingstation
FR Lampe baladeuse à LED avec chargeur
NL LED-inspectielamp met oplader
ES Lámpara de inspección LED con estación de recarga
IT Lampada di ispezione a LED
PT Lâmpada de inspecção LED com carregador
RU Светодиодный инспекционный фонарь
PL Lampa inspekcyjna LED ze stacją dokującą
SV Inspektionslampa med LED med laddningsstation
NO LED-inspeksjonslampe med koplingsstasjon
DA LED inspektionslampe med opladningsstation
SU LED-tarkastuslamppu latausalustan kanssa
pal_hpds_lamp_guide_bat2_pal_hpds_lamp_guide 18/08/11 11:14 Page2
2
EN
English
Before you start
Thank you for buying the Philips LED
Inspection lamp. Its high-quality LED lighting
offers a powerful wide-angle light output and
a useful UV-A beam that will let you work in
your workshop, garage, or any other
professional environment under the best
lighting conditions.
Important
Please read this user guide carefully
before using your LED Inspection
lamp. This guide contains important
health and safety information.
If you need further assistance, please dial the
Philips lighting consumer care
toll-free number
Europe
+800 74 45 47 75
North America +1 800 257 6054
or visit your local Philips dealer.
For more information visit www.philips.com
The Philips LED Inspection
lamp bears the official Philips
Original Quality Equipment
seal. It is your assurance that
it is manufactured or
licensed by Philips using the highest-quality
components and materials. Philips, #1 in
automotive lighting worldwide, brings you
the professional lighting tool you need. It
combines Philips Original Quality, durability,
and simple-to-use design.
pal_hpds_lamp_guide_bat2_pal_hpds_lamp_guide 18/08/11 11:14 Page2
3
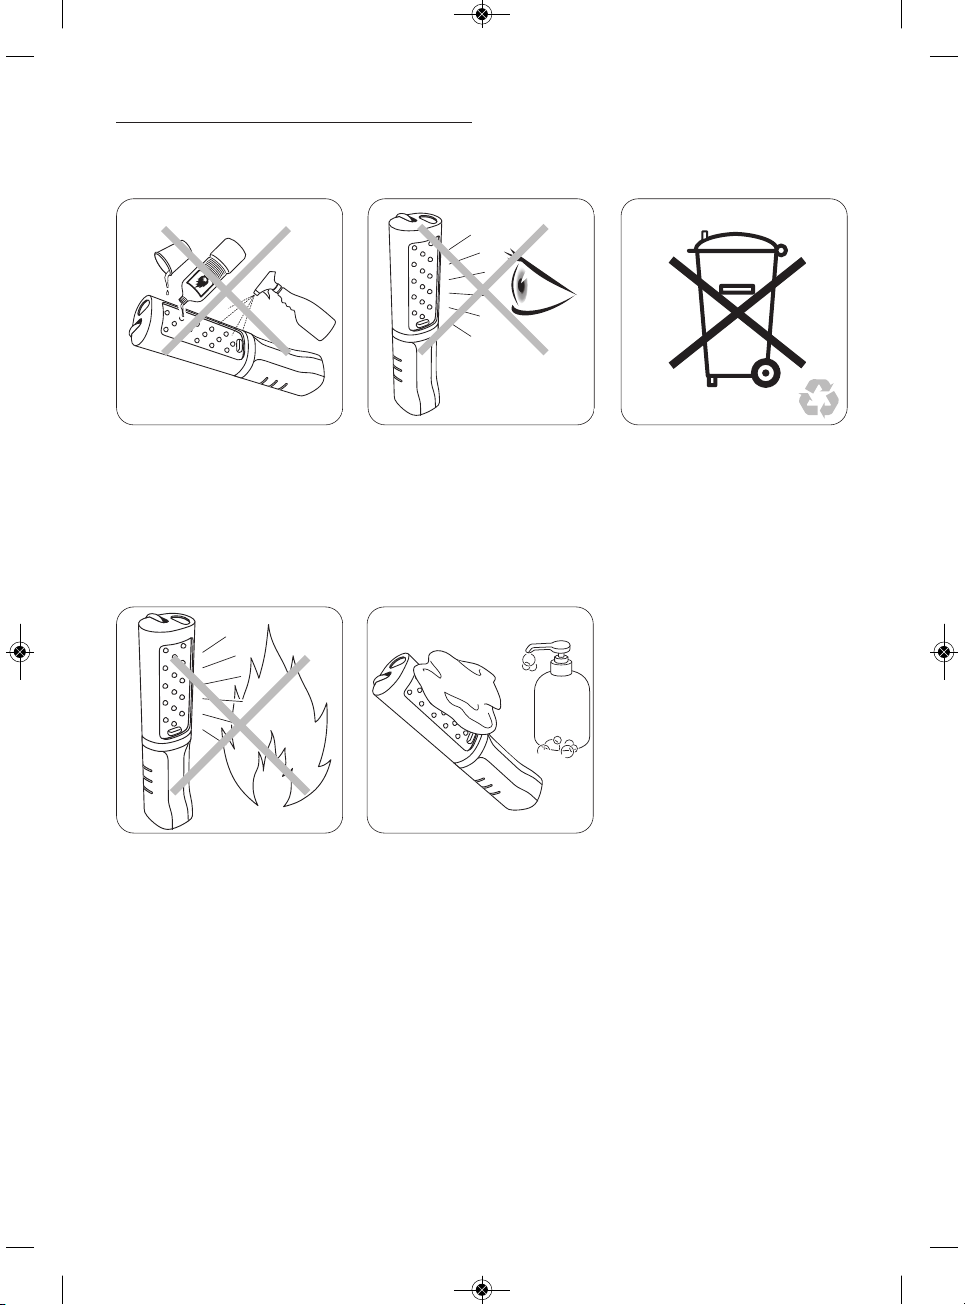
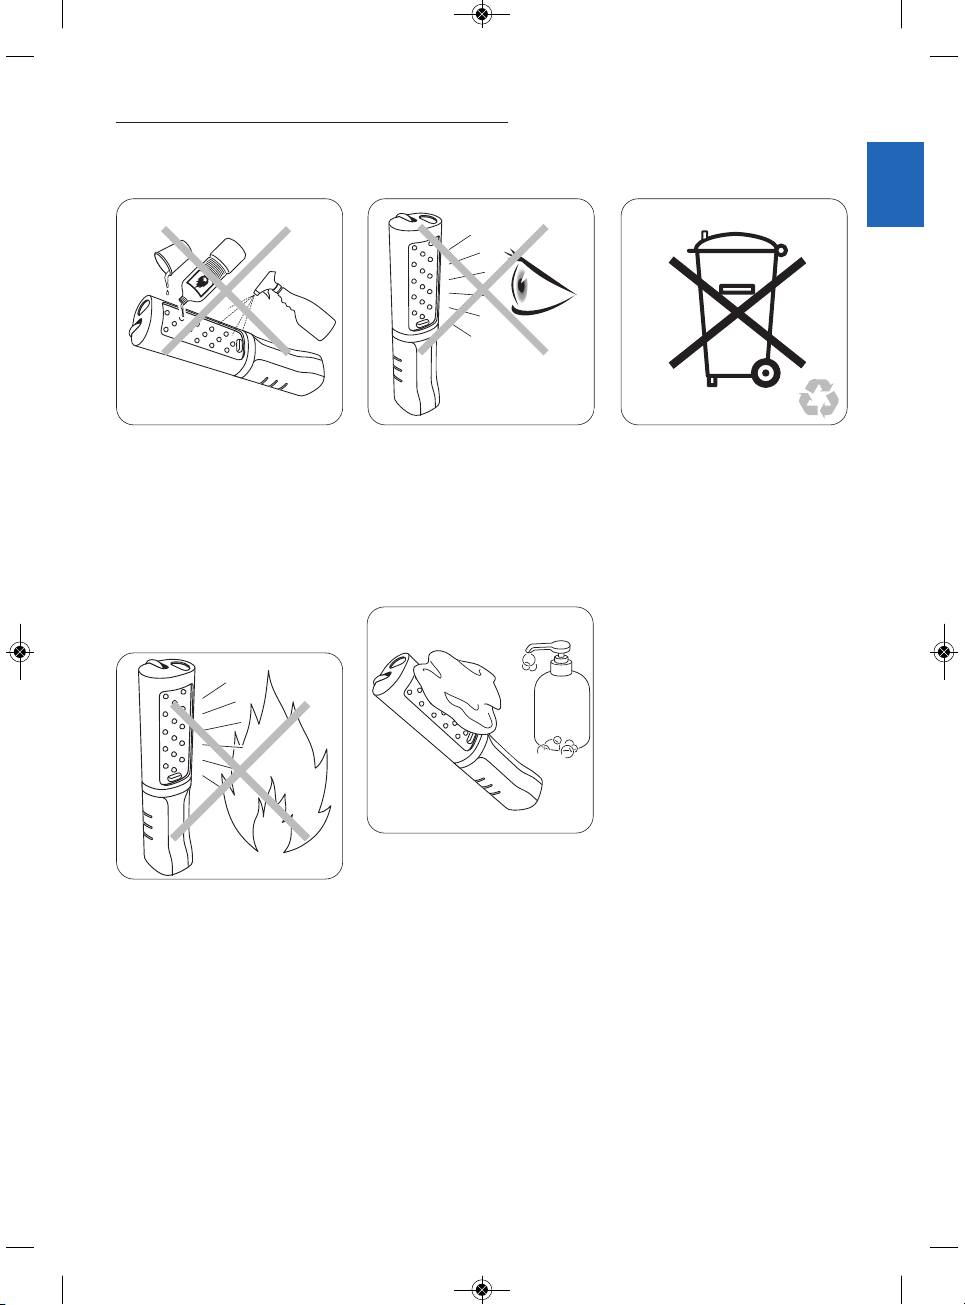
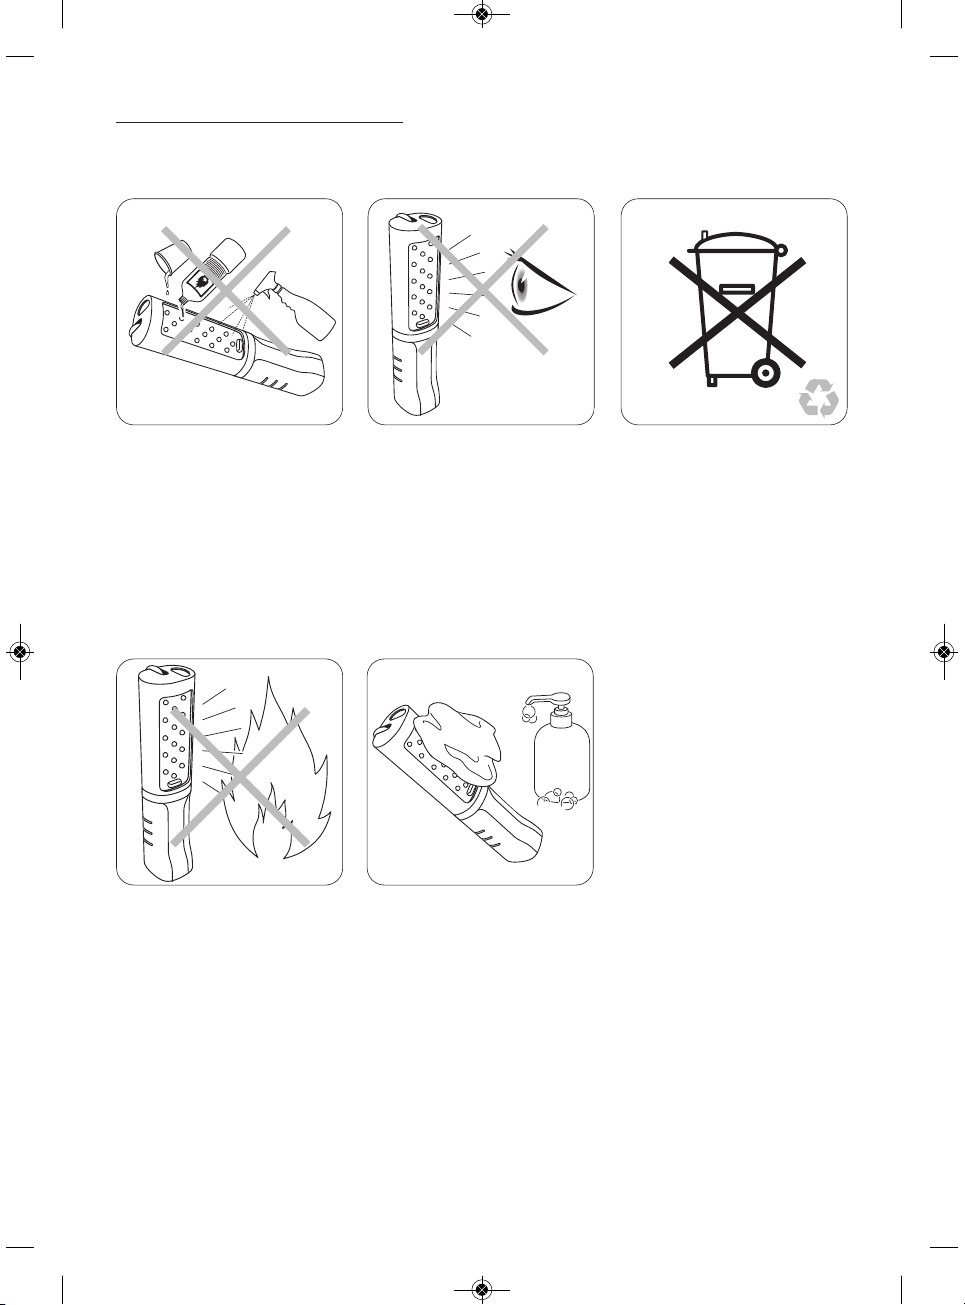
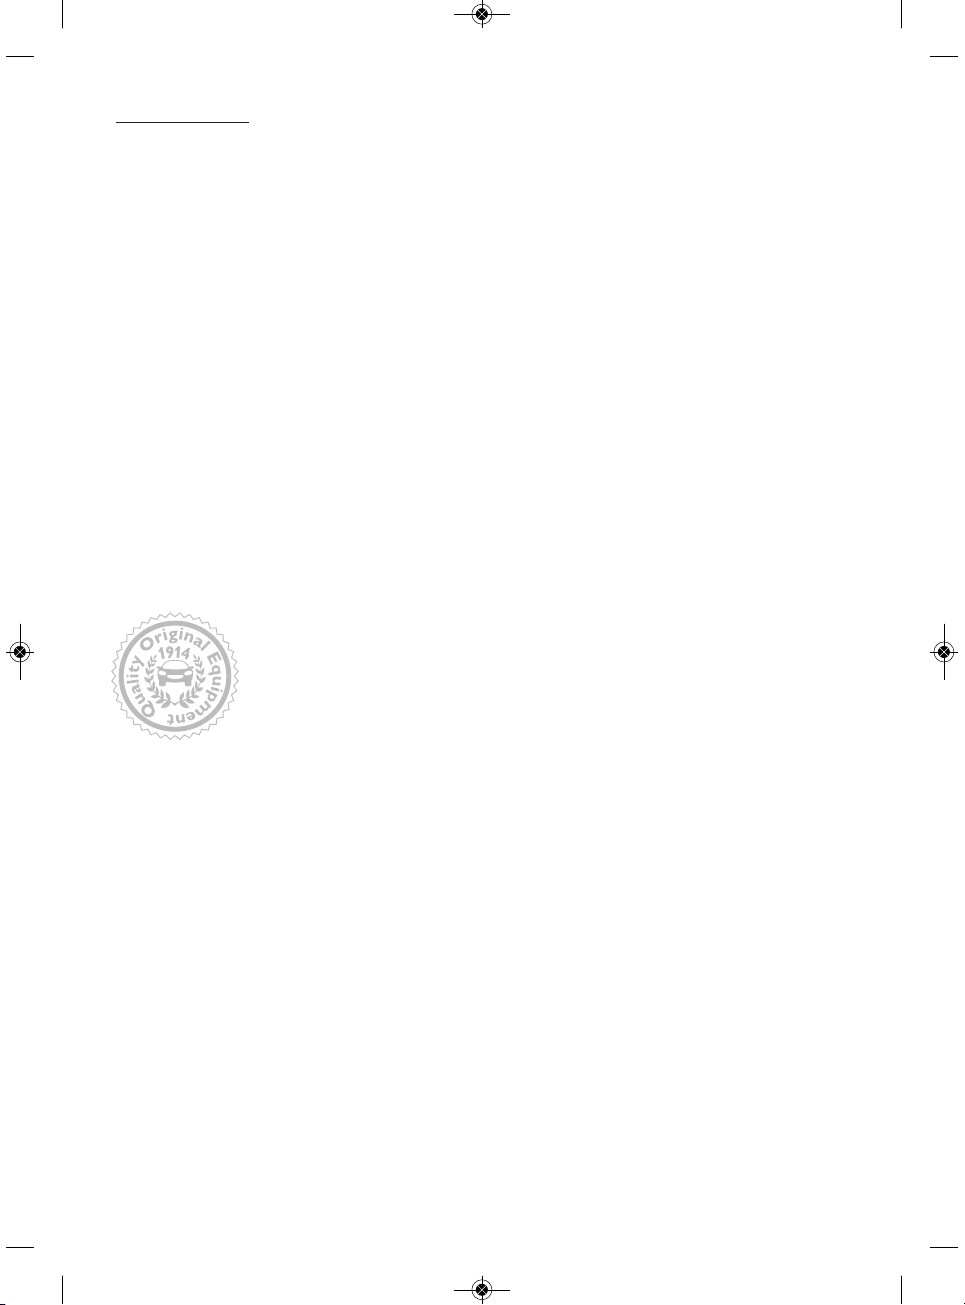
Danger
To avoid an electric shock
and/or a fire hazard, never use
the lamp near an open flame
or excessive heat.
Danger
Never look directly into the
operating lamp. It could be
harmful to your eyes.
Caution
To clean the LED Inspection
lamp:
• Use only plain soap with
a damp cloth
• Make sure the device is
completely dry before placing
it back on the docking station.
1 Important safety information
Danger
To avoid an electric shock
and/or a fire hazard, do not spill
water, detergent, or other
flammable liquids directly on
the LED Inspection lamp.
Environment
Important
Help to preserve the
environment.
Do not discard the packaging
and the device with household
waste.
It contains materials that may
be recycled.
Bring it to your neighborhood
recycling center.
pal_hpds_lamp_guide_bat2_pal_hpds_lamp_guide 18/08/11 11:14 Page3
4
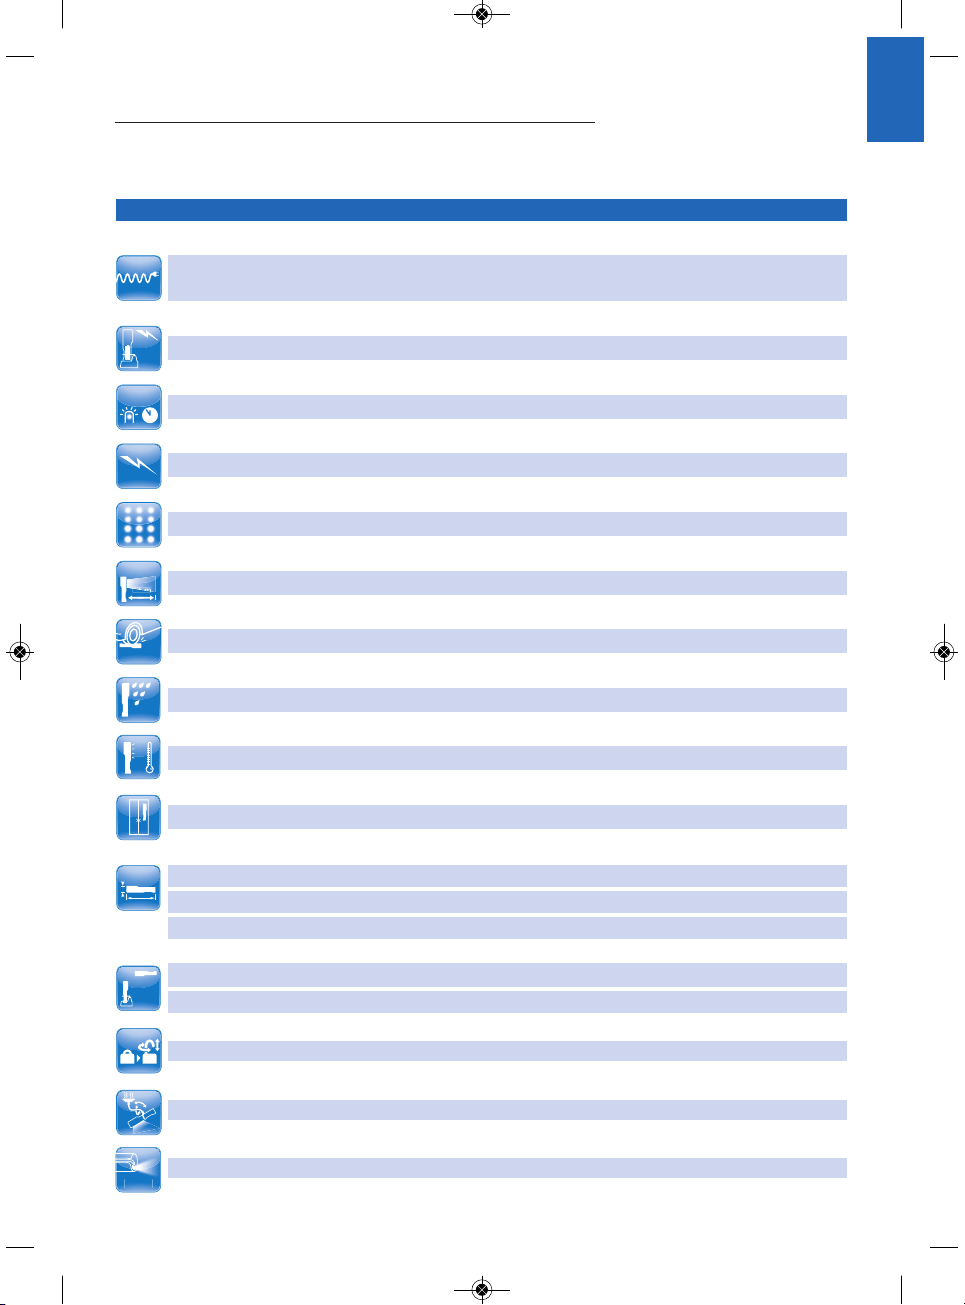
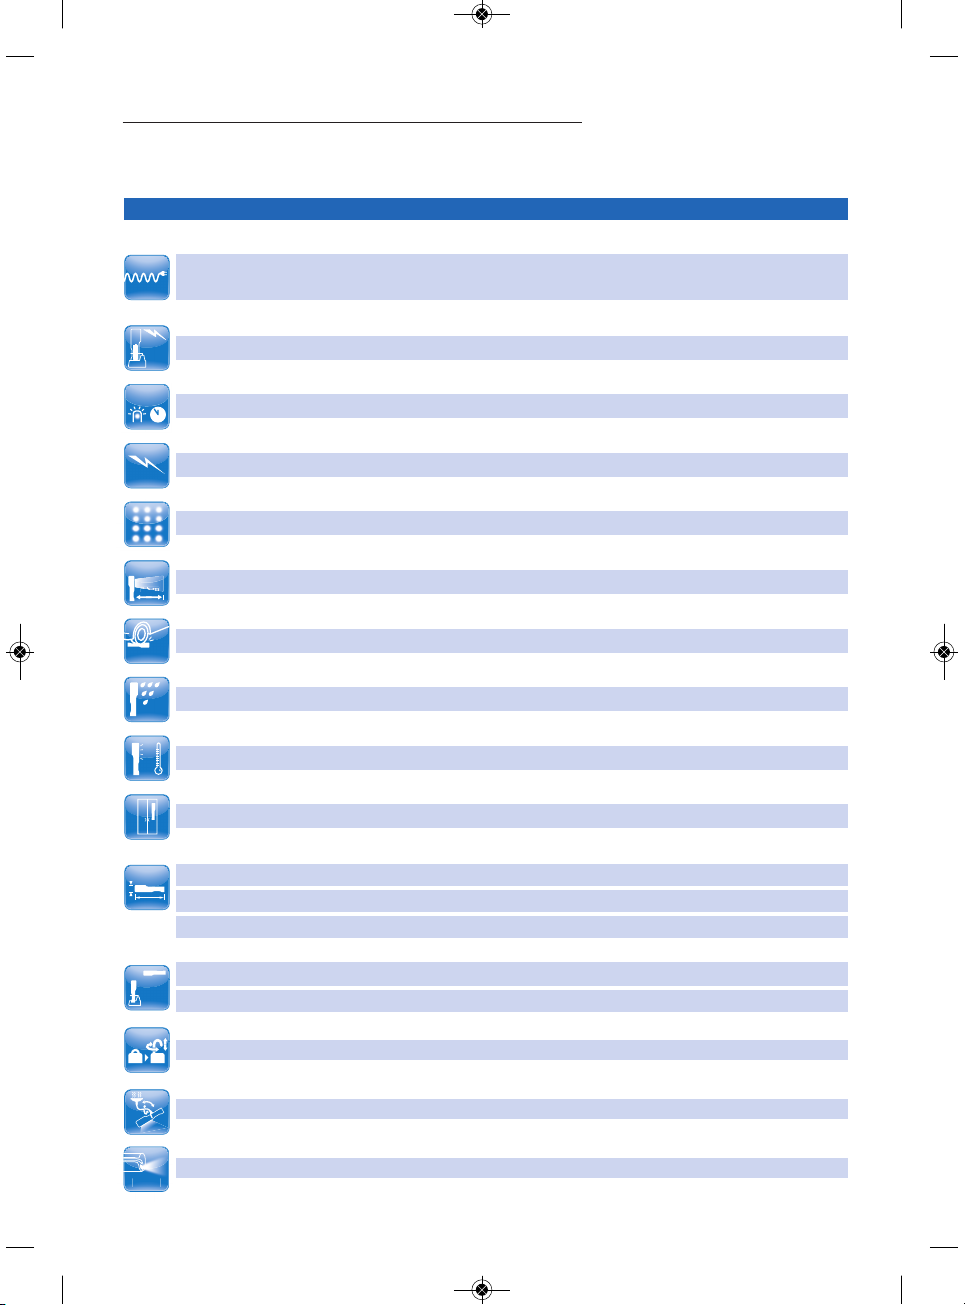
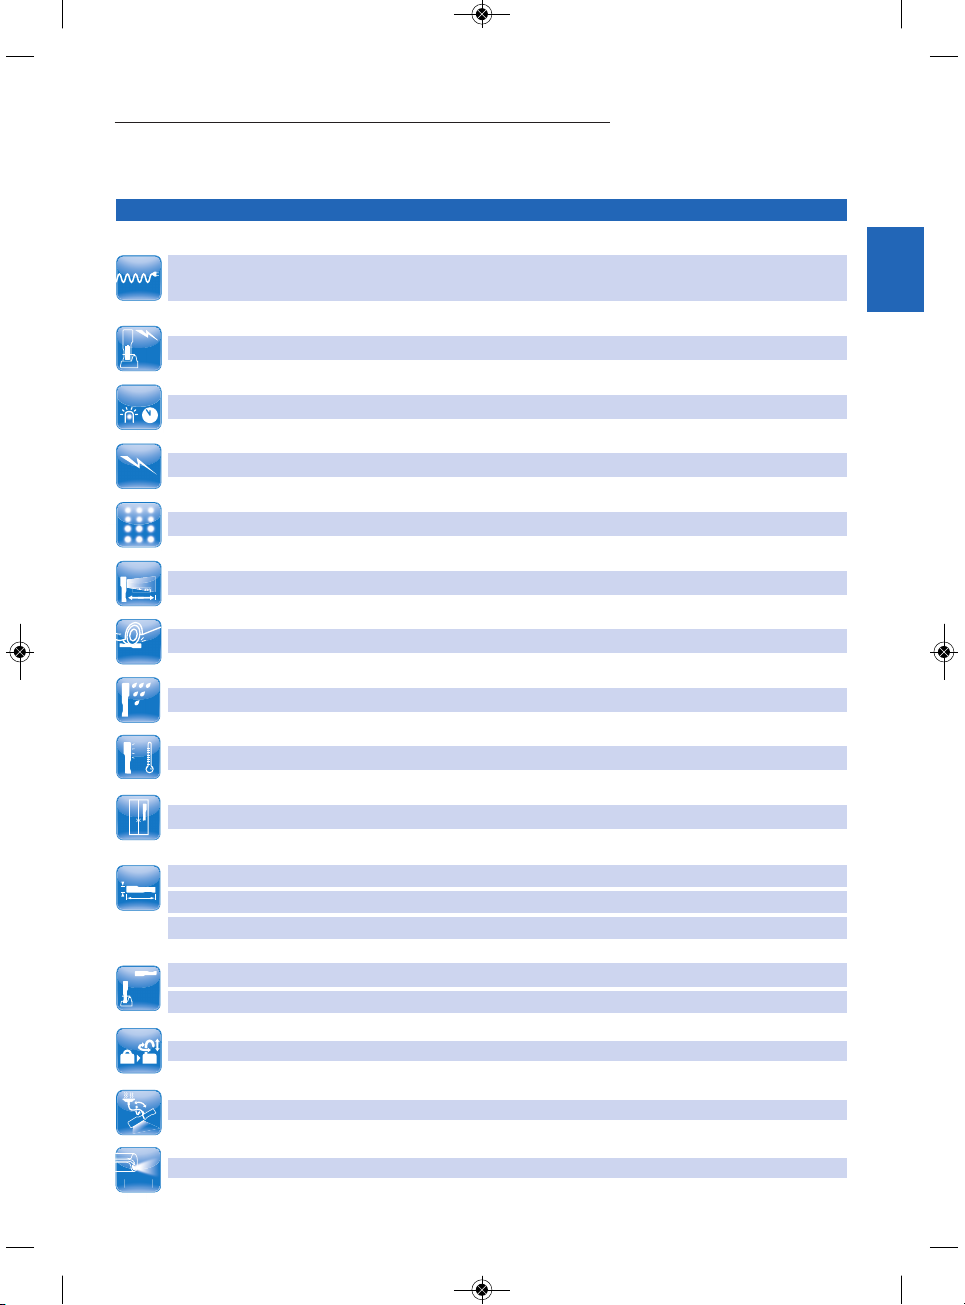
Product technical specifications and features
Description EU US
Operating line voltage 100~240V for adaptor 100~240V for adaptor
Output: 12V 1A Output: 12V 1A
Charging time 3.5 hours 3.5 hours
Battery performance up to 6 hours up to 6 hours
Power consumption 1.5W 1.5W
Number of LED 15 15
Light intensity (at 0.5m) 1 200 lux 1 200 lux
Impact protection rating IK09 IK09
Ingress protection rating IP66 IP66
Operating temperature -10°C to 50°C 14°F to 122°F
Storage temperature -20°C to 60°C -4°F to 140°F
Lamp dimensions 231 x 59 x 57 mm 9.1 x 2.3 x 2.2″
Docking station dimensions 108 x 123 x 129 mm 4.2 x 4.8 x 5″
Magnet holder dimensions 107 x 155 x 72 mm 4.2 x 6.1 x 2.8″
Product weight (with docking station) 550 g 19.4 lb.
Product weight (without docking station) 220 g 7.7 lb.
360° hook retractable retractable
Magnet holder magnet magnet
UV-A mode UV-A light UV-A light
220 g
550 g
3.5
h
> 6
H
IP
IK
0.5 m
100 V
240V
UV-A
UV-A
EN
pal_hpds_lamp_guide_bat2_pal_hpds_lamp_guide 18/08/11 11:14 Page4
5
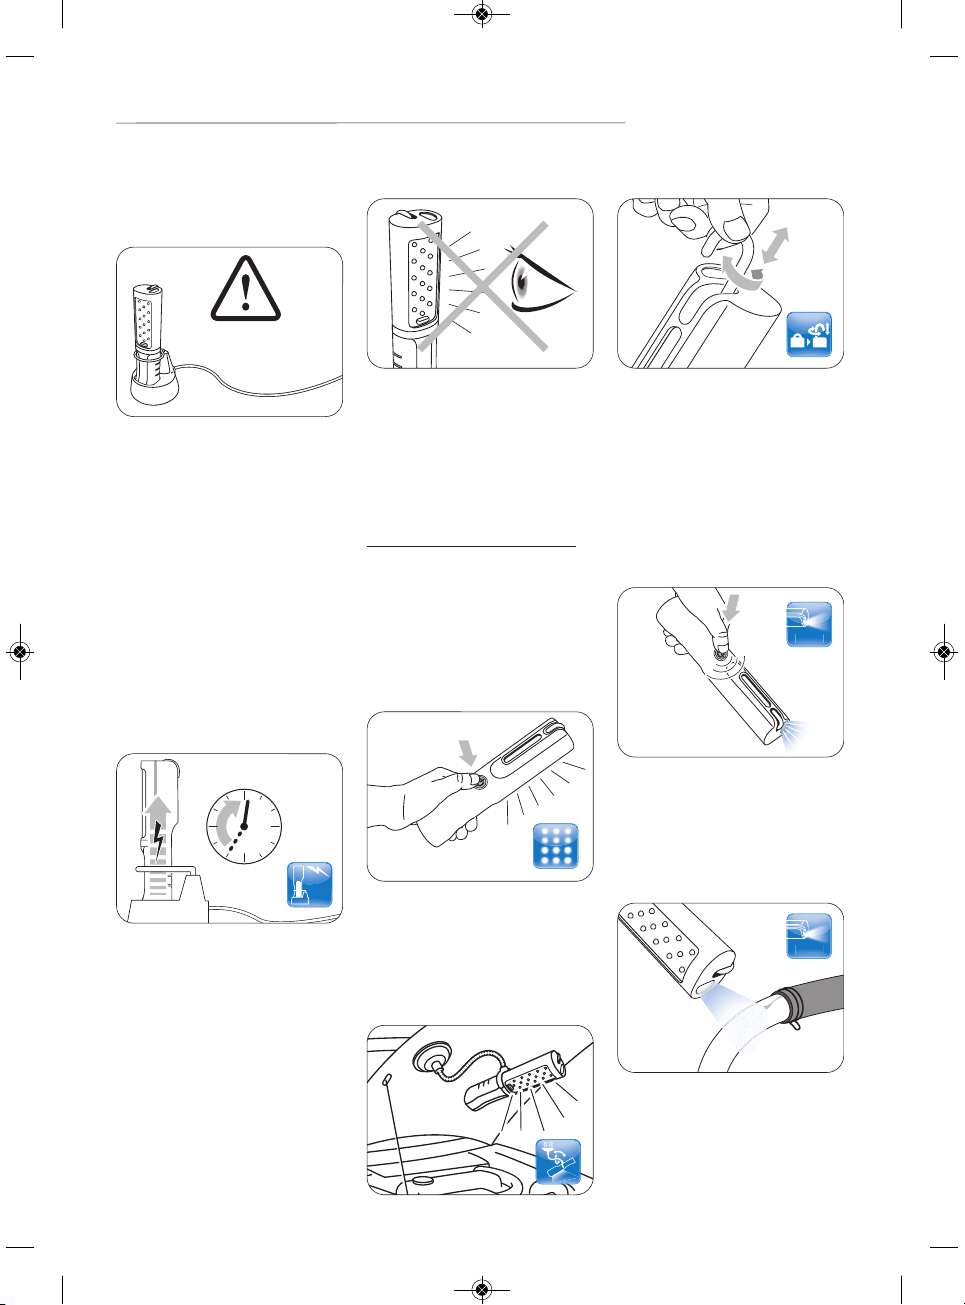
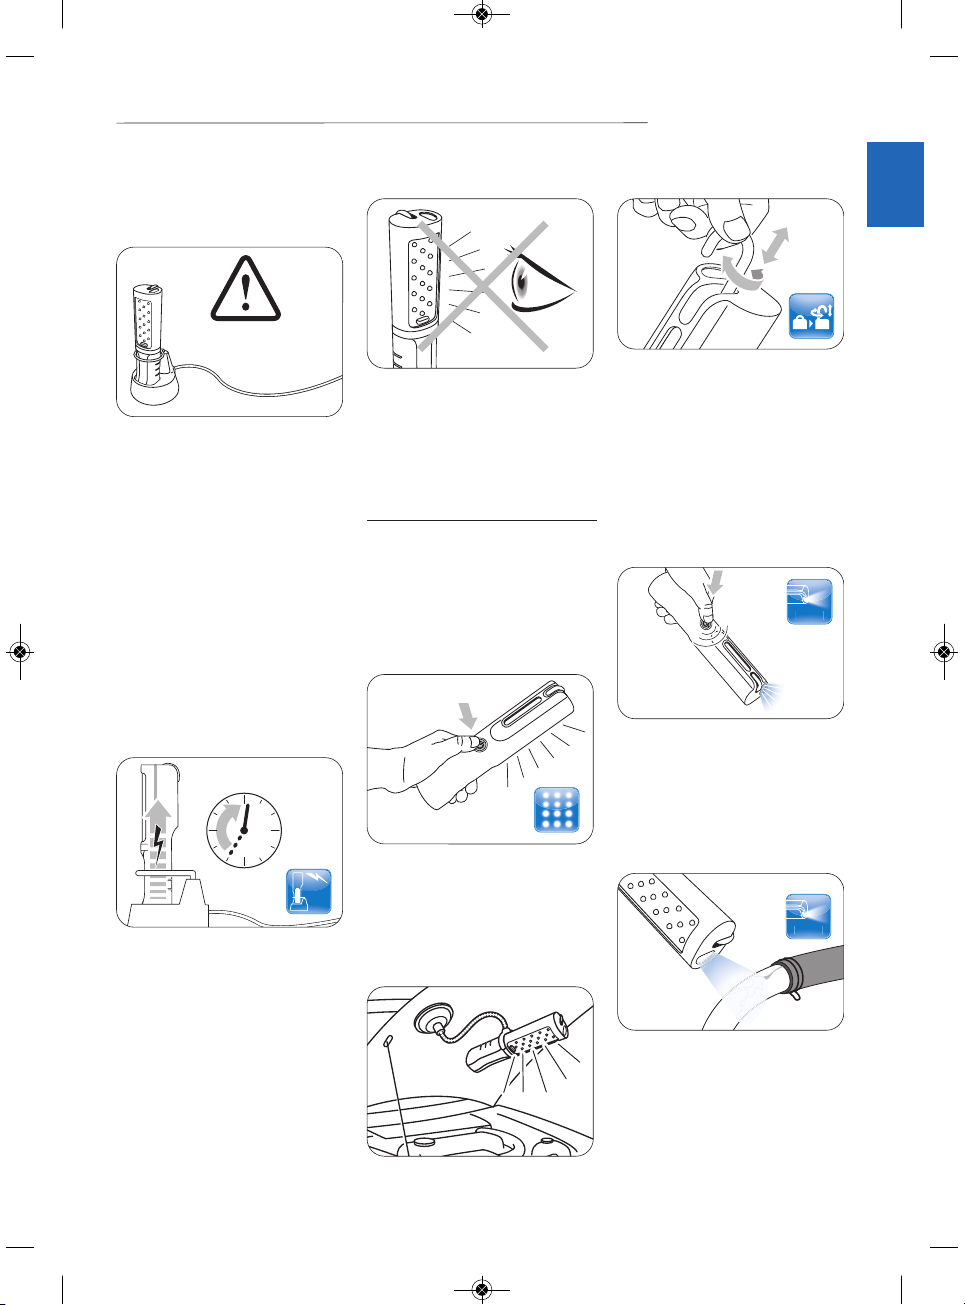
2 How to use the Philips LED Inspection lamp
2.1.2 Before you use
Philips LED Inspection
lamp for the first time
• Charge the device on your
docking station for 6 hours.
Important Maximum
autonomy may be reached after
2 complete charge-discharge
cycles.
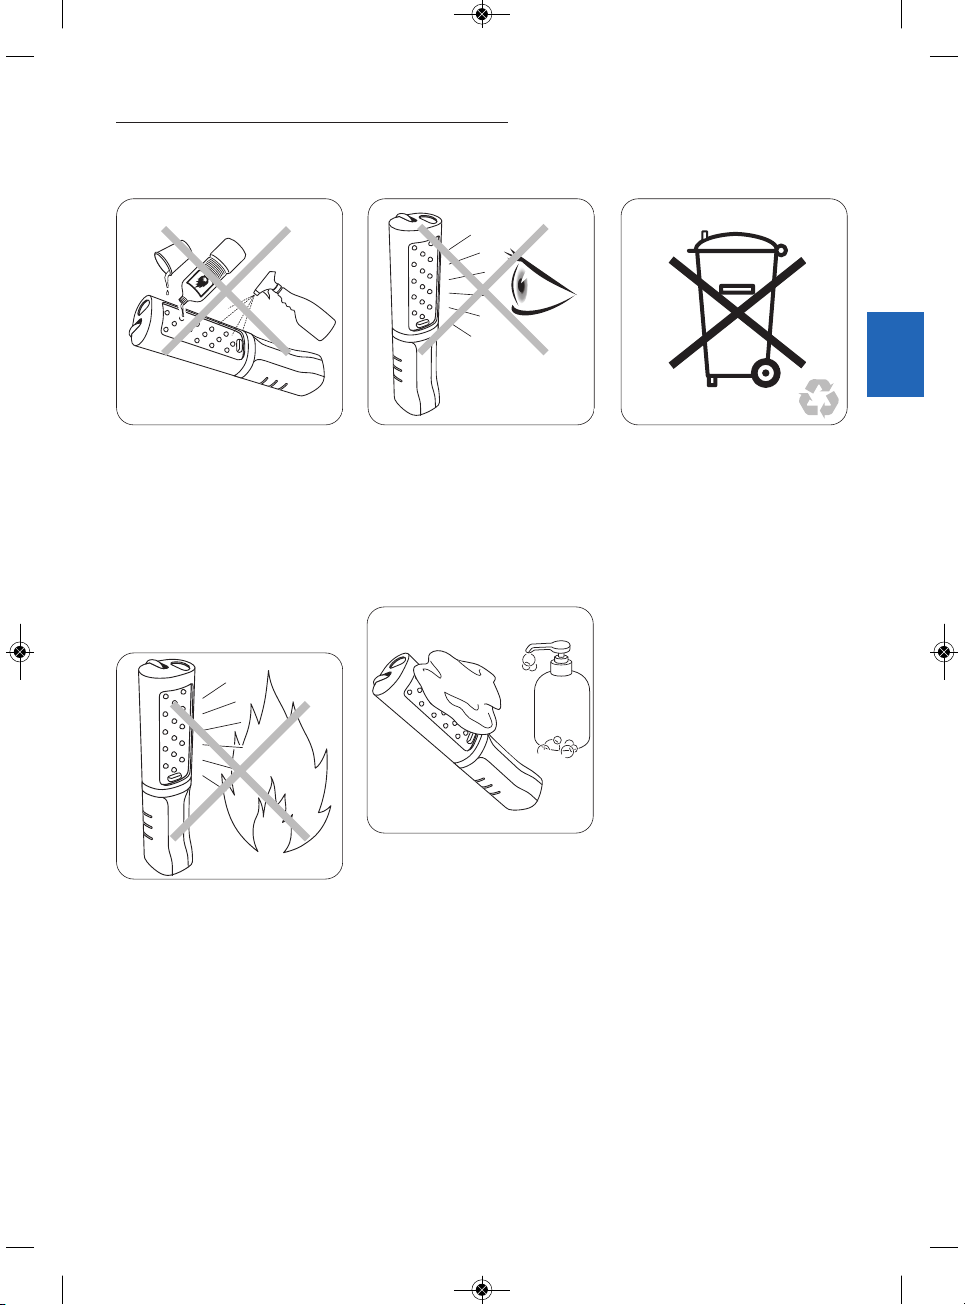
2.1.1 Connect the power
cord to the docking station and
plug it into the electrical outlet.
Important Philips LED
Inspection lamp docking station
has a wide-range power supply
input voltage.
From 100~120V AC to
200~240V AC.
100~240V
6
h
• To turn on/off, press the
power button on the back of
the Philips LED Inspection lamp
briefly.
• Use may use the flexible
magnet holder or the 360°
retractable hook to install
your LED inspection lamp
where and how needed.
• To turn the UVA-mode
on, press the power button for
at least 3 seconds.
• To turn the UV-A mode off,
press briefly.
2.2.2 To use the UV-A
mode
The UV-A mode lets you
detect motor fluid leaks quickly
and easily.
Note For best results, confirm
leaks with a tracer.
Danger
Before you turn the Philips LED
Inspection lamp ON, make sure
it is turned away from anyone’s
direct vision.
2.2.1 To use the LED light
UV-A
UV-A
UV-A
UV-A
2.1 Electrical connection
2.2 How to use the LED
light and UV-A modes
pal_hpds_lamp_guide_bat2_pal_hpds_lamp_guide 18/08/11 11:14 Page5

6
EN
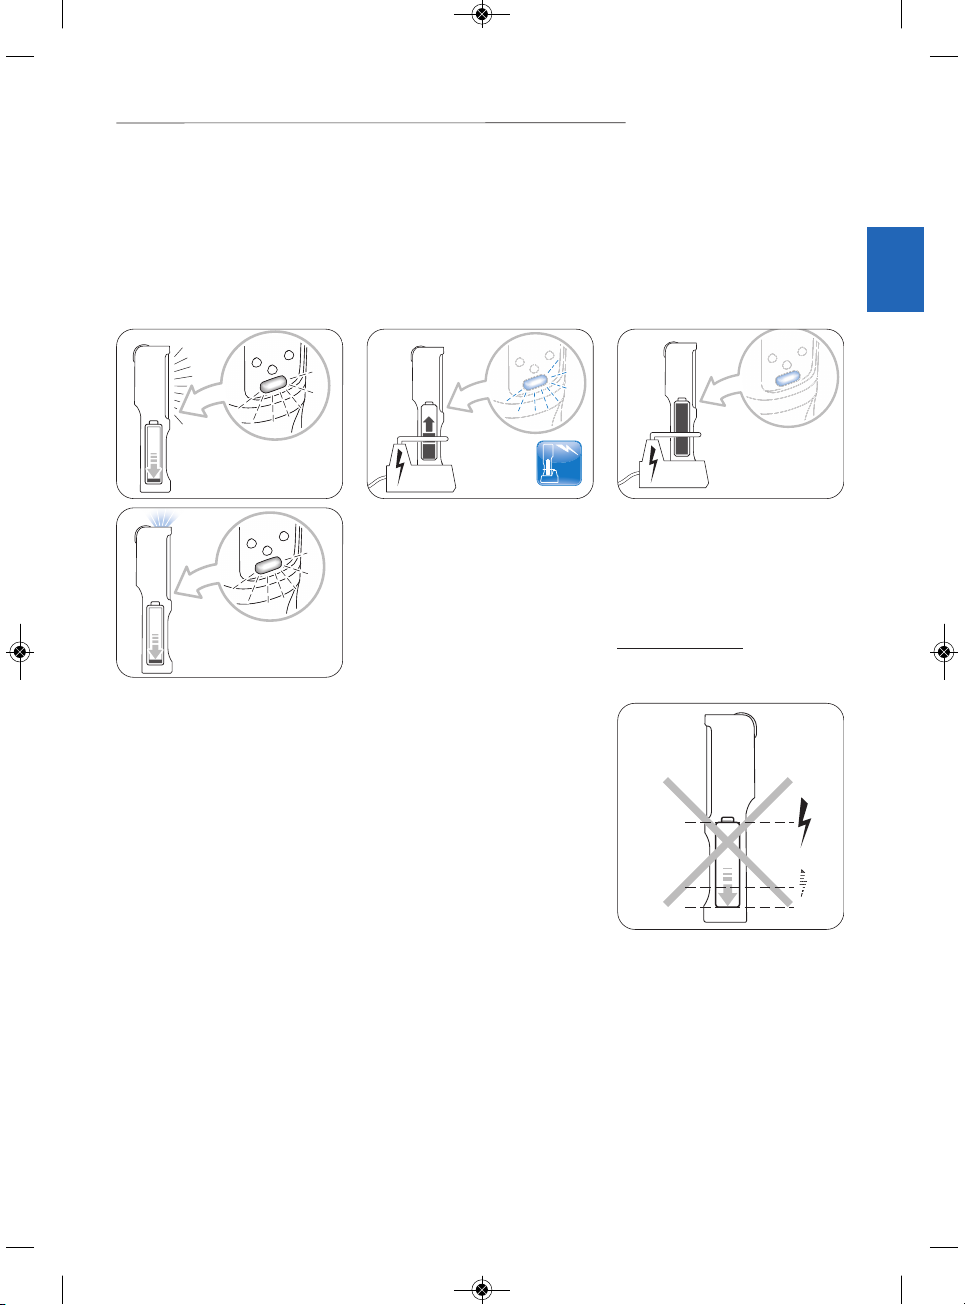
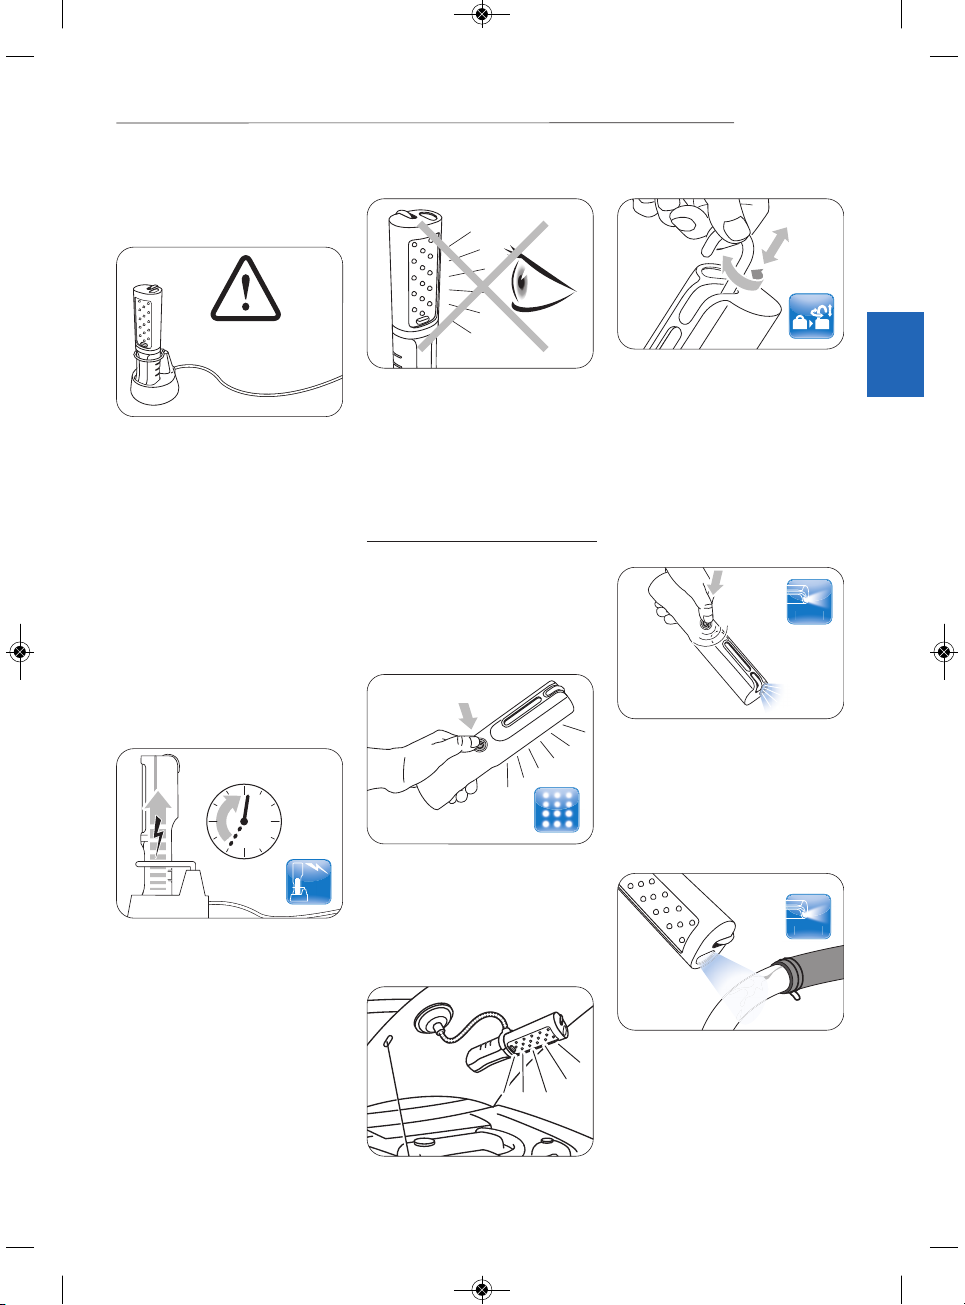
3 How to recharge the Philips LED Inspection lamp
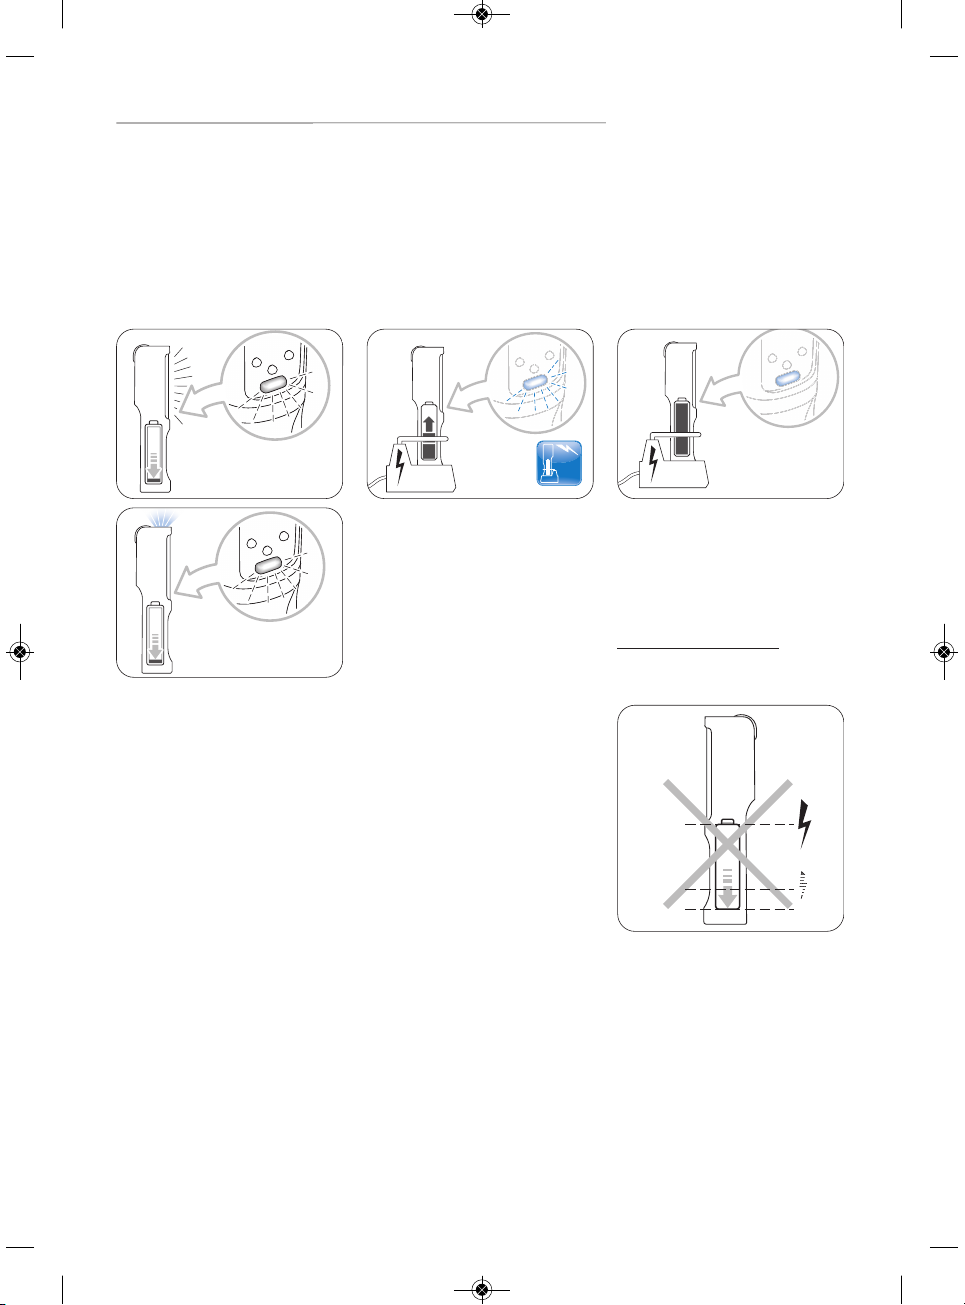
4 Maintenance
3.1 Understanding the charge indicator lights
• You must set the Philips LED
Inspection lamp onto the
docking station rapidly to
recharge the battery.
See > 4 Maintenance
3.1.1 The red indicator
starts blinking while in use
• The LED Inspection lamp
battery is charging.
3.1.2 The blue indicator
is blinking
• The LED Inspection lamp
battery is fully recharged.
• You may use your lamp again.
3.1.3 The blue indicator
is on
LED light mode
UV-A mode
3.5
h
Warning
To extend the battery life
• Do not over-discharge the
battery
• Before a longer use, or if you
have not used your lamp for a
longer period of time, perform
a full charge-discharge
cycle.
0
pal_hpds_lamp_guide_bat2_pal_hpds_lamp_guide 18/08/11 11:14 Page6
7
Deutsch
Bevor Sie anfangen
Wir danken Ihnen für den Kauf einer Philips
LED-Inspektionslampe. Ihre hochwertige
LED-Leuchte bietet eine leistungsfähige,
breite Ausleuchtung und einen nützlichen
UV A-Strahl, mit der Sie in Ihrem Atelier,
Ihrer Werkstatt und jedem anderen
Arbeitsbereich unter optimalen
Bedingungen arbeiten können.
Wichtiger Hinweis
Bitte lesen Sie diese Bedienungsanleitung vor der Verwendung Ihrer
LED-Inspektionslampe sorgfältig
durch. Sie enthält wichtige
Gesundheits- und Sicherheitshinweise.
Weitere Informationen erhalten Sie
bei der gebührenfreien
Verbraucherhotline
von Philips Lighting.
Europa +800 74 45 47 75
Nordamerika +1 800 257 6054
Oder wenden Sie sich an Ihren Philips-Händler.
Weitere Informationen unter
www.philips.com
Die Philips LED-
Inspektionslampe trägt
das offizielle Philips Original
Quality Equipment-
Qualitätssiegel. Es ist
Ihre Garantie für die Herstellung oder
Lizenzierung durch Philips unter Verwendung
hochwertiger Bauteile und Materialien.
Philips ist bei Autolampen weltweit führend
und bietet Ihnen professionelle Beleuchtung,
die Philips-Qualität mit langer Lebensdauer
und einfacher Verwendung verbindet.
pal_hpds_lamp_guide_bat2_pal_hpds_lamp_guide 18/08/11 11:14 Page7
8
DE
Vorsicht
Zur Vermeidung von
Stromschlägen und/oder
Feuergefahr sollten Sie die
Lampe nie in der Nähe eines
offenen Feuers oder großer
Hitze verwenden.
Vorsicht
Schauen Sie nie direkt in das
Licht der Lampe, das Ihren
Augen schaden könnte.
Sicherheitshinweis
Zur Reinigung der LEDInspektionslampe:
• Nur Seife und ein feuchtes
Tuch verwenden
• Vergewissern Sie sich, dass
das Gerät vollkommen trocken
ist, bevor Sie es wieder in die
Dockingstation stecken.
1 Wichtige Sicherheitsinformation
Vorsicht
Zur Vermeidung von
Stromschlägen und/oder
Feuergefahr sollten Sie kein
Wasser, Reinigungsmittel oder
andere brennbare Flüssigkeiten
direkt auf die LEDInspektionslampe schütten.
Umwelt
Wichtiger Hinweis
Helfen Sie mit beim
Umweltschutz. Werfen Sie
Verpackung und Gerät nicht in
den Hausmüll.
Sie enthalten recyclingfähige
Materialien.
Entsorgen Sie sie im nächsten
Wertstoffhof.
pal_hpds_lamp_guide_bat2_pal_hpds_lamp_guide 18/08/11 11:14 Page8
99
Technische Spezifikationen und Merkmale
Beschreibung EU USA
Betriebsspannung 100~240V für Adapter 100~240V für Adapter
Output: 12V 1A Output: 12V 1A
Ladezeit 3,5 Stunden 3,5 Stunden
Batterieautonomie bis zu 6 Stunden bis zu 6 Stunden
Stromverbrauch 1,5W 1,5W
Anzahl LEDs 15 15
Lichtstärke (at 0,5m) 1.200 lux 1.200 lux
Stoßfestigkeit IK09 IK09
Dichtheit IP66 IP66
Betriebstemperatur -10°C to 50°C 14°F to 122°F
Lagertemperatur -20°C to 60°C -4°F to 140°F
Maße 231 x 59 x 57 mm 9,1 x 2,3 x 2,2″
Maße der Dockingstation 108 x 123 x 129 mm 4,2 x 4,8 x 5″
Maße der Magnethalterung 107 x 155 x 72 mm 4,2 x 6,1 x 2,8″
Gewicht (mit Dockingstation) 550 g 19,4 Pfund
Gewicht (ohne Dockingstation) 220 g 7,7 Pfund
360° Haken anklappbar anklappbar
Magnethalterung Magnet Magnet
UV-A-Modus UV-A-Licht UV-A-Licht
220 g
550 g
3.5
h
> 6
H
IP
IK
0.5 m
100 V
240V
UV-A
UV-A
9
pal_hpds_lamp_guide_bat2_pal_hpds_lamp_guide 18/08/11 11:14 Page9
2 Verwendung der Philips LED-Inspektionslampe
2.1.2 Vor der ersten
Verwendung der Philips
LED-Inspektionslampe
• Laden Sie das Gerät 6 Stunden
an der Dockingstation.
Wichtig Maximale
Autonomie wird nach 2
kompletten Auf- und
Entladezyklen erreicht.
2.1.1 Stecken Sie das
Stromkabel in der
Dockingstation ein und
schließen Sie es an eine
Steckdose an.
Wichtig Die Docking-
station für die Philips LEDInspektionslampe ist für ein
breites Spannungsspektrum
geeignet.
Von 100~120V Wechselstrom
bis 200~240V Wechselstrom.
100~240V
6
h
• Zum Ein- und Ausschalten,
bitte den Einschaltknopf auf der
Rückseite der Philips LEDInspektionslampe kurz
drücken.
• Für die bedarfsgerechte
Installation der LEDInspektionslampe können Sie
die flexible Magnethalterung
oder den anklappbaren 360°-
Haken verwenden.
• Zum Einschalten des
UVA-Modus, Einschaltknopf
mindestens 3 Sekunden lang
gedrückt halten.
• Zum Ausschalten des UV-AModus kurz drücken.
2.2.2 Verwendung des
UV-A-Modus
Mit Hilfe des UV-A-Modus
können undichte Stellen im Motor
rasch und einfach festgestellt
werden.
Hinweis Um optimale Ergebnisse
zu erzielen, kennzeichnen Sie
undichte Stellen mit einem
Markierer.
Vorsicht
Vergewissern sie sich vor dem
Einschalten der Philips LEDInspektionslampe, dass niemand
direkt in das Licht schaut.
2.2.1 Verwendung des
LED-Lichts
UV-A
UV-A
UV-A
UV-A
2.1 Elektrischer Anschluss
2.2 Verwendung des LED-
Lichts und des UV-A-Modus
10
DE
pal_hpds_lamp_guide_bat2_pal_hpds_lamp_guide 18/08/11 11:14 Page10

11
3 Aufladen der Philips LED-Inspektionslampe
4 Wartung
3.1 Ladungsanzeige
• Sie müssen die Philips LEDInspektionslampe möglichst
schnell auf die Dockingstation
setzen, um die Batterie wieder
aufzuladen.
Siehe > 4 Wartung
3.1.1 Die rote Anzeige
beginnt während der
Verwendung zu blinken
• Die Batterie der LED-
Inspektionslampe wird geladen.
3.1.2 Die blaue Anzeige
blinkt
• Die Batterie der LEDInspektionslampe ist komplett
geladen.
• Sie können Ihre Lampe wieder
verwenden.
3.1.3 Die blaue Anzeige
ist an
LED-Lichtmodus
UV-A-Modus
3.5
h
Warnung
Für eine optimale
Lebensdauer der Batterie gilt:
• Überladen Sie die Batterie nicht.
• Vor einer längeren Nutzung oder
wenn Sie die Lampe längere Zeit
nicht benutzt haben, sollten Sie
einen kompletten Auf- und
Entladezyklus durchführen.
0
pal_hpds_lamp_guide_bat2_pal_hpds_lamp_guide 18/08/11 11:14 Page11
12
FR
Avant de commencer
Merci d’avoir choisi la lampe baladeuse à LED
Philips. Celle-ci produit un puissant éclairage
LED grand-angle de haute qualité et un
faisceau UV-A très utile qui vous permettra
de travailler dans votre atelier, votre garage
ou tout autre environnement professionnel
dans les meilleures conditions
Important
Lisez attentivement ce guide
d’utilisation avant de vous servir
de votre lampe baladeuse à LED.
Celui-ci contient des informations
importantes en matière de santé
et de sécurité.
Si vous avez besoin d’une assistance
supplémentaire, composez le
numéro vert
du service consommateurs éclairage Philips :
Europe +800 74 45 47 75
Amérique du Nord +1 800 257 6054
ou contactez votre revendeur Philips.
Pour plus d’informations www.philips.com
Français
La lampe baladeuse à LED
Philips porte le label
Original Equipment Quality.
Celui-ci certifie que le
produit est fabriqué par
Philips ou sous licence à partir de
composants et de matériaux haute qualité.
Philips, N°1 mondial de l’éclairage
automobile, vous apporte la lampe
professionnelle dont vous avez besoin,
alliant qualité d’origine, longue durée de vie
et simplicité d’utilisation.
pal_hpds_lamp_guide_bat2_pal_hpds_lamp_guide 18/08/11 11:14 Page12
13
1 Instructions de sécurité
Danger
Pour éviter toute risque
d’électrocution et/ou
d’incendie, n’utilisez jamais
la lampe à proximité d’une
flamme ou d’une source
de chaleur excessive.
Danger
Ne regardez jamais directement
le faisceau lumineux pour ne
pas endommager vos yeux.
Attention
Pour nettoyer la lampe
baladeuse à LED :
• utilisez exclusivement
du savon de Marseille
avec un chiffon humide,
• assurez-vous que la lampe
est entièrement sèche avant
de la replacer sur son chargeur.
Danger
Pour éviter toute risque
d’électrocution et/ou
d’incendie, ne renversez pas
d’eau, de détergent ni aucun
liquide inflammable
directement sur la lampe
baladeuse à LED.
Environnement
Important
Préservez l’environnement.
Ne jetez pas la lampe et son
emballage avec les déchets
ménagers.
Ils contiennent des matériaux
recyclables.
Déposez-les dans un conteneur
de déchets recyclables.
pal_hpds_lamp_guide_bat2_pal_hpds_lamp_guide 18/08/11 11:14 Page13
14
FRNL
Caractéristiques techniques et fonctionnalités
Caractéristiques EU US
Tension 100~240V pour l’adaptateur 100~240 V pour l’adaptateur
Sortie : 12 V 1 A Sortie : 12 V 1 A
Temps de charge 3,5 heures 3,5 heures
Autonomie de la batterie jusqu’à 6 heures jusqu’à 6 heures
Consommation électrique 1,5 W 1,5 W
Nombre de LED 15 15
Intensité lumineuse (à 0,5 m) 1 200 lux 1 200 lux
Indice de résistance aux chocs IK09 IK09
Indice d’étanchéité IP66 IP66
Température d’utilisation -10°C à 50°C 14°F à 122°F
Température de stockage -20°C à 60°C -4°F à 140°F
Dimensions de la lampe 231 x 59 x 57 mm 9,1 x 2,3 x 2,2 pouces
Dimensions du chargeur 108 x 123 x 129 mm 4,2 x 4,8 x 5 pouces
Dimensions du support magnétique 107 x 155 x 72 mm 4,2 x 6,1 x 2,8 pouces
Poids du produit (avec chargeur) 550 g 19,4 livres
Poids du produit (sans chargeur) 220 g 7,7 livres
Crochet 360° rétractable rétractable
Support magnétique magnétique
Mode UV-A lumière UV-A lumière UV-A
220 g
550 g
3.5
h
> 6
H
IP
IK
0.5 m
100 V
240V
UV-A
UV-A
pal_hpds_lamp_guide_bat2_pal_hpds_lamp_guide 18/08/11 11:14 Page14

15
2 Comment utiliser la lampe baladeuse à LED Philips
2.1.2 Avant la première
utilisation de la lampe
baladeuse à LED Philips
• Chargez la lampe sur son
support pendant 6 heures.
Important L’autonomie
maximale peut être obtenue
après 2 cycles complets
de charge-décharge.
2.1.1 Branchez le cordon
d’alimentation sur le chargeur,
puis sur une prise de courant.
Important Le chargeur de
la lampe baladeuse à LED Philips
fonctionne sur une large plage
de tensions d’alimentation.
De 100~120 V à 200~240 V
(courant alternatif).
100~240V
6
h
• Pour allumer ou éteindre,
appuyez brièvement sur le
bouton on/off à l’arrière de la
lampe baladeuse à LED Philips.
• Vous pouvez utiliser le
support magnétique souple
ou le crochet à 360°
rétractable pour suspendre
la lampe où vous le souhaitez.
• Pour activer le mode
UV-A, pressez le bouton on/off
pendant au moins 3 secondes.
• Pour désactiver le mode
UV-A, appuyez brièvement.
2.2.2 Pour utiliser
le mode UV-A
Le mode UV-A permet
de détecter facilement et
rapidement les fuites du moteur.
Note Pour des résultats
optimaux, confirmez les fuites
au moyen d’un traceur.
Danger
Avant d’allumer la lampe
baladeuse à LED Philips,
assurez-vous qu’elle n’est
pas dirigée vers les yeux
de quelqu’un.
2.2.1 Pour utiliser
le mode LED
UV-A
UV-A
UV-A
UV-A
2.1 Connexion électrique
2.2 Utilisation des modes
LED et UV-A
pal_hpds_lamp_guide_bat2_pal_hpds_lamp_guide 18/08/11 11:14 Page15
16
FR
3 Recharger la lampe baladeuse à LED Philips
4 Entretien
3.1 Signification des voyants de charge
• Vous devez placer la lampe
baladeuse à LED Philips
rapidement sur son chargeur
afin de recharger la batterie.
Voir > 4 Entretien
3.1.1 Le voyant rouge se
met à clignoter en cours
d’utilisation
• La batterie de la lampe
baladeuse à LED est en charge.
3.1.2 Le voyant bleu
clignote
• La batterie de la lampe
est entièrement rechargée.
• Vous pouvez à nouveau utiliser
votre lampe.
3.1.3 Le voyant bleu
est allumé fixe
Mode LED
Mode UV-A
3.5
h
Avertissement
Pour prolonger la durée de
vie de la batterie
• Ne déchargez pas
excessivement la batterie.
• Avant une utilisation prolongée
ou après une période de
non-utilisation prolongée
de la lampe, effectuez
un cycle complet
de charge-décharge.
0
pal_hpds_lamp_guide_bat2_pal_hpds_lamp_guide 18/08/11 11:14 Page16
17
Nederlands
Voordat u begint
Bedankt voor uw aanschaf van de Philips
LED-inspectielamp De topklasse LED-
verlichting geeft een brede en sterke
lichtbundel en een handige UV-A straal,
zodat u in uw werkplaats, garage of andere
werkruimte met optimaal licht kunt werken.
Belangrijk
Lees a.u.b. aandachtig deze
gebruiksaanwijzing voordat
u uw LED-inspectielamp gebruikt
Deze gebruiksaanwijzing bevat
belangrijke informatie voor uw
gezondheid en veiligheid.
Als u meer informatie wenst, kunt u gratis
bellen
naar de Philips verlichting klantenservice.
Europa +800 74 45 47 75
Noord-Amerika +1 800 257 6054
of uw Philips-dealer bezoeken.
Zie voor meer informatie www.philips.com
De Philips LED-
inspectielamp heeft het
officiële Philips Original
Quality Equipment stempel.
Dit stempel garandeert
dat het product door Philips of onder Philips-
licentie is gefabriceerd met hoogwaardige
onderdelen en materialen. Philips, wereldwijd
nummer 1 in autoverlichting, biedt u de
professionele werklampen die u nodig hebt.
Ze combineren Philips Original Quality,
duurzaamheid en een gebruiksvriendelijk
ontwerp.
pal_hpds_lamp_guide_bat2_pal_hpds_lamp_guide 18/08/11 11:14 Page17
18
NL
Gevaar
Om het risico van een
elektrische schok en/of
brandgevaar te vermijden,
de lamp nooit in de buurt
van open vuur of een
hittebron gebruiken.
Gevaar
Kijk nooit rechtsreeks in de
brandende lamp. Het licht kan
schadelijk zijn voor uw ogen.
Attentie
Om de LED-inspectielamp
schoon te maken:
• Gebruik alleen een vochtige
doek met zeep
• De lamp moet volledig droog
zijn voordat u hem weer op de
oplader zet.
Gevaar
Om het risico van een
elektrische schok en/of
brandgevaar te vermijden,
geen water, schoonmaakmiddel
of een ander brandbaar
product op de LEDinspectielamp morsen.
Milieubescherming
Belangrijk
Draag bij aan de bescherming
van het milieu.
Gooi de verpakking en het
product niet weg met het
huishoudelijke afval.
Ze bevatten recycleerbare
materialen.
Voer ze af naar een gescheiden
afvalinzameling.
1 Belangrijke veiligheidsinformatie
pal_hpds_lamp_guide_bat2_pal_hpds_lamp_guide 18/08/11 11:14 Page18

19
Technische gegevens en kenmerken
Beschrijving EU USA
Voltage elektriciteitsnet 100~240V voor adaptor 100~240V voor adaptor
Uitvoer: 12V 1A Uitvoer: 12V 1A
Oplaadtijd 3,5 uur 3,5 uur
Gebruiksduur van de accu tot 6 uur tot 6 uur
Energieverbruik 1,5 W 1,5 W
Aantal LEDs 15 15
Lichtsterkte (op 0,5 m) 1.200 lux 1.200 lux
Schokbestendigheid IK09 IK09
Waterdichtheid IP66 IP66
Gebruikstemperatuur -10°C tot 50°C 14°F tot 122°F
Opslagtemperatuur -20°C tot 60°C -4°F tot 140°F
Afmetingen lamp 231 x 59 x 57 mm 9,1 x 2,3 x 2,2″
Afmetingen oplader 108 x 123 x 129 mm 4,2 x 4,8 x 5″
Afmetingen magnetische bevestiging 107 x 155 x 72 mm 4,2 x 6,1 x 2,8″
Gewicht (met oplader) 550 g 19,4 Pfund
Gewicht (zonder oplader) 220 g 7,7 Pfund
360° haak inschuifbaar inschuifbaar
Magnetische bevestiging magneet magneet
UV-A functie UV-A lamp UV-A lamp
220 g
550 g
3.5
h
> 6
H
IP
IK
0.5 m
100 V
240V
UV-A
UV-A
19
pal_hpds_lamp_guide_bat2_pal_hpds_lamp_guide 18/08/11 11:14 Page19
20
NL
2 Gebruiksaanwijzing voor de Philips LED-inspectielamp
2.1.2 Voordat u de Philips
LED-inspectielamp voor
de eerste maal gebruikt
• De lamp 6 uur lang opladen
op de oplader.
Belangrijk De maximale
autonomie kan worden bereikt
na tweemaal compleet opladen
en legen.
2.1.1 Het snoer aansluiten
op de oplader en de stekker
in een stopcontact steken.
Belangrijk De oplader van
de Philips LED-inspectielamp is
geschikt voor een ruim
invoervoltage.
Van 100~120V AC
tot 200~240V AC.
100~240V
6
h
• Druk op de aan/uit knop
op de achterzijde van de Philips
LED-inspectielamp.
• Gebruik de flexibele
magneet of de inschuifbare
360° haak om de LED-
inspectielamp op de gewenste
te plaats te bevestigen.
• Schakel de UV-A-stand in
door de schakelaar minstens
3 seconden in te drukken.
• Om de UV-A functie uit te
schakelen, kort op de knop
drukken.
2.2.2 Gebruik van
de UV-A functie
Met het UV-A licht kunt u de
lekkages van motorvloeistoffen
snel en gemakkelijk opsporen
OpmerkingVoor een optimaal
resultaat de lekdetectie
controleren met een tracer.
Gevaar
Controleer voordat u de Philips
LED-inspectielamp aanschakelt
altijd of de lichtbundel niet
rechtstreeks op iemands ogen
is gericht.
2.2.1 Gebruik van
de LED-lamp
UV-A
UV-A
UV-A
UV-A
2.1 Elektrische aansluiting
2.2 Gebruik van de LED-
lamp en UV-A functie
pal_hpds_lamp_guide_bat2_pal_hpds_lamp_guide 18/08/11 11:14 Page20
21
3 Opladen van de Philips LED-inspectielamp
4 Onderhoud
3.1 Betekenis van de oplaadlampjes
• Plaats de Philips LEDinspectielamp snel op de oplader
om de accu weer op te laden.
Zie > 4 Onderhoud
3.1.1 Het rode indicatielamp
gaat knipperen tijdens het
gebruik
• De accu van de LED-
inspectielamp wordt opgeladen.
3.1.2 Het blauwe
indicatielampje knippert
• De accu van de LEDinspectielamp is volledig
opgeladen.
• Uw lamp is weer klaar voor
gebruik.
3.1.3 Het blauwe
indicatielampje brandt
LED-lampfunctie
UV-A functie
3.5
h
Waarschuwing
Voor een langere levensduur
van de accu:
• De accu niet overmatig opladen.
• Voorafgaand aan een langdurig
gebruik, of als u uw lamp een lange
tijd niet hebt gebruikt, raden wij u
aan de lamp volledig op te laden
en te legen.
0
pal_hpds_lamp_guide_bat2_pal_hpds_lamp_guide 18/08/11 11:14 Page21
 Loading...