

Page 1

1
English
Your remote control 2
Preparation 3
Installation 4
Store TV channels 4
Select the menu language and country 4
Automatic installation 5
Manual installation 5
Give name 6
Reshuffle the programme list 6
Select favourite TV channels 6
Install TV setup 7
EasyLink features are based on the “one touch operation” approach.This
means that a sequence of actions are executed at the same time in both
the television and the video cassette recorder,
provided both are fitted
with the EasyLink function
and connected with the eurocable
supplied with your video recorder.
Installation
Operation
Use of the remote control 8-9
Use of the menus
Picture menu
10
Sound menu 10
Features menu 11
Keys on top of the TV 11
NEXTVIEW 12-15
Teletext 16-17
Connect peripheral equipment
Connecting and selecting equipment 18-21
Remote control functions for peripherals 21-22
Recording 23
Tips 24
Index 24
Glossary 25
Contents
Page 2

M h a
SMART
ACTIVE
CONTROLSMART
213
546
879
0
B
w
®
Ò
‡π
†
æ b
Ï
i
Mqa
SQ
TV
MOVIE SPORT CHILD NEWS OTHER
VCR DVD SAT
TUNER CD
OK
MENU
TAPE CDR
SMARTSMART
PICTURESOUND
¬V P
0
◊
U
XP
fh
Uf
yÚ
o
œ
pπ
yÚ
®q
b ficd
INSTANT
ZOOM
2 Preparation
Teletext p. 17
U time display/subpage selection
f solution to puzzles
display PDC/VPS code
h enlarge
P no function
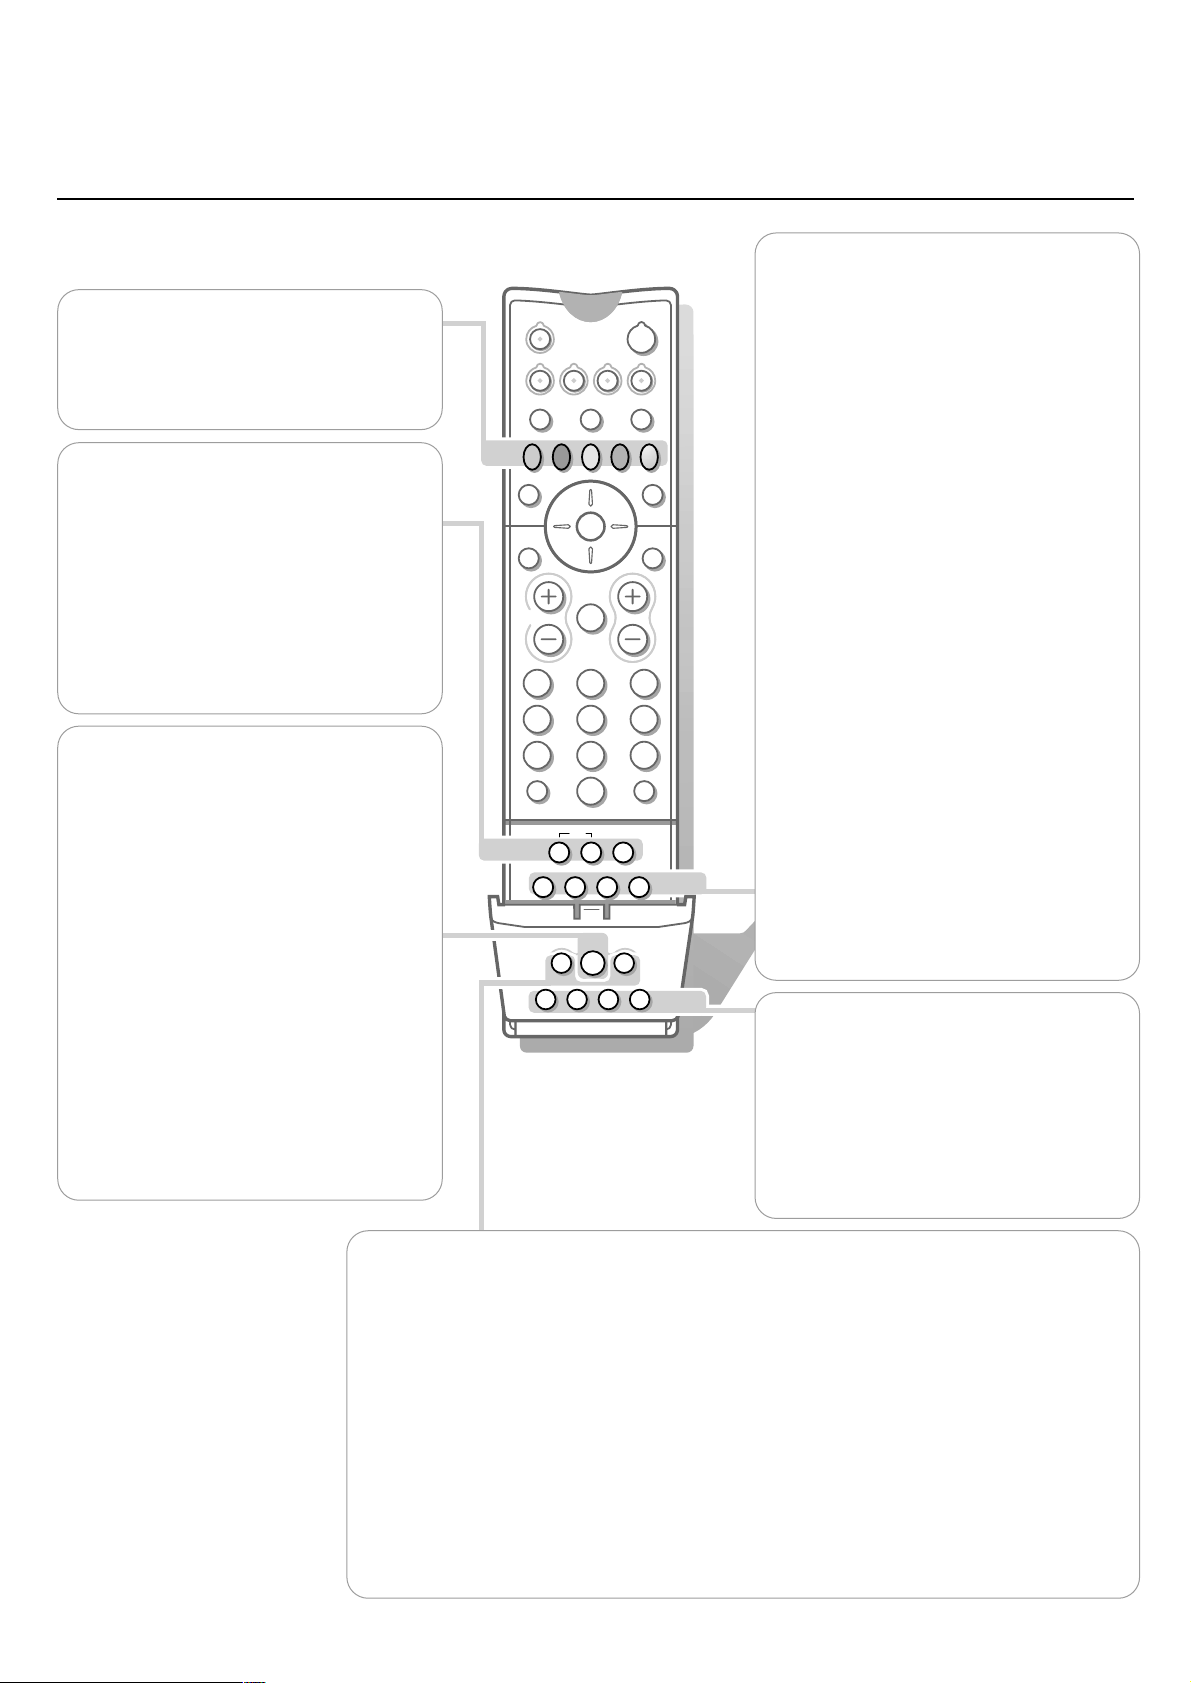
Smart Controls
M smart sound p.9
h active control on/off p. 9
a smart picture p.9
b c d no function
fi strobe p. 9
B switch to standby p.8
i on screen info p. 8
0 previous programme p. 8
◊ video recorder/DVD function p.8
X bilingual choice/sound info p.9
TXT language group selection p.16
EasyLink p. 23
® INSTANT recording
q picture format p. 9
b teletext on/off p.16
Ï main menu on/off p.10
cursor to select
your choice p.4
Installation p. 4
V volume up/down p.8
¬ sound mute p.8
P programme selection p.8
Peripherals p. 21
w selection of EXT1, EXT2,EXT3
or FRONT
TV, videorecorder (VCR),DVD,
Satellite (SAT), TUNER,CD, TAPE or
cd-recordable (CDR) selection.
Colour keys
- NEXTVIEW selection p.12
- direct teletext page or
subject selection p.16-17
Audio- and video equipment
p.21-22
O no function
S freeze the picture p. 8
hold teletext page p.17
Q incredible surround on/off p.8
æ NEXTVIEW/TXT guide on/off p.8
OK activate your choice
Your remote control
Page 3

3Preparation
& Place the TV on a solid surface.
For ventilation,leave at least 5 cm free all around the TV.
Do not place the TV on a carpet.
To prevent any unsafe situations,do not place any objects on top of the TV.
Avoid heat,direct sunlight and exposure to rain or water.
é Insert the aerial plug firmly into the aerial socket x at the back of the
TV.
“ Insert the mains plug in the wall socket having a mains voltage of 220V-
240V.
To prevent damaging the mains (AC) cord which could cause a fire or electric
shock,do not place the TV on the cord.
‘ Remote control:Remove the cover of the battery compartment.
Insert the 2 batteries supplied (Type R6-1,5V).
Press the
TV key to be sure your remote control is in the TV mode .
The batteries supplied do not contain the heavy metals mercur y and cadmium.
Nevertheless in many countries exhausted batteries may not be disposed of with
your household waste. Please check on how to dispose of exhausted batteries
according to local regulations.
Note: this remote control functions with TVs which use the RC6 signalling standard.
( Switch the TV on : Press the power switch A on the front of your TV.
A green indicator on the front of the TV lights up and the screen comes on.
If the indicator is red,press the
-
P+
keys on the remote control.
The green lamp blinks every time you press a key on the remote control.
When you switch on your set
for the first time, the menu LANGUAGE
automatically appears on the screen.The explanation appears in different languages
one at a time. Choose your own language and press the
OK key on the remote
control.
Go on to page 4.
Preparation
CABLE
TV
R6 / AA
w
B
VCR
TV DVD SAT
CDTUNER TAPE CDR
SQ
MOVIE OTHERNEWSCHILDSPORT
æ b
Page 4

& Open the door of the remote control.
é Press U and f at the same time.
4
Installation
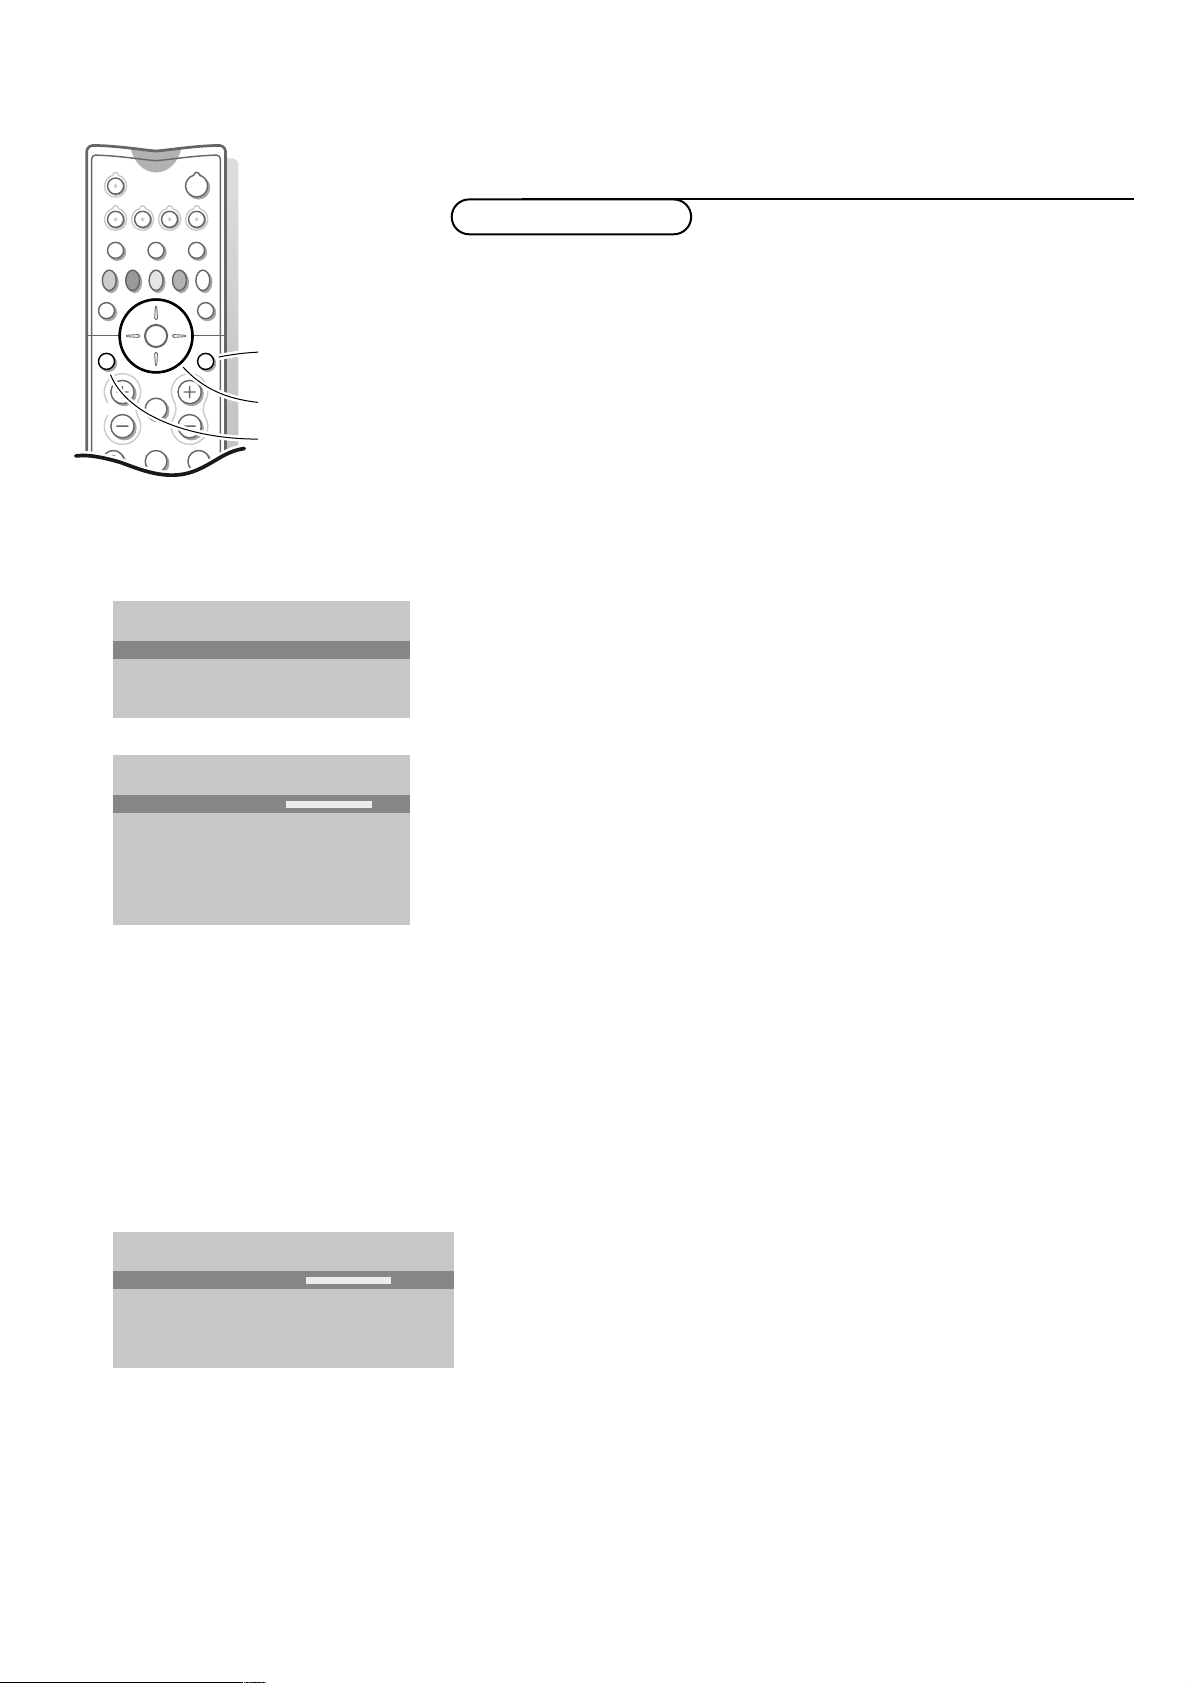
& Use the cursor in the up/down,left/right directions to select a menu item.
é Press the OK key to activate.
“ Use the Ï key to return or to switch the menu off.
After the new or extra TV channels have been stored, the TV automatically transfers
those TV channels to the video recorder if it is equipped with the EasyLink function.
The message
EasyLink : Downloading ...... appears on the screen.
The programme list of the video recorder is now the same as the one of the TV.
If the TV is connected to a video recorder which supports the
NEXTVIEWLink function,
the TV also automatically transfers the language and countr y selections to the video
recorder.
First,select your language and country.
& Select Menu Language and press the OK key.
é Select your language and press the OK key.
Use the cursor up/down to scroll through the list and to bring up other
languages which are not displayed on the screen at present.
“ Select Country and press the OK key.
‘ Select the country where you are now located and press the OK key.
Use the cursor up/down to scroll through the list and bring up other
countries which are not displayed on the screen at present.
Select
Other when none of the countries applies.
You can now search for and store the TV channels in two different ways :
using
automatic installation or manual installation (tuning-in channel by
channel).
Select your choice and press the
OK key .
MENU TITLE
Subject 1
Subject 2
Subject 3
J Subject 4
Subject 5
Subject 6
J Subject 4 L M
o
œ
pπ
o
œ
pπ
213
B
w
æ b
Ï
TV VCR DVD SAT
TUNER CD TAPE CDR
¬V P
SQ
MOVIE OTHERNEWSCHILDSPORT
OK
MENU
select menu item
activate
return or switch
main menu off
MENU TITLE
Menu language
J INSTALLATION
MENU TITLE
United Kingdom
....
....
J Country
MENU TITLE
English
....
....
J Menu language
213
546
879
0
i
0
◊
U
X®qP
fyÚh
ZOOM
INSTANT
Select the menu language and country
Store TV channels
To use the menus
Select the INSTALLATION menu
Installation
Page 5

Searching for and storing TV channels is done channel by channel.
You must go through ever y step of the Manual installation menu.
Selection mode is only present and lights up if the country selected also
offers the channel option (C-channels for aerial channels,S-channels for cable
channels).
You can choose either channel or frequency mode.
& Select the TV system
Select the country or part of the world from where you want to receive the
TV channel.
If you are connected to a cable system,select your countr y or part of the
world where you are now located.
é Press the cursor down and enter the programme number with the digit keys.
“ Search for a TV channel
Press the cursor left/right.
The frequency or the channel number increases until a TV channel is found.
Direct selection of a TV channel
If you know the frequency, the C- or S-channel number,enter it directly with
the digit keys 0 to 9.
Ask for a list from your cable company or dealer,alternatively consult the
Table of frequencies on the inside backcover of this handbook.
‘ Fine tune
In case of poor reception,you can improve the reception by adjusting the
frequency with the cursor left/right.
( To store your TV channel, select Store and press the OK key.
Repeat steps
& to ( to store another TV channel.
§ To exit from the menu press the Ï key on the remote control.
In the Automatic installation menu select
Start and press the OK key to
activate the searching. All TV channels are searched for and stored
automatically.
If a cable system which broadcasts ACI (Automatic Channel Installation) or a
TV channel transmitting a teletext page with the frequencies and programme
names of all the TV channels which can be received,is detected, the search is
stopped and a programme list appears.
The programme list is automatically filled with all the programme numbers
and names of the TV channels transmitted.
It is possible that the cable company or the TV channel displays a broadcast
selection menu. Layout and items are defined by the cable company or the TV channel.
Make your choice with the cursor and press the
OK key.
To exit from the menu press the Ï key on the remote control.
Go on to page 6.
5Installation
Automatic installation
Start
Stop
TV is searching
One moment please ...
J Stop K
Automatic installation
Start
Stop
1 BBC1
2 BBC2
3 CNN
....
....
J Start K
Manual installation
(Selection mode)
System
Programme no.
Search
Fine tune
Store
J System K
Manual installation
Automatic installation
Page 6

6
Installation
According to your preference you can change the order of the stored TV
channels.
& Select Reshuffle in the INSTALLATION menu and press the OK key.
é Select the programme number you want to exchange.
“ Press the OK key.
‘ Select the new number you want to exchange it with.
( Press the OK key.
Repeat the operation until all TV channels are allocated as you like.
§ Press the Ï key to return to the INSTALLATION menu.
After leaving the installation you can browse through the TV channels by
pressing the
- P + keys. Only those TV channels which are in the favourite list
will be displayed.Non-favourite TV channels can still be selected with the digit
keys.By default all stored channels are added to the favourite list.
& Select Favourite programmes in the INSTALLATION menu and press
the
OK key .
é Select your favourite programme number.
“ Select Yes or No with the cursor left/right.
‘ Repeat for every TV channel you want to make a favourite or a
non-favourite TV channel.
( Press the Ï key to return to the INSTALLATION menu.
In order for NEXTVIEW to function proper ly, the fir st TV channel from the favour ite list
should also broadcast the correct local date and time via teletext.
INSTALLATION
Menu Language
Country
Automatic installation
Manual installation
Give Name
Reshuffle
Favourite programmes
SETUP
J Give name
Give name
EXT1
EXT2
EXT3
FRONT
0
1 BBC1
2 BBC2
3 ....
4 ....
5 ....
J 0
Reshuffle
0
1 CNN
2 BBC2
3 ....
4 ....
5 ....
J 1 CNN
Favourite programmes
EXT1
EXT2
EXT3
FRONT
0 ... No
1 ... Yes
2 ... No
3 .... No
4 .... Yes
5 ....
J 2 ... Yes
Select Favourite TV channels
Reshuffle the programme list
It is possible to change the name stored in the memory or to assign a name
to a TV channel which has not yet been entered. A name with up to 5 letters
or numbers can be given to the programme numbers 0 to 99.For example
SUPER,BBC1, ... Between 99 and 0 you can also name any peripherals that
are connected to a euroconnector.
& Select Give name in the INSTALLATION menu and press the OK key.
é Select the programme number.
“ Press the OK key.
‘ Select the character with the cursor up/down.
( Select the following position with the cursor right.
§ Select the following character.
è Press the OK key when finished.
! Press the Ï key to return to the INSTALLATION menu.
Space, numbers and other special characters are located between Z and A.
Give name
Page 7

7Installation
INSTALLATION
Menu language
Country
Automatic installation
Manual installation
Give name
Reshuffle
Favourite programmes
SETUP
J SETUP
Decoder/Descrambler
Programme
Decoder status
J Programme
SETUP
Digital Sources
Decoder/Descrambler
Information line
Factory settings
INSTALLATION
J Digital sources
The Setup menu allows you to adjust initial settings,i.e . those which are not
related to the installation of the TV channels.
The Setup menu contains items that control the settings of the TV’s functions,
features,services and peripherals you may have connected.
& Use the cursor in the up/down,left/right directions to select the menu item.
é Use the OK key to activate.
“ Use the Ï key to return or switch menu off.
Digital sources
See Connect Peripheral Equipment,p.19 to connect your digital equipment,
like a DVD,a digital satellite tuner or a similar digital device.
Define Decoder/Descrambler programme numbers
If a decoder or a descrambler is connected,see p. 18, you can define one or
more programme numbers as decoder programme numbers.
Press the cursor left/right to select the input used to connect to your
decoder
Off, EXT1 or EXT2.
Select
Off if you do not want the selected programme number being
activated as a decoder programme number.
Select EXT2 when the decoder is connected to your EasyLink video recorder.
When selecting the decoder,the message
EasyLink: Downloading Presets....
appears on the screen.
Information Line
Select On and after the selection of a TV programme or after pressing the
i key on the remote control,a TV channel which broadcasts teletext may
transmit the name of the TV channel, the programme name or another
message.This is displayed on screen next to information about the sound
setting.
When selected
Off,only sound information is displayed after the selection of
a TV channel or after pressing the
i key.
Factory settings
Select Factory settings and press the OK key to restore picture and sound
settings,predefined in the factory.
Installation
Select Installation and press the OK key to return immediately to the
INSTALLATION menu.
‘ To exit from the menu press the Ï key repeatedly.
Install TV Setup
Page 8

8
Use of the remote control
Use of the remote control
M h a
SMART
ACTIVE
CONTROL
SMART
PICTURESOUND
213
546
879
0
B
w
®
Ò
‡π
†
æ b
Ï
i
TV VCR DVD SAT
TUNER CD TAPE CDR
¬V P
0
◊
SQ
MOVIE SPORT CHILD NEWS OTHER
OK
MENU
w Select peripherals
Press this key repeatedly to select EXT1,
EXT2, EXT3 or FRONT, according to where
you connected the peripherals (see p.21).
TV VCR DVD SAT TUNER CD TAPE CDR
Press one of these keys to use the remote
control directly in the TV, video recorder,
DVD or satellite mode. A green indicator
lights up.Press the same key again within 3
seconds to use the remote control in the
mode indicated below the key
(tuner, CD, tape or CD-recordable).
A red indicator lights up.
Press the key again to return to the function
mentioned above the key.
B Standby
The set is switched off and the red indicator
lights up.
To switch the TV on again,press
- P + or the
digit keys.
If your EasyLink video recorder has the
system standby function and you press the
standby key for 3 seconds,both the TV and
video recorder are switched to standby.
Your TV consumes energy in the standby mode.
Energy consumption contributes to air and water
pollution.We advise to switch off your TV
overnight instead of leaving it on standby.You
save energy.
®Ò‡π† Video recorder see p.21
O no function
æ NEXTVIEW/TXT guide on/off
see p.12
OK Press this key to activate your choice,
when in the menus.
S Freeze
To activate/de-activate the frozen picture or
to hold the teletext picture.
Q Incredible Surround
In MONO sound mode, this feature, when
switched on,enables you to hear a spatial
effect of sound.
In
STEREO sound mode, when Incredible
Surround On
is selected,it seems as though
the loudspeakers are spread further apart
from one another
i Screen information
Press for 5 seconds to activate/de-activate
the extended or reduced display of TV
channel and programme information
on the screen.
Press briefly to display information about the
selected TV channel and programme, the
sound reception,picture settings and the
remaining time set with the sleeptimer.
0/9 Digit keys
To select a TV channel.
For a two digit programme number, enter the
second digit within 2 seconds.
To switch immediately to a selected one digit
TV channel,keep the digit key pressed a bit
longer.
0 Previous programme
The previously selected TV channel is
displayed.
The
◊ indication is only for video
recorder/DVD.
b Teletext on/off see p. 16
Ï Main menu on/off see p. 10
V Volume
Press + or - to adjust the volume.
¬ Mute
Temporarily interrupt the sound or
restore it.
P Programme selection
To browse through the TV channels
activated in the Favourite Programme menu.
Use of the remote control
Operation
Page 9
9Use of the remote control
U
X®qP
fh
INSTANT
ZOOM
yÚ
213
546
879
0
B
w
®
Ò
‡π
†
æ b
Ï
i
TV VCR DVD SAT
TUNER CD TAPE CDR
¬V P
0
◊
SQ
MOVIE SPORT CHILD NEWS OTHER
OK
MENU
bcdfi
Mah
SMARTSMART
ACTIVE
CONTROL
X Bilingual choice and
sound mode selection
Press this key
• to switch from
Stereo to Mono sound, in
case of stereo transmission,or from
Nicam Stereo to Nicam available, in case
of digital transmission;
• to choose between language
Y (Dual Y) or
language
Z (Dual Z),in case of bilingual
transmission. The setting is separately
stored for each TV channel.
® Instant record
If your video recorder has the EasyLink
function the
INSTANT ® key for record can
be operated in the TV mode.
q Picture format
Press this key to switch to a wide screen
format.A black bar appears at the top and
the bottom of the screen.
The TV has an automatic switching function via
eurocable.V ideo recorder s or programmes
carr ying special signals will automatically switch
the TV to the correct screen format, if connected
with a eurocable.
P no function
NEXTVIEW selection see p. 12
Teletext
direct teletext page or subject selection
see p.16-17
U Time display
The time, downloaded from the TV channel
(with teletext) stored on programme number
1 or the lowest favourite programme
number, is displayed on the screen.
This function is not available when continuous
subtitles have been switched on.
Ufh Teletext functions
see p.17
h Active control
Active control is a pro-active and automatic
system. The TV continuously measures and
corrects all incoming signals in order to
provide the best picture possible.
Press the
h key to select the Active
Control values Off or On.
Off Sharpness and Dynamic Contrast are
controlled automatically
On Sharpness, Dynamic Contrast and Noise
Reduction are controlled automatically.
Press the cursor in the up/down directions
while the selected Active Control setting
information is on top of the screen.
The Active Control menu appears.
The picture settings are being adapted
continuously and automatically.
The menu items cannot be selected.
Press the cursor in the up/down directions
again to switch off the menu.
Smart Keys
To select predefined picture and sound settings.
M Smart Sound
Each time it is pressed,a different sound setting is selected,corresponding with specific factory
setting of treble and bass.
a Smart Picture
Each time it is pressed,a different picture setting is selected,corresponding with specific factory
settings of Contrast,Colour,Sharpness and Dynamic Contrast.
Personal refers to the personal preference settings of picture and sound selected in the picture
and sound menu.
Remark: the moment you are in a predefined smart sound or picture setting and you modify a setting in
the picture or sound menu, all values of the menu will overwrite the previously made settings.
bcd no function
fi Strobe
Press this key to reproduce the picture image
by image.
Press the
fi key again to have a faster
speed.
Press the
fi again to switch off the strobe
function.
Page 10
10 Use of the menus
PICTURE
Contrast
Brightness
Colour
Sharpness
Tint
Digital Scan
Dynamic Contrast
J Contrast L M
MAIN MENU
Contrast
SOUND
FEATURES
PROGRAMMES
J PICTURE
213
546
B
w
æ b
Ï
TV VCR DVD SAT
TUNER CD TAPE CDR
¬V P
SQ
MOVIE OTHERNEWSCHILDSPORT
OK
MENU
OK key to activate
cursor to select
adjustments
return or switch
main menu on/off
SOUND
Volume
Balance
Treble
Bass
Headphone volume
J Volume L M
& Press the Ï key to display/cancel the MAIN MENU.
é Use the cursor in the up/down direction to select the PICTURE,SOUND or
FEATURES menu or to select PROGRAMMES.
“ Press the cursor right to activate the selected menu.
‘ Use the cursor in the up/down,left/right directions to select the menu item.
( Use the OK key to activate.
§ Press the Ï key repeatedly to return or to switch the menu off.
Picture menu
If an NTSC peripheral is connected to one of the euroconnectors, the option Hue
also appears.
Tint
Select the colour temperature:Normal, Warm or Cool.
Digital Scan (Line Flicker Reduction)
In rare circumstances while watching TV programmes it may be preferable to
switch off the digital scan line flicker reduction.Normally keep it switched on.
Press the cursor left/right to select
On or Off.
Dynamic Contrast
To make the contrast in the darker and the brighter picture areas more
noticeable, select the
Med setting.
In certain circumstances it may be preferred to select
Min, Max or Off.
The modified adjustments for Contrast,Brightness, Colour,Sharpness,Tint,
Digital Scan and Dynamic Contrast are automatically stored for all TV
channels.
Select
Factory settings in the Setup menu to restore the predefined factory
settings,see p. 7.
Sound menu
The modified adjustments for Volume,Balance,Treble and Bass are
automatically stored for all TV channels.
Select
Factory settings in the Setup menu to restore the predefined factory
settings,see p. 7.
Headphone volume
See Connect Peripheral Equipment,p.20 for the connection of the
headphone.
Use of the menus
Page 11
11Use of the menus
213
B
w
æ b
Ï
TV VCR DVD SAT
TUNER CD TAPE CDR
¬V P
SQ
MOVIE OTHERNEWSCHILDSPORT
OK
MENU
OK key to activate
cursor to select
adjustments
return or switch
main menu on/off
Sleeptimer Off
Child lock Off
Subtitle Off
J FEATURES
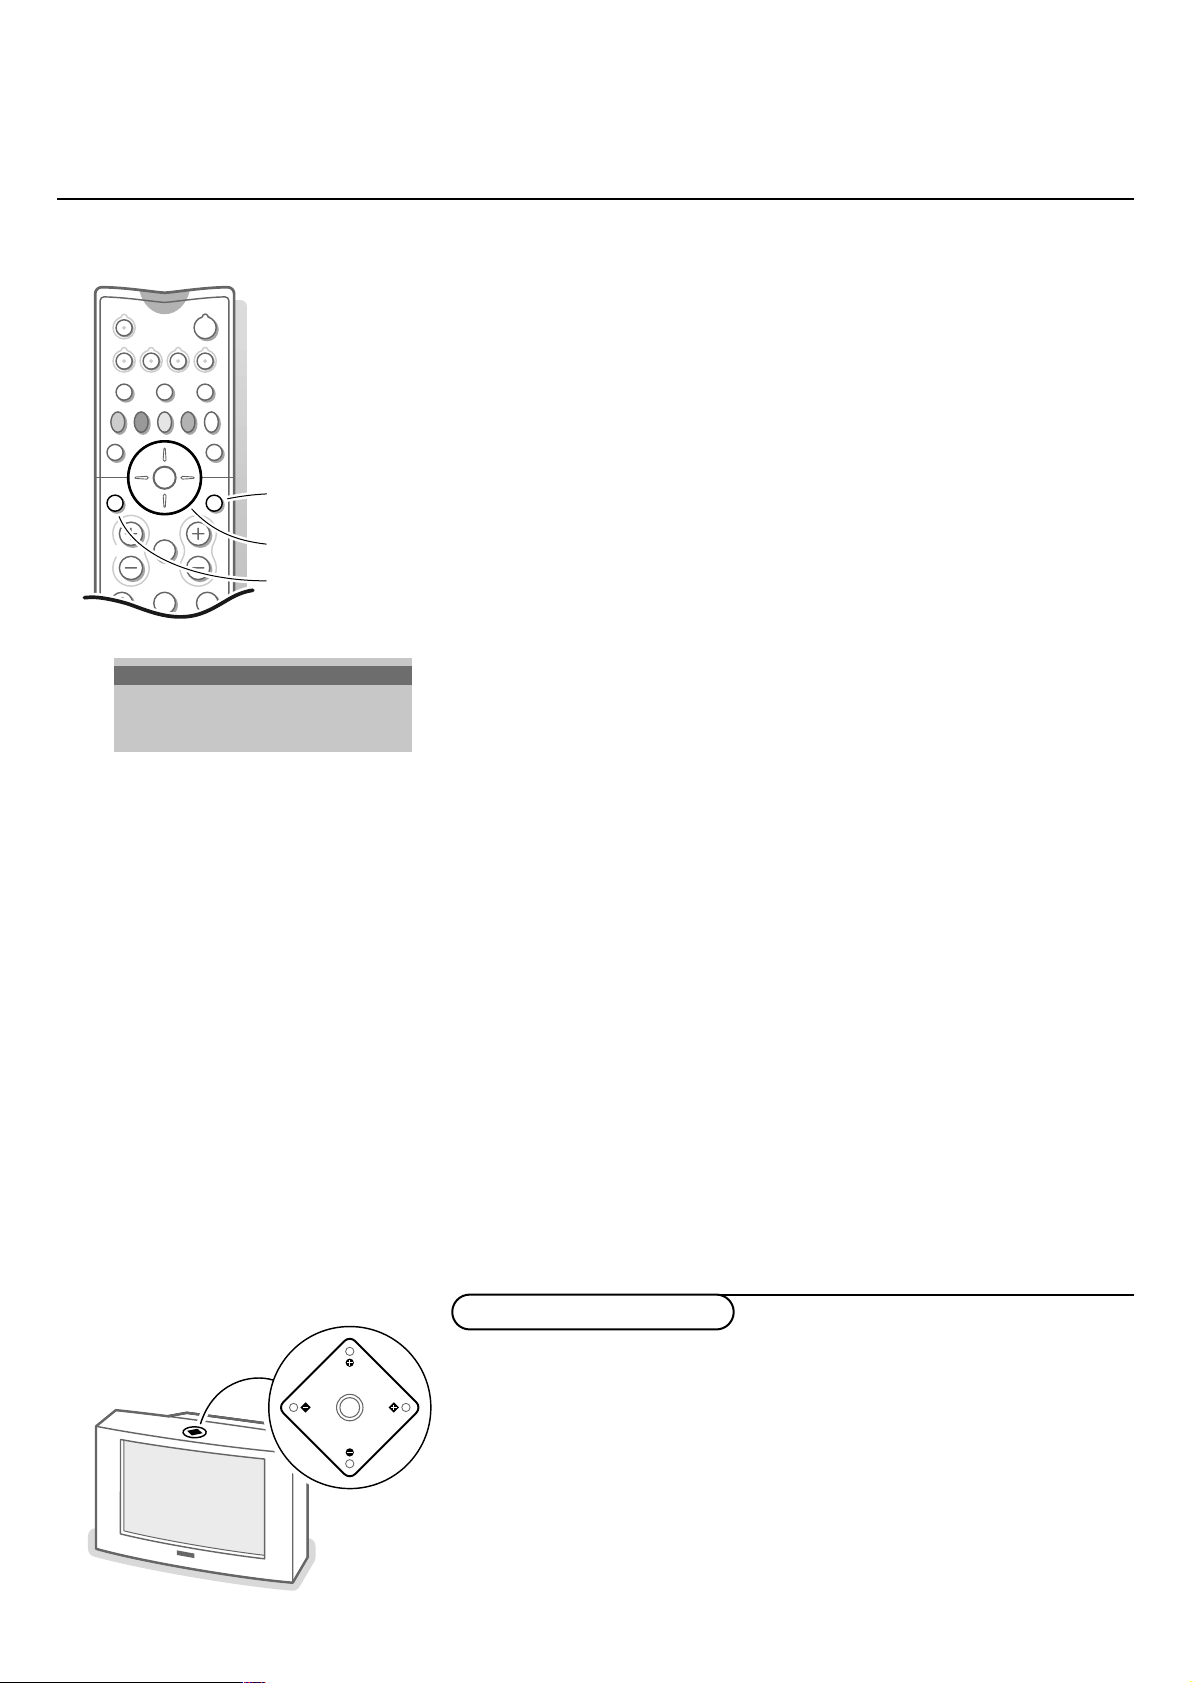
Should your remote control be lost or broken you can still change some of
the basic picture settings with the keys on top of the TV.
Press the
M key repeatedly to select Volume, Brightness, Colour, Contrast,
Treble, Bass.
Press the
P - or + keys to carry out the selected adjustment.
When the menu adjustment is not displayed,the
P- or + keys enable you
to select the TV channels, the
V - or + keys to adjust the volume.
The selected adjustment automatically switches off when no action has been
executed within 10 seconds.
M
P
V
Keys on top of the TV
Features menu
& Press the Ï key to display/cancel the MAIN MENU.
é Use the cursor in the up/down direction to select the FEATURES menu.
“ Press the cursor right to activate the selected menu.
‘ Use the cursor in the up/down direction to select a menu item.
( Use the cursor in the left/right directions to select the desired setting.
Sleeptimer
With the sleeptimer you can set a time period after which the TV should
switch itself to standby. The counter runs from
Off up to 180 min. One
minute before the TV is set to go to standby,the remaining seconds appear
on screen.You can always switch off your set earlier or change the set time.
Child lock
If the child lock is on,the TV can only be switched on with the remote
control.The
P - and + keys on top of the TV cannot be used to select a TV
channel.In this way you can prevent unauthorised use of your TV.
If the message
Child lock On appears, the child lock must be switched off
before you can use the
P - and + keys on top of the TV to select a TV
channel.
Subtitle
TV channels with teletext often transmit certain programmes with subtitling.
See Teletext, Continuous subtitles, p. 17 how to select the proper subtitle
page from the teletext index.
Select
Subtitle On or Off.
Press the
Ï key to switch off the Features menu.
Programme list
& Press the Ï key to display/cancel the MAIN MENU.
é Select PROGRAMMES with the cursor up/down.
“ Press the cursor right to activate and to display an over view of all the TV
channels installed.
‘ Press the cursor up/down to run through the list and press OK to select the
desired TV channel.
Press the
Ï key to switch off the Programme list.
Page 12
12 NEXTVIEW
OK key
to activate
cursor to select
adjustments
213
546
B
w
æ b
Ï
SQ
TV VCR DVD SAT
TUNER CD TAPE CDR
¬V P
MOVIE OTHERNEWSCHILDSPORT
OK
MENU
æ
NEXTVIEW
selection
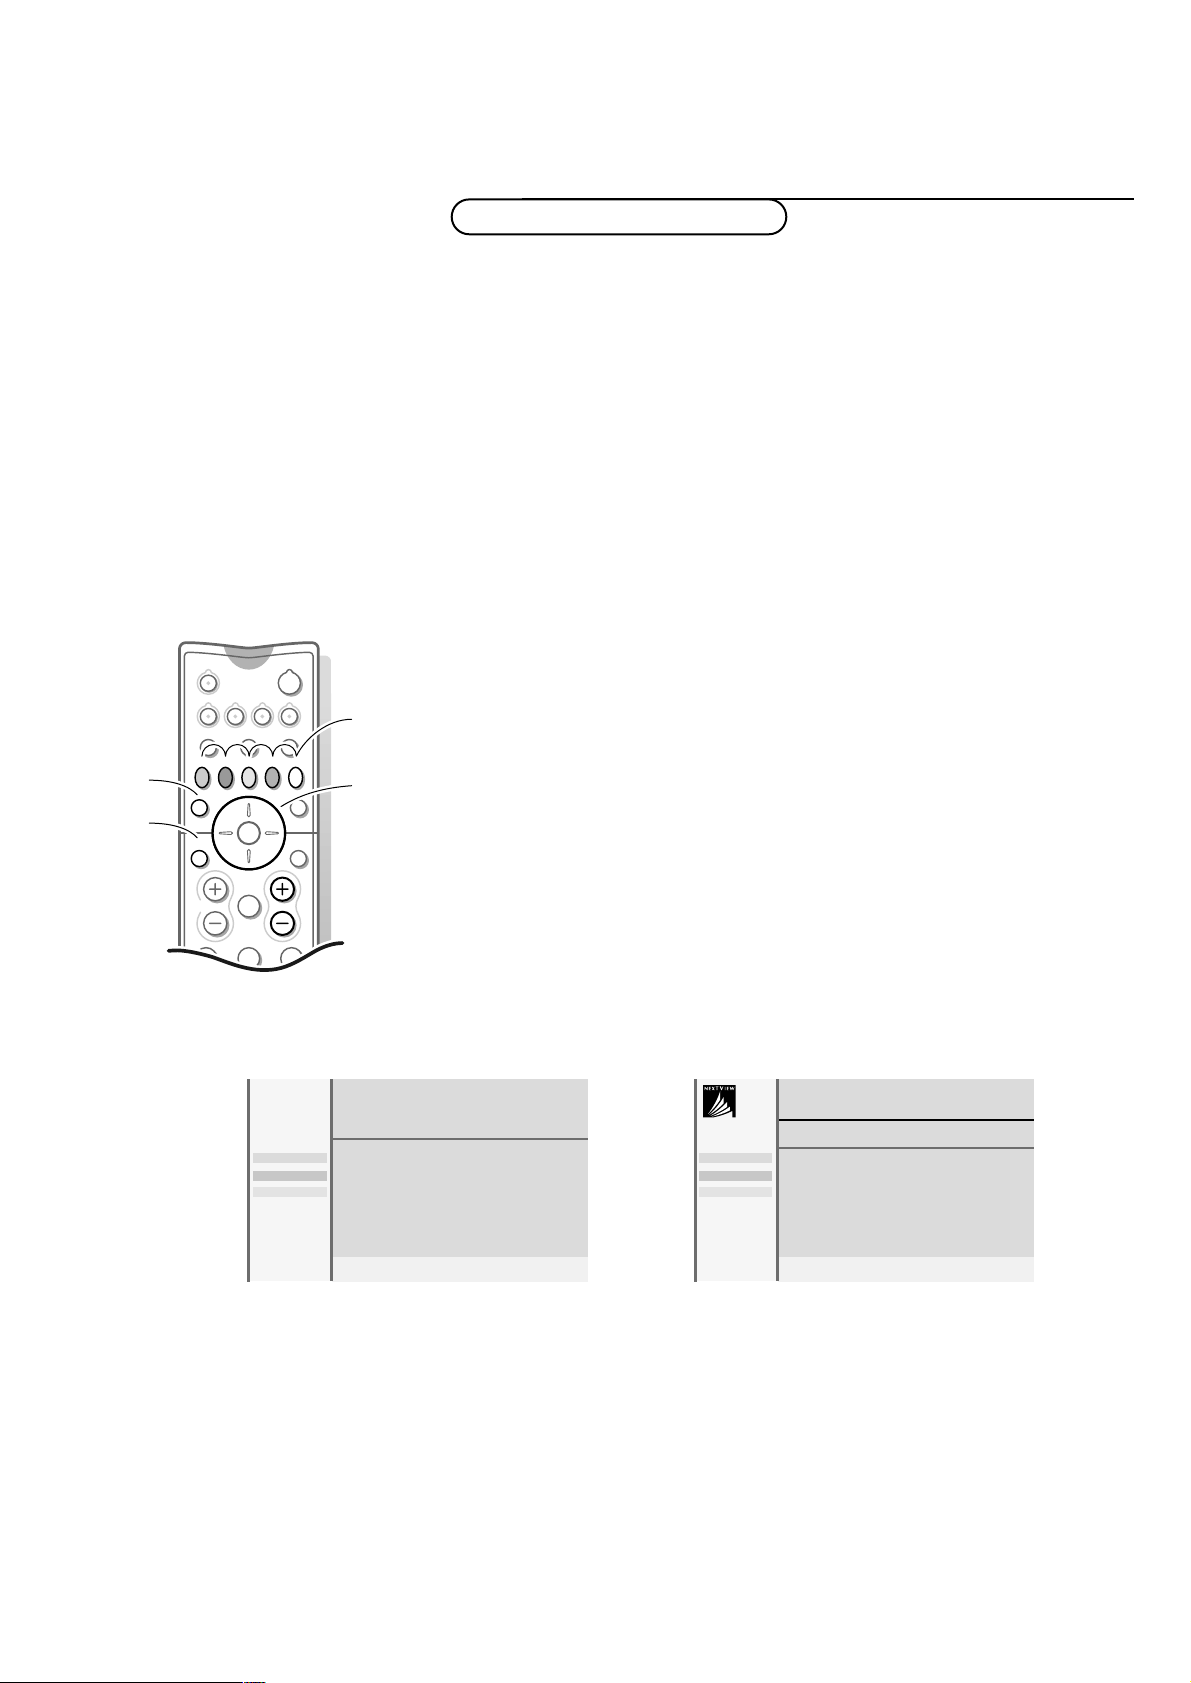
“ Enter the proper programme guide page number
with the digit keys or with the
– P + keys.
‘ Press the cursor left/right to run through the
subpages.
( Select a programme with the cursor up/down.
§ Press one of the colour keys to select one of the
basic functions (if available);
record,remind,info.
See Basic functions further on.
è Press the OK key to return to the header area
again.
“ Select a programme with the cursor up/down.
‘ Press one of the colour keys to select one of the
basic functions (if available);
record,remind,info.
See Basic functions further on.
( Press the OK key to return to the header area
again.
Channel Overview
BBC1 BBC2
p.202
p 01 02 ... π
BBC1
11.03 ................
14.35 ................ 226/3
17.50 ................ 231
Record
Remind
Info
Teletext Guide NEXTVIEW
Monday 9 Oct 18:03
Channel Theme Overview
BBC1
NEXTVIEW
What’s on now
Preview
Themes
Ratings
Record
Remind
Info
Today,most broadcasters in Europe, are offering teletext pages containing
their programme schedule of today. These pages can be requested by switching
the TV to
Teletext Guide.
An increasing number of broadcasters are offering an extended programme
guide service called
NEXTVIEW. NEXTVIEW is a new way of presenting
programme schedules and offers more features than common teletext.
With
NEXTVIEW it is possible to show for instance all the movies coming
tonight.
Both facilities are integrated in this TV:
NEXTVIEW and T eletext Programme
Guide. If a TV channel suppor ts
NEXTVIEW then the TV will automatically
present the
NEXTVIEW programme schedule. If the TV channel supports just
teletext,then the TV will switch automatically to Teletext Guide.
Both facilities are offering the same functions:record,remind and info.
However in case of Teletext Guide the broadcaster is responsible if these
functions are possible.
You can search for the programmes you want to watch up to 7 days in
advance. It is also possible to search for a programme by theme, e.g. sport,
movie, etc. Once a programme has been selected it can be tagged,to remind
you,or to record on the video recorder automatically (provided the video
recorder is equipped with
NEXTVIEWLink),once, daily, weekly or series.
Teletext Guide/
NEXTVIEW also allows direct access to detailed information
about programmes if provided by the broadcaster.
The broadcaster is responsible for the contents of the information.
The TV is responsible for the capture of that information and for the presentation to
the user.
Use of the Teletext Guide/NEXTVIEW menus
& Press the æ key on the remote control to display/cancel the Teletext Guide/
NEXTVIEW menu.
é Use the cursor in the up/down,left/right directions to select the date,
CHANNEL for the channel guide , THEME for the theme guide, OVERVIEW
for an overview of all the programmes which are marked as reminders or for
recording,the programme guide page number or to enter the programme list.
NEXTVIEW / T eletext Guide
Page 13
13NEXTVIEW
Channel Theme Overview
BBC 1 BBC 2 CNN
p.202
p 01 02 ... π
BBC 2
11.03 ................
14.35 ................ 226/3
17.50 ................ 231
One moment please
Record
Remind
Info
Monday 9 Oct 18:03
Channel Theme Overview
BBC1 CNN BBC2
BBC1
NEXTVIEW
........
........
........
Record
Remind
Info
Monday 9 Oct 18:03
Channel Theme Overview
Culture Movie ....
BBC1
NEXTVIEW
BBC1
CNN
TVE
Record
Remind
Info
Monday 9 Oct 18:03
Channel Theme Overview
BBC1
NEXTVIEW
BBC1 17.10
CNN 17.30
TVE 18.05
BBC2 19.00
Record
Remind
Info
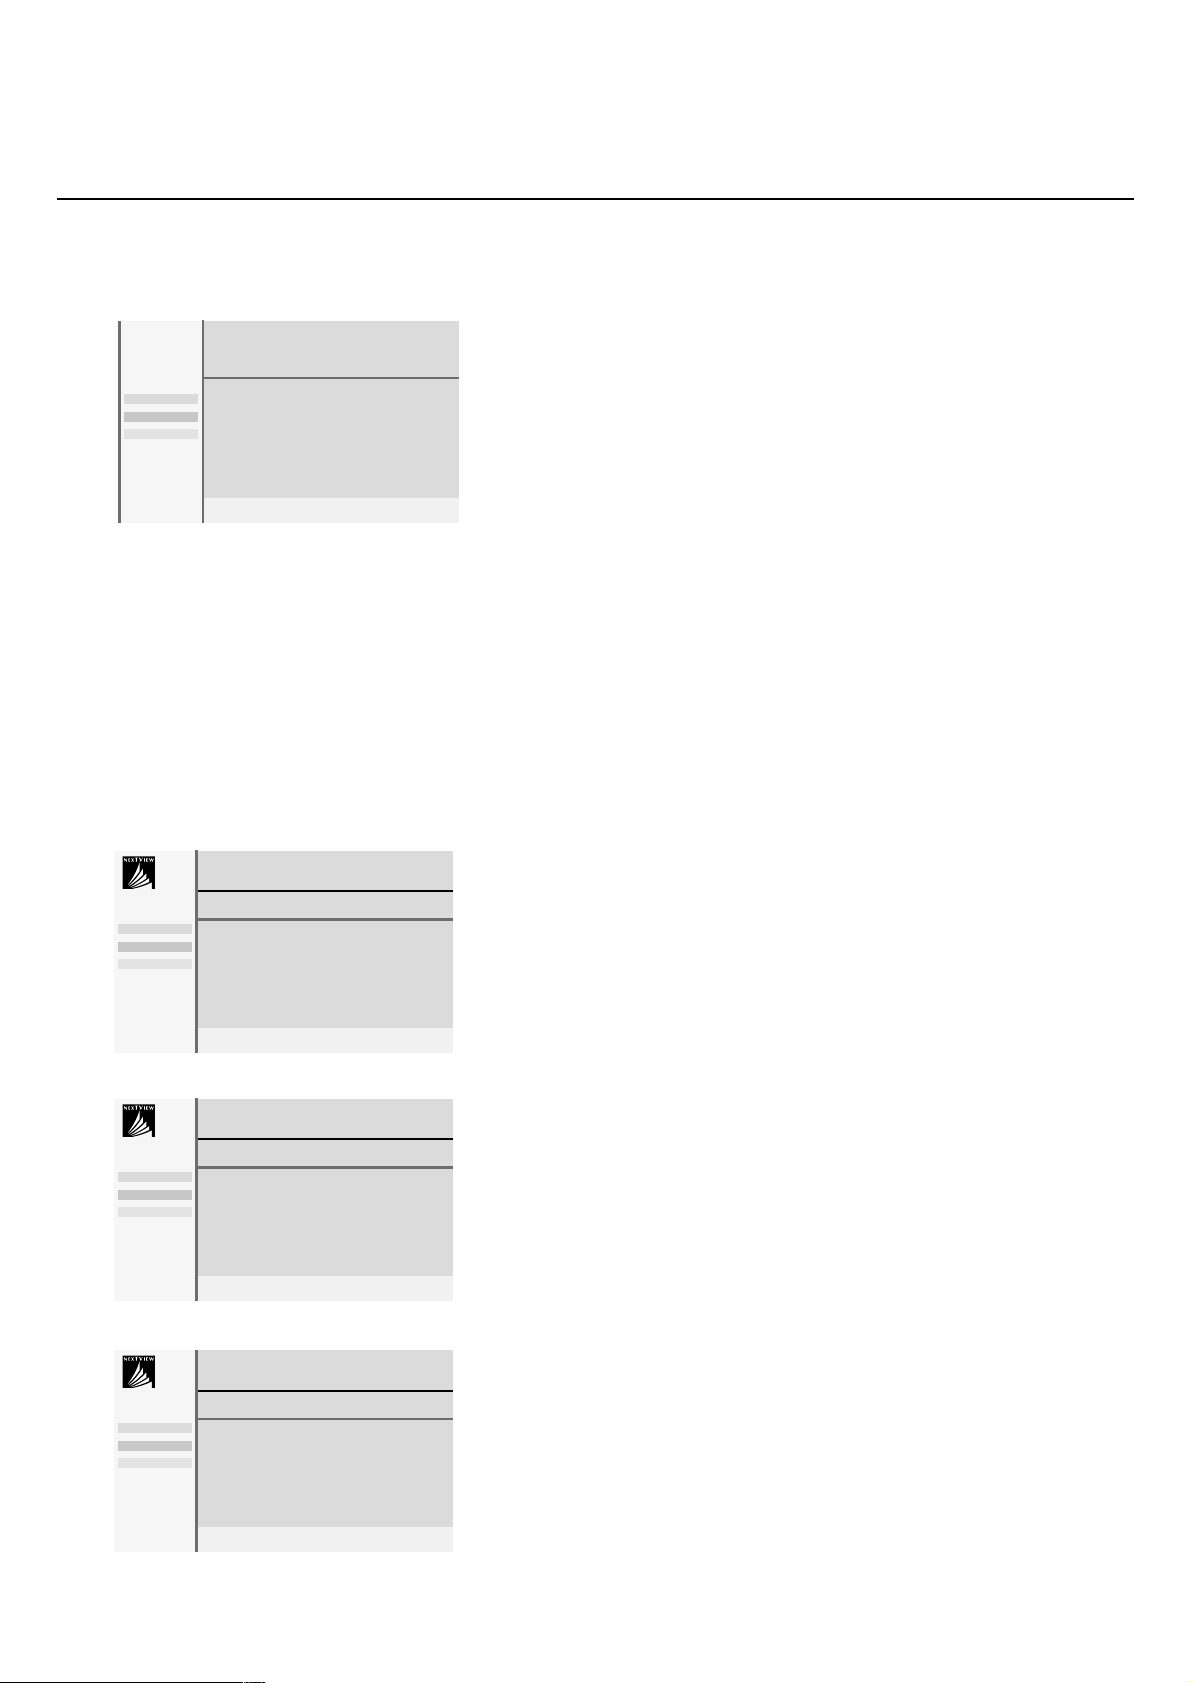
Teletext guide
TV channels which broadcast teletext also transmit a page with the
programme guide of the day.For each selected TV channel the programme
guide page can be selected with the
æ key:
- automatically if the selected TV channel supports services like PDC
(Programme Delivery Control) or MIP (Magazine Inventor y Page).
- if automatic pre-selection is not possible then the index page is displayed
and the proper programme guide page number of the selected TV channel
has to be entered with the digit keys.
The programme guide page will be stored automatically only if it satisfies
Video Programming via Teletext (VPT) requirements.
Every time you press the
æ key, the programme guide page of the
selected TV channel will be available if the TV channel does not support
NEXTVIEW.
The function items record,remind and info, corresponding with the coloured
keys,become highlighted if the displayed programme page satisfies the Video
Programming via Teletext (VPT) requirements. Select a programme item and
press one of the function keys,e.g. Record or Remind. See Basic functions
further on.
The Info item is enabled if the selected programme contains a page number
with an optional subcode referring to a page with more info about the
programme.
NEXTVIEW modes to sort and represent information
Channel
The Channel guide provides an overview of all programmes that are
broadcast by a single channel during one day.
Already passed programmes can be made visible via cursor up.
The list will start with the earliest broadcast programme.
With cursor left/right another favourite TV channel can be selected.
Theme
The theme guide displays a list of all programmes at the selected date,that
matches with the selected category (news, sport, culture, movies, …).
The default starting item will be the current or next programme on the
current TV channel.
The
THEME selection is only present if programmes in the TV guide have
defined themes.
Overview
The Overview menu provides a list of programmes that are marked as
reminders or to be recorded each day.
When more than one programme to be recorded has an overlap in time,
these programmes will be marked by a red colour.
After the programme has been broadcast,all items set for once will be
deleted from the list the following day.This menu can be used to change a
reminder or recorder.
Note: the TV will automatically interpret the broadcast time (as shown on the
teletext guide) of your selected programme into the correct local time and
date.
Page 14

14 NEXTVIEW
Record
Remind
Info
Info block
Date time
CHANNEL THEME OVERVIEW
CNN
11.03 Travel Guide
14.35 World news
17.50 Insight
............................
R
!
p
OnceπDaily Weekly Clear
Basic functions
The functions Record,Remind and Info can be activated with the
corresponding colour keys on the remote control.
If the function is not available,then the text is shown at reduced brightness.
Select a programme with the cursor up/down.
Record R or Remind !
& Press the red colour key to activate Record or the green colour key to
activate
Remind.
If the programme number of the broadcaster is not yet known,a message appears
with the request to input the correct programme number with the cursor left/right.
Press the OK key.
A small menu pops up in which you can choose the interval:once, daily or
weekly, or clear an earlier made record or remind setting. The default inter val
is set to
Once.If a programme is an episode of a series, it is identified by the
system and the options
daily and weekly are replaced by the option series.In
this case the system identifies when the next episode of the series will be
broadcast.This is not possible in the Teletext guide.
é Use the cursor in the left/right directions to select the interval.
The colour of the tag refers to the interval.
“ Press the OK key.
When
Record R is activated:
Storing is displayed to indicate the video recorder is programmed.
When
Remind ! is activated:
- a message will be displayed the moment the tagged programme
with
! starts, when watching the TV later on.
- the TV switches on the moment the tagged programme with
! starts,
when the TV is in standby.
Note: Recordings and reminder s are not possible when the broadcaster does not
transmit dates and times of the programmes.
The message
No TV programming possible appears .
Make sure you are on the TV programming page.
Info
& Press the yellow colour key to activate Info.
Advertisements or information relating to the selected programme are
displayed.In some cases all of the information does not fit on the screen. Use
the cursor up/down to browse through all the information.
é Press the yellow colour key again to switch off the information.
Page 15

15NEXTVIEW
Video recorder restrictions with NEXTVIEW
The Record item and the automatic recording will only be present and
possible if your video recorder is equipped with nexTViewLink.
Your video recorder should be connected to
EXTERNAL 2.See Connect
Peripheral Equipment,p.18.
The daily, weekly and series options,the number of recordings set and the
way overlapping recordings are managed, depend on the type of video
recorder you have.When all video recorder timers are full,the item
Record
in the menu will not be present.
Upload video recorder overview.
When the TV is switched on, the timer recording are uploaded to the TV to
check if any manual addition or deletions have been done.This is shown in the
overview.
The video recorder manages and removes timer recordings when performed.
Some
NEXTVIEWLink video recorders do not allow a daily programming of the
recording to start on a Saturday or Sunday.In this case the item
daily will be
removed from the menu on those days.
Page 16
16 Teletext
cursor to select
pages
213
546
879
0
B
w
æ b
Ï
i
SQ
TV VCR DVD SAT
TUNER CD TAPE CDR
¬V P
0
◊
OK
MENU
b
0
X
U
X ®qP
fyÚh
ZOOM
INSTANT
colour keys to
select
Most TV channels broadcast information via teletext.
Each channel which broadcasts teletext transmits a page with information on
how to use its teletext system.Look for the teletext page with the main
index (usually p.100).
Depending on the TV channel, teletext is transmitted in different systems.
The colours used in the options line correspond with the colour keys of your
remote control.
About Easy Text
Easy Text considerably reduces the waiting time (on condition that the
teletext broadcast of the particular TV channel is received for at least half a
minute) by :
• a direct selection of previous and following pages which are in transmission
and of the pages referred to in the options line
• a habit watcher list:frequently used pages are put automatically in a list of
preferred pages,so that they are immediately available
• the precapturing of the page numbers referred to in the displayed page
• the precapturing of all the subpages.
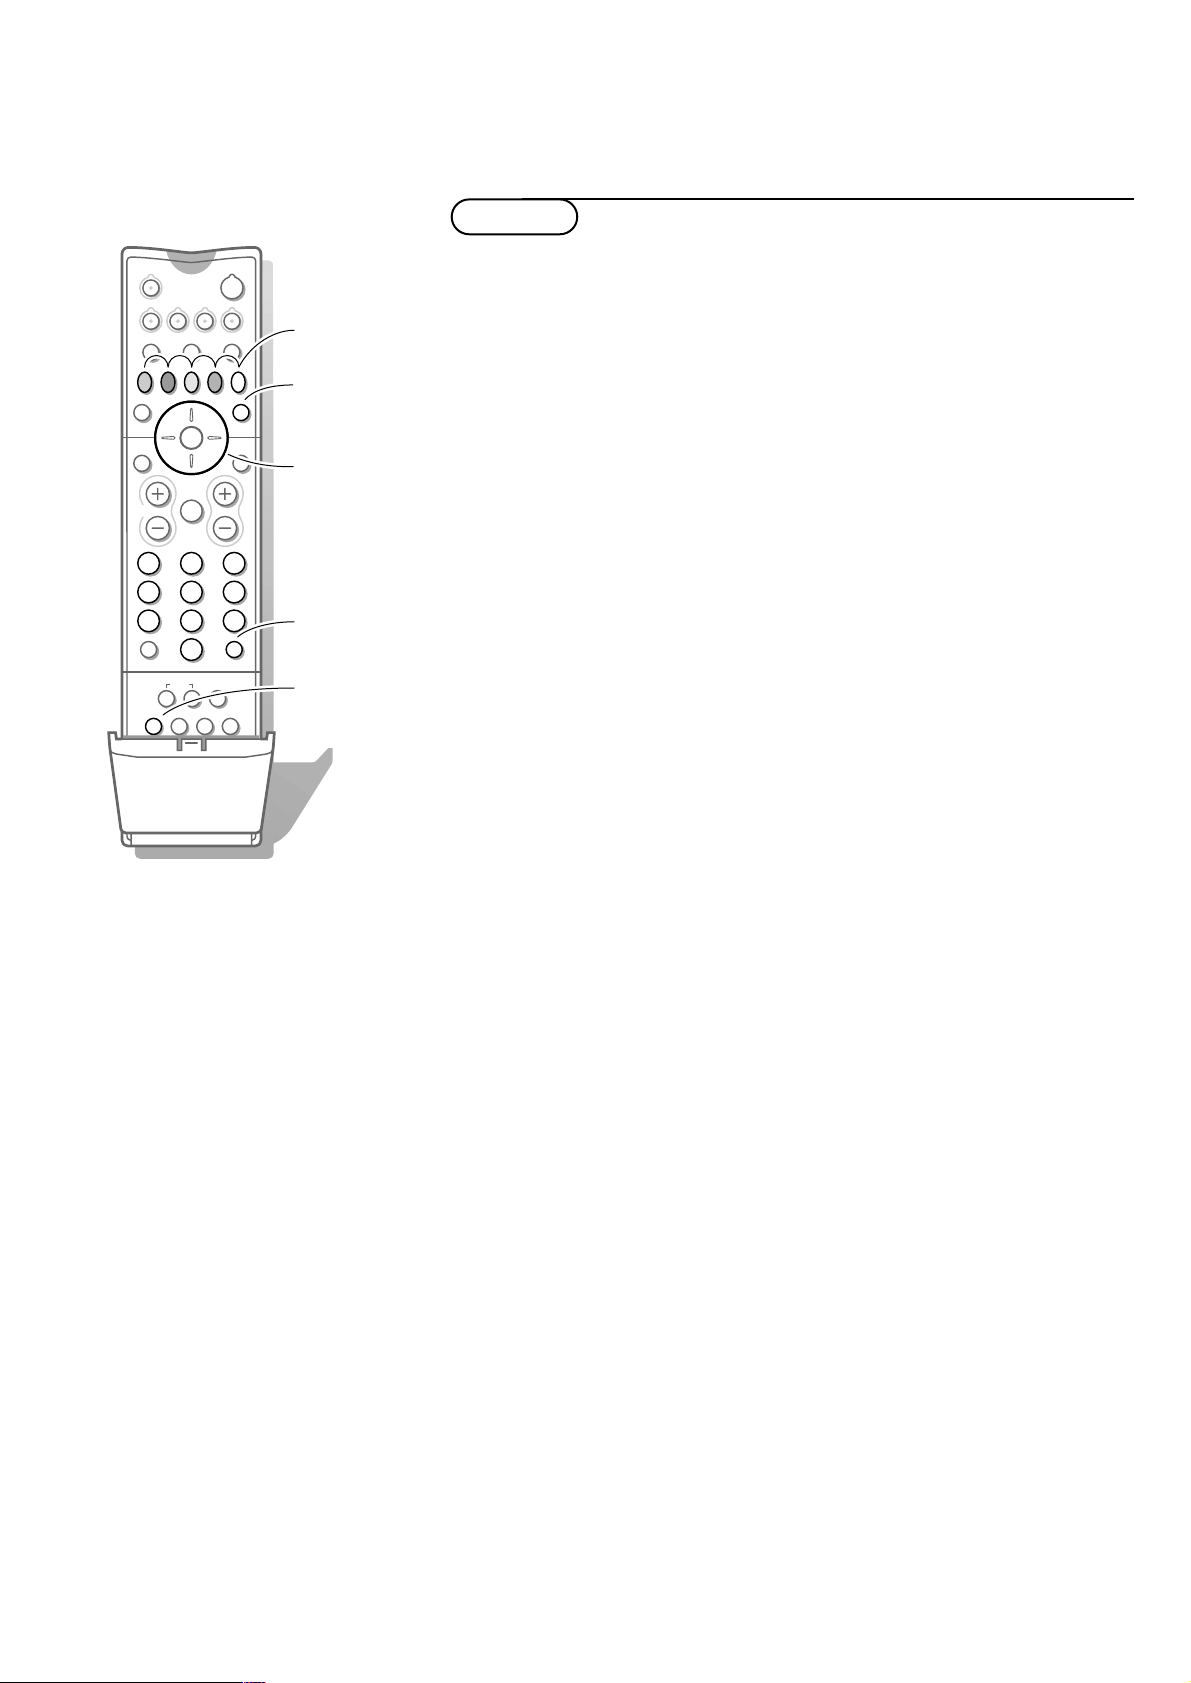
Switch Teletext on and off
Press b to switch the teletext on or off.
The main index page appears on the screen together with two information
lines at the top and one option line at the bottom of the screen.
Remark: if the displayed teletext characters on screen do not correspond with the
characters used in your language, press the
X key,under the door of the remote
control, repeatedly to select language group 1 or 2.
Select a Teletext page
With the digit keys
Enter the desired page number with the digit keys.
The page counter seeks the page or the page appears immediately when the
page number has been stored in the memory.
A message appears when you have entered a non existent or incorrect page
number.Page numbers beginning with 0 or 9 do not exist.Choose another number.
With the option line
Select with the colour keys,corresponding to the coloured options at the
bottom of the screen,the desired subject.
Quickly run through the teletext pages
Press the cursor up/down or the - P + keys to run through the previous or
the following pages.
Select the previously selected txt page
Press the 0 key.
Select the index teletext page
Press the white colour key to display the main index (usually p.100).
Only for T.O.P teletext broadcasts :
T.O.P orders the pages in categories and adds other possibilities of enhancing
ease of use.
Press
i. A T.O.P. overview of the teletext subjects available is displayed.
Not all TV channels broadcast T.O.P. teletext.When the teletext system
is not T.O.P. teletext,a message appears at the top of the screen.
Select with the cursor up/down,left/right the desired subject and press the
OK key .
Teletext
Page 17

17Teletext
cursor to select
subpages
S
213
546
879
0
B
w
æ b
Ï
i
S Q
TV VCR DVD SAT
TUNER CD TAPE CDR
¬V P
0
◊
OK
MENU
U
X®qP
fyÚh
ZOOM
INSTANT
U
f
h
i
MOVIE SPORT CHILD NEWS OTHER
OK to activate
Select subpages
When a selected teletext page consists of different subpages,one of the
subpages appears on the screen.
The coloured number in the first information line refers to the displayed
subpage.
The other subpages can be selected in 2 ways :
With the cursor left/right
The other subpage numbers appear in white as soon as the transmission has
found them. They are stored in the memory so that they are available while
the teletext page is on screen.
Select with the cursor left/right the previous or the following subpage.
With the U key
• Enter the subpage number yourself:
Press
U.Enter the desired subpage with the digit keys :e.g. 3 for the third
page of seven subpages.
The TV searches for the selected subpage.
• Automatically rotating subpages:
Press
U again to cancel the entered digit key for the subpage.
Now the subpages rotate automatically.
Press
U again to select the subpages with the cursor left/right again.
Special teletext functions
Hold
Press S to stop the automatically rotating of the subpages or to stop the
page counter from seeking when you have entered a wrong page number or
when the page is not available.
Enter another page number.
Enlarge
Press h repeatedly to display the upper part,the lower part and then to
return to the normal page size. When the upper par t is displayed,you can
scroll the text,line by line using the cursor up/down.
Reveal
Press f to reveal/conceal the hidden information,such as solutions to
riddles and puzzles.
Select Continuous Subtitles
TV channels with teletext often transmit programmes with subtitling.For
each TV channel you can store a subtitle page which will be displayed
continuously if the programme being broadcast is transmitted with subtitles.
Switch on teletext and select the proper subtitle page from the index.
Switch off teletext.
Now the subtitle page is stored for the selected TV channel.
Once subtitles have been stored and
Subtitle On has been selected they will
automatically be displayed on the selected TV channel if subtitles are in the
transmission.
Select
Subtitle On or Off in the Features menu,see p. 11.
The subtitle symbol
j appears when Subtitle On is selected.
Remark: you are in teletext mode, so only teletext functions are available.
Page 18
18 Connect Peripheral Equipment
There is a wide range of audio and video equipment that can be connected
to your TV.
The following connection diagrams show you how to connect them.
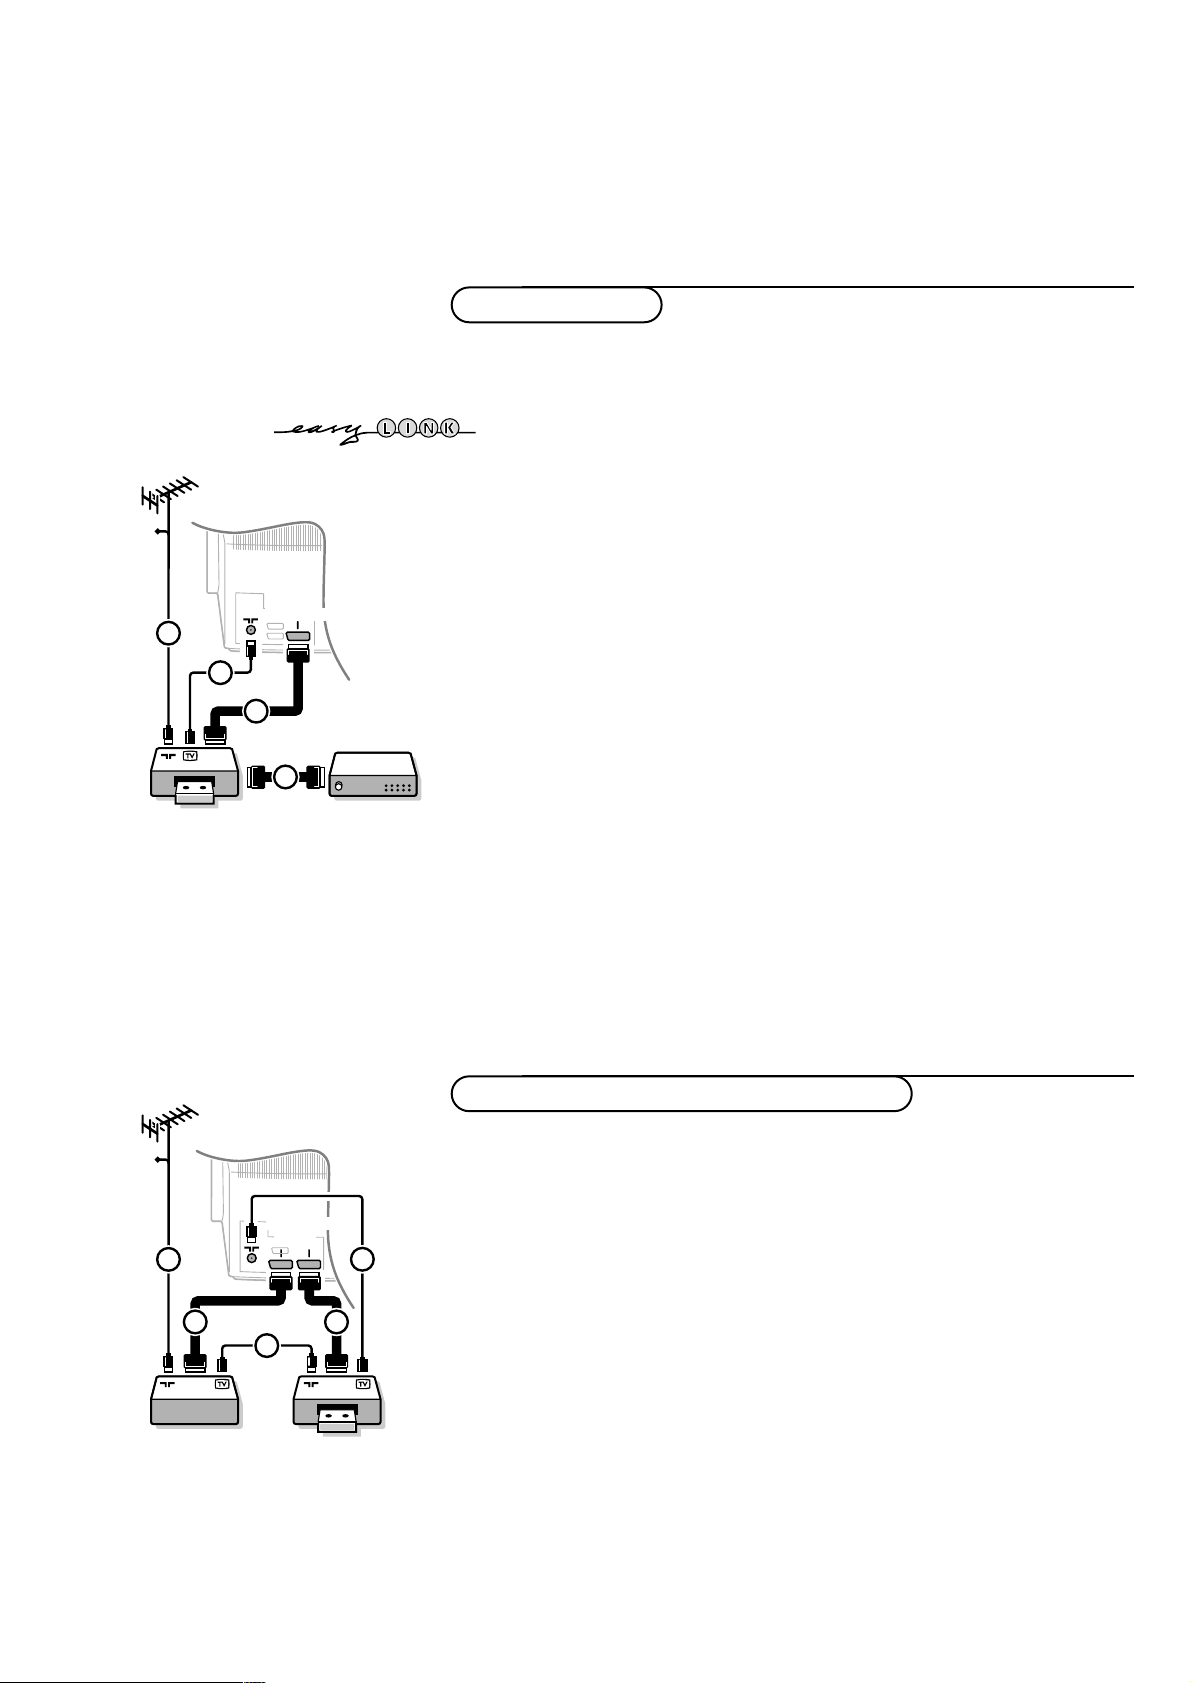
Connect the aerial cables 1, 2 and, to obtain the optimum picture quality,
eurocable
3 as shown opposite.
If your video recorder is provided with the EasyLink function, the eurocable supplied
with it should be connected to
EXTERNAL 2 to benefit from the EasyLink
functionality.
If the eurocable 3 is not used the following steps are required:
Search for and store the test signal of the video recorder
& Unplug the aerial cable 1 from the aerial socket x of your video recorder.
é Switch on your TV and put the video recorder on the test signal.
(See the handbook for your video recorder.)
“ Search for the test signal of your video recorder in the same way as you
searched for and stored the TV signals. See Installation,Searching for and
storing TV channels, Manual installation, p.5.
‘ Store the test signal under programme number 0 or between 90 and 99.
( Replace the aerial cable in the aerial socket x of your video recorder after
you have stored the test signal.
Decoder and video recorder
Connect a eurocable 4 to your decoder and to the special euroconnector
of your video recorder. See also the video recorder handbook.
See Define Decoder/Descrambler prog.numbers,p. 7.
You can also connect your decoder directly to
EXTERNAL 1 or 2 with a
eurocable.
VCR 1
CABLE
1
4
2
EXTERNAL
2
3
VCR 1
CABLE
1
21
EXTERNAL
2
4 5
3
& Connect the aerial cables 1, 2 and 3 as shown opposite. Better picture
quality can be obtained if you also connect eurocable
5 to EXTERNAL 2
and a eurocable 4 to EXTERNAL 1 or 3.
é Look for the test signal of your peripheral in the same way as you do for
a video recorder.
When a video recorder is connected to EXTERNAL 1 you can only record a
programme from your TV.
Only when a video recorder is connected to
EXTERNAL 2 it is possible to record
a programme from your TV as well as from other connected equipment. See Record
with your video recorder,p. 23.
Note:
EXTERNAL 1 can handle CVBS and RGB, EXTERNAL 2 CVBS, Y/C and RGB,
EXTERNAL 3 only CVBS.
(except Digital Sources)
Video recorder and other peripherals
Video recorder
Connect Peripheral Equipment
Page 19
19Connect Peripheral Equipment
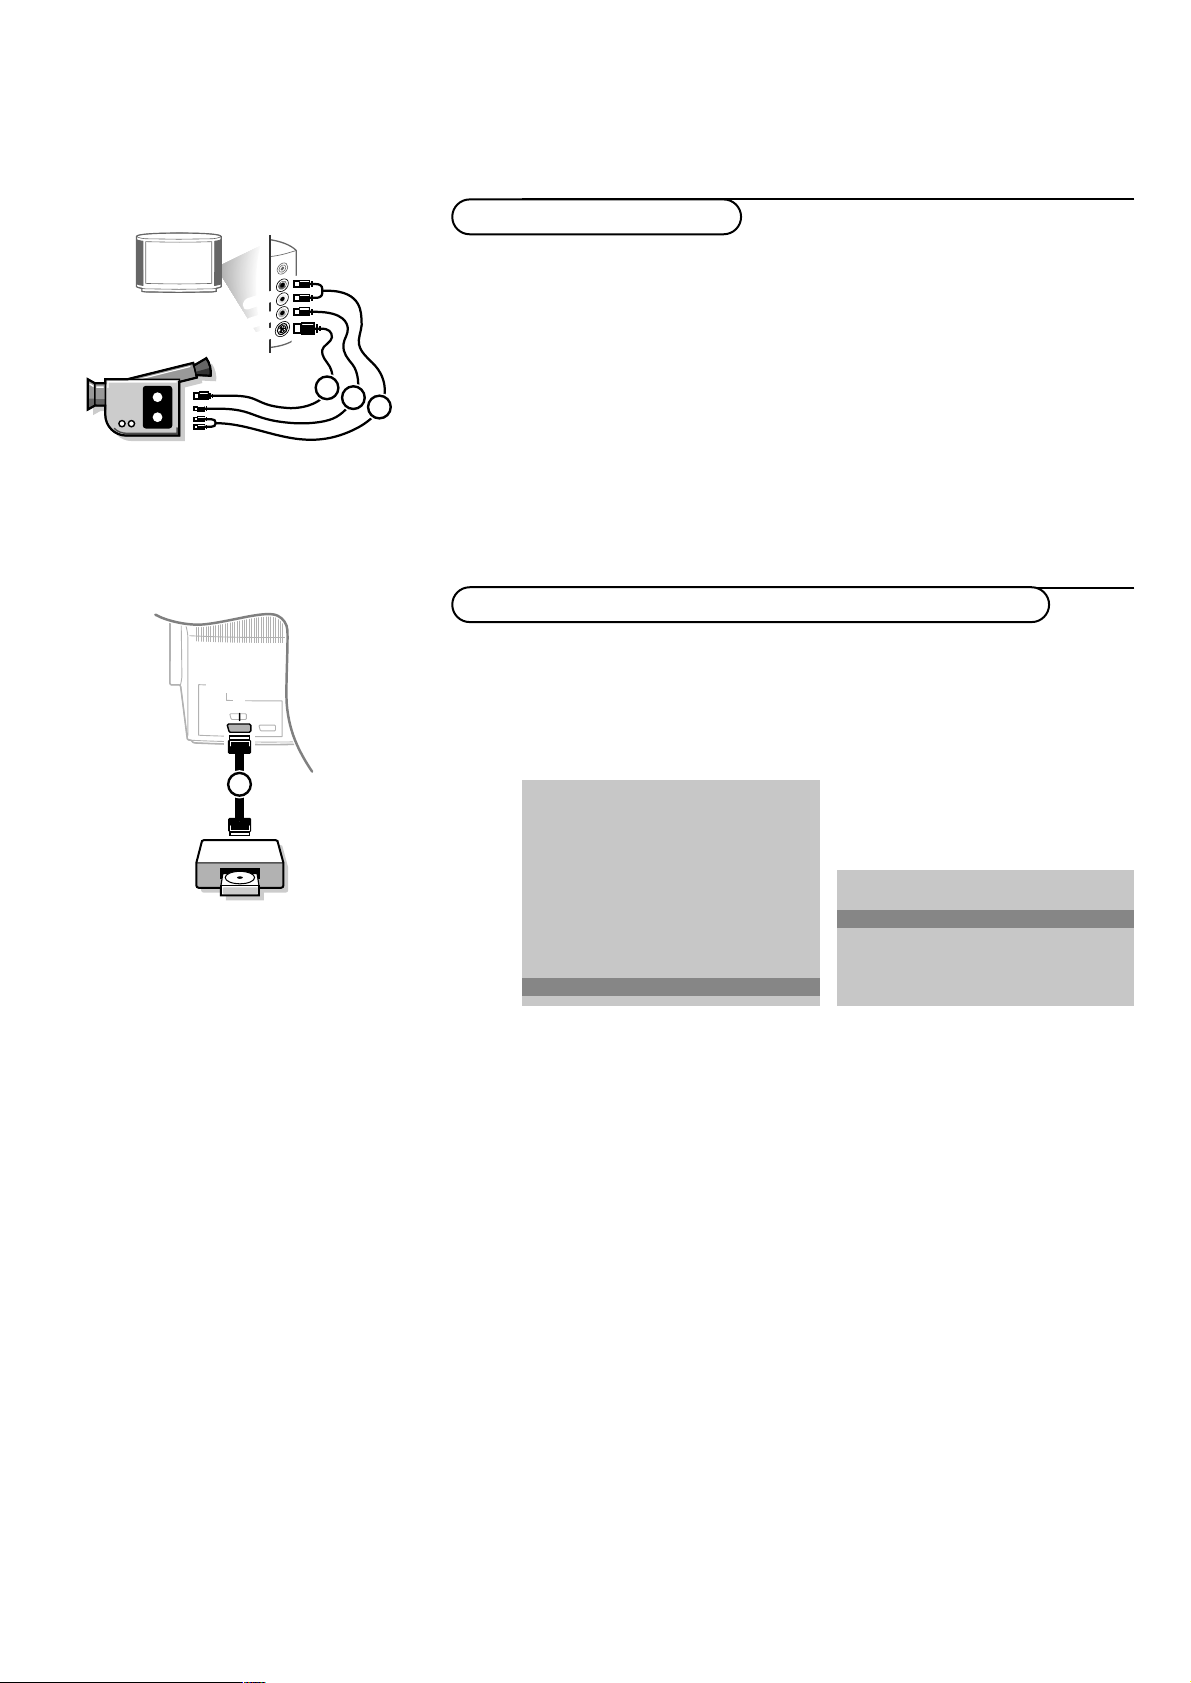
& Connect your camera or camcorder to sockets at the right side of your TV.
é Connect the equipment to VIDEO 2 and AUDIO L 3 for mono
equipment.
Press the
X key repeatedly to select the sound coming from one or
both loudspeakers of your TV.
“ For stereo equipment also connect AUDIO R 3.
S-VHS quality with an S-VHS camcorder is obtained by connecting the S-VHS
cables with the
S-VIDEO input 1 and AUDIO inputs 3.
A
U
D
IO
VID
E
O
S•V
ID
E
O
3
2
1
Connect your digital equipment with a eurocable 1 to one of the
euroconnectors (
EXT1, EXT2 or EXT3), or with a cinch cable to the VIDEO
input at the right side of the TV (see illustration).
& Press U and f at the same time.
é Select Digital sources in the Setup menu of the INSTALLATION menu and
select:
•
None if you have no digital source connected,
•
EXT1, EXT2 or EXT3 if you have connected your equipment to a
euroconnector,
•
FRONT in case you connected to the right side of the TV.
“ Press the Ï key to switch off all menus.
Note: the low quality of some digital picture material may be the cause of digital
image distortion. In this case select
Eco under the SMART PICTURE a key on the
remote control as this setting is intended to improve distorted picture quality.
INSTALLATION
Menu language
Country
Automatic installation
Manual installation
Give name
Reshuffle
Favourite programmes
SETUP
J SETUP
1/2/3
EXTERNAL
DVD
1
SETUP
Digital Sources
Decoder/Descrambler
Information line
Factory settings
INSTALLATION
J Digital sources
Digital equipment (DVD,digital satellite tuner,...)
Camera & camcorder
Page 20
20
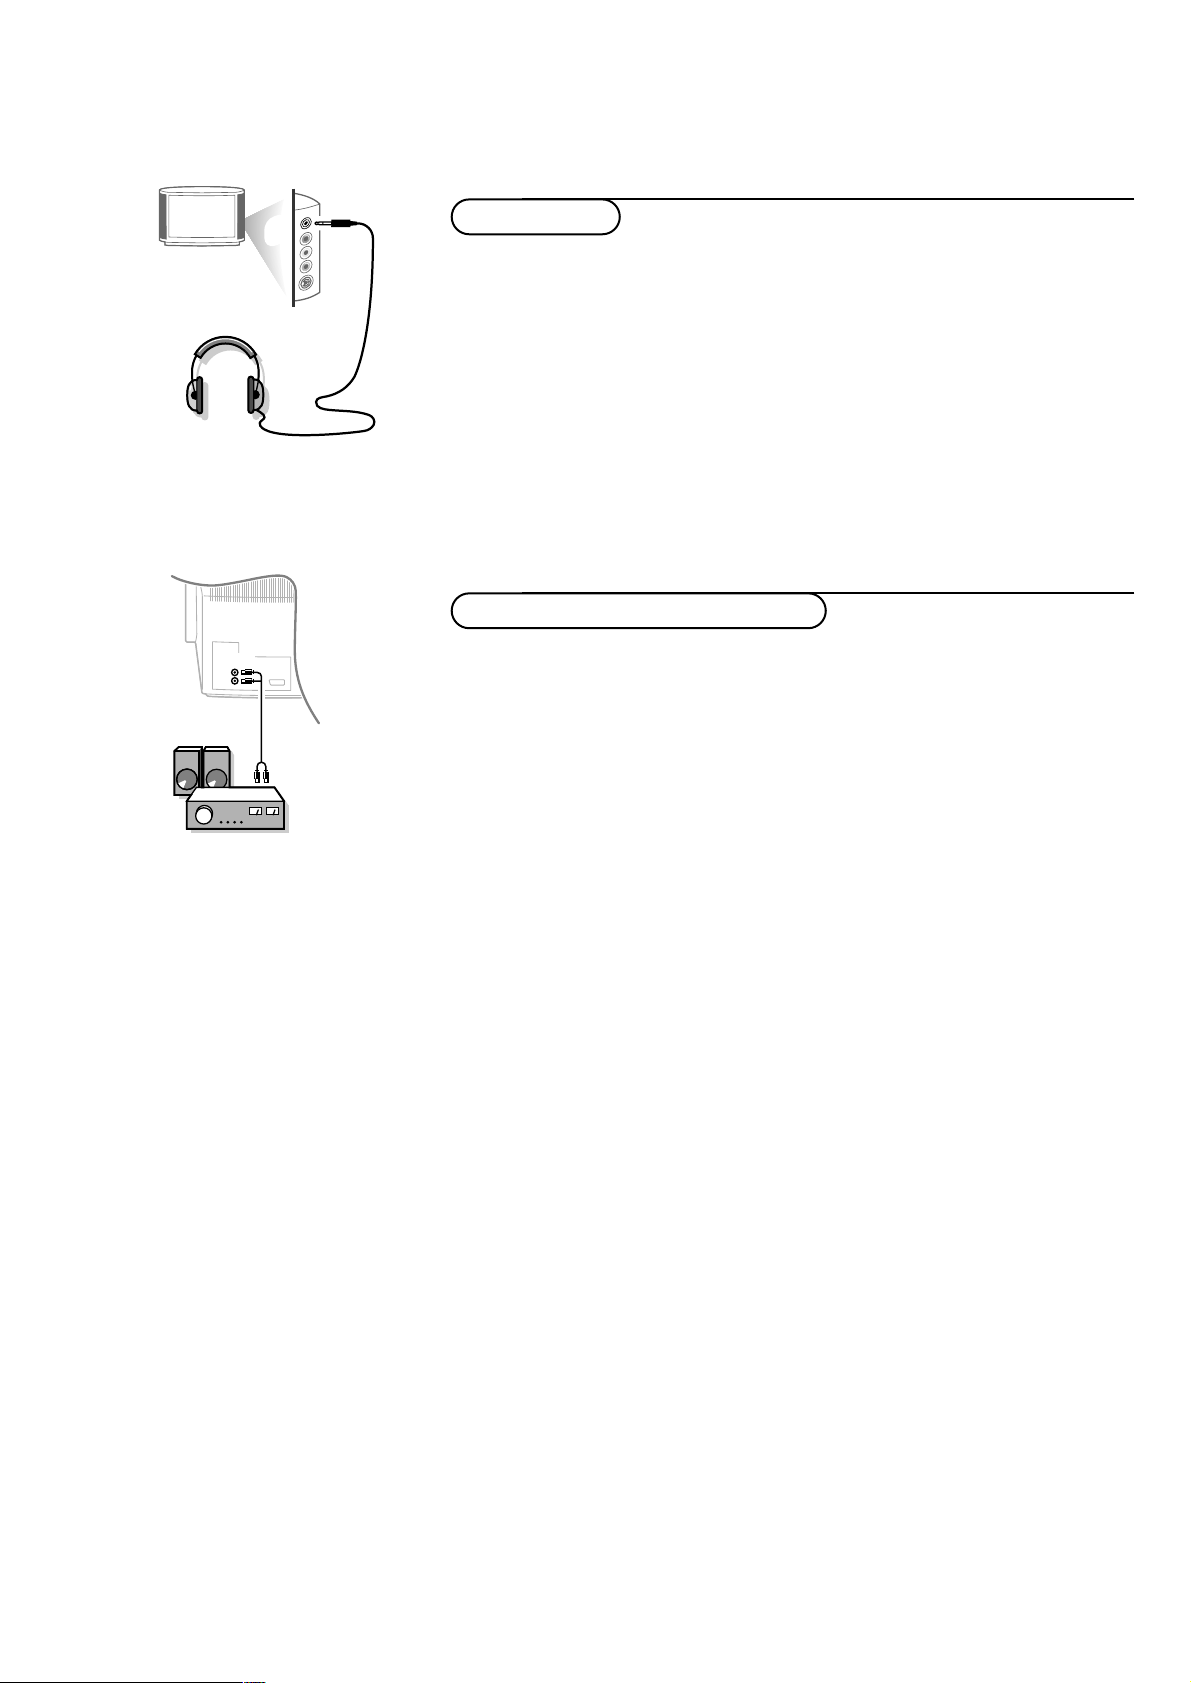
& Insert the plug into the headphone socket L at the right side of the TV.
é Press ¬ on the remote control to switch off the internal loudspeakers
of the TV.
The headphone impedance must be between 8 and 4000 Ohm.
The headphone socket has a 3.5 mm jack.
In the SOUND menu select Headphone volume to adjust the headphone
volume.See p.10.
L
Connect the audio cables to the audio input of your audio equipment and to
AUDIO L and R at the back of your TV.
You can listen to your TV sound via your audio equipment.
If you want to connect more equipment to your TV, consult your dealer.
AUDIO
Connect Peripheral Equipment
Audio equipment / Amplifier
Headphone
Page 21
21Connect Peripheral Equipment
If the TV is connected to a video recorder with the EasyLink function, in some cases
the TV will be switched on, even when it was in standby. (E.g. playback tape,...)
This is not possible when Child Lock On is selected.
Equipment connected with an aerial cable only :
Select the programme number under which you have stored the test signal
with the digit keys.
Equipment connected to a euroconnector or to the right side of
the TV
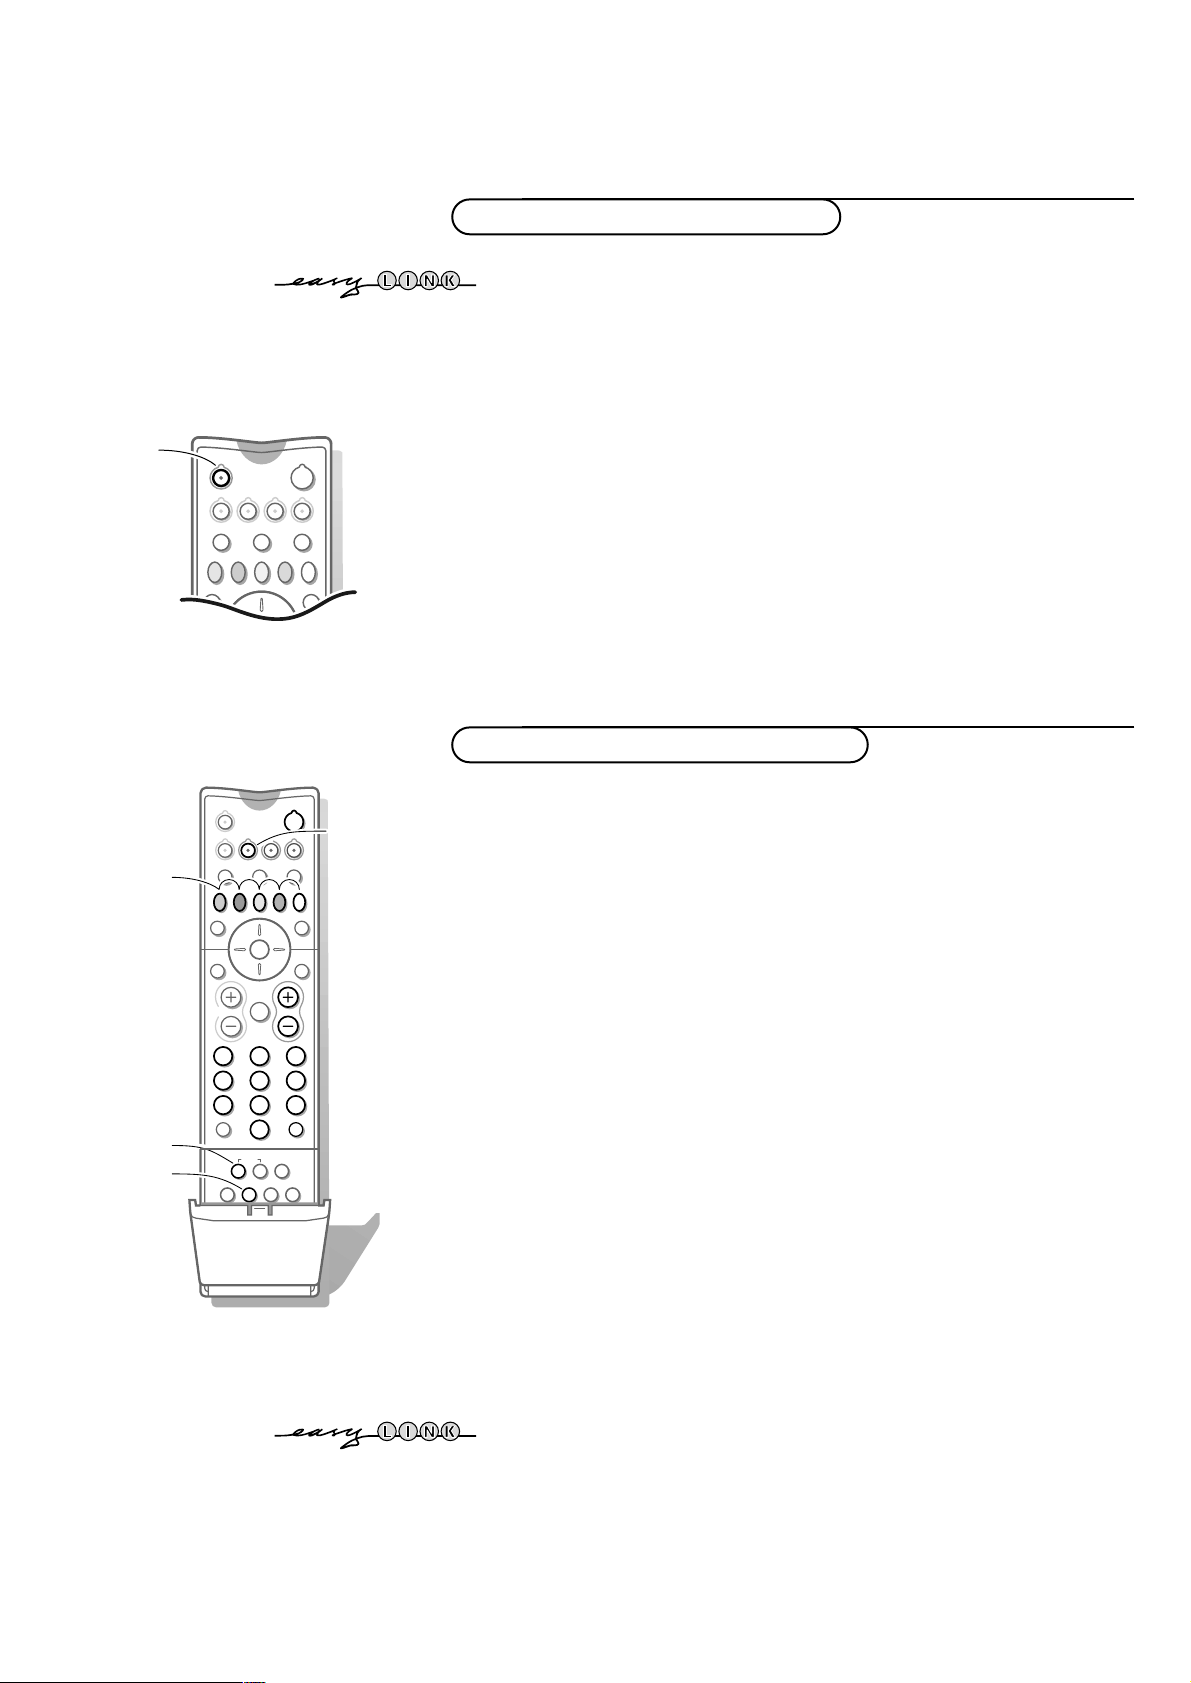
Press the w key repeatedly to select EXT1,EXT2, EXT3 or FRONT,
according to where you connected your equipment at the back or the right
side of your TV.
Remark : Most equipment (decoder,video recorder, satellite receiver) carr ies out the
switching itself.
If you want to change to TV channels?
Enter the programme number of the TV channel which you want to watch
with the digit keys.
B
w
æ b
VCRTV DVD SAT
CDTUNER TAPE CDR
w
SQ
MOVIE OTHERNEWSCHILDSPORT
VCR
213
546
879
0
B
w
æ b
Ï
i
TV VCR DVD SAT
TUNER CD TAPE CDR
¬V P
0
◊
®Ò‡π
†
SQ
OK
MENU
INSTANT
U
XqP
fyÚh
ZOOM
INSTANT
®
®
U
®
Ò
‡
π
†
Most of the audio and video equipment from our range of products can be
operated with the remote control of your TV.
Press the
VCR, DVD, SAT,TUNER, CD,TAPE or CDR key according to the
equipment you want to operate with this remote control.See Use of the
remote control,p. 8.
Video recorder keys
Press one of the video recorder keys after you pressed the VCR key:
® for record,
Ò for rewind,
‡ for stop,
π for play,
† for fast forward,
◊ for selecting 1- or 2-digit programme numbers from the video
recorder,
- P + for sequential programme selection from the video recorder tuner,
0 to 9 to select a programme number from your video recorder tuner,
B to switch the video recorder to standby
U VCR timer
These keys function with equipment which use the RC5 signalling standard.
If your video recorder has the EasyLink function, the key INSTANT ® for recording,
under the door of the remote control, can be operated in the TV mode.
If your EasyLink video recorder has the system standby function, when you press the
B key for 3 seconds, both TV and the video recorder are switched to standby.
Audio- and video equipment keys
To select connected equipment
Page 22
22 Connect Peripheral Equipment
DVD
SAT
213
546
879
0
B
w
æ b
Ï
i
TV VCR DVD SAT
TUNER CD TAPE CDR
¬V P
0
◊
®Ò‡π
†
SQ
OK
MENU
®
Ò
‡
π
†
æ
b
Ï
0
bcdfi
Mah
SMARTSMART
ACTIVE
CONTROL
TUNER
CD
TAPE
CDR
213
546
879
0
B
w
æ b
Ï
i
TV VCR DVD SAT
TUNER CD TAPE CDR
¬V P
0
◊
®Ò‡π
†
SQ
OK
MENU
®
Ò
‡
π
†
æ
b
Q
S
Ï
0
bcdfi
Mah
SMARTSMART
ACTIVE
CONTROL
MOVIE SPORT CHILD NEWS OTHER
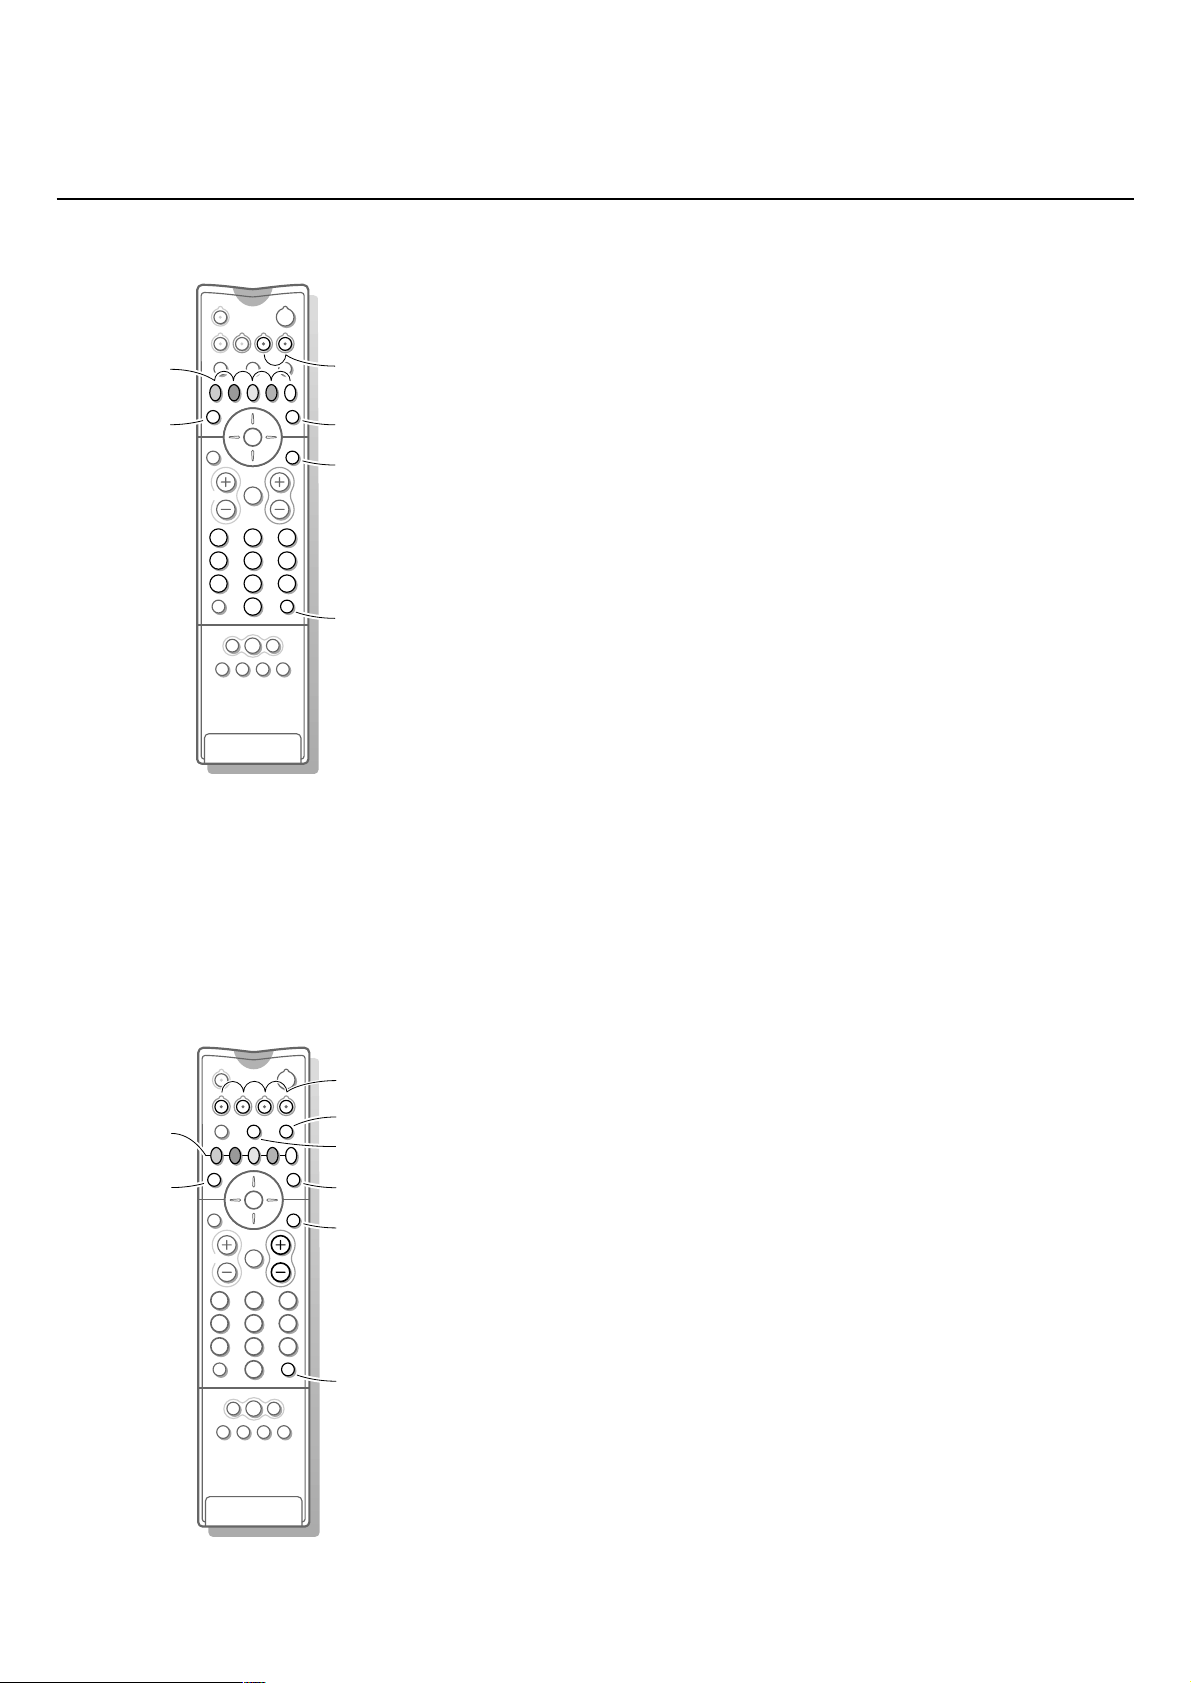
DVD keys
Press one of the following keys after you have pressed the DVD key.
Ï to switch the DVD menu on or off
b to select a DVDtitle
0 to select a DVD chapter
æ to select your choice of subtitle language
® for pause
Ò to search down
‡ for stop
π for play
† to search forward
0-9 to select a programme number from your DVD
OK to enter the selected menu item
These keys function with equipment which use the RC6 signalling standard.
Satellite receiver keys
Press one of the TV keys after you have pressed the SAT key.
These keys function with equipment which use the RC5 signalling standard.
Tuner, CD,Tape and CDR keys
Press one of the following keys after you have pressed the TUNER,CD,
TAPE or CDR key.
Ï to switch the menu on or off (tuner)
0 to select a frequency (tuner)
® to record
Ò to search down (tuner);rewind (CD/tape);speed down (CDR)
‡ to stop
π to play
† to search up (tuner);forward (CD/tape);speed up (CDR)
b RDS display (tuner);info on screen (CD/CDR)
æ RDS news/TA (tuner); disc increment (CD/CDR)
S pause (CD/CDR/tape)
Q surround modes (CD/CDR/tape)
+ P - next/previous (CD)
Page 23
23Record
If you have connected an S-VHS video recorder provided with the EasyLink function,
you can record S-VHS quality from an S-VHS peripheral connected to the right side
of the TV. (E.g. from an S-VHS camcorder.)
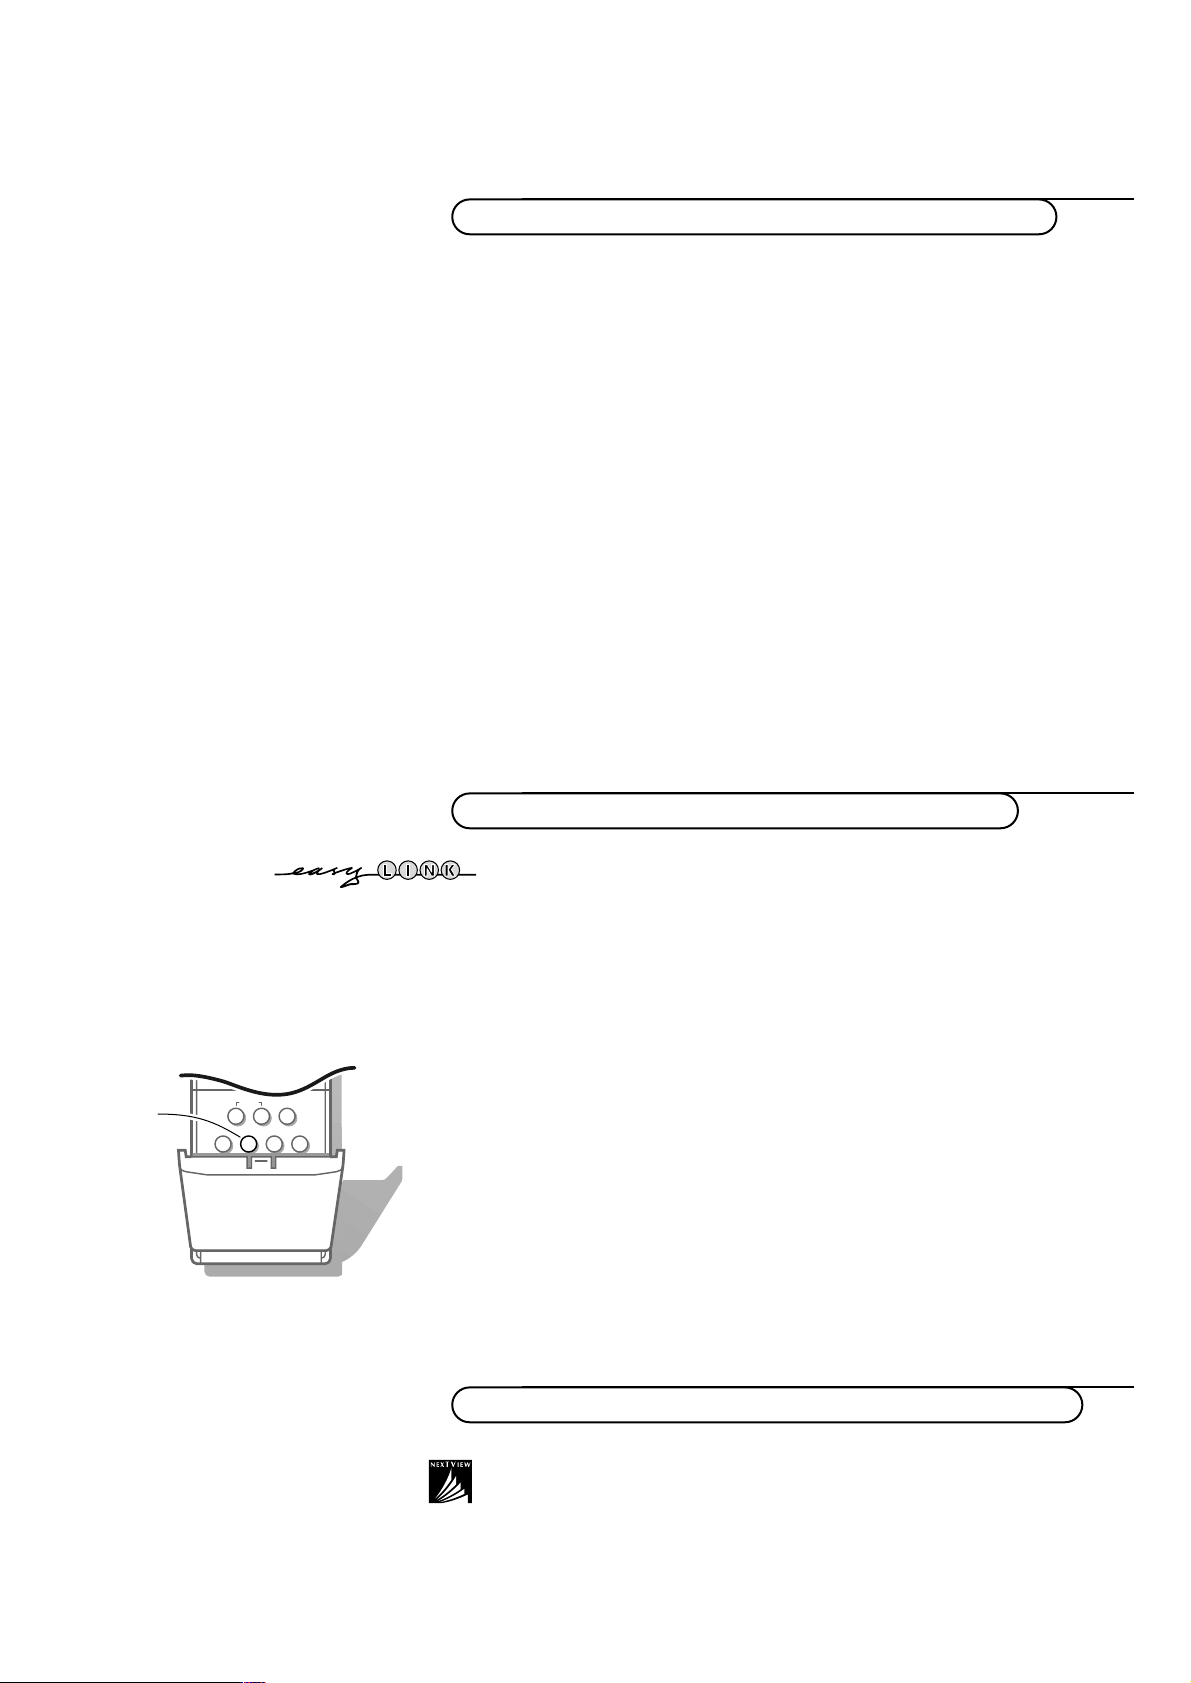
In TV mode, it is possible to start a direct recording of the programme which is being
displayed on the TV screen.
Press the
INSTANT ® record key, under the door of the remote control.
The video recorder switches on from standby and a message of what is being
recorded appears on the screen.
The video recorder starts recording the programme you are watching.
Switching programme numbers on your TV does not disturb recording !
When recording a programme from a peripheral connected to
EXTERNAL 1, 3 or
FRONT, you can not select another TV programme on the screen.
To watch TV programmes again, press the programme number you want to select
twice.
Attention: the recording is stopped and your video recorder switches to standby.
If you switch to standby during recording of a programme from a peripheral
connected to
EXTERNAL 1, 3 or FRONT, the blinking lamp on the front of your TV
indicates that you are still recording. The blinking stops after the recording is finished.
0
i
0
◊
U
XqP
fh
INSTANT
yÚ
ZOOM
®
INSTANT
®
If your video recorder is equipped with NEXTVIEWLink, and you tagged one or more
programmes to be recorded automatically in the
NEXTVIEW mode, it is not necessary
for the TV to be in the standby mode or switched on for the recording to start.
Record with your video recorder with NEXTVIEWLink
Record with your video recorder with EasyLink
To record S-VHS quality,connect an S-VHS peripheral directly to the video
recorder.
Record a TV programme
& Select the programme number on your video recorder.
é Set your video recorder to record.
See the handbook for your video recorder.
Switching programme numbers on your TV does not disturb recording !
Record a programme on your video recorder connected to
EXTERNAL 2 from Audio/Video equipment connected to
EXTERNAL 1, EXTERNAL 3 or to sockets on the right side of the TV
& Switch on the equipment.
é Select the right external on your video recorder.
“ Set your video recorder to record.
You record what you are watching on the screen.
Do not switch programme numbers or do not switch off your TV when you are
recording !
Record with your video recorder without EasyLink
Page 24

24
Tips & Index
Care of the screen
Clean the TV with a slightly damp soft cloth.
Do not use abrasive solvent as it can damage
the TV screen.
Poor Picture
• Have you selected the correct TV system?
• Is your TV or house aerial located too
close to loudspeakers,non-ear thed audio
equipment or neon lights,etc.?
• Mountains or high buildings can cause
double pictures or ghost images.
Sometimes you can improve the picture
quality by changing the direction of the
aerial.
• Is the picture or teletext unrecognisable?
Check if you have entered the correct
frequency. See Installation, p.5.
• Are brightness and contrast out of
adjustment? Select Factory settings in the
Setup menu,p.7.
• Sometimes poor picture quality is possible
when having activated an S-VHS camera or
camcorder connected to the right side of
your TV and another peripheral is
connected to
EXT1 or EXT2 at the same
time. In this case switch off one of the
other peripherals.
No picture
• Is the aerial connected properly?
• Are the plugs tightly connected in the
aerial socket?
• Is the aerial cable in good condition and
does it have suitable plugs?
• Are the connection facilities to a possible
second TV in good condition? If in doubt,
consult your dealer.
No sound
• No sound on any channel? Check the
volume isn’t at minimum.
• Is the sound interrupted with the mute
key
¬?
Remote control
• If your TV no longer responds to the
remote control,the batteries may be dead.
• You can still use the
M key and the -/+
keys at the top of your TV.
Menu
Have you selected the wrong menu? Press
the same key again to exit from the menu.
No solution
Switch your TV off and then on again once.
Never attempt to repair a defective TV
yourself.
Check with your dealer or call a TV technician.
End of life directives
Philips is paying a lot of attention to
producing environmentally-friendly in green
focal areas.Your new TV contains materials
which can be recycled and reused.
At the end of its life specialised companies
can dismantle the discarded TV to
concentrate the reusable materials and to
minimise the amount of materials to be
disposed of.
Please ensure you dispose of your old TV
according to local regulations.
How to dispose of dead batteries?
The batteries supplied do not contain the
heavy metals mercury and cadmium.
Nevertheless in many countries dead batteries
may not be disposed of with your household
waste.Please ensure you dispose of dead
batteries according to local regulations.
a ACI, 5
active control, 9
automatic installation, 5
b bilingual broadcast, 9
c camcorder, 19
child lock, 11
continuous subtitles, 17
country, 4
d decoder/descrambler, 7
digital scan, 10
digital sources, 19
DVD, 22
dynamic contrast, 10
e easy text, 16
eurocable, 18
f factory settings, 7
favourite programmes, 6
freeze, 8
frequency, 5
g give name, 6
h headphone, 20
hue, 10
i incredible surround, 8
info on screen, 8
information line, 7
interrupt the sound, 8
l language, 4
m manual installation, 5
menu language, 4
n NEXTVIEW, 12
nicam, 9
p picture adjustments, 10
picture format, 9
programme selection, 8
r recording, 23
reshuffle, 6
s satellite receiver, 22
search for TV channels, 5
setup, 7
sleeptimer, 11
smart picture and sound, 9
sound adjustments, 10
stereo, 9
store TV channels, 4
strobe, 9
subpages teletext, 17
subtitle, 11
S-VHS, 23
switch TV on, 3
t teletext, 16
v video recorder, 18
volume, 8
Index
Tips
Page 25

25
Glossary
100 Hz
100 Hertz provides a superior solution to
the problem of picture flicker which is
particularly noticeable with larger screen
sizes.In a conventional TV, the picture area
is scanned 50 times a second (50 Hertz) –
a frequency which is still detectable by the
human eye in the form of a flickering
picture.In 100 Hertz sets, the picture area
is scanned at a rate of 100 times per
second (100 Hertz).At this frequency, the
eye cannot detect flicker, resulting in a
clearer picture which is more relaxing to
the eye.
Automatic Channel Installation (ACI)
Automatically installs all TV channels in
the same order as offered by your cable
company, provided of course that the data
is transmitted.It also automatically
includes programme number and
programme name.
With ACI,channel installation is fully
automatic, simple and fast.
Child Lock
Feature to prevent unauthorised use of
your TV .
Digital Scan
If you look at a television screen you will
see small imperfections in the picture
caused by line vibration.Digital Scan (an
internal process) removes interline flicker.
When combined with 100 Hz,you will see
a totally stable image.
Easy Link
Digital ‘intelligent’ ESI bus-system between
TV and VCR (Scar t connection required).
Turns source selection and control into a
one-button operation.
Easy T ext
Teletext memor y that automatically
memorises Teletext pages and gives you
instant access to them.
Euroconnector
A 21-pin connector system enabling you
to simply connect various types of
audio/video and computer equipment.
Menu
On-screen display of functions and
facilities in a well-organised survey, which
you can select using your remote control.
NEXTVIEW
NEXTVIEW is a new feature to assist the TV
and VCR user in selecting the programmes
she or he likes to watch from a television
programme guide on the screen.It enables
the user to see a description of every
programme,and mark interesting
programmes to be reminded (auto TV on)
or recorded (
NEXTVIEWLink video
recorder required).
NTSC
The broadcasting system used in the USA,
Japan and parts of South America and
Southeast-Asia.
Smart Picture and Sound Controls
Keys on the remote control to select
predefined picture and sound settings.
Sleeptimer
Function with which you can set a time
period after which the TV should switch
itself to standby.
Picture Freeze
TV mode which allows you to “freeze” a
certain image in order to study a specific
detail at ease, e .g. to make notes of certain
programme information like phone
numbers.
Teletext
See also Easy Text
WST: World Standard Teletext.
FLOF:Full Level one Features.System
applied by the BBC, RVE....that provides a
fast access to the teletext pages.
TOP: Table of (Teletext) Pages. German
system for an easy access to the teletext
pages.
Tint
TV-function to modify the general colour
balance between cool and warm and to
adjust it according to your personal
preference.
Glossary
Page 26

Contents
Your remote control
Preparation
Installation
Select the INSTALLATION menu
To use the menus
Store TV channels
Select the menu language and country
Automatic installation
Manual installation
Give name
Reshuffle the programme list
Select Favourite TV channels
Install TV Setup
Operation
Use of the remote control
Use of the menus
Picture menu
Sound menu
Features menu
Programme list
Keys on top of the TV
nexTView / Teletext Guide
Use of the Teletext Guide/nexTView menus
Teletext guide
nexTView modes to sort and represent information
Basic functions
Video recorder restrictions with nexTView
Teletext
About Easy Text
Switch Teletext on and off
Select a Teletext page
Quickly run through the teletext pages
Select the previously selected txt page
Select the index teletext page
Select subpages
Special teletext functions
Connect Peripheral Equipment
Video recorder
Video recorder and other peripherals
Camera & camcorder
Digital equipment (DVD, digital satellite tuner,...)
Headphone
Audio equipment / Amplifier
To select connected equipment
Audio- and video equipment keys
Record with your video recorder without EasyLink
Record with your video recorder with EasyLink
Record with your video recorder with nexTViewLink
Tips
Index
Glossary
 Loading...