

Philips 29PT5516-01 User Manual

Introduction
Thank you for purchasing this television set.
This handbook has been designed to help you install and operate your TV set.
We would strongly recommend that you read it thoroughly.
We hope our technology meets entirely with your satisfaction.
Table of Contents
Installation
Installing your television set . . . . . . . . . . . . . . . . . . . . . . . . . . . . . . . . . . . . . . . . . .2
The keys on the TV set . . . . . . . . . . . . . . . . . . . . . . . . . . . . . . . . . . . . . . . . . . . . . .2
The remote control keys . . . . . . . . . . . . . . . . . . . . . . . . . . . . . . . . . . . . . . . . . . . .3
Quick installation . . . . . . . . . . . . . . . . . . . . . . . . . . . . . . . . . . . . . . . . . . . . . . . . . .4
Sorting programmes . . . . . . . . . . . . . . . . . . . . . . . . . . . . . . . . . . . . . . . . . . . . . . . .4
EasyLink function . . . . . . . . . . . . . . . . . . . . . . . . . . . . . . . . . . . . . . . . . . . . . . . . . . .4
Using other menus . . . . . . . . . . . . . . . . . . . . . . . . . . . . . . . . . . . . . . . . . . . . . . . . .5
Choosing a language and country . . . . . . . . . . . . . . . . . . . . . . . . . . . . . . . . . . . . .5
Automatic tuning . . . . . . . . . . . . . . . . . . . . . . . . . . . . . . . . . . . . . . . . . . . . . . . . . .5
Manual tuning . . . . . . . . . . . . . . . . . . . . . . . . . . . . . . . . . . . . . . . . . . . . . . . . . . . . .6
Programme name . . . . . . . . . . . . . . . . . . . . . . . . . . . . . . . . . . . . . . . . . . . . . . . . . .6
Operation
Adjusting the picture . . . . . . . . . . . . . . . . . . . . . . . . . . . . . . . . . . . . . . . . . . . . . . .7
Adjusting the sound . . . . . . . . . . . . . . . . . . . . . . . . . . . . . . . . . . . . . . . . . . . . . . . .7
16:9 Formats . . . . . . . . . . . . . . . . . . . . . . . . . . . . . . . . . . . . . . . . . . . . . . . . . . . . . .7
Timer function . . . . . . . . . . . . . . . . . . . . . . . . . . . . . . . . . . . . . . . . . . . . . . . . . . . .8
Locking the set . . . . . . . . . . . . . . . . . . . . . . . . . . . . . . . . . . . . . . . . . . . . . . . . . . . .8
Teletext . . . . . . . . . . . . . . . . . . . . . . . . . . . . . . . . . . . . . . . . . . . . . . . . . . . . . . . . . .9
NexTView Guide . . . . . . . . . . . . . . . . . . . . . . . . . . . . . . . . . . . . . . . . . . . . . . . . . .10
NexTViewLink Function . . . . . . . . . . . . . . . . . . . . . . . . . . . . . . . . . . . . . . . . . . . .10
°
Peripherals
Video recorder . . . . . . . . . . . . . . . . . . . . . . . . . . . . . . . . . . . . . . . . . . . . . . . . . . .12
Other equipment . . . . . . . . . . . . . . . . . . . . . . . . . . . . . . . . . . . . . . . . . . . . . . . . .12
To select connected equipment . . . . . . . . . . . . . . . . . . . . . . . . . . . . . . . . . . . . .12
Connecting other appliances . . . . . . . . . . . . . . . . . . . . . . . . . . . . . . . . . . . . . . . .13
TV / VCR / DVD mode selector . . . . . . . . . . . . . . . . . . . . . . . . . . . . . . . . . . . . . .13
Practical information
Tips . . . . . . . . . . . . . . . . . . . . . . . . . . . . . . . . . . . . . . . . . . . . . . . . . . . . . . . . . . . .14
Glossary . . . . . . . . . . . . . . . . . . . . . . . . . . . . . . . . . . . . . . . . . . . . . . . . . . . . . . . .14
Recycling
The materials used in your set are either reusable or can be recycled.
To minimise environmental waste, specialist companies collect used appliances
and dismantle them after retrieving any materials that can be used again (ask
your dealer for further details).
1

Installing your television set
&
Positioning the television set
Place your TV on a solid,stable surface, leaving
a space of at least 5 cm around the appliance.
To avoid accidents, do not put anything on the
set such as a cloth or cover,a container full of
liquid (vase) or a heat source (lamp).The set
must not be exposed to water.
é
Connections
• Insert the aerial plug into the : socket at
the rear of the set.
• Insert the mains plug into a wall socket (220-
240 V / 50 Hz).
“
Remote control
Insert the two R6-type batteries (supplied)
making sure that they are the right way round.
Check that the mode selector is set to TV.
The batteries supplied with this appliance do not
contain mercury or nickel cadmium. If you have
access to a recycling fa c i l i t y ,please do not discard
your used batteries (if in doubt, consult your dealer).
When the batteries are replaced, use the same type.
‘
Switching on
To switch on the set, press the on/off key.
A red indicator comes on and the screen
lights up.Go straight to the chapter Quick
installation on page 4.
The keys on the TV set
The television set has 4 keys which are
located on the front or the top of the set
depending on the model.
2
If the television remains in standby mode,
press P # on the remote control.
The indicator will flashe when you use the remote
control.
The VOLUME - + (- ” +) keys are used to
adjust sound levels.
The PROGRAM - + (- P +) keys are used to
select the required programmes.
To access the menus, simultaneously hold
down the ” - and ” + keys.The
PROGRAM - + keys may then be used to
select an adjustment and the - ” + keys to
make that adjustment.
To exit from the menus, hold down the 2 ”
- and ” + keys.
Note: when the CHILD LOCK function is activated,
these keys are unavailable (refer to FEATURES
menu on page 8).
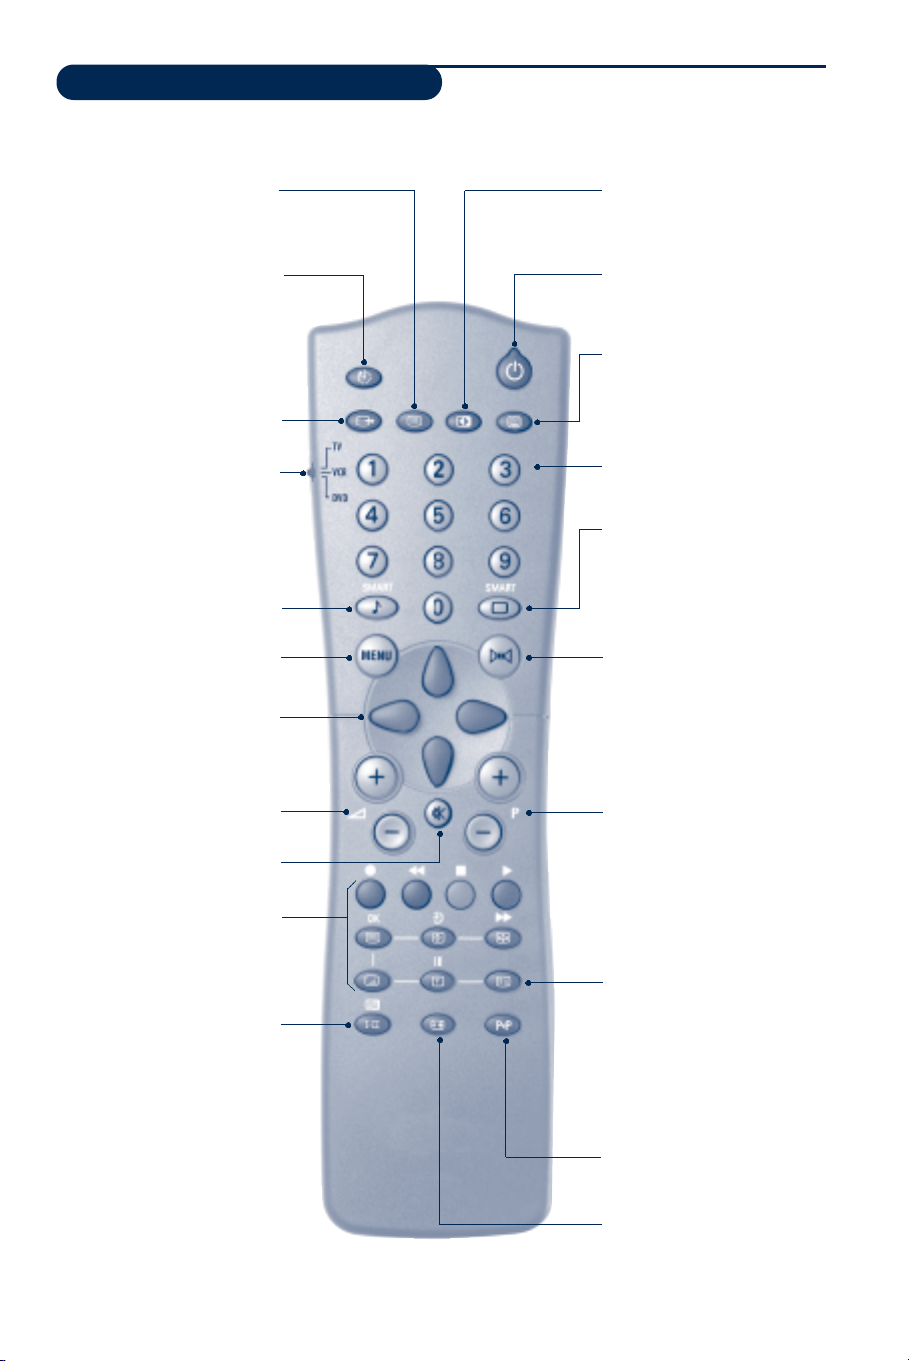
The remote control keys
To display/clear the list of pro g r a m m e s .
List of programmes
Use the keys I J to select a
p rogramme and the key Lto display it.
The symbol + is displayed alongside
all programmes which are locked (p. 8 )
or ? if they are not locke d .
Sleeptimer
To select the length of time
before the set automatically
switches to standby (from 0 to
240 minutes)
Select EXT sockets
P ress several times to select
E X T 1 , EXT2 and EXT3, S-VHS2
and S-VHS3.
Mode selector (p. 13)
To activate the remote control
in TV,VCR (video recorder) or
DVD mode.
Smart sound controls
To access a series of settings:
VOICE,MUSIC,THEATRE and
return to PERSONAL
Menu
To display or exit from the menu s
Cursor
These 4 keys are used to move
within the menus or to have
d i rect access to the 16:9 fo r m a t s
(p 7).
Volume
To adjust the sound level
Mute
To disable or enable the sound.
Teletext features (p. 9)
Sound mode
To switch from STEREO to
MONO or to choose between
Dual I and Dual II for
bilingual transmissions.
For TV sets fitted with NICAM
reception, depending on the
transmission, you can switch
from NICAM STEREO to
MONO or choose between
NICAM DUAL I, NICAM
DUAL II and MONO.
When the sound mode is switched
to MONO, the indication is
displayed in red.
Contrast +
To activate / de-activate the
automatic contrast adjustment
system (the dark areas are made
d a r ker whilst maintaining the detail).
Standby
To set the TV to standby mode.
To switch the TV set on again,
press P @ # or 0 9.
NexTView Guide (p. 10)
Numerical keys
For direct access to programmes.
For a 2 digit programme number,
the 2nddigit must be entered
before the dash disappears.
Smart picture controls
To access a series of settings:R I C H ,
N AT U R A L ,S O F T,M U LT I M E D I A
and return to PERSONAL.
Surround sound
To activate/deactivate the surround
sound effe c t .In stere o,this gives the
i m p ression that the speakers are furt h e r
ap a rt .For models equipped with V i rt u a l
D o l by Surro u n d * ,you can obtain Dolby
S u rround Pro Logic sound quality. I n
m o n o,a stereo spatial effect is simu l a t e d .
* Manufactured under license from Dolby
L a b o ra t o ries Licensing Corpora t i o n .” D o l by ””Pro Logic”
and the double-D symbol £ are trademarks of
Dolby Laboratories Licensing Corporation.
Selecting TV programmes
To move up or down a pro g r a m m e.
The nu m b e r,(the name) and the sound
mode are displayed for a few seconds.
For some TV programmes the title of
the programme appears at the
bottom of the screen.
Screen information
To display / re m o ve the pro g r a m m e
nu m b e r,the name (if it exists),t h e
t i m e, the sound mode and the time
remaining on the timer.Hold dow n
for 5 seconds to permanently
d i s p l ay the programme number on
the scre e n .The volume level and the
s m a rt control adjustments are then
d i s p l ayed each time they are used.
Previous programme
To access the previously viewed
programme.
16:9 formats (p.7)
3
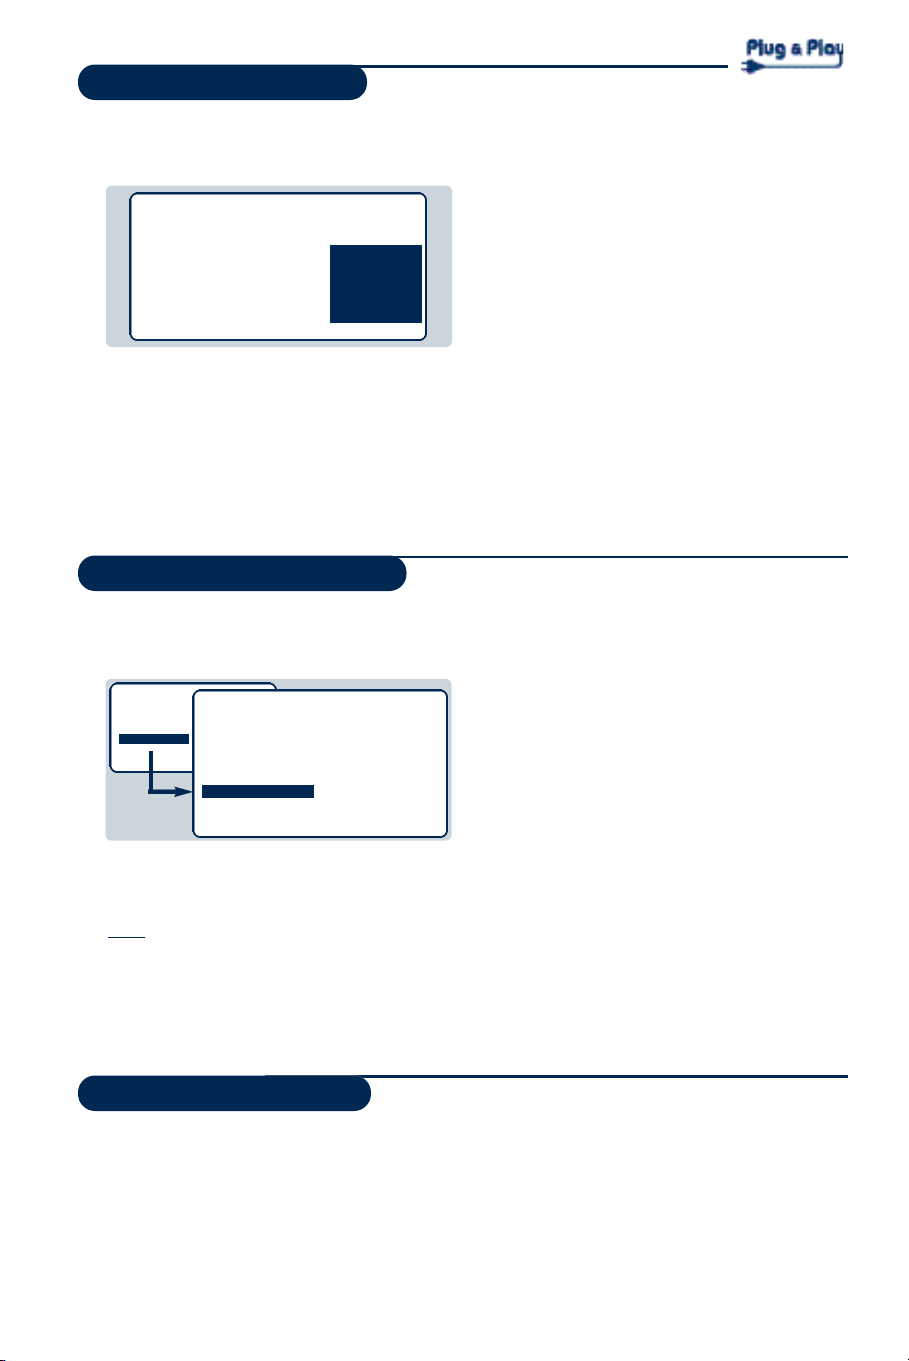
Quick installation
The first time you switch on the television,a
menu appears on the screen and the tuning
starts automatically.
SELECT LANGUAGE
LANGUAGE
•
ENGLISH
DANSK
N E D E R L A N D S
FINNISH
FRANCAIS
COUNTRY
A U S T R I A
B E L G I U M
S W I T Z E R L A N D
G E R M A N Y
D E N M A R K
SEARCHING
PLEASE WAIT
PROG. NO. 2
215.18 MHZ
If the menu does not appear, hold down the ” and ” + keys on the set for 5 seconds to start
the tuning.
Sorting programmes
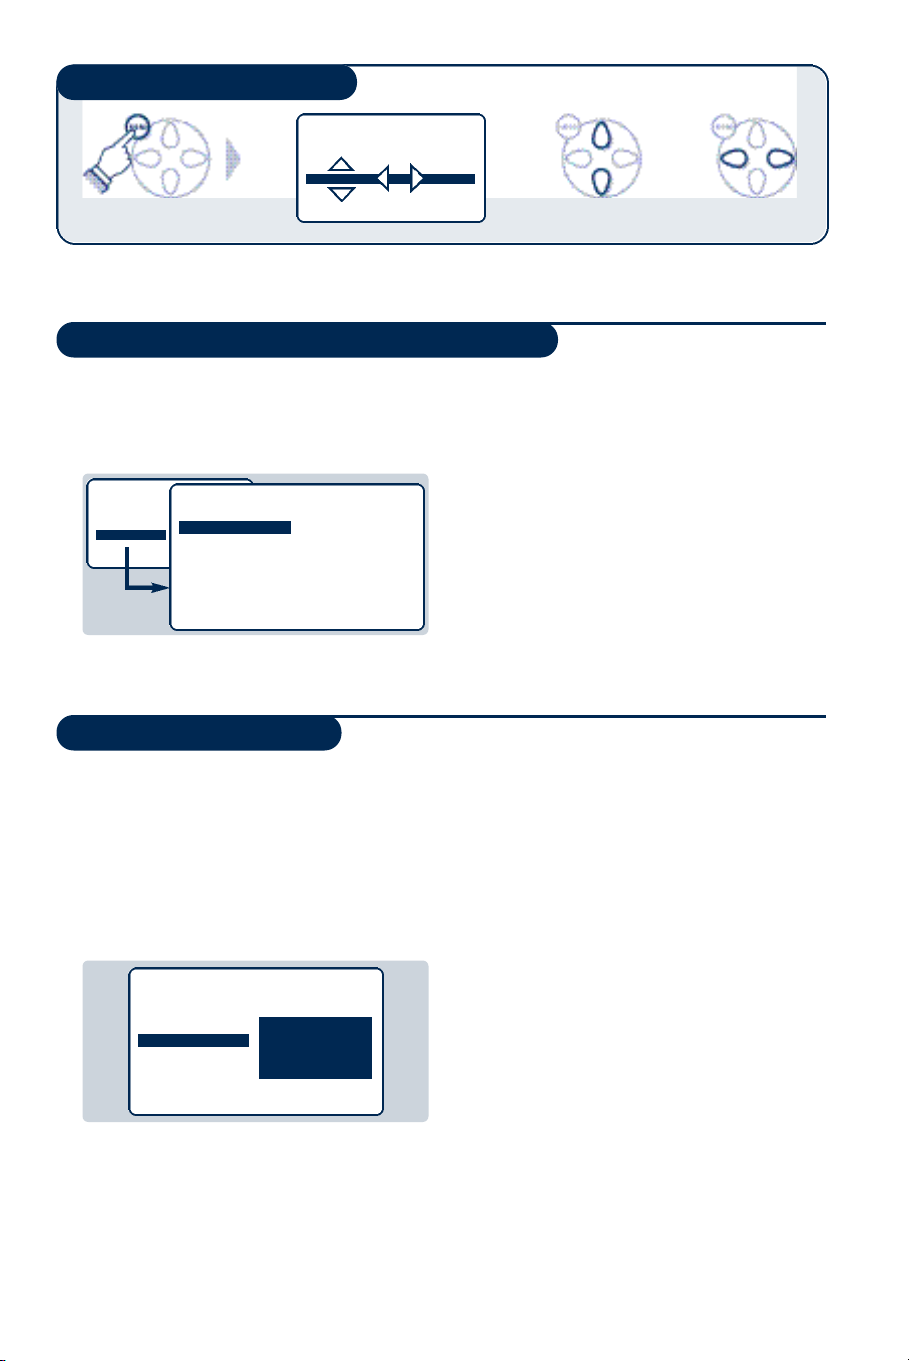
& Press the H key.The main menu is displayed.
é Select INSTALL (J),then press L.
The INSTALL menu appears.
• PICTURE
• SOUND
• FEATURES
• INSTALL
“ Using the J key, select SORT then press L.
The SORT menu appears.The FROM option is
activated.
Note: this menu works as follows:
• Change "FROM" (enter the current programme
number),
• "TO" (enter the new number),
• EXCHANGE numbers" (the operation is carried out).
INSTALL
• LANGUAGE
• COUNTRY
• AUTO STORE
• MANUAL STORE
• SORT
• NAME
FROM
TO
EXCHANGE
The operation takes several minutes.
A display shows the search status and the
number of programmes found.When it has
finished the menu disappears.
To exit or interrupt the search, press the H key.
If no programmes are found, refer to the chapter
entitled Tips on p. 14.
& If the transmitter or the cable network
broadcasts the automatic sort signal, the
programmes will be correctly numbered.
é If not, the programmes found will be
numbered in descending order starting at 99,
98, 97, etc.
Use the SORT menu to renumber them.
Some transmitters or cable networks broadcast
their own sort parameters (region, language, etc.).
Where this is the case, make your choice using the
I J keys and confirm with L.
‘ Select the programme you wish to renumber
using K L keys or 0 to 9.
Example:to renumber programme 78 as 2
press 7 8.
( Select TO (using J key) and enter the new
number with K L keys or 0 to 9 (for the
example given,enter 2).
§ Select EXCHANGE (J key) and press L.
The message EXCHANGED appears, the
exchange takes place. In our example,
programme 78 is renumbered as 2 (and
programme 2 as 78).
è Select the option FROM (I key) and repeat
stages ‘ to § as many times as there are
programmes to renumber.
See also: EasyLink function below.
! To exit from the menus,press R.
EasyLink function
If the set is connected (by the EXT2 socket)
to a video equipped with the EasyLink
function, the language, country and channels
found are automatically transmitted to the
video recorder at the time of installation.A
4
(only available on certain versions)
message is displayed on-screen during loading.
The list of video recorder channels is then the
same as those of the set.
The EASY LINK setting in the OPTIONS menu
must be set to ON (default setting), see page 10.
Using other menus
PICTURE
• BRIGHTNESS
• COLOUR
• CONTRAST --I------ 39
• SHARPNESS
• STORE
Choosing a language and country
& Press the H key to display the main menu.
é Select INSTALL (J),then press L.
The INSTALL menu appears.
The LANGUAGE option is activated.
• PICTURE
• SOUND
• FEATURES
• INSTALL
INSTALL
• LANGUAGE
• COUNTRY
• AUTO STORE
• MANUAL STORE
• SORT
•
N A M E
ENGLISH
DANSK
NEDERLANDS
Automatic tuning
This menu allows you to automatically search
for all the programmes available in your region
(or on your cable network).
& First carry out operations & to ! a b ove, t h e n :
é Press J once to select AUTO STORE then
press L.The search begins.
After several minutes,the INSTALL menu
reappears automatically.
INSTALL
• LANGUAGE
• COUNTRY
• AUTO STORE
• MANUAL STORE
• SORT
•
N A M E
SEARCHING
PLEASE WAIT
PROG. NO. 2
215.18 MHZ
“ Press L to go into the LANGUAGE menu.
‘ Select your language with the I J keys.
The menus will appear in the chosen language.
( Press K to exit the LANGUAGE menu.
§ Select the option COUNTRY and press L.
è Select your country with I J keys (GB).
If your country does not appear in the list, select
OTHER.
! Press K to exit the COUNTRY menu.
ç To exit from the menus, press R.
See also: EasyLink function,page 4.
“ If the transmitter or the cable network
broadcasts the automatic sort signal, the
programmes will be correctly numbered.
‘ If not, the programmes found will be
numbered in descending order starting at 99,
98, 97, etc.
Use the SORT menu to renumber them.
Some transmitters or cable networks broadcast
their own sort parameters (region, language, etc.).
Where this is the case, make your choice using the
I J keys and confirm with L.
To exit or interrupt the search, press the H key. If
no picture is found, refer to the chapter entitled
Tips on p. 14.
See also: EasyLink function, page 4.
( To exit from the menus, press R.
5
 Loading...