

Page 1

Information for users in the UK
(Not applicable outside the UK)
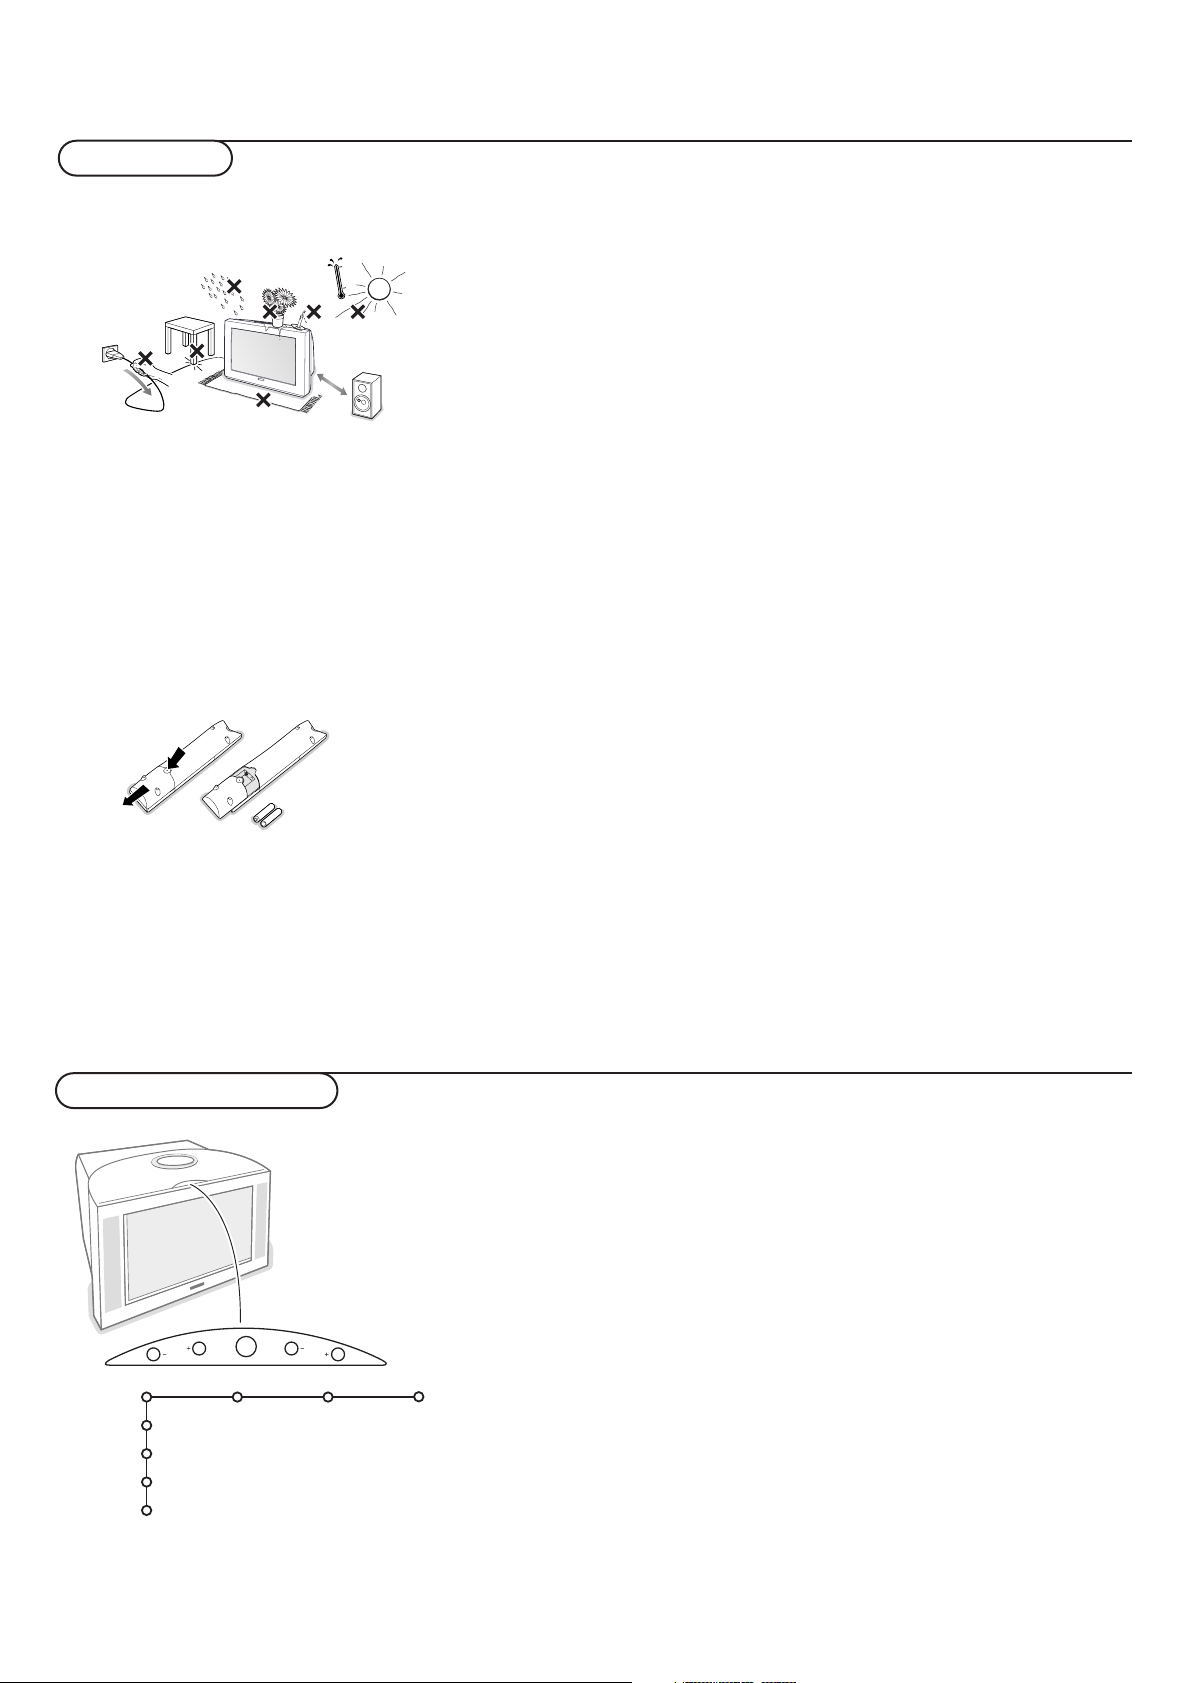
Positioning the TV
For the best results, choose a position where light does not fall directly on the screen, and at some distance away from radiators
or other sources of heat. Leave a space of at least 5 cm all around the TV for ventilation, making sure that curtains, cupboards etc.
cannot obstruct the air flow through the ventilation apertures.
The TV is intended for use in a domestic environment only and should never be operated or stored in excessively hot or humid
atmospheres.
General Points
Please take note of the section 'Tips' at the end of this booklet.
Interference
The Department of Trade and Industry operates a Radio Interference Investigation Service to help TV license holders improve
reception of BBC and IBA programmes where they are being spoilt by interference.
If your dealer cannot help, ask at a main Post Office for the booklet "How to improve Television and Radio Reception".
Mains connection
Before connecting the TV to the mains, check that the mains supply voltage corresponds to the voltage printed on the type plate
on the rear panel of the TV. If the mains voltage is different, consult your dealer.
Important
This apparatus is fitted with an approved moulded 13 Amp plug.
To change a fuse in this type of plug proceed as follows :
1. Remove fuse cover and fuse.
2. Fit new fuse which should be a BS1362 5A,A.S.T.A. or BSI approved type.
3. Refit the fuse cover.
In order to maintain conformity to the EMC directive, the mains plug on this product must not be removed.
Connecting the aerial
The aerial should be connected to the socket marked x at the back of the set. An inferior aerial is likely to result in a poor,
perhaps unstable picture with ghost images and lack of contrast. Make-shift or set-top aerials are unlikely to give adequate results.
Your dealer will know from experience the most suitable type for your locality.
Should you wish to use the set in conjunction with other equipment, which connects to the aerial socket such as TV games, or a
video camera, it is recommended that you consult your dealer on the best method of connection.
Stand (if provided)
Use only the stand provided with the set, making sure that the fixings are properly tightened.A diagram showing how to assemble
the stand is packed with the stand. Never use a make-shift stand, or legs fixed with woodscrews.
Page 2

Page 3

Contents
Installation
Preparation 2
Keys on top of the TV 2
Your remote control 3-5
Menu Info / Remote Control Info 5
To use the menus and the menu system 6
Select the menu language and country 7
Store TV channels 7
Automatic installation 7
Manual installation 8
Give name 8
Reshuffle the programme list 8
Select favourite TV channels 8
Install TV setup 9-11
Speakers 9
General 10
Source 11
Decoder 11
Demo 12
English
Help?
If this instruction manual does not give an answer or if
‘Tips’ do not solve your TV problem, you can call your
Local Philips Customer or Service Centre. See the
supplied World-wide guarantee booklet.
Please, have the Model and Product number which
you can find at the back of your television set or on
the packaging, ready, before calling the Philips helpline.
Model: . . . . . . . . . . . . . . . . . . . . . . . . . . . . . . . . . .
Product No: . . . . . . . . . . . . . . . . . . . . . . . . . . . . . .
Operation
TV menu
Picture menu 12
Sound menu 13
Features menu 14
NEXTVIEW/Teletext guide 15-16
Teletext 17-18
Connect peripheral equipment
Connecting and selecting equipment 19-21
Remote control functions for peripherals 21
Recording 22
Appendix: Optional Wireless surround speaker system 23
Tips 24
Index 25
Glossary 25
EasyLink features are based on the “one touch operation” approach. This
means that a sequence of actions are executed at the same time in both
the television and the video cassette recorder, provided both are fitted
with the EasyLink function and connected with the eurocable
supplied with your video recorder.
1
Page 4
V
P
M
Preparation
& Place the TV on a solid surface.
! 28PW9527: 41 kg; 32PW9527: 59 kg; 36PW9527: 79 kg !
min.
1m
‘ Insert the mains plug of the TV in the wall socket
having a mains voltage of 220V-240V.
To prevent damaging the mains (AC) cord which could
cause a fire or electric shock, do not place the TV on the
cord.
( Switch the TV on : Press the power switch A on the
front of your TV.
A green indicator on the front of the TV lights up and the
screen comes on.
If the indicator is red, press the -P+ keys on the remote
control.
For ventilation, leave at least 5 cm free all around the TV.
Do not place the TV on a carpet.
To prevent any unsafe situations, do not place any objects
on top of the TV.Avoid heat, direct sunlight and exposure
to rain or water. Keep mobile telephones at a safe distance
to avoid disturbances in picture and sound.
é Insert the aerial plug firmly into the aerial socket x at the
back of the TV. For best picture quality use the suppressoraerial cable supplied.
“ Remote control: Remove the cover of the battery
compartment.
Insert the 2 batteries supplied (Type R6-1,5V).
R6 / 1,5V
The batteries supplied do not contain the heavy metals mercury
and cadmium. Nevertheless in many countries exhausted
batteries may not be disposed of with your household waste.
Please check on how to dispose of exhausted batteries according
to local regulations.
Note: this remote control functions with TVs and other equipment
which use the RC6 signalling standard.
The green lamp blinks every time you press a key on the remote
control.
When you switch on your set for the first time, the menu
LANGUAGE automatically appears on the screen. The
explanation appears in different languages one at a time.
Choose your own language and press the OK key on the remote
control.
Optional wireless transmitter module
Your TV has been prepared and equipped to connect a
wireless transmitter module with an integrated cable and
wireless surround sound loudspeakers. Such a kit may be
purchased at your TV retailer. (Type no:AD902W).
Select the correct type of transmitter in the Setup menu,
Speakers,Wireless transmitter, p. 9 Default 864 MHz has
been selected at the factory.
How to connect and to operate, see the appendix to this
manual, p. 23.
Keys on top of the TV
Picture Sound Features
TV
Setup
Demo
Install
Exit
Preparation
2
Should your remote be lost or broken you can still change some
of the basic settings with the keys on top of your TV.
• Press the V - or + key to adjust the volume.
• Press the
P - and + key to browse through the TV channels or
sources stored and to select them.
• Press the M key to summon the main menu.
Use the V - and + keys to select the menu items in the
horizontal axis.
Use the
P - and + keys to select submenu items in the vertical
axis.
Use the
M key to confirm your selection.
Note:
- Sometimes not all the menu items are visible on the screen;
Press the
-
Exit lets you dismiss the menu. Select Exit and press the M key.
P + key to reveal all items.
Page 5
M h a
SMART
ACTIVE
CONTROL
SMART
PICTURESOUND
213
546
879
0
B
v
®
Ò
‡π
†
æ b
Ï
i
VCR DVD AMP AUX
¬V P
0
SbÌ
MOVIE SPORT CHILD NEWS PIXEL PLUS
OK
MENU
rc2048 use rc 1
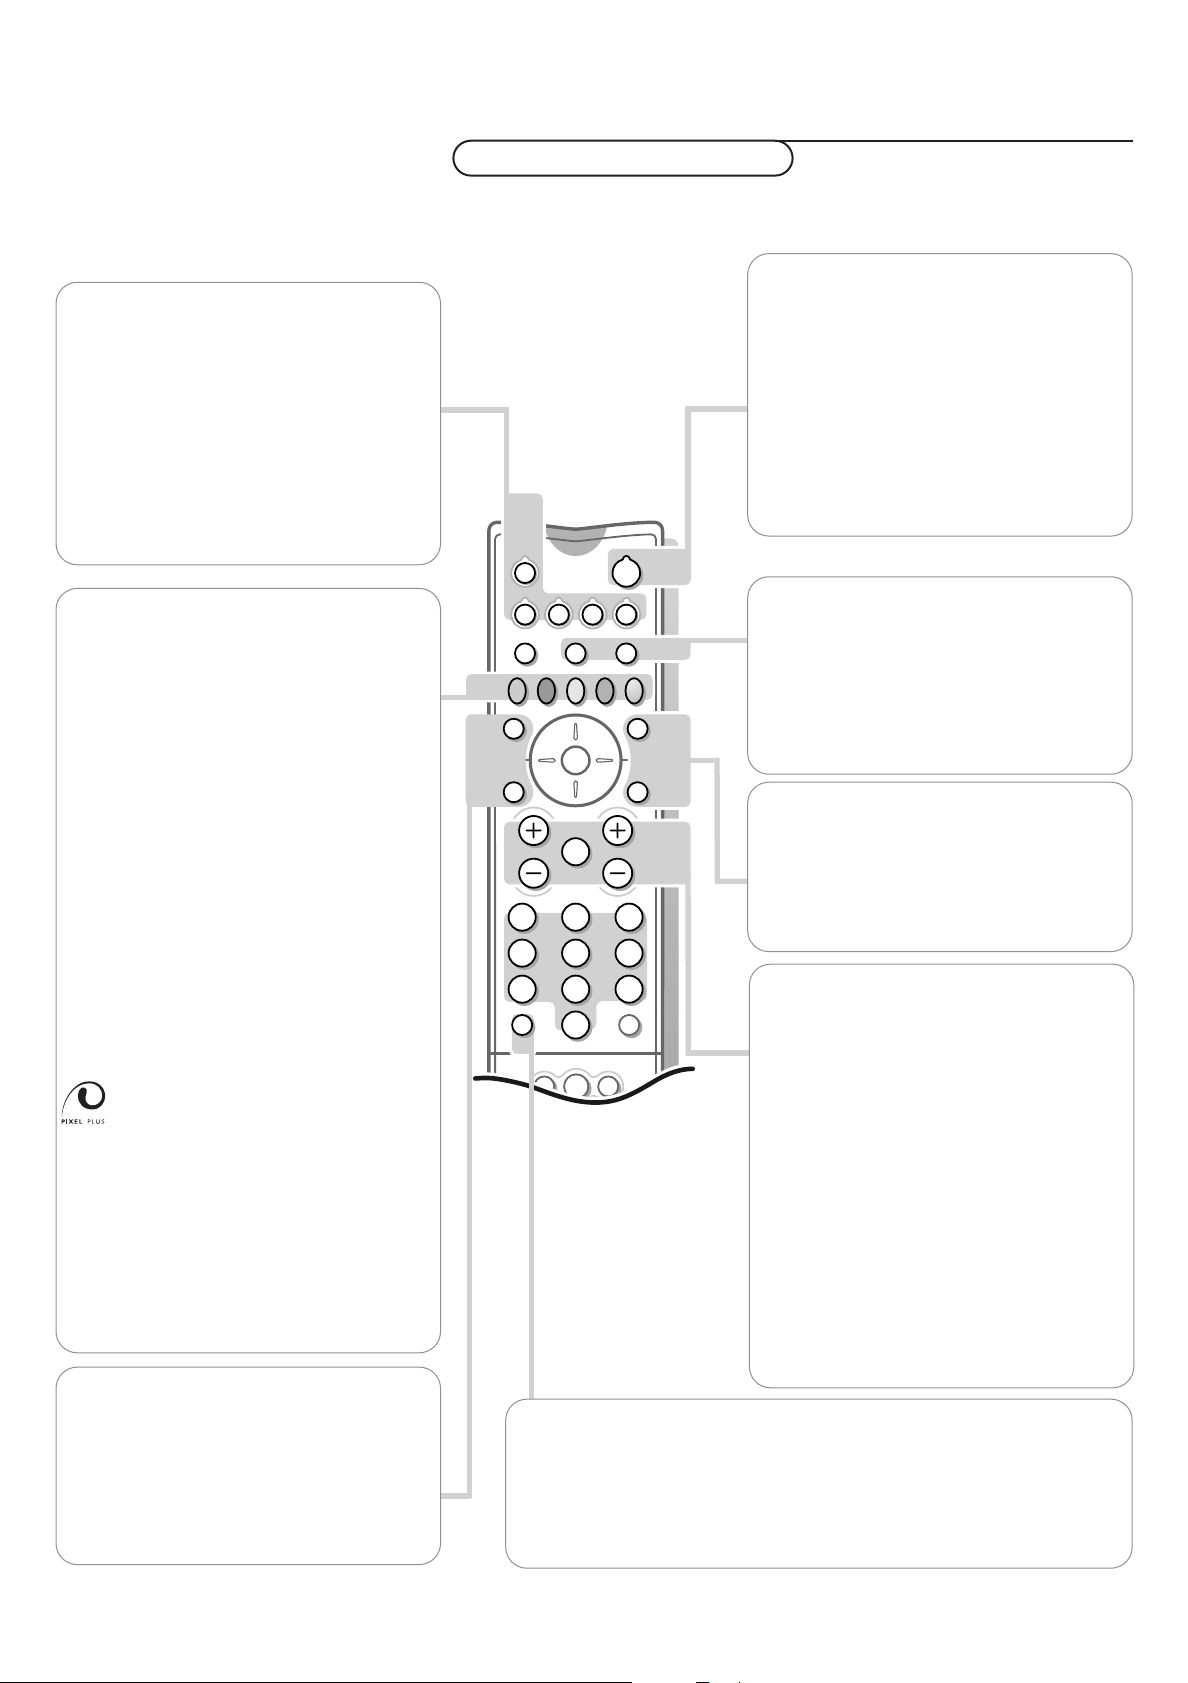
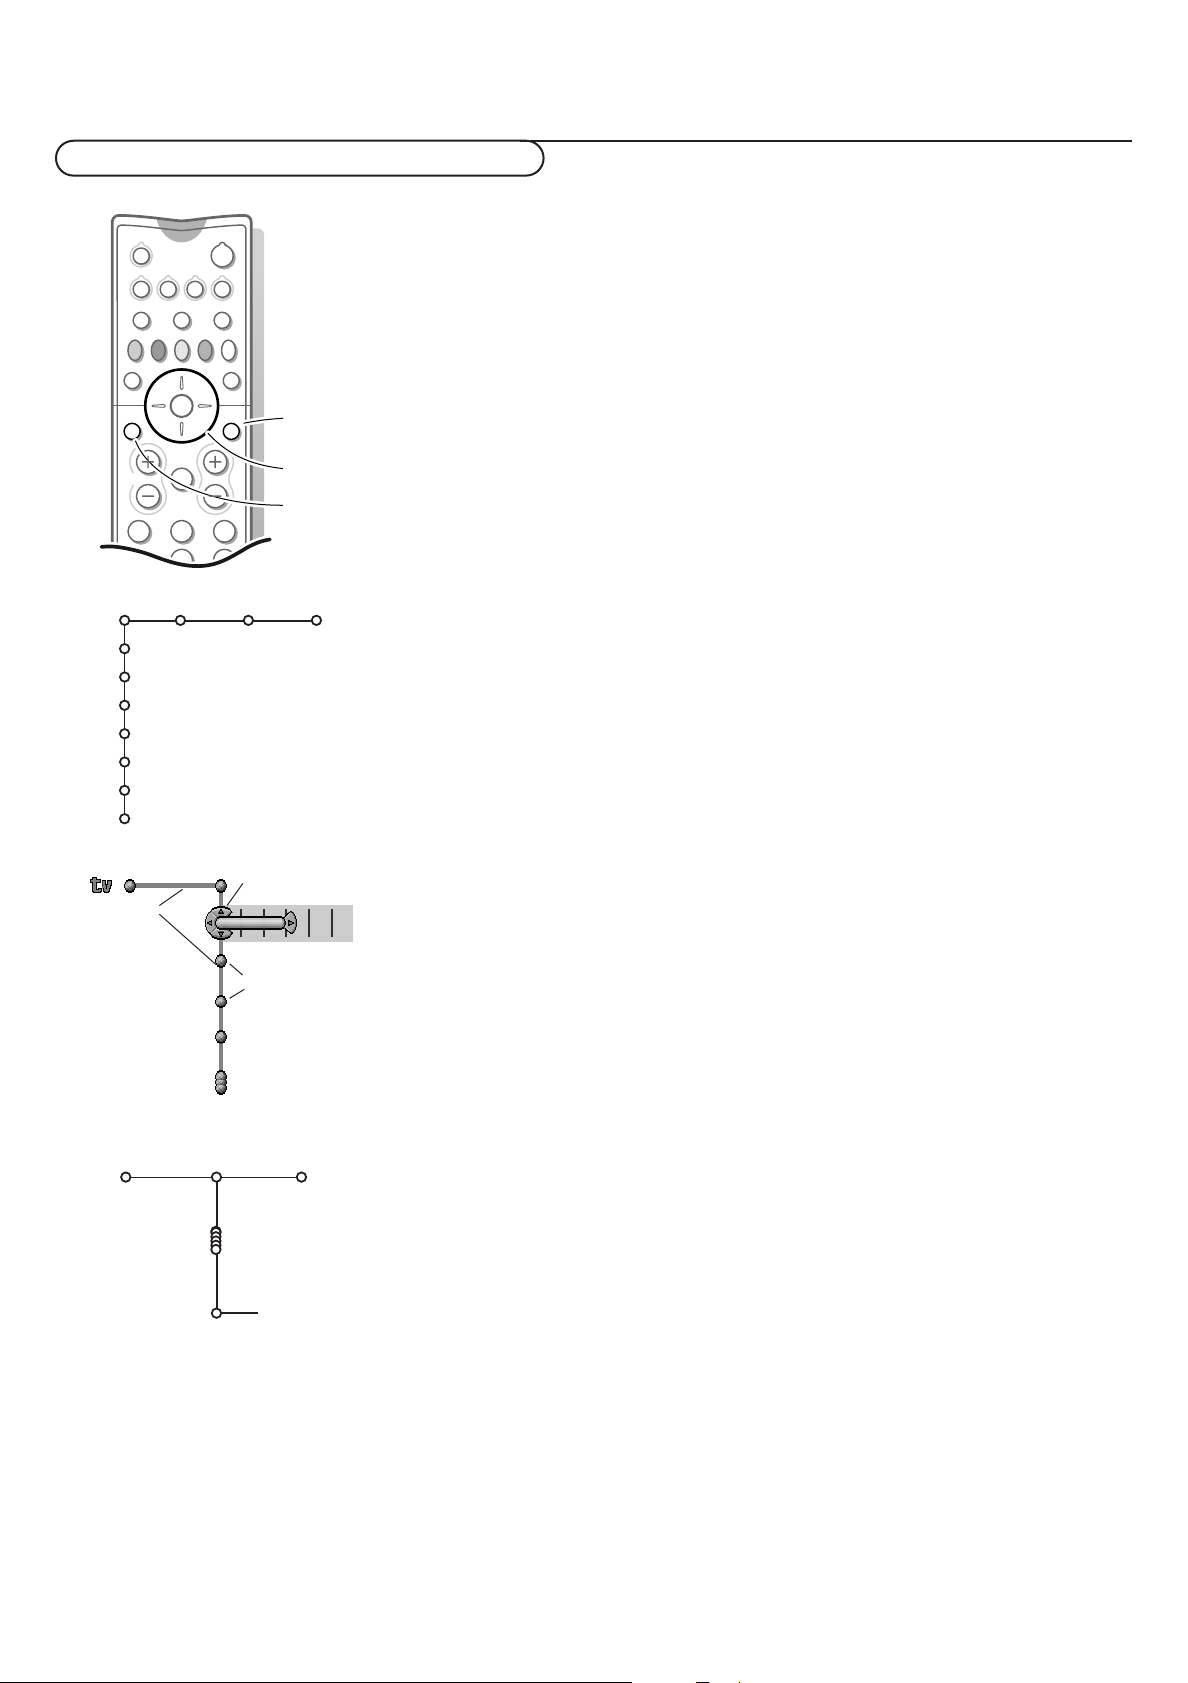
v Select peripherals
Press this key to select
SIDE, according to where you connected the
peripherals (p. 21).
VCR DVD AMP AUX (see p. 21)
Press one of these keys to use the remote
control directly in the video recorder, DVD,
amplifier or other auxiliary mode (CD, SAT).
A green indicator lights up.
Press the key again to return to TV mode.
®Ò‡π†Video recorder see p. 21
Select TV channels by theme
If NEXTVIEW with defined themes is
broadcast, it is possible to quickly select TV
programmes with the coloured keys.
EXT1, EXT2, EXT3 or
& Press the red, green, yellow or blue key to
select one of the four predefined theme
categories
NEWS.
MOVIES, SPORTS, CHILDREN,
The TV switches to the first TV channel
broadcasting a programme of the selected
theme. At the same time a list of all the
TV channels currently transmitting a
programme of the selected theme appears
on the screen.
é Use the cursor up/down to select a
programme.
“ Press the same colour key again to
remove the list. (After 10 seconds the list
is removed automatically.)
Switching Pixel Plus demo
on/off
& Press the PIXEL PLUS key.
The TV screen is divided into 2 parts:
- in the left part Pixel Plus and Digital
Natural Motion switched off;
- in the right part Pixel Plus and Digital
Natural Motion switched on.
é Press the PIXEL PLUS key again to switch
the Pixel Plus demo off.
æ NEXTVIEW see p. 15
Press this key to activate
Guide. Press the æ key to select
Picture/
NEXTVIEW- Teletext Guide in dual
screen format. Press æ again to display a full
screen picture.
OK Press this key to activate your choice,
when in the menus.
NEXTVIEW/Teletext
Use of the remote control
Use the on-screen info for more information about the different keys. See p. 5
B Standby
Press to switch the TV on or off.
When switched off, a red indicator (orange
when acquiring
up.When acquiring
NEXTVIEW information) lights
NEXTVIEW the TV is
switched to full standby after a period of
max. 1 hour and the red indicator lights up.
If your EasyLink video recorder has the
system standby function and you press the
standby key for 3 seconds, both the TV and
video recorder are switched to standby.
S Freeze
To activate/de-activate the frozen picture and
to hold a teletext page.
Ì Cinema Go
See separate Cinema Link instruction manual
supplied.
b Teletext see p. 17
Press this key to activate Teletext.
Press b to select Picture/Teletext in dual
screen format. Press b again to display a full
screen picture.
Ï Main menu on/off see p. 6
V Press + or - to adjust the volume.
¬ Interrupt the sound or restore it.
P Programme selection
To browse through the TV channels and
sources stored.
Only those channels which are in the
favourite list can be selected with the -P+
keys.
0/9 Digit keys
To select a TV channel.
For a two digit programme number, enter
the second digit within 2 seconds.
To switch immediately to a selected one
digit TV channel, keep the digit key pressed a
bit longer.
i Screen information
Press to display information about the selected TV channel and programme.
Menu information
When the menu is on screen, press i to display info on the selected menu
item.While the menu info is displayed, press any key to display remote
control info.
3Use of the remote control
Page 6
INSTANT
213
546
879
0
B
v
®
Ò
‡π
†
æ b
Ï
i
VCR DVD AMP AUX
¬V P
0
Sb Ì
MOVIE SPORT CHILD NEWS PIXEL PLUS
OK
MENU
U
Q q c
fih
ZOOM
®
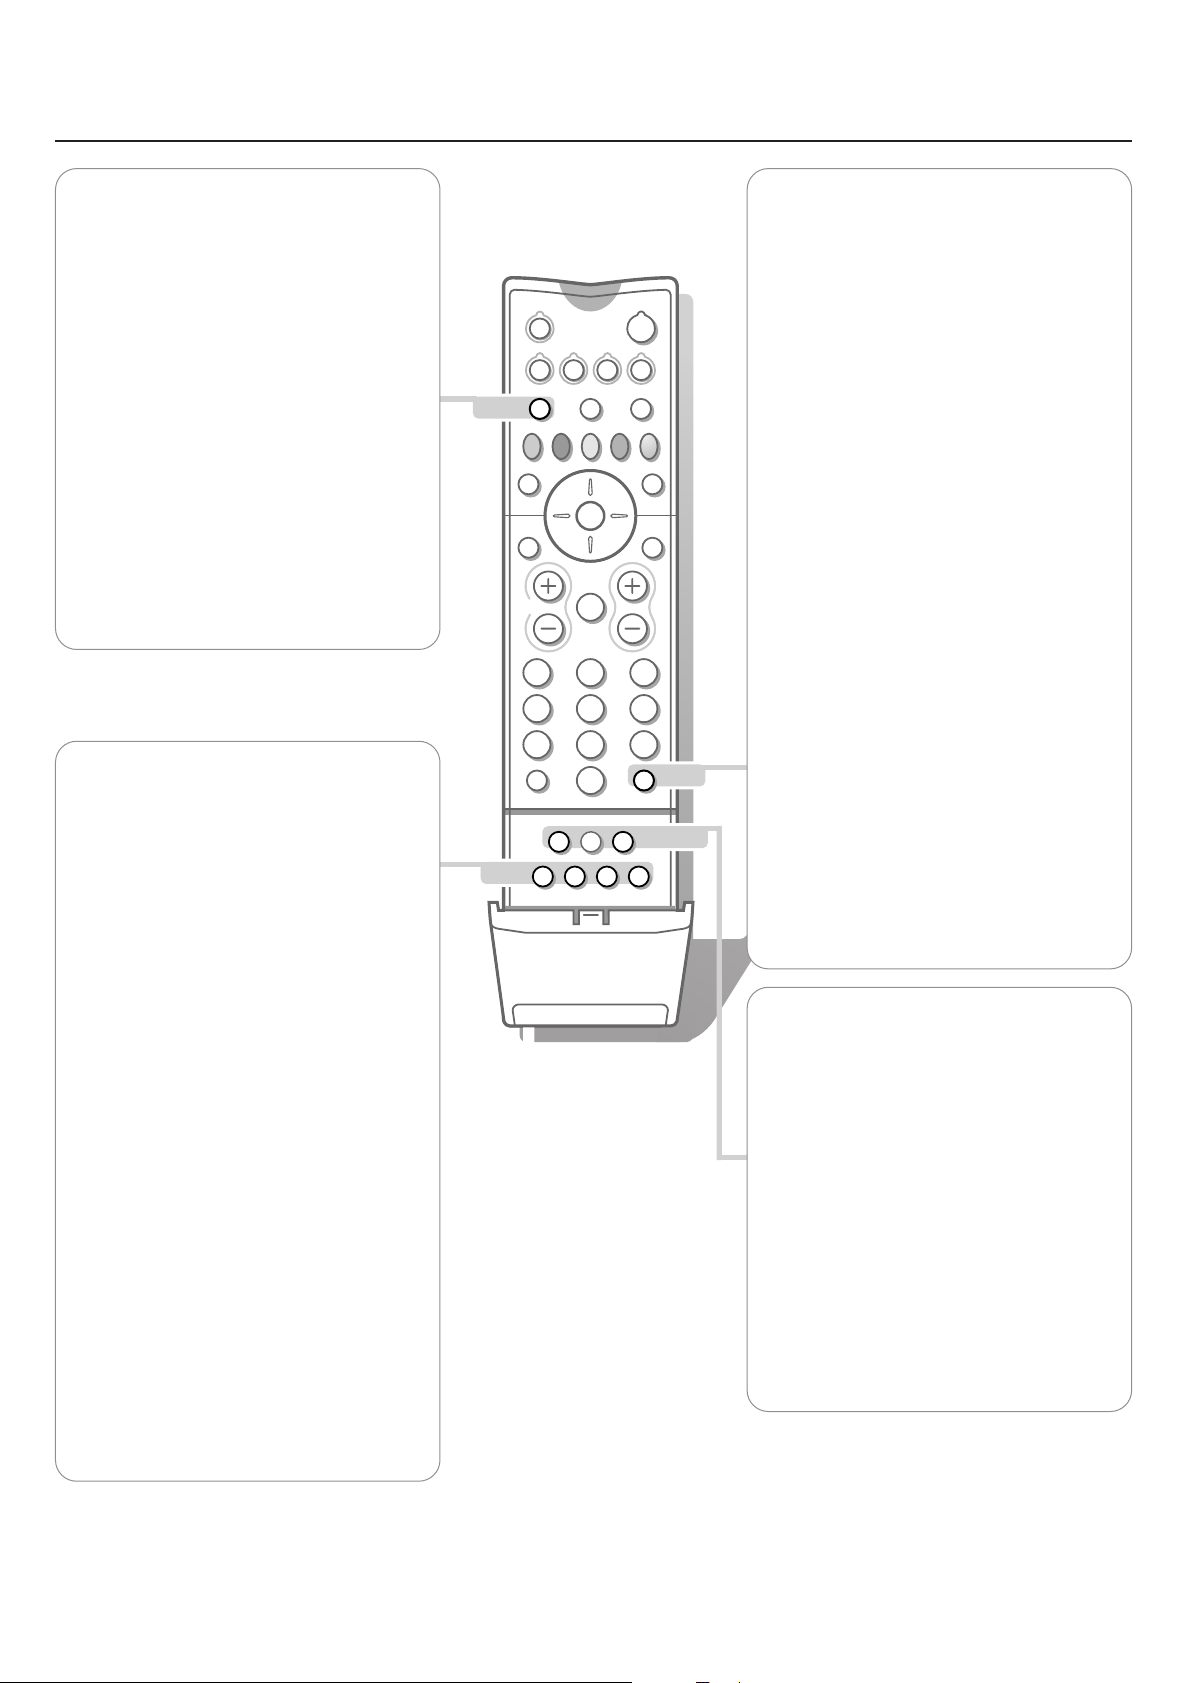
b Dual screen
& Press the b or æ key.
Press the b key to switch on Dual
screen.
The TV screen is divided into 2 parts:
the left side for the normal main picture,
the right side for teletext broadcast by
the selected TV channel or for
To operate
NEXTVIEW, see p. 15.
NEXTVIEW.
To operate teletext, see p. 17.
é Press the q key under the door of the
remote control to select a vertical
squeezed or a non vertical squeezed
picture size.
“ Move the puck to the blue ball in the left
screen. Press + P - to select another TV
channel.
‘ Press the æ key or the b key to
switch off dual screen.
Q Surround mode
Press this key repeatedly to select another
available surround mode: Stereo, Dolby 3
Stereo, 3D Surround, Hall or Dolby Pro Logic.
® Instant record
If your video recorder has the EasyLink
function, the
be operated in the TV mode.
q Picture format
Press this key to summon a list of available
picture formats.
Press this key repeatedly or press the cursor
up/down to select another picture format:
Auto format, Super zoom, 4:3, Movie Expand
14:9, Movie Expand 16:9, Subtitle zoom, Wide
screen.
Auto format makes the picture fill the screen
as much as possible.
In case of subtitles in the bottom black bar,
Auto format makes the subtitles visible. In
case of a broadcaster logo in the corner of
the top black bar, the logo disappears from
the screen.
Super zoom removes the black bars on the
sides of 4:3 programs with minimal distortion.
When in Movie Expand 14:9, 16:9 or Super
zoom picture format, you can make subtitles
visible with the cursor up/down.
INSTANT ® key for record can
0 Smart surf
With this feature you can easily switch
between up to 9 different TV channels/
sources.
In the menu system, you can set Smart surf
to 2- or 9-programme.
(See General, Smart surf, p. 10.)
Press this key to select the previously viewed
TV channel or source in case of a 2
programme surf.
In case of a 9 programme surf, a list appears
at the right side of the screen. On top, the
most recent programme is displayed.The
puck is on the channel number currently
viewed.
Press the 0 key to turn to the next channel
in the list or press cursor up/down to
immediately select the desired TV channel of
the list.
To add a new channel or source: tune to the
channel or source you wish to add.
Press the 0 key. Press the cursor right to
add.
If there are already nine channels/sources in
the list, the one at the bottom of the list will
be removed.
To remove a channel or source: select the
channel number you want to remove.
Press the 0 key. Press the cursor right to
remove.
Press the OK key or wait for the time out to
dismiss the Smart surf display.
U Time display: The time is displayed
on the screen.
fi no function
h ZOOM on/off
Press the
deactivate the zoom function.
Press the OK key repeatedly to select one of
the zoom magnifications (x1, x4, x9, x16). Use
the cursor up/down, left/right to shift the
selected zoom window over the screen with
the cursor.
The zoom window is reset after: selecting
another TV channel, another picture format
or when another picture format is selected
automatically.
ZOOM h key to activate/
c no function
Use of the remote control
4
Page 7
Mah
213
546
879
0
®
Ò
‡π
†
æ b
Ï
i
¬V P
0
HC! SQ
MOVIE SPORT CHILD NEWS OTHER
OK
MENU
SMART
SOUND
SMART
PICTURE
ACTIVE
CONTROL
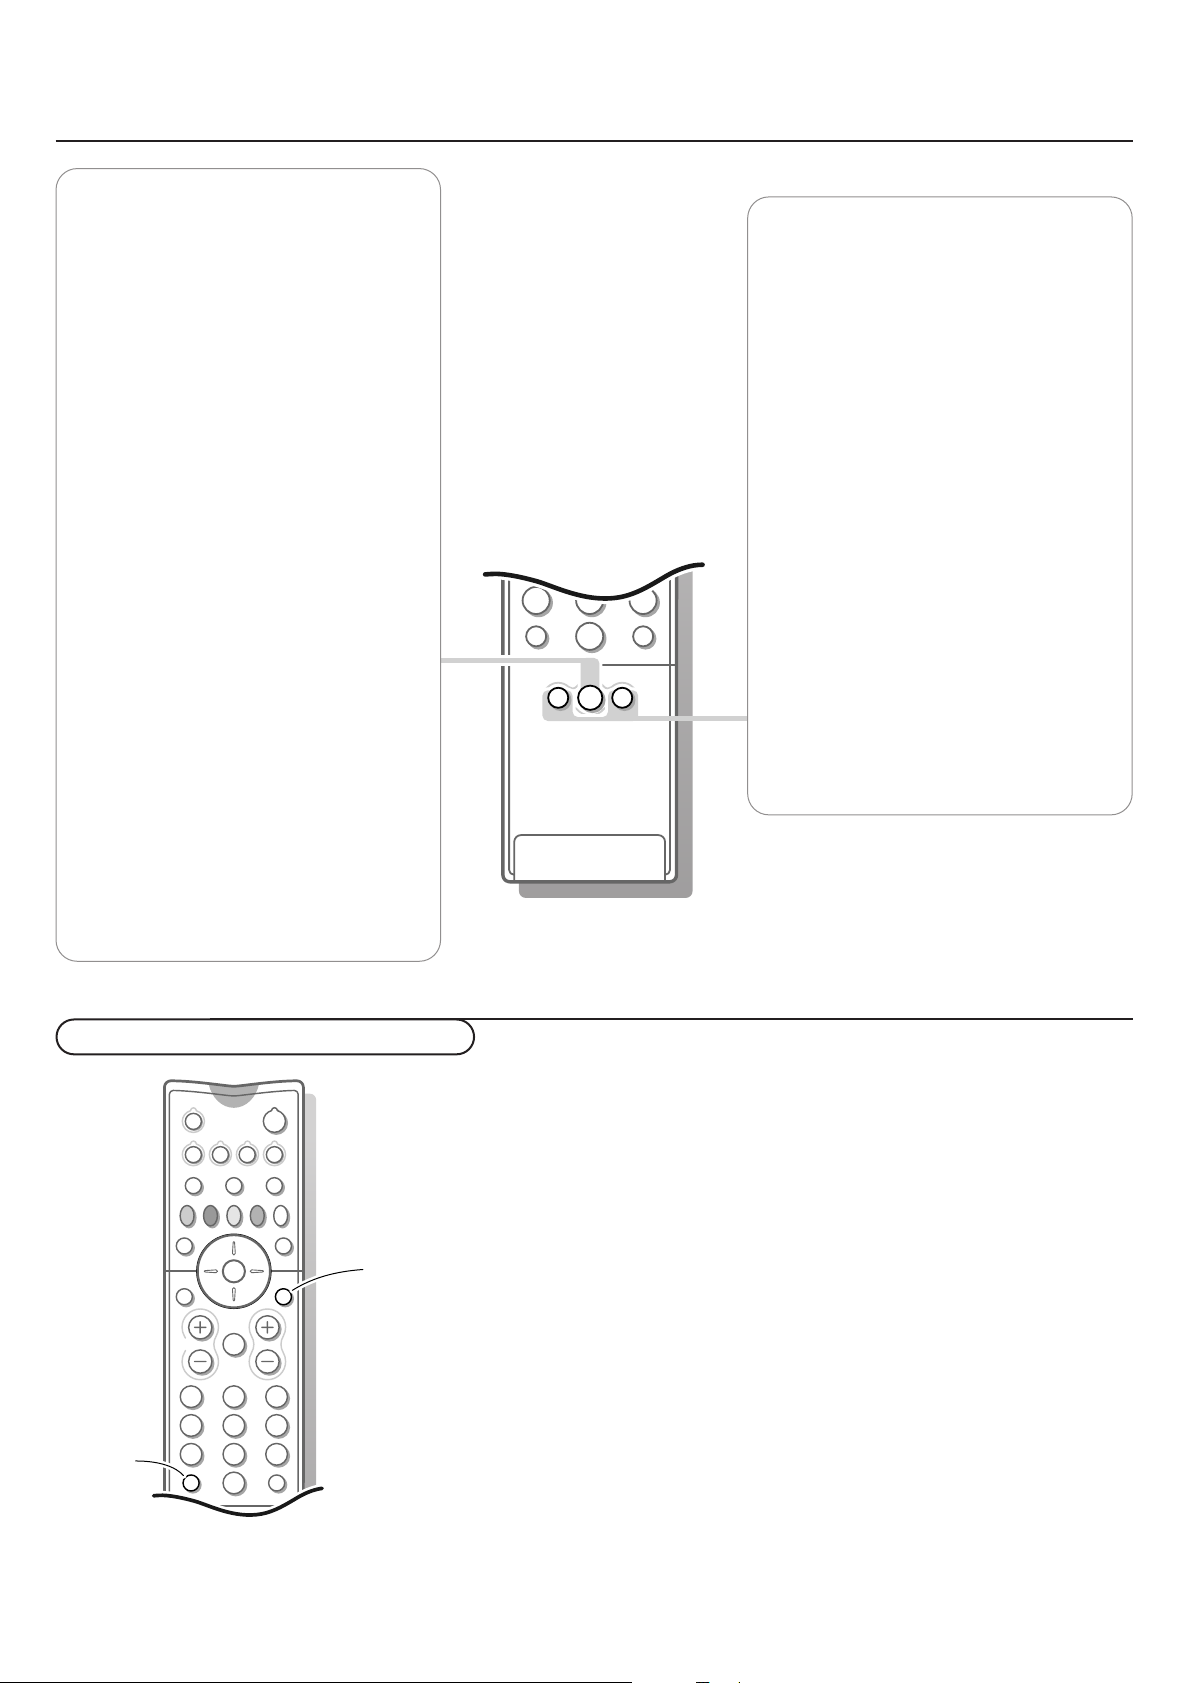
h Active control
213
546
879
0
B
w
æ b
Ï
i
VCR DVD AMP AUX
¬V P
0
Mqa
SMARTSMART
PICTURESOUND
SbÌ
MOVIE PIXEL PLUSNEWSCHILDSPORT
OK
MENU
i
Ï
Active control is a pro-active and automatic
system.The TV continuously measures and
corrects all incoming signals in order to
provide the best picture possible.Thanks to
the Ambient Light Sensor which measures
the light conditions of the room, the
contrast, dynamic contrast, brightness and
colour picture settings are adjusted
automatically. The light sensor is active when
the Active control function is switched to
Medium or Maximum. Press the h key
repeatedly to select the Active Control
values Off, Minimum, Medium or Maximum
(recommended).
Off Sharpness and Dynamic Contrast are
controlled automatically
Minimum Sharpness, Dynamic Contrast
and Noise Reduction are controlled
automatically.
Medium Dynamic Contrast, Colour,
Sharpness and Noise reduction are
controlled automatically.
Maximum Contrast, Dynamic Contrast,
Colour, Sharpness and Noise reduction
are controlled automatically.
Press the cursor right to select
The Active Control demo menu appears.
The picture settings are being adapted
continuously and automatically.
The menu items cannot be selected.
The sliders will be moving, showing how the
TV is tweaking the current picture. None of
the sliders is user controllable.
Press the OK key to switch off the Demo.
INFO+.
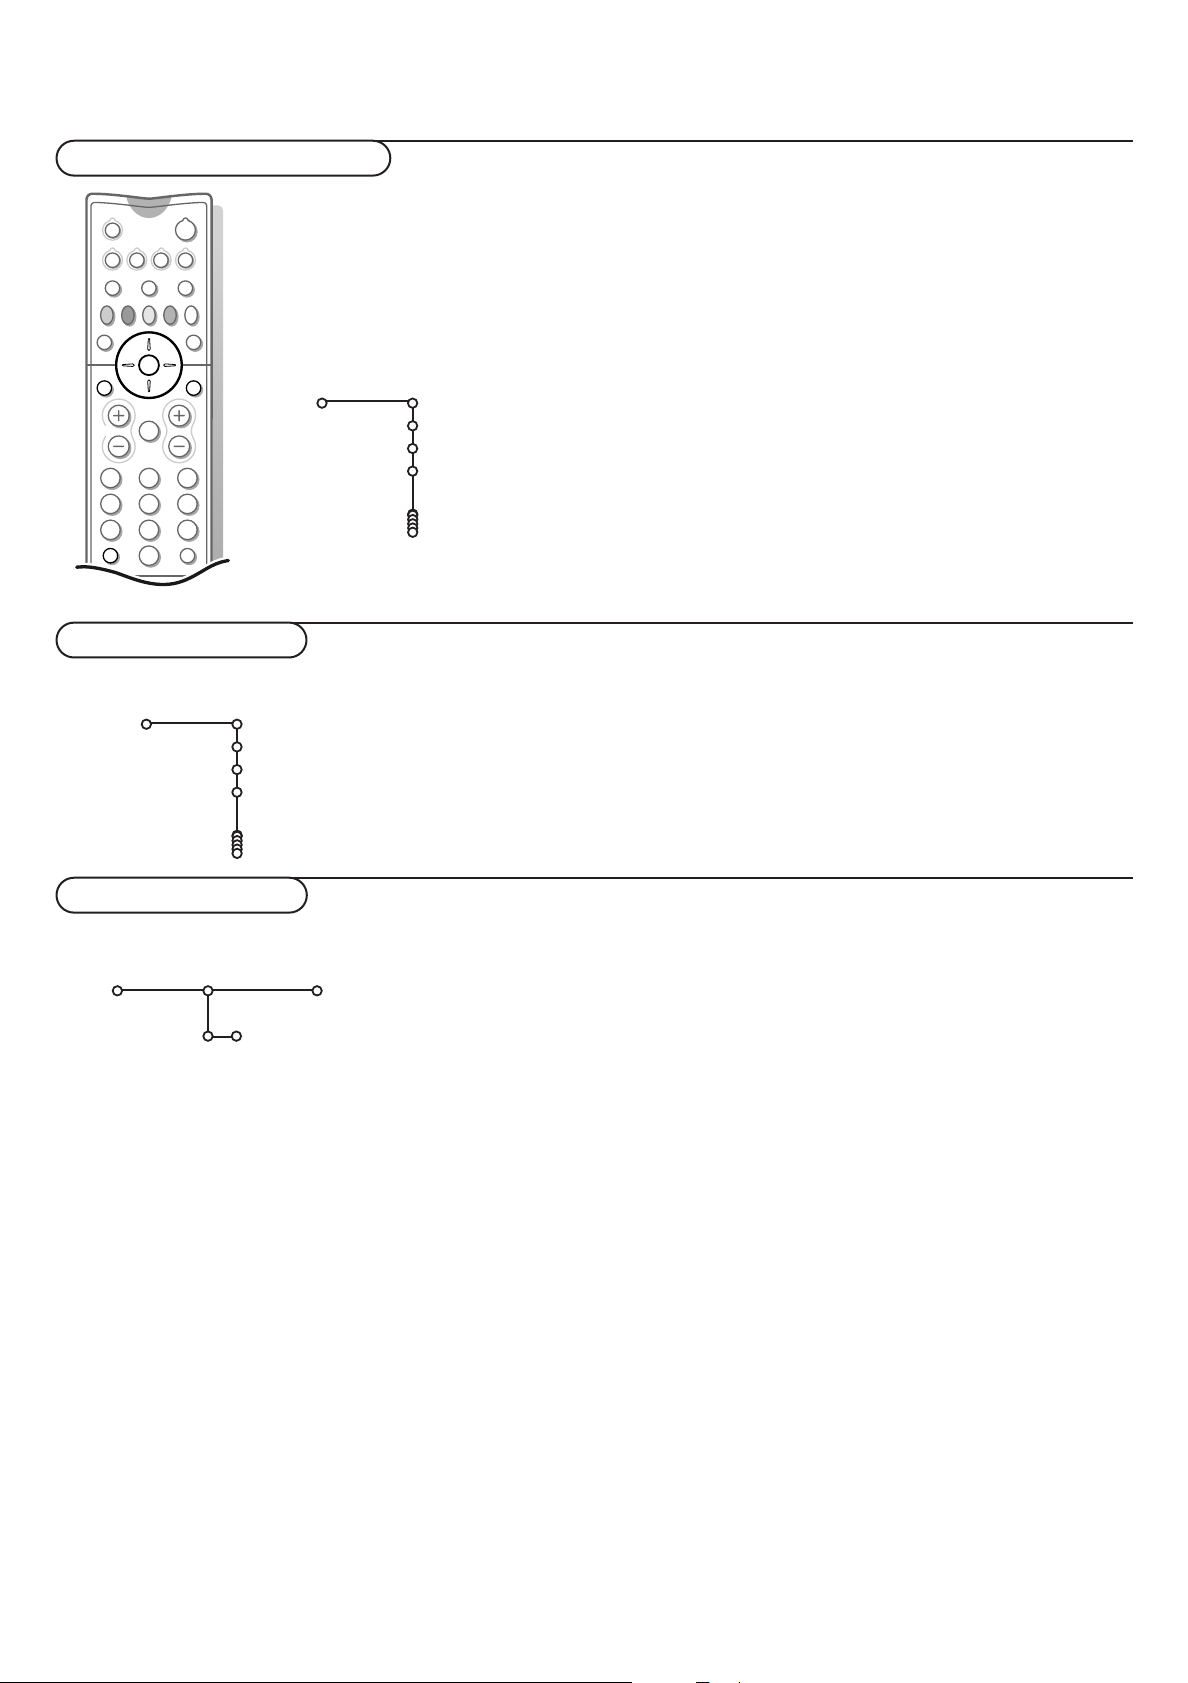
Smart Keys
To select predefined picture and sound
settings.
M Smart Sound
Each time it is pressed, a different sound
setting is selected, corresponding with
specific factory settings of treble and bass.
a Smart Picture
Each time it is pressed, a different picture
setting is selected, corresponding with
specific factory settings of Contrast, Colour,
Sharpness, Dynamic Contrast and Colour
enhancement.
Personal refers to the personal preference
settings of picture and sound selected in the
picture and sound menu.
Remark: the moment you are in a predefined
smart sound or picture setting and you modify a
setting in the picture or sound menu, all values of
the menu will overwrite the previously made
Personal settings.The predefined factory settings
remain unchanged.
Menu Info / Remote Control Info
Menu Info
& Press the MENU Ï key and select a menu item or submenu item.
é Press the i key on the remote control to get information about the
selected menu item.
“ Press the i key again to exit.
Remote Control Info
& Press the MENU Ï key.
é Press the i key.
“ Press any key on the remote control (except the cursor keys, the OK, the
MENU Ï, the digit, the i and the B keys) and you get information about
the pressed key.
The normal function of the key is not executed.
The moment one of the remote control keys which do not invoke remote
control info, is pressed, remote info is cancelled.
‘ Press the i key to display the menu that was on screen before a remote
control key for info was pressed.
5Use of the remote control
Page 8
To use the menus and the menu system
213
546
B
w
æ b
Ï
VCR DVD AMP AUX
¬V P
SbÌ
MOVIE PIXEL PLUSNEWSCHILDSPORT
OK
MENU
return or switch
main menu on/off
cursor to select
adjustments
OK key to activate
Picture Sound Features
TV
(DVD)
(Recorder)
(Receiver)
Setup
Demo
Install
(Exit)
puck
pipes
balls
Picture Sound
TV
Attention: point the remote control to the indicator of the TV.
& Press the MENU Ï key on the remote control to summon the main menu.
Which items appear in the main menu depends on the peripherals connected.
In case of an Cinema Link VCR or DVD, the menu items
Recorder and DVD
are present, see p. 21.
In case of a Cinema Link audio receiver or DVD, the menu item
DVD is present. See the separate Cinema Link booklet supplied.
Note:The Main menu only contains the item
Exit to dismiss the menu, when
Receiver or
you switch on your TV for the first time, or when the Main menu is summoned
with the
M key on top of the TV.
é Use the cursor in the up/down direction to select the TV, (DVD), (Recorder),
(Receiver), Setup, Demo or Install menu.
Note: Sometimes not all the menu items are visible on the screen. Press the cursor
down to reveal all items.
“ Use the cursor in the left/right direction to select the menu item.
‘ Use the cursor up/down again to select the control you want to select or to
adjust.
( Press the MENU Ï key again to turn off the main menu.
The menu system
Pipes, balls and a puck
The hierarchy of menus and controls is represented by an animated visual
mechanism of pipes, balls and a puck. The animated mechanism constantly
shows the current whereabouts and continually expands the view of the
immediate neighbourhood.
The puck surrounds the ball indicating the user’s current position in the menu
hierarchy.
The puck is always present when the menu system is displayed.
The puck is divided into 4 parts.They correspond to the directional controls
(up/down, left/right) on the remote control.The arrows on the cursor
indicate which directions to choose.
In this way users can navigate through the menu hierarchy to the control they
wish to adjust.
When items are more numerous than can fit comfortably on the TV display,
only a portion are shown.Those omitted are indicated by a cluster of balls
which indicates that there are ‘more’ items.
Direct selection and control
Menu items are controlled as soon as they are selected by the puck. Only a
few items require confirmation with the OK key.
Picture format
6
Use of the menus
Auto format
Superzoom
4:3
Movie expand 14:9
Movie expand 16:9
16:9 Subtitle
Widescreen
List controls
A list control is used to select one or more items from a list of options.
For instance, the Picture format option list with 4:3, Movie Expand 14:9, etc.
Press the right key to move the puck into the list.At least one item is the
current value and is highlighted.
Moving the puck up or down with the up/down key causes the list to move
down or up.
Page 9
213
546
879
0
B
w
æ b
Ï
i
VCR DVD AMP AUX
¬V P
0
Mqa
SMARTSMART
SbÌ
MOVIE PIXEL PLUSNEWSCHILDSPORT
OK
MENU
Select the menu language
Install
Deutsch
Français
Select the country
Language
English
& Press the MENU Ï key on the remote control.
When you switch on your TV for the first time and no channels are stored so
far, the menu Language automatically appears on the screen. This menu also
has an additional item
Exit with which the menu can be dismissed. The
explanation appears in different languages, one at a time. Choose your
preferred language and press the OK key on the remote control. Proceed
with the Install menu.
é Use the cursor down to select Install.
“ Use the cursor right to select Language.
Follow the instructions on screen.
‘ Use the cursor up/down to select your preferred language and press
the OK key to confirm your selection.
( Proceed with the Install menu.
Install
Country
Austria
Belgium
Croatia
Store TV channels
Install
Automatic installation
Install Start
Automatic installation
&
Select Automatic installation in the Install menu.
Note: All channels must be unlocked in order to autoprogram. If
requested, enter your code to unlock all channels. (See TV,
é Press the cursor down.
“ Press the cursor right.
‘ The message Searching appears and the progress of
Features menu, Childlock, p. 14.)
The autoprogramming option label
autoprogramming is displayed.
When the Automatic installation is complete, the puck
Start appears.
navigates to Install again.
& Use the cursor right to select Country.
é Select the country where you are now located and press the OK key.
Other when none of the countries applies.
Select
“ Proceed with the Install menu.
You can now search for and store the TV channels in two different
ways: using Automatic Installation or Manual Installation (tuning-in
channel by channel).
Select your choice with the cursor right.
After the new or extra TV channels have been stored, the TV automatically
transfers those TV channels to the video recorder if it is equipped with the
EasyLink function. The message
screen. The programme list of the video recorder is now the same as the one
of the TV.
If a cable system or a TV channel which broadcasts ACI
(Automatic Channel Installation) is detected, the search is
stopped and the programme list appears.
Without ACI broadcast, the channels are numbered
according your language and country selection.You can use
Reshuffle to renumber them. See p. 8
It is possible that the cable company or the TV channel displays
a broadcast selection menu. Layout and items are defined by
the cable company or the TV channel. Make your choice with the
cursor and press the OK key.
EasyLink: downloading ...... appears on the
7Installation
Page 10

Manual installation
Install
Manual installation
Selection mode
System
Programme
Search
Fine tune
Store
& Select Manual installation in the Install menu.
é Press the cursor down.
Give name
Give name
® Space ® Delete
VCR1
BBC1
BBC2
CNN
TVE
π.....
It is possible to change the name stored in the memory or to
assign a name to a TV channel for which a name has not yet
been entered.A name with up to 5 letters or numbers can be
given to the programme numbers 0 to 99. For example SUPER,
BBC1,... Before programme number 0 you can also enter a
name for the peripherals that are connected to a
euroconnector.
pπ
ABCDEFG 1 23
HIJKLMN 4 56
OPQRSTU 7 89
VWXYZ 0
® Shift ® Special
Searching for and storing TV channels is done channel by channel.You
must go through every step of the Manual Installation menu.
Follow the instructions on screen.
Note: Search or direct selection of a TV channel
If you know the frequency, the C- or S-channel number, enter the 3 digits of the
frequency directly with the digit keys 0 to 9 (e.g. 048). Press the cursor down
to proceed.
Repeat to search for another TV channel.
& Select Give Name in the Install menu and press the cursor
down.
é Select the programme number.
Note: keep the cursor up/down pressed to scroll through the
programme list and to avoid that the TV tunes to each channel
passed by.
“ Press the cursor right.
A keyboard appears on the screen.
Press the cursor right to enter the keyboard.
Press the cursor up/down, left/right to select the first
character and press OK. Repeat for every character you
want to enter.
Space to enter a space; Delete to erase the
Select
highlighted character in the name entered;
upper- or undercast characters on the keyboard;
display special characters on the keyboard. Press OK to
confirm.
Shift to display
Special to
‘ Press the cursor left repeatedly when you have finished the
name giving of the selected channel or peripheral.
( Select another programme number and repeat steps “
to ‘.
Reshuffle the programme list
According to your preference you can change the order of
the stored TV channels.
& Select Reshuffle in the INSTALLATION menu and press
the OK key.
é Follow the instructions on screen.
Installation
8
Select Favourite TV channels
&
Select Favourite programmes in the Install menu.
é Select your programme number with the cursor up/down.
“ Select Ye s or No with the cursor right.
‘ Repeat é and “ for every TV channel or external you
want to make a favourite or a non-favourite TV channel or
external.
Page 11

Install TV Setup
Setup
Speakers General Source Decoder
Test tone
Front left volume
Front right volume
Centre volume
(Surround volume)
(Centre mode)
Surround speakers
Wireless surround
FM transmitter
Auto surround
Speakers
The Setup menu contains items that control the settings of the TV’s functions,
features, services and peripherals you may have connected.
The Speakers menu reflects the speaker-related controls.
The General menu allows you to change settings that will typically be accessed only
occasionally.
The Source menu allows you to select a source and/or to name each input source.
The Decoder menu allows you to define one or more programme numbers as
decoder programme numbers.
In order to receive the full reproduction capability of true Dolby Surround
Sound you should include the proper use and arrangement of the speakers:
Availability of Speaker menu items
Test tone
Front left volume •••••
Front right volume •••••
Centre volume •• •
Surround volume ••
Centre mode •••••
Surround speakers ••
•••••
• via the TV and its internal Front right, Centre and Left speakers and two
amplified rear surround speakers connected to the back of the TV;
• or via the Variable Line Out connectors and an external Dolby amplifier.
See External speakers/Amplifier, p. 20.
Select the various Speakers menu controls to setup the configuration of the
TV’s speakers system for Dolby audio playback.
Each volume control can be adjusted to match test tone levels.
Depending on the output and Surround mode (see Main menu,TV, Surround,
Sound mode, p. 13) selected, some menu items may be greyed out and are
Stereo
3 Stereo
3D Surround
Hall
Pro Logic
not selectable.
Test tone and Volume controls
The menu item
Test tone enables you to adjust the
volume level of each until they are balanced.
The speakers activated light up in the screen graphic.
& Select Test tone.
é Press the cursor right.
“ Select On or Off with the cursor up/down.
Once turned on, the Test Tone will circulate through the
Left, Centre, Right and both Rear surround speakers (if
present).
‘ Press the cursor left.
( Press the cursor up/down to select the desired speaker
for individual volume level adjustment.
§ Press the cursor left/right to adjust the volume level.
è Continue and select the other speakers for adjustment as
desired.
! Press the cursor up to return to the Test Tone menu item
when speaker adjustments are complete and turn the
control
Off.
If no External Front Speakers are connected, do not
change the predefined factory settings which is
mode Off
connected, select
. If an external amplifier with Front Speakers is
Centre mode On.
Centre
In this setting, the centre channel in surround mode is
directed to all three internal TV speakers (left, centre and
right).
Surround Speakers
See Connect Peripheral Equipment, Connect extra
loudspeakers/amplifier, p. 20.
If no Surround Speakers are connected do not change the
predefined factory settings which is
If Surround Speakers are connected select
(Dolby Pro Logic and Hall are not available if
Off.
On.
Off is
selected.)
Wireless Surround
Only operational when you connected a special wireless
transmitter module and wireless surround sound
loudspeakers. (Kit with type no.AD902W).
See: Optional Wireless Surround speaker system, p. 23.
FM transmitter
Select the correct type of transmitter, when connected at
the rear of the TV. See Optional Wireless surround speaker
system, p. 23.
Centre Mode
See Connect Peripheral Equipment, External Speakers,
Amplifier, p. 20.
Auto Surround
Sometimes the broadcaster transmits special signals for
Surround Sound encoded programmes.
The TV automatically switches to the best surround sound
mode when
Auto Surround is switched On.
However it is possible to overwrite this setting.
9Installation
Page 12

General
Setup
Menu background
Smart surf
Factory settings
NEXTVIEW provider
Tilt adjust
Programme title
Teletext level 2.5
Set/Change code
Menu background
General
OSD
& Select Menu background.
é Press the cursor right.
“ Select Ye s or No to turn the Menu background on or off.
Smart surf
& Select Smart surf.
é Select 2 programmes or 9 programmes with the cursor
left/right.
2 programmes if you want the 0 key to toggle
Select
between the current and the previously selected channel.
9 programmes if you want the 0 key to summon
Select
a list of up to 9 channels which can be selected. (See Use
of the Remote Control, p. 4.)
Factory settings
This function allows you to reset most of the picture and
sound settings to their predefined factory values.
& Select Factory settings.
é Press OK to erase settings and reset them to their default
values.
NEXTVIEW provider
Most broadcasters in Europe are offering teletext pages
containing the day’s programme schedule.These pages can
be requested by switching the TV to Teletext Guide.
Some broadcasters are offering an extended programme
guide service called
NEXTVIEW is a new way of presenting programme schedules
and offers more features than basic teletext.With
NEXTVIEW it is possible to show for instance all the movies
or children programmes for today or the following days.
If you select
capture data from the available TV channels if they
broadcast
NEXTVIEW. Broadcaster defined menus will not
be available.
If you select a programme number of a TV channel
broadcasting
provide
NEXTVIEW data and additional information of its
own broadcasts as well as from other (non selected) TV
channels.
Normally you will select the
transmits most information in your language.You can make
the best selection via information from TV announcements
or from the newspapers.
NEXTVIEW.
None as
NEXTVIEW, the selected TV channel will
NEX
TVIEW provider, the TV will
NEXTVIEW provider that
Important:
In order for
NEXTVIEW to function properly, the first TV channel
from the favourite list should also broadcast the correct local
date and time via teletext. Please check at startup if the time
and date are correct in the
NEXTVIEW screen.
Remark:
Only some TV broadcasters support
How to make use of
NEXTVIEW, see p. 15.
NEXTVIEW.
Tilt adjust
Select
Tilt adjust.
Keep the cursor left/right pressed to adjust the rotation of
the picture.
OSD (On Screen Display)
& Select OSD.
é Press the cursor right to select Normal or Minimum.
Normal to activate the continuous display of the
programme number and extended display of TV channel
and programme information on screen.
Minimum to
activate the display of reduced channel information.
See Use of the Remote Control, p. 3, i On screen
information.
Note: When Subtitles is switched on, see Features, p. 15,
continuous display of the programme number is not possible.
Programme title
& Select Programme title.
é Press the cursor right to select Programme title Yes or
No.
When selected
Ye s , after the selection of a TV programme
or after pressing the i key on the remote control, a TV
channel which broadcasts teletext may transmit the name
of the TV channel or the programme title. When selected
No, the programme title will only appear after pressing the
i key, and not after the selection of a TV channel.
Teletext level 2.5
Some broadcasters offer the opportunity to see more
colours, other background colours and nicer pictures in the
teletext pages.
& Select Teletext level 2.5.
é Press the cursor right to select Teletext level 2.5 On to
take advantage of this feature.
“ Press the cursor right again to select Teletext level 2.5 Off
if you like the more neutral teletext layout.
The selection made is valid for all channels which
broadcast teletext.
Note: It may take a few seconds before teletext broadcast
switches over to Teletext level 2.5.
Installation
10
Page 13

Set/Change code
The Child lock feature (see TV, Features, p. 14) allows you
to lock channels to prevent children from watching certain
programmes.To watch locked channels, you need to enter
an access code.
Set/Change code menu item allows you to create or
The
change a Personal Identification Number (PIN).
& Select Set/Change code.
é If no code exists yet, the menu item is set to Set code.
If a code has previously been entered, the menu item is set
Change code. Follow the instructions on screen.
to
All number combinations from 0000 to 9999 are valid
numbers.
“ The General menu reappears with a message confirming
that the code has been created.
Source
Setup
This menu allows you to select the peripheral you
connected to one of the external inputs.
Source
EXT1
EXT2
EXT3
SIDE
(Centre input)
& Select Source.
é Press the cursor down to select one of the external inputs.
“ Press the cursor right to enter the list of names of
peripherals attached to the selected input.
‘ Select the peripheral device with the cursor up/down.
Important:You have forgotten your code !
& Select Set/Change code in the General menu.
é Press OK.
“ Press the cursor right.
‘ Enter the overriding code 8-8-8-8.
( Press the cursor again and enter a new personal 4-digit
code.The previous code is erased and the new code is
stored.
Once you have selected the source, e.g.VCR, this source
will automatically be selected when your remote control is
in VCR mode, see p. 3, and when you press the v key on
the remote control.
Centre input
When you have connected a Cinema Link surround
receiver to the TV (See separate Cinema Link instruction
manual supplied) and you have selected one of the external
inputs as centre input, the loudspeakers of the TV will act
as centre speaker, making a separate centre speaker
unnecessary.
Decoder
Decoder
Setup
Programme
Status
If a decoder or a descrambler is connected, see p. 19, you
can define one or more programme numbers as decoder
programme numbers.
& Select Decoder with the cursor right.
é Select Programme.
“ Select the programme number under which you have
stored the programme coming from your decoder.
‘ Select Status.
• Select the input used to connect your decoder:
EXT1 or EXT2.
• Select
None if you do not want the selected
programme number being activated as a decoder
programme number.
None,
11Installation
Page 14

Demo
TV
& Select Demo in the Main menu.
é Select Auto demo or one of the features with the cursor
right and press the OK key on the remote control.
Demo
Auto demo
Zoom
Teletext
Install
Main menu
Picture
Speakers
NEXTVIEW
Active control
Dealer demo - Digital options
- Light sensor
- Comb filter
The Demo menu allows to demonstrate the TV features
separately or in a continuous loop.
TV menu
w
VCR DVD AMP AUX
MOVIE PIXEL PLUSNEWSCHILDSPORT
æ b
OK
TV
Digital options
Dynamic contrast
Colour enhancement
Smart picture
Picture format
B
SbÌ
MENU
Ï
¬V P
213
546
879
Picture Sound Features
Contrast
Brightness
Colour
Sharpness
Tint
DNR
(Hue)
return or switch
main menu on/off
cursor to select
adjustments
OK key to activate
Auto demo has been selected the demo will
If
automatically present all the features sequentially in a loop.
Press one of the cursor keys to stop the Auto demo.
If one of the features has been selected, this particular
feature demo will run only once, and the Demo menu will
disappear.
Select Digital options, Light sensor and Comb filter
On or Off
Select one of the Digital options, Light sensor and Comb
filter On or Off to really see the difference in picture
quality.
In Dealer demo mode it is possible to change channels
with -P+ and to adjust the volume.
Note:The Dealer demo is not part of the automatic sequence
and can only be activated separately.
Press the MENU Ï key on the remote control to summon the main menu.
Use the on-screen Menu-Info, see p. 5, for more information about the menu items.
Note: When the main menu is accessed from the keypad on top of the TV, it has an
additional Exit item, which lets you dismiss the menu.
Picture menu
Press the cursor right to select Picture.
Select the menu items in the Picture menu with the cursor up/down.Adjust the
settings with the cursor left/right or enter the list of submenu items with the
cursor right. Select a submenu item with the cursor up/down.
Note:To remove the menu background before adjusting the picture settings, see Select TV
setup, General, p. 10.
Digital options
Although Pixel Plus is the most ideal setting, it may be preferable, dependent on
your own preference, to select Double lines, or 100 Hz Digital Scan.
100 Hz Dig. Scan = 100 Hz + Dig. Scan (Field and line flicker reduction) without
•
motion compensation.
Pixel Plus = creates near High Definition performance inside the TV on the
•
basis of a regular input signal.
The number of lines are increased and the number of pixels on a line are
doubled in combination with Digital Natural Motion.As such Pixel Plus enhances
both regular broadcast signals and DVD or Digital TV input towards unparalleled
sharpness and depth, near High Definition and natural detail.
Double Lines = provides for a doubling of vertical and horizontal resolution
•
which adds astonishing sharpness and a total absence of visible picture lines.
Motion compensation reduces jitter and offers smooth, yet sharp motion
reproduction.
Advised for NTSC (60 Hz) pictures.
Note:
- Pixel Plus is not active when Teletext (Except when Subtitling is activated),
Teletext Dual screen is selected.
- When having selected Pixel Plus, the size of the menus on screen is reduced. This is a
normal behaviour.
- Interference, caused by fluorescent lights just above the TV, may occur when having
selected Pixel Plus.
NEXTVIEW or
Installation
12
The modified adjustments for Contrast, Brightness, Colour, Sharpness, Colour
enhancement,Tint, Digital options and Dynamic Contrast are automatically stored.
Select Factory settings in the Setup menu, General, to restore the predefined
factory settings, see p. 10.
Page 15

Sound menu
TV
Sound Features
Volume
Equalizer
(Loudness)
Headphone volume
Surround mode
(Dual I-II)
(Mono/Stereo)
(Nicam/Analogue)
(3D effect)
AVL
Delta volume
(Audio only)
Smart sound
Surround Modes
Select the menu items in the Sound menu with the cursor up/down and adjust the
settings with the cursor left/right.
Remember, control settings are at normal mid-range levels when the bar scale is
centred.
Note:
- Some menu items are only available in case of a Cinema Link configuration and when
the Cinema Link is activated. Others are steered by the audio receiver instead of by the
TV. See the separate Cinema Link booklet supplied.
- Dual X is only available with dual sound transmission.
- Mono/Stereo is only selectable in case of analogue stereo transmission.
- Nicam/Analogue is only selectable in case of Nicam transmission.
- Surround modes can not be modified when a headphone has been connected and the
mode is always stereo.
Dependent on the sound signal broadcasted, select one of the
Surround modes.
Press the cursor right to select Sound.
Stereo
This mode reproduces only the left and
right front sound signals.
You only hear a stereo sound if the
broadcast which you are receiving is
transmitted in stereo or nicam stereo.
Dolby 3 Stereo (optimal with Dolby Surround broadcasting)
The sound signal is now distributed over
the front left, the front right and the centre
TV loudspeakers.
The rear loudspeakers do not produce any
signal.
3D Surround (optimal with Dolby Surround broadcasting)
3D Surround enables you to experience the
effect of Dolby Surround Pro Logic *
without the need of having rear speakers
connected or activated.
The graphical representation of the rear
loudspeakers is replaced by the symbol ®r.
Select the level of
3D effect with the cursor left/right.
Hall
The special sound signal is distributed over
the rear loudspeakers which creates a hall
effect from the rear.
The centre loudspeaker does not
reproduce any signal.
This mode is recommended when you wish
to add surround sound to a broadcast which is not encoded
Dolby Surround or to a mono signal.
Pro Logic (with Dolby Surround broadcasting)
In addition to the left and right internal
speakers, the centre and the rear surround
loudspeakers reproduce the Dolby
Surround Pro Logic sounds.
This sound is always present in the movie
or programme marked with G Dolby Surround.This mode is
especially recommended for such programmes or movies.
Dolby Pro Logic signals are also present on some DVD tracks.
Note: Normal stereo broadcast is not always encoded to produce a
rear surround sound.
Note: In case of a Cinema Link configuration connected, the surround
modes of the receiver can be selected.
Pro Logic and Hall can only be reproduced if Surround speakers is set
to Yes in the Setup, Speakers menu, p. 9, and rear speakers are
connected.
With two extra front loudspeakers connected
*
To enhance the sound reproduction of your TV you may connect two extra front
loudspeakers via an external amplifier. See Connect Peripheral Equipment, Extra
loudspeakers/Amplifier, p. 20.
In the Surround modes
+ ext. amp is added to indicate that you should switch on
your amplifier as in these modes the internal TV speakers produce only centre
sound.The subwoofer speaker is muted.
Note: If extra front speakers are connected and selected, all internal TV speakers produce
centre sound in the surround modes Pro Logic, Dolby 3 Stereo and 3D Surround.
‘Dolby’ ‘Pro Logic’ and the double-D symbol are trademarks of Dolby Laboratories Licensing Corporation.
Manufactured under license from Dolby Laboratories Licensing Corporation.
13Use of the menus
Page 16

Features menu
Press the cursor right to select Features.
Subtitle
Features
Off
On
On during mute
TV
Programme list
Sleeptimer
Child lock
On timer
Select the menu items in the Features menu with the cursor
up/down and adjust the settings with the cursor left/right.
Use the on-screen Menu-Info i for more information about
the menu items.
Programme list
Press the OK key to switch over to the selected TV channel or
external.
Select subtitles
Switch on teletext and select the proper subtitle page from the
index.
Switch off teletext.
Now the subtitle page is stored for the selected TV channel.
Once subtitles have been stored and
Subtitle On has been
selected they will automatically be displayed on the selected TV
channels if subtitles are in the transmission.
A symbol will indicate that the mode is on.
On during mute when you want to have the subtitles
Select
automatically displayed when the sound has been muted with
the ¬ key on the remote control.
“ Select one of the menu items of the child lock menu.
• Select
• Select
• Select
On timer
Lock if you want to lock all channels and externals.
Custom lock and press the cursor right.
The items Age lock and Category lock are available when
NEXTVIEW broadcast is available.
- Select
Age lock if you want to lock programmes related
to a certain age: off, 2, 4 ... 18.
- Select
Programme lock if you want to lock the
programmes from a certain TV channel or external.
- Select
Category lock if you want to lock programmes
related to a certain theme: Movies, Sports,Shows....
NEXTVIEW,p.15.
See
- Select
Lock after if you want to lock all programmes
from a certain time onwards.
Press the cursor right and enter the time with the
cursor up/down and right. Press the OK key to validate.
Note:The entered time will remain valid for every day, until
you have selected Unlock.
Unlock to unlock all locked channels and externals
at once.
& Select On timer.
On timer
Off
On
VCR1
BBC1
BBC2
CNN
TVE
π.....
Sunday
Monday
.......
Daily
15:45
Child lock
& Select Child lock.
Subtitle
On timer
Features
Lock
Custom lock
Unlock
Age lock
Lock after
Programme lock
Category lock
TV
Programme
Sleeptimer
Child lock
é Press the cursor right to enter the Child lock menu.
Yo u ’re summoned to enter your code. Enter the access
code.
Note:You have to re-enter your code each time you enter the
child lock menu.
Important:You have forgotten your code ! See p. 11.
é Select On with the cursor right.
“ Press the cursor right again to enter the programme list.
‘ Select the TV channel or external you want your TV to
switch to on a selected time and day.
( Press the cursor right again to select a day of the week or
to select
Daily.
§ Press the cursor right once again to enter the time.
è Enter the time with the digit keys or with the cursor
up/down.
! Press the OK key to activate.
ç Press the MENU Ï key to turn off the menu.
Note:To check your timer settings, press the i key.
Use of the menus
14
Page 17

NEXTVIEW / Teletext guide
NEXTVIEW is an electronic guide that allows you to look up programmes as you would in a newspaper or a
TV magazine.You can sort the programmes by subject (films, sport...), obtain detailed information and
programme your video recorder if it comes with the
Important note: The
When no
NEX
teletext programme information (if available) and offers most functions of
Note:The broadcaster is responsible for the content of the information. The TV is responsible for the capture of that
information and for the presentation to the user.
NEXTVIEWLink function.
NEX
TV
IEW service is only available on certain programmes and in certain countries.
TV
IEW information is broadcast, the teletext programme guide appears in its place. this is based on
NEXTVIEW.
Display of a NEXTVIEW
page
The information is set by the channel that transmits the NEXTVIEW service.
For example:
puck
Programme name and
broadcast time
This logo is only displayed
during a
NEXTVIEW
transmission. No logo
indicates it is a teletext
programme guide
Mon 05 Feb 18.00
Menu 18.00 Channel Theme
Mon 03
Mon 03
BBC1 18.00 BBC News
Tue 04
BBC2 18.00 The Simpsons
Wed 05
CNN 18.00 World News
Thu 06
FR2 18.00 On a tout essayé!
Fri 07
CH5 18.15 Tomorrow Never Dies
Sat 08
Review Record Remind Watch Lock
NEXTVIEW
guides
function
keys
NEXTVIEW guides:
• choice of the day
• channel choice
• sort by subject
• programme preview
NEXTVIEW functions:
Use the coloured keys on
the remote control to
activate them.
The text appears in grey when
the function is not available.
Using NEXTVIEW / Teletext guide
Call Teletext/
Press the æ key on the remote control to call the Teletext/
After a while you obtain:
NEXTVIEW page, if the selected channel broadcasts this service (the NEXTVIEW logo is displayed. See also Setup menu, General,
• a
NEX
TVIEW provider, p. 10),
• a teletext page, if the selected channel does not broadcast
No information available is displayed if neither NEXTVIEW nor teletext are transmitted. In this case, select another channel.
•
Note: Press the æ key to exit
NEX
TVIEW guide
NEXTVIEW guide. A menu appears with the message One moment please.
NEXTVIEW,
NEXTVIEW/Teletext Guide.
Teletext Guide
selection
puck
BBC1
BBC2
ITV
CH4
CH5
Review Record Remind Watch Lock
page ball
ball
Mon 05 Feb 16.35
subpages
100 1
BBC CEEFAX
LIONS RECORD ANOTHER WIN 430
Index 100 News 300
BBC Info 110 Headlines 305
Children 120 Weather 400
Cookery 150 Sports 415
Education 200 Radio 50
function
items
scroll
ball
& When in Teletext Guide mode, select a TV channel with the cursor
up/down and press OK.
é Move the cursor up to the top of the channel list where the name
of the selected TV channel reappears.
“ In the Teletext index page, look for the programme guide page of
the day or the following day.
‘ Enter with the digit keys, the programme guide page number.
( Press the cursor right to move the puck over the selection ball.
§ Use the cursor up/down to scroll through the different
programmes.
• If the selected programme contains a page number with an
optional subcode referring to a page with more info about the
programme, press the OK key to display the information. Press
the OK key again to return to the programme guide page.
• If the selected programme guide page satisfies the VPT
requirements,
- it will be possible to record, remind, watch or lock programmes:
- the TV will remember the last selected teletext page number of
that channel that contains programme guide information and
indicates which programme starts at what time.
Every time you press the æ key, the teletext programme guide
page of the selected TV channel will be available.
15NEXTVIEW
Page 18

NEXTVIEW
puck
Mon 05 Feb 18.00
Time Channel Theme Date
Menu
Day Guide
Channel Guide
Theme Guide
Review Record Remind Watch Lock
function
keys
If in the Setup menu, General, see p. 10, you have selected
a TV channel as
channel broadcasts this service, the
appears when
NEXTVIEW starts up with the Time Guide.
NEXTVIEW provider and the selected
NEXTVIEW menu
NEXTVIEW is switched on. In other cases,
& Use the cursor key left/right to select Time, Channel,
Theme, the date (or the menu).
Time guide provides an overview of all programme
The
titles active in the selected time block.
Channel guide provides an overview of all
The
programmes that are broadcast by a single channel during
one day.
With the
The
selected date, that matches with the selected category.
Date guide you can choose a specific date.
Theme guide displays a list of all programmes at the
puck
Mon 05 Feb 18.15
Channel Theme Date Menu
18.00
18.00
BBC1 18.00 BBC News
18.30
BBC2 18.00 The Simpsons
19.00
CNN 18.00 World News
19.30
FR2 18.10 On a tout essayé!
20.00
CH5 18.15 Tomorrow Never Dies
20.30
Review Record Remind Watch Lock
NEXTVIEW
guides
function
keys
Going through the menu guide, the TV is collecting the
sorting criteria to finally display a list of programme
events.
é Press the OK key to select the guide type.
“ Move the puck down and to the right to select the
programmes.
If available a summary or commentary on the programme
is displayed at the bottom of the screen.
‘ Use the cursor up/down to scroll through the
programmes.
( Press one of the colour keys to select one of the basic
functions (if available):
lock..
review, record, remind, watch,
Basic functions
Press one of the grey, red, green, yellow or blue keys to
activate a Teletext Guide,
NEXTVIEW function.
The keys appear in grey if the function is not available.
Review (not available in Teletext Guide): this menu provides
a list of programmes that are marked as reminders, those
that have to be recorded and those that are locked.This
menu can be used to change a reminder of programmes
to be recorded.
Record: to programme the recording of the video
recorder (if it has a
connected to
Remind: automatically switch on the TV if it is in standby
NEXTVIEWLink function and is
EXTERNAL 2).
or stops a programme from being broadcast by displaying
a message if the TV is on.
Lock: to lock certain programmes to prevent recording
or watching.
Select Picture/NEXTVIEW Guide
Press the æ key.
Press the b key.
The screen is divided into two parts: the left side for the
normal main picture, the right side for
Guide.
Press the b key to return to a full
Guide picture or press the æ key to return to a full
picture screen.
Note:
- in half screen mode the basic functions of the
Teletext Guide are limited to Record, Remind and Watch.
NEXTVIEW/Teletext
NEXTVIEW/Teletext
NEXTVIEW/
For the functions Record, Remind or Lock, a small menu
pops up in which you can choose the interval:
once, daily
or weekly, or clear an earlier made record, remind or
lock setting.The default interval is sit to
Once. to confirm
the frequency, press the OK key.
Note: For certain broadcasts, the Series option is suggested.
With this option, the system will independently search for when
the next episode in the series is being broadcast.
Watch: to watch the selected and currently broadcast
programme. (Not available in Teletext guide).
Acquisition and updating of NEXTVIEW
information
Acquisition and updating of NEXTVIEW is done when you
are watching the TV channel of the selected
provider, see Setup menu, p. 10, or when the TV is
switched to standby;
The indicator on the front of the TV remains orange
during standby.After all needed acquisition or updating is
complete, it turns red.
Acquisition of fresh date will happen once during the
night.
Note: it may be necessar y to put the TV in standby mode when
NEXTVIEW information is outdated, e.g. returning from
all
holiday.
NEXTVIEW
NEXTVIEW
16
Page 19

Teletext
Most TV channels broadcast information via teletext.This TV has
a 1200 pages memory that will store most broadcasted pages
and subpages to reduce waiting time. After each programme
change, the memory is refreshed. It may take some time for all
pages to load.
Depending on the TV channel, teletext is transmitted in different
systems.The colours used in the bottom line of the teletext page
correspond with the colour keys of your remote control.
Switch Teletext on and off
Press b to switch the teletext on or off.
Press again to display a picture/teletext screen.
Press once again to return to a full screen picture.
v
b
S
®Ò‡ π †
æ b
OK
i
puck
i
Menu 100 01
Favourite
Search
LIONS RECORD ANOTHER WIN 430
Index 100 News 300
BBC Info 110 Headlines 305
Children 120 Weather 400
Cookery 150 Sports 415
Education 200 Radio 500
Lottery 230 Travel 550
Finance 240 Subtitling 888
Music 280 TV Listings 600
Red Green Yellow Blue
B
VCR DVD AMP AUX
b
S
colour keys to
select
Ì
b
Ï
MENU
Ï
¬V P
213
546
879
0
ZOOM
U
fiyÚh
INSTANT
Q ®qc
BBC CEEFAX
0
0
h
Mon 05 Feb 16.35.22
Select Picture/Teletext
Select a TV channel which broadcasts teletext.
Press the b key.
Press the b key.
The screen is divided into two parts: the left side for the normal
main picture, the right side for teletext broadcast by the
selected TV channel.
Press the b key to return to a full teletext picture or press
the b key to return to a full screen picture.
Quickly run through the teletext pages
Press the cursor up/down or the - P + key to run through the
previous or the following pages.
Select the previously selected teletext page
Press the 0 key.
Note: Only possible when teletext pages are active, not when the
Teletext menu is displayed.
Select the index teletext page
Press the grey colour key † to display the main index (usually
p.100).
Only for T.O.P teletext broadcasts :
T.O.P orders the pages in categories and adds other possibilities
of enhancing ease of use.
Press i. A T.O.P. overview of the teletext subjects available is
displayed.
Not all TV channels broadcast T.O.P. teletext.When the teletext
system is not T.O.P. teletext, a message appears at the bottom of
the screen.
Select with the cursor up/down, left/right the desired subject
and press the OK key.
Select subpages
When a selected teletext page consists of different subpages,
one of the subpages appears on the screen.
Press the cursor right to highlight the subpagenumber.
Press the cursor up/down to select the next or previous
subpage or enter the subpagenumber with the digit keys.
The main index page appears on the screen together with an
information line at the top, an option line at the bottom and a
puck in the top left corner of the screen.
Select a Teletext page
With the digit keys
Enter the desired page number with the digit keys.
The page counter seeks the page or the page appears
immediately when the page number has been stored in the
memory.
A message appears when you have entered a non existent or
incorrect page number. Page numbers beginning with 0 or 9 do
not exist. Choose another number.
With the option line
Select with the colour keys, corresponding to the coloured
options at the bottom of the screen, the desired subject.
Special teletext functions
Hold
Press S to stop the automatically rotating of the subpages or
to stop the page counter from seeking when you have entered a
wrong page number or when the page is not available. Enter
another page number.
Enlarge
Press h repeatedly to display the upper part, the lower part
and then to return to the normal page size.When the upper
part is displayed, you can scroll the text, line by line using the
cursor up/down.
17Teletext
Page 20

Hypertext
With hypertext you can select and search for pages
containing any word or number on the current teletext
page.
& Make sure you are not in the teletext menu and that the
puck is in the upper left corner of the screen.
é Press the cursor key down to highlight the first word or a
number on the page.
“ Use the cursor up/down, left/right to select the word or
number you want to search for.
‘ Press the OK key to confirm.
A message appears at the bottom of the screen to indicate
that the searching is going on or that the word or page is
not found.
Searching a word
& Type in the word on screen or select a word from the
history list on the right and press OK.
é Select Accept and press OK again.
The message
it is highlighted in the teletext page.
Searching appears.When the word is found,
“ To continue the search, press the OK key twice.
When a word is not found, a message appears.
‘ To search for a new word, select Keyboard and press OK.
( Select the new word.
Reveal
Reveals/conceals hidden information on a page, such as
solutions to riddles and puzzles. Press the OK key to
activate.
Press OK again to return to the Teletext menu.
Teletext menu (only available in full screen teletext mode)
& Press the Ï menu key to activate the menu.
é Press the cursor up/down to select the menu items.
Favourite
This list contains up to eight favourite teletext pages.
Only the pages of the current channel can be selected.
& Press the cursor right to add the current page or to select
one of the favourite pages to the list.
é Press the OK key or the cursor right again to add.
“ Press the cursor left to return to the Teletext menu.
Search
On the keyboard on screen you can type in a word you
want to search for in the teletext pages.Whether upper- or
lowercase is used has no influence. Searching for
pagenumbers is not possible.
puck
Menu
100 01
Favourite
Search
Cancel Accept
Space Delete
ABCDEFG 1 2 3
11.03 ........................
HIJKLMN 4 5 6
OP QRSTU 7 8 9
14.35 ........................ 226
V W X Y Z 0
17.50 ........................ 231
Shift Special
Red Green Yellow Blue
TELETEXT
Mon 05 Feb 16:35:19
WORD
NAME
FOOTBALL
BBC1
& Press the cursor left/right, up/down to select the
characters, words or functions.
é Press the OK key to confirm each character selected.
“ Select Cancel to cancel the word or character selected.
Space to enter a space; Delete to delete the last
Select
character selected;
capital characters;
Shift to switch between undercast or
Special to display special characters on
the keyboard.
‘ Press the cursor left repeatedly to return to the Teletext
menu again.
Cycle subpages
Makes the subpages cycle automatically. Press the OK key
to activate and to de-activate again.
Timed page
To display a specific page at a certain time.
& Press the cursor right to select Ye s or No.
é Enter the time and pagenumber with the cursor keys or
the digit keys.
Note:Teletext does not have to remain switched on. It is not
possible to display a timed page when the TV is switched to
standby.
Language
If the displayed characters on screen do not correspond
with the characters used by the teletext broadcaster, you
can change the language group here.
Group 1 or Group 2 with the cursor keys left/right.
Select
Press the
MENU Ï key to leave the Teletext menu.
Select Continuous Subtitles
TV channels with teletext often transmit programmes with
subtitling. For each TV channel you can store a subtitle
page.
Switch on teletext and select the proper subtitle page from
the index.
Switch off teletext.
Now the subtitle page is stored for the selected TV
channel.
18
Teletext
Page 21

AUDIO
VIDEO
S•VIDEO
1 2 3
Connect Peripheral Equipment
There is a wide range of audio and video equipment that can be connected to your TV.
The following connection diagrams show you how to connect them.
Recorder Connect the aerial cables 1, 2 and, to obtain the optimum picture quality, eurocable 3
as shown.
If your recorder is provided with the EasyLink function, the eurocable supplied with it should be
CABLE
connected to
EXTERNAL 2 to benefit from the EasyLink functionality.
2
1
EXT.
2
3
If the eurocable 3 is not used the following steps are required:
Search for and store the test signal of the recorder
& Unplug the aerial cable 1 from the aerial socket x of your recorder.
é Switch on your TV and put the recorder on the test signal. (See the handbook for your
recorder.)
4
VCR 1
“ Search for the test signal of your recorder in the same way as you searched for and
stored the TV signals. See Installation, Store TV channels, Manual Installation, p. 8.
‘ Store the test signal under programme number 0 or between 90 and 99.
( Replace the aerial cable in the aerial socket x of your recorder after you have stored
the test signal.
Decoder and Recorder
Connect a eurocable 4 to your decoder and to the special euroconnector of your
recorder. See also the recorder handbook. See Decoder, p.11.
You can also connect your decoder directly to
Other equipment (except Digital Sources)
&
Connect the aerial cables 1, 2 and 3 as shown. Better picture quality can be
CABLE
obtained if you also connect eurocable 5 to
EXTERNAL 1 or 3.
é Look for the test signal of your peripheral in the same way as you do for a recorder.
1
1
4
2
EXT.
2
5
3
When a recorder is connected to
Only when a recorder is connected to
your TV as well as from other connected equipment. See Record with your recorder, p. 22.
EXTERNAL 1 can handle CVBS and RGB, EXTERNAL 2 CVBS and Y/C, EXTERNAL 3
Note:
CVBS and RGB. It is preferred to connect peripherals with RGB output to EXTERNAL 1 or 3 as
RGB provides a better picture quality.
EXTERNAL 1 or 2 with a eurocable.
EXTERNAL 2 and a eurocable 4 to
EXTERNAL 1 you can only record a programme from your TV.
EXTERNAL 2 it is possible to record a programme from
VCR 1
Side connections Camera or Camcorder
& Connect your camera or camcorder to sockets at the right side of your TV.
é Connect the equipment to VIDEO 2 and AUDIO L 3 for mono equipment.
“ For stereo equipment also connect AUDIO R 3.
S-VHS quality with an S-VHS camcorder is obtained by connecting the S-VHS cables
with the
S-VIDEO input 1 and AUDIO inputs 3.
Do not connect cable 1 and 2 at the same time.This may cause picture distortion !
Headphone
& Insert the plug into the headphone socket L at the right side of the TV.
é Press ¬ on the remote control to switch off the internal loudspeakers of the TV.
The headphone impedance must be between 8 and 4000 Ohm.The headphone socket has a
3.5 mm jack.
SOUND menu select Headphone volume to adjust the headphone volume.
In the
Note:The surround mode is always stereo when the headphone is connected.
19Connect Peripheral Equipment
Page 22

Digital equipment Connect your digital equipment with a eurocable 1 to one of the euroconnectors
1/2/3
EXTERNAL
DVD
1
S
AUDIO
EXT1, EXT2 or EXT3), or with a cinch cable to the VIDEO input at the right side of the
(
TV.
Note: the low quality of some digital picture material may be the cause of digital image distortion.
According to the connected digital equipment, select
Setup/Source menu. See p. 11.
(In case the digital transmission is still poor, also select the
Picture a key, without changing the picture setting manually.
DVD, SAT, Game or Digital STB in the
Multimedia setting using the Smart
Connect extra loudspeakers/amplifier
REAR multimedia loudspeakers You can enjoy Dolby Pro Logic Surround sound by connecting two rear loudspeakers to
be connected to the Dolby Surround output S at the back of your TV.
& Connect two rear loudspeakers with built in amplifiers or an audio amplifier with rear
loudspeakers.
Connect the audio cables to the rear loudspeakers and to the Dolby surround output S
at the back of your TV as shown above.There is only one output for both speakers.
Note: Switch off the TV and the rear loudspeakers before connecting them.
The surround output S has a 3.5 mm stereo jack.
é Select Surround speakers Yes in the Setup menu. See p. 9.
See Surround sound modes in the Sound menu, p. 13 for the available Surround modes.
Rear Surround Sound loudspeakers should always be located behind or to either side of
the listener at about 1 m above the listener.
“ Adjust the volume of the rear loudspeakers when audio distortion occurs.
Use the Test tone function in the Speakers menu, see p. 9, to have a reference of the
loudness of the separate loudspeakers.
Note: Once you have adjusted the volume of the rear loudspeakers, do not change it while
watching TV as the whole configuration operates with the volume adjustment of your TV.
Stereo amplifier and two extra FRONT speakers
To enhance the sound reproduction of your TV you can connect two extra front
loudspeakers via an external amplifier.
& Connect the audio cables to the audio input of your amplifier and to AUDIO L and R
at the back of your TV.
The output level is controlled by the volume control of your TV.
Note: Switch off the TV and your audio amplifier before connecting them. Set the audio
amplifier’s volume to minimum.
é Select Centre mode On in the Setup, Speakers menu. See p. 9. See Surround mode in
the Sound menu, p. 13 for the available Surround modes.
“ Adjust the volume of the audio amplifier.
Use the Test tone function in the Setup, Speakers menu, see p. 9 to have a reference of
the loudness of the separate loudspeakers.
Note: Once you have adjusted the volume of the amplifier, do not change it while watching TV
as the whole configuration operates with the volume adjustment of your TV.
If extra front speakers are connected and selected, all internal TV speakers produce centre
sound in the surround modes Dolby Pro Logic and Dolby 3 Stereo.
Cinema Link Surround receiver
& Connect the Dolby Pro Logic Surround amplifier to the
AUDIO L and R at the back of your TV.
é If you want the loudspeakers of your TV to act as centre
speaker, also connect a cinch to scart cable (not supplied) to
the multichannel Surround receiver and to
the back of your TV.
“ Select Centre mode On in the Setup, Speakers menu, p. 9.
The loudspeakers of the TV will now produce centre sound,
the loudspeakers connected to the audio receiver will
produce Surround sound.
EXT1 or EXT3 at
‘ Switch off the volume of the TV with the mute key ¬.
All volume settings, tone control and speaker connections
have to be done via the external Dolby Pro Logic amplifier.
Attention: the sound info on screen will not correspond with the
actual sound reproduction.
No sound will be heard when a TV channel or external source is
blocked via the Child lock menu, see p. 14.
If you want to connect more equipment to your TV, consult
your dealer.
Connect Peripheral Equipment
20
Page 23

To select connected equipment
213
546
879
0
B
v
æ b
Ï
i
VCR DVD AMP AUX
¬V P
0
®Ò‡π
†
SbÌ
OK
MENU
U
Q q c
fih
ZOOM
INSTANT
®
U
®
Ò
‡
π
†
v
v
MOVIE PIXEL PLUSNEWSCHILDSPORT
æ b
B
DVDVCR AMP AUX
SbÌ
Equipment connected with an aerial cable only :
Select the programme number under which you have stored the test signal
with the digit keys.
Equipment connected to a euroconnector or to the right side of the
TV
& Press the v key repeatedly to select EXT1, EXT2, EXT3 or SIDE
according to where you connected your equipment at the back or the
right side of your TV.
Remark : Most equipment (decoder, recorder) carries out the switching itself.
é Press the cursor up/down and press OK.
If you want to change to TV channels?
Enter the programme number of the TV channel you want to watch with the
digit keys.
Recorder or DVD with EasyLink
The recorder or DVD can be operated via the Recorder or
DVD menu on screen.
& Press the MENU Ï key on the remote control.
é Select the recorder or DVD menu with the cursor
up/down.
REC
Ò p ‡ π † ® Ï
Rwd Play Stop Play Ffw Rec Eject
Audio- and video equipment keys
B to switch to standby (
S for pause (
® for record,
Ò for rewind (
search down (
‡ for stop,
π for play,
† for fast forward (
search up (
æ to select your choice of subtitle
language (
RDS news/TA (
to shuffle play (
b to select a
AMP); info on screen (CD)
(
Note: If no action has been taken within 30 seconds, the remote control goes back to the TV mode.
DVD
Ò p ‡ π † Ï
Prev. Play Stop Play Next Eject
“ Press the cursor left/right, up/down to select one of the
recorder or DVD functions.
The key
remote control, can be operated in the TV mode.
If your EasyLink recorder has the system standby function, when
you press the B key for 3 seconds, both TV and the recorder
are switched to standby.
Most of the audio and video equipment from our range of products can be
operated with the remote control of your TV.
Press one of the keys after you pressed the
according to the equipment you want to operate with this remote control.
See Use of the remote control, p. 3.
VCR)
DVD, CD)
VCR, CD);
DVD, AMP)
VCR, CD);
DVD/AMP)
DVD );
AMP);
CD)
DVD title; RDS display
INSTANT ® for recording, under the door of the
VCR, DVD, AMP or AUX key
i display information
Ï to switch the menu on or off
- P + for chapter, channel, track selection
0 to 9 digit entry,
0 tape index (
select a frequency (
VCR), select a DVD chapter,
AMP)
U VCR timer
Q surround on/off (
AMP, CD)
cursor up/down to select the next or the
previous disc (
CD)
cursor left/right to select the previous or
following track (
CD)
AUX keys
The
you want to operate: a CD player, a satellite receiver with RC5
signalling standard or a satellite receiver with RC6 or RC5
signalling standard.
AUX mode can be customised according to the equipment
Press the OK key together
with the digit key 1 to select the CD system,
with the digit key 2 to select the
with the digit key 3 to select the
SAT RC-5 system,
SAT RC-6 system.
21Connect Peripheral Equipment
Page 24

Record with your recorder without EasyLink
879
To record S-VHS quality, connect an S-VHS peripheral
directly to the recorder.
Record a TV programme
& Select the programme number on your recorder.
é Set your recorder to record.
See the handbook of your recorder.
Switching programme numbers on your TV does not disturb
recording !
Record with your recorder with EasyLink
If you have connected an S-VHS recorder provided with the EasyLink
function, you can record S-VHS quality from an S-VHS peripheral
connected to the right side of the TV. (E.g. from an S-VHS camcorder.)
In TV mode, it is possible to start a direct recording of the programme
which is being displayed on the TV screen.
Press the
control.
INSTANT ® record key, under the door of the remote
0
yÚ
fh
®
ZOOM
◊
0
INSTANT
®
i
U
INSTANT
XqP
Record a programme on your recorder connected
EXTERNAL 2 from Audio/Video equipment
to
connected to
EXTERNAL 1, EXTERNAL 3 or to
sockets on the right side of the TV
& Switch on the equipment.
é Select the correct external on your recorder.
“ Set your recorder to record.
You record what you are watching on the screen.
Do not switch programme numbers or do not switch off your TV
when you are recording !
The recorder switches on from standby and a message of what is
being recorded appears on the screen.
The recorder starts recording the programme you are watching.
Switching programme numbers on your TV does not disturb recording !
When recording a programme from a peripheral connected to
EXTERNAL 1, 3 or SIDE, you can not select another TV programme on
the screen.
To watch TV programmes again, press the programme number you
want to select twice.
Attention: the recording is stopped and your recorder switches to
standby.
If you switch to standby during recording of a programme from a
peripheral connected to
front of your TV indicates that you are still recording. The blinking stops
after the recording is finished.
EXTERNAL 1, 3 or SIDE, the blinking lamp on the
Record with your recorder with
If your recorder is equipped with NEXTVIEWLink, and you tagged one or
more programmes to be recorded automatically in the
mode, it is not necessar y for the TV to be in the standby mode or
switched on for the recording to start.
Record
22
NEXTVIEWLink
NEXTVIEW
Page 25

Appendix: Optional Wireless Surround speaker system - Kit type no:AD902W
Wireless transmitter module
• Switch the TV off with the power switch.
• Attach the wireless module to the back of the TV as shown.
• Connect the attached cable to the wireless module connector.
• Switch the TV on.
Surround loudspeakers
There are two surround loudspeakers supplied. One is the active loudspeaker A.
WIRELESS MODULE
The other loudspeaker B is a passive one which has to be connected with the
active loudspeaker.
1
Setup
A
B A
4
2
3
Speakers General Source Decoder
Test tone
Front left volume
Front right volume
Centre volume
(Surround volume)
(Centre mode)
Surround speakers
(Wireless surround)
(FM transmitter)
Auto surround
• The slide channel switch 1 at the bottom of the active loudspeaker has been
set default to channel 1 in the factory.
• Connect the active to the passive loudspeaker with the supplied speaker
cable 2. Insert the marked wire into the openings of the same coloured
connector clips on both speakers. Do not insert the wires too far.
• The Surround sound loudspeakers can be located behind or to either side of
the listener.The front of the loudspeakers do not have to face the listener. The
distance between the TV and the surround speakers should not exceed 15 m.
Note: In rare occasions people moving around close to the TV may interfere with the
sound transmission.
• Connect the active loudspeaker to the mains with the mains cable 3.
• Switch on the active loudspeaker with the
POWER switch 4.
The red indicator at the front of the active surround speaker shows that the
speaker is in standby. During sound transmission the indicator turns to green.
10-15 min. after the sound transmission of the TV has stopped, the indicator
turns back to red to indicate the low power standby.
To switch the active speaker off, use the
POWER switch.
Setup - Speakers menu
• Press the
• Use the cursor down to select
• Use the cursor right to select
• Use the cursor down to select
MENU Ï key on the remote control.
Setup.
Speakers.
Wireless surround.
The system has already been configured in the factory to work properly. In rare
circumstances, interference from external RF (wireless) equipments such as RF
headphones, mobile phones or remote controls for lights, may occur.Then it
may be necessary to shift to another wireless channel.
Important: Always be sure that the active surround speaker (A) and the
Wireless surround setting are switched to the same transmitting channel.
Otherwise no sound or only a distorted sound will be heard on the surround
speakers.
• Select
FM transmitter and select the correct type of transmitter, 864 MHz or
433 MHz, valid for the country where you are now located.
When the TV is tuned to a channel in the neighbourhood of 864 MHz (alternatively
433 MHz), the transmitter is switched off because no RF surround sound is possible.
This is necessary to avoid interfered picture.
In rare cases, when no RF surround sound is possible or when there is too
much interference, use the wired back up solution with a 3.5 mm stereo jack.
In this case select
Off in the Wireless surround menu item. See Connect
Peripheral Equipment, p. 20.
23Optional Wireless Surround speaker system
Page 26

Tips
Care of the screen
Clean the TV with a slightly damp soft
cloth. Do not use abrasive solvent as it
can damage the TV screen.
Mobile telephone warning !
To avoid disturbances in picture and
sound, malfunctioning of your TV or even
damage to the TV, keep away your mobile
telephone from the TV.
Poor Picture
• Have you selected the correct TV
system?
• Is your TV or house aerial located too
close to loudspeakers, non-earthed
audio equipment or neon lights, etc.?
• Mountains or high buildings can cause
double pictures or ghost images.
Sometimes you can improve the picture
quality by changing the direction of the
aerial.
• Is the picture or teletext
unrecognisable? Check if you have
entered the correct frequency. See
Installation, p. 8.
• Are brightness, sharpness and contrast
out of adjustment? Select Factory
settings in the Setup menu, p. 10.
• Sometimes poor picture quality is
possible when having activated an S-VHS
camera or camcorder connected to the
right side of your TV and another
peripheral is connected to
EXT1, EXT2
or EXT3 at the same time. In this case
switch off one of the other peripherals.
No picture
• Is the aerial connected properly?
• Are the plugs tightly connected in the
aerial socket?
• Is the aerial cable in good condition and
does it have suitable plugs?
• Are the connection facilities to a possible
second TV in good condition? If in doubt,
consult your dealer.
No sound
• No sound on any channel? Check the
volume isn’t at minimum.
• Is the sound interrupted with the mute
key ¬? Check if your speaker
configuration corresponds with the
selections made in the Setup menu,
Speakers, p. 9. E.g. is your amplifier
switched on when you have 2 extra
front speakers connected?
• No sound from the rear speakers or
the centre speakers? Select an
appropriate surround mode, according
to the broadcasted sound signal or
adjust the volume or check if the
wireless transmitter is properly
connected. See Surround Modes, p. 13.
No Surround sound
• Check if the headphone is not plugged
in.
• Check if the channel is broadcasting
good quality surround sound.
Remote control
• If your TV no longer responds to the
remote control, the batteries may be
dead or the wrong mode (TV or other
peripheral, see p. 3) is selected.
• You can still use the M key and
the -/+ keys at the top of your TV.
Menu
Have you selected the wrong menu? Press
MENU key again to exit from the
the
menu.
NEXTVIEW - No information
See Acquisition and updating of
NEXTV
IEW
information, p. 16.
NEXTVIEW - Displayed time is wrong
The broadcaster on programme number
one does not transmit the correct local
date and time. Use
INSTALLATION menu to place another
Reshuffle in the
broadcaster on programme number one.
Wireless Surround speaker system
• Are the active surround speaker and the
Surround Sound setting in the Setup
menu switched to the same transmitting
channel?
• External RF equipment, mobile
telephones or people moving around
close to the TV may disturb the sound
transmission.
• When no RF surround sound is
possible, or when there is too much
interference, try to switch to another
wireless channel or use the wired back
up solution. See Connect extra
loudspeakers/amplifier, p. 20.
• When you switch to another wireless
channel, take care to select the same
transmitting channel as well in the setup
menu as on the speaker box.
• For wireless transmitter modules with a
built in antenna: direct the antenna to
achieve the best reception.
No solution
Switch your TV off and then on again
once.
Never attempt to repair a defective
TV yourself.
Check with your dealer or call a TV
technician.
End of life directives
Philips is paying a lot of attention to
producing environmentally-friendly in
green focal areas.Your new TV contains
materials which can be recycled and
reused.At the end of its life specialised
companies can dismantle the discarded TV
to concentrate the reusable materials and
to minimise the amount of materials to be
disposed of.
Please ensure you dispose of your old TV
according to local regulations.
How to dispose of dead batteries?
The batteries supplied do not contain the
heavy metals mercury and cadmium.
Nevertheless in many countries dead
batteries may not be disposed of with your
household waste. Please ensure you dispose
of dead batteries according to local
regulations.
24
Tips
Page 27

Index
a ACI,
c camcorder,
d decoder,
7
active control,
5
automatic installation,
19
centre volume,
child lock,
14
continuous subtitles,
country,
delta volume,
7
11
13
digital options,
digital sources,
12
DNR,
dolby 3 stereo,
dolby surround settings,
double lines,
dual screen,
DVD keys,
12
4
21
Glossary
12
20
9
13
18
19
8
12
menu info,
n NEXTVIEW,
20
10
8
NEXTV
nicam,
p picture adjustments,
picture format,
programme list,
23
Pro Logic,
r recording,
remote control info,
8
reshuffle,
s satellite receiver keys,
19
search for TV channels,
setup,
3
3
sleeptimer,
smart picture & sound,
smart surf,
8
sound adjustments,
dynamic contrast,
7
eurocable,
e equalizer,
13
extra front speakers,
f factory settings,
favourite programmes,
fine tune,
8
FM transmitter,
3
freeze,
frequency,
g give name,
h hall,
13
headphone,
12
13
hue,
i info on screen,
interrupt the sound,
l language,
7
m manual installation,
IEW
13
9
5
15
provider,
4
13
22
8
14
4
14
10
12
13
13
stereo,
store TV channels,
surround mode,
22
S-VHS,
switch TV on,
t teletext,
tilt adjust,
17
10
time display,
5
volume,
v recorder,
19
3
w wireless surround,
20
z zoom,
7
4
3D effect,
13
3D surround,
5
7
4
2
4
23
13
100 Hz Digital Scan
If you look at a television screen you will see
small imperfections in the picture caused by
line vibration. Digital Scan (an internal
process) removes interline flicker.When
combined with 100 Hz, you will see a totally
stable image.
Automatic Channel Installation (ACI)
Automatically installs all TV channels in the
same order as offered by your cable
company, provided of course that the data is
transmitted. It also automatically includes
programme number and programme name.
With ACI, channel installation is fully
automatic, simple and fast.
Child Lock
Feature to prevent unauthorised use of your
TV.
Digital Natural Motion
100 Hz Digital Natural Motion eliminates the
juddering effect that is noticeable when
there are moving objects in the picture.This
results in razor sharp pictures and ensures
smooth movements.
DNR
Digital Noise Reduction.
By encoding signals digitally in 100 Hz sets, it
is possible to clean up picture noise.This is
especially beneficial in poor signal areas and
when viewing poor quality video tapes.
Dolby Surround Pro Logic
Literally wraps you in 4-channel sound. it
brings your favourite movies to life with all
the realism and impact of cinema sound as
though you are part of the action.
Easy Link
Digital ‘intelligent’ ESI bus-system between
TV and VCR (Scart connection required).
Turns source selection and control into a
one-button operation.
Easy Text
Teletext memory that automatically
memorises Teletext pages and gives you
instant access to them.
Euroconnector
A 21-pin connector system enabling you to
simply connect various types of audio/video
and computer equipment.
Menu
On-screen display of functions and facilities
in a well-organised survey, which you can
select using your remote control.
NEXTVIEW
TVIEW is a new feature to assist the TV
NEX
and VCR user in selecting the programmes
she or he likes to watch from a television
programme guide on the screen.
It enables the user to see a description of
every programme, and mark interesting
programmes to be reminded (auto TV on) or
recorded (
NEXTVIEWLink recorder required).
NTSC
The broadcasting system used in the USA,
Japan and parts of South America and
Southeast-Asia.
Smart Picture and Sound Controls
Keys on the remote control to select
predefined picture and sound settings.The
eco picture mode is intended to lower
power consumption of the TV and to
improve picture quality of low quality digital
sources.
Sleeptimer
Function with which you can set a time
period after which the TV should switch
itself to standby.
Picture Freeze
TV mode which allows you to “freeze” a
certain image in order to study a specific
detail at ease, e.g. to make notes of certain
programme information like phone numbers.
Teletext
See also Easy Text
WST:World Standard Teletext.
FLOF: Full Level one Features. System applied
by the BBC, RVE.... that provides a fast
access to the teletext pages.
TOP :Table of (Teletext) Pages. German
system for an easy access to the teletext
pages.
Tint
TV-function to modify the general colour
balance between cool and warm and to
adjust it according to your personal
preference.
VPT
VPT (Video Programming by Teletext) is a
way to set the VCR timer with the help of
Teletext. There are two requirements: the
first is that the recorder must have the VPT
feature, and the second is that the channel,
which broadcasts the programme you want
to record, must have teletext.
25Glossary
Page 28

 Loading...