

Page 1
Color Television
27PT91S1
Instructions for use
3135 015 17531
Page 2

Page 3

Return your Warranty Registration card today to ensure you
receive all the benefits you’re entitled to.
Once your PHILIPS purchase is registered, you're eligible to receive all the privileges of owning a
PHILIPS product. So complete and return the Warranty Registration Card enclosed with your pur
chase at once. And take advantage of these important benefits.
i; | î\ f ■ ÎJiSTi-- ;
îfeiC ÎÎf
' ;;;î
Congratulations on your purchase,
and welcome to the “familyl”
PHILIPS
Dear PHILIPS product owner:
Thank you for your confidence in PHILIPS. You’ve selected one of the best-built, best-backed prod
ucts available today. And we’ll do everything in our power to keep you happy with your purchase
for many years to come.
As a member of the PHILIPS Tamlly,” you’re entitled to protection by one of the most comprehensive
warranties and outstanding service networks in the industry.
What’s more, your purchase guarantees you’ll receive all the information and special offers for which
you qualify, plus easy access to accessories from our convenient home shopping network.
And most importantly you can count on our uncompromising commitment to your total satisfaction.
All of this is our way of saying welcome-^nd thanks for investing in a PHILIPS product
Sincerely,
H N'
Robert Minkhorst
President and Chief Executive Officer
Know these
SSifoty symbols
CAUTIOIM
MM Of ELCCmC SHOCK
CMIflON: TO KDUCC THE MSK Of aCCTMC SHOCK. 00 NOT
NEMO«! COVEI <00 SACK). N0 USEX-SENMCCASU MKTS
smoc. SEnil SCOVTONO TO OMUnCO SEKVtCE KMONNa.
DONOTOKN
PHILIPS Visit our World Wide Web Site at http://www.philipsusa.com
P.S. Remember, to get the most from your PHILIPS
product, you must return your
Warranty Registration Card within 10 days. So
please mail it to us right now!
A This ‘bolt of lightning' indicates uninsulated material wKhin your unit may cause an electrical
shock. For the safety of everyone in your household, please do not remove product covering. ■
The ‘exclamation point' calls attention to features for which you should read the enclosed lit
erature closely to prevent operating and maintenance problems.
WARNING: TO PREVENT FIRE OR SHOCK HAZARD, DO NOT EXPOSE THIS EQUIPMENT
TO RAIN OR MOISTURE.
CAUTION: To prevent electric shock, match wide blade of plug to wide stot, and fully insert.
ATTENTION: Pour éviter les chocs électriques, introduire la lame la plus large de la fiche dans la
borne correspondante de la prise et pousser jusqu'au fond.
Page 4

iss»
Page 5
SAFETY INSTRUCTIONS - Read before operating equipment
This product was designed and manufactured to meet strict quality and
safety standards. There are, however, some installation and operation pre
cautions which you should be particularly aware of.
1. Read Instructions - All the safe^ and operating instructions should
be read before the appliance is operatecf.
2. Retain Instructions - The safety and operating instructions should
be retained for future reference.
3. Heed Warnings - All warnings on the appliance and in the operating
instructions snould be adhered to.
4. Follow Instructions - Ail operating and use instructions should be
followed.
5. Water and Moisture - The appliance should not be used near water
- for example, near a bathtub, washbowl, kitchen sink, laundry tub,
in a wet basement or near a swimming pool, etc.
6. Carts and Stands - The appliance should be used only with a cart or
stand that is recommended by the manufacturer.
6A. An appliance and cart combination should be moved
with care. Quick stops, excessive force, and uneven sur
faces may cause the appliance and cart combination to
overturn.
6B. Tilt/StabiliW - All televisions must comply with recommended inter
national global safety standards for tilt and stabili^ properties of its
cabinet design.
• Do not compromise these design standards by applying exces
sive pull force to the front, or top, of the cabinet which could
ultimately overturn the product.
• Also, do not endanger yourself, or children, by placing elec
tronic equipment/toys on the top of the cabinet. Such items
could unsuspectingly fall from the top of the set and cause
product damage and/or personal injury.
7. Wall or Ceiling Mounting - The appliance should be mounted to a
wall or ceiling only as recommended by the manufacturer.
8. Ventilation - The appliance should be situated so that its location or
position does not interfere with its proper ventilation. For example,
the appliance should not be situated on a bed, sofa, rug, or similar
surface that may block the ventilation openings; or, placed in a builtin installation, such as a bookcase or cabinet that may impede the
flow of air through the ventilation openings.
9. Heat - The appliance should be situated away from heat sources
such as radiators, heat registers, stoves, or other appliances (includ
ing amplifiers) that produce heat.
10. Power Sources - The appliance should be connected to a power sup
ply only of the type described in the operating instructions or as
marked on the appliance.
11. Power-Cord Protectiwj - Power supply cords should be routed so
that they are not likely to be walked on or pinched by items placed
upon or against them, paying particular attention to cords and plugs,
convenience receptacles, and the point where they exit from me
appliance.
12. Cleaning - The appliance should be cleaned only as recommended
by the manufacturer.
13. Power Lines - An outdoor antenna should be located away from
power lines.
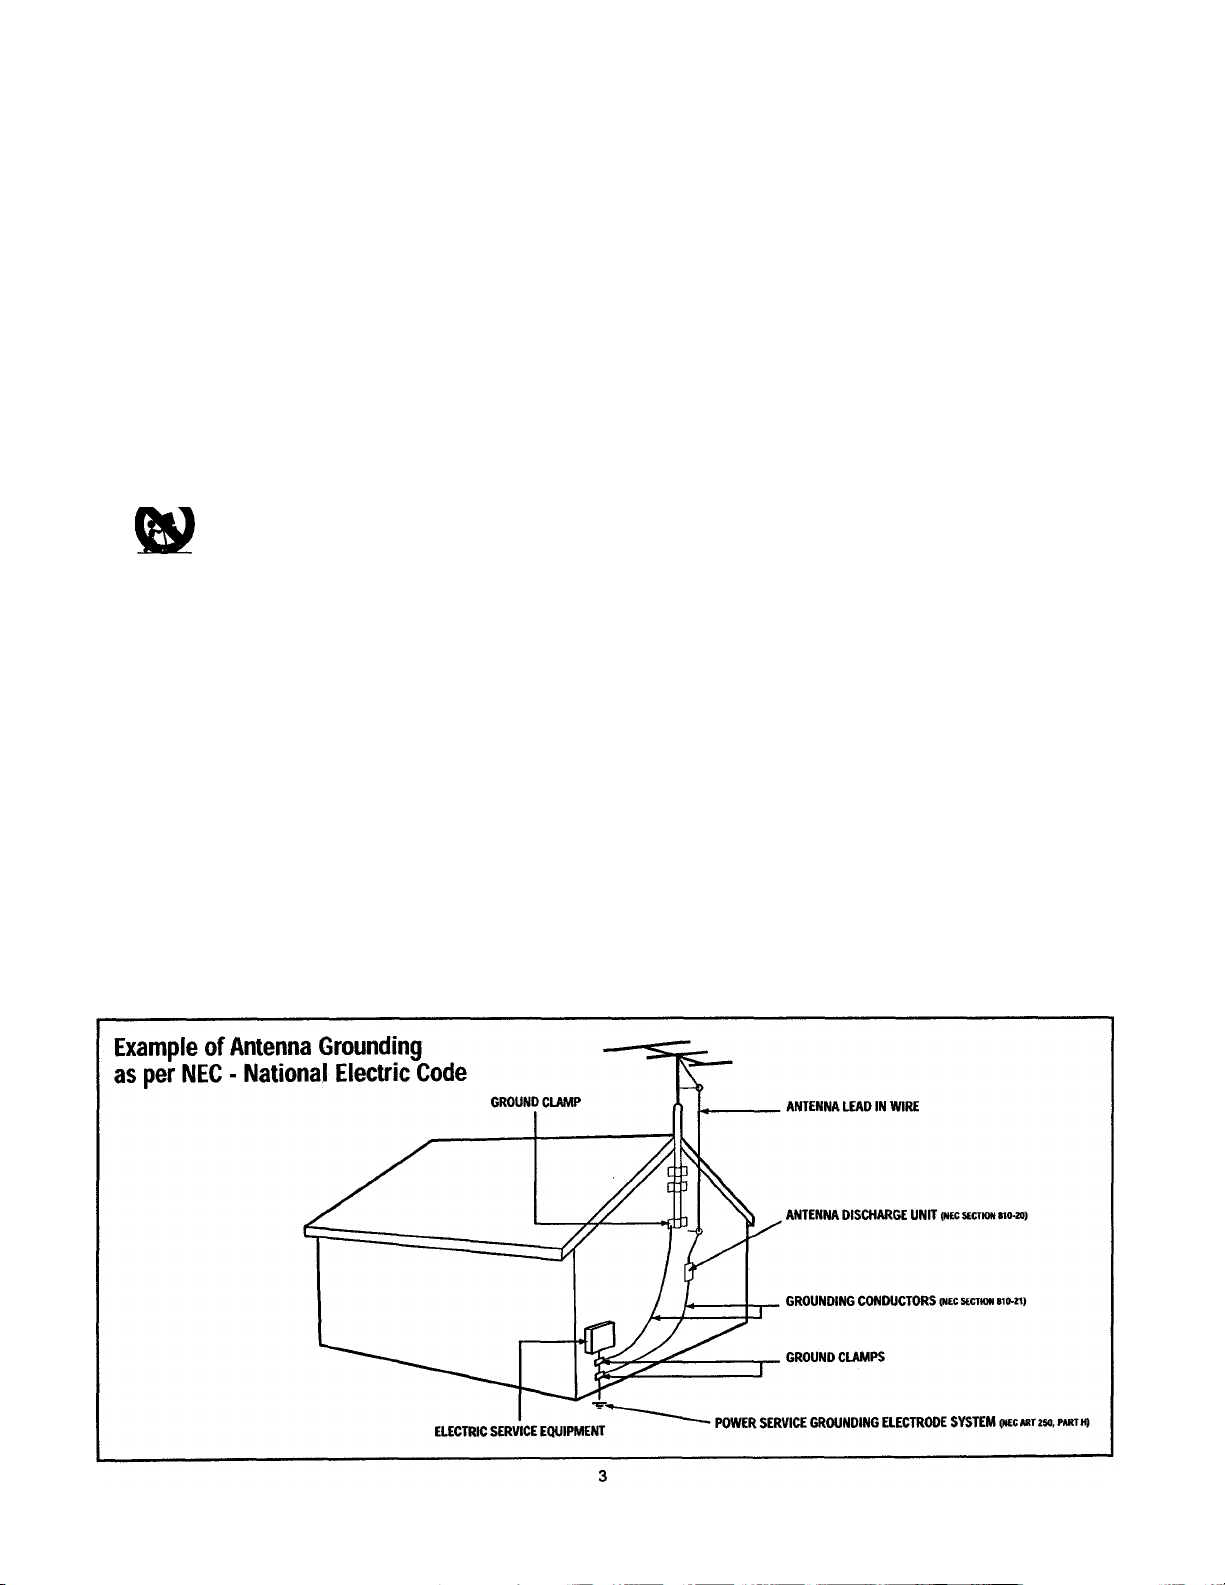
14. Outdoor Antenna Grounding - If an outside antenna is connected to
the receiver, be sure the antenna system is grounded so as to pro
vide some protection against voltage surges and built up static
charges.
Section 810 of the National Electric Code, ANSI/NFPA No. 70-1984,
provides information with respect to proper grounding of the mats
and supporting structure grounding of the lead-in wire to an anten
na discharge unit, size of grounding connectors, location of antennadischarge unit, connection to grounding electrodes and require
ments for the grounding electrode. See Fig. below.
15. Non-use Periods - The power cord of the appliance should be
unplugged from the outlet when left unused for a long period of time.
16. Object and Liquid Entry - Care should be taken so that objects do not
fall and liquids are not spilled into the enclosure through openings.
17. Damage Requiring Service - The appliance should be serviced by
qualified service personnel when:
A. The power supply cord or the plug has been damaged; or
B. Objects have fallen, or liquid has been spilled into the appliance;
or
C. The appliance has been exposed to rain; or
D. The appliance does not appear to operate normally or exhibits a
marked change in performance; or
E The appliance has been dropped, or the enclosure damaged.
18. Servicing - The user should not attempt to service the appliance
beyond that described in the operating instructions. All other servic
ing should be referred to qualified service personnel.
Note to the CATV system installer: This reminder is provided to call the
CATV system installer's attention to Article 820-40 of the NEC that pro
vides guidelines for proper grounding and, in particular, specifies that the
cable ground shall be connected to tne grounding system of the building,
as close to the point of cable entry as practical.
Page 6

■^#áHí 5^ШЖ]
_— 'I
Page 7

Tahli: of Com fm s
Introduction
Welcome/Registration of Your TV........................................2
■❖ ■Safety/Precautions..............................................................3
^Table of Contents
■❖ ■Features
ONSCREEN MENU
Picture
□
Features
•❖ Turning ON the Dynamic Noise Reduction
•❖ Turning ON the ImageMax™ Control..................................7
•❖ Using the Closed Ct^tioning Control
❖ ^ Activating the Blue Mute Control.......................................10
•❖ Activating the Guide Plus+* Demo
•❖ Using the Sleep Timer Control
❖ The Timer - Setting the Start Time
•❖ The Timer - Setting the Stop Time
■❖ The Timer - Selecting die Channel .....................................16
■❖ The Timer - Selecting die Tuner
■❖ The Timer - Setting Activate to ON or OFF
❖ The Timer - Turning ON the Timer Display
0
■❖ AutoLockfM - Setting Up the Access Code.......................21
❖ AutoLock™ - Blocking Channels
■❖ AutoLock™ - Blocking by Movie Rating
■❖ AutoLock™ - Blocking by TV Rating ..............................24
❖ AutoLock™ - Turning Block ON or OFF
■❖ AutoLock™ - Blocking Unrated
■❖ AutoLock™ - Blocking Broadcasts That
■❖ AutoLock™ - Reviewing Your Settings ...........................28
■❖ AutoLock™ - Viewing Blocked
N
❖ Sound - Setting the Volume
❖ Sound - Using the AVL (Audio Volume
❖ Sound - Using Incredible Surround......................................32
❖ Sound - Adjusting the Headphone Control
❖ Sound - Setting the TV for Stereo and
❖ Sound-Setting the Audio Out Control
❖ Sound - Using the TV Speaker Control
❖ Sound - Using the Surround Sound
❖ Sound - Using the Audio/Video
Adjusting the Picture
Control....................................................................................7
Using the Screen Format Control...........................................9
The Timer Feature
•❖ The Timer - Setting the Clock............................... .13
The AutoLock’’^” Feature
Understanding AutoLock™..........................................20
Broadcasts
Have No Rating ...................................................................27
Programming........................................................................29
lllll Sound
" Sound - Adjusting the Treble, Bass, and
and Balance
Leveler) ...............................................................................31
SAP (Second Audio Program).............................................34
and Audio Output Jacks
External Speaker Connections
Input Jacks
.....................................................................
..............................................................................
..................................................
....................................
...................................
...........................................
......................................
....................................
........................................
......................
........................
.......................................
........................
............................
...........................................................................
.........................................................................
...............................................
........................
..................................
.......................................................
.............................................
......................................................................
11
12
15
17
22
23
26
30
31
33
35
36
37
38-40
18
4
5
6
8
14
19
25
Remote Control Operation
❖ Remote Control - Using AutoPicture™........................41
■
❖ Remote Control - Using AutoSound™.........................42
❖ Remote Control - Using Channel Surf
❖ Remote Control - Using the VCR Plus+® Feature .. .44
..................................
43
Tm j The PIP (Picture-in>Picture) Feature
L-^ ❖ PIP - Basic Connections ....................................................45
❖ PIP - Selecting the Signal Source
❖ PIP - Remote Control Buttons
❖ PIP - PIP Window size and Double Window PIP ... .48
❖ PIP - Adjusting the Color and Tint
❖ PIP - More Connections .................................................50-51
General Information
❖ Itoubleshooting
❖ Glossary of Television Terms...............................................53
❖ Index .....................................................................................54
❖ Factoiy Service Locations.....................................................55
❖ Limited Warranty .................................................................56
NOfL: This o\\ik‘i‘'s imiiiiuil is used nilh si'scral ililteri'iil Ick'sisioii niodds. Not all IValurcs (aiul dranin;4s) discussed in this inaiuial nill iKccssaril\ nialcli
those round illi \ our telex isioii s\ stem. Ill is is normal
and does not retiiiii'e that \ou contact xonr dealei' or
rc(|iiest serxicc.
........................................................
........................................
..............................................
....................................
52
46
47
.49
FM)-oI -L111 I) 1 sPOSA 1,
Your new television and its packing contain mate
rials that can be recycled and reused. Specialized
companies can recycle your product to increase the
amount of reusable materials and minimize the
amoimts that need to be properly disposed.
Your product also uses batteries that should not be
thrown away when depleted, but should be handed
in and disposed of as small chemical waste.
When you replace your existing equipment, please
find out about the local regulations regarding dis
posal of yoiu: old television, batteries, and packing
materials.
AutoChron, AutoLock, AutoPicture, AutoSound, M-Link, and
ImageMax are trademarks of Philips Consumer Electronics Company.
Copyright & 2000 Philips Consumer Electronics Company.
All rights reserved.
Page 8

!'-- '||œÆ:âi!j
I
Ispr
-g^-- I --SAV-rsi^j
5-
z]
i-:-.- •:
.1
-----------------
'
Page 9
Features
AudioAldeo Jack Panel allows direct connections with VCRs, DVDs, or
odier devices, providing quality TV picture and sound playback.
Audio Volume Leveler (AVL) Control keeps the TV sound at an even
level. Peaks and valleys that occur during program changes or commercial
breaks are reduced, making for a more consistent, comfortable sound.
AutoLock™ allows you to block the viewing of certain channels or pro
grams with certain ratings if you do not want your children to view inap
propriate materials.
Auto Programming scans (when activated) for all available channels
from regular antenna or cable signals and stores only active broadcast sta
tions in the TV’s memory.
AutoPicture™ allows you to change the picture settings (color, tint, con
trast, etc.) for various types of programming, such as sports, movies, multimedia (games), or weak signals with the push of one button.
AutoSountF** allows you to select fiom three factory-set controls and a
personal control that you set according to your own preferences through
die onscreen Sound menu. The three factory-set controls (Voice, Music,
and Theatre) enable you to tailor the TV sound so as to enhance the partic
ular progamming you are watching.
Channel Edit allows you to add or delete channels from the list stored in
the TV’s memory. Channel Edit makes it easy to limit or expand the num
ber of channels diat are available to you when you press the Channel (+) or
(-) buttons on your remote control.
Closed Captioning allows the viewer to read TV program dialogue or
voice conversations as onscreen text.
Gemstar Guide Plus+* gives the user a listing of current programming
right on the TV screen. Can be used to set recordings of certain programs,
get up to date news bulletins, and much more.
ImageMax™ helps you sharpen the picture quality by making dark por
tions of the picture darker and light portiotK brighter.
Infrared Remote Control works your TV and other remote-controlled
devices, such as VCRs, DVD players, cable converters, and satellite
receivers.
Infrared Remote (IR) Blaster works with the M-Link feature to enable
your TV to “leam” the remote-control commands of new Philips devices
or multibiand devices that you have connected to your TV. After the com
mands are learned, you can use your TV remote control to operate and
control all of the devices.
M-Llnk™ allows you to convert your TV into a home-cinema control
center composed of up to six devices (including an audio amplifier). You
activate the devices by pressing macro buttons and control the devices by
pressing “hot” buttons on your remote control. Choose from cable box,
digital set top box, DVD (digital video disc), laser disc (LD), satellite digi
tal TV, VCD (video compact disc), and VCR (video cassette recorder)
devices. {IR Blaster must be plugged In before turning the TV ON.)
Onscreen Menu shows helpful messages and instructions for setting TV
feature controls (can be viewed in English, French, or Spanish).
Sleep Timer automatically turns the TV OFF after a set amount of time
that you choose.
Standard Broadcast (VHFAJHi) or Cable TV (CATV) channel capabil
ity allows for viewing by antenna or cable.
Stereo c^ability, including a built-in audio amplifier and twin-speaker
system, allows for the reception of TV programs broadcast in stereo sound.
Surf Button allows you to easily switch among only the channels that are
of interest to you (the ones that you have programmed into the TV’s Surf
control through the onscreen menu).
Timer allows you to set your TV to turn itself ON and OFF once or daily
like an alarm clock.
Quick Use and Insialeation Guide
Use the simple Quick Use and Installation
Guide (supplied with your TV information
pacMfo^deUi.»: ||
Cable/Antenna
Hookups
Automatic Channel
Programming
Channel Editing
Basic Operation of the TV and Remote
Control
Selection of the Onscreen Menu Language
M-LINK IXSI RI chons FOR USE
Use the simple M-Link Instructions for Use
(supplied with your TV information packet)
for details on:
• Operating Accessory
Devices (VCR, DVD, Cable
Box, and Others)
• Automatic Programming Via
the TV Remote Control
• Setting Up Personal
Commands
• Inputting Commands from the Remote
Controls of Your Accessory Devices
Gem.siar Guide Pei s+ Guide
Use the simple Guide Plus+* Guide (sup
plied with your TV information packet) for
details on:
Television Program
Listings
•• >
Setting the TV to
Watch a certain Broadcast when it’s
Programmed to Air.
Set a VCR Plus+* Recording
Receive Current Information Regarding
Upcoming Shows,Specials and News
Sort by Movies, Sporting Events or
Children’s Programming
W
Page 10

кя1Щ
iTRrÿ- ir« *:
шш
a.aT-.="ír*íi
гГГ.-î*-'" “
Page 11
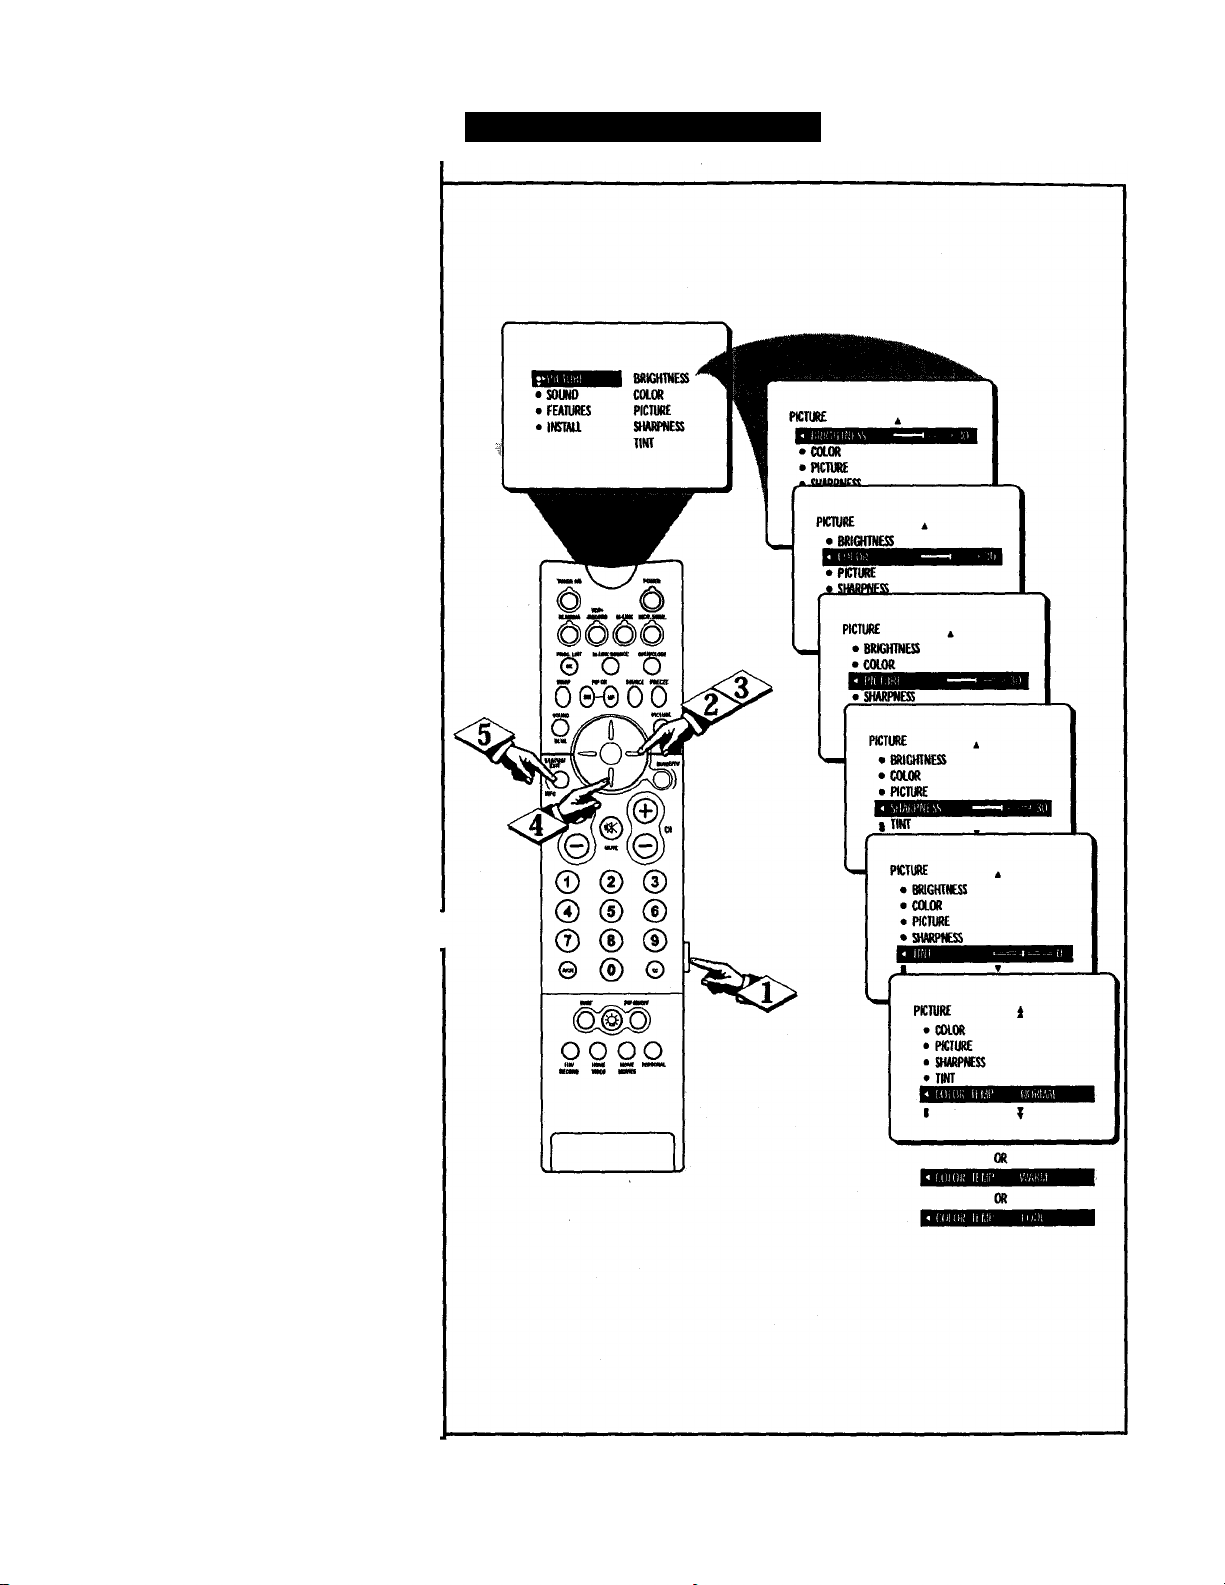
□I
& adjust your TVpicture controls,
select a charnel and follow these
7
steps.
Pms the MENU button on the
remote control to show the onscreen
menu. PICTURE will be highlighted.
I
Press the CURSOR RING RIGHT
and the menu will shift to the left.
BRIGHTNESS will be hi^lighted and an
adjustment bar will be shown to the ri^t.
I
<|> Use the CURSOR RING LEFT or
I CURSOR RING RIGHT to adjust the
I BRIGHTNESS level of the picture.
After adjusting die BRIGHTNESS
“ control, press flie CURSOR RING
DOWN to select ancnher picture adjust
ment: COLOR, PICTURE, SHARP
NESS, TINT, OR COLOR TEMP.
Press the CURSOR RING LEFT or
CURSOR RING RIGHT to adjust the
selected control.
NOTE; The menu will show only five
items at a time, so you will need to con
tinue scrolling with the CURSOR RING
RING DOWN to adjust the TINT and
COLOR TEMP.
Press the STATUS^XIT button to
' remove the menu from the screen.
dUM)
Ai).ii SI !N(; nil Picn Ri:
Remember, when the bar scale is cwitered , the control set
tings are at normal, mid-range levels.
Picture adjustments are described here.
BRIGHTNESS - adds or subtracts
light from the darkest part of the pic
ture.
COLOR - adds or eliminates color.
PICTURE - improves the detail of the
lightest parts of the picture.
SHARPNESS - improves the detail in
the picture.
TINT - adjusts the picture to obtain
natural skin tones.
COLOR TEMP offers NORMAL,
COOL, or WARM picture preferences.
NORMAL - keeps whites, white.
COOL - makes whites, bluish.
WARM - makes whites, reddish.
Page 12

Page 13
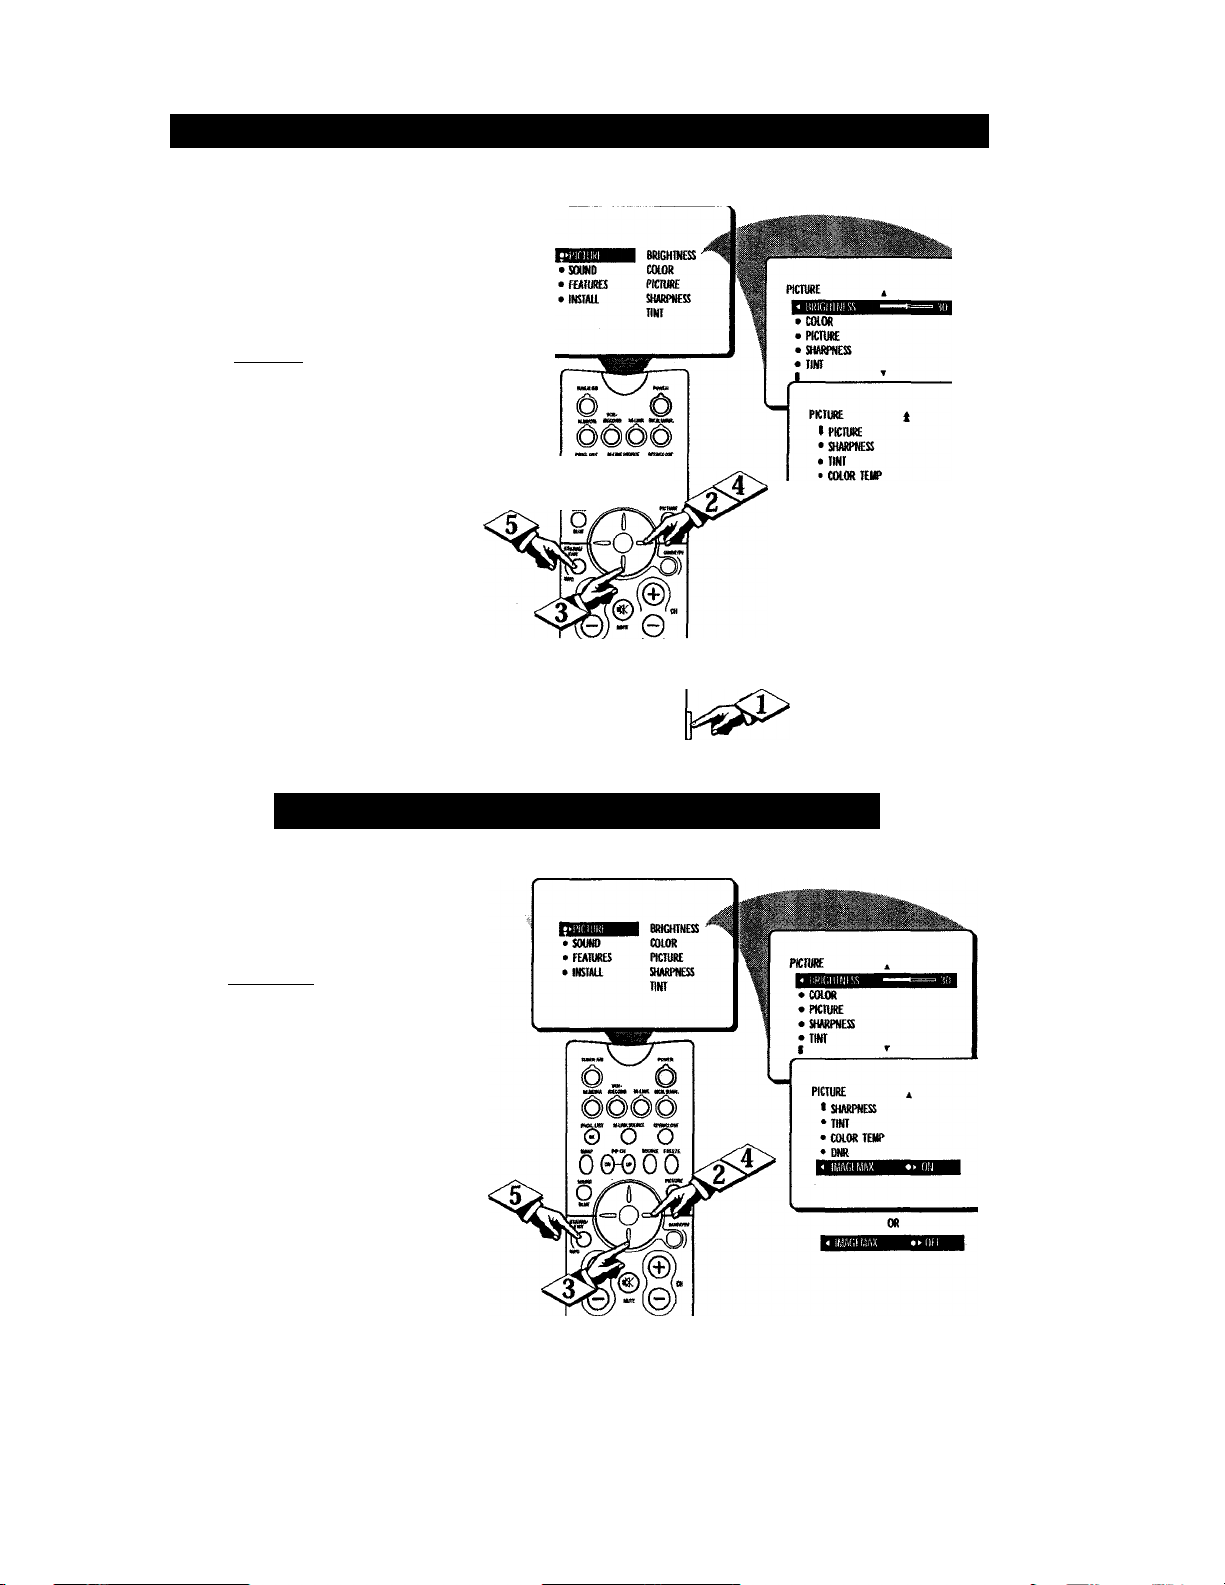
Turning ON the Dynamic Noise Reduction Control
T~yte to many reasons, such as poor
JL/cable reception, the picture can
sometimes appear slightly “speckled”
(cm indication of signal noise in the
picture). The DNR (Dynamic Noise
Reduction) control can help eliminate
this type of interference and improve
the quality of the picture.
tBEGIWU
Press the MENU button on the
remote to show the onscreen menu.
PICTURE will be highlighted.
I
<|> Press the CURSOR RING
RIGHT and the menu will shift to the
left. BRIGHTNESS will be highlight
ed.
I
<|> Press the CURSOR RING
DOWN repeatedly until die DNR
control is highli^ted.
(
Press the CURSOR RING
RIGHT to switch DNR ON or press
the CURSOR RING LEFT to switch
DNR OFF.
I
Press the STATUS^XIT button
to remove the menu fiom die screen.
o
© O O
otióoo
OR
(@)
© © ©
0 © ©
© © ©
© ® 0
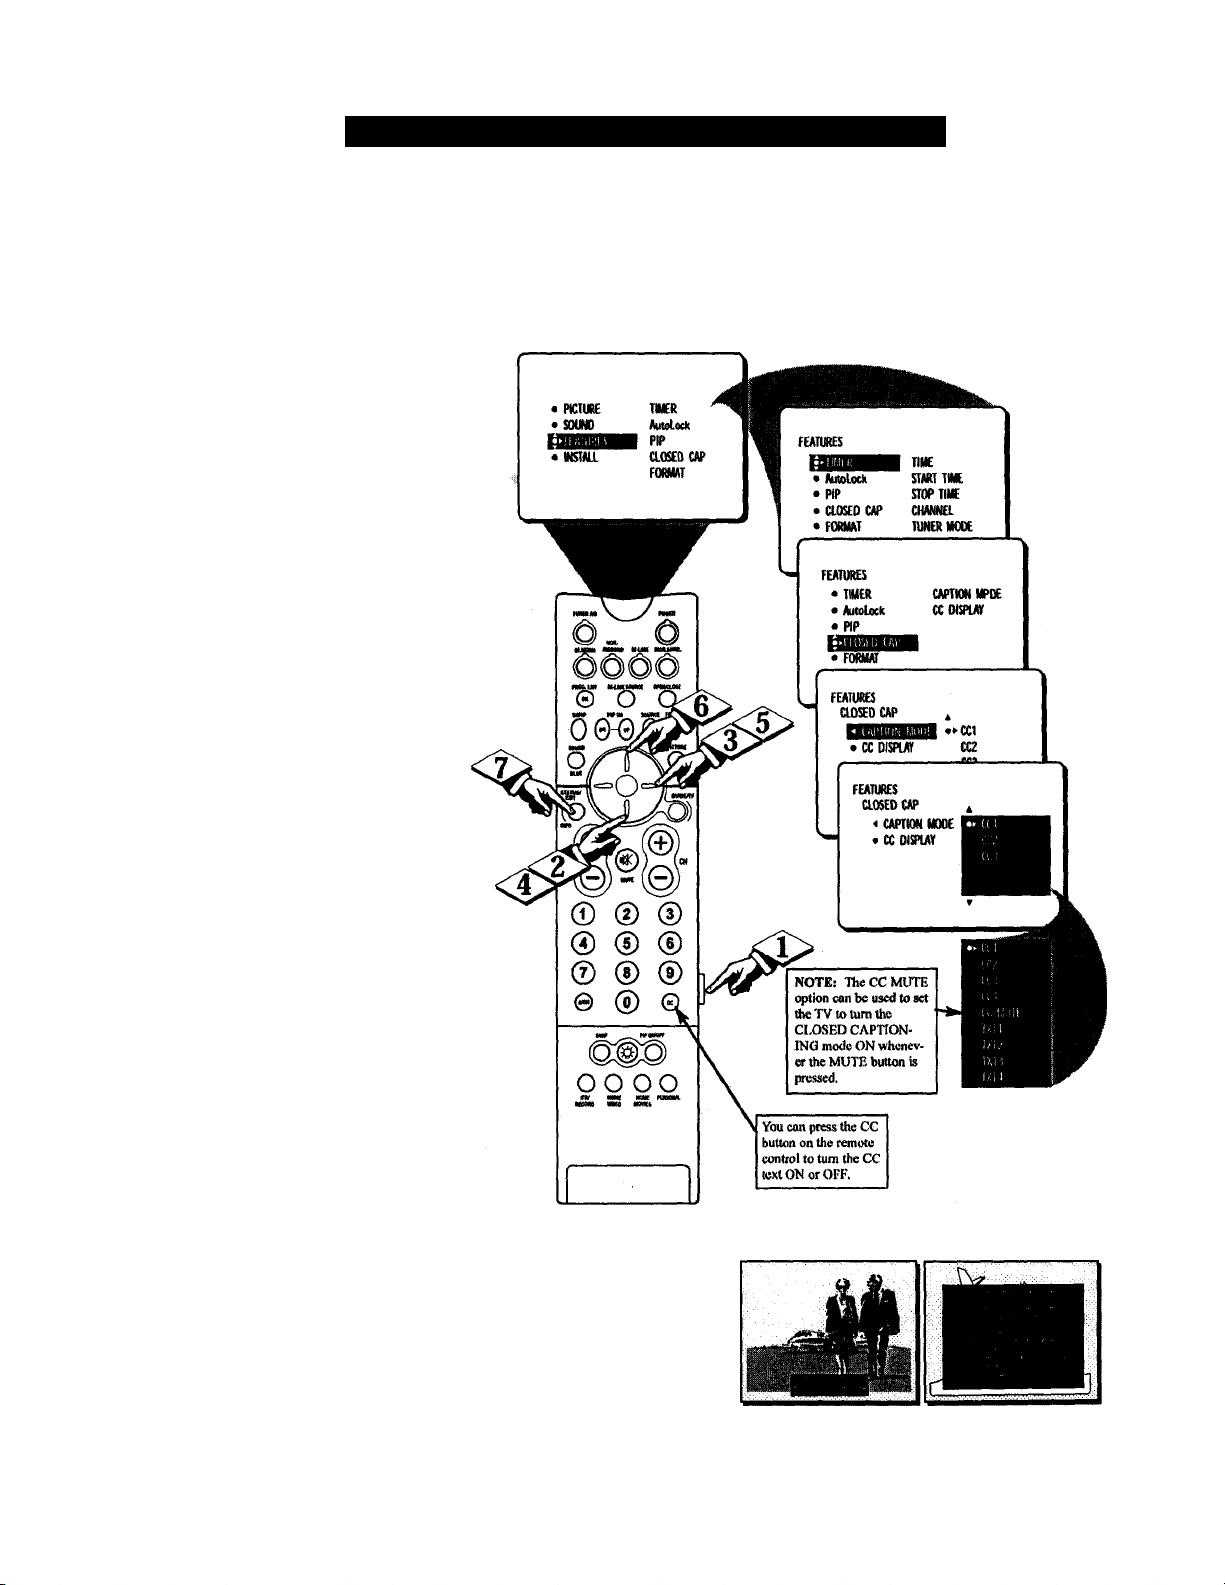
Turning On the ImageMax*’'* Control
TmageMax^ helps you sharpen the
1 picture quality by making dark por
tions of the picture darker and light
portions of the picture brighter. Follow
these steps to turn ImageMax™ ON.
IISEGIMU
Press the MENU button on the
remote control to show the onscreen
menu. PICTURE will be highlighted.
(
<|> Press the CURSOR RING
RIGHT and the menu will shift to the
left. BRIGHTNESS will be highlight
ed.
I
<|> Pre.ss the CURSOR RING
I DOWN repeatedly until the IMAGEI MAX control is highlighted.
<J> Press the CURSOR RING
RIGHT to switch between ON and
OFF.
(
Press the STATUS/EXIT button
<$>
to remove the menu from the screen.
!□
© © ®
© ® ©
® ® ®
0 ® ©
Page 14
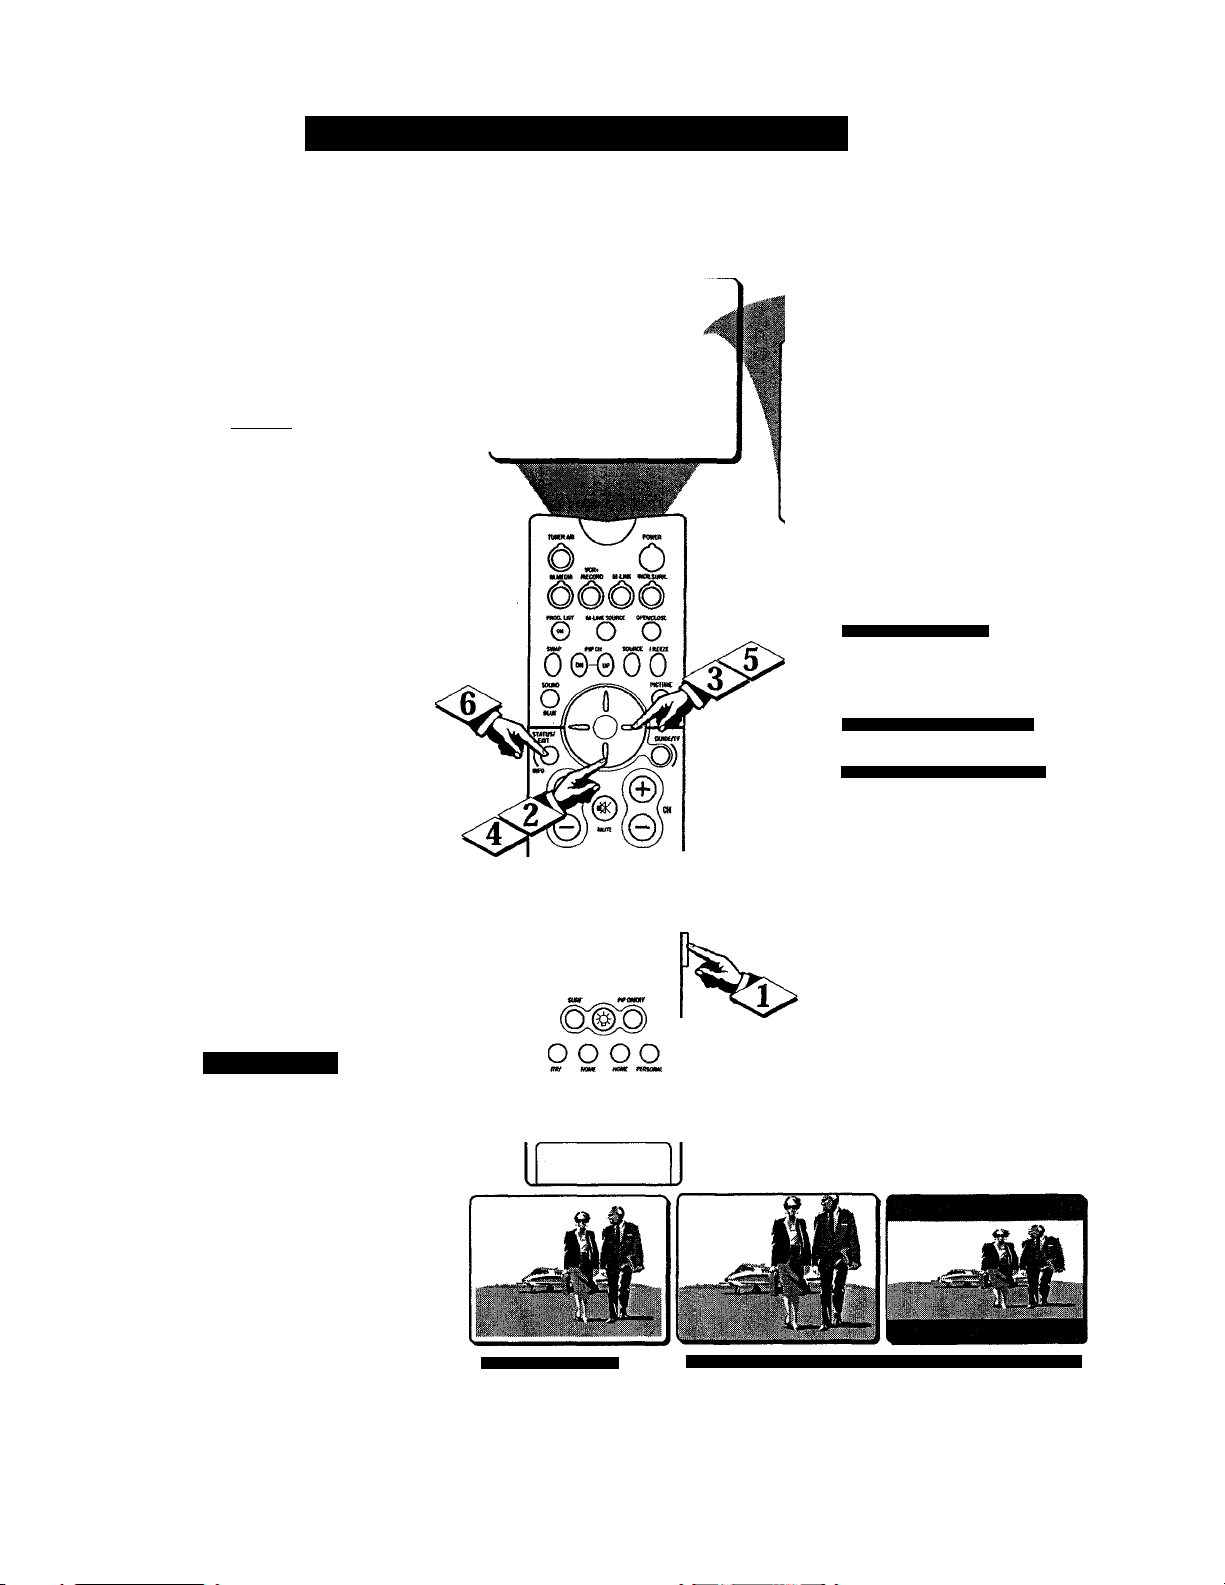
□I
Vosed Captioning (CC) allows
you to read the voice content of
C
television programs on the TV
screen. Designed to help the hear
ing impaired, this feature uses
onscreen “text boxes" to show dia
logue and conversations while the
TV program is in progress.
IBEfiUD
Press the MENU button on
the remote control to show the on
screen menu.
I
<|> Press the CURSOR RING
' DOWN twice to highlight FEA
TURES.
<|> Press the CURSOR RING
RIGHT and the menu will shift to
the left.
(
<|> Press the CURSOR RING
DOWN repeatedly until the
CLOSED CAP control is highlight
ed.
I
Press the CURSOR RING
' RIGHT again. The menu will shift
to the left and CAPTION MODE
will be highlighted. Then press the
CURSOR RING RIGHT to high
light CAPTION MODEs.
UsiNc, nil: Closi I) Caphomnc; Com rol
NOTE: Not all TV programs and product commercials are broadcast with Closed
Captioning (CC). Nor are all Closed Captioning MODEs (CAPTION 1-4 or TEXT
1-4) necessarily being used by broadcast stations during the transmission of a pro
gram offering Closed Captioning. Refer to your area’s TV program listings for the
stations and times of shows being broadcast with Closed Captioning.
<|> Press the CURSOR RING UP
or CURSOR RING DOWN to
select a CAPTION MODE; CCl,
CC2, CC3, CC4, CC MUTE,
TXTl,TXT2,TXT3,orTXT4. CC
DISPLAY turns text OFF or ON if
the TV station broadcasting on the
channel is making CLOSED CAP
TIONING available. With CC DIS
PLAY highlighted, press the CUR
SOR RING RIGHT to toggle
Closed Captioning ON or OFF.
NOTE: You also can press the CC
button on the remote control to turn
Press the STATUS/EXIT but
the CC TEXT option ON or OFF.
<2>
ton to remove ftie menu from the
screen.
CAPTION Mode
Ex«rople DispUy
TEXT M<Mk ExMinpl« JMipluy >
The TV screen wiü be
blocked ftotn viewing.
Page 15
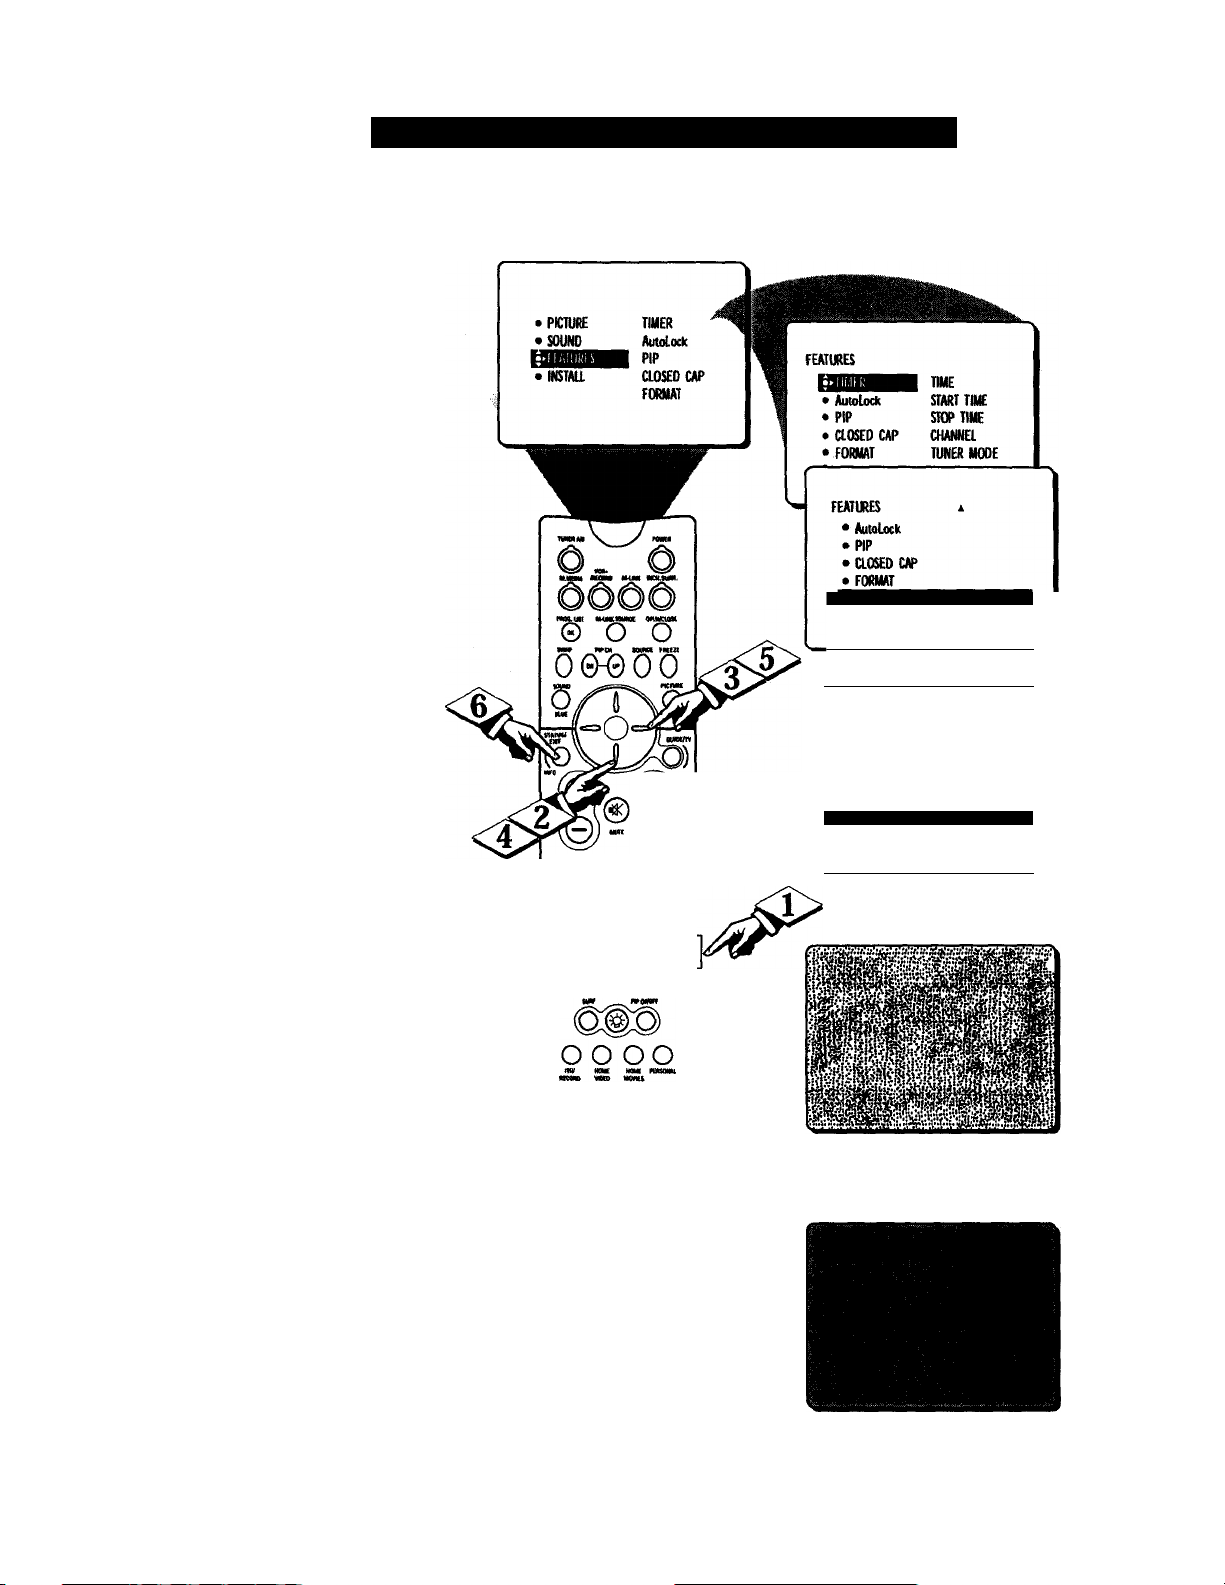
Selecting the Screen Format Size
can change the screen for-
JL mat size to match the type of
program you’re watching. Select
the normal 4:3 aspect ratio or
expand the 4:3 aspect ratio to com
pletely fill the screen. There also is
a compres.sed 16:9 aspect ratio,
which allows movies to be viewed
in their full width (known as letter
box style).
(BEGINJ
Press the MENU button on
the remote control to show the on
screen menu.
I
<|> Press the CURSOR RING
DOWN twice to highlight FEA
TURES.
I
<|> Press the CURSOR RING
" RIGHT and the menu will shift to
the left.
<i> Press the CURSOR RING
DOWN repeatedly until the FOR
MAT control is highlighted.
Press the CURSOR RING
RIGHT repeatedly to toggle
among the three screen format sizes
- 4:3, EXPAND 4:3, or COM
PRESS 16:9.
<|> Press the STATUS/EXIT but
ton to remove the menu fiom the
screen.
• PICTURE
• SOUND
• INSTAIL
® @ ®
0 ® ®
® ® ®
© ® ©
TIMER
Autolock
PIP
aoSED CAP
FORMAT
FEATURES
• Autolock
• PIP
• aOSEO CAP
• FORMAT
FEATURES
• Autolock
• PIP
• CIOSED CAP
• BLUE MUTE
< rOKMAT 4:3
< fORM/il FXP№D 4 3
< FORMAT .. COMPRESS 16:9
o
Tl№
START TIME
STOP TIME
CHANNEt
TUNER IWOE
OR
OR
S.MARI HKI P
_ Without the on.screen
•menu display showing, you
also can press the CURSOR RING
UP or CURSOR RING DOWN on
the remote control to toggle among
the screen sizes 4:3, Expand 4:3,
or Compress 16:9.
fORMAT .► 4:3
FORMAT .► EXPAND 4:3 FORMAT .►COMPRESS 16:9
Page 16
□I
he Blue Mute feature will elimimte annoying snow from the
7
screen when no video signal us pres
ent by displaying a pleasent blue
screen. This occurs in cases such as
when a yCR tape is removed or an
antenna signal is broken. To turn the
Blue Mute feature ON or OFF, fol
low the steps below.
iassaw
Press the MENU button on
the remote control to show the on
screen menu.
i
<|> Press the CURSOR RING
DOWN twice to highlight FEA
TURES.
i
<|> Press the CURSOR RING
RIGHT and the menu will shift to
the left.
(
АсnVATlNC; ГПК BlA к Мп гк COMROl.
■ ^ hi [If Millf •МИ!
•
OR
?
Press the CURSOR RING
‘ DOWN repeatedly until the
BLUE MUTE control is highlight
ed.
Press the CURSOR RING
RIGHT repeatedly to toggle the
Blue Mute option ON or OFF.
(
<|> Press the STATUS/EXIT but
ton to remove the menu from the
screen.
0
Ш
©00
0 0 0
0 0 0
© 0 ©
FEATURES
a Autolock
a ИР
aaOSEOCAP
a FORMAT
■ В'ЛИ fvnill • > OH
•
BLUE MUTE OFF
-with no video flgnol; acreen
ia snowing looking.
BLUE MUTE ON
-with no video aignal; acreen ia
a pieaaent blue color.
к
▼
10
Page 17
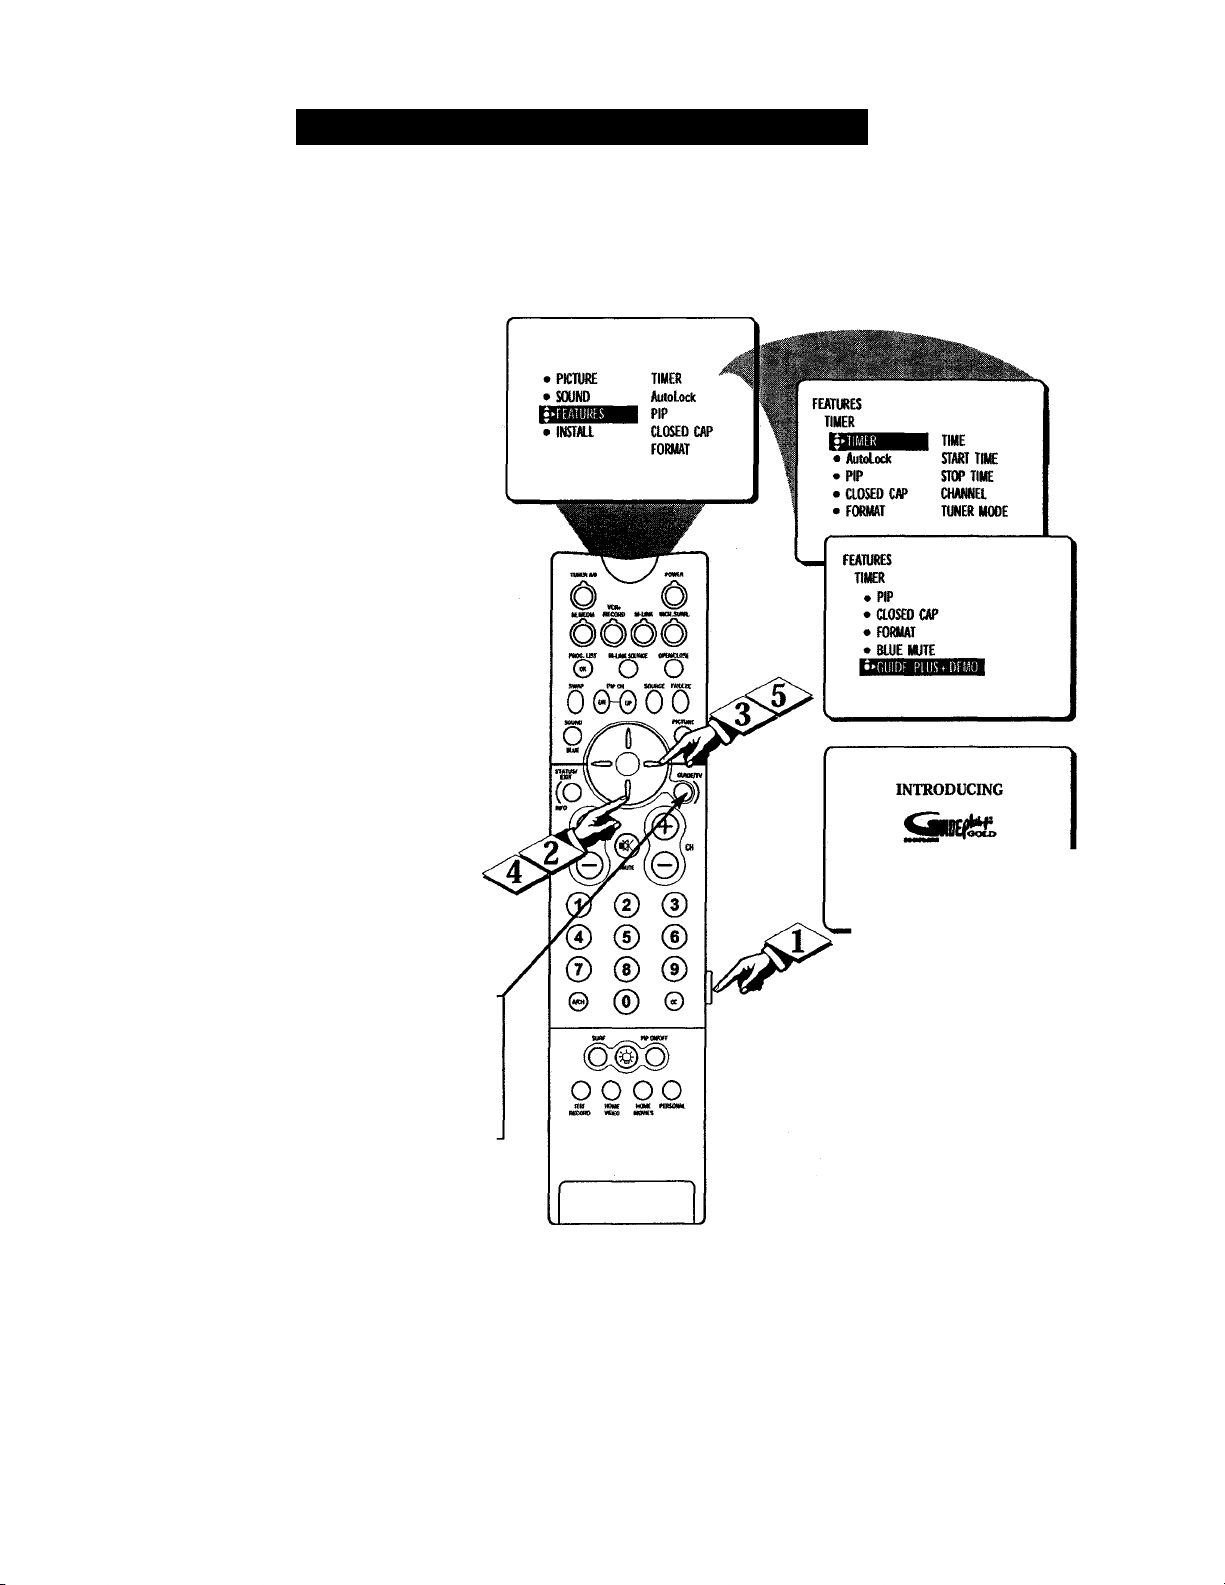
Activating the GUIDE Plus+" Demo
b help you understand the
GUIDE Plus+* System, a short
J
but informative demonstration is
available.
IBEPiNJ
<|> Press the MENU/SELECTbut-
' ton on the remote to show the
onscreen menu.
<|> Press the CURSOR RING
DOWN twice to highlight FEA
TURES.
I
<|> Press the CURSOR RING
RIGHT and the menu will shift to
the left. TIMER will be highlighted.
(
Press the CURSOR RING
DOWN to highlight the Guide
Plus+* DEMO control.
I
<|> Press the CURSOR RING
RIGHT again. The GUIDE Plus+*
Demonstration will start, then time
out shortly.
!□
NOTE: Refer to the GUIDE Plus+* Guide supplied with your TV for a
detailed description of GUIDE Plus+* and it’s features.
NOTE: The GOIDEmf button will
also allow you to access the GUIDE
Plus+* information menus where the
View Demo option can be accessed
within the Setup screen. Please refer
to the Guide Plus+* Guide that
came with your TV for details and
instructions.
The Interactive, On>Screen
Program Guide
Built into this TV
11
Page 18
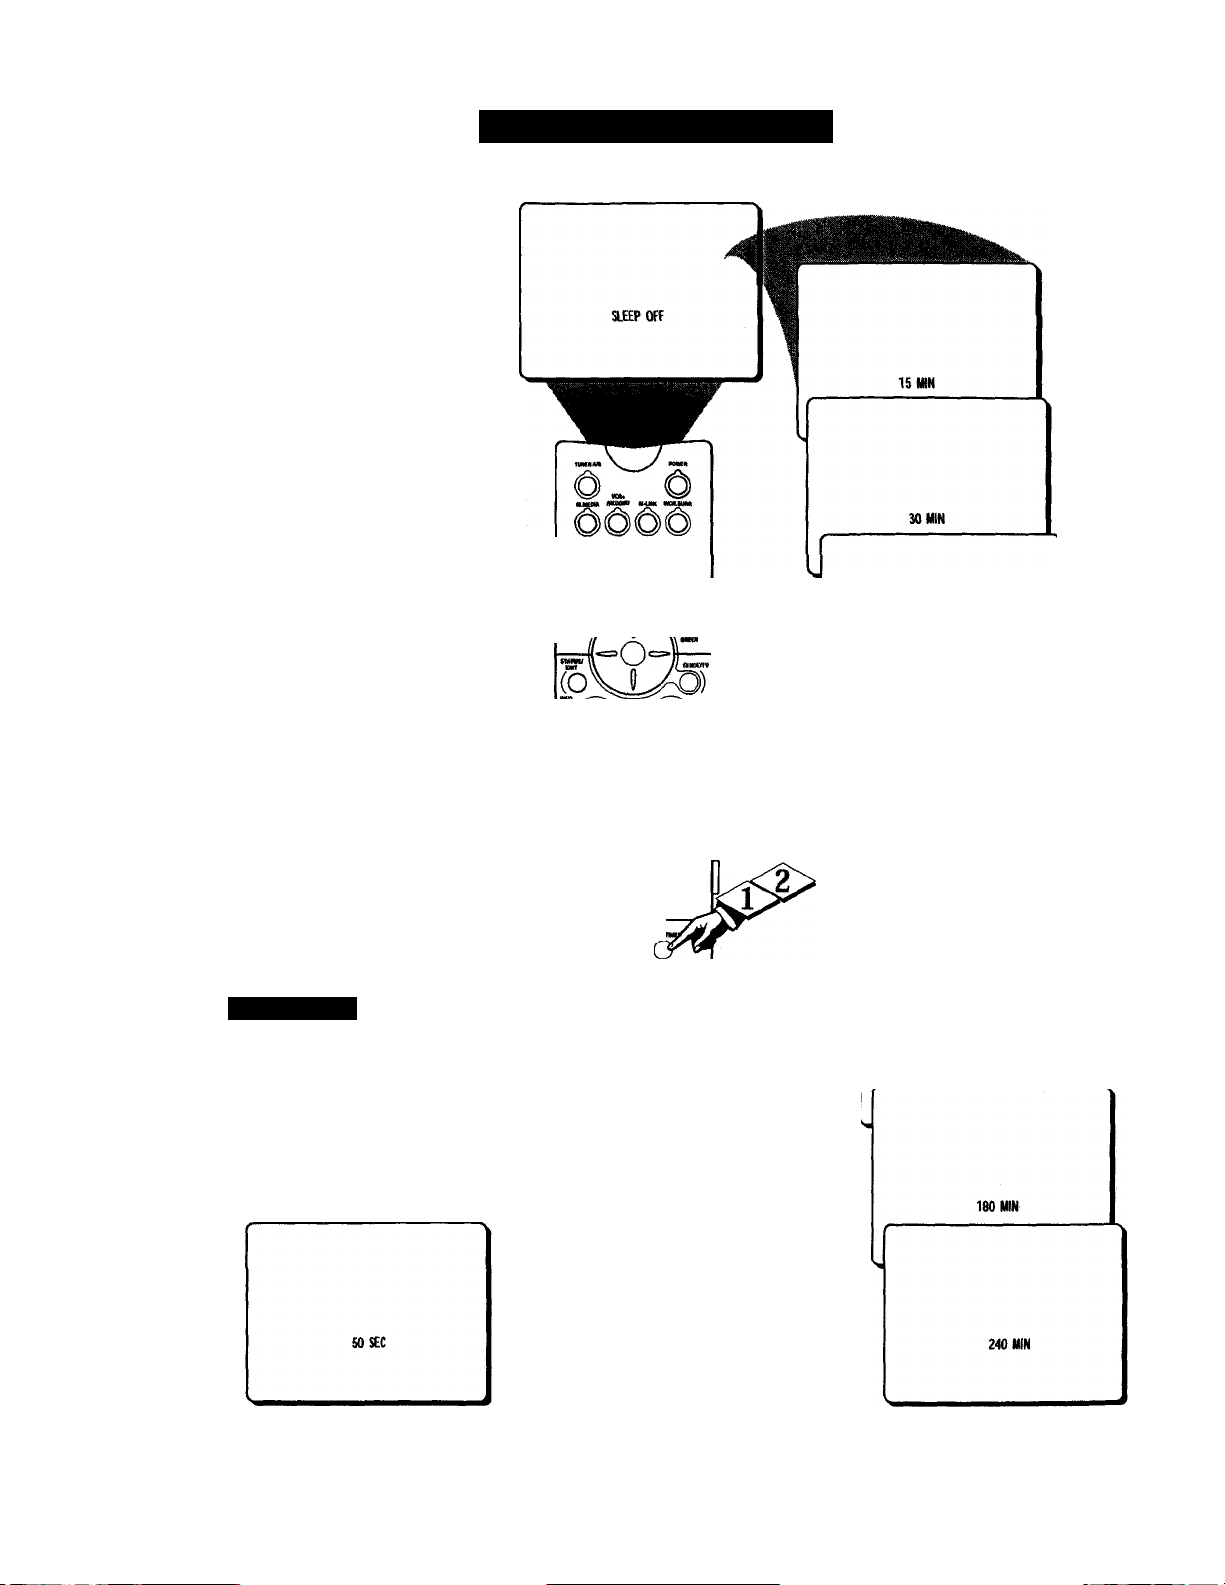
□ I
TJave you ever fallen asleep in
jn front of the TV, only to have it
wake you up at two in the morning
with a test pattern sound screeching
in your ears? Well, your TV can
enable you to avoid that discomfort
by automatically turning itself off.
With the Sleep Timer feature, you
can set a timer to automatically
switch the TV OFF after a period
of time you choose (15-minute
increments up to 60 minutes, then
30-minute increments up to 90 min
utes, then 60-minute increments up
to 240 minutes).
Usi\(, ruE Su:i pTimkr
LBEOIW)
Press the SLEEP button on
<$>
the remote control. The SLEEP
timer onscreen display will appear
in the upper part of the screen.
Within five seconds, press the
SLEEP button repeatedly to pick
the amount of time (15-minute
increments up to 60 minutes, then
30-minute increments up to 90 min
utes, then 60-minute increments up
to 240 minutes) before the TV will
turn itself off.
An onscreen countdown will i^pear
during the last minute before the
TV shuts itself off.
SmAid III f V
To see how many min
utes remain before the TV
shuts itself off, press the STA-
TUS/EXIT button.
MMUV MMiiaMa okhomc
© O O
SHv npcH seum pirb
0GK500
o/T\o
0 0 0
0 0 0
0 0 0
© 0 0
Msmoir $uar
O ® '
@ ® @
O® O
QQQQ
45 MIN
60 MIN
90 MIN
120 MIN
During Ihe last minute of a
SLEEP timer setting, an onscreen
countdown will be displayed.
During the last 10 seconds of a
SLEEP timer setting, an onscreen
display will read (XX)D BYE.
GOOD BYE
12
Page 19
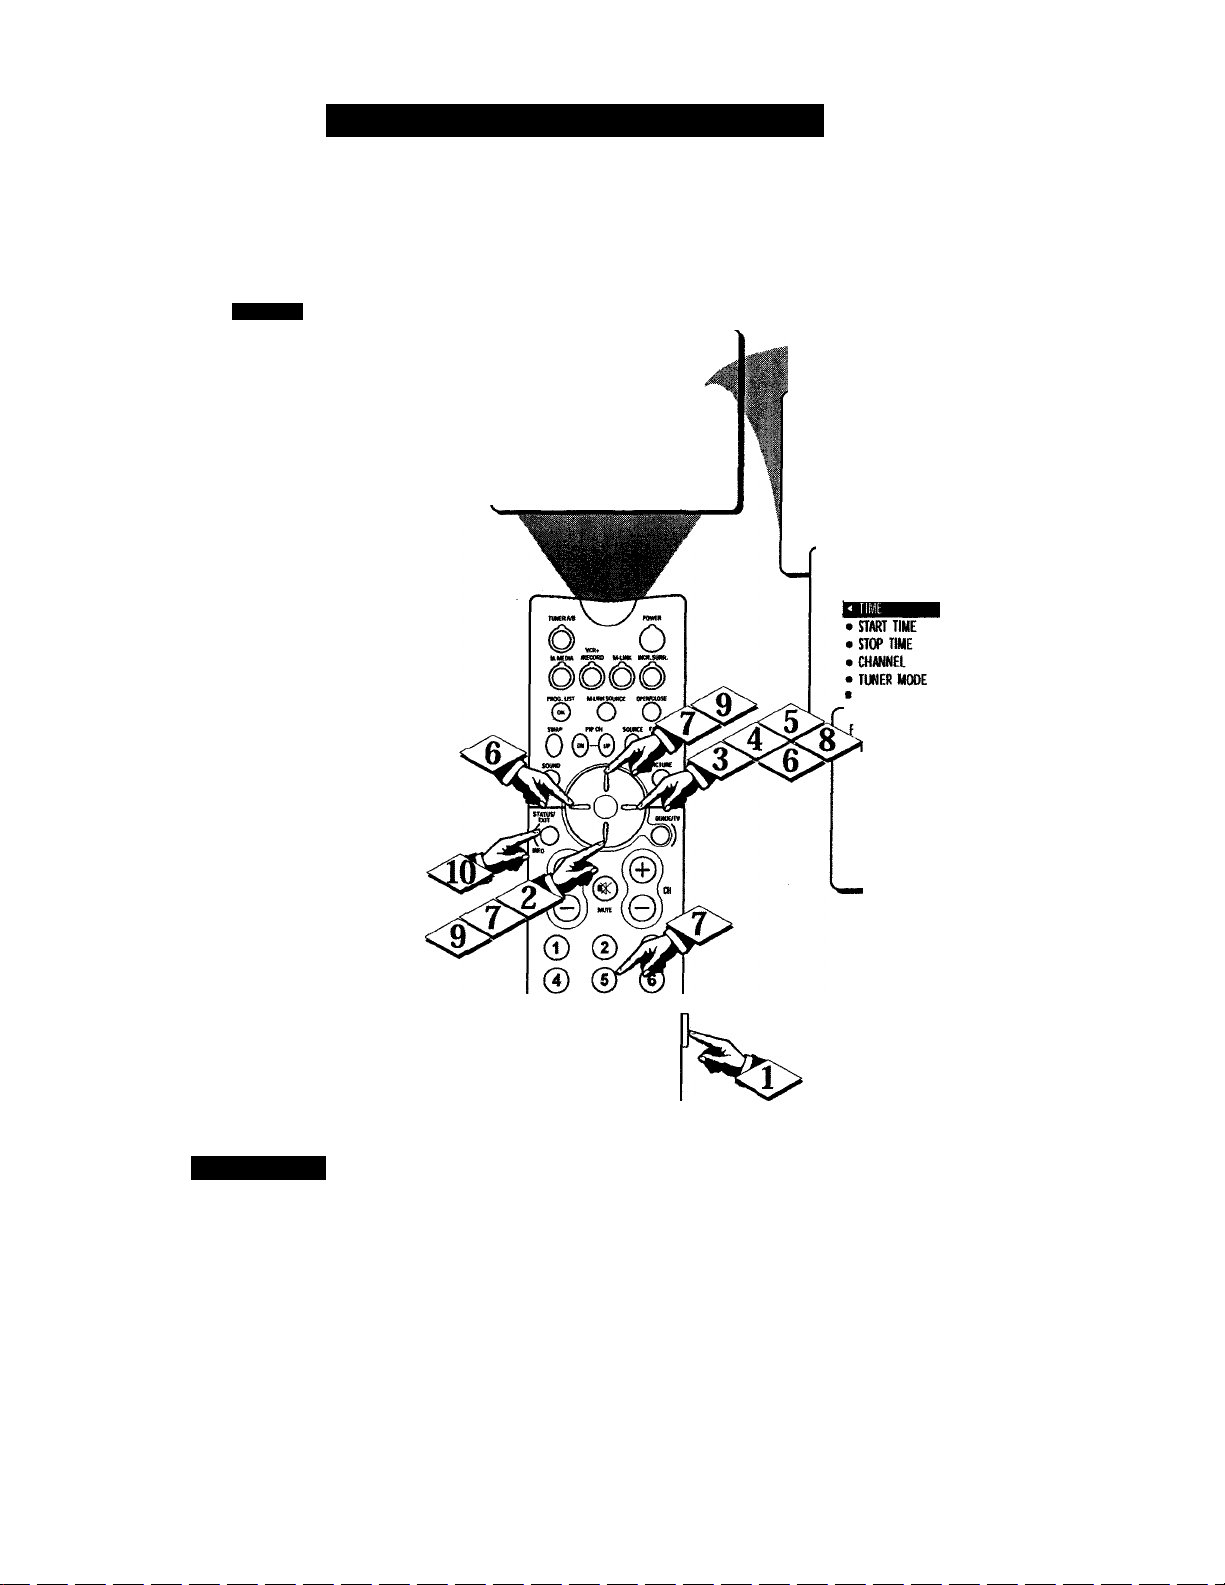
The Timer - Setting the Clock
"^ur television comes with an on-
1 screen clock. During normal oper
ation, the clock appears on the screen
when the STATUS/EXIT button is
pressed or if the TIMER DISPLAY
control is turned ON.
Press the MENU button on the
remote control to show the onscreen
I menu.
<f> Press the CURSOR RING
I DOWN twice to highlight FEAI TORES.
<|> Press the CURSOR RING
RIGHT and the menu will shift to
the left. TIMER will be highlighted.
(
With TIMER selected, press the
I CURSOR RING RIGHT to
I shift the display left and highlight the
I TIME control.
<|> Press the CURSOR RING
RIGHT again to highlight the time
indicator area.
(
Press the CURSOR RING
I LEFT or CURSOR RING RIGHT
I to select the position or digit you wish
I to enter.
Press the CURSOR RING UP or
^CURSOR RING DOWN to select
the digits for the time. Or press the
NUMBERED buttons to enter the
correct time.
<|> Press the CURSOR RING
I RIGHT to mo ve to the AM or PM
I position.
<|> Press the CURSOR RING UP or
I DOWN to set AM or PM.
Press the STATUS/EXIT button
" to remove the menu from the screen.
• PICTURE
• SOUND
• INSTAU
© ® (D
© © ©
TIMER
Autolock
PIP
CIDSEDCAP
FORMAT
FEATURES
TIMER
• AutoLock
• PIP
• aOSED CAP
• FORMAT
FEATURES
TIMER
!□
TIME
START TIME
STOP TIME
CHANNEl
TUNER MODE
AM
EATURES
IMER
-< TIME
• START TIME
• STOP TIME
• CHANNEL
• TUNER MODE
Smari Help
Remember, be sure to press
I 0 first and then the hour num
ber for single-digit entries.
The Clock can also be set using the
Guide Plus+* download. Please refer
to the Guide Plus+® User;s Guide for
more details and instructions.
The TV’s clock settings may be lost
when the TV is unplugged (or when
AC power to the set is interrupted).
o o oo
13
Page 20
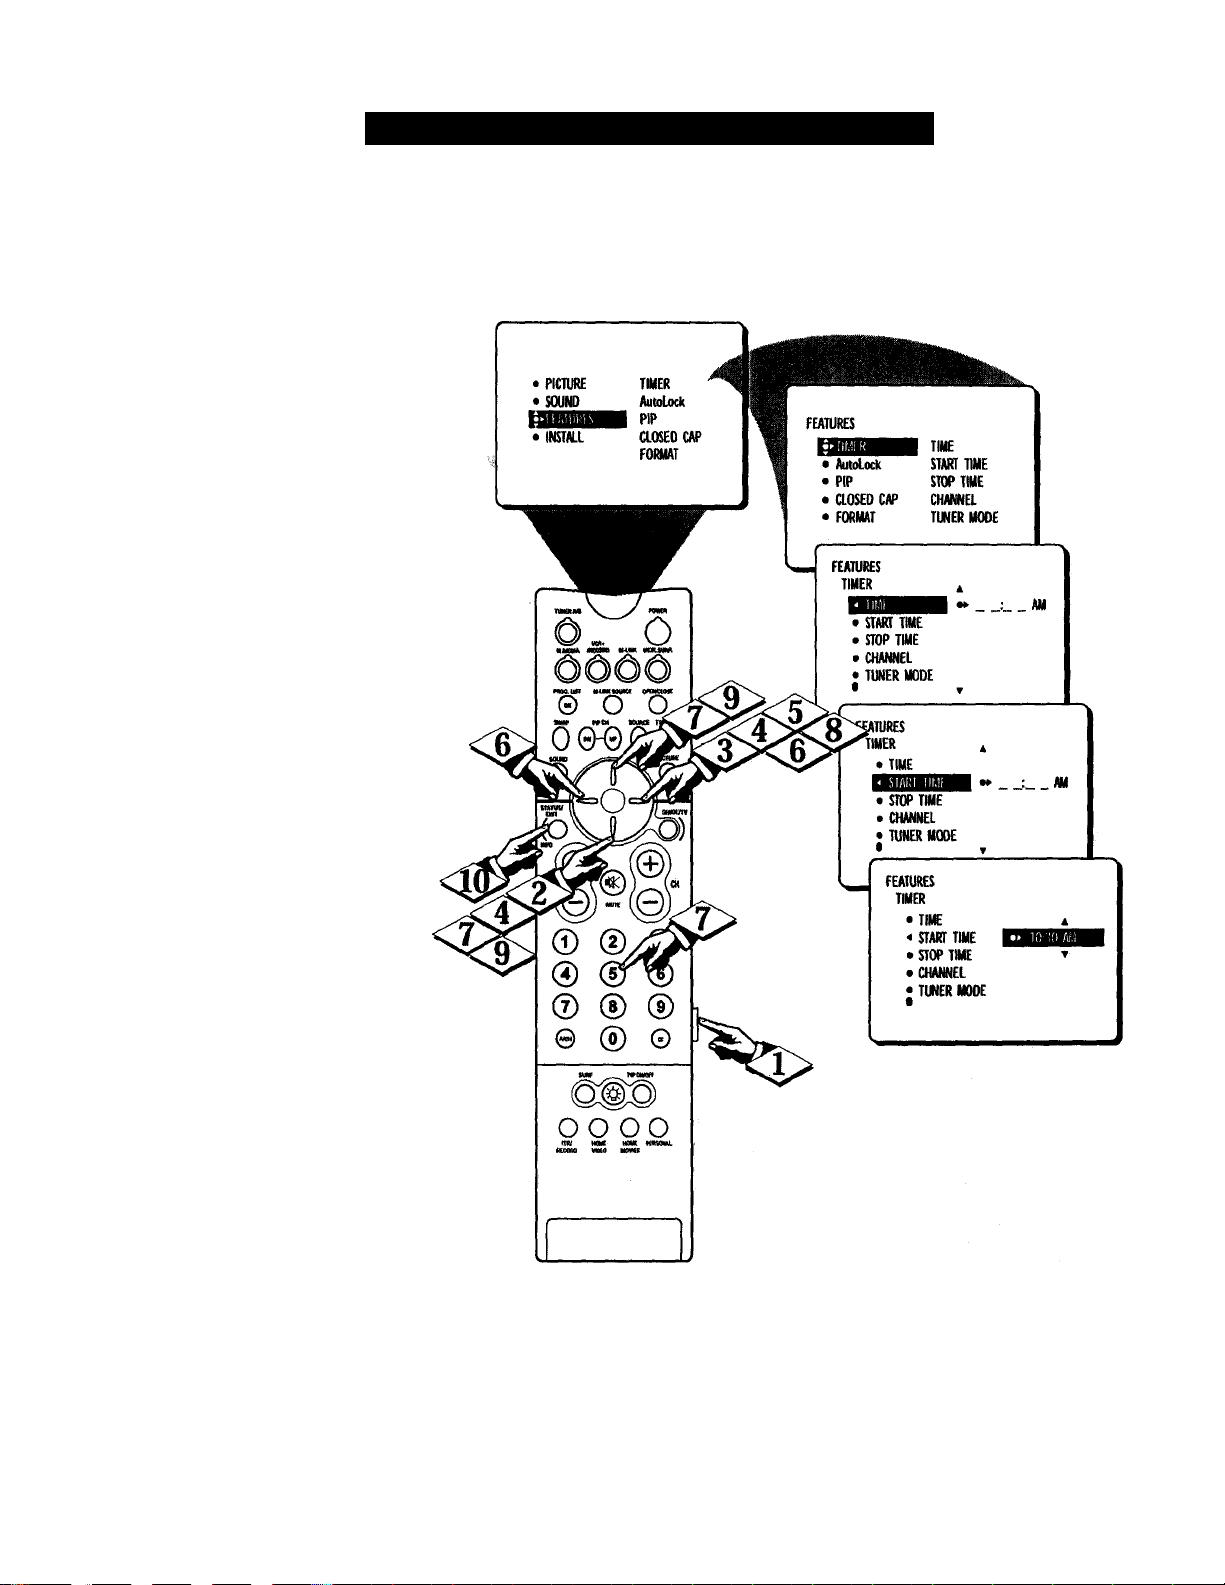
□i
to as you would an alarm clock,
you can set the TV to turn itself
J
ON once or at the same time every
day. Follow these steps to set the
Start Time.
CBEfilM)
Pm$ the MENU button on the
remote control to show the
onscreen menu.
I
<|> Press the CURSOR RING
DOWN twice to highlight FEA
TURES.
(
<|> Press the CURSOR RING
RIGHT and the menu will shift to
the left TIMER will be highlighted.
(
Press the CURSOR RING
““ RIGHT e^ain to shift the display
left. Then press the CURSOR
RING DOWN once to highlight
the START TIME control.
1 in: Timer ~ SE/m\ci hie S iart Time
<J> Press the CURSOR RING
RIGHT again to highlight die time
indicator area.
t
<|> Press the CURSOR RING
" RIGHT or CURSOR RING
LEFT to move among the positions
where the time is input.
Press the CURSOR RING UP
" or CURSOR RING DOWN to
select the digits for the time. Or
press the NUMBERED buttons to
enter the correct time.
Press the CURSOR RING
RIGHT to move to the AM or PM
position.
¡
<|> Press the CURSOR RING UP
j| or DOWN to set AM or PM.
Press the STATUS/EXIT but
ton to remove the menu from the
screen.
14
Page 21
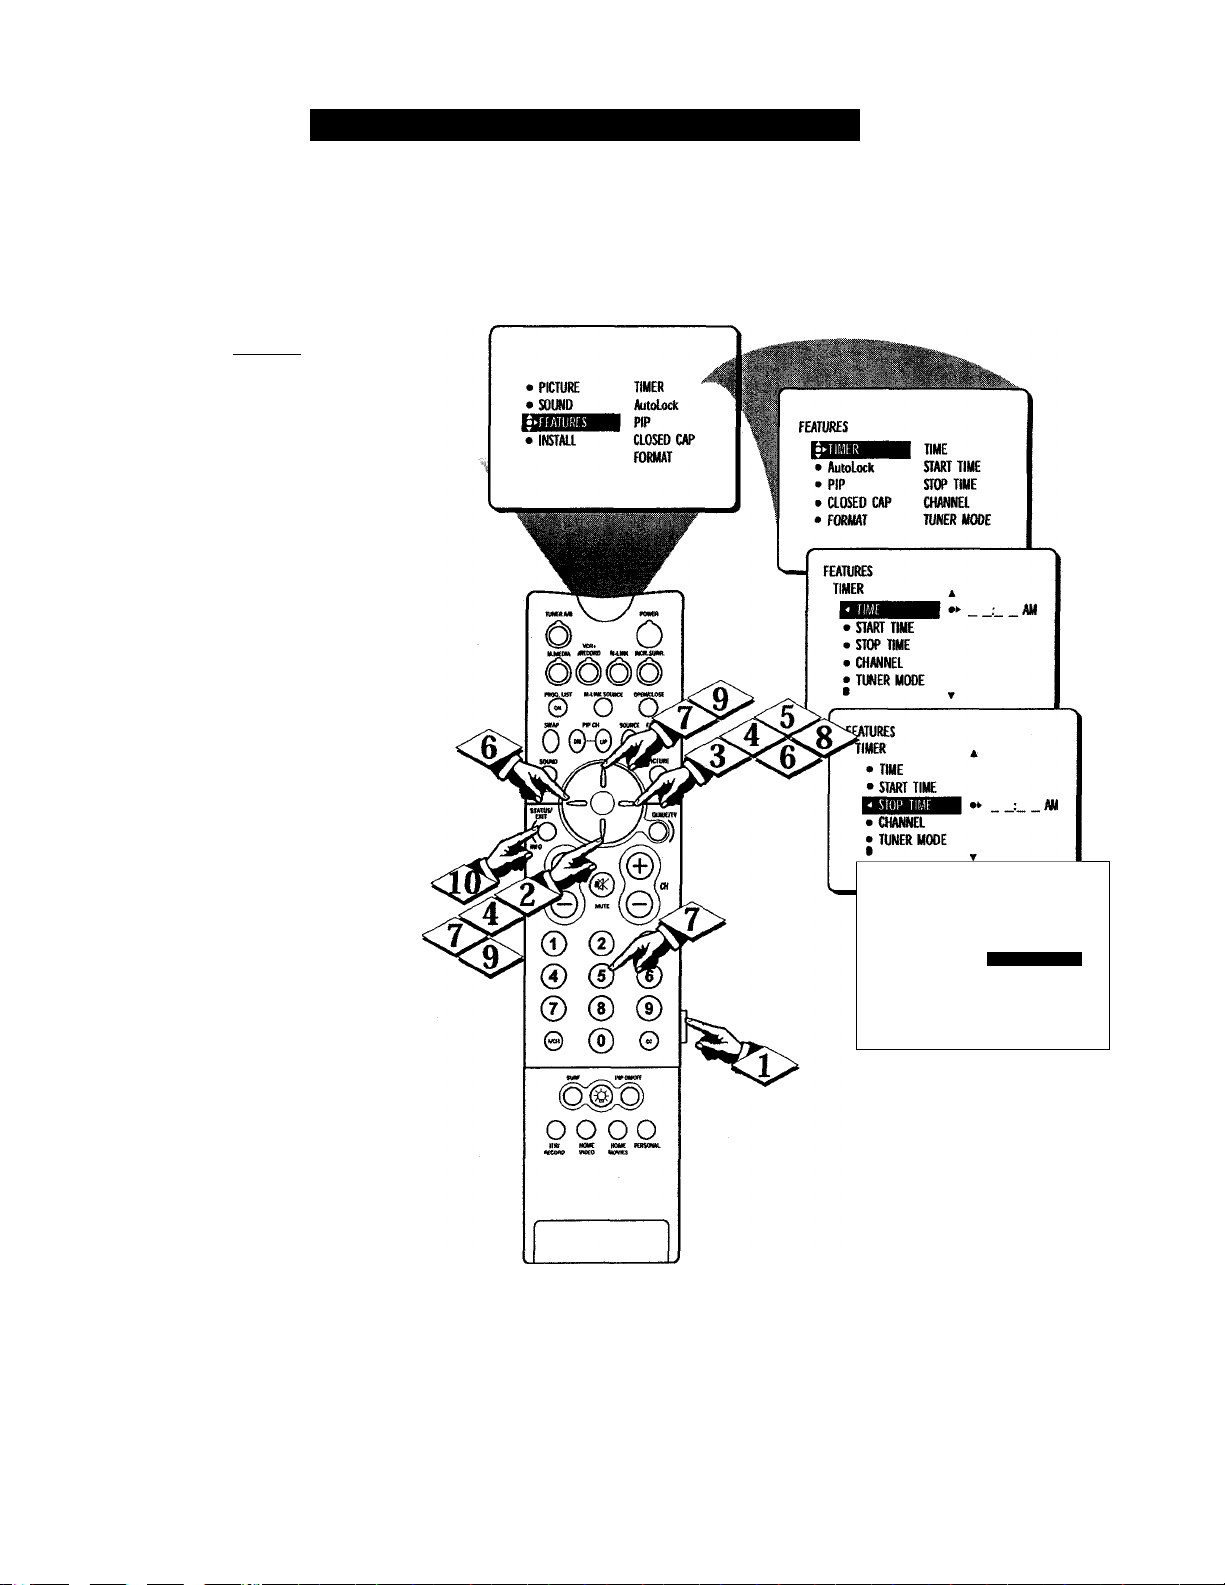
The Timer - Setting the Stop Time
T Jse the START TIME control to
KJ set the TV to turn itself ON
once or at the same time every day
(see page 12 for details). The fol
lowing steps will guide you in set
ting the TV to turn itself OFF once
or at the same time every day.
LBEGIWJ
<|> Press the MENU button on the
remote control to show the on
screen menu.
I
<|> Press the CURSOR RING
DOWN twice to highlight FEA
TURES.
I
Press the CURSOR RING
RIGHT and the menu will shift to
the left. TIMER will be highlight
ed.
Press the CURSOR RING
RIGHT again to shift the display
left. Then press the CURSOR
RING DOWN once twice to high
light the STOP TIME control.
o
Press the CURSOR RING
RIGHT again to highlight the time
indicator area.
(
Press the CURSOR RING
" RIGHT or CURSOR RING
LEFT to move among the positions
where the time is input.
<2> Press the CURSOR RING UP
" or CURSOR RING DOWN to
select the digits for the time. Or
press the NUMBERED buttons to
enter the correct time.
Press the CURSOR RING
RIGHT to move to the AM or PM
position.
¡
<|> Press the CURSOR RING UP
I or DOWN to .set AM or PM.
Press the STATUS/EXIT but
ton to remove the menu from the
screen.
FEATURES
TIMER
• TIME
• START TIME
- STOP TIME
• CHANNEL
• TUNER MODE
•
10:30 AM
A
1
▼
15
Page 22
□I
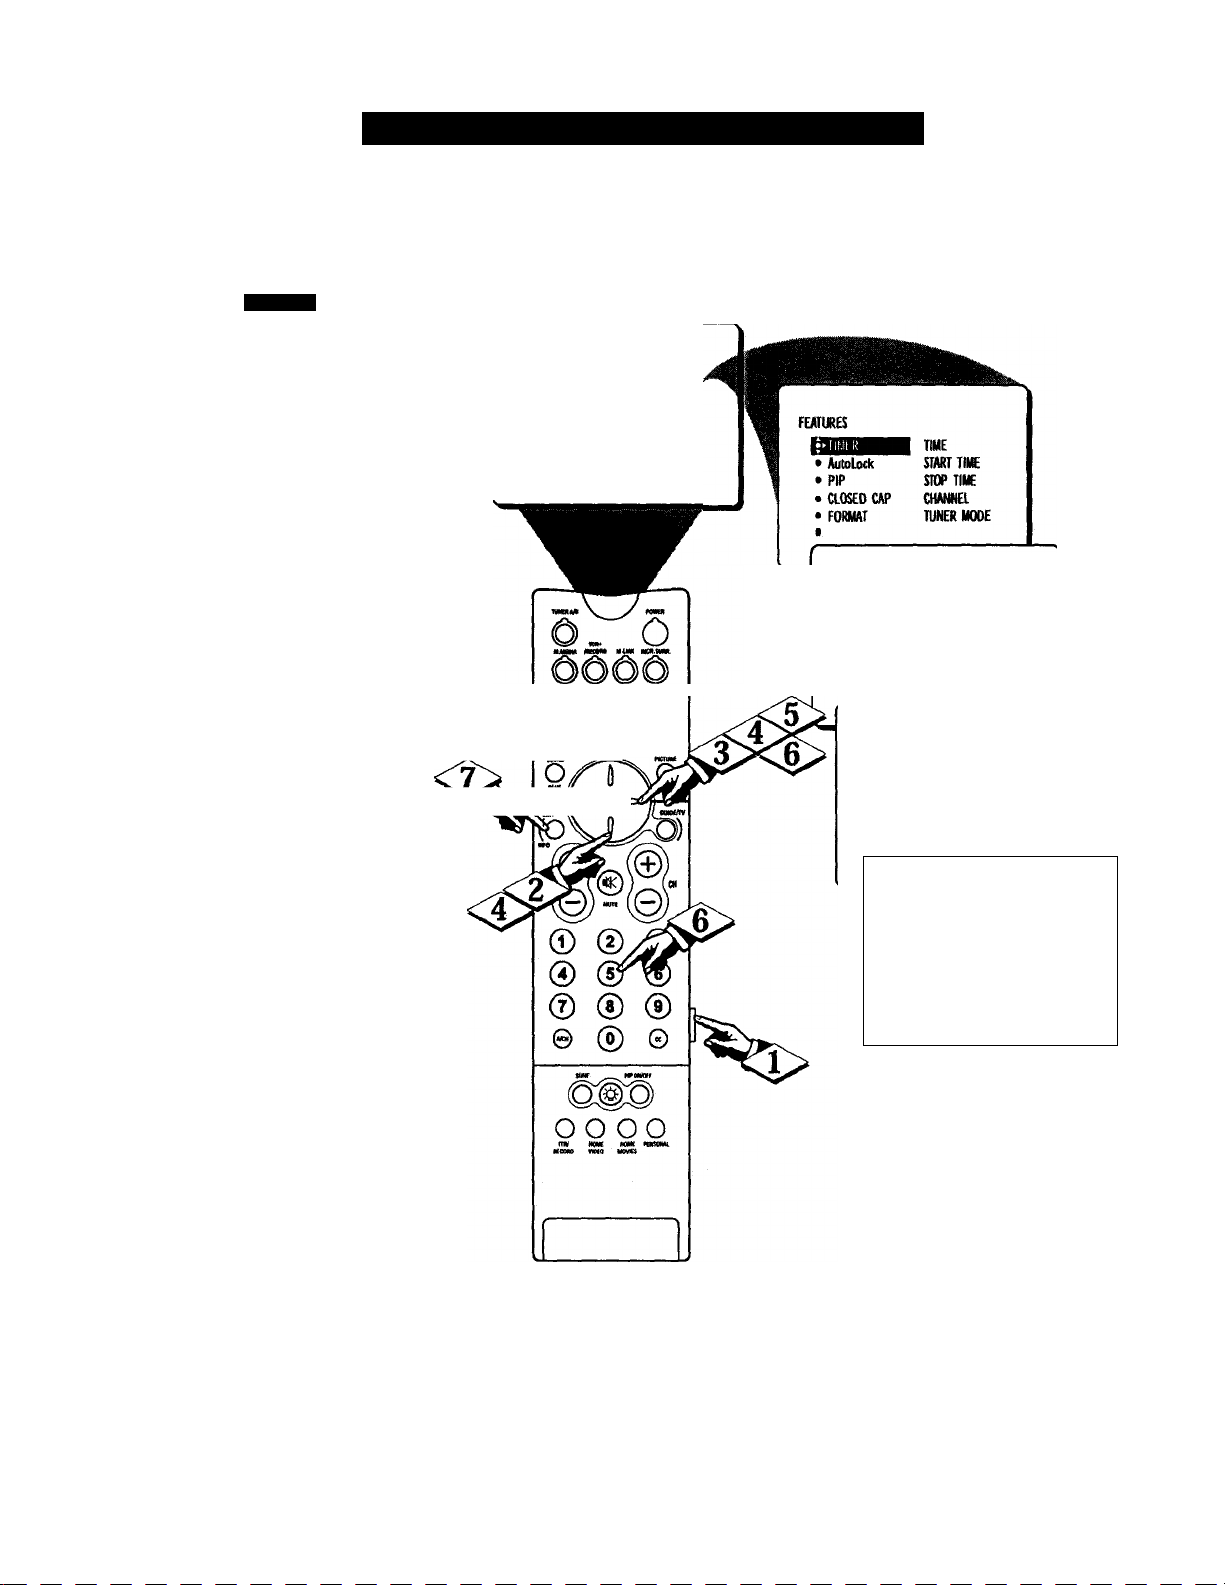
\^u can select a specific channel
J. that the television will tune to
when the timer turns the set ON.
Follow these steps to select the
channel.
ITR7TT7I
Press the MENU button on die
remote control to show the
onscreen menu.
<|> Press the CURSOR RING
DOWN twice to highlight FEA
TURES.
Press the CURSOR RING
RIGHT and the menu will shift to
the left. TIMER will be highlighted.
<^> Press the CURSOR RING
RIGHT again to shift the menu to
the left. Then press the CURSOR
RING DOWN repeatedly until the
CHANNEL control is hi^ilighted.
Tin: TiMi R ~ Si:u:c I INC riu: Ciianm:l
• MCIURE
•SOUND
• INSMll
TMR
Autolock
PIP
CLOSED CAP
FORMAT
FEATURES
TWER
• START TIME
• STOP TWE
• CHANNEL
.AM
<|> Press the CURSOR RING
RIGHT again to highlight the
channel indicator area.
Press the NUMBERED but
<S>
tons to enter the desired start-up
channel. Or, press the CURSOR
RING RIGHT repeatedly to enter
the start-up channel you want
Press the STATUS/EXIT but
ton to remove the menu from the
screen.
© cT ^
SNHP. WO) SOUKS FNRR
00:000
■0‘
FEATURES
TWIER
« TIME
• START TIME
• STOP TIME
TUNER MODE
FEATURES
TMER
• TIME
• START TIME
• STOP TIME
• CHA№ 1
•TUNER MODE
•» 12
k
w
16
Page 23
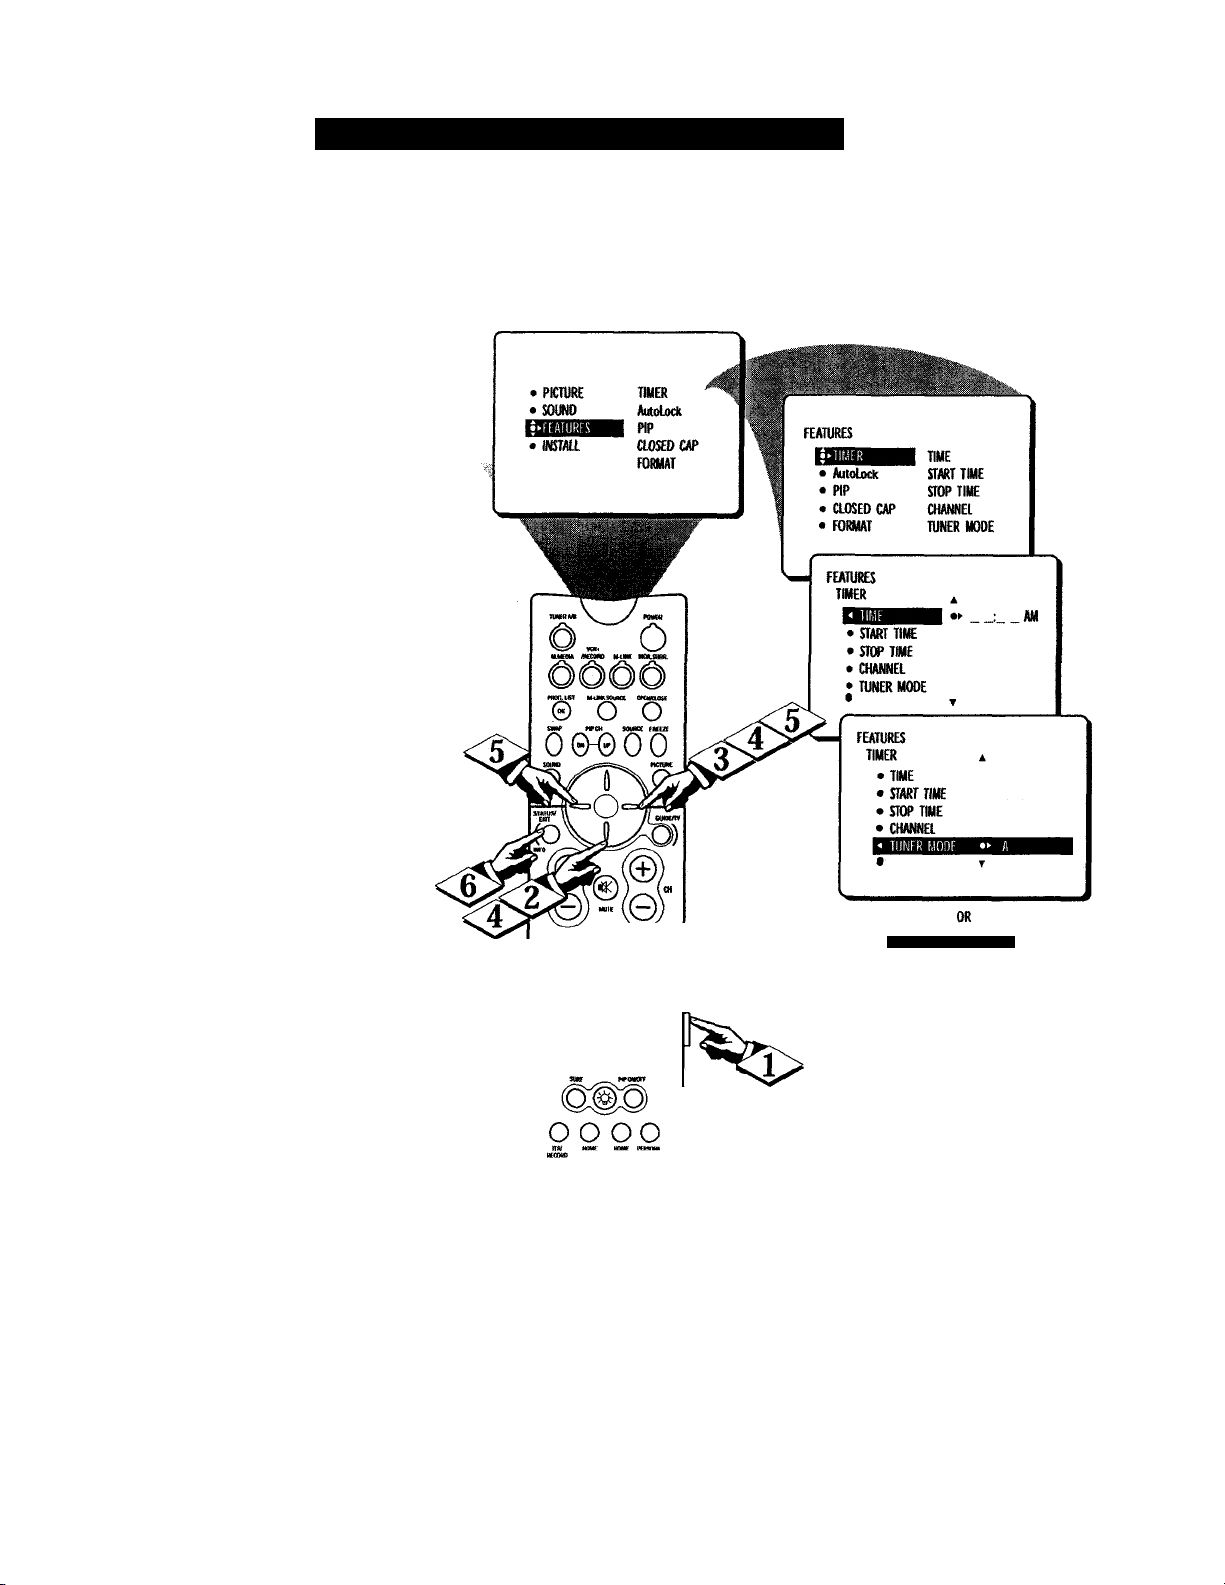
hrough the START TIMEfeature, you can select either
TUNER A or TUNER B to he the
main signal source when the TV is
powered ON
C BEGIN)
Press the MENU button on
the remote control to show the on
screen menu.
<|> Press the CURSOR RING
DOWN twice to highlight FEA
TURES.
(
Press the CURSOR RING
" RIGHT and the menu will shift to
the left. TIMER will be highlight
ed.
<|> Press the CURSOR RING
' RIGHT again to shift the menu to
the left. Then press the CURSOR
RING DOWN repeatedly until the
TUNER MODE control is high
lighted.
Press the CURSOR RING
<l>
LEFT or CURSOR RING
RIGHT to select A or B.
The Timer - Selecting the Tuner
a
<|> Press the STATUS/EXIT but
ton to remove the menu from the
screen.
0
© ® ®
® ® ®
® ® ®
© ® ©
mo HCMG
TUNtR UODf •> B
17
Page 24
□
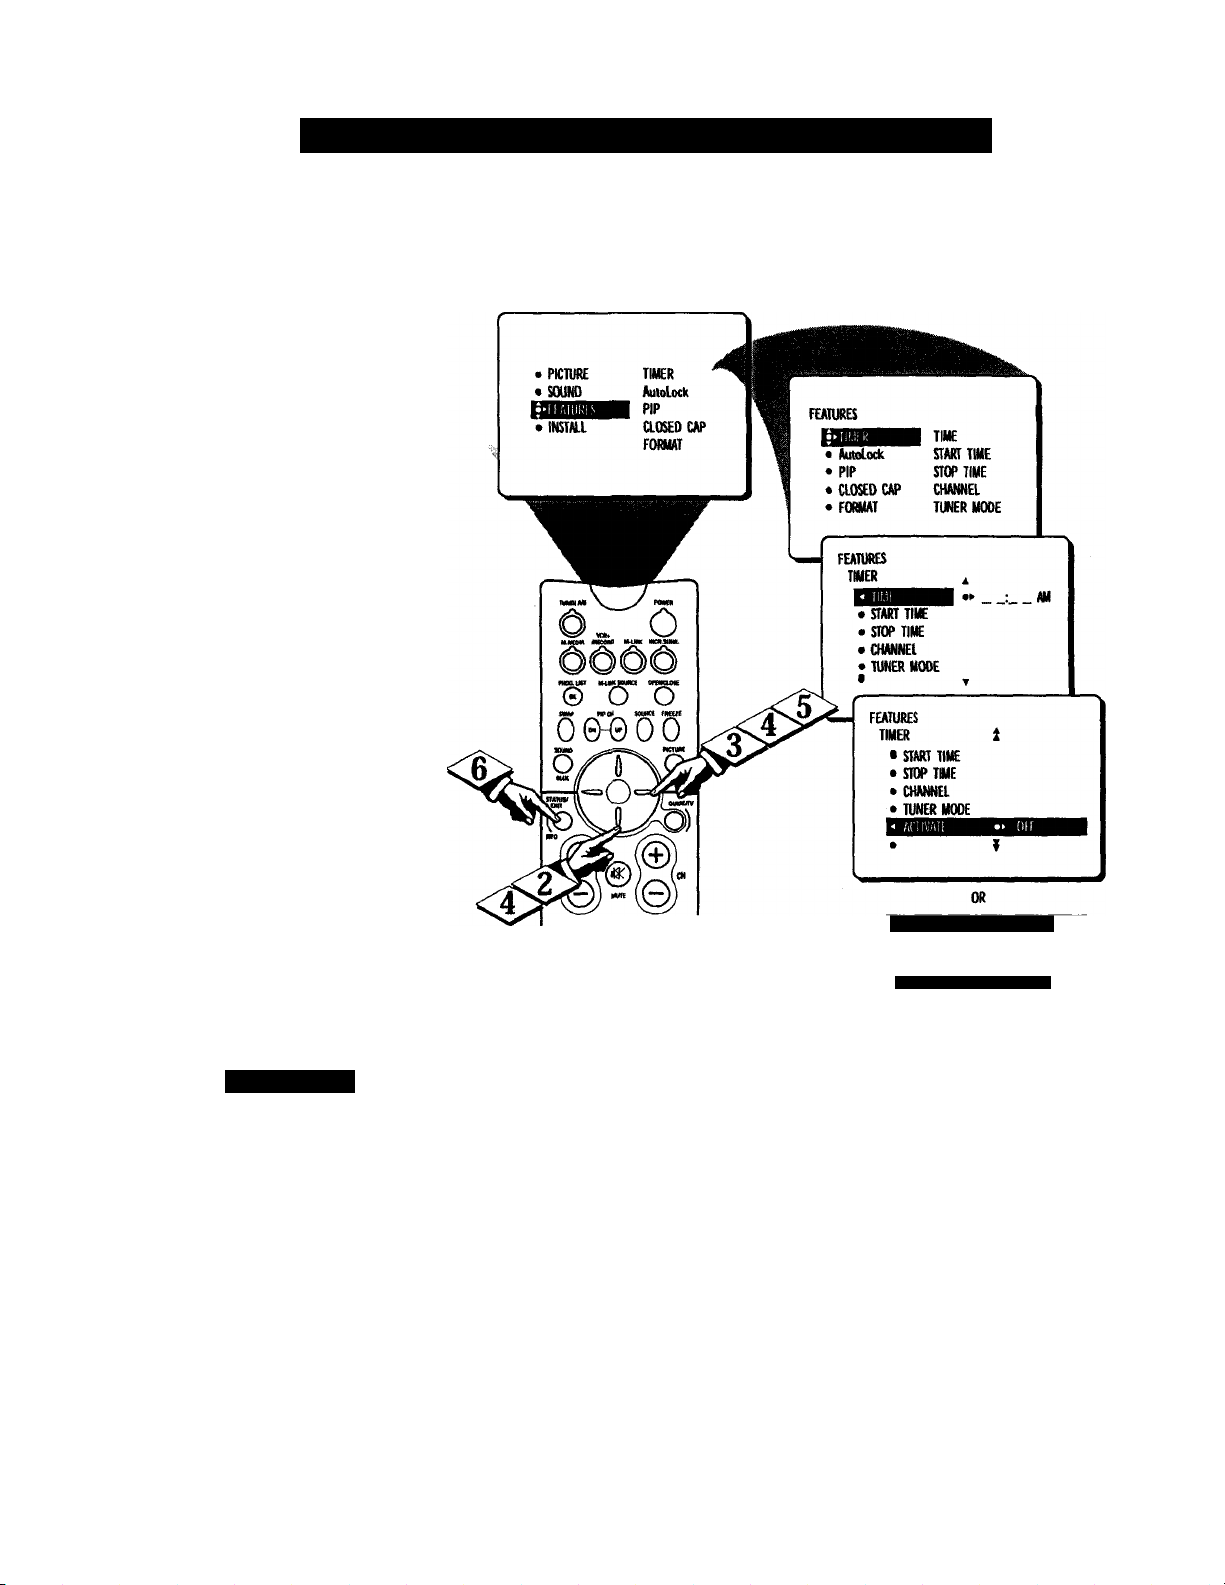
After you have set the Time, Start
./x Time, Stop Time, and Start
Channel, the timer must be set to
come on ONCE or DAILY, or
turned OFF through the ACTIVATE
control.
Cficfiiu)
Press the MENU button cm the
<3>
remote control to show the
onscreen menu.
Press the CURSOR RING
DOWN twice to highlight FEA
TURES.
Press the CURSOR RING
' RIGHT and the menu will shift to
the left. TIMER will be highlight
ed.
Press the CURSOR RING
RIGHT again to shift the display
to the left. Then press the CUR
SOR RING DOWN repeatedly
until the ACTIVATE control is
highlighted.
Tin: 1 iMKR - Skitinc Aci iwn: lo ON or OFF
Press the CURSOR RING
<l>.
RIGHT again to set ACTIVATE to
ONCE; press the CURSOR RING
RIGHT again for DAILY; and
press the CURSOR RING
RIGHT again to toggle ACTIVATE
to OFF.
<|> Press the STATUS/EXIT but-
‘ ton to remove the menu from the
screen.
Smaki llll 1>
Remember, before set
ting the TIMER controls,
the TV’s clock must be set to the
correct time manually (see page
13).
Try it! After following the steps on
pages 13-18, use your TV as an
alarm clock.
©00
0 0 0
©00
© 0 ©
o o oo
WCQW VHO MMR
^ uw'm onQ
OR
Ai:ilV/UI •- I1A:1Y
18
Page 25
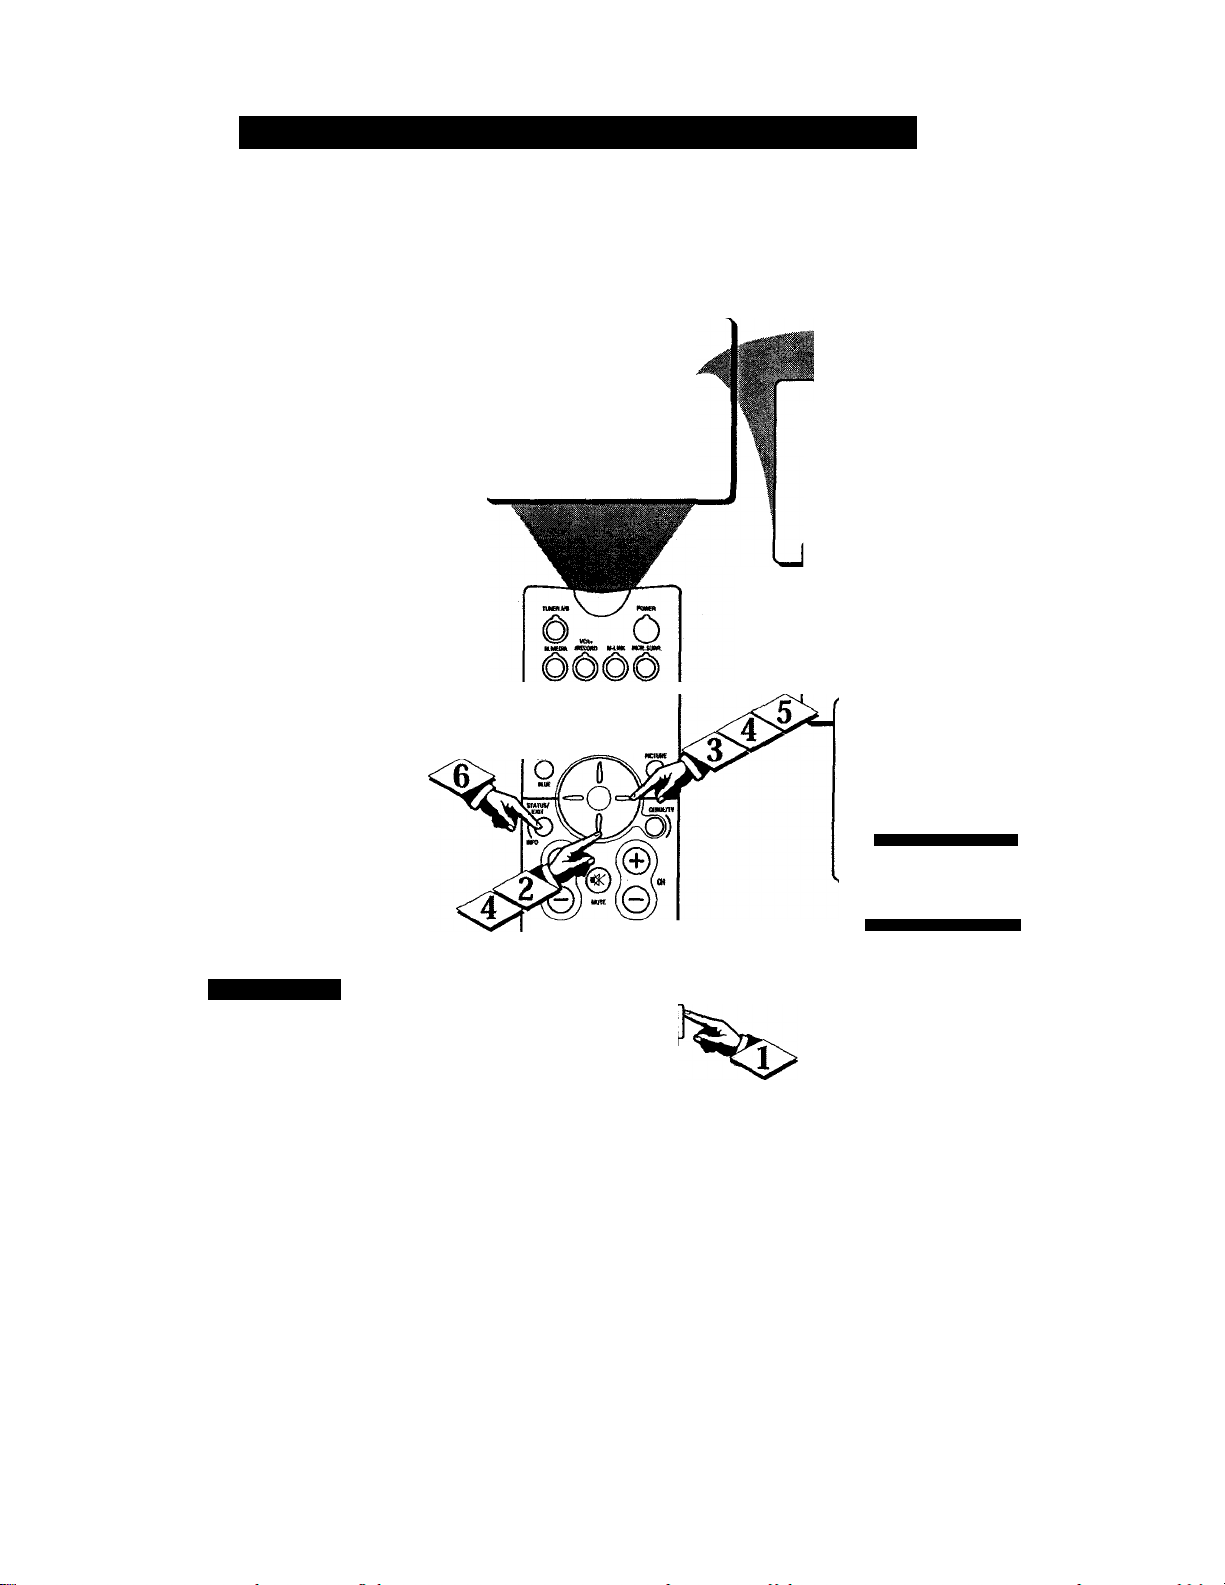
The Timer -- Turning ON the Timer Display
After the TV’s clock has been set,
,/i.you can we your TV as a clock.
The TIMER DISPLAY control
allows you to permanently display
the time in the upper right comer
of the screen.
(BEPIN)
Press the MENU button on
<?>
the remote to show the onscreen
menu.
<|> Press the CURSOR RING
DOWN twice to highlight FEA
TURES.
<|> Press the CURSOR RING
' RIGHT and the menu will shift to
the left. TIMER will be highlighted.
<|> Press the CURSOR RING
RIGHT again to shift the menu
left. Then press the CURSOR
RING DOWN repeatedly until the
DISPLAY control is highlighted.
Press the CURSOR RING
‘ RIGHT or CURSOR RING
LEFT to turn the TIMER DIS
PLAY ON or OFF.
Press the STATUS/EXIT but
<P
ton to remove the menu from the
screen.
Sm.mu Help
Remember, be sure you
have set the TV’s clock with
the correct current time. (Refer to
page 13 to set the clock manually.)
• PICTURE
• SOUND
INSTALL
PWM.Un «UKSOUKt OnWOOSE
© o o
smr PIPCM SOtMCE FMEH
0 GH3 0 0
SOWD
TIMER
Autolxick
PIP
aOSED CAP
FORMAT
® ®
© 0 ©
© © ®
© © ©
GO GO
HooHu vMo mats
FEATURES
QHH
• AutoLock
• PIP
• aOSEO CAP
> FORMAT
FEATURES
TIMER
• START TIME
• STOP TIME
• CHANNEL
• TUNER MODE
o
TIME
START TIME
STOP TIME
CHANNEL
TUNER MODE
AM
FEATURES
TIMER
» STOP HME
• CHANNEL
• TUNER MODE
• ACTWATE
DISPLAY ON
OR
« OISPIAY OFF
19
Page 26
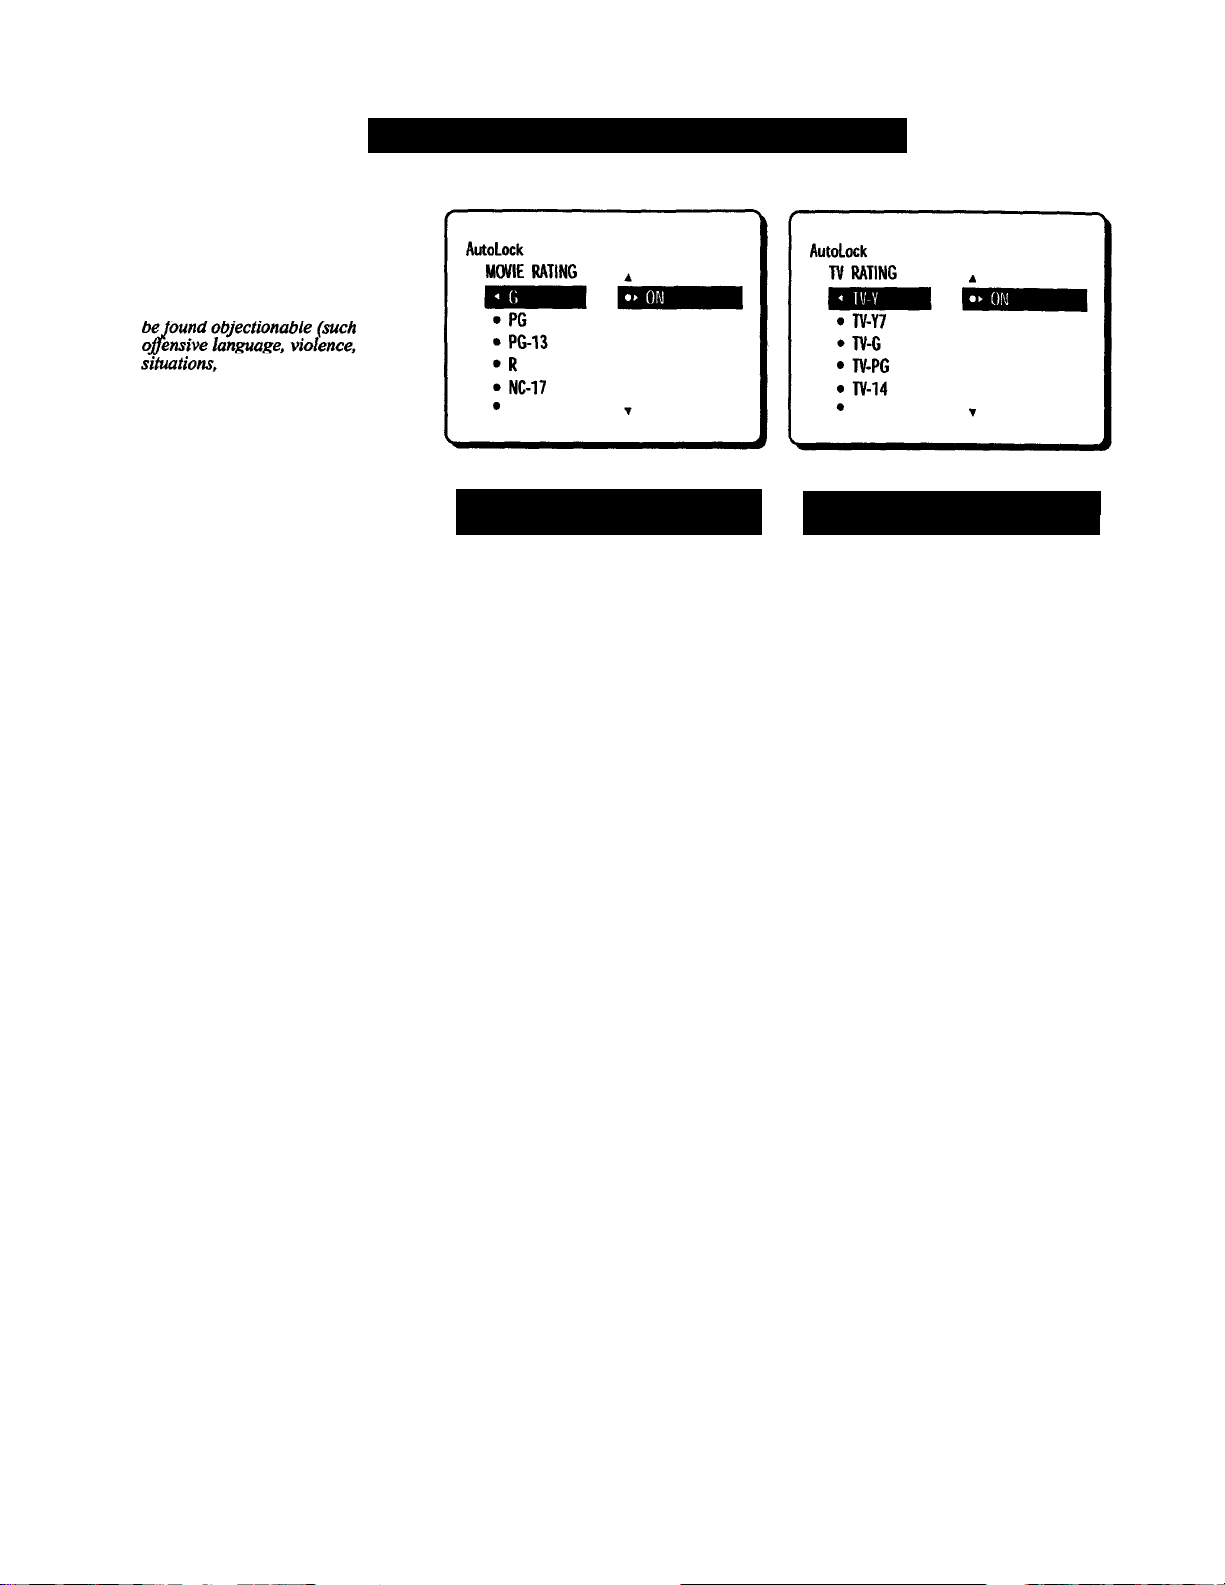
IJ N1)i:RS I AM) 1N( ; AIJK)Loc k ‘
'he AutoLock^feature receives
and processes data sent by
7
broadcasters or other program
providers that contain program con
tent advisories. When programmed
by the viewer, a TV with AutoLock™
can respond to the content advisories
and block program content that may
.................................................
etc.). This is a great fea
ture to censor the type of program
ming children may watch.
In the AutoLock™ section, you’ll
leam how to block channels and pro
gramming that is not rated, is unrat
ed, or has no rating. You will also
find out how to turn these blocking
features ON or OFF. Following are
brief explanations of some terms and
ratings related to the AutoLock™
feature.
AutoLock^^ offers various
Blocking Options from which to
choose;
BLOCKING: The BLOCKING con
trol is what can be thought of as the
“master switch” for AutoLock™.
This control affects the settings you
have chosen for blocking programs
according to movie ratings or TV
ratings, or for blocking programs
that nave no rating or are unrated.
When the BLOC&NG control is
OFF, the blocking or censoring of
programs is disabled. When the
BLOCKING control is ON, blocking
will occur according to the settings
you have chosen.
BLOCK UNRATED: ALL unrated
progimns will be blocked if this fea
ture is set to ON.
UNRATED programming is encoded
with information from the MPAA
(Motion Picture Association of
America) or TV broadcasters, but it
does not have a specific rating, In
other words, the MPAA or the TV
broadcasters have chosen not to
assign a rating to the programming.
NO RATING: ALL programming
with no content advisory data can be
blocked if NO RATING is set to
ON.
Programming that has No Rating is
not encoded with any rating infor
mation fivm the MPAA or the
Parental Guidelines. Any program
ming couldfall into this category.
You also can block individual
channels or block programming
based on ratings of the MPAA and
TV broadcasters. (See a description
of the ratings on this page.)
as
sexual
.M()\Ii Rvil\(.s
(Moi ]()\ !’i( 11 R] AsssK HI i()\ III Ami KK \)
G: General Audience - All ages admitted.
Most parents woidd find this program
ming suitable for all ages. This type of
programming contains little or no vio
lence, no strong language, and little or no
sexual dialogue or sexual situations.
PG: Parental Guidance Suggested - This
programming contains material that parents
may find unsuitable for younger children. It
may contain one or more of the following;
Mr^erate violence, some sexual situations,
infrequent coarse language, or some sugges
tive dialogue.
PG-13: Parents Strongly Cautioned - This
programming contains material that parents
may find unsuitable for children under the
age of 13. It contains one or more of the
following: violence, sexual situations,
coarse language, or suggestive dialogue.
R: Restricted -This programming is specifi
cally designed for adults. Anyone under the
age of 17 should view this programming
only with an accompanying parent or adult
guardian. It contains one or more of the fol
lowing: intense violence; intense sexual sit
uations; strong, coarse language; or intense
ly suggestive dialogue.
NC-17; No one under the age of 17 will be
admitted, - This type of programming
should be viewed by adults only. It contains
graphic violence; explicit sex; or cmde,
indecent language.
X: Adults Only - This type of programming
contains one or more of the following; very
graphic violence, very graphic and explicit
or indecent sexual acts, very coarse and
intensely suggestive language.
I PaKIM \L (il IDLUM S
(1 \ IÌKO\m \s 11 Rs)
TV-Y: (All children - This program
is designed to be appropriate for all
children.) Designed for a veiy young
audience, including children ages 2-^. This
type of programming is not expected to
frighten younger children.
I TV-Y7-. (Directed to Older
Children - This program is designed
for children ages 7 and above.) It
may be more appropriate for children who
have acquired the ^elopment skills needed
to distinguish between make-believe and
reality. This programming may include mild
fanta^ and comic violence (FV).
TV-G: (General Audience ~ A/ost
parents would find this program suit
able for all ages.) This type of pro
gramming contains little or no violence, no
strong language, and little or no sexual dia
logue or sexual situations.
TV-PG: (Parental Guidance
Suggested ~ This program contains
material that parents may find unsuit
able for younger children.) This type of pro
gramming contains one or more of the fol
lowing: Moderate violence (V), some sexual
situations (S), infrequent coarse language
(L), or some suggestive dialogue (D).
TV-14: (Parents Strongly
Cautioned - This program contains
some material that many parents
wouldfind unsuitable for children under 14
years of age.) This type of programming
contains one or more of the following:
intense violence (V); intense sexual situa
tions (S); strong, coarse language (L); or
intensely suggestive dialogue (D).
TV-MA: (Mature Audience OnlyThis program is specifically designed
to be viewed by adults and ther^ore
may be unsuitable for children under 17.)
This type of programming contains one or
more of the following; graphic violence (V);
explicit sexual situations (S); or cmde, inde
cent language (L).
20
Page 27
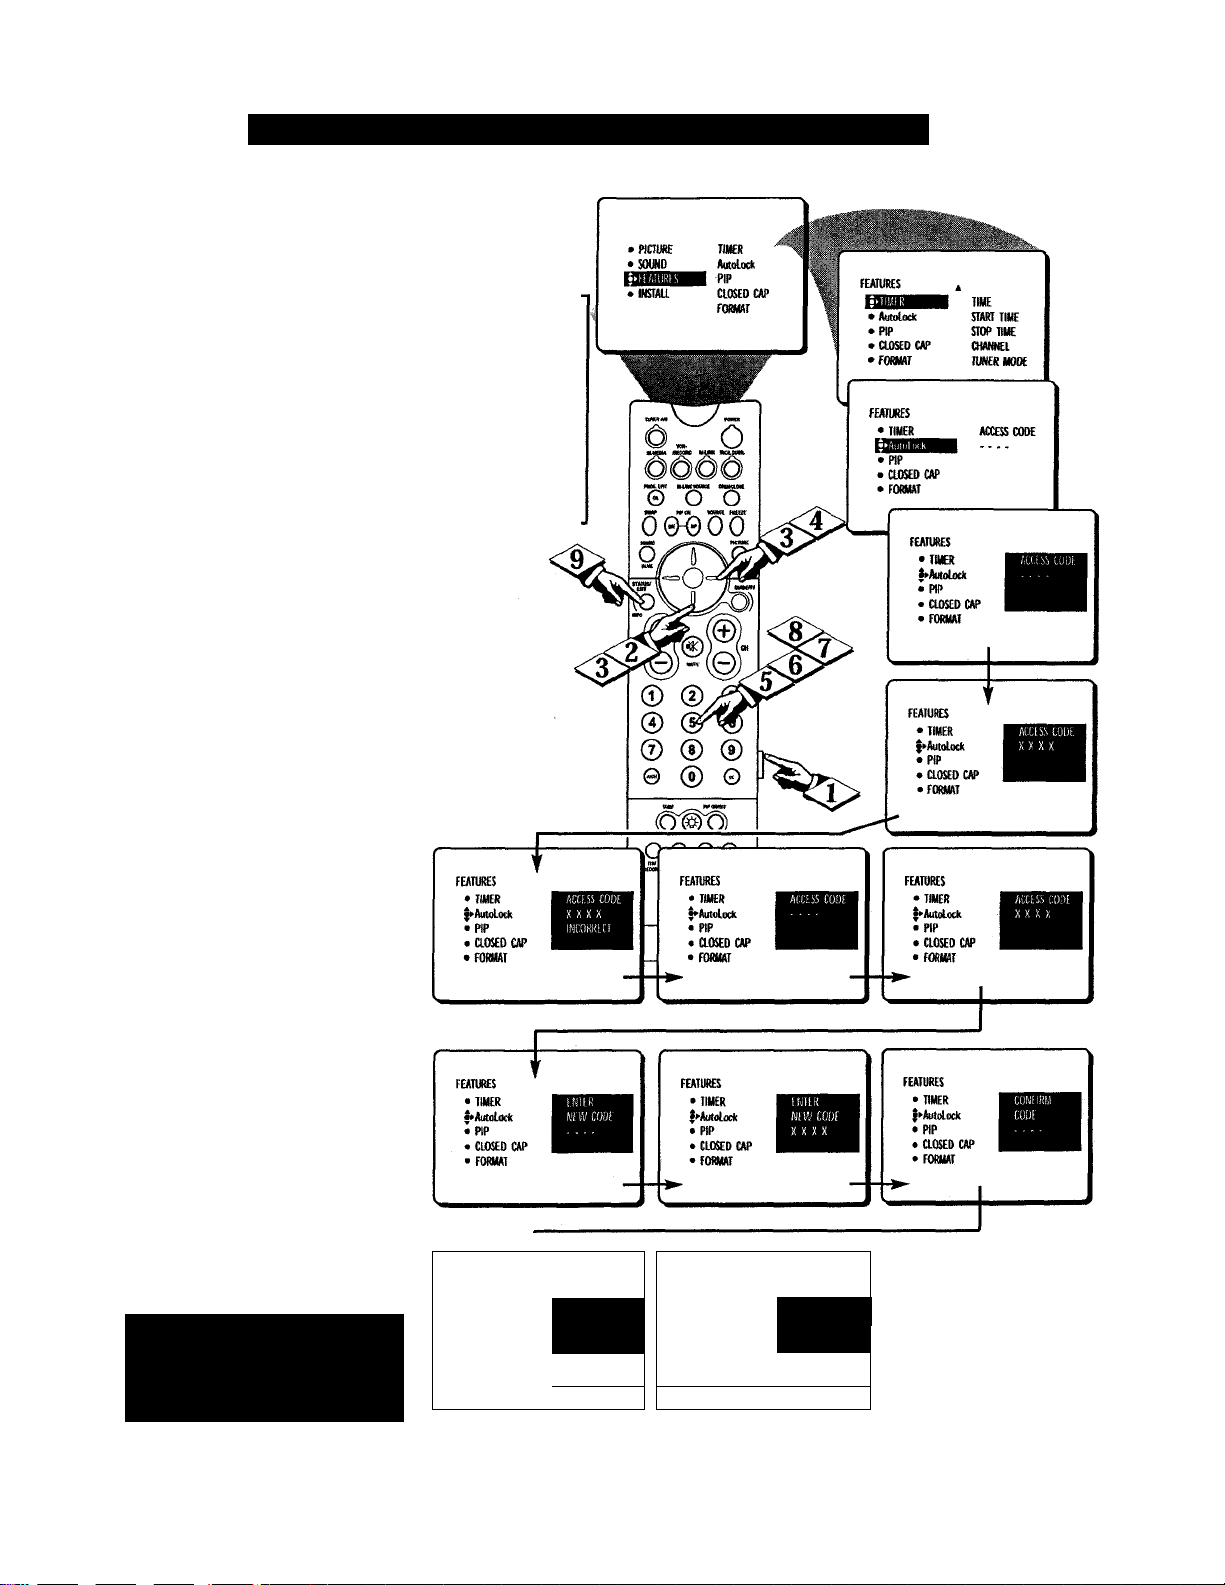
A utoLock'^" allows parents to
./xblock out or "censor” any
channels they think children should
not watch. A channel blocked by
theAutoLock™ control cannot be
viewed until a correct access code
is used to unlock the channel for
viewing. First, let’s set your
AutoLock access code.
KSEsm)
Press the MENU button on
the remote control to show the
onscreen menu.
Press the CURSOR RING
DOWN twice to highlight FEA
TURES.
T
Press the CURSOR RING
<l>
RIGHT and the menu will shiR to
the left. Then press the CURSOR
RING DOWN once to highlight
the AutoLock control.
AuToLocK^^i - Setting Up the Access Code
NOTE TO PARENTS:
It isn’t possible for
your child to unblock a
channel without know
ing your access code or
chan^ng it to a new
one. If your code has
been changed without
your knowledge, then
you will become aware
that blocked channels
may have been viewed.
<|> Press the CURSOR RING
RIGHT to highlight ACCESS
CODE.
(
Press 0,7,1,1 on the remote
control. /NCO/?/i£Cr will appear
on the screen.
(
Press 0,7,1,1 on the remote control again. ENTER NEW CODE
will appear on the screen.
I
Enter a new four-digit code
‘ using the number buttons. CON
FIRM CODE will appear on the
screen.
Enter your new four-digit
‘ code again. CORRECT w\\\ flash
on the screen briefly and the high
Press the STATUS/EXIT but
light bar goes back to AutoLock.
<9>
ton to remove the menu from the
screen.
kcmcmbcr that (1711 is the deraiilt
Autol.ock'” cmlc. If >uur access code has
iK’en chan^^ed b> sonieoiie other tlian you
(a child, for e\ami)le) or \ou have forgot
ten the code, ><m can alv\avs ^et in In
inpmtino the default code.
FEATURES
• TIMER coNi ms I
$k Autolock
• PIP
• aOSEOCAP
• FORMAT
1
COiJL 1
Y.KKK 1
FEATURa
• TIMER
f^Autolock
• PIP
• CLOSED CAP
• FORMAT
iomwm 1
coni 1
Y X YX 1
(i 1
FEATURtS
•TIMER
>PIP
• CLOSED CAP
• FORMAT
ACCESS CODE
1
21
Page 28
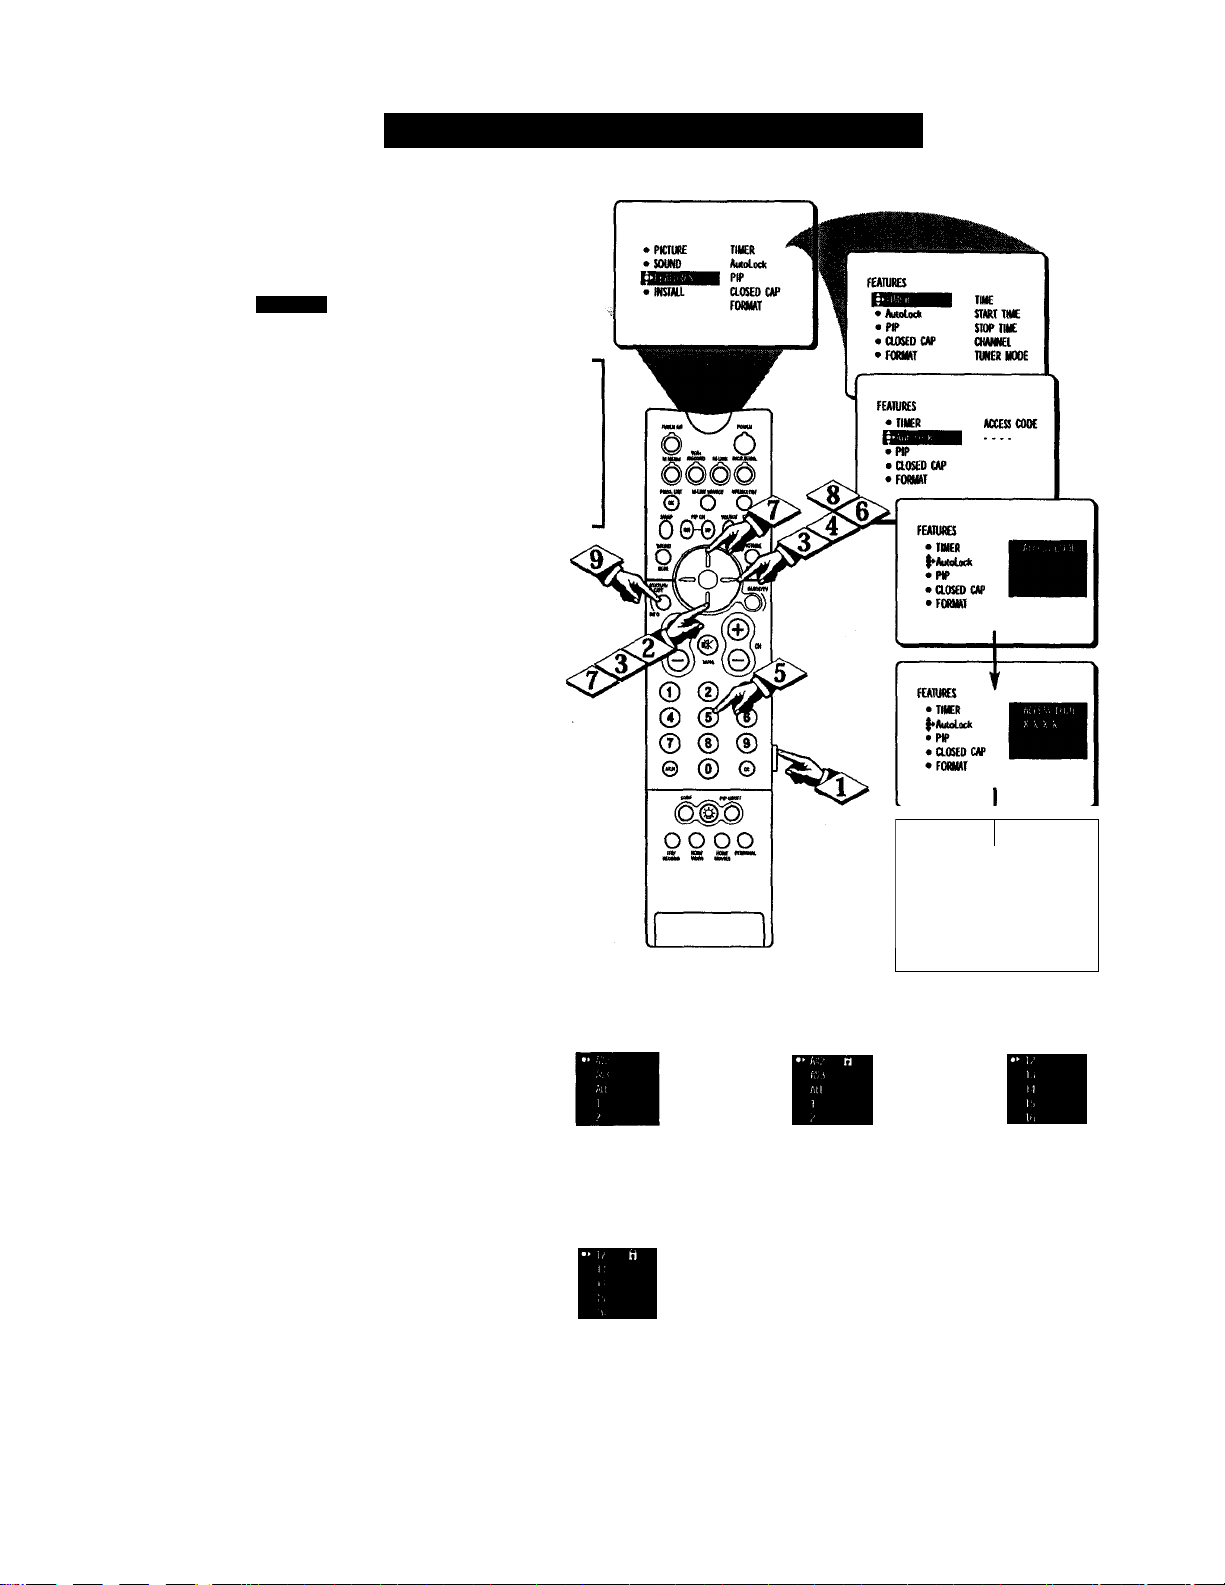
After your personal access code
has been set (see the previous
page), you are ready to select the
channels or inputs you want to
block out or censor.
rriiTIT)
Press the MENU button on
the remote control to show the
onscreen menu.
I
<|> Press the CURSOR RING
DOWN twice to highlight FEA
TURES.
(
<J> Press the CURSOR RING
'' RIGHT and flie menu will shift to
the left Then press the CURSOR
RING DOWN once to highlight
the AutoLock™ control.
Press the CURSOR RING
<P
RIGHT again to highlight
ACCESS CODE.
Enter your four-digit
‘ ACCESS CODE. CORRECT will
flash very briefly and the menu will
move to the left with BLOCK
CHANNEL highlighted.
Ali roLocK' '* - Bloc KiNCi Ciiannli.s
NOT£: Blocked
channels will be
skipped when you
press the Channel
+/-buttons. To
view a blocked
channel, refer to
page 29 for details.
<|> Press the CURSOR RING
RIGHT to highlight the TV’s
available channels.
I
i
Press the CURSOR RING UP
<2>
or CURSOR RING DOWN to
highlight the channel you want to
block.
Press the CURSOR RING
<s>
RIGHT to block the channel. A
padlock image appears to the right
of the channel number.
Repeat steps 7 and 8 for any chan
nels you want to block from view
ing.
<|> Press the STATUS/EXITbut-
' ton to remove the menu from the
screen.
NOTE: You also can block out the use of die A/V external inputs on the rear of the TV. This stops the viewing of VCR, DVD, and other sources that can be
shown through the A/V ir^jut jacks. Select AV1, AV2, or AV3 and then select BLOCK.
mmii Y
Sutotock
< 8UXX CWMIEl
•SEW coot
•ClEARMi
• HOWE MTMG
• TVIMnNG
FEATURES T
AutoLock
^ BLOCK CHANNEL
« SETUP CODE
• aEARAU
• MOVIE RATING
• TV RATING
FtaWES
Autolock
«BIOCKGNMML
•SEW CODE
• UEARAU
• MOMt RAtING
• TV«Atl№
Tf ft chaimel is blocked by the
BLOCK CHANNEL option, the
TV will display die screen shown
to the right To watch the channel,
enter your access code or change
the BLOCK CHANNEL option
back to off.
FEAfURES '
AutoLock
•SEW CODE
• CUtKJIU
• MOVIE lUTING 1
• 1VMTWG 2
0
FEXrURES
AutoLock
4 BLOCK CHANNtL
•SEIWCOK
• CLEM ALL
• MOVIE RATING
•TVnOING
Channel 12
6loc<i«d by AutoLock
TV rating TV-PG
Accofs Cods
A
B •» AV2
ALL
T
m
22
Page 29
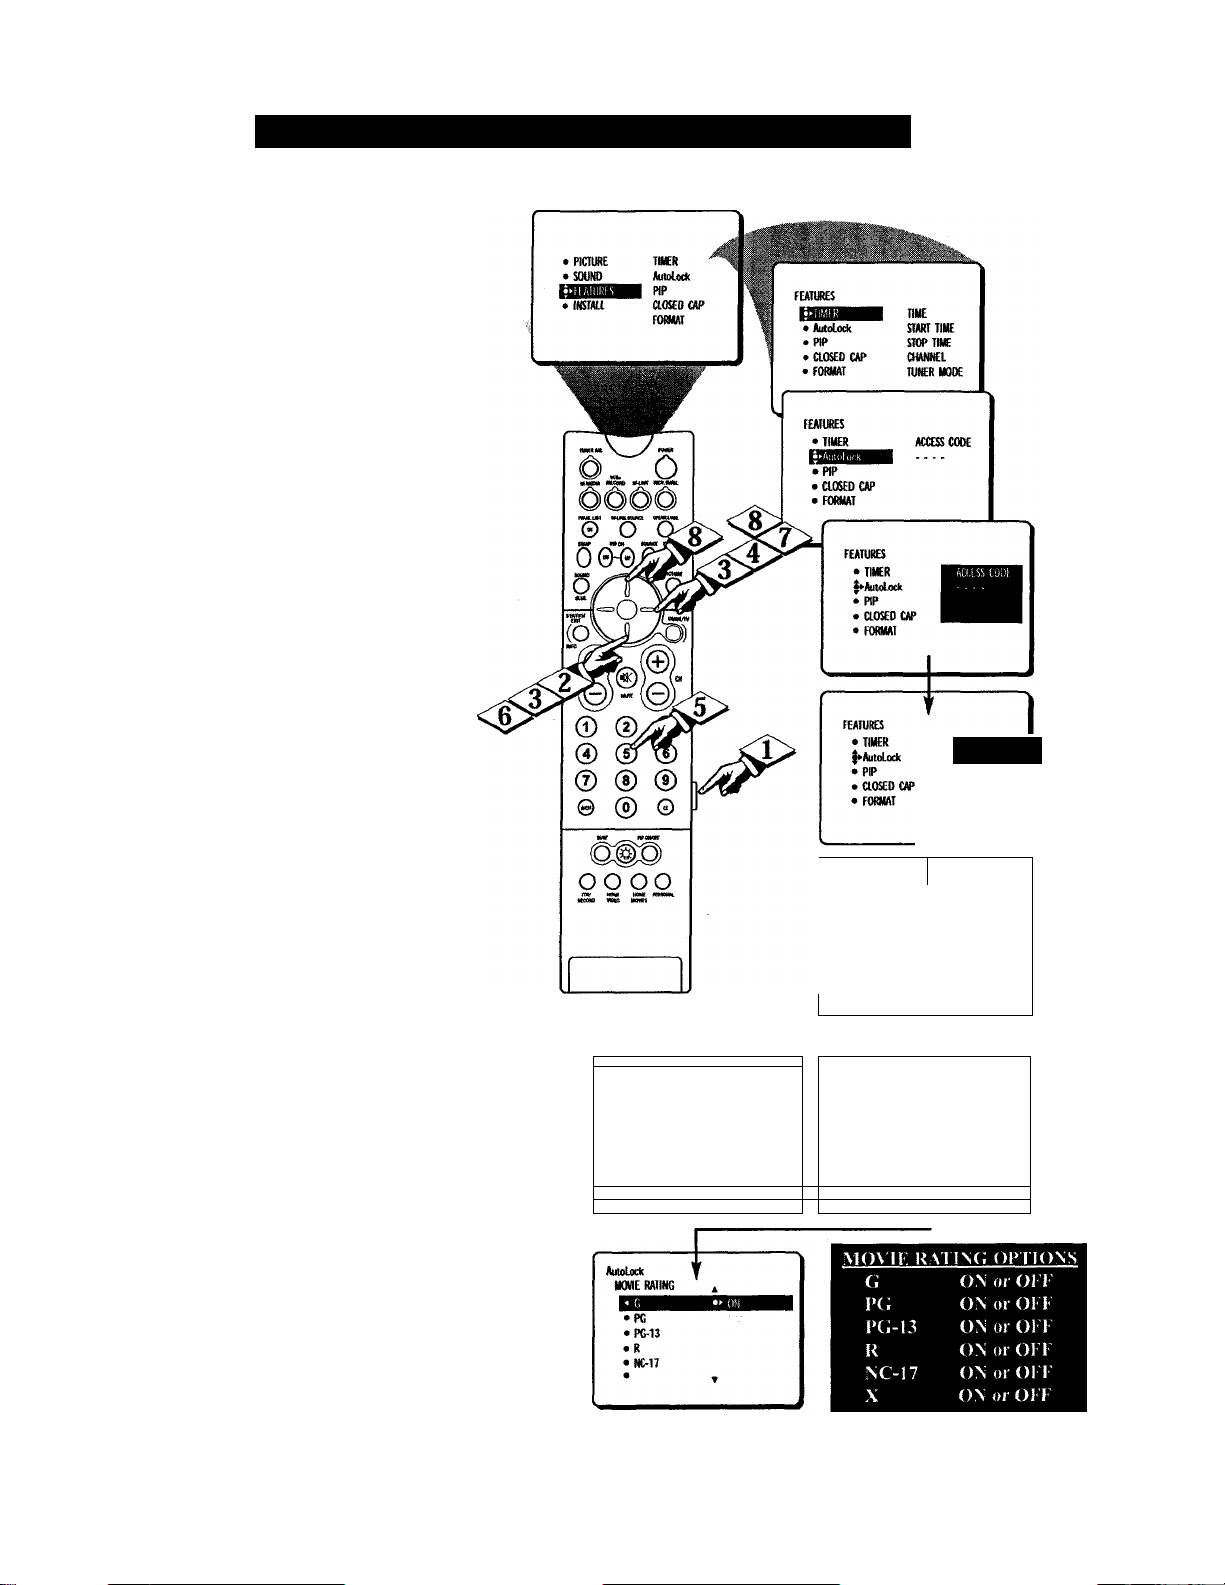
AuToLocK^'* - Blocking by Movie Rating
After your personal access code
,/j.has been set (see page 20), you
can select specific movie ratings
that you want to censor.
(.PBigIlSU
Press the MENU button on
the remote control to show the
onscreen menu.
I
Press the CURSOR RING
<l>
DOWN twice to highlight FEA
TURES.
Press the CURSOR RING
RIGHT and the menu will shift to
the left. Then press the CURSOR
RING DOWN once to highlight
the AutoLock control.
Press the CURSOR RING
"" RIGHT again to highlight
ACCESS CODE.
Enter your four-digit
‘ ACCESS CODE. CORRECT m\\
flash very briefly in red and the
menu will move to the left with
BLOCK CHANNEL highlighted.
ACCESS CODE
K X ): X
Press the CURSOR RING
" DOWN repeatedly until MOVIE
RATING is highlighted.
Press the CURSOR RING
RIGHT and the Rating menu shifts
to the left with G highlighted.
T
Press the CURSOR RING UP
<l>
or CURSOR RING DOWN to
highlight each rating you want.
Then press the CURSOR RING
RIGHT to turn the rating ON or
OFF. Turning the rating ON will
block programs with that rating
from being seen.
<|> Press the STATUS/EXIT but-
" ton to remove the menu from the
screen.
NOTE: When a rating is turned
ON, all higher ratings also will be
turned on automatically. For exam
ple, if the
R rating is turned on, the
NC-17 and X ratings also will be
turned on.
-----------------------------1-------------------------------FEATURES T AutoLock
AuttiLock 4
• SEOCA CHAMNEl fi
• SETUP COOE PC • PG
• ClEAR AU PC-T3 • PG-13
1^031^1^11 R
• TV RATING Ne-T7
• V • T
< ' '
-
---------------------------------
AutoLodc
tMHUMIHHiiM » m
•SOUP coot
• UEARAU
• MOVIE MTING T
• IV RATING
•
........................................................
MOVIE RATING ^
• R
• N017
A
T
... ...................
I
m
AU
2
——IM
23
Page 30
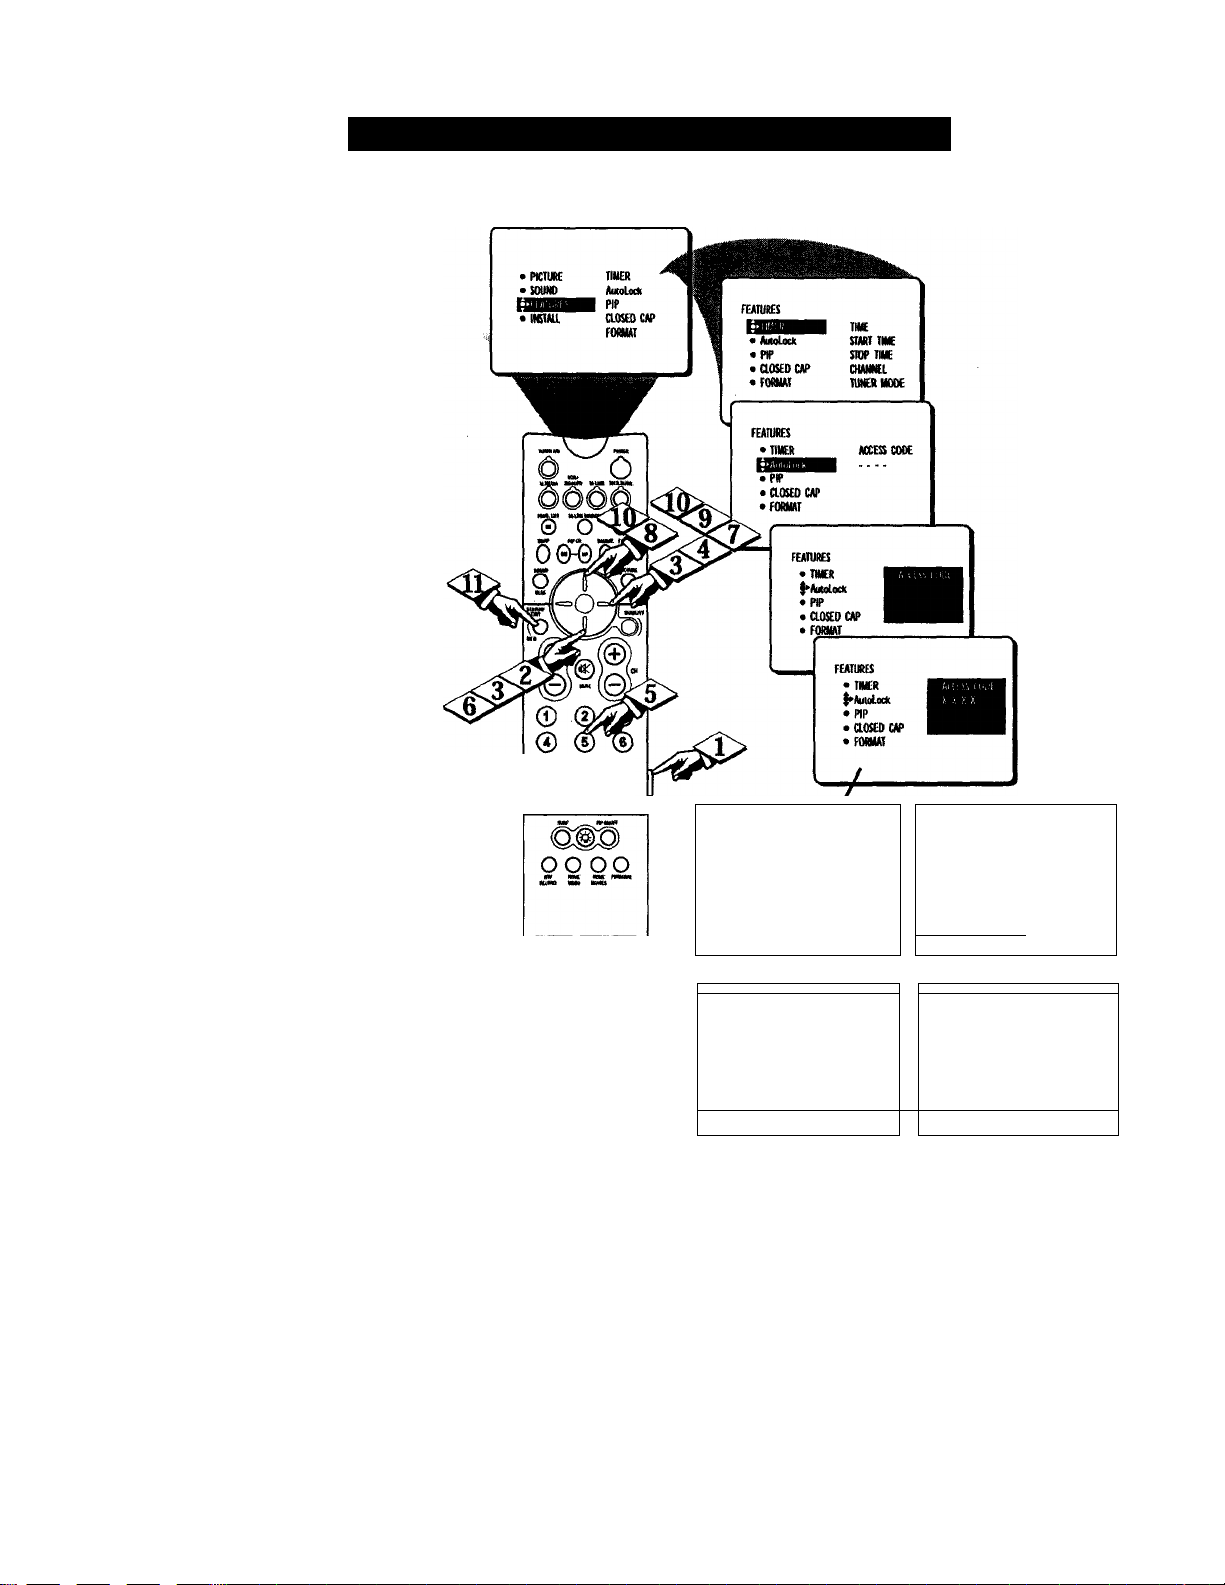
Ai roLocK* "^’ - Blockinc; by TV vn\c
T7&M also can select specific TV
£ ratings that you want to censor
by following these steps.
CUfiuD
Press the MENU button on the
remote control to show the
onscreen menu.
T
Press the CURSOR RING
DOWN twice to highlight FEA
TURES.
I
Press the CURSOR RING
<l>
RIGHT and the menu will shift to
the left. Then press the CUI^OR
RING DOWN once to highlight
the AutoLock control.
Press the CURSOR RING
RIGHT again to highlight
ACCESS CODE.
I
Enter your four-digit ACCESS
<fe
CODE and the menu will move to
the left with BLOCK CHANNEL
highlighted.
Press the CURSOR RING
DOWN repeatedly until TV RAT
ING is highlighted.
t
Press the CURSOR RING
<l>
RIGHT and the menu will shift to
highlight the TV RATING options.
I
Press the CURSOR RING UP
or DOWN to select a rating.
t
Press the CURSOR RING
<l>
RIGHT or LEFT to turn the block
on the rating ON or OFF.
NOTE: More specific subratings
(for violence, sexual content, dia
logue, or fantasy violence) are avail
able for TV-Y7, TV-PG, TV-14, and
TV-MA.
<1^ To access these subiatings, press
■the CURSOR RING RIGHT.
Press the CURSOR RING UP or
DOWN to select the subrating that
you want to block or unblock. Then
press the CURSOR RING RIGHT
or CURSOR RING LEFT to turn
the block on the subrating ON or
OFF.
^ Press the STATUS/EXIT but-
<0>.
" ton to remove the menu.
© ® ®
© ® ©
FEATUKS
Aoutock
• setup coot
• CLEAR JU. ALL
• MOVIE RAIING
• lyRAHNG
•
-----------------------J--------------------------Auuleck f
TV RATING A
• w-e
• IV-PG • iv-re
• TV-14
• T
TV-Y: (AH childiai ThLi program b designed to he appmimate for all chiktren.) D«iigmd for a very young audience, including
children ages 1-6. This type of pmgtmnniing is not expected to fn^ten younger children.
TV-Y7: (Directed to Older Children - Thb program b designed for children age 7 and above.) It may be more appropriate for chil
dren who have aa)uircd the development skilhi needed to distinguish between make-believe and really. This pcognunming may
include mild Ihniasy and comic violence (FV).
TV-G: (Geireinl Audience ~ Most parenb would find thb program sullable. for all ages.) This type of piagtanuning contains little
or no violence, no strong language, and little or no sexual dialogue or sUuations.
TV-PG: (Parental Guidance Suggested - Thb program contains maleiial thatparenis mayfind unsuitable for younger children.)
This type of programming conlaiiui one or more of the following: some suggestive dialogue (D), iniretiuent coarse language (L),
.some sexual .situations (S), or moderate violence (V).
TV-14: (Patents Strongly Cautioned ~ Thb program contains some material that mmyimrenis would find unsuitableJbr children
under 14 years of ¡me.) This type of programming contains one or more of the following: intensely suggestive dialogue (D): -strong,
coarae language (L); intense sexual situations (Sy, or intense violence (V).
TV-MA: (Mature Audience Only - Thb program a specifically designed to be viewed by adulb and therefore may be unsuitable for
children under 17.) This typo of programming conltuns one or more of the foltawing cnalc, indecent language (L); explieil .sexu^
situations (S); or graphle violence (V).
A
1 •►AV2
▼
m
1
2
FEA1URES
^
__________
Aulolodi
-►
hacUcK
• BtOOICHAWEl
•SEW CODE w-n
• CEEWN-l
• MOVIE RMING
•
L
TVMII№ 1
• WO
• nr-14
• •
A
IV-G
W-PG
WM
T
24
Page 31
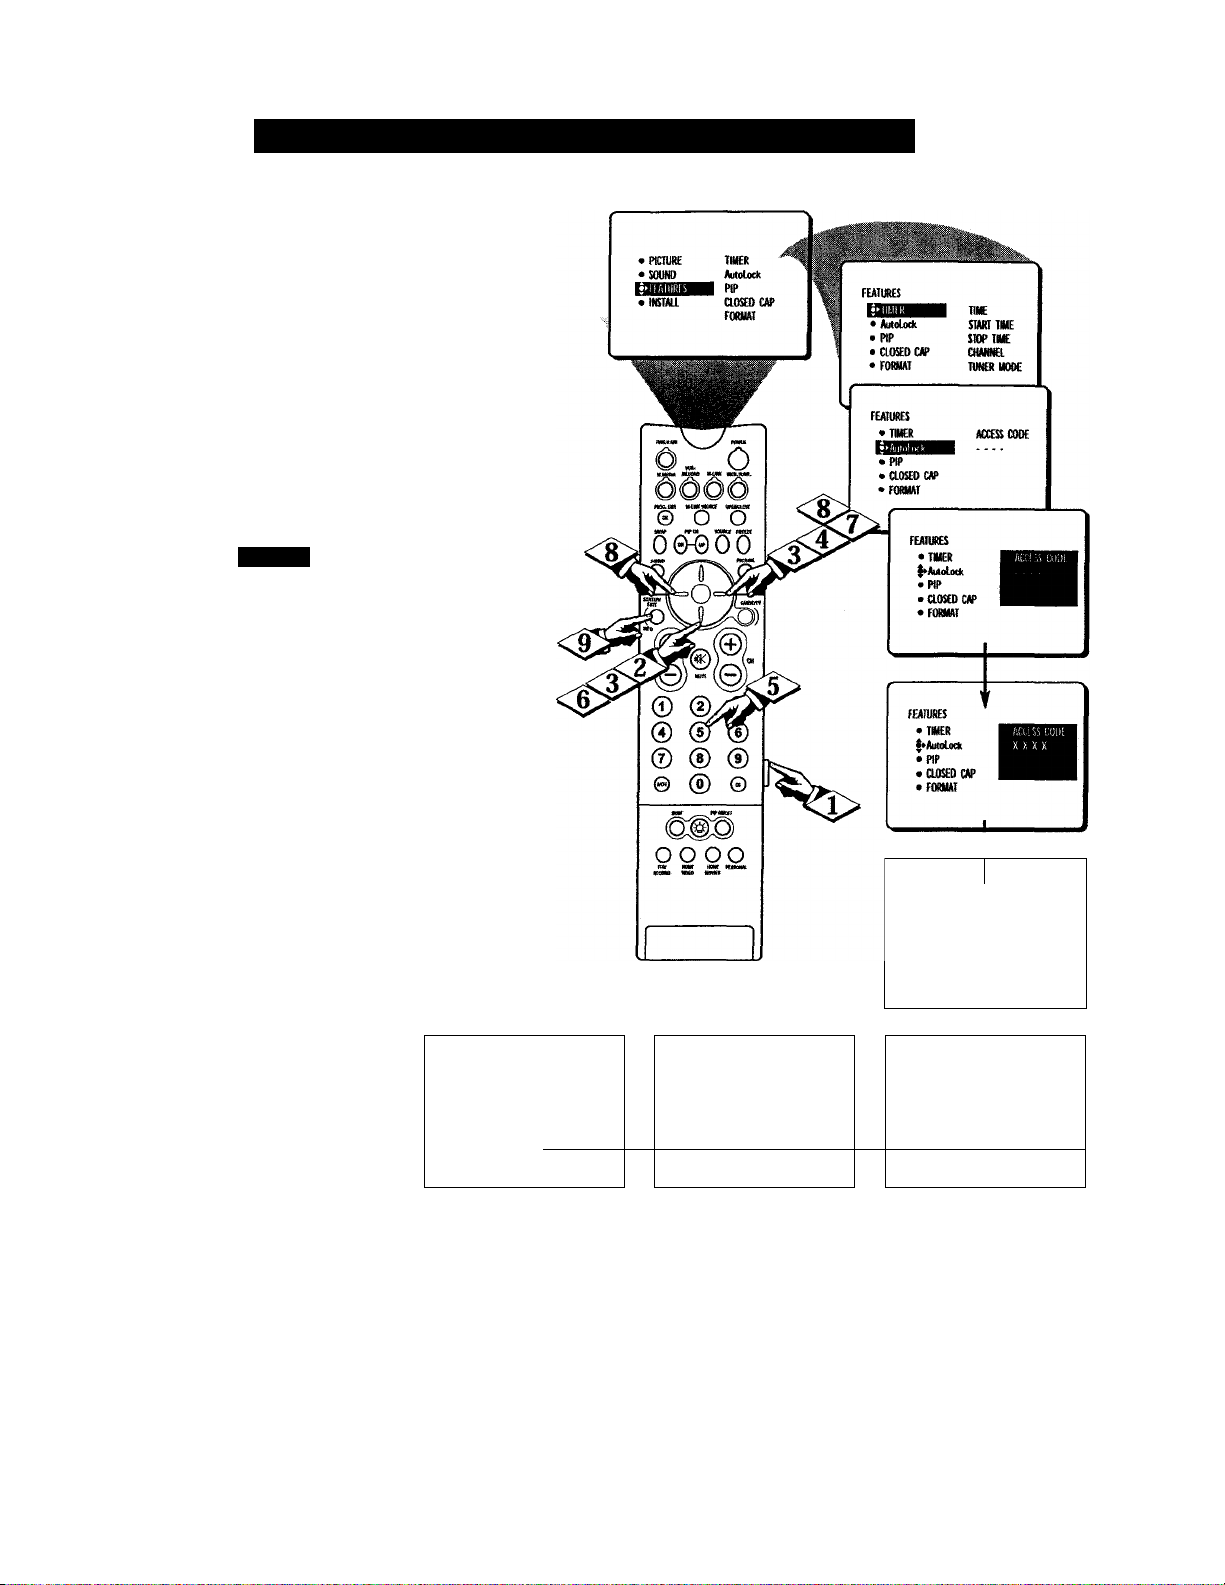
AuToLocKTf^i - Turning Block ON or OFF
fie BLOCKING control is what
J
can be thought of as the "mas
ter switch "for AutoLock™. This
control affects the settings you have
chosen for blocking programs
according to movie ratings or TV
ratings, or for blocking programs
that have no rating or are unrated.
When the BLOCKING control is
OFF, the blocking or censoring of
programs is disabled. When the
BLOCKING control Ls ON, block
ing will occur according to the set
tings you have chosen. Follow
these steps to toggle BLOCKING
OFF or ON.
Press the MENU button on the
<i>
remote control to show the
onscreen menu.
I
Press the CURSOR RING
<$>
DOWN twice to highlight FEA
TURES.
\
Press the CURSOR RING
<s>
RIGHT and the menu will shift to
the left. Then press the CURSOR
RING DOWN once to highlight
the AutoLock control.
i
Press the CURSOR RING
RIGHT again to highlight
ACCESS CODE.
I
Enter your four-digit
ACCESS CODE and the menu
will move to the left with BLOCK
I
CHANNEL highlighted.
<|> Press the CURSOR RING
I DOWN repeatedly until BLOCK
I OPTIONS is highlighted.
<J> Press the CURSOR RING
■ RIGHT to enter the BLOCK
OPTIONS menu. BLOCKING will
be highlighted.
<|> Press the CURSOR RING
RIGHT or LEFT to toggle
BLOCKING ON or OFF.
<|> Press the STATUS/EXIT but
ton to remove the menu.
<1^
FEATURES f AutoLock
AutoLock
• SETUP CODE
*a m ALL
• MOVIE RATING
• TV RATING
iSHBISSBIIIIliIil
BLOCKING
BLOCK UNRATED • SLOCK UNRATED
NO RATING
BLOCK OPTIONS i
• NO RATING
FEATUMS '
AutoLock
HHIllllHIMiWI w AV2
•SOUP CODE
• CLEAR Aa ALL
• asm RATING
• IVRATa№ 2
•
AuttAock
Buxxomntfi 1
• SLOCK UNRATEO
• NO RATING
I
'
m
T
f
.................
t
25
Page 32
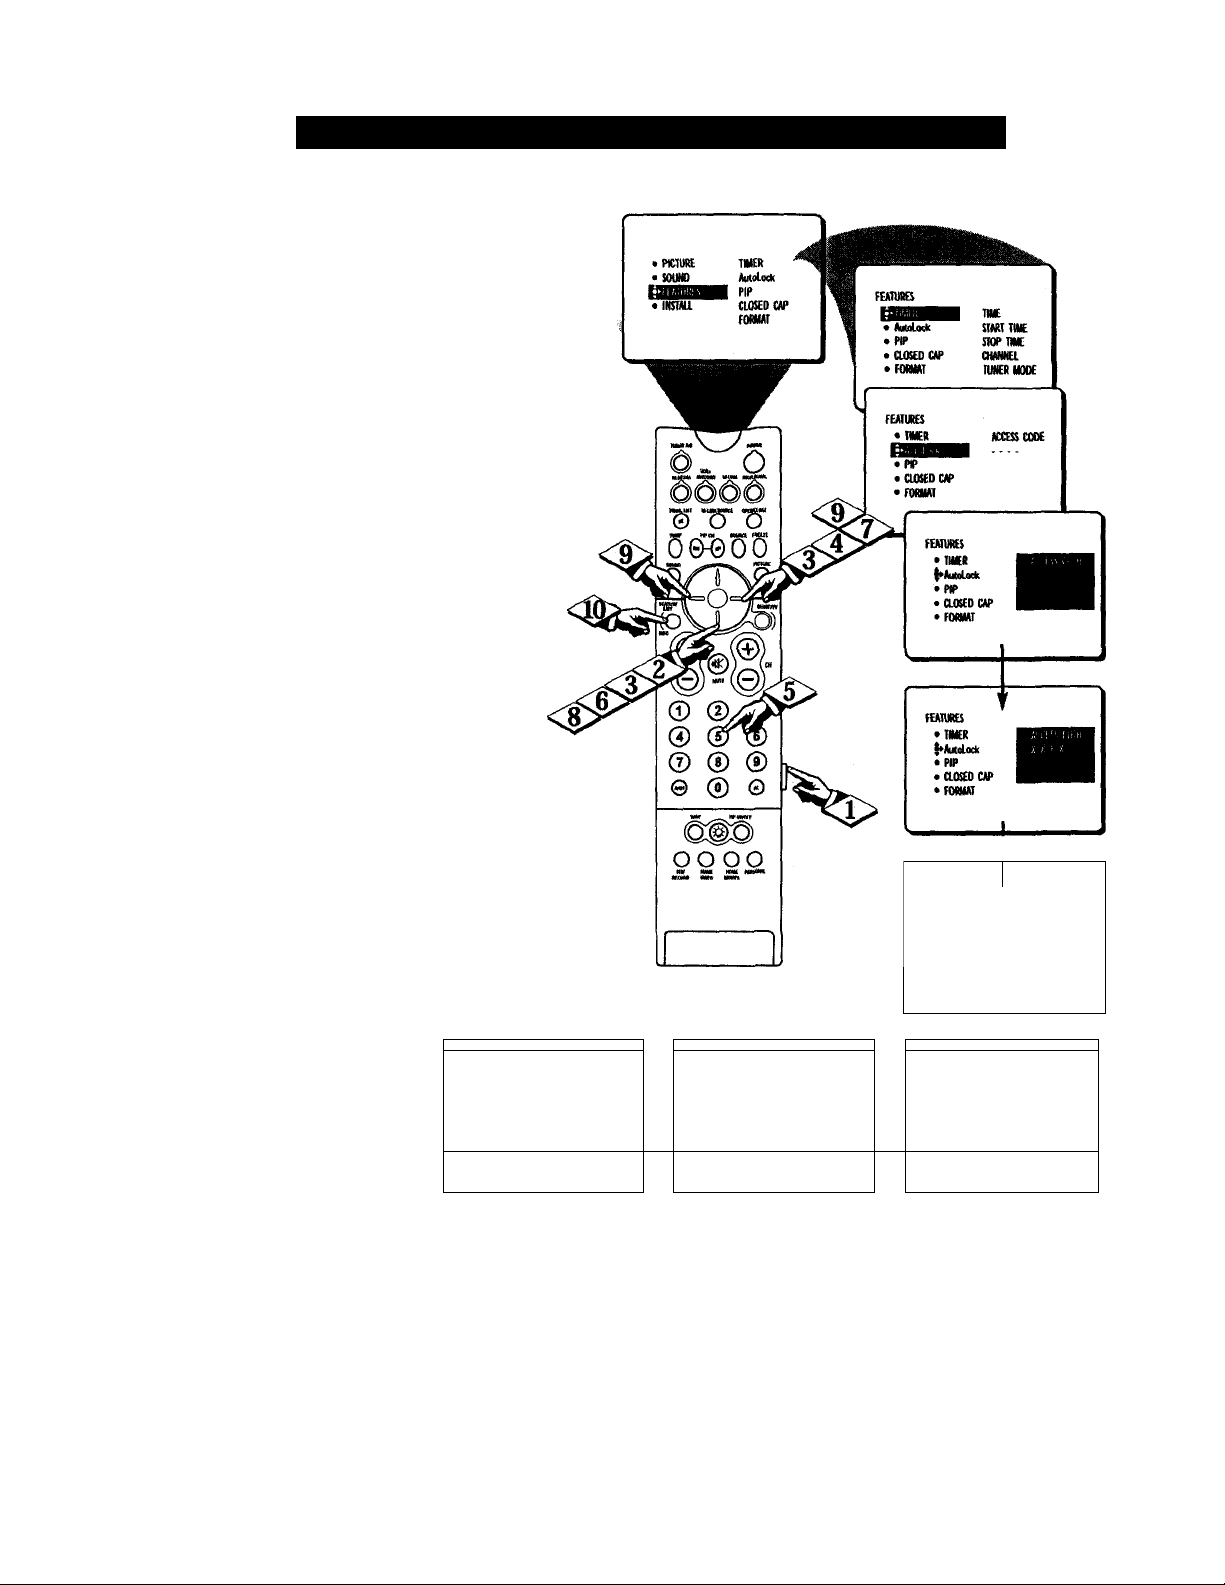
Al rol.ociv*’'* - Blockinc; Unrati:d Broadcasi s
Tn addition to blocking specific
J. ratings or channels, you may
choose to block all programming
that is unrated.
UBECIW
Press the MENU button on flie
remote control to show the
onscreen menu.
I
Press the CURSOR RING
<l>
DOWN twice to highlight FEA
TURES.
I
Press the CURSOR RING
<l>
RIGHT and the menu will shift to
the left. Then press the CURSOR
RING DOWN once to highlight
the AutoLock control.
Press the CURSOR RING
RIGHT again to highlight
ACCESS CODE.
(
Enter your four-digit
ACCESS CODE and the menu
will move to the left with BLOCK
I
CHANNEL highlighted.
<|> Press the CURSOR RING
“I DOWN repeatedly until BLOCK
I
OPTIONS is highlighted.
Press the CURSOR RING
<P
RIGHT to enter the BLOCK
OPTIONS menu. BLOCKING will
be highlighted.
Press the CURSOR RING
‘ DOWN once to select BLOCK
UNRATED.
Press the CURSOR RING
RIGHT or CURSOR RING
LEFT to toggle BLOCK UNRAT
ED ON or OFF.
Press the STATUS/EXIT but
<0>
ton to remove the menu.
----------------------------1----------------------------FUIURB T
IMoLock
• SCTUI> CODE BLOCKING
• CLEM! AIL BLOCK UNRATED
• MOVIE RADNG NO BATWO
• W RATING
iSRMiiffiflm
OwiMl 12
BtacM liy Aixoliick
Umutd
haa Code
FEAIUffiS '
ftuUiMk
•SERPCOOe
• aciKAU AU
• WWIflUTING 1
• IVUITING
•
Auiolock
BLOCK OPIlONS < BLOCK OPIlOW 1
• BLOCKING
•NORADNO
r T
NOTE: If the BLOCK OPTION, BLOCK UNRATED
control is turned ON, all unrated programs will display
the screen shown to the IcB. To watch the channel,
enter your access code or change the BLOCK UNRAT
ED option back to OPE.
Autolock
• BLOCKING
• NO RATING
'
A
m
2
f
1
______
26
Page 33
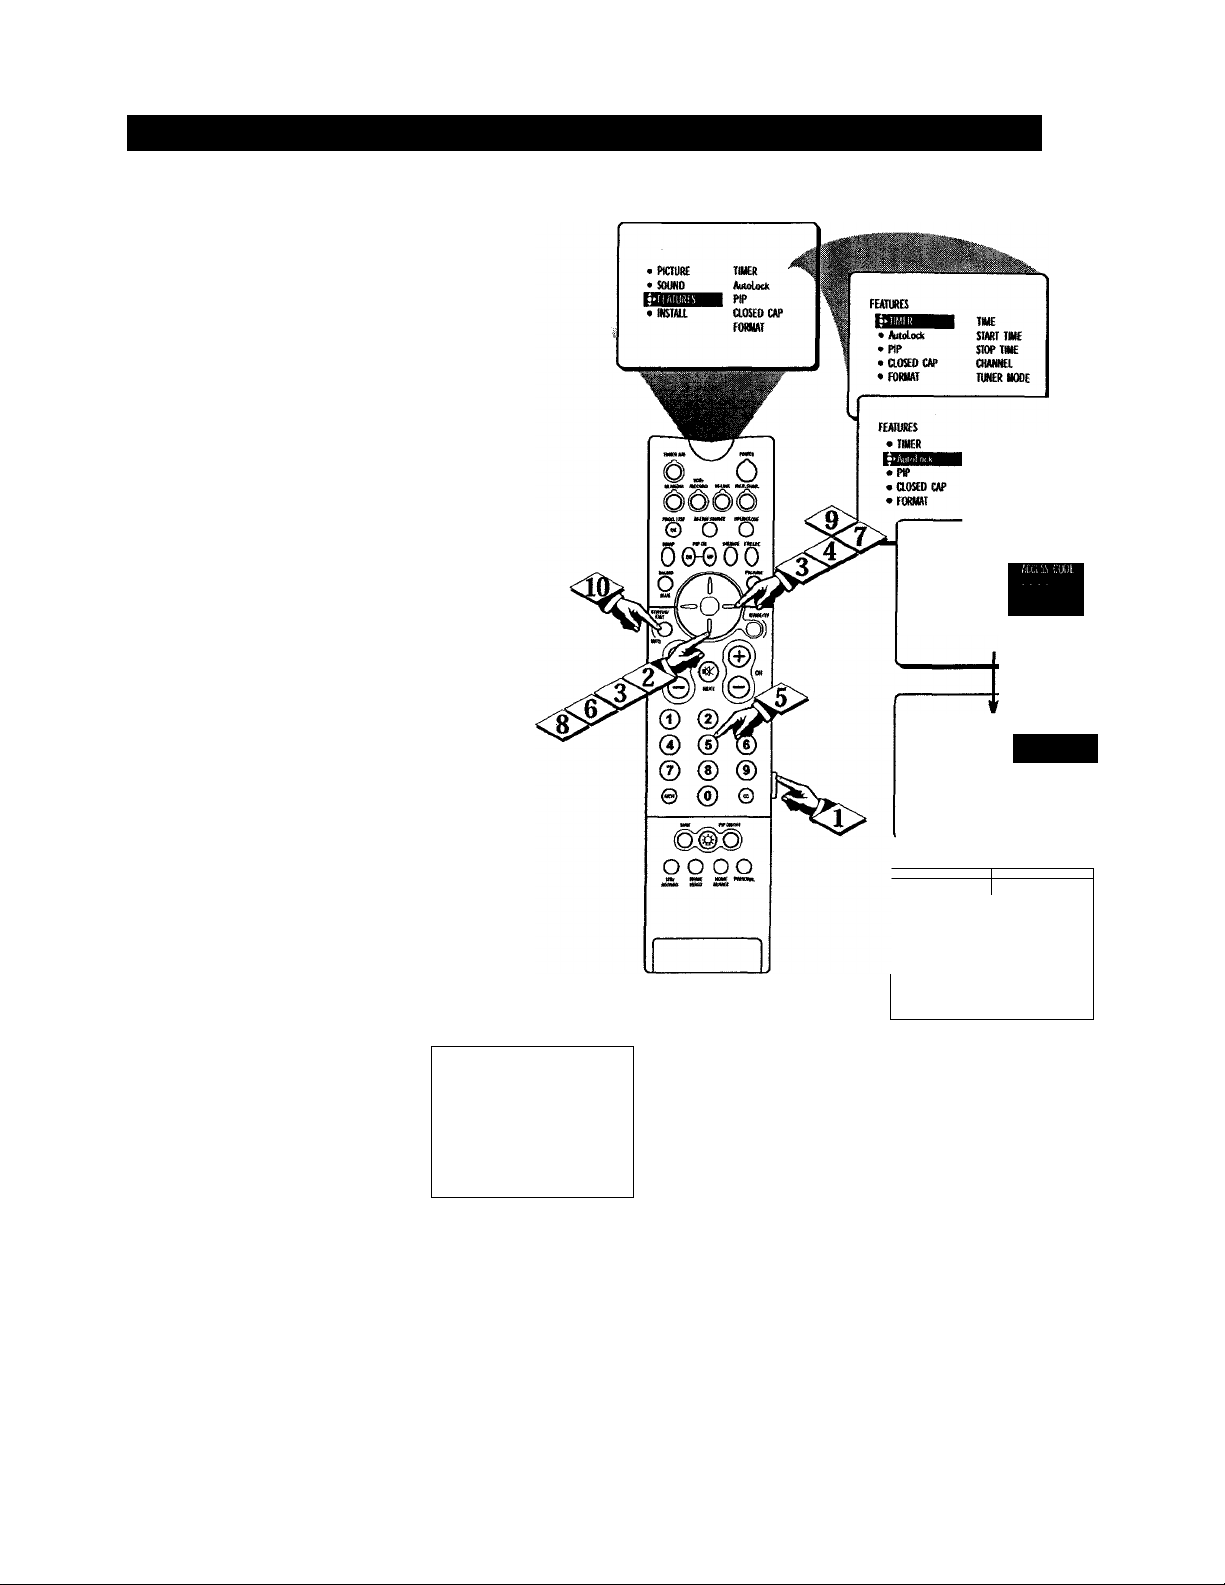
AuToLocK^^ - Blocking Broadcasts That Have No Rating
i^me programming is not encod-
kJed with content advisory data by
the MPAA (Motion Picture
Association of America) or the tele
vision broadcasters (see the expla
nation on page 19). To block such
programming, follow these steps.
CffEgHVlJ
Press the MENU button on the
I remote to show the onscreen menu.
Press the CURSOR RING
DOWN twice to highlight FEA
TURES.
(
<|> Press the CURSOR RING
RIGHT and the menu will shift to
the left. Then press the CURSOR
RING DOWN once to highlight
the AutoLock control.
Press the CURSOR RING
RIGHT again to highlight
ACCESS CODE.
I
Enter your four-digit ACCESS
<l>
CODE and the menu will move to
the left with BLOCK CHANNEL
highlighted.
<|> Press the CURSOR RING
' DOWN repeatedly until BLOCK
OPTIONS is highlighted.
Press the CURSOR RING
<l>
RIGHT to enter the BLOCK
OPTIONS menu. BLOCKING will
be highlighted.
<i> Press the CURSOR RING
DOWN button twice to highlight
NO RATING.
<l>
Press the CURSOR RING
RIGHT or CURSOR RING
LEFT to toggle NO RATING ON
or OFF.
FEATURES 7
AiAoLock
• SETUP CODE BLOCKING
• CLEAR AIL
• MOVIE RATING
• TV RATING
BLOCK UNRATED
NO RATING
AutoLock
BLOCK OPTIONS
• BLOCKING
• BLOCK UNRATED
ACCESS CODE
FEATURES
•IMER
I^AutoLodt
• PIP
• aOSEDCAP
• FORMAT
FEATURES
•TIMER
I^Aidolock
•PB»
• CLOSED CAP
•FORMAT
FEAHIRCS '
kAmiodk
iimiiiiMiiiiiHiH •* w2
•S£TI#>C00E
• UEARALL
• MOVIE RATMG 1
•TV RATING 2
•
AtRolock
BLOCK OPTIONS
• BL0CKI№
• BLOQl imTEO
<
A
▼
____________
X X X X
AV3
m.
i
COOL
'
Press the STATUS/EXIT but-
ton to remove the menu.
Channd 12
Btod«d by Autd^
No rsting
Access Code
27
NOTE: if the BL(X:KING OPTION, NO RATING
control is turned ON, all programs coiUaining NO con
tent advisory data will display the screen shown to the
left. To wiUch the channel, enter your access code or
change the NO RATING option back to OFF.
Page 34
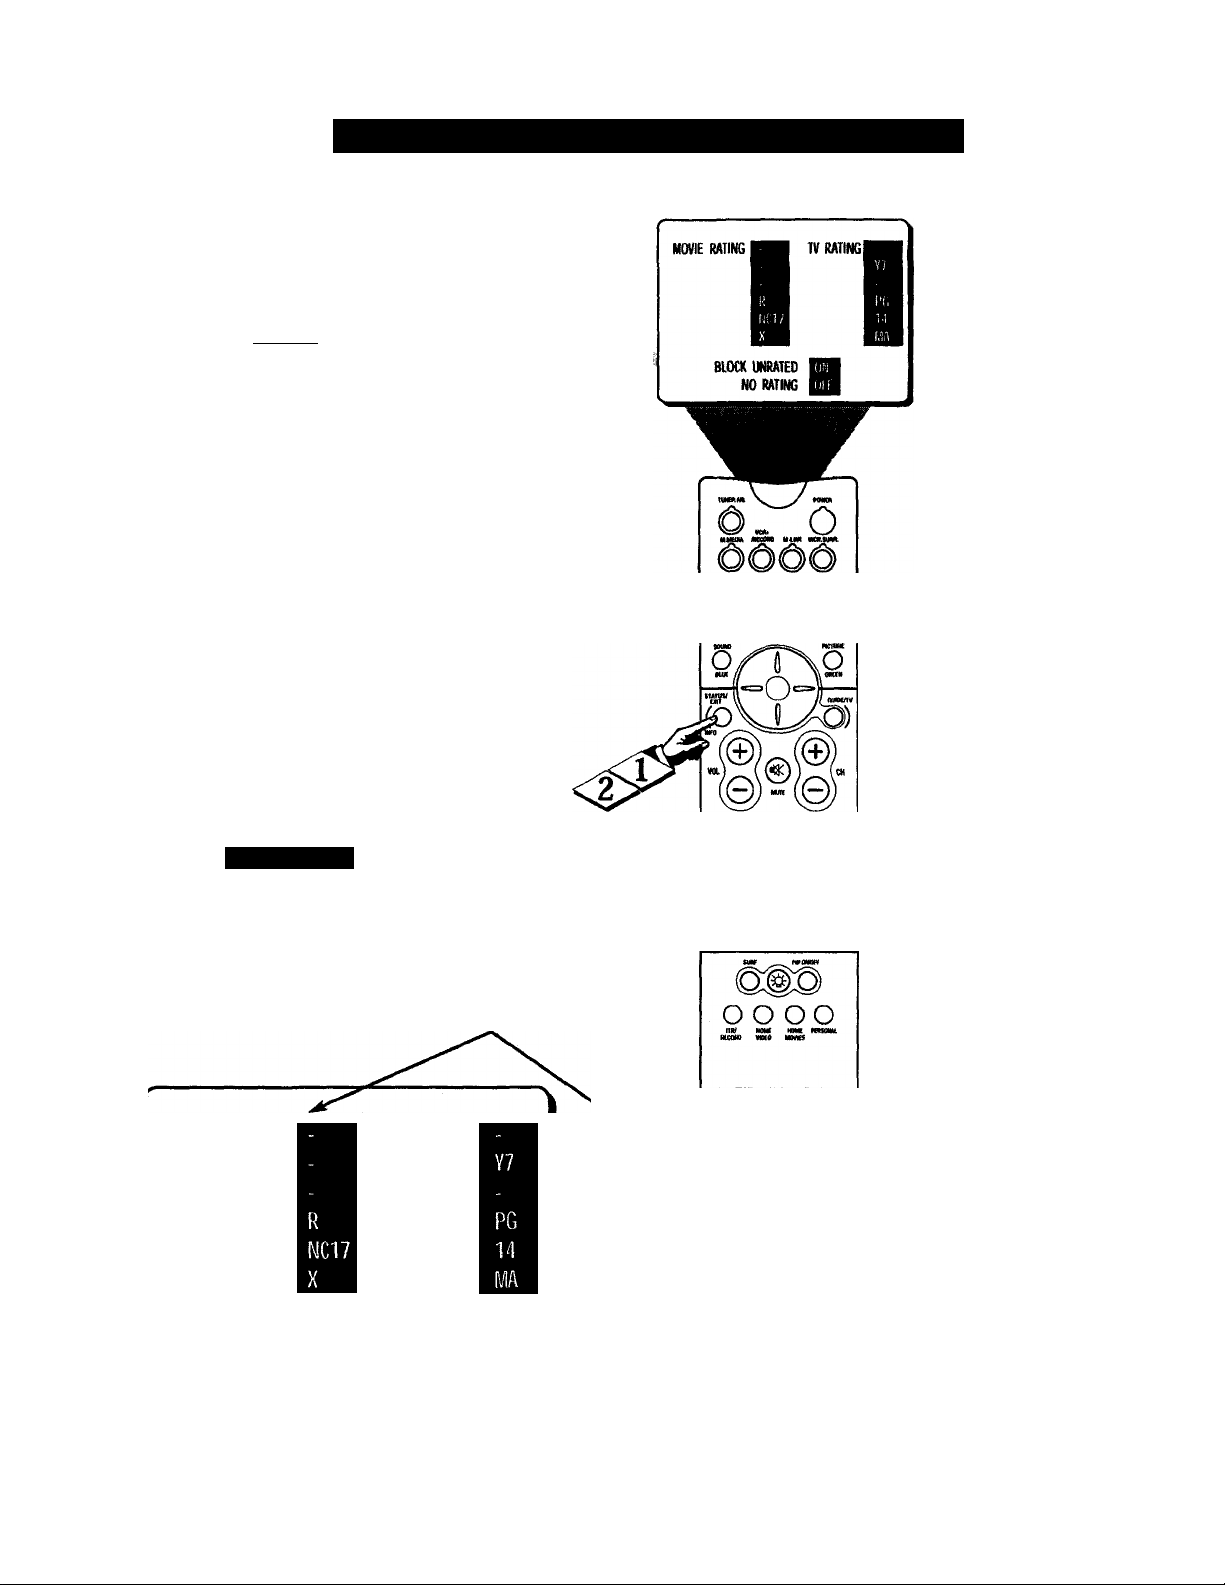
t> remind you which ratings you
have blocked and which Block
T
Options you have selected, a review
screen is available to review your
AutoLock™settings. To access this
screen follow the steps below.
IBEOIWU
<|> Press the STATUS/EXITbut-
" ton on your remote control twice.
Your AutoLock™ settings will
appear on the screen.
NOTE: If you have blocked specif
ic subratings, such as V for Violence
in the TV-PG category, these
blocked subratings will not appear
in the review. The subratings how
ever, are still blocked according to
your selections.
After a few seconds, the set
tings will leave the screen auto
matically, or you can press the
STATUS/EXIT button a third time
to remove them from the screen.
Au loLociv^^’ - Rkmi:\M\c Yoi r Skii incs
MMU«T IMlItWUllCt QHIglOW
^ O ^
mr wcH jQuncf fMcii
00-000
Smaui III I I'
Remember, the review
screen will appear only if
BLOCKING is set to ON. For
details, see page 25.
MOVIE RATING
BLOCK UNRATED
N0 RATING
TV RATING
©
0
®
® 0 0
0 0®
© 0 ©
MOVIG R A'llNCiiS - Shows all blocked movie ratings (hat were set within the MOVIE
RATING feature. Some or all may be blocked at one time. NOTE! If a lower ratitig is
blocked, higher ratings also will blocked automatically (for example, if R is set to be
blocked, AT also wilt automatically be blacked).
TV RATINGS - Shows all blocked TV ratings that were set within the feature. Some or all
may be blocked at one time. NOTE: If a lower rating is blocked, higher »tings also will be
blocked automatically (for example, if rV-f 4 is set to be blocked,
cally be Mocked). TV ratings also have aubratinga for Violence (V), Fantasy Violence (FV),
Sexual Situations (S), Coarse Language (L), and Suggestive Language (D). If the main rating
is aimed OFF but tlie subrating is turned ON, the program will be blocked; however, the rat
ing will not appear within the AutoLock review menu.
BLOCKUNRATED-Shows ON or OFF, depending mi the status of«» BLOCK UNRAT
ED feature.
BLOCK NO RATING - Shows ON or OFF, depending on the status of the BLOCK NO
RATING feature.
TV-MA also will automati
28
Page 35
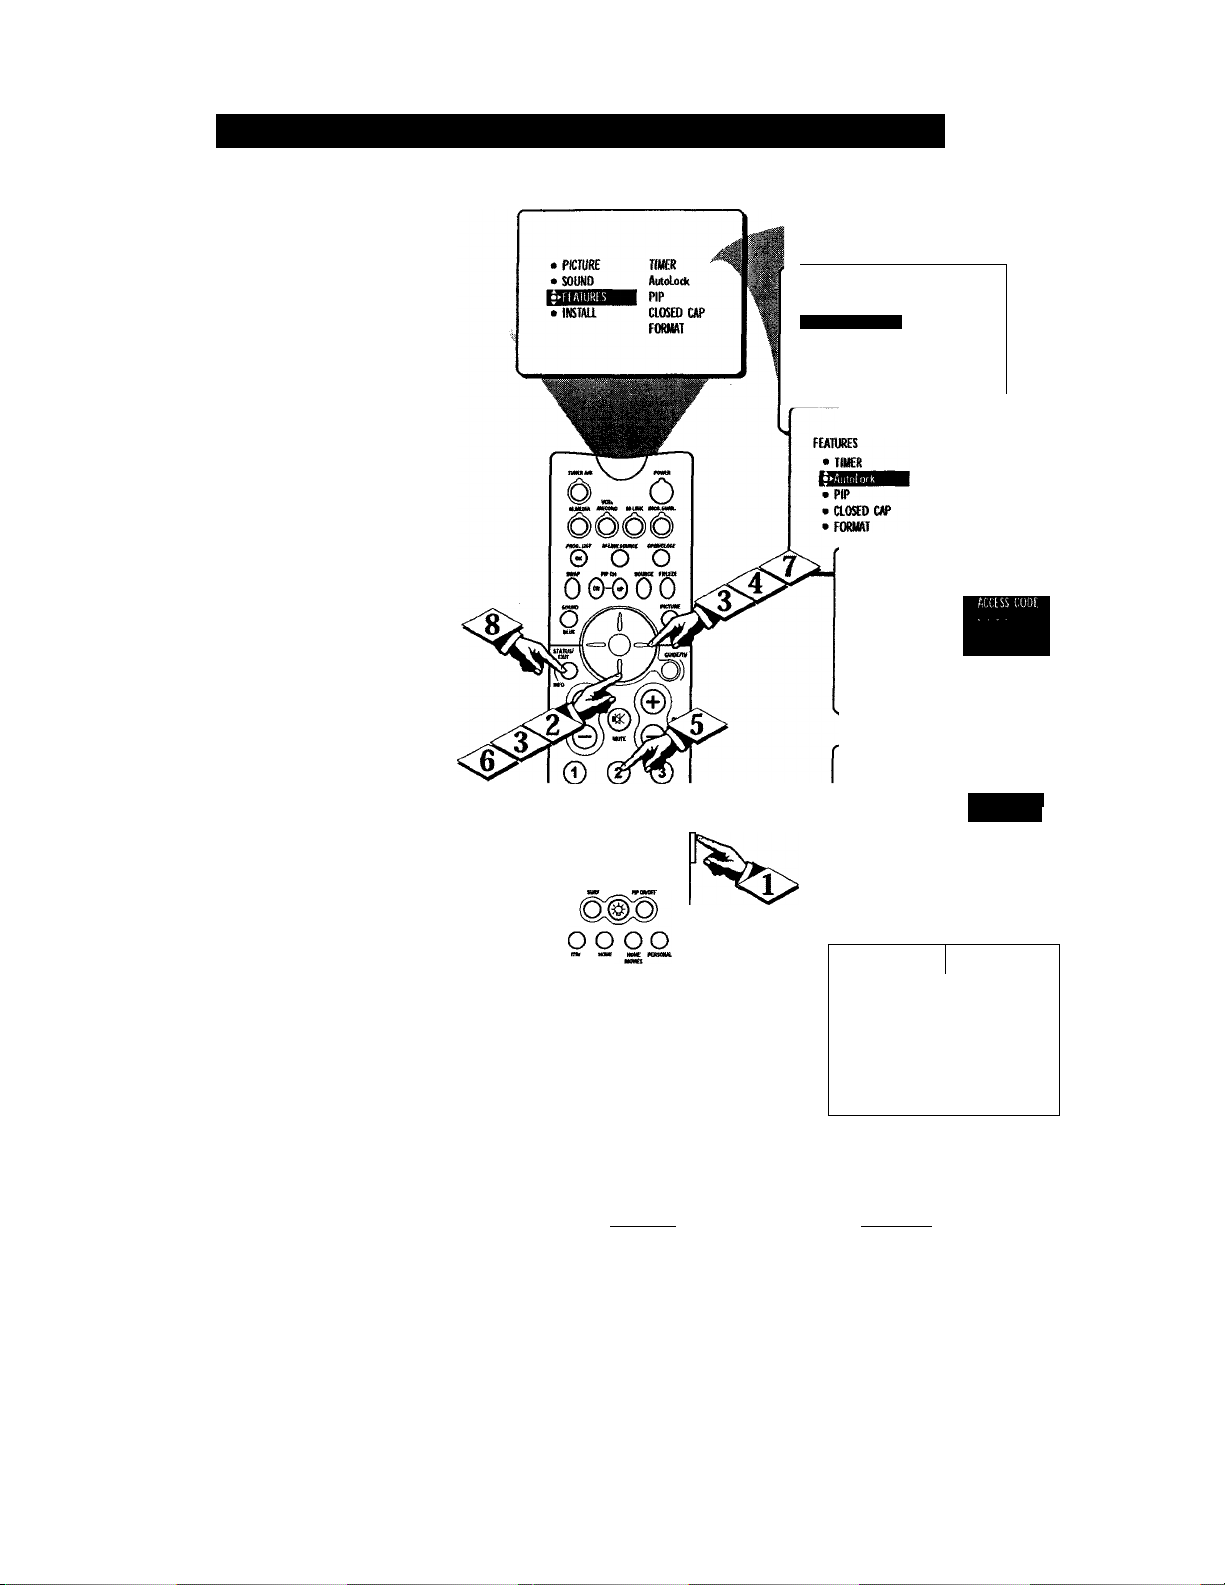
AuToLocK^^* - Viewing Blocked Programming
TVarious onscreen messages will
V appear when someone tries to
view blocked programming. The
message is determined by how the
current programming is blocked.
You may view the blocked program
ming and turn OFF the AutoLock'^
feature by clearing all blocking
options or by entering your access
code.
t BEGIN]
<i>
<|> Press the CURSOR RING
I DOWN twice to highlight FEA-
Itures.
<l>.
I
<|> Press the CURSOR RING
Press the MENU button on the
j remote to show the onscreen menu.
Press the CURSOR RING
RIGHT and die menu will shift to
dle left. Then press the CURSOR
RING DOWN once to highlight
the AutoLock control.
RIGHT again to highlight
ACCESS CODE.
(
<l>
Enter your four-digit
ACCESS CODE and the menu
will move to the left with BLOCK
CHANNEL highlighted.
Press the CURSOR RING
DOWN twice to highlight CLEAR
ALL.
T
Press the CURSOR RING
<p.
RIGHT twice. The CLEAR ALL
option will display the word
CLEARED. All blocked channels are
now viewable. This control clears
blocked channels only and will not
clear any channels being blocked by
Movie Ratings, TV Ratings, No
Rating, or Unrated settings.
0 © ®
® © ®
© © ©
accott M«fo
FEATURES
1 «»-IIMiR
• AutoLock
• PIP
• aOSEDCAP
• FORMAT
TIW
SMRTTiME
STOP TIME
CHANNR
TLMRMOOE
FEATURES
• TIMER
t»Au(olod<
• PIP
• aOSED CAP
• FORMAT
FEATUffiS
• nWR
t»Auatod(
• PIP
• CLOSED CAP
• FORMAT
FEATURES '
AutoLock
MmtiiiiiiiMii •» Av?
• S£T№C0D£
• aEARALL
• MOVIE RATING 1
• TV RATING 2
•
ACCESS CODE
Acciss cm
X X X X
.
...........................
J
A
AV3
ALL
i
..
Press the STATUS/EXIT but
<s>
ton to remove the menu.
If you tune to a specific channel
that has been blocked by BLOCK
CHANNEL or any of the
AutoLock™ RATING options, sim
ply enter your four-digit access
code to view the channel.
NOTE; this will imblock ALL
channels until the TV is shut OFF.
When powered back ON, all previ
ously blocked charmels will be
blocked again.
FEATURES
AutoLock
• BLOCK CHAWEL
» SETUP CODE
• MOVIE RATING
• TV RATING
29
______________T.....................
FEATURES
AutoLock
• BLOCK CHANNEL
» SETIff CODE
• MOVIE RATW6
• TV RATING
—
Page 36
*41
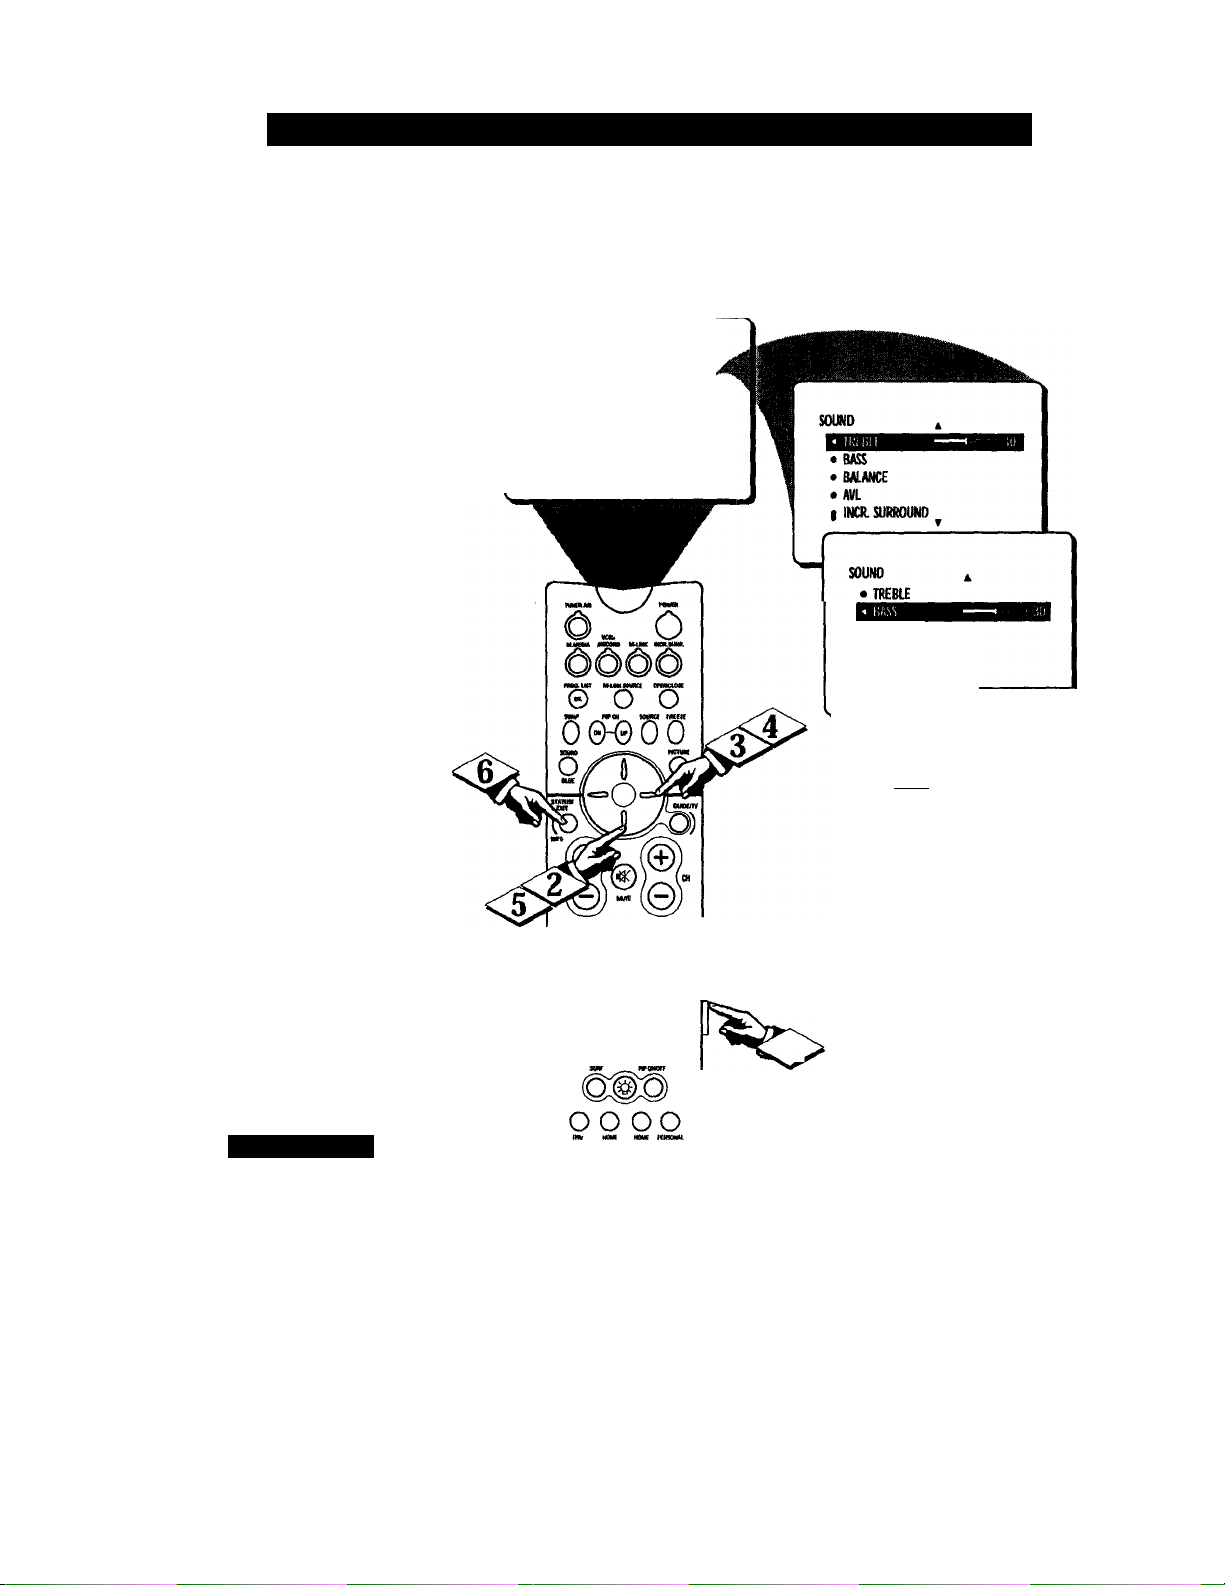
SoiiM) -Лш1 s i i.NCi rm: ì ki bi i:, Bass, and Bai anc i:
jnesides the normal volume level
£j control, your TV also has indi
vidual sound-adjustment controls.
The TREBLE (high jrequency),
BASS (low jrequency), and Speaker
BALANCE may all be used to
adjust the sound playback of TV
programs.
IBEOIWJ
Press the MENU button on the
remote control to show the
onscreen menu.
¡
<|> Press the CURSOR RING
|| DOWN once to highlight SOUND.
<p
Press the CURSOR RING
RIGHT and the menu will shift to
the left. TREBLE will be highlight
ed and an adjustment bar will be
shown to the right
Use the CURSOR RING
RIGHT or CURSOR RING
LEFT to adjust the TREBLE (high
frequency) level of the television’s
sound.
After adjusting the TREBLE
Ф
control, press the CURSOR
RING DOWN to select another
sound adjustment: BASS or BAL
ANCE. Press the CURSOR
RING RIGHT or CURSOR
RING LEFT to adjust the selected
control.
Press the STATUS/EXIT but
ton to remove the menu from the
screen.
Ф
• FEdTURK
• l№»U.L
0
© ®
© © ©
© © ®
© © ©
TREBLE
BASS
BALANCE
AVL
INCR. SURROUND
• BALANCE
• AVL
t INCH SURROUND
Щ ^
SOUND
• TREBLE
• BASS
ИЯЯ
• AVL
I INCR. SURROUND
1.
Smauì 111 i.i>
Remember, when the bar
Iscale is centered, speaker
BALANCE is centered between the
TV’s left and right side speakers.
WCCM WEO MtWKS
30
Page 37
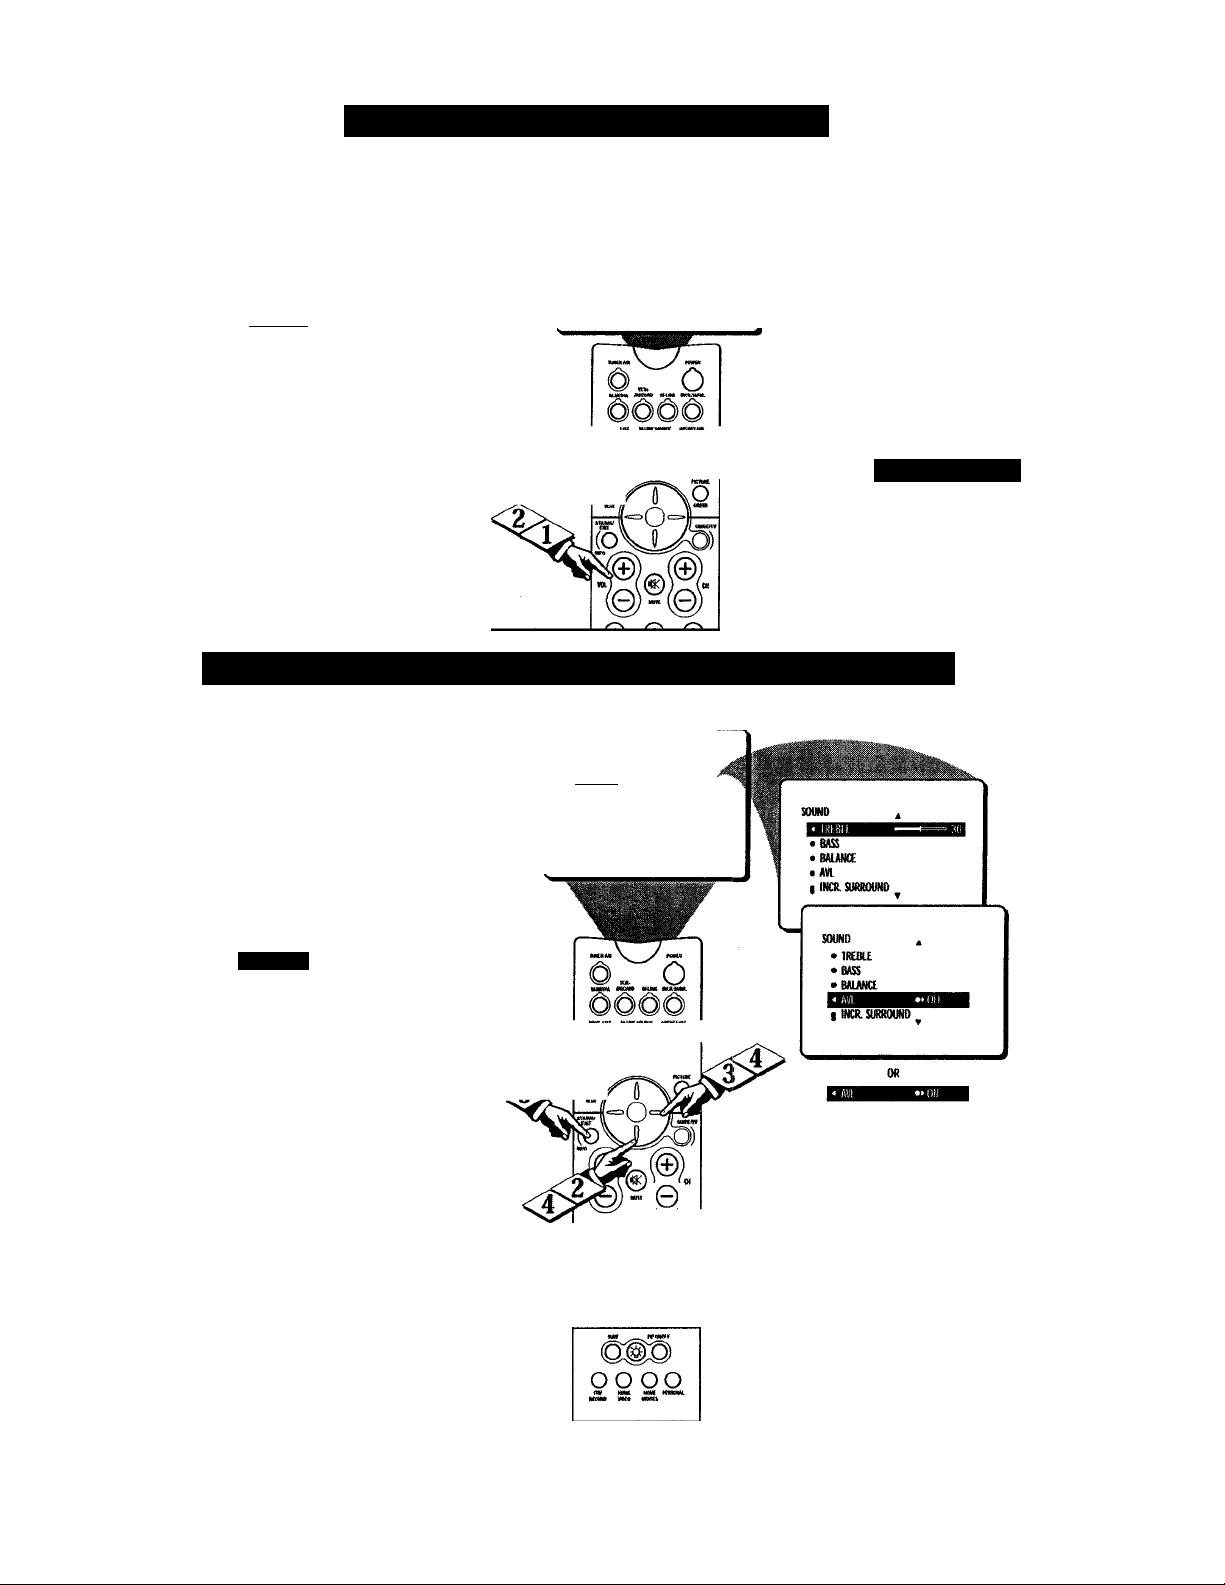
Sound - Adjusting the VolUiMe
|Se the Volume Bar control to see
the TV’s volume level settings
on the TV screen. The Volume Bar
will he seen each time the VOLUME
buttons (on the TV or remote con
trol) are pressed.
IBEGiWJ
<P> Press the VOLUME (+) or {-)
button on the remote control to
show the VOLUME bar display on
the screen.
Press the VOLUME (+) or (-)
button to adjust the television’s
sound level.
Sound - Using the AVL (Audio Volume Leveler)
WUIIE-
0 o o
am rtm amt mat
O&^OO
o,
SviAKT Hi;li>
_ Try it out. Press the VOL
8(+) and (-) buttons. The
VOLUME bar will appear near the
bottom center of the screen.
Jn most cases, the volume levels
1 coming from broadcast program
ming or commercials are never the
same. With the A VL (Audio Volume
Leveler) control turned ON, you can
have the TV level out sound that is
being heard. This makes for a more
consistent somd by reducing the
peaks and valleys that occur during
program changes or commercial
breaks. To turn the AVL ON, follow
these steps.
ninm
Press the MENU button on the
remote control to show the
onscreen menu.
(
Press the CURSOR RING
I DOWN once to highlight SOUND.
<|> Press the CURSOR RING
RIGHT and the menu will shift to
the left. TREBLE will be highlighted
I
and an adjustment bar will ^ shown
to the right
Press the CURSOR RING
<i>
DOWN repeatedly until AVL is
highlighted. Then press the CUR
SOR RING RIGHT or CURSOR
RING LEFT to toggle AVL ON or
OFF.
Press the STATUS/EXIT but
ton to remove the menu from the
ton to
screen.
4
• PlCIUffi IMBIE
• FUIUliES BAUWCE
• INSTttl «VL
INCIi. SURROiWD
0 O O
OG^OO
o.
(g)
© ® ©
® ® ®
® ® ®
© ® ©
31
Page 38
«»Il
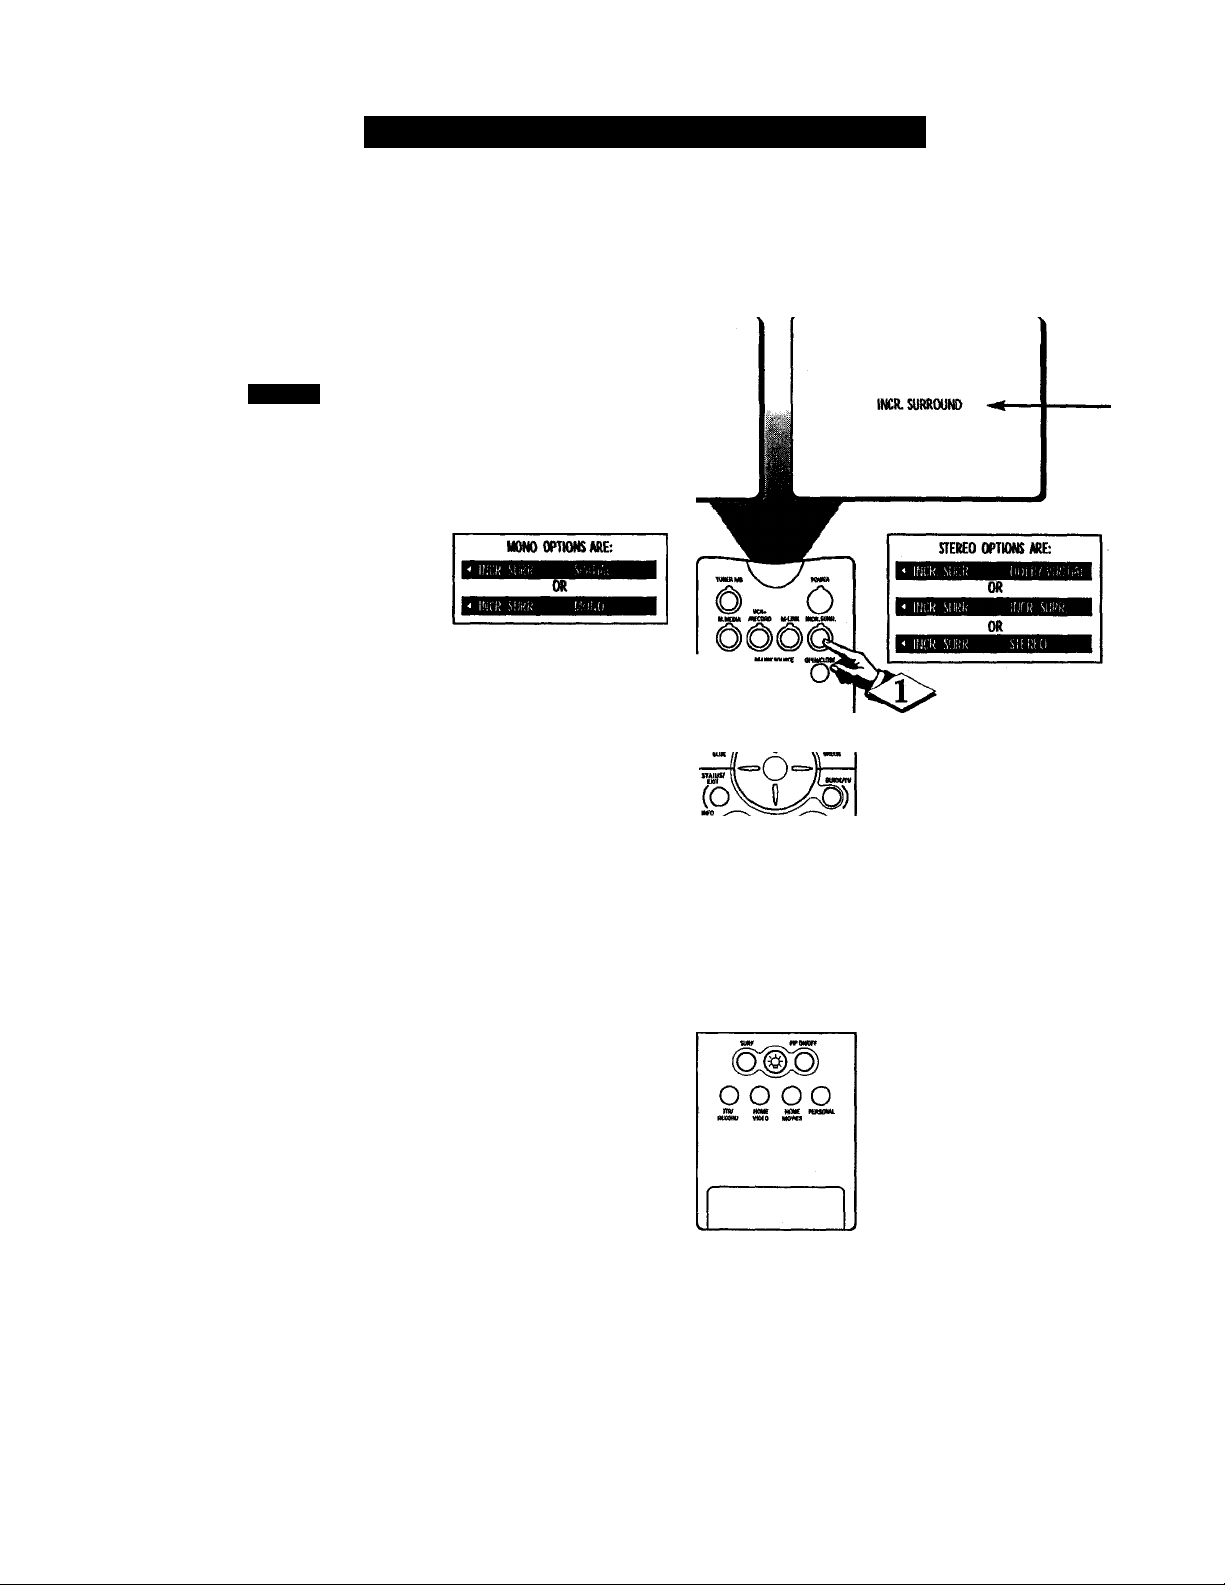
he Incredible Surround feature
J
adds greater depth and dimen
sion to both monaural (MONO)
and stereo TV sound. With the
control set to INCR. SURROUND
(Incredible Surround) or VIRTUAL
DOLBY SURR., the TV’s speakers
can add even wider sound separa
tion to normal broadcasts.
Sound ~ Usinc; Incrkdiblu Surround
Press the INCR. SURR. but
<3>
ton on the remote control to turn
the Incredible Surround feature
ON.
When the TV signal is being
received in Stereo, pressing this
button will give you three options:
STEREO, INCR. SURROUND,
and VIRTUAL DOLBY SURR.
When the TV signal is in MONO,
the choices displayed will read
SPATIAL or MONO.
OnscrecD menii o|Klan< for Incredible
Succovnd in MONO mode
NOTE: If the TV signal is being
received liem a mono source, press
ing the INCR. SURR. button will
cause either MONO or SPATIAL to
appear on the the screen.
SPATIAL - widens the sound, simu
lating a broader, fuller sound.
■ m\n
" o
MW N»«
0€H300
«0UV mniK
MMf nUIH
____
_____
q/TXq
(©)^(©)
“) ( w) (“
(@)-(@)
© ® ©
® ® ®
® ® ®
© ® ©
Onscreen mean options for Incredible
Surround in STEREO mode
NOTE; If the TV signal is being
received from a stereo source, press
ing the INCR, SURR. button will
toggle three choices: STEREO,
INCR. SURROUND, and VIRTUAL
DOLBY SURR
INCH. SURROUND - widens the
sound, simulating a broader, fuller
sound.
VIRTUAL DOLBY SURR - gives
the sensation of having full, rear sur
round sound. This feature gives a
3D sound effect like at theaters.
32
Page 39
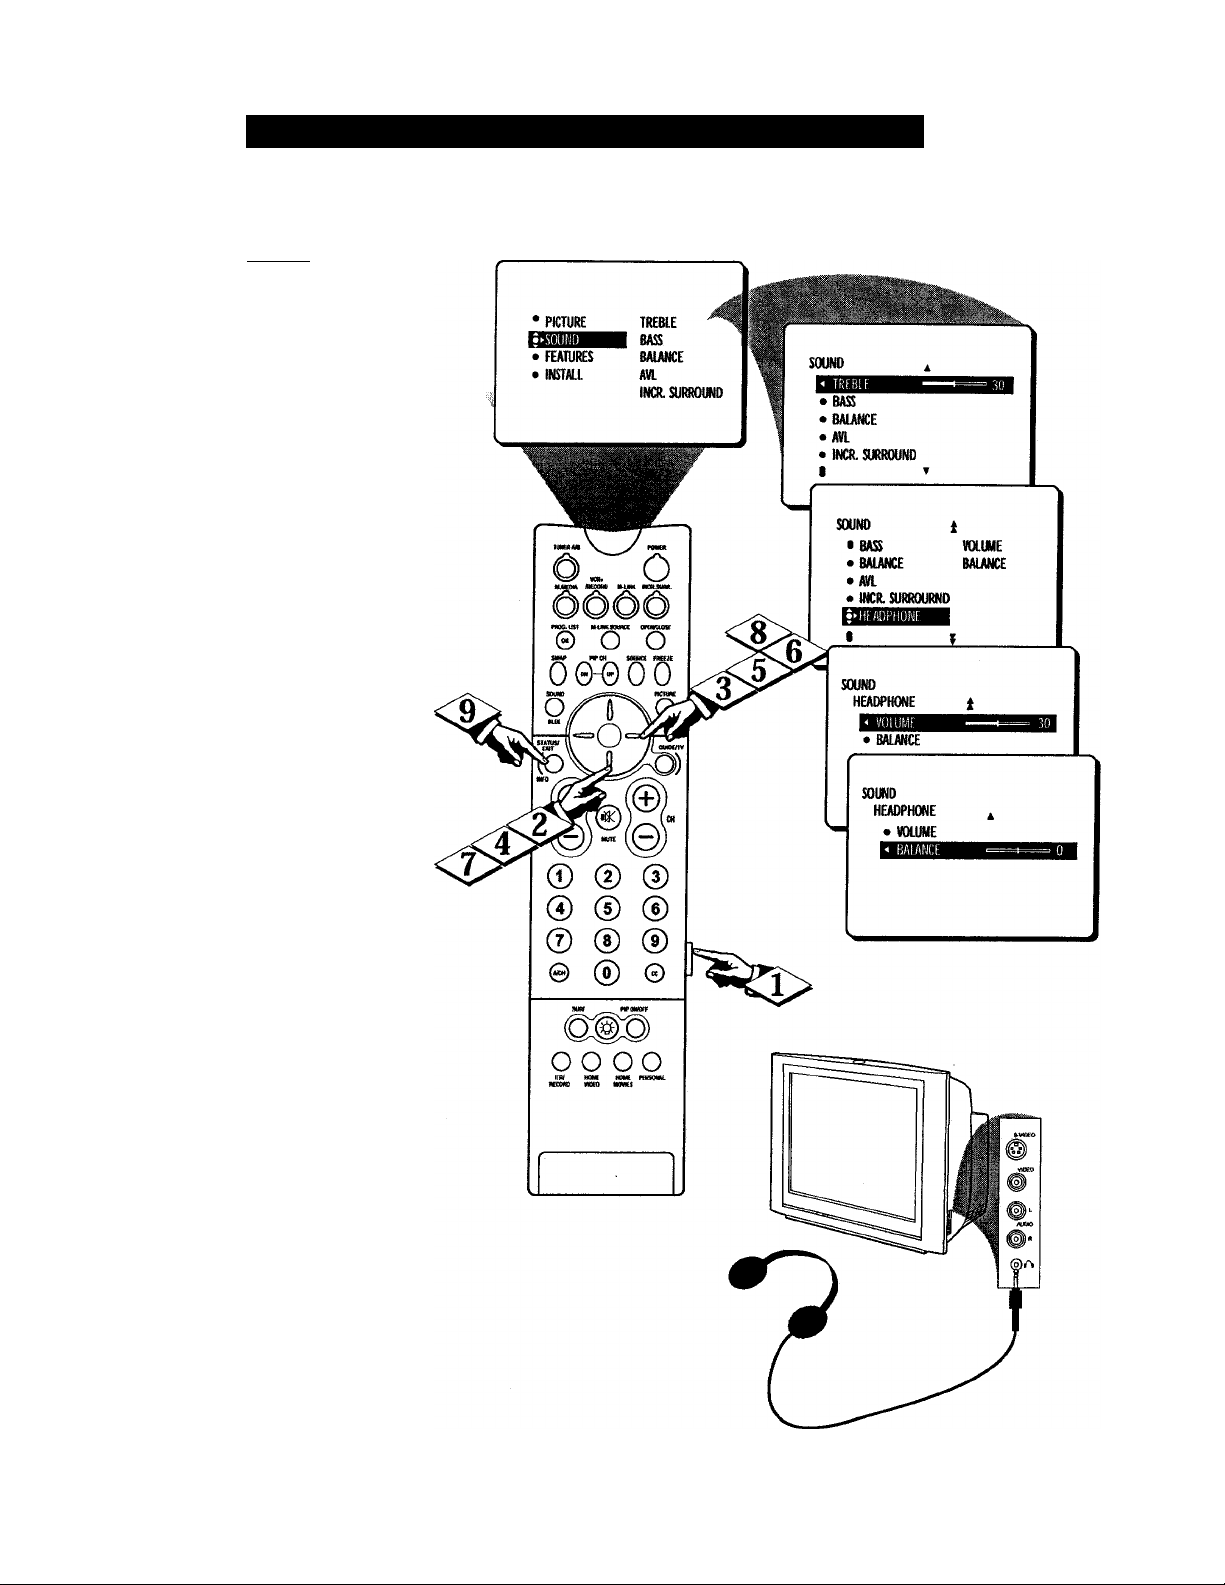
Sound - Adjusting the Headphone Settings
b adjust the sound volume and
J
balance of your headphones,
follow these steps.
tPECIWJ
Press the MENU button on the
I remote to show the onscreen menu.
<|> Press the CURSOR RING
I DOWN once to highlight SOUND.
<|> Press the CURSOR RING
RIGHT and the menu will shift to
the left.
I
Press the CURSOR RING
DOWN repeatedly until HEAD
PHONE is highlighted.
I
<|> Press the CURSOR RING
" RIGHT and the menu will shift to
the left. VOLUME will be high
lighted and an adjustment bar will
be shown to the right.
Press the CURSOR RING
RIGHT or CURSOR RING
LEFT to adjust the VOLUME set
(
ting.
Press the CURSOR RING
jj DOWN to highlight BALANCE.
<|> Press the CURSOR RING
RIGHT or CURSOR RING
LEFT to adjust the BALANCE
I
setting.
<|> Press the STATUS/EXIT but
ton to remove the menu from the
screen.
33
Page 40
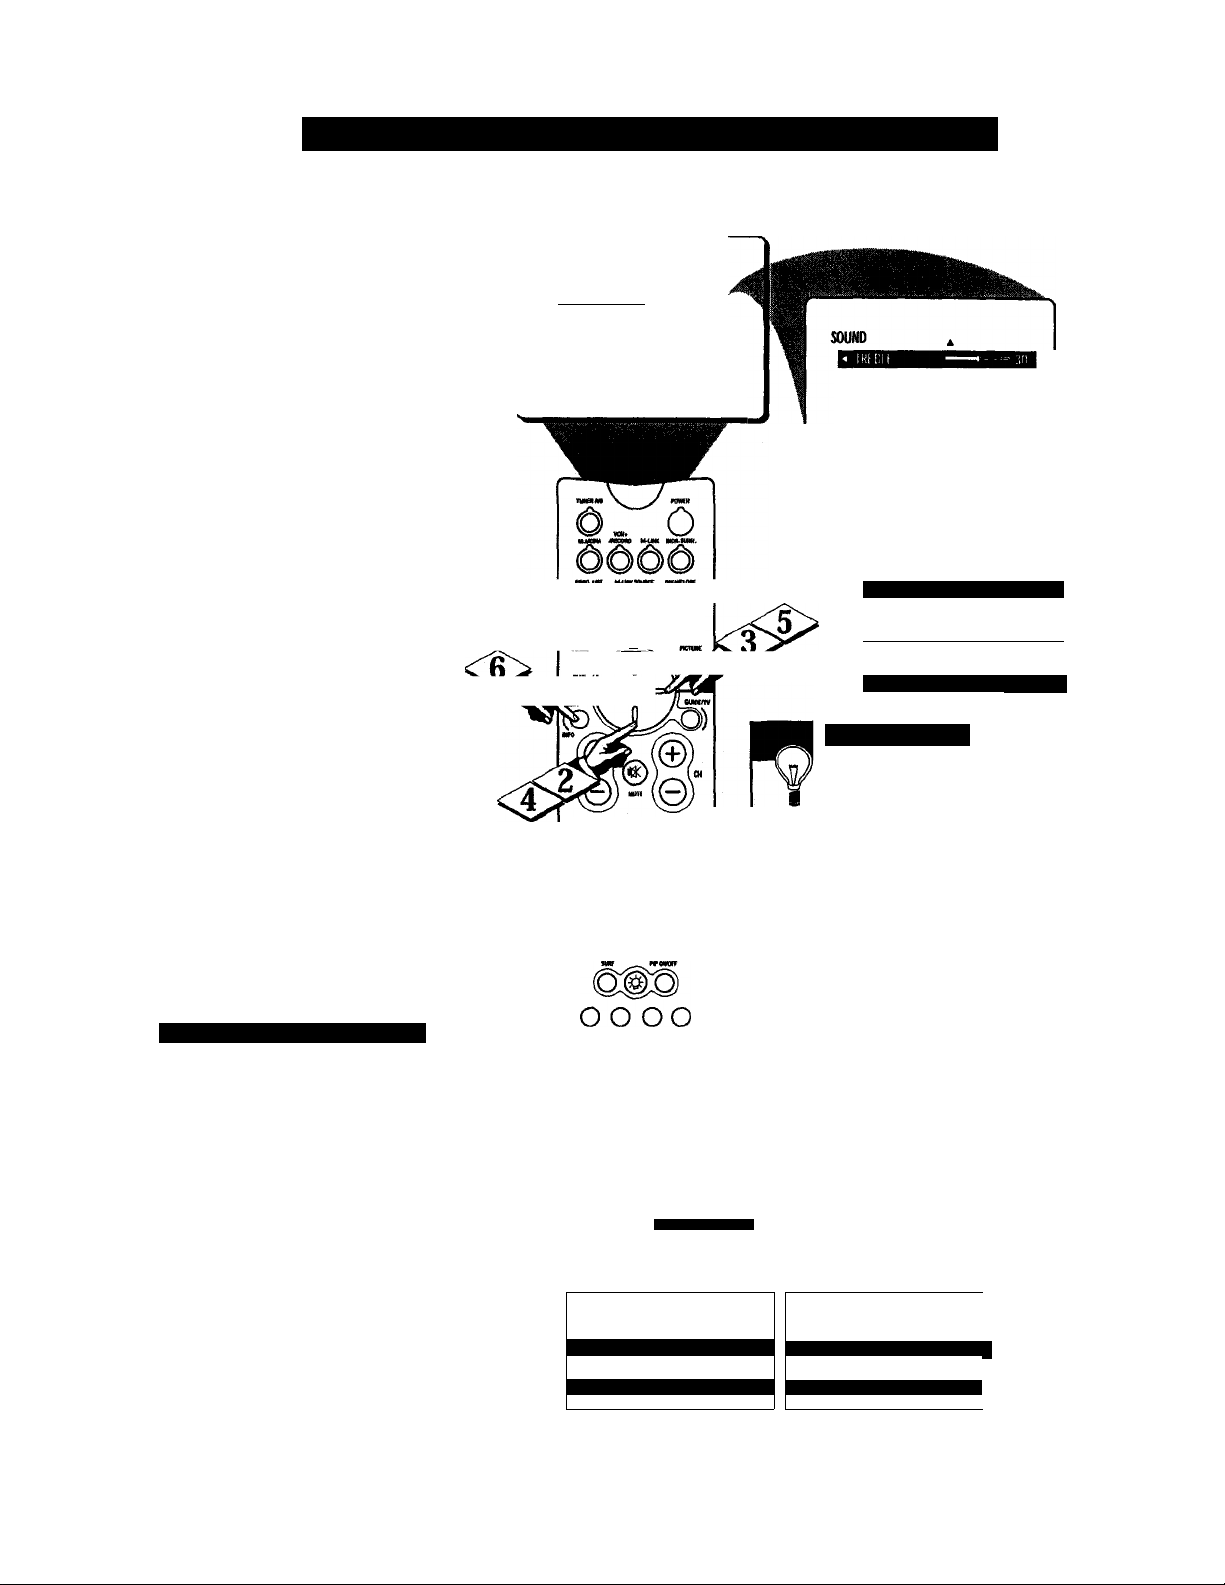
«»li
©W can receive broadcast
yo
JL s.
stereo TVprograms. The TV
has both an amplifier and twin
speakers through which the stereo
sound can be heard.
dUSD
Press the MENU button on
the remote control to show the
onscreen menu.
Press the CURSOR RING
DOWN once to highlight the
SOUND menu.
t
Press the CURSOR RING
RIGHT and the menu will shift
to the left.
T
<£> Press the CURSOR RING
DOWN repeatedly until the
STEREO control is highlighted.
SoiM) - Si:n INC 1 hi: TV^ ior Sti:ri:o and SAP
(
<|> Press the CURSOR RING
^ LEFT or CURSOR RING
RIGHT to select STEREO or
MONO. When STEREO has
been selected, file television will
reproduce any stereo broadcast
signal it receives.
Press the STATUS/EXIT but
<|>
ton to remove the menu from the
screen.
’ PICTURE
FEATURES
• INSTALL
© o o
UIB — Ji." -
O'
©
0
0 0 0
©00
© 0 ©
TREBLE
BASS
BALANCE
AVL
INCR. SURROUND
©
placed in the STEREO mode, the sound
coming from the set will remain monaural.
• BASS
• BALANCE
• №L
• INCH SURROUND
I
S0U№ 1
( BALANCE
• AM.
• WCR.SURROUNO
• HEADPHONE
1« Ml Hli.l
1
1 ^ .Ml i;i()
Small I Hi i i*
Remember, if stereo is not present
i on a selected show and the TV is
OR
I
Si
1 Ri a 1
Six u\i) Ai iHu I’Rui.u \M (SAI M
An SAP is an additional part of the
stereo broadcast system. Sent as a
third audio channel, an SAP can be
heard apart from the current TV pro
gram sound. TV stations are free to
use SAP for any number of purpos
es.
If an SAP signal is not present with
a selected program, the SAP option
cannot be selected. Also, if SAP is
selected on a channel (with SAP)
and you select another channel,
when you return to the original
channel, SAP will be OFF. You will
have to reselect the SAP feature.
SOUND
I AVL
• mCR. SURROUND
• HEADPHONE
• STEREO
IF SECONDAI» AUDIO PROGRAMING
IS BEING BROADCAST:
h SaV' 1
^ S.M' «»OU 1
• ►UOi AVAiiABlL
IF SECONDARY AUDIO PROGRAMING
IS NOT BEING BROADCAST;
1^ SAP ••■Ai.t: A'.'AKAiil
OR
I* SAP •►()!}
34
SOUND j
• AVL
• INCH SURROUND
• HEADPHONE
• STEREO
OR
Page 41
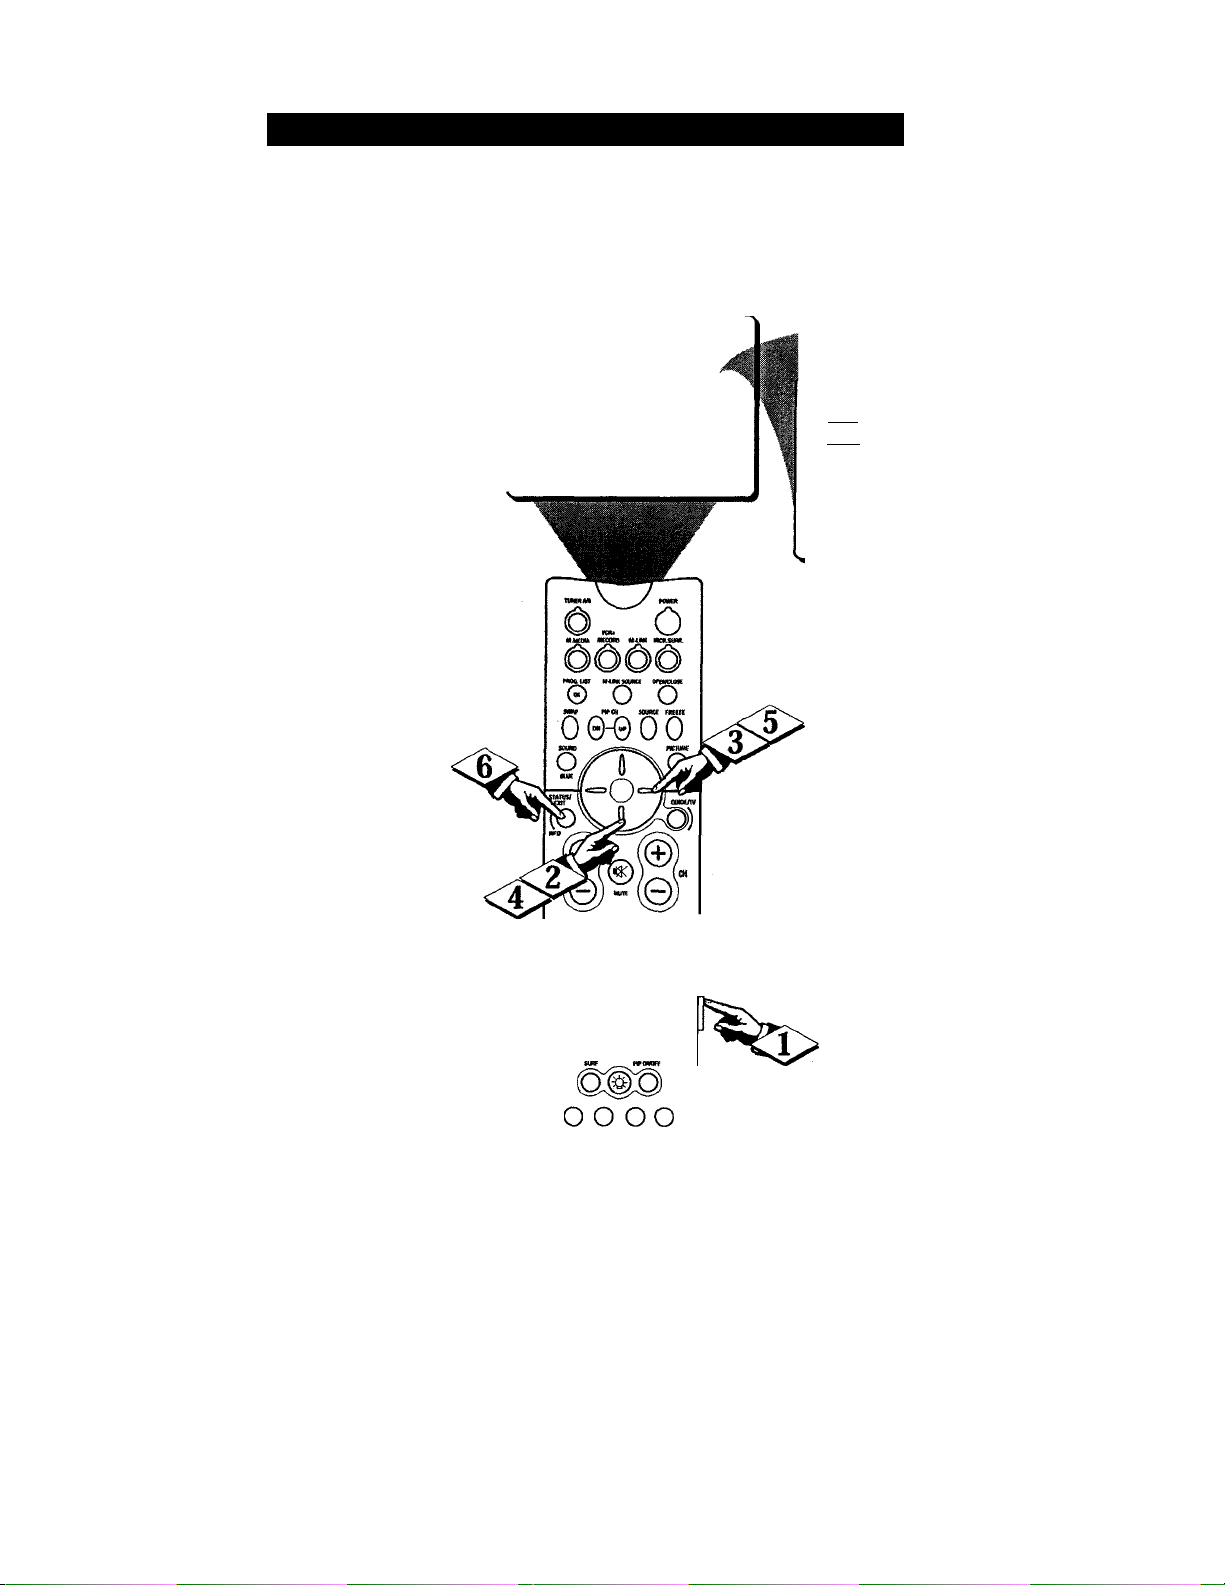
Sound - Setting the Audio Out Control
Jf ym have connected the TV’s
lAUDIO OUTPUT jacks to Oie
A UDIO INPUT jacks on a stereo
receiver, set AUDIO OUT to either
VARIABLE or FIXED to determine
whether you adjust the volume at
the stereo or at the TV. If you
select VARIABLE, change the vol
ume at the TV using the TV’s
remote control. If you select
FIXED, adjust the volume at the
stereo using the stereo’s controls.
To select FDCED or VARIABLE,
follow these steps.
Press the MENU button on
the remote control to show the
onscreen menu.
I
<|> Press the CURSOR RING
I DOWN once to highlight SOUND.
Press the CURSOR RING
RIGHT and the menu will shift to
the left.
Press the CURSOR RING
DOWN repeatedly until AUDIO
OUT is highlighted.
(
Press the CURSOR RING
^ LEFT or CURSOR RING
RIGHT to set the AUDIO OUT to
VARIABLE or FIXED.
Press the STATUS/EXIT but
ton to remove the menu from the
screen.
'PKIUSE
• FEATURES
• INSTAU
0
® ®
® ® ®
@ ® ®
© ® ©
TREBLE
BASS
BAlAtfCE
AVI
INCR. SURROUND
SOUND
Bnm
________
• BASS
• BALAWE
• AVI
• INCH SURROUND
SOUND 1
• INCR. SURROUND
• HEADPHONE
• STEREO
• SAP
SOUND t
I INCR. SURROUND
• NEA№H(XVE
• STEREO
• SAP
OR
35
Page 42
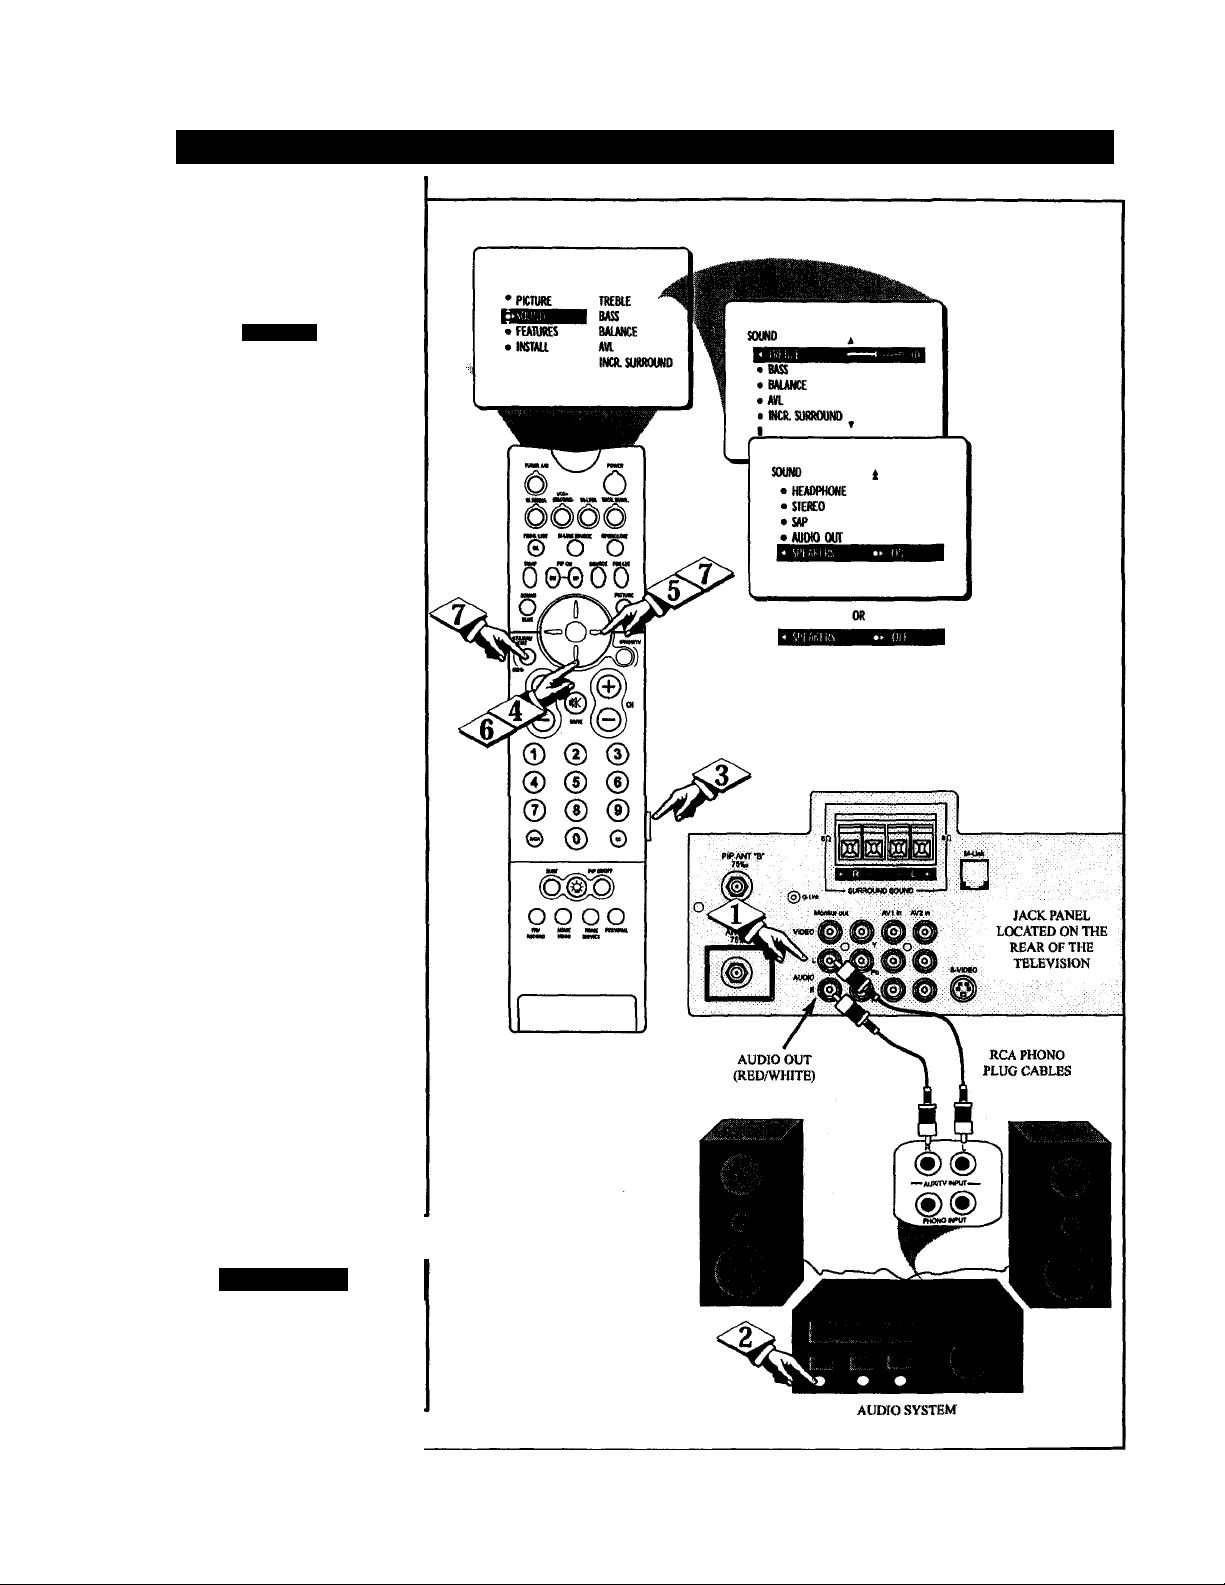
H"i)l
<i>
SoliM) - llsi\(; nn: TV Spi:aivi:r Com kol am) Ai dio Oh i Pin Jacks
TJTbuldyou like to hear TVpro-
grams through your audio hi-
yy ^
fi system? The TV’s Audio Output
jacks and TV Speaker ON/OFF
control work together to offer you
this TV sound option.
rfilTTTTi
Connect the R(ight) and
L(eft) AUDIO OUT jacks on the
TV to the R and L audio input
jacks on your amplifier or sound
system. Set the audio system’s
volume to a normal listening level.
Turn the TV and audio systern ON. You can now adjust the
sound level coming from fte audio
system with the VOLUME {+) or
(-) button on the TV or remote
control.
To hear the TV sound from only
the audio system speakers:
Press the MENU button on
the remote control to .show the
onscreen menu.
I
<J> Press the CURSOR RING
I DOWN once to highlight SOUND.
Press the CURSOR RING
RIGHT and the menu will shift to
the left.
(
<§> Press the CURSOR RING
DOWN repeatedly until the
SPEAKERS control is highlighted.
i
Press the CURSOR RING
RIGHT or CURSOR RING
LEFT to turn the television’s
speakers ON or OFR With the
SPEAKERS control set to OFF,
you should hear the TV sound
coming only from the audio system
speakers.
Smaui Um i-
Remember, the audio
* system may have to be in
AUX(iliary) mode to play sound
from the TV.
36
Page 43
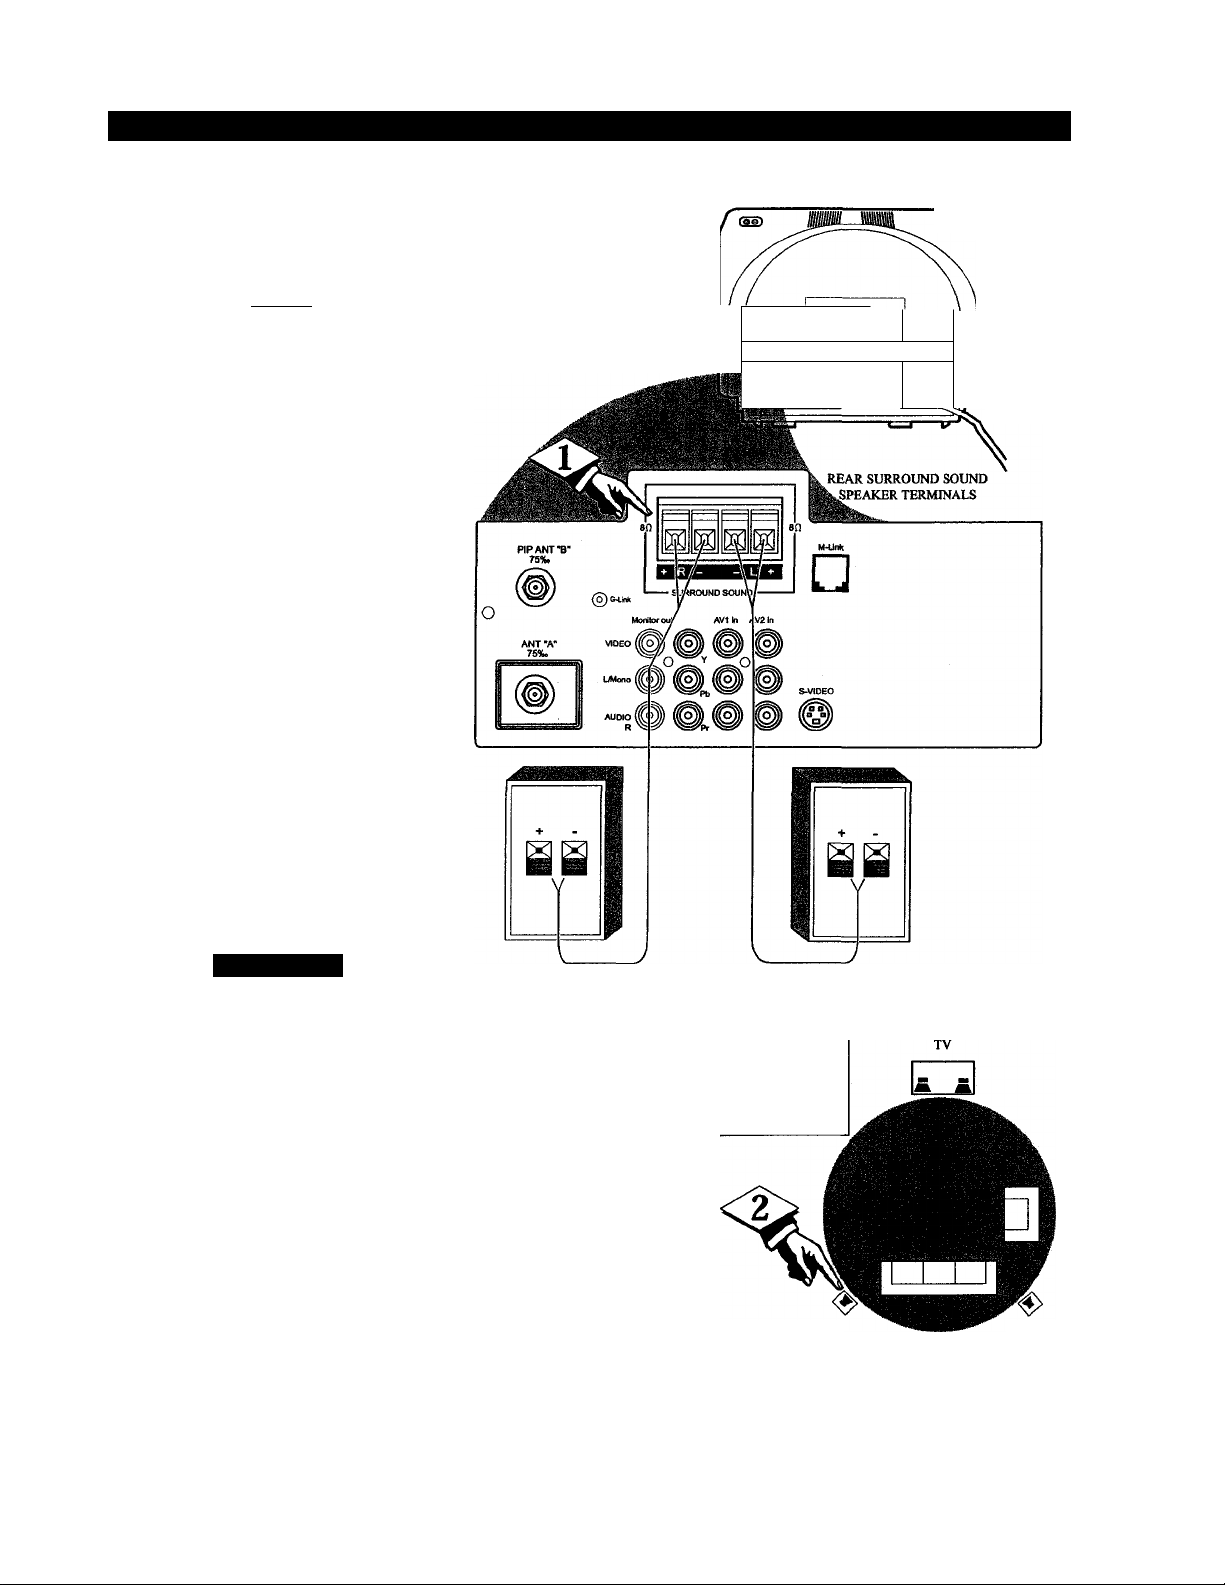
Sound - Using the Surround Sound External Speaker Connections
T)y adding optional external
£j speakers to the TV’s sound sys
tem, you can create the feeling of
reflected sound that surrounds you
at a movie theater or concert hall.
¿BEGIW)
Connect both external speak
ers to the speaker wire terminals
on the TV.
Recommended speakers: 8 ohm,
15 watt minimum. Be sure the (+)
and (-) speaker wires are connect
ed to the correct R(ight) and L(eft)
speaker terminals on the TV.
Place the speakers so that the
viewing area is between the TV
and the rear surround speakers.
(See overhead view drawing.)
Ttirn the TV ON. The rear
Surround Sound speakers will not
be heard at the same volinne level
as the front TV speakers. Adjust
the sound level with the Volume
buttons.
BACK OF TV
—
—1
IMifs.
After setup, whenever a stereo sig
nal is received, the audio will be
heard in Surround Sound.
Smart Hi lp
Remember, Surround
Sound will not work with
only one speaker connected, nor
with a monaural audio source sup
plied, unless the Incredible
Surround feature is turned ON
(see page 32).
REAR SURROUND SOUND SPEAKERS
NOTE: The rear speakers are intended to give
a background noise effect that requires a lower
volume level than the TV’s front speakers. The
volume level being heard from these speakers
will be lower than the volume level being
heard at the front TV speakers
REAR SPEAKER
REAR SPEAKER
PRIMARY VIEWING AREA
37
Page 44
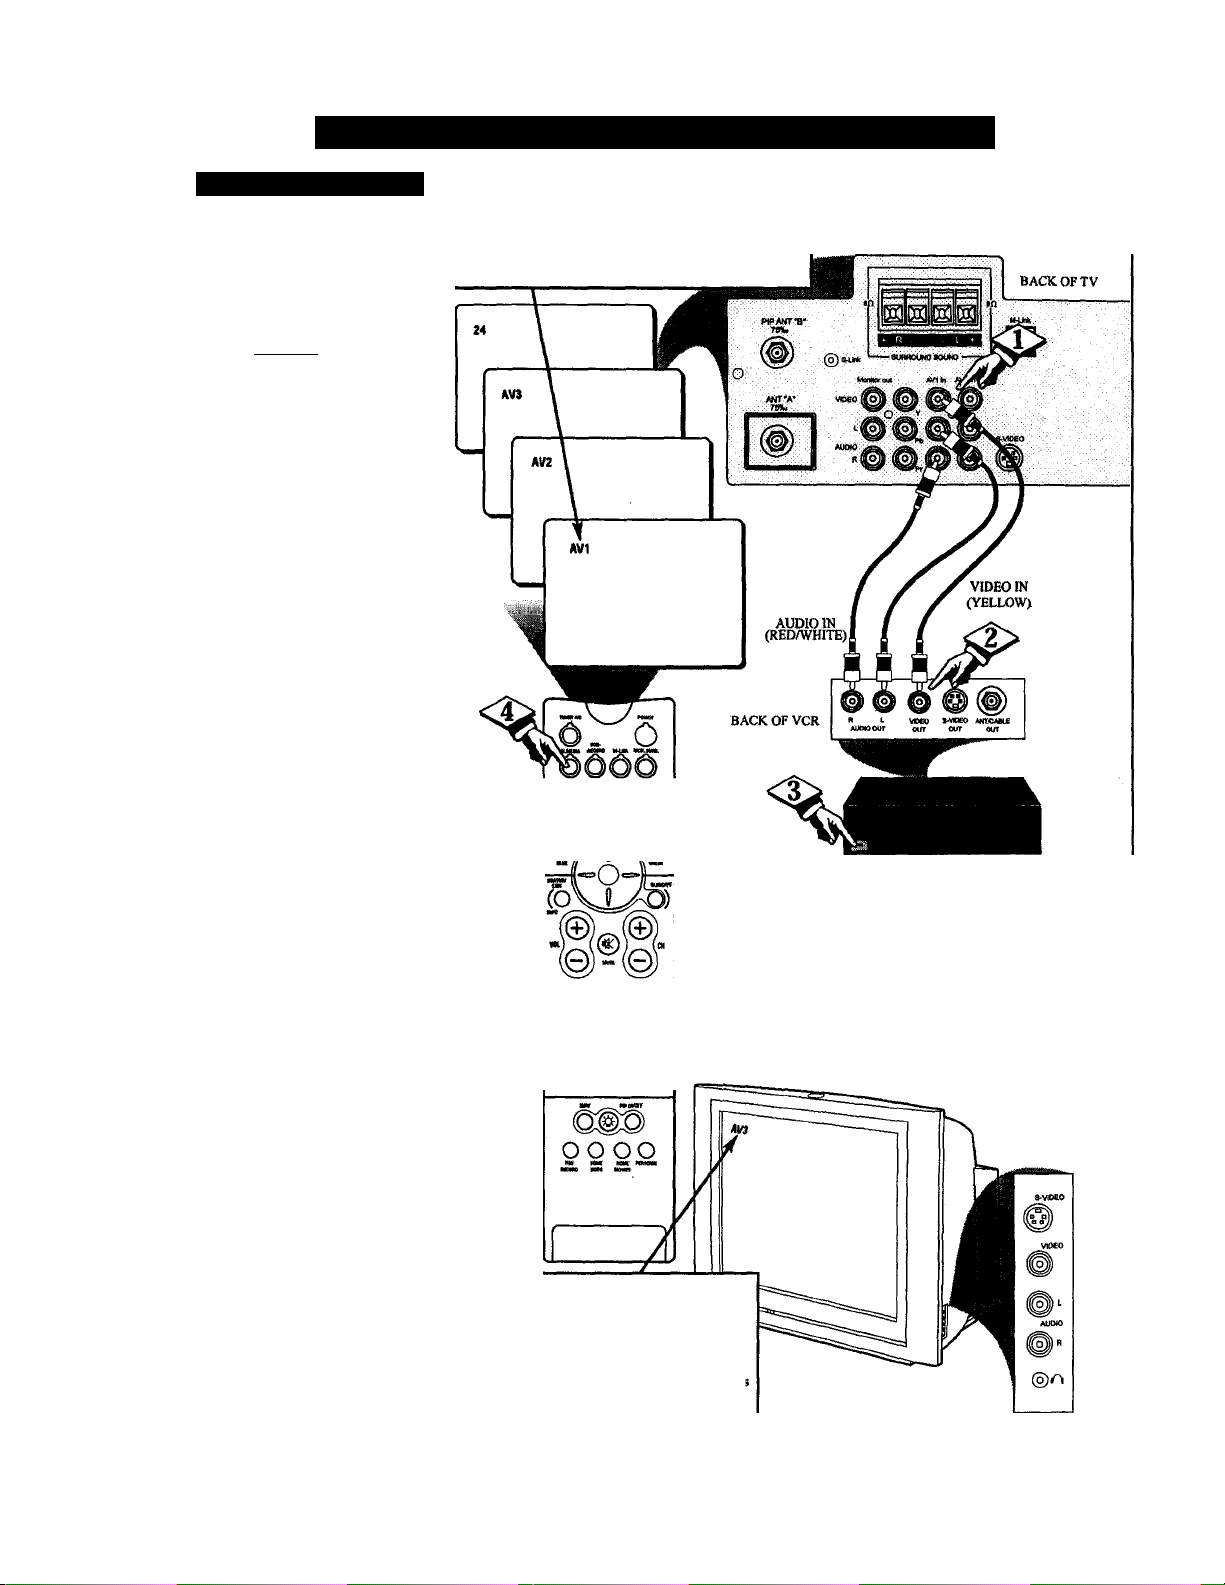
Sound - Usiní; rni: Ai dio/V'idi:o Input Jacks
At i)io/\ 11)1 () iM't I s
"he TV’s audio/video input
jacks are for direct picture
7
and sound connections between
the TV and a VCR (or similar
device) that has audio/video out
put jacks.
iBEOlWf'l
Connect the VIDEO (yellow)
cable to the VIDEO AV1 jack on
the back of the TV. Then con
nect the AUDIO (red and
white) cables to the AUDIO (left
and right) AVI jacks on the rear
of the W.
Connect the VIDEO (yellow)
cable to the VIDEO OUT jack
on the back of the VCR. Then
connect the AUDIO (red and
white) cables to the AUDIO (left
and right) OUT jacks on the rear
of the VCR.
'Dim the VCR and the TV
I ON.
Press the M. MEDIA button
<i>
on the remote control until the
AVI source is selected. After
AVI appears, insert a prerecord
ed tape into ftie VCR and press
the PLAY button to view me tape
on the television. If AVI did not
appear, perform steps 5-9.
NOTE: the actions described in
steps 5-9 are not illustrated on
this page.
If AVI did not appear
onscreen as one of the choices
available to you by pressing the
M. MEDIA button, press the
M Link button on the remote
control to display the M-Link"'
onscreen menu..
<|> Press the CURSOR RING
YmCHT or CURSOR RING
I LEFT button to highlight CVI.
<£> Press the CURSOR RING
I UP to toggle from CVI to AVI.
Press the STATUS/EXIT
button to remove the M-Link"
menu from the screen.
I
Press the M. MEDIA button
to tune the AV 1 source. You are
now ready to view the VCR tape
on the TV.
0
NOTE: Repeatedly pressing the M. MEDIA button on
the remote control will toggle the picture source from
dte current channel (Tuner A or B), the last viewed
channel, then AVI (or CVI) connection, then the AV2
connection, and then the AV3 connection.
^ cT o
0GH9Ü0
5/T\0
© ® ®
® ® ®
® ® ®
© ® ©
NOTE: For mote ctmvenient direct playback con
nections, you can use your TV’s side video input
panel, located on the right and angled toward the
fiont for easy access. The audio/video jacks in this
panel allow for quick connections that are especially
handy tor playing back camcotder (composite video
or S-VHS) tape recordings. Press the temóte control'i
M. MEDIA button to select the AV3 mode. Then use
the side jack panel inputs for playback on the TV.
(EQUIPPED WITH VIDEO AND
VCR
AUDIO OUTPUT JACKS)
If you ate using a
nonstereo device, use
only the Audio R jack.
JACK PANEL INPUTS
SIDE VIDEO
38
Page 45
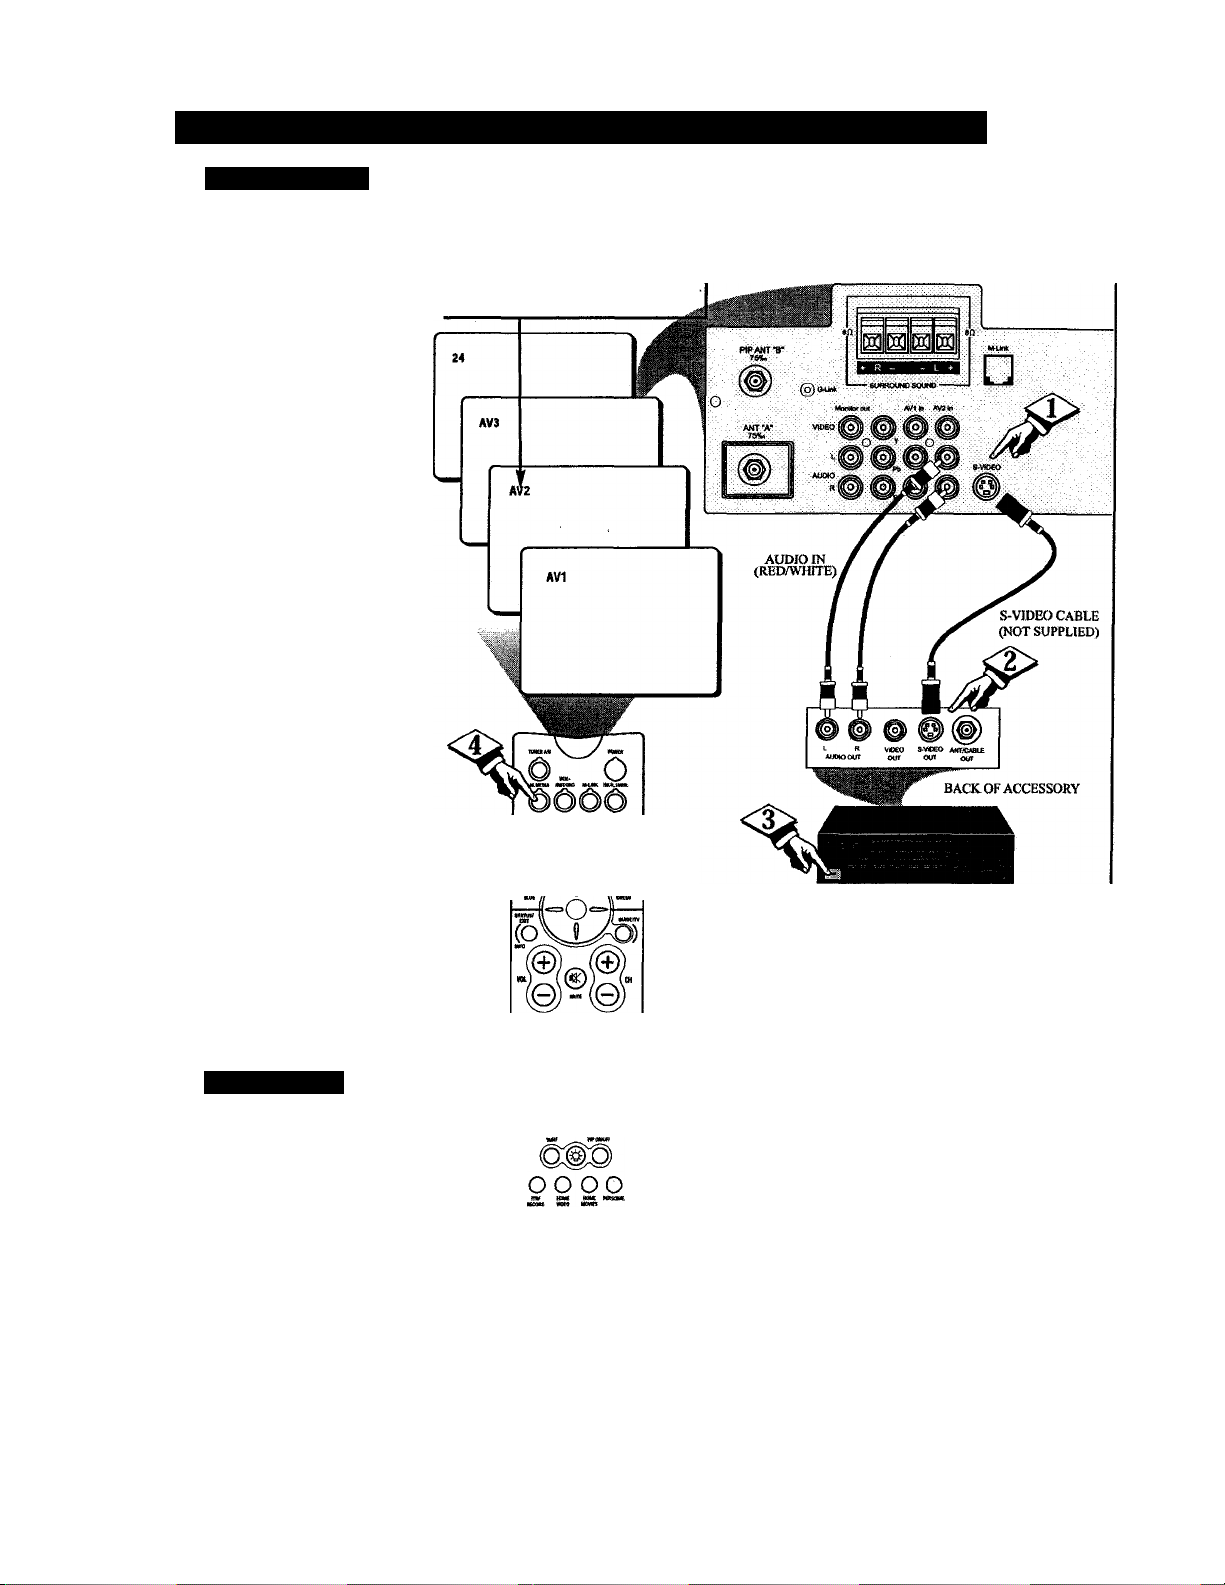
Sound - Using the Audio/Video Input Jacks (cont’d)
S-ViDKO INPI T
he S(uper)-Video connection
J
on the rear of the TV can pro
vide you with better picture detail
and clarity for the playback of
acc&isory sources such as DBS
(digital broadcast satellite), DVD
(digital video discs), video games,
andS-VHS VCR (video cassette
recorder) tapes than the normal
antenna picture connections.
NOTE: The accessory device
must have an S-VIDEO OUT(put)
jack in order for you to complete
the connection on this page.
(BEGIN)
<i> Connect the S-VIDEO
CABLE to the S-VlDEO input
jack on the rear of the television.
Then connect the AUDIO (red
and white) cables to the AUDIO
AV2 jacks on the rear of the TV.
<|> Connect the S-VIDEO
^CABLE to the S-VIDEO output
jack on the accessory device.
Then connect the red and white
AUDIO cables to the AUDIO
(left and right) output jacks on the
rear of the accessory device.
Him the accessory device
I ON.
Press the M. MEDIA button
on the remote control to tune the
AV2 channel. You are now ready
to view the tape or disc on the
TV.
S.MAUi Hi;u>
The S-VIDEO and
B VIDEO AV2 in(puts) are in
parallel. The S-VIDEO input is
dominant when in use. If separate
video signals are connected to the
S-VIDEO and VIDEO AV2
in(puts), the signal from the
VIDEO AVI in(put) will not be
usable.
If you have added AV2 in(puts) to
the TV’s channel memory, just
press the CHANNEL (+) or (-)
button until the AV2 in(puts)
(channel) mode is selected.
NOTE: Repeatedly pressing the M. MEDIA
button on the remote vWl! toggle the picture
source from the current channel, die
viewed channel, then the AVI (or (JVl) con
nection, the AV2 connection, and the AV3 con
nection. Use AV2 for S-Video Connections.
©(To
O(T0OO
Q/TXO
© (D (D
© © ®
® © ©
© © 0
1
BACK. OF TV
DBS, DVD, Video Game, etc.
(EQUIPPED WITH S-VIDEO AND
AUDIO OUTPUT JACKS)
NOTE: If you are usuig a
nonstereo device, use only
the Audio Rjack.
39
Page 46
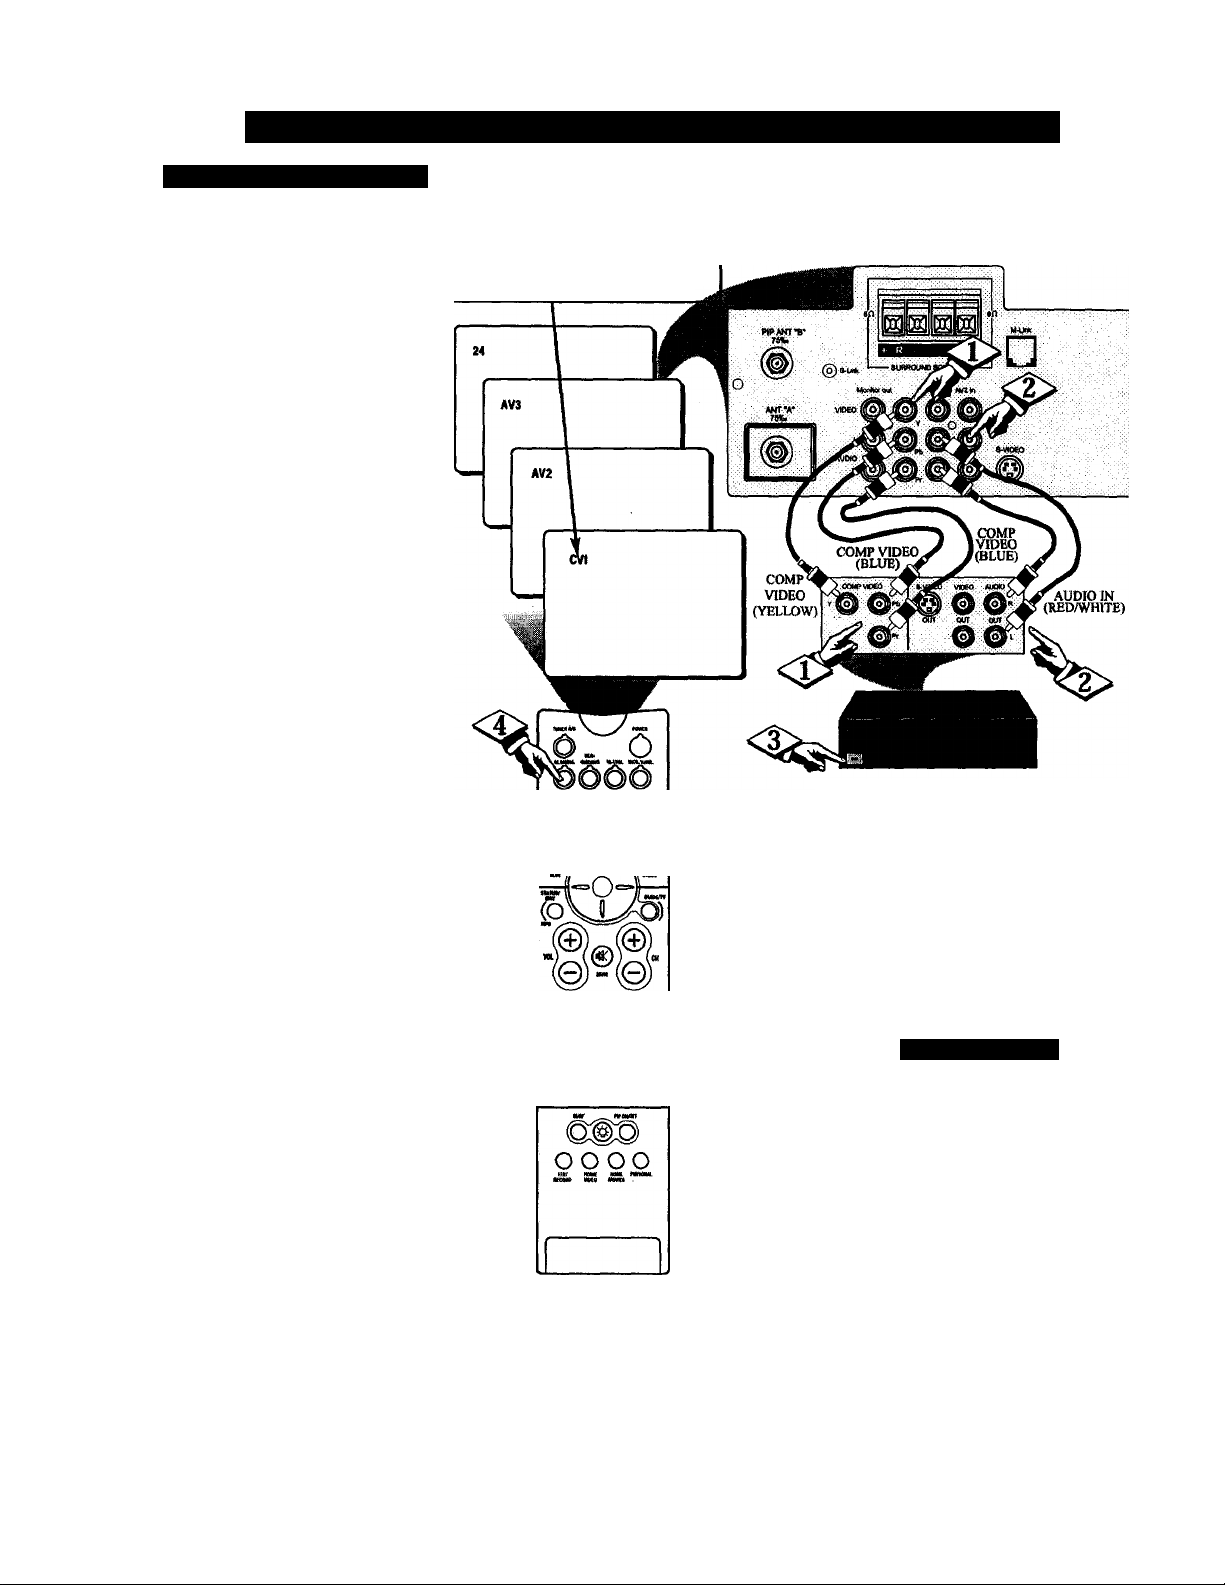
|ф|)|
( (Ull’OM N I \ iUl.O IM4 I s
SoiM) - Usim; Tin: Ai i)io/\ ideo 1мп t Jacks ((om’d)
mponent Video inputs pro-
'vick for the highest possible
color aña picture resolution in the
playback of digital simal source
material, such as with DVD play
ers. The color difference signals
(Pb, Pr) and the luminance (Y)
signal are connected and received
separately, which allows for
improvea color bandwidth infor
mation (not possible when using
comjMsite video or S-Video con
nections).
ÍBEOIW1
Connect the Component (Y,
Ф.
Pb, Pr) Video OUT j^ks from
the DVD player (or similar
device) to the (Y, Pb, Pr) in(put)
jacks on the TV.
Connect the red and white
<l>
AUDIO CABLES to the Axidio
(left and right) output jacks on the
rear of the accessoiy oevice to the
Audio (L and R) AV1 in(put) jacks
on the TV.
<|> 'Dim the TV and the DVD
f (or digital accessory device)
I ON.
Press the M. MEDIA button
on the remote control until the
CVI source is selected. After CVI
mmears, insert a disc into ftie
DVD (or oftier digital accessory
device) and press Are PLAY but
ton to view the disc on the televi
sion, If CVI did not appear, per
form steps 5-9.
NOTE: The actions described in
steps 5-9 are not illustrated on this
If CVI did not appear
onscreen as one of the choices
available to you by pressing the
M. MEDIA button, press the M
Link button on the remote con
trol to display the M-Link’"
onscreen menu.
Press the CURSOR RING
Y RIGHT or CURSOR RING
I LEFT to highlight AVI.
<J> Press the CURSOR RING
I UP to toggle from AVI to CVI.
<|> Press the STATUS/EXITbut-
ton to remove the M-Link™ menu
I from the screen.
Press the M. MEDIA button
I to tune to the CVI source. You
I are now ready to view the disc on
I the TV. ^
—I
NOTE; RqfHXitciUy pressing the M. MEDIA
button on ilw remote will toggle the picture
source from the current chsnncl, the lest viewed
channel, then the CVI (or AVI ) connection, the
AV2 connection, and die AV3 connection. l).sc
CVI for Component Video Connections.
«MW
-----
NEtIN.'
о/ТЛо
© ® ©
® ® ©
® © ©
© ® ©
I
BACK OF TV
BACK OF DIGITAL
ACCESSORY
DBS, DVD, Video Game, etc.
{EQUIPFED WITH COMPONENT VIDEO
OUTPUTS AND AUDIO OUTPUT JACKS)
NOTE: Optional video/audio cables (with
standard RCA plug connectors) are available
to complete your component video input jack
connections. Contact your dealer or our Parts
Information Center (l-SOO-SS I-8SS5) to order
any optional accessories.
.SMAKI 111 11’
The description for the
component video connectors
may differ depending on the DVD
player or accessory digital source
equipment used (for example, Y,
Pb, Pr; Y, B-Y, R-Y; Y, Cr, Cb).
Although abbreviations and terms
may vary, the letters b and r stand
for the blue and red color compo
nent signal connectors, and Y indi
cates ftie luminance signal. Refer
to your DVD or digital accessory
owner’s manual for definitions and
connection details.
40
Page 47
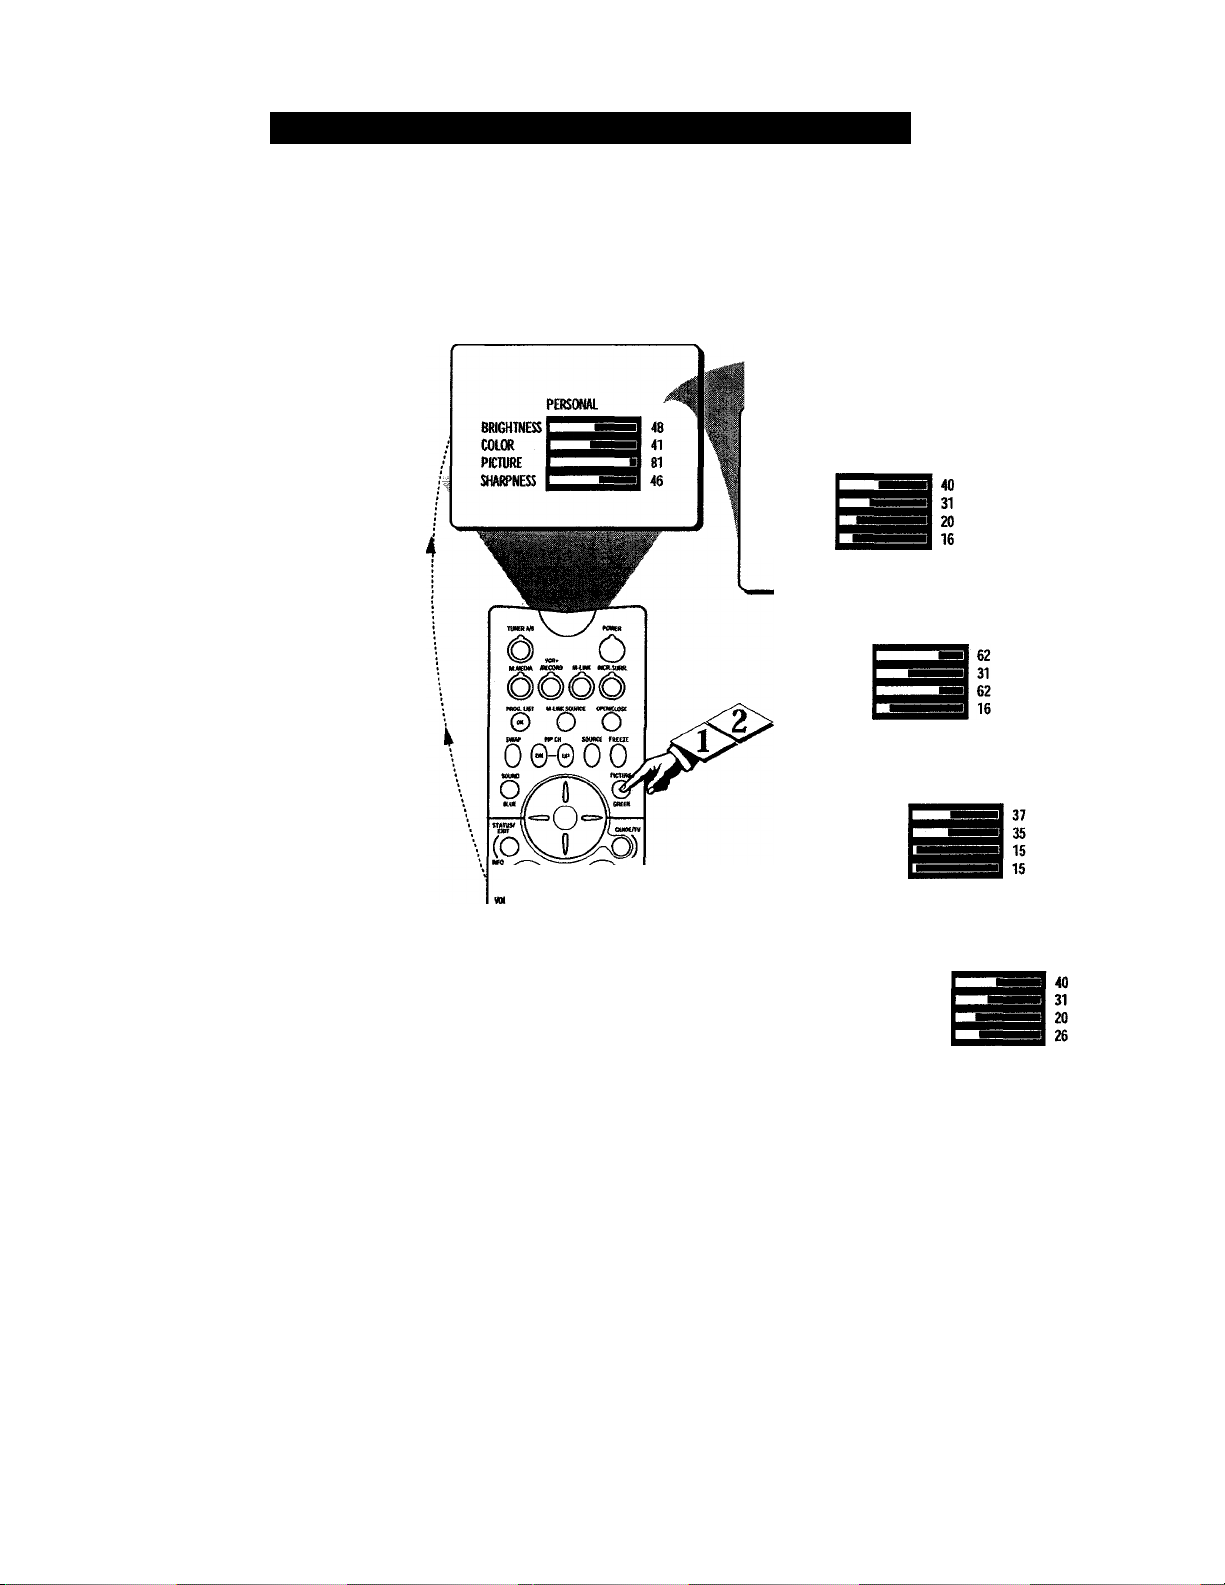
Remote Control - Using AutoPicture*
TlTThether you 're watching a
VV movie or a video game, your
TV has automatic video control set
tings that will match with your cur
rent program source or content.
AutoPlcture™ quickly resets your
TV’s video controls for a number of
different types of programs and
viewing conditions that you may
have in your home. The Movies,
Sports, Weak Signal, and
Multimedia AutoPicture™ controls
have been preset at the factory to
automatically adjust the TV’s
brightness, color, picture, sharp
ness, tint, and color temperature
levels. The Personal AutoPicture’’^
settings are the ones that you made
through the PICTURE options with
in the onscreen menu.
CBECiW )
Press the PICTURE button
<P
on the remote control. The current
AutoPicture™ setting will appear in
the middle of the screen.
MOVIES
BRIGHTNESS
COLOR
PICTURE
SHARPNESS
SPORTS
BRIGHTNESS
COLOR
PICTURE
SHARPNESS
Press the PICTURE button
" repeatedly to select either PER
SONAL, MOVIES, SPORTS,
WEAK SIGNAL, or MULTI
MEDIA picture settings.
NOTE: The PERSONAL setting
within AutoPicture™ is determined
by the setting used in the PICTURE
options within the onscreen menu.
All other settings are set up at the
factory during production and can
not be adjusted.
© (D ©
0 © ©
@ © ©
© © ©
oo oo
WEAK SIGNAL
BRIGHTNESS
COLCTi
PICTURE
SHARPNESS
MULTI MEDIA
BRIGHTNESS
COLOR
PICTURE
SHARPNESS
1
41
Page 48
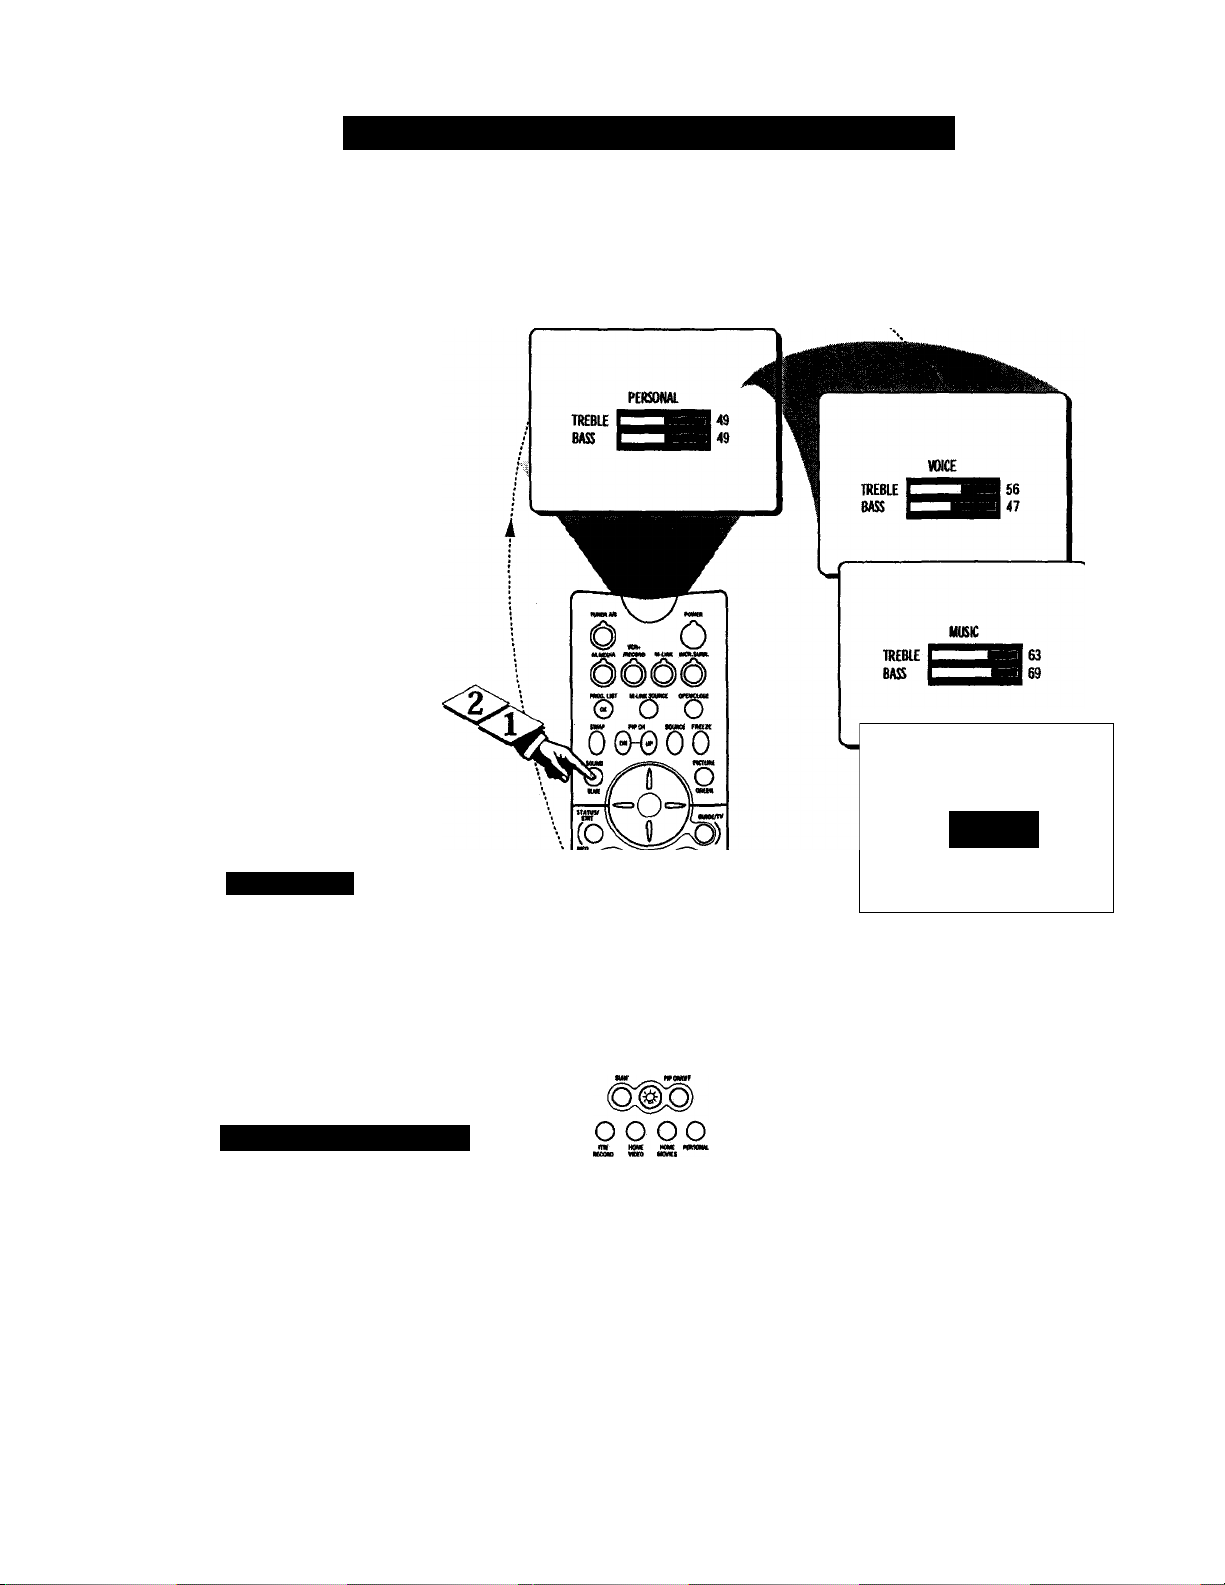
A utoSomdP* allows you to
select from three factory-set
controls and a personal control that
you set according to your own pref
erences through the onscreen Sound
menu. The three factory-set controls
(Voice, Music, and Theatre) enable
you to tailor the TV sound .so as to
enhance the particular program
you are watching. Follow these
steps to select any of the options.
IBEOIW)
Press the SOUND button on
<P.
the remote control. The current
AutoSound™ setting will appear in
the middle of the screen.
I
Press the SOUND button
repeatedly to toggle among the
four settings: PERSONAL,
VOICE, MUSIC, or THEATRE.
NOTE; The PERSONAL setting
within AutoSound™ is determined
by the settings used in the SOUND
options within the onscreen menu.
All other settings are set up at the
factory during production and can
not be adjusted.
RiMon: CoM ROi ~ LIsinc AirioSoiiM)*^'
.
--------------------
TREBLE
BASS
THEATRE
■■■■ .t::~
60
72
Sm \Ki Hu p
Remember, AutoSound™
works only with the pro
grams coming through the
ANTENNA/CABLE (ANT A or B)
input on the rear of the TV (RF
audio). It will not control the
sound levels for the external con
nections.
AutoSound*''' Options
PERSONAL - presents the TV’s sound
according to the settings you make widiin the
sound menu.
VOICE - brings voices to die forefront and
emphasizes them. Moves music to the back
ground.
MUSIC - emphasizes music over voices,
THEATRE - provides a balance between
voices and music.
\0)^(©)
Wm
0 ® ®
® ®
© © ©
® ® ©
1
42
Page 49
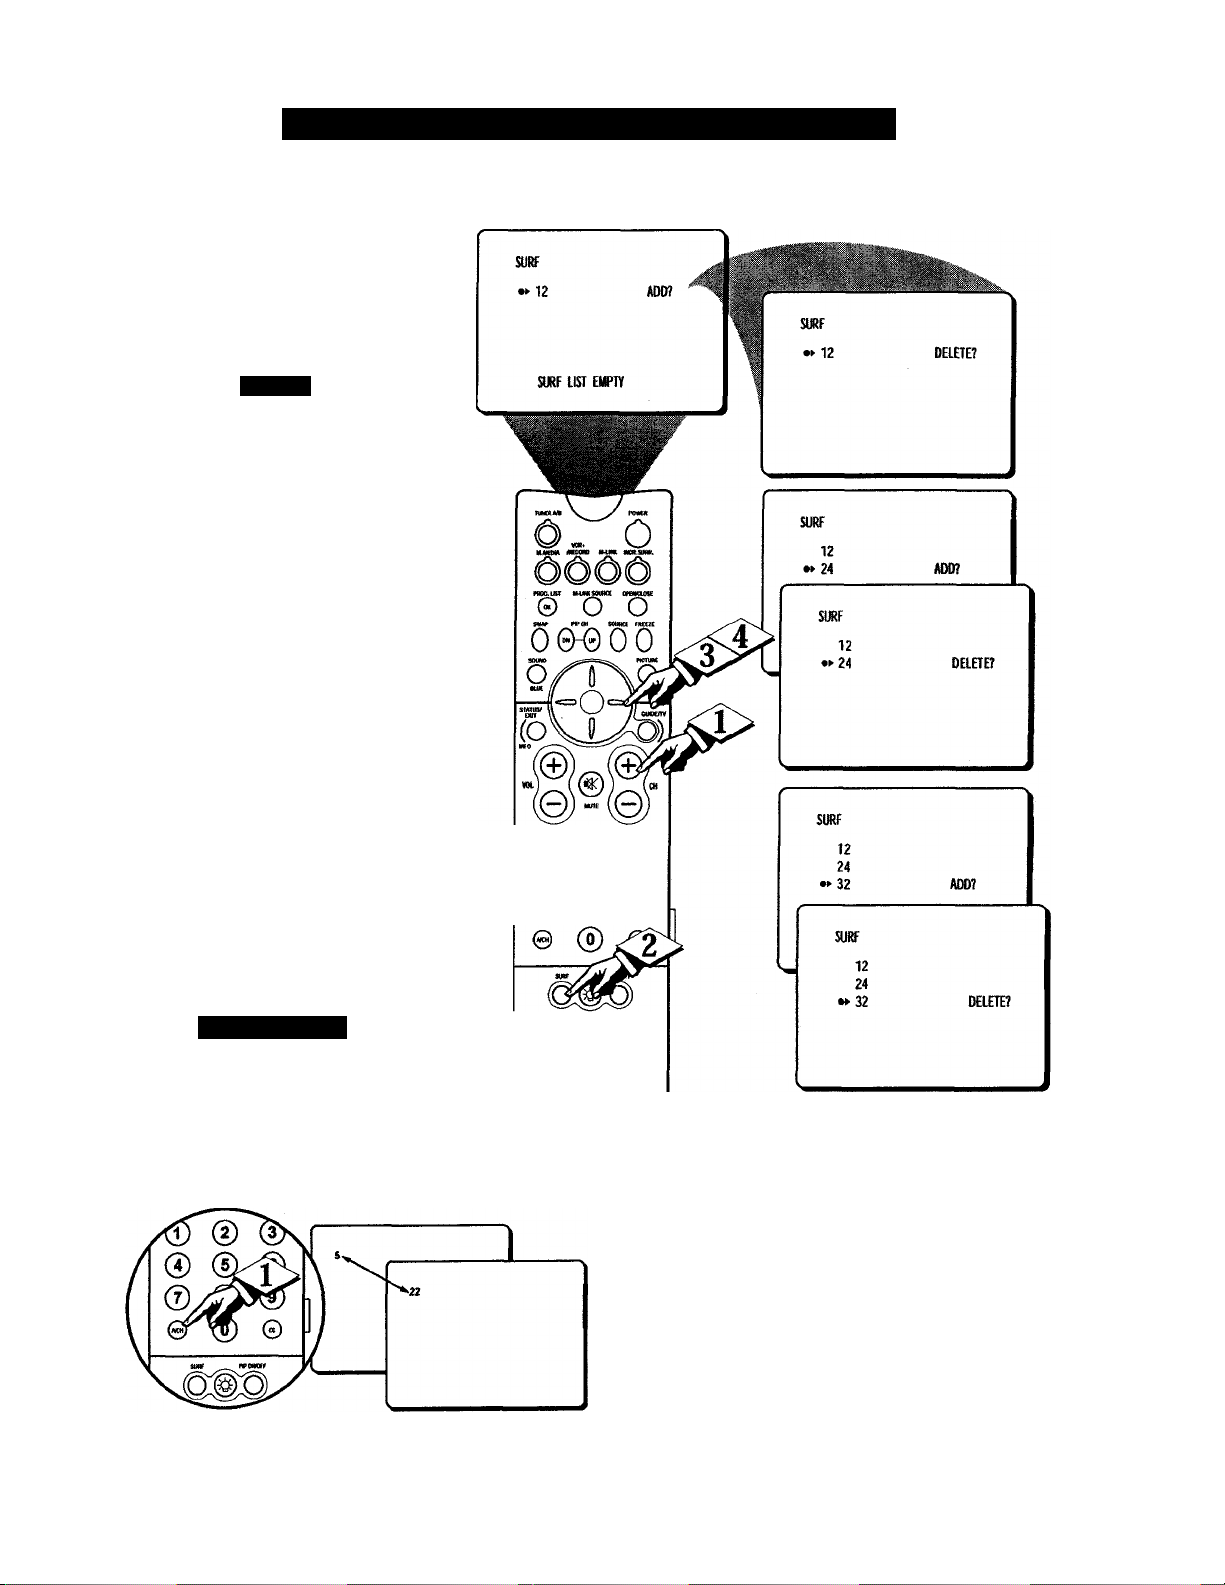
Remote Control - Using Channel Surf
A list or series of previously
.¿Í viewed channels can be select
ed with the SURF button on your
remote control. With this feature,
you can easily switch between dif
ferent TV channels that currently
interest you. The SURF control
allows you to set up to ten channels
in its quick viewing list.
Press the CHANNEL{+) or (-)
<i>
button (or the numbered buttons)
to select a channel to add to the
SURF list.
Press the SURF button on the
remote control. The onscreen dis
play may read, “SURF LIST
EMPTY.” The number of the cur
rent channel will be shown with
“ADD?” to the right.
While the SURF list message or
the SURF channel list appears on
the screen, press the CURSOR
RING RIGHT to add the present
channel to the SURF list.
1 f you want to delete the present
channel from the SURF list, press
the CURSOR RING RIGHT again.
Repeat steps 1 through 3 to add
more channels (up to 10) to the
SURF list.
A/CH Bi noN
Your remote also has an A/CH
(Alternate Channel) button.
Pressing this button will toggle
between the current and one previ
ous channel.
©
0
®
0 0©
©00
oo oo
KCMO «K0 Moves
NOTE; Along with regularly pro
grammed channels, the external video
source connections can be added to the
SURF list. This means that the AVI,
AV2, and AV3 channels can be added to
your SURF list. Just tune to their chan
nel and iLse the same procedure
described on this page.
43
Page 50
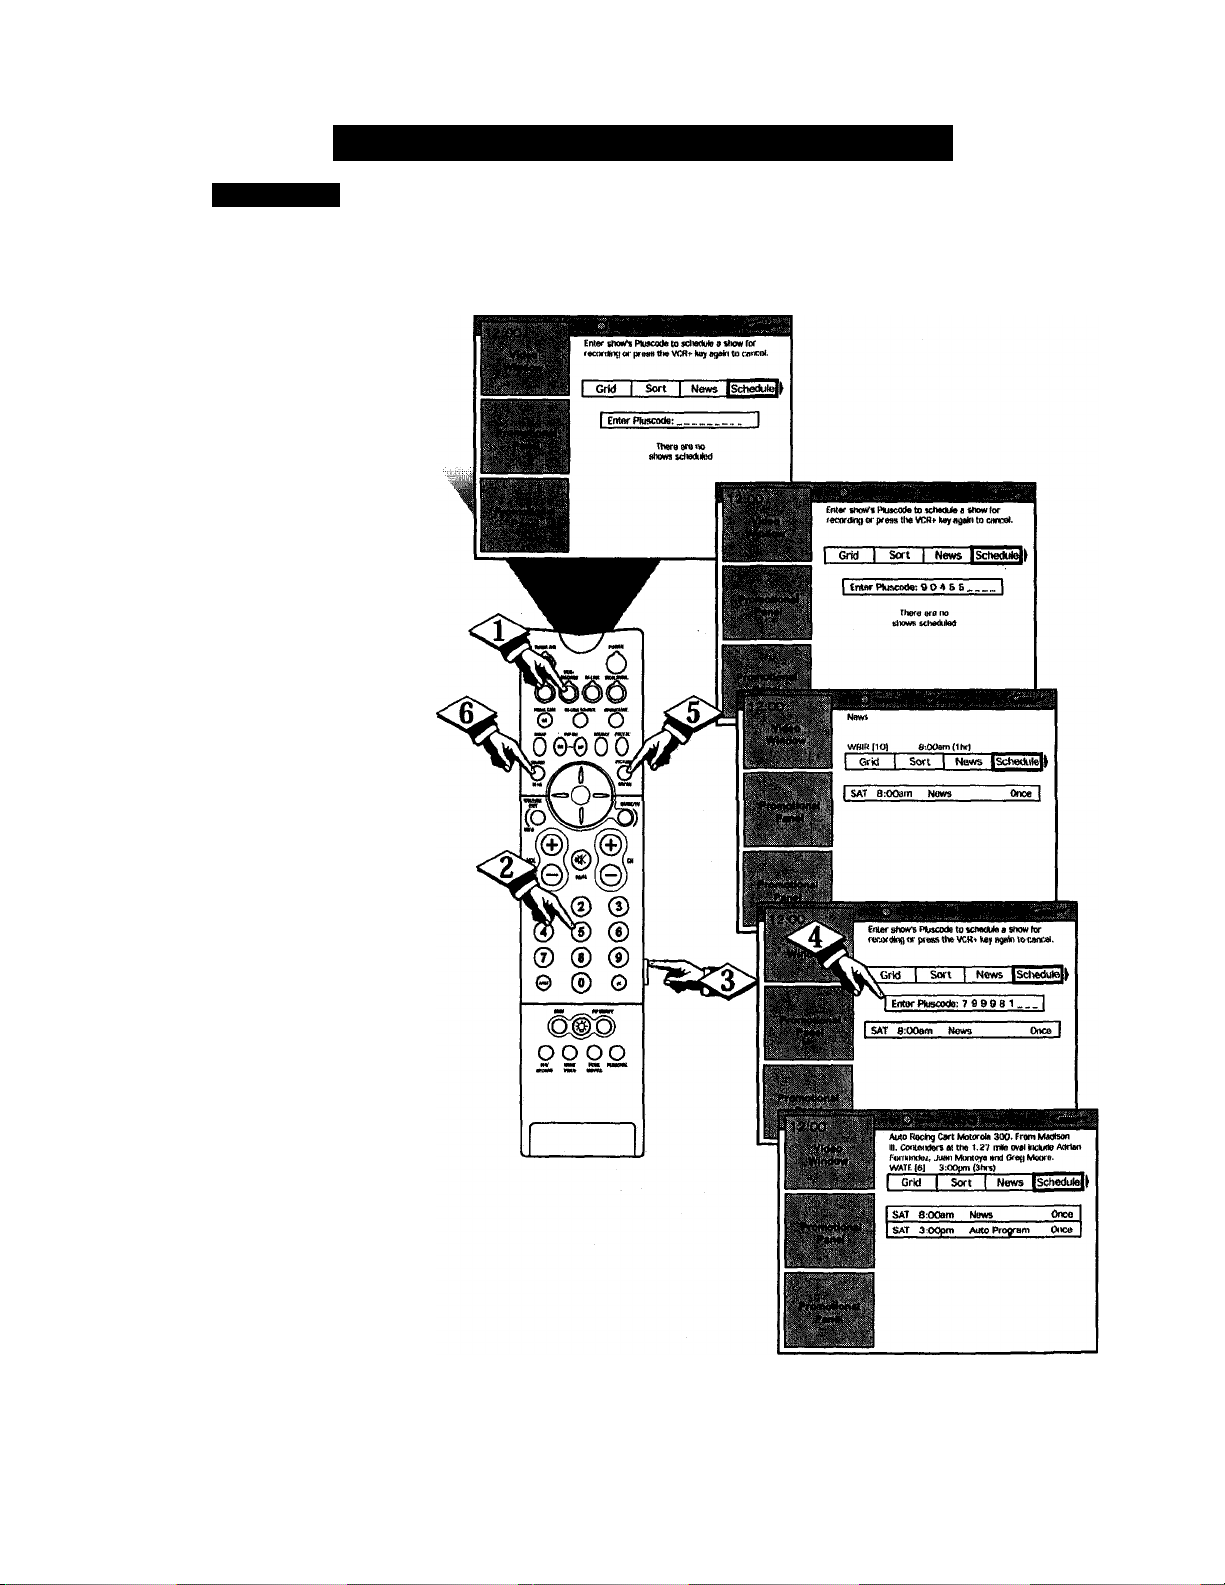
\ (:u iMus f
lisiNc; rm: VCR Pmjs+ Svshm Fi vu ri:
the GUIDE Plus+*‘
VV GOLD system, there is an
option to set a timer recording
using the VCR Plus+* system.
This system works with your
local “TV Guide " or program
ming information printed in a
special magazine or your local
newspaper. The broadca.sters
have listed a multiple digit num
ber next to the program listing.
This is the PlusCode number
needed to setup the recording.
Please note that a VCR is
required to use this system.
Follo w the steps below to set a
VCR Plus+* timer recording.
difiuD
<|> Press the VCR+/RECORD
button on the remote to display
the GUIDE Plus+* GOLD sys
tem Schedule onscreen menu
asking you to:
Enter Pluscode:
Press the NUMBERED but
tons on the remote to enter the
PlusCode number for the desired
program (find the code in the
newspaper listings or “TV
Guide” listings).
-------------
NOTE: Refer to the GUIDE P1US+™ GOLD Quick Use Guide supplied with your
TV for a detailed description of GUIDE Plus+™ GOLD system and it’s features.
After the PlusCode number
<s>
has been entered, press the
MENU button on the remote to
set the VCR Plus+* timer record
ing. The record information will
appear in a red bar on the Guide
Plus+* GOLD system Schedule
screen.
To add other VCR Plus+*
I codes repeat the steps above.
To change the the record fre
quency (ONCE, DAILY,
WEEKLY) press the GREEN
button located under the flip
open door on the remote.
Press the BLUE button on
the remote to remove the VCR
Plus+* timer recording from the
Schedule.
44
Page 51
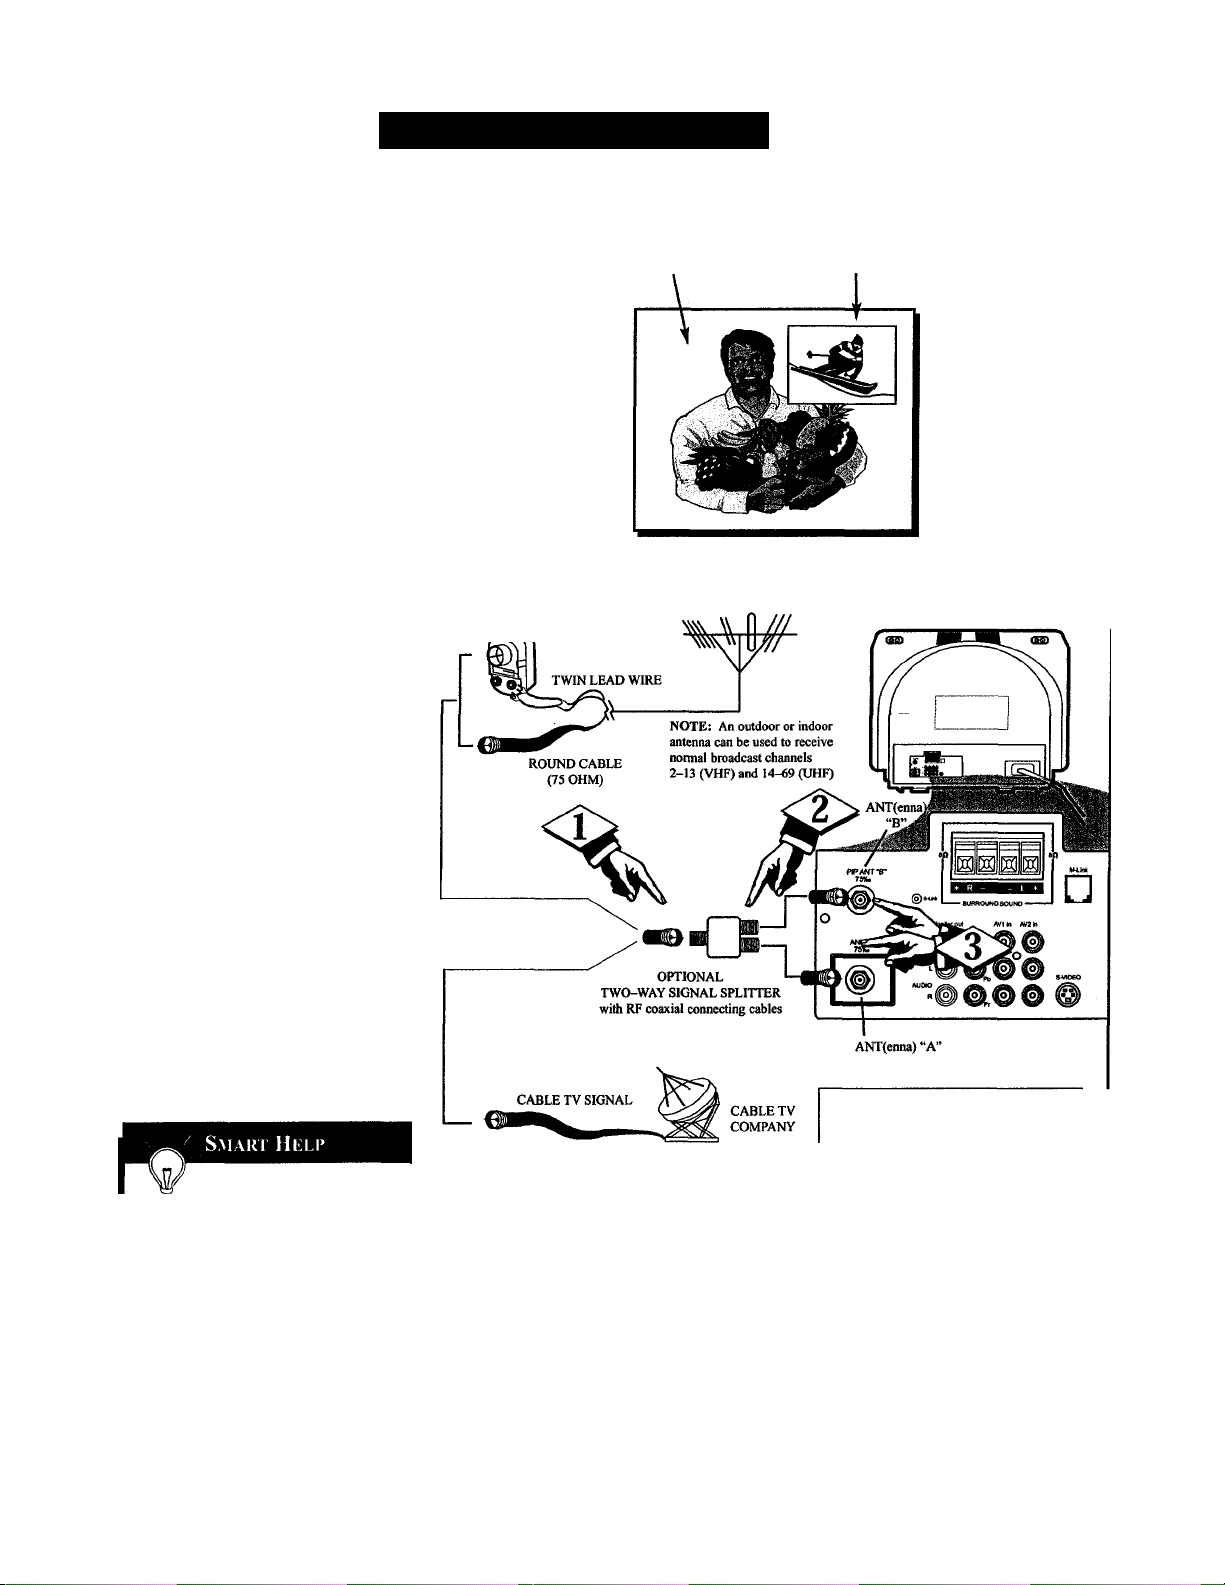
Tycture-In-Picture (PIP) is the
£ showing of two pictures on the
TV screen at the same time (one
main screen picture and one small
picture, or PIP). For your ease and
convenience, this TV has two sepa
rate inputs (ANTenna A and PIP
ANTenna B) for your home’s Antenna
and/or Cable TV system signal.
The ANT A input is primarily for the
TV’s main screen picture. 'The PIP
ANT B input is provided as a second
dedicated source option for the TV’s
PIP “window” and its feature opera
tions. The signal connected to the
PIP ANT B input can be either a split
signal input (as described in the sec
tion on this page) or another type of
external signal source (such as a
satellite dish system, additional home
antenna, video accessory, etc.).
See the following steps on how chan
nels connected to the PIP ANT(enna)
B Input can be shown and used with
in the PIP window.
PIP - Basic Connections
MAIN SCREEN PICTURE PIP PICTURE
COMBINATION
300-TO 75-OHM
, ADAPTER
VHF/UHF ANTENNA
lEJ
BACK OF TV
CBEfilH)
Connect your Antenna or
<3>
Cable TV signal to the single,
75-ohm input plug on a two-way
signal splitter (not supplied).
Connect two lengths of RF coaxial
cable (F-type connectors on both
ends) to the two output plugs on
the two-way signal splitter.
<|> Connect the twin OUTPUT
plugs on the signal splitter to the
ANT A and PIP ANT B inputs on
the rear of the TV.
For other possible PIP
connections see the “More
Connections” section on pages
50-51.
If you need any accessories or parts
to complete the described PIP con
nections, contact your dealer, or call
our Parts Information Center at:
1-800-851-8885
ROUND CABLE (75 OHM)
NOTE: The purpose of the PIP ANT B
input is to provide an easily connected,
dedicated picture source for PIP feature
use. Other signal source options (such
as a satellite dish system, an additional
external antenna, a VCR, or a video
game) also could be connected and dis
played on the TV’s PIP screen window
through the use of the PIP ANT B input.
45
Page 52
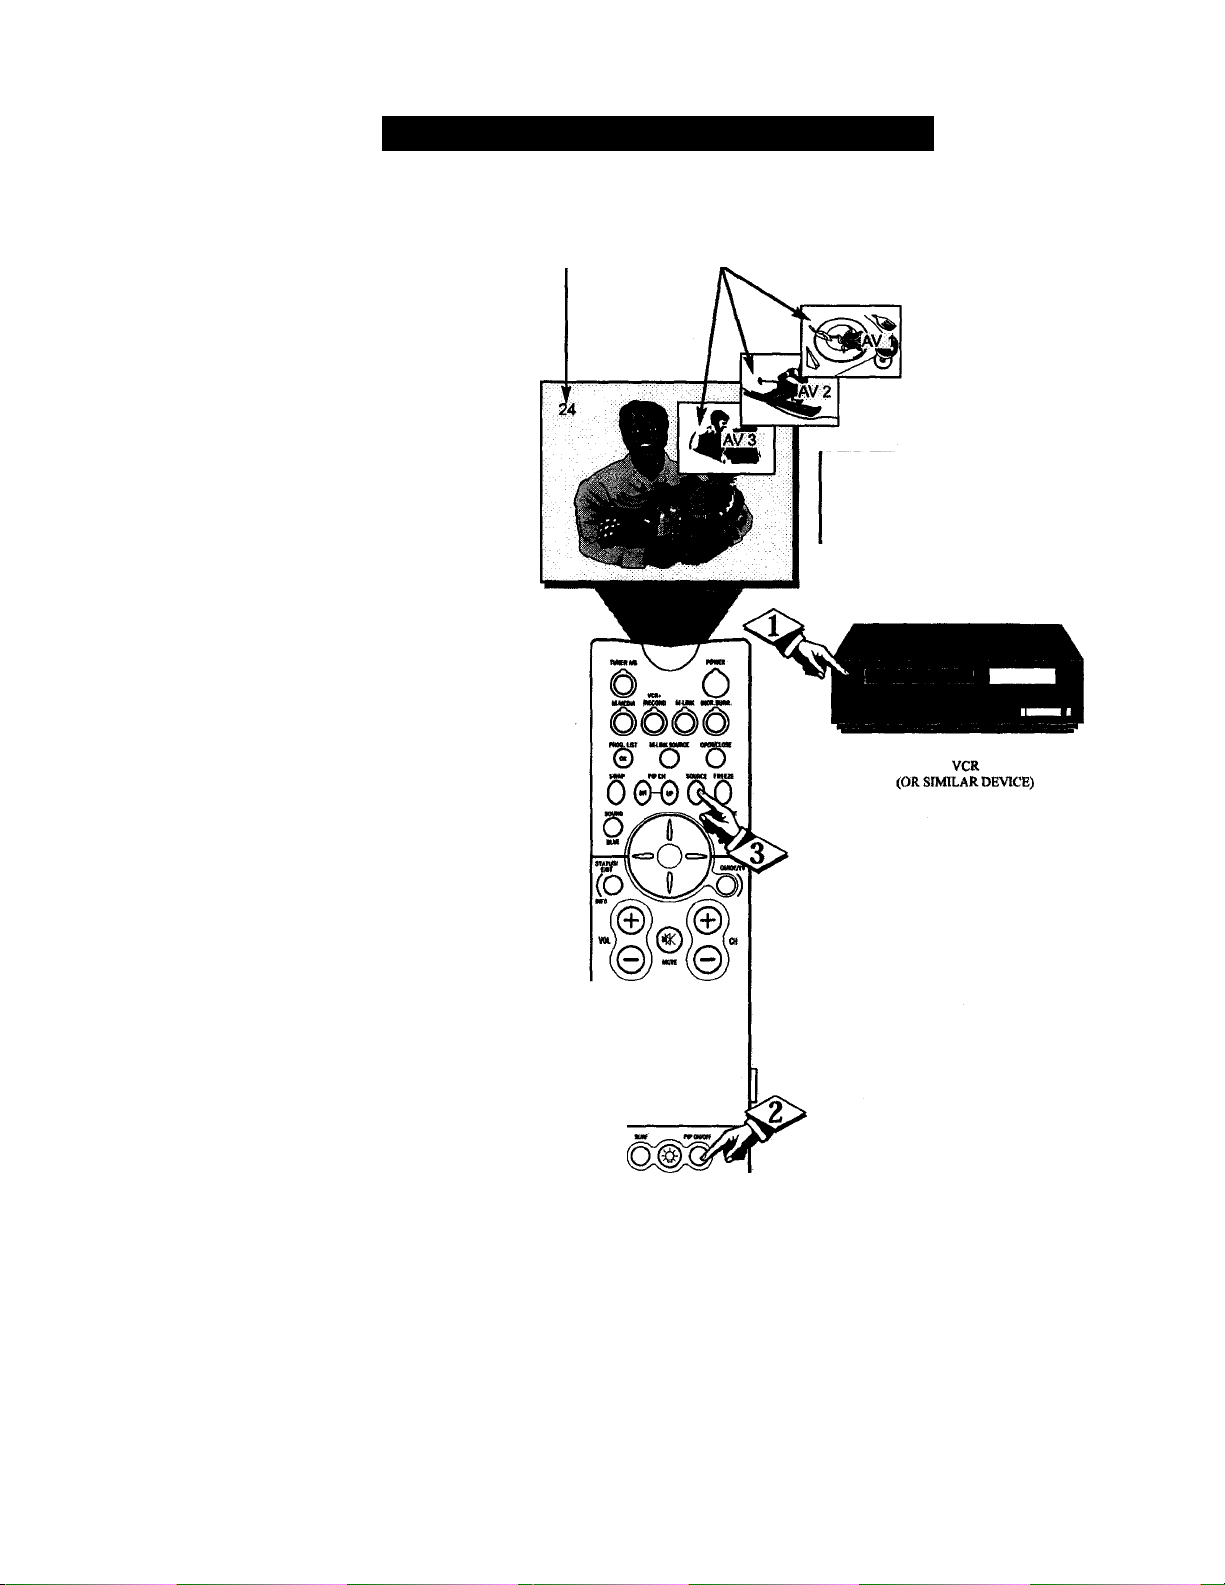
he picture for the PIP win
J
dow can come through either
the ANT/CABLE or any of the
external Audio/Video connections
at the rear of the TV. PIP
SOURCE simply tells the TV
which one of these sources it is to
show in the PIP window.
dEfiuD
<j> Ttarn the TV and VCR (or
other device hooked to the exter
nal AJV connections) ON.
(
Press the PIP ON/OFF but
ton on the remote control. The
PIP windows should appear in the
upper right-hand portion of the
screen.
Press the SOURCE button
<l>
on the remote control to toggle
among the different external con
nections.
PIP - Sllkc ГI^c; J iii: S[(í^AL Soi iu i:
MAIN SCREEN PICT’URE PIP PICTURE
NOTE: The PIP source picture can come ftcrni the
ANT/CABLE input, the AUDIOMDEO AVI, the
AUDIO/VIDEO AV2, the AUDIOWIDEO AV3, or
the S-VIDEO input jacks located at the rear and side
of the TV.
The PIP SOURCE may come
from the following:
AVl,AV2,AV3,S-VIDEO: for
picture signal coming from the
external audio/video jacks on the
TV. (You must have an external
device hooked up at these loca
tions.)
ANTENNA/CABLE: for a pic
ture signal coming from the
ANT/CABLE input on the back
of the TV.
© © ©
0 0 0
© © ©
© © ©
oo oo
46
Page 53
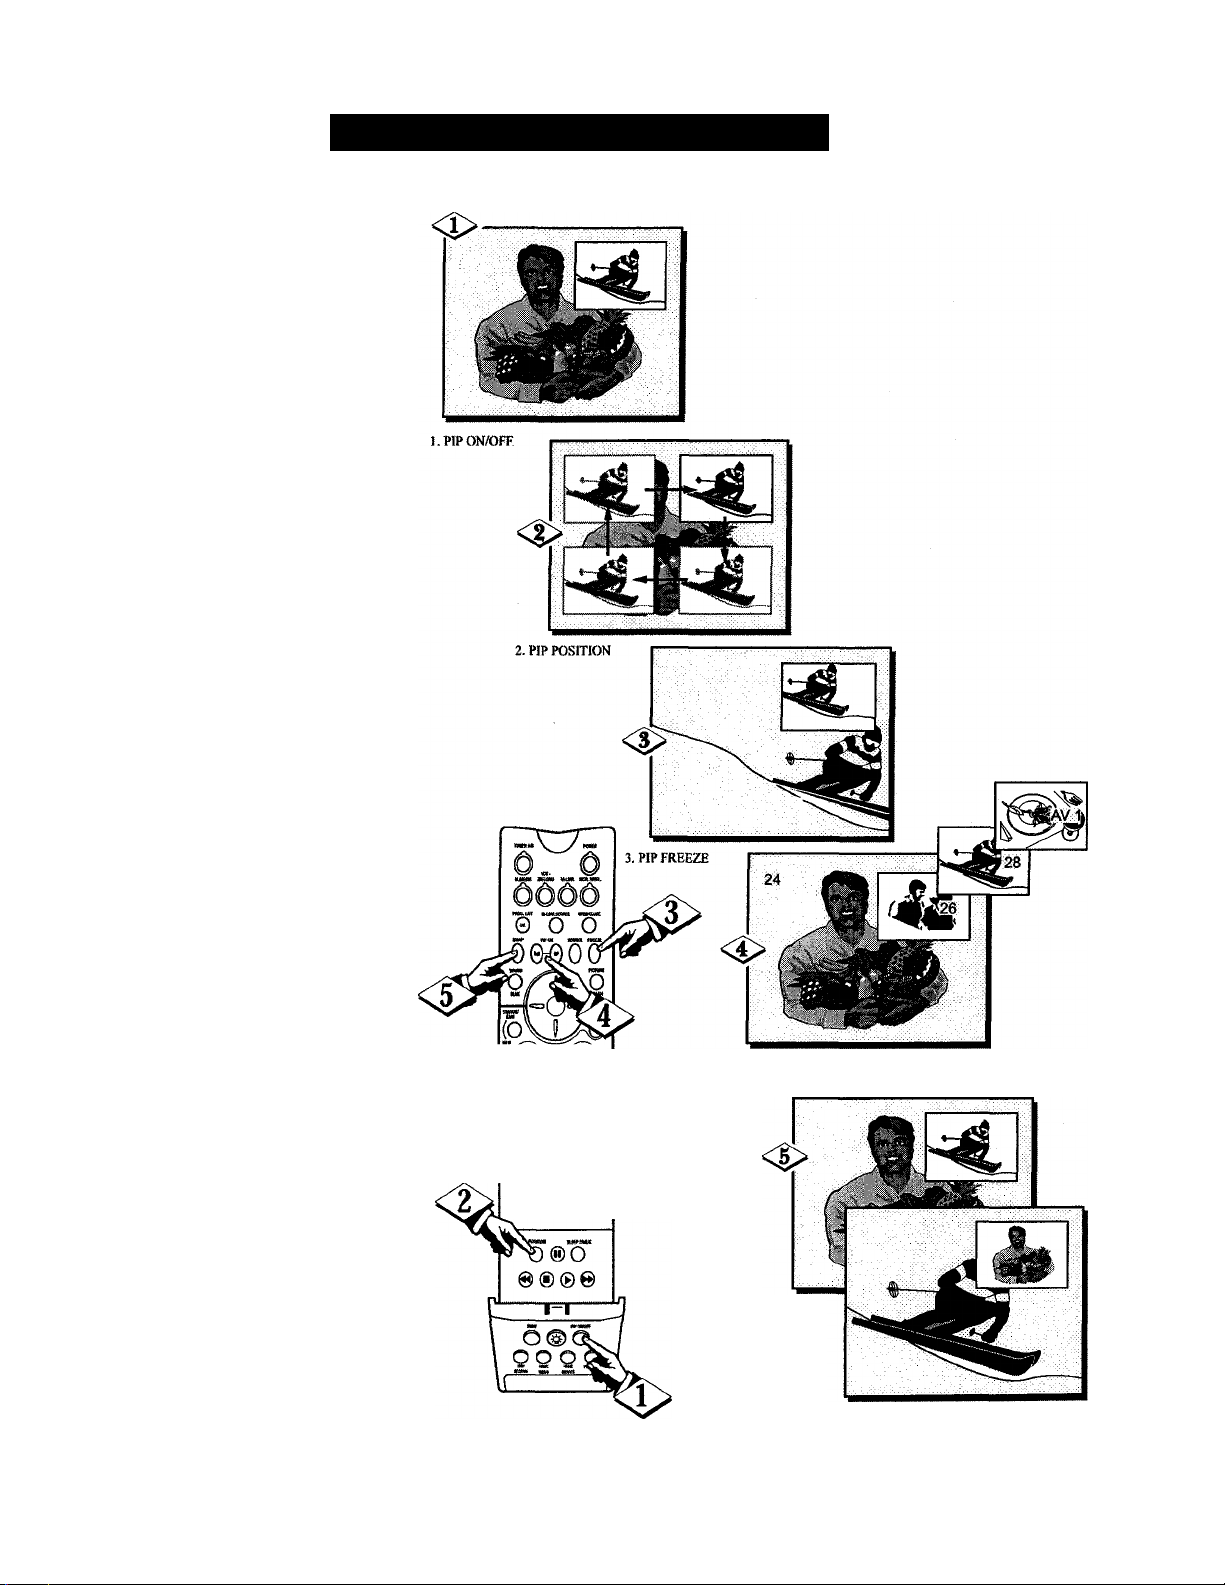
jyy using the PIP buttons on
JD the remote control, you can
change the size of the PIP win
dow and move and swap the PIP
picture with the main screen.
The PIP picture also can be
frozen within the PIP window.
tPECiWJ
Press the PIP ON/OFF but
<£>
ton to show the PIP window.
PIP appears in one of the four
comers of the screen.
The PIP ON/OFF button will also
change the PIP Window size and
format (refer to page 48, PIP
Window Size & Double Window
PIP section).
Press the POSITION button
on the remote control to move
the PIP picture to any of the four
comers.
PIP - Remote Control Buttons
lEJ
Press the FREEZE button on
the remote control to stop the
action within the PIP window.
Press the FREEZE button
again to resume the normal view
ing action.
Press the PIP CH(auneI)
UP/DN buttons on the remote
control to choose a different
channel or a different PIP source.
Press the SWAP button to
swap the main screen picture
with the PIP picture. Pressing
the SWAP button again will
return the main picture to the
screen.
0
4. PIP CHANNEL UP/t)N
Wm
® © ®
® © ©
© © ®
© © ©
5. PIP SWAP
47
Page 54
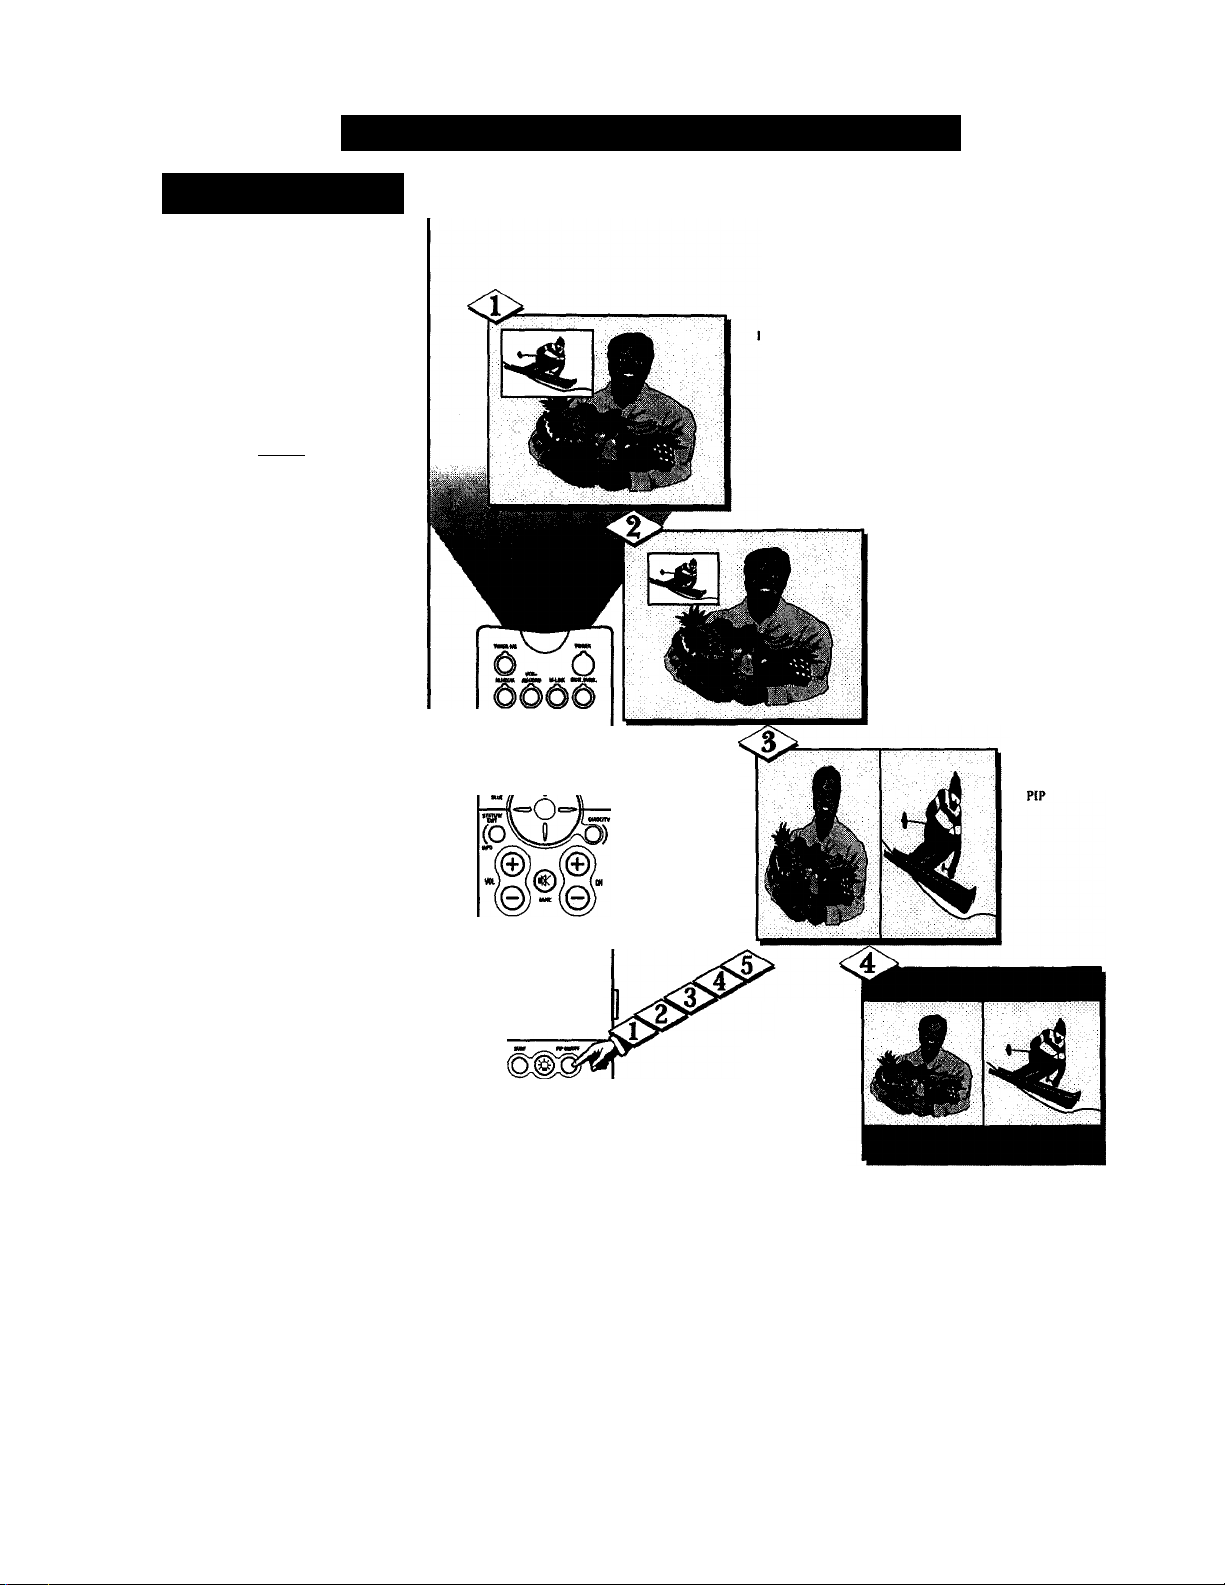
IMP \\ INDOW S(/l
Doi lil I IMP \\ INDOW
The PIP Window can be viewed
in a number of sizes. There is a
large and small PIP Window
along with a Double PIP Window
(two pictures appearing side-byside) that can be .set two different
ways. Die steps below show how
to access the PIP Window and
how to size them.
(beoinI
Press the PIP ON/OFF button
on the remote to show the PIP
Window. The PIP window will
appear in the format
Press the PIP ON/OFF but
<P
ton on the remote again and the
PIP Wndow will reduce in size
to the format.
<|> Pressing the PIP ON/OFF
button on the remote a third
time will show a Double
Window PIP. The main picture
source will be show on the left
and the PIP picture source on the
right (Note: These picture
sources can be swapped as
described on page 47.)
PIP - VViM)()w Si/i /Doi Bi.i; Window PIP
.PIP Window-LARGE
MUM iKtm
o/T\o
2. PIP Window-SMALL
3. Double Window
Press the PIP ON/OFF but
ton on the remote a forth time
and the Double Window PIP will
display the two pictures in their
proper format The vertical
height of the pictures will be
adjusted to show proper viewing
proportions.
Press the PIP ON/OFF button a
fifth time and the PIP window
will be shut OFF.
© ® ©
© ® ®
© ® ®
© 0 ©
oooo
4. Double Window
PIP Vertically
adjusted.
48
Page 55
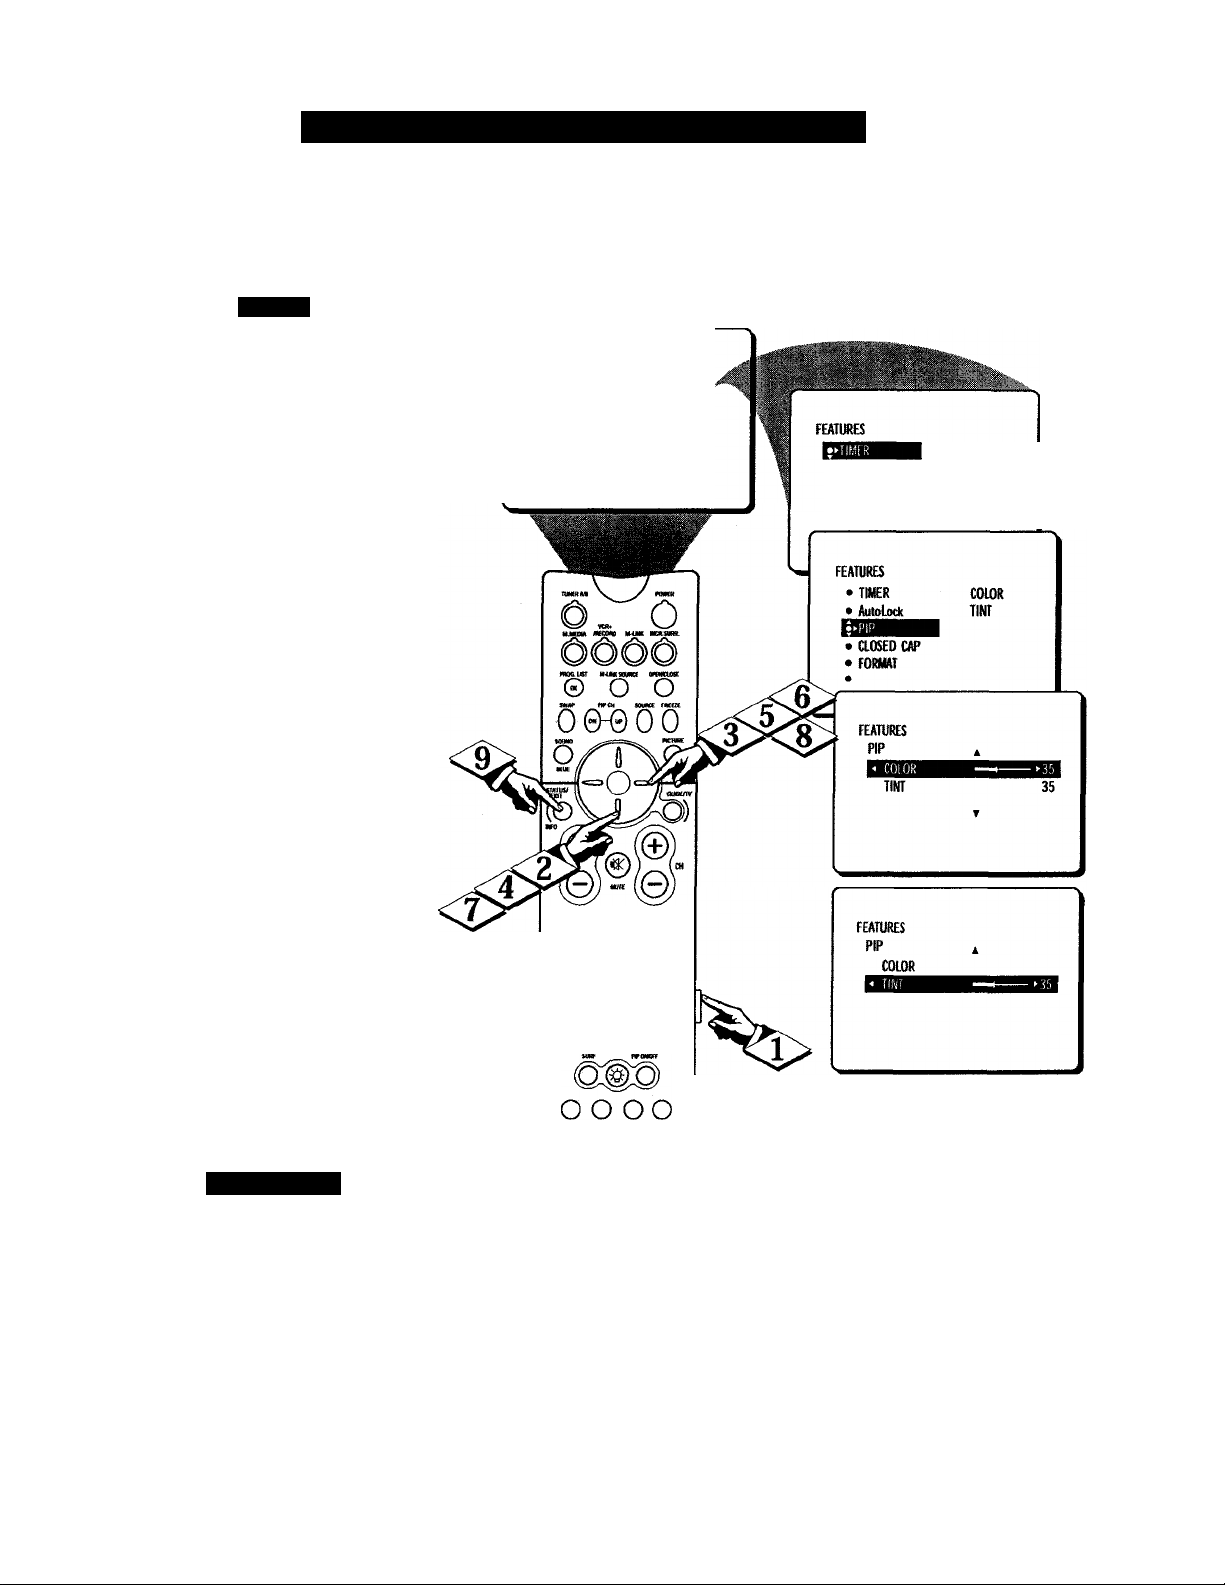
PIP-Adjusting the Color and Tint
>The Picture-in-Picture (PIP)
J L
COLOR and TINT controls are
used to make fine-tune adjustments
to the picture settings for PIP
(when shown on the TV screen).
IQ
4>
onscreen menu.
<|> Press the CURSOR RING
DOWN twice to highlight FEA
TURES.
<l>
RIGHT and the menu will shift to
the left.
Press the MENU button on the
remote control to show the
Press the CURSOR RING
<j> Press the CURSOR RING
I DOWN twice to highlight PIP.
Press the CURSOR RING
RIGHT again to shift the display
to the COLOR adjustment bar.
(
<|> Press the CURSOR RING
RIGHT or the CURSOR RING
LEFT to adjust the COLOR bar to
the desired level.
<|> Press the CURSOR RING
DOWN to highlight the TINT
adjustment bar.
Press the CURSOR RING
<l>
RIGHT or the CURSOR RING
LEFT to adjust the TINT bar to the
desired level.
<|> Press the STATUS/EXIT but
ton to remove the menu from the
screen.
• PICriKE
• SOUND
• INSTMi
© © @
® © ®
® © ®
© © ©
TIIKR
Autolodt
PIP
aOSED CAP
FORMAT
• Autolock
• PIP
• CLOSED CAP
• FORMAT
TIME
START TIME
STOP TIME
CHANNEL
TUNER MODE
Smari Hi;lp
Remember, although
there is a separate TINT con
trol for PIP, the adjustment levels
for this control depend on the TV’s
main picture. For example, if you
are viewing a classic movie in black
and white, PIP also will be seen in
black and white (even though the
PIP picture source is in color).
49
Page 56
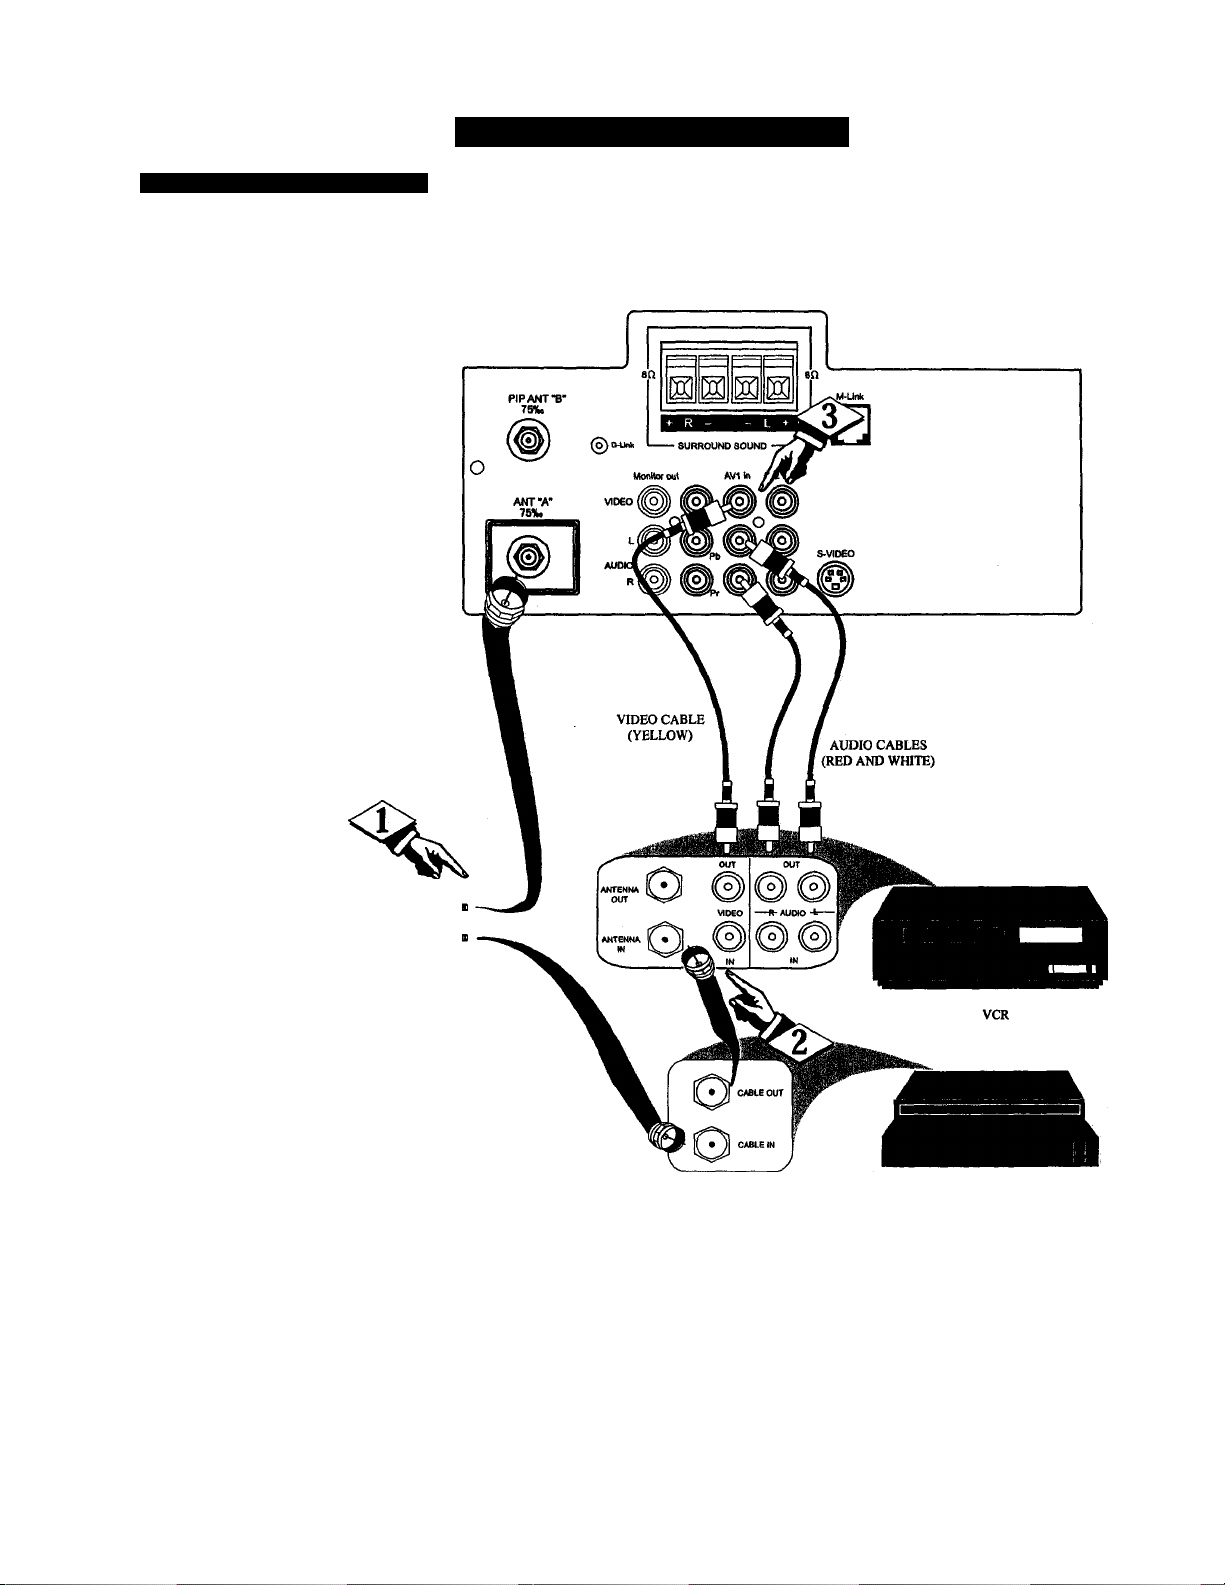
EJI
C';il)li' Box and NX R (OiiiK'dions
his page shows how to hook
PIP up with a cable box and a
Z
VCR.
CUfiuD
First, use an optional signal
<i>
splitter and connect the original
cable TV signal to both the CABLE
IN on the cable converter and the
ANTENNA plug on the back of the
television.
Connect the CABLE OUT on
the converter to the ANTENNA IN
on the VCR.
(
<l>
Connect the VIDEO OUT
jack on the VCR to the VIDEO IN
jack on the TV.
Also connect the AUDIO OUT
(right and left) Jacks from the
VCR to the AUDIO IN jacks on the
television.
PJP- Mori: Conm:c tions
BACK OF TV
(
I SIGNAL
™| SPLITTER
Contact the Parts
Infonnation Center
at 1-300-851-8885
to order any optional
accessories.
CABLE TV CONVERTER
SO
Page 57
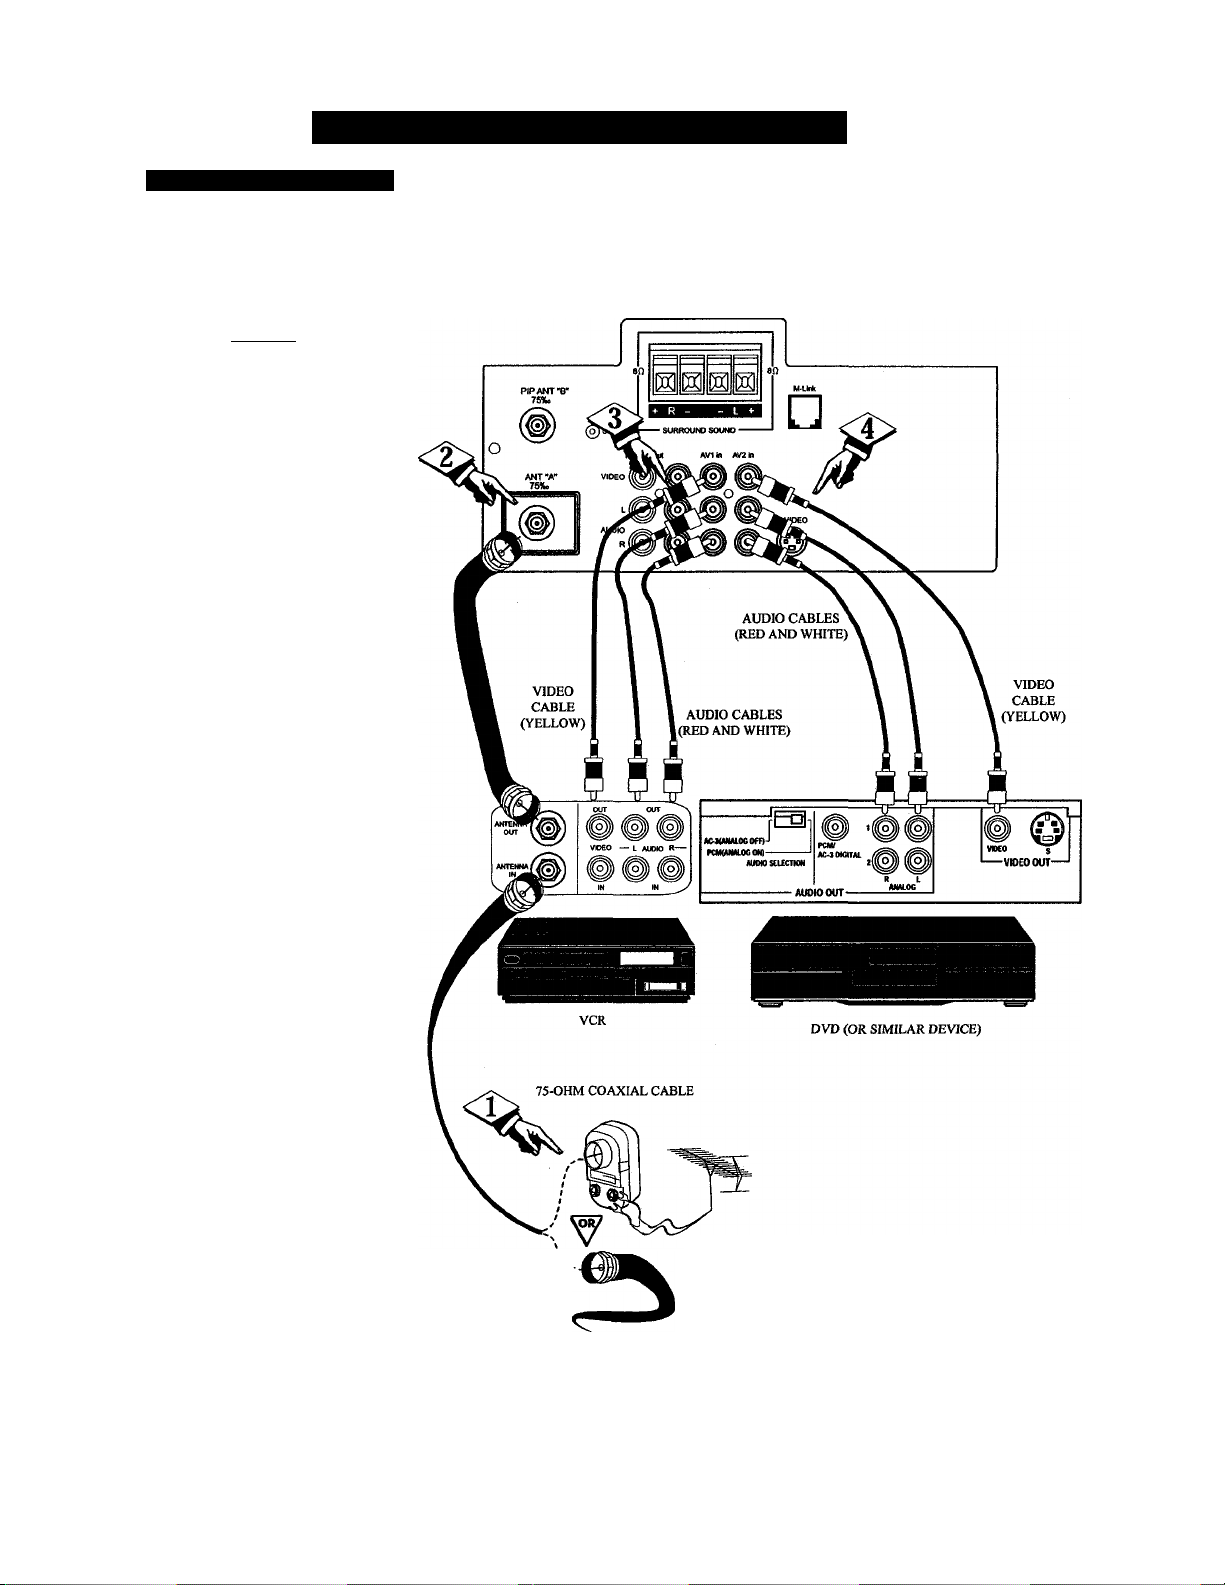
VCR and D\ D Connections
he steps for hooking up a VCR
T
(video cassette recorder), DVD
(digital video disc player), or simi
lar device to work with PIP are
shown here.
CBEGIWJ
First, connect the original
<P
cable TV signal or antenna signal
to the ANTENNA IN jack on the
back of the VCR.
Connect the ANTENNA OUT
jack on the back of the VCR to the
ANT(enna) “A” jack on the back of
the TV.
Connect the yellow video
<l>
cable from the VIDEO OUT jack
on the VCR to the AVI in(put)
VIDEO jack on the TV. Then con
nect the red and white audio
cables from the AUDIO OUT jacks
(L and R) on the VCR to the AVI
in(put) AUDIO jacks on the back of
the TV.
PIP - More Connections (cont’d)
BACK OF TV
Connect the yellow video
cable from the VIDEO OUT jack
on the DVD or similar device to the
AV2 in(put) VIDEO jack on the
TV. Then connect the red and
white audio cables from the
AUDIO OUT jacks (L and R) on
the DVD or similar device to the
AV2 in(put) AUDIO jacks (L and
R) on the back of the TV.
NOTE: Remember that when you
are selecting the PIP SOURCE, the
VCR will appear on the AVI chan
nel and the DVD or similar device
will appear on the AV2 channel.
OUTSIDE UHFWHF
ANTENNA OR
CABLE TV SIGNAL
51
Page 58

1 ROlilìl.FSIIOOl INC
jyiease make these simple checks
JL before calling for service.
Because charges for TV installa
tion and adjustment of customer
controls are not covered under
your warranty, these tips can save
you time and money.
No Power
No Picture
No Sound
CAUTION: A video source (such as a video game, compact disc interactive [GDI], or
TV information channel) that shows a constant nonmoving pattern on the TV screen can
cause picture tube damage. When your TV is continuously used with such a source, the
pattern of the nonmoving portion of the game (or other source) can leave a permanent
image on the picture tube. When you’re not using the video source, turn it OFF. Also,
regularly alternate the use of such video sources with normal TV viewing.
Check the TV power cord. Unplug the TV, wait 10 seconds, then reinsert the plug into
the outlet and push the POWER button again.
Check that the outlet is not on a wall switch.
Be sure the fuse is not blown on the AC power strip, if one is being used.
Check antenna connections. Are they properly secured to the TV's ANT A/B 75£2 plug?
Check the TUNER MODE control for the correct tuner setting.
Tty running the Auto Program feature to find all available channels.
Press the SOURCE button on the remote to make sure the correct signal source is
selected (AVI [or CVI], AV2, AV3, or S-VIDEO).
• Check the VOLUME buttons.
• Check the MUTE button on the remote control.
• Check the SPEAKER onscreen control. If it is in the OFF position, sound at the set will
be eliminated.
• If you’re attempting to hook up auxiliary equipment, check the audio jack connections.
• (If applicable) Check the audio receiver for the correct operating mode.
Remote Does Not
Work
TV Displays Wrong
Channel or No
Channels Above 13
Cleaning and Care
Check the batteries. If necessary, replace them with AA Heavy Duty (Zinc Chloride) or
Alkaline batteries.
Clean the remote control and the remote control sensor window on the TV.
Check the TV power cord. Unplug the TV, wait 10 seconds, then reinsert the plug into
the outlet and push the POWER button again.
' Be sure the fuse is not blown on the AC power strip, if one is being used.
Check to be sure the TV outlet is not on a wall switch.
Repeat channel selection.
Add the desired channel numbers (using the CHANNEL EDIT control) into the TV’s
memory.
Check to be sure the TUNER MODES are set to the CABLE option and run the Auto
Program feature to find all available channels.
To avoid possible shock hazard, be sure the TV is unplugged from the electrical outlet
before cleaning.
When you are cleaning the TV, take care not to scratch or damage the screen surface
(avoid wearing jewelry or using anything abrasive). Wipe the front screen with a clean
cloth dampened with water. Use even, easy, vertical strokes when cleaning.
Gently wipe the cabinet surfaces with a clean cloth or sponge dampened in a solution of
cool, clear water. Use a clean, dry cloth to diy the wiped surfaces.
Never use thinners, insecticide sprays, or other chemicals on or near the cabinet, as they
might cause permanent marring of the cabinet finish.
52
Page 59

Glossary of Television Terms
Alternate Channel • The feature that allows you to toggle
between the last two channels viewed by pressing the A/CH but
ton on the remote control.
Auto Programming • The feature that, when activated, scans
for all available channels from regular antenna or cable signals
and stores only active broadcast stations in the TV’s memory.
Channel Edit • The feature that allows you to add or delete
channels from the list of channels stored in the TV’s memory.
Channel Edit makes it easy to limit or expand the number of
channels that are available to you when you press the Channel
(+) or (-) buttons on your remote control.
Closed Captioning • The broadcast standard feature that allows
you to read the voice content of television programs on the TV
screen. Designed to help the hearing impaired, Closed
Captioning uses onscreen “text boxes” to show dialogue and
conversations while a TV program is in progress.
Coaxial Cable * A single, solid antenna wire normally matched
with a metal plug (F type) end connector that screws (or pushes)
directly onto a 75-ohm input found on the television or VCR.
Direct AudioA^ideo Inputs • Connectors, located on the rear of
the TV, used for the input of audio and video signals. These
inputs are designed for use with VCRs (or other accessories) in
order to receive higher picture resolution and offer sound-con
nection options.
Identify • The method by which a TV remote control searches
and finds an operating code for another product (such as a VCR
or a cable converter). After the code has been “identified,” the
TV remote control can operate and send commands to the other
product.
Incredible Stereo (or Surround) • False acoustic management
of the audio signal that produces a dramatic expansion of the
wall of sound that surrounds the listener and heightens overall
viewing pleasure.
Multichannel Television Sound (MTS) • The broadcast stan
dard that allows for stereo sound to be transmitted with the TV
picture.
Onscreen Displays (OSD) • The wording or messages generated
by the television (or VCR) to help you with specific feature con
trols (color adjustment or programming, for example).
Picture-in-Picture • The showing of two pictures on the TV
screen at the same time (one main screen picture and one small
picture, or PIP).
Programming • The process of adding or deleting channel num
bers into the television’s memory circuits. Through program
ming, the TV “remembers” only the locally available or desired
channel numbers and skips over any unwanted channel numbers.
Remote Control Sensor Window • The window or opening
found on the television control panel and through which infrared
remote control command signals are received.
Second Audio Program (SAP) • An additional audio channel
provided for within the Multichannel Television Soxmd (MTS)
broadcast standard. The most frequently proposed use for SAP
is the simultaneous bilingual broadcast of TV material.
Status/Exit Button • The remote-control fimction that allows
you to quickly confirm what channel number is being viewed.
Status/Exit also can be used to clear the television of onscreen
displays or information (rather than waiting for the displays to
“time out,” or automatically disappear from the screen).
Twin-lead Wire • The more commonly used name for the twostrand, 300-ohm antenna wire used with many indoor and out
door antenna systems. In many cases, this type of antenna wire
requires an additional adapter (or balun) in order to connect to
the 75-ohm input terminals designed into the more recent TVs
and VCRs.
Menu • An onscreen listing of feature controls that are available
for you to adjust.
53
Page 60

Indi :\
Accessories/Optional Parts..........................38-40, 45, 50-51, *QAJ-1
Alternate Channel Button (A/CH).......................................................43
Antenna Hookup
Audio Out Control ..............................................................................35
Audio Output Jacks..............................................................................36
AudioMdeo Input Jacks .................................................................38-40
AutoChron™ Control
AutoLock™
Access Code ....................................................................................21
Blocking Channels
Block No Rating Programs..............................................................27
Block ON/OFF Control
Block Unrated Programs .................................................................26
Movie Ratings .................................................................................23
Review AutoLock™ Settings
TV Ratings........................................................................................24
Understanding AutoLock™ ............................................................20
Viewing Blocked Programming/Channels
AutoPicture™ Controls.................................................................... .41
Auto Program Channels Control ................................................*Q/U-3
AutoSound™ Controls
AVL (Audio Volume Leveler) Control
Balance Control ..................................................................................30
Bass Control.........................................................................................30
Blue Mute Control ..............................................................................10
Cable Box Connection................................................................♦Q/U-1
Cable TV Hookup ......................................................................*Q/U-1
Channel Edit Control...................................................................*Q/U-4
Channel Name Control ...............................................................*Q/U-4
Clock ...................................................................................................13
Closed Captioning Control ...................................................................8
Component Video Input Jacks.............................................................40
DVD (or similar device) Hookup............................................38-40, 51
Dynamic Noise Reduction (DNR) Control
External Speaker Connections.............................................................37
Features .................................................................................................5
Format (Screen) Control .......................................................................9
Guide Plus+* Demo............................................................................11
Headphone Controls ...........................................................................33
Glossary of Television Terms
.........................................................................
................................................................
..........................................................................
..................................................................
........................................................
.....................................
.......................................................................
..............................................
..........................................
............................................................
*Q/U-1
"'QAJ-4
22
25
28
29
31
ImageMax™...........................................................................................7
Incredible Surround..............................................................................32
Language Control ........................................................................*QAJ-3
M-Link-specific Remote Control Buttons
(M Link, ITR/REC, Home Video, Home Movies,
Personal).......................................................................................*Q/U-2
Picture Adjustment Controls
PIP (Picture-in-Picture)
Color/Tint Control ............................................................................49
Connections .........................................................................45, 50-51
Remote Control Buttons...................................................................47
Source Control..................................................................................46
Window Size/Double Window.........................................................48
Registration/Welcome............................................................................2
Remote Control
Battery Installation...................................................................*Q/U-2
Buttons......................................................................................*Q/U-2
S-Video Input Jacks
Safety/Precautions..........................................................................3, 52
SAP (Second Audio Program) Control................................................34
Sleep Timer Control ............................................................................12
42
Start Time
Activate Control................................................................................18
Channel Control ...............................................................................16
Control..............................................................................................14
Stereo/Mono Control............................................................................34
Stop Time Control................................................................................15
Surf Control .........................................................................................43
Surround Sound (Connections) ...........................................................37
Table of Contents
Timer Display Control
Troubleshooting
Treble Control
Tuner Mode Control
7
TV Keypad (Buttons) ..................................................................»Q/U-2
TV Speaker Control
VCR Connections ..........................................................................38, 50
VCR Plus+* Feature ............................................................................44
Volume Control
Warranty ..............................................................................................56
53
..................................................................................
..................................................................................
......................................................................................
...................................................................................
..................................................................
...........................................................................
.........................................................................
...................................................................
............................................................................
6
39
4
19
52
30
*Q/U-3
36
31
* Refer to the Quick Use and Installation Guide for information.
54
Page 61
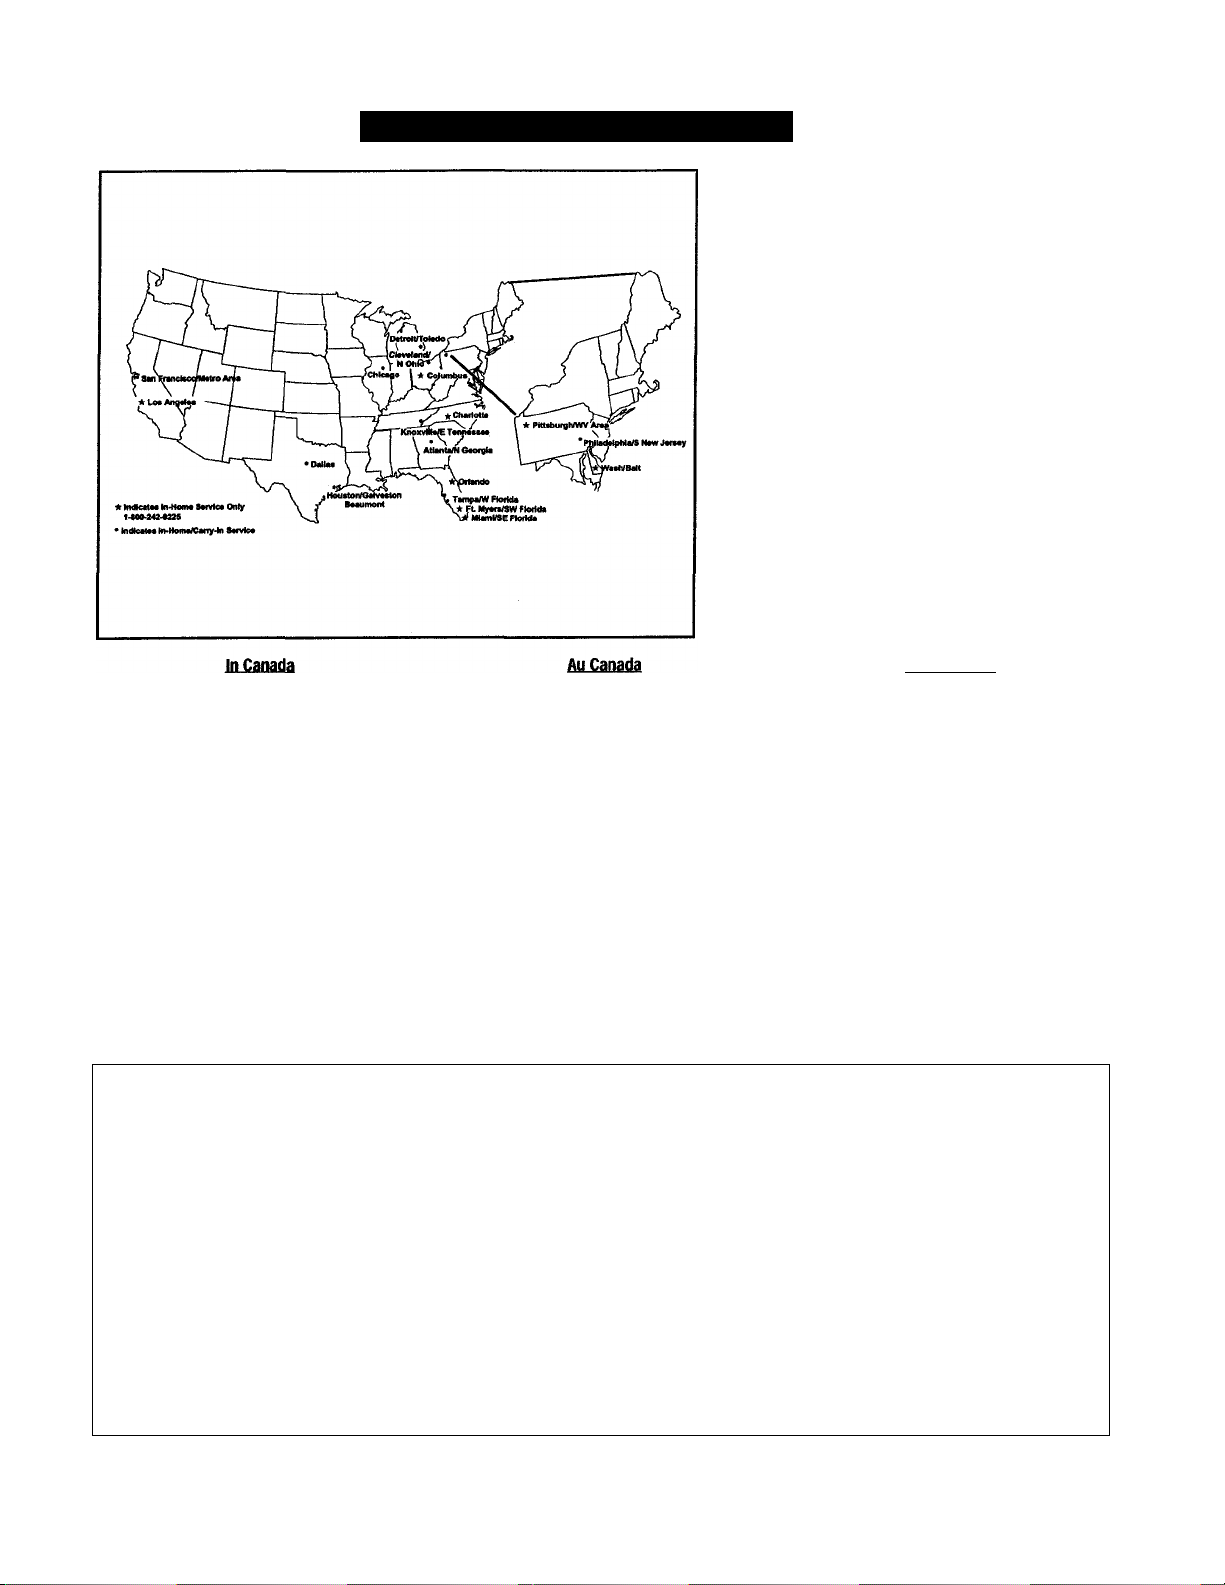
Factory Service Locations
Hew you can obtaki efficient and expedient carry-in,
mail-in, or ki-home service for you" product
Please contact Philips at
1-800-661-6162 (French speaking)
1-800-363-7278 (English speaking)
NOTE: If you reside in one of our Philips Factory Service
Branch areas (see directory on back), you can contact the
nearest Service Branch to obtain efficient and e)q)edient
repair for your product. If your product is In-Warranty, you
should have proof-of-purchase to ensure No Charge Service.
For Out-of-Warranty service, call the location nearest you.
NOTA; Si vous résidez dans une des régions desservies par
une succursale de service après vente du fabricant Philips
(voir liste ci-dessous), vous pourrez contacter la branche de
service après vente la plus près de chez vous pour obtenir un
service après vente rapide et efficace. Si le produit est sous
garantie, il suffira de présenter une preuve d'achat pour
bénéficier d'un service sans frais. Pour les produits non cou
verts par la garantie, contactez le centre le plus près de chez
vous.
NOTA: Si Ud. reside en una de nuestras zonas para sucur
sales Philips de servicio al de fábrica (ver directorio más
abajo), Uo. puede comunicarse con la sucursal de servicio
más cercana para obtener una reparación oportuna y eficaz
de su producto. Si su producto está todavfa bajo garantía,
Ud. ddie presentar conprobante de compra para no ocasion
ar ningunos cargos por servicio. Para servicio después del
vencimiento de la garantía, llame al lugar más cercano de los
abajo indicados.
Comment obtenir le service après-vente pour
les produits apportés ou envoyés par la poste à
notre centre de service ou le service à domicile
Veuillez contacter philips à:
1-800-661-6162 (Francophone)
1-800-363-7278
En el Canadá
Cómo recibir servicio efficiente para su produc
to, en persona, por correo o a domicilio
Favor de comunicarse con Philips al:
1-800-661-6162 (francófono)
1-800-363-7278 (anglòfono)
Quality service is as close as your telephone! Simply look over the ust below for the nuiwer of a Factory Service Center
KNOWING YOUR PRODUa IS BEING GIVEN THE EXPERT ATTENTION OF PHIUPS' FACTORY SERVICE. AND, IF THE PHONE NUMBER LISTED FOR YOUR AREA IS LONG DIS
COMMENT obtenir NOTRE SERVICE APRÈS VENTE RAPIDE ET EFFICACE SOIT PAR COURRIER, A DOMICILE, OU EN SE PRÉSENTANT A UN CENTRE DE SERVICE PHILIPS. PLUS DE 600 CENTRES
DE RÉCEPTION DE PRODUITS A RÉPARER A TRAVERS LE PAYS; CONTACTER LE CENTRE DE SERVICE AUX CONSOIWMTEURS LE PLUS PROCHE POUR SAVOIR L'EMPUCEMENT DE CES DÉPÔTS
CÚMO OBTENER UN SERVICIO OPORTUNO Y EFICIENTE POR CORREO, EN CASA O EN PERSONA PARA SU PRODUCTO A TRAVÉS DE UN CENTRO PHIUPS DE SERVICIO. MAS DE 600 SITIOS POR
TODO EL PAIS PARA LA RECEPCION DE PRDDUCTOS NECESITADOS DE REPARACIONES; COMUNICARSE CON EL CENTRO DE SERVICIO DE FABRICA MAS CERCANO PARA ESTOS LUGARES DENTRO
GEORGIA
Philips Factory Service of Georgia
200 N. Cobb Pkwy., Suite 120
Marietta, GA 30062
(770) 795-0085
FLORIDA
Philips Factory Service of Florida
1911 US Highway 301 North
Tampa, FL 33619
(813)621-8181
WESTERN U.S.A.
Philips Factory Service Western
Region
681 East Brokaw Rd.
San Jose, CA 95112
(408) 436-8566
MAC2929 12/99
NEAR YOU. Your product wia receive efficient and expedient carry-in, mail-in, or in-home service, and you will receive peace of mind,
TANCE, CAU1-800-242-9225 for Factory Service.
DANS UN RAYON № 50 A 75 MILES (80 KM A120 KM) DU CENTRE DE SERVICE LOCAL.
DE UN RADIO DE 80 A120 KM (50 A 75 MILLAS) DEL CENTRO DE SERVICIO LOCAL.
TEXAS
Philips Factory Service of Texas
1110 N. Post Oak Rd., Suite 100
Houston, TX 77055
(713) 682-3990
CENTRAL U.S.A.
Philips Factory Service Central
US
950 Keynote Circle
Brooklyn Heights, OH 44131
(216) 741-3334
MICHIGAN
Philips Factory Service of
Michigan
25173 Dequindre
Madison Heights, Ml 48071
(248) 544-2110
DALLAS AREA
Philips Factory Service of Dallas
415 N. Main Street, #107
Euless, TX 76040
(713) 682-3990
LLINOIS
Philips Factory Service of Illinois
1279 W. Hamilton Pkwy.
Itasca, IL 60143
(630) 775-0990
TENNESSEE
Philips Factory Service of East
Tennessee
6700 D Papermill Rd.
Knoxville, TN 37919
(423) 584-6614
MID-ATLANTIC
Philips Factory Service Mid-
Atlantic
352 Dunks Ferry Rd.
Bensalem, PA 19020
(215) 638-7500
EL4482-3 Rev. BB 3135 015 07541
55
Page 62

LIMITED WARRANTY
COLOR TELEVISION
90 Days Free Labor
One Year Free Replacement of Parts (Two Years Free Replacement on Color Picture Tube)
This product can be repaired in-home.
WHO IS COVERED?
You must have proof of purchase to receive warranty service, A sales
receipt or other document showing that you purchased the product is
considered proof of purchase.
WHAT IS COVERED?
Warranty coverage begins the day you buy your product. For 90 days
thereafter, all parts will be repaired or replaced free, and labor Is free.
From 90 days to one year from the day of purchase, all parts will be
repaired or replaced free, but you pay for all labor charges. From one
to two years from the day of purchase, you pay for the replacement or
repair of all parts except the picture tube, and for all labor charges.
After two years from the day of purchase, you pay for the replacement
or repair of all parts, and for all labor charges.
All parts, including repaired and replaced parts, are covered only for
the original warranty period. When the warranty on the product
expires, the warranty on all replaced and repaired parts also expires.
WHAT IS EXCLUDED?
Your warranty does not cover:
* labor charges for installation or setup of the product, adjustment of
customer controls on the product, and installation or repair of
antenna systems outside of the product.
> product repair and/or part replacement because of misuse, acci
dent, unauthorized repair or other cause not within the control of
Philips Consumer Electronics Company.
* reception problems caused by signal conditions or cable or antenna
systems outside the unit.
* a product that requires modification or adaptation to enable it to
operate in any country other than the country for which it was
designed, manufactured, approved and/or authorized, or repair of
products damaged by these modifications.
* incidental or consequential damages resulting from the product.
(Some states do not allow the exclusion of incidental or consequen
tial damages, so the above exclusion may not apply to you. This
includes, but is not limited to, prerecorded material, whether copy
righted or not copyrighted.)
* a product used for commercial or institutional purposes.
WHERE IS SERVICE AVAILABLE?
Warranty service is available in all countries where the product is offi
cially distributed by Philips Consumer Electronics Company. In coun
tries where Philips Consumer Electronics Company does not distribute
the product, the local Philips service organization will attempt to pro
vide service (although there may be a delay if the appropriate spare
parts and technical manual(s) are not readily available).
MAKE SURE YOU KEEP...
Please keep your sales receipt or other document showing proof of
purchase. Attach it to this owner's manual and keep both nearby.
Also keep the original box and packing material in case you need to
return your product.
BEFORE REQUESTING SERVICE...
Please check your owner’s manual before requesting service.
Adjustments of the controls discussed there may save you a service
call.
TO GET WARRANTY SERVICE IN U.S.A.,
PUERTO RICO OR U.S. VIRGIN ISLANDS...
Contact a Philips factory service center (see enclosed list) or author
ized service center to arrange repair.
(In U.S.A., Puerto Rico and U.S. Virgin Islands, all implied warranties,
including implied warranties of merchantability and fitness for a partic
ular purpose, are limited in duration to the duration of this express
warranty. But, because some states do not allow limitations on how
long an implied warranty may last, this limitation may not apply to
you.)
TO GET WARRANTY SERVICE IN CANADA...
Please contact Philips at:
1-800-661-6162 (French Speaking)
1-800-363-7278 (English Speaking)
(In Canada, this warranty is given in lieu of all other warranties. No
other warranties are expressed or implied, including any implied war
ranties of merchantability or fitness for a particular purpose. Philips is
not liable under any circumstances for any direct, indirect, special, inci
dental or consequential damages, howsoever incurred, even if notified
of the possibility of such damages.)
REMEMBER...
Please record the model and serial numbers found on the product
below. Also, please fill out and mail your warranty registration card
promptly. It will be easier for us to notify you if necessary.
MODEL# _________________________________________________________
SERIAL# _________________________________________________________
Printed in U.S.A.
Philips Consumer Electronics Company, P.O. Box 2976, Longview, Texas 75606, (903) 242-4800
56
 Loading...