How it Works
Log In / Sign Up
Buy Points
How it Works
FAQ
Contact Us
Questions and Suggestions
Users
Philips
Loading...
#
271B8QJEB
7
271B8QJEB/00
3
271B8QJKEB
8
271B8QJKEB/00
2
271E1
2
271E1CA
6
271E1CA/00
271E1S
271E1SCA
8
271E1SCA/00
271E1SD
4
271P4
2
271P4QPJEB
2
271P4QPJEB-00
2
271P4QPJEB-27
3
271P4QPJES
271P4QPJKEB
271P4QPJKES
271S4
2
271S4LPYEB
6
271S4LPYEB-27
271S4LPYSB
2
271S4LPYSS
271S7
2
271S7QJMB
4
271S7QJMB/00
2
271V8L
4
271V8LA
3
271V8LA/00
3
272B1
272B1G
4
272B1G/00
3
272B4QPJCB
13
272B4QPJCG
272B4QPJCG/00
272B7
4
272B7QPJEB
6
272B7QPJEB/00
3
272B7QPTKEB
9
272B7QPTKEB/00
2
272B7QUBHEB
8
272B7QUBHEB/00
3
272B7QUPBEB
10
272B7QUPBEB/00
272B8QJEB
8
272B8QJEB/00
2
272C4
9
272C4QPJKAB
3
272E1
3
272E1CA
6
272E1CA/00
2
272E1GAEZ
6
272E1GAJ
8
272E1SA
4
272E2FA
5
272G5
7
272G5DJEB
27
272G5DYEB
272hu
272P4
4
272P4APJKHB
2
272P4QPJKEB
6
272P4QPJKEB-00
2
272P4QPJKEB/27
2
272P7
4
272P7VPTKB
272P7VPTKEB
5
272P7VPTKEB/00
3
272S1
272S1AE
5
272S1AE/00
3
272S4
272S4LPJCB
31
272V8A
7
272V8A/00
2
272V8LA
2
273B9
8
273B9/00
2
2701
2
2730
2
2731
2
2732
2
27254
270414
273E3
22
273E3L
28
273E3LH
273E3LHSB
3
27-COLOR TV W-STEREO-REMOTE CONTROL 29LL600
27-CTV W-REMOTE CONT-DBX STEREO 29LW602
27-HDTV MONITOR 27PT8320
27-HDTV MONITOR TV 27PT8302
2
27-PROG SCAN PS1127
27-REAL FLAT STEREO REMOTE COLOR MONITOR-RECEIVER 27RF70
27-REAL FLAT STEREO TV 27PT6341
27-REAL FLAT STEREO TV 27PT6341-07B
27-REAL FLAT TV 27PT6442-37B
27-STEREO TV 27PT5245
27-STEREO TV 27PT5445
27-STEREO TV 27PT5445-37B
Loading...
Loading...
Nothing found
272B7
User Manual
40 pgs
3.62 Mb
0
User Manual
36 pgs
3.6 Mb
0
User Manual
41 pgs
7.25 Mb
0
User Manual
33 pgs
3.18 Mb
0
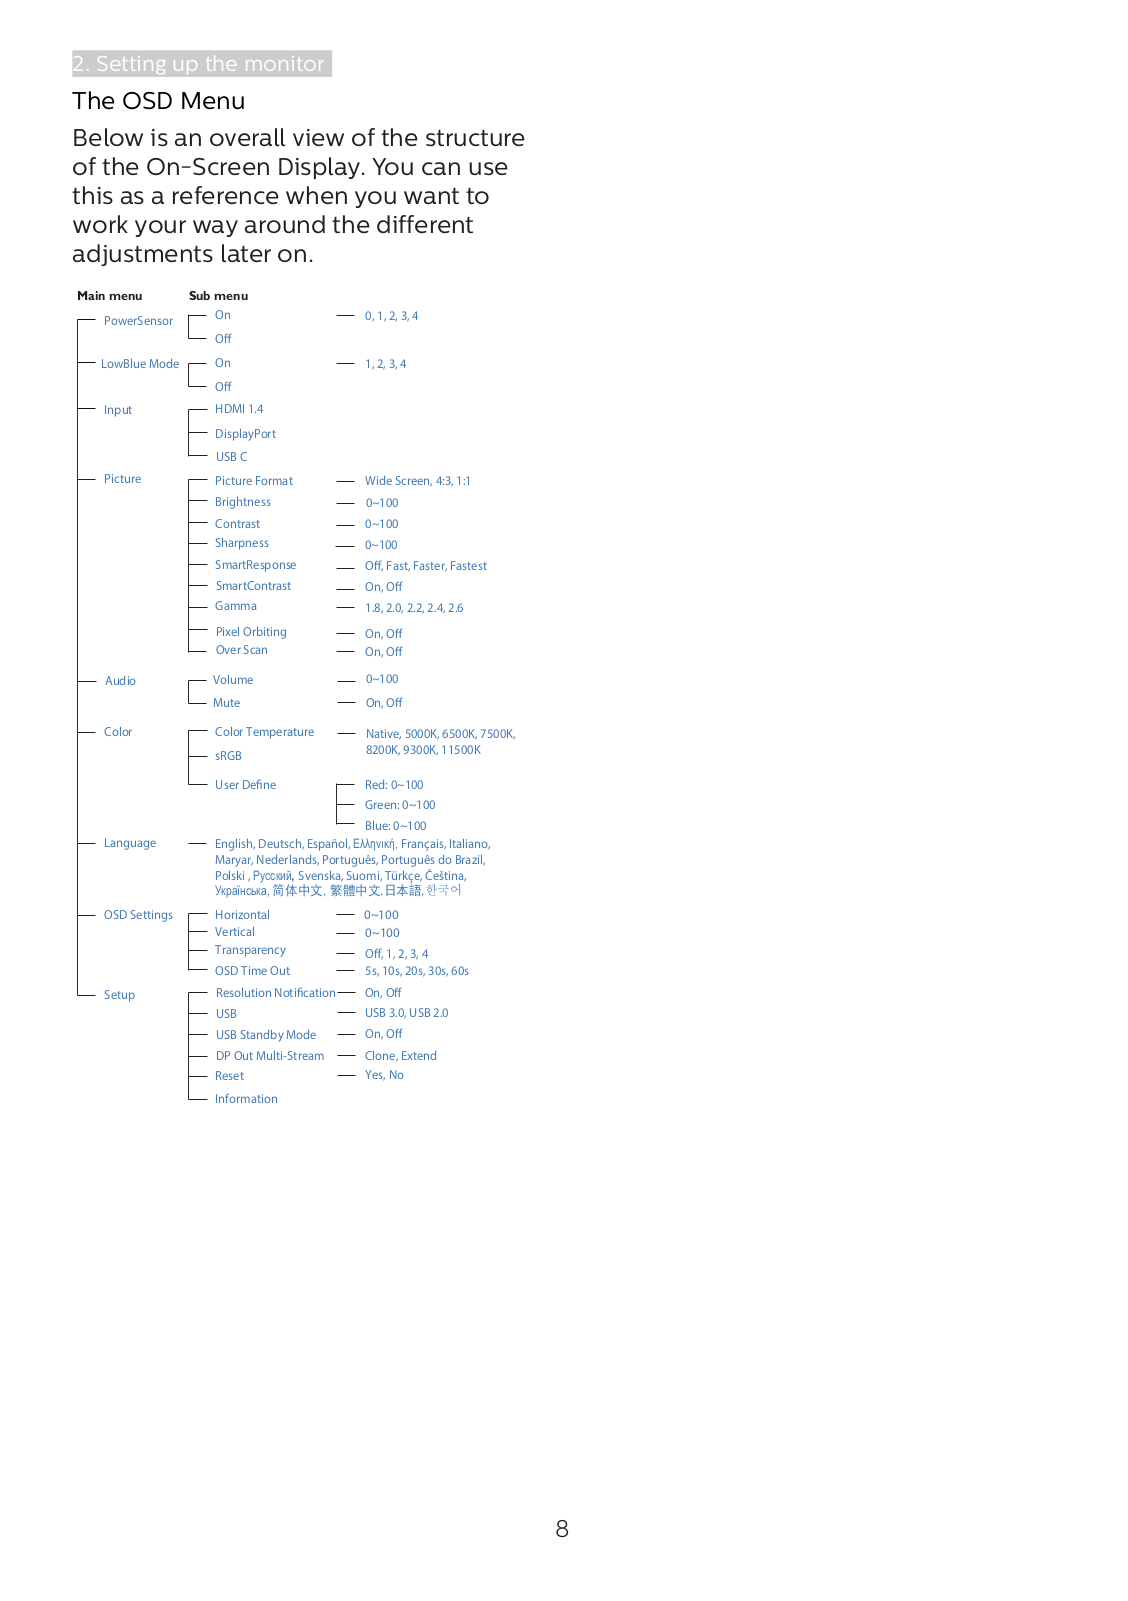
Table of contents
Loading...
Philips 272B7 User Manual
...
Philips User Manual
Download
Specifications and Main Features
Frequently Asked Questions
User Manual
Download
Loading...
+
23
hidden pages
Unhide
You need points to download manuals.
1 point = 1 manual.
You can buy points or you can get point for every manual you upload.
Buy points
Upload your manuals
 Loading...