

Philips 26PFL5322S, 26PFL7332S, 32PFL5332S, 37PFL5322S, 42PFL5322S User Manual
www.philips.com/support
EN USER MANUAL
26PFL3312S
26PFL5322S
26PFL7332S
32PFL3312S
32PFL5322S
32PFL5332S
37PFL3312S
37PFL5322S
42PFL3312S
42PFL5322S
Downloaded From TV-Manual.com Manuals

Model
www.philips.com/support
Serial
Country Number Tariff
Austria 0810 000205 €0.07/min
Belgium 078250145 €0.06/min
Czech Rep 800142840 free
Denmark 3525 8759 local
Finland 09 2311 3415 local
France 0821 611655 €0.09/min
Germany 01803 386 852 €0.09/min
Greece 0 0800 3122 1280 free
Hungary 0680018189 free
Ireland 01 601 1777 local
Italy 840320086 €0.08/min
Luxemburg 40 6661 5644 local
Netherlands 0900 8407 €0.10/min
Norway 2270 8111 local
Poland 0223491504 local
Portugal 2 1359 1442 local
Slovakia 0800004537 free
Spain 902 888 784 €0.10/min
Sweden 08 5792 9100 local
Switzerland 0844 800 544 local
UK 0870 900 9070 local
This information is correct at the time of press.
For updated information, see www.support.philips.com
Downloaded From TV-Manual.com Manuals

Recycling
The packaging of this product is intended to
be recycled. Apply to the local authorities for
correct disposal.
Disposal of your old product
Product information
The model and serial number can be found
at the rear of the TV and on the packaging.
For a larger TV, information is also on left
hand underside of the TV.
Your product is designed and manufactured
with highly quality material and components,
which can be recycled and reused. When this
crossed-out wheeled bin symbol is attached
to a product, it means the product is covered by the European Directive 2002/96/EC.
Please inform yourself about the local separate collection system for electrical and electronic products. Please act according to your
local rules and do not dispose of your old
products with your normal household waste.
The correct disposal of your old product will
help prevent potential negative consequences
for the environment and human health.
Disposal of batteries
The batteries supplied do not contain the
heavy metals mercury and cadmium. Please
check on how to dispose of exhausted bat-
teries according to local regulations.
Standby power consumption is less than
•
1W.
The power consumption of the set is
•
given on the type plate at the rear of the
TV.
•
For more product specifications, see the
product leafl et on www.philips.com/support.
Note: specifi cations and information are
subject to change without notice.
For further assistance call the customer
support service in your country. The
corresponding telephone numbers and addresses are given in the supplied worldwide
guarantee booklet.
Downloaded From TV-Manual.com Manuals

Information for Users in the UK
This information is specific to the UK. If
you are using your TV in the UK, use this
information in conjunction with the rest of
this manual.
Positioning the TV
For the best results, choose a position
where light does not fall directly on the
screen, and at some distance away from
radiators or other sources of heat. Leave
a space of at least 5cm around the TV for
ventilation. Ensure that curtains, cupboards
and other items cannot obstruct the air flow
through the ventilation apertures. The TV is
intended for use in a domestic environment
only and should never be operated or stored
in excessively hot or humid atmospheres.
Interference
The Department of Trade and Industry
operates a Radio Interference Investigation
Service to help TV licence holders improve
reception of BBC and IBA programmes
where they are being spoilt by interference.
If your dealer cannot help, ask at a main Post
Office for the booklet “How to Improve Televi-
sion and Radio Reception”.
Mains Connection
Before connecting the TV to the mains,
check that the mains supply voltage corresponds to the voltage printed on the
type plate on the rear panel of the TV. If
the mains voltage is different, consult your
dealer.
Important
This apparatus is fitted with an approved
moulded 13 AMP plug. Should it become
necessary to replace the mains fuse, this
Downloaded From TV-Manual.com Manuals
must be replaced with a fuse of the same
value as indicated on the plug.
1.
Remove fuse cover and fuse.
2.
Replace the fuse.
The replacement fuse must comply with
BS 1362 and have the ASTA approval
mark. If the fuse is lost, contact your retailer in order to verify the correct type.
3.
Refit the fuse cover.
If for any reason the fitted plug is not
suitable for your socket outlet, consult
your retailer or a qualified electrician
before proceeding with the installation.
Connecting the Aerial
The aerial should be connected to the
socket marked : at the back of the set. An
inferior aerial is likely to result in a poor,
perhaps unstable picture with ghost images
and lack of contrast. Make-shift loft or settop aerials are often inadequate. Your dealer
will know from experience the most suitable
type for your locality. Should you wish to
use the set in conjunction with other equipment, which connects to the aerial socket
such as TV games, or a video camera it is
recommended that these be connected via a
combiner unit to avoid repeated connection
and disconnection of the aerial plug.
Fitting the Stand (If Provided)
Use only the stand provided with the set.
Ensure that the fixings are properly tightened. A diagram showing how to assemble
the stand is packed with the stand. Never
use a make-shift stand, or legs fixed with
screws.

Contents
1 Introduction .............................................EN-2
Stationary Images ..................................EN-2
Electric, Magnetic and Electromagnetic
Fields (“EMF”) .........................................EN-2
2 Safety .........................................................EN-3
Caring for the screen............................EN-3
3 Television Controls and Connectors EN-4
Side or top controls ..............................EN-4
Rear connectors ...................................EN-4
Side connectors (EXT3) .......................EN-4
4 Getting Started .......................................EN-5
Connecting the aerial ............................EN-5
Connecting and disconnecting the mains
EN-5
Switching the TV on ..............................EN-5
Using the remote control ....................EN-5
5 Remote Control .....................................EN-6
6 Quick Installation ....................................EN-8
ATS (Automatic Tuning System) ........EN-8
ACI (Automatic Channel Installation) EN-8
7 Auto Store ...............................................EN-9
8 Manual Store ............................................EN-10
9 Programme Sort .....................................EN-11
10 Naming Channels .................................EN-12
11 Storing Your Favourite Channels .....EN-13
12 Features ..................................................EN-14
Timer ........................................................EN-14
Parental lock ...........................................EN-15
Child lock ................................................EN-16
Active control .........................................EN-16
13 Picture and Sound Settings ................EN-17
Smart picture ..........................................EN-18
Smart sound ............................................EN-18
15 Picture Format ......................................EN-19
16 Teletext ..................................................EN-20
17 Using the TV as a PC Monitor ..........EN-22
Connecting a PC to the TV .................EN-22
Adjusting TV settings in PC Mode .....EN-22
Picture menu for PCs ...........................EN-22
Feature menu for PCs ..........................EN-22
18 Using the TV in HD Mode .................EN-23
Connecting HD equipment .................EN-23
Controlling TV settings in HD mode EN-23
Picture menu for HD mode ................EN-23
Sound menu for HD mode ..................EN-23
Supported formats for HD mode ......EN-24
19 Connecting Other Equipment ...........EN-25
Overview of connections ....................EN-25
Connecting a VCR or DVD Recorder
EN-26
Connecting a decoder and a VCR .....EN-26
Connecting two VCRs, a VCR and a DVD
recorder .................................................EN-27
Connecting with Eurocables ...............EN-27
Connecting a satellite receiver ...........EN-27
Connecting with a Eurocable.............EN-27
Connecting a DVD player, cable box or
game console ..........................................EN-28
Connect a DVD player, satellite receiver or
cable box ................................................EN-28
Connecting a PC ....................................EN-29
20 Troubleshooting ...................................EN-31
21 Reference Table of Countries ...........EN-33
14 Smart Picture and Smart Sound ........EN-18
Downloaded From TV-Manual.com Manuals
EN-1

1 Introduction
Thank you for purchasing this TV. This
manual contains information about how to
install and operate your TV.
If this instruction manual does not answer
your problem or if the troubleshooting page
does not solve your problem, call your local
Philips customer or service centre. See the
supplied worldwide guarantee booklet for
details. Please have the model and product
number ready, before calling the Philips
customer support service. The model and
product number can be found at the back or
bottom of your TV, or on the packaging.
Stationary Images
A characteristic of LCD and Plasma Panels
is that displaying the same image for a long
time can cause a permanent after-image to
remain on the screen. This is called phosphor burn in. Normal use of the TV should
involve the showing of pictures that contain
constantly moving and changing images that
fill the screen. The following list gives some
examples of stationary images that you may
encounter others in your viewing:
TV and DVD menus: listings of DVD
•
disk content.
Black bars: when black bars appear at
•
the left and right side of the screen, it is
recommended to change to a picture
format so that the picture fills the entire
screen.
TV channel logos: logos present a prob-
•
lem if they are bright and stationary.
Moving or low-contrast graphics are
less likely to cause uneven aging of the
screen.
Stock market stickers: presented at the
•
bottom of the TV screen.
Shopping channel logos and pricing
•
displays: bright and shown constantly or
repeatedly in the same location on the
TV screen.
Examples of still pictures also include
•
logos, computer images, time display,
teletext and images displayed in 4:3
mode, static images or characters, etc.
TIP: Reduce contrast and brightness when
viewing.
Electric, Magnetic and Electromagnetic Fields (“EMF”)
Royal Philips Electronics manufactures
•
and sells many products targeted at
consumers, which, like any electronic
apparatus, in general have the ability to
emit and receive electromagnetic signals.
One of Philips’ leading Business
•
Principles is to take all necessary health
and safety measures for our products, to
comply with all applicable legal requirements and to stay well within the EMF
standards applicable at the time of
producing the products.
Philips is committed to develop, produce
•
and market products that cause no
adverse health effects.
Philips confirms that if its products are
•
handled properly for their intended use,
they are safe to use according to scientific evidence available today.
Philips plays an active role in the
•
development of international EMF and
safety standards, enabling Philips to
anticipate further developments in
standardization for early integration in its
products.
Downloaded From TV-Manual.com Manuals
EN-2

X
2 Safety
1.
Two people are required to lift and carry a
TV that weighs more than 25kg. Improper
handling of the TV can cause serious injury.
2.
If you place the TV set on a surface, ensure
the surface is level and that it can withstand
the weight of the TV.
3.
If you wish to hang your TV on a wall, do not
hang the TV yourself. Your TV must be hung
by qualified technician. Improper hanging can
cause the TV to be unsafe.
4.
Before you hang your TV on a wall, ensure the
wall is suitable to carry the weight of the TV.
5.
The connections do not have to be made
before you hang the TV, but the cables must
be inserted into the TV.
6.
Wherever you place or hang the TV, ensure
that air can circulate freely through the
ventilation slots. Do not position the TV in a
confined space.
7.
If the TV is mounted on a swivel base or
swivel arm, ensure no strain is placed on the
power cord when the TV is swivelled. Strain
on the power cord can loosen connections
and cause arcing or fire.
8.
Do not place naked flame sources such as
lighted candles close to the TV set.
9.
Do not place a vase filled with water on top of
or near the TV. Spilling water into the TV can
result in electric shock. Do not operate the
TV if water is spilled into the set. Unplug the
power cord from the mains immediately and
have the set checked by a qualified technician.
10.
Do not expose the TV or the batteries of the
remote control to heat, direct sunlight, rain
or water.
X
X
Do not leave the TV in standby mode for an
12.
extended period of time. Instead, disconnect
the TV from the mains.
Pull the power lead by the plug. Do not pull
13.
on the power lead. Do not use a poor fitting
mains socket. Insert the plug fully into the
mains. If it is loose, it may cause arcing and
result in fire.
X
X
X
Do not connect too much equipment to the
14.
same mains socket. Excess equipment can
cause overloading and result in fire or electric
shock.
Caring for the screen
Do not remove the protective sheet until you
1.
have completed the stand or wall mounting
and connections. Please handle with care.
Use only a soft cloth to clean the front of the
2.
TV.
Do not use a cloth that is dripping with water.
3.
Do not use acetone, toluene or alcohol to
clean the TV. As a safety precaution, unplug
the power cord from the mains when you
clean the set.
Do not touch, push or rub or strike the
4.
screen with anything hard as this may scratch
or damage the screen permanently.
EN
X
X
Do not touch any part of the TV, power lead,
11.
or aerial lead during lightning storms.
Downloaded From TV-Manual.com Manuals
EN-3
3 Television Controls and Connectors
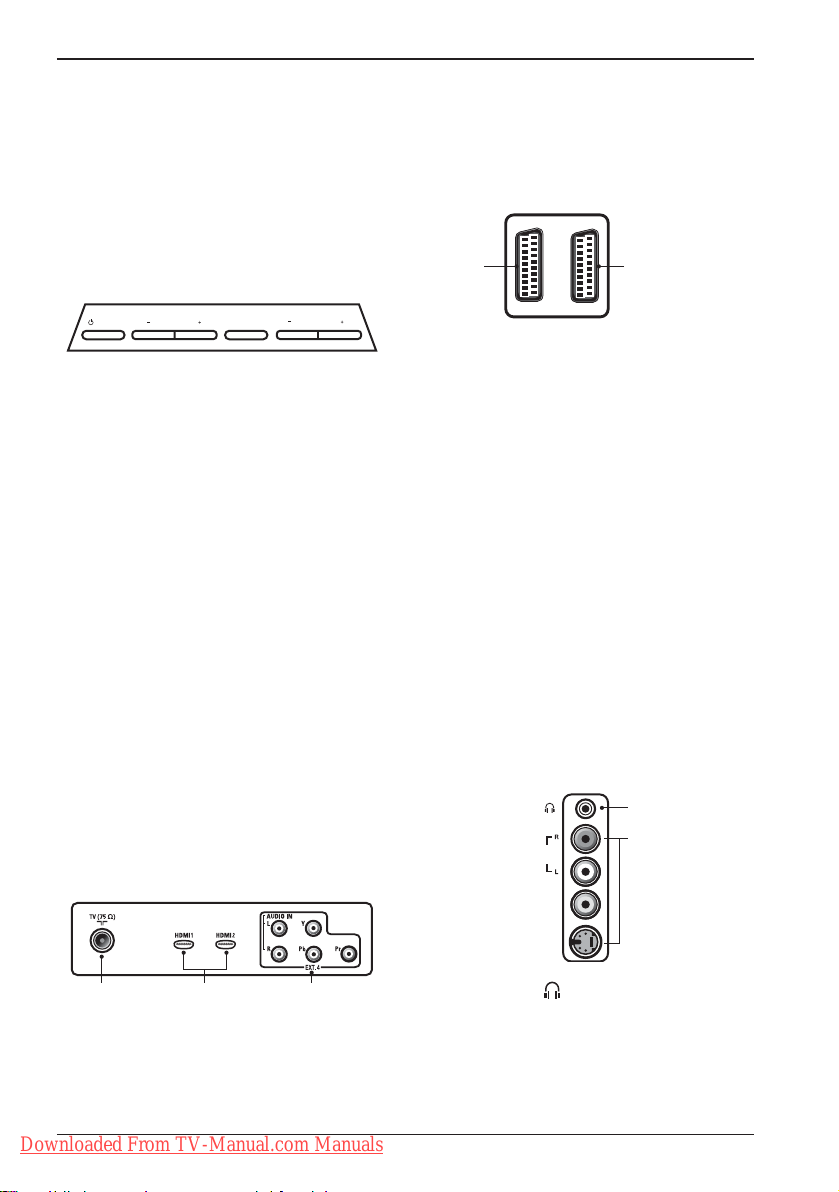
Side or top controls
Use the side or top keys to control the
power, menu, volume and programme
number.
POWER
PROGRAM
MENU
VOLUME
12 3 4
.
1.
POWER
Switch the TV on and off. For zero
power, remove the mains cord from the
mains socket.
2.
- PROGRAM +
Select the channel.
3.
MENU
Display or close menus. The PROGRAM
– / + keys can be used to select a menu
item and the VOLUME – / + keys can
be used to enter into the selected menu
item and make adjustments.
4.
- VOLUME +
Make the volume louder or quieter.
The following connectors are located on
the rear of the TV.
4 EXT 1
(RGB)
TV aerial socket
1.
EXT 2
5
(CVBS/S-VIDEO)
Insert the aerial plug into the TV aerial
socket.
HDMI 1 / HDMI 2
2.
To connect to a set-top box, DVD
player/recorder, high-definition equipment or personal
EXT4 (YPbPr)
3.
computer.
To connect to peripheral equipment.
EXT 1 (RGB)
4.
To connect to peripheral equipment.
EXT 2 (CVBS/S-VIDEO)
5.
To connect to peripheral equipment.
Side connectors (EXT3)
These connectors are on the side of the TV.
Rear connectors
The rear connectors are located on the rear
of the TV and face downward.
1 2 3
Downloaded From TV-Manual.com Manuals
EN-4
1
2
Headphone
1.
AUDIO
VIDEO
S-VIDEO
IN
IN
Connect your headphone jack to the
headphone connector of the TV.
Audio Video
2.
To connect devices such as cameras or
camcorders.
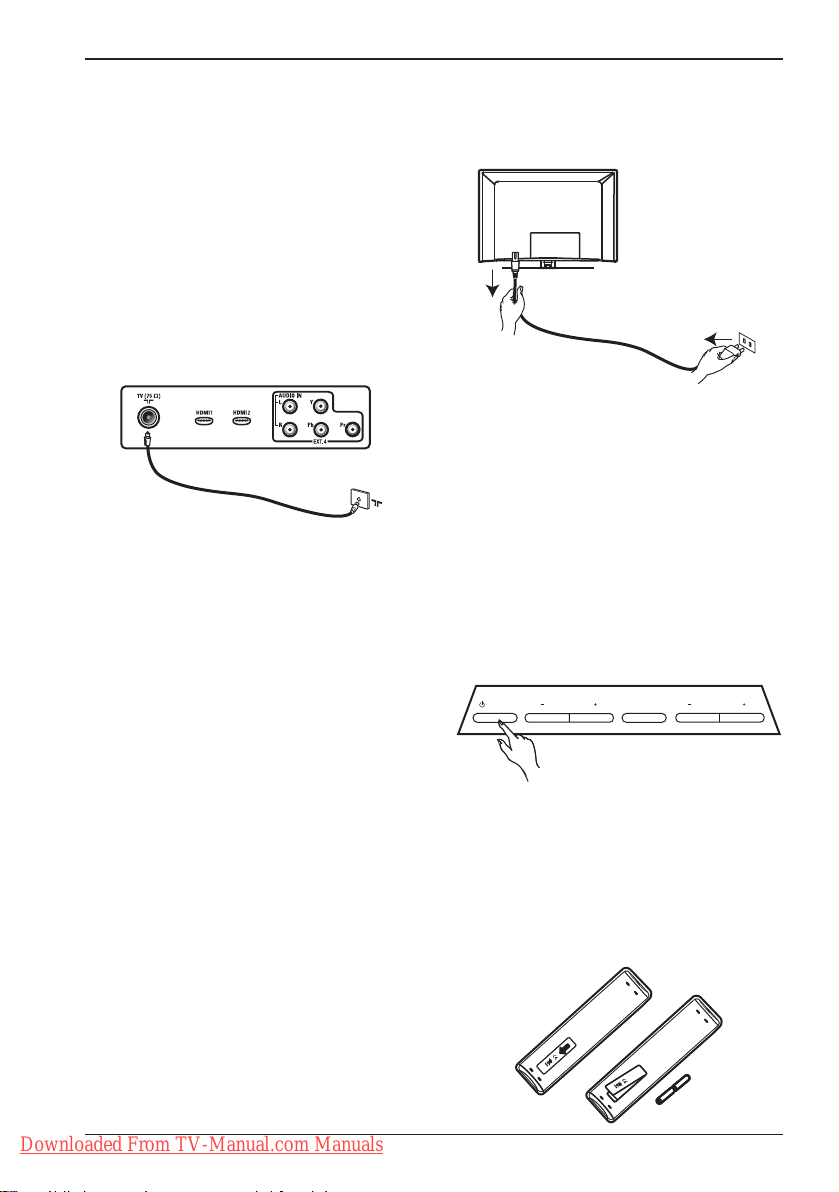
4 Getting Started
Warning: The connections do not have
to be made before hanging the TV, but the
cables must be inserted into connectors of
the TV.
Connecting the aerial
Insert the aerial plug firmly into the 75 ohms
aerial socket at the bottom of the TV and in
the wall aerial socket.
Connecting and disconnecting the
mains
Warning: Plasma TV is a Class 1 apparatus.
It must be connected to a mains socket out
with a protective earthing connection.
Warning: Verify that the mains supply voltage in your home corresponds to the voltage
printed on the sticker at the rear of the TV.
To connect the TV to the mains, insert the
appliance coupler on the mains cord into the
mains inlet at the back of the TV, and inert
the mains plug into the wall socket.
The appliance coupler of the mains cord on
the TV is the disconnect device.
To disconnect the TV from the mains,
remove the appliance coupler on the mains
cord from the back of the TV or remove the
mains plug from the wall socket. For information, see the following illustration.
Switching the TV on
To switch on the TV, press the POWER
key on the side or top of the set. A blue or
green indicator comes on and after a few
seconds, the screen lights up at the left and
bottom of the front of the set.
If the TV set remains in standby mode
(red indicator), press the - PROGRAM +
key on the side or top controls or the - P
+ key on the remote control.
POWER
PROGRAM
MENU
VOLUME
Using the remote control
Insert the 2 supplied batteries into the remote control. Ensure that the + and - ends
of the batteries are aligned as shown inside
the remote control case.
Downloaded From TV-Manual.com Manuals
EN-5
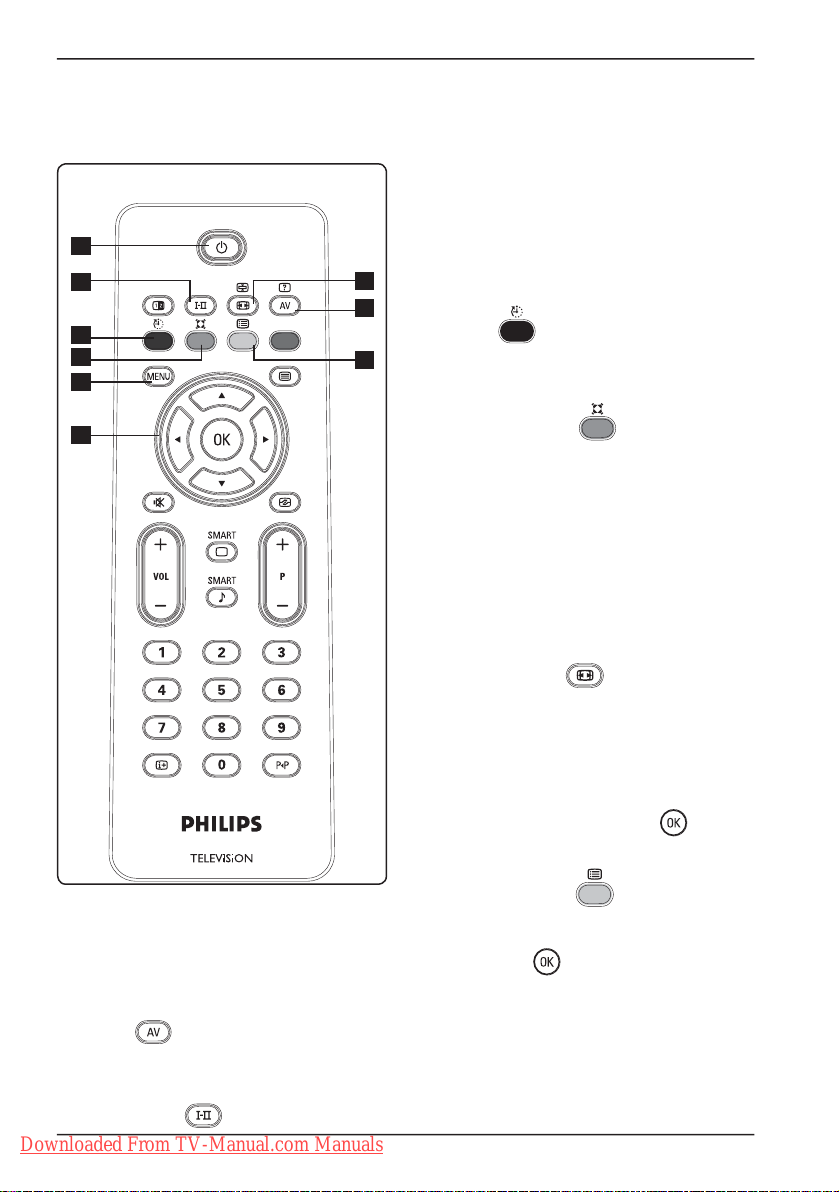
5 Remote Control
1
2
3
4
5
6
Forces programmes in Stereo and
Nicam Stereo to Mono. For bilingual
programmes, select Dual å or Dual »
(as indicated on the screen during such
broadcasts). The Mono indication shows
7
8
9
up in red when in forced position.
Sleep
3.
To switch off TV to standby at a specified
time (see page 14).
Surround Sound
4.
To turn on/off the surround sound effect.
In stereo, this gives the impression that
the speakers are further apart.
5.
MENU h
To call up or exit the TV menus.
6.
Cursors Up/Down/Left/Right ( Î ï Æ
Í) These 4 keys select and adjust menu
items.
II
Standby .
1.
To set the TV to standby mode. To
switch the TV on from standby, press
one of the following keys: ., 0 to 9, P
+/-, or
When the TV is switched on from standby, the last viewed mode is displayed
Sound mode
2.
Downloaded From TV-Manual.com Manuals
EN-6
.
7.
Picture format
(see page 19).
Display source list
8.
Used to select TV or peripheral equipment on EXT 1, EXT 2, EXT 3, EXT 4,
HDMI 1 or HDMI 2). Use the Î ï keys
to select source and the Æ / key to
confirm your selection.
Programme List
9.
To display / exit the list of programmes.
Use the Î ï keys to select a programme
and the Æ / key to display it.
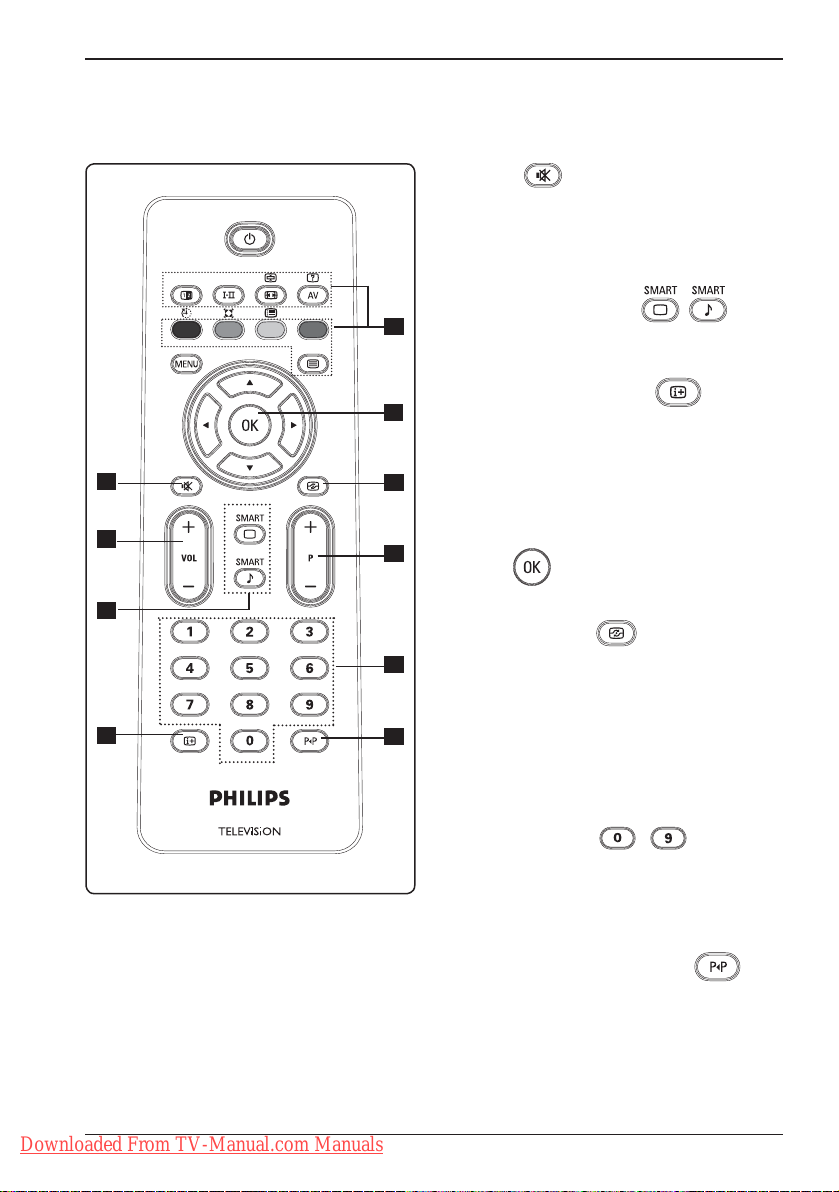
Mute
10.
Turn sound on or off.
Volume ( + VOL – )
11.
To change sound to be louder or quieter.
EN
10
11
12
13
14
Smart Picture /Sound
12.
Accesses a series of predefined picture
and sound settings (see page 18).
On-Screen information
15
13.
Press to display (when available) information about the selected TV channel and
programme.
16
Teletext
14.
(See pages 20-21).
17
OK
15.
Confirms selection.
18
Active Control
16.
Automatically adjusts the picture setting
for optimal picture quality continuously
under any signal conditions. (See page
16).
19
Programme ( + P – )
17.
Selects next or previous available
channel/source.
II
Numerical keys
18.
/
For direct access to programmes. For a
two digit programme number, the 2nd
digit must be entered shortly after the
first digit, before the dash disappears.
Downloaded From TV-Manual.com Manuals
Previous/Present programme
19.
To alternate between the last viewed
and the current programme.
EN-7
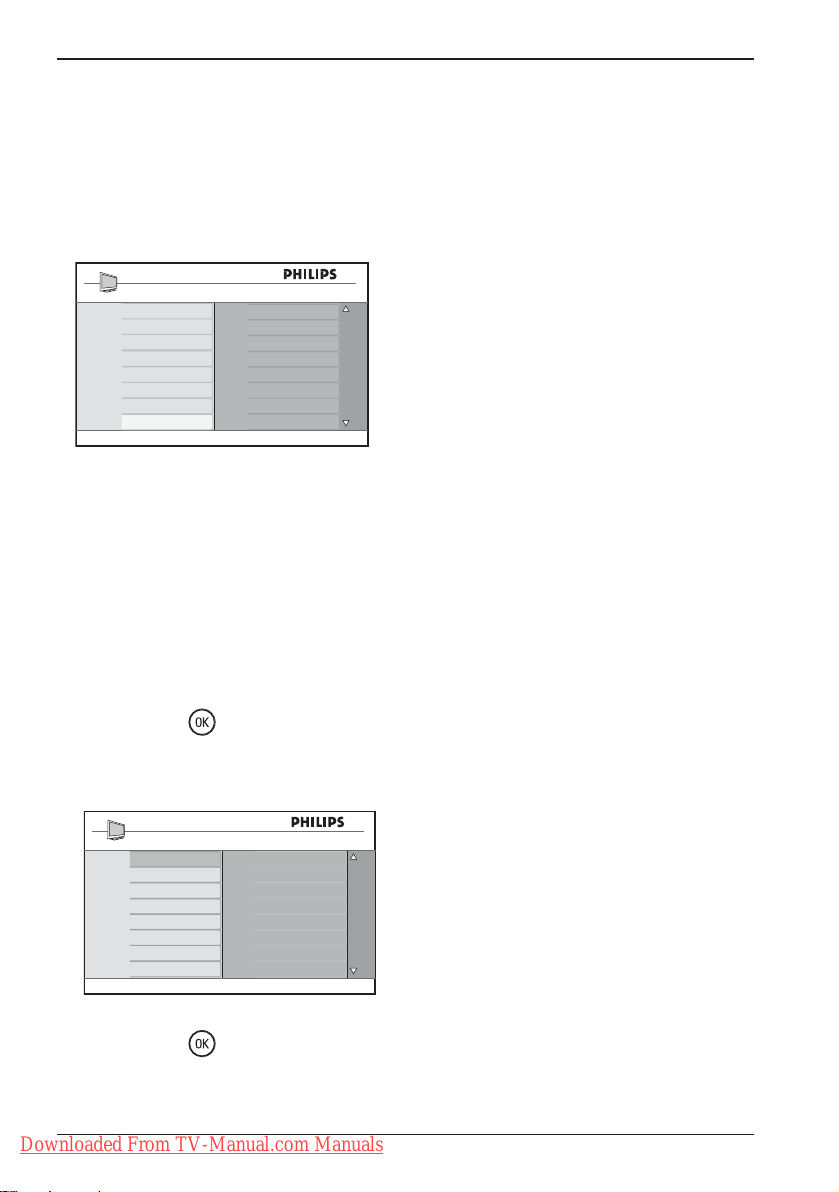
6 Quick Installation
When you switch on the TV set for the first
time, a menu is displayed on screen. This
menu prompts you to select the country of
your choice.
Country
B
CH
D
DK
E
F
FI
GB
Press OK
to continue
Note: If the above menu is not displayed,
proceed to do the installation of channels by
the Auto Store method (see page 9). If above
menu is displayed, proceed to the following
steps:
Press the Î ï keys on the remote control
to select your country. If your
country does not appear in the list,
select “. . . “ . Refer to the “Reference
table of countries” on page 33.
1.
Press the Æ / key to select the
language mode.
2.
Select your language by using the Î ï
keys.
Language
English
Dansk
Nederlands
Suomi
Français
Deutsch
Eλληνικα
Italiano
Press OK
to continue
The search starts automatically. All the
available TV programmes will be stored.
This operation takes a few minutes.
The display shows the progress of the
search and the number of programmes
found.
Important : To exit or interrupt the
search before it is completed, press the
menu key. If you interrupt search during
auto store, not all channels will be stored.
To store all channels, you must perform a
complete auto store search again.
ATS (Automatic Tuning System)
If the transmitter or cable network sends
the automatic sort signal, the programmes
are numbered correctly. In this case, the
installation is complete.
If the transmitter or cable network does
not send the automatic sort signal, the
programmes are not numbered correctly.
You can use the Sort menu to number the
programmes.
ACI (Automatic Channel Installation)
If a cable system or a TV channel which
broadcasts ACI is detected, a programme
list appears. Without ACI broadcast, the
channels are numbered according to your
language and country selection. You can use
the Sort menu to renumber the channels.
Press the Æ / key to start search.
3.
Downloaded From TV-Manual.com Manuals
EN-8
 Loading...