

Page 1
25M2N3200W
EN
User manual 1
Customer care and warranty 19
Troubleshooting and FAQs 23
Register your product and get support at www.philips.com/welcome
Page 2

Table of Contents
1. Important ...................................... 1
1.1 Safety precautions and
maintenance ..................................1
1.2 Notational Descriptions .............. 3
1.3 Disposal of product and packing
material ............................................4
2. Setting up the monitor .............. 5
2.1 Installation ......................................5
2.2 Operating the monitor ................ 6
2.3 Remove the Base Assembly for
VESA Mounting .............................9
3. Image Optimization ................. 10
3.1 SmartImage ................................. 10
3.2 SmartContrast ............................. 11
4. Adaptive Sync ............................ 12
5. Designs to prevent computer
vision syndrome (CVS) .............13
6. TechnicalSpecications ...........14
6.1 Resolution & Preset Modes ..... 17
7. Power Management ................18
8. Customer care and warranty ..19
8.1 Philips’ Flat Panel Monitors Pixel
Defect Policy ................................ 19
8.2 Customer Care & Warranty ..... 22
9. Troubleshooting & FAQs ......... 23
9.1 Troubleshooting ......................... 23
9.2 General FAQs ............................... 24
Page 3

1. Important
This electronic user’s guide is intended
for anyone who uses the Philips monitor.
Take time to read this user manual
before you use your monitor. It contains
important information and notes
regarding operating your monitor.
The Philips guarantee applies provided
the product is handled properly for
its intended use, in accordance with
its operating instructions and upon
presentation of the original invoice
or cash receipt, indicating the date of
purchase, dealer’s name and model and
production number of the product.
1.1 Safety precautions and
maintenance
Warnings
Use of controls, adjustments or
procedures other than those specied
in this documentation may result in
exposure to shock, electrical hazards
and/or mechanical hazards.
Read and follow these instructions when
connecting and using your computer
monitor.
Excessive sound pressure from earphones
and headphones can cause hearing
loss. Adjustment of the equalizer to
maximum increases the earphones
and headphones output voltage and
therefore the sound pressure level.
Operation
• Please Keep the monitor out of
direct sunlight, very strong bright
lights and away from any other heat
source. Lengthy exposure to this
type of environment may result in
discoloration and damage to the
monitor.
• Keep the display away from oil. Oil
may damage the plastic cover of the
display and void the warranty.
• Remove any object that could fall
into ventilation holes or prevent
proper cooling of the monitor’s
electronics.
• Do not block the ventilation holes
on the cabinet.
• When positioning the monitor, make
sure the power plug and outlet are
easily accessible.
• If turning off the monitor by
detaching the power cable or DC
power cord, wait for 6 seconds
before attaching the power cable or
DC power cord for normal operation.
• Please use approved power cord
provided by Philips all the time. If
your power cord is missing, please
contact with your local service
center. (Please refer to Service
contact information listed in
Important information manual.)
• Operate under the specified power
supply. Be sure to operate the
monitor only with the specified
power supply. Use of an incorrect
voltage will cause malfunction and
may cause fire or electric shock.
• Protect the cable. Do not pull or
bend the power cable and signal
cable. Do not place the monitor
or any other heavy objects on the
cables, if damaged, the cables may
cause fire or electric shock.
• Do not subject the monitor to severe
vibration or high impact conditions
during operation.
• To avoid potential damage, for
example the panel peeling from the
bezel, ensure that the monitor does
not tilt downward by more than -5
degrees. If the -5 degree downward
tilt angle maximum is exceeded, the
1
Page 4

monitor damage will not be covered
under warranty.
• Do not knock or drop the monitor
during operation or transportation.
• Excessive usage of monitor can cause
eye discomfort, it’s better to take
shorter breaks more often at your
workstation than longer breaks
and less often; for example a 5-10
minute break after 50-60-minute
continuous screen use is likely to
be better than a 15-minute break
every two hours. Try to keep your
eyes from eye strain while using the
screen for a constant period of time
by :
• Looking at something varying
distances after a long period
focusing on the screen.
• Conscious Blinking often while
you work.
• Gently closing and rolling your
eyes to relax.
• Reposition your screen to appro-
priate height and angle according to your height.
• Adjusting the brightness and
contrast to appropriate level.
• Adjusting the environment light-
ing similar to that of your screen
brightness, avoid the uorescent
lighting, and surfaces that don’t
reect too much light.
• Seeing a doctor if your symp-
toms.
Maintenance
• To protect your monitor from
possible damage, do not put
excessive pressure on the LCD panel.
When moving your monitor, grasp
the frame to lift; do not lift the
monitor by placing your hand or
fingers on the LCD panel.
• Oil-based cleaning solutions may
damage the plastic parts and void
the warranty.
• Unplug the monitor if you are not
going to use it for an extensive
period of time.
• Unplug the monitor if you need to
clean it with a slightly damp cloth.
The screen may be wiped with a
dry cloth when the power is off.
However, never use organic solvent,
such as, alcohol, or ammonia-based
liquids to clean your monitor.
• To avoid the risk of shock or
permanent damage to the set, do
not expose the monitor to dust,
rain, water, or excessive moisture
environment.
• If your monitor gets wet, wipe it
with dry cloth as soon as possible.
• If foreign substance or water gets in
your monitor, please turn the power
off immediately and disconnect
the power cord. Then, remove the
foreign substance or water, and send
it to the maintenance center.
• Do not store or use the monitor in
locations exposed to heat, direct
sunlight or extreme cold.
• In order to maintain the best
performance of your monitor and
use it for a longer lifetime, please
use the monitor in a location
that falls within the following
temperature and humidity ranges.
• Temperature: 0-40°C 32-104°F
• Humidity: 20-80% RH
Important information for Burn-in/
Ghost image
• Always activate a moving screen
saver program when you leave
your monitor unattended. Always
activate a periodic screen refresh
application if your monitor will
display unchanging static content.
2
Page 5

Uninterrupted display of still or
static images over an extended
period may cause “burn-in”, also
known as “after-imaging” or “ghost
imaging”, on your screen.
• “Burn-in”, “after-imaging”, or
“ghost imaging” is a well-known
phenomenon in LCD panel
technology. In most cases, the “burnin” or “after-imaging” or “ghost
imaging” will disappear gradually
over a period of time after the
power has been switched off.
Warning
Failure to activate a screen saver, or
a periodic screen refresh application
may result in severe “burn-in” or “afterimage” or “ghost image” symptoms
that will not disappear and cannot be
repaired. The damage mentioned above
is not covered under your warranty.
Service
• The casing cover should be opened
only by qualified service personnel.
• If there is any need for any
document for repair or integration,
please contact with your local
service center. (Please refer to
Service contact information listed in
Important information manual.)
• For transportation information,
please refer to “Technical
Specifications”.
• Do not leave your monitor in a car/
trunk under direct sun light.
Note
Consult a service technician if the
monitor does not operate normally, or
you are not sure what procedure to take
when the operating instructions given in
this manual have been followed.
1.2 Notational Descriptions
The following subsections describe
notational conventions used in this
document.
Notes, Cautions and Warnings
Throughout this guide, blocks of text
may be accompanied by an icon and
printed in bold or italic type. These blocks
contain notes, cautions or warnings.
They are used as follows:
Note
This icon indicates important
information and tips that help you make
better use of your computer system.
Caution
This icon indicates information that
tells you how to avoid either potential
damage to hardware or loss of data.
Warning
This icon indicates the potential for
bodily harm and tells you how to avoid
the problem.
Some warnings may appear in alternate
formats and may not be accompanied
by an icon. In such cases, the specic
presentation of the warning is
mandated by the relevant regulatory
authority.
3
Page 6

1.3 Disposal of product and packing material
Waste Electrical and Electronic
Equipment-WEEE
This marking on the product or on
its packaging illustrates that, under
European Directive 2012/19/EU
governing used electrical and electronic
appliances, this product may not be
disposed of with normal household
waste. You are responsible for disposal
of this equipment through a designated
waste electrical and electronic
equipment collection. To determine the
locations for dropping o such waste
electrical and electronic, contact your
local government oce, the waste
disposal organization that serves your
household or the store at which you
purchased the product.
Your new monitor contains materials
that can be recycled and reused.
Specialized companies can recycle your
product to increase the amount of
reusable materials and to minimize the
amount to be disposed of.
All redundant packing material has
been omitted. We have done our utmost
to make the packaging easily separable
into mono materials.
Please nd out about the local
regulations on how to dispose of your
old monitor and packing from your sales
representative.
Taking back/Recycling Information for
Customers
Philips establishes technically and
economically viable objectives
to optimize the environmental
performance of the organization's
product, service and activities.
From the planning, design and
production stages, Philips emphasizes
the important of making products
that can easily be recycled. At Philips,
end-of-life management primarily
entails participation in national takeback initiatives and recycling programs
whenever possible, preferably in
cooperation with competitors,
which recycle all materials (products
and related packaging material) in
accordance with all Environmental
Laws and taking back program with the
contractor company.
Your display is manufactured with high
quality materials and components which
can be recycled and reused.
To learn more about our recycling
program please visit
http://www.philips.com/a-w/about/
sustainability.html
4
Page 7
2. Setting up the
* HDMI *DP
Power
25M2N3200W
Quick start
Register your product and get support at www.philips.com/welcome
monitor
2.1 Installation
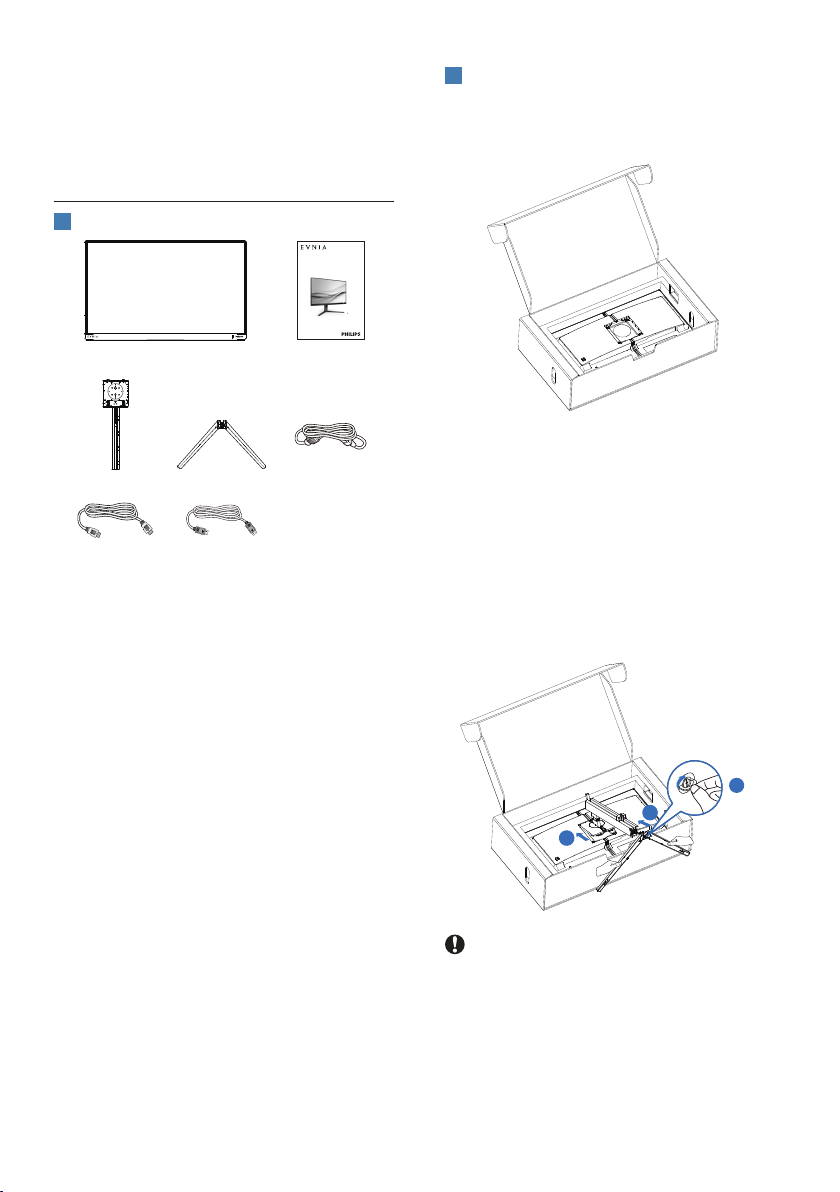
Package contents
1
*Dierent according to region
Install the base
2
1. Place the monitor face down on a
smooth surface. Pay attention not to
scratch or damage the screen.
2. Hold the stand with both hands.
(1) Gently attach the base to the
stand.
(2) Use your ngers to tighten the
screw located at the bottom of
the base.
(3) Gently attach the stand to the
VESA mount area until the latch
locks the stand.
2
1
3
Caution
Place the monitor face down on a
smooth surface. Pay attention not to
scratch or damage the screen.
5
Page 8
Connecting to your PC
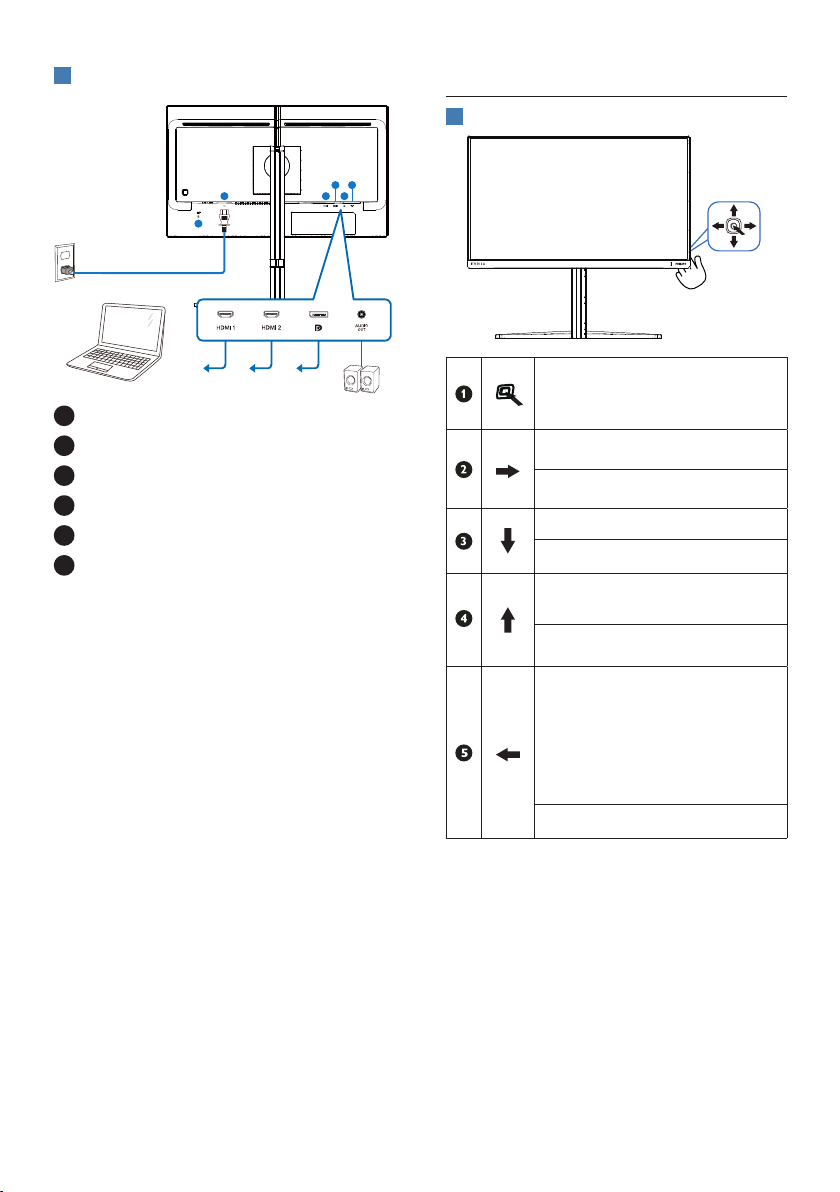
3
2.2 Operating the monitor
Description of the control buttons
1
1
6
1
AC power input
2
HDMI 1 input
3
HDMI 2 input
4
DisplayPort input
5
Audio Out
6
Kensington anti-theft lock
3 5
42
Connect to PC
1. Connect the power cord to the back
of the monitor rmly.
2. Turn o your computer and unplug
its power cable.
3. Connect the monitor signal cable to
the video connector on the back of
your computer.
4. Plug the power cord of your
computer and your monitor into a
nearby outlet.
5. Turn on your computer and monitor.
If the monitor displays an image,
installation is complete.
Press to switch power on.
Press more than 3 seconds to
switch power o.
Access the OSD menu
.
Conrm the OSD adjustment.
Adjust the Game Setting.
Adjust the OSD menu.
Change the signal input
source.
Adjust the OSD menu.
SmartImage Game menu.
There are multiple selections:
Standard, FPS, Racing, RTS,
Movie, LowBlue Mode,
EasyRead, Economy, Game 1
and Game 2.
Return to previous OSD level.
6
Page 9
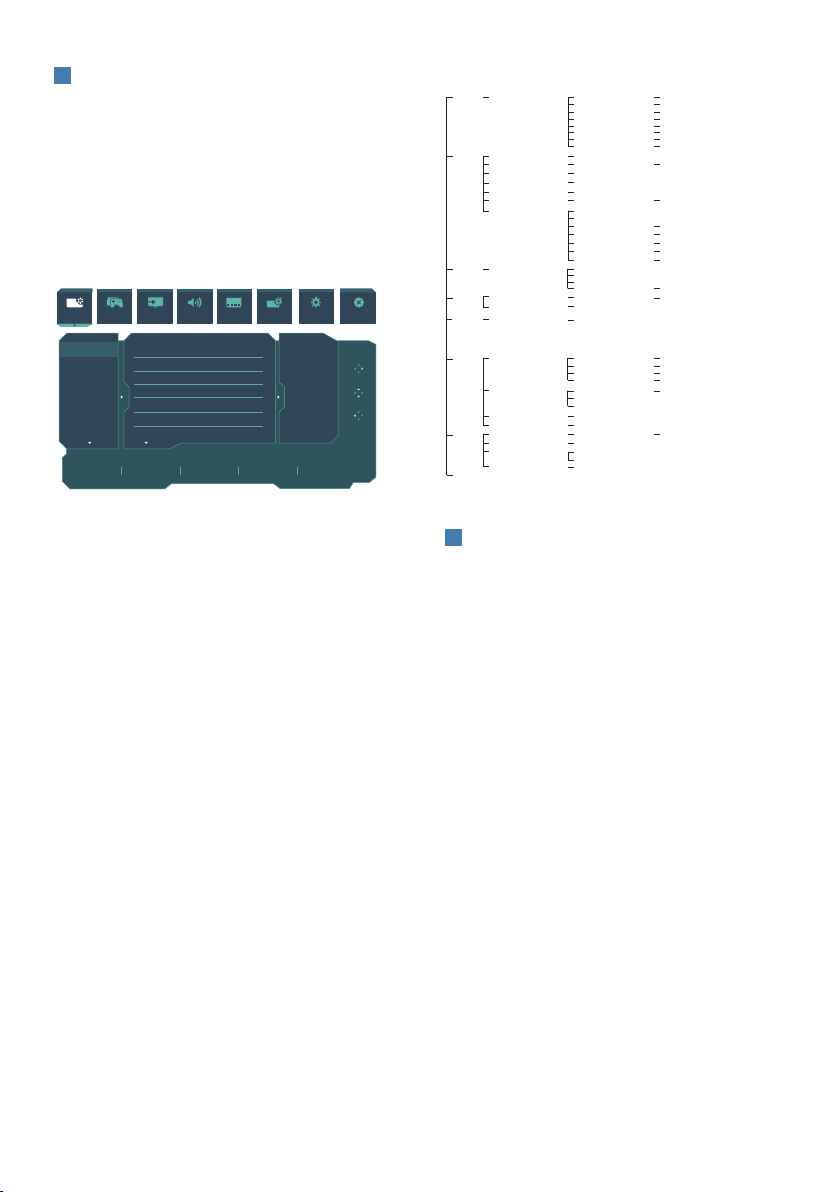
Description of the On Screen Display
Main menu Sub menu
Close
2
What is On-Screen Display (OSD)?
On-Screen Display (OSD) is a feature in
all Philips LCD monitors. It allows an end
user to adjust screen performance or
select functions of the monitors directly
through an on-screen instruction
window. A user friendly on screen
display interface is shown as below:
Game Mode Input Audio Language System Setup Close
SmartImage
Standard
FPS
Racing
RTS
Movie
LowBlue Mode
EasyRead
Brightness
Contrast
SmartContrast
Gamma
Sharpness
sRGB
Color Temperature
Resolution
Refresh Rate Input Source Adaptive Sync SmartImage
1920X1080 60Hz HDMI 1 On Standard
TXT
40
6500K
50
Off
2.2
50
Off
Select
OK
Close
SmartImage
Game Mode
Input
Audio
Language
System
Setup
Standard, FPS, Racing, RTS, Movie,
LowBlue Mode, EasyRead, Economy,
Game1, Game2
Adaptive Sync
Smart MBR
Crosshair
Shadow Boost
Low Input Lag
SmartResponse
SmartFrame
Input
Volume
Mute
Language
OSD Setting
Smart Size
Pixel Orbiting
Over Scan
Power LED
Resolution Notice
Information
Reset
Brightness
Contrast
SmartContrast
Gamma
Sharpness
sRGB
Color Temperature
Reset
Adaptive Sync On, Adaptive Sync O
MBR Level
O, On, Smart Crosshair On
O, Level 1, Level 2, Level 3
Low Input Lag On, Low Input Lag O
SmartResponse
SmartFrame O
SmartFrame On
Size
Brightness
Contrast
H. position
V. position
HDMI 1
HDMI 2
DisplayPort
Auto
0~100
Mute(On, O)
English, Deutsch, Español, Ελληνική,
Français, Italiano, Magyar,
Nederlands, Português,
Português do Brasil,Polski,
Русский, Svenska,Suomi,Türkçe,
Čeština,Українська, 简体中文,
繁體中文,日本語,한국어
Horizontal
Vertical
Transparency
OSD Time out
Screen Size
1:1
Aspect
On, O
Over Scan On, Over Scan O
Power LED 0~4
Resolution Notice On, Resolution Notice O
Model
SN
Yes, No
0~100
0~100
On, O
1.8, 2.0, 2.2, 2.4, 2.6
0~100
On, O
Native, Preset, 5000K, 6500K, 7500K, 8200K, 9300K, 11500K
Yes, No
0~20
O, Fast , Faster, Fastest
1, 2, 3, 4, 5, 6, 7
0~100
0~100
1~Max
1~Max
On, O
0~100
0~100
0~100
O, 1, 2, 3, 4
5s, 10s, 20s, 30s, 60s
25''W, 24''W, 23''W, 22''W, 21.5''W,
20''W, 19.5''W, 19''W, 19'', 18.5''W
Basic and simple instruction on the
control keys
To access the OSD menu on this Philips
display simply use the single toggle
button on the rear side of the display.
The single button operates like a
joystick. To move the cursor, simply
toggle the button in four directions.
Press the button to select desired option.
The OSD Menu
Below is an overall view of the structure
of the On-Screen Display. You can use
this as a reference when you want to
work your way around the dierent
adjustments later on.
Resolution notication
3
This monitor is designed for optimal
performance at its native resolution,
1920 x 1080. When the monitor is
powered on at a dierent resolution, an
alert is displayed on screen: Use 1920 x
1080 for best results.
Display of the native resolution alert can
be switched o from Setup in the OSD
(On Screen Display) menu.
7
Page 10
4
Firmware
The over-the-air (OTA) rmware update
is through the SmartControl software
and is easily downloadable through the
Philips website. What does SmartControl
do? It is an additional software that
helps control the photo, audio, and the
other on-screen graphic settings of the
monitor.
In the “Setup” section, you can check
which rmware version you currently
have and if you need to upgrade or not.
In addition, it is important to note that
the rmware upgrades must be done
through the SmartControl software.
It is necessary to be connected to a
network when updating the rmware
on SmartControl over-the-air (OTA).
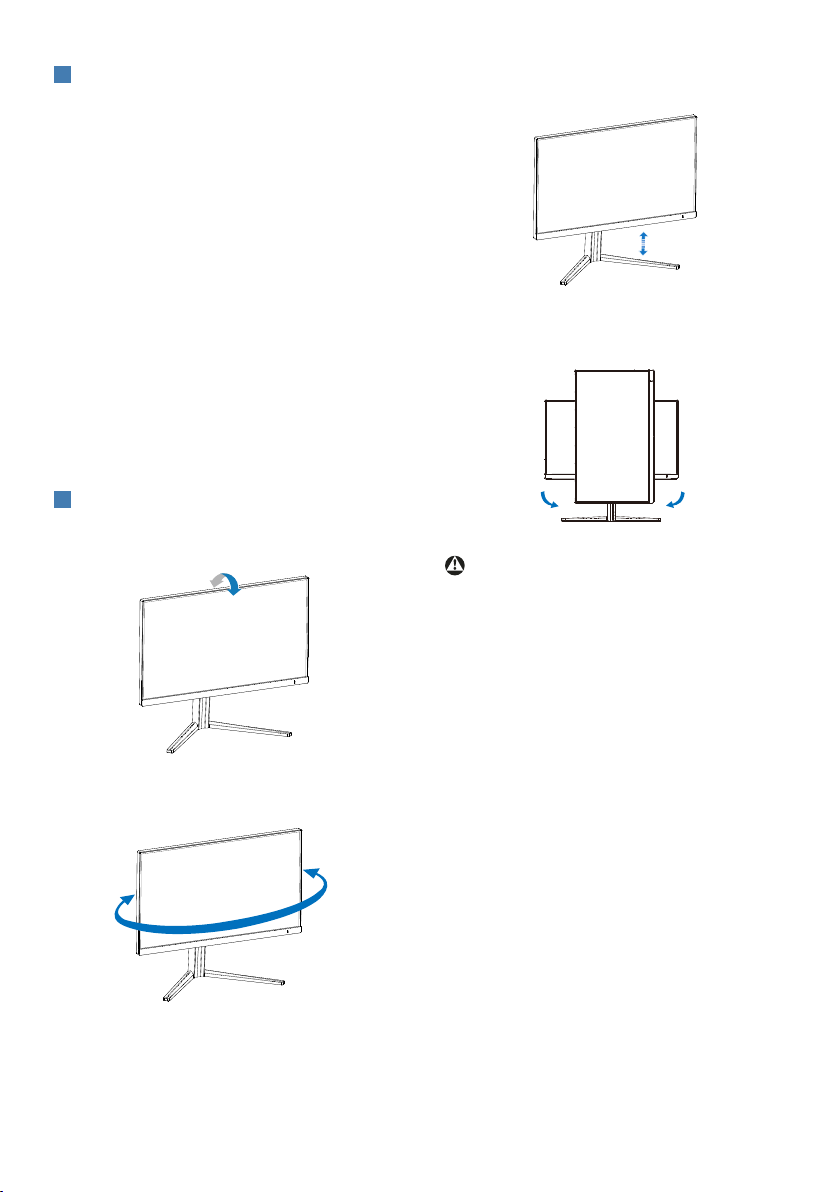
Physical Function
5
Tilt
20°
-5°
Height adjustment
130mm
Pivot
0°
-90°
Warning
• To avoid potential screen damage,
such as panel peeling, ensure that
the monitor does not tilt downward
by more than -5 degrees.
• Do not press the screen while
adjusting the angle of the monitor.
Grasp only the bezel.
0°
90°
Swivel
-30°
+30°
8
Page 11
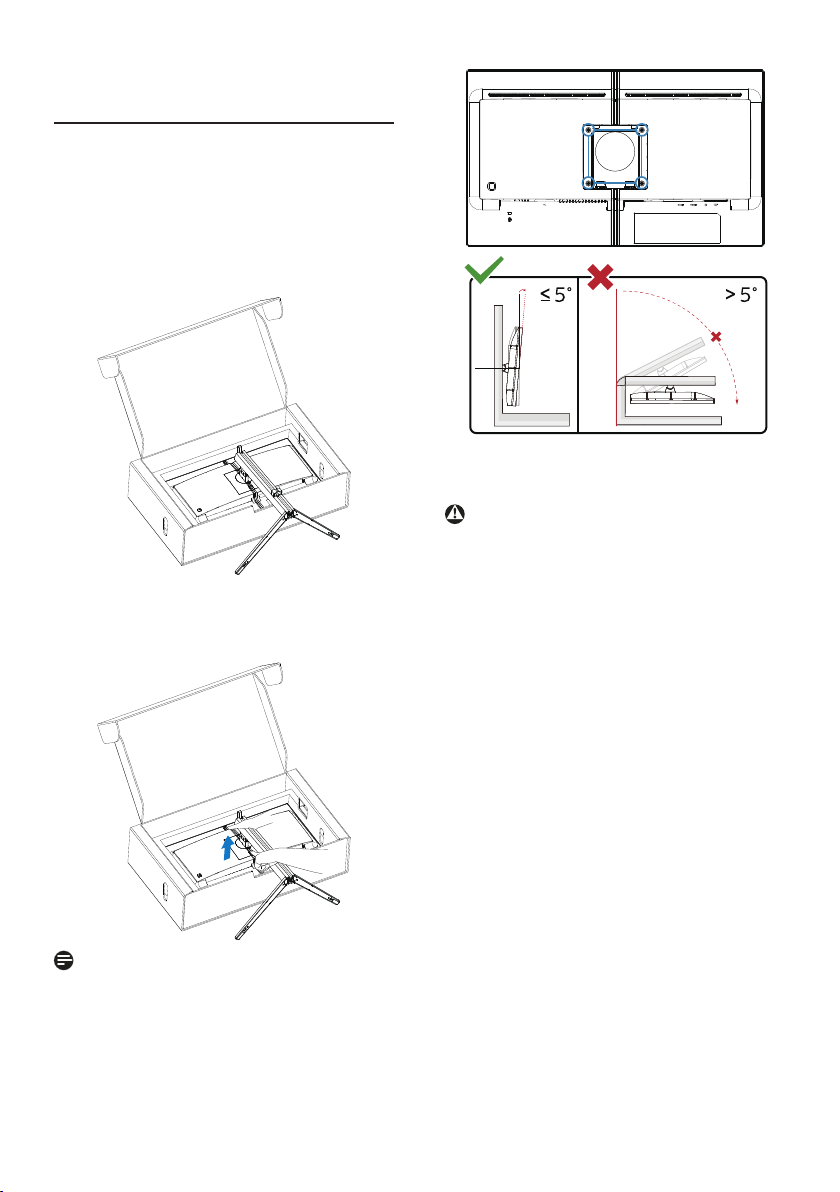
2.3 Remove the Base Assembly for VESA Mounting
Before you start disassembling the
Display base, please follow the
instructions below to avoid any possible
damage or injury.
1. Place the monitor face down on a
smooth surface. Pay attention not to
scratch or damage the screen.
2. While keeping the release button
pressed, tilt the stand and slide it
out.
100mm
100mm
0° 90°
-5°
* Display design may dier from those
illustrated.
Warning
• To avoid potential screen damage,
such as panel peeling, ensure that
the monitor does not tilt downward
by more than -5 degrees.
• Do not press the screen while
adjusting the angle of the monitor.
Grasp only the bezel.
Note
This monitor accepts a 100mm x 100mm
VESA-Compliant mounting interface.
VESA Mounting Screw M4. Always
contact manufacturer for wall-mount
installation.
9
Page 12
3. Image Optimization
3.1 SmartImage
What is it?
1
SmartImage provides presets that
optimize display for dierent types
of content, dynamically adjusting
brightness, contrast, color and sharpness
in real time. Whether you're working
with text applications, displaying images
or watching a video, Philips SmartImage
delivers great optimized monitor
performance.
Why do I need it?
2
You want a monitor that delivers
optimized display all your favorite
types of content, SmartImage software
dynamically adjust brightness, contrast,
color and sharpness in real time
to enhance your monitor viewing
experience.
How does it work?
3
SmartImage is an exclusive, leading edge
Philips technology that analyzes the
content displayed on your screen. Based
on a scenario you select, SmartImage
dynamically enhances the contrast, color
saturation and sharpness of images to
enhance the contents being displayed all in real time with the press of a single
button.
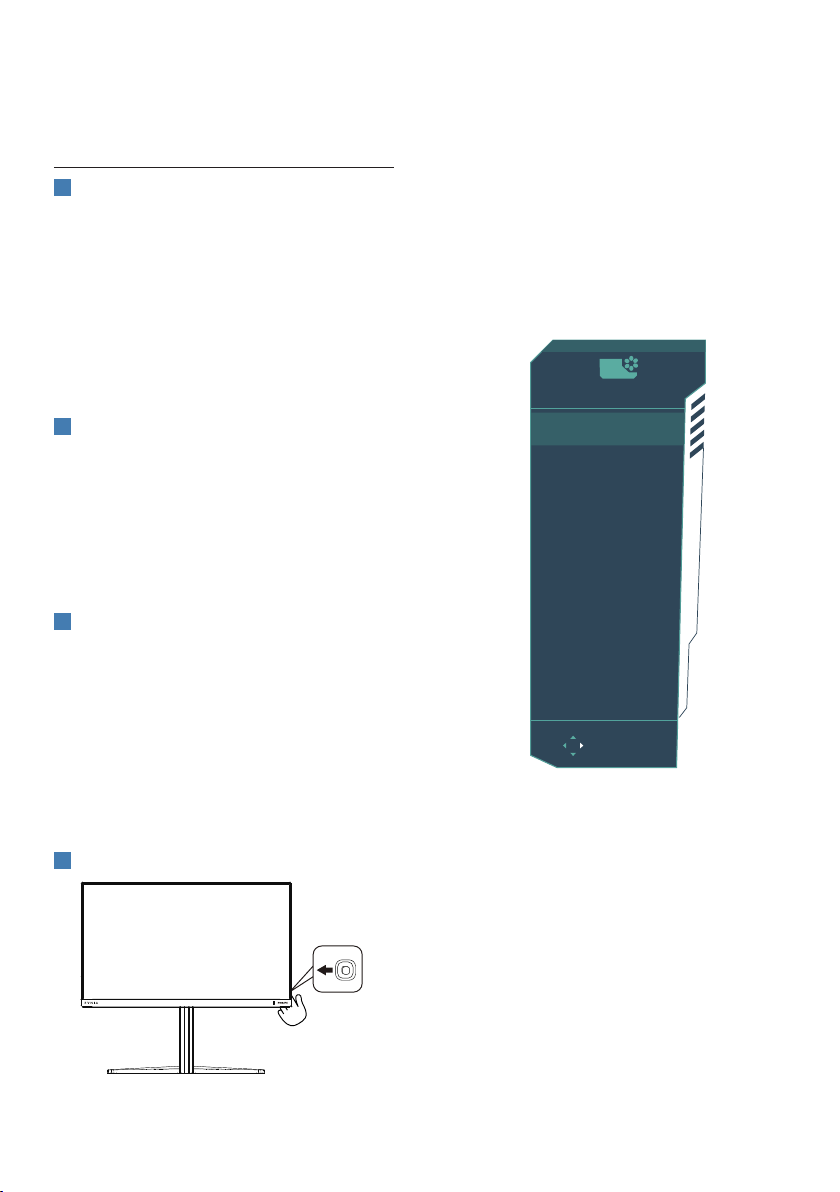
How to enable SmartImage?
4
1. Toggle to the left to launch the
SmartImage on screen display.
2. Toggle to the up or down to select
between the smartImage modes.
3. The SmartImage on screen display
will remain on screen for 8 seconds,
or you can also toggle to the left to
make conrmation.
There are multiple selections: Standard,
FPS, Racing, RTS, Movie, LowBlue Mode,
EasyRead, Economy, Game 1 and Game 2
SmartImage
Standard
FPS
Racing
RTS
Movie
LowBlue Mode
EasyRead
Economy
Game 1
Game 2
GAME
OK
• Standard: Enhances text and
dampens brightness to increase
readability and reduce eye strain.
This mode significantly enhances
readability and productivity when
you're working with spreadsheets,
PDF files, scanned articles or other
general office applications.
• FPS: For playing FPS (First Person
Shooters) games. Improves dark
theme black level details.
• Racing: For playing Racing games.
Provides fastest response time and
high color saturation.
10
Page 13

• RTS: For playing RTS (Real Time
Strategy) games, a user-selected
portion can be highlighted for RTS
games (through SmartFrame). The
picture quality can be adjusted for
the highlighted portion.
• Movie: Ramped up luminance,
deepened color saturation, dynamic
contrast and razor sharpness displays
every details in darker areas of
your videos without color washout
in brighter areas maintaining a
dynamic natural values for the
ultimate video display.
• LowBlue Mode: LowBlue Mode for
easy on-the-eyes productivity Studies
have shown that just as ultraviolet rays can cause eye damage,
shortwave length blue light rays
from LED displays can cause eye
damage and affect vision over time.
Developed for wellbeing, Philips
LowBlue Mode setting uses a smart
software technology to reduce
harmful shortwave blue light.
• EasyRead: Helps improve reading
of text based application like PDF
ebooks. By using a special algorithm
which increases the contrast and
boundary sharpness of text content,
the display is optimized for a
stress-free reading by adjusting
the brightness, contrast and color
temperature of the monitor.
• Economy: Under this profile,
brightness, contrast are adjusted
and backlighting finetuned for
just right display of everyday office
applications and lower power
consumption.
• Game 1: User’s preference settings
saved as Game 1.
• Game 2: User’s preference settings
saved as Game 2.
3.2 SmartContrast
What is it?
1
Unique technology that dynamically
analyzes displayed content and
automatically optimizes a Monitor's
contrast ratio for maximum visual
clarity and viewing enjoyment, stepping
up backlighting for clearer, crisper
and brighter images or dimming
backlighting for clear display of images
on dark backgrounds.
Why do I need it?
2
You want the very best visual clarity
and viewing comfort for every type of
content. SmartContrast dynamically
controls contrast and adjusts
backlighting for clear, crisp, bright
gaming and video images or displays
clear, readable text for oce work.
By reducing your monitor's power
consumption, you save on energy costs
and extend the lifetime of your monitor.
How does it work?
3
When you activate SmartContrast, it will
analyse the content you are displaying
in real time to adjust colors and control
backlight intensity. This function will
dynamically enhance contrast for a great
entertainment experience when viewing
videos or playing games.
11
Page 14

4. Adaptive Sync
Adaptive Sync
PC gaming has long been an imperfect
experience because GPUs and monitors
update at dierent rates. Sometimes
a GPU can render many new pictures
during a single update of the monitor,
and the monitor will show pieces of each
picture as a single image. This is called
“tearing.” Gamers can x tearing with
a feature called “v-sync,” but the image
can become jerky as the GPU waits on
the monitor to call for an update before
delivering new pictures.
The responsiveness of mouse input and
overall frames per second are reduced
with v-sync, too. AMD Adaptive Sync™
technology eliminates all of these
problems by letting the GPU update the
monitor the moment a new picture is
ready, leaving gamers with unbelievably
smooth, responsive, tearing-free games.
• AMD Radeon R9 285
• AMD Radeon R7 260X
• AMD Radeon R7 260
■ Processor A-Series Desktop and
Mobility APUs
• AMD A10-7890K
• AMD A10-7870K
• AMD A10-7850K
• AMD A10-7800
• AMD A10-7700K
• AMD A8-7670K
• AMD A8-7650K
• AMD A8-7600
• AMD A6-7400K
• AMD RX 6500 XT
• AMD RX 6600 XT
• AMD RX 6700 XT
• AMD RX 6750 XT
• AMD RX 6800
• AMD RX 6800 XT
• AMD RX 6900 XT
Followed by the graphic card that are
compatible.
■ Operating system
• Windows 11/10/8.1/8
■ Graphic Card: R9 290/300 Series &
R7 260 Series
• AMD Radeon R9 300 Series
• AMD Radeon R9 Fury X
• AMD Radeon R9 360
• AMD Radeon R7 360
• AMD Radeon R9 295X2
• AMD Radeon R9 290X
• AMD Radeon R9 290
12
Page 15

5. Designs to prevent computer vision syndrome (CVS)
Philips monitor is designed to prevent
eye strain caused by prolonged
computer use.
Follow below instructions and use Philips
monitor to efficiently reduce fatigue and
maximum working productivity.
1. Appropriate environment lighting:
• Adjusting the environment
lighting similar to that of your
screen brightness, avoid the
fluorescent lighting, and surfaces
that don’t reflect too much light.
• Adjusting the brightness and
contrast to appropriate level.
2. Good working habits:
• Excessive usage of monitor can
cause eye discomfort, it’s better
to take shorter breaks more
often at your workstation than
longer breaks and less often; for
example a 5-10 minute break after
50-60-minute continuous screen
use is likely to be better than a
15-minute break every two hours.
3. Ideal working posture
• Reposition your screen to
appropriate height and angle
according to your height.
4. Choose Philips monitor for easy-oneyes.
• Anti-glare screen: Anti-glare screen
efficiently reduces annoying and
distracting reflections that caused
eye fatigue.
• Flicker-free technology designs to
regulate brightness and reduce
flicker for more comfortable
viewing.
• LowBlue mode: Blue light may
cause eye strains. Philips LowBlue
mode allows you to set different
blue light filter levels for variety
working situation.
• EasyRead mode for a paper-like
reading experience, giving a more
comfortable viewing experience
while dealing with long
documents on the screen.
• Looking at something varying
distances after a long period
focusing on the screen.
• Gently closing and rolling your
eyes to relax.
• Conscious blinking often while
working.
• Gently stretch your neck, and
slowly tilt your head forward,
backward, side for pain relief.
13
Page 16
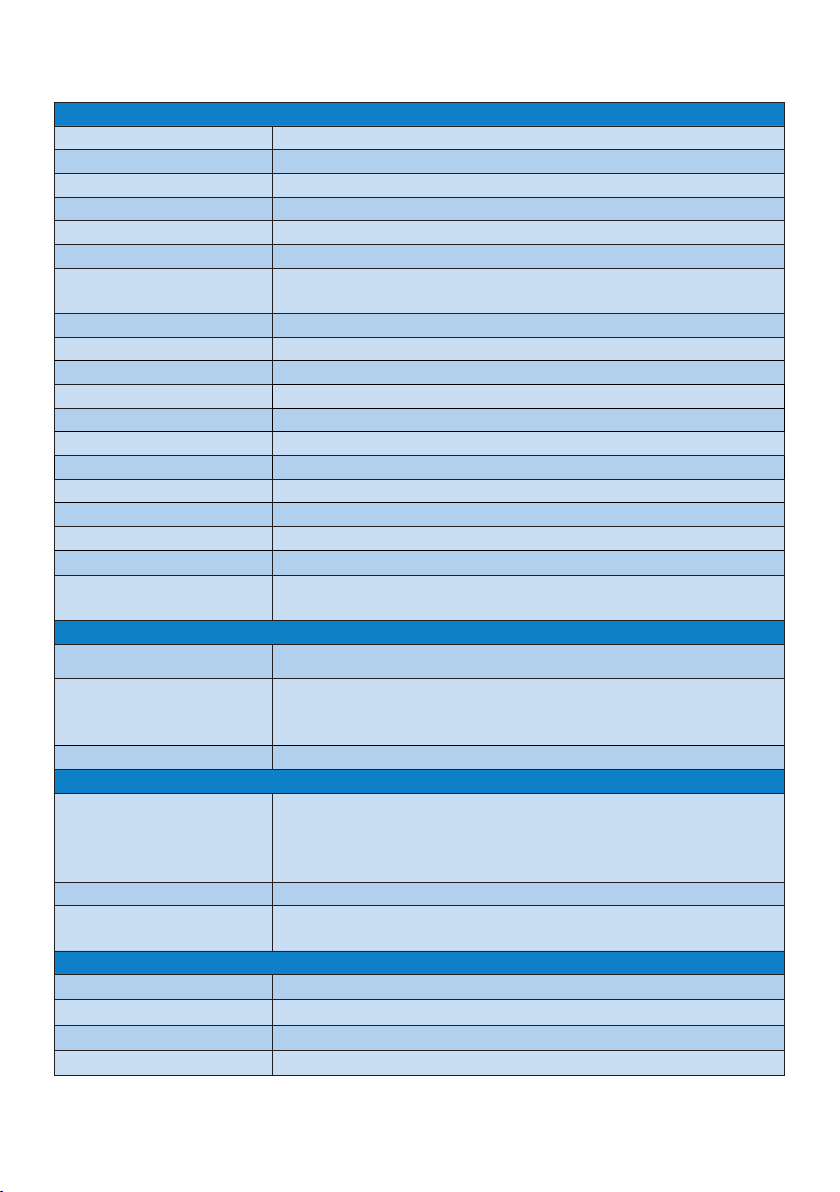
6. Technical Specifications
Picture/Display
Monitor Panel Type VA
Backlight W-LED
Panel Size 24.5" W (62.2 cm)
Aspect Ratio 16:9
Pixel Pitch 0.2832 (H) mm x 0.2802 (V) mm
Contrast Ratio (typ.) 3000:1
Recommended
Resolution
Maximum Resolution 1920 x 1080 @ 240 Hz
Viewing Angle 178° (H) / 178° (V) @ C/R > 10 (typ.)
Picture Enhancement SmartImage Game
Vertical Refresh Rate 48 Hz - 240 Hz
Horizontal Frequency 30 KHz - 274 KHz
sRGB YES
Flicker Free YES
LowBlue Mode YES
Monitor Colors 1.07B (8bit+FRC)
Adaptive Sync YES
EasyRead YES
Over-the-air rmware
update
Connectivity
Signal Input source HDMI 1, HDMI 2, DisplayPort
Connectors
Sync input Separate Sync
Convenience
OSD Languages
Other Convenience VESA mount (100 x 100 mm), Kensington Lock
Plug & Play
Compatibility
Stand
Tilt -5 / +20 degree
Swivel -30° / +30°
Height adjustment 130 mm
Pivot -90 / +90 degree
1920 x 1080 @ 60 Hz
YES
2 x HDMI 2.0 (HDCP 1.4, HDCP 2.2)
1 x DisplayPort 1.4 (HDCP 1.4, HDCP 2.2)
1 x Audio out
English, German, Spanish, Greek, French, Italian, Hungarian,
Dutch, Portuguese, Brazil Portuguese, Polish, Russian,
Swedish, Finnish, Turkish, Czech, Ukranian, Simplied
Chinese, Traditional Chinese, Japanese, Korean
DDC/CI, sRGB, Windows 11/10/8.1/8, Mac OS X
14
Page 17
Power
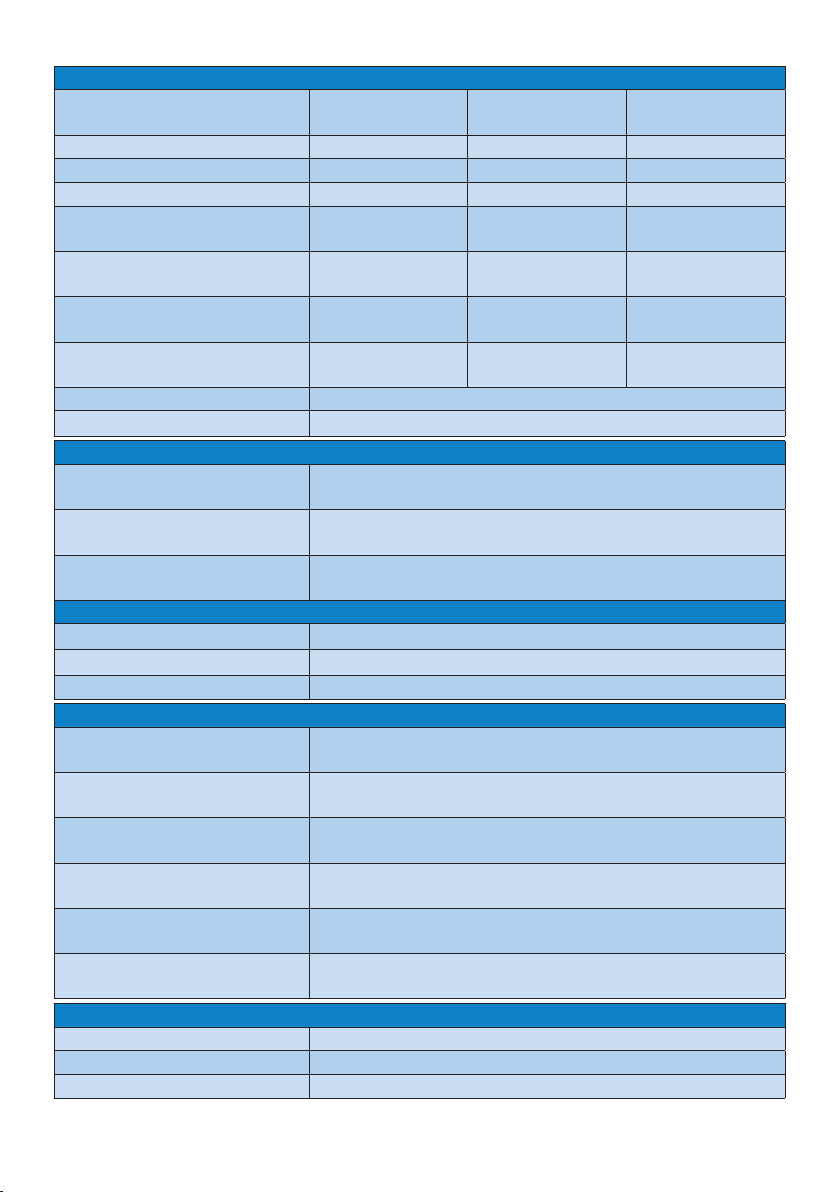
Consumption
Normal Operation 27.7 W (typ.) 27.7 W (typ.) 27.7 W (typ.)
Sleep (Standby mode) 0.5 W (typ.) 0.5 W (typ.) 0.5 W (typ.)
O mode 0.3 W (typ.) 0.3 W (typ.) 0.3 W (typ.)
Heat Dissipation*
Normal Operation
Sleep (Standby mode)
O mode
Power LED indicator On mode: White, Standby/Sleep mode: White (blinking)
Power Supply Built-in, 100-240VAC, 50/60Hz
Dimensions
Product with stand
(WxHxD)
Product without stand
(WxHxD)
Product with packaging
(WxHxD)
Weight
Product with stand 4.64 kg
Product without stand 3.30 kg
Product with packaging 7.60 kg
Operating Condition
Temperature range
(operation)
Relative humidity
(operation)
Atmospheric pressure
(operation)
Temperature range
(Non-operation)
Relative humidity
(Non-operation)
Atmospheric pressure
(Non-operation)
Environmental and energy
ROHS YES
Packaging 100% recyclable
Specic Substances 100% PVC BFR free housing
AC Input Voltage
at 100VAC, 60Hz
AC Input Voltage
at 100VAC, 60Hz
94.54 BTU/hr
(typ.)
1.71 BTU/hr
(typ.)
1.02 BTU/hr
(typ.)
557 x 508 x 239 mm
557 x 331 x 64 mm
730 x 420 x 188 mm
0°C to 40°C
20% to 80%
700 to 1060hPa
-20°C to 60°C
10% to 90%
500 to 1060hPa
AC Input Voltage
at 115VAC, 60Hz
AC Input Voltage
at 115VAC, 60Hz
94.54 BTU/hr
(typ.)
1.71 BTU/hr
(typ.)
1.02 BTU/hr
(typ.)
AC Input Voltage
at 230VAC, 50Hz
AC Input Voltage
at 230VAC, 50Hz
94.54 BTU/hr
(typ.)
1.71 BTU/hr
(typ.)
1.02 BTU/hr
(typ.)
15
Page 18

Cabinet
Color Dark Slate
Finish Texture
Note
1. This data is subject to change without notice. Go to www.philips.com/support to
download the latest version of leaet.
2. SmartUniformity and Delta E information sheets are included in the box.
3. In order to update the monitor’s rmware to the latest version, Please download
the SmartControl software from Philips website. It is necessary to be connected to a
network when updating the rmware on SmartControl over-the-air (OTA).
16
Page 19
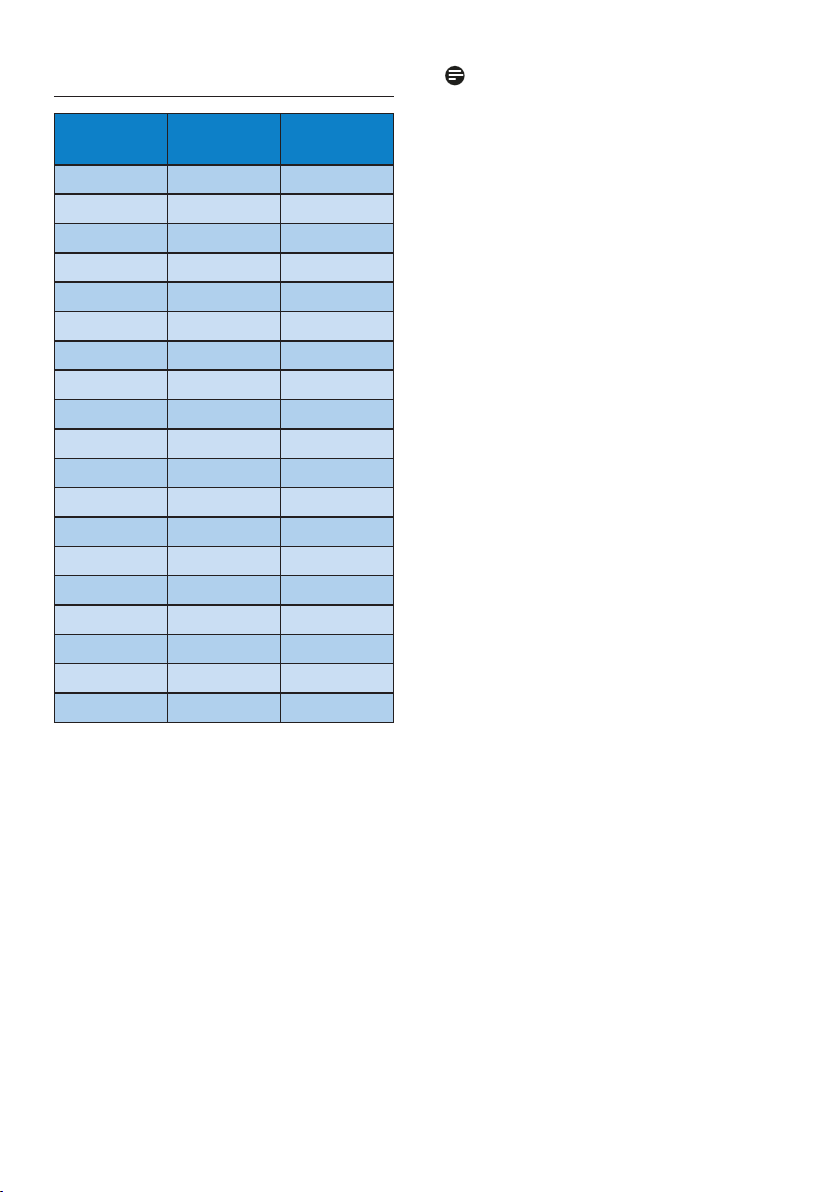
6.1 Resolution & Preset Modes
H. freq
(kHz)
31.47 720 x 400 70.09
31.47 640 x 480 59.94
35.00 640 x 480 66.67
37.86 640 x 480 72.81
37.50 640 x 480 75.00
35.16 800 x 600 56.25
37.88 800 x 600 60.32
46.88 800 x 600 75.00
48.08 800 x 600 72.19
47.73 832 x 624 74.55
48.36 1024 x 768 60.00
56.48 1024 x 768 70.07
60.02 1024 x 768 75.03
63.89 1280 x 1024 60.02
79.98 1280 x 1024 75.03
67.50 1920 x 1080 60.00
137.26 1920 x 1080 119.98
158.40 1920 x 1080 143.99
274.52 1920 x 1080 239.96
Resolution V. freq (Hz)
Note
Please notice that your display works
best at native resolution of 1920 x 1080.
For best output performance, please
always ensure that your graphic card
is capable of achieving the maximum
resolution and refresh rate of this Philips
display.
17
Page 20
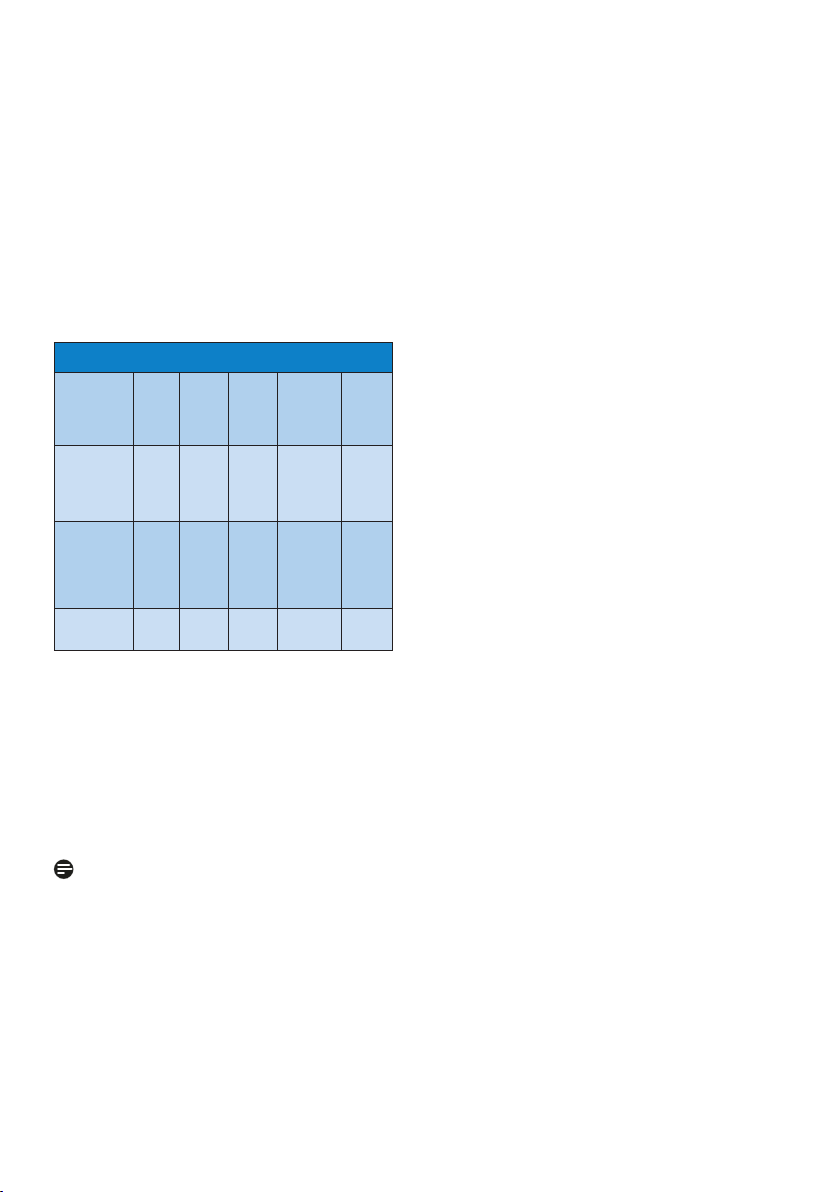
7. Power Management
If you have VESA DPM compliance
display card or software installed in
your PC, the monitor can automatically
reduce its power consumption when
not in use. If an input from a keyboard,
mouse or other input device is detected,
the monitor will 'wake up' automatically.
The following table shows the power
consumption and signaling of this
automatic power saving feature:
Power Management Denition
VESA Mode Video H-sync V-sync
Active ON Ye s Ye s
Sleep
(Standby
mode)
O mode OFF - -
OFF No No
Power
Used
27.7 W
(typ.)
39.7 W
(max.)
0.5 W
(typ.)
0.3 W
(typ.)
LED
Color
White
White
(blink)
OFF
The following setup is used to measure
power consumption on this monitor.
• Native resolution: 1920 x 1080
• Contrast: 50%
• Brightness: 40%
• Color temperature: 6500k with full
white pattern
Note
This data is subject to change without
notice.
18
Page 21
8. Customer care and
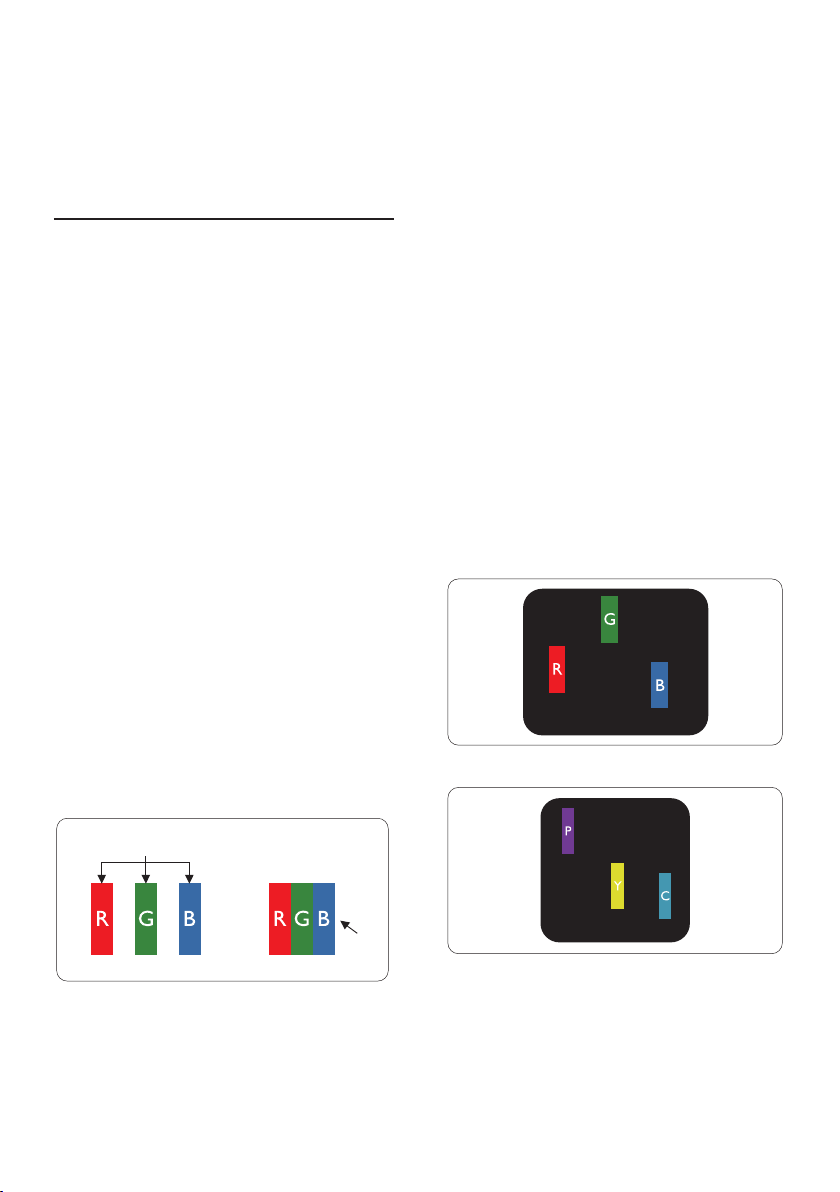
Sub pixels
Pixels
warranty
8.1 Philips’ Flat Panel Monitors
Pixel Defect Policy
Philips strives to deliver the highest
quality products. We use some of the
industry's most advanced manufacturing
processes and practice stringent quality
control. However, pixel or sub pixel
defects on the TFT Monitor panels used
in at panel monitors are sometimes
unavoidable. No manufacturer can
guarantee that all panels will be
free from pixel defects, but Philips
guarantees that any monitor with an
unacceptable number of defects will be
repaired or replaced under warranty.
This notice explains the dierent types
of pixel defects and denes acceptable
defect levels for each type. In order to
qualify for repair or replacement under
warranty, the number of pixel defects
on a TFT Monitor panel must exceed
these acceptable levels. For example,
no more than 0.0004% of the sub
pixels on a monitor may be defective.
Furthermore, Philips sets even higher
quality standards for certain types or
combinations of pixel defects that are
more noticeable than others. This policy
is valid worldwide.
together form an image. When all sub
pixels of a pixel are lit, the three colored
sub pixels together appear as a single
white pixel. When all are dark, the three
colored sub pixels together appear as a
single black pixel. Other combinations of
lit and dark sub pixels appear as single
pixels of other colors.
Types of Pixel Defects
Pixel and sub pixel defects appear on the
screen in dierent ways. There are two
categories of pixel defects and several
types of sub pixel defects within each
category.
Bright Dot Defects
Bright dot defects appear as pixels or
sub pixels that are always lit or 'on'. That
is, a bright dot is a sub-pixel that stands
out on the screen when the monitor
displays a dark pattern. There are the
types of bright dot defects.
One lit red, green or blue sub pixel.
Pixels and Sub pixels
A pixel, or picture element, is composed
of three sub pixels in the primary colors
of red, green and blue. Many pixels
Two adjacent lit sub pixels:
- Red + Blue = Purple
- Red + Green = Yellow
- Green + Blue = Cyan (Light Blue)
19
Page 22
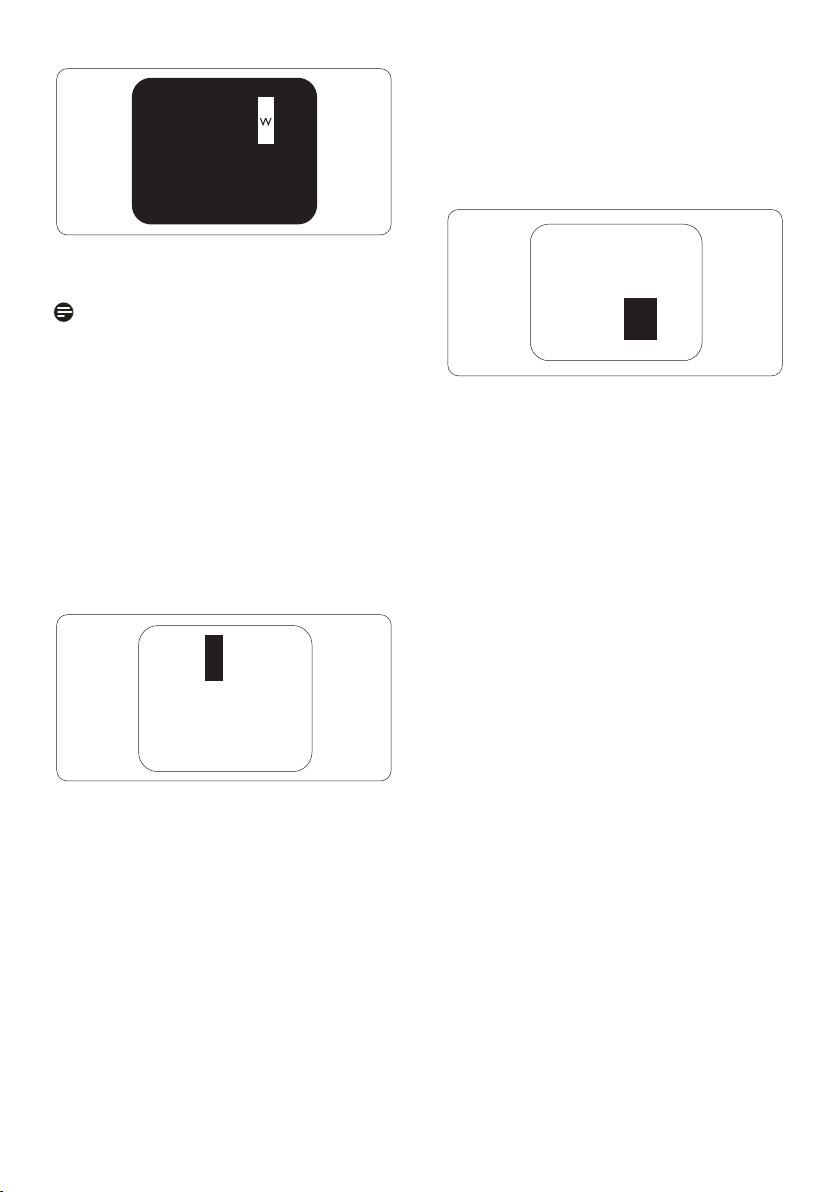
Three adjacent lit sub pixels (one white
pixel).
Note
A red or blue bright dot must be
more
than 50 percent brighter than
neighboring dots while a green
bright dot is 30 percent brighter than
neighboring dots.
Black Dot Defects
Black dot defects appear as pixels or sub
pixels that are always dark or 'o'. That
is, a dark dot is a sub-pixel that stands
out on the screen when the monitor
displays a light pattern. These are the
types of black dot defects.
Proximity of Pixel Defects
Because pixel and sub pixels defects
of the same type that are near to one
another may be more noticeable,
Philips also species tolerances for the
proximity of pixel defects.
Pixel Defect Tolerances
In order to qualify for repair or
replacement due to pixel defects during
the warranty period, a TFT Monitor
panel in a Philips at panel monitor
must have pixel or sub pixel defects
exceeding the tolerances listed in the
following tables.
20
Page 23
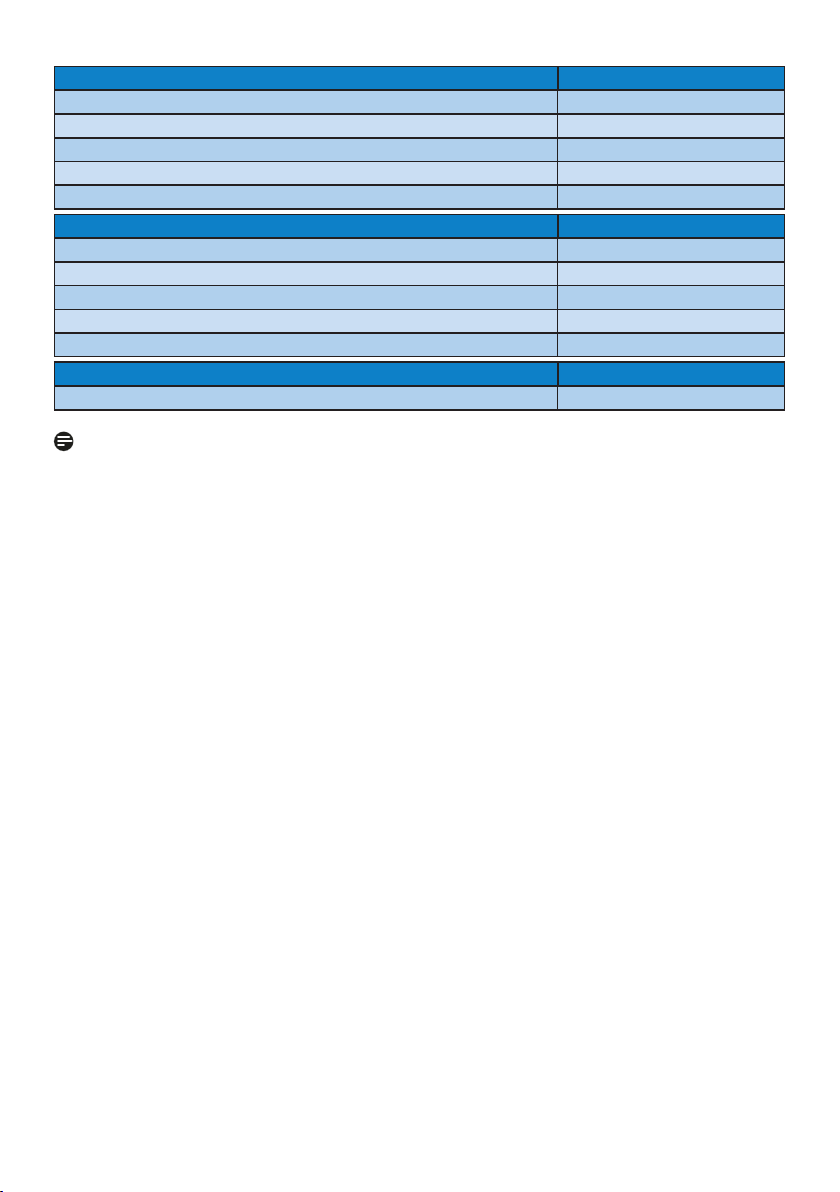
BRIGHT DOT DEFECTS ACCEPTABLE LEVEL
1 lit subpixel 2
2 adjacent lit subpixels 1
3 adjacent lit subpixels (one white pixel) 0
Distance between two bright dot defects* >15mm
Total bright dot defects of all types 2
BLACK DOT DEFECTS ACCEPTABLE LEVEL
1 dark subpixel 3 or fewer
2 adjacent dark subpixels 2 or fewer
3 adjacent dark subpixels 0
Distance between two black dot defects* >15mm
Total black dot defects of all types 3 or fewer
TOTAL DOT DEFECTS ACCEPTABLE LEVEL
Total bright or black dot defects of all types 5 or fewer
Note
1 or 2 adjacent sub pixel defects = 1 dot defect
21
Page 24
8.2 Customer Care & Warranty
For warranty coverage information and additional support requirements valid for your
region, please visit www.philips.com/support website for details or contact your local
Philips Customer Care Center.
For extended warranty, if you would like to extend your general warranty period, an
Out of Warranty service package is oered via our Certied Service Center.
For Warranty Period please refer to Warranty Statement in Important information
manual.
If you wish to make use of this service, please be sure to purchase the service within 30
calendar days of your original purchase date. During the extended warranty period, the
service includes pickup, repair and return service, however the user will be responsible
for all costs accrued.
If the Certied Service Partner cannot perform the required repairs under the oered
extended warranty package, we will nd alternative solutions for you, if possible, up to
the extended warranty period you have purchased.
Please contact our Philips Customer Service Representative or local contact center (by
Consumer care number) for more details.
Philips Customer Care Center number listed below.
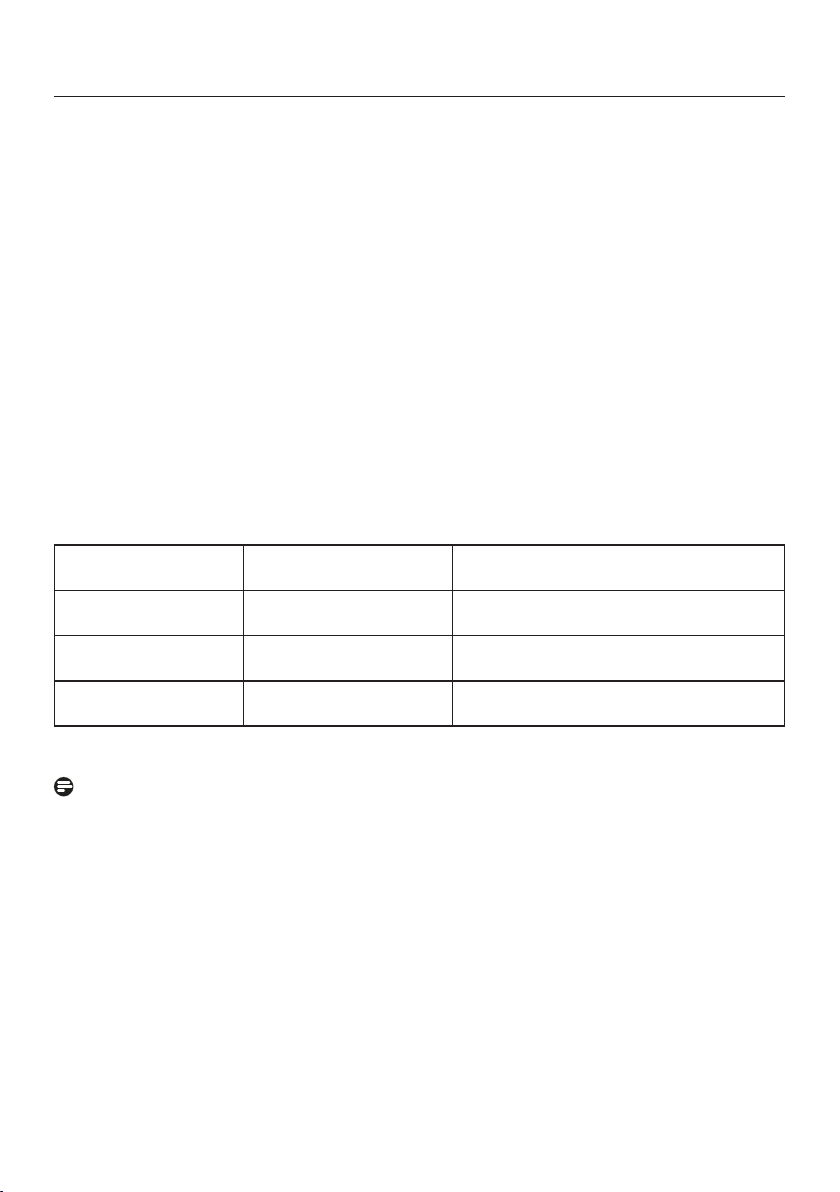
• Local Standard
Warranty Period
• Depend on
dierent Regions
**Proof of original purchase and extended warranty purchase required.
• Extended Warranty
Period
• + 1 Year • Local Standard warranty period
• + 2 Years • Local Standard warranty period
• + 3 Years • Local Standard warranty period
• Total Warranty Period
+1
+2
+3
Note
Please refer to Important information manual for regional service hotline, which is
available on the Philips website support page.
22
Page 25

9. Troubleshooting &
FAQs
9.1 Troubleshooting
This page deals with problems that can
be corrected by a user. If the problem
still persists after you have tried these
solutions, contact Philips customer
service representative.
Common Problems
1
No Picture (Power LED not lit)
• Make sure the power cord is
plugged into the power outlet and
into the back of the monitor.
• First, ensure that the power button
on the rear of the monitor is in the
OFF position, then press it to the ON
position.
No Picture (Power LED is White)
• Make sure the computer is turned
on.
• Make sure the signal cable is
properly connected to your
computer.
• Make sure the monitor cable has no
bent pins on the connect side. If yes,
repair or replace the cable.
• The Energy Saving feature may be
activated
Screen says
• Make sure the monitor cable
is properly connected to your
computer. (Also refer to the Quick
Start Guide).
• Check to see if the monitor cable has
bent pins.
• Make sure the computer is turned
on.
Visible signs of smoke or sparks
• Do not perform any troubleshooting
steps
• Disconnect the monitor from mains
power source immediately for safety
• Contact with Philips customer service
representative immediately.
Imaging Problems
2
Image vibrates on the screen
• Check that the signal cable is
properly securely connected to the
graphics board or PC.
Image appears blurred, indistinct or too
dark
• Adjust the contrast and brightness
on On-Screen Display.
An "after-image", "burn-in" or "ghost
image" remains after the power has
been turned o.
• Uninterrupted display of still or
static images over an extended
period may cause "burn-in", also
known as "after-imaging" or "ghost
imaging", on your screen. "Burn-in",
"after-imaging", or "ghost imaging"
is a well-known phenomenon in
LCD panel technology. In most cases,
the "burn-in" or "after-imaging"
or "ghost imaging" will disappear
gradually over a period of time after
the power has been switched off.
• Always activate a moving screen
saver program when you leave your
monitor unattended.
• Always activate a periodic screen
refresh application if your LCD
monitor will display unchanging
static content.
• Failure to activate a screen saver, or
a periodic screen refresh application
may result in severe “burn-in” or
23
Page 26

“after-imaging” or “ghost imaging”
symptoms that will not disappear
and cannot be repaired. The damage
mentioned above is not covered
under your warranty.
Image appears distorted. Text is fuzzy or
blurred.
• Set the PC’s display resolution
to the same mode as monitor’s
recommended screen native
resolution.
Green, red, blue, dark, and white dots
appears on the screen
• The remaining dots are normal
characteristic of the liquid crystal
used in today’s technology, Please
refer the pixel policy for more detail.
* The "power on" light is too strong and
is disturbing
• You can adjust “power on” light
using the power LED Setup in OSD
main Controls.
For further assistance, refer to the
Service contact information listed
in Important information manual
and contact Philips customer service
representative.
* Functionality dierent according to
display.
9.2 General FAQs
Q1: When I install my monitor what
should I do if the screen shows
'Cannot display this video mode'?
Ans.: Recommended resolution for this
monitor: 1920 x 1080.
• Unplug all cables, then connect your
PC to the monitor that you used
previously.
• In the Windows Start Menu, select
Settings/Control Panel. In the
Control Panel Window, select the
Display icon. Inside the Display
Control Panel, select the 'Settings'
tab. Under the setting tab, in box
labelled 'desktop area', move the
sidebar to 1920 x 1080 pixels.
• Open 'Advanced Properties' and set
the Refresh Rate to 60 Hz, then click
OK.
• Restart your computer and repeat
step 2 and 3 to verify that your PC is
set at 1920 x 1080.
• Shut down your computer,
disconnect your old monitor and
reconnect your Philips LCD monitor.
• Turn on your monitor and then turn
on your PC.
Q2: What is the recommended refresh
rate for LCD monitor?
Ans.: Recommended refresh rate in
LCD monitors is 60 Hz, In case of
any disturbance on screen, you
can set it up to 75 Hz to see if that
removes the disturbance.
Q3: What are the .inf and .icm les?
How do I install the drivers (.inf
and .icm)?
Ans.: These are the driver les for your
monitor. Your computer may
ask you for monitor drivers (.inf
and .icm les) when you rst
install your monitor. Follow the
24
Page 27

instructions in your user manual,
monitor drivers (.inf and .icm les)
will be installed automatically.
Q4: How do I adjust the resolution?
Ans.: Your video card/graphic driver
and monitor together determine
the available resolutions. You
can select the desired resolution
under Windows® Control Panel
with the "Display properties".
Q5: What if I get lost when I am
making monitor adjustments via
OSD?
Ans.: Simply press the button, then
select [Reset] to recall all the
original factory settings.
Q6: Is the LCD screen resistant to
scratches?
Ans.: In general it is recommended
that the panel surface is not
subjected to excessive shocks
and is protected from sharp or
blunt objects. When handling the
monitor, make sure that there is
no pressure or force applied to
the panel surface side. This may
aect your warranty conditions.
Q7: How should I clean the LCD
surface?
Ans.: For normal cleaning, use a clean,
soft cloth. For extensive cleaning,
please use isopropyl alcohol. Do
not use other solvents such as
ethyl alcohol, ethanol, acetone,
hexane, etc.
Q8: Can I change the color setting of
my monitor?
Ans.: Yes, you can change your color
setting through OSD control as
the following procedures.
• Press button to show the OSD
(On Screen Display) menu
• Press button to select the option
[Color] then press button to
enter color setting, there are three
settings as below.
1. Color Temperature: The settings
are Native, 5000K, 6500K, 7500K,
8200K, 9300K and 11500K. With
settings in the 5000K range the
panel appears "warm, with a
red-white color tone", while a
11500K temperature yields "cool,
bluewhite toning".
2. sRGB: This is a standard setting
for ensuring correct exchange of
colors between dierent device
(e.g. digital cameras, monitors,
printers, scanners, etc).
3. User Dene: The user can choose
his/her preference color setting
by adjusting red, green, blue
color.
Note
A measurement of the color of light
radiated by an object while it is being
heated. This measurement is expressed
in terms of absolute scale, (degrees
Kelvin). Lower Kevin temperatures such
as 2004K are red; higher temperatures
such as 9300K are blue. Neutral
temperature is white, at 6504K.
Q9: Can I connect my LCD monitor to
any PC, workstation or Mac?
Ans.: Yes. All Philips LCD monitors are
fully compatible with standard
PCs, Macs and workstations.
You may need a cable adapter
to connect the monitor to your
Mac system. Please contact your
Philips sales representative for
more information.
25
Page 28

Q10: Are Philips LCD monitors Plug-
and- Play?
Ans.: Yes, the monitors are Plug-and-
Play compatible with Windows
11/10/8.1/8, Mac OSX.
Q11: What is Image Sticking, or Image
Burn-in, or After Image, or Ghost
Image in LCD panels?
Ans.: Uninterrupted display of still or
static images over an extended
period may cause "burn-in", also
known as "after-imaging" or
"ghost imaging", on your screen.
"Burn-in", "after-imaging", or
"ghost imaging" is a well-known
phenomenon in LCD panel
technology. In most cases, the
"burn-in" or "after-imaging" or
"ghost imaging" will disappear
gradually over a period of
time after the power has been
switched o.
Always activate a moving screen
saver program when you leave
your monitor unattended.
Always activate a periodic screen
refresh application if your LCD
monitor will display unchanging
static content.
Q13: How to unlock/lock my hot key?
Ans.: Please press for 10 seconds
to unlock/lock the hot key, by
doing so, your display pops out
“Attention” to show the unlock/
lock status as shown below
illustrators.
Q14: Where can I nd Important
information manual mentioned
in EDFU?
Ans.: Important information manual
can be download on the Philips
website support page.
Warning
Failure to activate a screen saver, or
a periodic screen refresh application
may result in severe “burn-in” or “afterimage” or “ghost image” symptoms
that will not disappear and cannot be
repaired. The damage mentioned above
is not covered under your warranty.
Q12: Why is my Display not showing
sharp text, and is displaying
jagged characters?
Ans.: Your LCD monitor works best at
its native resolution of 1920 x
1080. For best display, please use
this resolution.
26
Page 29

2023 © TOP Victory Investments Ltd. All rights reserved.
This product has been manufactured by and is sold under the responsibility of Top Victory Investments Ltd., and Top Victory
Investments Ltd. is the warrantor in relation to this product. Philips and the Philips Shield Emblem are registered trademarks of
Koninklijke Philips N.V. and are used under license.
Specications are subject to change without notice.
Version: 25M2N3200E1T
 Loading...