

Philips 24PHT4354, 24PHS4354 User Manual

Register your product and get support at
www.philips.com/TVsupport
4354 series
User Manual
24PHS4354
24PHT4354

Contents
1 Get Support 3
1.1 Identify and Register your TV 3
1.2 TV Help and User Manual 3
1.3 On-line Help and User Manual 3
1.4 Consumer Care / Repair 3
2 Software 4
2.1 Update Software 4
2.2 Software Version 4
3 Quick Guide 5
3.1 Remote Control 5
3.2 IR sensor 6
3.3 Joystick - Local Control (if available) 6
4 Setting Up 8
4.1 Read Safety 8
4.2 TV Placement 8
4.3 Turn on TV 9
5 Connections 11
5.1 Connectivity guide 11
5.2 Antenna 11
5.3 Satellite (if available) 11
5.4 Video Device 12
5.5 Audio Device 13
5.6 Computer 14
5.7 CAM with Smart Card - CI+ 14
5.8 USB Device 15
5.9 Wired Network - Freeview (Network port is only for
UK models) 16
6 Switch Source 17
6.1 Source List 17
6.2 Rename Device 17
7 Channels 18
7.1 About Channels and Switch Channels 18
7.2 Install Channel 18
7.3 Channel List 23
7.4 Select Channel Filter 24
7.5 Favourite Channels 24
8 TV Guide 27
8.1 What You Need 27
8.2 Using the TV Guide 27
9 Recording and Pause TV 29
9.1 What You Need 29
9.2 Recording 29
9.3 Pause TV 30
10 Videos, Photos and Music 31
10.1 From a USB Connection 31
10.2 Photos 31
10.3 Videos 31
10.4 Music 32
11 Open TV Setting Menus 33
11.1 Home Menu Overview 33
11.2 Utilities Menu 33
11.3 Quick Settings and All Settings 33
11.4 All Settings 33
12 Environmental 40
12.1 European Energy Label 40
12.2 Product Fiche 40
12.3 End of Use 40
13 Specifications 41
13.1 Power 41
13.2 Reception 41
13.3 Display Resolution 41
13.4 Display Input Resolution 41
13.5 Sound 42
13.6 Multimedia 42
13.7 Connectivity 42
14 Troubleshooting 44
14.1 Tips 44
14.2 Switch On 44
14.3 Remote Control 44
14.4 Channels 44
14.5 Picture 45
14.6 Sound 45
14.7 HDMI 45
14.8 USB 46
15 Safety and Care 47
15.1 Safety 47
15.2 Screen Care 48
15.3 Terms of Use 48
16 Copyrights 50
16.1 HDMI 50
16.2 Dolby Audio 50
16.3 DTS 2.0 + Digital Out ™ 50
16.4 Other Trademarks 50
17 Open Source 51
17.1 Open Source Software 51
17.2 Open Source License 51
Index 54
2

1
Get Support
1.1
Identify and Register your TV
On the support site you can find your country's
telephone number to contact us as well as answers to
frequently asked questions (FAQs). In some countries,
you can chat with one of our collaborators and ask
your question directly or send a question by email.
You can download new TV software or the manual to
read on your computer.
Identify your TV - TV model number and serial
number
You might be asked to provide the TV product model
number and serial number. Find these numbers on
the packaging label or on the type label on the back
or bottom of the TV.
Register your TV
Register your TV and enjoy a range of benefits
including full support (including downloads),
privileged access to information about new products,
exclusive offers and discounts, the chance to win
prizes and even participate in special surveys about
new releases.
Go to www.philips.com/TVsupport
1.2
TV Help and User Manual
Press Settings > Help
In Help menu, you can easily get software updated,
reset TV to default settings, and read user manual.
- Update software: Check available software updates.
- User manual: Read the user manual for TV
information.
- Troubleshooting: Find a solution for frequent ask
questions.
- Factory settings: Reset all settings to factory
settings.
- Reinstall TV: Reinstall and redo the complete TV
installation.
- Contact info: Show the telephone number or web
address for your country or region.
For more TV troubleshooting and frequently asked
questions (FAQs)...
Go
to http://philips-tvconsumercare.kxondemand.com/
portal/en/ModelSelect
TV Help on your tablet, smartphone or computer
To carry out extended sequences of instructions more
easily, you can download the TV Help in PDF format
to read on your smartphone, tablet or
computer. Alternatively, you can print the relevant
Help page from your computer.
To download the Help (user manual) go
to www.philips.com/TVsupport
1.4
Consumer Care / Repair
For support and repair, call the Consumer Care
hotline in your country. Our service engineers will take
care of a repair, if necessary.
Find the telephone number in the printed
documentation that came with the TV.
Or consult our
website www.philips.com/TVsupport and select
your country if needed.
TV model number and serial number
You might be asked to provide the TV product model
number and serial number. Find these numbers on
the packaging label or on the type label on the back
or bottom of the TV.
Warning
Do not attemp to repair the TV yourself. This may
cause severe injury, irrepairable damage to your TV or
void your warranty.
1.3
On-line Help and User
Manual
To solve any Philips TV related problem, you can
consult our online support. You can select your
language and enter your product model number.
Go to www.philips.com/TVsupport.
3

2
Look for OAD updates (Over-the-air
Software
2.1
Update Software
Search for Updates
(Home) > Settings > Update
software > Search for updates.
You need a computer and a USB memory device to
upload the software on the TV. Use a USB memory
device with 256MB free space. Make sure that write
protection is switched off.
1. Start the update on TV
- (Home) > Settings > Update
software > Search for updates.
2. Identify the TV
- Insert the USB memory into one of the USB
connections of the TV.
Select Start and press OK. An identification file is
written on the USB memory device.
Download)
Scan to search for an Over-the-air software update.
(Home) > Settings > Update software > Look
for OAD updates.
* The availability of OAD updates is dependent on
your country.
2.2
Software Version
To view the current TV software version…
(Home) > Settings > Update
software > Current software Info
3. Download the TV software
- Insert the USB memory into your computer.
- On the USB memory device, locate the
file update.htm and double click it.
- Click on Send ID.
- Select your region
- If new software is available, download the .zip file.
After the download, unzip the file and copy the
file autorun.upg onto the USB memory device.
4. Update the TV software
- Insert the USB memory into the TV again. The
update starts automatically.
The TV switches itself off for 10 seconds and then
back on again. Please wait.
Do not . . .
- remove the USB memory device from the TV
If a power cut occurs during the update, never
remove the USB memory device from the TV. When
the power returns, the update will continue.
Local Updates
For dealers and expert users…
(Home) > Settings > Update software > Local
updates.
4

3
Quick Guide
3.1
Remote Control
Batteries and Cleaning
Replace batteries
If the TV does not react on a key press on the remote
control, the batteries might be empty.
To replace the batteries, open the battery
compartment on the back of the remote control.
1. Slide the battery door in the direction shown by the
arrow.
2. Replace the old batteries with 2
type AAA-R03-1.5V batteries. Make sure the + and
the - ends of the batteries line up correctly.
3. Reposition the battery door and slide it back until it
clicks.
1. Standby / On
To switch the TV on or back to Standby.
2. Playback keys
- Play , to playback
- Pause , to pause playback
- Stop , to stop playback
- Rewind , to rewind
- Fast forward , to go fast forward
- Record , to record now
3. TV GUIDE
To open or close the TV Guide.
4. FORMAT
To open or close the Picture format menu.
5. SETUP
To open the Settings menu.
Middle
- Remove the batteries if you are not using the
remote control for a long time.
- Safely dispose of your old batteries according to the
end of use directions.
Cleaning
Your remote control is treated with a scratch-resistant
coating.
To clean the remote control, use a soft damp cloth.
Never use substances such as alcohol, chemicals or
household cleaners on the remote control.
Key Overview
Top
1. HOME
To open or close the home menu.
2. SOURCES
To open or close the Sources menu - the list of
connected devices.
3. Colour keys
The buttons function follow the on-screen
instructions.
4. INFO
To open or close programme infomation.
5

5. BACK
To switch back to the previous channel you selected.
To close a menu without changing a setting.
3.2
IR sensor
6. EXIT
To switch back to watching TV.
7. OPTIONS
To open or close the Options menu.
8. OK key
To confirm a selection or setting.
9. Arrow / navigation keys
To navigate up, down, left or right.
10. LIST
To open or close the channel list.
Bottom
The TV can receive commands from a remote control
that uses IR (infrared) to send commands. If you use
such a remote control, always make sure you point
the remote control at the infrared sensor on the front
of the TV.
Warning
Do not put any objects in front of IR sensor of the TV,
it may block the IR signal.
3.3
Joystick - Local Control (if
1. Mute
To mute the sound or to restore it.
2. Volume
To adjust the volume level.
3. Number keys
To select a TV channel directly.
4. SUBTITLE
To switch subtitles on, off or Automatic.
5. Channel
To switch to the next or previous channel in the
channel list. To open the next or previous page in
Text/Teletext. To start the next or previous chapter on
a disc.
available)
Joystick - Local Control
If you lost the remote control or its batteries are
empty, you can still do some basic TV operations.
To open the basic menu…
1. With the TV switched on, press the joystick key on
the back of the TV to bring up the basic menu.
2. Press left or right to
select Volume, Channel or Sources.
6. TEXT
To open or close Text / Teletext.
Press up or down to adjust the volume or tune to the
next or previous channel. Press up or down to go
6

through the list of sources, including the tuner
selection.
The menu will disappear automatically.
7

4
Wall Mounting
Setting Up
4.1
Read Safety
Read the safety instructions first before you use the
TV.
To read the instructions, in User manual, see
chapter Safety and Care.
4.2
TV Placement
Tips on Placement
- Position the TV where light does not shine directly
on the screen.
- Position the TV up to 15 cm away from the wall.
- The ideal distance to watch TV is 3 times its
diagonal screen size. When seated, your eyes should
be level with the centre of the screen.
4304, 4354 series TV
Your TV is also prepared for a VESA-compliant wall
mount bracket (sold separately).
Use the following VESA code when purchasing the
wall mount . . .
- 24PHx43x4 - VESA MIS-F 75x75, M6 (Minimum 10
mm, Maximum 12 mm)
Preparation
Make sure that the metal screws, to mount the TV to
the VESA-compliant bracket, go about 10mm deep
inside the threaded bushes of the TV.
Caution
Note:
Please keep the TV away from dust-producing
sources such as stoves. It is suggested to clean the
dust regularly to avoid getting dust into the TV.
TV Stand
You can find the instructions for mounting the TV
stand in the Quick Start Guide that came with the TV.
In case you lost this guide, you can download it
from www.philips.com.
Use the model number of the TV to look for
the Quick Start Guide to download.
Wall mounting the TV requires special skills and
should only be performed by qualified personnel. The
TV wall mounting should meet safety standards
according to the TVs weight. Also read the safety
precautions before positioning the TV.
TP Vision Europe B.V. bears no responsibility for
improper mounting or any mounting that results in
accident or injury.
4504 series TV
Your TV is also prepared for a VESA-compliant wall
mount bracket (sold separately).
Use the following VESA code when purchasing the
wall mount . . .
- 32PHx4504 - VESA MIS-F 100, M6 (Minimum 10
mm, Maximum 14 mm)
Preparation
Make sure that the metal screws, to mount the TV to
8

the VESA-compliant bracket, go about 10mm deep
inside the threaded bushes of the TV.
Connect Power Cable
Caution
Wall mounting the TV requires special skills and
should only be performed by qualified personnel. The
TV wall mounting should meet safety standards
according to the TVs weight. Also read the safety
precautions before positioning the TV.
TP Vision Europe B.V. bears no responsibility for
improper mounting or any mounting that results in
accident or injury.
5304 series TV
Your TV is also prepared for a VESA-compliant wall
mount bracket (sold separately).
Use the following VESA code when purchasing the
wall mount . . .
- Insert the power cable into the POWER connector
on the back of the TV.
- Make sure the power cable is securely inserted in
the connector.
- Make sure that the power plug, in the wall socket, is
accessible at all times.
- When you unplug the power cable, always pull the
plug, never pull the cable.
For 32" or above
- 22PFS5304 - VESA MIS-F 75x75, M4 (Minimum 8
mm, Maximum 8 mm)
Preparation
Make sure that the metal screws, to mount the TV to
the VESA-compliant bracket, go about 10mm deep
inside the threaded bushes of the TV.
Caution
Wall mounting the TV requires special skills and
should only be performed by qualified personnel. The
TV wall mounting should meet safety standards
according to the TVs weight. Also read the safety
precautions before positioning the TV.
TP Vision Europe B.V. bears no responsibility for
improper mounting or any mounting that results in
accident or injury.
4.3
For 22"/24"
Turn on TV
Although this TV has a very low standby power
consumption, unplug the power cable to save energy
if you do not use the TV for a long period of time.
9

Switch On or Standby
Before you switch on the TV, make sure you plugged
in the mains power in the POWER connector on the
back of the TV.
Switch On
Press the power button on the side or the back of the
TV.
Switch to standby
To switch the TV to Standby, press on the remote
control.
To switch off the TV completely, disconnect the
power plug.
When disconnecting the power plug, always pull the
power plug, never the cord. Ensure that you have full
access to the power plug, power cord and outlet
socket at all times.
10

5
Connections
5.1
Connectivity guide
Always connect a device to the TV with the highest
quality connection available. Also, use good quality
cables to ensure a good transfer of picture and
sound.
When you connect a device, the TV recognizes its
type and gives each device a correct type name. You
can change the type name if you wish. If a correct
type name for a device is set, the TV automatically
switches to the ideal TV settings when you switch to
this device in the Sources menu.
5.2
Antenna
Insert the antenna plug firmly into
the Antenna socket at the back of the TV.
You can connect your own antenna or an antenna
signal from an antenna distribution system. Use an
IEC Coax 75 Ohm RF antenna connector.
Use this antenna connection for DVB-T and DVB-C
input signals.
For 32" or above
* Network port is only for UK models
** Satellite port is only for xxPxSxxxx series
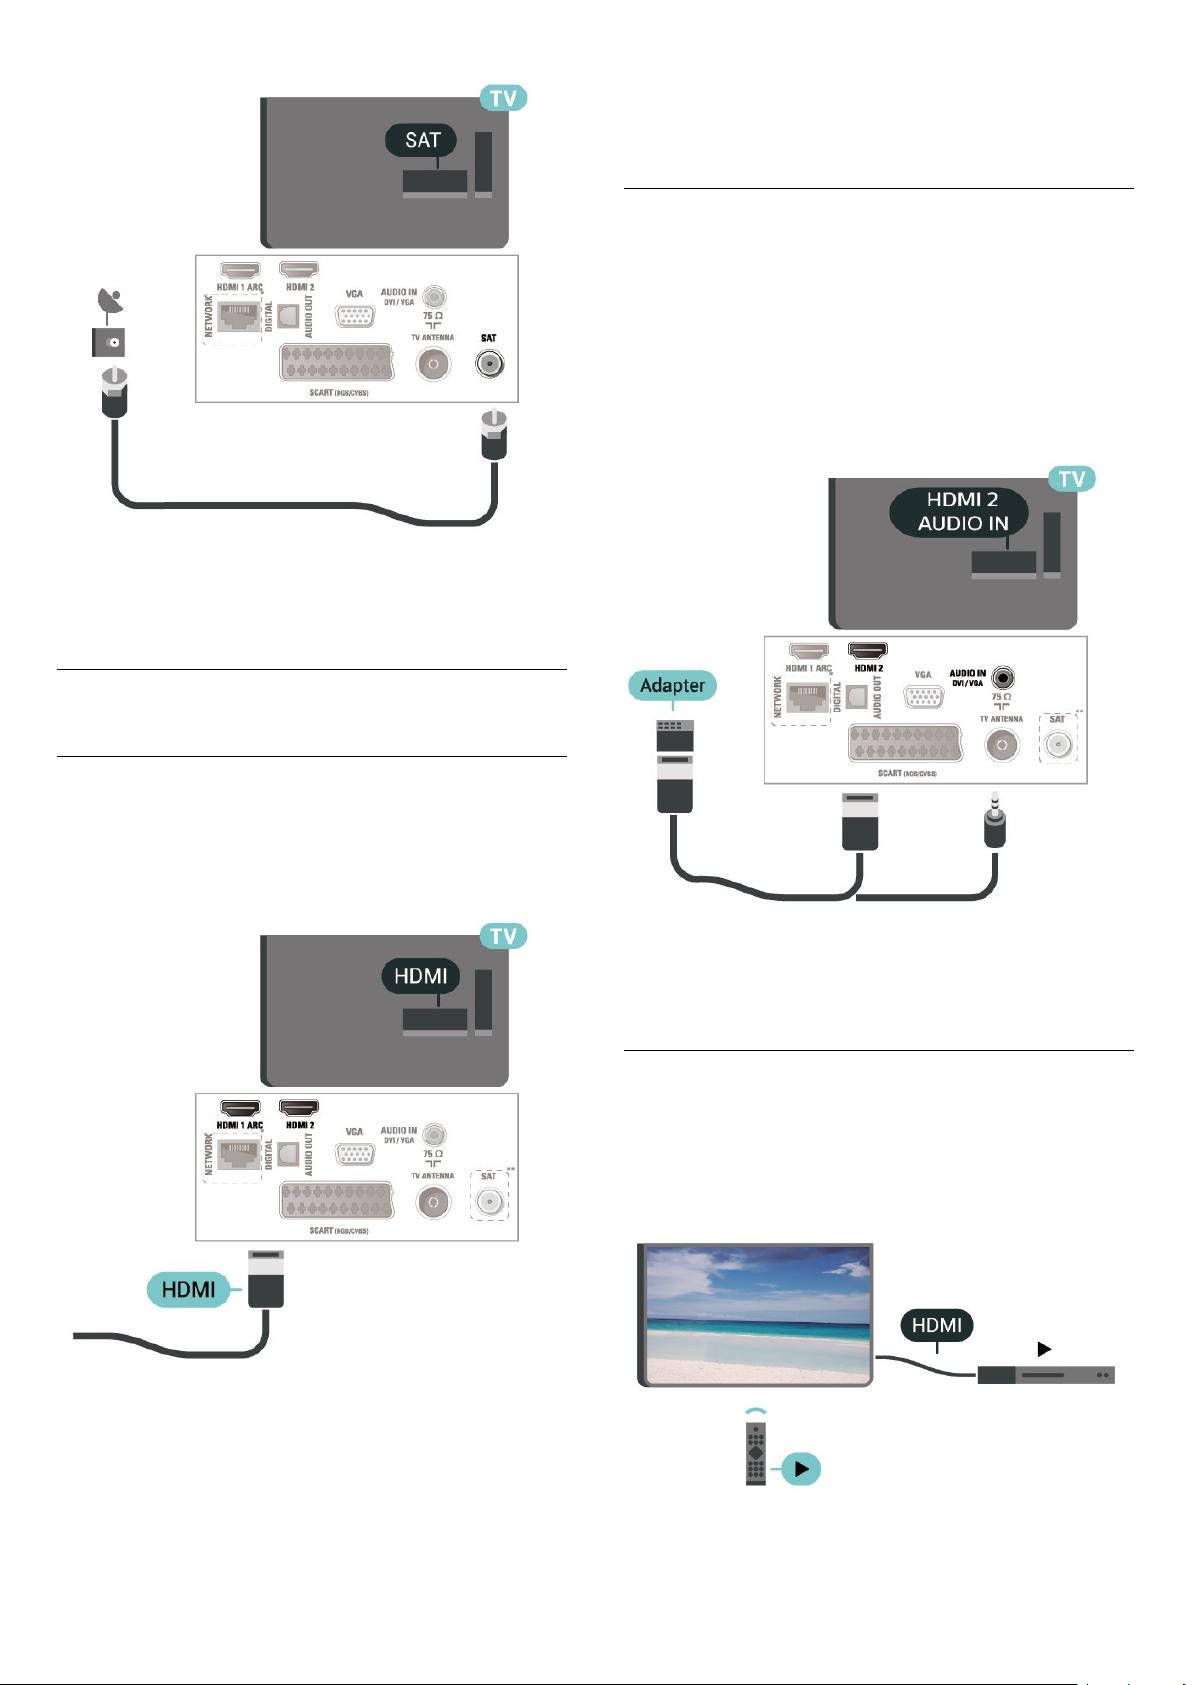
5.3
Satellite (if available)
Attach the satellite F-type connector to the satellite
connection SAT at the back of the TV.
For 32" or above
For 22"/24"
For 22"/24"
11
* Network port is only for UK models
that prevents copying content from a DVD disc or Bluray Disc. Also referred to as DRM (Digital Rights
Management).
HDMI - DVI
If you still own a device that only has a DVI
connection, you can connect the device to HDMI 2
connection with a DVI to HDMI adapter.
Use a DVI to HDMI adapter if your device only has a
DVI connection. Use HDMI 2 connection and add
an Audio L/R cable (mini-jack 3.5mm) to Audio In for
sound, on the back of the TV.
5.4
Video Device
HDMI
For best signal quality transfer, use a High speed
HDMI cable and do not use an HDMI cable longer
than 5 m.
* Network port is only for UK models
** Satellite port is only for xxPxSxxxx series
HDMI-CEC Connection - EasyLink
Connect HDMI CEC-compatible devices to your TV,
you can operate them with the TV remote
control. EasyLink HDMI CEC must be switched on on
the TV and the connected device.
* Network port is only for UK models
** Satellite port is only for xxPxSxxxx series
Copy protection
HDMI cables support HDCP (High-bandwidth Digital
Content Protection). HDCP is a copy protection signal
Switch on EasyLink
12

(Home) > Settings > General
settings > EasyLink > EasyLink > On
5.5
Audio Device
Operate HDMI CEC-compatible devices with TV
remote control
(Home) > Settings > General
settings > EasyLink > EasyLink remote
control > On
Note:
- EasyLink might not work with devices from other
brands.
- The HDMI CEC functionality has different names on
different brands. Some examples are: Anynet, Aquos
Link, Bravia Theatre Sync, Kuro Link, Simplink and
Viera Link. Not all brands are fully compatible with
EasyLink. Example HDMI CEC branding names are
property of their respective owners.
SCART (if available)
SCART is a good quality connection.
The SCART connection can be used for CVBS and
RGB video signals but cannot be used for High
Definition (HD) TV signals. The SCART connection
combines video and audio signals. The SCART
connection also supports NTSC playback.
HDMI ARC
Only HDMI 1 on the TV have HDMI ARC (Audio
Return Channel).
If the device, typically a Home Theatre System (HTS),
also has the HDMI ARC connection, connect it
to HDMI 1 connection on this TV. With the HDMI
ARC connection, you do not need to connect the
extra audio cable that sends the sound of the TV
picture to the HTS. The HDMI ARC connection
combines both signals.
Digital Audio Out - Optical
Audio Out - Optical is a high quality sound
connection.
This optical connection can carry 5.1 audio channels.
If your device, typically a Home Theatre System
(HTS), has no HDMI ARC connection, you can use this
connection with the Audio In - Optical connection on
the HTS. The Audio Out - Optical connection sends
the sound from the TV to the HTS.
* Network port is only for UK models
** Satellite port is only for xxPxSxxxx series
* Network port is only for UK models
** Satellite port is only for xxPxSxxxx series
13

Headphones
VGA (if available)
You can connect a set of headphones to
the connection on the side of the TV. The
connection is a mini-jack 3.5mm. You can adjust the
volume of the headphones separately.
5.6
Computer
HDMI - DVI
If you still own a device that only has a DVI
connection, you can connect the device
to HDMI 2 connection with a DVI to HDMI adapter.
Use a VGA cable if your device only has a VGA
connection. Use VGA connection and add an Audio
L/R cable (mini-jack 3.5mm) to Audio In for sound, on
the back of the TV.
* Network port is only for UK models
** Satellite port is only for xxPxSxxxx series
Use a DVI to HDMI adapter if your device only has a
DVI connection. Use HDMI 2 connection and add
an Audio L/R cable (mini-jack 3.5mm) to Audio In for
sound, on the back of the TV.
* Network port is only for UK models
** Satellite port is only for xxPxSxxxx series
Ideal Settings
(Home) > Settings > Picture >
Advanced > Computer
Set to On to have the ideal picture setting for use
your TV as a computer monitor.
* Only available for HDMI and VGA sources.
5.7
CAM with Smart Card - CI+
About CI+
This TV is ready for the CI+ Conditional Access.
With CI+ you can watch premium HD programmes,
like movies and sports, offered by digital TV operators
in your region. These programmes are scrambled by
the TV operator and descrambled with a prepaid CI+
module.
Digital TV operators provide a CI+ module
(Conditional Access Module - CAM) and an
accompanying smart card, when you subscribe to
their premium programmes. These programmes have
a high level of copy protection.
14

Contact a digital TV operator for more information on
terms & conditions.
Watch Channel on Smart Card
You can watch channels which are installed from
CI/CAM cards.
1. While watching a TV channel, press LIST to
open the channel list.
2. Select: CI+ Channel list .
Set Passwords and PIN Codes
Smart Card
Digital TV operators provide a CI+ module
(Conditional Access Module - CAM) and an
accompanying smart card, when you subscribe to
their premium programmes.
Insert the smart card into the CAM module. See the
instruction you received from the operator.
To insert the CAM in the TV…
1. Look on the CAM for the correct method of
insertion. Incorrect insertion can damage the CAM
and TV.
2. While looking at the back of the TV, with the front
of the CAM facing towards you, gently insert the CAM
into the slot COMMON INTERFACE.
3. Push the CAM in as far as it will go. Leave it in the
slot permanently.
When you switch on the TV, it may take a few minutes
before the CAM is activated. If a CAM is inserted and
subscription fees are paid (subscription methods can
differ), you can watch the scrambled channels
supported by the CAM smart card.
For some CAMs, you must enter a PIN code to watch
its channels. When you set the PIN code for the CAM,
we recommend you to use the same code you are
using to unlock the TV.
To set the PIN code for the CAM…
(Home) > Settings > Child lock > CAM PIN
5.8
USB Device
USB Flash Drive
You can view photos or play your music and videos
from a connected USB flash drive. Insert a USB flash
drive in the USB connection on the TV while the TV
is switched on.
The TV detects the flash drive and opens a list
showing its content.
If the contents list does not appear automatically,
press SOURCES and select USB.
The CAM and smart card are exclusively for your TV. If
you remove the CAM, you will no longer be able to
watch the scrambled channels supported by the
CAM.
USB Hard Drive
If you connect a USB Hard Drive, you can pause or
record digital TV broadcasts (DVB broadcasts or
similar).
Minimum Disk Space
- To pause a broadcast, you need a USB compatible
Hard Drive with a minimum of 4GB disk space.
- To pause and record a broadcast, you need a
minimum of 32GB disk space.
15

Before you can pause or record a broadcast, you
must connect and format a USB Hard Drive.
Formatting removes all files from the USB Hard Drive.
Warning
The USB Hard Drive is formatted exclusively for this
TV, you cannot use the stored recordings on another
TV or PC. Do not copy or change recording files on
the USB Hard Drive with any PC application. This will
corrupt your recordings. When you format another
USB Hard Drive, the content on the former will be lost.
A USB Hard Drive installed on your TV will need
reformatting for use with a computer.
5.9
Wired Network - Freeview
(Network port is only for UK
models)
Network
About Network
Network port and function is for Freeview HD
streaming features only.
Make the connection
To make a wired connection…
1. Connect the router to the TV with a network cable
(Ethernet cable**).
2. Make sure that the router is switched on.
3. Press (Home) , select Settings > Network and
press (right) to enter the menu.
4. Select Connect to network and press OK.
5. Select Wired and press OK. The TV constantly
searches for the network connection.
6. A message will be shown when the connection is
successful.
If the connection fails, you can check the DHCP
setting of the router. DHCP should be switched on.
Network Settings
(Home) > Settings > Network > View network
settings
You can view all current network settings here. The IP
and MAC address, signal strength, speed, encryption
method, etc.
Connect to Network
To connect the TV to the Internet, you need a
network router with a connection to the Internet.
Use a high-speed (broadband) connection to the
Internet.
(Home) > Settings > Network > Network
configuration
If you are an advanced user and want to install your
network with Static IP addressing, set the TV to Static
IP.
Select Static IP configuration and configure the
connection. You can set the number for IP
address, Netmask, Gateway, DNS.
16

6
Switch Source
6.1
Source List
- To open the sources menu, press SOURCES .
- To switch to a connected device, select the device
with the arrows (up) or (down) and press OK.
- To close the Source menu without switching to a
device, press SOURCES again.
6.2
Rename Device
- Only HDMI, VGA (if available), SCART (if
available) sources can be renamed or replace device
icon
1. Press SOURCES , and select HDMI or VGA (if
available).
2. Press Edit and press OK.
3. Select one of the device icons and press OK, the
preset name appears in the typing field.
4. Select Rename, then enter new name using onscreen keyboard.
- Press (red) key to enter with lower-case
- Press (green) key to enter with upper-case
- Press (yellow) key to enter number and
symbol
- Press (blue) key to delete a character
5. Select Done when complete the editing.
17
 Loading...