

Page 1

Thank you for choosing Philips.
Need help fast?
Read your Quick Use Guide and/or
Owner's Manual first for quick tips
that make using your Philips product
more enjoyable.
If you have read your instructions
and still need assistance,
you may access our online help at
www.usasupport.philips.com
or call
1-888-PHILIPS (744-5477)
while with your product
(and Model / Serial number)
S
T
O
P
Page 2

CONTENTS
Welcome/Registration of Your TV
. . . . . . . . . . . . . . . . . . . . . .
. . . . . . . . . . . . . . . . . . . . . . . . . . .
GUIDE
. . . . . . . . . . . . . . . . . . .
. . . . . . . . . . . . . . . .
. . . . . . . . . . . . . . . . . . . . . . . . . . . . . . .
AV(Audio/Video) Input Connection
. . . . . . . . . . . . . . . . . . . . .
Connections
. . . . . . . . . . . . . . . . . . . . . . . . . . . . . . . . .
. . . . . . . . . . . . . . . . . . . .
. . . . . . . . . . . . .
AV
. . . . . . . . . . . . . . . . . . . . . . . . . . . . . . . . . . . .
. . . . . . . . . . . . . . . . . .
. . . . . . . . . . . . . . . . . . . . .
to
. . . . . . . . . . . . . . . . . .
Auto Program
. . . . . . . . . . . . . . . . . . . . . . . . . . . . . . . . . . . . .
. . . . . . . . . . . . . . . . . . . . . . . . . . . . . . . . . . . . . . .
. . . . . . . . . . . . . . . . . . . . . . . . . . . . . .
. . . . . . . . . . . . . . . . . . . . . . . . . . . . . . .
. . . . . . . . . . . . . . . . . . . . . . .
MENU
. . . . . . . . . . . . . . . . . . . . . .
Access Code
. . . . . . . . . . . . . . . . . . . . . . . . . .
. . . . . . . . . . . . . . . . . . . . . . . . . . . . . . . . . . . .
t The Same Time
. . . . . . . . . . . .
. . . . . . . . . . . . . . . . . . . . . . . . . . . . . . . . . . . . . .
. . . . . . . . . . . . . . . . . . . . . . . . . . . . . . . . . . . . . . . . .
. . . . . . . . . . . . . . . . . . . . . . . . . . . . . . . . . . . . .
. . . . . . . . . . . . . . . . . . . . . . . . . . . . . . . . . . .
. . . . . . . . . . . . . . . . . . . . . . . . . . . . . . . . . . . . . . . . .
. . . . . . . . . . . . . . . . . . . . . . . . . . . . . . . . . . . .
Alternating Channels with A/CH button
. . . . . . . . . . . . . . .
Auto
Picture
. . . . . . . . . . . . . . . . . . . . . . . . . . . . . . . . . . . . . .
Auto
Sound
. . . . . . . . . . . . . . . . . . . . . . . . . . . . . . . . . . . . . . . .
. . . . . . . . . . . . . . . . . . . . . . . . . . . . . . . . . . . . . . . . . .
. . . . . . . . . . . . . . . . . . . . . . . . . . . . . . . . . .
. . . . . . . . . . . . . . . . . . . . . . . . . . . . . . . .
. . . . . . . . . . . . . . . . . . . . . . . . . . . . . . . . . . . . . .
. . . . . . . . . . . . . . . . . . . . . . . . . . . . . . . . . . .
. . . . . . . . . . . . . . . . . . . . . . . . . . . . . . . . . . . . . . . . . . .
AutoLock
Auto
to your preference. The five pre-set controls (Personal, Movie,
Auto
to your preference. The four pre-set controls (Personal, Voice,
the sound of the program you are watching (Pg. 19).
the TV memory. Channel Edit makes it easy to limit or expand the
ws you to store and
you choose
the viewer to set a timer to automatically turn
the TV off
As an Energy Star® Partner, Philips Consumer
Electronics has determined this product meets
the Energy Star® guidelines for energy efficiency
AutoPicture, AutoSound, and Incredible Surround are
trademarks of Philips Consumer Electronics Company.
Page 3
to features for which you should
WARNING:
with liquids, such as vases, should not be
Pour éviter les choc
that your date of purchase will be on
turer - in the rare case of a product recall
Return your Product Registration Card today
to get the very most from your purchase
Visit our World Wide Web Site at http://www.usasupport.philips.com
Page 4
Keep these instructions.
Follow all instructions.
Do not use this TV near water.
Clean only with a dry cloth.
with the manufacturers instructions.
Do not install near any heat sources such as radiators, heat
Do not defeat the safety purpose of the polarized or grounding-
type plug. A polarized plug has two blades with one wider than the
When the provided plug does not fit into your outlet, consult an
they exit from the apparatus.
specified by the manufacturer, or sold with the TV
When a cart is used, use caution when moving
the cart/TV combination to avoid injury from tip-over.
Refer all servicing to qualified service personnel. Servicing is
Damage Requiring Service - The TV should be serviced by qualified
Objects have fallen, or liquid has been spilled into the TV; or
The TV has been exposed to rain; or
The TV does not appear to operate normally or exhibits a
The TV has been dropped, or the enclosure damaged.
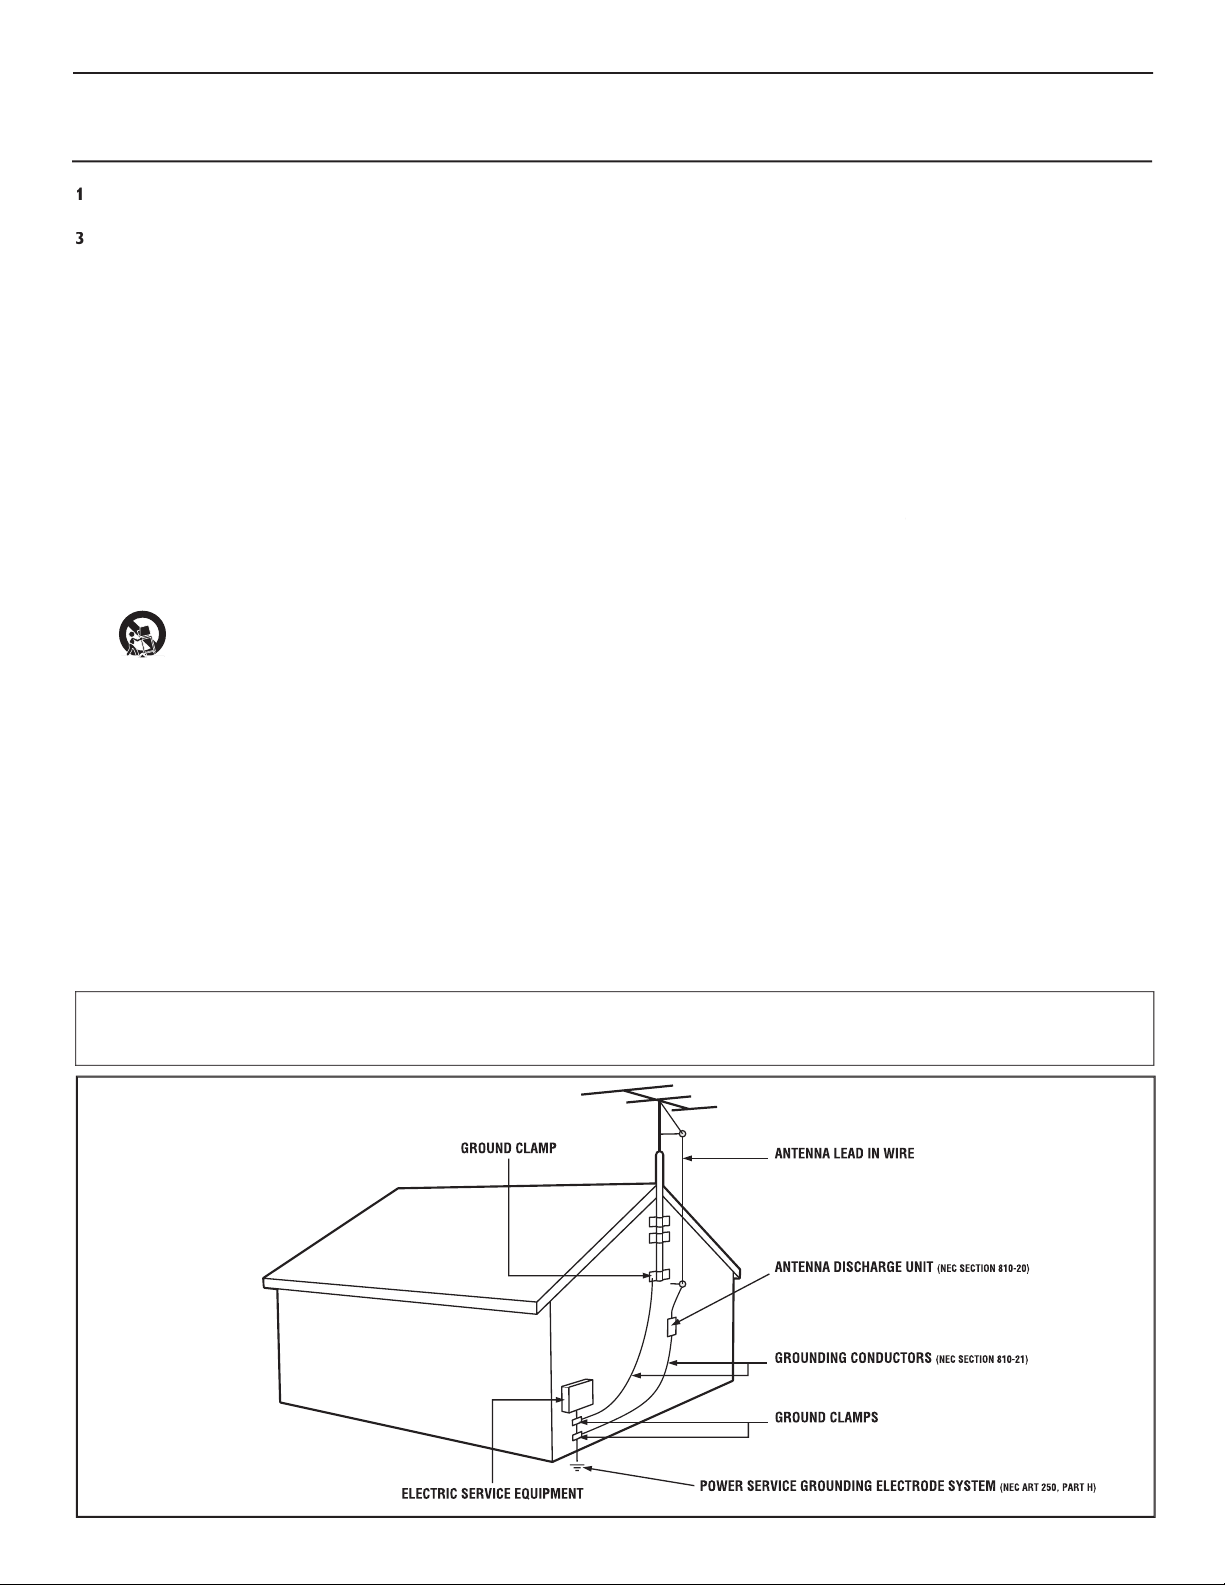
- All televisions must comply with recommended
• Do not compromise these design standards by applying excessive
• Also, do not endanger yourself, or children, by placing electronic
wall or ceiling only as recommended by the manufacturer.
- If an outside antenna is
Section 810 of the National Electric Code, ANSI/NFPA No. 70-
the mast and supporting structure, grounding of the lead-in wire to
Object and Liquid Entry
- Care should be taken so that
through openings.
a)
Warning: To reduce the risk of fire or electric shock, this
• Install all batteries correctly, with + and - aligned as marked on
the unit.
• Do not mix batteries (old and new or carbon and alkaline, etc.).
• Remove batteries when the unit is not used for a long time.
This reminder is provided to call the CATV system installer's attention to Article 820-40 of the NEC
that provides guidelines for proper grounding and, in particular, specifies that the cable ground shall be connected to the grounding system of the
Page 5
75
75‰
L
R
S-VIDE
O
VIDE
O
AUDI
O
CV
IAV out
Y
Pb
Pr
AV in
1
Back of TV
Cable signal
coming from
Cable Company
Jack Panel Back of TV
75
1
2
75‰
L
R
S-VIDE
O
VIDE
O
AUDI
O
CV
IAV out
Y
Pb
Pr
AV in
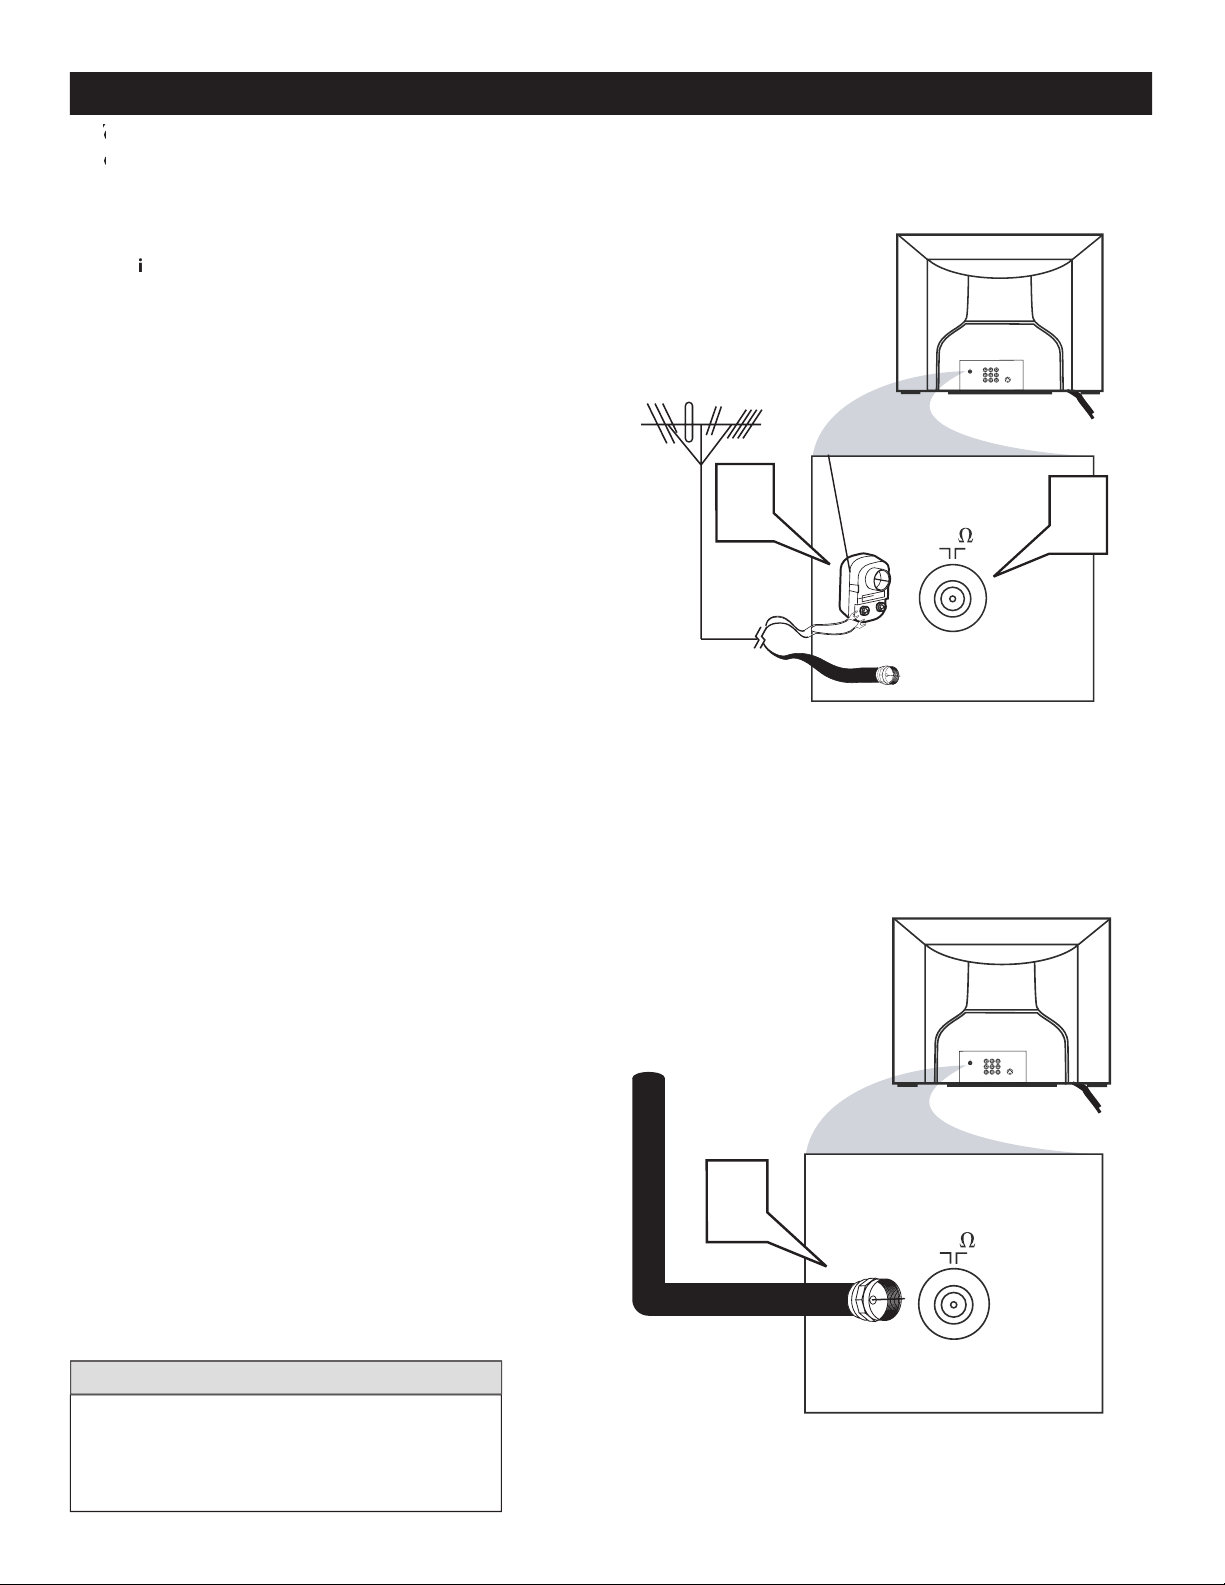
Antenna Connection
300 to 75Ω
Adapte
r
Combination
VHF/UHF Antenna
(Outdoor or Indoor)
Twin Lead
Wire
Round Cable
75Ω
Back of TV
Direct Cable Connection
75Ω Round
Coaxial Cable
BASIC ANTENNA AND CABLE CONNECTIONS
After using the Auto Program Control, press the
(75 ohm) then you are ready
to connect to the TV.
win
wires to the screws of a 75 ohm adapter.
gnal IN(put) plug on the C
on
the TV
If you have a Cable Converter Box : Connect
the OUT (
1
2
Ω
Ω
Page 6
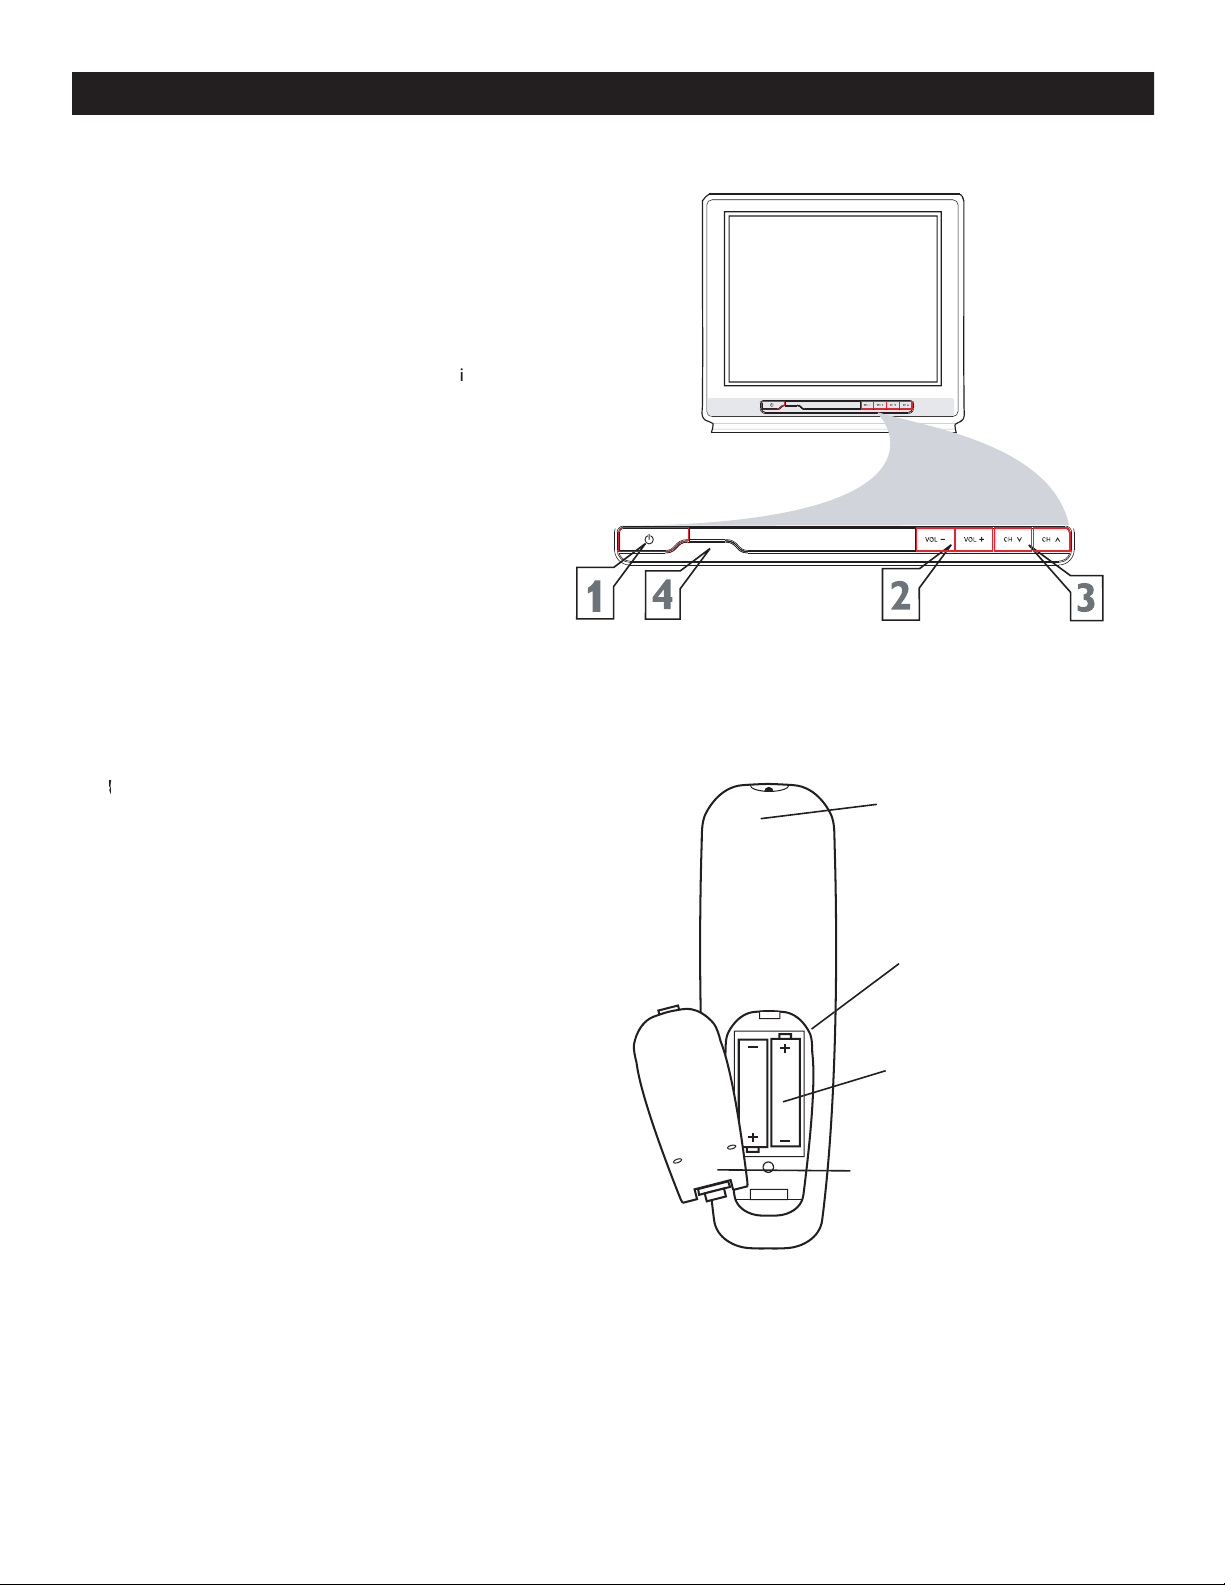
1
WER button
to tu
to increase
the sound level
VOLUME - button
to
will display the on-screen menu
toward the
ve the battery compartment lid
the back of the remote.
2
3
4
BASIC TV AND REMOTE CONTROL OPERATION
1
2
3
Page 7

1
to the signal IN(pu
t) plug at the back of
the Cable Box.
(or ANT,
your cable box may be labeled differently)
jack
AVI Video Input on the TV.
Connect the
Audio L & R Input jacks
button on the TV remote control
to tune to the
channel or the cable box
L/Mono
VIDEO
S-VIDEO
CVI
Y
Pb
Pr
AUDIO
TO
TV/VCR
CABLE
IN
IR
USB
DVD-D OUT
AUDIO IN
SPDIF
VIDE
O
IN OUT
S-VIDEO
R L
AUDIO OUT
TV
PASSCARD
Y Pb Pr
OPTICAL
SPDIF
4
6
24
5
75‰
L
R
S-VIDEO
VIDE
O
AUDI
O
CV
IAV out
Y
Pb
Pr
AV in
AV
In
AV
out
Cable Signal IN
from the Cable
Company
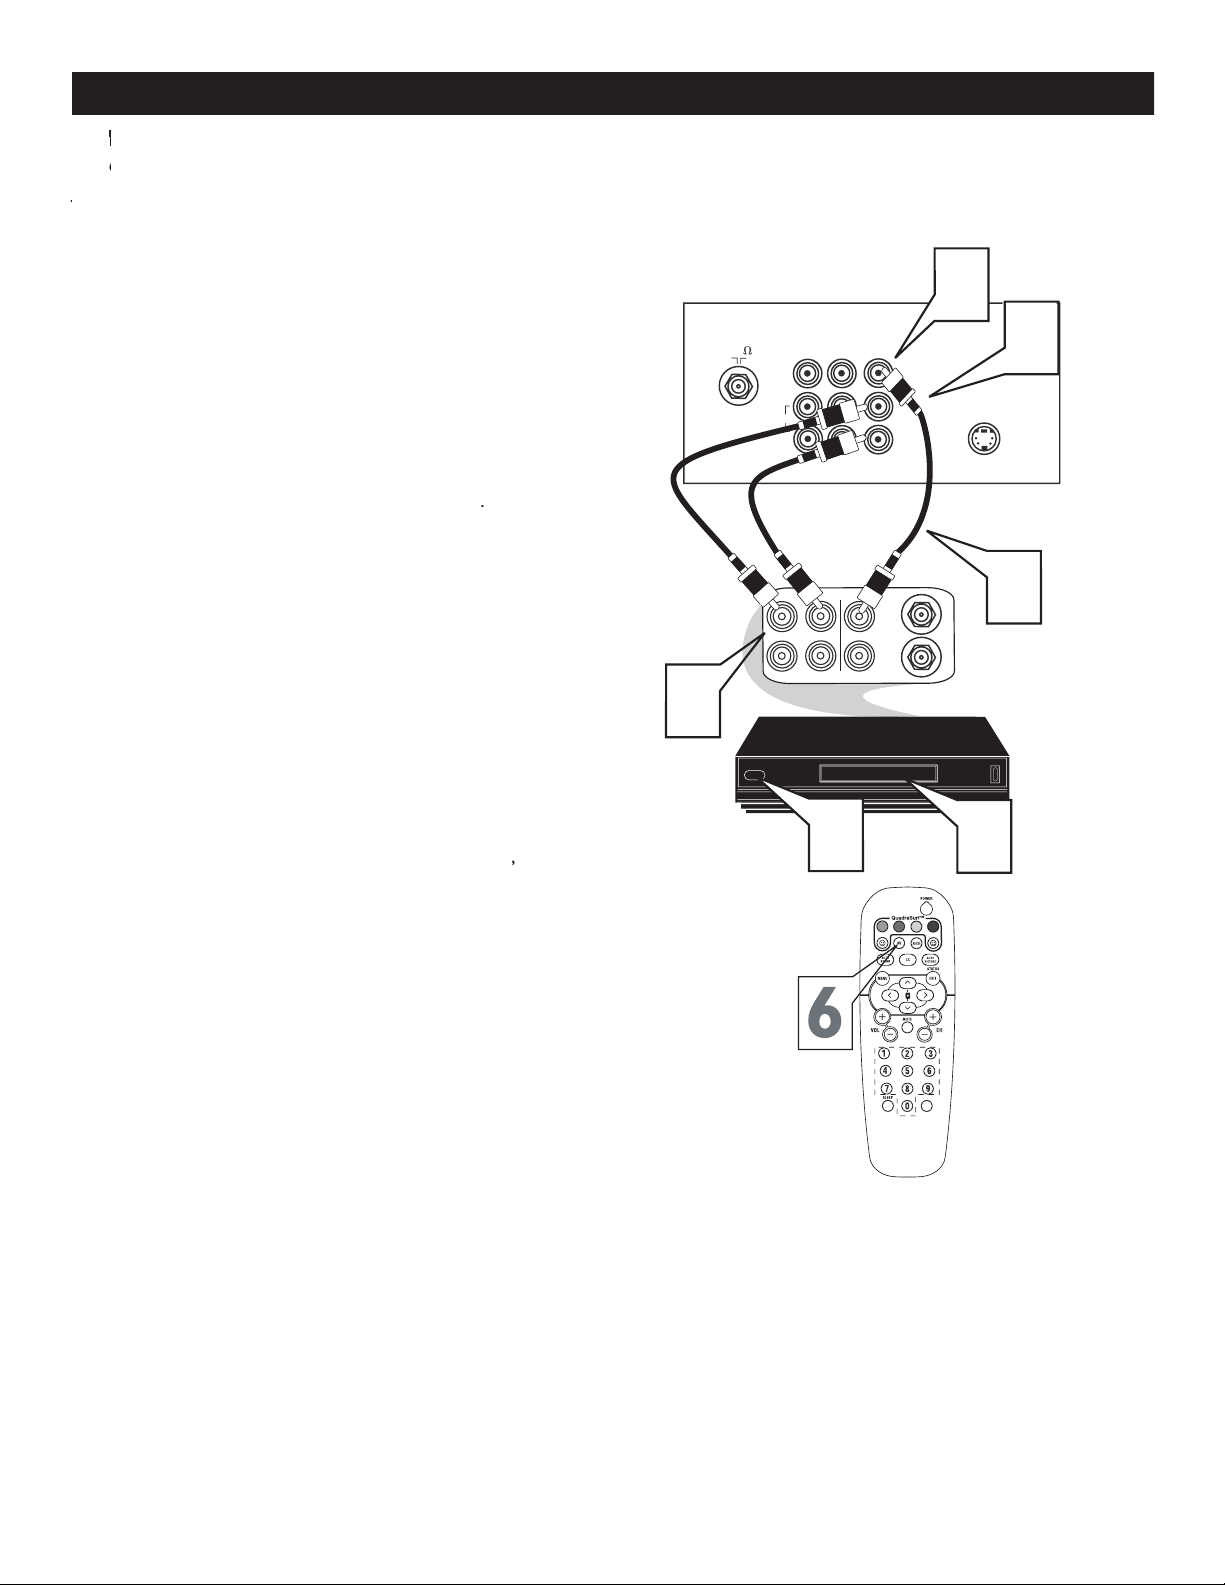
Cable Box with A/V Outputs
Jack Panel Back of TV
Audio Cables
L (White) & R (Red)
Video Cable
(Yellow)
Cable Box (w/Audio/Video Outputs):
R
2
3
CABLE BOX CONNECTIONS
Page 8
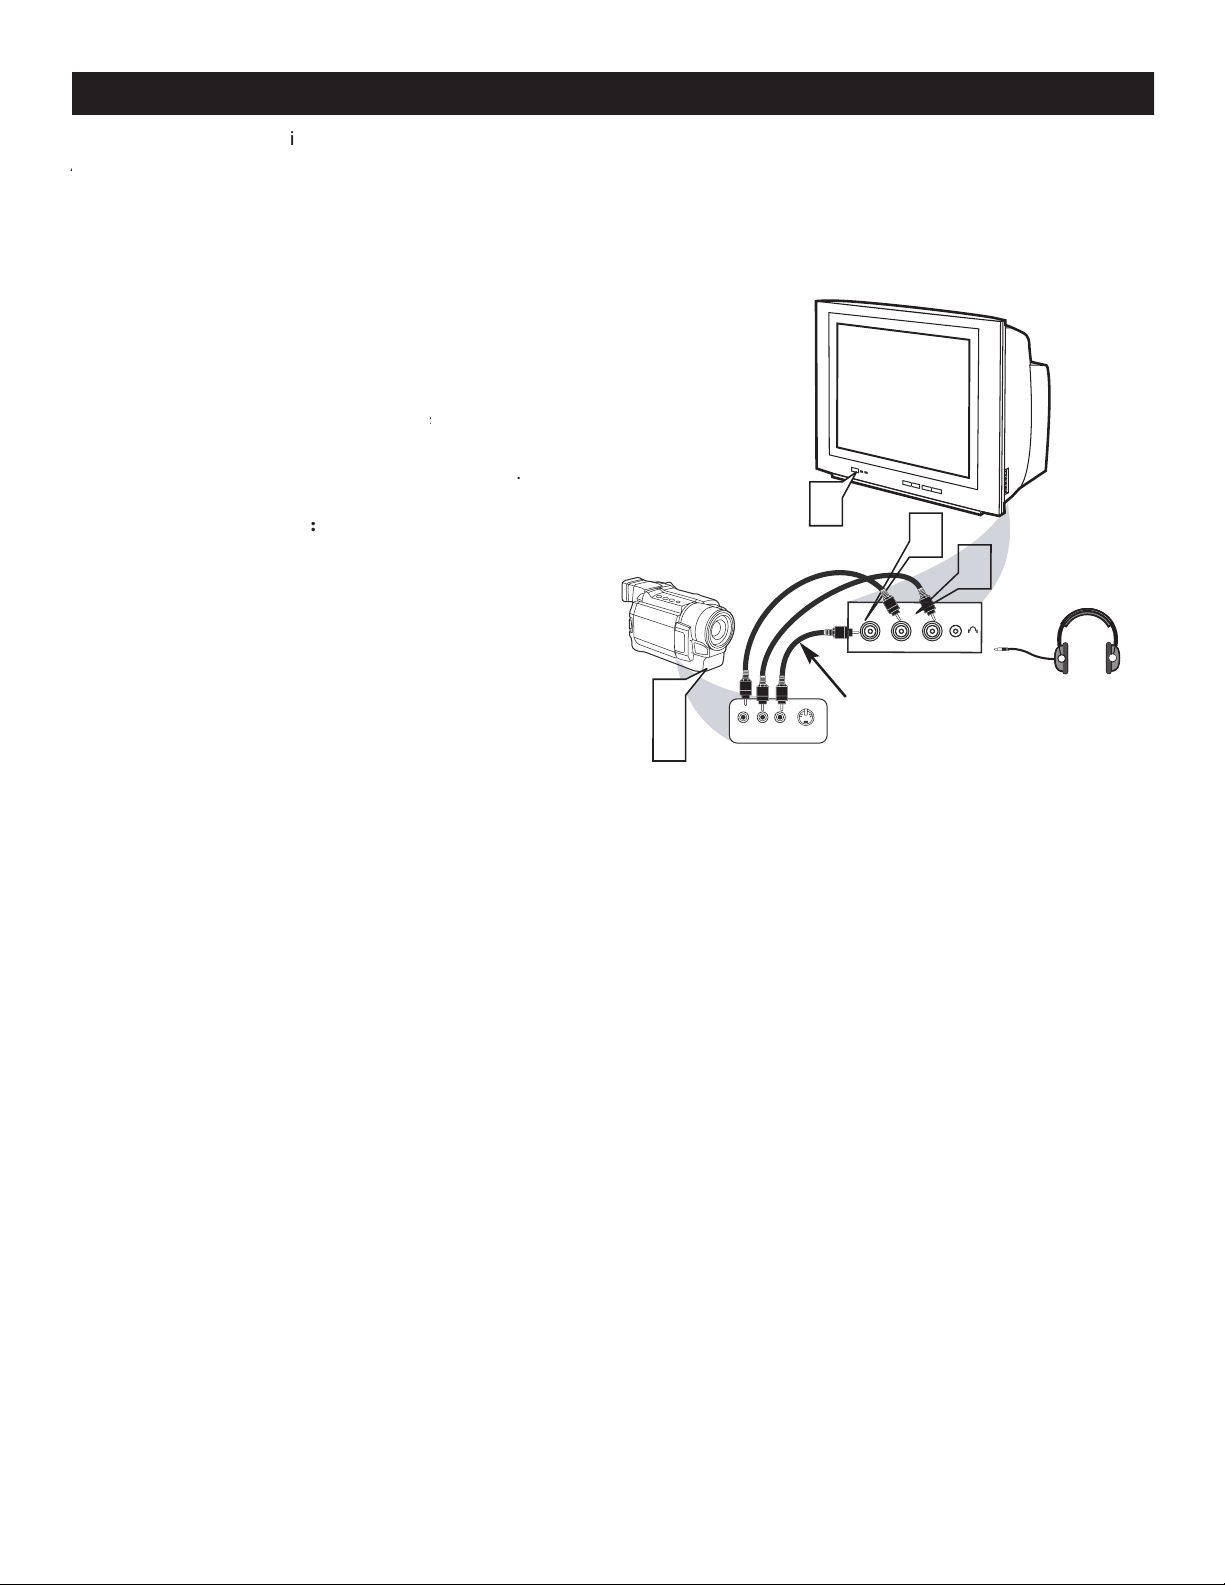
Jacks located at the back of the TV.
Jacks located at the back of the TV.
1
V
to the AUDIO (left and right) AV
jacks on the re
to the
VIDEO OUT jack
to the
j
to select the AV Channel
will appear
the upper left corner of the TV screen.
With the VCR (or accessory de
VD, etc
to view the tape
222
75
S-VIDEO
ANTENNA
OU
T
ANTENNA
IN
VIDE
O
AUDIO
IN
IN
OU
TOUT
LR
5
3
7
Y
Pb
2
1
Video Cable
(Yellow)
Audio Cables
(Red & White)
Back of TV
Back of Typical VCR
VCR
with
Audio/Video Outputs
VOL
VIDEO
CVI
AUDI
O
AV
In
AV ou
t
R
Pr
L/Mono
4
2
3
4
AV (AUDIO/VIDEO) INPUT CONNECTION
5
6
7
Page 9
A
A
gaming device
butt
1
the Vi
the SIDE (or FRONT) of the TV.
t and Right
jack on the SIDE (or FRONT)of the tel
Connect one end of the
television.
the TV and the
.
t
n
o
r
F
S-VIDEO
VIDEOAUDIO
LEFT RIGHT
3
1
2
3
5
Side AV Inputs:
Side Jack
panel of TV
Vide
o
Cable
Audio
Cables
Jack Panel of Accessory Device
Optional
Headphones
VIDE
O
AUD
IO
L
R
2
SIDE AV CONNECTIONS
3
4
5
Page 10
(Digital
B
VHS VCR (video cassette
recorder) tapes than the norma
t have an S-VIDEO
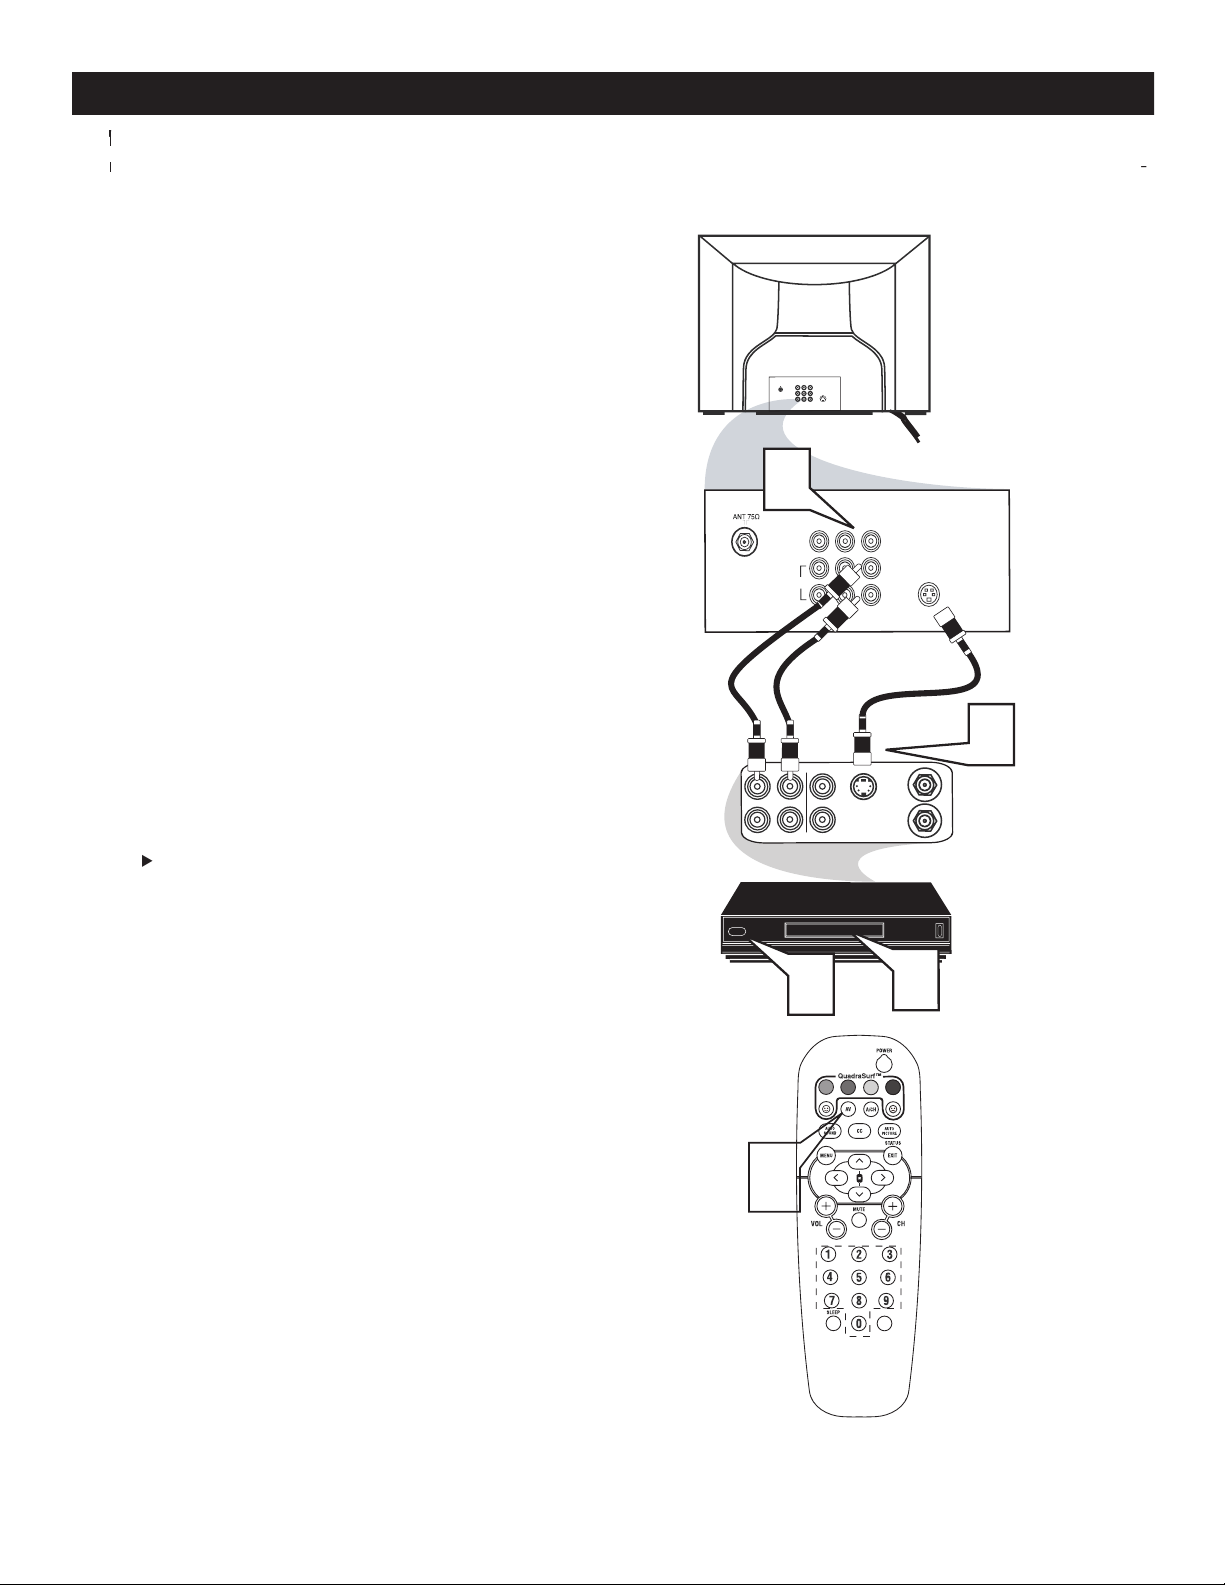
1
one end of the S-VIDEO CABLE
to the S-VIDEO jack to the back of the TV.
to the S-VHS (S-Video
the back of the VCR. Connect
the other end
the
AUDIO (left and right) OUT jacks on the rear
the
VCR and
to scroll the channels until
video tape in
the
VCR and
press the PLAY
button
75‰
L
R
S-VIDE
O
VIDE
O
AUDI
O
CV
IAV out
Y
Pb
Pr
AV in
L/Mono
VIDEO
S-VIDEO
CV
I
Y
Pb
Pr
AUDI
O
AV in
R
ANTENNA
OUT
ANTENNA
IN
VIDEO
AUDIO
IN
IN
OUTOUT
LR
S-VHS OUT
3
2
5
4
1
VOL
AV out
Audio
VCR or External
Accessory Device
S-VIDEO (S-VHS) INPUT CONNECTIONS
2
3
4
5
Page 11
1
Vid
jacks from the DVD player (or
When using the Component Video
AV in Video Ja
to the Audio (
jacks on the rear of the accessory de
vice to the
Audio (L and R) AV
to scroll the channels until
button on the DVD Player
vary, the letters b and r stand for blue and red
L
VIDEO
S-VIDEO
CVI
Y
Pb
Pr
AUDIO
AV
In
R
S-VIDEO
OUT
OUT
OUT
L
R
AUDIO
VIDEO
COMP VIDEO
Y
Pb
Pr
3
5
4
1
2
Component
Video Cables
(Green, Blue,
Red)
Audio
Cables
(Red &
White)
Accessory Device
Equipped with
Component Vide
o
Outputs
Back of TV
VOL
L/Mono
AUDIO
R
2
COMPONENT VIDEO (CVI) INPUT CONNECTIONS
3
4
5
Page 12

AUDIO SYSTEM CONNECTION :
1
AUDIO
jacks on the TV to the R and L audio
ystem
will need to change the volume at the external
CONNECTION :
the AV1 channel to view a pre-rec
you to connect a s
to
Audio cable
tape and its ready to record what’s being
vi
the TV
A
U
X
/
T
V
I
N
P
U
T
P
H
O
N
O
IN
P
U
T
R
L
2
L/Mono
AV Ou
t
VIDE
O
S-VIDE
O
CVI
Y
Pb
Pr
AV
In
AUDIO
1
1
R
Back of TV
Audio Cables
(Red and White)
AUDIO SYSTEM CONNECTION:
AUDIO SYSTEM CONNECTION :
Y
Pb
Pr
ANTENNA
OU
T
ANTENNA
IN
VIDE
O
AUDI
O
IN
IN
OU
TOUT
LR
ANTENNA
OU
T
ANTENNA
IN
VIDE
O
AUDI
O
IN
IN
OUT OUT
RL
1
2
3
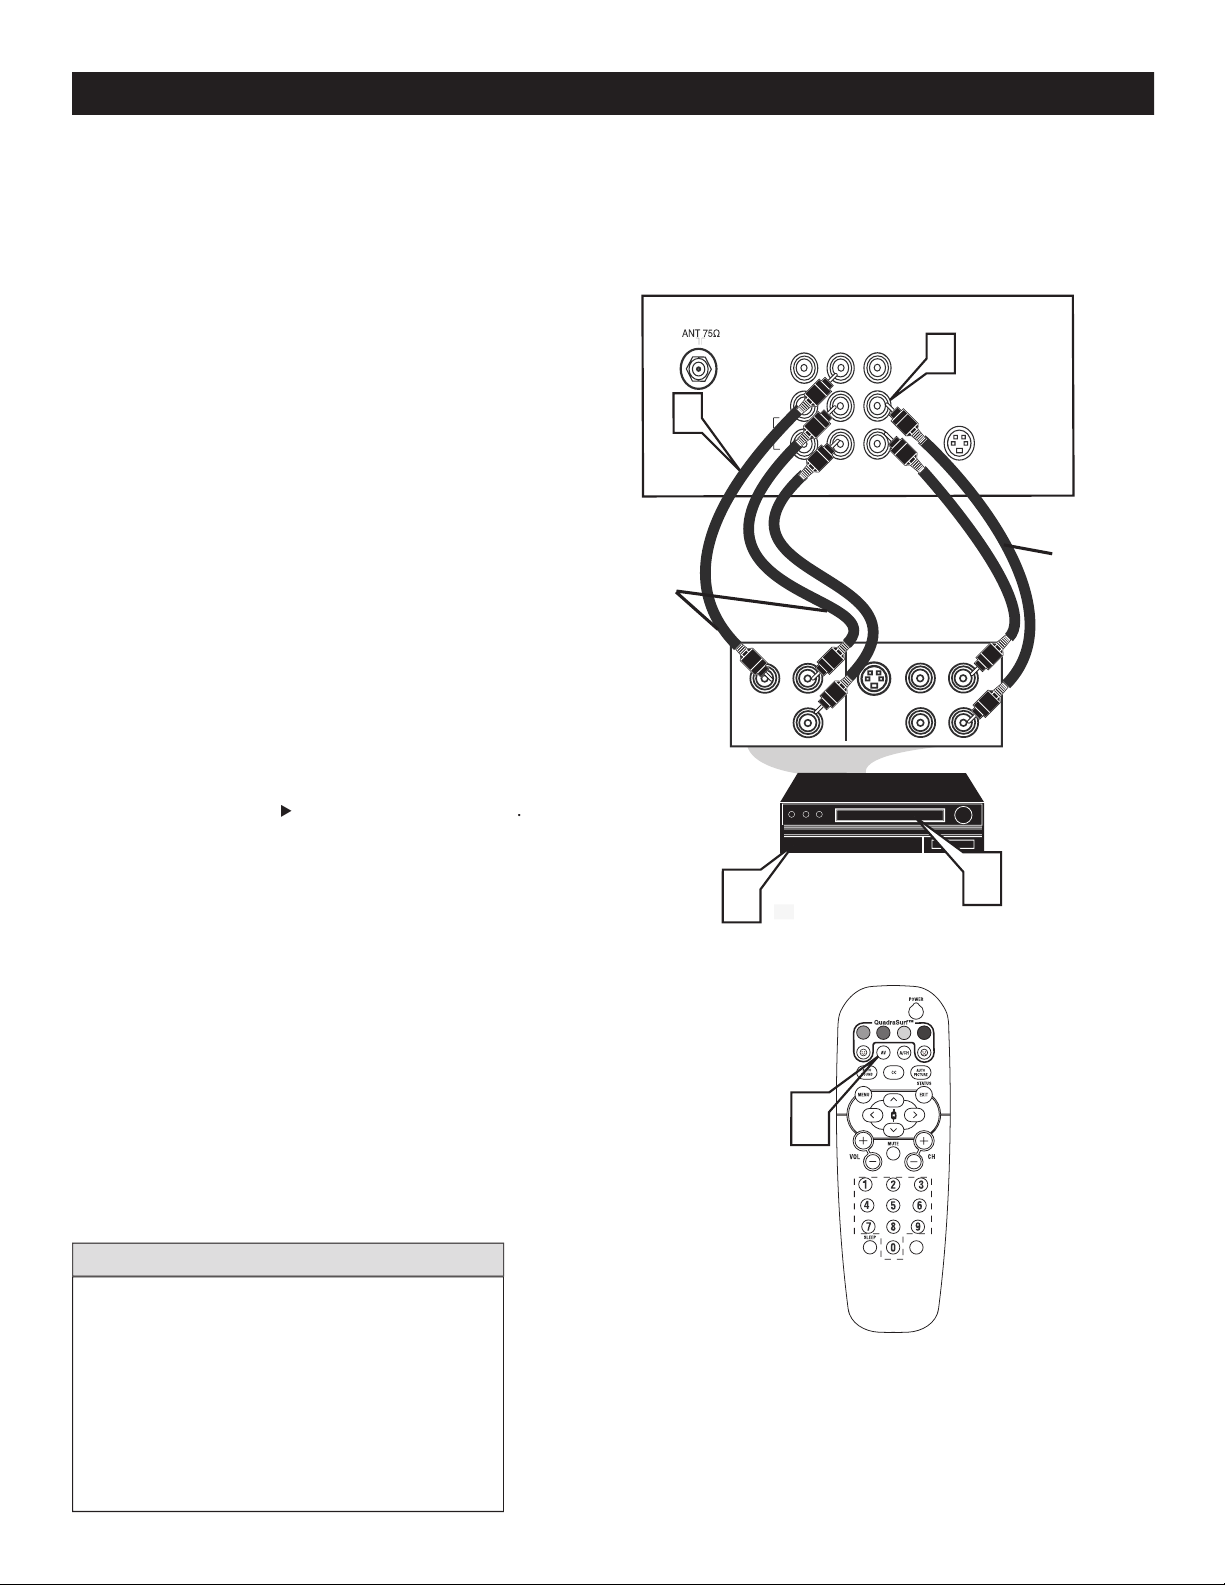
AV Out
S-VIDE
O
CV
I
AV
In
R
Back of TV
Audio Cables
1st VCR
(refer to panel 4 for
proper connection)
Vide
o
Cable
2nd VCR with Audio and
Video Input Jacks
AUDIO SYSTEM CONNECTION:
L/Mono
VIDEO
AUDIO
R
CONNECTION :
2
AV OUTPUT CONNECTIONS
1
2
3
Page 13

VOL
REMOTE CONTROL BUTTON DESCRIPTIONS
Button - To turn off the sound
will appear on
the TV screen. Press again to restore
to its previous level.
Button - Press to turn
the TV
or put on
AUTO
PICTURE
Button - To
Weak Signal, or Multimedia).
Button - To display
Buttons - To select
the chosen channel.
SOUND
Button - To choose
Buttons (
VOL(ume) + / -
Buttons - To
A/CH
(Alternate Channel) Button -
Button - To display the main
Button - Set the TV to
tedly to select 15,
WNIE
Allows you
to
Button -
ws you to
AV
Button -
Wor
Page 14

Language
Tuner Mode
Auto Progra
m
Channel Edit
Language
Tuner Mode
Auto Progra
m
Channel Edit
Instal
l
Main
Idioma
Sintonía
Auto Programa
Editor Canal
Instala
r
Langue
Mode synt.
Progr. auto
Editer Progr.
Installation
VOL
you can set the TV’s on-screen menu to be show in English, French or Spanish.
1
>
to scro
through the on-sc
is highlighted.
to display the
menu features.
to scroll
through the Install features unti
to select
W
/ EXIT
HOW TO USE THE LANGUAGE CONTROL
2
3
4
5
6
Page 15

the AUTO PROGRAM feature is activated, the TV will automatically choose the correct mode.
When CABLE is selected, channels 1 - 125 are available.
When ANTENNA is selected, channels 2 - 69 are
When AUTO is selected, the TV will automatically set
Language
Tuner Mode
Auto Program
Channel Edit
Language
Tuner Mode
Auto Progra
m
Channel Edit
Install
Language
Tuner Mode
Auto Progra
m
Channel Edit
Install
OR
Language
Tuner Mode
Auto Progra
m
Channel Edit
Install
OR
Cable
Auto
VOL
1
>
to scro
through the on-sc
is highlighted.
to display the
menu features.
to scroll
through the Install features unti
to select
ANTENNA, CABLE or
AUTO
W
/ EXIT
2
3
4
5
HOW TO USE THE TUNER MODE CONTROL
6
Page 16

when the CH+ or CH– buttons are pressed.
When CABLE is selected, channels 1 - 125 are available.
When ANTENNA is selected, channels 2 - 69 are available.
When AUTO is selected, the TV will automatically set itself to
the correct mode based on the type of signal it detects when the
AUTO PROGRAM feature is activated.
is activated.
1
control to show the on-screen menu.
>
to scro
through the on-sc
is highlighted.
to display the
menu features.
to scroll
through the Install features unti
CURSOR >
to s
tart the Auto
W
/
58
59
VOL
Channel Edit
Channel Edit
2
3
4
AUTO PROGRAM
5
6
Page 17

1
control to show the on-screen menu.
>
to scro
through the on-sc
is highlighted.
to display the
menu features.
>
to scroll
through the Install features unti
to select
With the CHANNEL EDIT options
you can use the
to scroll
th
that you wish
to
ADD
(skipped OFF
(skipped
to go
directly
to a specific channel that you want to add or
or
to
is selected the channel
is s
when scrolling channels with
or
is selected the channel is not skipped
when scrolling with
or
When finished
or
channels from the list of channels st
An “X” appearing in front
that channel has skipped
Install
Language
Tuner Mode
Auto Program
Channel Edit
Channel No.
Skipped
Channel Edit
Channel No. 3
Skipped
Off
Language
Tuner Mode
Auto Progra
m
Channel Edit
Channel Edit
Channel No.
3
Skipped
On
Channel Edit
Channel No.
3
Skipped
On
VOL
2
3
4
5
6
CHANNEL EDIT
7
8
9
Page 18

button on the remote control
to display the onscreen menu.
feature is highlighted.
to adjust
picture are as bright as you want.
to add or remove color.
adjust until the lightest parts of the
picture show good detail.
to improve sharpness in the
picture.
to select Normal, Cool,
or Warm picture preferences. For Normal, whites
will maintain their whiteness;
Cool will make the whites bluish; and Warm will
make the whites reddish.
w
PICTURE
The current Smart Picture
AUTO
PIC
repeatedly to
Weak Signal
picture
settings.
The way you choose to set the Picture Menu
W
your current program source or content.
VOL
Color Temp
Contrast +
VOL
AUTO
1
2
3
PICTURE MENU CONTROLS
1
2
AUTO PICTURE
Page 19

button on the remote control
to display the onscreen menu.
feature is highlighted.
to adjust
will
high frequency sounds.
The control will enhance the low
frequency sounds.
and righ
t speakers.
AVL
(Auto Volume Leveler)
(Auto Volume Leveler)
When On, AVL
will level out the sound being heard when sudden
changes in volume occur
during commercial breaks
during commercial breaks changes in volume occur
or channel
changes.
or
settings if you're in
or
if you're in Mono mode.
-
Toggles Ultra Bass
When
On,
y sound will be enhanced.
or
settings.
AUTO
SOUND
Sound
SOUND
toggle between the four settings. (
Voice, Music, or
The way you choose to set the Sound Menu
VOL
AUTO
Spatial
or Mono
Incr. Surround
or Stereo
or
Ultra Bass
VOL
1
2
3
SOUND MENU CONTROLS
1
2
AUTO SOUND
Page 20

button on the remote control to
display the onscreen menu.
is highlighted.
to display the
opt
to highlight
to select one of the t
options
4:3 or Expand 4:3.
4:3 -
Expand 4:3 -
entire screen area, eliminating the “letterbox” effect.
When finished
button on
the remote control to remove the menu from the
V’s
the
or
when the onscreen menu is not
and
M
M
4:3
Expand 4:
3
Format
4:3 Expand
Features
AutoLoc
k
Format
VOL
4:3
1
2
3
4
THE 4:3 EXPAND FORMAT CONTROL
5
6
Page 21

UNDERSTANDING AUTOLOCK CONTROLS
MOVIE RATINGS
- All ages admitted. Suitable for all ages.
- Contains material
- Contains material
No one under the age of 17 will be admitted.
- Contains one or more of the following: very
graphic violence, very graphic and explicit or indecent sexual acts,
very coarse and intensely suggestive language.
that may be found objectionable (such as offensive language, violence, sexual situations, etc.). This feature is useful for adults to prevent
AutoLock
offers various BLOCKING controls to choose from:
Access Code
- An Access Code must be set to prevent children from unblocking questionable or censored programming set by their
- After an access code has been programmed, you can block individual channels including the A/V inputs.
- Lets you block ALL channels including A/V inputs.
- Certain blocking options exist which will block programming based on ratings patterned by the Motion Pictures
Association of America (MPAA).
- Like the Movie Ratings, programs can be blocked from viewing using standard TV ratings set by TV broadcasters.
Designed for a very young audience, including children
Appropriate for children age 7 and above who have
Suitable for most audiences. Contains little or no violence,
Contains material unsuitable for younger children.
Viewed by adults and therefore may be unsuitable for
Page 22

button on the remote control to
display the onscreen menu.
is
highlighted.
to display the
opt
til the word
and the screen will read
ACCESS CODE - - - - .“
enter
“
you press the
“
will appear
and you
will need to enter 0
scree
You will be as
the code
the new code again
“XXXX” will appear when you
enter your new code and then display the AutoLock
menu options.
Main
Pictur
e
Sound
Features
Instal
l
AutoLock
Format
Features
AutoLock
Format
Timer
Start
Time
Stop Time
Channe
l
Activate
Displa
y
Features
AutoLoc
k
Format
Access Code
- - -
-
AutoLock
Block Channe
l
Setup Code
Clear Al
l
Block Al
l
Movie Rating
TV Rating
OffStop Time
Channe
l
Activate
Displa
y
Features
AutoLock
Format
Access Code
XXXX
Features
AutoLock
Format
Access Code
XXXX
Incorrect
Features
AutoLock
Format
New Code
- - -
-
Features
AutoLock
Format
Confirm Code
XXXX
VOL
1
2
3
SETTING UP AN ACCESS CODE
4
5
6
7
Page 23

B
are highlighted
to turn blocking
or
for
that channel. When
is selected the channel
will be blocked.
to select other channels
you wish to bl
Repeat step 2 to b
new channel.
CH+ or CH-
to scroll
to the chann
will show a message
telling you
that
the channel has
been blocked by AutoLock a
your Access Code to
your Access Code.
The Blocked channel will be UnBlocked.
When finished
button
on the remote c
the screen.
A
A
t to block out or censor
AutoLock
Block Channe
l
Setup Code
Clear Al
l
Block Al
l
Movie Rating
TV Ratin
g
OffStop Time
Channe
l
Activate
Displa
y
Channel 12
Blocked By AutoLock
Channel Blocking
Access Code
- - - -
Block Channel
On
Enter your
Access Code to
view a
tuned
channel that is
blocked wit
h
Block C
hannel.
VOL
1
2
3
4
BLOCK CHANNELS
5
6
Page 24

to select eit
or
is selected, press
to
clear all blocked channels. All channels will be
viewable. Now all blocked channels can be viewed.
If
is selected, press
to
turn the control
or
is
selected, ALL available channels will be blocked
from viewing.
When finished
/EXIT
button
on the remote control to remove the menu from
the screen.
AutoLock
Block Channe
l
Setup Code
Clear Al
l
Block Al
l
Movie Rating
TV Ratin
g
Clear ?Stop Time
Channe
l
Activat
e
Displa
y
Clear All
Cleare
d
AutoLock
Block Channe
l
Setup Code
Clear Al
l
Block Al
l
Movie Rating
TV Ratin
g
Off
Block All
On
VOL
1
2
3
BLOCK/CLEAR ALL CHANNELS AT THE SAME TIME
Page 25

to
words
> button to display the
VIE
opt
17, or X)
to high
M
these options can be turned
(
blocking
(
or
the Move
AutoLock
Block Channe
l
Setup Code
Clear Al
l
Block Al
l
Movie Ratin
g
TV Ratin
g
G
PG
PG-1
3
R
NC-17
X
Movie Rating
G
PG
PG-1
3
R
NC-17
X
Off
G
On
VOL
1
2
3
4
MOVIE RATINGS
Page 26

to
words
RATING
> button to display the
opt
Y7
PG, TV-14 or TV
to high
Rating options. When highlighted
these options can be turned
(
blocking
(
to block V (violence), FV (fantasy violence), S (sex scenes), L
the TV-
Y or TV-G rating
or
to enter the
sub
ratings.
A sub-
is accessed, press
to select one
o
t
the option
or
the TV
TV Rating
TV-Y
TV-Y
7
TV-G
TV-P
G
TV-14
TV-M
A
Off
TV-Y
On
TV-Y7
Block
All, FV
TV-G
Of
f
TV-14
Block All, V, S, L, D
TV-MA
Block
All, V, S, L
TV-PG
Block
All, V, S, L, D
CC
VOL
1
2
3
TV RATINGS
4
5
6
Page 27

BLOCKING O
> button to display the
or NO RATING) menu.
:
AutoLock
:
All unrated programs based on the Movie
:
All programs with NO content advisory
or
to
feature.
When highlighted
or
> or <
A
A
tions as
well. With these
AutoLock
Setup Code
Clear Al
l
Block All
Movie Rating
TV Ratin
g
Block Option
s
Blocking
On
Unrated
On
No Rating
On
VOL
1
2
BLOCKING OPTIONS
3
4
Page 28

to display the
Closed Caption settings.
button repeatedly
to choose
from the four Closed Caption options (CC
Off, CC1, CC Mute).
When finished
the remote control to remove the menu from the
TV screen.
on the remote control to
display the sleeptimer menu.
on the remote control
to select the amount of time (15, 30, 45, 60,
An onscreen countdown will appear during
the last minute before the TV switches
turn the TV off after a period of ti
CC Off
CC1
CC2
CC Off
VOL
Sleep 15
Sleep 30
Sleep 45
Sleep 60
Sleep 90
Sleep 120
Sleep 180
Sleep 240
Sleep 15
Sleep off
VOL
You will not be able to
1
2
3
CLOSE CAPTIONING
1
2
SLEEPTIMER
Page 29

1
to select a ch
button
to ADD the
channel to one of the
Yellow or BLUE)
t
that button’s Surf list. You can store up to 10
Repeat steps 1 through 3 to add additional
the remote control). Each colored button can hold
ten channels in its quick viewing list.
12
VOL
Select List!
12
12 Added!
12
Remove item ? - Press
12
button
the
will display the channel number with a colored
to.
While the colored
face
the
Repeat steps 4 through 6 to
2
3
QUADRASURF
4
5
6
Page 30

Yellow
or Blue). The screen will display a
with the first programmed
While the colored
button
while the
appears will tune
the first channel i
After the
disappears from the
button is
buttons (Surf list) if desired.
button on the
appears
with the channel number will allow you to
the remote control allo
w you to st
channels per button (40 in total). You
Assuming channels have been added to the four Quadra Surf lists (the four colored buttons, see previous page).
10
12
18
22
28
35
39
41
56
99
12
Remove Item? - Press
VOL
5
12
VOL
(Alternate Channel) button which allows you toggle between the current channel
you are watching and the previous channel.
toggle
1
2
3
QUADRASURF
4
5
1
(ALTERNATING CHANNELS)
Page 31

GLOSSARY
Aspect Ratio
Audio Video (A/V)
A term often used when discussing a channel on a TV receiver or on video equipment, which has been
within the TV set to prevent picture distortion and skewing. It is also used for audio-video processors, which
A device that allows your television to receive the expanded number of channels provided by broadcasters. Some of these
An analog encoded video signal that includes vertical and horizontal synchronizing information. Since both luminance
video.
An encoded video s
Concerning Stationary Images on the TV Screen:
that contain constantly moving and changing images that fill the
temperatures can become excessively hot; for example, in
the screen surface. Avoid wearing jewelry or using anything
wiped surfaces.
CLEANING AND CARE
Page 32

TROUBLESHOOTING TIPS
and
before requesting Service. You may be able to solve the problem yourself.
button on the remote control repeatedly to select the desired AV channels.
Wrong
in the television menu and select the correct signal source, then perform the
in the television menu and select the correct signal source, then perform the
with several major network stations to be sure that the station you selected is in
the plug into your wall outlet. Power On the TV again.
the fuse on the AC power strip is not blown.
when viewing a
type of disc with extra video information can produce a number of small white lines in the
Page 33

SPECIFICATIONS
Aspect ratio :
Weight (incl. Packaging) :
Weight (excl. Packaging) :
Visible diagonal / screen size :
Auto Program
Auto Volume Leveller (AVL)
AV1:
AV2
S-Video
AV3: Monitor Out
kg / 54.15 lbs
inch / 50.8 cm
Auto Picture (5 modes)
Page 34

PHILIPS LIMITED WARRANTY
warrants this prod-
You must have proof of the date
that you purchased the product as well as the authorized retailer
For a period of ninety (90) days from the date of pur-
For a period of one (1) year from the date of purchase,
will provide removal and installation of the part under the speci-
For a period of two (2) years from the date of pur-
Your warranty does not cover:
1-888-PHILIPS (1-888-744-5477)
1-800-661-6162 (French Speaking)
1-888-PHILIPS (1-888-744-5477) - (English or Spanish
Speaking)
WARRANTY IS THE EXCLUSIVE REMEDY FOR THE
the date of sale, the limitation on how long an implied warranty
Page 35

Alternating Channels
. . . . . . . . . . . . . . . . . . . . . . . . . . . . . . . .
A
. . . . . . . . . . . . . . . . . . . . . . . . . . . . . . . . .
AutoLock Controls
Access Code
. . . . . . . . . . . . . . . . . . . . . . . . . . . . . . . . . . . . .
. . . . . . . . . . . . . . . . . . . . . . . . . . . . . . . . . . .
. . . . . . . . . . . . . . . . . . . . . . . . . . .
Movie Ratings
. . . . . . . . . . . . . . . . . . . . . . . . . . . . . . . . . . . .
TV Ratings
. . . . . . . . . . . . . . . . . . . . . . . . . . . . . . . . . . . . . . .
Blocking Options
. . . . . . . . . . . . . . . . . . . . . . . . . . . . . . . . . .
AV (Audio/Video
. . . . . . . . . . . . . . . . . . . .
AV (Audio/Video
. . . . . . . . . . . . . . . . . .
. . . . . . . . . . . . . . . .
. . . . . . . . . . . . . . . . . . . . . . . . . . . . . .
Channel
. . . . . . . . . . . . . . . . . . .
. . . . . . . . . . . . . . . . . . . . . . . . . . . . . . . . . .
. . . . . . . . . . . . . . . . . . . . . . . . . . . . . . . . . . .
. . . . . . . . . . . . .
. . . . . . . . . . . . . . . . . . . . . . . . . . . . . . . . . . . .
. . . . . . . . . . . . . . . . . . . . . . . . . . . . . . . . . . . .
. . . . . . . . . . . . . . . . . . . . . . . . . . . . . . . . . . . . . . . . . .
. . . . . . . . . . . . . . . . . . . . . . . . . . . . . . . . . . .
. . . . . . . . . . . . . . . . . . . . . . . . . . . . . . .
Brightness
. . . . . . . . . . . . . . . . . . . . . . . . . . . . . . . . . . . . . .
18
. . . . . . . . . . . . . . . . . . . . . . . . . . . . . . . . . . . . . . . .
18
C
. . . . . . . . . . . . . . . . .
18
Contrast
. . . . . . . . . . . . . . . . . . . . . . . . . . . . . . . . . . . . . . . .
Color Temperature (Color Temp) Control
. . . . . . . . . . . .
Picture
. . . . . . . . . . . . . . . . . . . . . . . . . . . . . . . . . . . . . . . . .
Sharpness
. . . . . . . . . . . . . . . . . . . . . . . . . . . . . . . . . . . . . . . .
. . . . . . . . . . . . . . . . . . . . . . . . .
. . . . . . . . . . . . . . . . .
. . . . . . . . . . . . . . . . . . . . . . . . . . . . . . . . . .
. . . . . . . . . . . . . . . . . . . .
. . . . . . . . . . . . . . . . . . . . . . . . . . . . . . . . .
. . . . . . . . . . . . . . . . . . . . . . . . . . . . . . . . . . . . . . . .
. . . . . . . . . . . . . . . . . . . . . . . . . . . . . . . . . . . . . .
. . . . . . . . . . . . . . . . . . . . . . . . . . . . . . . . . . . . . . .
. . . . . . . . . . . . . . . . . . . . . . . . . . . . . . . . . . . . . . .
Menu Control
. . . . . . . . . . . . . . . . . . . . . . . . . . . . . . . .
AVL (Automatic Volume Leveler)
. . . . . . . . . . . . . . . . . . .
19
. . . . . . . . . . . . . . . . . . . . . . . . . . . . . . . . . . . . . . .
19
. . . . . . . . . . . . . . . . . . . . . . . . . . . . . . . . . . . . . . . . . .
19
Incr. Surround
. . . . . . . . . . . . . . . . . . . . . . . . . . . . . . . . . . . .
Sound
. . . . . . . . . . . . . . . . . . . . . . . . . . . . . . . . . . . . . . . . . . .
Ultra Bass
. . . . . . . . . . . . . . . . . . . . . . . . . . . . . . . . . . . . . . .
. . . . . . . . . . . . . . . . . . . . . . . . . . . . . . . . . . . .
. . . . . . . . . . . . . . . . . . . . . . . . . . . . . . . .
. . . . . . . . . . . . . . . . . . . .
Warraty (L
. . . . . . . . . . . . . . . . . . . . . . . . . . . . . . . . . . .
INDEX
Page 36

www.philips.com
 Loading...