

Philips 20PF9925/12S, 20PF9925 - 20PF - 9925 User Manual

English
Contents
Installation
Use of the remote control 8-9
Keys in front of the TV 10
Picture menu 11
Sound menu 11
Special menu 12
Teletext 13-14
Your remote control 2
Preparation 3
To use the menus 4
Store TV channels 4
Select the menu language 4
Automatic installation 5
Manual installation 6
Reshuffle the programme list 7
Displaying the programme list 7
Connect peripheral equipment
Connecting and selecting equipment 15-17
Video recorder keys 18
Tips 19
Index 20
Help?
If this instruction manual does not
give an answer or if ‘Tips’ do not
solve your TV problem, you can call
your Local Philips Customer or
Service Centre. See the supplied
World-wide guarantee booklet.
Please, have the Model and
Product number which you can
find at the back of your television
set or on the packaging, ready,
before calling the Philips helpline.
Model:
Product No:
Operation
1
B
AUTO
AUTO
PV
w
C
B
2
1
3
54 6
87 9
0
OK
MENU
¬
Ò
‡
π
†
®
M
a
Y-Z
D
0
LIST
h
U
fg
c
e
k
b
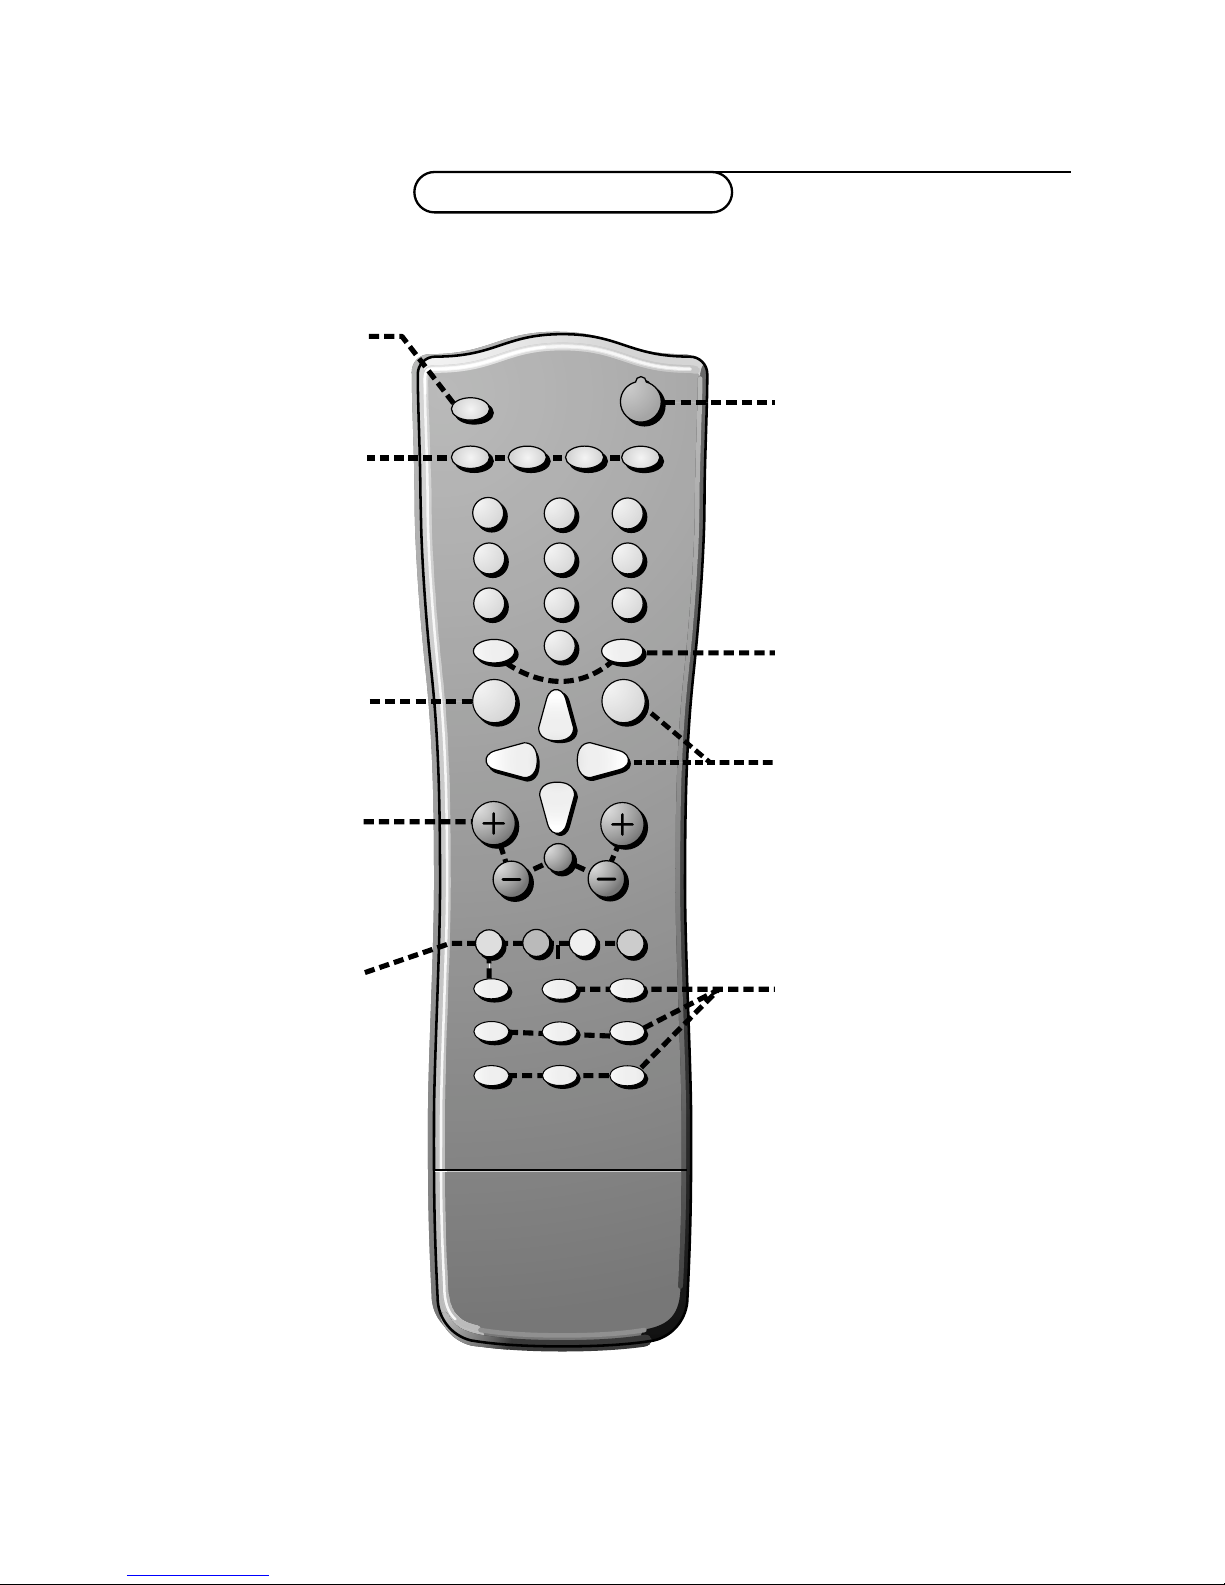
MENU main menu on/off
p. 9
w Peripherals p. 8
selection of TV or
AV mode
X bilingual choice/sound
info p. 8
M auto sound p. 8
a auto picture p. 8
D set the sleeptimer p. 9
V volume up/down p. 9
¬ sound mute p. 9
P programme selection
p. 9
B switch to standby p. 8
Colour keys
- direct teletext page or
subject selection, p. 9
- video recorder functions
p. 18
® record
Ò rewind
‡ stop
π play
† wind
C VCR timer
0
previous programme p. 9
LIST programme list p. 9
Cursor to select
your choice
OK activate your choice
Your remote control
2 Your remote control
Installation
Teletext p. 14
h enlarge
b teletext on/off
U time display
subpage selection
f solution to puzzles
g hold
c mix tv/txt picture
e interrupt
k main index

Preparation
&
Place the TV on a solid surface.
Ensure that the TV is placed in a position
to allow free flow of air. Do not cover the
ventilation openings on the back cover.
To prevent any unsafe situations, no naked
flame sources, such as lighted candles,
should be placed on or in the vicinity.
Avoid heat, direct sunlight and exposure to
rain or water. The equipment shall not be
exposed to dripping or splashing.
é
Insert the aerial plug firmly into the
aerial socket
ANT IN x 75 Ω at the back
of the TV.
“ Remote control: Remove the cover of the
battery compartment. Insert the 2
batteries supplied (Type R6-1.5V).
1m
min.
ANT IN
x
75
Ω
CABLE
.
‘
Power:This TV operates on a DC supply
provided by the AC-DC adaptor.The
voltage is as indicated on the label on the
back cover.
Only use the AC-DC adaptor supplied
with the TV and never apply an AC mains
to the TV directly.The AC-DC adaptor
operates on an AC mains supply, the
voltage is as indicated on the label of the
AC-DC adaptor.
Connect the DC plug of the AC-DC
adaptor to the DC 15V socket at the back
of the TV.
Connect the AC-DC adaptor and its mains
cord.
Insert the mains plug in the wall socket
having a mains voltage of 110V-240V.
( Switch the TV on: Press the power key
at the front side of the TV to switch it on
or off.
If the TV is in standby mode, the standby
indicator in front of the TV illuminates brightly.
Press the standby key B again or the – P +
key or one of the digit keys on the remote
control to switch the TV on.
R6 / 1,5 V
3Preparation
DC 15V
_
+
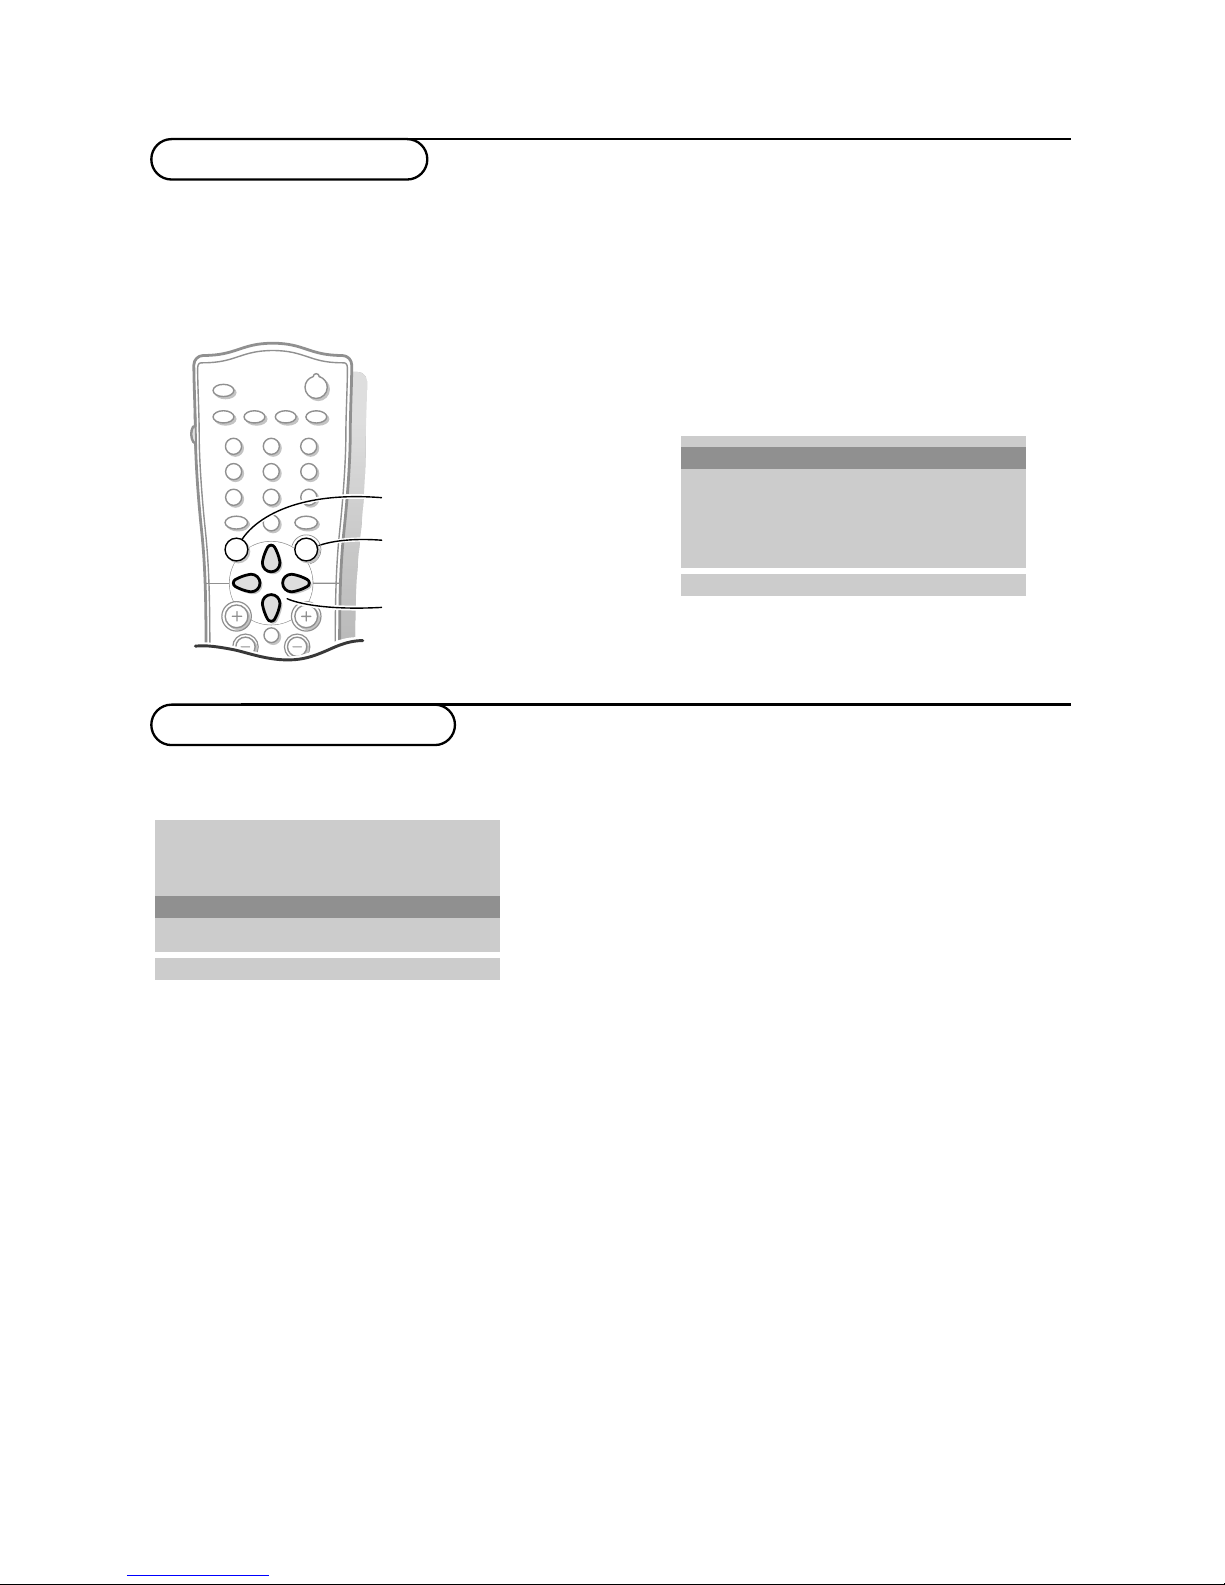
& Press the MENU key repeatedly to display each menu.
é Use the cursor up/down to select a menu item.
“ Use the cursor left/right to adjust the setting of a menu item or press the OK key to enter a
submenu.
B
M
a
AUTO
AUTO
w
Y-Z
Ò
‡
π
®
D
1
2
9
3
6
5
7
4
8
0
0
LIST
P
¬
V
MENU
OK
& Press the MENU key on the remote control
once to select the installation menu.
é Use the cursor down to select Language.
“ Press the OK key.
‘ Press the cursor up/down to select your
language.
( Press the OK key.
You can search for and store the TV channels in
two different ways: using Automatic installation,
see p. 5 or Manual installation (tuning-in channel
by channel), see p. 6.
Select your choice and press the OK key.
4
Installation
To use the menus
Store TV channels
Select the menu language
Automatic installation
Manual installation
Reshuffle
Language
oœ
OK MENU
Language
Auto programme
Manual installation
Reshuffle
Language
oœ
OK MENU
Automatic installation
switch menu on/off
select menu item
activate

Automatic installation
& Select the TV system.
é Press the cursor left/right to select the TV
system of the country or part of the
world from where you want to receive the
TV channels.
If you are connected to a cable system,
select the TV system of your country or
part of the world you are now located.
DK: PAL D/K, SECAM D/K (East Europe)
BG: PAL B/G, SECAM B/G
(Europe/East Europe/France)
I: PAL I/II ( U.K./Ireland)
L (if provided) (France)
“ Press the cursor up/down to select
Storage from.
‘ Press the cursor left/right to select a
channel number or enter the channel
number with the digit keys from where
you want to start searching for new
channels. If e.g. you want to keep the
channels 1 to 11 stored earlier, enter
channel number 12.
Your TV will search for new channels from
number 12 onwards.
( Press the cursor up/down to select
Search.
§ Press the OK key to start Automatic
programming.
All available TV channels are searched for
and stored automatically.
The names of the TV channels are stored
as well if the TV channels broadcast VPS
(Video Programme Service), PDC
(Programme Delivery Control) or
Teletext.
If no name can be assigned to the TV
channel, the channel number only is
assigned and stored as C-channel (V/UHF
01-69) or S-channel (Cable 01-47),
followed by a number.
To stop auto programming, press the
MENU key.
When auto programming is completed, the
Programme reshuffle menu appears. See
further on.
è Press the MENU key repeatedly if you
want to exit the menu.
Auto programme
Manual installation
Reshuffle
Language
oœ
OK MENU
Automatic installation
System BG
Storage from 1
Search C 1 5
1
‡ 2%
MENU
System BG
5Installation

Manual installation
Searching for and storing TV channels is
done channel by channel.Also you can
assign a name to a TV channel with up to
5 letters or numbers.
You must go through every step of
the manual programme menu.
& Select Manual installation in the
installation menu.
é Press the OK key to enter the Manual
installation menu.
“ Press the cursor left/right to select the TV
system of the country or part of the
world from where you want to receive the
TV channel.
If you are connected to a cable system,
select the TV system of your country or
part of the world you are now located.
DK: PAL D/K, SECAM D/K (East Europe)
BG: PAL B/G, SECAM B/G
(Europe/East Europe/France)
I: PAL I/II ( U.K./Ireland)
L (if provided) (France)
‘ Press the cursor up/down to select
Channel.
( Press the cursor left/right to select C-ch
for aerial channels or S-ch for cable
channels.
If you know the C- (01-69) or S-channel
number (01-47), enter it directly with the
digit keys 0 to 9.
Ask for a list from your cable company or
dealer.
§ Press the cursor up/down to select
Search.
è Press the cursor left/right to start
searching. If a channel is found the search
will stop.
Fine tune
In case of poor reception, you can
improve the reception by fine tuning.
Press the cursor up/down to select
Fine
tune
.
Press the cursor left/right to fine tune for
the best picture and sound.
Assigning a channel name
It is possible to change the name stored in
the memory or to assign a name to a TV
channel which has not yet been entered.A
name with up to five letters or numbers
can be given to the programme numbers 0
to 99.
Press the cursor up/down to select
Name.
Select the character with the cursor
left/right.
Space, numbers and other special
characters are located between Z and A.
Press the OK key.
Select a following character.
Proceed with the following steps.
! If the channel is the one required, press
the cursor up/down to select
Store.
ç Press the cursor left/right to select a
channel number or enter the channel
number with the digit keys.
0 Press the OK key to store the TV channel.
Repeat steps 4 to 10 to store another TV
channel.
Press the
MENU key repeatedly if you
want to exit the menu.
Automatic installation
Manual installation
Reshuffle
Language
oœ
OK MENU
Manual installation
System BG
Channel S-ch/C-ch
Fine tune πππ
Search
Name C 0 1
Store 1
oœ p π
OK MENU
6
Installation
 Loading...