

Page 1
LCD TV
Kullanma K›lavuzu
User’s Manual
Model No.:
Seri No.:
20PF1000/62
065 001 056 911
Türkçe English
065001056911 20"LOC-1 CFULL LCD 17/7/06 9:46 Page 1
Page 2
SSaatt››nn aalldd››¤¤››nn››zz iiççiinn tteebbrriikklleerr,, ""aaiilleemmiizzee""
hhooflflggeellddiinniizz.. SSeevvggiillii PPHHIILLIIPPSS üürrüünn ssaahhiibbii
PHILIPS'e güvendi¤iniz için teflekkür ederiz.
Günümüzde mevcut olan en iyi üretim ve sat›fl
sonras› destek hizmetlerine sahip ürünü ald›¤›n›z
için kutlar›z. Ald›¤›n›z ürünü y›llar boyu en mutlu
flekilde kullanabilmeniz için elimizden gelenin en
iyisini yapaca¤›z.
PHILIPS "ailesinin" bir üyesi olarak en kapsaml›
garantilerden ve sektördeki en iyi hizmet
a¤lar›ndan birisini kullanabiliyorsunuz.
En önemlisi, toplam müflteri memnuniyeti için
eflsiz taahhütlerimiz var. Bizim düflüncemiz
tamam›yla, PHILIPS ürünü ald›¤›n›z için size
teflekkür etmek ve hoflgeldiniz demek.
Not: PHILIPS ürününden en yüksek verimi almak için Garanti Kayd›n›z› doldurunuz ve gönderiniz.
C‹HAZINIZDAN EN YÜKSEK VER‹M‹ ALMAK ‹Ç‹N
GARANT‹ KARTINIZI BUGÜN ‹ADE ED‹N‹Z
2
Modelinizi PHILIPS’e kay›t ettirmeniz afla¤›dakilerden yararlanman›z› sa¤lar. Kaç›rmay›n. Garanti
kart›n›z› hemen göndererek afla¤›dakileri garanti ediniz.
** SSaatt››nn aallmmaa bbeellggeessii::
Ekteki kart› bize vermeniz,
ürünü sat›n ald›¤›n›z tarihin
kaydedilmesini sa¤lar, böylece,
garanti için ek yaz›flmalar yapman›za gerek kalmaz
** ÜÜrrüünn GGüüvveennllii¤¤ii BBiillddiirriimmii::
Ürününüzü kay›t ettirirseniz,
nadirde olsa ürünlerin toplanmas› veya güvenlik ar›zas› durumunda, do¤rudan üretici
taraf›ndan size bir bildirim gönderilir
** ÜÜrrüünn ssaahhiippllii¤¤iinniinn eekk ffaayy--
ddaallaarr››::
Ürününüzü kay›t ettirmeniz,
hakk›n›z olan tüm imtiyazlar› ve
tasarruf tekliflerini kullanabilmenizi sa¤lar
Afla¤›daki emniyet sembollerini ö¤reniniz:
Bu flimflek iflareti, cihaz›n›z içerisinde bulunan yal›t›lmam›fl malzemenin elektrik çarpmalar›na sebep olabilece¤ini gösterir.
Evdeki herkesin emniyeti için lütfen ürün
kapa¤›n› ç›karmay›n›z.
Ünlem iflareti, çal›flt›rma ve bak›m problemlerini önlemek için ekteki k›lavuzlarda
dikkatle okuman›z gereken özelliklere
dikkat çekmektedir.
UUYYAARRII::
Yang›n veya elektrik çarpmalar›n›n
önüne geçmek için bu cihaz ya¤mura veya neme
maruz kalmamal›d›r, vazolar gibi s›v› ile dolu nes
neler bu cihaz›n üzerine konulmamal›d›r.
DD‹‹KKKKAATT::
Elektrik çarpmas›n› önlemek için fiflin
genifl k›sm›n› genifl priz taraf›na tamam›yla
yerlefltiriniz.
UYARI: ELEKTR‹K ÇARPMASI R‹SK‹N‹
AZALTMAK ‹Ç‹N KAPA⁄I (VEYA
ARKAYI) ÇIKARMAYINIZ, ‹ÇER‹DE KUL-
LANICININ MÜDAHALE EDECE⁄‹ B‹R
fiEY YOKTUR, UZMAN SERV‹S PERSON-
EL‹NE BAfiVURUNUZ.
MMüüflfltteerrii KKuullllaann››mm›› iiççiinn::
Kabinin arkas›nda
bulunan afla¤›daki Seri Numaras›n› giriniz.
Bu bilgiyi, ileride bakmak için saklay›n›z.
Model No:---------------------------------------Seri No:----------------------------------------
Bizi http://www.philips.com.tr Adresinden ziyaret edebilirsiniz
Türkçe
065001056911 20"LOC-1 CFULL LCD 17/7/06 9:46 Page 2
Page 3

3
1. Bu talimatlar› okuyunuz.
2. Bu talimatlar› saklay›n›z.
3. Tüm uyar›lara uygun hareket ediniz
4. Tüm talimatlar› yerine getiriniz
5. Cihaz› suya yak›n olan yerlerde kullanmay›n›z
6. Sadece kuru bir bezle temizleyiniz
7. Havaland›rma aç›kl›klar›n›n üstünü kapatmay›n›z. Üretici talimatlar›na uygun olarak
monte ediniz.
8. Radyatörler, ›s› kaynaklar›, ocaklar ve ›s›
üreten di¤er cihazlara (amplifikatörler dahil)
yak›n yerlere takmay›n›z
9. Polarize veya toprakl› tip fifli kesinlikle kullan›n›z. Polarize bir fiflin, biri di¤erinden daha
genifl olan iki ucu bulunmaktad›r. Toprakl› tip bir
fiflin iki ucu vard›r, üçüncüsü ise topraklama
çatal›d›r. Genifl uç ve 3. çatal, güvenli¤iniz içindir.
Fiflin prizinize uymamas› durumunda, eski prizin
de¤ifltirilmesi için elektrikçinize baflvurunuz.
10. Elektrik kablosunun üzerinde yürünmemesine, ve özellikle prizlerde, muhafazalarda ve
cihazdan ç›kt›klar› noktalarda darbe almamas›na
dikkat ediniz.
11.Sadece, üretici taraf›ndan tan›mlanan ekleri /
aksesuarlar› kullan›n›z.
12.Sadece, üretici taraf›ndan tan›mlanan veya
cihazla birlikte sat›lan bir masa, stand,tripod,
braket veya tabla ile birlikte
kullan›n›z. Bir masa kullan›ld›¤›nda,
masa / cihaz› birlikte yer
de¤ifltirirken dikkat ediniz.
13. Cihaz›, flimflekli havalarda veya uzun süre
kullan›lmayaca¤› durumlarda fiflten çekiniz
14. Tüm servis ifllemlerinin uzman servis personeli taraf›ndan yap›lmas›na dikkat ediniz.
Servis ifllemi, cihaz, mesela elektrik kablosu veya
fiflinde herhangi bir flekilde zarar gördü¤ünde,
üzerine s›v› döküldü¤ünde veya yabanc› nesneler
düfltü¤ünde, cihaz neme veya ya¤mura maruz
kald›¤›nda, normal çal›flmad›¤›nda veya yüksekten düfltü¤ünde gerekecektir.
15. Ürünün içerisinde kurflun veya c›va bulunabilir. Bu malzemelerin at›lmas› çevresel yönetmeliklere göre olmal›d›r. Atma ve dönüfltürme
bilgileri için bölgenizdeki resmi makamlara ya
da Elektronik Sanayi Birli¤i www.eiae.org'a
baflvurunuz.
16. Servis Gerektiren Hasarlar: Cihaz, afla¤›daki
durumlarda uzman servis teknisyeni taraf›ndan
servise al›nmal›d›r:
a. Güç kablosunun veya fiflin hasar görmesi
b. Cihaz›n içerisine yabanc› maddelerin düflmesi
veya s›v› dökülmesi
c. Cihaz›n ya¤mur alt›nda kalmas›
d. Cihaz›n normal çal›flmamas› veya performansta belirgin bir de¤ifliklik olmas›
e. Cihaz›n düflmesi veya kasas›n›n hasar görmesi
17. Devrilme/ Stabilite
Tüm televizyonlar, kabin tasar›m›n›n yatma ve
stabilite özellikleri konusunda tavsiye edilen
uluslararas› güvenlik standartlar›na uygun
olmal›d›rlar.
* Kabinin önüne veya üstüne çok fazla çekme
kuvveti uygulayarak tasar›m standartlar›n› tehlikeye atmay›n›z, zira cihaz› devirebilirsiniz.
* Yine, kendinizi ve çocuklar›n›z›, kabinin üzerine elektronik ekipman / oyuncak koyarak
tehlikeye atmay›n›z. Bunlar cihaz›n üstünden
düflerek ürün hasar›na ve/veya kiflisel yaralanmalara sebep olacakt›r.
18. Duvara veya Tavana Monte
Cihaz, sadece, üretici taraf›ndan tavsiye edilen
flekilde duvara veya tavana monte edilecektir.
19. Elektrik Hatlar›
Aç›khava anteni, elektrik hatlar›n›n uza¤›na
monte edilmelidir.
20. Aç›khava Anteninin Topraklanmas›
Aç›khava anteninin al›c›ya ba¤lanmas› durumunda anten sisteminin topraklanmas›na dikkat
ederek gerilim dalgalanmalar›na ve oluflan statik
yüklere karfl› koruma temin ediniz.
Ulusal Elektrik Yönetmeli¤inin 810. Bölümü,
ANSI/NFPA No. 70-1984. dire¤in ve destek
yap›s›n›n gerekti¤i gibi topraklanmas›, topraklama fifllerinin boyutlar›, antenin - deflarj
ünitesinin yeri, topraklama elektrotlar›na
ba¤lant› ve topraklama elektrodu ile ilgili
koflullar konusunda bilgi vermektedir. Afla¤›daki
flekle bak›n›z.
21. Yabanc› Nesnelerin ve S›v›lar›n Girmesi
Deliklerden yabanc› nesnelerin girmemesine
veya s›v›lar›n dökülmemesine dikkat edilmelidir.
22. Pil Kullanma UYARISI: ‹nsanlara, mala veya
cihaza zarar verebilecek olan pil kaçaklar›n›
önlemek için,
* Pilleri, cihaz üzerindeki + ve - uyumlu flekilde
do¤ru tak›n›z
* Pilleri kar›flt›rmay›n›z (yeni ve eski veya karbon
veya alkalin)
* Cihaz›n uzun süre kullan›lmayaca¤› durumlarda
pilleri ç›kar›n›z
ÖNEML‹ GÜVENL‹K TAL‹MATLARI
Türkçe
065001056911 20"LOC-1 CFULL LCD 17/7/06 9:46 Page 3
Page 4
4
ÖNEML‹ GÜVENL‹K TAL‹MATLARI
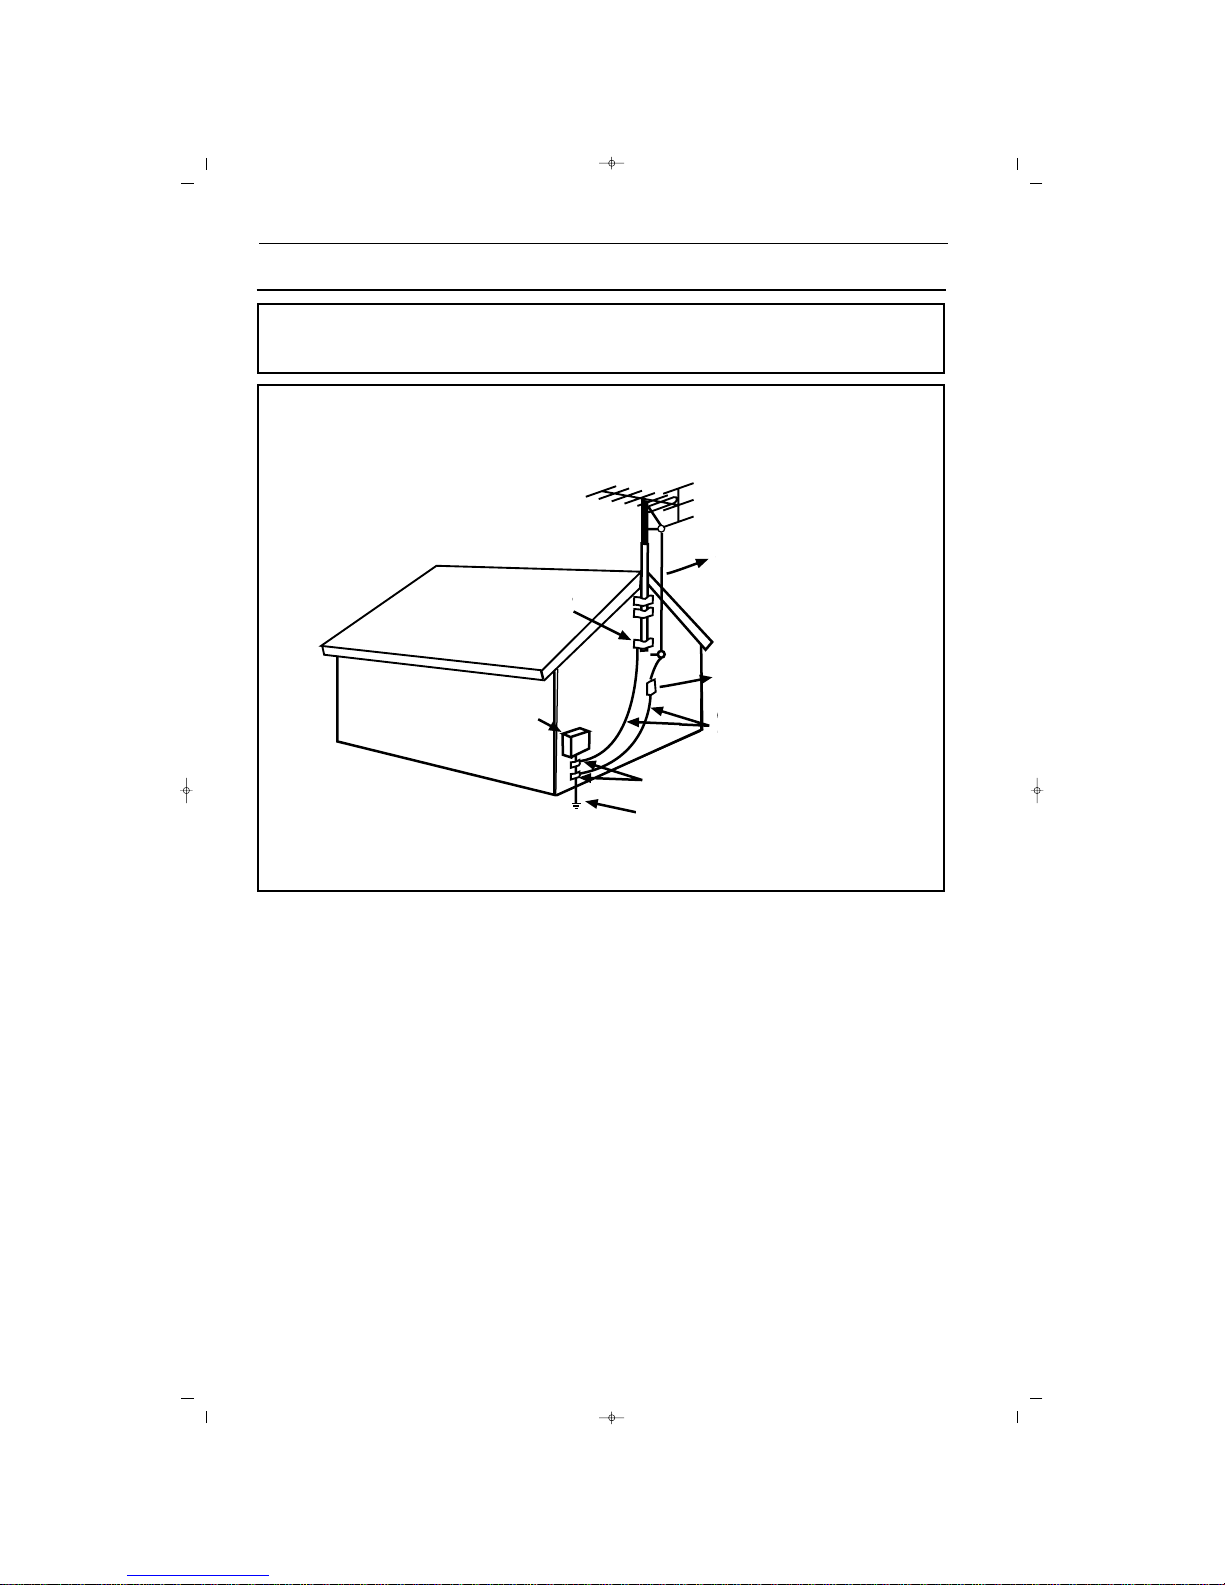
CATV Sistemi Kurucusuna Notlar: Bu uyar›, CATV sistem kurucusunun dikkatini NEC 820-40'a
çekmek içindir, burada uygun topraklama k›lavuzu bulunmakta ve kablo topraklamas›n›n, binan›n
topraklama sistemine, kablo girifline en k›sa mesafede tak›lmas›n› flart koflmaktad›r.
NEC - Ulusal Elektrik Yönetmeli¤ine Göre Anten
Topraklamas› Örne¤i
Topraklama Kelepçesi
Anten Kablosu
Anten deflarj ünitesi
(NEC Bölüm 810-20)
Topraklama ‹letkenleri
(NEC Bölüm 810-21)
Topraklama
Kelepçesi
Elektrik servis
ekipman›
Elektrik Servis Topraklama
Elektrot Sistemi
(NEC, Bölüm 250, K›s›m H)
NEC-Ulusal elektrik yönetmeli¤i
065001056911 20"LOC-1 CFULL LCD 17/7/06 9:46 Page 4
Page 5

5
EEKK GGÜÜVVEENNLL‹‹KK UUYYAARRIILLAARRII
* LCD TV stand›n›n cihaza gerekti¤i gibi tak›lmas›na D‹KKAT ED‹N‹Z (Stand›n vidas›n› cihaza
s›k›flt›rmadan önce Kolay Kullan›m Rehberine bak›n›z. Vidan›n gerekti¤i gibi tak›lmamas›, cihaz›n
güvenli¤ini tehlikeye atar
* Afla¤›daki durumlarda ana fifli çekiniz:
* TV ekran›n› temizlerken, kesinlikle afl›nd›r›c› temizlik malzemeleri kullanmay›n›z
* fiimflek çakmas› durumunda
* Cihaz›n uzun süre kullan›lmadan kalmas› durumunda
* Çal›fl›rken LCD TV'nin yerini de¤ifltirmeyiniz
* LCD ekran›n yüzeyine keskin veya sert nesnelerle dokunmay›n›z, bunlar› ittirmeyiniz veya sürtmeyiniz
* LCD ekran›n yüzeyi tozland›¤›nda, emici pamuklu bez ya da deri gibi yumuflak bir malzeme ile
temizleyiniz. Ekran›n yüzeyini temizlemek için aseton, tolüen veya alkol KULLANMAYINIZ. Bu
kimyasal maddeler yüzeye zarar verecektir.
* Ekran üzerine gelen suyu veya tükürü¤ü hemen temizleyiniz. Bu s›v›lar, belirli bir süre ekran
üzerinde kalmalar› halinde LCD ekran›n deformasyona ve renklerinin kaybolmas›na sebep olurlar.
* S›cakl›k de¤iflimleri meydana geldi¤inde yo¤uflmaya dikkat ediniz. Yo¤uflma, LCD ekranda ve elektrikli parçalarda zarara sebep olabilir. Yo¤uflma azald›¤›nda, LCD ekranda noktalar ve lekeler mevcut olacakt›r.
LCD TELEV‹ZYONUN YERLEfiT‹R‹LMES‹
* LCD TV yi sa¤lam ve dengeli bir tabla üzerine yerlefltiriniz. Tablan›n, LCD TV nin a¤›rl›¤›n›
tafl›yacak güçte olmas›na dikkat ediniz.
* Uygun havaland›rmay› temin etmek üzere LCD TV kabininin her iki taraf›nda 15 cm’ lik bir alan
kalmas›na dikkat ediniz.
* LCD TV'yi, radyatör veya ›s› kaynaklar›n›n yak›n›na koymay›n›z.
* LCD TV'yi, ya¤mura veya afl›r› neme maruz kalabilece¤i bir yere koymay›n›z.
GER‹ KAZANIM / SÜRES‹ B‹TT‹⁄‹NDE ATMA
* Çevreye verilen zarar› minimuma indirmek için, LCD TV ile birlikte verilen pillerde c›va veya nikel
kadmiyum bulunmamaktad›r. Mümkünse, pilleri atarken, bölgenizde mevcut olan geri kazan›m
imkanlar›n› araflt›r›n›z.
* LCD TV, geri kazan›m› mümkün olan malzemeleri kullanmaktad›r. At›klar› minimuma indirmek
için, çevrenizde kullan›lm›fl televizyonlar› sökerek geri kazan›ma alan firmalara bak›n›z veya TV parça
geri kazan›m bilgileri için bayinizle irtibat kurunuz.
* Koli ve ambalaj malzemesini, bölgenizdeki at›k kurallar›na göre çöpe at›n›z.
UYARILAR
065001056911 20"LOC-1 CFULL LCD 17/7/06 9:46 Page 5
Page 6
6
‹Ç‹NDEK‹LER
GGiirriiflfl
Hoflgeldiniz / TV nizin kay›t ettirilmesi 2
ÖNEML‹ GÜVENL‹K TAL‹MATLARI 3
ÖNLEMLER 5
‹çindekiler 6
AAyyaarrllaarr MMeennüüssüü
Ülke ve Dil ayarlar› 7
KKuurruulluumm
Otomatik Programlama
(Kanallar›n Ayarlanmas›) 8
TV Kanallar›n›n Manuel olarak ayarlanmas› 10
Program Düzenleme 12
LCD TV nin Sunumu 14
LCD TV nin duvara monte edilmesi 16
TV ve Uzaktan Kumandan›n Çal›flmas› 17
Uzaktan Kumanda 18
RReessiimm MMeennüüssüü
TV Resim Menüsü Kontrolleri 19
SSeess MMeennüüssüü
TV Ses Menüsü Kontrolleri 21
AAyyaarrllaarr MMeennüüssüü
Çocuk Kilidi / Kilit Fonksiyonu 23
Saat Ayarlamak 26
Zamanlay›c› Menüsü 27
Görüntü Format›n›n Kullan›lmas› 29
Teletext Dili seçmek 29
Teletext 30
PPCC MMoodduu
PC Görüntü Kontrolleri 31
GGeenneell BBiillggiilleerr
Ar›zalar›n Giderilmesi 32
Bak›m ve Temizlik 34
Teknik Özellikler 35
YYeennii LLCCDD TTVV''nniizziinn öözzeelllliikklleerrii flfluunnllaarrdd››rr::
SSeess // GGöörrüünnttüü JJaakkllaarr››::
Di¤er cihazlar› h›zl› bir
flekilde LCD TV’nize takmak için kullan›n›z
OOttoommaattiikk KKaannaall PPrrooggrraammllaammaa ((OOttoommaattiikk
PPrrooggrraammllaammaa))
: Mevcut kanallar›n h›zl› ve
kolayl›kla ayarlanmas›
MMeennüülleerr ((OOSSDD))::
Faydal› Mesajlar, TV
Kontrollerinin ayar› için
UUzzaakkttaann KKuummaannddaa
: LCD TV özelliklerinizi
çal›flt›r›r
KKaappaattmmaa ZZaammaannllaayy››cc››::
LCD TV nizi,
tan›mlad›¤›n›z süre içerisinde kapat›r (mevcut
saatten sonraki 5 ila 120 dakika aras› sürede)
SSttaannddaarrtt yyaayy››nn
(VHF / UHF) veya
KKaabblloo TTVV
KKaannaall››
SStteerreeoo öözzeelllliikk::
Dahili amplifikatör ve ikili hoparlör sistemini içerir, stereo yay›n yapan TV
kanallar›n›n al›nmas›n› sa¤lar
TTrreebbllee,, BBaassss vvee BBaallaannss::
LCD TV'nin sesini
gelifltirir
Yeni LCD TV niz ve ambalaj›, geri kazan›labilen
ve kullan›labilen malzemeleri içermektedir.
Uzman firmalar, ürününüzün at›klar›n› geri
kazanabilir ve at›k miktar›n› azaltabilir. Cihazda,
bittiklerinde at›lmamas› gereken piller bulunmaktad›r, bunlar küçük kimyasal at›k olarak
at›lmal›d›rlar. Mevcut cihaz›n›z› de¤ifltirdi¤inizde,
eski televizyonunuzu, pillerinizi ve ambalaj
malzemesini nas›l geri kazanabilece¤iniz
konusunda yerel yönetmeliklere bak›n›z.
Ömür Bitiminde
NNoott::
Bu k›lavuz farkl› versiyonlar› ve
modelleri içerir. Bu k›lavuzda yer alan
tüm özellikler LCD TV'nize uymayabilir.
Bu normaldir ve bayinizle veya servisle
irtibata geçmeniz gerekmez.
065001056911 20"LOC-1 CFULL LCD 17/7/06 9:46 Page 6
Page 7
7
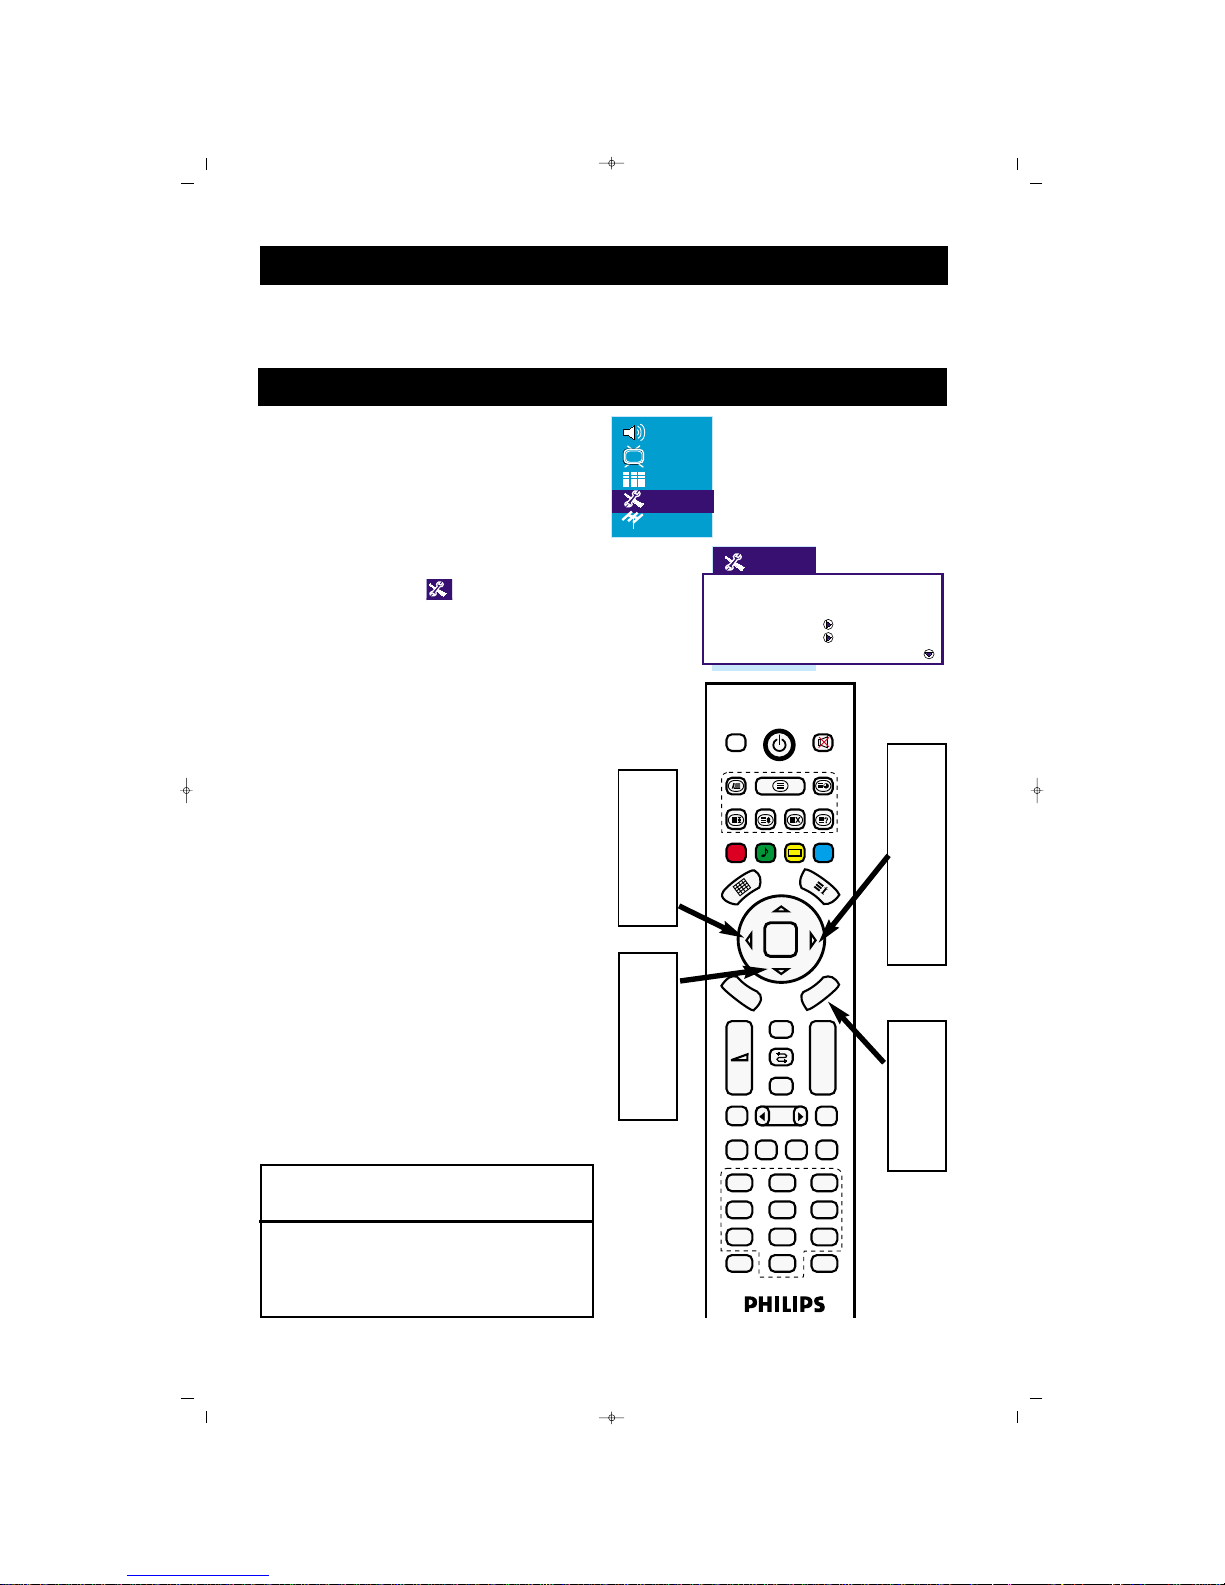
LCD TV’nizin kurulum ayarlar›n› cihaz›n›z›n menülerinde afla¤›da anlat›lan flekillerde kolayca yapabilirsiniz.
KURULUM
Ülke ve Dil Ayar›:
Kullan›c›lar menü lisan›n› afla¤›daki flekilde
de¤ifltirebilirler.
Uzaktan Kumanda üzerindeki menü
tufluna bas›n›z ekranda menü belirecektir.
Ekranda AYAR menüsü seçili olana
kadar Afla¤› yön (
ï) tufluna ard arda
bas›n›z ve Sa¤ yön (
Æ) tufluna basarak
menüye giriniz
“Dil” seçili olana kadar Afla¤› yön (
ï)
tufluna ard arda bas›n›z.
Sola Yön (
Í) ve Sa¤ yön (Æ) tufllar›n› kul-
lanarak istedi¤iniz menü dilini seçiniz.
“Ülke” seçili olana kadar Afla¤› yön (
ï)
tufluna ard arda bas›n›z.
Sola Yön (
Í) ve Sa¤ yön (Æ) tufllar›n› kul-
lanarak bulundu¤unuz ülkenin k›salt›lm›fl
ismini seçiniz.
Ard arda “Menu” tufluna basarak
menülerden ç›k›n›z.
1
2
3
4
5
FFAAYYDDAALLII NNOOTT
Lisan de¤iflimini yapt›¤›n›zda sadece Menü
konular›n› de¤ifltirebilirsiniz. Baflka bir OSD metin
özelli¤ini de¤ifltirmez.
FAV+ EPG RADIO
PP
OK
MENU
P+
P-
+
–
PIP
AV
FREEZE
16:9
TV PC DVI
YPbPr
1
2
3
4
5
6
7
8
9
0
ZOOM
S/M/D
FAV-
DVB
DVB
MENU
Zap
1
7
2
4
6
2
5
4
6
6
7
Kal›c› OSD Kapal›
Dil Türkçe
Ülke TR
Çocuk kilidi
Zamanlay›c›
Teletekst dili Avrupa
065001056911 20"LOC-1 CFULL LCD 17/7/06 9:46 Page 7
Page 8
8
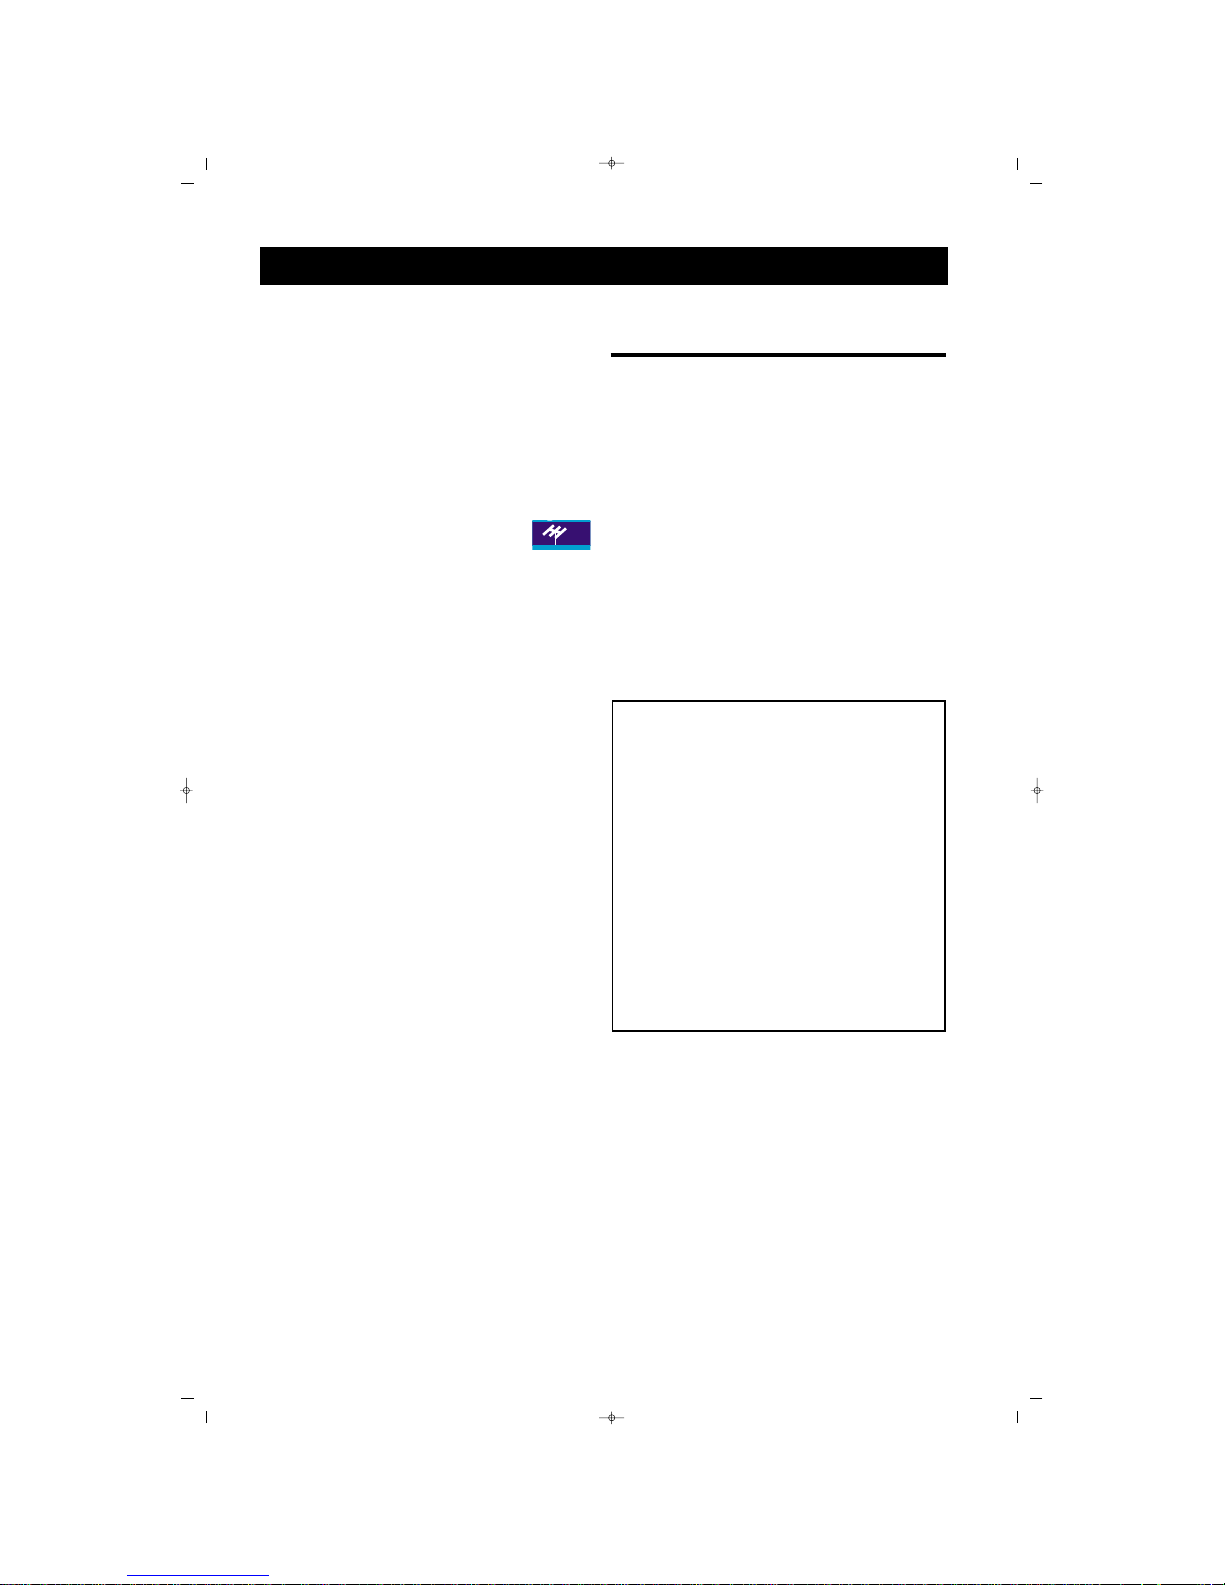
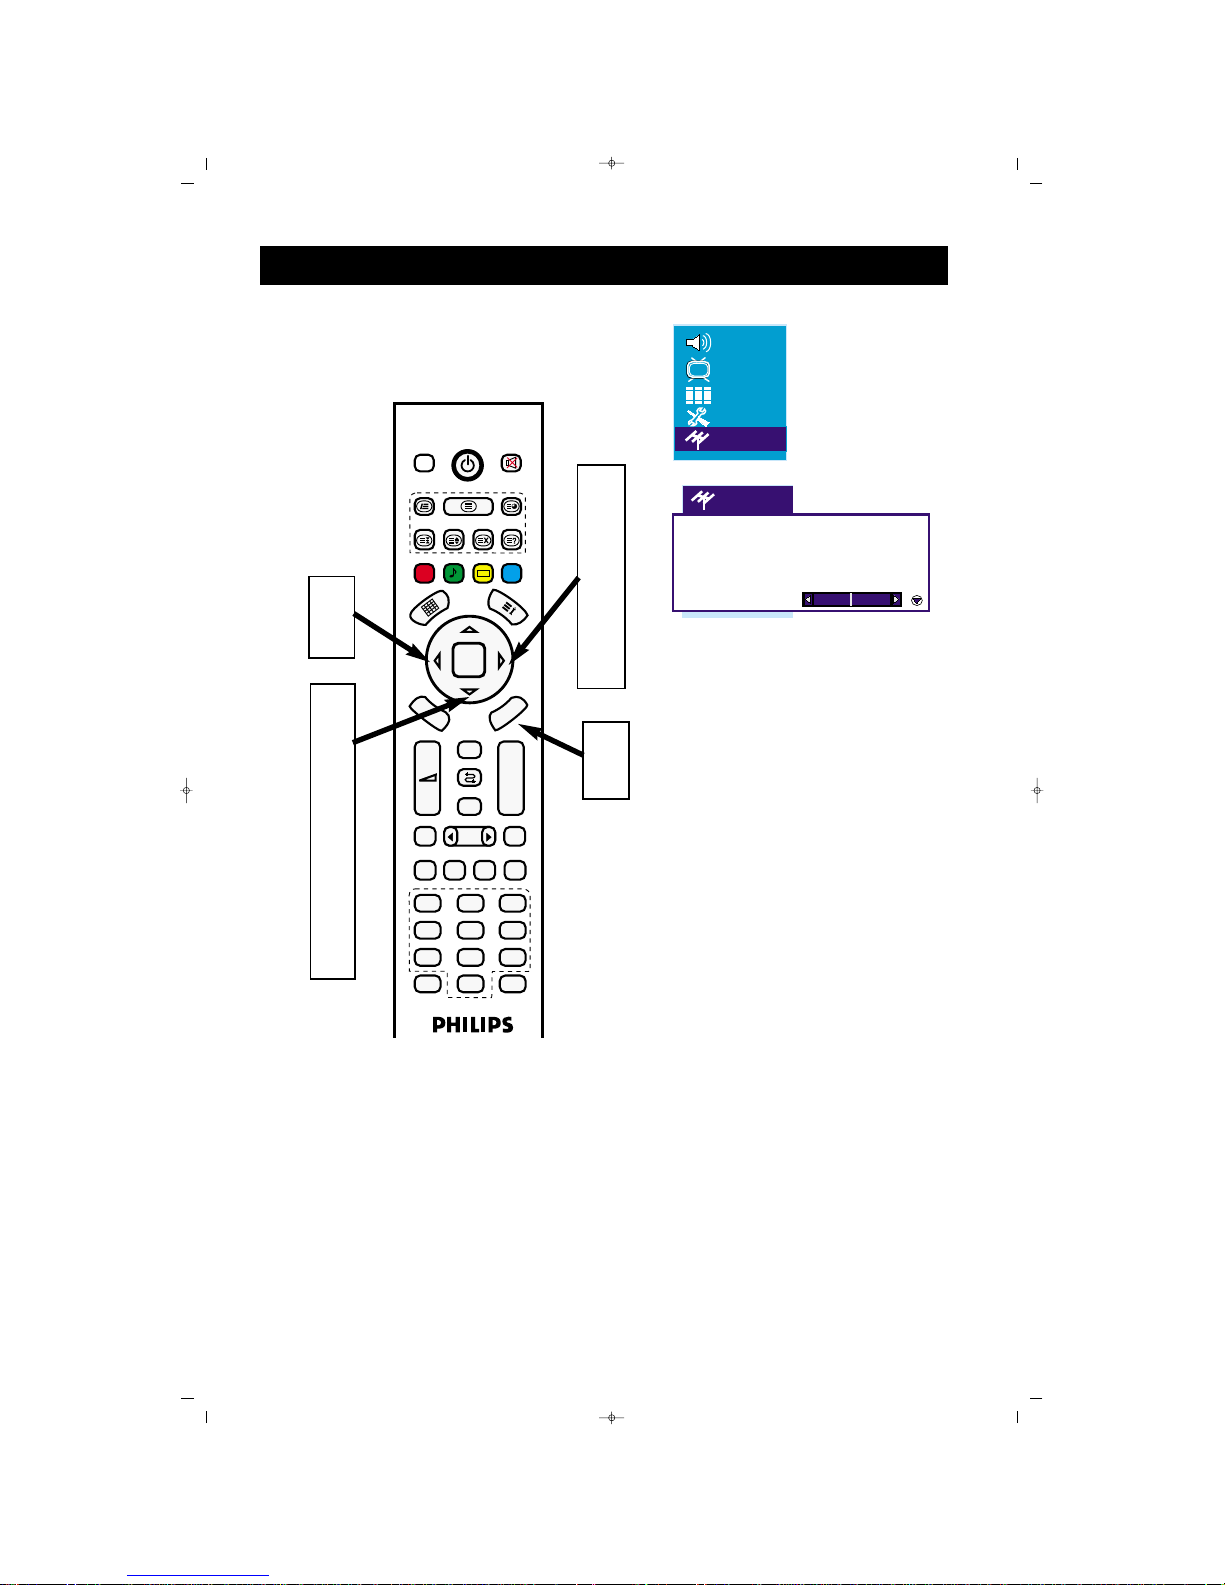
OTOMAT‹K PROGRAMLAMA (KANALLARIN AYARLANMASI)
LCD TV'niz otomatik olarak yerel bölge (veya
kablo TV) kanallar›na ayarlanabilir. Böylece,
PP++ //
PP--
tufllar›na basarak sadece bölgenizdeki TV istas-
yonlar›n› seçebilmeniz mümkündür.
Uzaktan Kumanda üzerindeki menü
tufluna bas›n›z ekranda menü belirecektir.
Ekranda PROGRAMLAR
menüsü belirene kadar Afla¤› yön (
ï)
tufluna bas›n›z.
Sa¤ yön (
Æ) tufluna basarak menüye
giriniz.
“Sistem” seçili olana kadar Afla¤› yön
(
ï) tufluna ard arda bas›n›z.
Sa¤ ve sol yön (
Í/Æ) tufllar›yla sistemi
seçiniz.
“Otomatik Arama” seçili olana kadar
Afla¤› yön (
ï) tufluna ard arda bas›n›z.
Sa¤ yön (
Æ) tufluna bas›n›z, otomatik
arama bafllayacakt›r. Cihaz›n›z kanalar›
otomatik olarak bulup haf›zaya alacakt›r.
1
2
3
4
5
FFAAYYDDAALLII NNOOTT
* Yeni televizyonunuzu ambalaj›ndan ç›kard›ktan
ve fifle takt›ktan hemen sonra, TV yi, bölgenizde
mevcut olan yay›nlara ve kablo kanallara ayarlamak
için otomatik programlama seçene¤ini çal›flt›r›n›z.
Otomatik programlama fonksiyonuyla kanallar›
ayarlamaz-san›z, televizyonunuz gerekti¤i gibi
çal›flmayabilir
* Otomatik Programlamay› çal›flt›rd›ktan sonra
sonuçlar› kontrol ediniz. P(+) veya P(-) tufluna
bas›n›z ve hangi kanallar› seçebilece¤inizi görünüz.
* Bir antenin veya kablo TV nin ilk olarak LCD TV
nize tak›lmas› gerekti¤ini unutmay›n›z.
6
7
065001056911 20"LOC-1 CFULL LCD 17/7/06 9:46 Page 8
Page 9
9
OTOMAT‹K PROGRAMLAMA (KANALLARIN AYARLANMASI)
FAV+ EPG RADIO
PP
OK
MENU
P+
P-
+
–
PIP
AV
FREEZE
16:9
TV PC DVI
YPbPr
1
2
3
4
5
6
7
8
9
0
ZOOM
S/M/D
FAV-
DVB
DVB
MENU
Zap
1
3
5
7
2
4
6
7
5
Program no. 2
Kanal ad›
Sistem Avrupa
Oto. program
Frekans 182.25 MHz
‹nce ayar
065001056911 20"LOC-1 CFULL LCD 17/7/06 9:46 Page 9
Page 10
10
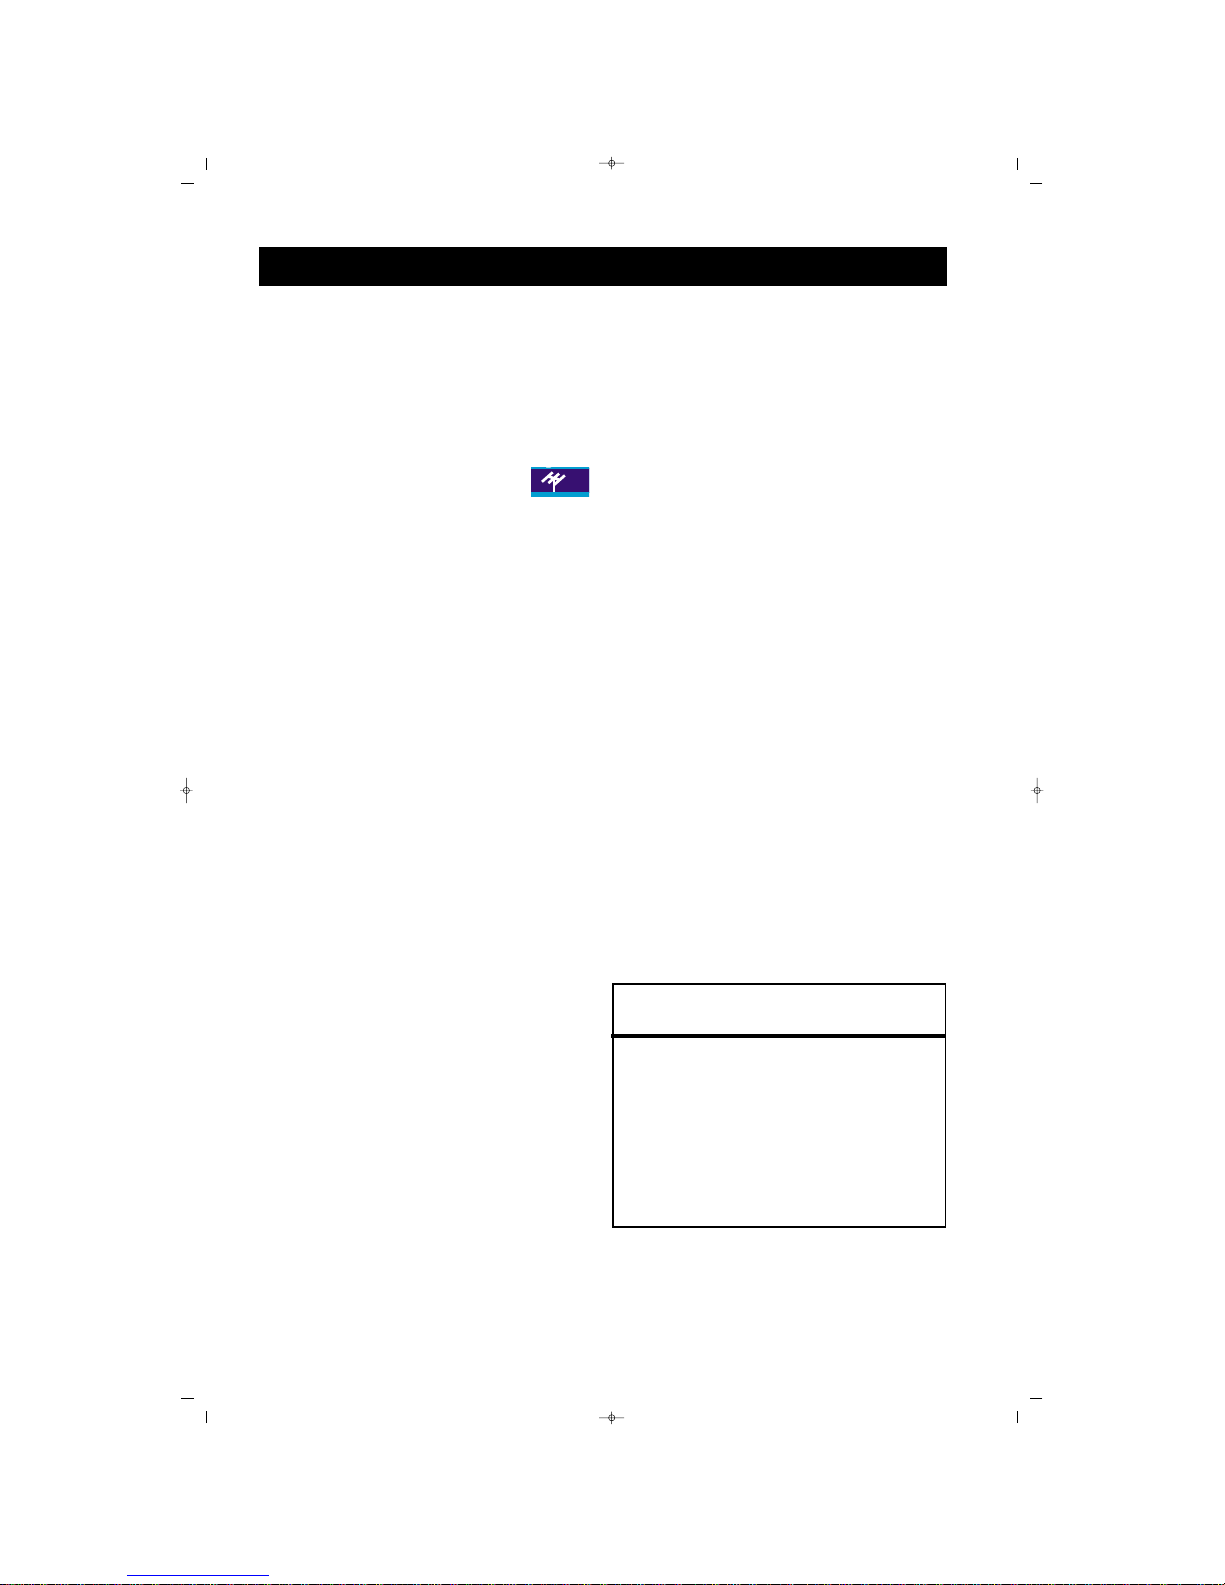
TV KANALLARININ MANUEL OLARAK HAFIZAYA ALINMASI
TV kanallar›n› manuel olarak ta ayarlayabilirsiniz.
Manuel ayarlama, her program› manuel olarak
saklaman›za olanak verir.
Uzaktan Kumanda üzerindeki menü
tufluna bas›n›z ekranda menü belirecektir.
Ekranda PROGRAMLAR
menüsü belirene kadar Afla¤› yön (
ï)
tufluna bas›n›z.
Sa¤ yön (
Æ) tufluna basarak menüye
giriniz.
“Program No” seçili olana kadar Afla¤›
yön (
ï) tufluna ard arda bas›n›z.
Kanal numaras› vermek için say› tufllar›na
veya Sa¤ ve sol yön (
Í/Æ) tufllar›na
bas›n›z.
“Sistem” seçili olana kadar Afla¤› yön
(
ï) tufluna ard arda bas›n›z.
Sa¤ ve sol yön (
Í/Æ) tufllar›yla sistemi
seçiniz.
Frekans Ayar› seçili olana kadar Afla¤›
yön (
ï) tufluna ard arda bas›n›z.
Sa¤ yön (
Æ) tufluna basarak otomatik
arama kanal frekans›n› aktif hale getiriniz
veya istedi¤iniz kanal frekans›n› girmek
için say› tufllar›na bas›n›z.
Kanal›n net olmamas› durumunda, ‹nce
Ayar› seçmek için Afla¤› yön (
ï)
bas›n›z, sonra ayarlamak için Sa¤ yön
(
Æ) tufluna bas›n›z.
“Kaydet” seçili olana kadar Afla¤› yön
(
ï) tufluna ard arda bas›n›z ve Sa¤ yön
(
Æ) tufluna basarak kay›t ifllemni
yap›n›z.
Ard arda “Menu” tufluna basarak
menülerden ç›k›n›z.
1
2
3
4
5
6
7
8
9
10
11
12
FFAAYYDDAALLII NNOOTT
*Sistem Fransa hariç tüm avrupa ülkeleri için
“Avrupa” seçilmelidir. Fransa için ise “Fransa“
seçilmelidir.
*Manuel programlama yaparken yine ayn› menüde
olan AFC fonksiyonunu aç›k hale getirirseniz, LCD
Tv’niz vericiden kaynaklanan çok ufak frekans
kaymalar›n› alg›lyarak kendisi otomatik olarak
düzeltecektir.
065001056911 20"LOC-1 CFULL LCD 17/7/06 9:46 Page 10
Page 11
1111
TV KANALLARININ MANUEL OLARAK HAFIZAYA ALINMASI
FAV+ EPG RADIO
PP
OK
MENU
P+
P-
+
–
PIP
AV
FREEZE
16:9
TV PC DVI
YPbPr
1
2
3
4
5
6
7
8
9
0
ZOOM
S/M/D
FAV-
DVB
DVB
MENU
Zap
3
5
7
9
10
11
2
4
6
8
10
11
5
7
1
12
Program no. 2
Kanal ad›
Sistem Avrupa
Oto. program
Frekans 182.25 MHz
‹nce ayar
AFC Aç›k
Kilit Kapal›
Kaydet
065001056911 20"LOC-1 CFULL LCD 17/7/06 9:46 Page 11
Page 12
1212
PROGRAM DÜZENLEME
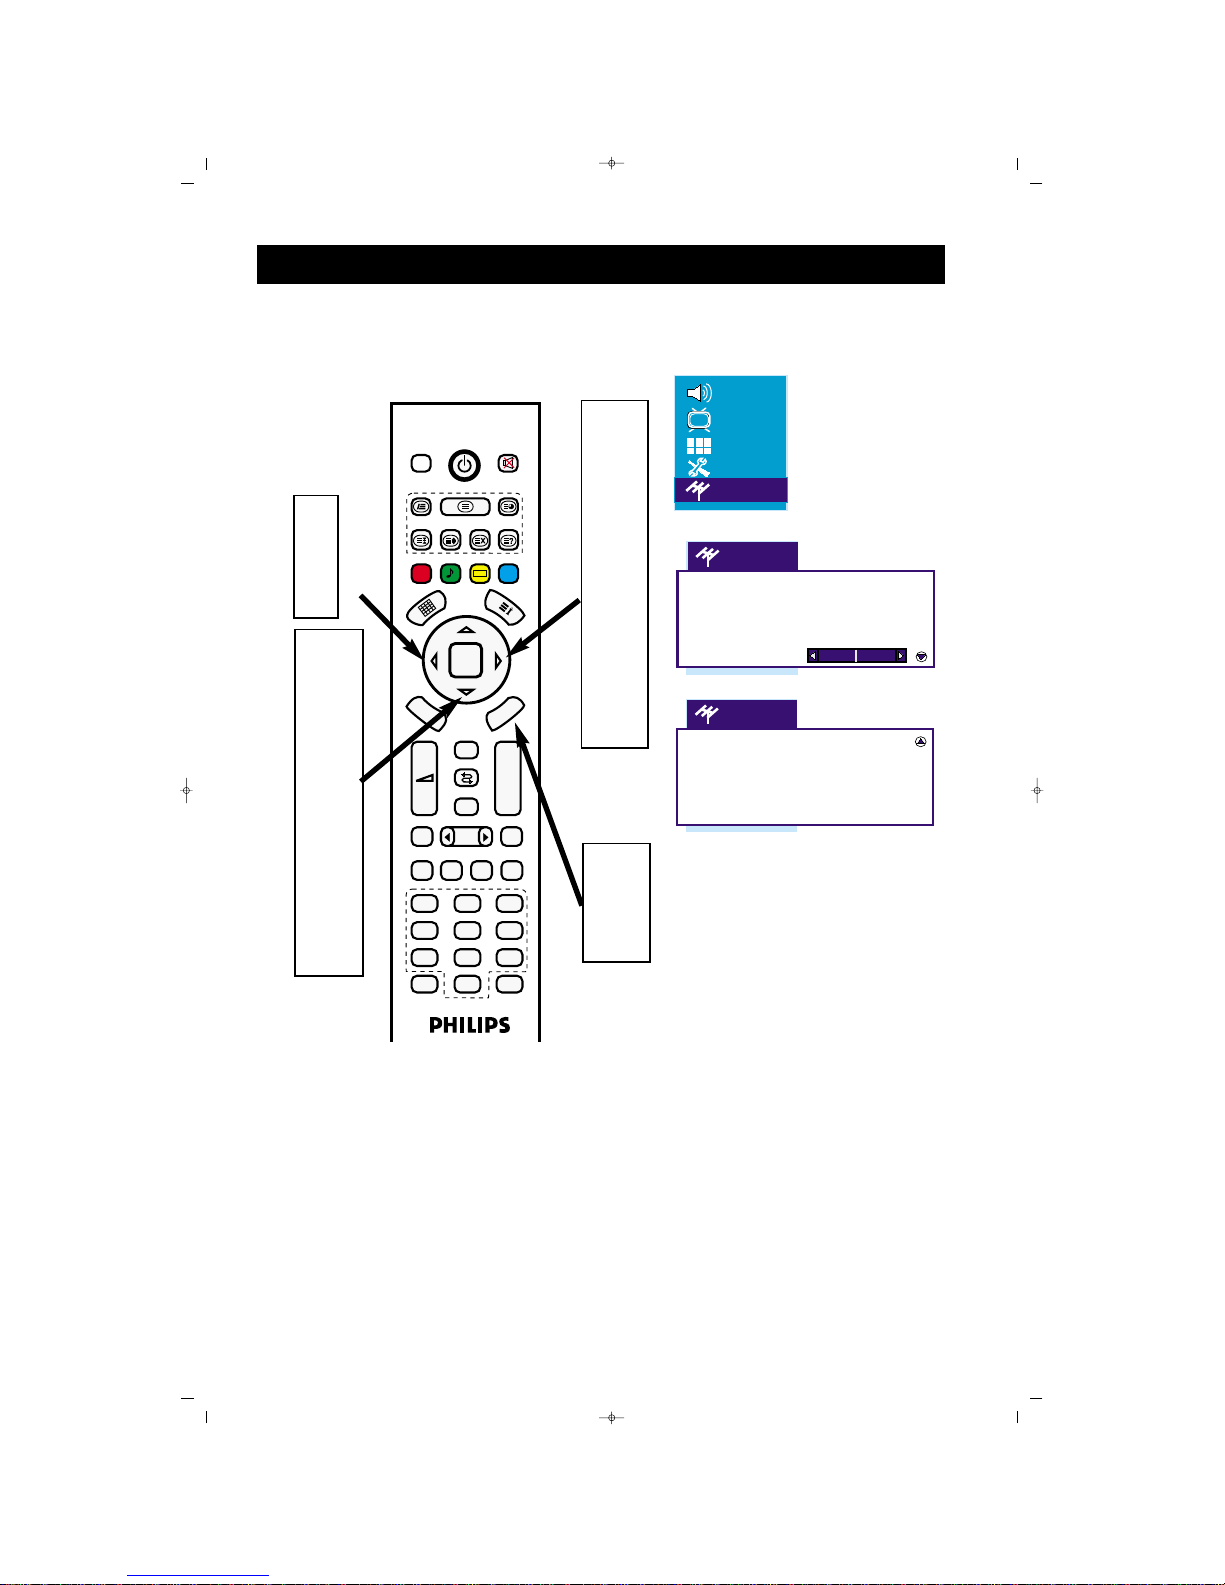
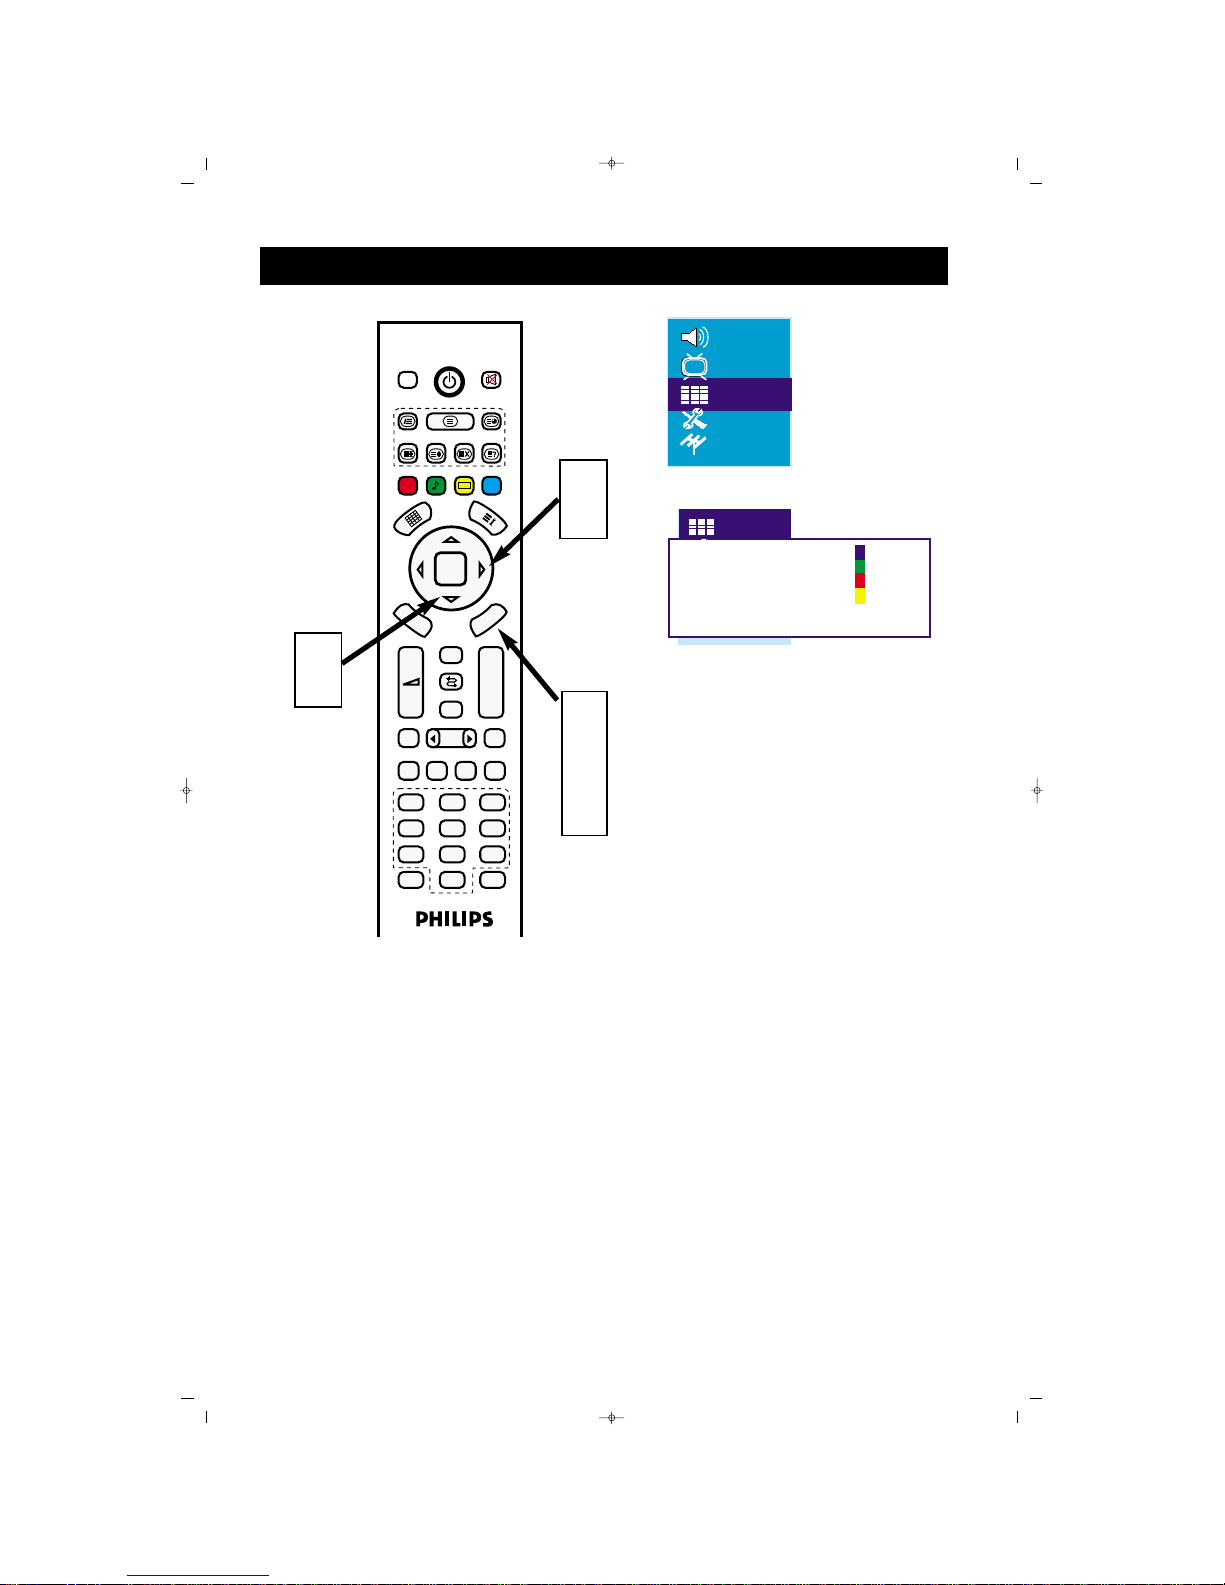
Kanallarla iligili di¤er ayarlar› yapabilirsiniz.
Uzaktan Kumanda üzerindeki menü
tufluna bas›n›z, ekranda menü belirecektir.
Ekranda PROGRAM TABLOSU seçili
olana kadar Afla¤› yön (
ï) tufluna
bas›n›z.
Sa¤ yön (
Æ) tufluna basarak menüye
giriniz.
‹‹SS‹‹MM VVEERRMMEE
Program tablosunda, Afla¤› ve yukar›
yön (
Î,ï) tufllar›yla isim vermek istedi¤iniz kanal›n üzerine geliniz. Mavi tufl
ile program› seçiniz, yön (
Í,Æ)
tufllar›yla ismin ilk karakterini belirleyin
ve daha sonraki karakter için Sa¤ yön
(
Æ) tufluna bas›n›z. ‹sim yazma ifllemi
bitince tekrar mavi tuflla ifllemi onaylay›n›z.
PPRROOGGRRAAMM TTAAfifiIIMMAA
Program sütununda, Afla¤› ve yukar› yön
(
Î,ï) tufllar›yla tafl›mak istedi¤iniz
kanal›n üzerine geliniz. Yeflil tufl ile program› seçiniz, Afla¤› ve yukar› yön (
Î,ï)
tufllar›yla istedi¤iniz yere tafl›y›n›z, Tekrar
Yeflil tufla basarak ifllemi sonland›r›n›z.
PPRROOGGRRAAMM SS‹‹LLMMEE
Program tablosunda, Afla¤› ve yukar›
yön (
Î,ï) tufllar›yla silmek istedi¤iniz
kanal›n üzerine geliniz. K›rm›z› tufl ile
program› seçiniz ve tekrar k›rm›z› tufla
basarak ifllemi onaylay›n›z.
KANAL ATLAMA
Program tablosunda, Afla¤› ve yukar›
yön (
Î,ï) tufllar›yla, zapping yaparken
atlanmas›n› istedi¤iniz kanal›n üzerine
geliniz. Sar› tufla basarak ifllemi onaylay›n›z. Bu kanal P+ ve P- ile yapt›¤›n›z
kanal geçifllerinde gösterilmeyecektir.
Ard arda “Menu” tufluna basarak
menülerden ç›k›n›z.
1
2
3
A
B
C
4
D
FFAAYYDDAALLII NNOOTT
*Atlanan veya gizlenen kanal› P+ ve P- ile
görmezsiniz ama Nümerik tufllarla program
numaras›n› tufllayarak görebilirsiniz.
065001056911 20"LOC-1 CFULL LCD 17/7/06 9:46 Page 12
Page 13
13
PROGRAM DÜZENLEME
FAV+ EPG RADIO
PP
OK
MENU
P+
P-
+
–
PIP
AV
FREEZE
16:9
TV PC DVI
YPbPr
1
2
3
4
5
6
7
8
9
0
ZOOM
S/M/D
FAV-
DVB
D
V
B
M
E
N
U
Zap
1
4
2
3
1
2
3
4
5
6
7
8
9
10
11
12
‹sim
Tafl›
Sil
Atla
065001056911 20"LOC-1 CFULL LCD 17/7/06 9:46 Page 13
Page 14
14
LLCCDD TTVV''nniinn YYeerrlleeflflttiirriillmmeessii
* LCD TV'yi, sa¤lam ve dengeli bir yüzeye
yerlefltiriniz. Yüzeyin, LCD TV'nin a¤›rl›¤›n›
tafl›yacak kadar güçlü olmas›na dikkat ediniz.
* ‹yi bir havaland›rma temin etmek için LCD TV
kabininin her iki taraf›nda en az 15cm' lik bir
boflluk b›rak›n›z.
* LCD TV'yi bir radyatör ya da ›s› kayna¤›n›n
yak›n›na b›rakmay›n›z.
* LCD TV'yi, ya¤mura veya neme maruz kalaca¤›
yerlere koymay›n›z.
LCD TV'N‹N SUNUMU
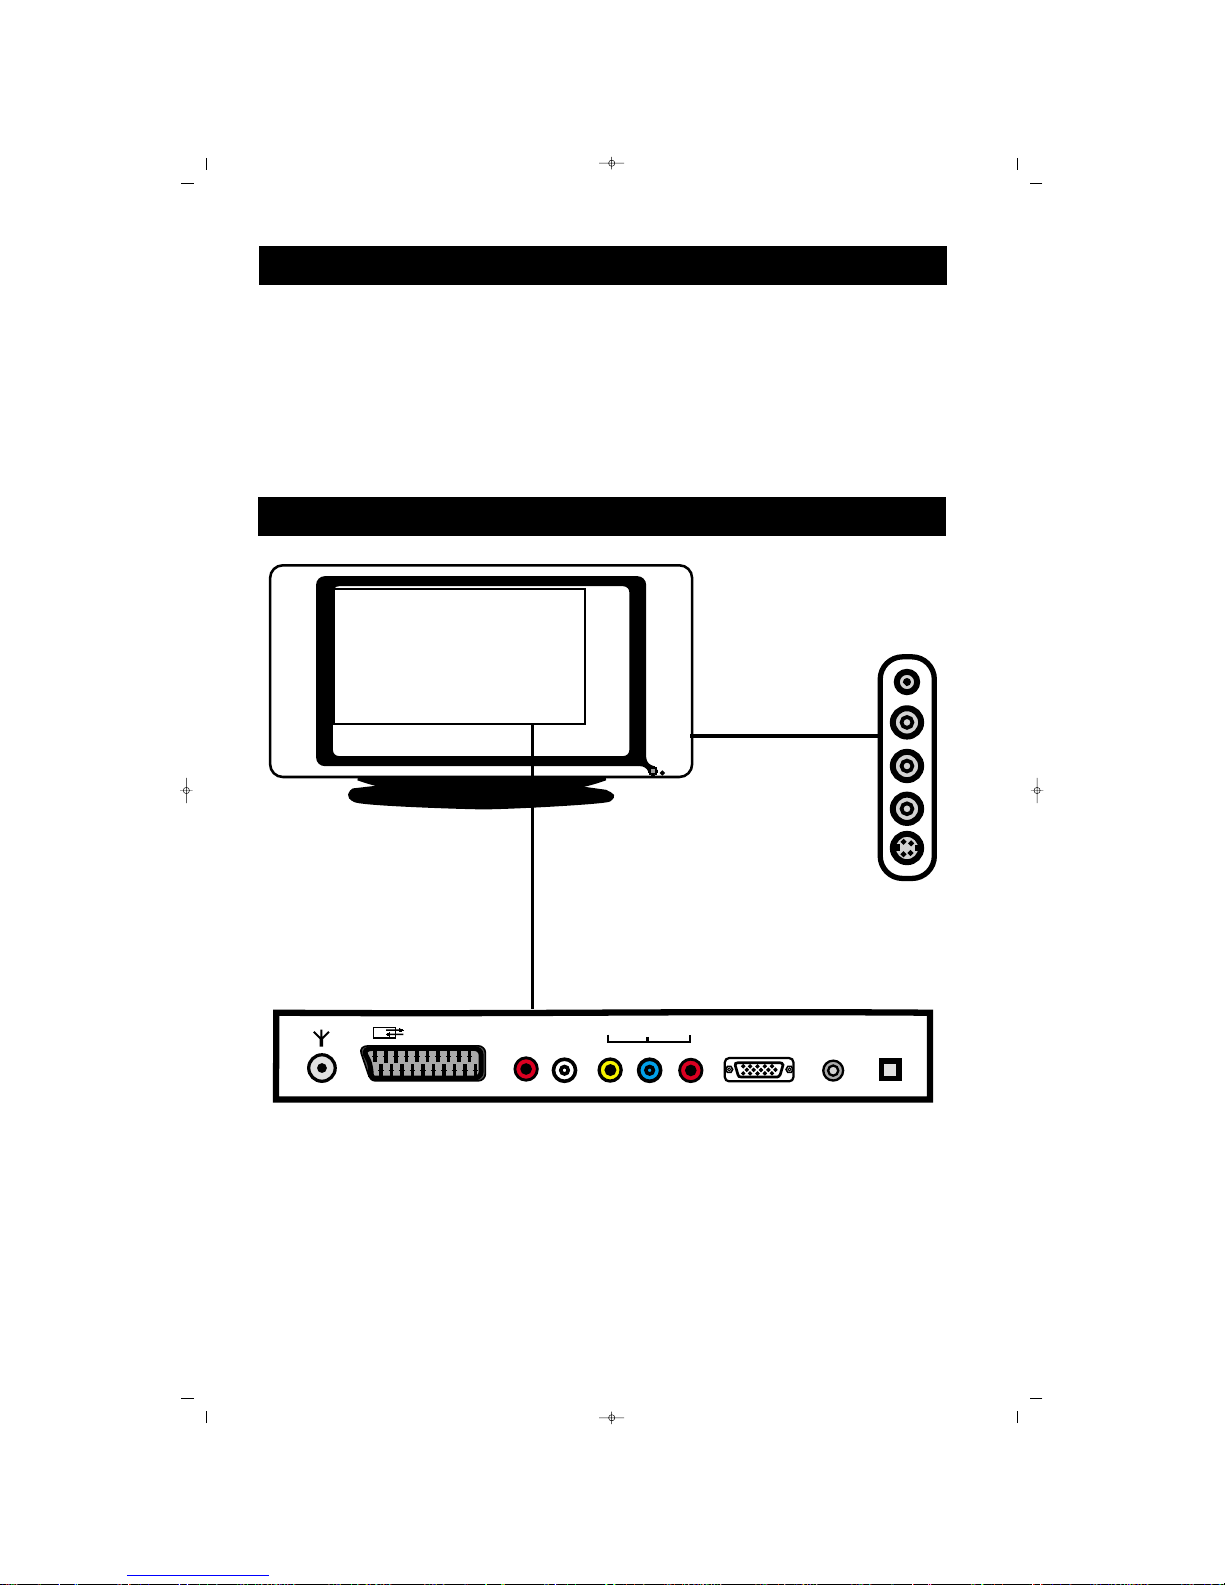
TÜM F‹fiLER‹N TANIMI (ARKA TARAF)
DC 12V
EURO AV
Y
PC INPUT
PC
AUDIO IN
RL
AUDIO IN
Pb Pr
IN
7
5
4
1
2
3
6
8
9
10
065001056911 20"LOC-1 CFULL LCD 17/7/06 9:46 Page 14
Page 15

15
EEUURROO AAVV
VCR'nizin veya di¤er görüntü
cihazlar›n›z›n skart ç›k›fllar›na ba¤lan›r.
YYAANN AAVV
VCR'nizin ya da di¤er görüntü cihazlar›n›n ç›k›fl jaklar›na ba¤lan›r.
KKuullaakkll››kk JJaakk››
Kulakl›klar›n›za ba¤lan›r
YY PPbb PPrr IINN
YPbPr görüntü format›n› destekleyen
Dijital Uydu Al›c›s›na veya di¤er görüntü
cihaz›na ba¤lant› yapar
VVHHFF // UUHHFF
VHF / UHF anteninize veya kablonuza
ba¤lan›r.
PPCC IINN
VGA tipi görüntü ç›k›fl›na sahip PC nizi
ba¤lar.
PPCC AAUUDDIIOO IINN
VGA tipi görüntü ç›k›fl›na sahip PC nizin
ses ba¤lant›s›n› yapabilirsiniz.
LL//RR AAUUDDIIOO IINN
Y Pb Pr Audio ses girifli
12V DC Adaptör girifli
SVHS girifli
TÜM F‹fiLER‹N TANIMI (ARKA TARAF)
1
2
3
4
5
6
7
9
8
Cihaz› ambalaj›ndan ç›kard›¤›n›zda, afla¤›dakilerin bulunmas›na dikkat ediniz:
Uzaktan Kumanda ve Pilleri
Kullanma K›lavuzu
Kolay Kullan›m Rehberi
Garanti Kart›
World Wide Garanti Kart›
AKSESUARLAR
1
2
3
4
5
10
065001056911 20"LOC-1 CFULL LCD 17/7/06 9:46 Page 15
Page 16
16
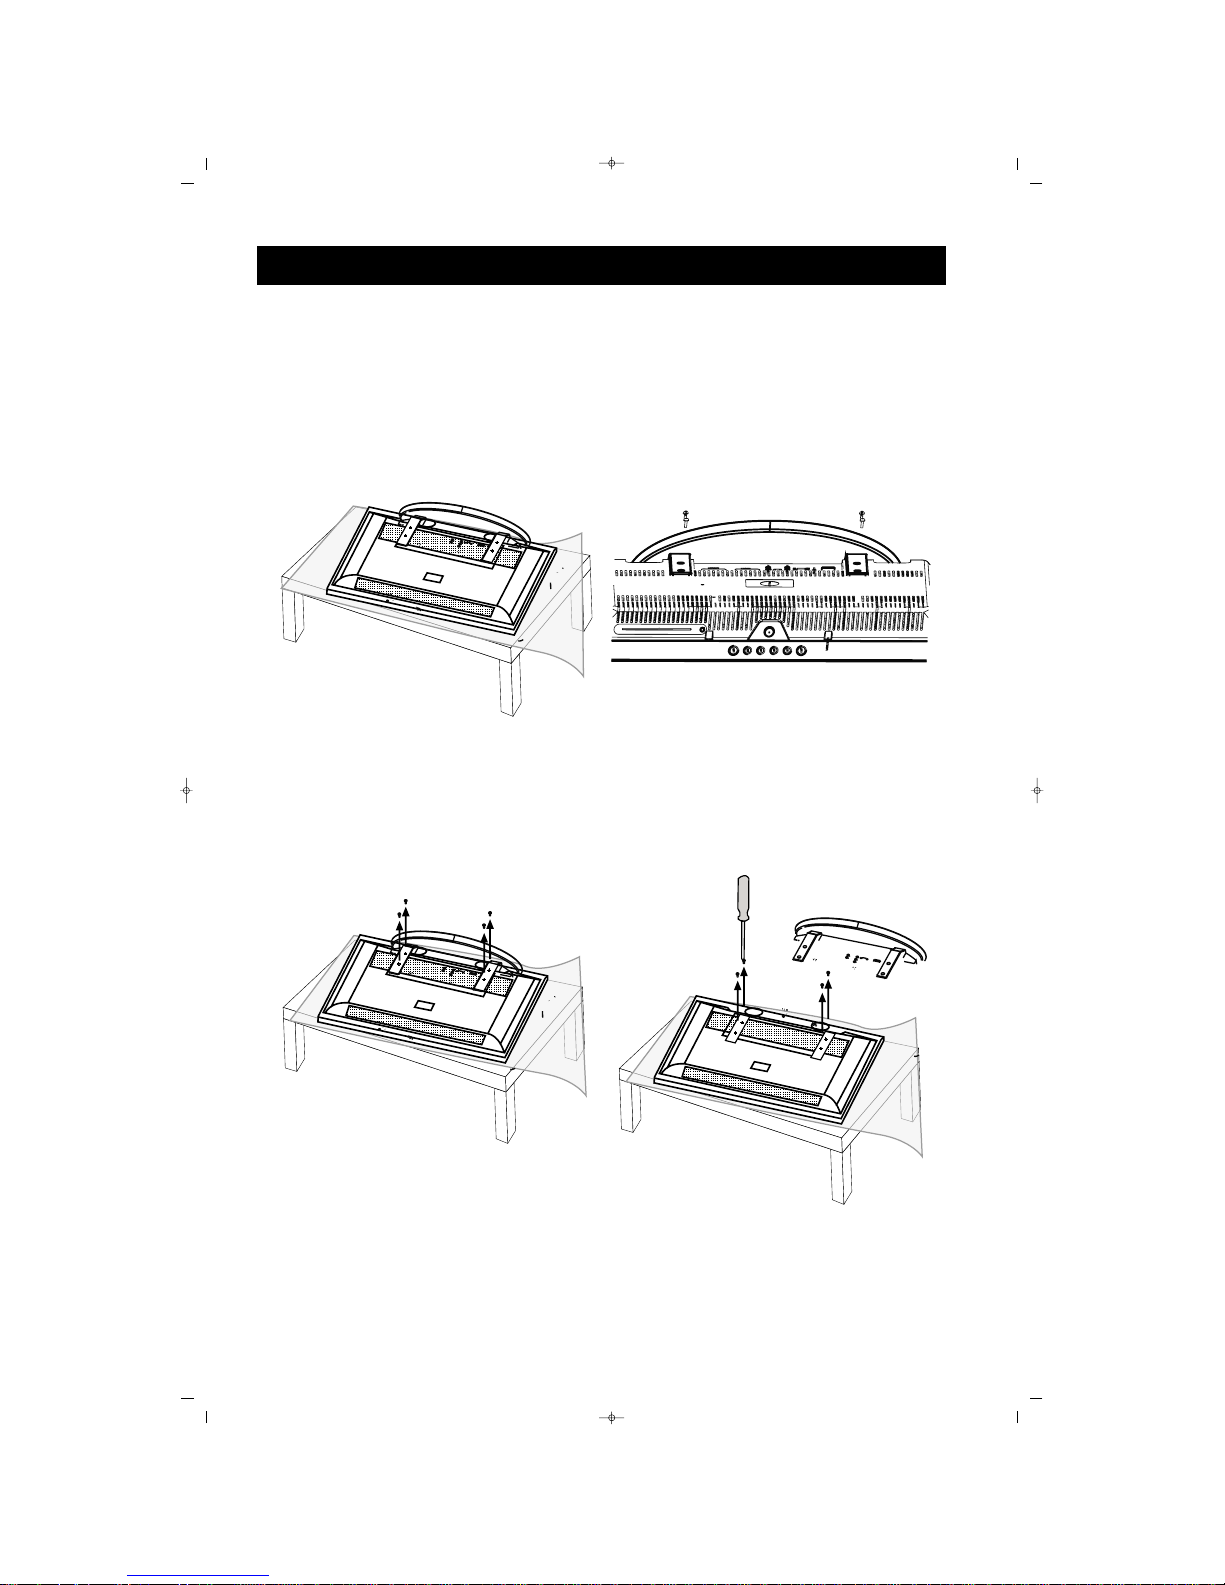
LCD TV'nin DUVARA MONTE ED‹LMES‹
LCD TV nizi duvara monte etmeden önce, ilk olarak, afla¤›daki ad›mlarla taban› ç›karman›z gerekmektedir:
11
Cihaz› düz bir yüzeye, koruyucu bir levha
veya kumafl üzerine, afla¤› bakar vaziyette
yerlefltiriniz.
22
Ayak vidalar›n› sökünüz.
33
44
LCD TV'nizin stand› VESA standard›na uygundur. LCD TV yi duvara monte ederken, gerekli montaj için
uzman bir teknisyene dan›fl›n›z. Montaj›n uzman bir teknisyen taraf›ndan yap›lmamas› durumunda Üretici
herhangi bir sorumluluk kabul etmemektedir.
Vidalar› sökünüz.
Aya¤› afla¤› do¤ru çekiniz.
065001056911 20"LOC-1 CFULL LCD 17/7/06 9:46 Page 16
Page 17
17
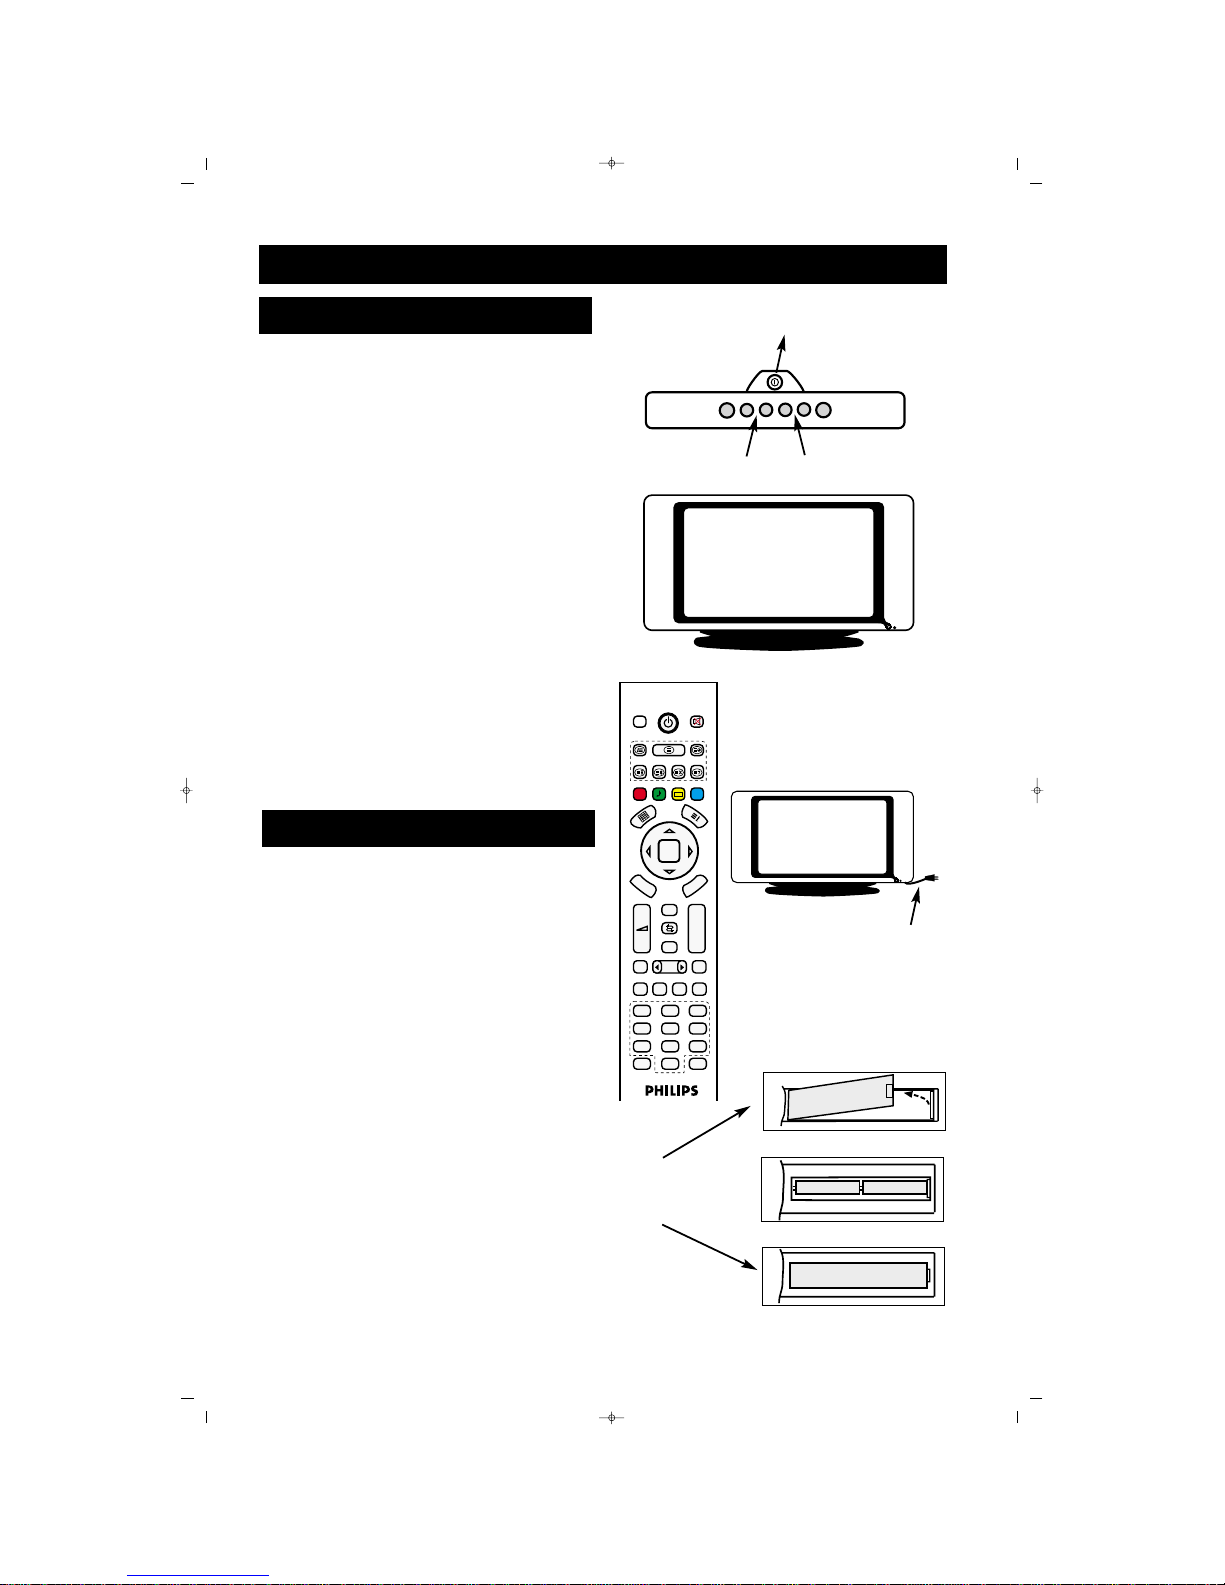
Güç kablosunu LCD TV üzerindeki AC
girifle tak›n›z. Güç kablosunu bir prize
tak›n›z ve TV yi çal›flt›r›n›z.
LCD TV'yi çal›flt›rmak için Stand-by
tufluna bas›n›z
Ses düzeyini artt›rmak için (
”+) tufluna,
azaltmak için (
”-) tufluna bas›n›z.
P +/- ye basarak kanallar› seçiniz.
LCD TV'yi uzaktan kumanda ile
çal›flt›r›rken, uzaktan kumanday› LCD
TV'nin ön k›sm›na tutunuz.
Uzaktan kumandan›n alt›nda bulunan pil
bölmesi kapa¤›n› ç›kar›n›z.
Uzaktan kumandaya iki adet AAA pilini
koyunuz. Pillerin (+) ve (-) uçlar›n›n, pil
bölmesinin içerisinde iflaretlendi¤i gibi
hizalanmas›na dikkat ediniz.
Pil bölmesi kapa¤›n› tekrar tak›n›z.
TV VE UZAKTAN KUMANDANIN ÇALIfiMASI
1
2
3
4
5
6
7
8
TELEV‹ZYON VE UZAKTAN KUMANDA
P‹LLER‹N TAKILMASI
P–
P+
MENU
V+V–
SOURCE
34
2
FAV+ EPG RADIO
PP
OK
M
EN
U
P+
P-
+
–
PIP
AV
FREEZE
16:9
TV PC DVI
YPbPr
1
2
3
4
5
6
7
8
9
0
ZOOM
S/M/D
FAV-
DVB
D
V
B
M
E
N
U
Zap
1
6
8
7
065001056911 20"LOC-1 CFULL LCD 17/7/06 9:46 Page 17
Page 18
18
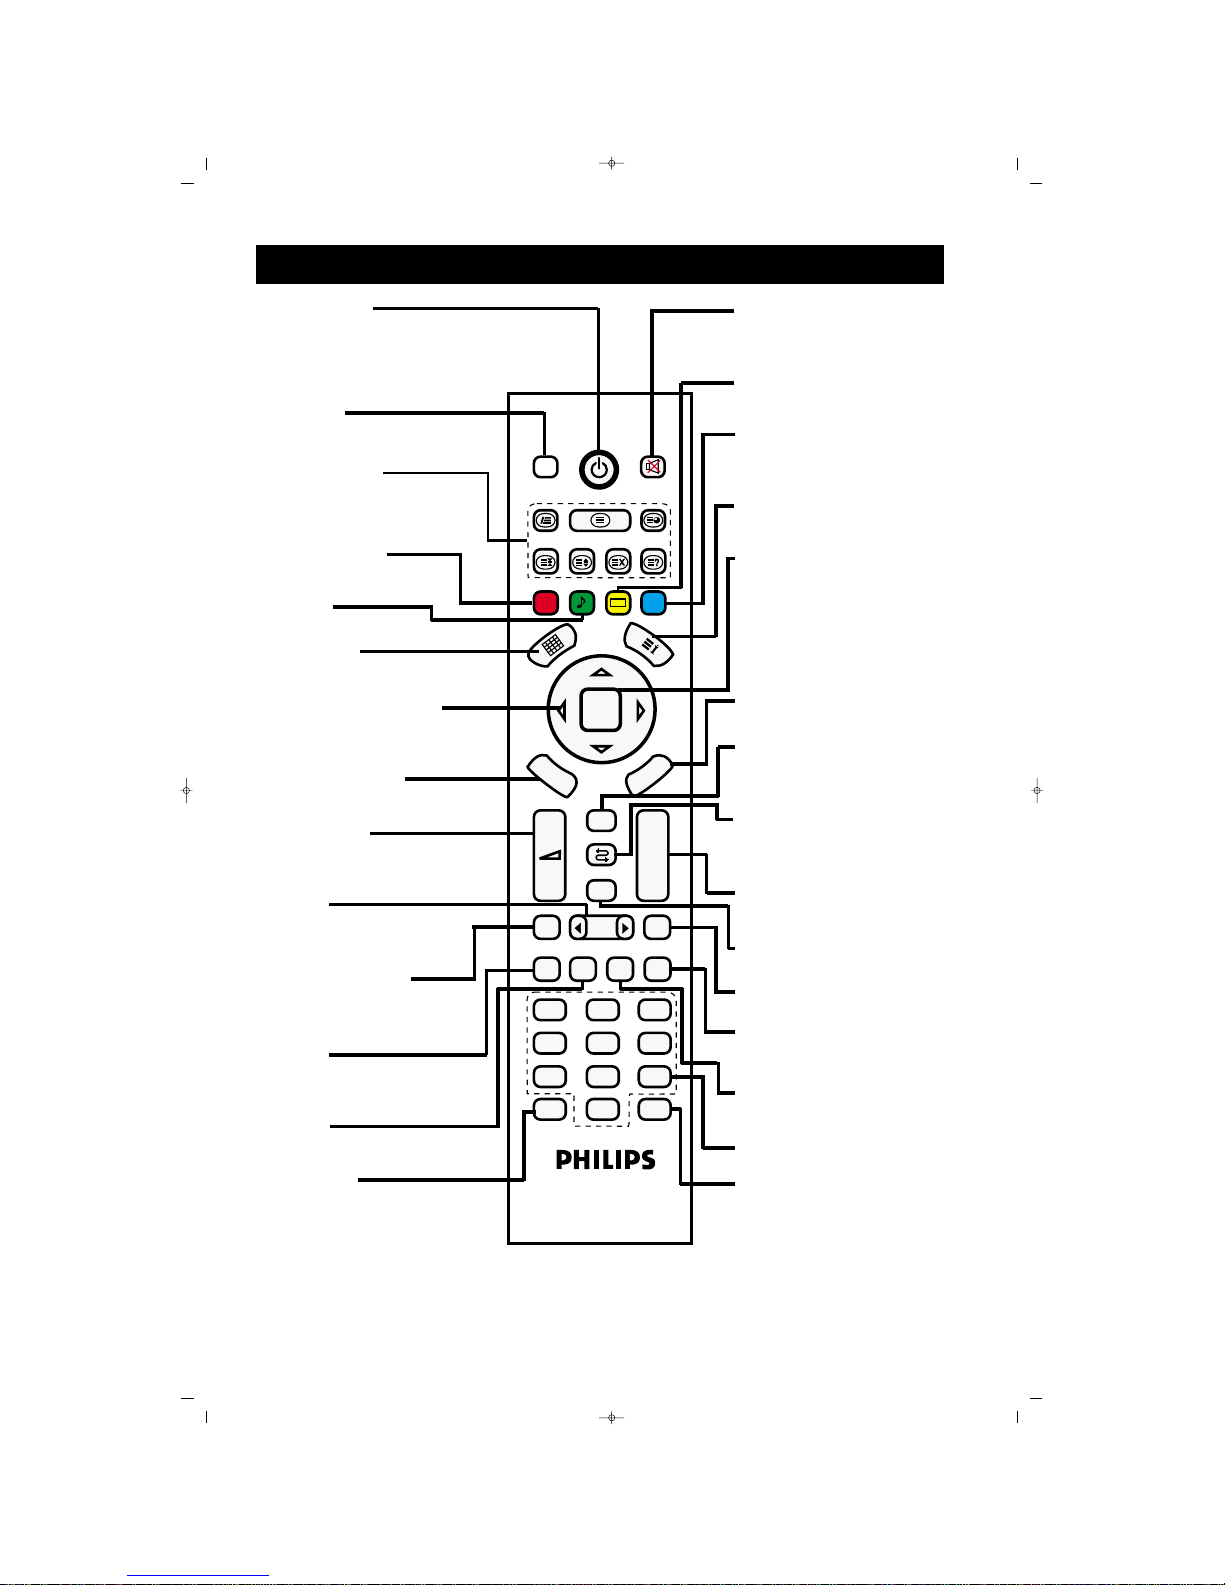
UZAKTAN KUMANDA
SSttaanndd BByy ttuuflfluu::
Cihaz›n›z› Stand By’dan
açmaya veya Stand By’a
(kapatman›z›) alman›z›
sa¤lar.
DDVVBB ttuuflfluu::
Bu modelde ifllevi yoktur.
TTeelleetteexxtt ttuuflflllaarr››::
KK››rrmm››zz›› ttuuflfl ((PPPP))::
Normalizasyon tuflu.
YYeeflfliill ttuuflfl::
Ses ön de¤erleri
MMoozzaaiikk ttuuflfluu::
Bu modelde ifllevi yoktur.
((
ÍÍ/ÆÆ/ÎÎ/ïï)) YYöönn ttuuflflllaarr››::
Menülerde dolafl›m ve
ayarlar için kullan›l›r.
DDVVBB MMEENNUU ttuuflfluu::
Bu modelde ifllevi yoktur.
”+/-
ttuuflflllaarr››::
Ses seviyesini azaltabilir
”-
veya yükseltebilirsiniz ”+.
AAVV ttuuflfluu::
Harici cihazlar›n ba¤lanaca¤› modlar› seçebilirsiniz.
MMaavvii ttuuflfl::
((SSmmaarrtt sseess ttuuflfluu))::
Ses mod-
unu de¤ifltirebilirsiniz.
TTVV ttuuflfluu::
PC ve YPbPr konumundan
ç›kmak için
PPCC ttuuflfluu::
PC moduna geçifli sa¤lar.
ZZoooomm TTuuflfluu::
Bu modelde ifllevi yoktur.
MMuuttee ttuuflfluu::
Cihaz›n›z›n sesini kesebilirsiniz.
SSaarr›› ttuuflfl::
Resim ön de¤erleri
MMaavvii ttuuflfl::
((SSmmaarrtt sseess ttuuflfluu))::
Ses mo-
dunu de¤ifltirebilirsiniz.
((‹‹)) ttuuflfluu::
Bilgi ekran›n› gösterir.
OOKK ttuuflfluu::
Yapt›¤›n›z seçimleri onaylamak için kullan›l›r.
MMEENNUU ttuuflfluu::
Menülere girebilirsiniz.
ZZaapp ttuuflfluu::
Kay›tl› kanallar›n›z›n görüntüsünü s›rayla ekranda
görebilirsiniz.
SSwwaapp ttuuflfluu::
Seyretti¤iniz bir önceki AV
modu ya da TV kanal›na
dönüflü sa¤lar
PP--,,PP++ ttuuflflllaarr››::
Program artt›rma ve azaltma tufllar›.
PPIIPP ttuuflfluu::
Bu modelde ifllevi yoktur.
1166::99 ttuuflfluu::
Resim format›n›
de¤ifltirir.
YYPPbbPPrr ttuuflfluu::
YPbPr harici moduna geçifl
yapabilirsiniz.
DDVVII ttuuflfluu::
Bu modelde ifllevi yoktur.
SSaayy››ssaall ttuuflflllaarr
SS//MM//DD ttuuflfluu::
Stereo, mono ve dual
modlar› aras›nda geçifli
sa¤lar (Yay›nda mevcut ise).
FAV+ EPG RADIO
PP
OK
MENU
P+
P-
+
–
PIP
AV
FREEZE
16:9
TV PC DVI
YPbPr
1
2
3
4
5
6
7
8
9
0
ZOOM
S/M/D
FAV-
DVB
DVB
M
E
N
U
Zap
065001056911 20"LOC-1 CFULL LCD 17/7/06 9:46 Page 18
Page 19

19
LCD TV resmini ayarlamak için bir kanal seçiniz
ve afla¤›daki ad›mlar› takip ediniz.
Uzaktan Kumanda üzerindeki menü
tufluna bas›n›z, ekranda menü belirecektir.
Ekranda RES‹M menüsü belirene kadar
Afla¤› yön (
ïï
) tufluna bas›n›z.
Resim menüsüne girmek için Sa¤ yön (
ÆÆ
)
tufluna bas›n›z.
RReessiimm mmeennüü kkoonnuullaarr››::
Parlakl›k,
Kontrast, Renk, Keskinlik, Din. Ten
rengi ve Beyaz dengesi
PPaarrllaakkll››kk::
Resmin koyu k›s›mlar›n› parlatmak için ayarlay›n›z. Renge beyazl›k
eklenecektir.
KKoonnttrraasstt::
Görüntü kalitesini
"keskinlefltirmek" için ayarlay›n›z.
Resmin siyah k›s›mlar›, koyuda daha
zengin olurken, beyaz daha parlak olur.
RReennkk::
Rengi artt›rmak veya azaltmak için
ayarlay›n›z.
KKeesskkiinnlliikk::
Detaylar› gelifltirmek için
ayarlay›n›z.
DDiinn.. TTeenn rreennggii::
Görüntüdeki insan ten
rengini daha çok gerçe¤e yaklaflt›rmak
için bu fonksiyonu açabilirsiniz.
BBeeyyaazz ddeennggeessii::
Görüntüdeki beyaz
de¤erini de¤ifltirebilirsiniz.
Seçti¤iniz resim konusunu Sola yön (
ÍÍ
)
ve Sa¤ yön (
ÆÆ
) tuflunu kullanarak
ayarlayabilirisiniz.
Ard arda “Menu” tufluna basarak
menülerden ç›k›n›z.
TV RES‹M MENÜ KONTROLLER‹
1
2
3
4
5
6
065001056911 20"LOC-1 CFULL LCD 17/7/06 9:46 Page 19
Page 20
20
FAV+ EPG RADIO
PP
OK
M
E
N
U
P+
P-
+
–
PIP
AV
FREEZE
16:9
TV PC DVI
YPbPr
1
2
3
4
5
6
7
8
9
0
ZOOM
S/M/D
FAV-
DVB
D
V
B
M
E
N
U
Zap
1
6
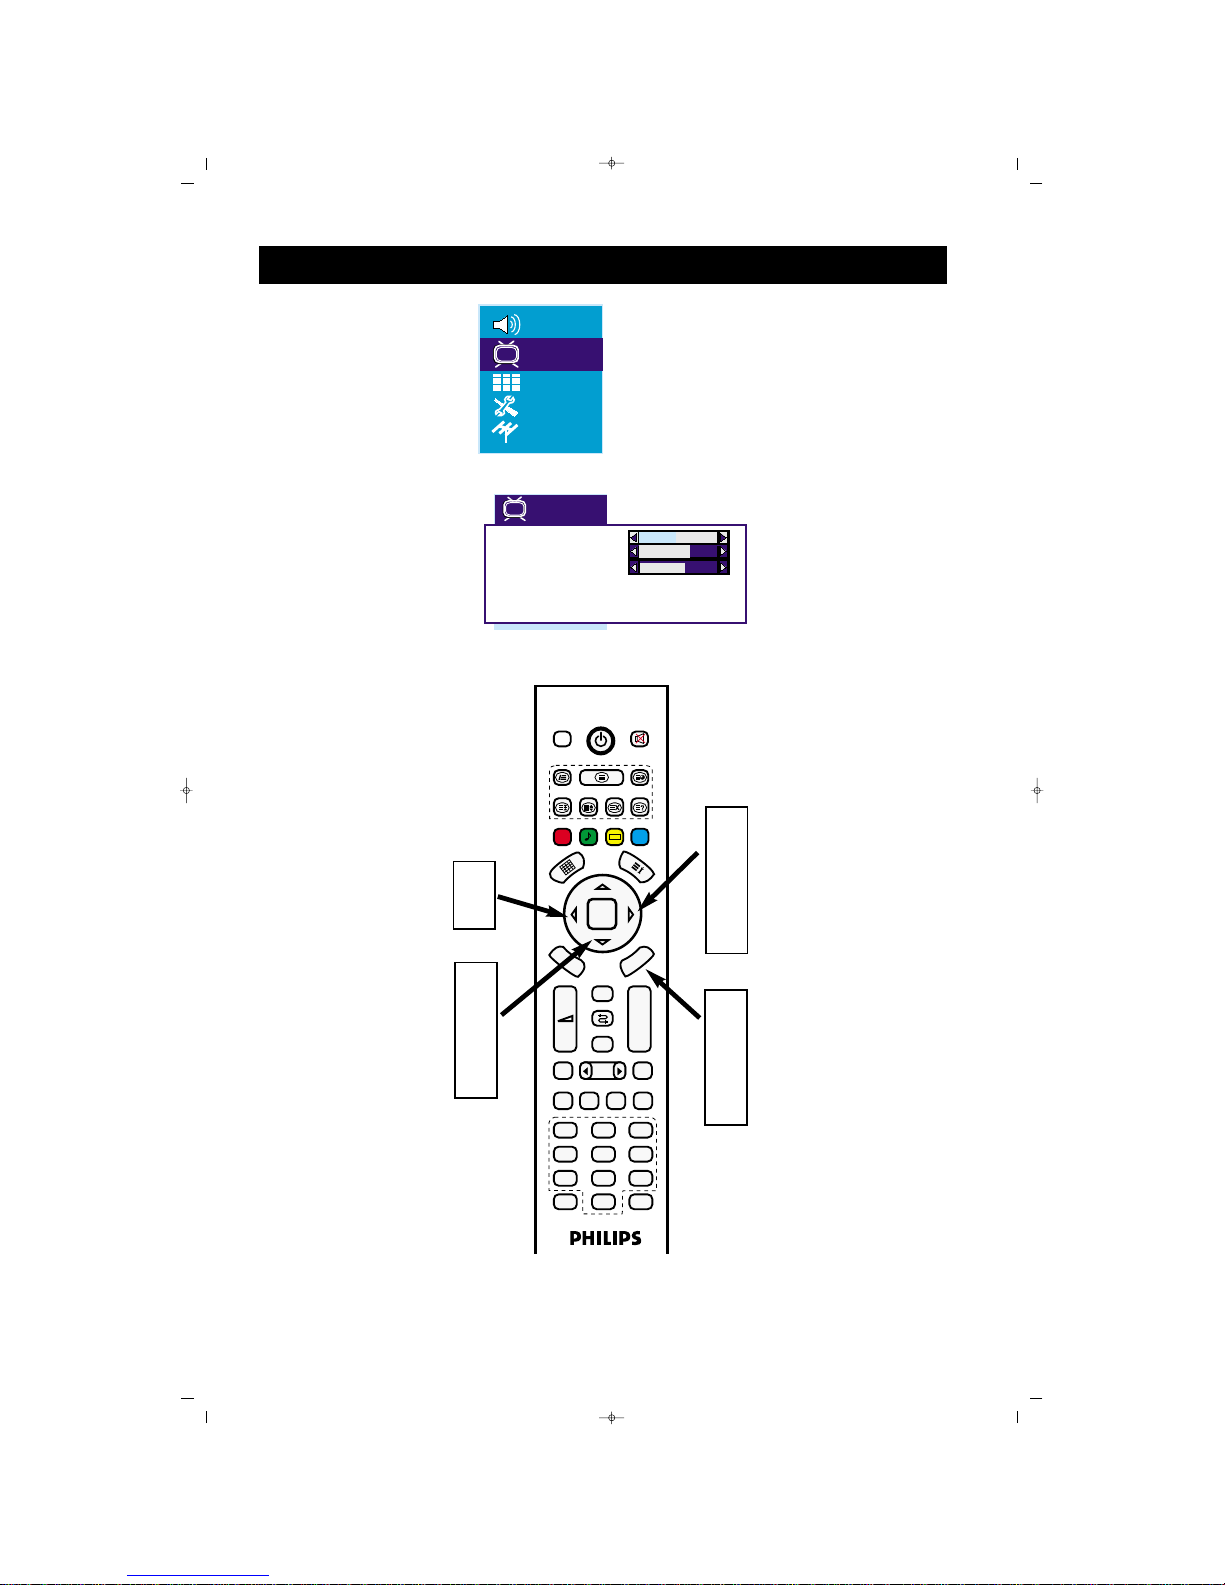
TV RES‹M MENÜ KONTROLLER‹
2
4
3
5
5
Parlakl›k
Kontrast
Renk
Keskinlik Normal
Din. ten rengi Kapal›
Beyaz dengesi Normal
065001056911 20"LOC-1 CFULL LCD 17/7/06 9:46 Page 20
Page 21
21
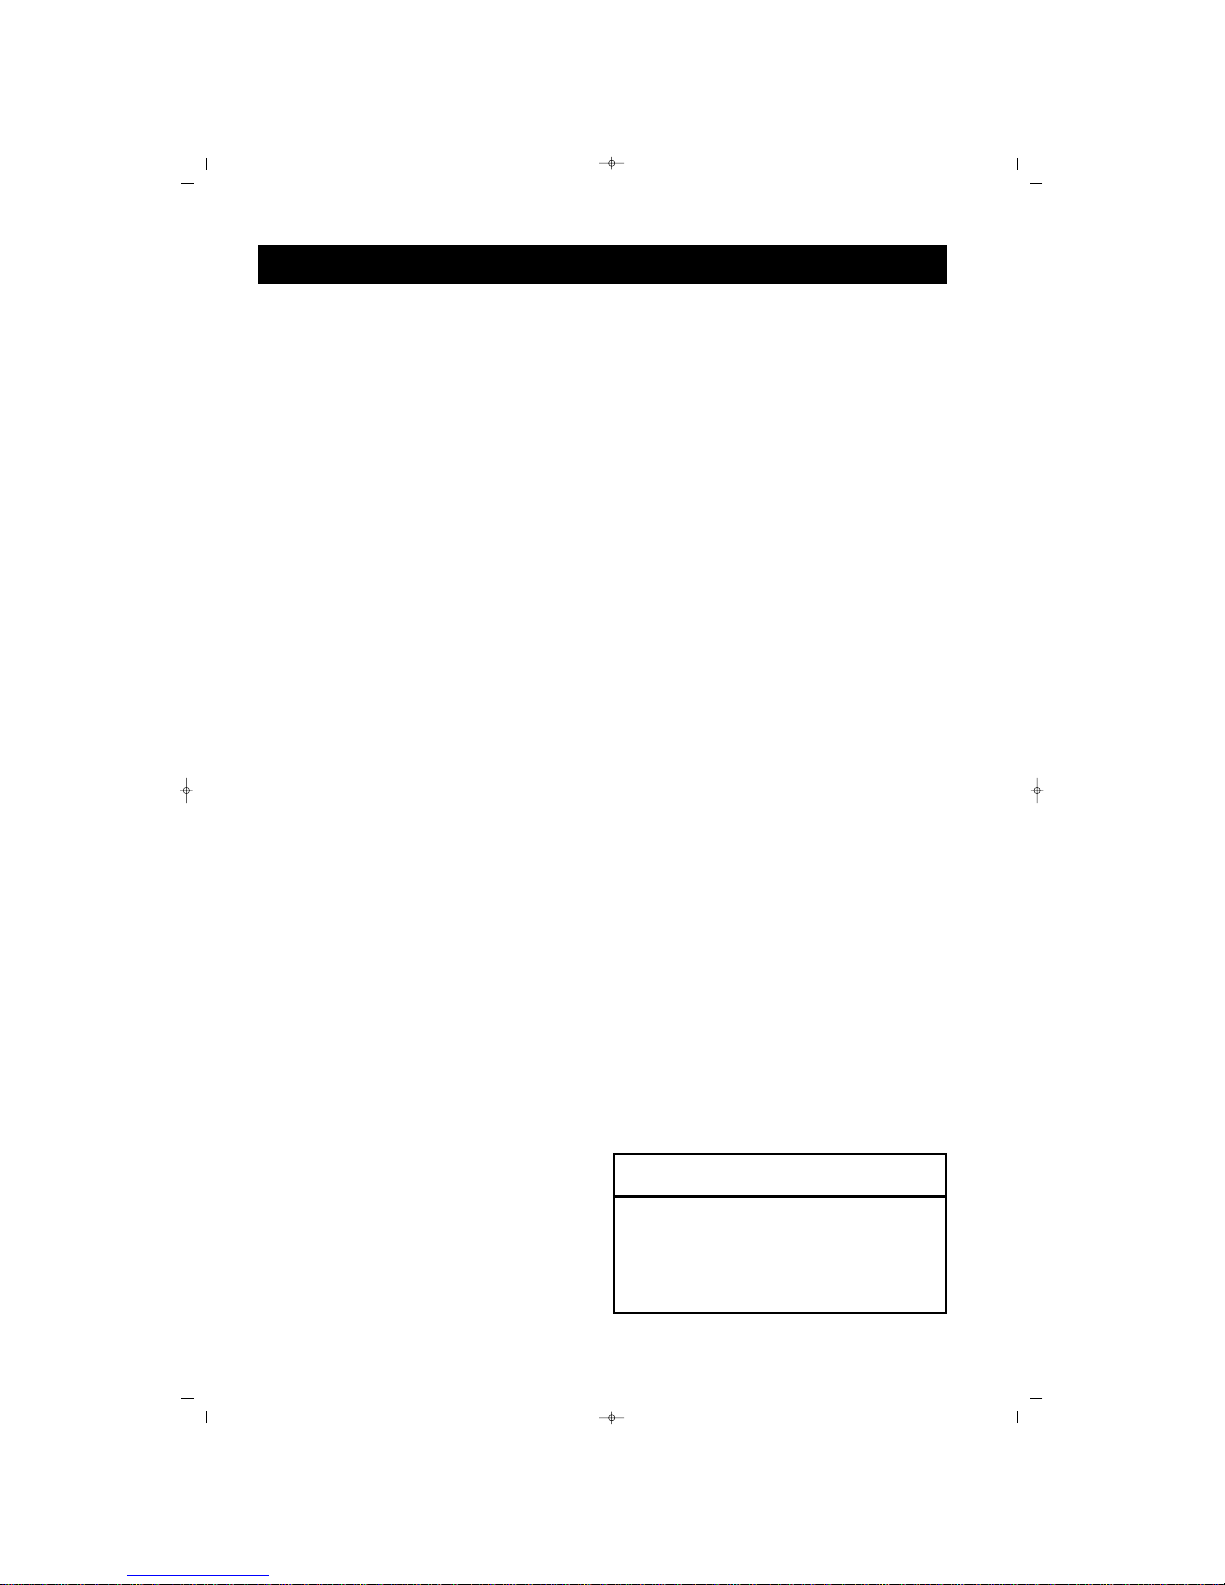
LCD TV resmini ayarlamak için bir kanal seçiniz
ve afla¤›daki ad›mlar› takip ediniz.
Uzaktan Kumanda üzerindeki menü
tufluna bas›n›z, ekranda menü belirecektir.
Ekranda SES menüsü belirene kadar
Afla¤› yön (
ïï
) tufluna bas›n›z.
Ses menüsüne girmek için Sa¤ yön (
ÆÆ
)
tufluna bas›n›z.
Ayarlamak istedi¤iniz Ses menü konular›n› Yukar› Yön (
ïï
) tuflunu kullanarak
seçiniz.
SSeess mmeennüü kkoonnuullaarr››:: SSeess,, BBaallaannss,, BBaass,, TTiizz
vvee EEkkoollaayyzzeerr,,
SSeess::
Ses seviyesini art›rabilir veya azaltabilirsiniz.
BBaallaannss::
Balans seviyesini ayarlayabilirsiniz.
BBaass::
Bas ses seviyesini ayarlayabilirsiniz.
TTiizz::
Tiz ses seviyesini ayarlayabilirsiniz.
EEkkoollaayyzzeerr::
Sa¤ yön (
ÆÆ
) tuflu ile girdi¤iniz
bu menüde Ekolayzeri ayarlayabilirsiniz.
Seçti¤iniz Ses konusunu Sola yön (
ÍÍ
) ve
Sa¤ yön (
ÆÆ
) tuflunu kullanarak ayarlayabilirisiniz.
(Ekolayzer frekans de¤erlerini ayarlarken
Afla¤› yön (
ïï
) ve Yukar› yön (ÎÎ)
tufllar›n›da kullanmal›s›n›z.)
Ard arda “Menu” tufluna basarak
menülerden ç›k›n›z.
1
2
3
4
5
6
FFaayyddaall›› ‹‹ppuuccuu
Seçilen yay›nda stereo yoksa ve TV nin stereo
modunda olmas› halinde, TV den gelen ses
mono modda kalacakt›r.
TV SES MENÜ KONTROLLER‹
065001056911 20"LOC-1 CFULL LCD 17/7/06 9:46 Page 21
Page 22
22
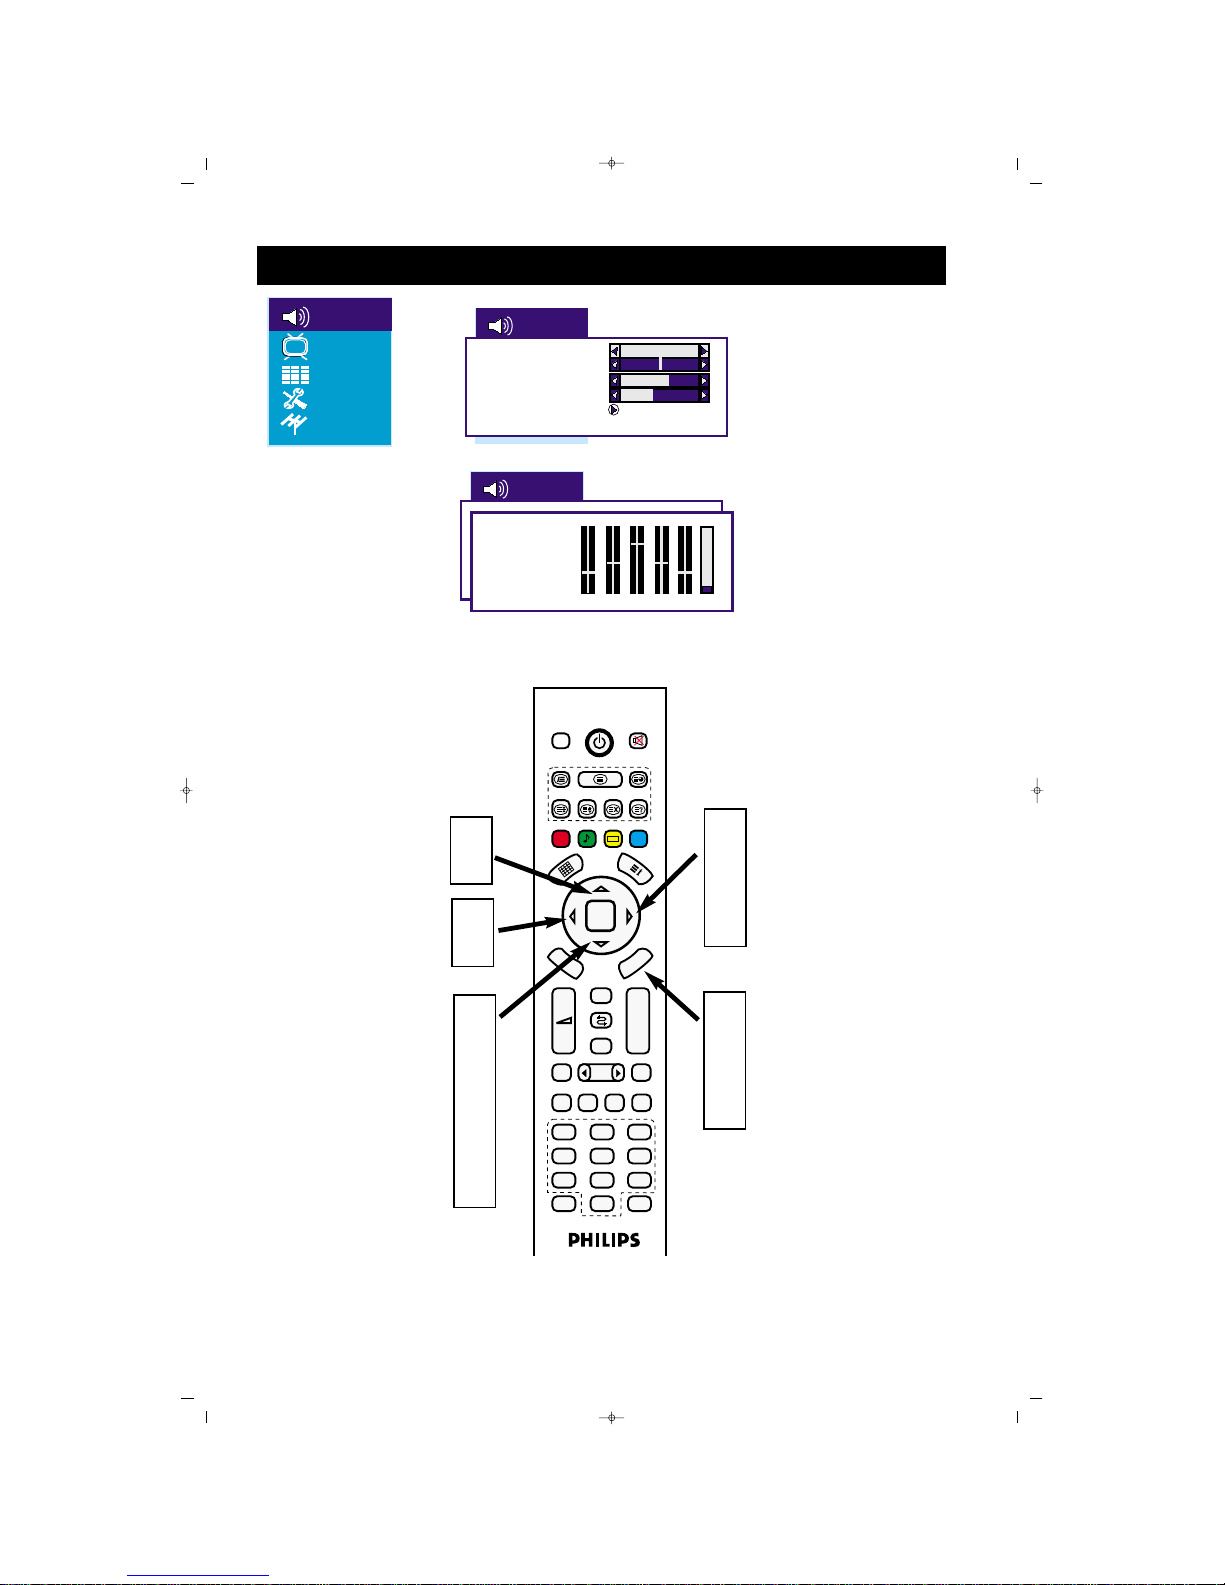
TV SES MENÜ KONTROLLER‹
FAV+ EPG RADIO
PP
OK
M
E
N
U
P+
P-
+
–
PIP
AV
FREEZE
16:9
TV PC DVI
YPbPr
1
2
3
4
5
6
7
8
9
0
ZOOM
S/M/D
FAV-
DVB
D
V
B
M
E
N
U
Zap
1
6
5
2
4
5
3
5
5
Ses
Balans
Bas
Tiz
Ekolayzer
Kullan›c›
100 300 1k 3k 8k
065001056911 20"LOC-1 CFULL LCD 17/7/06 9:46 Page 22
Page 23

23
ÇÇooccuukk kkiilliiddii
özelli¤i kanallar› kilitlemenizi ve
çocuklar›n›z›n, uygun olmayan program içeri¤ini
izlemesini önlemenizi sa¤lar.
ÇÇooccuukk kkiilliiddiinnii aakkttiiff hhaallee ggeettiirrmmeekk::
Uzaktan Kumanda üzerindeki menü
tufluna bas›n›z, ekranda menü belirecektir.
Ekranda AYAR menüsü seçili olana
kadar Afla¤› yön (
ïï
) tufluna ard arda
bas›n›z ve Sa¤ yön (
ÆÆ
) tufluna basarak
menüye giriniz.
Çocuk kilidi seçili olana kadar Afla¤› yön
(
ïï
) tufluna ard arda bas›n›z.
KKiilliitt ffoonnkkssiiyyoonnuunnuu aakkttiiff hhaallee ggeettiirrmmeekk::
Sa¤ yön (ÆÆ) tufluna bas›n›z, ekranda yeni
bir menü belirecektir.
Parola seçili olana kadar Afla¤› yön (
ïï
)
tufluna bas›n›z.
0..9 nümerik tufllar› ile 4 haneli belirledi¤iniz kilit parolas›n› giriniz.
Tekrar kilit parolas›n› giriniz. Parola
belirlenmifltir.
Yukar› yön (
ÎÎ
) tufluna basarak Kilit
sat›r›n› seçili hale getirin
Sa¤ yön (
ÆÆ
) tuflunu kullanarak “Aç›k”
yap›n›z.
Ard arda “Menu” tufluna basarak
menülerden ç›k›n›z.
KKiilliitt ffoonnkkssiiyyoonnuunnuu KKaappaattmmaakk::
Sa¤ yön (ÆÆ) tufluna bas›n›z, ekranda yeni
bir menü belirecektir.
Parola seçili olana kadar Afla¤› yön (
ïï
)
tufluna bas›n›z.
0..9 nümerik tufllar› ile 4 haneli daha
önce girdi¤iniz kilit parolas›n› yaz›n›z.
Tekrar kilit parolas›n› giriniz.
Yukar› yön (
ÎÎ
) tufluna basarak Kilit
sat›r›n› seçili hale getirin
Sa¤ yön (
ÆÆ
) tuflunu kullanarak “Kapal›”
yap›n›z.
Ard arda “Menu” tufluna basarak
menülerden ç›k›n›z.
1
2
3
4
ÇOCUK K‹L‹D‹
5
6
7
8
9
5
6
7
8
9
10
4
10
065001056911 20"LOC-1 CFULL LCD 17/7/06 9:46 Page 23
Page 24
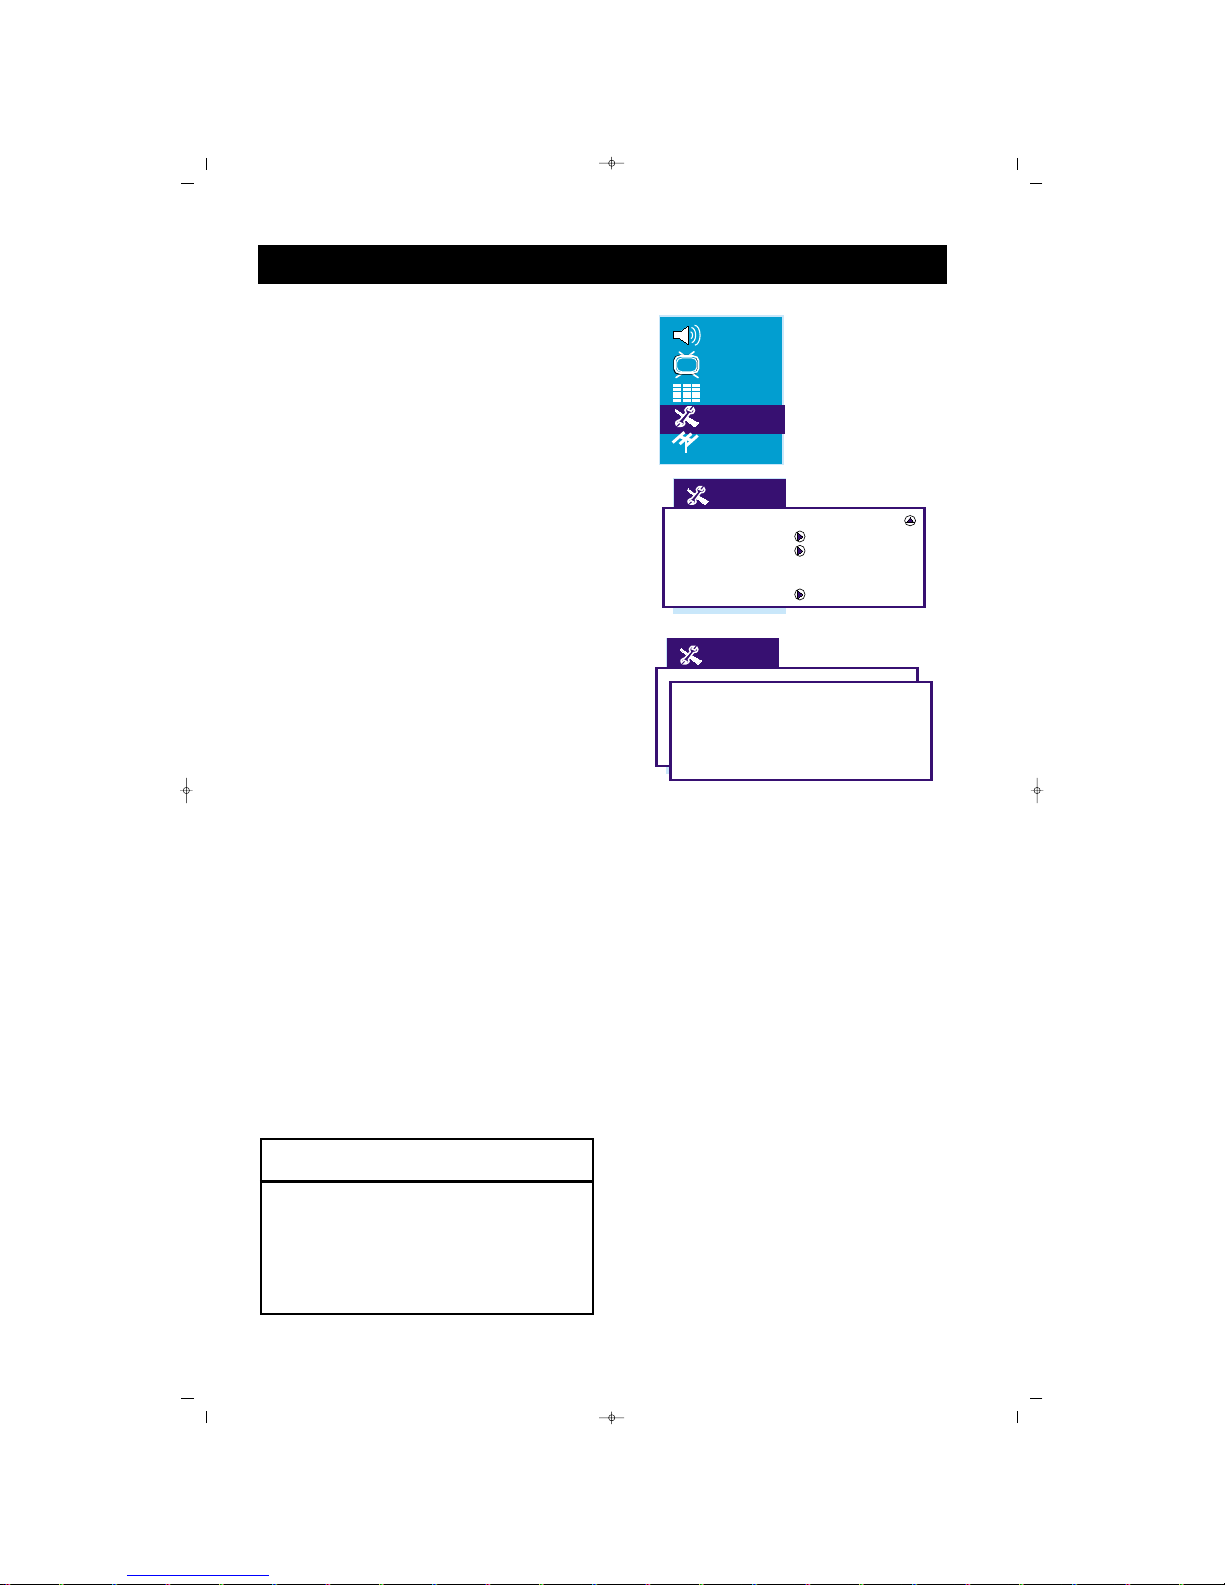
ÇÇooccuukk kkiilliiddiinnii aakkttiiff hhaallee ggeettiirrmmeekk::
ÇÇooccuukk kkiilliiddiinnii aaçç››kk yyaapptt››kkttaann ssoonnrraa hhaannggii kkaannaall--
llaarr››nn kkiilliittlleenneeccee¤¤iinniinnddee bbeelliirrlleennmmeessii ggeerreekkiirr..
Uzaktan Kumanda üzerindeki menü
tufluna bas›n›z, ekranda menü belirecektir.
Ekranda PROGRAMLAR seçili olana
kadar Afla¤› yön (
ïï
) tufluna bas›n›z.
Sa¤ yön (
ÆÆ
) tufluna basarak menüye
giriniz.
“Kilit” seçili olana kadar Afla¤› yön (
ïï
)
tufluna ard arda bas›n›z.
Sa¤ yön (
ÆÆ
) tuflunu kullanarak “Aç›k”
yap›n›z. ‹zledi¤iniz veya yeni ayarlad›¤›n›z
kanal kilitlenmifltir. Bu kanal seyretmek
istedi¤inizde mutlaka parolay›
girmelisiniz.
“Kaydet” seçili olana kadar Afla¤› yön
(
ïï
) tufluna ard arda bas›n›z ve Sa¤ yön
(
ÆÆ
) tufluna basarak kay›t ifllemini yap›n›z.
Ard arda “Menu” tufluna basarak
menülerden ç›k›n›z.
1
2
3
4
ÇOCUK K‹L‹D‹
5
6
7
FFaayyddaall›› ‹‹ppuuccuu
0711 standart Kilit flifresidir. Eriflim flifreniz,
sizin d›fl›n›zdaki birisi taraf›ndan (mesela, bir
çocuk) de¤ifltirilirse veya flifreyi unutursan›z,
her zaman, standart kodu kullanarak girebilirsiniz.
Ülke TR
Çocuk kilidi
Zamanlay›c›
Teletekst dili Pan European
Teletekst D / B Bat›
Saat
Kilit Aç›k
Parola * * * *
065001056911 20"LOC-1 CFULL LCD 17/7/06 9:46 Page 24
Page 25
25
FAV+ EPG RADIO
PP
OK
M
E
N
U
P+
P-
+
–
PIP
AV
FREEZE
16:9
TV PC DVI
YPbPr
1
2
3
4
5
6
7
8
9
0
ZOOM
S/M/D
FAV-
DVB
D
VB
MENU
Zap
10
5
4
9
6
7
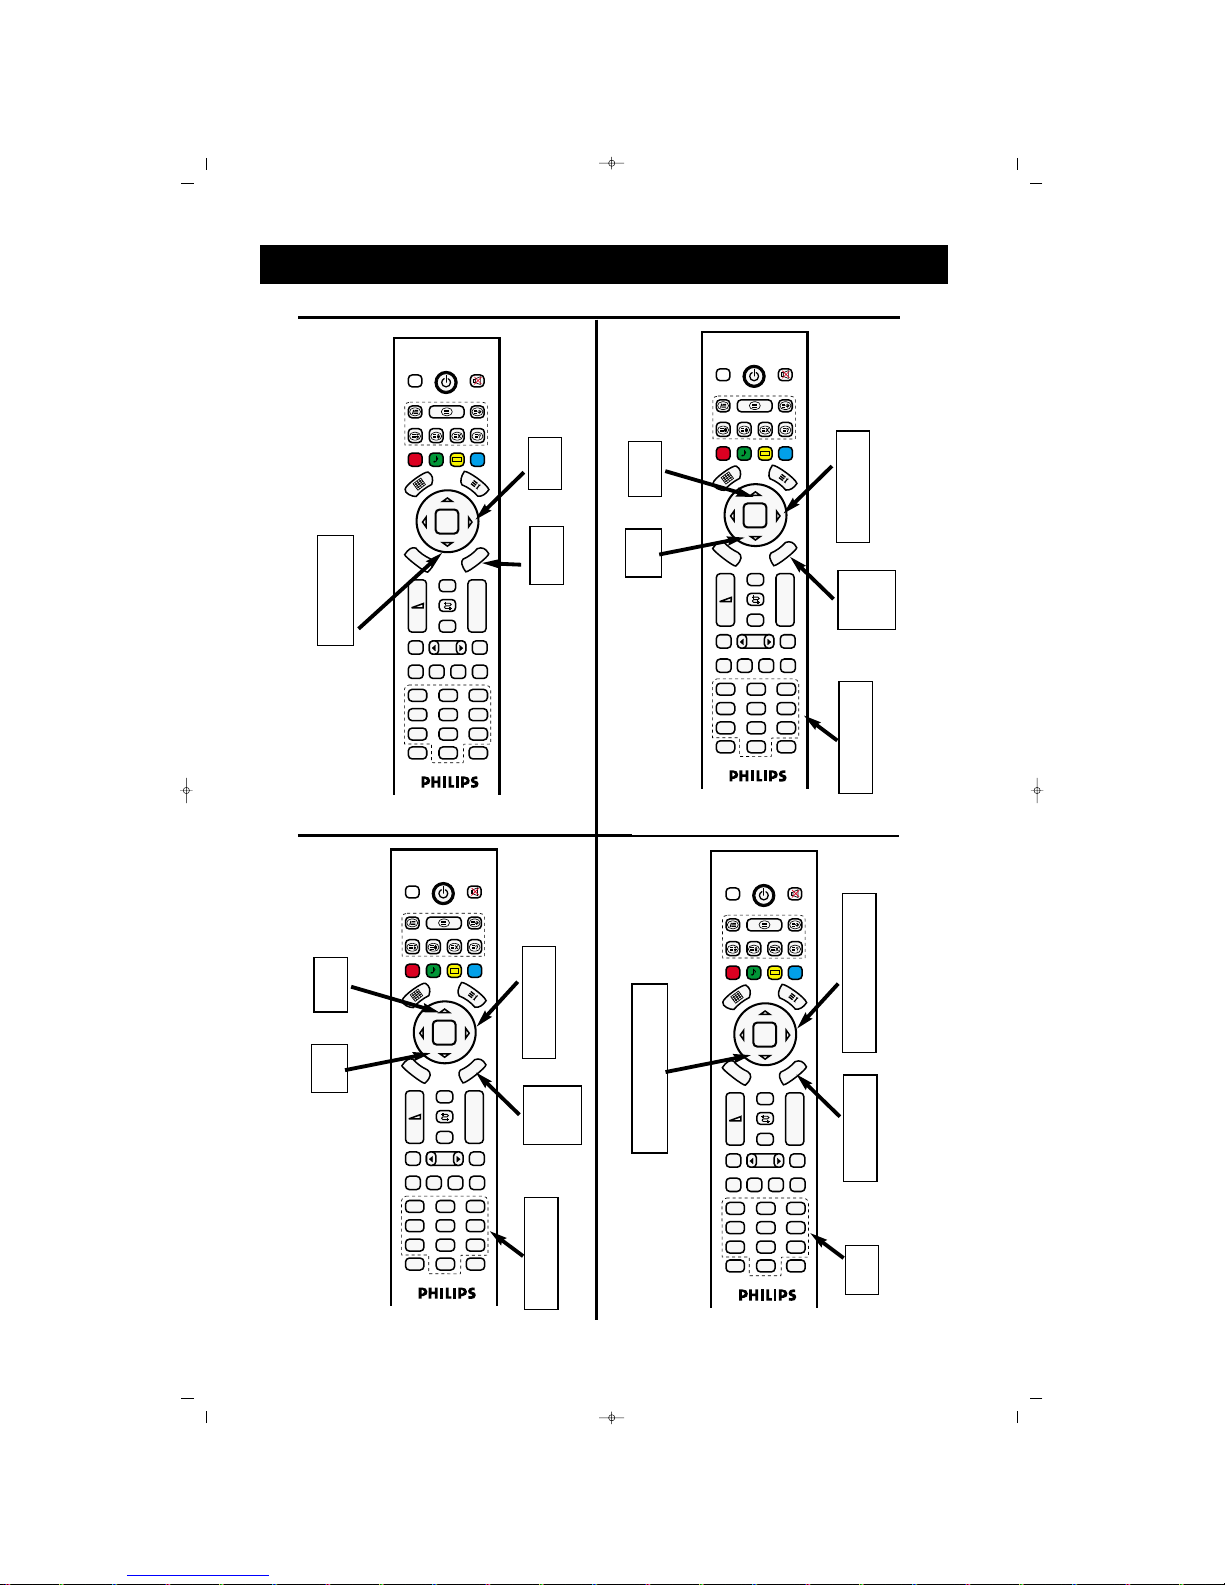
K‹L‹T FONKS‹YONLARI
FAV+ EPG RADIO
PP
OK
M
E
N
U
P+
P-
+
–
PIP
AV
FREEZE
16:9
TV PC DVI
YPbPr
1
2
3
4
5
6
7
8
9
0
ZOOM
S/M/D
FAV-
DVB
DVB
M
E
NU
Zap
KKiilliitt ffoonnkkssiiyyoonnuunnuu aakkttiiff hhaallee ggeettiirrmmeekk::
KKiilliitt ffoonnkkssiiyyoonnuunnuu KKaappaattmmaakk::
FAV+ EPG RADIO
PP
OK
M
E
N
U
P+
P-
+
–
PIP
AV
FREEZE
16:9
TV PC DVI
YPbPr
1
2
3
4
5
6
7
8
9
0
ZOOM
S/M/D
FAV-
DVB
D
VB
M
EN
U
Zap
1
2
3
3
ÇÇooccuukk kkiilliiddiinnii aakkttiiff hhaallee ggeettiirrmmeekk::
8
10
5
4
9
6
7
8
FAV+ EPG RADIO
PP
OK
M
E
N
U
P+
P-
+
–
PIP
AV
FREEZE
16:9
TV PC DVI
YPbPr
1
2
3
4
5
6
7
8
9
0
ZOOM
S/M/D
FAV-
DVB
DVB
M
EN
U
Zap
ÇÇooccuukk KKiilliittllii kkaannaall bbeelliirrlleemmeekk::
2
4
6
3
5
6
5
1
7
065001056911 20"LOC-1 CFULL LCD 17/7/06 9:46 Page 25
Page 26
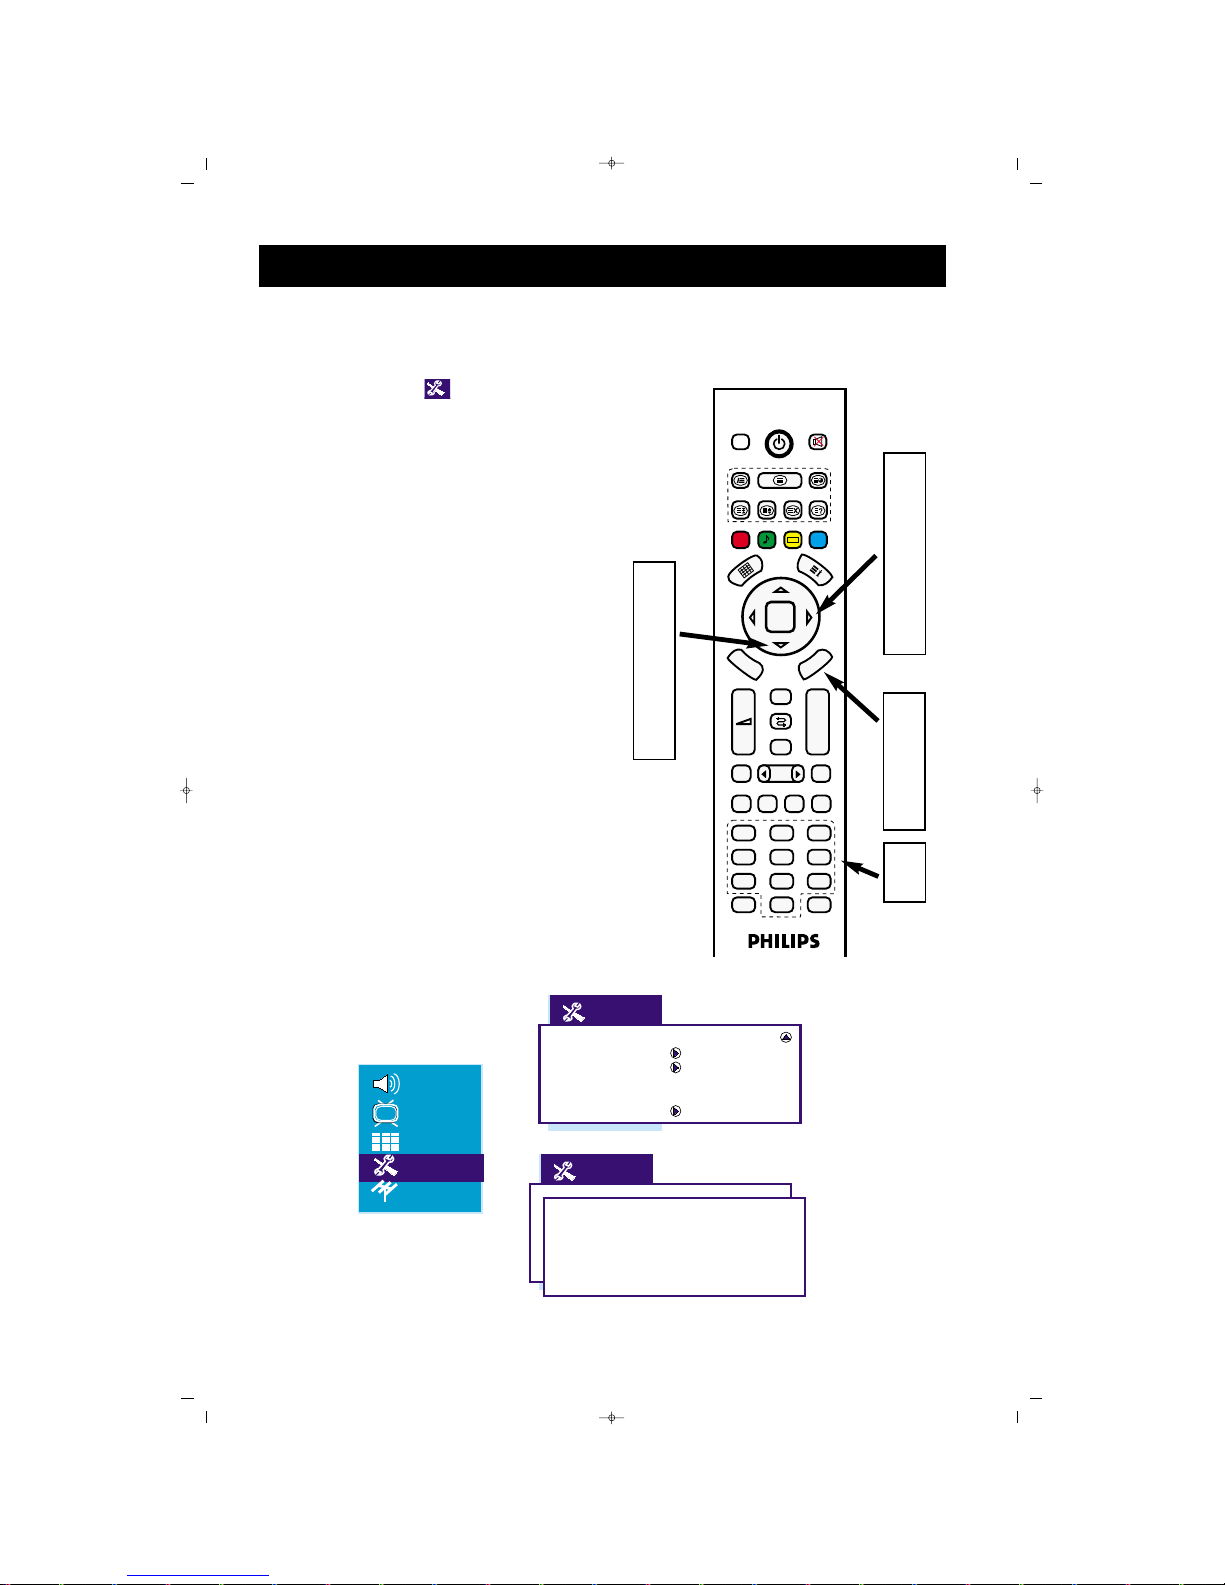
Uzaktan Kumanda üzerindeki menü
tufluna bas›n›z ekranda menü belirecektir.
Ekranda AYAR menüsü seçili olana
kadar Afla¤› yön (
ïï
) tufluna ard arda
bas›n›z ve Sa¤ yön (
ÆÆ
) tufluna basarak
menüye giriniz.
Saat seçili olana kadar Afla¤› yön (
ïï
)
tufluna ard arda bas›n›z.
Sa¤ yön (
ÆÆ
) tufluna basarak menüye
giriniz.
Sa¤ yön (
ÆÆ
) tuflunu kullanarak saat mo-
dunu seçiniz.
Afla¤› yön (
ïï
) tufluna basarak Saat
sat›r›na geliniz.
Say› tufllar›yla saati ayarlay›n›z.
Ard arda “Menu” tufluna basarak
menülerden ç›k›n›z.
SAAT AYARLAMAK
26
1
2
3
4
5
6
7
8
FAV+ EPG RADIO
PP
OK
M
E
N
U
P+
P-
+
–
PIP
AV
FREEZE
16:9
TV PC DVI
YPbPr
1
2
3
4
5
6
7
8
9
0
ZOOM
S/M/D
FAV-
DVB
D
V
B
M
E
N
U
Zap
1
8
2
3
6
2
4
5
7
Ülke TR
Çocuk kilidi
Zamanlay›c›
Teletekst dili Pan European
Teletekst D / B Bat›
Saat
Mod Kapal›
Saat 01:22
065001056911 20"LOC-1 CFULL LCD 17/7/06 9:46 Page 26
Page 27
2727
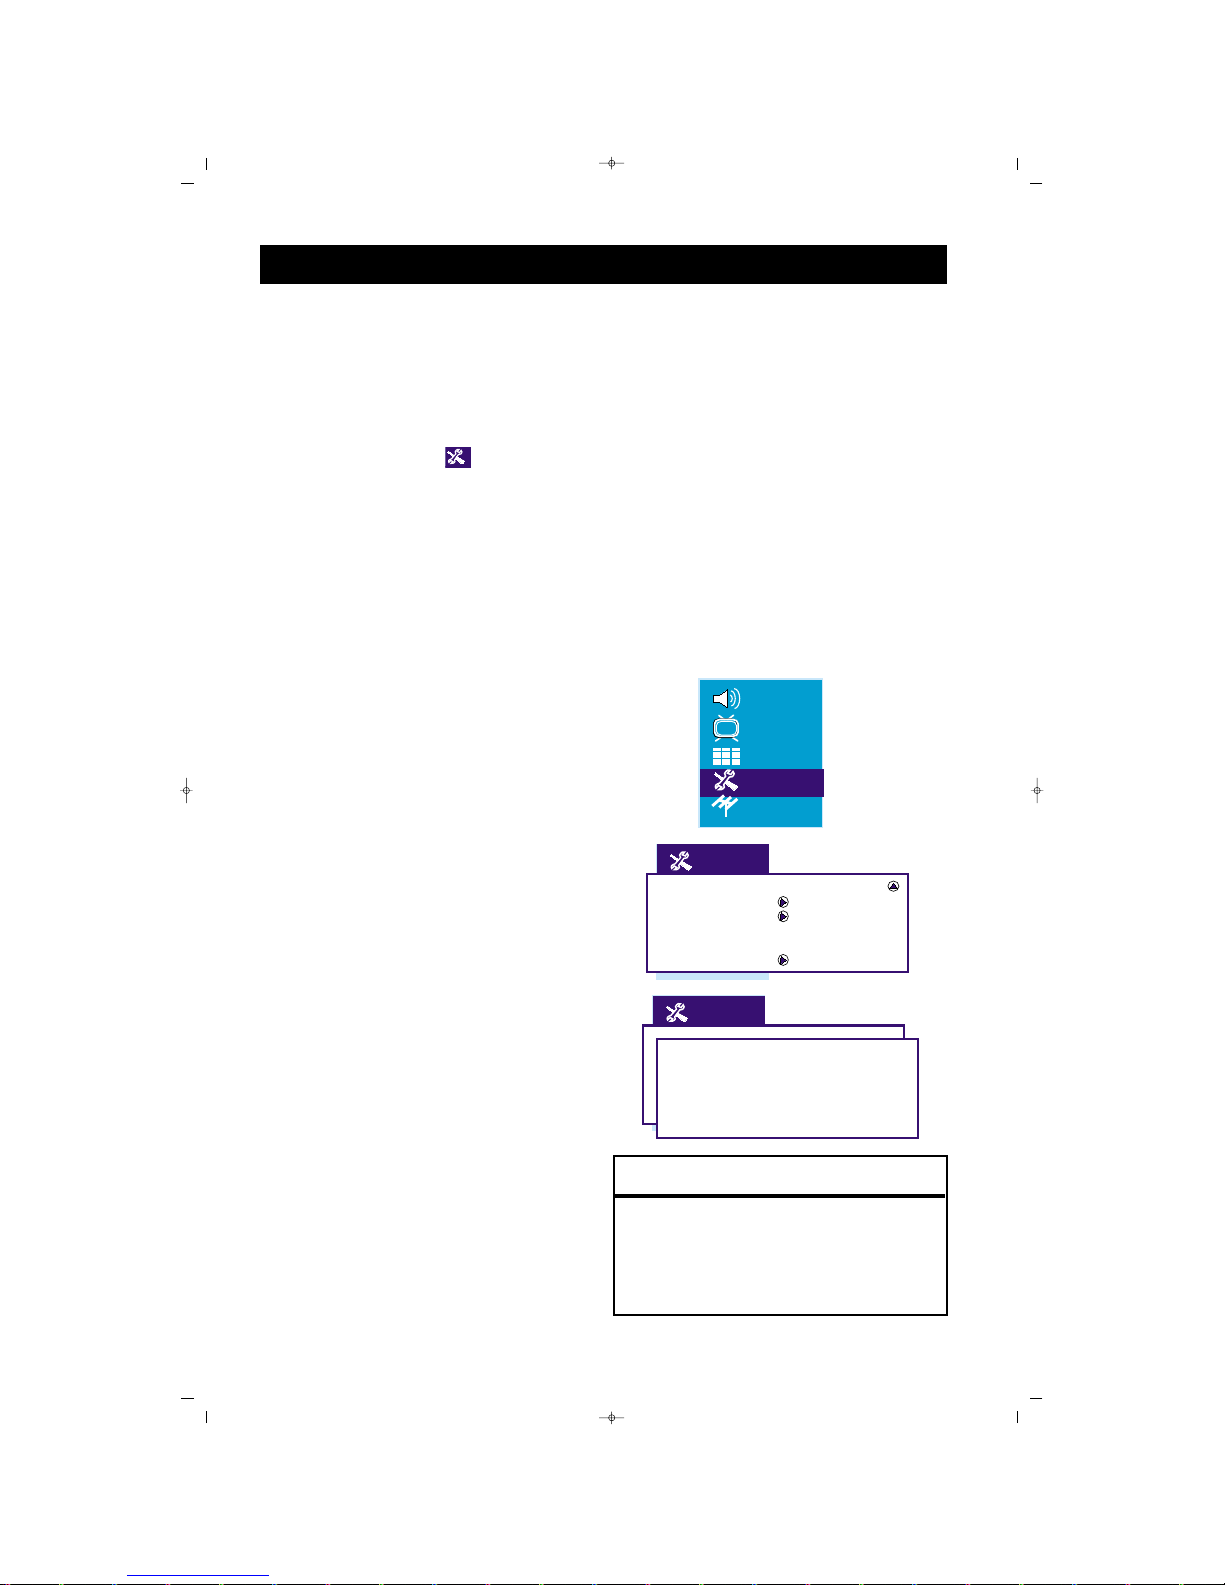
ZAMANLAYICI MENÜSÜ
Bu menüde yapt›¤›n›z ayarlarla cihaz›n›z›n
otomatik kapan›fl›n› veya program de¤ifltirmesini
sa¤layabilirsiniz.
Uzaktan Kumanda üzerindeki menü
tufluna bas›n›z, ekranda menü belirecektir.
Ekranda AYAR menüsü seçili
olana kadar Afla¤› yön (
ïï
) tufluna ard
arda bas›n›z ve Sa¤ yön (
ÆÆ
) tufluna
basarak menüye giriniz.
Zamanlay›c› Alt menüsü
seçili olana
kadar Afla¤› yön (
ïï
) tufluna ard arda
bas›n›z.
Sa¤ yön
(ÆÆ)
tufluna bas›n›z, ekranda
Zamanlay›c› menüsü belirecektir.
OOttoommaattiikk kkaappaannmmaa ((SSlleeeepp TTiimmeerr))::
Afla¤› yön
(ïï)
tuflunu kullanarak “Oto
kapan›fl” fonksiyonunu seçili hale getiriniz.
Sa¤ yön
(ÆÆ)
tuflunu kullanarak TV’nizin
kapanma saatini (5’er dakikal›k
dilimlerlerle) belirleyiniz.
Ard arda “Menu” tufluna basarak
menülerden ç›k›n›z. Cihaz›n›z belirledi¤iniz
saatte kapanacakt›r.
KKaappaann››flfl ssaaaattii aayyaarrllaammaakk::
Afla¤› yön
(ïï)
tuflunu kullanarak “Kapan›fl
saati” fonksiyonunu seçili hale getiriniz.
0..9 nümerik tufllar› ile saati giriniz.
Ard arda “Menu” tufluna basarak
menülerden ç›k›n›z. Cihaz›n›z belirledi¤iniz
saatte kapanacakt›r.
KKaannaall ggeeççiiflflii aayyaarrllaammaakk::
Afla¤› yön
(ïï)
tuflunu kullanarak “Geçifl”
fonksiyonunu seçili hale getiriniz.
0..9 nümerik tufllar› ile saati giriniz.
Afla¤› yön (
ïï
)
tuflunu kullanarak
“Geçilecek pr.” satr›n› seçili hale getiriniz.
0..9 nümerik tufllar›yla veya yön tufllar›yla
(
ÍÍÆÆ,ïïÎÎ
) ile Program numaras›n› giriniz.
Ard arda “Menu” tufluna basarak
menülerden ç›k›n›z. Cihaz›n›z belirledi¤iniz
saatte ilgili programa geçecektir.
1
2
3
4
5
6
7
5
6
5
6
7
8
9
7
FFaayyddaall›› ‹‹ppuuccuu
*Otomatik kapanma ile Kanal geçifli saatlerinin
birbiriyle çak›flmamas›na özen gösteriniz.
* Hat›rlatma fonksiyonunu Sa¤ yön
(ÆÆ)
tufluyla
ayarlad›¤›n›zda, Kapan›fl saati veya Program geçifl
saati gelmeden önce sizi uyaracakt›r.
Ülke TR
Çocuk kilidi
Zamanlay›c›
Teletekst dili Pan European
Teletekst D / B Bat›
Saat
Oto kapan›fl Kapal›
Hat›rlatma Kapal›
Kapan›fl saati - -:- Geçifl - -:- Geçilecek pr. 5
065001056911 20"LOC-1 CFULL LCD 17/7/06 9:46 Page 27
Page 28
2828
FAV+ EPG RADIO
PP
OK
M
E
N
U
P+
P-
+
–
PIP
AV
FREEZE
16:9
TV PC DVI
YPbPr
1
2
3
4
5
6
7
8
9
0
ZOOM
S/M/D
FAV-
DVB
DVB
MEN
U
Zap
5
6
7
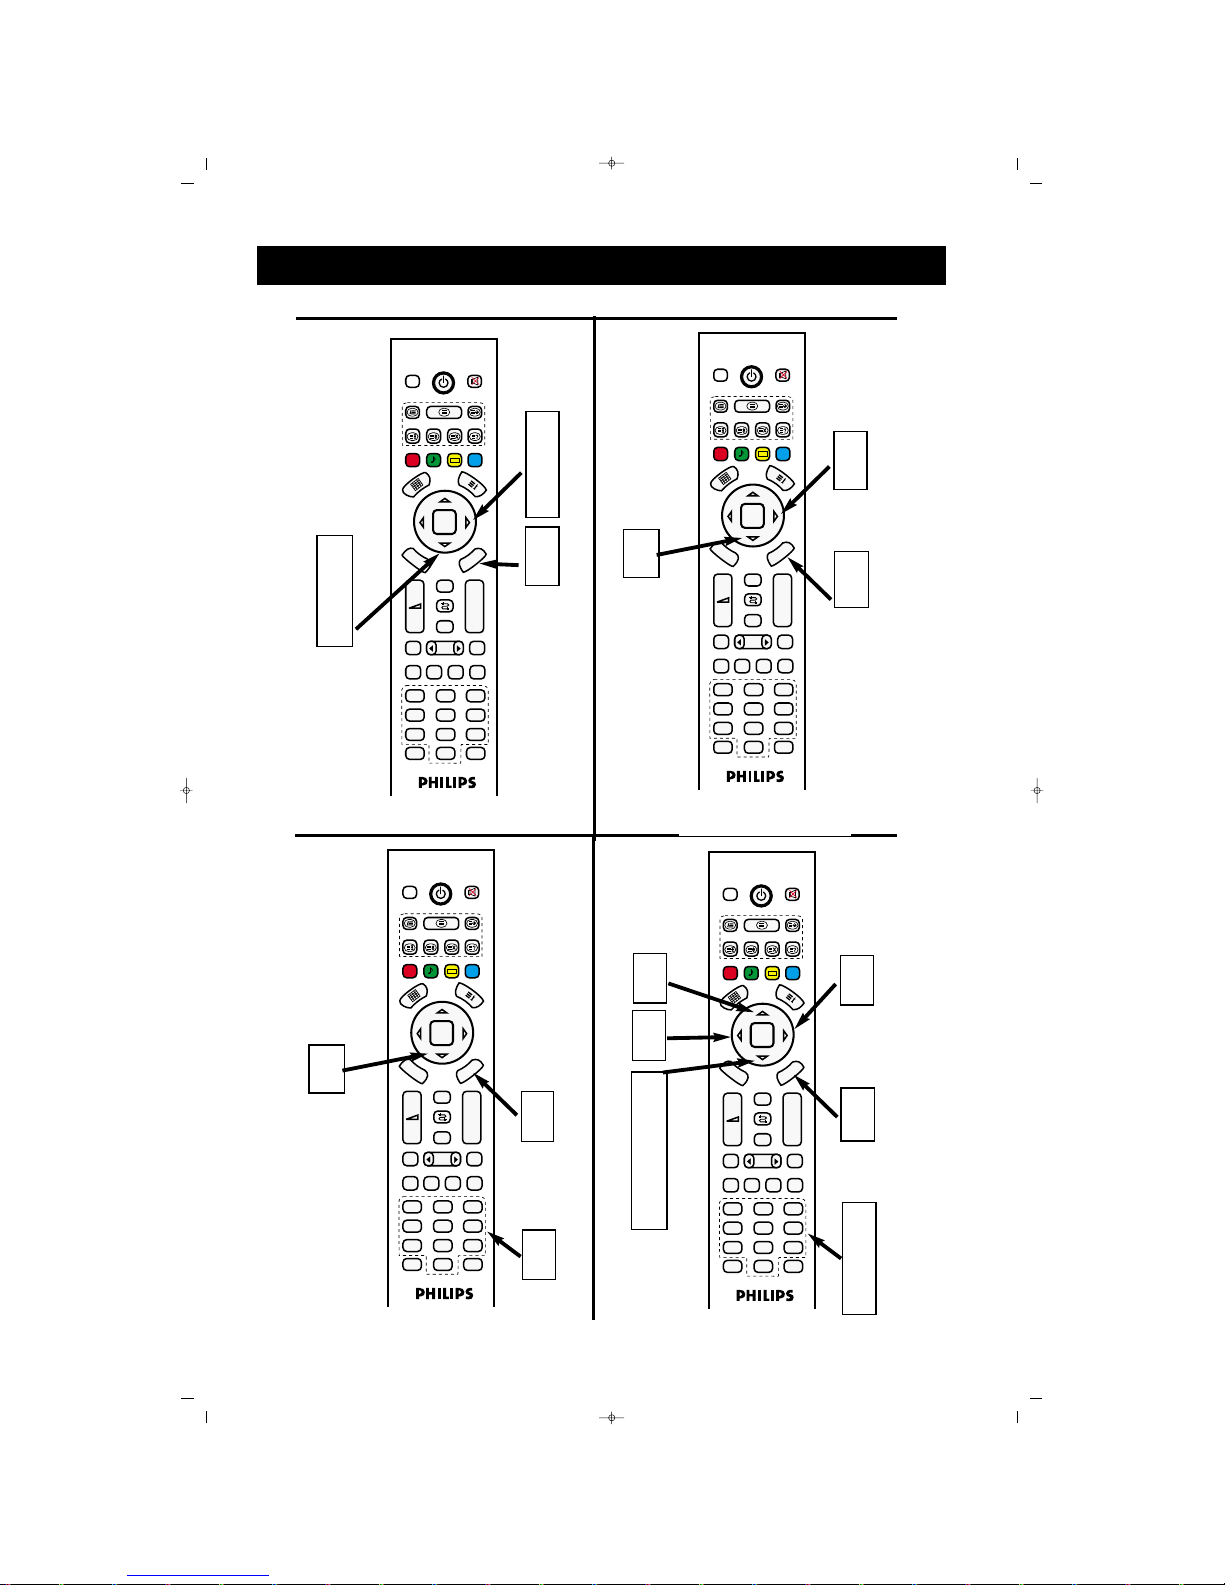
ZAMANLAYICI MENÜSÜ
FAV+ EPG RADIO
PP
OK
M
E
N
U
P+
P-
+
–
PIP
AV
FREEZE
16:9
TV PC DVI
YPbPr
1
2
3
4
5
6
7
8
9
0
ZOOM
S/M/D
FAV-
DVB
D
VB
M
ENU
Zap
OOttoommaattiikk kkaappaannmmaa((SSlleeeepp TTiimmeerr))::
KKaappaann››flfl ssaaaattii aayyaarrllaammaakk::
FAV+ EPG RADIO
PP
OK
M
E
N
U
P+
P-
+
–
PIP
AV
FREEZE
16:9
TV PC DVI
YPbPr
1
2
3
4
5
6
7
8
9
0
ZOOM
S/M/D
FAV-
DVB
D
VB
M
EN
U
Zap
1
2
3
2
4
7
5
6
FAV+ EPG RADIO
PP
OK
M
E
N
U
P+
P-
+
–
PIP
AV
FREEZE
16:9
TV PC DVI
YPbPr
1
2
3
4
5
6
7
8
9
0
ZOOM
S/M/D
FAV-
DVB
D
V
B
M
EN
U
Zap
KKaannaall ggeeççiiflflii aayyaarrllaammaakk::
5
7
8
8
6
8
9
8
8
065001056911 20"LOC-1 CFULL LCD 17/7/06 9:46 Page 28
Page 29
29
NNoorrmmaall,, GGeenniiflfl,, DDaarr,, OOttoo
Resim formatlar›ndan birini seçebilirsiniz.
FFaayyddaall›› ‹‹ppuuccuu
PC ve YPbPr modunda, standart görüntü format› TAM EKRAN'd›r, görüntü format›
özelli¤ine eriflilemez.
GÖRÜNTÜ FORMATININ KULLANILMASI
Görüntü format› büyüklü¤ünü, seyretmekte oldu¤unuz program tipine göre de¤ifltirebilirsiniz.
Ekran format› büyüklükleri aras›nda geçifl yapmak için 16:9 tufluna tekrarl› olarak bas›n›z:
MENU tufluna tekrarl› basarak menüyü ekrandan silebilirsiniz.
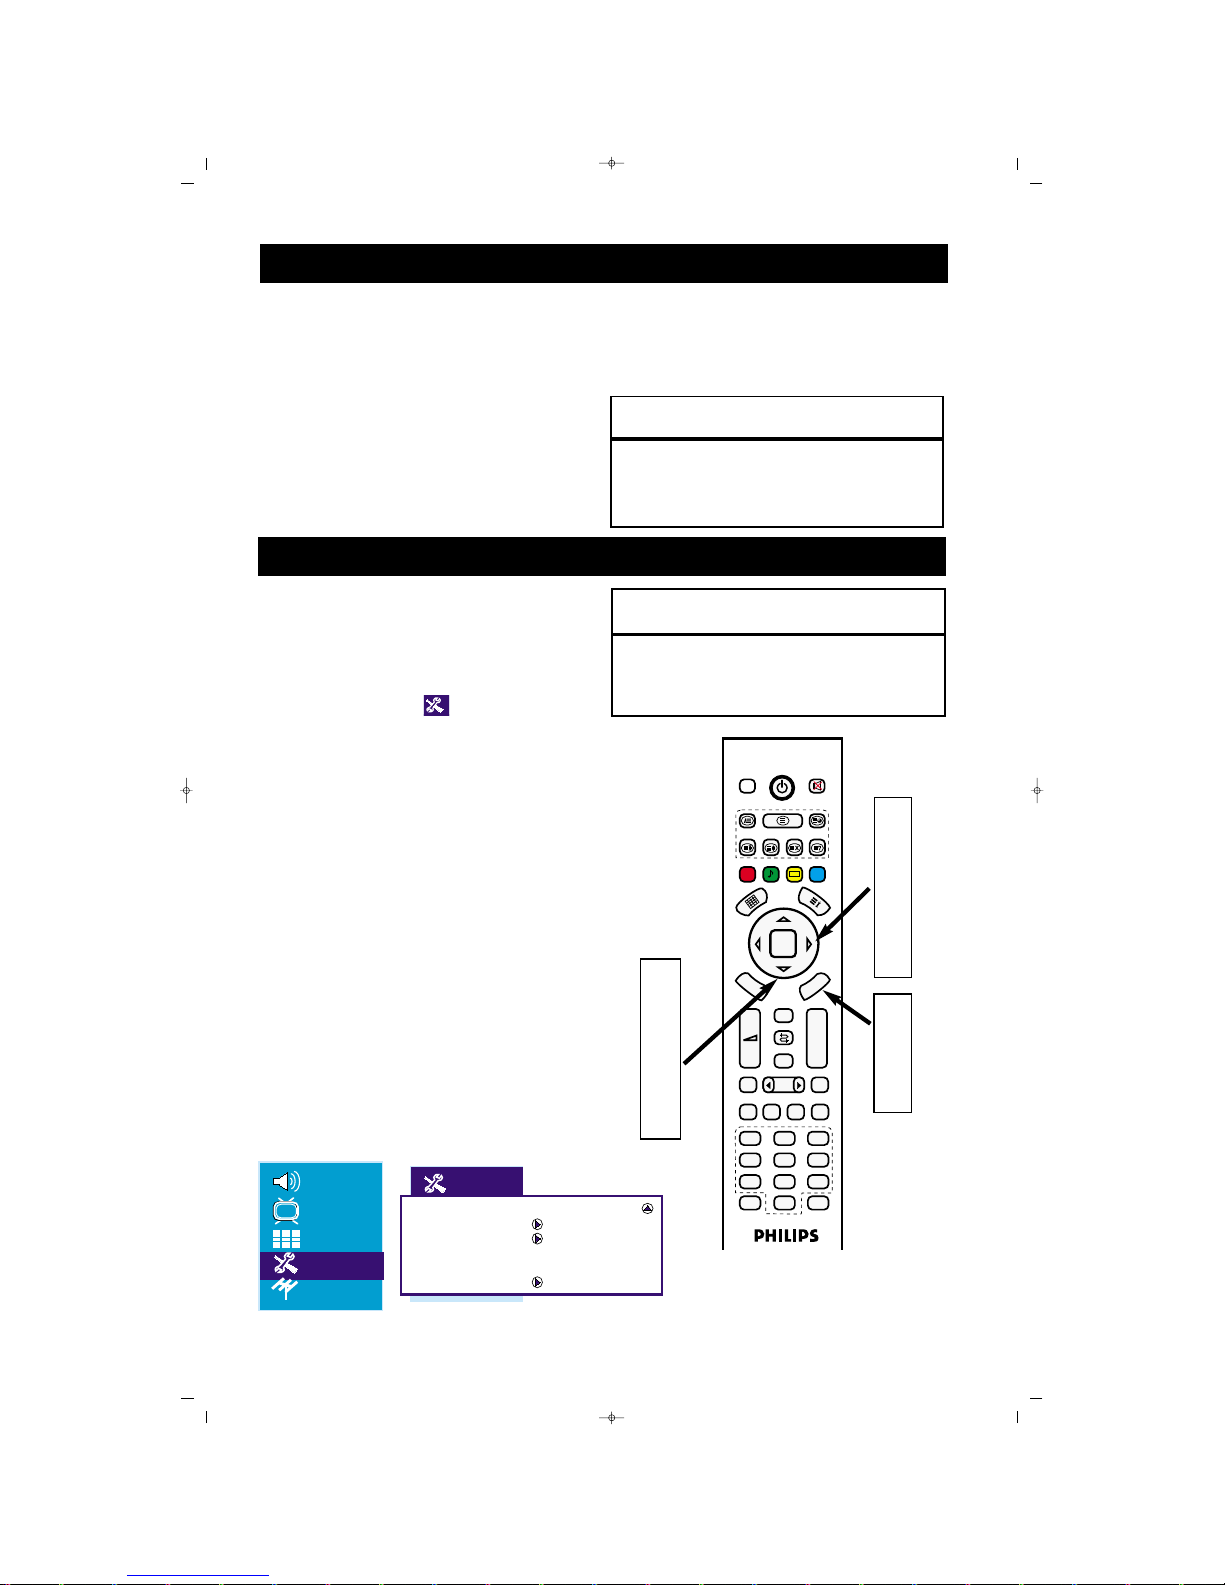
TELETEXT D‹L‹ SEÇMEK
Uzaktan Kumanda üzerindeki menü
tufluna bas›n›z ekranda menü belirecektir.
Ekranda AYAR menüsü seçili olana
kadar (
ïï
) tufluna ard arda bas›n›z ve Sa¤
yön (
ÆÆ
) tufluna basarak menüye giriniz.
Teletekst dili seçili olana kadar Afla¤› yön
(
ïï
) tufluna ard arda bas›n›z..
Sa¤ yön (
ÆÆ
) tuflunu kullanarak Teletext
dil karakterini seçiniz.
Afla¤› yön (
ïï
) tufluna bas›n›z. Teletekst
D/B (Do¤u/Bat›) seçili olacakt›r.
Sa¤ yön (
ÆÆ
) tuflunu kullanarak Teletekst
için ülkenizin bulundu¤u bölgeyi seçiniz.
Ard arda “Menu” tufluna basarak
menülerden ç›k›n›z.
1
2
3
4
5
6
7
Ülke TR
Çocuk kilidi
Zamanlay›c›
Teletekst dili Pan European
Teletekst D / B Bat›
Saat
FAV+ EPG RADIO
PP
OK
MENU
P+
P-
+
–
PIP
AV
FREEZE
16:9
TV PC DVI
YPbPr
1
2
3
4
5
6
7
8
9
0
ZOOM
S/M/D
FAV-
DVB
D
V
B
M
E
N
U
Zap
1
7
2
3
5
2
4
6
FFaayyddaall›› ‹‹ppuuccuu
* Teletext modunda baz› karekterlerin ç›kmamas›, Teletekst dili ve Teletekst D/B modlar›n›n
düzgün seçilmemesinden olabilir.
065001056911 20"LOC-1 CFULL LCD 17/7/06 9:46 Page 29
Page 30
30
TELETEXT
Teletext, bir gazete gibi dan›flman›n mümkün oldu¤u belirli kanallardan yap›lan bilgi sistemi yay›n›d›r.
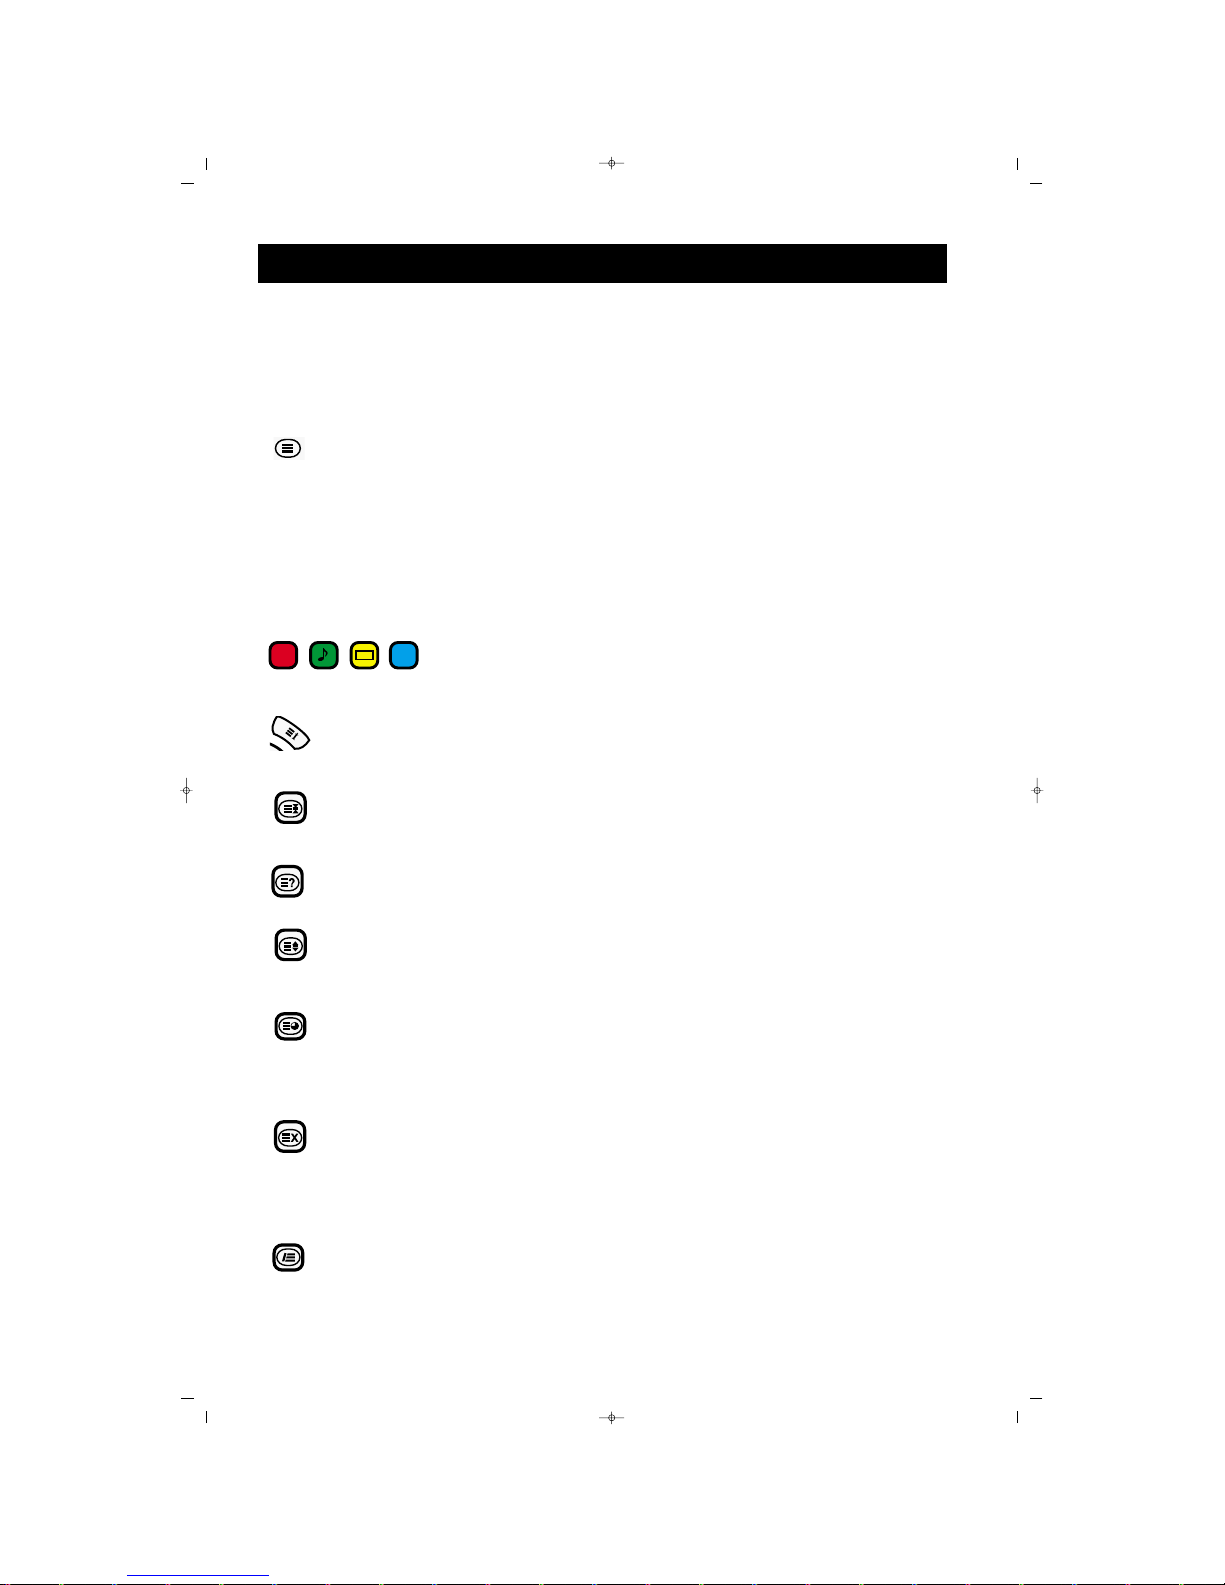
Ayn› zamanda, duyma problemi olan ya da yay›n dilini bilmeyen izleyiciler için eriflim altyaz›lar› sunmaktad›r (kablo a¤lar›, uydu kanallar› vs.)
BBaass››nn››zz
Teletext
Bir sayfan›n seçilmesi
0/9
P #/@
Konulara do¤rudan eriflim
‹çerik
Alt sayfalara girifli durdurma
Gizli bilgiler
Sayfan›n büyütülmesi
Teletext Saati
Güncellefltirme
Mix (TV ve TELETEXT bilgisini birarada seyretme)
SSoonnuuçç
‹zledi¤iniz kanalda teletext yay›n›na geçmeyi sa¤lar. 2. Bas›flta mix
konumuna geçer. 3. bas›flta izledi¤iniz TV yay›n›na geçersiniz.
Gerekli sayfa numaras› 0 ila 9 aras› bir rakamla veya P +/- tufllar›yla
giriniz.
Örnek: Sayfa 120 için 120 giriniz.
Say›, üst solda ekrana getirilir, sayaç döner ve sayfa ekrana getirilir.
Bir baflka sayfay› incelemek için bu ifllemi tekrar ediniz.
Sayac›n aramaya devam etmesi durumunda, sayfa iletilmiyordur. Bir
baflka say›y› seçiniz
Ekran›n alt›nda renkli alanlar görünür. 4 renkli tufl, konulara veya
karfl›l›k gelen sayfalara geçifl için kullan›l›r.
Bu sizi içerik sayfas›na geri gönderir (genellikle 100 sayfas›)
Belirli sayfalar, birbiri ard›na otomatik olarak ekrana getirilen alt sayfalara sahiptirler. Bu tufl, alt sayfan›n geliflini durdurmak veya devam
ettirmek amac›yla kullan›l›r. fiekli sol üstte yer al›r
Gizli bilgilerin (oyun çözümlerinin) ekrana getirilmesi veya gizlenmesi
içindir
Sayfan›n üst veya alt k›sm›n› ekrana getirmenizi ve daha sonra normal
büyüklü¤e geri dönmenizi sa¤lar
TV modunda iken izledi¤iniz kanal›n teletextinden al›nan saati ekran›n sa¤ üst köflesinde görüntüler.
Teletext sayfas› aç›kken bu tufla bas›ld›¤›nda teletext sayfas›n›n alt
sayfas› var ise ekran›n alt k›sm›nda görüntülenir ve P+/- ile bu sayfalar
de¤ifltirilebilir. Ç›kmak için ayn› tufla bas›n›z.
Teletext modunda iken, bu tufla bas›l›rsa ekrana izledi¤iniz TV yay›n› gelir. Fakat teletext yine aktiftir ve e¤er yeni bir sayfa numaras›
girilir ise sayfay› aramaya devam eder. ‹stenilen sayfa bulundu¤u zaman ekranda sayfa numaras›n› gösteren bir mesaj ç›kar. Tekrar bu
tufla basarsan›z bulunan teletext sayfas› ekrana gelir.
‹zledi¤iniz kanal ile o kanala ait teletext bilgisinin ayn› anda yanyana
ekranda görülmesini sa¤layabilirsiniz. Bunun için MIX tufluna 1.
bas›flta Teletext sayfas› ve TV Resmini ayn› anda izleybilir, 2 bas›flta
sa¤ taraftaki TV yay›n›n›n boyutunu de¤ifltire-bilirsiniz. 3. bas›flta
Teletext sayfas› tam ekran olarak görünür. Bu moddan ç›kmak için
Teletext tufluna bas›n›z.
PP
065001056911 20"LOC-1 CFULL LCD 17/7/06 9:46 Page 30
Page 31
31
Bu TV ayn› zamanda PC Monitörü olarak ta kullan›labilir. PC Görüntü kontrolleri, görüntüyü
ayarlayabilmenizi sa¤lar.
PC modunda olmaya dikkat ediniz.
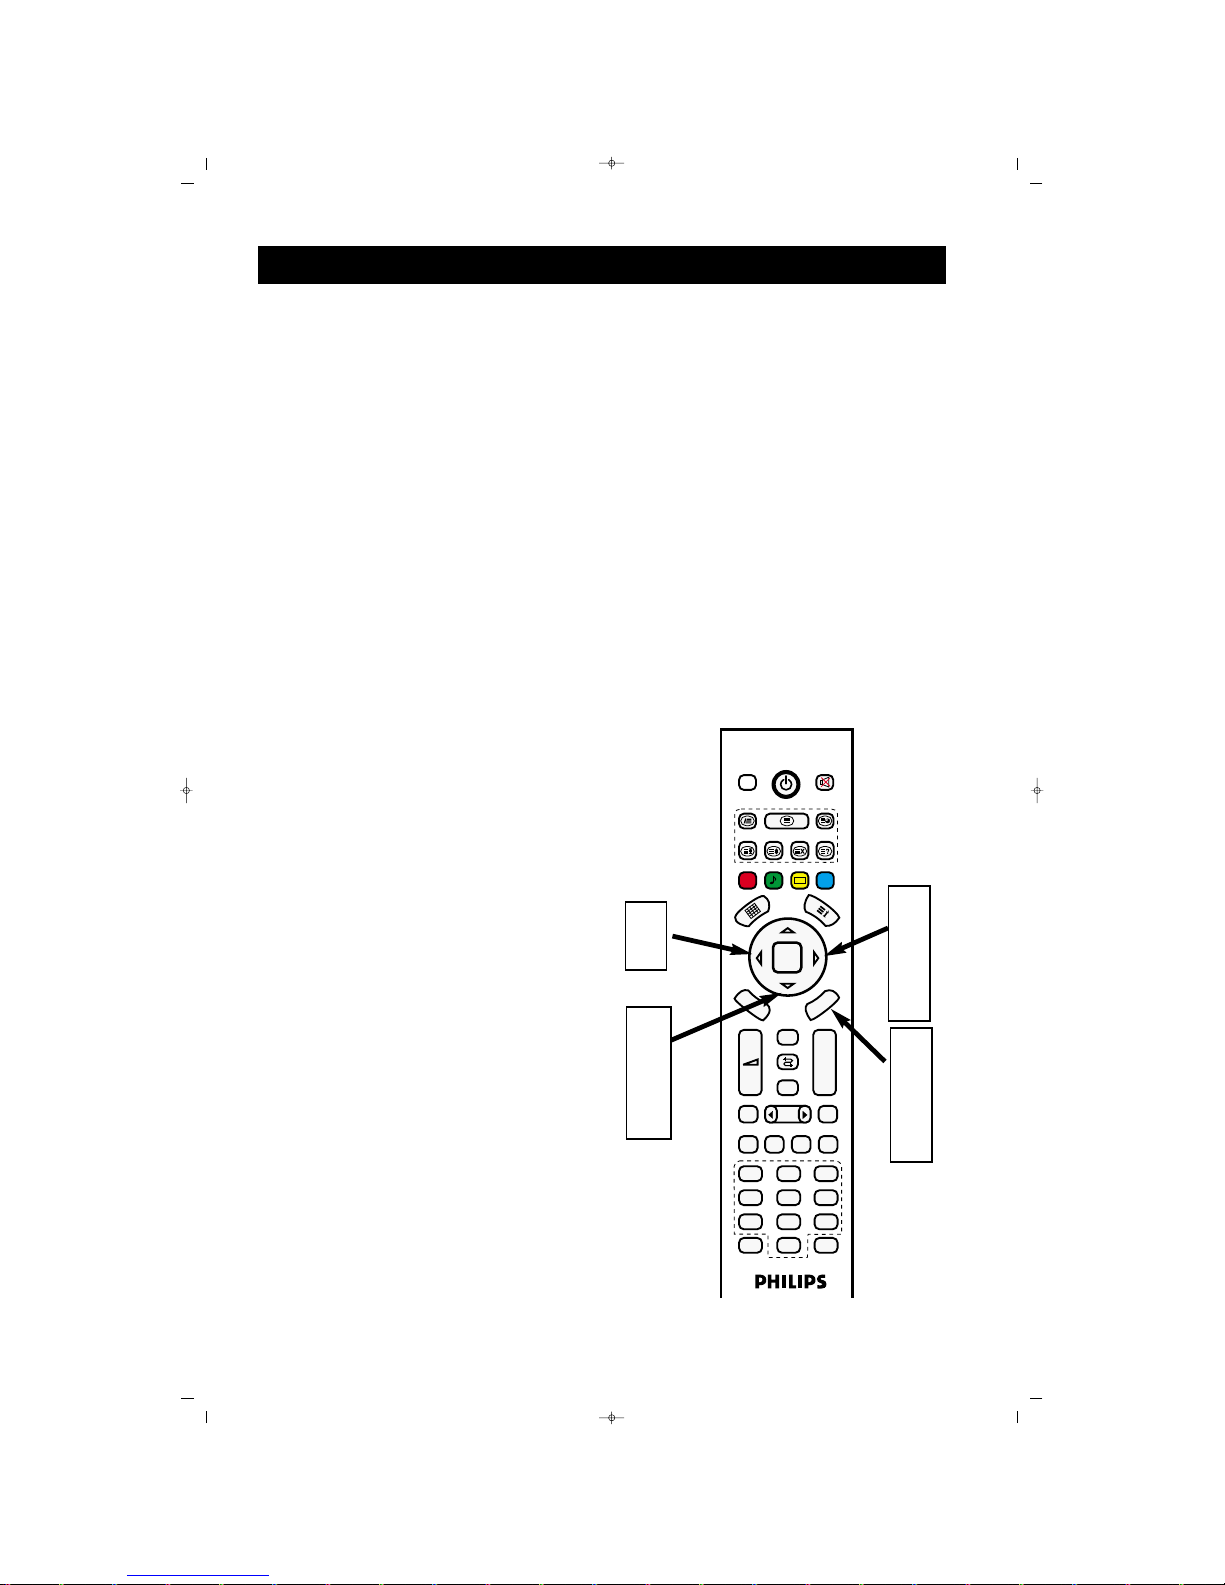
MMOONN‹‹TTÖÖRR RREESS‹‹MM MMEENNÜÜSSÜÜ
LCD Monitör resmini ayarlamak afla¤›daki
ad›mlar› takip ediniz.
Uzaktan Kumanda üzerindeki menü
tufluna bas›n›z, ekranda menü belirecektir.
Ekranda RES‹M menüsü belirene kadar
Afla¤› yön (
ïï
) tufluna bas›n›z.
Resim menüsüne girmek için Sa¤ yön (
ÆÆ
)
tufluna bas›n›z.
Ayarlamak istedi¤iniz Resim menü konular›n› Afla¤› yön (
ïï
) tuflunu kullanarak
seçiniz.
RReessiimm mmeennüü kkoonnuullaarr››::
Parlakl›k, Kontrast,
Pozisyon, Oto ayar, Bilgi, Fabrika, Renk S›cakl›¤›,
K›rm›z›, Yeflil ve Mavi
PPaarrllaakkll››kk::
Resmin koyu k›s›mlar›n› parlatmak için
ayarlay›n›z. Renge beyazl›k eklenecektir.
KKoonnttrraasstt::
Görüntü kalitesini "keskinlefltirmek"
için ayarlay›n›z. Resmin siyah k›s›mlar›, koyuda
daha zengin olurken, beyaz daha parlak olur.
PPoozziissyyoonn::
Sa¤ yön (
ÆÆ
) tuflunu kullanarak
girdi¤iniz bu alt menüde yön tufllar›n› kullanarak
(
ÍÍ,ÆÆ,ïï,ÎÎ
) Yatay ve düfley resim de¤erlerini
ayarlayabilirsiniz.
RReessiimm aayyaarr::
Resim Faz ve frekans de¤erlerini, alt
menüde yön tufllar›n› kullanarak (
ÍÍ,ÆÆ,ïï,ÎÎ
)
ayarlayabilirsiniz.
KKeesskkiinnlliikk::
Detaylar› gelifltirmek için ayarlay›n›z.
OOttoo aayyaarr::
Bu fonksiyonla cihaz›n›z otomatik
olarak resim ayarlar›n› yapar.
BBiillggii::
Cihaz›n›zla ilgili bilgiyi görebilirsiniz.
FFaabbrriikkaa::
Fabrika de¤erlerine dönmenizi sa¤lar.
RReennkk SS››ccaakkll››¤¤››::
Renk s›cakl›k de¤erini ayarlayabilirsiniz.
KK››rrmm››zz››::
Resimdeki K›rm›z› renk seviyesini
ayarlayabilirsiniz.
YYeeflfliill::
Resimdeki Yeflil renk seviyesini ayarlayabilirsiniz.
MMaavvii::
Resimdeki Mavi renk seviyesini ayarlayabilirsiniz.
Seçti¤iniz resim konusunu Sola yön (
ÍÍ
)
ve Sa¤ yön (
ÆÆ
) tuflunu kullanarak
ayarlayabilirsiniz.
Ard arda “Menu” tufluna basarak
menülerden ç›k›n›z.
1
2
3
4
PC GÖRÜNTÜ KONTROLLER‹
5
6
FAV+ EPG RADIO
PP
OK
M
E
N
U
P+
P-
+
–
PIP
AV
FREEZE
16:9
TV PC DVI
YPbPr
1
2
3
4
5
6
7
8
9
0
ZOOM
S/M/D
FAV-
DVB
D
V
B
M
E
N
U
Zap
1
6
2
4
3
5
5
065001056911 20"LOC-1 CFULL LCD 17/7/06 9:46 Page 31
Page 32

32
ARIZALARIN G‹DER‹LMES‹
GGüüçç ggeellmmiiyyoorr
GGöörrüünnttüü YYookk
SSeess GGeellmmiiyyoorr
AAVV SSiinnyyaallii ggeellmmiiyyoorr
SS--VVHHSS RReennggii SSoolluukkllaaflfl››yyoorr
TTVV ddeenn ssaaddeeccee MMoonnoo sseess
ggeelliiyyoorr
* TV Güç kablosunu kontrol edin. TV nin fiflini prizden çekin ve
10 saniye bekleyin, daha sonra fifli prize tekrar tak›n ve POWER
tufluna tekrar bas›n
* Prizin bir duvar flalterine ba¤l› olmamas›n› kontrol ediniz
* Varsa, AC güç band›ndaki sigortan›n atmam›fl olmas›n›
kontrol ediniz
* Anten / Kablo ba¤lant›lar›n› kontrol ediniz. TV'nin ANT75
ohm fifline uygun flekilde tak›lm›fllar m›?
* Mevcut tüm kanallar› bulmak için Otomatik Program› çal›flt›r›n
* Uzaktan kumanda üzerindeki AV tufluna basarak, do¤ru sinyal
kayna¤›n›n seçilmesini kontrol edin
* Aksesuar bir cihaz› kullan›yorsan›z, bunun do¤ru çal›flmas›n›
kontrol ediniz
* PC modunda, görüntü sinyali OLMALIDIR, aksi halde TV
kapan›r.
* Ses tuflunu kontrol ediniz
* Uzaktan kumanda üzerindeki MUTE tuflunu kontrol ediniz
* Yard›mc› ekipman takmak istiyorsan›z, ses jak› ba¤lant›lar›n›
kontrol edin
AV ve S-Video soketlerinin efl zamanl› olarak ba¤lanmas›n› kontrol ediniz. Ba¤l›larsa, S-video soketini ç›kar›n›z. AV sinyali, her
iki soketin ayn› zamanda ba¤l› olmas› durumunda S-Video'yu
devred›fl› b›rak›r.
S-Video ba¤lant›s› için soketi ç›kar›n›z. TV'nin S-Video soketini
dikkatle VCR soketine tekrar ba¤lay›n›z
* RF tipi ba¤lant›lar› olan bir kablo kutusu kullan›yorsan›z, kablo
kutusundan gelen sinyal sadece MONO olacakt›r.
* Ses kontrol ayarlar›n› kontrol ediniz. Ayarlar› stereo yap›n›z
* Gelen yay›n›n stereo olup olmad›¤›n› kontrol ediniz.
065001056911 20"LOC-1 CFULL LCD 17/7/06 9:46 Page 32
Page 33

33
ARIZALARIN G‹DER‹LMES‹
UUzzaakkttaann kkuummaannddaa ççaall››flflmm››yyoorr
TTVV ddee YYaannll››flfl KKaannaall çç››kk››yyoorr,,
vveeyyaa hhiiçç kkaannaall yyookk
* Pilleri kontrol ediniz. Uzaktan kumandaya lityum pil tak›n›z.
Pillerin + ve - uçlar›n›n, pil bölmesinin içinde oldu¤u gibi
gereken yerde olmas›na dikkat ediniz.
* Uzaktan kumanday› ve TV üzerindeki uzaktan kumanda sensör penceresini temizleyiniz.
* TV Güç kablosunu kontrol ediniz. TV nin fiflini çekiniz, 10
saniye bekleyiniz ve sonra fifli prize tekrar yerlefltirerek yine
;
Açma tufluna bas›n›z.
* Kullan›l›yorsa, AC güç bant› üzerindeki sigortan›n atmam›fl
oldu¤unu kontrol ediniz
* TV ç›k›fl›n›n bir duvar flalteri üzerinde olmamas›n› kontrol
ediniz
* Uzaktan kumandan›n do¤ru çal›flma modunda oldu¤unu kontrol ediniz
* Uzaktan kumandan›n, TV üzerindeki Uzaktan Kumanda
Sensör Penceresine yönelmesine dikkat ediniz.
* Kanal seçimini tekrarlay›n
* ‹stedi¤iniz kanal numaralar›n› (Manuel Ayarlama ile) TV'nin
haf›zas›na ekleyiniz
* Otomatik Program özelli¤ini çal›flt›rarak uygun kanallar›
bulunuz
065001056911 20"LOC-1 CFULL LCD 17/7/06 9:46 Page 33
Page 34

34
BAKIM VE TEM‹ZL‹K
TTVV üüzzeerriinnddeekkii ssaabbiitt ggöörrüünnttüülleerr kkoonnuussuunnddaa UUYYAARRII
Ekran: Uzun süreli olarak ekranda sabit görüntüler durmamal›d›r. LCD panelin dengesiz bir flekilde
eskimesine sebep olabilir. TV nin normal kullan›m›, sürekli olarak hareket eden veya de¤iflen görüntülere sahip olan programlar›n izlenmesi olmal›d›r. Ayn› görüntüleri çok s›k görüntülemeyiniz, aksi
halde LCD ekranda "hayalet" görüntüler oluflacakt›r. Hareketsiz görüntü kaynaklar›, lazer diskler,
video oyunlar›, Kompakt Disk ‹nteraktif (CD-i) veya durdurulmufl Dijital Video Diskleri (DVD) ya
da video kasetleri olabilir.
Afla¤›da sabit görüntülere ait baz› örnekler bulunmaktad›r:
* DVD menü listesi DVD içeri¤i
* Standart 4:3 görüntü oranl› bir TV de 16:9 genifl ekranl› bir film izlendi¤inde ekran›n alt›nda ve
üstünde siyah çubuklar oluflur. Bu baz› DVD lerde sözkonusu olabilir.
* Video oyunlar› ve skor tablolar›
* TV istasyonu logolar›, parlak ve sabitlerse sorun olabilirler. Hareketli veya düflük kontrastl› grafiklerin, resim tüpüne zarar vermeleri daha düflük bir ihtimaldir.
* Borsa fiyat fleritleri, bu haberler yay›nlan›rken TV ekran›n›n alt›nda görünebilir
* Al›flverifl kanal› logolar›, fiyatland›rma görüntüleri parlak olabilir ve yay›n esnas›nda sürekli olarak
görülebilirler. Bunlar genellikle TV ekran›nda ayn› yerdedirler.
TTVV nniinn yyeerrii
* Kabinin flekil ve renk de¤ifltirmesini ve TV nin ar›za yapmas›n› önlemek için cihaz› çok s›cak yerlere koymay›n›z (mesela, do¤rudan günefl ›fl›¤› alt›na veya bir ›s›tma aletinin yan›na)
* TV nin etraf›nda serbest hava ak›m›n› sa¤lay›n›z
TTeemmiizzlliikk
* Elektrik çarpmalar›n› önlemek için temizli¤e bafllamadan önce elektrik kablosunu prizden çekiniz
* TV yi düzenli olarak, kuru ve çizmeyen bir toz bezi ile temizleyiniz
* TV yi temizlerken, ekran yüzeyini çizmemeye ve zarar vermemeye dikkat ediniz. Temizlik
yaparken mücevher takmay›n›z veya afl›nd›r›c› araçlar kullanmay›n›z. Ev temizlik malzemeleri kullanmay›n›z. Ekran›, nemli temiz bir bezle siliniz. Temizlik yaparken düzgün, dikey flekilde siliniz.
* Zaman zaman TV nin arkas›ndaki havaland›rma deliklerinde elektrikli süpürge ile toz çekiniz
* Kabin üzerinde veya yak›n›nda tiner, böcek ilaçlar› veya kimyasal maddeler kullanmay›n›z. Bunlar
kabinde kal›c› lekeler b›rakabilirler.
065001056911 20"LOC-1 CFULL LCD 17/7/06 9:46 Page 34
Page 35

35
Ekran boyu
2200””
Standart anma de¤eri (cm) 51 cm
Güç tüketimi (Watt) 70 W
Çal›flma gerilimi 230 V (AC) 50 Hz
TV sistemi PAL BG / NTSC PLAYBACK
Kanal band› VHF I Kanal 2 - 4
VHF III Kanal 5 - 12
UHF Kanal 21 - 69
S Kanal S1 - S41
Anten girifli 75 ohm standart anten soketi
Program kapasitesi 100 + AV
Resim Paneli TFT LCD Panel 640 x 480 resolution
Ses ç›k›fl gücü (rms 10% THD) 2 x 2 W
TEKN‹K ÖZELL‹KLER
065001056911 20"LOC-1 CFULL LCD 17/7/06 9:46 Page 35
Page 36
CCoonnggrraattuullaattiioonnss oonn yyoouurr ppuurrcchhaassee,,
aanndd wweellccoommee ttoo tthhee ““ffaammiillyy!!””
DDeeaarr PPHHIILLIIPPSS pprroodduucctt oowwnneerr::
Thank you for your confidence in PHILIPS. You
’ve selected one of the best-built,best-backed
products available today.
We ’ll do everything in our power to keep you
happy with your purchase for many years to
come.
As a member of the PHILIPS “family,” you ’re
entitled to protection by one of the most comprehensive warranties and outstanding service
networks in the industry.What ’s more, your
purchase guarantees you ’ll receive all the
information and special offers for which you
qualify, plus easy access to accessories from our
convenient home shopping network.
Most importantly, you can count on our
uncompromising commitment to your total satisfaction.
All of this is our way of saying welcome -and
thanks for investing in a PHILIPS product.
PP..SS..TToo ggeett tthhee mmoosstt ffrroomm yyoouurr PPHHIILLIIPPSS ppuurr--
cchhaassee,,bbee ssuurree ttoo ccoommpplleettee aanndd rreettuurrnn yyoouurr
WWaarrrraannttyy RReeggiissttrraattiioonn aatt oonnccee..
RETURN YOUR PRODUCT WARRANTY CARD TODAY
TO GET THE VERY MOST FROM YOUR PURCHASE.
36
Registering your model with PHILIPS makes you eligible for all of the valuable bene.ts listed below, so
don’t miss out. Complete and return your Warranty Card at once to ensure:
**PPrrooooff ooff PPuurrcchhaassee
Returning the enclosed card
guarantees that your date of
purchase will be on .le, so no
additional paperwork will be
required from you to obtain
warranty service.
**PPrroodduucctt SSaaffeettyy
NNoottiiffiiccaattiioonn
By registering your product,
you’ll receive noti.cation directly from the manufacturer in the rare case of a product
recall or safety defect.
**AAddddiittiioonnaall BBeenneeffiittss ooff
PPrroodduucctt OOwwnneerrsshhiipp
Registering your product guarantees that you’ll receive all of
the privileges to which you’re
entitled, including special
money-saving offers.
Know these
ssaaffeettyy
symbols
This “bolt of lightning” indicates uninsulated
material within your unit may cause an elec-
trical shock. For the safety of everyone in
your household, please do not remove product
covering.
The “exclamation point” calls attention to
features for which you should read the
enclosed literature closely to prevent
operating and maintenance problems.
WARNING :To reduce the risk of fire or
electric shock, this apparatus should not
be exposed to rain or moisture and
objects filled with liquids, such as vases,
should not be placed on this apparatus.
CAUTION :To prevent electric shock,
match wide blade of plug to wide slot,
fully insert .
ATTENTION :Pour éviter les choc élec
triques, introduire la lame la plus large de
la fiche dans la borne correspondante de
la prise et pousser jusqu ’au fond.
CAUTION: TO REDUCE THE RISK OF
ELECTRIC SHOCK, DO NOT REMOVE
COVER (OR BACK). NO USER SERVICE-
ABLE PARTS INSIDE. REFER SERVICING
TO QUALIFIED SERVICE PERSONNEL.
FFoorr CCuussttoommeerr UUssee
Enter below the Serial No.which is located
on the rear of the cabinet .Retain this
information for future reference.
Model No._______________________
Serial No._______________________
Visit our World Wide Web Site at http://www.philips.com.tr
English
065001056911 20"LOC-1 CFULL LCD 17/7/06 9:47 Page 36
Page 37
English
37
1. Read these instructions.
2. Keep these instructions.
3. Heed all warnings.
4. Follow all instructions.
5. Do not use this apparatus near water.
6. Clean only with a dry cloth.
7. Do not block any of the ventilation openings.
Install in accordance with the manufacturers
instructions.
8. Do not install near any heat sources such as
radiators, heat registers, stoves, or other
apparatus (including amplifiers) that produce
heat.
9. Do not defeat the safety purpose of the
polarized or grounding-type plug. A polarizedplug has two blades with one wider than the
other. A grounding type plug has two blades
and third grounding prong. The wide blade or
third prong are provided for your safety.
When the provided plug does not fit into your
outlet, consult an electrician for replacement of
the obsolete outlet.
10.Protect the power cord from being walked
on or pinched particularly at plugs, convenience
receptacles, and the point where they exit from
the apparatus.
11.Only use at t achments /accessories specified
by the manufacturer.
12. Use only with a cart, stand, tripod, bracket, or table specified by
the manufacturer, or sold with the
apparatus. When a cart is used, use
caution when moving the cart/apparatus combination to avoid injury from tip-over.
13.Unplug this apparatus during lightning storms
or when unused for long periods of time.
14.Refer all servicing to qualified service personnel. Servicing is required when the apparatus has
been damaged in anyway, such as power-supply
cord or plug is damaged, liquid has been spilled
or objects have fallen into apparatus, the apparatus has been exposed to rain or moisture, does
not operate normally, or has been dropped.
15.This product may contain lead and mercury.
Disposal of these materials may be regulated
due to environmental considerations. For disposal or recycling information, please contact
your local authorities or the Electronic
Industries Alliance: www.eiae.org
16.
DDaammaaggee RReeqquuiirriinngg SSeerrvviiccee --
The appliance
should be serviced by qualified service personnel when:
A. The power supply cord or the plug has been
damaged;
B. Objects have fallen, or liquid has been spilled
into the appliance;
C. The appliance has been exposed to rain
D. The appliance does not appear to operate
normally or exhibits a marked change in performance;
E. The appliance has been dropped, or the
enclosure damaged.
17.
TTiilltt//SSttaabbiilliittyy --
All televisions must comply
with recommended international global safety
standards for tilt and stability properties of its
cabinet design.
* Do not compromise these design standards by
applying excessive pull force to the front, or
top, of the cabinet which could ultimately overturn the product.
* Also, do not endanger yourself, or children, by
placing electronic equipment/toys on the top of
the cabinet. Such items could unsuspectingly fall
from the top of the set and cause product damage and/or personal injury.
18.
WWaallll oorr CCeeiilliinngg MMoouunnttiinngg
- The appliance
should be mounted to a wall or ceiling only as
recommended by the manufacturer.
19.
PPoowweerr LLiinneess
- An outdoor antenna should be
located away from power lines.
20.
OOuuttddoooorr AAnntteennnnaa GGrroouunnddiinngg
- If an outside
antenna is connected to the receiver, be sure
the antenna system is grounded so as to provide
some protection against voltage surges and built
up static charges.
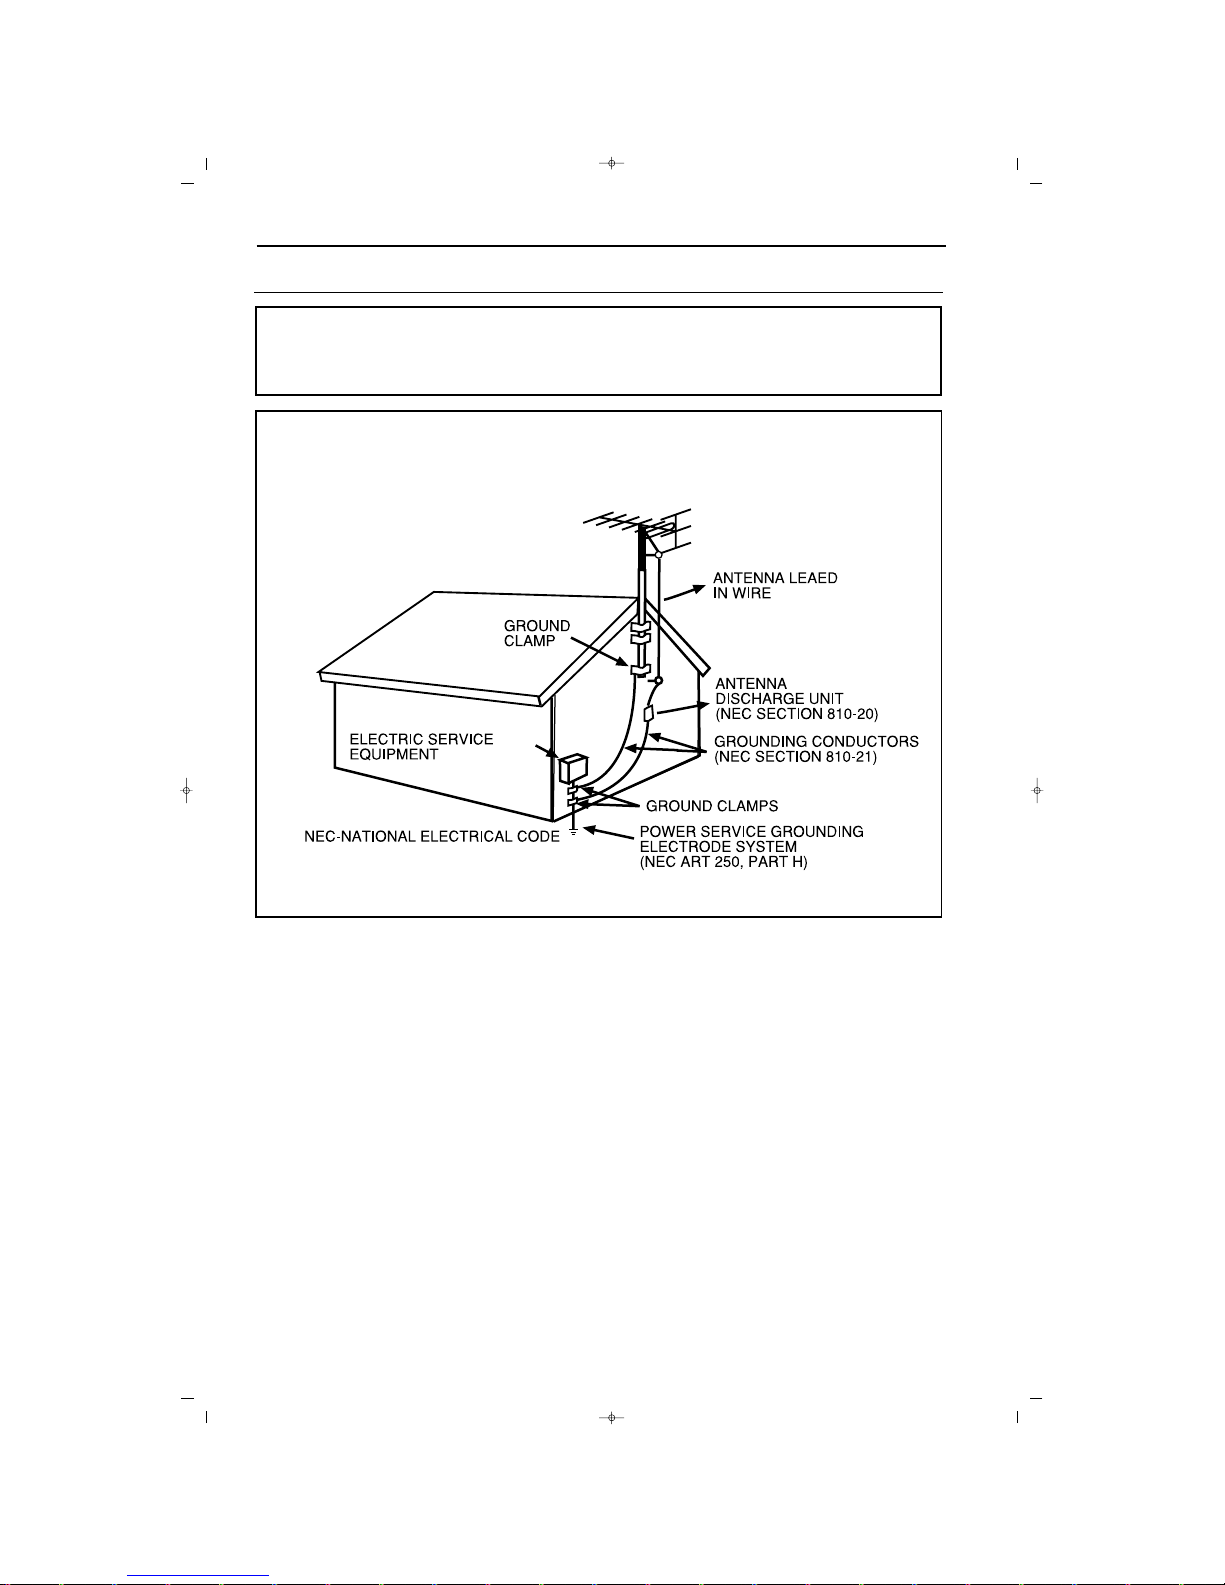
Section 810 of the National Electric Code,
ANSI/NFPA No. 70-1984, provides information
with respect to proper grounding of the mast
and supporting structure, grounding of the leadin wire to an antenna discharge unit, size of
grounding connectors, location of antenna-discharge unit, connection to grounding electrodes, and requirements for the grounding
electrode. See Figure below.
21.
OObbjjeecctt aanndd LLiiqquuiidd EEnnttrryy
- Care should be
taken so that objects do not fall and liquids are
not spilled into the enclosure through openings.
22.
BBaatttteerryy UUssaaggee CCAAUUTTIIOONN
- To prevent battery leakage that may result in bodily injury,
property damage, or damage to the unit:
* Install all batteries correctly, with + and aligned as marked on the unit.
* Do not mix batteries (old and new or carbon
and alkaline, etc.).
* Remove batteries when the unit is not used
for a long time.
IMPORTANT SAFETY INSTRUCTIONS
READ BEFORE OPERATING EQUIPMENT
065001056911 20"LOC-1 CFULL LCD 17/7/06 9:47 Page 37
Page 38
38
IMPORTANT SAFETY INSTRUCTIONS
Note to the CATV system installer: This reminder is provided to call the CATV system
installer’s attention to Article 820-40 of the NEC that provides guidelines for proper grounding
and, in particular, speci.es that the cable ground shall be connected to the grounding system of the
building, as close to the point of cable entry as practical.
EExxaammppllee ooff AAnntteennnnaa GGrroouunnddiinngg aass
ppeerr NNEECC -- NNaattiioonnaall EElleeccttrriicc CCooddee
065001056911 20"LOC-1 CFULL LCD 17/7/06 9:47 Page 38
Page 39

39
AADDDDIITTIIOONNAALL SSAAFFEETTYY PPRREECCAAUUTTIIOONNSS
* ENSURE that LCD TV stand is tightened properly to the set (See Quick Guide on the right way
of tightening of the screw of the stand to the set. Improper tightening of screw may render the set
unsafe.
* If LCD TV is installed on the wall, installation should be carried out by qualif ied servicemen.
Improperor incorrect installation may render the set unsafe.
* Disconnect main plug when :
- cleaning the TV screen, never use abrasive cleaning agents.
- there is a lightning storm.
- the set is left unattended for a prolonged period of time.
* Do not shift or move the LCD TV around when it is powered on.
* Do not touch, push or rub the surface of the LCD screen with any sharp or hard objects.
* When the surface of the LCD screen becomes dusty, wipe it gently with an absorbent cotton
cloth or other soft material like chamois. DO NOT USE acetone, toluene or alcohol to clean the
surface of the screen. These chemicals will cause damage to the surface.
* Wipe off water or saliva as soon as possible. These liquids can cause deformation and color fading of the LCD screen when left exposed for some time.
* Be careful of condensation when temperature changes occur. Condensation can cause damage to
the LCD screen and electrically parts. After condensation fades, spots or blemishes will be present
on the LCD screen.
* CAUTION information is located on the inside of the VESA cover (see diagram below). To read
information, open the VESA cover.
POSITIONING THE LCD TELEVISON
* Place the LCD TV on a solid, sturdy base or stand. Be sure the stand is strong enough to handle
the weight of the LCD TV.
* Try to leave at least 6" of space around each side of the LCD TV cabinet to allow for proper ventilation.
* Do not place the LCD TV near a radiator or other sources of heat.
* Do not place the LCD TV where it can be exposed to rain or excessive moisture.
RECYCLING PROCEDURE/END OF LIFE DISPOSAL
* To minimize harm to the environment, the batteries supplied with the LCD TV do not contain
mercury or nickel cadmium. If possible, when disposing of batteries, use recycling means available
in your area.
* The LCD TV uses materials that can be recycled. To minimize the amount of waste in the environment, check your area for companies that will recover used televisions for dismantling and collection of reusable materials, or contact your dealer for TV recycling tips.
* Please dispose of the carton and packing material through the proper waste disposal management
in your area.
PRECAUT›ON
065001056911 20"LOC-1 CFULL LCD 17/7/06 9:47 Page 39
Page 40
40
CONTENTS
IInnttrroodduuccttiioonn
Welcome / Registering your TV 36
IMPORTANT SAFETY INSTRUCTIONS 37
PRECAUTIONS 39
Contents 40
SSeettuupp MMeennuu
Country and Language Setup 41
IInnssttaallllaattiioonn
Automatic Programming
(Channel Setup) 42
Manuel TV Channel Setup 44
Program Editing 46
LCD TV Presentation 48
Mounting LCD TV on the wall 50
Using the TV and Remote Control 51
Remote Control 52
PPiiccttuurree MMeennuu
TV Picture Menu Controls 53
VVoolluummee MMeennuu
TV Volume Menu Controls 55
SSeettuupp MMeennuu
Child Lock/Lock Function 57
Timer Setup 60
Timing Setup 61
Using Screen Format 63
Teletext Language Setup 63
Teletext 64
PPCC MMooddee
PC Picture Controls 65
GGeenneerraall IInnffoorrmmaattiioonn
Troubleshooting 66
Maintenance and Cleaning 68
Technical Specifications 69
BBeellooww aarree tthhee ffeeaattuurreess ooff yyoouurr nneeww LLCCDD
SSoouunndd // DDiissppllaayy JJaacckkss::
Use these jacks to connect other devices to your LCD TV quickly
AAuuttoommaattiicc CChhaannnneell PPrrooggrraammmmiinngg ((AAuuttoommaattiicc
PPrrooggrraammmmiinngg))::
Fast and easy adjustment of the
existing channels
MMeennuuss ((OOSSDD))::
Beneficial Messages, for setting
the TV Controls
RReemmoottee CCoonnttrrooll::
Operates the LCD TV features
SSwwiittcchhiinngg OOffff TTiimmeerr::
Switches Off the LCD TV
in the time programmed by you (from 5 to 120
minutes after current time)
SSttaannddaarrdd BBrrooaaddccaassttiinngg
(VHF/UHF) or
CCaabbllee TTVV
CChhaannnneell
SStteerreeoo::
This contains internal amplifier and
double speaker system, and provides receiving
of the stereo broadcasting TV channels
TTrreebbllee,, BBaassss aanndd BBaallaannccee::
Improves the sound of
the LCD TV
Your new LCD TV and its packing are made of
recyclable material. Expertized companies may
recycle the wastes of your product and reduce
the waste amount. There are batteries in the
equipment, which should not be disposed as
normal waste when consumed. These should be
disposed as small chemical wastes. When you
replace the current unit, please check how to
recycle the batteries and packing material,
from the regulations.
At the end of the Service Life
NNoottee::
This manual contains different ver-
sions and models. All features stated
here may not comply with your LCD TV.
This is normal. There is no need to contact with your dealer or service.
065001056911 20"LOC-1 CFULL LCD 17/7/06 9:47 Page 40
Page 41
41
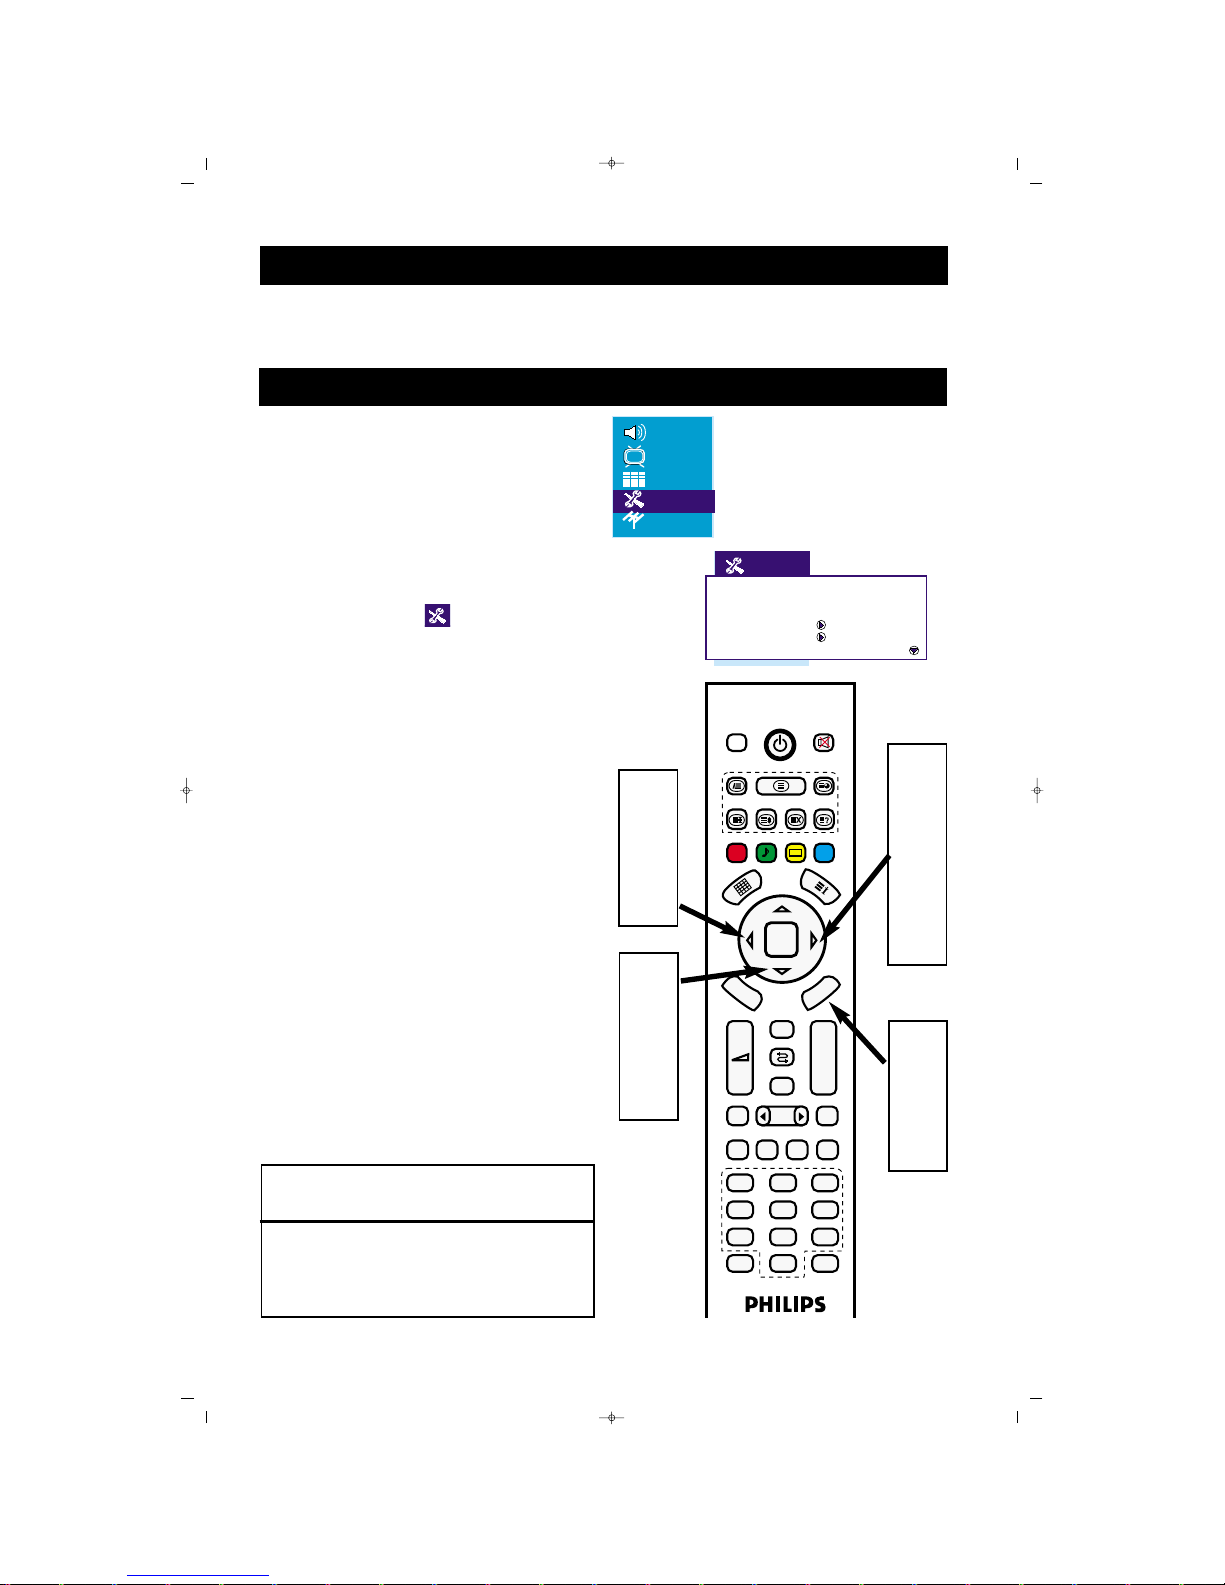
You can make the installation setup you LCD TV easily as defined below.
INSTALLATION
Country and Language Setup
Users can change the menu language as follows:
Press the menu button on the remote
control. The menu appears on the
screen.
Press down (
ï) arrow button repeatedly until SETUP menu is selected on
the screen and Press right (
Æ) arrow
button to enter the menu.
Press down (
ï) arrow button repeatedly
until “Language” is selected.
Select the desired menu language using
Left (
Í) and Right (Æ) tarrow keys.
Press down (
ï) arrow button repea-
tedly until “Country is selected.
Select the abbreviation of your country
using Left (
Í) and Right (Æ) arrow keys.
Press Menu button repeatedly to exit
from the menus
1
2
3
4
5
HHEELLPPFFUULL HHIINNTT
When you change the language you can change
only the menu subjects. No other OSD text
characteristics are changed.
FAV+ EPG RADIO
PP
OK
MENU
P+
P-
+
–
PIP
AV
FREEZE
16:9
TV PC DVI
YPbPr
1
2
3
4
5
6
7
8
9
0
ZOOM
S/M/D
FAV-
DVB
DVB
MENU
Zap
1
7
2
4
6
2
5
4
6
6
7
Source OSD Off
Language English
Country GB
Child lock
Timers
Teletext lang Pan European
065001056911 20"LOC-1 CFULL LCD 17/7/06 9:47 Page 41
Page 42
42
AUTOMATIG PROGRAMMING (SETTING THE CHANNELS)
Your LCD TV might be setup for the local channels (or cable TV) automatically. In this way you
can select the TV stations only in your own
region by pressing P+/P- buttons.
Press the menu button on the remote
control. The menu appears on the
screen.
Press down (
ï) arrow button repea-
tedly until PROGRAMS menu
appears on the screen
Press right (
Æ) arrow button to enter
the menu.
Press down (
ï) arrow button repea-
tedly until “System” is selected.
Select the system using Left and Right
(
Í/Æ) arrow keys.
Press down (
ï) arrow button repeatedly
until “Automatic Search” is selected.
When you press Right (
Æ) key automat-
ic search starts.
1
2
3
4
5
HHEELLPPFFUULL HHIINNTT
* Right after you take your new television take out
of its package and plug it into the socket, use the
automatic programming option to setup your TV
for the existing broadcasting or cable channels in
your region. If you do not setup the channels using
automatic programming function, your televisions
might not operate properly.
* Check the results after you operate automatic
programming. See which channels you can select
by pressing P(+) and P(-) buttons.
* Don’t forget that an antenna our cable
connections of your LCD TV should be made first.
6
7
065001056911 20"LOC-1 CFULL LCD 17/7/06 9:47 Page 42
Page 43
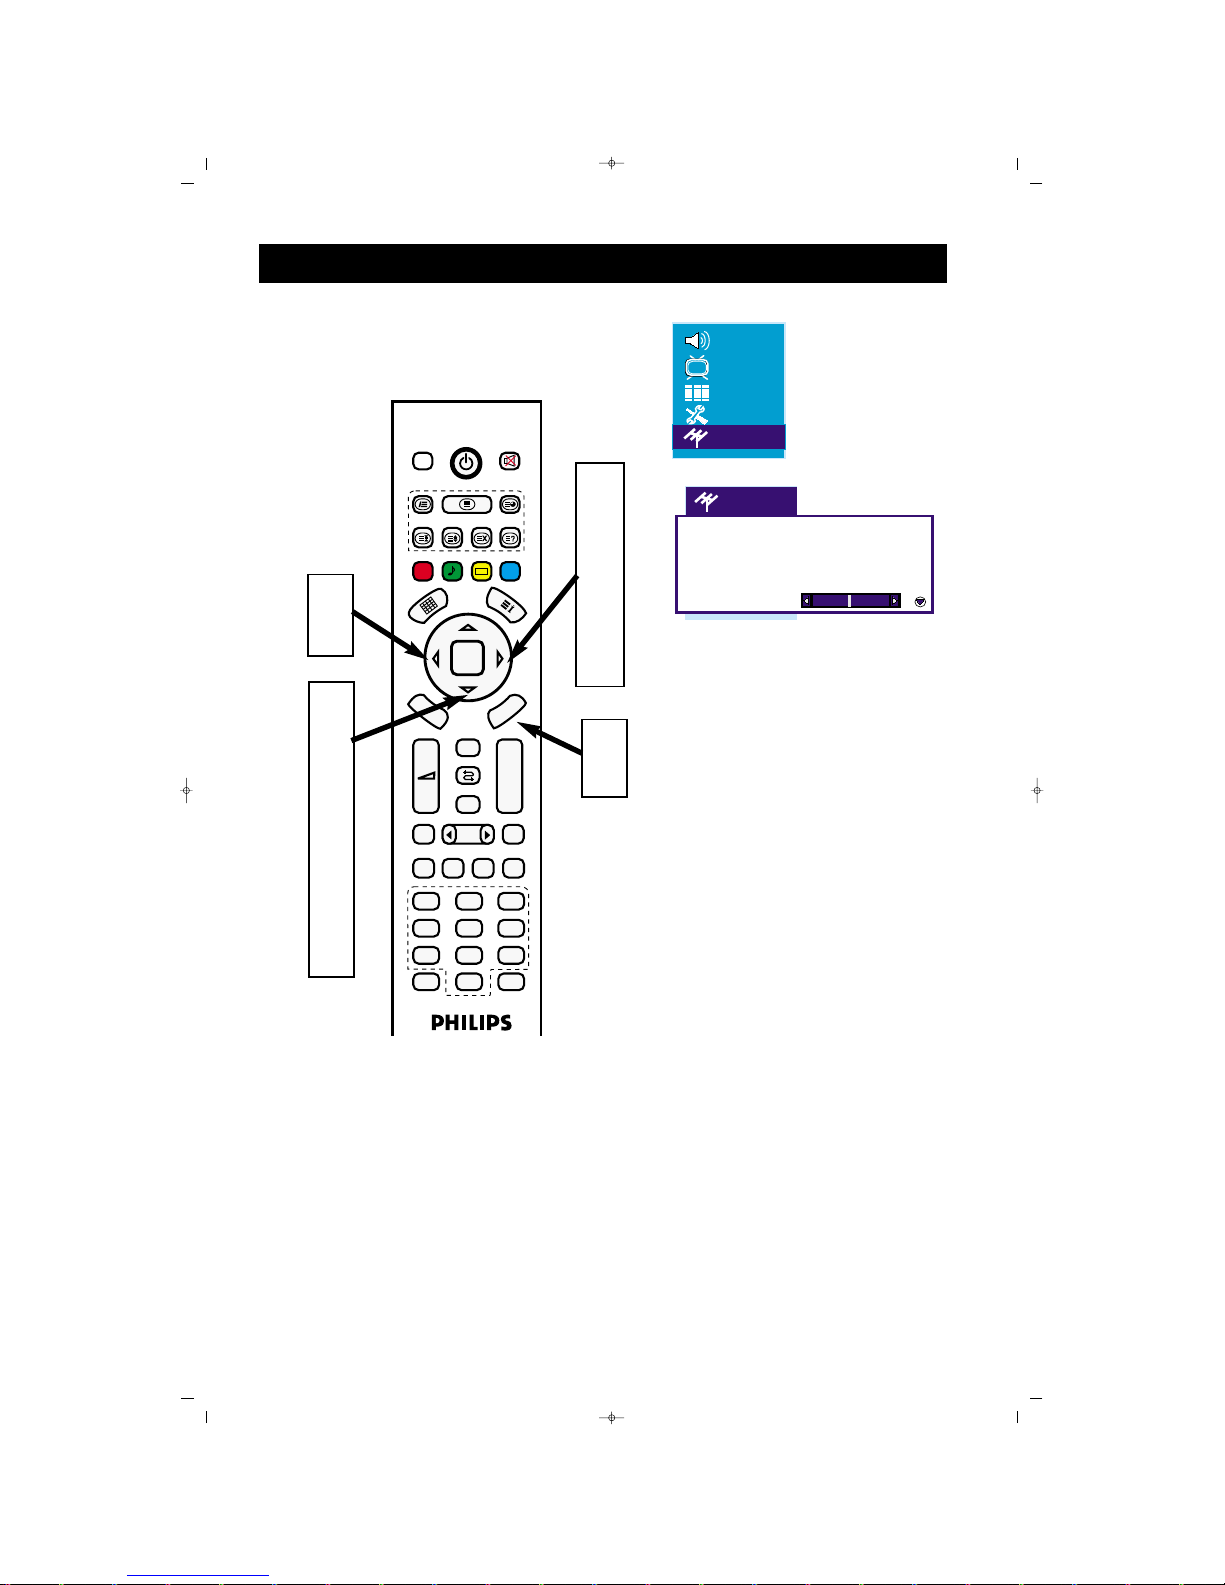
43
AUTOMATIG PROGRAMMING (SETTING THE CHANNELS)
FAV+ EPG RADIO
PP
OK
MENU
P+
P-
+
–
PIP
AV
FREEZE
16:9
TV PC DVI
YPbPr
1
2
3
4
5
6
7
8
9
0
ZOOM
S/M/D
FAV-
DVB
DVB
MENU
Zap
1
3
5
7
2
4
6
7
5
Program nr. 2
Program name
System standard Europe
Autostore
Frequency 182.25 MHz
Fine tune
065001056911 20"LOC-1 CFULL LCD 17/7/06 9:47 Page 43
Page 44
44
MANUAL SETTING OF TV CHANNELS
You can also set the TV channel manually.
Manual setting allows you store any program
manually.
Press Menu button on the RC, menu will
appear on the screen
Press down (
ï) arrow button repea-
tedly until PROGRAMS menu
appears on the screen
Press right (
Æ)arrow button to enter
the menu.
Press down (
ï) arrow button repeatedly
until “Program No” is selected.
Press the numeric buttons or use Left
and Right (
Í/Æ) arrow keys to assign a
channel number.
Press down (
ï) arrow button repeatedly
until “System” is selected.
Select the system using Left and Right
(
Í/Æ) arrow keys.
Press down (
ï) arrow button repeat-
edly until “Frequency Setup” is selected.
Activate automatic search channel frequency by pressing Right (
Æ) arrow key
or use the numeric keys to enter the
desires channel frequency.
When the channel is not clear in order
to select fine tuning Press down (
ï)
arrow key and then use the right
arrow (
Æ) key.
Press down (
ï) arrow button
repeatedly until “Store” is selected
and use the Right arrow (
Æ) key to
store.
Exit the menus pressing “Menu” key
repeatedly.
1
2
3
4
5
6
7
8
9
10
11
12
HHEELLPPFFUULL HHIINNTT
* The system should be chosen as “Europe” for all
the countries in Europe except France. “France”
should be selected for France.
* If you turn the AFC function in the same menu
during manual programming, your LCD TV can
perceive the tinny frequency shifts stem from the
transmitter and correct them automatically.
065001056911 20"LOC-1 CFULL LCD 17/7/06 9:47 Page 44
Page 45
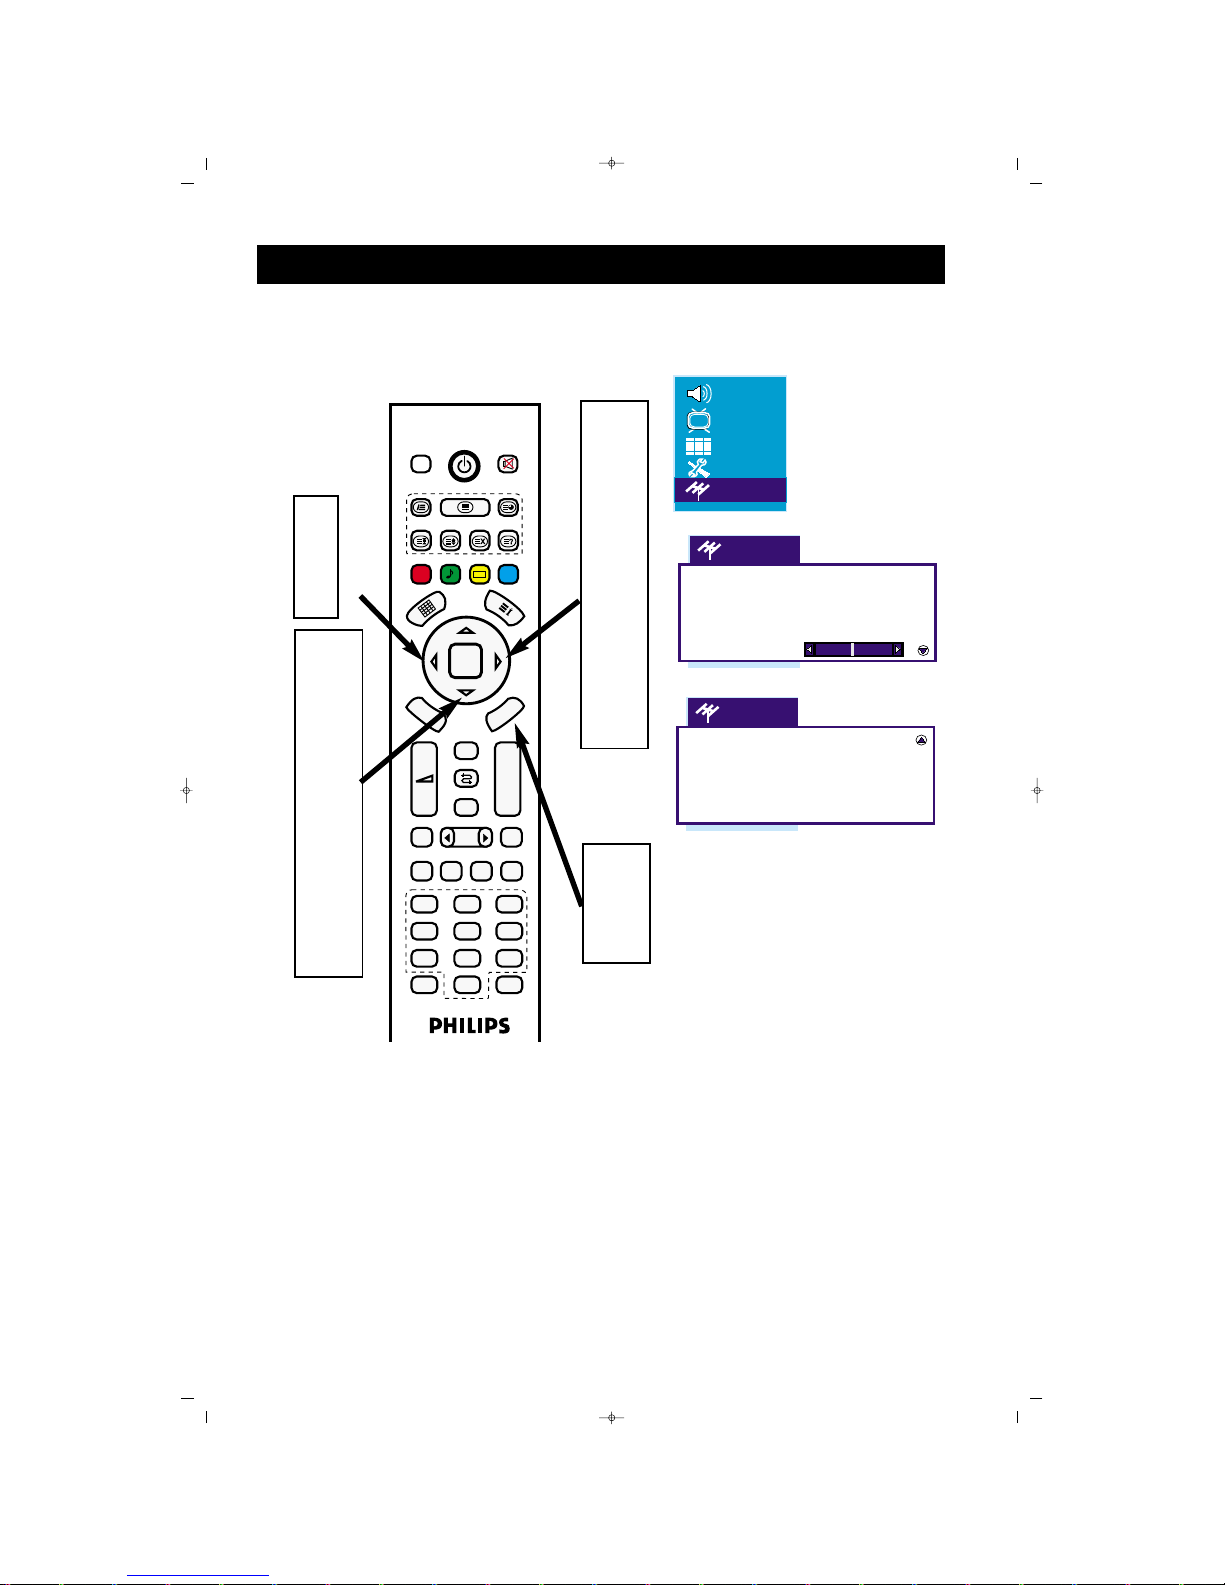
4545
MANUAL SETTING OF TV CHANNELS
FAV+ EPG RADIO
PP
OK
MENU
P+
P-
+
–
PIP
AV
FREEZE
16:9
TV PC DVI
YPbPr
1
2
3
4
5
6
7
8
9
0
ZOOM
S/M/D
FAV-
DVB
DVB
MENU
Zap
3
5
7
9
10
11
2
4
6
8
10
11
5
7
1
12
Program nr. 2
Program name
System standard Europe
Autostore
Frequency 182.25 MHz
Fine tune
AFC On
Lock Off
Store
065001056911 20"LOC-1 CFULL LCD 17/7/06 9:47 Page 45
Page 46
4646
PROGRAM EDITING
You can make other changes on the channels.
Press Menu button on the RC, menu
will appear on the screen.
Press down (
ï) arrow button repea-
tedly until PROGRAMS menu
appears on the screen
Press Right (
Æ) arrow button to enter
the menu.
AASSSSIIGGNNIINNGG AA TTIITTLLEE
In the program table, use up and down
arrow keys (
Î,ï) to select the channel you want to assign a name for.
Select the program using the blue key
and select the first character of the
title using arrow keys (
Í,Æ) and then
press right arrow (
Æ) key for the next
character. When you finish, press the
blue button to approve the transaction.
PPRROOGGRRAAMM SSWWIITTCCHH
In the program table, use up and down
arrow keys (
Î,ï) to select the channel
you want to replace. Select the program
using the green key. Replace its place
using arrow keys (
Î,ï) and complete
the transaction pressing the green button again.
PPRROOGGRRAAMM DDEELLEETTIINNGG
In the program table, use up and down
arrow keys (
Î,ï) to select the channel
you want to delete. Select the program
using the red key and confirm the
transaction pressing the red button
again.
CHANNEL SKIP
In the program table, use up and down
arrow keys (
Î,ï) to select the channel
you want to skip during zapping.
Confirm the transaction pressing the
yellow button. This channel shall not
be seen in the screen when you toggle
among the channels using P+ and P-.
Exit the menus pressing “Menu” key
repeatedly.
1
2
3
A
B
C
4
D
HHEELLPPFFUULL HHIINNTT
* You can not see the skipped channels using P+
or P- keys but access them using numeric keys.
065001056911 20"LOC-1 CFULL LCD 17/7/06 9:47 Page 46
Page 47
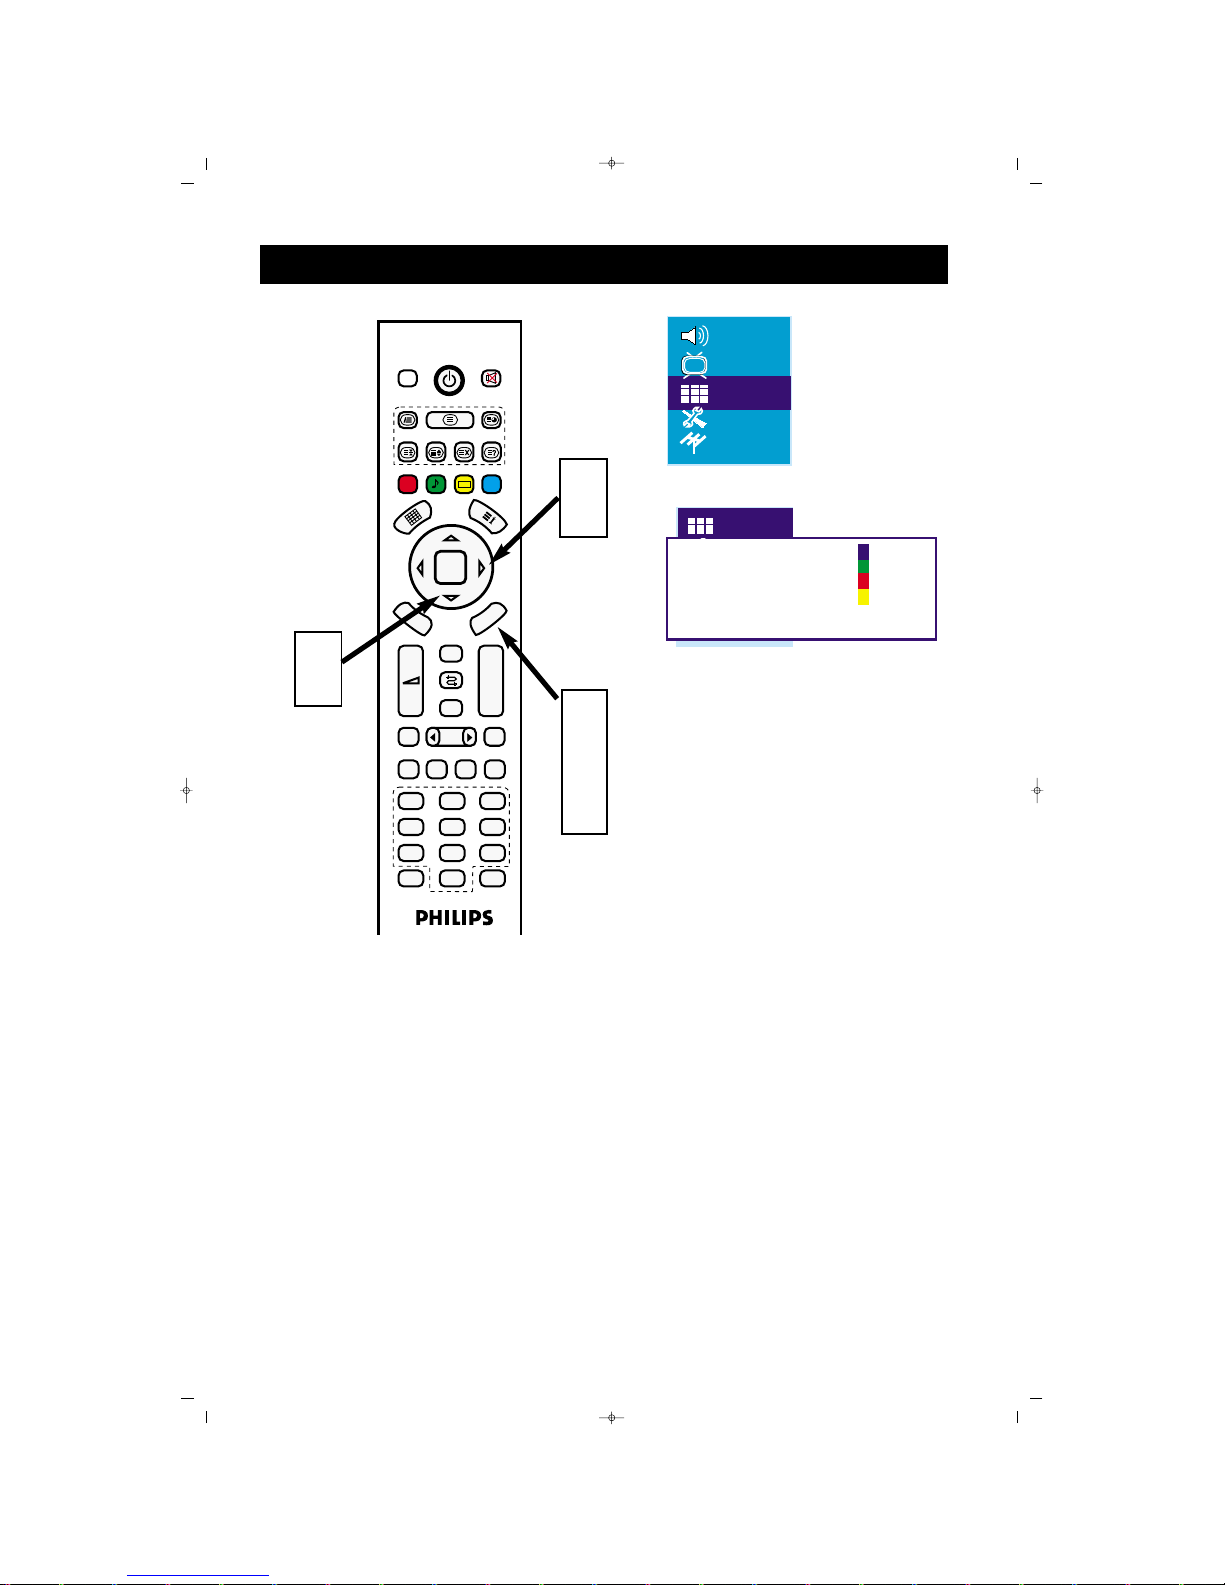
47
PROGRAM EDITING
FAV+ EPG RADIO
PP
OK
MENU
P+
P-
+
–
PIP
AV
FREEZE
16:9
TV PC DVI
YPbPr
1
2
3
4
5
6
7
8
9
0
ZOOM
S/M/D
FAV-
DVB
D
V
B
M
E
N
U
Zap
1
4
2
3
1
2
3
4
5
6
7
8
9
10
11
12
Name
Move
Delete
Skip
065001056911 20"LOC-1 CFULL LCD 17/7/06 9:47 Page 47
Page 48
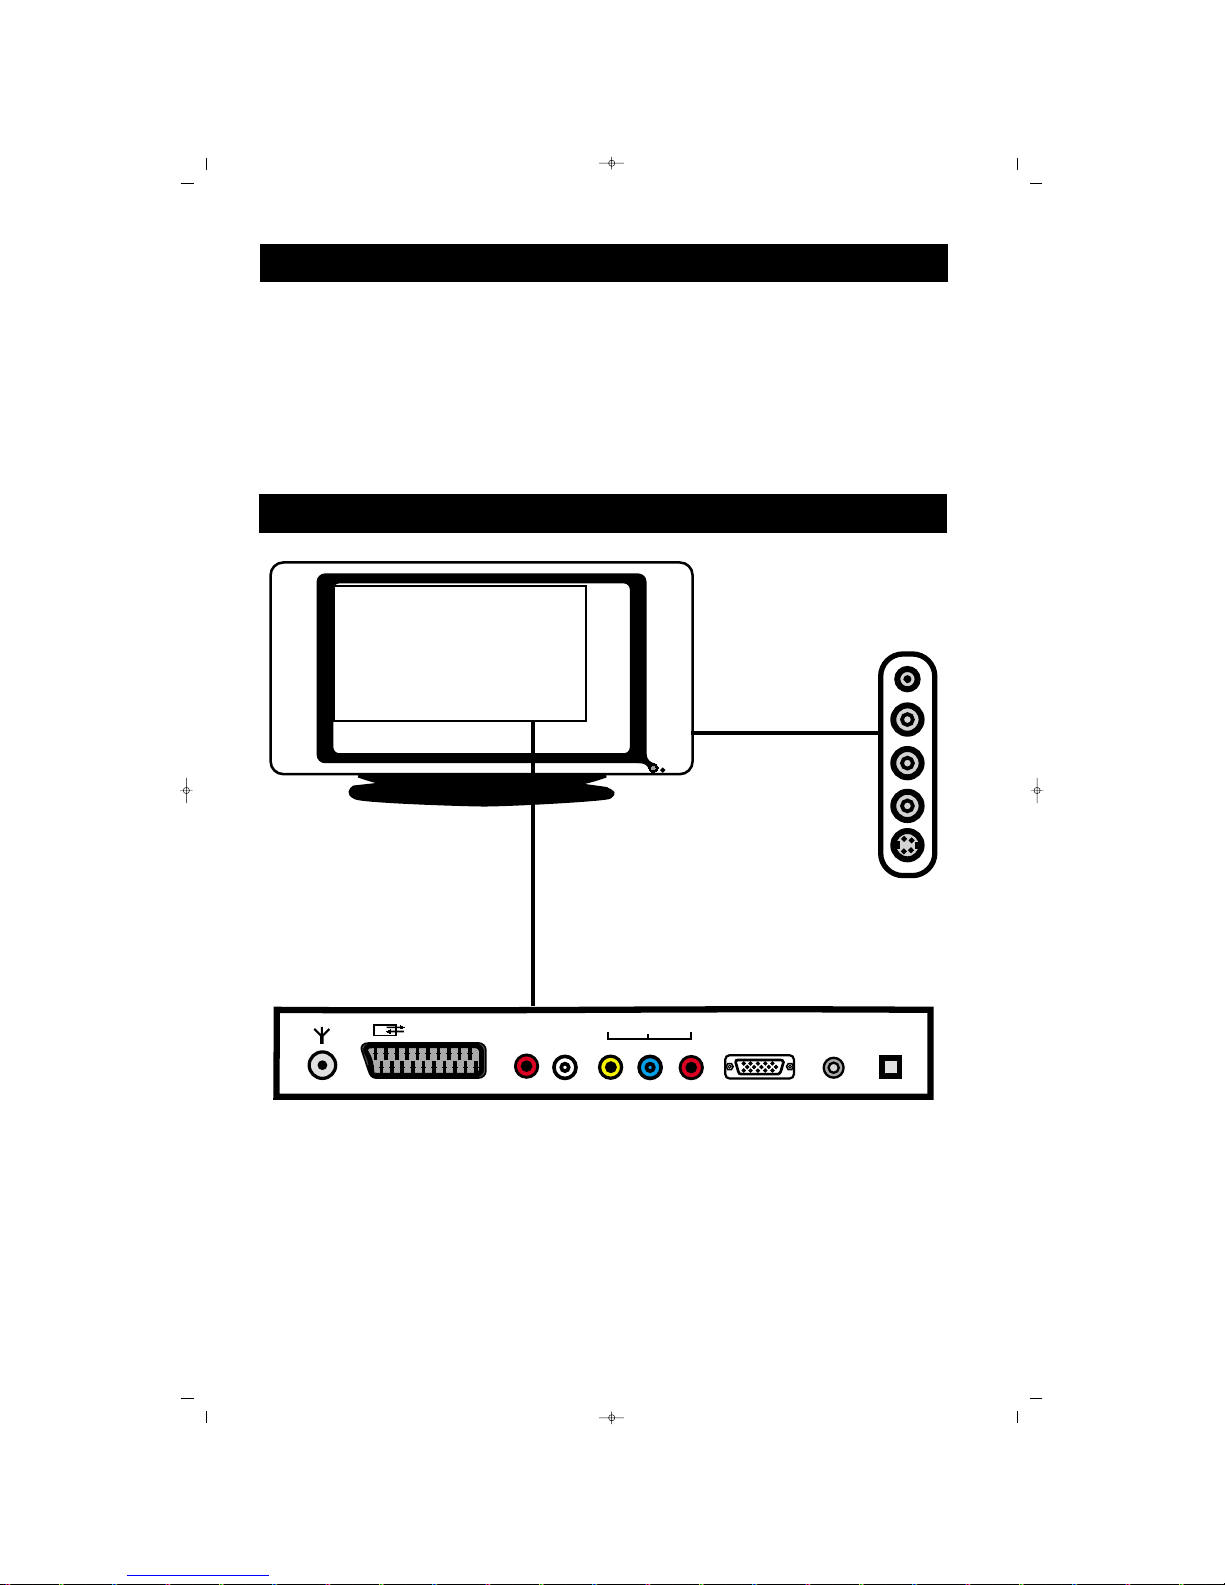
48
PPllaacciinngg yyoouurr LLCCDD TTVV
* Place your LCD TV on a flat and sound surface. Be careful that the surface is sound enough
to carry the load of LCD TV.
* Leave 15 cm clearance in both sides of your
LCD TV in order to achieve good ventilation.
* Keep the LCD TV away from the radiators
and heat sources.
* Avoid the LCD TV from rain and humidity.
LCD TV PRESENTATION
DESCRIPTION OF ALL SOCKETS
DC 12V
EURO AV
Y
PC INPUT
PC
AUDIO IN
RL
AUDIO IN
Pb Pr
IN
7
5
4
1
2
3
6
8
9
10
065001056911 20"LOC-1 CFULL LCD 17/7/06 9:47 Page 48
Page 49

49
EEUURROO AAVV::
Connects the scard outputs
of your VCR or other video devices.
SSIIDDEE AAVV::
Connects the outputs of your
VCR or other video devices.
EEaarrpphhoonnee JJaacckk::
connects the earphones.
YY PPbb PPrr IINN::
Connects the Digital
Satellite Receiver or other video device
supporting YPbPr video format.
VVHHFF//UUHHFF::
Connects to VHF/UHF
antenna or cable.
PPCC IINN::
Connects your PC having VGA
type video output
PPCC AAUUDDIIOO IINN::
Connects the audio of
your PC having VGA type video output
LL//RR AAUUDDIIOO IINN::
Y Pb Pr Audio input
12 V DC Adaptor Input
SVHS Input
DESCRIPTION OF ALL SOCKETS (REAR PANEL)
1
2
3
4
5
6
7
9
8
Please ensure that followings are included in your device package.
Remote Control and its batteries.
User’s Guide
Quick Start Guide
Warranty Card
World Wide Warranty Card
ACCESSORIES
1
2
3
4
5
10
065001056911 20"LOC-1 CFULL LCD 17/7/06 9:47 Page 49
Page 50
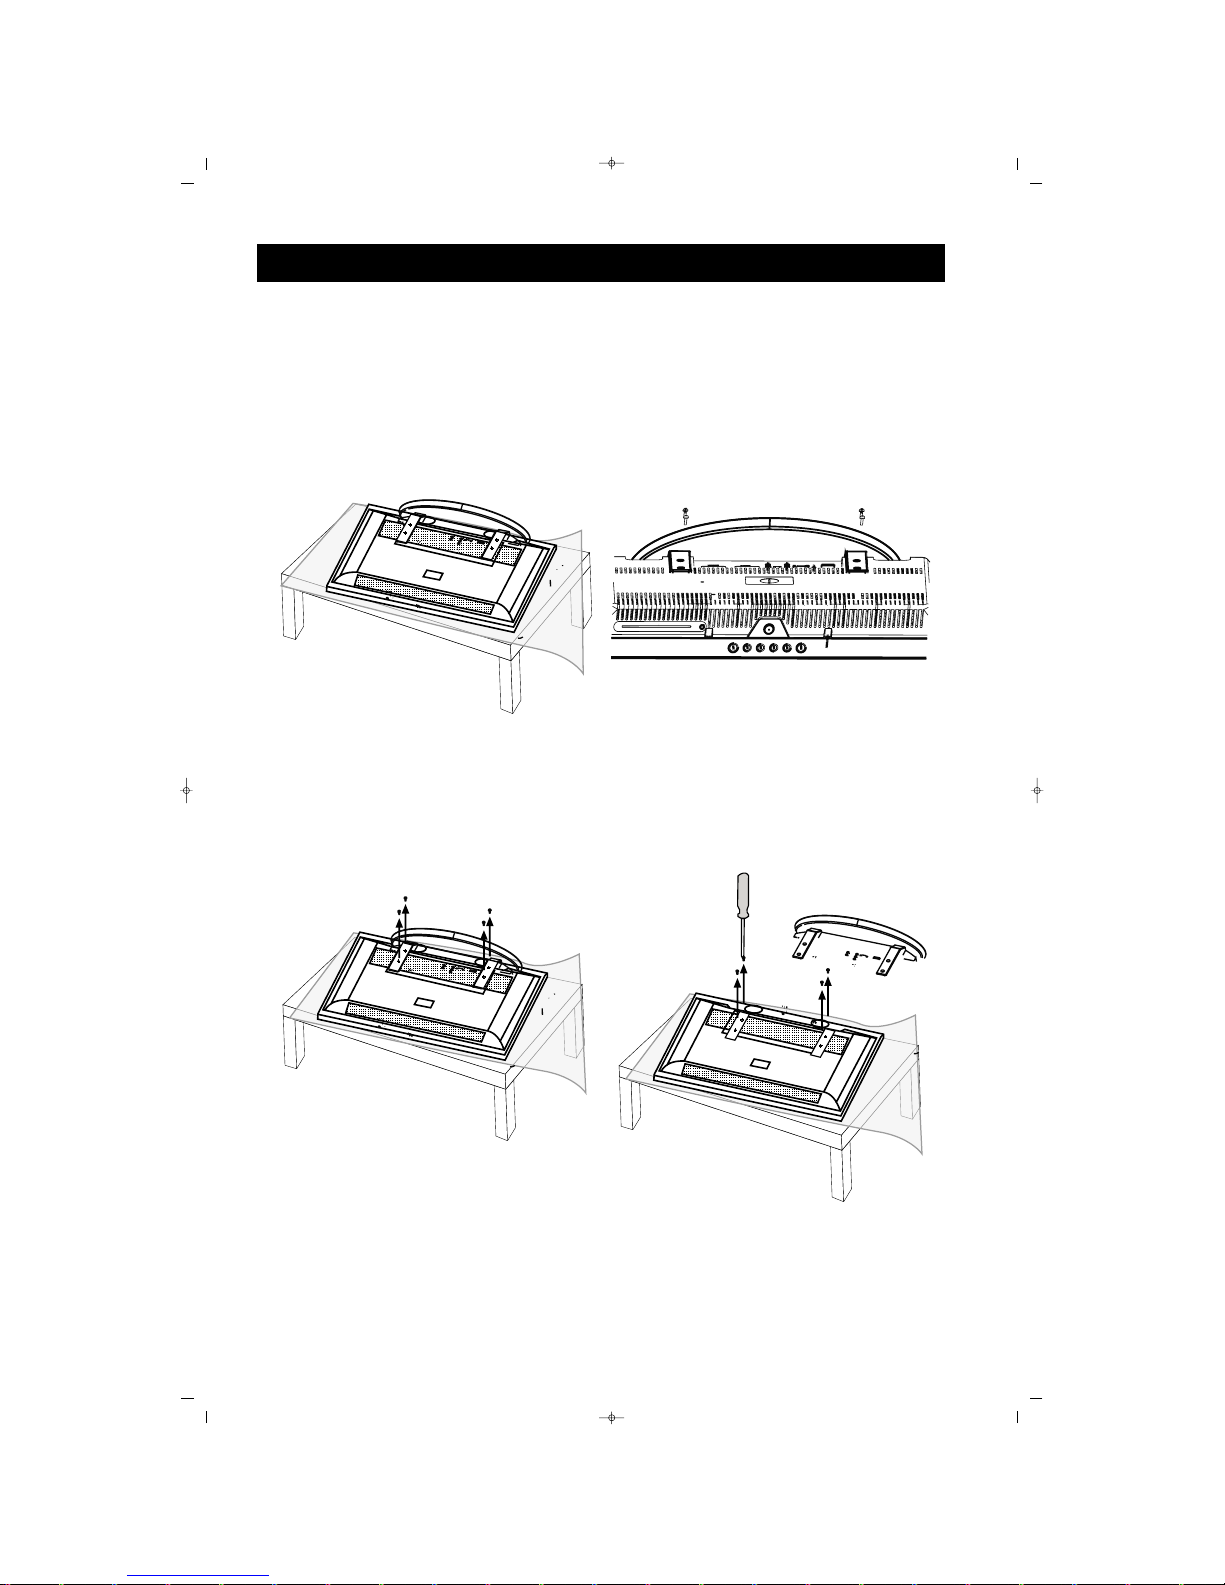
50
MOUNTING LCD TV ON THE WALL
Before mounting you LCD TV on the wall, you have to remove the bottom cover first as defined
below.
11
1. Place the device on a flat surface covered
with protective layer or cloth as in the figure
below.
22
2. Remove the bottom screws.
33
44
Stand of your LCD TV is in compliance with VESA standard. Consult an expert technician to mount
your LCD TV on the wall. The Manufacturer shall have no responsibility if the mounting is not carried
out by an expert technician.
Remove the bottom screws.
Hold the bottom cover and pull it
outwards.
065001056911 20"LOC-1 CFULL LCD 17/7/06 9:47 Page 50
Page 51
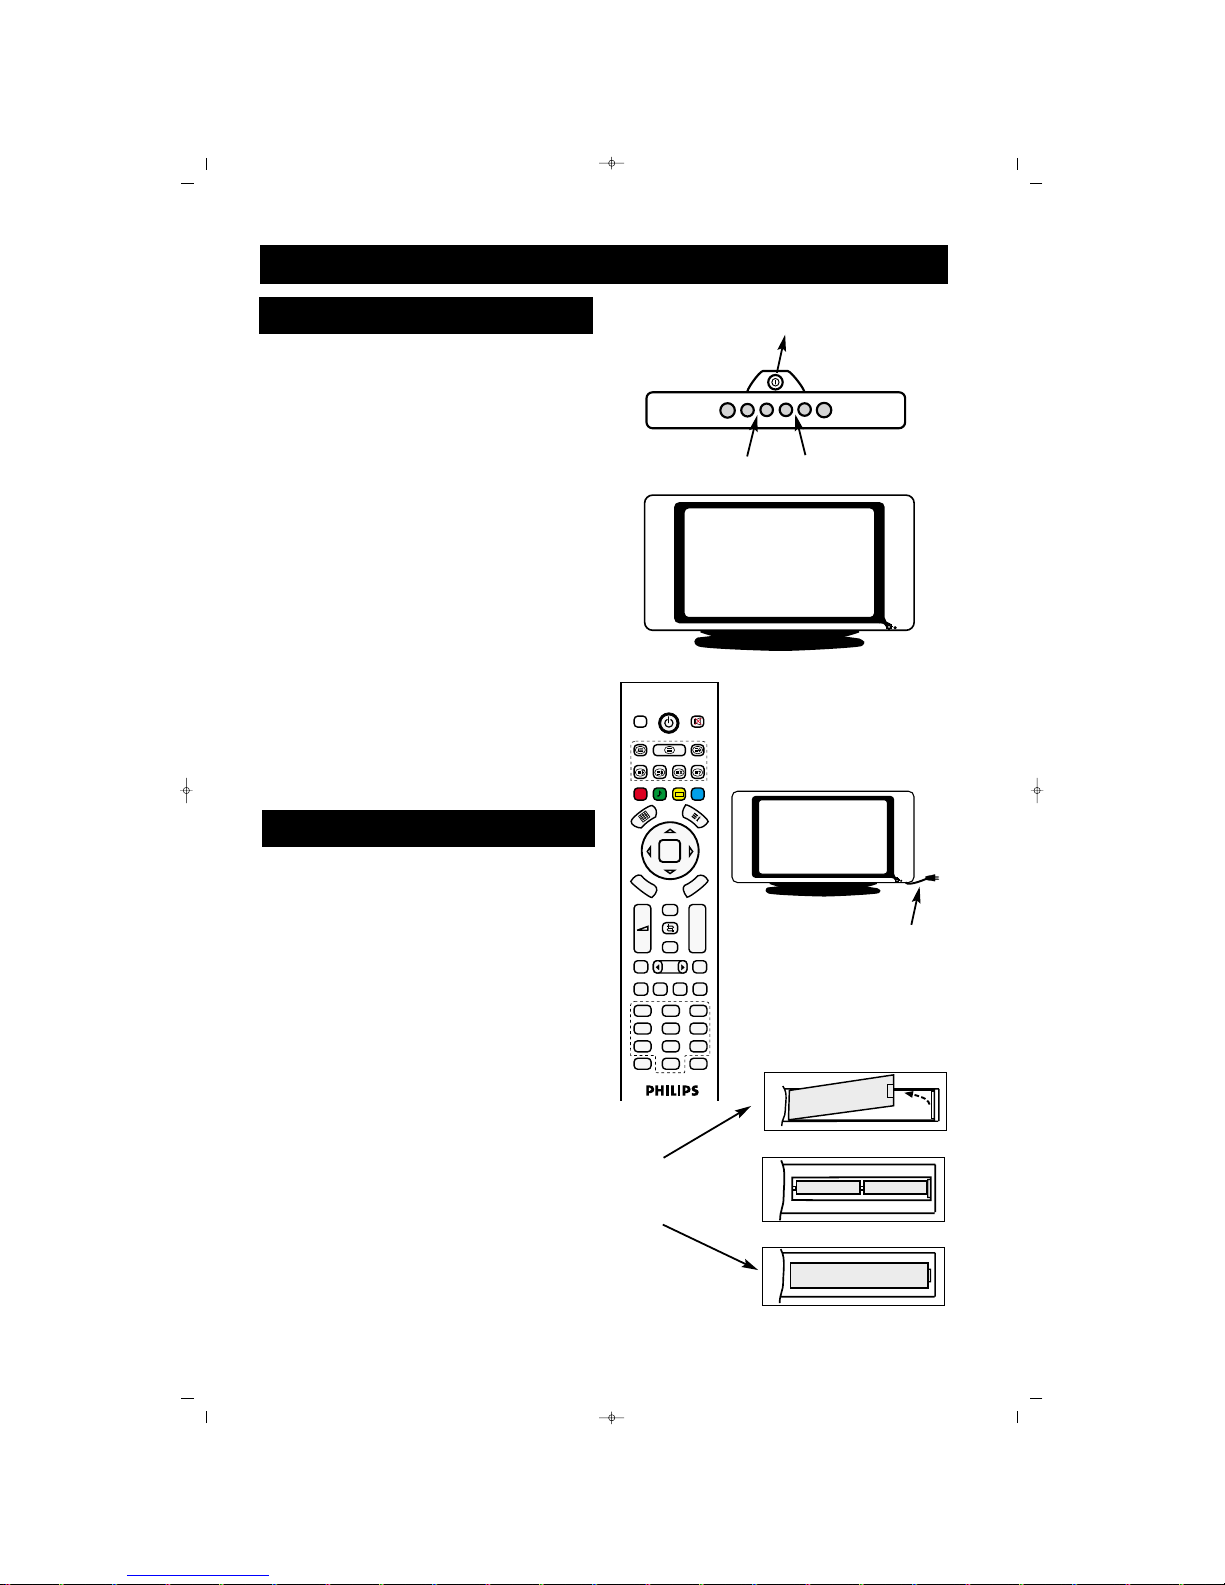
51
Connect the power cable to the AC
inlet on the LCD TV. Plug the power
cable on a socket and turn your TV on.
Press on Stan-by button to turn your TV
on.
Press (
”+) to turn the volume up and
(
”-) to turn the volume down.
Select the channels using P +/- .
To operate your LCD TV using remote
control keeps the remote control in
front of the TV.
Take the battery cover under the
remote control away.
Install two AAA batteries into to remote
control. Be careful to place the (+) and
(-) ends properly.
Close the battery compartment cover
again.
USING THE TV AND REMOTE CONTROL
1
2
3
4
5
6
7
8
TV AND REMOTE CONTROL
INSTALLING THE BATTERIES
P–
P+
MENU
V+V–
SOURCE
34
2
FAV+ EPG RADIO
PP
OK
M
ENU
P+
P-
+
–
PIP
AV
FREEZE
16:9
TV PC DVI
YPbPr
1
2
3
4
5
6
7
8
9
0
ZOOM
S/M/D
FAV-
DVB
D
V
B
M
E
N
U
Zap
1
6
8
7
065001056911 20"LOC-1 CFULL LCD 17/7/06 9:47 Page 51
Page 52
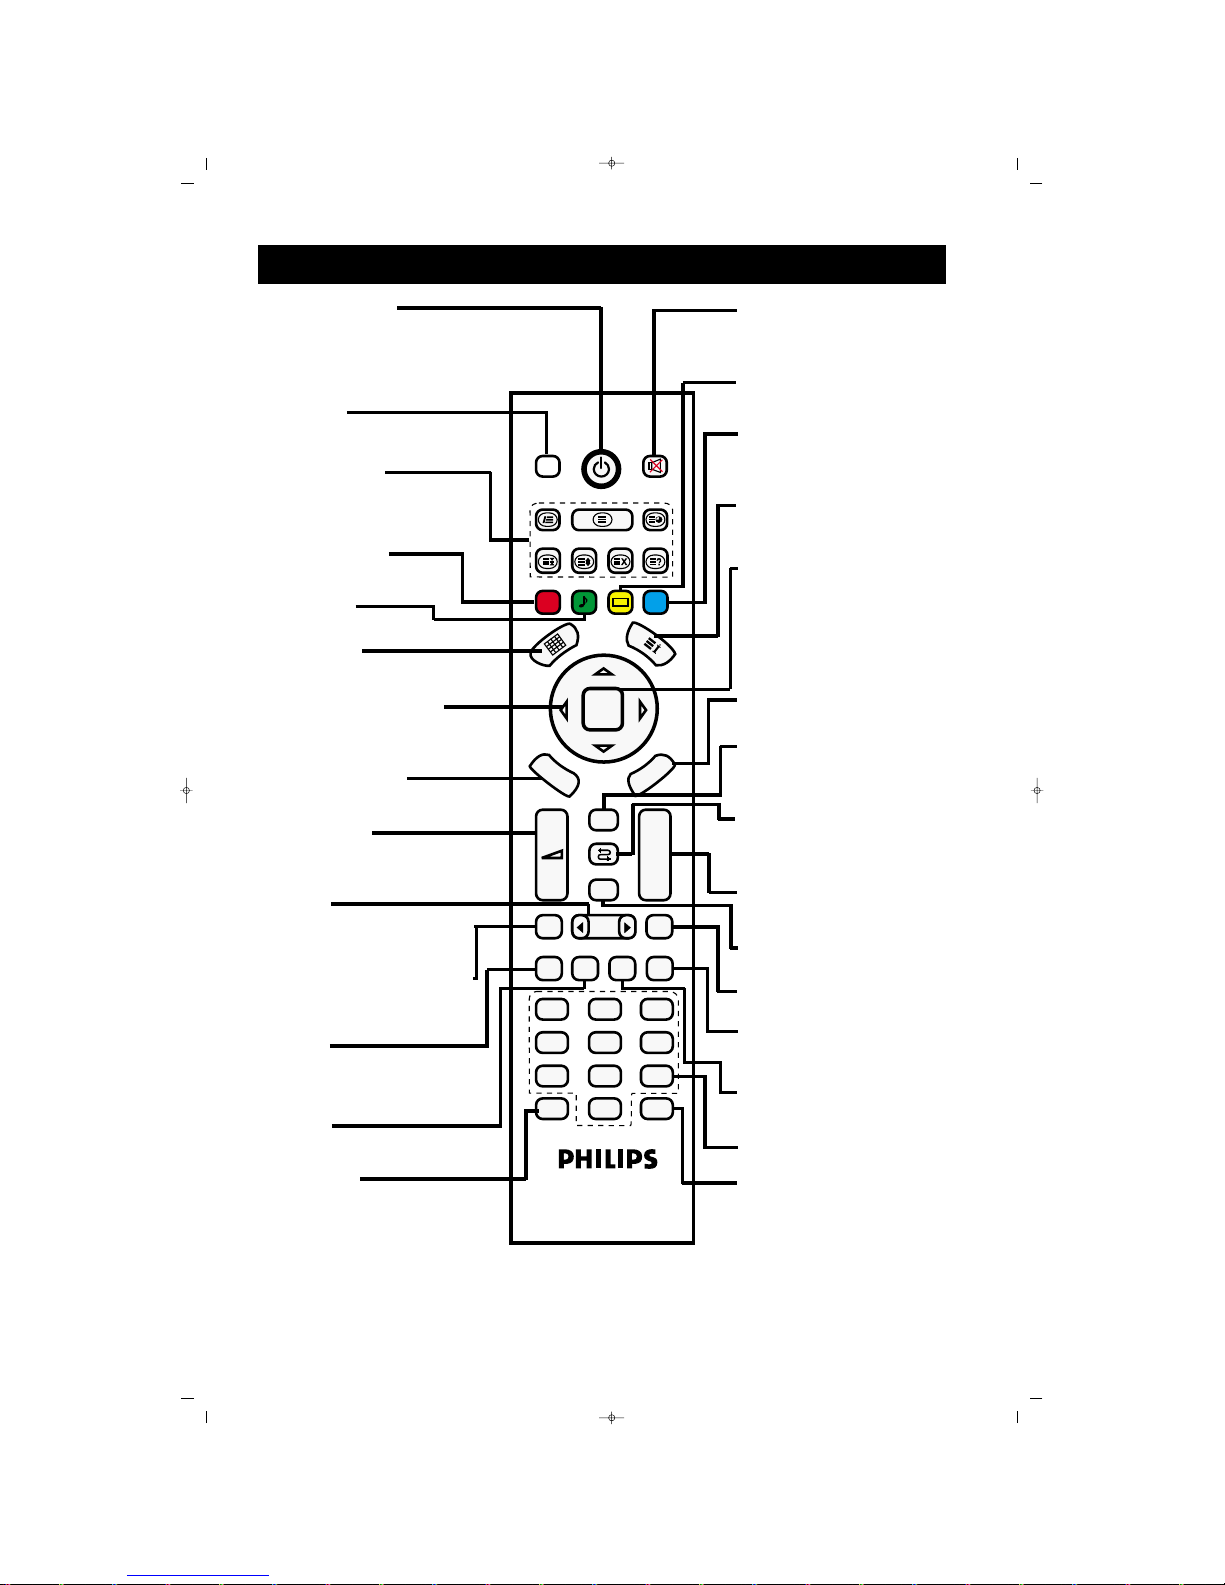
52
REMOTE CONTROL
SSttaanndd bbyy BBuuttttoonn::
Used to turn your device
on (or off) in Stand by
mode or turns it to Stand
by Mode.
DDVVBB KKeeyy::
Does not function in this
model.
TTeelleetteexxtt KKeeyyss::
RReedd KKeeyy ((PPPP))::
Normalization key
GGrreeeenn KKeeyy::
Voice presets
MMoossaaiicc kkeeyy::
It has no function in this
model
((ÍÍ/ÆÆ/ÎÎ/ïï)) YYöönn ttuuflflllaarr››::
Arrow keys: used to toggle
among the menus and set up
DDVVBB MMeennuu KKeeyy::
Not functional in this
model
”+/-
KKeeyyss::
You can increase
”- or
decrease
”+ the Volume.
AAVV KKeeyy::
Used to select the modes
to be connected by the
external devices
BBlluuee KKeeyy::((SSmmaarrtt AAuuddiioo KKeeyy))::
You can change the audio
mode
TTVV KKeeyy::
Used to exit from PC and
YPbPr modes.
PPCC KKeeyy::
Turns the PC mode on
ZZoooomm KKeeyy::
Not functions in this
model.
MMuuttee KKeeyy::
You can turn the voice off
YYeellllooww KKeeyy::
Images presets
BBlluuee KKeeyy:: ((SSmmaarrtt AAuuddiioo
KKeeyy))::
you can change the
audio mode.
((‹‹)) KKeeyy::
Displays the information
screen
OOKK KKeeyy::
Used to approve the selections made.
MMEENNUU KKeeyy::
You can enter to the
Menus
ZZaapp KKeeyy::
Used to view the stored
channels on the screen.
SSwwaapp KKeeyy::
It turns the previous AV
mode or TV channel.
PP--PP++ KKeeyyss::
Used to scroll among the
programs in antenna mode.
PPIIPP KKeeyy::
Not function in this model.
1166::99 kkeeyy::
: changes the pic-
ture format.
YYPPbbPPrr KKeeyy::
Turns the YPbPr external
mode on
DDVVII KKeeyy::
Not function in this model
NNuummeerriiccaall kkeeyyss
SS//MM//DD KKeeyy::
Toggles among stereo,
mono and dual modes (if
the broadcasting has these
characteristics)
FAV+ EPG RADIO
PP
OK
MENU
P+
P-
+
–
PIP
AV
FREEZE
16:9
TV PC DVI
YPbPr
1
2
3
4
5
6
7
8
9
0
ZOOM
S/M/D
FAV-
DVB
DVB
M
E
N
U
Zap
065001056911 20"LOC-1 CFULL LCD 17/7/06 9:47 Page 52
Page 53

53
Choose the channel and follow the following
stages in order to setup the LCD TV picture.
Press the menu button on the remote
control. The menu appears on the
screen.
Press down (
ïï
) arrow button repeatedly
until PICTURE menu appears on the
screen
Press Right (
ÆÆ
) arrow button to enter
the PICTURE menu.
PPiiccttuurree mmeennuu ccoonnttaaiinnss tthhee ffoolllloowwiinnggss::
Brightness, Contrast, Color, Sharpness,
Din. Complexion color and White
Balance.
BBrriigghhttnneessss::
Setup in order to make the
dark sides of the picture brighter. The
color shall be whitened.
CCoonnttrraasstt::
Setup in order to sharpen the
image quality. While the black parts
enrich in the dark parts, white becomes
brighter.
CCoolloorr::
Setup to increase or decrease the
color.
SShhaarrppnneessss::
Setup to improve the details,
DDiinn.. CCoommpplleexxiioonn ccoolloorr::
You can turn
this function on in order to approach
the complexion color to the real tone.
WWhhiittee BBaallaannccee::
You can change the
white value on the image.
You can change the image subject using
Left (
ÍÍ
) and Right (ÆÆ) arrow keys.
Exit the menus pressing “Menu” key
repeatedly.
TV PICTURE CONTROLS
1
2
3
4
5
6
065001056911 20"LOC-1 CFULL LCD 17/7/06 9:47 Page 53
Page 54
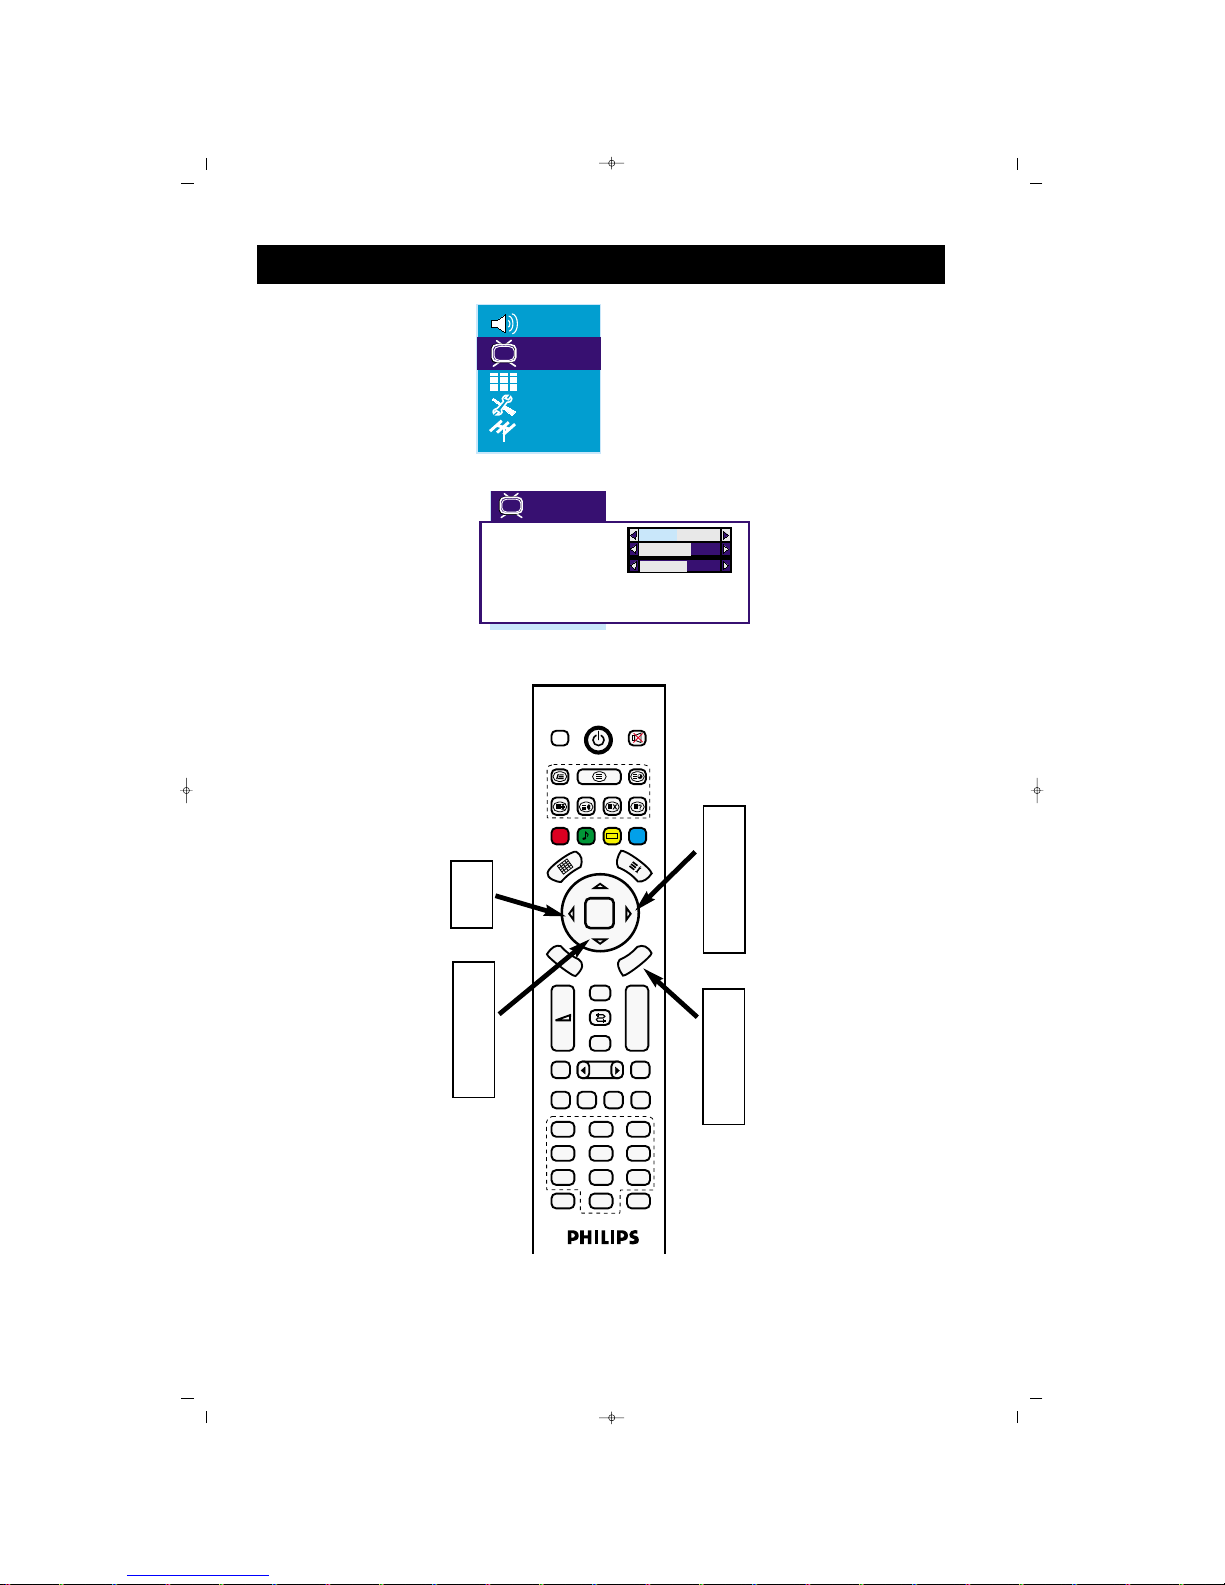
54
FAV+ EPG RADIO
PP
OK
M
E
NU
P+
P-
+
–
PIP
AV
FREEZE
16:9
TV PC DVI
YPbPr
1
2
3
4
5
6
7
8
9
0
ZOOM
S/M/D
FAV-
DVB
D
V
B
M
E
N
U
Zap
1
6
TV PICTURE CONTROLS
2
4
3
5
5
Brightness
Contrast
Colour
Sharpness Normal
Dyn. skin tone Off
White tone Normal
065001056911 20"LOC-1 CFULL LCD 17/7/06 9:47 Page 54
Page 55
55
Choose the channel and follow the following
stages in order to setup the LCD TV audio.
Press the menu button on the remote
control. The menu appears on the
screen.
Press down (
ïï
) arrow button repeatedly
until AUDIO menu appears on the
screen
Press Right (
ÆÆ
) arrow button to enter
the AUDIO menu.
4. Select the Sound Menu Subjects you
want to set using (
ïï
) button
SSoouunndd mmeennuu ccoonnttaaiinnss tthhee ffoolllloowwiinnggss ssuubb--
jjeeccttss::
Volume, Balance, Bas, Pitch and
Equalizer.
VVoolluummee::
you can turn the volume up or
down.
BBaallaannccee::
You can arrange the balance
level.
BBaassss::
you can arrange the bass level.
PPiittcchh::
you can arrange the pitch level
EEqquuaalliizzeerr::
you can enter using the Right
(
Æ) arrow key and arrange the equalizer.
You can setup the selected audio subject
using Left (
ÍÍ
) and Right (ÆÆ) arrow keys.
(You should use the down (
ïï
) and up
(
ÎÎ
) keys to arrange equalizer frequency
values).
Exit the menus pressing “Menu” key
repeatedly.
1
2
3
4
5
6
HHEELLPPFFUULL HHIINNTT
If there is no stereo characteristic in the selected broadcasting and TV is in the stereo mode,
the voice from the TV shall be in mono mode.
TV AUDIO MENU CONTROLS
065001056911 20"LOC-1 CFULL LCD 17/7/06 9:47 Page 55
Page 56
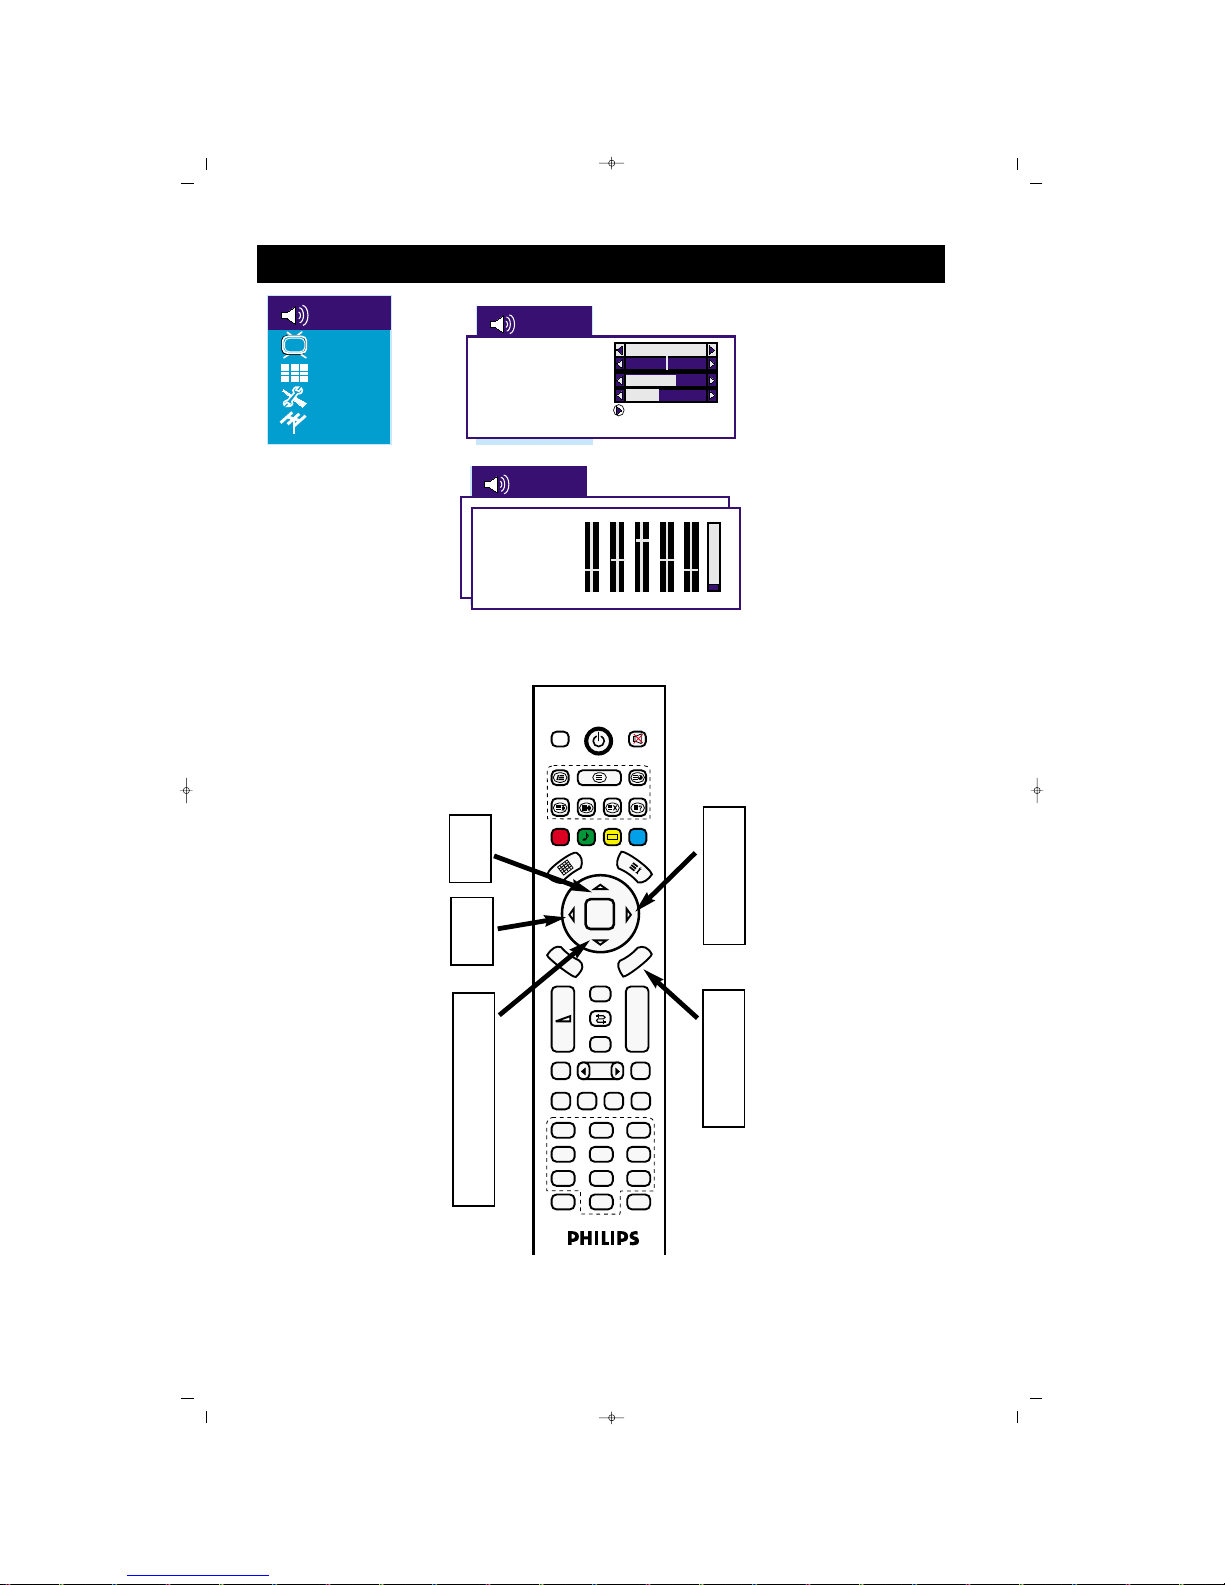
56
TV AUDIO MENU CONTROLS
FAV+ EPG RADIO
PP
OK
M
E
N
U
P+
P-
+
–
PIP
AV
FREEZE
16:9
TV PC DVI
YPbPr
1
2
3
4
5
6
7
8
9
0
ZOOM
S/M/D
FAV-
DVB
D
V
B
M
E
N
U
Zap
1
6
5
2
4
5
3
5
5
Volume
Balance
Bass
Treble
Equalizer
Personal
100 300 1k 3k 8k
065001056911 20"LOC-1 CFULL LCD 17/7/06 9:47 Page 56
Page 57

57
CChhiilldd lloocckk ffuunnccttiioonn eennaabblleess yyoouu ttoo lloocckk tthhee
cchhaannnneellss aanndd aavvooiidd yyoouurr cchhiillddrreenn ttoo wwaattcchh cchhaann--
nneellss wwiitthh aann uunnssuuiittaabbllee ccoonntteenntt..
AAccttiivvaattiinngg cchhiilldd lloocckk::
Press the menu button on the remote
control. The menu appears on the
screen.
Press down (
ïï
) arrow button repeatedly
until SETUP menu appears on the
screen. Press Right (
ÆÆ
) arrow button to
enter the menu.
Press down (
ïï
) arrow button repeated-
ly until Child Lock is selected.
AAccttiivvaattiinngg lloocckk ffuunnccttiioonn::
Press Right arrow (ÆÆ) key a new menu
appears on the screen.
Press down(
ïï
) arrow button repeatedly
until Password is selected.
Enter the 4 digit lock password using
numeric keys (0-9).
Reenter the lock password. The password is determined.
Press up (
ÎÎ
) arrow and select the Lock
line.
Press Right (
ÆÆ
) arrow button and select
“ON”
Exit the menus pressing “Menu” key
repeatedly.
TTuurrnniinngg tthhee LLoocckk FFuunnccttiioonn ooffff..
Press Right (ÆÆ) arrow button, a menu
appears on the screen.
Press down (
ïï
) arrow button repeatedly
until the password is selected.
Enter the 4-digit lock password (0-9).
Reenter the lock password.
Press up (
ÎÎ
) arrow and select the Lock
line.
Press Right (
ÆÆ
) arrow button and select
“ON”
Exit the menus pressing “Menu” key
repeatedly.
1
2
3
4
CHILD LOCK
5
6
7
8
9
5
6
7
8
9
10
4
10
065001056911 20"LOC-1 CFULL LCD 17/7/06 9:47 Page 57
Page 58
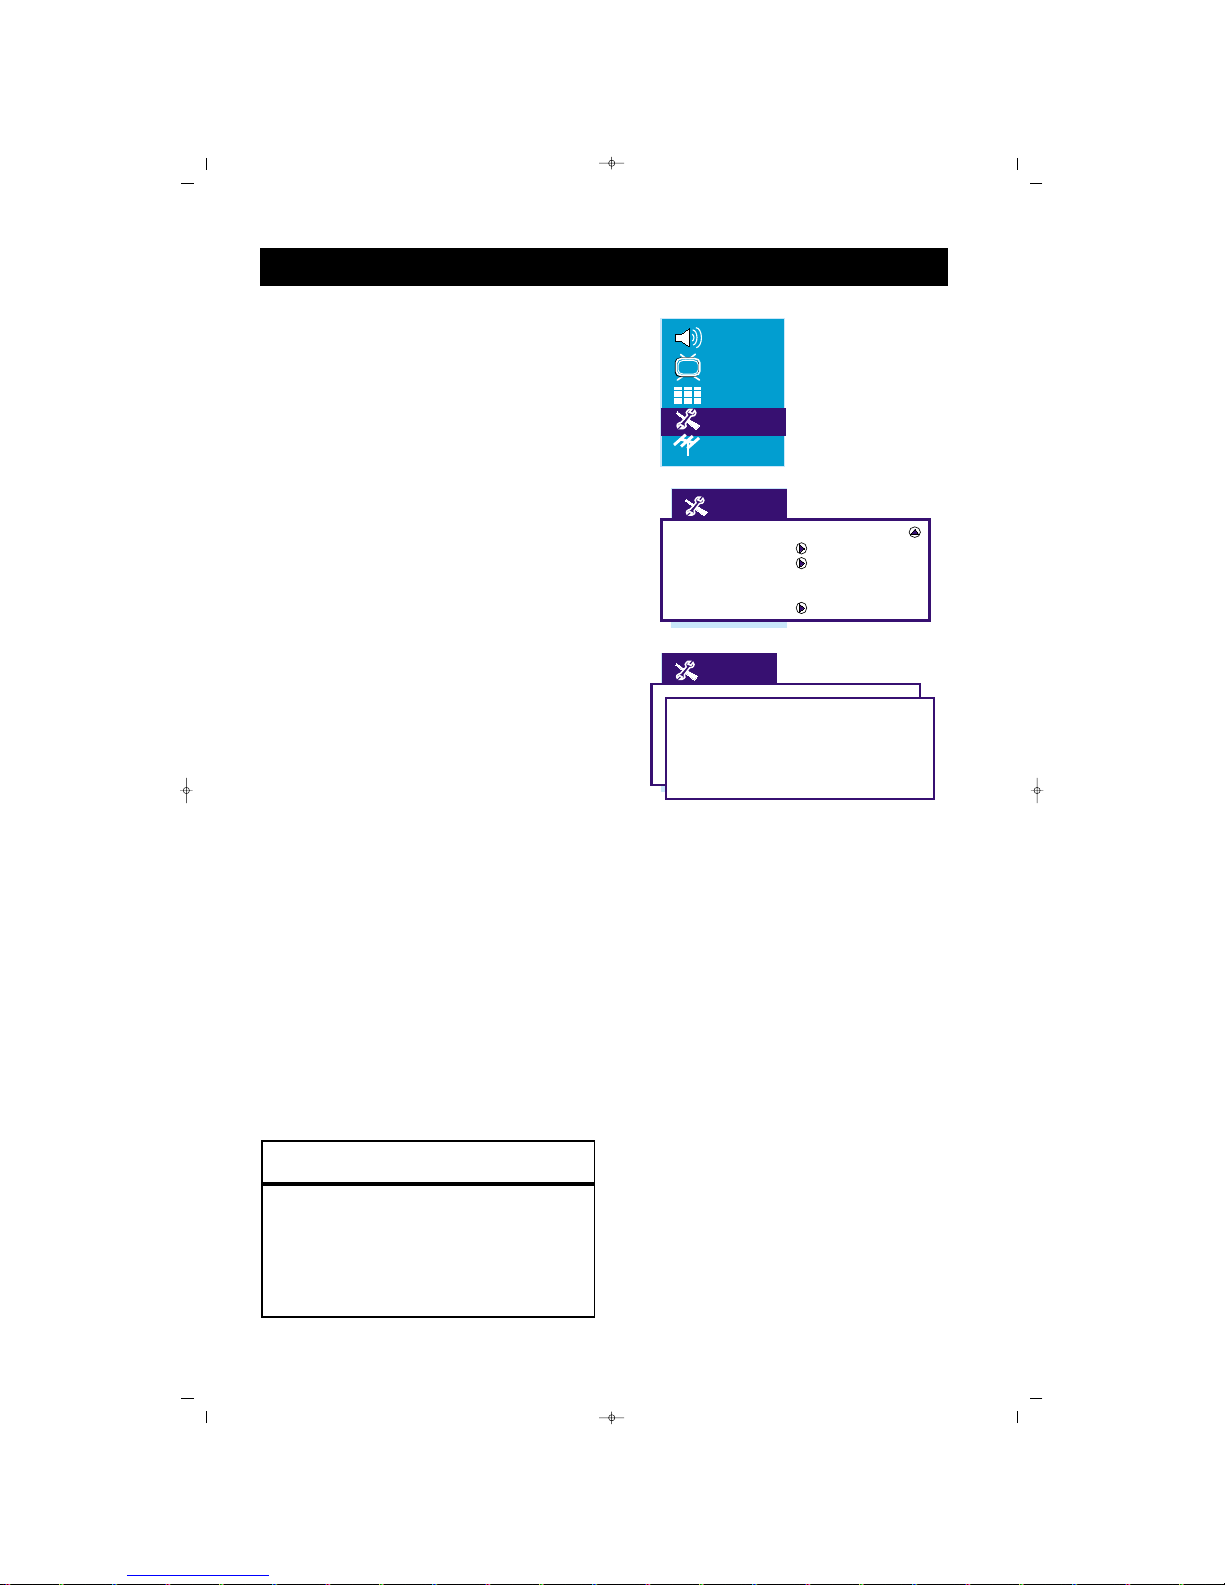
AAccttiivvaattiinngg cchhiilldd lloocckk::
WWhheenn yyoouu ttuurrnn tthhee cchhiilldd lloocckk oonn,, yyoouu sshhoouulldd
ddeeffiinnee tthhee cchhaannnneellss ttoo bbee lloocckkeedd..
Press the menu button on the remote
control. The menu appears on the screen.
Press down (
ïï
) arrow button repeatedly
until PROGRAMS menu appears on the
screen.
Press Right (
ÆÆ
) arrow button to enter
the menu.
Press down (
ïï
) arrow button repeatedly
until “Lock” is selected.
Press Right arrow (
ÆÆ
) key to turn the
function ON. The channel you watched
or setup is locked. You must enter the
password when you watch this channel.
Press down (
ïï
) arrow button repeatedly until “Store” is selected and complete the store transaction by pressing
right arrow (
ÆÆ
) key.
Exit the menus pressing “Menu” key
repeatedly.
1
2
3
4
CHILD LOCK
5
6
7
HHEELLPPFFUULL HHIINNTT
0711 is the standard Lock Password. If you
access password is changed by someone else by
any person other than you (for example a child)
or if you forget the password. You can enter
anytime using the standard code.
Country GB
Child Lock
Timers
Teletext lang. Pan European
Teletext E / W West
RT Clock
Lock Off
Lock code 1111
58
065001056911 20"LOC-1 CFULL LCD 17/7/06 9:47 Page 58
Page 59
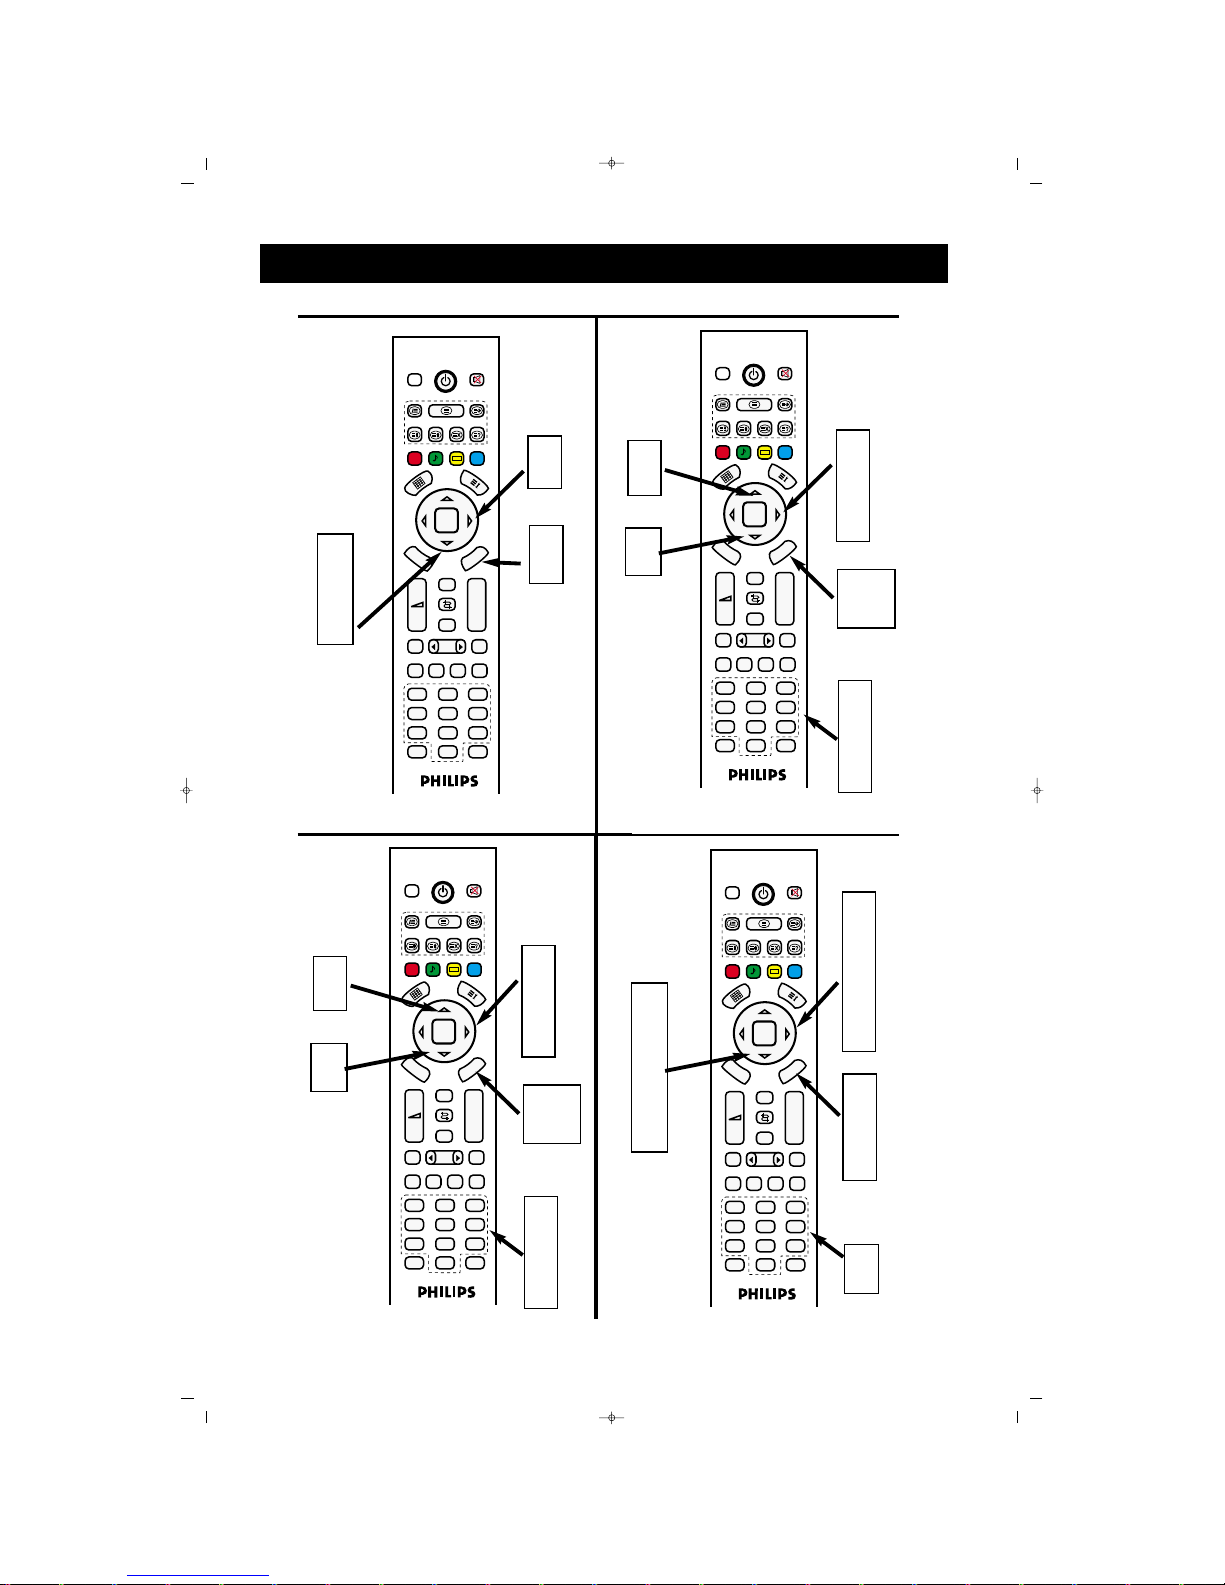
59
FAV+ EPG RADIO
PP
OK
M
E
N
U
P+
P-
+
–
PIP
AV
FREEZE
16:9
TV PC DVI
YPbPr
1
2
3
4
5
6
7
8
9
0
ZOOM
S/M/D
FAV-
DVB
DVB
M
EN
U
Zap
10
5
4
9
6
7
LOCK FUNCTIONS
FAV+ EPG RADIO
PP
OK
M
E
N
U
P+
P-
+
–
PIP
AV
FREEZE
16:9
TV PC DVI
YPbPr
1
2
3
4
5
6
7
8
9
0
ZOOM
S/M/D
FAV-
DVB
DV
B
M
ENU
Zap
AAccttiivvaattiinngg LLoocckk FFuunnccttiioonn
TTuurrnniinngg LLoocckk FFuunnccttiioonn OOffff
FAV+ EPG RADIO
PP
OK
M
E
N
U
P+
P-
+
–
PIP
AV
FREEZE
16:9
TV PC DVI
YPbPr
1
2
3
4
5
6
7
8
9
0
ZOOM
S/M/D
FAV-
DVB
D
VB
M
ENU
Zap
1
2
3
3
AAccttiivvaattiinngg CChhiilldd LLoocckk
8
10
5
4
9
6
7
8
FAV+ EPG RADIO
PP
OK
M
E
N
U
P+
P-
+
–
PIP
AV
FREEZE
16:9
TV PC DVI
YPbPr
1
2
3
4
5
6
7
8
9
0
ZOOM
S/M/D
FAV-
DVB
DV
B
M
ENU
Zap
DDeetteerrmmiinniinngg CChhiilldd LLoocckk CChhaannnneellss
2
4
6
3
5
6
5
1
7
065001056911 20"LOC-1 CFULL LCD 17/7/06 9:47 Page 59
Page 60
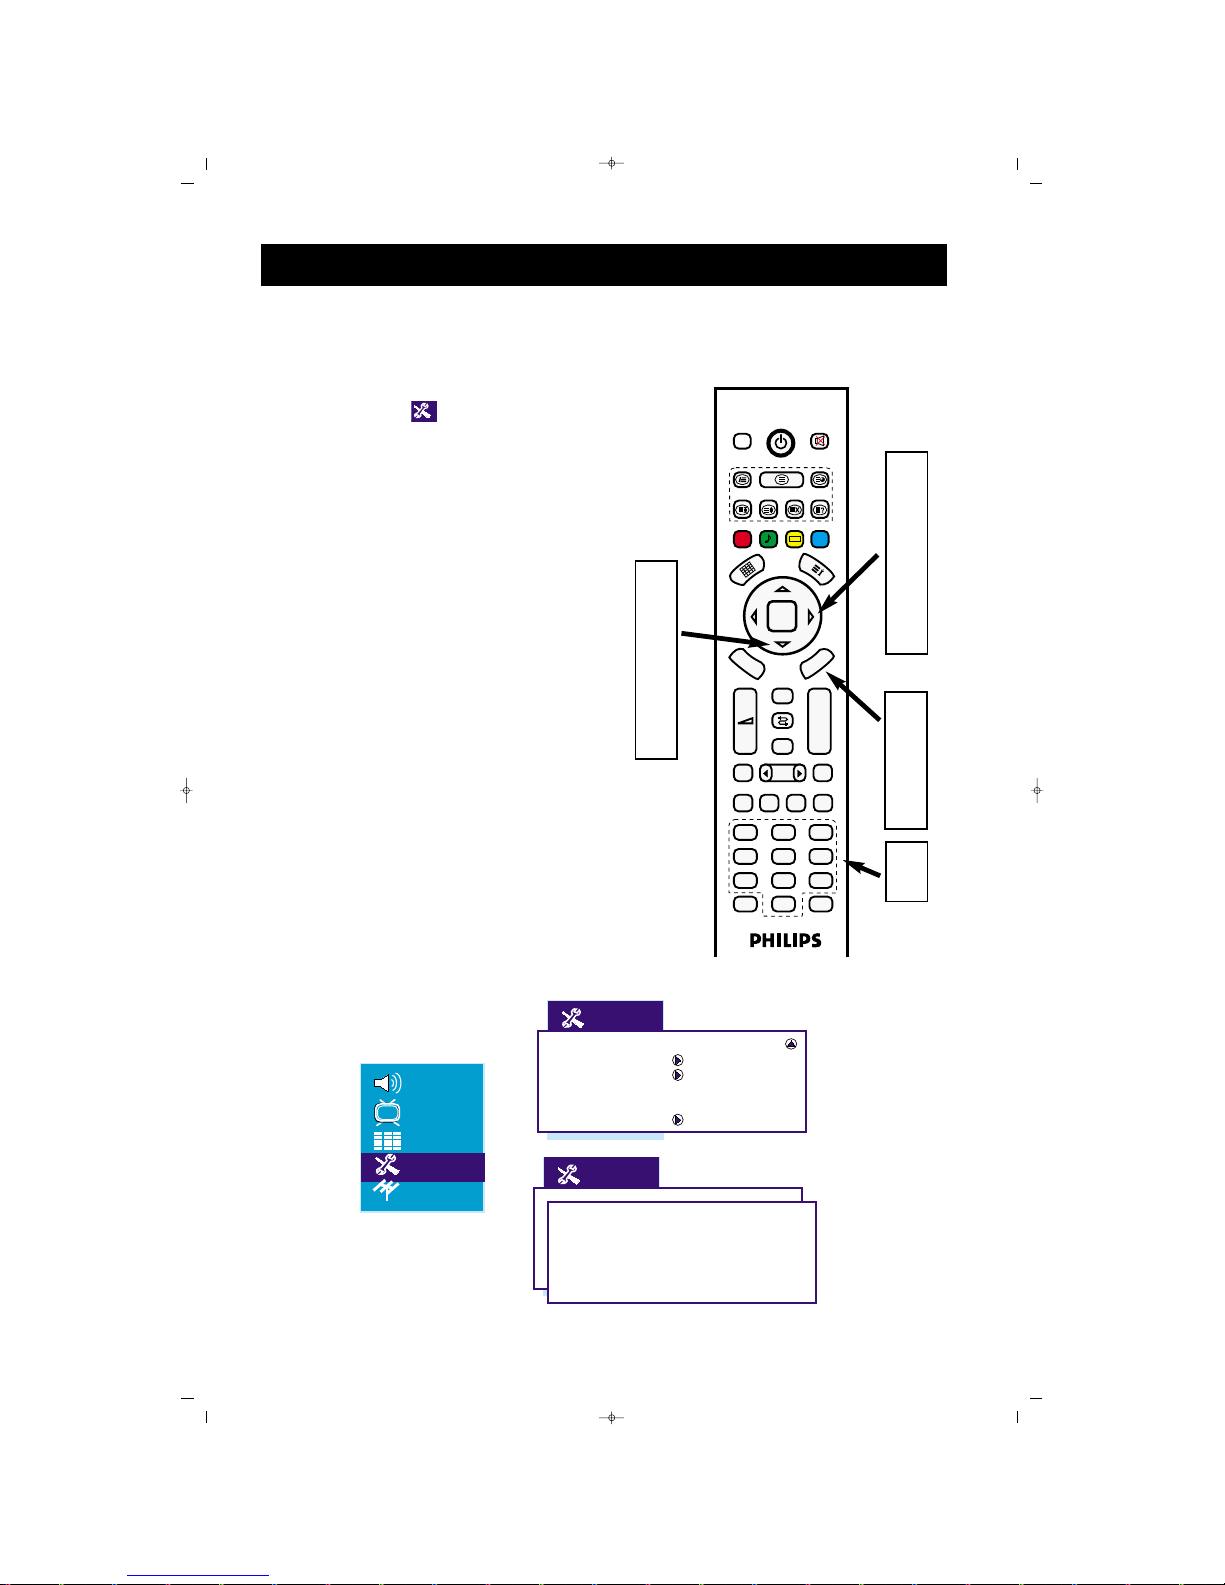
You can setup the turning off time off
time for your device by using this menu.
Press down (
ïï
) arrow button repeatedly
until SETUP menu appears on the
screen. Press Right (
ÆÆ
) arrow button to
enter the menu.
Press down (
ïï
) arrow button repeatedly
until Time is selected.
Press Right arrow (
ÆÆ
) key to enter the
menu.
Toggle the timer mode using Right (
ÆÆ
)
arrow button.
Press Down arrow (
ïï
) key to go to
Time line.
Setup the time using the numeric keys.
Exit the menus pressing “Menu” key
repeatedly.
TIMER SETUP
60
1
2
3
4
5
6
7
8
FAV+ EPG RADIO
PP
OK
M
E
N
U
P+
P-
+
–
PIP
AV
FREEZE
16:9
TV PC DVI
YPbPr
1
2
3
4
5
6
7
8
9
0
ZOOM
S/M/D
FAV-
DVB
D
V
B
M
E
N
U
Zap
1
8
2
3
6
2
4
5
7
Country GB
Child Lock
Timers
Teletext lang. Pan European
Teletext E / W West
RT Clock
Clock Off
Time 01:22
065001056911 20"LOC-1 CFULL LCD 17/7/06 9:47 Page 60
Page 61
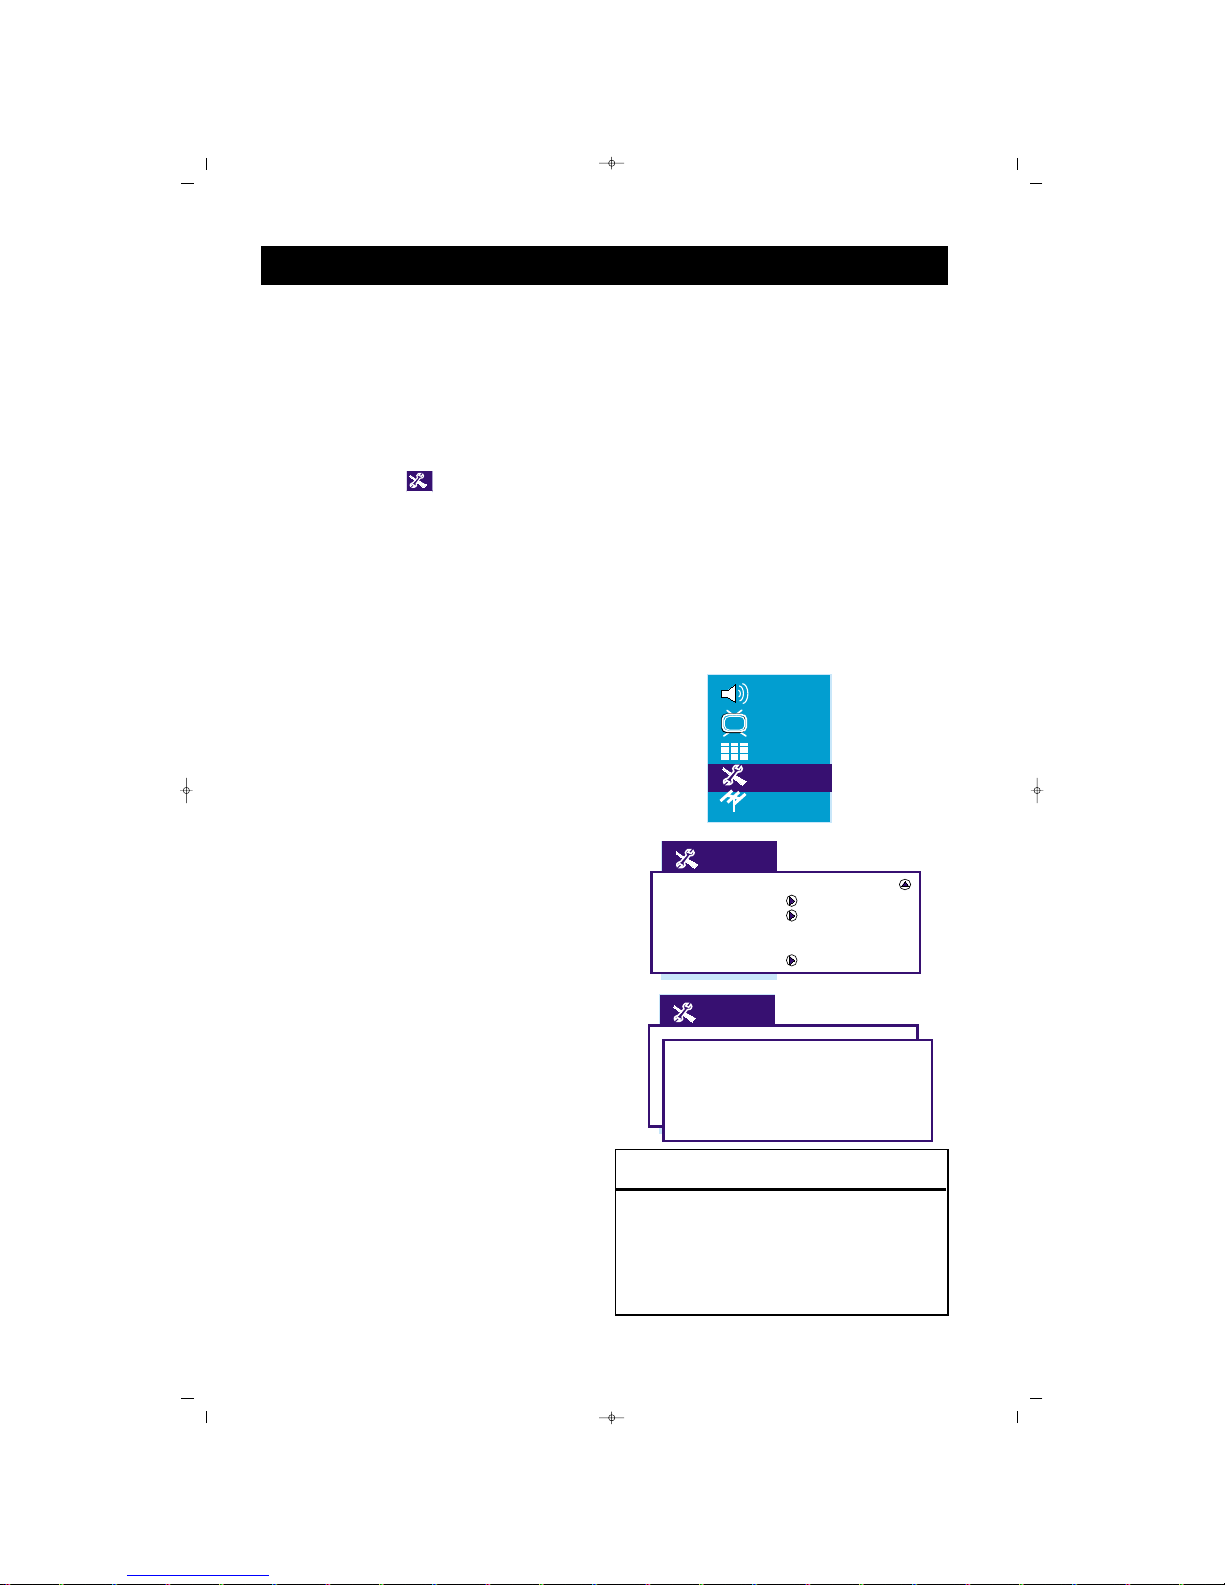
6161
TIMING MENU
You can setup the turning off time off time for
your device by using this menu.
Press the menu button on the remote
control. The menu appears on the screen.
Press down (
ïï
) arrow button repeatedly
until SETUP menu appears on the
screen. Press Right (
ÆÆ
) arrow button to
enter the menu.
Press down
(ïï) arrow button
repeatedly until Timer Sub Menu is
selected.
Press Right arrow
(ÆÆ)
key to display
Timer menu on the screen.
AAuuttoommaattiicc TTuurrnn ooffff ((SSlleeeepp TTiimmeerr))
Press Down arrow
(ïï)
key to select
“Sleep Timer” function.
Use Right
(ÆÆ)
key to setup the sleep
time for your TV (within 5 minute
intervals).
Exit the menus pressing “Menu” key
repeatedly.
TTuurrnn ooffff ttiimmee sseettuupp
Press Down arrow
(ïï)
key to select
“Turn of Time” function.
Enter the turn off time using numeric
keys (0-9).
Exit the menus pressing “Menu” key
repeatedly.
CChhaannnneell SSwwiittcchh SSeettuupp
Press Down arrow
(ïï)
key to select
“Switch” function.
Enter the turn off time using numeric
keys (0-9).
Press Down arrow (
ïï
)
key to select “To
Channel” line.
Enter the Channel Number using
(
ÍÍÆÆ,ïïÎÎ
) arrow keys or numeric keys
(0-9).
Exit the menus pressing “Menu” key
repeatedly. Your device will automatically
passed to the determined channel at the
determined time.
1
2
3
4
5
6
7
5
6
5
6
7
8
9
7
HHEELLPPFFUULL HHIINNTT
* Avoid to give the same time to sleep timer and
channel transfer functions.
* When you arrange the reminding function with
the Right
(ÆÆ)
arrow key, a warning shall appear
on the screen before the Turn Off or Program
Switch Time.
Country GB
Child Lock
Timers
Teletext lang. Pan European
Teletext E / W West
RT Clock
Sleep timer Off
Reminder timer Off
Off timer - -:- Switch timer - -:- Switch program 5
065001056911 20"LOC-1 CFULL LCD 17/7/06 9:47 Page 61
Page 62
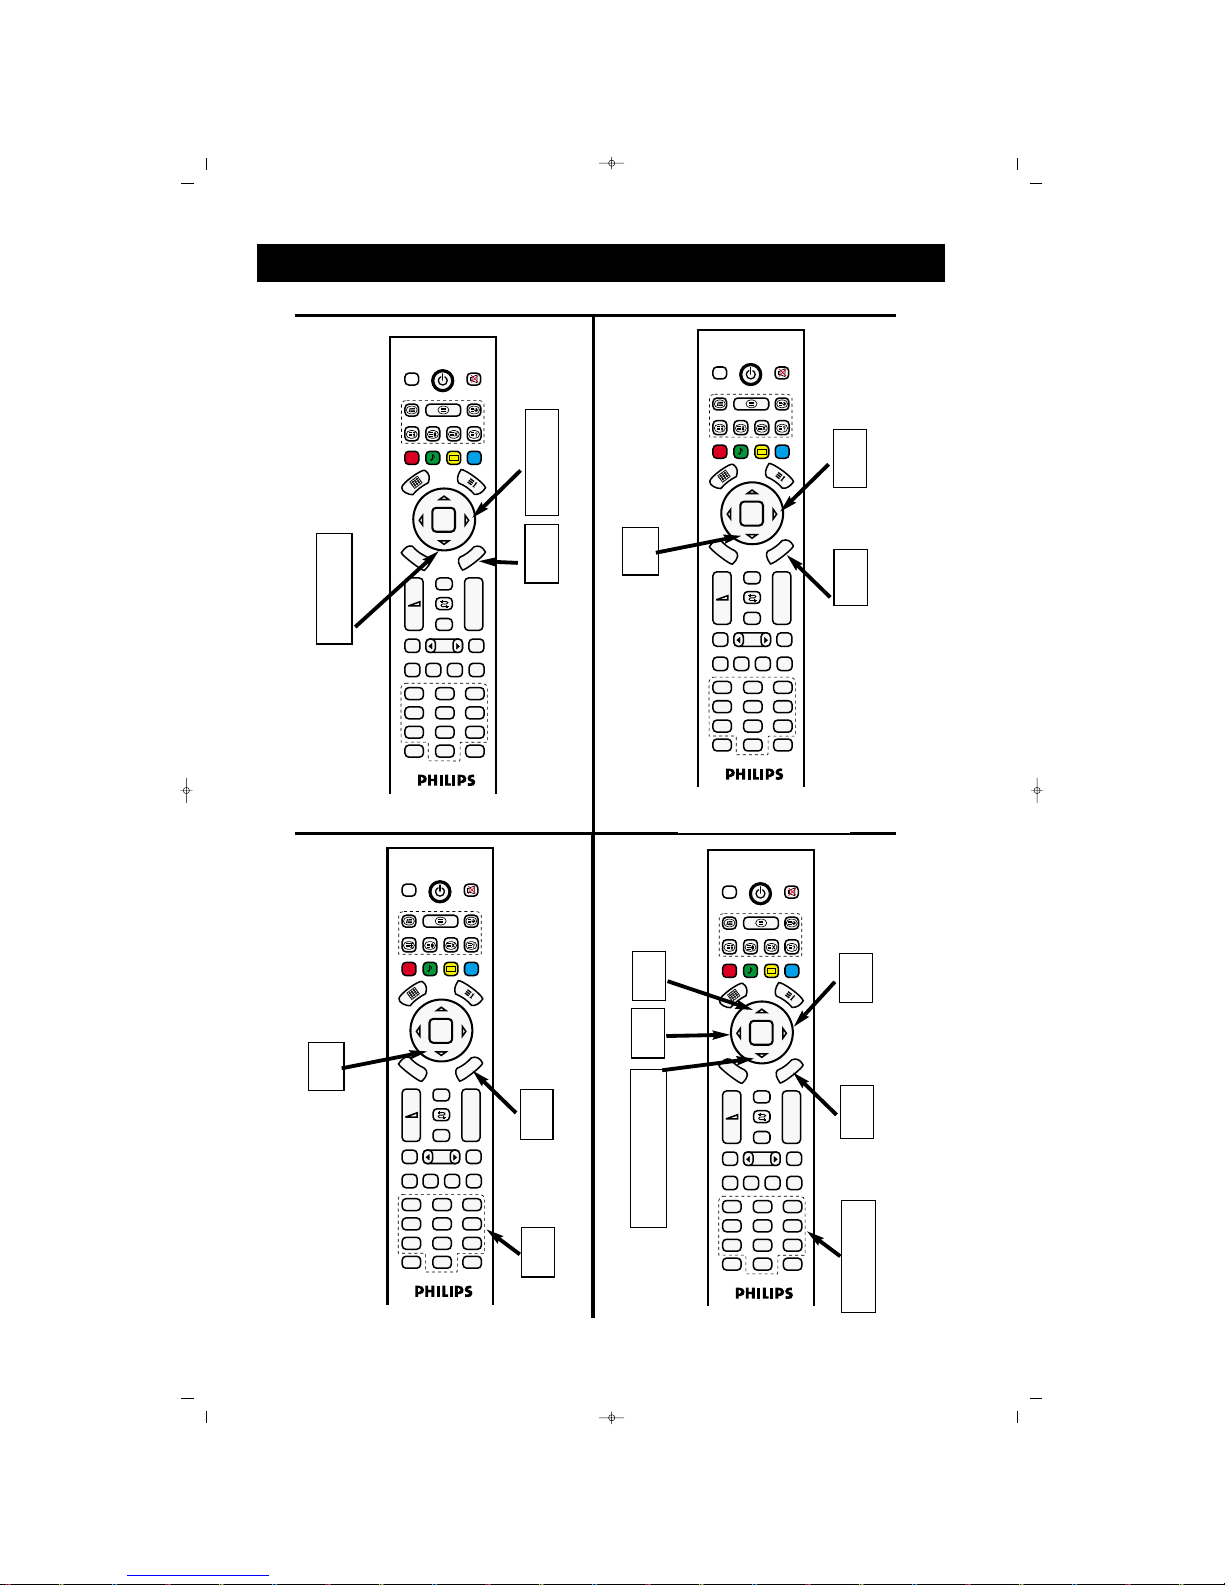
6262
FAV+ EPG RADIO
PP
OK
M
E
N
U
P+
P-
+
–
PIP
AV
FREEZE
16:9
TV PC DVI
YPbPr
1
2
3
4
5
6
7
8
9
0
ZOOM
S/M/D
FAV-
DVB
DVB
M
ENU
Zap
5
6
7
TIMING MENU
FAV+ EPG RADIO
PP
OK
M
E
N
U
P+
P-
+
–
PIP
AV
FREEZE
16:9
TV PC DVI
YPbPr
1
2
3
4
5
6
7
8
9
0
ZOOM
S/M/D
FAV-
DVB
DV
B
M
EN
U
Zap
SSlleeeepp TTiimmeerr
TTuurrnn ooffff ttiimmee sseettuupp
FAV+ EPG RADIO
PP
OK
M
E
N
U
P+
P-
+
–
PIP
AV
FREEZE
16:9
TV PC DVI
YPbPr
1
2
3
4
5
6
7
8
9
0
ZOOM
S/M/D
FAV-
DVB
D
VB
M
ENU
Zap
1
2
3
2
4
7
5
6
FAV+ EPG RADIO
PP
OK
M
E
N
U
P+
P-
+
–
PIP
AV
FREEZE
16:9
TV PC DVI
YPbPr
1
2
3
4
5
6
7
8
9
0
ZOOM
S/M/D
FAV-
DVB
D
VB
M
ENU
Zap
CChhaannnneell SSwwiittcchh SSeettuupp
5
7
8
8
6
8
9
8
8
065001056911 20"LOC-1 CFULL LCD 17/7/06 9:47 Page 62
Page 63
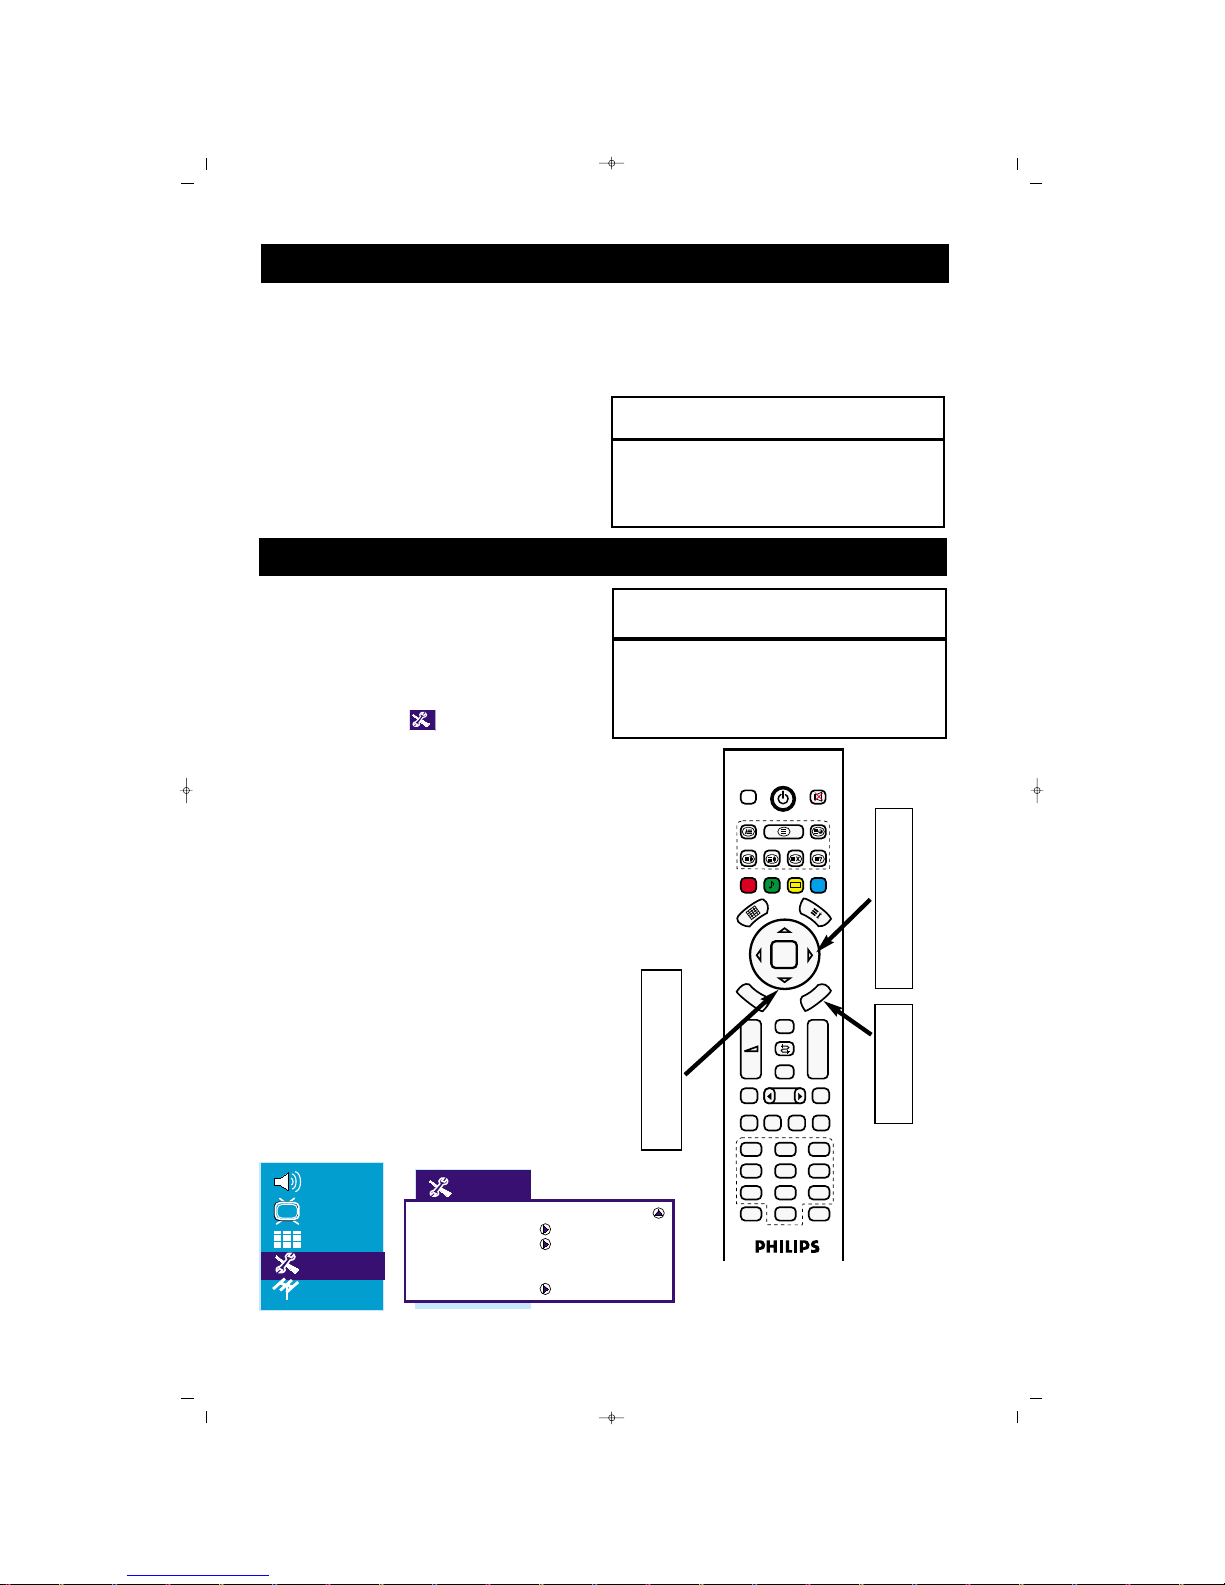
63
YYoouu ccaann sseelleecctt aannyy oonnee ooff NNoorrmmaall,, WWiiddee,, NNaarrrrooww,, AAuuttoo SSccrreeeenn ffoorrmmaattss..
UUSSEEFFUULL HHIINNTT
Standard screen format in PC and YPbPr mode
is FULL SCREEN. Screen format function can
not be accessed in this mode.
USING SCREEN FORMAT
You can change the Screen Format Size on the basis of the program type watched. In order to
switch among the screen formats press 16:9 key repeatedly.
You can delete the menu from the screen by
pressing MENU key.
SELECTING TELETEXT LANGUAGE
Press the menu button on the remote
control. The menu appears on the
screen.
Press down (
ïï
) arrow button repeatedly
until SETUP menu appears on the
screen. Press Right (
ÆÆ
) arrow button to
enter the menu.
Press down (
ïï
) arrow button repeatedly
until Teletext Language is selected.
Press Right arrow (
ÆÆ
) key to select
Teletext language character.
Press Down arrow (
ïï
) key to select
“Teletext D/B (East/West)”.
Use Right (
ÆÆ
) key to select your country
region for Teletext.
Exit the menus pressing “Menu” key
repeatedly.
1
2
3
4
5
6
7
FAV+ EPG RADIO
PP
OK
MENU
P+
P-
+
–
PIP
AV
FREEZE
16:9
TV PC DVI
YPbPr
1
2
3
4
5
6
7
8
9
0
ZOOM
S/M/D
FAV-
DVB
D
V
B
M
E
N
U
Zap
1
7
2
3
5
2
4
6
HHEELLPPFFUULL HHIINNTT
* If some characters do not appear properly in
teletext mode, this might stem from unsuitable
selection of Teletext language and Teletext D/B
modes.
Country GB
Child Lock
Timers
Teletext lang. Pan European
Teletext E / W West
RT Clock
065001056911 20"LOC-1 CFULL LCD 17/7/06 9:47 Page 63
Page 64
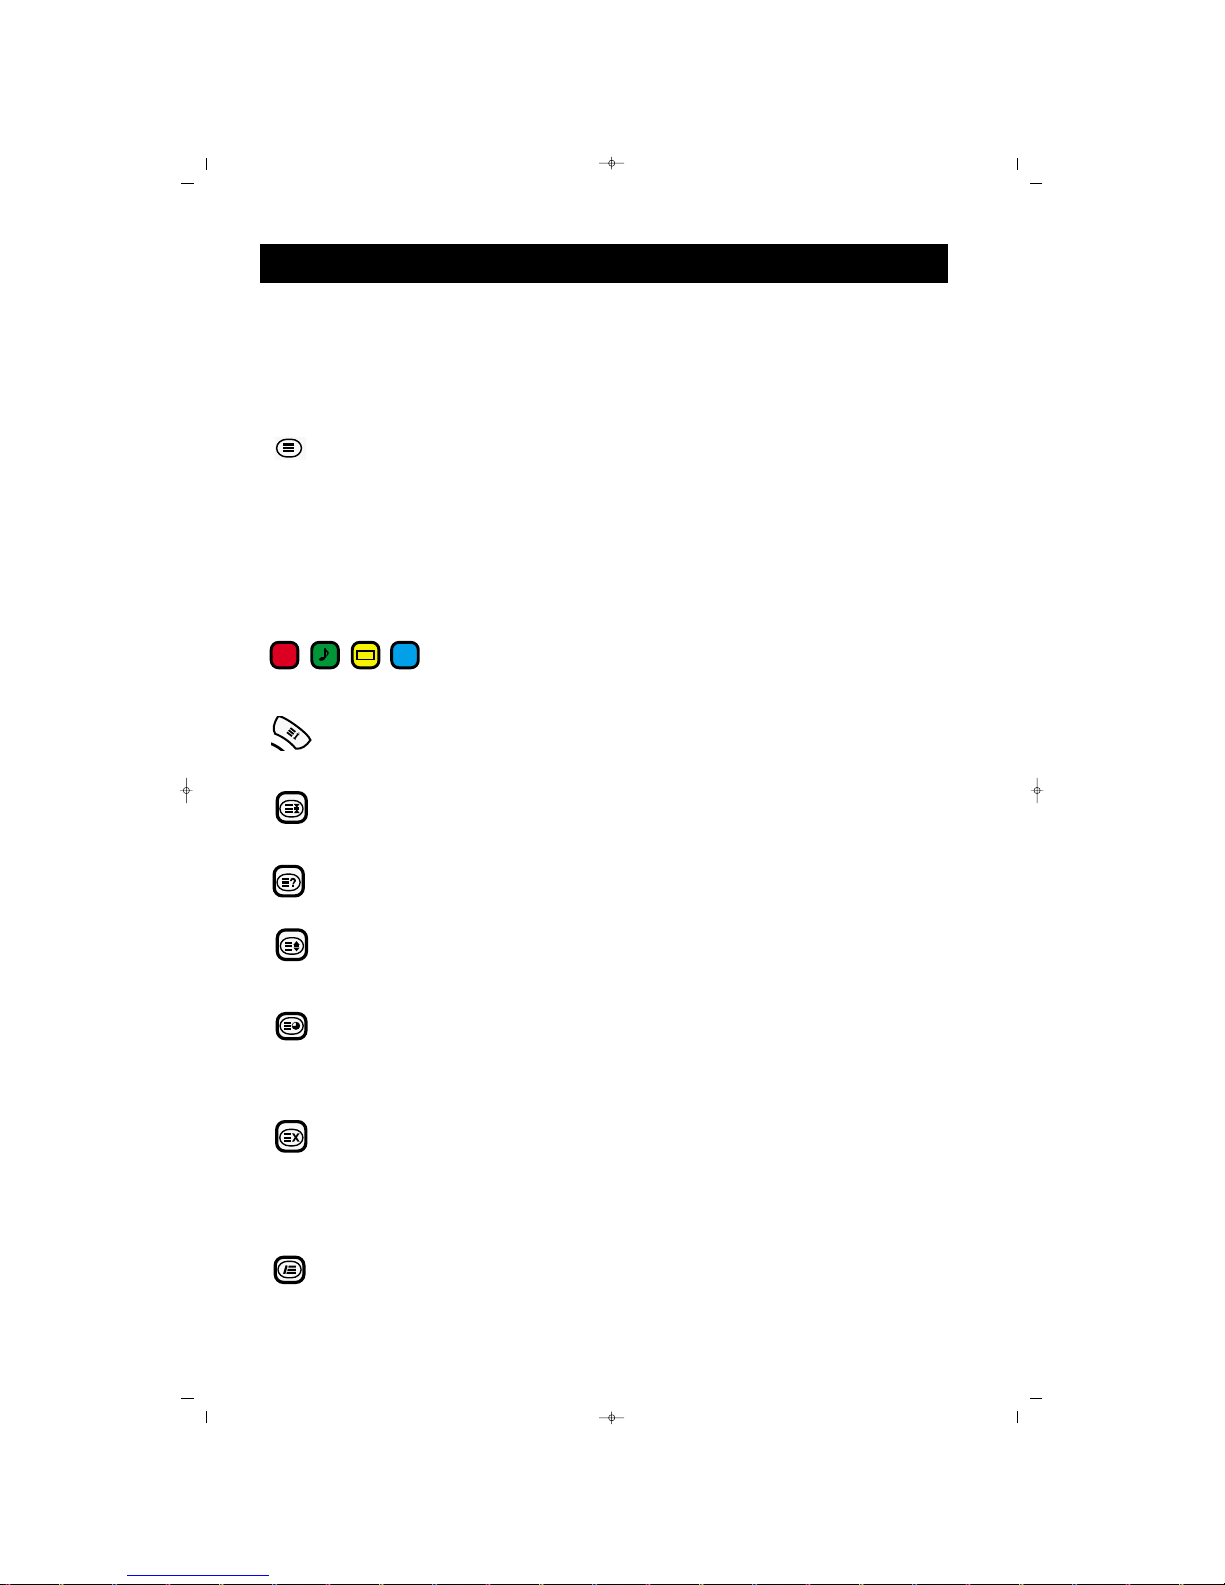
64
TELETEXT
Teletext is an information system broadcasting through certain channels as if in a newspaper. It also
provides access subtitles for the hearing disordered watchers, or the ones who do not know the
language (cable networks, satellite channels etc.)
PPrreessss
Teletext
Selecting a page
0/9
P #/@
Direct access to subjects
Content
Stopping access to sub-pages
Confidential information
Enlarging the page
Teletext Hour
Updating
Mix (mixed TV and TELETEXT information display)
RReessuulltt
Provides access to the teletext broadcasting of the channel you
select. In 2nd press, it shifts to mix. In 3rd press, you can shift to TV
broadcasting.
Enter the required page number by a number from 0 to 9, or P± buttons
Example: For page 120, enter 120
The number is displayed on upper left, the counter counts and the
page is displayed. Repeat this procedure to examine another page.
If the counter continues to search, the page is not transmitted.
Select another number
Colored areas appear below the screen. 4 colored button is used to
shift subjects or corresponding pages
This returns to contents page (generally, page 100)
Certain pages have sub-pages which are displayed successively. This
button is used to stop or continue the subpage. Its icon is on the
upper left
For displaying or hiding confidential information (game solutions)
This provides displaying upper or lower part of the page, then
returning to normal size
Displays the hour from the teletext of the current channel in TV
mode, on the upper right corner of the screen
When pressing teletext button while teletext page is open, the subpage of teletext page is displayed on the lower part of the screen,
those pages can be changed by pressing P± button. Press the same
button to leave
Pressing this button in teletext mode, the current TV broadcasting
is displayed. But teletext is still active, and if a new page number is
entered, page search will continue. When the required page is found,
a message showing the page number appears on the screen. Pressing
this button again will bring teletext page.
You can watch channel and teletext information side to side. For
that purpose, press once to MIX button. So, teletext page and TV
picture can be displayed side to side. 2nd press will change the size
of TV display on the right. 3rd press will cause teletext page to be
full site. Press teletext button to leave this mode.
PP
065001056911 20"LOC-1 CFULL LCD 17/7/06 9:47 Page 64
Page 65
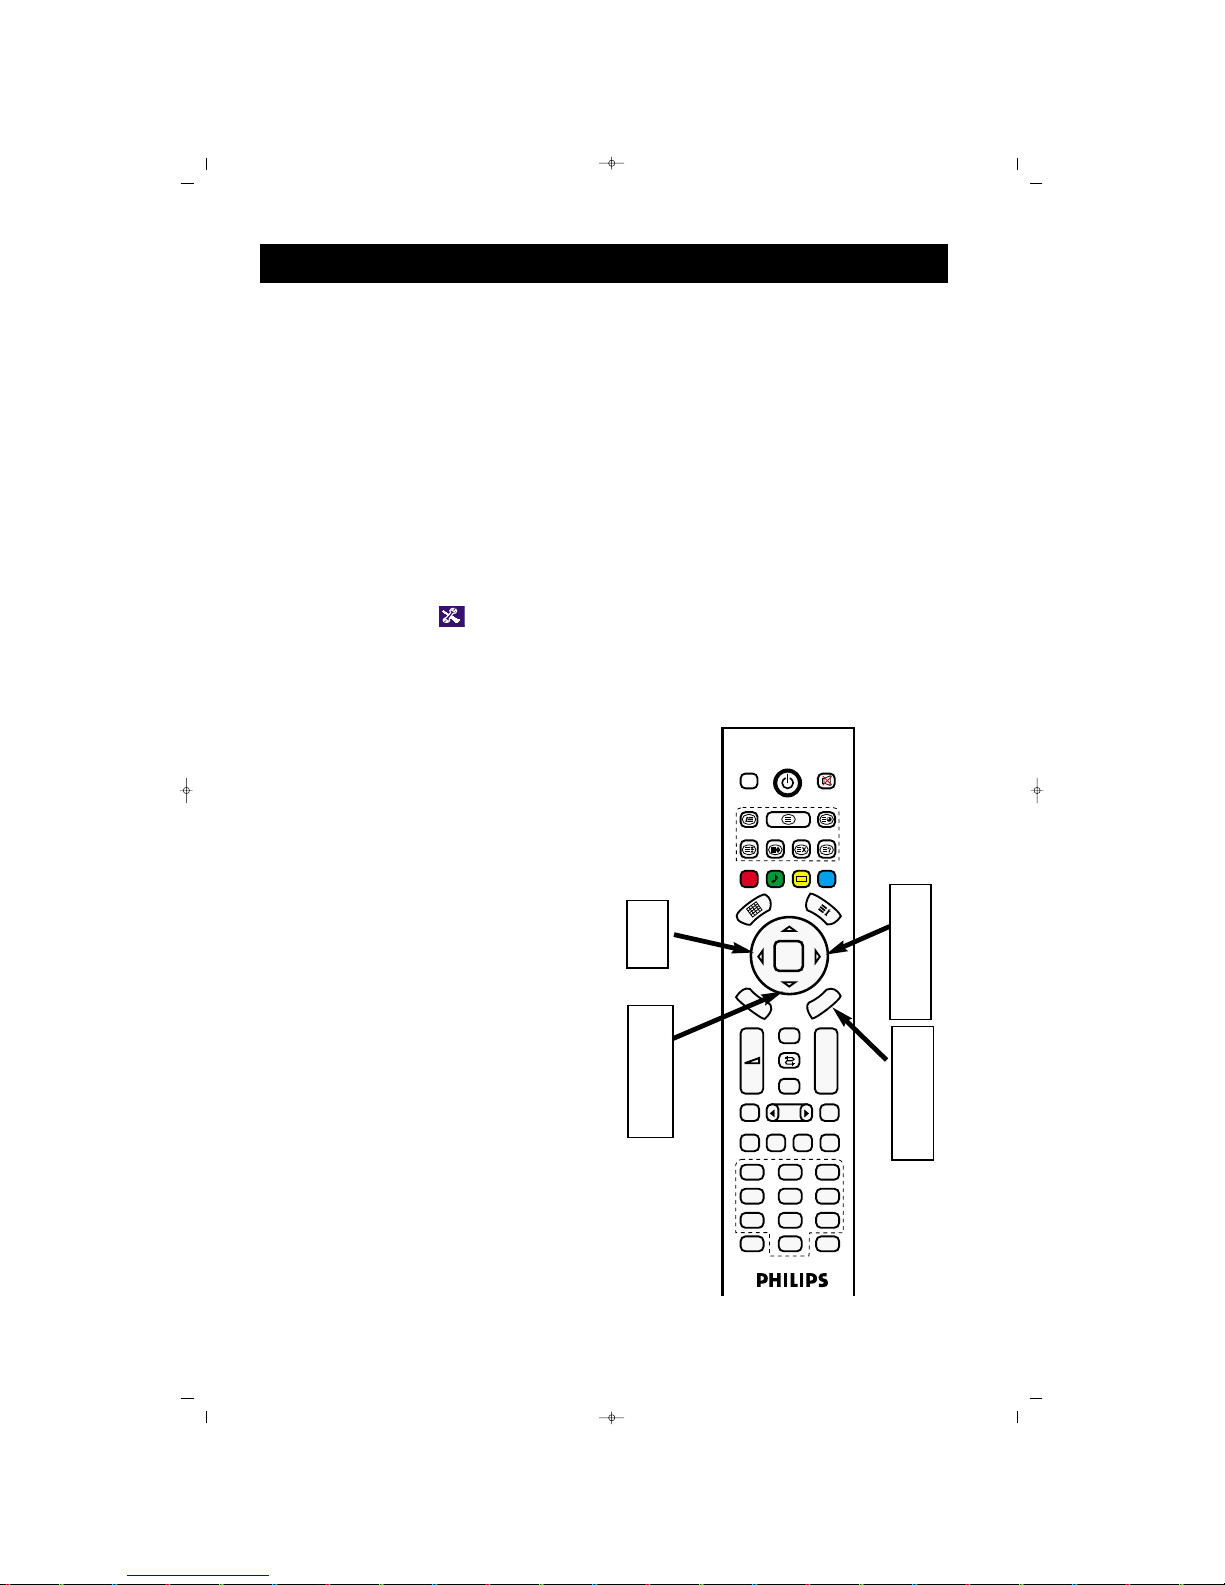
65
This TV is also available as PC Monitor. PC
Display controls allows you to adjust the display.
Ensure that the TV is in PC Mode
MMOONNIITTOORR IIMMAAGGEE MMEENNUU
Follow the step below to setup LCD Monitor
image.
Press the menu button on the remote
control. The menu appears on the screen.
Press down (
ïï
) arrow button repeatedly until SETUP menu appears on
the screen.
Press Right (
ÆÆ
) arrow button to enter
the Picture menu.
Press down (
ïï
) arrow button to select
the picture menu subjects desired to be
setup.
PPiiccttuurree MMeennuu ssuubbjjeeccttss::
Brightness, Contrast,
Position, Auto Setup, Information, Factory,
Color Temperature, Red, Green and Blue.
BBrriigghhttnneessss::
Setup in order to make the dark
sides of the picture brighter. The color shall be
whitened.
CCoonnttrraasstt::
Setup in order to sharpen the image
quality. While the black parts enrich in the dark
parts, white becomes brighter.
PPoossiittiioonn::
You can enter this sub menu using
Right arrow (
ÆÆ
) key and setup vertical and hor-
izontal picture values using (
ÍÍ,ÆÆ,ïï,ÎÎ
) arrow
keys.
PPiiccttuurree SSeettuupp::
You can setup picture phase and
frequency values using (
ÍÍ,ÆÆ,ïï,ÎÎ
) keys in the
submenu.
SShhaarrppnneessss::
Setup to improve the details.
AAuuttoo sseettuupp::
Your device automatically makes
the picture setup automatically with the help of
this function.
IInnffoorrmmaattiioonn::
You can see the information about
your device.
FFaaccttoorryy::
Restores the factory defaults.
CCoolloorr TTeemmppeerraattuurree::
You can setup the color
temperature value.
RReedd::
You can arrange the red color level.
GGrreeeenn::
You can arrange the green color level.
BBlluuee::
You can arrange the blue color level.
You can change the image subject using
Left (
ÍÍ
) and Right (ÆÆ) arrow keys.
6. Exit the menus pressing “Menu” key
repeatedly.
1
2
3
4
PC DISPLAY CONTROLS
5
6
FAV+ EPG RADIO
PP
OK
M
E
N
U
P+
P-
+
–
PIP
AV
FREEZE
16:9
TV PC DVI
YPbPr
1
2
3
4
5
6
7
8
9
0
ZOOM
S/M/D
FAV-
DVB
D
V
B
M
E
N
U
Zap
1
6
2
4
3
5
5
065001056911 20"LOC-1 CFULL LCD 17/7/06 9:47 Page 65
Page 66

66
TROUBLE SHOOTING TIPS
NNoo PPoowweerr
NNoo PPiiccttuurree
NNoo SSoouunndd
NNoo AAVV SSiiggnnaall
SS--VVHHSS CCoolloorr BBeeccoommeess FFaaiinntt
TTVV OOnnllyy PPrroodduucceess MMOONNOO
SSoouunndd
• Check the TV power cord. Unplug the TV, wait 10 seconds,
then reinsert the plug into the outlet and push the POWER
button again.
• Check that the outlet is not on a wall switch.
• Be sure the fuse is not blown on the AC power strip, if one
is being used.
• Check antenna/cable connections. Are they properly secured
to the TV’s ANT75Ω plug?
• Try running the Auto Program feature to find all available
channels.
• Press the AV button on the remote to make sure the correct
signal source is selected.
• If using an accessory device, be sure that it i functioning properly.
• If in PC Mode, a video signal MUST BE present or the TV will
turn off.
• Check the VOLUME buttons.
• Check the MUTE button on the remote control.
• If you’re attempting to hook up auxiliary equipment, check
the audio jack connections.
• Check whether AV and S-Video sockets connected simultaneously. If they are, disconnect the S-Video socket. AV signal
automatically overrides the S-Video signal if both sockets are
connected simultaneously.
• Unplug socket for S-Video connection. Reconnect the SVideo socket of the TV carefully to the VCR socket.
• If using a cable box with RF only type connections, the signal
coming from the cable box will be produced in MONO only.
• Check Sound control setting. Change setting to Stereo.
065001056911 20"LOC-1 CFULL LCD 17/7/06 9:47 Page 66
Page 67

67
TROUBLE SHOOTING TIPS
RReemmoottee DDooeess NNoott WWoorrkk
TTVV DDiissppllaayyss WWrroonngg CChhaannnneell
oorr NNoo CChhaannnneellss
• Check the batteries. Place lithium cell in the remote. Be sure
the (+) and (-) ends of the batteries line up as marked inside
the battery compartment.
• Clean the remote control and the remote control sensor
window on the TV.
• Check the TV power cord. Unplug the TV, wait 10 seconds,then reinsert the plug into the outlet and push the
POWER button again.
• Be sure the fuse is not blown on the AC power strip, if one
is being used.
• Check to be sure the TV outlet is not on a wall switch.
• Be sure that the remote is in the correct operating mode.
• Be sure the remote is pointed at the Remote Sensor Window
on the TV. See page 2 of the Quick Use Guidefor details.
• Repeat channel selection.
• Add the desired channel numbers (using the CHANNEL EDIT
control) into the TV’s memory.
• Run the Auto Program feature to find all available channels.
065001056911 20"LOC-1 CFULL LCD 17/7/06 9:47 Page 67
Page 68

68
CARE AND CLEANING
WWAARRNNIINNGG ccoonncceerrnniinngg ssttaattiioonnaarryy iimmaaggeess oonn tthhee TTVV
Screen: Do not leave fixed images on the screen for extended periods of time. This can cause
uneven aging of the LCD panel. Normal use of the TV should involve viewing of programs that have
constantly moving or changing images. Do not leave still images on screen for extended periods of
time. Do not display the same images too frequently; if you do, subtle “ghost” images can be left
on the LCD screen. Sources of stationary images may be Laser discs, video games,
Compact Discs Interactive (CD-i), or paused Digital Video Discs (DVDs) or video tapes.
HHeerree aarree ssoommee ccoommmmoonn eexxaammpplleess ooff ssttaattiioonnaarryy iimmaaggeess::
• DVD menus list DVD content.
• Letterbox black bars appear at the top and bottom of the TV screen when a wide screen (16:9)
movie is viewed on a
TV with standard (4:3) aspect ratio. This is available with some DVDs.
• Video game images and scoreboards
• Television station logos cause a problem if they are bright and stationary. Moving or low-contrast
graphics are less likely to damage the picture tube.
• Stock market tickers may appear at the bottom of the TV screen if the TV programming covers
this news.
• Shopping channel logos, pricing displays may be bright and may appear constantly during the
show.
These are usually in the same location on the TV screen.
TTVV LLooccaattiioonn
• To avoid cabinet warping, cabinet color changes, and an increased chance of TV failure, do not
place the TV where temperatures can become excessively hot (for example, in direct sunlight or
near a heating appliance).
• Allow a free flow of air around the TV.
CClleeaanniinngg
• To avoid possible shock hazard, remove the TV’s power cord from the electrical outlet before
cleaning.
• Regularly dust the TV with a dry, non-scratching duster.
• When cleaning the TV, take care not to scratch or damage the screen surface. Avoid wearing
jewelry or using anything abrasive. Do not use household cleaners. Wipe the screen with a clean
cloth dampened with water.
Use even, easy, vertical strokes when cleaning.
• Occasionally vacuum the vents on the rear of the TV.
• Never use thinners, insecticide sprays, or other chemicals on or near the cabinet. They may blemish the cabinet permanently.
065001056911 20"LOC-1 CFULL LCD 17/7/06 9:47 Page 68
Page 69

69
Screen Size
2200””
Standard Size 51 cm
Power Consumption 70 W
Operating Voltage 230 V (AC) 50 Hz
TV System PAL BG / NTSC PLAYBACK
Band VHF I Band 2 - 4
VHF III Band 5 - 12
UHF Band 21 - 69
S Band S1 - S41
Aerial Input 75 ohm Standard Antenna Socket
Program Capacity 100 + AV
Picture Panel TFT LCD Panel 640 x 480 resolution
Sound Output (rms 10% THD) 2 x 2 W
TTEECCHHNNIICCAALL SSPPEECCIIFFIICCAATTIIOONNSS
065001056911 20"LOC-1 CFULL LCD 17/7/06 9:47 Page 69
Page 70

Cemal Sahir Sokak 26/28
Mecidiyeköy,80300 istanbul
Tel: (0212) 274 75 12 (PBX)
Fax : (0212) 211 21 10
Teleks : 26271 tera tr
PROF‹LO TELRA A.fi
TARAFINDAN ÜRET‹LM‹fiT‹R
Cihaz kullan›m ömrü 10 y›ld›r.
065001056911 20"LOC-1 CFULL LCD 17/7/06 9:47 Page 70
Page 71
TÜRK PHILIPS T‹C. A.fi.
Yukar› Dudullu Organize Sanayi
Bölgesi 2. Cadde No: 22
81260 ÜMRAN‹YE - ‹STANBUL
www. philips.com.tr
PHILIPS TÜKET‹C‹ DANIfiMA MERKEZ‹
0800 261 33 02
Her türlü bilgi sorma ve flikayetleriniz için, yukar›daki
ücretsiz telefonumuza müracaatlar›n›z› rica ederiz.
NOT: Philips bu k›lavuzda belirtilen ürün özelliklerini önceden haber vermeksizin de¤ifltirebilir.
Türkçe English
065001056911 20"LOC-1 CFULL LCD 17/7/06 9:47 Page 71
 Loading...