

Page 1

Philips Hospitality LCD TV: Pro range
EN 20HFL3330D/10
Please ask your local sales support for additional information on correct installation/ positioning of the TV
in the room and complementary accessories
DFU-AUG2008
PHILIPS
PB1
Page 2

Table of contents
1 INTRODUCTION FOR PBS MODE 2
2 REMOTE CONTROL 3
2.1 Remote control 2573 overview (optional) 3
2.2 Guest Remote control overview 3
3 INITIAL SETUP 5
3.1 Virgin mode – Out of box Setting 5
4 SETUP MENU AND PBS MODE BEHAVIOR
4.1 PBS MODE 6
4.2 APPLICATION 6
4.3 SWITCH ON SETTINGS 7
4.4 CONTROL SETTINGS 7
4.5 BLANK CHANNEL 8
4.6 SMARTLOADER TO TV 8
4.7 TV TO SMARTLOADER 8
4.8 STORE 9
4 PRACTICAL HINTS 9
PB2
Page 3
1 INTRODUCTION TO PBS MODE
The Professional Business Solutions (PBS) mode defines a specific TV or monitor mode (similar to hotel mode).
This mode limits the amount of TV controls (e.g. like volume limitation), that a normal user (i.e. hotel guest) can use.
The amount of access can be configured in the setup menu by a super-user (e.g. hotel installer).
This manual describes how to setup a television channels using Virgin Mode, configure other TV settings and activate
the PBS mode.
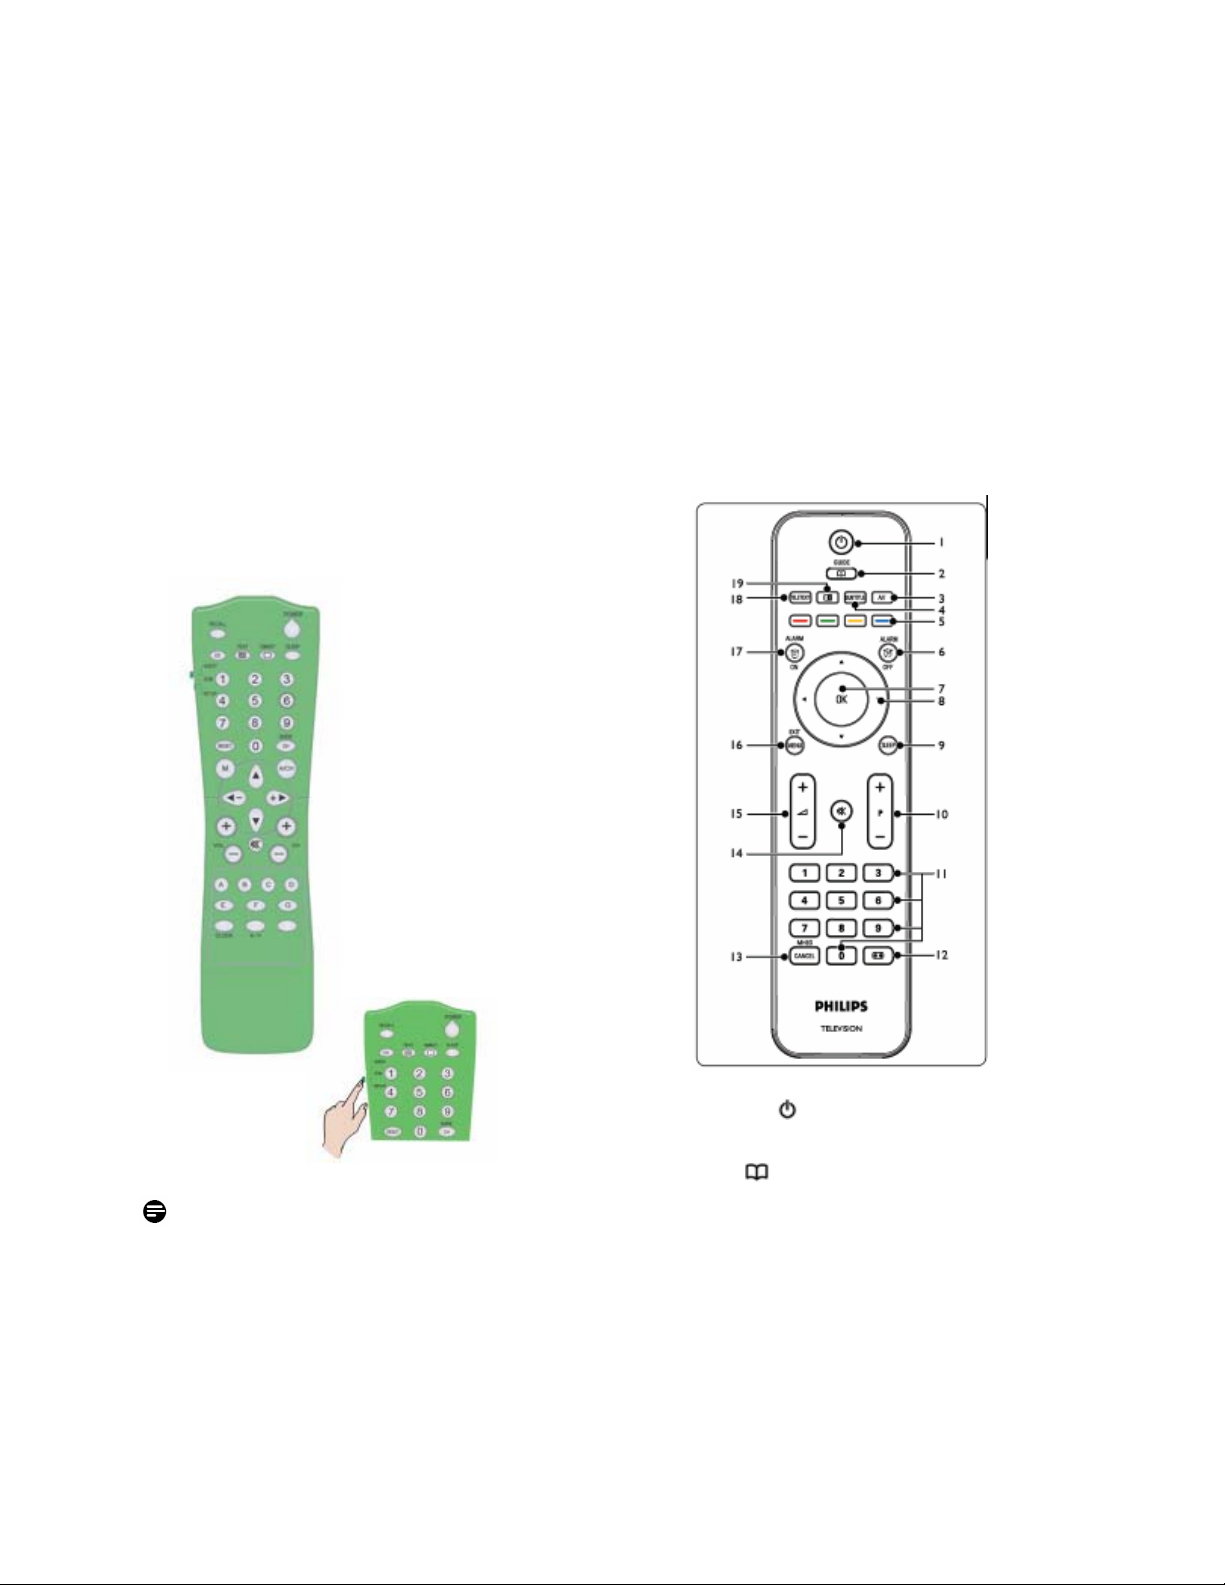
2 REMOTE CONTROL
2.1 PBS Set-Up Remote control 2573
(optional)
Note: Setup mode should be selected for hotel
installer.
PB3
2.2 Guest Remote control
22AV1104/10
1. On/Standby
Switches the TV on from standby or back to
standby.
2. GUIDE
Toggles the Electronic Program Guide on or off.
Only active with digital channels.
3. SOURCE
Selects connected devices.
4. SUBTITLE
Activates or deactivates subtitles.
5. COLOUR KEYS
Selects tasks or teletext pages.
6. ALARM OFF
Disable Alarm status - Not applicable for this
model.
(DVB-T)
(DVB-T)
Page 4

7. OK
Accesses the All channels menu or activates a
setting.
8.
Navigate the menu.
9. SLEEP
Display the sleep timer menu and adjust the sleep
timer.
10. P +/-
Switches to the next or previous channel.
11. NUMBER KEYS
Selects a channel, page or setting.
12.
Selects a picture format.
13. MHEG CANCEL
Cancels digital text or interactive services (UK
only).
14.
Mutes or restores sound.
15.
Increases or decreases volume.
16. MENU/EXIT
Toggles the menu on or off.
17. ALARM ON
Display the Alarm menu - not applicable for this
model.
18. TELETEXT
Toggles teletext on or off.
19.
Splits the current channel or source on the left of
the screen. Teletext appears on the right.
PBS EN
PB4
Page 5

3 INITIAL SETUP
1.1 Virgin mode – Out Of Box Setting and Initial
Setup
This TV set includes an installation feature that, at
initial set-up of the TV, guides you through the
installer menu to apply the proper installation settings.
This feature, named Virgin Mode, active when the TV
set is unpacked and first powered on, is normally
used for installation/setting of first TV set. To save
time during a complete setup for hospitality system
with more televisions, the settings of this first TV set
can be duplicated to other televisions using the
cloning mechanism (described in chapters 4.6 and
4.7).
Please select your language
Press OK or the green color key on your remote control
to confirm
Before setting PBS Mode to ON, and not
using cloning as configuration mechanism,
the television must be configured.
Note: In case of cloning the TV settings,
Virgin mode can be skipped by pressing the
“Menu” button on the television twice.
Follow the Virgin Mode guiding to set all
channels/programs
Digital Channels start at Program Number 1, Analogue
Channels start at Program Number 900.
Note:The channel list can be customized by hotel
installer through Rearrange channel list feature
as indicated below.
Also rearrange channels can be easily done
through using Rename Channels feature by
PB5
entering direct channel numbers and channel
name if needed.
After setup/installation is completed, subsequent
switching on the TV will not let this Virgin Mode menu
to pop up again.
For details refer to consumer TV User Guide.
Preferred customer picture, sound and feature
settings - these settings will be used whenever the TV
is switched on from mains or standby in PBS Mode
This can be achieved by popping up consumer TV setup menu
as below and do Picture/sound setup and channel installation etc
accordingly: Apart from manually adjusting picture settings, you
can use Smart settings to set your TV to a predefined picture and
sound setting.
For details refer to consumer TV User Guide.
The installer should change the TV to Home mode by
select Install > Preferences > Location
Page 6
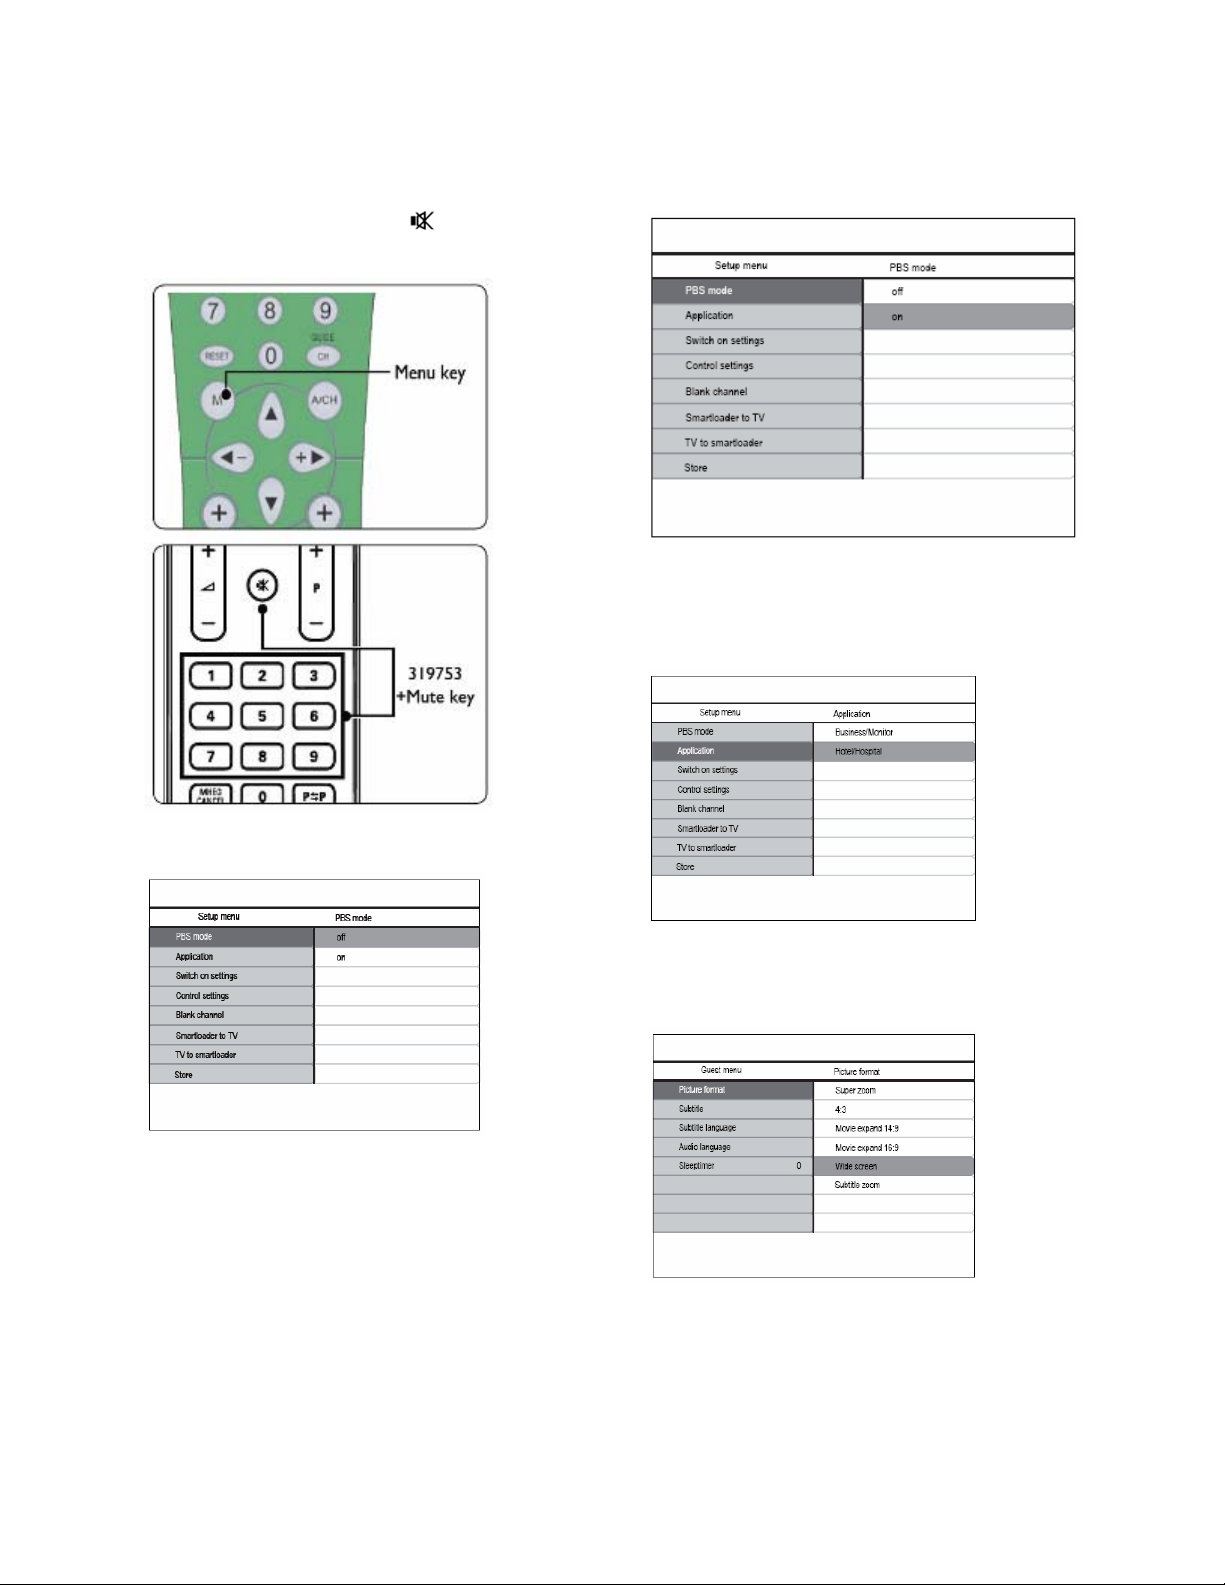
4 DISPLAY SETUP MENUS
The TV can display PBS Setup menu by pressing
RC2573 MENU key in SETUP mode or by following
Guest RC key sequence “319753 ”” key within 10
seconds if high security mode set to Off.
4.1 PBS MODE
To activate PBS Mode, select ON.
The following menu appears.
4.2 APPLICATION
The Application to select is Hotel/Hospital or Business
Monitor; this is based on the installer requirement.
When APPLICATION is Hotel/Hospital, the limited
Guest TV menu can be accessed by guest as below:
Refer to consumer TV User Guide for the description
of each menu item.
PB6
When APPLICATION is BUSINESS MONITOR, the
normal consumer TV setup menu can be accessed by
using guest RC menu key with the additional control
features listed in the PBS setup menu.
Page 7

4.3 SWITCH ON SETTINGS
• WELCOME MESSAGE – Define welcome message
of 2 lines of 20 alphanumeric characters each. The
characters used depend on the language selected
for consumer operation.
• SWITCH ON VOLUME - The TV will always switch
on (via mains-switch or standby) to this preset value.
The On volume setting cannot exceed the max
volume. The current volume should follow the on
volume, and adjusting on volume should also affect
the current volume.
• MAXIMUM VOLUME – refers to the maximum
volume which the guest could adjust to.
• SWITCH ON CHANNEL – choice of channel
number (analog or digital) or an external video
source to go to when the TV set is switched on from
mains power or standby. In case of LAST STATUS
setting, the set will switch to the last channel or
source before the TV went to standby or mains
power off. This LAST STATUS setting takes priority
over the APPLICATION settings.
• POWER ON – Refers to power state after mains
power on. ON means the set should turn On after
mains power on, while Standby means the set
should turn to standby. LAST STATUS means that
the set should switch to the last power state before
mains power off.
• DISPLAY MESSAGE – Enable the display of the
welcome message for 30 secs after switching on the
set from mains power or standby. However, if OSD
Display is OFF, the welcome message display is
always disabled, regardless of the Display Message
Setting
The letters are entered and navigated through cursor
keys and digit keys.
4.4 CONTROL SETTINGS
• TELEVISION BUTTONS LOCKED – Selection of
television buttons locked or unlocked. ON means all
television buttons are locked, except the Power
button, OFF means all television buttons are enabled,
while ALL means all television buttons are locked,
including the Power button.
PB7
Page 8

• REMOTE CONTROL LOCKED – Enable or disable
the operation of the normal remotes. However, when
the High Security Mode is OFF, to enter PBS Mode
Menu, using the “319753 ”” key sequence is not
blocked, even when Remote Control Locked is ON.
• OSD DISPLAY – Enable or disable OSD display
(e.g., channel number or name, sound mode, volume
bar, clock, etc.).
• HIGH SECURITY MODE – choice between using
normal consumer RC or PBS setup RC to display the
setup menu. When enabled, only the setup RC menu
key can display the setup menu. When disabled, both
the setup RC menu key and normal guest remote
control sequence “319753 ” can display the setup
menu.
• AUTO SCART – Enable (ON) or disable (OFF)
autoscart switching or break-in in PBS mode.
• LOW POWER STANDBY - define the power mode
when TV set goes to standby by pressing RC power
key or Local Keyboard power key - Green: TV will
enter low standby power mode to achieve minimum
power consumption; Fast: TV will enter semi-standby
mode to achieve fast powering up,
4.5 BLANK CHANNEL
• BLANK CHANNEL - choice of either blank or not
blanking the video for the current channel. In PBS
application, the blanked channel is used for off-air
radio transmission, e.g., re-modulated FM radio,
music CDs etc. The current blank mode should follow
the channel blanked status and changing the channel
blanked should also blank or unblank the current
channel.
4.6 SMARTLOADER TO TV (using USB)
Copy TV configuration data (Video, Audio,
Channel Table, PBS Mode settings) from USB
Memory stick to TV. Upon copying progress
completion, an indication message will feedback to
PBS-user (“Settings copied to TV”).
Note:During copying process, the USB memory stick
should not be removed to prevent any undersigned
functionality of the TV.
Note:During this process, the cloning files
NVM_MTK_2K8_EU.BIN and CH_MTK_2K8_EU.BIN
are retrieved by TV and update the TV NVM and
Channel setup accordingly.
Note:All RC command and local keyboard will be
disabled during copying process
Note:It is recommended to do a television switch
off/switch on after the cloning is done.
4.7 TV TO SMARTLOADER (using USB)
Note:Channel Blank will apply for the current
channel, to navigate and blank other channels,
Blank channel submenu should be selected by
clicking on right cursor key as below:
PB8
Copy TV configuration data ( Video, Audio, Channel
Table, PBS Mode settings[i.e.Welcome Message, …])
from TV to USB drive.
• Upon copying progress completion, an indication will
given as feedback to PBS-user (“Settings copied to
USB”)
Page 9
A 128MB USB Memory Stick with at least
10MB free memory space will be suitable.
Note:During copying process, USB drive should
not be removed to prevent any undersigned
functionality of the TV.
Note:After completed, there are 2 files
generated in the USB root directory NVM_MTK_2K8_EU.BIN containing the general
setting for example, Video/Audio, etc. and
CH_MTK_2K8_EU.BIN containing the channel
installation setting for example channel list, etc.
Note:All RC command and local keyboard will
be disabled during copying process
Note: Normally, the first TV is manually
configured/setup by the hotel installer, then all
the data are transferred/ cloned to USB drive through
TV to Smart Loader, subsequently, others TVs can be
updated by using same USB drive. This cloning
feature prevent multi manually setup on all the TV
sets, hence, speed up the hotel installation process.
4.8 STORE
Activation of this item will store PBS mode settings.
The PBS mode setting will take effect after putting the
set to standby.
Important:
Cloning system and configuration setttings, using
USB or SerialXpress, is only supported in case of
using equal televisions.
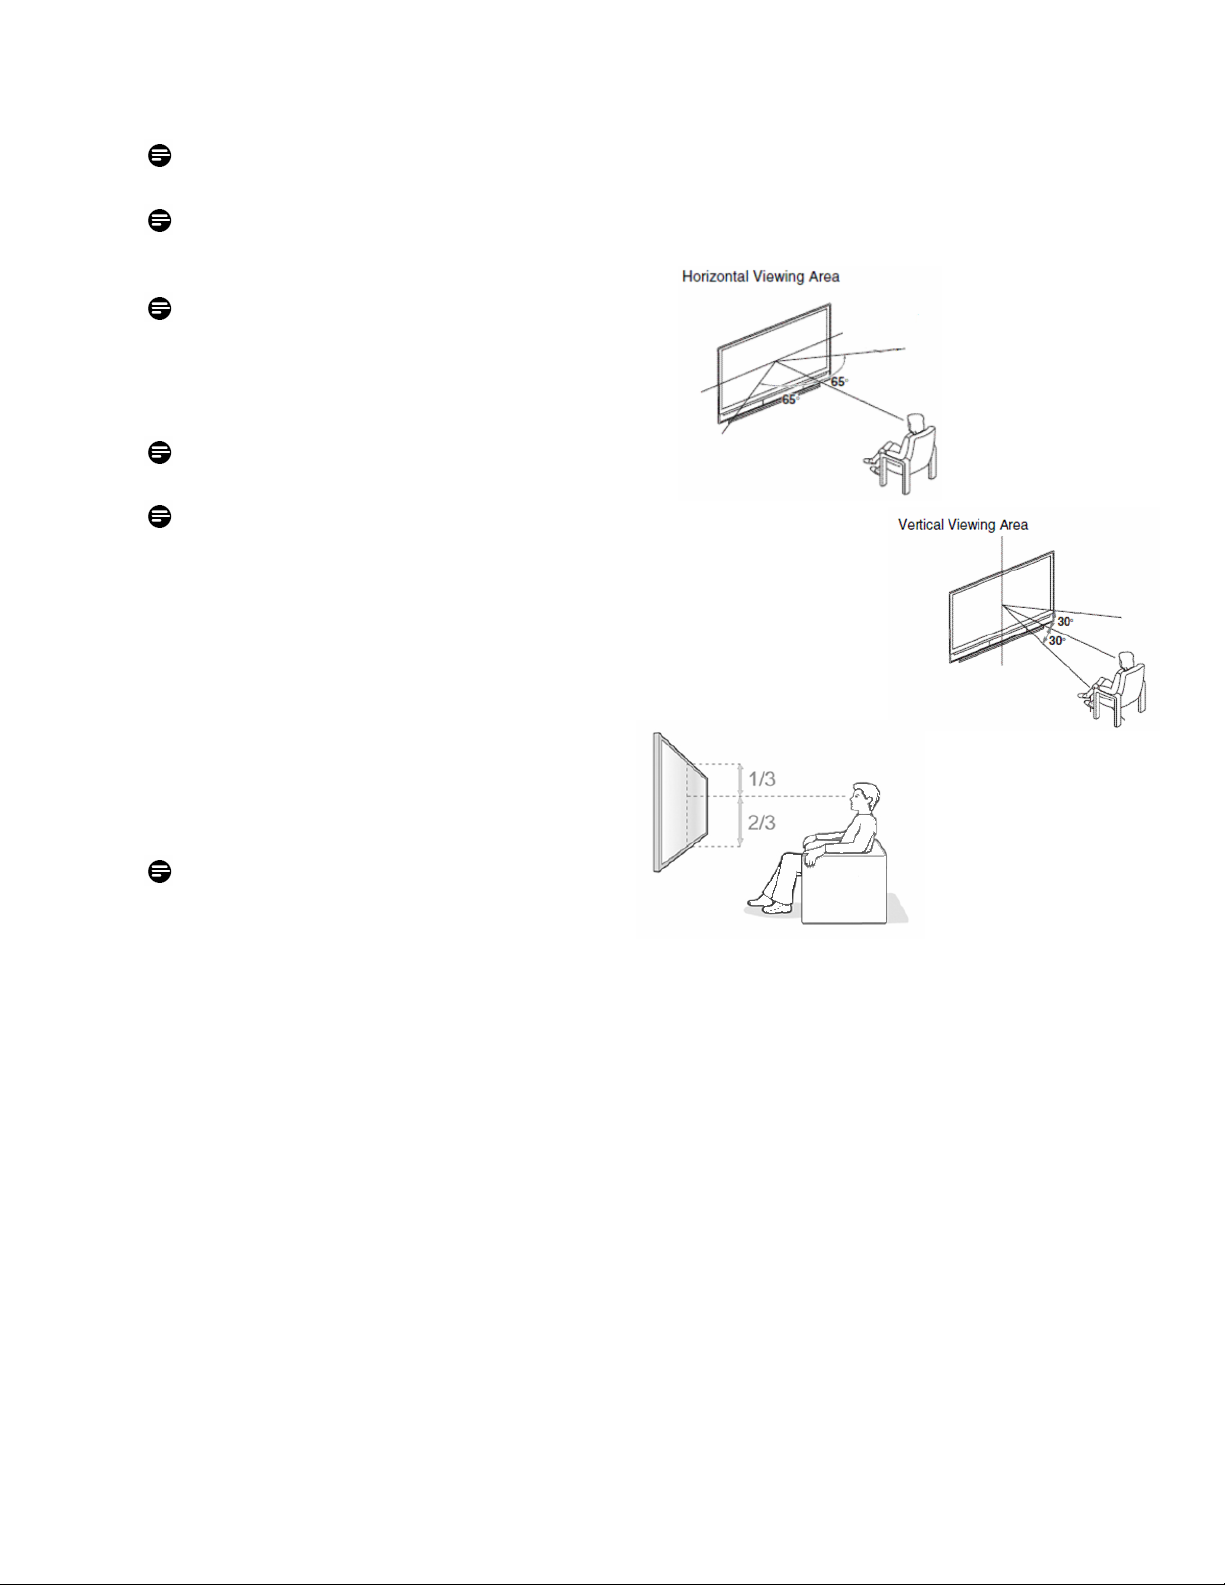
5 HOW TO POSITION YOUR TV
VIEWING ANGLE is the most convenient angle at
which a display can be viewed with good visual
performance
How a TV and panel are designed:
What to do if viewing angle is not good enough:
• Add tilt (vertical) or swivel (horizontal) to the TV,
in order to position the TV in the most optimal
situation.
• If the TV is placed above a certain height, it’s
advised to always tilt the TV.
Philips has wall mounts with tilt for hotel TVs as
optional accessories.
PhilipsisrecommendingtopositiontheTVasmentioned
above.PositioningtheTVdifferentlymighthaveimpact
ontheviewingangle.Philipsisnotresponsiblefor
reducedviewingexperienceduetowrongviewingangle
iftheTVispositioneddifferentlythenrecommended.
PB9
Page 10

ABC
© 2008 Koninklijke Philips Electronics N.V.
All rights reserved.
72-E330MD-X411A
PB10
Page 11

Register your product and get support at
www.philips.com/welcome
EN USER MANUAL
DE BENUTZERHANDBUCH
FR MANUEL DE L’UTILISATEUR
NL GEBRUIKERSHANDLEIDING
IT MANUALE D’USO
ES MANUAL DEL USUARIO
PT MANUAL DO UTILIZADOR
EL ΕΓΧΕΙΡΙΔΙΟ ΧΡΗΣΗΣ
Page 12

Model
www.philips.com/support
Serial
Country Number Tariff
Austria 0810 000205 €0.07/min
Belgium 078250145 €0.06/min
Bulgaria +3592 489 99 96 local
Croatia 01 3033 754 local
Czech Rep 800142840 free
Denmark 3525 8759 local
Finland 09 2311 3415 local
France 0821 611655 €0.09/min
Germany 01803 386 852 €0.09/min
Greece 0 0800 3122 1280 free
Hungary 0680018189 free
Ireland 01 601 1777 local
Italy 840320086 €0.08/min
Luxembourg 40 6661 5644 local
Netherlands 0900 8407 €0.10/min
Norway 2270 8111 local
Poland 0223491504 local
Portugal 2 1359 1442 local
Romania 1-203-2060 local
Russia (495) 961-1111 local
Serbia +381 114 440 841 local
Slovakia 0800 004537 free
Slovenia 01 280 95 22 local
Spain 902 888 784 €0.10/min
Sweden 08 5792 9100 local
Switzerland 0844 800 544 local
Turkey 0800 261 3302 local
UK 0870 900 9070 local
Ukraine 044 254 2392 local
This information is correct at the time of press. For updated contact information, refer to
www.philips.com/support.
Page 13

Table of contents
1 Important � � � � � � � � � � � � � � � � � � � � � 3
1.1 Safety . . . . . . . . . . . . . . . . . . . . . . . . . . 3
1.2 Screen care . . . . . . . . . . . . . . . . . . . . . 4
1.3 Environmental care . . . . . . . . . . . . . . . 4
2 Your TV � � � � � � � � � � � � � � � � � � � � � � � 5
2.1 TV overview . . . . . . . . . . . . . . . . . . . . 5
3 Get started � � � � � � � � � � � � � � � � � � � � 7
3.1 Position the TV . . . . . . . . . . . . . . . . . . 7
3.2 Wall mount the TV . . . . . . . . . . . . . . . 7
3.3 Connect the antenna cable . . . . . . . . . 8
3.4 Connect the mains cord . . . . . . . . . . . 8
3.5 Manage cables . . . . . . . . . . . . . . . . . . . 9
3.6 Insert the remote control batteries . . 9
3.7 Switch on the TV . . . . . . . . . . . . . . . . . 9
3.8 First time setup . . . . . . . . . . . . . . . . . . 9
4 Use your TV � � � � � � � � � � � � � � � � � � 1 0
4.1 Switch your TV on/off or to standby 10
4.2 Watch TV. . . . . . . . . . . . . . . . . . . . . . 10
4.3 Watch connected devices . . . . . . . . . 11
4.4 Use teletext. . . . . . . . . . . . . . . . . . . . 11
5 Use more of your TV � � � � � � � � � � � 1 2
5.1 Remote control overview . . . . . . . . . 12
5.2 Use TV menus . . . . . . . . . . . . . . . . . . 13
5.3 Adjust picture and sound settings. . . 15
5.4 Change to Shop or Home mode . . . 17
5.5 Use advanced teletext features. . . . . 18
5.6 Use Electronic Programme Guide. . . 18
5.7 Adjust feature settings. . . . . . . . . . . . 19
5.8 Use subtitles . . . . . . . . . . . . . . . . . . . 21
5.9 Listen to digital radio channels . . . . . 21
5.10 Update your TV software . . . . . . . . . 21
6 Install channels � � � � � � � � � � � � � � � � � 2 2
6.1 Automatically install channels . . . . . . 22
6.2 Manually install channels . . . . . . . . . . 23
6.3 Rearrange channels . . . . . . . . . . . . . . 24
6.4 Rename channels . . . . . . . . . . . . . . . . 24
6.5 Uninstall or reinstall channels . . . . . . 24
6.6 Manually update the channel list . . . . 25
6.7 Test digital reception . . . . . . . . . . . . . 25
7 Connect devices � � � � � � � � � � � � � � � � 2 6
7.1 Connection overview . . . . . . . . . . . . 26
7.2 Connect devices . . . . . . . . . . . . . . . . 27
7.3 Setup devices . . . . . . . . . . . . . . . . . . . 28
7.4 Use Philips EasyLink. . . . . . . . . . . . . . 29
7.5 Prepare TV for digital services . . . . . 29
8 Technical specifications� � � � � � � � � � � 3 1
9 Troubleshooting � � � � � � � � � � � � � � � � 3 2
9.1 General TV issues . . . . . . . . . . . . . . . 32
9.2 TV channel issues . . . . . . . . . . . . . . . 32
9.3 Picture issues. . . . . . . . . . . . . . . . . . . 32
9.4 Sound issues. . . . . . . . . . . . . . . . . . . . 33
9.5 HDMI connection issues . . . . . . . . . . 33
9.6 PC connection issues . . . . . . . . . . . . 33
9.7 Contact us . . . . . . . . . . . . . . . . . . . . . 33
Page 14

2008 © Koninklijke Philips
Electronics N.V. All rights reserved.
Specications are subject to change
without notice. Trademarks are
the property of Koninklijke Philips
Electronics N.V. or their respective
owners.
Philips reserves the right to change
products at any time without being
obliged to adjust earlier supplies
accordingly.
The material in this manual is
believed adequate for the intended
use of the system. If the product, or
its individual modules or procedures,
are used for purposes other than
those specied herein, conrmation
of their validity and suitability must
be obtained. Philips warrants that
the material itself does not infringe
any United States patents. No
further warranty is expressed or
implied.
Warranty
No components are userserviceable. Do not open or remove
covers to the inside of the product.
Repairs may only be done by Philips
Service Centres and ofcial repair
shops. Failure to do so shall void
any warranty, stated or implied.
Any operation expressly prohibited
in this manual, any adjustments,
or assembly procedures not
recommended or authorised in this
manual shall void the warranty.
Pixel characteristics
This LCD product has a high
number of colour pixels. Although
it has effective pixels of 99,999% or
more, black dots or bright points of
light (red, green or blue) may appear
constantly on the screen. This is a
structural proper ty of the display
(within common industry standards)
and is not a malfunction.
and receive electromagnetic signals.
One of Philips’ leading Business
Principles is to take all necessary
health and safety measures for
our products, to comply with all
applicable legal requirements and to
stay well within the EMF standards
applicable at the time of producing
the products.
Philips is committed to develop,
produce and market products that
cause no adverse health effects.
Philips conrms that if its products
are handled properly for their
intended use, they are safe to use
according to scientic evidence
available today.
Philips plays an active role in the
development of international EMF
and safety standards, enabling Philips
to anticipate further developments
in standardisation for early
integration in its products.
Mains fuse (UK only)
This TV is tted with an approved
moulded plug. Should it become
necessary to replace the mains fuse,
this must be replaced with a fuse of
the same value as indicated on the
plug (example 10A).
Remove fuse cover and fuse.1.
The replacement fuse must 2.
comply with BS 1362 and have
the ASTA approval mark. If the
fuse is lost, contact your dealer in
order to verify the correct type.
Ret the fuse cover.3.
In order to maintain conformity
to the EMC directive, the mains
plug on this product must not be
detached from the mains cord.
Copyright
the Video Electronics Standards
Association.
® Kensington and Micro Saver
are registered US trademarks of
ACCO World Corporation with
issued registrations and pending
applications in other countries
throughout the world. All other
registered and unregistered
trademarks are the proper ty of their
respective owners.
Compliance with EMF
Koninklijke Philips Electronics N.V.
manufactures and sells many
products targeted at consumers,
which, like any electronic apparatus,
in general have the ability to emit
VESA, FDMI and the VESA Mounting
Compliant logo are trademarks of
Page 15

Important1
Congratulations on your purchase and
welcome to Philips!
Read this user manual before you start to use
this product.
Pay close attention to this section and follow
the safety and screen care instructions. The
product warranty does not apply if damage is
caused by failing to follow these instructions.
To fully benefit from the support that Philips
offers, register your product at
www.philips.com/welcome.
The model and serial number of your TV can
be found on the back and side of the TV as well
as on the packaging.
Safety1�1
If transporting the TV in low temperatures •
(less than 5°C), open the box and wait until
the TV matches the ambient temperature
of the room before unpacking.
To avoid short circuit, do not expose the •
TV, remote control or remote control
batteries to rain or water.
Do not place vessels of water or other •
liquids on top of or near the TV. Spilling
liquids on the TV can cause electric shock.
If liquids are spilt on the TV, do not operate
the TV. Immediately disconnect the TV from
the mains and have the TV checked by a
qualified technician.
Do not insert any strange object into the •
ventilation slot. This might lead to damage
of TV.
To avoid risk of fire or electric shock, do •
not place the TV, remote control or remote
control batteries near naked flame sources
(e.g. lighted candles) and other heat sources
including direct sunlight.
Do not install the TV in a confined space •
such as a bookcase. Leave a space of at
least 10cm (four inches) around the TV
for ventilation. Be sure air flow is not
obstructed.
If placing the TV on a flat, solid surface be •
sure to use only the supplied stand. Do not
move the TV if the stand is not properly
screwed to the TV.
Wall mounting of the TV should only be •
performed by qualified personnel. The TV
must only be mounted on an appropriate
wall bracket and on a wall that can safely
hold the weight of the TV. Improper wall
mounting can result in severe injury or
damage. Do not attempt to wall mount the
TV yourself.
If the TV is mounted on a swivel base or •
swivel arm, ensure no strain is placed on
the power cord when the TV is swivelled.
Strain on the power cord can loosen
connections and cause arcing or fire.
Disconnect the TV from the mains and •
antenna before lightning storms. During
lightning storms do not touch any part of
the TV, mains cord or antenna cable.
Be sure that you have full access to the •
mains cord for easy disconnection of the
TV from the mains.
Permanent hearing loss can occur if you use •
earphones or headphones at high volumes.
Though high volume may sound normal
over time, it can damage your hearing. To
protect your hearing, limit the amount of
time you use earphones or headphones at
high volume.
When disconnecting the TV from the mains, •
be sure to:
EN
EN-3
Page 16

EN-4
Turn off the TV, then the mains power •
(if available).
Unplug the mains cord from the mains •
socket outlet.
Unplug the mains cord from the power •
connector at the back of the TV. Always
pull the mains cord by the plug. Do not
pull the mains cord
1�2 Screen care
reduce the screen contrast and brightness
to avoid screen damage.
1�3 Environmental care
Recycling your packaging
The packaging of this product is intended to
be recycled. Contact your local authorities for
information on how to recycle the packaging.
Disposing your used product
Your product is manufactured with high-quality
materials and components that can be recycled
and reused. When you see the crossed-out
wheel bin symbol attached to a product, it
means the product is covered by the European
Directive 2002/96/EC:
Do not dispose your used product with
household waste. Ask your dealer for
information on how to safely dispose of the
product. Uncontrolled waste disposal harms
both the environment and human health.
Turn off and unplug the mains cord before •
cleaning the screen. Clean the screen with a
soft, dry cloth. Do not use substances such
as household cleaning agents as these may
damage the screen.
To avoid deformations or colour fading, •
wipe off water droplets as soon as possible.
Do not touch, push, rub or strike the •
screen with hard objects as this may
damage the screen permanently.
Where possible, avoid stationary images •
that remain on-screen for extended periods
of time. Examples include screen menus,
teletext pages, black bars or stock market
tickers. If you must use stationary images,
Disposing used batteries
The supplied batteries do not contain
mercury or cadmium. Dispose supplied and all
other used batteries according to your local
regulations.
Power consumption
The TV consumes minimal energy in standby
mode to minimise environmental impact. Active
power consumption is displayed at the back of
the TV.
For more product specifications, see the
product leaflet at www.philips.com/support.
Page 17

EN-5
EN
Your TV2
POWER
PROGRAM
MENU
VOLUME
1
2
4
3
5
Side connectors
This section gives you an overview of
commonly-used TV controls and functions.
2�1 TV overview
Side controls and indicators
POWER1.
PROGRAM +/-2.
MENU3.
VOLUME +/-4.
Standby indicator/remote control sensor5.
Use the TV side connectors to connect to
mobile devices such as a high-definition
camcorder or game console. You can also
connect a pair of headphone.
Back connectors
Use the TV back connectors to connect to the
antenna and permanent devices such as a highdefinition disc player, DVD player or VCR.
Note: D For more information about
connections, see Section 7 Connect devices.
Page 18

EN-6
Remote control
1
2
3
4
5
6
7
8
. 1. Power
SOURCE2.
TELETEXT3.
Colour keys4.
Selects tasks or teletext pages
Í5. , Æ, Î, ï, OK
Navigation or cursor keys
MENU6.
P +/- 7.
Program up or down
”8. +/-
Volume up or down
For advanced information about the remote
control, see Section 5.1 Remote control overview.
Page 19

EN-7
EN
3 Get started
3�2 Wall mount the TV
This section helps you position and install the
TV and supplements the information provided
in the Quick Start Guide.
Note: D Refer to the Quick Start Guide for
stand mounting instructions.
3�1 Position the TV
In addition to reading and understanding the
safety instructions in Section 1.1, consider the
following before positioning your TV:
The ideal viewing distance for watching TV •
is three times its screen size.
Position the TV where light does not fall on •
the screen.
Connect your devices before you position •
your TV.
• Your TV is equipped with a Kensington
Security Slot at the back of the TV. If
connecting an anti-theft Kensington lock
(not supplied), position the TV within reach
of a permanent object (such as a table) that
can be easily attached to the lock
WARNING: Wall mounting of the B
TV should only be performed by
qualied installers. Koninklijke
Philips Electronics N�V� bears no
responsibility for improper mounting
that results in accident or injury.
Step 1 Purchase a B VESA-compatible
wall bracket
Depending on the size of your TV screen,
purchase one of the following wall brackets:
TV screen
size
(inches/
cm)
VESAcompatible
wall bracket
type
Special
instructions
(millimeters)
19”/48cm
20”/51cm
22”/56cm
26”/66cm Adjustable
Adjustable
100 x 100
100 x 200
None
Step 2 Connect cables
Connect the antenna cable, mains cord and
all other devices to the back of the TV as
described in the following sections.
Step 3 Secure the VESA-compatible wall
bracket to the TV
WARNING: Only use the bolts (M4 B
for all models) and spacers (4cm)
to secure the VESA-compatible wall
bracket to your TV�
The bolts are designed to match
the weight of your TV; spacers are
designed for easy cable management�
Note: D Depending on your VESA-compatible
wall bracket, you may need to separate the
mounting plate from the wall bracket for
easier installation. Refer to your VESAcompatible wall bracket documentation for
instructions.
Page 20

EN-8
3�3 Connect the antenna cable
Locate the 1. TV ANTENNA connector at
the back of the TV.
Connect one end of an antenna cable 2.
(not supplied) to the TV ANTENNA
connector. Use an adaptor if the antenna
cable does not fit.
Connect the other end of the antenna 3.
cable to your antenna outlet, ensuring that
the cable is tightly secured at both ends.
Connect the mains cord to the 2. AC IN
mains connector.
Connect the mains cord to the mains, 3.
ensuring that the cord is tightly secured at
both ends.
3�4 Connect the mains cord
WARNING: Verify that your mains B
voltage corresponds with the voltage
printed at the back of the TV� Do not
insert the mains cord if the voltage is
different�
To connect the mains cord
Note: D The location of the mains connector
according to TV model.
Locate the 1. AC IN mains connector at the
back or on the bottom of the TV.
Page 21

EN-9
EN
3�5 Manage cables
1
Route your mains cord, antenna cable and all
other device cables through the cable holder
(1) at the back of the TV.
3�6 Insert the remote control
batteries
Slide the battery cover off the back of the 1.
remote control.
Insert the two supplied batteries (Size AAA, 2.
Type LR03). Be sure the + and - ends of the
batteries line up with the markings inside
the case.
Slide the cover back into position.3.
Note: D Remove the batteries if not using the
remote control for an extended period of
time.
Note: D Certain TV models require you to
press and hold POWER for up to two
seconds. Your TV may take up to 15 seconds
to start.
First time setup3�8
When you turn on the TV set for the first
time, a menu is displayed on screen. This
menu prompts you to select the Country and
Language for the menus:
If the menu is not displayed, press the MENU
key to display the menu.
Press 1. Î or ï to select your language, and
press OK to confirm your choice.
Press 2. Î or ï to select your country, and
press OK to confirm your choice.
The search starts automatically. All available
TV programmes and radio stations are
stored. This operation takes a few minutes.
The display shows the progress of the
search and the number of programs
found. At the end of the search, the menu
disappears.
Note: D If no programme is found, consult
the possible solutions see section 9
troubleshooting.
If the transmitter or cable network sends
the automatic sort signal, the programs will
be numbered correctly. In this case, the
installation is complete.
If this is not the case, use the 3. Channel
setting menu to number the programs
correctly.
3�7 Switch on the TV
The first time you switch on the TV, check that
the mains cord is properly connected. When
ready, then press POWER on the side of the
TV.
Page 22

EN-10
Use your TV 4
1
POWER
PROGRAM
MENU
This section helps you perform basic TV
operations. Instructions on advanced TV operations are provided in Section 5 Use more of your
TV.
Switch your TV on/off or to 4�1
standby
Switch on your TV
If the power indicator (1) is off, press •
POWER on the side of the TV.
Switch off your TV
Press • POWER on the side of the TV. The
power indicator (1) switches off.
for extended periods of time, switch off and
disconnect the TV from the mains.
Switch on from standby
If the power indicator is in standby (red), •
press . on the remote control.
Note: D If you cannot locate your remote
control and you want to switch on the TV
from standby, press PROGRAM+/- on the
side of the TV.
Watch TV4�2
Switch channels
Switch to standby
Press • . on the remote control. The power
indicator switches to standby (red).
Tip: E Though your TV consumes very little
power when in standby, energy continues to
be consumed as long as the mains remain
connected and powered. When not in use
Press a number (1 to 999) or press 1. P +/on your remote control.
Press 2. PROGRAM +/- on the side controls
of the TV.
Press 3.
on the remote control to return
to the previously-viewed TV channel.
Adjust volume
Page 23

EN-11
EN
Press 1. ” + or - on the remote control,
or Press VOLUME + or - on the side
controls of your TV.
Press 2. [ on the remote control to mute
the sound. Press [ again to unmute on
the sound.
Note: D If headphones are connected, adjust
headphone volume as described in Section
5.3 Adjust sound settings. You must press the
MUTE button on the remote control to
mute audio from the TV speakers. Pressing
VOLUME +/- buttons turns on the TV
speakers again.
4�3 Watch connected devices
Switch on the device.1.
Press 2. SOURCE on the remote control.
Use teletext4�4
Press 1. TELETEXT on the remote control.
The main index page appears.
To select a page with the remote control:•
Enter the page number with the number •
keys.
Press • Î ï to view the next or previous
page.
Press a colour key to select one of the •
colour coded items at the bottom of the
screen.
Tip: E Press
viewed page.
Press 2. TELETEXT again to switch off
teletext.
Note (for UK users only): D Some digital
TV channels offer dedicated digital text
services (for example, BBC1).
to return to the previously
Press 3. Î or ï to select the input your
device is connected to.
Press 4. OK to select the device.
For advanced information on teletext, see
Section 5.5 Use advanced teletext features.
Page 24

EN-12
Use more of your TV5
1
2
21
20
19
18
17
16
15
14
13
3
4
5
6
7
8
9
10
11
12
Colour keys 5.
Selects tasks or teletext pages.
INFO6.
Remote control overview5�1
Displays programme information, if available.
OK7.
Accesses the All channels menu or
activates a setting.
Í8. , Æ, Î, ï
Navigate the menu.
OPTION9.
Activates the Quick access menu.
P +/-10.
Switches to the next or previous channel.
Number keys11.
Selects a channel, page or setting.
12.
Returns to the previously-viewed channel.
MHEG CANCEL 13.
Cancels digital text or interactive services
(UK only).
[14.
Mutes or restores sound.
”15. +/-
Increases or decreases volume.
MENU/EXIT/BROWSE(not available 16.
for this model)
Toggles the menu on or off.
BACK17.
To return to the previous menu.
GUIDE 18.
. 1.
Switches the TV on from standby or back
to standby.
SOURCE2.
Selects connected devices.
∏3.
Selects a picture format.
SUBTITLE4.
Activates or deactivates subtitles.
Toggles the Electronic Programme Guide
on or off. Only active with digital channels.
DEMO19.
Not Supported.
TELETEXT 20.
Toggles teletext on or off.
21.
Splits the current channel or source on the
left of the screen. Teletext appears on the
right.
Page 25

EN-13
EN
Use TV menus5�2
TV Menu
Picture
Sound
Features
Install
Smart settings
Vivid
Standard
Movie
Power saver
Personal
Smart settings
TV Menu
Picture
Sound
Features
Install
Smart settings
Vivid
Standard
Movie
Power saver
Personal
Smart settings
TV Menu Picture
Picture
Sound
Features
Brightness
Color
Sharpness
Tint
Color temperature
Picture format
Noise Reduction
Install
ContrastSmart settings
On-screen menus help you install your TV,
adjust picture and sound settings and access
other features. This section describes how to
navigate the menus.
Access the main menu
Press 1. MENU on the remote control to
display the main menu.
The following menu appears.
Use the main menu
The following steps of adjusting brightness is
one example to show how to use the main
menu.
Press 1. MENU on the remote control to
display the TV menu.
Press 2. Î or ï to move the cursor to the
following items:
Smart settings•
Picture•
Sound•
Feature•
Install•
Press 3. Æ or OK to select an item.
Press 4. MENU to exit.
Press 2. ï to select Picture.
Press 3. Æ to enter the Picture settings.
Page 26

EN-14
Picture Brightness
98
47
52
Brightness
Colour
Sharpness
Tint
Color temperature
Picture format
Contrast
4
Noise reduction
0
Press 4. ï to select Brightness�
Picture Brightness
98
47
52
Brightness
Colour
Sharpness
Tint
Color temperature
Picture format
Contrast
4
Noise reduction
0
Brightness
Quick access
Subtitle language
Subtitle
Audio language
Picture format
Clock
Use the Quick access menu
The Quick access menu gives direct access to
some often-needed menu items.
Note: D When digital channels are installed
and broadcasted, the relevant digital options
are displayed in the Quick access menu.
Press 1. OPTION on the remote control.
Press 2. Î or ï to select an option.
Press 5. Æ to enter the Brightness setting.
Press 6. Î or ï to adjust the setting.
Press 7. Í to return to the Picture settings
or press MENU to exit.
Note: D More choices are available when
digital channels are installed and broadcast.
Press 3. OK to display the selected option
menu.
Press 4. Î, ï, Æ, Í to adjust the settings in
the menu.
Press 5. OPTION to exit Quick access
menu, or press MENU to exit the Main
menu.
Page 27

EN-15
EN
Adjust picture and sound 5�3
TV Menu Picture
Picture
Sound
Features
Brightness
Color
Sharpness
Tint
Color temperature
Picture format
Noise Reduction
Install
ContrastSmart settings
settings
Adjust picture settings
Press 1. MENU on the remote control and
select Picture.
Press 2. Æ to enter the list.
Press 3. Î or ï to select a setting:
• Contrast: Changes the level of bright
parts in the picture keeping the dark
parts unchanged.
• Brightness: Changes the level of light in
the picture.
• Colour: Changes the level of saturation.
• Sharpness: Changes the level of
sharpness of fine details.
Tint: • Changes the colours to reddish or
bluish. (This function is available only in
NTSC model)
Colour temperature:• There are 3
items can be selected. Press Æ to enter
the select menu. Press Î or ï to move
to the item. Press OK to change to the
selected colour temperature: Normal
(balanced), Warm (redder), Cool
(bluer).
Picture format: • See Section 5.3.3
Change picture format.
• Noise reduction: Filters and reduces
the noise in the picture. Select ON to
enable. OFF to disable this function
Use smart settings
Apart from manually adjusting picture settings,
you can use Smart settings to set your TV to
a predefined picture and sound setting.
Press 1. MENU on the remote control and
select Smart settings.
Press 2. Æ to enter the list.
Press 3. Î or ï to select one of the following
settings:
• Personal: Applies manually selected
picture and sound settings.
• Vivid: Applies brilliant picture and
sound settings suitable for bright
surroundings
• Standard: Applies natural picture and
sound settings suitable for most living
room conditions.
• Movie: Applies dynamic picture and
sound settings suitable for a complete
cinematic experience.
• Power saver: Applies lower picture
brightness and smaller sound for power
economy.
Press 4. OK to store your selection.
Page 28

EN-16
Change picture format
Change the picture format to suit your content.
Press 1. ∏ (PICTURE FORMAT) on your
remote control. Alternatively, press MENU
and select Picture > Picture format.
Press 2. Î or ï to select one of the following
picture formats,
determined by the type of model you own
For 20 inch model
available display formats are
4:3• (Not for HD)
Displays the classic
4:3 format
• Expand 4:3
Scales the classic
4:3 format to 14:9
4:3• (Not for HD)
Displays the classic
4:3 format
D Note: Constant use of the 4:3 picture
format can cause screen distortion.
Movie Expand 14:9•
Scales the classic 4:3
format to 14:9.
• Movie Expand 16:9(Not for HD)
Scales the classic 4:3
format to 14:9
Note: D Constant use of the 16:9 picture
format can cause screen distortion.
Wide screen•
Stretches the classic
4:3 format to 16:9
• Compress 16:9
Scales the classic 4:3
format to 16:9.
For 19 inch model/22 inch model/26 inch
model
Super zoom• (Not for HD)
removes the black
bar on the side of
4:3 broadcasts with
minimal distortion
Subtitle zoom•
Scales the classic 4:3
format to 16:9 and
capable to move up
and down by press
Î or ï keys to
show subtitle.
Page 29

EN-17
EN
Adjust sound settings
TV settings Sound
Picture
Sound
Features
Incredible surround
Audio language
Volume-visually impaired
Dual l-ll
Auto volume leveling
Mono/Stereo
Install
SettingsSmart settings
This section describes how to adjust sound
settings.
Press 1. MENU on the remote control and
select Sound.
Press 2. Æ to enter the list.
Press 3. Î or ï to select one of the following
settings:
Settings: •
-Treble:To adjust the treble value to fit
your best listening.
-Bass: To adjust the bass value to fit
your best.
-Balance: Sets the balance of the left
and right speakers to best fit your
listening position.
Incredible surround:• Automatically
switches the TV to the best surround
sound mode available from a broadcast.
Select On or Off.
Volume-visually impaired• : Adjusts the
aids on volume settings.
• Audio language: Available for digital
channels only, when multiple languages
are broadcast. Lists available audio
languages.
• Dual I-II: If available, choose between
two different languages.
• Mono/Stereo: If stereo broadcasting
is available, choose between mono or
stereo.
• Auto volume leveling: Reduces
sudden volume changes, for example,
during commercials or when switching
from one channel to another. Select On
or Off.
5�4 Change to Shop or Home
mode
Press 1. MENU on the remote control and
select Install > Preferences > Location.
Press 2. Æ to enter the Location menu.
Press 3. Î or ï to select the TV mode:
Shop: • Sets smart settings to Vivid, ideal
for a shop environment. The flexibility to
change settings is limited.
Home: • Gives home users the full
flexibility to change all TV settings.
Press 4. OK to confirm.
Press 5. MENU to exit.
Page 30

EN-18
Use advanced teletext 5�5
features
Your TV has a 100 page memory that stores
broadcasted teletext pages and subpages.
Select teletext subpages
A teletext page can hold several subpages.
Subpages are displayed on a bar next to the
main page number.
Press 1. TELETEXT on the remote control.
Select a teletext page.2.
Press 3. Î or ï to select a subpage.
Use dual screen teletext
Enabling dual screen teletext displays your
channel or source on the left of the screen.
Teletext is displayed on the right.
Press 1.
remote control to enable dual screen
teletext.
Press 2.
Press 3. TELETEXT to switch off teletext.
Use digital text services (UK only)
Some digital TV broadcasters in UK offer
dedicated digital text or interactive services
(for example, BBC1). These services work like
normal teletext with the addition of number,
colour and navigation keys.
Press 1. TELETEXT on the remote control.
Press 2. Î, ï, Æ ,Í to select or highlight
items.
Press 3. OK to confirm or activate
Press one of the colour keys to select an 4.
option..
Press 5. MHEG Cancel to cancel digital text
or interactive services.
(DUAL SCREEN) on your
again to display normal teletext.
part of the screen, twice to zoom in on the
bottom of the screen, three times to return
to normal display.
Caution: C Digital text services are blocked
when subtitles are broadcasted and
Subtitle On is set in the Features menu
as described in Section 5.8 Subtitles.
5�6 Use Electronic Programme
Guide
EPG is an on-screen guide that displays
scheduled digital TV programmes. This guide is
not available with analogue channels. You can
navigate, select and view programmes.
There are two types of EPG, ‘Now and Next’
and ‘7 or 8 day’ EPG. ‘Now and Next’ is
always available but the ‘7 or 8 day’ EPG is
only available in certain countries.
With the EPG menu you can:
View a list of currently broadcast digital •
programmes.
View upcoming programmes.•
Group programmes.•
Switch on EPG
Note: D ThersttimeyouuseEPG,youmay
be prompted to perform an update. If so,
follow the on-screen instructions.
Press 1.
the “Now and Next” EPG will appear and
the detailed information about the current
programme is displayed.
GUIDE on the remote control,
when D you in teletext mode, press option
on remote:once to zoom in on the top
Use the colour keys on the remote control 2.
Page 31

EN-19
EN
to activate available actions.
Viewing Date: 01/03/2002 Current Time:wed 02 Apr 04:02:15
BBCi
BBC CHOICE
BBC TWO
BBC NEW 24
2
7
10
11
12 BBC PARLMNT
13 BBC knowledge
800 Eurosport
801 TERRA NOVA
16:30
17:15
Ready Steady Cook
The Weakest Link
16:30 ~ 17:15
Prev Day Next Day Detail Filter
Viewing Date: 01/03/2002 Current Time: 01/03/2002 Thu 16:49:22
Take a couple of chefs, Paul Rankin and Phil vickery, add two
cntestants, throw in some ingredients and garnish liberally with
Ainsley Harriott. Simmer and enjoy.
Test
Prev Page Next Page Returm
TV menu Features
Picture
Sound
Features
Auto lock
Subtitle language
Install
TimerSmart settings
Common interface
Subtitle
Subtitle
Use the colour keys to view 7 or 8 day 3.
EPG.
Prev Day• (Red): List the previous day’s
EPG.
Next Day• (Green): List the next day’s
EPG.
Detail • (Yellow): Display the description
about this program.
Filter • (Blue): Group programs.
Press 4. GUIDE to exit the EPG.
Press 3. Î or ï to select one of the following
settings:
Timer•
Auto lock•
Subtitle•
Subtitle language•
Common interface•
Use timers
Press MENU on the remote control and select
Features > Timer > Clock.
Auto clock mode: • You can set current
clock by manual or automatic:
Manual: • Allows you to enter the
current time and day of the week by
yourself
Automatic: • Allow you to select the
channel from which the TV will read the
time.
Time zone: • Adjusted time is based on
GMT.
Adjust feature settings5�7
Press 1. MENU on the remote control and
select Features�
Press 2. Æ to enter.
Page 32

EN-20
Automatically switch the TV to standby
(Sleeptimer)
Sleeptimer switches the TV to standby after a
defined period of time.
Press 1. MENU on the remote control and
select Features > Timer > Sleeptimer.
Press 2. Æ to enter the Sleeptimer menu
Press 3. Î or ï to set the sleep time up to
180 minutes in steps of five minutes. If set
to zero minutes, the Sleeptimer is switched
off.
Press 4. OK to activate the Sleeptimer.
Note: D You can always switch off your
TV earlier or reset Sleeptimer during the
countdown.
Automatically switch the TV on (Start
time)
Start time switches the TV to a specified
channel at a specified time, from standby.
Press 1. MENU on the remote control and
select Features > Timer > Start time.
Press 2. Æ to enter the start time menu.
Use 3. Î or ï, Æ or Í to select and enter
the menu items to set a channel, day of the
week, frequency and starting time.
Press 4. OK to confirm your choice.
Press 5. MENU to exit.
Tip: E To switch off Start time, select Off in
the Start time menu.
Use 3. Î or ï , Æ or Í to select and enter
the menu items to set the day of week.
Press 4. OK to confirm.
Press 5. MENU to exit.
Note: D You can always switch off your
TV earlier or reset Sleeptimer during the
countdown.
Lock TV channels or connected devices
(Auto Lock)
Lock TV channels or connected devices with
a four digit code to prevent children from
watching unauthorised content.
To set or change the Auto Lock code
Press1. MENU on the remote control and
select Features > Auto lock > Change
code.
Press 2. Æ to enter the code setup.
Enter your code with the number keys. 3.
The Features menu reappears with a
message confirming that your code is
created or changed.
Tip: E Use the master code 0711 to reset
your PIN code.
To enter the Auto Lock menu
Press 1. MENU on the remote control and
select Features > Auto Lock and press
Æ to enter your code.
Enter your code with the number keys.2.
Automatically switch the TV off (Stop
time)
Stop time switches the TV to standby at a
specified time.
Press 1. MENU on the remote control and
select Features > Timer > Stop time.
Press 2. Æ to enter the Stop time menu.
To unlock all channels and connected
devices
In the 1. Auto Lock menu, select Clear all�
Press 2. OK.
To lock or unlock one or more channels
and connected devices
In the 1. Auto Lock menu, select Lock
program.
Page 33

EN-21
EN
Press 2. Æ to enter.
TV menu Features
Picture
Sound
Features
Auto lock
Subtitle language
Install
TimerSmart settings
Common interface
Subtitle
Subtitle
Press 3. Î or ï to select channel lock�
Press 4. Æ to lock or unlock the channel.
display subtitles only when the sound is
muted with the [ key on the remote
control.
Press 4. OK to return to the Features menu.
To set parental ratings
Some digital broadcasters rate their
programmes according to age. You can set your
TV to display only programmes with age ratings
higher than your child’s.
In the 1. Auto Lock menu, select Parental
rating.
Press 2. Æ to enter.
Press 3. Î or ï to select age rating.
Select the age and Press 4. OK.
Press 5. Menu to exit the menu.
5�8 Use subtitles
You can enable subtitles for each TV channel.
Subtitles are broadcast via teletext or DVB-T
digital broadcasts. With digital broadcasts,
you have the additional option of selecting a
preferred subtitle language.
Press 1. MENU on the remote control and
select Features > Subtitle.
Press 2. Æ to enter the list.
Select a subtitle language on digital TV
channels
Note: D When you select a subtitle language
on a digital TV channel as described below,
the preferred subtitle language set in the
Install menu is temporarily overruled.
Press 1. MENU on the remote control and
select Features> Subtitle language�
Press 2. Æ to enter the list of available
languages.
Press 3. Î or ï to select a subtitle language.
Press 4. OK.
5�9 Listen to digital radio
channels
If digital broadcasting is available, digital radio
channels are installed automatically during
installation. To reorder the digital radio
channels, see Section 6.3 Rearrange the channels.
Press 1. OK on the remote control. The All
channels menu is displayed.
Use the number keys to select a radio 2.
channel.
Press 3. OK.
Press 3. Î or ï to select On to display
subtitles always or On during mute to
5�10 Update your TV software
Philips continuously tries to improve its
products and we strongly recommend that
you update the TV software when updates are
available. Check www.philips.com/support for
availability.
Check your current software version
Press 1. MENU on the remote control and
Page 34

EN-22
select Install > Current software info.
Install Language
Preferred audio language
Preferred subtitle language
Menu language
Country
Channel installation
Preferences
Source labels
Decoder
Current software info
Hearing impaired
Audio description
Language
Factory reset
6 Install channels
Update software (digital broadcasts)
If using (DVB-T) digital broadcasts, your TV
automatically receives software updates. If you
receive a message on-screen prompting you to
update your software:
Select • Now (recommended) to update the
software immediately.
Select • Later to be reminded to update the
software later.
Select • Cancel to exit the update (not
recommended).
The first time you setup your TV, you are
prompted to select an appropriate menu
language and to perform automatic installation
of TV and digital radio channels (if available).
This chapter provides instructions on how
to reinstall channels as well as other useful
channel installation features.
Note: D Re-installingchannelsmodiesthe
All channels list.
6�1 Automatically install
channels
This section describes how to search and store
channels automatically. Instructions are for both
digital and analogue channels.
Step 1 Select your menu language
Press 1. MENU on the remote control and
select Install > Language.
Press 2. Æ to enter Menu language.
Press 3. Î or ï to select your language.
Press 4. OK to confirm.
Press 5. Í to return to the Install menu.
Page 35

EN-23
EN
In addition to menu language, you can
Channel installation Analog: Manual installation
Search
Fine tune
System
Installation update
Digital: Test reception
Analog: Manual installation
Rearrange
Store current channel
Store as new channel
Automatic insatllation
configure the following language settings via the
Language menu (digital channels only):
Preferred audio• language: Select
one of the available audio languages as
your preferred audio language. For more
information, see Section 5.3 Adjust sound
settings.
Preferred subtitle language:• Select one
of the available subtitle languages. For more
information, see Section 5.8 Select a subtitle
language on digital TV channels.
• Hearing impaired: If available, select On
to display the hearing impaired subtitle with
your preferred language.
Audio description: • If available, select On
to hear the audio description with your
preferred language.
Step 2 Select your country
Select the country where you are located. The
TV installs and arranges channels according to
your country.
In the 1. Install menu, press ï to select
Country.
Press 2. Æ to enter the list.
Press 3. Î or ï to select your country.
Press 4. Í to return to the Install menu.
When the channel search is completed, 5.
press the red key to return to the
Installation menu.
Press 6. MENU to exit.
Tip: E When digital TV channels are found,
the list of installed channels may display
empty channel numbers. If you want
to rename, reorder or uninstall stored
channels, see Section 6.3 Rearrange channels.
6�2 Manually install channels
This section describes how to search and store
analogue TV channels manually. If you want to
search and store digital channel, please kindly
refer to Section 6.7. Test digital reception
Step 1 Select your system
Note: D Skip to Step 2 Search and store new TV
channels if your system settings are correct.
Press 1. MENU on the remote control and
select Install > Channel installation >
Analogue: Manual installation.
Press 2. Æ to enter the Channel
installation menu, and System is
highlighted.
Press 3. Æ to enter the System list.
Step 3 Install channels
Your TV searches and stores all available digital
and analogue TV channels as well as all available
digital radio channels.
In the 1. Install menu, press Î or ï to select
Channel installation > Automatic
installation.
Press 2. Æ to select Start now.
Press 3. OK.
Press the green key to start. 4.
The installation may take a few minutes.
Press 4. Î or ï to select your country or
region.
Press 5. Í to return to the Channel
installation menu.
Page 36

EN-24
Step 2 Search and store new TV channels
Press 1. MENU on the remote control and
select Install > Channel installation
> Analogue: Manual installation >
Search.
Press 2. Æ to enter the Search menu.
Press the red key and the number keys on 3.
the remote control to enter the three digit
frequency. Alternatively, press the green
key to automatically search for the next
channel.
Press 4. Í when the new channel is found.
Select 5. Store as new channel, and press
Æ to enter.
Press 6. OK to save this channel.
The channel number will is shown on the
screen.
Press 7. MENU to exit.
Fine tune analogue channels
You can manually fine tune analogue channels
when reception is poor.
Press 1. MENU on the remote control and
select Install > Channel installation >
Analogue: manual installation > Fine
tune.
Press 2. Æ to enter the Fine tune menu.
Press 3. Î or ï to adjust the frequency.
Press 4. OK when done.
Select 5. Store current channel to store
the fine tuned channel under the current
channel number.
Press 6. Æ to enter.
Press 7. OK.
Press 8. MENU to exit.
6�3 Rearrange channels
Press 1. MENU on the remote control and
select Install > Channel installation >
Rearrange.
Press 2. Æ to enter the Rearrange list.
Press 3. Î or ï to select the channel you
want to rearrange.
Press the yellow key to move the channel 4.
up the list, or press the blue key to move
the channel down the list.
Press 5. MENU to exit.
Rename channels6�4
Press 1. MENU on the remote control and
select Install > Channel installation >
Rearrange.
Press 2. Æ to enter the Rearrange list.
Press 3. Î or ï in the Rearrange list to
select the channel you want to rename.
Press the red key.4.
Press 5. Í and Æ to select characters or Î
and ï to change the characters. Space,
numbers (0-9) and other special characters
are located between z and A.
Press the green key or 6. OK to finish.
Tip: E Delete all characters by pressing the
yellow key. Delete only the highlighted
character by pressing the blue key.
6�5 Uninstall or reinstall
channels
You can uninstall a stored channel or 1.
reinstall an uninstalled channel.
Press MENU on the remote control and
select Install > Channel installation >
Rearrange.
Press 2. Æ to enter the Rearrange list.
Press 3. Î or ï to select the channel you
want to uninstall or reinstall.
Press the green key to uninstall or reinstall 4.
Page 37

EN-25
EN
the channel.
Press 5. MENU to exit.
Manually update the channel 6�6
list
You can manually update the channel list.
Press 1. MENU on the remote control and
select Install > Channel installation >
Installation update.
Press 2. Æ to enter the Installation update
menu. Start now is highlighted.
Press 3. OK.
Press the green key to start the update. 4.
This may take a few minutes.
When the update is complete, press 5.
the red key to return to the Channel
installation menu.
Press 6. MENU to exit.
6�7 Test digital reception
Note: D If you have further problems with
the reception of your digital broadcast,
contact a specialised installer.
If using digital broadcasts, you can check the
quality and signal strength of digital channels.
This allows you to reposition and test your
antenna or satellite dish.
Press 1. MENU on the remote control and
select Install > Channel installation >
Digital: Test reception.
Press 2. OK.
Press the green key to automatically start 3.
the test or manually enter the frequency of
the channel you want to test. If the signal
quality and strength is poor, reposition the
antenna or satellite dish and retest.
When complete, press the yellow key to 4.
store the frequency.
Press the red key to return to the 5.
Channel installation menu.
Press 6. MENU to exit.
Page 38

EN-26
Connect devices7
7
10
8
9
equipment connected, press the SOURCE
button on the remote control: once to
select EXT 1, twice to select EXT 2,
etc. For some equipment (connected to
Connection overview7�1
the SCART socket), this selection is done
Back connectors
Digital Audio Out1.
Sound output cinch connectors for home
theatres systems etc.
TV (75Ω)2.
TV antenna.
EXT 1 - SCART (input-output) 3.
For a range of equipment, including video
recorders, camcorders (VHS, 8 mm or
Hi 8 format), decoders, satellite receivers,
DVD players, games consoles or devices
producing an RGB signal.
EXT 3 - PC Audio/YPbPr/Audio L/R 4.
component sockets (input)
Component PC Audio and video (Y Pb
Pr) and Audio L/R input connectors for
PC(when connecting a PC via a DVI-HDMI
adaptor), DVD players, digital receivers,
game consoles and other component video
devices.
VGA (PC) socket (input) 5.
or a computer. To display images using the
automatically.
HDMI(input) 1/26.
HDMI input connectors for Blu-ray Disc
players, digital receivers, game consoles and
other high-definition devices.
Side connectors
EXT2-CVBS/S-Video7.
Video input cinch connector for composite
devices.S-Video input connector for
S-Video devices
Headphone8.
Stereo mini-jack, size, e.g. 3.5mm
Common Interface9.
Slot for Conditional Access Modules.
AUDIO L/R10.
Audio L/R input connectors for composite
and S-Video devices.
Page 39

EN-27
EN
7�2 Connect devices
This section describes how to connect
various devices with different connectors and
supplements examples provided in the Quick
Start Guide.
Caution: C Disconnect the mains cord
before connecting devices.
Note: D Different types of connectors may
be used to connect a device to your TV,
depending on availability and your needs.
Blu-ray Disc player
For full high-definition video, connect a HDMI
cable as illustrated:
DVD player
For DVD video, connect a SCART cable as
illustrated:
Satellite receiver
To receive analogue channels via antenna
and digital channels via a satellite receiver,
connect an antenna cable and SCART cable as
illustrated:
Separate DVD recorder and receiver
To receive analogue channels via antenna
and record programmes on a separate DVD
recorder and receiver, connect three antenna
cables and one SCART cables as illustrated:
DVD recorder and home theatre system
To receive analogue channels via antenna,
output sound to a home theatre system and
record programmes on a DVD recorder,
connect two antenna cables, one SCART cable
and two digital audio cables as illustrated:
Note: D If using a home theatre or other
audio system, the best synchronisation
between images and sound is achieved
by connecting the audio signal from your
playbackdevicetotheTVrst.Subsequently,
channel the audio signal to the home
theatre system or audio device via the audio
connectors on the back of the TV.
HD digital receiver
To receive analogue channels via antenna
and digital channels via a HD digital receiver,
connect two antenna cables and HDMI cable as
illustrated:
Combined DVD recorder and digital
receiver
To receive analogue channels via antenna and
record programs on a combined DVD recorder
and digital receiver, connect two antenna cables
and one SCART cable as illustrated
Page 40

EN-28
Game console or camcorder
TV Menu
Picture
Sound
Features
Install
Smart settings
Country
Channel installation
Preferences
Source labels
Current software info
Language
Factory reset
Decoder
Install
The most practical connection for a mobile
game console or camcorder may be at the side
of the TV. You can, for example, connect the
game console or camcorder to VIDEO/S-Video
and AUDIO L/R connectors at the side of the
TV. A HDMI connector is also available for
high-definition devices.
A permanent game console or camcorder can
be connected to a HDMI connector or EXT 3
(component) connectors at the back of the TV.
7�3 Setup devices
Assign a channel decoder
Decoders that decode digital channels can be
connected to SCART. You have to assign the
TV channel as a channel to be decoded. Then
assign the connection where the decoder is
connected.
Press 1. MENU on the remote control and
select Install > Decoder.
Personal Computer
Before connecting the PC:
Set the PC monitor refresh rate to 60Hz. •
See Section 8 Technical specifications for a list
of computer resolutions.
C• hange the TV picture format to Wide
Screen as described in Section 5.3 Change
picture format.
To connect a PC to the back of the TV
Using a VGA cable connect to PC IN 1.
connect on the back of your TV.
Connect a Mini-jack audio cable from your 2.
PC to the AUDIO IN mini-jack connector
at the back of the TV.
Press 2. Æ to enter the list.
Press 3. Î or ï to select the channel to
decode.
Press 4. OK to select or unselect the channel.
Page 41

EN-29
EN
Press 5. Í to return to the previous menu.
Press 6. MENU to exit.
Use Philips EasyLink7�4
Your TV supports Philips EasyLink, which
enables one-touch play and one-touch standby
between EasyLink-compliant devices. Compliant
devices must be connected to your TV via
HDMI and assigned as described in Section 7.4.1
Assign devices to connectors.
Enable or disable EasyLink
Press 1. MENU on the remote control then
select Install > Preferences > EasyLink.
Select 2. On or Off.
Use one-touch play
One-touch play enables you to press the play
button on, for example, your DVD remote
control. This starts playback on your DVD
device and automatically switches your TV to
the correct source, displaying DVD content.
your digital TV service operator for more
information about services and terms.
Using the Conditional Access Module
WARNING: Switch off your TV before B
inserting a CAM� Be sure to follow the
instructions described below� Wrong
insertion of a CAM may damage both
the CAM and your TV�
Following the directions printed on the 1.
CAM, gently insert the CAM into the
Common Interface on the side of the TV.
Push the CAM in as far as it will go.2.
Use System standby
System standby enables you to press and hold
the POWER button on, for example, your
TV remote control. This switches your TV and
all connected HDMI devices on or to standby
mode. You can perform system standby using
remote controls from any of the connected
HDMI devices.
7�5 Prepare TV for digital
services
Scrambled digital TV channels can be decoded
with a Conditional Access Module (CAM) and
a Smart card provided by a digital TV service
operator.
The CAM may enable several digital services,
depending on the operator and services
you choose (for example, pay TV). Contact
Turn on the TV and wait for the CAM to 3.
be activated. This may take several minutes.
Note: D Do not remove the CAM from the
slot. Removing the CAM will deactivate the
digital services.
Access CAM services
Page 42

EN-30
After inserting and activating the CAM, •
press MENU on the remote control and
select TV menu > Features > Common
interface.
This menu option is only available if the CAM
is correctly inserted and activated. On-screen
applications and content are provided by your
digital TV service operator.
Page 43

EN-31
EN
8 Technical
specifications
Supported display resolutions
Computer formats (PC)•
Resolution Refresh rate
720 x 400 70Hz
640 x 480 60Hz
800 x 600 60Hz
1024 x 768 60Hz
1680 x 1050(22” only) 60Hz
1366 x 768(26" only) 60Hz
Notes D
Model 20PFL3403D supports the format
640x480 60Hz only.
• Video formats
Resolution Refresh rate
480i 60Hz
480p 60Hz
576i 50Hz
576p 50Hz
720p 50Hz, 60Hz
1080i 50Hz, 60Hz
1080p 50Hz, 60Hz(HDMI only)
Notes D
Model 20PFL3403D supports the format
480i 60Hz\576i 50Hz and 480p 60Hz\576p
50Hz only.
Tuner / Reception / Transmission
Antenna input: 75ohm coaxial (IEC75)•
TV system: PAL D/K, BG, I •
SECAM L’/L
Video playback: NTSC, SECAM, PAL•
DVB Terrestrial (see listed countries on the •
back of the TV)
EXT 3 Component PC Audio, (Y Pb Pr), •
Audio L/R in.
VGA•
HDMI 1/2/•
SPDIF OUT: Digital audio out (coaxial-•
cinch-S/PDIF). Display synchronised.
TV ANTENNA•
Connections (Side)
Headphone out (stereo mini-jack)•
EXT 2 Component AUDIO L/R in, Video •
(CVBS) in, S-Video
Common Interface (CAM slot)•
Power
Mains power: AC 100-240V (±10%)•
Power and standby power consumption: •
See technical specifications at www.philips.
com
Ambient temperature: 5°C - 35°C•
Specifications are subject to change without
notice. For detailed specifications of this
product go to www.philips.com/support.
Remote control
Type: RC-6•
Batteries: 2 x AAA size (LR03 type)•
Connections (Rear)
EXT 1 (SCART): SCART input-output•
Page 44

EN-32
Troubleshooting 9
This section describes commonly-encountered
issues and accompanying solutions.
General TV issues 9�1
The TV does not switch on:
Unplug the mains cord, wait for one minute •
and plug in the mains again.
Verify that the mains cord is properly •
connected and that the mains are powered.
Verify that the correct list is selected.•
The channel may have been uninstalled to •
the Rearrange menu. To access the menu,
press MENU on the remote control and
select Install > Channel installation >
Rearrange.
No digital channels were found during
the installation:
Verify if the TV supports DVB-T in your •
country. See the listed countries on the
back of the TV.
The remote control is not working
properly:
Verify that the remote control batteries •
are correctly inserted according to the +/orientation.
Replace the remote control batteries if •
they are flat or weak.
Clean the remote control and TV sensor •
lens.
You forgot your code to unlock Auto
Lock
Enter ‘0711’ as described in • Section 5.7 Lock
TV channels or connected devices (Auto Lock).
The TV menu is in the wrong language
See • Section 6.1 Automatically install channels
for instructions on how to change the TV
menu to your preferred language.
When turning the TV on/off/to standby,
you hear a creaking sound from the TV
chassis:
No action is required. The creaking sound •
is normal expansion and contraction of the
TV as it cools and warms up. This does not
impact performance.
Picture issues9�3
The power indicator is on, but there is no
picture:
Verify if the antenna is connected properly.•
Verify if the correct device is selected.•
There is sound but no picture:
Verify that picture settings are correctly set. •
See Section 5.3 Adjust picture settings.
You receive poor TV reception from an
antenna connection:
Check that the antenna is properly •
connected to the TV.
Loud speakers, unearthed audio devices, •
neon lights, high buildings or mountains can
influence the picture quality. Try to improve
the reception quality by changing the
antenna direction or moving devices away
from the TV.
Verify if the correct TV system is selected •
for your region. See Section 6.2 Manually
install channels.
If reception on only one channel is poor, •
try to fine tune this channel. See Section 6.2
Fine tune analogue channels.
TV channel issues9�2
Previously installed channels do not
appear in the channel list:
You receive poor picture quality from
connected devices:
Page 45

EN-33
EN
Check that the devices are connected •
properly.
Verify that picture settings are correctly set. •
See Section 5.3 Adjust picture settings.
The TV did not save my settings:
Verify that the TV is set to • Home mode,
which offers you complete flexibility to
change settings. See Section 5.4 Change to
Shop or Home mode.
The picture does not fit the screen, it is
too big or too small:
Try using a different picture format as •
described in Section 5.3 Change picture
format.
The picture position on screen is not
correct:
Picture signals from some devices do not •
fit the screen correctly. Check the signal
output of the device.
Sound issues9�4
There is picture but no sound from the
TV:
HDMI connection issues9�5
You encounter problems with HDMI
devices
HDCP support can delay the time taken for •
a TV to display content from a device.
If the TV does not recognise the device and •
the screen displays no picture, try switching
from one device to another and back again
to restart.
If you experience intermittent sound •
disruptions, check the user manual of the
HDMI device to verify that output settings
are correct. Alternatively, try connecting the
audio signal from the HDMI device to the
TV via AUDIO IN at the back of the TV.
PC connection issues 9�6
The PC display on my TV is not stable or
is not synchronised:
Check that a supported resolution and •
refresh rate is selected on your PC.
See Section 8 Technical specifications for
supported resolutions and refresh rates.
Note: D If no audio signal is detected, the TV
automatically switches off audio output and
does not indicate malfunction.
Check that all cables are properly •
connected.
Check that the volume is not set to 0.•
Check that the sound is not muted.•
There is picture but sound quality is
poor:
Check • Sound settings as described in
Section 5.3 Adjust sound settings.
There is picture but sound comes from
one speaker only:
Verify that • Balance correctly set as
described in Section 5.3 Adjust sound settings.
Contact us9�7
If you cannot resolve your problem, refer
to the FAQ for this TV at www.philips.com/
support.
If the problem remains unresolved, contact the
Customer Support Centre in your country as
listed in this user manual.
WARNING: Do not attempt to repair B
the TV yourself� This may cause severe
injury, irreparable damage to your TV
or void your warranty�
Note: D Please have available your TV model
and serial number before contacting us.
These numbers are available on the back
and side of your TV, as well as on the
packaging.
Page 46

Page 47

Page 48

© 2008 Koninklijke Philips Electronics N.V.
All rights reserved.
72-E340M5-X411E
 Loading...