

Philips 19PFL5622D-37B, 19PFL5622D-37E, 19PFL5622D User Manual
Model / Model / Model:
19PFL5622D
built-in DVD player
with DivX®
Thank you for choosing Philips.
Need help fast?
Read your Quick Start Guide and/or
User Manual first for quick tips
that make using your Philips product
more enjoyable.
If you have read your instructions
and still need assistance,
you may access our online help at
www.philips.com
/welcome
or call
1-888-PHILIPS (744-5477)
while with your product
(and Model
/ Serial number)
Philips vous remercie de
votre confiance.
Besoin d'une aide
rapide?
Le Guide rapide de début et
Manuel de l'utilisateur regorgent
d'astuces destinées
à simplifier
l'utilisation de votre produit Philips.
Toutefois,
si vous ne parvenez
pas
à résoudre votre problème,
vous pouvez accéder
à
notre aide en ligne à l'adresse
www.philips.com/welcome
ou formez le
1-800-661-6162 (Francophone)
1-888-PHILIPS (744-5477)
(English speaking)
Veillez
à avoir votre produit à
portée de main
(et model
/ serial nombre)
Gracias por escoger Philips
Necesita ayuda
inmediata?
Lea primero la Guía rápida del
comienzo
o el Manual del usuario,
en donde encontrará consejos que
le ayudarán
a disfrutar plenamente
de
su producto Philips.
Si después de leerlo aún necesita ayuda,
consulte nuestro servicio de
asistencia en línea en
www.philips.com/welcome
o llame al teléfono
1-888-PHILIPS (744-5477)
y tenga a mano el producto
(y número de model
/ serial)
P41T9021813 1B

How to make the optimal connection
(Need a Cable? Philips has them at: www. shopping.philips.com/cables)
Comment réaliser une bonne connexion
(Need a Cable? Philips has them at: www. shopping.philips.com/cables)
Cómo realizar la mejor conexión
(¿Need a Cable? Philips has them at: www. shopping.philips.com/cables)
Best
HDMI
High-Definition Multimedia
Interface provides an
uncompressed, all-digital
audio/video connection. HDMI
provides the ultimate
connection (Please use a
certified HDMI cable.)
Better
Component Video input
Provides superior picture
quality by separating the green,
blue and red luminance signals.
Typically used with red/white
audio cables.
Good
S-Video
Supplies a better picture than
RF and Composite
connections. Used with red/
white audio cables.
Supérieure
HDMI
l’interface HDMI (High-Definition
Multimedia Interface) Propose une
connexion décompressée audio/
vidéo entièrement numérique.
HDMI propose l’ultime connexion
(Veuillez utiliser un câble HDMI
certifié).
Excellente
Entrée vidéo composant
Fournit une qualité d’image
supérieure en séparant les signaux
de luminance vert, bleu et rouge.
Utilisée généralement avec les
câbles audio rouge/blanc.
Remarque: l’entrée vidéo
composant aparaît sur le tableau
de connexions comme YPbPr.
Bonne
S-Vidéo
Fournit une meilleure image que
les connexions RF et composite.
Utilisée avec les câbles audio
rouge/blanc.
La mejor
HDMI
La interfaz multimedia de alta
definición (HDMI, por sus siglas en
inglés) proporciona una conexión de
audio/video completamente digital
sin comprimir. La HDMI proporciona
la mejor conexión (Sírvase utilizar un
cable HDMI certificado).
Mejor
Entrada de video componente
Proporciona calidad de imagen
superior al separar las señales de
luminancia verde, azul y roja. Se usa
normalmente con cables de audio
rojo/blanco.
Nota: La entrada de video
componente se muestra en el panel
de conexión como YPbPr.
Buena
S-Video
Brinda una mejor imagen que las
conexiones RF y compuestas. Se usa
con cables de audio rojo/blanco.
Cover & Connection 1
Basic
Composite Audio/Video
Separate video (yellow) and
audio (red/white) cables that
provide a basic connection
from the cable box and other
devices. Note: The color of
audio inputs may differ, e.g.
red/ white or red/ black.
RF
Provides a basic connection
for antenna or cable. Provides
both audio and video.
De base
Audio/Vidéo
Composite
Câbles vidéo (jaune) et audio
(rouge/blanc) séparés fournissant
une connexion de base à partir
du boîtier de connexion et autres
dispositifs. Remarque: La couleur
des entrées audio peut varier, par
ex. rouge/blanc ou rouge/noir.
RF
Fournit une connexion de base
pour l’antenne ou le service et la
vidéo.
Básica
Audio/Video Compuesto
Cables de video (amarillo) y audio
(rojo/blanco), que proporcionan una
conexión básica de la caja de cable y
otros dispositivos.
Nota: El color de las entradas de
audio puede diferir, por ej., rojo/
blanco o rojo/negro.
RF
Proporciona una conexión de antena
o cable básica. Suministra audio y
video.
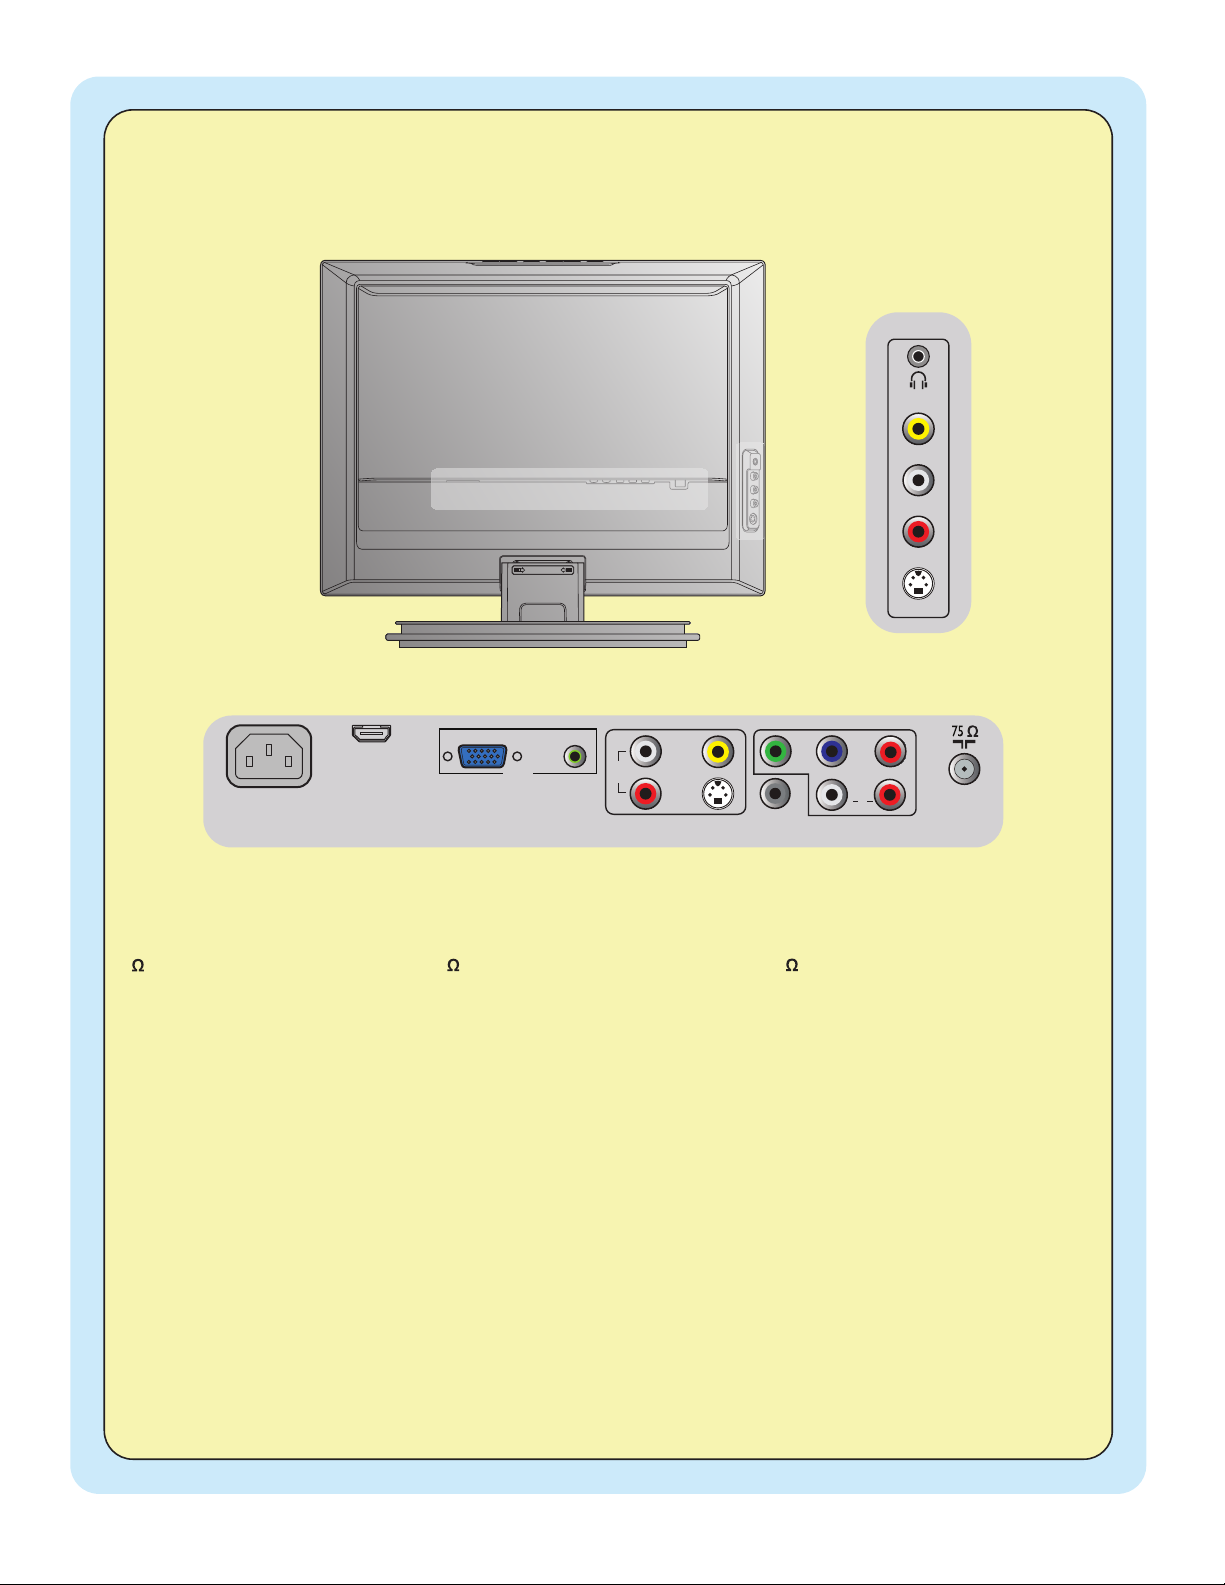
75 / RF
AV1 - Component Video (YPbPr),
Audio L/R input
AV2 - Composite Video (Video In),
S-Video, Audio L/R input
SPDIF output (Digital Only)
PC - VGA, Audio
HDMI
AC In
Side AV Composite Video (Video In),
S-Video, Audio L/R input, Earphone
75 / RF
AV1 - Video por Componente (YPbPr),
Entrada de Audio Izq. /Der.
AV2 - Video Compuesto (Video In),
S-video, Entrada de Audio Izq. /Der.
Salida SPDIF (Digital Solamente)
PC - VGA, Audio
HDMI
Entrada CA
Side AV Video Compuesto (Video In),
S-video, Entrada de Audio Izq. /Der. , Audífono
AC IN
HDMI
VGA
AUDIO
PC IN
AV2
AV1
VIDEO
IN
S-VIDEO
R
L
AUDIO
IN
Pr
Y
Pb
RL
AUDIO
IN
SPDIF
OUT
VIDEO IN
AUDIO - L
AUDIO - R
S-VIDEO
SIDE AV
75 / RF
AV1 - Vidéo composante (YPbPr),
Entrée audio G/D
AV2 - Vidéo composite (entrée Vidéo),
S-vidéo, Entrée audio G/D
Sortie SPDIF (numérique seulement)
Ordinateur - VGA, Audio
HDMI
Entrée CA
Side AV -
Vidéo composite (entrée Vidéo),
S-vidéo, Entrée audio G/D, Écouteurs
Cover & Connection 2
1
2
A
A
B
C
A
B
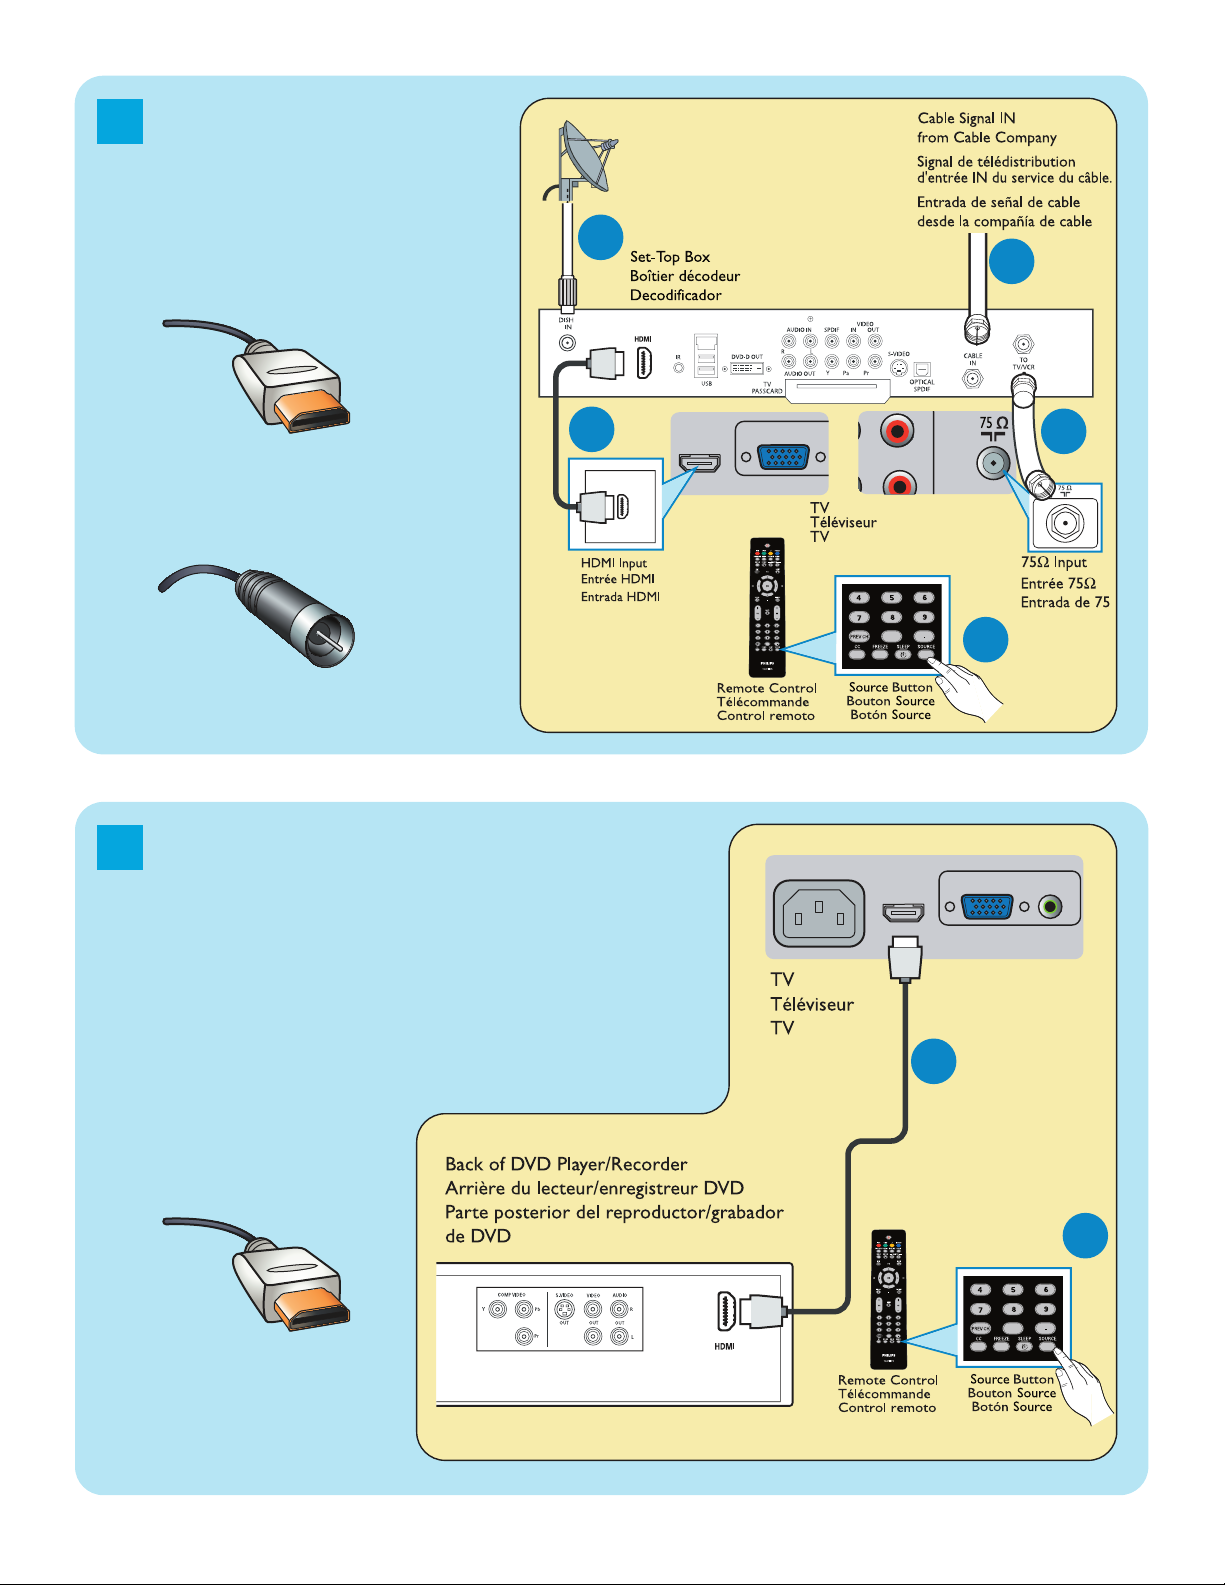
RF
Set-
Top Box toTV
Boîtier de décodag
e
vers téléviseur
De la caja superior
HDMI
OR/OU/O
DVD Player/Recorder to TV
Lecteur
DVD/Enregistreur
DVD vers téléviseur
Del
reproductor o grabador
de
DVD al TV
HDMI
o caja de cable alTV
VGA
PC IN
HDMI
Pr
RL
AC IN
VGA
PC IN
AUDIO
HDMI
B
Cover & Connection 3
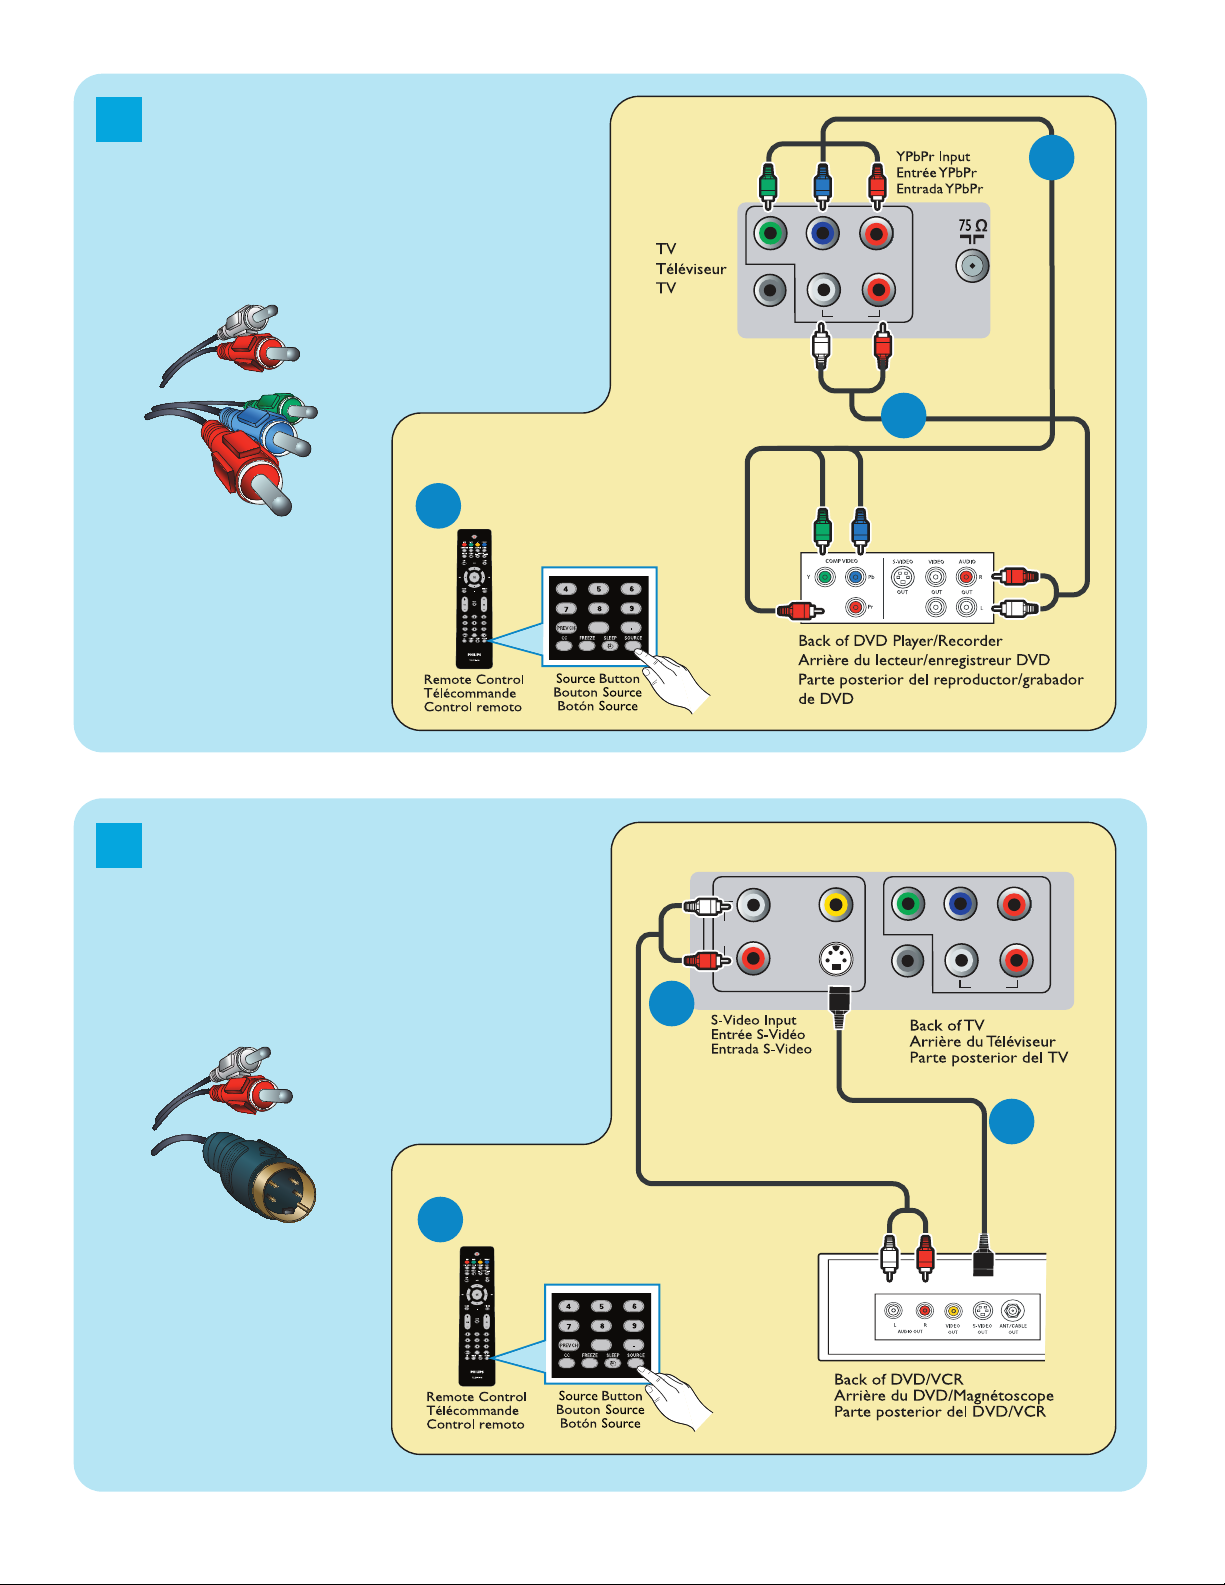
3
4
DVD Player or Recorder toTV
Le
cteur DVD ou Enregistreur
vers téléviseur
Del
reproductor o
gra
bador de DVD alTV
ComponentVideo Input
/Ent
rée vidéo composant
/Entrada de video
componente
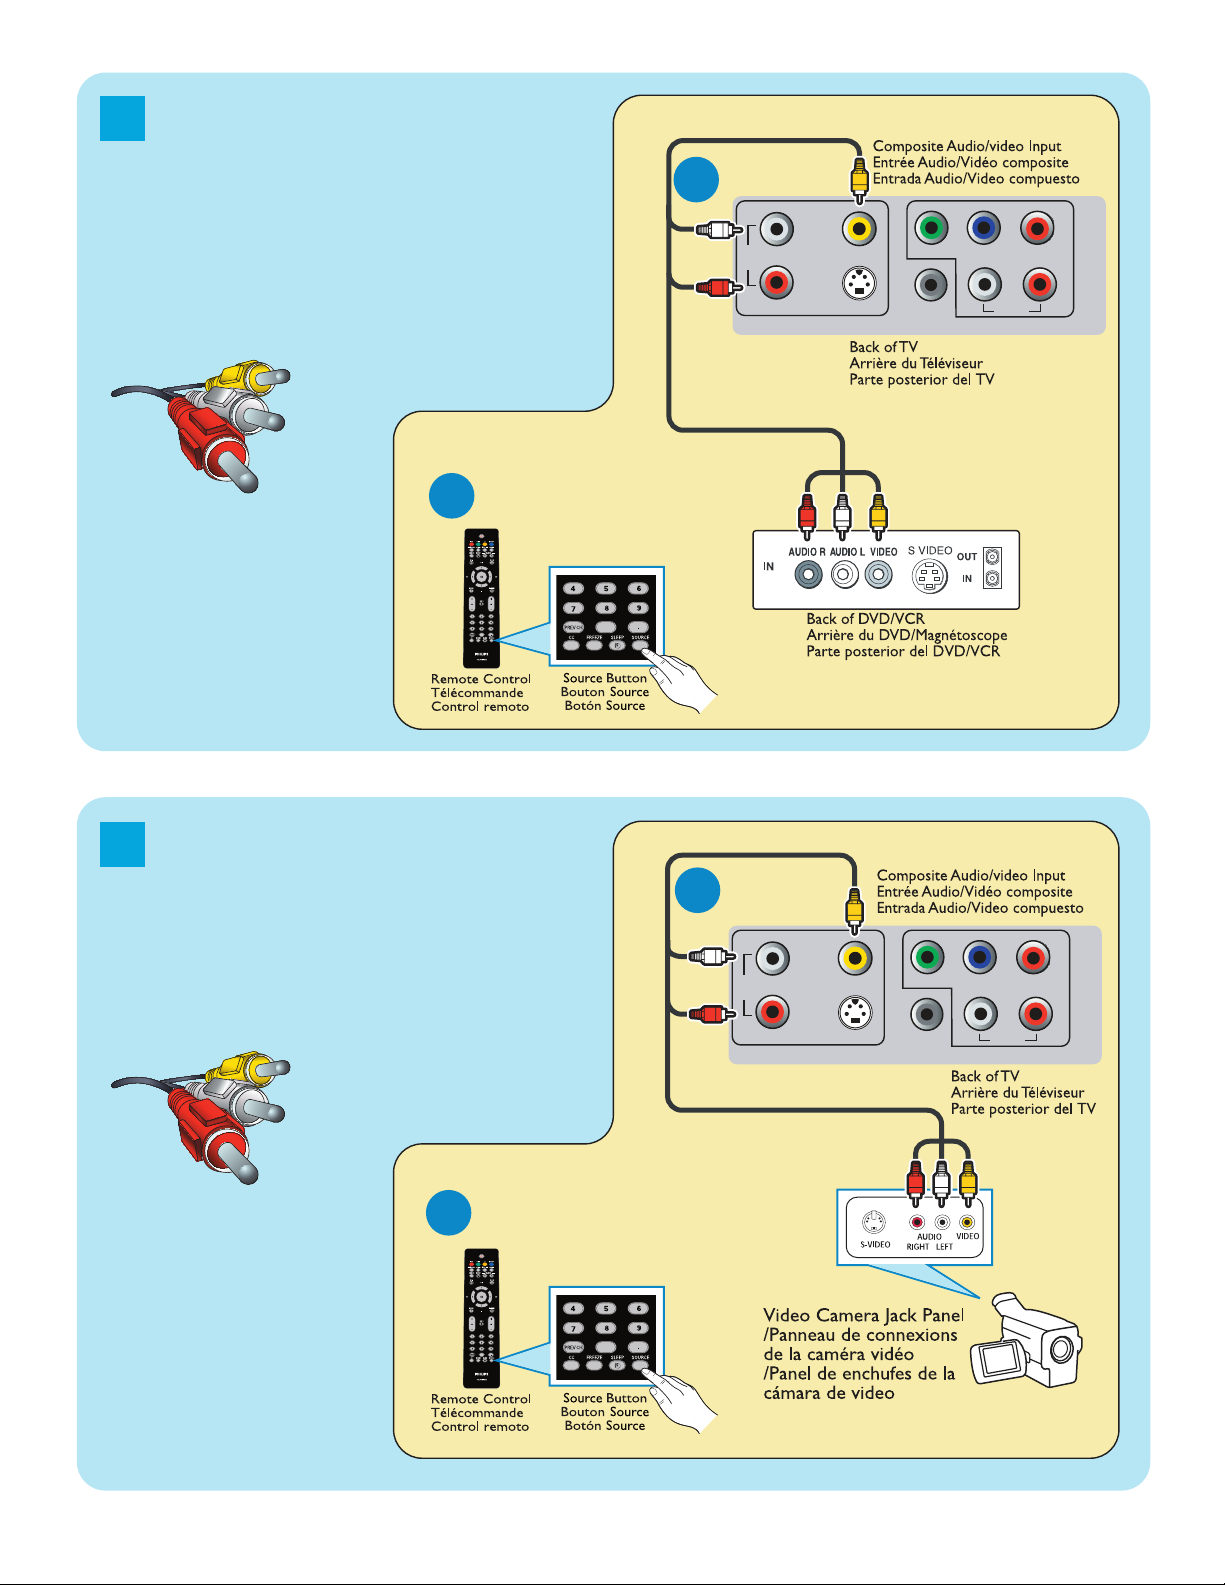
DVD Player/Recorder/VCR to TV
Lecteur
DVD/Enregistreur
DVD/Magnétoscope vers
tél
éviseur
Del
reproductor/grabador de
DVD/VCR al TV
S-Video
/S-Vidéo
/S-Video
AV 1
Y
Pb
Pr
RL
AUDIO IN
SPDIF
OUT
C
A
B
AV 1
Y
Pb
Pr
RL
AUDIO IN
SPDIF
OUT
AV 2
VIDEO
IN
S-VIDEO
R
L
AUDIO
IN
A
B
C
* You can connect this input by AV2 or Side AV.
* Vous pouvez connecter cette entrée
par AV2 ou Side AV.
* Puede conectar esta entrada por medio del
conector AV2 o el conector Side AV.
Cover & Connection 4
5
6
DVD Player/Recorder/VCR
to TV
Lecteur
DVD/Enregistreur
DVD/Magnétoscope vers
tél
éviseur
Del reproductor/grabador de
DVD/VCR al TV
Composite Audio-video
/Audio-Vidéo composite
/Audio-Video compuesto
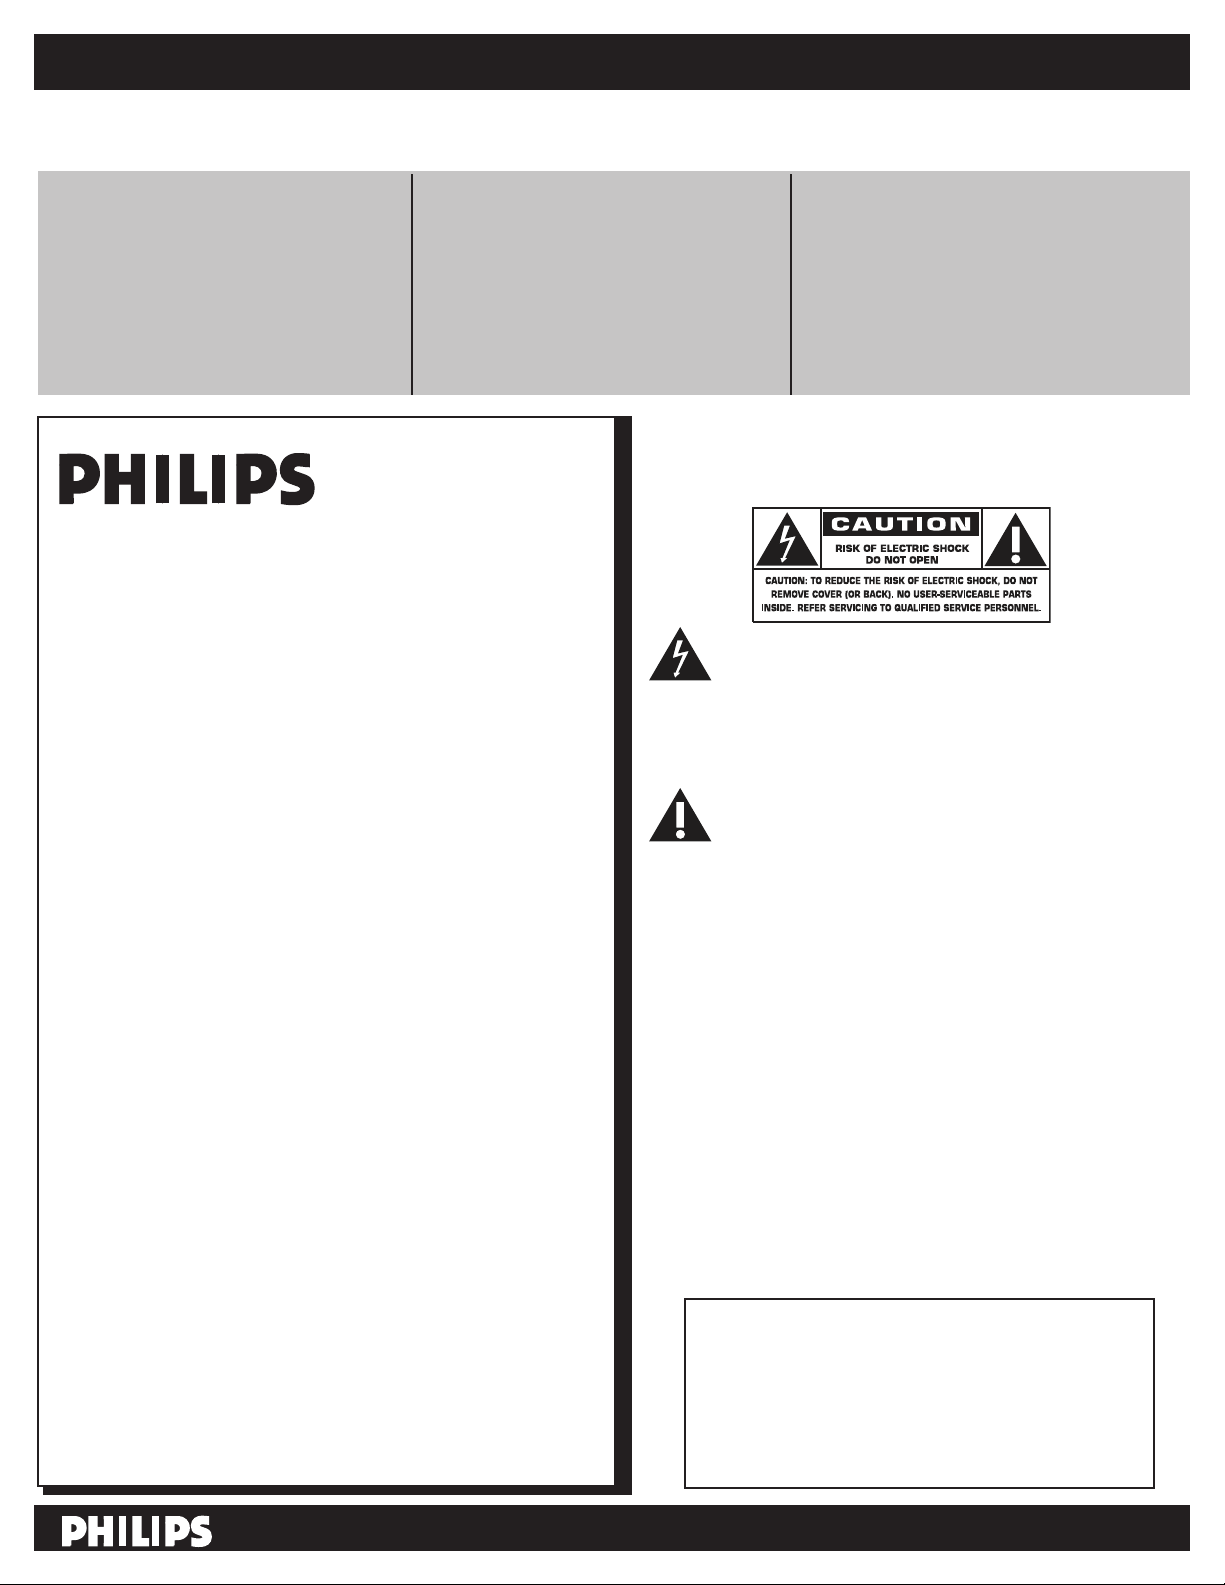
Video Camera /Games
Console to TV
Caméra vidéo/Console de
jeux
vers téléviseur
De la cámara de video/
Consola de jue
gos alTV
AV 1
Y
Pb
Pr
RL
AUDIO IN
SPDIF
OUT
AV 2
VIDEO
IN
S-VIDEO
R
L
AUDIO
IN
A
B
AV 1
Y
Pb
Pr
RL
AUDIO IN
SPDIF
OUT
AV 2
VIDEO
IN
S-VIDEO
R
L
AUDIO
IN
A
B
Composite Audio-video
/Audio-Vidéo composite
/Audio-Video compuesto
* You can connect this input by AV2 or Side AV.
* Vous pouvez connecter cette entrée
par AV2 ou Side AV.
* Puede conectar esta entrada por medio del
conector AV2 o el conector Side AV.
* You can connect this input by AV2 or Side AV.
* Vous pouvez connecter cette entrée
par AV2 ou Side AV.
* Puede conectar esta entrada por medio del
conector AV2 o el conector Side AV.
Cover & Connection 5

7
8
A
AV 2
VIDEO
IN
S-VIDEO
R
L
AUDIO
IN
VGA
PC IN
AUDIO
HDMI
Audio to Hi-fi System (Digital)
Audio vers chaîne haute fidélité (Numérique)
Audio al sistema Hi-fi (Digital)
SPDIF
PC connects toTV (as PC monitor)
AV 1
Y
Pb
Pr
RL
AUDIO IN
SPDIF
OUT
AV 2
VIDEO
IN
S-VIDEO
R
L
AUDIO
IN
A
A
B
L’ordinateur se connecte
sur un téléviseur
(en tant que moniteur d’ordinateur)
El computador (PC) se
conecta al televisor
(como monitor del computador).
Cover & Connection 6
Return your Product Registration Card or register online at
www.philips.com/welcome today to get the very most from your purchase.
Registering your model with PHILIPS makes you eligible for all of the valuable benefits listed below, so don’t miss out. Complete and
return your Product Registration Card at once, or register online at www.philips.com/welcome to ensure:
*Proof of Purchase
Returning the enclosed card
guarantees that your date of
purchase will be on file, so no
additional paperwork will be
required from you to obtain
warranty service.
Congratulations on your purchase,
and welcome to the “family!”
Dear PHILIPS product owner:
Thank you for your confidence in PHILIPS. You’ve
selected one of the best-built, best-backed products
available today. We’ll do everything in our power to
keep you happy with your purchase for many years to
come.
*Product Safety
Notification
By registering your product, you’ll
receive notification directly from the
manufacturer - in the rare case of a
product recall or safety defect.
*Additional Benefits
Registering your product
guarantees that you’ll receive all of
the privileges to which you’re entitled,
including special money-saving offers.
Know these
safety symbols
This “bolt of lightning” indicates
uninsulated material within your unit
may cause an electrical shock. For the safety of
everyone in your household, please do not
remove product covering.
As a member of the PHILIPS “family,” you’re entitled
to protection by one of the most comprehensive
warranties and outstanding service networks in the
industry. What’s more, your purchase guarantees you’ll
receive all the information and special offers for which
you qualify, plus easy access to accessories from our
convenient home shopping network.
Most importantly, you can count on our
uncompromising commitment to your total
satisfaction.
All of this is our way of saying welcome - and thanks
for investing in a PHILIPS product.
P.S. To get the most from your PHILIPS purchase,
be sure to complete and return your Product
Registration Card at once or register online at:
www.philips.com/welcome
The “exclamation point” calls attention to
features for which you should read the
enclosed literature closely to prevent operating
and maintenance problems.
WARNING: To reduce the risk of fire or
electric shock, this apparatus should not be
exposed to rain or moisture and objects filled
with liquids, such as vases, should not be placed
on this apparatus.
CAUTION: To prevent electric shock, match
wide blade of plug to wide slot, fully insert.
ATTENTION: Pour éviter les choc
électriques, introduire la lame la plus large de la
fiche dans la borne correspondante de la prise et
pousser jusqu’au fond.
For Customer Use
Enter below the Serial No. which is located
on the rear of the cabinet. Retain this
information for future reference.
Model No._______________________
Serial No. _______________________
Visit our World Wide Web Site at http://www.philips.com/welcome
1
IMPORTANT SAFETY INSTRUCTIONS
ANTENNA LEAD IN WIRE
ANTENNA DISCHARGE UNIT (NEC SECTION 810-20)
GROUNDING CONDUCTORS (NEC SECTION 810-21)
GROUND CLAMPS
POWER SERVICE GROUNDING ELECTRODE SYSTEM (NEC ART 250, PART H)
GROUND CLAMP
ELECTRIC SERVICE EQUIPMENT
Read before operating equipment
Read these instructions.
1.
Keep these instructions.
2.
Heed all warnings.
3.
Follow all instructions.
4.
Do not use this apparatus near water.
5.
Clean only with a dry cloth.
6.
Do not block any of the ventilation openings.
7.
Install in accordance with the manufacturers instructions.
8.
Do not install near any heat sources such as radiators, heat
registers, stoves, or other apparatus (including amplifiers)
that produce heat.
Do not defeat the safety purpose of the polarized or
9.
grounding-type plug. A polarized plug has two blades with
one wider than the other. A grounding type plug has two
blades and third grounding prong. The wide blade or third
prong are provided for your safety. When the provided
plug does not fit into your outlet, consult an electrician for
replacement of the obsolete outlet.
Protect the power cord from being walked on or pinched
10.
particularly at plugs, convenience receptacles, and the point
where they exit from the apparatus.
Only use attachments/accessories specified by the
11.
manufacturer.
12
apparatus. When a cart is used, use caution when moving the
cart/apparatus combination to avoid injury from tip-over.
Unplug this apparatus during lightning storms or when
13.
unused for long periods of time.
14.
Refer all servicing to qualified service personnel. Servicing is
required when the apparatus has been damaged in any way,
such as power-supply cord or plug is damaged, liquid has
been spilled or objects have fallen into apparatus, the
apparatus has been exposed to rain or moisture, does not
operate normally, or has been dropped.
15.
Damage Requiring Service - The appliance should be
serviced by qualified service personnel when:
A. The power supply cord or the plug has been damaged;
B. Objects have fallen, or liquid has been spilled into the
appliance;
C. The appliance has been exposed to rain
D. The appliance does not appear to operate normally or
exhibits a marked change in performance;
E. The appliance has been dropped, or the enclosure
damaged.
16.
Tilt/Stability - All televisions must comply with
recommended international global safety standards for tilt
and stability properties of its cabinet design.
• Do not compromise these design standards by applying
excessive pull force to the front, or top, of the cabinet which
could ultimately overturn the product.
• Also, do not endanger yourself, or children, by placing
electronic equipment/toys on the top of the cabinet. Such
items could unsuspectingly fall from the top of the set and
cause product damage and/or personal injury.
17.
Wall or Ceiling Mounting - The appliance should be
mounted to a wall or ceiling only as recommended by the
manufacturer.
Power Lines - An outdoor antenna should be located away
18.
from power lines.
Use only with a cart, stand, tripod, bracket, or table
specified by the manufacturer, or sold with the
19.
Outdoor Antenna Grounding - If an outside antenna is
connected to the receiver, be sure the antenna system is
grounded so as to provide some protection against voltage
surges and built up static charges.
Section 810 of the National Electric Code, ANSI/NFPA
No. 70-1984, provides information with respect to proper
grounding of the mast and supporting structure, grounding of the lead-in wire to an antenna discharge unit, size of
grounding connectors, location of antenna-discharge unit,
connection to grounding electrodes, and requirements for
the grounding electrode. See Figure below.
20.
Object and Liquid Entry - Care should be taken so that
objects do not fall and liquids are not spilled into the
enclosure through openings.
Battery Usage CAUTION - To prevent battery leakage
21.
that may result in bodily injury, property damage, or
damage to the unit:
• Install all batteries correctly, with + and - aligned as
marked on the unit.
• Do not mix batteries (old and new or carbon and
alkaline, etc.).
• Remove batteries when the unit is not used for a long
time.
For ventilation, leave at least 4” to 6” free all around the TV.
22.
Do not place the TV on a carpet.
23.
The equipment shall not be exposed to dripping or
splashing.
24.
The equipment shall not be exposed to rain or moisture
and objects filled with liquids, such as vases, shall be placed
on the apparatus.
25.
The apparatus must be connected to a mains socket outlet
with a protected earthed connection.
26.
The appliance coupler is used as the disconnect device of
this apparatus, the disconnect device shall remain readily
operable.
Note to the CATV system installer:
This reminder is provided to call the CATV system installer’s
attention to Article 820-40 of the NEC that provides guidelines
for proper grounding and, in particular, specifies that the cable
ground shall be connected to the grounding system of the
building, as close to the point of cable entry as practical.
Example of Antenna Grounding as per
NEC - National Electric Code
2

Precaution
ADDITIONAL SAFETY PRECAUTIONS
• ENSURE that LCD TV stand is tightened properly to the set on the right way of tightening of
the screw of the stand to the set. Improper tightening of screw may render the set unsafe.
• If LCD TV is installed on the wall, installation should be carried out by qualified servicemen. Improper or incorrect
installation may render the set unsafe.
• Disconnect main plug when :
— cleaning the TV screen, never use abrasive cleaning agents.
— there is a lightning storm.
— the set is left unattended for a prolonged period of time.
• Do not shift or move the LCD TV around when it is powered on.
• Do not touch, push or rub the surface of the LCD screen with any sharp or hard objects.
• When the surface of the LCD screen becomes dusty, wipe it gently with an absorbent cotton cloth or
other soft material like chamois. DO NOT USE acetone, toluene or alcohol to clean the surface of the screen.
These chemicals will cause damage to the surface.
• Wipe off water or saliva as soon as possible. These liquids can cause deformation and color fading of the
LCD screen when left exposed for some time.
• Be careful of condensation when temperature changes occur. Condensation can cause damage to the LCD
screen and electrically parts. After condensation fades, spots or blemishes will be present on the LCD screen.
POSITIONING THE LCD TELEVISION
• Place the LCD TV on a solid, sturdy base or stand. Be sure the stand is strong enough to handle the weight of
the LCD TV.
• Try to leave at least 6” of space around each side of the LCD TV cabinet to allow for proper ventilation.
• Do not place the LCD TV near a radiator or other sources of heat.
• Do not place the LCD TV where it can be exposed to rain or excessive moisture.
RECYCLING PROCEDURE/END OF LIFE DISPOSAL
• To minimize harm to the environment, the batteries supplied with the LCD TV do not contain mercury or
nickel cadmium. If possible, when disposing of batteries, use recycling means available in your area.
• The LCD TV uses materials that can be recycled. To minimize the amount of waste in the environment, check
your area for companies that will recover used televisions for dismantling and collection of reusable
materials, or contact your dealer for TV recycling tips.
• Please dispose of the carton and packing material through the proper waste disposal management in your
area.
This product contains mercury -
and must be recycled or disposed of according to local, state or federal laws.
As this material maybe regulated due to environmental considerations, please contact you local authorities or the
Electronic Industries Alliance: www.eiae.org.
3

Help
If this User Manual does not provide an
answer or if the “Trouble Shooting Tips” do
not solve your TV problem, you can call the
Philips Customer Care Center at
1-888-PHILIPS (744-5477)
Please have your model and serial number of
your TV before making this call. You can find
your TV’s model and serial number located
on a sticker on the front of this User Manual
or on the back side of the TV.
Model: 19PFL5622D
Serial No:
Care of the screen See Tips, p. 43
End of life directives - Recycling
Philips has paid a lot of attention to
producing an environmentally friendly product.
Your new TV contains several materials that can
be recycled for new uses. At the end of its life,
specialized companies can dismantle and recycle
this set. This will minimize the amount of
materials being disposed of. Please be sure to
dispose of this set in accordance with all state and
local regulations. Like all LCD products, this set
contains a lamp with Mercury, please dispose of
according to all Local, State and Federal laws.
ENERGY STAR
As an ENERGY STAR
determined this product meets the ENERGY
STAR® guidelines for energy efficiency.
ENERGY STAR
products with ENERGY STAR® label can save
energy. Saving energy reduces air pollution and
lowers utility bills.
Manufactured under license from Dolby
Laboratories. ‘Dolby’ and the double-D symbol are
trademarks of Dolby Laboratories.
DivX, DivX Certificated, and associated logos
are trademarks of DivX, Inc. and are used under
license.
®
Partner, Philips has
®
is a U.S. registered mark. Using
Contents
. .
. . .
.
1
2
3
4
5
5
8
10
11
11
12
12
12
13
13
13
13
14
15
16
19
20
22
26
26
27
31
32
33
35
36
36
37
38
39
39
39
40
41
42
43
44
45
46
47
Welcome/registration of your TV . . . . . . . . . . . . . . .
IMPORTANT SAFETY INSTRUCTIONS
. . . . . . . . .
Precaution . . . . . . . . . . . . . . . . . . . . . . . . . . . . . . . . . . .
Conten
ts . . . . . . . . . . . . . . . . . . . . . . . . . . . . . . . . . . . . .
Preparation . . . . . . . . . . . . . . . . . . . . . . . . . . . . . . . . . .
Wall mounting . . . . . . . . . . . . . . . . . . . . . . . . . . . . . . . .
Use of the remote control . . . . . . . . . . . . . . . . . . . . . .
Use of the remote control - DVD . . . . . . . . . . . . . . . .
Buttons on the top of the TV
. . . . . . . . . . . . . . . . . . . .
Buttons on the DVD base . . . . . . . . . . . . . . . . . . . . . . .
To use the menus . . . . . . . . . . . . . . . . . . . . . . . . . . .
How to navigate through the Settings menu
Introduction . . . . . . . . . . . . . . . . . . . . . . . . . .
TV menu
. . . . . . . . . . . . . . . . . . . . . . . . . . . . . . . . . . . .
. . . . . . . .
Installation
Select the menu language
Store TV channels
Weak channel installation
Source, Analog Audio In, Clock, Reset AV settings
Features menu
Picture menu
Sound menu
Parental Control menu
DVD meun
. . . . . . . . . . . . . . . . . . . . . . . . . . . . . . . . . . . . . .
Disc operation
Playing a DivX disc
Picture menu
Sound menu
Partental Control menu
Installation
PC menu
Installation
. . . . . . . . . . . . . . . . . . . . . . . . . . . . . . . . . . . .
Picture menu
Sound menu
Record with your recorder. . . . . . . . . . . . . . . . . . .
Record a TV program
To select connected devices . . . . . . . . . . . . . . . . . . .
Trouble shooting tips
. . . . . . . . . . . . . . . . . . . . . . . . . .
Trouble shooting tips- DVD . . . . . . . . . . . . . . . . . . . . .
Glossary. . . . . . . . . . . . . . . . . . . . . . . . . . .
Care and cleaning
Regulatory
. . . . . . . . . . . . . . . . . . . . . . . . . . . . . . . . . . .
. . . . . . . . . . . . . . . . . . . . . . . . . . . . .
. . . . . . . . . .
FCC Declaration of Conformity . . . . . . . . . . . . . . . . .
Specification
Limited
4
. . . . . . . . . . . . . . . . . . . . . . . . . . . . . . . . .
warranty . . . . . . . . . . . . . . . . . . . . . . . . . . . . .
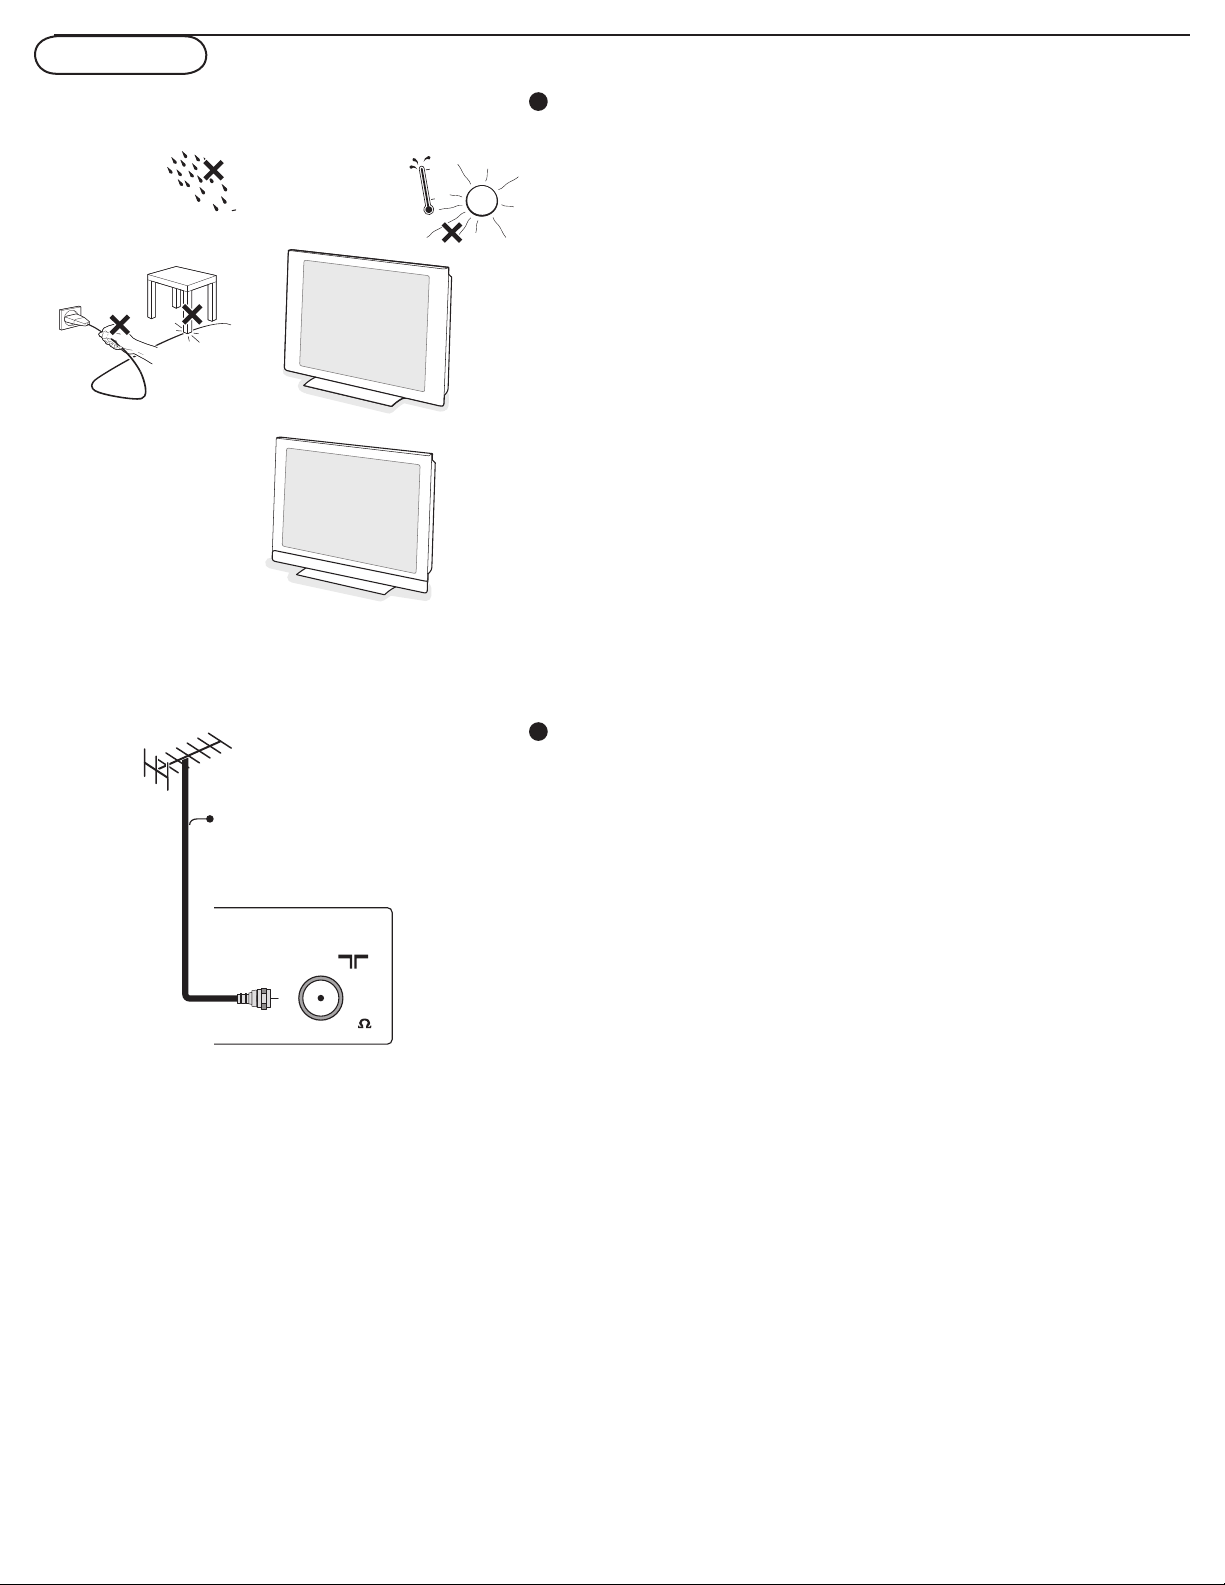
Preparation
CABLE OR ANTENNA
75
CABLE
ANTENNA
Do not insert the power plug in a wall socket before
1
all connections are made.
Place the TV on a solid surface.
For ventilation, leave at least 4” to 6” free all around the TV. Do
not place the TV on a carpet. To prevent any unsafe
situations, no naked flame sources, such as lighted candles,
should be placed in the vicinity. Avoid heat, direct sunlight and
exposure to rain or water. The equipment shall not be exposed
to dripping or splashing.
Note: This Television in not designed to be wall mounted.
2
Basic connections to the TV
Your integrated digital TV automatically decodes and
displays the four basic DTV picture resolution standards.
- SDTV (Standard Definition TV) are broadcast as 480i
(480-line interlaced) or 480p (480-line progressive scan)
video.
- HDTV (High-Definition TV) are broadcast either in the
1080i or 720p formats, always with a widescreen picture.
Note: Progressive scan video (p) is more like what you see in a
movie theater. Images are much more distinct, free of flicker
and motion is smoother.
Your TV has an integrated HDTV tuner, which receives and
decodes terrestrial ATSC and unscrambled cable (QAM)
signals and displays them. There are two ways to obtain
HDTV content:
- through a cable provider
- through an antenna.
Note: Use the illustrations on the left for cable or Antenna
connections.
5
CABLE OR ANTENNA
75
CABLE
2IMDH1IMDHEC
CABLE OR ANTENNA
75
Cable box
/OUT
OUTPUT
(TO TV)
IN
CABL E
3
2
ANTENNA
ANTENNA
Cable box
OUTIN
75
CABLE OR ANTENNA
SPLITTER
3
2
CABL E
1
4
AV2:
L+R+CVBS
ANTE NNA
PC IN
VGA
SIDE AV
VIDEO
IN
S
-VID
O
R
L
VIDEO IN
S
-VID
E
O
AUDIO R
AUDIO L
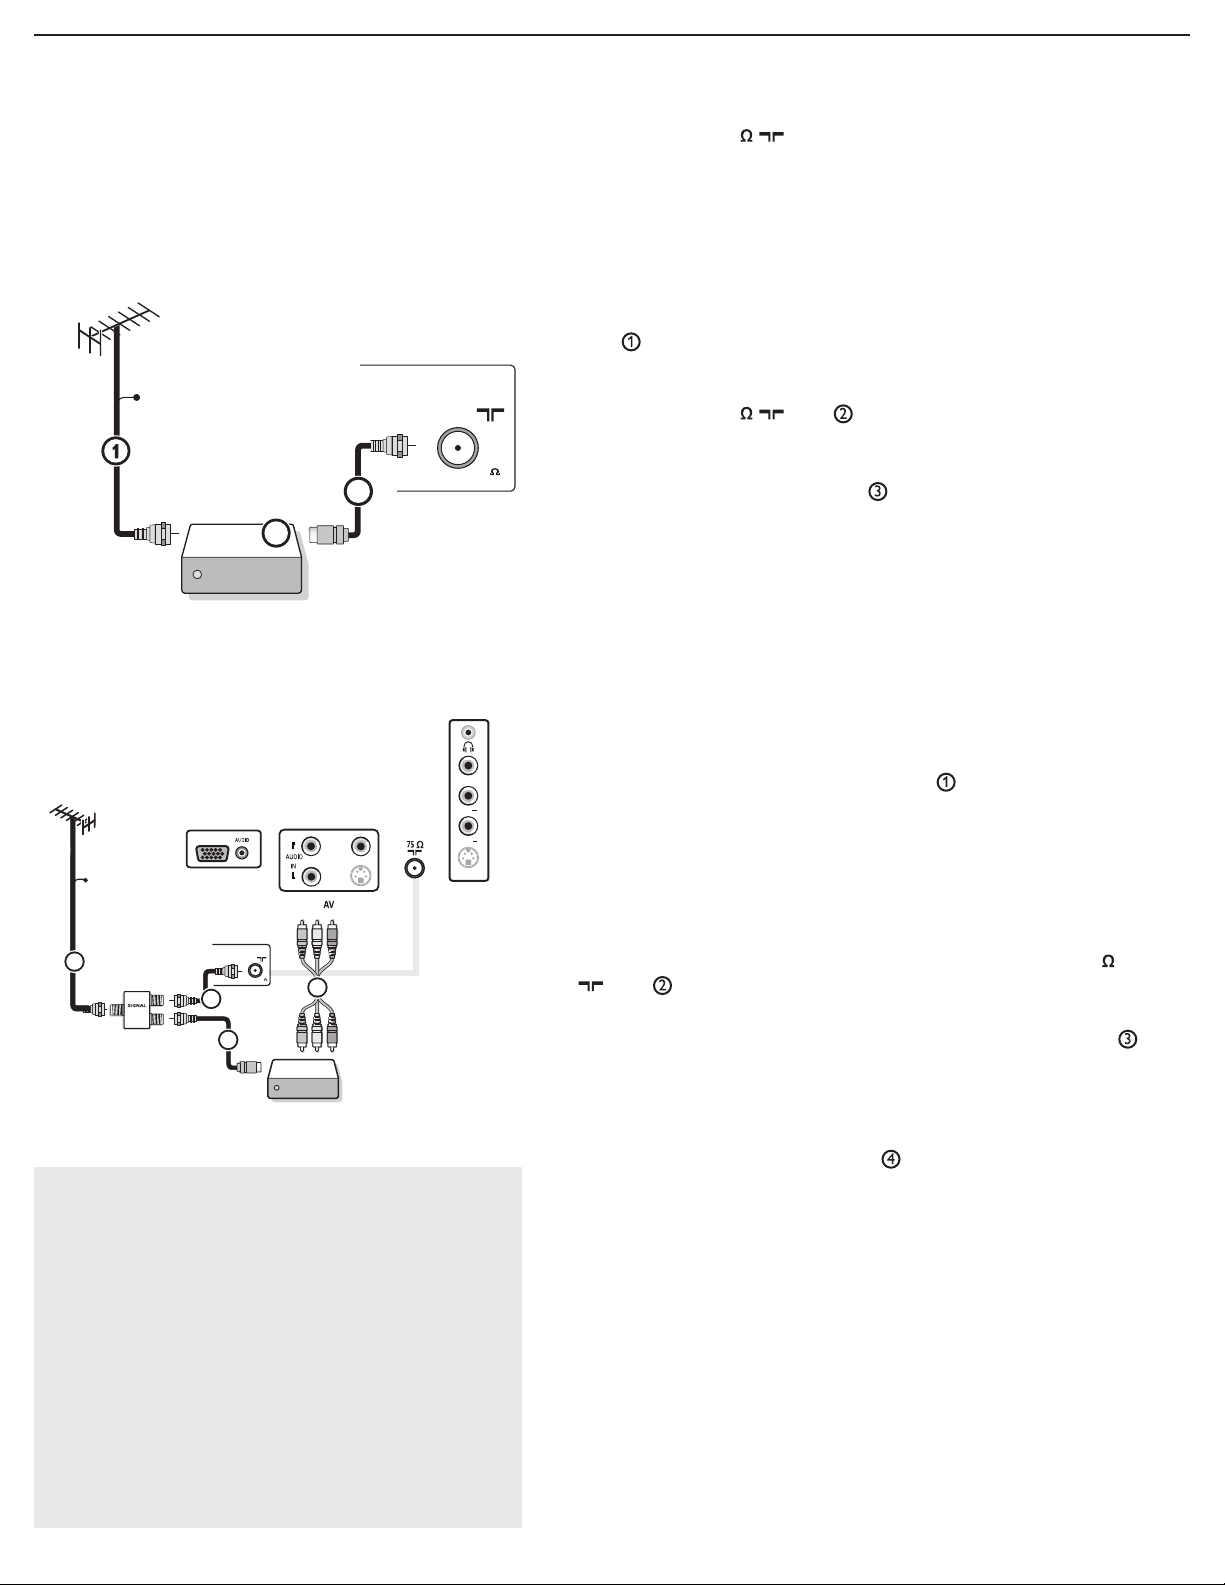
Watching cable TV programs that don’t
require the use of a cable box.
Since you’ve connected the cable TV signal
directly to the TV’s tuner, you can also watch
unscrambled programs by simply tuning to
the desired channel; however, you must fi rst use
Auto program to store available channels in the
TV’s memory. (p. 13)
Note: This connection will supply stereo sound to the
TV if the station you are viewing broadcasts stereo
sound.
- Cable TV
Connect the cable TV signal to the CABLE/
ANTENNA 75 jack at the bottom of the TV.
See page 13 for details on using Autoprogram to store
channels in the TV’s memory.
Note: This connection will supply stereo sound to the TV if
the station you are viewing broadcasts stereo sound.
- Cable box with RF IN/OUT
• Connect the incoming cable TV signal to the cable IN
jack on the back of the cable box.
• Connect a coaxial cable (not supplied) from the TO TV
jack on the back of the cable box to the CABLE/
ANTENNA 75
jack at the bottom of the TV.
Note: Your cable box may have a different label for the TO
T V jack. Commonly used labels include OUTPUT or OUT.
• Set the OUTPUT CH switch on the cable box to CH
3 or 4 (whichever is correct for your cable box). Next,
tune the TV to the corresponding channel. Once
tuned, change channels using the cable box, not the TV.
Note: This connection will not supply stereo sound to the TV. The
reason is that the RF output on a cable box - labeled
OUT or OUTPUT for example - will not send a stereo signal to
TO TV,
the tuner (VHF/UHF) input on a TV.
- Cable box with A/V outputs
• Connect the incoming cable TV signal to a signal
splitter (not supplied). The signal splitter enables you to avoid
having to use the TO TV jack on the back of the cable box.
This jack will not supply stereo sound to the TV.
Note: Your cable box may have a different label for the TO
T V
jack. Commonly used labels include OUTPUT or OUT.
• Connect a coaxial cable (not supplied) to a connector on
the signal splitter and to the CABLE/ANTENNA 75
jack on the TV.
• Connect another coaxial cable (not supplied) to a
connector on the signal splitter and to the cable IN jack
on the back of the cable box.
• Connect A/V cables (not supplied) to the VIDEO IN and
AUDIO L and
R outputs on the back of the cable box
and to the AV2 or Side AV video (labeled VIDEO IN) and
AUDIO (labeled L and
R) jacks on the back of the TV.
• To view programs from your cable box, fi rst press the
SOURCE button on the remote control.
• Press the cursor down or up buttons until the AV2 or Side
AV signal source is selected.
• Press the OK button to confi rm your selection. The AV2 or
Side AV input source becomes current for the viewing of
cable TV programs through your cable box.
Note: If your cable box audio/video outputs do not supply
video and stereo audio to the TV, you will need to make the
connection shown above in “Cable box with
6
RF IN /OUT.
- Cable box with S-Video, component video (YPbPr)
CABLE OR ANTENNA
75
CABLE
ANTENNA
A A A
A A A
or HDMI connectors
See “Cover and connection”
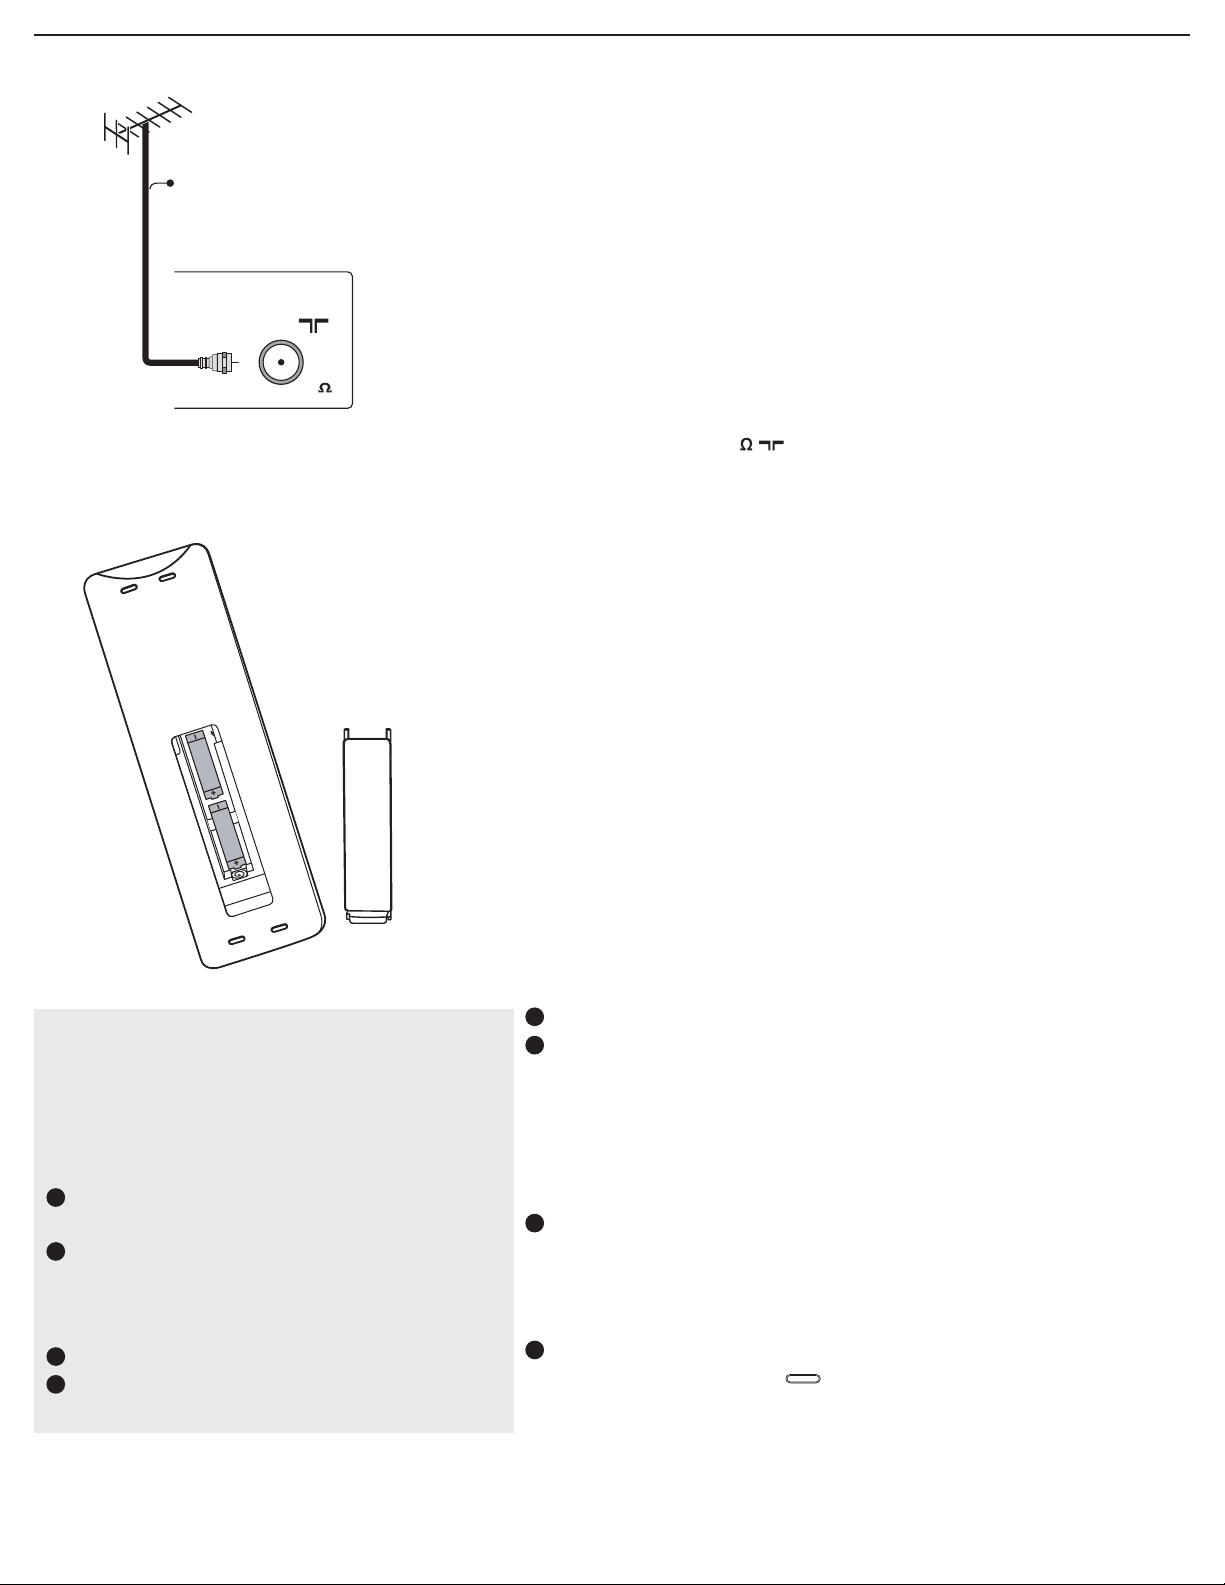
- Antenna
Through an antenna, you can watch any HDTV programs
that are broadcast in your area without paying fees.
If you’re not sure what HDTV programming is available in
your area, contact your local content provider or your
local electronics retailer.
Broadcasters are currently transitioning from analog to digital
TV. This means that a given broadcaster will have two
channels on the air, one analog and one digital.
Connect the incoming antenna signal to the CABLE/
ANTENNA 75 jack at the bottom of the TV.
See page 13 for details on using Autoprogram to store
channels in the TV’s memory.
Note: This connection will supply stereo sound to the TV if it is
being broadcast by the station you are watching.
- Direct Broadcast Satellite (DBS)
Satellite systems offer many of the same premium channels
available on cable systems, often at a lower price. To view
these channels, you’ll need to install a small dish antenna
outside your home.
The two main DBS systems, DirecTV and DishNetwork,
require separate, proprietary set-top receiver boxes to
decode their signals and send them to your digital TV set.
These boxes may include a digital TV tuner for off-air DTV
broadcasts.
Satellite broadcasters also provide major local channels,
depending on the market in which you live.
DBS also provides service in areas not covered by cable
because they are in rural areas or other areas not passed by a
cable line.
DBS also allows you to watch pay-per-view events.
Note: The first time
(and only the first time) you turn on your set
you see an installation introduction screen. The
installation procedure consists of a series
of screens that guide you through the process.
1
After an introduction screen, you are asked to
select a language of the TV’s on-screen menus.
2
Press the cursor up/down to highlight your
language.
(The text of the header and the info on screen
continuously change language.)
3
Press the OK button.
4
Follow the on-screen instructions to proceed.
3
To connect accessory devices, see Cover and Connection.
4
Refer to the bottom of the set (Model label) for the
correct operation voltage.
Insert the power cord into the wall socket.
Consult your local dealer if your main power supply voltage is
different than that indicated for the TV. Never place the TV
on top of the (AC) cord. Placing the TV on top of the AC cord
could cause a fire or electric shock.
Remote control:
5
Insert the two supplied AAA batteries.
The batteries supplied do not contain the heavy metals mercury
and cadmium. Please determine and comply with local
regulations when disposing of depleted batteries.
6
Turn the TV on:
Press the power switch on the top of the TV. An
indicator on the front of the TV lights up.
Press the POWER button or the CH + / - button on the
remote control.
7
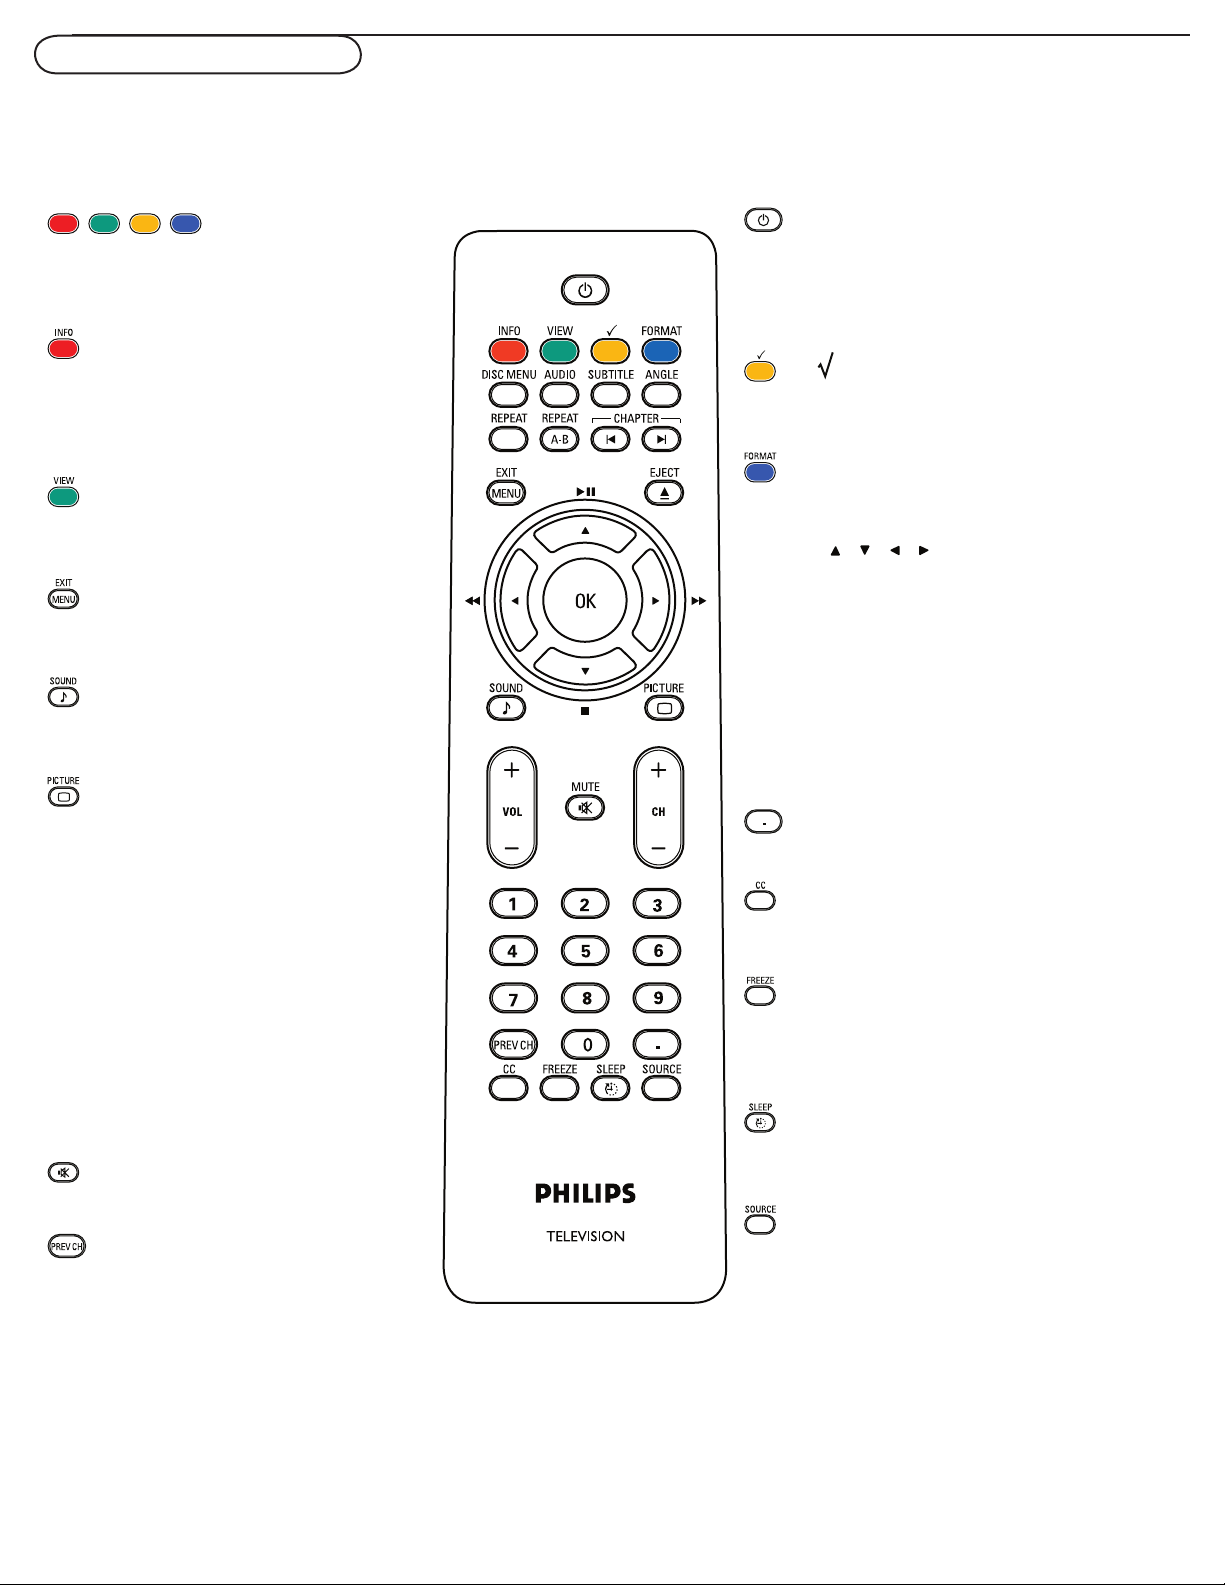
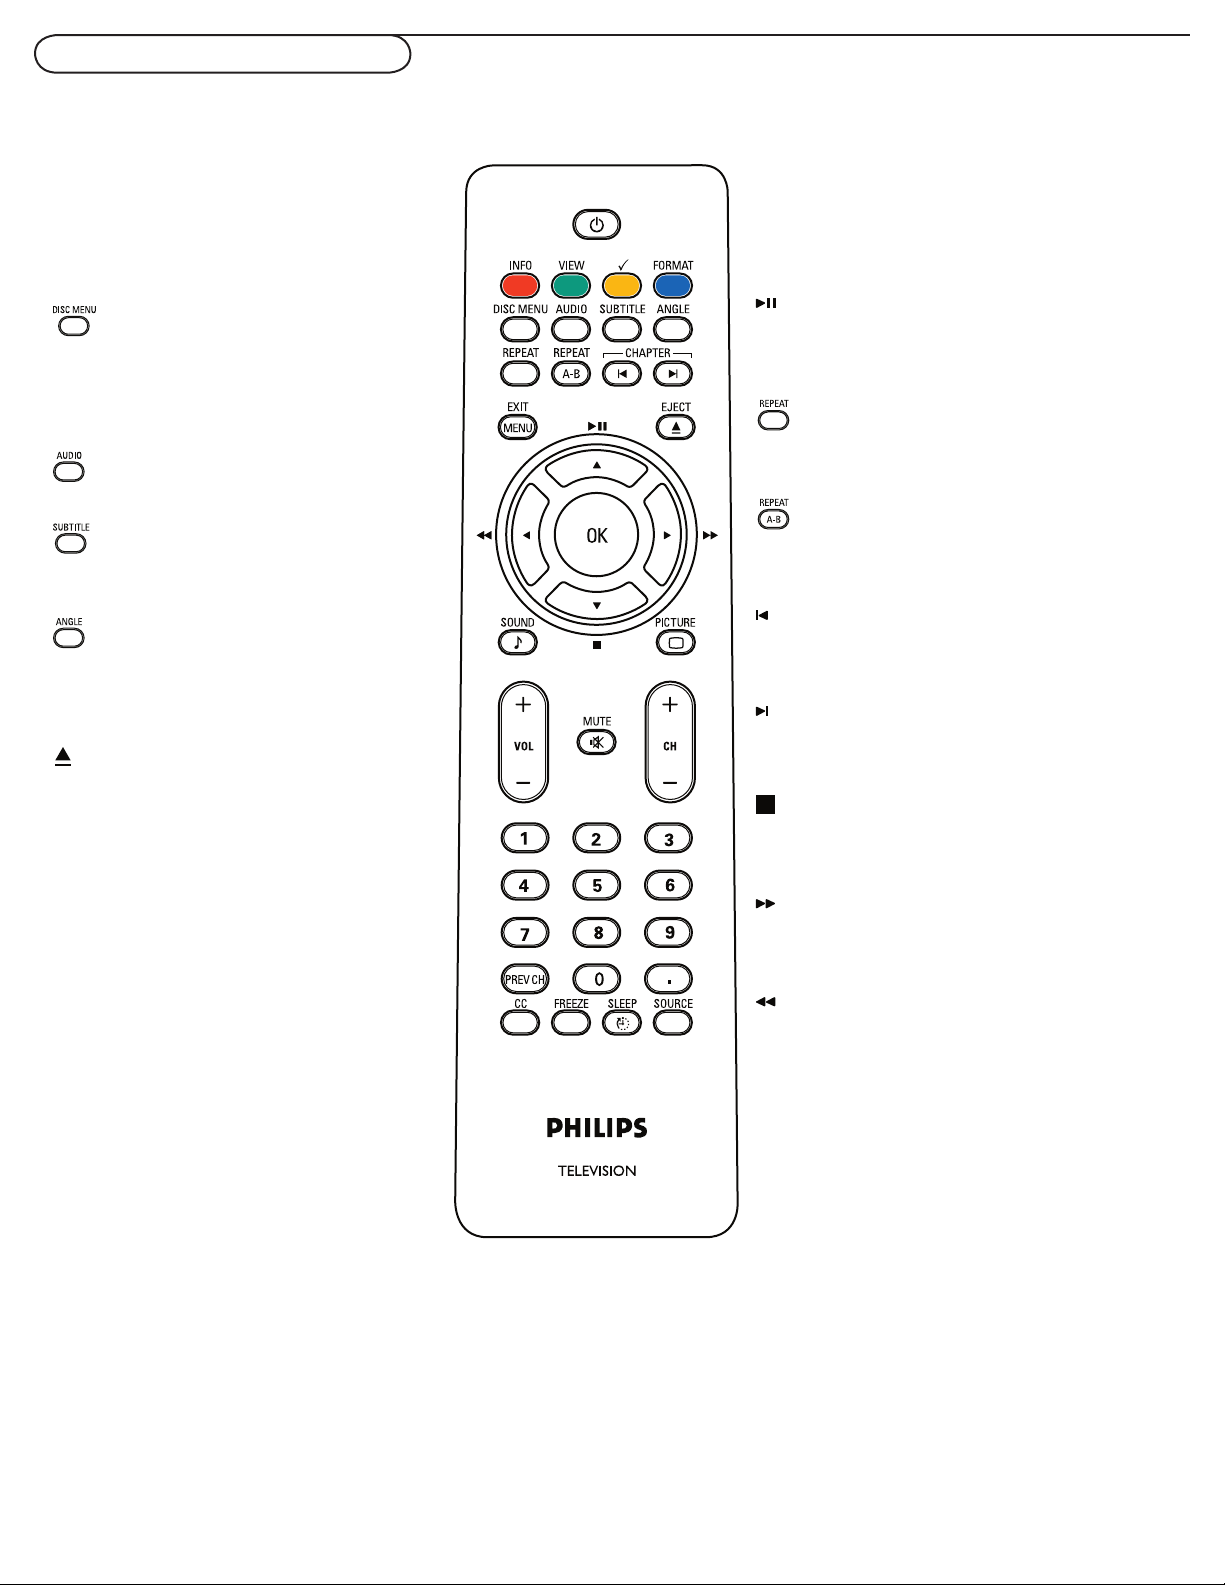
Use of the remote control
Note: Pressing most buttons once will activate the assigned function. Pressing a second time will de-activate it.
When a button enables multiple options, a small list will be shown. Press repeatedly to select the next item in the list.
The list will be removed automatically after six seconds or press OK to remove immediately.
Color buttons
When functions attached to the color
buttons are active or selected, the color
buttons are shown on screen.
INFO button
Display information: Press to display
(when available) information about the
selected TV channel and program or
accessory device.
VIEW
To display a list of all channels marked as
favorite (incl. subchannels).
MENU/EXIT
Press menu to activate on screen menu
on/off.
Smart Sound button
Press repeatedly to select among the three
settings; Personal, Speech, Movies.
Smart Picture button
Press repeatedly to select among
Personal, Rich, Natural, Soft, Multimedia,
or Eco.
VOL +/- Volume
Press + or - to adjust the volume.
POWER
Press to turn on/off the TV or to standby
mode.
Note: The TV is never powered off
completely unless it is physically unplugged.
To add or remove a channel in the favorite list
of TV channels.
Format
Please refer to page 9.
CH +/-
-To browse through the TV channels or
sources stored in the preferred channel list
(see p. 18).
-To select between Antenna or Cable TV
channels, first make your selection in the
Settings menu, see, p. 13.
Note: You don’t have to start the installation
again once you have searched for and stored
the available TV channels.
Dot button
Use the dot for digital channels.
CC button (Close Caption)
Press the CC button to select CC On, Off, or
On during mute.
Channel selection
OK
- to activate a setting
- to display the list of channels stored
(according to the selection made in the
Installation mode (Antenna or Cable),
p.13.
MUTE
Interrupt the sound or restore it.
Prev CH
Press to alternate between the
currently viewed channel and the
previously viewed channel.
FREEZE
To freeze the picture on the screen, press
freeze button. To release, press FREEZE button
8
again.
Sleep button
Press to set the LCD TV to turn itself off
within a certain time.
SOURCE
Press this button repeatedly to select TV, DVD,
AV1, AV2, HDMI, Side, or PC. When in TV
mode, according to where you connected the
accessory devices. (see Cover and Connection)
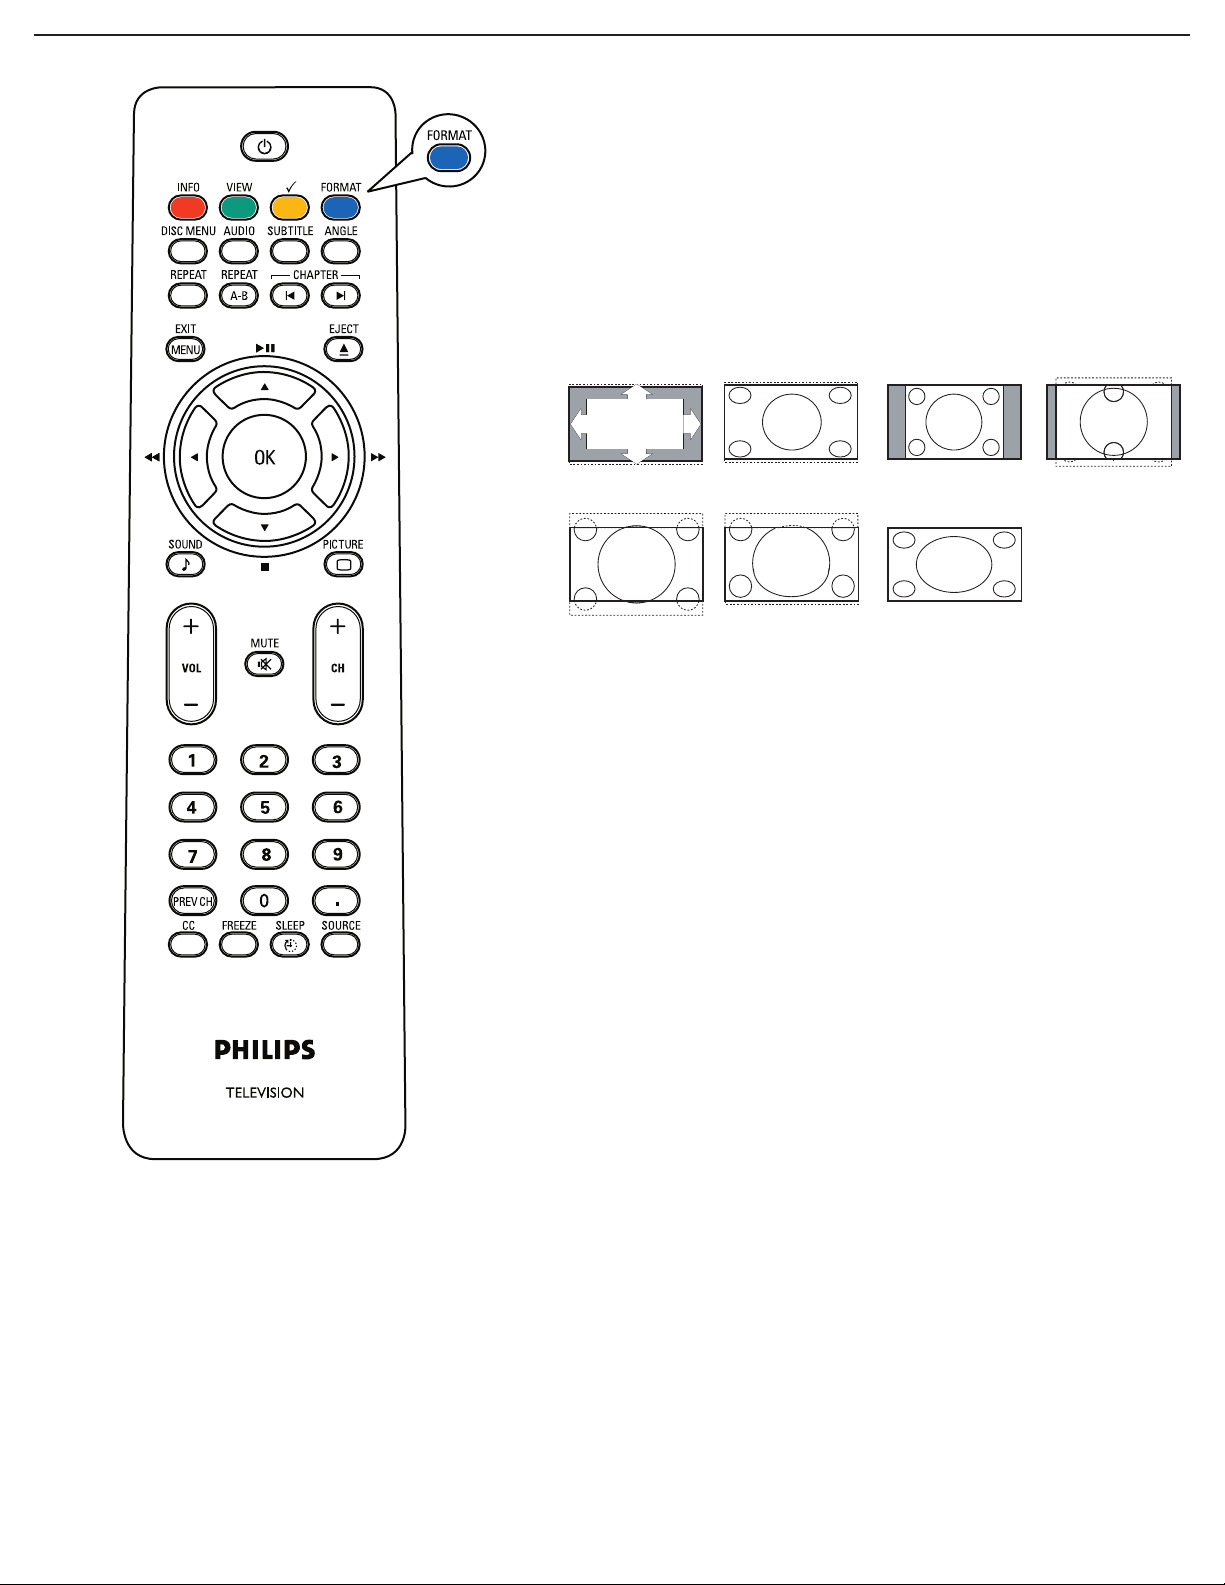
Automatic
Super zoom 4:3 Movie expand 14:9
Movie expand 16:9 16:9 subtitle
Widescreen
FORMAT
Press this button to display a list of available display formats.
Available display formats are determined by the type of signal you
are receiving.
To choose the display format you prefer, press the FORMAT
button repeatedly:
For 19PFL5622D
Automatic, Super Zoom, 4:3, Movie expand 14:9,
Movie expand 16:9, 16:9 subtitle and Widescreen.
Super Zoom, Movie expand 14:9, Movie expand 16:9 and 16:9
Subtitle makes the picture fill the screen as much as possible. It
is recommended to press the cursor up/down key to adjust the
picture position on the screen.
Super zoom removes the black bars on the sides of 4:3
programs with minimal distortion. When in the Movie expand 14:9,
Movie expand 16:9 or Super zoom picture format, you can make
subtitles visible with the cursor up/down.
Note: Not all screen formats are available when displaying HD sources.
9
Use of the remote control-DVD
Press the “SOURCE” button repeatedly to select source DVD to activate DVD function.
Make sure the source “DVD” is selected.
PLAY / PAUSE
DISC MENU
Enter the disc contents menu.
Switches on or off the playback control
mode (for VCD version 2.0 only)
Press the key once to start plyback.
Press the key second time to pause
playback temporarily.
Repeat
Select various repeat modes.
AUDIO
Select the DVD audio language.
Repeat A-B
SUBTITLE
Repeat playback a specific section on a disc.
Select the the DVD subtitle language.
CHAPTER
ANGLE
To search or select previous chapter or track.
Select a DVD camera angle.
EJECT
Eject the disc from the DVD player.
CHAPTER
To search or select next chapter or track.
STOP
To stop playback.
FF
Forward/Quick forward
RWD
Backward/Slow backward
10
 Loading...