

Page 1

User Manual
19HFL5014W
Page 2
Contents
1 TV Tour 3
1.1 Professional Mode 3
2 Setting Up 4
2.1 Read Safety 4
2.2 TV Stand and Wall Mounting 4
2.3 Tips on Placement 4
2.4 Power Cable 4
2.5 Antenna Cable 4
3 Arm mounting 6
3.1 Handle 6
3.2 Arm mounting 6
4 Keys on TV 7
5 Switching On and Off 8
5.1 On or Standby 8
6 Specifications 9
6.1 Environmental 9
6.2 Operating System 9
6.3 Display Type 9
6.4 Display Input Resolution 9
6.5 Connectivity 9
6.6 Dimensions and Weights 10
6.7 Sound 10
7 Connect Devices 11
7.1 Connect Devices 11
7.2 Receiver - Set-Top Box 12
7.3 Blu-ray Disc Player 12
7.4 Headphones 12
7.5 Game Console 13
7.6 USB Flash Drive 13
7.7 Computer 13
8 Videos, Photos and Music 15
8.1 From a USB Connection 15
8.2 Play your Videos 15
8.3 View your Photos 15
8.4 Play your Music 16
9 Games 18
9.1 Play a Game 18
10 Professional Menu App 19
10.1 About the Professional Menu App 19
10.2 Open the Professional Menu App 19
10.3 TV Channels 19
10.4 Games 19
10.5 Professional Settings 20
10.6 Google Account 20
11 Android TV Home Screen 22
11.1 About the Android TV Home Screen 22
11.2 Open the Android TV Home Screen 22
11.3 Android TV Settings 22
11.4 Connect your Android TV 25
11.5 Channels 27
11.6 Channel Installation 27
11.7 Internet 29
11.8 Software 29
12 Open Source Software 31
12.1 Open Source License 31
13 Help and Support 119
13.1 Troubleshooting 119
13.2 Online Help 120
13.3 Support and Repair 120
14 Safety and Care 122
14.1 Safety 122
14.2 Screen Care 123
14.3 Radiation Exposure Statement 123
15 Terms of Use 124
15.1 Terms of Use - TV 124
16 Copyrights 125
16.1 HDMI 125
16.2 Dolby Audio 125
16.3 DTS-HD (italics) 125
16.4 Wi-Fi Alliance 125
16.5 Kensington 125
16.6 Other Trademarks 125
17 Disclaimer regarding services and/or
software offered by third parties 126
Index 127
2
Page 3
1
TV Tour
1.1
Professional Mode
What you can do
In Professional Mode ON, you can have access to a
large number of expert settings that enable advanced
control of the TV’s state or to add additional
functions.
This mode is intended for installations of TV’s in
places such as hotels, cruise ships, stadia or any other
business area where such control is required.
If you use the TV at home, it is recommended to use it
in Professional Mode OFF.
Please consult the Professional installation manual
for further details.
3
Page 4
2
Setting Up
2.1
Read Safety
Read the safety instructions first before you use the
TV.
2.2
TV Stand and Wall Mounting
should only be performed by qualified personnel. The
TV wall mounting should meet safety standards
according to the TVs weight. Also read the safety
precautions before positioning the TV.
TP Vision Europe B.V. bears no responsibility for
improper mounting or any mounting that results in
accident or injury.
2.3
Tips on Placement
• Position the TV where light does not shine directly
on the screen.
• The ideal distance to watch TV is 3 times its diagonal
screen size. When seated, your eyes should be level
with the centre of the screen.
Note:
Please keep the TV away from dust-producing
sources such as stoves. It is suggested to clean the
dust regularly to avoid getting dust into the TV.
TV Stand
You can find the instructions for mounting the TV
stand in the Quick Start Guide that came with the TV.
In case you lost this guide, you can download it
from www.philips.com.
Use the product type number of the TV to look for
the Quick Start Guide to download.
Wall Mounting
Your TV is also prepared for a VESA-compliant wall
mount bracket (sold separately).
Use the following VESA code when purchasing the
wall mount . . .
2.4
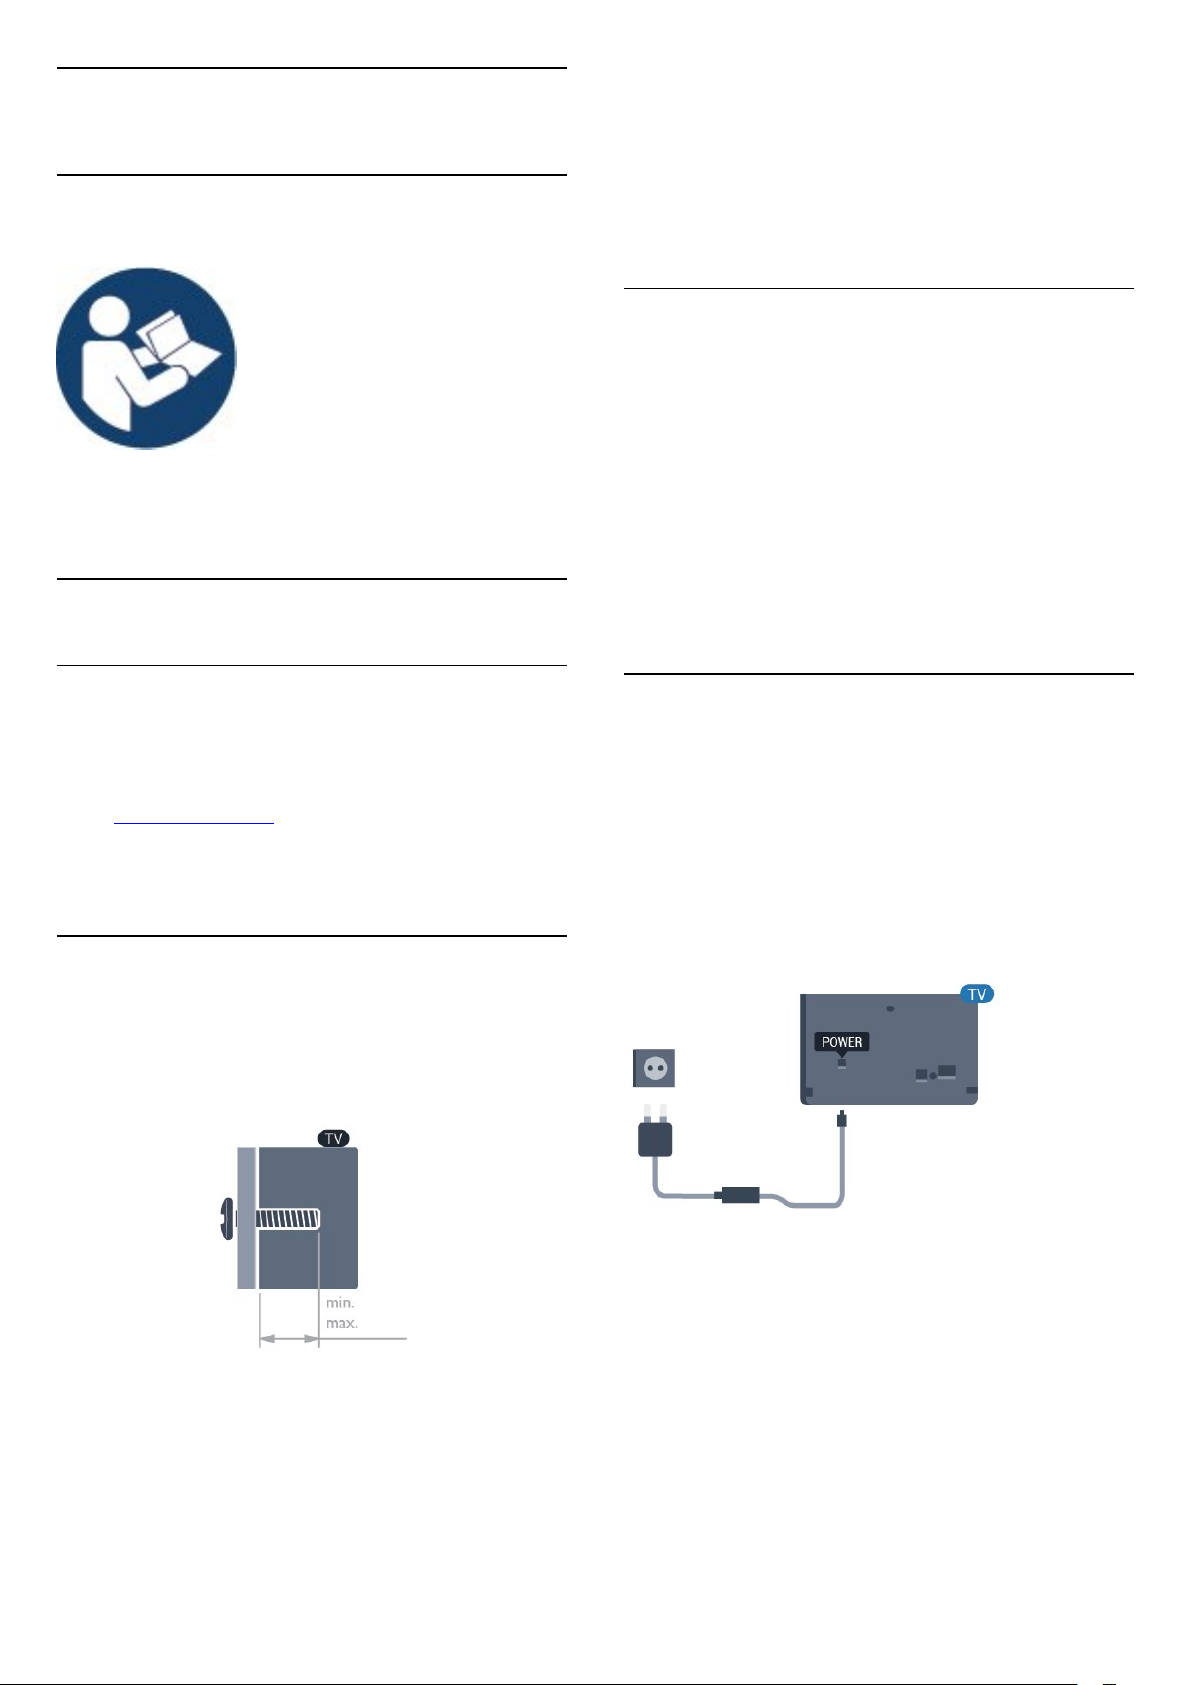
Power Cable
• Insert the power cable into the POWER connector
on the back of the TV.
• Make sure the power cable is securely inserted in
the connector.
• Make sure that the power plug, in the wall socket, is
accessible at all times.
• When you unplug the power cable, always pull the
plug, never pull the cable.
• 19HFL5014W
VESA MIS-F 75x75, M4 (min.: 8 mm, max.: 10 mm)
Caution
Wall mounting the TV requires special skills and
4
Page 5
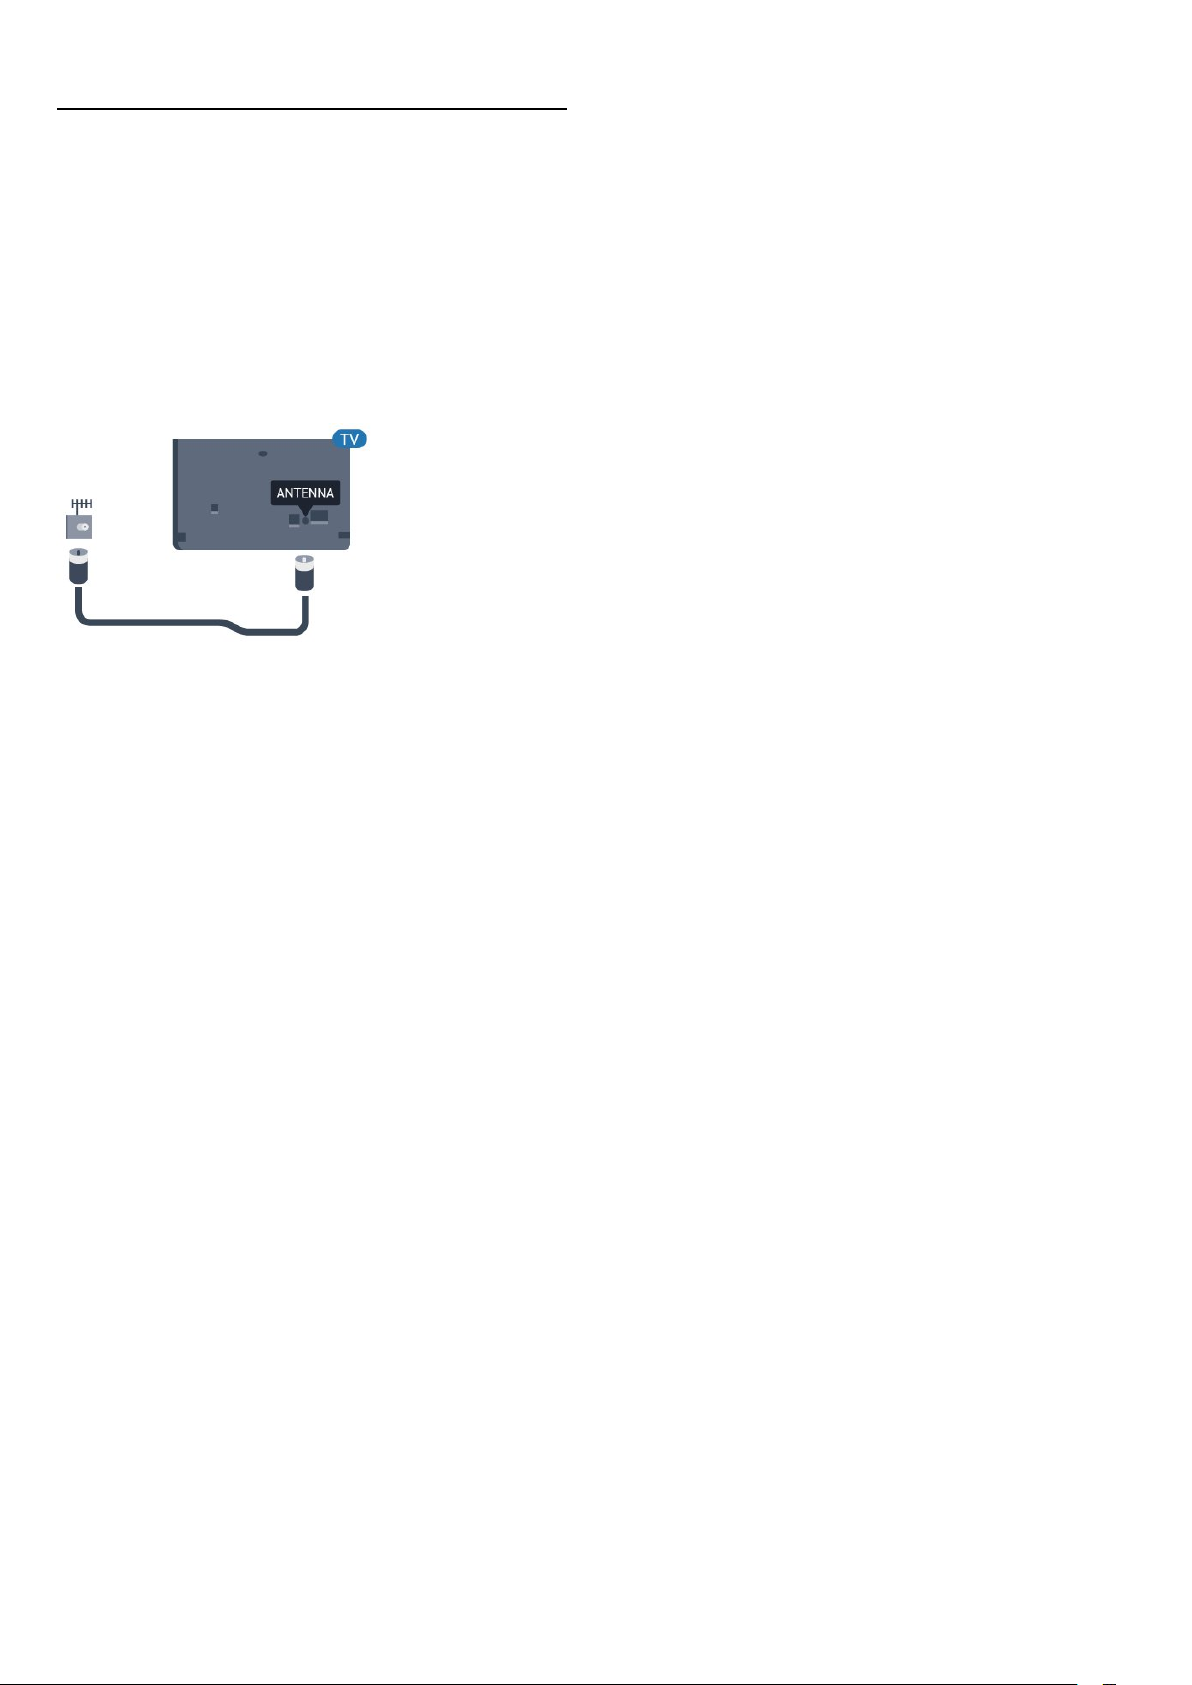
2.5
Antenna Cable
Insert the antenna plug firmly into
the Antenna
You can connect your own antenna or an antenna
signal from an antenna distribution system. Use an
IEC Coax 75 Ohm RF antenna connector.
Use this antenna connection for DVB-T and DVB-C
input signals.
socket at the back of the TV.
5
Page 6
3
Arm mounting
3.1
Handle
You can find the instructions for mounting the handle
in the Quick Start Guide from www.philips.com.
Use the product type number of the TV to look for the
Quick Start Guide to download.
3.2
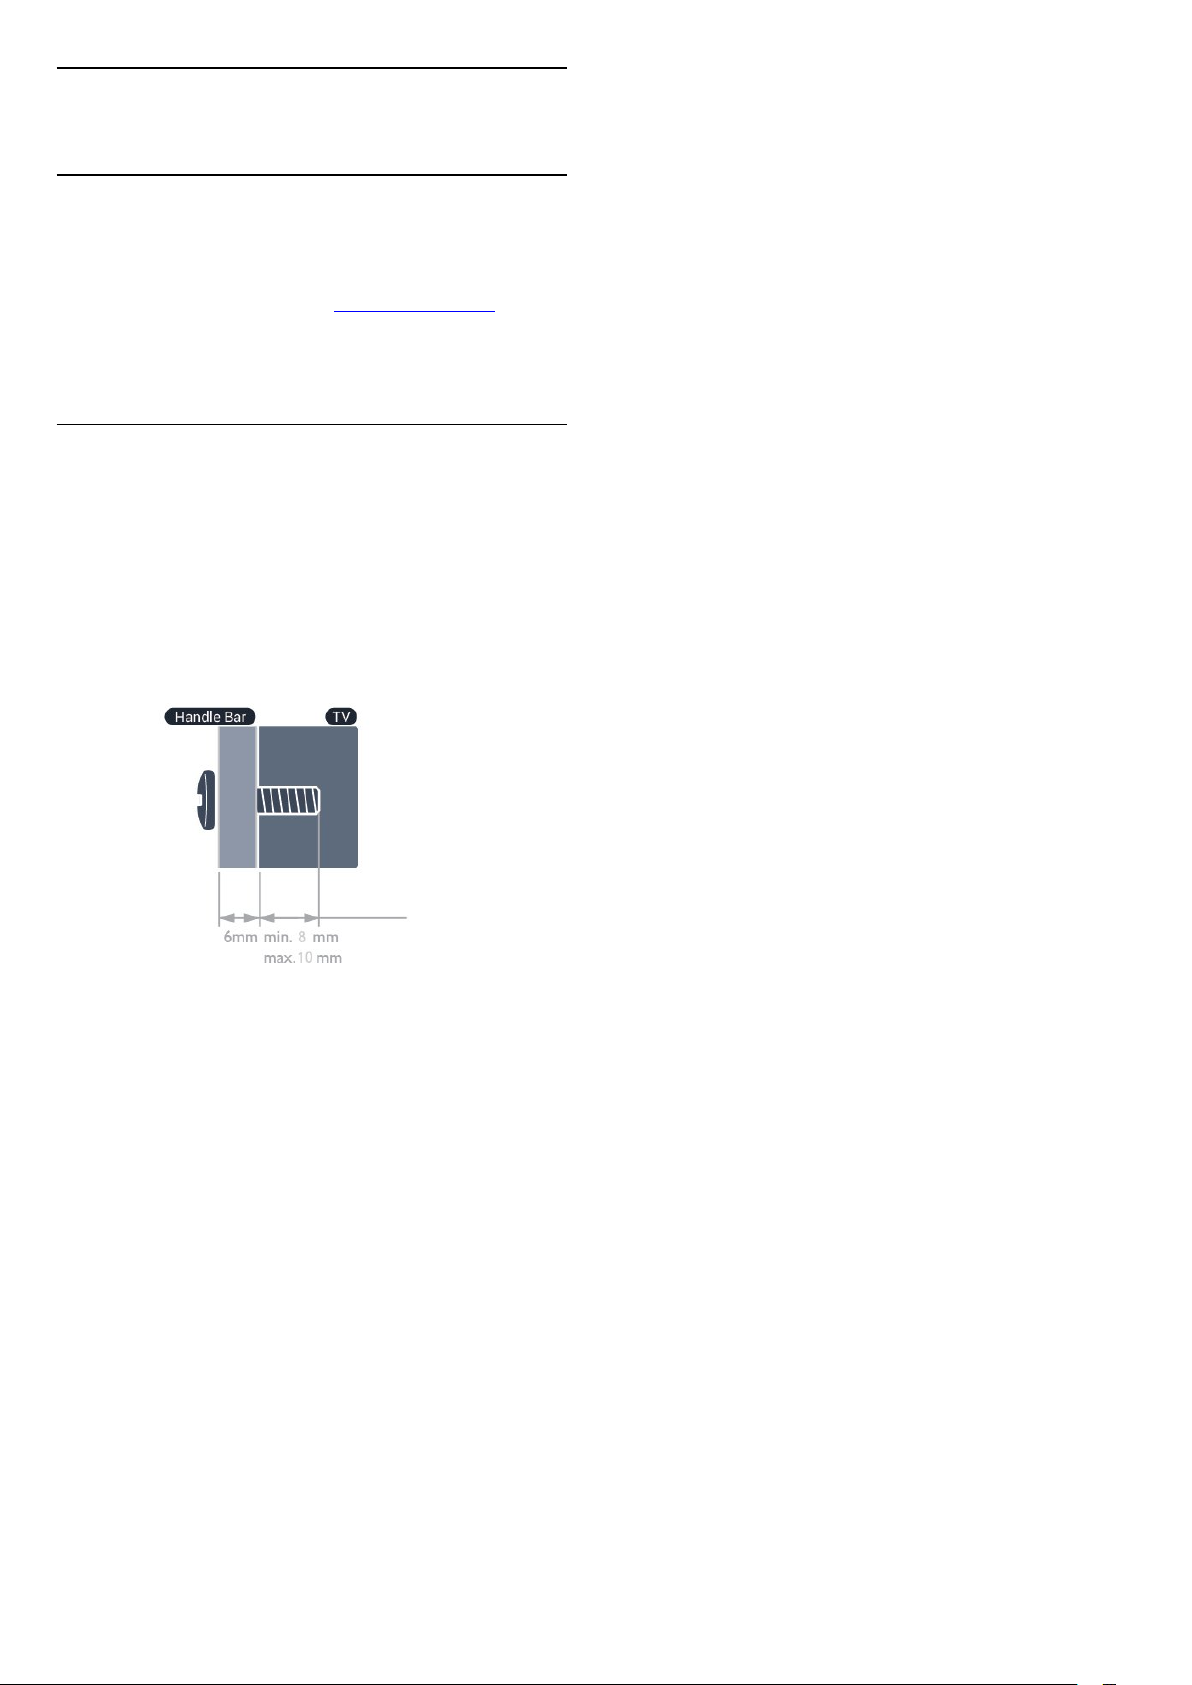
Arm mounting
Your TV is also prepared for a VESA-compliant arm
mount bracket (sold separately).
Use the following VESA code when purchasing the
arm mount . . .
To fix the bracket securely, use screws with a length
indicated in the drawing.
or damage.
To prevent damage to cables and connectors, leave a
gap of at least 5.5 cm / 2.2 inches from the back of
the TV.
Before you mount the TV to the arm, find the correct
length of the screw. To find the length of the screw,
add the thickness of your arm mount to the screw
length.
• 19HFL5014W - VESA MIS-F 75x75, M4
Installed with handle bar: (Minimum 14mm, Maximum
16mm)
Installed without handle bar: (Minimum 8mm,
Maximum 10mm)
Caution
Arm mounting the TV requires special skills and
should only be performed by qualified personnel. The
TV arm mounting should meet safety standards
according to the TV's weight. Also read the safety
precautions before positioning the TV.
TP Vision Europe B.V. bears no responsibility for
improper mounting or any mounting that results in
accident or injury.
Note
Before mounting the TV to the arm, remove the
existing VESA screws on the back panel.
Warning
Follow all instructions provided with the TV mount. TP
Vision Europe B.V. bears no responsibility for
improper TV mounting that results in accident, injury
6
Page 7
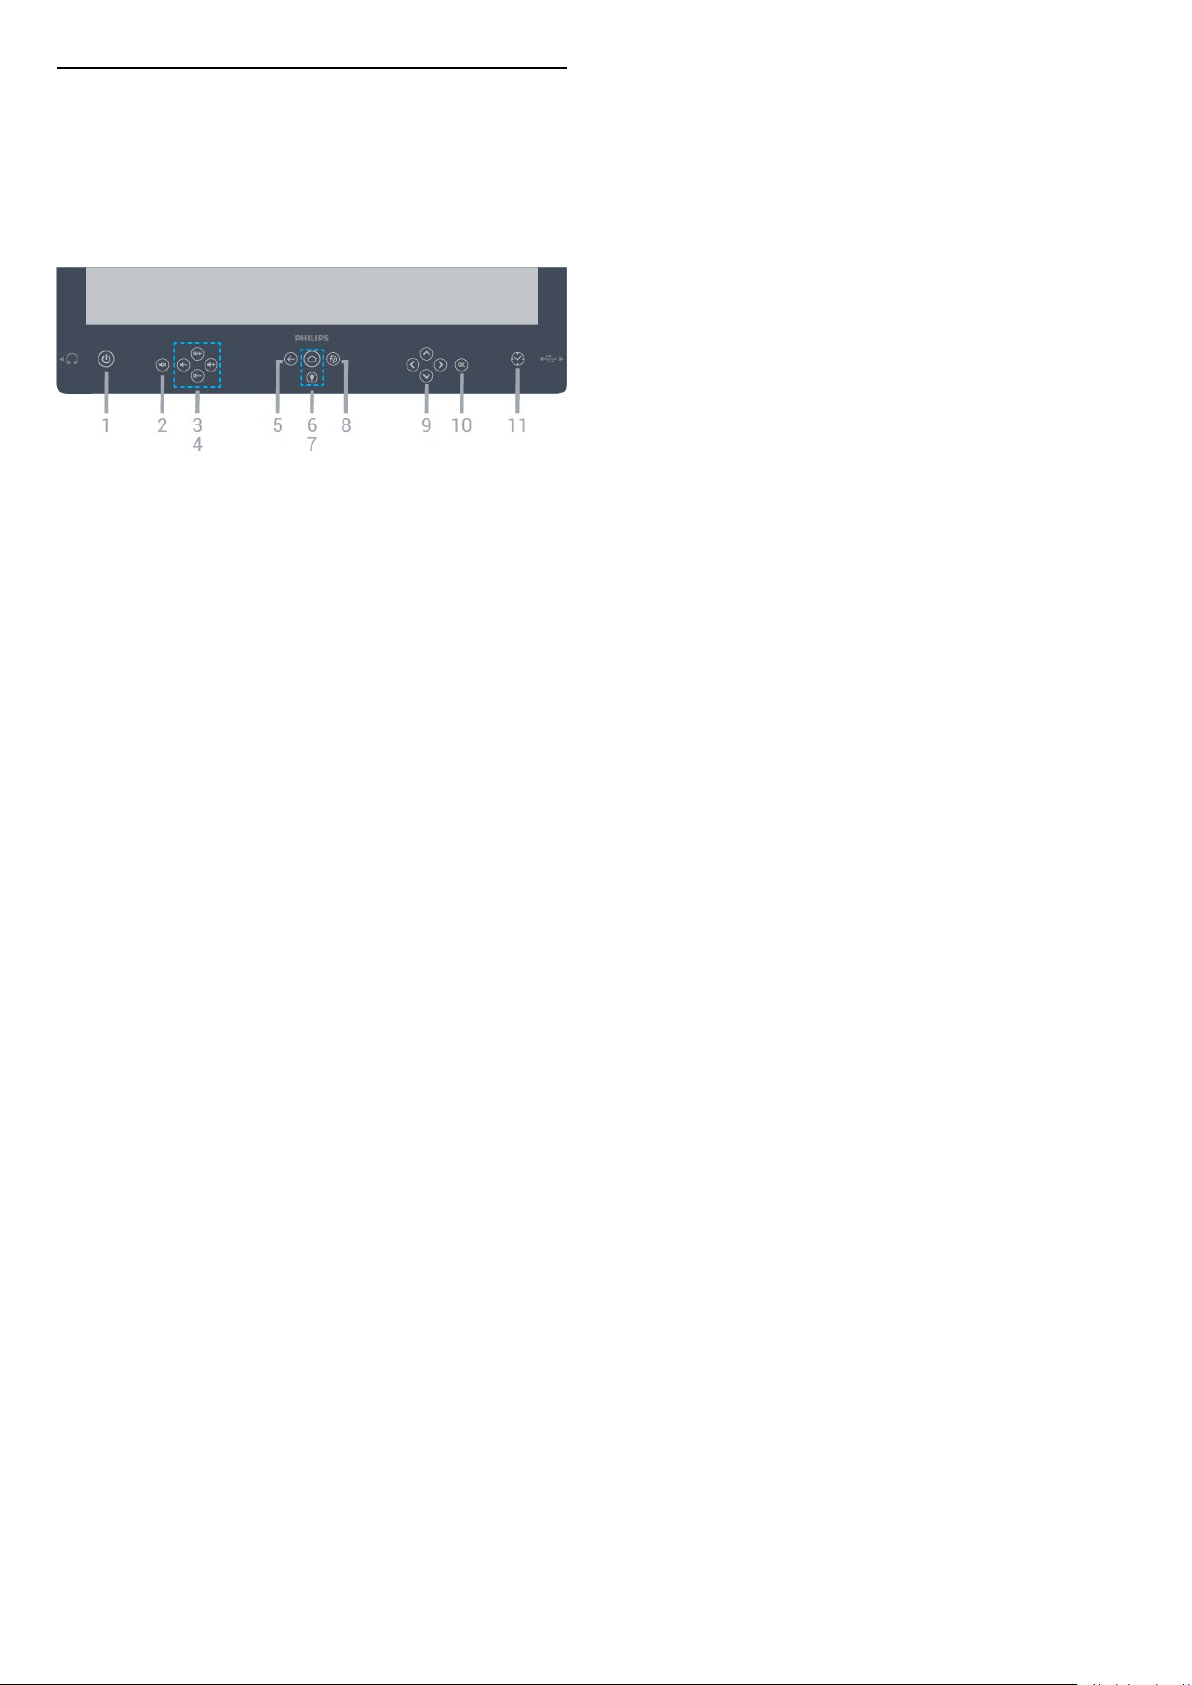
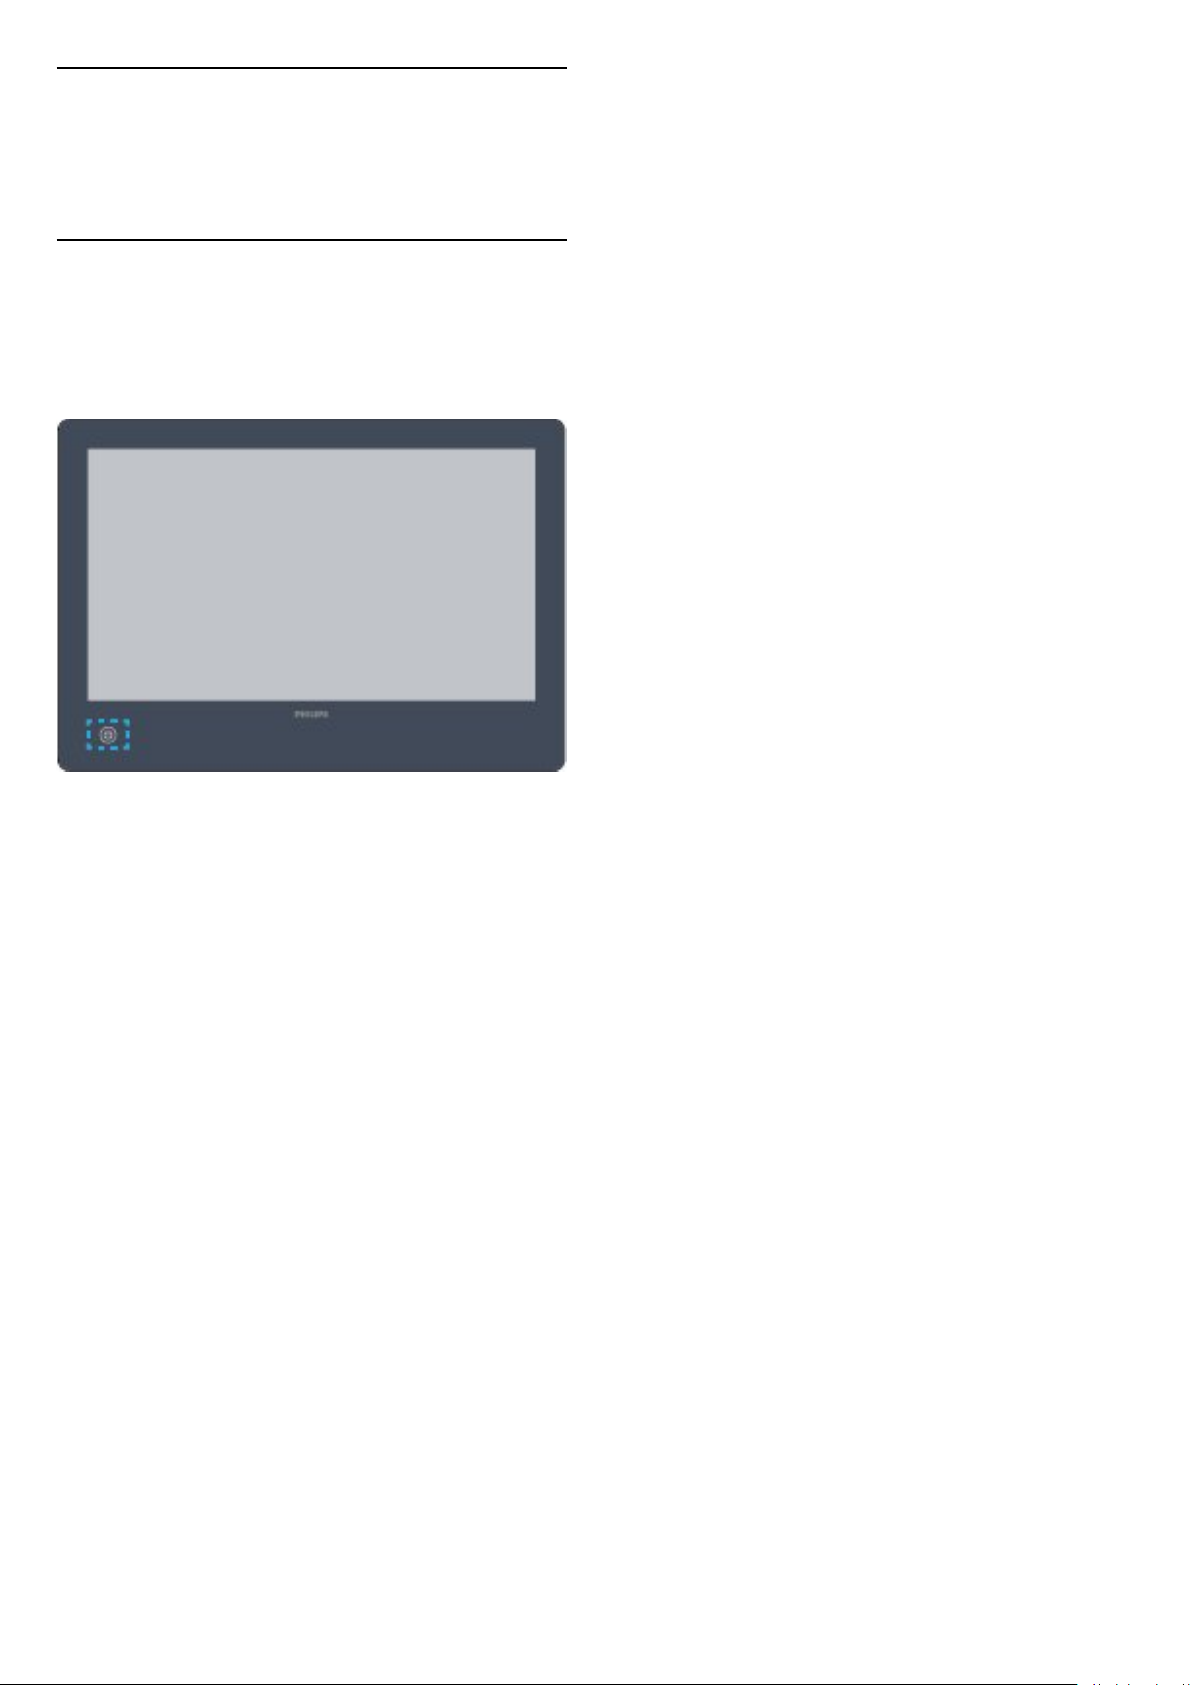
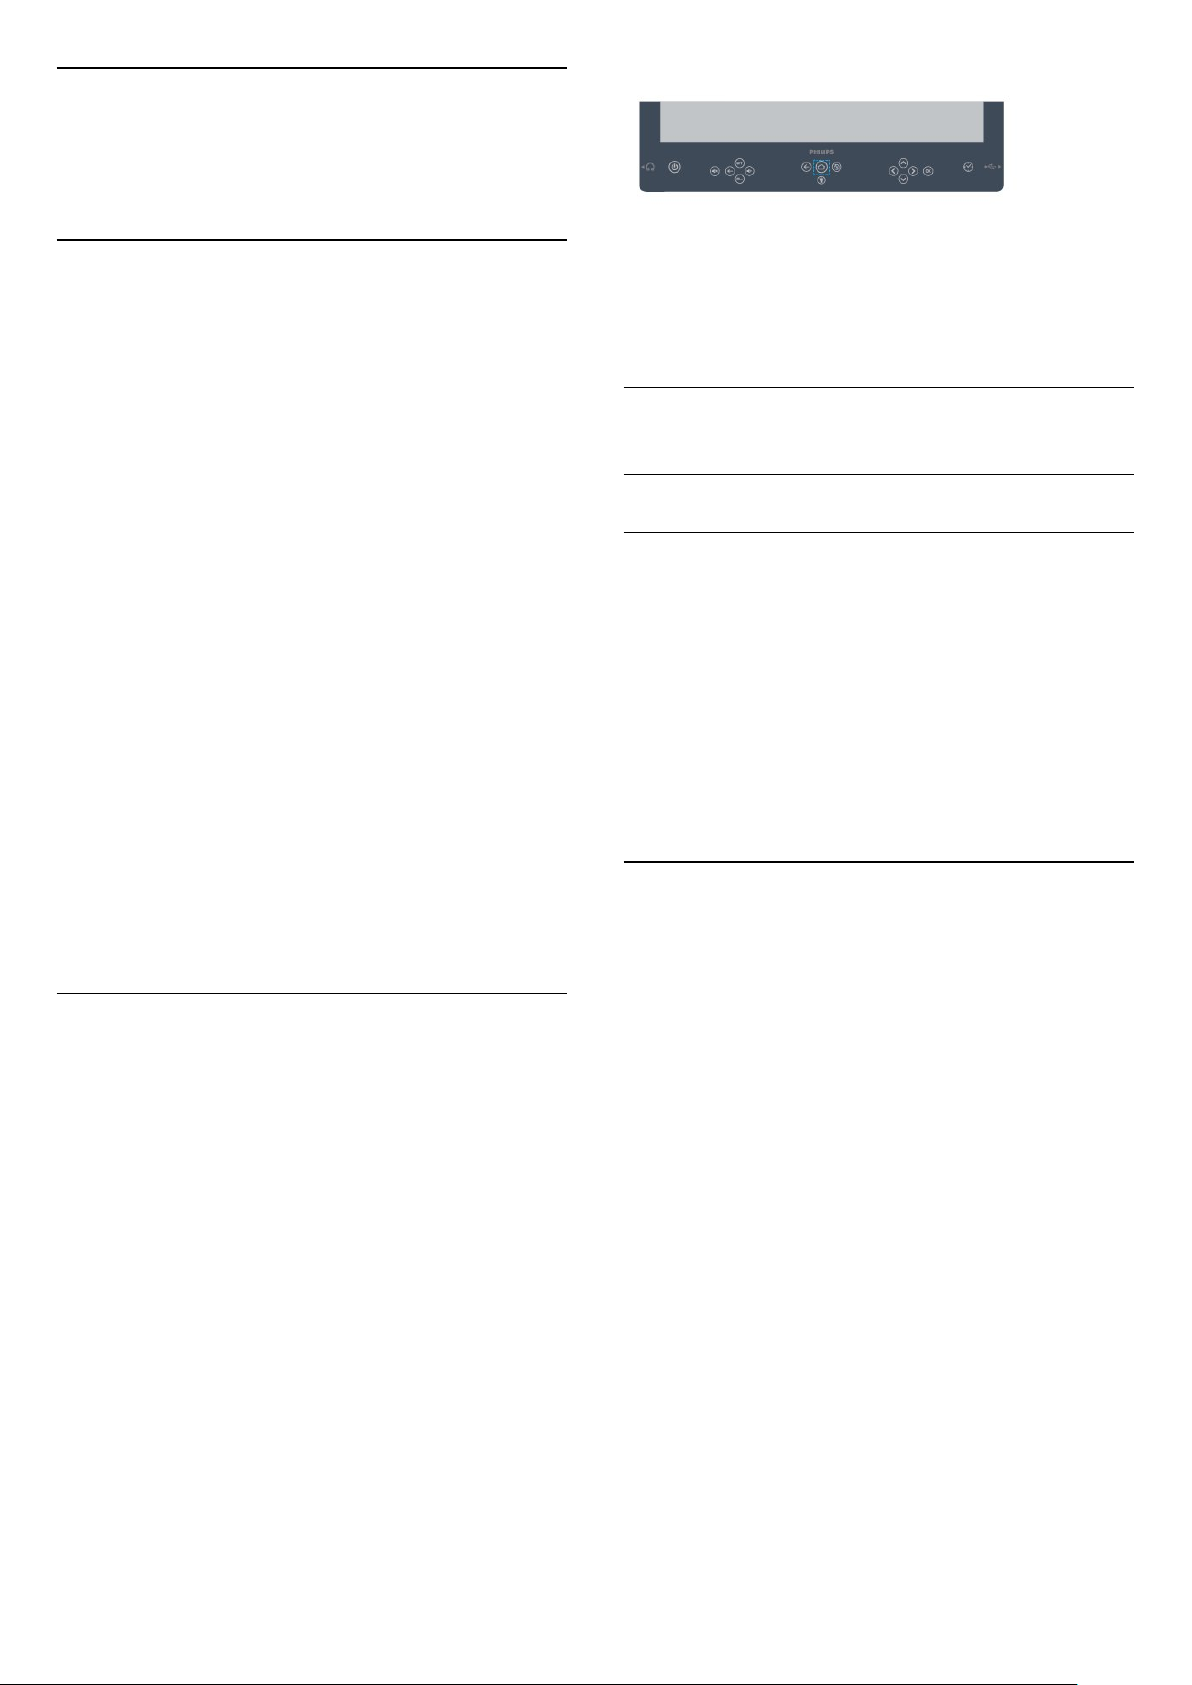
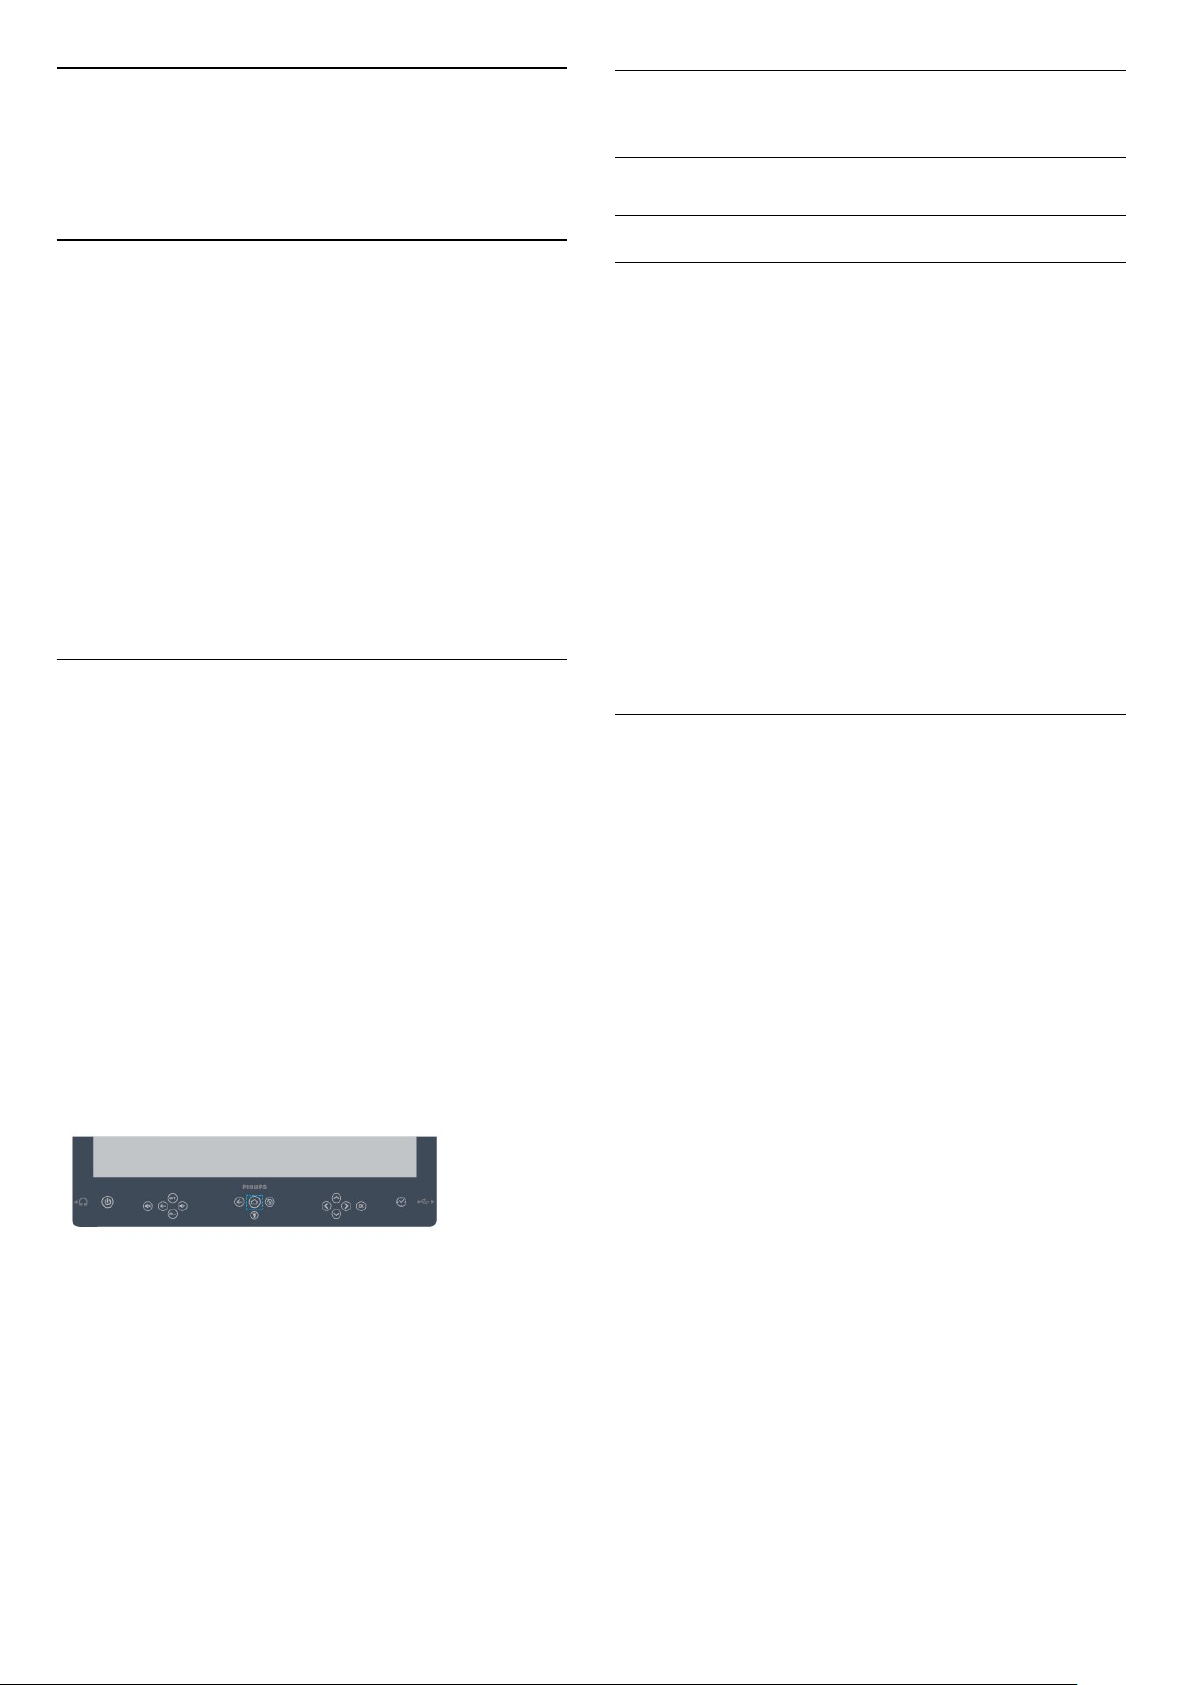
4
Keys on TV
Use the front keypad to control the on-screen
operation. The keypad consists of following key
buttons:
1. Power: To switch the TV On or back to Standby.
2. Mute: To mute the sound or to restore it.
3. Channel CH+/-: To switch to the next or previous
channel in the channel list.
4. Volume /-: To adjust the volume level.
5. Back: To switch back to the previous channel you
selected. To return to previous menu.
6. Home : To open the Home menu.
7. Brightness: To adjust the brightness of the light at
the bottom of the TV.
8. Exit: To switch back to watching TV.
9. Arrow / navigation keys: To navigate up ,
down , left or right .
10. OK: To confirm a selection or setting.
11. Clock: To show the current time. To adjust the
alarm clock.
7
Page 8
5
Switching On and
Off
5.1
On or Standby
Make sure the TV is connected to the mains AC
power. Connect the supplied power cord to the AC
in connector at the back of the TV.
Switch on
Press on the TV to switch on.
Switch to standby
Please switch the TV to standby mode while not using
TV.
To switch the TV to standby, press on the TV.
In standby mode, the TV is still connected to the
mains power but consumes very little energy.
To switch off the TV completely, disconnect the
power plug.
When disconnecting the power plug, always pull the
power plug, never the cord. Ensure that you have full
access to the power plug, power cord and outlet
socket at all times.
Please use the power adapter that came with your
TV.
Brand: FSP
Model: FSP065M-DHA (Output: 12 Vdc, 5.42 A max)
8
Page 9
6
Specifications
6.1
Environmental
Product Fiche
19HFL5014W
• Energy Efficiency Class : A
• Visible Screen Size : 47 cm / 19 inch
• On Mode Power Consumption (W) : 18 W
• Annual Energy Consumption (kWh) * : 27 kWh
• Standby Power Consumption (W) ** : 0.5 W
• Display Resolution (Pixels) : 1366 x 768p
• Ratings: 12Vdc, Max. 24W
* Energy consumption kWh per year, based on the
power consumption of the television operating 4
hours per day for 365 days. The actual energy
consumption depends on how the television is used.
End of Use
Please find out for yourself about the local rules on
separate collection of batteries because correct
disposal will help to prevent negative consequences
for the environment and human health.
6.2
Operating System
Android OS :
Android Nougat 7
6.3
Display Type
Diagonal screen size
• 47 cm / 19 inch
Display resolution
• 1366 x 768
Disposal of your old product and batteries
Your product is designed and manufactured with high
quality materials and components, which can be
recycled and reused.
When this crossed-out wheeled bin symbol is
attached to a product it means that the product is
covered by the European Directive 2012/19/EU.
Please inform yourself about the local separate
collection system for electrical and electronic
products.
Please act according to your local rules and do not
dispose of your old products with your normal
household waste. Correct disposal of your old
product helps to prevent potential negative
consequences for the environment and human
health.
6.4
Display Input Resolution
Video formats
Resolution — Refresh rate
• 480i - 60 Hz
• 480p - 60 Hz
• 576i - 50 Hz
• 576p - 50 Hz
• 720p - 50 Hz, 60 Hz
• 1080i - 50 Hz, 60 Hz
• 1080p - 24 Hz, 25 Hz, 30 Hz
Computer formats
Resolutions (amongst others)
• 640 x 480 - 60 Hz
• 800 x 600 - 60 Hz
• 1024 x 768 - 60 Hz
• 1280 x 768 - 60 Hz
• 1360 x 765 - 60 Hz
• 1360 x 768 - 60 Hz
• 1280 x 1024 - 60 Hz
• 1920 x 1080 - 60 Hz
Your product contains batteries covered by the
European Directive 2006/66/EC, which cannot be
disposed with normal household waste.
9
Page 10
6.5
Connectivity
TV Back
• HDMI in - ARC - Ultra HD
• Antenna (75 ohm)
• Network LAN - RJ45
• 8 Bathroom Out
• RJ-48 data connector
TV Side
• USB - USB 2.0
• Headphones - Stereo mini-jack 3.5mm
6.6
Dimensions and Weights
19HFL5014W
• without TV stand:
Width 468.8 mm - Height 326.4 mm - Depth 38.9
mm - Weight ± 3.35 kg
• with TV stand:
Width 468.8 mm - Height 370.2 mm - Depth 44.9
mm - Weight ± 3.65 kg
6.7
Sound
• Output power (RMS) : 5W (2.5w*2)
• Dolby Audio
• DTS HD
10
Page 11
7
Connect Devices
7.1
Connect Devices
Connectivity Guide
Always connect a device to the TV with the highest
quality connection available. Also, use good quality
cables to ensure a good transfer of picture and
sound.
For best signal quality transfer, use a High speed
HDMI cable and do not use an HDMI cable longer
than 5 m.
When you connect a device, the TV recognizes its
type and gives each device a correct type name. You
can change the type name if you wish. If a correct
type name for a device is set, the TV automatically
switches to the ideal TV settings when you switch to
this device in the Sources menu.
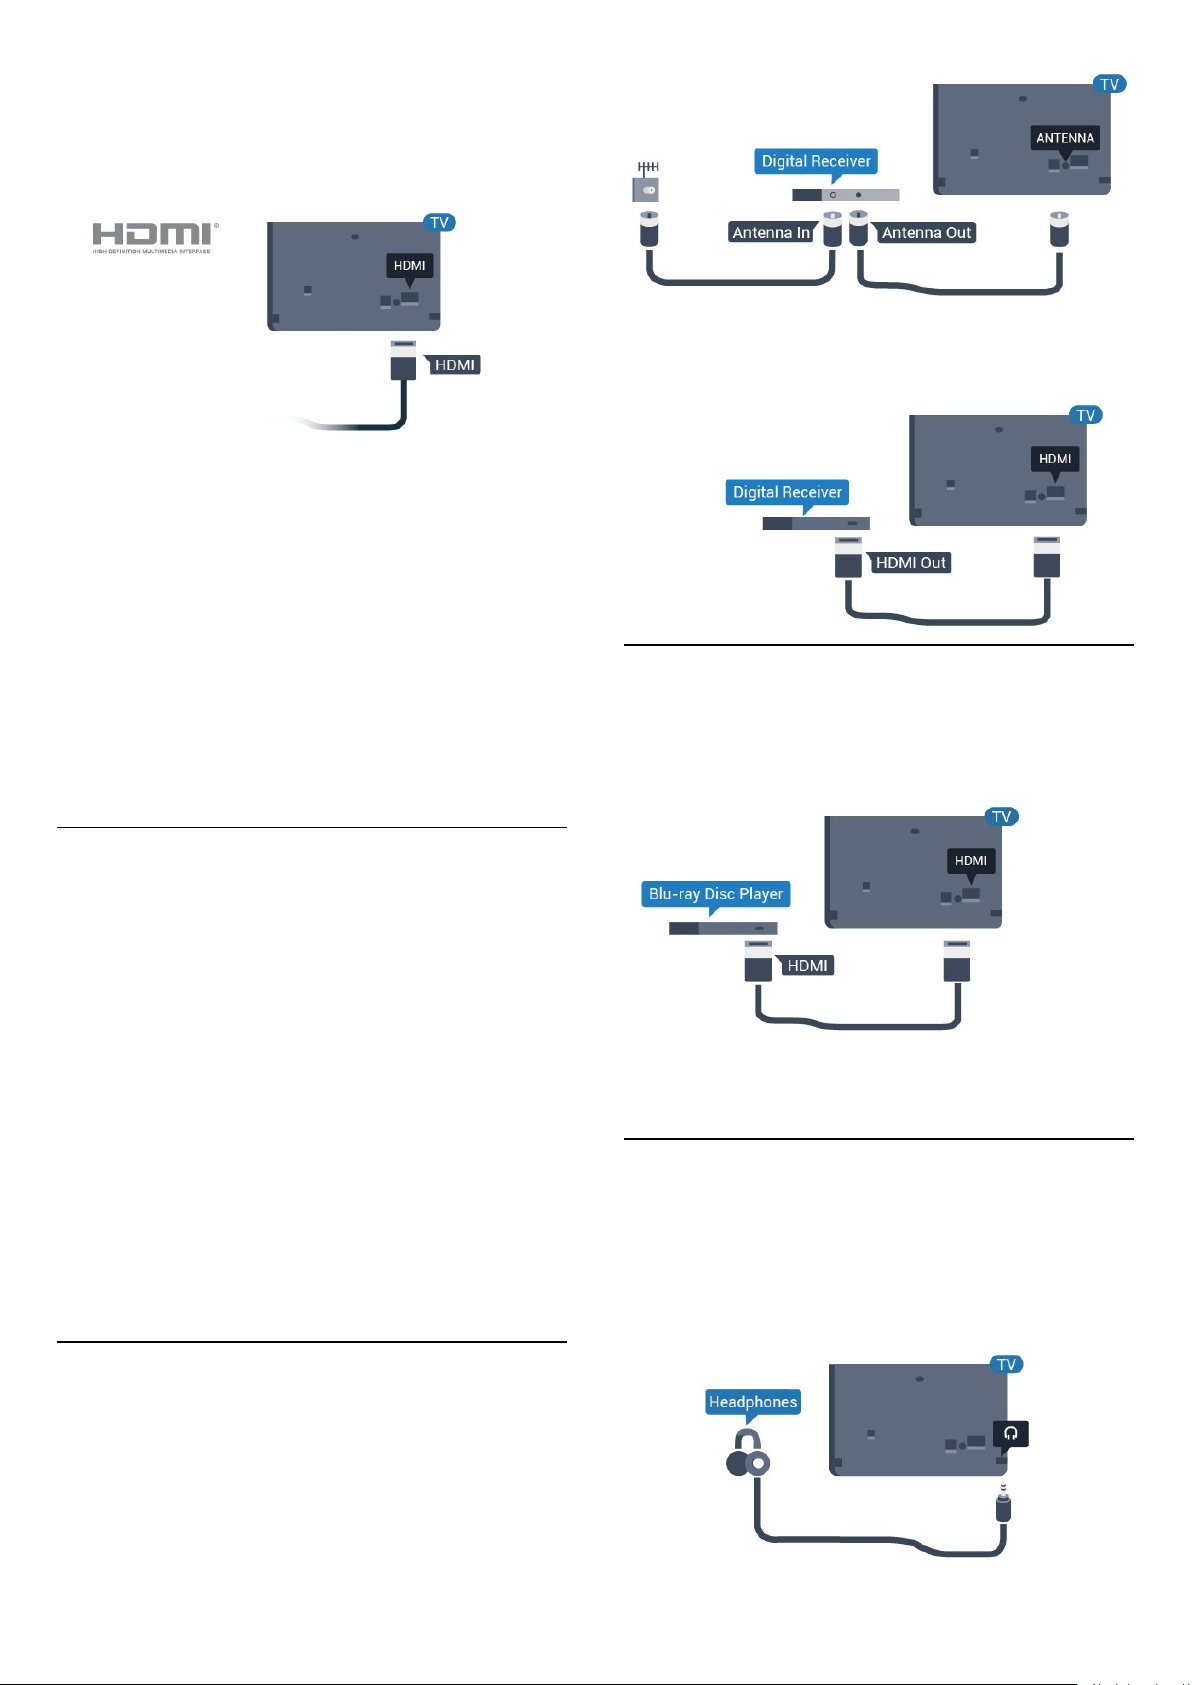
Antenna port
If you have a Set-top box (a digital receiver) or
Recorder, connect the antenna cables to run the
antenna signal through the Set-top box and/or
Recorder first before it enters the TV. In this way, the
antenna and the Set-top box can send possible
additional channels to the Recorder to record.
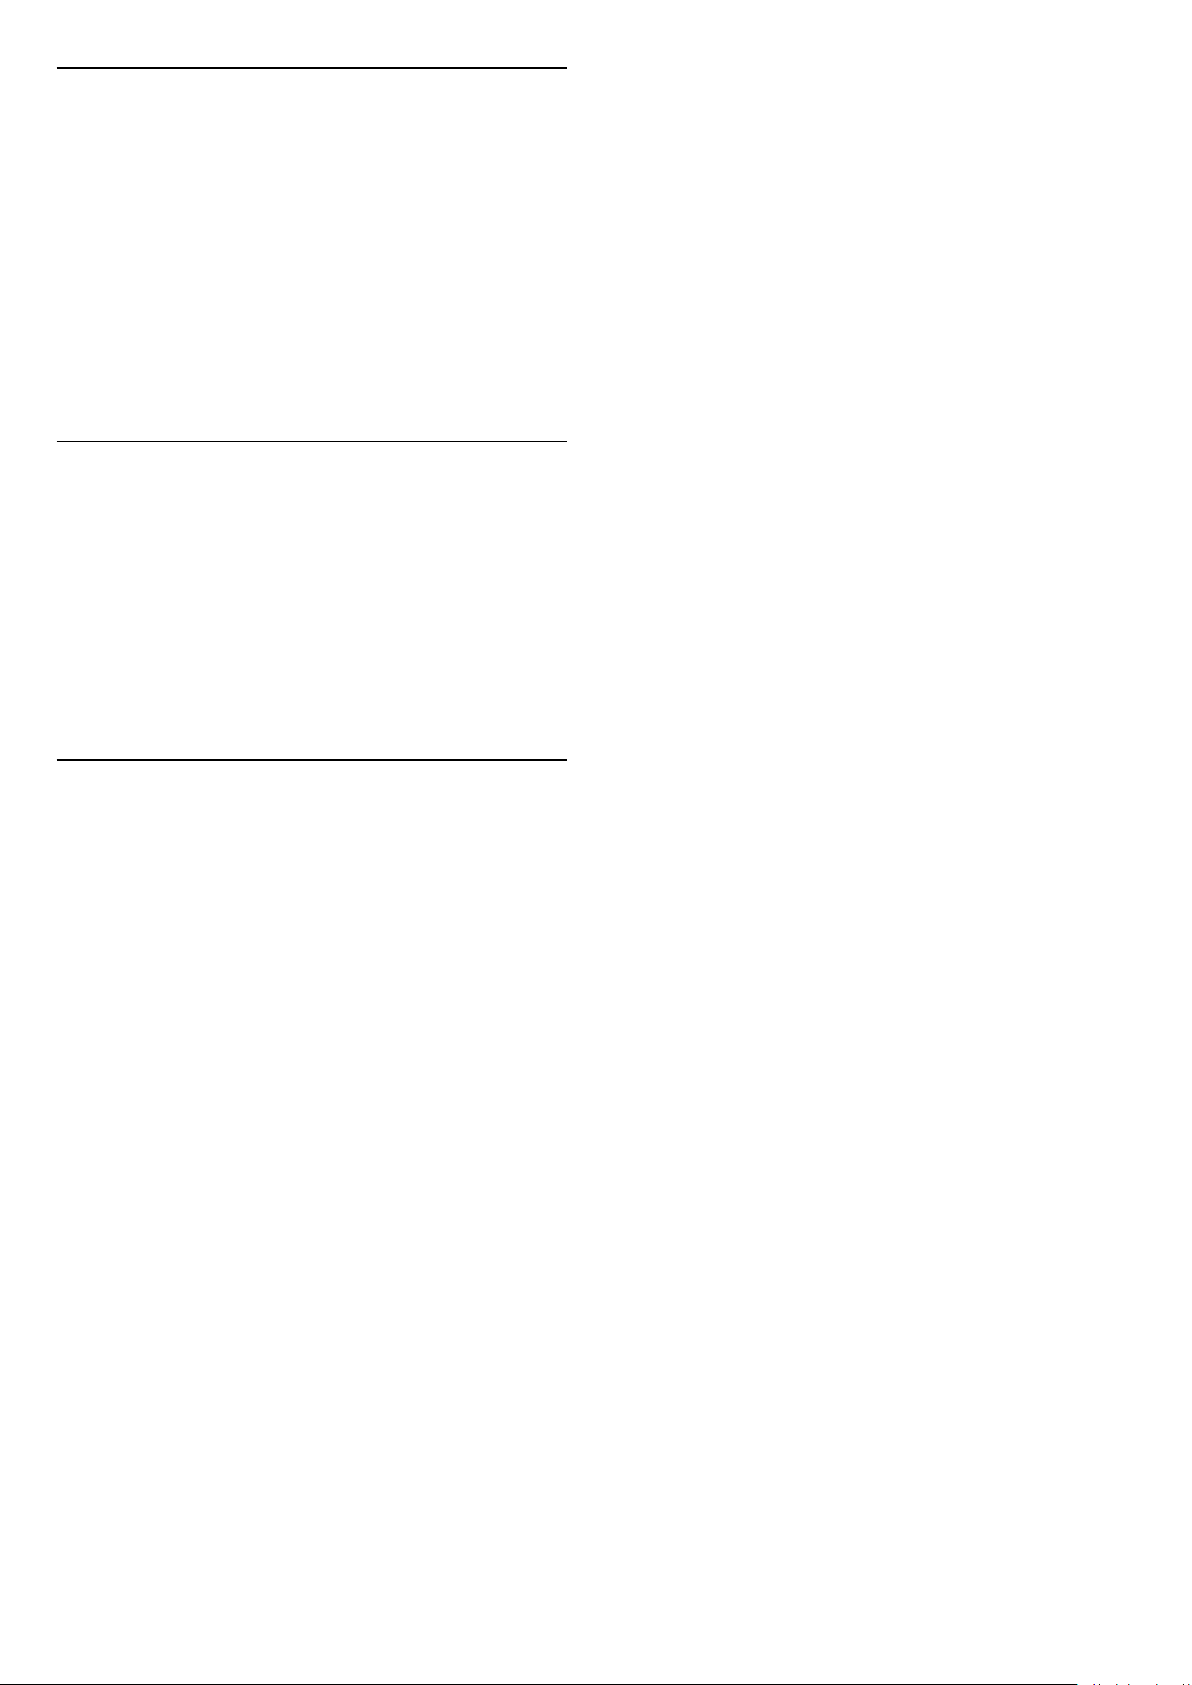
HDMI ports
Operate devices
Copy protection
HDMI cables support HDCP (High-bandwidth Digital
Content Protection). HDCP is a copy protection signal
that prevents copying content from a DVD disc or Bluray Disc. Also referred to as DRM (Digital Rights
Management).
HDMI ARC
All of the HDMI connections on the TV have HDMI
ARC (Audio Return Channel).
If the device, typically a Home Theatre System (HTS),
also has the HDMI ARC connection, connect it to any
of the HDMI connections on this TV. With the HDMI
ARC connection, you do not need to connect the
extra audio cable that sends the sound of the TV
picture to the HTS. The HDMI ARC connection
combines both signals.
You can use any HDMI connection on this TV to
connect the HTS but ARC is only available for 1
device/connection at a time.
To operate a device connected to HDMI and set up
with EasyLink, select the device - or its activity - in
the list of TV connections.
Professional Mode OFF Press Home,
select Apps, select SOURCES . Choose a
device connected to an HDMI connection and
press OK.
Professional Mode ON Press Home, select
TV Channels, select Sources. Choose a
device connected to an HDMI connection and
press OK.
HDMI Quality
An HDMI connection has the best picture and sound
quality. One HDMI cable combines video and audio
signals. Use an HDMI cable for TV signal.
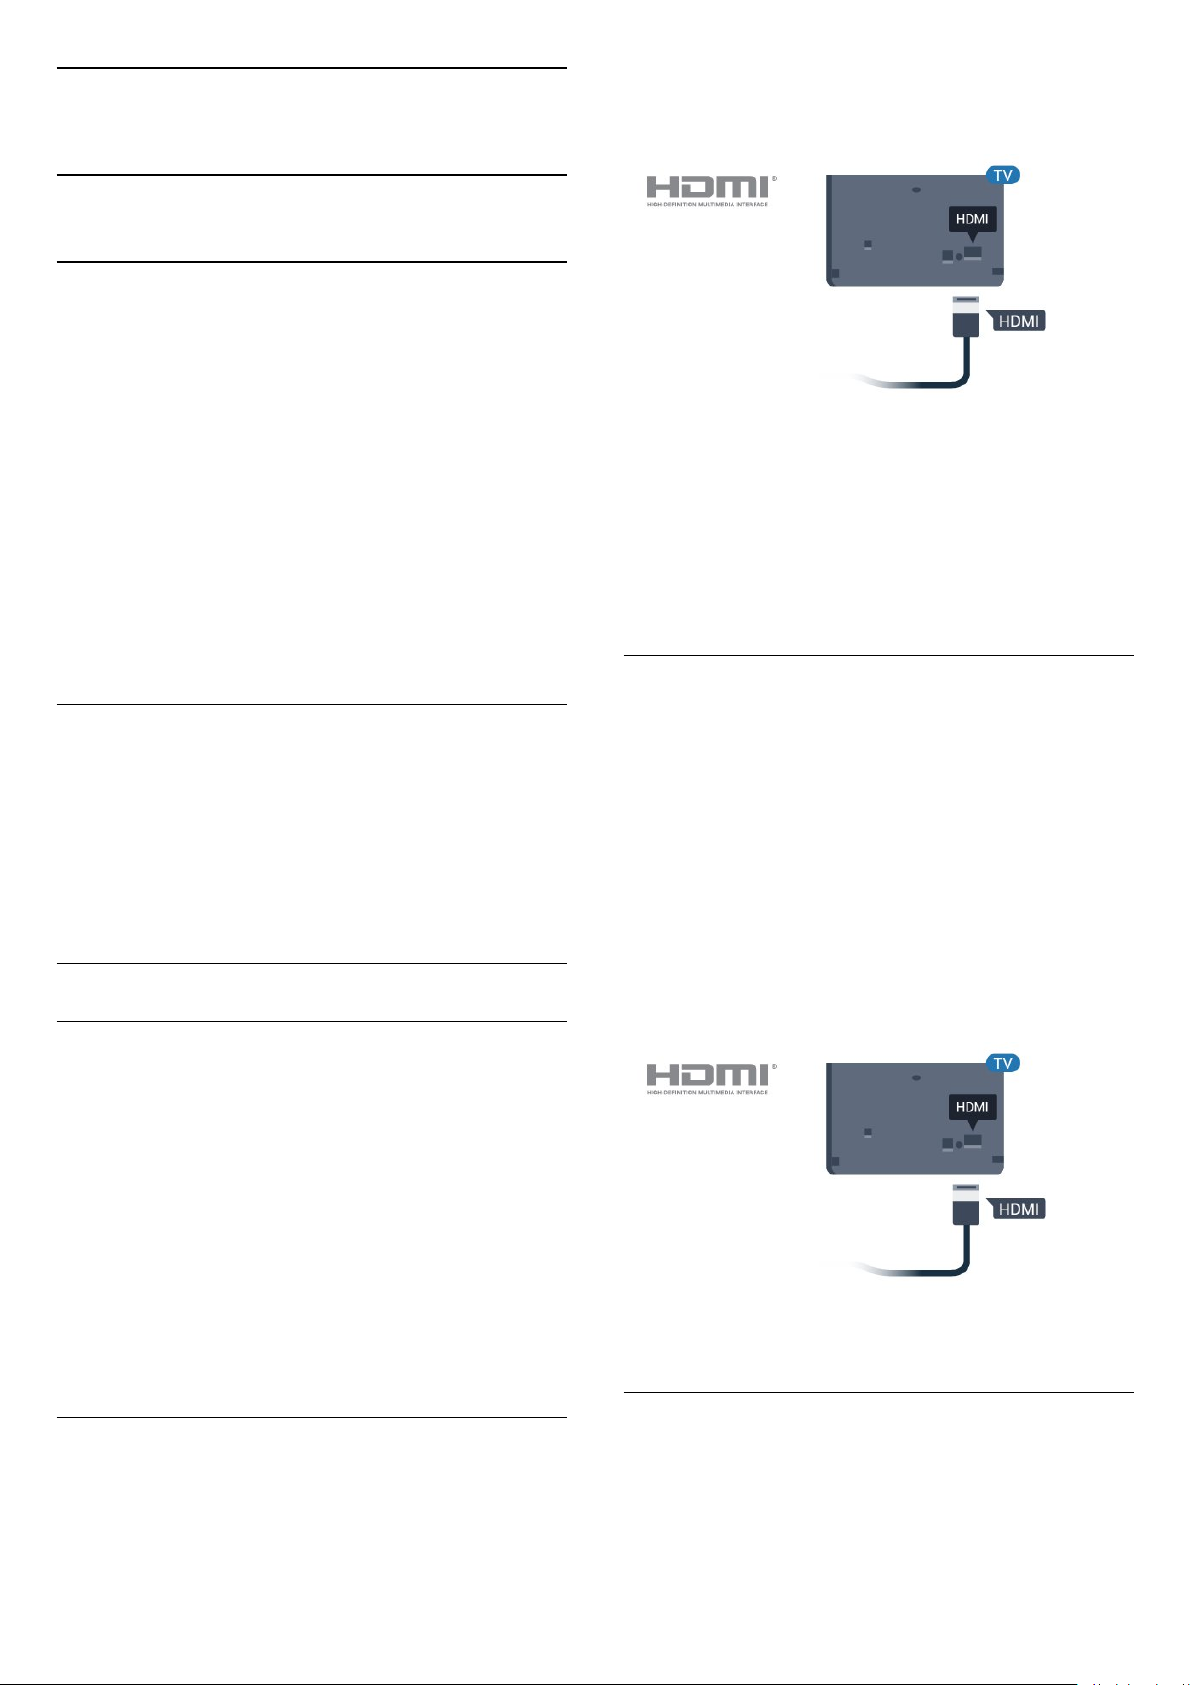
HDMI CEC - EasyLink
An HDMI connection has the best picture and sound
quality. One HDMI cable combines video and audio
signals. Use an HDMI cable for High Definition (HD)
TV signals. For best signal quality transfer, use a High
speed HDMI cable and do not use an HDMI cable
11
Page 12
longer than 5 m.
Connect HDMI CEC-compatible devices to your TV.
EasyLink HDMI CEC must be switched on on the TV
and the connected device.
Note:
• EasyLink might not work with devices from other
brands.
• The HDMI CEC functionality has different names on
different brands. Some examples are: Anynet, Aquos
Link, Bravia Theatre Sync, Kuro Link, Simplink and
Viera Link. Not all brands are fully compatible with
EasyLink. Example HDMI CEC branding names are
property of their respective owners.
Next to the antenna connections, add an HDMI cable
to connect the Set-top box to the TV.
7.3
Blu-ray Disc Player
Use a High speed HDMI cable to connect the Bluray Disc player to the TV.
EasyLink On or Off
You can switch EasyLink on or off. The TV comes with
the EasyLink settings switched on.
To switch off EasyLink completely…
Professional Mode OFF Press Home.Press
(down), select Settings and press OK.
Select Sources > EasyLink, and press OK.
Select EasyLink, and press OK.
Select Off and press OK.
Press BACK, repeatedly if necessary, to close the
menu.
Professional Mode ON Please refer to the
installation manual.
7.2
Receiver - Set-Top Box
If the Blu-ray Disc player has EasyLink HDMI CEC.
7.4
Headphones
You can connect a set of headphones to
the
connection is a mini-jack 3.5mm. You can adjust the
volume of the headphones separately.
connection on the back of the TV. The
Use 2 antenna cables to connect the antenna to the
Set-top box (a digital receiver) and the TV.
12
Page 13
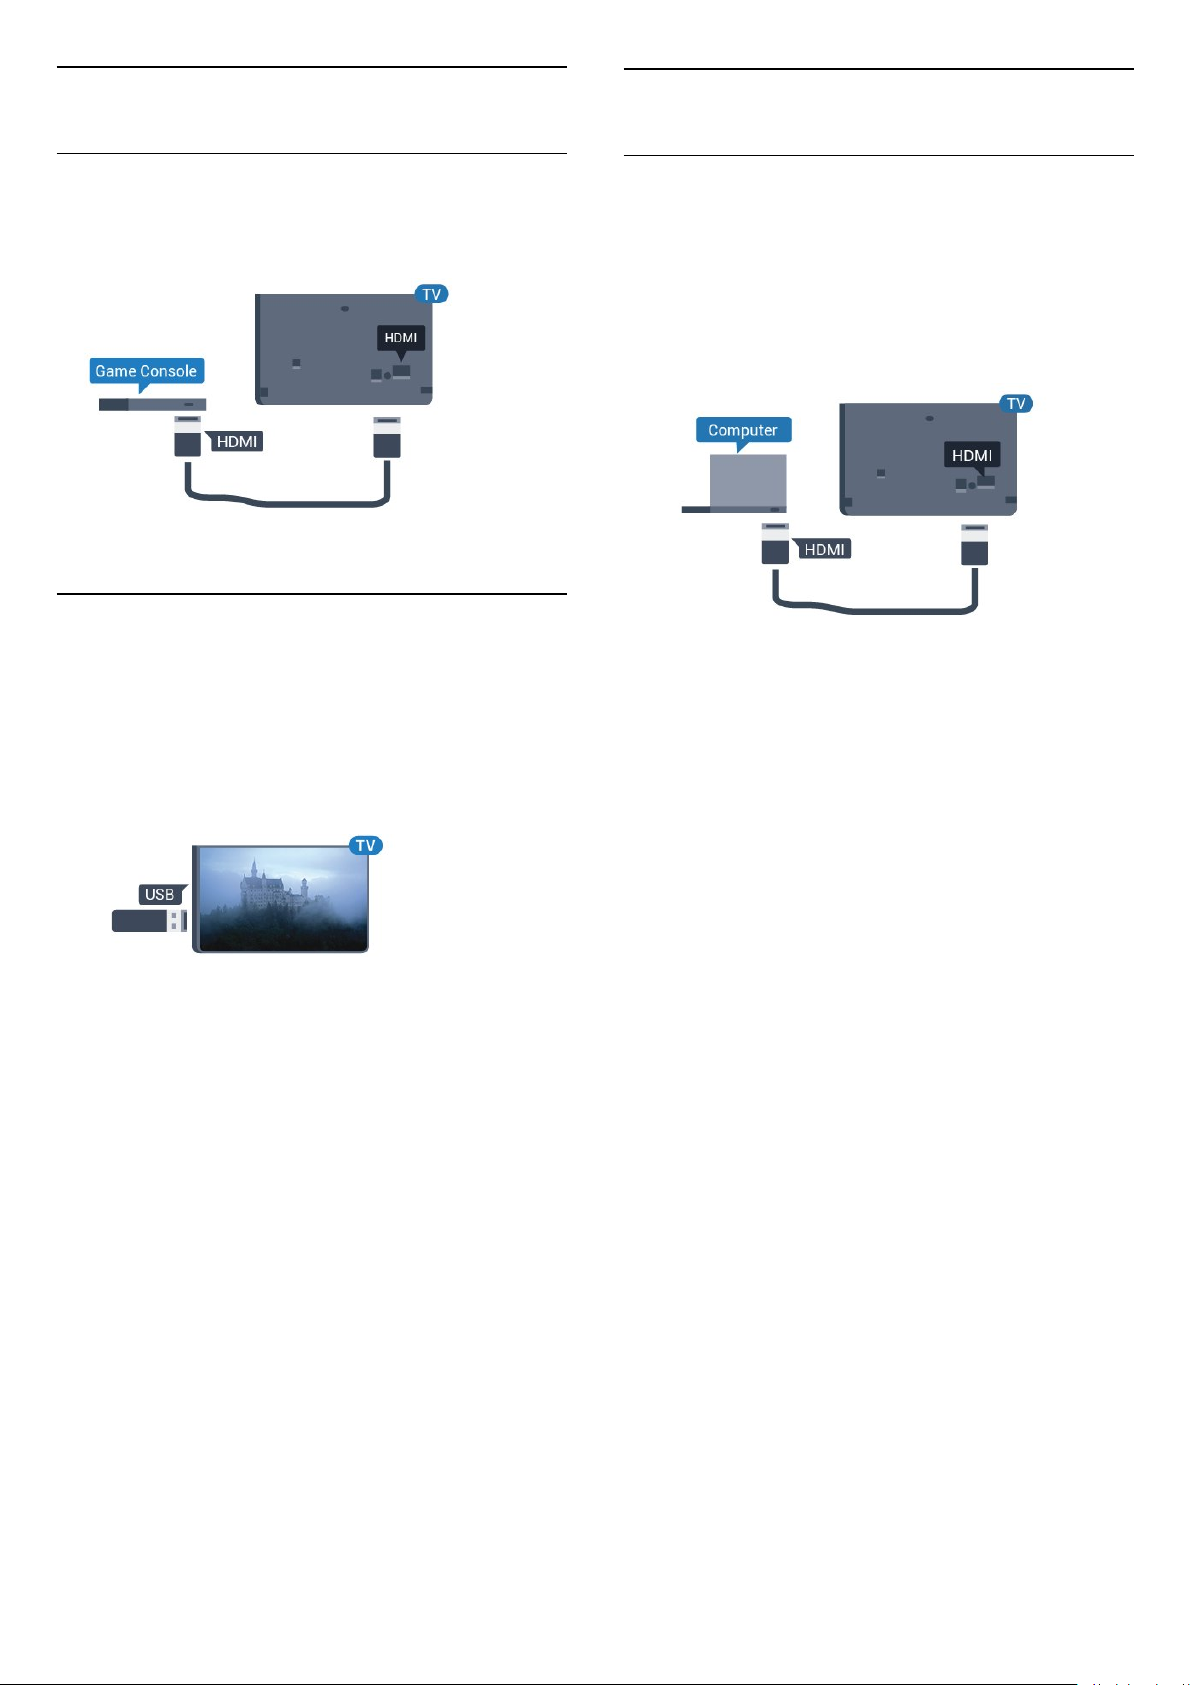
7.5
7.7
Game Console
HDMI
For best quality, connect the game console with a
High speed HDMI cable to the TV.
7.6
USB Flash Drive
You can view photos or play your music and videos
from a connected USB flash drive.
Computer
Connect
You can connect your computer to the TV and use
the TV as a PC monitor.
With HDMI
Use an HDMI cable to connect the computer to the
TV.
Insert a USB flash drive in one of
the USB connections on the TV while the TV is
switched on.
The TV detects the flash drive and opens a list
showing its content.
If the contents list does not appear automatically...
Professional Mode
OFF Press Home, select
Apps, select Sources. Choose USB press OK.
Professional Mode On Press Home,
select TV Channels , select SOURCES .
Choose USB and press OK.
To stop watching the USB flash drive content,
press or select another activity.
To disconnect the USB flash drive, you can pull out
the flash drive anytime.
13
Page 14

Ideal Setting
If you connect a computer, we advice you to give the
connection, on which the computer is connected, the
correct device type name in the Source menu. If you
switch to
set to the ideal Computer setting automatically.
To set the TV to the ideal setting…
Computer in the Source menu, the TV is
Professional Mode OFF
(down), select Settings and press OK.
Select Picture and press
menu. Select Picture Style > Computer and
press OK.
Select On or Off, and press OK.
Press repeatedly if necessary, to close the menu.
Professional Mode
ON Press Home > More >
Settings > Picture. Press OK.
Select Picture Style >
Select On
Press repeatedly if necessary, to close the menu.
(For professional mode information, please refer to
Installation manual)
or Off, and press OK.
Press Home. Press
(right) to enter the
Computer and press OK.
14
Page 15
8
Videos, Photos and
Music
8.1
From a USB Connection
You can view your photos or play your music and
videos from a connected USB flash drive or USB Hard
Drive.
With the TV switched on, plug in a USB flash drive or a
USB Hard Drive to one of the USB connections. The
TV detects the device and will list your media files.
If the list of files does not appear automatically…
1 - Press Press Home, select TV Channels .
2 - Select USB and press OK.
3 - You can browse your files in the folder structure
you have organised on the drive.
4 - To stop playing videos, photos and music,
press .
8.2
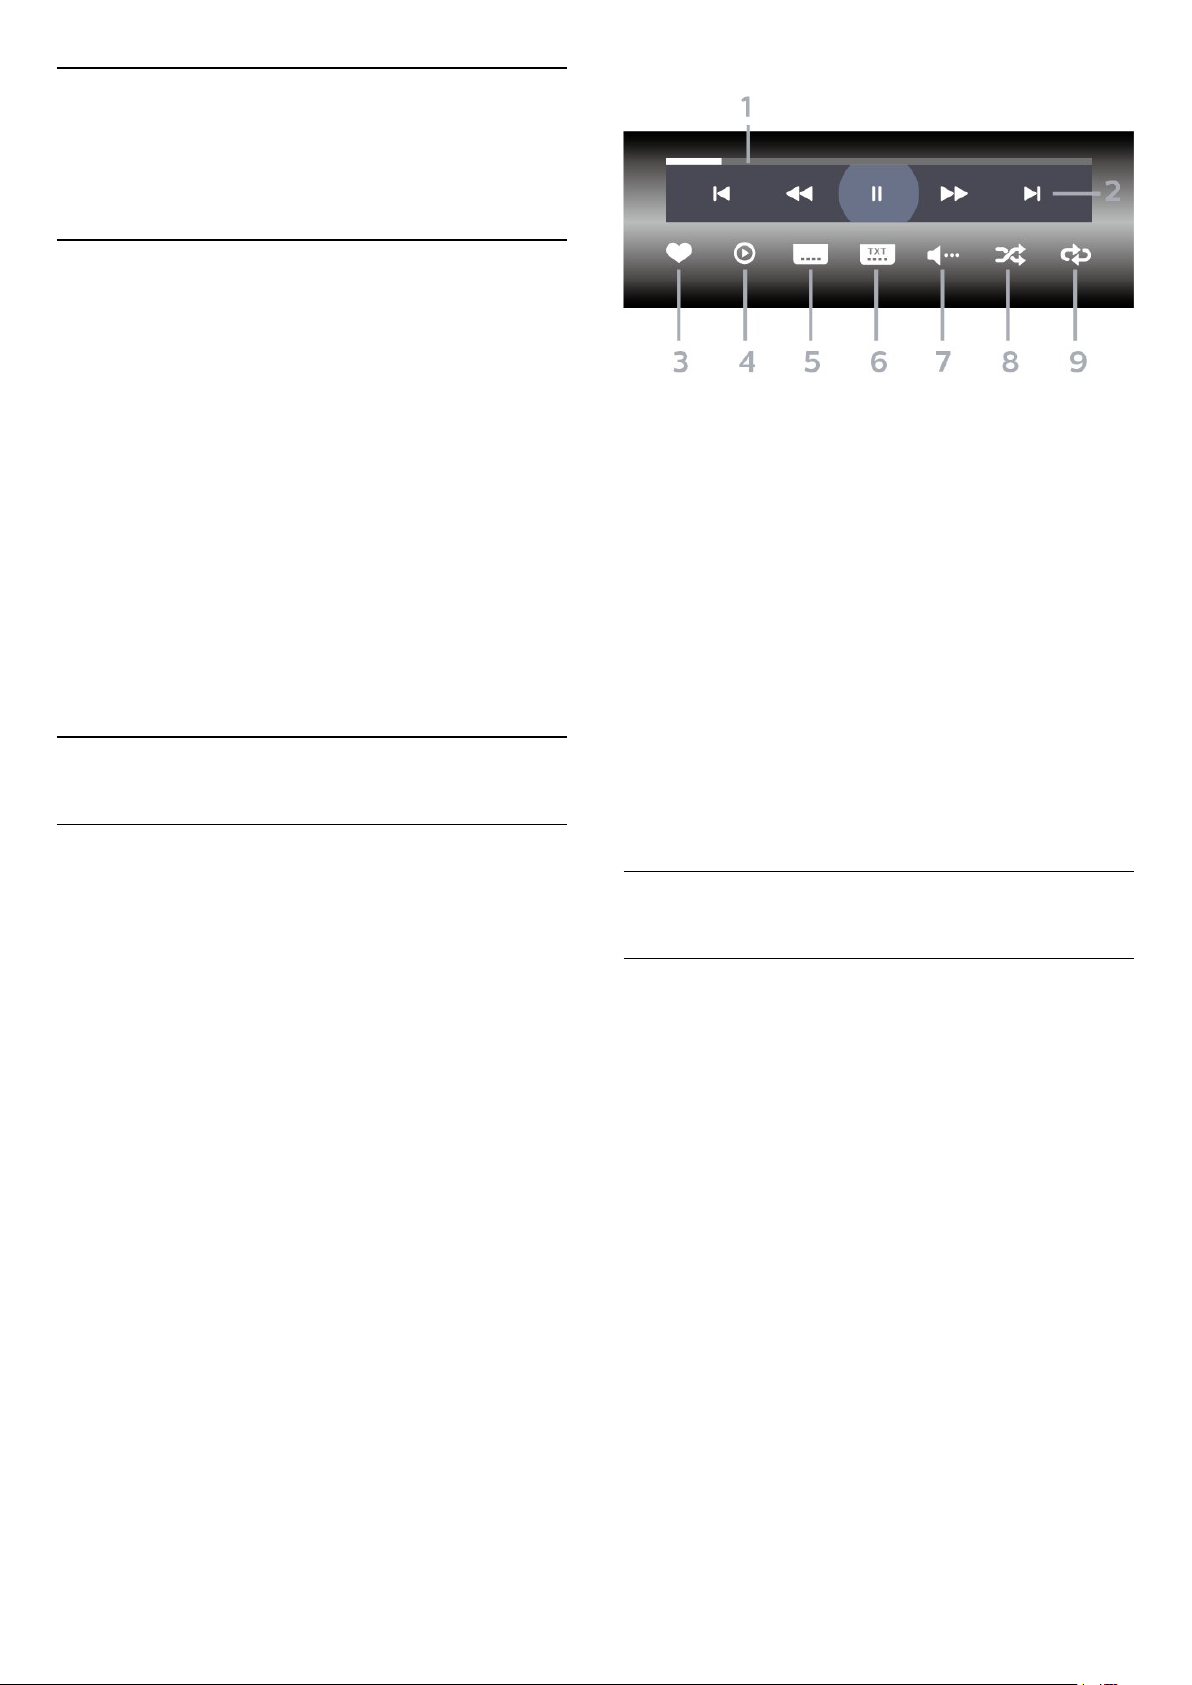
Play your Videos
1 - Progress bar
2 - Playback control bar
- : Jump to the previous video in a folder
- : Jump to the next video in a folder
- : Rewind
- : Fast forward
- : Pause the playback
3 - Mark as favourites
4 - Play all videos
5 - Subtitle: switch subtitles On, Off or On During
Mute.
6 - Subtitle language: select a Subtitle Language
(Not available for Professional Mode ON.)
7 - Audio language: select an audio language
8 - Shuffle: play your files in a random order
9 - Repeat: plays all videos in this folder once or
continuously
Play Videos
Open video folder
1 - Press Home, select TV Channels .
2 - Select USB , select Videos and
press OK.
To go back to the folder, press .
Play a video
1 - Press Home, select TV Channels .
2 - Select USB , select Videos and
press OK.
3 - Select one of video .
To pause the video, press OK. Press OK again to
continue.
Control bar
To show or hide the control bar when a video is
playing, press OK.
8.3
View your Photos
View Photos
Open photo folder
1 - Press Home
2 - Select USB , select Photos and
press OK.
View a photo
1 - Press Home, select TV Channels .
2 - Select USB , select Photos and
press OK.
3 - Select Photos and select one of photos .
Control bar
, select TV Channels .
15
Page 16

1 - Playback control bar
- : Jump to the previous photo in a folder
- : Jump to the next photo in a folder
- : Pause the slideshow playback
2 - Mark as favourites
3 - Start a slideshow
4 - Rotate the photo
5 - Shuffle: play your files in a random order
6 - Repeat: plays all photos in this folder once or
continuously
7 - Stop the music playing in the background (Not
available in Professional Mode ON)
8 - Set the speed of the slide show
View 360 Photos
Open 360 Photos folder
1 - Press Home, select TV Channels .
2 - Select USB Devices and press (right) to
select the USB device you need.
3 - Select 360 Photos.
1 - Playback control bar
- : Jump to the previous photo in a folder
- : Jump to the next photo in a folder
- : Rewind playback at 2x, 4x, 32x speed
- : Wind playback at 2x, 4x, 32x speed
- : Pause the playback
2 - Mark as favourites
3 - Play one / Play all: play one photo or play all
photos in this folder.
4 - Manual mode /Auto mode: when the 360 player
is started, it will auto pan the selected 360 photo from
left to right (0 to 360 degrees) in 360 view.
5 - Little Planet view: Little Planet is an alternate and
fun view of 360 photo. When Little Planet view is
started, the 360 photo will be rendered in a wrapped
around view like a planet.
6 - Shuffle: play your files in a random order.
7 - Repeat: plays all photos in this folder once or
continuously.
8 - Stop the music playing in the background.
8.4
View a 360 photo
1 - Press Home, select TV Channels .
2 - Select USB Devices and press (right) to
select the USB device you need.
3 - Select 360 Photos and select one of photos .
Control bar
Play your Music
Play Music
Open Music folder
1 - Press Home, select TV Channels .
2 - Select USB Devices, select Music and
press OK.
Play music
1 - Press Home, select TV Channels .
2 - Select USB Devices , select Music and
press OK.
3 - You can quickly find a music using classification
- Genres, Artists, Albums, Tracks.
Control bar
16
Page 17
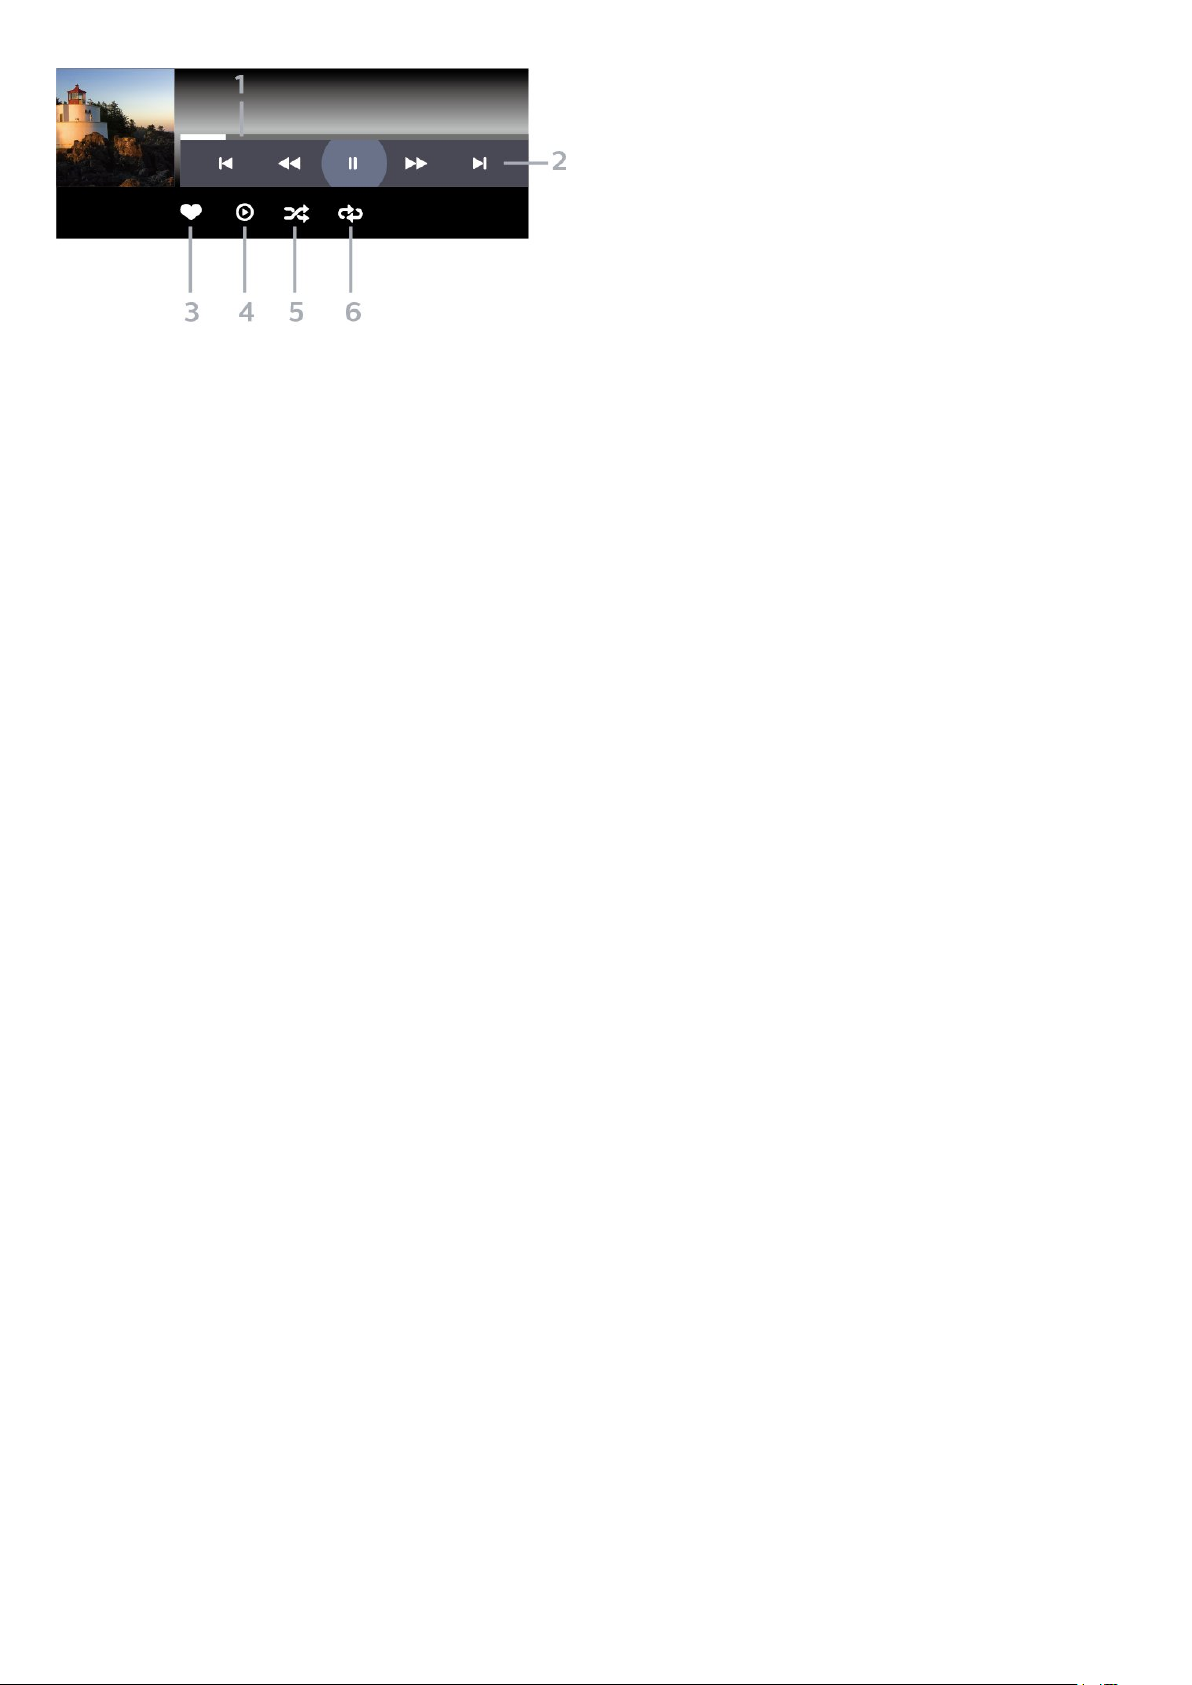
1 - Progress bar
2 - Playback control bar
- : Jump to the previous music in a folder
- : Jump to the next music in a folder
- : Rewind
- : Fast forward
- : Pause the playback
3 - Mark as favourites
4 - Play all music
5 - Shuffle: play your files in a random order
6 - Repeat: plays all music in this folder once or
continuously
17
Page 18
9
Games
9.1
Play a Game
From a Game Console
To start a game from a Game Console…
Switch on the Game Console.
Professional Mode OFF Press Home, select
Apps. Choose Sources and press OK.
Start the game.
Press BACK repeatedly or press EXIT or
stop the app with its dedicated exit/stop button.
Professional Mode ON Press Home,
select TV Channels and select a game console
or the name of the connection.
Start the game.
Press BACK repeatedly or press EXIT or
stop the app with its dedicated exit/stop button.
By Apps
To start a game from a Game Apps…
Professional Mode Off Press Home,
select Apps and then select Google Play
Games.
Sign in your Google account and start a game.
Press BACK repeatedly or press EXIT or
stop the app with its dedicated exit/stop button.
Professional Mode ON Press Home.
Select Games.
Sign in your Google account and start a game.
Press BACK repeatedly or press EXIT or
stop the app with its dedicated exit/stop button.
18
Page 19
10
Professional Menu
App
10.1
About the Professional Menu
App
From the Professional Menu App, you can start any
activity you can do with the TV.
The left part of the Professional Menu App is
organised in rows…
• Recommended
• TV Channels
• Cast
• Apps
• Games
• More
The upper right part of the Professional Menu App is
organised in rows…
• Manage Account
• Messages (This in an optional function
depends on Hotel's internal settings.)
• Bill (This in an optional function depends on
Hotel's internal settings.)
• Set Alarm
• Weather
• Menu Language
• Current Time
10.2
Open the Professional Menu
When opening the Professional Menu App, the
background application/content playback will stop.
You have to select the application or content
from the Professional Menu App to resume.
10.3
TV Channels
Watching channels
Tune to a Channel
To start watching TV channels, press
tunes to the channel you last watched.
Switch channels
- To switch channels, press CH +/-.
Previous channel
- To switch back to the previously tuned channel,
press
10.4
BACK.
. The TV
Games
To open the Professional Menu App and open
Games…
1 - Press
App.
Home to pen the Professional Menu
App
Professional Mode OFF - Please refer to Chapter
"Android TV Home Screen".
Professional Mode ON - To open the Professional
Menu App and open an item…
1 - Open the Professional Menu App by pressing
Home .
2 - Select an activity by using the arrow keys and
press OK to start the activity.
3 - To close the Professional Menu App without
changing the current activity, press .
2 -
Select Games and press OK .
Ideal game setting
For some games, where speed and precision is
needed, set the TV to the ideal Game
you start playing.
If your game console is added as a Game type of
device in the Sources menu (list of connections), the
TV is set to the ideal Game setting automatically.
If the type of your game console is set as Player and
used as a disc player most of the time, leave the
19
setting before
Page 20
device type set to Player.
To set the TV to the ideal setting manually . . .
1 - Select Home > More > Settings
> Picture > Picture style.
2 - Select Game and press OK.
3 - Press , repeatedly if necessary, to close the
menu. Remember to set the Game or computer
setting back to Off when you stop playing the game.
10.5
Professional Settings
Picture Style
Select a style
Sound Style
Select a style
Press Home > More > Settings >
Sound > Sound style.
For easy sound adjustment, you can select a preset
setting with sound style.
• Personal - Your personal choices made in
Personalise picture and sound
• Original - Most neutral sound setting
• Movie - Ideal for watching movies
• Music - Ideal for listening to music
• Game - Ideal for gaming
• News - Ideal for speech
Press Home > More > Settings >
Picture > Picture style.
For easy picture adjustment, you can select a preset
picture style.
• Personal - The picture preferences you set during
the first start up.
• Vivid - Ideal for daylight viewing
• Natural - Natural picture settings
• Standard - Most energy conscious setting Factory setting
• Movie - Ideal for watching movies
• Game - Ideal for playing games
• Computer - Ideal for connecting to computer
Picture Format
Select picture format
If the picture is not filling the whole screen, if black
bars are showing on the top or bottom or at both
sides, you can adjust the picture to fill the screen
completely.
To select one of the basic settings to fill the screen…
Language
Change the language of the TV menu and messages
Press Home > More > Settings > Menu
Language.
Select your language and press OK.
Eco Settings
Set screen off to save energy consumption
Press Home > More >
Features > Sleep Timer > Screen Off.
If you only listen to music on TV, you can switch off
the TV screen.
Only the TV screen will switch off.
Set TV switch off timer
Press Home > More > Features >
Sleep Timer > Sleep Timer.
Press Home > More > Settings
> Picture format.
The following format can be available according the
picture on screen.
• Wide screen
• Fill screen
• Fit to Screen
• Unscaled
Press the arrows (up) or (down) to adjust the
value. The value 0 (Off) deactivates the automatic
switch off.
Select Switch off timer, the TV switches off
automatically to save energy.
* If you use the TV as a monitor or use a digital
receiver to watch TV (a Set-Top Box - STB), you
should deactivate this automatic switch off, to set the
value to 0.
20
Page 21
10.6
Google Account
Sign In
To enjoy the full capabilities of your Philips Android
TV, you can sign in to Google with your Google
Account.
By signing in you'll be able to play your favourite
games across phone, tablet and TV. You'll also get
customised video and music recommendations on
your TV home screen as well as access to YouTube,
Google Play and other apps.
Use your existing Google Account to sign in to
Google on your TV. A Google Account consists of an
email address and a password. If you don't have an
Google Account yet, use your computer or tablet to
create one (accounts.google.com). If you did not sign
in during the first TV installation, you can always sign
in later.
Sign In
Press > Open the Professional Menu App screen.
Choose the Manage Account at the upper right part
of the Professional Menu App screen and
press OK. With the on-screen keyboard, enter your
email address and password, press the same OK key
to sign in.
21
Page 22
11
11.3
Android TV Home
Screen
11.1
About the Android TV Home
Screen
To enjoy the benefits of your Android TV, connect the
TV to the Internet.
Like on your Android smartphone or tablet, the Home
screen is the centre of your TV. From the Home sreen
you can decide what to watch by browsing
entertainment options from app and live TV. Your
Home has channels to let you discover great contents
from your favourite apps. You can also add additional
channels or find new apps to get more contents.
11.2
Android TV Settings
Picture
Picture Settings
Picture Style
Select a style
Press
For easy picture adjustment, you can select a preset
picture style.
• Personal - The picture preferences you set during
the first start up.
• Vivid - Ideal for daylight viewing
• Natural - Natural picture settings
• Standard - Most energy conscious setting Factory setting
• Movie - Ideal for watching movies
• Game - Ideal for playing games
• Computer - Ideal for connecting to computer
> Settings > Picture > Picture style.
Open the Android TV Home
Screen
Professional Mode ON - please refer to the
installation manual.
Professional Mode OFF - To open the Android TV
Home Screen and open an item…
1 - Press Menu and navigate to ‘Philips Collection’,
then press OK.
2 - Select an activity using the arrow keys and
press OK to start the activity.
3 - To close the Home menu without changing the
current activity, press .
When opening the Android TV Home screen, the
background application/content playback will stop.
You have to select the application or content from the
Android TV Home screen to resume.
Colour, Contrast, Sharpness, Brightness
Adjust the picture colour
Press
Press the arrows (up) or (down) to adjust the
colour saturation value of the picture.
Adjust the picture contrast
Press
Picture > Contrast.Press the arrows (up) or
(down) to adjust the contrast value of the picture.
You can decrease contrast value to reduce power
consumption.
Adjust the picture sharpness
Press
> Picture > Sharpness.
Press the arrows (up) or (down) to adjust the
sharpness value of the picture.
Adjust brightness
Press
> Picture > Brightness.
Press the arrows (up) or (down) to set the
level of brightness of the picture signal.
Home > Settings > Picture > Colour.
Home > Settings >
Home > Settings
Home > Settings
Note: Setting of brightness much away from
reference value (50) may result lower contrast.
22
Page 23
Advanced Picture Settings
Video Contrast, Gamma
Colour Settings
Advanced Colour Settings
Adjust the colour enhancement
Press Home > Settings >
Picture > Advanced > Colour > Colour
Enhancement.
Select Maximum, Medium, or Minimum to set the
level of the colour intensity and the details in bright
colours.
Select the preset colour temperature
Press Home > Settings >
Picture > Advanced > Colour > Colour
Temperature.
Select Normal, Warm, or Cool to set the colour
temperature for your preference.
Customise colour temperature
Press Home > Settings >
Picture > Advance
d > Colour > Custom Colour temperature.
Select Custom in Colour temperature menu
to customise a colour temperature yourself. Press
the arrows (up) or (down) to adjust the
value. WP is white point and BL is black level. You
can also select one of the presets in this menu.
Video contrast
Press Home > Settings >
Picture > Advanced > Contrast > Video
contrast.
Press the arrows (up) or (down) to adjust the
video contrast level.
Gamma
Press Home > Settings >
Picture > Advanced > Contrast > Gamma.
Press the arrows (up) or (down) to set a nonlinear setting for picture luminance and contrast.
Advanced Sharpness Settings
Picture Clean
Noise reduction
Press Home > Settings > Picture > Advanced >
Picture clean > Noise reduction.
Select Maximum, Medium, or Minimum to set the
level for removing the noise in video content.
Noise is mostly visible as small moving dots in onscreen picture.
Advanced Contrast Settings
Contrast Modes
Press Home > Settings >
Picture > Advanced > Contrast > Contrast
mode.
Select Normal, Optimized for picture, or Optimized
for energy savings to set the TV automatically
reduces the contrast, for best power consumption or
for best picture experience, or select Off to switch
off the adjustment.
Dynamic Contrast
Press Home > Settings >
Picture > Advanced > Contrast > Dynamic
contrast.
Select Maximum, Medium, or Minimum to set the
level at which the TV automatically enhances the
details in the dark, middle and light areas of the
picture.
MPEG Artefact Reduction
Press Home > Settings > Picture > Advanced >
Picture clean > MPEG Artefact Reduction.
Select Maximum, Medium, or Minimum to have
different degress of smoothing the artefects in digital
video content.
MPEG artefacts are mostly visible as small blocks or
jagged edges in on-screen images.
Picture Format
If the picture is not filling the whole screen, if black
bars are showing on the top or bottom or at both
sides, you can adjust the picture to fill the screen
completely.
To select one of the basic settings to fill the screen…
1 - While watching a TV channel, press Home >
Settings > Picture > Picture Format.
2 - Select a format from the list and press OK.
3 - Press BACK, repeatedly if necessary, to close
the menu.
23
Page 24
The following format can be available according the
picture on screen . . .
• Wide screen
• Fill screen
• Fit to Screen
• Unscaled
Sound
Sound Style
Select a style
Press Home > Settings > Sound > Sound
style.
For easy sound adjustment, you can select a preset
setting with sound style.
• Personal - Your personal choices made in
Personalise picture and sound
• Original - Most neutral sound setting
• Movie - Ideal for watching movies
• Music - Ideal for listening to music
• Game - Ideal for gaming
• News - Ideal for speech
Sound Management
Select a device.
Press Home > Settings > Sound > Sound
Management.
Configure the audio output devices.
• Surround Mode - Select the surround sound effect
for the internal TV speakers.
• Auto volume - Select DTS TruVolume to deliver a
robust consistent output. Select Night Mode for a
more comfortable quiet listening experience.
• Clear Sound - Select On to improve the sound for
speech. Ideal for news programmes.
• Audio Out Format - Stereo (uncompressed): If your
audio playback devices have no multichannel sound
processing, select to only output stereo content to
your audio playback devices. Multichannel: Select to
only output 5.1 audio content (compressed
multichannel sound signal) to your audio playback
devices. Multichannel (bypass): Select to send
original bitstream from HDMI ARC to the connected
HDMI Sound System. Dolby Digital Plus: Select to
output Dolby Digital Plus or DTS content to your
audio playback devices or Home theatre system.
• Audio Out Leveling - Adjust the loudness level from
device which is connected to digital audio output
(SPDIF) or HDMI.
• Audio Out Delay - For some Home Theatre
Systems you might need to adjust the audio sync
delay to synchronise the audio to the
video. Select Off if a sound delay is set on your
Home Theatre System.
• Audio Out Offset (Only available when Digital out
delay set to On) - If you cannot set a delay on the
Home Theatre System, you can set the TV to sync the
sound. You can set an offset that compensates for the
time necessary for the Home Theatre System to
process the sound of the TV picture. You can set the
value in steps of 5ms. Maximum setting is 60ms.
• TV Speakers - Set the TV to play the sound on TV or
on the connected audio system.
• Headphone/Bathroom speakers - On/Off.
• Headphone/Bathroom Spk Fixed Vol - When
enabled, the volume level of
the Headphone/Bathroom speaker will be fixed to
the Switch on Settings.
• Headphone Detection - On/Off.
TV placement
Press Home > Settings > Sound > TV
Placement.
Select On a TV stand or On the wall to have best
sound reproduction according to the setting.
Advanced
Press Home > Settings > Sound >
Advanced.
Eco Settings
Sleep Timer
Press Home > Settings > Eco Settings > Sleep
Timer.
Set the TV to switch to standby automatically after a
preset time.To disable this feature, please set time to
zero.
Press the arrows (up) or (down) to adjust the
value. The value 0 (Off) deactivates the automatic
switch off.
Select Switch off timer, the TV switches off
automatically to save energy.
* If you use the TV as a monitor or use a digital
receiver to watch TV (a Set-Top Box - STB), you
should deactivate this automatic switch off, to set the
value to 0.
Adjust the advanced sound settings individually.
24
Page 25
Screen Off
Press Home > Settings > Eco Settings >
Screen Off.
If you only listen to music on TV, you can switch off
the TV screen.
Only the TV screen will switch off.
Region, and Language
languages
Press Home > Settings > Region, and
Language > Languages.
Digital TV channels can broadcast special audio
commentary describing what is happening on
screen.
access > Audio description > Mixed volume, Audio
effects, Speech.
• Select Mixed volume, you can mix the volume of
the normal audio with the audio commentary. Press
the arrows (up) or
• Set Audio effect to On for extra audio effects in
the commentary audio, like stereo or fading sound.
• Select Speech to set speech
preference, Descriptive or Subtitles.
Settings > Accessibility > Universal
(down) to adjust the value.
Set the region or language settings.
• Android system / Menu Language - Change the
language for menus and messages.
• Primary Audio - Set your highest preference for
audio language in broadcasts.
• Secondary Audio - Set your next preference for
audio language in broadcasts.
• Primary Subtitles - Set your highest preference for
subtitles language in broadcasts.
• Secondary Subtitles - Set your next preference for
subtitles language in broadcasts.
• Primary Text - Set your first preference for Text
language in broadcasts.
• Secondary Text - Set your next preference
for Text language in broadcasts.
Universal Access Settings
Press > Settings > Accessibility > Universal
access.
With Universal Access switched on, the TV is
prepared for use for the deaf, hard of hearing, blind or
partially sighted people.
Content Rating
Rating Level
Press > Settings > Content rating.
To prevent children from watching a programme not
suitable for their age, you can set an age
rating. Digital channels can have their programmes
age rated. When the age rating of a programme is
equal to or higher than the age you have set as age
rating for your child, the programme will be
locked. To watch a locked programme, you must
enter the code first.
To set an age rating
Press
Level.
Select the age and press OK. To switch off the age
rating, select None. However, in some countries you
must set an age rating.
> Settings > Content rating > Rating
Switch on universal access settings
Press > Settings > Accessibility > Universal
access > On.
Universal access for hearing impaired people
Press > Settings > Accessibility > Universal
access > Hearing impaired > On.
• Some digital TV channels broadcast special audio
and subtitles adapted for the hard of hearing or deaf
people.
• Switched on, the TV automatically switches to the
adapted audio and subtitles, if available.
Universal access for blind or partially sighted
people
Press > Settings > Accessibility > Universal
access > Audio description > Audio description >
On.
Set Code and Change Code
Press Home> Settings > Content rating.
The child lock code is used to lock or unlock channels
or programmes.
Set new code or reset change code.
Press Home > Settings > Content rating >
Change Code.
Note:
If you forgot your PIN code, you can override the
current code use 8888 and enter a new code.
25
Page 26
11.4
Connect your Android TV
Network and Internet
Networks > Connect to Network > WPS.
If your router has WPS, you can directly connect to
the router without scanning for networks. If you have
devices in your wireless network that use the WEP
security encryption system, you cannot use WPS.
Home Network
To enjoy the full capabilities of your Philips Android
TV, your TV must be connected to the Internet.
Connect the TV to a home network with a high-speed
Internet connection. You can connect your TV
wirelessly or wired to your network router.
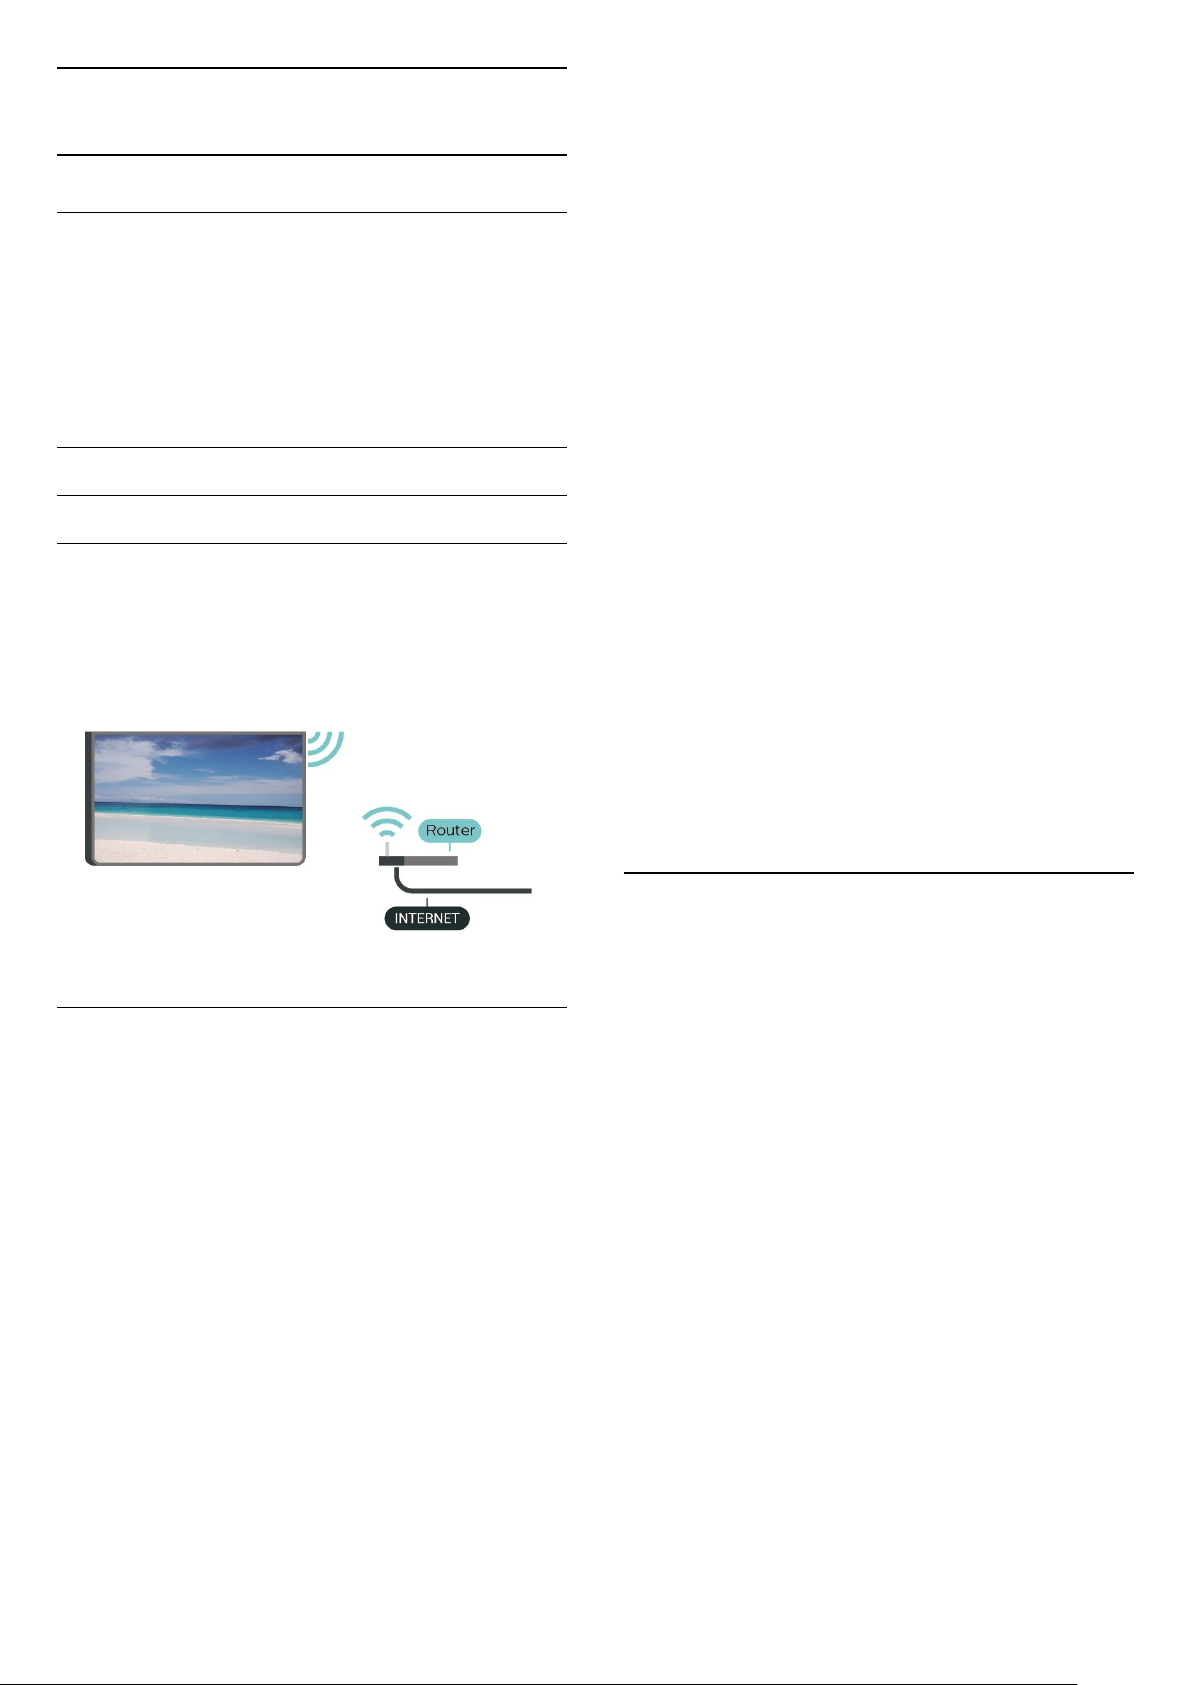
Connect to Network
Wireless Connection
What You Need
To connect the TV to the Internet wirelessly, you need
a Wi-Fi router with a connection to the Internet.
Use a high-speed (broadband) connection to the
Internet.
1 - Go to the router, press the WPS button and return
to the TV within 2 minutes.
2 - Select Connect to make the connection.
3 - A message will be shown when the connection is
successful.
Make the Connection - WPS WITH PIN Code
Press Home > Settings > Wireless and
Networks > Connect to Network > WPS WITH PIN
Code.
If your router has WPS with a PIN code, you can
directly connect to the router without scanning for
networks. If you have devices in your wireless
network that use the WEP security encryption system,
you cannot use WPS.
1 - Write down the 8-digit PIN code shown on screen
and enter it in the router software on your PC. Consult
the router manual on where to enter the PIN code in
the router software.
2 - Select Connect to make the connection.
3 - A message will be shown when the connection is
successful.
Make the Connection
Make the Connection - WIRELESS
Press Home > Settings > Wireless and
Networks > Connect to Network > WIRELESS.
1 - In the list of found networks, select on your
wireless network. If your network is not in the list
because the network name is hidden (you switched
off the SSID broadcast of the router), select Add New
Network to enter the network name yourself.
2 - Depending on the type of router, enter your
encryption key - WEP, WPA or WPA2. If you entered
the encryption key for this network before, you can
select OK to make the connection immediately.
3 - A message will be shown when the connection is
successful.
Problems
Wireless network not found or distorted
• Microwave ovens, DECT phones or other Wi-Fi
802.11b/g/n/ac devices in your proximity might
disturb the wireless network.
• Make sure that the firewalls in your network allow
access to the TV's wireless connection.
• If the wireless network does not work properly in
your home, try the wired network installation.
Internet does not work
• If the connection to the router is OK, check the
router connection to the Internet.
The PC and Internet connection are slow
• Look in your wireless router's user manual for
information on indoor range, transfer rate and other
factors of signal quality.
• Use a high-speed (broadband) Internet connection
for your router.
DHCP
• If the connection fails, you can check the DHCP
(Dynamic Host Configuration Protocol) setting of the
router. DHCP should be switched on.
Make the Connection - WPS
Press Home > Settings > Wireless and
26
Page 27
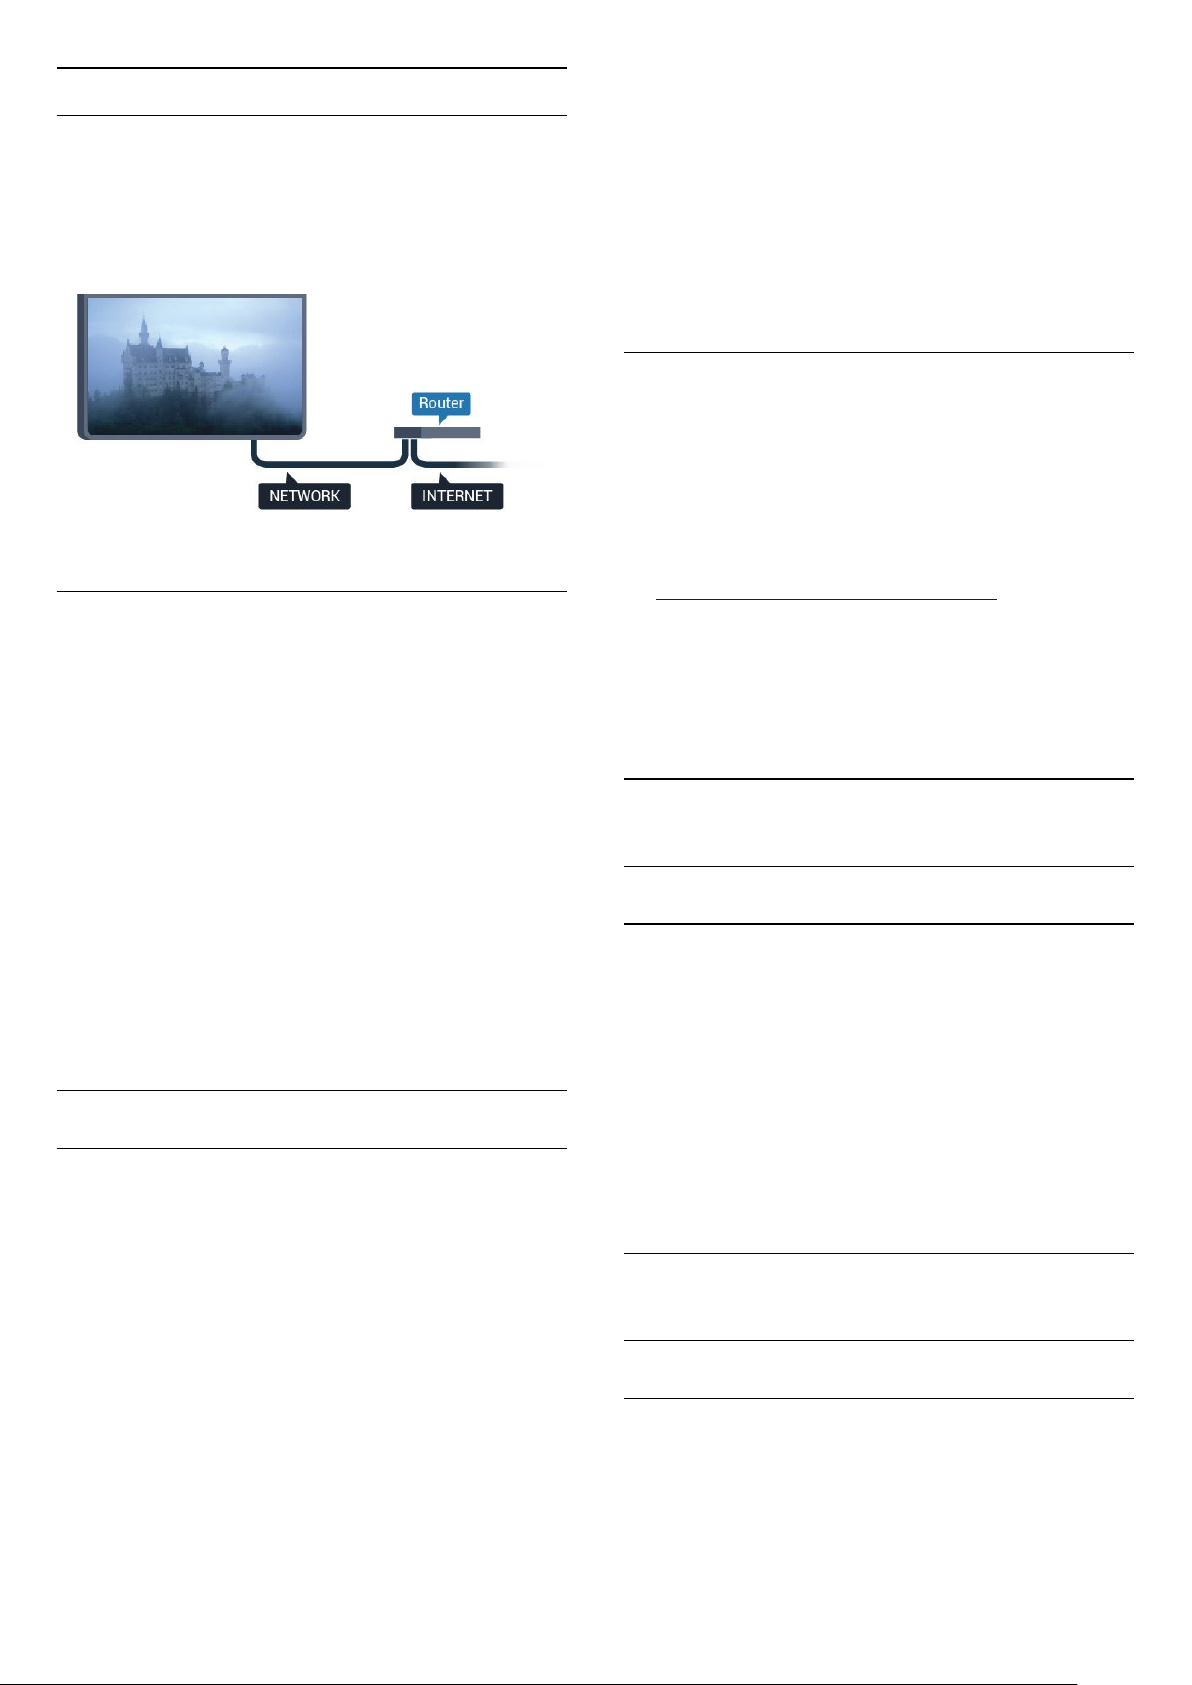
Wired Connection
did not sign in during the first TV installation, you can
always sign in later.
What You Need
To connect the TV to the Internet, you need a
network router with a connection to the
Internet. Use a high-speed (broadband) connection
to the Internet.
Make the Connection
Make the Connection - WIRED
Press Home > Settings > Wireless and
Networks > Connect to Network > WIRED.
Sign In
Press Home > Apps > Google Play.
With the on-screen keyboard, enter your email
address and password, press the same OK key to
sign in.
Android Settings
You can set or view several Android specific settings
or information. You can find the list of apps installed
on your TV and the storage space they need. You can
set the language you like to use with Voice
Search. You can configure the onscreen keyboard or
allow apps to use your location. Explore the different
Android settings. You can go
to www.support.google.com/androidtv
information on these settings.
To open these settings
Press Home > Settings > Settings > Android
Settings.
for more
1 - Connect the router to the TV with a network cable
(Ethernet cable**).
2 - Make sure that the router is switched on.
3 - The TV constantly searches for the network
connection.
4 - A message will be shown when the connection is
successful.
If the connection fails, you can check the DHCP
setting of the router. DHCP should be switched on.
**To fulfill EMC regulations, use a shielded FTP Cat.
5E Ethernet cable.
Google Account
Sign In
To enjoy the full capabilities of your Philips Android
TV, you can sign in to Google with your Google
Account.
By signing in you'll be able to play your favourite
games across phone, tablet and TV. You'll also get
customised video and music recommendations on
your TV home screen as well as access to YouTube,
Google Play and other apps.
Use your existing Google Account to sign in to
Google on your TV. A Google Account consists of an
email address and a password. If you don't have an
Google Account yet, use your computer or tablet to
create one (accounts.google.com). To play games
with Google Play, you need a Google+ profile. If you
11.5
Channels
Watching channels
Tune to a Channel
To start watching TV channels, press . The TV
tunes to the channel you last watched.
Switch channels
- To switch channels, press CH+ or CH- .
Previous channel
- To switch back to the previously tuned channel,
press BACK.
11.6
Channel Installation
Install Channels
Antenna/Cable Installation
27
Page 28

Search for Channels
You can reinstall all channels and leave all other TV
settings untouched.
If a PIN code is set, you will need to enter this code
before you can reinstall channels.
To Search for Channels…
1 - Press Home > Settings > Install
channels and press OK.
2 - Select RF Channel Installation and press OK.
3 - Enter your PIN code if necessary.
Select Search for Channels and press OK.
Select Start and press OK.
Select the country where you are now and press OK.
Select Start and press OK.
Select the type of installation you want, Antenna
(DVB-T) or Cable (DVB-C) and press OK.
Select Next and press OK.
Select the type of channels you want, Digital and
Analogue Channels or Only Digital Channels and
press OK.
Select Next and press OK.
Select Start and press OK to update the digital
channels. This can take a few minutes.
Press (left) to go back one step or press BACK
to close the menu.
Automatic Channel Update
If you receive digital channels, you can set the TV to
automatically update these channels.
Once a day, at 6 AM, the TV updates the channels
and stores new channels. New channels are stored in
the Channels List and are marked with a .
Channels without a signal are removed. The TV must
be in standby to automatically update channels. You
can switch off Auromatic Channel Update.
To switch off the automatic update…
1 - Press Home > Settings > Install
channels and press OK.
2 - Select RF Channel Installation and press OK.
3 - Enter your PIN code if necessary.
4 - Select Automatic Channel Update and
press OK
5 - Select Off and press OK.
6 - Press (left) to go back one step or
press BACK to close the menu.
To switch off the message…
1 - Press Home > Settings > Install
channels and press OK.
2 - Select RF Channel Installation and press OK.
3 - Enter your PIN code if necessary.
4 - Select Automatic Channel Update and
press OK
5 - Select Off and press OK.
6 - Press (left) to go back one step or
press BACK to close the menu.
In certain countries, the Automatic channel update is
done while watching TV or on any moment when the
TV is in standby.
Digital: Manual Installation
Digital TV channels can be manually installed,
channel by channel.
To install digital channels manually…
1 - Press Home > Settings > Install
channels and press OK.
2 - Select RF Channel Installation and press OK.
3 - Select Digital: Manual Installation and
press OK.
4 - Select Search and press OK. You can enter a
frequency yourself to find a channel or let the TV
search for a channel. Press (right) to
select Search and press OK to search for a channel
automatically. The found channel is shown on screen
and if the reception is poor, press Search again. If
you want to store the channel, select Done and
press OK.
Analogue: Manual Installation
Analogue TV channels can be manually installed,
channel by channel.
To install analogue channels manually…
1 - Press Home > Settings > Install
channels and press OK.
2 - Select RF Channel Installation and press OK.
3 - Select Analogue: Manual Installation and
press OK.
• System
To set up the TV system, select System.
Select your country or the part of the world where
you are now and press OK.
Channel Update Message
When new channels are found or if channels are
updated or removed, a message is shown at TV start
up. To avoid this message to appear after every
channel update, you can switch it off.
• Search Channel
To find a channel, select Search Channel and
press OK. You can enter a frequency yourself to find
a channel or let the TV search for a channel.
Press (right) to select Search and press OK to
search for a channel automatically. The found
channel is shown on screen and if the reception is
28
Page 29
poor, press Search again. If you want to store the
channel, select Done and press OK.
• Store
You can store the channel on the current channel
number or as a new channel number.
Select Store Current Channel or Store as New
Channel and press OK. The new channel number is
shown briefly.
You can redo these steps until you have found all
available analogue TV channels.
11.7
Internet
Start Internet
You can browse the Internet on your TV. You can
view any Internet website but most of them are not
prepared for a TV screen.
• Some plug-ins (e.g. to view pages or videos) are not
available on your TV.
• You cannot send or download files.
• Internet pages are shown one page at a time and
full screen.
To start the Internet browser…
1 - Press HOME.
2 - Scroll down and
select Apps > Internet and press OK.
3 - Enter an Internet address and select ,
press OK.
4 - To close Internet, press HOME or .
11.8
Update from website
You can find the current firmware version of your TV
in the settings menu under “Update Software” >
"Current firmware".
Regularly check www.philips.com/support for new
Firmware updates.
Follow the instructions below to update the firmware
of your TV.
Download the latest software...
1 - Launch the Internet Explorer.
2 - Enter the Philips support site at url
http://www.philips.com/support .
3 - Enter the model number. (You can find your
model number from the label on the rear of the TV. )
4 - When enter your TV’s product page, select
Support.
5 - Select “Software updates”, and click on
“Download file” to download the software. (The
software is available as a zip file.)
6 - If the software version is higher than the version
installed on your TV, click the software download
link.
7 - Accept the license agreement/Terms and
Conditions, select “I agree”, then the zip file will be
downloaded automatically.
8 - Unzip the zip file to any directory using an archive
utility.
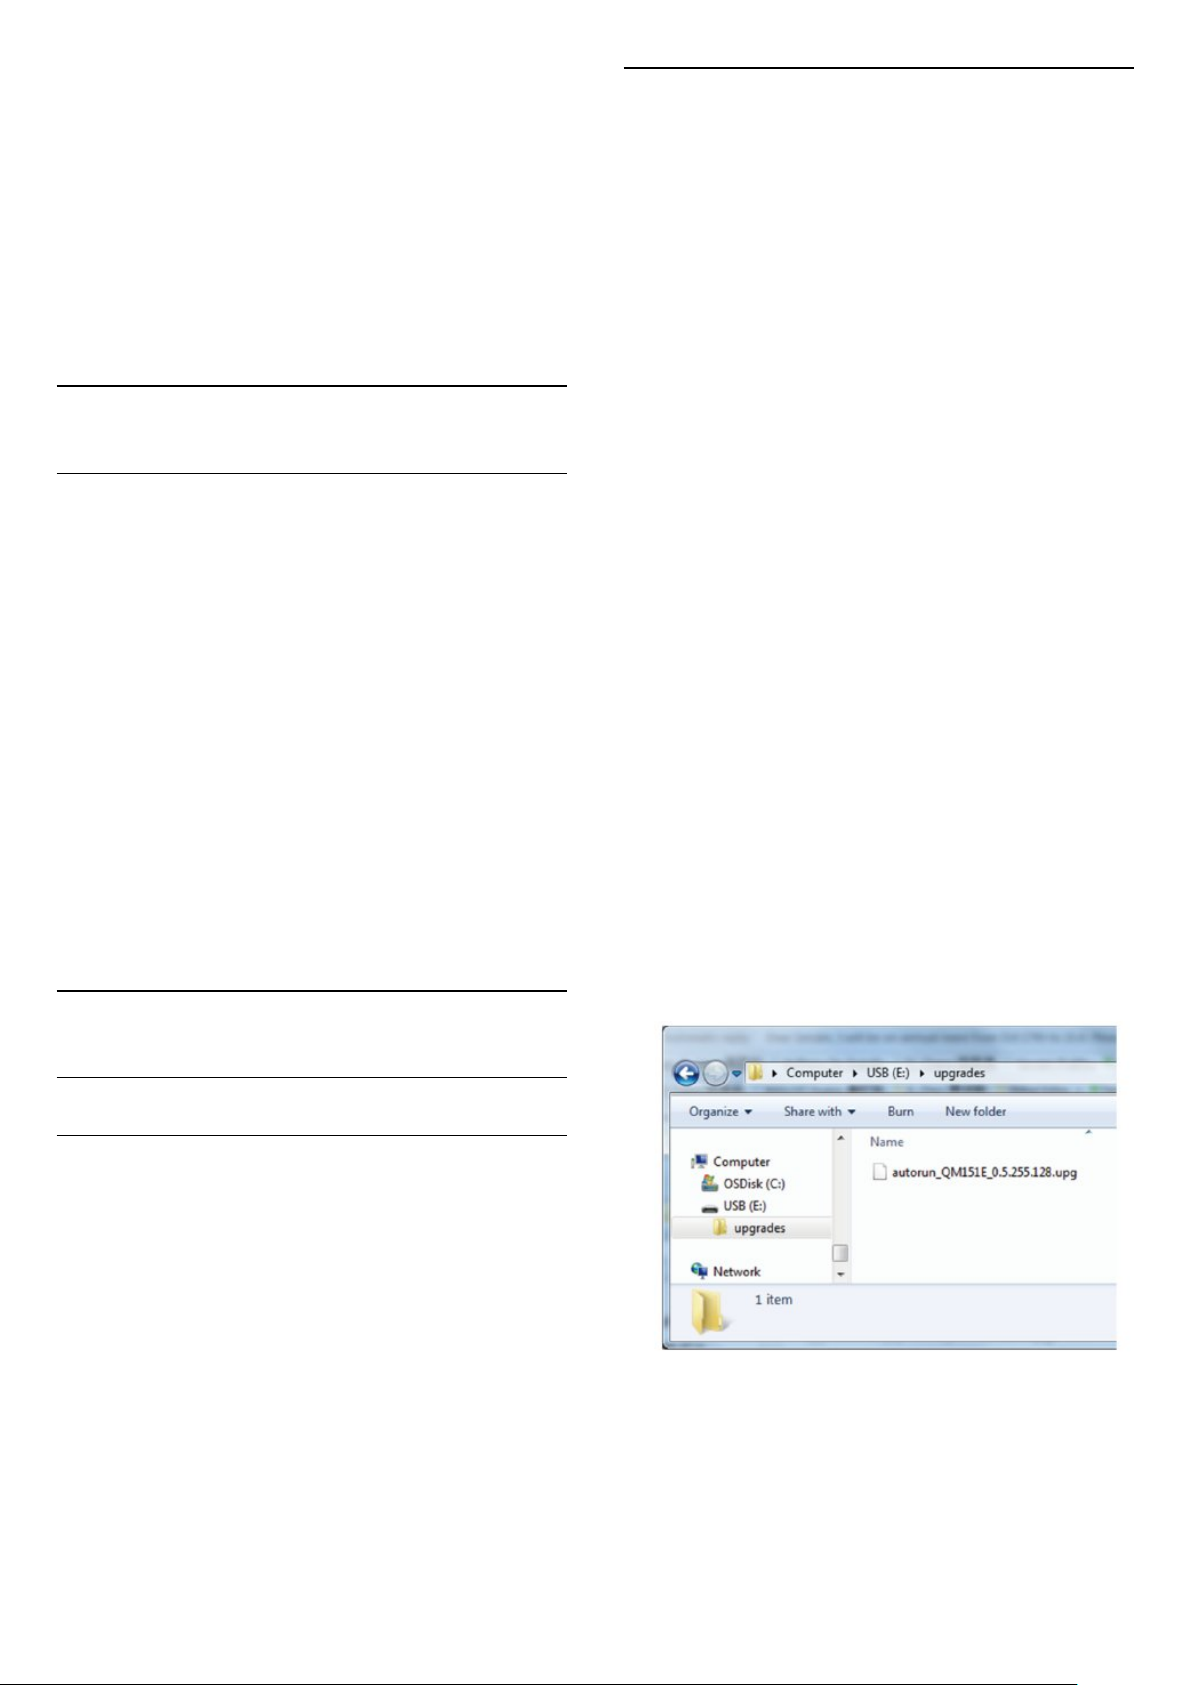
9 - Create a folder name “upgrades” in the main
directory of your USB flash drive.
10 - Copy the upg file you have extract earlier into
the upgrades folder, as depicted in the picture
below.
11 - Disconnect your USB flash drive from the
computer.
Software
Update Software
Software Version
To view the current TV software version…
1 - Press , select Settings and press OK.
2 - Select Update Software > Current
Firmware and press OK.
3 - The version, release notes and creation date are
shown.
4 - Press (left) repeatedly if necessary, to close
the menu.
Update the software...
1 - Connect your USB flash drive (containing the
software update) to the USB connector on the TV.
Wait 30 seconds or until the USB drive is recognized
by the TV.
2 - Your TV will start loading the software
29
Page 30

automatically.
3 - When the loading of the software finished, press
“Start” to activate the upgrade of the TV.
30
Page 31

12
Open Source
Software
12.1
Open Source License
About Open Source License
README for the source code of the parts of TP Vision
Netherlands B.V. TV software that fall under open
source licenses.
This is a document describing the distribution of the
source code used on the TP Vision Netherlands B.V.
TV, which fall either under the GNU General Public
License (the GPL), or the GNU Lesser General Public
License (the LGPL), or any other open source license.
Instructions to obtain copies of this software can be
found in the Directions For Use.
TP Vision Netherlands B.V. MAKES NO WARRANTIES
WHATSOEVER, EITHER EXPRESS OR IMPLIED,
INCLUDING ANY WARRANTIES OF
MERCHANTABILITY OR FITNESS FOR A PARTICULAR
PURPOSE, REGARDING THIS SOFTWARE. TP Vision
Netherlands B.V. offers no support for this software.
The preceding does not affect your warranties and
statutory rights regarding any TP Vision Netherlands
B.V. product(s) you purchased. It only applies to this
source code made available to you.
Open Source
Android (7.1.1)
This tv contains the Android Nougat Software.
Android is a Linux-based operating system designed
primarily for touchscreen mobile devices such as
smartphones and tablet computers. This software will
also be reused in TPVision Android based TV's. The
original download site for this software is
: https://android.googlesource.com/
software is made available under the terms and
conditions of the Apache license version 2, which can
be found below. Android APACHE License Version 2
( http://source.android.com/source/licenses.html ).
This includes all external sources used by official
Android AOSP.
. This piece of
GPL v2 license, which can be found below.
Additionally, following exception applies: "NOTE! This
copyright does *not* cover user programs that use
kernel services by normal system calls - this is merely
considered normal use of the kernel, and does *not*
fall under the heading of "derived work". Also note
that the GPL below is copyrighted by the Free
Software Foundation, but the instance of code that it
refers to (the linux kernel) is copyrighted by me and
others who actually wrote it. Also note that the only
valid version of the GPL as far as the kernel is
concerned is _this_ particular version of the license (ie
v2, not v2.2 or v3.x or whatever), unless explicitly
otherwise stated. Linus Torvalds"
libcurl (7.50.1)
libcurl is a free and easy-to-use client-side URL
transfer library, supporting DICT, FILE, FTP, FTPS,
Gopher, HTTP, HTTPS, IMAP, IMAPS, LDAP, LDAPS,
POP3, POP3S, RTMP, RTSP, SCP, SFTP, SMTP,
SMTPS, Telnet and TFTP. libcurl supports SSL
certificates, HTTP POST, HTTP PUT, FTP uploading,
HTTP form based upload, proxies, cookies,
user+password authentication (Basic, Digest, NTLM,
Negotiate, Kerberos), file transfer resume, http proxy
tunneling and more! The original download site for
this software is
: http://curl.haxx.se/libcurl/ COPYRIGHT AND
PERMISSION NOTICE Copyright (c) 1996 - 2010,
Daniel Stenberg, daniel@haxx.se. All rights reserved.
Permission to use, copy, modify, and distribute this
software for any purpose with or without fee is
hereby granted, provided that the above copyright
notice and this permission notice appear in all copies.
THE SOFTWARE IS PROVIDED "AS IS", WITHOUT
WARRANTY OF ANY KIND, EXPRESS ORIMPLIED,
INCLUDING BUT NOT LIMITED TO THE WARRANTIES
OF MERCHANTABILITY,FITNESS FOR A PARTICULAR
PURPOSE AND NONINFRINGEMENT OF THIRD
PARTY RIGHTS. INNO EVENT SHALL THE AUTHORS
OR COPYRIGHT HOLDERS BE LIABLE FOR ANY
CLAIM, DAMAGES OR OTHER LIABILITY, WHETHER
IN AN ACTION OF CONTRACT, TORT OROTHERWISE,
ARISING FROM, OUT OF OR IN CONNECTION WITH
THE SOFTWARE OR THE USEOR OTHER DEALINGS
IN THE SOFTWARE. Except as contained in this
notice, the name of a copyright holder shall not be
used in advertising or otherwise to promote the sale,
use or other dealings in this Software without prior
written authorization of the copyright holder.
linux kernel (3.10.79)
This tv contains the Linux Kernel. The original
download site for this software is
: http://www.kernel.org/ . This piece of software is
made available under the terms and conditions of the
libfreetypeex (2.4.2)
FreeType is a software development library, available
in source and binary forms, used to render text on to
bitmaps and provides support for other font-related
operations. The original download site for this
software is
31
Page 32

: https://github.com/julienr/libfreetype-android
Freetype License
libjpegex (8a)
This package contains C software to implement JPEG
image encoding, decoding, and transcoding. This
software is based in part on the work of the
Independent JPEG Group.----------------------The
authors make NO WARRANTY or representation,
either express or implied, with respect to this
software, its quality, accuracy, merchantability, or
fitness for a particular purpose. This software is
provided "AS IS", and you, its user, assume the entire
risk as to its quality and accuracy. This software is
copyright (C) 1991-1998, Thomas G. Lane. All Rights
Reserved except as specified below. Permission is
hereby granted to use, copy, modify, and distribute
this software (or portions thereof) for any purpose,
without fee, subject to these conditions:(1) If any part
of the source code for this software is distributed,
then this README file must be included, with this
copyright and no-warranty notice unaltered; and any
additions, deletions, or changes to the original files
must be clearly indicated in accompanying
documentation.(2) If only executable code is
distributed, then the accompanying documentation
must state that "this software is based in part on the
work of the Independent JPEG Group".(3) Permission
for use of this software is granted only if the user
accepts full responsibility for any undesirable
consequences; the authors accept NO LIABILITY for
damages of any kind. These conditions apply to any
software derived from or based on the IJG code, not
just to the unmodified library. If you use our work, you
ought to acknowledge us. Permission is NOT granted
for the use of any IJG author's name or company
name in advertising or publicity relating to this
software or products derived from it. This software
may be referred to only as "the Independent JPEG
Group's software". We specifically permit and
encourage the use of this software as the basis of
commercial products, provided that all warranty or
liability claims are assumed by the product vendor.
libpngex (1.4.1)
libpng is the official Portable Network Graphics (PNG)
reference library (originally called pnglib). It is a
platform-independent library that contains C
functions for handling PNG images. It supports almost
all of PNG's features, is extensible. The original
download site for this software is :
https://github.com/julienr/libpng-androidlibpng
license
dvbsnoop (1.2)
dvbsnoop is a DVB / MPEG stream analyzer program.
For generating CRC32 values required for composing
PAT, PMT, EIT sections The original download site for
this software is :
https://github.com/a4tunado/dvbsnoop/blob/master
/src/misc/crc32.cGPL v2
http://dvbsnoop.sourceforge.net/dvbsnoop.html
gSoap (2.7.15)
The gSOAP toolkit is an open source C and C++
software development toolkit for SOAP/XML Web
services and generic (non-SOAP) C/C++ XML data
bindings. Part of the software embedded in this
product is gSOAP software. Portions created by
gSOAP are Copyright 2001-2009 Robert A. van
Engelen, Genivia inc. All Rights Reserved. THE
SOFTWARE IN THIS PRODUCT WAS IN PART
PROVIDED BY GENIVIA INC AND ANY EXPRESS OR
IMPLIED WARRANTIES, INCLUDING, BUT NOT
LIMITED TO, THE IMPLIED WARRANTIES OF
MERCHANTABILITY AND FITNESS FOR A
PARTICULAR PURPOSE ARE DISCLAIMED. IN NO
EVENT SHALL THE AUTHOR BE LIABLE FOR ANY
DIRECT, INDIRECT, INCIDENTAL, SPECIAL,
EXEMPLARY, OR CONSEQUENTIAL DAMAGES
(INCLUDING, BUT NOT LIMITED TO, PROCUREMENT
OF SUBSTITUTE GOODS OR SERVICES; LOSS OF
USE, DATA, OR PROFITS; OR BUSINESS
INTERRUPTION) HOWEVER CAUSED AND ON ANY
THEORY OF LIABILITY, WHETHER IN CONTRACT,
STRICT LIABILITY, OR TORT (INCLUDING
NEGLIGENCE OR OTHERWISE) ARISING IN ANY WAY
OUT OF THE USE OF THIS SOFTWARE, EVEN IF
ADVISED OF THE POSSIBILITY OF SUCH DAMAGE.
restlet (2.3.0)
Restlet is a lightweight, comprehensive, open source
REST framework for the Java platform. Restlet is
suitable for both server and client Web applications. It
supports major Internet transport, data format, and
service description standards like HTTP and HTTPS,
SMTP, XML, JSON, Atom, and WADL. The original
download site for this software is
: http://restlet.org
This piece of software is made
available under the terms and conditions of the
Apache License version 2.
FaceBook SDK (3.0.1)
This TV contains Facebook SDK. The Facebook SDK
for Android is the easiest way to integrate your
Android app with Facebook's platform. The SDK
provides support for Login with Facebook
authentication, reading and writing to Facebook APIs
and support for UI elements such as pickers and
dialogs. The original download site for this software is
: https://developer.facebook.com/docs/android
This piece of software is made available under the
32
Page 33

terms and conditions of the Apache License version 2.
TomCrypt (1.1)
ffmpeg (2.1.3)
This TV uses FFmpeg. FFmpeg is a complete, cross-
platform solution to record, convert and stream audio
and video. The original download site for this
software is : http://ffmpeg.org This piece of software
is made available under the terms and conditions of
the GPL v2 license, which can be found below.
gson (2.3)
This TV uses gson. Gson is a Java library that can be
used to convert Java Objects into their JSON
representation. It can also be used to convert a JSON
string to an equivalent Java object. Gson can work
with arbitrary Java objects including pre-existing
objects that you do not have source-code of. The
original download site for this software is
: https://code.google.com/p/google-gson/ . This
piece of software is made available under the terms
and conditions of the Apache License 2.0
This software includes an implementation of the AES
Cipher, licensed by Brian Gladman. The original
download site for this software is
: http://www.gladman.me.uk/ This piece of software
is licensed by Brian Gladman.
libUpNp (1.2.1)
The original download site for this software is
: http://upnp.sourceforge.net/ This piece of software
is made available under the terms and conditions of
the BSD.
live555 (0.82)
Live555 provides RTP/RTCP/RTSP client.The original
download site for this software is
: http://www.live555.com This piece of software is
made available under the terms and conditions of the
LGPL v2.1 license, which can be found below.
iwedia stack is using tomcrypt for sw decryption. The
original download site for this software is
:
http://manpages.ubuntu.com/manpages/saucy/man
3/libtomcrypt.3.html. This piece of software is made
available under the terms and conditions of the
WTFPL.
u-boot (2011-12)
U-boot is a boot loader for embedded boards based
on ARM, MIPS and other processors, which can be
installed in a boot ROM and used to initialize and test
the hardware or to download and run application
code. This piece of software is made available under
the terms and conditions of the GPL v2 license, which
can be found below.
AsyncHttpclient (1.4.9)
The original download site for this software is
: http://loopj.com/android-async-http/ This piece
of software is made available under the terms and
conditions of the APACHE LICENSE 2.0
httpclient-4.4.1.1 (4.4.1.1)
This is needed to import
cz.msebera.android.httpclient used by
AssyncHttpClientThe original download site for this
software is
:
http://mvnrepository.com/artifact/cz.msebera.androi
d/httpclient/4.4.1.1 This piece of software is made
available under the terms and conditions of the
APACHE LICENSE 2.0
Jackson Parser (2.x)
Ipepg client uses Jackson Parser for string
manipulation. The original download site for this
software is
: https://github.com/FasterXML/jackson-core This
piece of software is made available under the terms
and conditions of the APACHE LICENSE 2.0
dnsmasq
Dnsmasq is a lightweight, easy to configure DNS
forwarder and DHCP server. The original download
site for this software is
:
https://android.googlesource.com/platform/external/
dnmasq This piece of software is made available
under the terms and conditions of the GPL v2 license,
which can be found below.
libexif (0.6.21)
Exif JPEG header manipulation tool. The original
download site for this software is
: http://libexif.sourceforge.net/ This piece of
software is made available under the terms and
conditions of the APACHE LICENSE 2.0
libexpat (2.1.0)
33
Page 34

Expat XML Parser. The original download site for this
software is : http://www.libexpat.org/Expat is free
software. You may copy, distribute, and modify it
under the terms of the License contained in the file
COPYING distributed with this package. This license is
the same as the MIT/X Consortium license.
libFFTEm ( )
neven face recognition library. The original download
site for this software is : No info. This piece of
software is made available under the terms and
conditions of the APACHE LICENSE 2.0
libicui18n (49.1.1)
International Components for unicode. The original
download site for this software is
: http://icu-project.org This piece of software is
made available under the terms and conditions of the
BSD.
libiprouteutil (3.4.0)
iproute2 TCP/IP networking and traffic control. The
original download site for this software is
: http://www.linuxfoundation.org/ This piece of
software is made available under the terms and
conditions of the GPL v2. which can be found below
libjpeg (3.4.0)
libjpeg-turbo is a JPEG image codec that uses SIMD
instructions (MMX, SSE2, NEON) to accelerate
baseline JPEG compression and decompression on
x86, x86-64, and ARM systems. The original
download site for this software is
: http://www.ijg.org/libjpeg-turbo is covered by
three compatible BSD-style open source licenses.
Refer to LICENSE.txt for a roll-up of license terms.
libmtp (1.0.1)
libmtp The original download site for this software is
: http://libmtp.sourceforge.net/ . This piece of
software is made available under the terms and
conditions of the LGPL V2.
libmdnssd (320.10.80)
MDNS Responder. The mDNSResponder project is a
component of Bonjour, 5Apple's ease-of-use IP
networking initiative. The original download site for
this software is
:
http://www.opensource.apple.com/tarballs/mDNSRe
sponder/ This piece of software is made available
under the terms and conditions of the Apache license
version 2
libnfc_ndef ( )
The original download site for this software is : No
info. This piece of software is made available under
the terms and conditions of the Apache license
version 2
libskia ( )
skia 2D graphics library Skia is a complete 2D graphic
library for drawing Text, Geometries, and Images. The
original download site for this software is
: http://code.google.com/p/skia/ This piece of
software is made available under the terms and
conditions of the BSD.
libsonivox ( )
The original download site for this software is : No
info. This piece of software is made available under
the terms and conditions of the Android APACHE
License Version 2.
libsqlite (3.9.2)
SQLite database. The original download site for this
software is : http://www.sqlite.org This piece of
software is made available under the terms and
conditions of the Android APACHE License Version 2.
libttspico ( )
The original download site for this software is : No
info. This piece of software is made available under
the terms and conditions of the Android APACHE
License Version 2.
libtinyalsa ( )
tinyalsa: a small library to interface with ALSA in the
Linux kernel. The original download site for this
software is : No info. This piece of software is made
available under the terms and conditions of the BSD.
wpa_supplicant (0.8)
Library used by legacy HAL to talk to wpa_supplicant
daemon. The original download site for this software
is : http://hostap.epitest.fi/ This piece of software is
made available under the terms and conditions of the
GPLv2.
libz (1.2.8)
zlib compression library. The original download site
34
Page 35

for this software is : http://zlib.net This piece of
software is made available under the terms and
conditions of the BSD.
iptables (1.4.20)
libffmpeg_av (2.1)
FFmpeg media player. The original download site for
this software is : https://ffmpeg.org/ This piece of
software is licensed under LGPL v2.1
iptables is a user space application program that
allows a system administrator to configure the tables
provided by the Linux kernel firewall (implemented as
different Netfilter modules) and the chains and rules it
stores. Different kernel modules and programs are
currently used for different protocols; iptables applies
to IPv4The original download site for this software is
: https://android.googlesource.com/ This piece of
software is made available under the terms and
conditions of the GPLv2.
toolbox (1.2.8)
The 'toolbox' command in Android is a multi-function
program. It encapsulates the functionality of many
common Linux commands (and some special Android
ones) into a single binary. This makes it more
compact than having all those other commands
installed individually. The original download site for
this software is
: https://android.googlesource.com/ This piece of
software is made available under the terms and
conditions of the Android APACHE License Version 2.
libssl
(7b8b9c17db93ea5287575b437c77fb36eeb81b31)
BoringSSL The original download site for this software
is
: https://boringssl.googlesource.com/boringssl/ This
piece of software is made available under the terms
and conditions of the BSD.
libOpenMAXAL
(7b8b9c17db93ea5287575b437c77fb36eeb81b31)
OpenMAX AL is an application-level multimedia
playback and recording API for mobile embedded
devicesThe original download site for this software is
: https://www.khronos.org/openmax/ License free
libOpenSLES (1.0)
Khronos OpenSL Sound API spec. The original
download site for this software is
: https://www.khronos.org/opensles/ License free
libEGL libGLESv1_CM (3.1)
Khronos OpenGL Graphics API spec. The original
download site for this software is
: https://www.opengl.org/ License free
libcurlmheg (7.21.6)
curl for MHEG. The original download site for this
software is : https://ffmpeg.org/ Curl and libcurl are
licensed under a MIT/X derivate license. Please look
at https://curl.haxx.se/docs/copyright.html
boringssl
(af0e32cb84f0c9cc65b9233a3414d2562642b342)
ssl for MHEG, Taken from android M. The original
download site for this software is
: https://boringssl.googlesource.com/boringssl/
Licensed under BSD, please find in /android/nbase/external/boringssl/NOTICE
libpng (1.6.22beta)
libpng is the official Portable Network Graphics (PNG)
reference library (originally called pnglib). It is a
platform-independent library that contains C
functions for handling PNG images. It supports almost
all of PNG's features, is extensible. The original
download site for this software is
: https://github.com/julienr/libpng-android This
code is released under the libpng license.
Hue SDK (1.8.1)
TV ambihue app uses Philips SDK to find the hue
bridge name. The original download site for this
software is
:
https://developers.meethue.com/documentation/jav
a-multi-platform-and-android-sdk
Opera Web Browser (SDK 4.8.0)
This TV contains Opera Browser Software.
Third-party licenses
WebKit
name License
WebKit URL: http://webkit.org/
(WebKit doesn't distribute an explicit license. This
LICENSE is derived from license text in the source.)
35
Page 36

Copyright (c) 1997, 1998, 1999, 2000, 2001, 2002,
2003, 2004, 2005, 2006, 2007 Alexander Kellett,
Alexey Proskuryakov, Alex Mathews, Allan Sandfeld
Jensen, Alp Toker, Anders Carlsson, Andrew
Wellington, Antti Koivisto, Apple Inc., Arthur
Langereis, Baron Schwartz, Bjoern Graf, Brent
Fulgham, Cameron Zwarich, Charles Samuels,
Christian Dywan, Collabora Ltd., Cyrus Patel, Daniel
Molkentin, Dave Maclachlan, David Smith, Dawit
Alemayehu, Dirk Mueller, Dirk Schulze, Don Gibson,
Enrico Ros, Eric Seidel, Frederik Holljen, Frerich
Raabe, Friedmann Kleint, George Staikos, Google
Inc., Graham Dennis, Harri Porten, Henry
Mason, Hiroyuki Ikezoe, Holger Hans Peter Freyther,
IBM, James G. Speth, Jan Alonzo, Jean-Loup Gailly,
John Reis, Jonas Witt, Jon Shier, Jonas Witt, Julien
Chaffraix, Justin Haygood, Kevin Ollivier, Kevin
Watters, Kimmo Kinnunen, Kouhei Sutou, Krzysztof
Kowalczyk, Lars Knoll, Luca Bruno, Maks Orlovich,
Malte Starostik, Mark Adler, Martin Jones, Marvin
Decker, Matt Lilek, Michael Emmel, Mitz Pettel,
mozilla.org, Netscape Communications Corporation,
Nicholas Shanks, Nikolas Zimmermann, Nokia, Oliver
Hunt, Opened Hand, Paul Johnston, Peter Kelly,
Pioneer Research Center USA, Rich Moore, Rob Buis,
Robin Dunn, Ronald Tschalär, Samuel Weinig, Simon
Hausmann, Staikos Computing Services Inc., Stefan
Schimanski, Symantec Corporation, The
Dojo Foundation, The Karbon Developers, Thomas
Boyer, Tim Copperfield, Tobias Anton, Torben Weis,
Trolltech, University of Cambridge, Vaclav Slavik,
Waldo Bastian, Xan Lopez, Zack Rusin
The terms and conditions vary from file to file, but
are one of:
Redistribution and use in source and binary forms,
with or without modification, are permitted provided
that the following conditions are met:
*OR*
Redistribution and use in source and binary forms,
with or without modification, are permitted provided
that the following conditions are met:
THIS SOFTWARE IS PROVIDED BY APPLE
COMPUTER, INC. ``AS IS'' AND ANY EXPRESS OR
IMPLIED WARRANTIES, INCLUDING, BUT NOT
LIMITED TO, THE IMPLIED WARRANTIES OF
MERCHANTABILITY AND FITNESS FOR A
PARTICULAR PURPOSE ARE DISCLAIMED. IN NO
EVENT SHALL APPLE COMPUTER, INC.
OR CONTRIBUTORS BE LIABLE FOR ANY DIRECT,
INDIRECT, INCIDENTAL, SPECIAL, EXEMPLARY, OR
CONSEQUENTIAL DAMAGES (INCLUDING, BUT NOT
LIMITED TO, PROCUREMENT OF SUBSTITUTE
GOODS OR SERVICES; LOSS OF USE, DATA,
OR PROFITS; OR BUSINESS INTERRUPTION)
HOWEVER CAUSED AND ON ANY THEORY OF
LIABILITY, WHETHER IN CONTRACT, STRICT
LIABILITY, OR TORT (INCLUDING NEGLIGENCE OR
OTHERWISE) ARISING IN ANY WAY OUT OF THE
USE OF THIS SOFTWARE, EVEN IF ADVISED OF THE
POSSIBILITY OF SUCH DAMAGE.
GNU LIBRARY GENERAL PUBLIC LICENSE
Version 2, June 1991
Copyright (C) 1991 Free Software Foundation, Inc.
51 Franklin Street, Fifth Floor, Boston, MA 02110-1301
USA
Everyone is permitted to copy and distribute verbatim
copies of this license document, but changing it is not
allowed.
Preamble
The licenses for most software are designed to take
away your freedom to share and change it. By
contrast, the GNU General Public Licenses are
intended to guarantee your freedom to share and
change free software--to make sure the software is
free for all its users.
This license, the Library General Public License,
applies to some specially designated Free Software
Foundation software, and to any other libraries
whose authors decide to use it. You can use it for
your libraries, too.
When we speak of free software, we are referring to
freedom, not price. Our General Public Licenses are
designed to make sure that you have the freedom to
distribute copies of free software (and charge for this
service if you wish), that you receive source code or
can get it if you want it, that you can change the
software or use pieces of it in new free programs; and
that you know you can do these things.
To protect your rights, we need to make restrictions
that forbid anyone to deny you these rights or to ask
you to surrender the rights. These restrictions
translate to certain responsibilities for you if you
distribute copies of the library, or if you modify it.
For example, if you distribute copies of the library,
whether gratis or for a fee, you must give the
recipients all the rights that we gave you. You must
make sure that they, too, receive or can get the
source code. If you link a program with the library,
you must provide complete object files to the
recipients so that they can relink them with the library,
after making changes to the library and recompiling it.
And you must show them these terms so they know
their rights.
Our method of protecting your rights has two steps:
(1) copyright the library, and (2) offer you this license
which gives you legal permission to copy, distribute
and/or modify the library.
36
Page 37

Also, for each distributor's protection, we want to
make certain that everyone understands that there is
no warranty for this free library. If the library is
modified by someone else and passed on, we want
its recipients to know that what they have is not the
original version, so that any problems introduced by
others will not reflect on the original authors'
reputations.
Finally, any free program is threatened constantly by
software patents. We wish to avoid the danger that
companies distributing free software will individually
obtain patent licenses, thus in effect transforming the
program into proprietary software. To prevent this, we
have made it clear that any patent must be licensed
for everyone's free use or not licensed at all.
Most GNU software, including some libraries, is
covered by the ordinary GNU General Public License,
which was designed for utility programs. This license,
the GNU Library General Public License, applies to
certain designated libraries. This license is quite
different from the ordinary one; be sure to read it in
full, and don't assume that anything in it is the same
as in the ordinary license.
The reason we have a separate public license for
some libraries is that they blur the distinction we
usually make between modifying or adding to a
program and simply using it. Linking a program with
a library, without changing the library, is in some
sense simply using the library, and is analogous to
running a utility program or application program.
However, in a textual and legal sense, the linked
executable is a combined work, a derivative of the
original library, and the ordinary General Public
License treats it as such.
Because of this blurred distinction, using the ordinary
General Public License for libraries did not effectively
promote software sharing, because most developers
did not use the libraries. We concluded that weaker
conditions might promote sharing better.
However, unrestricted linking of non-free programs
would deprive the users of those programs of all
benefit from the free status of the libraries
themselves. This Library General Public License is
intended to permit developers of non-free programs
to use free libraries, while preserving your freedom as
a user of such programs to change the free libraries
that are incorporated in them. (We have not seen how
to achieve this as regards changes in header files, but
we have achieved it as regards changes in the actual
functions of the Library.) The hope is that this will lead
to faster development of free libraries.
The precise terms and conditions for copying,
distribution and modification follow. Pay close
attention to the difference between a"work based on
the library" and a "work that uses the library". The
former contains code derived from the library, while
the latter only works together with the library.
Note that it is possible for a library to be covered by
the ordinary General Public License rather than by
this special one.
GNU LIBRARY GENERAL
PUBLIC LICENSE
TERMS AND CONDITIONS FOR COPYING,
DISTRIBUTION AND MODIFICATION
0. This License Agreement applies to any software
library which contains a notice placed by the
copyright holder or other authorized party saying it
may be distributed under the terms of this
Library General Public License (also called "this
License"). Each licensee is addressed as "you".
A "library" means a collection of software functions
and/or data prepared so as to be conveniently
linked with application programs (which use some of
those functions and data) to form executables.
The "Library", below, refers to any such software
library or work which has been distributed under
these terms. A "work based on the Library" means
either the Library or any derivative work
under copyright law: that is to say, a work containing
the Library or a portion of it, either verbatim or with
modifications and/or translated straightforwardly
into another language. (Hereinafter, translation
is included without limitation in the term
"modification".)
"Source code" for a work means the preferred form of
the work for making modifications to it. For a library,
complete source code means all the source code for
all modules it contains, plus any associate interface
definition files, plus the scripts used to control
compilation and installation of the library.
Activities other than copying, distribution and
modification are not covered by this License; they
are outside its scope. The act of running a program
using the Library is not restricted, and output
from such a program is covered only if its contents
constitute a work based on the Library (independent
of the use of the Library in a tool for writing it).
Whether that is true depends on what the Library
does and what the program that uses the Library
does.
1. You may copy and distribute verbatim copies of the
Library's complete source code as you receive it, in
any medium, provided that you conspicuously and
appropriately publish on each copy an appropriate
copyright notice and disclaimer of warranty; keep
intact all the notices that refer to this License and to
the absence of any warranty; and distribute a copy
of this License along with the
37
Page 38

You may charge a fee for the physical act of
transferring a copy, and you may at your option offer
warranty protection in exchange for a
2. You may modify your copy or copies of the Library
or any portion of it, thus forming a work based on the
Library, and copy and distribute such modifications
or work under the terms of Section 1 above, provided
that you also meet all of these conditions:
a) The modified work must itself be a software
library.
b) You must cause the files modified to carry
prominent notices stating that you changed the files
and the date of any change.
c) You must cause the whole of the work to be
licensed at no charge to all third parties under the
terms of this License.
d) If a facility in the modified Library refers to a
function or a table of data to be supplied by an
application program that uses the facility, other than
as an argument passed when the facility is invoked,
then you must make a good faith effort to ensure
that, in the event an application does not supply
such function or table, the facility still operates, and
performs whatever part of its purpose remains
meaningful.
(For example, a function in a library to compute
square roots has a purpose that is entirely welldefined independent of the application. Therefore,
Subsection 2d requires that any application-supplied
function or table used by this function must be
optional: if the application does not supply it, the
squareroot function must still compute square roots.)
These requirements apply to the modified work as a
whole. If identifiable sections of that work are not
derived from the Library, and can be reasonably
considered independent and separate works
in themselves, then this License, and its terms, do not
apply to those sections when you distribute them as
separate works. But when you distribute the same
sections as part of a whole which is a work based on
the Library, the distribution of the whole must be on
the terms of this License, whose permissions for
other licensees extend to the entire whole, and thus
to each and every part regardless of who
wrote. Thus, it is not the intent of this section to claim
rights or contest your rights to work written entirely
by you; rather, the intent is to exercise the right to
control the distribution of derivative or collective
works based on the Library.
In addition, mere aggregation of another work not
based on the Library with the Library (or with a work
based on the Library) on a volume of a storage or
distribution medium does not bring the other work
under the scope of this License.
3. You may opt to apply the terms of the ordinary
GNU General Public License instead of this License
to a given copy of the Library. To do this, you must
alter all the notices that refer to this License, so that
they refer to the ordinary GNU General Public
License, version 2, instead of to this License. (If a
newer version than version 2 of the ordinary GNU
General Public License has appeared, then you can
specify that version instead if you wish.) Do not
make any other change in these notices.
Once this change is made in a given copy, it is
irreversible for that copy, so the ordinary GNU
General Public License applies to all subsequent
copies and derivative works made from that copy.
This option is useful when you wish to copy part of
the code of the Library into a program that is not a
library.
4. You may copy and distribute the Library (or a
portion or derivative of it, under Section 2) in object
code or executable form under the terms of Sections
1 and 2 above provided that you accompany it with
the complete corresponding machine-readable
source code, which must be distributed under the
terms of Sections 1 and 2 above on a medium
customarily used for software interchange.
If distribution of object code is made by offering
access to copy from a designated place, then
offering equivalent access to copy the source code
from the same place satisfies the requirement
to distribute the source code, even though third
parties are not compelled to copy the source along
with the object code.
5. A program that contains no derivative of any
portion of the Library, but is designed to work with
the Library by being compiled or linked with it, is
called a "work that uses the Library". Such a work, in
isolation, is not a derivative work of the Library,
and therefore falls outside the scope of this License.
However, linking a "work that uses the Library" with
the Library creates an executable that is a derivative
of the Library (because it contains portions of the
Library), rather than a "work that uses the library".
The executable is therefore covered by this License.
Section 6 states terms for distribution of such
executables.
When a "work that uses the Library" uses material
from a header file that is part of the Library, the
object code for the work may be a derivative work of
the Library even though the source code is
not. Whether this is true is especially significant if the
work can be linked without the Library, or if the work
is itself a library. The threshold for this to be true is
not precisely defined by law.
If such an object file uses only numerical parameters,
data structure layouts and accessors, and small
macros and small inline functions (ten lines or less in
38
Page 39

length), then the use of the object file is unrestricted,
regardless of whether it is legally a derivative
work. (Executables containing this object code plus
portions of the Library will still fall under Section 6.)
Otherwise, if the work is a derivative of the Library,
you may distribute the object code for the work
under the terms of Section 6. Any executables
containing that work also fall under Section
6, whether or not they are linked directly with the
Library itself.
6. As an exception to the Sections above, you may
also compile or link a "work that uses the Library"
with the Library to produce a work containing
portions of the Library, and distribute that
work under terms of your choice, provided that the
terms permit modification of the work for the
customer's own use and reverse engineering for
debugging such modifications.
You must give prominent notice with each copy of
the work that the Library is used in it and that the
Library and its use are covered by this License. You
must supply a copy of this License. If the
work during execution displays copyright notices,
you must include the copyright notice for the Library
among them, as well as a reference directing the user
to the copy of this License. Also, you must do
one of these things:
a) Accompany the work with the complete
corresponding machine-readable source code for
the Library including whateve changes were used in
the work (which must be distributed under Sections 1
and 2 above); and, if the work is an executable
linked with the Library, with the complete machinereadable "work that uses the Library", as object code
and/or source code, so that the user can modify the
Library and then relink to produce a
modified executable containing the modified
Library. (It is understood that the user who changes
the contents of definitions files in the Library will not
necessarily be able to recompile the application to
use the modified definitions.)
b) Accompany the work with a written offer, valid
for at least three years, to give the same user the
materials specified in Subsection 6a, above, for a
charge no more than the cost of performing this
distribution.
c) If distribution of the work is made by offering
access to copy from a designated place, offer
equivalent access to copy the above specified
materials from the same place.
d) Verify that the user has already received a
copy of these materials or that you have already sent
this user a copy.
For an executable, the required form of the "work that
uses the Library" must include any data and utility
programs needed for reproducing the executable
from it. However, as a special exception, the source
code distributed need not include anything that is
normally distributed (in either source or binary form)
with the major components (compiler, kernel, and so
on) of the operating system on which the executable
runs, unless that component itself accompanies the
executable.
It may happen that this requirement contradicts the
license restrictions of other proprietary libraries that
do not normally accompany the operating system.
Such a contradiction means you cannot use both
them and the Library together in an executable that
you distribute.
7. You may place library facilities that are a work
based on the Library side-by-side in a single library
together with other library facilities not covered by
this License, and distribute such a combined library,
provided that the separate distribution of the work
based on the Library and of the other library facilities
is otherwise permitted, and provided that you do
these two things:
a) Accompany the combined library with a copy
of the same work based on the Library, uncombined
with any other library facilities. This must be
distributed under the terms of the Sections above.
b) Give prominent notice with the combined
library of the fact that part of it is a work based on
the Library, and explaining where to find the
accompanying uncombined form of the same work.
8. You may not copy, modify, sublicense, link with, or
distribute the Library except as expressly provided
under this License. Any attempt otherwise to copy,
modify, sublicense, link with, or distribute the Library
is void, and will automatically terminate your rights
under this License. However, parties who have
received copies, or rights, from you under this
License will not have their licenses terminated so
long as such parties remain in full compliance.
9. You are not required to accept this License, since
you have not signed it. However, nothing else
grants you permission to modify or distribute the
Library or its derivative works. These actions
are prohibited by law if you do not accept this
License. Therefore, by modifying or distributing the
Library (or any work based on the Library), you
indicate your acceptance of this License to do so,
and all its terms and conditions for copying,
distributing or modifying the Library or works based
on it.
10. Each time you redistribute the Library (or any work
based on the Library), the recipient automatically
receives a license from the original licensor to copy,
distribute, link with or modify the Library subject to
these terms and conditions. You may not impose
any further restrictions on the recipients' exercise of
39
Page 40

the rights granted herein. You are not responsible for
enforcing compliance by third parties to this License.
11. If, as a consequence of a court judgment or
allegation of patent infringement or for any other
reason (not limited to patent issues), conditions are
imposed on you (whether by court order, agreement
or otherwise) that contradict the conditions of this
License, they do not excuse you from the conditions
of this License. If you cannot distribute so as to
satisfy simultaneously your obligations under
this License and any other pertinent obligations, then
as a consequence you may not distribute the Library
at all. For example, if a patent license would not
permit royalty-free redistribution of the Library by all
those who receive copies directly or indirectly
through you, then the only way you could satisfy
both it and this License would be to refrain entirely
from distribution of the Library.
If any portion of this section is held invalid or
unenforceable under any particular circumstance,
the balance of the section is intended to apply, and
the section as a whole is intended to apply in other
circumstances.
It is not the purpose of this section to induce you to
infringe any patents or other property right claims or
to contest validity of any such claims; this section
has the sole purpose of protecting the integrity of the
free software distribution system which
is implemented by public license practices. Many
people have made generous contributions to the
wide range of software distributed through that
system in reliance on consistent application of
that system; it is up to the author/donor to decide if
he or she is willing to distribute software through any
other system and a licensee cannot impose that
choice.
This section is intended to make thoroughly clear
what is believed to be a consequence of the rest of
this License.
12. If the distribution and/or use of the Library is
restricted in certain countries either by patents or by
copyrighted interfaces, the original copyright holder
who places the Library under this License may
add an explicit geographical distribution limitation
excluding those countries, so that distribution is
permitted only in or among countries not thus
excluded. In such case, this License incorporates the
limitation as if written in the body of this License.
13. The Free Software Foundation may publish
revised and/or new versions of the Library General
Public License from time to time. Such new versions
will be similar in spirit to the present version, but may
differ in detail to address new problems or concerns.
Each version is given a distinguishing version
number. If the Library specifies a version number of
this License which applies to it and "any later
version", you have the option of following the terms
and conditions either of that version or of any later
version published by the Free Software Foundation.
If the Library does not specify a license version
number, you may choose any version ever published
by the Free Software Foundation.
14. If you wish to incorporate parts of the Library into
other free programs whose distribution conditions
are incompatible with these, write to the author to
ask for permission. For software which
is copyrighted by the Free Software Foundation,
write to the Free Software Foundation; we
sometimes make exceptions for this. Our decision
will be guided by the two goals of preserving the free
status of all derivatives of our free software and of
promoting the sharing and reuse of software
generally.
NO WARRANTY
15. BECAUSE THE LIBRARY IS LICENSED FREE OF
CHARGE, THERE IS NO
WARRANTY FOR THE LIBRARY, TO THE EXTENT
PERMITTED BY APPLICABLE LAW.
EXCEPT WHEN OTHERWISE STATED IN WRITING
THE COPYRIGHT HOLDERS AND/OR
OTHER PARTIES PROVIDE THE LIBRARY "AS IS"
WITHOUT WARRANTY OF ANY
KIND, EITHER EXPRESSED OR IMPLIED, INCLUDING,
BUT NOT LIMITED TO, THE
IMPLIED WARRANTIES OF MERCHANTABILITY AND
FITNESS FOR A PARTICULAR PURPOSE.
THE ENTIRE RISK AS TO THE QUALITY AND
PERFORMANCE OF THE
LIBRARY IS WITH YOU. SHOULD THE LIBRARY
PROVE DEFECTIVE, YOU ASSUME
THE COST OF ALL NECESSARY SERVICING, REPAIR
OR CORRECTION.
16. IN NO EVENT UNLESS REQUIRED BY APPLICABLE
LAW OR AGREED TO IN
WRITING WILL ANY COPYRIGHT HOLDER, OR ANY
OTHER PARTY WHO MAY MODIFY
AND/OR REDISTRIBUTE THE LIBRARY AS
PERMITTED ABOVE, BE LIABLE TO YOU
FOR DAMAGES, INCLUDING ANY GENERAL,
SPECIAL, INCIDENTAL OR
CONSEQUENTIAL DAMAGES ARISING OUT OF THE
USE OR INABILITY TO USE THE
LIBRARY (INCLUDING BUT NOT LIMITED TO LOSS OF
DATA OR DATA BEING
RENDERED INACCURATE OR LOSSES SUSTAINED BY
YOU OR THIRD PARTIES OR A
FAILURE OF THE LIBRARY TO OPERATE WITH ANY
40
Page 41

OTHER SOFTWARE), EVEN IF
SUCH HOLDER OR OTHER PARTY HAS BEEN
ADVISED OF THE POSSIBILITY OF SUCH
END OF TERMS AND
CONDITIONS
GNU LESSER GENERAL PUBLIC LICENSE
Version 2.1, February 1999
Copyright (C) 1991, 1999 Free Software Foundation,
Inc.
51 Franklin Street, Fifth Floor, Boston, MA
02110-1301 USA
Everyone is permitted to copy and distribute verbatim
copies of this license document, but changing it is
not allowed.
[This is the first released version of the Lesser GPL. It
also counts as the successor of the GNU Library
Public License, version 2, hence the version number
2.1.]
Preamble
The licenses for most software are designed to take
away your freedom to share and change it. By
contrast, the GNU General Public Licenses are
intended to guarantee your freedom to share and
change free software--to make sure the software is
free for all its users.
This license, the Lesser General Public License,
applies to some specially designated software
packages--typically libraries--of the Free Software
Foundation and other authors who decide to use it.
You can use it too, but we suggest you first think
carefully about whether this license or the ordinary
General Public License is the better strategy to use in
any particular case, based on the explanations below.
When we speak of free software, we are referring to
freedom of use, not price. Our General Public
Licenses are designed to make sure that you have
the freedom to distribute copies of free software (and
charge for this service if you wish); that you receive
source code or can get it if you want it; that you can
change the software and use pieces of it in new free
programs; and that you are informed that you can
do these things.
To protect your rights, we need to make restrictions
that forbid distributors to deny you these rights or to
ask you to surrender these rights. These restrictions
translate to certain responsibilities for you if you
distribute copies of the library or if you modify it.
For example, if you distribute copies of the library,
whether gratis or for a fee, you must give the
recipients all the rights that we gave you. You must
make sure that they, too, receive or can get the
source code. If you link other code with the library,
you must provide complete object files to the
recipients, so that they can relink them with the
library after making changes to the library and
recompiling it. And you must show them these terms
so they know their rights.
We protect your rights with a two-step method: (1) we
copyright the library, and (2) we offer you this
license, which gives you legal permission to copy,
distribute and/or modify the library.
To protect each distributor, we want to make it very
clear that there is no warranty for the free library.
Also, if the library is modified by someone else and
passed on, the recipients should know that what
they have is not the original version, so that the
original author's reputation will not be affected by
problems that might be introduced by others.
Finally, software patents pose a constant threat to the
existence of any free program. We wish to make
sure that a company cannot effectively restrict the
users of a free program by obtaining a restrictive
license from a patent holder. Therefore, we insist
that any patent license obtained for a version of the
library must be consistent with the full freedom of
use specified in this license.
Most GNU software, including some libraries, is
covered by the ordinary GNU General Public
License. This license, the GNU Lesser General
Public License, applies to certain designated libraries,
and is quite different from the ordinary General
Public License. We use this license for certain
libraries in order to permit linking those libraries into
non-free programs.
When a program is linked with a library, whether
statically or using a shared library, the combination
of the two is legally speaking a combined work, a
derivative of the original library. The
ordinary General Public License therefore permits
such linking only if the entire combination fits its
criteria of freedom. The Lesser General Public
License permits more lax criteria for linking other code
with the library.
We call this license the "Lesser" General Public
License because it does Less to protect the user's
freedom than the ordinary General Public License.
It also provides other free software developers
Less of an advantage over competing non-free
programs. These disadvantages are the reason we
use the ordinary General Public License for
many libraries. However, the Lesser license provides
advantages in certain special circumstances.
For example, on rare occasions, there may be a
special need to encourage the widest possible use of
a certain library, so that it becomes a de-facto
standard. To achieve this, non-free programs must
be allowed to use the library. A more frequent case
is that a free library does the same job as widely
41
Page 42

used non-free libraries. In this case, there is little to
gain by limiting the free library to free software only,
so we use the Lesser General Public License.
In other cases, permission to use a particular library in
non-free programs enables a greater number of
people to use a large body of free software. For
example, permission to use the GNU C Library in nonfree programs enables many more people to use the
whole GNU operating system, as well as its variant,
the GNU/Linux operating system.
Although the Lesser General Public License is Less
protective of the users' freedom, it does ensure that
the user of a program that is linked with the Library
has the freedom and the wherewithal to run that
program using a modified version of the Library.
The precise terms and conditions for copying,
distribution and modification follow. Pay close
attention to the difference between a "work based
on the library" and a "work that uses the library".
The former contains code derived from the library,
whereas the latter must be combined with the library
in order to run.
GNU LESSER GENERAL
PUBLIC LICENSE
Activities other than copying, distribution and
modification are not covered by this License; they
are outside its scope. The act of running a program
using the Library is not restricted, and output
from such a program is covered only if its contents
constitute a work based on the Library (independent
of the use of the Library in a tool for writing it).
Whether that is true depends on what the Library
does and what the program that uses the Library
does.
1. You may copy and distribute verbatim copies of the
Library's complete source code as you receive it, in
any medium, provided that you conspicuously and
appropriately publish on each copy an appropriate
copyright notice and disclaimer of warranty; keep
intact all the notices that refer to this License and to
the absence of any warranty; and distribute a copy
of this License along with the Library.
You may charge a fee for the physical act of
transferring a copy, and you may at your option offer
warranty protection in exchange for a fee.
2. You may modify your copy or copies of the Library
or any portion of it, thus forming a work based on the
Library, and copy and distribute such modifications
or work under the terms of Section 1 above, provided
that you also meet all of these conditions:
TERMS AND CONDITIONS FOR COPYING,
DISTRIBUTION AND MODIFICATION
0. This License Agreement applies to any software
library or other program which contains a notice
placed by the copyright holder or other authorized
party saying it may be distributed under the terms
of this Lesser General Public License (also called
"this License"). Each licensee is addressed as "you".
A "library" means a collection of software functions
and/or data prepared so as to be conveniently
linked with application programs (which use some of
those functions and data) to form executables.
The "Library", below, refers to any such software
library or work which has been distributed under
these terms. A "work based on the Library" means
either the Library or any derivative work
under copyright law: that is to say, a work containing
the Library or a portion of it, either verbatim or with
modifications and/or translated straightforwardly
into another language. (Hereinafter, translation
is included without limitation in the term
"modification".)
"Source code" for a work means the preferred form of
the work for making modifications to it. For a library,
complete source code means all the source code for
all modules it contains, plus any associated interface
definition files, plus the scripts used to control
compilation and installation of the library.
a) The modified work must itself be a software
library.
b) You must cause the files modified to carry
prominent noticesstating that you changed the files
and the date of any change.
c) You must cause the whole of the work to be
licensed at no charge to all third parties under the
terms of this License.
d) If a facility in the modified Library refers to a
function or a table of data to be supplied by an
application program that uses the facility, other than
as an argument passed when the facility is invoked,
then you must make a good faith effort to ensure
that, in the event an application does not supply
such function or table, the facility still operates, and
performs whatever part of its purpose remains
meaningful.
(For example, a function in a library to compute
square roots has a purpose that is entirely welldefined independent of the application. Therefore,
Subsection 2d requires that any application-supplied
function or table used by this function must be
optional: if the application does not supply it, the
square root function must still compute square
roots.)
These requirements apply to the modified work as a
whole. If identifiable sections of that work are not
derived from the Library, and can be reasonably
considered independent and separate works
in themselves, then this License, and its terms, do not
42
Page 43

apply to those sections when you distribute them as
separate works. But when you distribute the same
sections as part of a whole which is a work based on
the Library, the distribution of the whole must be on
the terms of this License, whose permissions for
other licensees extend to the entire whole, and thus
to each and every part regardless of who wrote
Thus, it is not the intent of this section to claim rights
or contest your rights to work written entirely by you;
rather, the intent is to exercise the right to control the
distribution of derivative or collective works based on
the Library.
In addition, mere aggregation of another work not
based on the Library with the Library (or with a work
based on the Library) on a volume of a storage or
distribution medium does not bring the other work
under the scope of this License.
3. You may opt to apply the terms of the ordinary
GNU General Public License instead of this License
to a given copy of the Library. To do this, you must
alter all the notices that refer to this License, so that
they refer to the ordinary GNU General Public
License, version 2, instead of to this License. (If a
newer version than version 2 of the ordinary GNU
General Public License has appeared, then you can
specify that version instead if you wish.) Do not
make any other change in these notices.
Once this change is made in a given copy, it is
irreversible for that copy, so the ordinary GNU
General Public License applies to all subsequent
copies and derivative works made from that copy.
This option is useful when you wish to copy part of
the code of the Library into a program that is not a
library.
4. You may copy and distribute the Library (or a
portion or derivative of it, under Section 2) in object
code or executable form under the terms of Sections
1 and 2 above provided that you accompany it with
the complete corresponding machine-readable
source code, which must be distributed under the
terms of Sections 1 and 2 above on a medium
customarily used for software interchange.
If distribution of object code is made by offering
access to copy from a designated place, then
offering equivalent access to copy the source code
from the same place satisfies the requirement
to distribute the source code, even though third
parties are not compelled to copy the source along
with the object code.
5. A program that contains no derivative of any
portion of the Library, but is designed to work with
the Library by being compiled or linked with it, is
called a "work that uses the Library". Such a work, in
isolation, is not a derivative work of the Library,
and therefore falls outside the scope of this License.
However, linking a "work that uses the Library" with
the Library creates an executable that is a derivative
of the Library (because it contains portions of the
Library), rather than a "work that uses the library".
The executable is therefore covered by this License.
Section 6 states terms for distribution of such
executables.
When a "work that uses the Library" uses material
from a header file that is part of the Library, the
object code for the work may be a derivative work of
the Library even though the source code is
not. Whether this is true is especially significant if the
work can be linked without the Library, or if the work
is itself a library. The threshold for this to be true is
not precisely defined by law.
If such an object file uses only numerical parameters,
data structure layouts and accessors, and small
macros and small inline functions (ten lines or less in
length), then the use of the object file is unrestricted,
regardless of whether it is legally a derivative
work. (Executables containing this object code plus
portions of the Library will still fall under Section 6.)
Otherwise, if the work is a derivative of the Library,
you may distribute the object code for the work
under the terms of Section 6. Any executables
containing that work also fall under Section
6, whether or not they are linked directly with the
Library itself.
6. As an exception to the Sections above, you may
also combine or link a "work that uses the Library"
with the Library to produce a work containing
portions of the Library, and distribute that
work under terms of your choice, provided that the
terms permit modification of the work for the
customer's own use and reverse engineering for
debugging such modifications.
You must give prominent notice with each copy of the
work that the Library is used in it and that the Library
and its use are covered by this License. You must
supply a copy of this License. If the work during
execution displays copyright notices, you must
include the copyright notice for the Library among
them, as well as a reference directing the user to the
copy of this License. Also, you must do one of
these things:
a) Accompany the work with the complete
corresponding machine-readable source code for
the Library including whatever changes were used in
the work (which must be distributed under Sections 1
and 2 above); and, if the work is an executable
linked with the Library, with the complete machinereadable "work that uses the Library", as object code
and/or source code, so that the user can modify the
Library and then relink to produce a
modified executable containing the modified
Library. (It is understood that the user who changes
the contents of definitions files in the Library will not
necessarily be able to recompile the application to
43
Page 44

use the modified definitions.)
b) Use a suitable shared library mechanism for
linking with the Library. A suitable mechanism is
one that (1) uses at run time a copy of the library
already present on the user's computer syste rather
than copying library functions into the executable,
and (2) will operate properly with a modified version
of the library, if the user installs one, as long as the
modified version is interface-compatible with the
version that the work was made with.
c) Accompany the work with a written offer, valid
for at least three years, to give the same user the
materials specified in Subsection 6a, above, for a
charge no more than the cost of performing this
distribution.
d) If distribution of the work is made by offering
access to copy from a designated place, offer
equivalent access to copy the above specified
materials from the same place.
e) Verify that the user has already received a copy
of these materials or that you have already sent this
user a copy.
For an executable, the required form of the "work that
uses the Library" must include any data and utility
programs needed for reproducing the executable
from it. However, as a special exception, the
materials to be distributed need not include anything
that is normally distributed (in either source or binary
form) with the major components (compiler, kernel,
and so on) of the operating system on which the
executable runs, unless that component itself
accompanies the executable.
It may happen that this requirement contradicts the
license restrictions of other proprietary libraries that
do not normally accompany the operating system.
Such a contradiction means you cannot use both
them and the Library together in an executable that
you
7. You may place library facilities that are a work
based on the Library side-by-side in a single library
together with other library facilities not covered by
this License, and distribute such a combined library,
provided that the separate distribution of the work
based on the Library and of the other library facilities
is otherwise permitted, and provided that you do
these two things:
a) Accompany the combined library with a copy
of the same work based on the Library, uncombined
with any other library facilities. This must be
distributed under the terms of the Sections above.
b) Give prominent notice with the combined
library of the fact that part of it is a work based on
the Library, and explaining where to find the
accompanying uncombined form of the same work.
8. You may not copy, modify, sublicense, link with, or
distribute the Library except as expressly provided
under this License. Any attempt otherwise to copy,
modify, sublicense, link with, or distribute the Library
is void, and will automatically terminate your rights
under this License. However, parties who have
received copies, or rights, from you under this
License will not have their licenses terminated so
long as such parties remain in full compliance.
9. You are not required to accept this License, since
you have not signed it. However, nothing else
grants you permission to modify or distribute the
Library or its derivative works. These actions
are prohibited by law if you do not accept this
License. Therefore, by modifying or distributing the
Library (or any work based on the Library), you
indicate your acceptance of this License to do so,
and all its terms and conditions for copying,
distributing or modifying the Library or works based
on it.
10. Each time you redistribute the Library (or any work
based on the Library), the recipient automatically
receives a license from the original licensor to copy,
distribute, link with or modify the Library subject to
these terms and conditions. You may not impose
any further restrictions on the recipients' exercise of
the rights granted herein. You are not responsible for
enforcing compliance by third parties with this
License.
11. If, as a consequence of a court judgment or
allegation of patent infringement or for any other
reason (not limited to patent issues), conditions are
imposed on you (whether by court order, agreement
or otherwise) that contradict the conditions of this
License, they do not excuse you from the conditions
of this License. If you cannot distribute so as to
satisfy simultaneously your obligations under
this License and any other pertinent obligations, then
as a consequence you may not distribute the Library
at all. For example, if a patent license would not
permit royalty-free redistribution of the Library by all
those who receive copies directly or indirectly
through you, then the only way you could satisfy
both it and this License would be to refrain entirely
from distribution of the Library.
If any portion of this section is held invalid or
unenforceable under any particular circumstance,
the balance of the section is intended to apply, and
the section as a whole is intended to apply in other
circumstances.
It is not the purpose of this section to induce you to
infringe any patents or other property right claims or
to contest validity of any such claims; this section
has the sole purpose of protecting the integrity of the
free software distribution system which
is implemented by public license practices. Many
people have made generous contributions to the
wide range of software distributed through that
system in reliance on consistent application of
44
Page 45

that system; it is up to the author/donor to decide if
he or she is willing to distribute software through any
other system and a licensee cannot impose that
choice.
This section is intended to make thoroughly clear
what is believed to be a consequence of the rest of
this License.
12. If the distribution and/or use of the Library is
restricted in certain countries either by patents or by
copyrighted interfaces, the original copyright holder
who places the Library under this License may
add an explicit geographical distribution limitation
excluding those countries, so that distribution is
permitted only in or among countries not thus
excluded. In such case, this License incorporates the
limitation as if written in the body of this License.
13. The Free Software Foundation may publish
revised and/or new versions of the Lesser General
Public License from time to time. Such new versions
will be similar in spirit to the present version, but may
differ in detail to address new problems or concerns.
Each version is given a distinguishing version
number. If the Library specifies a version number of
this License which applies to it and "any later
version", you have the option of following the terms
and conditions either of that version or of any later
version published by the Free Software Foundation.
If the Library does not specify a license version
number, you may choose any version ever published
by the Free Software Foundation.
FITNESS FOR A PARTICULAR
PURPOSE. THE ENTIRE RISK AS TO THE QUALITY
AND PERFORMANCE OF THE
LIBRARY IS WITH YOU. SHOULD THE LIBRARY
PROVE DEFECTIVE, YOU ASSUME
THE COST OF ALL NECESSARY SERVICING, REPAIR
OR CORRECTION.
16. IN NO EVENT UNLESS REQUIRED BY
APPLICABLE LAW OR AGREED TO IN
WRITING WILL ANY COPYRIGHT HOLDER, OR ANY
OTHER PARTY WHO MAY MODIFY
AND/OR REDISTRIBUTE THE LIBRARY AS
PERMITTED ABOVE, BE LIABLE TO YOU
FOR DAMAGES, INCLUDING ANY GENERAL,
SPECIAL, INCIDENTAL OR
CONSEQUENTIAL DAMAGES ARISING OUT OF THE
USE OR INABILITY TO USE THE
LIBRARY (INCLUDING BUT NOT LIMITED TO LOSS OF
DATA OR DATA BEING
RENDERED INACCURATE OR LOSSES SUSTAINED BY
YOU OR THIRD PARTIES OR A
FAILURE OF THE LIBRARY TO OPERATE WITH ANY
OTHER SOFTWARE), EVEN IF
SUCH HOLDER OR OTHER PARTY HAS BEEN
ADVISED OF THE POSSIBILITY OF SUCH
14. If you wish to incorporate parts of the Library into
other free programs whose distribution conditions
are incompatible with these, write to the author to
ask for permission. For software which
is copyrighted by the Free Software Foundation,
write to the Free Software Foundation; we
sometimes make exceptions for this. Our decision
will be guided by the two goals of preserving the free
status of all derivatives of our free software and of
promoting the sharing and reuse of software
generally.
NO WARRANTY
15. BECAUSE THE LIBRARY IS LICENSED FREE OF
CHARGE, THERE IS NO
WARRANTY FOR THE LIBRARY, TO THE EXTENT
PERMITTED BY APPLICABLE LAW.
EXCEPT WHEN OTHERWISE STATED IN WRITING
THE COPYRIGHT HOLDERS AND/OR
OTHER PARTIES PROVIDE THE LIBRARY "AS IS"
WITHOUT WARRANTY OF ANY
KIND, EITHER EXPRESSED OR IMPLIED, INCLUDING,
BUT NOT LIMITED TO, THE
IMPLIED WARRANTIES OF MERCHANTABILITY AND
END OF TERMS AND
CONDITIONS
Other
name License
Chromium URL: http://www.chromium.org
Copyright (c) 2013 The Chromium Authors. All rights
reserved.
Redistribution and use in source and binary forms,
with or without modification, are permitted provided
that the following conditions are met:
* Redistributions of source code must retain the
above copyright
notice, this list of conditions and the following
disclaimer.
* Redistributions in binary form must reproduce
the above
copyright notice, this list of conditions and the
following disclaimer
in the documentation and/or other materials provided
with the
45
Page 46

* Neither the name of Google Inc. nor the names
of its
contributors may be used to endorse or promote
products derived from
this software without specific prior written permission.
THIS SOFTWARE IS PROVIDED BY THE COPYRIGHT
HOLDERS AND CONTRIBUTORS
"AS IS" AND ANY EXPRESS OR IMPLIED
WARRANTIES, INCLUDING, BUT NOT
license:
Fontconfig
URL: http://www.fontconfig.org
Copyright © 2000,2001,2002,2003,2004,2006,2007
Keith Packard
Copyright © 2005 Patrick Lam
Copyright © 2009 Roozbeh Pournader
LIMITED TO, THE IMPLIED WARRANTIES OF
MERCHANTABILITY AND FITNESS FOR
A PARTICULAR PURPOSE ARE DISCLAIMED. IN NO
EVENT SHALL THE COPYRIGHT
OWNER OR CONTRIBUTORS BE LIABLE FOR ANY
DIRECT, INDIRECT, INCIDENTAL,
SPECIAL, EXEMPLARY, OR CONSEQUENTIAL
DAMAGES (INCLUDING, BUT NOT
LIMITED TO, PROCUREMENT OF SUBSTITUTE
GOODS OR SERVICES; LOSS OF USE,
DATA, OR PROFITS; OR BUSINESS INTERRUPTION)
HOWEVER CAUSED AND ON ANY
THEORY OF LIABILITY, WHETHER IN CONTRACT,
STRICT LIABILITY, OR TORT
(INCLUDING NEGLIGENCE OR OTHERWISE) ARISING
IN ANY WAY OUT OF THE USE
OF THIS SOFTWARE, EVEN IF ADVISED OF THE
POSSIBILITY OF SUCH DAMAGE.
--
Copyright © 2008,2009 Red Hat, Inc.
Copyright © 2008 Danilo Šegan
Permission to use, copy, modify, distribute, and sell
this software and its
documentation for any purpose is hereby granted
without fee, provided that
the above copyright notice appear in all copies and
that both that
copyright notice and this permission notice appear in
supporting
documentation, and that the name of the author(s)
not be used in
advertising or publicity pertaining to distribution of
the software without
specific, written prior permission. The authors make
no
representations about the suitability of this software
for any purpose. It
is provided "as is" without express or implied
warranty.
The following files are distributed under the MPL
1.1/GPL 2.0/LGPL 2.1 tri-license:
chromium-nss.h
chromium-blapi.h
chromium-blapit.h
chromium-sha256.h
chromium-prtypes.h
The following files contain portions distributed under
the MPL 1.1/GPL 2.0/LGPL 2.1 tri-license:
registry_controlled_domains/registry_controlled_dom
ain.cc
registry_controlled_domains/registry_controlled_dom
ain.h
The following files are distributed under the MPL 2.0
THE AUTHOR(S) DISCLAIMS ALL WARRANTIES WITH
REGARD TO THIS SOFTWARE,
INCLUDING ALL IMPLIED WARRANTIES OF
MERCHANTABILITY AND FITNESS, IN NO
EVENT SHALL THE AUTHOR(S) BE LIABLE FOR ANY
SPECIAL, INDIRECT OR
CONSEQUENTIAL DAMAGES OR ANY DAMAGES
WHATSOEVER RESULTING FROM LOSS OF USE,
DATA OR PROFITS, WHETHER IN AN ACTION OF
CONTRACT, NEGLIGENCE OR OTHER
TORTIOUS ACTION, ARISING OUT OF OR IN
CONNECTION WITH THE USE OR
PERFORMANCE OF THIS SOFTWARE.
Arphic fonts
46
Page 47

URL:
http://www.freedesktop.org/wiki/Software/CJKUnifo
nts/Download
ARPHIC PUBLIC LICENSE
Copyright (C) 1999 Arphic Technology Co., Ltd.
All rights reserved except as specified below.
Everyone is permitted to copy and distribute verbatim
copies of this license document, but changing it is
forbidden.
Preamble
The licenses for most software are designed to
take away your freedom to share and change it. By
contrast, the ARPHIC PUBLIC LICENSE specifically
permits and encourages you to use this software,
provided that you give the recipients all the rights that
we gave you and make sure they can get the
modifications of this software.
Legal Terms
Throughout this License, "Font" means the
TrueType fonts "AR PL Mingti2L Big5", "AR PL KaitiM
Big5" (BIG-5 character set) and "AR PL SungtiL GB",
"AR PL KaitiM GB" (GB character set) which are
originally distributed by Arphic, and the derivatives of
those fonts created through any modification
including modifying glyph, reordering glyph,
converting format, changing font name, or
adding/deleting some characters in/from glyph table.
"PL" means "Public License".
"Copyright Holder" means whoever is named in
the copyright or copyrights for the Font.
modified file stating how and when you changed that
file.
b) You must make such modifications Freely
Available as a whole to all third parties under the
terms of this License, such as by offering access to
copy the modifications from a designated place, or
distributing the modifications on a medium
customarily used for software interchange.
c) If the modified fonts normally reads
commands interactively when run, you must cause it,
when started running for such interactive use in the
most ordinary way, to print or display an
announcement including an appropriate copyright
notice and a notice that there is no warranty (or else,
saying that you provide a warranty) and that users
may redistribute the Font under these conditions, and
telling the user how to view a copy of this License.
These requirements apply to the modified work
as a whole. If identifiable sections of that work are not
derived from the Font, and can be reasonably
considered independent and separate works in
themselves, then this License and its terms, do not
apply to those sections when you distribute them as
separate works. Therefore, mere aggregation of
another work not based on the Font with the Font on
a volume of a storage or distribution medium does
not bring the other work under the scope of this
License.
You may not copy, modify, sublicense, or
distribute the Font except as expressly provided
under this License. Any attempt otherwise to copy,
modify, sublicense or distribute the Font will
automatically retroactively void your rights under this
License. However, parties who have received copies
or rights from you under this License will keep their
licenses valid so long as such parties remain in full
compliance.
"You" means the licensee, or person copying,
redistributing or modifying the Font.
"Freely Available" means that you have the
freedom to copy or modify the Font as well as
redistribute copies of the Font under the same
conditions you received, not price. If you wish, you
can charge for this service.
You may copy and distribute verbatim copies of
this Font in any medium, without restriction, provided
that you retain this license file (ARPHICPL.TXT)
unaltered in all copies.
You may otherwise modify your copy of this Font
in any way, including modifying glyph, reordering
glyph, converting format, changing font name, or
adding/deleting some characters in/from glyph table,
and copy and distribute such modifications under the
terms of Section 1 above, provided that the following
conditions are met:
a) You must insert a prominent notice in each
You are not required to accept this License, since
you have not signed it. However, nothing else grants
you permission to copy, modify, sublicense or
distribute the Font. These actions are prohibited by
law if you do not accept this License. Therefore, by
copying, modifying, sublicensing or distributing the
Font, you indicate your acceptance of this License
and all its terms and conditions.
Each time you redistribute the Font, the recipient
automatically receives a license from the original
licensor to copy, distribute or modify the Font subject
to these terms and conditions. You may not impose
any further restrictions on the recipients' exercise of
the rights granted herein. You are not responsible for
enforcing compliance by third parties to this License.
If, as a consequence of a court judgment or
allegation of patent infringement or for any other
reason (not limited to patent issues), conditions are
imposed on you (whether by court order, agreement
or otherwise) that contradict the conditions of this
47
Page 48

License, they do not excuse you from the conditions
of this License. If you cannot distribute so as to satisfy
simultaneously your obligations under this License
and any other pertinent obligations, then as a
consequence you may not distribute the Font at all.
For example, if a patent license would not permit
royalty-free redistribution of the Font by all those
who receive copies directly or indirectly through you,
then the only way you could satisfy both it and this
License would be to refrain entirely from distribution
of the Font.
If any portion of this section is held invalid or
unenforceable under any particular circumstance, the
balance of the section is intended to apply and the
section as a whole is intended to apply in other
circumstances.
BECAUSE THE FONT IS LICENSED FREE OF
CHARGE, THERE IS NO WARRANTY FOR THE FONT,
TO THE EXTENT PERMITTED BY APPLICABLE LAW.
EXCEPT WHEN OTHERWISE STATED IN WRITING
THE COPYRIGHT HOLDERS OR OTHER PARTIES
PROVIDE THE FONT "AS IS" WITHOUT WARRANTY
OF ANY KIND, EITHER EXPRESSED OR IMPLIED,
INCLUDING BUT NOT LIMITED TO THE IMPLIED
WARRANTIES OF MERCHANTABILITY AND FITNESS
FOR A PARTICULAR PURPOSE. THE ENTIRE RISK AS
TO THE QUALITY AND PERFORMANCE OF THE
FONT IS WITH YOU. SHOULD THE FONT PROVE
DEFECTIVE, YOU ASSUME THE COST OF ALL
NECESSARY SERVICING, REPAIR OR CORRECTION.
UNLESS REQUIRED BY APPLICABLE LAW OR
AGREED TO IN WRITING, IN NO EVENT WILL ANY
COPYRIGHTT HOLDERS, OR OTHER PARTIES WHO
MAY COPY, MODIFY OR REDISTRIBUTE THE FONT
AS PERMITTED ABOVE, BE LIABLE TO YOU FOR ANY
DIRECT, INDIRECT, CONSEQUENTIAL, INCIDENTAL,
SPECIAL OR EXEMPLARY DAMAGES ARISING OUT
OF THE USE OR INABILITY TO USE THE FONT
(INCLUDING BUT NOT LIMITED TO PROCUREMENT
OF SUBSTITUTE GOODS OR SERVICES; LOSS OF
USE, DATA OR PROFITS; OR BUSINESS
INTERRUPTION), EVEN IF SUCH HOLDERS OR
OTHER PARTIES HAVE BEEN ADVISED OF THE
POSSIBILITY OF SUCH DAMAGES.
Bitstream Vera fonts
URL:
http://www.gnome.org/fonts/#Final_Bitstream_Vera
_Fonts
Bitstream Vera Fonts Copyright
The fonts have a generous copyright, allowing
derivative works (as long as "Bitstream" or "Vera" are
not in the names), and full redistribution (so long as
they are not *sold* by themselves). They can be be
bundled, redistributed and sold with any software.
The fonts are distributed under the following
copyright:
Copyright
=========
Copyright (c) 2003 by Bitstream, Inc. All Rights
Reserved. Bitstream
Vera is a trademark of Bitstream, Inc.
Permission is hereby granted, free of charge, to any
person obtaining
a copy of the fonts accompanying this license
("Fonts") and associated
documentation files (the "Font Software"), to
reproduce and distribute
the Font Software, including without limitation the
rights to use,
copy, merge, publish, distribute, and/or sell copies of
the Font
Software, and to permit persons to whom the Font
Software is furnished
to do so, subject to the following conditions:
The above copyright and trademark notices and this
permission notice
shall be included in all copies of one or more of the
Font Software
The Font Software may be modified, altered, or
added to, and in
particular the designs of glyphs or characters in the
Fonts may be
modified and additional glyphs or characters may be
added to the
Fonts, only if the fonts are renamed to names not
containing either
the words "Bitstream" or the word "Vera".
This License becomes null and void to the extent
applicable to Fonts
or Font Software that has been modified and is
distributed under the
"Bitstream Vera" names.
The Font Software may be sold as part of a larger
software package but
no copy of one or more of the Font Software
typefaces may be sold by itself.
THE FONT SOFTWARE IS PROVIDED "AS IS",
WITHOUT WARRANTY OF ANY KIND,
EXPRESS OR IMPLIED, INCLUDING BUT NOT
LIMITED TO ANY WARRANTIES OF
MERCHANTABILITY, FITNESS FOR A PARTICULAR
PURPOSE AND NONINFRINGEMENT
48
Page 49

OF COPYRIGHT, PATENT, TRADEMARK, OR OTHER
RIGHT. IN NO EVENT SHALL
BITSTREAM OR THE GNOME FOUNDATION BE
LIABLE FOR ANY CLAIM, DAMAGES OR
OTHER LIABILITY, INCLUDING ANY GENERAL,
SPECIAL, INDIRECT, INCIDENTAL,
independently by themselves.
See 1. above.
3. Are derivative works allowed?
Yes!
OR CONSEQUENTIAL DAMAGES, WHETHER IN AN
ACTION OF CONTRACT, TORT OR
OTHERWISE, ARISING FROM, OUT OF THE USE OR
INABILITY TO USE THE FONT
SOFTWARE OR FROM OTHER DEALINGS IN THE
FONT SOFTWARE.
Except as contained in this notice, the names of
Gnome, the Gnome
Foundation, and Bitstream Inc., shall not be used in
advertising or
otherwise to promote the sale, use or other dealings
in this Font
Software without prior written authorization from the
Gnome Foundation
or Bitstream Inc., respectively. For further information,
contact:
fonts at gnome dot org.
Copyright FAQ
4. Can I change or add to the font(s)?
Yes, but you must change the name(s) of the
font(s).
5. Under what terms are derivative works allowed?
You must change the name(s) of the fonts.
This is to ensure the
quality of the fonts, both to protect Bitstream
and Gnome. We want to
ensure that if an application has opened a
font specifically of these
names, it gets what it expects (though of
course, using fontconfig,
substitutions could still could have occurred
during font
opening). You must include the Bitstream
copyright. Additional
copyrights can be added, as per copyright law.
Happy Font Hacking!
=============
1. I don't understand the resale restriction... What
gives?
Bitstream is giving away these fonts, but
wishes to ensure its
competitors can't just drop the fonts as is into
a font sale system
and sell them as is. It seems fair that if
Bitstream can't make money
from the Bitstream Vera fonts, their
competitors should not be able to
do so either. You can sell the fonts as part of
any software package,
however.
2. I want to package these fonts separately for
distribution and
sale as part of a larger software package or
system. Can I do so?
Yes. A RPM or Debian package is a "larger
software package" to begin
with, and you aren't selling them
6. If I have improvements for Bitstream Vera, is it
possible they might get
adopted in future versions?
Yes. The contract between the Gnome
Foundation and Bitstream has
provisions for working with Bitstream to ensure
quality additions to
the Bitstream Vera font family. Please contact
us if you have such
additions. Note, that in general, we will want
such additions for the
entire family, not just a single font, and that
you'll have to keep
both Gnome and Jim Lyles, Vera's designer,
happy! To make sense to add
glyphs to the font, they must be stylistically in
keeping with Vera's
design. Vera cannot become a "ransom note"
font. Jim Lyles will be
providing a document describing the design
elements used in Vera, as a
49
Page 50

guide and aid for people interested in
contributing to Vera.
1. Definitions.
"License" shall mean the terms and conditions
for use, reproduction,
7. I want to sell a software package that uses these
fonts: Can I do so?
Sure. Bundle the fonts with your software and
sell your software
with the fonts. That is the intent of the
copyright.
8. If applications have built the names "Bitstream
Vera" into them,
can I override this somehow to use fonts of my
choosing?
This depends on exact details of the software.
Most open source
systems and software (e.g., Gnome, KDE, etc.)
are now converting to
use fontconfig (see www.fontconfig.org ) to
handle font configuration,
selection and substitution; it has provisions for
overriding font
names and subsituting alternatives. An
example is provided by the
supplied local.conf file, which chooses the
family Bitstream Vera for
and distribution as defined by Sections 1
through 9 of this document.
"Licensor" shall mean the copyright owner or
entity authorized by
the copyright owner that is granting the
License.
"Legal Entity" shall mean the union of the
acting entity and all
other entities that control, are controlled by, or
are under common
control with that entity. For the purposes of
this definition,
"control" means (i) the power, direct or
indirect, to cause the
direction or management of such entity,
whether by contract or
otherwise, or (ii) ownership of fifty percent
(50%) or more of the
outstanding shares, or (iii) beneficial
ownership of such entity.
"You" (or "Your") shall mean an individual or
Legal Entity
exercising permissions granted by this License.
"sans", "serif" and "monospace". Other
software (e.g., the XFree86
core server) has other mechanisms for font
substitution.
Open Sans fonts
URL:
http://www.google.com/fonts/specimen/Open+Sans
License for Open Sans Font Family
-------------------------------Apache License
Version 2.0,
January 2004
http://www.apache.org/licenses/
TERMS AND CONDITIONS FOR USE,
REPRODUCTION, AND DISTRIBUTION
"Source" form shall mean the preferred form
for making modifications,
including but not limited to software source
code, documentation
source, and configuration files.
"Object" form shall mean any form resulting
from mechanical
transformation or translation of a Source form,
including but
not limited to compiled object code,
generated documentation,
and conversions to other media types.
"Work" shall mean the work of authorship,
whether in Source or
Object form, made available under the
License, as indicated by a
copyright notice that is included in or attached
to the work
(an example is provided in the Appendix
below).
"Derivative Works" shall mean any work,
whether in Source or Object
50
Page 51

form, that is based on (or derived from) the
Work and for which the
editorial revisions, annotations, elaborations,
or other modifications
represent, as a whole, an original work of
authorship. For the purposes
of this License, Derivative Works shall not
include works that remain
separable from, or merely link (or bind by
name) to the interfaces of,
the Work and Derivative Works thereof.
"Contribution" shall mean any work of
authorship, including
the original version of the Work and any
modifications or additions
to that Work or Derivative Works thereof, that
is intentionally
submitted to Licensor for inclusion in the Work
by the copyright owner
or by an individual or Legal Entity authorized
to submit on behalf of
the copyright owner. For the purposes of this
definition, "submitted"
means any form of electronic, verbal, or
written communication sent
to the Licensor or its representatives, including
but not limited to
communication on electronic mailing lists,
source code control systems,
and issue tracking systems that are managed
by, or on behalf of, the
Licensor for the purpose of discussing and
improving the Work, but
excluding communication that is
conspicuously marked or otherwise
designated in writing by the copyright owner
as "Not a Contribution."
"Contributor" shall mean Licensor and any
individual or Legal Entity
on behalf of whom a Contribution has been
received by Licensor and
subsequently incorporated within the Work.
2. Grant of Copyright License. Subject to the terms
and conditions of
this License, each Contributor hereby grants to
You a perpetual,
worldwide, non-exclusive, no-charge, royalty-
free, irrevocable
copyright license to reproduce, prepare
Derivative Works of,
publicly display, publicly perform, sublicense,
and distribute the
Work and such Derivative Works in Source or
Object form.
3. Grant of Patent License. Subject to the terms
and conditions of
this License, each Contributor hereby grants to
You a perpetual,
worldwide, non-exclusive, no-charge, royaltyfree, irrevocable
(except as stated in this section) patent license
to make, have made,
use, offer to sell, sell, import, and otherwise
transfer the Work,
where such license applies only to those
patent claims licensable
by such Contributor that are necessarily
infringed by their
Contribution(s) alone or by combination of
their Contribution(s)
with the Work to which such Contribution(s)
was submitted. If You
institute patent litigation against any entity
(including a
cross-claim or counterclaim in a lawsuit)
alleging that the Work
or a Contribution incorporated within the Work
constitutes direct
or contributory patent infringement, then any
patent licenses
granted to You under this License for that
Work shall terminate
as of the date such litigation is filed.
4. Redistribution. You may reproduce and
distribute copies of the
Work or Derivative Works thereof in any
medium, with or without
modifications, and in Source or Object form,
provided that You
meet the following conditions:
(a) You must give any other recipients of the
Work or
51
Page 52

Derivative Works a copy of this License;
and
may provide additional or different license
terms and conditions
(b) You must cause any modified files to carry
prominent notices
stating that You changed the files; and
(c) You must retain, in the Source form of any
Derivative Works
that You distribute, all copyright, patent,
trademark, and
attribution notices from the Source form
of the Work,
excluding those notices that do not
pertain to any part of
the Derivative Works; and
(d) If the Work includes a "NOTICE" text file as
part of its
distribution, then any Derivative Works
that You distribute must
include a readable copy of the
attribution notices contained
within such NOTICE file, excluding those
notices that do not
for use, reproduction, or distribution of Your
modifications, or
for any such Derivative Works as a whole,
provided Your use,
reproduction, and distribution of the Work
otherwise complies with
the conditions stated in this License.
5. Submission of Contributions. Unless You
explicitly state otherwise,
any Contribution intentionally submitted for
inclusion in the Work
by You to the Licensor shall be under the
terms and conditions of
this License, without any additional terms or
conditions.
Notwithstanding the above, nothing herein
shall supersede or modify
the terms of any separate license agreement
you may have executed
pertain to any part of the Derivative
Works, in at least one
of the following places: within a NOTICE
text file distributed
as part of the Derivative Works; within
the Source form or
documentation, if provided along with
the Derivative Works; or,
within a display generated by the
Derivative Works, if and
wherever such third-party notices
normally appear. The contents
of the NOTICE file are for informational
purposes only and
do not modify the License. You may add
Your own attribution
notices within Derivative Works that You
distribute, alongside
or as an addendum to the NOTICE text
from the Work, provided
that such additional attribution notices
cannot be construed
as modifying the License.
You may add Your own copyright statement to
Your modifications and
with Licensor regarding such Contributions.
6. Trademarks. This License does not grant
permission to use the trade
names, trademarks, service marks, or product
names of the Licensor,
except as required for reasonable and
customary use in describing the
origin of the Work and reproducing the
content of the NOTICE file.
7. Disclaimer of Warranty. Unless required by
applicable law or
agreed to in writing, Licensor provides the
Work (and each
Contributor provides its Contributions) on an
"AS IS" BASIS,
WITHOUT WARRANTIES OR CONDITIONS OF
ANY KIND, either express or
implied, including, without limitation, any
warranties or conditions
of TITLE, NON-INFRINGEMENT,
MERCHANTABILITY, or FITNESS FOR A
PARTICULAR PURPOSE. You are solely
responsible for determining the
appropriateness of using or redistributing the
52
Page 53

Work and assume any
END OF TERMS AND CONDITIONS
risks associated with Your exercise of
permissions under this License.
8. Limitation of Liability. In no event and under no
legal theory,
whether in tort (including negligence),
contract, or otherwise,
unless required by applicable law (such as
deliberate and grossly
negligent acts) or agreed to in writing, shall
any Contributor be
liable to You for damages, including any
direct, indirect, special,
incidental, or consequential damages of any
character arising as a
result of this License or out of the use or
inability to use the
Work (including but not limited to damages for
loss of goodwill,
work stoppage, computer failure or
malfunction, or any and all
other commercial damages or losses), even if
such Contributor
APPENDIX: How to apply the Apache License to
your work.
To apply the Apache License to your work,
attach the following
boilerplate notice, with the fields enclosed by
brackets "[]"
replaced with your own identifying
information. (Don't include
the brackets!) The text should be enclosed in
the appropriate
comment syntax for the file format. We also
recommend that a
file or class name and description of purpose
be included on the
same "printed page" as the copyright notice
for easier
identification within third-party archives.
Copyright [yyyy] [name of copyright owner]
has been advised of the possibility of such
damages.
9. Accepting Warranty or Additional Liability. While
redistributing
the Work or Derivative Works thereof, You may
choose to offer,
and charge a fee for, acceptance of support,
warranty, indemnity,
or other liability obligations and/or rights
consistent with this
License. However, in accepting such
obligations, You may act only
on Your own behalf and on Your sole
responsibility, not on behalf
of any other Contributor, and only if You agree
to indemnify,
defend, and hold each Contributor harmless
for any liability
incurred by, or claims asserted against, such
Contributor by reason
of your accepting any such warranty or
additional liability.
Licensed under the Apache License, Version 2.0
(the "License");
you may not use this file except in compliance
with the License.
You may obtain a copy of the License at
http://www.apache.org/licenses/LICENSE-2.0
Unless required by applicable law or agreed to in
writing, software
distributed under the License is distributed on an
"AS IS" BASIS,
WITHOUT WARRANTIES OR CONDITIONS OF ANY
KIND, either express or implied.
See the License for the specific language
governing permissions and
limitations under the License.
VL Gothic fonts
URL: http://dicey.org/vlgothic/index.html
License for VLGothic Font Family
--------------------------------
53
Page 54

This font includes glyphs derived from M+ FONTS
which is created by
written permission.
M+ FONTS PROJECT. License for M+ FONTS part is
described in M+ FONTS
PROJECT's license. See attached 'LICENSE_E.mplus'.
This font also includes glyphs derived from
Sazanami Gothic font which
is created by Electronic Font Open Laboratory
(/efont/). License for
Sazanami Gothic part is described in it's license. See
attached
'README.sazanami' for original Sazanami Gothic font
license.
This font also includes original glyphs which is
created by Daisuke
SUZUKI and Project Vine based on M+ FONTS. Licese
for VL Gothic
original glyphs is same as M+ FONTS PROJECT's
license.
There is no limitation and the below description is
not applied
as for in order not to reuse as font (ex: font is
embeded to documents).
THIS SOFTWARE IS PROVIDED BY WADA
LABORATORY, THE UNIVERSITY OF TOKYO AND
CONTRIBUTORS ``AS IS'' AND ANY EXPRESS OR
IMPLIED WARRANTIES, INCLUDING, BUT
NOT LIMITED TO, THE IMPLIED WARRANTIES OF
MERCHANTABILITY AND FITNESS FOR A
PARTICULAR PURPOSE ARE DISCLAIMED. IN NO
EVENT SHALL THE LABORATORY OR
CONTRIBUTORS BE LIABLE FOR ANY DIRECT,
INDIRECT, INCIDENTAL, SPECIAL,
EXEMPLARY, OR CONSEQUENTIAL DAMAGES
(INCLUDING, BUT NOT LIMITED TO,
PROCUREMENT OF SUBSTITUTE GOODS OR
SERVICES; LOSS OF USE, DATA, OR PROFITS;
OR BUSINESS INTERRUPTION) HOWEVER CAUSED
AND ON ANY THEORY OF LIABILITY,
WHETHER IN CONTRACT, STRICT LIABILITY, OR
TORT (INCLUDING NEGLIGENCE OR
OTHERWISE) ARISING IN ANY WAY OUT OF THE USE
OF THIS SOFTWARE, EVEN IF
ADVISED OF THE POSSIBILITY OF SUCH DAMAGE.
Copyright (c) 1990-2003 Wada Laboratory, the
University of Tokyo.
Copyright (c) 2003-2004 Electronic Font Open
Laboratory (/efont/).
Copyright (C) 2003-2009 M+ FONTS PROJECT
Copyright (C) 2006-2009 Daisuke SUZUKI
<daisuke@vinelinux.org>.
Copyright (C) 2006-2009 Project Vine
<Vine@vinelinux.org>.
All rights reserved.
Redistribution and use in source and binary forms,
with or without
modification, are permitted provided that the
following conditions
are met:
this list of conditions and the following disclaimer.
this list of conditions and the following disclaimer
in the documentation
and/or other materials provided with the
distribution.
Nanum fonts
URL: http://hangeul.naver.com/
Copyright (c) 2010, NAVER Corporation (
http://www.nhncorp.com ).
with Reserved Font Name Nanum, Naver Nanum,
NanumGothic, Naver NanumGothic,
NanumMyeongjo, Naver NanumMyeongjo,
NanumBrush, Naver NanumBrush, NanumPen, Naver
NanumPen, Naver NanumGothicEco,
NanumGothicEco, Naver NanumMyeongjoEco,
NanumMyeongjoEco, Naver NanumGothicLight,
NanumGothicLight, NanumBarunGothic, Naver
NanumBarunGothic,
This Font Software is licensed under the SIL Open
Font License, Version 1.1.
This license is copied below, and is also available with
a FAQ at: http://scripts.sil.org/OFL
This Font Software is licensed under the SIL Open
Font License, Version 1.1.
This license is copied below, and is also available with
a FAQ at:
http://scripts.sil.org/OFL
the names of its contributors may be used to
endorse or promote products
derived from this software without specific prior
-------------------------------------------------
----------
54
Page 55

SIL OPEN FONT LICENSE Version 1.1 - 26 February
2007
in Original or Modified Versions, may be sold by itself.
-------------------------------------------------
----------
PREAMBLE
The goals of the Open Font License (OFL) are to
stimulate worldwide development of collaborative
font projects, to support the font creation efforts of
academic and linguistic communities, and to provide
a free and open framework in which fonts may be
shared and improved in partnership with others.
The OFL allows the licensed fonts to be used,
studied, modified and redistributed freely as long as
they are not sold by themselves. The fonts, including
any derivative works, can be bundled,
embedded, redistributed and/or sold with any
software provided that any reserved names are not
used by derivative works. The fonts and
derivatives, however, cannot be released under any
other type of license. The requirement for fonts to
remain under this license does not apply to any
document created using the fonts or their derivatives.
DEFINITIONS
"Font Software" refers to the set of files released by
the Copyright Holder(s) under this license and clearly
marked as such. This may include source files, build
scripts and documentation.
"Reserved Font Name" refers to any names specified
as such after the copyright statement(s).
"Original Version" refers to the collection of Font
Software components as distributed by the
Copyright Holder(s).
"Modified Version" refers to any derivative made by
adding to, deleting, or substituting -- in part or in
whole -- any of the components of the Original
Version, by changing formats or by porting the Font
Software to a new environment.
2) Original or Modified Versions of the Font Software
may be bundled,
redistributed and/or sold with any software, provided
that each copy
contains the above copyright notice and this license.
These can be
included either as stand-alone text files, humanreadable headers or
in the appropriate machine-readable metadata fields
within text or
binary files as long as those fields can be easily
viewed by the user.
3) No Modified Version of the Font Software may use
the Reserved Font
Name(s) unless explicit written permission is granted
by the corresponding
Copyright Holder. This restriction only applies to the
primary font name as
presented to the users.
4) The name(s) of the Copyright Holder(s) or the
Author(s) of the Font
Software shall not be used to promote, endorse or
advertise any
Modified Version, except to acknowledge the
contribution(s) of the
Copyright Holder(s) and the Author(s) or with their
explicit written
5) The Font Software, modified or unmodified, in part
or in whole,
"Author" refers to any designer, engineer,
programmer, technical writer or other person who
contributed to the Font Software.
PERMISSION & CONDITIONS
Permission is hereby granted, free of charge, to any
person obtaining
a copy of the Font Software, to use, study, copy,
merge, embed, modify,
redistribute, and sell modified and unmodified copies
of the Font
Software, subject to the following conditions:
1) Neither the Font Software nor any of its individual
components,
must be distributed entirely under this license, and
must not be
distributed under any other license. The requirement
for fonts to
remain under this license does not apply to any
document created
using the Font Software.
TERMINATION
This license becomes null and void if any of the
above conditions are
not met.
55
Page 56

DISCLAIMER
THE FONT SOFTWARE IS PROVIDED "AS IS",
WITHOUT WARRANTY OF ANY KIND,
EXPRESS OR IMPLIED, INCLUDING BUT NOT
LIMITED TO ANY WARRANTIES OF
MERCHANTABILITY, FITNESS FOR A PARTICULAR
PURPOSE AND NONINFRINGEMENT
intended to guarantee your freedom to share and
change free software--to make sure the software is
free for all its users.
This license, the Library General Public License,
applies to some specially designated Free Software
Foundation software, and to any other libraries
whose authors decide to use it. You can use it for
your libraries, too.
OF COPYRIGHT, PATENT, TRADEMARK, OR OTHER
RIGHT. IN NO EVENT SHALL THE
COPYRIGHT HOLDER BE LIABLE FOR ANY CLAIM,
DAMAGES OR OTHER LIABILITY,
INCLUDING ANY GENERAL, SPECIAL, INDIRECT,
INCIDENTAL, OR CONSEQUENTIAL
DAMAGES, WHETHER IN AN ACTION OF CONTRACT,
TORT OR OTHERWISE, ARISING
FROM, OUT OF THE USE OR INABILITY TO USE THE
FONT SOFTWARE OR FROM
OTHER DEALINGS IN THE FONT SOFTWARE.
Mini-XML
URL: http://www.msweet.org/projects.php?Z3
Mini-XML License
The Mini-XML library and included programs are
provided under the terms of the GNU Library General
Public License version 2 (LGPL2) with the following
exceptions:
If you link the application to a modified version of
Mini-XML, then the changes to Mini-XML must be
provided under the terms of the LGPL2 in sections 1,
2, and 4.
GNU LIBRARY GENERAL PUBLIC LICENSE
Version 2, June 1991
Copyright (C) 1991 Free Software Foundation, Inc.
59 Temple Place - Suite 330, Boston, MA 02111-1307,
USA
Everyone is permitted to copy and distribute verbatim
copies of this license document, but changing it is not
allowed.
[This is the first released version of the library GPL. It
is numbered 2 because it goes with version 2 of the
ordinary GPL.]
Preamble
The licenses for most software are designed to take
away your freedom to share and change it. By
contrast, the GNU General Public Licenses are
When we speak of free software, we are referring to
freedom, not price. Our General Public Licenses are
designed to make sure that you have the freedom to
distribute copies of free software (and charge for this
service if you wish), that you receive source code or
can get it if you want it, that you can change the
software or use pieces of it in new free programs; and
that you know you can do these things.
To protect your rights, we need to make restrictions
that forbid anyone to deny you these rights or to ask
you to surrender the rights. These restrictions
translate to certain responsibilities for you if you
distribute copies of the library, or if you modify it.
For example, if you distribute copies of the library,
whether gratis or for a fee, you must give the
recipients all the rights that we gave you. You must
make sure that they, too, receive or can get the
source code. If you link a program with the library,
you must provide complete object files to the
recipients so that they can relink them with the library,
after making changes to the library and recompiling it.
And you must show them these terms so they know
their rights.
Our method of protecting your rights has two steps:
(1) copyright the library, and (2) offer you this license
which gives you legal permission to copy, distribute
and/or modify the library.
Also, for each distributor's protection, we want to
make certain that everyone understands that there is
no warranty for this free library. If the library is
modified by someone else and passed on, we want
its recipients to know that what they have is not the
original version, so that any problems introduced by
others will not reflect on the original authors'
reputations.
Finally, any free program is threatened constantly by
software patents. We wish to avoid the danger that
companies distributing free software will individually
obtain patent licenses, thus in effect transforming the
program into proprietary software. To prevent this, we
have made it clear that any patent must be licensed
for everyone's free use or not licensed at all.
Most GNU software, including some libraries, is
covered by the ordinary GNU General Public License,
which was designed for utility programs. This license,
the GNU Library General Public License, applies to
certain designated libraries. This license is quite
different from the ordinary one; be sure to read it in
56
Page 57

full, and don't assume that anything in it is the same
as in the ordinary license.
The reason we have a separate public license for
some libraries is that they blur the distinction we
usually make between modifying or adding to a
program and simply using it. Linking a program with a
library, without changing the library, is in some sense
simply using the library, and is analogous to running a
utility program or application program. However, in a
textual and legal sense, the linked executable is a
combined work, a derivative of the original library,
and the ordinary General Public License treats it as
such.
Because of this blurred distinction, using the ordinary
General Public License for libraries did not effectively
promote software sharing, because most developers
did not use the libraries. We concluded that weaker
conditions might promote sharing better.
"Source code" for a work means the preferred form of
the work for making modifications to it. For a library,
complete source code means all the source code for
all modules it contains, plus any associated interface
definition files, plus the scripts used to control
compilation and installation of the library.
Activities other than copying, distribution and
modification are not covered by this License; they are
outside its scope. The act of running a program using
the Library is not restricted, and output from such a
program is covered only if its contents constitute a
work based on the Library (independent of the use of
the Library in a tool for writing it). Whether that is true
depends on what the Library does and what the
program that uses the Library does.
You may charge a fee for the physical act of
transferring a copy, and you may at your option offer
warranty protection in exchange for a fee.
However, unrestricted linking of non-free programs
would deprive the users of those programs of all
benefit from the free status of the libraries
themselves. This Library General Public License is
intended to permit developers of non-free programs
to use free libraries, while preserving your freedom as
a user of such programs to change the free libraries
that are incorporated in them. (We have not seen how
to achieve this as regards changes in header files, but
we have achieved it as regards changes in the actual
functions of the Library.) The hope is that this will lead
to faster development of free libraries.
The precise terms and conditions for copying,
distribution and modification follow. Pay close
attention to the difference between a "work based on
the libary" and a "work that uses the library". The
former contains code derived from the library, while
the latter only works together with the library.
Note that it is possible for a library to be covered by
the ordinary General Public License rather than by
this special one.
TERMS AND CONDITIONS FOR COPYING,
DISTRIBUTION AND MODIFICATION
A "library" means a collection of software functions
and/or data prepared so as to be conveniently linked
with application programs (which use some of those
functions and data) to form executables.
The "Library", below, refers to any such software
library or work which has been distributed under
these terms. A "work based on the Library" means
either the Library or any derivative work under
copyright law: that is to say, a work containing the
Library or a portion of it, either verbatim or with
modifications and/or translated straightforwardly into
another language. (Hereinafter, translation is included
without limitation in the term "modification".)
a) The modified work must itself be a software library.
b) You must cause the files modified to carry
prominent notices stating that you changed the files
and the date of any change.
c) You must cause the whole of the work to be
licensed at no charge to all third parties under the
terms of this License.
d) If a facility in the modified Library refers to a
function or a table of data to be supplied by an
application program that uses the facility, other than
as an argument passed when the facility is invoked,
then you must make a good faith effort to ensure that,
in the event an application does not supply such
function or table, the facility still operates, and
performs whatever part of its purpose remains
meaningful.
(For example, a function in a library to compute
square roots has a purpose that is entirely welldefined independent of the application. Therefore,
Subsection 2d requires that any application-supplied
function or table used by this function must be
optional: if the application does not supply it, the
square root function must still compute square roots.)
These requirements apply to the modified work as a
whole. If identifiable sections of that work are not
derived from the Library, and can be reasonably
considered independent and separate works in
themselves, then this License, and its terms, do not
apply to those sections when you distribute them as
separate works. But when you distribute the same
sections as part of a whole which is a work based on
the Library, the distribution of the whole must be on
the terms of this License, whose permissions for other
licensees extend to the entire whole, and thus to
each and every part regardless of who wrote it.
Thus, it is not the intent of this section to claim rights
or contest your rights to work written entirely by you;
rather, the intent is to exercise the right to control the
57
Page 58

distribution of derivative or collective works based on
the Library.
In addition, mere aggregation of another work not
based on the Library with the Library (or with a work
based on the Library) on a volume of a storage or
distribution medium does not bring the other work
under the scope of this License.
Once this change is made in a given copy, it is
irreversible for that copy, so the ordinary GNU
General Public License applies to all subsequent
copies and derivative works made from that copy.
This option is useful when you wish to copy part of
the code of the Library into a program that is not a
library.
If distribution of object code is made by offering
access to copy from a designated place, then offering
equivalent access to copy the source code from the
same place satisfies the requirement to distribute the
source code, even though third parties are not
compelled to copy the source along with the object
code.
However, linking a "work that uses the Library" with
the Library creates an executable that is a derivative
of the Library (because it contains portions of the
Library), rather than a "work that uses the library". The
executable is therefore covered by this License.
Section 6 states terms for distribution of such
executables.
When a "work that uses the Library" uses material
from a header file that is part of the Library, the object
code for the work may be a derivative work of the
Library even though the source code is not. Whether
this is true is especially significant if the work can be
linked without the Library, or if the work is itself a
library. The threshold for this to be true is not
precisely defined by law.
If such an object file uses only numerical parameters,
data structure layouts and accessors, and small
macros and small inline functions (ten lines or less in
length), then the use of the object file is unrestricted,
regardless of whether it is legally a derivative work.
(Executables containing this object code plus
portions of the Library will still fall under Section 6.)
Otherwise, if the work is a derivative of the Library,
you may distribute the object code for the work under
the terms of Section 6. Any executables containing
that work also fall under Section 6, whether or not
they are linked directly with the Library itself.
You must give prominent notice with each copy of the
work that the Library is used in it and that the Library
and its use are covered by this License. You must
supply a copy of this License. If the work during
execution displays copyright notices, you must
include the copyright notice for the Library among
them, as well as a reference directing the user to the
copy of this License. Also, you must do one of these
things:
a) Accompany the work with the complete
corresponding machine-readable source code for the
Library including whatever changes were used in the
work (which must be distributed under Sections 1 and
2 above); and, if the work is an executable linked with
the Library, with the complete machine-readable
"work that uses the Library", as object code and/or
source code, so that the user can modify the Library
and then relink to produce a modified executable
containing the modified Library. (It is understood that
the user who changes the contents of definitions files
in the Library will not necessarily be able to recompile
the application to use the modified definitions.)
b) Accompany the work with a written offer, valid for
at least three years, to give the same user the
materials specified in Subsection 6a, above, for a
charge no more than the cost of performing this
distribution.
c) If distribution of the work is made by offering
access to copy from a designated place, offer
equivalent access to copy the above specified
materials from the same place.
d) Verify that the user has already received a copy of
these materials or that you have already sent this user
a copy.
For an executable, the required form of the "work that
uses the Library" must include any data and utility
programs needed for reproducing the executable
from it. However, as a special exception, the source
code distributed need not include anything that is
normally distributed (in either source or binary form)
with the major components (compiler, kernel, and so
on) of the operating system on which the executable
runs, unless that component itself accompanies the
executable.
It may happen that this requirement contradicts the
license restrictions of other proprietary libraries that
do not normally accompany the operating system.
Such a contradiction means you cannot use both
them and the Library together in an executable that
you distribute.
a) Accompany the combined library with a copy of
the same work based on the Library, uncombined
with any other library facilities. This must be
distributed under the terms of the Sections above.
b) Give prominent notice with the combined library of
the fact that part of it is a work based on the Library,
and explaining where to find the accompanying
uncombined form of the same work.
If any portion of this section is held invalid or
unenforceable under any particular circumstance, the
balance of the section is intended to apply, and the
section as a whole is intended to apply in other
circumstances.
58
Page 59

It is not the purpose of this section to induce you to
infringe any patents or other property right claims or
to contest validity of any such claims; this section has
the sole purpose of protecting the integrity of the free
software distribution system which is implemented by
public license practices. Many people have made
generous contributions to the wide range of software
distributed through that system in reliance on
consistent application of that system; it is up to the
author/donor to decide if he or she is willing to
distribute software through any other system and a
licensee cannot impose that choice.
This section is intended to make thoroughly clear
what is believed to be a consequence of the rest of
this License.
Each version is given a distinguishing version number.
If the Library specifies a version number of this
License which applies to it and "any later version",
you have the option of following the terms and
conditions either of that version or of any later version
published by the Free Software Foundation. If the
Library does not specify a license version number,
you may choose any version ever published by the
Free Software Foundation.
NO WARRANTY
END OF TERMS AND CONDITIONS
How to Apply These Terms to Your New Libraries
If you develop a new library, and you want it to be of
the greatest possible use to the public, we
recommend making it free software that everyone
can redistribute and change. You can do so by
permitting redistribution under these terms (or,
alternatively, under the terms of the ordinary General
Public License).
To apply these terms, attach the following notices to
the library. It is safest to attach them to the start of
each source file to most effectively convey the
exclusion of warranty; and each file should have at
least the "copyright" line and a pointer to where the
full notice is found.
one line to give the library's name and an idea of
what it does.
Copyright (C) year name of author
This library is free software; you can redistribute it
and/or modify it under the terms of the GNU Lesser
General Public License as published by the Free
Software Foundation; either version 2.1 of the License,
or (at your option) any later version.
Lesser General Public License for more details.
You should have received a copy of the GNU Lesser
General Public License along with this library; if not,
write to the Free Software Foundation, Inc., 59
Temple Place, Suite 330, Boston, MA 02111-1307 USA
Also add information on how to contact you by
electronic and paper mail.
You should also get your employer (if you work as a
programmer) or your school, if any, to sign a
"copyright disclaimer" for the library, if necessary.
Here is a sample; alter the names:
Yoyodyne, Inc., hereby disclaims all copyright interest
in the library `Frob' (a library for tweaking knobs)
written by James Random Hacker.
signature of Ty Coon, 1 April 1990 Ty Coon, President
of Vice
That's all there is to it!
Boost
URL: http://www.boost.org/
Boost Software License - Version 1.0 - August 17th,
2003
Permission is hereby granted, free of charge, to any
person or organization
obtaining a copy of the software and accompanying
documentation covered by
this license (the "Software") to use, reproduce,
display, distribute,
execute, and transmit the Software, and to prepare
derivative works of the
Software, and to permit third-parties to whom the
Software is furnished to
do so, all subject to the following:
The copyright notices in the Software and this entire
statement, including
the above license grant, this restriction and the
following disclaimer,
must be included in all copies of the Software, in
whole or in part, and
all derivative works of the Software, unless such
copies or derivative
works are solely in the form of machine-executable
object code generated by
This library is distributed in the hope that it will be
useful, but WITHOUT ANY WARRANTY; without even
the implied warranty of MERCHANTABILITY or
FITNESS FOR A PARTICULAR PURPOSE. See the GNU
a source language processor.
THE SOFTWARE IS PROVIDED "AS IS", WITHOUT
59
Page 60

WARRANTY OF ANY KIND, EXPRESS OR
.c
IMPLIED, INCLUDING BUT NOT LIMITED TO THE
WARRANTIES OF MERCHANTABILITY,
FITNESS FOR A PARTICULAR PURPOSE, TITLE AND
NON-INFRINGEMENT. IN NO EVENT
SHALL THE COPYRIGHT HOLDERS OR ANYONE
DISTRIBUTING THE SOFTWARE BE LIABLE
FOR ANY DAMAGES OR OTHER LIABILITY,
WHETHER IN CONTRACT, TORT OR OTHERWISE,
ARISING FROM, OUT OF OR IN CONNECTION WITH
THE SOFTWARE OR THE USE OR OTHER
DEALINGS IN THE SOFTWARE.
libcurl
URL: http://curl.haxx.se/
COPYRIGHT AND PERMISSION NOTICE
Copyright (c) 1996 - 2014, Daniel Stenberg,
<daniel@haxx.se>.
All rights reserved.
/* GSSAPI/krb5 support for FTP - loosely based on
old krb4.c
*
* Copyright (c) 1995, 1996, 1997, 1998, 1999, 2013
Kungliga Tekniska Högskolan
* (Royal Institute of Technology, Stockholm,
Sweden).
* Copyright (c) 2004 - 2012 Daniel Stenberg
* All rights reserved.
*
* Redistribution and use in source and binary forms,
with or without
* modification, are permitted provided that the
following conditions
* are met:
*
* 1. Redistributions of source code must retain the
above copyright
Permission to use, copy, modify, and distribute this
software for any purpose
with or without fee is hereby granted, provided that
the above copyright
notice and this permission notice appear in all copies.
THE SOFTWARE IS PROVIDED "AS IS", WITHOUT
WARRANTY OF ANY KIND, EXPRESS OR
IMPLIED, INCLUDING BUT NOT LIMITED TO THE
WARRANTIES OF MERCHANTABILITY,
FITNESS FOR A PARTICULAR PURPOSE AND
NONINFRINGEMENT OF THIRD PARTY RIGHTS. IN
NO EVENT SHALL THE AUTHORS OR COPYRIGHT
HOLDERS BE LIABLE FOR ANY CLAIM,
DAMAGES OR OTHER LIABILITY, WHETHER IN AN
ACTION OF CONTRACT, TORT OR
OTHERWISE, ARISING FROM, OUT OF OR IN
CONNECTION WITH THE SOFTWARE OR THE USE
OR OTHER DEALINGS IN THE SOFTWARE.
Except as contained in this notice, the name of a
copyright holder shall not
be used in advertising or otherwise to promote the
sale, use or other dealings
in this Software without prior written authorization of
the copyright holder.
libcurl - lib/krb5.c
* notice, this list of conditions and the following
disclaimer.
*
* 2. Redistributions in binary form must reproduce
the above copyright
* notice, this list of conditions and the following
disclaimer in the
* documentation and/or other materials
provided with the distribution.
*
* 3. Neither the name of the Institute nor the names
of its contributors
* may be used to endorse or promote products
derived from this software
* without specific prior written permission.
*
* THIS SOFTWARE IS PROVIDED BY THE INSTITUTE
AND CONTRIBUTORS ``AS IS'' AND
* ANY EXPRESS OR IMPLIED WARRANTIES,
INCLUDING, BUT NOT LIMITED TO, THE
* IMPLIED WARRANTIES OF MERCHANTABILITY
AND FITNESS FOR A PARTICULAR PURPOSE
* ARE DISCLAIMED. IN NO EVENT SHALL THE
INSTITUTE OR CONTRIBUTORS BE LIABLE
* FOR ANY DIRECT, INDIRECT, INCIDENTAL,
SPECIAL, EXEMPLARY, OR CONSEQUENTIAL
URL:
https://github.com/bagder/curl/blob/master/lib/krb5
* DAMAGES (INCLUDING, BUT NOT LIMITED TO,
PROCUREMENT OF SUBSTITUTE GOODS
60
Page 61

* OR SERVICES; LOSS OF USE, DATA, OR PROFITS;
OR BUSINESS INTERRUPTION)
* HOWEVER CAUSED AND ON ANY THEORY OF
LIABILITY, WHETHER IN CONTRACT, STRICT
* LIABILITY, OR TORT (INCLUDING NEGLIGENCE OR
OTHERWISE) ARISING IN ANY WAY
* OUT OF THE USE OF THIS SOFTWARE, EVEN IF
ADVISED OF THE POSSIBILITY OF
* SUCH DAMAGE. */
above copyright
* notice, this list of conditions and the following
disclaimer.
*
* 2. Redistributions in binary form must reproduce
the above copyright
* notice, this list of conditions and the following
disclaimer in the
* documentation and/or other materials
provided with the distribution.
libcurl - lib/security.c
URL:
https://github.com/bagder/curl/blob/master/lib/secu
rity.c
/* This source code was modified by Martin
Hedenfalk <mhe@stacken.kth.se> for
* use in Curl. His latest changes were done
2000-09-18.
*
* It has since been patched and modified a lot by
Daniel Stenberg
* <daniel@haxx.se> to make it better applied to curl
conditions, and to make
* it not use globals, pollute name space and more.
This source code awaits a
* rewrite to work around the paragraph 2 in the BSD
licenses as explained
* below.
*
* 3. Neither the name of the Institute nor the names
of its contributors
* may be used to endorse or promote products
derived from this software
* without specific prior written permission.
*
* THIS SOFTWARE IS PROVIDED BY THE INSTITUTE
AND CONTRIBUTORS ``AS IS'' AND
* ANY EXPRESS OR IMPLIED WARRANTIES,
INCLUDING, BUT NOT LIMITED TO, THE
* IMPLIED WARRANTIES OF MERCHANTABILITY
AND FITNESS FOR A PARTICULAR PURPOSE
* ARE DISCLAIMED. IN NO EVENT SHALL THE
INSTITUTE OR CONTRIBUTORS BE LIABLE
* FOR ANY DIRECT, INDIRECT, INCIDENTAL,
SPECIAL, EXEMPLARY, OR CONSEQUENTIAL
* DAMAGES (INCLUDING, BUT NOT LIMITED TO,
PROCUREMENT OF SUBSTITUTE GOODS
*
* Copyright (c) 1998, 1999, 2013 Kungliga Tekniska
Högskolan
* (Royal Institute of Technology, Stockholm,
Sweden).
*
* Copyright (C) 2001 - 2013, Daniel Stenberg,
<daniel@haxx.se>, et al.
*
* All rights reserved.
*
* Redistribution and use in source and binary forms,
with or without
* modification, are permitted provided that the
following conditions
* are met:
*
* 1. Redistributions of source code must retain the
* OR SERVICES; LOSS OF USE, DATA, OR PROFITS;
OR BUSINESS INTERRUPTION)
* HOWEVER CAUSED AND ON ANY THEORY OF
LIABILITY, WHETHER IN CONTRACT, STRICT
* LIABILITY, OR TORT (INCLUDING NEGLIGENCE OR
OTHERWISE) ARISING IN ANY WAY
* OUT OF THE USE OF THIS SOFTWARE, EVEN IF
ADVISED OF THE POSSIBILITY OF
* SUCH DAMAGE. */
David M. Gay's floating point routines
URL: http://www.netlib.org/fp/
/*********************************************************
*******
*
* The author of this software is David M. Gay.
*
* Copyright (c) 1991, 2000, 2001 by Lucent
61
Page 62

Technologies.
*
* Permission to use, copy, modify, and distribute this
software for any
* purpose without fee is hereby granted, provided
that this entire notice
* is included in all copies of any software which is or
includes a copy
* or modification of this software and in all copies of
the supporting
* documentation for such software.
*
* THIS SOFTWARE IS BEING PROVIDED "AS IS",
WITHOUT ANY EXPRESS OR IMPLIED
* WARRANTY. IN PARTICULAR, NEITHER THE
AUTHOR NOR LUCENT MAKES ANY
* REPRESENTATION OR WARRANTY OF ANY KIND
CONCERNING THE MERCHANTABILITY
* OF THIS SOFTWARE OR ITS FITNESS FOR ANY
PARTICULAR PURPOSE.
*
* THIS SOFTWARE IS PROVIDED BY THE
COPYRIGHT HOLDERS AND CONTRIBUTORS
* "AS IS" AND ANY EXPRESS OR IMPLIED
WARRANTIES, INCLUDING, BUT NOT
* LIMITED TO, THE IMPLIED WARRANTIES OF
MERCHANTABILITY AND FITNESS FOR
* A PARTICULAR PURPOSE ARE DISCLAIMED. IN
NO EVENT SHALL THE COPYRIGHT
* OWNER OR CONTRIBUTORS BE LIABLE FOR ANY
DIRECT, INDIRECT, INCIDENTAL,
* SPECIAL, EXEMPLARY, OR CONSEQUENTIAL
DAMAGES (INCLUDING, BUT NOT
* LIMITED TO, PROCUREMENT OF SUBSTITUTE
GOODS OR SERVICES; LOSS OF USE,
* DATA, OR PROFITS; OR BUSINESS
INTERRUPTION) HOWEVER CAUSED AND ON ANY
* THEORY OF LIABILITY, WHETHER IN CONTRACT,
STRICT LIABILITY, OR TORT
* (INCLUDING NEGLIGENCE OR OTHERWISE)
ARISING IN ANY WAY OUT OF THE USE
* OF THIS SOFTWARE, EVEN IF ADVISED OF THE
POSSIBILITY OF SUCH DAMAGE.
********************************************************
*******/
dynamic annotations
URL: http://code.google.com/p/data-race-
test/wiki/DynamicAnnotations
/* Copyright (c) 2008-2009, Google Inc.
* All rights reserved.
*
* Redistribution and use in source and binary forms,
with or without
* modification, are permitted provided that the
following conditions are
* met:
*
* * Redistributions of source code must retain
the above copyright
* notice, this list of conditions and the following
disclaimer.
* * Neither the name of Google Inc. nor the
names of its
* contributors may be used to endorse or promote
products derived from
*
* -- * Author: Kostya Serebryany
*/
libevent
URL: http://libevent.org/
Libevent is available for use under the following
license, commonly known
as the 3-clause (or "modified") BSD license:
==============================
Copyright (c) 2000-2007 Niels Provos
<provos@citi.umich.edu>
Copyright (c) 2007-2010 Niels Provos and Nick
Mathewson
Redistribution and use in source and binary forms,
with or without
modification, are permitted provided that the
following conditions
are met:
* this software without specific prior written
permission.
*
notice, this list of conditions and the following
disclaimer.
notice, this list of conditions and the following
62
Page 63

disclaimer in the
<provos@citi.umich.edu>
documentation and/or other materials provided
with the distribution.
derived from this software without specific prior
written permission.
THIS SOFTWARE IS PROVIDED BY THE AUTHOR ``AS
IS'' AND ANY EXPRESS OR
IMPLIED WARRANTIES, INCLUDING, BUT NOT
LIMITED TO, THE IMPLIED WARRANTIES
OF MERCHANTABILITY AND FITNESS FOR A
PARTICULAR PURPOSE ARE DISCLAIMED.
IN NO EVENT SHALL THE AUTHOR BE LIABLE FOR
ANY DIRECT, INDIRECT,
INCIDENTAL, SPECIAL, EXEMPLARY, OR
CONSEQUENTIAL DAMAGES (INCLUDING, BUT
NOT LIMITED TO, PROCUREMENT OF SUBSTITUTE
GOODS OR SERVICES; LOSS OF USE,
DATA, OR PROFITS; OR BUSINESS INTERRUPTION)
HOWEVER CAUSED AND ON ANY
THEORY OF LIABILITY, WHETHER IN CONTRACT,
STRICT LIABILITY, OR TORT
(INCLUDING NEGLIGENCE OR OTHERWISE) ARISING
IN ANY WAY OUT OF THE USE OF
THIS SOFTWARE, EVEN IF ADVISED OF THE
POSSIBILITY OF SUCH DAMAGE.
==============================
Portions of Libevent are based on works by others,
also made available by
them under the three-clause BSD license above.
The copyright notices are
available in the corresponding source files; the license
is as above. Here's
a list:
Copyright (c) 2000 Dug Song
<dugsong@monkey.org>
Copyright (c) 1993 The Regents of the University of
California.
Copyright (c) 1998 Todd C. Miller
<Todd.Miller@courtesan.com>
Copyright (c) 2003 Michael A. Davis
<mike@datanerds.net>
Copyright (c) 2007 Sun Microsystems
Copyright (c) 2006 Maxim Yegorushkin
<maxim.yegorushkin@gmail.com>
Copyright 2002 Niels Provos
Netscape Portable Runtime (NSPR)
URL: http://www.mozilla.org/projects/nspr/
/* ***** BEGIN LICENSE BLOCK *****
* Version: MPL 1.1/GPL 2.0/LGPL 2.1
*
* The contents of this file are subject to the Mozilla
Public License Version
* 1.1 (the "License"); you may not use this file except
in compliance with
* the License. You may obtain a copy of the License
at
* http://www.mozilla.org/MPL/
*
* Software distributed under the License is
distributed on an "AS IS" basis,
* WITHOUT WARRANTY OF ANY KIND, either
express or implied. See the License
* for the specific language governing rights and
limitations under the
* License.
*
* The Original Code is the Netscape Portable
Runtime (NSPR).
*
* The Initial Developer of the Original Code is
* Netscape Communications Corporation.
* Portions created by the Initial Developer are
Copyright (C) 1998-2000
* the Initial Developer. All Rights Reserved.
*
* Contributor(s):
*
* Alternatively, the contents of this file may be used
under the terms of
* either the GNU General Public License Version 2 or
later (the "GPL"), or
* the GNU Lesser General Public License Version 2.1
or later (the "LGPL"),
* in which case the provisions of the GPL or the
LGPL are applicable instead
* of those above. If you wish to allow use of your
version of this file only
* under the terms of either the GPL or the LGPL, and
not to allow others to
63
Page 64

* use your version of this file under the terms of the
MPL, indicate your
(INCLUDING, BUT NOT LIMITED TO, PROCUREMENT
OF SUBSTITUTE GOODS OR SERVICES;
* decision by deleting the provisions above and
replace them with the notice
* and other provisions required by the GPL or the
LGPL. If you do not delete
* the provisions above, a recipient may use your
version of this file under
* the terms of any one of the MPL, the GPL or the
LGPL.
*
* ***** END LICENSE BLOCK ***** */
Paul Hsieh's SuperFastHash
URL:
http://www.azillionmonkeys.com/qed/hash.html
Paul Hsieh OLD BSD license
Copyright (c) 2010, Paul Hsieh
All rights reserved.
Redistribution and use in source and binary forms,
with or without modification,
are permitted provided that the following conditions
are met:
* Redistributions of source code must retain the
above copyright notice, this
list of conditions and the following disclaimer.
* Redistributions in binary form must reproduce the
above copyright notice, this
list of conditions and the following disclaimer in the
documentation and/or
other materials provided with the distribution.
* Neither my name, Paul Hsieh, nor the names of any
other contributors to the
code use may not be used to endorse or promote
products derived from this
software without specific prior written permission.
THIS SOFTWARE IS PROVIDED BY THE COPYRIGHT
HOLDERS AND CONTRIBUTORS "AS IS" AND
ANY EXPRESS OR IMPLIED WARRANTIES,
INCLUDING, BUT NOT LIMITED TO, THE IMPLIED
WARRANTIES OF MERCHANTABILITY AND FITNESS
FOR A PARTICULAR PURPOSE ARE
ANY DIRECT, INDIRECT, INCIDENTAL, SPECIAL,
EXEMPLARY, OR CONSEQUENTIAL DAMAGES
LOSS OF USE, DATA, OR PROFITS; OR BUSINESS
INTERRUPTION) HOWEVER CAUSED AND ON
ANY THEORY OF LIABILITY, WHETHER IN
CONTRACT, STRICT LIABILITY, OR TORT
(INCLUDING NEGLIGENCE OR OTHERWISE) ARISING
IN ANY WAY OUT OF THE USE OF THIS
SOFTWARE, EVEN IF ADVISED OF THE POSSIBILITY
OF SUCH DAMAGE.
google-glog's symbolization library
URL: https://github.com/google/glog
Copyright (c) 2006, Google Inc.
All rights reserved.
Redistribution and use in source and binary forms,
with or without modification, are permitted provided
that the following conditions are met:
* Redistributions of source code must retain the
above copyright notice, this list of conditions and the
following disclaimer.
* Redistributions in binary form must reproduce the
above copyright notice, this list of conditions and the
following disclaimer in the documentation and/or
other materials provided with the distribution.
* Neither the name of Google Inc. nor the names of
its contributors may be used to endorse or promote
products derived from this software without specific
prior written permission.
THIS SOFTWARE IS PROVIDED BY THE COPYRIGHT
HOLDERS AND CONTRIBUTORS
"AS IS" AND ANY EXPRESS OR IMPLIED
WARRANTIES, INCLUDING, BUT NOT
LIMITED TO, THE IMPLIED WARRANTIES OF
MERCHANTABILITY AND FITNESS FOR
A PARTICULAR PURPOSE ARE DISCLAIMED. IN NO
EVENT SHALL THE COPYRIGHT
OWNER OR CONTRIBUTORS BE LIABLE FOR ANY
DIRECT, INDIRECT, INCIDENTAL,
SPECIAL, EXEMPLARY, OR CONSEQUENTIAL
DAMAGES (INCLUDING, BUT NOT
LIMITED TO, PROCUREMENT OF SUBSTITUTE
GOODS OR SERVICES; LOSS OF USE,
DATA, OR PROFITS; OR BUSINESS INTERRUPTION)
HOWEVER CAUSED AND ON ANY
THEORY OF LIABILITY, WHETHER IN CONTRACT,
STRICT LIABILITY, OR TORT
(INCLUDING NEGLIGENCE OR OTHERWISE) ARISING
64
Page 65

IN ANY WAY OUT OF THE USE
OF THIS SOFTWARE, EVEN IF ADVISED OF THE
POSSIBILITY OF SUCH DAMAGE.
valgrind
URL: http://valgrind.org
Notice that the following BSD-style license applies
to the Valgrind header
files used by Chromium (valgrind.h and
memcheck.h). However, the rest of
Valgrind is licensed under the terms of the GNU
General Public License,
version 2, unless otherwise indicated.
----------------------------------------------
------------------
Copyright (C) 2000-2008 Julian Seward. All
rights reserved.
Redistribution and use in source and binary forms,
with or without
modification, are permitted provided that the
following conditions
are met:
1. Redistributions of source code must retain the
above copyright
THIS SOFTWARE IS PROVIDED BY THE AUTHOR
``AS IS'' AND ANY EXPRESS
OR IMPLIED WARRANTIES, INCLUDING, BUT NOT
LIMITED TO, THE IMPLIED
WARRANTIES OF MERCHANTABILITY AND
FITNESS FOR A PARTICULAR PURPOSE
ARE DISCLAIMED. IN NO EVENT SHALL THE
AUTHOR BE LIABLE FOR ANY
DIRECT, INDIRECT, INCIDENTAL, SPECIAL,
EXEMPLARY, OR CONSEQUENTIAL
DAMAGES (INCLUDING, BUT NOT LIMITED TO,
PROCUREMENT OF SUBSTITUTE
GOODS OR SERVICES; LOSS OF USE, DATA, OR
PROFITS; OR BUSINESS
INTERRUPTION) HOWEVER CAUSED AND ON
ANY THEORY OF LIABILITY,
WHETHER IN CONTRACT, STRICT LIABILITY, OR
TORT (INCLUDING
NEGLIGENCE OR OTHERWISE) ARISING IN ANY
WAY OUT OF THE USE OF THIS
SOFTWARE, EVEN IF ADVISED OF THE
POSSIBILITY OF SUCH DAMAGE.
Mozilla Personal Security Manager
URL: http://mxr.mozilla.org/mozilla-
central/source/security/manager/
/* ***** BEGIN LICENSE BLOCK *****
notice, this list of conditions and the following
disclaimer.
2. The origin of this software must not be
misrepresented; you must
not claim that you wrote the original
software. If you use this
software in a product, an acknowledgment in
the product
documentation would be appreciated but is
not required.
3. Altered source versions must be plainly marked
as such, and must
not be misrepresented as being the original
software.
4. The name of the author may not be used to
endorse or promote
products derived from this software without
specific prior written
permission.
* Version: MPL 1.1/GPL 2.0/LGPL 2.1
*
* The contents of this file are subject to the Mozilla
Public License Version
* 1.1 (the "License"); you may not use this file except
in compliance with
* the License. You may obtain a copy of the License
at
* http://www.mozilla.org/MPL/
*
* Software distributed under the License is
distributed on an "AS IS" basis,
* WITHOUT WARRANTY OF ANY KIND, either
express or implied. See the License
* for the specific language governing rights and
limitations under the
* License.
*
65
Page 66

* The Original Code is the Netscape security libraries.
*
* The Initial Developer of the Original Code is
* Netscape Communications Corporation.
* Portions created by the Initial Developer are
Copyright (C) 2000
* the Initial Developer. All Rights Reserved.
*
* Contributor(s):
* the License. You may obtain a copy of the License
at
* http://www.mozilla.org/MPL/
*
* Software distributed under the License is
distributed on an "AS IS" basis,
* WITHOUT WARRANTY OF ANY KIND, either
express or implied. See the License
* for the specific language governing rights and
limitations under the
*
* Alternatively, the contents of this file may be used
under the terms of
* either the GNU General Public License Version 2 or
later (the "GPL"), or
* the GNU Lesser General Public License Version 2.1
or later (the "LGPL"),
* in which case the provisions of the GPL or the
LGPL are applicable instead
* of those above. If you wish to allow use of your
version of this file only
* under the terms of either the GPL or the LGPL, and
not to allow others to
* use your version of this file under the terms of the
MPL, indicate your
* decision by deleting the provisions above and
replace them with the notice
* and other provisions required by the GPL or the
LGPL. If you do not delete
* the provisions above, a recipient may use your
version of this file under
* the terms of any one of the MPL, the GPL or the
LGPL.
*
* ***** END LICENSE BLOCK ***** */
Network Security Services (NSS)
* License.
*
* The Original Code is the Netscape security libraries.
*
* The Initial Developer of the Original Code is
* Netscape Communications Corporation.
* Portions created by the Initial Developer are
Copyright (C) 1994-2000
* the Initial Developer. All Rights Reserved.
*
* Contributor(s):
*
* Alternatively, the contents of this file may be used
under the terms of
* either the GNU General Public License Version 2 or
later (the "GPL"), or
* the GNU Lesser General Public License Version 2.1
or later (the "LGPL"),
* in which case the provisions of the GPL or the
LGPL are applicable instead
* of those above. If you wish to allow use of your
version of this file only
* under the terms of either the GPL or the LGPL, and
not to allow others to
* use your version of this file under the terms of the
MPL, indicate your
URL:
http://www.mozilla.org/projects/security/pki/nss/
/* ***** BEGIN LICENSE BLOCK *****
* Version: MPL 1.1/GPL 2.0/LGPL 2.1
*
* The contents of this file are subject to the Mozilla
Public License Version
* 1.1 (the "License"); you may not use this file except
in compliance with
* decision by deleting the provisions above and
replace them with the notice
* and other provisions required by the GPL or the
LGPL. If you do not delete
* the provisions above, a recipient may use your
version of this file under
* the terms of any one of the MPL, the GPL or the
LGPL.
*
* ***** END LICENSE BLOCK ***** */
66
Page 67

boringssl
open-vcdiff
URL: https://github.com/google/open-vcdiff
Almost Native Graphics Layer Engine
URL: http://code.google.com/p/angleproject/
Copyright (C) 2002-2013 The ANGLE Project Authors.
All rights reserved.
Redistribution and use in source and binary forms,
with or without modification, are permitted provided
that the following conditions are met:
Redistributions of source code must retain the above
copyright notice, this list of conditions and the
following disclaimer.
Redistributions in binary form must reproduce the
above copyright notice, this list of conditions and the
following disclaimer in the documentation and/or
other materials provided with the distribution.
Neither the name of TransGaming Inc., Google Inc.,
3DLabs Inc. Ltd., nor the names of their contributors
may be used to endorse or promote products
derived from this software without specific prior
written permission.
THIS SOFTWARE IS PROVIDED BY THE COPYRIGHT
HOLDERS AND CONTRIBUTORS
"AS IS" AND ANY EXPRESS OR IMPLIED
WARRANTIES, INCLUDING, BUT NOT
LIMITED TO, THE IMPLIED WARRANTIES OF
MERCHANTABILITY AND FITNESS
FOR A PARTICULAR PURPOSE ARE DISCLAIMED. IN
NO EVENT SHALL THE
COPYRIGHT OWNER OR CONTRIBUTORS BE LIABLE
FOR ANY DIRECT, INDIRECT,
INCIDENTAL, SPECIAL, EXEMPLARY, OR
CONSEQUENTIAL DAMAGES (INCLUDING,
BUT NOT LIMITED TO, PROCUREMENT OF
SUBSTITUTE GOODS OR SERVICES;
LOSS OF USE, DATA, OR PROFITS; OR BUSINESS
INTERRUPTION) HOWEVER
CAUSED AND ON ANY THEORY OF LIABILITY,
WHETHER IN CONTRACT, STRICT
LIABILITY, OR TORT (INCLUDING NEGLIGENCE OR
OTHERWISE) ARISING IN
ANY WAY OUT OF THE USE OF THIS SOFTWARE,
EVEN IF ADVISED OF THEPOSSIBILITY OF SUCH
DAMAGE.
URL: https://boringssl.googlesource.com/boringssl
LICENSE ISSUES
==============
The OpenSSL toolkit stays under a dual license, i.e.
both the conditions of
the OpenSSL License and the original SSLeay
license apply to the toolkit.
See below for the actual license texts. Actually both
licenses are BSD-style
Open Source licenses. In case of any license issues
related to OpenSSL
please contact openssl-core@openssl.org.
OpenSSL License
---------------
/* ==============================================
======================
* Copyright (c) 1998-2011 The OpenSSL Project. All
rights reserved.
*
* Redistribution and use in source and binary forms,
with or without
* modification, are permitted provided that the
following conditions
* are met:
*
* 1. Redistributions of source code must retain the
above copyright
* notice, this list of conditions and the following
disclaimer.
*
* 2. Redistributions in binary form must reproduce
the above copyright
* notice, this list of conditions and the following
disclaimer in
* the documentation and/or other materials
provided with the
* distribution.
*
* 3. All advertising materials mentioning features or
use of this
* software must display the following
acknowledgment:
67
Page 68

* "This product includes software developed by
the OpenSSL Project
* for use in the OpenSSL Toolkit. (
http://www.openssl.org/ )"
*
* 4. The names "OpenSSL Toolkit" and "OpenSSL
Project" must not be used to
* endorse or promote products derived from this
software without
* prior written permission. For written
permission, please contact
* openssl-core@openssl.org.
*
* 5. Products derived from this software may not be
called "OpenSSL"
SOFTWARE, EVEN IF ADVISED
* OF THE POSSIBILITY OF SUCH DAMAGE.
* ==============================================
======================
*
* This product includes cryptographic software
written by Eric Young
* (eay@cryptsoft.com). This product includes
software written by Tim
* Hudson (tjh@cryptsoft.com).
*
*/
Original SSLeay License
* nor may "OpenSSL" appear in their names
without prior written
* permission of the OpenSSL Project.
*
* 6. Redistributions of any form whatsoever must
retain the following
* acknowledgment:
* "This product includes software developed by
the OpenSSL Project
* for use in the OpenSSL Toolkit (
http://www.openssl.org/ )"
*
* THIS SOFTWARE IS PROVIDED BY THE OpenSSL
PROJECT ``AS IS'' AND ANY
* EXPRESSED OR IMPLIED WARRANTIES,
INCLUDING, BUT NOT LIMITED TO, THE
* IMPLIED WARRANTIES OF MERCHANTABILITY
AND FITNESS FOR A PARTICULAR
* PURPOSE ARE DISCLAIMED. IN NO EVENT
SHALL THE OpenSSL PROJECT OR
* ITS CONTRIBUTORS BE LIABLE FOR ANY DIRECT,
INDIRECT, INCIDENTAL,
* SPECIAL, EXEMPLARY, OR CONSEQUENTIAL
DAMAGES (INCLUDING, BUT
* NOT LIMITED TO, PROCUREMENT OF
SUBSTITUTE GOODS OR SERVICES;
* LOSS OF USE, DATA, OR PROFITS; OR BUSINESS
INTERRUPTION)
* HOWEVER CAUSED AND ON ANY THEORY OF
LIABILITY, WHETHER IN CONTRACT,
* STRICT LIABILITY, OR TORT (INCLUDING
NEGLIGENCE OR OTHERWISE)
* ARISING IN ANY WAY OUT OF THE USE OF THIS
-----------------------
/* Copyright (C) 1995-1998 Eric Young
(eay@cryptsoft.com)
* All rights reserved.
*
* This package is an SSL implementation written
* by Eric Young (eay@cryptsoft.com).
* The implementation was written so as to conform
with Netscapes SSL.
*
* This library is free for commercial and non-
commercial use as long as
* the following conditions are aheared to. The
following conditions
* apply to all code found in this distribution, be it the
RC4, RSA,
* lhash, DES, etc., code; not just the SSL code. The
SSL documentation
* included with this distribution is covered by the
same copyright terms
* except that the holder is Tim Hudson
(tjh@cryptsoft.com).
*
* Copyright remains Eric Young's, and as such any
Copyright notices in
* the code are not to be removed.
* If this package is used in a product, Eric Young
should be given attribution
* as the author of the parts of the library used.
* This can be in the form of a textual message at
program startup or
68
Page 69

* in documentation (online or textual) provided with
the package.
* HOWEVER CAUSED AND ON ANY THEORY OF
LIABILITY, WHETHER IN CONTRACT, STRICT
*
* Redistribution and use in source and binary forms,
with or without
* modification, are permitted provided that the
following conditions
* are met:
* 1. Redistributions of source code must retain the
copyright
* notice, this list of conditions and the following
disclaimer.
* 2. Redistributions in binary form must reproduce
the above copyright
* notice, this list of conditions and the following
disclaimer in the
* documentation and/or other materials
provided with the distribution.
* 3. All advertising materials mentioning features or
use of this software
* must display the following acknowledgement:
* "This product includes cryptographic software
written by
* Eric Young (eay@cryptsoft.com)"
* The word 'cryptographic' can be left out if the
rouines from the library
* LIABILITY, OR TORT (INCLUDING NEGLIGENCE OR
OTHERWISE) ARISING IN ANY WAY
* OUT OF THE USE OF THIS SOFTWARE, EVEN IF
ADVISED OF THE POSSIBILITY OF
* SUCH DAMAGE.
*
* The licence and distribution terms for any
publically available version or
* derivative of this code cannot be changed. i.e. this
code cannot simply be
* copied and put under another distribution licence
* [including the GNU Public Licence.]
*/
Brotli
URL: https://github.com/google/brotli
Google Cache Invalidation API
URL:
https://chromium.googlesource.com/chromium/src/+
/master/third_party/cacheinvalidation/README.chro
mium
* being used are not cryptographic related :-).
* 4. If you include any Windows specific code (or a
derivative thereof) from
* the apps directory (application code) you must
include an acknowledgement:
* "This product includes software written by Tim
Hudson (tjh@cryptsoft.com)"
*
* THIS SOFTWARE IS PROVIDED BY ERIC YOUNG
``AS IS'' AND
* ANY EXPRESS OR IMPLIED WARRANTIES,
INCLUDING, BUT NOT LIMITED TO, THE
* IMPLIED WARRANTIES OF MERCHANTABILITY
AND FITNESS FOR A PARTICULAR PURPOSE
* ARE DISCLAIMED. IN NO EVENT SHALL THE
AUTHOR OR CONTRIBUTORS BE LIABLE
* FOR ANY DIRECT, INDIRECT, INCIDENTAL,
SPECIAL, EXEMPLARY, OR CONSEQUENTIAL
* DAMAGES (INCLUDING, BUT NOT LIMITED TO,
PROCUREMENT OF SUBSTITUTE GOODS
* OR SERVICES; LOSS OF USE, DATA, OR PROFITS;
OR BUSINESS INTERRUPTION)
Crashpad
URL: https://crashpad.chromium.org/
drawElements Quality Program
URL:
https://source.android.com/devices/graphics/testing.
html
dom-distiller-js
URL: https://github.com/chromium/dom-distiller
Copyright 2014 The Chromium Authors. All rights
reserved.
Redistribution and use in source and binary forms,
with or without
modification, are permitted provided that the
following conditions are
met:
69
Page 70

* Redistributions of source code must retain the
above copyright
notice, this list of conditions and the following
disclaimer.
* Redistributions in binary form must reproduce
the above
third_party/gwt_exporter
Copyright 2007 Timepedia.org
third_party/gwt-2.5.1
Copyright 2008 Google
copyright notice, this list of conditions and the
following disclaimer
in the documentation and/or other materials provided
with the
* Neither the name of Google Inc. nor the names
of its
contributors may be used to endorse or promote
products derived from
this software without specific prior written permission.
THIS SOFTWARE IS PROVIDED BY THE COPYRIGHT
HOLDERS AND CONTRIBUTORS
"AS IS" AND ANY EXPRESS OR IMPLIED
WARRANTIES, INCLUDING, BUT NOT
LIMITED TO, THE IMPLIED WARRANTIES OF
MERCHANTABILITY AND FITNESS FOR
A PARTICULAR PURPOSE ARE DISCLAIMED. IN NO
EVENT SHALL THE COPYRIGHT
OWNER OR CONTRIBUTORS BE LIABLE FOR ANY
DIRECT, INDIRECT, INCIDENTAL,
SPECIAL, EXEMPLARY, OR CONSEQUENTIAL
DAMAGES (INCLUDING, BUT NOT
LIMITED TO, PROCUREMENT OF SUBSTITUTE
GOODS OR SERVICES; LOSS OF USE,
DATA, OR PROFITS; OR BUSINESS INTERRUPTION)
HOWEVER CAUSED AND ON ANY
THEORY OF LIABILITY, WHETHER IN CONTRACT,
STRICT LIABILITY, OR TORT
(INCLUDING NEGLIGENCE OR OTHERWISE) ARISING
IN ANY WAY OUT OF THE USE
OF THIS SOFTWARE, EVEN IF ADVISED OF THE
POSSIBILITY OF SUCH DAMAGE.
Parts of the following directories are available under
Apache v2.0
src/de
Copyright (c) 2009-2011 Christian Kohlschütter
java/org/chromium/distiller/dev
Copyright 2008 Google
Apache License
Version 2.0, January 2004
http://www.apache.org/licenses/
TERMS AND CONDITIONS FOR USE,
REPRODUCTION, AND DISTRIBUTION
"License" shall mean the terms and conditions for
use, reproduction, and distribution as defined by
Sections 1 through 9 of this document.
"Licensor" shall mean the copyright owner or entity
authorized by the copyright owner that is granting the
License.
"Legal Entity" shall mean the union of the acting
entity and all other entities that control, are controlled
by, or are under common control with that entity. For
the purposes of this definition, "control" means (i) the
power, direct or indirect, to cause the direction or
management of such entity, whether by contract or
otherwise, or (ii) ownership of fifty percent (50%) or
more of the outstanding shares, or (iii) beneficial
ownership of such entity.
"You" (or "Your") shall mean an individual or Legal
Entity exercising permissions granted by this License.
"Source" form shall mean the preferred form for
making modifications, including but not limited to
software source code, documentation source, and
configuration files.
"Object" form shall mean any form resulting from
mechanical transformation or translation of a Source
70
Page 71

form, including but not limited to compiled object
code, generated documentation, and conversions to
other media types.
"Work" shall mean the work of authorship, whether in
Source or Object form, made available under the
License, as indicated by a copyright notice that is
included in or attached to the work (an example is
provided in the Appendix below).
"Derivative Works" shall mean any work, whether in
Source or Object form, that is based on (or derived
from) the Work and for which the editorial revisions,
annotations, elaborations, or other modifications
represent, as a whole, an original work of authorship.
For the purposes of this License, Derivative Works
shall not include works that remain separable from, or
merely link (or bind by name) to the interfaces of, the
Work and Derivative Works thereof.
"Contribution" shall mean any work of authorship,
including the original version of the Work and any
modifications or additions to that Work or Derivative
Works thereof, that is intentionally submitted to
Licensor for inclusion in the Work by the copyright
owner or by an individual or Legal Entity authorized
to submit on behalf of the copyright owner. For the
purposes of this definition, "submitted" means any
form of electronic, verbal, or written communication
sent to the Licensor or its representatives, including
but not limited to communication on electronic
mailing lists, source code control systems, and issue
tracking systems that are managed by, or on behalf
of, the Licensor for the purpose of discussing and
improving the Work, but excluding communication
that is conspicuously marked or otherwise designated
in writing by the copyright owner as "Not a
Contribution."
distribute must include a readable copy of the
attribution notices contained within such NOTICE file,
excluding those notices that do not pertain to any
part of the Derivative Works, in at least one of the
following places: within a NOTICE text file distributed
as part of the Derivative Works; within the Source
form or documentation, if provided along with the
Derivative Works; or, within a display generated by
the Derivative Works, if and wherever such third-party
notices normally appear. The contents of the NOTICE
file are for informational purposes only and do not
modify the License. You may add Your own
attribution notices within Derivative Works that You
distribute, alongside or as an addendum to the
NOTICE text from the Work, provided that such
additional attribution notices cannot be construed as
modifying the License.
You may add Your own copyright statement to Your
modifications and may provide additional or different
license terms and conditions for use, reproduction, or
distribution of Your modifications, or for any such
Derivative Works as a whole, provided Your use,
reproduction, and distribution of the Work otherwise
complies with the conditions stated in this License.
END OF TERMS AND CONDITIONS
Expat XML Parser
URL: http://sourceforge.net/projects/expat/
Copyright (c) 1998, 1999, 2000 Thai Open Source
Software Center Ltd
and Clark
Cooper
Copyright (c) 2001, 2002, 2003, 2004, 2005, 2006
Expat maintainers.
"Contributor" shall mean Licensor and any individual
or Legal Entity on behalf of whom a Contribution has
been received by Licensor and subsequently
incorporated within the Work.
You must give any other recipients of the Work or
Derivative Works a copy of this License; and
You must cause any modified files to carry prominent
notices stating that You changed the files; and
You must retain, in the Source form of any Derivative
Works that You distribute, all copyright, patent,
trademark, and attribution notices from the Source
form of the Work, excluding those notices that do not
pertain to any part of the Derivative Works; and
If the Work includes a "NOTICE" text file as part of its
distribution, then any Derivative Works that You
Permission is hereby granted, free of charge, to any
person obtaining
a copy of this software and associated
documentation files (the
"Software"), to deal in the Software without
restriction, including
without limitation the rights to use, copy, modify,
merge, publish,
distribute, sublicense, and/or sell copies of the
Software, and to
permit persons to whom the Software is furnished to
do so, subject to
the following conditions:
71
Page 72

The above copyright notice and this permission
notice shall be included
in all copies or substantial portions of the Software.
``AS IS'' AND ANY EXPRESS
OR IMPLIED WARRANTIES, INCLUDING, BUT NOT
LIMITED TO, THE IMPLIED
THE SOFTWARE IS PROVIDED "AS IS", WITHOUT
WARRANTY OF ANY KIND,
EXPRESS OR IMPLIED, INCLUDING BUT NOT
LIMITED TO THE WARRANTIES OF
MERCHANTABILITY, FITNESS FOR A PARTICULAR
PURPOSE AND NONINFRINGEMENT.
IN NO EVENT SHALL THE AUTHORS OR COPYRIGHT
HOLDERS BE LIABLE FOR ANY
CLAIM, DAMAGES OR OTHER LIABILITY, WHETHER
IN AN ACTION OF CONTRACT,
TORT OR OTHERWISE, ARISING FROM, OUT OF OR
IN CONNECTION WITH THE
SOFTWARE OR THE USE OR OTHER DEALINGS IN
THE SOFTWARE.
fips181
URL: http://www.adel.nursat.kz/apg/
Copyright (c) 1999, 2000, 2001, 2002
Adel I. Mirzazhanov. All rights reserved
WARRANTIES OF MERCHANTABILITY AND FITNESS
FOR A PARTICULAR PURPOSE
ARE DISCLAIMED. IN NO EVENT SHALL THE
AUTHOR BE LIABLE FOR ANY
DIRECT, INDIRECT, INCIDENTAL, SPECIAL,
EXEMPLARY, OR CONSEQUENTIAL
DAMAGES (INCLUDING, BUT NOT LIMITED TO,
PROCUREMENT OF SUBSTITUTE
GOODS OR SERVICES; LOSS OF USE, DATA, OR
PROFITS; OR BUSINESS
INTERRUPTION) HOWEVER CAUSED AND ON
ANY THEORY OF LIABILITY,
WHETHER IN CONTRACT, STRICT LIABILITY,
OR TORT (INCLUDING
NEGLIGENCE OR OTHERWISE) ARISING IN ANY WAY
OUT OF THE USE OF THIS
SOFTWARE, EVEN IF ADVISED OF THE POSSIBILITY
OF SUCH DAMAGE.
flac
URL: http://sourceforge.net/projects/flac/files/flac-
src/flac-1.2.1-src/flac-1.2.1.tar.gz/download
Redistribution and use in source and binary forms,
with or without
modification, are permitted provided that the
following conditions
are met:
1.Redistributions of source code must retain the
above copyright notice,
this list of conditions and the following
disclaimer.
2.Redistributions in binary form must reproduce
the above copyright
notice, this list of conditions and the
following disclaimer in the
documentation and/or other materials
provided with the distribution.
3.The name of the author may not be used to
endorse or promote products
derived from this software without specific
prior written permission.
THIS SOFTWARE IS PROVIDED BY THE AUTHOR
Copyright (C)
2000,2001,2002,2003,2004,2005,2006,2007 Josh
Coalson
Redistribution and use in source and binary forms,
with or without
modification, are permitted provided that the
following conditions
are met:
- Redistributions of source code must retain the
above copyright
notice, this list of conditions and the following
disclaimer.
- Redistributions in binary form must reproduce the
above copyright
notice, this list of conditions and the following
disclaimer in the
documentation and/or other materials provided with
the distribution.
72
Page 73

International
- Neither the name of the Xiph.org Foundation nor
the names of its
contributors may be used to endorse or promote
products derived from
this software without specific prior written permission.
THIS SOFTWARE IS PROVIDED BY THE COPYRIGHT
HOLDERS AND CONTRIBUTORS
``AS IS'' AND ANY EXPRESS OR IMPLIED
WARRANTIES, INCLUDING, BUT NOT
LIMITED TO, THE IMPLIED WARRANTIES OF
MERCHANTABILITY AND FITNESS FOR
A PARTICULAR PURPOSE ARE DISCLAIMED. IN NO
EVENT SHALL THE FOUNDATION OR
CONTRIBUTORS BE LIABLE FOR ANY DIRECT,
INDIRECT, INCIDENTAL, SPECIAL,
EXEMPLARY, OR CONSEQUENTIAL DAMAGES
(INCLUDING, BUT NOT LIMITED TO,
PROCUREMENT OF SUBSTITUTE GOODS OR
SERVICES; LOSS OF USE, DATA, OR
PROFITS; OR BUSINESS INTERRUPTION) HOWEVER
CAUSED AND ON ANY THEORY OF
Copyright © 2007 Chris Wilson
Copyright © 2006 Behdad Esfahbod
Copyright © 2005 David Turner
Copyright © 2004,2007,2008,2009,2010 Red Hat,
Inc.
Copyright © 1998-2004 David Turner and Werner
Lemberg
For full copyright notices consult the individual files in
the package.
Permission is hereby granted, without written
agreement and without
license or royalty fees, to use, copy, modify, and
distribute this
software and its documentation for any purpose,
provided that the
above copyright notice and the following two
paragraphs appear in
all copies of this software.
LIABILITY, WHETHER IN CONTRACT, STRICT
LIABILITY, OR TORT (INCLUDING
NEGLIGENCE OR OTHERWISE) ARISING IN ANY WAY
OUT OF THE USE OF THIS
SOFTWARE, EVEN IF ADVISED OF THE POSSIBILITY
OF SUCH DAMAGE.
harfbuzz-ng
URL: http://harfbuzz.org
HarfBuzz is licensed under the so-called "Old MIT"
license. Details follow.
For parts of HarfBuzz that are licensed under different
licenses see individual
files names COPYING in subdirectories where
applicable.
Copyright © 2010,2011,2012 Google, Inc.
Copyright © 2012 Mozilla Foundation
IN NO EVENT SHALL THE COPYRIGHT HOLDER BE
LIABLE TO ANY PARTY FOR
DIRECT, INDIRECT, SPECIAL, INCIDENTAL, OR
CONSEQUENTIAL DAMAGES
ARISING OUT OF THE USE OF THIS SOFTWARE AND
ITS DOCUMENTATION, EVEN
IF THE COPYRIGHT HOLDER HAS BEEN ADVISED OF
THE POSSIBILITY OF SUCH
THE COPYRIGHT HOLDER SPECIFICALLY DISCLAIMS
ANY WARRANTIES, INCLUDING,
BUT NOT LIMITED TO, THE IMPLIED WARRANTIES
OF MERCHANTABILITY AND
FITNESS FOR A PARTICULAR PURPOSE. THE
SOFTWARE PROVIDED HEREUNDER IS
ON AN "AS IS" BASIS, AND THE COPYRIGHT HOLDER
HAS NO OBLIGATION TO
PROVIDE MAINTENANCE, SUPPORT, UPDATES,
ENHANCEMENTS, OR MODIFICATIONS.
Copyright © 2011 Codethink Limited
Copyright © 2008,2010 Nokia Corporation and/or its
subsidiary(-ies)
Copyright © 2009 Keith Stribley
Copyright © 2009 Martin Hosken and SIL
iccjpeg
URL: http://www.ijg.org
73
Page 74

The authors make NO WARRANTY or representation,
either express or implied,
This software may be referred to only as "the
Independent JPEG Group's
with respect to this software, its quality, accuracy,
merchantability, or
fitness for a particular purpose. This software is
provided "AS IS", and you,
its user, assume the entire risk as to its quality and
accuracy.
This software is copyright (C) 1991-1998, Thomas G.
Lane.
All Rights Reserved except as specified below.
Permission is hereby granted to use, copy, modify,
and distribute this
software (or portions thereof) for any purpose,
without fee, subject to these
conditions:
(1) If any part of the source code for this software is
distributed, then this
README file must be included, with this copyright
and no-warranty notice
unaltered; and any additions, deletions, or changes to
the original files
must be clearly indicated in accompanying
documentation.
(2) If only executable code is distributed, then the
accompanying
documentation must state that "this software is based
in part on the work of
the Independent JPEG Group".
(3) Permission for use of this software is granted only
if the user accepts
full responsibility for any undesirable consequences;
the authors accept
NO LIABILITY for damages of any kind.
These conditions apply to any software derived from
or based on the IJG code,
not just to the unmodified library. If you use our
work, you ought to
acknowledge us.
Permission is NOT granted for the use of any IJG
author's name or company name
in advertising or publicity relating to this software or
products derived from it.
software".
We specifically permit and encourage the use of this
software as the basis of
commercial products, provided that all warranty or
liability claims are
assumed by the product vendor.
icu
URL: http://site.icu-project.org/
ICU License - ICU 1.8.1 and later
COPYRIGHT AND PERMISSION NOTICE
Copyright (c) 1995-2014 International Business
Machines Corporation and
others
All rights reserved.
Permission is hereby granted, free of charge, to
any person obtaining a
copy of this software and associated
documentation files (the
"Software"), to deal in the Software without
restriction, including
without limitation the rights to use, copy, modify,
merge, publish,
distribute, and/or sell copies of the Software, and
to permit persons to
whom the Software is furnished to do so, provided
that the above
copyright notice(s) and this permission notice
appear in all copies of
the Software and that both the above copyright
notice(s) and this
permission notice appear in supporting
documentation.
THE SOFTWARE IS PROVIDED "AS IS", WITHOUT
WARRANTY OF ANY KIND, EXPRESS
OR IMPLIED, INCLUDING BUT NOT LIMITED TO
74
Page 75

THE WARRANTIES OF
http://www.unicode.org/copyright.html.
MERCHANTABILITY, FITNESS FOR A PARTICULAR
PURPOSE AND NONINFRINGEMENT OF
THIRD PARTY RIGHTS. IN NO EVENT SHALL THE
COPYRIGHT HOLDER OR HOLDERS
INCLUDED IN THIS NOTICE BE LIABLE FOR ANY
CLAIM, OR ANY SPECIAL INDIRECT
OR CONSEQUENTIAL DAMAGES, OR ANY
DAMAGES WHATSOEVER RESULTING FROM LOSS
OF USE, DATA OR PROFITS, WHETHER IN AN
ACTION OF CONTRACT, NEGLIGENCE OR
OTHER TORTIOUS ACTION, ARISING OUT OF OR
IN CONNECTION WITH THE USE OR
PERFORMANCE OF THIS SOFTWARE.
Except as contained in this notice, the name of a
copyright holder shall
not be used in advertising or otherwise to promote
the sale, use or
other dealings in this Software without prior
written authorization of
the copyright holder.
________________________________________
___________________________
All trademarks and registered trademarks
mentioned herein are the
property of their respective owners.
________________________________________
___________________________
Third-Party Software Licenses
Permission is hereby granted, free of charge, to any
person obtaining
a copy of the Unicode data files and any associated
documentation
(the "Data Files") or Unicode software and any
associated documentation
(the "Software") to deal in the Data Files or Software
without restriction, including without limitation the
rights to use,
copy, modify, merge, publish, distribute, and/or sell
copies of
the Data Files or Software, and to permit persons to
whom the Data Files
or Software are furnished to do so, provided that
(a) this copyright and permission notice appear with
all copies
of the Data Files or Software,
(b) this copyright and permission notice appear in
associated
documentation, and
(c) there is clear notice in each modified Data File or
in the Software
as well as in the documentation associated with the
Data File(s) or
Software that the data or software has been modified.
THE DATA FILES AND SOFTWARE ARE PROVIDED
"AS IS", WITHOUT WARRANTY OF
ANY KIND, EXPRESS OR IMPLIED, INCLUDING BUT
NOT LIMITED TO THE
This section contains third-party software notices
and/or additional
terms for licensed third-party software
components included within ICU
libraries.
1. Unicode Data Files and Software
COPYRIGHT AND PERMISSION NOTICE
Copyright © 1991-2014 Unicode, Inc. All rights
reserved.
Distributed under the Terms of Use in
WARRANTIES OF MERCHANTABILITY, FITNESS FOR
A PARTICULAR PURPOSE AND
NONINFRINGEMENT OF THIRD PARTY RIGHTS.
IN NO EVENT SHALL THE COPYRIGHT HOLDER OR
HOLDERS INCLUDED IN THIS
NOTICE BE LIABLE FOR ANY CLAIM, OR ANY
SPECIAL INDIRECT OR CONSEQUENTIAL
DAMAGES, OR ANY DAMAGES WHATSOEVER
RESULTING FROM LOSS OF USE,
DATA OR PROFITS, WHETHER IN AN ACTION OF
CONTRACT, NEGLIGENCE OR OTHER
TORTIOUS ACTION, ARISING OUT OF OR IN
CONNECTION WITH THE USE OR
PERFORMANCE OF THE DATA FILES OR SOFTWARE.
75
Page 76

Except as contained in this notice, the name of a
copyright holder
IED WARRANTIES OF MERCHANTABILITY AND
FITNESS FOR A PARTICULAR PURPOSE ARE DISCLA
shall not be used in advertising or otherwise to
promote the sale,
use or other dealings in these Data Files or Software
without prior
written authorization of the copyright holder.
2. Chinese/Japanese Word Break Dictionary Data
(cjdict.txt)
# The Google Chrome software developed by
Google is licensed under the BSD li
ses, as set forth below.
#
# The BSD License
# http://opensource.org/licenses/bsd-
license.php
# Copyright (C) 2006-2008, Google Inc.
#
# All rights reserved.
#
ECT, INDIRECT, INCIDENTAL, SPECIAL, EXEMPLARY,
OR CONSEQUENTIAL DAMAGES (INCLUDIN
G, BUT NOT LIMITED TO, PROCUREMENT OF
SUBSTITUTE GOODS OR SERVICES; LOSS OF USE,
DATA, OR PROFITS; OR BUSINESS INTERRUPTION)
HOWEVER CAUSED AND ON ANY THEORY OF L
IABILITY, WHETHER IN CONTRACT, STRICT LIABILITY,
OR TORT (INCLUDING NEGLIGENCE OR
OTHERWISE) ARISING IN ANY WAY OUT OF THE
USE OF THIS SOFTWARE, EVEN IF ADVISED O
F THE POSSIBILITY OF SUCH DAMAGE.
#
#
# The word list in cjdict.txt are generated by
combining three word lists l
isted
# below with further processing for
compound word breaking. The frequency i
s generated
# with an iterative training against Google
web corpora.
# Redistribution and use in source and binary
forms, with or without modifi
cation, are permitted provided that the following
conditions are met:
#
# Redistributions of source code must retain
the above copyright notice, th
is list of conditions and the following disclaimer.
# Redistributions in binary form must
reproduce the above copyright notice,
this list of conditions and the following disclaimer in
the documentation and/or
other materials provided with the distribution.
# Neither the name of Google Inc. nor the
names of its contributors may be
used to endorse or promote products derived from
this software without specific
prior written permission.
#
#
# THIS SOFTWARE IS PROVIDED BY THE
COPYRIGHT HOLDERS AND CONTRIBUTORS "AS I
S" AND ANY EXPRESS OR IMPLIED WARRANTIES,
INCLUDING, BUT NOT LIMITED TO, THE IMPL
#
# * Libtabe (Chinese)
#
- https://sourceforge.net/project/?group_id=1519
# - Its license terms and conditions are
shown below.
#
# * IPADIC (Japanese)
#
- http://chasen.aist-
nara.ac.jp/chasen/distribution.html
# - Its license terms and conditions are
shown below.
#
# ---------COPYING.libtabe ----
BEGIN------------------- #
# /*
# * Copyrighy (c) 1999 TaBE Project.
# * Copyright (c) 1999 Pai-Hsiang Hsiao.
# * All rights reserved.
# *
# * Redistribution and use in source and
76
Page 77

binary forms, with or without
#
# * modification, are permitted provided
that the following conditions
# * are met:
# *
# * . Redistributions of source code must
retain the above copyright
# * notice, this list of conditions and the
following disclaimer.
# * . Redistributions in binary form must
reproduce the above copyright
# * notice, this list of conditions and the
following disclaimer in
# * the documentation and/or other
materials provided with the
# * distribution.
# * . Neither the name of the TaBE Project
nor the names of its
# * contributors may be used to endorse
or promote products derived
# * from this software without specific
prior written permission.
# *
# * THIS SOFTWARE IS PROVIDED BY THE
COPYRIGHT HOLDERS AND CONTRIBUTORS
# * "AS IS" AND ANY EXPRESS OR IMPLIED
WARRANTIES, INCLUDING, BUT NOT
# * LIMITED TO, THE IMPLIED
WARRANTIES OF MERCHANTABILITY AND FITNESS
# * FOR A PARTICULAR PURPOSE ARE
DISCLAIMED. IN NO EVENT SHALL THE
# * REGENTS OR CONTRIBUTORS BE
LIABLE FOR ANY DIRECT, INDIRECT,
# * INCIDENTAL, SPECIAL, EXEMPLARY, OR
CONSEQUENTIAL DAMAGES
# * (INCLUDING, BUT NOT LIMITED TO,
PROCUREMENT OF SUBSTITUTE GOODS OR
# * SERVICES; LOSS OF USE, DATA, OR
PROFITS; OR BUSINESS INTERRUPTION)
# * HOWEVER CAUSED AND ON ANY
THEORY OF LIABILITY, WHETHER IN CONTRACT,
# * STRICT LIABILITY, OR TORT (INCLUDING
NEGLIGENCE OR OTHERWISE)
# * ARISING IN ANY WAY OUT OF THE USE
OF THIS SOFTWARE, EVEN IF ADVISED
# * OF THE POSSIBILITY OF SUCH
DAMAGE.
# */
# /*
# * Copyright (c) 1999 Computer Systems
and Communication Lab,
# * Institute of
Information Science, Academia Sinica.
# * All rights reserved.
# *
# * Redistribution and use in source and
binary forms, with or without
# * modification, are permitted provided
that the following conditions
# * are met:
# *
# * . Redistributions of source code must
retain the above copyright
# * notice, this list of conditions and the
following disclaimer.
# * . Redistributions in binary form must
reproduce the above copyright
# * notice, this list of conditions and the
following disclaimer in
# * the documentation and/or other
materials provided with the
# * distribution.
# * . Neither the name of the Computer
Systems and Communication Lab
# * nor the names of its contributors may
be used to endorse or
# * promote products derived from this
software without specific
# * prior written permission.
# *
# * THIS SOFTWARE IS PROVIDED BY THE
COPYRIGHT HOLDERS AND CONTRIBUTORS
# * "AS IS" AND ANY EXPRESS OR IMPLIED
WARRANTIES, INCLUDING, BUT NOT
# * LIMITED TO, THE IMPLIED
WARRANTIES OF MERCHANTABILITY AND FITNESS
# * FOR A PARTICULAR PURPOSE ARE
DISCLAIMED. IN NO EVENT SHALL THE
# * REGENTS OR CONTRIBUTORS BE
LIABLE FOR ANY DIRECT, INDIRECT,
# * INCIDENTAL, SPECIAL, EXEMPLARY, OR
CONSEQUENTIAL DAMAGES
# * (INCLUDING, BUT NOT LIMITED TO,
PROCUREMENT OF SUBSTITUTE GOODS OR
77
Page 78

# * SERVICES; LOSS OF USE, DATA, OR
PROFITS; OR BUSINESS INTERRUPTION)
# whatsoever resulting from loss of use, data
or profits, whether in an
# * HOWEVER CAUSED AND ON ANY
THEORY OF LIABILITY, WHETHER IN CONTRACT,
# * STRICT LIABILITY, OR TORT (INCLUDING
NEGLIGENCE OR OTHERWISE)
# * ARISING IN ANY WAY OUT OF THE USE
OF THIS SOFTWARE, EVEN IF ADVISED
# * OF THE POSSIBILITY OF SUCH
DAMAGE.
# */
#
# Copyright 1996 Chih-Hao Tsai @ Beckman
Institute, University of Illinois
# c-tsai4@uiuc.edu
http://casper.beckman.uiuc.edu/~c-tsai4
#
# ---------------COPYING.libtabe-----END
-----------------------------------
#
#
# ---------------COPYING.ipadic-----BEGI
N----------------------------------
- #
# action of contract, negligence or other
tortuous action, arising out
# of or in connection with the use or
performance of this software.
#
# A large portion of the dictionary entries
# originate from ICOT Free Software. The
following conditions for ICOT
# Free Software applies to the current
dictionary as well.
#
# Each User may also freely distribute the
Program, whether in its
# original form or modified, to any third party
or parties, PROVIDED
# that the provisions of Section 3 ("NO
WARRANTY") will ALWAYS appear
# on, or be attached to, the Program, which is
distributed substantially
# in the same form as set out herein and that
such intended
# distribution, if actually made, will neither
violate or otherwise
# contravene any of the laws and regulations
of the countries having
# Copyright 2000, 2001, 2002, 2003 Nara
Institute of Science
# and Technology. All Rights Reserved.
#
# Use, reproduction, and distribution of this
software is permitted.
# Any copy of this software, whether in its
original form or modified,
# must include both the above copyright
notice and the following
# paragraphs.
#
# Nara Institute of Science and Technology
(NAIST),
# the copyright holders, disclaims all
warranties with regard to this
# software, including all implied warranties of
merchantability and
# fitness, in no event shall NAIST be liable for
# any special, indirect or consequential
damages or any damages
# jurisdiction over the User or the intended
distribution itself.
#
# NO WARRANTY
#
# The program was produced on an
experimental basis in the course of the
# research and development conducted
during the project and is provided
# to users as so produced on an
experimental basis. Accordingly, the
# program is provided without any warranty
whatsoever, whether express,
# implied, statutory or otherwise. The term
"warranty" used herein
# includes, but is not limited to, any warranty
of the quality,
# performance, merchantability and fitness
for a particular purpose of
# the program and the nonexistence of any
infringement or violation of
78
Page 79

# any right of any third party.
#
# Each user of the program will agree and
understand, and be deemed to
# have agreed and understood, that there is
no warranty whatsoever for
# the program and, accordingly, the entire
risk arising from or
# grants independently of ICOT any specific
warranty to the user in
# writing, such person, organization or entity,
will also be exempted
# from and not be held liable to the user for
any such damages as noted
# above as far as the program is concerned.
#
# otherwise connected with the program is
assumed by the user.
#
# Therefore, neither ICOT, the copyright
holder, or any other
# organization that participated in or was
otherwise related to the
# development of the program and their
respective officials, directors,
# officers and other employees shall be held
liable for any and all
# damages, including, without limitation,
general, special, incidental
# and consequential damages, arising out of
or otherwise in connection
# with the use or inability to use the program
or any product, material
# or result produced or otherwise obtained
by using the program,
# regardless of whether they have been
advised of, or otherwise had
# knowledge of, the possibility of such
damages at any time during the
# ---------------COPYING.ipadic-----END-
-----------------------------------
3. Lao Word Break Dictionary Data (laodict.txt)
Copyright (c) 2013 International Business Machines
Corporation and others. All Rights Reserved.
Project: http://code.google.com/p/lao-
dictionary/
Dictionary: http://lao-
dictionary.googlecode.com/git/Lao-Dictionary.txt
License: http://lao-dictionary.googlecode.com/g
it/Lao-Dictionary-LICEN
(copied below)
This file is derived from the above dictionary, with
slight modifications.
-------------------------------------------------
------------------------
Copyright (C) 2013 Brian Eugene Wilson, Robert
Martin Campbell.
All rights reserved.
# project or thereafter. Each user will be
deemed to have agreed to the
# foregoing by his or her commencement of
use of the program. The term
# "use" as used herein includes, but is not
limited to, the use,
# modification, copying and distribution of
the program and the
# production of secondary products from the
program.
#
# In the case where the program, whether in
its original form or
# modified, was distributed or delivered to or
received by a user from
# any person, organization or entity other
than ICOT, unless it makes or
Redistribution and use in source and binary forms,
with or without modification, are permitted provided
that the following conditions are met:
Redistributions of source code must retain the above
copyright no
tice, this list of conditions and the following
disclaimer. Redistributions
in binary form must reproduce the above copyright
notice, this list of cond
itions and the following disclaimer in the
documentation and/or other materi
als provided with the distribution.
THIS SOFTWARE IS PROVIDED BY THE COPYRIGHT
HOLDERS AND CONTRIBUTORS "AS IS" AND ANY
EXPRESS OR IMPLIED WARRANTIES, INCLUDING,
BUT NOT LIMITED TO, THE IMPLIED WARRANTIES
OF MERCHANTABILITY AND FITNESS FOR A
79
Page 80

PARTICULAR PURPOSE ARE DISCLAIMED. IN NO
EVENT SHALL THE COPYRIGHT HOLDER OR
CONTRIBUTORS BE LIABLE FOR ANY DIRECT,
INDIRECT, INCIDENTAL, SPECIAL, EXEMPLARY, OR
CONSEQUENTIAL DAMAGES
(INCLUDING, BUT NOT LIMITED TO, PROCUREMENT
OF SUBSTITUTE GOODS OR SERVIC
ES; LOSS OF USE, DATA, OR PROFITS; OR BUSINESS
INTERRUPTION) HOWEVER CAUSED A
ND ON ANY THEORY OF LIABILITY, WHETHER IN
CONTRACT, STRICT LIABILITY, OR TORT
(INCLUDING NEGLIGENCE OR OTHERWISE) ARISING
IN ANY WAY OUT OF THE USE OF
THIS SOFTWARE, EVEN IF ADVISED OF THE
POSSIBILITY OF SUCH DAMAGE.
-------------------------------------------------
------------------------
4. Burmese Word Break Dictionary Data
(burmesedict.txt)
Copyright (c) 2014 International Business Machines
Corporation and others. All Rights Reserved.
This list is part of a project hosted at:
github.com/kanyawtech/myanmar-karen-word-lists
-------------------------------------------------
------------------------
Copyright (c) 2013, LeRoy Benjamin Sharon
All rights reserved.
HOLDERS AND CONTRIBUTORS "AS I
S" AND ANY EXPRESS OR IMPLIED WARRANTIES,
INCLUDING, BUT NOT LIMITED TO, THE IMP
LIED WARRANTIES OF MERCHANTABILITY AND
FITNESS FOR A PARTICULAR PURPOSE ARE
DISCLAIMED. IN NO EVENT SHALL THE COPYRIGHT
HOLDER OR CONTRIBUTORS BE LIABLE FOR
ANY DIRECT, INDIRECT, INCIDENTAL, SPECIAL,
EXEMPLARY, OR CONSEQUENTIAL DA
MAGES (INCLUDING, BUT NOT LIMITED TO,
PROCUREMENT OF SUBSTITUTE GOODS OR SERVIC
ES; LOSS OF USE, DATA, OR PROFITS; OR BUSINESS
INTERRUPTION) HOWEVER CAUSED A
ND ON ANY THEORY OF LIABILITY, WHETHER IN
CONTRACT, STRICT LIABILITY, OR TORT
(INCLUDING NEGLIGENCE OR OTHERWISE) ARISING
IN ANY WAY OUT OF THE USE OF
THIS SOFTWARE, EVEN IF ADVISED OF THE
POSSIBILITY OF SUCH DAMAGE.
-------------------------------------------------
------------------------
5. Time Zone Database
ICU uses the public domain data and code derived
from Time Zone Database
for its time zone support. The ownership of the TZ
database is explained
in BCP 175: Procedure for Maintaining the Time
Zone Database section 7.
Redistribution and use in source and binary forms,
with or without modifi
cation, are permitted provided that the following
conditions are met:
Redistributions of source code must retain the above
copyright notice,
this list of conditions and the following disclaimer.
Redistributions in binary form must reproduce the
above copyright notic
e, this list of conditions and the following disclaimer
in the documentation an
d/or other materials provided with the distribution.
Neither the name Myanmar Karen Word Lists, nor
the names of its contributors may be used to
endorse or promote products derived from this
software without specific prior written permission.
THIS SOFTWARE IS PROVIDED BY THE COPYRIGHT
1 - Database Ownership
The TZ database itself is not an IETF Contribution
or an IETF
document. Rather it is a pre-existing and
regularly updated work
that is in the public domain, and is intended to
remain in the public
domain. Therefore, BCPs 78 [RFC5378] and 79
[RFC3979] do not apply
to the TZ Database or contributions that
individuals make to it.
Should any claims be made and substantiated
against the TZ Database,
the organization that is providing the IANA
Considerations defined in
this RFC, under the memorandum of
80
Page 81

understanding with the IETF,
IN AN ACTION OF CONTRACT,
currently ICANN, may act in accordance with all
competent court
orders. No ownership claims will be made by
ICANN or the IETF Trust
on the database or the code. Any person making
a contribution to the
database or code waives all rights to future claims
in that
contribution or in the TZ Database.
google-jstemplate
URL: http://code.google.com/p/google-jstemplate/
Khronos header files
URL: http://www.khronos.org/registry
Copyright (c) 2007-2010 The Khronos Group Inc.
Permission is hereby granted, free of charge, to any
person obtaining a
copy of this software and/or associated
documentation files (the
TORT OR OTHERWISE, ARISING FROM, OUT OF OR
IN CONNECTION WITH THE
MATERIALS OR THE USE OR OTHER DEALINGS IN
THE MATERIALS.
SGI FREE SOFTWARE LICENSE B (Version 2.0, Sept.
18, 2008)
Copyright (C) 1992 Silicon Graphics, Inc. All Rights
Reserved.
Permission is hereby granted, free of charge, to any
person obtaining a copy of
this software and associated documentation files (the
"Software"), to deal in
the Software without restriction, including without
limitation the rights to
use, copy, modify, merge, publish, distribute,
sublicense, and/or sell copies
of the Software, and to permit persons to whom the
Software is furnished to do
so, subject to the following conditions:
"Materials"), to deal in the Materials without
restriction, including
without limitation the rights to use, copy, modify,
merge, publish,
distribute, sublicense, and/or sell copies of the
Materials, and to
permit persons to whom the Materials are furnished
to do so, subject to
the following conditions:
The above copyright notice and this permission
notice shall be included
in all copies or substantial portions of the Materials.
THE MATERIALS ARE PROVIDED "AS IS", WITHOUT
WARRANTY OF ANY KIND,
EXPRESS OR IMPLIED, INCLUDING BUT NOT
LIMITED TO THE WARRANTIES OF
MERCHANTABILITY, FITNESS FOR A PARTICULAR
PURPOSE AND NONINFRINGEMENT.
IN NO EVENT SHALL THE AUTHORS OR COPYRIGHT
HOLDERS BE LIABLE FOR ANY
CLAIM, DAMAGES OR OTHER LIABILITY, WHETHER
The above copyright notice including the dates of first
publication and either
this permission notice or a reference to
http://oss.sgi.com/projects/FreeB/
shall be included in all copies or substantial portions
of the Software.
THE SOFTWARE IS PROVIDED "AS IS", WITHOUT
WARRANTY OF ANY KIND, EXPRESS OR
IMPLIED, INCLUDING BUT NOT LIMITED TO THE
WARRANTIES OF MERCHANTABILITY,
FITNESS FOR A PARTICULAR PURPOSE AND
NONINFRINGEMENT. IN NO EVENT SHALL SILICON
GRAPHICS, INC. BE LIABLE FOR ANY CLAIM,
DAMAGES OR OTHER LIABILITY, WHETHER IN
AN ACTION OF CONTRACT, TORT OR OTHERWISE,
ARISING FROM, OUT OF OR IN CONNECTION
WITH THE SOFTWARE OR THE USE OR OTHER
DEALINGS IN THE SOFTWARE.
Except as contained in this notice, the name of Silicon
Graphics, Inc. shall
81
Page 82

not be used in advertising or otherwise to promote
the sale, use or other
dealings in this Software without prior written
authorization from Silicon
Graphics, Inc.
GOODS OR SERVICES; LOSS OF USE,
DATA, OR PROFITS; OR BUSINESS INTERRUPTION)
HOWEVER CAUSED AND ON ANY
THEORY OF LIABILITY, WHETHER IN CONTRACT,
STRICT LIABILITY, OR TORT
LevelDB: A Fast Persistent Key-Value Store
URL: https://github.com/google/leveldb.git
Copyright (c) 2011 The LevelDB Authors. All rights
reserved.
Redistribution and use in source and binary forms,
with or without
modification, are permitted provided that the
following conditions are
met:
* Redistributions of source code must retain the
above copyright
notice, this list of conditions and the following
disclaimer.
* Redistributions in binary form must reproduce
the above
copyright notice, this list of conditions and the
following disclaimer
in the documentation and/or other materials provided
with the
* Neither the name of Google Inc. nor the names
of its
contributors may be used to endorse or promote
products derived from
this software without specific prior written permission.
THIS SOFTWARE IS PROVIDED BY THE COPYRIGHT
HOLDERS AND CONTRIBUTORS
"AS IS" AND ANY EXPRESS OR IMPLIED
WARRANTIES, INCLUDING, BUT NOT
LIMITED TO, THE IMPLIED WARRANTIES OF
MERCHANTABILITY AND FITNESS FOR
A PARTICULAR PURPOSE ARE DISCLAIMED. IN NO
EVENT SHALL THE COPYRIGHT
OWNER OR CONTRIBUTORS BE LIABLE FOR ANY
DIRECT, INDIRECT, INCIDENTAL,
SPECIAL, EXEMPLARY, OR CONSEQUENTIAL
DAMAGES (INCLUDING, BUT NOT
LIMITED TO, PROCUREMENT OF SUBSTITUTE
(INCLUDING NEGLIGENCE OR OTHERWISE) ARISING
IN ANY WAY OUT OF THE USE
OF THIS SOFTWARE, EVEN IF ADVISED OF THE
POSSIBILITY OF SUCH DAMAGE.
The library to input, validate, and display
addresses.
URL: https://github.com/googlei18n/libaddressinput
libjingle
URL: http://www.webrtc.org
libjpeg
URL: http://www.ijg.org/
-------------------------------------------------
-------------------------------
The authors make NO WARRANTY or representation,
either express or implied,
with respect to this software, its quality, accuracy,
merchantability, or
fitness for a particular purpose. This software is
provided "AS IS", and you,
its user, assume the entire risk as to its quality and
accuracy.
This software is copyright (C) 1991-1998, Thomas G.
Lane.
All Rights Reserved except as specified below.
Permission is hereby granted to use, copy, modify,
and distribute this
software (or portions thereof) for any purpose,
without fee, subject to these
conditions:
(1) If any part of the source code for this software is
distributed, then this
README file must be included, with this copyright
and no-warranty notice
82
Page 83

unaltered; and any additions, deletions, or changes to
the original files
must be clearly indicated in accompanying
documentation.
(2) If only executable code is distributed, then the
accompanying
documentation must state that "this software is based
in part on the work of
the Independent JPEG Group".
The Unix configuration script "configure" was
produced with GNU Autoconf.
It is copyright by the Free Software Foundation but is
freely distributable.
The same holds for its supporting scripts
(config.guess, config.sub,
ltconfig, ltmain.sh). Another support script, install-sh,
is copyright
(3) Permission for use of this software is granted only
if the user accepts
full responsibility for any undesirable consequences;
the authors accept
NO LIABILITY for damages of any kind.
These conditions apply to any software derived from
or based on the IJG code,
not just to the unmodified library. If you use our
work, you ought to
acknowledge us.
Permission is NOT granted for the use of any IJG
author's name or company name
in advertising or publicity relating to this software or
products derived from it.
This software may be referred to only as "the
Independent JPEG Group's
software".
We specifically permit and encourage the use of this
software as the basis of
commercial products, provided that all warranty or
liability claims are
assumed by the product vendor.
by M.I.T. but is also freely distributable.
It appears that the arithmetic coding option of the
JPEG spec is covered by
patents owned by IBM, AT&T, and Mitsubishi. Hence
arithmetic coding cannot
legally be used without obtaining one or more
licenses. For this reason,
support for arithmetic coding has been removed from
the free JPEG software.
(Since arithmetic coding provides only a marginal gain
over the unpatented
Huffman mode, it is unlikely that very many
implementations will support it.)
So far as we are aware, there are no patent
restrictions on the remaining
The IJG distribution formerly included code to read
and write GIF files.
To avoid entanglement with the Unisys LZW patent,
GIF reading support has
been removed altogether, and the GIF writer has
been simplified to produce
"uncompressed GIFs". This technique does not use
the LZW algorithm; the
resulting GIF files are larger than usual, but are
readable by all standard
sole proprietor of its copyright holder, Aladdin
Enterprises of Menlo Park, CA.
by the usual distribution terms of the Free Software
Foundation; principally,
that you must include source code if you redistribute
it. (See the file ansi2knr.c for
full details.)
However, since ansi2knr.c is not needed as part
of any program generated from the IJG code, this
does not limit you more than
the foregoing paragraphs do.
GIF decoders.
We are required to state that
"The Graphics Interchange Format(c) is the
Copyright property of
CompuServe Incorporated. GIF(sm) is a Service
Mark property of
CompuServe Incorporated."
-------------------------------------------------
-------------------------------
83
Page 84

Public License.
libjpeg-turbo
URL: http://sourceforge.net/projects/libjpeg-turbo/
libjpeg-turbo is licensed under a non-restrictive, BSDstyle license
(see README.) The TurboJPEG/OSS wrapper (both
C and Java versions) and
associated test programs bear a similar license, which
is reproduced below:
Redistribution and use in source and binary forms,
with or without
modification, are permitted provided that the
following conditions are met:
DATA, OR PROFITS; OR BUSINESS
INTERRUPTION) HOWEVER CAUSED AND ON ANY
THEORY OF LIABILITY, WHETHER IN
CONTRACT, STRICT LIABILITY, OR TORT (INCLUDING
NEGLIGENCE OR OTHERWISE)
ARISING IN ANY WAY OUT OF THE USE OF THIS
SOFTWARE, EVEN IF ADVISED OF THE
POSSIBILITY OF SUCH DAMAGE.
International Phone Number Library
URL:
http://libphonenumber.googlecode.com/svn/trunk/
Copyright (C) 2011 Google Inc.
Licensed under the Apache License, Version 2.0 (the
"License");
you may not use this file except in compliance with
the License.
- Redistributions of source code must retain the
above copyright notice,
this list of conditions and the following disclaimer.
- Redistributions in binary form must reproduce the
above copyright notice,
this list of conditions and the following disclaimer in
the documentation
and/or other materials provided with the
distribution.
- Neither the name of the libjpeg-turbo Project nor
the names of its
contributors may be used to endorse or promote
products derived from this
software without specific prior written permission.
THIS SOFTWARE IS PROVIDED BY THE COPYRIGHT
HOLDERS AND CONTRIBUTORS "AS IS",
AND ANY EXPRESS OR IMPLIED WARRANTIES,
INCLUDING, BUT NOT LIMITED TO, THE
IMPLIED WARRANTIES OF MERCHANTABILITY AND
FITNESS FOR A PARTICULAR PURPOSE
ARE DISCLAIMED. IN NO EVENT SHALL THE
COPYRIGHT HOLDERS OR CONTRIBUTORS BE
LIABLE FOR ANY DIRECT, INDIRECT, INCIDENTAL,
SPECIAL, EXEMPLARY, OR
You may obtain a copy of the License at
http://www.apache.org/licenses/LICENSE-2.0
Unless required by applicable law or agreed to in
writing, software
distributed under the License is distributed on an "AS
IS" BASIS,
WITHOUT WARRANTIES OR CONDITIONS OF ANY
KIND, either express or implied.
See the License for the specific language governing
permissions and
limitations under the License.
libpng
URL: http://libpng.org/
This copy of the libpng notices is provided for your
convenience. In case of
any discrepancy between this copy and the notices in
the file png.h that is
included in the libpng distribution, the latter shall
prevail.
CONSEQUENTIAL DAMAGES (INCLUDING, BUT NOT
LIMITED TO, PROCUREMENT OF
SUBSTITUTE GOODS OR SERVICES; LOSS OF USE,
COPYRIGHT NOTICE, DISCLAIMER, and LICENSE:
84
Page 85

If you modify libpng you may insert additional notices
immediately following
this sentence.
This code is released under the libpng license.
Tom Lane
Glenn Randers-Pehrson
Willem van Schaik
libpng versions 0.89, June 1996, through 0.96, May
1997, are
libpng versions 1.0.7, July 1, 2000, through 1.2.54,
November 12, 2015, are
Copyright (c) 2000-2002, 2004, 2006-2015 Glenn
Randers-Pehrson, are
derived from libpng-1.0.6, and are distributed
according to the same
disclaimer and license as libpng-1.0.6 with the
following individuals
added to the list of Contributing Authors:
Simon-Pierre Cadieux
Eric S. Raymond
Cosmin Truta
Gilles Vollant
and with the following additions to the disclaimer:
There is no warranty against interference with your
enjoyment of the
Copyright (c) 1996-1997 Andreas Dilger, are derived
from libpng-0.88,
and are distributed according to the same disclaimer
and license as
libpng-0.88, with the following individuals added to
the list of
Contributing Authors:
John Bowler
Kevin Bracey
Sam Bushell
Magnus Holmgren
Greg Roelofs
Tom Tanner
libpng versions 0.5, May 1995, through 0.88, January
1996, are
Copyright (c) 1995-1996 Guy Eric Schalnat, Group 42,
Inc.
library or against infringement. There is no
warranty that our
efforts or the library will fulfill any of your
particular purposes
or needs. This library is provided with all faults,
and the entire
risk of satisfactory quality, performance, accuracy,
and effort is with
the user.
libpng versions 0.97, January 1998, through 1.0.6,
March 20, 2000, are
Copyright (c) 1998-2000 Glenn Randers-Pehrson, are
derived from
libpng-0.96, and are distributed according to the
same disclaimer and
license as libpng-0.96, with the following individuals
added to the list
of Contributing Authors:
For the purposes of this copyright and license,
"Contributing Authors"
is defined as the following set of individuals:
Andreas Dilger
Dave Martindale
Guy Eric Schalnat
Paul Schmidt
Tim Wegner
The PNG Reference Library is supplied "AS IS". The
Contributing Authors
and Group 42, Inc. disclaim all warranties, expressed
or implied,
including, without limitation, the warranties of
merchantability and of
fitness for any purpose. The Contributing Authors
and Group 42, Inc.
assume no liability for direct, indirect, incidental,
85
Page 86

special, exemplary,
or consequential damages, which may result from the
use of the PNG
Reference Library, even if advised of the possibility of
such damage.
Libpng is OSI Certified Open Source Software. OSI
Certified Open Source is
a certification mark of the Open Source Initiative. OSI
has not addressed
the additional disclaimers inserted at version 1.0.7.
Permission is hereby granted to use, copy, modify,
and distribute this
source code, or portions hereof, for any purpose,
without fee, subject
to the following restrictions:
1. The origin of this source code must not be
misrepresented.
2. Altered versions must be plainly marked as such
and must not
be misrepresented as being the original source.
3. This Copyright notice may not be removed or
altered from any
source or altered source distribution.
Glenn Randers-Pehrson
glennrp at users.sourceforge.net
November 12, 2015
libsrtp
URL: https://github.com/cisco/libsrtp
/*
*
* Copyright (c) 2001-2006 Cisco Systems, Inc.
* All rights reserved.
*
* Redistribution and use in source and binary forms,
with or without
* modification, are permitted provided that the
following conditions
The Contributing Authors and Group 42, Inc.
specifically permit, without
fee, and encourage the use of this source code as a
component to
supporting the PNG file format in commercial
products. If you use this
source code in a product, acknowledgment is not
required but would be
END OF COPYRIGHT NOTICE, DISCLAIMER, and
LICENSE.
A "png_get_copyright" function is available, for
convenient use in "about"
boxes and the like:
printf("%s", png_get_copyright(NULL));
Also, the PNG logo (in PNG format, of course) is
supplied in the
files "pngbar.png.jpg" and "pngbar.jpg (88x31) and
"pngnow.png.jpg" (98x31).
* are met:
*
* Redistributions of source code must retain the
above copyright
* notice, this list of conditions and the following
disclaimer.
*
* Redistributions in binary form must reproduce
the above
* copyright notice, this list of conditions and the
following
* disclaimer in the documentation and/or other
materials provided
* with the distribution.
*
* Neither the name of the Cisco Systems, Inc. nor
the names of its
* contributors may be used to endorse or
promote products derived
* from this software without specific prior written
permission.
*
* THIS SOFTWARE IS PROVIDED BY THE
86
Page 87

COPYRIGHT HOLDERS AND CONTRIBUTORS
above copyright
* "AS IS" AND ANY EXPRESS OR IMPLIED
WARRANTIES, INCLUDING, BUT NOT
* LIMITED TO, THE IMPLIED WARRANTIES OF
MERCHANTABILITY AND FITNESS
* FOR A PARTICULAR PURPOSE ARE DISCLAIMED.
IN NO EVENT SHALL THE
* COPYRIGHT HOLDERS OR CONTRIBUTORS BE
LIABLE FOR ANY DIRECT,
* INDIRECT, INCIDENTAL, SPECIAL, EXEMPLARY,
OR CONSEQUENTIAL DAMAGES
* (INCLUDING, BUT NOT LIMITED TO,
PROCUREMENT OF SUBSTITUTE GOODS OR
* SERVICES; LOSS OF USE, DATA, OR PROFITS; OR
BUSINESS INTERRUPTION)
* HOWEVER CAUSED AND ON ANY THEORY OF
LIABILITY, WHETHER IN CONTRACT,
* STRICT LIABILITY, OR TORT (INCLUDING
NEGLIGENCE OR OTHERWISE)
* ARISING IN ANY WAY OUT OF THE USE OF THIS
SOFTWARE, EVEN IF ADVISED
* OF THE POSSIBILITY OF SUCH DAMAGE.
*
*/
notice, this list of conditions and the following
disclaimer in
the documentation and/or other materials
provided with the
distribution.
* Neither the name of Google, nor the WebM
Project, nor the names
of its contributors may be used to endorse or
promote products
derived from this software without specific prior
written
permission.
THIS SOFTWARE IS PROVIDED BY THE COPYRIGHT
HOLDERS AND CONTRIBUTORS
"AS IS" AND ANY EXPRESS OR IMPLIED
WARRANTIES, INCLUDING, BUT NOT
LIMITED TO, THE IMPLIED WARRANTIES OF
MERCHANTABILITY AND FITNESS FOR
A PARTICULAR PURPOSE ARE DISCLAIMED. IN NO
EVENT SHALL THE COPYRIGHT
HOLDER OR CONTRIBUTORS BE LIABLE FOR ANY
DIRECT, INDIRECT, INCIDENTAL,
libusbx
URL: http://libusb.org
libvpx
URL: http://www.webmproject.org
Copyright (c) 2010, The WebM Project authors. All
rights reserved.
Redistribution and use in source and binary forms,
with or without
modification, are permitted provided that the
following conditions are
met:
* Redistributions of source code must retain the
above copyright
notice, this list of conditions and the following
disclaimer.
* Redistributions in binary form must reproduce the
SPECIAL, EXEMPLARY, OR CONSEQUENTIAL
DAMAGES (INCLUDING, BUT NOT
LIMITED TO, PROCUREMENT OF SUBSTITUTE
GOODS OR SERVICES; LOSS OF USE,
DATA, OR PROFITS; OR BUSINESS INTERRUPTION)
HOWEVER CAUSED AND ON ANY
THEORY OF LIABILITY, WHETHER IN CONTRACT,
STRICT LIABILITY, OR TORT
(INCLUDING NEGLIGENCE OR OTHERWISE) ARISING
IN ANY WAY OUT OF THE USE
OF THIS SOFTWARE, EVEN IF ADVISED OF THE
POSSIBILITY OF SUCH DAMAGE.
WebP image encoder/decoder
URL: http://developers.google.com/speed/webp
Additional IP Rights Grant (Patents)
------------------------------------
"These implementations" means the copyrightable
works that implement the WebM
87
Page 88

codecs distributed by Google as part of the WebM
Project.
of this software and associated documentation files
(the "Software"), to deal
Google hereby grants to you a perpetual, worldwide,
non-exclusive, no-charge,
royalty-free, irrevocable (except as stated in this
section) patent license to
make, have made, use, offer to sell, sell, import,
transfer, and otherwise
run, modify and propagate the contents of these
implementations of WebM, where
such license applies only to those patent claims, both
currently owned by
Google and acquired in the future, licensable by
Google that are necessarily
infringed by these implementations of WebM. This
grant does not include claims
that would be infringed only as a consequence of
further modification of these
or agree to the institution of patent litigation or any
other patent
enforcement activity against any entity (including a
cross-claim or
counterclaim in a lawsuit) alleging that any of these
implementations of WebM
or any code incorporated within any of these
implementations of WebM
constitute direct or contributory patent infringement,
or inducement of
in the Software without restriction, including without
limitation the rights
to use, copy, modify, merge, publish, distribute,
sublicense, and/or sell
copies of the Software, and to permit persons to
whom the Software is fur-
nished to do so, subject to the following conditions:
The above copyright notice and this permission
notice shall be included in
all copies or substantial portions of the Software.
THE SOFTWARE IS PROVIDED "AS IS", WITHOUT
WARRANTY OF ANY KIND, EXPRESS OR
IMPLIED, INCLUDING BUT NOT LIMITED TO THE
WARRANTIES OF MERCHANTABILITY, FIT-
NESS FOR A PARTICULAR PURPOSE AND
NONINFRINGEMENT. IN NO EVENT SHALL THE
AUTHORS OR COPYRIGHT HOLDERS BE LIABLE FOR
ANY CLAIM, DAMAGES OR OTHER
LIABILITY, WHETHER IN AN ACTION OF CONTRACT,
TORT OR OTHERWISE, ARISING FROM,
OUT OF OR IN CONNECTION WITH THE SOFTWARE
OR THE USE OR OTHER DEALINGS IN
THE SOFTWARE.
patent infringement, then any patent rights granted to
you under this License
for these implementations of WebM shall terminate
as of the date such
litigation is filed.
libxml
URL: http://xmlsoft.org
Except where otherwise noted in the source code
(e.g. the files hash.c,
with different Copyright notices) all the files are:
Copyright (C) 1998-2012 Daniel Veillard. All Rights
Reserved.
Permission is hereby granted, free of charge, to any
person obtaining a copy
libxslt
URL: http://xmlsoft.org/XSLT
Licence for libxslt except libexslt
-------------------------------------------------
-------------------- Copyright (C) 2001-2002 Daniel Veillard. All Rights
Reserved.
Permission is hereby granted, free of charge, to any
person obtaining a copy
of this software and associated documentation files
(the "Software"), to deal
in the Software without restriction, including without
limitation the rights
to use, copy, modify, merge, publish, distribute,
sublicense, and/or sell
copies of the Software, and to permit persons to
whom the Software is fur-
88
Page 89

nished to do so, subject to the following conditions:
The above copyright notice and this permission
notice shall be included in
all copies or substantial portions of the Software.
THE SOFTWARE IS PROVIDED "AS IS", WITHOUT
WARRANTY OF ANY KIND, EXPRESS OR
IMPLIED, INCLUDING BUT NOT LIMITED TO THE
WARRANTIES OF MERCHANTABILITY, FIT-
NESS FOR A PARTICULAR PURPOSE AND
NONINFRINGEMENT. IN NO EVENT SHALL THE
DANIEL VEILLARD BE LIABLE FOR ANY CLAIM,
DAMAGES OR OTHER LIABILITY, WHETHER
IN AN ACTION OF CONTRACT, TORT OR OTHERWISE,
ARISING FROM, OUT OF OR IN CON-
NECTION WITH THE SOFTWARE OR THE USE OR
OTHER DEALINGS IN THE SOFTWARE.
Except as contained in this notice, the name of Daniel
Veillard shall not
be used in advertising or otherwise to promote the
sale, use or other deal-
ings in this Software without prior written
authorization from him.
-------------------------------------------------
---------------------
The above copyright notice and this permission
notice shall be included in
all copies or substantial portions of the Software.
THE SOFTWARE IS PROVIDED "AS IS", WITHOUT
WARRANTY OF ANY KIND, EXPRESS OR
IMPLIED, INCLUDING BUT NOT LIMITED TO THE
WARRANTIES OF MERCHANTABILITY, FIT-
NESS FOR A PARTICULAR PURPOSE AND
NONINFRINGEMENT. IN NO EVENT SHALL THE
AUTHORS BE LIABLE FOR ANY CLAIM, DAMAGES OR
OTHER LIABILITY, WHETHER
IN AN ACTION OF CONTRACT, TORT OR OTHERWISE,
ARISING FROM, OUT OF OR IN CON-
NECTION WITH THE SOFTWARE OR THE USE OR
OTHER DEALINGS IN THE SOFTWARE.
Except as contained in this notice, the name of the
authors shall not
be used in advertising or otherwise to promote the
sale, use or other deal-
ings in this Software without prior written
authorization from him.
-------------------------------------------------
---------------------
libyuv
Licence for libexslt
-------------------------------------------------
-------------------- Copyright (C) 2001-2002 Thomas Broyer, Charlie
Bozeman and Daniel Veillard.
All Rights Reserved.
Permission is hereby granted, free of charge, to any
person obtaining a copy
of this software and associated documentation files
(the "Software"), to deal
in the Software without restriction, including without
limitation the rights
to use, copy, modify, merge, publish, distribute,
sublicense, and/or sell
copies of the Software, and to permit persons to
whom the Software is fur-
nished to do so, subject to the following conditions:
URL: http://code.google.com/p/libyuv/
Copyright 2011 The LibYuv Project Authors. All rights
reserved.
Redistribution and use in source and binary forms,
with or without
modification, are permitted provided that the
following conditions are
met:
* Redistributions of source code must retain the
above copyright
notice, this list of conditions and the following
disclaimer.
* Redistributions in binary form must reproduce the
above copyright
notice, this list of conditions and the following
89
Page 90

disclaimer in
the documentation and/or other materials
provided with the
distribution.
* Neither the name of Google nor the names of its
contributors may
be used to endorse or promote products derived
from this software
without specific prior written permission.
THIS SOFTWARE IS PROVIDED BY THE COPYRIGHT
HOLDERS AND CONTRIBUTORS
"AS IS" AND ANY EXPRESS OR IMPLIED
WARRANTIES, INCLUDING, BUT NOT
LIMITED TO, THE IMPLIED WARRANTIES OF
MERCHANTABILITY AND FITNESS FOR
A PARTICULAR PURPOSE ARE DISCLAIMED. IN NO
EVENT SHALL THE COPYRIGHT
HOLDER OR CONTRIBUTORS BE LIABLE FOR ANY
DIRECT, INDIRECT, INCIDENTAL,
SPECIAL, EXEMPLARY, OR CONSEQUENTIAL
DAMAGES (INCLUDING, BUT NOT
LIMITED TO, PROCUREMENT OF SUBSTITUTE
GOODS OR SERVICES; LOSS OF USE,
DATA, OR PROFITS; OR BUSINESS INTERRUPTION)
HOWEVER CAUSED AND ON ANY
THEORY OF LIABILITY, WHETHER IN CONTRACT,
STRICT LIABILITY, OR TORT
(INCLUDING NEGLIGENCE OR OTHERWISE) ARISING
IN ANY WAY OUT OF THE USE
OF THIS SOFTWARE, EVEN IF ADVISED OF THE
POSSIBILITY OF SUCH DAMAGE.
linux-syscall-support
// * Redistributions of source code must retain
the above copyright
// notice, this list of conditions and the following
disclaimer.
// * Redistributions in binary form must reproduce
the above
// copyright notice, this list of conditions and the
following disclaimer
// in the documentation and/or other materials
provided with the
// distribution.
// * Neither the name of Google Inc. nor the
names of its
// contributors may be used to endorse or promote
products derived from
// this software without specific prior written
permission.
//
// THIS SOFTWARE IS PROVIDED BY THE
COPYRIGHT HOLDERS AND CONTRIBUTORS
// "AS IS" AND ANY EXPRESS OR IMPLIED
WARRANTIES, INCLUDING, BUT NOT
// LIMITED TO, THE IMPLIED WARRANTIES OF
MERCHANTABILITY AND FITNESS FOR
// A PARTICULAR PURPOSE ARE DISCLAIMED. IN NO
EVENT SHALL THE COPYRIGHT
// OWNER OR CONTRIBUTORS BE LIABLE FOR ANY
DIRECT, INDIRECT, INCIDENTAL,
// SPECIAL, EXEMPLARY, OR CONSEQUENTIAL
DAMAGES (INCLUDING, BUT NOT
// LIMITED TO, PROCUREMENT OF SUBSTITUTE
GOODS OR SERVICES; LOSS OF USE,
// DATA, OR PROFITS; OR BUSINESS
INTERRUPTION) HOWEVER CAUSED AND ON ANY
// THEORY OF LIABILITY, WHETHER IN CONTRACT,
STRICT LIABILITY, OR TORT
URL: http://code.google.com/p/linux-syscallsupport/
// Copyright 2015 The Chromium Authors. All rights
reserved.
//
// Redistribution and use in source and binary forms,
with or without
// modification, are permitted provided that the
following conditions are
// met:
//
// (INCLUDING NEGLIGENCE OR OTHERWISE)
ARISING IN ANY WAY OUT OF THE USE
// OF THIS SOFTWARE, EVEN IF ADVISED OF THE
POSSIBILITY OF SUCH DAMAGE.
LZ4 - Extremely fast compression
URL: https://code.google.com/p/lz4/
LZ4 Library
Copyright (c) 2011-2014, Yann Collet
All rights reserved.
90
Page 91

Redistribution and use in source and binary forms,
with or without modification,
are permitted provided that the following conditions
are met:
* Redistributions of source code must retain the
above copyright notice, this
list of conditions and the following disclaimer.
* Redistributions in binary form must reproduce the
above copyright notice, this
list of conditions and the following disclaimer in the
documentation and/or
other materials provided with the distribution.
THIS SOFTWARE IS PROVIDED BY THE COPYRIGHT
HOLDERS AND CONTRIBUTORS "AS IS" AND
ANY EXPRESS OR IMPLIED WARRANTIES,
INCLUDING, BUT NOT LIMITED TO, THE IMPLIED
WARRANTIES OF MERCHANTABILITY AND FITNESS
FOR A PARTICULAR PURPOSE ARE
ANY DIRECT, INDIRECT, INCIDENTAL, SPECIAL,
EXEMPLARY, OR CONSEQUENTIAL DAMAGES
(INCLUDING, BUT NOT LIMITED TO, PROCUREMENT
OF SUBSTITUTE GOODS OR SERVICES;
LOSS OF USE, DATA, OR PROFITS; OR BUSINESS
INTERRUPTION) HOWEVER CAUSED AND ON
ANY THEORY OF LIABILITY, WHETHER IN
CONTRACT, STRICT LIABILITY, OR TORT
(INCLUDING NEGLIGENCE OR OTHERWISE) ARISING
IN ANY WAY OUT OF THE USE OF THIS
SOFTWARE, EVEN IF ADVISED OF THE POSSIBILITY
OF SUCH DAMAGE.
Permission is hereby granted, free of charge, to any
person obtaining a
copy of this software and associated documentation
files (the "Software"),
to deal in the Software without restriction, including
without limitation
the rights to use, copy, modify, merge, publish,
distribute, sublicense,
and/or sell copies of the Software, and to permit
persons to whom the
Software is furnished to do so, subject to the
following conditions:
The above copyright notice and this permission
notice shall be included
in all copies or substantial portions of the Software.
THE SOFTWARE IS PROVIDED "AS IS", WITHOUT
WARRANTY OF ANY KIND, EXPRESS
OR IMPLIED, INCLUDING BUT NOT LIMITED TO THE
WARRANTIES OF MERCHANTABILITY,
FITNESS FOR A PARTICULAR PURPOSE AND
NONINFRINGEMENT. IN NO EVENT SHALL
BRIAN PAUL BE LIABLE FOR ANY CLAIM, DAMAGES
OR OTHER LIABILITY, WHETHER IN
AN ACTION OF CONTRACT, TORT OR OTHERWISE,
ARISING FROM, OUT OF OR IN
CONNECTION WITH THE SOFTWARE OR THE USE
OR OTHER DEALINGS IN THE SOFTWARE.
Some parts of Mesa are copyrighted under the GNU
LGPL. See the
Mesa/docs/COPYRIGHT file for details.
LZMA SDK
URL: http://www.7-zip.org/sdk.html
LZMA SDK is placed in the public domain.
mesa
URL: http://www.mesa3d.org/
The default Mesa license is as follows:
Copyright (C) 1999-2007 Brian Paul All Rights
Reserved.
modp base64 decoder
URL: https://github.com/client9/stringencoders
* MODP_B64 - High performance base64
encoder/decoder
* Version 1.3 -- 17-Mar-2006
* http://modp.com/release/base64
*
* Copyright (c) 2005, 2006 Nick Galbreath -- nickg
[at] modp [dot] com
* All rights reserved.
91
Page 92

*
* Redistribution and use in source and binary forms,
with or without
* modification, are permitted provided that the
following conditions are
* met:
*
* Redistributions of source code must retain the
above copyright
* notice, this list of conditions and the following
disclaimer.
*
* Redistributions in binary form must reproduce
the above copyright
* notice, this list of conditions and the following
disclaimer in the
* documentation and/or other materials provided
with the distribution.
*
* Neither the name of the modp.com nor the
names of its
* contributors may be used to endorse or
promote products derived from
* this software without specific prior written
permission.
*
* THIS SOFTWARE IS PROVIDED BY THE
COPYRIGHT HOLDERS AND CONTRIBUTORS
* "AS IS" AND ANY EXPRESS OR IMPLIED
WARRANTIES, INCLUDING, BUT NOT
* LIMITED TO, THE IMPLIED WARRANTIES OF
MERCHANTABILITY AND FITNESS FOR
* A PARTICULAR PURPOSE ARE DISCLAIMED. IN
NO EVENT SHALL THE COPYRIGHT
* OWNER OR CONTRIBUTORS BE LIABLE FOR ANY
DIRECT, INDIRECT, INCIDENTAL,
* SPECIAL, EXEMPLARY, OR CONSEQUENTIAL
DAMAGES (INCLUDING, BUT NOT
* LIMITED TO, PROCUREMENT OF SUBSTITUTE
GOODS OR SERVICES; LOSS OF USE,
* DATA, OR PROFITS; OR BUSINESS
INTERRUPTION) HOWEVER CAUSED AND ON ANY
* THEORY OF LIABILITY, WHETHER IN CONTRACT,
STRICT LIABILITY, OR TORT
* (INCLUDING NEGLIGENCE OR OTHERWISE)
ARISING IN ANY WAY OUT OF THE USE
* OF THIS SOFTWARE, EVEN IF ADVISED OF THE
POSSIBILITY OF SUCH DAMAGE.
Mojo
URL: https://github.com/domokit/mojo
// Copyright 2014 The Chromium Authors. All rights
reserved.
//
// Redistribution and use in source and binary forms,
with or without
// modification, are permitted provided that the
following conditions are
// met:
//
// * Redistributions of source code must retain
the above copyright
// notice, this list of conditions and the following
disclaimer.
// * Redistributions in binary form must reproduce
the above
// copyright notice, this list of conditions and the
following disclaimer
// in the documentation and/or other materials
provided with the
// distribution.
// * Neither the name of Google Inc. nor the
names of its
// contributors may be used to endorse or promote
products derived from
// this software without specific prior written
permission.
//
// THIS SOFTWARE IS PROVIDED BY THE
COPYRIGHT HOLDERS AND CONTRIBUTORS
// "AS IS" AND ANY EXPRESS OR IMPLIED
WARRANTIES, INCLUDING, BUT NOT
// LIMITED TO, THE IMPLIED WARRANTIES OF
MERCHANTABILITY AND FITNESS FOR
// A PARTICULAR PURPOSE ARE DISCLAIMED. IN NO
EVENT SHALL THE COPYRIGHT
// OWNER OR CONTRIBUTORS BE LIABLE FOR ANY
DIRECT, INDIRECT, INCIDENTAL,
// SPECIAL, EXEMPLARY, OR CONSEQUENTIAL
DAMAGES (INCLUDING, BUT NOT
// LIMITED TO, PROCUREMENT OF SUBSTITUTE
GOODS OR SERVICES; LOSS OF USE,
// DATA, OR PROFITS; OR BUSINESS
INTERRUPTION) HOWEVER CAUSED AND ON ANY
92
Page 93

// THEORY OF LIABILITY, WHETHER IN CONTRACT,
STRICT LIABILITY, OR TORT
// (INCLUDING NEGLIGENCE OR OTHERWISE)
ARISING IN ANY WAY OUT OF THE USE
// OF THIS SOFTWARE, EVEN IF ADVISED OF THE
POSSIBILITY OF SUCH DAMAGE.
mt19937ar
permission.
THIS SOFTWARE IS PROVIDED BY THE
COPYRIGHT HOLDERS AND CONTRIBUTORS
"AS IS" AND ANY EXPRESS OR IMPLIED
WARRANTIES, INCLUDING, BUT NOT
LIMITED TO, THE IMPLIED WARRANTIES OF
MERCHANTABILITY AND FITNESS FOR
URL: http://www.math.sci.hiroshima-u.ac.jp/~m-
mat/MT/MT2002/emt19937ar.html
A C-program for MT19937, with initialization
improved 2002/1/26.
Coded by Takuji Nishimura and Makoto
Matsumoto.
Before using, initialize the state by using
init_genrand(seed)
or init_by_array(init_key, key_length).
Copyright (C) 1997 - 2002, Makoto Matsumoto
and Takuji Nishimura,
All rights
reserved.
Redistribution and use in source and binary forms,
with or without
modification, are permitted provided that the
following conditions
are met:
1. Redistributions of source code must retain the
above copyright
notice, this list of conditions and the
following disclaimer.
2. Redistributions in binary form must reproduce
the above copyright
notice, this list of conditions and the
following disclaimer in the
documentation and/or other materials
provided with the distribution.
3. The names of its contributors may not be
used to endorse or promote
A PARTICULAR PURPOSE ARE DISCLAIMED. IN
NO EVENT SHALL THE COPYRIGHT OWNER OR
CONTRIBUTORS BE LIABLE FOR ANY DIRECT,
INDIRECT, INCIDENTAL, SPECIAL,
EXEMPLARY, OR CONSEQUENTIAL DAMAGES
(INCLUDING, BUT NOT LIMITED TO,
PROCUREMENT OF SUBSTITUTE GOODS OR
SERVICES; LOSS OF USE, DATA, OR
PROFITS; OR BUSINESS INTERRUPTION)
HOWEVER CAUSED AND ON ANY THEORY OF
LIABILITY, WHETHER IN CONTRACT, STRICT
LIABILITY, OR TORT (INCLUDING
NEGLIGENCE OR OTHERWISE) ARISING IN ANY
WAY OUT OF THE USE OF THIS
SOFTWARE, EVEN IF ADVISED OF THE
POSSIBILITY OF SUCH DAMAGE.
Netscape Plugin Application Programming Interface
(NPAPI)
URL: http://mxr.mozilla.org/mozilla-
central/source/modules/plugin/base/public/
Version: MPL 1.1/GPL 2.0/LGPL 2.1
The contents of this file are subject to the Mozilla
Public License Version
the License. You may obtain a copy of the License at
http://www.mozilla.org/MPL/
Software distributed under the License is distributed
on an "AS IS" basis,
WITHOUT WARRANTY OF ANY KIND, either express
or implied. See the License
for the specific language governing rights and
limitations under the
The Original Code is mozilla.org code.
products derived from this software without
specific prior written
The Initial Developer of the Original Code is
93
Page 94

Netscape Communications Corporation.
Portions created by the Initial Developer are
Copyright (C) 1998
the Initial Developer. All Rights Reserved.
Contributor(s):
Alternatively, the contents of this file may be used
under the terms of
either the GNU General Public License Version 2 or
later (the "GPL"), or
the GNU Lesser General Public License Version 2.1 or
later (the "LGPL"),
in which case the provisions of the GPL or the LGPL
are applicable instead
of those above. If you wish to allow use of your
version of this file only
under the terms of either the GPL or the LGPL, and
not to allow others to
use your version of this file under the terms of the
MPL, indicate your
decision by deleting the provisions above and replace
them with the notice
and other provisions required by the GPL or the LGPL.
If you do not delete
the provisions above, a recipient may use your
version of this file under
the terms of any one of the MPL, the GPL or the
LGPL.
OpenMAX DL
URL:
https://silver.arm.com/download/Software/Graphics/
OX000-BU-00010-r1p0-00bet0/OX000-BU-00010
-r1p0-00bet0.tgz
* dl/api/omxtypes.h
* dl/sp/api/omxSP.h
are licensed by Khronos:
Copyright © 2005-2008 The Khronos Group Inc. All
Rights Reserved.
These materials are protected by copyright laws and
contain material
proprietary to the Khronos Group, Inc. You may use
these materials
for implementing Khronos specifications, without
altering or removing
any trademark, copyright or other notice from the
specification.
Khronos Group makes no, and expressly disclaims
any, representations
or warranties, express or implied, regarding these
materials, including,
without limitation, any implied warranties of
merchantability or fitness
for a particular purpose or non-infringement of any
intellectual property.
Khronos Group makes no, and expressly disclaims
any, warranties, express
or implied, regarding the correctness, accuracy,
completeness, timeliness,
and reliability of these materials.
Under no circumstances will the Khronos Group, or
any of its Promoters,
Use of this source code is governed by a BSD-style
license that can be
found in the LICENSE file in the root of the source
tree. All
contributing project authors may be found in the
AUTHORS file in the
root of the source tree.
The files were originally licensed by ARM Limited.
The following files:
Contributors or Members or their respective partners,
officers, directors,
employees, agents or representatives be liable for
any damages, whether
direct, indirect, special or consequential damages for
lost revenues,
lost profits, or otherwise, arising from or in connection
with these
Khronos and OpenMAX are trademarks of the
Khronos Group Inc.
opus
94
Page 95

URL: http://git.xiph.org/?p=opus.git
Copyright 2001-2011 Xiph.Org, Skype Limited, Octasic,
Jean-Marc Valin, Timothy
B. Terriberry,
CSIRO, Gregory Maxwell,
Mark Borgerding,
Erik de Castro Lopo
Redistribution and use in source and binary forms,
with or without
modification, are permitted provided that the
following conditions
are met:
- Redistributions of source code must retain the
above copyright
PROFITS; OR BUSINESS INTERRUPTION) HOWEVER
CAUSED AND ON ANY THEORY OF
LIABILITY, WHETHER IN CONTRACT, STRICT
LIABILITY, OR TORT (INCLUDING
NEGLIGENCE OR OTHERWISE) ARISING IN ANY WAY
OUT OF THE USE OF THIS
SOFTWARE, EVEN IF ADVISED OF THE POSSIBILITY
OF SUCH DAMAGE.
Opus is subject to the royalty-free patent licenses
which are
specified at:
https://datatracker.ietf.org/ipr/1524/
Microsoft Corporation:
https://datatracker.ietf.org/ipr/1914/
notice, this list of conditions and the following
disclaimer.
- Redistributions in binary form must reproduce the
above copyright
notice, this list of conditions and the following
disclaimer in the
documentation and/or other materials provided with
the distribution.
- Neither the name of Internet Society, IETF or IETF
Trust, nor the
names of specific contributors, may be used to
endorse or promote
products derived from this software without specific
prior written
THIS SOFTWARE IS PROVIDED BY THE COPYRIGHT
HOLDERS AND CONTRIBUTORS
``AS IS'' AND ANY EXPRESS OR IMPLIED
WARRANTIES, INCLUDING, BUT NOT
LIMITED TO, THE IMPLIED WARRANTIES OF
MERCHANTABILITY AND FITNESS FOR
A PARTICULAR PURPOSE ARE DISCLAIMED. IN NO
EVENT SHALL THE COPYRIGHT OWNER
OR CONTRIBUTORS BE LIABLE FOR ANY DIRECT,
INDIRECT, INCIDENTAL, SPECIAL,
EXEMPLARY, OR CONSEQUENTIAL DAMAGES
(INCLUDING, BUT NOT LIMITED TO,
PROCUREMENT OF SUBSTITUTE GOODS OR
SERVICES; LOSS OF USE, DATA, OR
Broadcom Corporation:
https://datatracker.ietf.org/ipr/1526/
OTS (OpenType Sanitizer)
URL: https://github.com/khaledhosny/ots.git
PLY (Python Lex-Yacc)
URL: http://www.dabeaz.com/ply/ply-3.4.tar.gz
PLY (Python Lex-Yacc)
Version 3.4
Protocol Buffers
URL: http://protobuf.googlecode.com/svn/trunk
Code generated by the Protocol Buffer compiler is
owned by the owner
of the input file used when generating it. This code is
not
standalone and requires a support library to be linked
with it. This
support library is itself covered by the above license.
Quick Color Management System
URL: https://github.com/jrmuizel/qcms/tree/v4
qcms
Copyright (C) 2009 Mozilla Corporation
95
Page 96

Copyright (C) 1998-2007 Marti Maria
Permission is hereby granted, free of charge, to any
person obtaining
a copy of this software and associated
documentation files (the "Software"),
to deal in the Software without restriction, including
without limitation
the rights to use, copy, modify, merge, publish,
distribute, sublicense,
and/or sell copies of the Software, and to permit
persons to whom the Software
is furnished to do so, subject to the following
conditions:
The above copyright notice and this permission
notice shall be included in
all copies or substantial portions of the Software.
THE SOFTWARE IS PROVIDED "AS IS", WITHOUT
WARRANTY OF ANY KIND,
EXPRESS OR IMPLIED, INCLUDING BUT NOT
LIMITED TO
THE WARRANTIES OF MERCHANTABILITY, FITNESS
FOR A PARTICULAR PURPOSE AND
Unlimited Commercial Use
We try to make it clear that you may use all clipart
from Openclipart even for unlimited commercial use.
We believe that giving away our images is a great way
to share with the world our talents and that will come
back around in a better form.
May I Use Openclipart for?
We put together a small chart of as many possibilities
and questions we have heard from people asking
how they may use Openclipart. If you have an
additional question, please email
love@openclipart.org.
All Clipart are Released into the Public Domain.
Each artist at Openclipart releases all rights to the
images they share at Openclipart. The reason is so
that there is no friction in using and sharing images
authors make available at this website so that each
artist might also receive the same benefit in using
other artists clipart totally for any possible reason.
SMHasher
URL: http://code.google.com/p/smhasher/
LIABLE FOR ANY CLAIM, DAMAGES OR OTHER
LIABILITY, WHETHER IN AN ACTION
OF CONTRACT, TORT OR OTHERWISE, ARISING
FROM, OUT OF OR IN CONNECTION
WITH THE SOFTWARE OR THE USE OR OTHER
DEALINGS IN THE SOFTWARE.
re2 - an efficient, principled regular expression
library
URL: https://github.com/google/re2
sfntly
URL: https://github.com/googlei18n/sfntly
Skia
URL: https://skia.org/
-------------------------------------------------
------------------------------Some files under resources are under the following
license:
Snappy: A fast compressor/decompressor
URL: http://google.github.io/snappy/
sqlite
URL: http://sqlite.org/
The author disclaims copyright to this source code.
In place of a legal notice, here is a blessing:
May you do good and not evil.
May you find forgiveness for yourself and forgive
others.
May you share freely, never taking more than you
give.
tcmalloc
URL: http://gperftools.googlecode.com/
The USB ID Repository
URL: http://www.linux-usb.org/usb-ids.html
96
Page 97

Copyright (c) 2012, Linux USB Project
refimpl/source/browse/trunk/COPYRIGHT)
All rights reserved.
Redistribution and use in source and binary forms,
with or without modification, are permitted provided
that the following conditions are met:
o Redistributions of source code must retain the
above copyright notice,
this list of conditions and the following disclaimer.
o Redistributions in binary form must reproduce the
above copyright
notice, this list of conditions and the following
disclaimer in the
documentation and/or other materials provided
with the distribution.
o Neither the name of the Linux USB Project nor the
names of its
contributors may be used to endorse or promote
products derived from
this software without specific prior written
permission.
THIS SOFTWARE IS PROVIDED BY THE COPYRIGHT
HOLDERS AND CONTRIBUTORS "AS IS" AND ANY
EXPRESS OR IMPLIED WARRANTIES, INCLUDING,
BUT NOT LIMITED TO, THE IMPLIED WARRANTIES
OF MERCHANTABILITY AND FITNESS FOR A
PARTICULAR PURPOSE ARE DISCLAIMED. IN NO
EVENT SHALL THE COPYRIGHT HOLDER OR
CONTRIBUTORS BE LIABLE FOR ANY DIRECT,
INDIRECT, INCIDENTAL, SPECIAL, EXEMPLARY, OR
CONSEQUENTIAL DAMAGES (INCLUDING, BUT NOT
LIMITED TO, PROCUREMENT OF SUBSTITUTE
GOODS OR SERVICES; LOSS OF USE, DATA, OR
PROFITS; OR BUSINESS INTERRUPTION) HOWEVER
CAUSED AND ON ANY THEORY OF LIABILITY,
WHETHER IN CONTRACT, STRICT LIABILITY, OR
TORT (INCLUDING NEGLIGENCE OR OTHERWISE)
ARISING IN ANY WAY OUT OF THE USE OF THIS
SOFTWARE, EVEN IF ADVISED OF THE POSSIBILITY
OF SUCH DAMAGE.
usrsctp
URL: http://github.com/sctplab/usrsctp
(Copied from the COPYRIGHT file of
https://code.google.com/p/sctp-
-------------------------------------------------
-------------------------------
Copyright (c) 2001, 2002 Cisco Systems, Inc.
Copyright (c) 2002-12 Randall R. Stewart
Copyright (c) 2002-12 Michael Tuexen
All rights reserved.
Redistribution and use in source and binary forms,
with or without
modification, are permitted provided that the
following conditions
are met:
notice, this list of conditions and the following
disclaimer.
notice, this list of conditions and the following
disclaimer in the
documentation and/or other materials provided
with the distribution.
THIS SOFTWARE IS PROVIDED BY THE AUTHOR AND
CONTRIBUTORS ``AS IS'' AND
ANY EXPRESS OR IMPLIED WARRANTIES,
INCLUDING, BUT NOT LIMITED TO, THE
IMPLIED WARRANTIES OF MERCHANTABILITY AND
FITNESS FOR A PARTICULAR PURPOSE
ARE DISCLAIMED. IN NO EVENT SHALL THE
AUTHOR OR CONTRIBUTORS BE LIABLE
FOR ANY DIRECT, INDIRECT, INCIDENTAL, SPECIAL,
EXEMPLARY, OR CONSEQUENTIAL
DAMAGES (INCLUDING, BUT NOT LIMITED TO,
PROCUREMENT OF SUBSTITUTE GOODS
OR SERVICES; LOSS OF USE, DATA, OR PROFITS; OR
BUSINESS INTERRUPTION)
HOWEVER CAUSED AND ON ANY THEORY OF
LIABILITY, WHETHER IN CONTRACT, STRICT
LIABILITY, OR TORT (INCLUDING NEGLIGENCE OR
OTHERWISE) ARISING IN ANY WAY
OUT OF THE USE OF THIS SOFTWARE, EVEN IF
ADVISED OF THE POSSIBILITY OF
SUCH DAMAGE.
wayland
URL: http://wayland.freedesktop.org/
97
Page 98

wayland-protocols
Copyright © 2008-2012 Kristian Høgsberg
Copyright © 2010-2012 Intel Corporation
Copyright © 2011 Benjamin Franzke
Copyright © 2012 Collabora, Ltd.
Permission is hereby granted, free of charge, to any
person obtaining a
copy of this software and associated documentation
files (the "Software"),
to deal in the Software without restriction, including
without limitation
the rights to use, copy, modify, merge, publish,
distribute, sublicense,
and/or sell copies of the Software, and to permit
persons to whom the
Software is furnished to do so, subject to the
following conditions:
URL: http://wayland.freedesktop.org/
Copyright © 2008-2013 Kristian Høgsberg
Copyright © 2010-2013 Intel Corporation
Copyright © 2013 Rafael Antognolli
Copyright © 2013 Jasper St. Pierre
Copyright © 2014 Jonas Ådahl
Copyright © 2014 Jason Ekstrand
Copyright © 2014-2015 Collabora, Ltd.
Copyright © 2015 Red Hat Inc.
Permission is hereby granted, free of charge, to any
person obtaining a
copy of this software and associated documentation
files (the "Software"),
to deal in the Software without restriction, including
without limitation
The above copyright notice and this permission
notice (including the next
paragraph) shall be included in all copies or
substantial portions of the
THE SOFTWARE IS PROVIDED "AS IS", WITHOUT
WARRANTY OF ANY KIND, EXPRESS OR
IMPLIED, INCLUDING BUT NOT LIMITED TO THE
WARRANTIES OF MERCHANTABILITY,
FITNESS FOR A PARTICULAR PURPOSE AND
NONINFRINGEMENT. IN NO EVENT SHALL
THE AUTHORS OR COPYRIGHT HOLDERS BE LIABLE
FOR ANY CLAIM, DAMAGES OR OTHER
LIABILITY, WHETHER IN AN ACTION OF CONTRACT,
TORT OR OTHERWISE, ARISING
FROM, OUT OF OR IN CONNECTION WITH THE
SOFTWARE OR THE USE OR OTHER
DEALINGS IN THE SOFTWARE.
---
The above is the version of the MIT "Expat" License
used by X.org:
http://cgit.freedesktop.org/xorg/xserver/tree/COPYIN
G
the rights to use, copy, modify, merge, publish,
distribute, sublicense,
and/or sell copies of the Software, and to permit
persons to whom the
Software is furnished to do so, subject to the
following conditions:
The above copyright notice and this permission
notice (including the next
paragraph) shall be included in all copies or
substantial portions of the
THE SOFTWARE IS PROVIDED "AS IS", WITHOUT
WARRANTY OF ANY KIND, EXPRESS OR
IMPLIED, INCLUDING BUT NOT LIMITED TO THE
WARRANTIES OF MERCHANTABILITY,
FITNESS FOR A PARTICULAR PURPOSE AND
NONINFRINGEMENT. IN NO EVENT SHALL
THE AUTHORS OR COPYRIGHT HOLDERS BE LIABLE
FOR ANY CLAIM, DAMAGES OR OTHER
LIABILITY, WHETHER IN AN ACTION OF CONTRACT,
TORT OR OTHERWISE, ARISING
FROM, OUT OF OR IN CONNECTION WITH THE
SOFTWARE OR THE USE OR OTHER
DEALINGS IN THE SOFTWARE.
---
98
Page 99

The above is the version of the MIT "Expat" License
used by X.org:
LIMITED TO, THE IMPLIED WARRANTIES OF
MERCHANTABILITY AND FITNESS FOR
http://cgit.freedesktop.org/xorg/xserver/tree/COPYIN
G
Web Animations JS
URL: https://github.com/web-animations/web-
animations-js
WebRTC
URL: http://www.webrtc.org
Copyright (c) 2011, The WebRTC project authors. All
rights reserved.
Redistribution and use in source and binary forms,
with or without
modification, are permitted provided that the
following conditions are
met:
* Redistributions of source code must retain the
above copyright
notice, this list of conditions and the following
disclaimer.
* Redistributions in binary form must reproduce the
above copyright
A PARTICULAR PURPOSE ARE DISCLAIMED. IN NO
EVENT SHALL THE COPYRIGHT
HOLDER OR CONTRIBUTORS BE LIABLE FOR ANY
DIRECT, INDIRECT, INCIDENTAL,
SPECIAL, EXEMPLARY, OR CONSEQUENTIAL
DAMAGES (INCLUDING, BUT NOT
LIMITED TO, PROCUREMENT OF SUBSTITUTE
GOODS OR SERVICES; LOSS OF USE,
DATA, OR PROFITS; OR BUSINESS INTERRUPTION)
HOWEVER CAUSED AND ON ANY
THEORY OF LIABILITY, WHETHER IN CONTRACT,
STRICT LIABILITY, OR TORT
(INCLUDING NEGLIGENCE OR OTHERWISE) ARISING
IN ANY WAY OUT OF THE USE
OF THIS SOFTWARE, EVEN IF ADVISED OF THE
POSSIBILITY OF SUCH DAMAGE.
x86inc
URL:
http://git.videolan.org/?p=x264.git;a=blob;f=common/
x86/x86inc.asm
;*********************************************************
********************
;* x86inc.asm
;*********************************************************
********************
;* Copyright (C) 2005-2011 x264 project
;*
notice, this list of conditions and the following
disclaimer in
the documentation and/or other materials
provided with the
distribution.
* Neither the name of Google nor the names of its
contributors may
be used to endorse or promote products derived
from this software
without specific prior written permission.
THIS SOFTWARE IS PROVIDED BY THE COPYRIGHT
HOLDERS AND CONTRIBUTORS
"AS IS" AND ANY EXPRESS OR IMPLIED
WARRANTIES, INCLUDING, BUT NOT
;* Authors: Loren Merritt <lorenm@u.washington.edu>
;* Anton Mitrofanov
<BugMaster@narod.ru>
;* Jason Garrett-Glaser
<darkshikari@gmail.com>
;*
;* Permission to use, copy, modify, and/or distribute
this software for any
;* purpose with or without fee is hereby granted,
provided that the above
;* copyright notice and this permission notice appear
in all copies.
;*
;* THE SOFTWARE IS PROVIDED "AS IS" AND THE
AUTHOR DISCLAIMS ALL WARRANTIES
;* WITH REGARD TO THIS SOFTWARE INCLUDING
ALL IMPLIED WARRANTIES OF
99
Page 100

;* MERCHANTABILITY AND FITNESS. IN NO EVENT
SHALL THE AUTHOR BE LIABLE FOR
warranty. In no event will the authors be held
liable for any damages
;* ANY SPECIAL, DIRECT, INDIRECT, OR
CONSEQUENTIAL DAMAGES OR ANY DAMAGES
;* WHATSOEVER RESULTING FROM LOSS OF USE,
DATA OR PROFITS, WHETHER IN AN
;* ACTION OF CONTRACT, NEGLIGENCE OR OTHER
TORTIOUS ACTION, ARISING OUT OF
;* OR IN CONNECTION WITH THE USE OR
PERFORMANCE OF THIS SOFTWARE.
;*********************************************************
********************
; This is a header file for the x264ASM assembly
language, which uses
; NASM/YASM syntax combined with a large number
of macros to provide easy
; abstraction between different calling conventions
(x86_32, win64, linux64).
; It also has various other useful features to simplify
writing the kind of
arising from the use of this software.
Permission is granted to anyone to use this
software for any purpose,
including commercial applications, and to alter it
and redistribute it
freely, subject to the following restrictions:
1. The origin of this software must not be
misrepresented; you must not
claim that you wrote the original software. If
you use this software
in a product, an acknowledgment in the product
documentation would be
appreciated but is not required.
2. Altered source versions must be plainly marked
as such, and must not be
misrepresented as being the original software.
; DSP functions that are most often used in x264.
; Unlike the rest of x264, this file is available under an
ISC license, as it
; has significant usefulness outside of x264 and we
want it to be available
; to the largest audience possible. Of course, if you
modify it for your own
; purposes to add a new feature, we strongly
encourage contributing a patch
; as this feature might be useful for others as well.
Send patches or ideas
; to x264-devel@videolan.org
.
zlib
URL: http://zlib.net/
/* zlib.h -- interface of the 'zlib' general purpose
compression library
version 1.2.4, March 14th, 2010
3. This notice may not be removed or altered from
any source distribution.
Jean-loup Gailly
Mark Adler
*/
url_parse
URL: http://mxr.mozilla.org/comm-central/source/m
ozilla/netwerk/base/src/nsURLParsers.cpp
Copyright 2007, Google Inc.
All rights reserved.
Redistribution and use in source and binary forms,
with or without
modification, are permitted provided that the
following conditions are
Copyright (C) 1995-2010 Jean-loup Gailly and Mark
Adler
This software is provided 'as-is', without any
express or implied
met:
* Redistributions of source code must retain the
above copyright
notice, this list of conditions and the following
100
 Loading...