

Philips 190S6FGT/00, 190S6FG, 190S6FGT User Manual

Philips
Business
Solutions
User Manual
EN
TYPE Nr. 190S6FGT


User Manual 190S6FGT
1
TABLE OF CONTENTS
1 IMPORTANT NOTES AND SAFETY INSTRUCTIONS . . . . . . . . . . . . . . . . . . . . . . . . . . . . .3
1.1 Safety Instructions . . . . . . . . . . . . . . . . . . . . . . . . . . . . . . . . . . . . . . . . . . . . . . . . . . . . . . . . . . . . . . . . . . . 3
1.1.1 Operation: . . . . . . . . . . . . . . . . . . . . . . . . . . . . . . . . . . . . . . . . . . . . . . . . . . . . . . . . . . . . . . . . . . . 3
1.1.2 Maintenance: . . . . . . . . . . . . . . . . . . . . . . . . . . . . . . . . . . . . . . . . . . . . . . . . . . . . . . . . . . . . . . . . . . 4
1.1.3 Service: . . . . . . . . . . . . . . . . . . . . . . . . . . . . . . . . . . . . . . . . . . . . . . . . . . . . . . . . . . . . . . . . . . . . . . 4
1.2 Warnings and Precautions . . . . . . . . . . . . . . . . . . . . . . . . . . . . . . . . . . . . . . . . . . . . . . . . . . . . . . . . . . . . . 5
1.3 Cleaning & Care . . . . . . . . . . . . . . . . . . . . . . . . . . . . . . . . . . . . . . . . . . . . . . . . . . . . . . . . . . . . . . . . . . . . . 6
1.4 End-of-Life Disposal . . . . . . . . . . . . . . . . . . . . . . . . . . . . . . . . . . . . . . . . . . . . . . . . . . . . . . . . . . . . . . . . . . 6
1.5 Information for Users in the UK . . . . . . . . . . . . . . . . . . . . . . . . . . . . . . . . . . . . . . . . . . . . . . . . . . . . . . . . 7
2 REGULATORY NOTICE . . . . . . . . . . . . . . . . . . . . . . . . . . . . . . . . . . . . . . . . . . . . . . . . . . . . . . .9
3 PRODUCT FEATURES . . . . . . . . . . . . . . . . . . . . . . . . . . . . . . . . . . . . . . . . . . . . . . . . . . . . . . .11
4 UNPACKING AND INSTALLATION . . . . . . . . . . . . . . . . . . . . . . . . . . . . . . . . . . . . . . . . . . .13
4.1 Unpacking . . . . . . . . . . . . . . . . . . . . . . . . . . . . . . . . . . . . . . . . . . . . . . . . . . . . . . . . . . . . . . . . . . . . . . . . . 13
4.2 Package Contents . . . . . . . . . . . . . . . . . . . . . . . . . . . . . . . . . . . . . . . . . . . . . . . . . . . . . . . . . . . . . . . . . . . 13
4.3 Installation Notes . . . . . . . . . . . . . . . . . . . . . . . . . . . . . . . . . . . . . . . . . . . . . . . . . . . . . . . . . . . . . . . . . . . 14
5 PARTS & FUNCTIONS . . . . . . . . . . . . . . . . . . . . . . . . . . . . . . . . . . . . . . . . . . . . . . . . . . . . . . .15
5.1 Front View . . . . . . . . . . . . . . . . . . . . . . . . . . . . . . . . . . . . . . . . . . . . . . . . . . . . . . . . . . . . . . . . . . . . . . . . 15
5.2 Rear View . . . . . . . . . . . . . . . . . . . . . . . . . . . . . . . . . . . . . . . . . . . . . . . . . . . . . . . . . . . . . . . . . . . . . . . . . 16
6 CONNECTION TO EXTERNAL EQUIPMENT . . . . . . . . . . . . . . . . . . . . . . . . . . . . . . . . . . .17
6.1 Connecting a PC. . . . . . . . . . . . . . . . . . . . . . . . . . . . . . . . . . . . . . . . . . . . . . . . . . . . . . . . . . . . . . . . . . . . 17
6.1.1 The touch screen connections. . . . . . . . . . . . . . . . . . . . . . . . . . . . . . . . . . . . . . . . . . . . . . . . . . . 17
6.1.2 PC connections. . . . . . . . . . . . . . . . . . . . . . . . . . . . . . . . . . . . . . . . . . . . . . . . . . . . . . . . . . . . . . . 18
6.2 Start up . . . . . . . . . . . . . . . . . . . . . . . . . . . . . . . . . . . . . . . . . . . . . . . . . . . . . . . . . . . . . . . . . . . . . . . . . . . 19
6.2.1 Installing the monitor driver. . . . . . . . . . . . . . . . . . . . . . . . . . . . . . . . . . . . . . . . . . . . . . . . . . . . . 19
6.2.2 Installing the serial touch driver for Windows . . . . . . . . . . . . . . . . . . . . . . . . . . . . . . . . . . . . . . 22
7 BASIC FUNCTIONS . . . . . . . . . . . . . . . . . . . . . . . . . . . . . . . . . . . . . . . . . . . . . . . . . . . . . . . . .27
7.1 Powering On/Off . . . . . . . . . . . . . . . . . . . . . . . . . . . . . . . . . . . . . . . . . . . . . . . . . . . . . . . . . . . . . . . . . . . 27
7.2 Touch screen function . . . . . . . . . . . . . . . . . . . . . . . . . . . . . . . . . . . . . . . . . . . . . . . . . . . . . . . . . . . . . . . 27
7.3 On-Screen Display menu . . . . . . . . . . . . . . . . . . . . . . . . . . . . . . . . . . . . . . . . . . . . . . . . . . . . . . . . . . . . . 27
7.4 The OSD Tree . . . . . . . . . . . . . . . . . . . . . . . . . . . . . . . . . . . . . . . . . . . . . . . . . . . . . . . . . . . . . . . . . . . . . 28
8 ADVANCED FUNCTIONS . . . . . . . . . . . . . . . . . . . . . . . . . . . . . . . . . . . . . . . . . . . . . . . . . . . .29
8.1 Smart Manage . . . . . . . . . . . . . . . . . . . . . . . . . . . . . . . . . . . . . . . . . . . . . . . . . . . . . . . . . . . . . . . . . . . . . . 29
8.1.1 Introduction . . . . . . . . . . . . . . . . . . . . . . . . . . . . . . . . . . . . . . . . . . . . . . . . . . . . . . . . . . . . . . . . . 29
8.1.2 SmartManage Features and Benefits. . . . . . . . . . . . . . . . . . . . . . . . . . . . . . . . . . . . . . . . . . . . . . . 29
9 TECHNICAL SPECIFICATIONS . . . . . . . . . . . . . . . . . . . . . . . . . . . . . . . . . . . . . . . . . . . . . . .33
10 TROUBLESHOOTING . . . . . . . . . . . . . . . . . . . . . . . . . . . . . . . . . . . . . . . . . . . . . . . . . . . . . . .37
10.1 Common problems . . . . . . . . . . . . . . . . . . . . . . . . . . . . . . . . . . . . . . . . . . . . . . . . . . . . . . . . . . . . . . . . . 37
11 LIMITED WARRANTY (USA). . . . . . . . . . . . . . . . . . . . . . . . . . . . . . . . . . . . . . . . . . . . . . . . . .39
12 WARRANTY (WESTERN EUROPE) . . . . . . . . . . . . . . . . . . . . . . . . . . . . . . . . . . . . . . . . . . . .41
13 APPENDIX . . . . . . . . . . . . . . . . . . . . . . . . . . . . . . . . . . . . . . . . . . . . . . . . . . . . . . . . . . . . . . . . .45
13.1 Philips' Flat Panel Monitors Pixel Defect Policy. . . . . . . . . . . . . . . . . . . . . . . . . . . . . . . . . . . . . . . . . . . . 45
13.1.1 Pixels and Sub pixels. . . . . . . . . . . . . . . . . . . . . . . . . . . . . . . . . . . . . . . . . . . . . . . . . . . . . . . . . . . 45
13.1.2 Types of Pixel Defects . . . . . . . . . . . . . . . . . . . . . . . . . . . . . . . . . . . . . . . . . . . . . . . . . . . . . . . . . 45

User Manual 190S6FGT
2
13.1.3 Bright Dot Defects . . . . . . . . . . . . . . . . . . . . . . . . . . . . . . . . . . . . . . . . . . . . . . . . . . . . . . . . . . . . 46
13.1.4 Black Dot Defects . . . . . . . . . . . . . . . . . . . . . . . . . . . . . . . . . . . . . . . . . . . . . . . . . . . . . . . . . . . . 46
13.1.5 Proximity of Pixel Defects . . . . . . . . . . . . . . . . . . . . . . . . . . . . . . . . . . . . . . . . . . . . . . . . . . . . . . 46
13.1.6 Pixel Defect Tolerances . . . . . . . . . . . . . . . . . . . . . . . . . . . . . . . . . . . . . . . . . . . . . . . . . . . . . . . . 46
13.2 The Working Principle of 5 Wire Resistive Touch screen . . . . . . . . . . . . . . . . . . . . . . . . . . . . . . . . . . . 48
13.3 Frequently Asked Questions (FAQ) . . . . . . . . . . . . . . . . . . . . . . . . . . . . . . . . . . . . . . . . . . . . . . . . . . . . 49
13.3.1 FAQ’s for monitor . . . . . . . . . . . . . . . . . . . . . . . . . . . . . . . . . . . . . . . . . . . . . . . . . . . . . . . . . . . . 49
13.3.7 FAQ’s for touch screen . . . . . . . . . . . . . . . . . . . . . . . . . . . . . . . . . . . . . . . . . . . . . . . . . . . . . . . . 55

User Manual 190S6FGT
3
1. IMPORTANT NOTES AND SAFETY INSTRUCTIONS
1.1 SAFETY INSTRUCTIONS
WARNING:
Use of controls, adjustments or procedures other than those
specified in this documentation may result in exposure to
shock, electrical hazards and/or mechanical hazards.
Read and follow these instructions when connecting and using your
touch screen monitor:
1.1.1 OPERATION:
■ To avoid risk of an electric shock, do not disassemble the touch
screen monitor cabinet. The unit is not user serviceable. Remember
to unplug the touch screen monitor from the power outlet before
cleaning.
■ Keep the touch screen monitor out of direct sunlight and away from
stoves or any other heat source.
■ Remove any object that could fall into ventilation holes or prevent
proper cooling of the monitor’s electronics.
■ Do not block the ventilation holes located on the top and bottom of
the touch screen monitor cabinet. Do not insert anything inside the
ventilation holes.
■ When positioning the touch screen monitor, make sure the power
plug and outlet are easily accessible.
■ If turning off the touch screen monitor by detaching the power cable
or DC power cord, wait for 6 seconds before attaching the power
cable or DC power cord for normal operation.
■ Please use approved power cord provided by Philips all the time.
If your power cord is missing, please contact with your local service
center. (Please refer to Customer Care Consumer Information
Center)
■ Do not subject the touch screen monitor to severe vibration or high
impact conditions during operation.
■ Do not knock or drop the touch screen monitor during operation
or transportation.
Precautions
Please pay attention to the following precautions when handling the
touch screen:
■ When operating the touch screen do not use objects with a
hardness factor higher than 3H. Any damage resulting from such
misuse will not be covered by the product warranty.
■ When operating the touch screen do not apply a pressure greater
than 15kg/cm2 on the touch panel surface. This could cause
irreparable damage to the touch screen.

User Manual 190S6FGT
4
■ This product has already been treated for low static electricity
buildup and radiation emission. However, since children do not have
fully developed eyesight, to avoid damage to their eyesight we
recommend young children rest their eyes after 30 minutes of use.
1.1.2 MAINTENANCE:
■ To protect your touch screen monitor from possible damage, do not
put excessive pressure on the touch screen panel. When moving
your monitor, grasp the frame to lift; do not lift the monitor by
placing your hand or fingers on the touch screen panel.
■ Avoid getting liquids inside the touch screen monitor. If liquid does
get inside, have a qualified service technician check it before you
power it on again.
■ To avoid the risk of shock or permanent damage to the set, do not
expose the touch screen monitor to dust, rain, water, or excessive
moisture environment.
■ If your touch screen monitor gets wet, wipe it with dry cloth as soon
as possible.
■ If foreign substance or water gets in your touch screen monitor,
please turn the power off immediately and disconnect the power
cord. Then, remove the foreign substance or water, and send it to
the maintenance center. Do not attempt to repair it yourself.
■ Unplug the touch screen monitor if you are not going to use it for an
extensive period of time.
■ Do not store or use the touch screen monitor in locations exposed
to heat, direct sunlight or extreme cold.
■ In order to maintain the best performance of your touch screen
monitor and use it for a longer lifetime, please use the monitor in a
location that falls within the following temperature and humidity
ranges.
● Temperature: 5-35°C or 41-95°F
● Humidity: 20-80% RH
1.1.3 SERVICE:
■ The casing cover should be opened only by qualified service
personnel.
■ If there is any need for any document for repair or integration,
please contact with your local service center. (please refer to the
chapter of "Consumer Information Center".)
■ For transportation information, please refer to "Physical
Specifications".
■ Do not leave your touch screen monitor in a car/trunk under direct
sun light.
Consult a service technician if the touch screen monitor does
not operate normally, or you are not sure what procedure to
take when the operating instructions given in this manual have
been followed.
User Manual 190S6FGT
5
1.2 WARNINGS AND PRECAUTIONS
KNOW THESE SAFETY SYMBOLS
■ This lightning flash with arrow-head within a triangle indicates
uninsulated material within your unit, which can cause an electric
shock. For the safety of everyone in your household, do not remove
product cover.
■ For the safety of everyone in your household, do not remove
product cover. The exclamation point within a triangle calls attention
to features for which you must read the enclosed literature closely
to prevent operating and maintenance problems.
WARNINGS
Use of controls adjustments or procedures other than those specified in
this documentation, may result in exposure to shock electrical hazards
and/or mechanical hazards.
To reduce the risk of fire or electric shock, this appliance must not be
exposed to rain or moisture, and objects filled with liquids, such as
vases, must not be placed upon this apparatus.
CAUTION
To prevent electric shock, match wide plug blade to wide slot, and fully
insert.
ATTENTION
Pour éviter les chocs électriques, introduire la lame la plus large de la
fiche dans la bome correspondante de la prise et pousser jusqu’au fond.
CAUTION
RISK OF ELECTRIC SHOCK
DO NOT OPEN
CAUTION: TO REDUCE THE RISK OF ELECTRIC
SHOCK, DO NOT REMOVE COVER (OR BACK). NO
USER SERVICEABLE PARTS INSIDE. REFER SERVICING TO QUALIFIED SERVICE PERSONEL. a

User Manual 190S6FGT
6
1.3 CLEANING & CARE
■ To avoid possible shock hazard, please be sure that the touch screen
monitor is unplugged from the electrical outlet before cleaning.
■ Never use thinners, insecticide sprays, or other chemicals on or near
the touch screen cabinet, as they might cause permanent marring of
the cabinet finish.
■ To clean the touch screen monitor cabinet, use a cloth lightly
dampened with a mild detergent. Use a clean dry cloth to dry the
wiped surfaces.
Do not use alcohol (methyl, ethyl or isopropyl), ammonia-based
liquids or any strong dissolvent. Do not use thinner or benzene,
abrasive cleansers or compressed air.
■ To clean the touch screen, use window or glass cleaner. Put the
cleaner on the rag and wipe the touch screen. Never apply the
cleaner directly on the touch screen.
■ Wipe the front of the screen with a clean cloth dampened with
water. Use even, easy, vertical strokes when cleaning.
■ When cleaning the touch screen, take care not to scratch or damage
the screen surface (avoid wearing jewellery or using anything
abrasive).
■ Occasionally vacuum the ventilation holes in the touch screen
cabinet.
1.4 END-OF-LIFE DISPOSAL
■ This Philips product and its packaging contain materials that can be
recycled and re-used. Specialized companies can recycle your
product to increase the amount of reusable materials and minimize
the amounts which need to be properly disposed.
User Manual 190S6FGT
7
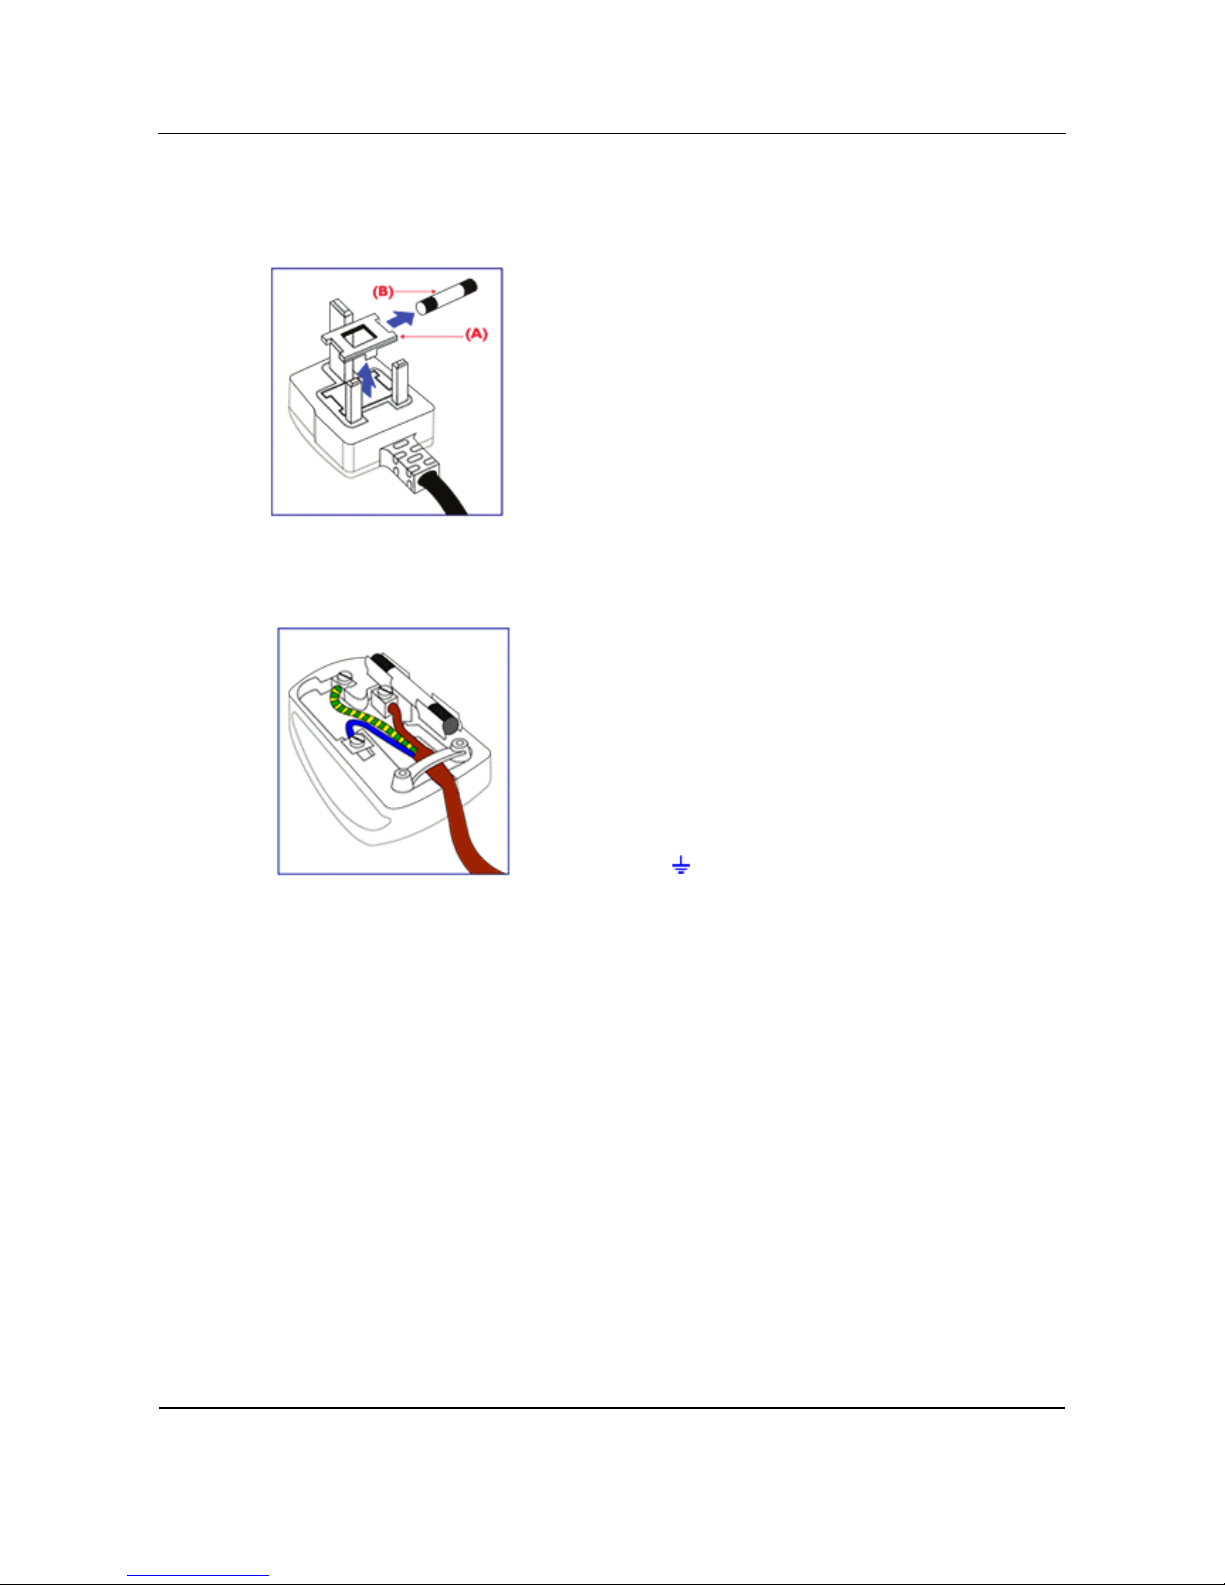
1.5 INFORMATION FOR USERS IN THE UK
WARNING: THIS APPLIANCE MUST BE EARTHED
This apparatus is supplied with an approved moulded 13A plug.
To change a fuse in this type of plug proceed as follows:
1 Remove fuse cover and fuse.
2 Fit new fuse which should be a BS 1362 5A,A.S.T.A. or BSI approved
type.
3 Refit the fuse cover.
If the fitted plug is not suitable for your socket outlets, it should be cut
off and an appropriate 3-pin plug fitted in its place.If the mains plug
contains a fuse, this should have a value of 5A.
If a plug without a fuse is used, the fuse at the distribution board should
not be greater than 5A.
Note:
The severed plug must be destroyed to avoid a possible shock hazard
should it be inserted into a 13A socket elsewhere.
How to connect a plug
The wires in the mains lead are coloured in accordance with the
following code:
■ BLUE - "NEUTRAL" ("N")
■ BROWN - "LIVE" ("L")
■ GREEN & YELLOW - "EARTH" ("E")
1 The GREEN AND YELLOW wire must be connected to the
terminal in the plug which is marked with the letter "E" or by the
Earth symbol or coloured GREEN or GREEN AND YELLOW.
2 The BLUE wire must be connected to the terminal which is marked
with the letter "N" or coloured BLACK.
3 The BROWN wire must be connected to the terminal which
marked with the letter "L" or coloured RED.
Before replacing the plug cover, make certain that the cord grip is
clamped over the sheath of the lead - not simply over the three wires.

User Manual 190S6FGT
8

User Manual 190S6FGT
9
2. REGULATORY NOTICE
FCC Statement
The Federal Communications Commission Radio Frequency
Interference Statement includes the following warning:
This equipment has been tested and found to comply with the limits for
a Class B digital device, pursuant to Part 15 of the FCC Rules.
These limits are designed to provide reasonable protection against
harmful interference in a residential installation. This equipment
generates, uses, and can radiate radio frequency energy and, if not
installed and used in accordance with the instructions, may cause
harmful interference to radio communications. However, there is no
guarantee that interference will not occur in a particular installation.
If this equipment does cause harmful interference to radio or television
receptions, which can be determined by turning the equipment off and
on, the user is encouraged to try to correct the interference by one or
more of the following measures:
■ Connect the equipment into an outlet on a circuit different from that
to which the receiver is connected.
■ Consult the dealer or an experienced radio/TV technician for help.
Warning
User must use shielded signal interface cables to maintain FCC
compliance for the product. Provided with this display is a detachable
power supply cord with IEC320 style terminations. It may be suitable for
connection to any UL Listed personal computer with similar
configuration. Before making the connection, make sure the voltage
rating of the computer convenience outlet is the same as the monitor
and that the ampere rating of the computer convenience outlet is equal
to or exceeds the monitor voltage rating. For 120 Volt applications,
use only UL Listed detachable power cord with NEMA configuration
5-15P type (parallel blades) plug cap. For 240 Volt applications use only
UL Listed Detachable power supply cord with NEMA configuration
6015P type (tandem blades) plug cap.
IC Compliance Notice
This Class B digital apparatus meets all requirements of the Canadian
Interference-Causing Equipment Regulations of ICES-003.
Cet appareil Numerique de classe B respecte toutes les exigences du
Reglemont NMB-03 sur les equipements produisant des interferences au
Canada.
Notice de Conformit IC
Cet appareil numerique de classe B respecte toutes les exigences du
Reglement ICES-003 sur les equipements produisant des interferences
au Canada.

User Manual 190S6FGT
10
User Manual 190S6FGT
11
3. PRODUCT FEATURES
Lower total cost of ownership
● SmartManage enabled
● Lower power consumption
Optimal Public Displayfront of screen experience
● SXGA, 1280 x 1024 resolution
● sRGB ready
● Fast response time
Convenient adaptability
● Built-in Touch screen
● Ultra robust metal housing
● Cable management supported
● VESA mounting holes
Product highlights
■ SmartManage enabled
SmartManage is a system for monitoring, managing and checking
status of display devices as well as delivering remote support to
users who experience difficulties - all accomplished over a LAN
.
■
Lower power consumption
Reduction of the electrical power required to operate a device.
■ Energy Star partner
A manufacturer in compliance with power conservation
requirements set forth by the Environmental Protection Agency of
the U.S. government.
■ TCO '03 compliance
A TCO (Swedish confederation of Professional Employees) standard
even more stringent than MPR-II for safety and ergonomics,
especially concerning alternating electric fields (AEF).
■ 8-ms Response time
Response time is the period required for a liquid crystal cell to go
from active (black) to inactive (white) and back to active (black)
again. It is measured in milliseconds. Faster is better: Lower response
time means faster transitions and, therefore, results in fewer visible
image artifacts in the display of fast-moving images.

User Manual 190S6FGT
12
User Manual 190S6FGT
13
4. UNPACKING AND INSTALLATION
4.1 UNPACKING
■ The monitor is packed in a carton, together with the standard
accessories. Any other optional accessories will be packed
separately.
■ The touch screen is a plastic-coated glass plate placed on top of the
19" LCD-panel. Please be careful, the glass is very fragile.
■ After opening the carton, please check that the content is in good
condition and complete.
Important:
Please keep the original box and package material in case you need to
return the product.
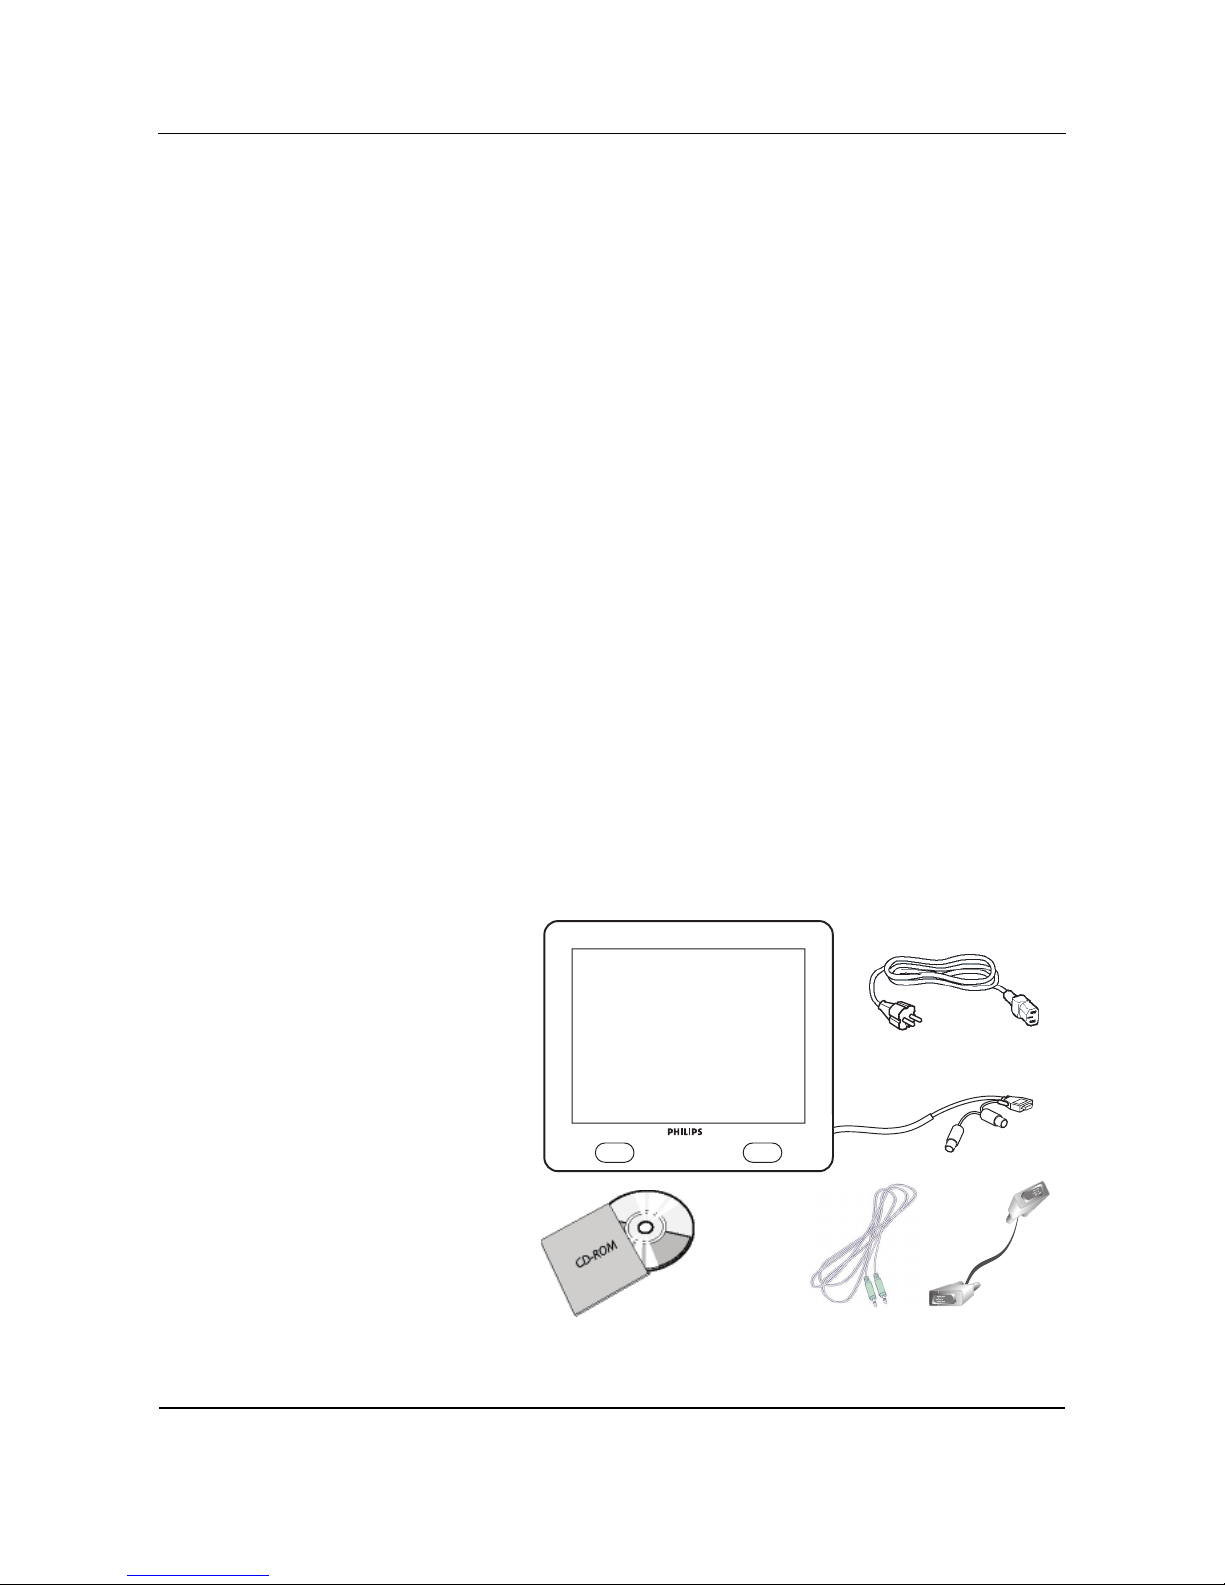
4.2 PACKAGE CONTENTS
Please verify that you received the following items with your package
content:
■ 19" Touch screen monitor
■ CD-ROM with User Manual + drivers
■ Power cable
■ VGA signal cable
■ Touch screen cable
Note:
The serial cable is fixed to the monitor and can not be removed.
■ Speaker cable
User Manual 190S6FGT
14
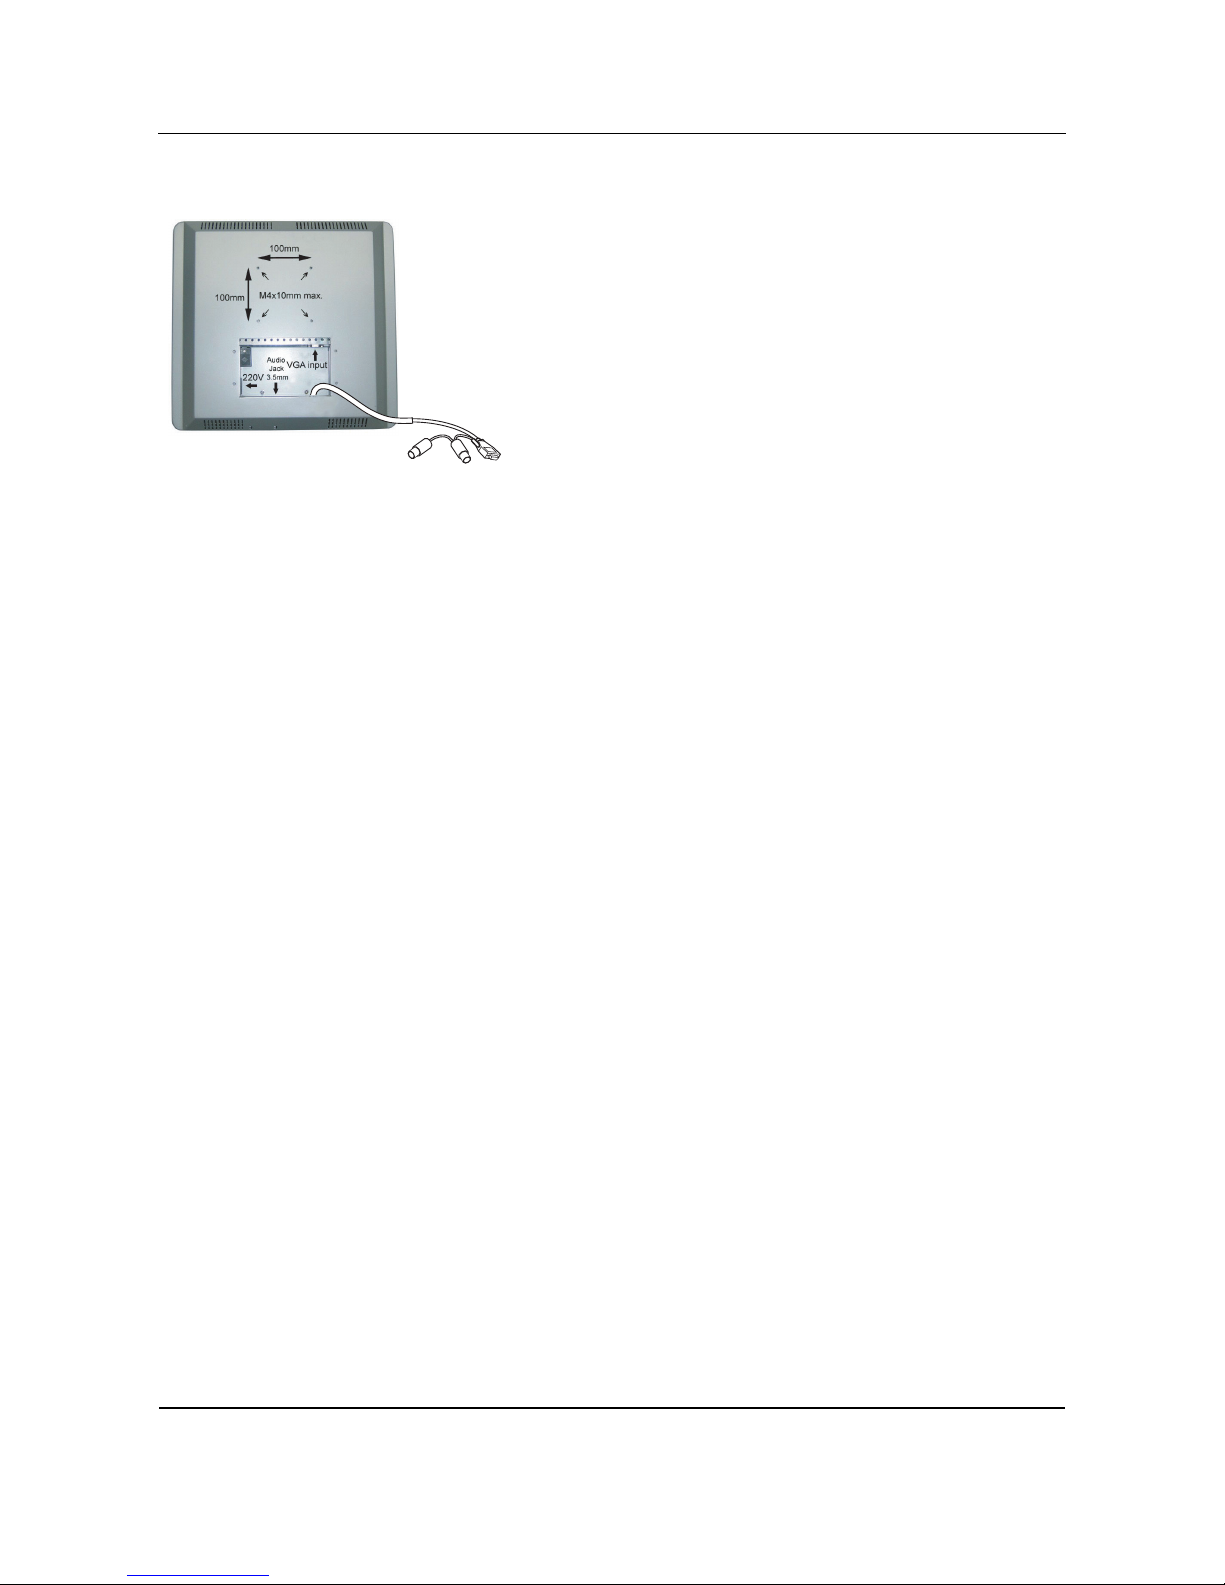
4.3 INSTALLATION NOTES
The touch screen monitor meets the Vesa Flat Panel Monitor Physical
Mounting Interface standard. The VESA mounting interface is located at
the back of the touch screen monitor.
Use M4 screws with a length of 10 mm to install mounting devices, such
as wall and table arms.
Note:
Use the original screws.

User Manual 190S6FGT
15
5. PARTS & FUNCTIONS
5.1 FRONT VIEW
1. Touch screen
2. Speakers left and right
1
2
User Manual 190S6FGT
16
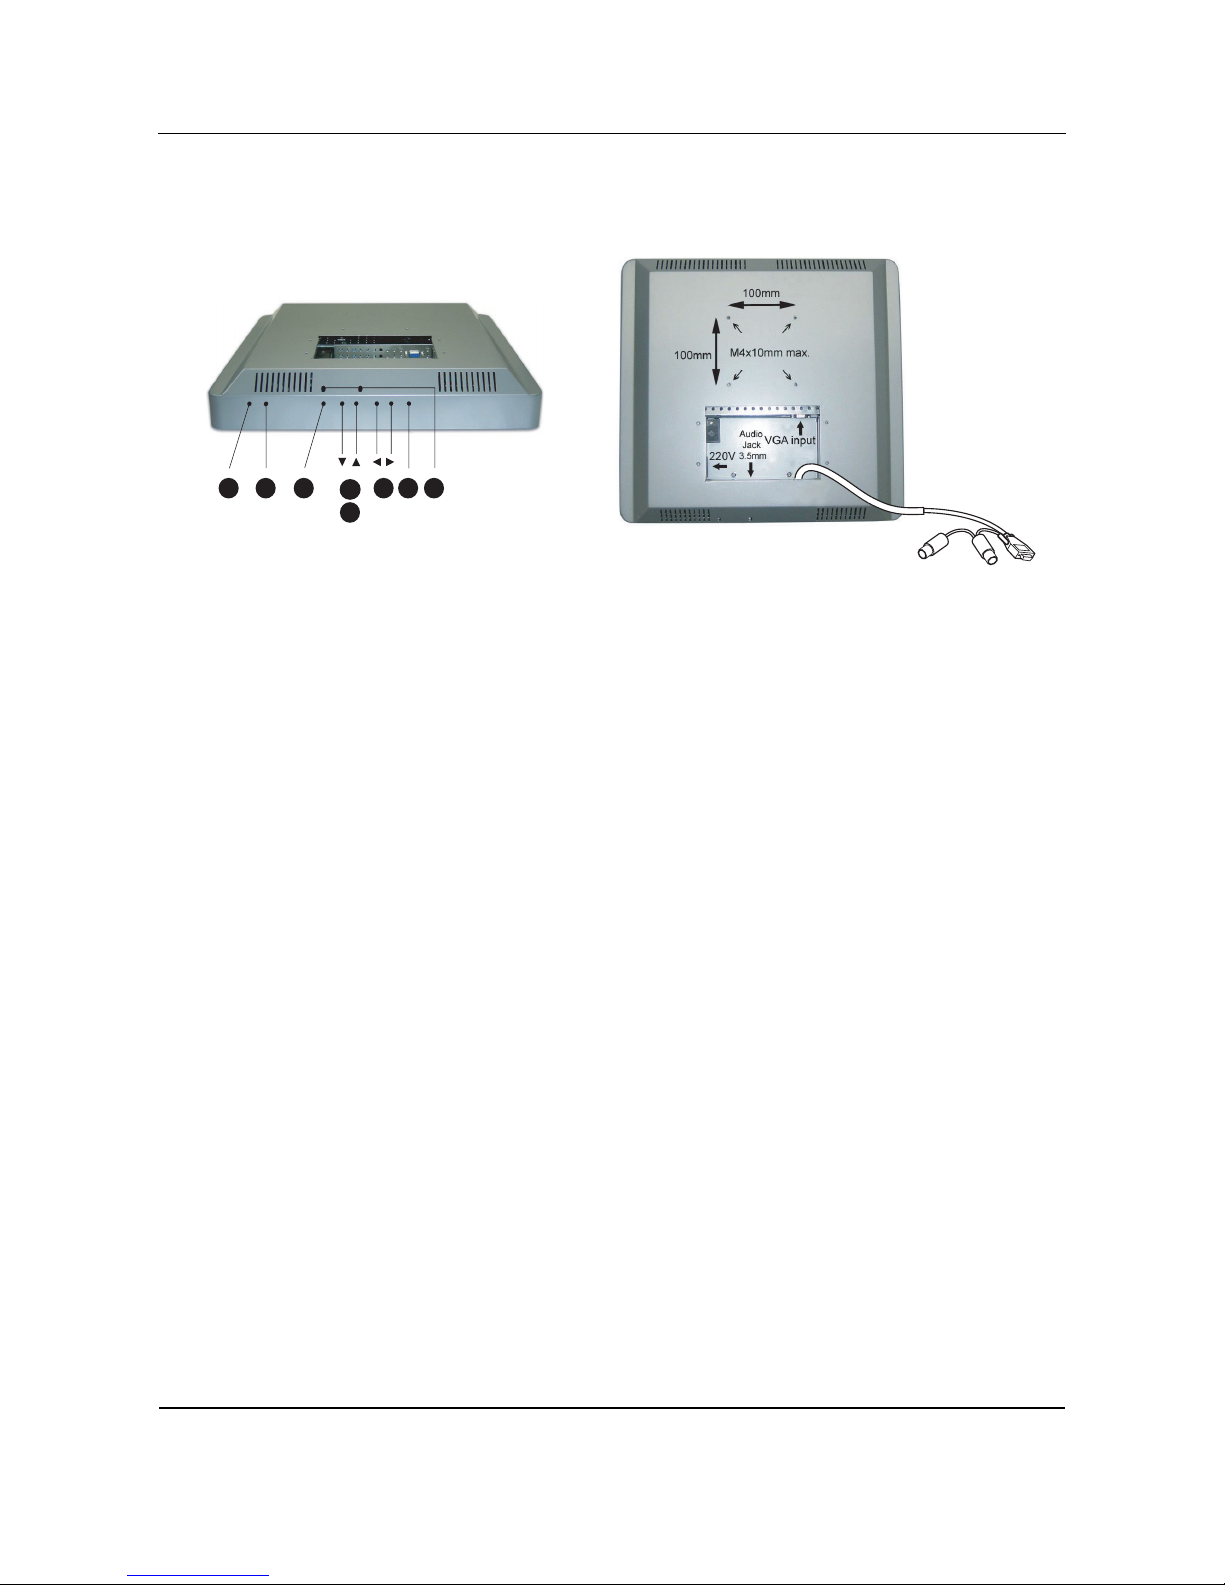
5.2 REAR VIEW
1. STATUS LED
Indicates the status of the monitor.
2. POWER switch
Turns power on/off from stand-by mode. There is a wait period
between on/off cycles.
3. OSD Menu button
Use this button to enter the OSD controls.
4. Arrow Up /Down buttons
Use these buttons to navigate through the On Screen Display menu.
5. Brightness hotkey
When the Up and Down arrow buttons are pressed, the adjustment
control for the BRIGHTNESS will be shown.
6. Arrow Left/Right buttons
Use these buttons to navigate through the On Screen Display menu.
7. Auto adjust
Use this button to adjust the
● Horizontal position
● Vertical position
● Phase and clock settings
8. Volume L/R controls
Use a small screwdriver with slot tip to set the required volume
level. Turn the controls clockwise to increase the volume level, or
counter-clockwise to decrease the volume level.
+-
2 31 6 7 8
4
4
55
 Loading...