


English
Contents
Installation
Use of the remote control 8-9
Keys in front of the TV 10
Picture menu 11
Sound menu 11
Special menu 12
Teletext 13-14
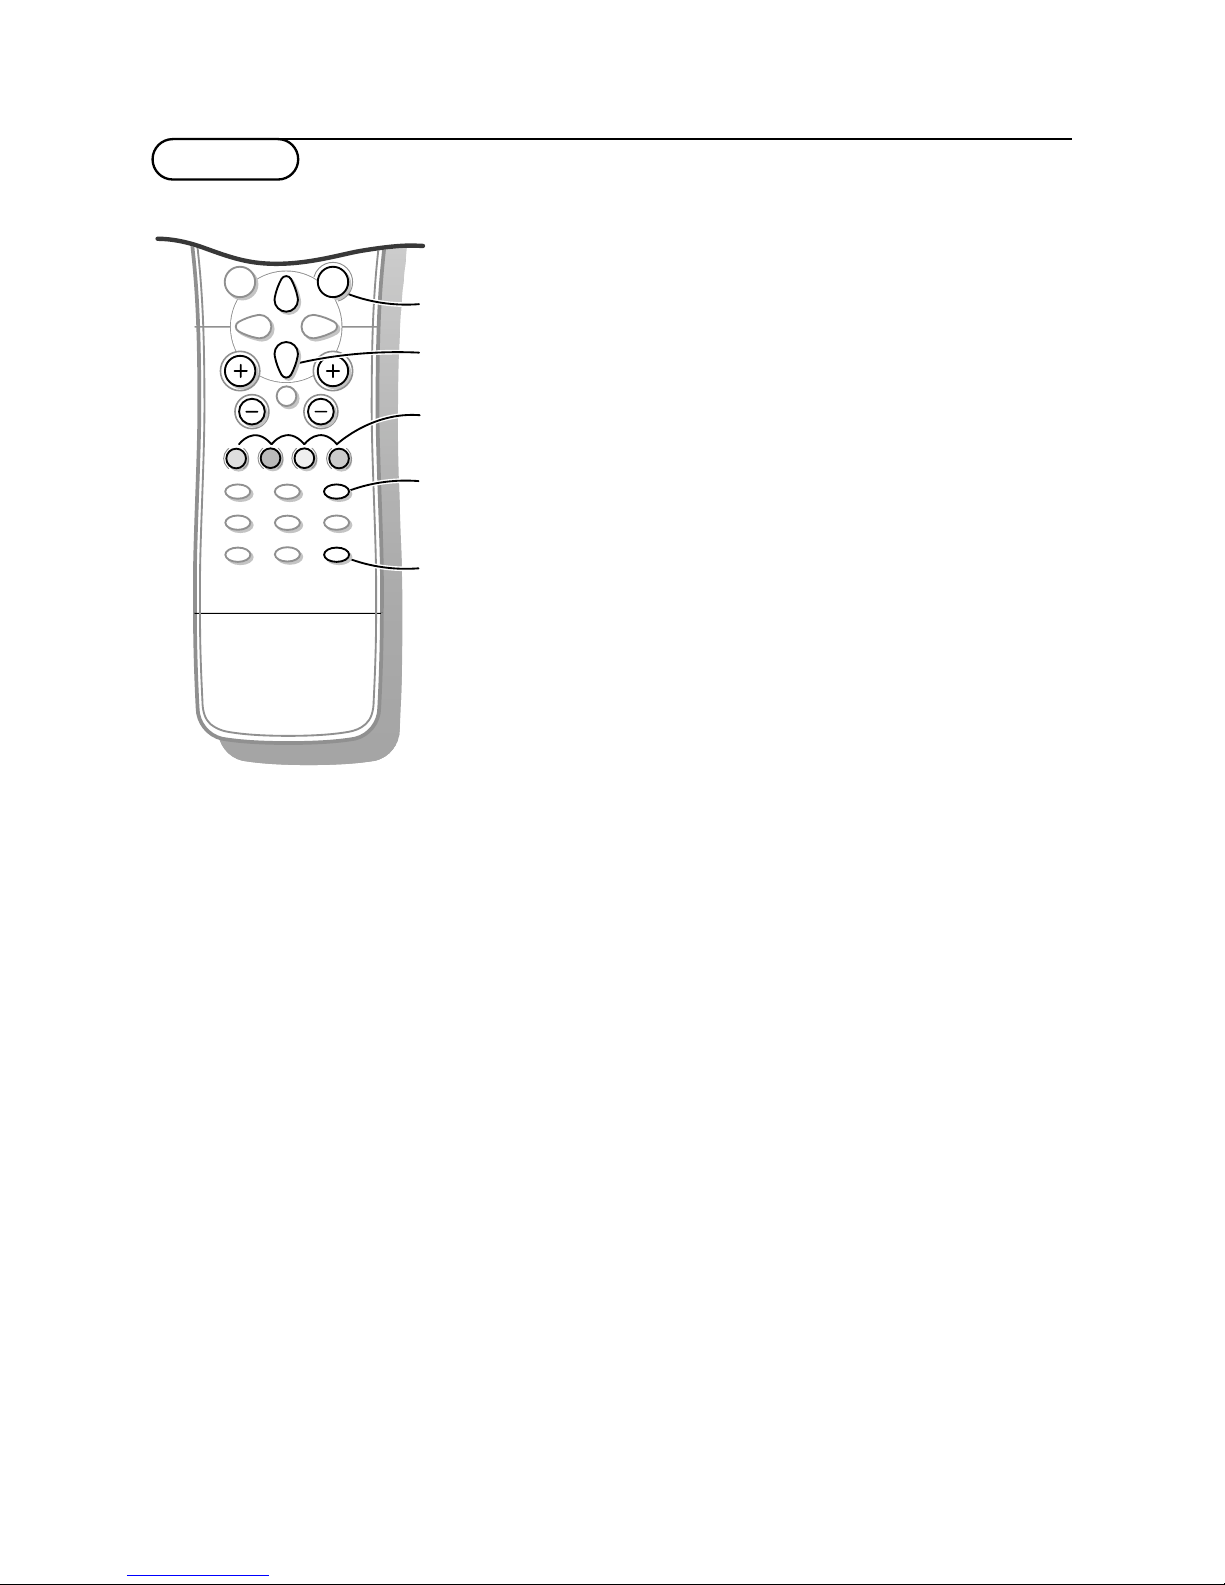
Your remote control 2
Preparation 3
To use the menus 4
Store TV channels 4
Select the menu language 4
Automatic installation 5
Manual installation 6
Reshuffle the programme list 7
Displaying the programme list 7
Connect peripheral equipment
Connecting and selecting equipment 15-16
Connect your PC 16
Use of your PC 18
Video recorder keys 19
Tips 20
Index 21
Help?
If this instruction manual does not
give an answer or if ‘Tips’ do not
solve your TV problem, you can call
your Local Philips Customer or
Service Centre. See the supplied
World-wide guarantee booklet.
Please, have the Model and
Product number which you can
find at the back of your television
set or on the packaging, ready,
before calling the Philips helpline.
Model: . . . . . . . . . . . . . . . . . . . .
Product No: . . . . . . . . . . . . . . . .
Operation
1
B
AUTO
AUTO
PV
w
C
B
2
1
3
54 6
87 9
0
OK
MENU
¬
Ò
‡
π
†
®
M
a
Y-Z
D
0
LIST
h
U
fg
c
e
k
b
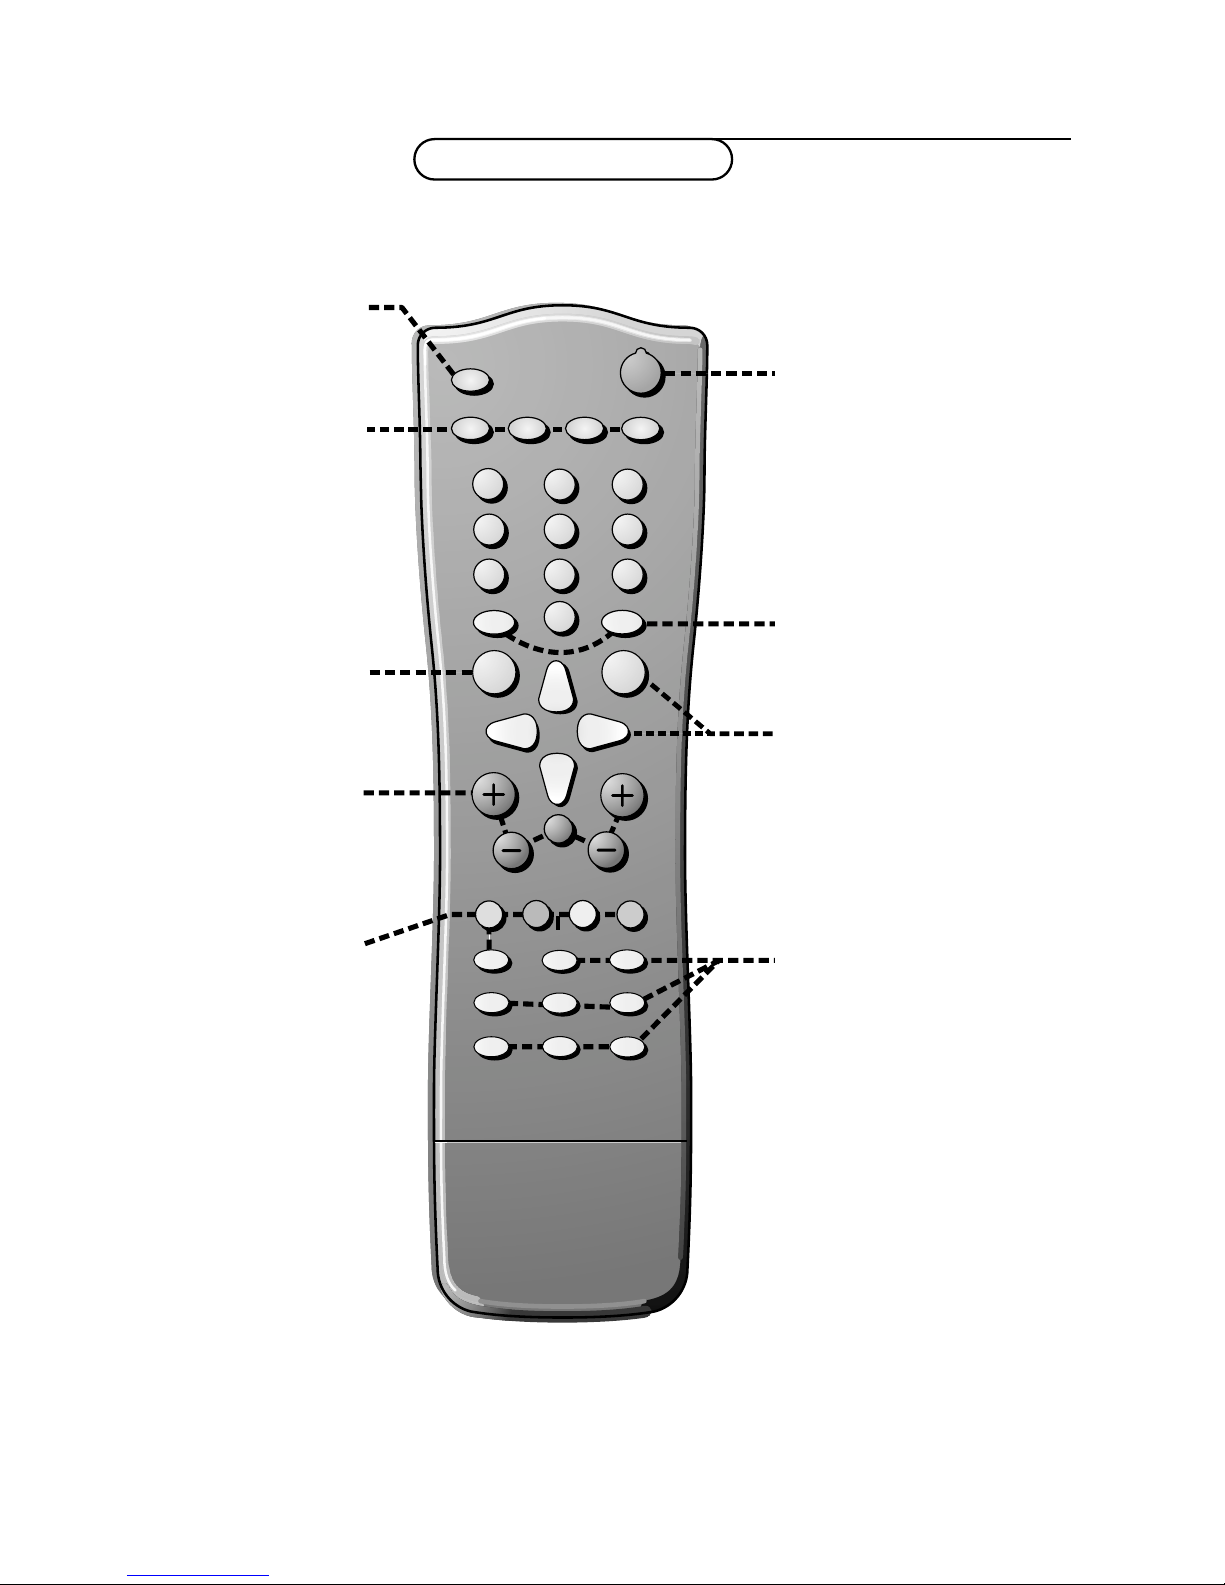
MENU main menu on/off
p. 9
w Peripherals p. 8
selection of TV, AV
or PC mode
X bilingual choice/sound
info p. 8
M auto sound p. 8
a auto picture p. 8
D set the sleeptimer p. 9
V volume up/down p. 9
¬ sound mute p. 9
P programme selection
p. 9
B switch to standby p. 8
Colour keys
- direct teletext page or
subject selection, p. 9
- video recorder functions
p. 19
® record
Ò rewind
‡ stop
π play
† wind
C VCR timer
0
previous programme p. 9
LIST programme list p. 9
Cursor to select
your choice
OK activate your choice
Your remote control
2 Your remote control
Installation
Teletext p. 14
h enlarge
b teletext on/off
U time display
subpage selection
f solution to puzzles
g hold
c mix tv/txt picture
e interrupt
k main index
Preparation
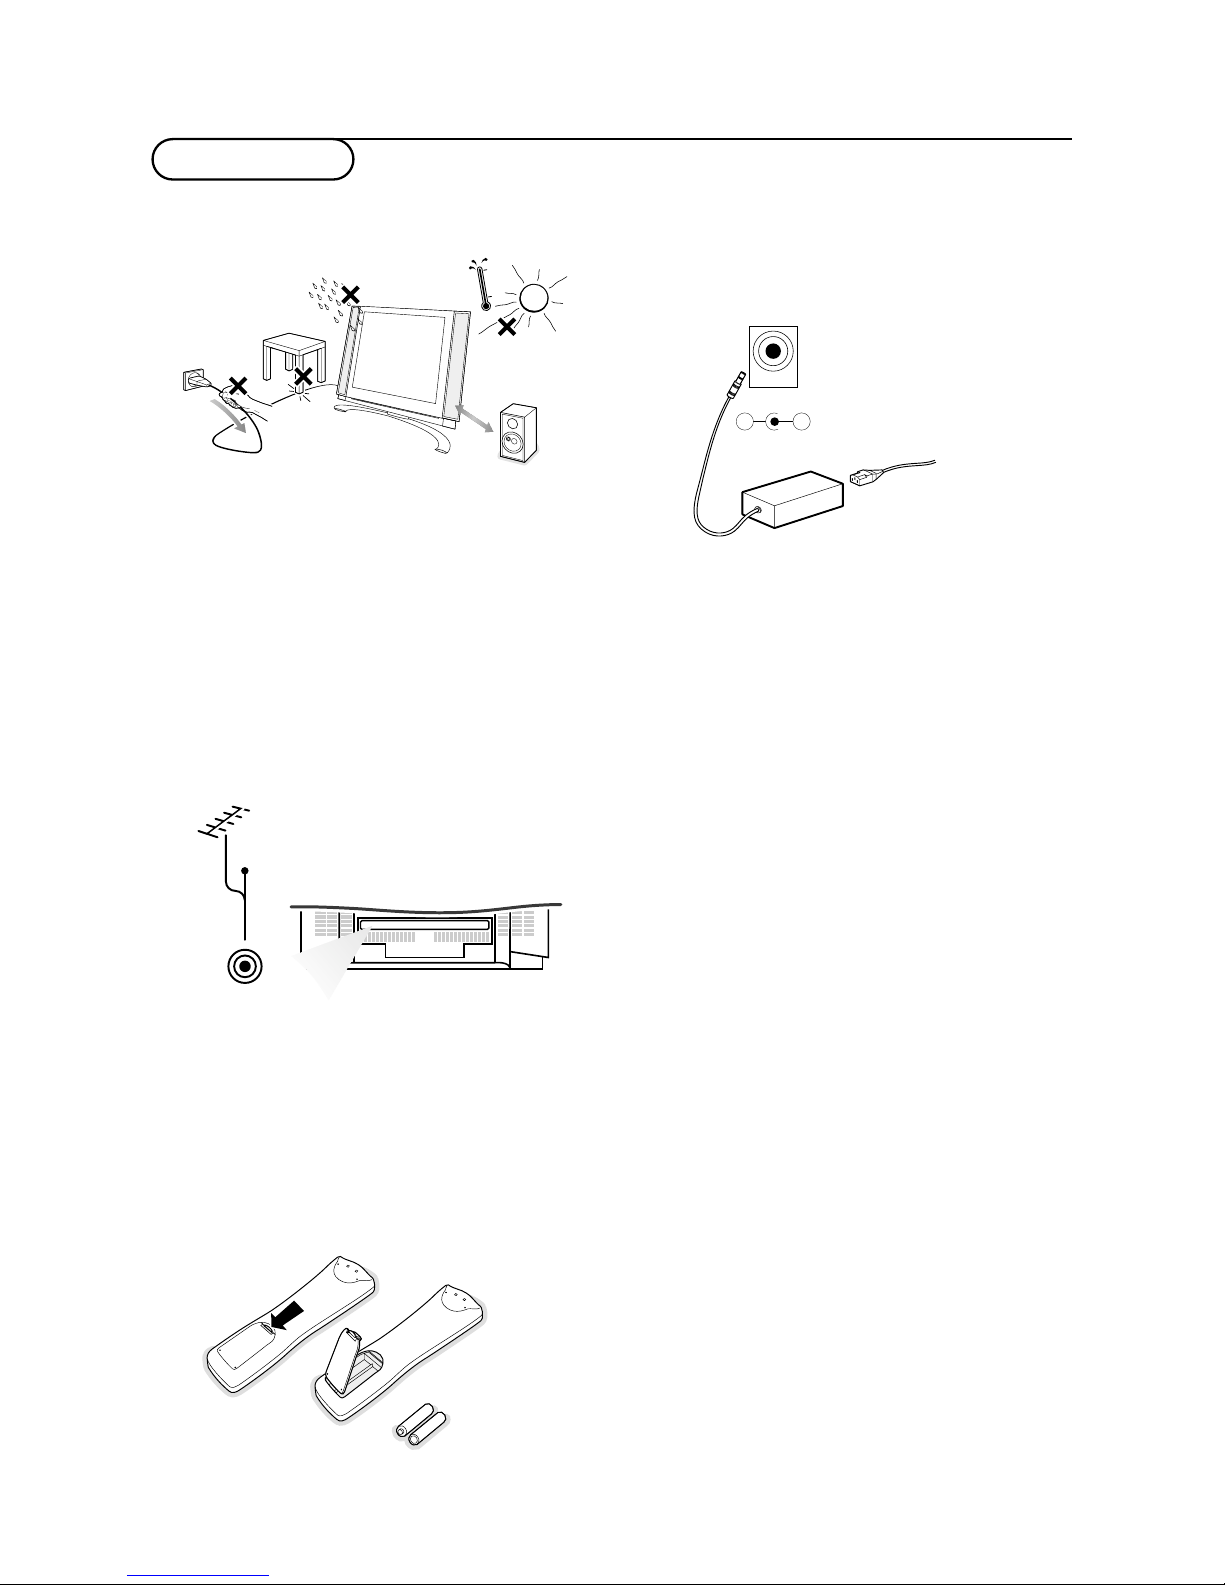
&
Place the TV on a solid surface.
Ensure that the TV is placed in a position
to allow free flow of air. Do not cover the
ventilation openings on the back cover.
To prevent any unsafe situations, no naked
flame sources, such as lighted candles,
should be placed on or in the vicinity.
Avoid heat, direct sunlight and exposure to
rain or water. The equipment shall not be
exposed to dripping or splashing.
é
Insert the aerial plug firmly into the
aerial socket
ANT IN x 75 Ω at the back
of the TV.
“ To connect your computer, see Connect
peripheral equipment, Personal computer,
p 18.
‘ Remote control: Remove the cover of the
battery compartment. Insert the 2
batteries supplied (Type R6-1.5V).
1m
min.
ANT IN
x
75
Ω
CABLE
.
(
Power:This TV operates on a DC supply
provided by the AC-DC adaptor.The
voltage is as indicated on the label on the
back cover.
Only use the AC-DC adaptor supplied
with the TV and never apply an AC mains
to the TV directly.The AC-DC adaptor
operates on an AC mains supply, the
voltage is as indicated on the label of the
AC-DC adaptor.
Connect the DC plug of the AC-DC
adaptor to the DC 12V socket at the back
of the TV.
Connect the AC-DC adaptor and its mains
cord.
Insert the mains plug in the wall socket
having a mains voltage of 110V-240V.
§ Switch the TV on: Press the power key
at the front side of the TV to switch it on
or off.
If the TV is in standby mode, the standby
indicator in front of the TV illuminates brightly.,
Press the standby key B again or the – P +
key or one of the digit keys on the remote
control to switch the TV on.
R6 / 1,5 V
3Preparation
DC 12V
_
+
& Press the MENU key repeatedly to display each menu.
é Use the cursor up/down to select a menu item.
“ Use the cursor left/right to adjust the setting of a menu item or press the OK key to enter a
submenu.
B
M
a
AUTO
AUTO
w
Y-Z
Ò
‡
π
®
D
1
2
9
3
6
5
7
4
8
0
0
LIST
P
¬
V
MENU
OK
& Press the MENU key on the remote control
once to select the installation menu.
é Use the cursor down to select Language.
“ Press the OK key.
‘ Press the cursor up/down to select your
language.
( Press the OK key.
You can search for and store the TV channels in
two different ways: using Automatic installation,
see p. 5 or Manual installation (tuning-in channel
by channel), see p. 6.
Select your choice and press the OK key.
4
Installation
To use the menus
Store TV channels
Select the menu language
Automatic installation
Manual installation
Reshuffle
Language
oœ
OK MENU
Language
Auto programme
Manual installation
Reshuffle
Language
oœ
OK MENU
Automatic installation
switch menu on/off
select menu item
activate

Automatic installation
& Select the TV system.
é Press the cursor left/right to select the TV
system of the country or part of the
world from where you want to receive the
TV channels.
If you are connected to a cable system,
select the TV system of your country or
part of the world you are now located.
DK: PAL D/K, SECAM D/K (East Europe)
BG: PAL B/G, SECAM B/G
(Europe/East Europe/France)
I: PAL I/II (U.K./Ireland)
L (if provided) (France)
“ Press the cursor up/down to select
Storage from.
‘ Press the cursor left/right to select a
channel number or enter the channel
number with the digit keys from where
you want to start searching for new
channels. If e.g. you want to keep the
channels 1 to 11 stored earlier, enter
channel number 12.
Your TV will search for new channels from
number 12 onwards.
( Press the cursor up/down to select
Search.
§ Press the OK key to start Automatic
programming.
All available TV channels are searched for
and stored automatically.
The names of the TV channels are stored
as well if the TV channels broadcast VPS
(Video Programme Service), PDC
(Programme Delivery Control) or
Teletext.
If no name can be assigned to the TV
channel, the channel number only is
assigned and stored as C-channel (V/UHF
01-69) or S-channel (Cable 01-47),
followed by a number.
To stop auto programming, press the
MENU key.
When auto programming is completed, the
Programme reshuffle menu appears. See
further on.
è Press the MENU key repeatedly if you
want to exit the menu.
Auto programme
Manual installation
Reshuffle
Language
oœ
OK MENU
Automatic installation
System BG
Storage from 1
Search C 1 5
1
‡ 2%
MENU
System BG
5Installation

Manual installation
Searching for and storing TV channels is
done channel by channel.Also you can
assign a name to a TV channel with up to
5 letters or numbers.
You must go through every step of
the manual programme menu.
& Select Manual installation in the
installation menu.
é Press the OK key to enter the Manual
installation menu.
“ Press the cursor left/right to select the TV
system of the country or part of the
world from where you want to receive the
TV channel.
If you are connected to a cable system,
select the TV system of your country or
part of the world you are now located.
DK: PAL D/K, SECAM D/K (East Europe)
BG: PAL B/G, SECAM B/G
(Europe/East Europe/France)
I: PAL I/II ( U.K./Ireland)
L (if provided) (France)
‘ Press the cursor up/down to select
Channel.
( Press the cursor left/right to select C-ch
for aerial channels or S-ch for cable
channels.
If you know the C- (01-69) or S-channel
number (01-47), enter it directly with the
digit keys 0 to 9.
Ask for a list from your cable company or
dealer.
§ Press the cursor up/down to select
Search.
è Press the cursor left/right to start
searching. If a channel is found the search
will stop.
Fine tune
In case of poor reception, you can
improve the reception by fine tuning.
Press the cursor up/down to select
Fine
tune
.
Press the cursor left/right to fine tune for
the best picture and sound.
Assigning a channel name
It is possible to change the name stored in
the memory or to assign a name to a TV
channel which has not yet been entered.A
name with up to five letters or numbers
can be given to the programme numbers 0
to 99.
Press the cursor up/down to select
Name.
Select the character with the cursor
left/right.
Space, numbers and other special
characters are located between Z and A.
Press the OK key.
Select a following character.
Proceed with the following steps.
! If the channel is the one required, press
the cursor up/down to select
Store.
ç Press the cursor left/right to select a
channel number or enter the channel
number with the digit keys.
0 Press the OK key to store the TV channel.
Repeat steps 4 to 10 to store another TV
channel.
Press the
MENU key repeatedly if you
want to exit the menu.
Automatic installation
Manual installation
Reshuffle
Language
oœ
OK MENU
Manual installation
System BG
Channel S-ch/C-ch
Fine tune πππ
Search
Name C 0 1
Store 1
oœ p π
OK MENU
6
Installation

Reshuffle the programme list
According to your preference you can
delete or skip the stored TV channels.You
can also change the order of the stored
TV channels or insert a blank data into
the selected channel number.
& Press the cursor up/down to select
Reshuffle in the Installation menu.
é Press the OK key to enter the Reshuffle
menu.
Deleting a TV channel
& Press the cursor up/down, left/right to
select a TV channel to be deleted.
é Press the red key on the remote control
twice.
The selected TV channel number is
deleted, all the following channels are
shifted up one position.
Copying a TV channel
& Press the cursor up/down, left/right to
select a TV channel to be copied.
é Press the green key on the remote
control.
All the following channel numbers are
shifted down one position.
Moving a TV channel
& Press the cursor up/down, left/right to
select a channel number to be moved.
é Press the yellow key on the remote
control.
“ Press the cursor up/down, left/right to
move the TV channel to the desired
channel number.
‘ Press the yellow key again to release this
function.
Skipping a channel number
& Press the cursor up/down, left/right to
select a channel number to be skipped.
é Press the blue key on the remote control.
The skipped TV channel is displayed in
blue.
“ Press the blue key again.
After leaving the installation you can
browse through the TV channels by
pressing the cursor keys up/down. Only
those TV channels which are not skipped
can be selected. Skipped TV channels can
still be selected with the digit keys or in
the programme list in which they will be
displayed in blue.
Press the
MENU key repeatedly to exit
the menu.
Auto programme
Manual installation
Reshuffle
Language
oœ
OK MENU
Automatic installation
0 ARD
1 ZDF
2 C12
3S 4
4 CH-5
•
Delete
•
Move
oœ p π
OK MENU
5 ARD1
6 ZDF1
7 C12
8S 44
9 CH-5
•
Copy
•
Skip
1 ZDF
Displaying the programme list
& Press the LIST key on the remote control
to display the programme list.
é Press the cursor up/down, left/right to run
through the list of 100 channel numbers.
“ Press the OK key to select the desired TV
channel.
Note:TV channels displayed in blue have been
set up to be skipped in the Reshuffle
menu.
0 ARD
1 ZDF
2 C12
3S 4
4 CH-5
oœ p π
OK MENU
5 ARD1
6 ZDF1
7 C12
8S 44
9 CH-5
1 ZDF
7Installation

Operation
Use of the remote control
8
Use of the remote control
MENU
OK
PV
¬
5
1
3
2
4
6
7
9
8
0
0
LIST
h
fg
Ò
‡
π
c
b
®
†
U
e
k
C
a
D
B
M
AUTO
AUTO
w
Y-Z
w Source
Select your computer or other
peripherals: press repeatedly to
select
TV, AV1, AV2, S-VIDEO
or PC monitor mode.
X Bilingual choice and
sound mode selection
Press this key
• to switch from
Stereo to
Mono sound in case of
stereo transmission, or from
Nicam Stereo to Nicam
Mono
, in case of digital
transmission
• to switch from
Nicam Dual
Y to Nicam Dual Z or
Nicam Dual X in case of
Nicam Dual transmission
• to choose between
Dual Y,
Dual Z or Dual X in case
of bilingual transmission:
Dual Y sends the primary
broadcast language to the
loudspeakers;
Dual Z sends the secondary
broadcast language to the
loudspeakers;
Dual X sends a separate
language to each loudspeaker.
Note: in case of weak stereo
sound signals, with stereo or
Nicam stereo transmission, select
mono reception.
Sound output selection in AV mode
In AV mode, you can select the output sound for the left and right loudspeakers.
Press the X key repeatedly to select:
• L+R: the audio signal from the audio L input is sent to the left loudspeaker, the audio signal
from the audio R input to the right loudspeaker
• L+L: the audio signal from the audio L input is sent to the left and right loudspeakers
• R+R: the audio signal from the audio R input is sent to the left and right loudspeakers.
B Standby
Switches the TV on from
standby or off to standby.
AUTO keys
To select predefined picture
and sound settings.
a
AUTO picture
Each time it is pressed, a
different picture setting is
selected, corresponding with
specific factory settings of
Contrast, Brightness, Colour
and Sharpness.
M
AUTO
sound
Each time it is pressed, a
different sound setting is
selected, corresponding with
specific factory settings of
treble and bass.
Personal refers to the personal
preference settings of picture
and sound selected and stored
in the picture and sound menu.

B
M
a
AUTO
AUTO
w
Y-Z
C
h
fg
c
b
e
k
Ò
‡
π
®
†
U
D
1
2
9
3
6
5
7
4
8
0
0
LIST
MENU
OK
P
¬
V
V Volume
Press + or - to adjust the
volume.
¬ Mute
Temporarily interrupt the
sound or restore it.
P Programme selection
• to browse through the TV
channels which are not
skipped
• to switch the TV on from
standby.
®Ò‡π† Video
recorder keys see p. 19.
U Time display
The time, downloaded from the
TV channel (with teletext
broadcast) stored on
programme number 1 or the
lowest not skipped programme
number, is displayed on the
screen.
0/9 Digit keys
To select a TV channel.
0 Previous programme
To display the previously
selected TV channel.
LIST Programme list
To display the programme list.
b Teletext on/off
see p. 13.
Teletext functions see p. 14.
hUfgcek
D Sleeptimer
With this key you can set a
time period after which the
TV should switch itself to
standby.
Press the key repeatedly to
select the number of minutes.
The counter runs from B 0,
10, 20, 30... to 240 minutes.
The timer begins to count
down from the number of
minutes selected.
Note:To view the remaining time,
press the
D key once. To cancel
the sleep time, repeatedly press
the
D key until B 0 appears.
MENU Press repeatedly to
display each menu.
OK Press this key to activate
your choice, when in the menus.
9Use of the remote control
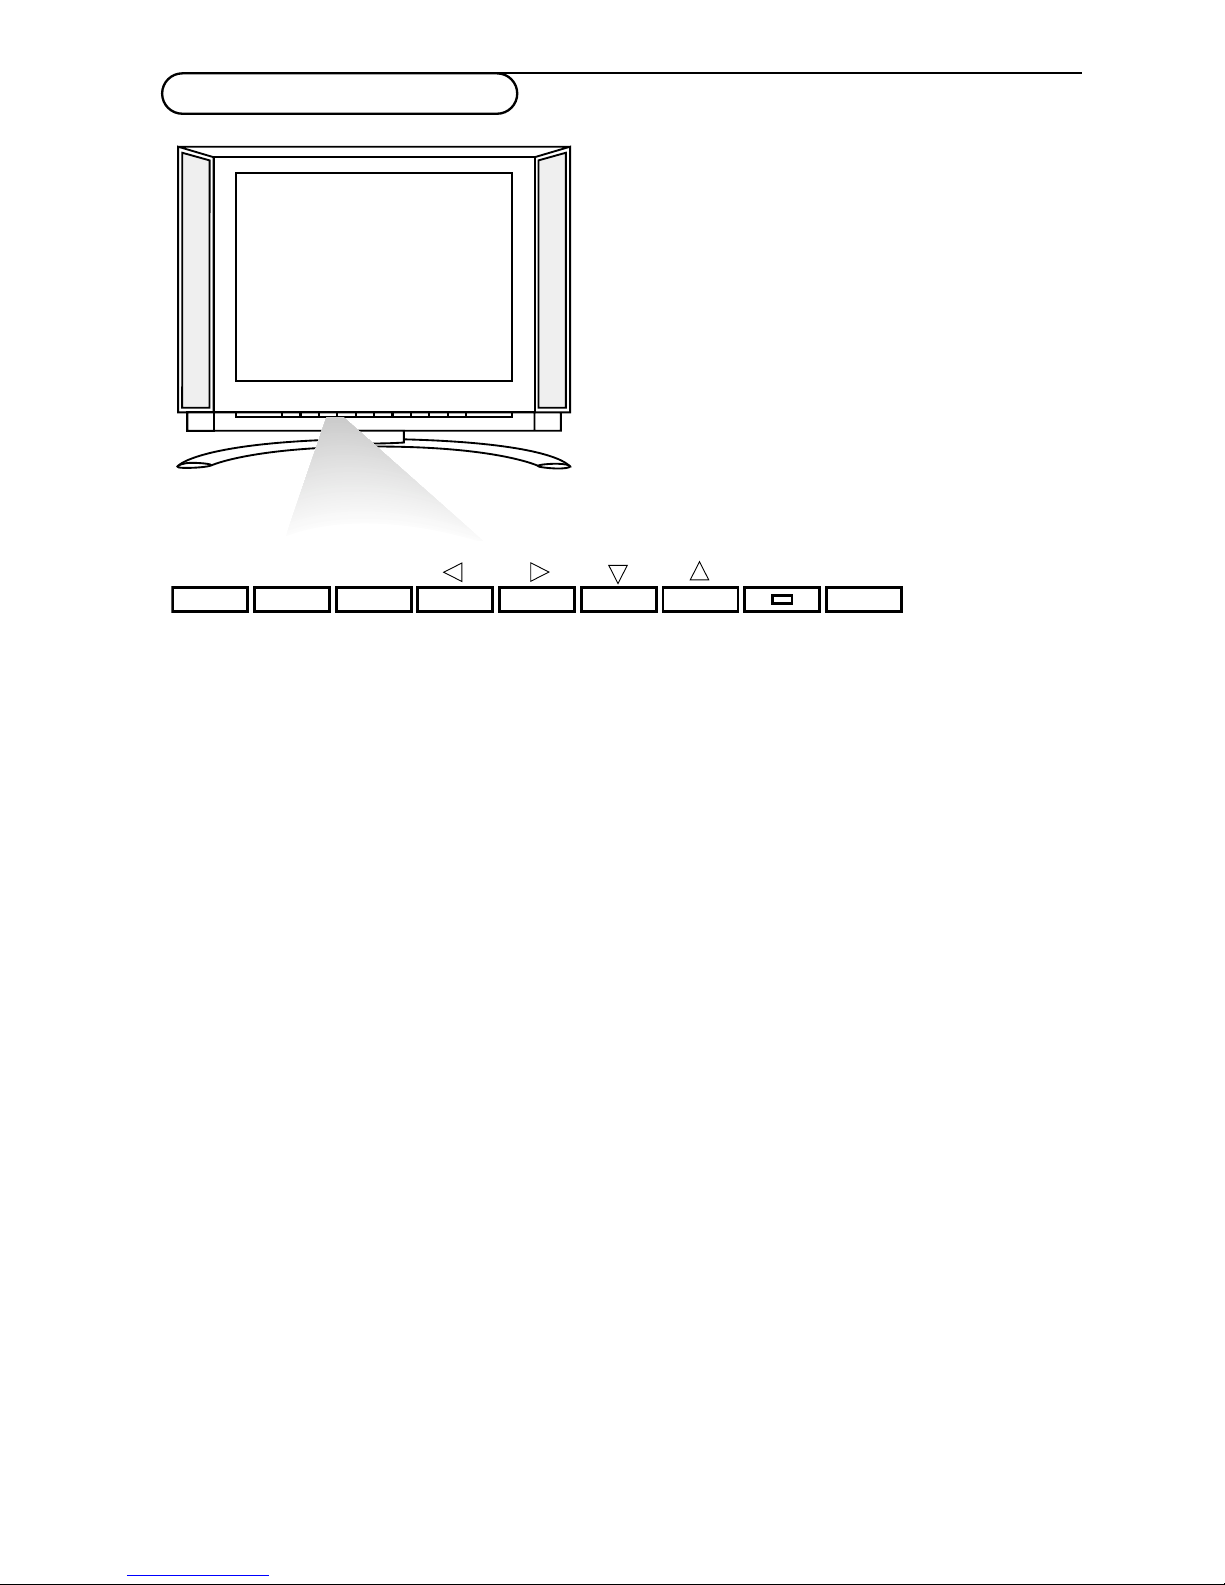
Should your remote control be lost or broken you can still operate your TV with the keys
in front of the TV.
ON/OFF: Press the power ON/OFF key to switch the TV on or off
TV/VIDEO: Press repeatedly to select TV, AV or PC monitor mode
MENU: Press repeatedly to display each menu
OK: - Press this key to activate your choice when in the menu
-
Auto demonstration: Keep the OK key pressed for about 10 seconds.
All the menus are being displayed automatically one after the other.
To stop Auto demonstration, press any key on the front panel.
- VOL + : - Press - or + to select a menu item;
- Press - or + to adjust the volume;
- Press - or + to adjust the menu settings.
- CH/PR +:- Press - or + to browse through the TV channels which are not skipped;
- Press - or + to select a menu item;
- To switch the TV on from standby.
B: Switches the TV on from standby or off to standby.
The B indicator lights up brightly when the TV is in standby, dims when the TV is
switched on.
Keys in front of the TV
10
Keys in front of the TV
TV / VIDEO
MENU
OK
VOL
CH / PR
_
+
_
+
B
ON / OFF

B
M
a
AUTO
AUTO
w
Y-Z
D
1
2
9
3
6
5
7
4
8
0
0
LIST
P
¬
V
MENU
OK
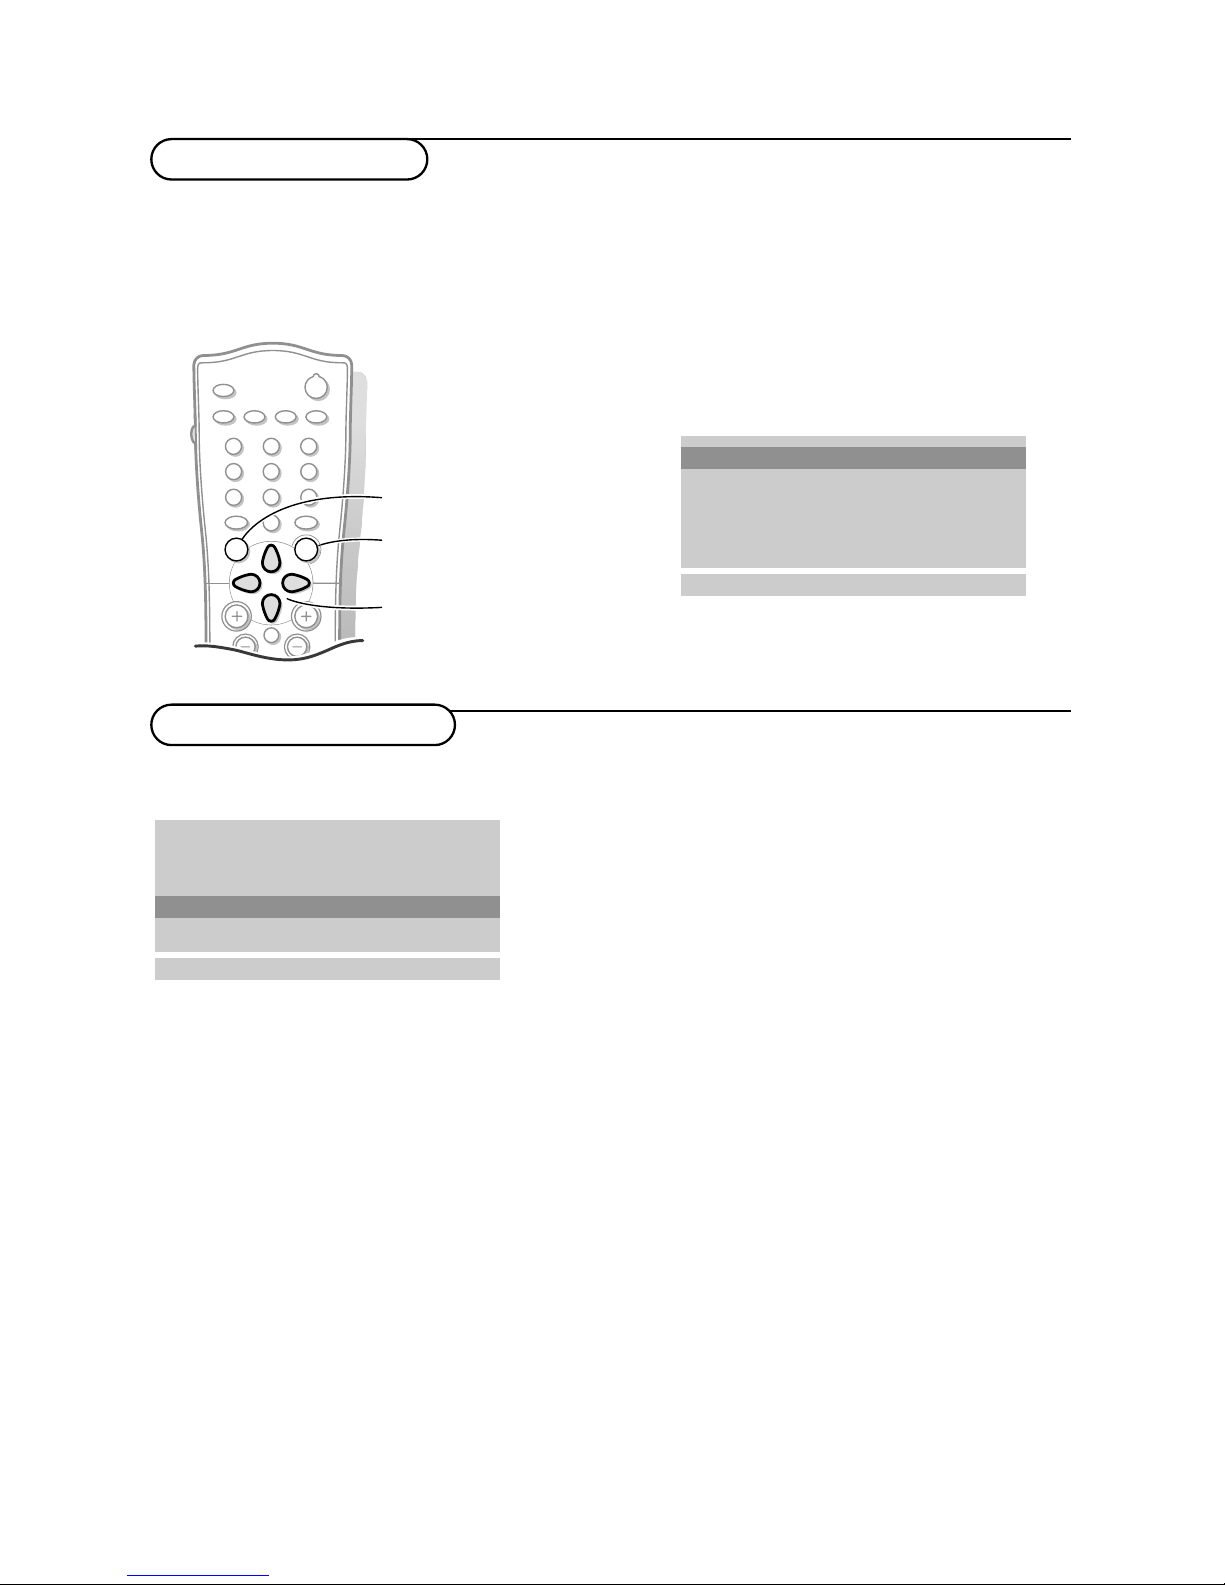
& Press the MENU key repeatedly to display
the picture, sound or special menu.
é Use the cursor up/down to select a menu
item.
“ Use the cursor left/right to adjust the
setting of a menu item or press the OK
key to enter a submenu.
‘ Press the MENU key repeatedly if you want
to exit the menu.
You can adjust picture contrast, brightness,
colour, sharpness and tint (NTSC AV only) to
the levels you prefer.
Press the OK key to store the adjustments.
The message
Stored appears.
Now your picture settings are stored and can
be recalled with the
AUTO a key on the
remote control, selecting
Personal.
To select one of the predefined factory picture
settings, press the
AUTO a key on the remote
control.
Press the
MENU key repeatedly to exit the
menu
Equalizer
& Select Equalizer and press the OK key to
enter the Equalizer menu.
é Select one of the predefined factory sound
settings or select
Personal to adjust your
personal sound settings of treble and bass.
Setting the equalizer Personal
& Select Personal with the cursor up/down.
é Press the cursor left/right to select a
sound band.
“ Press the cursor up/down to adjust the
appropriate sound level.
‘ Press the OK key to store the Personal
adjustments.
The message
Stored appears.
Press the
MENU key repeatedly to exit
the menu.
Picture menu
Sound menu
Use of the menus
Contrast 100
Brightness 95
Colour 85
Sharpness 80
Tint
oœ p π
OK MENU
Contrast
100
Equalizer
Balance 0
AVL On/Off
oœ
OK MENU
Equalizer
Flat
Music
Movie
Speech
Personal
oœ p π
MENU
0.1 0.5 1.5 5.0 10 kHz
Natural
You can select your preferred sound setting or
you can also adjust the sound frequency of
equalizer and the balance of the right and left
speaker’s sound output.
Switch
AVL On to maintain constant volume
levels when switching TV channels.
switch menu on/off
select menu item
activate
11Use of the menus

Special menu
Auto AV switching
If your VCR is connected to the
euroconnector and the VCR is switched to
playback, the TV is automatically switched
to
AV1 mode. If you want to keep on
watching in TV mode, press the cursor
up/down,
+ P - or press the digit keys.
C
hild lock
If the child lock is on, the TV can only be
switched on and operated with the
remote control.The keys in front of the
TV cannot be used. In this way you can
prevent unauthorised use of your TV.
If the message
Child lock On appears, the
child lock must be switched off before you
can use the front panel keys to select a TV
channel.
& Select Child lock in the Special menu.
é Press the cursor left/right to select Child
lock On
.
“ Press the MENU key repeatedly to exit
the menu.
Auto off
If Auto off is switched
On, the TV
automatically switches to standby if for a
period of about 12 minutes no aerial signal
is received.
& Select Auto off in the Special menu.
é Press the cursor left/right to select Auto
off
Off.
“ Press the MENU key repeatedly to exit
the menu.
12 Use of the menus
Select TV, AV or PC monitor mode
& Select Source in the Special menu.
é Press the cursor left/right to select TV,
AV1, AV2, S-VIDEO or PC.
•
AV1 for VCR connected to the w 1
euroconnector (See Connect Peripheral
equipment, p. 16)
•
AV2 for a VCR connected to the AV 2
connector of the TV.
•
S-VIDEO for a S-Video VCR connected
to the S-Video connector of the TV.
•
PC for a personal computer connected
to the PC INPUT connector of the TV.
Note: When a VCR is connected via the aerial
socket, the TV is used in TV mode.
Alternatively you can select the TV, AV or PC
monitor mode with the source key on the
remote control.
To return to TV mode, press the cursor
up/down or the digit keys.
Input TV
Child lock Off
Auto off Off
oœ p π
MENU
Source TV
Teletext
Switch Teletext on and off
Press b to switch the teletext on or off.
The main index page or the last selected page
appears on the screen together with an
information headline and an option line at the
bottom of the screen.
Select a Teletext page
With the digit keys
Enter the desired page number with the digit
keys.
The page counter seeks the page.
A message appears when you have entered a non
existent or incorrect page number. Complete the
3- digit number and then re-enter the correct
page number. Page numbers beginning with 0 or 9
do not exist.
With the bottom option line
Select with the colour keys, corresponding to
the coloured options at the bottom of the
screen, the desired subject.
With the cursor up/down
Press the cursor up/down to select the
previous or the following page.
Select the index teletext page
Press the k key to display the main index
(usually p.100).
Only for TOP teletext broadcasts:
Not all TV channels broadcast TOP teletext.
TOP orders the pages in categories and adds
other possibilities of enhancing ease of use.
Press the k key. A TOP overview of the
teletext subjects available is displayed.
Make use of the colour keys to select teletext
information or directly select the teletext
pages with the digit keys.
cursor to select
pages
colour keys
to select
C
h
fg
c
e
Ò
‡
π
®
†
U
9
7
8
0
0
LIST
P
¬
V
MENU
OK
b
k
b
k
OK key to activate
Most TV channels broadcast information via
teletext.
Each channel which broadcasts teletext
transmits a page with information on how to
use its teletext system. Look for the teletext
page with the main index (usually page 100).
Depending on the TV channel, teletext is
transmitted in different systems:
Standard
teletext
, TOP and FASTEXT.
•
Standard teletext consists of a number of
pages which are selected by directly entering
the corresponding page number.
•
TOP and FASTEXT make use of the colours
along the bottom line, corresponding with
the colour keys of your remote control, to
select teletext information
13Teletext

Special teletext functions
Enlarge
Press h repeatedly to display the upper
part, the lower part and then to return to the
normal page size.When the upper part is
displayed, you can scroll the text, line by line
using the cursor up/down.
Reveal
Press f to reveal/conceal the hidden
information, such as solutions to riddles and
puzzles.
Hold
Press g to stop the automatically rotating of
the subpages if these are available.
The g icon is displayed at the top of the
screen.
Press the g key again to continue the
automatic rotating again
Mix
Press the c key to display the teletext pages
superimposed on the TV picture.
Press the c key again to switch the TV
picture off again.
Interrupt
Press e.
The TV programme appears.
b at the top of the screen indicates that you
are still in the teletext mode.
Before interrupting teletext, you may select a
page number.
When the page has been found, the
information line appears briefly on your
screen.
Press e again.
Teletext reappears
C
h
fg
c
b
e
k
Ò
‡
π
®
†
9
7
8
0
0
LIST
P
¬
V
OK
MENU
MENU
U
U
c
h
f
e
b
g
cursor to select
subpages
OK to activate
14 Teletext
Select subpages
If subpages are available you can stop them
from automatically rotating or select the
described subpage yourself.
Press the U key.
The subpage number is displayed at the
bottom of the screen.
Press the red or green key to select the
previous or following subpage, or change the
subpage with the cursor up/down or with the
digit keys.
Press the U key again to exit this function.

Connect Peripheral Equipment
There is a wide range of video and audio
equipment that can be connected to your TV.
The following connection diagrams show you
how to connect them.
Preparation
Remove the backplate at the back of the TV as
shown on the illustration opposite.
Lay the LCD TV with the screen down on a
table as it will be easier to connect your
peripheral equipment. Please take your
precautions not to damage the screen.
With a eurocable
With a eurocable you will obtain a better
picture quality than with an aerial cable
only.
& Connect the aerial cables 1, 2 and the
eurocable 3 as shown opposite.
é Press the π key on the VCR.
The TV will switch to
AV1 mode
automatically.
If you want to keep on watching in TV
mode, press the cursor up/down,
+ P - or
press the digit keys.
With an aerial cable only
& Connect the aerial cables 1 and 2 as
shown opposite.
é Search for and store the test signal
of the VCR.
• Unplug the aerial cable 1 from the aerial
socket x of your VCR.
• Switch on your TV and put the VCR on
the test signal. (See the handbook for your
VCR)
• Search for the test signal of your VCR in
the same way as you searched for and
stored TV channels. See Manual
installation, p. 6
• Store the test signal under a programme
number.
• Replace the aerial cable in the aerial
socket x of your VCR after you have
stored the test signal.
“ Select the programme number under
which the VCR is stored.
‘ Press the π key on the VCR.
Video recorder
PC INPUT
w 1
•
•
•
•
•
•
S-VIDEO
DC 12V
_
+
ANT IN
x
7
5
Ω
VIDEO (MONO) L AUDIO R
AV2
L
•
•
............
...........
VCR
CABLE
1
2
3
PC INPUT
w 1
•
•
•
•
•
•
S-VIDEO
DC 12V
_
+
ANT IN
x
7
5
Ω
VIDEO (MONO) L AUDIO R
AV2
L
•
•
............
...........
VCR
CABLE
1
2
15Connect Peripheral equipment

& Connect your camera or camcorder to the
VIDEO socket 2 and AUDIO (MONO) L
3 for mono equipment.
é For stereo equipment also connect
AUDIO R 3.
S-VHS quality with an S-VHS camcorder is
obtained by connecting the S-VHS cables
with the
S-VIDEO input 1 and AUDIO
input 3.
Camera & camcorder
PC INPUT
w 1
•
•
•
•
•
•
S-VIDEO
DC 12V
_
+
ANT IN
x
75
Ω
VIDEO (MONO) L AUDIO R
AV2
L
•
•
............
...........
A
U
D
IO
VID
E
O
S•V
IDEO
3
2
1
16 Connect Peripheral Equipment
With Audio/Video cables
& Connect the aerial cable 1 and the
Audio/Video cables 2 and 3 as shown
opposite.
é Press the w key on the remote control
or select
Source in the Special menu (See
p. 12) to select
AV2.
“ Press the π key on the VCR.
Note: If you have a mono VCR, connect the
audio cable from the VCR to the
AUDIO
(MONO) L connector only at the back of the
TV.
PC INPUT
w 1
•
•
•
•
•
•
S-VIDEO
DC 12V
_
+
ANT IN
x
75
Ω
VIDEO (MONO) L AUDIO R
AV2
L
•
•
............
...........
VCR
CABLE
1
2
3
With an S-VHS VCR you will obtain a
better picture quality.
& Connect the aerial cables 1 and 2 as
shown opposite.
é Connect the S-Video cable 3 to the
S-VIDEO socket of the TV.
“ Connect the audio cable 4 as shown
opposite.
Note: Never connect to the same TV one VCR
with S-VHS cables at the same time as one
VCR with a euroconnector.
‘ Press the w key on the remote control
or select
Source in the Special menu (See
p. 12) to select S-Video.
( Press the π key on the VCR.
PC INPUT
w 1
•
•
•
•
•
•
S-VIDEO
DC 12V
_
+
ANT IN
x
7
5
Ω
VIDEO (MONO) L AUDIO R
AV2
L
•
•
............
...........
AUDIO
VIDEO
S
•VIDEO
4
3
2
VCR
CABLE
1
S-VHS video recorder

& Insert the plug into the headphone socket L
at the back of the TV.
é Press the ¬ key on the remote control to
switch off the sound from the headphone and
the internal loudspeakers of the TV.
“ Press the cursor left/right to adjust the volume.
Headphone
PC INPUT
w 1
•
•
•
•
•
•
S-VIDEO
DC 12V
_
+
ANT IN
x
75
Ω
VIDEO (MONO) L AUDIO R
AV2
L
•
•
............
...........
L
Monitor Display modes
MODE Resolution Horizontal Vertical
Frequency (KHz) Frequency (KHz)
VGA 640x480 31,5 KHz 60Hz
640x480 35 KHz 67Hz
640x480 37,9 KHz 72Hz
640x480 37,5 KHz 75Hz
640x480 43,3 KHz 85Hz
720x400 31,5 KHz 70Hz
SVGA 800x600 35,2 KHz 56Hz
800x600 37,9 KHz 60Hz
800x600 48,1 KHz 72Hz
800x600 46,9 KHz 75Hz
800x600 53,7 KHz 85Hz
(MAC) 832x624 49,7KHz 75Hz
XGA 1024x768 48,4KHz 60Hz
1024x768 56,5KHz 70Hz
1024x768 60,2KHz 75Hz
1024x768 68,7KHz 85Hz
Note:
- If the set is cold, there may be a small "flicker"
when the set is switched on.This is normal, there is
nothing wrong with the set.
- If possible, use the VESA 1,024x768@60Hz video
mode to obtain the best image quality for your
LCD monitor. If used under the other resolutions,
some scaled or processed pictures may appear on
the screen.The TV has been pre-adjusted to the
mode VESA 1,024x768@60Hz.
- Some dot defects may appear on the screen, like
red, green or blue spots. However, this will have no
impact or effect on the monitor performance.
- Do not press the LCD screen with your finger for a
long time as this may incur some afterimages.
Personal computer
PC INPUT
w 1
•
•
•
•
•
•
S-VIDEO
DC 12V
_
+
ANT IN
x
75
Ω
VIDEO (MONO) L AUDIO R
AV2
L
•
•
............
...........
& Connect one end of a (male to male)
VGA cable to the video card of the
computer and the other end to the VGA
connector
PC INPUT at the back of the
TV. Fix the connectors firmly with the
screws on the plug.
Note: the VGA cable is not supplied with the
TV.
é In case of a Multimedia computer, connect
the audio cables to the audio outputs of
your Multimedia computer and to the
AUDIO L and R connectors of the AV2
input of the TV.
“ Press the w key on the remote control
or select
Source in the Special menu (See
p. 12) to select PC.
‘ Switch on the computer. The TV can be
operated as the computer monitor.
Note: If you have an Apple Macintosh
computer, connect the VGA desktop block from
the 3 row 15 pin to 2 row 15 pin with the
signal cable and connect the VGA desktop
block to the Apple Macintosh computer.
17Connect peripheral equipment

You can adjust picture contrast, brightness,
horizontal and vertical position, clock,
clock phase, auto-configure and factory
settings as you prefer.
& Repeatedly press the w key on the
remote control or select
Source in the
Special menu See p. 12) to select the PC
monitor mode.
é Press the MENU key to select the PC
menu.
“ Use the cursor up/down to select the
desired item.
‘ Use the cursor left/right to make
appropriate adjustments.
Use of the PC menu
Horizontal and vertical picture
position.
Press the cursor left/right to adjust the
picture position.
Clock
Press the cursor left/right to minimise any
vertical bars or stripes visible on the
screen background.
Clock phase
Press the cursor left/right to, when
necessary, adjust the pixel phase of the
picture to avoid picture interference.
Auto-configure
Select
Auto-configure On for the
automatic adjustment of the screen
position, clock and clock phase.
When Auto-configure is in progress, the
displayed picture will disappear for a few
seconds.
Note: Some signals from some graphic boards
may not function properly. If the results are
unsatisfactory, adjust your monitor’s position,
clock and clock phase manually.
Factory settings
Select
Factory settings On to return to
the factory predefined settings.
( Press the OK key to store the PC
monitor picture settings.
The message
Stored is displayed.
§ Press the w key repeatedly and select
TV to return to normal TV viewing.
18
Use of the PC menu
Input PC
H 60
G 90
≈ 0
Ú 0
Clock 40
Clock phase 16
Auto configure
Factory settings
oœ p π
OK MENU
Input PC

Most of the video equipment from our range of
products can be operated with the remote
control of your TV.
Keep the VCR key on the left side of the
remote control pressed and simultaneously
press:
® for record
Ò for rewind
‡ for stop
π for play
† for fast forward
C for VCR timer
- P + for sequential programme selection from
the VCR tuner
0 to 9 to select a programme number from
your VCR tuner
B to switch the VCR to standby
B
a
M
AUTO
AUTO
w
Y-Z
D
C
h
f
c
e
Ò
‡
π
®
†
U
1
2
9
3
6
5
7
4
8
0
0
LIST
¬
V
MENU
OK
b
k
VCR
M
a
AUTO
AUTO
w
Y-Z
D
g
®
Ò
‡
π
†
C
P
P
B
BB
Video recorder keys
19Video recorder keys

Tips
Care of the screen
Do not rub or strike the screen with anything
hard as this may scratch, mar, or damage the
screen permanently.
Unplug the screen before cleaning the screen.
Dust the TV by wiping the screen and the
cabinet with a soft, clean cloth. If the screen
requires additional cleaning, use a clean, damp
cloth. Do not use liquid cleaners or aerosol
cleaners.
Mobile telephone warning
To avoid disturbances in picture and sound,
malfunctioning of your TV or even damage to
the TV, keep away your mobile telephone from
the TV.
Poor Picture
• Have you selected the correct TV system?
• Are the cables connected properly? (The
aerial cable to the TV or VCR, the VGA cables
to the TV, the power cable.)
• Is your TV or house aerial located too close
to loudspeakers, non-earthed audio equipment
or neon lights, etc.?
• Mountains or high buildings can cause double
pictures or ghost images. Sometimes you can
improve the picture quality by changing the
direction of the aerial.
• Are brightness and contrast out of
adjustment? Press the
AUTO M or a key to
restore the predefined factory settings.Try
another channel, perhaps the received signal is
too weak
• Sometimes poor picture quality is possible
when having an S-VHS VCR, camera or
camcorder connected and another peripheral
is connected to
AV1 or AV2 at the same time.
In this case switch off one of the other
peripherals.
• Check if you have selected the correct VGA
mode in your PC.Autofigure or adjust the
H/V position, the clock and clock phase.
No picture
• Is the TV switched on
• Is the aerial connected properly? Are the
plugs tightly connected in the aerial socket?
• Is the aerial cable in good condition and does
it have suitable plugs?
• Is your PC switched on?
No sound
No sound on any channel? Check the volume
isn’t at minimum. Is the sound interrupted
with the mute key ¬?
Remote control
• If your TV no longer responds to the remote
control, the batteries may be dead.
You can still use the keys in front of the TV.
• Has the child lock been switched off?
No solution
Switch your TV off and on again once.
Never attempt to repair a defective TV
yourself.
Never remove the back cover of the TV.
If the TV does not operate properly, unplug it
and call your dealer or a TV technician.
End of life directives
We are paying a lot of attention to produce
environmentally-friendly in green focal areas.
Your new TV contains materials which can be
recycled and reused.
At the end of its life specialised companies
can dismantle the discarded TV to
concentrate the reusable materials and to
minimise the amount of materials to be
disposed of.
Please ensure you dispose of your old TV
according to local regulations.
How to dispose of batteries?
The batteries supplied do not contain the
heavy metals mercury and cadmium.
Nevertheless in many countries batteries may
not be disposed of with your household
waste. Please ensure you dispose of batteries
according to local regulations.
20 Tips

a auto picture, 8
auto sound, 8
auto-configure, 18
automatic installation, 5
AVL, 11
b balance, 11
bass, 11
bilingual broadcast, 8
brightness, 11
c camcorder, 16
C-channels, 6
child lock, 12
clock-phase, 18
colour, 11
e equalizer, 11
eurocable, 15
f factory settings, 18
fine tune, 6
h headphone, 17
l language, 4
m manual installation, 6
menu language, 4
monitor display modes, 17
mono, 8
mute, 9
n name, 6
nicam, 8
p pc input, 17
pc menu, 18
picture mute, 12
programme list, 7
s S-channels, 6
search, 5
search for tv channels, 5
sharpness, 11
sleeptimer, 9
source, 12
sound adjustments, 11
stereo, 8
store TV channels, 4
S-VHS, 16
s-video, 16
switch TV on, 3
system, 5
t teletext, 13
tint, 11
treble, 11
v video recorder, 15
volume, 9
Index
21Index
Contents 1
Installation 2
Operation 8
Connect Peripheral Equipment 15

 Loading...