

Page 1

E
N
1
Table of Contents
1 5 0 B
1 5 L 5 0 8 2 Q
GETTING STARTED
INTRODUCTION. . . . . . . . . . . . . . . . . . . . . . . . . . . . . . . . . . 2
SAFETY. . . . . . . . . . . . . . . . . . . . . . . . . . . . . . . . . . . . . . . 2
I
NSTALLATION LOCATION . . . . . . . . . . . . . . . . . . . . . . . . . . . 3
CORRECT HANDLING . . . . . . . . . . . . . . . . . . . . . . . . . . . . . . 3
ACCESSORIES . . . . . . . . . . . . . . . . . . . . . . . . . . . . . . . . . . 3
CONNECTION TO PC. . . . . . . . . . . . . . . . . . . . . . . . . . . . . 4-5
DESCRIPTION OF CONTROLS . . . . . . . . . . . . . . . . . . . . . . . 6-8
HOW TO USE THE OSD [CONTROL LEVEL STRUCTURE] . . . . 9-18
SETTING UP GUIDE. . . . . . . . . . . . . . . . . . . . . . . . . . FOLDOUT
HOW TO USE THE ON SCREEN DISPLAY
MAIN CONTROLS WINDOW
BRIGHTNESS . . . . . . . . . . . . . . . . . . . . . . . . . . . . . . . . . . 10
CONTRAST . . . . . . . . . . . . . . . . . . . . . . . . . . . . . . . . . . . 11
SCREEN POSITION & QUALITY WINDOW
VERTICAL POSITION . . . . . . . . . . . . . . . . . . . . . . . . . . . . . 12
H
ORIZONTAL POSITION . . . . . . . . . . . . . . . . . . . . . . . . . . . 12
PHASE ADJUSTMENT . . . . . . . . . . . . . . . . . . . . . . . . . . . . . 13
CLOCK ADJUSTMENT . . . . . . . . . . . . . . . . . . . . . . . . . . . . . 13
COLOR TEMPERATURE WINDOW
9300 K CAD/CAM. . . . . . . . . . . . . . . . . . . . . . . . . . . . . 14
6500 K DTP . . . . . . . . . . . . . . . . . . . . . . . . . . . . . . . . . 14
U
SER PRESETS . . . . . . . . . . . . . . . . . . . . . . . . . . . . . . . . 15
SPECIAL CONTROLS WINDOW
LANGUAGE . . . . . . . . . . . . . . . . . . . . . . . . . . . . . . . . . . . 16
OSD CONTROLS . . . . . . . . . . . . . . . . . . . . . . . . . . . . . . . 16
P
OWER SAVING . . . . . . . . . . . . . . . . . . . . . . . . . . . . . . . . 17
ROTARY DEFAULT . . . . . . . . . . . . . . . . . . . . . . . . . . . . . . . 17
EXIT OR RESET . . . . . . . . . . . . . . . . . . . . . . . . . . . . . . . . 18
ADDITIONAL INFORMATION
OSD WARNING SIGNAL . . . . . . . . . . . . . . . . . . . . . . . . . . 19
POWER SAVING & PRESET RESOLUTION MODE . . . . . . . . . . . 20
PIN ASSIGNMENT . . . . . . . . . . . . . . . . . . . . . . . . . . . . . . . 20
SPECIFICATIONS . . . . . . . . . . . . . . . . . . . . . . . . . . . . . . . . 20
WHAT TO DO IF SOMETHING ISN’T WORKING . . . . . . . . . . . . 21
INDEX. . . . . . . . . . . . . . . . . . . . . . . . . . . . . . . . . . . . . . . 22
GLOSSARY . . . . . . . . . . . . . . . . . . . . . . . . . . . . . . . . . . . 22
Other language versions
F
RENCH (FRANCAIS) . . . . . . . . . . . . . . . . . . . . . . . . .23
ITALIAN (ITALIANO) . . . . . . . . . . . . . . . . . . . . . . . . . .89
SPANISH (ESPAÑOL) . . . . . . . . . . . . . . . . . . . . . . . . .45
GERMAN (DEUTSCH) . . . . . . . . . . . . . . . . . . . . . . . . .67
a p p e n d i x
English Information for Users in the U.S.. . . . . . . . . . . . . . . . . . . . . . . . . . . . A1
FCC Declaration . . . . . . . . . . . . . . . . . . . . . . . . . . . . . . . . . . . . . . . . A2
TCO’99 . . . . . . . . . . . . . . . . . . . . . . . . . . . . . . . . . . . . . . . . . . . . A3-A4
ENERGY DECLARATION. . . . . . . . . . . . . . . . . . . . . . . . . . . . . . . . . . . A5
Information for UK only. . . . . . . . . . . . . . . . . . . . . . . . . . . . . . . . . . . A6
Français FCC Declaration . . . . . . . . . . . . . . . . . . . . . . . . . . . . . . . . . . . . . . . . A7
Dansk ADVARSEL . . . . . . . . . . . . . . . . . . . . . . . . . . . . . . . . . . . . . . . . . . . . A8
Norsk ADVARSEL . . . . . . . . . . . . . . . . . . . . . . . . . . . . . . . . . . . . . . . . . . . . A8
Svenska VARNING. . . . . . . . . . . . . . . . . . . . . . . . . . . . . . . . . . . . . . . . . . . . . . A8
Suomi VARNING. . . . . . . . . . . . . . . . . . . . . . . . . . . . . . . . . . . . . . . . . . . . . . A8
BECAUSE OF CONTINUOUS PRODUCT IMPROVEMENTS,
THE INFORMATION MENTIONED IN THIS DOCUMENT IS SUBJECT TO CHANGE WITHOUT NOTICE.
Page 2

Introduction and Safety
I n t ro d u c t i o n
The Philips 150B Flat Panel Monitor satisfies the need of
high-end corporate and professional users. This monitor is
for those who are seeking advanced design, a small
footprint, high quality picture and ergonomic features in a
monitor that takes minimal desk space. Its innovative
technology delivers outstanding brightness and contrast,
z e ro emissions, and low-energy consumption.
F e a t u re s
E
X C E L L E N T D I S P L AY Q U A L I T Y
• 15 inch viewable area display - comparable to the
viewable screen size of a 17-inch CRT monitor, with even
better picture clarity and geometry.
• Full compatibility with all standard video cards and all
common VESA modes up to 1024 x 768 Hz with 30 to 61
kHz horizontal scanning.
• State of the art image processing for optimal full scre e n
image expansion at resolutions for DOS, VGA 640 x 480,
and SVGA 800 x 600
• Advance auto function for automatic adjustment of
horizontal position, vertical position, phase, and clock
s e t t i n g .
E
R G O N O M I C D E S I G N
• To protect the LCD panel against wear and scratches, an
optional protective cover can be ord e red separately. Please
i n q u i re with your dealer.
• Detachable pedestal for swing arm or wall mount
applications. A special hinge design on the monitor insure s
full tilt and rotation adjustability even on the simplest
m o u n t .
• Easy OSD with five (5) language text.
• TCO ‘99 appro v e d
O
T H E R S
• USB Bay for an optional powered hub with four (4)
d o w n s t ream port s
• Anti-theft Kensington®socket lock and OSD lock to
p revent tampering especially useful at point-of-sale and
customer interaction sites.
N o t e : Your monitor operates according to the VESA DDC level 1/2B. Only computers and
s o f t w a res that support the same guidelines and operate at the same or a higher level can
make use of this feature. If your computer does not support the relevant guidelines, you can
still use your monitor and computer. However, you may need to manually specify the
a p p ropriate resolution in the software or computer.
As an ENERGY STA R®Pa rt n e r,
P H I L I P Shas determined that this
p roduct meets the ENERGY STA R
guidelines for energy eff i c i e n c y.
®
Contact us at our web site: HTTP://www.pcstuff.philips.com
Safety precautions and maintenance
• Unplug the monitor, if you are not going to use it for an
extensive period of time.
• Unplug the monitor, if you need to clean it with a slightly
damp cloth. Wiping the screen with a dry cloth is possible
when the power is off. However, never use alcohol,
solvents, or ammonia-based liquids.
• Consult a service technician if the monitor does not
operate normally when following the instructions in this
m a n u a l .
• The casing cover should be opened only by qualified
s e rvice personnel.
• Keep the monitor out of direct sunlight and away fro m
stoves or any other heat sourc e .
• Remove any object that could fall into the vents or
p revent proper cooling of the monitor’s electronics.
• Do not block the ventilation holes on the cabinet.
ENERGY STAR is a U.S.registered mark.
IBM, IBM PC, and Power PC are registered trademarks of International Business Machines Corporation.
Apple, Macintosh, Quadra, Performa, and Centris are registered trademarks of Apple Computer, Inc.
• Keep the monitor dry. To avoid electric shock, do not
expose it to rain or excessive moisture .
• When positioning the monitor, make sure the power plug
and outlet are easily accessible.
• If turning off the monitor by detaching mains cord or DC
power cord, wait for 6 seconds, then attach the mains cord
or DC power cord for normal operation.
End-of-life disposal
Your new monitor contains materials that can be re c y c l e d
and reused. Specialized companies can recycle your
p roduct to increase the amount of reusable materials and
to minimize the amount to be disposed of.
Please find out about the local regulations on how to
dispose of your old monitor.
2
Page 3
I n s ta l l ation Lo cations & Ac c e ss o r i e s
E
N
Installation Locations
AV O I D HE AT A N D CO L D EX T R E M E S
• Do not store or use the LCD monitor in locations
exposed to heat, direct sunlight, or extreme cold.
• Avoid moving the LCD monitor between locations
with large temperature diff e rences. Choose a site
falling within the following temperature and humidity
r a n g e s .
Te m p e r a t u re: 5-35°C (40-90°F )
Humidity: 20-80% RH
• Do not subject the LCD monitor to severe vibration
or high impact conditions. Do not place the LCD
monitor inside a car tru n k .
• Take care not to mishandle this product by either
knocking or dropping during operation or
t r a n s p o rt a t i o n .
• Do not store or use the LCD monitor in locations
exposed to high humidity or dusty environment. Also
do not allow water or other liquids to spill on or into
the LCD monitor.
Correct handling of the monitor
1. When handling the monitor, grip the bottom firmly with both hands and
ensure that the front panel faces outward before lifting. Please refer to the
diagram on the right.
2.Handling the monitor with care prevents scratching and damage. If the
monitor becomes damaged, immediately disconnect the power from the
unit and have it checked by a qualified service person before using it again.
3. Do not drop the monitor to prevent fire or electrical shock.
4. When moving the monitor, be sure to unplug all power cords in order to
avoid injury or damage to the equipment.
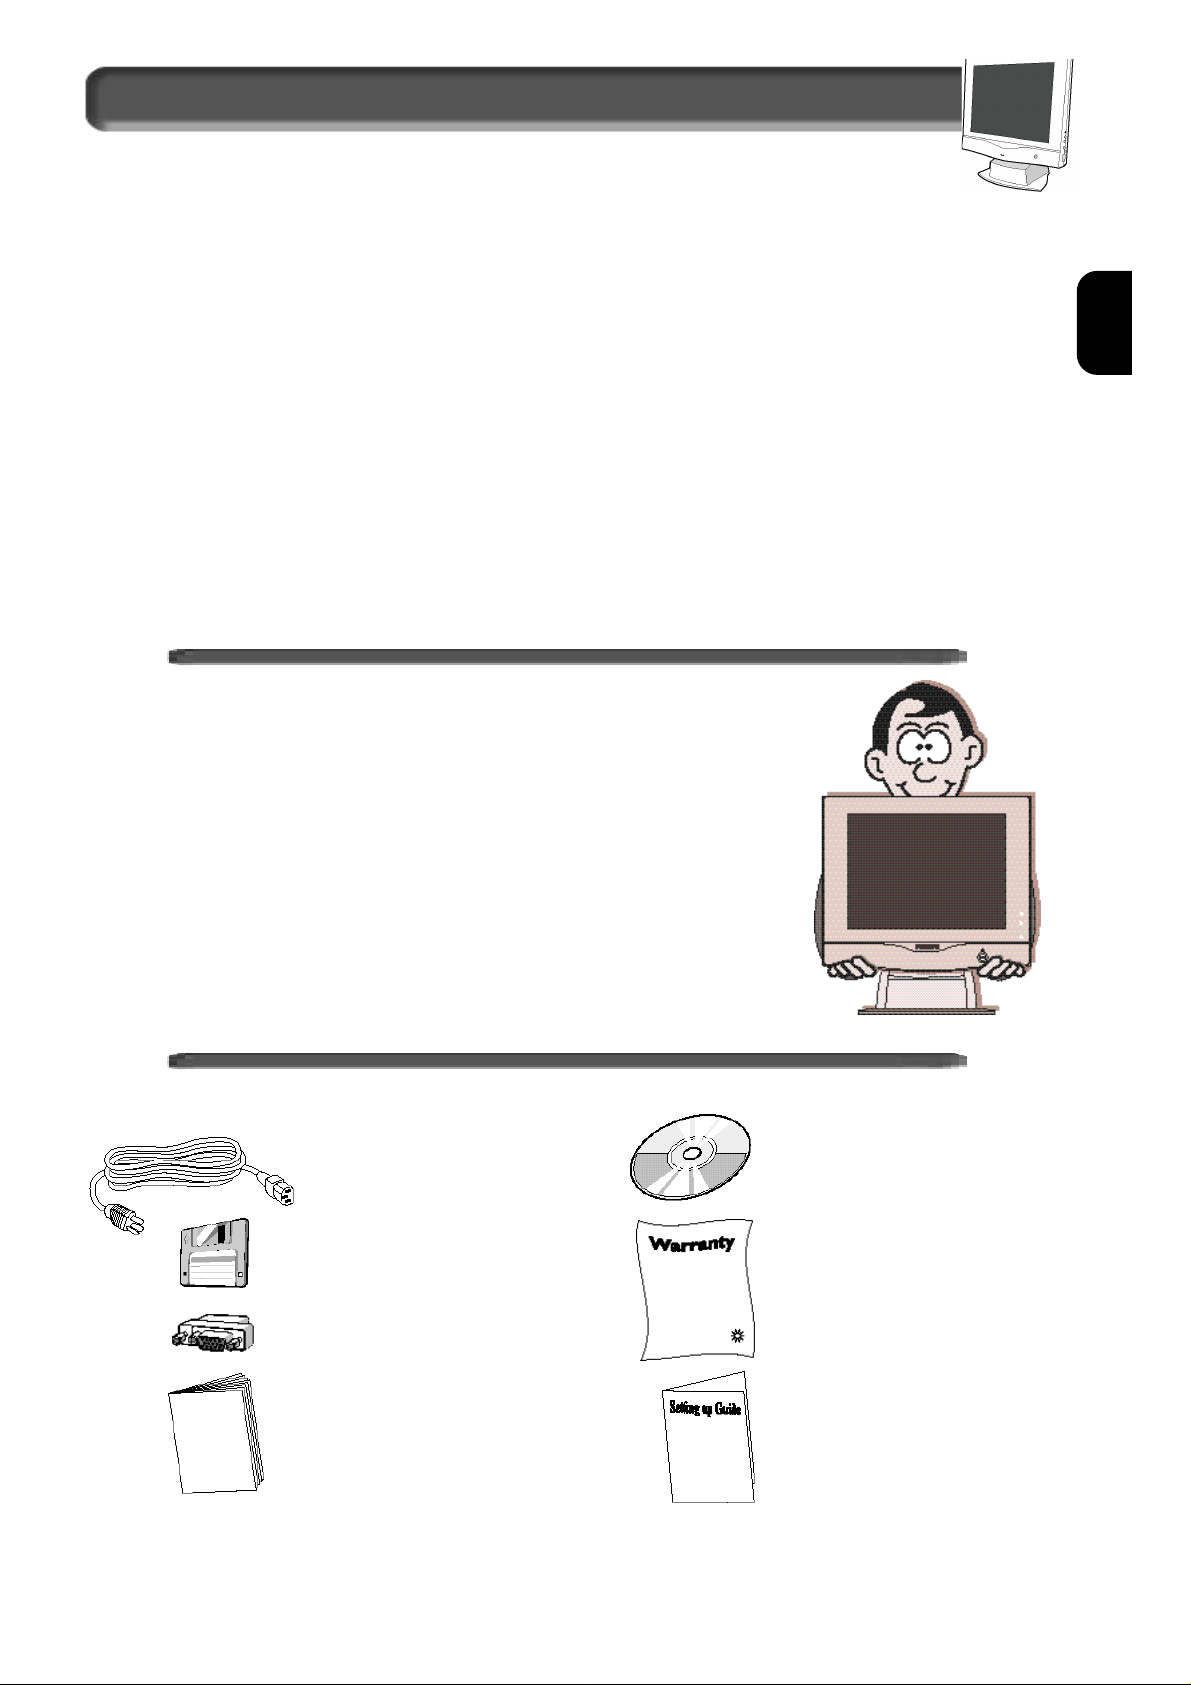
A c c e s s o r i e s
1. Power cable
2. Windows driver disk
3. Macintosh adapter
( o p t i o n a l )
4. User manual
5. CD-ROM
6. Wa rranty Card s
7. Quick Set-up Guide
3
3
Page 4

connection to PC
U S B (Universal Serial Bus) is an innovation in connecting your IBM-compatible computer to your monitor. By using the USB, you will be able
to connect your keyboard, mouse, printer, and other peripherals to your monitor instead of having to connect them to your computer. This
will give you greater flexibility in setting up your system. Plus, you will have true plug-and-play capability. Philips provides for the optional
U S B Hub so you will be ready to take advantage of this advancement in computer development.
For an IBM-compatible Computer:
1 . Tu rn off the computer.
2 . I n s e rt the (optional) USB Hub and connect the
USB cable to the computer. (Computer must have
USB port . )
3 . Tu rn on the monitor. Then turn on the computer.
4 . With the installation of the correct software, you
will be able to connect USB peripherals to the
m o n i t o r’s USB Hub.
Note:
1-USB Hub and cables sold separately. The USB
Bay is located in back of monitor.
2- Please refer to the USB Hub’s manual and
installation guide for more details.
Refer to the “Setting Up your Philips flat panel monitor” foldout for a more detailed guide to set up your monitor.
4
Page 5

E
N
connection to PC
VIDEO SETTINGS
Before connecting your LCD Monitor to the PC, make sure that the computer’s video settings (resolution
and frequency) are in accordance with those below.
If you have Windows ’95 or later . . .
FOLLOW THESE STEPS TO COMPLETE SETTING UP YOUR MONITOR
1. Insert Windows ‘95 floppy disk supplied with this monitor.
2. Click on the “START” icon. Next, click on the “SETTINGS” icon. Then click on “CONTROL PANEL.”
3. Double-click on “DISPLAY” icon. Next, click on “SETTINGS” tab. Then click on “ADVA N C E D
PROPERTIES” dialog box.
4. Click on “MONITOR” tab.
5a. If you have an old computer, click on “CHANGE” dialog box. Next, “SELECT DEVICE” screen appears.
Now click on “HAVE DISK” dialog box. and select A drive
Or
5b. If you have a new computer, “SELECT DEVICE” screen automatically appears.
Click on “HAVE DISK” dialog box and select A drive.
6. Select “OK” in the “INSTALL FROM DISK” dialog box. If model name of the Philips monitor is cor rect,
click “OK” tab in the “SELECT DEVICE” dialog box.
7. Click “CLOSE” tab in the “ADVANCED PROPERTIES” dialog box. If your Windows ’95 version is
different or you need more detailed installation information, please refer to the Windows ’95 user’s
manual.
5
Page 6
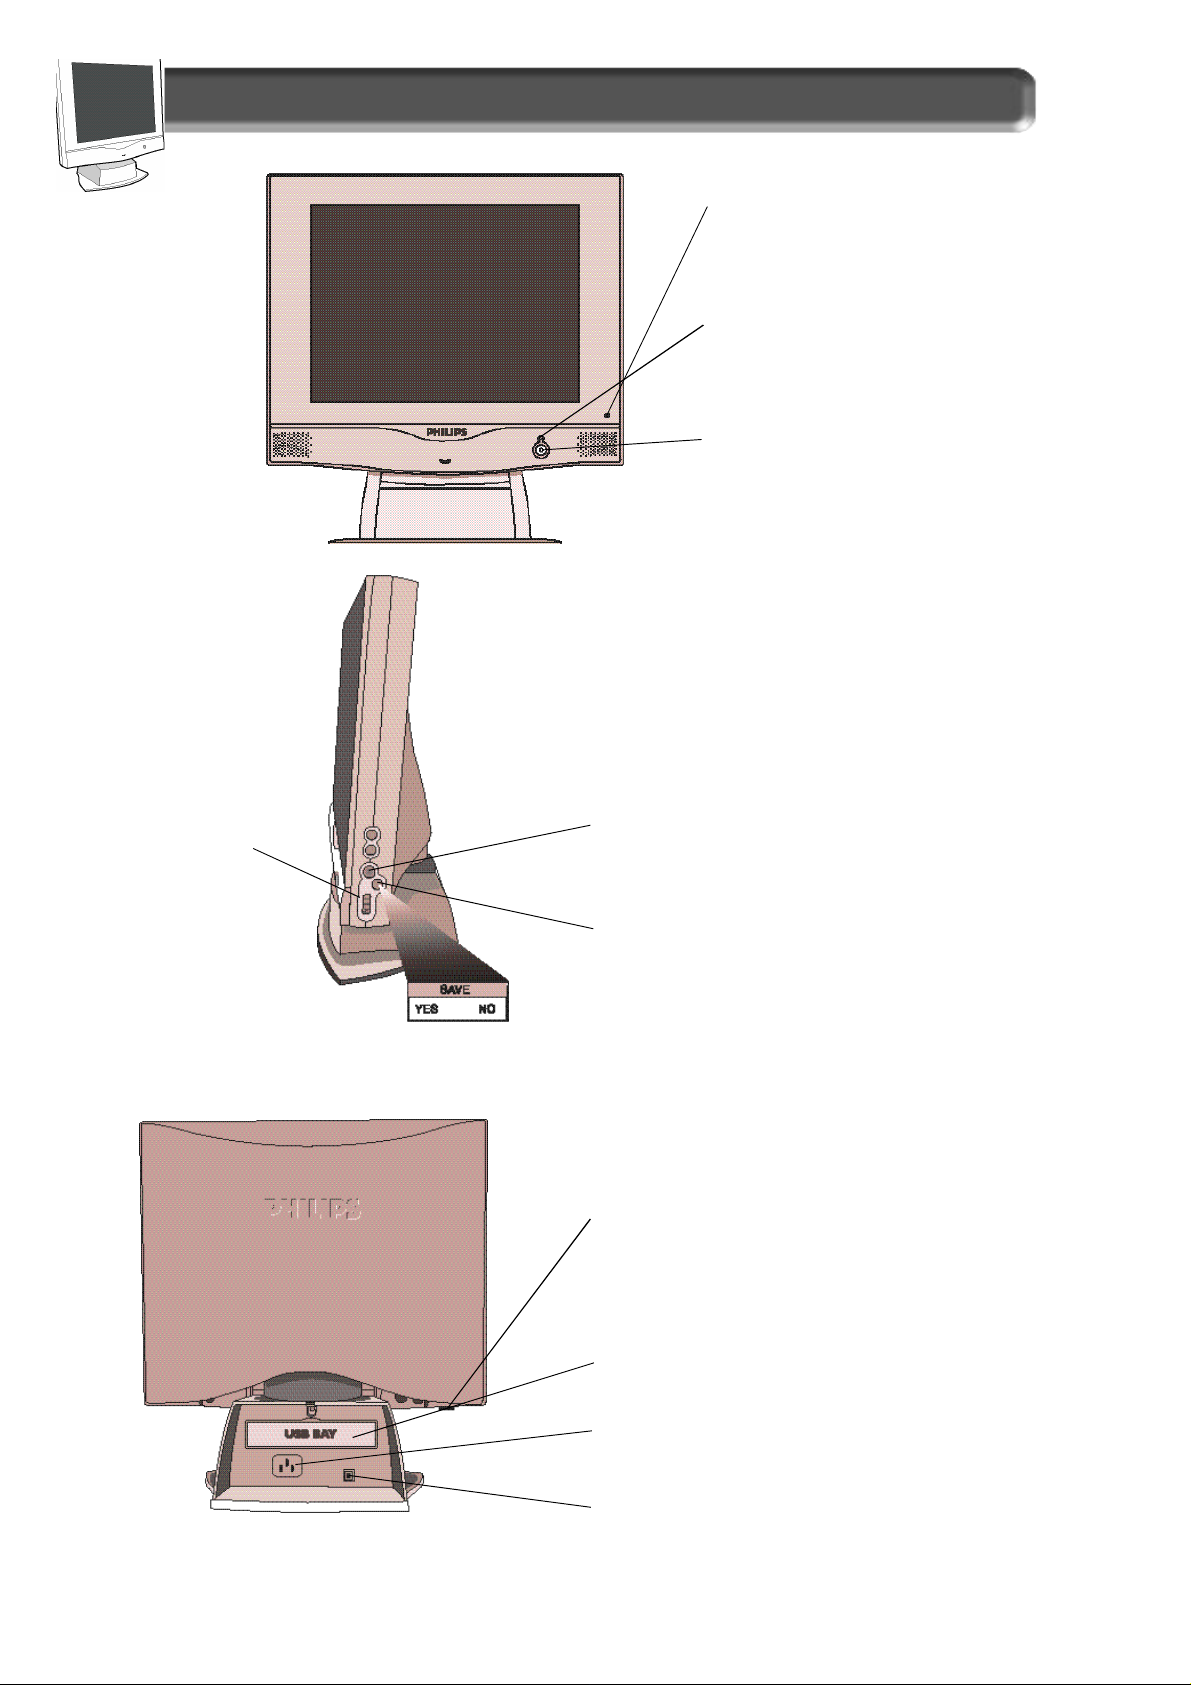
FRONT VIEW
SIDE VIEW
Description of Controls
C o n t rol Indicators – for OSD button .
L E D – Light Emitting Diode turn s
g reen when the monitor is on.
Power Button – Tu rns the monitor
On and Off .
R o t a ry Knob – Helps
guide you through the
On Screen Display.
R
EAR VIEW
On Screen Display (OSD) button – Brings up the
On Screen Display and helps you navigate thro u g h
i t .
Auto Button – Press this button to automatically
adjust the horizontal position, vertical position,
phase, and clock settings. After few seconds, the
S AVE window will appear. Choose YES to keep the
new setting or NO to re s t o re the previous settings.
Kensington Lock S o c k e t – A special feature to
lock your monitor for anti-theft.
USB Bay –Slot for plugging in USB Hub. Optional
h a rd w a re that allows true Plug-and-Play.
See page 4 for installation details.
Power Plug – Plug the AC power cord in here.
See Setting-up foldout for details.
DC Jack – Plug the monitor’s DC power cord here .
6
Page 7

E
N
Description of Controls
Pedestal - With the built-in pedestal, you can tilt and swivel the
monitor to the most comfortable viewing angle. For best viewing,
always place the monitor at eye level. This pedestal can be
separated from the main LCD monitor body for mechanical arm or
wall-mount applications.(as specified within manufactuer’s
recommendations)
Using the Side Panel OSD
Button - To use the OSD
function, please refer to Page 8
for details.
NOTE: DO NOT REMOVE WITHOUT FIRST READING “REMOVING INSTRUCTIONS” FOUND IN THE
GUIDE BUNDLED WITH THE ACCESSORIES.
7
Page 8

Description of Controls
On Screen Display - Your monitor is preset at the factory for normal operation. However, you can adjust
it using the On Screen Display Button and the Rotary Knob as described on Page 6. Below is a brief
description of the four windows on the On Screen Display function.
Main Controls - The first window highlighted after the
OSD has been selected. It has three features: Brightness,
Contrast. To adjust the three features, turn to page 10 &
11.
Color Temperature - The third window
highlighted is the adjustment of the Color
Temperature. Select the color temperature you
prefer or make your own with User Setting 1 or 2.
Details are on Pages 14 & 15.
OSD Button
Screen Position & Quality -
This is the second window
highlighted after the OSD has been
selected. The four features are:
Vertical Position,Horizontal
Position, Phase Adjustment, and
Clock Adjustment. More details on
adjusting these features are on
Page 12 & 13.
Special Controls - The fourth window
features: Language, OSD Controls, Power Saving,
and Rotary Default. Details on adjusting these
features are on pages16 & 17.
Note: Language allows you to change the On
Screen Display from English to French,
Spanish, German, or Italian. See Page 16 for
more details.
8
Page 9

E
N
How to Use the On Screen Display (OSD)
OSD Menu control level structure
9
Page 10

How to Use the On Screen Display (OSD)
To adjust your scre e n ’s brightness, follow the steps below.
Brightness is the overall intensity of the light coming fro m
the scre e n .
Press the OSD button.
1
P ress the O S D
button to highlight
B
R I G H T N E S S i c o n .
Main Controls window
3
P ress the OSD
button to bring
up B
R I G H T N E S S
s c re e n .
4
5
P ress the
O S D
button to
re t u rn to E
w i n d o w.
X I T
Tu rn the RO TA RY knob to
adjust the brightness.
Smart Help
After re t u rning to Exit . . .
. . .to continue to Contrast,t u rn the R
CO N T R O L S WI N D O W is highlighted. Next, follow steps 2 - 5 under
CO N T R A S T.
. . . to exit completely, p ress the OSD button and choose either
SAV E or NO SAV E in setting mode, then push OSD button to exit
OSD. (See page 18 for other exit options.)
O TA RY knob until MA I N
10
Page 11

E
N
How to Use the On Screen Display (OSD)
Main Controls window
To adjust your scre e n ’s contrast, follow the steps below.
Contrast is the diff e rence between the brightest and
darkest areas on the scre e n .
Press the OSD button.
1
P ress the O S D
button. Next, turn
the RO TA RY k n o b
until the CO N T R A S T
icon is highlighted.
P ress the OSD
3
button to bring
up CO N T R A S T
s c re e n .
4
5
Tu rn the RO TA RY knob to
adjust the contrast.
Smart Help
After re t u rning to Exit . . .
. . . to continue to the Ve rtical Position,t u rn the RO TA RY k n o b
until SC R E E N PO S I T I O N & QU A L I T Y WI N D O W is highlighted. Next,
P R E S S T H E OSD B U T T O N. FO L L O WS T E P S 2-5 U N D E R VE RT I C A L PO S I T I O N
(on the next page).
. . . to exit completely,p ress the OSD button and choose either
S
AV E or NO SAV E in setting mode, then push OSD button to exit
OSD. (See page 18 for other exit options.)
11
Page 12

How to Use the On Screen Display (OSD)
Screen Position & Quality window
Ve rtical Position adjusts the image on your screen either
up or down. Use this feature if your image does not
appear centere d .
Press the OSD button.
1
Tu rn the RO TA RY
k n o b until the
SC R E E N PO S I T I O N &
QU A L I T Y w i n d o wi s
highlighted. Next,
p ress the O S D
button to highlight
Ve rtical position
Icon.
Horizontal Position shifts the image on your screen either
to the left or right. Use this feature if your image does not
appear centere d .
Press the OSD button.
1
Tu rn the RO TA RY
k n o b until the
S
C R E E N PO S I T I O N &
QU A L I T Y w i n d o wi s
highlighted. Next,
p ress the O S D
button. Then, turn
the RO TA RY k n o b
until HO R I Z O N TA L
PO S I T I O N i s
h i g h l i g h t e d .
P ress the OSD
3
button to bring up
the VE RT I C A L
PO S I T I O N s c re e n .
4
5
button to
re t u rn to E
w i n d o w.
O S D
X I T
Tu rn the R
until the image is
v e rtically balanced.
O TA RY k n o b
Smart Help
After re t u rning to Exit . . .
. . . to continue to the Horizontal Position, t u rn the RO TA RY
knob until SC R E E N PO S I T I O N &QU A L I T Y is highlighted. Next, pre s s
the OSD button. Follow steps 2-5 under HO R I Z O N TA L PO S I T I O N.
. . . to exit completely, p ress the OSD button and choose either
S
AV E or NO SAV E in setting mode, then push OSD button to exit
OSD. (See page 18 for other exit options.)
P ress the OSD
3
button to bring up
the HO R I Z O N TA L
PO S I T I O N s c re e n .
4
P ress the
5P ress the
O S D
button to
re t u rn to EX I T
w i n d o w.
Tu rn the RO TA RY k n o b
until the image is
horizontally balanced.
Smart Help
After re t u rning to Exit . . .
. . . to continue to Phase Adjustment,t u rn the RO TA RY k n o b
until SC R E E N PO S I T I O N & QU A L I T Y is highlighted. Next, press the
OSD button. Follow steps 2-5 under PH A S E AD J U S T M E N T.
. . . to exit completely,p ress the OSD button and choose either
SAV E or NO SAV E in setting mode, then push OSD button to exit
OSD. (See page 18 for other exit options.)
12
Page 13

E
N
How to Use the On Screen Display (OSD)
Screen Position & Quality window
Phase Adjustment reduce the horizontal flicker of
characters on the screen to a minimum.
Press the OSD button.
1
Tu rn the RO TA RY
k n o b until the
SC R E E N PO S I T I O N &
QU A L I T Y w i n d o wi s
highlighted. Next,
p ress the O S D
button. Then, turn
the RO TA RY k n o b
until PH A S E
AD J U S T M E N T i s
h i g h l i g h t e d .
Clock Adjustment reduce the vertical flicker of characters
on the screen to a minimum.
Press the OSD button.
1
Tu rn the RO TA RY k n o b
until the S
PO S I T I O N & QU A L I T Y
w i n d o wi s
highlighted. Next,
p ress the O S D
button. Then, turn
the RO TA RY knob until
CL O C K AD J U S T M E N T i s
h i g h l i g h t e d .
C R E E N
P ress the O S D
3
button to bring up
the P
H A S E AD J U S T M E N T
s c re e n .
4
5
P ress the
button to
re t u rn to E
w i n d o w.
O S D
X I T
Tu rn the RO TA RY k n o b
until the image on the
monitor does not flicker.
Smart Help
After re t u rning to Exit . . .
. . . to continue to Clock Adjustment,t u rn the RO TA RY knob until
SC R E E N PO S I T I O N & QU A L I T Y is highlighted. Next, press the OSD
button. Follow steps 2-5 under CL O C K AD J U S T M E N T.
. . . to exit completely, p ress the OSD button and choose either
S
AV E or NO SAV E in setting mode, then push OSD button to exit
OSD. (See page 18 for other exit options.)
P ress the O S D
3
button to bring up
the CL O C K
AD J U S T M E N T
s c re e n .
4
5
P ress the
O S D
button to
re t u rn to EX I T
w i n d o w.
Tu rn the RO TA RY k n o b
until the image on the
monitor does not flicker.
Smart Help
After re t u rning to Exit . . .
. . . to continue to the Color Te m p e r a t u re window, t u rn the
R
O TA RY knob until EX I T is highlighted. Next, press the OSD button.
Then follow steps 2-4 under CO L O R TE M P E R AT U R E W I N D O W on the
next page.
. . . to exit completely, p ress the OSD button and choose either
SAV E or NO SAV E in setting mode, then push OSD button to exit
OSD. (See page 18 for other exit options.)
13
Page 14

How to Use the On Screen Display (OSD)
Color Temperature window
Your monitor has two preset options for color temperatures from which you can choose from. One 6500 K option for
computer automatically adjusts itself for that color temperature. Monitor default setting for color temperatures is 6500 K
Desktop Publishing (DTP). Another 9300 K option for Computer Aided Design (CAD) work. When you select an option, the
Press the OSD button.
1
Tu rn the RO TA RY
k n o b until the
CO L O R w i n d o wi s
highlighted. Then
p ress the ON
SC R E E N DI S P L AY
button.
Smart Help
Tu rn the RO TA RY k n o b
until DTP O R C A D / C A M
is highlighted.
After each pre s e t
setting is saved,
the on scre e n
display automatically
re t u rns to the
EX I T w i n d o w.
After re t u rning to Exit . . .
. . . to continue to User Pre s e t s ,t u rn the RO TA RY knob until CO L O R TE M P E R AT U R EWI N D O W is highlighted. Next, follow steps 2 - 8 under US E R
PR E S E T S on the next page.
. . . to exit completely, p ress the OSD button and choose either SAV Eor NO SAV Ein setting mode, then push OSD button to exit OSD. (See
page 18 for other exit options.)
14
Page 15

E
N
How to Use the On Screen Display (OSD)
Color Temperature window
If you need to adjust any of the two preset options (DTP or CAD/CAM), follow the steps below to modify the colors that
appear on your screen. You can make individual adjustments to each of the preset options.
Press the OSD button.
1
Tu rn the RO TA RY k n o b until the CO L O R
w i n d o w is highlighted. Next, press the
OSD button. Then, turn the RO TA RY k n o b
until US E R PR E S E T S icon is highlighted.
7
To exit US E R PR E S E T 1 , press the OSD button. Next,
t u rn the RO TA RY knob until the EX I T box is highlighted.
6
When done with green, pre s s
the O S Dbutton. BL U E will be
highlighted. Then, turn the
RO TA RY knob to increase or
d e c rease the blue.
Smart Help
You will now be back at the EX I T
8
w i n d o w. See SM A RTHE L P b e l o w
for options.
Then, press the ON SC R E E N DI S P L AY b u t t o n .
5
When done with red, press the
O S D button. GR E E N will be
highlighted. Then, turn the
RO TA RY knob to increase or
d e c rease the green.
4
First, RE D will be highlighted.
Next, to adjust the re d ,
p ress the OSD button again.
Then, turn the RO TA RY knob to
i n c rease or decrease the re d .
3
If necessary,
t u rn the RO TA RY
knob until
of the US E R
PR E S E T S i s
h i g h l i g h t e d .
Next, press the
O
N SC R E E N
DI S P L AY button.
After re t u rning to Exit . . .
. . . to continue to User Preset 2,repeat steps 3 through 7, selecting US E R PR E S E T 2 .
. . . to continue to Special Contro l s w i n d o w, t u rn the RO TA RY knob until SP E C I A LC O N T R O L WI N D O W is highlighted. Next, press the ON SC R E E N
DI S P L AYbutton. Now, follow steps 2 - 5 under SP E C I A L CO N T R O L S on the next page.
. . .to exit the On Screen Display completely, p ress the OSD button and choose either SAV Eor NO SAV E in setting mode, then push OSD
button to exit OSD. (See page 18 for other exit options.)
15
Page 16

How to Use the On Screen Display (OSD)
Special Controls window
The ON SC R E E N DI S P L AY shows its settings in one of five
languages. The default is English, but you can select
F rench, Spanish, German, or Italian.
Press the OSD button.
Tu rn the RO TA RY
knob until SP E C I A L
CO N T R O L S i s
highlighted. Then,
p ress the ON
SC R E E N DI S P L AY
button to highlight
LA N G U A G E i c o n .
WI T H OSD CO N T R O L S, you can set the time for the On
S c reen Display to time out, change the vertical and
horizontal position of the OSD on the monitor scre e n .
P ress the OSD b u t t o n .
Tu rn the RO TA RY
knob until SP E C I A L
CO N T R O L S i s
highlighted. Next,
p ress the O S D
button. Then, turn
the R
O TA RY k n o b
until the O S D
CO N T R O L S icon is
h i g h l i g h t e d .
P ress the ON
SC R E E N DI S P L AY
button to bring
up LA N G U A G E
s c re e n .
5
P ress the
O S D
button to
re t u rn to EX I T
w i n d o w.
Tu rn the RO TA RY knob to
until desired language is
s e l e c t e d .
Smart Help
After re t u rning to EX I T . . .
. . . to continue to OS D CO N T R O L S, t u rn the RO TA RYknob until
SP E C I A L CO N T R O L S WI N D O W is highlighted. Next, press the OSD
button. Follow steps 2-5 under OS D CO N T R O L.
. . . to exit completely, p ress the OSD button and choose either
SAV E or NO SAV E in setting mode, then push OSD button to exit
OSD. (See page 18 for other exit options.)
P ress the O S D
button to bring up
O
S D CO N T R O L S s c re e n .
P ress the O S D
8
button to re t u rn
to EX I T w i n d o w.
P ress the O S D
Tu rn the RO TA RY k n o b
to select VE RT I C A L o r
HO R I Z O N TA L PO S I T I O N,
and repeat steps 3-6.
P ress the OSD button to add
your change and re t u rn to
O
S D CO N T R O L S s c re e n .
button to bring up
TI M E R s c re e n .
Tu rn the RO TA RY k n o b
to select : 05, 10, 25
seconds, or OF F .
Smart Help
After re t u rning to EX I T . . .
. . . to continue to PO W E R SA V I N G, t u rn the RO TA RY knob until
SP E C I A L CO N T R O L WI N D O W is highlighted. Next, press the OSD
button. Follow steps 2-5 under PO W E R SAV I N G.
. . . to exit completely, p ress the OSD button and choose either
S
AV E or NO SAV E in setting mode, then push OSD button to exit
OSD. (See page 18 for other exit options.)
16
Page 17

How to Use the On Screen Display (OSD)
E
N
Special Controls window
PO W E R SAV I N G helps save energy when the monitor is on
but not being used. After a preset time, the monitor will go
blank. To select P
O W E R SAV I N G, follow the steps below.
P ress the OSD b u t t o n .
Tu rn the RO TA RY
knob until SP E C I A L
CO N T R O L S i s
highlighted. Next,
p ress the O S D
button.
RO TA RY DE FA U LT allows you to pick the feature your RO TA RY
knob will default to when not used in adjusting your O S D .
The normal default is brightness. To select your RO TA RY DE FA U LT,
follow the steps below.
P ress the OSD b u t t o n .
Tu rn the R
knob until SP E C I A L
CO N T R O L S i s
highlighted. Next,
p ress the O S D
b u t t o n .
O TA RY
P ress the
OSD b u t t o n
to re t u rn to EX I T
w i n d o w.
Tu rn the RO TA RY knob until PO W E R
SAV I N G is highlighted. Then, pre s s
the O S D b u t t o n .
Tu rn the RO TA RY
knob to select
PO W E R SAV I N G
ON o r OF F.
Smart Help
After re t u rning to EX I T . . .
. . . to continue to RO T A R Y DE F A U L T, t u rn the RO TA RY knob until
SP E C I A L CO N T R O L is highlighted. Next, press the OS D b u t t o n .
Follow steps 2-5 under RO TA RY DE FA U LT.
. . . to exit completely,p ress the OSD button and choose either
SAV E or NO SAV E in setting mode, then push OSD button to exit
OSD. (See page 18 for other exit options.)
P ress the
OSD b u t t o n
to re t u rn to EX I T
w i n d o w.
Tu rn the RO TA RY knob until RO TA RY
DE FA U LT is highlighted. Then, pre s s
the O S Db u t t o n .
Tu rn the RO TA RY
knob to select
CO N T R A S T, o r
Smart Help
After re t u rning to EX I T . . .
. . . to continue to another window, t u rn the RO TA RY knob until
that window is highlighted. Next, press the OS D button. Follow
the instructions for that window.
. . . to exit completely, p ress the OSD button and choose either
S
AV E or NO SAV E in setting mode, then push OSD button to exit
OSD. (See page 18 for other exit options.)
17
BR I G H T N E S S,
VO L U M E.
Page 18

How to Use the On Screen Display (OSD)
Exit or Reset
Choosing EX I T allows you to save results of adjustment on
settings and exit the OSD scre e n .
When you are at a
c o n t rol window. for
example MA I N CO N T R O L S,
an icon is highlighted.
Tu rn the RO TA RY k n o b
until EX I T is highlighted.
Next, press the O S D
b u t t o n .
The settings mode is now
highlighted. You can
choose to either Y
NO. Then, press the O S D
button to EX I T.
E S o r
Choosing RE S E T re t u rns all the settings in that window to factory
p re s e t s .
Make sure you have
exited from all icons in a
w i n d o w. (See T
F R O M A NI N D I V I D U A L
W I N D O W
MA I N CO N T R O L S will be
highlighted.
Tu rn the RO TA RYk n o b
until RE S E T is highlighted.
Next, press the O S D
button. The On Scre e n
Display will disappear.
Tu rn the ro t a ry knob to
select R
YE S or NO. Press the O S D
button to E X I T.
O EX I T
.) For example,
E S E T AL L SE T T I N G S,
18
Page 19

E
N
Additional Informat i o n
The monitor will detect various display situation automatically. When the monitor detects the problems, the screen will automatically show the
d i ff e rent warning signals to remind you. This warning signals can be disabled by pressing AUTO button for more than 10 seconds if there is no
video signal in.
• NO VIDEO INPUT •
This screen appears when there is no video signal input. Please check
that the signal cable is properly connected to the graphics board or
P C .
• CANNOT DISPLAY THIS VIDEO MODE •
This screen appears when the input frequency from the computer is
not standard video mode or out of the monitor’s scanning range.
Please change the display mode of the operating software in the
computer (i.e. Windows) to1024 x 768 @ 60 Hz for best display
re s u l t s .
• ENTERING SLEEP MODE •
This screen warns when the monitor is about to enter the sleep mode.
Please press any key on the keyboard or click the mouse for waking
the monitor and computer.
19
Page 20

Additional informat i o n
If you have VESA's DPMS compliance display card or software installed in your PC, the monitor can automatically reduce its power
consumption when not in use. If input from a keyboard, mouse, or other device is detected, the PC & monitor automatically “wakes up.” The
table below shows the power consumption and signalling of this automatic power-saving feature. To turn this feature on and off, see page
17. The table below shows the 14 factory preset video modes.
Power Management Definition
VESA mode Video H-sync V-sync Power Power LED
used saving(%) color
ON Active Yes Yes < 38W 0% Green
Stand-by Blanked No Yes < 5 W 86.8% Amber
Suspend Blanked Yes No < 5 W 86.8% Amber
OFF Blanked No No < 5 W 86.8% Amber
• Above power consumptions exclude USB watts.
• This monitor is ENERGY STA R®c o m p l i a n t .
As an ENERGY STA R®Pa rt n e r, P H I L I P S has determined that this
product meets the ENERGY STAR®guidelines for energy efficiency.
The proper operation of the function re q u i res a computer with VESA
DPMS power management capabilities.
The 15-pin D-sub connector (male) of the signal cable:
Pin No. Assignment
1 Red video input
2 G reen video input
3 Blue video input
4 Identical output
- connected to pin 10
5 Self test
6 Red video gro u n d
7 G reen video gro u n d
8 Blue video gro u n d
9 No pin
1 0 Logic gro u n d
1 1 Identical output
- connected to pin 10
1 2 Serial data line (SDA)
1 3 H. Sync / H+V
1 4 V. Sync (VCLK for DDC)
1 5 Data clock line (SCL)
Factory Preset Resolution Modes
MODE RESOLUTION H. FREQ. V. FREQ. STANDARD
(KHZ) (HZ)
1 640 x 350 31.5 70 IBM VGA
2 720 x 400 31.5 70 IBM VGA
3 640 x 480 31.5 60 IBM VGA
4 640 x 480 35.0 67 MAC
5 640 x 480 37.9 73 VESA
6 640 x 480 37.5 75 VESA
7 800 x 600 35.2 56 VESA
8 800 x 600 37.9 60 VESA
9 800 x 600 48.1 72 VESA
10 800 x 600 46.9 75 VESA
11 832 x 624 49.7 75 MAC
12 1024 x 768 48.4 60 VESA
13 1024 x 768 56.5 70 VESA
14 1024 x 768 60.0 75 VESA
DISPLAY :15 inch
Type : Flat panel active matrix-TFT LCD
VIEWABLE IMAGE SIZE (VIS) :15 inch diagonal
S
URFACE TREATMENT :Anti-glare coating
WEIGHT (UNPACKED) :5.5kgs
MAXIMUM DIMENSIONS
Height :418 mm
Depth :176 mm
Width :402 mm
MAXIMUM GRAPHICS
RESOLUTION :1024 x 768 at 75 Hz Refresh Rate
TEXT MODE :720 x 400
DOT PITCH :0.297 mm
HORIZONTAL FREQUENCY :30 to 61 kHz
VERTICAL FREQUENCY :56 to 75 Hz
ENVIRONMENTAL
REQUIREMENTS TEMPERATURE
Operating Temperature : 41 to 95°F 5 to 35°C
Storage Temperature :-43 to 140°F -20 to 60°C
HUMIDITY (NON-CONDENSING)
Operating :20 to 80%
Non-operating :5 to 95%
POWER SOURCE :100-240VAC±10%,60-50Hz
POWER CONSUMPTION :< 38 watt (excluding USB)
I
NPUT TERMINAL :15-pin D-type connector with cable
Mains Cord :Non-shield
Pedestal
Tilt & Swivel :-2° to 32°, +/- 30°
(38.1 cm)
(90-264VAC)
20
Page 21

E
N
Additional Informat i o n
What to Do if Something isn't Working
This page presents problems that can be corrected by the user. If the problem still exists after these possible solutions, contact your
nearest Philips dealer.
No Picture • Make sure the Power cable is plugged to the wall and back of the monitor.
(Power LED not lit) • Make sure the DC power cord has been attached to the DC Jack.
• First, power button in front of the monitor should be in the OFF position, then press it to ON position again.
No Picture • Make sure the computer is turned on.
(Power LED is Amber • Make sure the signal cable is properly connected to your computer.
or Yellow in color) • Check to see if the monitor cable has bent pins.
• The Energy Saving Feature may be activated. See pages 2 and 20 for more detail.
S c reen says • Make sure the monitor cable is properly connected to your computer. See Setting Up foldout.
A U T O button not working • The A
p ro p e r l y Wi n d o w s .
• Check to see if the monitor cable has bent pins.
• Make sure the computer is turned on.
U T O FU N C T I O N is designed for use on standard Macintosh or IBM-compatible PC running Microsoft
• It may not work properly if using non-standard PC or video board .
Imaging Pro b l e m s
Display position is • Push the A
i n c o rre c t • Adjust the image position using the HO R I Z O N TA L PO S I T I O N &/or VE RT I C A L PO S I T I O N in the SC R E E N PO S I T I O NA N D
QU A L I T Y WI N D O W.
Image vibrates on the • Check that the signal cable is properly connected to the graphics board or PC.
s c re e n
Ve rtical flicker • Push the AU T O button.
a p p e a r s • Eliminate the vertical bars using the C
See Page 13 for details.
Horizontal flicker • Push the AU T O button.
a p p e a r s • Eliminate the horizontal bars using the PH A S E AD J U S T M E N T in the SC R E E N PO S I T I O N& QU A L I T Y WI N D O W.
See Page 13 for details.
U T O button.
L O C K AD J U S T M E N T in the SC R E E N PO S I T I O N&QU A L I T Y WI N D O W.
The screen is too bright • Adjust the contrast and brightness using the MA I N CO N T R O L S WI N D O W. See Page 10 for details.
or too dark (The backlight of the LCD monitor has a fixed life span. When the screen becomes dark or begins to flicker,
An after- i m a g e • If an image remains in the screen for an extended period of time, it may be imprinted in the screen and leave
a p p e a r s an after-image. This usually disappears after a few hours.
An after-image r e m a i n s • This is characteristic of liquid crystal and is not caused by a malfunction or deterioration of the
after the power has been liquid crystal. The after-image will disappear after a set amount of time.
t u rned off
G reen, red, and blue dots • The remaining dots are charactericstic of the liquid crystal used in today’s technology.
remain on the scre e n
please contact your dealer. )
21
Page 22

Additional Informat i o n
A c c e s s o r i e s . . . . . . . . . . . . . .3
Automatic Power Saving . . .2 0
B r i g h t n e s s . . . . . . . . . . . .7, 10
C A D / C A M . . . . . . . . . . . . . .1 4
Clock Adjustment . . . . . . . .1 3
Color Te m p e r a t u re . . . . . . .1 4
C o n t r a s t . . . . . . . . . . . . . . . .1 0
C o rrect handling . . . . . . . . . .3
Description of contro l s . . .6 - 8
D T P . . . . . . . . . . . . . . . . . . .1 4
End-of -life disposal . . . . . . .2
E x i t . . . . . . . . . . . . . . . . . . .1 8
F e a t u re s . . . . . . . . . . . . . . . . .2
G l o s s a ry . . . . . . . . . . . . . . .2 2
Horizontal Position . . . . . . .1 2
Kensington Lock . . . . . . . . . .6
Installation location . . . . . . . .3
L a n g u a g e . . . . . . . . . . . . . .1 6
Main Contro l s . . . . . .8, 10-11
On Screen Display . . . . . . . .1 0
OSD button . . . . . . . . . . . . . .8
OSD Contro l s . . . . . . . . . . .1 6
OSD Control Level Stru c t u re .9
O S D Wa rning Signals . . . . .1 9
P e d e s t a l . . . . . . . . . . . . . . . . .7
Phase Adjustment . . . . . . . .1 3
Pin Assignment . . . . . . . . . .2 0
Power button .Set Up Guide, 2
Power plug . . .Set Up Guide, 2
Power Saving . . . . . . . . . . .1 7
R e s e t . . . . . . . . . . . . . . . . . .1 8
Resolution Modes . . . . . . . .2 0
R o t a ry Default . . . . . . . . . . .1 7
R o t a ry knob . . . . . . . . . . . .6 - 7
Safety pre c a u t i o n s . . . . . . . .2
S c reen Size & Quality . .1 2 - 1 3
Special Contro l s . . . .8, 17-18
S p e c i f i c a t i o n s . . . . . . . . . . .2 0
Tro u b l e s h o o t i n g . . . . . . . . 2 1 ,
. . . . . . . . . . . . . .Set Up Guide
USB hub . . . . . . . . . . . . . . . .6
USB connections . . . . . . . . . .4
User Pre s e t s . . . . . . . . . . . .1 5
Ve rtical Position . . . . . . . . .1 2
Video Input . . . . . . . . . .19, 21
Video Settings . . . . . . . . . . . .5
Windows ‘95 . . . . . . . . . . . .5 ,
. . . . . . . . . . . . . .Set Up Guide
Here are a few definitions that may help you.
D - S u b Two ways of connecting your monitor to your
c o m p u t e r. Your monitor comes with a D-Sub cable.
U S B Universal Serial Bus. A way to connect your
c o m p u t e r, monitor, and peripherals for true Plug-andPlay functions.
22
 Loading...