

Philips 15L5200Q, 15L5082Q/20C, 15L5100Q, 15L5082/02C, 150B10 User Manual [pt]

E
N
1
Table of Contents
1 5 0 B
1 5 L 5 0 8 2 Q
GETTING STARTED
INTRODUCTION. . . . . . . . . . . . . . . . . . . . . . . . . . . . . . . . . . 2
SAFETY. . . . . . . . . . . . . . . . . . . . . . . . . . . . . . . . . . . . . . . 2
I
NSTALLATION LOCATION . . . . . . . . . . . . . . . . . . . . . . . . . . . 3
CORRECT HANDLING . . . . . . . . . . . . . . . . . . . . . . . . . . . . . . 3
ACCESSORIES . . . . . . . . . . . . . . . . . . . . . . . . . . . . . . . . . . 3
CONNECTION TO PC. . . . . . . . . . . . . . . . . . . . . . . . . . . . . 4-5
DESCRIPTION OF CONTROLS . . . . . . . . . . . . . . . . . . . . . . . 6-8
HOW TO USE THE OSD [CONTROL LEVEL STRUCTURE] . . . . 9-18
SETTING UP GUIDE. . . . . . . . . . . . . . . . . . . . . . . . . . FOLDOUT
HOW TO USE THE ON SCREEN DISPLAY
MAIN CONTROLS WINDOW
BRIGHTNESS . . . . . . . . . . . . . . . . . . . . . . . . . . . . . . . . . . 10
CONTRAST . . . . . . . . . . . . . . . . . . . . . . . . . . . . . . . . . . . 11
SCREEN POSITION & QUALITY WINDOW
VERTICAL POSITION . . . . . . . . . . . . . . . . . . . . . . . . . . . . . 12
H
ORIZONTAL POSITION . . . . . . . . . . . . . . . . . . . . . . . . . . . 12
PHASE ADJUSTMENT . . . . . . . . . . . . . . . . . . . . . . . . . . . . . 13
CLOCK ADJUSTMENT . . . . . . . . . . . . . . . . . . . . . . . . . . . . . 13
COLOR TEMPERATURE WINDOW
9300 K CAD/CAM. . . . . . . . . . . . . . . . . . . . . . . . . . . . . 14
6500 K DTP . . . . . . . . . . . . . . . . . . . . . . . . . . . . . . . . . 14
U
SER PRESETS . . . . . . . . . . . . . . . . . . . . . . . . . . . . . . . . 15
SPECIAL CONTROLS WINDOW
LANGUAGE . . . . . . . . . . . . . . . . . . . . . . . . . . . . . . . . . . . 16
OSD CONTROLS . . . . . . . . . . . . . . . . . . . . . . . . . . . . . . . 16
P
OWER SAVING . . . . . . . . . . . . . . . . . . . . . . . . . . . . . . . . 17
ROTARY DEFAULT . . . . . . . . . . . . . . . . . . . . . . . . . . . . . . . 17
EXIT OR RESET . . . . . . . . . . . . . . . . . . . . . . . . . . . . . . . . 18
ADDITIONAL INFORMATION
OSD WARNING SIGNAL . . . . . . . . . . . . . . . . . . . . . . . . . . 19
POWER SAVING & PRESET RESOLUTION MODE . . . . . . . . . . . 20
PIN ASSIGNMENT . . . . . . . . . . . . . . . . . . . . . . . . . . . . . . . 20
SPECIFICATIONS . . . . . . . . . . . . . . . . . . . . . . . . . . . . . . . . 20
WHAT TO DO IF SOMETHING ISN’T WORKING . . . . . . . . . . . . 21
INDEX. . . . . . . . . . . . . . . . . . . . . . . . . . . . . . . . . . . . . . . 22
GLOSSARY . . . . . . . . . . . . . . . . . . . . . . . . . . . . . . . . . . . 22
Other language versions
F
RENCH (FRANCAIS) . . . . . . . . . . . . . . . . . . . . . . . . .23
ITALIAN (ITALIANO) . . . . . . . . . . . . . . . . . . . . . . . . . .89
SPANISH (ESPAÑOL) . . . . . . . . . . . . . . . . . . . . . . . . .45
GERMAN (DEUTSCH) . . . . . . . . . . . . . . . . . . . . . . . . .67
a p p e n d i x
English Information for Users in the U.S.. . . . . . . . . . . . . . . . . . . . . . . . . . . . A1
FCC Declaration . . . . . . . . . . . . . . . . . . . . . . . . . . . . . . . . . . . . . . . . A2
TCO’99 . . . . . . . . . . . . . . . . . . . . . . . . . . . . . . . . . . . . . . . . . . . . A3-A4
ENERGY DECLARATION. . . . . . . . . . . . . . . . . . . . . . . . . . . . . . . . . . . A5
Information for UK only. . . . . . . . . . . . . . . . . . . . . . . . . . . . . . . . . . . A6
Français FCC Declaration . . . . . . . . . . . . . . . . . . . . . . . . . . . . . . . . . . . . . . . . A7
Dansk ADVARSEL . . . . . . . . . . . . . . . . . . . . . . . . . . . . . . . . . . . . . . . . . . . . A8
Norsk ADVARSEL . . . . . . . . . . . . . . . . . . . . . . . . . . . . . . . . . . . . . . . . . . . . A8
Svenska VARNING. . . . . . . . . . . . . . . . . . . . . . . . . . . . . . . . . . . . . . . . . . . . . . A8
Suomi VARNING. . . . . . . . . . . . . . . . . . . . . . . . . . . . . . . . . . . . . . . . . . . . . . A8
BECAUSE OF CONTINUOUS PRODUCT IMPROVEMENTS,
THE INFORMATION MENTIONED IN THIS DOCUMENT IS SUBJECT TO CHANGE WITHOUT NOTICE.

Introduction and Safety
I n t ro d u c t i o n
The Philips 150B Flat Panel Monitor satisfies the need of
high-end corporate and professional users. This monitor is
for those who are seeking advanced design, a small
footprint, high quality picture and ergonomic features in a
monitor that takes minimal desk space. Its innovative
technology delivers outstanding brightness and contrast,
z e ro emissions, and low-energy consumption.
F e a t u re s
E
X C E L L E N T D I S P L AY Q U A L I T Y
• 15 inch viewable area display - comparable to the
viewable screen size of a 17-inch CRT monitor, with even
better picture clarity and geometry.
• Full compatibility with all standard video cards and all
common VESA modes up to 1024 x 768 Hz with 30 to 61
kHz horizontal scanning.
• State of the art image processing for optimal full scre e n
image expansion at resolutions for DOS, VGA 640 x 480,
and SVGA 800 x 600
• Advance auto function for automatic adjustment of
horizontal position, vertical position, phase, and clock
s e t t i n g .
E
R G O N O M I C D E S I G N
• To protect the LCD panel against wear and scratches, an
optional protective cover can be ord e red separately. Please
i n q u i re with your dealer.
• Detachable pedestal for swing arm or wall mount
applications. A special hinge design on the monitor insure s
full tilt and rotation adjustability even on the simplest
m o u n t .
• Easy OSD with five (5) language text.
• TCO ‘99 appro v e d
O
T H E R S
• USB Bay for an optional powered hub with four (4)
d o w n s t ream port s
• Anti-theft Kensington®socket lock and OSD lock to
p revent tampering especially useful at point-of-sale and
customer interaction sites.
N o t e : Your monitor operates according to the VESA DDC level 1/2B. Only computers and
s o f t w a res that support the same guidelines and operate at the same or a higher level can
make use of this feature. If your computer does not support the relevant guidelines, you can
still use your monitor and computer. However, you may need to manually specify the
a p p ropriate resolution in the software or computer.
As an ENERGY STA R®Pa rt n e r,
P H I L I P Shas determined that this
p roduct meets the ENERGY STA R
guidelines for energy eff i c i e n c y.
®
Contact us at our web site: HTTP://www.pcstuff.philips.com
Safety precautions and maintenance
• Unplug the monitor, if you are not going to use it for an
extensive period of time.
• Unplug the monitor, if you need to clean it with a slightly
damp cloth. Wiping the screen with a dry cloth is possible
when the power is off. However, never use alcohol,
solvents, or ammonia-based liquids.
• Consult a service technician if the monitor does not
operate normally when following the instructions in this
m a n u a l .
• The casing cover should be opened only by qualified
s e rvice personnel.
• Keep the monitor out of direct sunlight and away fro m
stoves or any other heat sourc e .
• Remove any object that could fall into the vents or
p revent proper cooling of the monitor’s electronics.
• Do not block the ventilation holes on the cabinet.
ENERGY STAR is a U.S.registered mark.
IBM, IBM PC, and Power PC are registered trademarks of International Business Machines Corporation.
Apple, Macintosh, Quadra, Performa, and Centris are registered trademarks of Apple Computer, Inc.
• Keep the monitor dry. To avoid electric shock, do not
expose it to rain or excessive moisture .
• When positioning the monitor, make sure the power plug
and outlet are easily accessible.
• If turning off the monitor by detaching mains cord or DC
power cord, wait for 6 seconds, then attach the mains cord
or DC power cord for normal operation.
End-of-life disposal
Your new monitor contains materials that can be re c y c l e d
and reused. Specialized companies can recycle your
p roduct to increase the amount of reusable materials and
to minimize the amount to be disposed of.
Please find out about the local regulations on how to
dispose of your old monitor.
2
I n s ta l l ation Lo cations & Ac c e ss o r i e s
E
N
Installation Locations
AV O I D HE AT A N D CO L D EX T R E M E S
• Do not store or use the LCD monitor in locations
exposed to heat, direct sunlight, or extreme cold.
• Avoid moving the LCD monitor between locations
with large temperature diff e rences. Choose a site
falling within the following temperature and humidity
r a n g e s .
Te m p e r a t u re: 5-35°C (40-90°F )
Humidity: 20-80% RH
• Do not subject the LCD monitor to severe vibration
or high impact conditions. Do not place the LCD
monitor inside a car tru n k .
• Take care not to mishandle this product by either
knocking or dropping during operation or
t r a n s p o rt a t i o n .
• Do not store or use the LCD monitor in locations
exposed to high humidity or dusty environment. Also
do not allow water or other liquids to spill on or into
the LCD monitor.
Correct handling of the monitor
1. When handling the monitor, grip the bottom firmly with both hands and
ensure that the front panel faces outward before lifting. Please refer to the
diagram on the right.
2.Handling the monitor with care prevents scratching and damage. If the
monitor becomes damaged, immediately disconnect the power from the
unit and have it checked by a qualified service person before using it again.
3. Do not drop the monitor to prevent fire or electrical shock.
4. When moving the monitor, be sure to unplug all power cords in order to
avoid injury or damage to the equipment.
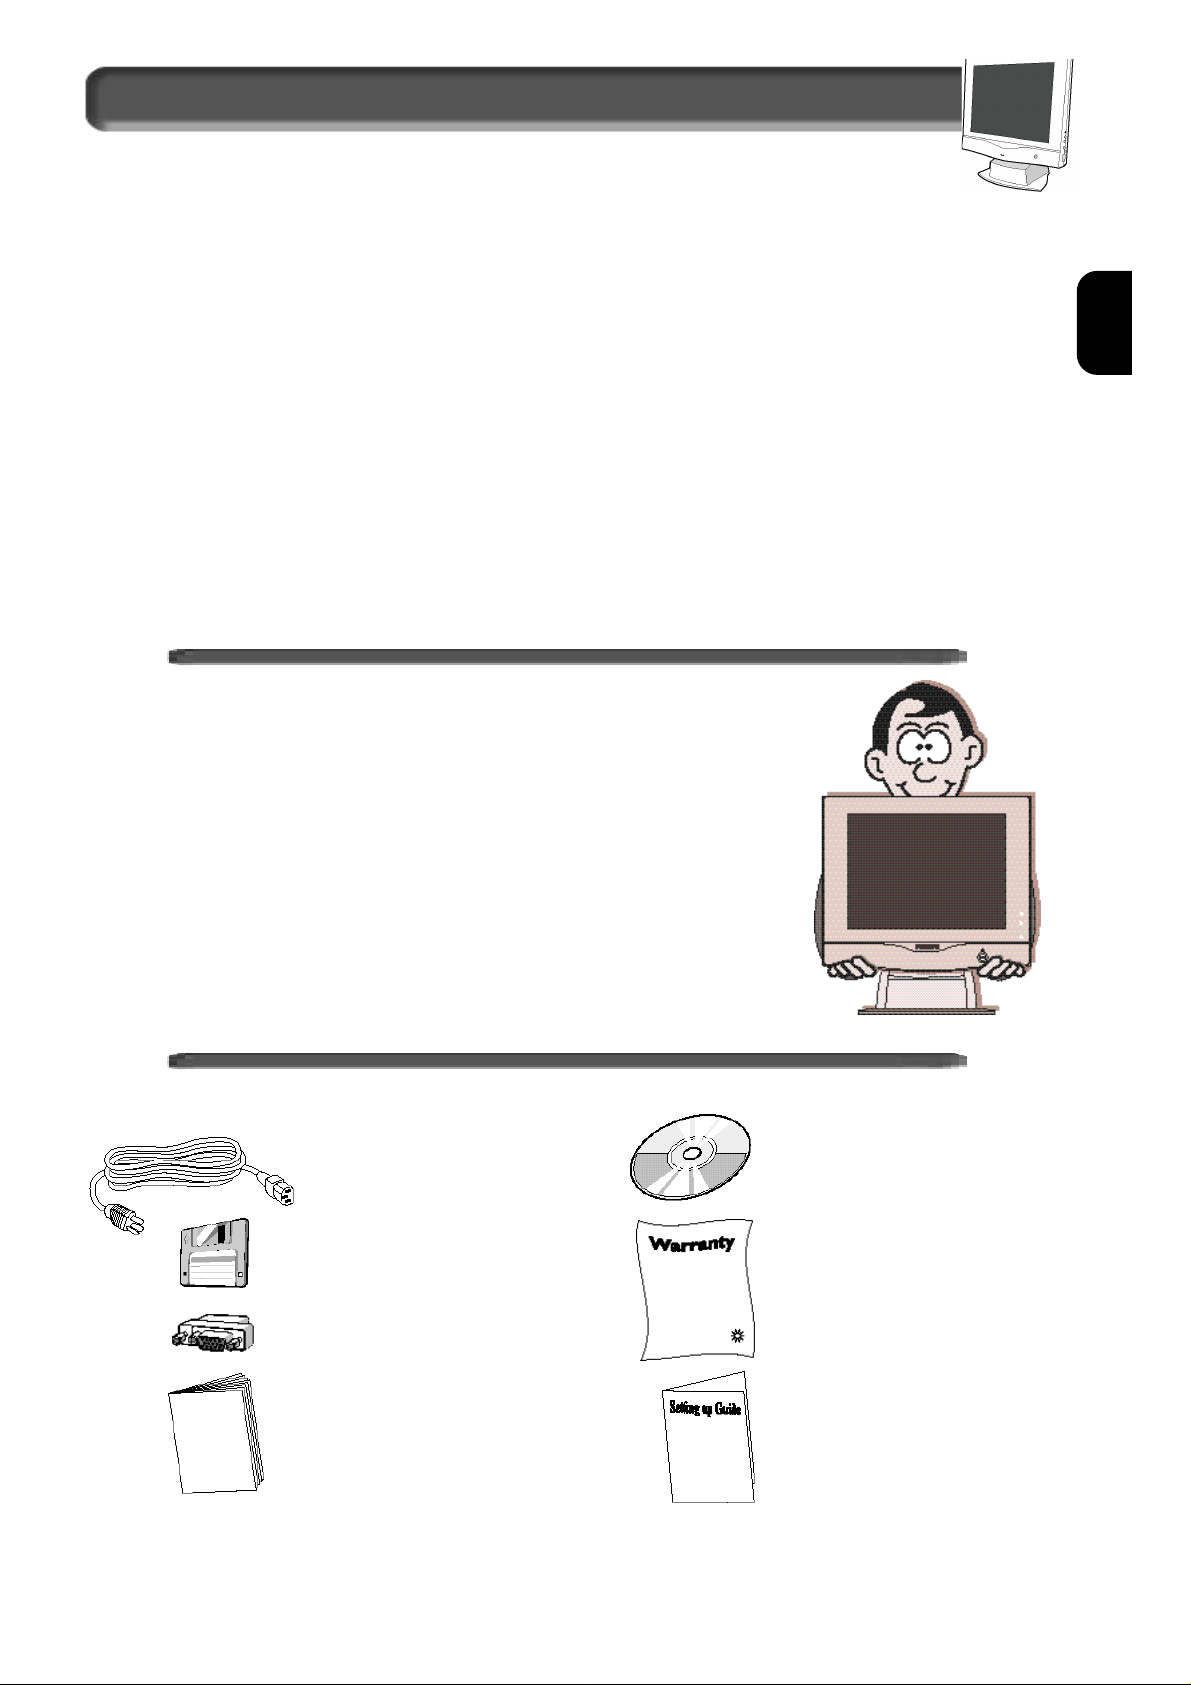
A c c e s s o r i e s
1. Power cable
2. Windows driver disk
3. Macintosh adapter
( o p t i o n a l )
4. User manual
5. CD-ROM
6. Wa rranty Card s
7. Quick Set-up Guide
3
3

connection to PC
U S B (Universal Serial Bus) is an innovation in connecting your IBM-compatible computer to your monitor. By using the USB, you will be able
to connect your keyboard, mouse, printer, and other peripherals to your monitor instead of having to connect them to your computer. This
will give you greater flexibility in setting up your system. Plus, you will have true plug-and-play capability. Philips provides for the optional
U S B Hub so you will be ready to take advantage of this advancement in computer development.
For an IBM-compatible Computer:
1 . Tu rn off the computer.
2 . I n s e rt the (optional) USB Hub and connect the
USB cable to the computer. (Computer must have
USB port . )
3 . Tu rn on the monitor. Then turn on the computer.
4 . With the installation of the correct software, you
will be able to connect USB peripherals to the
m o n i t o r’s USB Hub.
Note:
1-USB Hub and cables sold separately. The USB
Bay is located in back of monitor.
2- Please refer to the USB Hub’s manual and
installation guide for more details.
Refer to the “Setting Up your Philips flat panel monitor” foldout for a more detailed guide to set up your monitor.
4

E
N
connection to PC
VIDEO SETTINGS
Before connecting your LCD Monitor to the PC, make sure that the computer’s video settings (resolution
and frequency) are in accordance with those below.
If you have Windows ’95 or later . . .
FOLLOW THESE STEPS TO COMPLETE SETTING UP YOUR MONITOR
1. Insert Windows ‘95 floppy disk supplied with this monitor.
2. Click on the “START” icon. Next, click on the “SETTINGS” icon. Then click on “CONTROL PANEL.”
3. Double-click on “DISPLAY” icon. Next, click on “SETTINGS” tab. Then click on “ADVA N C E D
PROPERTIES” dialog box.
4. Click on “MONITOR” tab.
5a. If you have an old computer, click on “CHANGE” dialog box. Next, “SELECT DEVICE” screen appears.
Now click on “HAVE DISK” dialog box. and select A drive
Or
5b. If you have a new computer, “SELECT DEVICE” screen automatically appears.
Click on “HAVE DISK” dialog box and select A drive.
6. Select “OK” in the “INSTALL FROM DISK” dialog box. If model name of the Philips monitor is cor rect,
click “OK” tab in the “SELECT DEVICE” dialog box.
7. Click “CLOSE” tab in the “ADVANCED PROPERTIES” dialog box. If your Windows ’95 version is
different or you need more detailed installation information, please refer to the Windows ’95 user’s
manual.
5
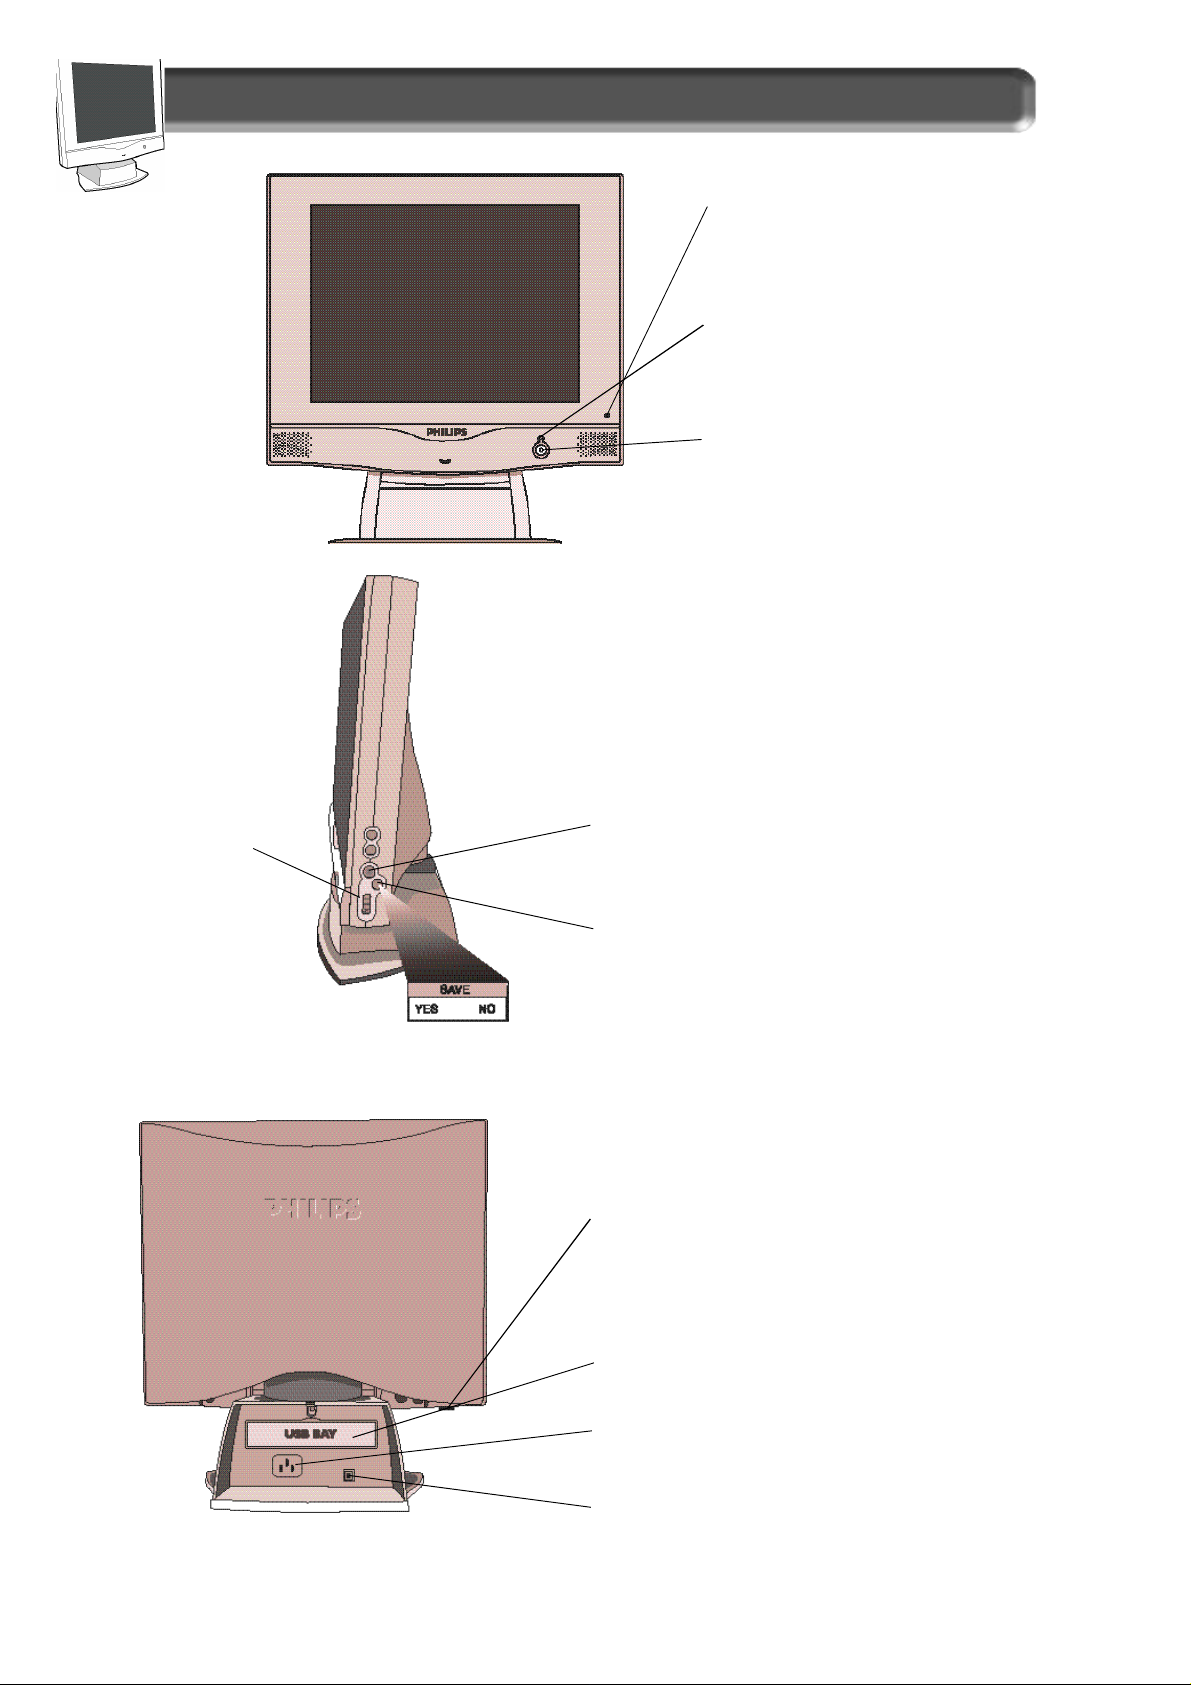
FRONT VIEW
SIDE VIEW
Description of Controls
C o n t rol Indicators – for OSD button .
L E D – Light Emitting Diode turn s
g reen when the monitor is on.
Power Button – Tu rns the monitor
On and Off .
R o t a ry Knob – Helps
guide you through the
On Screen Display.
R
EAR VIEW
On Screen Display (OSD) button – Brings up the
On Screen Display and helps you navigate thro u g h
i t .
Auto Button – Press this button to automatically
adjust the horizontal position, vertical position,
phase, and clock settings. After few seconds, the
S AVE window will appear. Choose YES to keep the
new setting or NO to re s t o re the previous settings.
Kensington Lock S o c k e t – A special feature to
lock your monitor for anti-theft.
USB Bay –Slot for plugging in USB Hub. Optional
h a rd w a re that allows true Plug-and-Play.
See page 4 for installation details.
Power Plug – Plug the AC power cord in here.
See Setting-up foldout for details.
DC Jack – Plug the monitor’s DC power cord here .
6

E
N
Description of Controls
Pedestal - With the built-in pedestal, you can tilt and swivel the
monitor to the most comfortable viewing angle. For best viewing,
always place the monitor at eye level. This pedestal can be
separated from the main LCD monitor body for mechanical arm or
wall-mount applications.(as specified within manufactuer’s
recommendations)
Using the Side Panel OSD
Button - To use the OSD
function, please refer to Page 8
for details.
NOTE: DO NOT REMOVE WITHOUT FIRST READING “REMOVING INSTRUCTIONS” FOUND IN THE
GUIDE BUNDLED WITH THE ACCESSORIES.
7
 Loading...