

Page 1

RELEASE 1.0
Page 2

Philips Solid-State Lighting Solutions
3 Burlington Woods Drive
Burlington, MA, USA 01803
Tel: 617.423.9999
888 FULL RGB (888.385.5742)
FAX: 617.423.9998
Copyright © 2007 Philips State-State Lighting Solutions. All rights reserved.
Chromacore, Chromasic, CK, the CK logo, Color Kinetics, the Color Kinetics logo,
Color Kinetics The Leader in Intelligent Light, ColorBlast, ColorBlaze, ColorBurst,
ColorCast, ColorPlay, ColorScape, DIMand, Direct Light, EssentialWhite, eW, iColor,
iColor Cove, IntelliWhite, iW, iPlayer, Light Without Limits, Optibin, Powercore,
QuickPlay, Sauce, the Sauce logo, and Smartjuice are either registered trademarks
or trademarks of Philips State-State Lighting Solutions in the United States and/or other
countries.
All other brand or product names are trademarks or registered trademarks of their
respective owners.
This product is protected by and/or is for use under one or more of the following U.S.
Patents and their foreign counterparts: 6,016,038, 6,150,774, 6,636,003, 6,777,891,
6,788,011, 6,806,659, 6,975,079, 6,969,954, 7,014,336, 7,139,617, and 7,161,556.
Other patents pending.
PUB-000178-00 Rev 00
Page 3

CONTENTS
Introduction ............................................................................................. 5
iPlayer 3 Overview .......................................................................................................5
ColorPlay 3 Software ................................................................................................... 9
Introduction to iPlayer 3 Modes ................................................................................10
Installation ............................................................................................. 11
iPlayer 3 Components ...............................................................................................11
Electrical Specifications .............................................................................................12
Environmental Specifications ....................................................................................12
Mounting Bracket Installation ...................................................................................12
Scenario A: Quick-Release Mounting ..................................................................13
Scenario B: Locked Mounting ..............................................................................13
Removing the Mounting Bracket / iPlayer 3 Assembly ........................................14
Connecting and Setting Up the iPlayer 3 .................................................................14
Setting Up the iPlayer 3 in USB Mode .................................................................14
Setting Up the iPlayer 3 in Run Mode .................................................................16
Setting Up the iPlayer 3 in Configuration Mode .................................................17
Connecting an External Show Controller .................................................................. 17
Connecting the Controller Keypad ......................................................................17
Connecting Contact Closure Switch Inputs .............................................................. 18
USB Mode .............................................................................................. 20
Overview ...................................................................................................................20
About Shows .............................................................................................................20
About Triggers and Alarms .......................................................................................20
Downloading Show Files From ColorPlay 3 ..............................................................21
Downloading Triggers From ColorPlay 3 ..................................................................22
Downloading Alarms From ColorPlay 3 ....................................................................22
Run Mode .............................................................................................. 23
Overview ...................................................................................................................23
Playing Shows ............................................................................................................23
Preset Shows ........................................................................................................23
Alarm Playback .....................................................................................................24
Switching Shows Without Using the Preset Buttons or Controller Keypad ........24
Light Show Brightness .......................................................................................... 24
Run Mode Display ................................................................................................24
3
Page 4

Configuration Mode .............................................................................. 26
Overview ...................................................................................................................26
Navigating Menus .....................................................................................................26
Saving or Canceling Changes ..............................................................................30
Exiting from Configuration Mode ............................................................................. 30
Assigning Triggers ....................................................................................................30
Assigning a Trigger to a Preconfigured, “Canned” Show ...................................30
Assigning a Trigger to a Show Downloaded from ColorPlay 3 ........................... 31
Setting an Alarm ........................................................................................................32
Setup Menu ...............................................................................................................34
Setting a DMX Address .......................................................................................35
Testing a DMX Address .......................................................................................36
Info Menu ..................................................................................................................36
Pinouts and DIP Switch Functions .......................................................... 37
Serial Port: DB9F Pinouts ..........................................................................................37
DMX: RJ-45—8 Pinouts ............................................................................................. 38
iPlayer 3 DIP Switch Functions ..................................................................................39
External Show Controller Configuration ................................................ 40
Electrical ....................................................................................................................40
Protocol .....................................................................................................................41
iPlayer 3 Commands ............................................................................................ 41
Replies from the iPlayer 3 ....................................................................................42
Auxiliary Device Configuration .............................................................. 43
Formatting an SD Memory Card for Use in the iPlayer 3 .........................................43
4
Page 5
This document provides an overview of the iPlayer® 3 controller
and describes how to install and use the device. If you need
further information, contact Color Kinetics technical support:
Phone: 617.423.9999 or 888 FULL RGB
(888.385.5742), option 3
Email: technicalsupport@colorkinetics.com
Web: http://www.colorkinetics.com/support/
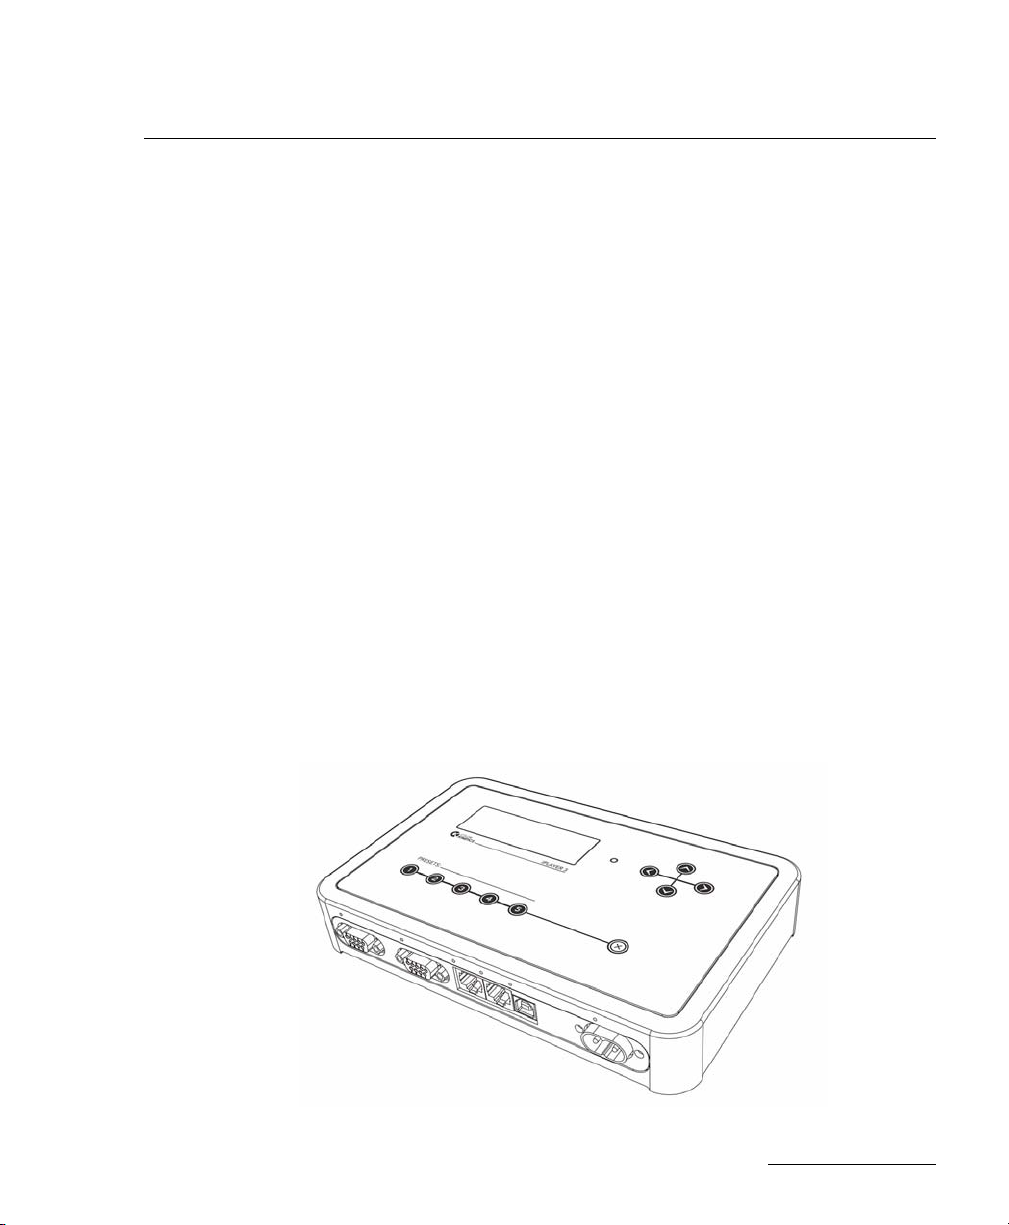
iPlayer 3 Overview
The iPlayer 3 controller is a multi-show storage and playback
device from Color Kinetics.
INTRODUCTION
CHAPTER 1
INTRODUCTION
The iPlayer 3 has the following hardware features:
5
Page 6
INTRODUCTION
1 2 3
4
5
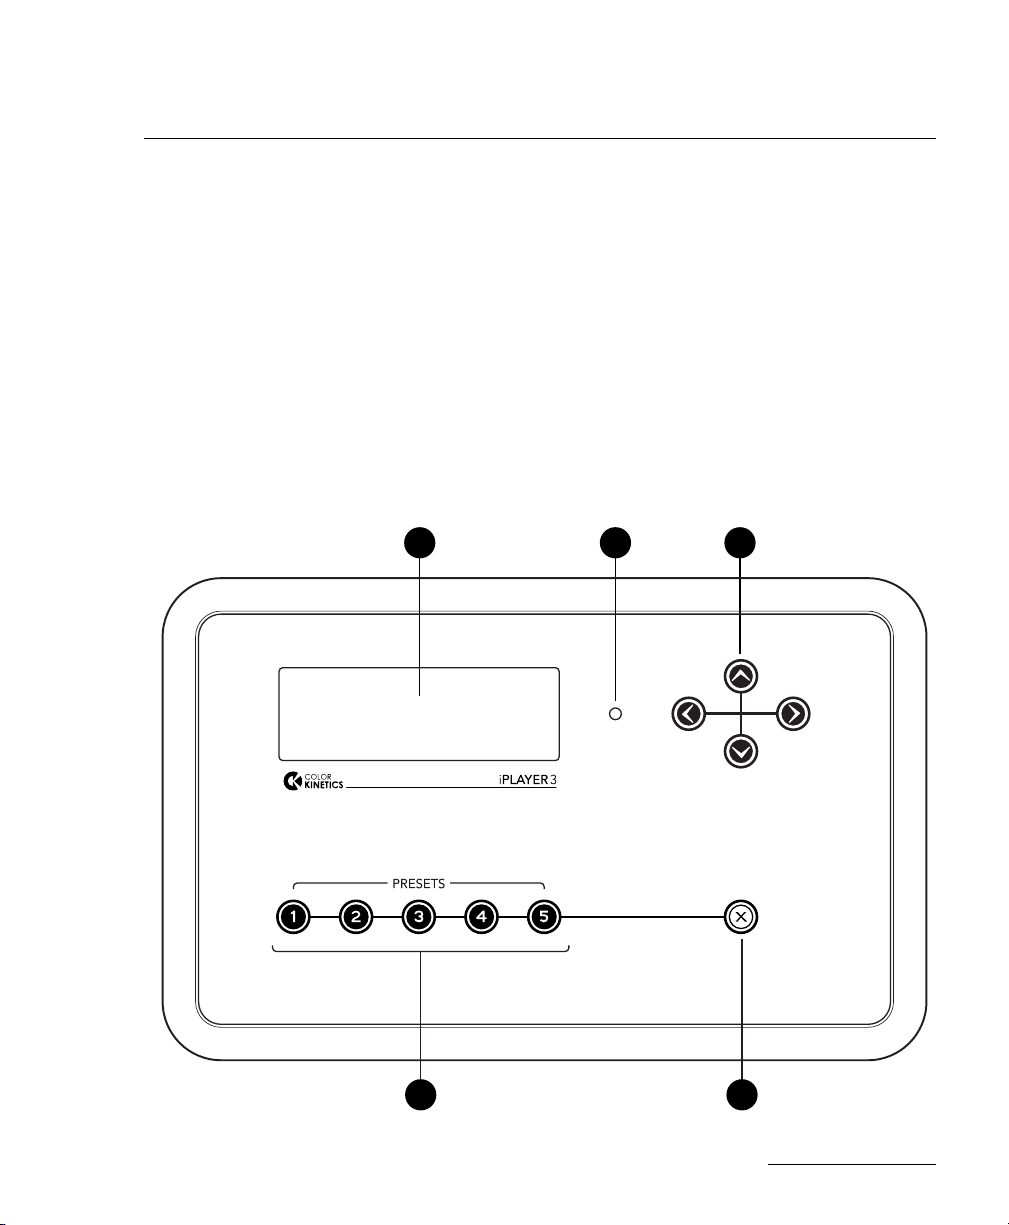
TOP
1 An LCD screen — Displays messages and menus.
See Navigating Menus on page 26.
2 Full-color LED indicator — Changes color when a show is
playing. It shows the color of the light at address 1 on DMX
output 1. (DMX is a data transmission method that enables
lighting control equipment produced by different
manufacturers to be interconnected.)
3 Arrow (navigation) buttons — Used to enter Configuration
Mode, navigate menus, change settings, and save your
changes, and to adjust the overall playback brightness in Run
Mode.
6
Page 7
INTRODUCTION
6
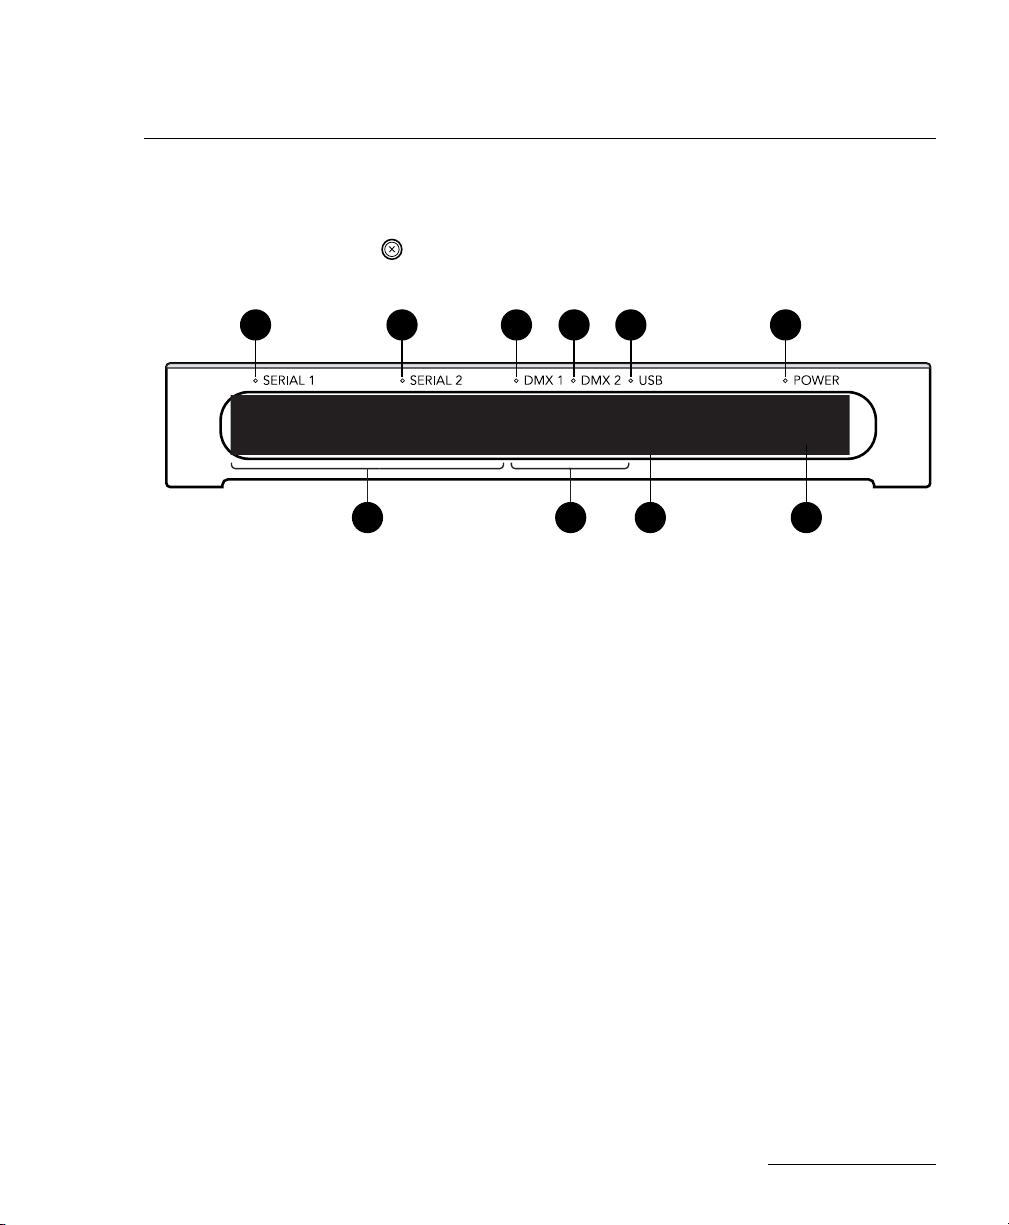
FRONT
6 6 6 6 6
1097 8
4 Preset buttons — Associated with triggers. See Preset Shows
on page 23 for details.
5 The button — Used to cancel action in Configuration
Mode and to pause or resume action in Run Mode.
6 Status LEDs. The Power status LED is orange when power is
supplied. The five other status LEDs are green when the
corresponding port is active.
7 Two RS-232 serial port connectors labeled SERIAL 1 and
SERIAL 2. See Electrical on page 40 and Serial Port: DB9F
Pinouts on page 20.
8 Two DMX port connectors, labeled DMX 1 and DMX 2 —
Used to output DMX512 data to control compatible lights.
The iPlayer 3 can control two full DMX512 universes for a
total of 340 individually addressed Color Kinetics light
fixtures.
9 USB 2.0 port — Connects the iPlayer 3 to your computer for
downloading shows.
10 Power inlet.
11 SD flash memory card in card slot. The iPlayer 3 utilizes a
standard SD flash memory card for storing shows and
configuration settings.
7
Page 8
INTRODUCTION
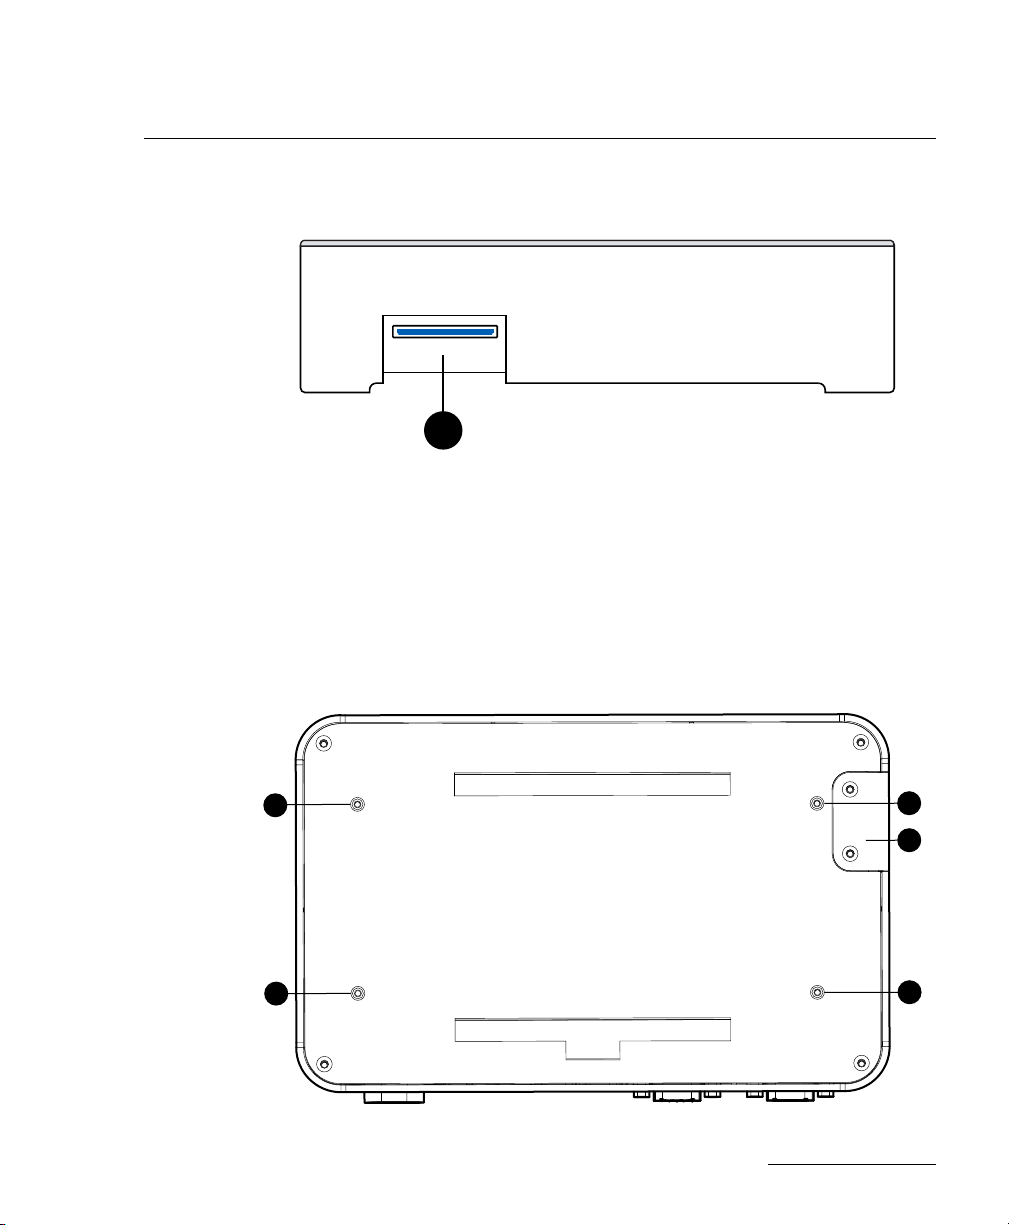
SIDE
11
13
12
BOTTOM
13
13
13
12 Access door. Remove the two access door screws on the
bottom of the iPlayer 3 to access the memory card or
configuration DIP switches. See Auxiliary Device
Configuration on page 43, which describes how to format an
SD memory card for use in the iPlayer 3, and iPlayer 3 DIP
Switch Functions on page 22, which shows the switch
numbering and on/off positions.
8
Page 9
13 Mounting bracket screw holes.
The iPlayer 3 also supports an optional, wall-mounted keypad,
which enables you to trigger shows stored on the iPlayer 3, to
adjust the brightness of those shows, and to turn all lights off.
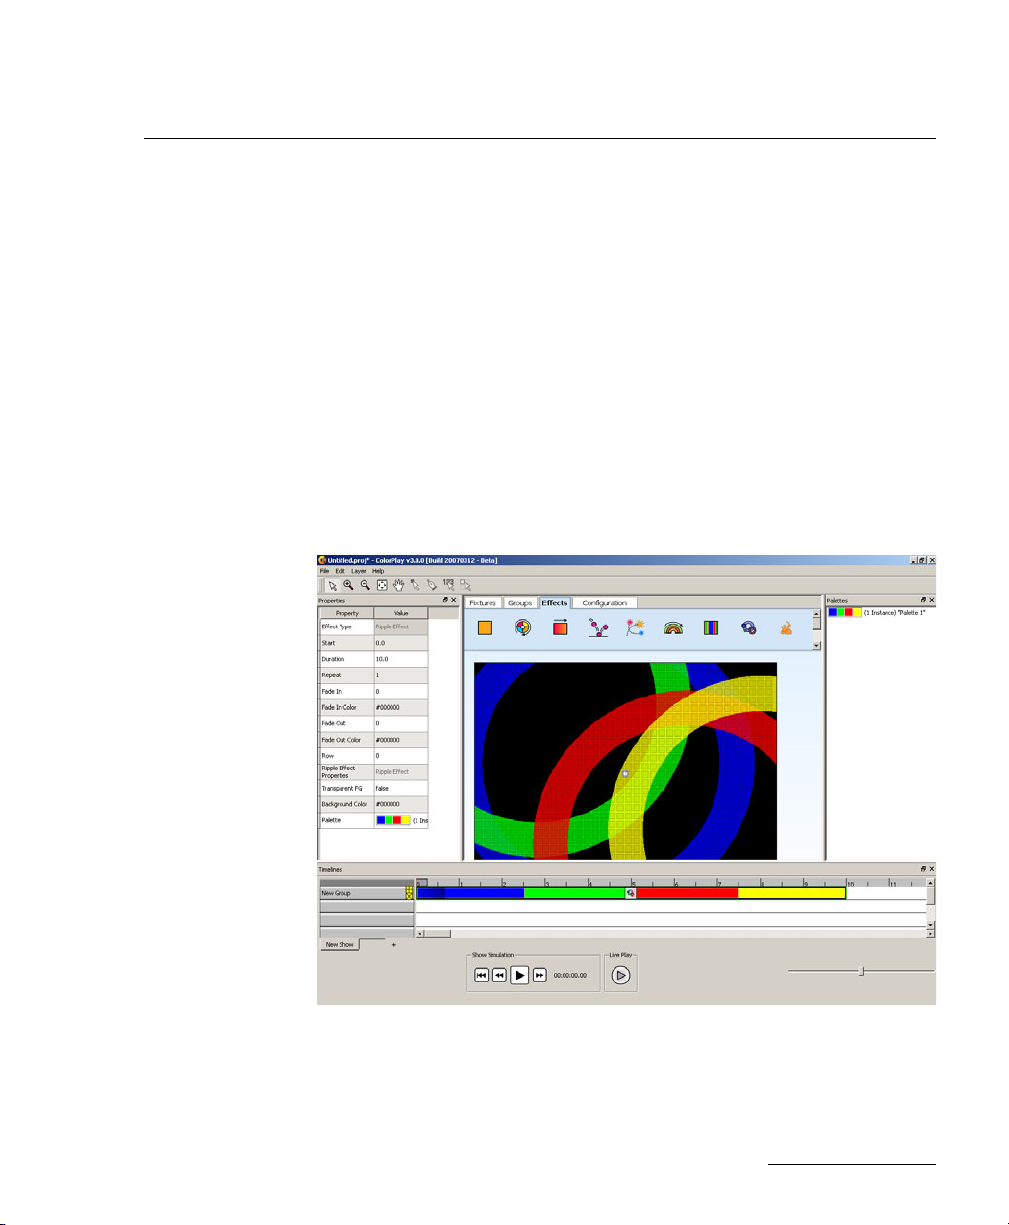
ColorPlay 3 Software
The iPlayer 3 controller comes packaged with ColorPlay® 3 light
show authoring software. You can use ColorPlay 3 to control the
iPlayer 3 from your PC or Mac.
ColorPlay 3 enables you to create unique shows, assign
triggers, set alarms, download light show files to your iPlayer 3,
and manage the show files on your iPlayer 3.
INTRODUCTION
Refer to http://colorkinetics.com/ls/controllers/colorplay3/ for
an overview of ColorPlay 3. Refer to the ColorPlay 3 User Guide
included on the software CD for complete information about
using ColorPlay 3.
9
Page 10

Introduction to iPlayer 3 Modes
The iPlayer 3 controller has three modes of operation:
• USB Mode. You use USB Mode to transfer data between the
iPlayer 3 and ColorPlay 3 software on your PC or Mac. See
Setting Up the iPlayer 3 in USB Mode on page 14 and
Chapter
• Run Mode. You use Run Mode to play light shows. See
Setting Up the iPlayer 3 in Run Mode on page 16 and
Chapter
• Configuration Mode. You use Configuration Mode to:
– Set up and display general information, such as date and
time, latitude and longitude (for sunrise/sunset
calculation), and firmware version number.
– Define or customize triggers and alarms.
See Setting Up the iPlayer 3 in Configuration Mode on page
17 and Chapter
3: USB Mode on page 20.
4: Run Mode on page 23.
5: Configuration Mode on page 26.
INTRODUCTION
10
Page 11

CHAPTER 2
INSTALLATION
iPlayer 3 Components
Take a moment to confirm you have received these iPlayer 3
components:
• iPlayer 3
• Mounting bracket
• Mounting bracket screws
• North American power cord
• USB 2.0 cable
• RJ-45 DMX512 data cable
• ColorPlay 3 software CD
Depending on your configuration and location, you may need
other cables:
INSTALLATION
• Customers outside of North America may need to
provide a power cable suitable for their region’s electrical
system.
• You may require a longer RJ-45 data cable.
• You will need a second RJ-45 data cable if you will use
both DMX ports. (Serial cables are supplied with the
optional AuxBox and Controller Keypad.)
11
Page 12

Electrical Specifications
Power requirements: 100 – 240 VAC, 50/60 Hz, 5W
Environmental Specifications
Operating temperature range: 14F to 122F (-10C to +50C)
Maximum 95% relative humidity
Mounting Bracket Installation
You can install the mounting bracket using either quick-release
mounting or locked mounting.
With either method:
• You can use either the outermost or innermost screw
holes for surface mounting. The four tabs containing the
outermost screw holes are scored and can be removed
with heavy-duty pliers.
• You install so that the release tab (located in the center of
the bracket) points downward.
INSTALLATION
12
Page 13
INSTALLATION
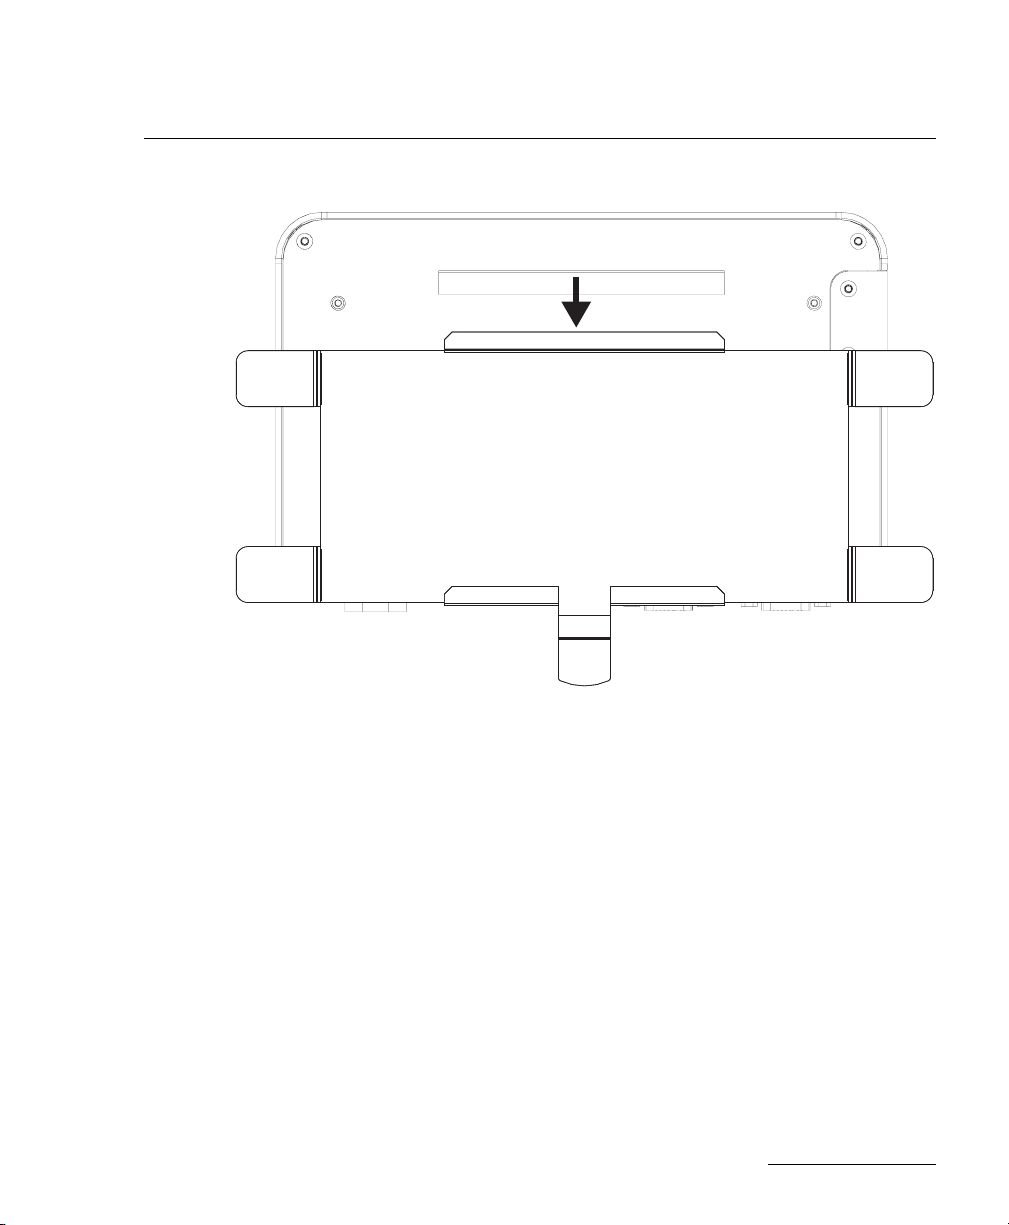
Scenario A: Quick-Release Mounting
1. Screw the mounting bracket onto a surface (with the release
tab pointing downward).
2. Slide the iPlayer 3 onto the mounting bracket until the iPlayer
3 clicks securely into place.
Scenario B: Locked Mounting
1. Slide the iPlayer 3 onto the mounting bracket until the iPlayer
3 clicks securely into place.
2. Using the supplied machine screws, secure the mounting
bracket to the iPlayer 3.
3. Using the outermost screw holes, install the mounting
bracket/iPlayer 3 assembly onto a surface.
13
Page 14
INSTALLATION
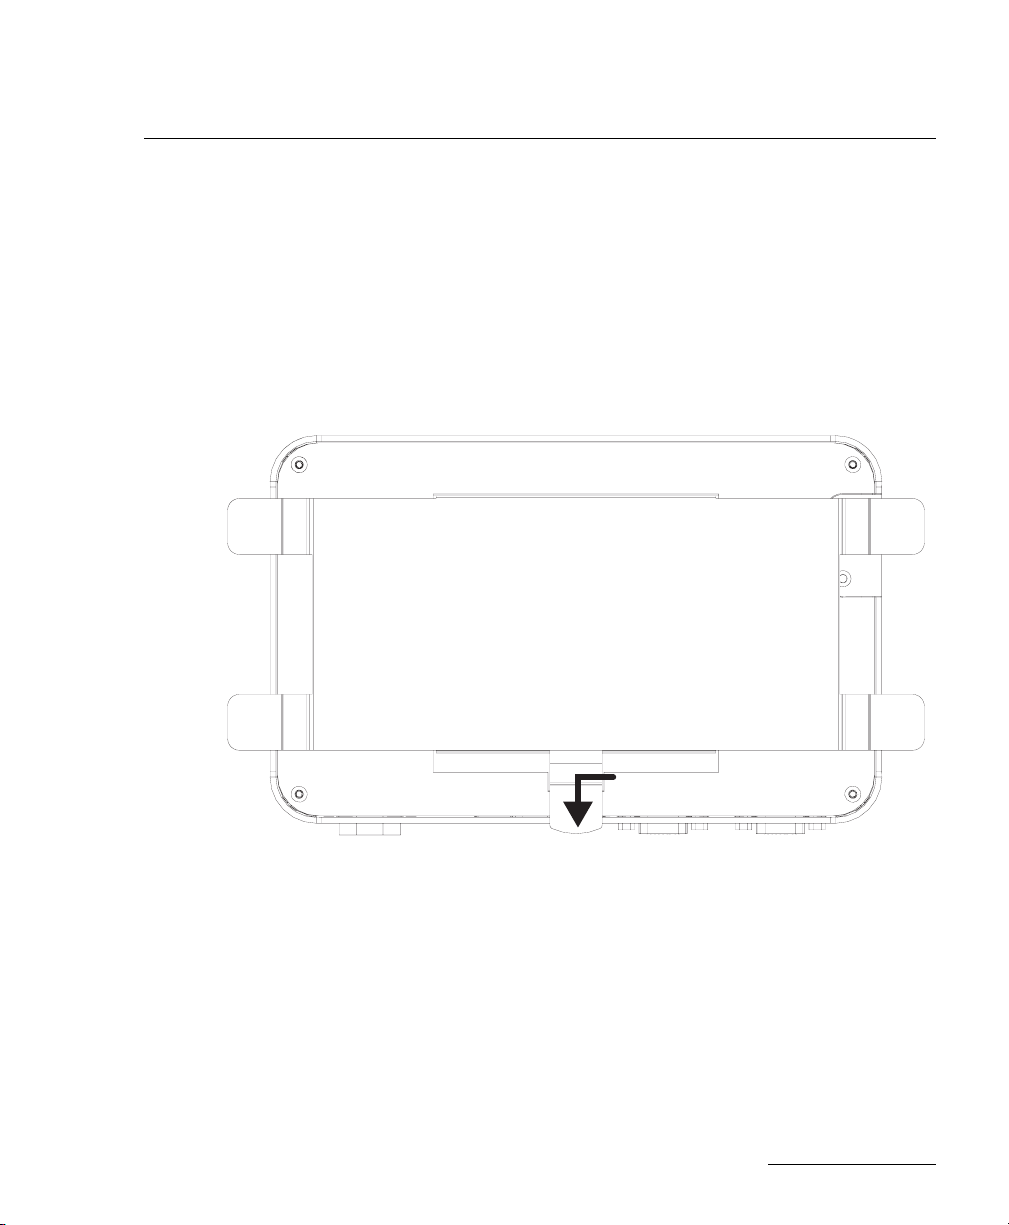
Removing the Mounting Bracket / iPlayer 3 Assembly
To remove the mounting bracket/iPlayer 3 assembly from the
mounting surface installed with locked mounting, remove the
screws installed in step 3 above.
To remove the iPlayer 3 from the mounting bracket installed
with quick-release mounting, press on the release tab and push
the iPlayer 3 upward.
Connecting and Setting Up the iPlayer 3
The following sections describe how to set up the iPlayer 3 in
each mode of operation. Subsequent chapters provide more
details.
Setting Up the iPlayer 3 in USB Mode
USB Mode is used to transfer data to and from the iPlayer 3’s
associated ColorPlay 3 software tool on your PC/Mac.
14
Page 15

INSTALLATION
You must be in USB mode to download light show files to the
iPlayer 3 or to use the ColorPlay 3 live play simulation feature.
You can initiate USB mode only from your PC/Mac, not from the
iPlayer itself. USB Mode is active when you are connected to the
iPlayer 3 via ColorPlay 3.
See Chapter 3: USB Mode on page 20 for details about USB
Mode.
Note: If using Windows®, you must install ColorPlay 3
software prior to connecting the iPlayer 3 controller to your
computer for the first time. The ColorPlay 3 Windows
installation installs the USB device drivers used by the
iPlayer 3. (MacOS does not need a special device driver.)
See the Installing ColorPlay 3 chapter in the ColorPlay 3 User
Guide for instructions on installing ColorPlay 3.
To set up the iPlayer 3 in USB Mode:
1. Verify that ColorPlay 3 is installed on your system.
2. Power on the iPlayer 3 by plugging one end of the power
cord into the power inlet on the iPlayer 3 and the other end
into an electrical outlet.
3. Using the supplied USB cable, connect the USB port on the
iPlayer 3 to your computer’s USB port. The USB light on the
iPlayer 3 will light and the LCD screen will read
USB
on its
bottom row, indicating that the USB connection is active.
Note: The maximum USB cable length is 5m.
4. Launch the ColorPlay 3 software on your computer.
5. There are two methods for initiating USB Mode from
ColorPlay 3:
– Open the ColorPlay 3 configuration layer and click
CONNECT. Once in USB mode, the LCD screen indicates
USB MODE, and you can now download show files,
triggers, and alarms. You can also manage iPlayer 3 files
from the ColorPlay 3 configuration layer. (See the
ColorPlay 3 User Guide for details.)
15
Page 16

– Design or load a show file in ColorPlay 3. Click the LIVE
PLAY button to initiate USB Mode and simulate your show
on your light fixtures.
6. End USB Mode by clicking DISCONNECT in the ColorPlay 3
configuration layer.
Note: While in USB mode, you cannot access standard
iPlayer 3 operational modes. End USB Mode to resume
normal iPlayer 3 functionality.
Setting Up the iPlayer 3 in Run Mode
Run Mode is used to play light shows.
In Run Mode, the iPlayer 3 controller is not connected to your
computer. The iPlayer 3 must be in Run Mode to play light
shows.
See Chapter 4 for details about Run Mode.
To set up the iPlayer 3 in Run Mode:
1. Using the supplied RJ-45 data cable, connect the DMX 1 port
or DMX 2 port to the light fixture(s) you want to use for
playback.
2. Disconnect the USB cable from the iPlayer 3.
INSTALLATION
The LCD screen will indicate
RUN MODE
.
3. (Optional) Press the iPlayer 3 button to pause playback.
The LCD screen will read
LIGHTS OFF
.
Press the button again to resume Run Mode.
Note: When you power on the iPlayer 3 or exit from USB Mode,
the iPlayer 3 automatically enters Run Mode and begins playing
the show assigned to show Preset 1 (the show assigned to
trigger 1). To switch to another show, press another Preset
button (2 through 5) or use an external switch such as the
Controller Keypad available from Color Kinetics.
16
Page 17

Setting Up the iPlayer 3 in Configuration Mode
Configuration Mode is used for configuration and to display
information. Configuration Mode enables you to access
onboard menus for setup or to browse info screens. In
Configuration Mode, the iPlayer 3 controller does not need to
be connected to your computer. You enter Configuration Mode
from the iPlayer3 user interface; you cannot enter it from the
PC.
See Chapter 5: Configuration Mode on page 26 for details
about Configuration Mode.
To set up the iPlayer 3 in Configuration Mode:
1. Press the iPlayer 3 right arrow button. The LCD screen will
indicate
submenu item.
2. Use the arrow buttons to navigate menus, change settings,
and save your changes.
3. At any point, you can press the iPlayer 3 button to cancel
the current operation and return to Run Mode.
CONFIG MODE
and display the current menu or
INSTALLATION
Connecting an External Show Controller
The iPlayer 3 has two RS-232 serial ports that allow external
controllers to select and control light shows. The ports are
intended for use by Color Kinetics’ Controller Keypad, Color
Kinetics’ AuxBox (used to connect contact closure switch
inputs), and third-party devices such as architectural controllers.
See External Show Controller Configuration on page 40.
Connecting the Controller Keypad
The Controller Keypad is an optional iPlayer 3 accessory,
available from Color Kinetics. It is a wall-mounted keypad with
eight show buttons, dimmer controls, and a master OFF switch.
17
Page 18

INSTALLATION
To connect Controller Keypad to the iPlayer 3:
1. Unplug the power cord from the iPlayer 3.
2. Select serial port 1 or 2.
3. Set the iPlayer 3 DIP switch to apply power to the selected
serial port. See iPlayer 3 DIP Switch Functions on page 22.
4. Choose the Controller Keypad power option:
– Power the Controller Keypad via the iPlayer 3 serial
connection
– Power the Controller Keypad via an external source
The Controller Keypad power source selection is configured
via wiring. Refer to the Controller Keypad instructions for
details.
5. Connect one end of the serial cable to the Controller Keypad.
A serial cable is supplied with the Controller Keypad.
Note: The maximum serial cable length is 50’ (15.24m).
6. Connect the other end of the serial cable to the selected
serial port on the iPlayer 3.
Connecting Contact Closure Switch Inputs
The iPlayer 3 accepts input from any standard contact closure
switch via serial port 1 or serial port 2. Note that an optional
Color Kinetics’ AuxBox is required for closure switch
connection.
Connecting the AuxBox to the iPlayer 3
1. Unplug the power cord from the iPlayer 3.
2. Select serial port 1 or 2.
3. Set the iPlayer 3 DIP switch to apply power to the selected
serial port. See iPlayer 3 DIP Switch Functions on page 22.
18
Page 19

INSTALLATION
4. Confirm that the AuxBox is properly set up, including power
configuration and connection to both the iPlayer 3 and the
external switches with which it communicates
5. Connect one end of the serial cable to the AuxBox. A serial
cable is supplied with the AuxBox.
Note: The maximum serial cable length is 50’ (15.24m).
6. Connect the other end of the serial cable to the selected
serial port on the iPlayer 3.
19
Page 20

Overview
This chapter details how to download shows, triggers, and
alarms directly from ColorPlay 3 to the iPlayer 3 using USB
Mode.
About Shows
The iPlayer 3 handles two types of shows: onboard, preconfigured shows and downloaded shows.
Shows authored on ColorPlay 3 contain data about fixtures,
settings such as groups, and effects. After you author shows on
ColorPlay 3, you download your show files to the iPlayer 3 and
then configure your show playback instructions by creating
triggers and alarms.
USB MODE
CHAPTER 3
USB MODE
About Triggers and Alarms
Using ColorPlay 3, you assign trigger numbers to show files.
Using the iPlayer 3, you can use alarms to activate a trigger at a
particular time (such as every Monday at 5:00:00 p.m.) or for an
astronomical event (such as every day at sunset).
Alarms enable you to set triggers for automatic playback. See
Alarm Playback on page 24, Switching Shows Without Using the
Preset Buttons or Controller Keypad on page 24, and Setting an
Alarm on page 32.
20
Page 21

USB MODE
A trigger plays one or more shows and enables you to specify
show playback behaviors such as repeat, jump to another show,
or snap transition.
Triggers are required for show playback on the iPlayer 3. You
can link a show either:
• To one of five buttons on the iPlayer 3. (You manually start
the show by pressing the corresponding button.)
• To buttons on a Controller Keypad or to contact switches
connected to an AuxBox that is connected to one of the
serial ports.
See:
• Preset Shows on page 23
• Trigger Number Message on page 24
• Assigning a Trigger to a Preconfigured, “Canned” Show on
page 30
• Assigning a Trigger to a Show Downloaded from ColorPlay 3
on page 31
Downloading Show Files From ColorPlay 3
1. Initiate USB Mode (see Connecting and Setting Up the
iPlayer 3 on page 14).
2. In the ColorPlay 3 configuration layer, click the
and then select one or more show files.
3. Click the
begin downloading.
Once fully downloaded, show files appear in the right column
of the file manager with a *.SHO file extension.
Alternatively, you can download a show using an SD card
reader, which may be more time-efficient. See Formatting an SD
Memory Card for Use in the iPlayer 3 on page 43 for more
information.
COPY SELECTED SHOWS TO CONTROLLER
SHOW FILES TAB
arrow button to
21
Page 22

Downloading Triggers From ColorPlay 3
1. Initiate USB Mode (see Connecting and Setting Up the
iPlayer 3 on page 14 in the previous chapter).
2. In the ColorPlay 3 configuration layer, click the
and then select one or more triggers in the left column.
3. Click the
COPY SELECTED TRIGGERS TO CONTROLLER
begin downloading.
Once fully downloaded, triggers appear in the right column
of the file manager.
Downloading Alarms From ColorPlay 3
1. Initiate USB Mode (see Connecting and Setting Up the
iPlayer 3 on page 14 in the previous chapter).
USB MODE
TRIGGERS TAB
arrow button to
2. In the ColorPlay 3 configuration layer, click the
ALARMS TAB
and then select one or more alarms in the left column.
3. Click the
COPY SELECTED ALARMS TO CONTROLLER arrow button to
begin downloading.
Once fully downloaded, alarms appear in the right column of
the file manager.
22
Page 23

Overview
Run Mode is the default iPlayer 3 playback mode and
automatically launches when you power on the iPlayer 3
controller. The iPlayer 3 must be in Run Mode for you to
manually play show presets or shows associated with automatic
playback alarms.
Note: Run Mode is suspended when you enter USB Mode or
Configuration Mode.
Playing Shows
RUN MODE
CHAPTER 4
RUN MODE
Preset Shows
There are five Preset buttons located on the faceplate of the
iPlayer 3. Each button is associated with a trigger. Press a Preset
button to set off a trigger and play its corresponding show
file(s).
When you power on the iPlayer 3 or exit from USB Mode, the
iPlayer 3 automatically enters Run Mode and begins playing the
show assigned to show Preset 1 (the show assigned to trigger
1). To switch to another show, press another Preset button (2
through 5) or use an external switch such as the Controller
Keypad available from Color Kinetics.
In addition to the Preset buttons, if you have an optional
Controller Keypad connected to your iPlayer 3, you can assign
triggers to the keys on the keypad.
23
Page 24

RUN MODE
Alarm Playback
You can configure up to 15 alarms on the iPlayer 3. When using
alarms, you do not have to manually press a Preset button to set
off a trigger. Alarms automatically set off triggers based on
settings such as time of day or an astronomical event.
Switching Shows Without Using the Preset Buttons or Controller Keypad
To switch shows without using the Preset buttons or Controller
Keypad, you can use alarms to automate show playback. See
Assigning Triggers on page 30 in the next chapter for iPlayer 3
trigger configuration information, or refer to the ColorPlay 3
User Guide for additional configuration instructions.
Light Show Brightness
Using the up and down buttons, you can set the overall
brightness level of lights in a show while it is being played. The
B
number displayed on the iPlayer 3 reflects the brightness level
you set between 0% and 100%.
Run Mode Display
The iPlayer 3 uses its LCD screen and LED indicator to provide
information during Run Mode.
Trigger Number Message
The LCD screen displays the current trigger (show) number
during playback.
Note: If you have not associated a trigger with a Preset
button, the LCD screen displays an
Preset button is pressed.
EMPTY
message when that
24
Page 25

RUN MODE
LED Indicator Light
The LED indicator light, located to the right of the LCD screen,
is active when a show is playing. It shows the color of the light at
address 1 on DMX output 1.
Lights Off Mode
You can pause Run Mode and show playback by pressing the
button located to the right of the Preset buttons. The LCD
screen displays a
LIGHTS OFF
turn black until you either:
• Press the button a second time to resume Run Mode
• Press a Preset button to start the selected show from the
beginning
message and the connected lights
25
Page 26

CONFIGURATION MODE
Overview
Configuration Mode provides a menu system to configure
triggers, set alarms, perform device setup, and view device
information.
You access and navigate Configuration Mode via the arrow
buttons on the iPlayer 3 faceplate. Press the right arrow button
to exit from Run Mode and launch Configuration Mode.
Navigating Menus
The Main Menu appears on the LCD screen when you enter
Configuration Mode. Use the up and down arrows to browse
the available menu options.
CONFIGURATION MODE
CHAPTER 5
From the Main Menu, press the right arrow to access a
submenu. Press the up and down arrows to change a submenu
item’s value or setting and then press the right arrow again to
access the next menu item.
There are four Main Menu options:
26
Page 27

Trigger
Number?
Integer 0-255
Show Type?
Downloaded
Canned Effect
Effect Type?
Fixed Color
Cross Fade
Rainbow
Random Color
Sparkle
Color Sweep
Color Streak
File Name?
Show File Picker
Test Show
Show Tester
Triggers
Main Menu
Alarms
Setup
Info
HSB Editor
Base Hue?
Red
Yellow
Green
Cyan
Blue
Magenta
Hue Adjust?
Integer -255 to 255
Saturation?
Integer 0-100
Brightness?
Integer 0-100
Duration Editor
Seconds?
Integer 00-59
Minutes?
Integer 0-1000
End Behavior?
Loop
Fade to Black
Jump to Another Trigger
Show
Number?
Integer 0-255
Fixed Color?
HSB Editor
Start Color?
HSB Editor
End Color?
HSB Editor
FG Color?
HSB Editor
BG Color?
HSB Editor
FG Color?
HSB Editor
BG Color?
HSB Editor
FG Color?
HSB Editor
BG Color?
HSB Editor
Cycle Time?
Duration Editor
Hold Time?
Duration Editor
Offset?
Integer 0-1001
Fade Time?
Duration Editor
Hold Time?
Duration Editor
Direction?
RGB Up
RGB Down
RBG Up
RBG Down
Offset?
Integer 0-1001
Density?
Integer 0-100
Time?
Duration Editor
Time?
Duration Editor
Fade Time?
Duration Editor
Color Count?
Integer 0-128
Fade Time?
Duration Editor
Width?
Integer 0-100
Offset?
Integer 0-1001
Test Effect
Effect Tester
Transition Type?
Fade Out & In
Snap
Cross Fade
Transition
Time?
Duration Editor
Save Changes?
No
Yes
• Triggers. See Assigning Triggers on page 30.
CONFIGURATION MODE
27
Page 28

• Alarms. See Setting an Alarm on page 32.
Alarm
Number?
Integer 0-15
Triggers
Main Menu
Alarms
Setup
Info
Time Editor
Second?
Integer 00-59
Minute?
Integer 00-59
Hour?
Integer 00-23
Alarm Days?
Specific Date
Every Day
Weekends
Weekdays
Mondays
Tuesdays
Wednesdays
Thursdays
Fridays
Saturdays
Sundays
Specific
Month?
Integer 1-12
Specific Day?
Integer 1-31
Alarm Type?
Astronomical
Time-of-day
Alarm Time?
Time Editor
Show Number?
Integer 0-255
Offset Hr?
Integer -12 to 12
Sunrise or
Sunset?
Sunrise
Sunset
Offset Min?
Integer 0 to 59
Save Changes?
No
Yes
CONFIGURATION MODE
28
Page 29

• Setup. See Setup Menu on page 34.
Lat Editor
Latitude Integer?
Integer -180 to 180
Latitude Fraction?
Integer 0 to 100
Long Editor
Longitude Integer?
Integer -180 to 180
Longitude
Fraction?
Integer 0 to 100
S/N Addr Editor
S/N Byte 1? S/N Byte 2? S/N Byte 3? S/N Byte 4? Test S/N? DMX Addr? Program? Test DMX?
Hex 00-FF Hex 00-FF Hex 00-FF Hex 00-FF S/N Test Integer 1-170 Yes DMX Test
No
Date Editor
Year?
Integer 00-99
Month?
Integer 1-12
Day?
Integer 1-31
Duration Editor
Seconds?
Integer 00-59
Minutes?
Integer 0-1000
All Same Addr Editor
DMX Addr? Program? Test DMX?
Integer 1-170 Yes DMX Test
No
Port 1 Base
Trigger #?
Integer 0-255
Set Date
Date Editor
Set Time
Time Editor
LCD
Contrast?
Integer 0-10
LCD
Backlight?
Integer 0-10
Volume?
Integer 0-3
Setup Menu
Set Clock
Set Lat/Long
Set DMX Addr
Test DMX Addr
LCD Setup
Sound Setup
Config Ports
Port 2 Base
Trigger #?
Integer 0-255
Set DMX Addr
By S/N
All Same Addr editor
S/N Addr Editor
DMX By S/N
S/N Addr Editor
All Same DMX
Test DMX Addr
Integer 1-170
Set Latitude
Lat Editor
Set Longitude
Long Editor
Set Time
Zone
TZ Editor
DST?
Yes/No
Triggers
Main Menu
Alarms
Setup
Info
Version Info
Version String
Triggers
Main Menu
Alarms
Setup
Info
Sunrise
Today’s Sunrise
Sunset
Today’s Sunset
Memory Usage
Free & Used Space
Info Screen
Version
Memory
Astronomical
CONFIGURATION MODE
• Info. See Info Menu on page 36.
29
Page 30

Saving or Canceling Changes
To save changes, continue pressing the right arrow to advance
to the end of a submenu. At the
the right arrow a final time to save your settings.
To cancel changes, either press the up arrow and then the right
arrow or press the button to return to Run mode without
making the change.
Exiting from Configuration Mode
To exit from Configuration Mode, either:
• Press the button
• Repeatedly press the left arrow until you return to Run Mode
Assigning Triggers
You can assign a trigger and associated settings to either:
S
AVE CHANGES
CONFIGURATION MODE
menu item, press
• A pre-configured, “canned” show
• A show file downloaded from ColorPlay 3
Assigning a Trigger to a Preconfigured, “Canned” Show
To assign a show to Preset button 3 and trigger 3:
1. Access Configuration Mode by pressing the right arrow
button on the iPlayer 3 faceplate.
2. Access the
3. Press the up or down arrow to trigger number
4. Press the right arrow to access the
press the up and down arrow until
T
RIGGERS
submenu from the Main Menu.
3
.
S
HOW TYPE
C
ANNED EFFECT
?
menu item, and
is displayed.
30
Page 31

CONFIGURATION MODE
5. Press the right arrow to the
E
FFECT TYPE
?
menu item, and then
press the up and down arrow to view effect types and make a
selection. There are seven effect types from which to choose:
F
IXED COLOR
–
–
C
ROSS FADE
–
R
AINBOW
–
R
ANDOM COLOR
–
S
PARKLE
–
C
OLOR SWEEP
–
C
OLOR STREAK
6. Press the right arrow to the next menu item, which is an
effect-specific menu item, and then enter a value. For
example, if you chose the
step, you will be prompted to enter a
R
ANDOM COLOR
effect in the previous
H
OLD TIME
minute value,
which determines the display duration for each random color
generated.
7. Continue navigating through the effect-specific menu items
and entering values. For example, after choosing the
OLOR
effect, you need to enter a
C
C
OLOR COUN
8. At the
t.
T
EST EFFECT
menu item, press the right arrow to use the
F
ADE TIME
,
O
FFSET
value, and
R
ANDOM
show tester, which runs a live preview of your show.
9. Select a transition type:
–
S
NAP
(no transition)
–
F
ADE OUT
–
C
10.Press the right arrow to save your changes.
ROSS FAD
(to black)
& I
N
e (effect morphing)
Assigning a Trigger to a Show Downloaded from ColorPlay 3
To assign a downloaded show to Preset button 4 and trigger 4:
1. Access Configuration Mode by pressing the right arrow
button on the iPlayer 3 faceplate.
2. Access the
T
RIGGERS
submenu from the Main Menu.
31
Page 32

3. Press the up arrow to trigger number 4.
4. Press the right arrow to access the
then use the up and down arrows until
S
HOW TYPE
D
OWNLOADED SHOW
?
menu item and
displayed.
5. Press the right arrow to the
E
FFECT TYPE
?
menu item and then
press the up or down arrow to make a selection.
6. At the
T
EST EFFECT
menu item, press the right arrow to use the
show tester, which runs a live preview of your show.
7. Select an
L
–
–
L
–
J
END B
OOP
IGHTS OFF
UMP TO TRIGGER
EHAVIOR
type:
8. Select a transition type:
–
S
NAP
(no transition)
–
F
ADE OUT
–
C
9. Press the right arrow to save your changes.
ROSS FAD
(to black)
& I
N
e (effect morphing)
CONFIGURATION MODE
is
Setting an Alarm
Alarms enable you to automate show playback. When you set
an alarm, you specify:
• The alarm number.
• Whether the alarm activates every day, on weekdays, on
weekends, on a specific day of the week, or on a specific
date.
• On what date the alarm turns off.
• Trigger / Show number with which to associate the alarm
• Whether the alarm turns on and off either:
– At a particular time on a clock. For clock time, the iPlayer 3
uses a 24-hour notation with hours ranging from 00 to 23.
– In relation to sunrise and sunset (astronomical time).
32
Page 33

CONFIGURATION MODE
Note: If you specify astronomical time, you also need to
specify both:
— The alarm hour and minute offset, which tells the iPlayer 3
when to fire a show with respect to a selected astronomical
S
UNRISE
event. For example, if you select
+30
minutes, the alarm will fire two and one-half hours after
S
UNSET
sunrise, and if you select
and offset = -1 hour, it will fire
and offset = +2 hours
one hour before sunset.
— Your latitude and longitude in order for the iPlayer 3 to
correctly calculate astronomical events. You do this via the
Setup Menu.
Note: The astronomical time alarm type does not
automatically make adjustments for daylight savings time.
You can configure up to 15 alarms. For example, to configure
alarm number 5 for every day at sunset:
1. Access Configuration Mode by pressing the right arrow
button on the iPlayer 3 faceplate.
A
LARM
2. Press the up or down arrow until the
submenu is
selected, and then press the right arrow.
3. Press the up or down arrow to alarm number 5.
4. At the
E
VERY DAY
A
LARM DAYS
?
menu item, press the up or down arrow until
is selected and then press the right arrow to
continue.
5. At the
A
A
LARM TYPE
STRONOMICAL
?
menu item, press the up or down arrow until
is selected, and then press the right arrow to
continue.
6. Select the
S
UNRISE
and the
S
UNRISE OR SUNSET
?
menu item and then
press the right arrow to continue.
7. If you want to add an offset value (so that the show is
triggered a certain amount of time before or after sunrise or
sunset:
a. Enter an
A
LARM HOUR OFFSET
value and then press the right
arrow
33
Page 34

CONFIGURATION MODE
Setup Menu
b. Enter an
A
LARM MINUTE OFFSET
value and then press the right
arrow
8. Select a Trigger / Show number with which to associate the
alarm and then press the right arrow to continue.
9. Save your changes.
The alarm will set off the trigger number you associated in step
8.
The Setup Menu contains configurable settings for:
• Expansion or serial ports. Devices attached to the two iPlayer
3 serial ports can trigger any of up to 255 shows stored on
the iPlayer 3. By default, an external device triggers shows
starting with show 1. However, you can use the iPlayer 3's
base show offset setting to specify a different starting show
number. When you specify an offset for the shows triggered
from a serial port, the sum of the offset and the number
specified by the external device triggers the shows played by
the iPlayer 3. For example, if you set an offset of 10 for one of
the serial ports and if the external device specifies show 2,
the iPlayer 3 will trigger show 12 (10 + 2). You specify the
offset at the iPlayer 3's
P
ORT
1
BASE TRIG
?
or
P
ORT
2
BASE TRIG
?
prompt.
• iPlayer 3 date and time. See Setting an Alarm on page 32.
• LCD screen appearance. You specify an integer from 0 to 10
to set the contrast and brightness, with 10 producing the
greatest brightness and contrast between the characters on
the screen and the background.
• Volume. You specify an integer from 0 to 3 to set the audible
volume of the iPlayer3's internal speaker, which produces a
beep with each button press. 3 is the loudest setting.
• Setting a DMX address. See Setting a DMX Address on page
35.
34
Page 35

• Testing a DMX address. See Testing a DMX Address on page
36.
Use the arrow keys to navigate the Setup Menu and enter
values.
Note: In the Setup Menu, your changes are saved automatically each
time you enter a new value.
Setting a DMX Address
When you use the iPlayer 3 to set a light fixture’s DMX address,
you have two options for specifying which fixture(s) to address.
You can set all connected fixtures to a single DMX address, or
you can specify a DMX address for each individual light fixture.
1. Access Configuration Mode by pressing the right arrow
button on the iPlayer 3 faceplate.
2. From the Configuration Mode main menu, select
then press the right arrow.
3. Select
4. If you want to specify a DMX address for all of the lights,
select
5. If you want to specify a DMX address for each individual
light:
a. Select
SET F
ALL S
AME ADDRESS
BY S
IXTURE
DMX A
ERIAL NUMBER
CONFIGURATION MODE
DD
, and then press the right arrow.
.
, and then press the right arrow.
S
ETUP
, and
b. At the
1? S/N B
YTE
2? S/N B
YTE
3?
and
S/N B
YTE
4?
prompts,
S/N B
YTE
enter the serial number of the light, using integers 00 to FF
hexadecimal (42 00 01 1F, e.g.). The light will blink when you
enter each correct byte.
c. Confirm the serial number by pressing the right arrow.
6. Specify the number of the light (1 through 170)
7. Select
P
ROGRAM
DMX A
DDR
?
, and then press the right arrow to
.
confirm you want to change the address of the light.
35
Page 36

If the programming is successful, the light illuminates at full
intensity after a few seconds. If the programming is not
successful, the light does not illuminate.
T
EST
DMX A
8. At the
DDR
3 performs a non-interactive test of the light you specified in
step 6 by setting the specified DMX address to FULL ON and
all other DMX address to OFF.
Testing a DMX Address
To test the DMX address of light fixtures:
1. Access Configuration Mode by pressing the right arrow
button on the iPlayer 3 faceplate.
2. From the Configuration Mode main menu, select
then press the right arrow.
3. Select
4. Specify the number of a light (1 through 170) you want to test.
The iPlayer3 sends test data to any lights which are set to
that address.
If the test is successful, the light(s) illuminate at full intensity. If
the programming is not successful, the light(s) do not
illuminate.
T
EST
DMX A
DDR
CONFIGURATION MODE
?
prompt, press the right arrow. The iPlayer
S
ETUP
, and
, and then press the right arrow.
Info Menu
The Info Menu contains:
• iPlayer 3 firmware version information.
• Memory usage / available memory. For example,
104K/1024
K
indicates 104KB used out of 1024KB available.
• Astronomical clock data (for example, the time of sunrise for
the current day).
36
Page 37

PINOUTS AND DIP SWITCH FUNCTIONS
APPENDIX A
PINOUTS AND DIP SWITCH FUNCTIONS
Serial Port: DB9F Pinouts
1 No connection
2TxD
3RxD
4 +5V DC controlled by the DIP switch setting
5 Ground
6 No connection
7 No connection
8 No connection
9 No connection
20
Page 38

DMX: RJ-45—8 Pinouts
1 8
1Data out -
2Data out +
3 Ground
4 No connection
5 No connection
6 Ground
7 No connection
PINOUTS AND DIP SWITCH FUNCTIONS
8 No connection
21
Page 39

iPlayer 3 DIP Switch Functions
ON
1 2 3 4
ON
1 2 3 4
The iPlayer 3 DIP switches are located on the bottom of the
device, below the SD memory card. Remove the two screws on
the access door, on the bottom of the iPlayer 3, to view the
switches.
PINOUTS AND DIP SWITCH FUNCTIONS
Switch 1 ON = provide +5 VDC power to serial port 1, pin 4
Switch 2 ON = provide +5 VDC power to serial port 2, pin 4
Switch 3 Reserved
Switch 4 ON = enable arrow buttons;
OFF = lock arrow buttons
22
Page 40

Electrical
EXTERNAL SHOW CONTROLLER CONFIGURATION
APPENDIX B
EXTERNAL SHOW CONTROLLER
C
ONFIGURATION
See Connecting an External Show Controller on page 17.
The RS-232 serial port connections on the iPlayer 3 are DB9F
connectors, labeled
information applies to each DB9F connector:
2 Transmit data
3 Receive data
SERIAL 1 and SERIAL 2. The following pinout
4 +5 VDC
5 Ground
The other pins are unconnected.
See Serial Port: DB9F Pinouts on page 20.
Note: +5 VDC is provided on pin 4 (normally the DTR pin).
Other devices can use this voltage provided they draw no
more than 50 mA. If the voltage on pin 4 is not desired, it
can be disabled by moving configuration DIP switch 1 (for
serial port 1) or DIP switch 2 (for serial port 2) to the OFF
position.
40
Page 41

Protocol
EXTERNAL SHOW CONTROLLER CONFIGURATION
The serial protocol is 9600 baud, 8 data bits, no parity, 1 stop
bit. There is no flow control. Each command to the iPlayer 3
consists of five characters. The first character is always
X
. The
next two characters are the ASCII representation of a
hexadecimal command byte. The last two characters are a
hexadecimal data byte. The hexadecimal alpha characters are
0
uppercase (
- 9, A - F).
Replies from the iPlayer 3 are also in this format but begin with
instead of
X
.
Characters are not echoed by the iPlayer 3 when they are
received.
Illegal characters or badly formatted packets are ignored with
no error indication.
iPlayer 3 Commands
Note: dd is used below to represent a hexadecimal byte.
X00dd
Set Mode. Sets the current operating mode to dd.
Not currently used.
X0100
Lights Off. Turns all lights off.
X02dd
Set Absolute Intensity. Sets the global brightness level to dd (00
= Off,
FF
= full On).
Y
X03dd
Set Relative Intensity. Raises or lowers the global brightness
level by dd (dd is 2’s complement, so
decreases by 2). Brightness is pegged between
02
increases by 2, FE
0
and
255
.
41
Page 42

X04dd
Set Show. Starts the show with trigger number dd, playing from
the beginning. The trigger number must be in the range 1
through 225 (
E1
).
Replies from the iPlayer 3
Y00dd
Returns current mode
Y0100
Entered off mode
Y02dd
Returns current intensity level
Y03dd
Not sent
EXTERNAL SHOW CONTROLLER CONFIGURATION
Y04dd
Returns current show
Y0Fdd
Error occurred, show number in data byte. This is most often
returned when the selected show is not available (so the keypad
knows to make the LED blink).
42
Page 43

AUXILIARY DEVICE CONFIGURATION
APPENDIX C
AUXILIARY DEVICE CONFIGURATION
Formatting an SD Memory Card for Use in the iPlayer 3
SD memory cards up to 2GB in size are compatible with the
iPlayer 3. All SD memory cards used in the iPlayer 3 must be
formatted to use the FAT file system.
You cannot format an SD memory card while it is installed in the
iPlayer 3. However, you can use a Windows PC or Mac with a
memory card reader to reformat an SD memory card with a FAT
file system.
To reformat an SD memory card using Windows:
1. Remove the two access door screws on the bottom of the
iPlayer 3.
2. Slide the door off the iPlayer, and remove the SD card.
3. Insert the SD card into a memory card reader on your Windows
PC.
4. Reformat the SD card as you would any drive partition on
your PC:
a. Double-click MY COMPUTER or COMPUTER.
b. Right-click the icon for the SD card.
c. Select Format from the pop-up menu.
d. Select FAT Format.
Note: Use the FAT file system format; do not use FAT 32.
e. Select Full Format.
43
Page 44

AUXILIARY DEVICE CONFIGURATION
To reformat an SD memory card using a Mac:
1. Remove the two screws holding the SD memory card cover
plate (located on the underside of the iPlayer 3) in place and
then remove the cover plate.
2. Remove the SD card.
3. Insert the SD card into a memory card reader on your Mac.
4. Run the Disk Utility application (located in the Utilities folder).
5. Select the Erase tab.
6. Select the SD card from the list of available disks in the left
column.
7. Under Volume For ma t, choose MS-DOS File System (FAT16).
8. Click the Erase button.
44
Page 45

INDEX
A
Alarms .............................................. 20
Downloading from ColorPlay 3 ......... 22
Setting ........................................ 32
Triggering ................................... 24
C
Canceling changes .............................. 30
ColorPlay 3 .......................................... 9
Downloading alarms from ............... 22
Downloading triggers from .............. 22
User guide ..................................... 9
Configuration Mode ............................ 26
Contact Closure Switch ........................ 18
Controller Keypad ............................... 17
D
DIP switch ..................................... 8, 40
DIP switches ...................................... 39
DMX .................................. 6, 7, 11, 25
Address .......................... 34, 35, 36
Ports .................................... 11, 16
RJ-45 pinouts ............................... 38
Downloading
Alarms ........................................ 22
Show files. See Shows.
Triggers
...................................... 22
E
Exiting from Configuration Mode ............ 30
L
LCD screen ............ 6, 15, 16, 17, 24, 25
Configuration ............................... 34
Menus ........................................ 26
LED indicator light ..................... 6, 24, 25
Lights Off Mode .................................. 25
M
Memory Card ..................................... 43
Memory card .................................... 7, 8
P
Playing Shows .................................... 23
Port # Base Trig prompts ...................... 34
Presets .............................................. 23
R
Run Mode .......................................... 23
S
Saving Changes .................................. 30
SD Memory Card .................................. 7
Reformatting ................................ 43
Serial Port Pinouts ............................... 37
Setting up the iPlayer 3
In Configuration Mode
In Run Mode ................................ 16
In USB Mode ................................ 14
Setup Menu ....................................... 34
Show Controller Configuration ............... 40
................... 17
I
Info Menu .......................................... 36
Installation ......................................... 11
45
Page 46

Shows ............................................... 20
Downloading show files ............ 21, 31
Jumping between ......................... 21
Playback .................... 16, 21, 23, 32
Pre-configured, canned .................. 30
Repeating .................................... 21
Show numbers .............................. 34
Snap transitions ............................ 21
Triggering ................................... 21
Types of ...................................... 20
T
Triggers ............................................ 20
Downloading from ColorPlay 3 ......... 22
Menu .................................... 30, 31
U
USB Mode ......................................... 20
46
 Loading...