

Page 1

RANGE HOOD
USER’S MANUAL
PEW 726 B
PEW 729 B
PEW 456 B
PEW 459 B
Page 2

Copyright © 2018, Fast ČR, a. s. 08/2018
Dear customer,
Thank you for buying aPHILCO brand product. So that your appliance serves you well, please read
all the instructions in this user’smanual.
Page 3

EN - 1
Copyright © 2018, Fast ČR, a. s. 08/2018
PART 1: IMPORTANT SAFETY INSTRUCTIONS ............................................................................................. 2
Cautions ........................................................................................................................................................................................2
Lamp ..............................................................................................................................................................................................4
PART 2: DESCRIPTION OF THE APPLIANCE .................................................................................................. 5
PART 3: INSTALLATION ................................................................................................................................... 6
Use ..................................................................................................................................................................................................6
Electrical connection ................................................................................................................................................................7
Mounting ......................................................................................................................................................................................7
Installation Step .........................................................................................................................................................................8
PART 4: OPERATION ...................................................................................................................................... 11
LCD Touch control .................................................................................................................................................................. 11
Five Keys Touch control ........................................................................................................................................................12
PART 5: MAINTENANCE AND CLEANING .................................................................................................... 13
PART 6: BEFORE YOU CALL THE SERVICE CENTRE..................................................................................... 14
PART 7: TECHNICAL SPECIFICATIONS ........................................................................................................ 15
Technical drawings PEW 456 B & PEW 459 B ................................................................................................................ 17
Technical drawings PEW 726 B & PEW 729 B ................................................................................................................ 18
CONTENTS
Page 4
EN - 2
Copyright © 2018, Fast ČR, a. s. 08/2018
PART 1: IMPORTANT SAFETY INSTRUCTIONS
Closely follow the instructions set out in this manual. All responsibility, for any eventual inconveniences,
damages or fires caused by not complying with the instructions in this manual, is declined. The hood is
conceived for the suction of cooking fumes and steam and is destined only for domestic use.
! It is important to conserve this booklet for consultation at any moment. In the case of sale, cession or
move, make sure it is together with the product.
! Read the instructions carefully: there is important information about installation, use and safety.
! Do not carry out electrical or mechanical variations on the product or on the discharge conduits.
! Before proceeding with the installation of the appliance verify that there are no damaged all components.
Otherwise contact your dealer and do not proceed with the installation.
Note: the elements marked with the symbol “(*)” are optional accessories supplied only with some models or
elements to purchase, not supplied.
Cautions
Before any cleaning or maintenance operation, disconnect
hood from the mains by removing the plug or disconnecting
the mains electrical supply.
Always wear work gloves for all installation and maintenance
operations.
This appliance can be used by children aged from 8 years and
above and persons with reduced physical, sensory or mental
capabilities or lack of experience and knowledge if they have
been given supervision or instruction concerning use of the
appliance in a safe way and understand the hazards involved.
Children shall not be allowed to tamper with the controls or
play with the appliance.
Cleaning and user maintenance shall not be made by children
without supervision.
The premises where the appliance is installed must be
sufficiently ventilated, when the kitchen hood is used together
with other gas combustion devices or other fuels.
The hood must be regularly cleaned on both the inside and
outside (AT LEAST ONCE A MONTH).
Page 5
EN - 3
Copyright © 2018, Fast ČR, a. s. 08/2018
This must be completed in accordance with the maintenance
instructions provided in this manual. Failure to follow the
instructions provided in this user guide regarding the cleaning
of the hood and filters will lead to the risk of fires.
The flaming of foods beneath the hood itself is severely
prohibited.
The use of exposed flames is detrimental to the filters and may cause a fire risk, and must therefore be avoided
in all circumstances.
Any frying must be done with care in order to make sure that the oil does not overheat and ignite.
CAUTION: Accessible parts of the hood may become hot when used with cooking appliances.
For lamp replacement use only lamp type indicated in the Maintenance/Replacing lamps section of this
manual.
WARNING! Do not connect the appliance to the mains until the installation is fully complete.
With regards to the technical and safety measures to be adopted for fume discharging it is important to closely
follow the regulations provided by the local authorities.
The ducting system for this appliance must not be connected to any existing ventilation system which is being
used for any other purpose such as discharging exhaust fumes from appliances burning gas or other fuels.
Do not use or leave the hood without the lamp correctly mounted due to the possible risk of electric shocks.
Never use the hood without effectively mounted grids.
The hood must NEVER be used as a support surface unless specifically indicated.
Use only the fixing screws supplied with the product for installation or, if not supplied, purchase the correct
screws type.
Use the correct length for the screws which are identified in the Installation Guide.
In case of doubt, consult an authorised service assistance centre or similar qualified person.
WARNING! Failure to install the screws or fixing device in accordance with these instructions may result in
electrical hazards.
This appliance is marked according to the European directive 2012/19/EC on Waste Electrical and Electronic
Equipment (WEEE). By ensuring this product is disposed of correctly, you will help prevent potential negative
consequences for the environment and human health, which could otherwise be caused by inappropriate
waste handling of this product.
The symbol on the product, or on the documents accompanying the product, indicates that this appliance
may not be treated as household waste. Instead it should be taken to the appropriate collection point for
the recycling of electrical and electronic equipment. Disposal must be carried out in accordance with local
environmental regulations for waste disposal.
For further detailed information regarding the process, collection and recycling of this product, please contact
the appropriate department of your local authorities or the local department for household waste or the shop
where you purchased this product.
Suggestions for a correct use in order to reduce the environmental impact: Switch ON the hood at
minimum speed when you start cooking and kept it running for few minutes after cooking is finished.
Increase the speed only in case of large amount of smoke and vapour and use boost speed(s) only in extreme
situations. Replace
Page 6
EN - 4
Copyright © 2018, Fast ČR, a. s. 08/2018
the charcoal filtres when necessary to maintain a good odour reduction efficiency. Clean the grease filtres
when necessary to maintain a good grease filtry efficiency. Use the maximum diameter of the ducting
system indicated in this manual to optimize efficiency and minimize noise.
Lamp
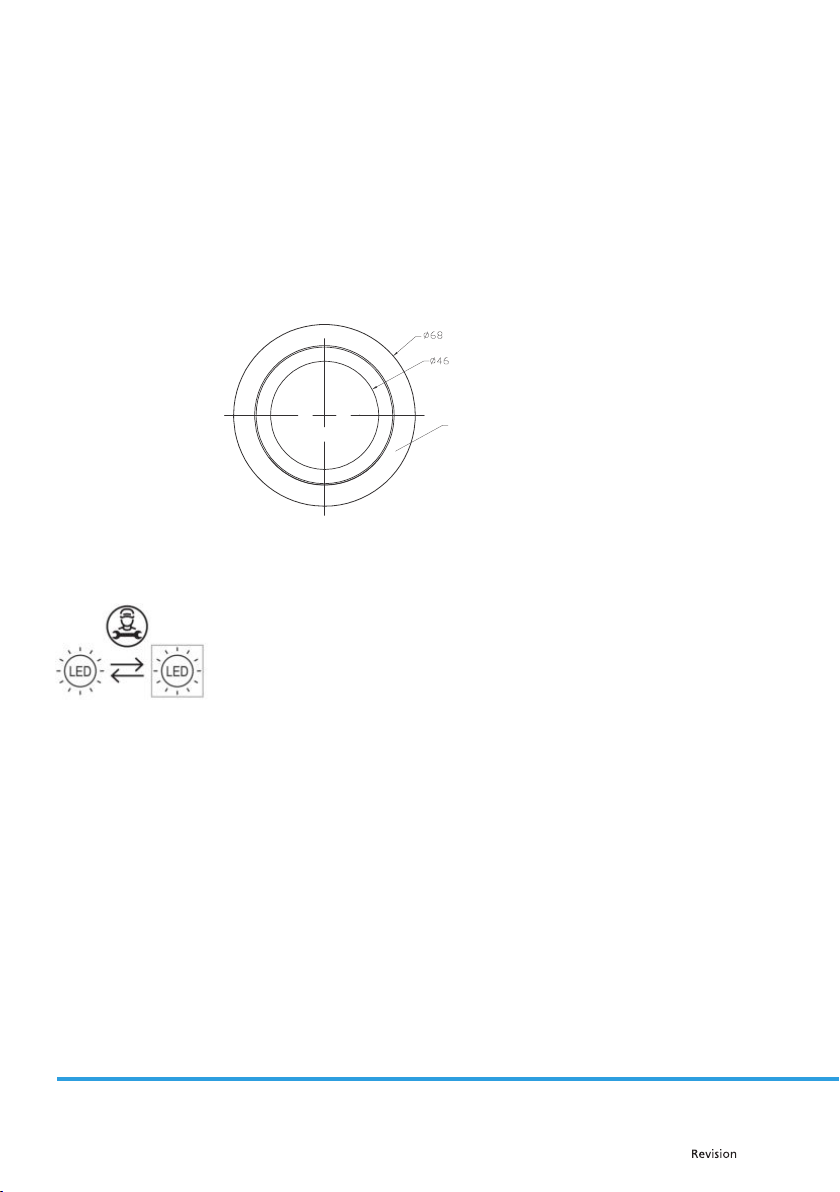
The available lamps and the correspondence ILCOS D codes and lamp pictures:
Use type lamp (or use in alternative type lamp) DSR-1.5-S-68 (ILCOS D code in according to standard IEC61231).
- Self-ballasted uorescent re ector lamp – Integral induction type ballast
- Max wattage: 1.5W
- Voltage range:12V
- Dimensions:
Stainless Steel Surface
Unit: mm
This appliance contains an LED light source which must be replaced by a service
person.
Page 7
EN - 5
Copyright © 2018, Fast ČR, a. s. 08/2018
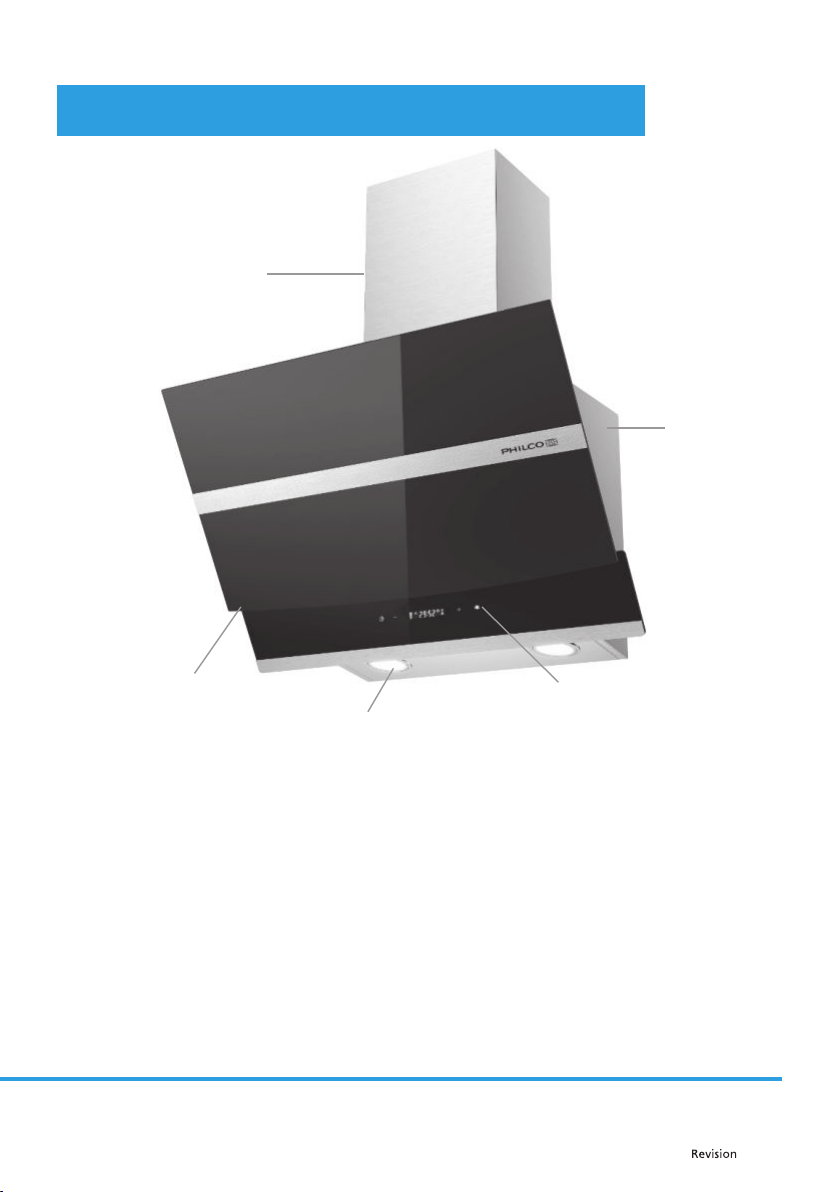
PART 2: DESCRIPTION OF THE APPLIANCE
1
2
5-6
3
4
1. Chimney
2. Casing
3. Touch Control Panel
4. LED lamp
5. Grease lter
6. Motor
Page 8
EN - 6
Copyright © 2018, Fast ČR, a. s. 08/2018
PART 3: INSTALLATION
Use
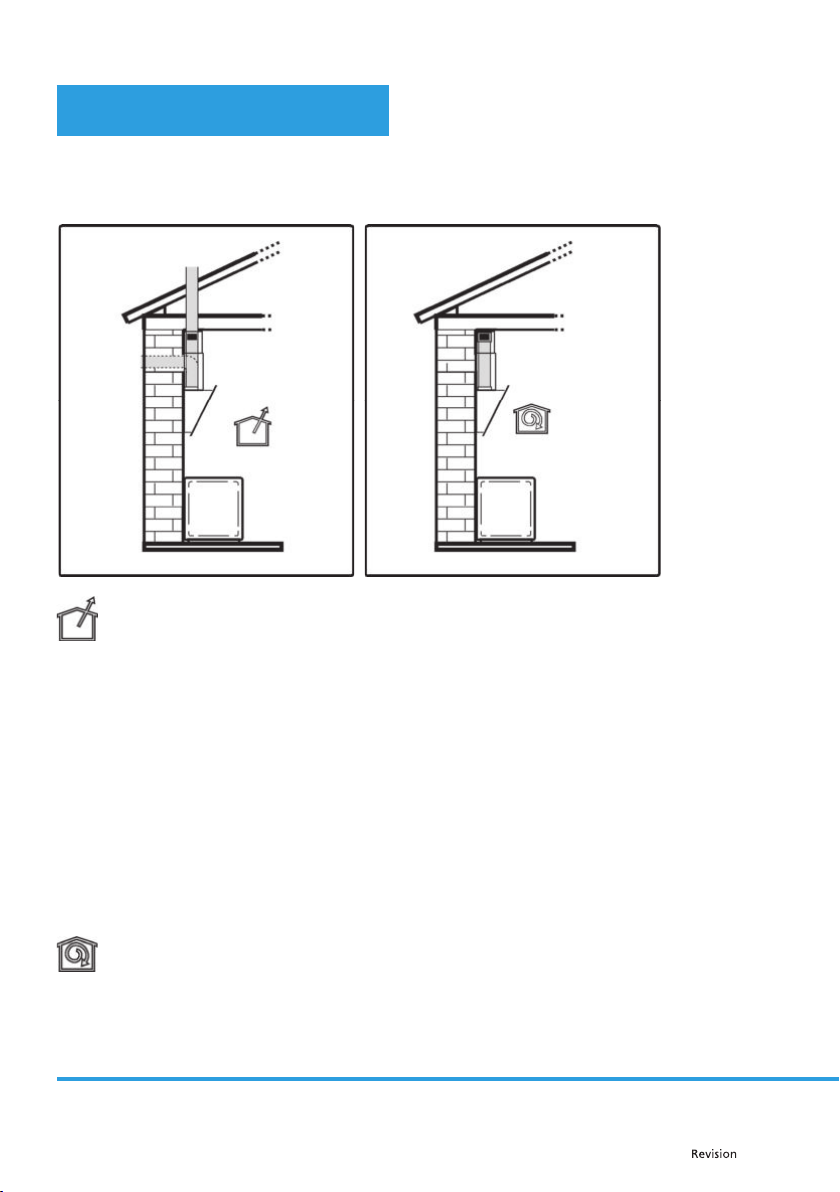
The hood is designed to be used either for exhausting or
filtry version.
Ducting version
In this case the fumes are conveyed outside of the building by means of a special pipe connected with the
connection ring located on top of the hood.
Attention! The exhausting pipe is supplied.
Diameter of the exhausting pipe must be equal to that of the connection ring.
Attention! The charcoal filtry is not supplied. If the hood is supplied with active charcoal filtry, then it must
be removed.
Connect the hood and discharge holes on the walls with a diameter equivalent to the air outlet (connection
flange).
Using the tubes and discharge holes on walls with smaller dimensions will cause a diminution of the suction
performance and a drastic increase in noise.
Any responsibility in the matter is therefore declined.
! Use a duct of the minimum indispensible length.
! Use a duct with as few elbows as possible (maximum elbow angle: 90°).
! Avoid drastic changes in the duct cross-section.
Filtry version
The aspirated air will be degreased and deodorised before being fed back into the room.
In order to use the hood in this version, you have to install a system of additional filtering based on activated
charcoal.
Attention! The charcoal filtry is not supplied and must be purchased apart.
Page 9

EN - 7
Copyright © 2018, Fast ČR, a. s. 08/2018
Electrical connection
The mains power supply must correspond to the rating indicated on the plate situated inside the hood. If
provided with a plug connect the hood to a socket in compliance with current regulations and positioned in
an accessible area, after installation. If it not fitted with a plug (direct mains connection) or if the plug is not
located in an accessible area, after installation, apply a double pole switch in accordance with standards which
assures the complete disconnection of the mains under conditions relating to over-current category III, in
accordance with installation instructions.
Warning! Before re-connecting the hood circuit to the mains supply and checking the efficient function,
always check that the mains cable is correctly assembled.
The hood is provided with a special power cable ; if the cable is damaged, request a new one from Technical
Service.
Mounting
Before beginning installation:
• Check that the product purchased is of a suitable size for the chosen installation area.
• Remove the charcoal (*) fi lter/s if supplied. This/these is/are to be mounted only if you want to use the
hood in the ltering version.
• Check (for transport reasons) that there is no other supplied material inside the hood (e.g. packets with
screws (*), guarantees (*), etc.), eventually removing them and keeping them.
• Remove the tape on the vent.
• Turn the unit o and unplug it from the outlet.
In the case of the presence of panels and/or walls and/or lateral wall units check that there is sufficient space
to install the hood and that access to the command panel is easy.
Expansion wall plugs are provided to secure the hood to most types of walls/ceilings. However, a qualified
technician must verify suitability of the materials in accordance with the type of wall/ceiling. The wall/ceiling
must be strong enough to take the weight of the hood. Do not tile, grout or silicone this appliance to the
wall. Surface mounting only.
The minimum distance between the supporting surface for the cooking equipment on the hob and the lowest
part of the range hood must be not less than 45cm from electric cookers and 55cm from gas or mixed cookers.
If the instructions for installation for the gas hob specify a greater distance, this must be adhered to.
Only for some models
An aesthetic flue can be purchased as an optional accessory. Check with the authorized dealer whether the
model in your possession envisages this possibility.
We advise installing the hood after having purchased the flue to check with certainty the most suitable
installation.
Page 10
EN - 8
Copyright © 2018, Fast ČR, a. s. 08/2018
Installation Step
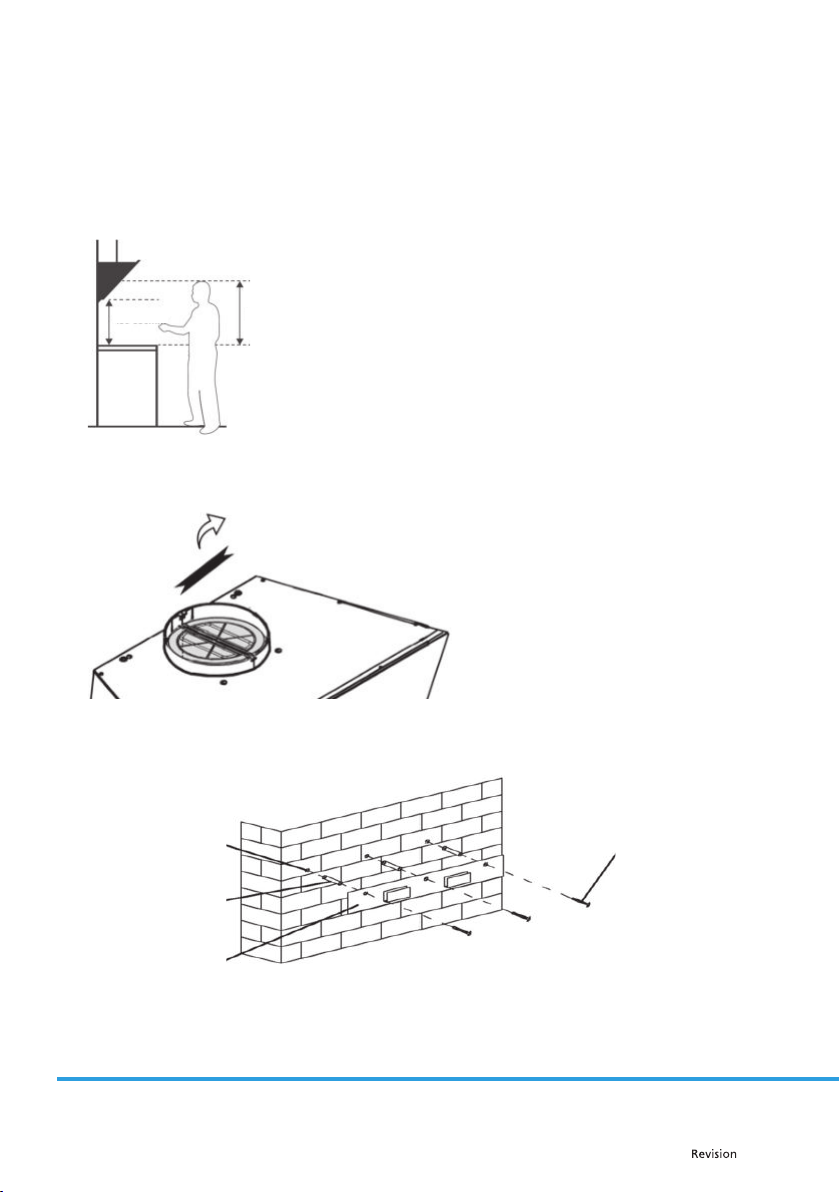
• The cooker hood should be installed so that there is a space of 650-760cm from the centre of the mesh
grease fi lters to the hob (450-550mm from the bottom of the hood to the hob). It is the manufacturer
of the hob who determines the clearance required and the clearance quoted by the hob manufacturer
must be followed. In the absence of any instructions supplied with a gas hob the minimum distance
between the hob and the hood must be at least 760mm.
650-760 mm
450-550 mm
• Double check the tape on the vent has been removed.
tape
• Drill 3 × 8 mm holes for hood holding bracket. Tighten the bracket with the screws and plugs provided.
Wall holes
Screw plug
Wall bracket
Screw (4mm × 30mm)
Page 11
EN - 9
Copyright © 2018, Fast ČR, a. s. 08/2018
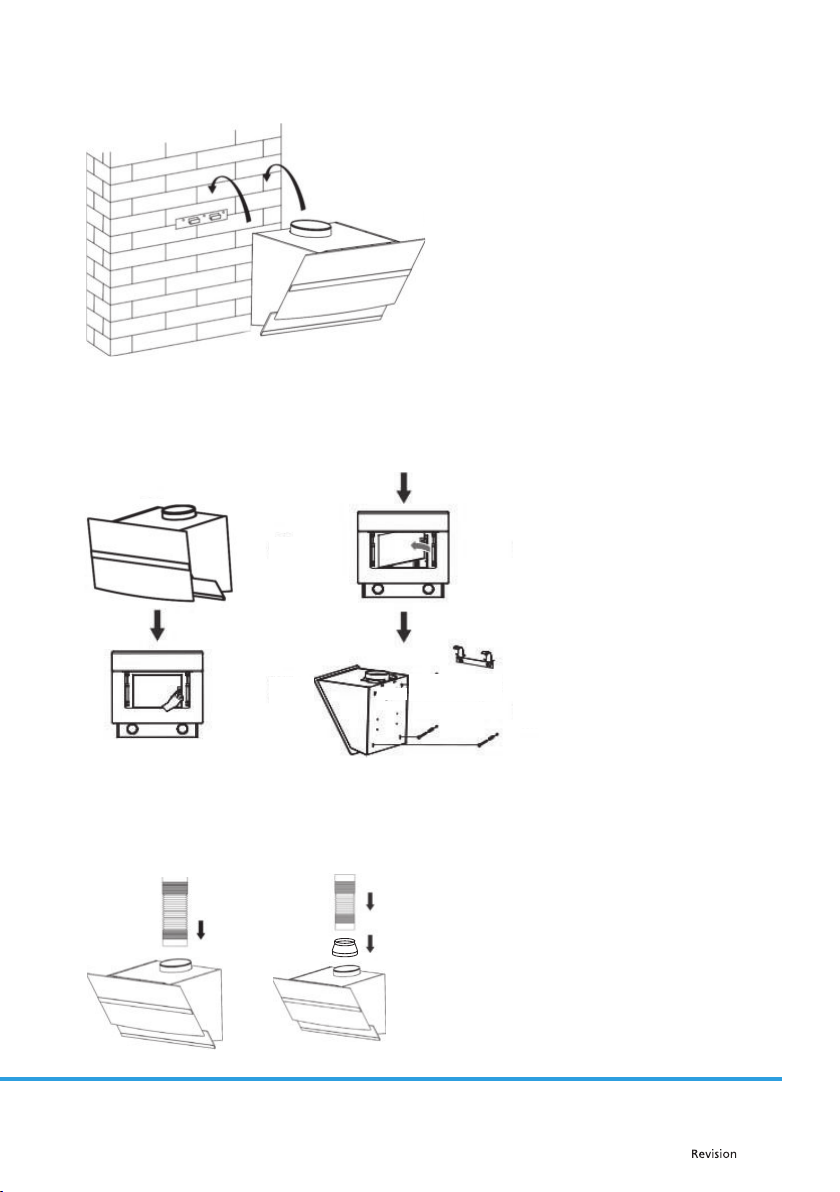
• Lift the hood up and hang it onto the wall bracket.
• Open the glass panel and remove the grease lter.
Mark the two holes for the security screws from hood inside.
Take the hood o again. Drill the two Ø8mm holes at the marked locations. IInsert 2 wall plugs into the
holes. Hang the hood back on the wall bracket and tighten 2 security screws from inside.
1
2
3
4
• The Ø150-Ø153mm exhausting pipe is supplied. When you choose the ducting version, place
the exhausting pipe Ø150-Ø153mm) on the hood. The head Ø153mm would connect to the hood.
If you need to use the Ø120-Ø123mm pipe, you can place the adapter (not supplied) fi rstly.
When you choose the fi lt er version, no need the exhausting pipe.
Page 12
EN - 10
Copyright © 2018, Fast ČR, a. s. 08/2018
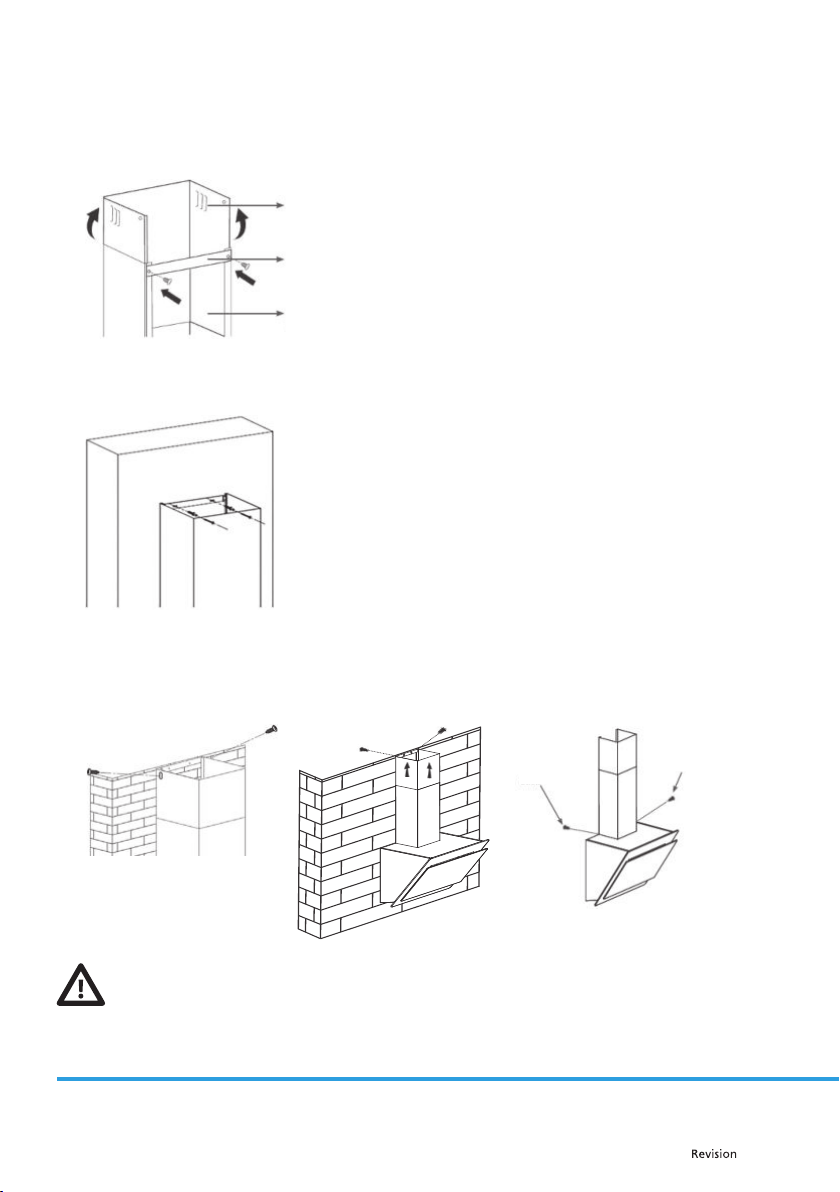
• The lower chimney bracket is used to x the upper chimney and lower chimney. Use 2pcs 4×8mm screws
to attach lower and upper chimney.
Noted: Do not fasten screws too strongly, make sure that the upper chimney can be telescopically adjusted
after assembling.
Upper decorative chimney (Inner)
Lower Chimney bracket
Lower decorative chimney (Outer)
• Put the chimney on the cooker hood. Fix the lower chimney bracket on the wall by 2 screws (4×30mm)).
• Fix the upper chimney bracket on the upper chimney by 2 screws (4×8mm). Pull the upper chimney
upwards to the desired height.
Screw the upper chimney bracket on the wall by 2 screws (4×30mm).
Fasten the lower chimney to the cooker hood with 2 screws (4×8mm).
Screw
Screw
For safety reasons, use only the same size of fixing or mounting screws that are recommended in this
instruction manual.
Failure to install the screws or fixing devices in accordance with these instructions may result in
electrical hazards.
Page 13
EN - 11
Copyright © 2018, Fast ČR, a. s. 08/2018
PART 4: OPERATION
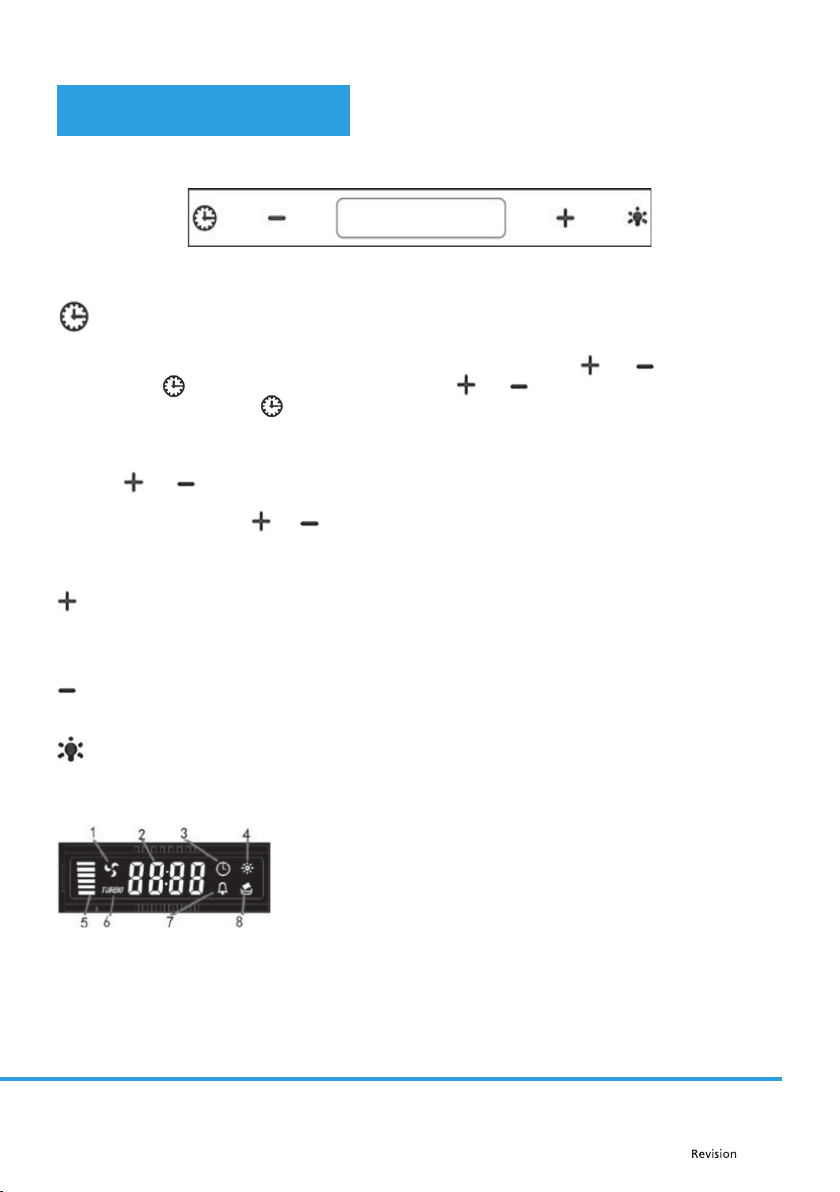
LCD Touch control
After plug in power, will into Stand By mode automatic.
Timer button
Time setting:
Keep pressing it when the machine is in stand by mode, it would start the time setting.
After pressing, the hour display would be flashing, you could press "
" or " " to do the setting.
Press "
" again, change to minute setting, press " " or " " to do the setting.
The third time press "
" or wait 10s, the time setting would finish.
Timer setting:
Short press during working mode, pre-set cycle: off15mins30mins45mins60minsoff.
"
" or " " is used for adjusting timer time, except "off " timer setting.
Quick timer: Press "
" & " " hold for 3 second, the digital display will be flashing and starting the
5 minutes counting down. After 5 minutes working, the motor & light will turn off automatically &
Buzzer sound on.
Speed plus button
For increasing the speed of the fan. Totally 1-2-3-Turbo speed.
When the Turbo speed symbol appear, the motor reach the highest speed. After 5 minutes working
in Turbo mode, the motor would change to the Third speed automatically.
Speed decrease button
For decreasing the speed of the fan.
Light button
Short press for lamp power control.
LCD display
1. Motor symbol, will rotate when the motor is working;
2. Time display;
3. Timer symbol, will appear when timer is setting and counting;
4. Light symbol;
5. Motor speed;
6. Turbo speed symbol, will appear when the speed is highest setted;
7. Alarm symbol, will appear 5 seconds when the counting down of
timer is over.
8. Cleanning alarm, appear when total working time up to 14 hours or
at the rst time using after pluging.
Page 14
EN - 12
Copyright © 2018, Fast ČR, a. s. 08/2018
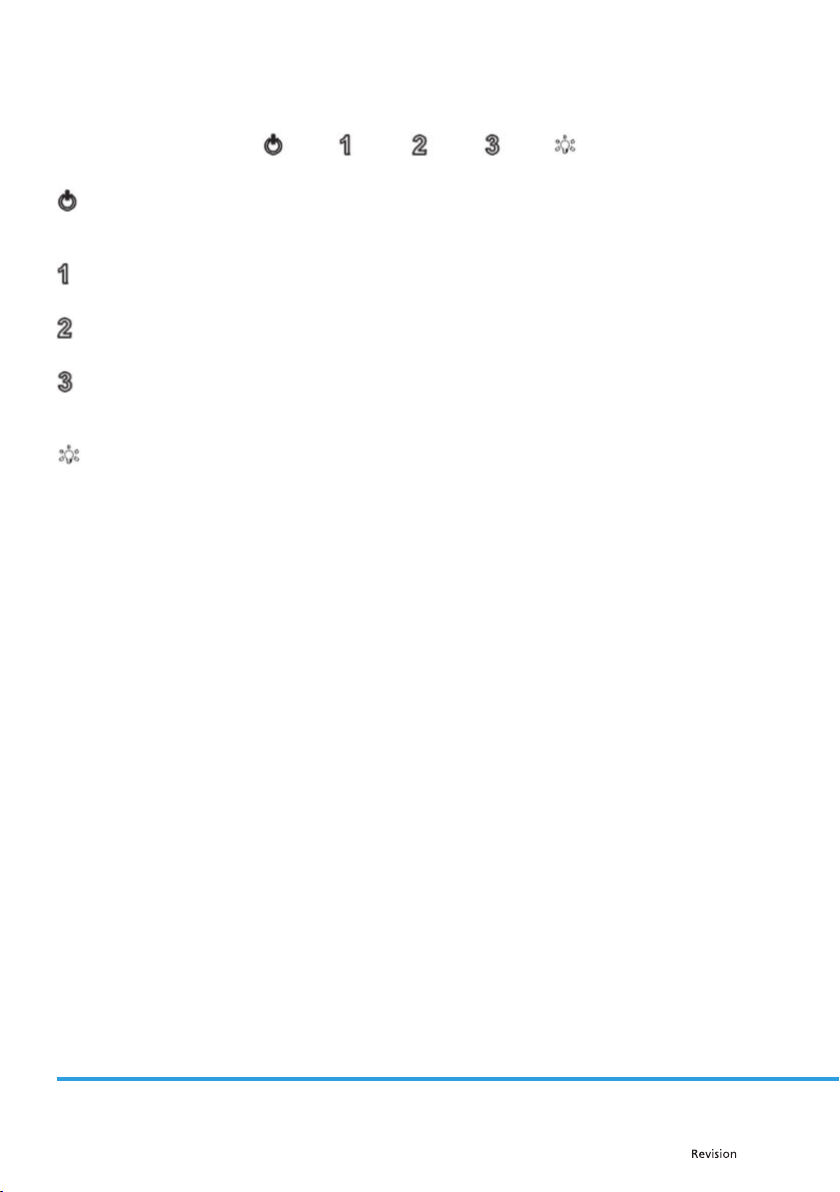
Five Keys Touch control
On/Off button
Press and hold for 2-3 seconds to turn the extractor fan on.
You can then change the speeds as per below. Press again to switch off.
Low Speed button
It is suitable for simmering and cooking which does not produce much steam or odour.
Medium Speed button
Airflow speed is ideal for extracting with standard cooking.
High Speed button
When a high amount of steam or odours are produced, use the high speed setting for the most
effective extraction.
Light button
Switches the light on and off.
Page 15
EN - 13
Copyright © 2018, Fast ČR, a. s. 08/2018
PART 5: MAINTENANCE AND CLEANING
Regarding the replacement of the bulb, cleaning and maintenance of the appliance, please refer to below
paragraphs of this manual.
Attention!
Before cleaning, switch the unit off and pull out the plug.
I.Regular Cleaning
Use a soft cloth moistened with hand-warm mild soap water or household cleaning detergent. Never use
metal pads, chemical, abrasive material or a stiff brush to clean the unit.
II.Monthly Cleaning of the Grease Filtry
ESSENTIAL: Clean the filtry every month to prevent any risk of fire.
The filtry collects grease, smoke and dust, so the filtry is directly affecting the efficiency of the cooker hood.
If not cleaned, the grease residue (potentially flammable) will saturate on the filtry. Clean it with household
cleaning detergent.
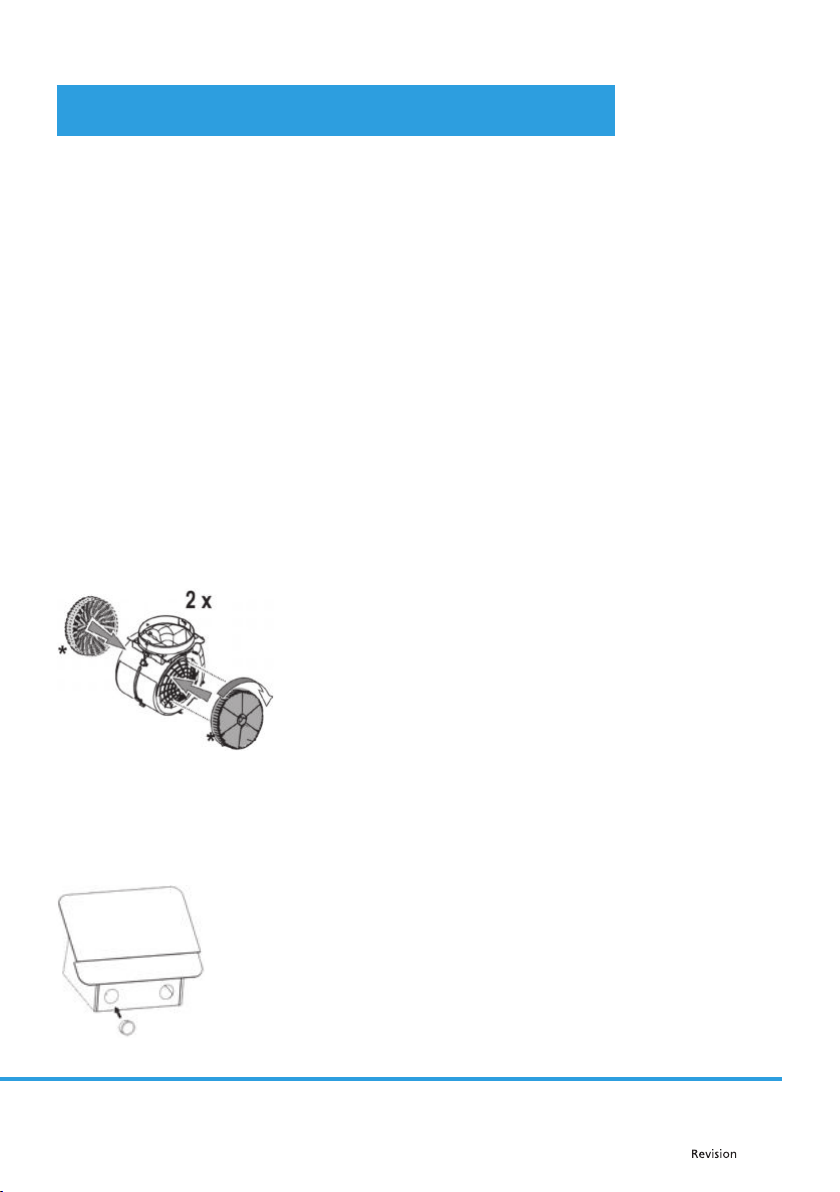
III.Charcoal fi lter (fi lter version only)
It absorbs unpleasant odours caused by cooking.
The saturation of the charcoal filtry occurs after more or less prolonged use, depending on the type of cooking
and the regularity of cleaning of the grease filtry. In any case it is necessary to replace the cartridge at least
every four mounths (or when the filtry saturation indication system – if envisaged on the model in possession
– indicates this necessity).The charcoal filtry may NOT be washed or regenerated.
IV. Bulb Replacement
1. Switch the unit o and unplug the appliance.
2. Open the cooker hood and remove the lters.
3. Release the lamp connecters and push the lamp out from inside.
4. Replace with the same type of lamp.
Page 16
EN - 14
Copyright © 2018, Fast ČR, a. s. 08/2018
PART 6: BEFORE YOU CALL THE SERVICE CENTRE
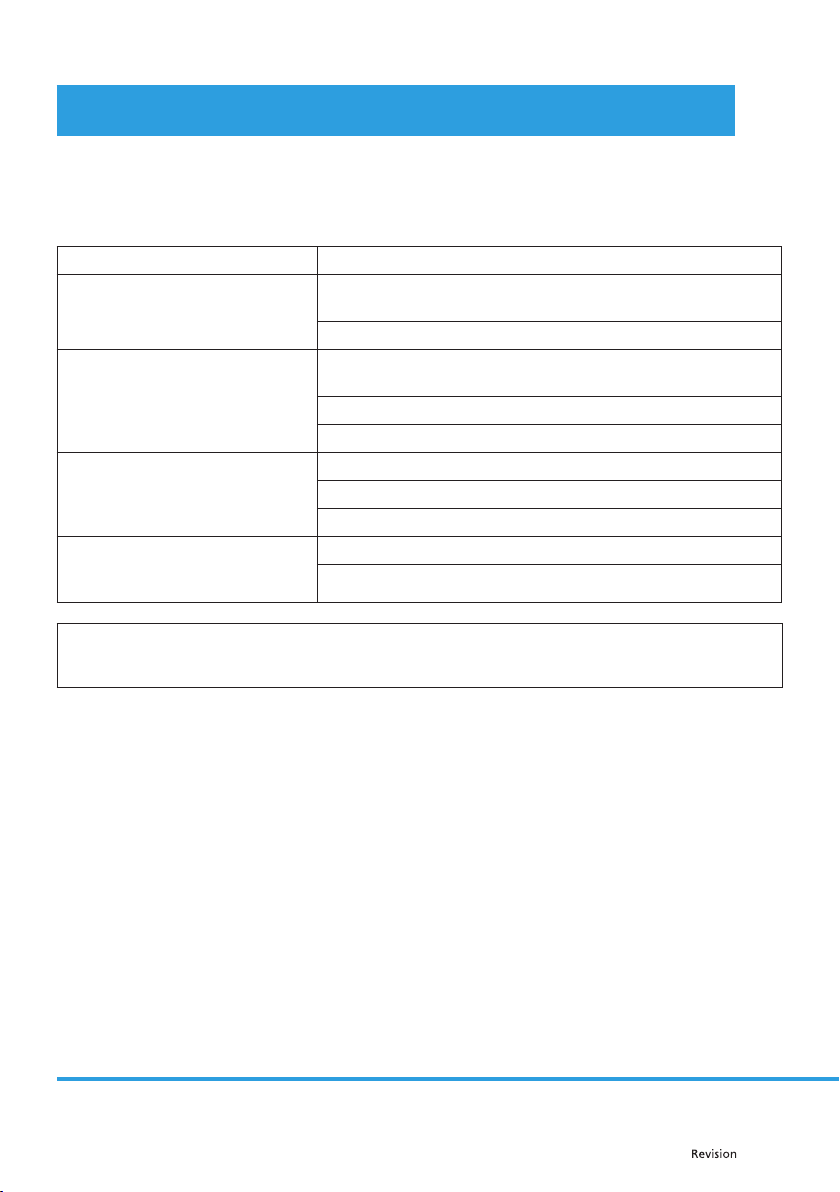
If the appliance is not working as it should check the following recommendations for resolving the most
common problems.
If the problem persists or it is not included in the table below, turn off the appliance and disconnect it from the
power socket and contact an authorised service centre.
Problem Solution
The range hood is not working. Check that the power plug is properly inserted in a properly
grounded power socket with the parameters 220 – 240 V ~ 50Hz.
Check that the motor power switch is in the "On" position.
The lights are not working. Check that the power plug is properly inserted in a properly
grounded power socket with the parameters 220 – 240 V ~ 50 Hz.
Check that the motor power switch is in the "On" position.
Check whether the light bulb or fluorescent tube is broken.
Exhaust power is weak. Check whether the aluminium filters are dirty.
Check the air outlet, it should be open.
Check whether the carbon filtry is not too dirty.
The range hood does not extract the
air directly out (for models without
an exhaust).
Check whether the aluminium filters are dirty.
Check whether the carbon filtry is not too dirty.
ATTENTION:
Use the range hood together with the stove. This will ensure the correct air exhaust. We recommend to
leave the range hood running a few minutes longer than the stove to ensure that all odours are extracted.
Page 17
EN - 15
Copyright © 2018, Fast ČR, a. s. 08/2018
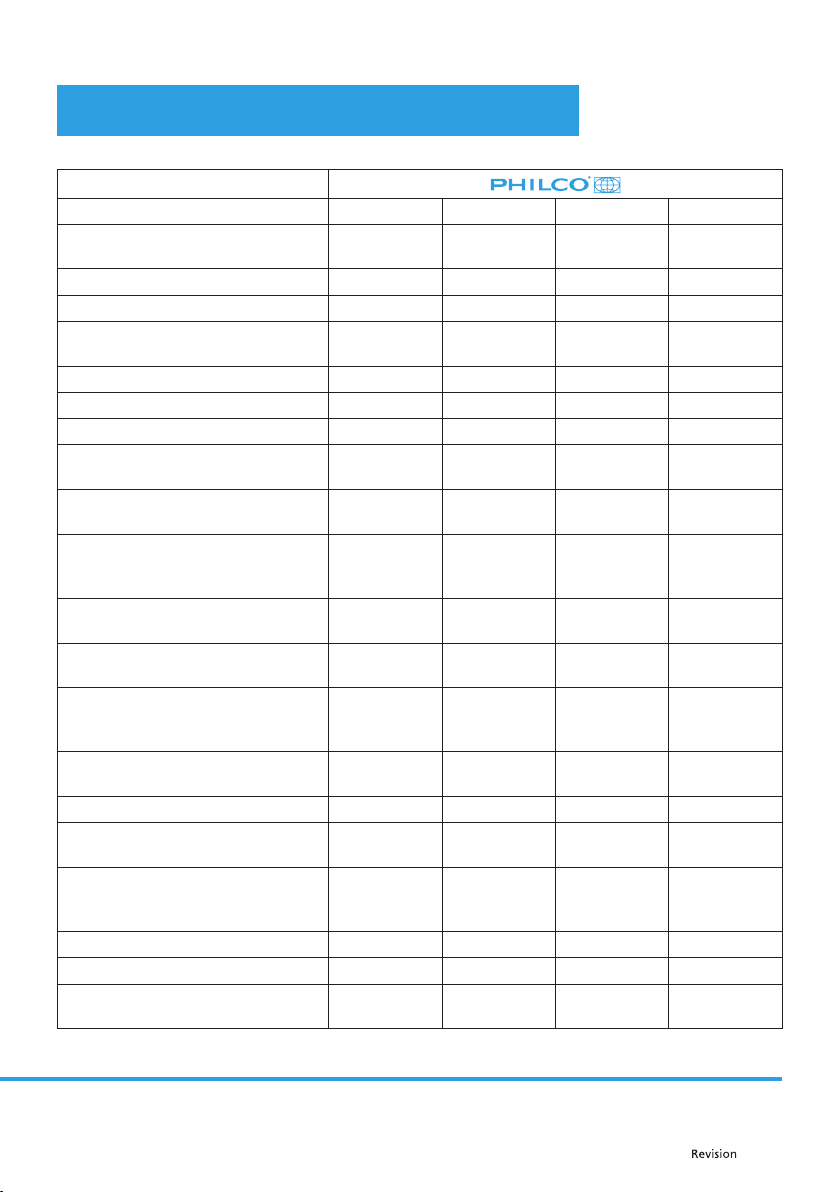
PART 7: TECHNICAL SPECIFICATIONS
Brand
Model PEW 726 B PEW 729 B PEW 456 B PEW 459 B
Annual Energy Consumption (AEC)
(kWh/a)
39 39 51 51
Energy Efficiency Class (EEI) AACC
Fluid Dynamic Efficiency (FDE) 30,2 30,2 16,3 16,3
Fluid Dynamic Efficiency class (FDE)
(Indice)
AADD
Light Efficiency (LE) 30 30 30 30
Lighting Efficiency Class (LE) (Indice) AAAA
Grease Filtering Efficiency (GFE) (%) 68,7 68,7 82,1 82,1
Grease Filtering Efficiency Class (GFE)
(Indice)
DDC C
Minimum Air Flow in Normal Use MIN
(m³/h)
405 405 290 290
Maximum Air Flow in Normal Use
(intensive/ boost excluded) MAX
(m³/h)
612 612 456 456
Air Flow at Intensive/Boost Setting
(m³/h)
720 720 N/A N/A
Sound Power Level at Minimum Speed
Avaible in Normal Use MIN (LWA) (dB)
58 58 52 52
Sound Power Level at Maximum
Speed Avaible in Normal Use MAX
(LWA) (dB)
66 66 56 56
Sound Power Level at Intensive/Boost
Setting (LWA) (dB)
69 69 N/A N/A
Power Consuption Off Mode (Po) (W) 0,38 0,38 0,38 0,38
Power Consuption in Standby Mode
(Ps) (W)
----
Product Information compliant
to commission regulation (EU)
No66/2014
(EU)65/2014
(EU)66/2014
(EU)65/2014
(EU)66/2014
(EU)65/2014
(EU)66/2014
(EU)65/2014
(EU)66/2014
Time increase factor (f) 0,9 0,9 1,4 1,4
Energy Efficiency (EElhood) 50,6 50,6 73,7 73,7
Measured air flow rate at best
efficiency point (QBEP) (m³/h)
323 323 230,3 230,3
Page 18
EN - 16
Copyright © 2018, Fast ČR, a. s. 08/2018
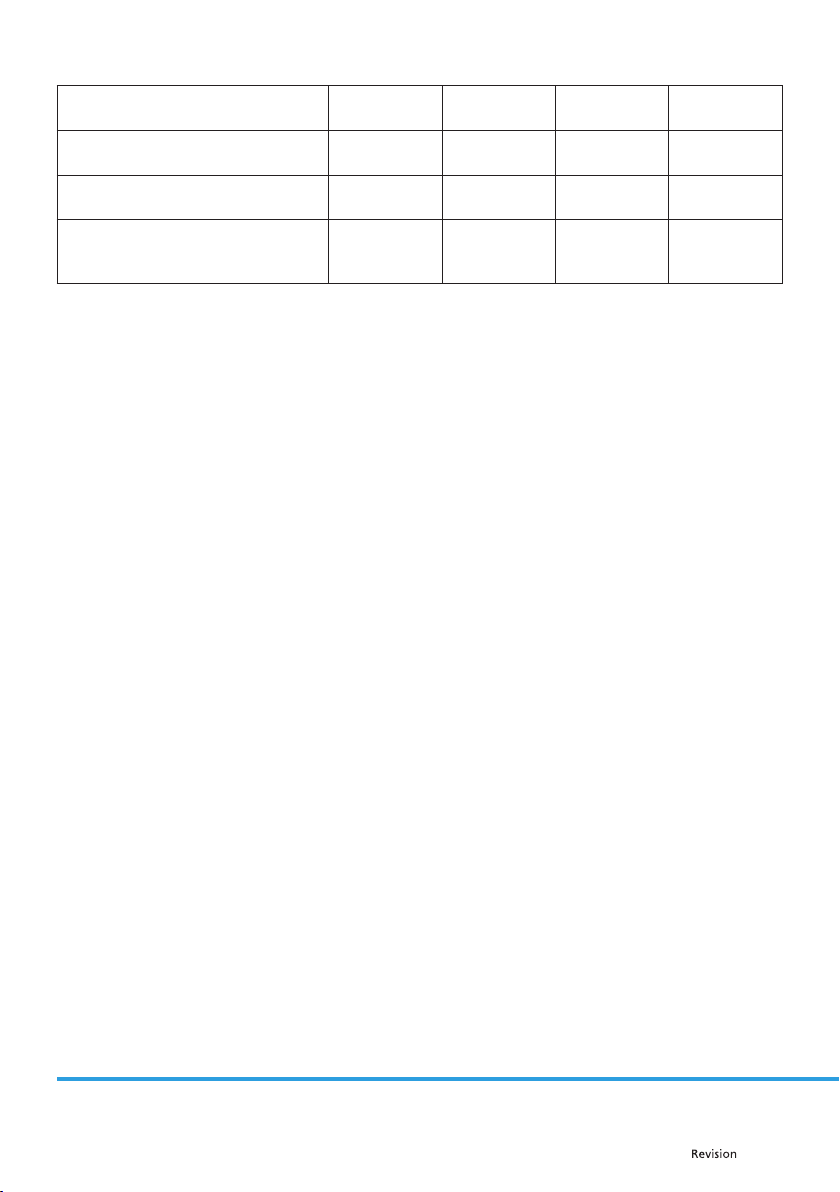
Measured air pressure at best
efficiency point (PBEP) (Pa)
343 343 241 241
Measured electric power input at best
efficiency point (WBEP)(W)
106 106 94,5 94,5
Nominal power of the lighting system
(WL)(W)
2*1.5 2*1.5 2*1.5 2*1.5
Average illumination of the lighting
system on the cooking surface
(Emiddle) (lux)
90 90 90 90
Page 19
EN - 17
Copyright © 2018, Fast ČR, a. s. 08/2018
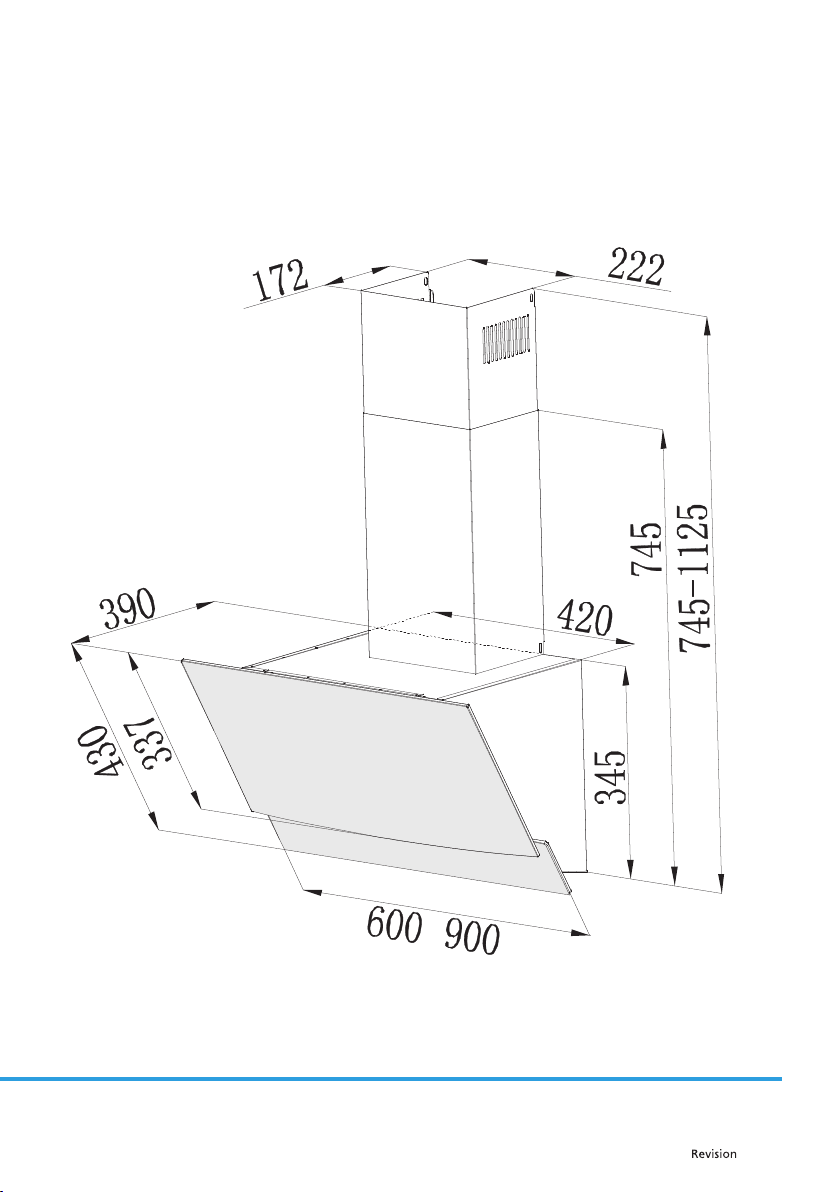
Technical drawings PEW 456 B & PEW 459 B
/
Page 20
EN - 18
Copyright © 2018, Fast ČR, a. s. 08/2018
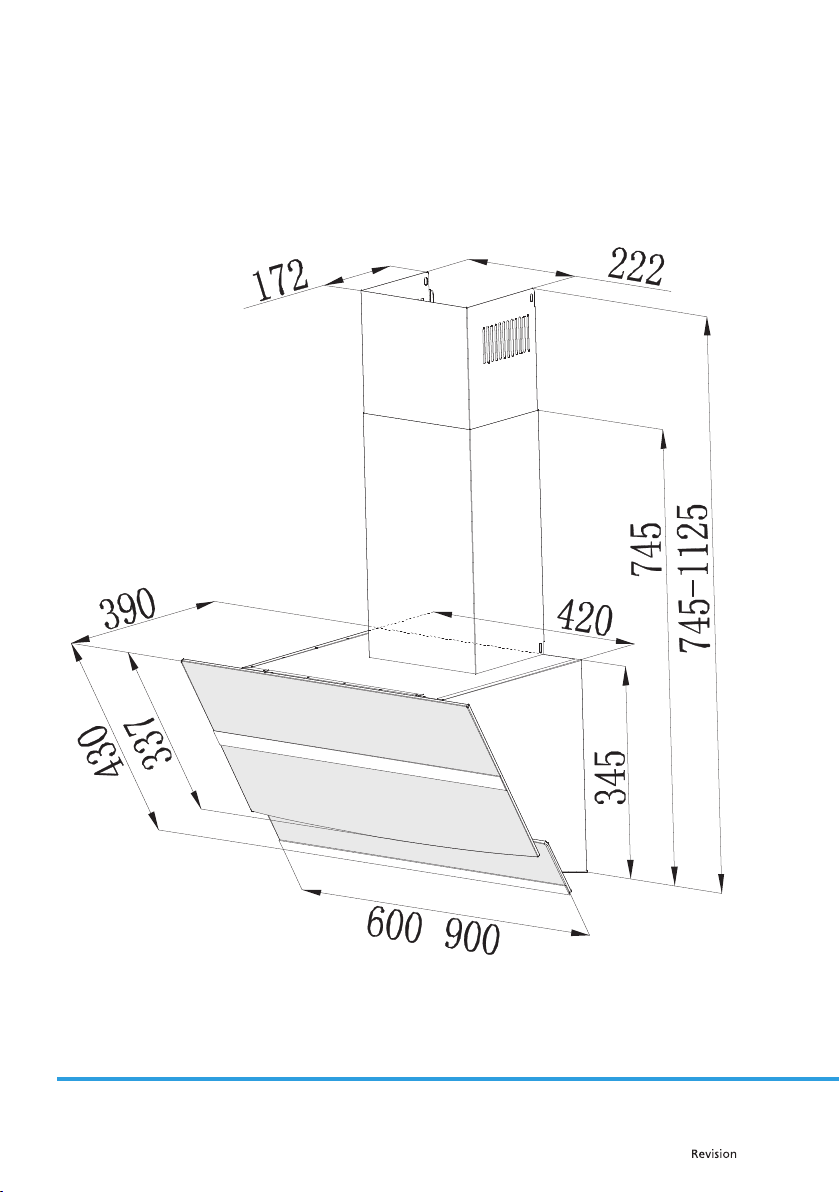
Technical drawings PEW 726 B & PEW 729 B
/
Page 21
EN - 19
Copyright © 2018, Fast ČR, a. s. 08/2018
INSTRUCTIONS AND INFORMATION REGARDING THE DISPOSAL OF USED
PACKAGING MATERIALS
Dispose of packaging material at a public waste disposal site.
DISPOSAL OF USED ELECTRICAL AND ELECTRONIC APPLIANCES
The meaning of the symbol on the product, its accessory or packaging indicates that this product
shall not be treated as household waste. Please, dispose of this product at your applicable collection
point for the recycling of electrical & electronic equipment waste. Alternatively in some states of
the European Union or other European states you may return your products to your local retailer
when buying an equivalent new product. The correct disposal of this product will help save valuable
natural resources and help in preventing the potential negative impact on the environment and
human health, which could be caused as a result of improper liquidation of waste. Please ask your
local authorities or the nearest waste collection centre for further details. The improper disposal of
this type of waste may fall subject to national regulations for fines.
For business entities in the European Union
If you wish to dispose of an electrical or electronic device, request the necessary information from
your seller or supplier.
Disposal in other countries outside the European Union
If you wish to dispose of this product, request the necessary information about the correct disposal
method from local government departments or from your seller.
This product meets all the basic EU regulation requirements that relate to it.
Changes to the text, design and technical specifications may occur without prior notice and we reserve the
right to make these changes.
The original version is in the Czech language.
Address of the manufacturer:
FAST ČR, a.s., Černokostelecká 1621, Říčany CZ-251 01
Page 22

TECHNICAL INFORMATION
Technical information can be found on the type plate on the inside of the appliance and on the
energy label. Keep the energy label, the instructions for use, together with other documents supplied
with the device.
TESTING INFORMATION
The delivered device is in accordance with Ecodesign and EN 61591:1997 + A1:2006 + A2:2011 +
A11:2014 + A12:2015 , EN 60704-1:2010+A11:2012, EN 60704-2-13:2011 , EN 50564:2011
If you have any further questions, please contact the manufacturer.
CUSTOMER CARE AND SERVICE
Always use original spare parts.
Model name and serial number can be found on the rating plate. Position of rating plate can be changed
without notice.
The original spare parts for some specific components are available for a minimum of 7 or 10 years, based on
the type of component, from the placing on the market of the last unit of the model.
When contacting our authorized service, have the model designation, serial number and defect description
available.
To download documents, visit www.philco.cz.
To report a defect and obtain additional service information, visit https://philco.cz/podpora-a-servis.
Subject to change without notice.
EN - 20
Copyright © 2020, Fast ČR, a. s.
Revision 08/2018
Page 23

Výrobce/Manufacturer:
Fast ČR, a.s.
U Sanitasu 1621
Říčany 251 01, CZECH REPUBLIC
Importer to SK:
FAST PLUS, a.s.
Na pántoch 18, 831 06 Bratislava
SLOVAKIA
is a pending or registered trademark of Electrolux Home
Products, Inc. and used under a license from Electrolux
Home Products, Inc.
 Loading...