


ECLIPSE SERIES
INSTALLATION GUIDE V1.0
INTRODUCTION
Thank you for choosing Phanteks. Please take a moment to carefully go through the manual. Phanteks will not take responsibility for any damages incurred due to incorrect installation or usage of this product.
Installation guide for:
Eclipse P360 models
Eclipse P418 models
INCLUDED ACCESSORIES
For PH-EC360A_DBK model, other models may vary
2x 120 mm |
2x 2.5” SSD Bracket |
D-RGB Case fan |
(Pre-Installed) |
|
|
22x Motherboard |
2x Thumb Screw |
12x Fan Screw |
6x Zip Tie |
+ SSD Screw |
|
|
|
1x Motherboard- |
4x PSU Screw |
1x This Manual |
|
Standoff |
|
|
|
PRODUCT OVERVIEW
FRONT I/O
2.Headphone
3.Microphone
4.USB 3.0 
5.D-RGB Color
6.D-RGB Mode
English |
Francais |
Deutch |
Espanol |
1. Power Button |
1. Bouton d’alimentation |
1. Ein-/Austaste |
1. Botón de encendido |
2. Headphone |
2. Casque |
2. Kopfhörer |
2. Auricular |
3. Microphone |
3. Microphone |
3. Mikrofon |
3. Micrófono |
4. USB 3.0 |
4. USB 3.0 |
4. USB 3.0 |
4. USB 3.0 |
5. D-RGB Color |
5. D-RGB Couleur |
5. D-RGB Farbe |
5. D-RGB Color |
6. D-RGB Mode |
6. D-RGB Mode |
6. D-RGB Modus |
6. D-RGB mode |
1. Power Button
FANS & RADIATORS CLEARANCES
CLEARANCE |
|
CPU Cooler Height |
160mm |
PSU Clearance |
250mm |
GPU Clearance |
400mm |
E-ATX Motherboard |
280mm |
REAR
120 FAN
120 |
120 |
|
RAD |
||
|
TOP |
|
|
140 |
|
FAN |
TOP FILTER |
120 |
|
|
|
FAN |
120 |
120 |
240 |
RAD |
*max motherboard component height is 38mm
|
|
FRONT |
|
|
|
|
140 |
|
|
|
FAN |
|
FRONT FILTER |
140 |
140 |
|
|
||
|
|
280 |
RAD |
|
|
Max 142x315mm |
|
|
|
|
120 |
|
|
|
FAN |
|
|
120 |
120 |
PSU FILTER |
|
240 |
RAD |
Max 122x315mm
ECLIPSE SERIES
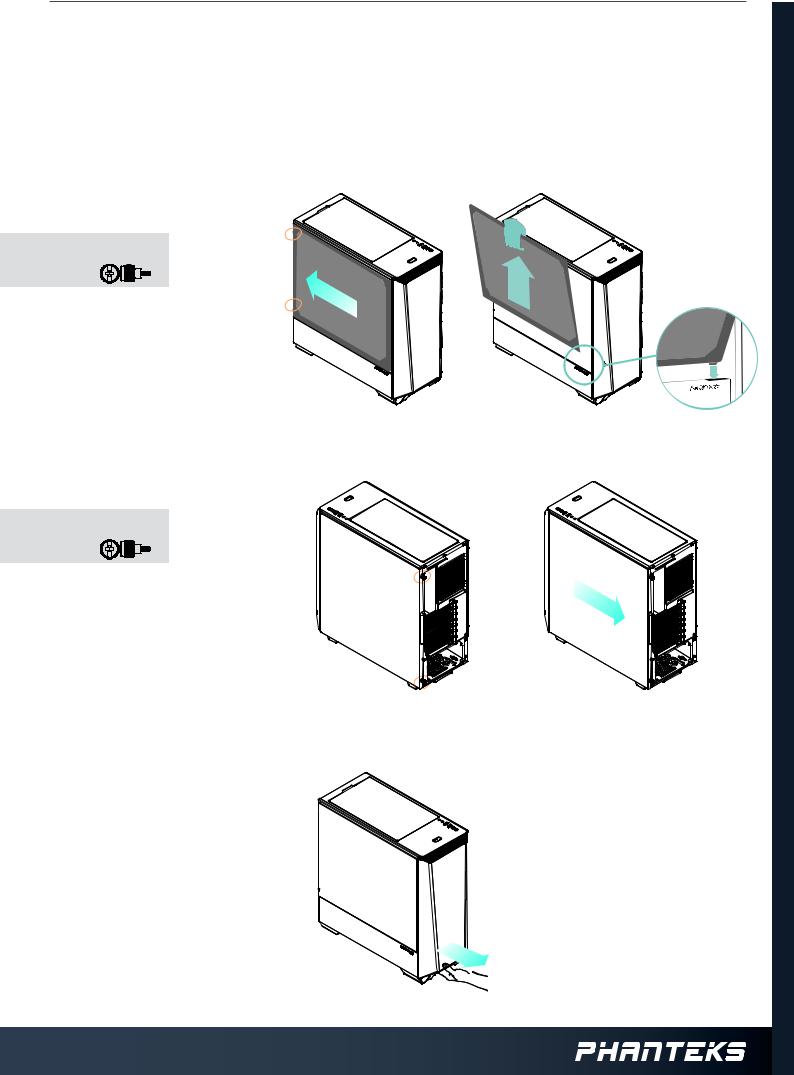
PANEL REMOVAL
There are three panels which can be removed from the P360A Chassis; the left side tempered glass panel, the right side panel and the front panel. Follow these steps below.
LEFT SIDE PANEL |
|
|
|
1. |
LOOSEN THUMB SCREWS AND |
1. |
2. |
|
SLIDE PANEL TO THE REAR |
|
|
|
LOOSEN: |
|
|
|
2 x |
|
|
2. |
REMOVE TEMPERED GLASS PANEL |
|
|
RIGHT SIDE PANEL |
|
|
|
1. |
LOOSEN THUMB SCREWS |
1. |
2. |
|
LOOSEN: |
|
|
|
2 x |
|
|
2. |
SLIDE SIDE PANEL OFF |
|
|
FRONT PANEL |
|
1. REMOVE FRONT PANEL BY PULLING ON |
1. |
THE PANEL FROM BELOW |
|
 Loading...