

Page 1

PGP Universal Server
Administrator's Guide
Page 2

Page 3

Version Information
PGP Universal Server Administrator's Guide. PGP Universal Server Version 3.0.0. Released March 2010.
Copyright Information
Copyright © 1991-2010 by PGP Corporation. All Rights Reserved. No part of this document can be reproduced or transmitted in any form or by any
means, electronic or mechanical, for any purpose, without the express written permission of PGP Corporation.
Trademark Information
PGP, Pretty Good Privacy, and the PGP logo are registered trademarks of PGP Corporation in the US and other countries. IDEA is a trademark of Ascom
Tech AG. Windows and ActiveX are registered trademarks of Microsoft Corporation. AOL is a registered trademark, and AOL Instant Messenger is a
trademark, of America Online, Inc. Red Hat and Red Hat Linux are trademarks or registered trademarks of Red Hat, Inc. Linux is a registered trademark
of Linus Torvalds. Solaris is a trademark or registered trademark of Sun Microsystems, Inc. AIX is a trademark or registered trademark of International
Business Machines Corporation. HP-UX is a trademark or registered trademark of Hewlett-Packard Company. SSH and Secure Shell are trademarks of
SSH Communications Security, Inc. Rendezvous and Mac OS X are trademarks or registered trademarks of Apple Computer, Inc. All other registered
and unregistered trademarks in this document are the sole property of their respective owners.
Licensing and Patent Information
The IDEA cryptographic cipher described in U.S. patent number 5,214,703 is licensed from Ascom Tech AG. The CAST-128 encryption algorithm,
implemented from RFC 2144, is available worldwide on a royalty-free basis for commercial and non-commercial uses. PGP Corporation has secured a
license to the patent rights contained in the patent application Serial Number 10/655,563 by The Regents of the University of California, entitled Block
Cipher Mode of Operation for Constructing a Wide-blocksize block Cipher from a Conventional Block Cipher. Some third-party software included in PGP
Universal Server is licensed under the GNU General Public License (GPL). PGP Universal Server as a whole is not licensed under the GPL. If you would
like a copy of the source code for the GPL software included in PGP Universal Server, contact PGP Support (
may have patents and/or pending patent applications covering subject matter in this software or its documentation; the furnishing of this software or
documentation does not give you any license to these patents.
https://support.pgp.com). PGP Corporation
Acknowledgments
This product includes or may include:
-- The Zip and ZLib compression code, created by Mark Adler and Jean-Loup Gailly, is used with permission from the free Info-ZIP implementation,
developed by zlib (
the MIT License found at
available high-quality data compressor, is copyrighted by Julian Seward, © 1996-2005. -- Application server (
http://www.apache.org/), Jakarta Commons (http://jakarta.apache.org/commons/license.html) and log4j, a Java-based library used to parse HTML,
(
developed by the Apache Software Foundation. The license is at
framework for moving data from XML to Java programming language objects and from Java to databases, is released by the ExoLab Group under an
Apache 2.0-style license, available at
Foundation that implements the XSLT XML transformation language and the XPath XML query language, is released under the Apache Software
License, version 1.1, available at
Protocol") used for communications between various PGP products is provided under the Apache license found at
http://www.apache.org/licenses/LICENSE-2.0.txt. -- mx4j, an open-source implementation of the Java Management Extensions (JMX), is released under
an Apache-style license, available at
Independent JPEG Group. (
distributed under the MIT License
distributed by University of Cambridge. ©1997-2006. The license agreement is at
and Domain Name System (DNS) protocols developed and copyrighted by Internet Systems Consortium, Inc. (
implementation of daemon developed by The FreeBSD Project, © 1994-2006. -- Simple Network Management Protocol Library developed and
copyrighted by Carnegie Mellon University © 1989, 1991, 1992, Networks Associates Technology, Inc, © 2001- 2003, Cambridge Broadband Ltd. ©
2001- 2003, Sun Microsystems, Inc., © 2003, Sparta, Inc, © 2003-2006, Cisco, Inc and Information Network Center of Beijing University of Posts and
Telecommunications, © 2004. The license agreement for these is at
by Network Time Protocol and copyrighted to various contributors. -- Lightweight Directory Access Protocol developed and copyrighted by OpenLDAP
Foundation. OpenLDAP is an open-source implementation of the Lightweight Directory Access Protocol (LDAP). Copyright © 1999-2003, The
OpenLDAP Foundation. The license agreement is at
OpenBSD project is released by the OpenBSD Project under a BSD-style license, available at
bin/cvsweb/src/usr.bin/ssh/LICENCE?rev=HEAD. -- PC/SC Lite is a free implementation of PC/SC, a specification for SmartCard integration is released
under the BSD license. -- Postfix, an open source mail transfer agent (MTA), is released under the IBM Public License 1.0, available at
http://www.opensource.org/licenses/ibmpl.php. -- PostgreSQL, a free software object-relational database management system, is released under a
BSD-style license, available at
PostgreSQL database using standard, database independent Java code, (c) 1997-2005, PostgreSQL Global Development Group, is released under a
BSD-style license, available at
database management system, is released under a BSD-style license, available at
version of cron, a standard UNIX daemon that runs specified programs at scheduled times. Copyright © 1993, 1994 by Paul Vixie; used by permission. -
- JacORB, a Java object used to facilitate communication between processes written in Java and the data layer, is open source licensed under the GNU
Library General Public License (LGPL) available at
open-source implementation of a CORBA Object Request Broker (ORB), and is used for communication between processes written in C/C++ and the
data layer. Copyright (c) 1993-2006 by Douglas C. Schmidt and his research group at Washington University, University of California, Irvine, and
Vanderbilt University. The open source software license is available at
downloading files via common network services, is open source software provided under a MIT/X derivate license available at
http://curl.haxx.se/docs/copyright.html. Copyright (c) 1996 - 2007, Daniel Stenberg. -- libuuid, a library used to generate unique identifiers, is released
under a BSD-style license, available at
libpopt, a library that parses command line options, is released under the terms of the GNU Free Documentation License available at
http://directory.fsf.org/libs/COPYING.DOC. Copyright © 2000-2003 Free Software Foundation, Inc. -- gSOAP, a development tool for Windows clients to
communicate with the Intel Corporation AMT chipset on a motherboard, is distributed under the gSOAP Public License version 1.3b, available at
http://www.zlib.net). -- Libxml2, the XML C parser and toolkit developed for the Gnome project and distributed and copyrighted under
http://www.opensource.org/licenses/mit-license.html. Copyright © 2007 by the Open Source Initiative. -- bzip2 1.0, a freely
http://jakarta.apache.org/), web server
www.apache.org/licenses/LICENSE-2.0.txt. -- Castor, an open-source, data-binding
http://www.castor.org/license.html. -- Xalan, an open-source software library from the Apache Software
http://xml.apache.org/xalan-j/#license1.1. -- Apache Axis is an implementation of the SOAP ("Simple Object Access
http://mx4j.sourceforge.net/docs/ch01s06.html. -- jpeglib version 6a is based in part on the work of the
http://www.ijg.org/) -- libxslt the XSLT C library developed for the GNOME project and used for XML transformations is
http://www.opensource.org/licenses/mit-license.html. -- PCRE Perl regular expression compiler, copyrighted and
http://www.pcre.org/license.txt. -- BIND Balanced Binary Tree Library
http://www.isc.org) -- Free BSD
http://net-snmp.sourceforge.net/about/license.html. -- NTP version 4.2 developed
http://www.openldap.org/software/release/license.html. Secure shell OpenSSH developed by
http://www.openbsd.org/cgi-
http://www.postgresql.org/about/licence. -- PostgreSQL JDBC driver, a free Java program used to connect to a
http://jdbc.postgresql.org/license.html. -- PostgreSQL Regular Expression Library, a free software object-relational
http://www.postgresql.org/about/licence. -- 21.vixie-cron is the Vixie
http://www.jacorb.org/lgpl.html. Copyright © 2006 The JacORB Project. -- TAO (The ACE ORB) is an
http://www.cs.wustl.edu/~schmidt/ACE-copying.html. -- libcURL, a library for
http://thunk.org/hg/e2fsprogs/?file/fe55db3e508c/lib/uuid/COPYING. Copyright (C) 1996, 1997 Theodore Ts'o. --
Page 4

http://www.cs.fsu.edu/~engelen/license.html. -- Windows Template Library (WTL) is used for developing user interface components and is distributed
under the Common Public License v1.0 found at
automate a variety of maintenance functions and is provided under the Perl Artistic License, found at
http://www.perl.com/pub/a/language/misc/Artistic.html. -- rEFIt - libeg, provides a graphical interface library for EFI, including image rendering, text
rendering, and alpha blending, and is distributed under the license found at
http://refit.svn.sourceforge.net/viewvc/*checkout*/refit/trunk/refit/LICENSE.txt?revision=288. Copyright (c) 2006 Christoph Pfisterer. All rights reserved.
-- Java Radius Client, used to authenticate PGP Universal Web Messenger users via Radius, is distributed under the Lesser General Public License
(LGPL) found at
Copyright (c) 2009, Yahoo! Inc. All rights reserved. Released under a BSD-style license, available at
JSON-lib version 2.2.1, a Java library used to convert Java objects to JSON (JavaScript Object Notation) objects for AJAX. Distributed under the Apache
2.0 license, available at
http://ezmorph.sourceforge.net/license.html. -- Apache Commons Lang, used by JSON-lib, is distributed under the Apache 2.0 license, available at
at
http://commons.apache.org/license.html. -- Apache Commons BeanUtils, used by JSON-lib, is distributed under the Apache 2.0 license, available at
http://commons.apache.org/license.html. -- SimpleIni is an .ini format file parser and provides the ability to read and write .ini files, a common
configuration file format used on Windows, on other platforms. Distributed under the MIT License found at
license.html. Copyright 2006-2008, Brodie Thiesfield. -- uSTL provides a small fast implementation of common Standard Template Library functions and
data structures and is distributed under the MIT License found at
Mike Sharov <
the PGP SDK. Distributed under the BSD license found at
reserved.
Additional acknowledgements and legal notices are included as part of the PGP Universal Server.
http://www.gnu.org/licenses/lgpl.html. -- Yahoo! User Interface (YUI) library version 2.5.2, a Web UI interface library for AJAX.
http://json-lib.sourceforge.net/license.html. -- EZMorph, used by JSON-lib, is distributed under the Apache 2.0 license, available
msharov@users.sourceforge.net>. -- Protocol Buffers (protobuf), Google's data interchange format, are used to serialize structure data in
http://opensource.org/licenses/cpl1.0.php. -- The Perl Kit provides several independent utilities used to
http://developer.yahoo.com/yui/license.html. --
http://www.opensource.org/licenses/mit-
http://www.opensource.org/licenses/mit-license.html. Copyright (c) 2005-2009 by
http://www.opensource.org/licenses/bsd-license.php. Copyright 2008 Google Inc. All rights
Export Information
Export of this software and documentation may be subject to compliance with the rules and regulations promulgated from time to time by the Bureau
of Export Administration, United States Department of Commerce, which restricts the export and re-export of certain products and technical data.
Limitations
The software provided with this documentation is licensed to you for your individual use under the terms of the End User License Agreement provided
with the software. The information in this document is subject to change without notice. PGP Corporation does not warrant that the information meets
your requirements or that the information is free of errors. The information may include technical inaccuracies or typographical errors. Changes may be
made to the information and incorporated in new editions of this document, if and when made available by PGP Corporation.
4
Page 5

Contents
Introduction
What is PGP Universal Server? 15
PGP Universal Server Product Family 16
Who Should Read This Guide 16
Common Criteria Environments 16
Improvements in this Version of PGP Universal Server 17
Using the PGP Universal Server with the Command Line 18
Symbols 18
Getting Assistance 19
Getting product information 19
Contact Information 20
15
The Big Picture 21
Important Terms 21
PGP Products 21
PGP Universal Server Concepts 22
PGP Universal Server Features 23
PGP Universal Server User Types 25
Installation Overview 26
Open Ports 33
TCP Ports 33
UDP Ports 35
Naming your PGP Universal Server
Considering a Name for Your PGP Universal Server 37
Methods for Naming a PGP Universal Server 38
37
Understanding the Administrative Interface 39
System Requirements 39
Logging In 39
The System Overview Page 41
Managing Alerts 42
Logging In For the First Time 43
Administrative Interface Map 43
Icons 45
i
Page 6

PGP Universal Server Contents
Licensing Your Software 51
Overview 51
Manual and Automatic Licensing 51
Licensing a PGP Universal Server 51
Licensing the Mail Proxy Feature 52
Operating in Learn Mode 53
Purpose of Learn Mode 53
Checking the Logs 54
Managing Learn Mode 54
Managed Domains
About Managed Domains 57
Adding Managed Domains 58
Deleting Managed Domains 58
57
Understanding Keys 59
Choosing a Key Mode For Key Management 59
Adding PGP Desktop Solutions to Existing Gateway Email Environments 62
Changing Key Modes 63
How PGP Universal Server Uses Certificate Revocation Lists 64
Key Reconstruction Blocks 64
Managed Key Permissions 65
Managing Organization Keys
About Organization Keys 67
Organization Key 67
Inspecting the Organization Key 68
Regenerating the Organization Key 68
Importing an Organization Key 69
Organization Certificate 70
Inspecting the Organization Certificate 71
Exporting the Organization Certificate 71
Deleting the Organization Certificate 72
Generating the Organization Certificate 72
Importing the Organization Certificate 73
Additional Decryption Key (ADK) 73
Importing the ADK 74
Inspecting the ADK 74
Deleting the ADK 74
Verified Directory Key 75
67
ii
Page 7

PGP Universal Server Contents
Importing the Verified Directory Key 75
Inspecting the Verified Directory Key 75
Deleting the Verified Directory Key 76
Administering Managed Keys 77
Viewing Managed Keys 78
Managed Key Information 79
Email Addresses 81
Subkeys 81
Certificates 81
Permissions 82
Attributes 83
Symmetric Key Series 83
Symmetric Keys 85
Custom Data Objects 86
Exporting Consumer Keys 87
Exporting the Managed Key of an Internal User 88
Exporting the Managed Key of an External User 88
Exporting PGP Verified Directory User Keys 89
Exporting the Managed Key of a Managed Device 89
Deleting Consumer Keys 90
Deleting the Managed Key of an Internal User 90
Deleting the Managed Key of an External User 90
Deleting the Key of a PGP Verified Directory User 91
Deleting the Managed Key of a Managed Device 91
Approving Pending Keys 91
Revoking Managed Keys 92
Managing Trusted Keys and Certificates 95
Overview 95
Trusted Keys 95
Trusted Certificates 95
Adding a Trusted Key or Certificate 96
Inspecting and Changing Trusted Key Properties 97
Deleting Trusted Keys and Certificates 97
Searching for Trusted Keys and Certificates 98
Setting Mail Policy 99
Overview 99
How Policy Chains Work 100
Mail Policy and Dictionaries 101
Mail Policy and Key Searches 101
Mail Policy and Cached Keys 102
Migrating Settings from Version 2.0.x 102
Restoring Mail Policy Rules 103
iii
Page 8

PGP Universal Server Contents
Understanding the Pre-Installed Policy Chains 108
Mail Policy Outside the Mailflow 110
Using the Rule Interface 111
The Conditions Card 111
The Actions Card 113
Building Valid Chains and Rules 114
Using Valid Processing Order 114
Creating Valid Groups 115
Creating a Valid Rule 116
Managing Policy Chains 117
Mail Policy Best Practices 117
Restoring Mail Policy to Default Settings 117
Editing Policy Chain Settings 118
Adding Policy Chains 118
Deleting Policy Chains 119
Exporting Policy Chains 120
Printing Policy Chains 120
Managing Rules 121
Adding Rules to Policy Chains 121
Deleting Rules from Policy Chains 121
Enabling and Disabling Rules 122
Changing the Processing Order of the Rules 122
Adding Key Searches 122
Choosing Condition Statements, Conditions, and Actions 123
Condition Statements 123
Conditions 124
Actions 131
Working with Common Access Cards 144
Applying Key Not Found Settings to External Users 145
Overview 145
Bounce the Message 146
PDF Messenger 146
Certified Delivery with PDF Messenger 147
Send Unencrypted 147
Smart Trailer 148
PGP Universal Web Messenger 149
Changing Policy Settings 150
Changing User Delivery Method Preference 151
Using Dictionaries with Policy 153
Overview 153
Default Dictionaries 154
Editing Default Dictionaries 156
User-Defined Dictionaries 157
Adding a User-Defined Dictionary 157
iv
Page 9

PGP Universal Server Contents
Editing a User-Defined Dictionary 158
Deleting a Dictionary 158
Exporting a Dictionary 159
Searching the Dictionaries 159
Keyservers, SMTP Archive Servers, and Mail Policy 161
Overview 161
Keyservers 161
Adding or Editing a Keyserver 162
Deleting a Keyserver 164
SMTP Servers 164
Adding or Editing an Archive Server 164
Deleting an Archive Server 165
Managing Keys in the Key Cache 167
Overview 167
Changing Cached Key Timeout 167
Purging Keys from the Cache 168
Trusting Cached Keys 168
Viewing Cached Keys 168
Searching the Key Cache 169
Configuring Mail Proxies 171
Overview 171
PGP Universal Server and Mail Proxies 171
Mail Proxies in an Internal Placement 172
Mail Proxies in a Gateway Placement 173
Changes in Proxy Settings from PGP Universal Server 2.0 to 2.5 and later 175
Mail Proxies Page 175
Creating New or Editing Existing Proxies 176
Creating or Editing a POP/IMAP Proxy 176
Creating or Editing an Outbound SMTP Proxy 178
Creating or Editing an Inbound SMTP Proxy 180
Creating or Editing a Unified SMTP Proxy 182
Email in the Mail Queue 187
Overview 187
Deleting Messages from the Mail Queue 188
Specifying Mail Routes 189
Overview 189
Managing Mail Routes 190
v
Page 10

PGP Universal Server Contents
Adding a Mail Route 190
Editing a Mail Route 191
Deleting a Mail Route 191
Customizing System Message Templates 193
Overview 193
Templates and Message Size 194
PDF Messenger Templates 194
Templates for New PGP Universal Web Messenger Users 194
Editing a Message Template 195
Managing Groups 197
Understanding Groups 197
Sorting Consumers into Groups 197
Everyone Group 198
Excluded Group 198
Policy Group Order 199
Migrating Groups from Version 2.x 199
Setting Policy Group Order 199
Creating a New Group 199
Deleting a Group 200
Viewing Group Members 200
Manually Adding Group Members 201
Manually Removing Members from a Group 201
Group Permissions 202
Adding Group Permissions 203
Deleting Group Permissions 203
Setting Group Membership 204
Searching Groups 205
Creating Group Client Installations 205
How Group Policy is Assigned to PGP Desktop Installers 206
Creating PGP Desktop Installers 207
Managing Devices 211
Managed Devices 212
Adding and Deleting Managed Devices 212
Adding Managed Devices to Groups 213
Managed Device Information 214
Deleting Managed Devices from PGP Universal Server 218
Deleting Managed Devices from Groups 219
WDE Devices (Computers and Disks) 220
WDE Computers 220
WDE Disks 222
Searching for Devices 223
vi
Page 11

PGP Universal Server Contents
Administering Consumer Policy 225
Understanding Consumer Policy 225
Making Sure Users Create Strong Passphrases 226
Understanding Entropy 226
Using the Windows Preinstallation Environment 227
X.509 Certificate Management in Lotus Notes Environments 227
Trusting Certificates Created by PGP Universal Server 228
Setting the Lotus Notes Key Settings in PGP Universal Server 230
Technical Deployment Information 231
Offline Policy 231
Using a Policy ADK 233
Out of Mail Stream Support 233
Enrolling Users through Silent Enrollment 235
Silent Enrollment with Windows 235
Silent Enrollment with Mac OS X 235
PGP Whole Disk Encryption Administration 235
PGP Whole Disk Encryption on Mac OS X with FileVault 236
How Does Single Sign-On Work? 236
Enabling Single Sign-On 237
Managing Clients Remotely Using a PGP WDE Administrator Active Directory Group 238
Managing Clients Locally Using the PGP WDE Administrator Key 239
Managing Consumer Policies 240
Adding a Consumer Policy 241
Editing a Consumer Policy 241
Deleting a Consumer Policy 242
Setting Policy for Clients 243
Client and PGP Universal Server Version Compatibility 243
Serving PGP Admin 8 Preferences 244
Establishing PGP Desktop Settings for Your PGP Desktop Clients 245
PGP Desktop Feature License Settings 245
Controlling PGP Desktop Components 246
PGP Portable 248
PGP Mobile 248
PGP NetShare 249
How the PGP NetShare Policy Settings Work Together 249
Multi-user environments and managing PGP NetShare 249
Backing Up PGP NetShare-Protected Files 250
Using Directory Synchronization to Manage Consumers
How PGP Universal Server Uses Directory Synchronization 251
Base DN and Bind DN 253
Consumer Matching Rules 254
Understanding User Enrollment Methods 254
vii
251
Page 12

PGP Universal Server Contents
Before Creating a Client Installer 255
Email Enrollment 256
Directory Enrollment 257
Enabling Directory Synchronization 260
Adding or Editing an LDAP Directory 260
The LDAP Servers Tab 261
The Base Distinguished Name Tab 262
The Consumer Matching Rules Tab 262
Testing the LDAP Connection 263
Using Sample Records to Configure LDAP Settings 263
Deleting an LDAP Directory 263
Setting LDAP Directory Order 264
Directory Synchronization Settings 264
Managing User Accounts
Understanding User Account Types 267
Viewing User Accounts 267
User Management Tasks 267
Setting User Authentication 268
Editing User Attributes 268
Adding Users to Groups 268
Editing User Permissions 269
Deleting Users 269
Searching for Users 270
Viewing User Log Entries 270
Changing Display Names and Usernames 270
Exporting a User’s X.509 Certificate 271
Revoking a User's X.509 Certificate 272
Managing User Keys 272
Managing Internal User Accounts 273
Importing Internal User Keys Manually 273
Creating New Internal User Accounts 274
Exporting PGP Whole Disk Encryption Login Failure Data 274
Internal User Settings 275
Managing External User Accounts 279
Importing External Users 280
Exporting Delivery Receipts 280
External User Settings 281
Managing Verified Directory User Accounts 283
Importing Verified Directory Users 284
PGP Verified Directory User Settings 284
267
Recovering Encrypted Data in an Enterprise Environment
Using Key Reconstruction 287
Recovering Encryption Key Material without Key Reconstruction 288
Encryption Key Recovery of CKM Keys 288
viii
287
Page 13

PGP Universal Server Contents
Encryption Key Recovery of GKM Keys 288
Encryption Key Recovery of SCKM Keys 289
Encryption Key Recovery of SKM Keys 290
Using an Additional Decryption Key for Data Recovery 290
PGP Universal Satellite 293
Overview 293
Technical Information 294
Distributing the PGP Universal Satellite Software 294
Configuration 295
Deployment Mode 295
Key Mode 295
PGP Universal Satellite Configurations 296
Switching Key Modes 300
Binding 300
Pre-Binding 301
Manual Binding 302
Policy and Key or Certificate Retrieval 303
Retrieving Lost Policies 304
Retrieving Lost Keys or Certificates 305
PGP Universal Satellite for Mac OS X 309
Overview 309
System Requirements 309
Obtaining the Installer 310
Installation 310
Updates 311
Files 311
PGP Universal Satellite for Windows
Overview 313
System Requirements 314
Obtaining the Installer 314
Installation 315
Updates 316
Files 316
MAPI Support 316
External MAPI Configuration 316
Internal MAPI Configuration 317
Using MAPI 318
Lotus Notes Support 319
External Lotus Notes Configuration 319
Internal Lotus Notes Configuration 320
Using Lotus Notes 321
Notes IDs 321
313
ix
Page 14

PGP Universal Server Contents
Configuring PGP Universal Web Messenger 323
Overview 323
PGP Universal Web Messenger and Clustering 324
External Authentication 325
Customizing PGP Universal Web Messenger 326
Adding a New Template 327
Troubleshooting Customization 331
Changing the Active Template 334
Deleting a Template 334
Editing a Template 334
Downloading Template Files 335
Restoring to Factory Defaults 335
Configuring the PGP Universal Web Messenger Service 335
Starting and Stopping PGP Universal Web Messenger 336
Selecting the PGP Universal Web Messenger Network Interface 336
Setting Up External Authentication 338
Creating Settings for PGP Universal Web Messenger User Accounts 339
Setting Message Replication in a Cluster 340
Configuring the Integrated Keyserver 341
Overview 341
Starting and Stopping the Keyserver Service 341
Configuring the Keyserver Service 342
Configuring the PGP Verified Directory 345
Overview 345
Starting and Stopping the PGP Verified Directory 346
Configuring the PGP Verified Directory 346
Managing the Certificate Revocation List Service
Overview 349
Starting and Stopping the CRL Service 349
Editing CRL Service Settings 350
349
Configuring Universal Services Protocol 351
Starting and Stopping USP 351
Adding USP Interfaces 351
x
Page 15

PGP Universal Server Contents
System Graphs 353
Overview 353
CPU Usage 353
Message Activity 354
Whole Disk Encryption 354
Recipient Statistics 355
Recipient Domain Statistics 355
System Logs 357
Overview 357
Filtering the Log View 358
Searching the Log Files 359
Exporting a Log File 359
Enabling External Logging 360
Configuring SNMP Monitoring 361
Overview 361
Starting and Stopping SNMP Monitoring 362
Configuring the SNMP Service 362
Downloading the Custom MIB File 363
Shutting Down and Restarting Services and Power 365
Overview 365
Server Information 365
Setting the Time 365
Updating Software 366
Licensing a PGP Universal Server 366
Downloading the Release Notes 367
Shutting Down and Restarting the PGP Universal Server Software Services 367
Shutting Down and Restarting the PGP Universal Server Hardware 367
Managing Administrator Accounts 369
Overview 369
Administrator Roles 370
Administrator Authentication 370
Creating a New Administrator 371
Importing SSH v2 Keys 372
Deleting Administrators 372
Inspecting and Changing the Settings of an Administrator 373
Configuring RSA SecurID Authentication 374
Resetting SecurID PINs 375
xi
Page 16

PGP Universal Server Contents
Daily Status Email 376
Protecting PGP Universal Server with Ignition Keys 377
Overview 377
Ignition Keys and Clustering 378
Preparing Hardware Tokens to be Ignition Keys 379
Configuring a Hardware Token Ignition Key 380
Configuring a Soft-Ignition Passphrase Ignition Key 381
Deleting Ignition Keys 381
Backing Up and Restoring System and User Data 383
Overview 383
Creating Backups 383
Scheduling Backups 384
Performing On-Demand Backups 384
Configuring the Backup Location 384
Restoring From a Backup 385
Restoring On-Demand 386
Restoring Configuration 386
Restoring from a Different Version 387
Updating PGP Universal Server Software 389
Overview 389
Inspecting Update Packages 390
Establishing Software Update Settings 390
Checking for New Updates 391
Uploading Update Packages 391
Manually Installing an Update 391
Setting Network Interfaces
Understanding the Network Settings 393
Connecting to a Proxy Server 394
Changing Interface Settings 394
Adding Interface Settings 395
Deleting Interface Settings 395
Editing Global Network Settings 395
Assigning a Certificate 396
Working with Certificates 396
Importing an Existing Certificate 397
Generating a Certificate Request 397
Adding a Pending Certificate 398
Inspecting a Certificate 399
Exporting a Certificate 399
Deleting a Certificate 399
393
xii
Page 17

PGP Universal Server Contents
Clustering your PGP Universal Servers 401
Overview 401
Clustering and PGP Universal Web Messenger 402
Cluster Status 403
Creating a Cluster 404
Deleting Cluster Members 406
Managing Settings for Cluster Members 406
Changing Network Settings in Clusters 408
Index 409
xiii
Page 18

Page 19

Introduction
1
This Administrator’s Guide describes both the PGP Universal Server ™ and client
software. It tells you how to get them up and running on your network, how to
configure them, and how to maintain them. This section provides a high-level
overview of PGP Universal Server.
What is PGP Universal Server?
PGP Universal Server is a single console for managing the applications that
provide email, disk, and network file encryption.
PGP Universal Server with PGP Universal Gateway Email gives you secure
messaging: it transparently protects your enterprise messages with little or no
user interaction.
The PGP Universal Server also replaces the PGP Keyserver product with a builtin keyserver, and the PGP Admin product with PGP Desktop configuration and
deployment capabilities.
PGP Universal Server automatically creates and maintains a Self-Managing
Security Architecture (SMSA) by monitoring authenticated users and their email
traffic. You can also send protected messages to addresses that are not part of
the SMSA. The PGP Universal Server encrypts, decrypts, signs, and verifies
messages automatically, providing strong security through policies you control.
PGP Universal Satellite, a client-side feature of PGP Universal Server, extends
PGP security for email messages all the way to the computer of the email user,
it allows external users to become part of the SMSA, and it gives end users the
option to create and manage their keys on their own computer (if allowed by the
PGP administrator).
PGP Desktop, a client product, is created and managed through PGP Universal
Server policy. It creates PGP keypairs and can manage user keypairs as well as
store the public keys of others. It encrypts user email and instant messaging
(IM). It can encrypt entire or partial hard drives. It also enables secure file
sharing with others over a network.
15
Page 20

PGP Universal Server Introduction
PGP Universal Server Product Family
PGP Universal Server functions as a management console for a variety of
encryption solutions. You can purchase any of the PGP Desktop applications or
bundles and use PGP Universal Server to create and manage client installations.
You can also purchase a license that enables PGP Gateway Email to encrypt
email in the mailstream.
The PGP Universal Server can manage any combination of PGP encryption
applications. PGP encryption applications are:
PGP Universal Gateway Email provides automatic email encryption in the
gateway, based on centralized mail policy. This product requires
administration by the PGP Universal Server.
PGP Desktop Email provides encryption at the desktop for mail, files, and
AOL Instant Messenger traffic. This product can be managed by the PGP
Universal Server.
PGP Whole Disk Encryption provides encryption at the desktop for an
entire disk. This product can be managed by the PGP Universal Server.
PGP NetShare provides transparent file encryption and sharing among
desktops. This product can be managed by the PGP Universal Server.
Who Should Read This Guide
This Administrator’s Guide is for the person or persons who implement and
maintain your organization’s PGP Universal Server environment. These are the
PGP Universal Server administrators.
This guide is also intended for anyone else who wants to learn about how PGP
Universal Server works.
Common Criteria Environments
To be Common Criteria compliant, please refer to the best practices shown in
PGP Universal Server 2.9 Common Criteria Supplemental. Note that these best
practices supersede recommendations made elsewhere in this and other
documentation.
16
Page 21

PGP Universal Server Introduction
Improvements in this Version of PGP Universal Server
This release of PGP Universal Server introduces the following new and
improved features:
General
Client policy management changes: Internal users, external users, PGP
Verified Directory users, and devices are now called consumers.
Consumers are sorted into groups manually, by user type, or by matching
consumer attributes to domains, dictionary entries or through LDAP values.
Group membership determines which policy consumers receive.
Expanded directory synchronization: The integrated directory
synchronization feature now connects to multiple LDAP directories.
Previous versions of PGP Universal Server could only connect to one
corporate directory at a time.
Managed PGP Mobile: PGP Universal Server now manages client policy
for PGP Mobile installations.
Operating system change: The new CentOS operating system improves
scalability and reliability, and supports a wider variety of hardware.
RSA SecurID support for administrator authentication: PGP Universal
Server now supports two-factor authentication using RSA SecurID. This
meets strong authentication requirements for environments with higher
security needs, and is compatible with existing RSA SecurID deployments.
PGP Keys
Key Management Server (KMS): The new key management feature
provides new and expanded key management capabilities for PGP
products. Key policy changes are now immediately enforced. KMS allows
management of asymmetric and symmetric keys. The API and SDK provide
key management functionality to non-PGP applications.
Server Key Mode offline use: The client can now store the SKM private
key, encrypted to a random passphrase, so users can read email offline.
PGP Messaging
ADK archival output: Administrators can archive end-to-end encrypted
email messages by decrypting the messages on PGP Universal Server
using the ADK, and sending the decrypted messages to an archive server.
Encrypted email messages are then searchable, making possible
compliance with regulatory mandates and requirements for message
retention, mail server data management, and legal discovery support.
17
Page 22

PGP Universal Server Introduction
Recursive encoding: Provides an additional layer of protection to email
messages that have been partially protected and to email messages that
have been signed. Supports an additional layer of encoding if the initial layer
is not complete.
Clustering
New clustering functionality: Cluster members now interact with each
other as peers, replacing the previous Primary/Secondaries model. Every
server in a cluster can serve all types of requests, and any server can
initiate persistent changes. The new cluster model also permits up to 20
nodes in a cluster.
Using the PGP Universal Server with the Command Line
Using the PGP Universal Server command line for read-only access (such as to
view settings, services, logs, processes, disk space, query the database, etc) is
supported. However, performing configuration modifications via the command
line voids your PGP Support agreement unless these procedures are followed.
Any changes made to the PGP Universal Server via the command line must be:
Symbols
Authorized in writing by PGP Support.
Implemented by a PGP Partner, reseller or internal employee who is
certified in the PGP Advanced Administration and Deployment Training.
Summarized and documented in a text file in /etc/pso on the PGP Universal
Server itself.
Changes made through the command line might not persist through reboots and
might be incompatible with future releases. PGP Support can require reverting
any custom configurations on the PGP Universal Server back to a default state
when troubleshooting new issues.
Notes, Cautions, and Warnings are used in the following ways.
Note: Notes are extra, but important, information. A Note calls your attention
to important aspects of the product. You can use the product better if you
read the Notes.
Caution: Cautions indicate the possibility of loss of data or a minor security
breach. A Caution tells you about a situation where problems can occur
unless precautions are taken. Pay attention to Cautions.
18
Page 23

PGP Universal Server Introduction
Warning: Warnings indicate the possibility of significant data loss or a major
security breach. A Warning means serious problems will occur unless you
take the appropriate action. Please take Warnings very seriously.
Getting Assistance
For additional resources, see these sections.
Getting product information
The following documents and online help are companions to the PGP Universal
Server Administrator’s Guide. This guide occasionally refers to information that
can be found in one or more of these sources:
Online help is installed and is available within the PGP Universal Server
product.
PGP Universal Server Installation Guide—Describes how to install the
PGP Universal Server software.
PGP Universal Server Upgrade Guide—Describes the process of
upgrading your PGP Universal Server.
PGP Universal Mail Policy Diagram—Provides a graphical representation
of how email is processed through mail policy. You can access this
document via the PGP Universal Server online help.
Tutorials—Provides animated introductions on how to manage the mail
policy feature in PGP Universal Server 2.5 and later, and how upgraded PGP
Universal Server settings migrate into the new mail policy feature.
You can also access all the documentation and tutorials by clicking the
online help icon in the upper-right corner of the PGP Universal Server
screen.
PGP Universal Satellite for Windows and Mac OS X include online help.
PGP Universal Server and PGP Satellite release notes are also provided,
which may have last-minute information not found in the product
documentation.
Once PGP Universal Server is released, additional information regarding the
product is added to the online Knowledge Base available on PGP Corporation’s
Support Portal (
https://support.pgp.com).
19
Page 24

PGP Universal Server Introduction
Contact Information
Contacting Technical Support
To learn about PGP support options and how to contact PGP Technical
Support, please visit the PGP Corporation Support Home Page
(
https://support.pgp.com).
To access the PGP Support Knowledge Base or request PGP Technical
Support, please visit PGP Support Portal Web Site
(
https://support.pgp.com). Note that you may access portions of the PGP
Support Knowledge Base without a support agreement; however, you
must have a valid support agreement to request Technical Support.
To access the PGP Support forums, please visit PGP Support
(
http://forum.pgp.com). These are user community support forums hosted
by PGP Corporation.
Contacting Customer Service
For help with orders, downloads, and licensing, please visit PGP
Corporation Customer Service (
https://pgp.custhelp.com/app/cshome).
Contacting Other Departments
For any other contacts at PGP Corporation, please visit the PGP Contacts
Page (
http://www.pgp.com/about_pgp_corporation/contact/index.html).
For general information about PGP Corporation, please visit the PGP Web
Site (
http://www.pgp.com).
20
Page 25

The Big Picture
2
This chapter describes some important terms and concepts and gives you a
high-level overview of the things you need to do to set up and maintain your
PGP Universal Server environment.
Important Terms
The following sections define important terms you will encounter throughout
the PGP Universal Server and this documentation.
PGP Products
PGP Universal Server: A device you add to your network that provides
secure messaging with little or no user interaction. The PGP Universal
Server automatically creates and maintains a security architecture by
monitoring authenticated users and their email traffic. You can also send
protected messages to addresses that are not part of the security
architecture.
PGP Global Directory: A free, public keyserver hosted by PGP Corporation.
The PGP Global Directory provides quick and easy access to the universe of
PGP keys. It uses next-generation keyserver technology that queries the
email address on a key (to verify that the owner of the email address wants
their key posted) and lets users manage their own keys. Using the PGP
Global Directory significantly enhances your chances of finding a valid public
key of someone to whom you want to send secured messages.
PGP Universal Satellite: The PGP Universal Satellite software resides on
the computer of the email user. It allows email to be encrypted end to end,
all the way to and from the desktop (for both internal and external users).
Using PGP Universal Satellite is one of the ways for external users to
participate in the SMSA. It also allows users the option of controlling their
keys on their local computers (if allowed by the administrator).
PGP Desktop: A client software tool that uses cryptography to protect your
data against unauthorized access. PGP Desktop is available for Mac OS X
and Windows.
PGP Whole Disk Encryption: Whole Disk Encryption is a feature of PGP
Desktop that encrypts your entire hard drive or partition (on Windows
systems), including your boot record, thus protecting all your files when you
are not using them.
21
Page 26

PGP Universal Server The Big Picture
PGP NetShare: A feature of PGP Desktop for Windows with which you can
securely and transparently share files and folders among selected
individuals. PGP NetShare users can protect their files and folders simply by
placing them within a folder that is designated as protected.
PGP Virtual Disk: PGP Virtual Disk volumes are a feature of PGP Desktop
that let you use part of your hard drive space as an encrypted virtual disk.
You can protect a PGP Virtual Disk volume with a key or a passphrase. You
can also create additional users for a volume, so that people you authorize
can also access the volume.
PGP Zip: A feature of PGP Desktop that lets you put any combination of
files and folders into a single encrypted, compressed package for
convenient transport or backup. You can encrypt a PGP Zip archive to a PGP
key or to a passphrase.
PGP Universal Web Messenger: The PGP Universal Web Messenger
service allows an external user to securely read a message from an internal
user before the external user has a relationship with the SMSA. If PGP
Universal Web Messenger is available via mail policy for a user and the
recipient’s key cannot be found, the message is stored on the PGP
Universal Server and an unprotected message is sent to the recipient. The
unprotected message includes a link to the original message, held on the
PGP Universal Server. The recipient must create a passphrase, and then
can access his encrypted messages stored on PGP Universal Server.
PDF Messenger: PDF Messenger enables sending encrypted PDF
messages to external users who do not have a relationship with the SMSA.
In the normal mode, as with PGP Universal Web Messenger, the user
receives a message with a link to the encrypted message location and uses
a PGP Universal Web Messenger passphrase to access the message. PDF
Messenger also provides Certified Delivery, which encrypts the message to
a one-time passphrase, and creates and logs a delivery receipt when the
user retrieves the passphrase.
PGP Universal Server Concepts
keys.<domain> convention: PGP Universal Server automatically looks for
valid public keys for email recipients at a special hostname, if no valid public
key is found locally to secure a message. This hostname is keys.<domain>
(where <domain> is the email domain of the recipient). For example,
Example Corporation’s externally visible PGP Universal Server is named
keys.example.com.
PGP Corporation strongly recommends you name your externally visible
PGP Universal Server according to this convention because it allows other
PGP Universal Servers to easily find valid public keys for email recipients in
your domain.
For more information, see Naming your PGP Universal Server (on page
22
37).
Page 27

PGP Universal Server The Big Picture
Security Architecture: Behind the scenes, the PGP Universal Server
creates and manages its own security architecture for the users whose
email domain it is securing. Because the security architecture is created
and managed automatically, we call this a self-managing security
architecture (SMSA).
PGP Universal Server Features
Administrative Interface: Each PGP Universal Server is controlled via a
Web-based administrative interface. The administrative interface gives you
control over PGP Universal Server. While many settings are initially
established using the web-based Setup Assistant, all settings of a PGP
Universal Server can be controlled via the administrative interface.
Backup and Restore: Because full backups of the data stored on your PGP
Universal Server are critical in a natural disaster or other unanticipated loss
of data or hardware, you can schedule automatic backups of your PGP
Universal Server data or manually perform a backup.
You can fully restore a PGP Universal Server from a backup. In the event of
a minor problem, you can restore the PGP Universal Server to any saved
backup. In the event that a PGP Universal Server is no longer usable, you
can restore its data from a backup onto a new PGP Universal Server during
initial setup of the new PGP Universal Server using the Setup Assistant. All
backups are encrypted to the Organization Key and can be stored securely
off the PGP Universal Server.
Cluster: When you have two or more PGP Universal Servers in your
network, you configure them to synchronize with each other; this is called a
“cluster.”
Dictionary: Dictionaries are lists of terms to be matched. The dictionaries
work with mail policy to allow you to define content lists that can trigger
rules.
Directory Synchronization: If you have LDAP directories in your
organization, your PGP Universal Server can be synchronized with the
directories. The PGP Universal Server automatically imports user
information from the directories when users send and receive email; it also
creates internal user accounts for them, including adding and using X.509
certificates if they are contained in the LDAP directories.
Ignition Keys: You can protect the contents of a PGP Universal Server,
even if the hardware is stolen, by requiring the use of a hardware token or a
software passphrase, or both, on start.
Keyserver: Each PGP Universal Server includes an integrated keyserver
populated with the public keys of your internal users. When an external
user sends a message to an internal user, the external PGP Universal
Server goes to the keyserver to find the public key of the recipient to use to
secure the message. The PGP Universal Server administrator can enable or
disable the service, and control access to it via the administrative interface.
23
Page 28

PGP Universal Server The Big Picture
Learn Mode: When you finish configuring a PGP Universal Server using the
Setup Assistant, it begins in Learn Mode, where the PGP Universal Server
sends messages through mail policy without taking any action on the
messages, and does not encrypt or sign any messages.
Learn Mode gives the PGP Universal Server a chance to build its SMSA
(creating keys for authenticated users, for example) so that when when
Learn Mode is turned off, the PGP Universal Server can immediately begin
securing messages. It is also an excellent way for administrators to learn
about the product.
You should check the logs of the PGP Universal Server while it is in Learn
Mode to see what it would be doing to email traffic if it were live on your
network. You can make changes to the PGP Universal Server’s policies
while it is in Learn Mode until things are working as expected.
Mail Policy: The PGP Universal Server processes email messages based
on the policies you establish. Mail policy applies to inbound and outbound
email for both PGP Universal Server traffic and email processed by PGP
client software. Mail policy consists of multiple policy chains, comprised of
sequential mail processing rules.
Organization Certificate: You must create or obtain an Organization
Certificate to enable S/MIME support by PGP Universal Server. The
Organization Certificate signs all X.509 certificates the server creates.
Organization Key: The Setup Assistant automatically creates an
Organization Key (actually a keypair) when it configures a PGP Universal
Server. The Organization Key is used to sign all PGP keys the PGP Universal
Server creates and to encrypt PGP Universal Server backups.
Caution: It is extremely important to back up your Organization Key: all
keys the PGP Universal Server creates are signed by the Organization Key,
and all backups are encrypted to the Organization Key. If you lose your
Organization Key and have not backed it up, the signatures on those keys
are meaningless and you cannot restore from backups encrypted to the
Organization Key.
PGP Verified Directory: The PGP Verified Directory supplements the
internal keyserver by letting internal and external users manage the
publishing of their own public keys. The PGP Verified Directory also serves
as a replacement for the PGP Keyserver product. The PGP Verified
Directory uses next-generation keyserver technology to ensure that the
keys in the directory can be trusted.
Server Placement: A PGP Universal Server can be placed in one of two
locations in your network to process email.
With an internal placement, the PGP Universal Server logically sits between
your email users and your mail server. It encrypts and signs outgoing SMTP
email and decrypts and verifies incoming mail being picked up by email
clients using POP or IMAP. Email stored on your mail server is stored
secured (encrypted).
24
Page 29

PGP Universal Server The Big Picture
With a gateway placement, the PGP Universal Server logically sits between
your mail server and the Internet. It encrypts and signs outgoing SMTP
email and decrypts and verifies incoming SMTP email. Email stored on your
mail server is stored unsecured.
For more information, see Configuring Mail Proxies (on page
PGP Universal Server Installation Guide.
Setup Assistant: When you attempt to log in for the first time to the
administrative interface of a PGP Universal Server, the Setup Assistant
takes you through the configuration of that PGP Universal Server.
PGP Universal Server User Types
Administrators: Any user who manages the PGP Universal Server and its
security configuration from inside the internal network.
Only administrators are allowed to access the administrative interface that
controls PGP Universal Server. A PGP Universal Server supports multiple
administrators, each of which can be assigned a different authority: from
read-only access to full control over every feature and function.
Consumers: Internal, external, and Verified Directory users, and devices.
External Users: External users are email users from other domains
(domains not being managed by your PGP Universal Server) who have
been added to the SMSA.
Internal Users: Internal users are email users from the domains being
managed by your PGP Universal Server.
171) and the
PGP Universal Server allows you to manage PGP Desktop deployments
to your internal users. The administrator can control which PGP Desktop
features are automatically implemented at install, and establish and
update mail security policy for PGP Desktop users that those users
cannot override (except on the side of being more secure).
PGP Verified Directory Users: Internal and external users who have
submitted their public keys to the PGP Verified Directory, a Webaccessible keyserver.
Devices: Managed devices, WDE computers, and WDE disks.
Managed devices are arbitrary objects whose keys are managed by
PGP Universal Server. WDE computers, and WDE disks are devices
that are detected when users enroll.
Other Email Users: Users within your organization can securely send email
to recipients outside the SMSA.
First, the PGP Universal Server attempts to find a key for the recipient. If
that fails, there are four fallback options, all controlled by mail policy:
bounce the message back to the sender (so it is not sent unencrypted),
send unencrypted, Smart Trailer, and PGP Universal Web Messenger mail.
25
Page 30

PGP Universal Server The Big Picture
Smart Trailer sends the message unencrypted and adds text giving the
recipient the option of joining the SMSA by installing PGP Universal
Satellite, using an existing key or certificate, or using PGP Universal Web
Messenger. PGP Universal Web Messenger lets the recipient securely read
the message on a secure website; it also gives the recipient options for
handling subsequent messages from the same domain: read the messages
on a secure website using a passphrase they establish, install PGP
Universal Satellite, or add an existing key or certificate to the SMSA.
Installation Overview
The following steps are a broad overview of what it takes to plan, set up, and
maintain your PGP Universal Server environment.
Most of the steps described here are described in detail in later chapters. Steps
1 and 4 are described in the PGP Universal Server Installation Guide. Note that
these steps apply to the installation of a new, stand-alone PGP Universal Server.
If you plan to install a cluster, you must install and configure one PGP Universal
Server following the steps outlined here. Subsequent cluster members will get
most of their configuration settings from the initial server by replication.
The steps to install and configure a PGP Universal Server are as follows:
1 Plan where in your network you want to locate your PGP Universal
Server(s).
Where you put PGP Universal Servers in your network, how many PGP
Universal Servers you have in your network, and other factors all have a
major impact on how you add them to your existing network.
Create a diagram of your network that includes all network components and
shows how email flows; this diagram details how adding a PGP Universal
Server impacts your network.
For more information on planning how to add PGP Universal Servers to your
existing network, see Adding the PGP Universal Server to Your Network in
the PGP Universal Server Installation Guide.
2 Perform necessary DNS changes.
Add IP addresses for your PGP Universal Servers, an alias to your
keyserver, update the MX record if necessary, add keys.<domain>,
hostnames of potential Secondary servers for a cluster, and so on.
Properly configured DNS settings (including root servers and appropriate
reverse lookup records) are required to support PGP Universal Server. Make
sure both host and pointer records are correct. IP addresses must be
resolvable to hostnames, as well as hostnames resolvable to IP addresses.
3 Prepare a hardware token Ignition Key.
26
Page 31

PGP Universal Server The Big Picture
If you want to add a hardware token Ignition Key during setup, install the
drivers and configure the token before you begin the PGP Universal Server
setup process. See Protecting PGP Universal Server with Ignition Keys (on
377) for information on how to prepare a hardware token Ignition Key.
page
Note: In a cluster, the Ignition Key configured on the first PGP Universal
Server in the cluster will also apply to the subsequent members of the
cluster.
4 Install and configure this PGP Universal Server.
The Setup Assistant runs automatically when you first access the
administrative interface for the PGP Universal Server. The Setup Assistant
is where you can set or confirm a number of basic settings such as your
network settings, administrator password, server placement option, mail
server address and so on. The details of this process are described in
Setting Up the PGP Universal Server in the PGP Universal Server
Installation Guide.
Note: If you plan to configure multiple servers as a cluster, you must
configure one server first in the normal manner, then add the additional
servers as cluster members. You can do this through the Setup Assistant
when you install a server that will join an existing cluster, or you can do
this through the PGP Universal Server administrative interface. For more
information see Cluster Member Configuration in the PGP Universal
Server Installation Guide.
5 License your server.
You cannot take a PGP Universal Server out of Learn Mode or install
updates until the product is licensed. Once it is licensed, you should check
for product updates and install them if found. For more information, see
Licensing Your Software (on page
51).
If you want the PGP Universal Server to provide mail proxy services, you
must have a PGP Universal Server license with the mailstream feature
enabled. For more information, see Licensing Your Software (on page
51).
6 If you have a PGP key you want to use as your Organization Key with
PGP Universal Server, import it, then back it up.
Your Organization Key does two important things: it is used to sign all user
keys the PGP Universal Server creates and it is used to encrypt PGP
Universal Server backups. This key represents the identity of your
organization, and is the root of the Web-of-Trust for your users.
If your organization uses PGP Desktop and already has an Corporate Key or
Organization Key, and you want to use that key with PGP Universal Server,
you should import it as soon as you have configured your server, then
create a backup of the key.
If your organization does not have an existing key that you want to use as
your Organization Key, use the Organization Key the Setup Assistant
automatically creates with default values. For more information, see
Managing Organization Keys (on page
67).
27
Page 32

PGP Universal Server The Big Picture
No matter which key you use as your Organization Key, it is very important
to make a backup of the key. Since PGP Universal Server’s built-in back-up
feature always encrypts backups to this key, you need to provide a copy of
your Organization Key to restore your data.
For more information, see Organization Certificate (on page
70).
7 If you have a PGP Additional Decryption Key (ADK) that you want to
use with PGP Universal Server, add it.
An ADK is a way to recover an email message if the recipient is unable or
unwilling to do so; every message that is also encrypted to the ADK can be
opened by the holder(s) of the ADK. You cannot create an ADK with the
PGP Universal Server, but if you have an existing PGP ADK (generated by
PGP Desktop, an ideal scenario for a split key; refer to the PGP Desktop
User’s Guide for more information), you can add it to your PGP Universal
Server and use it. For more information, see Additional Decryption Key
(ADK) (on page
73).
8 Create a SSL/TLS certificate or obtain a valid SSL/TLS certificate.
You can create a self-signed certificate for use with SSL/TLS traffic.
Because this certificate is self-signed, however, it might not be trusted by
email or Web browser clients. PGP Corporation recommends that you
obtain a valid SSL/TLS certificate for each of your PGP Universal Servers
from a reputable Certificate Authority.
This is especially important for PGP Universal Servers that are accessed
publicly. Older Web browsers might reject self-signed certificates or not
know how to handle them correctly when they encounter them via PGP
Universal Web Messenger or Smart Trailer.
For more information, see Working with Certificates (on page
396).
9 Configure the Directory Synchronization feature if you want to
synchronize an LDAP directory with your PGP Universal Server.
Using the Directory Synchronization feature gives you more control over
who is included in your SMSA, if you have an existing LDAP server.
By default, user enrollment is set to Email enrollment. If you elect to use
LDAP directory enrollment, it assumes that you have an LDAP directory
configured. You can change the client enrollment setting for Directory
Synchronization from the Directory Synchronization Settings page in the
PGP Universal Server administrative interface. You must have an LDAP
directory configured and Directory Synchronization enabled for LDAP user
enrollment to work.
For more information, see Using Directory Synchronization to Manage
Users (on page
251).
10 Add trusted keys, configure consumer policy, and establish mail
policy.
28
Page 33

PGP Universal Server The Big Picture
All these settings are important for secure operation of PGP Universal
Server. For more information on adding trusted keys from outside the
SMSA, see Managing Trusted Keys and Certificates (on page
95). For more
information about consumer policy settings, see Administering Consumer
Policy (on page
Mail Policy (on page
225). For information on setting up mail policy, see Setting
99).
Note: When setting policy for Consumers, PGP Universal Server provides
an option called Out of Mail Stream (OOMS) support. OOMS specifies
how the email gets transmitted from the client to the server when
Protector for Mail Encryption Client cannot find a key for the recipient and
therefore cannot encrypt the message.
OOMS is disabled by default. With OOMS disabled, sensitive messages
that can't be encrypted locally are sent to PGP Universal Server "in the
mail stream" like normal email. Importantly, this email is sent in the clear
(unencrypted). Mail or Network administrators could read these messages
by accessing the mail server's storage or monitoring network traffic.
However, archiving solutions, outbound anti-virus filters, or other systems
which monitor or proxy mail traffic will process these messages normally.
You can elect to enable OOMS, which means that sensitive messages
that can't be encrypted locally are sent to PGP Universal Server "out of the
mail stream." Protector for Mail Encryption Client creates a separate,
encrypted network connection to the PGP Universal Server to transmit the
message. However, archiving solutions, outbound anti-virus filters, or
other systems which monitor or proxy mail traffic will not see these
messages.
During your configuration of your PGP Universal Server you should
determine the appropriate settings for your requirements. This option can
be set separately for each policy group, and is set through the Consumer
Policy settings. For more details on the effects of enabling or disabling
OOMS, see Out of Mail Stream Support.
11 Install and configure additional cluster server members.
You can do this through the Setup Assistant when you install a server that
will join an existing cluster, or you can do this through the PGP Universal
Server administrative interface. Remember that you must configure one
server in the normal manner before you can add and configure additional
servers as cluster members. For more information, see Clustering your PGP
Universal Servers (on page
401).
12 Reconfigure the settings of your email clients and servers, if
necessary.
29
Page 34

PGP Universal Server The Big Picture
Depending on how you are adding the PGP Universal Server to your
network, some setting changes might be necessary. For example, if you
are using a PGP Universal Server placed internally, the email clients must
have SMTP authentication turned on. For PGP Universal Servers placed
externally, you must configure your mail server to relay SMTP traffic to the
PGP Universal Server.
13 Enable SNMP Polling and Traps.
You can configure PGP Universal Server to allow network management
applications to monitor system information for the device on which PGP
Universal Server is installed and to send system and application information
to an external destination. See Configuring SNMP Monitoring (on page
for more information.
14 Distribute PGP Universal Satellite and/or PGP Desktop to your internal
users, if appropriate.
If you want to provide seamless, end-to-end PGP message security without
the need for any user training, have them use PGP Universal Satellite.
Exchange/MAPI and Lotus Notes environments also require the use of PGP
Universal Satellite. PGP Desktop provides more features and user control
than PGP Universal Satellite. For more information, see PGP Universal
Satellite and Configuring PGP Desktop Installations.
361)
15 Analyze the data from Learn Mode.
In Learn Mode, your PGP Universal Server sends messages through mail
policy without actually taking action on the messages, decrypts and verifies
incoming messages when possible, and dynamically creates a SMSA. You
can see what the PGP Universal Server would have done without Learn
Mode by monitoring the system logs.
Learn Mode lets you become familiar with how the PGP Universal Server
operates and it lets you see the effects of the policy settings you have
established before the PGP Universal Server actually goes live on your
network. Naturally, you can fine tune settings while in Learn Mode, so that
the PGP Universal Server is operating just how you want before you go live.
For more information, see Operating in Learn Mode (on page
53).
16 Adjust policies as necessary.
It might take a few tries to get everything working just the way you want.
For example, you might need to revise your mail policy.
17 Perform backups of all PGP Universal Servers before you take them
out of Learn Mode.
This gives you a baseline backup in case you need to return to a clean
installation. For more information, see Backing Up and Restoring System
and User Data (on page
383).
18 Take your PGP Universal Servers out of Learn Mode.
30
Page 35

PGP Universal Server The Big Picture
Once this is done, email messages are encrypted, signed, and
decrypted/verified, according to the relevant policy rules. Make sure you
have licensed each of your PGP Universal Servers; you cannot take a PGP
Universal Server out of Learn Mode until it has been licensed.
19 Monitor the system logs to make sure your PGP Universal Server
environment is operating as expected.
31
Page 36

Page 37

Open Ports
3
This chapter lists and describes the ports a PGP Universal Server has open and
on which it is listening.
TCP Ports
Port Protocol/Service Comment
21
22
25
80
110
FTP (File Transfer Protocol)
Open SSH (Secure Shell)
SMTP (Simple Mail Transfer
Protocol)
HTTP (HyperText Transfer
Protocol)
POP (Post Office Protocol)
Used for transmitting encrypted
backup archives to other servers.
Data is sent via passive FTP, so
port 20 (FTP Data) is not used.
Used for remote shell access to
the server for low-level system
administration.
Used for sending mail. With a
gateway placement, the PGP
Universal Server listens on port
25 for both incoming and
outgoing SMTP traffic
Used to allow user access to the
PGP Verified Directory. If the
Verified Directory is not enabled,
access on this port is
automatically redirected to port
443 over HTTPS.
Used for retrieving mail by users
with POP accounts with internal
placements only. Closed for
gateway placements.
143
389
IMAP (Internet Message Access
Protocol)
LDAP (Lightweight Directory
Access Protocol)
Used for retrieving mail by users
with IMAP accounts with internal
placements only. Closed for
gateway placements.
Used to allow remote hosts to
look up public keys of local users.
33
Page 38

PGP Universal Server Open Ports
Port Protocol/Service Comment
443
444
465
636
993
HTTPS (HyperText Transfer
Protocol, Secure)
SOAPS (Simple Object Access
Protocol, Secure)
SMTPS (Simple Mail Transfer
Protocol, Secure)
LDAPS (Lightweight Directory
Access Protocol, Secure)
IMAPS (Internet Message Access
Protocol, Secure)
Used for PGP Desktop and PGP
Universal Satellite policy
distribution and PGP Universal
Web Messenger access.
Used for clustering replication
messages.
Used for sending mail securely
with internal placements only.
Closed for gateway placements.
This is a non-standard port used
only by legacy mail servers. We
recommend not using this port,
and instead always using
STARTTLS on port 25.
Used to securely allow remote
hosts to look up public keys of
local users.
Used for retrieving mail securely
by users with IMAP accounts
with internal placements only.
Closed for gateway placements.
995
9000
POPS (Post Office Protocol,
Secure)
HTTPS (HyperText Transfer
Protocol, Secure)
Used for retrieving mail securely
by users with POP accounts with
internal placements only. Closed
for gateway placements.
Used to allow access to the PGP
Universal Server administrative
interface.
34
Page 39

PGP Universal Server Open Ports
UDP Ports
Port Protocol/Service Comment
123
161
NTP (Network Time
Protocol)
SNMP (Simple Network
Management Protocol)
Used to synchronize the system’s clock
with a reference time source on a
different server.
Used by network management
applications to query the health and
activities of PGP Universal Server
software and the computer on which it is
installed.
35
Page 40

Page 41

Naming your PGP
4
Universal Server
This section describes how and why to name your PGP Universal Server using
the keys.<domain> convention.
Considering a Name for Your PGP Universal Server
Unless a valid public key is found locally, PGP Universal Servers automatically
look for valid public keys for email recipients by attempting to contact a
keyserver at a a special hostname, keys.<domain>, where <domain> is the
email domain of the recipient.
For example, an internal user at example.com is sending email to
susanjones@widgetcorp.com.” If no valid public key for Susan is found on the
“
Example Corp. PGP Universal Server (keys would be found locally if they are
cached, or if Susan was an external user who explicitly supplied her key via the
PGP Universal Web Messenger service), it automatically looks for a valid public
key for Susan at keys.widgetcorp.com, even if there is no domain policy for
widgetcorp.com on Example’s PGP Universal Server.
Naturally, the Example Corp. PGP Universal Server can only find a valid public
key for “
PGP Universal Server is named using the keys.<domain> convention.
susan@widgetcorp.com” at keys.widgetcorp.com if the Widgetcorp
Caution: PGP Corporation strongly recommends you name your PGP
Universal Server according to this convention, because doing so allows other
PGP Universal Servers to easily find valid public keys for email recipients in
your domain. Make sure to name your externally visible PGP Universal Server
using this convention.
If your organization uses email addresses such as “mingp@example.com” as
well as “
to be reachable at both keys.example.com and keys.corp.example.com.
If you have multiple PGP Universal Servers in a cluster managing an email
domain, only one of those PGP Universal Servers needs to use the
keys.<domain> convention.
Note: Keys that are found using the keys.<domain> convention are treated as
valid and trusted by default.
mingp@corp.example.com,” then you need your PGP Universal Server
37
Page 42

PGP Universal Server Naming your PGP Universal Server
Alternately, keys.<domain> should be the address of a load-balancing device
which then distributes connections to your PGP Universal Server’s keyserver
service. The ports that would need to be load-balanced are the ones on which
you are running your keyserver service (typically port 389 for LDAP and 636 for
LDAPS).
Another acceptable naming convention would be to name your PGP Universal
Server according to the required naming convention your company uses, and
make sure the server has a DNS alias of keys.<domain>.com.
If you are administering multiple email domains, you should establish the
keys.<domain> convention for each email domain.
If your PGP Universal Server is behind your corporate firewall (as it should be),
you need to make sure that ports 389 (LDAP) and 636 (LDAPS) are open to
support the keys.<domain> convention.
Methods for Naming a PGP Universal Server
There are three ways to name your PGP Universal Server to support the
keys.<domain> convention:
Name your PGP Universal Server “keys.<domain>” on the Host Name
field of the Network Setup page in the Setup Assistant.
Change the Host Name of your PGP Universal Server to keys.<domain>
using the administrative interface on the Network Settings section of the
System > Network page.
Create a DNS alias to your PGP Universal Server that uses the
keys.<domain> convention that is appropriate for your DNS server
configuration.
38
Page 43

Understanding the
5
Administrative Interface
This section describes the PGP Universal Server’s Web-based administrative
interface.
System Requirements
The PGP Universal Server administrative interface has been fully tested with the
following Web browsers:
Windows 2000 Professional and Advanced Server: Mozilla Firefox 3.0,
Internet Explorer 6.0, Internet Explorer 7.0
Windows XP Professional and Pro x64: Mozilla Firefox 3.0, Internet Explorer
6.0, Internet Explorer 7.0
Windows Vista: Mozilla Firefox 3.0, Internet Explorer 7.0
Mac OS X 10.4: Mozilla Firefox 3.0, Safari 2.0
Mac OS X 10.5: Mozilla Firefox 3.0, Safari 3.1
While you might find that the administrative interface works with other Web
browsers, we recommend these browsers for maximum compatibility.
Logging In
A login name and passphrase for the administrative interface were originally
established when you configured the server using the Setup Assistant. In
addition, the original administrator may have created additional administrators,
and may have configured your PGP Universal Server to accept RSA SecurID
authentication.
To log in to your server’s administrative interface
1 In a Web browser, type https://<domain name of server>:9000/ and
press Enter.
Note: If you see a Security Alert dialog box relating to the security
certificate, it means you need to replace the self-signed certificate created
automatically with a certificate from a public Certificate Authority.
The Login page appears.
39
Page 44

PGP Universal Server Understanding the Administrative Interface
2 Type the current login name in the Username field.
3 Type the current passphrase or SecurID passcode in the Passphrase field.
(If SecurID authentication is enabled, a message below the Passphrase field
will indicate that a SecurID passcode can be entered. A given administrator
is configured to use either passphrase or SecurID authentication, not both.)
4 Click the Login button or press Enter.
5 If the login credentials are accepted, the System Overview page appears.
6 If the login credentials do not match, an error is displayed. For passphrase
authentication that fails, an "Invalid Login" error appears. For SecurID
authentication, different events may occur. See the following procedure for
more information.
To log in using RSA SecurID authentication
1 Follow steps 1-4 in the procedure above. If your SecurID passcode is
accepted, and no PIN reset is required, the System Overview page appears.
Note: If PGP Universal Server fails to connect with any RSA Manager
server, you will be presented with the standard "Invalid Login" message.
The connection failure will be logged in the PGP Universal Server
Administration log, enabling you to determine whether this was the cause
of the login failure.
2 If the RSA server policy determines that a PIN reset is required, upon
successful login the PIN Reset dialog appears. Depending on the RSA
server policy, you may be able to have the RSA server generate a new PIN
for you, or enter a new PIN manually. When this is done, the System
Overview page appears. For more details see Resetting SecurID PINs (on
375).
page
3 If the RSA server detects a problem with the token code portion of your
passcode, you are asked to re-enter your PIN plus the next code shown on
your SecurID token. Type your PIN and the next token code that appears,
then click Login or press Enter.
4 Based on your RSA server policy, you may be given several chances to
authenticate successfully using the next token code. However, eventually
continued failures will result in a failed login.
Note: Log in events are logged in the PGP Universal Server Administration
log. Successful and failed attempts, and next tokencode requests are logged,
as are problems connecting to the RSA Manager servers.
40
Page 45

PGP Universal Server Understanding the Administrative Interface
The System Overview Page
The System Overview page is the first page you see when you log in to PGP
Universal Server. You can also view it from Reporting > Overview.
The page provides a general report of system information and statistics. The
information displayed includes:
System alerts, including licensing issues and PGP Whole Disk Encryption
login failures. System alerts appear at the top of the page.
System Graphs for CPU usage, message activity, and Whole Disk
Encryption. Click the buttons to switch the graphs. Click the System
Graphs heading to go to the Reporting > Graphs page. See System
Graphs (on page
Services information, including which services are running or stopped.
Depending on the service, the entry may also include the number of
users or keys handled by the service.
353) for more information about system graphs.
Click the service name link to go to the administrative page for that
service.
For a running Web Messenger service, click the URL to go to the Web
Messenger interface.
For a running Verified Directory service, click the URL to go to the
Verified Directory interface to search for a key, upload your own public
key, or remove your key from the searchable directory.
System Statistics, including software version number, system uptime,
total messages processed, and number of PGP Portable Disks created.
Click the Statistics link to go to the System > General Settings page.
Mail Queue statistics show the number of email messages in the queue
waiting to be processed, if applicable, and the size of the mail queue. Click
the Mail Queue link to go to the Mail > Mail Queue status page for
detailed information about the contents of the mail queue. Estimated Policy
Group Membership shows the number of members in each consumer
policy group. Click a policy group name to go to the page for configuring
that policy group.
Clustering provides status information about the cluster configuration, if
this PGP Universal Server is a member of a cluster. This display shows, for
each cluster member, its hostname or IP address, its status, its location
(Internal or DMZ) and a login icon (except for the member on which you are
currently logged in). Click the Clustering heading to go to the System >
Clustering page. This display does not appear if your PGP Universal Server
is not a member of a cluster.
Click Refresh (at the top of the System Overview page) to refresh the
information shown on this page.
41
Page 46

PGP Universal Server Understanding the Administrative Interface
The Manage Alerts button takes you to the Alerts page where you can
configure how you want to be notified about WDE login failures. For more
details, see Managing Alerts (on page
The Export Data button lets you export statistics for WDE Activity, WDE Login
Failures, PDF Messenger Certified Delivery Receipts, and the Mail Policy Print
View (which provides in a printable format all your mail policy chains and rules).
42).
Managing Alerts
The PGP Universal Server groups failed login attempts into reported login
failures. This feature is intended to make reporting about failed login attempts
more useful, because one or several failed login attempts by a PGP Whole Disk
Encryption user does not necessarily mean an attempted break-in. Use the
Alerts dialog box to choose how many failed login attempts constitutes a login
failure. For example, you can specify that an alert should be triggered after 3
failed login attempts. If 6 failed attempts occur, 2 login failure alerts appear.
Alerts about PGP Whole Disk Encryption login failures appear on the System
Overview page and in the Daily Status Email. Alerts for devices belonging to
specific users appear on the user's Internal Users dialog box.
Alerts are also sent when a user is locked out of a system because he or she
exceeded the number of allowable login failures set on the Disk Encryption tab
of Consumer Policy.
To specify how you want to be notified of PGP Whole Disk Encryption
login failures
1 From the System Overview page, click Manage Alerts.
The Alerts dialog box appears.
2 Specify how many consecutive failed login attempts a single device must
report before the administrator is notified.
3 Choose how long you want login failure alerts to be displayed on the
System Overview page, the Daily Status Email, and the Internal Users
page, in hours or days.
4 Specify how long you want to keep login failure records in the database, in
days.
42
Page 47

PGP Universal Server Understanding the Administrative Interface
Logging In For the First Time
The first time you log in to the PGP Universal Server, a welcome dialog box
appears. The welcome dialog box provides access to tutorials and
documentation. You can choose to have the welcome dialog box appear every
time you log in.
What’s New—Lists the new features in PGP Universal Server 3.0.
Mail Policy Diagram—Provides a graphical representation of how email is
processed through mail policy.
PGP Universal Upgrade Guide—Provides instructions on how to migrate
PGP Keyserver data, how to upgrade your PGP Universal Server, and how
version 2.0.6 settings migrate into the mail policy environment.
Tutorials—Provides animated introductions on how to manage the new
mail policy feature in PGP Universal Server, and how upgraded PGP
Universal Server settings migrate into the new mail policy feature.
You can also access all the documentation and tutorials by clicking the online
help icon in the upper right corner of the PGP Universal Server page.
Administrative Interface Map
The administrative interface is organized as follows:
Sections
Reporting
Consumers
Keys
Pages
Overview
Graphs
Logs
Groups
Users
Devices
Consumer Policy
Managed Domains
Directory Synchronization
Managed Keys
Trusted Keys
Organization Keys
43
Page 48

PGP Universal Server Understanding the Administrative Interface
Ignition Keys
Keyservers
Key Cache
Mail
Services
System
Mail Policy
Dictionaries
Archive Servers
Proxies
Mail Queue
Mail Routes
Message Templates
Web Messenger
Keyserver
SNMP
Verified Directory
Certificate Revocation
USP
General Settings
Administrators
Backups
Updates
Network
Clustering
44
Page 49
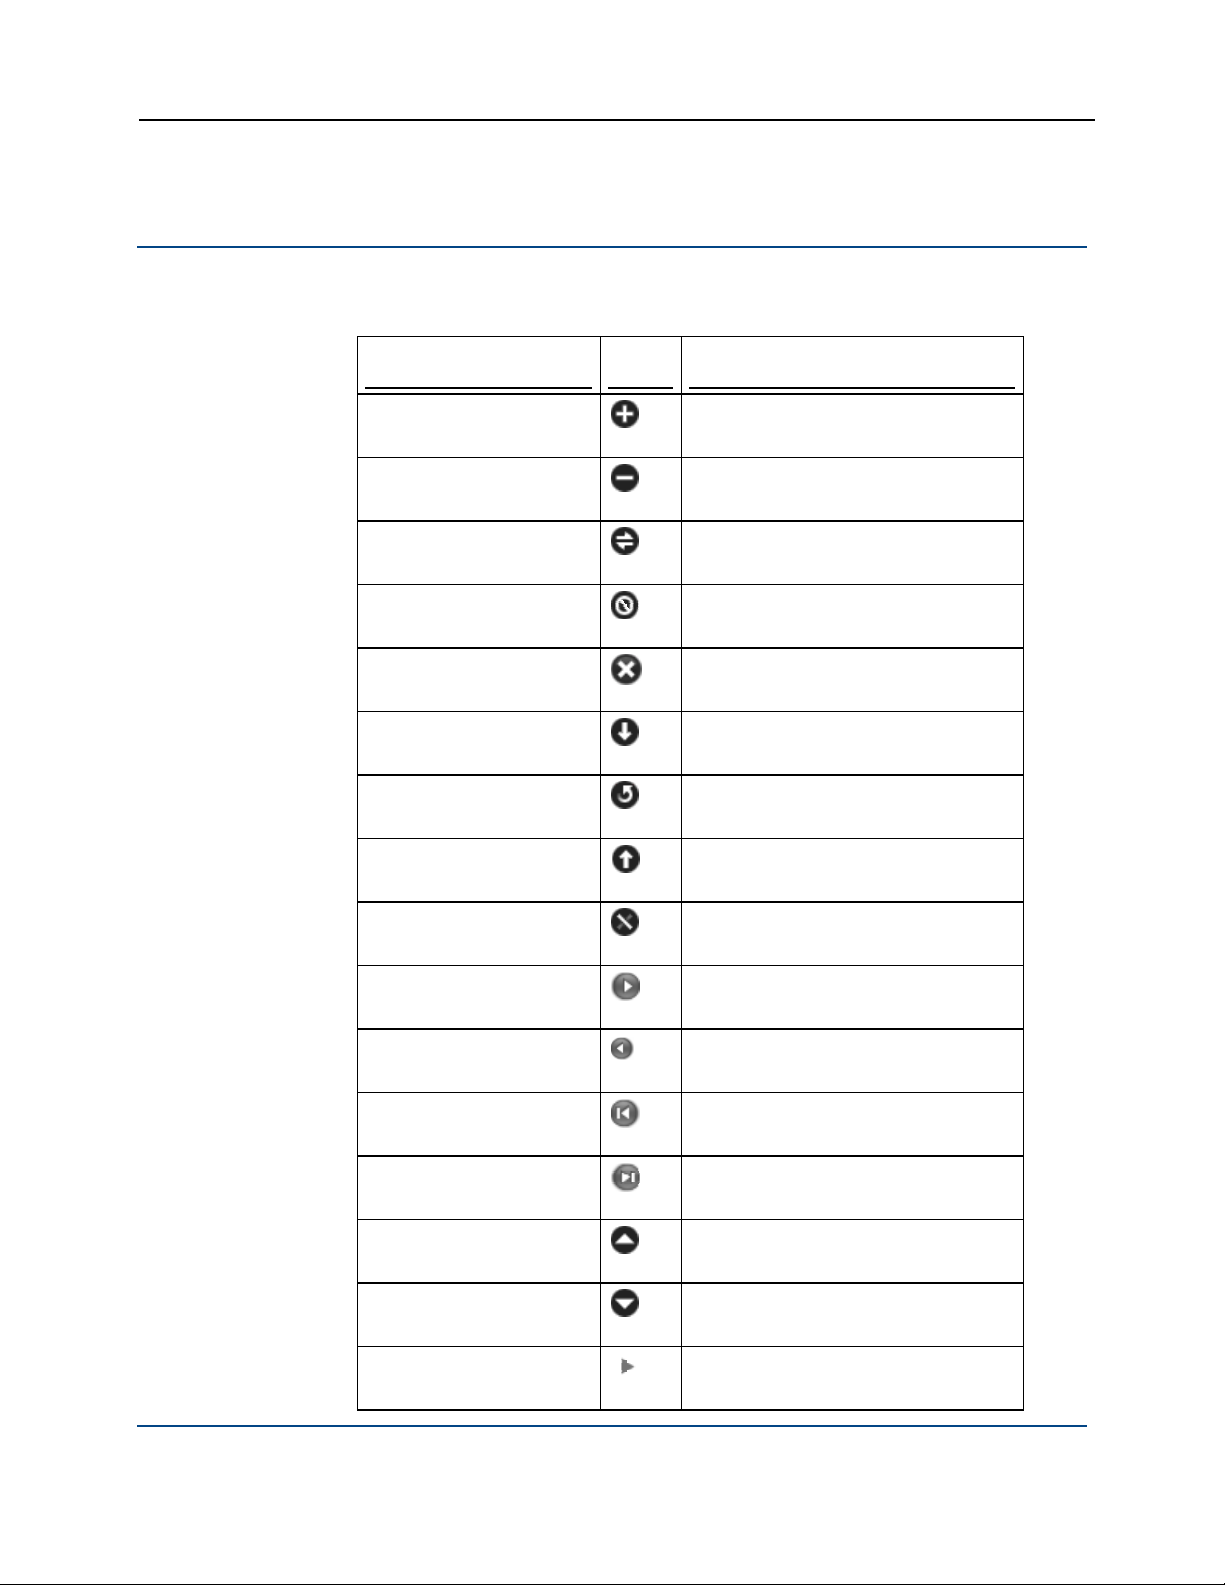
PGP Universal Server Understanding the Administrative Interface
Icons
The administrative interface uses the following icons.
Type
Actions
Icon Description
Add
Remove
Connect
Delete
Clear Search
Install/Export
Reinstall/Regenerate
Restore
Revoke
45
Forward
Back
First
Last
Move priority up
Move priority down
Closed Action
Page 50

PGP Universal Server Understanding the Administrative Interface
Type Icon Description
Opened Action
Help
Update software
Print
Users
Internal user
Administrative user
Excluded user
Internal user, revoked
Expired internal user
External user, revoked
External user
External user, pending
Expired external user
Directory user
Keys and Certificates
Expired directory user
Directory user, pending
Key
Key, expired
46
Page 51

PGP Universal Server Understanding the Administrative Interface
Type Icon Description
Key, revoked
Key reconstruction
Whole Disk Recovery Token
Keypair
Keypair, expired
Keypair, revoked
Certificate
Mail Policy
Expired certificate
Revoked certificate
Expired certificate pair
Certificate pair
Revoked certificate pair
ADK (Additional Decryption Key)
Organization Key
Verified Directory Key
Default policy chain
47
Policy chain
Policy rule
Page 52

PGP Universal Server Understanding the Administrative Interface
Type Icon Description
Dictionary term
Excluded address
`
User Policy
Web Messenger
Backup
Pending excluded address
Keyserver
Default keyserver
Default policy
Excluded policy
Default template
Customized template
Broken template
Backup successful
Update
Clustering
Backup pending
Backup failed
Successful install
Update ready to be installed
Failed install
Cluster
48
Page 53

PGP Universal Server Understanding the Administrative Interface
Type Icon Description
Active cluster
Inactive cluster
Logs
Miscellaneous
Info
Notice
Warning
Error
Domain
Mail proxy (SMTP, POP, IMAP)
Inbound mailserver
Outbound mailserver
SMTP server
49
Mail route
Network interface
Learn mode
Access control enabled
Page 54

Page 55

6
Overview
Licensing Your Software
This section describes how to license your PGP Universal Server.
Your PGP Universal Server must have a valid license to be taken out of Learn
Mode. In other words, without a valid license, your PGP Universal Server will
never encrypt or sign any email messages.
If you licensed your PGP Universal Server using the Setup Assistant, you do not
have to license it again. If you did not, then you can license it at any time
afterwards using the administrative interface.
The email proxying feature available on the PGP Universal Server can only be
used if you have the Gateway Email license.
The PGP Universal Server can provide security for email messaging by inserting
itself into the flow of email traffic in your network, intercepting, or proxying, that
traffic, and processing it (encrypt, sign, decrypt, verify) based on the applicable
policies.
Manual and Automatic Licensing
When you type your license number, the PGP Universal Server contacts an
authorization server to automatically authorize the license number. If your PGP
Universal Server does not have an active connection to the Internet, you must
contact PGP Support to acquire a manual authorization block.
Caution: The PGP Universal Server must not be behind a proxy server, unless
it is a transparent proxy, to receive licensing information automatically. If the
PGP Universal Server is behind a proxy server, use manual license
authorization.
Licensing a PGP Universal Server
For instructions, see Licensing a PGP Universal Server (on page 366).
51
Page 56

PGP Universal Server Licensing Your Software
Licensing the Mail Proxy Feature
You must have a PGP Universal Gateway Email license or you cannot use the
Mail Proxies feature on the administrative interface. For information about the
Mail Proxies feature, see Configuring Mail Proxies (on page
171).
52
Page 57

7
Operating in Learn Mode
When you finish configuring a PGP Universal Server using the Setup Assistant, it
begins running in Learn Mode.
In Learn Mode, messages are processed through mail policy, but none of the
actions from the policy are performed. Messages are neither encrypted nor
signed. This functions as a rehearsal, so that you can learn how policies would
affect email traffic if implemented. While running in Learn Mode, the PGP
Universal Server also creates keys for authenticated users so that when Learn
Mode is turned off, the server can secure messages immediately.
After messages go through mail policy, PGP Universal Server decrypts and
verifies incoming messages for which there are local internal or external user
keys. Outgoing messages are sent unencrypted. In Learn Mode, non-RFC
compliant email is sent unprocessed and in the clear. Turn Learn Mode off to
process messages through the mail policy exception chain.
In Learn Mode, the PGP Universal Server:
Creates user accounts with user keys, in accordance with Consumer Policy.
Decrypts messages using internal and external keys stored on the server,
but does not search for keys externally.
Does not encrypt or sign messages.
Will not apply mail policy to messages, and will not take any Key Not Found
action on messages.
Note: Your PGP Universal Server must be licensed before you can take it out
of Learn Mode.
Purpose of Learn Mode
Learn Mode allows you to:
View (by examining the logs) how policies would affect email traffic if
implemented.
Build the SMSA (creating keys for authenticated users, for example) so that
when the server goes live—when Learn Mode is turned off—the server can
secure messages immediately.
Identify mailing lists your users send messages to and add their addresses
to the dictionaries of Excluded Email Addresses. Most likely, users won't
send encrypted messages to a mailing list.
53
Page 58

PGP Universal Server Operating in Learn Mode
PGP Universal Server decrypts and verifies incoming email while operating
in Learn Mode.
PGP Universal Server still automatically detects mailing lists when Learn
Mode is off, but unless the addresses were retrieved via the Directory
Synchronization feature, they require approval from the PGP Universal
Server administrator to be added to the list of excluded email addresses.
For more information, see Using Dictionaries with Policy (on page
Mailing lists are identified per RFC 2919, List-Id: A Structured Field and
Namespace for the Identification of Mailing Lists, as well as by using
default exclusion rules.
153).
Checking the Logs
The effects of your policies can be checked while Learn Mode is on, even
though the server is not actually encrypting or signing messages.
To check the server’s logs
1 Access the administrative interface for the server.
The administrative interface appears.
2 Click Reporting, then Logs.
The System Logs page appears.
3 Check the logs to see what effect your policies are having on email traffic.
Managing Learn Mode
The PGP Universal Server is put into Learn Mode by the Setup Assistant. If your
server is in Learn Mode, you see a yellow icon, the Change Mode button, in the
upper-right corner of your browser page.
To turn off Learn Mode
1 Click the Change Mode button in the upper-right corner of the page.
The Mail Processing Settings dialog box appears.
2 Deselect Operate in Learn Mode.
3 Click Save.
Learn Mode is turned off.
54
Page 59

PGP Universal Server Operating in Learn Mode
To turn on Learn Mode
1 Click the Change Mode button in the upper-right corner of the page.
The Mail Processing Settings dialog box appears.
2 Select Operate in Learn Mode.
3 Click Save.
Learn Mode is turned on.
55
Page 60

Page 61

Managed Domains
8
This section describes how to create and manage the internal domains for
which your PGP Universal Server protects email messages.
About Managed Domains
The Managed Domains page gives you control over the domains for which the
PGP Universal Server is handling email.
Email users from domains being managed by your server are called “internal
users.” Conversely, email users from domains not being managed by your
server but who are part of the SMSA are called “external users.”
For example, if your company is “Example Corporation,” you can have the
domain “example.com” and your employees would have email addresses such
jsmith@example.com.”
as “
If this were the case, you would want to establish “example.com” as a domain
to be managed by your server. When you install your PGP Universal Server you
have the opportunity to add a managed domain in the Setup Assistant. If you do
not set it up at that time, you can use the Managed Domains page to add it. You
can also add additional managed domains from the Managed Domains page, if
you have users with addresses in multiple domains that you want to be
considered internal users.
Managed domains automatically include sub-domains, so in the example above,
users such as “
users. Multi-level domain structures as used by some countries are also
acceptable: for example, the domain “example.co.uk.”
The Managed Domains page accepts Internet DNS domain names and Domino
domains. You must have an Internet DNS domain name, and if you have Notes
users, you must also include the Domino domain name. WINS names (for
example,
Usually, you specify your Internet domain during installation through the Setup
Assistant. If your PGP Universal Server is also managing a Domino server, you
must add your Domino domain name manually through the Managed Domains
page.
For example, if you have an Internet domain "example.com" and a Domino
domain "ExDomino," you would add example.com as the managed domain
during setup, for SMTP addressing. You would then add ExDomino as an
additional managed domain, for Domino addressing.
mingp@corp.example.com” would also be considered internal
\\EXAMPLE) do not belong here.
57
Page 62

PGP Universal Server Managed Domains
Mail to and from your managed domains is processed according to your mail
policy. You can also create mail policy rules specifically for your managed
domains. See the chapter Setting Mail Policy (on page
on creating mail policies.
Managed domains entered on the Managed Domains page populate the
Managed Domains dictionary. The dynamic Managed Domains dictionary
automatically includes subdomains. See Using Dictionaries with Policy (on page
153) for more information on dictionaries.
99) for more information
Adding Managed Domains
To add a domain to the list of managed domains
1 Click Add Managed Domain.
The Add Managed Domain dialog box appears.
2 Type a domain name in the Domain field.
Do not type WINS names (for example,
Internet DNS domain names or Domino domain names.
3 Click Save.
Deleting Managed Domains
If you delete a managed domain, all the user IDs within that domain remain in
the system. Users can still encrypt and sign messages with their keys.
To remove a domain name already on the list of managed domains
1 Click the icon in the Delete column of the domain you want to remove from
the list.
A confirmation dialog box appears.
2 Click OK.
The confirmation dialog box disappears and the selected domain name is
removed from the list of managed domains.
\\EXAMPLE) here. Type only
58
Page 63

Understanding Keys
9
This chapter introduces some of the concepts related to how Consumer keys
are managed. It introduces the concept of key modes, which are used to control
whether internal and external users can manage their own keys or whether keys
should be managed by PGP Universal Server. It also discusses the use of
Certificate Revocation Lists and key reconstruction blocks.
Choosing a Key Mode For Key Management
When you create PGP Universal Satellite and PGP Desktop installers, you can
choose whether you want internal and external users to be able to manage their
own keys, or whether keys should be managed by the PGP Universal Server.
End-to-end email processing functions refer to encryption, decryption,and
signing performed at the client, rather than on the PGP Universal Server.
Client
Key
Mode
(CKM)
Guarded
Key
Mode
(GKM)
Server
Key
Mode
(SKM)
PGP
NetShare
Support
Yes No No No Yes Yes Yes No
Yes No No No Yes Yes Yes Private keys
No Yes Yes Yes Yes Yes Yes Yes
PGP Universal Gateway
Email Functions
Encrypt Decrypt Sign Encrypt Decrypt Sign
59
End-to-end Email
Processing Functions
Keys
Managed
By Server
stored
passphraseprotected
Page 64

PGP Universal Server Understanding Keys
Server
Client
Key
Mode
(SCKM)
PGP
NetShare
Support
PGP Universal Gateway
Email Functions
End-to-end Email
Processing Functions
Keys
Managed
By Server
Encrypt Decrypt Sign Encrypt Decrypt Sign
Yes Yes Yes No Yes Yes Yes Public and
private
encryption
subkeys
stored on
client and
PGP
Universal
Server,
private
signing
subkeys
stored only
on client
Server Key Mode (SKM)—The PGP Universal Server generates and
manages user keys.
Users cannot manage their own keys.
PGP Universal Server administrators have access to private keys.
If a user has a client installation, the user’s keys are downloaded to
the client at each use.
SKM can also be used without client installations; if there is no client
installation, you must use SKM.
The client stores the private key encrypted to a random passphrase,
so users can read email offline.
PGP NetShare does not support SKM.
In PGP Universal Gateway Email environments, existing users with
SKM key mode keys who install PGP Desktop for the first time will be
prompted automatically to re-enroll and create a CKM, GKM, or SCKM
key.
Client Key Mode (CKM)—Users use client software to generate and
manage their own keys.
PGP Universal Server administrators do not have access to private
keys.
CKM user email is secure on the mail server.
CKM users are responsible for backing up their keys; if they lose their
private keys, there is no way to retrieve them.
60
Page 65

PGP Universal Server Understanding Keys
Users who want to be able to read their email offline and unconnected
to PGP Universal Server must use CKM.
PGP NetShare supports CKM; it requires that users control their own
keys.
PGP Universal Gateway Email does not support CKM.
Guarded Key Mode (GKM)—Users generate and manage their own keys,
and store their passphrase-protected private keys on the server.
GKM is similar to CKM, except that PGP Universal Server stores
protected copies of private keys.
PGP NetShare supports GKM; it requires that users control their own
keys.
PGP Universal Gateway Email does not support GKM.
Server Client Key Mode (SCKM)—Keys are generated on the client.
Private encryption subkeys are stored on both the client and PGP Universal
Server, and private signing subkeys are stored only on the client.
SCKM allows for separate signing and encryption subkeys,
comparable to X.509 signing and encryption keys.
The public and private encryption subkey is on the server, but by
default encryption is not performed on the server.
The public-only signing subkey is on the server. PGP Universal Server
cannot sign email for the user.
Mail processing must take place on the client side to use the SCKM
signing subkey. If you want to use PGP Universal Gateway Email with
SCKM keys, you must be using PGP Universal Server 2.5 or later. PGP
Universal Gateway Email allows email encryption and decryption with
SCKM keys, but email will not be signed.
SCKM is compatible with smart cards, but encryption keys are not
generated on the token. Copy the keys onto the token after
generation.
If an SCKM user resets their key, the entire SCKM key is revoked,
including all subkeys, and remains on the PGP Universal Server as a
non-primary key for the user. This non-primary key can still be used for
decryption, and remain on the PGP Universal Server until manually
removed by the administrator.
SCKM is not supported by legacy PGP Desktop installations before
version 9.0.
PGP NetShare supports SCKM; it requires that users control their own
keys.
61
Page 66

PGP Universal Server Understanding Keys
Which key management option you choose depends on what your users need
and which client application they use. Server Key Mode is generally appropriate
for PGP Universal Satellite users. Client Key Mode is more appropriate for PGP
Desktop users. If your security policy requires that a user’s signing key is only in
the possession of the user, but the user’s encryption key must be archived,
SCKM is the correct choice.
Recommended Key Mode Compatibility Per PGP Product
If you want to use both PGP Desktop and PGP Universal Gateway Email, your
users need SCKM keys.
If your users only require support for messaging, PGP Universal Satellite and
SKM are sufficient. Both public and private keys are stored on the PGP Universal
Server, and the private key is only temporarily sent to the client application for
message signing and decryption. SKM is not as secure as CKM because the
private keys are not under individual management. Separate signing subkeys are
not available to SKM users.
PGP Desktop has more features than PGP Universal Satellite, and those
features require client-controlled keys. For example, to use the PGP Whole Disk
Encryption option with a hardware token in PGP Desktop, users must be able to
generate and manage the key stored on the Whole Disk token. If you want a
PGP Virtual Disk to be created automatically at installation, that also requires
CKM. PGP NetShare is also unavailable to SKM users.
For more information on key management settings, see Editing Internal User
Policies. For more information on key modes and their relationship to PGP
Universal Satellite, see Key Mode (on page
295).
Adding PGP Desktop Solutions to Existing Gateway Email Environments
PGP NetShare requires users' keys to use CKM, GKM, or SCKM mode. In PGP
Universal Gateway Email environments, existing users with SKM key mode
keys who install PGP Desktop for the first time are prompted automatically to
re-enroll and create a CKM, GKM, or SCKM key.
62
Page 67

PGP Universal Server Understanding Keys
Enrolling revokes the user's SKM key and replaces it with the key the user
generates using the wizard. Users can continue to decrypt with the revoked
SKM keys, but all new messages are encrypted to the new key and must be
decrypted at the client.
Changing Key Modes
If you allow PGP Desktop users to change their options and allow user-initiated
key generation, users can switch key modes.
If the user’s policy has changed to permit user-managed keys, then the user is
automatically prompted to create a new key, and no further action is necessary.
However, if the user’s policy has always permitted user key management, and
the user wants to switch key modes, the user should follow this procedure.
To change key mode
1 Open PGP Desktop and select the PGP Messaging service whose key
mode you want to determine.
The account properties and security policies for the selected service
appear.
2 Click Key Mode.
The PGP Universal Key Mode page appears, describing your current key
management mode.
3 Click Reset Key.
The PGP Key Setup Assistant appears.
4 Read the text, then click Next.
The Key Management Selection page appears.
5 Select the desired key mode.
Depending on how yourPGP Universal Server administrator configured your
copy of PGP Desktop, some key modes might not be available.
6 Click Next.
The Key Source Selection screen appears.
7 Choose one of the following:
New Key. You are prompted to create a new PGP key, which is used
to protect your messaging.
PGP Desktop Key. You are prompted to specify an existing PGP key
to use to protect your messaging.
Import Key. You are prompted to import a PGP key, which is used to
protect your messaging.
8 Make the desired selection, then click Next.
63
Page 68

PGP Universal Server Understanding Keys
9 If you selected New Key:
a Type a passphrase for the key, then click Next.
b When the key is generated, click Next.
c Click Finish.
10 If you selected PGP Desktop Key:
a Select the key from the local keyring that you want to use, then
click Next.
b Click Finish.
11 If you selected Import Key:
a Locate the file that holds the PGP key you want to import (it must
contain a private key), then click Next.
b Click Finish.
How PGP Universal Server Uses Certificate Revocation Lists
A certificate revocation list (CRL) is a list of certificates that have been revoked
before their scheduled expiration date. The PGP Universal Server retrieves CRLs
for certificates from CRL Distribution Points (DP).
The PGP Universal Server checks the CRL DPs automatically before encrypting
a message to a certificate, including certificates for internal and external users,
as well as certificates in the cache. The server also checks the CRL DPs before
importing any internal or external user certificate. It does not check before
importing Trusted Certificates, or before connecting to servers with SSL
certificates.
The PGP Universal Server checks the revocation status of just the recipient's
certificate. It does not check the revocation status of the other certificates in the
signing chain.
Once retrieved, certificate revocation status is stored on the parent certificate,
so the Trusted Certificate for each user certificate stores the list of all the
associated revoked certificates. Once the CRL is stored on the Trusted
Certificate, the PGP Universal Server runs future CRL checks based on the
“next update” date for that list.
Key Reconstruction Blocks
Key reconstruction blocks allow users to retrieve their private keys if they forget
their passphrases.
64
Page 69

PGP Universal Server Understanding Keys
Key reconstruction blocks contain several user-defined questions and the user's
private key, which is encrypted with the answers to those questions.
PGP Universal Server stores these questions and answers so that users can get
back their private keys in case they lose their passphrases. For example, if a
user writes five questions and answers, they can be asked three (or more) of
the questions to reconstruct their private key.
If an internal PGP Desktop user has uploaded a key reconstruction block to the
PGP Universal Server, you can delete it. You might want to delete a key
reconstruction block if you have already deleted or revoked the associated key
and you do not want the key to be recoverable. If you delete the key
reconstruction block, it is no longer stored on the PGP Universal Server,
although it is possible that the user also has a copy.
Note: Keys created on smart cards and tokens are not compatible with PGP
Desktop's key reconstruction feature.
See Recovering Encrypted Data in an Enterprise Environment (on page 287) for
information on other methods of data recovery.
Managed Key Permissions
Key permissions determine what actions consumers (users or managed
devices) can perform upon managed keys. Key permissions are set in three
ways:
At the group level: permissions can be set that determine how group
members can interact with managed keys. Permissions set for a group are
inherited by all members of the group.
At the consumer level: individual consumers may be granted permissions.
These permissions will exists in addition to the permissions the consumer
inherits from the groups of which it is a member.
At the managed key level: a managed key can have permissions that
specify what actions consumers or groups can take upon it. These are set
individually for a managed key.
Permissions are positive (they allow actions) and are additive: the actions
enabled for a consumer relative to a managed key are combination of the
permissions allowed by the consumer's group membership, plus permissions
allowed for the consumer, plus permissions allowed by the key.
There are no deny permissions.
65
Page 70

Page 71

Managing Organization
10
Keys
This section describes the various keys and certificates you can configure and
use with your PGP Universal Server.
About Organization Keys
There are multiple keys and certificates you can use with your PGP Universal
Server:
Organization Key. Used to sign all user keys the PGP Universal Server
creates and to encrypt server backups.
Organization Certificate. Required to support S/MIME environments.
Additional Decryption Key (ADK). Used to reconstruct messages if the
recipient is unable or unwilling to do so. Every message encrypted to an
external recipient by an internal user is also encrypted to the ADK, allowing
the PGP Universal Server administrator to decrypt any message sent by
internal users, if required to do so by regulations or security policy.
Verified Directory Key. Used to sign keys submitted to the PGP Verified
Directory by external users.
The Organization Keys page provides access to all of these.
Organization Key
Your Organization Key is used to sign all user keys the PGP Universal Server
creates and to encrypt server backups. The Organization Key is what was
referred to as the Corporate Key in the old PGP Keyserver environment.
Warning: You must make a backup of your Organization Key, in case of a
problem with the server. That way, you can restore your server from a backup
using the backup Organization Key.
Each PGP Universal Server is pre-configured with a unique Organization Key
generated by the Setup Assistant. If you would like to use different settings for
this key, you can regenerate the key with the settings you prefer. This should
only be done prior to live deployment of the server or creation of user keys by
the server.
67
Page 72

PGP Universal Server Managing Organization Keys
The Organization Key automatically renews itself one day before its expiration
date. It renews with all the same settings.
If you have multiple PGP Universal Servers in a cluster, the Organization Key is
synchronized.
An Organization Key’s identification is based on the name of the managed
domain for which the key was created. Organization Keys by convention have
one ID per managed domain so that they can be easily found via a directory
lookup.
The Organization Key information includes the Public Keyserver URL, as
specified on the Services > Keyserver page. Anytime the Public Keyserver URL
changes, that information on the Organization Key changes immediately.
Inspecting the Organization Key
To inspect the properties of an Organization Key
1 Click the name of the Organization Key.
The Organization Key Info dialog box appears.
2 Inspect the properties of the Organization Key.
3 To export either just the public key portion of the Organization Key or the
entire keypair, click the Export button and save the file to the desired
location. Optional: You can protect your Organization Key with a passphrase
when you export it.
When you export the Organization Key you also get the Organization
Certificate. You can use PGP Desktop to extract the Organization Certificate
from the Organization Key.
4 Click OK.
If you are going to regenerate your Organization Key, you should use a fairly
high bit size, such as 2048. However, if you are going to be using X.509
certificates and S/MIME, be aware that many clients only support up to
1024 bits; thus you may want to use 1024 bits for maximum compatibility
with S/MIME. All clients can be expected to support at least 4096 bits.
Regenerating the Organization Key
Warning: Changing the Organization Key makes all previous backups
undecryptable and all validity signatures on the keys of internal users are
unverifiable until they are automatically renewed. Only change the
Organization Key if you fully understand the consequences of this action.
68
Page 73

PGP Universal Server Managing Organization Keys
Caution: Changing the Organization Key deletes Ignition Keys. If you have
hard or soft token Ignition Keys configured, regenerating the Organization Key
deletes them. Without an Ignition Key, PGP Universal Web Messenger
messages are not stored encrypted.
Note: The Organization Key signs all Trusted Keys and Certificates. If you
regenerate the Organization Key, the signature on the Trusted Keys and
Certificates becomes invalid. You must re-import all Trusted Keys and
Certificates to have them signed by the new Organization Certificate. For
more information, see Managing Trusted Keys and Certificates (on page 95).
To regenerate an Organization Key
1 Click Regenerate in the Action column of the Organization Key whose
properties you want to change.
2 The following warning dialog box appears:
Regenerating the Organization Key will cause problems with existing key
signatures and backups. Any existing Ignition Keys and Organization
Certificate will also be removed. Are you sure you want to proceed?
3 Click OK.
The Organization Key Generation dialog box appears.
4 Make the desired changes to the properties of the Organization Key.
5 Click Generate.
Importing an Organization Key
You also have the option of importing an existing PKCS #12 key and using that
as your Organization Key.
Caution: Importing an Organization Key deletes Ignition Keys. If you have
hard or soft token Ignition Keys configured, importing an Organization Key
deletes them. Deleting the Ignition Key stops PGP Universal Web Messenger
from being stored encrypted
To import an Organization Key
Click the icon in the Import column of the Organization Key row.
1 The following warning dialog box appears:
Importing a new Organization Key will cause the current key (and
Organization Certificate, if any) to be deleted, and will cause problems with
existing key signatures and backups. Any existing Ignition Keys will also be
removed. Are you sure you want to proceed?
2 Click OK.
69
Page 74

PGP Universal Server Managing Organization Keys
The Import Organization Key dialog box appears.
3 Do one of the following:
If you want to import a key that has been saved as a file, click Browse
to locate the file of the key you want to import.
If you want to import a key by cutting and pasting, copy the key you
want to be your Organization Key to the Clipboard and paste it into the
Key Block box.
4 Type the passphrase for the key, if required.
5 Click Import.
The Organization Key you imported appears in the Organization Key row.
Organization Certificate
An Organization Certificate is required for S/MIME support. You can only have
one Organization Certificate attached to your Organization Key. You cannot
restore from a backup with more than one Organization Certificate associated
with your Organization Key.
The PGP Universal Server will automatically generate certificates as well as keys
for new internal consumers created after you import or generate an Organization
Certificate. All internal consumers receive a certificate added to their keys within
a certain amount of time, between 24 hours to two weeks. However,
certificates issued by the old Organization Certificate remains on users’ keys
until the certificate expires. PGP Universal Server also creates separate signing
and encryption certificates for imported SKM and SCKM internal keys, based on
the appropriate subkey. PGP Universal Server creates single signing and
encryption certificates for imported CKM and GKM keys, based on the user's
topkey.
You have several options for dealing with Organization Certificates. You can:
Create a self-signed Organization Certificate. Unfortunately, a self-signed
Organization Certificate will not be universally recognized, so PGP
Corporation recommends using a certificate from a recognized Certificate
Authority (CA). Self-signed X.509 Organization Certificates are version 3.
Create a Certificate Signing Request for a certificate authorized by an
existing CA. When you receive the certificate back from the CA as a file,
you will need to import that file.
Import an existing certificate to use as your Organization Certificate.
Imported X.509 certificates must be version 3.
To enable S/MIME support, the certificate of the issuing Root CA, and all other
certificates in the chain between the Root CA and the Organization Certificate,
are on the list of trusted keys and certificates on the Trusted Keys and
Certificates page.
70
Page 75

PGP Universal Server Managing Organization Keys
A self-signed Organization Certificate has the same expiration date as the
Organization Key, unless the Organization Key is set never to expire. If the
Organization Key never expires, the Organization Certificate expires 10 years
from the date you generate it. You must regenerate the Organization Certificate
before it expires and distribute the new Certificate to anyone who uses your old
Organization Certificate as a trusted root CA.
Inspecting the Organization Certificate
To inspect the settings of an Organization Certificate
1 Click the name of the Organization Certificate.
The Organization Certificate Info dialog box appears.
2 Inspect the settings of the Organization Certificate.
3 Click OK.
Exporting the Organization Certificate
To export an Organization Certificate to a file
1 Click on the Organization Certificate.
The Organization Certificate Info dialog box appears.
2 Click Export.
The Export Certificate dialog box appears.
3 Do one of the following:
To export just the public key portion of the certificate, select Export
Public Key.
To export the public and private key portions of the certificate, select
Export Keypair and type a passphrase to protect the private key once
it is exported. The resulting file is in PKCS #12 format.
4 Click Export.
5 At the prompt that appears, click Save.
6 Specify a name and location to save the file, then click Save.
The Organization Certificate Info dialog box appears.
7 Click OK.
71
Page 76

PGP Universal Server Managing Organization Keys
Deleting the Organization Certificate
To delete an Organization Certificate
1 Click the icon in the Action column of the Organization Certificate.
A confirmation dialog box appears.
2 Click OK.
The Organization Certificate is deleted.
Generating the Organization Certificate
To create a Certificate Signing Request (CSR)
1 Click the icon in the Action column of the Organization Certificate row.
The Generate Organization Certificate dialog box appears.
2 Type a name for the certificate in the Common Name field.
3 Type an email address in the Contact Email field.
4 Type your organization’s name in the Organization Name field.
5 Type your organization’s unit designation in the Organization Unit field.
6 Type a city or locality, as appropriate, in the City/Locality field.
7 Type a state or province, as appropriate, in the Province/State field.
8 Type a country in the Country field.
9 If you want to generate a self-signed certificate, click Generate Self-
signed. PGP Universal Server generates a certificate. To generate a
Certificate Request instead, proceed to the next step.
10 Click the Generate CSR button.
The CSR dialog box appears, showing the certificate request.
11 Copy the entire contents of the CSR dialog box to a file, then click OK.
12 Paste the CSR into the appropriate field on your third-party CA interface.
The CA sends the certificate back to you when it has approved it.
13 When you receive the certificate from the CA, use the Import feature to
import it as your Organization Certificate.
72
Page 77

PGP Universal Server Managing Organization Keys
Importing the Organization Certificate
To import a certificate to be your Organization Certificate
1 Click the icon in the Import column of the Organization Certificate row.
The Import Organization Certificate dialog box appears.
2 Copy the certificate you want to be your Organization Certificate.
3 Paste the text into the Certificate Block box.
4 Click Save.
The Organization Certificate you imported appears in the Organization
Certificate row.
Additional Decryption Key (ADK)
An Additional Decryption Key (ADK) is a way to retrieve an email message or
other encrypted data if the recipient is unable or unwilling to do so and if
required by regulation or security policy. Every message sent by an internal user
is also encrypted to the ADK. Messages encrypted to the ADK can be opened
by the recipient and/or by the holder(s) of the ADK. The ADK is also added to
disks encrypted with PGP Whole Disk Encryption.
If you have an Additional Decryption Key uploaded, all outbound email is
encrypted to it when mail policy is applied. This setting appears in the Send
(encrypted/signed) action and the setting cannot be disabled. For more
information, see the chapter "Setting Mail Policy."
You can create an ADK with PGP Desktop, then add it to your PGP Universal
Server and use it.
You can also add an ADK to a consumer policy. Clients with a policy with an
ADK have all messages and other data encrypted to the policy-specific ADK as
well as to the Organization ADK.
Note: S/MIME messages are not encrypted to the ADK.
If you use an ADK, PGP Universal Server adds the ADK to all new keys that it
generates and all outbound email messages are automatically encrypted to it.
If you are going to use an ADK on your PGP Universal Server, you should import
it prior to generating any user keys. You should also try to avoid changing to a
different ADK later on, because doing so results in some keys being associated
with the old ADK and some with the new ADK. If you add or change an ADK, it
is only associated with the keys of new users. Existing users do not get that
ADK added to their key.
Only PGP keys can be used as ADKs.
73
Page 78

PGP Universal Server Managing Organization Keys
For information on using an ADK in a split key scenario, see the PGP Desktop
User’s Guide.
Importing the ADK
To import an ADK to your PGP Universal Server
1 Copy the key of the ADK you are adding to the Clipboard using PGP
Desktop.
2 Click the Add icon in the Action column of the Additional Decryption Key
row.
The Add Additional Decryption Key dialog box appears.
3 Paste the key of the ADK into the Import Key Block box, or browse to find
and import a key.
4 Click Import.
The ADK you added appears in the Additional Decryption Key row.
Inspecting the ADK
To inspect the properties of an ADK
1 Click the name of the ADK.
2 Inspect the properties of the ADK.
3 To export the ADK, click Export and save the file to the desired location.
4 Click OK.
Deleting the ADK
To delete an ADK
1 Click the delete icon in the Action column of the ADK.
The Additional Decryption Key Info dialog box appears.
Note: All keys generated while the ADK was present continue to reference
the ADK even after you delete the ADK. The change applies only to keys that
are generated after the ADK is deleted.
A confirmation dialog box appears.
2 Click OK.
The ADK is deleted.
74
Page 79

PGP Universal Server Managing Organization Keys
Verified Directory Key
The Verified Directory Key is the signing key for PGP Verified Directory users
outside your managed domain. It must consist of both private and public keys.
Once you choose the setting to allow internal and external users to submit their
keys through the PGP Verified Directory, you must upload a Verified Directory
Key. Users cannot submit their keys to PGP Verified Directory until you have
added the Verified Directory Key. For more information, see Configuring the
PGP Verified Directory (on page
If you have multiple PGP Universal Servers in a cluster, the Verified Directory
Keys are synchronized.
Importing the Verified Directory Key
To import a Verified Directory Key to your PGP Universal Server
346).
1 Copy the key of the Verified Directory Key you are adding to the Clipboard
using PGP Desktop.
2 Click the Add icon in the Action column of the Verified Directory Key row.
The Add Verified Directory Key dialog box appears.
3 Paste the key of the Verified Directory Key into the Import Key Block box,
or browse to find and import a key.
4 Type the private key Passphrase.
5 Click Import.
The Verified Directory Key you added appears in the Verified Directory Key
row.
Inspecting the Verified Directory Key
To inspect the properties of the Verified Directory Key
1 Click the name of the Verified Directory Key.
The Verified Directory Key Info dialog box appears.
2 Inspect the properties of the Verified Directory Key.
3 To export the Verified Directory Key, click Export.
To export just the public key portion of the Verified Directory Key,
select Export Public Key.
75
Page 80

PGP Universal Server Managing Organization Keys
To export the public and private key portions of the key, select Export
Keypair and type a passphrase to protect the private key once it is
exported.
4 Click OK.
Deleting the Verified Directory Key
To delete the Verified Directory Key
1 Click the delete icon in the Action column of the Verified Directory Key.
A confirmation dialog box appears.
2 Click OK.
76
Page 81

Administering Managed
11
Keys
PGP Key Management Server (KMS) is new technology that centralizes the
management of multiple kinds of encryption keys for your organization onto a
single server, thus allowing multiple applications in your enterprise to operate
against the same set of keys.
To accommodate this new PGP KMS technology, new terms and concepts are
being used to describe how PGP applications understand keys, users, and
servers, and the relationships between them.
With PGP KMS, a Consumer is an identity associated with a person or a device.
A consumer can be a User, generally identified with a person. A user has a key,
can encrypt things, send and receive email, and so on. One person can have
more than one user identity (for example, they could be the holder of a
corporate ADK as one identity and a PGP Desktop user as a second identity,
each identity having a different PGP keypair).A consumer can also be a
Managed Device, such as a web server that handles credit cards or a bank's
automated teller machine. Each consumer has a Managed Key, which is a
keypair managed by PGP KMS for the consumer.
A Managed Key is a PGP keypair with some additional information. A managed
key can be used to encrypt, decrypt, sign, and verify. It is also known as a
Managed Asymmetric Key, or MAK, in the USP API and in PGP Command Line.
A managed key may or may not have associated symmetric keys, symmetric
key series, or custom data objects.
Symmetric Keys (also known as Managed Encryption Keys, or MEKs) are
always associated with a managed key. A symmetric key can be used to encrypt
and decrypt; it cannot sign or verify. Any number of symmetric keys can be
associated with a managed key. Symmetric keys can have a Validity Period,
allowing them to be valid for a specified period. At the end of the specified
period, the symmetric key expires and a new symmetric key can be
automatically created. The old symmetric key is retained in an expired state and
kept, to decrypt older data if necessary.
A Symmetric Key Series (or MEK series) is series of symmetric keys, each one
of which is automatically created, is valid for the duration of its Validity Period,
and then expires and is replaced by a new symmetric key. Consumers using a
symmetric key series can be automatically notified of a new symmetric key so
that they can synchronize to the series and thus use the correct symmetric key
at the correct time. In other cases, no notification is needed; when you encrypt
against the symmetric key series, the active symmetric key is used
automatically.
77
Page 82

PGP Universal Server Administering Managed Keys
Custom Data Objects are encrypted data objects stored on a PGP KMS and
associated with a managed key. It is just like a regular encrypted file except it is
stored on a PGP KMS. Custom data objects are also known as Managed Secure
Data, or MSDs).
Symmetric Keys and Custom Data Objects can be created, edited, searched for
and deleted by external applications using the USP APIs, or through PGP
Command Line commands. They can be viewed through the PGP Universal
Server administrative interface, but cannot be created or modified by a PGP
Universal Server administrator.
Viewing Managed Keys
Managed keys can be associated with several types of consumers: internal,
external, and verified directory users, and managed devices for which keys have
been imported.
There are a number of paths available to view managed keys.
For a User, you can access the Managed Key Information page by clicking
the Key ID from the Managed Key section of the user's User Information
page.
For a Managed Device, you can access the Managed Key Information page
by clicking the Key ID from the Managed Key section of the Managed
Device Information page.
The organization key and Verified Directory signing keys are also managed keys,
but are discussed in Managing Organization Keys (on page
To view all managed keys
Go to the Keys > Managed Keys page.
This displays the list of all managed keys in the PGP Universal Server
database.
The Managed Keys Display shows the following information about the keys:
Key ID: click this to view Managed Key Information for this managed key.
Name: the display name and email address of the user, or the display name
of the managed device.
Key Mode: the key mode type (SKM, CKM, GKM, SCKM)
Key Size and type: key size in bits and the key type (RSA or DH/DSS)
Created: date the key was created.
Expires: date the key will expire (or never if it does not expire
Status: the status of the key (valid, revoked, expired).
67).
Recovery: whether a key reconstruction block has been uploaded
78
Page 83

PGP Universal Server Administering Managed Keys
Owner: the owner of the key. For Users, the user is the owner of his/her
keys.
Using the icons under the Actions area you can:
Revoke the key
Export the key
Delete the key.
Managed Key Information
The Managed Key Information page shows detailed information about a
managed key.
To view detailed information about a specific managed key
Click the Key ID of the managed key from any of the following pages:
From the Managed Keys page
From the Managed Key section of a User Information page
From the Managed Key section of a Device Information page.
The Managed Key Information page appears for the key you selected.
From this page you can view detailed information about the key. You can also
add or change information about the device.
To changed the display name of the key
1 Click Edit Names... and type a new display name for the key.
2 Click Save to save the change or Cancel to close the dialog without making
the change.
To change the owner of the key
1 Click Edit Owner....
This takes you to the Edit Owner page where you can change the owner of
this managed key.
Note: Keys associated with email addresses cannot have their owner
modified. The Edit Owner... key will be disabled in this case.
2 Click Save to save the change or Cancel to close the dialog without making
the change.
79
Page 84

PGP Universal Server Administering Managed Keys
To revoke the managed key of an SKM key
1 Click Revoke.
A confirmation dialog box appears.
2 Click OK.
The key is revoked.
To Export the managed key
1 Click Export.
If only the public key is available, the text of the key downloads to your
system.
If both the public and the private key are available, the Export Key dialog
box appears.
2 Select Export Public Key to export just the public key portion of the
keypair.
3 Select Export Keypair to export the entire keypair, the public key and the
private key portions.
4 If you want to protect the exported key file with a passphrase, type it in the
Passphrase field.
If a private key already has an attached passphrase, it is already protected
and there is no need to type another passphrase. When you export the
keypair, you receive a file containing an unencrypted public key and an
encrypted private key.
5 Click Export.
The key is exported.
To delete the managed key
1 Click Delete.
A confirmation dialog box appears.
2 Click OK.
The key of is deleted.
Note: When you delete an internal user’s key, the private key material is
deleted, which means messages are no longer decryptable. If you want to
retain the private key material, you can revoke the key instead of deleting it.
To view Symmetric Key Series and the symmetric keys associated with
this managed key
Click Symmetric Key Series... to display the Symmetric Key Series
associated with this managed key.
80
Page 85

PGP Universal Server Administering Managed Keys
This button is only enabled for managed keys that have associated Symmetric
keys.
Symmetric keys, also known as Managed Encryption Keys, or MEKs, can be
used to encrypt or decrypt; it cannot sign or verify.
These keys can only be created by external applications using the USP API or
PGP Command Line. For more information about Symmetric Key Series and
Symmetric Keys, see Symmetric Key Series (on page
To view Custom Data Objects associated with this managed key
Click Custom Data Objects... to display the list of custom data objects
associated with this managed key.
This button is only enabled for managed keys that have associated data objects.
These objects can only be created by external applications using the USP API.
For more information about Custom Data Objects, see Custom Data Objects (on
page
86).
83).
Email Addresses
Subkeys
Certificates
To view the Email Addresses associated with this key
Expand the Email Addresses section of the Managed Key Information
page. This displays the list of email addresses associated with this
managed key.
If this is the managed key of a managed device, no email address will be
present.
To view the subkeys associated with this managed key
Expand the Subkeys section of the Managed Key Information page.
This displays any subkeys associated with this managed key.
For each subkey, this section shows the Key ID, the usage flags that are
set for the key, the key size (in bits) and key type (RSA or DH/DSS), the
date the key was create, the date it expires (or Never if it does not expire)
and the key status (Valid or Expired).
To view the certificates associated with this managed key
Expand the Certificates section of the Managed Key Information page.
81
Page 86

PGP Universal Server Administering Managed Keys
This displays any certificates that are associated with this managed key.
For each certificate, this section shows Common Name to which the
certificate was issued, the date the certificate was created (meaning when
it was imported into PGP Universal Server), the date on which it expires,and
the usage flags that are set for the certificate.
The Actions section at the end of the row provides icons for revoking,
exporting, and deleting the certificate.
Permissions
Managed Key permissions are similar to the permissions that can be granted to
a Consumer or Group, with an important exception: while group and consumer
permissions define the actions a consumer or group member can perform, a
Managed Key permission defines what actions others (Groups or Consumers)
can perform upon the Managed Key.
For example, a Consumer may be given a permission such as:
Can read public key of Managed Key Joe Smith
jsmith@example.com>
<
while a Managed Key may have a permission such as:
Group Marketing can delete
meaning that any Consumer that is a member of the group Marketing can delete
this key.
To view, set, or delete Permissions for this key
1 Expand the Permissions section of the Managed Key Information page.
If permissions have been added specifically for this device, the permission
settings are listed in this area.
If a listed permission involves a named consumer or a group, you can click
the name to see details about the consumer or group.
2 To add, edit, or delete permissions, click View and Edit Permissions....
The Permissions page for this key appears.
To remove a permission, click the Delete icon.
To remove multiple permissions, check the boxes next to the
permissions you want to delete and select Delete Selected from the
Options menu. To remove all permissions, select Delete All from the
Options menu.
3 To search for a specific permission, type the relevant string into the Search
field at the top right of the dialog box, and click the search icon.
The permissions list will be filtered to display only permissions that match
the search criterion.
82
Page 87

PGP Universal Server Administering Managed Keys
4 To add, remove or modify permissions, click Add Permissions...
5 Use the drop-down menus to create a new permission.
6 Click the Add icon to create as many permissions as necessary. Use the
Remove icon to remove individual permission.
Attributes
To view, add, or delete Attributes for this key
1 Expand the Attributes section of the Key Information page.
If attributes have been added, the attribute/value pairs are listed in this area.
Attributes are arbitrary name/value pairs. Outside applications can make
requests related to attributes through the USP API or using PGP Command
Line commands.
2 To add, delete, or modify attributes for this device, click Edit Attributes....
3 To add attributes, type the attribute name and its value in the fields
provided.
To add additional attributes, click the Add icon.
4 To change an attribute name or its value, just retype the information in the
field.
5 To remove an attribute, click the Remove icon.
Symmetric Key Series
A KMS license is required to access Symmetric Key Series and Symmetric Keys.
Symmetric keys (also known as Managed Encryption Keys, or MEKs) can be
used, through the USP API or the PGP Command Line commands, to encrypt
and decrypt data. A symmetric key typically has a limited life span, with a
specific validity period that determines how long the key remains valid. At the
end of the validity period, the current key expires and is replaced by a new
symmetric key.
The Symmetric Key Series is the set of the current plus expired keys,
maintained by PGP Universal Server. The currently valid key is used to encrypt
content during its validity period, and to decrypt content encrypted during this
validity period. The expired keys are maintained in order to decrypt content that
was encrypted in the past; PGP Universal Server determines which key to use
for decryption based on the date the content was encrypted.
83
Page 88

PGP Universal Server Administering Managed Keys
To view the symmetric key series associated with this managed key
1 Go to the Keys > Managed Keys page.
This displays the list of all managed keys in the PGP Universal Server
database.
2 Click the Key ID of the managed key.
The Managed Key Information page appears for the key you selected.
3 Click the Symmetric Key Series... button to display a list of Symmetric Key
Series owned by this managed key.
The information shown in this list includes the key series display name, the
validity period, the date at which the key will expire (or never); the date
when it will next be renewed (or never); and the number of symmetric keys
in this series.
4 To delete one or more key series, click the delete icon in the key series
row, or check one or more rows and select Delete Selected from the
Options menu, or select the Delete All option.
5 To export one or more keys, check one or more rows and select Export
Selected from the Options menu, or select the Delete All option.
6 Click the key series name to view the list of symmetric keys that are
included in the series.
To view an individual symmetric key series
1 From the Managed Key Information page, click the Symmetric Key
Series... button to display the list of Symmetric Key Series owned by this
managed key.
2 Click a key series name to view the list of symmetric keys that are included
in that series.
The Symmetric Key Series Information page appears.
On this page you can see the same basic information about the key series
as was shown in the Symmetric Key Series list. You can also view and set
attributes and permissions for the key, and force a rekey of the series.
3 To view or set attributes for this key series, expand the Attributes section
of the Symmetric Key Series Information page. This shows any
attribute/value pairs defined for this key series.
To add an attribute or to modify existing ones, click Edit Attributes...
4 To view the permissions for this key series, expand the Permissions
section of the Symmetric Key Series Information page. This shows any
permissions allowed for this key.
To add or delete permissions, click View and Edit Permissions....
84
Page 89

PGP Universal Server Administering Managed Keys
The Permissions page for this key appears. You can delete permissions
by clicking the delete icon next to a permission.
You can add a new permission by clicking Add Permissions..., which
takes you to a page where you can add permissions.
5 To view the individual Symmetric Keys within this series, click Symmetric
Keys.... For details of the pages that show the Symmetric Keys, see
Symmetric Keys (on page
per
85).
To force replacement of the current valid key
1 Click Force Rekey.
This lets you replace the current valid symmetric key, regardless of its
validity period or when it is due to expire. The current valid symmetric key
is marked expired, and a new symmetric key is created as the valid key.
Symmetric Keys
Individual Symmetric Keys are contained within a Symmetric Key Series, which
is itself associated with a specific managed key. To view the set of individual
Symmetric Keys, you must navigate through the Symmetric Key Series display.
To view the set of Symmetric Keys in a series
1 From the Managed Key Information page, click the Symmetric Key
2 Click a key series name to view the list of symmetric keys that are included
3 Click the Symmetric Keys... button to display the list of Symmetric Keys in
4 To delete an individual Symmetric Key, click the Delete icon. You can also
Series... button to display the list of Symmetric Key Series owned by this
managed key.
in that series.
The Symmetric Key Series Information page appears.
the selected key series.
From this list, you can see each Key ID, along with the Validity dates (start
and end dates) for each key.
The key icon at the left of each Key ID indicates whether the key is expired
or valid - normally only the last key in the list will be valid, the others will be
expired.
delete multiple keys by clicking check boxes and selecting Delete Selected
from the Options menu, or by selecting the Delete All option.
5 To export one or more individual Symmetric Keys, click their check boxes
and select Export Selected from the Options menu. You can export all the
keys by selecting the Export All option.
85
Page 90

PGP Universal Server Administering Managed Keys
To view the details of an individual Symmetric Key
1 From the list of symmetric keys, click the individual key ID to display the
Symmetric Key Information page.
This shows the key UUID, the date it was created, and its validity start and
end dates.
2 To view or set attributes for this key, expand the Attributes section of the
Symmetric Key Information page. This shows any attribute/value pairs
defined for this key series.
Note: Attributes of symmetric keys cannot be added or modified through
the PGP Universal Server administrative interface. They can only be
manipulated using PGP Command Line commands or through the USP
API.
3 To view the data in this key, click Show Data. This displays the data in a
text field. The administrator can copy the contents for use elsewhere.
Click Hide Data to hide the data display.
Custom Data Objects
A KMS license is required to access Custom Data Objects (also known as
Managed Secure Data, or MSDs).
Custom Data Objects are always associated with (owned by) a Managed Key.
They can be used to store arbitrary data objects securely in the PGP Universal
Server database. They are created and manipulated using the USP API or PGP
Command Line commands.
Custom Data Objects can be viewed through the PGP Universal Server
administrative interface. The administrator can also add and edit attributes and
permissions for a Custom Data Object.
To view a list of the Custom Data Objects associated with a managed key
1 From the Managed Key Information page, click the Custom Data
Objects... button to display the list of Custom Data Objects owned by this
managed key.
For each object in the list, this page shows its name, its size (in kbytes), and
its MIME type.
PGP Universal Server supports the MIME types for image files, plain text,
rich text, and PDF.
86
Page 91

PGP Universal Server Administering Managed Keys
2 To delete an individual Custom Data Object, click the Delete icon next to
the object. You can also delete multiple objects by clicking the appropriate
check boxes and selecting Delete Selected from the Options menu, or by
selecting the Delete All option.
3 To view an individual Custom Data Object, click the object ID.
To view the details of an individual Symmetric Key
1 From the list of symmetric keys, click the individual key ID to display the
Symmetric Key Information page.
This shows the key UUID, the date it was created, and its validity start and
end dates.
2 To view or set attributes for this Custom Data Object, expand the Attributes
section of the Custom Data Object Information page. This shows any
attribute/value pairs defined for this key series.
To add an attribute or to modify existing ones, click Edit Attributes...
For details on adding or editing attributes, see Attributes (Managed
Keys) (on page
83).
3 To view the permissions for this key series, expand the Permissions
section of the Custom Data Object Information page. This shows any
permissions allowed for this object.
To add or delete permissions, click View and Edit Permissions....
The Permissions page for this object appears. You can delete
permissions by clicking the Delete icon next to a permission.
4 You can add a new permission by clicking Add Permissions..., which takes
you to a page where you can add permissions. For details on adding or
editing permissions, see Permissions (on page
5 To view the data in this Custom Data Object as plain text, click Show Data.
If the MIME type of the object is one that PGP Universal Server recognizes,
it attempts to display the data using the appropriate application in a
separate browser window or tab. If it does not recognize the MIME type, it
displays the data in a text field.
Click Hide Data to hide the data display.
Exporting Consumer Keys
The following sections describe how to export keys for users and managed
devices.
82).
87
Page 92

PGP Universal Server Administering Managed Keys
Exporting the Managed Key of an Internal User
If the user’s key data is stored in Server Key Mode, you can export both public
and private key information. If the private key is stored protected by the user’s
passphrase, you cannot export it unencrypted. If the key data is in Client Key
Mode, the private key is not stored on the server and cannot be exported.
To export the managed key of an internal user
1 From the Consumers > Users page, click the check box for the internal
user whose key you want to export.
2 From the Options menu, select Export Keys for Selected.
If only the public key is available, the text of the key downloads to your local
system.
If both the public and the private key are available, the Export Key dialog
box appears, allowing you to choose to export only the public key, or both
public and private portions of the key.
3 Select Export Public Key to export just the public key portion of the
keypair.
4 Select Export Keypair to export the entire keypair, the public key and the
private key portions.
5 If you want to protect the exported key file with a passphrase, type it in the
Passphrase field.
If a private key already has an attached passphrase, it is already protected
and there is no need to type another passphrase at this time. When you
export the keypair, you receive a file containing an unencrypted public key
and an encrypted private key.
6 Click Export.
The key is exported to your local system.
Exporting the Managed Key of an External User
To export the managed key of an external user
1 From the Consumers > Users page, click the check box for the external
user whose key you want to export.
2 From the Options menu, select Export Keys for Selected.
If only the public key is available, the text of the key downloads to your
system.
If both the public and the private key are available, the Export Key dialog
box appears.
88
Page 93

PGP Universal Server Administering Managed Keys
3 Select Export Public Key to export just the public key portion of the
keypair.
4 Select Export Keypair to export the entire keypair, the public key and the
private key portions.
5 If you want to protect the exported key file with a passphrase, type it in the
Passphrase field.
If a private key already has an attached passphrase, it is already protected
and there is no need to type another passphrase. When you export the
keypair, you receive a file containing an unencrypted public key and an
encrypted private key.
6 Click Export.
The key is exported.
Exporting PGP Verified Directory User Keys
To export the key of directory users
1 From the Consumers > Users page,select the check box for the users
whose key you want to export.
2 From the Options menu, select Export Keys for Selected.
The text of the keys downloads to your local system.
Exporting the Managed Key of a Managed Device
To export the managed key of an external user
1 From the Consumers > Devices page, select the check box for the
managed device whose key you want to export.
The Managed Device Information page for the device appears.
2 From the Managed Keys tab, click the Export icon in the Actions column of
the managed key you want to delete.
If only the public key is available, the text of the key downloads to your
system.
If both the public and the private key are available, the Export Key dialog
box appears.
3 Select Export Public Key to export just the public key portion of the
keypair.
4 Select Export Keypair to export the entire keypair, the public key and the
private key portions.
89
Page 94

PGP Universal Server Administering Managed Keys
5 If you want to protect the exported key file with a passphrase, type it in the
Passphrase field.
If a private key already has an attached passphrase, it is already protected
and there is no need to type another passphrase. When you export the
keypair, you receive a file containing an unencrypted public key and an
encrypted private key.
6 Click Export.
The key is exported.
Deleting Consumer Keys
The following sections describe how to delete keys for users and managed
devices.
Deleting the Managed Key of an Internal User
If you delete a user’s key, the private key material is gone, which means
messages are no longer decryptable. If you want to retain the private key
material, you can revoke the key instead of deleting it. For more information see
Revoking Managed Keys (on page
To delete the managed key of an internal user
1 Select the user you want from the Internal Users page.
The Internal User Information dialog box appears.
2 From the Managed Keys tab, click the Delete icon in the Actions column of
the managed key you want to delete.
A confirmation dialog box appears.
3 Click OK.
The key of the internal user is deleted.
92).
Deleting the Managed Key of an External User
To delete the managed key of an external user
1 Select the user you want from the External Users page.
The External User Information dialog box appears.
2 From the Managed Keys tab, click the Delete icon for the managed key you
want to delete.
A confirmation dialog box appears.
90
Page 95

PGP Universal Server Administering Managed Keys
3 Click OK.
The key of the external user is deleted.
Deleting the Key of a PGP Verified Directory User
To delete the key of a PGP Verified Directory user
1 Select the user you want from the Verified Directory Users page.
The Directory User Information dialog box appears.
2 From the Managed Keys tab, click the Delete icon for the managed key you
want to delete.
A confirmation dialog box appears.
3 Click OK.
The key of the PGP Verified Directory user is deleted.
Deleting the Managed Key of a Managed Device
To delete the key of a managed device
1 Select the managed device you want from the All Devices or Managed
Devices page.
The Managed Device Information dialog box appears.
2 From the Managed Keys tab, click the Delete icon for the managed key you
want to delete.
A confirmation dialog box appears.
3 Click OK.
The key of the managed device is deleted.
Approving Pending Keys
Internal Users
In addition to automatically creating a key for your email users or manually
adding internal users, you can allow internal users to submit their own keys
through the PGP Verified Directory. Allowing user key submission is useful for
internal users who already have keys, such as existing PGP Desktop users who
of course would have their own PGP key. If the user already has a PGP key, and
the new key is approved, the new key replaces the old key.
91
Page 96

PGP Universal Server Administering Managed Keys
PGP Desktop users upload their public keys through the PGP Verified Directory
interface at the interface and port you configure on the Verified Directory page.
They can also upload keys through the PGP Desktop "Send To" function.
On the Verified Directory page, you can specify how you want these usersubmitted keys approved. If you have set the PGP Verified Directory to require
either a confirmation email from the user or to require you, the administrator, to
manually approve the key, the user’s PGP key status is marked pending. See
Configuring the PGP Verified Directory (on page
Verified Directory.
To manually approve the key submission
1 From the Internal Users page, click the plus sign icon to approve the key.
2 Click the minus sign icon to deny the submitted key.
3 Click the delete icon to delete the user.
Directory users
If you have set the PGP Verified Directory to require either a confirmation email
from the user or to require you, the administrator, to manually approve the key,
the user’s PGP key status are pending.
346) for information on the PGP
To manually approve the key submission, choose one of the following
1 To approve a single user key, click the plus sign icon in the Options column
to approve the key.
2 Click the minus sign icon to deny the submitted key.
3 Click the delete icon to delete the user.
Or
1 To approve multiple user keys, click the check box at the far right end of the
row of each of the directory user key you want to approve.
2 Select Approve Selected or Approve All from the Options menu.
Revoking Managed Keys
Revoking a key removes the Organization Key signature from the key. Only keys
for which the PGP Universal Server has the private key can be revoked; that is,
only the keys of SKM users can be revoked. The Revoke button is disabled for
all other keys.
If you revoke an internal user's managed key, it continues being published via
the LDAP server, but appears marked as a revoked key, and it appears on the
Certificate Revocation Lists.
92
Page 97

PGP Universal Server Administering Managed Keys
Once you revoke a key, you cannot un-revoke it.
Note: Revoking a key is safer than deleting a user because the private key
material is preserved, which means that decryption continues to work.
To revoke the managed key of an internal user
1 Select the user you want from the Internal Users page.
The Internal User Information dialog box appears.
2 From the Managed Keys tab, click the Revoke icon next to the key you
want to Revoke.
Note: If the key is not an SKM key, the Revoke icon is disabled.
A confirmation dialog box appears.
3 Click OK.
The internal user’s key is revoked.
To revoke the managed key of a managed device
1 Select the managed device you want from the All Devices or Managed
Devices page.
The Managed Device Information dialog box appears.
2 From the Managed Keys tab, click the Revoke icon next to the key you
want to revoke.
A confirmation dialog box appears.
3 Click OK.
The internal user’s key is revoked.
93
Page 98

Page 99

Managing Trusted Keys
12
Overview
Trusted Keys
and Certificates
This section describes how trusted keys and certificates are used with your PGP
Universal Server. You can find the list of trusted keys at Organization >
Trusted Keys.
The Trusted Keys and Certificates page lists keys and certificates that are not
part of the SMSA created by PGP Universal Server but which nevertheless you
do trust.
In those cases where your PGP Universal Server cannot find a public key for a
particular user on any of the keyservers you have defined as trusted, it also
searches the default directories. If it finds a key in one of the default directories,
it trusts (and therefore can use) that key only if it has been signed by one of the
keys in the trusted keys list.
For example, if your company’s law firm uses a PGP Corporate Signing Key
(CSK), you can add this key as a trusted key. Then, if someone in your firm
wants to send a message to someone at the law firm and the PGP Universal
Server finds that person’s key, signed by the law firm’s CSK, in a default
directory, then that key can be used by the server to securely send the message
to the recipient at the law firm.
Trusted Certificates
PGP Universal Server can use S/MIME only if it has the root certificates from
the CAs available to verify the client certificates. These CAs can be in your
company or they can be an outside-managed CA, such as VeriSign.
To enable S/MIME support, the certificate of the issuing Root CA, and all other
certificates in the chain between the Root CA and the Organization Certificate,
are on the list of trusted keys and certificates on the Trusted Keys and
Certificates page.
95
Page 100

PGP Universal Server Managing Trusted Keys and Certificates
PGP Universal Server comes with information on many public CAs already
installed on the Trusted Keys and Certificates page. Only in-house CAs or new
public CAs that issue user certificates need to be manually imported. You can
inspect, export (save on your computer), or delete the root certificates at any
time.
Trusted Certificates can be in any of the following formats: .cer, .crt, .pem and
.p7b.
Adding a Trusted Key or Certificate
To add a trusted key or certificate
1 On the Trusted Keys and Certificates page, click Add Trusted Key.
The Add Trusted Key dialog box appears.
2 Do one of the following:
To import a trusted key saved in a file, click Browse and choose the
file on your system that contains the trusted key or certificate you
want to add.
To import a key in key block format, paste the key block of the trusted
key or certificate into the Import Key Block box (you need to copy the
text of the trusted key or certificate first to paste it).
3 If desired, select any of the following:
Trust key for verifying mail encryption keys. Enable this option to
trust the key or certificate added to verify signatures on keys from
default keyservers.
Trust key for verifying SSL/TLS certificates (only valid if
importing X.509 certificate). Enable this option to trust the X.509
certificate added to verify SSL/TLS certificates presented from remote
SMTP/POP/IMAP mail servers.
Trust key for verifying keyserver client certificates (only valid if
importing X.509 certificate). Enable this option to trust the X.509
certificate added to verify keyserver client authentication certificates.
4 Click Save.
Note: SSL v1.0 certificates are not supported.
96
 Loading...