

Page 1

What is PGP NetShare?
The PGP NetShare product is a software tool that provides
multiple ways to protect and share your data.
Use PGP NetShare to:
Let authorized users share protected files in a shared
space—such as a fileserver, shared folder, or USB
removable drive.
Use part of your hard drive space as an encrypted virtual
disk volume with its own drive letter.
Create secure, encrypted Zip archives.
Put files and folders into a single encrypted, compressed
package that can be opened on Windows systems that do
not have PGP Desktop Email or PGP Desktop installed.
Completely destroy files and folders so that even file
recovery software cannot recover them.
Securely erase free space on your drives so that your
deleted data is truly unrecoverable.
Contents
• What is PGP NetShare? (page 1)
• New to PGP NetShare? (page 1)
• Understanding the Basics (page 1)
• What Am I Installing? (page 2)
• System Requirements (page 2)
• Installing PGP NetShare (page 2)
• Starting PGP NetShare (page 3)
• The PGP NetShare Main Screen (page 3)
• Using PGP NetShare (page 3)
• Creating PGP Virtual Disk Volumes (page 4)
• Creating a PGP Zip Archive (page 5)
• Using PGP Shred to Shred Files (page 6)
• Getting Assistance (page 7)
PGP NetShare
Quick Start Guide
Version 10.2
keypair is, why you might want to create one, how to
create one, and how to exchange keys with others so you
can encrypt your own data and share data securely with
others.
Note: A PGP NetShare license provides you with access
to a certain set of PGP NetShare features. Certain other
features of PGP NetShare may require a different
license. For more information, see the Licensing section
of the PGP Desktop User’s Guide.
For deployment, management, and policy enforcement
information for PGP NetShare, see the PGP Universal
Server Administrator’s Guide.
Understanding the Basics
After installation, PGP NetShare prompts you to create a PGP
keypair. A keypair is the combination of a private key and a
public key.
Keep your private key and its passphrase private, as the
name suggests. If someone gets your private key and its
passphrase, they can read your messages and
impersonate you to others. Your private key decrypts
incoming encrypted messages and signs outgoing
messages.
Your public key you can give to everyone. It does not have
a passphrase. Your public key encrypts messages that
only your private key can decrypt and verifies your
signed messages.
Your keyring holds both your keypairs and the public keys of
others, which you use to send encrypted messages to them.
Click the PGP Keys Control Box to see the keys on your
keyring:
1 The icon for a PGP keypair has two keys, denoting the
private and the public key. Alice Cameron has a PGP
keypair in this illustration, for example.
2 The icons for the public keys of others have just one key.
Ming Pa’s public key, for example, has been added to the
keyring shown in this illustration.
New to PGP NetShare?
Use this step-by-step guide to get started. You will find that,
with PGP NetShare, protecting your data will be as easy as
turning a key in a lock.
This Quick Start Guide helps you install PGP NetShare
and get started.
The PGP Desktop User’s Guide provides more detailed
information on PGP NetShare. In it, you will learn what a
1
Page 2

What Am I Installing?
PGP NetShare uses licensing to provide access to the features
you purchase. Depending on the license you have, some or all
of the PGP NetShare family of applications will be active.
This document contains instructions for viewing the features
activated by your license.
PGP NetShare is a member of the PGP Desktop family of
applications. You can use PGP NetShare to authorize users to
share protected files in a shared space, such as on a corporate
file server, in a shared folder, or on a removable media such as
a USB drive. The encrypted files in the Protected Folder
continue to appear as normal application files to the
authorized users; anyone else with physical access to the files
can see them but not use them.
Other components included with PGP NetShare are:
PGP Virtual Disk volumes uses part of your hard drive space
as an encrypted virtual disk volume with its own drive letter.
A PGP Virtual Disk is the perfect place for storing your
sensitive files; it is as if you have stored them in a safe. When
the door of the safe is open (when the volume is mounted),
you can change files stored in it, take files out of it, and move
files into it. Otherwise (when the volume is unmounted), all
the data on the volume is protected.
PGP Zip adds any combination of files and folders to an
encrypted, compressed, portable archive. PGP Desktop must
be installed on a system to create or open a PGP Zip archive.
PGP Zip is a tool for securely archiving your sensitive data,
whether you want to distribute it to others or back it up.
PGP Self-Decrypting Archives (SDAs) — Puts files and
folders into an encrypted, compressed package that can be
opened on Windows systems that do not have any PGP
software installed. SDAs are the perfect solution for securely
exchanging files with someone who does not have PGP
software installed.
PGP Shredder completely destroys files and folders so that
even file recovery software cannot recover them. Deleting a
file using the Windows Recycle Bin (on Windows systems) or
Trash (on Mac OS X systems) does not actually delete it; it sits
on your drive and eventually gets overwritten. Until then, it is
trivial for an attacker to recover that file. PGP Shredder, in
contrast, immediately overwrites files multiple times. This is
so effective that even sophisticated disk recovery software
cannot recover these files. This feature also completely wipes
free space on your drives so your deleted data is truly
unrecoverable.
Key Management manages PGP keys, both your keypairs and
the public keys of others. You use your private key to decrypt
messages sent to you encrypted to your public key and to
secure your PGP Virtual Disk volumes. You use public keys to
encrypt messages to others or to add users to PGP Virtual
Disk volumes.
System Requirements
PGP NetShare can be installed on systems running the
following versions of Microsoft Windows operating systems:
Windows XP Professional 32-bit (Service Pack 2 or 3),
Windows XP Professional 64-bit (Service Pack 2),
Windows XP Home Edition (Service Pack 2 or 3),
Microsoft Windows XP Tablet PC Edition 2005 SP2,
Windows Vista (all 32- and 64-bit editions, including
Service Pack 2), Windows 7 (all 32- and 64-bit editions,
including Service Pack 1), Windows Server 2003 (Service
Pack 1 and 2).
The above operating systems are supported only when all of
the latest hot fixes and security patches from Microsoft have
been applied.
Note: PGP Whole Disk Encryption (PGP WDE) is not
compatible with other third-party software that could
bypass the PGP WDE protection on the Master Boot
Record (MBR) and write to or modify the MBR. This
includes such off-line defragmentation tools that bypass
the PGP WDE file system protection in the OS or system
restore tools that replace the MBR.
Hardware Requirements
512 MB of RAM
64 MB hard disk space
Installing PGP NetShare
Symantec Corporation recommends exiting all open
applications before you begin the install. The installation
process requires a system restart.
Note: If you are using PGP NetShare in a PGP Universal
Server-managed environment, your PGP NetShare installer
may be configured with specific features and/or settings.
To install PGP NetShare
1 Locate the PGP NetShare installation program you
downloaded.
The installer program may have been distributed by your
PGP administrator using the Microsoft SMS deployment
tool.
2 Double-click the installer.
3 Follow the on-screen instructions.
4 Reboot your system when instructed.
5 When your system restarts, follow the on-screen
instructions to configure PGP NetShare.
2
Page 3
Licensing
To see what features your license supports, open PGP
NetShare and select Help > License. Those features with a
checkmark are supported by the active license.
Starting PGP NetShare
To start PGP NetShare, use any of the following methods:
Double-click the PGP Tray icon.
Right-click the PGP Tray icon and then select Open PGP
NetShare.
From the Start menu, select Programs > PGP > PGP
NetShare.
The PGP NetShare Main Screen
The PGP NetShare application window is your main interface
to the product.
decrypt, verify, and display messages outside the mail stream.
7 The PGP NetShare Control Box. Gives you control of PGP
NetShare.
8 The PGP NetShare Work area. Displays information and
actions you can take for the selected Control box.
9 PGP Keys Find box. Use to search for keys on your keyring.
As you type text in this box, PGP NetShare displays search
results based on either name or email address.
Each Control box expands to show available options, and
collapses to save space (only the Control Box banner displays).
Expand a Control Box by clicking its banner.
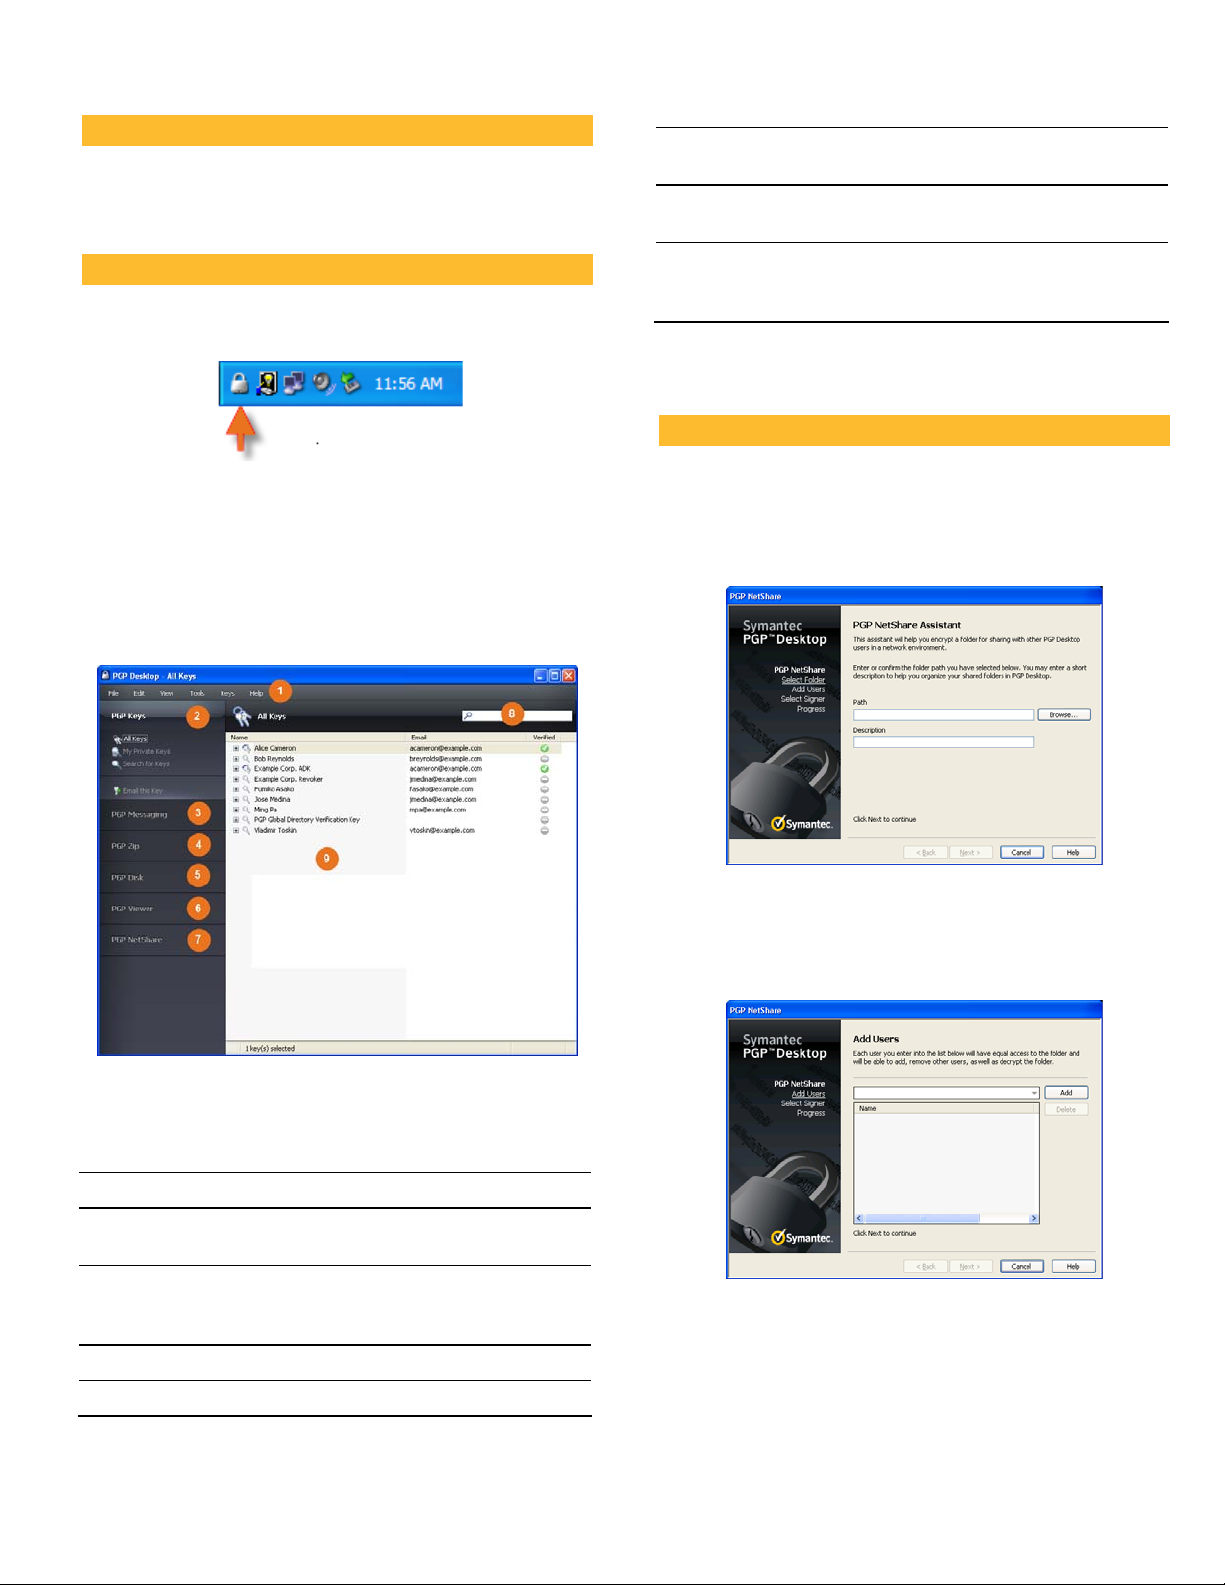
Using PGP NetShare
The PGP NetShare feature allows authorized users to share
protected files. You must first create a Protected Folder and
specify those users you want to be authorized to use the files.
1 Click Add Folder in the PGP NetShare Control Box. The
Select Folder screen appears.
The PGP NetShare main screen includes:
1
The Menu bar
The menus on the Menu bar change depending on which
Control box is selected.
The PGP Keys Control Box. Gives you control of PGP keys.
2
The PGP Messaging Control Box. Gives you control over
3
PGP Messaging.
4
The PGP Zip Control Box. Gives you control of PGP Zip, as
well as the PGP Zip Assistant, which helps you create new PGP
Zip archives.
5
The PGP Disk Control Box. Gives you control of PGP Disk.
6
The PGP Viewer Control Box. Gives you the ability to
. Gives you access to PGP NetShare commands.
2 Click Browse, then select the folder you want to protect.
3 In the Description field, type a description for the
Protected Folder you ware creating or leave blank to use
the default name.
4 Click Next. The Add Users screen appears.
5 To specify users of the files in the Protected Folder, click
the down arrow icon, select a user, then click Add.
Remember to add yourself if you want to access the files
in the Protected Folder.
3
Page 4

PGP NetShare does not notify users that they can access
the protected files; it is the responsibility of the creator of
a new Protected Folder to notify users.
6 To assign roles to each user, right-click the user's name
and select the role:
Admin: Create only one Admin per PGP NetShare
protected folder. This role has full read/write rights
to the folder, can add and remove users, assign roles
to other users, and can promote another user to be
the Admin.
Group Admin: Create as many Group Admins as you
need for each PGP NetShare protected folder. This
role has full read/write rights to the folder, can add
and remove users, and assign roles to other users.
User: Create as many Users as you need for each PGP
NetShare protected folder. This role has full
read/write rights to the folder.
You can change a user's role at any time after the
protected folder is created. Click on the protected folder
in the PGP NetShare, and right-click the user's name to
change the role.
7 Click Next. The Select Signer screen appears.
Symantec Data Loss Prevention uses two methods to identify
sensitive files, as specified by the Data Loss Administrator:
Data in Motion (DIM). This method monitors data that is
in transit, including data that is copied, moved from or to
the local disk, or saved.
Data at Rest (DAR). This method discovers stationary
data.
When Symantec Data Loss Prevention identifies a sensitive
file, it encrypts the file:
Whether or not the file is in a Protected Folder.
Using the keys specified by the Data Loss Administrator.
When Symantec Data Loss Prevention encrypts a file:
The keys may or may not be the same keys as those
defined by the Admin or Group Admin of the protected
file.
The file may be decrypted then re-encrypted if the file is
already encrypted by PGP NetShare. Decryption requires
that the file owner be logged on.
Provides the same user interface as files encrypted by
PGP NetShare:
Displays the same lock icon.
Allows you to view the encryption keys associated
with a file in the Properties dialog box under the PGP
NetShare tab. DIM files show ‘DLP Auto Encrypt’ as
the Signing Key; DAR files show the KEY ID. For more
information, see Accessing the Properties of a
Protected File or Folder.
Allows you to add or remove users from the access
list if you are the Admin or Group Admin.
8 Select one private key from the private keys on the local
keyring and enter the appropriate passphrase (if the
passphrase is not cached). This key will be used to secure
the PGP NetShare configuration information for the
Protected Folder and the files in it.
9 Click Next. The Progress screen appears. The files in the
specified Protected Folder are encrypted and the
specified users are authorized to use the files. If any files,
such as system files, were skipped, they are listed here.
10 Click Finish.
Integrating with Symantec Data Loss Prevention
Symantec Data Loss Prevention discovers, monitors, and
protects confidential data. When integrated with PGP
NetShare, Symantec Data Loss Prevention performs these
actions on endpoint local disks and on internal networks,
using PGP NetShare to protect (encrypt) sensitive files,
without user intervention.
Creating PGP Virtual Disk Volumes
The PGP Virtual Disk Volumes feature uses part of your hard
drive space as an encrypted virtual disk volume with its own
drive letter. You can create additional users for a volume so
that people you authorize can also access the volume.
4
Page 5

11 Click New Virtual Disk in the PGP Disk Control box.
12 Type a Name for the volume.
13 Specify a Disk File Location for the volume.
14 To specify your mount preferences, do the following::
select a drive letter for the volume to Mount as.
select Mount at Startup to have your new volume
mount automatically at startup.
select Unmount when inactive for x mins to have the
volume automatically unmount when it has been
inactive for the specified number of minutes.
Creating a PGP Zip Archive
PGP Zip archives let you put any combination of files and
folders into a compressed, portable archive. There are four
kinds of PGP Zip archives:
Recipient keys. Encrypts the archive to public keys. Only
the holder of the corresponding private keys can open the
archive. This is the most secure kind of PGP Zip archive.
Recipients must be using PGP software (for Windows or
Mac OS X).
Passphrase. Encrypts the archive to a passphrase, which
must be communicated to the recipients. Recipients must
be using PGP software (for Windows or Mac OS X).
PGP Self-Decrypting Archive. Encrypts the archive to a
passphrase. Recipients do not need to be using PGP
software to open it, but their computer must be running
Microsoft Windows. The passphrase must be
communicated to the recipients.
Sign only. Signs the archive but does not encrypt it,
allowing you to prove you are the sender. Recipients must
be using PGP software (for Windows or Mac OS X) to open
and verify the archive.
The Passphrase and Sign only PGP Zip types are described in
detail in the PGP Desktop User’s Guide; they are described
briefly here.
1 Click New PGP Zip in the PGP Zip Control Box.
15 From Capacity, select Dynamic (resizeable) if you want
the volume to grow in size as you add files or Fixed size if
you want the volume to always remain the same size.
16 Specify a file system Format for the volume.
17 Specify an Encryption algorithm for the volume.
18 Click Add User Key to add users who authenticate using
public-key cryptography or click New Passphrase User to
add users who authenticate using passphrases.
19 Click Create.
Use the User Access section to control existing users of a PGP
Virtual Disk volume:
1 Click Add User Key to add users who authenticate using
public-key cryptography.
2 Click New Passphrase User to add users who
authenticate using passphrases.
3 Select a passphrase user, then click Change Passphrase
to change their passphrase.
4 Select a user, then click Make Admin to give the user
administrative rights.
5 Select a user, then click Delete to delete the user.
2 Drag and drop the files/folders you want to be in the
archive or use the buttons to select them.
3 Select Send original files to PGP Shredder when finished
if you want the files/folders you put into the archive to be
shredded when the archive is created.
4 Click Next.
5 Select the desired kind of PGP Zip archive:
Recipient keys
Passphrase
PGP Self-Decrypting Archive
Sign only
6 Click Next.
Passphrase and Sign only are described in detail in the PGP
Desktop User’s Guide.
5
Page 6

Refer to the appropriate section on the following pages for the
kind of PGP Zip archive you specified.
Recipient Keys
The Add User Keys screen appears.
1 Click Add and use the User Selection screen to select the
public keys of those persons who you want to be able to
open the archive. If you want to be able to open the
archive yourself, be sure to include your public key.
2 Click Next.
3 Choose a private key on the local system to use to sign
the archive.
4 Specify a name and a location for the archive. The default
name is the name of the first file or folder in the archive;
the default location is the location of the files/folders
going into the archive.
5 Click Next. The PGP Zip archive is created. The Finished
screen displays information about the new archive.
6 Click Finish.
Note: The Passphrase type of PGP Zip archive is very similar
to Recipient Keys, the difference being that a passphrase is
used to protect the archive instead of a key.
Note: The Sign only type of PGP Zip archive is similar to
Recipient Keys, the difference being that because the archive
is only signed, not encrypted, you do not select public keys.
PGP Self-Decrypting Archive
The Create a passphrase screen appears.
1 Type a passphrase for the PGP Zip Self-Decrypting
Archive (SDA), then type it again to confirm it.
2 Click Next.
3 Choose a private key on the local system to use to sign
the archive.
4 Specify a name and a location for the archive. The default
name is the name of the first file or folder in the archive;
the default location is the location of the files/folders
going into the archive.
5 Click Next. The PGP SDA is created.
6 Click Finish.
Using PGP Shred to Shred Files
The PGP Shredder feature completely destroys files and
folders so that even sophisticated file recovery software
cannot recover them. While both the PGP Shredder icon and
the Windows Recycle Bin appear on your desktop, only PGP
Shredder immediately overwrites the files you specify so that
they are not recoverable.
You can shred files using any of the following methods:
Using the PGP Shredder icon.
Using the PGP toolbar.
Using the PGP shortcut menu.
Shredding Files Using the PGP Shredder Icon
To shred files using the PGP Shredder icon
1 On your Windows desktop, drag the files and folders you
want to shred into the PGP Shredder. A dialog box
appears, asking you to confirm you want to shred the
files.
2 Click Yes. The specified files and folders are shredded.
Shredding Files Using the PGP Toolbar
To shred files using the PGP Toolbar
1 In the PGP NetShare main application window, select
Tools > Shred Files. The Open dialog box is displayed.
2 Select the files on your system you want to shred, then
click Open. A confirmation dialog box is displayed, asking
you to confirm that you want to shred (secure delete) the
listed files and/or folders.
3 Click Yes. The files are securely deleted from your
system.
Shredding Files Using the PGP Shortcut Menu
To shred files in Windows Explorer
1 In Windows Explorer, right-click files/folders you want to
shred. A confirmation dialog box is displayed, asking you
to confirm that you want to shred (secure delete) the
listed files and/or folders.
2 Click Yes. The files are securely deleted from your
system.
Note: If you do not use the PGP Shredder feature often, you
can remove the PGP Shredder icon from your desktop via
PGP Options. To do this, select Tools > Options, select the
Disk tab, deselect the Place PGP Shredder icon on the
desktop option, and then click OK.
Note: You can also use PGP Options to control the number of
passes made when shredding (more passes is more secure
but takes longer), whether files in the Windows Recycle Bin
should be shredded when you empty it, and whether the
warning dialog box is displayed when you shred.
6
Page 7

Shredding Free Space
The PGP Shred Free Space feature completely shreds free
space on your drives so that your deleted data is truly
unrecoverable. Keep in mind that “free space” is actually a
misnomer. What PGP Shred Free Space does is overwrite the
portions of your hard drive that Windows believes to be
empty; in fact, that space could be empty or it could be
holding files Windows told you were deleted.
When you put files into the Windows Recycle Bin and empty
it, the files are not really deleted; Windows just acts like there
is nothing there and eventually overwrites the files. Until
those files are overwritten, they are easy for an attacker to
recover. PGP Shred Free Space overwrites this “free space” so
that even disk recovery software cannot get those files back.
To shred free space on your disks
1 Open PGP NetShare.
2 Select Tools > PGP Shred Free Space.
3 On the Introduction screen, read the information, then
click Next.
4 On the Gathering Information screen, in the Shred drive
field, select the disk or volume you want shredded and
the number of passes you want PGP Shred Free Space to
perform.
The recommended guidelines for passes are:
3 passes for personal use.
10 passes for commercial use.
18 passes for military use.
26 passes for maximum security.
5 Choose whether to Wipe internal NTFS data structures
(not available on all systems), then click Next.
This option shreds small (less than 1K) files in internal
data structures that might otherwise not get shredded.
6 On the Perform Shred screen, click Begin Shred.
Note: Click Schedule to schedule a shred of your free
space instead of doing it now. The Windows Task
Scheduler must be installed on your system.
The length of the shred session depends on the number
of passes you specified, the speed of the processor, how
many other applications are running, and so on.
7 When the shred session is complete, click Next.
8 On the Completing screen, click Finish.
Technical Support
Symantec Technical Support maintains support centers
globally. Technical Support’s primary role is to respond to
specific queries about product features and functionality. The
Technical Support group also creates content for our online
Knowledge Base. The Technical Support group works
collaboratively with the other functional areas within
Symantec to answer your questions in a timely fashion. For
example, the Technical Support group works with Product
Engineering and Symantec Security Response to provide
alerting services and virus definition updates.
Symantec’s support offerings include the following:
A range of support options that give you the flexibility to
select the right amount of service for any size
organization
Telephone and/or Web-based support that provides rapid
response and up-to-the-minute information
Upgrade assurance that delivers software upgrades
Global support purchased on a regional business hours or
24 hours a day, 7 days a week basis
Premium service offerings that include Account
Management Services
For information about Symantec’s support offerings, you can
visit our Web site at the following URL:
www.symantec.com/business/support/
All support services will be delivered in accordance with your
support agreement and the then-current enterprise technical
support policy.
Contacting Technical Support
Customers with a current support agreement may access
Technical Support information at the following URL:
www.symantec.com/business/support/
Before contacting Technical Support, make sure you have
satisfied the system requirements that are listed in your
product documentation. Also, you should be at the computer
on which the problem occurred, in case it is necessary to
replicate the problem.
When you contact Technical Support, please have the
following information available:
Product release level
Hardware information
Available memory, disk space, and NIC information
Operating system
Version and patch level
Network topology
Router, gateway, and IP address information
Problem description:
Error messages and log files
Troubleshooting that was performed before
contacting Symantec
Recent software configuration changes and network
changes
7
Page 8

Licensing and registration
If your Symantec product requires registration or a license
key, access our technical support Web page at the following
URL:
www.symantec.com/business/support/
Customer service
Customer service information is available at the following
URL:
www.symantec.com/business/support/
Customer Service is available to assist with non-technical
questions, such as the following types of issues:
Questions regarding product licensing or serialization
Product registration updates, such as address or name
changes
General product information (features, language
availability, local dealers)
Latest information about product updates and upgrades
Information about upgrade assurance and support
contracts
Information about the Symantec Buying Programs
Advice about Symantec's technical support options
Nontechnical presales questions
Issues that are related to CD-ROMs or manuals
Support agreement resources
If you want to contact Symantec regarding an existing
support agreement, please contact the support agreement
administration team for your region as follows:
Asia-Pacific and Japan customercare_apac@symantec.com
Europe, Middle-East, Africa semea@symantec.com
North America, Latin America supportsolutions@symantec.com
Copyright and Trademarks
Copyright (c) 2012 Symantec Corporation. All rights reserved.
Symantec, the Symantec Logo, PGP, Pretty Good Privacy, and
the PGP logo are trademarks or registered trademarks of
Symantec Corporation or its affiliates in the U.S. and other
countries. Other names may be trademarks of their respective
owners.
8
 Loading...