

Page 1

User Guide
PGP Endpoint Application Control 4.4 SR5
Page 2

PGP Endpoint Application Control
- 2 -
Page 3

Notices
Version Information
PGP Endpoint Application Control User Guide - PGP Endpoint Application Control Version 4.4SR5 - Released:
September 2010
Document Number: 02_104P_4.4SR5_102711507
Copyright Information
Copyright© 1991-2010 by PGP Corporation. All Rights Reserved. No part of this document can be reproduced or
transmitted in any form or by any means, electronic or mechanical, for any purpose, without the express written
permission of PGP Corporation.
Trademark Information
PGP, Pretty Good Privacy, and the PGP logo are registered trademarks of PGP Corporation in the US and other
countries. IDEA is a trademark of Ascom Tech AG. Windows and ActiveX are registered trademarks of Microsoft
Corporation. AOL is a registered trademark, and AOL Instant Messenger is a trademark, of America Online, Inc.
Red Hat and Red Hat Linux are trademarks or registered trademarks of Red Hat, Inc. Linux is a registered trademark
of Linus Torvalds. Solaris is a trademark or registered trademark of Sun Microsystems, Inc. AIX is a trademark or
registered trademark of International Business Machines Corporation. HP-UX is a trademark or registered trademark
of Hewlett-Packard Company. SSH and Secure Shell are trademarks of SSH Communications Security, Inc.
Rendezvous and Mac OS X are trademarks or registered trademarks of Apple Computer, Inc. All other registered
and unregistered trademarks in this document are the sole property of their respective owners.
Licensing and Patent Information
The IDEA cryptographic cipher described in U.S. patent number 5,214,703 is licensed from Ascom Tech AG. The
CAST-128 encryption algorithm, implemented from RFC 2144, is available worldwide on a royalty-free basis for
commercial and non-commercial uses. PGP Corporation has secured a license to the patent rights contained in the
patent application Serial Number 10/655,563 by The Regents of the University of California, entitled Block Cipher
Mode of Operation for Constructing a Wide-blocksize block Cipher from a Conventional Block Cipher. Some thirdparty software included in PGP Universal Server is licensed under the GNU General Public License (GPL). PGP
Universal Server as a whole is not licensed under the GPL. If you would like a copy of the source code for the GPL
software included in PGP Universal Server, contact PGP Support (http://www.pgp.com/support). PGP Corporation
may have patents and/or pending patent applications covering subject matter in this software or its documentation;
the furnishing of this software or documentation does not give you any license to these patents.
Acknowledgements
This product includes or may include:
• The Zip and ZLib compression code, created by Mark Adler and Jean-Loup Gailly, is used with permission from
the free Info-ZIP implementation, developed by zlib (http://www.zlib.net). • Libxml2, the XML C parser and
toolkit developed for the Gnome project and distributed and copyrighted under the MIT License found at http://
www.opensource.org/licenses/mit-license.html. Copyright © 2007 by the Open Source Initiative. • bzip2 1.0, a freely
available high-quality data compressor, is copyrighted by Julian Seward, © 1996-2005. • Application server (http://
jakarta.apache.org/), web server (http://www.apache.org/), Jakarta Commons (http://jakarta.apache.org/commons/
license.html) and log4j, a Java-based library used to parse HTML, developed by the Apache Software Foundation.
The license is at www.apache.org/licenses/LICENSE-2.0.txt. • Castor, an open-source, databinding framework
for moving data from XML to Java programming language objects and from Java to databases, is released by the
ExoLab Group under an Apache 2.0-style license, available at http://www.castor.org/license.html. • Xalan, an opensource software library from the Apache Software Foundation that implements the XSLT XML transformation
- 3 -
Page 4

PGP Endpoint Application Control
language and the XPath XML query language, is released under the Apache Software License, version 1.1, available
at http://xml.apache.org/xalan-j/#license1.1. • Apache Axis is an implementation of the SOAP (“Simple Object
Access Protocol”) used for communications between various PGP products is provided under the Apache license
found at http://www.apache.org/licenses/LICENSE-2.0.txt. • mx4j, an open-source implementation of the Java
Management Extensions (JMX), is released under an Apache-style license, available at http://mx4j.sourceforge.net/
docs/ch01s06.html. • jpeglib version 6a is based in part on the work of the Independent JPEG Group. (http://
www.ijg.org/) • libxslt the XSLT C library developed for the GNOME project and used for XML transformations
is distributed under the MIT License http://www.opensource.org/licenses/mit-license.html. • PCRE version 4.5
Perl regular expression compiler, copyrighted and distributed by University of Cambridge. ©1997-2006. The
license agreement is at http://www.pcre.org/license.txt. • BIND Balanced Binary Tree Library and Domain Name
System (DNS) protocols developed and copyrighted by Internet Systems Consortium, Inc. (http://www.isc.org)
• Free BSD implementation of daemon developed by The FreeBSD Project, © 1994-2006. • Simple Network
Management Protocol Library developed and copyrighted by Carnegie Mellon University © 1989, 1991, 1992,
Networks Associates Technology, Inc, © 2001- 2003, Cambridge Broadband Ltd.© 2001- 2003, Sun Microsystems,
Inc., © 2003, Sparta, Inc, © 2003-2006, Cisco, Inc and Information Network Center of Beijing University of Posts
and Telecommunications, © 2004. The license agreement for these is at http://net-snmp.sourceforge.net/about/
license.html. • NTP version 4.2 developed by Network Time Protocol and copyrighted to various contributors.
• Lightweight Directory Access Protocol developed and copyrighted by OpenLDAP Foundation. OpenLDAP is
an open-source implementation of the Lightweight Directory Access Protocol (LDAP). Copyright © 1999-2003,
The OpenLDAP Foundation. The license agreement is at http://www.openldap.org/software/release/license.html.
• Secure shell OpenSSH version 4.2.1 developed by OpenBSD project is released by the OpenBSD Project under
a BSD-style license, available at http://www.openbsd.org/cgibin/cvsweb/src/usr.bin/ssh/LICENCE?rev=HEAD.
• PC/SC Lite is a free implementation of PC/SC, a specification for SmartCard integration is released under the
BSD license. • Postfix, an open source mail transfer agent (MTA), is released under the IBM Public License 1.0,
available at http://www.opensource.org/licenses/ibmpl.php. • PostgreSQL, a free software object-relational database
management system, is released under a BSD-style license, available at http://www.postgresql.org/about/licence. •
PostgreSQL JDBC driver, a free Java program used to connect to a PostgreSQL database using standard, database
independent Java code, (c) 1997-2005, PostgreSQL Global Development Group, is released under a BSD-style
license, available at http://jdbc.postgresql.org/license.html. • PostgreSQL Regular Expression Library, a free
software object-relational database management system, is released under a BSD-style license, available at http://
www.postgresql.org/about/licence. • 21.vixie-cron is the Vixie version of cron, a standard UNIX daemon that runs
specified programs at scheduled times. Copyright © 1993, 1994 by Paul Vixie; used by permission. • JacORB, a Java
object used to facilitate communication between processes written in Java and the data layer, is open source licensed
under the GNU Library General Public License (LGPL) available at http://www.jacorb.org/lgpl.html. Copyright
2006 The JacORB Project. • TAO (The ACE ORB) is an open-source implementation of a CORBA Object Request
Broker (ORB), and is used for communication between processes written in C/C++ and the data layer. Copyright
(c) 1993-2006 by Douglas C. Schmidt and his research group at Washington University, University of California,
Irvine, and Vanderbilt University. The open source software license is available at http://www.cs.wustl.edu/
~schmidt/ACEcopying. html. • libcURL, a library for downloading files via common network services, is open
source software provided under a MIT/X derivate license available at http://curl.haxx.se/docs/copyright.html.
Copyright (c) 1996 - 2007, Daniel Stenberg. • libuuid, a library used to generate unique identifiers, is released under
a BSD-style license, available at http://thunk.org/hg/e2fsprogs/?file/fe55db3e508c/lib/uuid/COPYING. Copyright
(C) 1996, 1997 Theodore Ts’o. • libpopt, a library that parses command line options, is released under the terms
of the GNU Free Documentation License available at http://directory.fsf.org/libs/COPYING.DOC. Copyright
©
2000-2003 Free Software Foundation, Inc. • gSOAP, a development tool for Windows clients to communicate with
the Intel Corporation AMT chipset on a motherboard, is distributed under the GNU Public License, available at
©
- 4 -
Page 5

http://www.cs.fsu.edu/~engelen/soaplicense.html. • Windows Template Library (WRT) is used for developing user
interface components and is distributed under the Common Public License v1.0 found at http://opensource.org/
licenses/cpl1.0.php. • The Perl Kit provides several independent utilities used to automate a variety of maintenance
functions and is provided under the Perl Artistic License, found at http://www.perl.com/pub/a/language/misc/
Artistic.html.
Export Information
Export of this software and documentation may be subject to compliance with the rules and regulations promulgated
from time to time by the Bureau of Export Administration, United States Department of Commerce, which restricts
the export and re-export of certain products and technical data.
Limitations
The software provided with this documentation is licensed to you for your individual use under the terms of the End
User License Agreement provided with the software. The information in this document is subject to change without
notice. PGP Corporation does not warrant that the information meets your requirements or that the information is
free of errors. The information may include technical inaccuracies or typographical errors. Changes may be made to
the information and incorporated in new editions of this document, if and when made available by PGP Corporation.
Notices
- 5 -
Page 6

PGP Endpoint Application Control
- 6 -
Page 7

Table of Contents
Table of Contents
Preface: About This Document................................................................................................................................11
Typographical Conventions........................................................................................................................................................11
Getting Assistance......................................................................................................................................................................11
Chapter 1: PGP Endpoint Application Control Overview...................................................................................13
Product Overview.......................................................................................................................................................................14
Application Control Server, Database and Client Process........................................................................................................16
System Requirements.................................................................................................................................................................16
Minimum Hardware Requirements......................................................................................................................................17
Supported Operating Systems..............................................................................................................................................18
Supported Databases............................................................................................................................................................21
Other Software Requirements..............................................................................................................................................21
Recommended Configuration.............................................................................................................................................. 22
Client Supported Languages................................................................................................................................................22
Chapter 2: Using Application Control.................................................................................................................... 23
Getting Started with PGP Endpoint Application Control......................................................................................................... 23
The File Authorization Setup Process....................................................................................................................................... 24
Accessing the Management Server Console............................................................................................................................. 26
Logging In to the Management Server Console.................................................................................................................26
Logging Out of the Management Server Console.............................................................................................................. 27
Common Functions within the Management Server Console...................................................................................................27
Viewing the Management Server Console..........................................................................................................................27
Common Conventions..........................................................................................................................................................28
Using the Management Server Console Control Panel.......................................................................................................29
Resizing and Repositioning Panels..................................................................................................................................... 29
Organizing Columns for Display.........................................................................................................................................30
Using the File Menu............................................................................................................................................................31
Using the View Menu..........................................................................................................................................................31
Using the Tools Menu.........................................................................................................................................................32
Using the Reports Menu......................................................................................................................................................33
Using the Explorer Menu....................................................................................................................................................33
Using the Window Menu.................................................................................................................................................... 34
Using the Help Menu.......................................................................................................................................................... 34
- 7 -
Page 8

PGP Endpoint Application Control
PGP Endpoint Application Control Modules......................................................................................................................35
License Expiration......................................................................................................................................................................35
Chapter 3: Using the Authorization Wizard..........................................................................................................37
Working with the Authorization Wizard...................................................................................................................................37
Authorizing Executable Files...............................................................................................................................................38
Chapter 4: Using Modules........................................................................................................................................43
Working with Scan Explorer.....................................................................................................................................................44
Creating a File Scanning Template ....................................................................................................................................44
Scanning Files on a Client Computer................................................................................................................................. 47
Comparing Scans................................................................................................................................................................. 49
Modifying File Authorization..............................................................................................................................................51
Local Authorization............................................................................................................................................................. 51
Working with the Exe Explorer ............................................................................................................................................... 53
Setting Up the Exe Explorer Default Options.................................................................................................................... 53
Adding a File Group............................................................................................................................................................54
Renaming a File Group....................................................................................................................................................... 55
Deleting a File Group..........................................................................................................................................................56
Working with User Explorer..................................................................................................................................................... 56
About File Groups............................................................................................................................................................... 56
File Group by User Tab.....................................................................................................................................................57
The User by File Group Tab...............................................................................................................................................61
Working with Database Explorer.............................................................................................................................................. 63
The Files Tab.......................................................................................................................................................................65
The Groups Tab...................................................................................................................................................................68
Working with Log Explorer.......................................................................................................................................................70
The Log Explorer Window..................................................................................................................................................71
Navigation Control Bar........................................................................................................................................................71
Column Headers...................................................................................................................................................................72
Log Explorer Templates...................................................................................................................................................... 79
Select and Edit Templates Dialog.......................................................................................................................................84
Template Settings Dialog.....................................................................................................................................................87
Criteria/Properties Panel...................................................................................................................................................... 98
Results Panel/Custom Report Contents...............................................................................................................................98
Upload Latest Log Files....................................................................................................................................................102
Chapter 5: Using Tools........................................................................................................................................... 105
- 8 -
Page 9

Table of Contents
Synchronizing Domains........................................................................................................................................................... 106
Synchronizing Domain Members......................................................................................................................................106
Synchronizing Domain Users............................................................................................................................................107
Database Clean Up...................................................................................................................................................................107
Deleting Database Records................................................................................................................................................108
Defining User Access...............................................................................................................................................................109
Assigning Administrators...................................................................................................................................................110
Defining Administrator Roles............................................................................................................................................111
Assigning Administrator Roles..........................................................................................................................................113
Defining Default Options.........................................................................................................................................................114
Default Options Page.........................................................................................................................................................114
Default Option Precedence Rules......................................................................................................................................121
Changing Default Options.................................................................................................................................................127
Managing Path Rules............................................................................................................................................................... 127
Creating a Path Rule for All Users...................................................................................................................................129
Creating a Path Rule for a User or User Group............................................................................................................... 132
Modifying a Path Rule...................................................................................................................................................... 135
Deleting a Path Rule..........................................................................................................................................................137
Defining a Trusted Owner.................................................................................................................................................138
Deleting a Trusted Owner................................................................................................................................................. 140
Defining Spread Check............................................................................................................................................................141
Enabling Spread Check......................................................................................................................................................141
Sending File Authorization Updates to Computers.................................................................................................................142
Sending Updates to All Computers...................................................................................................................................142
Sending Updates to a Single Computer............................................................................................................................142
Working with Standard File Definitions................................................................................................................................. 143
Importing Standard File Definitions..................................................................................................................................144
Exporting File Authorization Settings..................................................................................................................................... 145
Exporting Settings..............................................................................................................................................................146
Importing Settings..............................................................................................................................................................146
Working with Endpoint Maintenance......................................................................................................................................147
Creating Endpoint Maintenance Tickets........................................................................................................................... 148
Chapter 6: Using Reports.......................................................................................................................................151
About Reports...........................................................................................................................................................................151
Reporting by User Role...........................................................................................................................................................151
Working with Reports..............................................................................................................................................................152
- 9 -
Page 10

PGP Endpoint Application Control
Opening a Report...............................................................................................................................................................152
Closing a Report................................................................................................................................................................ 152
Saving a Report..................................................................................................................................................................152
Printing a Report................................................................................................................................................................153
Available Reports...............................................................................................................................................................153
File Groups by User.......................................................................................................................................................... 154
User by File Group............................................................................................................................................................155
User Options.......................................................................................................................................................................156
Machine Options................................................................................................................................................................157
Client Status....................................................................................................................................................................... 158
Server Settings................................................................................................................................................................... 159
Chapter 7: Using PGP Endpoint Client Deployment..........................................................................................161
PGP Endpoint Client Deployment Window............................................................................................................................162
Packages Panel...................................................................................................................................................................162
Packages Menu...................................................................................................................................................................163
Computers Panel................................................................................................................................................................ 163
Computers Menu................................................................................................................................................................164
Creating Deployment Packages............................................................................................................................................... 165
Adding Computers....................................................................................................................................................................168
Deploying Packages................................................................................................................................................................. 170
Querying Client Status.............................................................................................................................................................174
Appendix A: PGP Endpoint Administrative Tools..............................................................................................177
Using the PGP Endpoint Authorization Service Tool.............................................................................................................177
Scheduling Domain Synchronization.......................................................................................................................................181
Manage Administrator Rights..................................................................................................................................................183
Using PGP Endpoint with Novell........................................................................................................................................... 184
Using Novell Shared Data File Directory.........................................................................................................................184
Running the Novell Synchronization Script......................................................................................................................185
Opening Firewall Ports............................................................................................................................................................ 186
Open Ports by Firewall Exception.................................................................................................................................... 186
Open Ports by Active Directory Policy............................................................................................................................ 187
- 10 -
Page 11

Preface
About This Document
This User Guide is a resource written for all users of PGP Endpoint Application Control 4.4 SR5. This document
defines the concepts and procedures for installing, configuring, implementing, and using PGP Endpoint
Application Control 4.4 SR5.
Tip:
PGP documentation is updated on a regular basis. To acquire the latest version of this or any other published
document, please refer to the PGP Support Portal Web Site (https://support.pgp.com).
Typographical Conventions
The following conventions are used throughout this documentation to help you identify various information
types.
Table 1: Typographical Conventions
Convention Usage
bold Buttons, menu items, window and screen objects.
bold italics
italics New terms, options, and variables.
MONOSPACE UPPERCASE Keyboard keys.
BOLD UPPERCASE SQL Commands.
monospace File names, path names, programs, executables, command syntax, and
Wizard names, window names, and page names.
property names.
Getting Assistance
Getting Product Information
Unless otherwise noted, the product documentation is provided as Adobe Acrobat PDF files that are installed
with PGP Endpoint. Online help is available within the PGP Endpoint product. Release notes are also available,
which may have last-minute information not found in the product documentation.
- 11 -
Page 12

PGP Endpoint Application Control
Contacting Technical Support
• To learn about PGP support options and how to contact PGP Technical Support, please visit the PGP
Corporation Support Home Page (http://www.pgp.com/support).
• To access the PGP Support Knowledge Base or request PGP Technical Support, please visit PGP Support
Portal Web Site (https://support.pgp.com).
Note:
You may access portions of the PGP Support Knowledge Base without a support agreement; however, you
must have a valid support agreement to request Technical Support.
• For any other contacts at PGP Corporation, please visit the PGP Contacts Page (http://www.pgp.com/
company/contact/index.html).
• For general information about PGP Corporation, please visit the PGP Web Site (http://www.pgp.com).
• To access the PGP Support forums, please visit PGP Support (http://forums.pgpsupport.com). These are user
community support forums hosted by PGP Corporation.
- 12 -
Page 13

Chapter
1
PGP Endpoint Application Control Overview
In this chapter:
• Product Overview
• Application Control Server,
Database and Client Process
• System Requirements
PGP offers a complete portfolio of solutions for controlling the use of
software applications and devices in your computing environment.
PGP Endpoint solutions include:
• PGP Endpoint Device Control, which prevents unauthorized
transfer of applications and data by controlling access to input and
output devices, such as memory sticks, modems, and PDAs.
• PGP Endpoint Device Control client for Embedded Devices, which
moves beyond the traditional desktop and laptop endpoints to a
variety of platforms that include ATMs, industrial robotics, thin
clients, set-top boxes, network area storage devices and the myriad
of other systems running Microsoft® Windows XP® Embedded.
• PGP Endpoint Application Control, which delivers granular control
of application execution in an enterprise environment.
• PGP Endpoint Application Control Terminal Services Edition,
which extends application control to Citrix® or Microsoft Terminal
Services ® environments that share applications among multiple
users.
• PGP Endpoint Application Control Server Edition, which delivers
application control to protect enterprise servers, such as web
servers, e-mail servers, and database servers.
- 13 -
Page 14

PGP Endpoint Application Control
Product Overview
PGP Endpoint software is based on a multi-tier software architecture that processes and stores data for
Application Control and Device Control. Users can interact with the application through the client interface. A
separate Management Server Console provides a user interface for network administrators.
The primary components of the PGP Endpoint Application Control solution are:
• The Application Control database which serves as the central repository of authorization information for
devices and applications.
• One or more Administration Servers that communicate between the database, the protected clients, and the
Management Server Console.
• The Management Server Console, which provides the administrative user interface for the Administration
Server.
• The Application Control client, which is installed on each computer, either endpoint or server, that you want
to protect.
- 14 -
Page 15

PGP Endpoint Application Control Overview
The following figure illustrates the relationships between the PGP Endpoint components.
Figure 1: Application Control Component Relationships
- 15 -
Page 16
PGP Endpoint Application Control
Application Control Server, Database and Client Process
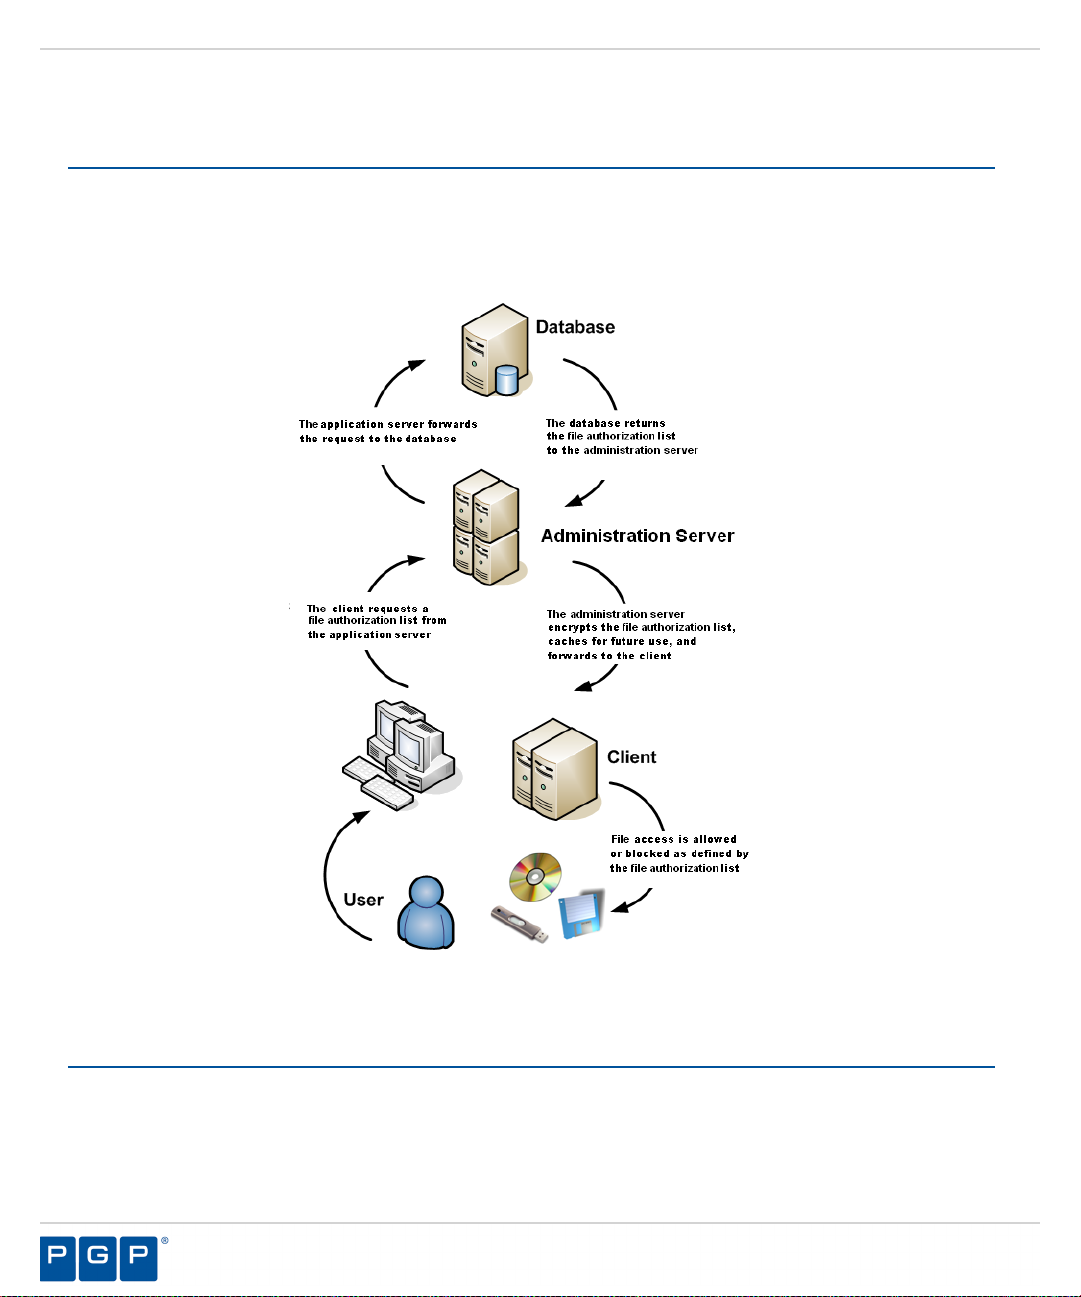
The Administration Server communicates between the database and the protected client computers.
The following describes the communication process flow between the Administration Servers, database, and
clients when using Application Control.
Figure 2: Application Control Process Flow
System Requirements
The following sections describe the minimum system requirements necessary for successful installation of PGP
Endpoint and the languages supported by the client.
The listed specifications are a minimum; larger network environments, may require additional hardware and
software resources. The system requirements for PGP Endpoint are listed in the following topics.
- 16 -
Page 17
PGP Endpoint Application Control Overview
Minimum Hardware Requirements
The minimum PGP Endpoint hardware requirements depend upon your service network environment, including
the type of database supported, the number of Administration Servers you need to support a distributed network,
and the number of subscribed clients.
The hardware requirements for PGP Endpoint vary depending upon the number of servers and clients you
manage. The following minimum hardware requirements will support up to:
• 200 connected PGP Endpoint clients for PGP Endpoint Device Control
• 50 connected PGP Endpoint clients for PGP Endpoint Application Control
Table 2: Minimum Hardware Requirements
PGP Endpoint Component Requirement
Database
Administration Server
Management Server Console
Client
• 1 GB (4 GB recommended) memory
• Pentium® Dual-Core CPU processor or AMD equivalent
• 3 GB minimum hard disk drive
• 100 MBits/s NIC
• 512 MB (1 GB recommended) memory
• Pentium® Dual-Core CPU or AMD equivalent
• 3 GB minimum hard disk drive
• 100 MBits/s NIC
• 512 MB (1 GB recommended) memory
• 15 MB hard disk drive for installation, and 150 MB additional for
application files
• 1024 by 768 pixels for display
• 256 MB (1 GB recommended) memory
• 10 MB hard disk drive for installation, and several additional GB for
full shadowing feature of PGP Endpoint Device Control
• 100 MBits/s NIC
- 17 -
Page 18

PGP Endpoint Application Control
Supported Operating Systems
PGP Endpoint supports multiple Microsoft Windows operations systems for the Administration Server,
Management Server Console, database, and client.
The operating system requirements for PGP Endpoint components are outlined as follows.
Table 3: Operating System Requirements
PGP Endpoint Component Requirement
Database One of the following:
• Microsoft Windows ® XP Professional Service Pack 2 or higher
(SP2+) (32-bit)
• Windows XP Service Pack 2 (SP2) (64-bit)
• Microsoft Windows Server 2003, Standard Edition with Service
Pack 2 (SP2) or later (32-bit)
• Microsoft Windows Server 2003, Enterprise Edition with SP2
or later (32-bit)
• Microsoft Windows Server 2008, Standard Edition with SP2 or
later (32-bit and 64-bit)
• Microsoft Windows Server 2008, Enterprise Edition with SP2
or later (32-bit and 64-bit)
• Microsoft Windows Server 2008 R2 (64 bit only)
Administration Server One of the following:
• Windows Server 2003, Standard Edition with SP2 or later (32bit)
• Windows Server 2003, Enterprise Edition with SP2 or later (32bit)
• Windows Server 2008, Standard Edition with SP2 or later (32bit and 64-bit)
• Windows Server 2008, Enterprise Edition with SP2 or later (32bit and 64-bit)
• Windows Server 2008 R2 (64 bit only)
- 18 -
Page 19
PGP Endpoint Component Requirement
Management Server Console One of the following:
• Windows XP Professional SP2+ (32-bit)
• Windows Server 2003, Standard Edition with SP2 or later (32bit)
• Windows Server 2003, Enterprise Edition with SP2 or later (32bit)
• Windows Server 2008, Standard Edition with SP2 or later (32bit and 64-bit)
• Windows Server 2008, Enterprise Edition with SP2 or later (32bit and 64-bit)
• Windows Server 2008 R2 (64 bit only)
• Microsoft Windows Vista™ SP1+ (32- and 64-bit)
• Microsoft Windows 7 (32- and 64-bit)
PGP Endpoint Application Control Overview
- 19 -
Page 20

PGP Endpoint Application Control
PGP Endpoint Component Requirement
Client One of the following:
• Microsoft Windows® Server 2000 Service Pack 4 or higher
(SP4+) (32-bit)
• Microsoft Windows 2000 Professional SP4+ (32-bit)
• Microsoft Windows XP Professional Service Pack 2 or higher
(SP2+) (32- and 64-bit)
• Windows Server 2003, Standard Edition with SP2 or later (32bit)
• Windows Server 2003, Enterprise Edition with SP2 or later (32bit)
• Windows Server 2008, Standard Edition with SP2 or later (32bit and 64-bit)
• Windows Server 2008, Enterprise Edition with SP2 or later (32bit and 64-bit)
• Windows Server 2008 R2 (64 bit only)
• Windows Vista SP1+ (32- and 64-bit)
• Windows 7 (32- and 64-bit)
• Microsoft Windows XP Embedded (XPe) Service Pack 2 (SP2)
(32-bit)
• Microsoft Windows Embedded Point of Service (WEPOS) (32bit)
• Microsoft Windows XP Tablet PC Edition (32-bit)
• Citrix Access Gateway™ 4.5
• Citrix Presentation Server™ 4.0 for Windows Server 2003 SP1/
SR2+ (32-bit)
• Citrix Presentation Server 4.5 for Windows Server 2003 SP1/
SR2+ (32- and 64-bit)
- 20 -
Page 21

PGP Endpoint Application Control Overview
Supported Databases
PGP Endpoint supports multiple releases of Microsoft® SQL Server®. You should choose the database instance
required by your network operating environment and the number of Administration Servers and subscribed
clients the application must support.
The database requirements for PGP Endpoint components are outlined as follows.
Table 4: Database Requirements
PGP Endpoint Component Requirement
Database One of the following:
• Microsoft SQL Server® 2005 Service Pack 2 or higher (SP2+) (32-bit and
64-bit)
• Microsoft SQL Server 2005 Express Edition SP2+ (32-bit and 64-bit)
• Microsoft SQL Server 2008
• Microsoft SQL Server 2008 Express Edition
Other Software Requirements
PGP Endpoint requires the following additional software.
Additional software requirements for PGP Endpoint components are outlined as follows.
Table 5: Other Software Requirements
PGP Endpoint Component Requirement
Database No additional software requirements.
Administration Server If you will be encrypting Windows user accounts for centralized
Device Control encryption, you will need to install an enterprise level
Certificate Authority. See Microsoft Certificate Authority (http://
technet.microsoft.com/en-us/library/cc756120.aspx) for additional
information about certificates.
Attention: Certificate authority installation applies to Device Control
only for centralized encryption capability.
A Certificate Authority is required to use secure communications
between clients and servers, and intra-server communications.
Attention: Certificate authority installation applies to both Device
Control and Application Control for secure server communications.
Management Server Console Microsoft Visual C++ 2008 Redistributable Package.
Client No additional software requirements.
- 21 -
Page 22
PGP Endpoint Application Control
Recommended Configuration
To maximize PGP Endpoint for operation in a Microsoft Windows environment, you should configure your
network environment database and client components using the following suggested configurations.
The recommended configurations for PGP Endpoint components are outlined as follows. These settings represent
the usual default settings, but should be confirmed before beginning PGP Endpoint installation.
Table 6: Recommended Configuration
PGP Endpoint Component Requirement
Database
Administration Server None recommended.
Management Server Console None recommended.
Client
• Change the Windows Event Viewer settings to 1024 KB and
choose to overwrite events as necessary.
• Change Windows Performance settings to prioritize for background
applications.
• If you are using Active Directory, configure a corresponding
Domain Name System (DNS) server as Active Directory (AD)
integrated and create a reverse lookup zone, to provide for name
resolution within the Management Server Console.
• Configure NIC to receive IP from DHCP service.
• Change the Windows Event Viewer settings to 1024 KB and
choose to overwrite events as necessary.
Client Supported Languages
The PGP Endpoint client supports multiple languages in text format.
The PGP Endpoint client is supported in the following languages:
• English
• French
• Italian
• German
• Spanish
• Japanese
• Simplified Chinese
• Traditional Chinese
• Russian
• Dutch
• Portuguese
• Swedish
- 22 -
Page 23

Chapter
2
Using Application Control
In this chapter:
• Getting Started with PGP Endpoint
Application Control
• The File Authorization Setup
Process
• Accessing the Management Server
Console
• Common Functions within the
Management Server Console
• License Expiration
The Management Server Console provides direct access to system
management, configuration, file authorization, reporting, and logging
functions.
The Management Server Console allows the user to communicate with
an Administration Server to send and retrieve file authorization data
from the database. The data is sent from the server to a client, thereby
establishing application control on the client. The Management Server
Console provides direct access to system management, configuration,
file authorization, reporting, and logging functions.
Getting Started with PGP Endpoint Application Control
Get started with Application Control by installing the application, which includes all server and database
components, the Management Server Console, and the client. Then you use the Management Server Console to
define user access permissions and file authorization rules.
You must begin the installation process with a clean machine that fulfills the minimum software and hardware
requirements. You must resolve all hardware and software conflicts prior installing PGP Endpoint solutions and
- 23 -
Page 24

PGP Endpoint Application Control
install the latest operating system and database service packs. Refer to the following processes to identify tasks
when installing Application Control.
Figure 3: PGP Endpoint Installation
The File Authorization Setup Process
After successfully installing Application Control, an administrator uses the Management Server Console
to configure and define user access permissions and file authorization rules required in a PGP Endpoint
environment that specify which executable files, scripts, and macros each user can use, as described by the
following process flow.
You can use standard Microsoft file definitions to quickly build a central file
authorization list for executable files, macros, and scripts.
- 24 -
Page 25
Using Application Control
You can assign administrator access rights using the User Access tool. An
Administrator has restricted access to the Management Server Console and can be
assigned various administrative roles by an Enterprise Administrator.
After defining Administrator roles, you can use the User Access tool to assign the
defined roles to Administrators.
File groups simplify the process of administering large numbers of executable,
script, and macro files for users. Instead of individually authorizing files, you can
group files together logically by creating file groups.
PGP Endpoint verifies which file group is associated with an executable, script,
or macro and whether the user has access permission for the file group. You
can assign specific permissions to local users and user groups. Only authorized
applications and scripts assigned to a user or a user group can run on the client.
After creating the file groups and parent-child relationships you want to use, you
can assign file groups to users or user groups.
You can create a template and scan a target computer running the client. You
can scan all files on a computer, or you can create a template to scan selected
directories or specific file types for example, *.exe, *.com, *.dll, *.ocx, *.sys,
*.drv, *.cpl, *.vbs, *.js, to reduce the scan time required.
After you create the necessary file groups and required parent-child relationships,
you can assign executable files, scripts, and macros to file groups.
Activating Execution blocking prohibits user access to unauthorized files. Local
authorization is permitted only for the administrators and LocalSystem account.
Once you identify all your files, categorize them into file groups, and assign the file groups to users or user
groups, these files are centrally authorized and immediately available to be run by all allowed users.
- 25 -
Page 26

PGP Endpoint Application Control
When a user wants to run an executable, script, or macro, the following actions take place automatically:
• A file that is identified as an executable, script, or macro, by the operating system is stored in the PGP
Endpoint database ready for execution (but not actually executed).
• A file is identified by PGP Endpoint as an executable, script, or macro, has the entire file content checked to
determine its digital signature (hash) before being allowed to execute by the operating system.
• The digital signature is compared to the digital signatures (stored in a central file authorization list) for files
that are authorized to run.
• If, and only if, the file signature corresponds exactly to a file signature in the central file authorization list,
in other words, the digital signatures are identical and the file is authorized for execution for the user or
computer requesting authorization, can the file run.
Accessing the Management Server Console
Access to the Management Server Console is controlled using the login and logout functions provided by the
Management Server Console. Only authorized administrators may access the Administration Server.
The Management Server Console is a Windows application that conforms to standard conventions. From the
Management Server Console, you navigate through the system with menu bars, scroll bars, icons, lists, and
checkboxes.
Logging In to the Management Server Console
You access the application by logging in to the Management Server Console.
Select Start > Programs > PGP > Endpoint Security > Endpoint Management Server Console > PGP
1.
Endpoint Management Server Console.
Step Result:
From the Administration Server drop-down list, select the Administration Server you want to connect to.
2.
You can type the server name as an IP address with port if required in square brackets, NetBios name, or fully
qualified domain name in the Administration Server field.
Select one of the following options:
3.
Option Description
Use current user
Log in as
Each time you access the Management Server Console, the Connect to PGP Endpoint
Administration Server dialog appears.
By default the system connects to the Administration Server using your
credentials.
Type the user name in the Username field and type the password in the
Password field.
Tip: Precede the user name by a computer workstation name and
backslash for a local user, or by a domain name and backslash for
domain users.
- 26 -
Page 27

Click OK.
4.
Step Result:
Using Application Control
The Connect to PGP Endpoint Administration Server dialog closes.
Result:
The PGP Endpoint Management Server Console window opens.
Logging Out of the Management Server Console
When you log out from the Management Server Console you can choose to terminate the adminstrative session
or disconnect from the Administration Server.
To disconnect from the Administration Server, select File from the navigation bar.
1.
Select one of the following options:
2.
Option Description
Disconnect
Exit
Result:
The Disconnect or Exit action terminates your current administrative session.
The Management Server Console remains open.
The Management Server Console closes.
Common Functions within the Management Server Console
PGP Endpoint uses standard browsing conventions and navigational functions.
Features specific to the Management Server Console include menu selections for Modules, Tools, and Reports.
From the console, you can access the PGP Endpoint Control Panel features that you have administrative user
access for. You can use the navigation bar to access administrative options and PGP Endpoint control features.
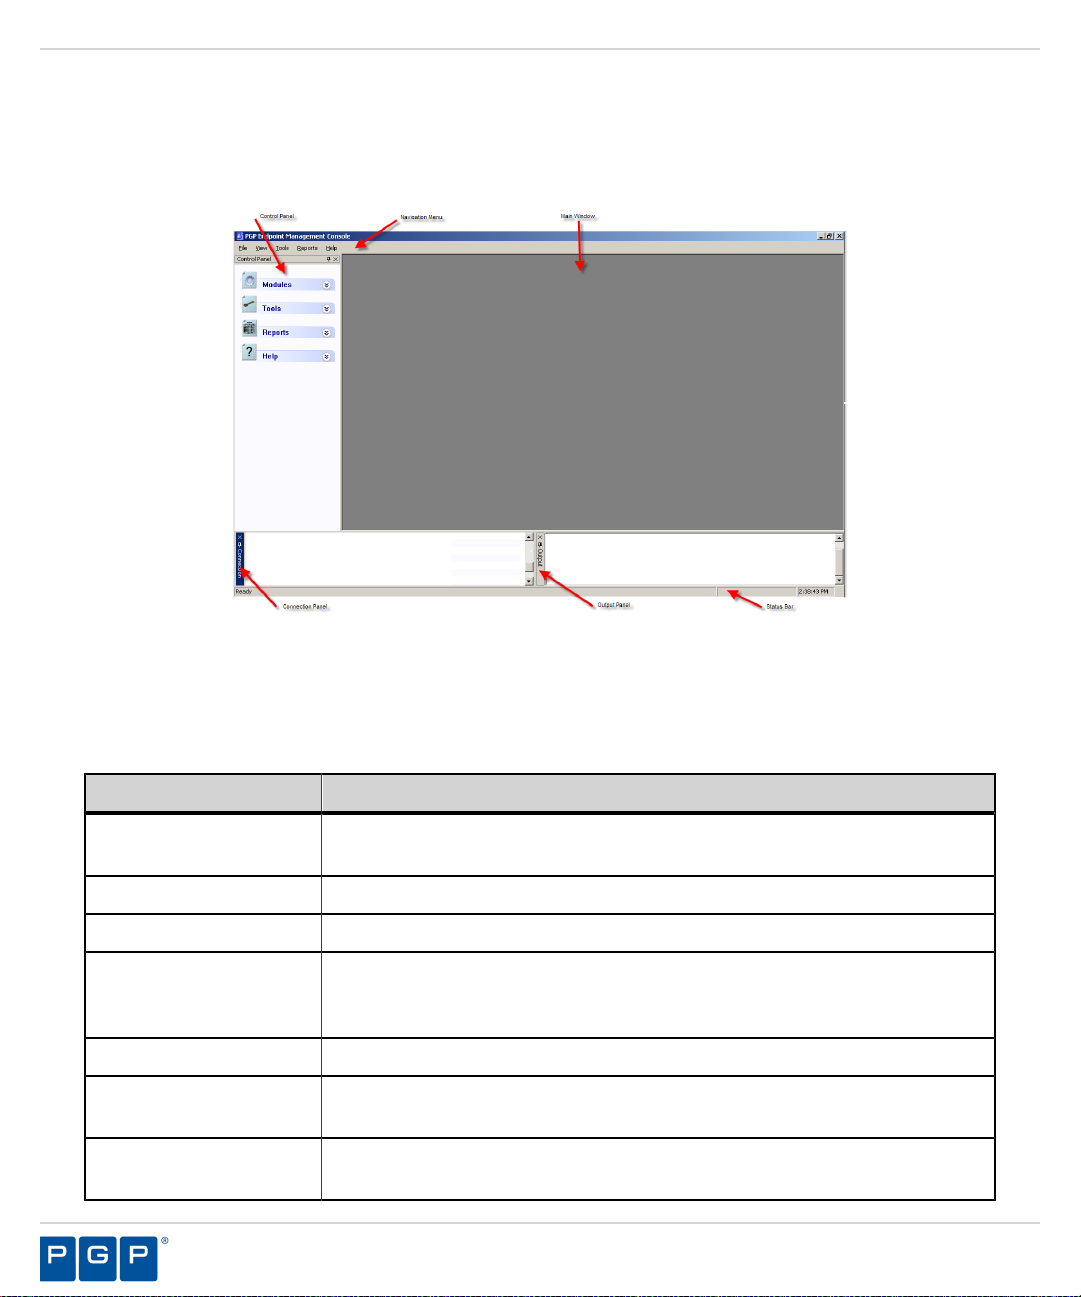
Viewing the Management Server Console
The Management Server Console graphically displays the administrative user features for the application.
The Management Server Console window is divided into four panels:
•
The Control Panel provides access to PGP Endpoint modules, tools, reports, and help functions.
•
The main panel displays a window for the module currently selected from the Control Panel. Modules
remain open and arranged as stacked tabs until closed.
•
The Connection panel shows information about the current user. You can use the scrollbar to navigate
through the text.
•
The Output panel displays system processing information and error messages.
- 27 -
Page 28
PGP Endpoint Application Control
You can also view the following bars in the Management Server Console window:
• The navigation bar provides access to different PGP Endpoint functions and commands. Some of these
commands and functions depend on the module you are currently using.
• The status bar displays information about the condition of the console.
Figure 4: Management Server Console
Common Conventions
This application supports user interface conventions common to most Web applications.
Table 7: Common User Interface Conventions
Screen Feature Function
Entry Fields Type data into these fields, which allow the system to retrieve matching criteria
or to enter new information.
Drop-Down Menus Displays a list to select preconfigured values.
Command Buttons Perform specific actions when clicked.
Check Boxes A check box is selected or cleared to enable a feature, disable a feature, or
initiate function for a list item. Some lists also include a Select All check box
that lets you select all the available listed items on that page.
Radio Buttons Select the button to select an item.
Sort Data presented in tables can be sorted by ascending (default) or descending order
within a respective column by clicking on a (enabled) column header.
Mouseovers Additional information may be displayed by hovering your mouse pointer over
an item.
- 28 -
Page 29

Using Application Control
Screen Feature Function
Auto Refresh Where present and when selected, the auto refresh function automatically
refreshes the page every 15 seconds.
Scrollbars Drag to see additional data that does not fit the window.
Tabs Click on the tab name to switch to different information related to the specific
page or dialog.
Bread Crumb Names the page you are currently viewing, that page's parent page (if
applicable), and the navigation menu item that opened the displayed page. If
viewing a page that is child to another page, you can view the parent page by
clicking the bread crumb, which also serves as a link, allowing you to retrace
your steps.
Tip: Most system pages support right-click.
Using the Management Server Console Control Panel
The Control Panel, adjacent to the Management Server Console main window, provides access the Modules,
Tools, Reports, and Help administrative user features.
You can perform the following tasks using the Control Panel:
• Use the application control Modules to administer routine PGP Endpoint control tasks.
• Generate Reports for users, file groups, PGP Endpoint clients, and administrator actions.
• Perform system administrative tasks using Tools.
• Get Help.
Resizing and Repositioning Panels
You can resize and reposition the Management Server Console panels.
You can customize the appearance of the main window as follows:
• Drag a panel, by selecting the title bar, to any position on the main page.
• Float a panel in any position in the window, to share the main window with open Modules.
• Dock a panel to minimize the appearance in the main window. The docked panel appears as a tab at the edge
of the main window.
• Scroll across an active panel.
• Close an active panel by clicking the Close icon.
• Double click a panel title bar to return to the original position on the main screen.
• Right-click a floating panel title bar to display a drop down menu to restore, move, size, minimize, maximize,
or close the panel.
Use the icons listed in the following table to resize or reposition a panel:
Table 8: Resizing and Repositioning Panels
Icon Function
Float a panel
- 29 -
Page 30
PGP Endpoint Application Control
Icon Function
Dock a panel
Scroll left or right
Close an active panel
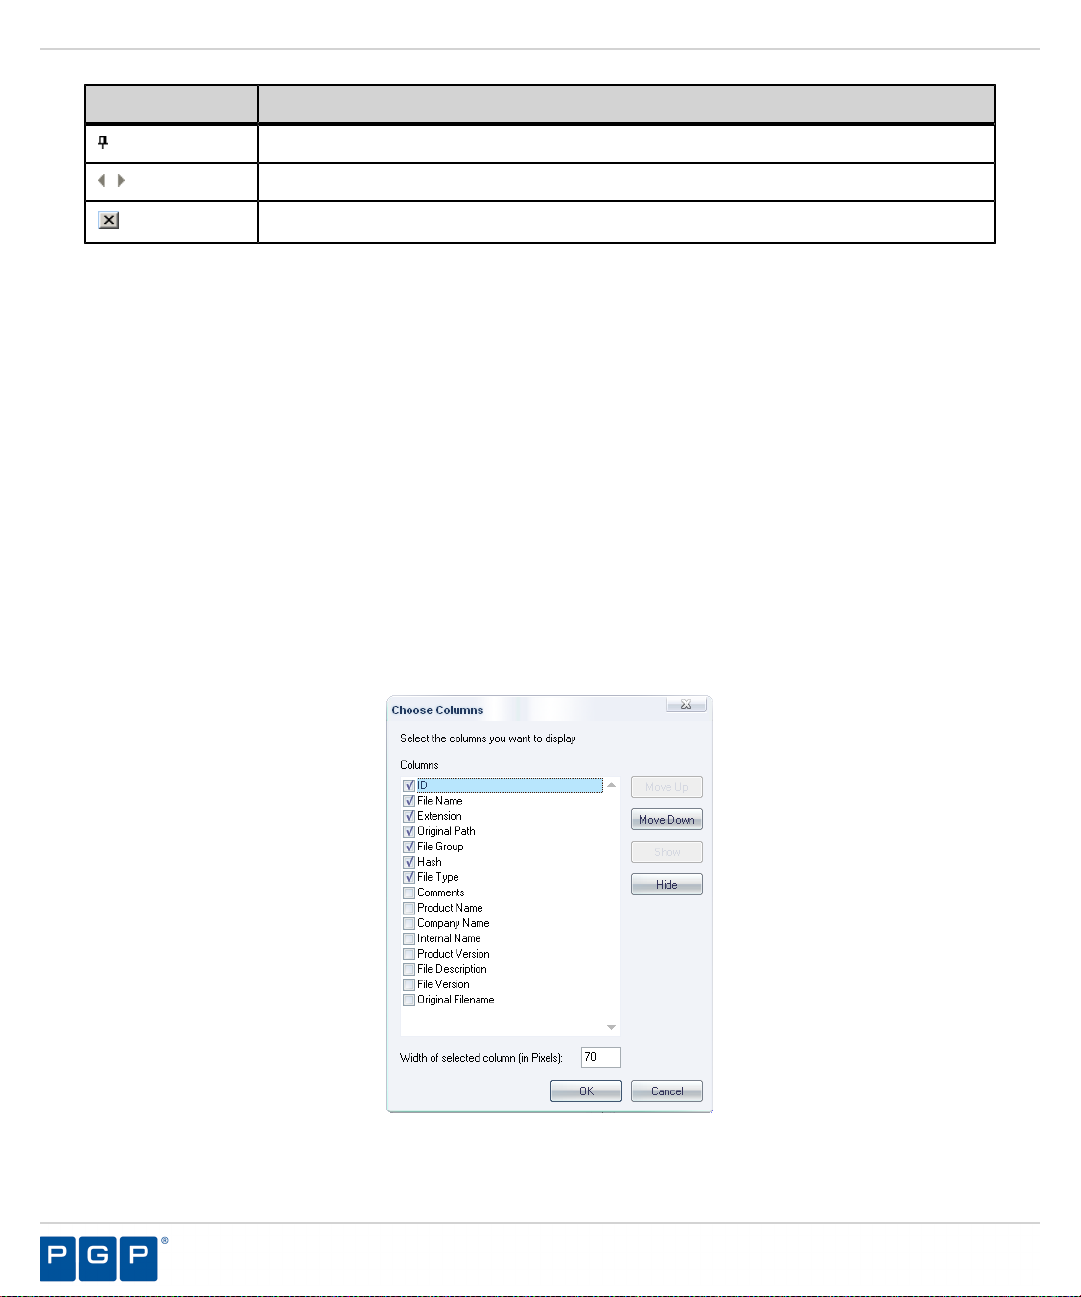
Organizing Columns for Display
You can customize the graphical display for columns in the Log Explorer module.
You can reorganize columns by headings only for the Log Explorer module.
1.
Select the Log Explorer module from the PGP Endpoint Control Panel.
Step Result:
2.
Right-click the table header row of the Explorer main window.
Step Result:
Select a column name from the list. A check beside the column name enables the column for display in the
3.
Explorer window.
To organize columns, select Choose Columns....
4.
Step Result:
The Explorer window opens for the module you select.
A right-mouse menu opens showing all available columns for display. The menu options
shown vary according to the PGP Endpoint control module you select and your license type.
The Choose Columns dialog opens.
Figure 5: Choose Columns Dialog
- 30 -
Page 31

5.
Choose any of the following options from the Choose Columns dialog:
Item Description
Using Application Control
Column
Move Up
Move Down
Hide
Show
Click OK.
6.
Result:
The Choose Columns dialog closes. The Explorer window shows the selected columns and associated
attributes.
Select or clear the check box for a column. You can modify the column
width in the Width of selected column field.
Shifts the column name description up one place in the dialog list.
Shifts the column name description down one place in the dialog list.
Masks the column display.
Displays the column.
Using the File Menu
The File menu displays options for managing the Administration Server from the main window. You can also
print and save the contents displayed in the main window of the Management Server Console.
The following table describes the File menu items and functions:
Table 9: File Menu
Menu Item Description
Connect Establishes communication between the Management Server Console and a
Administration Server connected to another computer or user.
Disconnect Detaches the Management Server Console from the current Administration
Server.
Save as Saves the contents of the main window in .html format for exporting data to
any .html compliant application.
Print Prints the active report window.
Exit Exits the current Management Server Console administrative session.
Using the View Menu
The View menu displays options for controlling the appearance of the main panel within the Management
Server Console.
The following table describes the View menu items and functions:
Table 10: The View Menu
Menu Item Description
Modules Shows a submenu for selecting a module.
- 31 -
Page 32

PGP Endpoint Application Control
Menu Item Description
Control Panel Shows or hides the menu for selecting Modules, Tools, Reports, and Help.
Output
Connection
Status bar Shows or hides the status bar.
Shows or hides the Output window, which displays a log of system activity.
Shows or hides the Connection window, which displays real-time system operating
information.
Using the Tools Menu
The Tools menu displays a list of tasks for performing user and database administration.
The following table describes the Tools menu items and functions:
Table 11: Tools Menu
Menu Item Description
Synchronize Domain
Members
Database
Maintenance
User Access Defines PGP Endpoint Enterprise Administrators and Administrators by allowing
Default Options Changes the default option settings for users and computers.
Updates the PGP Endpoint database using a current list of users and groups for a
domain or machine.
Deletes log and computer database scan files created before a specified date.
you to assign access rights for setting permissions and viewing audit information for
administrator actions.
Path Rules Uses file paths and trusted owners to define which applications can run.
Spread Check Prevents the spread of self-propagating code by disabling suspicious executables
that have been locally authorized on multiple computers.
Send Updates to All
Computers
Send Updates to Transmits the latest setting and permission changes to specific computers on the
Import Standard File
Definitions
Export Settings Places file authorization settings in an external file that can be sent to PGP Endpoint
Endpoint
Maintenance
Transmits the latest setting and permission changes to all managed devices. Changes
can be sent manually or automatically when computers restart or at the next login
event.
network.
Imports files and associated digital signatures for Windows operating systems
supported by the PGP Endpoint application.
clients working offline to update file authorization lists.
Creates and saves maintenance tickets for computers and computer groups that
allows modification of protected files and registries for PGP Endpoint clients.
- 32 -
Page 33

Using Application Control
Using the Reports Menu
The Reports menu displays options to save or print information about Application Control system operations.
The following table describes the Reports menu items and functions:
Table 12: Reports Menu
Menu Item Description
File Groups by User Shows one or more users and groups the assigned files groups assigned to
file groups.
Users by File Group Shows one or more file groups assigned to users and groups.
User Options Shows all the user options defined in the system.
Machine Options Shows all the computer options defined in the system.
Client Status Shows the hardening options, client version, and log and policy file status.
Server Settings Shows how your Administration Server is configured.
Using the Explorer Menu
The Explorer menu displays options that vary based upon the module selected in the Control Panel.
The following tables describe the Explorer menu items and functions.
Note: There is no Explorer menu for the User Explorer module.
Table 13: Database Explorer Module Menu
Menu Item Description
Assign Changes the file group assignment.
Manage File Groups Adds, renames, or deletes a file group.
Choose Columns Organizes the panels columns.
Table 14: Exe Explorer Module Menu
Menu Item Description
Map Network Drive Assigns a drive letter to a shared resource on a network.
Disconnect Network Drive Removes the drive letter assigned from any shared resource on a network to
prevent users from browsing without credentials.
Assign Changes the file group assignment.
Manage File Groups Adds, renames, or deletes a file group.
- 33 -
Page 34

PGP Endpoint Application Control
Menu Item Description
Choose Columns Organizes the panels columns.
Table 15: Log Explorer Module Menu
Menu Item Description
Fetch log Obtains the latest log data from a client.
Manage File Groups Adds, renames, or deletes a file group.
Table 16: Scan Explorer Module Menu
Menu Item Description
Perform Scan Scans a computer to identify executable files, scripts and macros to be
authorized.
Select Scans Provides the option to compare two scans.
Assign Changes the file group assignment.
Manage File Groups Adds, renames, or deletes a file group.
Choose Columns Organizes the panel columns.
Using the Window Menu
The Window menu provides options to control the navigation and display of open windows within the
Management Server Console.
The following table describes the Window menu options.
Table 17: Window Menu
Menu Item Description
Cascade Displays open windows in an overlapping arrangement.
Tile Displays open windows in a side-by-side arrangement.
Using the Help Menu
The Help menu displays option for using help features.
The following table describes the Help menu items and functions.
Table 18: Help Menu
Menu Item Description
Contents
Search
Index
Displays the Contents tab of the Help file.
Finds a specific topic in the Help file.
Displays the Help index page.
- 34 -
Page 35

Using Application Control
Menu Item Description
About Displays information about your installed version of PGP Endpoint.
PGP on the Web Redirects to the PGP home page for up-to-date information, resources,
and support.
PGP Knowledgebase Provides direct access to the PGP knowledge base, a source of tips,
questions and answers, and how-to articles.
PGP Endpoint Application Control Modules
The Application Control Modules provide access to the functions necessary for configuring and managing and
are grouped into several modules, represented by the icons in the Modules section of the Control Panel.
The PGP Endpoint Application Control Modules provide access to the functions necessary for configuring and
managing PGP Endpoint and are grouped into five modules, represented by the icons in the Modules section of
the Control Panel:
Table 19: PGP Endpoint Application Control Modules
Module Icon Description
Database
Explorer
Exe Explorer Builds a list of executable files, scripts, and macros that are allowed to run
Log Explorer Shows logs of applications, scripts, and macros that were run, files for
Scan Explorer Scans a computer or domain to identify executable files, scripts, and
User Explorer Links users or user groups with file groups, granting permission to use the
Shows the list of executable files, scripts, and macros that are stored in the
PGP Endpoint database and manages file assignment details.
on PGP Endpoint clients, and assigns files to file groups.
which access was denied, and files authorized locally.
macros to be authorized, and assigns files to a file group using templates.
files assigned to file groups.
License Expiration
A license expiration Warning message displays, if you are a subscription user, when you log in to the
Management Server Console.
The following table describes the types of license expiration warnings.
Expiration Period Warning Message Frequency
Expired The license has expired. Once
Less than one day The license will expire in x hours.
The license will expire in x minutes.
Once per hour
- 35 -
Page 36

PGP Endpoint Application Control
Expiration Period Warning Message Frequency
Less than 60 days The license will expire in x days. Once per day
More than 60 days No message. Not applicable
Note: When you must renew or add a license, contact your PGP representative.
- 36 -
Page 37

Chapter
3
Using the Authorization Wizard
In this chapter:
• Working with the Authorization
Wizard
The Authorization Wizard tool is used for performing an initial
inventory of existing software applications that can be authorized for
use.
PGP Endpoint allows the operating system determine whether a file
is executable and then checks the digital signature against the central
file authorization list. PGP Endpoint provides several strategies for
authorizing executable files, scripts, and macros including:
• Central authorization using digital signatures.
• Central authorization using file paths and trusted owners.
• Local authorization providing local users limited rights to authorize
executable files, scripts, and macros to run on a specific user
computer.
Scripts and macros are more difficult to identify than executables files.
PGP Endpoint recognizes and centrally manages the following types
of scripts and macros:
• VBScripts and JScripts that are interpreted by the Windows Script
Host that have the .vbs or .js extension.
• Scripts interpreted by cscript.exe and wscript.exe.
• Visual Basic scripts that run within Microsoft Office and other host
applications.
The Authorization Wizard Wizard is an administrative tool that you
can use to build an initial list of centrally authorized application files.
Working with the Authorization Wizard
The Authorization Wizard tool is used for performing an initial inventory of existing software applications that
can be authorized for use.
The Authorization Wizard tool provides a simple method for scanning existing files and directories on a
computer to add files to the central authorization list. The wizard can automatically assign scanned files with
existing digital signatures to file groups. Alternatively, scanned files without a digital signature can be processed
- 37 -
Page 38

PGP Endpoint Application Control
manually to create digital signatures and then assign these files to file groups. The wizard can also expand
compressed files during the scanning process, identify or create digital signatures, and then assign these files to
files groups.
The Authorization Wizard:
• Searches for executable files from a specific source, as a computer hard drive, network share (UNC path), or
CD/DVD-ROM.
Executable file sources include the following:
• Windows operating systems, applications, and service packs
• Self-extracting ZIP archives
• RAR, MSI, and Microsoft CAB files
• Creates digital signatures for selected files.
• Records the digital signatures in the PGP Endpoint database.
The Authorization Wizard does not scan for scripts or macros.
Restriction: The Authorization Wizard does not expand setup.exe files and classifies them as a single
executable file instead of an auto-extraction file.
Authorizing Executable Files
You can use the Authorization Wizard to scan a reference computer to build an initial list of centrally authorized
files.
Select Windows Start > Programs > PGP > Endpoint Management Server Console > Authorization
1.
Wizard.
Step Result:
Click Next.
2.
The wizard advances to the Options - Authorization Wizard dialog.
Figure 6: Options - Authorization Wizard Dialog
The Authorization Wizard dialog opens.
- 38 -
Page 39

Using the Authorization Wizard
Enter the name of a computer to connect to the Administration Server, using one of the following options:
3.
• Type the server name (my_server)
• Type the server IP address (192.168.1.1)
• Click different user name to use other server connection credentials (another dialog opens and you type
the user name and password)
Attention: When you can only leave certain non-standard ports open in your firewall, you need to specify
the server TCP port number between square brackets, for example: server[1234].
a) Click Check Server to verify the connection.
Select or clear the Process known files automatically check box as follows:
4.
Option Description
Select
Clear
Click Next.
5.
To browse to the root directory that you want to scan for executable files, select one of the following options,
6.
then click the ellipsis
adjacent to the Source field.
Option Description
Directory
File
Add existing files to the database that match an existing database entry
with a different digital signature, and assign the files to existing file
groups.
Identify unknown files and process them manually.
If you are scanning from a directory
If you are scanning from a file or compressed archive file.
- 39 -
Page 40

PGP Endpoint Application Control
7.
To select the temporary directory where the wizard can expand compressed files, click the ellipsis adjacent
to the Extract temporary files to: field.
Figure 7: Options - Source Selection - Authorization Wizard - Connected Dialog
Caution: If the Free space for extraction falls below 100 MB, you receive a message prompting
you to create more free disk space.
Click Start.
8.
Step Result:
The Assigning File(s) - Authorization Wizard - Connected dialog opens. The wizard searches
the source directory or file and lists the number of files found.
Figure 8: Assigning File(s) - Authorization Wizard - Connected Dialog
Click Next.
9.
If you select the Process known files automatically option, the wizard processes all executable files and
assigns them to corresponding file groups. If a matching filename exists in the database and is assigned to a
- 40 -
Page 41

Using the Authorization Wizard
file group, the wizard assigns the new file definition to the same file group. The results are summarized as
follows:
• Number of files processed
• Number of files assigned to file groups
• Number of files as duplicates of previously assigned files
Step Result:
Figure 9: Assigning File(s) - Authorization Wizard - Connected Dialog
The Assigning Files - Authorization Wizard - Connected Summary dialog opens.
- 41 -
Page 42

PGP Endpoint Application Control
Click Next.
10.
Step Result:
The Assigning Files - Authorization Wizard - Connected dialog opens. The wizard lists
files that are not assigned to file groups because they do not match existing filenames in the
database or cannot be processed automatically.
Figure 10: Assigning File(s) - Authorization Wizard - Connected Dialog
11.
To manually assign the unknown file(s) to a file group, select one or more file names from the File Name list.
12.
Click the Suggested File Group drop-down list or File Groups to select a file group for assignment.
Click Next.
13.
Step Result:
Click Finish.
14.
The new file definitions are added to the database.
You may select the Restart the wizard to add more files or CDs option.
Result:
The selected files are assigned to file groups.
After Completing This Task:
You may need to update user access permissions to enable users or user groups to run newly authorized
applications.
- 42 -
Page 43

Chapter
4
Using Modules
In this chapter:
• Working with Scan Explorer
• Working with the Exe Explorer
• Working with User Explorer
• Working with Database Explorer
• Working with Log Explorer
Device Control modules are based upon the type of user access or
software authorization rules that you want to establish. Using the
Management Server Consoleyou can access to the Device Control
modules.
Depending on the task, you may use one of the following modules in
the Management Server Console Control Panel:
• Exe Explorer to explore a few directories or files.
• Database Explorer to explore previously authorized files already
stored in the database.
• User Explorer to manage user and user group assignments to file
groups.
• Scan Explorer to explore a computer using a predefined scanning
template.
• Log Explorer to explore and analyze user activity logs.
- 43 -
Page 44

PGP Endpoint Application Control
Working with Scan Explorer
Using the Scan Explorer module you can create a template and scan a target computer that runs the client.
A scanning template provides a foundation for you to quickly build a centrally authorized list from the files
scanned on a client computer, using a reference computer, and authorize applications.
Figure 11: Scan Explorer Main Window
Creating a File Scanning Template
You can create a template to identify new file authorization changes to make when new software is installed.
You can scan for files by creating a template with the following rules:
• Scan all executables matching the pattern *.exe or *.dll in the %SYSTEMROOT% directory and
subdirectories.
• Scan all files matching the pattern *.exe or *.dll in the %PROGRAMFILES% directory and subdirectories.
- 44 -
Page 45

From the Management Server Console, select View > Modules > Scan Explorer > Perform New Scan >
1.
Create New Template.
Using Modules
Step Result:
Figure 12: Create New Template Dialog
In the New Template name: field, enter the name for the new template.
2.
Click Add.
3.
Step Result:
The Create New Template dialog opens.
The New Rule dialog opens.
Figure 13: New Rule Dialog
- 45 -
Page 46

PGP Endpoint Application Control
In the Scan files matching the pattern (use * wildcard for all files) field, enter the name patterns to use for
4.
scanning.
Caution: When you specify wildcard masks, for example: *.com, you can miss scanning for files that do
not use standard file extensions such as: *.exe, or *.dll, and so forth. The result is that these types of files
will not be authorized, which means that these applications will not work or work properly.
In the In directory field, enter the path name for the directory you want to scan.
5.
Select one or more of the following options:
6.
Option Description
Include subdirectories
Scan executables
Click OK.
7.
Step Result:
Click Save.
8.
Result:
The Perform New Scan dialog lists the new template in the From Template drop-down list.
Scan subdirectories of the root directory.
Scan for executable files and ignore all other file types. The scan also
searches for 16-bit executables.
Attention: If you do not select the Scan Executables option, you
must specify the *.exe and *.sys for the matching pattern to scan for
these types of files.
The New rule dialog closes and the rules you define appear on the Rules box.
- 46 -
Page 47

Using Modules
Scanning Files on a Client Computer
You can scan all files on a computer, or you can create a template to scan selected directories or specific file
types for example, *.exe, *.com, *.dll, *.ocx, *.sys, *.drv, *.cpl, *.vbs, *.js, to reduce the scan time required.
Prerequisites:
Before you scan a computer, create a file scanning template.
Important: If you are using Application Control with Device Control enabled, you must set the following
Device Control permissions before performing a scan on a secondary hard drive.
Device Class: Removable
User: LocalSystem
Permissions: Read
Encryption: Unencrypted (Unencrypted or unknown encryption type)
Bus: All
Drive: Hard Drive
From the Management Server Console, select View > Modules > Scan Explorer.
1.
Step Result:
The Scan Explorer window opens.
- 47 -
Page 48

PGP Endpoint Application Control
Click Perform New Scan.
2.
Step Result:
Figure 14: Perform New Scan Dialog
The Perform New Scan dialog opens.
In the From Template field, select a template from the drop-down list.
3.
4.
Click the ellipsis adjacent to the On Computer field.
a) Type the computer name.
b) Click Search or Browse.
c) Select the computer from the list.
d) Click OK.
You can type the computer name directly or use wildcard, such as * and ?.
Step Result:
Click Start Scan.
5.
Step Result:
Figure 15: Perform New Scan Dialog - Comment
Enter a name or comment to distinguish this scan in the Comment field.
6.
The Select Computer dialog opens.
The Perform New Scan dialog opens.
- 48 -
Page 49

Click OK.
7.
Using Modules
Result:
PGP Endpoint scans the specified file directories, calculates digital signatures for all executable files,
scripts, and macros, and adds these digital signatures to the database. The results are shown in the Scan
Explorer main window as follows.
Figure 16: Scan Explorer Window
Comparing Scans
You can compare a scan, performed before installing a new application, to a scan performed after the installation
process is complete. Alternatively, you can compare different scans to identify files associated with separate
applications.
Prerequisites:
Before you can compare two scans, you must perform at least two separate scans.
In the Management Server Console, select View > Modules > Scan Explorer.
1.
Step Result:
The Scan Explorer window opens.
- 49 -
Page 50

PGP Endpoint Application Control
Click Select Scans.
2.
Step Result:
Figure 17: Select Scans Dialog
The Select Scans dialog opens.
In the Show scans made from template field, select a template from the drop-down list.
3.
4.
In the First Scan panel:
a) Select a computer name from the drop-down list.
b) Select the name of your first scan from the drop-down list.
5.
In the Second Scan panel:
a) Select a computer from the drop-down list.
b) Select the name of for your second scan from the drop-down list.
Click OK.
6.
Result:
The system compares the two scans and lists the results in the Scan Explorer window. Each file is
assigned a status as follows:
• Added - The file was added between the first and second scans.
• Different - The file has been modified since the previous scan. The file has the same filename but a
different digital signature and may be a newer version.
• Original - The file remains unchanged from the previous scan. This output only shows when
comparing the same scan.
- 50 -
Page 51

Using Modules
Modifying File Authorization
After scanning a computer to identify executable files, scripts, and macros, or comparing two scans to identify
updates, you can change file assignment details so users can work with a new or upgraded application.
The purpose of the scan is to identify changes made when installing a new application, so you can assign new or
modified files to a specific file group, or remove them.
Tip: You can use the right-click menu to filter a scan and show only <Not Authorized> files or Show all files.
Select the files.
1.
Right-click the list.
2.
From the shortcut menu shown, select own the following options.
3.
•
Assign to File Group
•
Remove from File Group
Result:
After changing the file group assignment, the applications use is denied or allowed, depending of the
action specified in the User Explorer module.
Local Authorization
Local authorization allows users to locally authorize executable files, scripts, and macros that are not in the
central authorization list. Then, the user can then use the software locally, providing users with the flexibility
to run specific software applications without first requesting central authorization. You should limit use of this
feature to avoid compromising the central network protection policy provided by PGP Endpoint Application
Control.
Prerequisites:
• Using Tools > Default Options, verify that:
•
On the Computer tab, the Local Authorization default option is Enabled.
Tip: You can also use this option to disable local authorization on all computers.
•
On the User/User Group tab, Execution Blocking default option is set to: Ask user for *.exe only,
for the Blocking mode. The user is prompted to authorize the executable only. After the executable
file is authorized, any DLLs or other executable files used by the authorized file will automatically be
authorized.
Tip: You may type a customized user notification message in the Notification Text field, such as Do
you want to authorize this file locally?
•
On the User Explorer module File Groups by User tab, the users and user groups permitted to use local
authorization are listed.
Log in to a PGP Endpoint client computer using a locally authorized user or user group account.
1.
- 51 -
Page 52

PGP Endpoint Application Control
Select an executable file, script, or macro to run that is not centrally authorized.
2.
Step Result:
The PGP Endpoint - Unauthorized Application Detected dialog shows detailed information
about the application that is about to run.
Figure 18: PGP Endpoint - Unauthorized Application Detected
Select one of the following options:
3.
Option Description
Deny
Denies local authorization of the specific executable file, script, or
macro. The user is notified the next time an attempt is made to run the
software application.
Deny All
Authorize
Result:
A progress bar appears at the bottom of the dialog. The PGP Endpoint - Unauthorized Application
Denies local authorization of all executable file, scripts, and macros.
Authorizes the program locally only for that specific computer.
Detected dialog closes and the authorized application runs or is denied, based on the option selected.
Note: The file is automatically denied and the dialog closes, if you do not respond within the time-out
period.
- 52 -
Page 53

Using Modules
Working with the Exe Explorer
You can use the Exe Explorer module to create a list of executable files, scripts, and macros that you want to
authorize.
Use Exe Explorer for a newly configured reference computer to ensure that only clean (uncompromised) files
are authorized. The reference computer does not have to be the same computer that the Management Server
Console is installed on. You can browse the network and select any available computer as your reference. You
may manually assign macros and scripts to the central file authorization list using the Exe Explorer module,
although PGP recommends that you do this using the Log Explorer module.
Before using the Exe Explorer module, you must set up the default options for this module. The default options
determine the way PGP Endpoint searches computer directories and how results are displayed. When you choose
the root directory of a computer, the search process creates a list of all executable files, scripts, and macros on the
computer. This process can be slow and is typically done when you want to check all the applications installed on
a computer.
Restriction: Only administrators with defined user access rights can use the Exe Explorer module.
Setting Up the Exe Explorer Default Options
The Exe Explorer searches computer directories for executable files, scripts, and macros.
From the Management Server Console, select View > Modules > Exe Explorer.
1.
Step Result:
2.
From the PGP Endpoint Control Panel, select Tools > Default Options.
Step Result:
3.
Select the Exe Explorer tab.
Figure 19: Default Options Dialog - Exe Explorer Tab
The Exe Explorer window opens.
The Default Options dialog opens.
- 53 -
Page 54

PGP Endpoint Application Control
Select or clear one or more of the following check boxes:
4.
Option/button Description
Include SubDirectories
Fetch File Group information
for selected files only (allows
faster browsing)
Show only non-authorized files
Disable file filters and check
files (executable only)
To search for files with:
5.
• One or more non-standard file extensions, deselect the Disable File Filters and check all files
(executables only) check box and enter the custom file extension(s) in the Custom Filter(s) field.
Separate entries using semi-colons with no spaces.
• Specific file extensions, deselect the Disable File Filters and check all files (executables only) check
box and select the file extensions from the File Filters panel.
Result:
The Exe Explorer module window changes to reflect the default options you select.
Defines the directories to search. Select to search for files from a
named directory and sub-directories.
Displays the file group information for all files or only selected files.
Select search only for files with standard file extensions and display
file group information only for files you select.
Displays previously authorized files. Select to filter previously
authorized files and show the remaining files.
Checks for all files or files with specific extensions. Select to search for
files with standard file extensions.
Adding a File Group
File groups simplify the process of administering large numbers of executable, script, and macro files for users.
Instead of individually authorizing files, you can logically group files together logically by creating file groups.
In the Management Server Console, select View > Modules > Exe Explorer > Explorer > Manage File
1.
Groups.
Step Result:
The File Group Management dialog opens.
- 54 -
Page 55

Click Add File Group.
2.
Step Result:
Figure 20: Add File Group Management Dialog
Enter the name of the file group in the File Group field.
3.
Click OK.
4.
Step Result:
Click Close.
5.
Result:
The file group is added to the list. You can now assign files to the new file group.
The Add File Group dialog opens.
The file group is added to the File Groups list.
Using Modules
Note: You must grant dedicated accounts such as LocalSystem the right to use the appropriate file
groups containing services. For example, if you create a Windows File Group where you place
all operating system executable files (including Windows services that run with the LocalSystem
account), you should grant LocalSystem the right to use this Windows file group.
Renaming a File Group
You can rename an existing file group.
In the Management Server Console, select View > Modules > Exe Explorer > Explorer > Manage File
1.
Groups.
Step Result:
Select a file group to rename.
2.
Click Rename File Group.
3.
Type a new file group name.
4.
Click OK.
5.
Click Close.
6.
Step Result:
Result:
The file group is renamed.
The File Group Management dialog opens.
The File Group Management dialog closes.
- 55 -
Page 56

PGP Endpoint Application Control
Deleting a File Group
You can delete an existing file group.
In the Management Server Console, select View > Modules > Exe Explorer > Explorer > Manage File
1.
Groups.
Step Result:
Select the file group you want to delete.
2.
Click OK.
3.
Step Result:
Deleting a file group may remove parent-child dependencies for related file authorizations.
4.
Click Close.
5.
Step Result:
Result:
The file group is removed from the database.
Note: Deleting a file group may remove parent-child dependencies for related file authorizations.
The File Group Management dialog opens.
dialog closes.. The File Group Management
The File Group Management dialog closes.
Working with User Explorer
You can use the User Explorer module to control user access to authorized software.
Many enterprises differentiate between types of users to control user access to software applications. Controlling
user access to applications reduces the risk associated with malicious software applications. The User Explorer
main window is divided in two tab pages where you can:
•
Link users and user groups with the file groups containing files authorized for users, using the File Groups by
User tab.
•
Assign specific authorizations to users and groups, synchronize domains, and change options, using the Users
by File Group tab.
About File Groups
Associating file groups with domain user groups reduces administrative burden because new user group members
inherit application authorization assigned to the parent file group.
The users, groups, and computers assigned to each domain file group are defined within domain controllers as
follows.
• You can authorize users directly or indirectly through a user group assignment.
• A user can be a member of more than one user group. A user group member is authorized to use the
applications that are approved for the associated user groups.
• Users can have indirect authorization assignments resulting from creating parent-child relationships.
• When you assign a system group or system user a file authorization, the authorization is assigned to the
associated users for every computer in your network.
• You can authorize a global user groups to use an application. Any member of a global user group is then
indirectly authorized through domain user groups to use that application.
- 56 -
Page 57

File Group by User Tab
You can use the File Group by User tab to group administrative actions based on user access.
Using the File Groups by User tab you can:
• Associate users and user groups to file groups.
• Change user, user group, and computer options.
• Send updates to computers.
• Synchronize local users, user groups, and domain member information.
• View indirect file group assignments.
The File Groups by User tab consists of the following panels:
•
Users, Groups, Computers and Domains
•
File Groups
Using Modules
Figure 21: File Groups by User Tab
The following table describes the key elements in the Users, Groups, Computers and Domains panel:
Table 20: Users, Groups, Computers and Domains Panel
Name Description
Users, Groups, Computers and
Domains field
Add Adds a name to the list of users, groups, computers, and domains
Users; Groups; Computers; Domains
check box
Users, groups, computers and domains
list
Type a name to add to the list of available users, groups,
computers, and domains.
names.
Includes or excludes from the list of available users, groups,
computers, and domains.
Lists the selected users, groups, computers, and domains.
- 57 -
Page 58

PGP Endpoint Application Control
The following table describes the key elements in the File Groups panel:
Table 21: File Groups Panel
List Name Description
Authorized
Lists authorized files groups for the user or user group selected from
the list. This list may include indirect authorizations created by parentchild relationships.
Not Authorized
Lists files groups not authorized for the user or user group selected
from the list.
Indirectly Authorized through
Domain Groups
Lists file groups and domain user groups that specify the domain user
groups that indirectly authorize other file groups to the user or user
group selected from the list.
You can expand and collapse the hierarchy structure for an object in the Name column, to browse for the specific
users or user groups that you want to create file group assignments for.
The following table describes the key elements in the Users, Groups, Computers and Domains list:
Table 22: Users, Groups, Computers and Domains List Columns
Column Description
Name The name of the user, user group, computer, or domain.
Location Windows or Novell domain; only for computers or domains.
Type Description of the list item like computer, global user, domain, and so on.
Note: The LocalSystem user group is a built-in user group used to run services on Microsoft Windows
2000, XP, 2003, and Vista ® operating systems. Windows Vista also uses the built-in LocalService and
NetworkService user groups to run services.
Assigning File Groups to Users
After creating file groups and parent-child relationships you want to use, you can assign file groups to users or
user groups.
In the Management Server Console, select View > Modules > User Explorer.
1.
Step Result:
2.
Select the File Groups by User tab.
In the Users, Groups, Computers and Domains panel, select a user or user group.
3.
4.
Select one or more file groups from the Not Authorized list.
The User Explorer window opens.
- 58 -
Page 59

Select one of the following options:
5.
Command Action
Using Modules
Authorize
Authorize All
Note: Changes to file authorizations or user membership for a file group can remove users that are indirectly
authorized for a file group.
Result:
After Completing This Task:
You can send the updated authorization(s) immediately to the client computers using the Control Panel > Tools
> Send Updates option. If you do not send updates to protected clients, they automatically receive updates when
they restart or at next user log in.
Removing File Groups from Users
You can remove file group assignments by user or user group.
1.
2.
3.
4.
5.
The user or user group is now assigned to the designated file group.
In the Management Server Console, select View > Modules > User Explorer.
Step Result:
Select the File Groups by User tab.
In the Users, Groups, Computers and Domains panel, select a user or user group.
Select one or more file groups from the Authorized list.
Select one of the following options:
The User Explorer window opens.
Adds the selected file group to the list of file groups directly authorized
for the selected user or user group.
Adds the names of file listed as Not Authorized to file groups directly
authorized for the selected user or user group.
Command Action
Remove
Remove All
Result:
After Completing This Task:
You can send the updated authorization(s) immediately to the client computers using the Control Panel > Tools
> Send Updates option. If you do not send updates to protected clients, they automatically receive updates when
they restart or at next user log in.
The selected file group is no longer authorized for the chosen user or user group.
Deletes the selected file group from the list of file groups directly
authorized for the chosen user or user group.
Deletes the file group names listed as Authorized from file groups
directly authorized for the selected user or user group.
- 59 -
Page 60

PGP Endpoint Application Control
Changing the User Explorer Options
You can access the Default Options tool from the User Explorer using a shortcut menu.
From the Management Server Console, select View > Modules > User Explorer.
1.
Step Result:
2.
Select the File Groups by User tab.
In the Users, Groups, Computers and Domains panel, right-click to select user, user group, or computer in
3.
the Name column.
Step Result:
Select Options from the shortcut menu.
4.
Step Result:
Result:
Synchronizing Local Users and User Groups
An administrator must manually import and synchronize local user and user groups to add them to the database,
when the users and groups are not part of the existing domain.
The PGP Endpoint database contains only domain users by default, so local users and groups must be added
separately.
Restriction: Only an Enterprise Administrator can synchronize Novel Organization Units (OU) local user and
user group domain information.
1.
You have a shortcut to access the Default Options dialog directly from the User Explorer module to
the Control Panel > Tools > Default Options for changing user, user group, and computer options.
In the Management Server Console, select View > Modules > User Explorer.
Step Result:
The User Explorer window opens.
A right-mouse menu appears.
The Default Options dialog opens.
The User Explorer window opens.
2.
Select the File Groups by User tab.
In the Users, Groups, Computers and Domains panel, right-click to select a local computer on the Name
3.
column.
Step Result:
Select Synchronize Local Users/Groups from the context menu.
4.
The PGP Endpoint Management Server Console shows you an error message if the computer being
synchronized is offline.
Step Result:
Result:
The local user and user groups information is synchronized and imported to the database.
A right-mouse menu appears.
The operation result appears in the Output window.
- 60 -
Page 61

The User by File Group Tab
You can use the User by File Group tab to group administrative actions based on file groups.
Using the Users by File Group tab you can:
• Associate file groups to users and user groups.
• View file group assignments.
• Change user and user group options.
The Users by File Group tab consists of the following panels:
•
File Groups
•
Associated Users
Using Modules
Figure 22: The Users by File Group Tab
The following table describes the key elements for the Users by File Group tab:
Table 23: Users by File Group Tab Elements
List Name Description
File Groups
Associated Users
Restriction: For a Microsoft Windows 2000 default configuration, some of the global users and user groups
are pre-defined members of the system groups: Administrators, Everyone, Power Users, and Users.
When a computer joins a domain, the domain group is set by default as member of the system group for that
computer. In the User Explorer module, the system groups on each computer are assigned to the same sets of
authorized system file groups.However, you can change the domain for members of system groups on a per
computer basis. File groups authorized to global members of system groups do not appear in the Indirectly
Lists the existing file groups including file groups imported when
using the Standard File Definitions or file groups created by a PGP
Endpoint administrator.
Shows the list of users or user groups directly or indirectly authorized
to use the file group select from the File Groups list.
- 61 -
Page 62

PGP Endpoint Application Control
Authorized Through Domain Groups list when you view the authorizations for a domain user or domain group,
although the authorizations may exist on a per computer basis.
The following table describes the key elements in the Associated User list:
Table 24: Associated Users List Columns
Column
Name The name of the user, user group, computer, or
domain.
Location Windows or Novell domain; only for computers or
domains.
Type Description of the list item such as computer, global
user, domain, and so forth.
Note: The LocalSystem user group is a built-in user group used to run services on Microsoft Windows
2000, XP, 2003, and Vista ® operating systems. Windows Vista also uses the built-in LocalService and
NetworkService user groups to run services.
Assigning Users to a File Group
You can assign specific permissions to local users and user groups. Only authorized applications and scripts
assigned to a user or a user group can run on the client. PGP Endpoint verifies which file group is associated with
an executable, script, or macro and whether the user has permission for the file group.
From the Management Server Console, select View > Modules > User Explorer.
1.
Step Result:
2.
Select the User by File Group tab.
In the File Groups list, select a file group.
3.
Click Add.
4.
Step Result:
Click Search.
5.
Step Result:
Select one or more user or user group names from the list.
6.
Click OK.
7.
Step Result:
Result:
The file group is assigned to the designated user or user group.
The User Explorer window opens.
The Select Group, User, Local Group, Local User dialog opens.
The Name column list the user group, user, local user group, and local user names.
The Select Group, User, Local Group, Local User dialog closes.
After Completing This Task:
You can send the updated authorization(s) immediately to the client computers using the Control Panel > Tools
> Send Updates option. If you do not send updates to protected clients, they automatically receive updates when
they restart or at next user log in.
- 62 -
Page 63

Removing Users from a File Group
You can remove individual users or groups of users from existing file groups.
From the Management Server Console, select View > Modules > User Explorer.
1.
Using Modules
Step Result:
2.
Select the User by File Group tab.
In the File Groups list, select a file group.
3.
In the Associated Users list, select one or more users or user groups.
4.
Select one of the following options:
5.
Command Action
Remove
Remove All
Result:
After Completing This Task:
You can send the updated authorization(s) immediately to the client computers using the Control Panel > Tools
> Send Updates option. If you do not send updates to protected clients, they automatically receive updates when
they restart or at next user log in.
The designated user or user group link is deleted from the file group assignment.
The User Explorer window opens.
Deletes the link for the file group assignment from the selected file
group.
Deletes the link for the file group assignment for users and user groups
from the selected file group.
Working with Database Explorer
The Database Explorer module is the primary tool for viewing and managing database records as well as
creating and maintaining file group relationships.
You can use the Database Explorer to:
• Administer file group assignments.
• Manage file groups.
• View database records.
• Administer file group relationships.
The PGP Endpoint database serves as the central repository of authorization information for:
• Authorized executable files, scripts, and macros.
• Digital signatures that uniquely identify the authorized files.
• File groups.
• File group parent-child relationships.
• Authorized users and user groups.
- 63 -
Page 64

PGP Endpoint Application Control
The Database Explorer module consists of two tab pages:
•
The Files tab shows you all files stored in the PGP Endpoint database. You can assign files to file groups.
•
The Groups tab allows you to manage file group relationships.
When working in either tab you can access the Explorer menu to manage file groups, and the Tools menu to do
database maintenance.
On the Files tab page you can see the following columns and fields:
Table 25: Files Tab Column Descriptions
Column Description
File Name Object used to filter the result query for the Database Explorer main page, used in
combination with the File Group field, which field accepts wildcard.
File Group Field used to filter the result query in the Database Explorer main page to select
the required file group from the list or use with <All>, and is used in combination
with the File Group field.
ID Unique system file identifier.
File Name Full file name.
Extension File extension.
Original Path Full path from where the file was first scanned.
File Group The assigned file group. <Not Authorized> if the file has not been assigned.
Hash The calculated digital signature as stored in the database.
File Type The file category: executable, macro, or script.
On the Groups tab page you can see the following panels and columns:
Table 26: Groups Tab Column Descriptions
Item Description
File Groups This panel shows the top-level file groups. File groups displaying a lock symbol
cannot be deleted.
Relationships This panel shows all available relationships.
Name
Shows the file group name in the File Group or Relationship panel.
Type Shows the relationship type: Child, Parent, Child (indirect), Parent
(indirect).
- 64 -
Page 65

Using Modules
The Files Tab
The Database Explorer page shows the internal system ID, filename, extension, path, file group assignment, and
parent-child relationships between file groups for each file on the Files tab.
The Database Explorer module displays a list of all the files stored in the PGP Endpoint database with a valid
digital signature.
Figure 23: Database Explorer Files Tab
Assigning Files to File Groups
After you create the necessary file groups and required parent-child relationships, you can assign executable
files, scripts, and macros to file groups.
In the Management Server Console, select View > Modules > Database Explorer.
1.
Select the file(s) to assign to a file group.
2.
Right-click the file selection.
3.
- 65 -
Page 66

PGP Endpoint Application Control
4.
Select the Assign to File Group option.
Step Result:
Figure 24: Assign Files to File Groups Dialog
The Assign Files to a File Group dialog opens.
Table 27: Assign Files to File Groups Columns
Column Description
File Name of the file including extension.
File Path Complete file path name, including the drive.
Current File Group The file group to which the file currently belongs. Files
that are not assigned to a file group are designated as <Not
Authorized>.
Suggested File Group A proposed file group based on the file name. A file having the
same name as another file in the database is suggested to belong
to the same file group as the initial file.
Select a file group from the drop-down list in the Suggested File Group column.
5.
Click OK.
6.
Result:
The file(s) are now assigned to the designated file group.
Note: You can assign a script or macro to a file group as a script, as distinguished from an executable
file.
- 66 -
Page 67

Using Modules
Changing File Assignments
You can modify file lists and group assignments periodically.
You may need to modify your file lists or assignments when:
• New software has been installed on your protected endpoints, and you wish to permit users access to the new
applications.
• Updated versions of existing software are provided, and you want users to use the new versions.
• An executable file, script, or macro has become corrupted or is no longer appropriate, and you want to
prevent users from running the application.
• Multiple users are locally authorizing files that are centrally denied, as reported in the log files.
Viewing Database Records
The Database Explorer module displays a list of the executable, script, and macro files, digital signatures, and
assigned file groups stored in the PGP Endpoint database.
From the Management Server Console, select View > Modules > Database Explorer.
1.
Step Result:
Figure 25: Database Explorer Module
2.
Select the Files tab.
3.
Type a file name in the File name field. You can use wild cards (* and ?).
4.
Select a file group from the File Group list.
Click Search.
5.
Result:
You can view the files stored in the database including the digital signature and file group assignment.
The Database Explorer page opens.
Caution: Your request may process slowly when you have a large PGP Endpoint database.
- 67 -
Page 68

PGP Endpoint Application Control
Saving the Database Records
You can save database records as a Comma Separated Value *.csv files that you can use with third-party
reporting tools.
Use the File > Save as command.
1.
Step Result:
Select the file location and name.
2.
Click Save.
3.
The Windows Save as dialog opens.
Result:
The records are saved as a Comma Separated Value *.csv file. You can import the file information to
a third party reporting tool.
The Groups Tab
You use the Groups tab to manage parent-child relationships between file groups.
Creating Parent-Child Relationships
You administer parent-child relationships between file groups using the Database Explorer Groups tab.
Prerequisites:
You must create parent and child file groups before creating parent-child relationships.
Parent-child relationships may be direct or indirect. A direct relationship exists when a file group has a direct line
of descendants between parent and child file groups. All other file group relationships are indirect relationships.
From the Management Server Console, select View > Modules > Database Explorer.
1.
Step Result:
2.
Select the Groups tab.
3.
Select the desired group from the File Groups list.
4.
To assign a relationship, by selecting a file group from the Relationships list and click one of the following:
• Add child
• Add parent
The Database Explorer page opens.
- 68 -
Page 69

• Remove
Using Modules
Step Result:
Result:
The Type column changes from Available to:
• Child
• Parent
• Child (Indirect)
• Parent (Indirect)
The parent-child relationship associations are shown with one of the following icons indicating the
relationship status:
Table 28: File Group Relationship Status Icons
Icon Description
The file group is a parent of the one selected in the File Groups panel.
The file group is child of the one selected in the File Groups panel.
The file group is an indirect parent of the one selected in the File Groups panel.
The file group is an indirect child of the one selected in the File Groups panel.
A file group created by a PGP Endpoint administrator that can be deleted or
renamed.
A file group created by the program that is blocked and cannot be deleted.
Note: You cannot delete indirect relationships, you must first proceed to the directly related file group
and then remove the relationship.
The following examples demonstrate hierarchical parent-child file group relationships.
- 69 -
Page 70

PGP Endpoint Application Control
Example:
The file group 16 Bit Applications is the parent of Accessories, and also has indirect child
Alternative and CAD software:
Figure 26: File Group Parent Relationship
The File Group Accounting is the child of Marketing who also has an indirect child Payroll:
Figure 27: File Group Child Relationship
This is the consequence of the following parent-child assignments:
Figure 28: File Group Parent-Child Relationship
When assigning the file group Payroll to a user or user group; there is also an indirect assignment
because of this relationship:
Figure 29: File Group Indirect Assignment
You can view indirect parent-child relationship assignments by using the File Groups by User tab of
the User Explorer module.
Working with Log Explorer
Every endpoint protected by PGP Endpoint generates activity logs for administrator and user-defined client
actions. The information in these logs is sent to the Administration Server and can be viewed through the Log
• Sort, add criteria, define columns, create templates, and organize information.
• Monitor the activities of administrators using audit log information.
Explorer module of the Management Server Console.
• Save the results of querying log entries.
• Generate on-demand or automatic reports containing details of granted or denied applications or administrator
With the Log Explorer module you can also:
actions.
• Generate custom reports using templates.
- 70 -
Page 71

The Log Explorer Window
The Log Explorer window is the primary mode for administrator interaction with Log Explorer module
functions.
The Log Explorer window consists of the following components:
• Navigation control bar
•
Results panel
•
Criteria/Properties panel
Using Modules
Figure 30: Log Explorer Window
Navigation Control Bar
You can use the navigation control bar to select a template or navigate and control your results.
Figure 31: Navigation/Control Bar
The following table describes the features of the navigation control bar.
Table 29: Log Explorer Navigation Control Bar
Control Description
Templates Create a new template or select from your recently used templates list, shown as a drop-
down list.
Previous Allows you to navigate backward to the previous query result list stored internally, when
you are performing multiple queries.
- 71 -
Page 72

PGP Endpoint Application Control
Control Description
Next Allows you to navigate forward to the query result list stored internally, when you are
performing multiple queries.
Query Retrieves all log entries that match the criteria defined in the current template.
Column Headers
The column headers display the title of the columns.
In addition to displaying column titles, you can use column headers to:
• Sort results to classify the results and display them in a specified order depending on the value for the log
entry (or log entries) in one or more columns.
• Show/hide columns to determine what information is displayed for each result in the report.
• Change the size of the displayed columns by dragging the column header dividers to the left or right.
• Change the order in which the columns are displayed by dragging and dropping the column titles in the
column headers.
• Group log entries to display a single report row corresponding to multiple log entries grouped according to
the values in one column.
• Display computed columns to display calculated values such as a count of the number of log entries in a
grouped result, the maximum value, minimum value, sum of values, or average value.
• You can make changes to the columns to display different information from the log entries without reexecuting the query.
• You can also use the column context menu to access the advanced query settings for the template.
Note: Any on-the-fly changes you make to the column headers are saved in the template that you are currently
using.
Show/Hide Columns
You can show or hide selected columns of log entry information.
Prerequisites:
You must select a template that displays query results in the Log Explorer window.
- 72 -
Page 73

1.
Right-click the column header row to display the field names for the fields displayed in the Results panel.
Step Result:
A right-mouse menu appears showing all the column names.
Using Modules
Figure 32: Columns Right-Mouse Menu
Click a field name showing a check mark to hide the column, or a field name without a check mark to show
2.
the column.
Result:
The names of the columns that you selected are shown or hidden in the Results panel.
Group Log Entries
You can group multiple log entries into single report rows according to the values in one or more column log
entries.
Prerequisites:
You must select a template that displays query results in the Log Explorer window.
- 73 -
Page 74

PGP Endpoint Application Control
1.
Right-click the column header row to display the field names for the fields displayed in the Results panel.
Step Result:
A right-mouse menu appears showing all the column names.
Figure 33: Columns Right-Mouse Menu
Select Group by from the menu.
2.
- 74 -
Page 75

Check the column you want to group your template query results by.
3.
Using Modules
Figure 34: Group By Option
Result:
The log report results are grouped by the column you selected. Primary groups are denoted by a green
circle shown in the column title when a column is used to group results, as illustrated by the following:
Figure 35: Column Title Primary Group
You can repeat the above procedure to create subgroups. Secondary subgroups are denoted by a blue
circle with the number 2 shown in the column title when a column is used to group results, as illustrated
by the following:
Figure 36: Column Title Subgroup
- 75 -
Page 76

PGP Endpoint Application Control
Computed Columns
You can include computed columns in your report.
Prerequisites:
You must select a template that displays query results in the Log Explorer window.
You can show additional information alongside predefined log entry columns, corresponding to additional
information stored in the client activity logs.
1.
Right-click the column header row to display the field names for the fields displayed in the Results panel.
Step Result:
A right-mouse menu appears showing all the column names.
Figure 37: Columns Right-Mouse Menu
Select the Computed Columns option.
2.
The operations supported for computed columns are:
Table 30: Computed Columns Operations
Operation Description
Count Calculates the number of log entries for a value type, such as Count (Device Class) that
shows how many log entries contain device information. Count (Any) shows the total
number of log entries.
- 76 -
Page 77

Operation Description
Min Calculates the minimum value in a column for a set of results.
Max Calculates the maximum value in a column for a set of results.
Sum Calculates the sum of numerical data for a set of results; valid only for the File Size
column.
Average Calculates the numerical average of numerical data for a set of results; valid only for the
File Size column.
Note: These operations do not apply to all columns.
3.
Select the type of calculation you want to perform from the Computed Columns sub menu.
Using Modules
Figure 38: Computed Columns Menu
- 77 -
Page 78

PGP Endpoint Application Control
4.
Select the column shown in the Results panel that contains the data you want to calculate computed values
for.
Result:
The Log Explorer window shows the calculated column results.
Clear Columns Settings
You can reset columns to original values by clearing the sort and group filters.
1.
Right-click the column header row to display the field names for the fields displayed in the Results panel.
Step Result:
A right-mouse menu appears showing all the column names.
Figure 39: Columns Right-Mouse Menu
- 78 -
Page 79

Select the Current Column option.
2.
Using Modules
Figure 40: Reset Column Groups Headings
Select Unsort or Ungroup.
3.
Result:
The selected column groupings are reset according to your selection.
Log Explorer Templates
The operation of the Log Explorer module is based on templates that allow you generate custom reports
containing results that match specific criteria.
You use the Log Explorer templates to change criteria options, column size and order, columns are displayed in
the Results panel and custom reports, and the whole sets of configurable options to create templates. A template
is a set of rules used for displaying audit and activity log data in the Log Explorer.
- 79 -
Page 80

PGP Endpoint Application Control
You can create your own templates or use predefined templates created by PGP. You can save customized
templates for future use.
Note: The list of predefined templates depends upon your license type. Predefined Templates
PGP provides a set of predefined templates used by the Log Explorer, based on commonly used audit queries.
You can use the following predefined templates.
Table 31: Log Explorer Predefined Templates
Template Name Shows Prerequisite
Applications denied today All applications that have
been denied for the day.
Applications locally authorized
today
All applications that have
been locally authorized for
the day.
Applications often denied this
week
The most often denied
applications for the week.
Audit by Administrator 'adm' All actions performed by a
specific administrator.
This only applies to user for which the
Execution Blocking option is properly
configured.
Entries are only logged when the
Execution Log option is properly
configured.
This only applies to user for which the
Execution Blocking option is properly
configured.
You must enable the Local
Authorization option for each
computer you want to audit.
This only applies to user for which the
Execution Blocking option is properly
configured.
Entries are only logged when the
Execution Log option is properly
configured.
You must change the “adm” user to an
actual administrator in the Template
Settings dialog. The result is classified
by user.
Audit for PC xyz Audit trace for a specific
computer.
You must change the “xyz” computer
to an actual computer in the Template
Settings dialog.
Audit for user 'abcd' Audit trace for a specific
user.
You must change the “abcd” user to
an actual computer in the Template
Settings dialog.
Audit today Daily audit trace. No action is required.
- 80 -
Page 81

Template Name Shows Prerequisite
Using Modules
Everything today Everything that happened for
the day.
Hardening violations this month All client hardening
violations detected for the
month.
Relaxed logon apps this week All relaxed logon
applications done for the
month.
Users denied acc. to regedit this
week
Users denied app. device this
week
The user tried to run
Windows regedit utility and
access was denied.
All applications and device
denied this for the week.
No action is required.
You must configure the Client
Hardening option.
This only applies to user for which the
Execution Blocking option is properly
configured.
Entries are only logged when the
Execution Log option is properly
configured.
You must configure the Relaxed Logon
option for each user that you want to
audit.
This only applies to user for which the
Execution Blocking option is properly
configured.
Entries are only logged when the
Execution Log option is properly
configured.
This only applies to user for which the
Execution Blocking option is properly
configured.
Users denied apps this month All applications denied by
user for the month.
- 81 -
Entries are only logged when the
Execution Log option is properly
configured.
You must enable the Device Log
option.
This only applies to user for which the
Execution Blocking option is properly
configured.
Entries are only logged when the
Execution Log option is properly
configured.
Page 82

PGP Endpoint Application Control
Create New Template
The Log Explorer provides extended capability for creating custom audit query templates.
You can created customized templates that represent specific query criteria.
From the Management Server Console, select View > Modules > Log Explorer > Template.
1.
Step Result:
Figure 41: Select and Edit Templates Dialog
The Select and edit templates dialog opens.
- 82 -
Page 83

Click New.
2.
Step Result:
The Templates settings dialog opens, which consists of three tabs:
•
General tab
•
Simple Query tab
•
Schedule tab
Using Modules
Figure 42: Template Settings Dialog
3.
Select the General tab.
Enter a name for the new template in the Template name field.
4.
Type a brief description of the template in the in the Description field.
5.
Select one of the following options:
6.
Option Description
Private
The new template will only be accessible to the owner and Enterprise
Administrators.
Published
The template can be used by any user but can only be edited by the
owner and Enterprise Administrators.
Shared
The template can be accessed, used, and edited by any user.
- 83 -
Page 84

PGP Endpoint Application Control
7.
Select the Simple Query tab to specify your query columns and criteria.
These criteria determine which log entries are shown as results in the Log Explorer report, and the
information that is displayed.
To select log entries that match certain criteria, select the column to which the criteria apply, by selecting the
appropriate check box, clicking (ellipsis) in the Criteria column, and specifying the criteria you want to
match.
You can choose which information to display for each entry, the display size of the columns and how the
results are grouped or sorted in particular ways.
Note: If you select the Count column then the results are automatically grouped.
Click Execute Query.
8.
If you click OK, the window closes and then you will need to click Execute from the Select and Edit
Templates dialog.
Step Result:
Result:
The template is stored when you execute the query.
The Template settings dialog closes and you see the results in the Log Explorer window.
Select and Edit Templates Dialog
The Select and edit templates dialog is used to select, add, edit, import, export, schedule, and run templates.
Figure 43: Select and Edit Templates Dialog
The Select and edit templates columns are described in the following table:
Column Description
Name Lists all existing templates that you can access.
Selected Indicates whether the template is currently selected.
- 84 -
Page 85

Using Modules
Column Description
Owner The template owner with full rights to use and edit the template.
Permissions Indicates whether the template can be viewed or changed by users other
than the Owner.
Scheduled Indicates whether the template is used to create automatic reports
periodically.
Format Delivery Indicates whether schedule reports are e-mailed or where the reports are
stored.
When you right-click the main panel of the Select and edit templates dialog, the Templates right-mouse menu is
shown:
Figure 44: Templates Menu
Note: The options available in the Templates menu depend on whether you have a template selected when you
opened the menu.
You can use the Templates menu to:
• Create a new template or clone an existing template.
• Change the settings of a selected template.
• Delete a selected template.
• Import templates in XML format or legacy format (*.tmpl) from the registry.
• Export a selected template to an XML file.
• Execute a query to retrieve all log entries that match the criteria defined in the currently selected template,
and display these in the Log Explorer window.
•
Filter the templates shown in the Select and Edit Templates dialog.
Filtering Templates
You can create subsets of the templates listed in the Select and Edit Templates dialog.
You can select multiple filtering criteria to narrow the focus of template sets shown, thereby reducing the number
of templates that are listed.
From the Management Server Console, select View > Modules > Log Explorer > Templates.
1.
Step Result:
The Select and Edit Templates dialog opens.
- 85 -
Page 86

PGP Endpoint Application Control
Click Filter.
2.
Step Result:
Figure 45: Filter Dialog
Select one or more of the following options:
3.
The Filter dialog opens.
Option Description
Private
Published
Shared
Non-scheduled
Scheduled
Created by others
Click OK.
4.
Result:
A subset of all available templates is shown.
Shows templates visible only to the template owner and Enterprise
Administrator.
Shows templates visible to all Management Server Console users
within your system that can only be changed by the template owner and
Enterprise Administrator.
Shows templates viewed and changed by any Management Server
Console users within your system.
Shows templates used to generate specific reports.
Shows templates automatically run periodically to generate regular
reports. These are saved in a shared folder on your network or e-mailed
to specified recipients.
Shows templates created by users other than the Enterprise
Administrator.
- 86 -
Page 87

Using Modules
Template Settings Dialog
The Template settings dialog is used to define the settings used for a new template, or a template selected from
the Select and edit templates dialog:
You can use the Template settings dialog to:
•
Name a new template using the General tab and specify who is allowed to use and edit the template by
selecting the Private, Published, or Shared options.
• Choose whether the template is used to generate reports automatically on a periodic basis by setting the
parameters in the Schedule tab and selecting Generate scheduled reports.
•
Specify complex selection and display settings for the template by using the Advanced View with the Query
& Output tab.
•
Schedule the production of periodic reports using a template using the Schedule tab.
•
Define the format of scheduled reports using the Schedule tab.
•
Choose who you want the reports to be e-mailed to using the Schedule tab.
•
Execute the query specified by the template and display the results in the main Log Explorer window.
• Save the changes made to the template settings.
Figure 46: Template Settings Dialog
- 87 -
Page 88

PGP Endpoint Application Control
General Tab
The General tab is displayed by default when the Template settings dialog opens and is used to define general
template use conditions.
You can use the General tab to:
• Define the template name in the Template name field.
• Describe the template in the Description field.
• Define the user access type as:
• Private - Template can be used only by the Owner and Enterprise Administrators.
• Published - Template can be used by any user but can only be edited by the Owner and Enterprise
Administrators.
• Shared - Template can be used and edited by any user.
Simple Query Tab
The Simple Query tab is displayed by default when the Template settings dialog opens and is used define simple
template query conditions.
Using the Simple Query tab,you can:
• Show/hide columns by selecting or deselecting the column names in the Columns list.
Step Result:
The column name moves to the top section of the list when you check it.
• Change the display size of a column by:
a) Selecting a row.
b) Clicking Size.
c) Typing a new size.
• Sort ascending/descending:
a) Click the Sort/Group by cell of the row corresponding to the appropriate results column (or highlight the
row and click Sort/Group By).
b) Choose either Ascending or Descending from the drop-down list options.
c) If you want to sort the results of the query by the values in more than one column, select the multi-column
sorting box and choose the columns that you want to sort your results by in turn.
• Group results according to the value in a particular column:
a) Click the Sort/Group by cell of the row corresponding to the appropriate results column (or select the
row and click Sort/Group By).
b) Choose the Group by option from the drop-down list.
When grouping results, all log entries in the Log Explorer Results panel/custom report are compiled into
single entries corresponding to the unique values in the column. In the following figure, results are grouped
according to their File Type value. The ellipses indicate hidden log entries and the Count column indicates
how many log entries have the same File Type.
Figure 47: Grouping Results in the Query
- 88 -
Page 89

Using Modules
• Define the column display order using Move up and Move down commands.
Schedule Tab
The Schedule tab is displayed by default when the Template settings dialog opens and is used scheduling report
generation.
The Schedule tab is used to define the following:
•
Start and end dates between which reports are automatically generated using the Schedule template.
• How often the report is generated and the pattern for production. For example, you can choose report
generation on a daily or weekly basis for specific days, every few hours, or on a monthly basis.
• Who and where the information is sent, or stored, and the format.
Restriction: You cannot schedule a log report unless have the necessary administrative rights. If you do not
have administrative rights, you will see that the options are grayed-out and you receive a warning message.
Figure 48: Schedule Tab
Scheduling a Report
Using a template, you can schedule automatic report generation by specifying the report frequency and report
recipients.
From the Management Server Console, select View > Modules > Log Explorer > Templates.
1.
Step Result:
Choose the template from the list.
2.
Click Settings.
3.
Step Result:
The Select and edit template dialog opens.
The Template settings dialog opens.
- 89 -
Page 90

PGP Endpoint Application Control
4.
Select the Schedule tab.
Select the Generate scheduled reports option.
5.
6.
In the Range of recurrence panel:
a) Select the starting date and hour.
b) You may select the End by option and select and ending date and hour.
7.
In the Delivery targets panel:
a) Click New.
Step Result:
Figure 49: Edit Target Dialog
The Edit target dialog opens.
b) Select the Method from the drop-down list.
c) If you select the Share method, click Browse.
Step Result:
The Browse for Folder dialog opens.
Figure 50: Browse for Folder
d) Select a shared folder.
- 90 -
Page 91

e) Click OK.
Using Modules
Step Result:
Figure 51: E-mail Options
The Edit target dialog opens.
f) If you selected E-mail as method, specify the To, Cc, From recipients, and Mail server (SMTP) in the
Edit target dialog.
g) Click Ping to test the connection.
h) If you select the Apply for every target option, the Mail server field for every delivery target changes
and you lose any existing information. You must be careful when setting e-mail delivery options. If not
correctly set, the report may be sent to the junk mail folder. The specified mail server should accept
anonymous connections so that the reports delivery option works properly.
i) Click OK.
Step Result:
The Edit target dialog closes. The Schedule tab of the Template settings dialog opens. The
Schedule tab is used to define whether reports are sent via mail or saved in a shared folder
on the network.
In the Format field:
8.
a) Select the file Format from the drop-down list.
b) Change the Output extension, as necessary.
In the Recurrence pattern panel:
9.
a) Select a frequency option from the list shown.
The right panel changes to reflect your selection.
Click OK.
10.
Click Close.
11.
Result:
Step Result:
The selected template is ready to generate a regularly schedule report that is archived on a shared folder
or sent by e-mail as an attachment.
- 91 -
Page 92

PGP Endpoint Application Control
Criteria
You specify the criteria you want to use for a particular template using one or more context-dependent Criteria
dialogs.
Criteria narrow the query results you. Typically, the more specific you are with your search criteria, the fewer
results are returned.
Criteria choices range from a fixed value the Criteria dialog displays to a free text data field where you can
use wild cards to delimit the criteria. Others dialogs contain Select or Search commands, for example, when
specifying criteria involves matching one or more computers or users.
The Criteria dialog list is displayed when log entry fields contain one of a fixed set of values.
Figure 52: Criteria Dialog
The free-text Criteria dialog is used to filter the query results based on any text that you type in.
Figure 53: Free-text Criteria Dialog
The time Criteria dialog is used to search for log entries that were produced, or uploaded to the Administration
Server, at a certain date/time.
Figure 54: Time Criteria Dialog
- 92 -
Page 93

Using Modules
As you define the criteria used in your template, they are displayed in the Criteria column of the Template
settings dialog.
Figure 55: Example Criteria settings
Specify Criteria Type
You can view the device access event types by specifying log entry Type criteria.
The Computer, Traced on, and Transferred on fields are shown in the logs for every event associated with
input/output device access, as described in the following table.
Table 32: Log Explorer Criteria by Type
Criteria by Type Logged Event Additional Information
MEDIUM-INSERTED Occurs when a user inserts a CD/
DVD in the computer drive or
removable media reader.
DEVICE-ATTACHED Occurs when a device is connected
to a computer.
READ-DENIED Occurs when a user attempts to
access an unauthorized device.
Device type name of the device
medium.
Volume label is the medium tag.
Medium hash is the hash number
for the inserted medium.
Other is the inserted medium
serial number.
None.
Device type name of the device
medium.
Volume label is the medium tag.
File Name is the name of the file
the user attempted to read.
User Name is the name of the
user who attempted to access the
device.
Process Name is the application
used to access the device.
WRITE-DENIED Occurs when a user attempts to
write a file to a read-only device.
- 93 -
Other is the exact access mask, in
hexadecimal format, used to access
the device.
Device type name of the device
medium.
Volume label is the medium tag.
Page 94

PGP Endpoint Application Control
Criteria by Type Logged Event Additional Information
File Name is the name of the
file the user attempted to write to
removable media.
User Name is the name of the
user who attempted to access the
device.
Process Name is the application
used to access the device.
Other is the exact access mask, in
hexadecimal format, used to access
the device.
READ-GRANTED Occurs when a user accesses an
authorized device.
WRITE-GRANTED Occurs when a user copies data to
an authorized device.
ERROR Occurs for errors created when a
user accesses or encrypts a device.
KEYBOARD-DISABLED Occurs when the user keyboard is
disabled because a keylogger may
be present.
KEYLOGGER-DETECTED Occurs when a keylogger is
detected.
MEDIUM-ENCRYPTED Occurs when removable storage
medium is encrypted.
ADMIN-AUDIT Occurs when an administrator
performs an action through the
Management Server Console.
None.
None.
Error details specific to the user
action are shown.
None.
None.
None.
User Name is the name of the
administrator.
Audit Event is the type of action
performed by the administrator.
Target is the device that
permissions were changed for.
- 94 -
Target Computer is the name of
the computer that the administrator
changed permissions for.
Target User is the user name
that the administrator changed
permissions.
Page 95

Using Modules
The Advanced View
You can use Query & Output tab to perform queries, with more complex criteria and specifications.
In the advanced view of Query & Output tab, you enter complex queries using a control hierarchy. The hierarchy
representing the query has seven top-level nodes.
Figure 56: Query & Output Tab
The top level nodes are used to:
• Filter on raw data (OR’d criteria) to specify the criteria, based on information actually in the log entries,
used to select results to be included in reports generated using the template.
• Filter on derived data (OR’d criteria) to specify the criteria, based on information derived from the
Management Server Console, used to select results to be included in reports.
• User defined aggregate functions such as the sum, minimum, maximum, or average of values contained in
the log entries.
• Grouped data to produce a single result corresponding to multiple log entries with the same value for a
particular field.
• Filter on grouped data (OR’d criteria) to determine whether the report generated using the template
displays only results where the values for the computed columns match specified criteria.
• Displayed columns to determine which columns are displayed and their order.
• Sorting to determine the order in which rows of results are displayed.
• Insert adds a new child node into the selected node of the tree. If the nodes in the group cannot be reordered
then the new node is positioned below any existing nodes.
• Delete erases a selected child node from the tree.
• Move up and Move down exchanges a selected node for one place up or down.
- 95 -
Page 96

PGP Endpoint Application Control
When nodes representing columns are selected, a set of controls is displayed to the right. These controls can be
used to select columns, criteria, and so forth.
If you are on the Advanced View, you can revert to a simple query by selecting Simple View.
Note: You cannot revert to the Simple Query tab after you have defined a complex query that cannot be
represented correctly in the Simple Query tab. In this case, the Simple View is shown as disabled.
Create a Complex Query
You select Advanced View from the Simple Query tab to change the tab name to Query & Output and create
complex queries.
You can create, save, and execute a complex query as follows.
From the Management Server Console, select View > Modules > Log Explorer.
1.
Step Result:
Click Template.
2.
Step Result:
3.
Select the Simple Query tab.
Click Advanced View.
4.
Step Result:
Add the criteria you want to use to select results, as follows:
5.
a) Click the AND’d criteria node from the top-level node Filter on raw data (OR’d criteria).
b) Click Insert.
c) Select Type from the drop-down list.
d)
Click the ellipsis to select the column and the criteria you want from the drop-down list in the Criteria
dialog.
e) Click OK when you finish selecting your criteria.
Step Result:
f) Repeat the preceding steps for derived data, by selecting criteria from the top-level node Filter on
derived data (OR’d criteria).
Select computed information you want to display, as necessary.
6.
The Log Explorer window opens.
The Select and edit templates dialog opens.
The dialog changes to show the advanced view structure and the tab name changes to Query &
Output.
The Criteria dialog closes.
Tip: For example, you may want to display a count, an average value, or a maximum value for a column
when you group results. The computed information columns are named C1, C2, and so forth.
To add a computed column:
a)
Click the top-level node User defined aggregate functions.
b) Click Insert.
c) Select the column and the calculated function, using the drop-down list.
- 96 -
Page 97

Define how you want your results grouped, as necessary. To group results:
7.
a)
Click the top-level node Grouped data.
b) Click Insert.
c) Select the column you want to group results, using the drop-down list.
Tip: You can group results by values from several columns.
Specify that the values in your computed columns match particular criteria, as necessary.
8.
a)
Click on the AND’d criteria node of the top-level node Filter on grouped data (OR’d criteria).
b) Click Insert.
c) Select the computed column and criteria you want to use.
d) Enter a corresponding value.
Choose the columns of information you want to display and the order. To select each column you want to
9.
display:
a)
Click on the top-level node Displayed columns.
b) Click Insert.
c) Select the column from the drop-down list.
Tip: You can reorder the displayed columns by clicking Move up and Move down.
Specify how you want to sort the results in the report. To add a sorting level:
10.
a)
Click on the top-level node Sorting.
b) Click Insert.
c) Select the column you want to sort by and how you want to sort, using the drop-down lists.
Using Modules
Tip: You can sort results using several columns.
Click Execute query.
11.
Step Result:
Result:
You create, save, and execute a complex query.
The Template settings dialog closes.
- 97 -
Page 98

PGP Endpoint Application Control
Criteria/Properties Panel
The Criteria/Properties panel displays the criteria used in the template and the log entry information that
corresponds to rows shown in the Results panel.
The Criteria/Properties panel has two tabs:
•
The Props tab displays the log entry information corresponding to a selected results row in the Results panel.
To copy the contents of the tab window to the Windows clipboard, you can select a row displaying log entry
results and right-click in the Props tab, then select Copy.
Figure 57: Props Tab
•
The Criteria tab displays the criteria used in the template to select log entry results shown in the Results
panel.
Figure 58: Criteria Tab
Results Panel/Custom Report Contents
The Results panel is the area of the Log Explorer window which displays and categorizes the template query
results.
You can save the template query results as a Comma Separated Value (*.csv) file using the Management Server
Console Save as command. When you generate scheduled custom reports the results, are sent to designated email recipients or stored in a designated computer directory, rather than displayed in the Log Explorer Results
panel.
Columns in Results Panel/Custom Report
You can control how column information for log entries is displayed in the Results panel, from the Template
settings dialog.
The following table describes the log entry information for columns in the Results panel and custom reports.
Note: Ellipses (…) in the Results panel indicate hidden log entries. For example, if you group a set of results
using the value in one column, then multiple values in other columns, the results are shown as […].
Table 33: Log Explorer Columns
Column Description
Audit Event Shows the type of event that triggered the audit log.
- 98 -
Page 99

Using Modules
Column Description
Audit Type Shows the type of action the administrator carried out. The can be Device
Control, Application Control, or Unspecified.
Computer Shows the name of the computer where file access was requested.
Count Shows the number of log entries hidden in a single row, accompanied by a
grouping symbol displayed on the column header. Alternatively, The may be
a computed column of data.
Custom Message Indicates the reason the application is running or not running. For example,
although authorized, the file may not run because the computer is in non-
blocking mode or because there is a file path rule authorization.
File Ext Shows the file extension.
File Group Shows the file group the executable, script, macro, or file containing a VBA
macro assignment. The can also be shown as <Not Authorized>.
File Name Shows the file that access was authorized or denied for.
File Name (full) Shows the full name (including path) of the file that access was authorized or
denied.
File Path Shows the file path for the file that access was authorized or denied.
File Type Indicates whether the file relates to a script or an application, for example
Executable or Script.
Hash Shows the digital signature of the file, created by SHA-1 (Secure Hash
Algorithm -1) that differentiate files with the same name.
NT Account Name Domain user name of the person who triggered the event, for example
MARVIN/johns or LocalSystem.
Other Shows additional information for an audit event, such as, when an
administrator erases a scheduled permission. The column may also show
parameters.
Reason Indicates whether an action was granted or denied. The can have a value of
No Permission, Granted or Denied.
SID Shows the secondary identifier for the user, for example
S-1-5-21-647365748-5676349349-7385635473-1645. The is useful
when attributing actions recorded in log files to users who have left your
organization.
Target Shows the device name for which the permissions were modified.
Target Computer Shows the name of the computer that was the target of the administrator
action.
- 99 -
Page 100

PGP Endpoint Application Control
Column Description
Target User Shows the name of the user or group that the administrator action was
applied.
Traced On (Console time) Shows the date the event occurred on the console computer.
Traced On (Endpoint time) Shows the date the event occurred on the client computer.
Traced On (UTC) Shows the date (Coordinated Universal Time) the event occurred on the client
computer.
Transferred On (Console) Shows the date the event record was transferred from the client computer to
the PGP Endpoint Administration Server.
Transferred On (UTC) Shows the date (Coordinated Universal Time) the event record was
transferred from the client computer to the PGP Endpoint Administration
Server.
Type Shows the cause of the event that triggered the log. The can be Execution
Granted, Execution Denied, or the type of audit event.
User Shows the name of the user who triggered the event. For users removed from
the Active Directory, The field displays the SID, enabling the person who
triggered an event to be identified after they have left your organization.
X.500 User Name Shows the user name in Lightweight Directory Access Protocol format.
The reflects the directory tree in which the user information is stored. For
example, the X.500 user name may be CN=John Smith, CN=Users,or
DC=Marvin.
Note: Columns with names starting Count, Min, Max, Sum and Average may also be displayed. These
contain computed data based on the values in the specified columns.
The Custom Message field displays one of the following values which are affected by the system-wide option
settings for Execution Blocking and the logging mode:
Table 34: Custom Message Field Values
Value Description
Authorized The file is known, its digital signature is recorded in the PGP Endpoint database. If
The file is assigned to a file group, The is also shown.
Denied The file was not allowed to run because it was not centrally or locally authorized.
Logon The file was allowed to run because Relaxed logon default option is enabled.
ok-dllDontCare The *.dll execution was authorized because the Execution Blocking option was
set to Ask user for *.exe only.
- 100 -
 Loading...