

Page 1

PGP Endpoint Application Control
Version 4.3.0
User’s Guide
Page 2

Page 3

Version Information
PGP Endpoint Application Control User's Guide. PGP Endpoint Version 4.3.0. Released: June 2008.
02_104_4.3.0.40
Copyright Information
Copyright © 1991–2008 by PGP Corporation. All Rights Reserved. No part of this document can be reproduced or transmitted in
any form or by any means, electronic or mechanical, for any purpose, without the express written permission of PGP
Corporation.
Trademark Information
PGP, Pretty Good Privacy, and the PGP logo are registered trademarks of PGP Corporation in the US and other countries.
IDEA is a trademark of Ascom Tech AG. Windows and ActiveX are registered trademarks of Microsoft Corporation. AOL is a
registered trademark, and AOL Instant Messenger is a trademark, of America Online, Inc. Red Hat and Red Hat Linux are
trademarks or registered trademarks of Red Hat, Inc. Linux is a registered trademark of Linus Torvalds. Solaris is a trademark or
registered trademark of Sun Microsystems, Inc. AIX is a trademark or registered trademark of International Business Machines
Corporation. HP-UX is a trademark or registered trademark of Hewlett-Packard Company. SSH and Secure Shell are
trademarks of SSH Communications Security, Inc. Rendezvous and Mac OS X are trademarks or registered trademarks of
Apple Computer, Inc. All other registered and unregistered trademarks in this document are the sole property of their respective
owners.
Licensing and Patent Information
The IDEA cryptographic cipher described in U.S. patent number 5,214,703 is licensed from Ascom Tech AG. The CAST-128
encryption algorithm, implemented from RFC 2144, is available worldwide on a royalty-free basis for commercial and noncommercial uses. PGP Corporation has secured a license to the patent rights contained in the patent application Serial Number
10/655,563 by The Regents of the University of California, entitled Block Cipher Mode of Operation for Constructing a Wideblocksize block Cipher from a Conventional Block Cipher. Some third-party software included in PGP Universal Server is
licensed under the GNU General Public License (GPL). PGP Universal Server as a whole is not licensed under the GPL. If you
would like a copy of the source code for the GPL software included in PGP Universal Server, contact PGP Support
(http://www.pgp.com/support). PGP Corporation may have patents and/or pending patent applications covering subject matter in
this software or its documentation; the furnishing of this software or documentation does not give you any license to these
patents.
Acknowledgments
This product includes or may include:
• The Zip and ZLib compression code, created by Mark Adler and Jean-Loup Gailly, is used with permission from the free Info-
ZIP implementation, developed by zlib (http://www.zlib.net). • Libxml2, the XML C parser and toolkit developed for the Gnome
project and distributed and copyrighted under the MIT License found at http://www.opensource.org/licenses/mit-license.html.
Copyright © 2007 by the Open Source Initiative. • bzip2 1.0, a freely available high-quality data compressor, is copyrighted by
Julian Seward, © 1996-2005. • Application server (http://jakarta.apache.org/), web server (http://www.apache.org/), Jakarta
Commons (http://jakarta.apache.org/commons/license.html) and log4j, a Java-based library used to parse HTML, developed by
the Apache Software Foundation. The license is at www.apache.org/licenses/LICENSE-2.0.txt. • Castor, an open-source,
databinding framework for moving data from XML to Java programming language objects and from Java to databases, is
released by the ExoLab Group under an Apache 2.0-style license, available at http://www.castor.org/license.html. • Xalan, an
open-source software library from the Apache Software Foundation that implements the XSLT XML transformation language
and the XPath XML query language, is released under the Apache Software License, version 1.1, available at
http://xml.apache.org/xalan-j/#license1.1. • Apache Axis is an implementation of the SOAP ("Simple Object Access Protocol")
used for communications between various PGP products is provided under the Apache license found at
http://www.apache.org/licenses/LICENSE-2.0.txt. • mx4j, an open-source implementation of the Java Management Extensions
(JMX), is released under an Apache-style license, available at http://mx4j.sourceforge.net/docs/ch01s06.html. • jpeglib version
6a is based in part on the work of the Independent JPEG Group. (http://www.ijg.org/) • libxslt the XSLT C library developed for
Page 4

the GNOME project and used for XML transformations is distributed under the MIT License
http://www.opensource.org/licenses/mit-license.html. • PCRE version 4.5 Perl regular expression compiler, copyrighted and
distributed by University of Cambridge. ©1997-2006. The license agreement is at http://www.pcre.org/license.txt. • BIND
Balanced Binary Tree Library and Domain Name System (DNS) protocols developed and copyrighted by Internet Systems
Consortium, Inc. (http://www.isc.org) • Free BSD implementation of daemon developed by The FreeBSD Project, © 1994-2006. •
Simple Network Management Protocol Library developed and copyrighted by Carnegie Mellon University © 1989, 1991, 1992,
Networks Associates Technology, Inc, © 2001- 2003, Cambridge Broadband Ltd.© 2001- 2003, Sun Microsystems, Inc., ©
2003, Sparta, Inc, © 2003-2006, Cisco, Inc and Information Network Center of Beijing University of Posts and
Telecommunications, © 2004. The license agreement for these is at http://net-snmp.sourceforge.net/about/license.html. • NTP
version 4.2 developed by Network Time Protocol and copyrighted to various contributors. • Lightweight Directory Access
Protocol developed and copyrighted by OpenLDAP Foundation. OpenLDAP is an open-source implementation of the
Lightweight Directory Access Protocol (LDAP). Copyright © 1999-2003, The OpenLDAP Foundation. The license agreement is
at http://www.openldap.org/software/release/license.html. • Secure shell OpenSSH version 4.2.1 developed by OpenBSD
project is released by the OpenBSD Project under a BSD-style license, available at
http://www.openbsd.org/cgibin/cvsweb/src/usr.bin/ssh/LICENCE?rev=HEAD. • PC/SC Lite is a free implementation of PC/SC, a
specification for SmartCard integration is released under the BSD license. • Postfix, an open source mail transfer agent (MTA),
is released under the IBM Public License 1.0, available at http://www.opensource.org/licenses/ibmpl.php. • PostgreSQL, a free
software object-relational database management system, is released under a BSD-style license, available at
http://www.postgresql.org/about/licence. • PostgreSQL JDBC driver, a free Java program used to connect to a PostgreSQL
database using standard, database independent Java code, (c) 1997-2005, PostgreSQL Global Development Group, is
released under a BSD-style license, available at http://jdbc.postgresql.org/license.html. • PostgreSQL Regular Expression
Library, a free software object-relational database management system, is released under a BSD-style license, available at
http://www.postgresql.org/about/licence. • 21.vixie-cron is the Vixie version of cron, a standard UNIX daemon that runs specified
programs at scheduled times. Copyright © 1993, 1994 by Paul Vixie; used by permission. • JacORB, a Java object used to
facilitate communication between processes written in Java and the data layer, is open source licensed under the GNU Library
General Public License (LGPL) available at http://www.jacorb.org/lgpl.html. Copyright © 2006 The JacORB Project. • TAO (The
ACE ORB) is an open-source implementation of a CORBA Object Request Broker (ORB), and is used for communication
between processes written in C/C++ and the data layer. Copyright (c) 1993-2006 by Douglas C. Schmidt and his research group
at Washington University, University of California, Irvine, and Vanderbilt University. The open source software license is
available at http://www.cs.wustl.edu/~schmidt/ACE-copying.html. • libcURL, a library for downloading files via common network
services, is open source software provided under a MIT/X derivate license available at http://curl.haxx.se/docs/copyright.html.
Copyright (c) 1996 - 2007, Daniel Stenberg. • libuuid, a library used to generate unique identifiers, is released under a BSD-style
license, available at http://thunk.org/hg/e2fsprogs/?file/fe55db3e508c/lib/uuid/COPYING. Copyright (C) 1996, 1997 Theodore
Ts'o. • libpopt, a library that parses command line options, is released under the terms of the GNU Free Documentation License
available at http://directory.fsf.org/libs/COPYING.DOC. Copyright © 2000-2003 Free Software Foundation, Inc. • gSOAP, a
development tool for Windows clients to communicate with the Intel Corporation AMT chipset on a motherboard, is distributed
under the GNU Public License, available at http://www.cs.fsu.edu/~engelen/soaplicense.html. • Windows Template Library
(WRT) is used for developing user interface components and is distributed under the Common Public License v1.0 found at
http://opensource.org/licenses/cpl1.0.php. • The Perl Kit provides several independent utilities used to automate a variety of
maintenance functions and is provided under the Perl Artistic License, found at
http://www.perl.com/pub/a/language/misc/Artistic.html.
Export Information
Export of this software and documentation may be subject to compliance with the rules and regulations promulgated from time
to time by the Bureau of Export Administration, United States Department of Commerce, which restricts the export and re-export
of certain products and technical data.
Limitations
The software provided with this documentation is licensed to you for your individual use under the terms of the End User
License Agreement provided with the software. The information in this document is subject to change without notice. PGP
Corporation does not warrant that the information meets your requirements or that the information is free of errors. The
information may include technical inaccuracies or typographical errors. Changes may be made to the information and
incorporated in new editions of this document, if and when made available by PGP Corporation.
Page 5

Contents
Introducing PGP Endpoint Application Control Suite
A complete portfolio of security solutions 5
What can you find in this guide 5
Conventions 6
Typographical conventions 6
Symbol conventions 6
Keyboard conventions 6
Getting Assistance 7
Getting product information 7
Contacting Technical Support 7
Chapter 1: Understanding PGP Endpoint Application Control Suite
Welcome to PGP Endpoint Application Control Suite 9
Benefits of the white-list approach 9
How does the system know which files can be run? 10
Special note concerning macros and other changing files 11
What do you gain by using PGP Endpoint Application Control Suite? 11
Chapter 2: Using PGP Endpoint Application Control Suite
What is new in this version 13
Working with the PGP Endpoint Application Control Suite system 13
Starting up the PGP Endpoint Management Console 13
Connecting to a server 13
Log in as a different user 14
The PGP Endpoint Management Console 15
Controlling your workspace 16
The PGP Endpoint Application Control Suite modules 18
The PGP Endpoint Management Console menus and tools 18
File menu 18
View menu 18
Tools menu 19
Endpoint Maintenance 19
Reports menu 21
Explorer menu 21
Window menu 21
Help menu 22
5
9
13
Chapter 3: An overview of authorization strategies
Central authorization using digital signatures 23
Central authorization by file location (path) 25
Local authorization of executables, scripts, and macros 25
Local authorization of files that are not centrally authorized 25
Preventing the malicious spread of locally authorized files 26
Deleting user’s local authorization lists 27
Sending updated authorization information to computers 27
To push updates to all computers protected by PGP Endpoint 28
To push updates to a specific computer 28
Chapter 4: Setting up PGP Endpoint administrators
How to set up a PGP Endpoint system administrator 29
To define a system administrator with full management privileges 29
To define a system administrator with restricted access privileges 30
Administrator’s access privileges 30
Chapter 5: Building a white list of authorized files
Exporting and importing file authorization settings 33
Manually export or import file authorization settings 34
Importing Standard File Definitions 34
23
29
33
PGP Endpoint Application Control User Guide 4.3.0 1
Page 6

Contents
Benefits of importing Standard File Definitions 35
To import Standard File Definitions 35
Selecting files to authorize using the Exe Explorer module 37
To select files using the Exe Explorer modules 38
Automatically scanning a computer to identify files 39
Using the Scan Explorer module 39
Using the Authorization Wizard 44
To authorize executable files using the Authorization Wizard 44
Chapter 6: Organizing files into File Groups
Creating and managing File Groups 47
To create a new File Group 47
To delete a File Group 48
To rename a File Group 48
To create a parent-child relationship between File Groups 48
Assigning executable, script, and macro files to File Groups 49
To assign files to File Groups 49
Changing file assignments 50
To change the File Group to which a file is assigned 51
To delete a file from a File Group 51
To delete a file from the PGP Endpoint Database 51
Viewing file assignments 51
To sort entries by any attribute, such as filename or File Group 52
To display a subset of the files in the database 52
Using the Groups tab 52
Chapter 7: Authorizing files by location (Path Rules)
Creating, changing, and deleting Path Rules 53
To create a new Path Rule that applies to everybody 53
To create a new Path Rule that applies to a specific user or user group 54
To modify an existing Path Rule 55
To delete a single Path Rule for a user or user group 55
To delete all Path Rules for a user or user group 55
Conventions for specifying paths in the rules 56
Defining and working with Trusted Owners 56
To define or delete a Trusted Owner 56
Trusted Owner and Path Rule example 57
Path Rules precedence 57
Chapter 8: Granting access using the User Explorer
Users and user groups 59
Direct, indirect, and not authorized File Groups 59
Assigning File Groups to users/user groups 61
To assign/remove File Groups to/from users 61
Assigning users/user groups to File Groups 62
To assign/remove users to/from a File Group 62
47
53
59
Chapter 9: Monitoring activities using the Log Explorer
Accessing the Log Explorer module 66
Log Explorer templates 67
To use an existing template 67
Predefined templates 67
To create and use a new template 68
Backing-up your templates 70
Log Explorer window 70
Navigation/Control bar 70
Column headers 71
Results panel / custom report contents 75
Criteria/Properties panel 78
Control button panel 78
Select and edit templates window 78
Template settings window 81
General tab 81
Query & Output tab 82
Criteria 82
The advanced view 84
Schedule tab 89
Using the Log Explorer module to authorize unknown files 91
To authorize a new executable, script, or macro from the Log Explorer module 91
Forcing the latest log files to upload 91
65
2 PGP Endpoint Application Control User Guide 4.3.0
Page 7

Contents
Viewing administrator activity 92
Audit events 92
Generating reports of system status and settings 93
Chapter 10: Managing files using the Database Explorer
Viewing database records 95
Using the Database Explorer module 95
To sort entries by any attribute, such as filename or File Group 96
To expand the display to show/hide other columns 96
To save this list as a CSV file 96
Synchronizing PGP Endpoint accounts with Microsoft and/or Novell accounts 97
To synchronize domain members 97
SXDomain command-line tool 97
Novell’s synchronization script 97
To synchronize user/account information from a workgroup (not a domain) 97
Performing database maintenance 98
Backing up the PGP Endpoint Database 98
Removing old database records 98
To delete old database records 98
Removing obsolete computer connections records 99
Chapter 11: Generating PGP Endpoint reports
File Groups by User 102
Users by File Group 103
User Options 104
Machine Options 105
Online Machines 106
Server Settings Report 107
101
Chapter 12: Setting PGP Endpoint system options
Default options 109
To change default option settings 109
Default options for protected servers and computers 110
Client Hardening 111
eDirectory translation 111
Endpoint status 111
Execution blocking 112
Execution eventlog 112
Execution log 113
Execution notification 113
Local Authorization 113
Log upload interval 114
Log upload threshold 114
Log upload time 114
Log upload delay 114
Server address 114
Default options for users and user groups 115
Execution blocking 115
Execution eventlog 116
Execution log 116
Execution notification 116
Macro and Script protection 116
Relaxed logon 117
Relaxed logon time 117
Options that apply to specific machines or specific users 117
To override default option settings 118
Determining which option setting takes precedence 119
Precedence rules for computer options 119
Precedence rules for user and user group options 120
Precedence rules for options with both computer and user/user group values 122
Precedence rules for the Execution Blocking option 124
Informing client computers of changes 125
95
109
Chapter 13: Windows Updates and other tools
PGP Endpoint Authorization Service Tool 127
Microsoft Software Update Services and Windows Server Update Services 127
What does the PGP Endpoint Authorization Service Tool do? 127
Installing the PGP Endpoint Authorization Service Tool 129
Configuring the PGP Endpoint Authorization Service Tool 129
Versatile File Processor tool 131
127
PGP Endpoint Application Control User Guide 4.3.0 3
Page 8

Contents
Command line parameters 131
Usage notes 132
Examples 134
File Import/Export Tool 134
Command line parameters 134
Usage notes 135
Examples 135
Chapter 14: Inspecting your endpoints and authorizing software
The ‘Discover’ procedure 137
Exact match: ‘High-control foundation’ 138
Procedure 138
Authorizing your present installation 138
Pros and cons 139
Pragmatically: ‘Average foundation’ 139
Procedure 139
Authorizing your present installation 140
Pros and cons 140
Maintenance phase 140
Frequently changing programs 141
Operating system updates and patches 141
New software installations 141
Software updates 141
Changing from a test to a production environment 141
Identifying DLL dependencies 142
What are DLLs? 142
What are dependencies? 142
How are DLLs dependencies identified? 142
How to integrate dependencies with PGP Endpoint 143
Appendix A: PGP Endpoint’s Architecture
The whitelist approach 145
Concepts 145
Advantages/disadvantages of using a white list 145
Whitelist and blacklist examples 146
A complete security solutions portfolio 146
PGP Endpoint Application Control Suite 147
PGP Endpoint Device Control 147
PGP Endpoint for Embedded Devices 147
PGP Endpoint components 147
The PGP Endpoint Database 148
The PGP Endpoint Administration Server 148
PGP Endpoint Client Driver 150
Protocol and ports 152
Operation overview 153
Key usage 153
If the PGP Endpoint Administration Server is not reachable 154
The PGP Endpoint Management Console 157
Administration Tools 159
Network communications 160
PGP Endpoint Client Driver communications 160
PGP Endpoint Administration Server communications 160
How PGP Endpoint works 160
PGP Endpoint Application Control Suite 160
PGP Endpoint Device Control 162
145
137
Glossary
Index of Figures
Index of Tables
Index
167
171
175
176
4 PGP Endpoint Application Control User Guide 4.3.0
Page 9

Introducing PGP Endpoint Application Control Suite
The real world can be harsh: Trojans, worms, viruses, hackers, and even careless or disgruntled employees
threaten your company’s data and structure. They can undermine your business with extraordinary speed, and
the cost and damage to applications, data, confidentiality, and public image, can be immense.
Your role, until now, has been to try to anticipate malicious code and actions before they occur and to react to
them when they do — in a never-ending expenditure of time, money, and energy.
PGP Endpoint solutions stop that futile game for good. With PGP Endpoint software, you define what is allowed
to execute on your organization’s desktops and servers, and what devices are authorized to copy data.
Everything else is denied by default. Only authorized programs and devices can run on your network, regardless
of the source. Nothing else can get in. Nothing.
What makes PGP Endpoint so revolutionary is that it is proactive, not reactive. You are empowered, not
encumbered. You lower and raise the drawbridge. You open and close the borders. You create calm in a chaotic
world.
A complete portfolio of security solutions
PGP offers a complete portfolio of solutions for regulating your organization’s applications and devices.
> Our PGP Endpoint Application Control Suite, which includes any of the following programs:
> PGP Endpoint Application Control Terminal Services Edition extends application control to Citrix or
Microsoft Terminal Services environments, which share applications among multiple users.
> PGP Endpoint Application Control Server Edition delivers application control to protect your
organization’s servers, such as its Web server, email server, and database server.
> PGP Endpoint Device Control prevents unauthorized transfer of applications and data by controlling
access to input/output devices, such as memory sticks, modems, and PDAs.
> PGP Endpoint for Embedded Devices moves beyond the traditional desktop and laptop endpoints and
onto a variety of platforms that include ATMs, industrial robotics, thin clients, set-top boxes, network area
storage devices and the myriad of other systems running Windows XP Embedded.
What can you find in this guide
This guide explains how to use PGP Endpoint Application Control Suite (PGP Endpoint Application Control, PGP
Endpoint Application Control Terminal Services Edition or PGP Endpoint Application Control Server Edition - as
explained in the previous section) to enable your organization’s servers and computers to only run safe, approved
applications.
> Chapter 1: Understanding PGP Endpoint Application Control Suite, provides a high-level overview of the
solution, how it works and benefits your organization.
> Chapter 2: Using PGP Endpoint Application Control Suite, shows a high-level view of system modules,
menus, and tools.
> Chapter 3: An overview of authorization strategies, describes the various file tools and ways you can control
file execution.
> Chapter 4: Setting up PGP Endpoint administrators, tells how to set up two types of system administrators —
with full or limited privileges.
PGP Endpoint Application Control User Guide 4.3.0 5
Page 10

> Chapter 5: Building a white list of authorized files, describes four ways to load definitions of allowable
executables, scripts and macros into the system.
> Chapter 6: Organizing files into File Groups, describes the process of setting up File Groups and adding files
to those groups.
> Chapter 7: Authorizing files by location (Path Rules), describes the process of using pathname rather than
digital signature to define allowable files.
> Chapter 8: Granting access using the User Explorer, describes two key ways to give users privileges to use
executable files, scripts and macros.
> Chapter 9: Monitoring activities using the Log Explorer, describes the logs of application-execution activity
and explains how to verify the log of the system administrator activities.
> Chapter 10: Managing files using the Database Explorer, describes the database in full as well as routine
housekeeping functions such as system cleanup and backup.
> Chapter 11: Generating PGP Endpoint reports, describes the HTML reports that can be easily created by the
system.
> Chapter 12: Setting PGP Endpoint system options, describes the various options that govern system
operation at user, machine, group, or global levels.
Introducing PGP Endpoint Application Control Suite
> Chapter 13: Windows Updates and other tools, explains how you can use PGP Endpoint with the
technologies provided with Windows.
> Chapter 14: Inspecting your endpoints and authorizing software, outlines recommended procedures for using
PGP Endpoint in the context of a total security strategy.
> Appendix A: PGP Endpoint’s Architecture provides you with an overview of PGP Endpoint solution
architecture.
> The Glossary and indexes (Index of Figures, Index of Tables, and Index) provide quick access to specific
terms or topics.
Conventions
Typographical conventions
Different typefaces have been used to outline special types of content throughout this guide:
Italic text Represents fields, menu options, and cross-references.
This style Shows messages or commands typed at a prompt.
SMALL CAPS Represent buttons you select.
Symbol conventions
The following symbols emphasize important points:
Take note. You can find here more information about the topic in question. These may relate to
other parts of the system or points that need particular attention.
Shortcut. Here is a tip that may save you time.
Caution. This symbol means that proceeding with a course of action introduces a risk — data
loss or potential problem with the operation of your system, for example.
Keyboard conventions
A plus sign between two keyboard keys means that you must press those keys at the same time. For example,
ALT+R means that you hold down the ALT key while you press R.
6 PGP Endpoint Application Control User Guide 4.3.0
Page 11

Introducing PGP Endpoint Application Control Suite
A comma between two or more keys means you must press each of them consecutively. For example ‘Alt, R, U’
means that you press each key in sequence.
Getting Assistance
For additional resources, see these sections.
Getting product information
Unless otherwise noted, the product documentation is provided as Adobe Acrobat PDF files that are installed with
PGP Endpoint. Online help is available within the PGP Endpoint product. Release notes are also available, which
may have last-minute information not found in the product documentation.
Once PGP Endpoint is released, additional information regarding the product is entered into the online
Knowledge Base available on the PGP Corporation Support Portal (https://support.pgp.com).
Contacting Technical Support
> To learn about PGP support options and how to contact PGP Technical Support, please visit the PGP
Corporation Support Home Page (http://www.pgp.com/support).
> To access the PGP Support Knowledge Base or request PGP Technical Support, please visit PGP Support
Portal Web Site (https://support.pgp.com). Note that you may access portions of the PGP Support
Knowledge Base without a support agreement; however, you must have a valid support agreement to
request Technical Support.
> For any other contacts at PGP Corporation, please visit the PGP Contacts Page
(http://www.pgp.com/company/contact/index.html).
> For general information about PGP Corporation, please visit the PGP Web Site (http://www.pgp.com).
> To access the PGP Support forums, please visit PGP Support (http://forums.pgpsupport.com). These are
user community support forums hosted by PGP Corporation.
PGP Endpoint Application Control User Guide 4.3.0 7
Page 12

Page 13

Chapter 1: Understanding PGP Endpoint Application
Control Suite
This chapter introduces PGP Endpoint Application Control Suite and explains how it benefits your organization.
We explain:
> How PGP Endpoint Application Control Suite fundamentally differs from most anti-virus and intrusion-
detection systems on the market.
> How PGP Endpoint Application Control Suite streamlines your costs and network administration, adding
higher levels of protection.
> How it protects your environment enforcing proper use of user’s applications.
> Enhance productivity levels not allowing unauthorized and unlicensed program installations.
> The basic components of the PGP Endpoint Application Control Suite solution and how each one contributes
to the security strategy.
> What happens behind the scenes to make PGP Endpoint Application Control Suite such a powerful,
effective, yet easy-to-use solution.
> How to navigate through the different screens and options.
Welcome to PGP Endpoint Application Control Suite
If you are tired of worrying about viruses, worms, and other malicious code… tired of keeping up with illegal or
unlicensed software that finds its way onto crucial servers or computers… rest easy. Now you have PGP
Endpoint.
PGP Endpoint Application Control Suite is a unique product that provides a new approach to network security.
Rather than specifying what cannot run (an approach that has administrators scrambling to defend themselves
against every new threat that comes along), PGP Endpoint security specifies what can run. Nothing else works,
period. That means no matter how inventive and evolved some new malicious code might be, it simply does not
run. You are protected.
Using PGP Endpoint Application Control Suite ensures that:
> Your users cannot execute programs such as hacking tools, games, or unlicensed software.
> You eliminate the threats posed by Trojans, Worms, and executable viruses, both known and unknown.
PGP Endpoint Application Control Suite works in exactly the opposite way most security and antivirus products
on the market do. Rather than creating a ‘black list’ of files that are not allowed to run, PGP Endpoint uses a
‘white list’ of executable files, scripts, and macros that are allowed to run.
Benefits of the white-list approach
PGP Endpoint Application Control Suite innovative ‘white list’ approach offers several significant benefits (for a
complete description see Appendix A: PGP Endpoint’s Architecture on page 145):
> Greater protection. Even if dozens of new viruses, worms, and Trojans have been created since you
installed the software, you are protected. Unknown and unauthorized executable files, regardless of their
origin — email, Internet, DVD or CD — simply do not run.
PGP Endpoint Application Control User Guide 4.3.0 9
Page 14

> Early interception. For most malicious code, the application cannot even be installed, because the self-
install program itself is an executable file that does not run. That means requests for execution are
intercepted long before there is any chance of running them.
> Simple maintenance. You do not have to keep loading updates just to keep pace with the endless stream of
new viruses. You do not even need to know exactly what software is installed on every protected system.
You only have to monitor what is known and approved, not everything else.
In short, with PGP Endpoint, you have a robust shield protecting your organization’s servers and computers. For
a complete description of the advantages and disadvantages of white lists, see Appendix A: PGP Endpoint’s
Architecture on page 145.
Chapter 1: Understanding PGP Endpoint Application Control Suite
How does the system know which files can be run?
As a PGP Endpoint administrator, you can specify which executable files, scripts, and macros each user can
activate, in a simple three-stage process:
1. Build your white list of executables, scripts, and macros.
Collect files by using built-in tools to scan the servers and computers you wish to protect, or import standard
file definitions provided by PGP for popular Windows 2000, Windows 2000 Server, Windows XP, Windows
2003 Server, and Vista operating systems (see Importing Standard File Definitions on page 34).
The system calculates a unique signature (a ‘hash’) for each executable file, script, or macro, and uses this
distinctive signature to identify allowable files.
2. Organize the files into File Groups.
To streamline administration, you can logically organize files into File Groups, such as grouping together all
applications that would be needed by your Webmaster, all database management applications used by your
database administrators, or your payroll program.
A single File Group cannot contain both executables and scripts/macros.
3. Link users with their allowed File Groups.
Having defined File Groups, Users, and User Groups, you can now specify not only which executables,
scripts and macros can be used, but by whom. Once a file has been centrally authorized and it is
immediately available to be run by all authorized users.
When a user wants to run an executable, script or a macro, the following actions automatically take place:
1. If the file is an executable, it is identified as such by the operating system and loaded in memory ready
for execution (but not actually executed yet!).
2. If the file is identified by PGP Endpoint as an executable, script or macro, the entire file content is
checked to determine the digital signature (hash) before it is allowed to be executed by the operating
system.
PGP Endpoint can only recognize and centrally manage the following types of scripts and
macros:
VBScripts and JScripts that are interpreted by the Windows Script Host (using cscript.exe and
wscript.exe). These scripts are text files written using the grammar and semantics of the
appropriate language. To be recognized by PGP Endpoint your script files must have the
appropriate file extension — usually .vbs or .js.
Visual Basic scripts (VBA macros) that execute within Microsoft Office and other host
applications. These are embedded in Word documents, Excel spreadsheets, and so on.
Visual Basic scripts (VBA macros) can be embedded in many Microsoft Office formats, such as
.doc, .dot, .xls, and .ppt files. In this case, a hash is created for the whole file, not just the
macro.
10 PGP Endpoint Application Control User Guide 4.3.0
Page 15

Chapter 1: Understanding PGP Endpoint Application Control Suite
3. The digital signature is compared to those of files authorized to run (in the white list).
4. If and only if, the file corresponds exactly to a file on the white list, i.e. their digital signatures are
identical, and the file is authorized for execution by the user or machine that has requested it, the file is
executed.
If you are using PGP Endpoint Application Control Server Edition, the solution protects your organization’s
servers and, by nature, your ‘users’ are system administrators. For the purposes of this guide, we call them all
users, even though for some of our products they are not end-users in the typical sense of the word. PGP
Endpoint recognizes both local and domain users and groups.
Now you can have total control over applications running on your organization’s servers. Authorized
administrators and users can work with their applications, but they cannot run any other executable files, such as
viruses, Spyware, any unauthorized scripts and macros, or other inappropriate applications — whether loaded
deliberately or accidentally.
Special note concerning macros and other changing files
Macros embedded in other files (for example Microsoft Word or Excel files) are special cases. These files may be
constantly changing since once loaded in memory any user can edit them.
Consider, for example, the case of a Word document containing a macro. This file is loaded into memory ready to
be run by the user with a hash that has been previously calculated, assigned to a File Group, and authorized to
be used. This is, thus, a legal file and should be granted the right to run. Unfortunately, this file can also be edited
and saved back to the hard disk. Once this action done, the file does not correspond to the hash previously
calculated when first authorized. Next time this, previously legal file, is run, its access will be denied since the
hash does not matches what was originally computed.
You, as a PGP Endpoint administrator, will be constantly confronted to this type of challenge when authorizing
this kind of embedded macro. The only possible solution to avoid this sort of conflict is to keep the file content as
it was when its hash was initially calculated. Remember: PGP Endpoint Application Control bases its White List
control in static digital firm digests. To do this you MUST assign Read-Only permissions to these types of files;
this will stop the user from saving back the modified files and keeping its hashes intact.
What do you gain by using PGP Endpoint Application Control Suite?
We have already described the benefits of a white-list approach versus the typical black-list approach — see also
the Appendix A: PGP Endpoint’s Architecture on page 145. Looking further, PGP Endpoint offers a wide range of
features and benefits:
> Strong file identification — PGP Endpoint works by examining each executable, script, or macro file that
an administrator wishes to centrally authorize and calculating a unique digital signature based on the entire
contents of that executable. This digital signature is known as a hash. Even the slightest change to a file
would result in a different hash, which means the altered file would not be able to run.
> Software version control — Because the solution recognizes files by content rather than by name or
location, you can manage different versions of applications as different files. As a result, you cannot only
control which applications are allowed but also which versions.
For example, you may decide that an older version of an application is valid up to a certain date. Old and
new versions are valid during a transitional period, and only the new version may run after a designated
date.
> Reduced total cost of ownership — Is your organization buying software licenses on a per-computer basis
rather than a per-user basis? Are you, therefore, paying for idle computers, or duplicate licenses for a single
user, just to ensure compliance with software licensing terms?
If so, then you will appreciate the ability to manage application access at the user level. Since you always
know exactly how many users are authorized to use each application, you can reduce the total number of
licenses: one per user instead of one per computer.
> Preventing the installation of undesirable programs — Not only does PGP Endpoint stop undesirable
programs from running — in most cases, it prevents them from even being installed. That is because the
installation program itself is an executable file. It does not run, because it is not authorized.
PGP Endpoint Application Control User Guide 4.3.0 11
Page 16

> Easy installation — Despite being an extremely powerful security tool, PGP Endpoint is simple to install. A
wizard guides you through the installation process, prompting you for any information required.
> The ability to grant or revoke access on the fly — The administrator may grant or revoke access to
executables, scripts and macros ‘on the fly’. Users do not have to reboot or log off and then log on again for
the changes to take effect.
> A log trail of all system activity — Each time a user requests to run a file, a log entry is created. You can
access and maintain the File Group assignment details for the respective files — if required — directly from
the log.
> Integration with industry standard databases — PGP Endpoint integrates with the powerful Microsoft
SQL Server and MSDE databases, which offer speed, security, robustness, and interoperability with other
applications. With these databases, there is virtually no limit to the number of servers and/or computers that
you can protect.
> Non-stop protection — Although PGP Endpoint is a network-based solution, its power extends to off-line
systems as well. Whenever a server or computer is connected to the network, PGP Endpoint sends the latest
authorization information. If that machine is later isolated from the network—intentionally or otherwise—it is
still managed by the authorization information stored in a secure location on its hard disk. Whenever the
computer is reconnected to the network, it automatically receives an update.
> The ability to manage applications by their locations — Their unique digital signatures (hashes) identify
most executable files, but you can also inform the program that all files in secure locations are inherently
safe. ‘Path rules’ enable you to define approved applications based on their location rather than on binary
hash calculations.
Chapter 1: Understanding PGP Endpoint Application Control Suite
> Provisional and limited local override of application denial — You can opt to allow users to authorize an
application locally if it is not on the centralized master list of previously approved executables, scripts and
macros. The system displays its characteristics and potential security risks, grants provisional access, and
logs the activity. To prevent the spread of malicious code, such as Trojan horses, the system can
automatically disable the application if it appears on a certain number of computers in a given period.
> Protection from unauthorized scripts — Optionally, PGP Endpoint can control the execution of VBScripts,
Microsoft Office VBA macros, and JScripts. Depending on the settings, the execution can be authorized,
prevented altogether, or the user can be prompted with a dialog every time a script attempts to execute on
his computer.
> Windows Server Update Services support — You can deploy automatic update services inside your own
network: All Microsoft Authorized updates and fixes can be automatically authorized, their hash created, and
the database updated.
> Encrypted client-PGP Endpoint Administration Server communication using TLS protocol — Client -
PGP Endpoint Administration Server and intra PGP Endpoint Administration Server communication can,
optionally, be done using TLS protocol which encrypts all communications using a certificate signed with a
private key. If this option is not activated, communication messages are signed using the private/public key
pair generated during setup. See the PGP Endpoint Setup Guide for a complete description.
Rest easy. You have PGP Endpoint.
12 PGP Endpoint Application Control User Guide 4.3.0
Page 17

Chapter 2: Using PGP Endpoint Application Control
Suite
This chapter provides a high-level view of what it is like to work with PGP Endpoint. It includes:
> The administrative tasks that determine system operation.
> The menu selections available to authorized administrators.
> The five key modules of the PGP Endpoint management console.
What is new in this version
See the Readme.txt file located on your CD installation disk for a full list of features and changes.
Working with the PGP Endpoint Application Control Suite system
From the PGP Endpoint Management Console, you can perform all the tasks required to configure, monitor, and
maintain the solution — its database records, executable files, authorizations, and system activity.
Using a familiar Windows-styled interface with pull-down menus, pop-up dialog boxes, and Outlook-style screen
displays, you can easily perform the following tasks:
> Build a list of executable files, scripts and macros that you wish to allow.
> Define authorizations for the identified executable files (applications), scripts, and macros.
> Organize files into File Groups and manage those File Groups. You can also create a parent-child
relationship easing the task of classifying all the applications that use common components.
> Define individuals and groups who have permission to use applications.
> Associate File Groups with User Groups to define access privileges.
> Manage and maintain the database of authorizations.
> Monitor a record of system activity and settings.
> Set and change a variety of system options.
If you have already installed solution components by using the simple installation wizards or following the steps in
the PGP Endpoint Setup Guide, then you are ready to get going.
Starting up the PGP Endpoint Management Console
As with nearly all Windows programs, you start the PGP Endpoint Management Console by clicking on the
Windows START button and selecting Programs PGP Endpoint PGP Endpoint Management Console. You
can also create a shortcut in Windows desktop for your convenience.
Connecting to a server
When you initially launch the PGP Endpoint Management Console, you need to connect to a PGP Endpoint
Administration Server. The Connect to PGP Endpoint Administration Server dialog is displayed.
PGP Endpoint Application Control User Guide 4.3.0 13
Page 18

Figure 1. Connecting to the PGP Endpoint Administration Server
To connect to a server, follow these steps
1. Select the PGP Endpoint Administration Server to which you want to connect from the list (if available)
or type in the name. You can use the IP address, the NetBios name or the fully qualified domain name
of the PGP Endpoint Administration Server. If your Server is configured to use a fixed port, you must
append the port number to the server name as in this example:
secrsrv.secure.com[1234]
Chapter 2: Using PGP Endpoint Application Control Suite
Please refer to the description of the registry key settings of the PGP Endpoint Administration
Server in the PGP Endpoint Setup Guide for more information about how to configure the
server to use a fixed port.
When the PGP Endpoint Administration Server is installed on a Windows XP SP2 or Windows
2003 SP1 computer, you should configure the Windows XP Firewall to allow the communication
between the Server and the Console. See Appendix E in the ‘PGP Endpoint Setup Guide for
more details.
2. Select to login as the current user or as a different one using the Login as option.
3. Click on the OK button. The PGP Endpoint Management Console screen appears, as shown on Figure
3.
If the PGP Endpoint Management Console screen does not appear, an error message is displayed. This
indicates that there were problems when all the internal tests were carried out. Check that you have the required
permissions to connect to that server, on domain rights and PGP Endpoint Management Console rights level.
See Chapter 4: Setting up PGP Endpoint administrators on page 29.
Log in as a different user
By default, the system establishes the connection using your own credentials.
A local account is created on a single computer and is stored in its Security Account Manager
(SAM) database on its hard disk. Domain accounts are created on the domain controller and
stored in the Active Directory. To log onto the local machine, you need a local account. To log
onto the domain you need a domain account.
If you choose to click on the Login as option, instead of using your own credentials you must enter the user name
and password. Prefix the user name by a workstation name and slash for local accounts and by a domain name
and slash for domain accounts (e.g. DOMAIN1\ADMIN1).
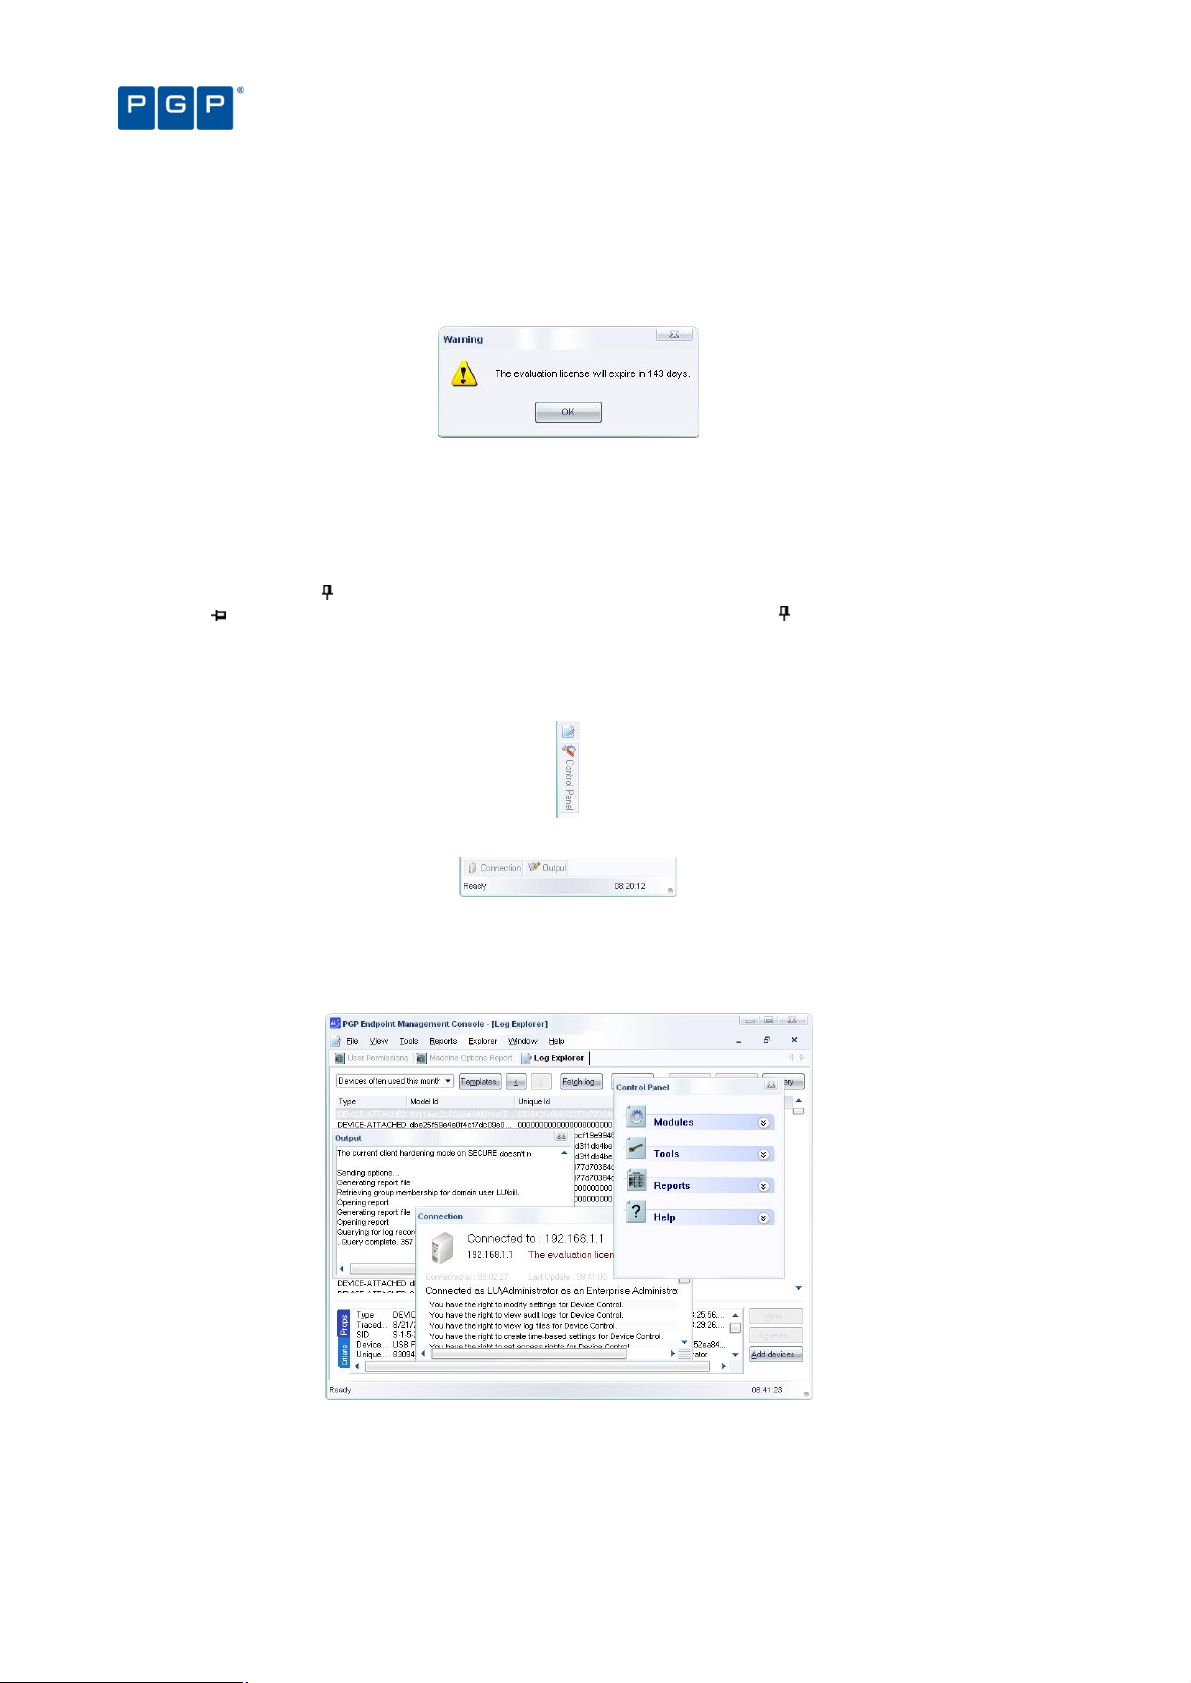
Once the connection established, the user’s credentials are shown in the Output panel while the Connection
panel show the license details. If you do not see these windows, select the VIEW CONNECTION and/or VIEW
OUTPUT command:
14 PGP Endpoint Application Control User Guide 4.3.0
Page 19

Chapter 2: Using PGP Endpoint Application Control Suite
Figure 2. Connection and Output window
The PGP Endpoint Management Console
When you log onto the PGP Endpoint system, the system displays the program’s user interface. From this
screen, you are only a click or two away from the full range of configuration and management functions. Take a
moment to get familiar with the menu selections, tools, panels, and modules available from this screen as shown
in the following image.
Figure 3. The main screen
The Menu bar in the upper part of the window let you choose different functions and commands. Some of these
depend on the module you are working with. As with nearly all Windows programs, you can use the ALT key to
have immediate access to the different commands. You can use, for example, Alt+R+O to get an HTML Online
Machine report.
In the left part of the window, you find the Control Panel from where you can directly select the available modules
and options without using the menu. If you do not see it, use the View Control Panel command to display it.
The Main Window panel changes its contents depending on the module selected in the left panel. You can refine
even more the resulting information in some modules. Every time you open a module, its stays open — arranged
in stacked tabs — until explicitly closed. You can use the Window command of the menu bar to organize your
workspace.
The Connection window shows rights information regarding the current user. Use the sidebars to navigate
through the text. If you do not see it, use the View Connection to display it.
The Output window shows you important information messages. Here you can find those messages generated by
updates sent to the clients, file fetching, I/O failures, and error messages. Use the sidebars to navigate through
the text. If you do not see it, use the View Output command to display it.
PGP Endpoint Application Control User Guide 4.3.0 15
Page 20
Chapter 2: Using PGP Endpoint Application Control Suite
The Status bar, at the bottom of the screen, shows important information about the condition of the console. If
you do not see it, use the View Status Bar to display it.
If you are using a time-limited license for PGP Endpoint then once a day, when starting the management console,
you get the following screen informing you of your license status:
Figure 4. License status warning
This dialog contains the same data reported to the Connection window in the main screen. This event also
generates a log that you can see using Windows Event Viewer.
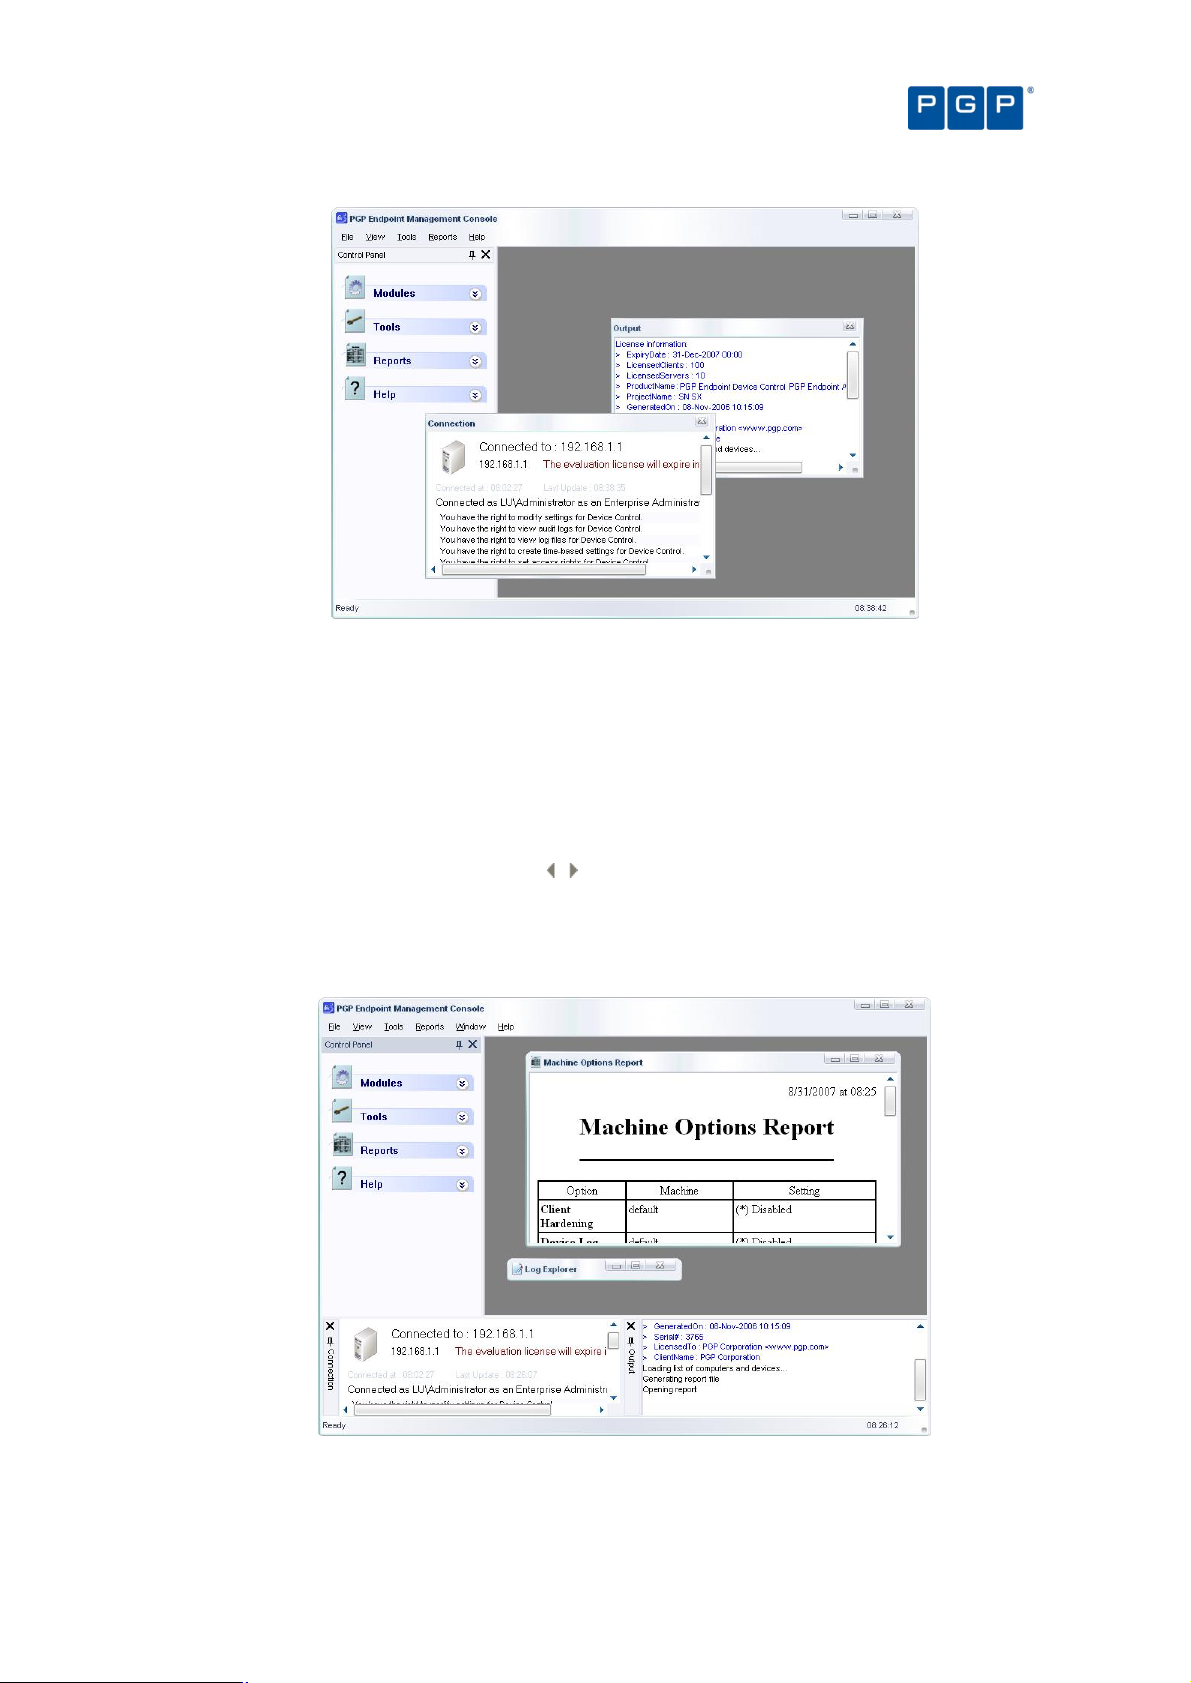
Controlling your workspace
You can use the Pin icon to ‘pin down’, or ‘park’ the Control Panel, Connection, or Output window. The icon
changes to . The alternative is to ‘float’ the window, in which the icon changes to .
In the Dock mode, the panel hides itself as a tab next to the program’s window border leaving more space for the
main window panel. In the Floating mode, the windows can be moved to any position in the screen, sharing the
working area with whatever module(s) is opened.
Figure 5. Docked Control panel
Figure 6. Docked window
Click again on the pin to ‘float’ again the window panel.
You can resize and drag the windows panes to whatever zone you prefer as in the following example:
Figure 7. Floating Control panel
16 PGP Endpoint Application Control User Guide 4.3.0
Page 21
Chapter 2: Using PGP Endpoint Application Control Suite
Figure 8. Floating windows
Double click on the window’s title bar to dock it to its previous position once more. You can also glide the window
to any edge until it docks itself — guide yourself with the rectangle shape preview before letting go the mouse
button.
All open modules occupy the main window area and can be ‘floated’ or ‘docked’ at will. You can use the Window
menu to arrange the opened module’s windows in a tile, cascade, or iconize mode. Each window can also be
closed, maximized, or iconized independently as needed. If several modules are already open (as shown in
Figure 7), you can choose between them using the stacked tab bar.
You can reorder the windows located at the main window panel by dragging them using their title bar, or traverse
them using the Scroll Left or Scroll Right icons .
To close the active window, click on its cross icon, right-click on the title bar and select Close, or press Ctrl+F4.
To minimize a window, right-click on the title bar and select Minimize. You can also use the Restore and
Maximize icons and commands as on any Windows program.
Figure 9. Minimized windows
PGP Endpoint Application Control User Guide 4.3.0 17
Page 22
Item Use to…
Item Use to…
Chapter 2: Using PGP Endpoint Application Control Suite
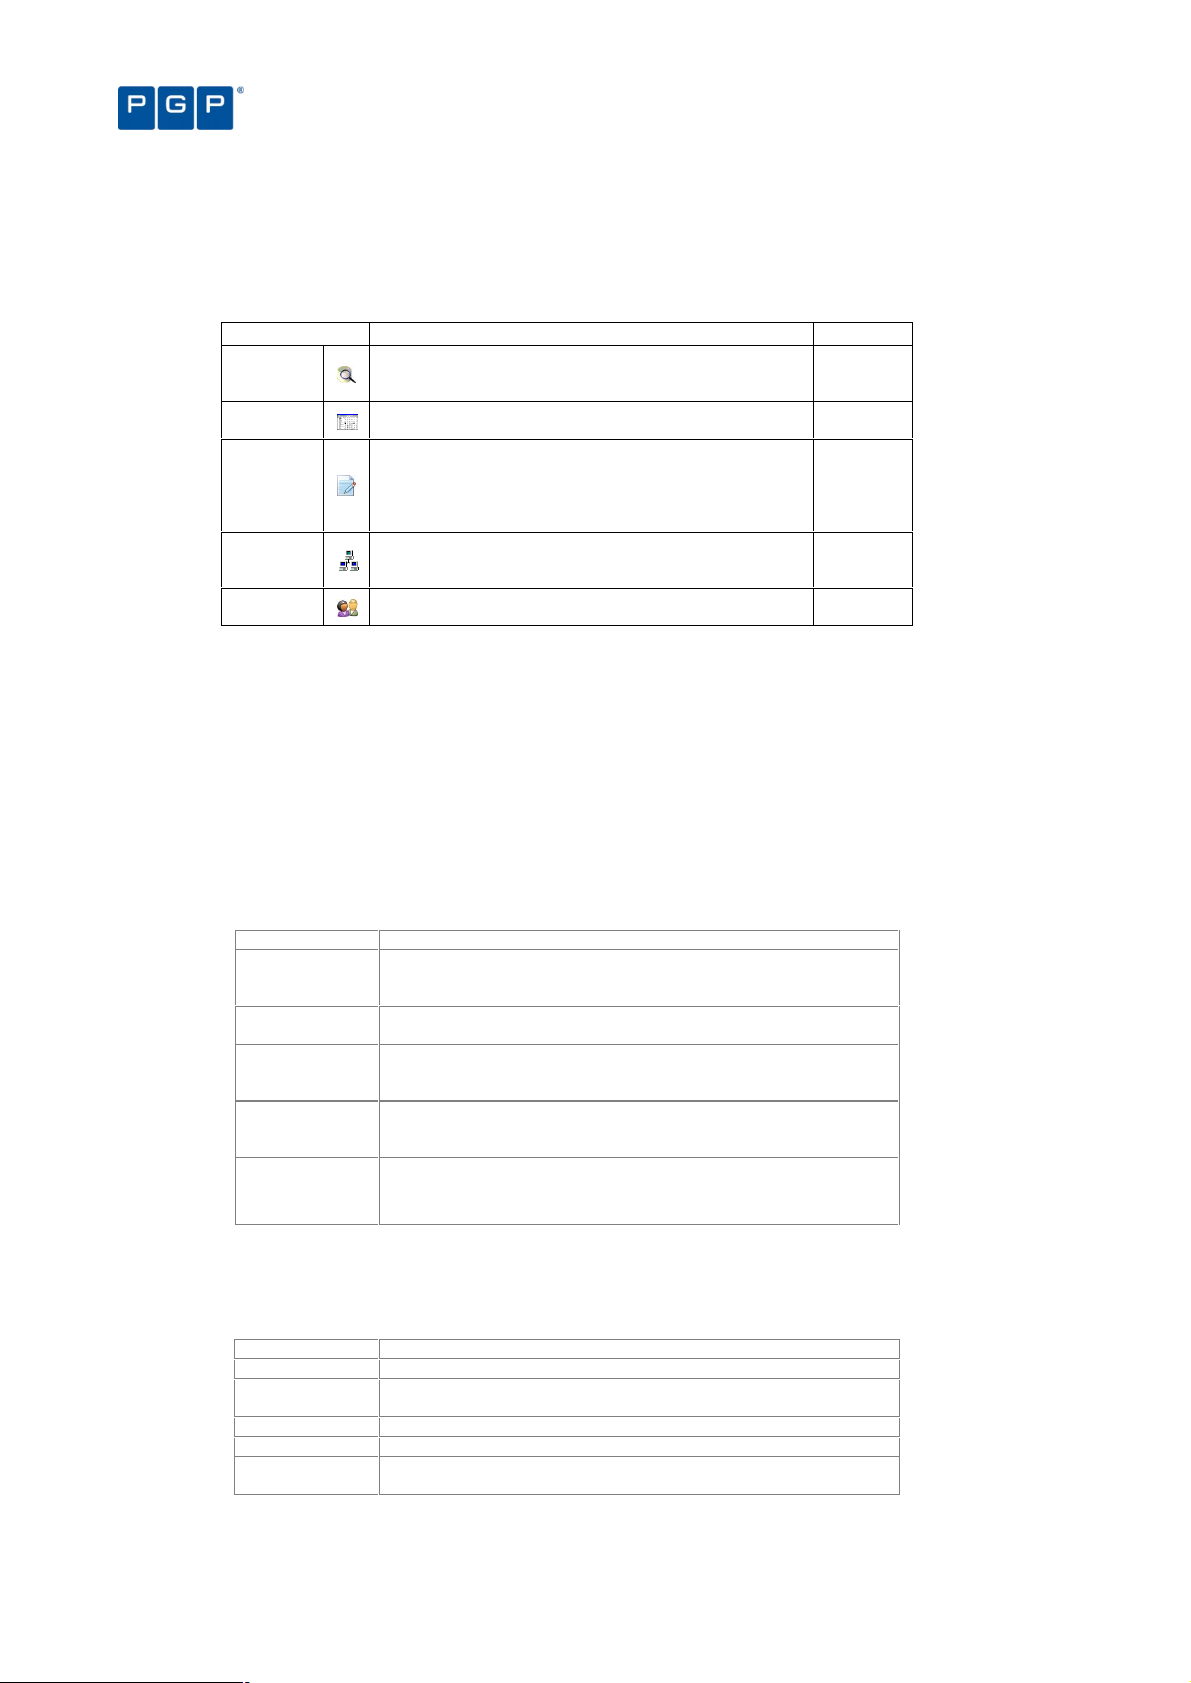
The PGP Endpoint Application Control Suite modules
The functions you need for configuring and managing PGP Endpoint are grouped into six modules, represented
by the icons in the Modules section of the Control Panel (usually located on the left side of the screen):
Module Use to… See page
Database
Explorer
Exe
Explorer
Log
Explorer
Scan
Explorer
User
Explorer
View the list of executable files, scripts and macros that
have been entered into the PGP Endpoint Database and
manage file assignment details.
Build a list of executable files, scripts and macros that are
allowed to run, assigning these files to File Groups.
View logs of applications, scripts and macros that have
been run, those to which access was denied, or those
locally authorized after denial. If you are an Enterprise
Administrator you can also view information about
Administrator actions from the Audit logs.
Scan a computer or domain to identify executable files,
scripts and macros that need to be authorized, and assign
the files to a File Group.
Align users or User Groups with File Groups, to grant them
permission to use the files in the File Groups.
Table 1. The System Modules
The procedure for assigning files to File Groups is the same, irrespective of which module you use. This is
explained in Chapter 6: Organizing files into File Groups on page 47.
95
37
65
39
59
Detailed information about how to use these modules work is given in the following chapters.
The PGP Endpoint Management Console menus and tools
This section describes all the commands you can directly access using the Menu bar.
File menu
The File menu (on the menu bar), gives you a one-click access to the following functions:
Connect Communicate with another PGP Endpoint Administration Server in
Disconnect Detach from the current PGP Endpoint Administration Server. You
Save As Save the contents of the main page in CSV format (only available for
Print Print the active report window. You get the standard Internet Explorer
Exit Exit from the PGP Endpoint Management Console application. Note
View menu
other machine or/a different user name in order to carry out
administrative tasks.
need to do this in order to reconnect using a different user or server.
specific modules). You can use it to export data to any CSV compliant
program, for example Excel.
print dialog where you can choose the printer and select several
printer options.
that this command does not stop the PGP Endpoint Administration
Server, just your administrative session.
Table 2. The File Menu
The View menu contains the following functions that regulate the appearance of the on-screen display:
Modules Show a submenu that allows you to select any available module.
Control Panel Show/hide the Control Panel that allows you to select modules, tools,
reports, and help from a convenient list.
Output Show/hide the Output window (log of system activity).
Connection Show/hide the Connection window (real-time operating information).
Status bar Show/hide the status bar (program’s conditions, clock, and
messages).
Table 3. The View Menu
18 PGP Endpoint Application Control User Guide 4.3.0
Page 23

Chapter 2: Using PGP Endpoint Application Control Suite
Item Use to…
See
Tools menu
The Tools menu (on the menu bar), gives you one-click access to the following functions:
page
Synchronize
Domain Members
Database
Maintenance
User Access Define PGP Endpoint Enterprise Administrators and PGP Endpoint Administrators. It allows you to
Default Options Change the default option settings for computers. 109
Path Rules Use path locations and file ‘owners’ to define which applications can run. 53
Spread Check Prevent the spread of self-propagating code by disabling suspicious executables that have been
Send Updates to
All Computers
Send Updates to Transmit the latest setting and permission changes to one or more selected computers. 27
Import Standard
File Definitions
Export Settings Export all file permission settings to an external file that can be used to import in a client or to
Purge Online
Table
Endpoint Maintenance
Update the PGP Endpoint Database with the current list of users and groups of a domain or
machine.
Delete log files and items generated from a database scan created before a specified date. 98
restrict the right to set permissions, view the audit information about Administrators actions or the
shadowing information. See PGP Endpoint Setup Guide to learn how to set rights to control
Organizational Units/ Users/ Computers/ Groups
locally authorized on too many computers.
Dispatch the latest setting and permission changes to all computers in the PGP Endpoint
Administration Server(s) online table(s). Changes can be sent in synchronous or asynchronous
mode
Import files and their hash definitions for any server platforms supported by the PGP Endpoint
solution (Windows 2000/XP/2003 and Vista). You can find new ones on our Web site:
www.pgp.com.
deploy the client component with predefined permissions. See also the PGP Endpoint Setup Guide.
The PGP Endpoint Administration Server keeps a record of the connected clients. Sometimes,
clients are disconnected without notifying their server that they are not available anymore. In this
case orphan entries are left in the online table affecting the performance of the ‘Send Updates’
functionality. When you purge the online table, the PGP Endpoint Administration Server erases all
information it has regarding connected clients. Every time a user logs on/off or unlocks his station
the online table is modified.
Create and save maintenance ‘tickets’ for computers/computer groups allowing protected files
and/or registries to be modified. See next section for an explanation.
Table 4. The Tools Menu
109
97
29
26
27
34
33
99
19,
You can also find all these commands in the Tools section of the Control Panel.
PGP Endpoint keeps a copy of the users’ information in its database. When a new user logs on PGP Endpoint
stores their Security Identifier (SID) but not their name. The same applies when you add a new computer to the
domain: PGP Endpoint identifies the computer and stores its name in the database. For performance reasons,
new user’s names are not resolved during logon but require an explicit synchronization (ToolsSynchronize
Domain Members). The synchronization process depends on whether the protected computers are in a domain
or a workgroup.
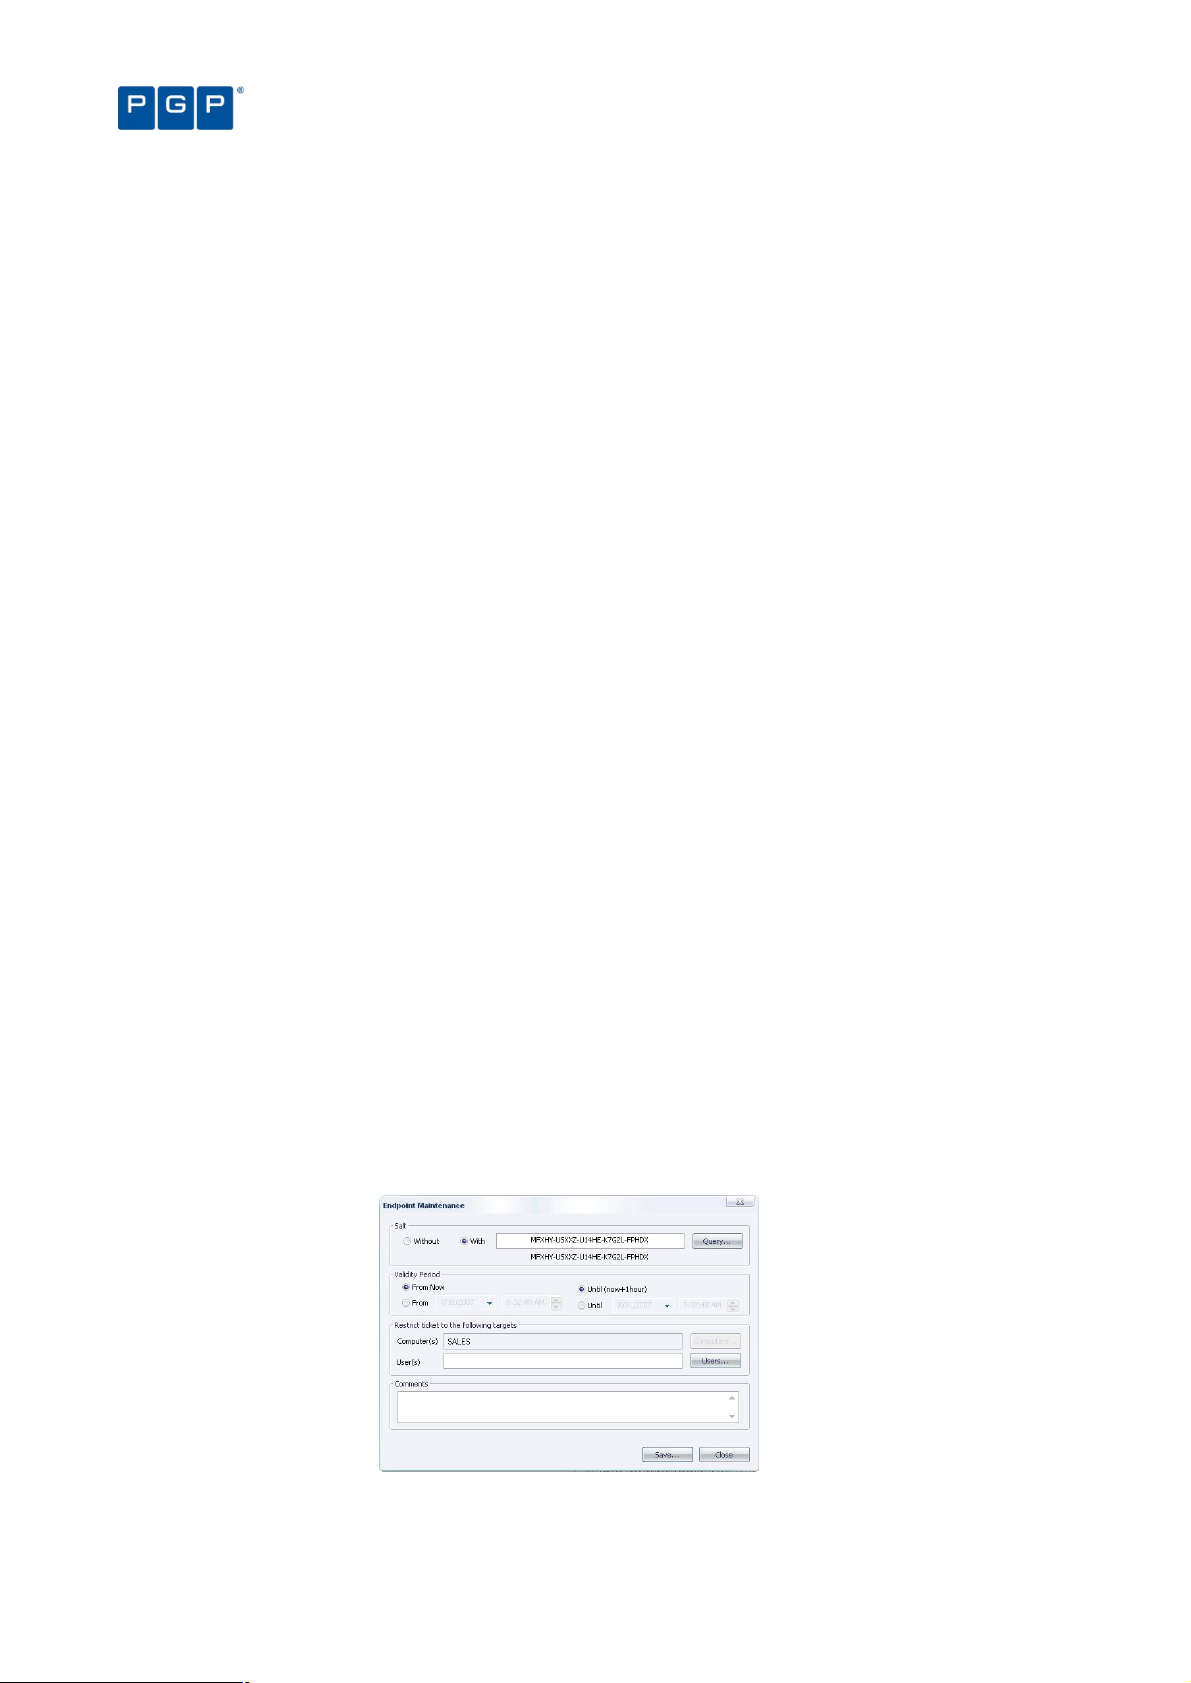
Endpoint Maintenance
When the client starts, it generates a 15-byte random value used for protection purposes. This key — which we
call Salt — is used to guarantee that only authorized processes/users can do maintenance. The Endpoint
Maintenance dialog is used to create and save a ‘ticket’ for this service. This provisional permission to modify,
repair, or remove the client, registry keys, or special directories, can be sent to computers or users.
This key value works in conjunction with the Client Hardening value established in the Default Options dialog (see
Default options on page 109). If the client hardening option is set to ‘Basic’ you do not need salt. If the client
hardening option is set to ‘Extended’ you need to enter or query the salt and relax the protection using the
endpoint maintenance. The generated ‘ticket’ can be saved and transported to the client computer(s) by any
available mean (shared directory, email, or removable device).
Do not use the ‘Send to’ right-click menu option to transfer the Maintenance ticket file, use Copy
and Paste instead.
If the client machine is not reachable, you can always get the ‘salt’ value and ‘hardening’ status
of the client computer by right-clicking its PGP Endpoint Client Driver’s icon — located on the
system bar — and selecting ‘Endpoint Maintenance’ from the context menu.
PGP Endpoint Application Control User Guide 4.3.0 19
Page 24
Chapter 2: Using PGP Endpoint Application Control Suite
You must enable the ‘Remote Registry’ service on Windows Vista machines if you want to
query the ‘Salt’ value using the PGP Endpoint Management Console. This service is disabled
by default in this operating system. A workaround is to ask the user to provide this value.
Client ticket rules
The client ticket follows these rules:
1. The maintenance ticket is unique and per machine. You cannot generate the same ticket for several
computers (even though you are allowed to do so if the client hardening option is set to ‘Basic’).
2. A validity period can be defined for the ticket. After this period, if the ticket has not been accepted it is
no longer accepted by clients. Once the ticket is accepted, there is no time limit for its use. To
deactivate the ticket you must reboot the machine.
3. If the maintenance ticket is generated for a specific user, this user must be logged to accept it. If this is
not the case, the ticket is rejected.
4. If you choose to ‘relax’ the client hardening value by creating and using a maintenance ticket for a
computer without choosing a user and another user logs into the same machine, the computer
continues in a ‘relaxed’ state until the next reboot.
5. Your comments appear on the audit log. You can review them by using the Log Explorer module (see
on Chapter 9: Monitoring activities using the Log Explorer page 65).
The client protection mechanism can also be temporary deactivated when using the PGP
Endpoint Client Deployment Tool. The protection is reactivated — and reset to its previous
setting — after the client’s reboot. Please consult the PGP Endpoint Setup Guide for more
details.
To create and save maintenance ‘tickets’ for endpoint machines/users
1. Select the TOOLS ENDPOINT MAINTENANCE item from the menu bar (or the Control Panel).
2. Select the salt value. (If the client hardening option is set to ‘Basic’ you do not need salt. If the client
hardening option is set to ‘Extended’ you need to enter or query the salt for the machine you are using
to relax.) Use the QUERY button to obtain the salt value directly from the client computer. Use the rightclick context menu of PGP Endpoint Client Driver’s icon when the machine is not connected to the
network.
3. Select the validity period for the ticket.
4. Select the user(s) and/or computer for which this ‘ticket’ is valid.
5. Add any valuable comments in the corresponding field.
6. Click on the SAVE button, choose a suitable location, click on SAVE and then on CLOSE.
Figure 10. Endpoint Maintenance
You can save this ticket (ticket.smt) and transfer it to selected computers by means of an email or external device
— the machine(s) needs to have the required permissions to access the device if using PGP Endpoint Device
20 PGP Endpoint Application Control User Guide 4.3.0
Page 25
Chapter 2: Using PGP Endpoint Application Control Suite
Item Use t
o…
See page
Control. You can also save directly to the ‘ticket’ directory of the necessary online machine. This ‘maintenance
ticket’ must then be copied to the predefined ticket directory in the client computer(s). See the PGP Endpoint
Setup Guide for a description of the registry keys. As previously explained, this ticket also depends of the Client
Hardening option value.
Reports menu
The Reports menu (on the menu bar), leads to the following functions:
File Groups by User Select one or more Users and/or Groups and generate a report of the File Groups
Users by File Group Select one or more File Groups and generate a report of the Users and Groups
User Options Display all the user options defined in the system. 104
Machine Options Display all the computer options defined in the system. 105
Online Machines Show all machines currently recognized by the PGP Endpoint Administration
Server Settings Find out how your PGP Endpoint Administration Server(s) is configured. This is
In addition to the standard reports that are available through the Reports menu, you can define
they may use.
given access to them.
Server that you are connected to.
provides you with very useful configuration and troubleshooting information.
Table 5. The Reports Menu
102
103
106
107
your own criteria for selecting log entries and producing reports using the Log Explorer module.
For more information see Chapter 9: Monitoring activities using the Log Explorer on page 65.
Explorer menu
The Explorer menu (on the menu bar) changes depending on the module you are using (as selected in the
ViewModules menu or using the Control Panel).
Item Use to…
In the Database Explorer module
Assign Change the File Group to which a file is assigned.
Manage file groups Add, rename and delete a File Group. See page 47 for more details.
Choose columns To organize the panels’ columns
In the Exe Explorer module
Map Network Drive Assign a drive letter (map) to any shared resource on a network. Doing this, you can quickly and easily
Disconnect
Network Drive
Assign Change the File Group to which a file is assigned.
Manage File
Groups
Choose columns To organize the panels’ columns.
In the Log Explorer module
Fetch log Obtain the latest log from a client computer. See page 91 for details.
Manage File
Groups
In the Scan Explorer module
Perform scan Scan a computer to identify executable files, scripts and macros that need to be authorized.
Select scans Choose the two scans you want to compare.
Assign Change the File Group to which a file is assigned.
Manage File
Groups
Choose columns To organize the panels’ columns.
In the User Explorer module
access the resource by using the letter instead of a full path qualifier.
Remove the letter assignation from any shared resource on a network. This is the opposite operation
than that done with the Map Network Drive command.
Add, rename, and delete a File Group. See page 47 for more details.
Add, rename, and delete a File Group. See page 47 for more details.
Add, rename, and delete a File Group. See page 47 for more details.
No options are available in the Explorer menu for this module.
Table 6. The Explorer Menu
Window menu
The Window menu controls the navigation and display of various elements of the Management Console window:
Use this item To
PGP Endpoint Application Control User Guide 4.3.0 21
Page 26

Chapter 2: Using PGP Endpoint Application Control Suite
Cascade Place all open windows in an overlapping arrangement.
Tile Lay all open windows side by side in a non-overlapping fashion.
Table 7: The Window menu items
Help menu
The Help menu gives you handy access to on-line help.
Use this item To
Help Access context-sensitive help. You can also use the shortcut function key F1.
Contents View the Help file by contents.
Search Search for a specific topic in the Help file.
Index Go directly to the help’s index page.
About Display information about your installed version of PGP Endpoint.
PGP on the Web Go to the PGP’s home page, where you can find up-to-date information, resources, support, etc. about
PGP
Knowledgebase
this and other useful products.
Direct access to PGP’s knowledge database. An invaluable source of tips, questions and answers, and
how-to articles.
Table 8. The Help Menu
22 PGP Endpoint Application Control User Guide 4.3.0
Page 27

Chapter 3: An overview of authorization strategies
PGP Endpoint protects your organization’s servers and computers by permitting only authorized applications to
run on them — unknown executable files that are not required for the authorized applications (or the operating
system) are blocked by default. In addition, PGP Endpoint can also protect your system from running many
unauthorized scripts and macros (as these contain commands that are interpreted either by host applications
running on the computers, or the Windows operating system itself — even though they are not Win32
executables).
The PGP Endpoint system offers several strategies for managing the running/blocking of executables, scripts and
macros. These include:
> Central authorization using digital signatures. This is the main method used to secure your servers and
computers against unwanted executables, scripts and macros — known or unknown. Your organization
centrally manages authorizations by establishing a list of the executables, scripts and macros that are
specifically approved by an authorized PGP Endpoint administrator (in a ‘white list’) and checking whether
the digital signatures (‘hashes’) of files users want to run are in this list.
> Central authorization by file location (path). This enables you to control executable files for which digital
signatures are not useful or applicable. You can establish Path Rules to handle exceptions, for example,
auto-changing executable files. You can also define Trusted Owners to reinforce security.
> Local authorization. You can choose to grant some local users limited rights to authorize additional
executables, scripts and macros — unknown files that they may require for their work.
Most executable files can be identified by their file extensions. File extensions such as .exe, .com, .dll (dynamic
link library), .cpl (control panel), .scr (screen-saver), .drv, and .sys (system driver) normally denote executable
files. When deciding whether a file is authorized to run PGP Endpoint does not rely on file extensions but lets the
operating system determine whether a file is an executable. If so, PGP Endpoint checks whether the digital
signature of the file is listed in its ‘white list’ of allowed files (in the case of central authorization using digital
signatures).
Scripts and macros are more difficult to identify than executables. PGP Endpoint can only recognize, and
centrally manage, the following types of scripts and macros:
> VBScripts and JScripts that are interpreted by the Windows Script Host (using cscript.exe and wscript.exe).
These scripts are text files written using the grammar and semantics of the appropriate language. To be
recognized by PGP Endpoint your script files must have the appropriate file extension — either .vbs or .js.
File names are only available for scripts interpreted by cscript.exe and wscript.exe. This means,
for example, that Java scripts executed by Internet Explorer cannot be centrally managed.
> Visual Basic scripts (VBA macros) that execute within Microsoft Office and other host applications. These are
embedded in Word documents, Excel spreadsheets, and so on.
PGP Endpoint also contains a mechanism to prevent the malicious spread of locally authorized files. If it detects
that an unknown executable, script, or macro has been locally authorized on a certain number of servers or
computers within the defined period, it can disable the executable and the local authorization capability.
We take a closer look at the various authorization strategies in the following sections.
Central authorization using digital signatures
The primary, and most powerful, method that PGP Endpoint uses to control executable files, scripts and macros
involves identifying individual files that a user wants to run based on their digital signatures. PGP Endpoint either
PGP Endpoint Application Control User Guide 4.3.0 23
Page 28

blocks these or allows them to run depending whether the files are in an authorized ‘white list’ and whether the
user (or user group containing the user) has been granted to the right to run them.
Central authorization using digital signatures typically controls all the applications required to manage and
maintain the organization’s servers (including the operating system itself), and applications and scripts that are
specific to your business.
Chapter 3: An overview of authorization strategies
Previous versions of PGP Endpoint did not let administrators authorize scripts and macros
using digital signatures — only executable files.
Central authorization using digital signatures works in combination with local authorization of
executables, scripts and macros, and the ‘Execution blocking’ and ‘Macro and Script protection’
options to either grant or deny authorization for a particular executable file, script, or macro.
Also see Local Authorization on page 113, and Macro and Script protection on page 116.
Central authorization of executables, scripts, and macros using digital signatures involves the following steps:
1. Building a list of executables, scripts, and macros that are authorized to run. This list can be
assembled by running a scan of target systems (using the Scan Explorer), by searching designated
directories (using the Exe Explorer), or by using the Authorization Wizard, the Log Explorer, or the
Versatile File Processor Tool. See Chapter 5: Building a white list of authorized files on page 33.
2. Creating a unique digital signature for each approved executable, script, or macro. PGP
Endpoint examines the binary contents of the executable files, scripts and MS office macros,
calculates a 20-character alphanumeric digital signature (or ‘hash’), and records this information in a
central repository.
The list of centrally authorized executables, scripts, and macros is the ‘white list’ of programs trusted within
your organization, and that you want all or some users/user groups to be able to run at any time.
Visual Basic scripts (VBA macros) can be embedded in many Microsoft Office formats, such as
.doc, .dot, .xls, and, .ppt files. In this case, a hash is created for the whole file, not just the
macro.
3. Organizing approved executables, scripts and macros files into File Groups. An authorized PGP
Endpoint administrator assigns the files identified in step 2 to particular File Groups, such as ‘Windows
Operating System’. This simplifies the administration of related and/or interdependent files.
4. Associating File Groups with users or user groups. An authorized PGP Endpoint administrator
then determines which users, and/or user groups, have access to which File Groups. This means that
a particular user can only run a particular application, script, or macro if they have the appropriate
privileges to do so.
5. Downloading authorization information to protect your computers. The digital signatures of
centrally approved files are downloaded to each user’s machine and stored in a secure location on
their local hard drive. PGP Endpoint references this locally stored authorization list whenever the user
(or a server administrator) attempts to launch an executable file or run an identifiable script or macro.
It is particularly important to centrally authorize operating system files and driver files (such as
the video card user interface, atiptaxx.exe) that execute before the user logs on.
You can set up and maintain the white list of files PGP Endpoint uses for central authorization using:
> The Database Explorer module (see Chapter 10: Managing files using the Database Explorer on page 95).
> The Exe Explorer module (see Selecting files to authorize using the Exe Explorer on page 37).
> The Log Explorer module (see Using the Log Explorer module to authorize unknown files on page 91).
> The Scan Explorer module (see Using the Scan Explorer module on page 39).
> Authorization Wizard, FileTool.exe, or the AuthSrv.exe tools (see Using the Authorization Wizard on page 44).
For more information, see Chapter 5: Building a white list of authorized files on page 33.
24 PGP Endpoint Application Control User Guide 4.3.0
Page 29

Chapter 3: An overview of authorization strategies
Central authorization by file location (path)
For a small number of applications, security based on file hashes simply does not work. For example, some
executables are modified as part of the installation procedure, typically to embed licensing information. In some
cases, internal applications change frequently, however you trust the modified files, as they are run under the
control of trusted administrators.
You cannot authorize scripts and macros by file location (Path Rules) — only executable files.
To allow for applications of this sort, PGP Endpoint lets you to authorize all executables that run from a specified
location, determined by the path of the file: Executable files in the specified directory location are exempted from
normal hash checking. They are presumed to be from a trusted source, so they are allowed to run.
To add a layer of protection to this type of authorization, you can have the system check the identity of the file’s
owner — and only execute files that belong to trusted owners.
Central authorization by file location is set up using the Path Rules option of the Tools menu (or from the Control
Panel). See Chapter 7: Authorizing files by location (Path Rules) on page 53 for more information.
Local authorization of executables, scripts, and macros
Local authorization relies on local users’ discretion to determine for themselves at the time of running a file,
whether it should be allowed or not. By default, PGP Endpoint does not permit users to perform local
authorization. Occasionally however, you may wish to give a user the right to locally authorize an application
required for their productivity, such as to run a special executable, macro, or script once.
In order to permit local authorization of executables, scripts and macros the ‘Local
Authorization’, ‘Execution blocking’ and ‘Macro and Script protection’ options must have the
required values. See Chapter 12: Setting PGP Endpoint system options on page 109.
For a user to be asked if they want to authorize or deny an executable, script, or macro, the file
must be assigned to a File Group and the user must be assigned permission to use files in that
File Group (either explicitly as a user, or through membership of a User Group).
PGP Endpoint contains a spread check mechanism to prevent the malicious spread of locally
authorized files. If PGP Endpoint detects that an unknown executable, script, or macro has
been locally authorized too many times within the defined period, it disables the local
authorization capability and the executable.
When a user creates or records a new macro in Microsoft Office (i.e. not by loading it from a
file), the macro is not intercepted and the user can run it without notification.
Local authorization of files that are not centrally authorized
Let us consider the situation when a user attempts to run an executable, script, or macro that has not been
centrally authorized, i.e. whose digital signature (hash) has not been included in the white list of files that are
authorized to run (provided the user has the appropriate permissions).
We also assume that:
> The Local Authorization option (see Local Authorization on page 113) has an ‘Enabled’ value either by
default (for all machines) or for the specific computer on which the user wants to run the file.
— and —
> The Local Authorization option has not been disabled because the Spread Check mechanism is enacted to
stop self-propagating code. See Preventing the malicious spread of locally authorized files on page 26 for
more information.
— and —
PGP Endpoint Application Control User Guide 4.3.0 25
Page 30
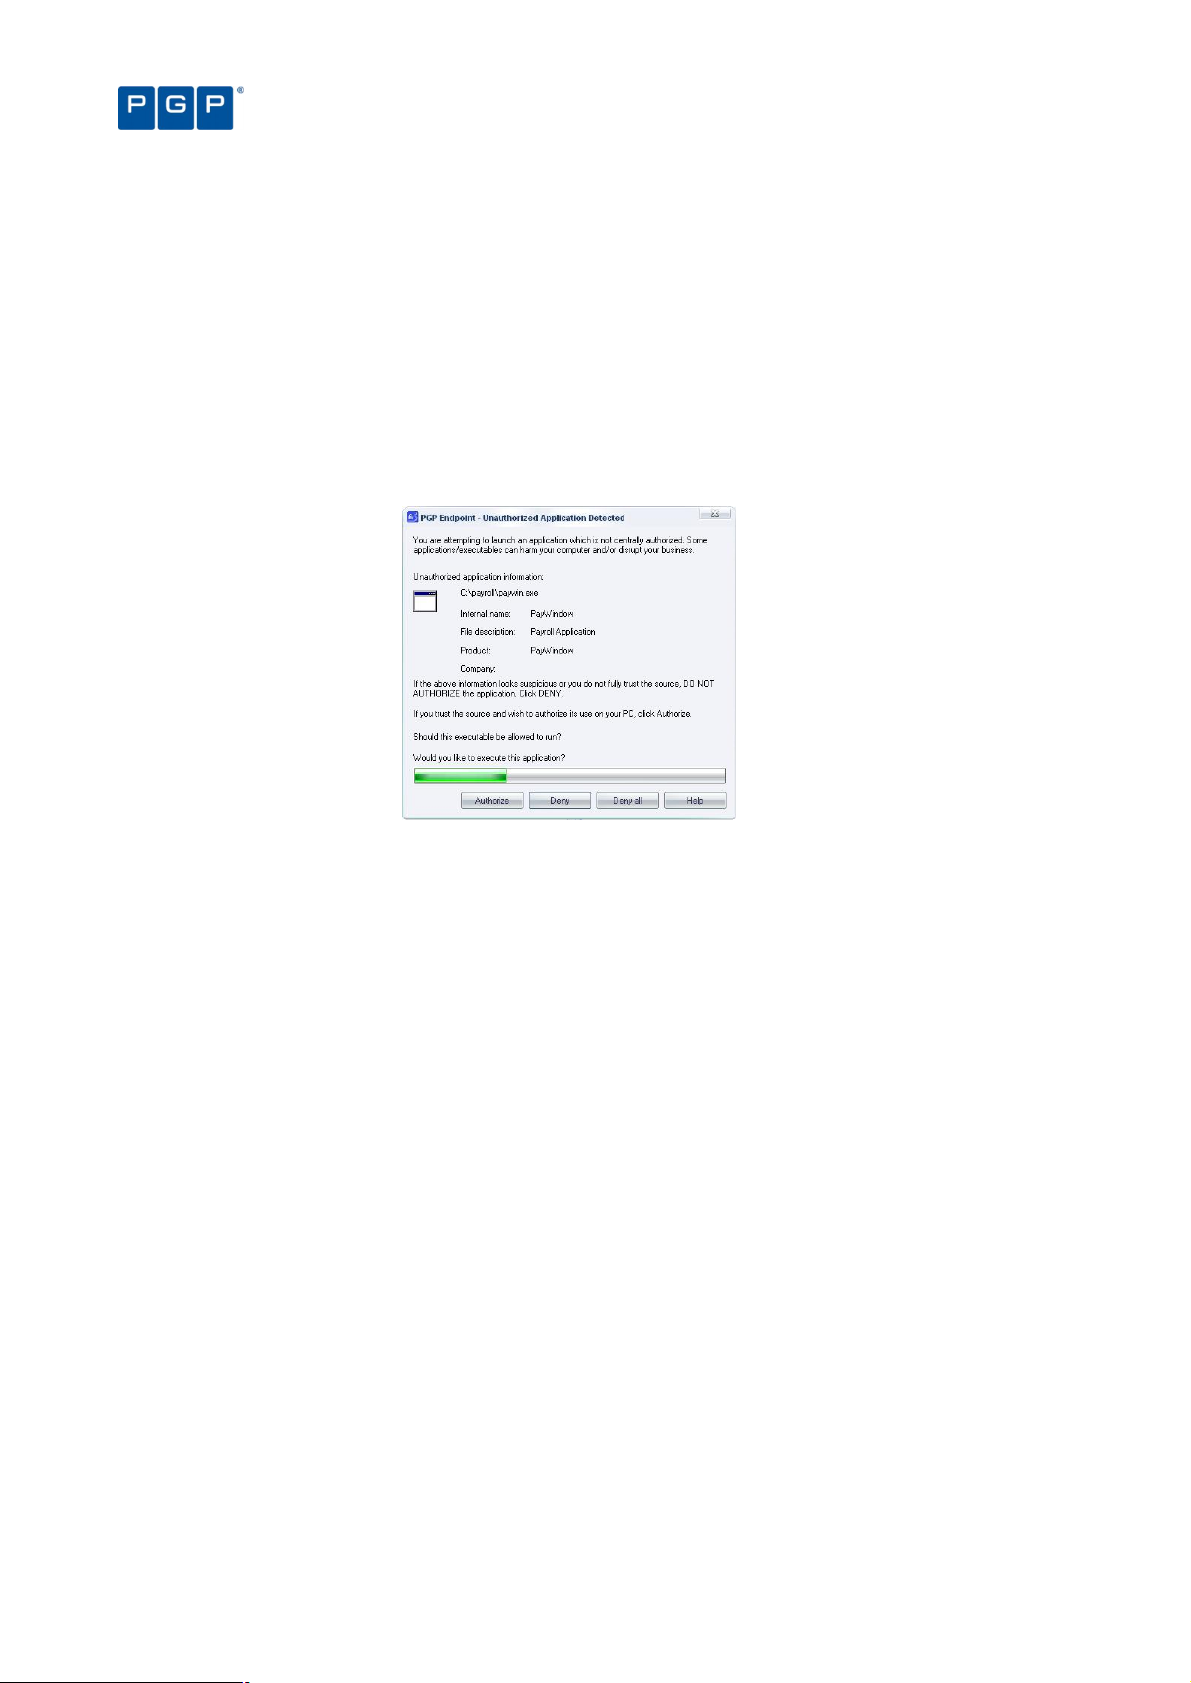
> The Execution Blocking option has a value of ‘Ask user for *.exe only’ or ‘Ask user always’ either for the user,
one of the groups of which he is a member, specific computer on which the user wants to run the file, or by
default (for all users or machines). See Examples of the precedence of Execution Blocking options on page
125 for more information.
In addition, in the case of a script or a macro, the Macros and script protection option must either have a value of
‘Ask User’ or ‘Disabled’ either for the user, one of the groups of which he is a member, or by default (for all
users).
When the user attempts to execute a file that is not centrally authorized the following takes place:
1. The user gets an alert message explaining that the executable, script, or macro has not been centrally
authorized. This alert message emphasizes the potential risks of authorizing this file and displays
details about it, such as its path, internal name, filename, description, and alleged source of origin.
Chapter 3: An overview of authorization strategies
Figure 11: Local authorization dialog
2. Within the alert dialog, the user can then choose one of the following actions:
> Authorize — To allow the script or macro to execute for this one time and one computer only. Once
authorized, this prompt does not appear again.
> Deny — To prevent the execution, as the source of the executable, script, or macro is not fully trusted.
> Deny all — To prevent execution of this and future scripts and macros.
You can reset the ‘Deny all’ local authorization setting, if required, by right-clicking on the PGP
Endpoint Client icon in the system tray of the machine running the client and selecting the
option in the context menu.
If the user does not respond within the time-out period (two minutes by default), the dialog
automatically disappears and the file is denied.
Some applications, such as Windows Media Player, start several scripts when they are loaded.
The user is prompted for each script launched by the application if the ‘Ask User’ option is set.
Whether the executable is authorized or denied, the PGP Endpoint system logs the action.
Preventing the malicious spread of locally authorized files
PGP Endpoint contains a mechanism to prevent the malicious spread of locally authorized files. If the PGP
Endpoint system detects that an unknown executable, script, or macro has been locally authorized on a certain
number of servers or computers within the defined period, it immediately disables the executable and the local
authorization capability. This does not disable the already running authorized executables, however selfpropagating viruses and worms are stopped in their tracks.
If you have more than one PGP Endpoint Administration Server on your network, only one of
them should be assigned the job of spread checking.
26 PGP Endpoint Application Control User Guide 4.3.0
Page 31

Chapter 3: An overview of authorization strategies
To set up spread checking:
1. Select Spread Check from the Tools menu (or from the Control Panel). The system displays the
following dialog.
Figure 12. Spread Check dialog
2. Select how frequently the system should check activity logs for suspicious propagation of locally
authorized files, for example, every 5 minutes or 15 minutes.
3. Enter the number of users that, if locally authorizing a particular unknown executable, script, or macro,
triggers the spread checking mechanism. This threshold of suspicion is, by default, set to one hundred
users.
4. Click on OK.
Once the PGP Endpoint administrator has investigated the reason why the spread check mechanism was
triggered, and possibly cleaned up any infected machines, local authorization can be turned back on.
Deleting user’s local authorization lists
Although local authorization should only be granted to trusted users, there are situations where you may want to
delete the list of all the applications that the user has locally allowed to run. This can arise because:
> You decide that if a user really needs an authorization, it is your job to authorize it centrally, regaining control.
> Your company’s policies have changed and all authorization is to be strictly controlled.
> You no longer trust a particular individual.
> The user made a mistake and wants to ‘un-authorize’ an application.
All local authorizations are kept in a local file located in the %WINDOWS%\sxdata folder. To ‘un-authorize’ all
locally authorized applications, simply erase all .locauth files located in this directory. You can either do this on a
per-user basis or delete them at every startup by defining a task in the Windows Scheduler (a simple batch file
does the job).
An administrator or a ‘normal’ user cannot erase these files if the hardening option is activated.
You need to emit a Maintenance Ticket or disable the Client hardening option for the machine.
Alternatively, you can disable all previously user-authorized executables, scripts or macros as follows:
1. Create a File Group called ‘Not allowed’ or similar.
2. Add all applications that should not be allowed to this new File Group.
3. Do not assign this File Group to any user/user group.
4. Send updates to all computers.
Since this File Group has not been assigned, it supersedes local authorization and, thus, disables all previously
user-authorized programs — see Local Authorization on page 113.
Sending updated authorization information to computers
When you change any system setting — options, parameters, file authorizations, etc. — you must distribute these
changes to servers and computers protected by the PGP Endpoint system. If you do not push updates to
computers, they are automatically downloaded whenever a server or computer logs on to the network.
PGP Endpoint Application Control User Guide 4.3.0 27
Page 32

Chapter 3: An overview of authorization strategies
To push updates to all computers protected by PGP Endpoint
If you want to update all computers running the PGP Endpoint Client, simply select Send Updates to All
Computers from the Tools menu (or the Control Panel). Updates are distributed to all clients in the PGP Endpoint
Administration Server(s) online table(s). All clients are sent an update signal. The clients that respond to this
contact the PGP Endpoint Administration Server and get the new hashes.
When you select the Send Updates to All Computers option, you are prompted for a decision as to whether to
send the updates:
> Synchronously (if you click on the YES button). PGP Endpoint may take a long time sending updates and the
PGP Endpoint Management Console has to wait for the PGP Endpoint Administration Server to finish
sending the updates to all machines in the online table.
> Asynchronously (if you click on the NO button). In this case, the PGP Endpoint Management Console does
not wait for the PGP Endpoint Administration Server to finish and you can continue working while the update
is done in the background.
To push updates to a specific computer
To update a specific computer you can either:
1. Activate the User Explorer module. To do this, click on the icon located in the Modules section of
the Control Panel of the main window or use the ViewModules command.
2. Right-click on the target computer.
3. Select Send Updates to <name> from the popup menu.
— or —
1. Select the Send Updates to item from the Tools menu (or the Control Panel).
2. Choose the computer you want to update using the Select Computer dialog.
3. Click on the OK button to close the dialog and send the updates.
28 PGP Endpoint Application Control User Guide 4.3.0
Page 33
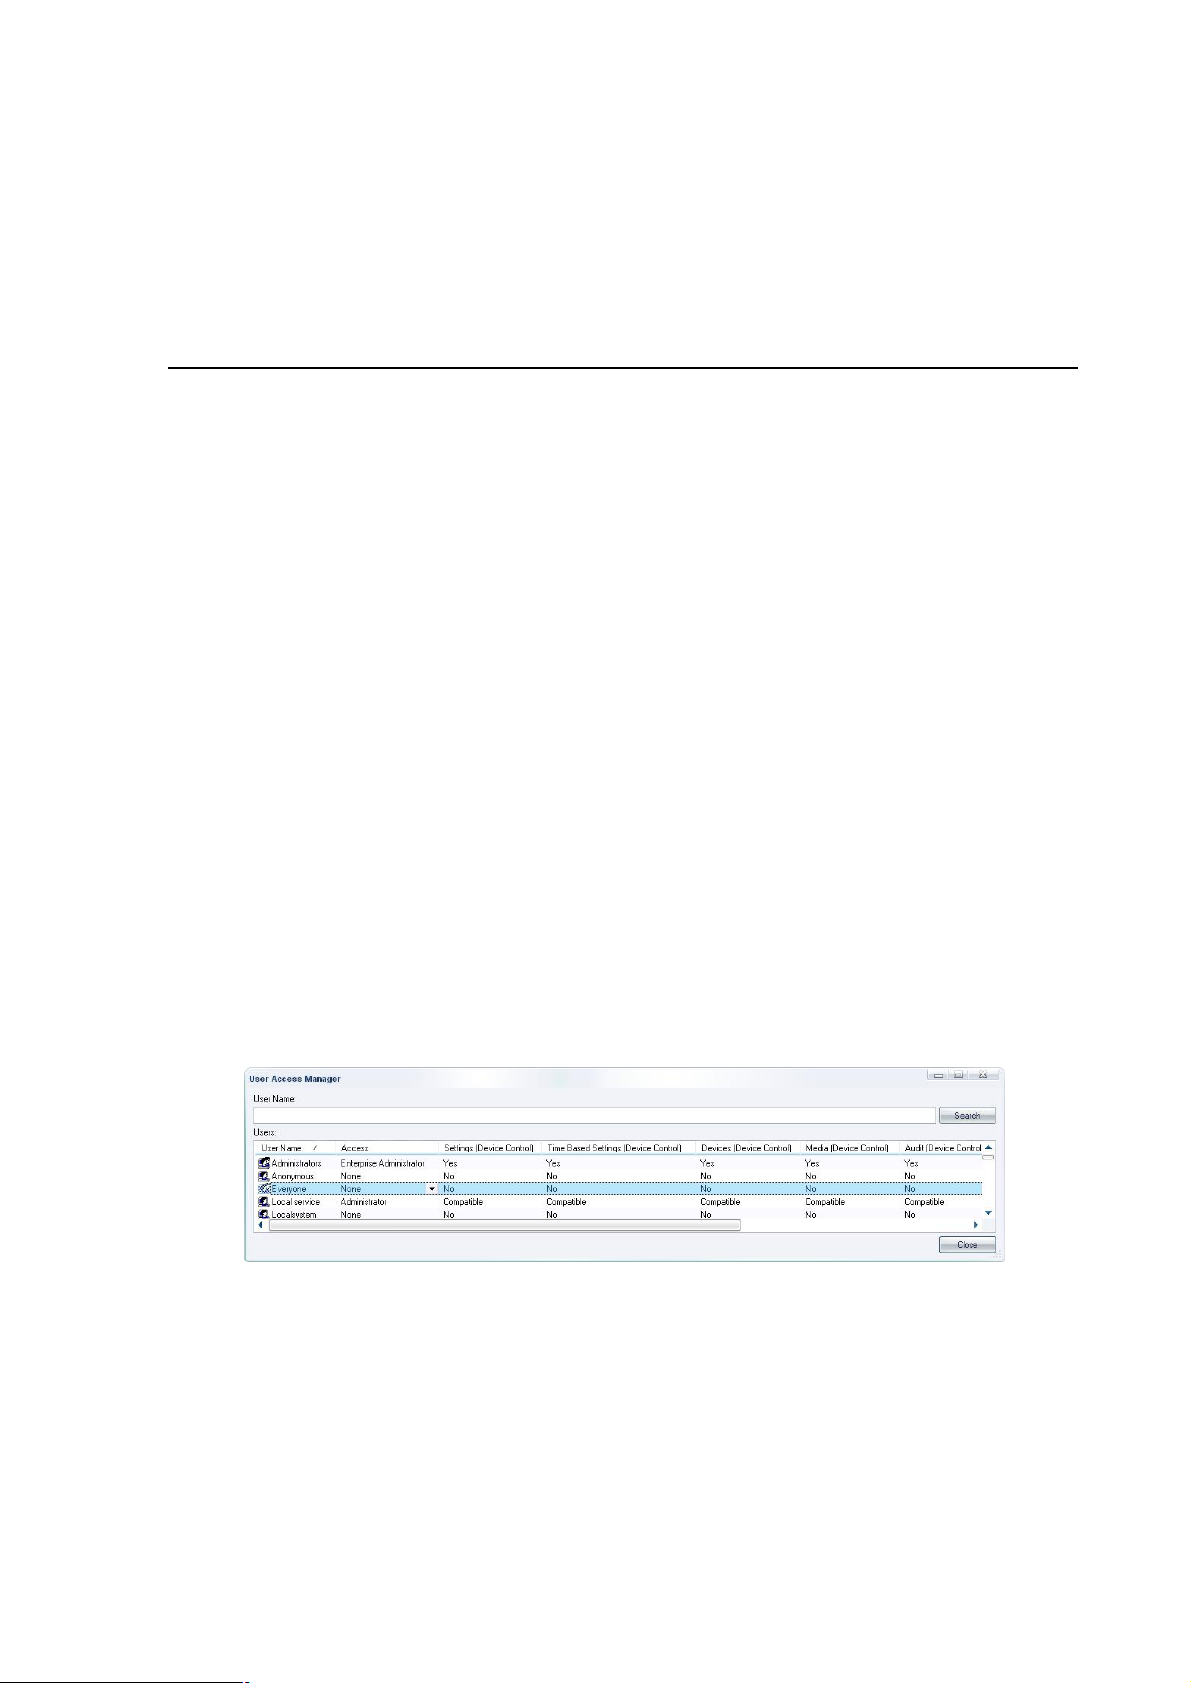
Chapter 4: Setting up PGP Endpoint administrators
Within PGP Endpoint, there are two types of administrators:
> PGP Endpoint administrators have permission to use management functions that affect the operation of
the PGP Endpoint system itself, such as building lists of executable, script, and macro files, setting and
changing authorizations, and viewing logs of system activity.
A PGP Endpoint Enterprise Administrator has full access to all management functions.
Regular PGP Endpoint Administrators have restricted privileges that are defined in the system by the
Enterprise Administrator.
> Administrators have permission to use functions specific to their server or computer software. For instance,
your Webmasters would be considered server administrators and be granted access to use applications
pertaining to their job functions. They would not be able to modify the operations of the PGP Endpoint
system. In the context of PGP Endpoint, administrators are only users.
Once an Enterprise Administrator has been defined, he is the only one allowed to assign other users as regular
Administrators. This chapter describes the process of setting up administrators to manage the PGP Endpoint
system: an authorized PGP Endpoint Enterprise Administrator and a PGP Endpoint Administrator(s).
How to set up a PGP Endpoint system administrator
To protect your security system itself from illegal access, only authorized administrators can access PGP
Endpoint management functions. The use of any of the administration tools requires administrative privileges.
Moreover, you must have administrative privileges in order to set up other administrators.
To define a system administrator with full management privileges
1. Select ToolsUser Access from the menu bar at the top of the management console display (or from
the Tools section of the Control Panel). This will open the User Access dialog as shown below.
Figure 13. User Access Manager dialog
2. Enter a user name in the User Name field.
3. Click on the SEARCH button to locate the user or group to whom you want to grant administrative rights.
You can use wildcards (* or ?) in the name.
4. Select the user in the Users list and click on the Access column.
5. Set that user as an Enterprise Administrator. This user now has rights to connect to the PGP Endpoint
Administration Server to manage any object (users, groups, computers, default options, Standard File
Definitions, Path Rules, and database maintenance).
PGP Endpoint Application Control User Guide 4.3.0 29
Page 34

Option
Administrator actions available when option set to ‘Yes’
Administrator actions available when
Chapter 4: Setting up PGP Endpoint administrators
By default, any member of the Windows Administrators groups on any PGP Endpoint
Administration Server has the privileges of a full Enterprise Administrator. However, once you
designate an official Enterprise Administrator, access privileges automatically are reduced for
the other members of the local Administrators group. These individuals no longer have access
to management functions unless specifically authorized.
Since all programs of our suite share the same database, some options you set for the Console
users are also enforced for other programs of our Suite. For instance, changing a user from
Enterprise Administrator to a ‘normal’ Administrator for PGP Endpoint Application Control Suite
also changes his role for PGP Endpoint Device Control.
When adding or removing Administrators from the list, make sure there is always at least one
Enterprise Administrator set. Be careful not to block yourself out.
To define a system administrator with restricted access privileges
1. Select ToolsUser Access from the menu bar at the top of the management console display (or from
the Tools section of the Control Panel). This will open the User Access dialog.
2. Click on the SEARCH button to locate the user or group to whom you want to grant administrative rights.
You can use wildcards (* or ?) in the name.
3. Select the user in the Users list and click on the Access column.
4. In the User Access Manager dialog, click the Access column and set the user as an Administrator.
This user now has rights to use designated management functions but cannot promote other users to be
Administrators or Enterprise Administrators.
Be sure to have at least one Enterprise Administrator. Only Enterprise Administrators have
access to the Tools menu.
Administrator’s access privileges
The following table summarized the administrator’s access privileges to specific functions and modules
depending if the option in the corresponding column of the User Access dialog is set to “yes” or “no”.
Settings
(App.Control)
Audit
(App.Control)
Execution Logs
(App. Control)
Machine Scans
(App. Control)
Endpoint
Maintenance
Scheduled
Reports
Synchronize
Computer
Can change permissions and system option for the objects for
which he/she has write permissions in the Active Directory
Can view and search audit logs of system activity (in the Log
Explorer).
Can view and search execution logs (in the Log Explorer) for
the objects for which he/she has write permission in the Active
Directory.
Can use the Scan Explorer to scan target computers to build
lists of approved executable, script, and macro files, view the
results of scans for objects for which he/she has write
permission in the Active Directory, and create new scan
templates.
Can issue Endpoint maintenance tickets to
user(s)/computers(s). See Endpoint Maintenance on page 19
for a complete explanation.
Can create custom reports at pre-scheduled times. See
Schedule tab on page 89 for a complete explanation.
Can synchronize domain or computers (local accounts) -
Table 9. Administrator’s access privileges to specific functions and modules
option set to ‘No’
Can view users’ access permissions but
not change them, cannot change system
options, and cannot authorize
applications using the Authorization
Wizard.
Cannot view or search audit logs.
Cannot view or search execution logs.
Cannot use the Scan Explorer.
Cannot issue Endpoint maintenance
tickets.
Cannot create custom reports at prescheduled times.
30 PGP Endpoint Application Control User Guide 4.3.0
Page 35

Chapter 4: Setting up PGP Endpoint administrators
The “Compatible” option is a legacy. It only appears for those users updating from previous
versions. This option is changed to “Yes” or “No” when edited. There are no restrictions for an
administrator that has the “Compatible” mode assigned.
PGP Endpoint Application Control User Guide 4.3.0 31
Page 36

Page 37

Chapter 5: Building a white list of authorized files
PGP Endpoint allows or denies the running of executables, scripts, and macros according to your predefined
specifications.
Most executable files are identified by their file extensions, for example, .exe, .com, .dll (dynamic link library), .cpl
(control panel), .scr (screen-saver), .drv, and .sys (system driver) file extensions normally denote executable files.
PGP Endpoint does not check, or rely on, file name extensions but lets the operating system take care of that.
Once the operating system has determined that a file is an executable, PGP Endpoint then checks the file's
signature against its ‘white list’ of allowed files.
Scripts and macros are more difficult to identify than executables. PGP Endpoint can only recognize and centrally
manage VBScripts and JScripts (.vbs or .js files that are interpreted by the Windows Script Host using cscript.exe
and wscript.exe) and Visual Basic scripts (VBA macros) that are embedded in Microsoft Office and other host
applications’ files.
PGP Endpoint provides a number of methods that you can use to build a white list of executable files, scripts and
macros to authorize. You can:
> Import standard file definitions. This identifies common Microsoft operating system components and
applications. Standard file definitions are available on the PGP Endpoint installation CD, and from our Web
site (www.pgp.com).
> Select files from your computer directories and add them to the list of executables that you want to
authorize.
> Scan each computer to ascertain which applications, scripts and macros reside on it.
> Scan a selected directory of a computer to identify files to authorize, without unnecessary scanning.
> Use the Authorization Wizard to streamline and automate the scanning process for executables.
> Use the FileTool.exe to scan file locations for executables.
When building a list of executable files (and generating their digital signatures) always use the
original media (CD/DVD or downloadable package from the official software vendor) to avoid
authorizing executables that have been tampered with or infected.
PGP Endpoint lets you export a list of file authorization settings from one computer and import these into another
computer to update the list of files that are locally authorized to run.
Exporting and importing file authorization settings
PGP Endpoint enables you to export a list of file authorization settings, approving a range of executables, scripts,
and macros, to a file and subsequently import this list onto another computer to synchronize them so that they
can be run on the two computers.
You can also use this feature when a computer is not connected to the network (and cannot be connected for the
time being) and you need to change authorizations. The same executable, script, and macro authorization rules
apply when you import a file of authorizations from the source computer into the target computer.
There is also a special case when you export to a file called ‘policies.dat’ to install a PGP Endpoint Client with a
set of predefined authorizations. Please consult the PGP Endpoint Setup Guide for more information.
Files containing exported permissions have a limited usability period of two weeks. The
exported authorization settings file is no longer valid after this. Contact support if you want to
extend the validity of your exported permission files.
PGP Endpoint Application Control User Guide 4.3.0 33
Page 38
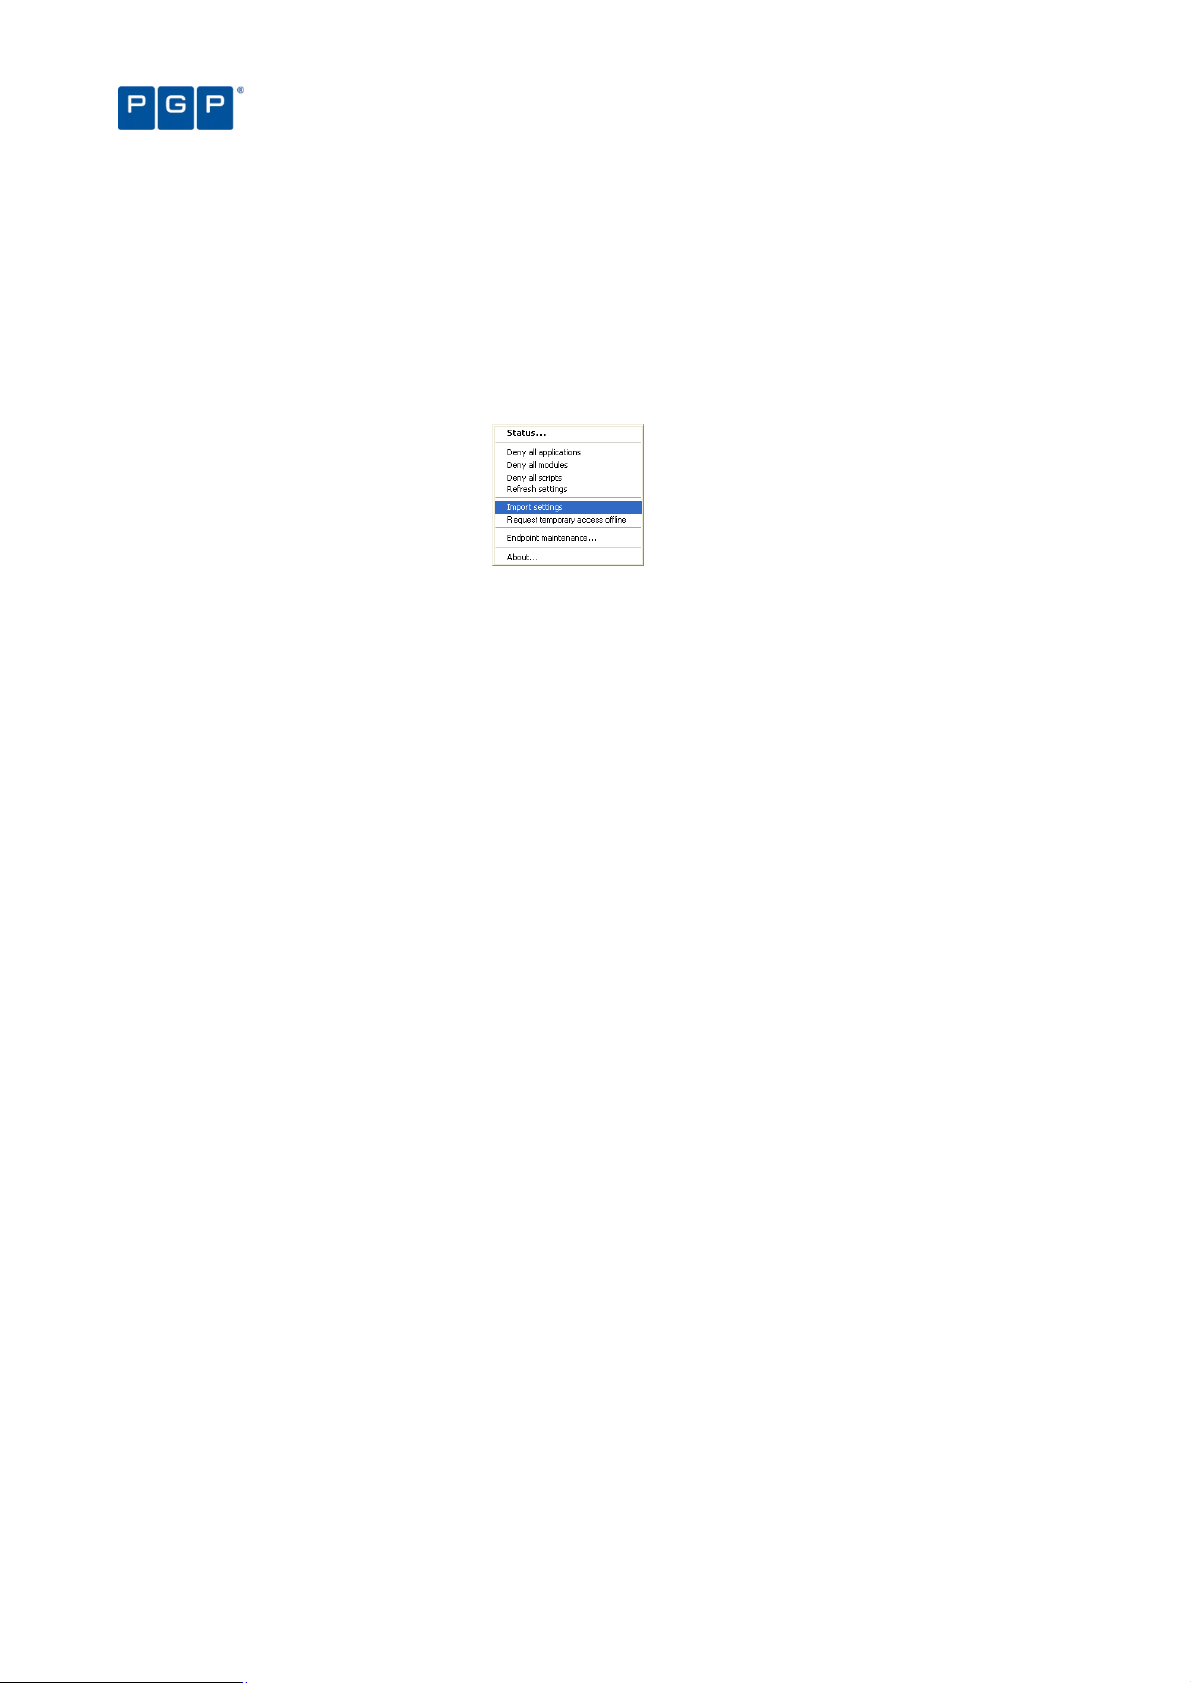
To export your file authorization settings from one machine and import them into another:
1. Select the Export Settings item from the Tools menu (or from the Control Panel).
2. Select the name and destination of the settings file in the standard Save As Windows dialog. Normally
the destination is a network drive or a removable storage device.
3. Go to the client computer where you want to import the permission settings and right-click on the PGP
Endpoint Client Driver icon in the system tray to display a popup menu. The dialog may change
depending on your license type and installed programs.
Figure 14: Importing a permission file
4. Select the Import settings option.
5. Select the source of the file authorization settings file from the Import Settings dialog.
Chapter 5: Building a white list of authorized files
Manually export or import file authorization settings
If you try to export (or import on the client side) a big database containing probably thousands of file
authorizations, rules, and settings, or using a very busy connection (or low bandwidth), you may get a timeout. If
you are experiencing this kind of problems, you may try to manually set a special registry key on the machine
where the console is installed (or where the client is if you are trying to import file authorizations). See Appendix
B of the PGP Endpoint Setup Guide for more details on how to configure these registry keys.
You can do this export process using the console (from the TOOLSEXPORT SETTINGS item) or manually using the
following command:
export.exe -f export_filename -s server_name [-e TLS] [-t connection_timeout]
-f (compulsory): Defines the file name where the file authorizations are saved.
-s (compulsory): Defines the name of the PGP Endpoint Administration Server from where the file authorizations
are recovered.
-e (optional): Use Transport Layer Security protocol.
-t (optional): Set connection timeout in milliseconds. Three minutes is used if this parameter is not specified.
Thirty seconds is used if less than 30,000 milliseconds or a wrong parameter is specified.
Examples:
export.exe -f corporate -s secure:65229 –e TLS -t 240000
Export file authorizations, rules, and settings to a file named “Corporate” contacting the Application Server
named “secure” on port 65229 (default TLS port) using TLS protocol and waiting a maximum of 4 minutes
(240,000 milliseconds) before timing-out.
export.exe -f backup -s secure
Export file authorizations, rules, and settings to a file named “backup” contacting the Application Server
named “secure” on the default port. No TLS protocol is used (but the communication is still signed) and a
maximum timeout of 3 minutes is used.
Importing Standard File Definitions
To simplify the building of a white list of executable files, PGP provides its clients with a number of readycalculated Standard File Definitions (SFD) files. These contain the hash numbers corresponding to standard
executables that are distributed as part of Windows 2000, Windows XP, and Windows 2003 operating systems.
Different language versions and service packs are available.
34 PGP Endpoint Application Control User Guide 4.3.0
Page 39

Chapter 5: Building a white list of authorized files
File Group
n
ame Users assigned
You can use the available Standard File Definitions to simplify the initial setup and maintenance of your PGP
Endpoint system, since they already contain the SHA-1 hash for various operating systems. Standard File
Definitions files also include the necessary information to automatically allocate files to predefined File Groups, if
you choose to do so. Standard File Definitions are particularly useful when authorizing product updates such as
service packs and ‘hot fixes’ as they can automatically assign the standard hashes to the appropriate File Group.
We recommend that you import Standard File Definitions when you first install your PGP Endpoint system. You
can import Standard File Definitions at any time of the configuration process.
When first importing the Standard File Definitions, PGP Endpoint creates a set of predefined File Groups and can
assign them to well-known user and User Groups (see following section for instructions on how to do this). You
can use them to save time when you logically regroup executable files into file groups:
16 Bit Applications Administrators (group)
Accessories Administrators (group), Everyone (group)
Administrative Tools Administrators (group)
Boot files Local Service (user), LocalSystem (user), Network Service (user)
Communication Administrators (group)
Control Panel Administrators (group)
DOS Applications Administrators (group)
Entertainment Administrators (group)
Logon files Everyone (group)
PGP support files Administrators (group), Everyone (group)
Setup Administrators (group)
Windows Common Everyone (group)
Table 10. Standard File Definitions File Groups and Well-Known users
Benefits of importing Standard File Definitions
Importing the pre-compiled file definitions provides the following benefits:
> You do not have to scan for basic operating system files or organize them into logical File Groups. PGP has
already done that for you.
> You do not have to assign the File Groups to User Groups, as PGP has already assigned them to a
predefined Administrators group and the Everyone group.
> You can be confident that pure versions of the operating system files were used to create the hashes. Using
SFDs avoids the risk of accidentally authorizing tampered versions of system files.
> It is easier to upgrade system files, since PGP Endpoint recognizes these standard files, and their respective
default File Groups, and can automatically save upgraded file definitions in the same locations as the
originals.
To import Standard File Definitions
To save you time when authorizing operating system files (which can add to several thousands) and assign them
to predefined File Groups and well-know users, you can opt for importing Standard File Definitions instead of
creating a scan template (see Using the Scan Explorer module on page 39). To manually import Standard File
Definitions:
1. Select Import Standard File Definitions from the Tool menu. The Import Standard File Definitions
dialog is displayed.
PGP Endpoint Application Control User Guide 4.3.0 35
Page 40
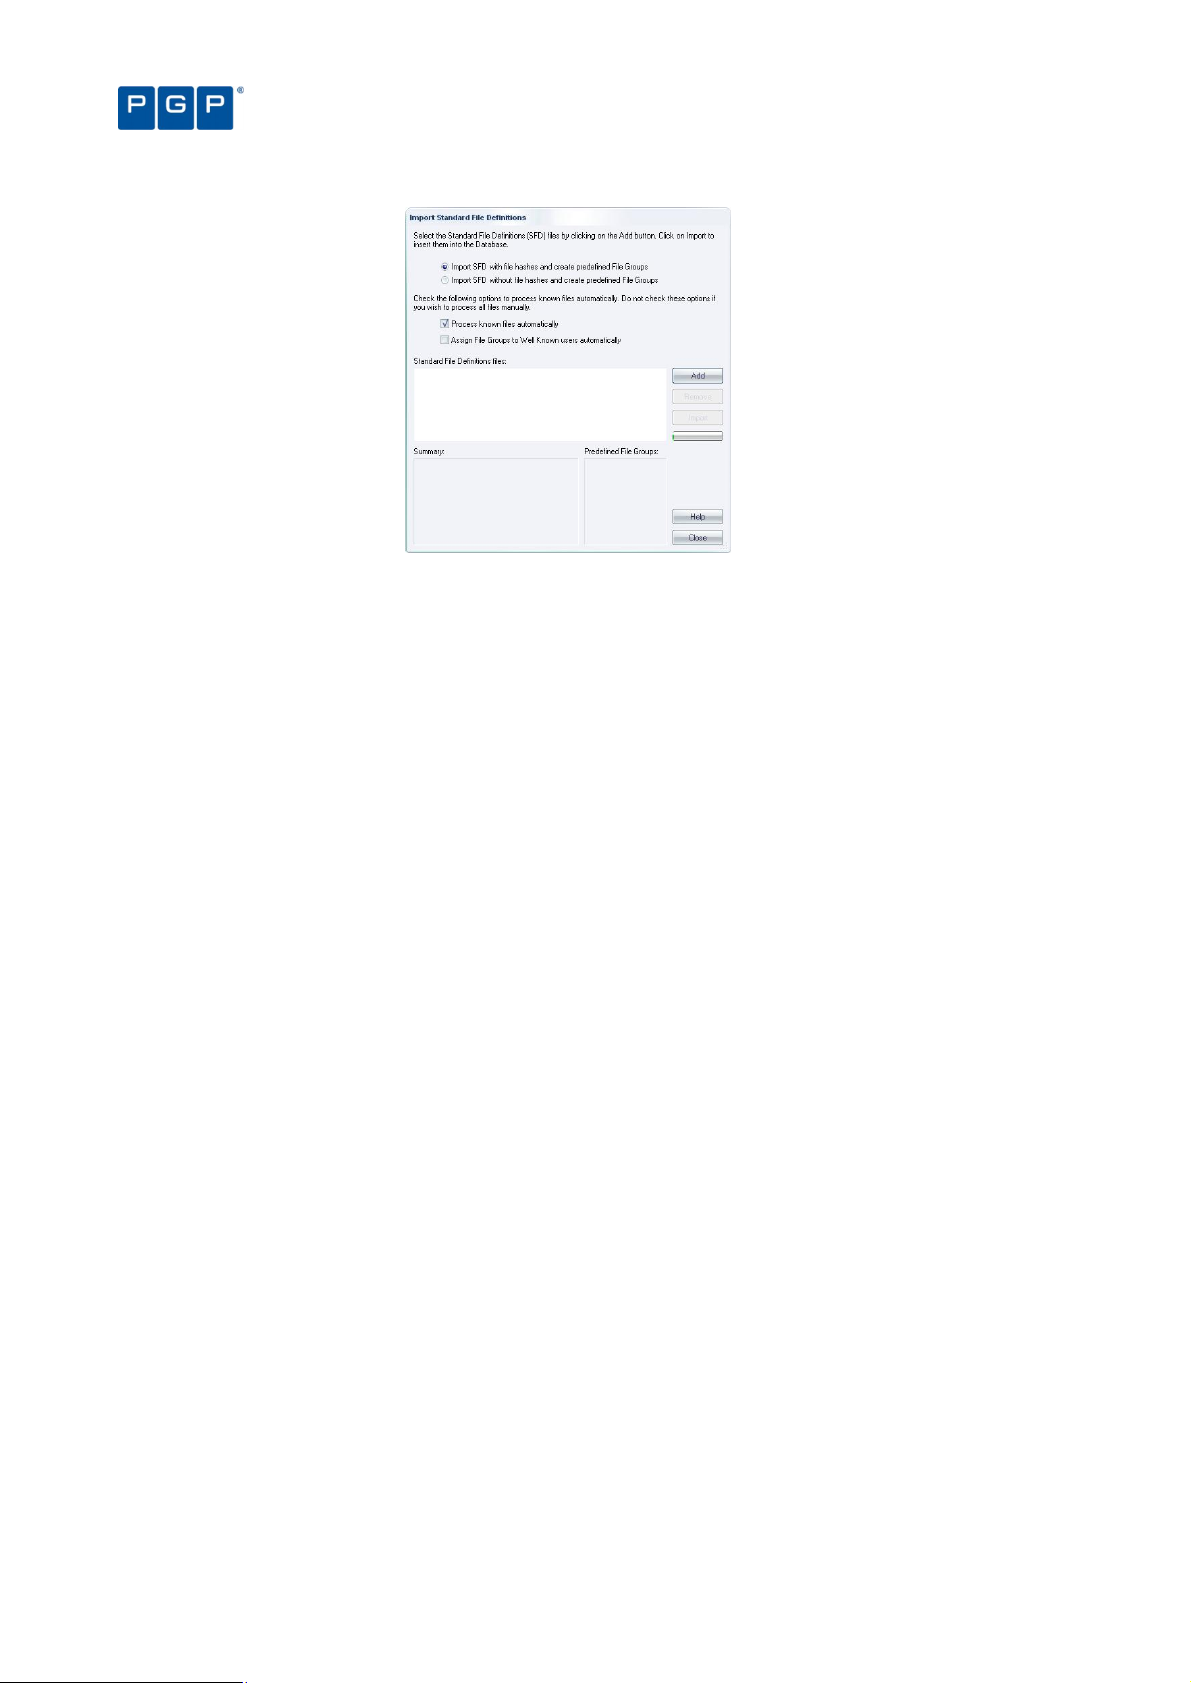
Figure 15. Import Standard File Definitions
2. Click on the ADD button. The dialog box displays available files and folders, with Standard File
Definitions having a .SFD extension.
If you want to import an SFD from our website, www.pgp.com, download this onto a local
computer and unzip it.
Chapter 5: Building a white list of authorized files
3. Navigate to the SFD file(s) you want to import and click OPEN. The file(s) are shown in the ADD window.
4. Repeat steps 2 and 3, if required.
5. Select the “Assign File Groups to Well Known user automatically” to assign the executables, scripts,
and macros found in the scan to the well-known user (see Table 10 on page 35).
6. Click on the IMPORT button to import the selected Standard File Definitions file(s). Since it can take a
few minutes to process these, only choose those you actually need.
7. Choose whether you want to import SFDs with or without file hashes by selecting one of the following:
> Import SFD with file hashes and create predefined File Groups: This means that PGP Endpoint imports
ALL files hashes in the predefined File Groups, even those that are seldom or never used by a ‘normal’
user. If you then proceed to the Database Explorer module, you can see that the database includes
signatures of all the executable files, scripts, and macros of the SFD file(s). You do not need any extra
steps (everything is handled for you). On the other hand, your database includes the signature of all the
operating system files, even for those not used. Transmitting this can be problematic, especially if you
have slow connections in your network.
You should not import SFD files for operating systems or programming languages you do not
use (or do not plan to use) in your environment.
> Import SFD without file hashes and create predefined File Groups: The process is similar to the previous
one except that no file hashes are imported. PGP Endpoint does however record the predefined File
Groups for each file. When the time comes to scan and assign files from on client machines, PGP
Endpoint uses the imported SFD to suggest ‘correct’ File Groups. If you choose this option, then once the
importation process finishes you have an empty database. You must then scan a newly installed client
machine and assign the scanned files to the proposed (or your own) File Groups. The disadvantage of
using this option is that you must carry out extra tasks as part of your PGP Endpoint installation and the
system only helps you partially by identifying the file names and proposing File Groups when the time
comes to authorize them. The advantage of using this option is that you have a smaller database that
contains only the files actually used by your PGP Endpoint Clients.
8. Click on the IMPORT button.
9. When the importing process finishes, click on OK and then click on CLOSE.
10. Assign the created File Groups to users or User Groups, if required. This step is not required if you
select the “Assign File Groups to Well Known user automatically” option. See Table 10 on page 35.
36 PGP Endpoint Application Control User Guide 4.3.0
Page 41

Chapter 5: Building a white list of authorized files
When Microsoft produces a new Service Pack or other update for one of its operating systems,
PGP creates a Standard File Definitions corresponding to it and makes this available to PGP
Endpoint users via our Web site, www.pgp.com. Updated definitions can be imported at any
time using the above procedure.
When you install Standard File Definitions, you should be careful to record the hash number
corresponding to the logon and boot files. If these are not authorized, the system does not work
properly. This is especially important for system updates.
When installing other PGP Endpoint products, check that the computer and user/user group
‘Execution Blocking’ option is set to ‘Non-blocking mode’. The setup cannot proceed otherwise.
See Precedence rules for the Execution Blocking option on page 124 for more information.
Selecting files to authorize using the Exe Explorer module
You can use the Exe Explorer module to create a list of executable files, scripts and macros that you want to
authorize. This is the easiest method and does not require a client to be installed on all the computers that you
want to explore.
Before you use the Exe Explorer module, you should set up the default options for this module. These determine
the default way it searches computer directories for executable files, scripts and macros and how the results are
displayed.
Using the Exe Explorer module, you can quickly build lists of files in a single computer directory, or in a directory
and all of its sub-directories. If you choose the root directory of a computer, this import process creates a list of all
executable files, scripts and macros on the entire computer. This can be slow and it is typically only done when
you want to check all the applications installed on a computer.
It is best to use a newly configured ‘reference’ computer to create a list of executable, script, and macro files that
you want to authorize, so you can be sure that only ‘clean’ files are authorized. The reference computer does not
have to be the same computer on which you are running PGP Endpoint Management Console. You can browse
the network and select any other available machine as your ‘reference’.
Only PGP Endpoint administrators with the appropriate user access rights can use the Exe
Explorer module. See Chapter 4: Setting up PGP Endpoint administrators on page 29 for more
information.
Although you can manually assign macros and scripts to the white list using the Exe Explorer
module, we recommend that you do this using the Log Explorer instead. See Using the Log
Explorer module to authorize unknown files on page 91.
An alternative way of selecting files from network directories is to use FileTool.exe. This has the
advantage that it can be scheduled using the AT or WinAT command. See Versatile File
Processor tool on page 131 for more information.
To set up the Exe Explorer default options
1. Click on the Exe Explorer icon located in the Modules section of the Control Panel of the main
window or use the ViewModules command.
2. Select Default Options from the Tools menu (or the Control Panel) to display the Options dialog.
3. Click on the Exe Explorer tab.
PGP Endpoint Application Control User Guide 4.3.0 37
Page 42

Figure 16. Default options dialog - Exe Explorer options
4. Choose which directories you want to search.
If you want to select files from the named directory and all its sub-directories, check the Include Sub-
Directories box. If you want to select files from the named directory only (which is faster), make sure it is
unchecked.
5. Choose whether you want to display the File Group information for all files or only the selected files.
If you want to display File Group information only for files you select (the faster of the two options), check the
Fetch File Group information for selected files only box. If you want to show File Group information for all
files, make sure it is unchecked.
Chapter 5: Building a white list of authorized files
6. Choose whether you want to display previously authorized files or not.
If you want to filter out previously authorized files and show only the rest (the faster of the two options),
check the Show only non-authorized files box. If you want to show all files regardless of whether they are
authorized or unauthorized, make sure it is unchecked.
7. Choose whether you want the Exe Explorer module to check all files or only files with specific
extensions to determine whether or not it is an executable, script, or macro.
If you only want to search files with specific file extensions, make sure the Disable File Filters and check all
files (executables only) box is unchecked, and check the boxes in the File Filters panel to indicate which
types of files to include (as determined by standard file extensions such as .exe, .com, and so on).
PGP Endpoint also searches 16-bit programs if you select the file filters options (*.exe and
*.com).
To search for files with one or more non-standard file extensions, make sure the Disable File Filters and
check all files (executables only) box is unchecked, and enter the custom extension(s) in the Custom Filter(s)
field. (When entering several file extensions in this field, separate entries using a semi-colon with no space.)
If you want to check every file (rather than only checking files with specific extensions), check the Disable
File Filters and check all files (executables only) box. This option is slower than only checking files with
specific extensions but it ensures that you do not miss any executable files just because they have nonstandard file extensions.
8. Click on the OK button to return to the Exe Explorer module.
To select files using the Exe Explorer modules
Once you have set up the default options you want to use for the Exe Explorer module you can click on the
directory that contains the files that you want to select in the left panel of the Exe Explorer window. Executable
files, scripts and macros in that directory (and its subdirectories, if appropriate) are displayed in the right panel of
the same window.
You can map network drives directly from the console. The ‘Explorer Map Network Drive’
command (when the Exe Explorer module is active) invokes the standard Windows dialog.
38 PGP Endpoint Application Control User Guide 4.3.0
Page 43

Chapter 5: Building a white list of authorized files
Figure 17. Exe Explorer Module Window
Selecting files using the Exe Explorer module may take a few minutes if you have a large system and have
selected the more processing-intensive options. The status bar keeps you informed of progress as file details are
loaded. A populated Exe Explorer screen appears as shown above.
The program does not uncompress archive files (Zip, Cab, RAR, LZH, ARJ, etc.). To do so, use
the Authorization Wizard or the FileTool.exe tool. See Using the Authorization Wizard on page
44 and Versatile File Processor tool on page 131 for more information.
You can use the ‘Choose columns’ option from the right-click menu to select and organize the
columns you want to display.
When you have created a list of executables, scripts and macros you are ready to organize them into File Groups
and assign these to users and User Groups. See Chapter 6: Organizing files into File Groups and Chapter 8:
Granting access using the User Explorer more details.
Automatically scanning a computer to identify files
The easiest method to identify all installed components of specific software is to automatically scan the computer.
The only limitation is that you must first install PGP Endpoint Client Driver on the machine.
Using the Scan Explorer module
The Scan Explorer module scans a target computer running the PGP Endpoint Client, and builds a detailed list of
all the files found on client machines. This is the easiest and quickest way to populate the PGP Endpoint
Database from a reference computer, as well as to identify unknown applications.
Figure 18. Scan Explorer module main window
You can choose to scan all files on a computer, or you can create a template that tells the system to scan only
selected directories, or specific file types (such as *.exe, *.com, *.dll, *.ocx, *.sys, *.drv, *.cpl, *.vbs, *.js), which
reduces the scan time required.
For example, you may want to create a template to identify the changes made when a particular application is
installed. If you know that this application installs the following:
PGP Endpoint Application Control User Guide 4.3.0 39
Page 44

Chapter 5: Building a white list of authorized files
> A group of files in sub-directories of the \Program Files folder.
> Executable files with extensions .exe and .dll in the WINDOWS directory and SYSTEM32 subdirectory
(system root folder).
Then, you could scan for these files by creating a template with the following two rules:
Scan all executables matching the pattern
*.exe or *.dll (regardless of case)
in directory
%SYSTEMROOT%
and its subdirectories
Scan all files matching the pattern
* (regardless of case)
in directory
%PROGRAMFILES%
and its subdirectories
To create a new template to scan files in a computer
1. Click on the Scan Explorer icon located in the Modules section of the Control Panel of the main
window or use the ViewModules command.
2. Click on the PERFORM NEW SCAN button.
3. Click on CREATE NEW TEMPLATE in the upper right of the Perform New Scan dialog.
Figure 19. Create New Template dialog
4. Enter the name you want to use for the new template. Choose a meaningful name so you can identify
this template again in the future.
5. Click on ADD to display the New Rule dialog.
Figure 20. New Rule dialog
6. Complete New Rule dialog as follows:
40 PGP Endpoint Application Control User Guide 4.3.0
Page 45

Chapter 5: Building a white list of authorized files
> Scan files matching the pattern — Specify the name patterns that you want to use to select executables,
scripts and macros from client machines. You can use a single asterisk (*) to select all files, an asterisk
followed by a dot and extension for specific file types (*.vbs) and/or semi-colons to separate multiple
wildcard entries, for example: *.exe;*.hdk;*.dll;*.vbs;*.js.
If you specify wildcard masks — for example, *.com — there is the potential to miss files that do
not use the standard file extensions (.exe, .com, .dll, etc.). If this happens the files are not
authorized and the application may not work properly, if at all.
> In directory — Enter the path of the directory you want to scan. You can use ‘\SystemRoot\’ (with this
capitalization) to indicate the Windows directory.
> Include subdirectories — Check this box if you also want to scan subdirectories of the directory.
> Scan executables — Check this box (recommended) if you only want to scan for executable files and
ignore all other files. This also searches for 16-bit executables. (If you do not select this, you should use
*.exe and *.sys on the matching pattern to search for them.)
7. Click on the OK button.
8. Click on the SAVE button to keep the template.
When you return to the Perform New Scan dialog, the template you have just created is available for selection in
the From Template drop-down list.
To scan files on a client computer
1. Click on the Scan Explorer icon located in the Modules section of the Control Panel of the main
window or use the ViewModules command.
2. Click on the PERFORM NEW SCAN button.
Figure 21. Perform New Scan dialog - template
3. In the From Template field, choose a template that selects all files (assuming a template already exists
with this mask. See To create a new template to scan files in a computer on page 40).
To save time, select a template that only scans the directories you are interested in.
4. Specify the computer you want to scan by clicking on the button to the right of the On Computer
field and browsing to the appropriate computer in the Select Computer window.
PGP Endpoint Application Control User Guide 4.3.0 41
Page 46

5. Click START SCAN to display another Perform New Scan dialog.
Figure 22. Perform New Scan dialog - comment
6. Enter a name or remark to distinguish this scan in the Comment field. Use a descriptive name,
especially if you plan to compare two scans afterwards.
7. Click on OK to start the scan.
PGP Endpoint scans all the files on the computer (or specified directories), calculates hashes for all
executables scripts and macros, and adds these new file definitions to the database. The populated Scan
Explorer display looks similar to this one:
Chapter 5: Building a white list of authorized files
Figure 23. Scan Explorer window after a scan
The lower left panel of the Scan Explorer module window contains important status information.
To compare two scans
1. Perform the scans you want to compare, using the previous procedure. These scans do not
necessarily have to be recent ones. In fact, you normally compare a scan done before installing a new
application with another one done after the installation process is complete.
2. Click on the SELECT SCANS button or select the Explorer Select Scans command from the menu bar
at the top of the screen. The following dialog is displayed.
42 PGP Endpoint Application Control User Guide 4.3.0
Page 47

Chapter 5: Building a white list of authorized files
Status
Description
Figure 24. Select Two Scans to Compare
3. In the Show scans made from template field, choose the template you used for the scans that you are
going to compare.
4. In the First Scan section, select the computer and the name of your first scan.
5. In the Second Scan section, select the computer and the name of your second scan.
6. Click on the OK button.
The system compares the two scans and displays the results in the Scan Explorer window. Each file has a
status assigned to it as a result of the comparison as shown in the following table:
Added The file was added between the first and second scans.
Different The file has been modified. It has the same filename but a different digital signature. It may be a
Original The file remains unchanged from the previous scan (only appears when comparing the same scan).
newer version.
Table 11. File status when comparing two scans.
It is only meaningful to compare two scans that have been carried out using the same template.
If you compare the same scan, it will show the same files, with the <original> tag.
Modifying file authorization
After scanning a computer to identify executables, scripts and macros, or comparing two scans to identify
updates, you may want to change your file assignment details. For example:
> If the purpose of your scan was to identify changes made when installing a new application, you may want to
assign the new/modified files to a specific File Group so users can work with the new application or upgrade.
> If the purpose of your scan was to identify files associated with different applications, you may want to
remove them from particular File Groups to prevent further use of the application.
To change the assignment of files to File Groups, right-click on a selected range of files in the Scan Explorer list
and select the Assign to file group or Remove from File Group option. For more information, see Chapter 8:
Granting access using the User Explorer on page 59.
You can use the right-click menu to assign selected files to a File Group, remove them from it, or filter a scan to
show only <Not Authorized> files. When using this last option, you can revert to the full listing by right-clicking
again and selecting Show all files from the menu.
PGP Endpoint Application Control User Guide 4.3.0 43
Page 48

Chapter 5: Building a white list of authorized files
Using the Authorization Wizard
The Authorization Wizard utility provides yet another way to:
> Search for executable files from a given source — such as a computer’s hard drive, a network share (UNC
path), or a CD/DVD-ROM.
> Create digital signatures (hashes) for the selected files.
> Incorporate these digital signatures (SHA-1 hashes) into the PGP Endpoint Database.
The Authorization Wizard can perform these tasks for:
> Windows operating systems, applications and service packs — even those packaged in ZIP files.
> Self-extracting ZIP archives.
> RAR, MSI, and Microsoft CAB files.
True to its name, the Authorization Wizard is easy to use. It guides you through the various stages, gives you
advice, and prompts you for information. All you have to do is answer prompts and click NEXT to move to the
following step.
The Authorization Wizard does not expand setup EXE files and wrongly considers them as a
single executable files instead of an auto-extraction file.
The Authorization Wizard does not scan for scripts or macros.
To authorize executable files using the Authorization Wizard
1. Click on the Windows START button and select Programs PGP Endpoint Authorization Wizard.
The Authorization Wizard starts.
2. Read the instructions and click on the NEXT button.
3. At the following dialog, enter the name of a computer running PGP Endpoint Administration Server
software. You may need to click CHECK SERVER to verify that the required server is connected.
If you only leave certain ports open in your firewall, you may need to specify the server TCP
port number between square brackets, e.g.: server[1234]. See the PGP Endpoint Setup Guide.
Figure 25. Authorization Wizard
4. Check the Process known files automatically box if you want the wizard to insert existing files into the
PGP Endpoint Database if they have the same name but different digital signature (hash) as an
existing database entry. The wizard also tries to find a suitable File Group for them. Uncheck this
option if you want the wizard to identify known files, but allow you to manually process them.
5. Click on the NEXT button.
6. In the next dialog, use the button to the right of the Source field to browse to the root directory
where you want to scan for executables and select the temporary directory where the wizard should
expand any archives (set of compressed files) found. (Both directories must already exist.)
44 PGP Endpoint Application Control User Guide 4.3.0
Page 49
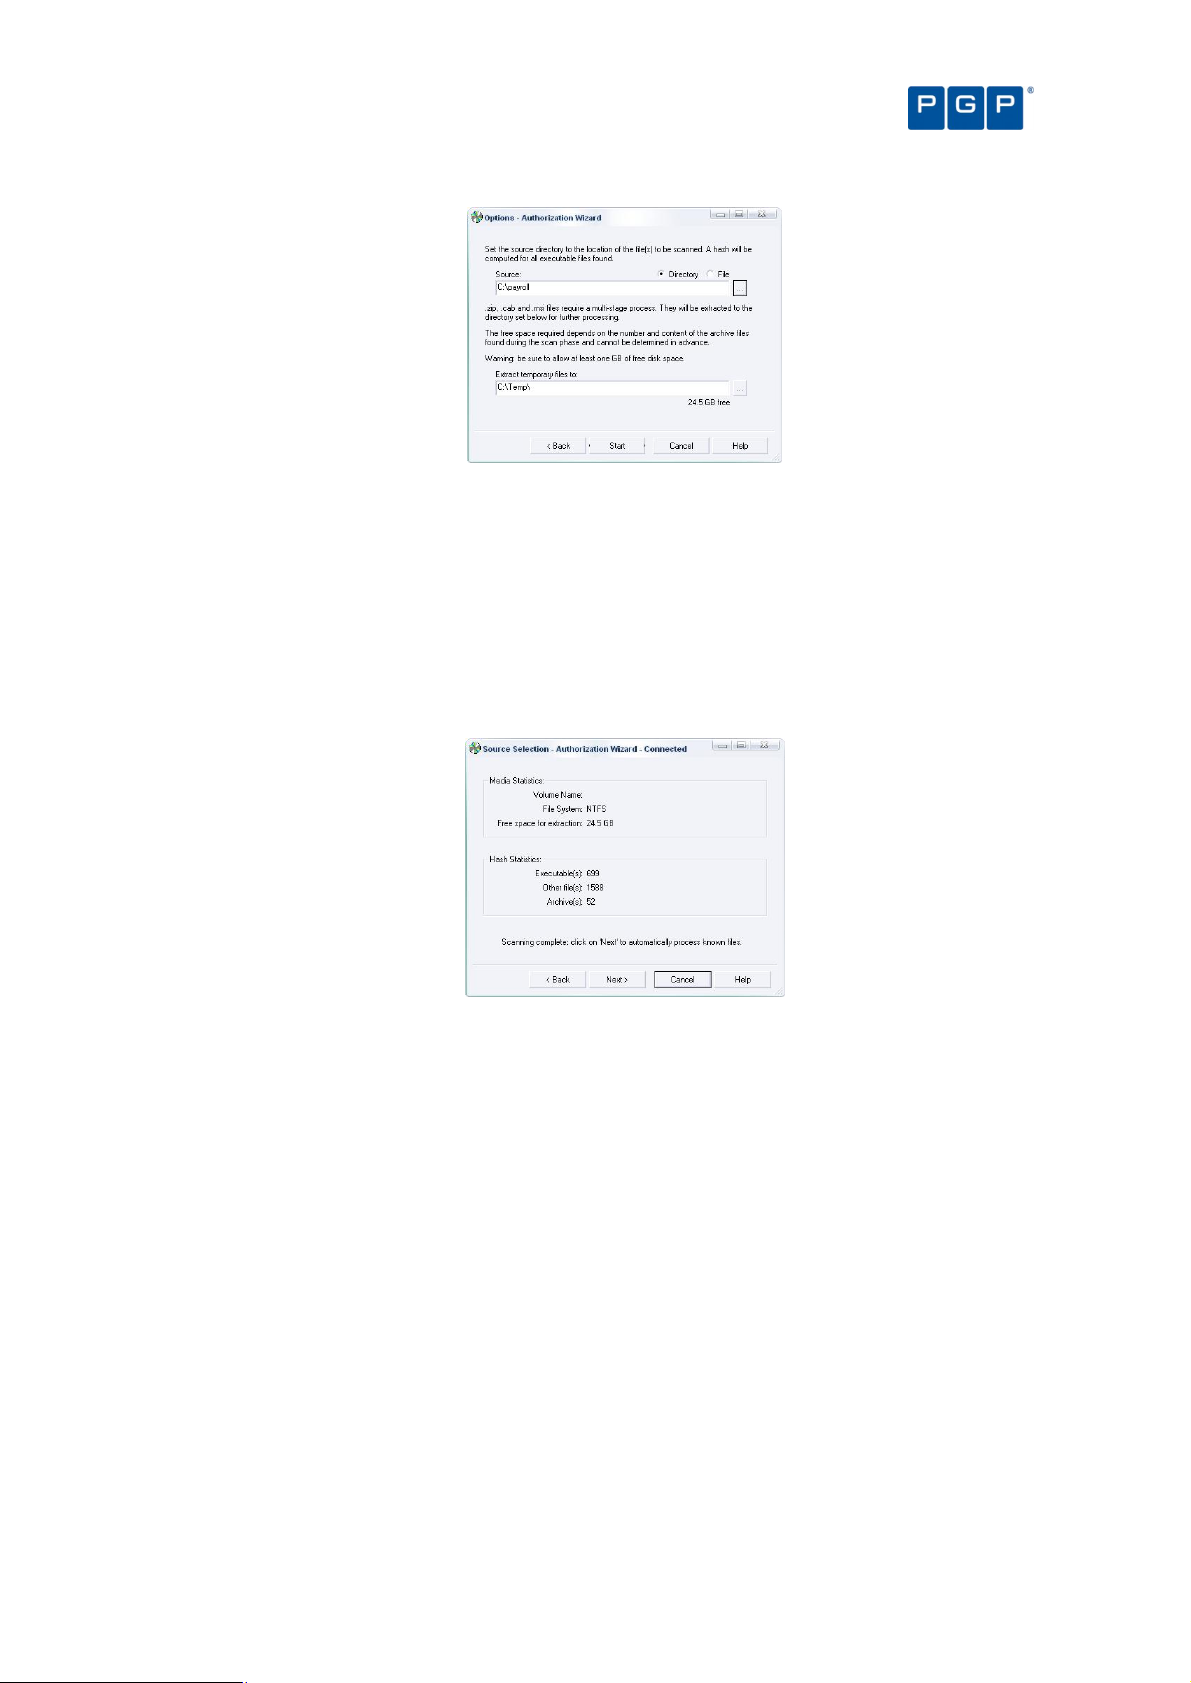
Chapter 5: Building a white list of authorized files
Figure 26. Authorization Wizard: Selecting the Source Directory
The wizard unpacks any archive found in the source directory into the temporary directory. It is
important, for this reason, to make sure that your hard disk has enough free space.
7. Click on the START button to begin scanning the Source for executables.
The wizard begins searching in the source directory and displays statistics. If you see the Free space for
extraction fall below 100 MB, you should release some extra disk space.
When the scan is complete, the Authorization Wizard presents a summary showing the number of
executables found, as shown in the following example:
Figure 27. Authorization Wizard: Statistics
8. Click on the NEXT button to continue.
If you checked the Process known files automatically option in step 4, the wizard processes all executable
files and attempts to assign a suitable File Group to each. If a matching filename exists in the database and
has been assigned to a particular File Group, the wizard assigns the new file definition to the same File
Group.
When the wizard has made all the automatic File Group assignments it can, it presents another summary.
This shows how many files were processed, how many were assigned to File Groups, and how many were
duplicates of previously assigned files.
PGP Endpoint Application Control User Guide 4.3.0 45
Page 50

Figure 28. Authorization Wizard: Processing the Files
9. Manually assign File Groups to any remaining files.
Chapter 5: Building a white list of authorized files
The wizard presents a list of files that were not automatically processed either because they did not match
existing filenames in the database or because you did not select the Process known files automatically
option in step 4. You can use this list to directly assign files to File Groups.
To manually assign a File Group, select one or several files (using the Ctrl and/or Shift key) and then click on
the Suggested File Group drop-down or the FILE GROUPS button to select the appropriate File Group. See
Chapter 6: Organizing files into File Groups on page 47 for more information.
Figure 29. Authorization Wizard: Assigning Files to File Groups
10. Once you finish assigning the files to File Groups, click on the NEXT button to insert the new file
definitions into the database.
You may have to update access permissions to enable users/user groups — using the User
Explorer module — to run any new applications.
11. Either run the Authorization Wizard again, using a button on its final page, or close the Authorization
Wizard.
46 PGP Endpoint Application Control User Guide 4.3.0
Page 51

Chapter 6: Organizing files into File Groups
File Groups simplify the process of administering large numbers of executable, script, and macro files and users.
Instead of individually authorizing files, you can logically group them to be managed together.
Your File Groups should reflect the way you want to administer PGP Endpoint. For example, you may want to
create an IIS (Internet Information Server) group to associate all network services needed by your Web master
when protecting your organization’s servers, or a Marketing group to cluster applications used by your marketing
department.
File Groups may have child File Groups associated with them. This reflects the way Windows is designed, where
applications share common files (libraries of code, data, or resources). If you create a parent-child relationship
between File Groups you can update a shared library without recompiling or changing the application itself.
The use of files in a child File Group can be indirectly authorized through a parent-child
relationship.
Both child and parent File Groups must exist before creating a relationship in the Database
Explorer module (in the Groups tab).
Creating and managing File Groups
To create a new File Group
1. Open the Database Explorer, Scan Explorer, Log Explorer, or Exe Explorer module. To do this, click
the appropriate icon in the Modules section of the Control Panel or use the ViewModules command.
2. Select Manage File Groups from the Explorer menu. The system displays the corresponding dialog.
Alternatively, if you are working in the Database Explorer, Exe Explorer, or Log Explorer module, you can do
this by selecting a file(s), choosing Assign from the Explorer menu, and clicking on the FILE GROUPS button in
the Assign Files to File Groups dialog. The right-click menu also has the Assign to File Group command that
opens the same dialog.
3. Click on the ADD FILE GROUP button at the top right of the dialog. The system Add File Group dialog.
Figure 30. File Group Management
4. Enter the name of a new File Group.
PGP Endpoint Application Control User Guide 4.3.0 47
Page 52

new File Group has now been added, and you can now assign files to it.
Database Explorer
,
Modules
from the
you want to remove.
ROUP
the impact of the delete action
If you are confident that you want to
performing this operation
ire for their day
they may authorize the use of related files needed by the parent File Group.
Database Explorer
,
Modules
from the
t the File Group you want to remove.
Select the desired File Group and then click
Type the new name of the File Group and click
relationship between File Groups
e created, deleted, or modified
Database Explorer
of the main window
. The system displays the corresponding dialog.
n the left panel
Relationships
Available
ay
Icon Description
This File Group is parent of the one selected in the
This File Group is child of the one selected in the
This File Group is an indirect parent of th
This File Group is an indirect child of the one selected in the
created by
by the program that is blocked and cannot be deleted
Table
is is demonstrated in th
Accounting
Chapter 6: Organizing files into File Groups
PGP Endpoint Application Control User Guide
module. To do this, click
Modules
menu. The system displays the corresponding dialog.
dialog that outlines
Groups, and files are affected.
OK
from running
This is also true when deleting child File Groups since
module. To do this, click
Modules
menu. The system displays the corresponding dialog.
button. The system displays the
. The new File Group name appear
module
Modules
elationships
, or
Parent (Indirect)
that can be deleted or renamed
File Group
also has an indirect parent
5. Click on the OK button. The
To delete a File Group
1. Open the
the appropriate icon in the
2. Select Manage File Groups
3. Select the File Group
4. Click on the DELETE FILE G
5.
removed from the list.
Take care
they requ
To rename a File Group
1. Open the
the appropriate icon in the
2. Select Manage File Groups
3. Selec
4.
Rename File Group dialog.
Scan Explorer, Log Explorer, or Exe Explorer
section of the Control Panel or use the View
Explorer
button. The system displays the Delete File Group
— which Users, User
continue and delete the File Group, click on
— it may prevent some users
-to-day work.
Scan Explorer, Log Explorer, or Exe Explorer
section of the Control Panel or use the View
Explorer
the RENAME FILE GROUP
. The group is
applications
command.
command.
5.
Group Management dialog.
To create a parent-child
Parent-child relationships ar
do this:
1. Open the
Control Panel
2. Select the Groups tab
3. Select the desired group i
File Group on the right one (
The type changes from
When creating the relationship you m
A File Group
A File Group created
You cannot delete indirect relationships
then continue from there. Th
OK
using the Database Explorer
module by clicking the appropriate icon in the
or using the ViewModules command.
(File groups) and assign the r
) and using the ADD CHILD, ADD PARENT
to Child, Parent, Child (Indirect), or
see the following icons:
File Groups panel.
File Groups panel.
e one selected in the File Groups panel.
File Groups panel.
a PGP Endpoint administrator
12. File Group relationship status icons.
— you must first proceed to the ‘direct’ related
e following examples.
s in the File
’s Groups tab. To
section of the
by selecting the
REMOVE buttons.
.
(left panel) and
Example 1 — The File Group ‘
48
’ is the parent of ‘Payroll’, which
‘Marketing’:
4.3.0
Page 53
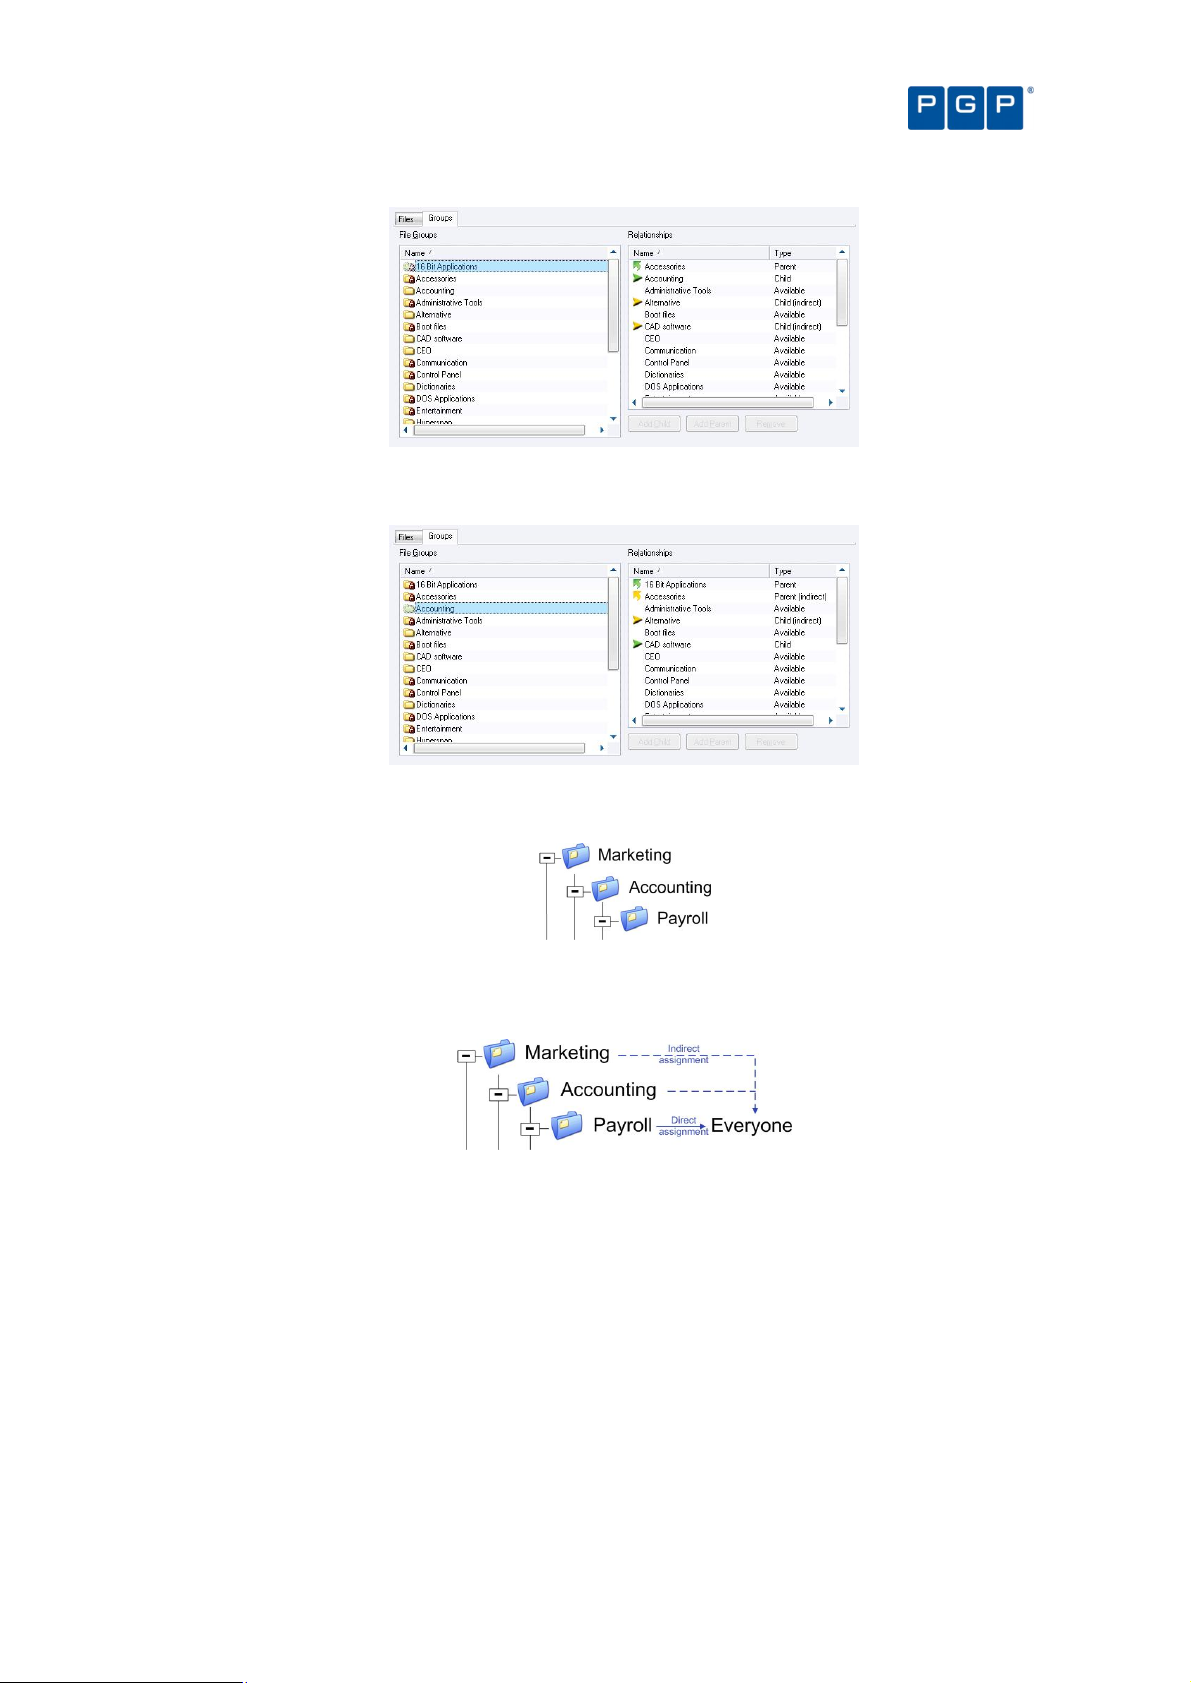
Chapter 6: Organizing files into File Groups
Figure 31. File Group parent relationship
Example 2 — The File Group ‘Accounting’ is the child of ‘Marketing’ who also has an indirect child ‘Payroll’:
Figure 32. File Group child relationship
This is the consequence of the following parent-child assignations:
Figure 33. File Group parent-child relationship
When assigning the File Group ‘Payroll’ to a user (or user group), there is also an indirect assignment
because of this relationship:
Figure 34. File Group indirect assignment
All the indirect assignations created by defining these relationships are shown in the User Explorer module
(File Groups by User tab; Authorized panel). See Direct, indirect, and not authorized File Groups on page 59
(and Figure 43 in the same section).
Assigning executable, script, and macro files to File Groups
When you have created the File Groups and any parent-child relationships you want to use, it is time to group
executable files, scripts and macros into your File Groups.
To assign files to File Groups
1. Open the Database Explorer, Scan Explorer, Log Explorer, or Exe Explorer module. To do this, click
the appropriate icon in the Modules section of the Control Panel or use the ViewModules command.
PGP Endpoint Application Control User Guide 4.3.0 49
Page 54
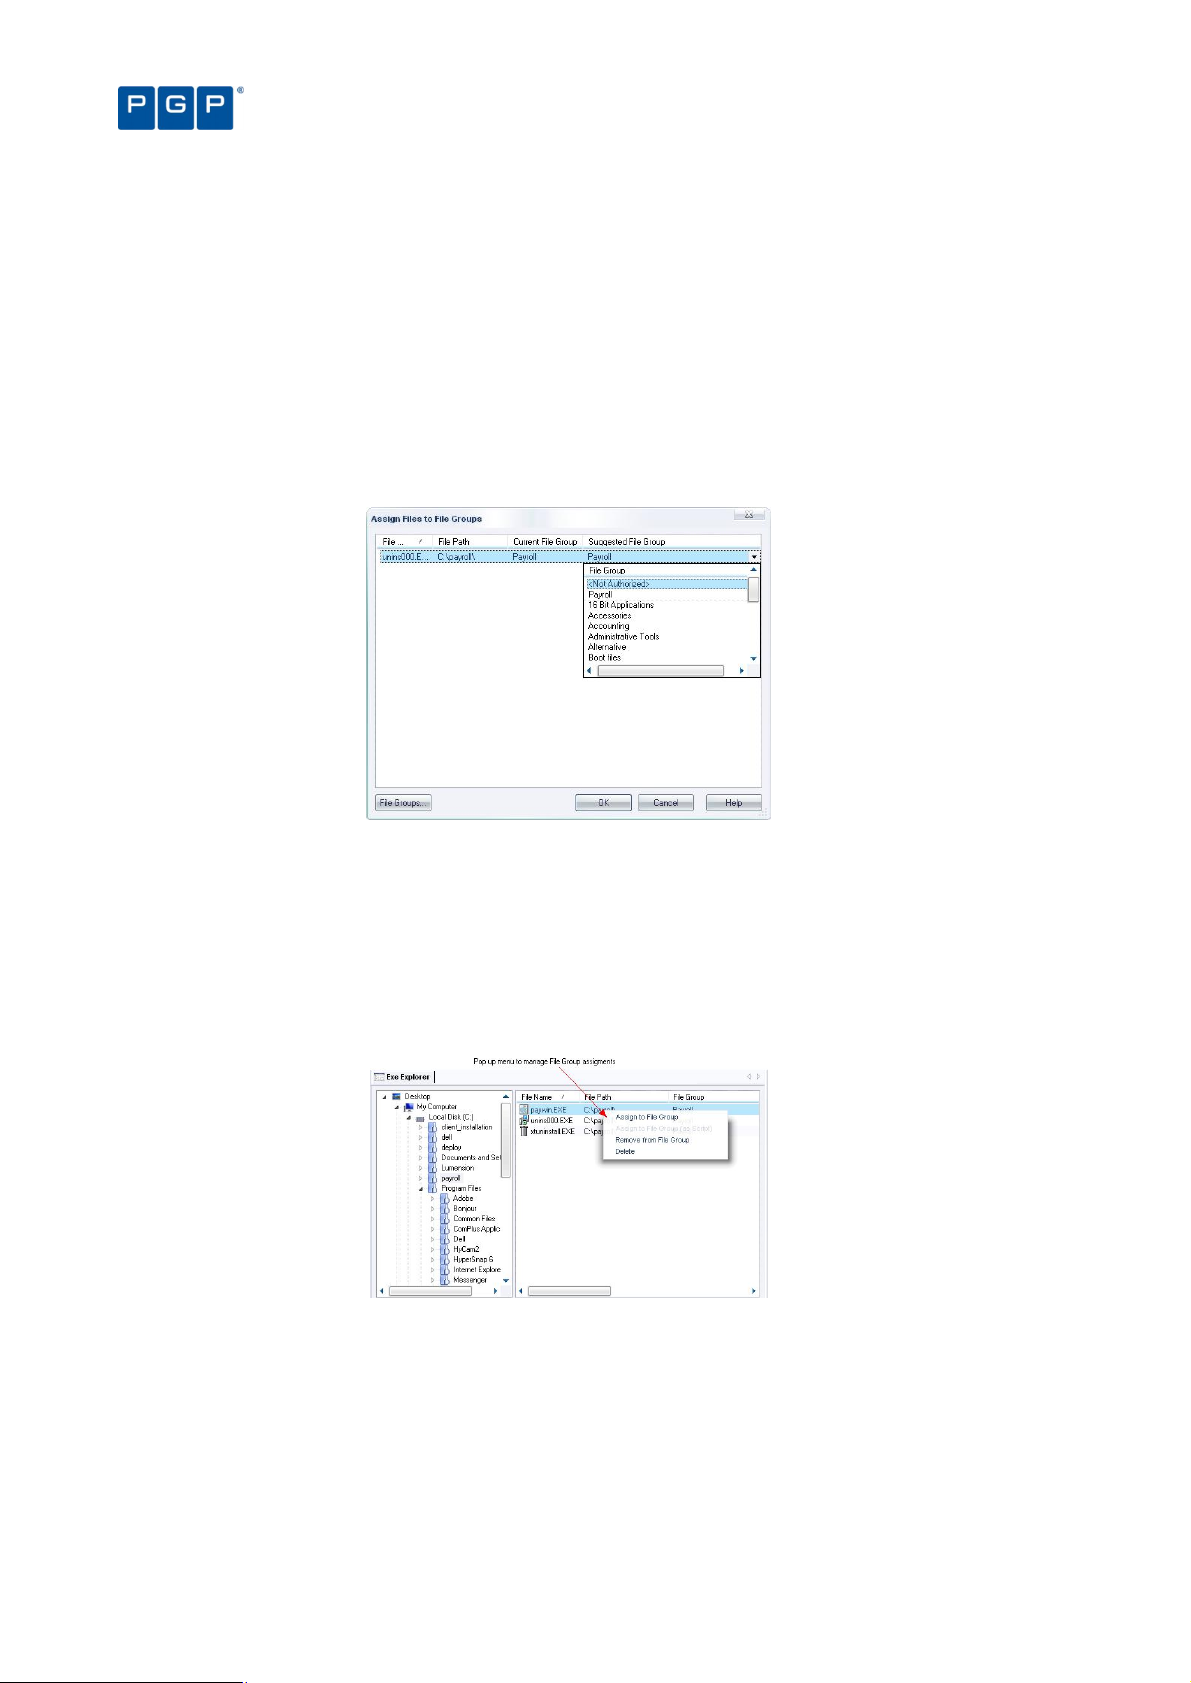
A list of the authorized executable files, scripts and macros, which have been recorded in the PGP Endpoint
Database, is shown.
2. Highlight the file, or a range of files, you want to assign to a File Group (using the Ctrl and/or Shift
keys).
3. Assign the file(s) to a File group. To do this do one of the following:
> Right-click the mouse button and select Assign to File Group.
> Select Assign from the Explorer menu while in the Database Explorer or Exe Explorer module.
> Double-click on the filename (if a single file is selected).
The Assign Files to a File Group window is displayed:
Chapter 6: Organizing files into File Groups
Figure 35: Assign Files to File Groups dialog
The Current File Group column shows the group to which the file currently belongs. If a file has not been
assigned to a File Group, this column shows <Not Authorized>.
The Suggested File Group column proposes a File Group based on the filename. If a file with the same
name already exists in the database (perhaps a different version of the same application), the system
suggests the same File Group to which the earlier file belongs (since you would normally want this to be the
same).
4. Select the File Group to which the file or files belong.
Figure 36. Assigning a File Group using the Exe Explorer module
You can assign a script or macro to a File Group as a script (as distinct from an executable).
You can assign File Groups using the Exe Explorer, Database Explorer, Log Explorer, and
Scan Explorer modules.
Changing file assignments
Sometimes you need to modify your file lists or file assignments. You typically do this when:
50 PGP Endpoint Application Control User Guide 4.3.0
Page 55

Chapter 6: Organizing files into File Groups
> New software has been installed on protected servers or computers, and you wish to grant users access to
the new applications.
> Updated versions of existing software have been provided, and you want users to switch to the new versions.
> An executable file, script, or macro has become corrupted or is no longer appropriate, and you want to
prevent users from running it.
> Multiple users are locally authorizing files that are centrally denied, as evidenced from the log files. If, and
only if, you are confident that the files can be trusted, you can add them to the PGP Endpoint Database
directly from the Log Explorer screen. Users will be grateful that they do no longer have to authorize these
harmless executables.
To change the File Group to which a file is assigned
1. Open the Database Explorer, Scan Explorer, Log Explorer, or Exe Explorer module. To do this, click
the appropriate icon in the Modules section of the Control Panel or use the ViewModules command
2. Highlight the file, or range of files, that you want to reassign a File Group to.
3. Right-click and use the Assign Files to File Groups option.
4. Choose a new File Group for the file(s). To do this do one of the following:
> Click on OK, to accept the suggested File Group.
> Select the file(s) again, click on the FILE GROUPS button (or the Suggested File Group list icon) and select a
different File Group, if required.
5. Click on OK. The new file assignment details are recorded in the database.
To delete a file from a File Group
1. Open the Database Explorer, Scan Explorer, Log Explorer, or Exe Explorer module. To do this, click
the appropriate icon in the Modules section of the Control Panel or use the ViewModules command
2. Highlight the file, or range of files, that you want to remove from a File Group.
3. Right-click and use the Remove from File Group option.
The system deletes the file and marks the File Group for that entry as <Not Authorized>. You can also
explicitly assign the file(s) as <Not Authorized>.
To delete a file from the PGP Endpoint Database
1. Open the Database Explorer, Scan Explorer, Log Explorer, or Exe Explorer module. To do this, click
the appropriate icon in the Modules section of the Control Panel or use the ViewModules command
2. Highlight the file, or range of files, that you want to delete from the database.
3. Right-click and use the Delete option.
4. Click on OK.
You cannot undo this delete operation. If you accidentally delete a file you wanted to keep, you
must use the Database Explorer, Scan Explorer, Log Explorer, or Exe Explorer module to
generate a new hash for it and add it to the database again.
Viewing file assignments
The Database Explorer module displays a list of all the files that have been recorded in the PGP Endpoint
Database. For each file the Database Explorer module shows the internal system ID, filename, extension,
location (path), and the File Group to which the file has been assigned. It also shows any parent-child
relationships between File Groups (on the Groups tab).
The following example shows a typical Database Explorer listing:
PGP Endpoint Application Control User Guide 4.3.0 51
Page 56
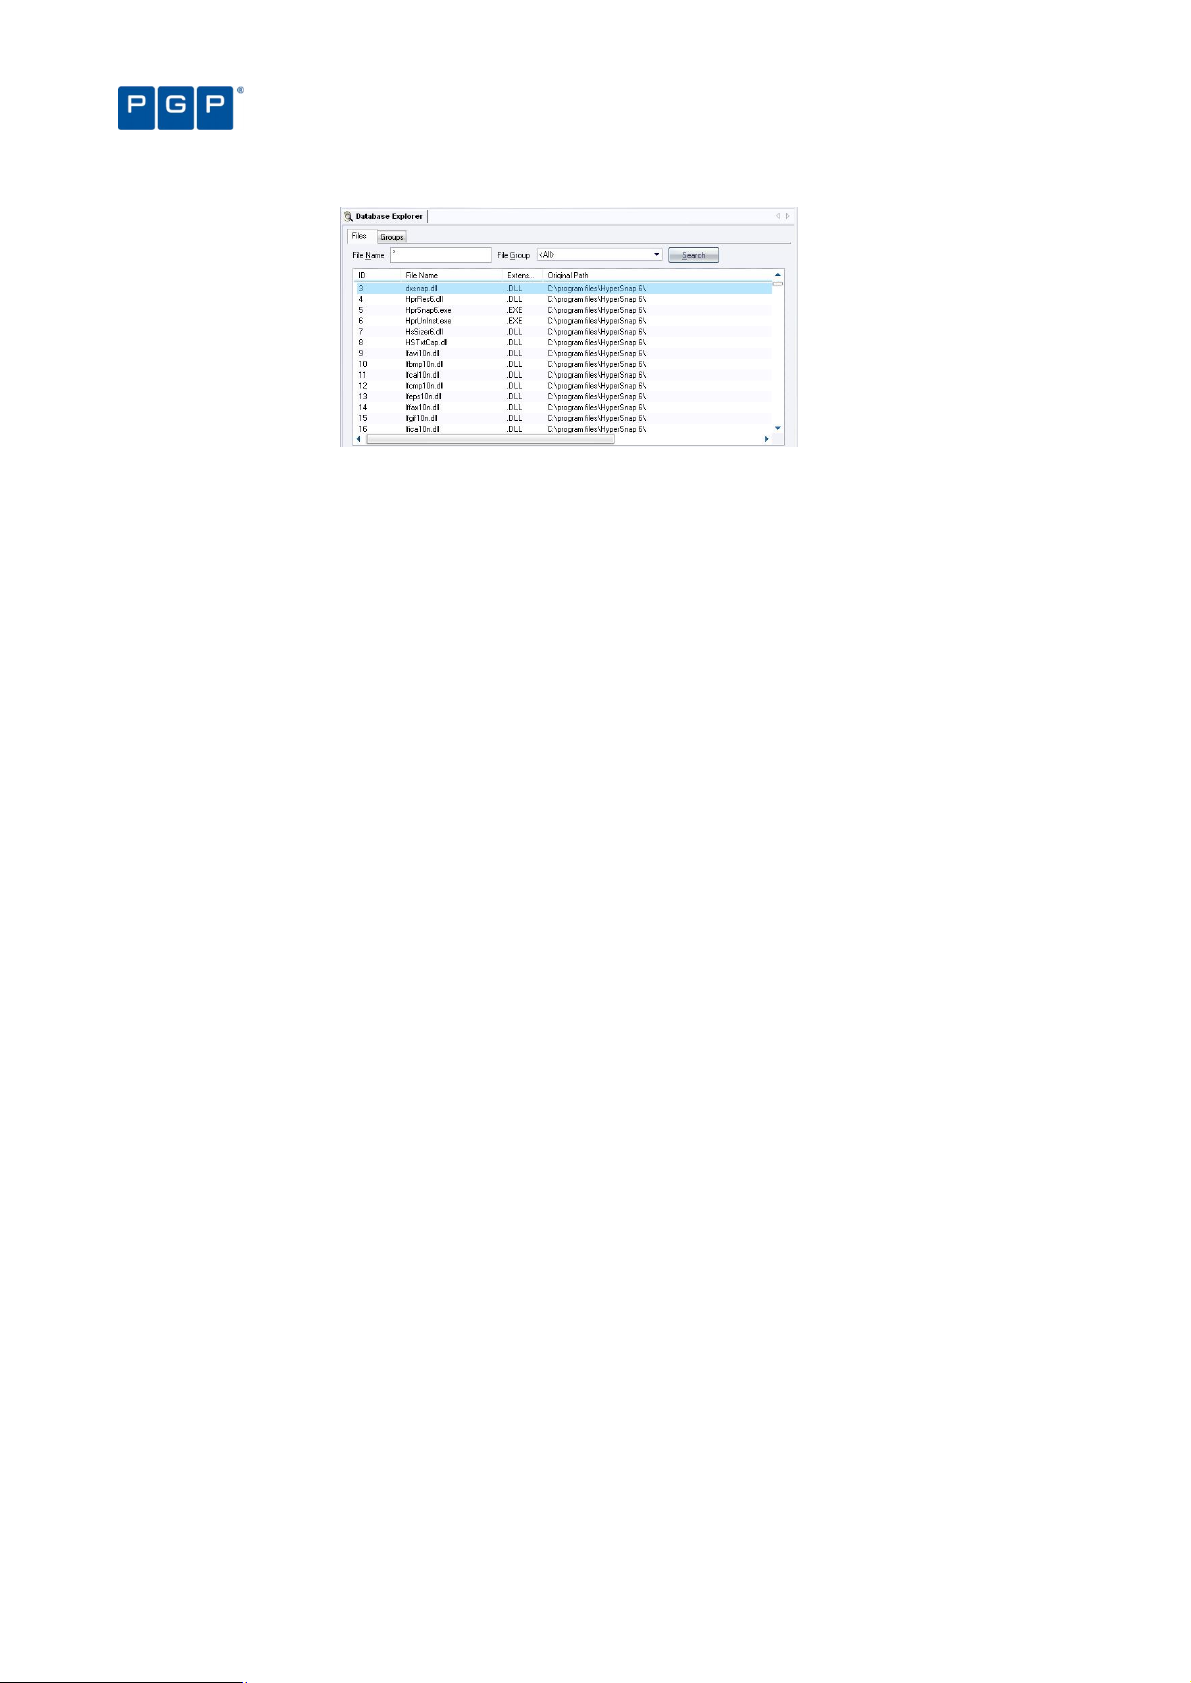
Figure 37. Database Explorer module
Chapter 6: Organizing files into File Groups
The Database Explorer module works in a similar way to the Windows Explorer program.
.
To sort entries by any attribute, such as filename or File Group
You can click on a column header to sort the file entries by that attribute. (Click again to change the order from
ascending to descending, or vice versa).
A small triangle on the header shows the sort order. The ID column shows the internal PGP Endpoint Database
ID, for information purposes only.
To display a subset of the files in the database
1. Choose the criteria to refine your query:
> File Name Display only filenames that match a given pattern. You can use the standard Windows
wildcards (‘?’ and ‘*’).
> File Group Display only the files for a specified File Group or the <Not Authorized> File Group.
2. Click SEARCH to retrieve the files. The system displays files that match your criteria.
You can change the File Group assignment for a file from this display, delete the file from a File Group, or delete
the file from the PGP Endpoint Database, using the procedures outlined earlier in this chapter.
Using the Groups tab
You can use the Groups tab to create, modify, or delete parent-child relationships between File Groups. See To
create a parent-child relationship between File Groups on page 48.
52 PGP Endpoint Application Control User Guide 4.3.0
Page 57

Chapter 7: Authorizing files by location (Path Rules)
PGP Endpoint identifies allowable files by calculating a unique digital signature (‘hash’) based on file contents. If
the hash does not match the one stored in the system and assigned to the user/machine, the executable cannot
run. Normally this is the desired behavior, since malicious programs may change or add executables invalidating
their hash.
You cannot authorize scripts and macros by file location (Path Rules) — only executable files.
For a small number of applications, security based on file hashes does not work. For example, some executables
are transformed as a natural part of the installation procedure, typically to embed licensing information. Some
internal applications may change frequently, yet they are run under the control of trusted users, so you may trust
the files.
To allow these sorts of applications to run, PGP Endpoint solution enables you to authorize executables from a
specified location, designated by path. Executable files in the specified directory location are exempted from
normal hash checking. They are presumed to be from a trusted source, so they are allowed to run.
To add yet another layer of protection for this type of authorization, you can have the system check the identity of
the file’s owner — and execute files only from trusted owners.
All these authorization rules are stored on the server and the client so they can be enforced when the machine is
disconnected.
Creating, changing, and deleting Path Rules
When creating or modifying a Path Rule you can use the following options:
> Ownership Check — The Path Rule only applies if a user or group is listed as a Trusted Owner and is the
proprietary of the executable file. This requires a direct match — the group membership is not resolved.
> Include subdirectories — Force the Path Rule to apply to all files in subfolders of the root folder defined in the
path field.
> Log Execution — The Path Rule attempt is logged with a log-access-denied flag. If the log-everything logging
mode is set (within the Execution Log option, then every execution attempt is logged regardless of this
setting. In all cases, the Path Rule is logged with the ok-PathRule custom message. Log Execution is On by
default for existing Path Rules.
To create a new Path Rule that applies to everybody
1. Select Path Rules from the Tools menu (or from the Control Panel). The following dialog appears:
PGP Endpoint Application Control User Guide 4.3.0 53
Page 58

Figure 38. Path Rules dialog
2. Select <default rules for all users> and click on EDIT. The following dialog appears:
Chapter 7: Authorizing files by location (Path Rules)
Figure 39. Editing the Path Rules
3. Click on the ADD button to insert a new path to the rule.
4. Type the path that identifies the location of the executable file. You can use the system variables
%SystemRoot%, %SystemDrive%, and %ProgramFiles%.
5. If you want the rule to apply only to executable files of a Trusted Owner, activate the Ownership
Check.
6. If you want to traverse all the subfolders beginning from the root, select the Include subdirectories
option.
7. If you want the Path Rule to be logged in the log-access-denied logging modes (in addition to the logeverything logging mode in which it is logged regardless of this setting), select the Log execution
option.
8. Click on the OK button to close the Path Rule dialog.
9. Click on the appropriate button: ADD to insert a new path, OK to save the rule, CANCEL to abandon the
operation, EDIT to change the selected path for the Path Rule, or DELETE to erase the selected path
from the Path Rule. The new Path Rule takes effect after an update has been sent to the user’s
computer.
To create a new Path Rule that applies to a specific user or user group
1. Select Path Rules from the Tools menu (or from the Control Panel) to display the corresponding
dialog.
2. Click on the ADD NEW button. The following dialog appears:
54 PGP Endpoint Application Control User Guide 4.3.0
Page 59

Chapter 7: Authorizing files by location (Path Rules)
Figure 40. Adding a Path Rule
3. Type the name of a User or User Group to whom the Path Rule will apply, or click on SELECT to search
for and choose a User or User Group.
4. Type the name for the Path Rule.
5. If you want the rule to apply only to executable files of a Trusted Owner, activate the Ownership
Check.
6. If you want to traverse all the subfolders beginning from the root, select the Include subdirectories
option.
7. If you want the Path Rule to be logged in the log-access-denied logging modes (in addition to the logeverything logging mode in which it is logged regardless of this setting), select the Log execution
option.
8. Click ADD to accept the Path Rule but keep the Path Rules dialog open.
9. Click on the OK button to add the Path Rule and close the dialog, or on CANCEL to interrupt the
operation.
To modify an existing Path Rule
1. In the Path Rules dialog, select the User whose Path Rule you want to modify and then click on the
EDIT button. The Edit Path Rules dialog appears.
2. Select the Path Rule you want to modify, and click on EDIT. The Path Rule appears on the Path Rule
dialog.
3. Modify the Path Rule and check/uncheck the Ownership Check, Include subdirectories and Log
execution options as appropriate.
4. Once you have finished modifying the Path Rule, click on the OK button.
To delete a single Path Rule for a user or user group
1. In the Path Rules dialog, select the User whose Path Rule you want to remove and then click on the
EDIT button. The Edit Path Rules dialog appears.
2. Select the Path Rule you want to delete from the Rules list.
3. Click DELETE and then click on OK.
If a User or Group has only one Path Rule specified, you cannot delete the rule by this method. To remove a
single rule, select the User or Group in the Path Rules dialog and delete it.
To delete all Path Rules for a user or user group
1. In the Path Rules dialog, select the User or Group whose Path Rules you want to delete.
2. Click on the DELETE button.
You cannot delete the <default rules for all users> account but you can remove its rules.
PGP Endpoint Application Control User Guide 4.3.0 55
Page 60

Chapter 7: Authorizing files by location (Path Rules)
Conventions for specifying paths in the rules
Some special conventions apply to paths in the Path Rules. They allow you to select multiple files in a more
convenient way.
Each path name can be up to 900 characters and can consist of the following parts:
> Root specifier.
> Path specifier.
> Filename specifier.
The root specifier can be:
> A Root token:
%SystemDrive% — The drive where Windows is installed.
%SystemRoot% — The folder where Windows is installed (usually C:\Windows or C:\WINNT).
%ProgramFiles% — The Program Files folder for the computer (usually C:\Program Files).
> A Drive letter: any valid drive letter (local drive or mapped network drive).
> A Server or computer name: the UNC name of a machine on the network, such as ‘\\serverA’.
The path specifier is simply the file path relative to the root token. This path name must start and end with a
backslash and cannot include wildcards.
The file specifier is the file name, with or without wildcards. Allowable wildcards are ‘*’ (asterisk) representing any
string of zero or more characters, and ‘?’ (question mark) representing any string of 0 or 1 characters.
Here are some examples of valid path names for a Path Rule:
> %SystemRoot%\system32\*.dll
> C:\SomeFolder\*.*
> \\serverA\\Some Folder\SomeFile.exe
If you specify a non-existing file or directory, the file/directory will not be found, but no error or
warning message is issued.
Defining and working with Trusted Owners
A fundamental principle of authorization by Path Rules is that the path leads to a trusted source. To add yet
another layer of protection for this type of authorization, you can ask the PGP Endpoint system to explicitly check
the ownership of the file — and execute files only owned by trusted owners. You can also adjust Windows NTFS
path security properties.
If you activated the Ownership Check when setting a Path Rule, the PGP Endpoint system only permits execution
of files owned by an account who is a Trusted Owner. Note that an account not explicitly specified as being a
Trusted Owner is not considered as such, even if this account is a member of a group that is a Trusted Owner.
Trusted Owners are not available for Novell users.
To define or delete a Trusted Owner
1. Select Path Rules from the Tools menu (or from the Control Panel).
2. Click on the TRUSTED OWNERS button in the Path Rules dialog. The following dialog appears:
56 PGP Endpoint Application Control User Guide 4.3.0
Page 61

Chapter 7: Authorizing files by location (Path Rules)
Figure 41. Setting Trusted Owners
3. Click ADD, select the User or Group you want to designate as a Trusted Owner, and click on the OK
button.
You can use this same dialog to delete a Trusted Owner by selecting it and clicking on the DELETE button.
Trusted Owner and Path Rule example
As an Administrator, you can create different Path Rules (see Creating, changing, and deleting Path Rules on
page 53) for different users and combine those with trusted owners to reinforce the effect as illustrated in the
following example:
1. The Administrator creates a Path Rule without selecting the Ownership Check option (no trusted
owner check) to a directory called c:\marketing\applications\*.exe for a user called Bill (he has neither
local nor domain administrative rights).
2. The user (Bill) can now execute all programs in that directory (only the ones with an EXE extension).
3. If the user copies – assuming he has the rights to do so – another EXE file to this already authorized
directory (by means of this Path Rule), he/she can run it without any problem. He can also try to copy
this file to another directory but it does not run (unless, of course, it belongs to another Path Rule)
4. Since this is not a generally accepted policy, we now add an Ownership Check option to the rule and
proceed to include Trusted Owners to it. We add the Administrators of the machine (or domain) to the
Trusted Owners.
Figure 42. Setting Path Rules with Ownership Checking
5. The situation changed radically from that described in step 3. Bill is not able to run applications that do
not belong to the Administrators (unless he himself is an administrator). Only the Administrators can
place ‘trusted’ EXE applications in that directory. If he tries to copy a file to that directory, he becomes
the owner — not the administrator — and thus, he cannot run it.
If you are using PGP Endpoint in a Novell environment, be aware that Path Rules do not work.
Path Rules precedence
When defining Path Rules (ToolsPath Rules or from the Control Panel), you can assign them at different levels:
PGP Endpoint Application Control User Guide 4.3.0 57
Page 62

Chapter 7: Authorizing files by location (Path Rules)
> As a default rule for all users.
> To a specific user group.
> To a specific user.
When Path Rules are defined at different levels (all users, user group, or user), it is important to understand the
resulting policy. For example, you can define a Path Rule that applies to all users and a second one that applies
only to a user but have some common files with the first one defined. The general rule is that ‘Path Rules are
cumulative’.
The next table shows if an application can run or not depending on the defined Path Rule:
Type of Path Rule defined: If the user is NOT a
member of the group
Will the application run?
Default rule for all users Yes Yes
For a group No Yes
For an specific User Yes Yes
Table 13. Resulting permissions when applying Path Rules
If the user is a member of
the group
58 PGP Endpoint Application Control User Guide 4.3.0
Page 63

Chapter 8: Granting access using the User Explorer
PGP Endpoint protects your organization’s servers and computers by permitting only authorized users to run
approved applications, scripts, or macros.
A small organization may simply define a standard set of approved applications and grant all users access to the
same accepted set of files. However, most organizations differentiate between different types of users, and grant
users access only to the applications they need to carry out their specific jobs. For example, you may only want
to grant your designated Webmaster access to Web server functions. Similarly, you may only want to grant
authorized database administrators access to database servers, or only allow your designated bookkeeper to
access your Accounting software. Controlling access to applications by user group or individual user minimizes
the risk of your systems being harmed — either accidentally or deliberately.
When you have gathered a list of the executable files, scripts or macros you need to manage, organized these
into logical File Groups, and defined users and user groups, the final step you need to carry out to define who can
do what is to assign File Groups to users/user groups.
Users and user groups
PGP Endpoint regulates application access by identifying users in the system and checking their access
privileges. When a request comes from a user to activate a particular application, script, or macro:
1. The PGP Endpoint Client Driver checks the digital signature (hash) of the requested file against those
2. If the application is on the white list of approved files, only authorized applications and scripts assigned
3. Finally, on the basis of the above, PGP Endpoint either grants or denies the ability to run the requested
Direct, indirect, and not authorized File Groups
If you are using PGP Endpoint Application Control Server Edition, by default your ‘users’ are
server administrators, typically Webmasters, email administrators, database management
specialists and other members of the IT team who need to access your organization’s critical
server’s functions. For the purposes of this chapter, and to distinguish them from PGP Endpoint
Administrators, we simply refer to these server administrators as ‘users’.
in the white list stored locally.
to a user or a user group from which this user is a member can run on the client. PGP Endpoint
therefore checks next which File Group the requested executable, script, or macro is in and whether
the user has permission for that File Group.
executable, script, or macro.
Most of the time, specific File Groups are associated with Domain User Groups to minimize management
overhead. This means that new group members automatically inherit the right to execute applications assigned to
the group.
You can grant permissions to users either directly, or indirectly through a user group. For example, you can
assign a right to use an application to a global group. Any member of that global group is then indirectly
authorized through Domain Groups to use that application.
A user can be a member of several groups of users, in which case he can use all programs, scripts and macros
that are authorized for the user groups of which he is a member.
Users can also have indirect assignations granted due to a parent-child relationships. These relationships were
set up using the Database Explorer module (see To create a parent-child relationship between File Groups on
page 48).
PGP Endpoint Application Control User Guide 4.3.0 59
Page 64

The following figure shows an example of the User Explorer window for a domain user called ‘Bill’ who has:
> Three File Groups indirectly authorized because of assignments made to Domain User Groups from which
he is a member. These are the Accessories, Communication, and the Microsoft Office File Groups, shown in
the Indirectly authorized through Domain Groups panel.
> Two File Groups directly authorized to him (as shown in the Authorized panel); Marketing and Sales. Since
these two groups contain parent-child relationships, they also give him an indirect relationship to other File
Groups, in this case to the Payroll and CRM.
> Several File Groups that are not authorized to him (as shown in the Not Authorized panel) — 16 Bit
Applications, Accessories, Administrations Tools, etc.
Chapter 8: Granting access using the User Explorer
Figure 43. A user having several File Groups indirectly authorized
The PGP Endpoint system recognizes and embeds ‘well-known’ groups that are normally found on each of your
computers, for example, Administrators, Everyone, Power Users, and Users. These standard groups also apply
in a server environment.
If you give a well-known group or user the permission to execute a file, this right is given to the
corresponding account on every computer on your network.
In a default Windows 2000 setup, some of the Global Users and Global Groups are set to be
members of the ‘well-known’ groups (Administrators, Everyone, Power Users, Users). For
instance, when a workstation joins a domain, the Domain Administrators group is set by default
to be a member of the Administrators group for that workstation. In the User Explorer module,
the well-known groups on each workstation get the same set of File Groups authorized.
However, it is possible to change which domain users and groups are members of a well-known
group on a per-computer basis.
File Groups authorized to Global Users or Global Groups via the well-known groups do not
appear in the ‘Indirectly Authorized Through Domain Groups’ list when you view the
authorizations for a Domain User or Domain Group, even though on a per-computer basis, the
authorizations may exist.
LocalSystem
The LocalSystem account is a built-in account used to run services on Windows 2000, XP, 2003 and Vista
operating systems. (Vista also uses the built-in LocalService and NetworkService accounts to run services.)
You must grant dedicated accounts such as LocalSystem the right to use the appropriate File Groups containing
services. For example, if you create a ‘Windows File Group where you put all operating system executable files
(including Windows services that run with the LocalSystem account), you should grant LocalSystem the right to
use this ‘Windows File Group.
The LocalSystem account and Administrators group are automatically configured in non-
blocking mode to simplify day-to-day management issues. You can change this default setting
(see Default options for users and user groups on page 115).
60 PGP Endpoint Application Control User Guide 4.3.0
Page 65
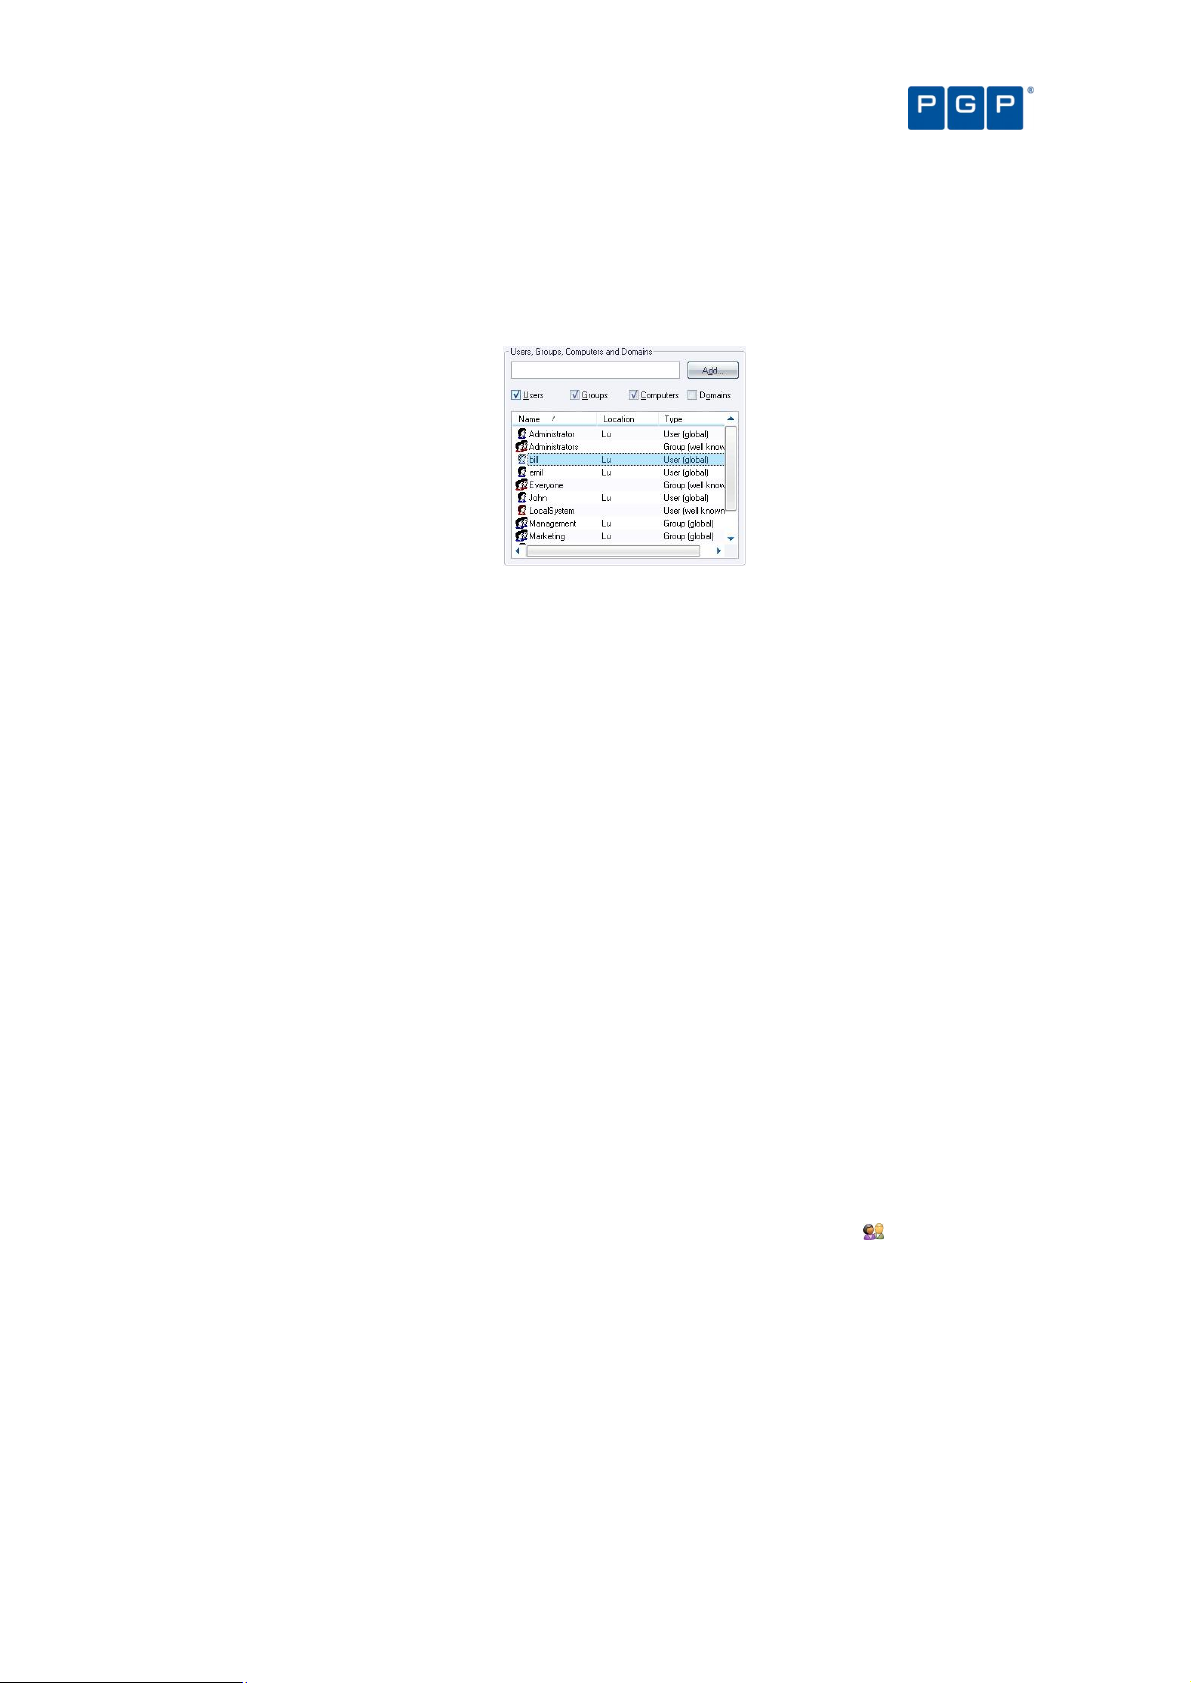
Chapter 8: Granting access using the User Explorer
Domains
The users, groups, and computers contained in each domain are defined in your respective domain controllers.
You can select the objects (user/groups/computers/domains) to expand and collapse the structure to browse for
the user or user group to which you want to grant File Group permissions:
Figure 44. User's tree
Use the ‘Synchronize Domain Members’ option on the ‘Tools’ menu (or the Control Panel) to
include local users of a computer in the Database, or if you do not see all your users/groups. If
you are using a Novell environment, use our synchronization script (described in the PGP
Endpoint Setup Guide).
Granting users or user groups permission to use designated File Groups is an easy point-and-click process done
using the User Explorer module. You can do one of the following:
> Display a list of users/user groups and bind them to File Groups.
> Display a list of File Groups and associate them with users and user groups.
Both functions are easily accessible in the User Explorer module, and both approaches yield the same result —
linking users/user groups with the files they are authorized to execute.
The User Explorer module can also be used to assign specific permissions to local users and groups. By default,
the PGP Endpoint Database contains only domain users; in order to import local users and groups information,
you need to select a computer and right-click on it and select Synchronize Local Users/Groups from the context
menu. The console prompts you for other credentials if your account does not have the necessary privileges. The
context menu also allows you to directly change the User/group options for the selected item.
Assigning File Groups to users/user groups
Users are not allowed to run a program, script, and macros (except if the Local Authorization option is activated)
unless it has previously been scanned, organized into a File Group, and then assign these File Groups to a
user/user group. In this section, we explain you how to perform this last step.
To assign/remove File Groups to/from users
1. Open the User Explorer module. To do this, click on the corresponding icon located in the Modules
section of the Control Panel of the main window or use the ViewModules command.
2. Click on the File Groups by User tab.
3. In the Users panel, select a user or user group. The File Groups panel shows you the File Groups for
which this user/user group already has authorizations, which ones are not authorized, and which are
indirectly authorized because the user belongs to a domain group that has authorization.
To add a Group File to the user’s Directly Authorized list, select it from the Not Authorized list and click on
the AUTHORIZE button.
To revoke a user’s access privileges for a File Group, select it from the Directly Authorized list and click on
the REMOVE button.
PGP Endpoint Application Control User Guide 4.3.0 61
Page 66

Even if a user is indirectly authorized for a File Group, you might want to directly authorize it as well, so the
user would not be inadvertently affected later if authorization privileges or membership of the group to which
he belongs changes.
4. If you want to make the change immediately, send the updated authorization(s) to affected machines.
Figure 45. User Explorer Module Window: File Groups by User
Chapter 8: Granting access using the User Explorer
To send the new authorization information to all machines, select Send Updates to All Computers from the
Tools menu (or from the Control Panel). To push updates to a specific computer, select Send Updates to
<name> from the Tools menu (or the Control Panel) and select the computer from there.
If you do not push updates to protected clients, they automatically receive updates at next time they restart
or logon.
The ‘Indirectly Authorized through Domain Groups’ panel does not show Active Directory
nested groups.
You can right-click on any user, group, or computer in the ‘User Explorer’ display to set its
Options. For more information, see Chapter 12: Setting PGP Endpoint system options on page
109.
Assigning users/user groups to File Groups
You may want to assign users/user groups to new File Groups, rather than the other way around. For instance, if
you have created a File Group for all the executables in an updated version of an already authorized application.
The next step is to grant users the access to the newly created File Group.
To assign/remove users to/from a File Group
1. Open the User Explorer module. To do this, click on the corresponding icon located in the Modules
section of the Control Panel of the main window or use the ViewModules command.
2. Click on the Users by File Group tab. The system displays a list of File Groups in the left panel and the
associated users/groups in the right one.
In the Associated Users panel, you find those users who are associated with the selected File Group — that
is, which users/groups have privileges to execute files in that File Group.
The underlying authorizations are the same as when viewed in the File Groups by User tab. This is just a
different way of presenting the same information.
3. Modify the users assigned to a File Group. To do one of the following actions:
> Select one or more user/user group and then click on the ADD button to insert them to the File Group.
> Select one or more user/user group and then click on the REMOVE button to delete them from the File
Group.
> Click on the REMOVE ALL button to delete all users/groups from the File Group.
62 PGP Endpoint Application Control User Guide 4.3.0
Page 67

Chapter 8: Granting access using the User Explorer
Figure 46. User Explorer Module Window: Users by File Groups
PGP Endpoint Application Control User Guide 4.3.0 63
Page 68

Page 69

Possible configurations
Domain
Logged
Result
Notes
Chapter 9: Monitoring activities using the Log
Explorer
Every server or computer under the protection of PGP Endpoint generates activity logs that record application
attempts, denials, and, optionally, authorizations. In addition, they also generate audit logs showing actions
carried out by administrators, such as changing user access rights and file group permissions. The information in
both these logs is sent to the PGP Endpoint Administration Server and can be viewed through the Log Explorer
module of the PGP Endpoint Management Console.
If you have appropriate administrative privileges, you can use the Log Explorer module to view logs of executable
files, scripts and macros:
> That have been executed or denied by central authorization.
> That were executed or denied by local authorization.
> For a designated user, computer, or filename (by matching pattern).
The Log Explorer module does more than display this information. From within the log displays you can also:
> Sort, add criteria, define columns, create templates, and organize information in several ways to suit your
needs and those of your company.
> Monitor the activities of administrators using audit log information.
> Save the results of querying log entries to a CSV file (comma-separated values).
> Authorize the use of files that have been denied.
You can use the Log Explorer module to generate automatic reports containing either details of granted or denied
applications or administrator actions. These can be scheduled to run at regular intervals between specified start
and end dates. Templates in the Log Explorer module enable you to generate customized reports quickly and
easily. They contain the criteria you want to use to select the results in the report. They also contain details of
what information is displayed for each result in your report.
Reports can either be generated on demand or you can schedule PGP Endpoint to generate them in a particular
format and deliver them either to a particular shared folder or email recipients. For example, you can specify that
you want to receive an email each Monday containing a custom report of the previous week’s activities.
The following limitations apply when using the Log Explorer module under various user/domain accounts:
PGP Endpoint Administration Server
and PGP Endpoint Management
Console are running on the same
machine
type
n/a
user*
Current
user
Other user
Works
properly
Works
properly
User has to use either localhost or the local
computer name in NetBios format in the
PGP Endpoint Management Console login
dialog.
PGP Endpoint Application Control User Guide 4.3.0 65
Page 70

Possible configurations
Domain
Logged
Result
Notes
Chapter 9: Monitoring activities using the Log Explorer
type
PGP Endpoint Administration Server
and PGP Endpoint Management
Console are running on different
machines
PGP Endpoint Administration Server
and PGP Endpoint Management
Console are running on different
machines
* Current User means that you have logged in to Windows and PGP Endpoint Management Console as the same user. See
Log in as a different user on page 14.
**A user needs to have both permissions on machine wide DCOM security, and the permissions set in DCOMCNFG to
successfully use DCOM. See http://www.microsoft.com/technet/prodtechnol/winxppro/maintain/mangxpsp2/mngsecps.mspx.
To correctly configure machine-wide DCOM (Group Policy):
1. Run gpedit.msd (Start Run).
2. Go to Computer Configuration\Windows Settings\Security Settings\Local Policies\Security Options.
3. Double click on ‘DCOM: Machine Access Restrictions in Security Descriptor Definition Language (SDDL) syntax’ on the
right pane, click on ‘Edit Security’ and add users and groups who are allowed Local/Remote access.
4. Double click on ‘DCOM: Machine Launch Restrictions in Security Descriptor Definition Language (SDDL) syntax’ on the
right pane, click on ‘Edit Security’ and add users and groups who will be allowed Local/Remote activation.
5. Close Group Policy Object Editor.
6. Run gpupdate.exe to refresh group policy.
To correctly configure DCOM (dcomcnfg.exe):
1. Run dcomcnfg.exe (Start Run).
2. Select ‘Component Services’ and open the ‘Computer’ branch.
3. Right-click on the specific computer on the right panel and select ‘Properties’.
4. Select the ‘COM Security’ tab, click on ‘Edit Limits’ in the ‘Launch and Activation Permissions’ panel.
5. Select the user you want to define as the PGP Endpoint Management Console administrator and activate the 'Remote
Activation' option.
5. Verify that the chosen user has ‘Remote Access' activated in the ‘Access Permissions’ panel.
Table 14: Log Explorer module limitations if using other user/domain account
Trusted
domain
Untrusted
domain
user*
Current
user
Other user
Current
user
Other user
Works
properly
Works
properly
Would not
work
Works
properly
Only if DCOM is configured correctly** (if
using Windows XP SP2 or later, Windows
2003 SP1 or SR2, or Vista).
Only if DCOM is configured correctly** (if
using Windows XP SP2 or later, Windows
2003 (SP1 or later), or Vista).
Only if DCOM is configured correctly** (if
using Windows XP SP2 or later, Windows
2003 (SP1 or later), or Vista).
The DCOM settings, as described in the above table must be modified on all machines where
the PGP Endpoint Administration Server is installed
DCOM does not work across non-trusted domains. This is especially true when using
Workgroups. This is a Windows limitation and one possible workaround for this issue is to use
the same login/password for the PGP Endpoint user, Windows user on the PGP Endpoint
Administration Server (SXS), and Windows user on the PGP Endpoint Management Console.
The Log Explorer module works better when using an account with administrative rights.
Accessing the Log Explorer module
You can access the Log Explorer module by clicking on the icon located on the Modules section of the
Control Panel in the main PGP Endpoint Management Console window.
Figure 47: Log Explorer main window
66 PGP Endpoint Application Control User Guide 4.3.0
Page 71

Chapter 9: Monitoring activities using the Log Explorer
Template’s name
Use to list:
See notes
Log Explorer templates
The operation of the Log Explorer module is based on templates. These let you generate custom reports
containing results that match particular criteria.
As you use the Log Explorer module - changing criteria options, column size and order, which columns are
displayed in the Results panel (and custom reports), and the whole set of configurable options - you are creating
a template. A template is, in this context, a set of rules to use when displaying data in the Log Explorer module.
Once satisfied with your log report, you can save this template for future use.
You can create your own templates and save them as you progress in your work. Alternatively, you can opt for a
simpler approach using predefined templates created by PGP.
The list of predefined templates may include some that do not apply to the type of license you
purchase and, thus, has no use for you.
If you have upgraded from a previous version of PGP Endpoint your existing templates were
stored in the registry (or elsewhere). In this case, when you start the Log Explorer module you
can specify how you want to update these. You can migrate some or all of the existing
templates stored in the registry, import any that are stored elsewhere, or remove templates
from the registry. The Select and edit templates window displays a list showing the templates
you can access that have been set-up, migrated or imported.
To use an existing template
1. Choose the template you want to use — created by PGP or by you. To do this, either select the
template from the list of recently used templates in the top left corner of the Log Explorer
navigation/control bar, or click on the TEMPLATES button, highlight the template in the list in the Select
and edit templates window and click on the SELECT button.
2. Execute the template to create a report that is shown in the main Log Explorer window. To do this,
click on the QUERY button.
A table of results displays in the main Log Explorer window. Each row represents one or more log entries that
match your query criteria. For each log entry or group of log entries, the columns represent the display
information that chosen for the template.
The query only returns results if you have appropriate access rights to view it. See Chapter 4:
Setting up PGP Endpoint administrators on page 29 for more details.
Predefined templates
You can use the following predefined templates:
Applications denied
today
Applications locally
authorized today
Applications often
denied this week
Audit by Administrator
'adm'
Audit for PC xyz Audit trace for a specific computer You must first change the “xyz” computer for a real one in
Audit for user 'abcd' Audit trace for a specific user You must first change the “abcd” user for a real one in the
Audit today Today’s audit trace 3
Everything today Everything that has been going on
Hardening violations
this month
All applications that have been denied
today
All applications that have been locally
authorized today
The most often denied applications this
week
All actions done by a specific
administrator
today
All client hardening violations detected
this month
1;2
1; 7
1; 2
3; You must first change the “adm” user for a real one in
the “Settings” section. The result is classified by user.
the “Settings” section. See Template settings window on
page 81.
“Settings” section. See Template settings window on
page 81.
5
PGP Endpoint Application Control User Guide 4.3.0 67
Page 72
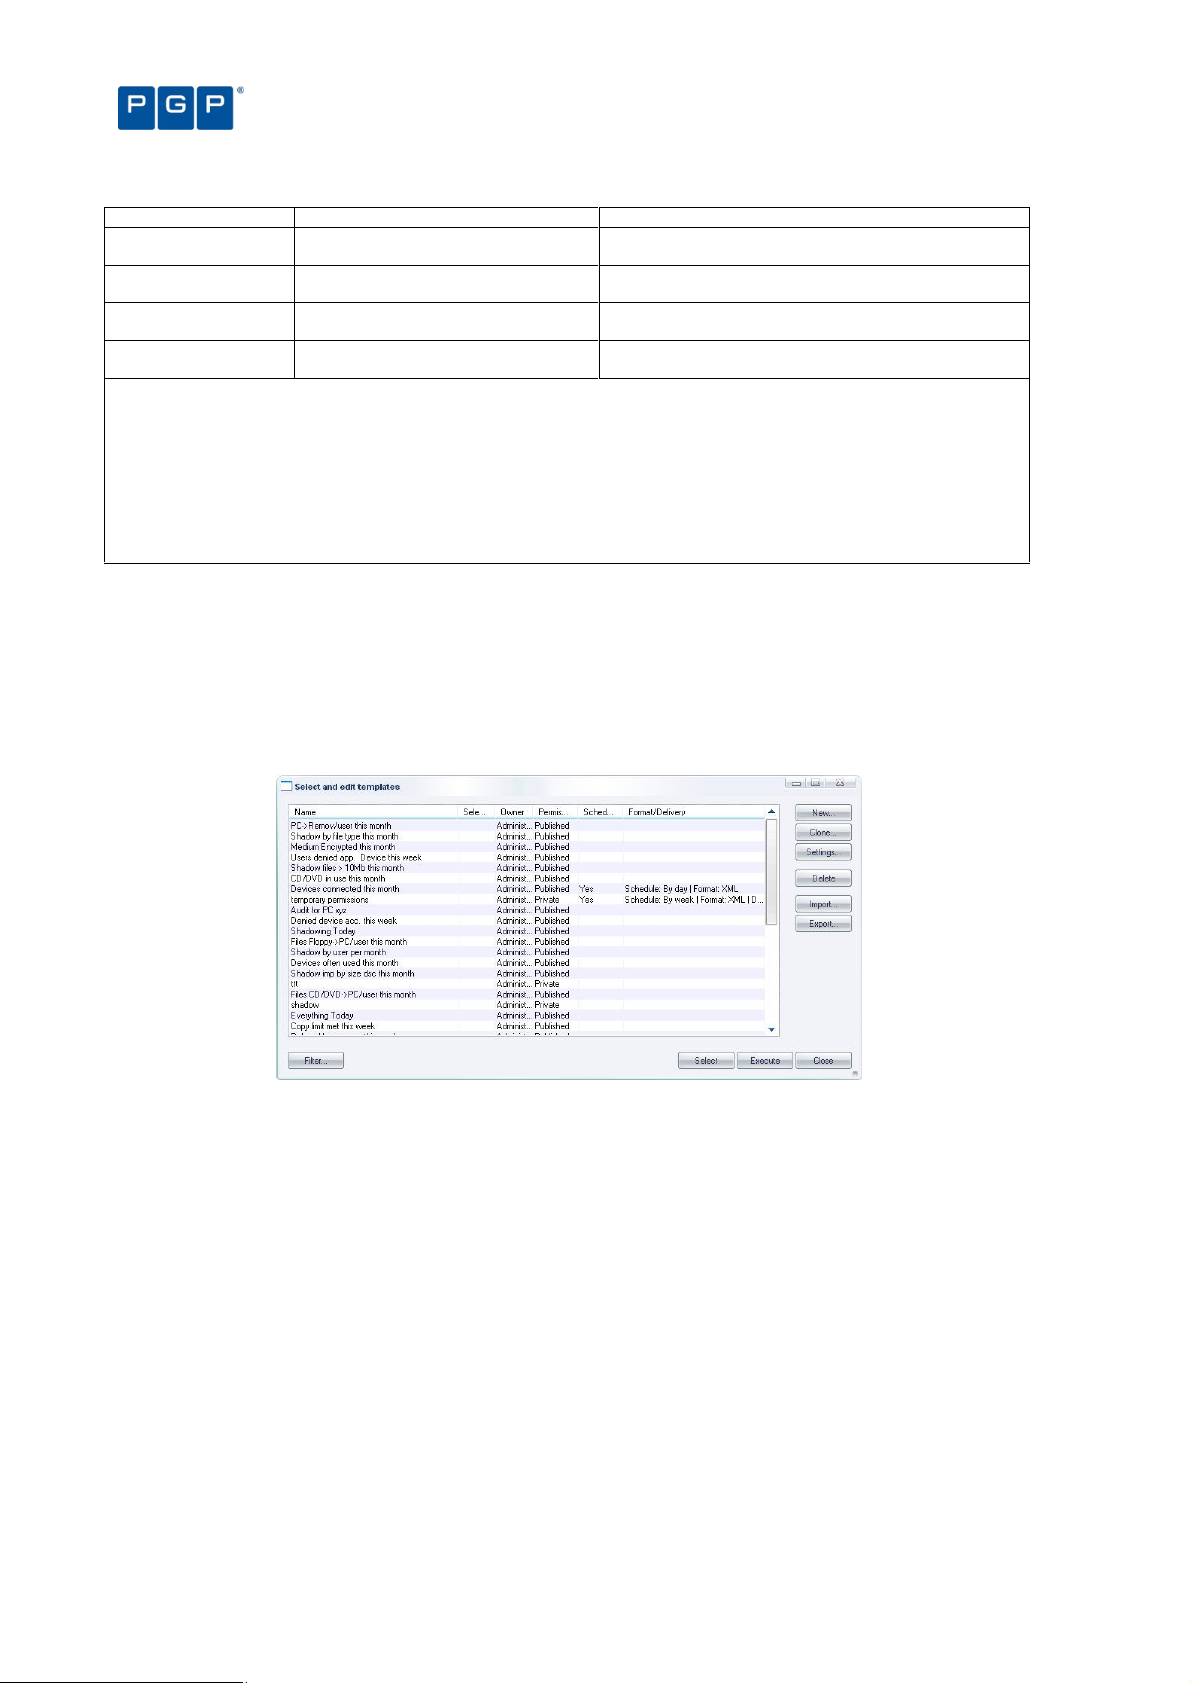
Template’s name
Use to list:
See notes
Chapter 9: Monitoring activities using the Log Explorer
Relaxed logon apps
this week
Users denied acc. to
regedit this week
Users denied app.
device this week
Users denied apps this
month
Notes:
1 This only applies to user for which the “Execution Blocking” option is properly configured.
2 Entries are only logged when the “Execution Log” option is properly configured.
3 No action is required.
4 You must first enable the “Device Log” option.
5 You must first configure the “Client Hardening” option.
6 You must first configure the “Relaxed Logon” option for each user that you want to audit.
7 You must first enable the “Local Authorization” option for each computer you want to audit.
See Chapter 12: Setting PGP Endpoint system options on page 109 for instruction on how to configure the options.
All relaxed logon applications done this
month
The user tried to run Windows’ regedit
utility and this access was not granted
All applications and device denied this
week
All applications denied by user this
month
Table 15: Log Explorer´s predefined templates
1: 2: 6
1; 2
1; 2; 4
1; 2
You should also consult the corresponding PGP Endpoint Device Control User Guide section if
you have a PGP Endpoint Device Control license.
To create and use a new template
1. Click on the TEMPLATES button in the Log Explorer window. The Select and edit templates window is
displayed.
Figure 48: Select and edit templates window
2. Click on the NEW button. The Templates settings window is displayed.
68 PGP Endpoint Application Control User Guide 4.3.0
Page 73

Chapter 9: Monitoring activities using the Log Explorer
Figure 49: The Templates settings window
3. Enter a name for your new template in the Template name field.
4. Type a brief explanation in the Description field.
5. Choose whether you want the new template to be accessible only to yourself and Enterprise
Administrators (Private), to be usable but only editable by the owner and Enterprise Administrators
(Published), or to be editable by anyone (Shared).
6. Proceed to the Query & Output tab to specify your query columns and criteria. These determine which
log entries are selected as results in the Log Explorer report, and the information that is displayed in
each.
To select log entries that match certain criteria, select the Column to which the criteria apply, by clicking on
the appropriate box, clicking in the Criteria column, and specifying what you want to match entry details
to. See Table 19 on page 84 for instructions on how to define query criteria.
You can choose which information to display for each entry, the display size of the columns and how the
results are grouped or sorted in particular ways.
If you select the Count Column then the results are automatically grouped.
For more information about criteria, displaying and sorting results and so on, see Criteria on page 82.
7. If you are creating a template for a regularly generated report, specify the schedule, i.e. when the
report is automatically produced, the format of the report and the recipients of the report. To do this,
complete the fields on the Schedule tab of the Template settings window.
For more information, see Schedule tab on page 89.
8. Execute the query. To do this, click on the QUERY button in the Log Explorer window, or the EXECUTE
button in the Template settings window.
If there are any records that match your query criteria, they appear in the Results panel list of the Log
Explorer window (and your custom reports). The query only returns results if you have appropriate access
rights to view it.
PGP Endpoint Application Control User Guide 4.3.0 69
All fields act interactively: when you change one of them, it does a logical AND with all the
others. If, for example, you select a range of traced dates and then a user, the resulting data
includes all events for the selected user that occurred between the selected dates.
The template is stored when you execute the query.
Page 74

Chapter 9: Monitoring activities using the Log Explorer
Backing-up your templates
Even though this is one of the most important tasks of the IT department, it is also one of the most neglected. A
regular backup saves a lot of time, even if you only have done a few personalized templates. Recreating them
after only a few weeks takes considerable time and effort and you will probably have forgotten by then how you
did them. Backing-up you data and templates only takes a few minutes and saves you a lot of grief.
All templates are saved in your SQL database so when you do a PGP Endpoint Database backup, you are also
doing a template backup. Microsoft provides its own tools for SQL backup or you can also use third-party
software for this task. Whatever your decision is, do not forget to do it in a regular basis safeguarding, this way,
your valuable device use policy, encryption & CD/DVDs associations, and template information.
Log Explorer window
The main Log Explorer window contains the following five main elements:
> Navigation/Control bar.
> Column headers.
> Results panel (the contents of which can scheduled for sending/storing as a custom report).
> Criteria/Properties panel.
> Control button panel.
Figure 50: Components of the Log Explorer window
Navigation/Control bar
> You can use the button bar on the upper part of the main window to select a template and navigate through
or control your results:
Figure 51: Navigation/Control bar
> Template list — selects a template from your recently used templates list, shown in the drop-down list.
In previous versions of PGP Endpoint the templates list included all templates created by you or
by PGP. All templates can be accessed by clicking on the TEMPLATES button.
70 PGP Endpoint Application Control User Guide 4.3.0
Page 75

Chapter 9: Monitoring activities using the Log Explorer
> TEMPLATES button — used to create a new template or select an existing one from the list in the Select and
edit templates window.
> (Previous) button — navigates to the preceding result list from the ones internally stored, if you are
carrying out multiple queries.
> (Next) button — navigates to the following result list, if you are carrying out multiple queries.
> FETCH LOG button —retrieves logs and shadow files from a computer or a list of computers running the PGP
Endpoint Client Driver. The Select Computer window is displayed. See Forcing the latest log files to upload
on page 91.
> SETTINGS button — goes directly to the advanced settings dialog for the template you are currently using.
Here you can select columns and define criteria. See Template settings window on page 81.
> STOP button — cancels the current query. This is used if you want to interrupt a lengthy sorting operation
involving a large number of log entries.
> PAUSE button — cancels the screen output, with any sorting processes continuing in the background. To
resume the screen display, click on this button again.
> QUERY button — retrieves all log entries that match the criteria defined in the current template.
Column headers
The column headers display the title of the columns. In addition, you can use them to:
> Sort results — classify the results and display them in a specified depending on the value for the log entry (or
log entries) in one or more columns.
> Show/hide columns — determine what information is displayed for each result in the report.
> Change the size of the displayed columns — by dragging the column header dividers to the left or right.
> Change the order in which the columns are displayed — by dragging and dropping the column titles in the
column headers.
> Group log entries — display a single report row corresponding to multiple log entries grouped according to
the values in one column.
> Display computed columns — display calculated values such as a count of the number of log entries in a
grouped result, the maximum value, minimum value, sum of values, or average value.
You can make changes to the columns to display different information from the log entries
without executing again the query.
Any on-the-fly changes you make to the column headers are saved in the template. For
example, if you use the column context menu to group the results the next time you run a query
using the template the results are automatically grouped.
You can also use the column context menu to access the advanced query settings for the
template. For more information about defining complex queries see The advanced view on
page 84.
Sorting results
To sort results in an ascending by a value in a particular column, click once on the header — click again to sort in
descending order. Click on another heading to change the sorting order to that column. You can see the result as
a green arrow in the column’s title with the sorting order number. The direction of this arrow shows whether
sorting is in ascending or descending order.
If you want to sub classify your results click on the SETTINGS button, select the Multi-column sorting checkbox,
and, in the right-click menu for the relevant Column, select either ‘Ascending’ or ‘Descending’. When you save
the settings a blue arrow, with the number ‘2’ on it is displayed in the column’s title bar. You can set up further
sub classifications in the same way.
PGP Endpoint Application Control User Guide 4.3.0 71
Page 76

Chapter 9: Monitoring activities using the Log Explorer
Figure 52: Column headers showing multiple classifications
Show/hide columns
If you want to show or hide particular columns of log entry information, right-click on the column headers and
select/deselect the required column(s) in the context menu respectively.
Figure 53: Columns context menu
The names of the columns in the Columns context menu, shown above, depend on the installed license.
Group log entries
You can group multiple log entries into single report rows according to the values in one or more columns log
entries. To do this, select the Group By option in the Columns context menu and check the column you want to
group your results by. For example, if you check the device type column then all log entries for devices of a
particular type are combined into a single result in the report.
72 PGP Endpoint Application Control User Guide 4.3.0
Page 77

Chapter 9: Monitoring activities using the Log Explorer
Figure 54: Group By option
A green ‘circle’ in the column’s title shows when a column is used to group results.
Figure 55: Column headers showing grouped results
You can also set up sub groups in the same way. Secondary subgroups are denoted by a blue ‘circle’ with the
number ‘2’ displayed in the column’s title bar. You can set up further sub groups in the same way.
Figure 56: Column headers showing sub groups
Computed columns
In addition to the columns corresponding to information stored in the log entries, you can also include computed
columns in your report, for example, you can display the number of log entries with a particular value or the
average value for the column in a group.
The operations supported by computed columns are:
> Count — calculates the number of log entries in which a certain type of value exists, for example Count
(Device Class) shows how many log entries contain device information. Count (Any) simply shows the total
number of log entries.
> Min, Max — calculates the minimum or maximum value in a column in a given set of results.
> Sum — (only valid for the file size column) calculates the sum of numerical data.
> Average — (only valid for the file size column) calculates the numerical average in a given set of results.
Not all of these operations work for all columns.
To set up a computed column, right-click on the column header, highlight the Computed Columns option in the
Column context menu, highlight the type of calculation you want to carry out in the Computed Columns sub
menu, and then select the column that contains the data you want to use to calculate computed values from. For
example, the following figure illustrates the selections required to display a column showing the number of
devices of each device class.
PGP Endpoint Application Control User Guide 4.3.0 73
Page 78

Chapter 9: Monitoring activities using the Log Explorer
Figure 57: Computed columns
The title of the computed column is displayed in the column header and the calculated values in the Results
panel (or custom report).
Figure 58: Column headers showing a computed and a sorted column
Clear column settings
If you want to clear the sorting filters and groups, you can either:
> Proceed to the Template settings window. For more information see Template settings window on page 81.
> Change the column settings of the currently selected column. To do this, select the Current Columns option
in the Column context menu and select the relevant choices, for example Unsort or Ungroup.
74 PGP Endpoint Application Control User Guide 4.3.0
Page 79
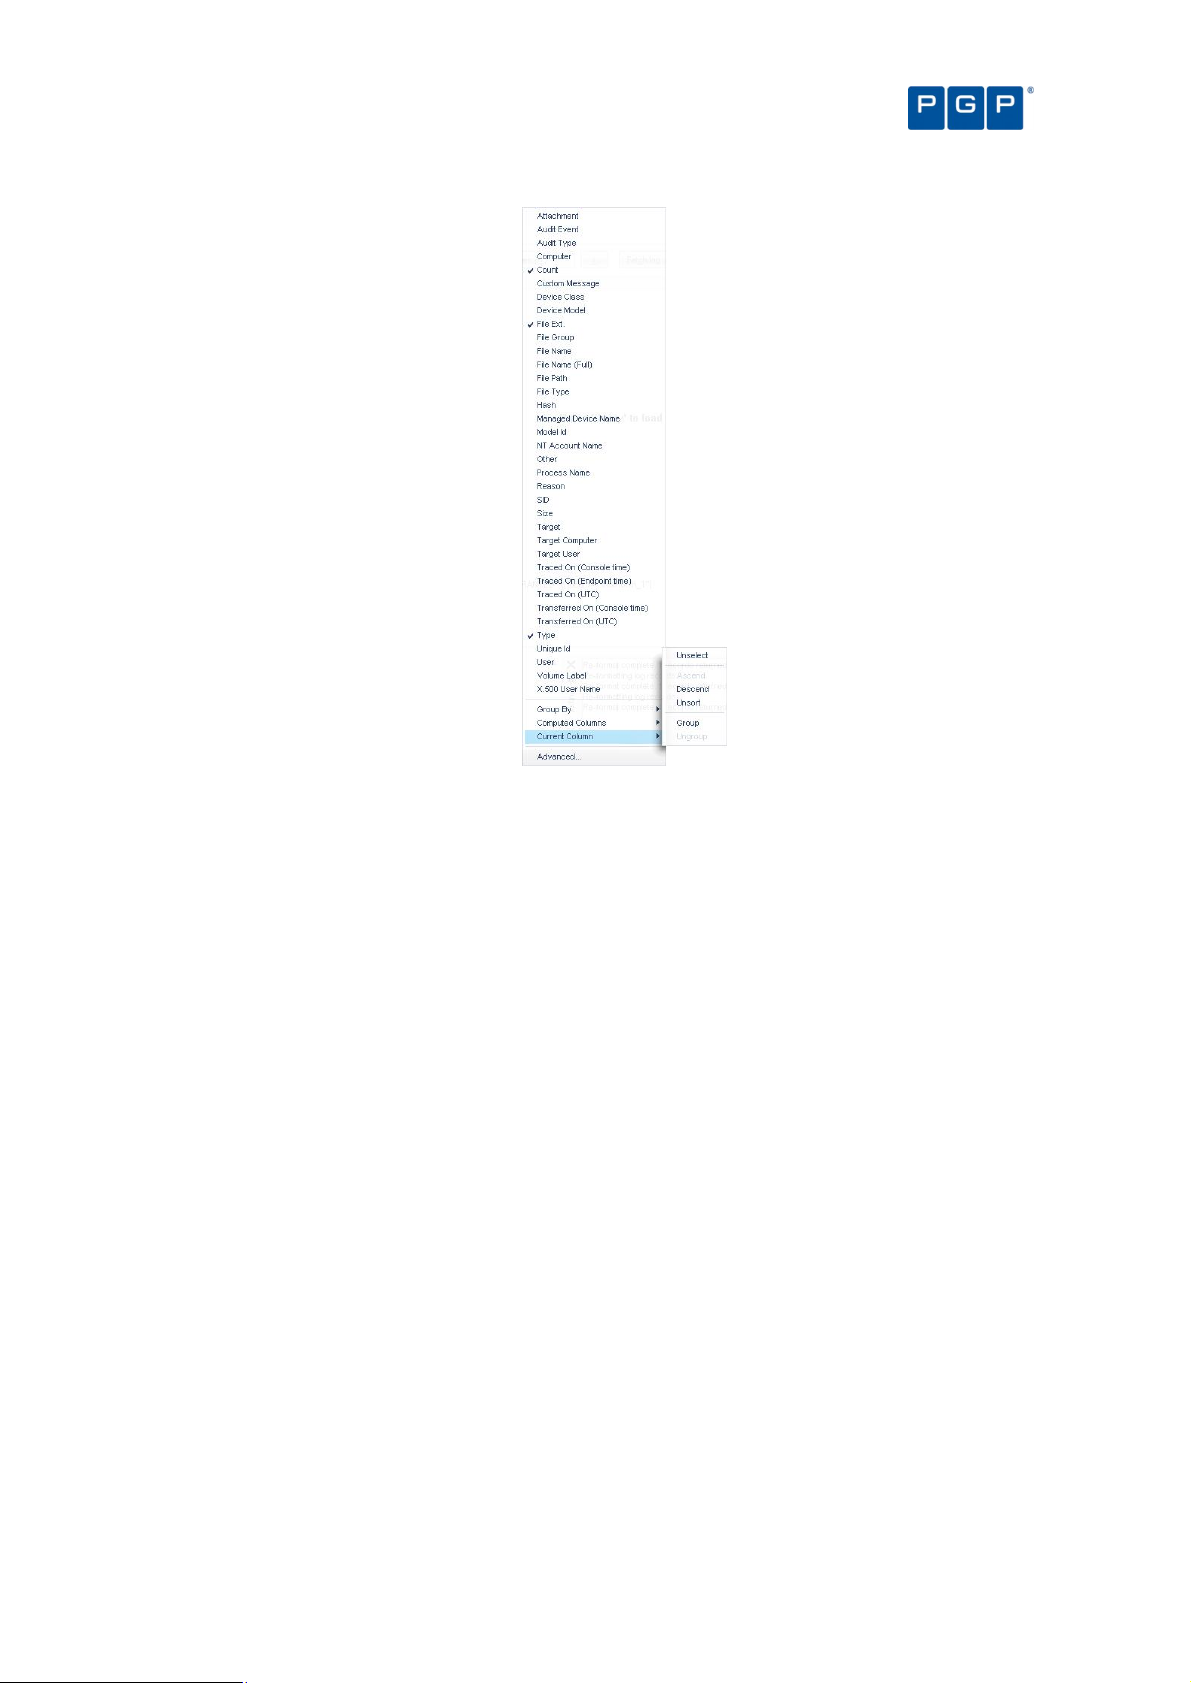
Chapter 9: Monitoring activities using the Log Explorer
Figure 59: Resetting column headers
Results panel / custom report contents
The Results panel is the main area of the Log Explorer window where the results are displayed and classified.
You can, among other things:
> See which files have been executed or denied by central authorization.
> Find out which files were executed or denied by local authorization.
> Check which File Groups were assigned to particular files.
The results you see may depend on the role assigned to you by the Enterprise Administrator.
You can save the information displayed as a CSV file using the SAVE AS button of the Control button panel (in the
bottom right corner of the Log Explorer window).
When you generate scheduled custom reports the results, rather than being displayed in the Results panel, are
sent to specified email recipients or stored in a specified directory.
Columns in Results panel / custom reports
You can control whether columns of information from log entries are displayed and their size, and position from
the Template settings window.
Some columns are specific to device logging or shadowing options while others are common to both of them.
There are a number of log entry columns that are only applicable when monitoring administrator actions, for
example Audit event, Target user, Target computer, and Target.
The following table summarizes the meaning of the log entry information columns:
PGP Endpoint Application Control User Guide 4.3.0 75
Page 80

Column
Description
Chapter 9: Monitoring activities using the Log Explorer
Audit Event The nature of the event that triggered the audit log. See Audit events on page 92 for a description of the
Audit Type The type of action the administrator carried out. This can be ‘Device Control’ or ‘Application Control’.
Computer The name of the machine where execution was attempted.
Count This shows how many log entries are hidden in a single row. Alternatively, this may be a computed column
Custom Message Indicates why the application is running or not running, for example because it is authorized, because the
File Ext The extension of the file.
File Group The file group to which the executable, script, macro (or file containing a VBA macro) has been assigned.
File Name The file whose execution was authorized or denied.
File Name (full) The full name (including path) of the file whose execution was authorized or denied.
File Path The path of the file whose execution was authorized or denied.
File Type Indicates whether the file relates to a script or an application, for example ‘Executable’ or ‘Script’.
Hash The digital signature of the file, created by SHA-1 (Secure Hash Algorithm -1). Knowing the hash enables
NT Account
Name
Other This may contain additional information, in the case of an audit event, for example, if an administrator
Reason Indicates whether an action was granted or denied. This can have a value of ‘NoPermission’, ‘Granted’ or
SID The Secondary Identifier of the user, for example ‘S-1-5-21-647365748-5676349349-7385635473-1645’.
Target The device for which the permissions were modified.
Target Computer Name of the computer that was the target of the administrator action.
Target User Name of the user or group to which the administrator action was applied.
Traced On
(Console time) *
Traced On
(Endpoint time) *
Traced On
(UTC)*
Transferred On
(Console)*
Transferred On
(UTC)*
Type The nature of the event that triggered the log. This can be ‘Execution Granted’, ‘Execution Denied’, or the
User Name of the user who triggered the event, e.g. ‘MARVIN/johns’. Also see note after table. For users
X.500 User
Name
*Old clients provide time in UTC format only leading to incomplete data in these fields
different audit events that can be recorded.
of data. A grouping symbol is displayed on the column header.
machine is in non-blocking mode, or because there is a Path Rule authorizing it. See Table 17.
This can also be <Not Authorized>.
you to differentiate between files with the same name.
Domain user name of the person who triggered the event, for example ‘MARVIN/johns’ or LocalSystem.
erases a scheduled permission, this may contain its parameters.
‘Denied’.
This is useful when attributing actions recorded in log files to users who have has left your organization.
Date the event occurred on the console computer.
Date the event occurred on the client computer.
Date (Coordinated Universal Time) the event occurred on the client computer.
Date the event record was transferred from the client computer to the PGP Endpoint Administration
Server.
Date (Coordinated Universal Time) the event record was transferred from the client computer to the PGP
Endpoint Administration Server.
type of audit event (see Audit events on page 92).
removed from the Active Directory, this field displays the SID, enabling the person who triggered an event
to be identified after they have left your organisation.
The username in Lightweight Directory Access Protocol format. This reflects the directory tree in which the
user information is stored, for example, the X.500 user name may be ‘CN=John Smith, CN=Users,
DC=Marvin…’
Table 16: Log Explorer module columns
The ‘User Name’ column may show the System Identification Number (SID) instead of the
resolved user’s name in Novell environments when Novell objects are not synchronized. You
should first consider running the synchronization script described in detail in the PGP Endpoint
Setup Guide. You can also automate this script’s execution for your convenience.
Columns with names starting ‘Count’, ‘Min’, ‘Max’, ‘Sum’ and ‘Average’ may also be displayed.
These contain computed data based on the values in the specified columns. See Computed
columns on page 73.
Ellipses (…) in the Results panel indicate hidden log entries. For example, if you group a set of
results using the value in one column, then the multiple values in some other columns for the
results group are shown as […].
The Custom Message field displays one of the following values (which are affected by the system-wide option
settings for Execution Blocking and the logging mode):
76 PGP Endpoint Application Control User Guide 4.3.0
Page 81

Chapter 9: Monitoring activities using the Log Explorer
Custom Message
Description
Did t
he
Column Value
Authorized This file is known, its digital signature is recorded in the PGP Endpoint Database. If this
file has been assigned to a File Group, it is also shown.
Denied The file was not allowed to run because it was neither centrally nor locally authorized. No
Logon This file was allowed to run because ‘Relaxed logon mode’ was active (Relaxed logon
option). See Relaxed logon on page 117 for more details.
ok-dllDontCare The DLL execution was authorized because the Execution Blocking option was set to ‘Ask
user for *.exe only.’
ok-hash The file was executed and this action was logged because the option to Log Everything
was set on. This option should only be set for a limited period, or else the system
generates an unmanageable amount of data.
ok-localAuth This file would have been denied because it is not centrally authorized, but the user was
prompted to locally authorize, and he/she allowed execution.
ok-nonBlocking If the system had been in blocking mode, this file would have been denied, but it was
executed because the NON-BLOCKING option was on.
ok-nonBlockUser The file would have been denied based on central authorization, but it was executed
because the non-blocking option was on for a user or group of users.
ok-pathRule This file was allowed to run because it matched a Path Rule. Yes
Table 17. Custom Message Field Values
file run?
Yes
Yes
Yes
Yes
Yes
Yes
Yes
Interpreting results
You can interpret data from the Log Explorer window in several ways. The two main reasons for not executing a
file, resulting in the value ‘Denied’ in the Custom Message column, are as follows:
> The file is unknown or not on the ‘white list’. This means that either:
The program is not authorized and should remain this way. This is a ‘normal’ situation where the user is
trying to run a non-allowed application.
– or –
That the software has not been yet authorized and should be investigated. If appropriate, you should add it to
the ‘white list’ to conduct your business.
It is dangerous to authorize executables directly from the Log Explorer unless you are
absolutely certain that the software can be trusted. A user may try to fool you by renaming an
unauthorized application, for example, she could rename an unauthorized file ‘notepad.exe’ and
complain that her notepad is not working. Before you authorize an application, first check the
program.
> The user does not have access to the File Group that the file belongs to. For example, the file may have
been scanned and in the ‘white list’ but may belongs to a File Group ‘Accessories’ which is not accessible to
the user. This means that either:
This is a ‘normal’ situation where a user is trying to run a program to which he has no rights.
– or –
The user, or one of the user groups to which he belongs, should be granted access to the appropriate File
Group to conduct your business.
When a user has permission to locally authorize files and uses a particular file frequently, it may be worth
scanning the file and including it in a special File Group to avoid having several users locally authorizing the
same application.
Log entries displaying ‘ok-dllDontCare’ in the Custom Message column are special case of Local Authorization
where the user only authorizes the EXE file (using the Execution blocking option ‘Ask user for *.exe only’) and all
DLL are automatically authorized. See Chapter 12: Setting PGP Endpoint system options on page 109.
When you are using the Log Explorer module to monitor administrator actions the Target field may show a
different set of information than that normally received for a File Group. You can see, for example:
> When a User Access role has been modified, for example from ‘Administrator’ to ‘Enterprise Administrator’.
> When options were changed.
PGP Endpoint Application Control User Guide 4.3.0 77
Page 82
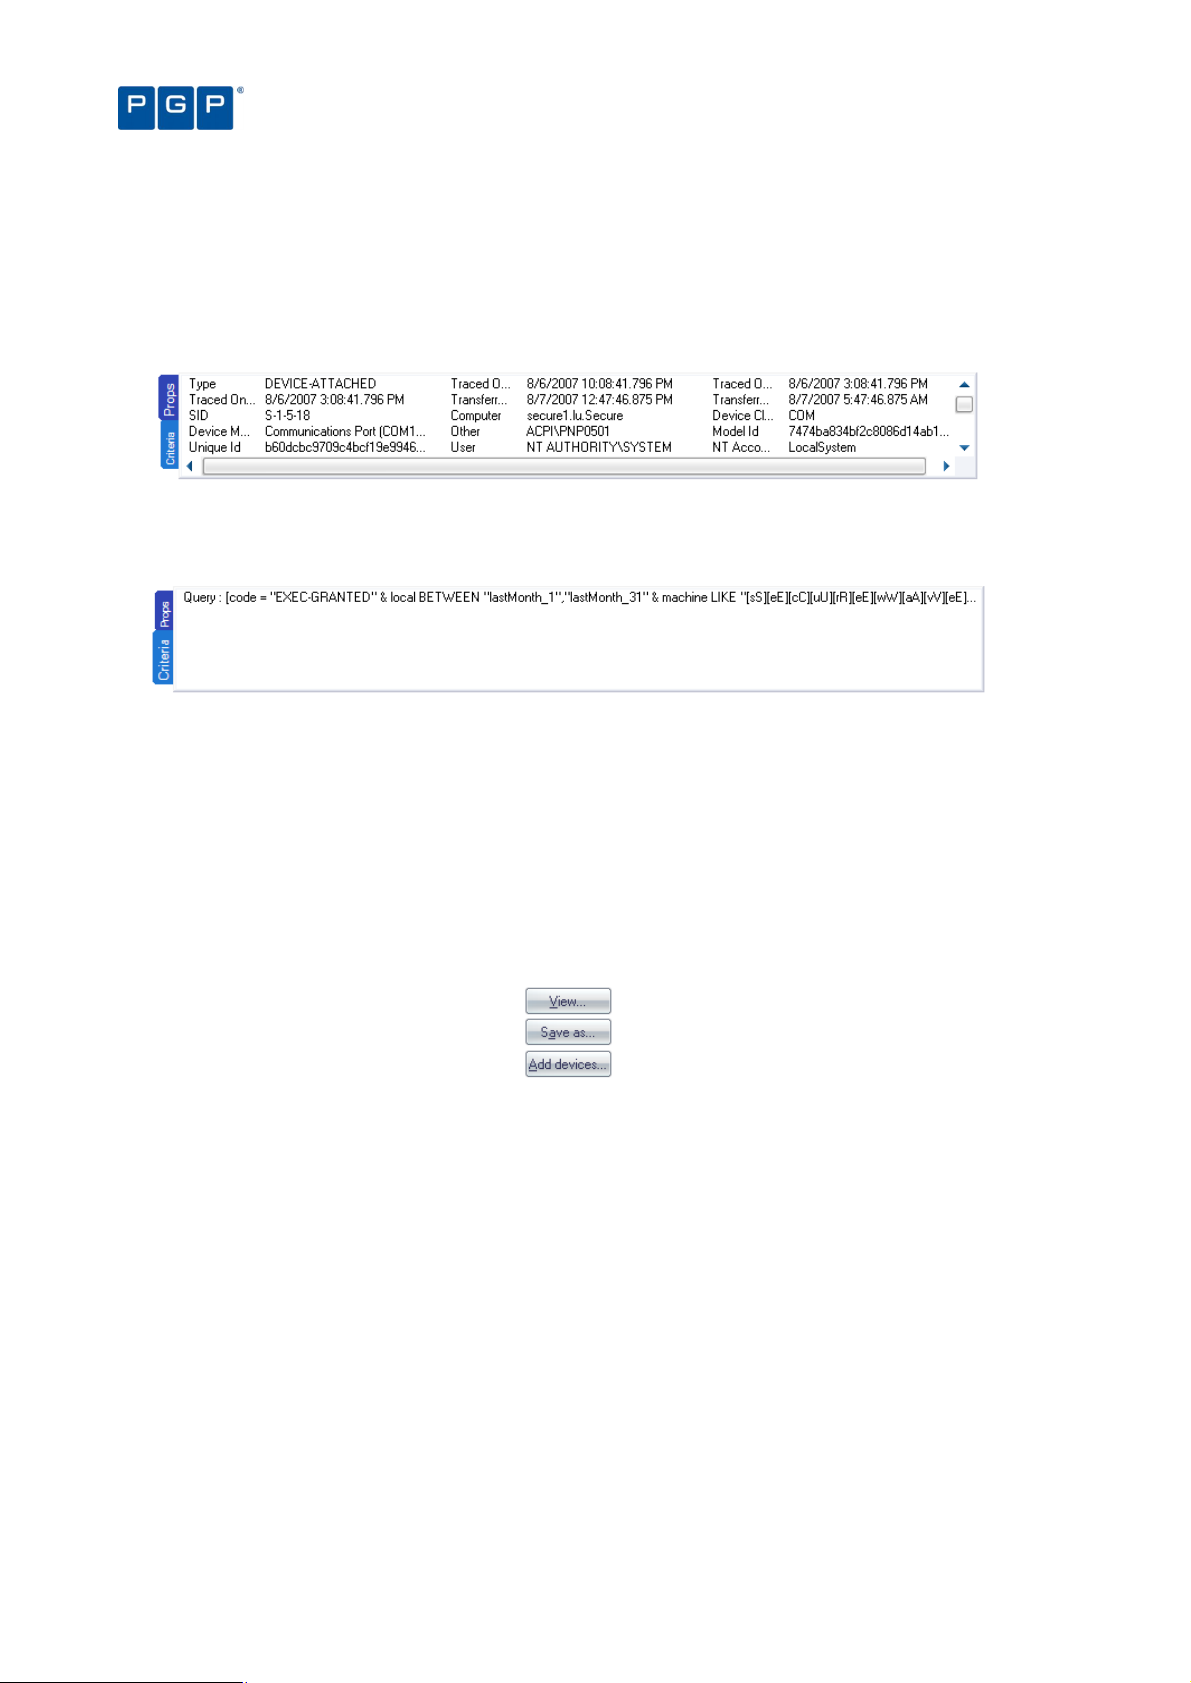
> When the name of the authorized files have been changed.
Chapter 9: Monitoring activities using the Log Explorer
Criteria/Properties panel
The Criteria/Properties panel has two tabs. These are:
> Props tab — displays the log entry information corresponding to a selected results row in the Results panel.
Figure 60: Props tab
> Criteria tab — displays the criteria used by the template to select log entry results to show in the Results
panel.
Figure 61: Criteria tab
Control button panel
On the lower right part of the main window, you can find the following control buttons:
> VIEW – Not used if you do not have PGP Endpoint Device Control installed. See the PGP Endpoint Device
Control User Guide for more details.
> SAVE AS – to save the information in the Log Explorer Results panel data as a CSV file.
> ADD DEVICES – Not used if you do not have PGP Endpoint Device Control installed. See the PGP Endpoint
Device Control User Guide for more details.
Figure 62: Control button bar
Select and edit templates window
The Select and edit templates window is used to select, add, edit, import, export, schedule, and execute
templates. To display the Select and edit templates window, simply click on the Log Explorer´s TEMPLATES button.
78 PGP Endpoint Application Control User Guide 4.3.0
Page 83
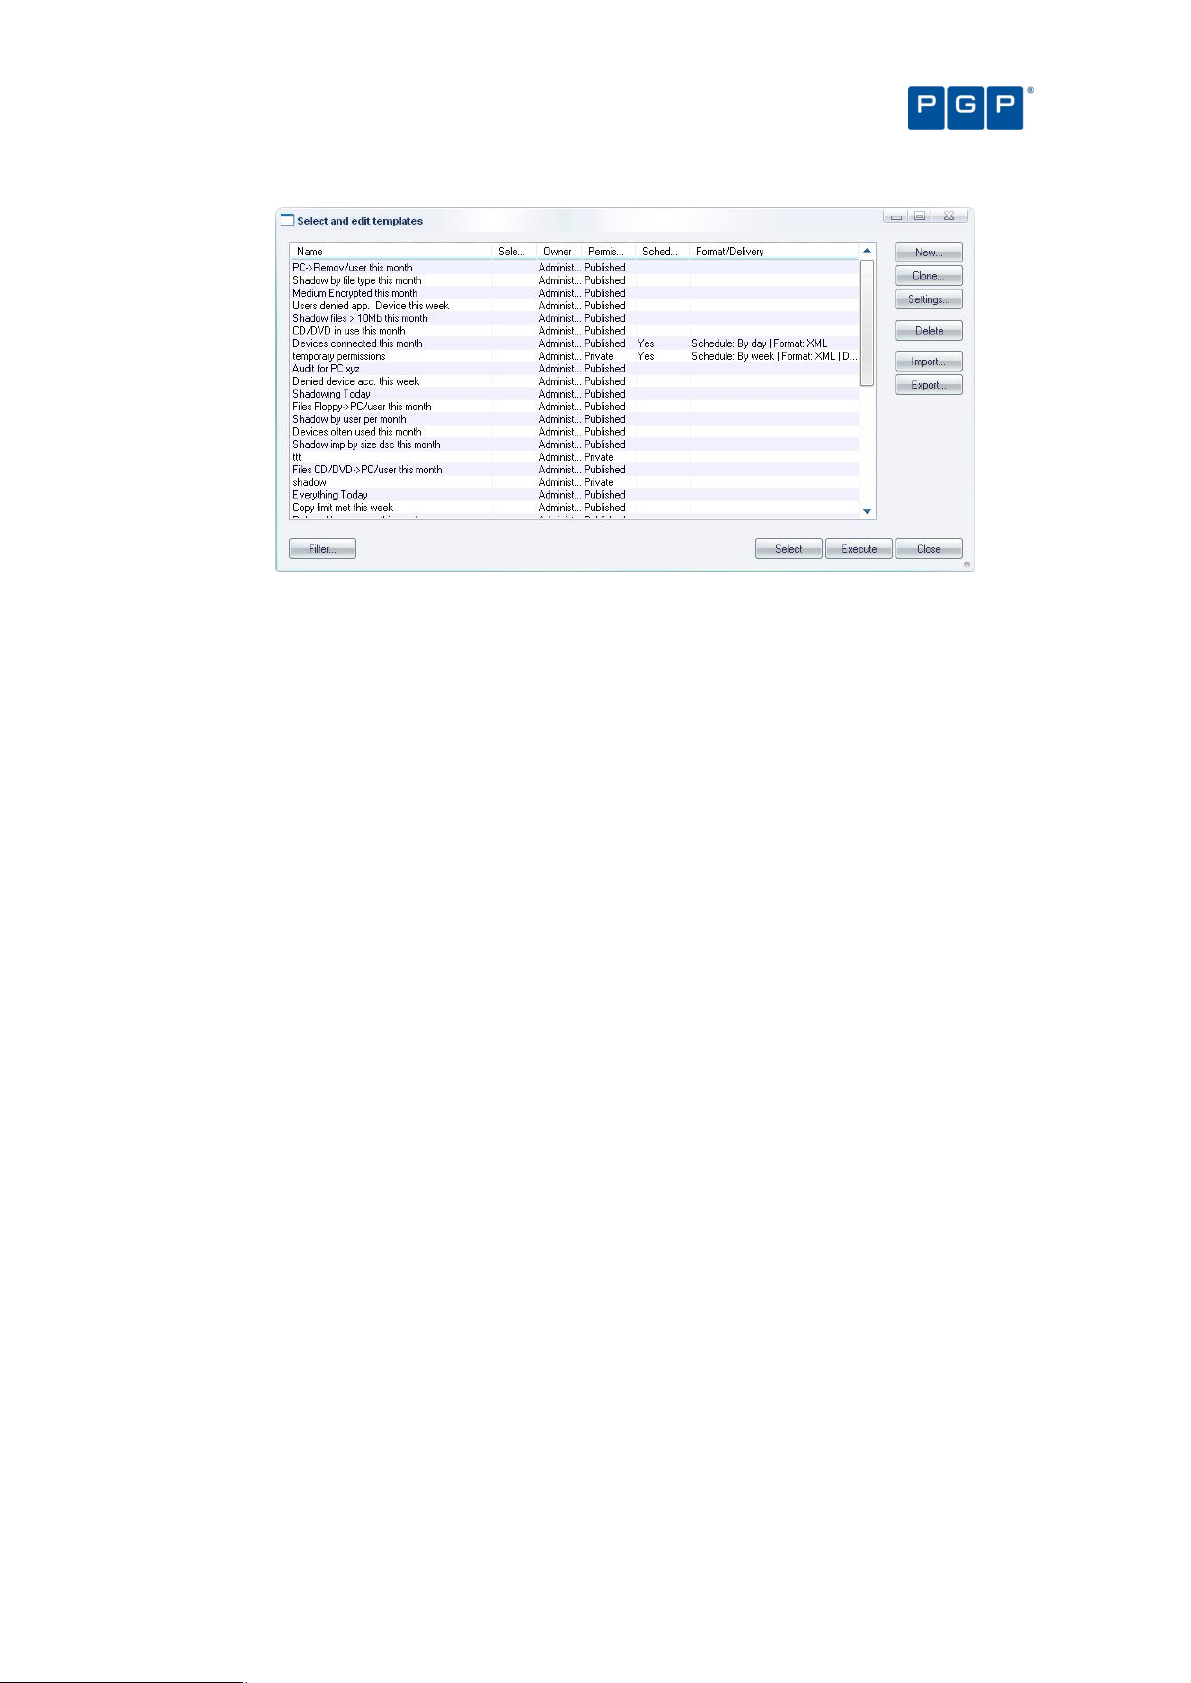
Chapter 9: Monitoring activities using the Log Explorer
Figure 63: Select and edit templates window
The Select and edit templates window contains the following elements:
> List of all the existing templates that you can access assuming this list is not filtered — see below). These
may be created by yourself, one of your colleagues, or PGP. You can select a template and right-click to
display a Templates context menu.
The asterisk (*) in the Selected column indicates the template that is currently selected. You
can either change the settings of this, or another highlighted template. To select a different
template, highlight it in the list and click on the SELECT button.
The Permissions column in the Select and edit templates window indicates whether the
template can be viewed or changed by people other than the owner. The Scheduled and
Format/Delivery columns indicate whether the template is used to create automatic reports
periodically and, if so, who these are emailed to and/or where they are stored.
You can click on the column headers to sort this list, or drag and drop the column titles to
reorder the column information.
> NEW button — to create a template (see To create and use a new template on page 68).
> CLONE button — to create a new template based on an existing template (with the Shared and Scheduled
flags removed, if these were present in the original template).
> SETTINGS button — go directly to the Template settings window for the selected template. Here you can
define the criteria used to select results and choose how the results are displayed. For more information see
Template settings window on page 81.
> DELETE button — to remove a selected template.
> IMPORT button — to import templates in XML format or to import legacy templates (*.tmpl) from the registry.
> EXPORT button — to export the highlighted template to an XML file.
> FILTER button — to choose which templates are displayed in the Select and edit templates window. See
below.
> SELECT button — to select the highlighted template as the current template and return to the main Log
Explorer window.
> EXECUTE button — to retrieve all log entries that match the criteria defined in the current template and display
these in the Log Explorer window.
> CLOSE button — to return to the Log Explorer window without changing the current template.
PGP Endpoint Application Control User Guide 4.3.0 79
Page 84
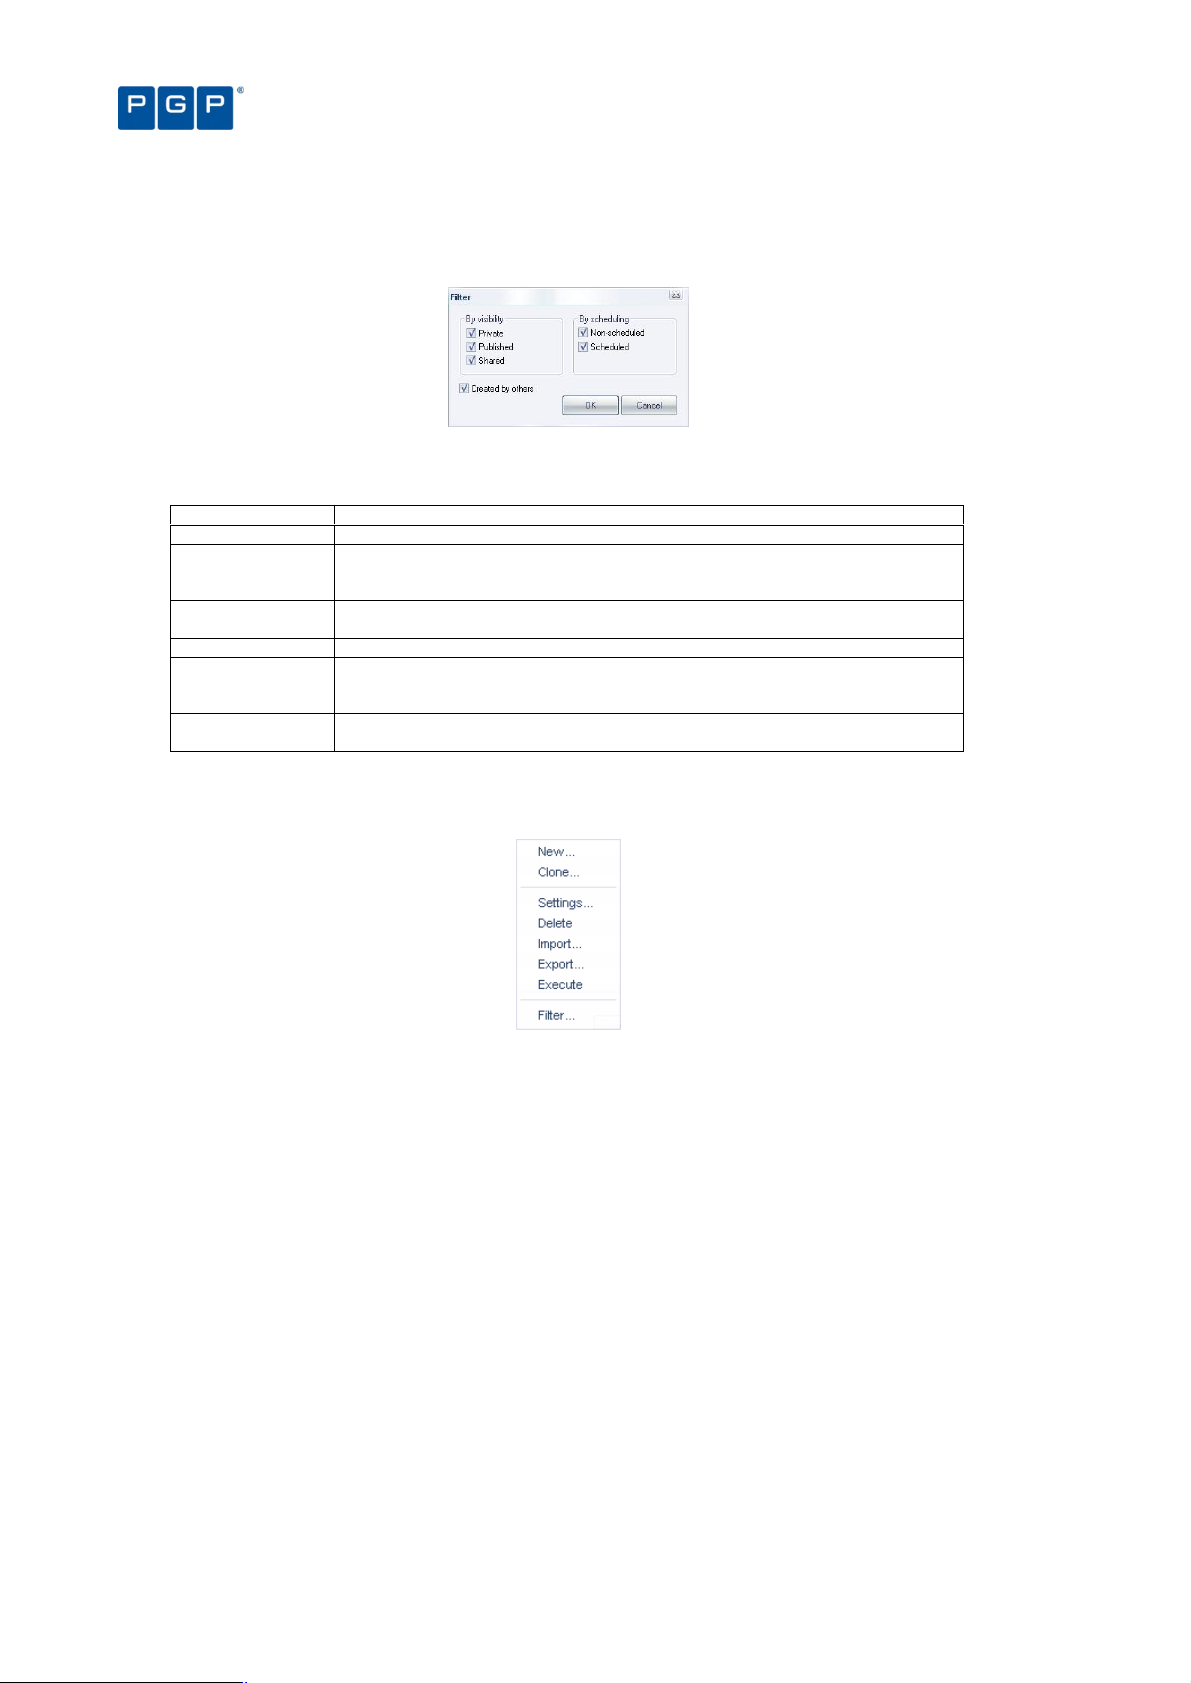
Chapter 9: Monitoring activities using the Log Explorer
To determine which templates are listed in the Select and edit templates window, click on the FILTER button,
select the appropriate check boxes and click on the OK button. Selecting multiple filtering criteria shows a more
focused set of templates, i.e. reduces the number of templates that are listed.
Figure 64: Filter templates dialog
The following template filters can be used:
Checkbox Used to display…
Private Templates that are only visible to the owner (and Enterprise Administrators).
Published Templates that are visible to all PGP Endpoint Management Console users within your
Shared Templates that can be seen and changed by all PGP Endpoint Management Console
Non-Scheduled Templates used to generate ad hoc reports.
Scheduled Templates that are automatically executed periodically to generate regular reports.
Created by others Templates created by other people. This is unchecked, for example, by Enterprise
PGP Endpoint system, but can only be changed by the owner (and Enterprise
Administrators).
users within your PGP Endpoint system.
These are either saved in a shared folder on your Network or emailed to specified
recipients.
Administrators when they want to display only their own templates.
Table 18: Template Filter checkboxes
When you right-click on the main panel of the Select and edit templates window, the Templates context menu is
displayed.
Figure 65: Templates context menu
The options that are available in the Templates context menu depend on whether you have a
template highlighted or not when you right-clicked.
You can use the Templates context menu to:
> Create a new template either from scratch (New) or based on an existing template (Clone).
> Change the settings of the highlighted template.
> Delete the highlighted template.
> Import either templates in XML format or legacy templates (*.tmpl) from the registry.
> Export the highlighted template to an XML file.
> Execute the query to retrieve all log entries that match the criteria defined in the current template, and display
these in the Log Explorer window. This makes the highlighted template the currently selected template.
> Filter the templates shown in the Select and edit templates window.
80 PGP Endpoint Application Control User Guide 4.3.0
Page 85
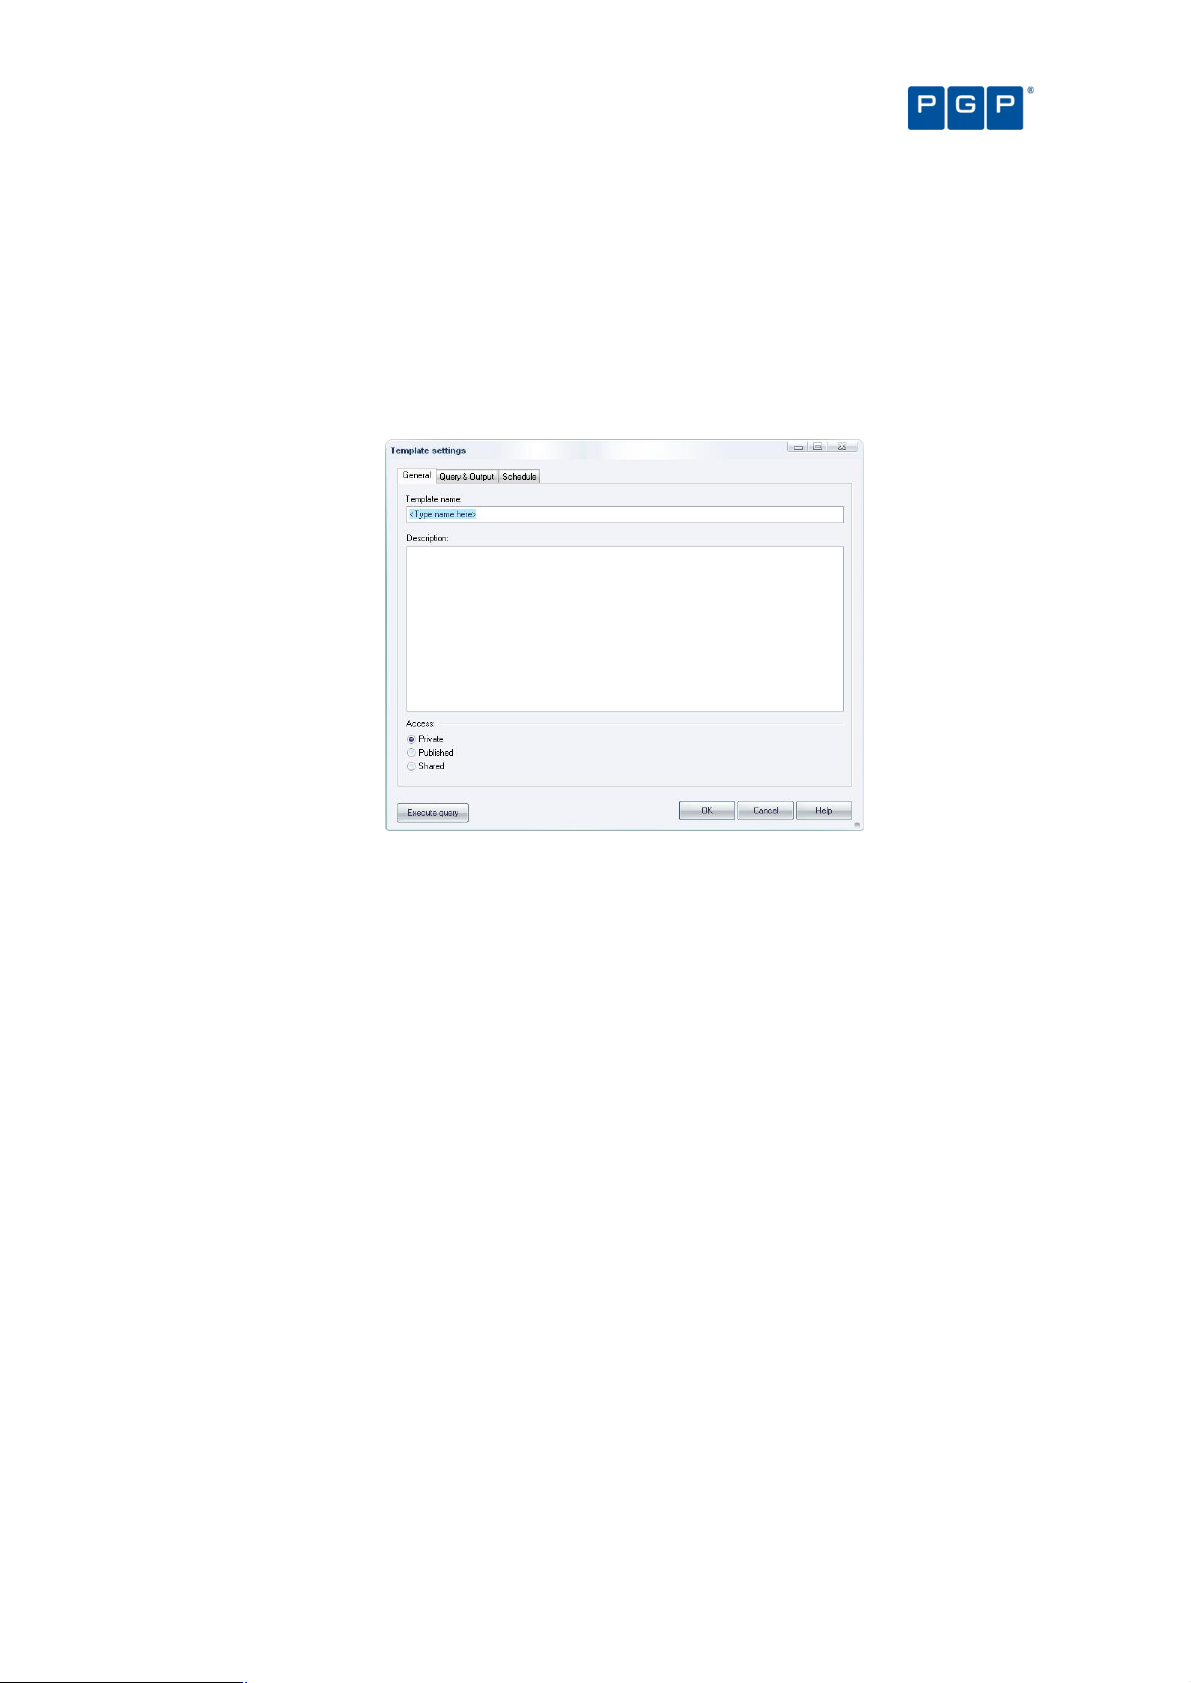
Chapter 9: Monitoring activities using the Log Explorer
You can also carry out the same actions on the highlighted template using the following
shortcut keys: Insert creates a new template, Delete removes a template, F2 opens the
Template settings window, Ctrl+C clones the template, Ctrl+I imports a template, Ctrl+E exports
the template, Ctrl+F filters the list of templates, and Ctrl+X executes the highlighted template.
Template settings window
The Template settings window is used to define the settings used for a new template, or one highlighted in the
Select and edit templates window:
Figure 66: Template settings window – Simple Query tab
You can use the Template settings window to do the following:
> Name of a new template and specify who is allowed to see it and edit it — by selecting one of the Private,
Published, or Shared options.
Template names are not required to be unique; however, we recommend they are to avoid
confusion.
> Choose whether the template is used to generate reports automatically on a periodic basis — by changing
the parameters in the Schedule tab and checking the Scheduled box.
> Specify the selection and display settings for the template — using the Query & Output tab.
> Specify complex selection and display settings for the template — by clicking on the ADVANCED button and
using the Query and Output tab.
> Schedule the production of periodic reports using the template — using the Schedule tab.
> Define the format of scheduled reports — using the Schedule tab.
> Choose who you want the reports to be emailed to — using the Schedule tab.
> Execute the query specified by the template and display the results in the main Log Explorer window. To do
this, click on the EXECUTE QUERY button. (This also makes the template you are editing the currently selected
template.)
> Save the changes made to the template settings — by clicking on the OK button.
General tab
The General tab is displayed by default when the Template settings window opens. You can use it to do the
following:
> Define the template’s name — simply write the name on the Template name field.
PGP Endpoint Application Control User Guide 4.3.0 81
Page 86
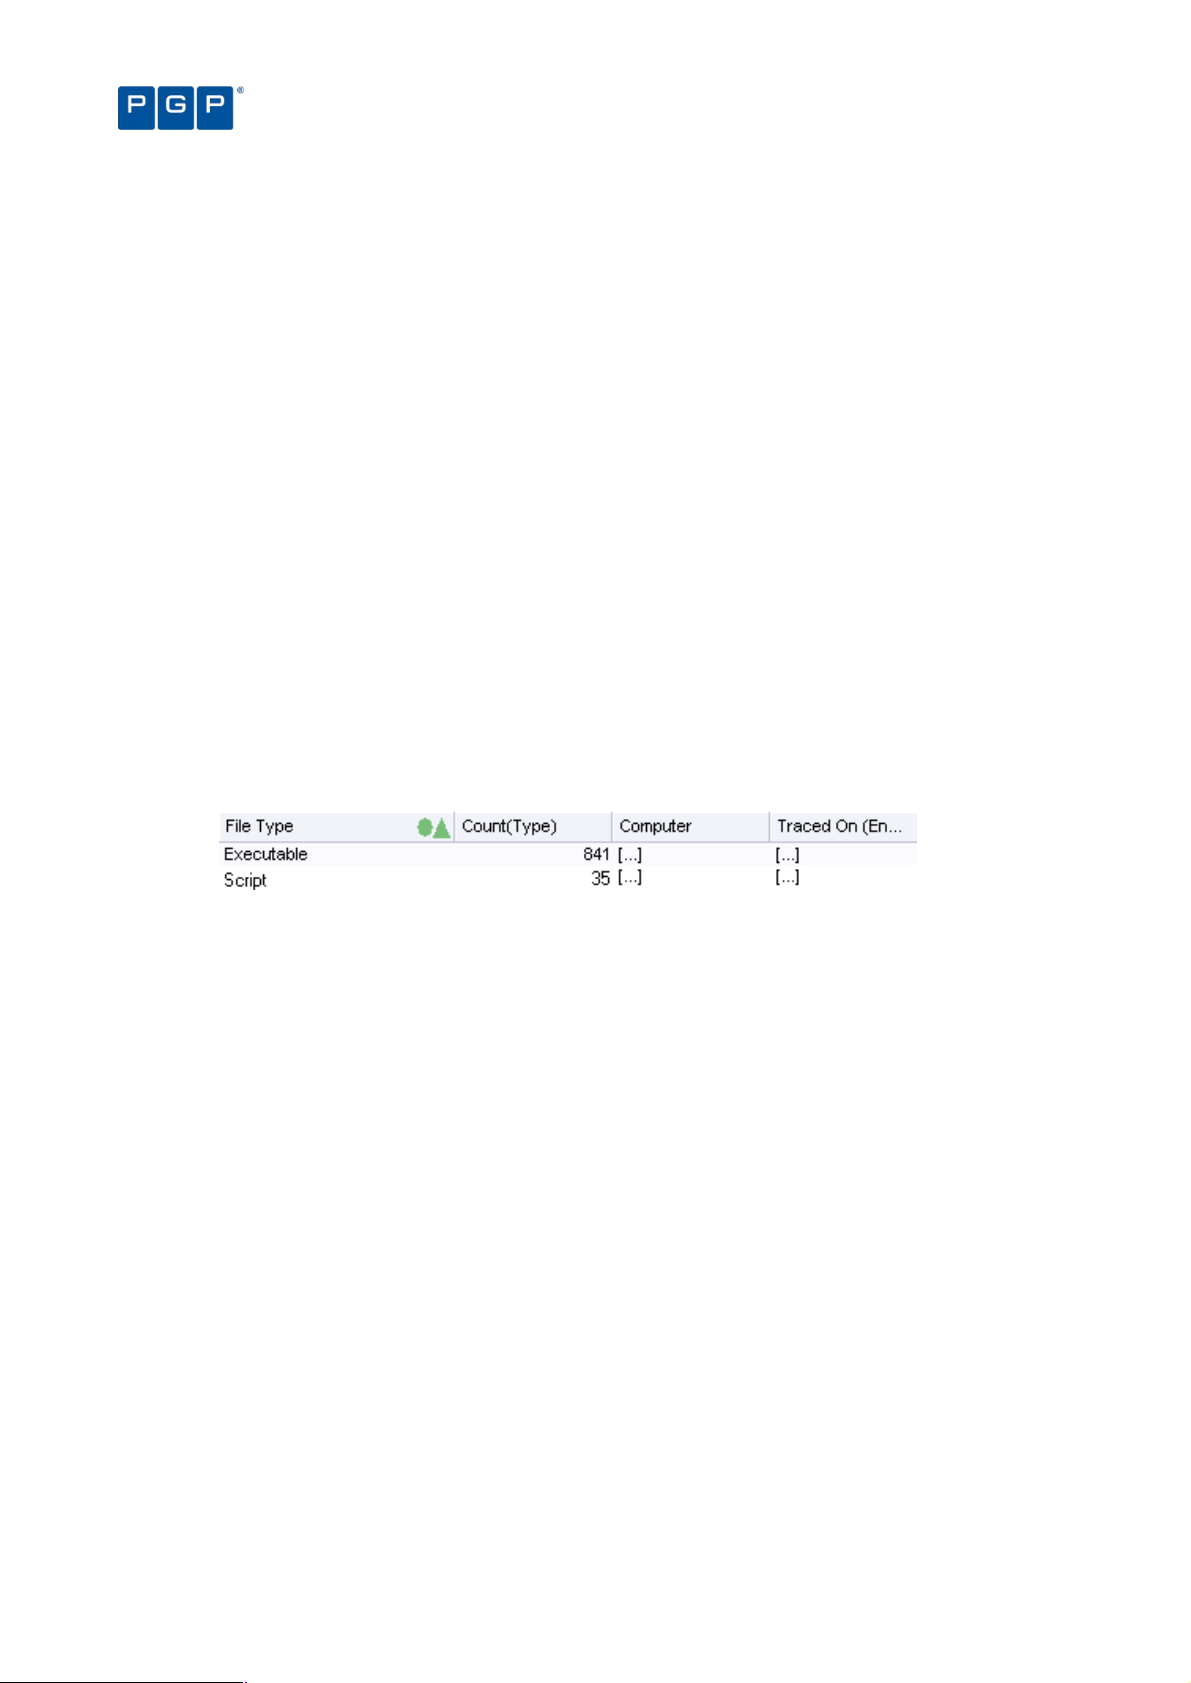
> Describe the template — type a short explanation on the Description field.
> Define the access type — Choose whether you want the new template to be accessible only to yourself and
Enterprise Administrators (Private), to be usable but only editable by the owner and Enterprise
Administrators (Published), or to be editable by anyone (Shared).
Chapter 9: Monitoring activities using the Log Explorer
Query & Output tab
In the Query & Output tab you can do the following tasks:
> Show/hide columns — simply check/uncheck the column names in the Columns list. The column name
moves to the top section of the list when you check it.
> Change the display size of a column — click on the Size cell of the row corresponding to the appropriate
results column (or highlight the row and click on the SIZE button) and type in the size you want. You can also
change the size of a column in the main Log Explorer window by dragging the column header divider left or
right.
> Sort ascending/descending — click on the Sort/Group by cell of the row corresponding to the appropriate
results column (or highlight the row and click on the SORT/GROUP BY button) and choose either Ascending or
Descending from the drop-down list options. If you want to sort the results of the query by the values in more
than one column, check the Multi-column sorting box in the lower left of this tab and choose the columns that
you want to sort your results by in turn.
> Group the results according to the value in a particular column — click on the Sort/Group by cell of the row
corresponding to the appropriate results column (or highlight the row and click on the SORT/GROUP BY button)
and choose the Group by option from the drop-down list. When grouping results, all log entries in the Log
Explorer Results panel/custom report are ‘piled’ into single entries corresponding to the unique values in the
column.
Figure 67. Grouping results in the query
In the above image, results are grouped according to their File Type value. The ellipses indicate hidden log
entries and the Count column indicates how many log entries have the same File Type.
> Specify the criteria used to select results to be shown in the report — click on the Criteria cell of the row
corresponding to the appropriate results column (or highlight the row and click on the CRITERIA button) and
select the criteria you want to use to select results to display in the main Log Explorer Results panel/custom
report. For more information about setting criteria, see next section.
If you want to use specify a complex set of selection criteria or display settings click on the
ADVANCED button and enter information on the Query and Output tab. For more information see
The advanced view on page 84.
> Decide the column display order — using the MOVE UP and MOVE DOWN buttons located on the right of the
window.
> Clear sorts, groups, add or remove criteria, change the size of any column, and execute the query — using
the corresponding buttons located on the lower and right part of the window.
Criteria
Criteria make it easier to find the result or results you are interested in. Typically the more specific you are with
your search criteria, the fewer results are returned, i.e. the Results list in the main Log Explorer window is less
clogged up with results that are irrelevant to your search.
You specify the criteria you want to use for a particular template using one or more context-dependent Criteria
dialogs. For example, when you are specifying that a log entry must match one (or more) or a fixed set of values
the Criteria dialog displays a list of the possible values you may want to match. Alternatively when you are
specifying a match to a free text data field the appropriate Criteria dialog lets you type in what is needed using
wildcards to delimit the criterion. For example, you can say enter ‘wind*.*’ to search for all files with names
82 PGP Endpoint Application Control User Guide 4.3.0
Page 87
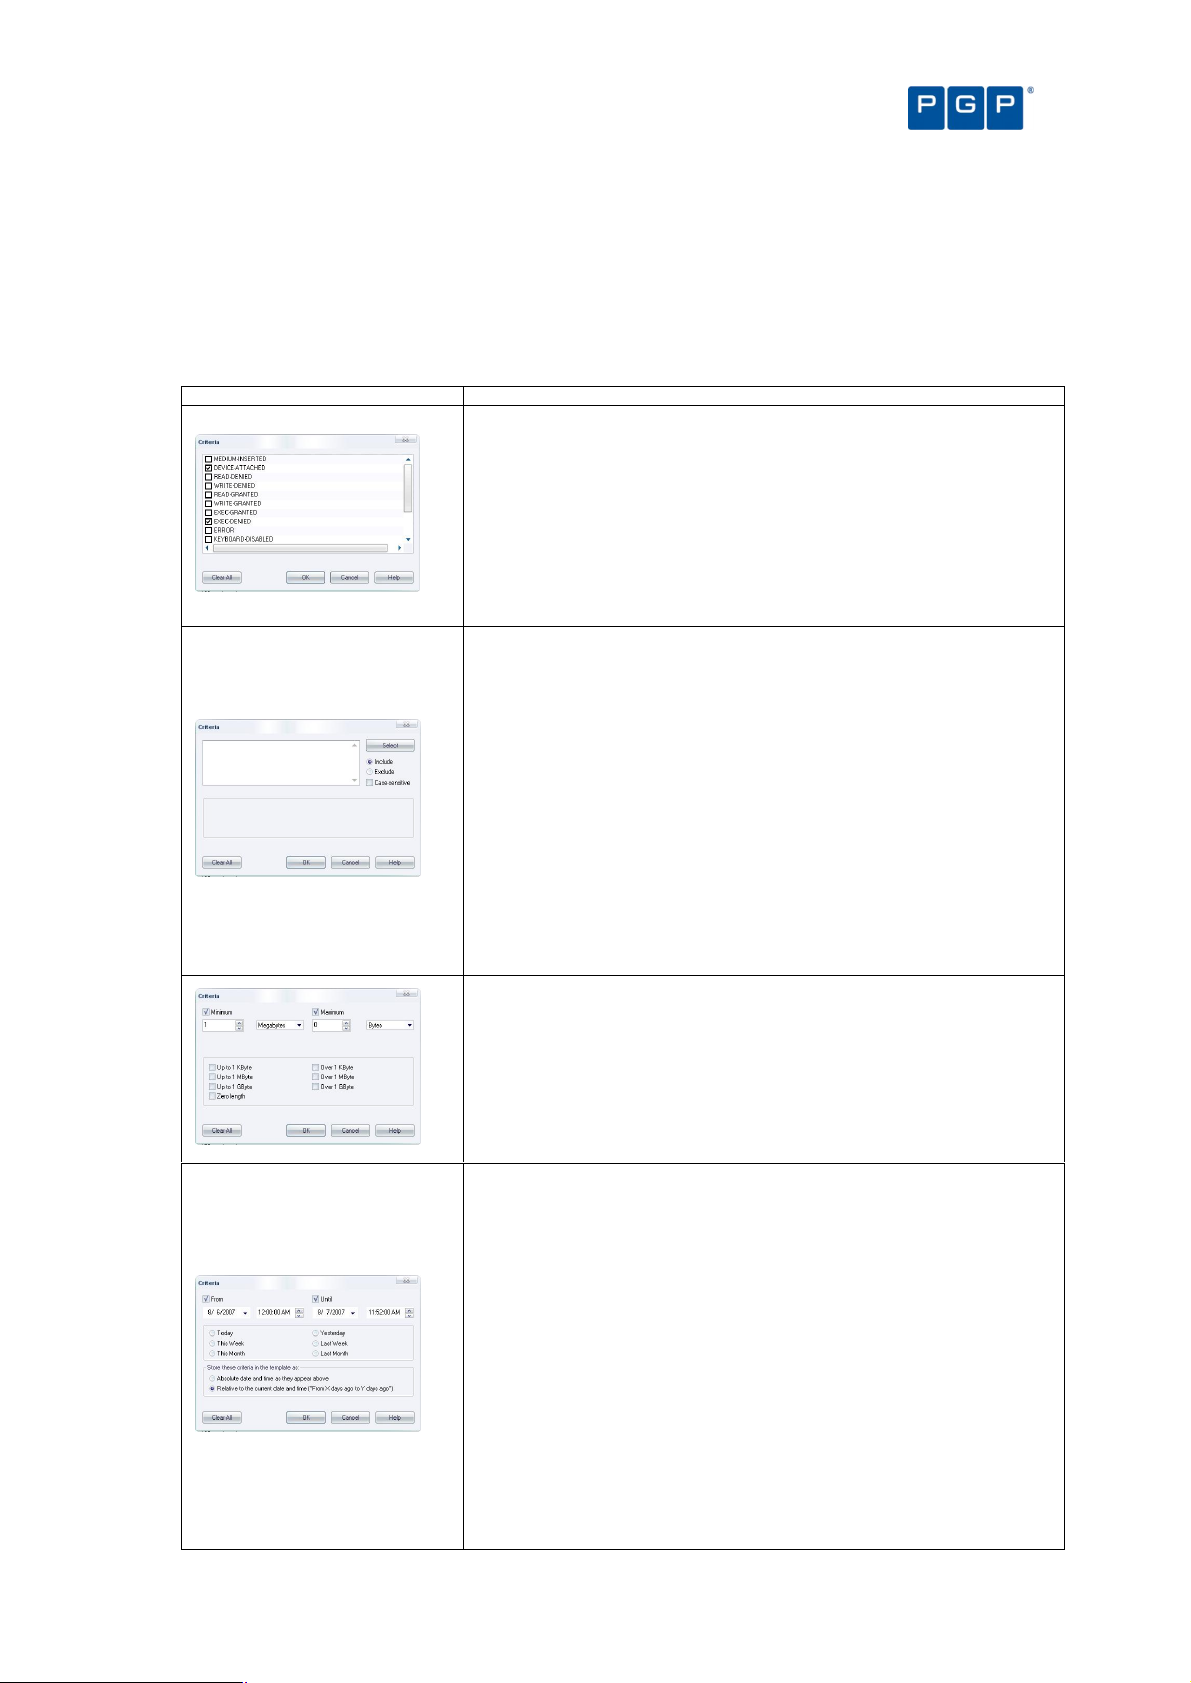
Chapter 9: Monitoring activities using the Log Explorer
Criteria Dialog
Description
Criteria List
Free-text criteria
Size criteria
Time criteria
starting with ‘wind’ and with any file extension, or enter ‘project.mp?’ to search for all files with names starting with
‘project.mp’ followed by one additional character.
In some Criteria dialogs, you can also choose to exclude results that match a criterion. Others contain a SELECT
or SEARCH button, for example, where specifying criteria involves matching to one or more particular computers or
users.
Various different types of Criteria dialogs are explained in the following table:
This form of the Criteria dialog is displayed when log entry fields contain one of a
fixed set of values.
Check or uncheck the boxes that correspond to the values you are looking for.
For example, using the ‘Custom Message’ column, if you are searching for log
entries related to executions that succeeded because the executable was
authorized, set the ‘ok-Hash’ checkbox and clear all others. If you additionally
want to see executions that were allowed because of matching Path Rules, set
this checkbox as well. The query then returns log entries related to these two
types of authorized execution.
This form of the Criteria dialog is used to filter the query results based on any text
that you type in.
Enter the text you want to use to search in the field. You can use wildcards (? to
match any single character and * to match any sequence of zero or more
characters).
If entering several strings, separate them using semicolons (;) to get log entries
matching any of the strings specified. You can further specify — using the options
on the right of the dialog — whether the search should be case-sensitive, and
whether the query should return entries that include or exclude the specified
strings.
For example, to search all log entries that contain main executables run by users,
enter ‘*.exe’ (without the quotes). To additionally return results concerning XP
Service Pack Message DLLs (xpsp1res.dll, xpsp2res.dll...), enter
‘*.exe;xpsp?res.dll’ (without quotes).
This form of the Criteria dialog is only meaningful if you also use PGP Endpoint
Device Control. It shows event logs for shadow files based on their size.
The query returns log entries concerning files with the size specified in the
‘minimum’ and ‘maximum’ values. Alternatively, you can select one of the
predefined common sizes by clicking the corresponding checkboxes.
This form of the Criteria dialog is used to search for log entries that were
produced, or uploaded to the server, at a certain date/time.
You can enter any period into the ‘From’ and ‘Until’ controls, or click one of the
commonly used time range settings. You can further specify how these time
criteria are stored in the template (this influences they are interpreted when you
execute the query).
If you chose to save your settings as absolute values, there are considered as
unconditional parameters. For example, a query for log entries between May 21st
2007 and May 23rd 2007 returns the log entries produced between these two
dates.
If, on the other hand, you select to store the values as relative ones, the values
are converted to a comparative time relative to the current date and time. For
example, if on May 23rd 2007 at 10h00 you query for entries generated after May
23rd 2007 9:00, and select ‘relative time’, the criterion is stored as ‘return all
entries generated in the last hour’. If you run this query again on June 12th 2007
at 11h30, you get log entries generated during the last hour, i.e. after June 12th
PGP Endpoint Application Control User Guide 4.3.0 83
Page 88
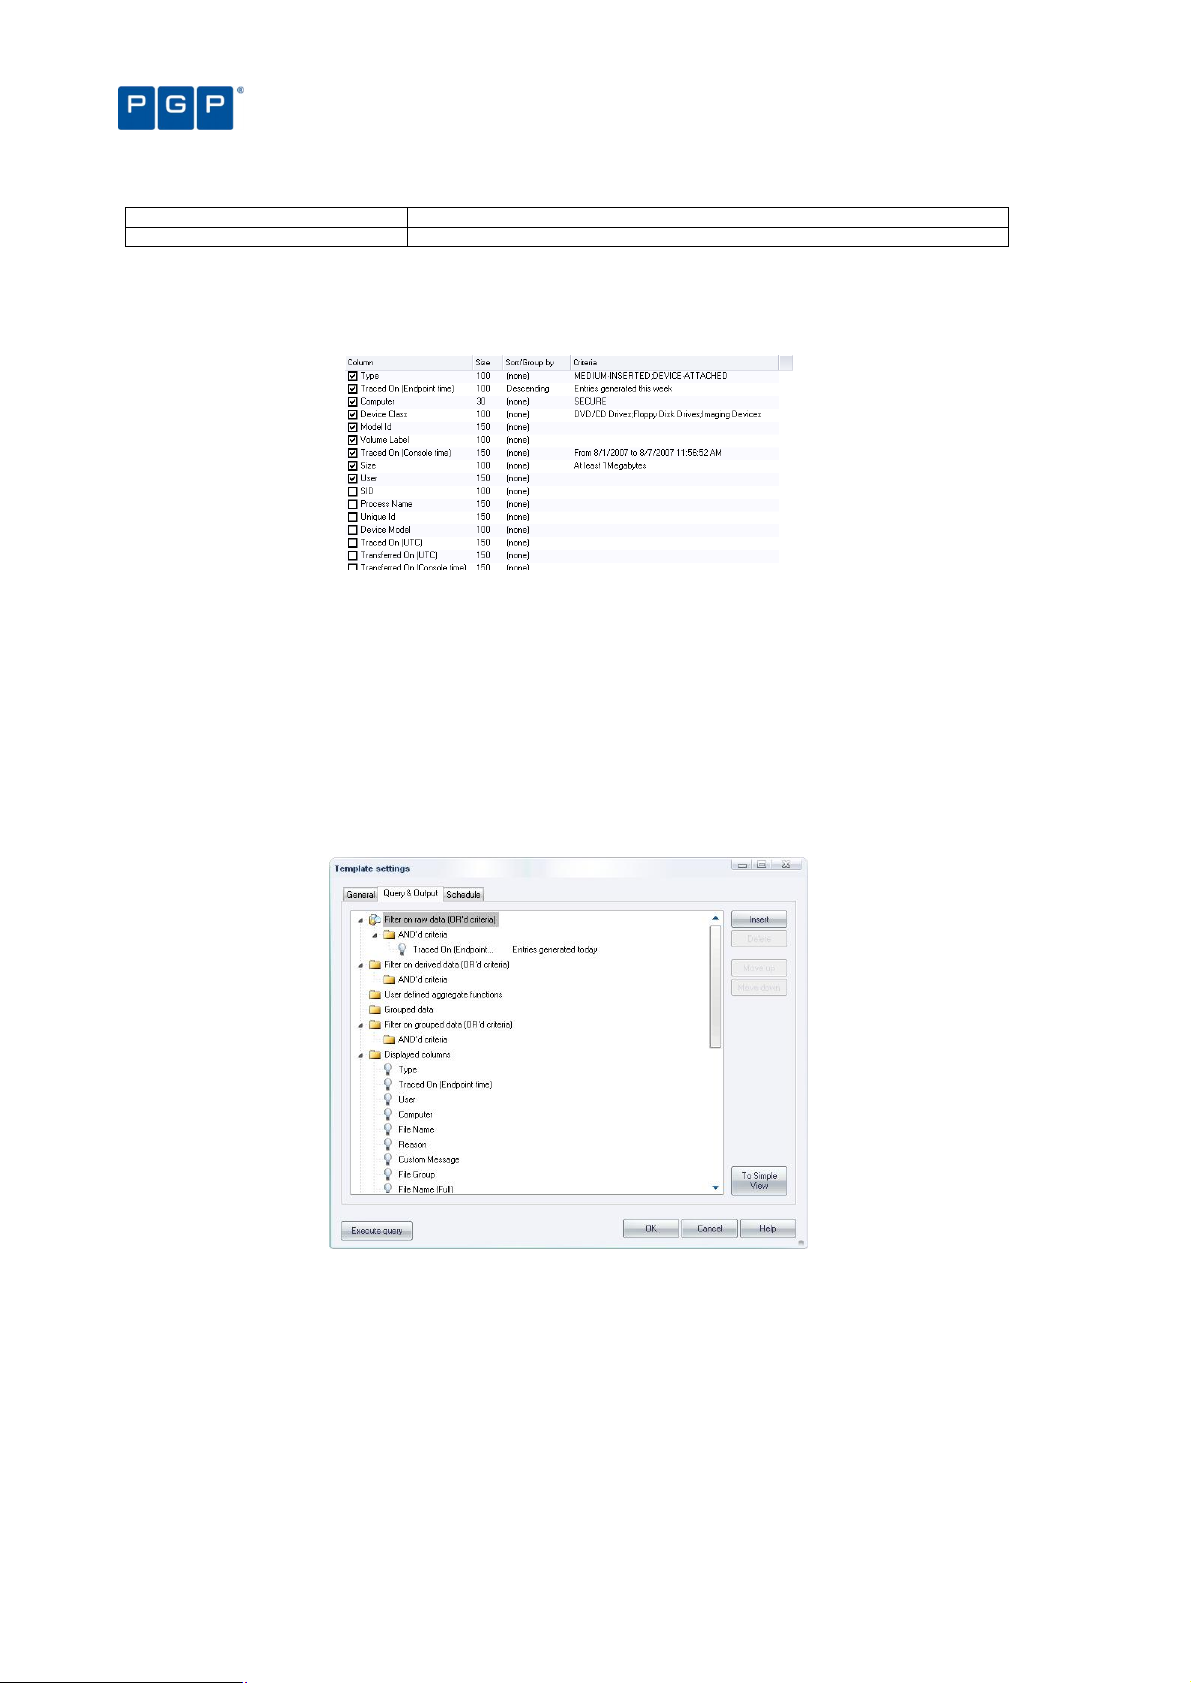
Criteria Dialog
Description
2007 10h30.
Table 19: How to use the available criteria dialogs
Once you have set up the criteria used in your template, these are displayed in the Criterion column of the
Template settings window after closing the Criteria dialog and clicking on the QUERY button (or by clicking on the
EXECUTE button of the Template settings window).
Figure 68: Example of criteria settings
Chapter 9: Monitoring activities using the Log Explorer
The advanced view
You can also have an advanced view when clicking on the TO ADVANCED VIEW button while in the Query & Output
tab. You can use it to carry out the same actions as a simple query, but with more complex criteria and
specifications. Once you are on the Advanced View, you can revert back to the Simple view by clicking on the TO
SIMPLE VIEW button.
You can normally switch back to the Simple query tab by clicking on the TO SIMPLE VIEW button.
This is not possible when you have defined a complex query that cannot be represented
correctly in the Simple Query tab. In this case, the TO SIMPLE VIEW button is disabled.
Figure 69: Advanced view
In the Query & Output tab you enter complex queries using a Tree control structure. The tree representing the
query has seven top-level nodes. These are used to:
> ‘Filter on raw data (OR’d criteria)’ — specify the criteria, based on information actually in the log entries, used
to select results to be included in reports generated using the template. For example, if you specify an
‘AND’d criteria’ of Type and the criteria ADDED FILE the report includes events when a user has added a file
to the system.
> ‘Filter on derived data (OR’d criteria)’ — specify the criteria, based on information derived from the PGP
Endpoint Management Console, used to select results to be included in reports. For example, you can
specify an ‘AND’d criteria’ of Traced On (Console time) or User.
84 PGP Endpoint Application Control User Guide 4.3.0
Page 89

Chapter 9: Monitoring activities using the Log Explorer
> ‘User defined aggregate functions’ — such as the sum, minimum, maximum, or average of values contained
in the log entries.
> ‘Grouped data’ — produce a single result corresponding to multiple log entries with the same value for a
particular field. You can, for example, group log entries by Type or Traced On (UTC) date.
> 'Filter on grouped data (OR’d criteria)’ — determine whether the report generated using the template only
displays results where the values for the computed columns match specified criteria.
> Displayed columns — determine which columns are displayed and their order.
> Sorting — determine the order in which rows of results are displayed.
The INSERT button adds a new node into the highlighted node of the tree. If the nodes in the group cannot be
reordered then the new node is positioned below any existing nodes.
When nodes representing columns are highlighted a set of controls is displayed to its right. These can be used to
select columns, criteria, and so on.
To set up and use a complex query:
1. Click on the ADVANCED button in the Template settings window.
2. Choose the criteria you want to use to select results.
To add each criterion, click on the ‘AND’d criteria’ node of the top-level node ‘Filter on raw data (OR’d
criteria)’, click on the INSERT button and select the column and the criteria you want to use (using the drop-
down list and the Criteria dialog opened when you click on the button). Repeat for derived data by setting
up criteria under the top-level node ‘Filter on derived data (OR’d criteria)’.
You can also use shortcut keys: Insert creates a new clause or term, Delete removes a clause
or term, and Ctrl+Up or Ctrl+Down move a clause up or down respectively.
3. Select computed information you want to display, if required. For example, you may want to display a
count, an average value, or a maximum value for a column when you have grouped results. These
computed information columns are named C1, C2, and so on. (They may be selected in step 5.)
To add each computed column, click on the top-level node ‘User defined aggregate functions’, click on the
INSERT button and select the column and the calculated function you want to use (using the drop-down list).
4. Define how you want your results grouped, if appropriate. To add each result grouping, click on the
top-level node ‘Grouped data’, click on the INSERT button and select the column you want to group
results by (using the drop-down list). You can group results by the values in several columns.
5. Specify that the values in your computed columns match particular criteria, if required. For example,
you may only want to include results in your report where the value of a computed field exceeds a
particular value.
To specify criteria based on the computed column values, click on the ‘AND’d criteria’ node of the top-level
node ‘Filter on grouped data (OR’d criteria)’, click on the INSERT button, select the computed column and
criteria you want to use, and enter an appropriate value.
6. Choose the columns of information you want to display and their ordering.
To select each column you want to display, click on the top-level node ‘Displayed columns’, click on the
INSERT button and select the column (using the drop-down list).
You can reorder the displayed columns by clicking on the MOVE UP and MOVE DOWN buttons.
7. Specify how you want to sort the results in the report. To add a level of sorting, click on the top-level
node Sorting, click on the INSERT button and select the column you want to sort by and how you want
this sorted (using the drop-down lists). You can sort results using several columns.
8. Click on the EXECUTE QUERY button to close the Template settings window and execute the query.
PGP Endpoint Application Control User Guide 4.3.0 85
Page 90

Chapter 9: Monitoring activities using the Log Explorer
Examples
In this section, we analyze some examples you can do using the Advanced View designer. Although you can
always use the simple view designer, sometimes is quicker to just proceed to this view, quickly select what you
want from each section, and execute your new or modified template.
In our first example, we want to show all application which execution has been denied this month for all
computers classified by File Type and showing the following fields: User, Computer, and File Name. So let us
proceed:
1. Open the Log Explorer by clicking on its icon.
2. Click on the TEMPLATE button on the control bar of the Log Explorer main window.
3. Click on the NEW button to create a template. The Template Setting dialog opens.
4. In the General tabs, enter the name for the template in the Template Name field. We choose
You can switch from one view to another to check your progress and gain confidence as you go
along with the first examples, but as they get more and more complex you cannot go back to
the simple view to verify your work. You can always delete the last element to get back to the
simple view or save your work as you go.
EXAMPLE1 for this example.
5. Enter a description and the access type.
6. Change to the Simple Query tab.
7. Since we are now advanced users, we immediately change to the advanced view designer by clicking
the TO ADVANCED VIEW button.
8. Right click on the “AND’d” criteria in the “Filter on raw data (OR’d criteria)” branch — since we are
using two conditions that must be simultaneously true: the execution has been denied and that it must
have been this month — and select the INSERT item.
9. Click on the chevron in the list to display all available fields and select TYPE (our first, partial,
condition).
10. Click on the ellipsis on the right side of the TYPE field and select EXEC-DENIED and click on OK to
accept our, now, full condition.
11. Right click on the “AND’d” criteria in the “Filter on raw data (OR’d criteria)” branch — since we need to
add a second condition here — and select the INSERT item.
12. Click on the chevron in the list to display all available fields and select TRACED ON (ENDPOINT
TIME) — our second, partial, condition.
13. Click on the ellipsis on the right side of the TRACED ON (ENDPOINT TIME field, select This Month,
Relative to the current…, and click on OK to accept our, now, full condition.
14. Right click on Grouped Data and select the INSERT item.
15. Click on the chevron in the list to display all available fields and select FILE TYPE.
16. Right click on Displayed Columns and select the INSERT item.
17. Click on the chevron in the list to display all available fields and select USER.
18. Repeat the last two steps selecting the following fields: COMPUTER and FILE NAME.
You can now proceed to execute your query. This saves your work so that you can use your template in the
future without the need to redesign it.
86 PGP Endpoint Application Control User Guide 4.3.0
Page 91

Chapter 9: Monitoring activities using the Log Explorer
Figure 70: Advanced view: Example 1
In this second example, we build from our first experience and take advantage of all its options but we slightly
change the conditions: we want to reorganize the displayed columns, display only for the EXE files, and count by
FILE GROUP (we suppose that you first created the template for the previous example):
1. In the Query & Output tab, click on the TO ADVANCED VIEW button.
2. Right click on the “AND’d” criteria in the “Filter on derived data (OR’d criteria)” branch and select the
INSERT item. From this point on you cannot go back to the simple design view.
3. Click on the chevron located at the right of the list to display all available fields and select FILE EXT.
4. Click on the ellipsis on the right side of the FILE EXT field and enter EXE on the dialog and click on OK
to accept the condition.
5. Right click on the “User defined aggregate functions” branch and select the INSERT item.
6. Click on the chevron in the list to display all available fields and select FILE GROUP. The second list
should show Count. If this is not the case, select it and change to count.
7. Go to the “Displayed columns” branch and play with the fields selecting them and using the MOVE UP
and MOVE DOWN buttons. Once satisfied with your template, click on OK or EXECUTE QUERY to close the
dialog and obtain the results in the Log Explorer main window.
Figure 71: Advanced view: Example 2
As a third, and last, example, we analyze how the operators in the query work. You need to remember that the
AND operator takes precedence over the OR and that:
AND is and operation where the result is true if and only if all its operands are true
PGP Endpoint Application Control User Guide 4.3.0 87
Page 92

Operand A
Operand B
Logical AND result
Logical OR result
Chapter 9: Monitoring activities using the Log Explorer
OR is and operation where the result is true if any of its operands are true
false false false false
false true false true
true false false true
true true true true
Table 20: AND and OR logical operations
Let us suppose we have the following results displayed by an empty query:
Figure 72: Empty template example
We now create a new template in which we add a TYPE field and modify its criteria to “Read-Denied” (use Figure
73 as a guide):
1. In the Query & Output tab, click on the TO ADVANCED VIEW button.
2. Right click on the “AND’d” criteria in the “Filter on raw data (OR’d criteria)” branch and select the
INSERT item.
3. Click on the chevron in the list to display all available fields and select TYPE.
4. Click on the ellipsis on the right side of the TYPE field and select READ-DENIED and click on OK to
accept the condition.
5. Click on OK or EXECUTE QUERY to close the dialog and obtain the results in the Log Explorer main
window
Data will now show only those events related to READ-DENIED excluding those of EXEC-DENIED, as expected.
As a second step, we modify our query, add a COMPUTER field modifying its criteria to show only “computer1”
— all this in a separate AND criteria sub branch (use Figure 73 as a guide). An unexpected thing happens here if
we do not take into account logical operator priority: the first OR filters every record for the READ-DENIED
condition, while the second one filters all records for “computer1”, the results of both are combined in an OR
expression:
(EVERYTHING OF TYPE “READ-DENIED”) OR (EVERY COMPUTER EQUAL TO “COMPUTER1”)
This is why we see READ-DENIED and EXEC-DENIED records in the final results.
We now modify this second branch and add a TYPE filed with a READ-DENIED criteria (use Figure 73 as a
guide). The results are now only those READ-DENIED for all computers since the two ANDed operators are then
united by an OR operator:
(EVERYTHING OF TYPE “READ-DENIED”) OR ((EVERYTHING OF TYPE “READ-DENIED”) AND (COMPUTER EQUAL
TO “COMPUTER1”))
Now we only see the records corresponding to the TYPE=READ-DENIED for all computers.
As you see from the previous examples, you have at your hands a powerful tool to analyze all log entries, client
or otherwise. Remember that you can also proceed to the Schedule tab to program your template for added
control as explained in the next section.
88 PGP Endpoint Application Control User Guide 4.3.0
Figure 73: Template with AND and OR conditions
Page 93

Chapter 9: Monitoring activities using the Log Explorer
As you see from the previous examples, you have at your hands a powerful tool to analyze all log entries, client
or otherwise. Remember that you can also proceed to the Schedule tab to program your template for added
control as explained in the next section.
Schedule tab
The Schedule tab is used to define the following:
> Start and end dates between which reports are automatically generated using this template.
> How often the report is generated and the pattern for its production. For example, you can choose for it to be
produced on a daily basis, every so many hours, on a weekly basis (on chosen days) or on a monthly basis.
> To whom or where (if needed) is this information going to be sent or stored and its format.
In order for the information in this tab to have an effect the Scheduled checkbox in the top right
corner of the Template settings window must be checked.
You cannot schedule a Log report if you do not have the required privileges. You will note that
the options are grayed-out and a warning message adverting you of this situation. See Chapter
4: Setting up PGP Endpoint administrators on page 29 for more details.
Figure 74: Schedule tab
Report format
Within the Schedule tab, you can also select the format in which Log reports can be sent by email or written to a
shared folder. You can define the following: .
> The format of the output file (using the Format field).
> The appropriate output file extension. Choose among XML, Comma Separated Value (CSV) or HTML
(mainly for emails).
Delivery targets
The Delivery Targets panel of the Schedule tab is used to define how and where reports are sent via email or
where they are saved in a shared folder on your network.
The Active status determines whether the report is sent to an email address or to a specified shared folder. The
Method of delivery is either ‘Share’ or ‘E-mail’ indicating whether the report is saved to a shared folder on the
network or emailed to ‘To’, ‘Cc’, and ‘From’ recipients specified in the Information column.
The Mail Server must be specified for emailed reports. Its connection status can be checked by ‘pinging’ it and it
can be used for all target email address you define for the scheduled reports if activating the ‘Apply for every
target’ option when defining the email addresses.
PGP Endpoint Application Control User Guide 4.3.0 89
Page 94

Chapter 9: Monitoring activities using the Log Explorer
If you select the ‘Apply for every target’ option, the server field of every delivery target is
change. You lose whatever information is already stored there.
You can also use the following shortcut keys: Insert creates a new target, Delete removes a
target, F2 edits a target.
You must be careful when setting email delivery options. If not correctly set, all report can end
up in the junk–email folder.
The chosen email server should accept anonymous connections or the report delivery option
may not work properly.
To set up a new target:
1. Click on the NEW button to the right of the Schedule tab. The Edit target dialog is displayed.
Figure 75: Edit target dialog
2. If you want to save the scheduled reports in a shared folder on your network, select the Method
‘Share’, click on the field below, click on the BROWSE button and select the shared folder.
Figure 76: Share folder section
Alternatively you can use the Ctrl+B shortcut key to browse for a folder.
3. If you want to send the scheduled report as an email, select the Method ‘E-mail’ and specify the ‘To’,
‘Cc’, and ‘From’ recipients in the resulting Edit target dialog.
Figure 77: Edit target dialog (E-mail)
90 PGP Endpoint Application Control User Guide 4.3.0
Page 95

Chapter 9: Monitoring activities using the Log Explorer
4. Click on the OK button.
Using the Log Explorer module to authorize unknown files
You can use the Log Explorer module to show Local Authorization decisions made by users, to override denials
from central authorization. This may reveal certain executables, scripts, and macros that are needed by users to
complete their work. These files should be included in the white list.
If a user is complaining that he needs certain executables, scripts and macros to do his daily work, you can check
which files the user has attempted to use and decide whether to authorize them or not. If you are absolutely
certain that the files can be trusted, you can authorize them directly from the Log Explorer module.
To authorize a new executable, script, or macro from the Log Explorer module
1. Right-click on a file, or range of files, in the Log Explorer window. The system displays the Assign Files
to File Groups dialog.
2. From the drop-down list associated with the Suggested File Group column, select the File Group to
which the new file(s) should be added.
Be careful when authorizing files directly from the Log Explorer module. There is no guarantee
that they are not infected with a virus or that the end user has not attempted to run a rogue
application under another name. For maximum security, it is best only to authorize applications
from trusted sources using the Log Explorer module.
Forcing the latest log files to upload
PGP Endpoint-protected clients upload their log information to the PGP Endpoint Administration Server at the
time specified in the system options. However, you may need to view up-to-the-minute log information to help you
quickly troubleshoot application problems or to verify that authorizations have been set correctly for new software.
To force the immediate retrieval of the latest logs from any client, you can:
1. Activate the Log Explorer module, if it is not already open. To do this, click on the Log Explorer icon
located in the Modules section of the Control Panel or use the ViewModules command.
2. Click on the FETCH LOG button or select Fetch Log from the Explorer menu. The system prompts you to
specify the machine from which you want to fetch all logs present on the client. You can only fetch logs
from the computers that have the PGP Endpoint Client Driver installed.
Figure 78. Fetching New Logs
3. Select the target machine from the drop-down list and click OK.
You may need to wait half a minute before the latest logs are available when using ‘Fetch log’.
When the log entries are retrieved from the client machine they are processed by the server,
put into a database insertion queue and inserted in a batch. The time between retrieving the log
entries from the client and the latest logs becoming available depends on the queue size and
the database availability at the time of upload.
PGP Endpoint Application Control User Guide 4.3.0 91
Page 96

Chapter 9: Monitoring activities using the Log Explorer
When you use the ‘Fetch Log’ functionality to retrieve the latest logs from client computers, the
logs are appended to the server log insertion queue. They are processed by the server, put into
a database insertion queue and inserted in a batch. This means that the data is not immediately
available after the log has been uploaded. The whole ‘Fetch Log’ can take about half a minute
(depending on the queue size and the database availability at the time of upload).
Viewing administrator activity
In addition to using the Log Explorer module to monitor executables and other files, you can also use it to monitor
the actions of your administrators including changes made to files, File Groups, and the assignment of resources
to users and user groups.
In previous versions of PGP Endpoint this was done using the Audit Log Viewer module. The
functionality of this module has now been incorporated into the Log Explorer module and the
Audit Log Viewer module no longer exists.
PGP Endpoint Device Control Enterprise Administrators have access to all audits. When
running under a Windows Active Directory based domain, the PGP Endpoint Administrator is
only shown audits of computers and users he/she is allowed to manage. You can use
Ctrlacx.vbs, explained in PGP Endpoint Setup Guide, to create, view, or modify control rights in
the active directory.
To view audit information about the actions carried out by administrators:
1. Click on the Log Explorer icon located in the Modules section of the Control Panel or use the
ViewModules command. The system opens the Log Explorer window.
2. Select (or amend, if required) the template that you want to use to generate a report showing the
administrator activity.
3. Execute the system administrator activity query. To do this, click on the QUERY button in the Log
Explorer window (or the EXECUTE button in the Template settings window).The system displays a list of
audit events showing, for example, all changes made to permissions between specified dates.
Audit events
Audit events describe the actions performed by administrators.
92 PGP Endpoint Application Control User Guide 4.3.0
Page 97

Chapter 9: Monitoring activities using the Log Explorer
Audit events
Description
ADDED FILE A file (includes the name, path, and ID) was added to the database.
ADDED FILE GROUP The File Group’s name and ID were added to the database.
ASSIGNED FILE TO FILE
GROUP
AUTHORIZED USER This user/user group was granted the right to use this File Group, shown by the name and
AUTOMATIC USER ACCESS
UPGRADE
DELETED DEFAULT OPTION Whenever a default option that applies to all the machines is deleted (in the ToolsDefault
DELETED EVERYONE OPTION An action that affects all users is removed.
DELETED FILE GROUP This File Group was erased.
DELETED OPTION Whenever an option specific to a machine is deleted, the option and the user/machine are
MODIFY USER ACCESS When changes are made to the PGP Endpoint Administrator’s roles, the user and role are
PURGED DB AND FILE
STORAGE
REMOVED FILE This file (includes the file name and File Group) was deleted from the database.
RENAMED FILE GROUP This file was renamed.
SET DEFAULT OPTION A default option is one that applies to all the machines. Whenever a change is done by the
SET EVERYONE OPTION An action is set that affects all users.
SET OPTION This action is traced whenever a change to the system options is made, the option,
SET USER/MACHINE OPTION A change was made to this option for this machine or user.
UNASSIGNED FILE FROM
FILE GROUP
UNASSIGNED FILE TO FILE
GROUP
UNAUTHORIZED USER This user’s permission to use the named File Group was revoked.
This file (includes the name, path, and ID) was added to this File Group.
ID.
This administrator was implicitly defined as an Enterprise Administrator, because none other
was identified.
Options menu), the option and the user/machine are traced.
traced.
logged.
This action is recorded every time maintenance is performed on the system.
administrator to one of these options (by using the ToolsDefault Options menu), the option
being changed and the user/machine are traced.
user/machine are logged.
This unassigned file was removed from this File Group.
This unassigned file was added to this File Group.
Table 21. Audit events
Generating reports of system status and settings
In addition to online audit trails of application execution and administrator activity, you can generate reports of
authorization information, system settings, and online machines.
For more information about reports, see Chapter 11: Generating PGP Endpoint reports on page 101.
PGP Endpoint Application Control User Guide 4.3.0 93
Page 98

Page 99

Chapter 10: Managing files using the Database Explorer
The PGP Endpoint Database serves as the central repository of authorization information, such as:
> The white list of approved executable files, scripts and macros.
> Digital signatures (‘hashes’) that uniquely identify the approved files.
> File Groups.
> File Groups parent-child relationships.
> Authorized users and user groups.
The PGP Endpoint Database is created using Microsoft SQL Server 2000/2005, SQL Server 2005 Express
Edition, or the Microsoft Database Engine (MSDE). For organizations with fewer than approximately 200 users,
SQL Server 2005 Express Edition is sufficient. Larger organizations use the Microsoft SQL Server.
There are inherent limitations when using SQL Server 2005 Express Edition (for example, 4 GB
database limit). See the PGP Endpoint Setup Guide.
The Database Explorer module of the PGP Endpoint Application Control Suite is the primary tool for viewing and
managing database records. Using it you can:
> View database records.
> Perform routine database maintenance.
> Back up the PGP Endpoint Database.
> Remove old execution logs and machine scans.
Viewing database records
The Database Explorer module displays a list of the executable, script, and macro files for which digital
signatures (hashes) are found in the PGP Endpoint Database — and the File Groups to which they are assigned.
Using the Database Explorer module
To open the Database Explorer module, click on the Database Explorer icon located in the Modules section of
the Control Panel (or use the ViewModules command). The system displays the Database Explorer window, as
shown in the following figure.
If your database includes a very large number of files, there may be a slight delay before this
list appears when you click on SEARCH.
The Database Explorer module works in a similar way to the Windows Explorer program.
PGP Endpoint Application Control User Guide 4.3.0 95
Page 100

To sort entries by any attribute, such as filename or File Group
You can click on a column header to sort the file entries by that attribute. (Click
from ascending to descending, or vice versa).
A small triangle on the header shows the sort order. The ID column shows the internal
To expand the display to show
on the header row of the
. Selecting columns to
columns of information
from where you can
can change the width of each individual column using the
To save this list as a CSV file
as a CSV file (comma
import the resulting informati
Chapter 10: Managing files using the Database Explorer
PGP Endpoint Application Control User Guide
again to change the order
PGP Endpoint
all available report columns.
Width of selected column (in Pixels)
File Save As
identifier, for information purposes only.
Figure 79. Database Explorer Module
on it
Database
/hide other columns
You can right-click
Figure 80
If you wish to organize
Choose Columns dialog is displayed,
of the dialog.
Database Explorer main window and add/remove
display in the Database Explorer Module
, select the Choose Columns option of the right-
select and classify
column(s).
click menu. The
You
field at the button
Figure 81. Choose Columns dialog
To save the list of database records
the File menu. You can then
96
-separated values), select the
on into a third party reporting tool.
option from
4.3.0
 Loading...