

Page 1

Setup Guide
PGP Endpoint 4.4 SR5
Page 2

PGP Endpoint
- 2 -
Page 3

Notices
Version Information
PGP Endpoint Setup Guide - PGP Endpoint Version 4.4SR5 - Released: September 2010
Document Number: 02_102P_4.4SR5_102711504
Copyright Information
Copyright© 1991-2010 by PGP Corporation. All Rights Reserved. No part of this document can be reproduced or
transmitted in any form or by any means, electronic or mechanical, for any purpose, without the express written
permission of PGP Corporation.
Trademark Information
PGP, Pretty Good Privacy, and the PGP logo are registered trademarks of PGP Corporation in the US and other
countries. IDEA is a trademark of Ascom Tech AG. Windows and ActiveX are registered trademarks of Microsoft
Corporation. AOL is a registered trademark, and AOL Instant Messenger is a trademark, of America Online, Inc.
Red Hat and Red Hat Linux are trademarks or registered trademarks of Red Hat, Inc. Linux is a registered trademark
of Linus Torvalds. Solaris is a trademark or registered trademark of Sun Microsystems, Inc. AIX is a trademark or
registered trademark of International Business Machines Corporation. HP-UX is a trademark or registered trademark
of Hewlett-Packard Company. SSH and Secure Shell are trademarks of SSH Communications Security, Inc.
Rendezvous and Mac OS X are trademarks or registered trademarks of Apple Computer, Inc. All other registered
and unregistered trademarks in this document are the sole property of their respective owners.
Licensing and Patent Information
The IDEA cryptographic cipher described in U.S. patent number 5,214,703 is licensed from Ascom Tech AG. The
CAST-128 encryption algorithm, implemented from RFC 2144, is available worldwide on a royalty-free basis for
commercial and non-commercial uses. PGP Corporation has secured a license to the patent rights contained in the
patent application Serial Number 10/655,563 by The Regents of the University of California, entitled Block Cipher
Mode of Operation for Constructing a Wide-blocksize block Cipher from a Conventional Block Cipher. Some thirdparty software included in PGP Universal Server is licensed under the GNU General Public License (GPL). PGP
Universal Server as a whole is not licensed under the GPL. If you would like a copy of the source code for the GPL
software included in PGP Universal Server, contact PGP Support (http://www.pgp.com/support). PGP Corporation
may have patents and/or pending patent applications covering subject matter in this software or its documentation;
the furnishing of this software or documentation does not give you any license to these patents.
Acknowledgements
This product includes or may include:
• The Zip and ZLib compression code, created by Mark Adler and Jean-Loup Gailly, is used with permission from
the free Info-ZIP implementation, developed by zlib (http://www.zlib.net). • Libxml2, the XML C parser and
toolkit developed for the Gnome project and distributed and copyrighted under the MIT License found at http://
www.opensource.org/licenses/mit-license.html. Copyright © 2007 by the Open Source Initiative. • bzip2 1.0, a freely
available high-quality data compressor, is copyrighted by Julian Seward, © 1996-2005. • Application server (http://
jakarta.apache.org/), web server (http://www.apache.org/), Jakarta Commons (http://jakarta.apache.org/commons/
license.html) and log4j, a Java-based library used to parse HTML, developed by the Apache Software Foundation.
The license is at www.apache.org/licenses/LICENSE-2.0.txt. • Castor, an open-source, databinding framework
for moving data from XML to Java programming language objects and from Java to databases, is released by the
ExoLab Group under an Apache 2.0-style license, available at http://www.castor.org/license.html. • Xalan, an opensource software library from the Apache Software Foundation that implements the XSLT XML transformation
language and the XPath XML query language, is released under the Apache Software License, version 1.1, available
- 3 -
Page 4

PGP Endpoint
at http://xml.apache.org/xalan-j/#license1.1. • Apache Axis is an implementation of the SOAP (“Simple Object
Access Protocol”) used for communications between various PGP products is provided under the Apache license
found at http://www.apache.org/licenses/LICENSE-2.0.txt. • mx4j, an open-source implementation of the Java
Management Extensions (JMX), is released under an Apache-style license, available at http://mx4j.sourceforge.net/
docs/ch01s06.html. • jpeglib version 6a is based in part on the work of the Independent JPEG Group. (http://
www.ijg.org/) • libxslt the XSLT C library developed for the GNOME project and used for XML transformations
is distributed under the MIT License http://www.opensource.org/licenses/mit-license.html. • PCRE version 4.5
Perl regular expression compiler, copyrighted and distributed by University of Cambridge. ©1997-2006. The
license agreement is at http://www.pcre.org/license.txt. • BIND Balanced Binary Tree Library and Domain Name
System (DNS) protocols developed and copyrighted by Internet Systems Consortium, Inc. (http://www.isc.org)
• Free BSD implementation of daemon developed by The FreeBSD Project, © 1994-2006. • Simple Network
Management Protocol Library developed and copyrighted by Carnegie Mellon University © 1989, 1991, 1992,
Networks Associates Technology, Inc, © 2001- 2003, Cambridge Broadband Ltd.© 2001- 2003, Sun Microsystems,
Inc., © 2003, Sparta, Inc, © 2003-2006, Cisco, Inc and Information Network Center of Beijing University of Posts
and Telecommunications, © 2004. The license agreement for these is at http://net-snmp.sourceforge.net/about/
license.html. • NTP version 4.2 developed by Network Time Protocol and copyrighted to various contributors.
• Lightweight Directory Access Protocol developed and copyrighted by OpenLDAP Foundation. OpenLDAP is
an open-source implementation of the Lightweight Directory Access Protocol (LDAP). Copyright © 1999-2003,
The OpenLDAP Foundation. The license agreement is at http://www.openldap.org/software/release/license.html.
• Secure shell OpenSSH version 4.2.1 developed by OpenBSD project is released by the OpenBSD Project under
a BSD-style license, available at http://www.openbsd.org/cgibin/cvsweb/src/usr.bin/ssh/LICENCE?rev=HEAD.
• PC/SC Lite is a free implementation of PC/SC, a specification for SmartCard integration is released under the
BSD license. • Postfix, an open source mail transfer agent (MTA), is released under the IBM Public License 1.0,
available at http://www.opensource.org/licenses/ibmpl.php. • PostgreSQL, a free software object-relational database
management system, is released under a BSD-style license, available at http://www.postgresql.org/about/licence. •
PostgreSQL JDBC driver, a free Java program used to connect to a PostgreSQL database using standard, database
independent Java code, (c) 1997-2005, PostgreSQL Global Development Group, is released under a BSD-style
license, available at http://jdbc.postgresql.org/license.html. • PostgreSQL Regular Expression Library, a free
software object-relational database management system, is released under a BSD-style license, available at http://
www.postgresql.org/about/licence. • 21.vixie-cron is the Vixie version of cron, a standard UNIX daemon that runs
specified programs at scheduled times. Copyright © 1993, 1994 by Paul Vixie; used by permission. • JacORB, a Java
object used to facilitate communication between processes written in Java and the data layer, is open source licensed
under the GNU Library General Public License (LGPL) available at http://www.jacorb.org/lgpl.html. Copyright
2006 The JacORB Project. • TAO (The ACE ORB) is an open-source implementation of a CORBA Object Request
Broker (ORB), and is used for communication between processes written in C/C++ and the data layer. Copyright
(c) 1993-2006 by Douglas C. Schmidt and his research group at Washington University, University of California,
Irvine, and Vanderbilt University. The open source software license is available at http://www.cs.wustl.edu/
~schmidt/ACEcopying. html. • libcURL, a library for downloading files via common network services, is open
source software provided under a MIT/X derivate license available at http://curl.haxx.se/docs/copyright.html.
Copyright (c) 1996 - 2007, Daniel Stenberg. • libuuid, a library used to generate unique identifiers, is released under
a BSD-style license, available at http://thunk.org/hg/e2fsprogs/?file/fe55db3e508c/lib/uuid/COPYING. Copyright
(C) 1996, 1997 Theodore Ts’o. • libpopt, a library that parses command line options, is released under the terms
of the GNU Free Documentation License available at http://directory.fsf.org/libs/COPYING.DOC. Copyright
©
2000-2003 Free Software Foundation, Inc. • gSOAP, a development tool for Windows clients to communicate with
the Intel Corporation AMT chipset on a motherboard, is distributed under the GNU Public License, available at
http://www.cs.fsu.edu/~engelen/soaplicense.html. • Windows Template Library (WRT) is used for developing user
©
- 4 -
Page 5

interface components and is distributed under the Common Public License v1.0 found at http://opensource.org/
licenses/cpl1.0.php. • The Perl Kit provides several independent utilities used to automate a variety of maintenance
functions and is provided under the Perl Artistic License, found at http://www.perl.com/pub/a/language/misc/
Artistic.html.
Export Information
Export of this software and documentation may be subject to compliance with the rules and regulations promulgated
from time to time by the Bureau of Export Administration, United States Department of Commerce, which restricts
the export and re-export of certain products and technical data.
Limitations
The software provided with this documentation is licensed to you for your individual use under the terms of the End
User License Agreement provided with the software. The information in this document is subject to change without
notice. PGP Corporation does not warrant that the information meets your requirements or that the information is
free of errors. The information may include technical inaccuracies or typographical errors. Changes may be made to
the information and incorporated in new editions of this document, if and when made available by PGP Corporation.
Notices
- 5 -
Page 6

PGP Endpoint
- 6 -
Page 7

Table of Contents
Table of Contents
Preface: About This Document..................................................................................................................................9
Typographical Conventions..........................................................................................................................................................9
Getting Assistance........................................................................................................................................................................9
Chapter 1: Planning Your Installation................................................................................................................... 11
Recommended Security Rules................................................................................................................................................... 11
System Requirements.................................................................................................................................................................12
Minimum Hardware Requirements......................................................................................................................................13
Supported Operating Systems..............................................................................................................................................14
Supported Databases............................................................................................................................................................17
Other Software Requirements..............................................................................................................................................17
Recommended Configuration.............................................................................................................................................. 18
Client Supported Languages................................................................................................................................................18
Licensing PGP Endpoint Products.............................................................................................................................................19
Chapter 2: Installing PGP Endpoint Components................................................................................................ 21
Installation Overview................................................................................................................................................................. 22
Installation Checklist..................................................................................................................................................................22
Installing the Database...............................................................................................................................................................24
Generating a Key Pair................................................................................................................................................................26
Installing the Administration Server..........................................................................................................................................28
Installing the Management Server Console...............................................................................................................................37
Installing the Client....................................................................................................................................................................41
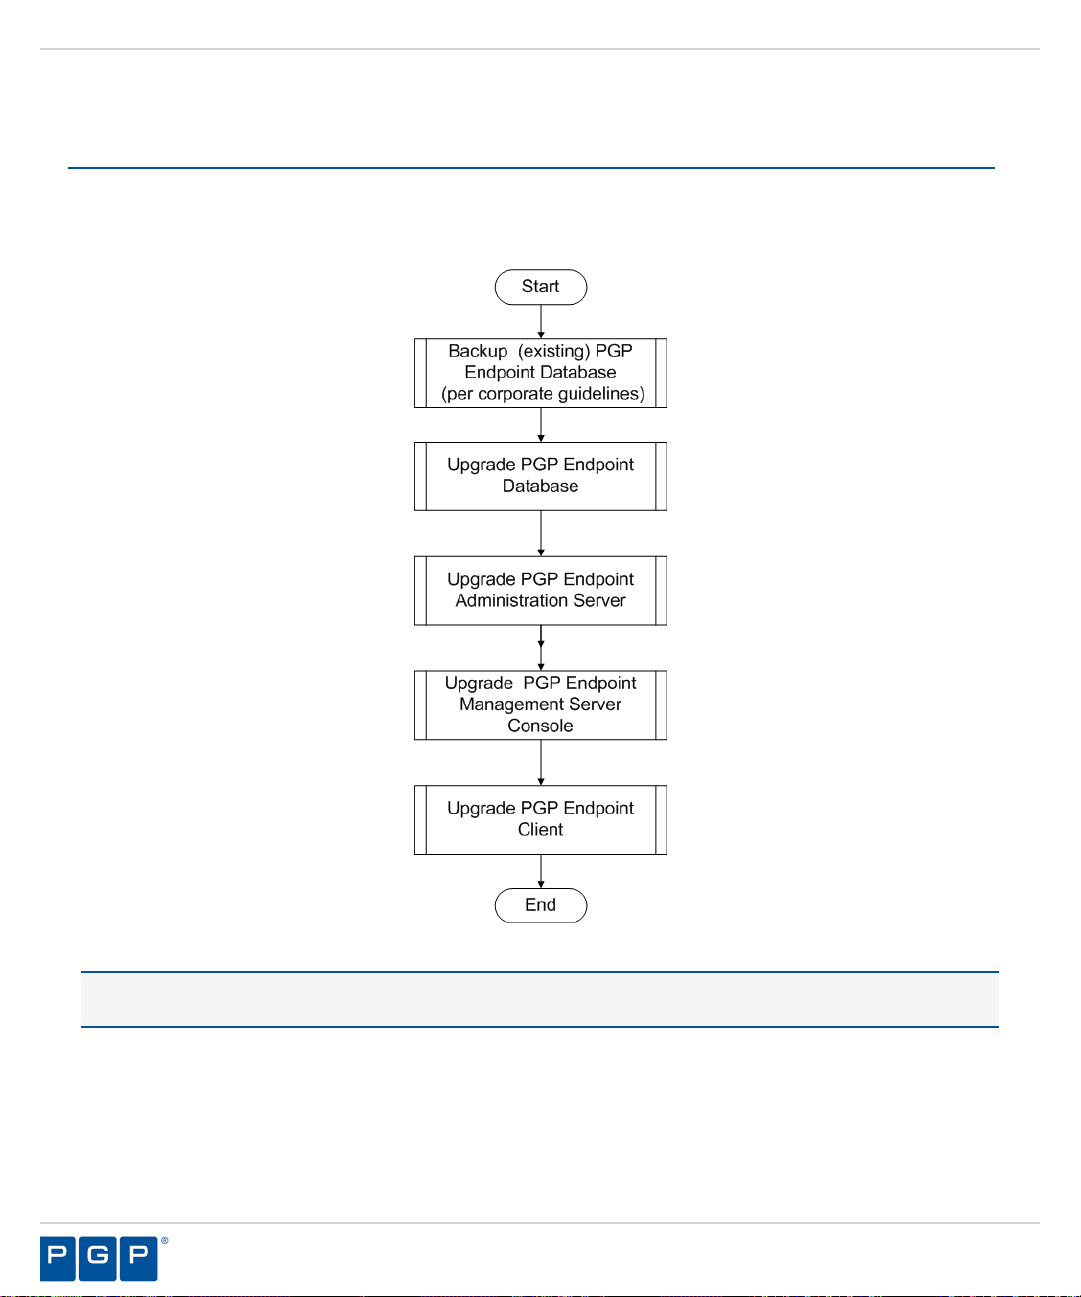
Chapter 3: Upgrading PGP Endpoint Components.............................................................................................. 49
Upgrade Overview......................................................................................................................................................................50
Upgrading the Database.............................................................................................................................................................51
Upgrading the Administration Server........................................................................................................................................54
Upgrading the Management Server Console.............................................................................................................................57
Upgrading the Client..................................................................................................................................................................58
Chapter 4: Installation Checklist.............................................................................................................................65
Installation Checklist..................................................................................................................................................................65
Chapter 5: Using PGP Endpoint Client Deployment............................................................................................67
- 7 -
Page 8

PGP Endpoint
PGP Endpoint Client Deployment Window..............................................................................................................................68
Packages Panel.....................................................................................................................................................................68
Packages Menu.....................................................................................................................................................................69
Computers Panel.................................................................................................................................................................. 69
Computers Menu..................................................................................................................................................................70
Creating Deployment Packages................................................................................................................................................. 71
Adding Computers......................................................................................................................................................................74
Deploying Packages................................................................................................................................................................... 76
Querying Client Status...............................................................................................................................................................80
Appendix A: Configuring DCOM Settings for the Administration Server.........................................................83
Setting Up Distributed Component Object Model (DCOM)....................................................................................................83
Set Access Control List Security Permissions.......................................................................................................................... 86
Appendix B: Installing the Client for Windows XP Embedded...........................................................................89
Windows XPe Client Limitations..............................................................................................................................................89
Supported Devices......................................................................................................................................................................90
Installing the Client for Windows XPe.....................................................................................................................................91
- 8 -
Page 9

Preface
About This Document
This Setup Guide is a resource written for all users of PGP Endpoint 4.4 SR5. This document defines the
concepts and procedures for installing, configuring, implementing, and using PGP Endpoint 4.4 SR5.
Tip:
PGP documentation is updated on a regular basis. To acquire the latest version of this or any other published
document, please refer to the PGP Support Portal Web Site (https://support.pgp.com).
Typographical Conventions
The following conventions are used throughout this documentation to help you identify various information
types.
Table 1: Typographical Conventions
Convention Usage
bold Buttons, menu items, window and screen objects.
bold italics
italics New terms, options, and variables.
MONOSPACE UPPERCASE Keyboard keys.
BOLD UPPERCASE SQL Commands.
monospace File names, path names, programs, executables, command syntax, and
Wizard names, window names, and page names.
property names.
Getting Assistance
Getting Product Information
Unless otherwise noted, the product documentation is provided as Adobe Acrobat PDF files that are installed
with PGP Endpoint. Online help is available within the PGP Endpoint product. Release notes are also available,
which may have last-minute information not found in the product documentation.
- 9 -
Page 10

PGP Endpoint
Contacting Technical Support
• To learn about PGP support options and how to contact PGP Technical Support, please visit the PGP
Corporation Support Home Page (http://www.pgp.com/support).
• To access the PGP Support Knowledge Base or request PGP Technical Support, please visit PGP Support
Portal Web Site (https://support.pgp.com).
Note:
You may access portions of the PGP Support Knowledge Base without a support agreement; however, you
must have a valid support agreement to request Technical Support.
• For any other contacts at PGP Corporation, please visit the PGP Contacts Page (http://www.pgp.com/
company/contact/index.html).
• For general information about PGP Corporation, please visit the PGP Web Site (http://www.pgp.com).
• To access the PGP Support forums, please visit PGP Support (http://forums.pgpsupport.com). These are user
community support forums hosted by PGP Corporation.
- 10 -
Page 11

Chapter
1
Planning Your Installation
In this chapter:
• Recommended Security Rules
• System Requirements
• Licensing PGP Endpoint Products
Planning for your software installation requires knowledge of the
minimum system requirements necessary to support Application
Control and Device Control coupled with recommendations for
network security rules that can enhance the security state of your
environment.
To assist in gathering the information required for a smooth
installation, PGP recommends that you use the Installation Checklist
on page 22.
Recommended Security Rules
PGP recommends that you define certain administrative security rules before installing PGP Endpoint.
The recommended security settings are specific to Microsoft® Windows® and complement operation of PGP
Endpoint.
Table 2: Recommended Security Rules
Security Rule Description
Hard Disk Encryption Encrypts computer disk drives to prevent unauthorized user
access to the computer hard disk drive.
Password Protect the BIOS Prevents administrative user access when using a CMOS
reset jumper, in combination with password protection for
the BIOS and seal/chassis intrusion protection.
Seal/Chassis Intrusion Protector Uses seal and/or chassis intrusion protection hardware to
prevent administrative user access using an external boot
device to bypass workstation security software.
Administrative Rights Remove local users from the local Administrators group to
prevent unrestricted local user computer access.
Power Users Remove local users from the Power Users group to prevent
users from tampering or bypassing standard Windows
security policies.
- 11 -
Page 12

PGP Endpoint
Security Rule Description
Access Policy Restrict network and file access as much as possible,
including use restriction only to NTFS partitions.
NTFS Partition Use of NTFS partitioning is required for installation of PGP
Endpoint product solutions.
Recovery Console
Service Pack and Hot Fixes Always install the latest service packs and hot fixes for
Firewalls Use traditional perimeter-based security systems, like
Password Policies Maintain strong password security policies.
Private and Public Key Generation Deploy PGP Endpoint product solutions using secure public
Password protect user access to the Recovery Console,
which is available for the Windows DVD/CD-ROM or
MSDN subscription.
the operating system supported by PGP Endpoint product
solutions.
firewalls, to complement PGP Endpoint product solutions.
and private key pairs.
System Requirements
The following sections describe the minimum system requirements necessary for successful installation of PGP
Endpoint and the languages supported by the client.
The listed specifications are a minimum; larger network environments, may require additional hardware and
software resources. The system requirements for PGP Endpoint are listed in the following topics.
- 12 -
Page 13

Planning Your Installation
Minimum Hardware Requirements
The minimum PGP Endpoint hardware requirements depend upon your service network environment, including
the type of database supported, the number of Administration Servers you need to support a distributed network,
and the number of subscribed clients.
The hardware requirements for PGP Endpoint vary depending upon the number of servers and clients you
manage. The following minimum hardware requirements will support up to:
• 200 connected PGP Endpoint clients for PGP Endpoint Device Control
• 50 connected PGP Endpoint clients for PGP Endpoint Application Control
Table 3: Minimum Hardware Requirements
PGP Endpoint Component Requirement
Database
Administration Server
Management Server Console
Client
• 1 GB (4 GB recommended) memory
• Pentium® Dual-Core CPU processor or AMD equivalent
• 3 GB minimum hard disk drive
• 100 MBits/s NIC
• 512 MB (1 GB recommended) memory
• Pentium® Dual-Core CPU or AMD equivalent
• 3 GB minimum hard disk drive
• 100 MBits/s NIC
• 512 MB (1 GB recommended) memory
• 15 MB hard disk drive for installation, and 150 MB additional for
application files
• 1024 by 768 pixels for display
• 256 MB (1 GB recommended) memory
• 10 MB hard disk drive for installation, and several additional GB for
full shadowing feature of PGP Endpoint Device Control
• 100 MBits/s NIC
- 13 -
Page 14

PGP Endpoint
Supported Operating Systems
PGP Endpoint supports multiple Microsoft Windows operations systems for the Administration Server,
Management Server Console, database, and client.
The operating system requirements for PGP Endpoint components are outlined as follows.
Table 4: Operating System Requirements
PGP Endpoint Component Requirement
Database One of the following:
• Microsoft Windows ® XP Professional Service Pack 2 or higher
(SP2+) (32-bit)
• Windows XP Service Pack 2 (SP2) (64-bit)
• Microsoft Windows Server 2003, Standard Edition with Service
Pack 2 (SP2) or later (32-bit)
• Microsoft Windows Server 2003, Enterprise Edition with SP2
or later (32-bit)
• Microsoft Windows Server 2008, Standard Edition with SP2 or
later (32-bit and 64-bit)
• Microsoft Windows Server 2008, Enterprise Edition with SP2
or later (32-bit and 64-bit)
• Microsoft Windows Server 2008 R2 (64 bit only)
Administration Server One of the following:
• Windows Server 2003, Standard Edition with SP2 or later (32bit)
• Windows Server 2003, Enterprise Edition with SP2 or later (32bit)
• Windows Server 2008, Standard Edition with SP2 or later (32bit and 64-bit)
• Windows Server 2008, Enterprise Edition with SP2 or later (32bit and 64-bit)
• Windows Server 2008 R2 (64 bit only)
- 14 -
Page 15

PGP Endpoint Component Requirement
Management Server Console One of the following:
• Windows XP Professional SP2+ (32-bit)
• Windows Server 2003, Standard Edition with SP2 or later (32bit)
• Windows Server 2003, Enterprise Edition with SP2 or later (32bit)
• Windows Server 2008, Standard Edition with SP2 or later (32bit and 64-bit)
• Windows Server 2008, Enterprise Edition with SP2 or later (32bit and 64-bit)
• Windows Server 2008 R2 (64 bit only)
• Microsoft Windows Vista™ SP1+ (32- and 64-bit)
• Microsoft Windows 7 (32- and 64-bit)
Planning Your Installation
- 15 -
Page 16

PGP Endpoint
PGP Endpoint Component Requirement
Client One of the following:
• Microsoft Windows® Server 2000 Service Pack 4 or higher
(SP4+) (32-bit)
• Microsoft Windows 2000 Professional SP4+ (32-bit)
• Microsoft Windows XP Professional Service Pack 2 or higher
(SP2+) (32- and 64-bit)
• Windows Server 2003, Standard Edition with SP2 or later (32bit)
• Windows Server 2003, Enterprise Edition with SP2 or later (32bit)
• Windows Server 2008, Standard Edition with SP2 or later (32bit and 64-bit)
• Windows Server 2008, Enterprise Edition with SP2 or later (32bit and 64-bit)
• Windows Server 2008 R2 (64 bit only)
• Windows Vista SP1+ (32- and 64-bit)
• Windows 7 (32- and 64-bit)
• Microsoft Windows XP Embedded (XPe) Service Pack 2 (SP2)
(32-bit)
• Microsoft Windows Embedded Point of Service (WEPOS) (32bit)
• Microsoft Windows XP Tablet PC Edition (32-bit)
• Citrix Access Gateway™ 4.5
• Citrix Presentation Server™ 4.0 for Windows Server 2003 SP1/
SR2+ (32-bit)
• Citrix Presentation Server 4.5 for Windows Server 2003 SP1/
SR2+ (32- and 64-bit)
- 16 -
Page 17

Planning Your Installation
Supported Databases
PGP Endpoint supports multiple releases of Microsoft® SQL Server®. You should choose the database instance
required by your network operating environment and the number of Administration Servers and subscribed
clients the application must support.
The database requirements for PGP Endpoint components are outlined as follows.
Table 5: Database Requirements
PGP Endpoint Component Requirement
Database One of the following:
• Microsoft SQL Server® 2005 Service Pack 2 or higher (SP2+) (32-bit and
64-bit)
• Microsoft SQL Server 2005 Express Edition SP2+ (32-bit and 64-bit)
• Microsoft SQL Server 2008
• Microsoft SQL Server 2008 Express Edition
Other Software Requirements
PGP Endpoint requires the following additional software.
Additional software requirements for PGP Endpoint components are outlined as follows.
Table 6: Other Software Requirements
PGP Endpoint Component Requirement
Database No additional software requirements.
Administration Server If you will be encrypting Windows user accounts for centralized
Device Control encryption, you will need to install an enterprise level
Certificate Authority. See Microsoft Certificate Authority (http://
technet.microsoft.com/en-us/library/cc756120.aspx) for additional
information about certificates.
Attention: Certificate authority installation applies to Device Control
only for centralized encryption capability.
A Certificate Authority is required to use secure communications
between clients and servers, and intra-server communications.
Attention: Certificate authority installation applies to both Device
Control and Application Control for secure server communications.
Management Server Console Microsoft Visual C++ 2008 Redistributable Package.
Client No additional software requirements.
- 17 -
Page 18

PGP Endpoint
Recommended Configuration
To maximize PGP Endpoint for operation in a Microsoft Windows environment, you should configure your
network environment database and client components using the following suggested configurations.
The recommended configurations for PGP Endpoint components are outlined as follows. These settings represent
the usual default settings, but should be confirmed before beginning PGP Endpoint installation.
Table 7: Recommended Configuration
PGP Endpoint Component Requirement
Database
Administration Server None recommended.
Management Server Console None recommended.
Client
• Change the Windows Event Viewer settings to 1024 KB and
choose to overwrite events as necessary.
• Change Windows Performance settings to prioritize for background
applications.
• If you are using Active Directory, configure a corresponding
Domain Name System (DNS) server as Active Directory (AD)
integrated and create a reverse lookup zone, to provide for name
resolution within the Management Server Console.
• Configure NIC to receive IP from DHCP service.
• Change the Windows Event Viewer settings to 1024 KB and
choose to overwrite events as necessary.
Client Supported Languages
The PGP Endpoint client supports multiple languages in text format.
The PGP Endpoint client is supported in the following languages:
• English
• French
• Italian
• German
• Spanish
• Japanese
• Simplified Chinese
• Traditional Chinese
• Russian
• Dutch
• Portuguese
• Swedish
- 18 -
Page 19

Planning Your Installation
Licensing PGP Endpoint Products
The following types of licenses are available for PGP Endpoint product solutions:
• An Evaluation License provides you with a fully functioning PGP Endpoint product solution for a limited
time.
• A Perpetual License provides full capacity for an unlimited period.
• A Subscription License provides full capacity for the time period specified by the terms of your license.
- 19 -
Page 20

PGP Endpoint
- 20 -
Page 21

Chapter
2
Installing PGP Endpoint Components
In this chapter:
• Installation Overview
• Installation Checklist
• Installing the Database
• Generating a Key Pair
• Installing the Administration Server
• Installing the Management Server
Console
• Installing the Client
PGP Endpoint component installation requires that you follow a series
of interdependent tasks in a prescribed order. Before you begin, you
must have a valid license key for each software application(s) that your
are installing.
Successful installation of PGP Endpoint requires you to install
components in the following order:
Install the database.
1.
Generate and save a public and private key pair. This action is not
2.
required, however, PGP strongly recommends the use of a publicprivate key pair to provide the highest level of security.
Install the Administration Server(s).
3.
Install the Management Server Console.
4.
Install and deploy the client.
5.
- 21 -
Page 22

PGP Endpoint
Installation Overview
PGP Endpoint component installation requires that you follow a series of interdependent tasks in a prescribed
order. Before you begin, you must have a valid license key for each software application(s) that your are
installing.
Use the following process to identify tasks for installing components installing PGP Endpoint, for your
convenience this process refers to the Installation Checklist on page 22.
Figure 1: PGP Endpoint Product Solution Installation Process Flow
Installation Checklist
The installation checklist outlines the detailed tasks that you must perform when installing the PGP Endpoint
solutions.
This checklist guides you through the installation process.
To begin your installation:
- 22 -
Page 23

Installing PGP Endpoint Components
Copy the PGP Endpoint license file to the \\Windows\System32 or \\Windows\SysWOW64 folder, and
1.
rename the file to Endpoint.lic. The license file may be installed after installing the database, however,
the license file must installed before installing the Administration Server.
Download the PGP Endpoint application software from the https://lems.pgp.com/account/login
2.
Create a device, media, or software application inventory which lists the items that you want PGP Endpoint
3.
to control.
Document company policy that defines:
4.
• Device permissions.
• Shadowing requirements.
• Device encryption requirements.
• PGP Endpoint administrators and their roles.
• Global domain groups for PGP Endpoint administrators.
Plan your PGP Endpoint network architecture, based on capacity requirements, that list the Administration
5.
Server host names and IP addresses.
Create a dedicated Administration Server domain user rights service account and set the following:
6.
• User cannot change password.
• Password never expires.
The domain account must have local administration rights when you plan to use the TLS communication
protocol for client- Administration Server and inter- Administration Server data transfers.
Create Impersonate a client after authentication user rights for the Administration Server. See Impersonate
7.
a Client After Authentication ( http://support.microsoft.com/kb/821546 ) for additional information about
impersonating a client after authentication user rights.
Verify that the Administration Server domain account has Log on as a service user rights. See Add the Log
8.
on as a service right to an account ( http://technet.microsoft.com/en-us/library/cc739424(WS.10).aspx ) for
additional information about logging on as a service user rights.
Install Microsoft® Internet Information Services on the same computer as the certification authority,
9.
otherwise the enterprise root certificate cannot be generated. See Internet Information Services (IIS) ( http://
www.iis.net ) for additional information about installing Internet Information Services.
Install a Microsoft enterprise root certification authority to enable removable device encryption for
10.
PGP Endpoint Device Control. See Install a Microsoft enterprise root certification authority ( http://
technet.microsoft.com/en-us/library/cc776709.aspx ) for additional information about installing an enterprise
root certificate.
Install a Microsoft SQL Server® . See Getting Started with SQL Server ( http://msdn.microsoft.com/en-us/
11.
sqlserver/default.aspx ) for additional information about installing a SQL server.
Complete Installing the Database on page 24.
12.
To install multiple Administration Server s, create a shared file directory on a file server to share the Datafile
13.
directory component. This action is only required if you will be using more than one Administration Server.
Complete Generating a Key Pair on page 26. This action is recommended, but not required.
14.
Complete Installing the Administration Server on page 28.
15.
Important: The Administration Server service account must have database owner (DBO) rights to the PGP
Endpoint database.
- 23 -
Page 24

PGP Endpoint
Complete Installing the Management Server Console on page 37.
16.
Complete Installing the Client on page 41.
17.
Test your PGP Endpoint product solution installation for functionality.
18.
Installing the Database
The PGP Endpoint database is the first component that you install. The database serves as the central repository
for device permissions rules and executable file authorizations.
Prerequisites:
Before you can successfully install the PGP Endpoint database, you must:
• Verify that you satisfy the minimum hardware and software system requirements.
• If you will be using a database cluster, you must specify an alternate TDS port during SQL server
setup. See Creating a Server Alias for Use by a Client (SQL Server Configuration Manager) (http://
msdn.microsoft.com/en-us/library/ms190445.aspx) for additional information about creating a server alias.
You can install the PGP Endpoint database on a server cluster, where there are at least two servers in the
cluster running SQL Server. For additional information regarding database clustering, see Microsoft Cluster
Service (MSCS) Installation Resources (http://support.microsoft.com/kb/259267).
Log in to a computer as an administrative user with access to a Microsoft® SQL Server®.
1.
Close all programs running on the computer.
2.
From the location where you saved the PGP Endpoint application software, run the \server\db
3.
\setup.exe file.
Step Result:
Click Next.
4.
Step Result:
Figure 2: License Agreement Page
Review the license agreement and, if you agree, select I accept the terms in the license agreement.
5.
The Installation Wizard Welcome page opens.
The License Agreement page opens.
- 24 -
Page 25
Installing PGP Endpoint Components
Click Next.
6.
Step Result:
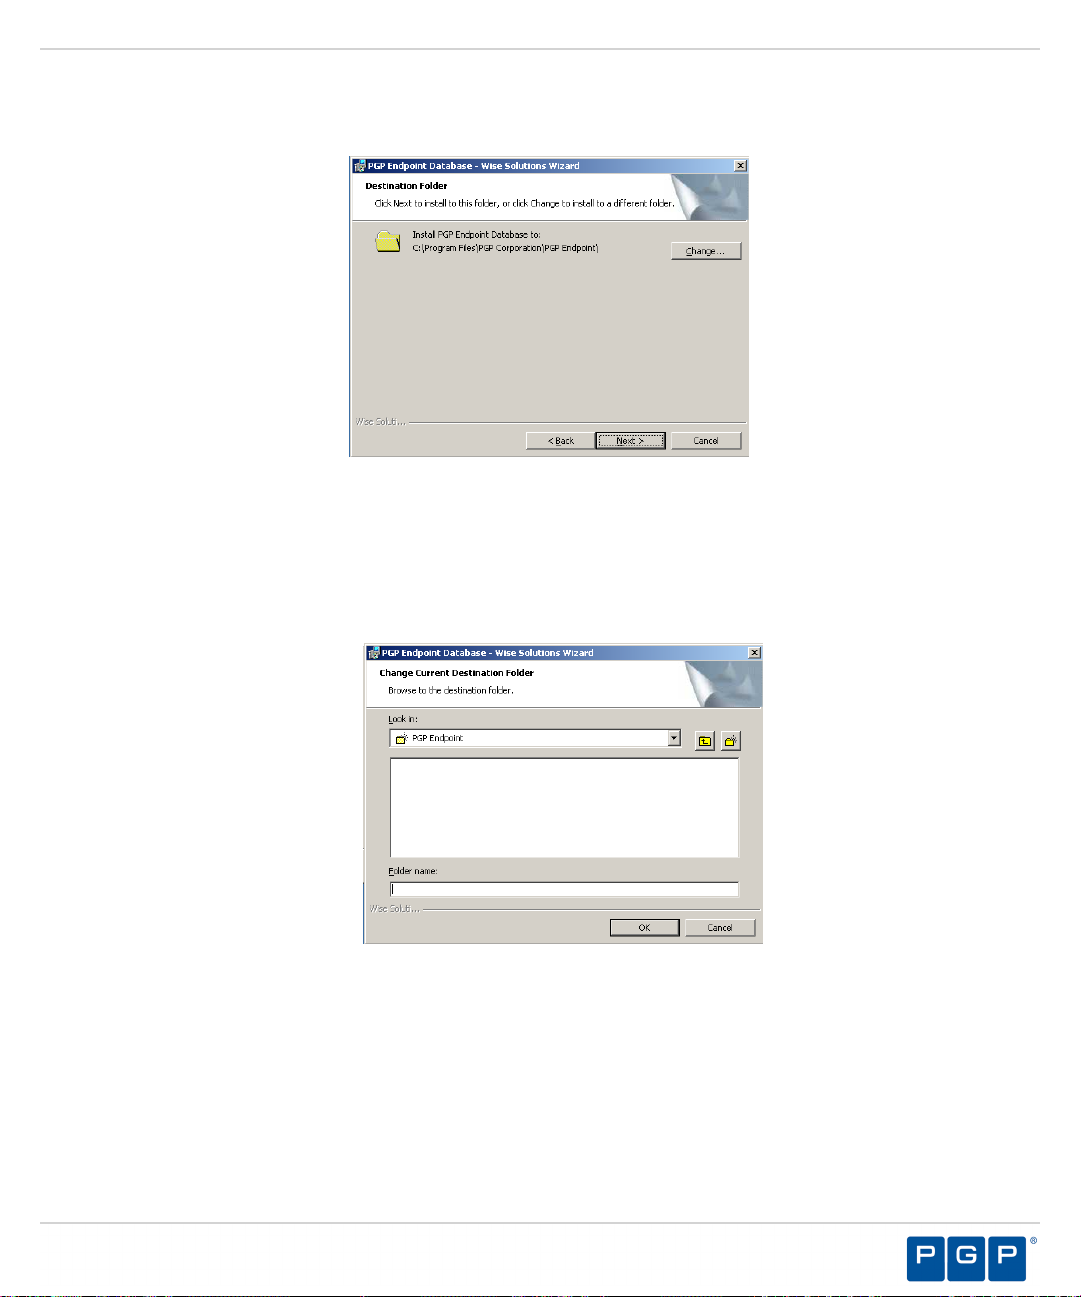
Figure 3: Destination Folder Page
You may choose an installation destination folder other than the default folder C:\Program Files\PGP
7.
Corporation\PGP Endpoint.
The Destination Folder page opens.
a) Click Change
Step Result:
Figure 4: Change Current Destination Folder Page
The Change Current Destination Folder page opens.
b) Select a folder from the Look in: field.
c) Click OK.
Step Result:
The Change Current Destination Folder closes, and the Destination Folder page changes
to reflect the new location.
- 25 -
Page 26

PGP Endpoint
Click Next.
8.
Step Result:
Figure 5: Ready to Install the Program Dialog
Click Install.
9.
A progress bar runs on the page, showing installation progress.
The Ready to Install the Program page opens.
Step Result:
Click Finish.
10.
Result:
PGP Endpoint setup runs the SQL installation scripts and creates the PGP Endpoint database for the
SQL Server database instance that you specified.
The Completed page opens.
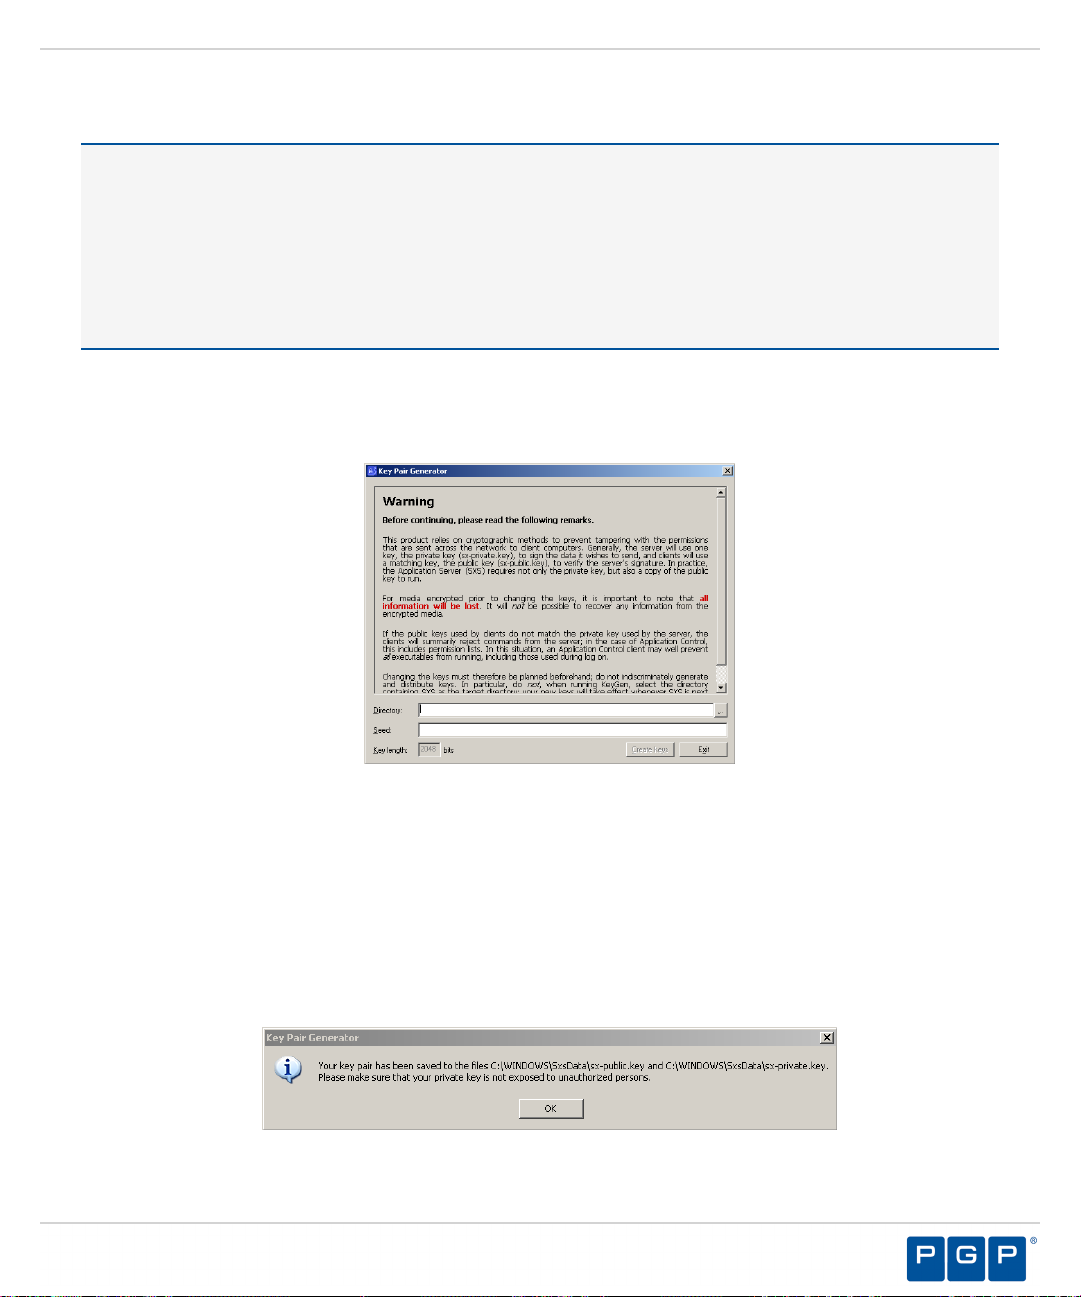
Generating a Key Pair
The Administration Server uses a symmetric encryption system to communicate with a client, using a publicprivate key pair that you generate during installation.
The Administration Server and PGP Endpoint clients contain a embedded default public and private key pair that
should only be used with an evaluation license. PGP provides a Key Pair Generator utility, which generates a
key pair for fully licensed application installations. The key pair ensures the integrity for communication between
the Administration Server and clients.
- 26 -
Page 27
Installing PGP Endpoint Components
When an Administration Server cannot find a valid key pair at startup, the event is logged and PGP Endpoint
uses the default key pair.
Caution: When you are using Device Control, do not change the key pair:
• For media encrypted before exchanging a key pair, which will result in disabling password recovery for the
previously encrypted media.
• During a PGP Endpoint upgrade installation which will result in the loss of access to media previously
encrypted centrally and subsequent loss of data.
• During a PGP Endpoint upgrade installation when client hardening is enabled, which will cause PGP
Endpoint Application Control and PGP Endpoint Device Control installations to fail.
From the location where you saved the PGP Endpoint application software, run the server\keygen
1.
\keygen.exe file.
Step Result:
Figure 6: Key Pair Generator Dialog
In the Directory field, enter the name of the temporary directory where you will save the key pair.
2.
In the Seed field, type a random alphanumeric text string.
3.
The Key Pair Generator dialog opens.
This text is used to initiate the random number generator; the longer the text string the more secure the key
pair.
Click Create keys.
4.
Step Result:
The Key Pair Generator confirmation dialog opens.
Figure 7: Key Pair Generator Dialog
- 27 -
Page 28

PGP Endpoint
Click OK.
5.
Step Result:
Click Exit.
6.
Result:
After Completing This Task:
Distribute the key pair by copying sx-private.key and sx-public.key files to the \\%windir%
\system 32 directory on the computer(s) where you are installing the Administration Server. At startup, the
Administration Server searches all drive locations for a valid key pair, stopping at the first valid key pair.
The keys are saved as sx-private.key and sx-public.key files in the directory you specified.
You return to the Key Pair Generator dialog.
Installing the Administration Server
The Administration Server processes PGP Endpoint client activities and is the only application component that
connects to the database. One or more Administration Servers communicate device and application control
information between the PGP Endpoint database and PGP Endpoint client(s).
Prerequisites:
Before you can successfully install the Administration Server, you must:
• Verify that a valid PGP Endpoint license file is listed in the \Windows\System32 or \\Windows
\SysWOW64 folder, and is name file to Endpoint.lic.
• Verify that you satisfy the minimum hardware and software system requirements.
Restriction: If you are installing the PGP Endpoint Application Control Terminal Services Edition, you
must install the Administration Server on a computer separate from the Citrix® Metaframe® Presentation
Server.
• When using TLS protocol confirm TCP ports 33115 and 65229 are open. When not using TLS protocol open
TCP port 65129. Depending upon how firewalls are setup in your environment, these ports may be closed.
• Configure the TCP/IP protocol to use a fixed IP address for the computer that runs the Administration Server.
• Configure the Administration Server host computer to perform fully qualified domain name (FQDN)
resolution for the PGP Endpoint clients that the server manages.
• Ensure that the Administration Server host computer account is configured to read domain information
using the Microsoft® Windows® Security Account Manager. See Security Account Manager (SAM) ( http://
technet.microsoft.com/en-us/library/cc756748.aspx ) for additional information about the Microsoft Windows
Security Account Manager.
• Synchronize the Administration Server's system clock with the PGP Endpoint database server's system clock
using the Microsoft Windows time service. See Time Service ( http://support.microsoft.com/kb/816042 ) for
details about using the Microsoft Windows time service.
Log in with administrative user access to the computer where you are installing the Administration Server.
1.
Important: For Active Directory environments, log in using the dedicated Administration Server domain
user rights service account. The Administration Server installation process configures the Administration
Server service account for access to the database.
- 28 -
Page 29

Installing PGP Endpoint Components
Close all programs running on the computer.
2.
From the location where you saved the PGP Endpoint application software, run \server\sxs\setup.exe.
3.
Click OK.
4.
Step Result:
Click Next.
5.
The Installation Wizard Welcome page opens.
Step Result:
Figure 8: License Agreement Page
Review the license agreement and, if you agree, select I accept the terms in the license agreement.
6.
Click Next.
7.
Step Result:
The License Agreement page opens.
The Setup dialog opens when the setup process detects an operating system that is subject to
security changes concerning Remote Procedure Calls (RPC).
Figure 9: Setup Dialog
- 29 -
Page 30
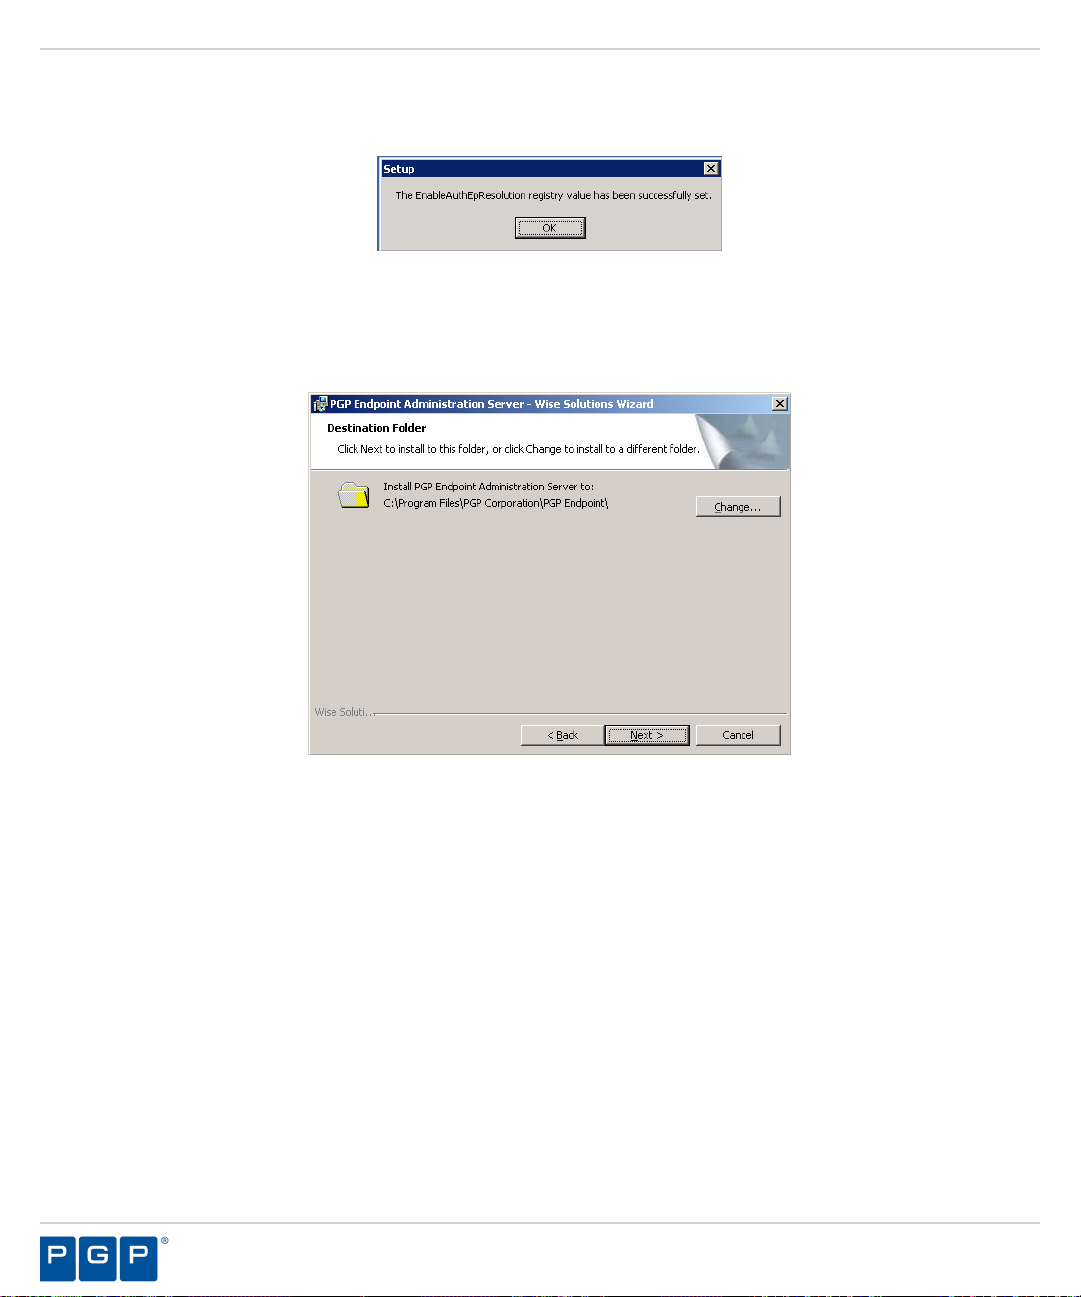
PGP Endpoint
Click Yes.
8.
Step Result:
Figure 10: The Setup Dialog
Click OK.
9.
Step Result:
A confirmation dialog opens after the registry value is reset.
The Destination Folder page opens.
Figure 11: Destination Folder Page
- 30 -
Page 31
Installing PGP Endpoint Components
You may choose an installation destination folder other than the PGP Endpoint default folder C:\Program
10.
Files\PGP Corporation\PGP Endpoint.
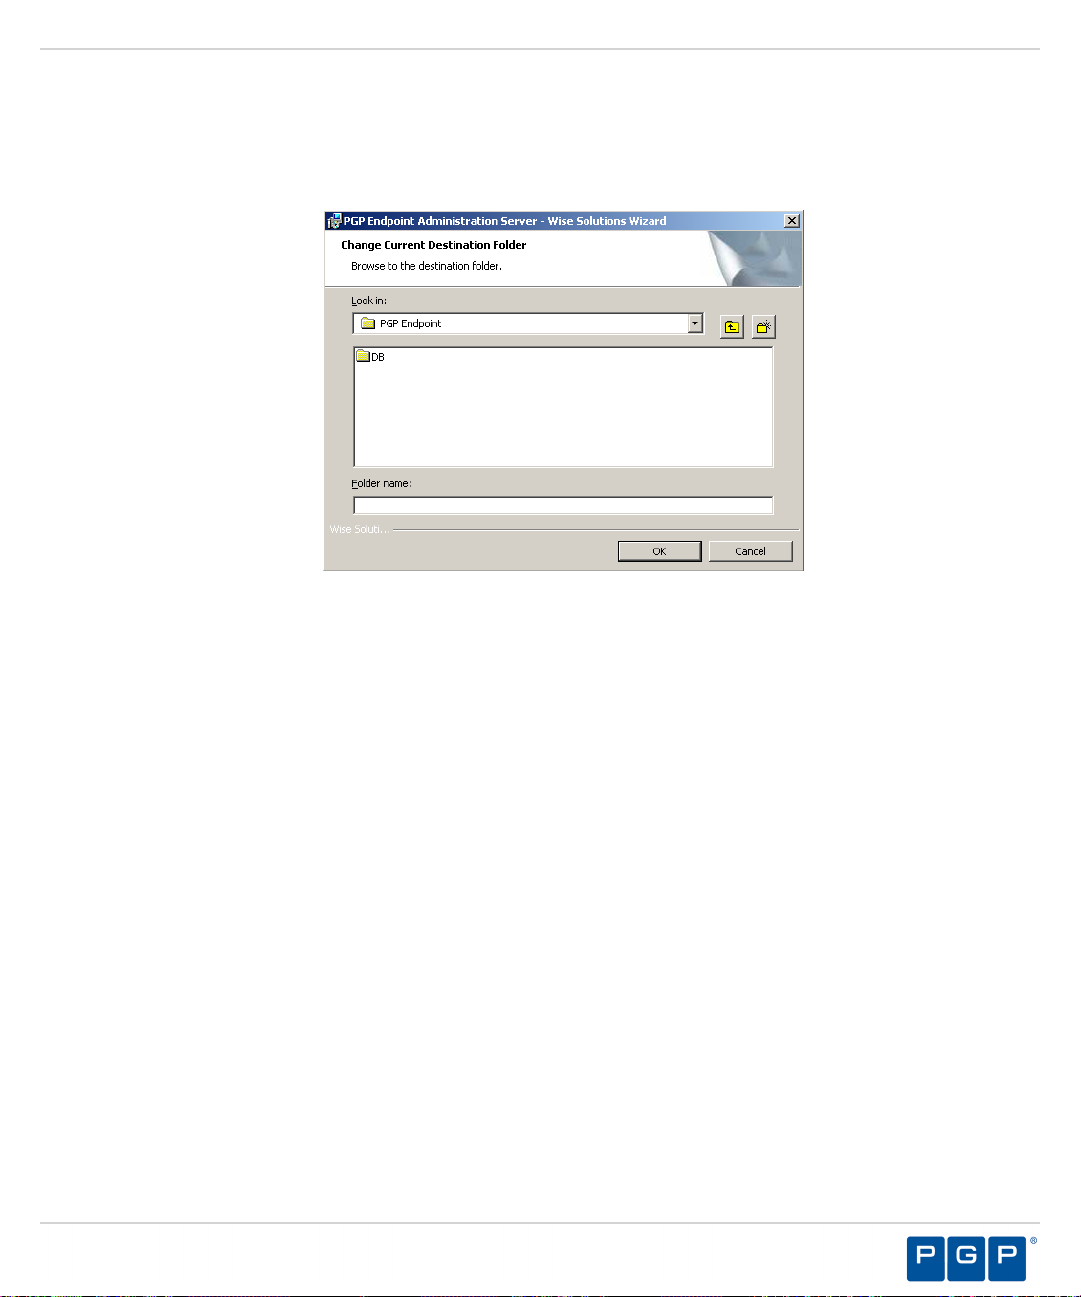
a) Click Change.
Step Result:
Figure 12: Change Current Destination Folder Page
The Change Current Destination Folder page opens.
b) Select a folder from the Look in: field.
c) Click OK.
Step Result:
The Change Current Destination Folder closes, and the Destination Folder page changes
to reflect the new location.
- 31 -
Page 32

PGP Endpoint
Click Next.
11.
Step Result:
Figure 13: Service Account Page
Type the name of the user or domain in the User Account field for access to the Administration Server.
12.
Enter domain account information using the Domain\User format, and local account information using the
Computer\User format. PGP Endpoint supports use of standard NetBIOS computer names up to fifteen (15)
characters long.
The Service Account page opens.
Tip: This is the user name that you created when you configured the domain service account for the
Administration Server .
In the Password field, type the user account access password.
13.
- 32 -
Page 33

Installing PGP Endpoint Components
Click Next.
14.
Step Result:
Figure 14: Database Server Page
Type the name of the database instance for the Administration Server connection, using the servername
15.
\instancename format.
The Database Server page opens.
The default database instance is automatically populated, when installed on the same computer. Alternately,
the instancename is not required if the database is installed in the default instance of Microsoft SQL
Server.
Click Next.
16.
Step Result:
Figure 15: Datafile Directory Page
The Datafile directory page opens.
- 33 -
Page 34
PGP Endpoint
You may choose a folder other than the PGP Endpoint default folder, C:\DataFileDirectory\ , where
17.
Administration Server log, shadow, and scan files are stored.
Tip: Use a permanent network share when you are installing more than one Administration Server or a
dedicated file server. To improve performance for a multi-server installation, assign a separate data file
directory to each server to provide load balancing; although more than one server can access the same data
file directory. Use a Universal\Uniform Name Convention path name; do not use a mapped drive
name.
a) Click Change.
Step Result:
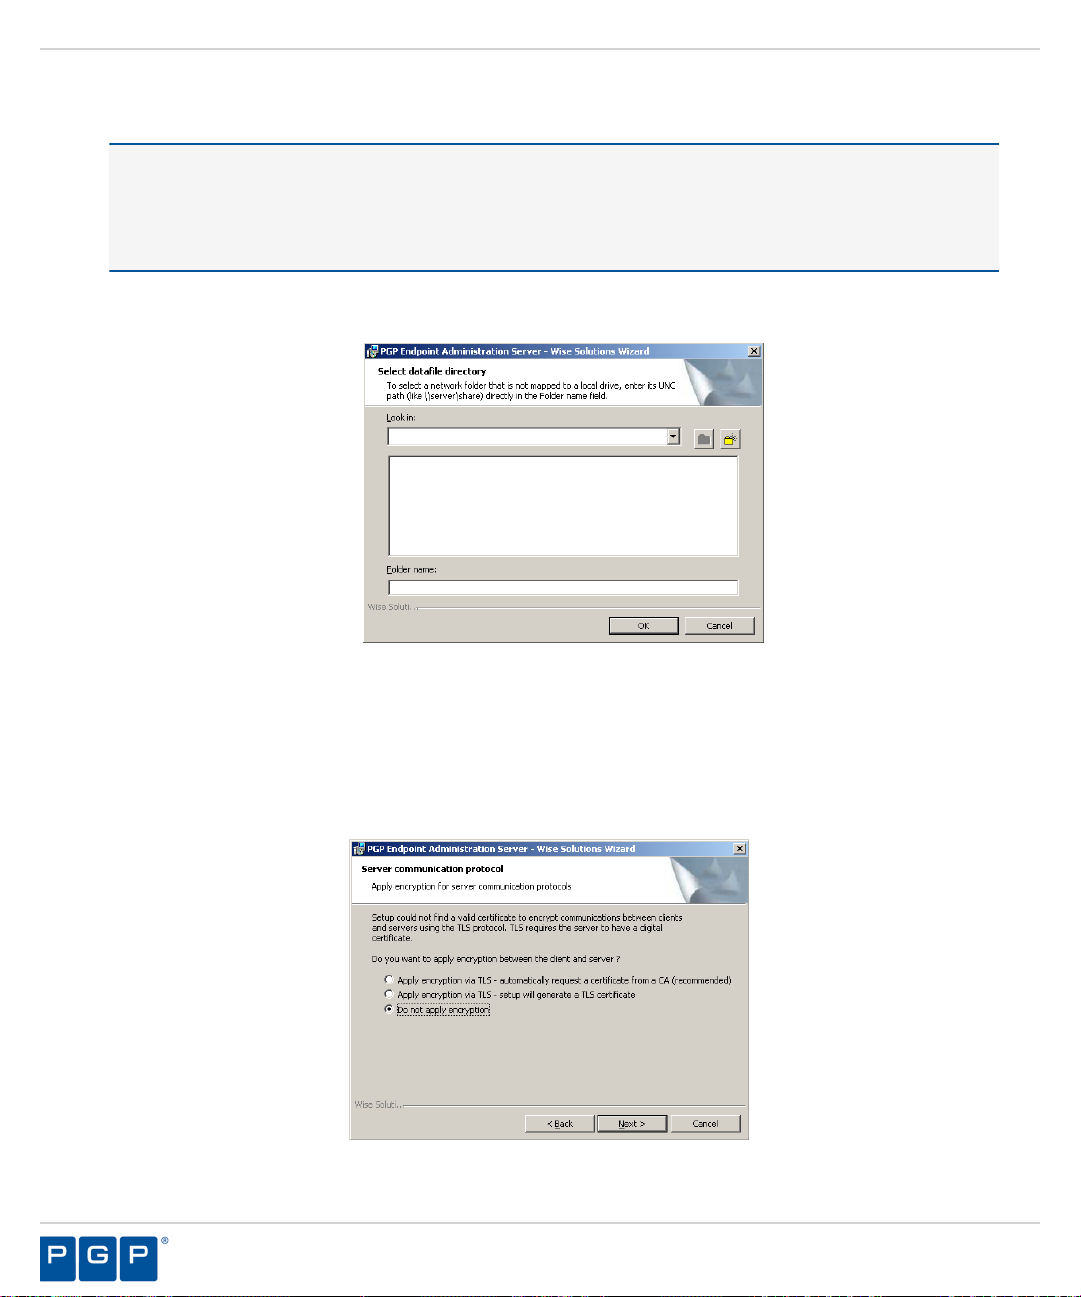
Figure 16: Select Datafile Directory Page
The Select datafile directory page opens.
b) Type the name of the datafile directory in the Folder name: field.
c) Click OK.
Click Next.
18.
Step Result:
The Server communication protocol page opens.
Figure 17: Server Communication Protocol Page
- 34 -
Page 35
Installing PGP Endpoint Components
Select an encryption option.
19.
Restriction: The server communication protocol options shown depend upon the client version supported
and whether a certification authority digital certificate is installed.
Click Next.
20.
Step Result:
Figure 18: Server Communication Protocol Ports Page
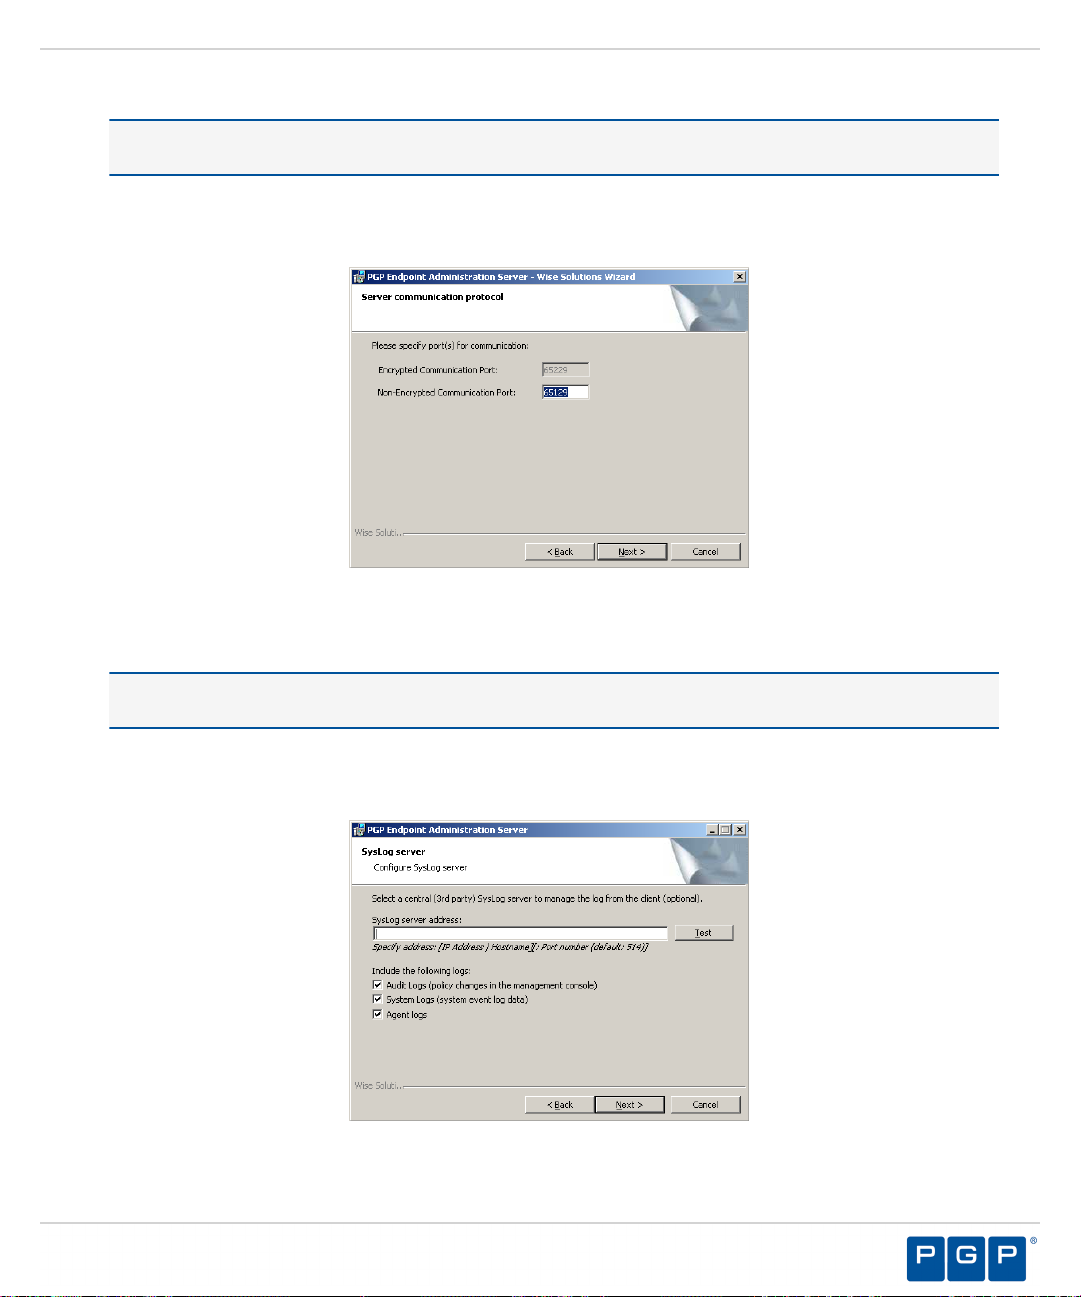
The Server communication protocol page opens.
Specify the communication port(s).
21.
Restriction: The port field(s) shown depend upon the encryption communication protocol that you selected
previously.
Click Next.
22.
Step Result:
Figure 19: Syslog Server Page
The Syslog Server page opens.
- 35 -
Page 36
PGP Endpoint
Type the name or the IP address of the SysLog server in the SysLog server address field.
23.
Important: This step is optional. You do not have to specify a Syslog server.
Select from the following options:
24.
Option Description
Audit Logs
System Logs
Agent Logs
Click Next.
25.
Step Result:
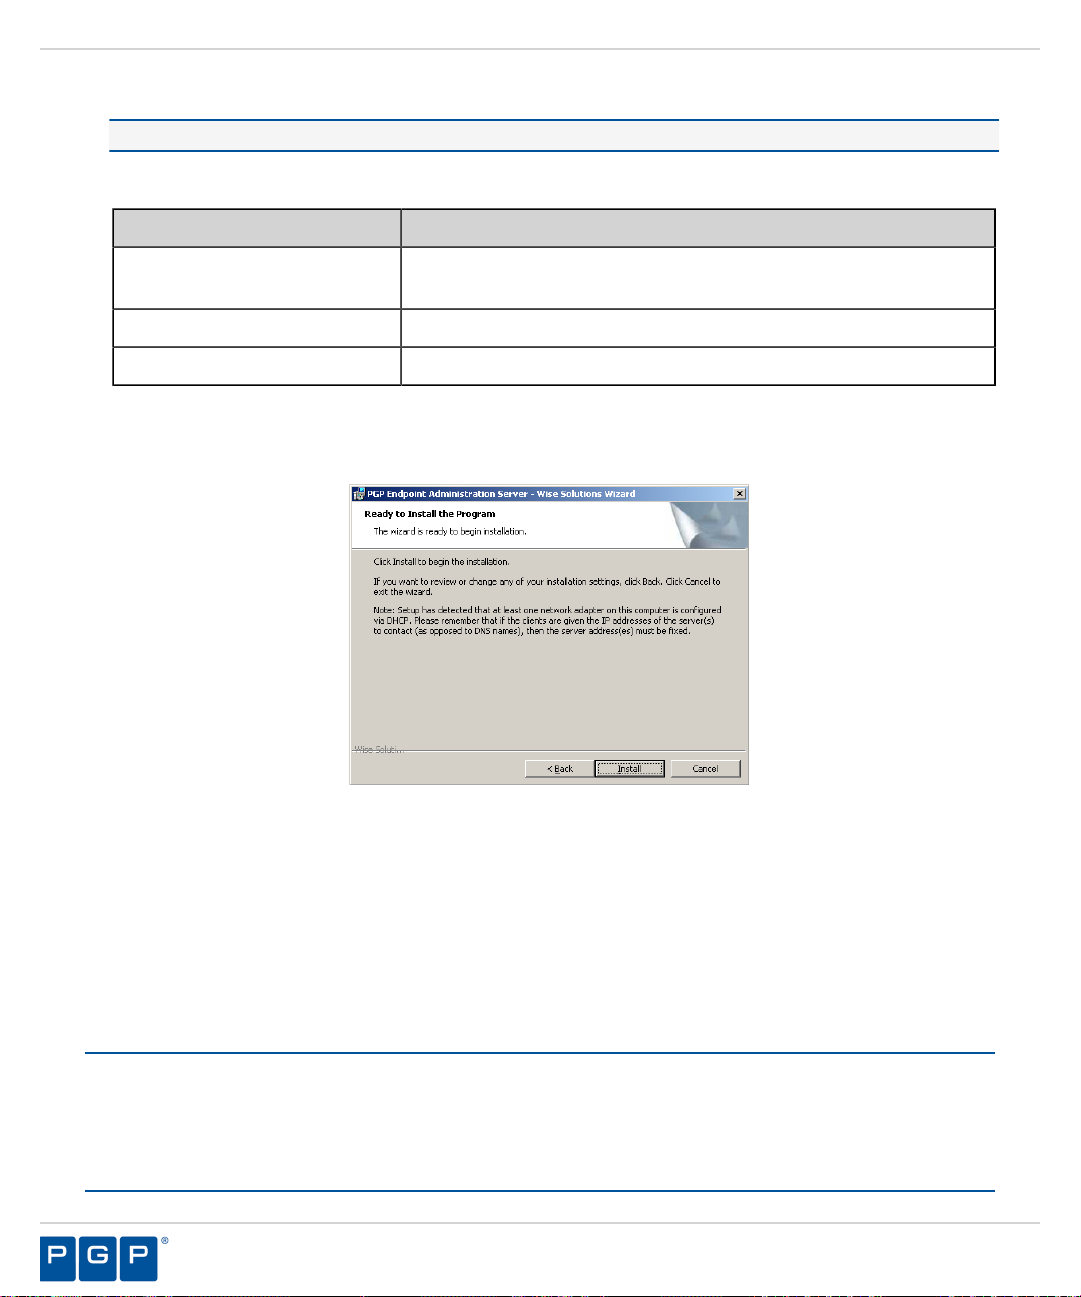
Figure 20: Ready to Install Program Page
The Ready to Install Program page opens.
Logs changes to policy administered through the Management Server
Console .
Logs system events.
Logs events uploaded directly from the PGP Endpoint client.
Click Install.
26.
A progress bar runs on the page, showing installation progress.
Step Result:
Click Finish.
27.
Result:
The Administration Server files are installed and the server establishes a connection to the PGP
The Completed page opens.
Endpoint database.
After Completing This Task:
If you intend to install the Management Server Console on a different computer or server than the Administration
Server , you must configure the Distributed Component Object Model (DCOM) settings and security permissions
for all Administration Server s in your environment, as outlined in Configuring DCOM Settings for the
Administration Server .
- 36 -
Page 37

Installing PGP Endpoint Components
Installing the Management Server Console
The Management Server Console is the administrative tool that used to configure and run the PGP Endpoint
software.
Prerequisites:
Before you can successfully install the Management Server Console, you must:
• Verify that you satisfy the minimum hardware and software system requirements.
Restriction: If you are installing the PGP Endpoint Application Control Terminal Services Edition,
you must install the Management Server Console on a computer separate from the Citrix® Metaframe
Presentation Server.
• Install the Administration Server.
• If you intend to install the Management Server Console on a different computer or server than the
Administration Server, you must configure DCOM settings and access restrictions as outlined for
Configuring DCOM Settings for the Administration Server .
Log in as an administrative user to the computer where you are installing the Management Server Console.
1.
Close all programs running on the computer.
2.
From the location where you saved the PGP Endpoint application software, run the \server\smc
3.
\setup.exe.
Attention: The Management Server Console requires the Microsoft® Visual C++ 2008 Redistributable
Package for proper operation. You may receive a message prompting you to allow setup to trigger the
redistributable package installation, if Visual C++ Libraries are not already installed. After the redistributable
package installs, the Management Server Console resumes installation as follows.
Figure 21: Microsoft Visual C++ 2008 Redistributable Package Setup
Step Result:
The Installation Wizard Welcome page opens.
®
- 37 -
Page 38
PGP Endpoint
Click Next.
4.
Step Result:
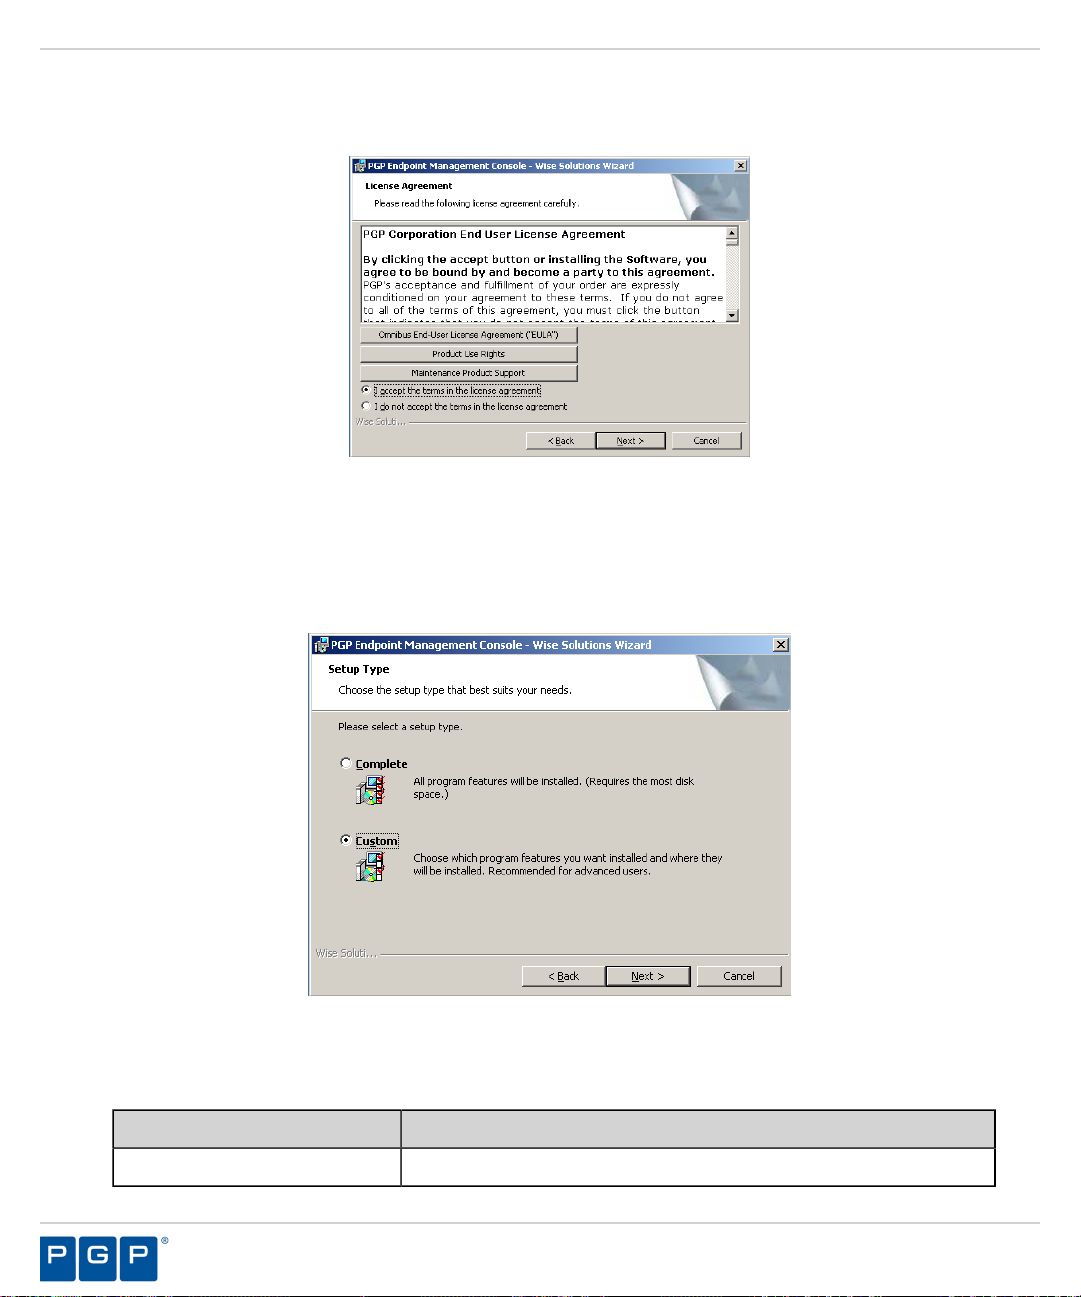
Figure 22: License Agreement Page
Review the license agreement and, if you agree, select I accept the terms in the license agreement.
5.
Click Next.
6.
The License Agreement page opens.
Step Result:
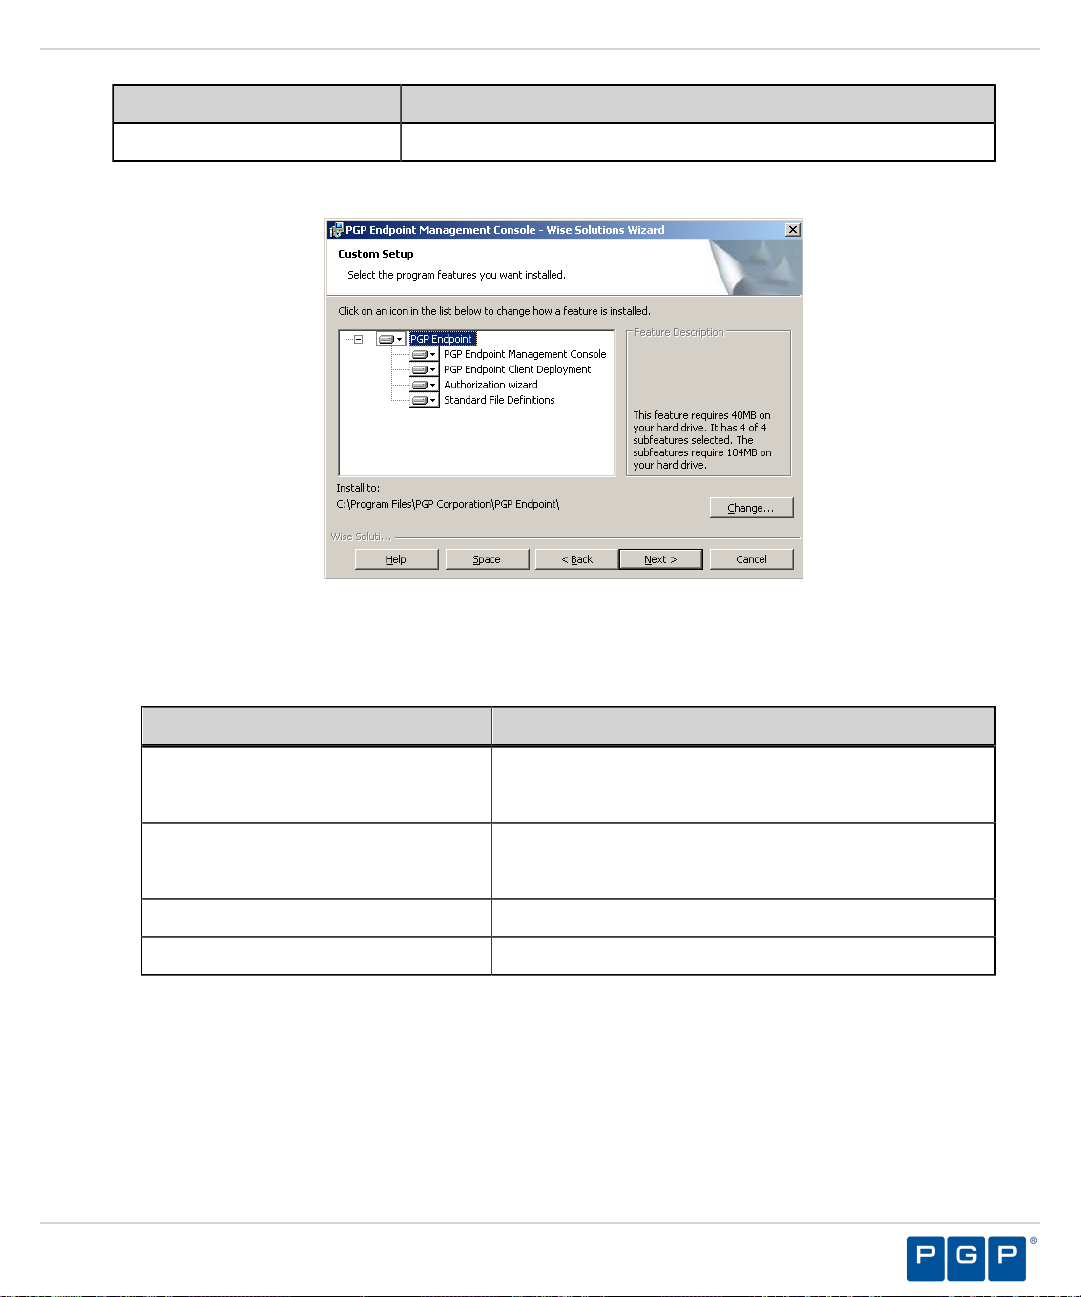
Figure 23: Setup Type Page
Select one of the following options:
7.
The Setup Type page opens.
Option Description
Complete
Installs all program features.
- 38 -
Page 39
Option Description
Installing PGP Endpoint Components
Custom
a)
If you select Custom, the Custom Setup page opens.
Install selected program features where you specify the location.
Step Result:
Figure 24: Custom Setup Page
b) Select the features you want to install.
The installation features shown depend upon the application you are licensed for.
Feature License Type(s)
Management Server Console PGP Endpoint Device Control
PGP Endpoint Application Control
PGP Endpoint Client Deployment
Tool
PGP Endpoint Device Control
PGP Endpoint Application Control
Standard File Definitions PGP Endpoint Application Control
Authorization Wizard PGP Endpoint Application Control
c) You may choose C:\Program Files\PGP Corporation\PGP Endpoint\Console.
Step Result:
Figure 25: Change Current Destination Folder Page
The Change Current Destination Folder Page opens.
d) Select a folder from the Look in: field.
- 39 -
Page 40

PGP Endpoint
e) Click OK.
Step Result:
The Change Current Destination Folder closes, and the Destination Folder page changes
to reflect the new location.
Click Next.
8.
Step Result:
Figure 26: Ready to Install Page
Click Install.
9.
The Ready to Install page opens.
A progress bar runs on the page, showing installation progress.
Step Result:
The Completed page opens.
Click Finish.
10.
Result:
The Management Server Console files are installed.
After Completing This Task:
Define PGP Endpoint administrator access as described in the PGP Endpoint Device Control User Guide or the
PGP Endpoint Application Control User Guide depending upon your license type. By default, only users who
are members of the Administrators group for the computer running the Management Server Console can connect
to the Administration Server.
- 40 -
Page 41
Installing PGP Endpoint Components
Installing the Client
The PGP Endpoint client manages permissions for device access and user access to software applications for
endpoint computers.
Prerequisites:
Before you can successfully install the PGP Endpoint client, you must:
• Verify that you satisfy the minimum hardware and software system requirements.
• Copy the sx-public.key file for the PGP Endpoint client to the Client folder located where you
downloaded the PGP Endpoint software. The PGP Endpoint client installer detects the public key during
installation and copies the key to the target directory ( %windir%\sxdata ).
Note: If you are installing the PGP Endpoint client for Windows XP Embedded (XPe), please refer to
Installing the Client for Windows XP Embedded, for specific installation instructions.
• Install the Administration Server.
• Install the Management Server Console.
• When installing PGP Endpoint Application Control, you must create a list of authorized executable files,
scripts and macros before setting Execution blocking default option to Non-blocking mode.
• When installing PGP Endpoint Application Control, you must ensure that the Execution blocking default
option is set to Non-blocking mode; otherwise the PGP Endpoint client computer will not restart after PGP
Endpoint client installation because executable system files cannot run until they are centrally authorized
from the Management Server Console.
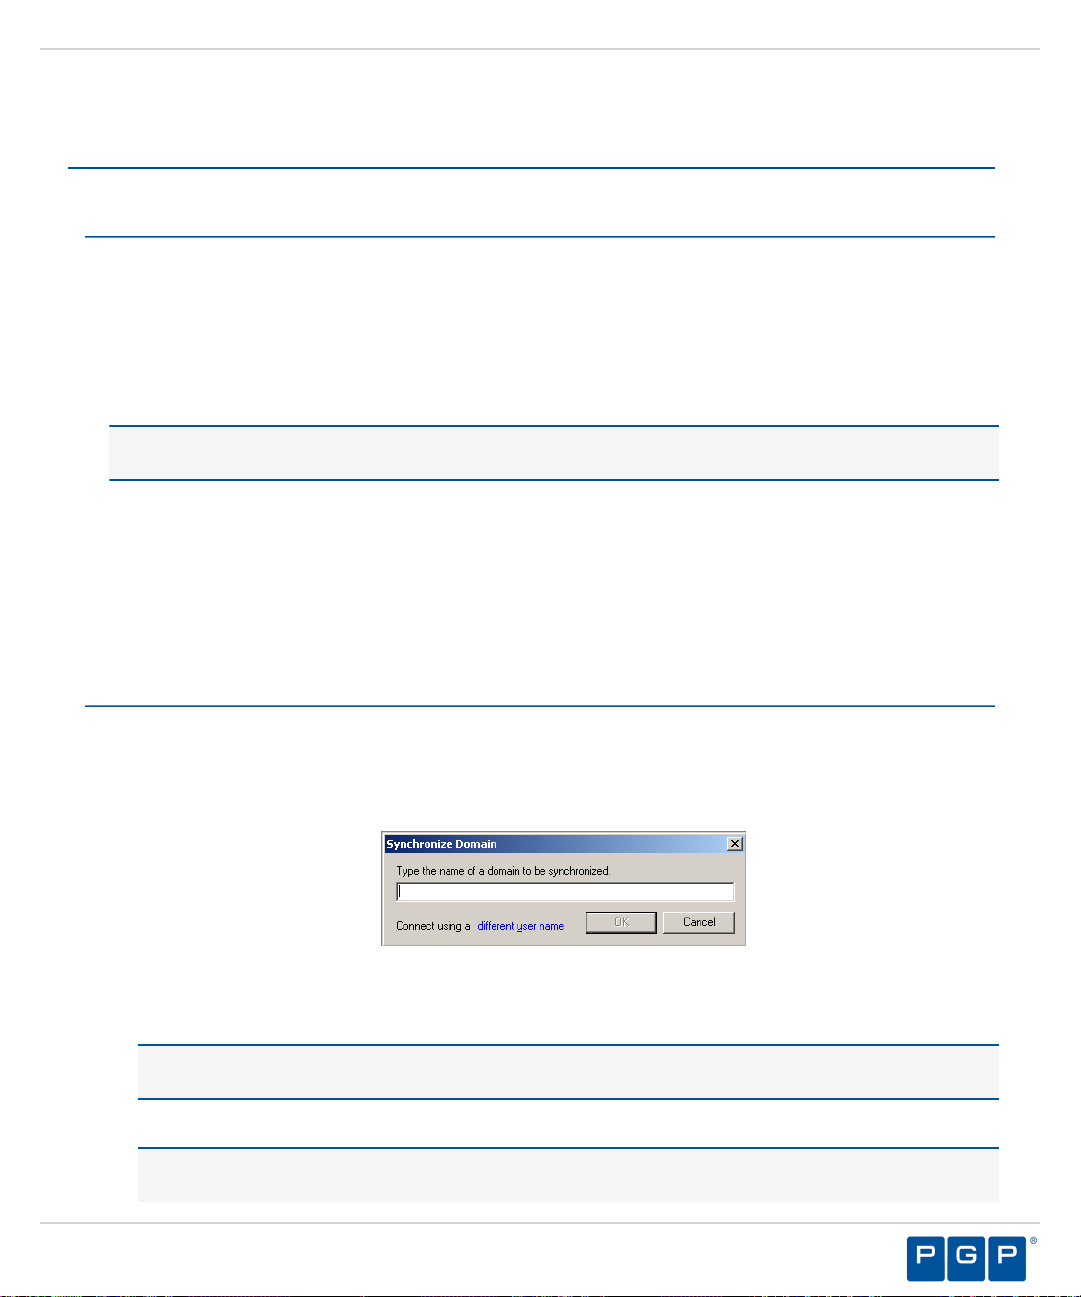
Verify that the domain information in the PGP Endpoint database is synchronized as follows:
1.
a) From the Management Server Console, select Tools > Synchronize Domain Members.
Step Result:
Figure 27: Synchronize Domain Dialog
b) Enter the name of the domain that you want to synchronize.
Note: When you enter a computer name that is a domain controller, the domain controller is used for
synchronization. This is useful when replication between domain controllers is slow.
c) Click OK.
Attention: When you use PGP Endpoint in a Novell environment, you must run the
ndssync_ldap.vbs synchronization script found in the scripts folder where you stored the
The Synchronize Domain dialog opens.
- 41 -
Page 42

PGP Endpoint
Log in as an administrative user to the computer where you are deploying the PGP Endpoint client.
2.
Close all programs running on the computer.
3.
From the location where you saved the PGP Endpoint application software, run \client\setup.exe file.
4.
Step Result:
Click Next.
5.
Step Result:
application software after downloading. This can be done manually when there are few changes in your
eDirectory structure or you use automatically scheduling software.
The Installation Wizard Welcome page opens.
The License Agreement page opens.
Figure 28: License Agreement Page
Review the license agreement, and, if you agree, select I accept the terms in the license agreement.
6.
Click Next.
7.
Step Result:
Figure 29: Encrypted Communication Page
The Encrypted Communication page opens.
- 42 -
Page 43
Installing PGP Endpoint Components
Select one of the following options that matches the option you selected when installing the Administration
8.
Server:
Option Description
Server is using unencrypted
protocol
Communication between the Administration Server and PGP Endpoint
client is not using the TLS communication protocol. Communication is
not encrypted but is signed using the private key.
Authentication certificate will
be generated by setup
Communication between the Administration Server and PGP Endpoint
client uses the TLS communication protocol. Communication is
encrypted and the digital certificate is generated manually during
installation.
Authentication certificate will
be retrieved from a CA
Communication between the Administration Server and PGP Endpoint
client uses the TLS communication protocol. Communication is
encrypted and the digital certificate is retrieved automatically during
installation.
Tip: PGP recommends that you use the automatic TLS retrieval option to deploy Certificate Authority
infrastructure for issuing valid digital certificates.
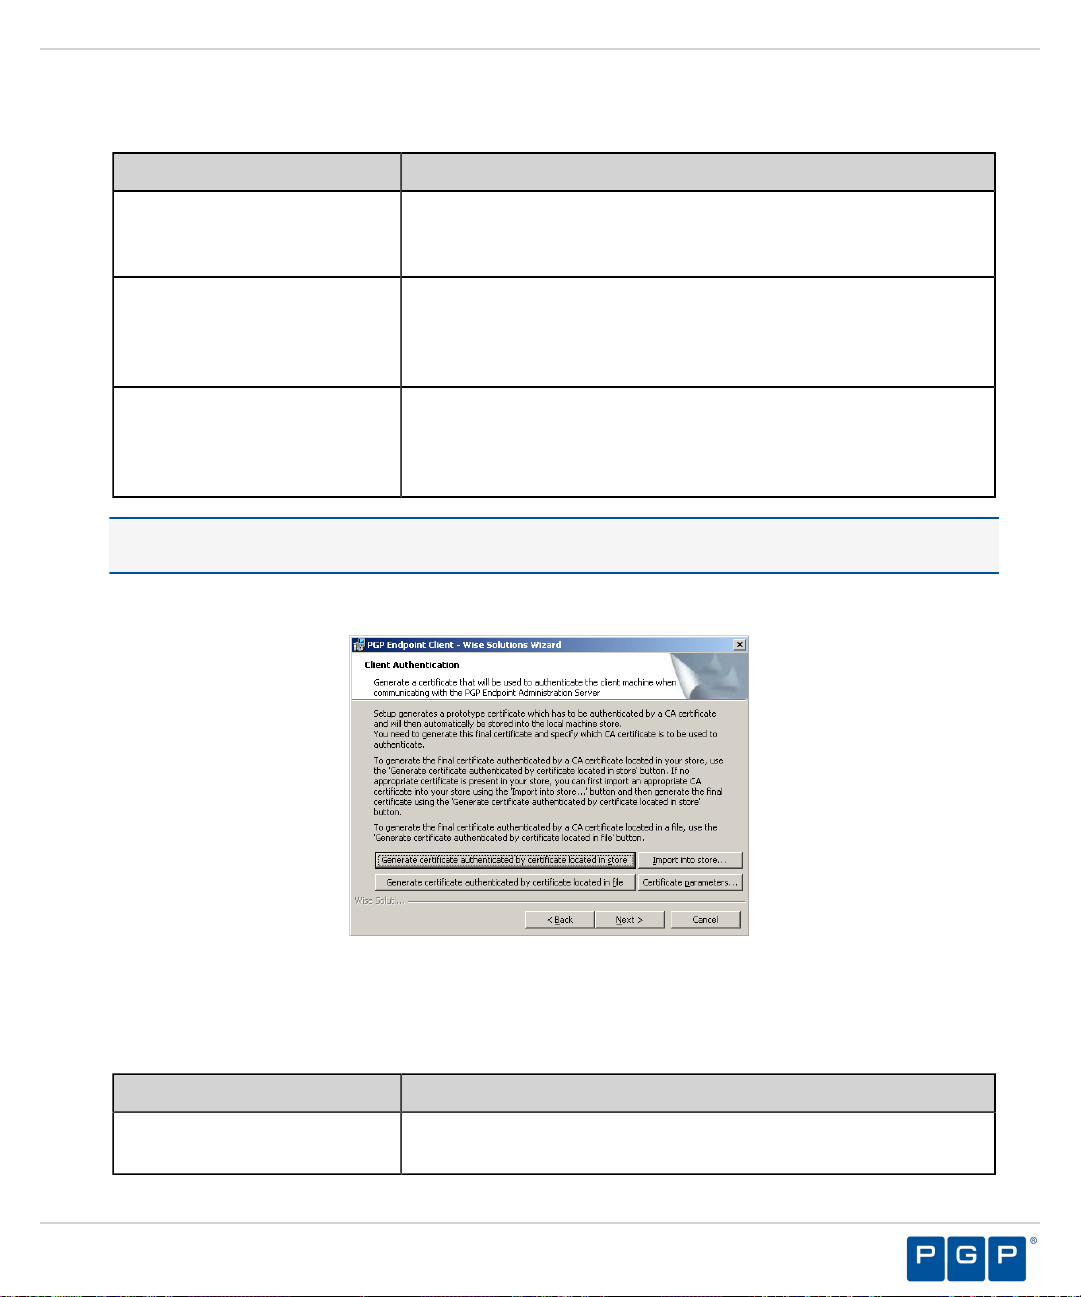
Step Result:
If you opt to manually generate a certificate during setup, the Client Authentication dialog
opens.
Figure 30: Client Authentication Dialog
To manually generate a certificate during setup specify the computer certificate location and parameters from
9.
the following options.
Option Description
Generate certificate signed by
certificate located in store
Generates a digital certificate during installation by using a signature
certificate located in the local user store.
- 43 -
Page 44

PGP Endpoint
Option Description
Generate certificate signed by
certificate located in file
Import into store
Certificate parameters
Click Next.
10.
Step Result:
The PGP Endpoint Administration Servers page opens.
Generates a digital certificate during installation by using a signature
certificate located in a specified file.
Imports a signature certificate into the local user store.
Specifies the certificate parameters for the Cryptographic service
provider, Key length, Validity, and Signature.
Figure 31: Administration Server s Page
Specify up to three server names using fully qualified domain names (FQDN) or IP addresses that are
11.
managed from the Management Server Console.
Caution: Do not use IP address(es) when using the TLS communication protocol for encryption. You can
only use FQDNs for when using the TLS communication protocol.
- 44 -
Page 45

Installing PGP Endpoint Components
Verify that the PGP Endpoint client connects to the Administration Server by clicking Test.
12.
Caution: You can proceed with client installation if the Administration Server is unavailable, by clicking
OK in the following dialog. The client can establish a connection with the server later, when the server is
available.
Figure 32: Error Dialog
Step Result:
By default, PGP Endpoint connects with the first available server and retrieves default policy
settings from the server.
If you are specifying more than one server, select or deselect the Select a server at random to spread the
13.
load option.
Click Next.
14.
Step Result:
Figure 33: Destination Folder Page
The Destination Folder page opens.
- 45 -
Page 46

PGP Endpoint
You may choose an installation destination folder other than the PGP Endpoint default folder C:\Program
15.
Files\PGP Corporation\PGP Endpoint, by clicking Change.
Step Result:
Figure 34: Change Current Destination Folder Page
Select a folder from the Look in: field.
16.
Click OK.
17.
Step Result:
The Change Current Destination Folder page opens.
The Change Current Destination Folder closes, and the Destination Folder page changes to
reflect the new location.
Click Next.
18.
Step Result:
The “Add or Remove Programs” list page opens.
Figure 35: Add or Remove Programs List Page
- 46 -
Page 47

Installing PGP Endpoint Components
You may select one of the following options, which are not required to proceed with installation:
19.
Option Description
Don’t display this product
Don’t display the Remove
button for this product
Click Next.
20.
Step Result:
The NDIS Device Control page opens.
Note: NDIS enables Device Control to control 802.1x wireless adapters. If you do not need
this protection, you may disable it here.
Does not display the PGP Endpoint component names in the Add or
Remove Programs list in the Windows Control Panel.
Displays the PGP Endpoint component names in the Add or Remove
Programs list in the Windows Control Panel without the Remove
option.
Figure 36: NDIS Device Control Page
Select the disable protection for NDIS devices check box to allow the use of wireless devices.
21.
Click Next.
22.
Step Result:
Click Install.
23.
Step Result:
The Ready to Install the Program page opens.
A progress bar runs on the page, showing installation progress.
Attention: The Setup dialog warning opens when there is an invalid, non-reachable server
address and no policy file exists.
- 47 -
Page 48
PGP Endpoint
Select one of the following options.
24.
Option Description
Abort
Retry
Ignore
Danger: If you select Ignore, the PGP Endpoint suite installs with the most restrictive default file execution
policy that denies use of all devices and/or executable files. This type of installation will deny you access to
devices and software that you use on your computer, which can make the computer inaccessible. When you
install a client offline for use with PGP Endpoint Application Control you must provide a policy settings file.
Refer the PGP Endpoint Application Control User Guide for more information about creating and exporting
policy settings files.
Step Result:
Click Finish.
25.
Result:
After Completing This Task:
You must restart your computer system for the PGP Endpoint client configuration changes to become effective
and enable the use of the PGP Endpoint client.
The PGP Endpoint client is installed and connects to the Administration Server.
The Completed page opens.
Does not retrieve the policy file and cancels the installation process.
Attempts to retrieve the policy file and continue setup.
Skips policy file retrieval and continues setup, creating the risk of
blocking the computer from all device and executable file access.
- 48 -
Page 49

Chapter
3
Upgrading PGP Endpoint Components
In this chapter:
• Upgrade Overview
• Upgrading the Database
• Upgrading the Administration Server
• Upgrading the Management Server
Console
• Upgrading the Client
You can use the installation software to upgrade previous versions
Application Controland Device Control.
With PGP Endpoint, you can upgrade your PGP Endpoint product
solution components that are versions 4.0 and higher.
- 49 -
Page 50
PGP Endpoint
Upgrade Overview
The PGP Endpoint upgrade process requires that you upgrade the primary software components, including the
database, Administration Server, Management Server Console, and client(s).
The following diagram illustrates the PGP Endpoint upgrade process.
Figure 37: PGP Endpoint Component Upgrade Process
Danger: Do not change the key pair during an upgrade process when the Client Hardening mode is enabled,
or the upgrade will fail.
- 50 -
Page 51

Upgrading PGP Endpoint Components
Upgrading the Database
Using the PGP Endpoint installation software, the Installation Wizard upgrades the PGP Endpoint database, the
first PGP Endpoint component that you upgrade.
Prerequisites:
• Back-up your database before performing any upgrade.
Please refer to the following for more information about database back-up and restore procedures for
Microsoft SQL Server 2005.
• See Backup Overview (SQL Server) ( http://msdn.microsoft.com/en-us/library/ms175477(SQL.90).aspx )
for more information backing up the database.
• See Backing Up and Restoring How-to Topics (SQL Server Management Studio) ( http://
msdn.microsoft.com/en-us/library/ms189621(SQL.90).aspx ) for more information about backing up and
restoring the database.
• See Backing Up and Restoring How-to Topics (Transact-SQL) ( http://msdn.microsoft.com/en-us/library/
aa337534(SQL.90).aspx ) for more information about backing up and restoring the database.
Please refer to the following for more information about database back-up and restore procedures for
Microsoft SQL Server 2008.
• See Backup Overview ( http://msdn.microsoft.com/en-us/library/ms175477.aspx ) for more information
about backing up the database.
• See Backing Up and Restoring How-to Topics (SQL Server Management Studio) ( http://
msdn.microsoft.com/en-us/library/ms189621.aspx ) for more information about backing up and restoring
the database.
• See Backing Up and Restoring How-to Topics (Transact-SQL) ( http://msdn.microsoft.com/en-us/library/
aa337534.aspx ) for more information about backing up and restoring the database.
Log in to the computer running the SQL server.
1.
Tip: If you are upgrading a database that was not installed on a SQL Server with the PGP Endpoint
installation executable file, for example the database was moved to another server after initial installation or
the database was installed using SQL script files, you must manually upgrade the PGP Endpoint database.
Close all programs running on the computer.
2.
- 51 -
Page 52

PGP Endpoint
Open SQL Server Management Studio.
3.
During database migration, the size of the database may double. You must ensure enough disk space is
available.
Caution: If a database size cap is set in SQL, database migration may fail.
a)
Expand the Databases directory in the Object Explorer panel and right-click the target database.
Step Result:
Figure 38: Right-Mouse Menu
A right-mouse menu opens.
b) Select Properties from the right-mouse menu.
Step Result:
Figure 39: Database Properties Window
The Database Properties window opens.
c) Select Files.
d) Click the ellipses [...] in Autogrowth column.
Step Result:
Figure 40: Change Autogrowth Dialog
The Change Autogrowth dialog opens.
e) Select Enable Autogrowth.
f) Select Unrestricted File Growth.
Important: You must maintain these settings until the database migration is finished. Database
migration begins the first time the PGP Endpoint starts after upgrading the application. Database
migration can take several hours or days, depending on the size of the database.
g) Click OK.
Step Result:
h) Click OK.
The Change Autogrowth dialog closes.
- 52 -
Page 53

Upgrading PGP Endpoint Components
From the location where you saved the PGP Endpoint application software, run \server\db\setup.exe.
4.
Step Result:
Figure 41: Welcome Page
Click OK.
5.
Click Upgrade.
6.
The Installation Wizard Welcome page opens.
Step Result:
The PGP Endpoint Database page opens showing a progress bar that indicates the installation
status.
Figure 42: Installing PGP Endpoint Database Page
Click Next.
7.
Step Result:
The Completed page opens.
- 53 -
Page 54
PGP Endpoint
Click Finish.
8.
Result:
PGP Endpoint setup upgrades the existing PGP Endpoint database.
Upgrading the Administration Server
Using the PGP Endpoint installation software, the Installation Wizard upgrades the Administration Server, the
second PGP Endpoint component that you upgrade.
Prerequisites:
•
Log in to the computer that runs the Administration Server.
1.
Close all programs running on the computer.
2.
From the location where you saved the PGP Endpoint application software, run \server\sxs\setup.exe
3.
file.
Click OK.
4.
Step Result:
Click Next.
5.
Step Result:
The Installation Wizard Welcome page opens.
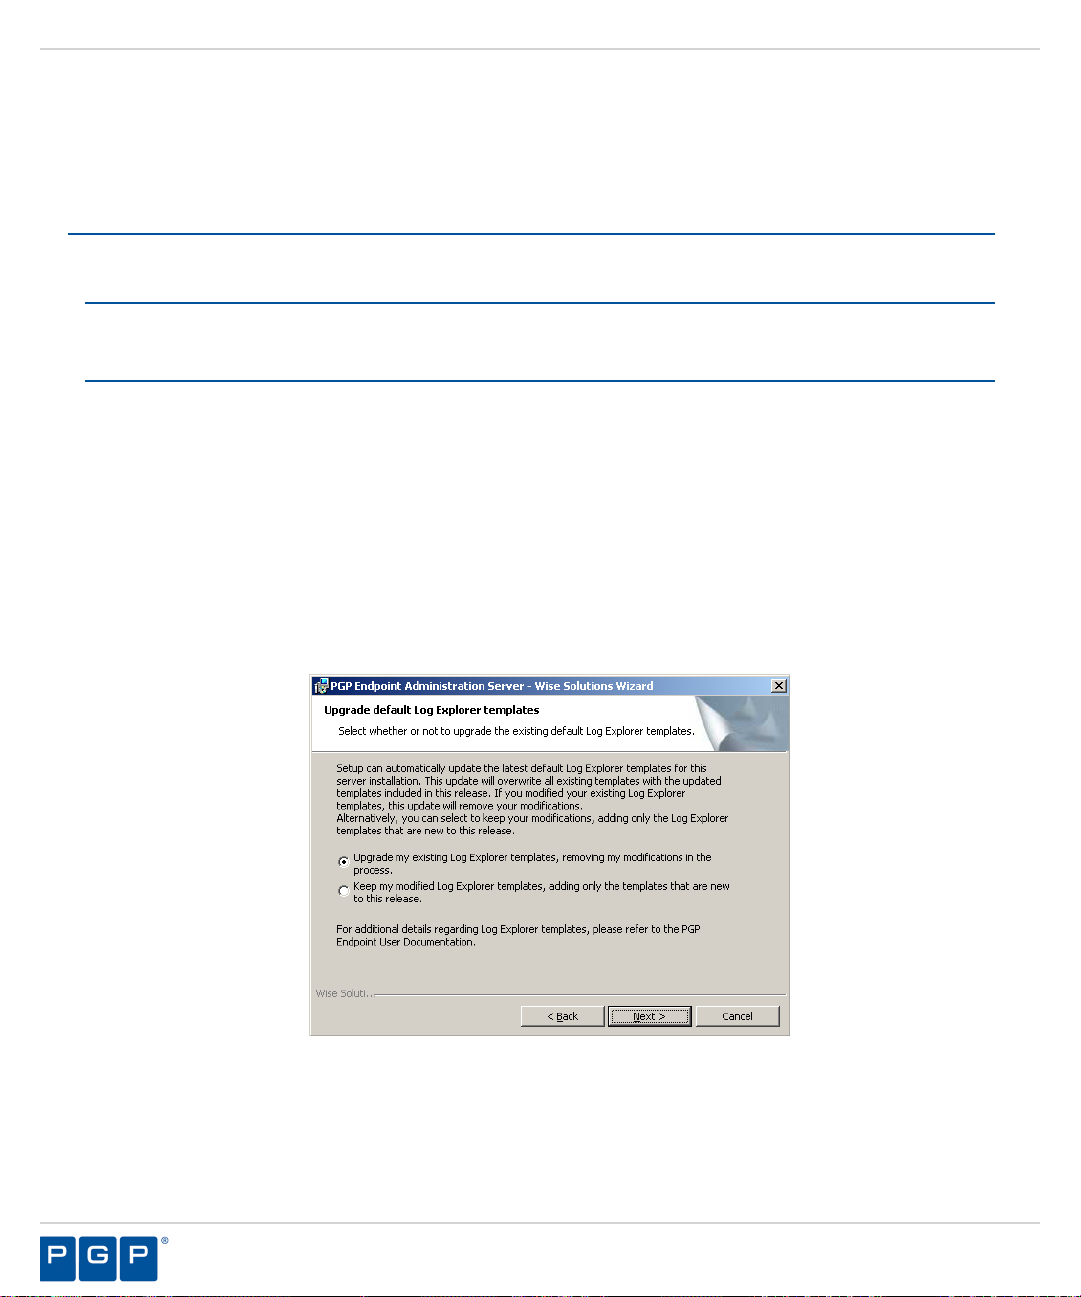
The Upgrade default Log Explorer templates page opens.
Figure 43: Upgrade Default Log Explorer Templates Page
6.
Select a Log Explorer template upgrade option.
- 54 -
Page 55

Click Next.
7.
Step Result:
Figure 44: Server Communication Protocol Page
Select an encryption option.
8.
The Server communication protocol page opens.
Upgrading PGP Endpoint Components
Restriction: The server communication protocol options shown depend upon the client version supported
and whether a certification authority digital certificate is installed.
Click Next.
9.
Step Result:
Figure 45: Server Communication Protocol Ports Page
The Server communication protocol page opens.
- 55 -
Page 56
PGP Endpoint
Specify the communication port(s).
10.
Restriction: The port field(s) shown depend upon the encryption communication protocol that you selected
previously.
Click Next.
11.
Step Result:
The Syslog Server page opens.
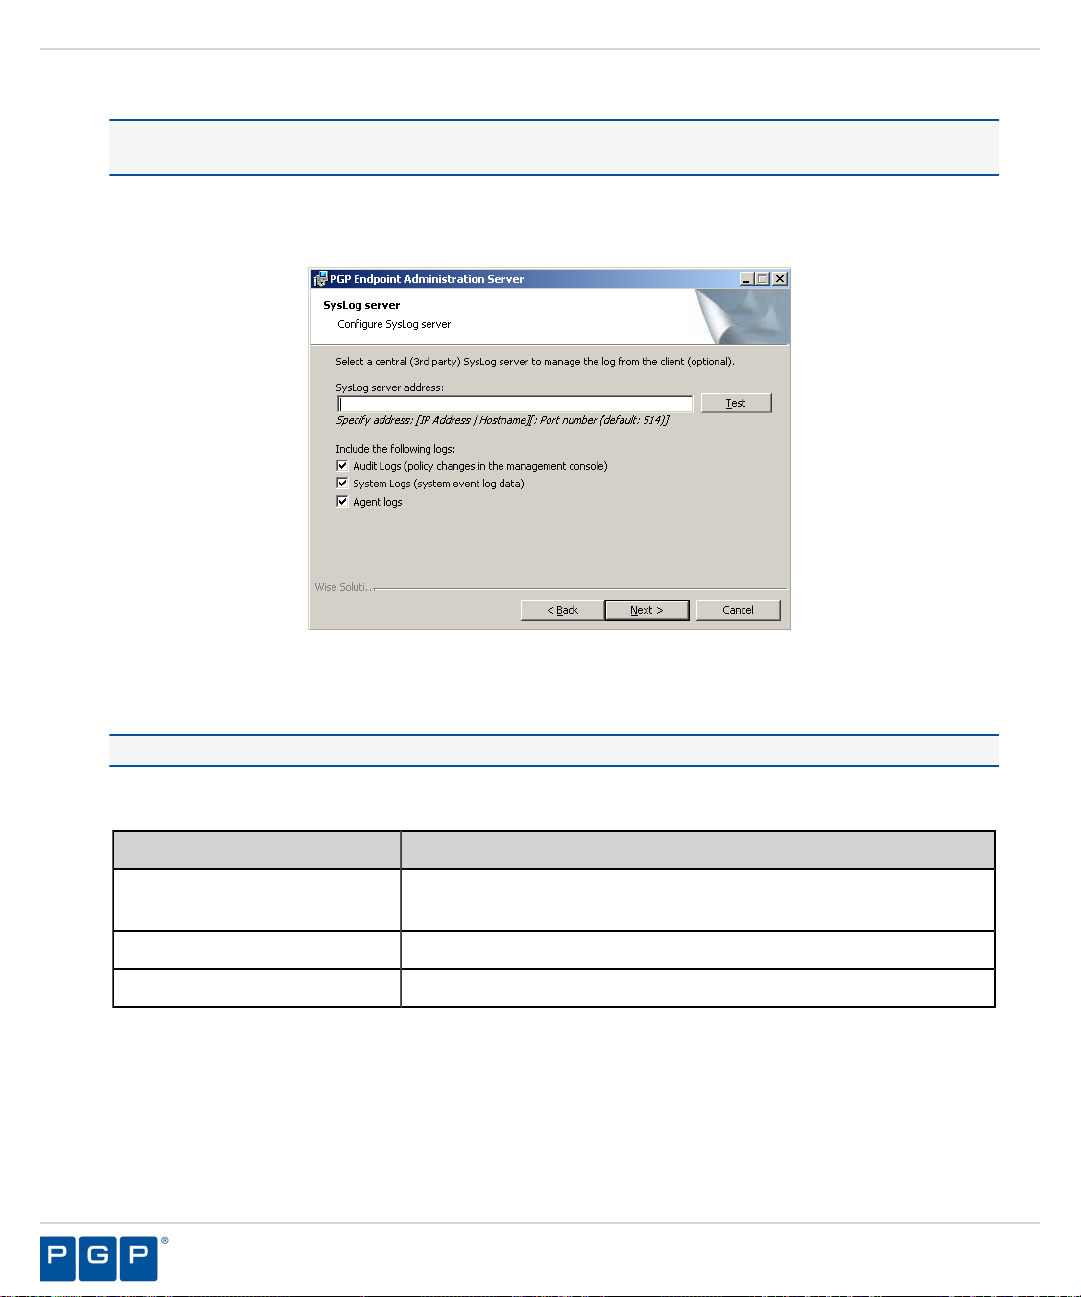
Figure 46: Syslog Server Page
Type the name or the IP address of the SysLog server in the SysLog server address field.
12.
Important: This step is optional. You do not have to specify a Syslog server.
Select from the following options:
13.
Option Description
Audit Logs
Logs changes to policy administered through the Management Server
Console.
System Logs
Agent Logs
Click Next.
14.
Step Result:
Figure 47: Ready to Upgrade Program Page
The Ready to Upgrade the Program page opens.
Logs system events.
Logs events upload directly from the PGP Endpoint client.
- 56 -
Page 57

Click Upgrade.
15.
A progress bar runs on the page, showing installation progress.
Upgrading PGP Endpoint Components
Step Result:
Click Finish.
16.
Result:
PGP Endpoint setup upgrades and restarts the existing Administration Server service.
The Completed page opens.
Upgrading the Management Server Console
Using the PGP Endpoint installation software, the Installation Wizard upgrades the Management Server
Console, the third PGP Endpoint component that you upgrade.
Log in to the computer where you are installing the Management Server Console.
1.
Close all programs running on the computer.
2.
From the location where you saved the PGP Endpoint application software, run the \server\smc
3.
\setup.exe file.
Click OK.
4.
Step Result:
The Installation Wizard Welcome page opens.
Figure 48: Welcome Page
- 57 -
Page 58
PGP Endpoint
Click Upgrade.
5.
Step Result:
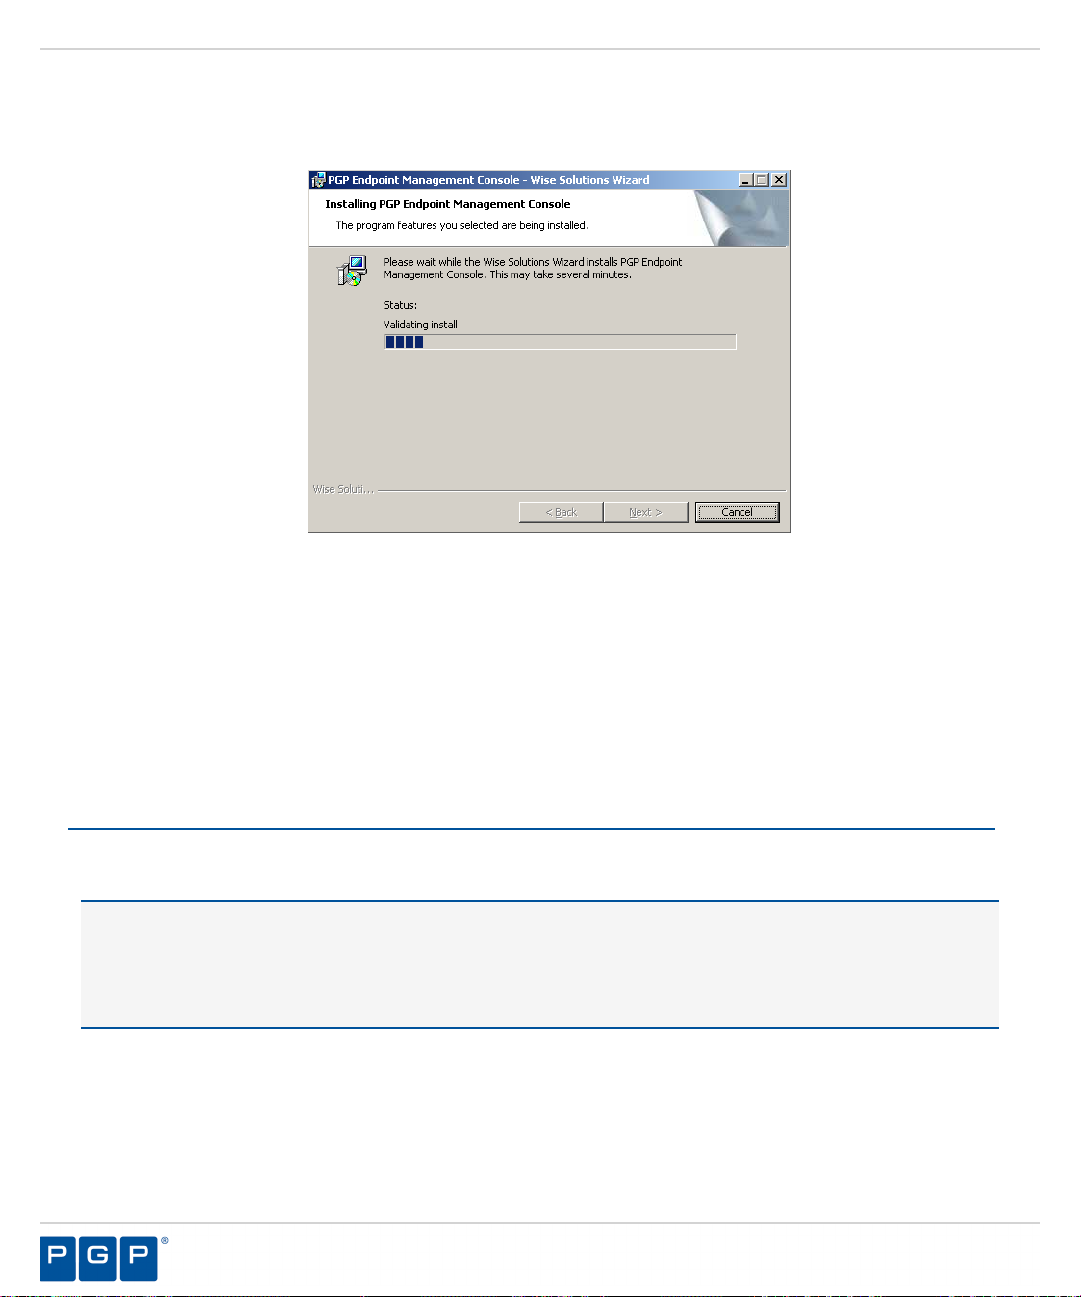
Figure 49: Installing Management Server Console Dialog
The PGP Endpoint Management Server Console page opens showing a progress bar that
indicates the installation status.
Click Next.
6.
Step Result:
Click Finish.
7.
Result:
PGP Endpoint setup upgrades the existing Management Server Console.
The Completed page opens.
Upgrading the Client
Using the PGP Endpoint installation software, the Installation Wizard upgrades the PGP Endpoint client, the
fourth PGP Endpoint component that you upgrade.
Caution: When installing the client for PGP Endpoint Application Control, you may need to set the Execution
blocking default option to Non-blocking mode. This is only necessary if the new client .exe and .msi files
were not previously added to the central file authorization list and assigned to the corresponding file group.
Otherwise, the PGP Endpoint client computer may not restart after PGP Endpoint client installation because
executable system files cannot run until they are centrally authorized from the Management Server Console.
Log in to the computer that will run the PGP Endpoint client.
1.
Close all programs running on the computer.
2.
From the location where you saved the PGP Endpoint application software, run the \server\client
3.
\setup.exe file.
Step Result:
The Installation Wizard Welcome page opens.
- 58 -
Page 59
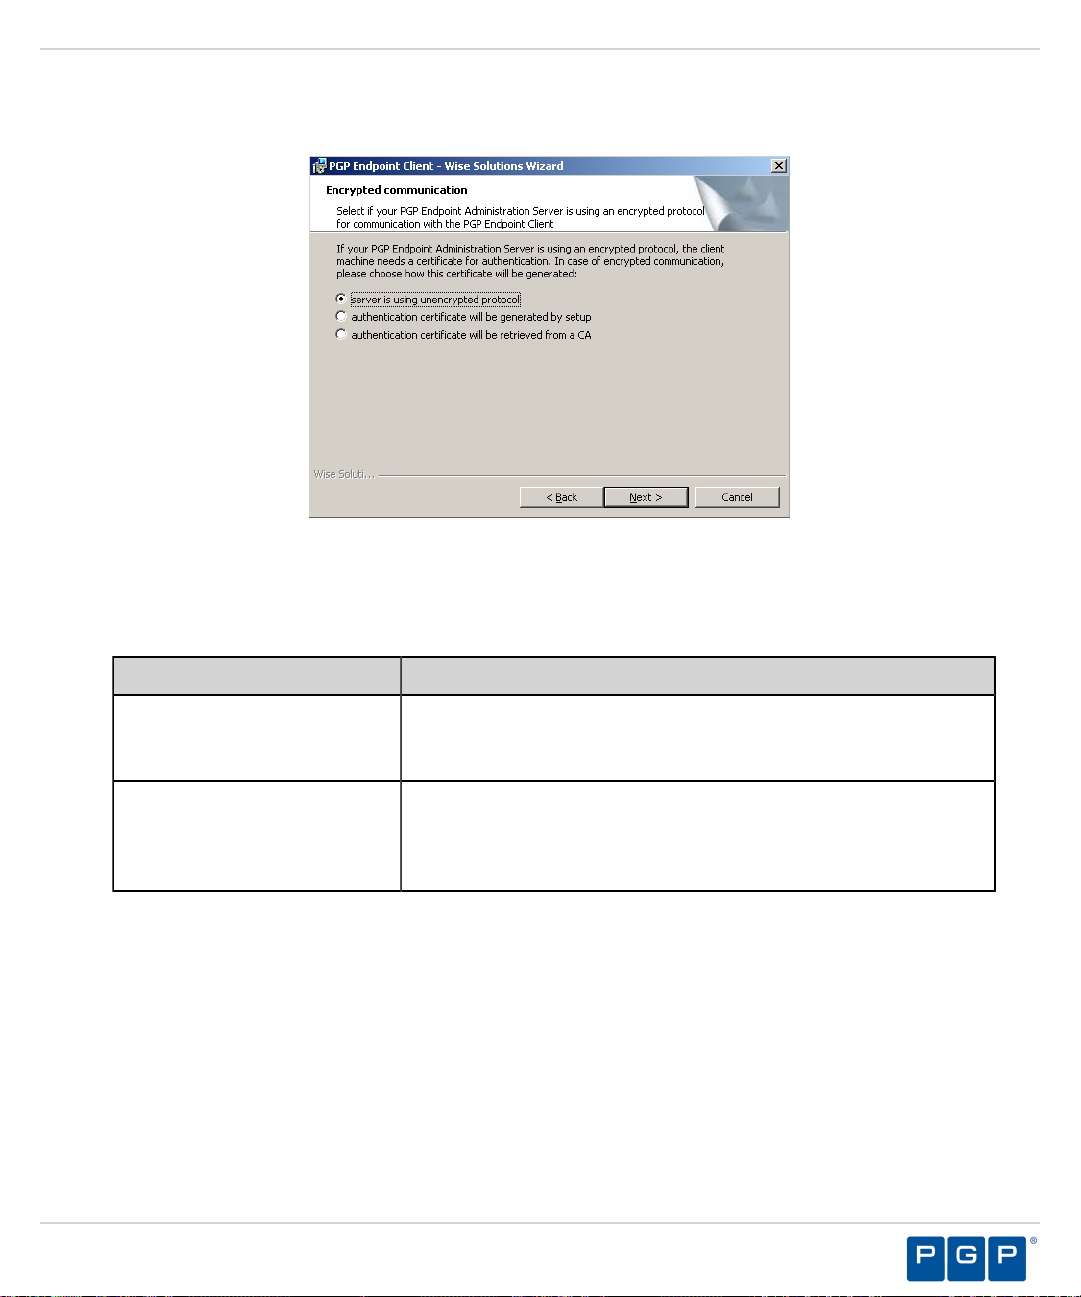
Upgrading PGP Endpoint Components
Click Next.
4.
Step Result:
Figure 50: Encrypted Communication Page
Select one of the following options that matches the options you selected when you upgraded the
5.
The Encrypted communication page opens.
Administration Server.
Option Description
Server is using unencrypted
protocol
Communication between the Administration Server and PGP Endpoint
client is not using the TLS communication protocol. Communication is
not encrypted but is signed using the private key.
Authentication certificate will
be generated by setup
Communication between the Administration Server and PGP Endpoint
client uses the TLS communication protocol. Communication is
encrypted and the digital certificate is generated manually during
installation.
- 59 -
Page 60

PGP Endpoint
Option Description
Authentication certificate will
be retrieved from a CA
Communication between the Administration Server and PGP Endpoint
client uses the TLS communication protocol. Communication is
encrypted and the digital certificate is retrieved automatically during
installation.
Tip: PGP recommends that you use the automatic TLS retrieval option to deploy Certificate Authority
infrastructure for issuing valid digital certificates.
Step Result:
If you opt to manually generate a certificate during setup, the Client Authentication dialog
opens.
Figure 51: Client Authentication Dialog
To manually generate a certificate during setup specify the computer certificate location and parameters from
6.
the following options.
Option Description
Generate certificate signed by
certificate located in store
Generate certificate signed by
certificate located in file
Import into store
Certificate parameters
Generates a digital certificate during installation by using a signature
certificate located in the local user store.
Generates a digital certificate during installation by using a signature
certificate located in a specified file.
Imports a signature certificate into the local user store.
Specifies the certificate parameters for the Cryptographic service
provider, Key length, Validity, and Signature.
- 60 -
Page 61

Upgrading PGP Endpoint Components
Click Next.
7.
Step Result:
Figure 52: Administration Servers Page
Specify up to three server names using fully qualified domain names (FQDN) or IP addresses that are
8.
The Administration Servers page opens.
managed from the Management Server Console.
Caution: Do not use IP address(es) when using the TLS communication protocol for encryption. You can
only use FQDNs for when using the TLS communication protocol.
Verify that the PGP Endpoint client connects to the Administration Server by clicking Test.
9.
Step Result:
If the server name is correctly specified, the Administration Server connects successfully with
the client.
- 61 -
Page 62
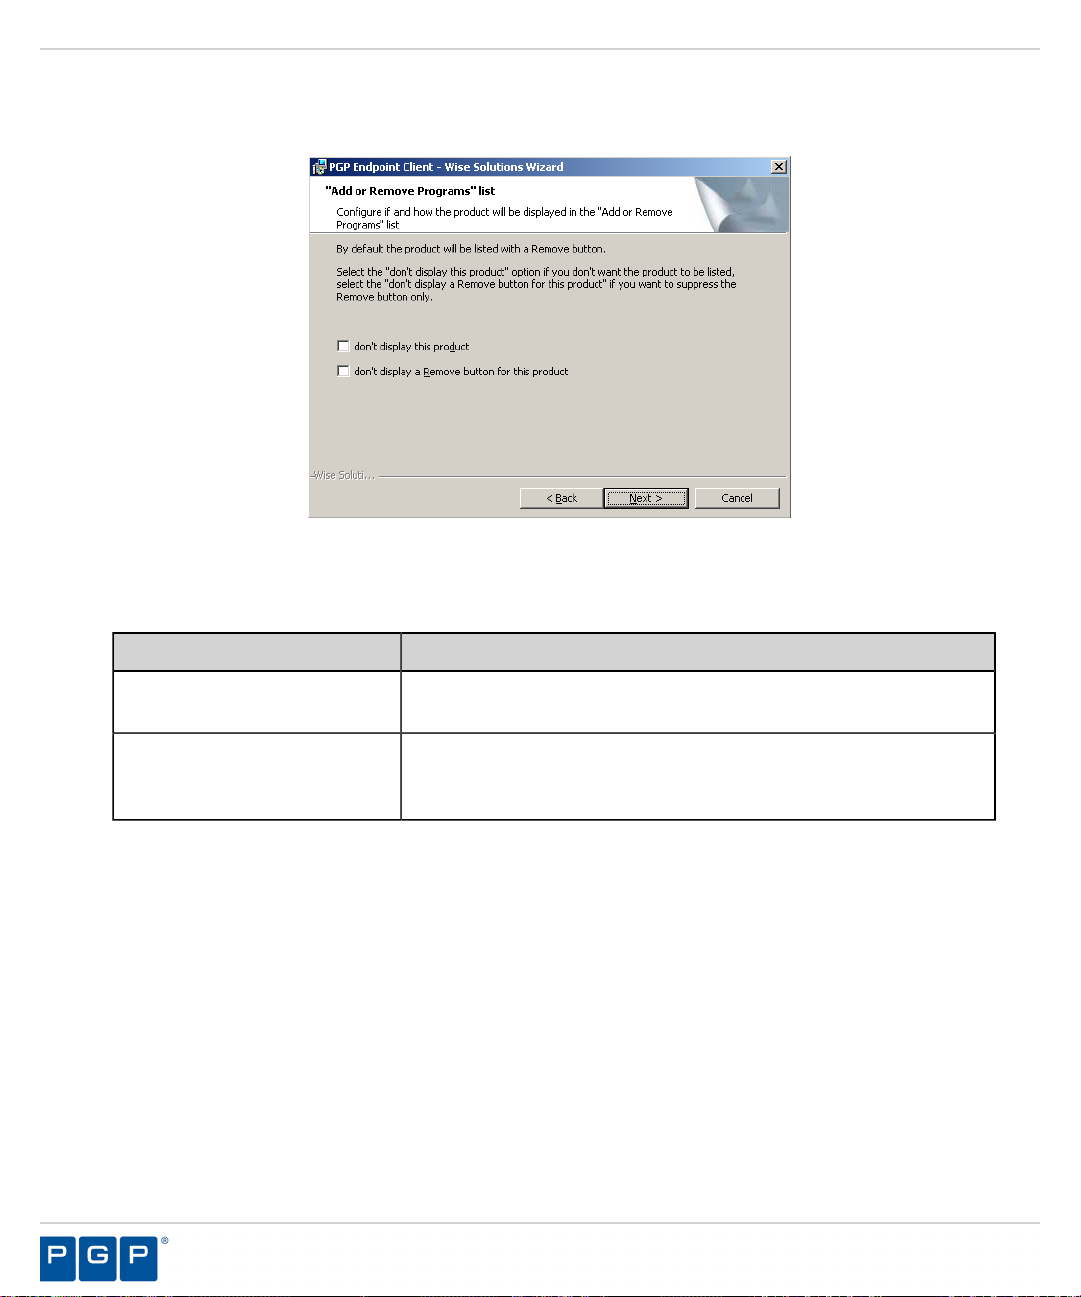
PGP Endpoint
Click Next.
10.
Step Result:
Figure 53: Add or Remove Programs List Page
You may select one of the following options, which are not required to proceed with the upgrade:
11.
The “Add or Remove Programs” list page opens.
Option Description
Don’t display this product
Displays the PGP Endpoint product name in the Add or Removes
Programs list in the Windows Control Panel with the Remove option.
Don’t display the Remove
button for this product
Displays the PGP Endpoint product name in the Add or Removes
Programs list in the Windows Control Panel without the Remove
option.
- 62 -
Page 63

Upgrading PGP Endpoint Components
Click Next.
12.
Attention: If NDIS was configured for the previously installed client version, the upgrade process may skip
this step and proceed directly to the following step.
Step Result:
The NDIS Device Control page opens.
Note: NDIS enables Device Control to control 802.1x wireless adapters. If you do not need
this protection, you may disable it here.
Figure 54: NDIS Device Control Page
Select the disable protection for NDIS devices check box to allow the use of wireless devices.
13.
- 63 -
Page 64
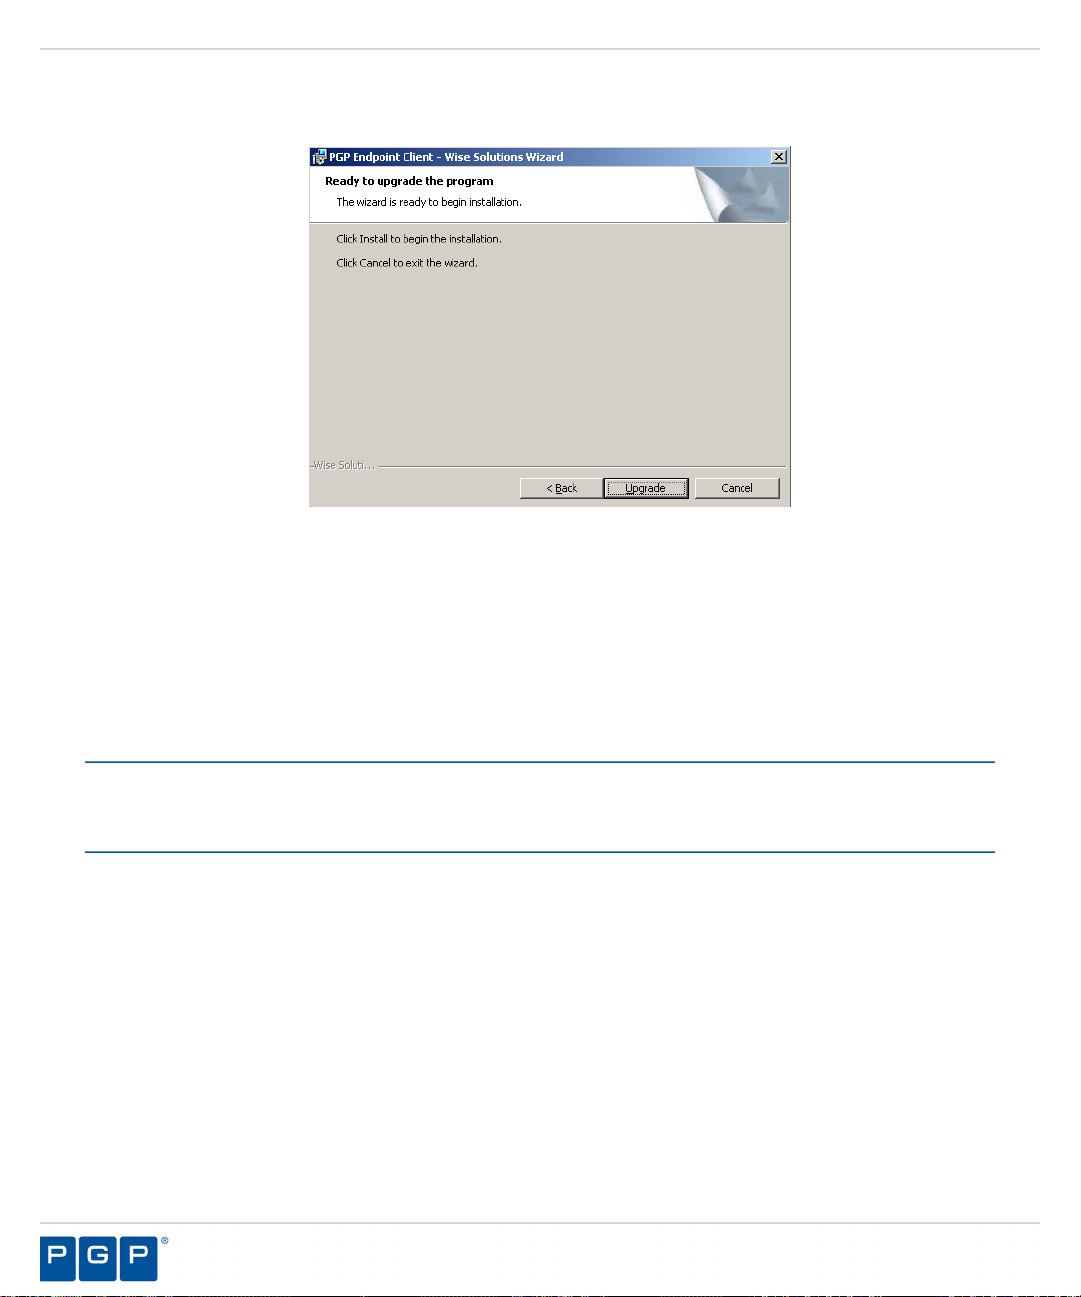
PGP Endpoint
Click Next.
14.
Step Result:
Figure 55: Ready to Upgrade the Program Page
Click Upgrade.
15.
A progress bar runs on the page, showing installation progress.
The Ready to Upgrade the Program page opens.
Step Result:
Click Finish.
16.
Result:
PGP Endpoint setup upgrades the existing PGP Endpoint client.
The Completed page opens.
After Completing This Task:
You must restart your computer system as soon as possible, to prevent any existing file authorizations or device
permission from becoming unstable and for the PGP Endpoint client configuration changes to become effective.
- 64 -
Page 65

Chapter
4
Installation Checklist
In this chapter:
• Installation Checklist
To assist in gathering the information required for a smooth
installation, PGP recommends that you use the following installation
checklist.
The installation checklist identifies tasks necessary for installing the
PGP Endpoint product solution.
Installation Checklist
The installation checklist outlines the detailed tasks that you must perform when installing the PGP Endpoint
solutions.
This checklist guides you through the installation process.
To begin your installation:
Copy the PGP Endpoint license file to the \\Windows\System32 or \\Windows\SysWOW64 folder, and
1.
rename the file to Endpoint.lic. The license file may be installed after installing the database, however,
the license file must installed before installing the Administration Server.
Download the PGP Endpoint application software from the https://lems.pgp.com/account/login
2.
Create a device, media, or software application inventory which lists the items that you want PGP Endpoint
3.
to control.
Document company policy that defines:
4.
• Device permissions.
• Shadowing requirements.
• Device encryption requirements.
• PGP Endpoint administrators and their roles.
• Global domain groups for PGP Endpoint administrators.
Plan your PGP Endpoint network architecture, based on capacity requirements, that list the Administration
5.
Server host names and IP addresses.
Create a dedicated Administration Server domain user rights service account and set the following:
6.
• User cannot change password.
• Password never expires.
- 65 -
Page 66

PGP Endpoint
The domain account must have local administration rights when you plan to use the TLS communication
protocol for client- Administration Server and inter- Administration Server data transfers.
Create Impersonate a client after authentication user rights for the Administration Server. See Impersonate
7.
a Client After Authentication ( http://support.microsoft.com/kb/821546 ) for additional information about
impersonating a client after authentication user rights.
Verify that the Administration Server domain account has Log on as a service user rights. See Add the Log
8.
on as a service right to an account ( http://technet.microsoft.com/en-us/library/cc739424(WS.10).aspx ) for
additional information about logging on as a service user rights.
Install Microsoft® Internet Information Services on the same computer as the certification authority,
9.
otherwise the enterprise root certificate cannot be generated. See Internet Information Services (IIS) ( http://
www.iis.net ) for additional information about installing Internet Information Services.
Install a Microsoft enterprise root certification authority to enable removable device encryption for
10.
PGP Endpoint Device Control. See Install a Microsoft enterprise root certification authority ( http://
technet.microsoft.com/en-us/library/cc776709.aspx ) for additional information about installing an enterprise
root certificate.
Install a Microsoft SQL Server® . See Getting Started with SQL Server ( http://msdn.microsoft.com/en-us/
11.
sqlserver/default.aspx ) for additional information about installing a SQL server.
Complete Installing the Database on page 24.
12.
To install multiple Administration Server s, create a shared file directory on a file server to share the Datafile
13.
directory component. This action is only required if you will be using more than one Administration Server.
Complete Generating a Key Pair on page 26. This action is recommended, but not required.
14.
Complete Installing the Administration Server on page 28.
15.
Important: The Administration Server service account must have database owner (DBO) rights to the PGP
Endpoint database.
Complete Installing the Management Server Console on page 37.
16.
Complete Installing the Client on page 41.
17.
Test your PGP Endpoint product solution installation for functionality.
18.
- 66 -
Page 67

Chapter
5
Using PGP Endpoint Client Deployment
In this chapter:
• PGP Endpoint Client Deployment
Window
• Creating Deployment Packages
• Adding Computers
• Deploying Packages
• Querying Client Status
PGP Endpoint provides the Client Deployment Tool tool that performs
silent, unattended installation of the client to computers distributed
throughout your network.
Client deployment employs the Microsoft Installer (MSI) service that
distributes installation packages that you create. After deployment
is complete, you can monitor the computers and status of the client
deployment packages throughout your network.
Attention: You cannot use the PGP Endpoint Client Deployment to
deploy clients for Windows XP Embedded (XPe) implementations.
- 67 -
Page 68

PGP Endpoint
PGP Endpoint Client Deployment Window
The PGP Endpoint Client Deployment dialog is the primary administrative interface used for creating and
deploying client installation packages.
The PGP Endpoint Client Deployment dialog consists of two panels:
•
Packages
•
Computers
Figure 56: PGP Endpoint Client Deployment Dialog
Packages Panel
The following table describes the columns in the Packages panel.
Table 8: Packages Panel Column Descriptions
Column Description
Name Shows the name of the deployment package.
Key Indicates whether the public key is included in the deployment package.
Progress Shows the installation progress of the deployment package for a computer.
Product Shows the name of the PGP Endpoint product included in the deployment package.
Version Shows the version of the PGP Endpoint product included in the deployment package.
Servers(s) Shows the name of the server(s) that connect to the selected client computer.
Last deployment Shows the date and time of the last client package deployment.
License Shows the type of product licensed.
Policies Shows whether permission policies are imported.
- 68 -
Page 69

Using PGP Endpoint Client Deployment
Column Description
TLS Shows whether the TLS communication protocol is in use.
Packages Menu
You can administer deployment packages from the Packages menu.
The following table describes the Packages menu.
Table 9: Packages Menu Options
Option Description
New Creates new deployment packages.
Delete Deletes a selected deployment package.
Rename Renames a selected deployment package.
Import public key Copies the sx-public.key in to the deployment package directory folder.
Set Licenses Adds a license to deployment package installed in the serverless mode.
Set Policies Allows addition of an Administration Server to retrieve the policy file (*.dat) for
a specific deployment package.
Test Connection Allows verification of connection with the Administration Server for the specific
deployment package, before deploying the package.
Install Installs the selected deployment package.
Uninstall Uninstalls the selected deployment package for the computers listed in the
Computers panel.
Open last report Displays a report describing the last install or uninstall, indicating the status of the
install or uninstall activity.
Options Allows modification of the directory where deployment packages are stored.
Computers Panel
The following table describes the columns in the Computers panel.
Table 10: Computers Panel Column Descriptions
Column Description
Name Shows the name of the computer associated with a deployment package.
Domain/Workgroup Shows the domain or workgroup that a computer belongs to.
Progress Shows the installation progress of the deployment package for a computer.
- 69 -
Page 70

PGP Endpoint
Column Description
Status Describes the attributes associated with the deployment package for a
computer, including the:
• Client operating system and version
• TLS communication protocol used
• Client hardening status
Computers Menu
You can administer deployment packages by computer from the Computers menu.
The following table describes Computers the Computers menu.
Table 11: Computers Menu Options
Option Description
Add Adds one or more computers to the list of computers for the specific deployment
package.
Remove Removes one or more computers from the list of computers for the specific
deployment package.
Import Imports a list of computers from an external ASCII or Unicode text file.
Export Exports a list of computers to an external ASCII or Unicode text file.
Change TLS mode Allow changes to the TLS communication protocol used for specific computers.
Reboot Forces specific computers to restart.
Query Queries the client version and driver status for every computer listed.
Progress details Displays the results of the install, uninstall, or query operation for specific
computers.
Open last log Opens the last installation log for specific computers.
- 70 -
Page 71
Using PGP Endpoint Client Deployment
Creating Deployment Packages
When you create a PGP Endpoint client deployment package, the PGP Endpoint Client Deployment tool copies
the local client setup .MSI file and creates an .MST transform file that is linked to the .MSI file.
Prerequisites:
Before you can successfully create an PGP Endpoint client deployment package, you must:
• Have access to the PGPEndpointClient.msi or PGPEndpointClient64.msi file on the computer where
you will deploy the client packages.
• If there is a firewall between the PGP Endpoint Client Deployment tool installed on the client computer and
the targeted computer(s), you must verify that firewall ports are open.
• Synchronize the Administration Server's system clock with the PGP Endpoint database server's system clock
using the Microsoft Windows time service. See Time Service ( http://support.microsoft.com/kb/816042 ) for
details about using the Microsoft Windows time service.
• Start the Windows Remote Registry service on the remote client computer.
• Have a valid digital certificate on the client computer that deploys the client and test the TLS connection
between the Administration Server.
Important: In Windows Server 2008 operating systems there is a security setting which blocks access to the
admin$ share required for PGP Endpoint Client Deployment . When the following error message is received
failed to start the remote registry service. Access is denied you must confirm the correct
registry keys. Check the following registry keys:
• HKLM\SOFTWARE\Microsoft\Windows\CurrentVersion\Policies\system
\LocalAccountTokenFilterPolicy? and change the DWORD entry to 1 to resolve the access to admin
$ share problem.
• If the LocalAccountTokenFilterPolicy registry entry does not exist then it has to be created.
The .MSI file contains the information necessary deploy the PGP Endpoint client to targeted computers.
1.
From the PGP Endpoint Client Deployment dialog, click New Package.
Step Result:
Figure 57: New Packages Dialog
The New Packages dialog opens.
- 71 -
Page 72
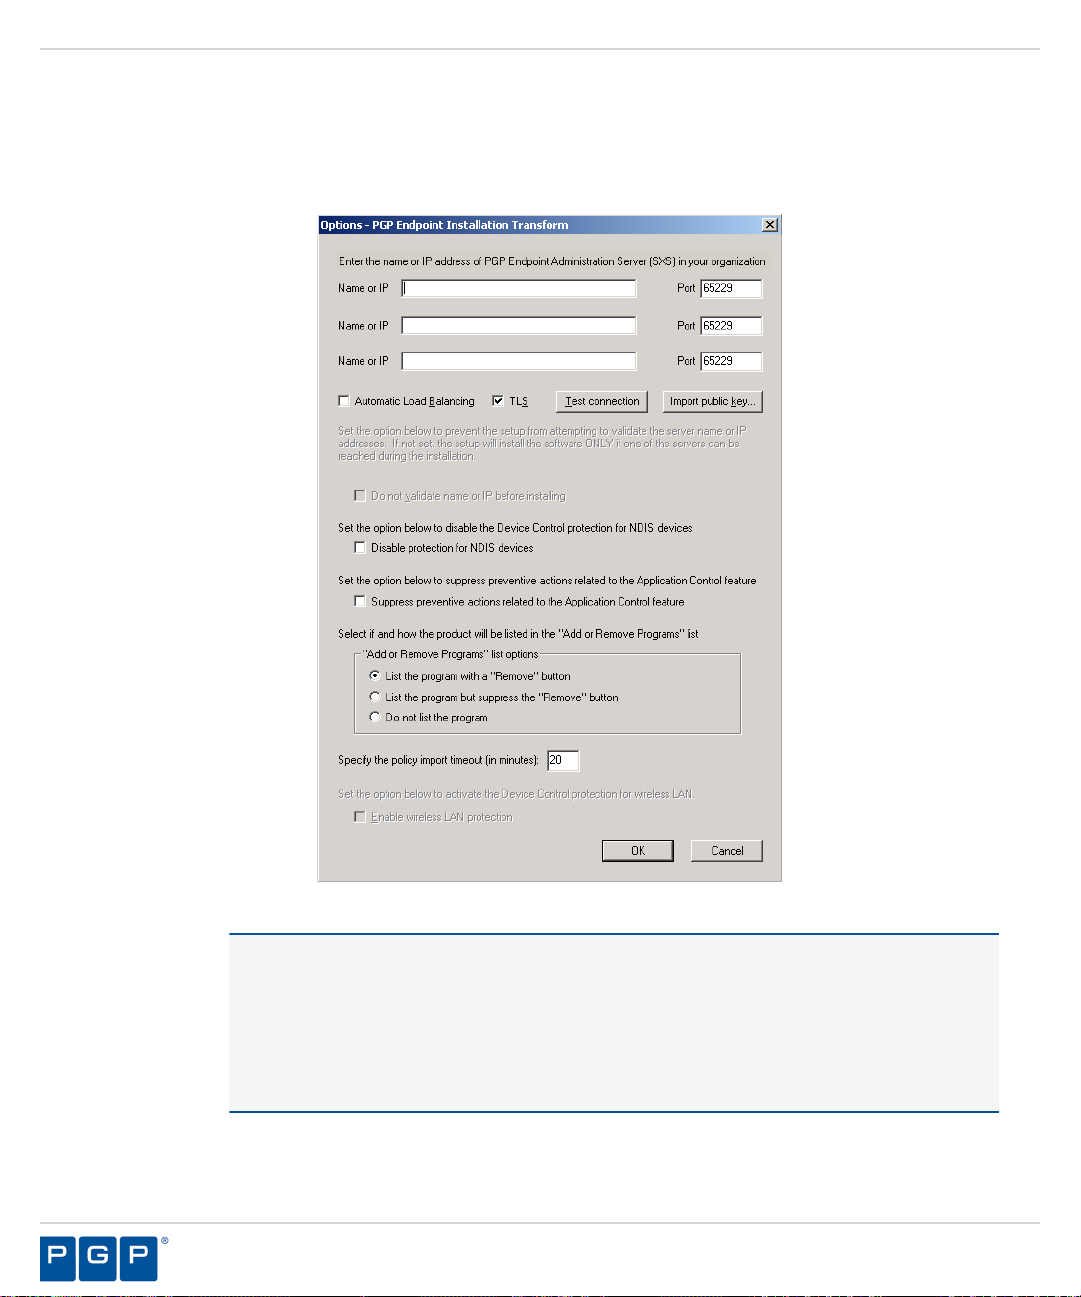
PGP Endpoint
2.
To select deployment package, select the ellipses from the Source panel.
3.
In the Package panel, enter a name for the deployment package in the Name field.
Click OK.
4.
Step Result:
The Options - PGP Endpoint Installation Transform dialog opens.
Figure 58: Options - PGP Endpoint Installation Transform Dialog
Attention: The shaded options are only valid when are installing versions client lower than
4.3. These options are:
• Do not validate name or IP before installing - Provides an Administration Server address
or name that is not currently available but is accessible after deployment.
• Enable wireless LAN protection - An option available in 2.8 clients lower that is now
deprecated by permissions rules.
Click Import public key.
5.
- 72 -
Page 73

Using PGP Endpoint Client Deployment
Select the sx-public.key file.
6.
If there is no sx-public.key file in your client setup folder, then the installation continues using the default
public key.
Step Result:
In the Name or IP field(s), enter the fully qualified domain name(s) or IP address(es) for the Administration
7.
Server (s) installed in your environment.
Tip: You may enter alternative port numbers, as necessary. When you do not specify fully qualified domain
name(s) or IP address(es), the PGP Endpoint clients are deployed in a serverless mode.
If PGP Endpoint is set up to use more than one Administration Server, you may select the Automatic Load
8.
Balancing check box to allow clients to contact any available Administration Server.
To specify that the PGP Endpoint client uses the TLS communication protocol, select the TLS check box.
9.
To disable Device Control for NDIS devices, select the Disable NDIS protection for devices check box.
10.
Note: NDIS enables Device Control to control 802.1x wireless adapters. If you do not need this protection,
you may disable it here.
To validate the fully qualified domain name(s) or IP address(es) for the Administration Server (s), click Test
11.
Connection.
The Client Deployment Tool tool copies the selected public key to the appropriated folder for
client deployment.
Step Result:
12.
From the “Add or Remove Programs” list options panel, select one of the following options:
Option Description
List the program with a
“Remove button”
List the program but suppress
the “Remove button”
Do not list the program
To suppress preventive actions associated with Application Control, select the Suppress preventive actions
13.
related to the Application Control feature check box.
In the Specify the policy import time-out (in minutes) field, enter a numerical value.
14.
You will receive a confirmation message indicating whether the server connection is
successful or not. If not, you follow the error resolution directions.
Displays the PGP Endpoint product name in the Add or Remove
Program list in the Windows Control Panel with the Remove option.
Displays the PGP Endpoint product name in the Add or Removes
Program list in the Windows Control Panel without the Remove
option.
Does not display the PGP Endpoint product name in the Add or
Remove Program list in the Windows Control Panel.
- 73 -
Page 74
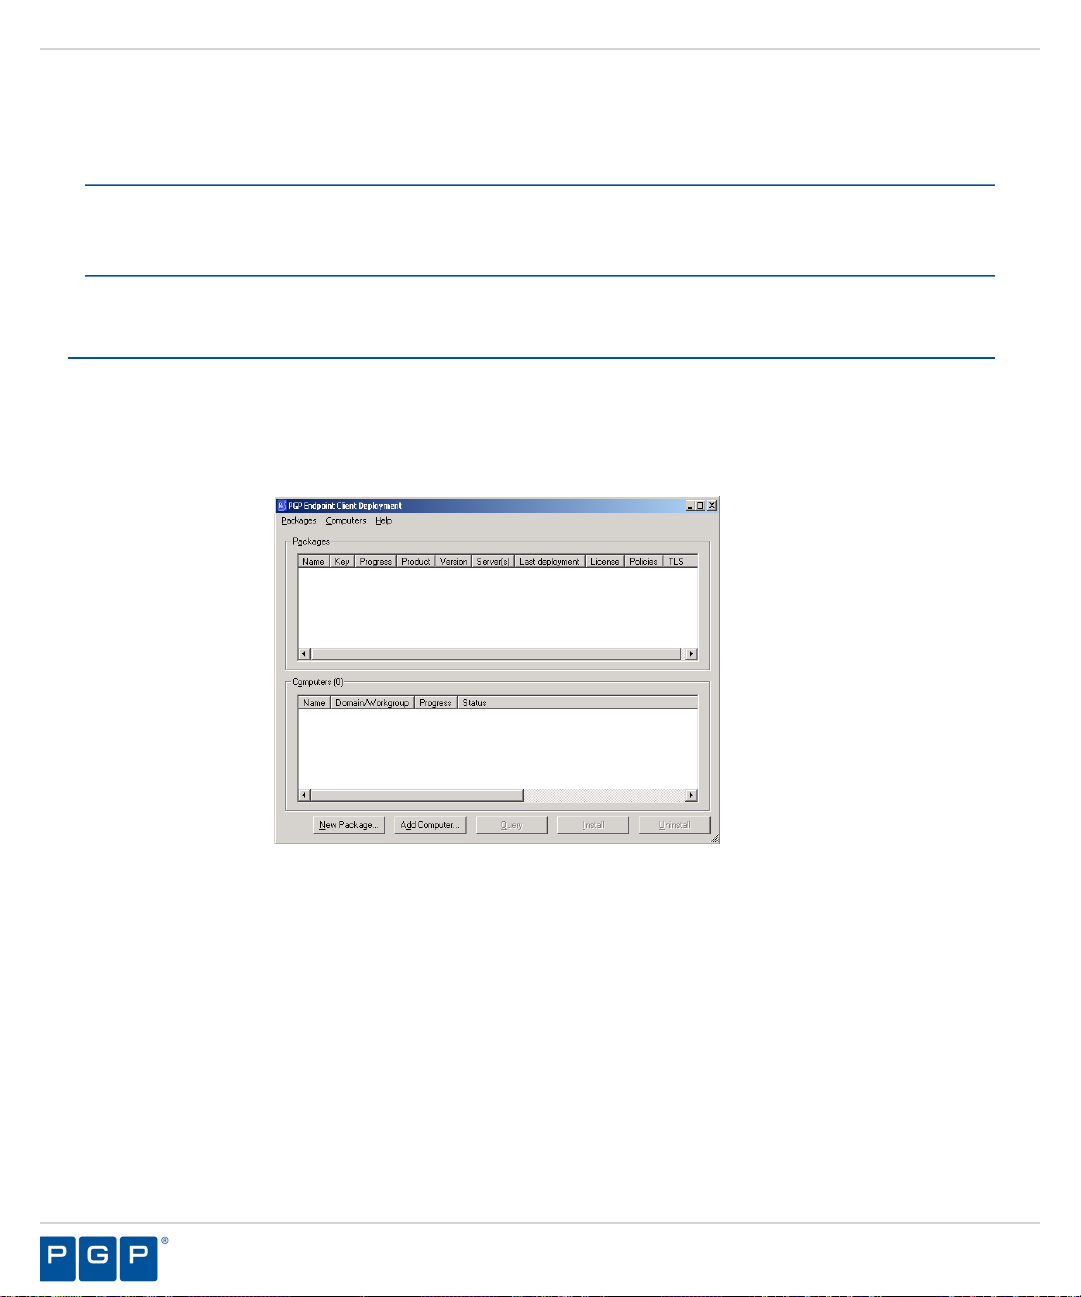
PGP Endpoint
Click OK.
15.
Result:
After Completing This Task:
Verify the location of the PGP Endpoint Client.mst file created in the deployment package folder you
specified, by selecting Packages > Options from the PGP Endpoint Client Deployment dialog.
The client deployment package files are copied to the specified directory. The new deployment package
is listed in the Packages panel of the PGP Endpoint Client Deployment dialog.
Adding Computers
You can add computers where the client is deployed with the Client Deployment Tool.
Select Start > Programs > PGP > Endpoint Management Server Console > PGP Endpoint Client
1.
Deployment.
Step Result:
The PGP Endpoint Client Deployment dialog opens.
Figure 59: PGP Endpoint Client Deployment Dialog
- 74 -
Page 75
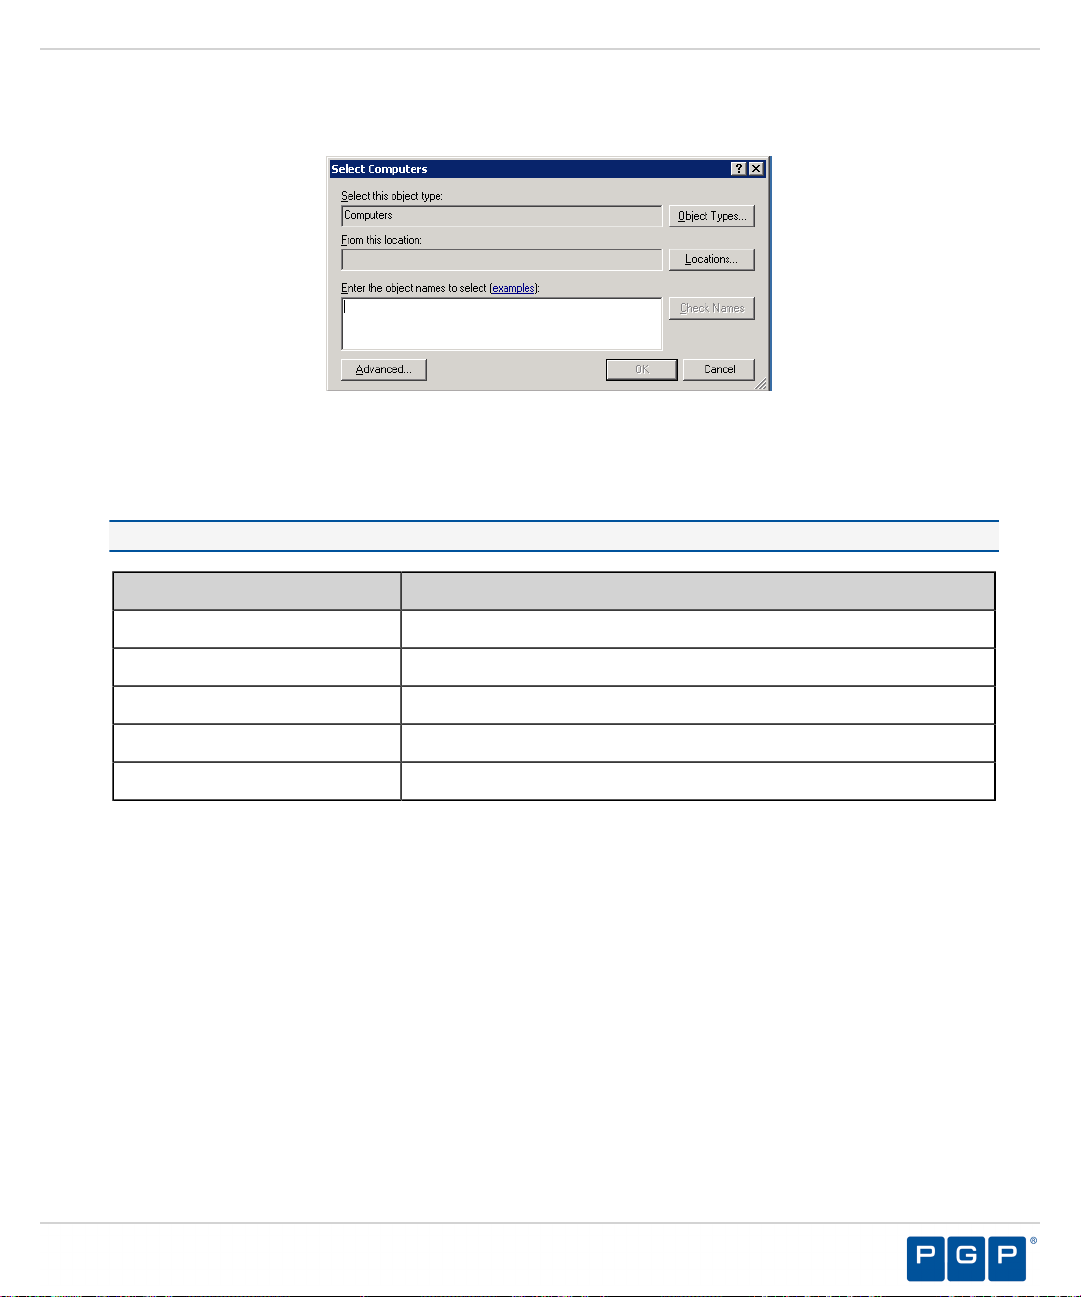
Using PGP Endpoint Client Deployment
Click Add Computer.
2.
Step Result:
Figure 60: Select Computers Dialog
In the Enter the object names to select field, select ObjectName to enter the names of the computers to add
3.
The Select Computers dialog opens.
to the list.
Note: ObjectName is the only format you can select to add computers.
Object Name Example
Display Name
ObjectName
UserName
ObjectName@DomainName
DomainName\ObjectName
FirstName LastName
Computer1
User1
User1@Domain1
Domain\User1
a) To verify the object name, click Check Names.
Step Result:
Click OK.
4.
Result:
The computer names are listed in the Computers panel of the PGP Endpoint Client Deployment
The object name is verified and underlined when correctly entered.
dialog.
- 75 -
Page 76

PGP Endpoint
Deploying Packages
The PGP Endpoint Client Deployment tool silently deploys PGP Endpoint client for unattended installation,
using deployment installation packages.
Prerequisites:
Before you can successfully deploy PGP Endpoint clients, you must:
• Create deployment packages.
• Be a member of the Local Administrators group for all targeted computers.
• If you will be deploying clients to computers that are not connected to the Administration Server, you must
import the policies.dat setting file to the same directory where the deployment packages that you create are
saved.
Select Start > Programs > PGP > Endpoint Management Server Console > PGP Endpoint Client
1.
Deployment.
Step Result:
Figure 61: PGP Endpoint Client Deployment Dialog
The PGP Endpoint Client Deployment dialog opens.
- 76 -
Page 77

Using PGP Endpoint Client Deployment
If you are deploying the client to computers that are not connected (offline) to the Administration Server, you
2.
must first export the policy file policies.dat to the targeted computer(s), as follows.
a) Select Packages > Options.
Step Result:
Figure 62: Options Dialog
The Options dialog opens.
b) To select the directory to store deployment copies, click the ellipses.
You must specify a directory that is different than a system drive root directory or directory containing
existing files. When the PGP Endpoint Client Deployment tool runs on different computers, you may
want to specify a shared directory where all instances of the PGP Endpoint Client Deployment tool have
access to the deployment packages.
Important: Installing a client using exported policies works well when policies.dat is placed locally
in the same directory as setup.exe. However if the policies.dat file is placed on a file share you must
change the security of the share directory so that computer accounts are able to access it must have access
to it through LocalSystem.
c) Click OK.
Step Result:
The Options dialog closes.
To add computers for client deployment, select the computer name(s).
3.
You can select multiple computers while pressing the CTRL key.
Click OK.
4.
5.
From the Packages panel, select a deployment package from the list.
a)
From the Computers panel, you may also select a subset of targeted computers for package deployment.
- 77 -
Page 78

PGP Endpoint
Click Install.
6.
Step Result:
Because deployment requires restarting the target computer(s), the Install/Uninstall/Reboot/
Options dialog opens.
Figure 63: Install/Uninstall/Reboot/Options Dialog
7.
From the When a reboot is needed at the end of a deployment panel, select the following options, as
necessary:
Option Description
Reboot after (x) second(s)
Restarts the target computer(s) after deployment, within the period that
you specify.
Force reboot even if some
applications are opened
Apply to
Forces the target computer(s) to restart after deployment, regardless of
open applications.
Applies reboot options to All target computers or a Selection of
computers, representing the subset chosen when selecting the
deployment package.
Message
You can type a message that users receive when the target computer(s)
restart.
- 78 -
Page 79

Using PGP Endpoint Client Deployment
To generate a certificate semi-automatically during setup, select the computer certificate location and
8.
parameters from the following options.
Option Description
Use local certificate store
Use memory certificate store
Import
Select
Advanced
Click Next.
9.
Click OK.
10.
Step Result:
The PGP Endpoint Client Deployment dialog reopens showing the deployment progress for
the computer(s) added to the deployment package selected.
PGP Endpoint Client Deployment
Generates a digital certificate during installation by using a signature
certificate located in the local user store.
Generates a digital certificate during installation by using a signature
certificate located in a specified file.
Imports a signature certificate into the local user store.
Allows you to select a signature certificate located in a specified file
Specifies the certificate parameters for the Cryptographic service
provider, Key length, Validity, and Signature.
Figure 64: Dialog - Computer Progress
The Progress column in the Computers panel displays a progress bar showing the deployment
status for each computer. The Progress column in the Packages panel displays a progress bar
- 79 -
Page 80
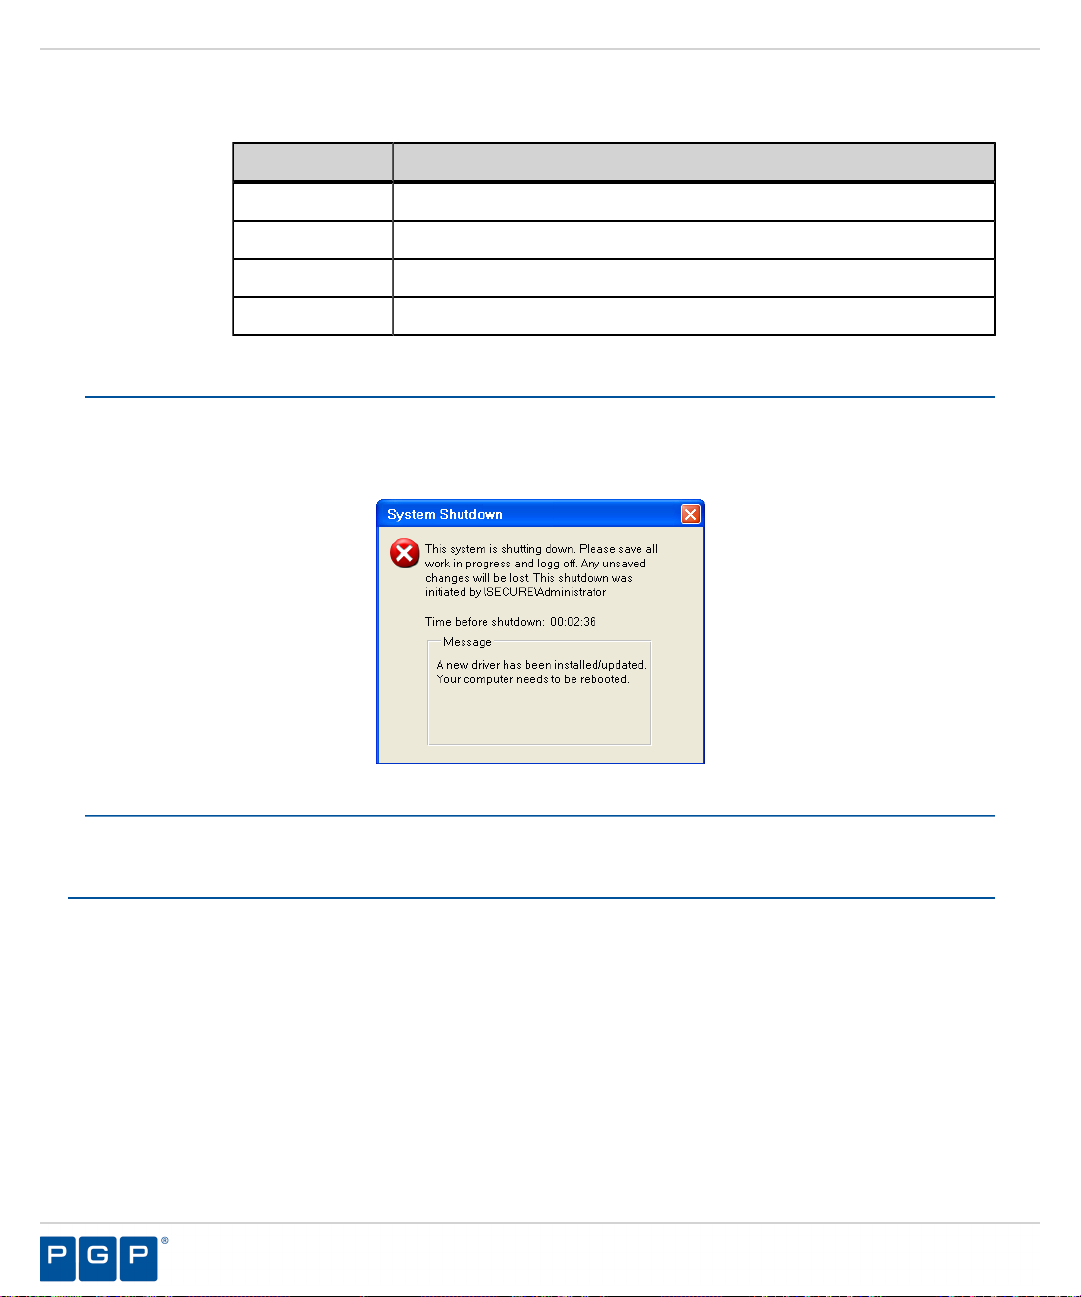
PGP Endpoint
showing the overall deployment status the deployment package. The following table describes
the status bar.
Color Status Condition
Turquoise Task completed successfully.
Green Task in progress with no warning.
Yellow Task in progress or completed with warnings.
Red Task in progress or stopped with an error.
Result:
After Completing This Task:
If you chose to restart the client after deployment is complete, the System Shutdown dialog displays with the
message created when selecting the reboot option(s), as illustrated by the following example.
Figure 65: System Shutdown Dialog
The deployment package is silently deployed the designated computer(s) or computer group(s).
Querying Client Status
You can use the PGP Endpoint Client Deployment Query for target computers to determine the operating system
that is running, whether a client is installed and which version, whether hardening is enabled, and whether the
PGP Endpoint components are running.
Select Start > Programs > PGP > PGP Endpoint > Endpoint Management Server Console > PGP
1.
Endpoint Client Deployment.
Step Result:
Click Query.
2.
The PGP Endpoint Client Deployment dialog opens.
- 80 -
Page 81
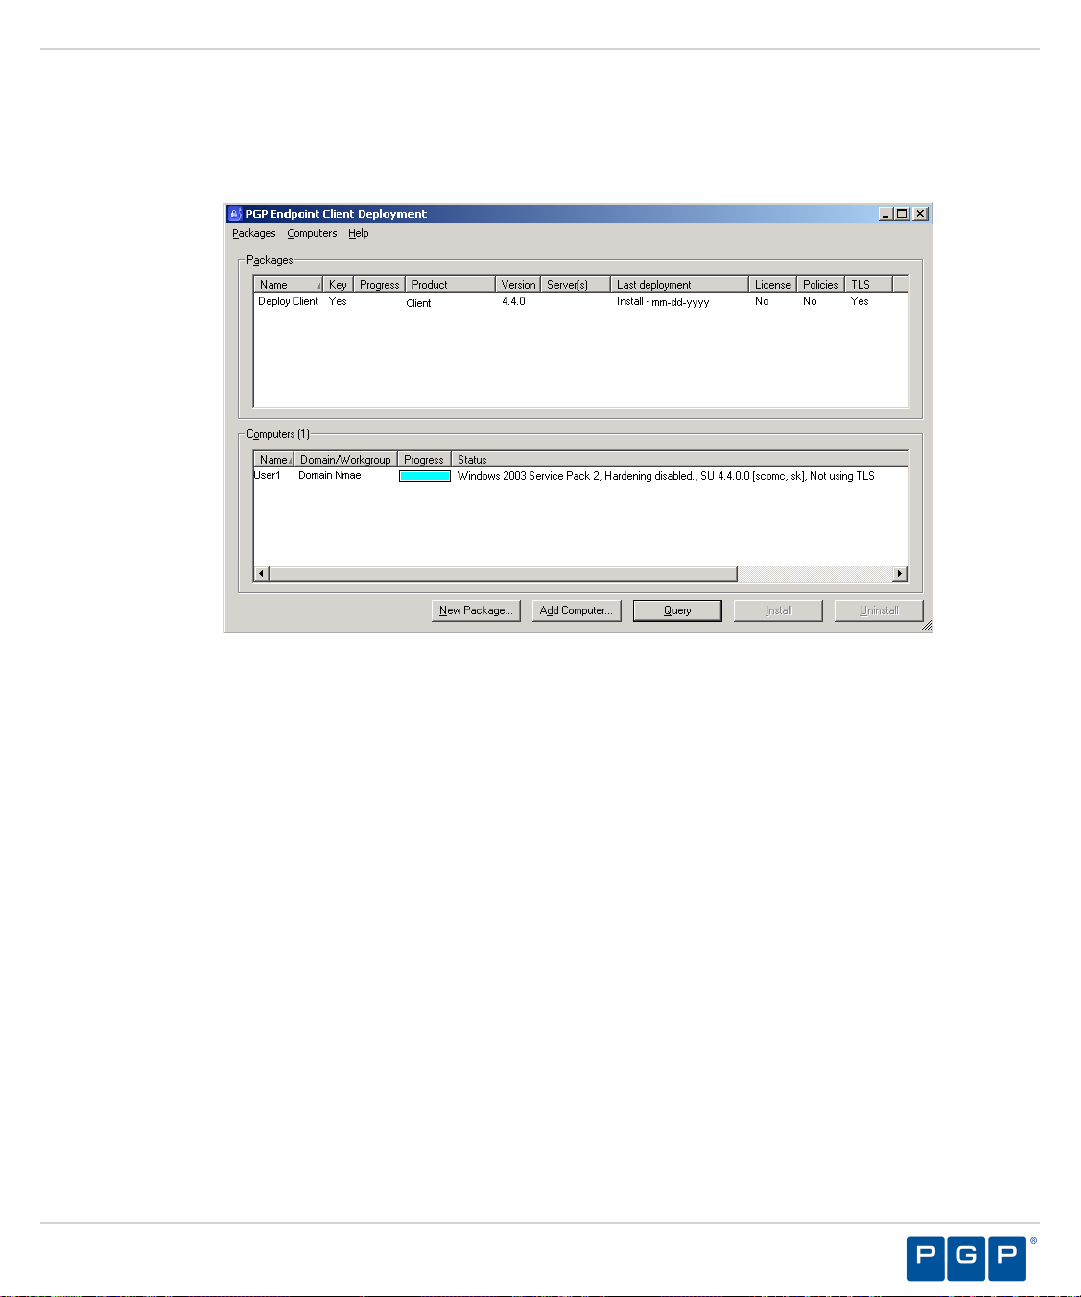
3.
From the Packages panel, select a deployment package from the list.
Using PGP Endpoint Client Deployment
Result:
The Computers panel lists the computers where the deployment package(s) are installed. The Status
column describes the client operating system and version, TLS protocol selection, and client hardening
status.
Figure 66: PGP Endpoint Client Deployment Dialog
- 81 -
Page 82

PGP Endpoint
- 82 -
Page 83

Appendix
A
Configuring DCOM Settings for the Administration Server
In this appendix:
• Setting Up Distributed Component
Object Model (DCOM)
• Set Access Control List Security
Permissions
The Distributed Component Object Model (DCOM) is a Microsoft
technology that supports communication among software components
distributed across networked computers, such as the PGP Endpoint
Administration Server and Management Server Console.
The Log Explorer module uses the Microsoft® Distributed Component
Object Model (DCOM) protocol to retrieve log entries from the
Management Server Console that is connected to theAdministration
Server. The other Management Server Console modules use Remote
procedure calls (RPC) for network communication. If you intend to
install the Management Server Console on a different computer or
server than the Administration Server, the network administrator must:
Configure the DCOM settings for the Administration Server.
1.
Set the security permissions for the computer-wide access control
2.
lists (ACLs) that govern access to all call, activation, or launch
requests on the server, using Microsoft Group Policy to manage
computer-wide DCOM access restrictions.
Note: DCOM does not work across non-trusted domains, especially
when using workgroups.
Setting Up Distributed Component Object Model (DCOM)
®
The network administrator(s) that are responsible for using the Management Server Console must have the
security access permissions set in Windows Component Services for DCOM properties.
Select Start > Run .
1.
- 83 -
Page 84
PGP Endpoint
Type dcomcnfg in the Open: field.
2.
Step Result:
Figure 67: Component Services Dialog
Double-click Component Services.
3.
Double-click Computers.
4.
Step Result:
The Component Services dialog opens.
Attention: The steps described in this procedure are based on using a Windows® Server
2003 SP1 operating system (OS). If you are using a different Windows OS, the steps and step
results may vary.
My Computer is listed in the right pane.
Right-click My Computer.
5.
- 84 -
Page 85
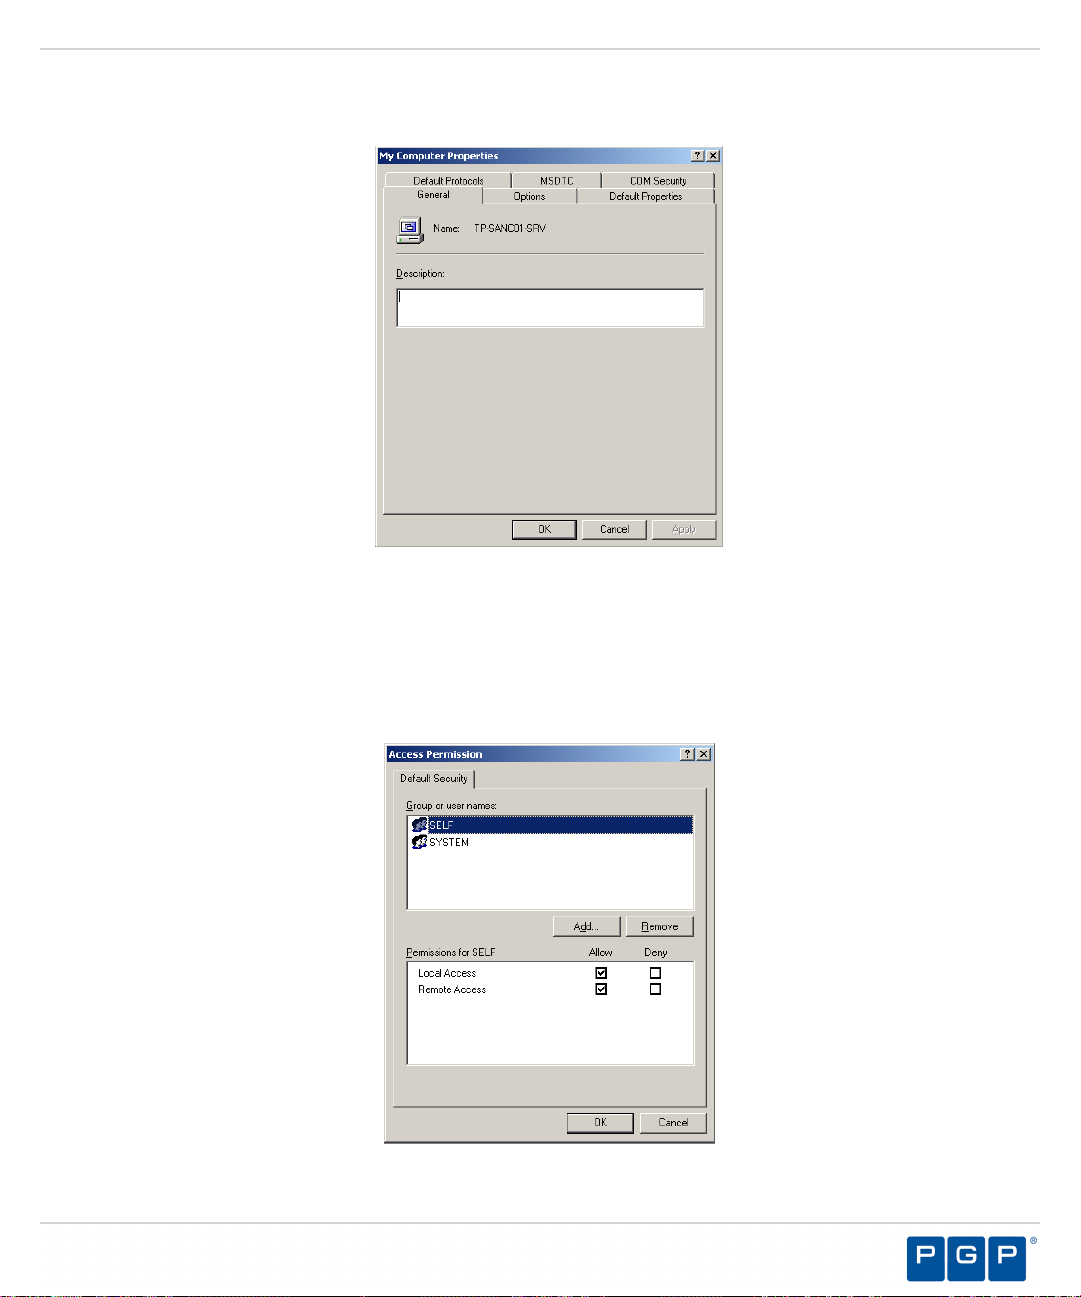
Select Properties.
6.
Step Result:
Figure 68: My Computer Properties Dialog
The My Computer Properties dialog opens.
Configuring DCOM Settings for the Administration Server
7.
Select the COM Security tab.
8.
In the Access Permissions panel, click Edit Default.
a) Click No, for any warning screens that appear.
Step Result:
Figure 69: Access Dialog
The Access Permissions dialog opens.
- 85 -
Page 86
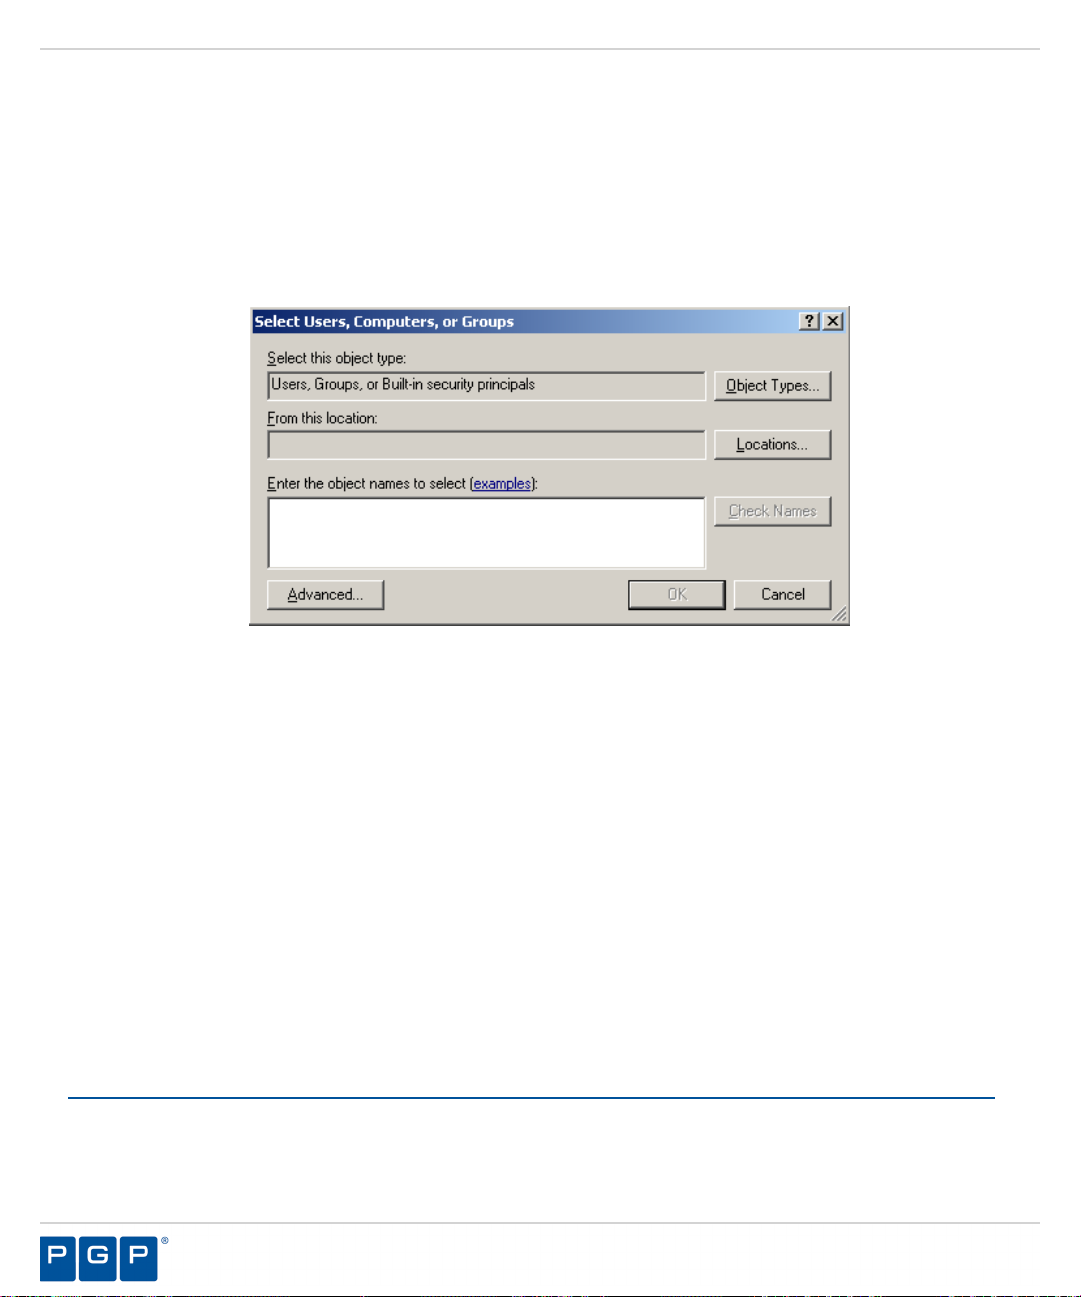
PGP Endpoint
Verify that:
9.
• SELF (the logged in user) is listed.
• SYSTEM is listed.
•
To create a new profile with the necessary permissions, click Add.
10.
The Permissions for SELF (and SYSTEM) Allow check boxes are selected for Local Access and
Remote Access.
Step Result:
Figure 70: Select Users or Groups
In the Select this object type field, verify that at least Users is entered. If not:
11.
a) Click Object Types and select Users.
b) In the From this location field, verify your computer name is entered.
c) Or, click Locations and select your computer name.
d) In the Enter objects name to select field, type a new object.
e) Click OK.
f)
In the Access dialog, select the new object.
g) Select the Allow check box.
Click OK.
12.
Click OK.
13.
14.
Close the Component Services dialog.
The Select Users or Groups dialog opens.
Set Access Control List Security Permissions
The network administrator(s) that are responsible for using the Management Server Console must have Access
Control List (ACL) permissions configured for network Distributed Component Object Model (DCOM) security.
Select Start > Run.
1.
- 86 -
Page 87

Configuring DCOM Settings for the Administration Server
Type gpedit.msc in the Open: field.
2.
Step Result:
Figure 71: Group Policy Object Editor Dialog
Select Computer Configuration > Windows Settings > Security Settings > Local Policies > Security
3.
The Group Policy Object Editor dialog opens.
Options.
Step Result:
The right pane refreshes, listing the Policy settings.
Figure 72: Group Policy Object Editor - Security Settings
Double-click DCOM: Machine Access Restrictions in Security Descriptor Definition Language (SDDL)
4.
syntax from the Policy column in right pane.
Click Edit Security.
5.
Add users and/or groups.
6.
Select any or all of the following options for each user or group:
7.
- 87 -
Page 88

PGP Endpoint
• Local Access
• Remote Access
Click OK.
8.
Double-click DCOM: Machine Launch Restrictions in Security Descriptor Definition Language
9.
(SDDL) syntax from the Policy column in the right pane.
Click Edit Security.
10.
Add users and/or groups.
11.
Select any or all of the following options for each user or group:
12.
• Local Launch
• Remote Launch
• Local Activation
• Remote Activation
Click OK.
13.
14.
Close Group Policy Object Editor dialog.
Select Start > Run.
15.
Run gpupdate.exe from the command line.
16.
Result:
Group policy settings are refreshed with the DCOM settings that you specified.
- 88 -
Page 89

Appendix
B
Installing the Client for Windows XP Embedded
In this appendix:
• Windows XPe Client Limitations
• Supported Devices
• Installing the Client for Windows
XPe
PGP Endpoint provides a modular version of Application Control and
Device Control for Windows XP® for Embedded Systems (XPe).
Windows XPe is an edition of Windows XP that contains the full
feature set of Windows XP Professional, but has restrictions on
licensing that require the resulting device to boot directly into the
original equipment manufacturer (OEM) application. Windows XPe is
a componentized version of Windows XP Professional. When building
the operating system (OS) image, the OEM chooses only necessary
software components, which reduces the OS footprint, compared to
XP Professional. Component behavior is defined by component script
and dynamic HTML.
The componentized PGP Endpoint client is a modular application that
expresses driver functionality as:
• Properties sets.
• Optional scripts.
• Resources including files, registry entries, and dependencies.
Windows XPe Client Limitations
The client has some limitations when used with Windows XPe.
The following limitations apply to using the PGP Endpoint client with Windows XP Embedded (XPe).
•
User notification displays only in the Explorer shell.
• The Rtnotify icon displays only when the Show notification in the Taskbar option is enabled in the
Explorer shell.
• The PGP Endpoint client cannot be deployed on Windows XPe thin clients using the PGP Endpoint Client
Deployment Tool.
• The public key sx-public.key cannot be imported using the componentized PGP Endpoint client
installation.
- 89 -
Page 90
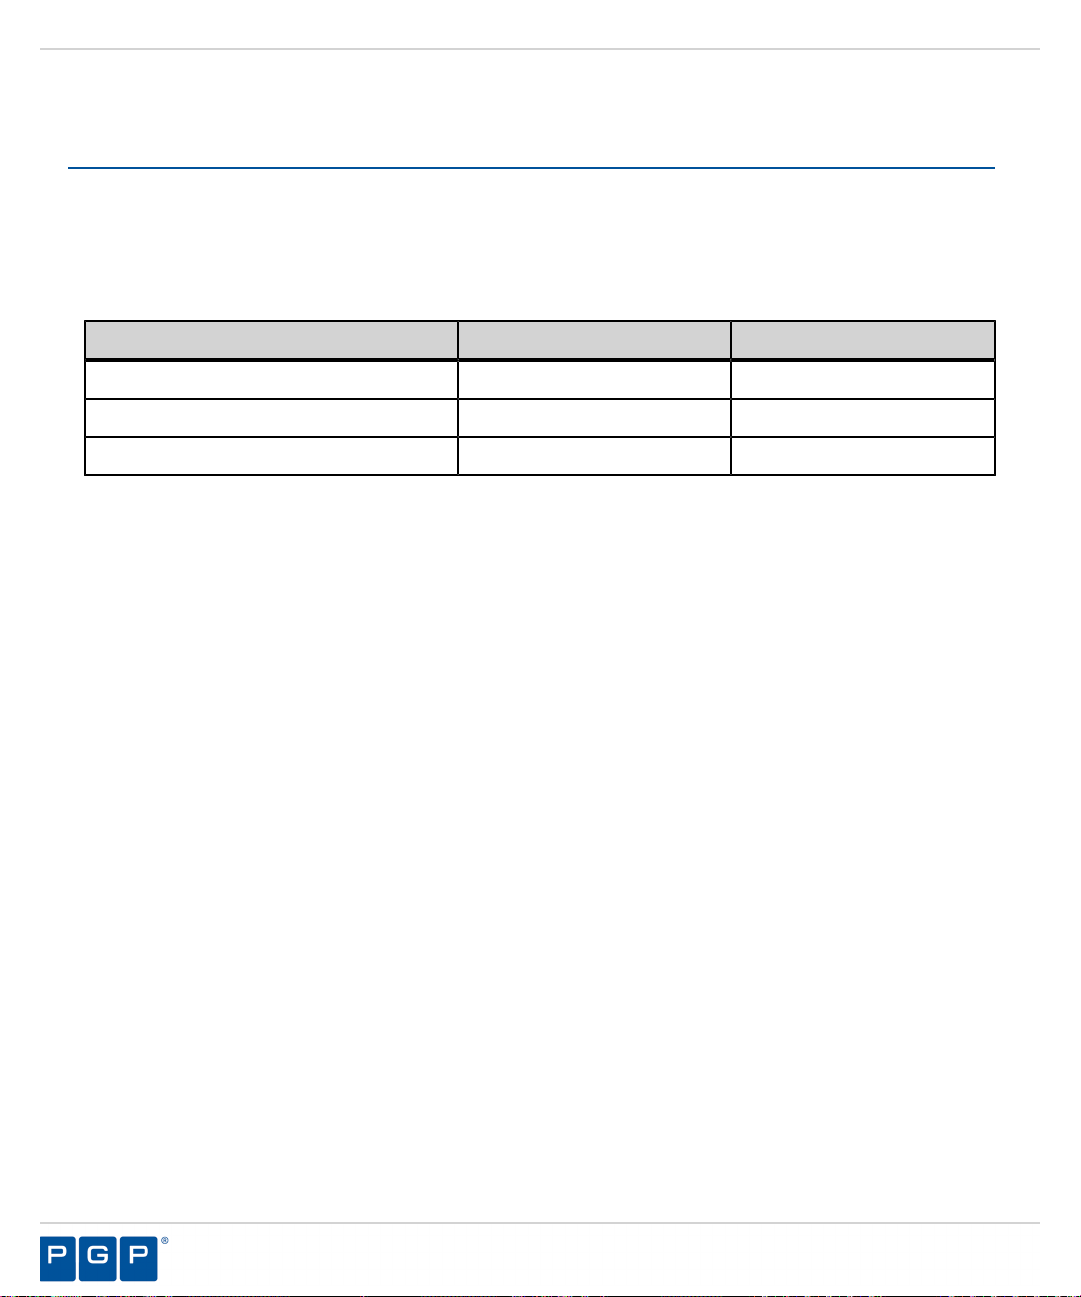
PGP Endpoint
Supported Devices
The PGP Endpoint client for Windows XPe supports a limited number of device groups for removable storage
devices.
The devices supported by the PGP Endpoint client running Windows XP® Embedded compared to Windows XP
Professional are listed in the following table.
Table 12: Device Groups Supported by PGP Endpoint
Device Group Window XP Windows XPe
DVD/CD Drives Supported Supported
Floppy Disk Drives Supported Supported
Removable Storage Devices Supported Supported
- 90 -
Page 91

Installing the Client for Windows XP Embedded
Installing the Client for Windows XPe
You install the PGP Endpoint client for Windows XPe using the same installation software as a Windows XP
installation. However, you must disable the Windows XPe Enhanced Write Filter (EWF) before installing the
client, and re-enable the EWF post-installation. EWF provides the ability to write-protect a run-time image.
Prerequisites:
Before you can successfully install the PGP Endpoint client, you must:
• Verify that you satisfy the minimum hardware and software system requirements.
• Copy the sx-public.key file for the PGP Endpoint client to the Client folder located where you
downloaded the PGP Endpoint software. The PGP Endpoint client installer detects the public key during
installation and copies the key to the target directory ( %windir%\sxdata ).
Note: If you are installing the PGP Endpoint client for Windows XP Embedded (XPe), please refer to
Installing the Client for Windows XP Embedded, for specific installation instructions.
• Install the Administration Server.
• Install the Management Server Console.
• You must identify the Administration Server IP address or fully qualified domain name (FQDN) using the
Target Designer component of Microsoft Windows Embedded Studio Development Tools for Windows
XP Embedded. See Microsoft Windows Embedded Studio Development Tools for Windows XP Embedded (
http://msdn.microsoft.com/en-us/library/ms838630.aspx ) for more information about the Target Designer
component.
•
You must disable the Windows XPe Enhanced Write Filter (EWF) using the configuration procedures
and vbscripts provided by Microsoft for Windows XPe. For specific procedures and code examples, see
Enhanced Write Filter, File-Based Write Filter, and Systems Management Server 2003 Interoperability
on Windows XP Embedded Service Pack 2 Feature Pack 2007 ( http://msdn.microsoft.com/en-us/library/
bb147518(WinEmbedded.5).aspx#Configuration ).
Verify that the domain information in the PGP Endpoint database is synchronized as follows:
1.
a) From the Management Server Console, select Tools > Synchronize Domain Members.
Step Result:
Figure 73: Synchronize Domain Dialog
The Synchronize Domain dialog opens.
- 91 -
Page 92

PGP Endpoint
b) Enter the name of the domain that you want to synchronize.
c) Click OK.
Log in as an administrative user to the computer where you are deploying the PGP Endpoint client.
2.
Close all programs running on the computer.
3.
From the location where you saved the PGP Endpoint application software, run \client\setup.exe file.
4.
Note: When you enter a computer name that is a domain controller, the domain controller is used for
synchronization. This is useful when replication between domain controllers is slow.
Attention: When you use PGP Endpoint in a Novell environment, you must run the
ndssync_ldap.vbs synchronization script found in the scripts folder where you stored the
application software after downloading. This can be done manually when there are few changes in your
eDirectory structure or you use automatically scheduling software.
Step Result:
Click Next.
5.
Step Result:
Figure 74: License Agreement Page
Review the license agreement, and, if you agree, select I accept the terms in the license agreement.
6.
The Installation Wizard Welcome page opens.
The License Agreement page opens.
- 92 -
Page 93

Installing the Client for Windows XP Embedded
Click Next.
7.
Step Result:
Figure 75: Encrypted Communication Page
Select one of the following options that matches the option you selected when installing the Administration
8.
The Encrypted Communication page opens.
Server:
Option Description
Server is using unencrypted
protocol
Communication between the Administration Server and PGP Endpoint
client is not using the TLS communication protocol. Communication is
not encrypted but is signed using the private key.
Authentication certificate will
be generated by setup
Communication between the Administration Server and PGP Endpoint
client uses the TLS communication protocol. Communication is
encrypted and the digital certificate is generated manually during
installation.
- 93 -
Page 94
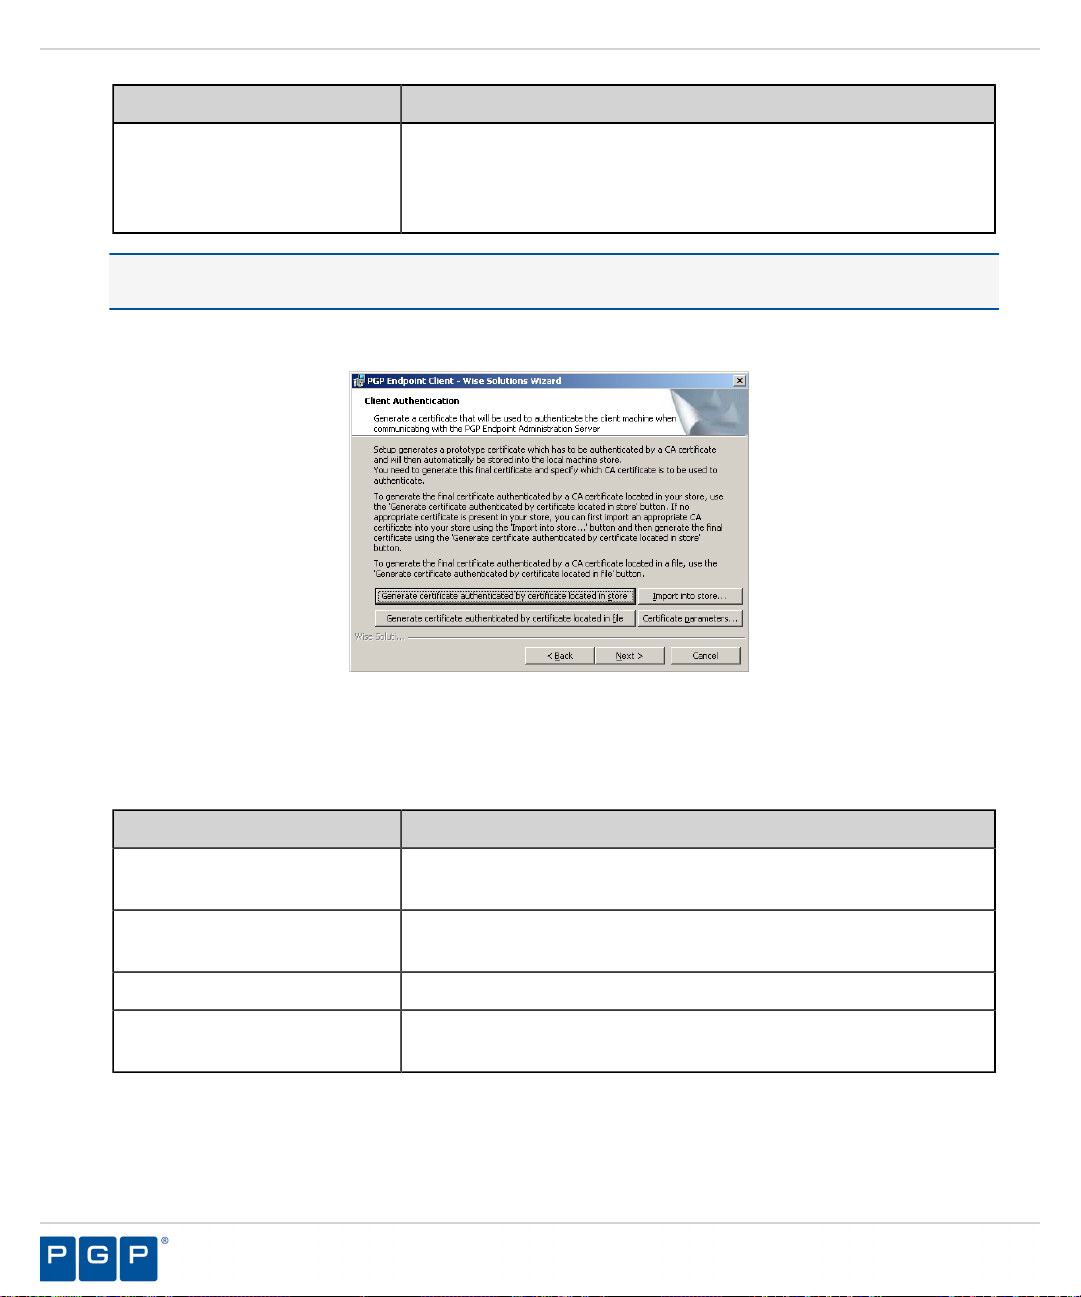
PGP Endpoint
Option Description
Authentication certificate will
be retrieved from a CA
Communication between the Administration Server and PGP Endpoint
client uses the TLS communication protocol. Communication is
encrypted and the digital certificate is retrieved automatically during
installation.
Tip: PGP recommends that you use the automatic TLS retrieval option to deploy Certificate Authority
infrastructure for issuing valid digital certificates.
Step Result:
If you opt to manually generate a certificate during setup, the Client Authentication dialog
opens.
Figure 76: Client Authentication Dialog
To manually generate a certificate during setup specify the computer certificate location and parameters from
9.
the following options.
Option Description
Generate certificate signed by
certificate located in store
Generate certificate signed by
certificate located in file
Import into store
Certificate parameters
Generates a digital certificate during installation by using a signature
certificate located in the local user store.
Generates a digital certificate during installation by using a signature
certificate located in a specified file.
Imports a signature certificate into the local user store.
Specifies the certificate parameters for the Cryptographic service
provider, Key length, Validity, and Signature.
- 94 -
Page 95
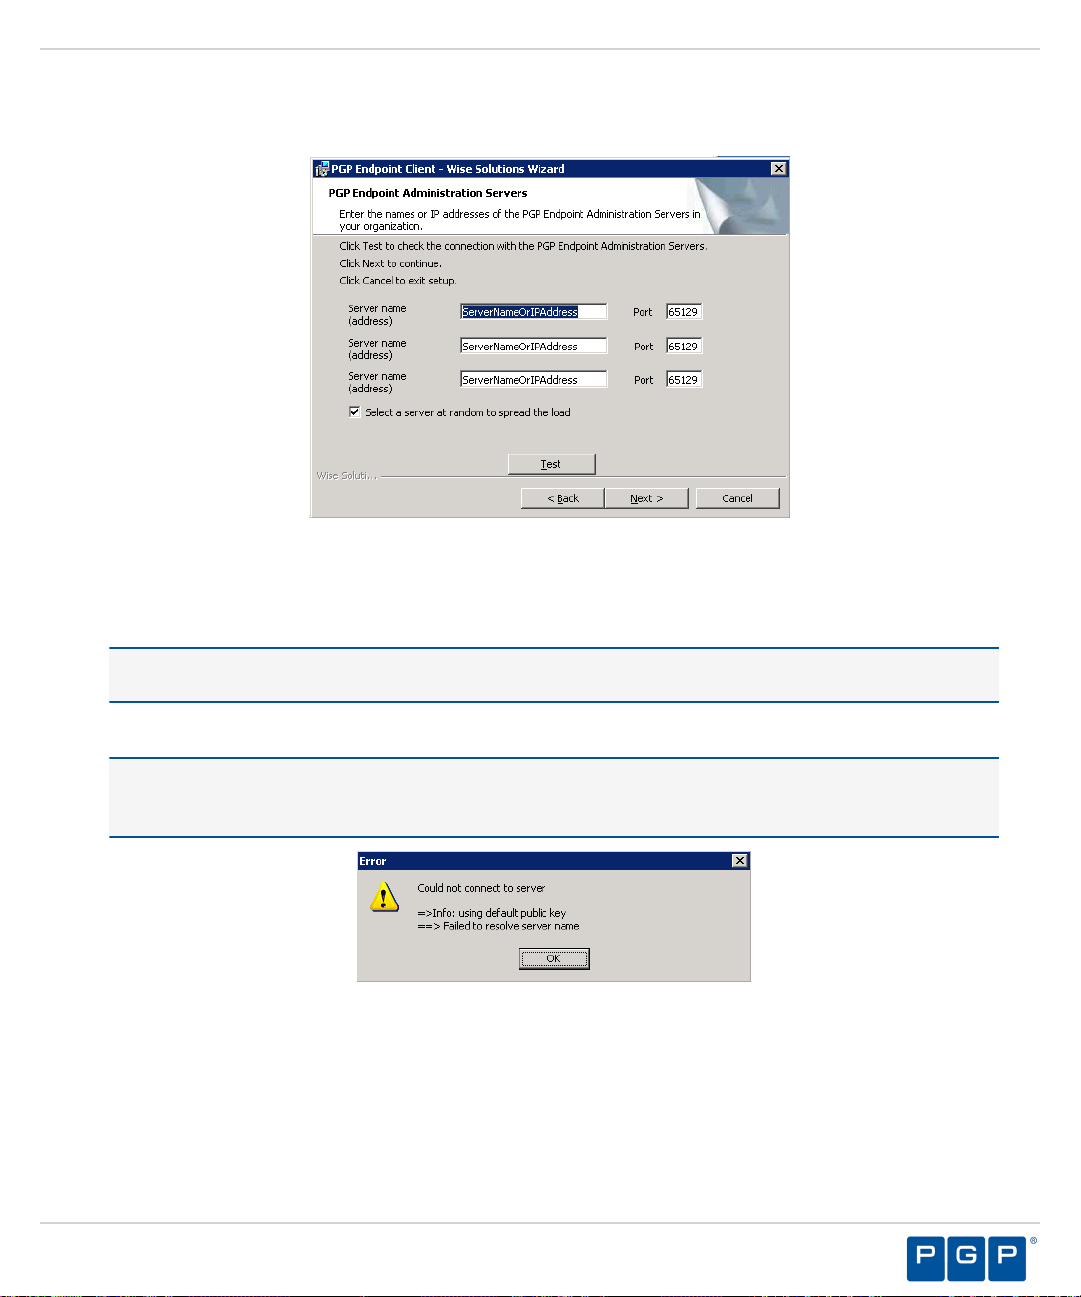
Installing the Client for Windows XP Embedded
Click Next.
10.
Step Result:
Figure 77: Administration Server s Page
Specify up to three server names using fully qualified domain names (FQDN) or IP addresses that are
11.
The PGP Endpoint Administration Servers page opens.
managed from the Management Server Console.
Caution: Do not use IP address(es) when using the TLS communication protocol for encryption. You can
only use FQDNs for when using the TLS communication protocol.
Verify that the PGP Endpoint client connects to the Administration Server by clicking Test.
12.
Caution: You can proceed with client installation if the Administration Server is unavailable, by clicking
OK in the following dialog. The client can establish a connection with the server later, when the server is
available.
Figure 78: Error Dialog
Step Result:
By default, PGP Endpoint connects with the first available server and retrieves default policy
settings from the server.
If you are specifying more than one server, select or deselect the Select a server at random to spread the
13.
load option.
- 95 -
Page 96
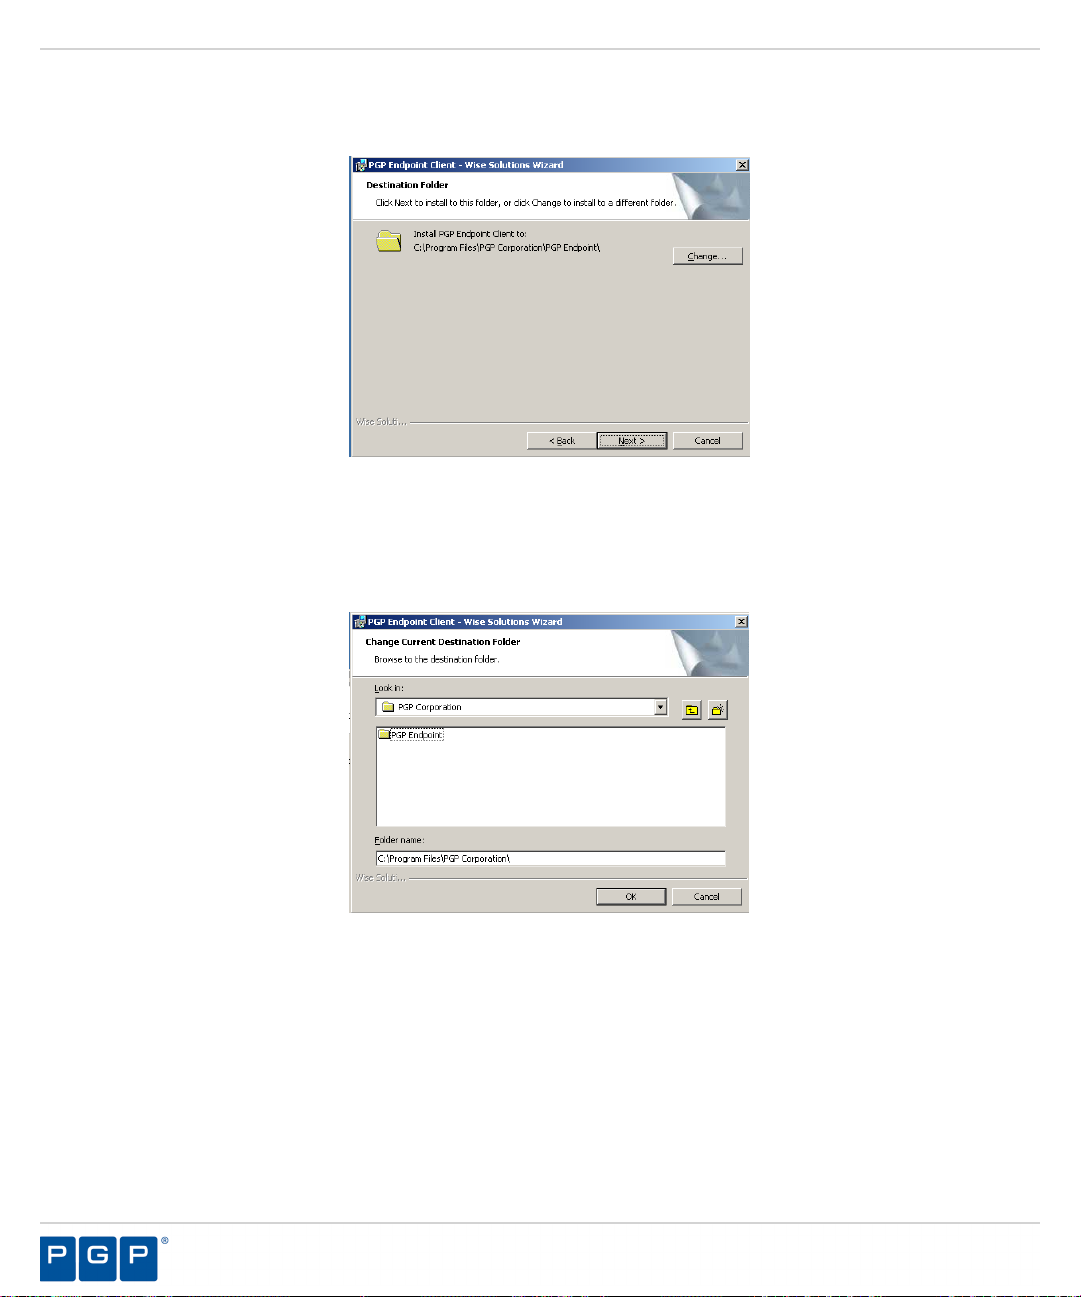
PGP Endpoint
Click Next.
14.
Step Result:
Figure 79: Destination Folder Page
You may choose an installation destination folder other than the PGP Endpoint default folder C:\Program
15.
Files\PGP Corporation\PGP Endpoint, by clicking Change.
The Destination Folder page opens.
Step Result:
Figure 80: Change Current Destination Folder Page
Select a folder from the Look in: field.
16.
Click OK.
17.
Step Result:
The Change Current Destination Folder page opens.
The Change Current Destination Folder closes, and the Destination Folder page changes to
reflect the new location.
- 96 -
Page 97
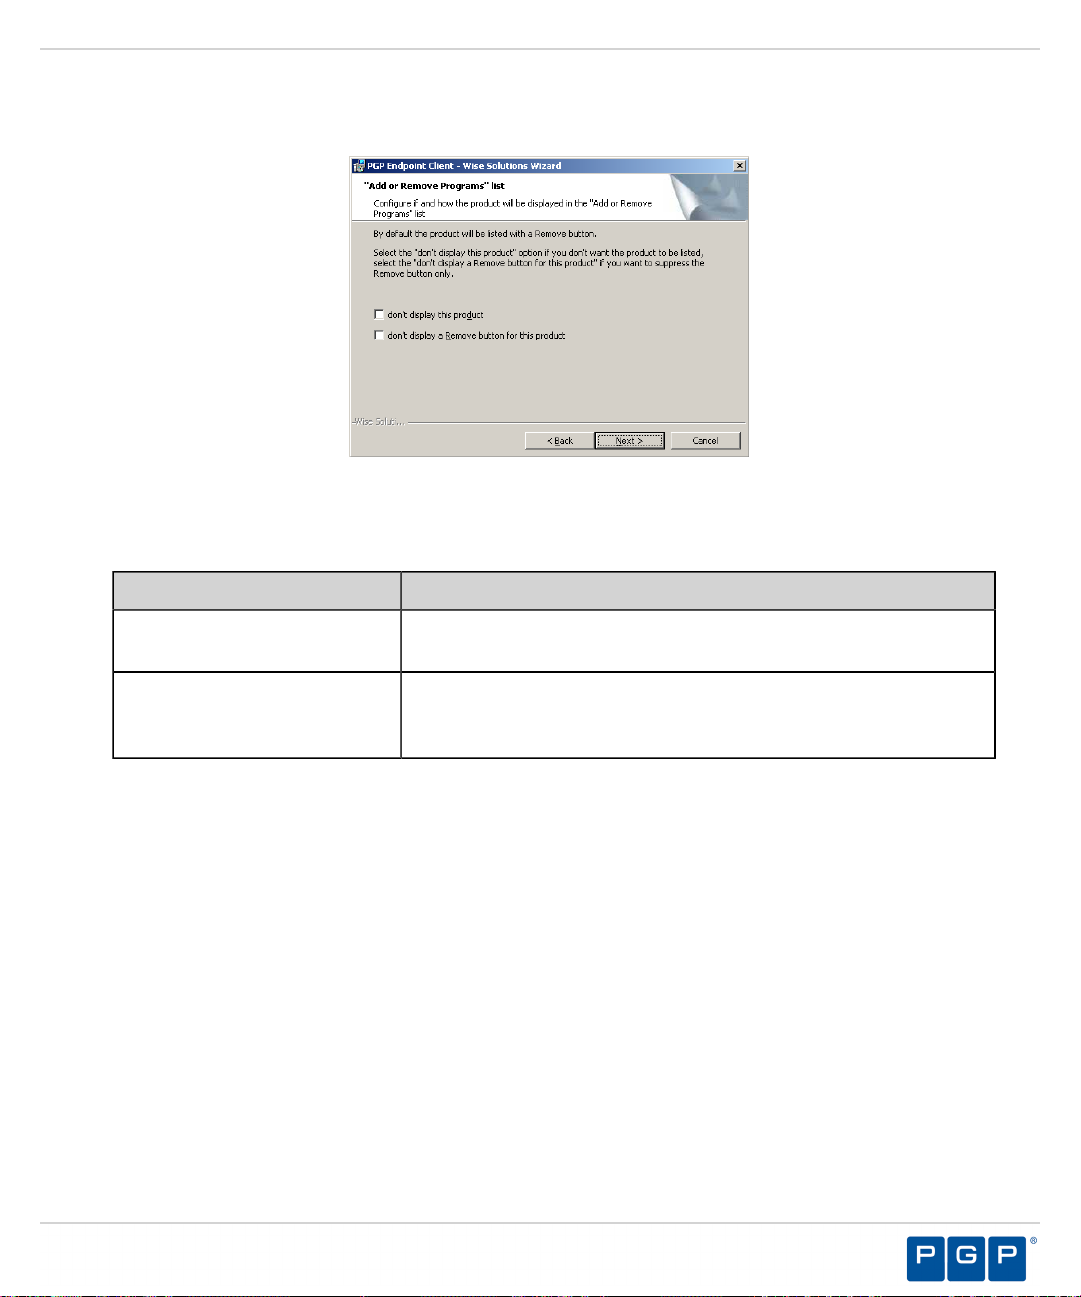
Installing the Client for Windows XP Embedded
Click Next.
18.
Step Result:
Figure 81: Add or Remove Programs List Page
You may select one of the following options, which are not required to proceed with installation:
19.
The “Add or Remove Programs” list page opens.
Option Description
Don’t display this product
Don’t display the Remove
button for this product
Does not display the PGP Endpoint component names in the Add or
Remove Programs list in the Windows Control Panel.
Displays the PGP Endpoint component names in the Add or Remove
Programs list in the Windows Control Panel without the Remove
option.
- 97 -
Page 98
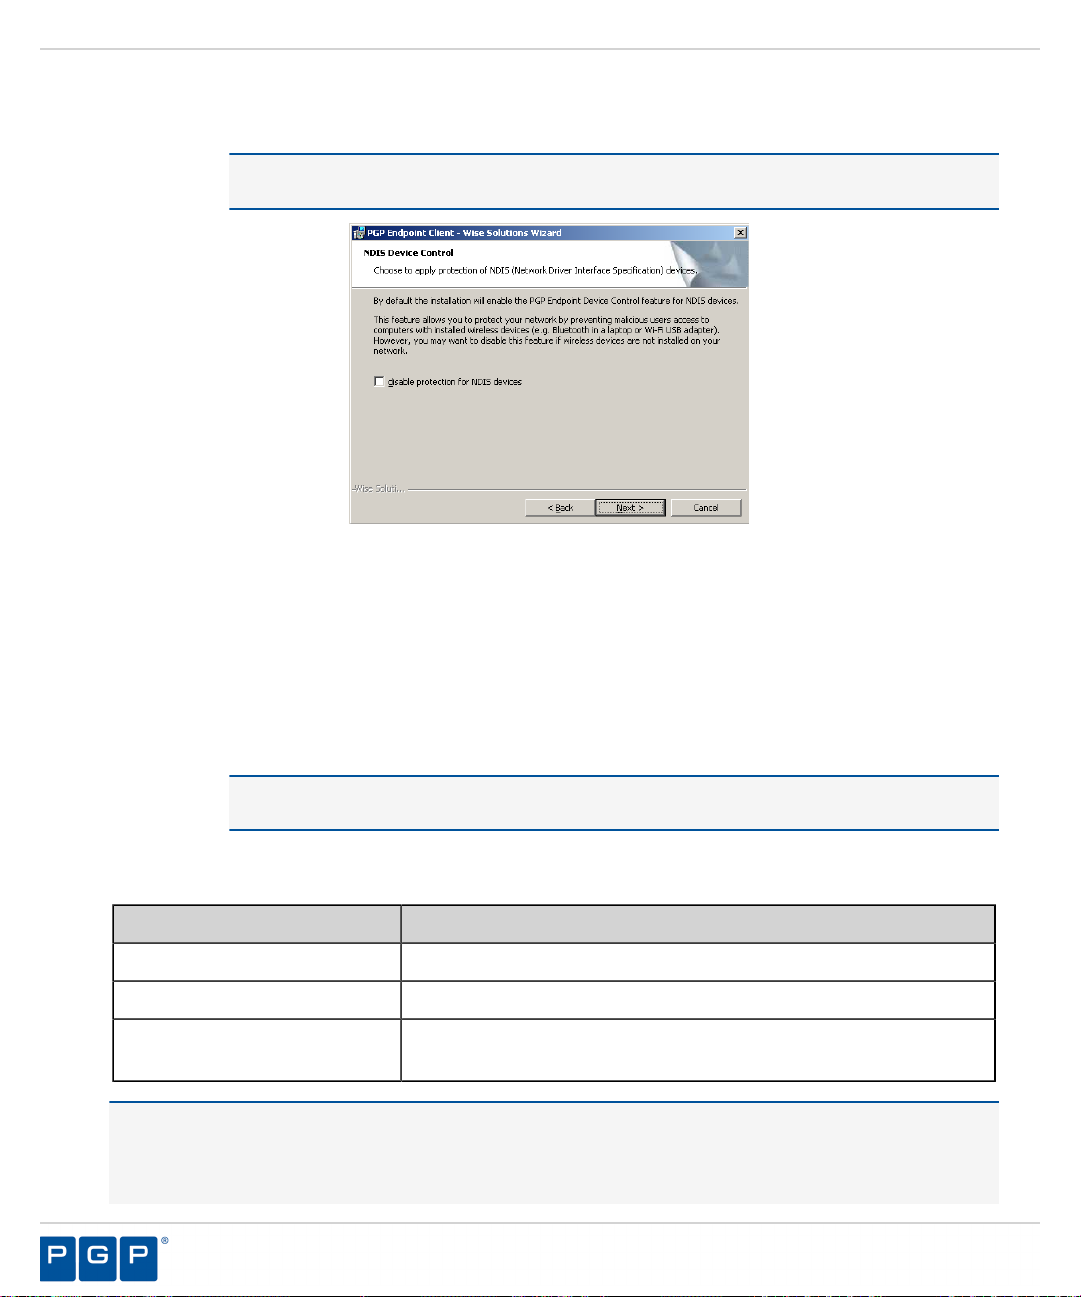
PGP Endpoint
Click Next.
20.
Step Result:
Figure 82: NDIS Device Control Page
Select the disable protection for NDIS devices check box to allow the use of wireless devices.
21.
Click Next.
22.
Step Result:
The NDIS Device Control page opens.
Note: NDIS enables Device Control to control 802.1x wireless adapters. If you do not need
this protection, you may disable it here.
The Ready to Install the Program page opens.
Click Install.
23.
Step Result:
A progress bar runs on the page, showing installation progress.
Attention: The Setup dialog warning opens when there is an invalid, non-reachable server
address and no policy file exists.
Select one of the following options.
24.
Option Description
Abort
Retry
Ignore
Does not retrieve the policy file and cancels the installation process.
Attempts to retrieve the policy file and continue setup.
Skips policy file retrieval and continues setup, creating the risk of
blocking the computer from all device and executable file access.
Danger: If you select Ignore, the PGP Endpoint suite installs with the most restrictive default file execution
policy that denies use of all devices and/or executable files. This type of installation will deny you access to
devices and software that you use on your computer, which can make the computer inaccessible. When you
install a client offline for use with PGP Endpoint Application Control you must provide a policy settings file.
- 98 -
Page 99

Installing the Client for Windows XP Embedded
Refer the PGP Endpoint Application Control User Guide for more information about creating and exporting
policy settings files.
Step Result:
Click Finish.
25.
Result:
After Completing This Task:
You must restart your computer system for the PGP Endpoint client configuration changes to become effective
and enable the use of the PGP Endpoint client.
Then, you must re-enable the Windows XPe Enhanced Write Filter after client installation using the
configuration procedures and vbscripts provided by Microsoft for Windows XPe. For specific procedures
and code examples, see Enhanced Write Filter, File-Based Write Filter, and Systems Management Server 2003
Interoperability on Windows XP Embedded Service Pack 2 Feature Pack 2007 ( http://msdn.microsoft.com/enus/library/bb147518(WinEmbedded.5).aspx#Configuration .
Important: Any changes to the client default settings require you to disable and re-enable the Enhanced Write
Filter before and after making changes to default settings.
The PGP Endpoint client is installed and connects to the Administration Server.
The Completed page opens.
- 99 -
Page 100

PGP Endpoint
- 100 -
 Loading...