

Page 1

PGP® Desktop 9.8 for Windows
User's Guide
Page 2

Page 3

Version Information
PGP Desktop for Windows User's Guide. PGP Desktop Version 9.8.2. Released March 2008.
Copyright Information
Copyright © 1991–2008 by PGP Corporation. All Rights Reserved. No part of this document can be reproduced or transmitted in any form or by any
means, electronic or mechanical, for any purpose, without the express written permission of PGP Corporation.
Trademark Information
PGP, Pretty Good Privacy, and the PGP logo are registered trademarks of PGP Corporation in the US and other countries. IDEA is a trademark of
Ascom Tech AG. Windows and ActiveX are registered trademarks of Microsoft Corporation. AOL is a registered trademark, and AOL Instant
Messenger is a trademark, of America Online, Inc. Red Hat and Red Hat Linux are trademarks or registered trademarks of Red Hat, Inc. Linux is a
registered trademark of Linus Torvalds. Solaris is a trademark or registered trademark of Sun Microsystems, Inc. AIX is a trademark or registered
trademark of International Business Machines Corporation. HP-UX is a trademark or registered trademark of Hewlett-Packard Company. SSH and
Secure Shell are trademarks of SSH Communications Security, Inc. Rendezvous and Mac OS X are trademarks or registered trademarks of Apple
Computer, Inc. All other registered and unregistered trademarks in this document are the sole property of their respective owners.
Licensing and Patent Information
The IDEA cryptographic cipher described in U.S. patent number 5,214,703 is licensed from Ascom Tech AG. The CAST-128 encryption algorithm,
implemented from RFC 2144, is available worldwide on a royalty-free basis for commercial and non-commercial uses. PGP Corporation has secured a
license to the patent rights contained in the patent application Serial Number 10/655,563 by The Regents of the University of California, entitled Block
Cipher Mode of Operation for Constructing a Wide-blocksize block Cipher from a Conventional Block Cipher. Some third-party software included in PGP
Universal Server is licensed under the GNU General Public License (GPL). PGP Universal Server as a whole is not licensed under the GPL. If you would
like a copy of the source code for the GPL software included in PGP Universal Server, contact PGP Support (
Corporation may have patents and/or pending patent applications covering subject matter in this software or its documentation; the furnishing of this
software or documentation does not give you any license to these patents.
http://www.pgp.com/support). PGP
Acknowledgments
This product includes or may include:
• The Zip and ZLib compression code, created by Mark Adler and Jean-Loup Gailly, is used with permission from the free Info-ZIP implementation,
developed by zlib (
under the MIT License found at
freely available high-quality data compressor, is copyrighted by Julian Seward, © 1996-2005. • Application server (
http://www.apache.org/), Jakarta Commons (http://jakarta.apache.org/commons/license.html) and log4j, a Java-based library used to parse
server (
HTML, developed by the Apache Software Foundation. The license is at
binding framework for moving data from XML to Java programming language objects and from Java to databases, is released by the ExoLab Group
under an Apache 2.0-style license, available at
Foundation that implements the XSLT XML transformation language and the XPath XML query language, is released under the Apache Software
License, version 1.1, available at
Protocol") used for communications between various PGP products is provided under the Apache license found at
http://www.apache.org/licenses/LICENSE-2.0.txt. • mx4j, an open-source implementation of the Java Management Extensions (JMX), is released
under an Apache-style license, available at
Independent JPEG Group. (
distributed under the MIT License
copyrighted and distributed by University of Cambridge. ©1997-2006. The license agreement is at
Binary Tree Library and Domain Name System (DNS) protocols developed and copyrighted by Internet Systems Consortium, Inc. (
• Free BSD implementation of daemon developed by The FreeBSD Project, © 1994-2006. • Simple Network Management Protocol Library developed
and copyrighted by Carnegie Mellon University © 1989, 1991, 1992, Networks Associates Technology, Inc, © 2001- 2003, Cambridge Broadband Ltd.
© 2001- 2003, Sun Microsystems, Inc., © 2003, Sparta, Inc, © 2003-2006, Cisco, Inc and Information Network Center of Beijing University of Posts
and Telecommunications, © 2004. The license agreement for these is at
developed by Network Time Protocol and copyrighted to various contributors. • Lightweight Directory Access Protocol developed and copyrighted by
OpenLDAP Foundation. OpenLDAP is an open-source implementation of the Lightweight Directory Access Protocol (LDAP). Copyright © 1999-2003,
The OpenLDAP Foundation. The license agreement is at
4.2.1 developed by OpenBSD project is released by the OpenBSD Project under a BSD-style license, available at
bin/cvsweb/src/usr.bin/ssh/LICENCE?rev=HEAD. • PC/SC Lite is a free implementation of PC/SC, a specification for SmartCard integration is released
under the BSD license. • Postfix, an open source mail transfer agent (MTA), is released under the IBM Public License 1.0, available at
http://www.opensource.org/licenses/ibmpl.php. • PostgreSQL, a free software object-relational database management system, is released under a
BSD-style license, available at
PostgreSQL database using standard, database independent Java code, (c) 1997-2005, PostgreSQL Global Development Group, is released under a
BSD-style license, available at
database management system, is released under a BSD-style license, available at
version of cron, a standard UNIX daemon that runs specified programs at scheduled times. Copyright © 1993, 1994 by Paul Vixie; used by permission.
• JacORB, a Java object used to facilitate communication between processes written in Java and the data layer, is open source licensed under the
GNU Library General Public License (LGPL) available at
is an open-source implementation of a CORBA Object Request Broker (ORB), and is used for communication between processes written in C/C++ and
the data layer. Copyright (c) 1993-2006 by Douglas C. Schmidt and his research group at Washington University, University of California, Irvine, and
Vanderbilt University. The open source software license is available at
downloading files via common network services, is open source software provided under a MIT/X derivate license available at
http://curl.haxx.se/docs/copyright.html. Copyright (c) 1996 - 2007, Daniel Stenberg. • libuuid, a library used to generate unique identifiers, is released
under a BSD-style license, available at
• libpopt, a library that parses command line options, is released under the terms of the GNU Free Documentation License available at
http://directory.fsf.org/libs/COPYING.DOC. Copyright © 2000-2003 Free Software Foundation, Inc. • gSOAP, a development tool for Windows clients
to communicate with the Intel Corporation AMT chipset on a motherboard, is distributed under the GNU Public License, available at
http://www.zlib.net). • Libxml2, the XML C parser and toolkit developed for the Gnome project and distributed and copyrighted
http://www.opensource.org/licenses/mit-license.html. Copyright © 2007 by the Open Source Initiative. • bzip2 1.0, a
http://jakarta.apache.org/), web
www.apache.org/licenses/LICENSE-2.0.txt. • Castor, an open-source, data-
http://www.castor.org/license.html. • Xalan, an open-source software library from the Apache Software
http://xml.apache.org/xalan-j/#license1.1. • Apache Axis is an implementation of the SOAP ("Simple Object Access
http://mx4j.sourceforge.net/docs/ch01s06.html. • jpeglib version 6a is based in part on the work of the
http://www.ijg.org/) • libxslt the XSLT C library developed for the GNOME project and used for XML transformations is
http://www.opensource.org/licenses/mit-license.html. • PCRE version 4.5 Perl regular expression compiler,
http://www.pcre.org/license.txt. • BIND Balanced
http://www.isc.org)
http://net-snmp.sourceforge.net/about/license.html. • NTP version 4.2
http://www.openldap.org/software/release/license.html. • Secure shell OpenSSH version
http://www.openbsd.org/cgi-
http://www.postgresql.org/about/licence. • PostgreSQL JDBC driver, a free Java program used to connect to a
http://jdbc.postgresql.org/license.html. • PostgreSQL Regular Expression Library, a free software object-relational
http://www.postgresql.org/about/licence. • 21.vixie-cron is the Vixie
http://www.jacorb.org/lgpl.html. Copyright © 2006 The JacORB Project. • TAO (The ACE ORB)
http://www.cs.wustl.edu/~schmidt/ACE-copying.html. • libcURL, a library for
http://thunk.org/hg/e2fsprogs/?file/fe55db3e508c/lib/uuid/COPYING. Copyright (C) 1996, 1997 Theodore Ts'o.
Page 4

PGP® Desktop 9.8 for Windows About PGP Desktop 9.8 for Windows
http://www.cs.fsu.edu/~engelen/soaplicense.html. • Windows Template Library (WRT) is used for developing user interface components and is
distributed under the Common Public License v1.0 found at
utilities used to automate a variety of maintenance functions and is provided under the Perl Artistic License, found at
http://www.perl.com/pub/a/language/misc/Artistic.html.
http://opensource.org/licenses/cpl1.0.php. • The Perl Kit provides several independent
Export Information
Export of this software and documentation may be subject to compliance with the rules and regulations promulgated from time to time by the Bureau
of Export Administration, United States Department of Commerce, which restricts the export and re-export of certain products and technical data.
Limitations
The software provided with this documentation is licensed to you for your individual use under the terms of the End User License Agreement provided
with the software. The information in this document is subject to change without notice. PGP Corporation does not warrant that the information meets
your requirements or that the information is free of errors. The information may include technical inaccuracies or typographical errors. Changes may be
made to the information and incorporated in new editions of this document, if and when made available by PGP Corporation.
4
Page 5

Contents
About PGP Desktop 9.8 for Windows 1
What's New in PGP Desktop for Windows Version 9.8 1
PGP Desktop General Features 2
PGP Whole Disk Encryption Features 2
PGP NetShare Features 4
PGP Desktop Email Features 4
Using this Guide 5
“Managed” versus “Unmanaged” Users 5
Conventions Used in This Guide 6
Who Should Read This Document 6
About PGP Desktop Licensing 7
Checking License Details 7
Getting Assistance 10
Getting product information 10
Contacting Technical Support 10
PGP Desktop Basics 13
PGP Desktop Terminology 13
PGP Product Components 13
Terms Used in PGP Desktop 14
Conventional and Public Key Cryptography 16
Learning More About Cryptography 16
Using PGP Desktop for the First Time 17
Installing PGP Desktop 21
Before You Install 21
System Requirements 21
Installing and Configuring PGP Desktop 22
Installing the Software 22
Upgrading the Software 22
Upgrading From Standalone to Managed PGP Desktop Builds 23
Running the Setup Assistant 23
Uninstalling PGP Desktop 24
Moving Your PGP Desktop Installation From One Computer to Another 24
The PGP Desktop User Interface
Accessing PGP Desktop Features 27
The PGP Desktop Main Screen 28
Using the PGP Tray Icon 29
Using Shortcut Menus in Windows Explorer 31
27
i
Page 6

PGP® Desktop 9.8 for Windows Contents
Using the Start Menu 33
PGP Desktop Notifier alerts 33
PGP Desktop Notifier for Messaging 33
PGP Desktop Notifier for Disk features 37
Enabling or Disabling Notifiers 38
Viewing the PGP Desktop Log 39
Working with PGP Keys 41
Viewing Keys 41
Creating a Keypair 42
Passwords and Passphrases 44
Protecting Your Private Key 45
Protecting Keys and Keyrings 46
Backing up Your Private Key 47
What if You Lose Your Key? 47
Distributing Your Public Key 47
Placing Your Public Key on a Keyserver 48
Including Your Public Key in an Email Message 49
Exporting Your Public Key to a File 50
Copying from a Smart Card Directly to Someone’s Keyring 50
Getting the Public Keys of Others 50
Getting Public Keys from a Keyserver 51
Getting Public Keys from Email Messages 52
Working with Keyservers 52
Using Master Keys 54
Adding Keys to the Master Key List 54
Deleting Keys from the Master Key List 55
Managing PGP Keys 57
Examining and Setting Key Properties 57
Adding and Removing Photographic IDs 58
Managing User Names and Email Addresses on a Key 59
Importing Keys and X.509 Certificates 60
Using the Import Certificate Assistant 61
Changing Your Passphrase 62
Deleting Keys, User IDs, and Signatures 64
Disabling and Enabling Public Keys 64
Verifying a Public Key 65
Signing a Public Key 66
Revoking Your Signature from a Public Key 68
Granting Trust for Key Validations 68
Working with Subkeys 69
Using Separate Subkeys 70
Viewing Subkeys 71
Creating New Subkeys 72
Revoking Subkeys 73
ii
Page 7

PGP® Desktop 9.8 for Windows Contents
Removing Subkeys 73
Working with ADKs 74
Adding an ADK to a Keypair 74
Updating an ADK 75
Removing an ADK 75
Working with Revokers 75
Appointing a Designated Revoker 76
Revoking a Key 76
Splitting and Rejoining Keys 77
Creating a Split Key 77
Rejoining Split Keys 78
If You Lost Your Key or Passphrase 80
Reconstructing Keys with PGP Universal 80
Reconstructing Keys in a Standalone Installation 82
Resetting Your Passphrase 86
Protecting Your Keys 87
Securing Email Messages 89
How PGP Desktop Secures Email Messages 89
Incoming Messages 90
Outgoing Messages 92
Services and Policies 92
Viewing Services and Policies 93
Creating a New Messaging Service 93
Editing Messaging Service Properties 98
Disabling or Enabling a Service 98
Deleting a Service 99
Multiple Services 99
Troubleshooting PGP Messaging Services 100
Creating a New Security Policy 102
Wildcards and Regular Expressions in Policies 107
Security Policy Information and Examples 107
Working with the Security Policy List 110
Editing a Security Policy 110
Editing a Mailing List Policy 111
Deleting a Security Policy 115
Changing the Order of Policies in the List 116
PGP Desktop and SSL 116
Key Modes 118
Determining Key Mode 119
Changing Key Mode 119
Viewing the PGP Desktop Log 121
Securing Instant Messaging 123
About PGP Desktop’s Instant Messaging Support 123
Instant Messaging Client Compatibility 124
iii
Page 8

PGP® Desktop 9.8 for Windows Contents
About the Keys Used for Encryption 125
Encrypting your IM Sessions 125
Protecting Disks with PGP Whole Disk Encryption 127
About PGP Whole Disk Encryption 128
How does PGP Whole Disk Encryption Differ from PGP Virtual Disk? 129
Licensing PGP Whole Disk Encryption 129
License Expiration 130
Prepare Your Disk for Encryption 130
Supported Disk Types 131
Supported Keyboards 132
Ensure Disk Health Before Encryption 133
Creating Recovery Disks 133
Calculate the Encryption Duration 135
Maintain Power Throughout Encryption 136
Run a Pilot Test to Ensure Software Compatibility 136
Determining the Authentication Method for the Disk 137
Passphrase and Single Sign-On Authentication 137
Public Key Authentication 138
Token-Based Authentication 138
Trusted Platform Module (TPM) Authentication 138
Setting Encryption Options 139
Partition-Level Encryption 140
Preparing a Smart Card or Token to Use For Authentication 140
Using PGP Whole Disk Encryption Options 143
Encrypting a Disk or Partition 144
Supported Characters for PGP WDE Passphrases 145
Encrypting the Disk 146
Encountering Disk Errors During Encryption 149
Using a PGP WDE-Encrypted Disk 150
Authenticating at the PGP BootGuard Screen 150
Selecting Keyboard Layouts 153
Using PGP WDE Single Sign-On 154
Prerequisites for Using Single Sign-On 155
Encrypting the Disk to Use Single Sign-On 155
Multiple Users and Single Sign-On 156
Logging in with Single Sign-On 156
Changing Your Passphrase With Single Sign-On 156
Displaying the Windows Login dialog box 157
Maintaining the Security of Your Disk 157
Getting Disk or Partition Information 158
Using the Bypass Feature 159
Adding Other Users to an Encrypted Disk or Partition 159
Deleting Users From an Encrypted Disk or Partition 160
Changing User Passphrases 160
Re-Encrypting an Encrypted Disk or Partition 162
Using Automatic Backup Software on a PGP WDE-Encrypted Disk 163
iv
Page 9

PGP® Desktop 9.8 for Windows Contents
Uninstalling PGP Desktop from Encrypted Disks or Partitions 163
Working with Removable Disks 163
Encrypting Removable Disks 164
Moving Removable Disks to Other Systems 165
Reformatting an Encrypted Removable Disk 165
Using PGP-WDE in a PGP Universal-Managed Environment 166
PGP Whole Disk Encryption Administration 166
Creating a Recovery Token 167
Using a Recovery Token 168
Recovering Data From an Encrypted Drive 168
Decrypting a PGP WDE-Encrypted Disk 169
Special Security Precautions Taken by PGP Desktop 171
Using the Windows Preinstallation Environment 171
Using PGP Whole Disk Encryption with IBM Lenovo ThinkPad Systems 171
Using PGP Whole Disk Encryption with the Microsoft Windows XP Recovery Console 172
Using PGP Virtual Disks 175
About PGP Virtual Disks 176
Creating a New PGP Virtual Disk 177
Viewing the Properties of a PGP Virtual Disk 180
Finding PGP Virtual Disks 180
Using a Mounted PGP Virtual Disk 181
Mounting a PGP Virtual Disk 181
Unmounting a PGP Virtual Disk 182
Compacting a PGP Virtual Disk 182
Re-Encrypting PGP Virtual Disks 183
Working with Alternate Users 184
Adding Alternate User Accounts to a PGP Virtual Disk 184
Deleting Alternate User Accounts from a PGP Virtual Disk 185
Disabling and Enabling Alternate User Accounts 185
Changing Read/Write and Read-Only Status 186
Granting Administrator Status to an Alternate User 186
Changing User Passphrases 187
Deleting PGP Virtual Disks 187
Maintaining PGP Virtual Disks 188
Mounting PGP Virtual Disk Volumes on a Remote Server 188
Backing up PGP Virtual Disk Volumes 188
Exchanging PGP Virtual Disks 189
The PGP Virtual Disk Encryption Algorithms 190
Special Security Precautions Taken by PGP Virtual Disk 190
Passphrase Erasure 191
Virtual Memory Protection 191
Hibernation 191
Memory Static Ion Migration Protection 191
Other Security Considerations 192
v
Page 10

PGP® Desktop 9.8 for Windows Contents
Using PGP NetShare 195
About PGP NetShare 195
PGP NetShare Roles 197
Licensing PGP NetShare 198
Authorized User Keys 199
Establishing a PGP NetShare Admin (Owner) 199
Working with Protected Folders 199
Choosing the Location for a Protected Folder 200
Creating a New PGP NetShare Protected Folder 203
Using Files in a PGP NetShare Protected Folder 210
Unlocking a Protected Folder 210
Determining the Files in a Protected Folder 211
Adding Subfolders to a Protected Folder 212
Checking Folder Status 212
Copying Protected Folders to Other Locations 213
Working with PGP NetShare Users 214
Adding a PGP NetShare User 214
Changing a User's Role 216
Deleting a User from a Protected Folder 217
Importing PGP NetShare Access Lists 218
Working with Active Directory Groups 218
Setting up PGP NetShare to Work with Groups 219
Refreshing Groups 219
Removing a Folder 220
Re-Encrypting a Folder 221
Clearing a Passphrase 222
Protecting Files Outside of a Protected Folder 222
Accessing PGP NetShare Features using the Shortcut Menu 224
PGP NetShare in a PGP Universal-Managed Environment 225
Accessing the Properties of a Protected File or Folder 226
Using the PGP NetShare Menus in PGP Desktop 227
The File Menu 227
The Edit Menu 227
The NetShare Menu 227
Using PGP Zip
Overview 229
Creating PGP Zip Archives 230
Encrypting to Recipient Keys 234
Encrypting with a Passphrase 238
Creating a PGP Self-Decrypting Archive (SDA) 242
Creating a Sign Only Archive 245
vi
229
Page 11

PGP® Desktop 9.8 for Windows Contents
Opening a PGP Zip Archive 248
Opening a PGP Zip SDA 248
Editing a PGP Zip Archive 249
Verifying Signed PGP Zip Archives 251
Shredding Files with PGP Shredder 253
Using PGP Shredder to Permanently Delete Files and Folders 253
Shredding Files using the PGP Shredder Icon on Your Desktop 254
Shredding Files From Within PGP Desktop 254
Shredding Files in Windows Explorer 255
Using the PGP Shred Free Space Assistant 256
Scheduling Free Space Shredding 257
Storing Keys on Smart Cards and Tokens 259
About Smart Cards and Tokens 259
Supported Smart Cards 261
Recognizing Smart Cards 261
Examining Smart Card Properties 262
Generating a PGP Keypair on a Smart Card 263
Copying your Public Key from a Smart Card to a Keyring 264
Copying a Keypair from Your Keyring to a Smart Card 265
Wiping Keys from Your Smart Card 266
Using Multiple Smart Cards 267
Special-Use Tokens 268
Configuring the Aladdin eToken 268
Setting PGP Desktop Options 271
Accessing the PGP Options dialog box 271
General Options 272
Keys Options 274
Master Keys Options 277
Messaging Options 277
Proxy Options 280
vii
Page 12

PGP® Desktop 9.8 for Windows Contents
PGP NetShare Options 284
Disk Options 285
Notifier Options 288
Advanced Options 289
Working with Passwords and Passphrases 293
Choosing whether to use a password or passphrase 293
The Passphrase Quality Bar 294
Creating Strong Passphrases 295
What if You Forget Your Passphrase? 297
Using PGP Desktop with PGP Universal Server
Overview 299
For PGP Administrators 300
299
Messaging with Lotus Notes and MAPI 303
About Lotus Notes and MAPI Support 303
Using PGP Desktop with Lotus Notes 303
Sending email to recipients inside your Lotus Notes organization 304
Sending email to recipients outside your Lotus Notes organization 304
Binding to a Universal Server 305
Pre-Binding 305
Manual Binding 305
Notes Addresses 306
Notes Client Settings 306
The Notes.ini Configuration File 307
Index 309
viii
Page 13

About PGP Desktop 9.8 for
1
Windows
PGP Desktop is a security tool that uses cryptography to protect your data
against unauthorized access.
PGP Desktop protects your data while being sent by email or by instant
messaging (IM). It lets you encrypt your entire hard drive or hard drive
partition—so everything is protected all the time—or just a portion of your hard
drive, via a virtual disk on which you can securely store your most sensitive
data. You can use it to share your files and folders securely with others over a
network. It lets you put any combination of files and folders into an encrypted,
compressed package for easy distribution or backup. Finally, use PGP Desktop
to shred (securely delete) sensitive files—so that no one can retrieve them—
and shred free space on your hard drive, so there are no unsecured remains of
any files.
Use PGP Desktop to create PGP keypairs and manage both your personal
keypairs and the public keys of others.
To make the most of PGP Desktop, you should be familiar with PGP Desktop
Terminology (on page
key cryptography, as described in Conventional and Public Key Cryptography (on
page
16).
13). You should also understand conventional and public-
In This Chapter
What's New in PGP Desktop for Windows Version 9.8............................ 1
Using this Guide ........................................................................................ 5
Who Should Read This Document ............................................................ 6
About PGP Desktop Licensing .................................................................. 7
Getting Assistance .................................................................................. 10
What's New in PGP Desktop for Windows Version 9.8
Building on PGP Corporation’s proven technology, PGP Desktop 9.8 for
Windows includes numerous improvements and the following new and
resolved features.
1
Page 14

PGP® Desktop 9.8 for Windows About PGP Desktop 9.8 for Windows
PGP Desktop General Features
Additional platform support. PGP Desktop is now available for Microsoft
Windows Vista 64-bit and Mac OS X 10.5 (Leopard).
Feature deployment control. Administrators can now enforce policy by
providing end users only with authorized client features, enabling or
disabling client capabilities before distributing PGP client software to endusers. Disabled features are then unavailable in the PGP Desktop user
interface.
Intel AMT support. PGP Desktop supports Intel Active Management
Technology (AMT) Agent Presence on those computers with properly
configured Intel AMT-equipped motherboards. PGP Desktop reports its
current status via AMT to enable Enterprises to query configuration
information even when a system is turned off.
Updated key reconstruction user interface. The PGP Desktop Key
Reconstruction user interface has been significantly improved in this
release. Primary new features include the ability to select and customize a
set of provided questions, a visually more appealing experience, and a new
Assistant to help guide the user through the process.
Local key reconstruction. Standalone installations of PGP Desktop
support Local Key Reconstruction. The Key Reconstruction Assistant saves
Key Reconstruction information in a file that can be used later to
reconstruct the user key.
PGP Log message filtering. The PGP Log feature of PGP Desktop now
provides a menu option to filter local log messages by topic to facilitate
troubleshooting (for example, displaying messages related only to Email,
IM, NetShare, or WDE).
Passphrase quality evaluation improvements. Passphrase quality
evaluation has been significantly enhanced both visually and functionally in
this release.
PGP Whole Disk Encryption Features
Advanced centralized event logging. PGP Universal now provides
significantly expanded reporting on PGP Whole Disk Encryption usage on
client systems. This logging feature itemizes events such as which
systems have been encrypted, the progress of encryption or decryption for
an individual system, errors encountered during encryption, the status of
recovery tokens, removable storage usage, and failed/successful login
attempts. Administrators can set thresholds that raise alerts in PGP
Universal on the PGP Daily Status Email or dashboard screen after a
configured number of failed logins has been exceeded.
Extended pre-boot smart card support. PGP Whole Disk Encryption has
greatly expanded pre-boot authentication to a variety of smart cards.
2
Page 15

PGP® Desktop 9.8 for Windows About PGP Desktop 9.8 for Windows
Customizable WDE BootGuard screens. Administrators in a PGP
Universal-managed environment can configure the PGP Whole Disk
Encryption boot screen to display the text and graphics of their choice.
Group administration access tokens. PGP Whole Disk Encryption admin
accounts can be added, allowing an administrator with a smart card key to
override the BootGuard prompt. This key can be specified separately for
each Internal User Policy. Using a single keypair copied to multiple smart
cards (each with its own PIN), an organization can enable multiple
administrators for each Policy.
Domain administrator restart bypass. Windows System and
Administrator account(s) may now engage a mode to bypass WDE
authentication on the next restart by utilizing the privileges of the
administration account to act as the authenticated user. This feature
enables administrators to perform remote software installations requiring a
restart of the target computer. Use of this feature is logged to the PGP
Universal server.
Partition encryption deployment. Administrators in a PGP Universal-
managed environment may now configure encryption of only the boot
partition or only Windows partitions rather than always encrypting entire
disks.
PGP WDE Single Sign-On for Novell environments. The PGP WDE
Single Sign-On (SSO) feature is now available for Windows systems
running in Novell network environments.
User Interface modifications for ADA compliance. As part of our
expanding support for the Americans with Disabilities Act (ADA) standards
for accessible design, the PGP WDE BootGuard screen has been modified
to provide audible feedback when the screen is ready for user input, when
a user types in an incorrect password, and when a user types a correct
password. This audio feedback is optional, configurable using PGP
Universal for managed clients.
Lenovo laptop Recovery button. PGP Whole Disk Encryption now
provides complete support for the Lenovo Rescue and Recovery software
(version 3.x and 4.x) including using the “Access IBM” blue button for
boot-level recovery of the OS even when the disk (or partition) is
encrypted.
Microsoft Windows PE support. PGP Desktop provides administrators
with the ability to create a Windows PE (Preinstallation Environment) boot
disk containing a subset of PGP Whole Disk Encryption. This bootable disc
can be used to perform a variety of management and recovery tasks.
3
Page 16

PGP® Desktop 9.8 for Windows About PGP Desktop 9.8 for Windows
Trusted Platform Module (TPM) support for PGP WDE. PGP Desktop
supports using the Trusted Platform Module as an additional authentication
device for PGP Whole Disk Encryption if present on the motherboard and
enabled via proper driver installation for your hardware. When use of the
TPM is specified prior to encryption, the user can authenticate to the disk
only on that particular machine, locking the disk to the machine hardware
and thus deterring attacks such as hard disk theft. This feature works with
passphrase users only and is compatible with the PGP WDE Single Sign-On
feature.
PGP NetShare Features
PGP NetShare per-folder administration. PGP NetShare administrative
granularity has been extended to restrict administrator control to a perfolder level, thus limiting administrative access to exactly where it is
needed.
Whitelists and blacklists. Administrators can now centrally define PGP
NetShare policy to protect files stored in specific directory locations,
enforcing security policy without impacting user behavior. Conversely,
administrators can also force specific directories to prevent encryption.
Directory roles. There are now three roles for PGP NetShare-protected
directories: Admin, with full rights over the directory; Group Admin, who
can add/remove users that are not Admins or Group Admins; and Users,
who can only access content, and have no administration abilities.
Centralized PGP NetShare logging. Centralized logging on PGP Universal
provides visibility into the activity of PGP NetShare deployments to satisfy
management and auditing requirements.
PGP NetShare Command Line. Most PGP NetShare functions can now
be scripted. This utility is documented in the PGP NetShare Command Line
Programmer's Guide.
PGP Desktop Email Features
MAPI support for PGP/MIME formatted messages. PGP Desktop now
provides the ability to encrypt PGP/MIME messages in Outlook clients
using MAPI. PGP/MIME decryption has also been significantly improved in
this area.
Microsoft CAPI integration. PGP Desktop supports the use of Microsoft
Cryptographic Application Programming Interface (CAPI) credentials,
enabling the user to make use of existing X.509 certificates directly from
the Microsoft operating system certificate store. PGP Universal
administrators can specify automatic enrollment of such certificates as
well.
4
Page 17

PGP® Desktop 9.8 for Windows About PGP Desktop 9.8 for Windows
IMAP speed improvements. This release of PGP Desktop contains
significant IMAP performance improvements. Users will experience quicker
responses and shorter downloads, particularly when accessing large
mailboxes, switching between folders, and checking for new messages.
Out-of-the-mail-stream support. PGP Desktop and PGP Universal
Satellite will selectively send email messages directly to the PGP Universal
Server via a SOAP connection if required by policy, such that the server
does not need to be in the mail stream to support Web Messenger or
Smart Trailer functionality.
Weak-cipher decryption. PGP products now decrypt S/MIME encoded
messages encrypted with weak 40-bit RC2 encryption for backwards
compatibility with older email clients. Additional warnings are added to
messages decrypted using that algorithm. Note that PGP Desktop will not
encrypt using weak ciphers.
Using this Guide
This Guide provides information on configuring and using the components
within PGP Desktop. Each chapter of the guide is devoted to one of the
components of PGP Desktop.
“Managed” versus “Unmanaged” Users
A PGP Universal Server can be used to control the policies and settings used by
components of PGP Desktop. This is often the case in enterprises using PGP
software. PGP Desktop users in this configuration are known as managed
users, because the settings and policies available in their PGP Desktop software
are pre-configured by a PGP administrator and managed using a PGP Universal
Server. If you are part of a managed environment, your company may have
specific usage requirements. For example, managed users may or may not be
allowed to send plaintext email, or may be required to encrypt their disk with
PGP Whole Disk Encryption.
Users not under the control of a PGP Universal Server are called unmanaged or
standalone users.
This document describes how PGP Desktop works in both situations; however,
managed users may discover while working with the product that some of the
settings described in this document are not available in their environments. See
Using PGP Desktop with PGP Universal Server (on page
information.
299) for more
Note: References to PGP Universal-managed environments do not apply to
the PGP Virtual Disk or PGP Virtual Disk Professional products.
5
Page 18

PGP® Desktop 9.8 for Windows About PGP Desktop 9.8 for Windows
Features Customized by Your PGP Universal Administrator
If you are using PGP Desktop as a "managed" user in a PGP Universal-managed
environment, there are some settings that can be specified by your
administrator. These settings may change the way features are displayed in
PGP Desktop.
Disabled features. Your PGP Universal administrator can enable or disable
specific functionality. For example, your administrator may disable the
ability to create PGP NetShare protected folders.
When a feature is disabled, the control item in the left side is not displayed
and the menu for that feature is not available. The graphics included in this
guide depict the default installation with all features enabled. The PGP
Desktop interface may look different if your administrator has customized
the features available.
Customized BootGuard. If you are using PGP Desktop in a PGP Universal-
managed environment, Your PGP administrator may have customized the
PGP Whole Disk Encryption BootGuard screen to include additional text or
a custom image such as your organization's logo. The graphics included in
this guide depict the default installation. Your actual login screen may look
different if your administrator has customized the screen.
Conventions Used in This Guide
Notes, Cautions, and Warnings are used in the following ways.
Notes: Notes are extra, but important, information. A Note calls your
attention to important aspects of the product. You will be able to use the
product better if you read the Notes.
Cautions: Cautions indicate the possibility of loss of data or a minor security
breach. A Caution tells you about a situation where problems could occur
unless precautions are taken. Pay attention to Cautions.
Warnings: Warnings indicate the possibility of significant data loss or a major
security breach. A Warning means serious problems are going to happen
unless you take the appropriate action. Please take Warnings very seriously.
Who Should Read This Document
This document is for anyone who is going to be using the PGP Desktop for
Windows software to protect their data.
6
Page 19
PGP® Desktop 9.8 for Windows About PGP Desktop 9.8 for Windows
Note: If you are new to cryptography and would like an overview of the
terminology and concepts in PGP Desktop, please refer to An Introduction to
Cryptography (it was installed onto your computer when you installed PGP
Desktop).
About PGP Desktop Licensing
A license is used within the PGP software to enable the functionality you
purchased, and sets the expiration of the software. Depending on the license
you have, some or all of the PGP Desktop family of applications will be active.
Once you have entered the license, you must then authorize the software with
PGP Corporation, either manually or online.
To license PGP Desktop Do one of the following:
If you are a managed user, you are most likely already using a licensed
copy of PGP Desktop. Check your license details as described in Checking
License Details (on page
administrator.
7). If you have questions, please contact your PGP
If you are an unmanaged user, or a PGP administrator, check your license
details as described in Checking License Details (on page
authorize your copy of PGP Desktop, do so as described in Authorizing PGP
Desktop for Windows (on page
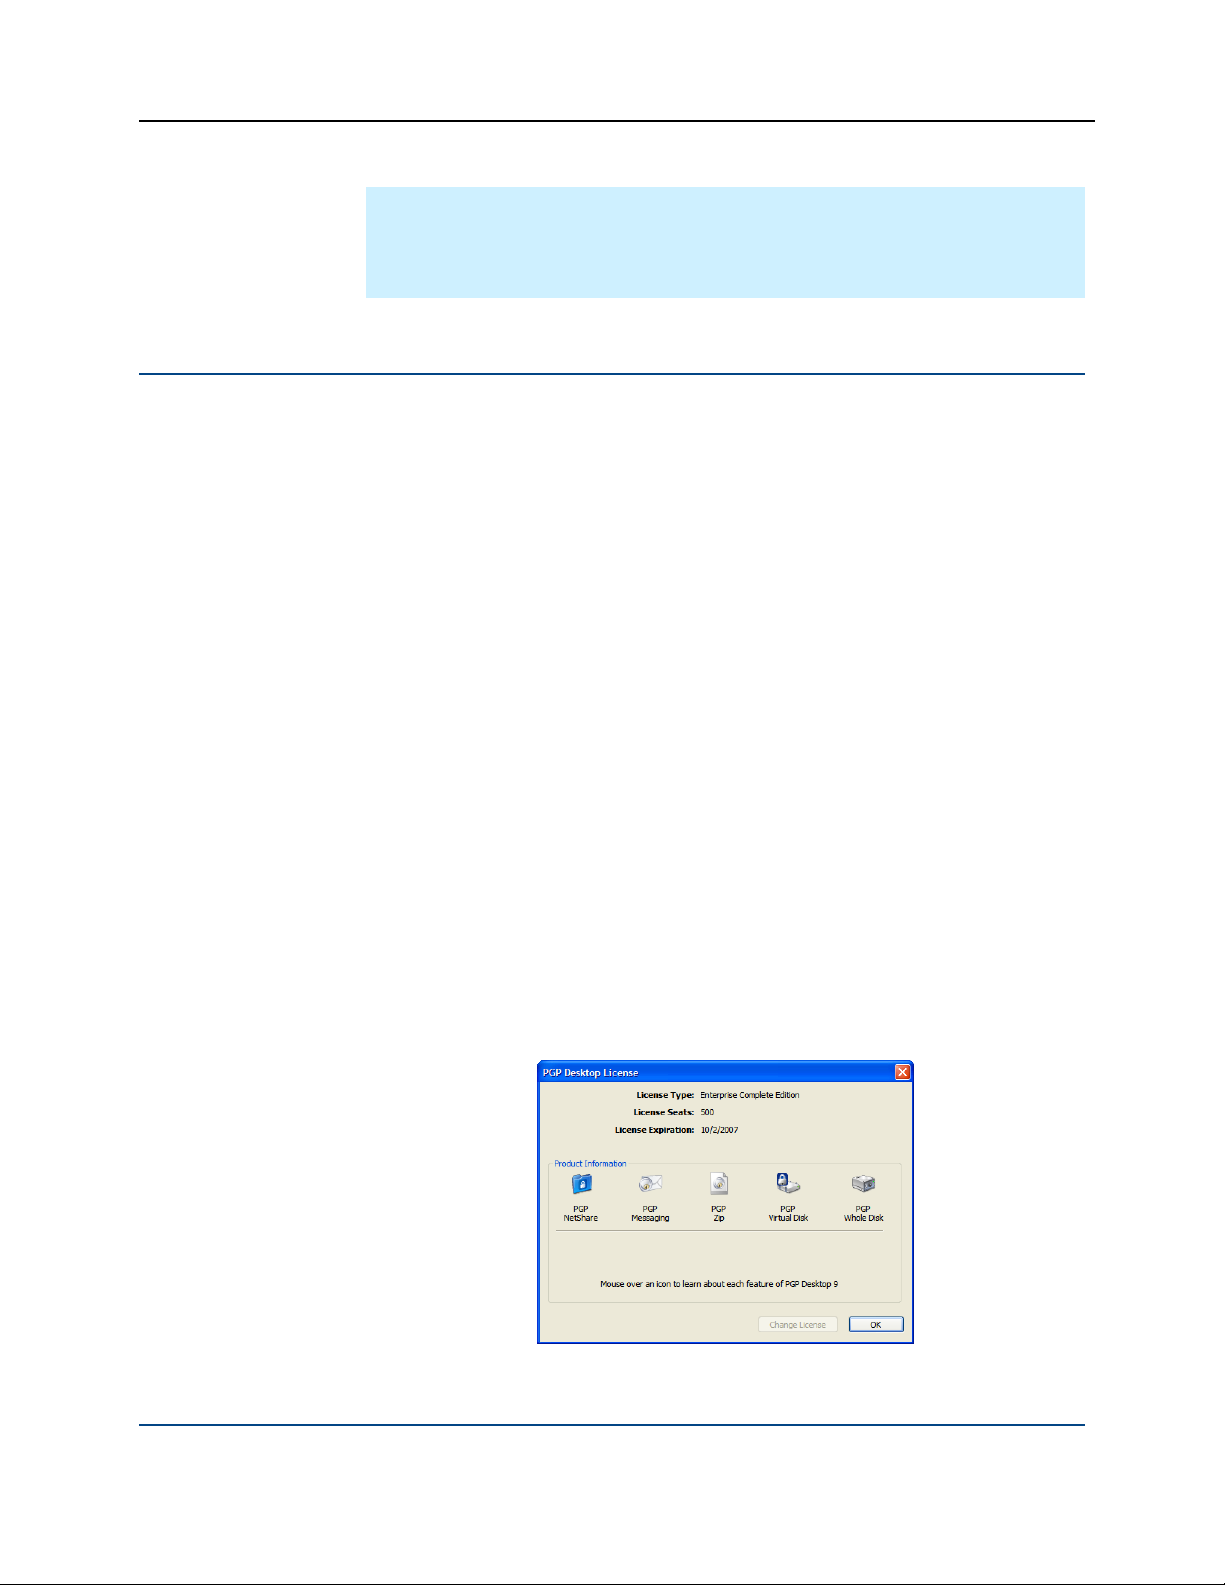
Checking License Details
To see the details of your PGP Desktop license
1 Double-click the PGP Desktop icon in the system tray.
2 Select Help > License. The PGP Desktop License dialog box appears.
7). If you need to
8).
This dialog box displays the following details:
7
Page 20

PGP® Desktop 9.8 for Windows About PGP Desktop 9.8 for Windows
Item Description
License Type The name of the licensed product.
License Seats The number of seats available for this license.
License Expiration The date when the license will expire.
Product Information The components that are active in your license.
Move your cursor over the product name to see
information about the product and to find out if
you are currently licensed to use it.
Note: If you do not authorize your copy of PGP Desktop, only limited features
will be available to you (PGP Zip and Keys).
Authorizing PGP Desktop for Windows
If you need to change to a new license number, or if you skipped the license
authorization process during configuration, follow these instructions to authorize
your software.
Note: Make sure your Internet connection is active before proceeding. If you
have no Internet connection, you must submit a request for a manual
authorization.
Before you begin
If you purchased PGP Desktop, you received an email order confirmation with
an attached .PDF file.
1 Make a note of the name, organization, and license number you received in
the email order confirmation. These are shown in the section titled
Important Note in the .PDF. You will need these details during the
licensing process.
During configuration of your PGP Desktop software, you must type the
name, organization, email address, and license number to authorize your
copy of PGP Desktop with PGP Corporation's authorization server.
Note: Your license number also appears on the download page of your
PGP product.
Double-click the PGP Desktop icon in the System Tray.
8
Page 21

PGP® Desktop 9.8 for Windows About PGP Desktop 9.8 for Windows
2 Select Help > License. The PGP Desktop License dialog box appears.
3 Click Change License. The PGP Licensing Assistant dialog box appears.
4 Type the Name and Organization exactly as specified in your PGP email
order confirmation .PDF. These will be shown in the section titled
Important Note in the .PDF. If the Important Note section does not exist
in your .PDF, your first authorization attempt will set the name and
organization permanently.
5 Type the email address you want to assign to the licensing of the product.
6 Type the email address again to confirm it.
Note: If you have previously authorized the same license number, you
must enter the same Name, Organization, and Email Address as you did
the previous time. If you enter different information, authorization will fail.
7 Click Next.
8 Do one of the following:
Type your 28-character license number in the provided fields (for
example, DEMO1-DEMO2-DEMO3-DEMO4-DEMO5-ABC).
Note: To avoid typing errors and make the authorization easier, copy the
entire license number, put the cursor in the first “License Number” field,
and paste. Your license number will be correctly entered into all six
“License Number” fields.
To request a one-time, 30-day evaluation of PGP Desktop, select
Request a one-time 30 day Evaluation of PGP Desktop. When you
purchase a license, you can enter it any time before the end of the 30day evaluation period. If you don’t enter a valid license, PGP Desktop
will revert to unlicensed functionality when the 30-day evaluation
period is over.
To purchase a PGP Desktop license, select Purchase a license
number now. A Web browser will open and take you to the online
PGP Store.
9
Page 22

PGP® Desktop 9.8 for Windows About PGP Desktop 9.8 for Windows
To use PGP Desktop without a license, select Use without a license
and disable most functionality. The only feature of PGP Desktop
you can use without a license is PGP Zip and Keys.
9 Click Next to authorize.
10 When PGP is authorized, the features enabled by your license will be
displayed. Click Next, and then click Finish to complete the process.
Resolving License Authorization Errors
If you receive any error messages while authorizing your software, the ways to
resolve this issue vary based on the error message. See the HOWTO: License
PGP Desktop 9.x section in the PGP Support Portal (
https://support.pgp.com)
for suggestions.
Getting Assistance
Getting product information
Refer to these sections for additional resources.
Unless otherwise noted, the product documentation is provided as Adobe
Acrobat PDF files that are installed with PGP Desktop. Online help is available
within the PGP Desktop product. Release notes are also available, which may
have last-minute information not found in the product documentation.
Once PGP Desktop is released, additional information regarding the product is
entered into the online Knowledge Base available on the PGP Corporation
Support Portal (
Contacting Technical Support
To learn about PGP support options and how to contact PGP Technical
Support, please visit the PGP Corporation Support Home Page
http://www.pgp.com/support).
(
To access the PGP Support Knowledge Base or request PGP Technical
Support, please visit PGP Support Portal Web Site
(
https://support.pgp.com). Note that you may access portions of the
PGP Support Knowledge Base without a support agreement;
however, you must have a valid support agreement to request
Technical Support.
https://support.pgp.com).
For any other contacts at PGP, please visit the PGP Contacts Page
http://www.pgp.com/company/contact/index.html).
(
10
Page 23

PGP® Desktop 9.8 for Windows About PGP Desktop 9.8 for Windows
For general information about PGP Corporation, please visit the PGP Web
Site (
http://www.pgp.com).
To access the PGP Support forums, please visit PGP Support
(
http://forums.pgpsupport.com). These are user community support forums
hosted by PGP Corporation.
11
Page 24

Page 25

2
PGP Desktop Basics
This section describes the PGP Desktop terminology and provides some highlevel conceptual information on cryptography.
In This Chapter
PGP Desktop Terminology ...................................................................... 13
Conventional and Public Key Cryptography............................................. 16
Using PGP Desktop for the First Time .................................................... 17
PGP Desktop Terminology
To make the most of PGP Desktop, you should be familiar with the terms in the
following sections.
PGP Product Components
PGP Desktop and its components are described in the following list. Depending
on your license, you may not have all functionality available. See About PGP
Desktop Licensing (on page
PGP Desktop: A software tool that uses cryptography to protect your data
against unauthorized access. PGP Desktop is available for Mac OS X and
Windows.
PGP Messaging: A feature of PGP Desktop that automatically and
transparently supports all of your email clients through policies you
control. PGP Desktop accomplishes this using a new proxy
technology; the older plug-in technology is also available. PGP
Messaging also protects many IM clients, such as AIM and iChat
(both users must have PGP Messaging enabled).
PGP Whole Disk Encryption: Whole Disk Encryption is a feature of
PGP Desktop that encrypts your entire hard drive or partition,
including your boot record, thus protecting all your files when you are
not using them. You can use PGP Whole Disk Encryption and PGP
Virtual Disk volumes on the same system. You can protect whole disk
encrypted drives with a passphrase or with a keypair on a USB token
for added security.
7) for more information.
13
Page 26

PGP® Desktop 9.8 for Windows PGP Desktop Basics
PGP NetShare: A feature of PGP Desktop for Windows with which
you can securely and transparently share files and folders among
selected individuals. PGP NetShare users can protect their files and
folders simply by placing them within a folder that is designated as
protected.
PGP Keys: A feature of PGP Desktop that gives you complete control
over both your own PGP keys, and the keys of those persons with
whom you are securely exchanging email messages.
PGP Virtual Disk volumes: PGP Virtual Disk volumes are a feature of
PGP Desktop that let you use part of your hard drive space as an
encrypted virtual disk. You can protect a PGP Virtual Disk volume with
a key or a passphrase. You can even create additional users for a
volume, so that people you authorize can also access the volume. The
PGP Virtual Disk feature is especially useful on laptops, because if
your computer is lost or stolen, the sensitive data stored on the PGP
Virtual Disk is protected against unauthorized access.
PGP Shred: A feature of PGP Desktop that lets you securely delete
data from your system. PGP Shred overwrites files so that even file
recovery software cannot recover them.
PGP Zip: A feature of PGP Desktop that lets you put any combination
of files and folders into a single encrypted, compressed package for
convenient transport or backup. You can encrypt a PGP Zip archive to
a PGP key or to a passphrase.
PGP Universal: A tool for enterprises to automatically and transparently
secure email messaging for their employees. If you are using PGP Desktop
in a PGP Universal-protected environment, your messaging policies and
other settings may be controlled by your organization’s PGP administrator.
PGP Global Directory: A free, public keyserver hosted by PGP
Corporation. The PGP Global Directory provides quick and easy access
to the universe of PGP keys. It uses next-generation keyserver
technology that queries the email address on a key (to verify that the
owner of the email address wants their key posted) and lets users
manage their own keys. Using the PGP Global Directory significantly
enhances your chances of finding a valid public key of someone to
whom you want to send secured messages. PGP Desktop is
designed to work closely with the PGP Global Directory.
Terms Used in PGP Desktop
Before you use PGP Desktop, you should be familiar with the following terms:
Decrypting: The process of taking encrypted (scrambled) data and making
it meaningful again. When you receive data that has been encrypted by
someone using your public key, you use your private key to decrypt the
data.
14
Page 27

PGP® Desktop 9.8 for Windows PGP Desktop Basics
Encrypting: The process of scrambling data so that if an unauthorized
person gets access to it, they cannot do anything with it. The data is so
scrambled, it’s meaningless.
Signing: The process of applying a digital signature to data using your
private key. Because data signed by your private key can be verified only by
your public key, the ability to verify signed data with your public key proves
that your private key signed the data and thus proves the data is from you.
Verifying: The process of proving that the private key was used to digitally
sign data by using that person’s public key. Because data signed by a
private key can only be verified by the corresponding public key, the fact
that a particular public key can verify signed data proves the signer was the
holder of the private key.
Keypair: A private key/public key combination. When you create a PGP
“key”, you are actually creating a keypair. As your keypair includes your
name and your email address, in addition to your private and public keys, it
might be more helpful to think of your keypair as your digital ID—it
identifies you in the digital world as your driver’s license or passport
identifies you in the physical world.
Private key: The key you keep very, very private. Only your private key can
decrypt data that was encrypted using your public key. Also, only your
private key can create a digital signature that your public key can verify.
Caution: Do not give your private key, or its passphrase, to anyone! And
keep your private key safe.
Public key: The key you distribute to others so that they can send
protected messages to you (messages that can only be decrypted by your
private key) and so they can verify your digital signature. Public keys are
meant to be widely distributed.
Your public and private keys are mathematically related, but there’s no way
to figure out your private key if someone has your public key.
Keyserver: A repository for keys. Some companies host keyservers for the
public keys of their employees, so other employees can find their public
keys and send them protected messages. The PGP Global Directory
https://keyserver.pgp.com) is a free, public keyserver hosted by PGP
(
Corporation.
Smart cards and tokens: Smart cards and tokens are portable devices on
which you can create your PGP keypair or copy your PGP keypair. Creating
your PGP keypair on a smart card or token adds security by requiring
possession of the smart card or token in order to encrypt, sign, decrypt, or
verify. So even if an unauthorized person gains access to your computer,
your encrypted data is secure because your PGP keypair is with you on
your smart card or token. Copying your PGP keypair to a smart card or
token is a good way to use it away from your main system, back it up, and
distribute your public key.
15
Page 28

PGP® Desktop 9.8 for Windows PGP Desktop Basics
Conventional and Public Key Cryptography
Conventional cryptography uses the same passphrase to encrypt and decrypt
data. Conventional cryptography is great for data that isn’t going anywhere
(because it encrypts and decrypts quickly). However, conventional cryptography
is not as well suited for situations where you need to send encrypted data to
someone else, especially if you want to send encrypted data to someone you
have never met.
Public-key cryptography uses two keys (called a keypair) for encrypting and
decrypting. One of these two keys is your private key; and, like the name
suggests, you need to keep it private. Very, very private. The other key is your
public key, and, like its name suggests, you can share it with the general public.
In fact, you’re supposed to share.
Public-key cryptography works this way: let’s say you and your cousin in
another city want to exchange private messages. Both of you have PGP
Desktop. First, you both need to create your keypair: one private key and one
public key. Your private key you keep secret, your public key you send to a
public keyserver like the PGP Global Directory (keyserver.pgp.com), which is a
public facility for distributing public keys. (Some companies have their own
private keyservers.)
Once the public keys are on the keyserver, you can go back to the keyserver
and get your cousin’s public key, and she can go to the keyserver and get yours
(there are other ways to exchange public keys; refer to Working with PGP Keys
(on page
41) for more information). This is important because to send an
encrypted email message that only your cousin can decrypt, you encrypt it
using your cousin’s public key. What makes this work is that only your cousin’s
private key can decrypt a message that was encrypted using her public key.
Even you, who have her public key, cannot decrypt the message once it has
been encrypted using her public key. Only the private key can decrypt data
that was encrypted with the corresponding public key.
Your public and private keys are mathematically related, but there’s no feasible
way to figure out someone’s private key if you just have a public key.
Learning More About Cryptography
For more information about cryptography, refer to An Introduction to
Cryptography, which was installed on your system when PGP Desktop was
installed. It is available through the Start menu.
16
Page 29

PGP® Desktop 9.8 for Windows PGP Desktop Basics
Using PGP Desktop for the First Time
PGP Corporation recommends the following procedure for getting started with
PGP Desktop:
1 Install PGP Desktop on your computer.
If you are a corporate user, your PGP administrator may have specific
installation instructions for you to follow or may have configured your PGP
installer with certain settings. Either way, this is the first step.
2 Let the Setup Assistant be your guide.
To help you get started, after you install PGP Desktop and reboot your
computer, the Setup Assistant appears. It assists with:
Licensing PGP Desktop
Creating a keypair—with or without subkeys (if you do not already
have a keypair).
Publishing your public key on the PGP Global Directory.
Enabling PGP Messaging
Giving you a quick overview of other features.
If your PGP Desktop installer application was configured by a PGP
administrator, the Setup Assistant may perform other tasks.
3 Exchange public keys with others.
After you have created a keypair, you can begin sending and receiving
secure messages with other PGP Desktop users (once you have
exchanged public keys with them). You can also use the PGP Desktop diskprotection features.
Exchanging public keys with others is an important first step. To send them
secure messages, you need a copy of their public key, and to reply with a
secure message, they need a copy of your public key. If you did not upload
your public key to the PGP Global Directory using the Setup Assistant, do
so now. If you do not have the public key for someone to whom you want
to send messages, the PGP Global Directory is the first place to look. PGP
Desktop does this for you—when you send email, it finds and verifies the
keys of other PGP Desktop users automatically. It then encrypts your
message to the recipient public key, and sends the message.
4 Validate the public keys you get from untrusted keyservers.
17
Page 30

PGP® Desktop 9.8 for Windows PGP Desktop Basics
When you get a public key from an untrusted keyserver, try to make sure
that it has not been tampered with, and that the key really belongs to the
person it names. To do this, use PGP Desktop compare the unique
fingerprint on your copy of someone’s public key to the fingerprint on that
person’s key (a good way to do that is by telephoning the key’s owner and
having them read you the fingerprint information so that you can compare
it). Keys from trusted keyservers like the PGP Global Directory have already
been verified.
5 Start securing your email, files, and instant message (IM) sessions.
After you have generated your keypair and exchanged public keys, you can
begin encrypting, decrypting, signing, and verifying email messages and
files. The secure IM chat session feature generates its own keys
automatically, so you can use this feature even before you generate your
keypair. The only requirement is that you must be chatting with another
PGP Desktop user for the chat session to be secured.
6 Watch for information boxes from the PGP Desktop Notifier feature to
appear.
As you send or receive messages, or perform other PGP Desktop
functions, the PGP Desktop Notifier feature displays information boxes that
appear in whichever corner of the screen you specify. These PGP Notifier
boxes tell you the action that PGP Desktop took, or will take. After you
grow familiar with the process of sending and receiving messages, you can
change options for the PGP Notifier feature—or turn it off.
7 After you have sent or received some messages, check the messaging
logs to make sure everything is working correctly.
If you want more information than the Notifier feature displays, the
Messaging Log provides detailed information about all messaging
operations.
8 Modify your messaging policies, if necessary.
Email messages are sent and received—automatically and seamlessly—if
PGP Desktop messaging policies are configured correctly. If your message
recipient has a key on the PGP Global Directory, the default PGP Desktop
policies provide opportunistic encryption. Opportunistic encryption means
that, if PGP Desktop has what it needs (such as the recipient's verified
public key) to encrypt the message automatically, then it does so.
Otherwise, it sends the message in clear text (unencrypted). The default
PGP Desktop policies also provide optional forced encryption. This means
that, if you include the text “[PGP]” in the Subject line of a message, then
the message must be sent securely. If verified keys cannot be found, then
the message is not sent, and a Notifier box alerts you.
9 Start using the other features in PGP Desktop.
Along with its messaging features, you can also use PGP Desktop to
secure the disks that you work with:
18
Page 31

PGP® Desktop 9.8 for Windows PGP Desktop Basics
Use PGP Whole Disk Encryption to encrypt a disk or disk partition
(on Windows systems) or an external disk or partition (on Macintosh
systems). All files on the disk or partition are secured — encrypted
and decrypted on the fly as you use them. The process is completely
transparent to you.
Use PGP Virtual Disk to create a secure “virtual hard disk.” You can
use this virtual disk like a bank vault for your files. Use PGP Desktop
or Windows Explorer or the Mac OS X finder to unmount and lock the
virtual disk, and your files are secure, even if the rest of your
computer is unlocked.
Use PGP Zip to create compressed and encrypted PGP Zip archives.
These archives offer an efficient way to transport or store files
securely.
Use PGP Shredder to delete sensitive files that you no longer need.
PGP Shredder removes them completely, eliminating any possibility of
recovery.
Use PGP NetShare to share files and folders securely and easily
among any number of people—with maximum access control.
19
Page 32

Page 33

3
Installing PGP Desktop
This section describes how to install PGP Desktop onto your computer and how
to get started after installation.
In This Chapter
Before You Install .................................................................................... 21
Installing and Configuring PGP Desktop.................................................. 22
Uninstalling PGP Desktop........................................................................ 24
Moving Your PGP Desktop Installation From One Computer to Another24
Before You Install
This section describes the minimum system requirements for installing PGP
Desktop on your Windows computer.
System Requirements
Before you begin the installation, verify that your system meets these minimum
requirements:
Microsoft Windows 2000 (Service Pack 4), Windows Server 2003 (Service
512 MB of RAM
64 MB hard disk space
Pack 1), Windows XP (Service Pack 1 or 2), Windows Vista (all 32-bit and
64-bit versions), Microsoft Windows XP Tablet PC Edition 2005 (requires
attached keyboard)
Note: The above operating systems are supported only when all of the
latest hot fixes and security patches from Microsoft have been applied.
PGP Whole Disk Encryption (WDE) is supported on client versions of
Windows 2000 (Service Pack 4) and Windows XP (Service Pack 1 or 2), and
on Windows Vista; it is not supported on Windows 2000 Server or 2003
Server.
Refer to the PGP Desktop 9.8 for Windows Release Notes for information on
supported email, instant messaging, and anti-virus software.
21
Page 34

PGP® Desktop 9.8 for Windows Installing PGP Desktop
Installing and Configuring PGP Desktop
This section includes information on installing or upgrading PGP Desktop, as
Installing the Software
well as information on the Setup Assistant.
To install PGP Desktop on your Windows system
1 Locate the PGP Desktop installation program. The installer program is an
.MSI file, which your PGP administrator may have distributed to you using
the Microsoft SMS deployment tool.
2 Double-click the PGP Desktop installer.
3 Follow the on-screen instructions.
4 If prompted to do so, restart your system.
Note: If you are in a domain protected by a PGP Universal Server, your PGP
administrator may have preconfigured your PGP Desktop installer with
specific features and/or settings.
Upgrading the Software
Note: PGP Desktop 9.8 for Windows or greater and
PGP Universal Satellite 2.7 for Windows or greater cannot both be installed
on the same system. The installation programs for both products detect the
presence of the other program and end the installation process if the other
product is found.
You can upgrade to PGP Desktop for Windows from a previous version of one
of the following products:
PGP Desktop for Windows
PGP Universal Satellite for Windows
If you are using Windows XP with your computer, you can upgrade only to PGP
Desktop 9.6 or greater from PGP Desktop 8.x. If you are using a Windows 2000
system, you can upgrade from PGP Desktop Versions 6.x, 7.x, or 8.x.
Important Note: If you are upgrading your computer to Microsoft Windows
Vista and want to use this version of PGP Desktop, be sure to uninstall any
previous versions of PGP Desktop before upgrading to Vista and installing
this release. Be sure to back up your keys and keyrings before uninstalling.
Note that if you have used PGP Whole Disk Encryption, you will need to
unencrypt your disk before you can uninstall PGP Desktop.
22
Page 35

PGP® Desktop 9.8 for Windows Installing PGP Desktop
To upgrade to PGP Desktop 9.8for Windows Do one of the following:
From PGP Desktop 8.x for Windows: Follow the standard installation
process for PGP Desktop 9.6 for Windows.
PGP Desktop for Windows 8.x is automatically uninstalled, and
PGP Desktop 9.8 for Windows is installed. Existing keyrings and
PGP Virtual Disk files are usable in the upgraded version.
From a version of PGP Desktop for Windows prior to 8.0: Manually
uninstall versions of PGP Desktop prior to 8.0 before beginning the
installation of PGP Desktop 9.8 for Windows. Existing keyrings and
PGP Virtual Disk files will be usable in the upgraded version.
From PGP Universal Satellite 1.2 for Windows or previous: Follow the
installation process for PGP Desktop 9.6 for Windows.
Existing versions of PGP Universal Satellite for Windows are automatically
uninstalled, and PGP Desktop 9.8 for Windows will be installed. Existing
settings will be retained.
Caution: Installing any version of PGP Universal Satellite on top of
PGP Desktop 9.8 for Windows is an unsupported configuration. Neither
program will work correctly. Uninstall both programs and then install only
PGP Desktop.
From PGP Desktop for Windows (Version 8.x) and
PGP Universal Satellite: Follow the installation process for PGP Desktop
9.8 for Windows.
PGP Desktop and PGP Universal Satellite for Windows are automatically
uninstalled, and then PGP Desktop 9.8 for Windows is installed. Existing
keyrings and PGP Virtual Disk files are usable in the upgraded version.
Upgrading From Standalone to Managed PGP Desktop Builds
If you have been using PGP Desktop in standalone mode and now will be
managed by a PGP Universal Server, you must install a bound and stamped
version of PGP Desktop over your existing, standalone installation. You must
also complete the enrollment process. Your PGP Administrator will provide an
.msi file so you can install a bound and stamped version.
Running the Setup Assistant
When the installation of PGP Desktop is complete, you are prompted to restart
your computer. Once the computer restarts, as soon as you see the Windows
Desktop, the PGP Desktop Setup Assistant starts automatically. The Setup
Assistant displays a series of screens that ask you questions—then uses your
answers to configure PGP Desktop for you.
Based on a number of factors, the Setup Assistant for your system contains
only those screens that are appropriate for your installation.
23
Page 36

PGP® Desktop 9.8 for Windows Installing PGP Desktop
The Setup Assistant does not configure all PGP Desktop settings. When you
finish going through the Setup Assistant screens, you can then configure those
settings not covered in the Setup Assistant.
Uninstalling PGP Desktop
You can uninstall PGP Desktop using the PGP Desktop uninstaller, or by using
Windows' Add or Remove Programs feature. The following procedure
describes using the PGP Desktop uninstaller directly.
If you are upgrading from PGP Desktop 8.x or later, you do not have to uninstall
PGP Desktop first. For more information, see Upgrading the Software (on page
22).
To uninstall PGP Desktop
1 Click the Start menu and select Programs > PGP > Uninstall PGP
Desktop. A confirmation dialog box appears.
2 Click Yes to continue with the uninstall process. The PGP Desktop
software is removed from your system.
Keyring, PGP Virtual Disk, and PGP Zip (.pgp) files are not removed from
your system, in case you decide to reinstall PGP Desktop in the future.
3 If prompted, restart your computer to complete the uninstall process.
Note: An alternative to uninstalling PGP Desktop is stopping PGP Desktop
background services. Doing this prevents PGP Desktop from protecting your
email and instant messages, but both PGP Virtual Disk volumes and disks or
partitions protected by PGP Whole Disk Encryption are still accessible. If you
just need to turn off the PGP Desktop email or IM proxies, you can do that in
the PGP Options dialog box (select Tools > Options, click the Messaging
tab, and deselect the options as needed).
Moving Your PGP Desktop Installation From One Computer to Another
Moving a PGP Desktop installation from one computer to another is not a
difficult process, although there are a few crucial steps which must be
completed successfully. The process consists of the following steps:
24
Page 37

PGP® Desktop 9.8 for Windows Installing PGP Desktop
To transfer your PGP Desktop installation to another computer
1 Uninstall PGP Desktop. To do this, choose Start > Programs > PGP >
Uninstall PGP Desktop. You can also use the Add/Remove Programs
functionality in the Windows Control Panel, which is the only way to
remove PGP Desktop if you are running an older version of the program.
Note that this step does not remove the keyring files.
2 Transfer the keyrings. To do this, copy the keyring files (both
pubring.pkr and secring.skr) from the old computer to diskette or
other removable media, and then copy them to the new computer. The
default location for the keyring files is C:\Documents and
Settings\<user>\My Documents\PGP\.
If PGP Desktop has never been installed on the new computer, create this
folder first before copying the keyring files to the computer.
3 Install PGP Desktop on the new computer. To do this, download PGP
Desktop by clicking the download link in your original PGP Corporation
order confirmation email.
4 During the installation process, do the following:
During the PGP Desktop setup wizard on the new computer select
No, I have existing keyrings and specify the location where you
copied the keyring files to on the new computer.
Use the same name, organization, and license number used when
PGP Desktop was originally authorized.
25
Page 38

Page 39

The PGP Desktop User
4
Interface
This section describes the PGP Desktop user interface.
In This Chapter
Accessing PGP Desktop Features........................................................... 27
PGP Desktop Notifier alerts..................................................................... 33
Viewing the PGP Desktop Log ................................................................ 39
Accessing PGP Desktop Features
There are four main ways to access PGP Desktop:
PGP Desktop Main Window (see "
28)
PGP Tray Icon (see "
Using the PGP Tray Icon" on page 29)
The PGP Desktop Main Screen" on page
Shortcut Menus in Windows Explorer (see "
Windows Explorer" on page
Start Menu (see "
Using the Start Menu" on page 33)
27
31)
Using Shortcut Menus in
Page 40

PGP® Desktop 9.8 for Windows The PGP Desktop User Interface
The PGP Desktop Main Screen
PGP Desktop’s main screen is your main interface to the product.
The PGP Desktop main screen includes:
1
The Menu bar. Gives you access to PGP Desktop commands.
The menus on the Menu bar change depending on which Control
box is selected.
2
The Toolbar. Gives you access to frequently used features. You
can create a new PGP Zip archive, verify an existing PGP Zip
archive, shred selected files, search for a key, synchronize your
keys, or find text in the user IDs of the keys currently visible in the
PGP Keys work area.
3
The PGP Keys Control Box. Gives you control of PGP keys.
4
The PGP Messaging Control Box. Gives you control over PGP
Messaging.
5
The PGP Zip Control Box. Gives you control of PGP Zip, as well
as the PGP Zip Assistant, which helps you create new PGP Zip
archives.
6
The PGP Disk Control Box. Gives you control of PGP Disk.
7
The PGP NetShare Control Box. Gives you control of PGP
NetShare.
28
Page 41

PGP® Desktop 9.8 for Windows The PGP Desktop User Interface
8
Expand/Collapse Control Box Control. Use to display or hide
Control Boxes.
9
The PGP Desktop Work area. Displays information and actions
you can take for the selected Control box.
10
PGP Keys Find box. Use to search for keys on your keyring. As
you type text in this box, PGP Desktop displays search results
based on either name or email address.
Each Control box expands to show available options, and collapses to save
space (only the Control Box’s banner displays). Expand a Control Box by clicking
its banner. Collapse a Control Box by clicking its Expand/Collapse arrow in the
upper right corner.
When expanded, the contents of Control Boxes change depending on what is
appropriate for what you are working on, or what is selected. For example,
when the PGP Keys Control Box is selected, if a public key is selected, the
options Email this Recipient and Email this Key appear at the bottom of the
PGP Keys Control Box. If a private key is selected, only Email this Key appears.
If no key is selected, neither option appears.
Note: Click Email this Recipient to open your system’s default email client
and create a new email using the address of the selected key. This makes it
easy to send a message to someone on your keyring. Click Email this Key to
open your system’s default email client and create a new email with the
selected public key attached (the message is not addressed). This is useful
for sending your public key, or a public key on your keyring, to someone who
does not already have it.
Using the PGP Tray Icon
One way to access many PGP Desktop features is from the PGP Tray icon.
Tip: You can open PGP Desktop by double-clicking the PGP Tray icon.
The PGP Tray displays one of four icons:
Normal operation (
passphrases are cached, message proxying is enabled, no other PGP
operations are in progress.
): PGP Desktop is operating normally; no
29
Page 42

PGP® Desktop 9.8 for Windows The PGP Desktop User Interface
Cached passphrase ( ): PGP Desktop is operating normally; additionally,
one or more private key passphrases has been cached. Caching
passphrases is an optional time-saving feature, in that you don’t have to
type your passphrase if it’s cached to sign a key, for example, but it’s also a
security risk in that if you leave your system with the passphrase cached,
whoever walks up to your system could use PGP Desktop without having
to type the appropriate passphrase.
Message proxying disabled (
): Proxying of email messages has been
disabled; incoming encrypted messages will not be decrypted or verified
and outgoing messages will not be encrypted or signed. You can turn
message proxying back on using the PGP Tray menu or the PGP Options.
Busy (
): PGP Desktop is in the middle of an operation, such as
encrypting a disk. When the operation is complete, the PGP Tray icon
changes back to the appropriate icon.
When you right or left click on the PGP Tray icon, a menu appears giving you
access to (from the top down):
Exit PGP Services. Stops PGP Desktop services on this computer. Be very
careful with this command; it will stop automatic encryption and decryption
of email and instant messaging sessions.
If you stop the PGP Services, you can start them again by restarting your
computer or by selecting PGP Desktop from the Start menu (Start >
Programs > PGP > PGP Desktop).
About PGP Desktop. Displays information about the version of PGP
Desktop you are using, including licensing information.
Check for Updates. Contacts the PGP Corporation update server to see if
a newer version of PGP Desktop is available for download.
Help. Opens PGP Desktop’s integrated online help.
Options. Opens the PGP Desktop Options dialog.
View Notifier. Displays the last incoming and outgoing message notifiers.
View PGP Log. Displays the PGP Desktop Log. Use the PGP Desktop Log
to see what actions PGP Desktop is taking to secure your data.
30
Page 43

PGP® Desktop 9.8 for Windows The PGP Desktop User Interface
Open PGP Desktop. Opens the PGP Desktop main screen. You can also
open PGP Desktop by double-clicking the PGP Desktop Tray icon.
Clear Caches. Clears from memory any cached information, such as
passphrases and cached public keys.
Note: A cached passphrase is not cleared if you used a smart card or
token to access a PGP NetShare protected folder, and removed the smart
card or token. To clear a cached passphrase, create a hot key. For more
information, see Advanced Options (on page 289).
Unmount PGP Virtual Disks. Unmounts all mounted PGP Virtual Disk
volumes.
Current Window. Lets you use PGP Desktop functionality (Decrypt &
Verify, Encrypt & Sign, Sign, Encrypt) on the contents of the current
window.
Clipboard. Lets you use PGP Desktop functionality (Decrypt & Verify,
Encrypt & Sign, Sign, Encrypt) on the contents of the Clipboard. Also lets
you clear or edit the contents of the Clipboard.
Using Shortcut Menus in Windows Explorer
You can also access PGP Desktop functions using shortcut menus in Windows
Explorer. Simply open Windows Explorer and then right-click the items you
want to work on.
Windows Explorer gives you access to PGP Desktop functions appropriate to
what you right-clicked:
31
Page 44

PGP® Desktop 9.8 for Windows The PGP Desktop User Interface
Drive. If you right-click a drive on your system in Windows Explorer and
select PGP Desktop from the menu that appears, you can do the following
to the drive:
PGP Shred Free Space on it
PGP Virtual Disk. If you right-click a mounted PGP Virtual Disk drive on
your system in Windows Explorer and select PGP Desktop from the menu
that appears, you can do the following to the drive:
Unmount the PGP Virtual Disk
Locate the PGP Virtual Disk file (.pgd) in Windows Explorer
Edit the PGP Virtual Disk properties
If you right-click the PGP Virtual Disk file (.pgd) in Windows Explorer for an
unmounted disk, and select PGP Desktop from the menu that appears, you
can also do the following:
Compact unused space
Use PGP Shred to securely delete the PGP Virtual Disk (note that this
also deletes all data on the disk)
Re-encrypt the PGP Virtual Disk
Folder. If you right-click a folder in Windows Explorer and select PGP
Desktop from the menu that appears, you can do the following to the
folder:
Add to new PGP Zip
Create Self-Decrypting Archive of the contents in the folder
Secure with a key or passphrase
Decrypt & Verify it
Add it to PGP NetShare
Shred it
File. If you right-click a file in Windows Explorer, and select PGP Desktop
from the menu that appears, you can do the following to the file,
depending on what kind of file it is:
If you select an unencrypted file, you can Secure it with a key or
passphrase, Sign, Shred, or Create a Self-Decrypting Archive
If you select an encrypted file, you can decrypt/verify or Shred it
If you select an unmounted PGP Virtual Disk volume (.pgd), you can
mount or edit it; if you select a mounted volume, you can unmount it
If you select a PGP Zip (.PGP) file, you can Decrypt & Verify it, View it,
or Shred it
If you select a PGP key file (.ASC), you can decrypt/verify or Shred it.
If you select decrypt/verify, you are given the option of importing the
file
32
Page 45

PGP® Desktop 9.8 for Windows The PGP Desktop User Interface
If you select a PGP public or private keyring file (PKR or SKR files,
respectively), you can add the keys in it to your keyring or Shred it
Using the Start Menu
You can access PGP Desktop through the Windows Start menu. To do this,
select Start > Programs > PGP.
The Start menu provides you with access to:
PGP Desktop documentation in English, German, and Japanese
The PGP Desktop application
Uninstalling PGP Desktop
PGP Desktop Notifier alerts
The PGP Desktop Notifier feature displays a small information box that tells you
the status of incoming and outgoing email messages, as well as instant
messaging sessions.
Note: The PGP Desktop Notifier feature also displays the status of the
PGP Whole Disk Encryption and PGP NetShare features on your computer.
For more information, see PGP Desktop Notifier for Disk features (on page
37).
PGP Desktop Notifier for Messaging
Use the PGP Desktop Notifier for Messaging feature to:
See if an incoming email is properly decrypted and/or signed.
See if an outgoing email is properly encrypted and/or signed.
33
Page 46

PGP® Desktop 9.8 for Windows The PGP Desktop User Interface
Stop an email message from being sent if the encryption options are not
what you want.
View a quick summary of the sender, subject, and encryption key of an
email.
Review, at any time, the status of previous incoming or outgoing messages
for that Windows session.
See that a chat session with another PGP Desktop user is being secured.
Use the PGP Desktop Notifier feature to monitor all or some of your incoming
email, as well as maintain precise control over all or some of your outgoing
messages. The choice is yours. You can set various Notifier options, or turn the
PGP Desktop Notifier feature completely off if you prefer.
Some additional points about the PGP Desktop Notifier feature:
For message notifications, use the left and right arrow buttons in the
upper-right corner of the Notifier box to scroll Notifier messages forward or
backward. This way, you can review messages that came before or after
the message you are viewing currently.
When they first display, Notifier message boxes have a partially transparent
appearance to prevent obscuring anything on your screen. Notifier
message boxes become opaque if you move your cursor over them, and
become translucent again when you move your mouse away from them.
Unless the cursor is over them, Notifier messages display for four seconds
(this default setting can be changed in the Notifier options). If you want
more time to read a Notifier, move your cursor over the Notifier and it
remains on your display.
If you completely miss reading a Notifier, or you would like to review
previous ones, do the following:
On Windows systems, choose View Notifier from the PGP Tray icon.
On Mac OS X systems, choose View Notifier from the PGP Desktop
icon in the Mac OS X Menu Bar.
Close a Notifier message by clicking the X (in the upper right corner of the
message on Windows systems, in the upper left corner on Mac OS X
systems).
For more information about setting PGP Desktop Notifier options, see Notifier
Options (on page
288).
34
Page 47

PGP® Desktop 9.8 for Windows The PGP Desktop User Interface
Incoming PGP Desktop Notifier Messages
Notifications for incoming email provide information on whether the email was
decrypted and verified, or decrypted and signed by an unverified or unknown
key. The following example shows an email message that was received,
decrypted successfully, and verified that it came from the person who it says it
was from.
Outgoing PGP Desktop Notifier Messages
For simple notification, choose to have a PGP Desktop Notifier appear
momentarily when email is sent (all email, or email meeting certain criteria). The
following example shows an outgoing email message that is ready to be sent
secured. The email is sent with no intervention from you.
You can also set PGP Desktop to include Block and Send buttons in the Notifier
box.
To manage the outgoing email with this Notifier
1 In the PGP Outgoing Message Notifier box, do the following:
To stop this email message from being sent, click Block. Note that
this blocks only this outgoing email message; future email messages
to this sender can be sent.
To send this message, even though the recipient’s key cannot be
found, click Send.
To continue to delay a message from being processed, hover your
mouse over the Notifier box. When you move your mouse away from
the Notifier box, the message is then processed using the default
rule.
35
Page 48

PGP® Desktop 9.8 for Windows The PGP Desktop User Interface
In Notifier options, the Delay outbound mail for setting specifies
how long (in seconds) the Notifier gives you before it sends the mail
without your intervention. The Notifier displays a countdown before it
sends your mail.
2 To view additional information, including the Action, Recipient, Policy, and
Signing Key, click More.
It is not necessary for you to view this additional information unless you
want to see it. To hide it again, click Less.
PGP Notifier for Instant Messaging
If you have PGP Desktop installed on your computer, and if you have specified
to receive Notifiers for Instant Messaging (under the Notifications tab in PGP
Desktop Preferences), then PGP Desktop Notifiers alert you when the AOL
Instant Messenger (AIM) sessions that you have with other PGP Desktop users
are protected.
36
Page 49

PGP® Desktop 9.8 for Windows The PGP Desktop User Interface
When you use the secure instant messaging feature, a Notifier displays when
you log on to the instant messaging program to inform you that your chat is
secure, and a padlock icon displays next to your “buddy name” with most AIMcompliant instant messaging clients.
When you log off of your instant messaging program, a final Notifier message
informs you that the secure session has ended.
For more information on proper configuration, as well as the use of the secure
instant message chat feature, see Securing Instant Messages.
PGP Desktop Notifier for Disk features
The PGP Desktop Notifier for Disk features keep you informed when you are
working with the PGP NetShare and the PGP Whole Disk Encryption features.
Note: The PGP Desktop Notifier feature also displays the status of incoming
and outgoing email messages on your computer. For more information, see
PGP Desktop Notifier for Messaging (on page 33).
PGP NetShare
When used with PGP NetShare, the PGP Desktop Notifier feature alerts you to
these things:
Actions taken to a shared folder.
Location of the affected folder.
Name of the affected folder.
Who performed the action.
PGP Whole Disk Encryption
When used with the PGP Whole Disk Encryption feature, the PGP Desktop
Notifier feature alerts you to these things:
37
Page 50

PGP® Desktop 9.8 for Windows The PGP Desktop User Interface
The disk being encrypted.
The size and type of disk.
Status of the encryption process.
Enabling or Disabling Notifiers
To enable or disable Notifiers
1 Open PGP Desktop and select Tools > PGP Options.
2 Click the Notifier tab.
3 Specify the Screen Position. PGP Desktop Notifications can appear at any
of the four corners of your screen (Lower Right, Lower Left, Upper
Right, or Upper Left). Select the corner that you want PGP Desktop
Notifications to appear. The default position is Lower Right.
4 If you are using PGP Desktop Messaging and you want PGP Desktop
Notifiers to appear, informing you of encryption and/or signing status when
you send email, select the checkbox to Notify when processing
outbound email. Deselect this checkbox to stop PGP Desktop Notifiers
from appearing when you send mail.
5 PGP Desktop looks for a public key for every recipient of the email
messages that you send. By default, if it cannot find a public key for a
recipient, it sends that email in the clear (without encryption). Select Ask
me before sending email when the recipient’s key is not found if you
want to be notified when a key is not found and be given a chance to block
the email so that it is not sent. Then specify the following options:
Always ask me before sending email: Select this checkbox if you
would prefer approving every email that you send. You can review the
encryption status in the Notifier, and either send or block the email.
Delay outbound email for n second(s) to confirm (where n is a
number from 1-30; the default is 4 seconds). To change the amount of
time that outbound messages are delayed, and a PGP Desktop
Notifier is displayed, click the up or down arrows. Use the delay
period to review the PGP Desktop Notifier message.
(For more information on the PGP Desktop default policy settings, see
Services and Policies (on page
92).)
6 For incoming email, specify how you are notified of its status upon arrival.
Select one of the following for Display notifications for incoming mail:
38
Page 51

PGP® Desktop 9.8 for Windows The PGP Desktop User Interface
When receiving secured email—A Notifier appears whenever you
receive secured email. The box displays who the email is from, its
subject, its encryption and verification status, and the email address of
the person sending it.
Only when message verification fails—For incoming email, you see
a Notifier only when PGP Desktop is unable to verify the signature of
the incoming email.
Never—If you do not need or want to see a Notifier as you receive
email, select this option. This option does not affect Notifiers for
outgoing mail.
7 If you want a PGP Desktop Notifier to appear briefly when you begin a
secure instant message chat, and appear briefly again when the chat ends,
select the checkbox to Notify for status of PGP Encrypted IM sessions.
Viewing the PGP Desktop Log
Use the PGP Desktop Log to see what actions PGP Desktop is taking to secure
your data.
To view the PGP Desktop Log
1 To view logs, you must turn on logging. To do this, in PGP Desktop select
Tools > Enable Logging.
2 Do one of the following:
Click the PGP Desktop system tray icon and select View PGP Log
from the shortcut menu. The PGP Desktop Log opens in a new
window.
In PGP Desktop, select Tools > View PGP Log. The PGP Desktop
Log opens in a new window.
39
Page 52

PGP® Desktop 9.8 for Windows The PGP Desktop User Interface
In PGP Desktop, click the PGP Messaging control box and then click
PGP Log. The PGP Desktop Log appears in the application window.
3 To change the view options or filter on specific logging information, do the
following:
Click the arrow for View log for to select the days of the logs you
want to view.
Click the arrow for View topic to select the types of logs you want to
view. Choose from All, PGP, Email, IM, Whole Disk, NetShare,
Zip/SDA, or Virtual Disk.
Click the arrow for View level to select the minimum severity of log
entries you want to view. Choose from Error, Warn, Info, or
Verbose. Note that Verbose can result in some large log files.
4 When you are finished viewing the log:
To save a copy of the PGP Messaging Log, click Save.
To clear the entries in the PGP Messaging Log, click Shred.
To exit the PGP Desktop Log window, click Close.
40
Page 53

5
Working with PGP Keys
PGP Keys is the feature of PGP Desktop you use to create and maintain your
keypair(s) and the public keys of other PGP Desktop users.
This section describes viewing keys, creating a keypair, distributing your public
key, getting the public keys of others, and working with keyservers.
Note: If you are using PGP Desktop in a PGP Universal-managed
environment, your PGP administrator may have disabled certain features.
When a feature is disabled, the control item in the left side is not displayed
and the menu and other options for that feature are not available. The
graphics included in this guide depict the default installation with all features
enabled. If your PGP administrator has disabled this functionality, this section
does not apply to you.
Viewing Keys
In This Chapter
Viewing Keys ........................................................................................... 41
Creating a Keypair.................................................................................... 42
Protecting Your Private Key..................................................................... 45
Distributing Your Public Key .................................................................... 47
Getting the Public Keys of Others........................................................... 50
Working with Keyservers ........................................................................ 52
Using Master Keys .................................................................................. 54
To view the keys on the local keyring, open PGP Desktop and click on the PGP
Keys Control box. Then click:
All Keys. Shows all PGP keys on your keyrings.
My Private Keys. Shows only the private keys on your keyrings.
Search for Keys. Lets you search for keys on your keyrings based on
criteria you specify.
Smartcard Keys. If you have a smartcard on your system, you also have
this option.
41
Page 54

PGP® Desktop 9.8 for Windows Working with PGP Keys
Some of the more common tasks you may want to perform are available from
the PGP Keys Control box or work area. These are:
If a public key is selected in any view of the PGP Keys on your keyrings,
the option to Email this Recipient is available in the PGP Keys Control box.
If you perform a search, and you select a public key found in the search
that is not on your local keyrings, the option Add to my Keyring is
available in the PGP Keys Control box.
To see the properties of any key displayed in the work area, just double-
click any part of the key listing to display the Key Properties dialog box for
that key.
When you perform a search, the option Save this Key Search appears in the
PGP Keys Control box, so you can save the results for later access.
Creating a Keypair
References to PGP Universal-managed environments do not apply to the PGP
Virtual Disk or PGP Virtual Disk Professional products. For more information
about PGP Universal-managed environments, see “Managed” versus
“Unmanaged” Users (on page
5).
You probably already created a PGP keypair for yourself using the PGP Desktop
Setup Assistant or with a previous version of PGP Desktop — but if you
haven’t, you need to now. Most of the things you do with PGP Desktop require
a keypair.
Caution: It is bad practice to keep creating new keys for yourself. A PGP
keypair is like a digital driver’s license or passport; if you create lots of them,
you’re going to end up confusing yourself and those people who want to
send you encrypted messages. It is best to have only one key that contains
all the email addresses that you use. The PGP Global Directory will publish
only one key per email address.
If you are using PGP Desktop in a PGP Universal-managed environment, keypair
creation may be disabled.
To create a PGP keypair
1 Make sure the PGP Keys Control box is selected.
2 Select File > New PGP Key or press Ctrl+N. The first screen of the PGP
Key Generation Assistant appears.
3 Read the information on this screen.
42
Page 55

PGP® Desktop 9.8 for Windows Working with PGP Keys
4 If you want to generate your new PGP keypair on a token or smart card,
make sure the token or smart card is connected to the system and then
select the box labeled Generate Key on Token: [name of smart card or
token on system]. Refer to Storing Keys on Smart Cards and Tokens (on
259) for more information about smart cards and tokens.
page
5 Click Next. The Name and Email Assignment screen appears.
6 Type your real name in the Full Name field and your correct email address
in the Primary Email field. It is not absolutely necessary to type your real
name or even your email address. However, using your real name makes it
easier for others to identify you as the owner of your public key. Also,
when you upload your public key to the PGP Global Directory (which makes
it easily available to other PGP Desktop users), your real email address is
required.
7 If you would like to add more email addresses to the key you are creating,
click More and type them in the fields that appear.
8 To specify advanced settings for the key you are creating, click Advanced.
The Advanced Key Settings dialog box appears. Use this dialog box to
specify the key type and size, expiration, and other settings.
9 Select settings for the following:
Key type. Choose between Diffie-Hellman/DSS and RSA.
Generate separate signing subkey. Select this box if you need a
separate subkey for signing. A separate Signing Subkey is created
along with the new keypair. You can also create additional signing or
encryption subkeys any time after the new key has been created.
Refer to Working with Subkeys (on page
69) for more information
about separate Signing and Encryption Subkeys.
Key size. Type from 1024 bits to 4096 bits. The larger the key, the
more secure it is, but the longer it will take to generate. Some smart
cards and tokens limit key size to 1024 bits.
Expiration. Select Never or specify a date on which the keypair you
are creating will expire.
Allowed Ciphers. Deselect any cipher you do not want the keypair
you are creating to support.
Preferred Cipher. Select the cipher you want to be used in those
cases where no algorithm is specified. Only a cipher that is allowed
can be selected as preferred.
Allowed Hashes. Deselect any hash you do not want the keypair you
are creating to support.
Preferred Hash. Select the hash you want to be used in those cases
where no hash is specified. Only a hash that is allowed can be
selected as preferred.
10 Click OK to close the Advanced Key Settings dialog box.
11 Click Next.
43
Page 56

PGP® Desktop 9.8 for Windows Working with PGP Keys
12 If you are part of a PGP-Universal managed environment, you may see the
Organization Settings screen, which displays keys your PGP administrator
has configured to add to your copy of PGP Desktop (such as your
organization’s Additional Decryption Key (ADK) or Organization Key).
The Passphrase Assignment screen appears.
13 Type the passphrase you want to use to maintain exclusive access to the
private key of the keypair being created.
14 To confirm your entry, press Tab to advance to the Confirmation field, then
type the same passphrase again. For information on the Passphrase Quality
Bar, see The Passphrase Quality Bar (on page
294).
Note: Normally, as an added level of security, the characters you type for
the passphrase do not appear on the screen. However, if you are sure
that no one is watching, and you want to see the characters of your
passphrase as you type, select the Show Keystrokes checkbox.
Warning: Unless your PGP administrator has implemented a PGP key
reconstruction policy for your company, no one, including PGP
Corporation, can salvage a key with a forgotten passphrase.
15 Click Next to begin the key generation process. PGP Desktop generates
your new keypair.
This process can take several minutes.
16 When the key generation process indicates that it is done, click Next. You
are prompted to add the public key portion of the key you just created to
the PGP Global Directory.
17 Read the text on the screen and click Next to add your new key to the PGP
Global Directory (recommended). Click Skip if you want to prevent the
public key from being posted to the PGP Global Directory.
18 Click Finish. Your new PGP keypair has been generated. It should be
visible in the PGP Keys Work area. If you don’t see it listed, make sure All
Keys or My Private Keys is selected in the PGP Keys Control box.
Caution: Consider backing up your private key to a safe location at this
point. Your private key is very important, and losing it could have
catastrophic consequences once you have data that is encrypted to it. See
Protecting Your Private Key
Passwords and Passphrases
Encrypting a file and then finding yourself unable to decrypt it is a painful lesson
in learning how to choose a passphrase you will remember.
(on page 45).
44
Page 57

PGP® Desktop 9.8 for Windows Working with PGP Keys
Most applications require a password between three and eight letters. Using a
single-word passphrase is generally a bad practice, and is discouraged. A single
word password is vulnerable to a dictionary attack, which consists of having a
computer try all the words in the dictionary until it finds your password. You can
imagine simple enhancements to dictionary attacks which manage to find broad
arrays of passwords even when slightly modified from dictionary terms.
To protect against this manner of attack, it is widely recommended that you
create a word that includes a combination of upper and lowercase alphabetic
letters, numbers, punctuation marks, and spaces. This results in a stronger
password, but an obscure one that you are unlikely to remember easily.
Trying to thwart a dictionary attack by arbitrarily inserting a lot of non-alphabetic
characters into a passphrase makes your passphrase too easy to forget and
could lead to a disastrous loss of information because you can’t decrypt your
own files. A multiple word passphrase is less vulnerable to a dictionary attack.
However, unless the passphrase you choose is something that is easily
committed to long-term memory, you are unlikely to remember it verbatim.
Picking a phrase on the spur of the moment is likely to result in forgetting it
entirely. Choose something that is already residing in your long-term memory. It
should not be something that you have repeated to others recently, nor a
famous quotation, because you want it to be hard for a sophisticated attacker to
guess. If it’s already deeply embedded in your long-term memory, you probably
won’t forget it. Of course, if you are reckless enough to write your passphrase
down and tape it to your monitor or put it in your desk drawer, it won’t matter
what you choose.
Refer to Working with Passwords and Passphrases (on page
information.
Protecting Your Private Key
PGP Corporation recommends that you take these actions immediately after
you create your keypair:
Caution: Failure to take these actions could result in a devastating loss of
data some time in the future.
Back up a copy of your private key file to another, safe location, in case
your primary copy is ever damaged or lost. See Backing up Your Private
Key (on page
Reflect on your chosen passphrase to ensure that you chose something
that you will not forget. If you are concerned that you chose a passphrase
during the key creation process that you will not remember, change it
RIGHT NOW to something you will not forget. For information on changing
your passphrase, see Changing Your Passphrase (on page
47).
293) for more
62).
45
Page 58

PGP® Desktop 9.8 for Windows Working with PGP Keys
Your private key file is very important because once you have encrypted data to
your public key; only the corresponding private key can be used to decrypt the
data. This holds true for your passphrase as well; losing your private key or the
passphrase means that you will not be able to decrypt data encrypted to the
corresponding public key. When you encrypt information, it is encrypted to both
your passphrase and your private key. You need both to decrypt the encrypted
data. Once the data is encrypted, no one—not even PGP Corporation—can
decrypt the data without your private key file and your passphrase.
Consider a situation where you have important encrypted data, and then either
forget your passphrase or lose your private key. The encrypted data would be
inaccessible, unusable, and unrecoverable.
Protecting Keys and Keyrings
Besides making backup copies of your keys, you should be especially careful
about where you store your private key. Even though your private key is
protected by a passphrase that only you should know, it is possible that
someone could discover your passphrase and then use your private key to
decipher your email or forge your digital signature. For instance, somebody
could look over your shoulder and watch the keystrokes you enter or intercept
them on the network or even over the Internet.
To prevent anyone who might happen to intercept your passphrase from using
your private key, store your private key only on your own computer. If your
computer is attached to a network, make sure that your files are not
automatically included in a system-wide backup where others might gain access
to your private key. Given the ease with which computers are accessible over
networks, if you are working with extremely sensitive information, you may
want to keep your private key on a floppy disk, which you can insert like an oldfashioned key whenever you want to read or sign private information.
As another security precaution, consider assigning a different name to your
private keyring file and then storing it somewhere other than in the default
location. Use the Keys tab of the Options dialog box to specify a name and
location for your private and public keyring files.
Your private and public keys are stored in separate keyring files. You can copy
them to another location on your hard drive or to a floppy disk. By default, the
private keyring (secring.skr) and the public keyring (pubring.pkr) are
stored along with the other program files in your “PGP” folder; you can save
your backups in any location you like.
Keys generated on a smart card cannot be backed up because the private
portion of your keypair is non-exportable.
You can configure PGP Desktop to back up your keyrings automatically after
you close PGP Desktop. Your keyring backup options can be set in the Keys tab
of the Options dialog box (for Windows) and in the Keys section of the
Preferences dialog box (for Mac OS X).
46
Page 59

PGP® Desktop 9.8 for Windows Working with PGP Keys
Backing up Your Private Key
To back up your private key
1 In the PGP Keys control box, click My Private Keys.
2 Select the icon representing your keypair.
3 Select File > Export.
4 Type a name for the file.
5 Select the Include Private Key(s) check box. This is important, because if
you do not do this, only your public key will be exported.
6 Click Save.
7 Copy the file (which has an .asc extension) to a secure location. This may
be a compact disc which you carefully archive, another personal computer,
or a USB flash drive that you keep in a safe location. Please remember not
to distribute this file to others, as it contains both your private key and your
public key.
What if You Lose Your Key?
If you lose your key and do not have a backed up copy from which to restore
your key, you will never again be able to decrypt any information encrypted to
your key. You can, however, reconstruct your key if your PGP administrator has
implemented a key restoration policy for your company. For more information,
see PGP Key Reconstruction (see "
80, "Reconstructing Keys with PGP Universal" on page 80) and contact your PGP
administrator.
Distributing Your Public Key
After you create your PGP Desktop keypair, you need to get your public key to
those with whom you intend to exchange encrypted messages.
You make your public key available to others so they can send you encrypted
information and verify your digital signature; and you need their public key to
send encrypted messages to them.
You can distribute your public key in various ways:
Publish your key on the PGP Global Directory (see "
on a Keyserver" on page
necessary once your key is published to this directory.
If You Lost Your Key or Passphrase" on page
Placing Your Public Key
48). Generally none of the other methods are
47
Page 60

PGP® Desktop 9.8 for Windows Working with PGP Keys
Include your public key in an email message (see "Including Your Public Key
in an Email Message" on page
49).
Export your public key or copy it to a text file (see "
Key to a File" on page
50).
On Windows systems, you can also:
Copy from a Smart Card directly to someone's keyring (see "
a Smart Card Directly to Someone’s Keyring" on page
Placing Your Public Key on a Keyserver
References to PGP Universal-managed environments do not apply to the PGP
Virtual Disk or PGP Virtual Disk Professional products. For more information
about PGP Universal-managed environments, see “Managed” versus
“Unmanaged” Users (on page
The best method for making your public key available is to place it on a public
keyserver, which is a large database of keys, where anyone can access it. That
way, people can send you encrypted email without having to explicitly request a
copy of your key. It also relieves you and others from having to maintain a large
number of public keys that you rarely use.
There are a number of keyservers worldwide, including the PGP Global
Directory, where you can make your key available for anyone to access. If you
are using PGP Desktop in a domain protected by a PGP Universal Server, your
PGP administrator will have preconfigured PGP Desktop with appropriate
settings.
Exporting Your Public
Copying from
50).
5).
When you’re working with a public keyserver, keep these things in mind before
you send your key:
Is this the key you intend to use? Others attempting to communicate with
you might encrypt important information to that key. For this reason, we
strongly recommend you only put keys on a keyserver that you intend for
others to use.
Will you remember your passphrase for this key so you can retrieve data
encrypted to it or, if you don’t want to use the key, so you can revoke it?
Other than the PGP Global Directory, once a key is up there, it’s up there.
Some public keyservers have a policy against deleting keys. Others have
replication features that replicate keys between keyservers, so even if you
are able to delete your key on one server, it could reappear later.
Most people post their public key to the PGP Global Directory right after they
create their keypair. If you have already posted your key to the PGP Global
Directory, you do not need to do it again. Under most circumstances, there is
no need to publish your key to any other keyserver. Note also that other
keyservers may not verify keys, and thus keys found on other keyservers may
require significantly more work on your part to contact the key owner for
fingerprint verification.
48
Page 61

PGP® Desktop 9.8 for Windows Working with PGP Keys
To manually send your public key to a keyserver
1 Open PGP Desktop.
2 Make sure the PGP Keys Control box is selected.
3 Right-click the keypair whose public key you want to send to the keyserver.
4 Select Send To and then select the keyserver you want to send the public
key to from the list. Refer to Working with Keyservers (on page
52) if the
keyserver you want to send your public key to is not on the list. PGP
Desktop lets you know when the public key is successfully copied to the
keyserver.
Once you place a copy of your public key on a keyserver, it’s available to people
who want to send you encrypted data or to verify your digital signature. Even if
you don’t explicitly point people to your public key, they can get a copy by
searching the keyserver for your name or email address.
Many people include the Web address for their public key at the end of their
email messages. In most cases, the recipient can just double-click the address
to access a copy of your key on the server. Some people even put their PGP
fingerprint on their business cards for easier verification.
Including Your Public Key in an Email Message
Another convenient method of delivering your public key to someone is to
include it with an email message.
When you send someone your public key, be sure to sign the email. That way,
the recipient can verify your signature and be sure no one has tampered with
the information along the way. Of course, if your key has not yet been signed
by any trusted introducers, recipients of your signature can only truly be sure
the signature is from you by verifying the fingerprint on your key.
To include your public key in an email message
1 In PGP Desktop, make sure the PGP Keys Control box is selected.
2 Right-click the keypair whose public key you want to include in an email
message.
3 Select Send To and then select Mail Recipient. Your email application
opens with your key information already in place.
4 Address the message and send it.
If this method does not work for you, you can open PGP Desktop, select your
keypair, select Edit > Copy, open an email message, then paste the public key
into the body of the message. With some email applications you can simply
drag your key from PGP Desktop into the text of your email message to transfer
the public key information.
49
Page 62

PGP® Desktop 9.8 for Windows Working with PGP Keys
Exporting Your Public Key to a File
Another method of distributing your public key is to export it to a file and then
make this file available to the person with whom you want to communicate
securely.
There are three ways to export or save your public key to a file:
Select your keypair, then select File > Export. Enter a name and a location
for the file, then click Save. Be sure not to include your private key along
with your public key if you plan on giving this file to others.
Ctrl-click the key you want to save to a file, select Export from the list,
enter a name and a location for the file, then click Save. Be sure not to
include your private key along with your public key if you plan on giving this
file to others.
Select your keypair, then select Edit > Copy. Open a text editor and select
Paste to insert the key information into the text file, and save the file. You
can then email or give the file to anyone you like. The recipient needs to
use PGP Desktop on his or her system to retrieve the public key portion.
Copying from a Smart Card Directly to Someone’s Keyring
Another method of distributing your public key—if you have it on a smart card—
is to copy it from the smart card directly to someone’s keyring.
Refer to Copying your Public Key from a Smart Card to a Keyring (on page
for more information about how to do this.
Getting the Public Keys of Others
References to PGP Universal-managed environments do not apply to the PGP
Virtual Disk or PGP Virtual Disk Professional products. For more information
about PGP Universal-managed environments, see “Managed” versus
“Unmanaged” Users (on page
Just as you need to distribute your public key to those who want to send you
encrypted mail or verify your digital signature, you need to obtain the public
keys of others to send them encrypted mail or verify their digital signatures.
There are multiple ways to obtain someone’s public key:
Automatically retrieve the verified key from the PGP Global Directory
Find the key manually on a public keyserver
5).
264)
50
Page 63

PGP® Desktop 9.8 for Windows Working with PGP Keys
Automatically add the public key to your keyring directly from an email
message
Import the public key from an exported file
Get the key from your organization’s PGP Universal Server
Public keys are just blocks of text, so they are easy to add to your keyring by
importing them from a file or by copying them from an email message and then
pasting them into your public keyring in PGP Desktop.
Getting Public Keys from a Keyserver
If the person to whom you want to send encrypted mail is an experienced PGP
Desktop user, it is likely that a copy of his or her public key is on the PGP Global
Directory or another public keyserver. This makes it very convenient for you to
get a copy of the most up-to-date key whenever you want to send him or her
mail and also relieves you from having to store a lot of keys on your public
keyring.
There are a number of public keyservers, such as the PGP Global Directory
maintained by PGP Corporation, where you can locate the keys of most PGP
users. If the recipient has not pointed you to the Web address where his or her
public key is stored, you can access any keyserver and do a search for the
user’s name or email address. This may or may not work, as not all public
keyservers are regularly updated to include the keys stored on all the other
servers.
If you are in a domain protected by a PGP Universal Server, then your PGP
administrator may direct you to use the keyserver built into the PGP Universal
Server. In this case, your PGP Desktop software is probably already configured
to access the appropriate PGP Universal Server.
Similarly, the PGP Universal Server is configured by default to communicate
with the PGP Global Directory. Thus, the PGP ecosystem distributes the load of
key lookup and verification.
To get someone’s public key from a keyserver
1 Open PGP Desktop and highlight the PGP Keys Control box.
2 Choose Search for Keys from the PGP Keys Control box. The Search for
Keys screen appears in the Work area.
3 Specify your search criteria, then click Search. If you want to search only a
specific keyserver, click the Search drop-down button and specify the
keyserver. If the keyserver you want to search isn’t currently on the list,
select Edit Keyserver List and add it.
You can search for keys on a keyserver by specifying values for multiple
key characteristics. The inverse of most operations is also available. For
example, you may search using “User ID is not Charles” as your criteria.
The results of the search appear.
51
Page 64

PGP® Desktop 9.8 for Windows Working with PGP Keys
4 If the search found a public key you want to add to your keyring, click Add
to My Keying in the PGP Keys Control box. The selected key is added to
your keyring.
Tip: If you set the search criteria to look for a very common name (for
example, 'Name', 'contains', "John"), only the first match found is returned.
This is by design, to prevent phishing (or harvesting keys from a keyserver).
For common names or domains, you may have to enter the entire name or
email address in order to find the correct key.
Getting Public Keys from Email Messages
A convenient way to get a copy of someone’s public key is to have that person
attach it to an email message.
To add a public key attached to an email message
1 Open the email message.
2 Double-click the .asc file that includes the public key. PGP Desktop
recognizes the file format and opens the Select key(s) dialog box.
3 If asked, specify to open the file.
4 Select the public key(s) you want to add to your keyring and click Import.
Working with Keyservers
References to PGP Universal-managed environments do not apply to the PGP
Virtual Disk or PGP Virtual Disk Professional products. For more information
about PGP Universal-managed environments, see “Managed” versus
“Unmanaged” Users (on page
PGP Desktop understands three kinds of keyservers:
PGP Universal keyservers. If you are using PGP Desktop in a domain
protected by a PGP Universal Server, PGP Desktop is preconfigured to only
communicate with the keyserver built into the PGP Universal Server with
which it has a relationship. To PGP Desktop, this is a trusted keyserver, and
PGP Desktop will automatically trust any key it finds on this keyserver
unless the PGP Universal Server tells PGP Desktop that the key is not
trusted—this can happen, for instance, when verifying signatures from
remote keys.
The address for your PGP Universal keyserver may look like
https://keyserver.example.com.
5).
52
Page 65

PGP® Desktop 9.8 for Windows Working with PGP Keys
The PGP Global Directory. If you are using PGP Desktop outside of a
domain protected by a PGP Universal Server, PGP Desktop is
preconfigured to communicate with the PGP Global Directory
https://keyserver.pgp.com).
(
The PGP Global Directory is a free, public keyserver hosted by PGP
Corporation and provides quick and easy access to the universe of PGP
keys. It uses next-generation keyserver technology that verifies the key
associated with each email address (so the keyserver does not fill up with
unused keys, multiple keys per email address, forged keys, and other
problems that plagued older keyservers) and lets you manage your own
keys, including replacing your key, deleting your key, and adding email
addresses to your key. Using the PGP Global Directory significantly
enhances your chances of finding the public key of someone with whom
you want to send secured messages.
To PGP Desktop, the PGP Global Directory is a trusted keyserver, and PGP
Desktop automatically trusts any key it finds there. During the initial
connection to the PGP Global Directory, the PGP Global Directory
Verification Key is downloaded, signed, and trusted by the key you publish
to the directory. The PGP Global Directory key is also added to your
keyring. All of the keys verified by the PGP Global Directory are thus
considered valid by PGP Desktop.
Other keyservers. In most cases, other keyservers are other public
keyservers. However, you may have access, through your company or
some other means, to a private keyserver.
Refer to Keys Options (on page
274) for more information about working with
keyservers.
53
Page 66

PGP® Desktop 9.8 for Windows Working with PGP Keys
Using Master Keys
The Master Key List is a set of keys that you want added by default any time
you are selecting keys for messaging, disk encryption, NetShare, and PGP Zip.
This saves you the step of dragging the keys that you regularly use into the
Recipients field.
Note: If you generated your key using the Setup Assistant, your key is
automatically added to the Master Key list. If you skipped key generation and
imported your key into PGP Desktop, your key is not automatically added to
the list.
Adding Keys to the Master Key List
To add keys to the Master Key List
1 In PGP Desktop, select Tools > Options.
2 Select the Master Keys tab.
3 To use the Master Key List, select the Use Master Key List checkbox. You
cannot add or remove keys from the Master Key List unless this box is
selected.
4 Click Add. The Select Master Keys dialog box is displayed.
5 From the Key Source list on the left, select the key(s) that you want to
use. Use Shift-click or Ctrl-click to select multiple keys.
54
Page 67

PGP® Desktop 9.8 for Windows Working with PGP Keys
6 After selecting the keys you want, click Add.
Tip: If there are any keys in the Keys to Add list on the right that you do
not want to include, select them and click Remove.
7 When you have finished selecting keys, click OK. The keys you have
selected appear in the Master Key List.
Deleting Keys from the Master Key List
To remove keys from the Master Key List
1 In PGP Desktop, select Tools > Options.
2 Select the Master Keys tab.
3 To use the Master Key List, select the Use Master Key List checkbox. You
cannot add or remove keys from the Master Key List unless this box is
selected.
4 Select the key(s) that you want to remove. You can Shift-click or Ctrl-click
to select multiple keys.
5 Click Remove. The key(s) are removed.
55
Page 68

Page 69

6
Managing PGP Keys
This section describes how to manage keys with the PGP Desktop application.
Note: If you are using PGP Desktop in a PGP Universal-managed
environment, your PGP administrator may have disabled certain features.
When a feature is disabled, the control item in the left side is not displayed
and the menu and other options for that feature are not available. The
graphics included in this guide depict the default installation with all features
enabled. If your PGP administrator has disabled this functionality, this section
does not apply to you.
In This Chapter
Examining and Setting Key Properties .................................................... 57
Adding and Removing Photographic IDs................................................. 58
Managing User Names and Email Addresses on a Key .......................... 59
Importing Keys and X.509 Certificates .................................................... 60
Changing Your Passphrase...................................................................... 62
Deleting Keys, User IDs, and Signatures ................................................ 64
Disabling and Enabling Public Keys ......................................................... 64
Verifying a Public Key .............................................................................. 65
Signing a Public Key ................................................................................ 66
Granting Trust for Key Validations ........................................................... 68
Working with Subkeys............................................................................. 69
Working with ADKs ................................................................................. 74
Working with Revokers ........................................................................... 75
Splitting and Rejoining Keys .................................................................... 77
If You Lost Your Key or Passphrase ........................................................ 80
Protecting Your Keys ............................................................................... 87
Examining and Setting Key Properties
The PGP Keys Work Area can display these important details about your keys:
Name
Email address
57
Page 70

PGP® Desktop 9.8 for Windows Managing PGP Keys
Validity
Size
KeyID
Trust
Creation date
Expiration date
ADK
Status
Key description
You can choose how many or how few details are displayed by clicking the
Keys item, then choosing columns to display by selecting View > Columns.
You can, however, see more information about a key and you can modify
certain information about a key, by examining its key properties.
To view a key’s properties
1 Open PGP Desktop, click the PGP Keys Control box, and then click All
Keys in the Control box. All keys on your keyring appear.
2 Double-click the key whose properties you want to view. The Key
Properties dialog box for the key you selected appears.
Adding and Removing Photographic IDs
You can include a photographic ID on your Diffie-Hellman/DSS and RSA keys.
58
Page 71

PGP® Desktop 9.8 for Windows Managing PGP Keys
To add your photograph to your key
1 Open PGP Desktop, click the PGP Keys Control box, and select My Private
Keys.
2 In the PGP Keys Work area, double-click the private key to which you are
adding the photo ID. The Key Properties dialog box for the selected key
appears.
3 Right-click the placeholder key and silhouette icon and select Add Photo
ID. The Add Photo dialog box is displayed.
4 Drag or paste your photograph onto the Add Photo dialog box or browse to
it by clicking Select File.
5 Click OK. The Passphrase dialog box opens.
6 Type your passphrase for the key you are modifying, then click OK. Your
photo ID is added to your public key.
To delete a photo ID
Right-click the existing photo on the Key Properties dialog and select
Remove Photo ID. The photo is removed from the key.
Managing User Names and Email Addresses on a Key
PGP Desktop supports multiple user names and email addresses on your
keypair. These names and email addresses help others find your key so that
they can send you encrypted messages.
To add a new user name or address to your key
1 Open PGP Desktop, click the PGP Keys Control box, and select My Private
Keys.
2 In the PGP Keys Work area, double-click the private key to which you are
adding a user name or email address. The Key Properties dialog box for the
key you double-clicked appears.
3 Click Add Email Address. The PGP New User Name dialog box appears.
4 Type the new name and email address in the appropriate fields, then click
OK. The PGP Enter Passphrase for Key dialog box appears.
5 Enter the private key passphrase of the key you are modifying, then click
OK.
59
Page 72

PGP® Desktop 9.8 for Windows Managing PGP Keys
6 To set the new user name and address as the primary identifier for your
key, click the name of the current primary keyholder in the Key Properties
dialog box and select the user you just added.
7 Exit the Key Properties dialog box. In the list of keys in PGP Desktop, the
new name is added to the end of the user name list associated with the
key.
To change the primary name associated with your key
1 Do one of the following:
In the Key Properties dialog box, click the name of the current primary
keyholder and select the name of the user from the list that appears.
In PGP Desktop, expand your key in the keys list, right-click the user
name you want to set as the primary identifier, and choose Set as
Primary Name from the shortcut menu.
To delete a name/email address from your keypair
1 From the list of keys, click the plus sign to the left of the key name to
expand the key.
2 Select the user ID you want to delete.
3 Press the Delete key on your keyboard. A confirmation dialog box appears.
Tip: You can also select Edit > Delete (on Windows systems) or Edit >
Clear (on Mac OS X systems).
4 Click Delete. The user ID is deleted.
Importing Keys and X.509 Certificates
You can import PGP public keys and PKCS-12 X.509 certificates (a digital
certificate format used by most Web browsers) to your PGP Desktop keyring.
You can also import Privacy Enhanced Mail (PEM) format X.509 certificates
from your browser by copying and pasting into your public keyring.
There are many ways to import someone’s PGP public key and add it to your
keyring. These methods include:
Double-clicking the file on your system. If PGP Desktop recognizes the file
format, it will open and ask if you want to import the key(s) in the file.
Choosing to import the key file in PGP Desktop.
Dragging the file containing the public key onto the PGP Keys window.
60
Page 73

PGP® Desktop 9.8 for Windows Managing PGP Keys
PGP Desktop provides an Import Certificate Assistant to help you with this task.
See Using the Import Certificate Assistant (on page
61) for more information.
Note: If you are using PGP Desktop in a PGP Universal-managed
environment and you imported an X.509 certificate on a token during
enrollment (choosing to import the certificate as a PGP key), you must
manually enable the Synchronize keyring with tokens and smartcards
option. To do this, in PGP Desktop choose Tools > Options and click the
Keys tab. This step is required in order for the key to work properly with PGP
Whole Disk Encryption.
Using the Import Certificate Assistant
X.509 certificates can be imported into PGP Desktop from files, the Windows
Personal Certificate store, or smartcards. Even smartcard-based certificates
which appear in your Windows Certificate store may be imported. The Import
Certificate Assistant guides you through the importation process.
When importing certificates from files, the certificate can only be imported from
a file with a PEM, PFX, or P12 extension.
Notes: When using certificates from the Windows Personal Certificate store,
you may get prompted for your certificate's password or PIN by Windows
itself (or the third-party smartcard software, if using smartcard-based
Windows Personal Certificates).
Some operations, such as changing the certificate's password, are not
permitted from within PGP Desktop when using certificates from the
Windows Personal Certificate store. Use the Windows (or smartcard)
software for performing such operations.
To import a certificate using the Import Certificate Assistant
Before You Begin: Make sure that you know the passphrase for the
certificate that you are importing.
1 Start the Assistant by:
Selecting File > Open.
Selecting File > Import Personal Certificates.
Dragging the file containing the public key into the PGP Keys window
2 If you are using PGP Desktop in a PGP Universal-managed environment,
and your administrator has defined that you can choose the method to
import the certificate, select:
Onto an existing key—the certificate is added to a key that is already
in your keyring.
61
Page 74

PGP® Desktop 9.8 for Windows Managing PGP Keys
As new PGP key(s)—a new PGP key is created using the imported
certificate.
As PGP X.509 wrapper key(s)—a new PGP key is created using the
imported certificate. PGP Desktop treats the new key as an X.509
certificate.
3 After you make your selection, click Next. Either the Certificate Passphrase
Entry screen or the PGP Enter Passphrase dialog box displays.
4 Provide the password for the certificate, then click Next.
If you are importing the certificate using the Onto an existing key
option, the Select Key screen displays. Go to the next step.
If you are importing the certificate using the As new PGP key(s)
option, the key is generated. Click Finish. The process is complete.
If you are importing the certificate using the As PGP X.509 wrapper
key(s) option, the Select key(s) dialog box displays. Click to select the
key, click Import, and the PGP X.509 wrapper key is generated. The
process is complete.
5 To complete importing the certificate using the Onto an existing key
option, from the Select Key dialog box, select the key onto which you
would like to import the certificate, then type the password for the key.
Click Next.
6 The Key Generation Progress dialog box is displayed as the certificate is
imported onto the key.
7 Click Finish. The process is complete.
Changing Your Passphrase
It’s a good practice to change your passphrase at regular intervals, perhaps
every three months. More importantly, you should change your passphrase the
moment you think it has been compromised, for example, by someone looking
over your shoulder at the keyboard as you typed it in.
To change the passphrase for a split key, you must rejoin it first.
Tip: Changing your passphrase on your key does not change the passphrase
on any copies of the key (such as backups you may have made). If you think
your key has been compromised, PGP Corporation recommends that you
shred any previous backup copies and then make new backups of your key.
To change your private key passphrase
1 Open PGP Desktop, click the PGP Keys Control box, and select My Private
Keys.
62
Page 75

PGP® Desktop 9.8 for Windows Managing PGP Keys
2 In the PGP Keys work area, double-click the private key for which you are
changing the passphrase. The Key Properties dialog box is displayed.
3 Click Change Passphrase. The PGP Passphrase Assistant is displayed.
4 Enter your current passphrase for the private key, then click Next. The
Create Passphrase dialog box appears.
5 Enter your new passphrase in the first text field, and then enter it again in
the Re-Enter Passphrase field to confirm the new passphrase.
To display your keystrokes as you type your passphrase, select the Show
Keystrokes box.
63
Page 76

PGP® Desktop 9.8 for Windows Managing PGP Keys
The Passphrase Quality bar provides a basic guideline for the strength of
the passphrase you are creating by comparing the amount of entropy in the
passphrase you type against a true 128-bit random string (the same
amount of entropy in an AES128 key). Refer to The Passphrase Quality Bar
(on page
294) for more information.
6 Click Finish. Your passphrase is changed.
Deleting Keys, User IDs, and Signatures
PGP Desktop gives you control over the keys on your keyrings, as well as the
user IDs and signatures on those keys.
With public keys on your keyrings, you can delete entire keys, any user IDs on a
key, and any or all signatures on a key.
With your keypairs, you can delete entire keypairs or any or all signatures, as
well as delete user IDs from a keypair as long as that is not the only user ID on
the keypair.
Note, however, that you cannot delete a user ID on a key if it is the only user
ID, and you cannot delete self-signatures from keys.
To delete a key, user ID, or signature from your PGP keyring
1 Open PGP Desktop, click the PGP Keys Control box, and then click All
Keys in the Control box. All keys on your keyring appear.
2 Do one of the following:
To delete a key, right-click on the key, select Delete from the list of
commands that appears, then click OK on the Confirmation dialog
box. The key is deleted from your keyring.
To delete a user ID (from a public key) or signature, click the plus sign
on the left side of the key to display the user IDs and signatures.
When you see the user ID or signature you wish to delete, right-click
it, select Delete from the list of commands that appears, then click
OK on the Confirmation dialog. The user ID or signature is deleted.
Disabling and Enabling Public Keys
Sometimes you may want to temporarily disable a public key on your keyring,
which can be useful when you want to retain a public key for future use, but
you don’t want it cluttering up your recipient list every time you send mail.
64
Page 77

PGP® Desktop 9.8 for Windows Managing PGP Keys
You cannot disable a keypair that is "implicitly trusted." In order to disable a key
that has been set to implicitly trust, you must first change the trust status to
None.
To disable or enable a public key
1 Open PGP Desktop, click the PGP Keys Control box, and then click All
Keys in the Control box. All keys on your keyring appear.
2 Double-click the public key you want to disable. The Key Properties dialog
box for the key you selected appears.
3 Locate the Enabled field in the Key Properties.
If the current Enabled setting is Yes, the key is enabled. To disable
the key, click Yes once. The Enabled field changes to No; the key is
disabled.
If the current Enabled setting is No, the key is disabled. To enable the
key, click No once. The Enabled field changes to Yes and the key is
enabled.
A disabled key cannot be used to encrypt or sign. You can use a disabled key,
however to decrypt or verify.
Verifying a Public Key
It is difficult to know for certain whether a public key belongs to a particular
individual unless that person physically hands the key to you on a removable
media or you get the key from the PGP Global Directory. Exchanging keys on
removable media is not usually practical, especially for users who are located
many miles apart.
So the question remains: how can I make sure the public key I got from a public
keyserver (not the PGP Global Directory) is really the public key of the person
listed on the key? The answer is: you have to check the key’s fingerprint.
There are several ways to check a key’s fingerprint, but the safest is to call the
person and have them read the fingerprint to you over the phone. Unless the
person is the target of an attack, it is highly unlikely that someone would be
able to intercept this random call and imitate the person you expect to hear on
the other end. You can also compare the fingerprint on your copy of someone’s
public key to the fingerprint on their original key on a public server.
The fingerprint can be viewed in two ways: in a unique list of words or in its
hexadecimal format.
To check the digital fingerprint of a public key
1 Open PGP Desktop, click the PGP Keys Control box, and then click All
Keys in the Control box.
65
Page 78

PGP® Desktop 9.8 for Windows Managing PGP Keys
All keys on your keyring appear.
2 Double-click the public key whose fingerprint you want to check. The Key
Properties dialog box for the key you selected appears.
The fingerprint of the key is shown under the name and email address, in
either hexadecimal format (10 sets of four characters per set) or word list
format (four columns with five unique words per column).
3 Compare the fingerprint on the key with the original fingerprint. If the two
are the same, then you have the real key. If not, then you do not have the
real key.
The word list is made up of special authentication words that PGP Desktop
uses and are carefully selected to be phonetically distinct and easy to
understand without phonetic ambiguity.
The word list serves a similar purpose as the military alphabet, which
allows pilots to convey information distinctly over a noisy radio channel.
4 If you have a forged key, delete it.
5 Open your Web browser, navigate to the PGP Global Directory
(
https://keyserver.pgp.com), and search for the real public key.
Signing a Public Key
When you create a keypair, the keys are automatically signed. Similarly, once
you are sure a key belongs to the correct person, you can sign that person’s
public key, indicating that you have verified the key. When you sign someone’s
public key, a signature icon along with your user name is shown attached to
that key.
If you import a keypair from a backup or from a different computer, that keypair
may also need to be signed.
Note: If you are using PGP Desktop in a PGP Universal-managed
environment, key signing may be disabled.
To sign someone’s key
1 Open PGP Desktop, click the PGP Keys Control box, and then click All
Keys in the Control box. All keys on your keyring appear.
2 Do one of the following:
From the Keys menu, select Sign.
Right-click on the key you want to sign and select Sign from the list of
The PGP Sign Key dialog box appears with the user name/email address
and hexadecimal fingerprint displayed in the text box.
commands that appears.
66
Page 79

PGP® Desktop 9.8 for Windows Managing PGP Keys
3 Select the Allow signature to be exported checkbox, to allow your
signature to be exported with this key.
An exportable signature is one that is allowed to be sent to servers and
travels with the key whenever it is exported, such as by dragging it to an
email message. The checkbox provides a shorthand means of indicating
that you wish to export your signature so that others can rely on your
signature and trust your keys as a result.
4 Click More Choices to configure options such as signature type and
signature expiration.
5 Choose a signature type to sign the public key with. Your choices are:
Non-exportable. Use this signature when you believe the key is valid,
but you don’t want others to rely on your certification. This signature
type cannot be sent with the associated key to a key server or
exported in any way.
Exportable. Use exportable signatures in situations where your
signature is sent with the key to the key server, so that others can
rely on your signature and trust your keys as a result. This is
equivalent to selecting the Allow signature to be exported
checkbox on the Sign Keys menu.
Meta-Introducer Non-Exportable. Certifies that this key and any
keys signed by this key with a Trusted Introducer Validity Assertion
are fully trusted introducers to you. This signature type is nonexportable.
Trusted Introducer Exportable. Use this signature in situations
where you certify that this key is valid, and that the owner of the key
should be completely trusted to vouch for other keys. This signature
type is exportable. You can restrict the validation capabilities of the
trusted introducer to a particular email domain.
6 The Maximum Trust Depth option enables you to identify how many
levels deep you can nest trusted-introducers. For example, if you set this to
1, there can only be one layer of introducers below the meta-introducer
key.
7 If you want to limit the trusted introducer’s key validation capabilities to a
single domain, type the domain name in the Domain Restriction text box.
8 In the Expiration field, select Never if you don’t want this signature to
expire or select a date on which it does expire.
9 Click OK. The PGP Enter Passphrase for Key dialog box appears.
10 Select the key you want to sign with from the drop-down list, then type the
passphrase of the signing key, if required. (If the passphrase is already
cached, you don’t need to type it again.)
11 Click OK. The key is signed.
67
Page 80

PGP® Desktop 9.8 for Windows Managing PGP Keys
Revoking Your Signature from a Public Key
You may, on occasion, want or need to revoke your signature from a key on
your keyring.
To revoke your signature
1 Open PGP Desktop, click the PGP Keys Control box, and then click All
Keys in the Control box. All keys on your keyring appear.
2 Expand the key from which you want to revoke your signature until you see
your signing key.
3 Right-click your signing key and then select Revoke from the list of
commands that appears. The Revoke Signature dialog box appears.
4 Verify that the Key ID and Name are the correct key (from which you want
to revoke your signature) and click OK. The PGP Enter Passphrase for Key
dialog box appears.
5 Enter your passphrase and click OK. Your signature is revoked from the
key.
Note: If your signature was exportable and you distributed the key with the
exportable signature, you must distribute the key with the revoked signature
before others can see the revocation.
Granting Trust for Key Validations
Besides certifying that a key belongs to someone, you can assign a level of
trust to the owner of the keys indicating how well you trust them to act as an
introducer for others, whose keys you may get in the future.
This means that if you ever get a key from someone that has been signed by an
individual whom you have designated as trustworthy, the key is considered
valid even though you have not done the check yourself.
You must sign a key before you can set a trust level for it.
Public keys can be None, Marginal, or Trusted. Your keypairs can be None or
Implicit (meaning it’s your own key and thus you trust it completely). You
shouldn’t have anyone else’s keypairs.
Refer to An Introduction to Cryptography for more information about trusting
keys.
Note: If you are using PGP Desktop in a PGP Universal-managed
environment, the ability to grant trust to keys may be disabled.
68
Page 81

PGP® Desktop 9.8 for Windows Managing PGP Keys
To grant trust to a key
1 Open PGP Desktop, click the PGP Keys Control box, and then click All
Keys in the Control box. All keys on your keyring appear.
2 Double-click the key for which you are granting trust. The Key Properties
dialog box for the key you selected appears.
3 Locate the Trust field.
4 Click the current setting and select the desired setting from the list.
If you are granting trust for a public key, you can select None,
Marginal, or Trusted. None means you don’t trust the owner to act
as an introducer, Marginal means you partially trust them, Trusted
means you fully trust them.
If you are granting trust for a keypair, you can select None or Implicit.
Only keypairs that you are importing from backup or from another
computer of yours need to have their trust set to Implicit; when you
create a keypair, its trust is automatically set to Implicit.
Working with Subkeys
A PGP Desktop keypair consists of these elements:
the Master Key, for signing only;
one mandatory Subkey for encryption;
one or more optional Separate Subkey(s) for signing, encryption, or
signing/encryption.
The Master Key is used by default for signing, while a subkey is always used for
encryption. This can improve the security of a PGP Desktop keypair, as a
separate encryption subkey can be revoked, removed, or added to the PGP
Desktop keypair without affecting the Master Key or the signatures on it.
In addition to the Master Key and the mandatory encryption subkey, you have
the option of creating one or more additional subkeys for your PGP Desktop
keypair. You can create any combination of subkeys that can be used for
encryption only, for signing only, or for both encryption and signing.
69
Page 82

PGP® Desktop 9.8 for Windows Managing PGP Keys
You can view the subkeys of a keypair from the Key Properties dialog box. The
Usage column indicates the function that a subkey performs:
Key
Using Separate Subkeys
Here are some examples of how additional separate subkeys can be useful:
Description
Encryption subkeys display a blue padlock symbol.
Signing subkeys display a blue pen symbol.
Subkeys used for both encryption and signing
display both symbols.
The default encryption subkey displays a small
green checkmark in the upper left corner.
The default signing subkey displays a small green
check mark in the upper left corner.
70
Page 83

PGP® Desktop 9.8 for Windows Managing PGP Keys
Multiple encryption subkeys that are valid during different portions of the
keypair’s lifetime can increase security. You can create encryption subkeys
that have the Start and Expiration dates set so that only one encryption
subkey at a time is valid. For example, you could create several encryption
subkeys that are valid only during one future year (make sure you specify
correct dates). The Encryption Subkey in use then changes with the new
year. This can be a useful security measure, as it provides an automatic
way to switch to a new encryption key periodically without having to
recreate and distribute a new public key. Expired subkeys display a key
icon with a red clock.
Separate signing subkeys are needed in regions where separate subkeys
for signing are required for legally-binding digital signatures.
The separate subkeys that you can create depend on the type of keypair that
you are working with:
For RSA keypairs, you can create subkeys for encryption, signing, and
encryption/signing.
For Diffie-Hellman/DSS keypairs, you can create subkeys for encryption or
signing, but you cannot create subkeys that both encrypt and sign.
Viewing Subkeys
For older PGP Legacy keypairs, subkeys are not supported.
You can view and change the subkey information on your own keypairs. The
subkey information on your keyring’s public keypairs can be viewed, but not
changed.
To view subkeys and subkey properties
1 Open PGP Desktop, click the PGP Keys control box, then click All Keys.
All keys on your Keyring appear.
2 View the properties of a key by doing one of the following:
Double-clicking the key you want to view.
Right-clicking on the key, then selecting Key Properties from the
shortcut menu.
Clicking to select the key in the Keyring, then selecting Keys >
Key Properties.
The Key Properties dialog box for the key you selected appears.
3 Click the Subkeys heading in the Key Properties dialog box. The Subkeys
for this key are displayed.
4 To view the properties of a subkey, right-click the subkey you want to view
and select Subkey Properties from the shortcut menu.
71
Page 84

PGP® Desktop 9.8 for Windows Managing PGP Keys
Creating New Subkeys
Most likely you will create new subkeys in the manner described in this section.
However, you can also create subkeys when you first install PGP Desktop and
are using the New Key wizard. For more information, see Using PGP Desktop
for the First Time (on page
To create new subkeys
1 In the Subkeys section of the Key Properties dialog, click the Add button.
The New Subkey dialog box appears.
17).
2 In the Use this subkey for area, select Encryption, Signing, or
Encryption and Signing, depending on how you want to use the new
subkey.
3 In the Key Size field, choose a key size from 1024 to 3072 bits, or type a
custom key size from 1024 to 4096 bits.
4 In the Start Date field, type a date on which the subkey you are creating
becomes effective or choose a date from the drop-down calendar.
5 In the Expiration area, select Never, or select Date and specify a date or
select a date from the drop-down calendar. This information controls when
the subkey expires.
6 Click OK. The Passphrase dialog box appears.
7 Type your passphrase and then click OK. The subkey is created.
72
Page 85

PGP® Desktop 9.8 for Windows Managing PGP Keys
Revoking Subkeys
To revoke a subkey
1 In the Subkeys section of the Key Properties dialog box, select the subkey
you want to revoke, then click Revoke (above the subkey list). A
PGP Warning dialog box appears, informing you that once you revoke the
subkey, other users will not be able to encrypt data to it.
2 Click Yes to revoke the subkey or click No to cancel. The Passphrase
dialog box appears.
3 Type your passphrase, then click OK. The subkey is revoked and the icon
changes.
Removing Subkeys
To remove a subkey
1 In the Subkeys section of the Key Properties dialog box, select the subkey
2 Click Yes to remove the subkey or click No to cancel. The subkey is
you want to remove, then click Remove (above the subkey list). A
PGP Warning dialog appears, informing you that once you remove the
subkey, you will not be able to decrypt information encrypted to it.
removed.
73
Page 86

PGP® Desktop 9.8 for Windows Managing PGP Keys
Working with ADKs
An additional decryption key (ADK) is a key generally used by security officers of
an organization to decrypt messages that have been sent to or from employees
within the organization.
Messages encrypted by a key with an ADK are encrypted to the public key of
the recipient and to the ADK, which means the holder of the ADK can also
decrypt the message.
ADKs are rarely used or needed outside of a PGP Universal-managed
environment. Although your PGP administrator should not ordinarily need to use
the additional decryption keys, there may be circumstances when it is
necessary to recover someone’s email. For example, if someone is injured and
out of work for some time, or if email records are subpoenaed by a law
enforcement agency and the corporation must decrypt mail as evidence for a
court case.
Adding an ADK to a Keypair
To add an ADK
1 Open PGP Desktop, click the PGP Keys Control box, and then click My
Private Keys in the Control box. The private keys on your keyring appear.
2 Double-click the key to which you are adding an ADK. The Key Properties
dialog box for the key you selected appears.
3 Click the up-arrow to the left of ADK, if applicable (only those keys that
already have at least one ADK already assigned will have the up-arrow). The
ADK information for this key appears, if configured.
4 Click the plus-sign icon on the right side of the ADK section. The Select
Key(s) dialog box appears.
5 Select the key you want to use as the ADK, then click OK. A PGP Warning
dialog box appears, asking if you are sure you would like to add the
selected key as an ADK.
6 Click Yes. The PGP Enter Passphrase for Key dialog box appears.
7 Type the passphrase for the key to which you are adding the ADK, then
click OK. A PGP Information dialog appears, telling you the ADK was added
to the key.
You can only modify ADKs on your keypairs.
8 Click OK.
Note: If add an ADK to your key, then those who send you encrypted email
must be able to access the public key portion of the ADK.
74
Page 87

PGP® Desktop 9.8 for Windows Managing PGP Keys
Updating an ADK
To update an ADK
1 Select the ADK you want to update from the list of ADKs. The selected
ADK highlights.
2 Click the down-facing arrow icon. The ADK is updated.
Removing an ADK
To remove an ADK
1 Select the ADK you want to remove from the list of ADKs. The selected
ADK highlights.
2 Click the minus-sign icon. A PGP Warning dialog box appears, asking if you
are sure you want to remove the ADK.
3 Click OK to remove the ADK. The ADK is removed.
Working with Revokers
It is possible that one day you might forget your passphrase or lose your keypair
(your laptop is stolen or your hard drive crashes, for example).
Unless you are also using Key Reconstruction and can reconstruct your private
key, you would be unable to use your key again, and you would have no way of
revoking it to show others not to encrypt to it. To safeguard against this
possibility, you can appoint a third-party key revoker. The third-party you
designate is then able to revoke your key just as if you had revoked it yourself.
This feature is available for both Diffie-Hellman/DSS and RSA keys.
You can only change revoker information on your keypairs. If a public key on
your keyring has a revoker, you can see that information but you cannot change
it.
75
Page 88

PGP® Desktop 9.8 for Windows Managing PGP Keys
Appointing a Designated Revoker
To add a designated revoker to your key
1 Open PGP Desktop, click the PGP Keys Control box, and then click My
Private Keys in the Control box. The private keys on your keyring appear.
2 Double-click the key to which you are adding a revoker. The Key Properties
dialog box for the key you selected appears.
3 Click the plus sign to the left of Revokers, if applicable (only those keys
that already have at least one revoker configured will have the plus sign).
The Revokers information for this key appears, if configured.
4 Click the plus-sign icon on the right side of the Revokers section. The
Select key(s) dialog box appears.
5 Select the key you want to use as the Revoker key, then click OK.
A PGP Warning dialog box appears, asking if you are certain that you want
to grant revoker privileges to the selected key(s).
Revoking a Key
6 Click Yes to continue or No to cancel. The PGP Enter Passphrase for Key
dialog box appears.
7 Type the passphrase for the keypair to which you are adding the revoker,
then click OK. A PGP Information dialog box appears.
8 Click OK. The selected key(s) is now authorized to revoke your key. For
effective key management, distribute a current copy of your key to the
revoker(s) or upload your key to the keyserver.
If the situation ever arises that you no longer trust your personal keypair, you
can revoke your key, which tells everyone to stop using your public key.
The best way to circulate a revoked key is to place it on a public keyserver.
To revoke a key
1 Open PGP Desktop, click the PGP Keys Control box, and then click My
Private Keys in the Control box. The private keys on your keyring appear.
2 Right-click the key you want to revoke, then select Revoke from the list of
commands that appears. A PGP Warning dialog box appears, asking if you
are sure you want to revoke this key.
3 Click Yes to confirm your intent to revoke the selected key or No to cancel.
The PGP Enter Passphrase for Key dialog box appears.
76
Page 89

PGP® Desktop 9.8 for Windows Managing PGP Keys
4 Type the passphrase for the keypair you are revoking, then click OK. When
you revoke a key, it is marked out with a red X to indicate that it is no
longer valid.
5 Synchronize the revoked key so everyone will know not to use the now
revoked public key.
Splitting and Rejoining Keys
Any private key can be split into shares among multiple “shareholders” using a
cryptographic process known as Blakely-Shamir key splitting. This technique is
recommended for extremely high security keys.
For example, PGP Corporation keeps a corporate key split between multiple
individuals. Whenever we need to sign with that key, the shares of the key are
rejoined temporarily.
Creating a Split Key
When you split a key, the shares are saved as files either encrypted to the
public key of a shareholder or encrypted conventionally if the shareholder has
no public key. After the key has been split, any attempts to sign or decrypt with
it will automatically attempt to rejoin the key.
To create a split key with multiple shares
1 Open PGP Desktop, click the PGP Keys Control box, and then click My
2 Click on the keypair you want to split. The selected keypair highlights.
3 Select Keys > Share Key > Make Shared. The Shared PGP Key dialog box
4 Add shareholders for the split key by dragging and dropping their keys in
5 When all of the shareholders are listed, you can specify the number of key
Private Keys in the Control box. The private keys on your keyring appear.
appears.
the Shareholder list.
To add a shareholder that does not have a public key, click Add, type the
person’s name, then allow the person to type in their passphrase. (The
shareholder needs to be physically present in order to type their own
passphrase.)
shares that are necessary to decrypt or sign with this key.
By default, each shareholder is responsible for one share. To increase the
number of shares a shareholder controls, click the name in the
shareholder’s list and then use the arrows to adjust the number of shares.
77
Page 90

PGP® Desktop 9.8 for Windows Managing PGP Keys
6 Click Split Key. You are prompted to select a directory in which to store
the shares.
7 Select a location to store the key shares, then click OK. The Passphrase
screen appears.
8 Enter the passphrase for the key you want to split, then click OK. A
confirmation dialog box is displayed.
9 Click Yes to split the key. The key is split and the shares are saved in the
location you specified. Each key share is saved with the shareholder’s
name as the file name and an SHF extension.
10 Distribute the key shares to the owners, then delete the local copies.
Once a key is split among multiple shareholders, attempting to sign or
decrypt with it will cause PGP Desktop to automatically attempt to rejoin
the key.
Rejoining Split Keys
Once a key is split among multiple shareholders, attempting to sign or decrypt
with it causes PGP Desktop to attempt to rejoin the key automatically. There
are two ways to rejoin the key: locally and remotely.
Rejoining key shares locally requires the shareholder’s presence at the rejoining
computer. Each shareholder is required to enter the passphrase for their key
share.
Rejoining key shares remotely requires the remote shareholders to authenticate
and decrypt their keys before sending them over the network. The PGP
Desktop Transport Layer Security (TLS) feature provides a secure link to
transmit key shares, allowing multiple individuals in distant locations to securely
sign or decrypt with their key share.
Caution: Before receiving key shares over the network, you should verify
each shareholder’s fingerprint and sign their public key to ensure that their
authenticating key is legitimate.
To rejoin a split key
1 Contact each shareholder of the split key. To rejoin key shares locally, the
shareholders of the key must be present.
To collect key shares over the network, make sure the remote
shareholders have PGP Desktop installed and are prepared to send their
key share file. Remote shareholders must have:
their key share files and passwords
a keypair (for authentication to the computer that is collecting the key
shares)
a network connection
78
Page 91

PGP® Desktop 9.8 for Windows Managing PGP Keys
the IP address or Fully Qualified Domain Name of the computer that is
collecting the key shares
2 Do one of the following:
To temporarily rejoin the key, at the rejoining computer, use Windows
Explorer to select the file(s) that you want to sign or decrypt with the
split key.
Right-click on the file(s) and select Sign or Decrypt from the PGP
shortcut menu. The PGP Enter Passphrase for Selected Key screen
appears with the split key selected.
Click OK to reconstitute the selected key. The Key Share Collection
screen appears.
To permanently rejoin the key, right-click the split key and select Key
Properties from the menu displayed.
In the Key Properties dialog box, click Join Key (this button is labeled
Change Passphrase for keys that are not split).
The Passphrase dialog box is displayed.
3 Do one of the following:
If you are collecting the key shares locally, click Select Share File and
then locate the share files associated with the split key. The share
files can be collected from the hard drive, a floppy disk, or a mounted
drive. Continue with the next step.
If you are collecting key shares over the network, click Start
Network. The remote user must start PGP Desktop and select Keys
> Share Key > Send Key Share. This starts the process of selecting
the share file, decrypting the share file, selecting an authorization key,
unlocking the authorization key, and entering the hostname/IP address
of the joining computer.
In the Signing Key field, select the keypair that you want to use for
authentication to the remote system and enter the passphrase.
Click OK to prepare the computer to receive the key shares.
The status of the transaction is displayed in the Network Shares box.
When the status changes to “Listening,” the PGP application is ready to
receive the key shares.
At this time, the shareholders must send their key shares.
When a share is received, the Remote Authentication dialog box
appears. If you have not signed the key that is being used to
authenticate the remote system, the key is considered invalid. Although
you can rejoin the split key with an invalid authenticating key, it is not
recommended. You should verify each shareholder’s fingerprint and
sign each shareholder’s public key to ensure that the authenticating key
is legitimate.
4 Click Confirm to accept the share file.
79
Page 92

PGP® Desktop 9.8 for Windows Managing PGP Keys
5 Continue collecting key shares until the value for Total Shares Collected
matches the value for Total Shares Needed on the Key Shares Collection
screen.
6 Click OK.
If you elected to temporarily rejoin the key in order to decrypt or sign,
the file is signed or decrypted with the split key and the rejoined key
is discarded.
If you elected to permanently rejoin the key, the key is saved as a fully
rejoined key (and is no longer split).
If You Lost Your Key or Passphrase
If you lost your key, you can reconstruct your key so you can continue to
encrypt and decrypt data. How you do this depends on if you are using PGP
Desktop in a standalone environment or in a PGP Universal-managed
environment.
If you forgot your passphrase, you can reset your passphrase. To do this, you
answer correctly three of the five security questions you answered when you
set up your key or created your security questions.
Reconstructing Keys with PGP Universal
This section applies only to PGP Desktop users in a PGP Universalmanaged environment whose PGP administrator has configured key
reconstruction support for their copy of PGP Desktop.
If you lose your key or forget your passphrase and do not have a backed up
copy from which to restore your key, you will never again be able to decrypt any
information encrypted to your key. You can, however, reconstruct your key if
your PGP administrator has implemented a PGP key reconstruction policy for
you, in which your key is encrypted and stored on a PGP Universal Server in
such a way that only you can retrieve it.
The PGP Universal Server holding the key reconstruction data stores your key in
such a way that only you can access it. Not even the PGP administrator has the
ability to decrypt your key.
If your PGP administrator has configured support for key reconstruction, you will
be prompted to enter additional “secret” information when you install PGP
Desktop or when you reset your key.
Once your key is on the server, you can restore it at anytime by selecting Keys
> Reconstruct Key in PGP Desktop.
80
Page 93

PGP® Desktop 9.8 for Windows Managing PGP Keys
Sending Key Reconstruction Data
You send key reconstruction data to your company's PGP Universal Server
whenever you install PGP Desktop or when you reset your key.
To send key reconstruction data to your company’s PGP Universal Server
1 Do one of the following:
Begin the installation of PGP Desktop normally.
Begin the process to reset your key (select the PGP Messaging
control panel and then click Reset Key).
2 When the Key Reconstruction screen dialog box appears, type five
questions that only you can answer in the Question fields (the default
questions are examples only).
Choose obscure personal questions with answers that you are not likely to
forget. Your questions can be up to 95 characters in length. An example of
a good question might be, “Who took me to the beach?” or “Why did Fred
leave?” An example of a bad question would be, “What is my mother’s
maiden name?” or “Where did I go to high school?”
3 In the Question fields, type the answers to the corresponding questions.
Your answers are case sensitive and can be up to 255 characters. Use the
Hide Answers checkbox to view or hide your answers.
4 Click OK to continue. If the Enter PGP Passphrase for Key dialog box
appears, type the passphrase for your key, then click OK.
5 Click OK. Your private key is split into five pieces, using Blakely-Shamir key
splitting. Three of the five pieces are needed to reconstruct the key. Each
piece is then encrypted with the hash, the uniquely identifying number, of
one answer. If you know any three answers, you can successfully
reconstruct the whole key.
81
Page 94

PGP® Desktop 9.8 for Windows Managing PGP Keys
Reconstructing Your Key
To reconstruct your key:
1 In PGP Desktop, click the PGP Keys Control box.
2 Select Keys > Reconstruct Key.
3 Answer the questions you established earlier, then click OK. You are
prompted to create a new passphrase. Your old passphrase will no longer
work once your key is reconstructed.
4 Type a new passphrase, then click OK. Your key is reconstructed.
Reconstructing Keys in a Standalone Installation
If you have lost your key or forgotten your passphrase, you can still recover
both. You must first create a set of security questions that only you can answer.
Then, if necessary, you answer three out of five of those questions, and you
can reconstruct your key or create a new passphrase.
Creating Your Security Questions
Before you can reconstruct your key or create a new passphrase when you've
forgotten it, you must create your security questions. You can customize the
five security questions so that the answers are something that only you would
know.
To create your security questions
1 In PGP Desktop, click the PGP Keys Control box.
82
Page 95

PGP® Desktop 9.8 for Windows Managing PGP Keys
2 Select Keys > Create My Security Questions. The PGP Security Question
Assistant is displayed.
3 Enter the passphrase for your key and click Next. The Create Security
Question 1 of 5 dialog box is displayed.
4 In the first Create Security Question screen, click the arrow for the first
field to select the question you want to use. Note that you can customize
parts of the question in the next step.
If you want to completely customize the question to create your own
question, select Enter my own question.
83
Page 96

PGP® Desktop 9.8 for Windows Managing PGP Keys
5 For Personalize Your Question, click the arrows next to any of the text
that you can customize. For example, if you selected the first question, you
can customize that question by changing "friend" to "boy" and "had a crush
on" to "held hands with."
If you chose to create your own question, enter the question in this field.
Be sure to enter a question that only you can know the answer to.
6 For Answer Your Question, enter the answer to this security question.
You can enter the answer using mixed upper- and lowercase letters, or use
all one case (when you answer the question, the case won't matter).
A hint is displayed in this field that disappears once you start entering the
answer. For example, to answer the question "Who was the first boy that I
ever held hands with?", the hint is "Enter first and last name".
7 When you have defined your question and entered the answer, click Next
to continue. The Create Security Question 2 of 5 dialog box is displayed.
8 You are prompted to create and answer a total of five security questions.
Continue to follow the steps above to select the question, customize the
question, and answer the question.
When you have entered all five questions and answers, the Completing the
PGP Security Question Assistant screen is displayed. Click Finish to exit
the assistant.
You have now defined the five security questions. If you lost your key or forget
your passphrase, you can reconstruct your key or reset your passphrase by
answering three of these five questions.
Reconstructing Your Key from Your Security Questions
If you have lost your key, you can recover it by reconstructing your key. You
must first have created a set of security questions that only you can answer.
For more information, see Creating Your Security Questions (on page
To reconstruct your key
1 In PGP Desktop, click the PGP Keys Control box.
82).
84
Page 97

PGP® Desktop 9.8 for Windows Managing PGP Keys
2 Select Keys > I Lost My Key. The PGP Passphrase Assistant: Answer
Security Questions dialog box is displayed.
Tip: If the questions displayed are not your questions, click the link for
These are not my questions. The PGP Passphrase Assistant: Select Key
to Reconstruct dialog box is displayed. Select the Key ID of the key you
want to reconstruct and click Next.
3 Answer three of the five security questions correctly and click Next. The
PGP Passphrase Assistant: Success dialog box is displayed.
4 Click Next. to continue with creating a new passphrase. The PGP
Passphrase Assistant: Create Passphrase dialog box is displayed.
85
Page 98

PGP® Desktop 9.8 for Windows Managing PGP Keys
5 Enter and re-enter your passphrase.
Select Show Keystrokes if you want to see the characters you type for
your passphrase. Be sure no one can see what you type.
The Passphrase Quality bar provides a basic guideline for the strength of
the passphrase you are creating by comparing the amount of entropy in the
passphrase you type against a true 128-bit random string (the same
amount of entropy in an AES128 key). Refer to The Passphrase Quality Bar
(on page
294) for more information.
6 Click Finish. Your key has been reconstructed.
Resetting Your Passphrase
If you forgot your passphrase, you can reset your passphrase. To do this, you
answer correctly three of the five security questions you answered when you
set up your key or created your security questions.
To reset your passphrase
1 In PGP Desktop, click the PGP Keys Control box.
2 Select Keys > I Forgot My Passphrase. The PGP Passphrase Assistant:
Answer Security Questions dialog box is displayed.
3 Answer three of the five security questions correctly and click Next. The
PGP Passphrase Assistant: Success dialog box is displayed.
86
Page 99

PGP® Desktop 9.8 for Windows Managing PGP Keys
4 Click Next. to continue with creating a new passphrase. The PGP
Passphrase Assistant: Create Passphrase dialog box is displayed.
5 Enter and re-enter your passphrase.
Select Show Keystrokes if you want to see the characters you type for
your passphrase. Be sure no one can see what you type.
The Passphrase Quality bar provides a basic guideline for the strength of
the passphrase you are creating by comparing the amount of entropy in the
passphrase you type against a true 128-bit random string (the same
amount of entropy in an AES128 key). Refer to The Passphrase Quality Bar
(on page
6 Click Finish. Your passphrase has been reset.
Protecting Your Keys
Besides making backup copies of your keys, you should be especially careful
about where you store your private key. Even though your private key is
protected by a passphrase that only you should know, it is possible that
someone could discover your passphrase and then use your private key to
decipher your email or forge your digital signature. For instance, somebody
could look over your shoulder and watch the keystrokes you enter or intercept
them on the network or even over the Internet.
294) for more information.
87
Page 100

PGP® Desktop 9.8 for Windows Managing PGP Keys
To prevent anyone who might happen to intercept your passphrase from using
your private key, store your private key only on your own computer. If your
computer is attached to a network, make sure that your files are not
automatically included in a system-wide backup where others might gain access
to your private key. Given the ease with which computers are accessible over
networks, if you are working with extremely sensitive information, you may
want to keep your private key on a flash drive, which you can insert like an oldfashioned key whenever you want to read or sign private information.
As another security precaution, consider assigning a different name to your
private keyring file and then storing it somewhere other than in the default
location.
Your private and public keys are stored in separate keyring files. You can copy
them to another location on your hard drive or to a floppy disk. By default, the
private keyring (secring.skr) and the public keyring (pubring.pkr) are
stored along with the other program files in your “PGP” folder; you can save
your backups in any location you like.
You can configure PGP Desktop to back up your keyrings automatically after
you close PGP Desktop. Your keyring backup options can be set in the Keys tab
of the Options dialog box (for Windows systems) or the Preferences dialog box
(for Mac OS X systems).
Tip: If you have changed your passphrase on your key, remember that it does
not change the passphrase on any copies of the key (such as backups you
may have made). If you think your key has been compromised, PGP
Corporation recommends that you shred any previous backup copies and
then make new backups of your key.
88
 Loading...