

Page 1

PGP Freeware for Windows 95, Windows 98, Windows NT, Windows 2000 & Windows Millennium
User’s Guide
Version 7.0
Page 2

Copyright©1990-2001NetworkAssociates,Inc.anditsAffiliatedCompanies.AllRights
Reserved.
PGP*,Version7.0.3
01-2001.PrintedintheUnitedStatesofAmerica.
PGP,PrettyGood,andPrettyGoodPrivacyareregisteredtrademarksofNetworkAssociates,
Inc.and/oritsAffiliatedCompaniesintheUSandothercountries.Allotherregisteredand
unregisteredtrademarksinthisdocumentarethesolepropertyoftheirrespectiveowners.
PortionsofthissoftwaremayusepublickeyalgorithmsdescribedinU.S.Patentnumbers
4,200,770,4,218,582,4,405,829,and4,424,414,licensedexclusivelybyPublicKeyPartners;the
IDEA(tm)cryptographiccipherdescribedinU.S.patentnumber5,214,703,licensedfrom
AscomTechAG;andtheNorthernTelecomLtd.,CASTEncryptionAlgorithm,licensedfrom
NorthernTelecom,Ltd.IDEAisatrademarkofAscomTechAG.NetworkAssociatesInc.may
havepatentsand/orpendingpatentapplicationscoveringsubjectmatterinthissoftwareor
itsdocumentation;thefurnishingofthissoftwareordocumentationdoesnotgiveyouany
licensetothesepatents.ThecompressioncodeinPGPisbyMarkAdlerandJean-LoupGailly,
usedwithpermissionfromthefreeInfo-ZIPimplementation.LDAPsoftwareprovided
courtesyUniversityofMichiganatAnnArbor,Copyright©1992-1996Regentsofthe
UniversityofMichigan.Allrightsreserved.Thisproductincludessoftwaredevelopedbythe
ApacheGroupforuseintheApacheHTTPserverproject(http://www.apache.org/).Balloon
helpsupportcourtesyofJamesW.Walker.Copyright©1995-1999TheApacheGroup.All
rightsreserved.SeetextfilesincludedwiththesoftwareorthePGPwebsiteforfurther
information.ThissoftwareisbasedinpartontheworkoftheIndependentJPEGGroup.Soft
TEMPESTfontcourtesyofRossAndersonandMarcusKuhn.Biometricwordlistfor
fingerprintverificationcourtesyofPatrickJuola.
Thesoftwareprovidedwiththisdocumentationislicensedtoyouforyourindividualuse
underthetermsoftheEndUserLicenseAgreementandLimitedWarrantyprovidedwiththe
software.Theinformationinthisdocumentissubjecttochangewithoutnotice.Network
AssociatesInc.doesnotwarrantthattheinformationmeetsyourequirementsorthatthe
informationisfreeoferrors.Theinformationmayincludetechnicalinaccuraciesor
typographicalerrors.Changesmaybemadetotheinformationandincorporatedinnew
editionsofthisdocument,ifandwhenmadeavailablebyNetworkAssociatesInc.
Exportofthissoftwareanddocumentationmaybesubjecttocompliancewiththerulesand
regulationspromulgatedfromtimetotimebytheBureauofExportAdministration,United
StatesDepartmentofCommerce,whichrestricttheexportandre-exportofcertainproducts
andtechnicaldata.
NetworkAssociates,Inc. (972)308-9960main
3965FreedomCircle http://www.nai.com
SantaClara,CA95054
*issometimesusedinsteadofthe®forregisteredtrademarkstoprotectmarksregisteredoutsideofthe
U.S.
Page 3

LIMITED WARRANTY
Limited Warranty.
substantially in accordance with the accompanying written materials for a period of sixty (60)
days from the date of original purchase. Tothe extent allowed by applicablelaw, implied
warranties on the Software Product, if any, are limited to such sixty (60) day period. Some
jurisdictions do not allow limitations on duration of an implied warranty, so the above
limitation may not apply to you.
Customer Remedies.
exclusive remedy shall be, at Network Associates Inc’s option, either (a) return of the purchase
price paid for the license, if any or (b) repair o r replacement of the Software Product that does
not meet Network Associates Inc’s limited warranty and which is returned at your expense to
Network Associates Inc. with a copy of your receipt. This lim ited warranty is void if failure of
the Software Product has resulted from accident, abuse, or misapplication. Any repaired or
replacement Software Product will be warranted for the remainder of the original warranty
period or thirty (30) days, whichever is longer. Outside the United States, neither these
remedies nor any product support services offered by Network Associates Inc. are available
without proof of purchase from an authorized internationalsource and may not be available
from Network Associates Inc. to the extent they subject to restrictions under U.S. export control
laws and regulations.
NO OTHER WARRANTIES. TO THE MAXIMUM EXTENT PERMITTED BY APPLICABLE
LAW, AND EXCEPT FOR THE LIMITED WARRANTIES SET FORTH HEREIN, THE
SOFTWARE AND DOCUMENTATION ARE PROVIDED “AS IS” AND NETWORK
ASSOCIATES, INC. AND ITS SUPPLIERS DISCLAIM ALL OTHER WARRANTIES AND
CONDITIONS, EITHER EXPRESS OR IMPLIED, INCLUDING, BUT NOT LIMITED TO,
IMPLIED WARRANTIES OF MERCHANTABILITY, FITNESS FOR A PARTICULAR
PURPOSE, CONFORMANCE WITH DESCRIPTION, TITLE AND NON-INFRINGEMENT OF
THIRD PARTY RIGHTS, AND THE PROVISION OF OR FAILURE TO PROVIDE SUPPORT
SERVICES. THIS LIMITED WARRANTY GIVES YOU SPECIFIC LEGAL RIGHTS. YOU MAY
HAVE OTHERS, WHICH VARY FROM JURISDICTION TO JURISDICTION.
Network Associates Inc. warrants that the Software Product will perform
Network Associates Inc’s and its suppliers’ entire liability and your
LIMITATION OF LIABILITY. TO THE MAXIMUM EXTENT PERMITTED BY APPLICABLE
LAW, IN NO EVENT SHALL NETWORK ASSOCIATES, INC. OR ITS SUPPLIERS BE LIABLE
FOR ANY INDIRECT, INCIDENTAL, CONSEQUENTIAL, SPECIAL OR EXEM PLARY
DAMAGES OR LOST PROFITS WHATSOEVER (INCLUDING, WITHOUT LIMITATION,
DAMAGES FOR LOSS OF BUSINESS PROFITS, BUSINESS INTERRUPTION, LOSS OF
BUSINESS INFORMATION, OR ANY OTHER PECUNIARY LOSS) ARISING OUT OF THE
USE OR INABILITY TO USE THE SOFTWARE PRODUCT OR THE FAILURE TO PROVIDE
SUPPORT SERVICES, EVEN IF NETWORK ASSOCIATES, INC. HAS BEEN ADVISED OF
THE POSSIBILITY OF SUCH DAMAGES. IN ANY CASE, NETWORK ASSOCIATES, INC’S
CUMULATIVE AND ENTIRE LIABILITY TO YOU OR ANY OTHER PARTY FOR ANY LOSS
OR DAMAGES RESULTING FROM ANY CLAIMS, DEMANDS OR ACTIONS ARISING OUT
OF OR RELATING TO THIS AGREEMENT SHALL NOT EXCEED THE PURCHASE PRICE
PAID FOR THIS LICENSE. BECAUSE SOME JURISDICTIONS DO NOT ALLOW THE
EXCLUSION OR LIMITATION OF LIABILITY, THE ABOVE LIMITATIONS MAY NOT
APPLY TO YOU.
Page 4

Page 5

Table of Contents
Part I: Overview
Preface.....................................................13
OrganizationofthisGuide.........................................14
HowtocontactPGPSecurityandNetworkAssociates .................16
Customerservice............................................16
Technical support ...........................................16
NetworkAssociatestraining...................................16
Comments and feedback . . . . . . . . ..............................17
Recommended readings . . . . . . . . . . . . ..............................17
Thehistoryofcryptography ...................................17
Technicalaspectsofcryptography .............................17
Politicsofcryptography ......................................19
Networksecurity ............................................20
Chapter1. PGPBasics .......................................21
PGPaspartofyoursecuritystructure...............................21
PGPfeatures ....................................................22
BasicstepsforusingPGP.........................................23
Chapter 2. A Quick Tour of PGP . . . . . . . . . . . . . . . . . . . . . . . . . . . . . . . . 25
Startmenu ......................................................25
PGPtools .......................................................26
PGP within supported email applications . . . . . . . . . . . . . . ..............26
PGP from Windows Explorer . . . . . . . . . ..............................27
PGPtray ........................................................27
Using the Clipboard and Current Window options . . . ..............28
Takingshortcuts.................................................29
GettingHelp.....................................................29
User’s Guide 5
Page 6

Table of Contents
Part II: Working with Keys
Chapter3. MakingandExchangingKeys ........................33
“Key”concepts..................................................33
Makingakeypair ................................................34
Creatingapassphrasethatyouwillremember ........................40
Changingyourkeypair ...........................................41
Backingupyourkeys.............................................41
Protectingyourkeys .............................................42
WhatifIforgetmypassphraseorlosemykey? .......................42
WhatisPGPkeyreconstruction?...............................43
Exchangingpublickeyswithothers.................................45
Distributingyourpublickey ...................................45
Placingyourpublickeyonakeyserver .....................45
Includingyourpublickeyinanemailmessage ...............46
Exportingyourpublickeytoafile..........................47
Obtainingthepublickeysofothers .............................47
Gettingpublickeysfromakeyserver.......................48
Gettingpublickeysfromemailmessages ...................49
Importing keys . . . . . . . . . . . . ..............................50
Verifyingtheauthenticityofakey ..............................50
Whyverifytheauthenticityofakey? .......................50
Verifywithadigitalfingerprint.............................51
Validatingapublickey........................................51
Workingwithtrustedintroducers...............................51
Whatisatrustedintroducer?..............................52
What is a meta-introducer? . ..............................52
Chapter4. ManagingKeys ....................................53
ManagingyourPGPkeyrings ......................................53
ThePGPkeyswindow ........................................54
PGPkeysattributedefinitions..............................54
Specifying a default key pair on your PGP keyring . . . . . . . . . . . .58
Importing and exporting keys on your PGP keyring . . . . . . . . . . .58
Deleting a key or signature on your PGP keyring . . . . . . . . . . . . .58
6 PGP Freeware
Page 7

Table of Contents
DisablingandenablingkeysonyourPGPkeyring ............59
Examiningandsettingkeyproperties ...........................60
Generalkeyproperties ...................................60
Subkeys properties . . . . . . . . ..............................70
Designatedrevokerproperties.............................73
AdditionalDecryptionKeyproperties .......................75
AddinganX.509certificatetoyourPGPkey......................76
Splittingandrejoiningkeys ...................................81
Creatingasplitkey ......................................81
Rejoiningsplitkeys......................................83
Updatingyourkeyonakeyserver..............................88
Reconstructingyourkey ......................................90
Part III: Securing Your Files and Communications
Chapter5. SecuringEmail ....................................95
Securing email communications . . . . . . ..............................95
PGP/MIME ..................................................95
Encryptingandsigningemail ..................................96
Encrypting and signing email using the PGP plug-ins . . . . . . . . .96
Encrypting and signing email without PGP plug-in support . . . .100
Encryptingemailtogroupsofrecipients ...................101
Decryptingandverifyingemail................................103
Decrypting and verifying email using the PGP plug-ins . . . . . . .103
Decrypting and verifying email without PGP plug-in support . . .104
Chapter6. SecuringFiles ....................................107
SecuringyourfilesandfolderswithPGP ...........................107
Encryptingandsigningfiles ..................................107
Decryptingandverifyingfiles.................................109
Openingaself-decryptingarchive.........................110
Signinganddecryptingfileswithasplitkey .........................110
Permanentlyerasingfilesandfreediskspace .......................110
UsingPGPWipetopermanentlydeleteafile ....................111
Using the PGP Wipe Free Space Wizard to clean free disk space . . .112
Schedulingfolderandfreespacewiping .......................113
User’s Guide 7
Page 8

Table of Contents
Chapter7. SecuringInstantMessages .........................117
ExchangingpublickeysinICQ................................118
EncryptingICQmessages....................................119
Part IV: Securing Your Network Communications with PGPnet
Chapter8. PGPnetBasics....................................123
Learning about PGPnet ..........................................123
WhatisaVirtualPrivateNetwork? .................................124
VPNterms .................................................125
Chapter 9. A Quick Tour of PGPnet . . . . . . . . . . . . . . . . . . . . . . . . . . . .127
DisplayingPGPnet ..............................................127
TurningPGPnetonandoff .......................................127
ExitingPGPnet .................................................128
PGPnetfeatures ................................................128
PGPtray’sicon .................................................129
The PGPnet window (at a glance) . . . . . .............................130
Menus ....................................................130
Panels ....................................................131
Statusbar .................................................132
ReviewingthestatusofexistingSAs ...............................133
EstablishingandterminatingSAs..................................135
Importing a host list . . . . . . . . . . . . .............................136
Exportingahostlist.........................................136
Blocking communications with other machines . . . . . . . . . .............136
Blocking a host and tracing the source of communications . . . . . . . .138
Tracinganattacker .........................................138
Removingahostfromthelistofblockedhosts ..................140
ReviewingPGPnet’slogentries ...................................140
Changingyoursecurenetworkinterface:SetAdapter.................141
8 PGP Freeware
Page 9

Table of Contents
Chapter10. ConfiguringPGPnet’sVPNFeature..................143
ConfiguringPGPnet’sVPNfeature .................................144
Step1.DisplayingPGPnet ...................................144
Step2.Selectingyourauthenticationkeyorcertificate............144
Step 3a. Importing a host list . . . . .............................146
Step 3b. Adding a host, subnet, or gateway . . . . . . . . .............146
Step4.EstablishinganSA ...................................146
UsingtheAddHostWizard .......................................147
Whatyouneedtoknow......................................148
Addingahost ..............................................149
Adding a subnet or gateway . . . . . .............................151
Modifyingahost,subnet,orgatewayentry ..........................154
Removing a hos t, subnet, or ga teway entry . . . . . . . . . . . . . .............154
Expert Mode: Bypassing the wizard to add hosts, gateways, and subnets 155
TurningExpertModeonandoff...............................156
DNS Lookup: Finding a host’s IP address . . . . . . . . . . .............157
SharedSecret ..............................................158
RemoteAuthentication ......................................158
Requiring a host to present a specific key or certificate . . . . . . . 158
AcquireVirtualIdentityandexclusivegateways .................160
Authenticationtype .....................................161
Enabling/DisablingtheVPNfeature............................162
UsingAggressiveMode......................................163
Part V: Appendices and Glossary
AppendixA. SettingOptions .................................167
SettingPGPoptions .............................................167
Settinggeneraloptions ......................................168
Settingfileoptions..........................................171
Settingemailoptions........................................173
SettingHotKeyoptions ......................................175
Settingserveroptions .......................................177
SettingCAoptions..........................................181
Settingadvancedoptions ....................................181
User’s Guide 9
Page 10

Table of Contents
SettingVPNoptions.........................................185
Settingautomatickeyrenewalvalues......................187
SettingVPNauthenticationoptions............................188
SettingVPNadvancedoptions ................................190
Adding and r emoving Allowed Remote proposals . . . . . . . . . . . .195
WorkingwithIKEandIPsecproposals .....................195
Appendix B. Troubleshooting PGP . . . . . . . . . . . . . . . . . . . . . . . . . . . . 199
Appendix C. Troubleshooting PGPnet . . . . . . . . . . . . . . . . . . . . . . . . . .203
PGPneterrormessages ..........................................203
Additionaltips..................................................204
Understandingauthentication.....................................205
TheVPNAuthenticationpanel ................................205
Host/Gatewaydialog:RemoteAuthentication ...................206
Appendix D. Transferring Files Between the MacOS and Windows . .207
Sending from the MacOS to Windows . .............................208
ReceivingWindowsfilesontheMacOS.............................210
Supportedapplications ......................................210
AppendixE. BiometricWordLists.............................213
BiometricWordLists ............................................213
Glossary...................................................219
Index......................................................231
10 PGP Freeware
Page 11

Part I: Overview
•Preface
• Chapter 1: PGP Basics
• Chapter 2: A Quick Tour of PGP
Page 12

Page 13

Preface
PGP is part of your organization’s security toolkit for protecting one of your
most important assets: information. Corporations have traditionally put locks
on their doors and file cabinets and require employees to show identification
to prove that they are permitted access into various parts of the business site.
PGP is a valuable tool to help you protect the security and integrity of your
organization’sdata andmessages.For many companies,lossof confidentiality
meanslossofbusiness.
This guide describes how to use PGP
Windows NT, and Windows Millennium. PGP Freeware (also referred to in
this document simply as PGP) has many new features, which are described in
the ReadMe.txt file that accompanies the product.
®
Freeware for Windows 95, 98, 2000,
NOTE: If you are new to cryptography and would like an overview of
the terminology and concepts you will encounter while using PGP, see
An Introduction to Cryptography, which is included with the product.
User’s Guide 13
Page 14

Preface
Organization of this Guide
This Guide is divided into the following parts and chapters:
Part I, “The Basics”
This section introduces you to the features of PGP and gives you a quick look
at the PGP user i nterface. Part I includes the following chapters:
• Chapter 1, “PGP Basics,” provides an overview of the capabilities of PGP
and how PGP fits into the larger security structure of an organization.
• Chapter 2 , “A Quick Tour of PGP,” provides you with a brief
introduction to accessing PGP utilities from your desktop.
Part II, “Working With Keys”
This section introduces the important concept of keys,whicharefundamental
to data encryption. Part II includes the following chapters:
• Chapter 3, “Making and Exchanging Keys,” explains the concept of a
data encryption key and describes how you create, protect, exchange,
and validate keys.
• Chapter 4, “Managing Keys,” provides you with more details of key
maintenance, including managing your keyring,examining andchanging
key properties, creating split keys.
14 PGP Freeware
Part III “Securing Your Files and Communications”
This section explains how to use your data encryption keys to secure data that
you send from or store on your computer. Part III includes the following
chapters:
• Chapter5,“SecuringEmail,”describeshowtosend encrypted email, and
how to decrypt and verify email you receive.
• Chapter 6, “Securing Files,” describes how to use PGP to securely
maintain files, either for email or for storage on your computer.
• Chapter 7, “Securing Instant Messages,”describes how you can use
PGP’s plug-in for ICQ—an applicationfor real-time communication over
the Internet—to secure your instant messages.
Page 15

Preface
Part IV, “Securing Your Network Communications with PGPnet”
This section describes the features of PGPnet, a PGP tool that enables you to
create Virtual Private Networks (VPNs) with trusted users not directly
connected to your network. The chapters of Part IV also guide you through
configuring the features of PGPnet to customize the security of your
workstation. Part IV includes the following chapters:
• Chapter 8, “PGPnet Basics,” gives you an overview of Virtual Private
Networks.
• Chapter9, “A QuickTourof PGPnet,”introducesyou to aspects of PGP’s
user interface that are related to PGPnet.
• Chapter 10, “Configuring PGPnet’s VPN Feature,” describes how to use
PGPnet to set up and customize a Virtual Private Network (VPN).
Part V, “Appendices and Glossary”
This section includes information on how to further customize PGP on your
computer, as well as troubleshooting tips should you encounter problems
using PGP. A Glossary is included as a convenient reference spot where you
will find definitions of terms related to network security. Part V includes the
following appendices:
• Appendix A, “Setting Options,” explains how to use the Options dialog
box to create a version of PGP on your computer that best suits your
needs.
• Appendix B, “Troubleshooting PGP,” guides you in solving problems
you may encounter when using PGP.
• AppendixC,“Troubleshooting PGPnet,” guides you in solving problems
you may encounter when using PGP’s PGPnet feature.
• Appendix D, “Transferring Files Between the MacOS and Windows,”
explains how PGP translates files that are sent between two systems
when one system operates using a Mac operating system (OS) and the
othersystemoperatesusingaWindowsOS.
• Appendix E, “Biometric Word Lists,” explains biometric word lists and
how they are used by PGP.
• Glossary,page219, provides you with definitions for many terms related
to PGP and network security.
User’s Guide 15
Page 16

Preface
How to contact PGP Security and Network Associates
Customer service
Network A ssociates continues to market and support the product lines from
each of the new independent business units. You may direct all questions,
comments, or requests concerning the software you purchased, your
registration status, or similar issues to the Network Associates Customer
Service department at the following address:
Network Associates Customer Service
4099 McEwen, Suite 500
Dallas, Texas 75244
U.S.A.
The department’s hours of operation are 8
through Friday.
Other contact information for corporate-licensed customers:
Phone: (972) 308-9960
E-Mail: services_corporate_division@nai.com
World Wide Web: http://support.nai.com
Other contact information for retail-licensed customers:
Phone: (972) 308-9960
E-Mail: cust_care@nai.com
World Wide Web: http://www.pgp.com/
Technical support
Network Associates does not provide technical support for freeware products.
Network Associates training
For information about scheduling on-site training for any PGP Security or
Network Associates product, call Network Associates Customer Service at:
(972) 308-9960.
A.M.to8P.M. Central time, Monday
16 PGP Freeware
Page 17

Comments and feedback
PGP Security appreciates your comments and reserves the right to use any
information you supply in any way it believes appropriate without incurring
any obligation whatsoever. Please send any documentation comments to
tns_documentation@nai.com.
Recommended readings
This section identifies Web sites, books, and periodicals about the history,
technical aspects, and politics of cryptography, as well as trusted PGP
download sites.
The history of cryptography
• The Code Book: The Evolution of Secrecy from Mary, Queen of Scots, to Quantum
Cryptography,SimonSingh,Doubleday&Company,Inc.,1999,ISBN
0-385-49531-5.
• The Codebreakers: The Story of Secret Writing,DavidKahn,Simon&Schuster
Trade,1996,ISBN0-684-83130-9(updatedfromthe1967 edition).Thisbook
is a history of codes and code breakers from the time of the Egyptians to the
end of WWII. Kahn first wrote it in the sixties—this is the revised edition.
This book won't teach you anything about how cryptography is done, but
it has been the inspiration of the whole modern generation of
cryptographers.
Preface
Technical aspects of cryptography
Web sites
• www.iacr.org—International Association for Cryptologic Research
(IACR). The IACR holds cryptographic conferences and publishes journals.
• www.pgpi.org
by PGP Security, Inc. or Network Associates, Inc., is an unofficial yet
comprehensive resource for PGP.
• www.nist.gov/aes
(NIST) Advanced Encryption Standard (AES) Development Effort,
perhaps t he most interesting project going on in cryptography today.
• www.ietf.org/rfc/rfc2440.txt
standard.
—An international PGP Web site, which is not maintained
—The National Institute of Standards and Technology
—The specification for the IETF OpenPGP
User’s Guide 17
Page 18

Preface
Books and periodicals
• Applied Cryptography: Protocols,Algorithms,andSourceCode in C,2ndedition,
Bruce Schneier, John Wiley & Sons, 1996; ISBN 0-471-12845-7. If you can
only buy one book to get started in cryptography, this is the one to buy.
• Handbook of Applied Cryptography, Alfred Menezes, Paul van Oorschot and
Scott Vanstone, CRC Press, 1996; ISBN 0-8493-8523-7. This is the technical
bookyoushouldgetafterSchneier.Thereis a lot of heavy-duty math in this
book, but it is nonetheless usable for those who do not understand the
math.
• Journal of Cryptology, International Association for Cryptologic Research
(IACR). See www.iacr.org
• Advances in Cryptology, conference proceedings of the IACR CRYPTO
conferences, published yearly by Springer-Verlag. See www.iacr.org
• Cryptography for the Internet, Philip Zimmermann, Scientific American,
October 1998 (introductory tutorial article).
• The Twofish Encryption Algorithm: A 128-Bit Block Cipher, Bruce Schneier, et
al, John Wiley & Sons, Inc., 1999; ISBN: 0471353817. Contains details about
the Twofish cipher ranging from design criteria to cryptanalysis of the
algorithm.
.
.
18 PGP Freeware
Page 19

Politics of cryptography
Web sites
• www.epic.org—Electronic Privacy Information Center.
Preface
• www.crypto.org
• www.eff.org
• www.privacy.org
privacy issues.
• www.cdt.org
• www.pgp.com/phil
testimony,and so on.
—Internet Privacy Coalition.
—Electronic Frontier Foundation.
—The Privacy Page. Great information resource about
—Center for Democracy and Technology.
—Phil Zimmermann’s home page, his Senate
Books
• Privacy on the Line: The Politics of Wiretapping and Encryption, Whitfield
Diffie and Susan Landau, The MIT Press, 1998, ISBN 0-262-04167-7. This
book is a discussion of the history and policy surrounding cryptography
and communications security. It is an excellent read, even for beginners
and non-technical people. Includes information that even a lot of experts
don’t know.
• Technology and Privacy: The New Landscape, Philip Agre and Marc
Rotenberg, The MIT Press, 1997;ISBN 0-262-01162-x.
• Building in Big Brother, The Cryptographic Policy Debate, edited by Lance
Hoffman, Springer-Verlag, 1995; ISBN 0-387-94441-9.
• The Official PGP User’s Guide, Philip Zimmermann, The MIT Press, 1995;
ISBN 0-262-74017-6. How to use PGP, written in Phil’s own words.
• The Code Book: The Evolution of Secrecy from Ancient Egypt to Quantum
Cryptography, Simon Singh, Doubleday & Company, Inc., September 2000;
ISBN: 0385495323. This book is an excellent primer for those wishing to
understand how the human n eed for privacy has manifested itself through
cryptography.
User’s Guide 19
Page 20

Preface
Network security
Books
• Building Internet Firewalls, Elizabeth D. Zwicky, D. Brent Chapman, Simon
Cooper, and Deborah Russell (Editor), O’Reilly & Associates, Inc., 2000;
ISBN:1565928717. This book is a practical guide to designing, building, and
maintaining firewalls.
• Firewalls and Internet Security: Repelling the Wily Hacker, William R.
Cheswick,Steven M. Bellovin, Addison Wesley Longman, Inc., 1994;ISBN:
0201633574. This book is a practical guide to protecting networks from
hacker attacks through the Internet.
• Hacking Exposed: Network Security Secrets and Solutions, Stuart McClure, Joel
Scambray, and George Kurtz, The McGraw-Hill Companies, 1999; ISBN:
0072121270. The state of the art in breaking into computers and networks,
as viewed from the vantage point of the attacker and the defender.
20 PGP Freeware
Page 21

1PGP Basics
This chapter provides you with an overview of how PGP Freeware fits into t he
larger security structure of your organization and how PGP Freeware
strengthens t hat security s tructure. PGP’s features are outlined, and you will
get a quick look at the procedures you normally follow in the course of using
PGP.
PGPaspartofyoursecuritystructure
Your company has various means by which it can protect information. It can
physically lock doors to the building and specific rooms in the building,
making those places accessible only to authorized personnel. It can require
employees to us e passwords to log on to the network. It can control the flow
of information traffic between the corporate network and outside networks by
setting up one computer as a firewall server that all information must pass
through. These are all mechanisms by which a corporation can bolster the
security of its information.
PGP Freeware adds to this security system by offering information protection
for individual computers. The types of added secu rity include:
1. data encryption, including email, stored files, and instant messaging
1
2. virtual private networking, for secure remote communications
Data encryption enables users to protect information that they send out—such
as emails—as well as information that they store ontheir own computers. Files
and messages are encrypted with a user’s key, which works in conjunction
with scrambling algorithms to produce data that can be decrypted only by its
intended recipients.
Data encryption is also an important part of a Virtual Private Network (VPN):
information is first encrypted and then sent in this secure form over the
Internet—an otherwise very insecure medium—to a remote host. Virtual
Private Networks are a feature of PGPnet, which is a PGP tool used for setting
up VPNs.
You should now be familiar with an overall picture of what PGP does. The
next section lists the features of PGP and gives references to specific chapters
in this User’s Guide for more detailed information.
User’s Guide 21
Page 22

PGP Basics
PGP features
PGP offers several features and utilities to help you secure your email, files,
disk, and network traffic with encryption and authentication.
Here is what you can do with PGP:
• Encrypt/sign and decrypt/verify within any application. With the PGP
menus and email plug-ins, you can access PGP functions while in any
application. To learn how to access PGP, see Chapter 2, “A Quick Tour of
PGP.” To learn how to encrypt/sign and decrypt/verify, see “Part III:
Securing Your Files and Communications.”
• Create and manage keys. Use PGPkeys to create, view, and maintain your
ownPGPkeypairaswellasanypublickeysofotherusersthatyouhave
added to your public keyring. To learn how to create a key pair, see
Chapter3,“MakingandExchangingKeys.” To learn about managing your
keys, see Chapter 4, “Managing Keys.”
• Create self-decrypting archives (SDAs). You can create self-decrypting
executable files that anyone can decrypt with the proper password. This
feature is especially convenient for sending encrypted files to people who
do not have PGP installed. For more informationabout SDAs, see Chapter
6, “Securing Files.”
22 PGP Freeware
• Permanently erase files,folders,andfreediskspace.You can use thePGP
Wipe utility to thoroughly delete your sensitive files and folders without
leaving fragments of their data behind. You can also use PGP Free Space
Wiper to erase the free disk space on your hard drive that contains data
from previously deleted files and programs. Both utilities ensure that your
deleted data is unrecoverable. To learn about fil e , folder, and free space
wiping, see “Permanently erasing files and free disk space” on page 110.
• Secure network traffic. You can use PGPnet, a Virtual Private Network
(VPN), to communicate securely and economically with other PGPnet
users over the internet. To l earn more about PGPnet and its components,
see “Part IV: Securing Your Network Communications with PGPnet.”
Page 23

Basic steps for using PGP
1. Install PGP on your computer.
Refer to the PGP Installation Guide or the ReadMe.txt file that accompanies
the product for complete installation instructions.
2. Create a private and public key pair.
Before you can begin using PGP, you need to generate a key pair.
You have the option of creating a new key pair during the PGP installation
procedure, or you can do so at any time by opening the PGPkeys
application.
You n eed a key pair to:
• encrypt information
• decrypt information that has been encrypted to your key
• sign information
For more information about creating a private and public key pair, refer to
“Making a key pair” on page 34.
PGP Basics
3. Exchange public keys with others.
After you have created a key pair, you can begin corresponding with other
PGP users. You will need a copy of their public key and they will need
yours. Your public key is just a block of text, so it’s quite easy to trade keys
with someone. You can include your public key in an email message, copy
it to a file, or post it on a public or corporate key server where anyone can
get a copy when he or she needs it.
For more information about exchanging public keys, refer to “Exchanging
public keys with others” on page 45.
4.Validate public keys.
Once you have a copy of someone’s public key, you can add it to your
public keyring. You should then check to make sure that the key has not
been tampered with and that it really belongs to the purported owner. You
do this by comparing the unique fingerprint on your copy of someone’s
public key to the fingerprint on that person’s original key. When you are
sure that you have a valid public key, you sign it to indicate that you feel
the key is safe to use. In addition, you can grant the owner of the key a level
of trust indicating how much confidence you have in that person to vouch
for the authenticity of someone else’s public key.
User’s Guide 23
Page 24

PGP Basics
For more information about validating your keys, refer to “Verifying the
authenticity of a key” on page 50.
5. Start securing your email and files.
After you have generated your key pair and have exchanged public keys,
you can begin encrypting, signing, decrypting and verifying your email
messages and files.
To perform a PGP task, you must select the file or email message that you
want to s ecure and then choose your task (Encrypt, Sign, Decrypt, or
Verify) from a PGP menu. PGP menus are available from most
applications. To learn how to access a PGP menu, see Chapter 2, “A Quick
Tour of PGP.”
For detailed instructions about securing email and files, refer to “Part III:
Securing Your Files and Communications.” For more information about
securing your network communications, refer to “Part IV: Securing Your
Network Communications with PGPnet.”
6. Wipe files.
When you need to permanently delete a file, you can use the Wipe feature
to ensure that the file is unrecoverable. The file is immediately overwritten
so that it cannot be retrieved using disk recovery software.
24 PGP Freeware
For more information about wiping files, refer to “Permanently erasing
files and free disk space” on page 110.
Page 25

2A Quick Tour of PGP
The way in which you access PGP largely depends on your preference—what
is easiest at the time. PGP works on the data generated by other applications.
Therefore, the appropriate PGP functions are designed to be immediately
available to you based on the task you are performing at any given moment.
4
1
2
Start menu
You can start many of the PGP utilities (PGPkeys, PGPtools, PGPtray, PGPnet,
andPGPDocumentation) from theStartmenu(asshown in Figure 2-1,#1).On
the Task bar, click the Start button, then click Programs and PGP to access
these utilities.
1. Start menu
2. PGPtools
3. Email application
Figure 2-1. Accessing PGP
4. Windows Explorer
5. PGPtray
User’s Guide 25
Page 26
A Quick Tour of PGP
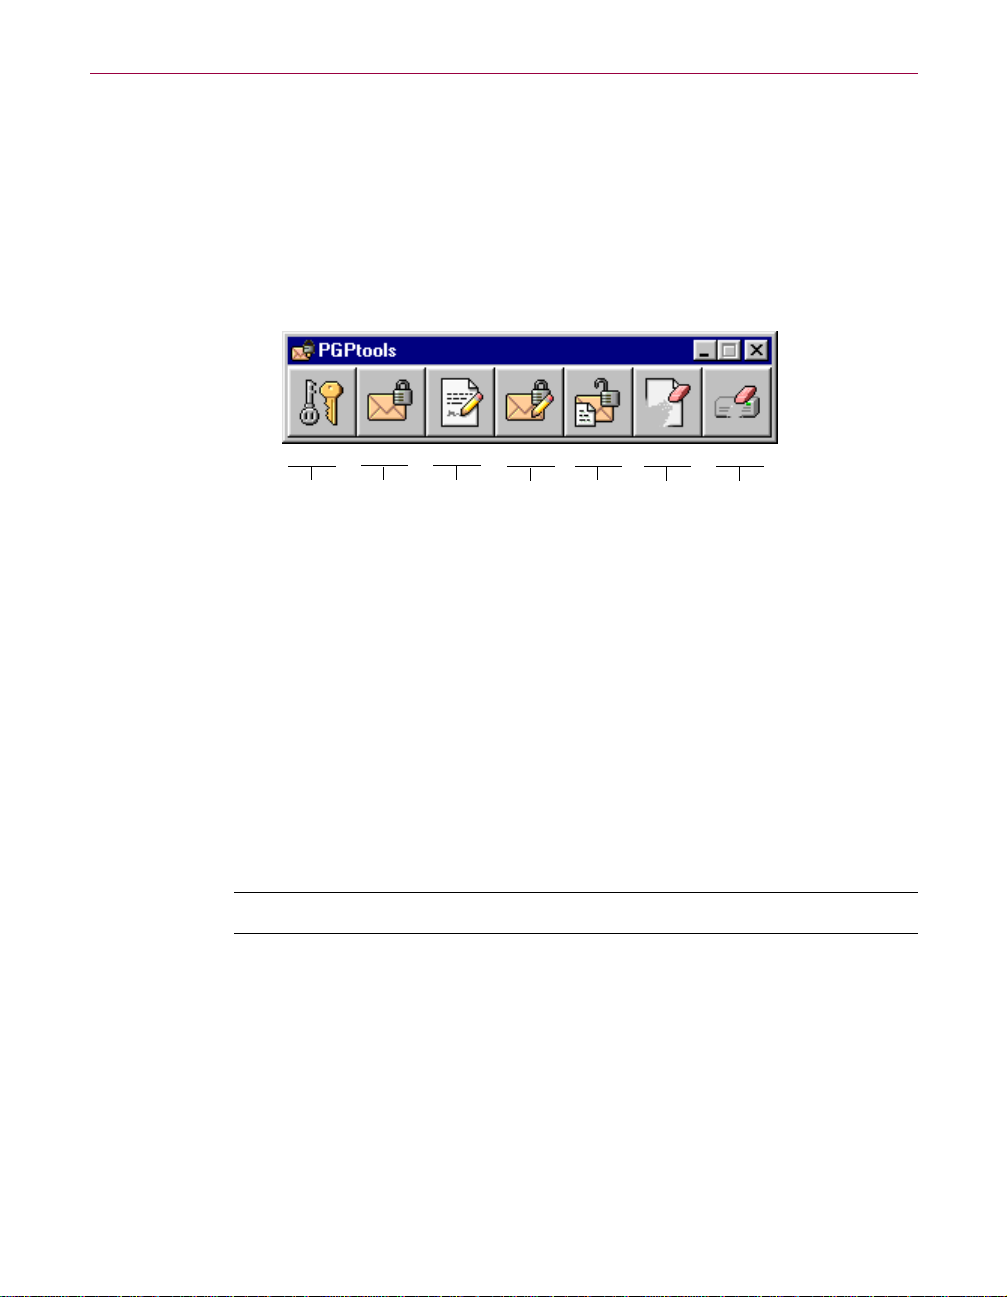
PGPtools
If you are using an email application that is not supported by the plug-ins, or
if you want to perform PGP functionsfromwithinotherapplications, you can
encrypt and sign, decrypt and verify, or securely wipe messages and files
directly from PGPtools. You can open PGPtools (as shown in Figure 2-1, #2)
from your System tray (as shown in Figure 2-1, #5) or by clicking
Start—>Programs—>PGP—>PGPtools.
PGPkeys
encrypt
sign
encrypt
and sign
decrypt/
verify
wipe
free space
wipe
Figure 2-2. PGPtools
If you are working with text or files, you can encrypt, decrypt, sign, and verify
by selecting the text or file and then dragging it onto the appropriate button in
PGPtools.
If you are working with files, click on the appropriate button in PGPtools to
choose a file or select the Clipboard data.
When you decrypt a file, a Save As dialogboxappearsandPGPcreatesanew
plaintext file with a . txt extension; the encrypted file has a .txt.pgp extension.
PGP within supported email applications
NOTE: The Lotus Notes plug-in is not supported in PGP Freeware.
PGP “plugs in” to many popular email applications. With these plug-ins, you
canperformmostPGPoperations withasimpleclickof a button whileyouare
composing and reading your mail.
If you are using an email application that is not supported by the plug-ins, you
can easily encrypt/decrypt messages using one of the other PGP utilities.
26 PGP Freeware
Page 27

PGP has plug-ins for the following email applications:
• Qualcomm Eudora
• Microsoft Exchange
• Microsoft Outlook
• Microsoft Outlook Express
• Lotus Notes
When a PGP plug-in is installed, Encrypt and Sign buttons appear in your
application’s toolbar (as shown in Figure 2-1, #3). You click the envelope and
lock icon ( ) to indicate that you want to encrypt your message, and the pen
and paper icon ( ) to indicate that you want to sign your message. Some
applications also have an icon of both a lock and quill, which lets you encrypt
and sign at once. For more information about using PGP within email
applications, see Chapter 5, “Securing Email.”
PGP from Windows Explorer
You can encrypt and sign or decrypt and verify files such as word processing
documents, spreadsheets, and video clips directly from Windows Explorer.
A Quick Tour of PGP
PGPtray
To access PGP functions from Windows Explorer, choose the appropriate
option from the PGP submenu of the File menu (as shown in Figure 2-1, #4).
The options that appear depend on the current state of the file you have
selected. If the file has not yet been encrypted or signed, then the options for
performingthesefunctionsappearonthemenu.Ifthefileisalreadyencrypted
or signed, then options for decrypting and verifying the contents of the file are
displayed.
NOTE: You can access many of the main PGP functions by clicking the
gray lock icon ( ), which is normally located in the System tray (as
shown in Figure 2-1, #5), and then choosing the appropriate menu
item.(If you can’t find this icon in your System tray, run PGPtray from
the Start menu or see “Setting general options” on page 168 for
additional instructions.) This feat ure gives you im mediate access to the
PGP functions regardless of which application you are using.
User’s Guide 27
Page 28
A Quick Tour of PGP
NOTE: The look of the PGPtray icon tells you if PGPnet is off or not
installed (gray lock on a network), or installed but not working (gray lock
on a netwo rk wi th a red X). If you did not install PGPnet, this gray lock
icon ( ) will appear in your System tray instead of the PGPnet lock icon.
For more information about the lock icons in PGPtray, see “PGPtray’s
icon” on page 129.
Using the Clipboard and Current Window options
If you are using an email application that is not supported by the PGP
plug-ins, or if you are working with text generated by some other application,
you can perform your encryption/decryption and signature/verification
functions via the Windows Clipboard or within the current application
window.
Via the Windows Clipboard
For instance, to encrypt or sign text, you copy it from your word processing
application to the Clipboard (
appropriate PGP functions, then paste (
before sending it to the intended recipients. You can also reverse the process
and copy the encrypted text—known as ciphertext—from your application to
theClipboard,decryptandverifytheinformation,andthenviewthecontents.
After y ou vi ew the decrypted message, you can decide whether to save the
information or retain it in its encrypted form.
CTRL+C), encrypt and sign it using the
CTRL+V) it back into your application
28 PGP Freeware
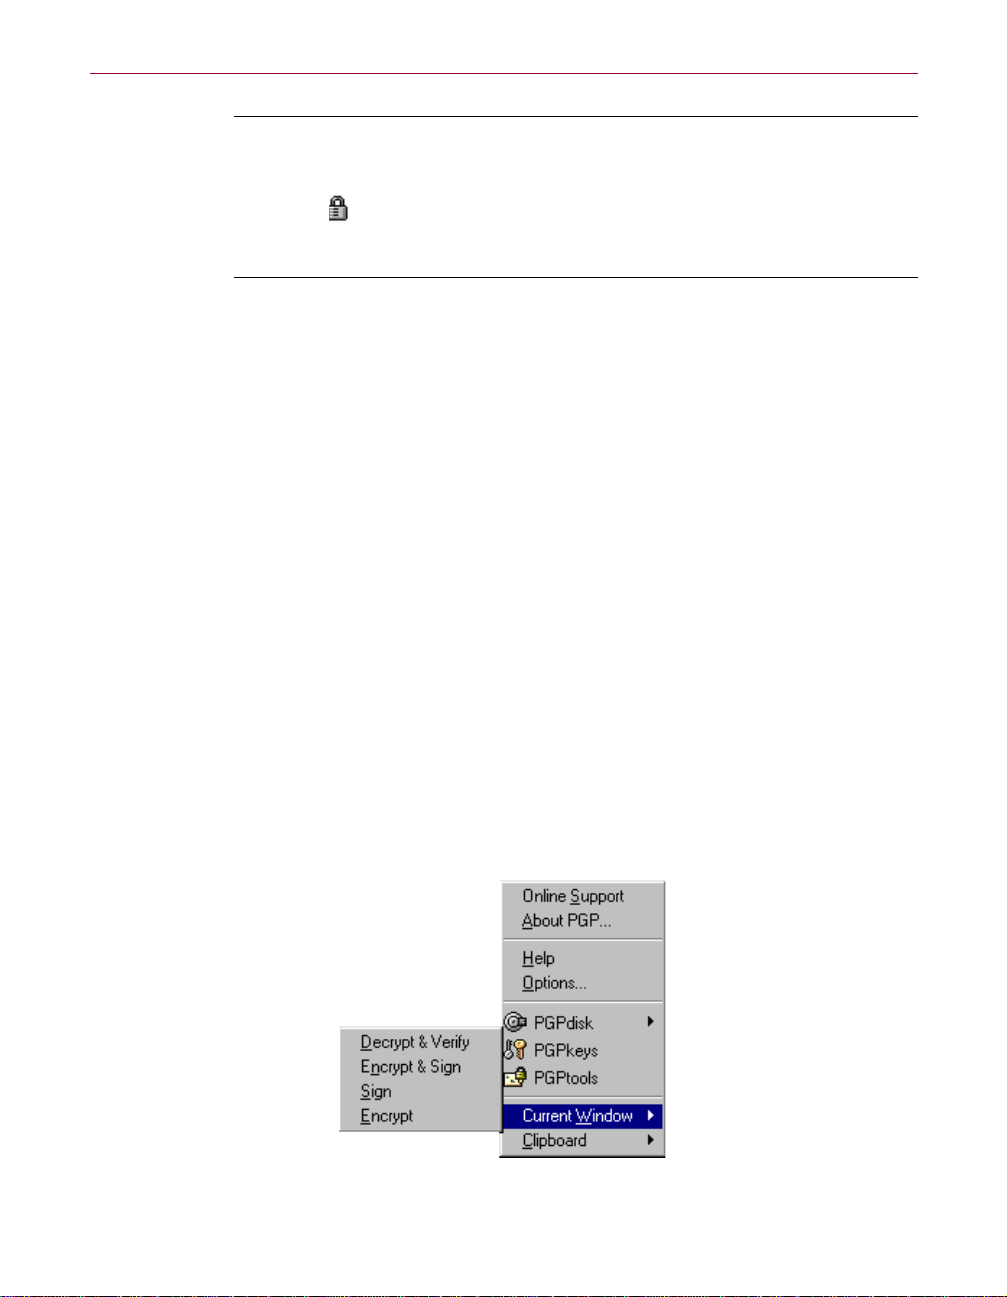
Within the Current Window
You can perform the same cryptographic tasks using the Current Window
menu item, which copies t he text in the current window to the Clipboard and
then perform s the selected task .
Figure 2-3. PGPtray’s Current Window feature
Page 29

Taking shortcuts
Although you will find that PGP is quite easy to use, a number of shortcuts are
available to help you accomplish your encryption tasks even quicker. For
example, while you are managing your keys in the PGPkeys window, you can
right-click to perform all the necessary PGP functions rather than accessing
them from the menu bar. You can also drag a file containing a key into the
PGPkeys window to add it to your keyring.
Keyboard shortcuts, or hotkeys, are also available for most menu operations.
For informationaboutcreatingPGPhotkeys,see“Setting HotKey options” on
page 175.
Getting Help
When you choose Help from PGPtray or from the Help menu within
PGPkeys, you access the PGP Help system, which provides a general
overview and instructions for all of the procedures you are likely to perform.
Many of the dialog boxes also have context-sensitive help, which you access
by clicking the question mark in the right corner of the window and then
pointing to the area of interest on the screen. A short explanation appears.
A Quick Tour of PGP
User’s Guide 29
Page 30

A Quick Tour of PGP
30 PGP Freeware
Page 31

Part II: Working with Keys
• Chapter 3: Making and Exchanging
Keys
• Chapter 4: Managing Keys
Page 32

Page 33

3Making and Exchanging
Keys
This chapter describes how to generate the public and private key pairs that
you need to correspond with other PGP users. It also explains how to
distribute your public key and obtain the public keys of others so that you can
begin exchanging private and authenticated email.
“Key” concepts
PGP is based on a widely accepted and highly trusted public key encryption
system, as shown in Figure 3-1, by which you and other PGP users generate a
key pair consisting of a private key and a public key. As its name implies, only
youhaveaccesstoyourprivatekey,butinorderto correspondwithotherPGP
users you need a copy of their public key and they need a copy of yours. You
use your private key to sign the email messages and file attachments you send
to ot hers and to decrypt the messages and files they send to you. Conversely,
you use the public keys of others to send them encrypted email and to verify
their digital signatures.
3
public key private key
decryptionencryption
plaintext ciphertext plaintext
Figure 3-1. Public Key Cryptography diagram
User’s Guide 33
Page 34

Making and Exchanging Keys
Making a key pair
Unless you have already done so while using another version of PGP, the first
thing you need to do before sending or receiving encrypted and signed email
is create a new key pair. You generate a new key pair from PGPkeys using the
PGP Key Generation Wizard, which guides you through the process.
However, if you have not already created a new key pair, the PGP Key
Generation Wizard leads you through the necessary steps.
NOTE:If you have an existing key pair, specify the location of your keys
when you run the PGPkeys application. You can go to the Files panel of
the Options dialog box and locate your keyring files at any time.
IMPORTANT: Although it’s fun, try not to create more than one key
pair unless you need to. When another user wants to send you email, it
mightconfusethemifyou have more than one key pair. Also, you might
not remember all of the passwords for each key pair.
To create a new key pair:
34 PGP Freeware
1. Open PGPkeys. You can open PGPkeys by:
• Clicking Start—>Programs—>PGP—>PGPkeys
• Clicking the PGPtray icon ( ) in the System tray, then selecting
PGPkeys
• Clicking in your email application’s toolbar
The PGPkeys window (Figure 3-2 on page 35) displays the private and
public key pairs you have created for yourself, as well as any public keys
of other users that you have added to your public keyring. It is from this
window that you will perform all future key management functions.
Page 35

Figure 3-2. PGPkeys
2. Click in the PGPkeys menu bar.
Making and Exchanging Keys
The PGP Key Generation Wizard provides some introductory
information on the first screen.
3. After you read this information, click Next to advance to the next panel.
Click the Expert button if you want to create a custom key. You can
choose the type of key to generate, specify a key size, and set an
expiration date. If you want to create a custom key, continue with the
instructions outlined in “To generate a custom key:” on page 37.
The PGP Key Generation Wizard asks you to enter your name and email
address.
4. EnteryournameintheName box and your email address in the Email
box.
5. It is not absolutely necessary to enter your real name or even your email
address. However, using your real name makes it easier for others to
identify you as the owner of your public key. Also, by u sing your correct
email address, you and others can take advantage of the plug-in feature
that automatically looks up the appropriate key on your current keyring
when you address mail to a particular recipient. Click Next to continue.
The PGP Key Generation Wizard asks you to enter a passphrase.
User’s Guide 35
Page 36

Making and Exchanging Keys
6. In the Passphrase dialog box, enter the string of characters or words you
want to use to maintain exclusive access to your private key. To confirm
your entry, press the T
same passphrase again.
Normally, as an added level of security, the characters you enter for the
passphrase do not appear on the screen. However, if you are sure that no
one is watching, and you would like to see the characters of your
passphrase as you type, clear the Hide Typing checkbox.
AB key to advance to the next line, then enter the
NOTE: Your passphrase should contain multiple words and may
include spaces, numbers, and punctuation characters. Choose
something that you can remember easily but that others won’t be
able to guess. The passphrase is case sensitive, meaning that it
distinguishes between uppercase and lowercase letters. The longer
your passphrase, and the greater the variety of characters it
contains, the more secure it is. Strong passphrases include upper
and lowercase letters, numbers, punctuation, and spaces but are
more likely to be forgotten. See “Creating a passphrasethatyouwill
remember” on page 40, for more information about choosing a
passphrase.
36 PGP Freeware
WARNING: Unless your administrator has implemented a PGP
key reconstruction policy for your company, no one, including
Network Associates, can salvage a key with a forgotten passphrase.
7. Click Next to begin the key generation process.
ThePGPKeyGenerationWizardindicatesthatitisbusygeneratingyour
key.
If you have entered an inadequate passphrase, a warning message
appears before the keys are generated and you have the choice of
accepting the bad passphrase or entering a more secure one before
continuing. For more information about passphrases, see “Creating a
passphrase that you will remember” on page 40.
Your mouse mov ements and keystrokes generate random information
that is needed to create a unique key pair. If there is not enough random
information upon which to build the key, the PGP Random Data dialog
box appears. As instructed in the dialog box, move your mouse around
and enter a series of random keystrokes until the progress bar is
completely filled in.
Page 37

Making and Exchanging Keys
NOTE: PGPkeys continually gathers random data from many
sources on the system, including mouse positions, timings, and
keystrokes. If the Random Data dialog box does not appear, it
indicates that PGP has already collected all the random data that it
needs to create the key pair.
After the key generation process begins, it may take a while to generate
the keys.
When the key generation process is complete, the final panel appears.
8. Click Finish. PGP automatically puts your private key on your private
keyring and your public key on your public keyring.
Once you have created a key pair, you can use PGPkeys to create new key
pairs and manage all of your other keys. For instance, this is where you
examine the attributes associated with a particular key, specify how confident
you are that the key actually belongs to the alleged owner, and indicate how
well you trust the owner of the key to vouch for the authenticity of other users’
keys. For a complete explanation of the key management functions you
perform from the PGPkeys window, see Chapter 4.
To generate a custom key:
1. Follow steps 1 - 2 in “To create a new key pair:” on page 34.
2. At the Key Generation Wizard Welcome screen, click the Expert button
to choose the key type, size, and/or an expiration date.
The Key Generation Wizard Expert panel appears, as in Figure 3-3 on
page 38.
User’s Guide 37
Page 38

Making and Exchanging Keys
3. Select a key type from the Key Type box.
Choose Diffie-Hellman/DSS if you want to take advantageof many
PGP key features including Additional Decryption Key (ADK),
designated revoker, multiple encryption subkeys, and photo ID.
Figure 3-3. Key Generation Wizard
(Expert Panel)
38 PGP Freeware
Choose RSA or RSA Legacy if you plan to correspond with people who
are using RSA keys.
The RSA key format provides support for PGP’s Additional Decryption
Key (ADK), designated revoker, multiple encryption subkeys and photo
ID features. Previously these features were only available to users with
Diffie-Hellman keys. PGP will continue to support users who have RSA
keys in the older key format (now called the RSA Legacy key format).
IMPORTANT:TheRSA key type is only fully compatible with PGP
versions 7.0 and above and other OpenPGP applications.
Choose the RSA Legacy key format only if those you communicate with
are using older versions of PGP; otherwise choose the new RSA key
format. RSA Legacy keys do not support many of the newer PGP key
features.
4. Click Next.
Page 39

Making and Exchanging Keys
5. In the Key Size box, select a key size from 1024 to 4096 bits for
Diffie-Hellman/DSS keys and 1024 to 2048 for RSA keys.
NOTE: A large key size may take a long time to generate,
depending on the speed of the computer you are using.
The k ey size corresponds to the number of bits used to construct your
digitalkey.Thelargerthekey,thelesschancethatsomeonewillbeable
to crack it, but the longer it takes to perform the decryption and
encryption process. You need to strike a balance between the
convenience of performing PGP functions quickly with asmallerkey and
the increased level of security provided by a larger key. Unless you are
exchanging extremely s ensi tive information that is of enough interest
that someone would be willing to mount an expensive and
time-consuming cryptographic attack in order to read it, you are
probably safe using a key composed of 1024 bits.
NOTE: When creating a Diffie-Hellman/DSS key pair, the size of
the DSS portion of the key is less than or equal to the size of the
Diffie-Hellman portion of the key and is limited to a maximum size
of 1024 bits.
6. Indicate when you w ant your keys to expire. You can either use the
default selection, which is Never,oryoucanenteraspecificdateafter
which the keys will expire.
Once you create a key pair and have distributed your public key to the
world, you will probably continue to u se the same keys from that point
on. However, under certain conditions you may want to create a special
key pair that you plan to use for onlya limited period of time. In this case,
when the public key expires, it can no longer be used by someone to
encryptmailtoyoubutitcanstillbeusedtoverifyyourdigitalsignature.
Similarly, when your private key expires, it can still be used to decrypt
mail that was sent to you before your public key expired but can no
longer be used to sign mail to others.
7. Follow Step 6 through Step 8 on page 36 to complete your key generation.
A key pair representing your newly created keys appears in the PGPkeys
window. At this point you can examine your keys by checking their
properties and the attributes associated withthe keys; you may also want
to add other email addresses that belong to you. See “Changing your key
pair” on page 41, for details about modifying the information in your key
pair.
User’s Guide 39
Page 40

Making and Exchanging Keys
Creating a passphrase that you will remember
Encrypting a file and then finding yourself unable to decrypt it is a painful
lesson in learning how to choose a passphrase you will remember. Most
applications require a single word password between three and eight letters.
For a couple of reasons we do not recommend that you use a single-word
passphrase. A single word password is vulnerable to a dictionary attack,
which consists of having a computer try all the words in the dictionary until it
finds your password. To protect against this manner of attack, it is widely
recommended that you create a word that includes a combination of upper
and lowercase alphabetic letters, numbers, punctuation marks, and spaces.
This results in a stronger password, but an obscure one that you are unlikely
to remember easily.
Trying to thwart a dictionary attack by arbitrarily inserting a lot of funny
non-alphabetic characters into your passphrase has the effect of making your
passphrase too easy to forget and could lead to a disastrousloss of information
because you can’t decrypt your own files. A multiple word passphrase is less
vulnerable to a dictionary attack. However, unless the passphrase you choose
is something that is easily committed to long-term memory, you are unlikely
to remember it verbatim. Picking a phrase on the spur of the moment is likely
to result in forgetting it entirely. Choose something that is already residing in
your long-term memory. It should not be something that you have repeated to
others recently, nor a famous quotation, because you want it to be hard for a
sophisticated attacker to guess. If it’s already deeply embedded in your
long-term memory, you probably won’t forget it.
40 PGP Freeware
Of course, if you are reckless enough to write your passphrase down and tape
it to your monitor or to the ins ide of you r desk drawer, it won't matter what
you choose.
Page 41

Changing your key pair
Once you create your key, you can add, remove, or change a number of items
in your key pair at any time.
To: See:
add a photographic ID “Adding a photographic ID to your key” on page 69
add additional subkeys “Creating new subkeys” on page 71
Making and Exchanging Keys
add a new user name and
email address
add or remove signatures “Deleting a key or signature on your PGP keyring”
change your passphrase “Changing your passphrase” on page 67
add designated revokers “Appointing a designated revoker” on page 74.
add an X.509 certificate “Adding an X.509 certificate to your PGP key” on
split a key into multiple shares “Splitting and rejoining keys” on page 81
Backing up your keys
Once you have generated a key pair, it is wise to put a copy of it in a safe place
in case something happens to the original. PGP prompts you to save a backup
copy when you close the PGPkeys application after creating a new key pair.
Your private and public keys are stored in separate keyring files. You can copy
them to another location on your hard drive or to a floppy disk. By default, the
private keyring (secring.skr) and the public keyring (pubring.pkr) are stored
along with the other program files in your “PGP” folder; you can save your
backups in any location you like.
You can configure PGP to back up your keyrings automatically after you close
PGP. Your keyring backup options can be set in the Advanced panel of the
Options dialog box. See “Setting advanced options” on page 181 for more
information.
“Adding a new user name or address to your key
pair” on page 68
on page 58
page 76.
User’s Guide 41
Page 42

Making and Exchanging Keys
Protecting your keys
Besides making backup copies of your keys, you should be especially careful
about where you store your private key. Even though your private key is
protected by a passphrase that only you should know, it is possible that
someone could discover your passphrase and then use your private key to
decipher your email or forge your digital signature. For instance, somebody
couldlook over your shoulder and watch the keystrokes you enter or intercept
them on the network or even over the Internet.
To prevent anyone who might happen to intercept your passphrase from
using your private key, store your private key only on your own computer. If
your computer is attached to a network, make sure that your files are not
automatically included in a system-wide backup where others might gain
access to your private key. Given the ease with which computers are accessible
over networks, if you are working with extremely sensitive information, you
may want to keep your private ke y on a floppy disk, which you can insert like
an old-fashioned key whenever you want to read or sign private information.
As another security precaution, consider assigning a different name to your
private keyring file and then storing it somewhere other than in the default
location. Use the Files panel of the Options dialog box to specify a name and
location for your private and public keyring files. For more information, see
“Setting file options” on page 171.
What if I forget my passphrase or lose my key?
If you lose your key or forget your passphrase and do not have a backed up
copy from which to restore your key, you will never again be able to decrypt
any information encrypted to your key. You can, however, reconstruct your
key if you implemented a PGP key restoration policy, where your key is
encrypted and stored on a PGP key reconstruction server.
42 PGP Freeware
Page 43

What is PGP key reconstruction?
A PGP key reconstruction server can be set up to act as sort o f a safety-net for
you if you lose your private key or passphrase. The reconstruction server
stores your key in such a way that only you can access it.
If you incorporated key reconstruction as part of your security policy, you will
be prompted to enter additional “secret” i nformation when you create your
PGP key pair or when you choose Send to... Key Reconstruction Server from
the Server menu in PGPkeys.
Once your key is on the server, you can restore it at anytime by selecting
ReconstructKeyfromtheKeys menu in PGPkeys. To learn how to reconstruct
your key, see “Reconstructing your key” on page 90.
To send your key to a key reconstruction server:
1. If the Key Reconstruction dialog box opened automatically as you
created a key pair, continue with Step 3; otherwise, open PGPkeys and
select your key pair.
2. Open the Server/Send To menu and select Reconstruction Server.
Making and Exchanging Keys
The Key Reconstruction dialog box appears, as shown in Figure 3-4.
Figure 3-4. Key Reconstruction dialog box
User’s Guide 43
Page 44

Making and Exchanging Keys
3. In the Key Reconstruction dialog box, as shown in Figure 3-4,enterfive
questions that only you can answer in the Prompt boxes (the default
questions are examples onl y). Choose obscure personal questions with
answers that you are not likely to forget. Your questions can be up to 95
characters in length.
An example of a good question might be, “Who took me to the beach?”
or “Why did Fred leave?”
An example of a bad question would be, “What is my mother’s maiden
name?” or “Where did I go to high school?”
4. In the Answer boxes, enter the answers to the corresponding questions.
Youranswersarecasesensitiveand can be up to 255 characters in length.
Use the Hide Answers checkbox to view or hide your answers.
5. Click OK to continue.
NOTE: If you prefer, you can also leave the questions blank and
simply provide 5 answers.
If the PGP Enter Passphrase for Key dialog box appears, enter the
passphrase for your key, then click OK.
If the Server User ID and Password dialog box appears, enter your user
ID and password to log on to the server. If you do not know your user ID
or password, consult your administrator.
6. Click OK.
Your private key is then split into five pieces, using Blakely-Shamir key
splitting. Three of the five pieces are needed to reconstruct the key. Each
piece is then encrypted with the hash, the uniquely identifying number,
of one answer. If you know any 3 answers, you can successfully
reconstruct the whole key. To learn how to reconstruct your key, see
“Reconstructing your key” on page 90.
44 PGP Freeware
Page 45

Exchanging public keys with others
After you create your keys, you need to exchange keys with those whom you
intend to correspond. You make your public key available to others so that
they can send you encrypted information and verify your digital signature; to
encrypt, you’ll need copies of others’ keys. Your public key is basically
composed of a block of text, so it is quite easy to make it available through a
public key server, include it in an email message, or export or copy it to a file.
The recipient can then use whatever method is most convenient to add your
public key to his or her public keyring.
Distributing your public key
You can dis tribute your public ke y in three ways:
• Make your public key available through a public key server
• Include your public key in an email message
• Export your public key or copy it to a text file
Placing your public key on a key server
Making and Exchanging Keys
The best method for making your public key available is to place it on a public
key server, which is a large database of keys, where anyone can access it. That
way, people can send you encrypted email without having to explicitly
request a copy of your key. It also relieves you and others from having to
maintain a large number of public keys that you rarely use. There are a
number of key servers worldwide, including those offered by Network
Associates, Inc., where you can make your key available for anyone to access.
When you’re working with a public key server, such as keys erver.pgp.com,
keep these things in mind before you send your key.
– Is this the key you intend to use? Othersattempting to communicate with
you might encrypt important information to that key. For this reason, we
strongly recommend that you only put keys on a key server that you
intend for others to use.
– Will you remember your passphrase for this key so you can retrieve data
encrypted to it or, if you don’t want to use the key, so you can revoke it?
– Onceit’s up there, it’s up there. Some public servers have a policy against
deleting keys. Others have replication features that replicate keys
between key servers, so that even if you are able to delete your key on
one server, it will probably reappear later.
User’s Guide 45
Page 46

Making and Exchanging Keys
To send your public key to a key server:
1. Connect to the Internet.
2. Open PGPkeys.
3. Select the public key to copy to the key server.
4. Open the Server menu, then select the key server on which you want to
add your key from the Send To submenu. (The key server at Network
Associates is http://keyserver.pgp.com.) PGP lets you know that the
keys are successfully copied to the server.
Once you place a copy of your public key on a key server, it’s available to
people who want t o send you encrypted data or to verify your digital
signature. Even if you don’t explicitly point people to your public key, they
can get a copy by searching the key server for your name or email address.
Many people include the Web address for their public key at the end of their
email messages. In most cases the recipient can j ust dou ble-click the address
to access a copy of your k ey on the server. Some people even put their PGP
fingerprint on their business cards for easier verification.
Including your public key in an email message
Another convenient method of delivering your public key to someone is to
include it with an email message. When you send someone your public key,
besuretosigntheemail. That way,therecipient can verifyyoursignature and
be sure that no one has tampered with the information along the way. Of
course, if your key has not yet been signed by any trusted introducers,
recipients of your signature can only truly be sure the signature is from you by
verifying the fingerprint on your key.
To include your public key in an email message:
1. Open PGPkeys.
2. Select your key pair and then choose Copy from the Edit menu.
3. Open the editor you use to compose your email messages, place the
cursor in the desi red area, and then choose Paste from t he Edit menu. In
some email applications, you can simply drag your key from PGPkeys
intothetextofyouremailmessagetotransferthekeyinformation.
46 PGP Freeware
Page 47

Exporting your public key to a file
Another method of distributing your public key is to copy it to a file and then
make this file available to the person with whom you want to communicate.
To export your public key to a file:
There are three ways to export or save your public key to a file:
• Select the icon representing your key pair from PGPkeys, then choose
Export from the Keys menu. Enter the nameofthefiletowhichyou want
to save the key.
• Drag the icon representing your key pair from PGPkeys to the folder
where you want to save the key.
• Select the icon representing your key pair in PGPkeys, choose Copy from
the Edit menu, then choose Paste to insert the key information into a text
document.
NOTE:Ifyouare sending your key to colleagues whoareusingPCs,
enter a name of up to eight initial characters and three additional
characters for the file type extension (for example, MyKey.txt).
Making and Exchanging Keys
Obtaining the public keys of others
Just as you need to distribute your public key to those who want to send you
encrypted mail or to verify your digital signature, you need to obtain the
public keys of others so you can send them encrypted mail or verify their
digital signatures.
There are three ways to obtain someone’s public key:
• Get the key from a public key server
• Add the public key to your keyring directly from an email message
• Import the public key from an exported file
Public keys are just blocks of text, so they are easy to add to your keyring by
importing them from a file or by copying them from an email message and
then pasting them into your public keyring.
User’s Guide 47
Page 48

Making and Exchanging Keys
Getting public keys from a key server
If the person to whom you want to send encrypted mail is an experienced PGP
user, it is likely that a copy of his or her public key is on a key server. This
makes it very convenient for you to get a copy of the most up-to-date key
whenever you want to send him or her mail and also relieves you from having
to store a lot of keys on your public keyring.
If you are in a corporate setting, then your administrator may direct you to use
a corporate key server that holds all of your organization’s frequently used
keys. In this case, your PGP software is probably already configured to access
the appropriate server.
There are a number of publ ic key servers, such as the one maintained by
Network Associates, Inc., where you can locate the keys of most PGP users. If
the recipient has not pointed you to the Web address where his or her public
key is stored, you can access any key server and do a search for the user’s name
or email address. This is because all key servers are regularly updated to
include the keys stored on all the other servers.
To get someone’s public key from a key server:
1. Open PGPkeys.
2. Choose Search from the Server menu or click the Search button ( ) in
PGPkeys.
The PGPkeys Search windowappearsasinFigure 3-5.
Figure 3-5. PGPkeys Search window
More Choices view
(
)
48 PGP Freeware
Page 49

Making and Exchanging Keys
3. Choose the server you wish to search from the Search for Keys On menu.
4. Specify your search criteria.
You can search for keys on a key server by specifying values for multiple
key characteristics.
The inverse of most of these operations is also available. For example,
you may search using “User ID is not Charles” as your criteria.
5. Enter the value you want to search for.
6. Click More Choices to add additional criteria to your search; for
example, Key IDs with the name Susan created on or before March 5,
1998.
7. To begin the search, click Search.
A progress bar appears displaying the status of the search.
NOTE: To cancel a search in progress, click Stop Search.
The resu lts of the search appear in the window.
8. To import the keys, drag them to the PGPkeys main window.
9. Click Clear Search to clear your search criteria.
Getting public keys from email messages
A convenient way to get a copy of someone’s public key is to have that person
include it in an email message. When a public key is sent through email, it
appears as a block of text in the body of the message.
To add a public key from an email message:
– If you have an email application that is supported by the PGP plug-ins,
then click in your email application to extract the sender’s public key
from the email and add it to your public keyring.
– If you are using an email application that is not supported by the
plug-ins, you can add the public key to the keyring by copying the block
of text that represents the public key and pasting it into PGPkeys.
User’s Guide 49
Page 50

Making and Exchanging Keys
Importing keys
You can import PGP public keys to your PGP public keyring.
Another method for obtaining someone’s public key is to have that person
save it to a file from which you can import it or copy and paste it into your
public keyring.
To import a public key:
There are three methods of extracting someone’s public key and adding it to
your public keyring:
•ClickonImportfrom the Keys menu and then navigate to the file where
the public key is stored
• Drag the file containing the public key onto the main PGPkeys window
• O pen the text document where the public key is stored, select the block
of text representing the key, a nd then click o n the Edit menu. Go to
PGPkeys and choose Paste from the Edit menu to copy the key. The key
thenshowsupasaniconinPGPkeys
Verifying the authenticity of a key
When you exchange keys with someone, it is sometimes hard to t ell if the key
really belongs to that person. PGP software provides a number of safeguards
that allow you to check a key’s authenticity and to certify that the key belongs
to a particular owner (that is, to validate it). The PGP program also warns you
if you attempt to use a key that is not valid and also by default warns you
when you are about to use a marginally valid key.
Why verify the authenticity of a key?
One of the major vulnerabilities of public key encryption systems is the ability
of sophisticated eavesdroppers to mount a “man-in-the-middle” attack by
replacing someone’s public key with one of their own. In this way they can
intercept any encrypted email intended for that person, decrypt it using their
own key, then encrypt it again with the person’s real key and send it on to
them as if nothing had ever happened. In fact, this could all be done
automatically through a sophisticated computer program that stands in the
middle and deciphers all of your correspondence.
50 PGP Freeware
Page 51

Based on this scenario, you and those with whom you exchange email need a
way to determine whether you do indeed have legitimate copies of each
others’ keys. The best way to be completely sure that a public key actually
belongs to a particular person is to have the owner copy it to a floppy disk and
then physically hand it to you. However, you are seldom close enough to
personally hand a disk to someone; you generally exchange public keys via
email or get them from a public key server.
Verify with a digital fingerprint
You can determine if a key really belongs to a particular person by checking
itsdigitalfingerprint,auniqueseriesofnumbersor words generated when the
key is created. By comparing the fingerprint on your copy of someone’s public
key to the fingerprint on their original key, you can be absolutely sure that you
do in fact have a valid copy of their key. To learn how to verify with a digital
fingerprint, see “Verifying someone’s public key” on page 61.
Validating a public key
Validity and trust are two tricky, yet vital concepts in PGP. An Introduction to
Cryptography discusses them in detail. In short, once you are absolutely
convinced that you have a legitimate copy of someone’s public key, you can
then sign that person’s key. By signing someone’s public key with your private
key, you are certifying that you are sure the key belongs to the alleged user.
For instance, when you create a new key, it is automatically certified with your
own digital signature. By default, signatures you make on other keys are not
exportable,whichmeanstheyapplyonlytothekeywhenitisonyourlocal
keyring.For detailed instructions on signing a key, see “Signing someone’s
public key” on page 63.
Making and Exchanging Keys
Working with trusted introducers
PGP users often have other trusted users sign their public keys to further attest
to their authenticity. For instance, you might send a trusted colleague a copy
of your public key with a request that he or she certify and return it so you can
include the signature when you post your key on a public key server. Using
PGP, when users get a copy of your public key, they don’t h ave to check the
key’s authenticity themselves, but can instead rely on how well they trust the
person(s) who signed your key. PGP provides the means for establishing this
level of validity for each of the public keys you add to your public keyring and
shows the level of trust and validity associated with each key. This means that
whenyou get akeyfrom someone whose key is signed by a trusted introducer,
you can be fairly sure that the key belongs to the purported user. For details
on how to sign keys and validate users, see “Signing someone’s public key” on
page 63.
User’s Guide 51
Page 52

Making and Exchanging Keys
In a corporate setting, your corporate Security Officer can act as a trusted
introducer, and you may then trust any keys signed by the corporate key to be
valid keys. If you work for a large company with several locations, you may
have regional introducers, and your Security Officer may be a
meta-introducer, or a trusted introducer of trusted introducers.
What is a trusted introducer?
PGP uses the concept of a trusted introducer, someone you trust to provide
you with keys that are valid. This concept may be familiar to you from
Victorian novels, in which people gave letters of introduction to one another.
For example, if your uncle knew someone in a faraway city with whom you
might want to do business, he might write a letter of introduction to his
acquaintance. With PGP, users can sign one another’s keys to validate them.
You sign someone’s key to indicate that you are sure that his or her key is
valid, which means that it truly is his or her key. There are several ways to do
this. When a trusted introducer signs another person’s key, you trust that the
keys they sign are valid, and you do not feel that y ou m ust verify their keys
before using them.
What is a meta-introducer ?
PGP also supports the concept o f a meta-introducer—a trusted introducer of
trusted introducers. If you work in a very large company, you might have a
regional Security Officer, a trusted introducer, who would sign users’ keys.
You could trust that these keys were valid because the regional Security
Officer had performed the actions to ensure validity. The organization may
also have a head Security Officer who works with the local Security Officers,
so that a person in a West Coast office could trust a person in an East Coast
office. This is because both their keys had been signed by their respective
regional Security Officers, who in turn had their keys signed by the head
Security Officer, who is a meta-introducer. This allows the establishment of a
trust hierarchy in the organization.
52 PGP Freeware
Page 53

4Managing Keys
This chapter explains how to examine and manage the keys stored on your
keyrings.
Managing your PGP keyrings
The keys you create, as well as those you collect from others, are stored on
keyrings,which are essentially files stored on your hard drive or on a floppy
disk. Normally your private keys are stored in a file named Secring.skr and
your public keys are stored in another file named Pubring.pkr. These files are
usually located in your Profiles folder and can be view ed and edited from the
PGPkeys window (Figure 4-1).
NOTE: As a result of your private key being encrypted automatically
and your passphrase being uncompromised, there is no danger in
leaving your keyrings o n your computer. However, if you are not
comfortable storing your keys in the default location, you can choose a
different filename or location. For details, see “Setting PGP options” on
page 167.
4
Occasionally, you may want to examine or change the attributes associated
with your keys. For instance, when you obtain someone’s public key, you
might want to identify its type (either RSA or Diffie-Hellman/DSS), check its
fingerprint, or determine its validity based on any digital signatures included
with the key. You may also want to sign someone’s public key to indicate that
you believe it is valid, assign a level of trust to the key’s owner, or change a
passphrase for your private key. You may even want to search a key server for
someone’s key. You perform all of these key-management functions from
PGPkeys.
User’s Guide 53
Page 54

Managing Keys
The PGPkeys window
The PGPkeys window, as shown in Figure 4-1, displays the keys you have
created for yourself, as well as any public keys you have added to your public
keyring. It is from this window that you perform all your key management
functions.
To open the PGPkeys window, open the Start menu, click
Programs—>PGP—>PGPkeys, or click the PGPtray lock icon ( ) in the
System tray and then click PGPkeys.
Figure 4-1. PGPkeys window
PGPkeys attribute definitions
Some of the attributes associated with keys can be displayed in the main
PGPkeys window. You can choose which attributes you want to make visible
by selecting them from the View menu. For each selected item in the View
menu, PGPkeys displays a column in the main window. If you want to change
the order of these columns, click and drag the header of the column you want
to move. For a list of PGPkeys attribute definitions, see Table 4-1 on page 55.
54 PGP Freeware
Page 55

Attribute Description
Shows an iconic representation of the key along with the user name, email address,
photograph of the owner, and the names of the key’s signers.
A gold key and user represents your Diffie-Hellman/DSS key pair, which
consists of your private key and your public key.
A gray key and user represents an RSA key pair, which consists of your private
key and your public key.
A single gold key represents a Diffie-Hellman/DSS public key.
A single gray key represents an RSA public key.
When a key or key pair is dimmed, the keys are temporarily unavailable for
encrypting and signing. You can disable a key from the PGPkeys window,
which prevents seldom-used keys from cluttering up the Key Selection dialog
box.
A key with a red X indicates that the key has been revoked. Users revoke their
keys when they are no longer valid or have been compromised in some way.
A single key with a clock icon represents a public key or key pair that has
Keys
expired.
Additional icons can be listed with a key indicating that a signature, certificate, or
photographicuser ID accompanies the key.
A pencil or fountain pen indicates the signatures of the PGP users who have
vouched for the authenticity of the key.
-A signature with a red X through it indicates a revoked signature.
-A signature with a dimmed pencil icon indicates a bad or invalid s ignature.
-A signature with a blue arrow next to it indicates that it is exportable.
Managing Keys
Table 4-1. PGPkeys attribute overview
A certificate represents an X.509 certificate, a recognized electronic document
used to prove identity and public key ownership over a communication network.
A clock indicates an expired X.509 certificate.
A red X indicates a revoked X.509 certificate.
This icon indicates that a photographic user ID accompanies the public key.
User’s Guide 55
Page 56

Managing Keys
Attribute Description
Indicates the level of confidence that the key actually belongs to the alleged owner.
The validity is based on who has signed the key and how well you trust the signer(s) to
vouch for the authenticity of a key. The public keys you sign yourself have the highest
level of validity, based on the assumption that you only sign someone’s key if you are
totally convinced that it is valid. The validity of any other keys, which you have not
personally signed, depends on the level of trust you have granted to any other users
who have signed the key. If there are no signatures associated with the key, then it is
not consideredvalid, and a message indicating this fact appears whenever you encrypt
to the key.
Validity is indicated by either circle or bar icons, depending upon your Advanced
Validity
Options “Display marginal validity level” setting (see “Setting advanced options” later
in this chapter). If not enabled, then validity appears as:
a gray circle for invalid keys and marginally valid keys if the Advanced
Options “Treat marginally valid keys as invalid” is set
a green circle for valid keys that you do not own
agreencircleandauserforvalidkeysthatyouown
In a corporate environment, your security officer may sign users’ keys with the
Corporate Signing Key. Keys signed with the Corporate Signing Key are usually
assumed to be completely valid. See Chapter 2, “A Quick Tour of PGP,” for more
information.
Shows the number of bits used to construct the key. Generally, the larger the key, the
less chance that it will ever be compromised. However, larger keys require slightly
Size
more time to encrypt and decrypt data than do smaller keys. When you create a
Diffie-Hellman/DSSkey, there is one number for the Diffie-Hellman portion and
another number for the DSS portion. The DSS portion is used for signing, and the
Diffie-Hellman portion for encryption.
Description
Additional
Describes the type of information displayed in the Keys column:keytype,typeofID,or
signature type.
Shows whether the key has an associated Additional Decryption Key.
Decryption
Key
A unique identifying number associated with each key. This identification number is
Key ID
useful for distinguishing between two k eys that share the same user name and email
address.
56 PGP Freeware
Page 57

Attribute Description
Indicates the level of trust you have granted to the owner of the key to serve as an
introducerfor the public keys of others. This trust comes into play when you are unable
to verify the validity of someone’s public key for yourself and instead rely on the
judgment of other users who have signed the key. When you create a new key pair,
these keys are considered implicitly trustworthy, as shown by the striping in the trust
and validity bars, or by a green dot and user icon.
An empty bar indicates an invalid key or an untrusted user.
Trust
A half-filled bar indicates a marginally valid key or marginally trusted user.
A striped bar indicates a valid key that you own and is implicitly trusted,
regardless of the signatures on the key.
A full bar indicates a completely valid key or a completely trusted user.
When a public key on your keyring is signed by another user, the level of authenticity
for that key is based on the trust you have granted to the signer. Use the Key
Properties dialog box to assign the signer a level of trust—Trusted, Marginal, or
Untrusted.
Shows the date when the k ey will expire. Most keys are set to Never; however, there
Expiration
may be instances when the owner of a key wants it to be used for only a fixed period of
time. A single key with a clock icon represents a public key or key pair that has expired.
Managing Keys
Creation
Shows the date when the key was originally created. You can sometimes make an
assumption about the validity of a key based on how long it has been in circulation. If
the key has been in use for a while, it is less likely that someone will try to replace it
becausethere are many other copies in circulation. Never rely on creation dates as the
sole indicator of validity.
User’s Guide 57
Page 58

Managing Keys
Specifying a default key pair on your PGP keyring
When encrypting messages or files, PGP gives you the option to additionally
encrypt to a key pair that you specify as your default key pair. When you sign
a message or someone’s public key, PGP will use this key pair by default. Your
default key pair is displayed in bold type to distinguish it from your other
keys. If you have more than one key pair, you may want to specifically
designateonepairasyourdefaultpair.
To specify your default key pair:
1. Open PGPkeys and highlight the key pair you want to designate as your
default key.
2. Choose Set Default from the Keys menu.
The selected key pair is displayed in bold type, indicating that it is now
designated as your default key pair.
Importing and exporting keys on your PGP keyring
Although you often distribute your public key and obtain the public keys of
others by cutting and pasting the raw text from a public or corporate key
server, you can also exchange keys by i mporting and exporting them as
separate text files. For instance, someone could hand you a disk containing
their public key, or you might want to make your public key available over an
FTP server. Refer to “Exchanging public keys with others” on page 45 for
details about importing and exporting public keys.
Deleting a key or signature on your PGP keyring
At some point you may want to remove a key or a signature from your PGP
keyring. When you delete a key or signature from a key, it is removed and not
recoverable. Signatures and user IDs can be re-added to a key, and an
imported public key can be re-imported to your keyring. However, a private
key that exists only on that keyring cannot be recreated, and all messages
encrypted to its public key copies can no longer be decrypted.
NOTE: If you want to delete a signature or user ID associated with your
public key on a key server, see “Updating your key on a key server” on
page 88 for instructions.
58 PGP Freeware
Page 59

To delete a key or signature from your PGP keyring:
1. Open PGPkeys and select the key or signature you want to delete.
2. Choose Delete from the Edit menu or click in the PGPkeys toolbar.
The Confirmation dialog box appears.
3. Click the OK button.
Disabling and enabling keys on your PGP keyring
Sometimes you may want to temporarily disable a key. The ability to disable
keys is useful when you want to retain a public key for future use, but you
don’t want it cluttering up your recipient list every time you send mail.
To disable a key:
1. Open PGPkeys and select the key you want to disable.
2. Select Disable in the Keys menu.
The k ey is dimmed and is tem porarily u navailable for use.
Managing Keys
To enable a key:
1. Open PGPkeys and select the key you w ant to enable.
2. Select Enable in the Keys menu.
The key becomes visible and can be used as before.
User’s Guide 59
Page 60

Managing Keys
Examining and setting key properties
In addition to the general attributes shown in the PGPkeys window, you can
also examine and change other key and subkey properties.
The Key Properties window includes the General, Subkeys, Revokers,and
ADK tabbed pages, each of which gives you necessary information about a
person’s public key, or the ability to create, configure, edit, or delete attributes
in your own public key. The following sections describe each element in more
detail.
For details on the: See:
General tab “General key properties” on page 60
Subkeys tab “Subkeys properties” on page 70
Revokers tab “Designated revoker properties” on page 73
ADK tab “Additional Decryption Key properties” on page
75
General key properties
From the General tabbed page, you can verify someone’s public key using
their key fingerprint, grant trust to a key, and change the passphrase on y our
own key as well as view other key attributes. To access the General Key
Propertiespanel (Figure 4-2 on page 61) for a particular key, select the desired
key and then choose Properties from the Keys menu.
60 PGP Freeware
Page 61

Figure 4-2. Key Property dialog box
(General panel)
Managing Keys
Verifying someone’s public key
In the past it was difficult to know for certain whether a key belonged to a
particular individual unless that person physically handed the key to you
on a floppy disk. Exchanging keys in this manner is not usually practical,
especially for users who are located many miles apart.
There are several ways to check a key’s fingerprint, but the safest is to call
the person and have them read the fingerprint to you over the phone.
Unless the person is the target of an attack, it is highly unlikely that
someonewouldbe able to interceptthisrandomcall and imitatetheperson
youexpecttohearontheotherend.Youcanalsocomparethefingerprint
on your copy of someone’s public key to the fingerprint on their original
key on a public server.
The fingerprint can be viewed in two ways: in a unique list of words or in
its hexadecimal format.
User’s Guide 61
Page 62

Managing Keys
To check a public key with its digital fingerprint:
1. Open PGPkeys and select the public key in which you want to verify.
2. Choose Properties from the Keys menu or click to open the
Properties dialog box.
The Properties dialog box opens, as shown in Figure 4-2.
3. Use the series of words or characters displayed in the Fingerprint text
box to compare with t he original fingerprint.
By default, a word list is displayed in the Fingerprint text box (example
shown in Figure 4-3). However, you can select the Hexadecimal check
box to view the fingerprint in 20 hexadecimal characters (example also
shown in Figure 4-3).
Word list view Hexadecimal view
62 PGP Freeware
Figure 4-3. Fingerprint text box
The word list in the fingerprint text box is made up of special
authentication words that PGP uses and are carefully selected to be
phonetically distinct and easy to understand without phonetic
ambiguity.
The word list serves a similar purpose as the military alphabet, which
allows pilots to convey information distinctly over a noisy radio channel.
Ifyou’dliketoknowmoreaboutthewordhashtechniqueandviewthe
word list, see Appendix E, “Biometric Word Lists.”
Page 63

Managing Keys
Signing someone’s public key
When you create a key pair, the keys are automatically signed by
themselves. Similarly, once you are sure that a key belongs to the proper
individual, you can sign that person’s public key, indicating that you are
sure it is a valid key. When you sign someone’s public key, a signature icon
along with your user name is shown attached to that key.
To sign someone’s public key:
1. Open PGPkeys and select the public key which you want to sign.
2. Choose Sign from the Keys menuorclick toopentheSign Keys
dialog box.
The Sign Keys dialog box appears with the public key and fingerprint
displayed in the text box.
3. Click the Allow signature to be Exported checkbox, to allow your
signature to be exported with this key.
An exportable signature is one that is allowed to be sent to servers and
travels with the key whenever it is exported, such as by dragging it to an
email message. The checkbox provides a shorthand means of indicating
that you wish to export your signature.
Or
Click the More Choices button to configure options, such as signature
type and signature expiration (Figure 4-4).
User’s Guide 63
Page 64

Managing Keys
More
signature
options
Figure 4-4. PGP Sign Keys dialog box
(More Choices)
Choose a signature type to sign the public key with. Your choices are:
• Non-exportable. Use this signature when you believe the key is
valid, but you don’t want others to rely on your certification. This
signature type cannot be sent with the associated key to a key server
or exported in any way.
• Exportable. Use exportable signatures in situations where your
signature is sent with the key to the key server, so that others can
rely on your signature and trust your keys as a result. This is
equivalent to checking the Allow signature to be exported
checkbox on the Sign Keys menu.
• Meta-Introducer Non-Exportable. Certifies that this key and any
keys signed by this key with a Trusted Introducer Validity
Assertion are fully trusted introducers to you. This signature type is
non-exportable.
The Maximum Trust Depth option enables you to identify how
many levels deep you can nest trusted-introducers. For example, if
you set this to 1, there can only be one layer ofintroducersbelowthe
meta-introducer key .
64 PGP Freeware
Page 65

Managing Keys
• Trusted Introducer Exportable. Use this signature in situations
whereyoucertifythatthiskeyisvalid,andthatthe owner of the key
should be completely trusted to vouch for other keys. This signature
type is exportable. You can restrict the validation capabilities of the
trusted introducer to a particular email domain.
4. If you want to limit the Trusted Introducer’s key validation capabilities
to a single domain, enter the domain name in the Domain Restriction
text box.
5. If you want to assign an expiration date to this signature, enter the date
on which you want this signature to expire in the Date text box.
Otherwise, the signature will never expire.
6. Click OK.
The Passphrase dialog box appears.
7. Enter your passphrase, then click OK.
An icon associated with your user name is now included with the public
key that you just signed.
User’s Guide 65
Page 66

Managing Keys
Granting trust for key validations
Besides certifying that a key belongs to someone, you can assign a level of
trust to the owner of the keys indicating how well you trust them to act as
an introducer for others, whose keys you may get in the future. This means
that if you ever get a key from someone that has been signed by an
individual whom you have designated as trustworthy, the key is
considered valid even though you have not done the check yourself.
To grant trust for a key:
1. Open PGPkeys and select the key for which you want to change the trust
level.
NOTE: Youmustsignthekeybeforeyoucansetthetrustlevelfor
it. If you have not already signed the key, see “Validating a public
key” on page 51 for instructions.
2. Choose Properties from the Keys menu or click to open the
Properties dialog box, as shown in Figure 4-2.
3. Use the Trust Level sliding bar to choose the appropriate level of trust for
the key pair.
Figure 4-5. Trust Level dialog box
4. Close the dialog box to accept the new setting.
66 PGP Freeware
Page 67

Managing Keys
Changing your passphrase
It’s a good practice to change your passphrase at regul ar intervals, perhaps
every three months. More importantly, you should change your
passphrase the moment you think it h as been compromised, for example,
by someone looking over your shoulder as you typed it in.
To change your passphrase:
1. Open PGPkeys and select the key for which you want to change the
passphrase.
Choose Properties from the Keys menu or click to open the
Properties dialog box.
The Properties dialog box appears, as in Figure 4-2.
2. Click Change Passphrase from the General tab.
The Passphrase dialog box appears.
NOTE: If you want to change the passphrase for a split key, you
must first rejoin the key shares. Click Join to collect the key shares.
See “Signing and decrypting files with a split key” on page 110 for
information about collecting key shares.
3. Enter your current passphrase in the space provided, then click OK.
The Confirmed Passphrase dialog box appears.
4. Enter your new passphrase in the first text box. Press the T
AB key to
advance to the next text box and confirm your entry by entering your
new passphrase again.
5. Click OK.
WARNING: If you are changing your passphrase because y ou feel
that y our passphrase has been compromis ed, you should wipe all
backup keyrings and wipe your freespace.
User’s Guide 67
Page 68

Managing Keys
Adding a new user name or address to your key pair
You may have m ore than one u ser name or email address for which you
want to us e the same key pair. After creating a key pair, you can add
alternate names and addresses to the keys. You can only add a new user
name or email a ddress if you have both the private and public keys.
To add a new user name or address to your key:
1. Open PGPkeys and select the key pair for which you want to add another
user name or address.
2. Choose Add/Name from the Keys menu.
The PGP New User Name dialog box appears.
3. Enterthenewnameandemail address in the appropriatefields,andthen
click OK.
The PGP Enter Passphrase dialog box appears.
4. Enter your passphrase, then click OK.
The new name is added to the end of the user name list associated with
the key. If you want to set the new user name and address as the primary
identifier for your key, select the name and address and then choose Set
as Primary Name from the Keys menu.
68 PGP Freeware
IMPORTANT: When you add or change information in your key
pair, always update it on the key server so that your most current
key can be available to anyone. See “Updating your key on a key
server” on page 88 for instructions.
Page 69

Managing Keys
Adding a photographic ID to your key
You can include a photographic user ID with your PGP keys.
NOTE: This feature is available for Diffie-Hellman/DSS and RSA keys.
The P hotog r aphic ID feature is not supported by RSA Legacy keys.
IMPORTANT: Although you can view the photographic ID
accompanied with someone’s key for verification, you should always
check and compare the digital fingerprints. See “Verifying someone’s
public key” on page 61 for more information about authentication.
To add your photograph to your key:
1. Open PGPkeysandselectyourkeypairandthenclickAdd Photo on the
Keys menu.
The Add Photo dialog box opens.
2. Drag or paste your photograph onto the Add Photo dialog box or browse
to it by clicking Select File.
NOTE: The photograph can be from the Clipboard, a .JPG, or .BMP
file. For maximum picture quality, crop thepicture to 120x144 pixels
before adding it to the Add Photo dialog box. If you do not do this,
PGP will scale the picture for you.
3. Click OK.
The Passphrase dialog box opens.
4. Enter your passphrase in the space provided, then click OK.
YourphotographicuserIDisaddedtoyourpublickeyandislistedinthe
PGPkeys window.
IMPORTANT: When you add or change information in your key
pair always update it on the key server so that y our most current
key can be available to anyone. See “Updating your key on a key
server” on page 88 for instructions.
User’s Guide 69
Page 70

Managing Keys
To replace your photographic ID:
1. Open PGPkeys and select the photograph which is listed under your key.
your
photograph
2. Choose Delete from the Edit menu.
3. Add your new photographic ID using the instructions outlined in “To
add your photograph to your key:” on page 69.
Subkeys properties
To access the Subkeys Properties panel for a particular key, select the desired
key and then choose Properties from the Keys menu. The Key Properties
dialog box appears. Click the Subkeys tab. The Subkeys panel appears as
shown in Figure 4-7.
Figure 4-6. PGPkeys
(Example: Photographic User ID)
70 PGP Freeware
Figure 4-7. Key Property dialog box
(Subkeys panel)
Page 71

Managing Keys
Creating new subkeys
EveryDiffie-Hellman/DSS and RSA key is actually two keys: a signing key
and an encryption subkey. PGP Version 6.0 and above provides the ability
to create and revoke new encryption keys without sacrificing your master
signing key and the signatures collected on it. One of the most common
uses for this feature is to create multiple subkeys that are set to be used
during different periods of the key's lifetime. For example, if you create a
key that will expire in three years, you might also create 3 subkeys and use
each of them for one of the years in the lifetime of the key. This can be a
useful security measure and provides an automatic way to periodically
switch to a new encryption key without having to recreate and distribute a
new public key.
NOTE: This feature is available for Diffie-Hellman/DSS and RSA keys.
Subkeys are not supported by RSA Legacy keys.
To create new subkeys:
1. Open PGPkeys and select your key pair, then click Properties from the
Keys menu,orclick .
The Properties dialog box appears.
2. Click the Subkeys tab.
The Subkeys dialog box opens, as shown in Figure 4-8 on page 72.
User’s Guide 71
Page 72

Managing Keys
Figure 4-8. PGP key property page
(Subkeys dialog box)
3. To create a new subkey, click New.
The New Subkey dialog box opens.
4. Enter a key size from 1024 to 3072 bits, or enter a custom key size from
1024 to 4096 bits.
5. Indicate the start date on which you want your subkey to activate.
6. Indicate when you want your subkey to expire. You can either use the
default selection, which is Never,oryoucanenteraspecificdateafter
which the subkey will expire.
NOTE: To avoid confusion when maintaining more than one
subkey on your key pair, try not to overlap your subkeys start and
expiration dates.
7. Click OK.
The Passphrase dialog box appears.
72 PGP Freeware
Page 73

8. EnteryourpassphraseandthenclickOK.
Your new subkey is listed in the Subkey window.
IMPORTANT: When you add or change information in your key
pair, always update it on the key server so that your most current
key can be available to anyone. See “Updating your key on a key
server” on page 88 for instructions.
Designated revoker properties
To access the Revokers panel for a particular key, select the desired key and
then choose Properties from the Keys menu. The Key Properties dialog box
appears, as shown in Figure 4-2 on page 61. Click the Revokers tab. The
Revokers panel appears as shown in Figure 4-9.(Note,ifthereareno
designated revokers for the selected key, then the R evokers tab does not
appear.)
Managing Keys
Figure 4-9. Key Property dialog box
(Revokers panel)
User’s Guide 73
Page 74

Managing Keys
The Revokerspanel lists any keys that have the ability to revoke your PGP
key, and provides a convenient means for updating a revokers’ key with the
Update from Server button.
Ifthe key belongingtotherevokerisnotonyourkeyring,then“Unknown Key”
followed by the keys' key ID displays instead of the user ID. Highlight the key
ID, and click the Update from Server button to search for the key on a key
server.
Appointing a designated revoker
It is possible that you might forget your passphrase someday or lose your
private key (your laptop is stolen or your hard drive crashes, for example).
Unless you are also using Key Reconstruction and can reconstruct your
private key, you would be unable to use your key again, and you would
have no way of revoking it to show others not to encrypt to it. To safeguard
against this possibility, you can appoint a third-party key revoker. The
third-party you designate is then able to revoke your key just as if you had
revoked it yourself.
NOTE: For a key to appear revoked to another user, both the revoked
key and the Designated Revoker key must be on his/her keyring. Thus,
the designated revoker feature is most effective in a corporate setting,
where all users' keyrings contain the company's Designated Revoker
key. If the revokers’ key is not present on a person's keyring, then the
revoked key does not appear revoked to that user and he/she may
continue to encrypt to it.
74 PGP Freeware
NOTE: This feature is available for Diffie-Hellman/DSS and RSA keys.
Key revoking is not supported by RSA Legacy keys.
To add a designated revoker to your key:
1. Open P GP keys and then select the key pair for w hich you want to add a
revoker.
2. Select Add/Revoker from the Keys menu.
A dialog box opens and displays a list of keys.
3. Select the key(s) in the User ID list that you want to appoint as a revoker.
4. Click OK.
A confirmation dialog box appears.
Page 75

Managing Keys
5. Click OK to continue.
The Passphrase dialog box appears.
6. Enter your passphrase, then click OK.
7. The selected key(s) is now authorized to revoke your key. For effective
key management, distribute a current copy of your key to the revoker(s)
or u pload your key to the server. See “Distributing your public key” on
page 45 for instructions.
Revoking a key
If the situation ever arises that you no longer trust your personal key pair,
you can issue a revocation to the world telling everyone to stop using your
public key. The best way to circulate a revoked key is to place it on a public
key server.
To revoke a key:
1. Open PGPkeys and select the key pair y ou want to revoke.
2. Choose Revoke from the Keys menu.
The Revocation Confirmation dialog box appears.
3. Click OK to confirm your intent to revoke the selected key.
The PGP Enter Passphrase dialog box appears.
4. Enter your passphrase, then click OK.
When you revoke a key, it is marked out with a red X to indicate that it
is no longer valid.
5. Send the revoked key to the server so everyone will know not to use your
old key.
Additional Decryption Key properties
To access the ADK panel for a particular key, select the desired key and then
choose Properties from the Keys menu. The Key Properties dialog box
appears, as shown in Figure 4-2 on page 61. Click the ADK t ab. The ADK
panel appears. (Note, if there are no Additional Decryption Keys associated
with the selected key, then the ADK tab does not appear.)
User’s Guide 75
Page 76

Managing Keys
The ADK panel lists all Additional Decryption Keys (ADKs) for the selected
key. ADKs are keys that allow the security officers of an organization to
decrypt messages that have been sent to or from people within your
organization. There are two types of keys: incoming additional decryption
keys and outgoing additional decryption keys.
NOTE: Although the security officer should not ordinarily use the
Additional D ecryption keys , there may be circumstances when it is
necessarytorecoversomeone’semail.Forexample, if someone is injured
and out of work for some time or if email records are subpoenaed by a
law enforcement agency and the corporation must decrypt mail as
evidence for a court case.
Adding an X.509 certificate to your PGP key
NOTE: X.509 authentication certificates are not supported in PGP
Freeware.
NOTE: The instructions in this section describe how to add an X.509
certificate to your key pair if you are using the Net Tools PKI Server. This
process varies between Certificate Authorities and some of the
terminology you must use when interacting with your CA is a policy
decision. You may need to consult your company’s PGP or PKI
Administrator for instructions.
76 PGP Freeware
An X.509 digital certificate is a recognized electronic document used to prove
identity and public key ownership over a communication network.
You can request an X.509 digital certificate and add it to your key pair using
PGP menu options and your company’s Certificate Authority (CA) or a public
CA (for example, VeriSign).
There are four main steps to adding an X.509 certificate to your key pair:
1. Retrieve the Root CA certificate from the CA and add it to your PGP
keyring (see Step 1).
2. Enter information about the CA in the CA panel in the Options dialog box
(see Step 2).
Page 77

Managing Keys
3. Request a certificate from the CA. Your X.509 certificate request is verified
andsignedbytheCA(seeStep 3). (The CA’s signature on the certificate
makes it possible to detect any subsequent tampering with the identifying
information or the public key, and it implies that the CA considers the
information in the certificate valid.)
4. Retrieve the certificate issued by the CA and add it to your key pair (see
Step 4).
Each of these four steps is described in greater detail in the fol lowing sections.
To add an X.509 certificate to your PGP key pair:
NOTE: X.509 authentication certificates are not supported in PGP
Freeware.
1. Obtain and add the Root CA certificate to your PGP keyring.
To do this, follow these steps:
a. Open your Web browser and connect to the C A’s enrollment site. If
you do not know the URL, consult your company’s PGP or PKI
administrator.
b. Locate and examine the Root CA certificate. This process varies
between Certificate Authorities. For example, if your company were
using the Net Tools PKI Server, you would click the Download a
CA Certificate link,andthenclicktheExamine this Certificate
button.
c. CopythekeyblockfortheRootCAcertificateandpasteitintoyour
PGPkeys window.
The Import Key dialog box appears and imports the Root CA
certificate into your keyring.
d. Sign the Root CA certificate with your key to make it valid, then
open the Key Properties andsetthetrustlevel.Trustmustbeseton
the Root CA.
2. Configure CA panel in the Options dialog box.
To do this, follow these steps:
a. Select Optionsfromthe PGPkeysEditmenu, then select the CA tab.
The CA panel appears, as shown in Figure4-10onpage78.
User’s Guide 77
Page 78

Managing Keys
Figure 4-10. PGP Options dialog box
(CA Panel)
78 PGP Freeware
b. Enter the CA’s URL in the CertificateAuthorityIdentificationURL
field, for example, https://nnn.nnn.nnn.nnn:nnnnn (this is the
same URL you used to retrieve the Root CA).
c. If there is a separate URL for retrieving certificate revocation lists
(CRLs), enter it in the corresponding field.
If you do not know the URL for Revocation, leave this field blank or
consult your company’s PGP or PKI administrator.
d. In the Type box, specify the name of certificate authority you are
using. Your choices are:
•NetToolsPKI
• VeriSign OnSite
•Entrust
•iPlanetCMS
• Windows 2000
Page 79

Managing Keys
e. Click the Select Certificate button, then select the Root CA
certificate you just retrieved.
The Root Certificate text box displays information on the selected
root CA certificate. The terminology for the certificate is a policy
decision. Typically, the following terminology is true for X.509
certificates.
Term: Description:
CN
(Common Name)
EMAIL The email address for the certificate
OU
(Organizational Unit)
O
(Organization)
L
(Locality)
Often a description of the type of
certificate (e.g., “Root”).
holder.
Theorganizationtowhichthecertificate
belongs (e.g.,“Accounting”).
Typically the name of the company to
whichthecertificatebelongs (e.g.,“Secure
Company”).
The location of the holder of the certificate
(e.g., “Santa Clara”).
f. Click OK.
3. Make a certificate request.
To do this, follow these steps:
a. Right-click on your PGP key pair and select
Keys—>Add—>Certificate from the Keys right-click menu.
The Certificate Attributes dialog box appears, as shown in Figure
4-11 on page 79.
Figure 4-11. Certificate Attributes Dialog Box
User’s Guide 79
Page 80

Managing Keys
b. Verify the certificate attributes; use the Add, Edit,andRemove
buttons to make any required changes, and click OK.ThePGP
Enter Passphrase dialog box appears.
c. Enter the passphrase for yo ur key pair, then click OK.
The PGP Server Progress bar appears.
The certi ficate request is sent to the CA server. The server
authenticates itself to your computer and accepts your request.
In a corporate setting, your company’s PGP or PKI administrator
verifies your information in the request. The identifying
information and public key are assembled and then digitally signed
with the CA’s own certificate to create your new certificate.
The administrator sends you an email message stating that your
certificate is ready for r etrieval.
4. Retrieve your certificate and add it to your key pair.
In a corporate s e tting, your certificate may be retrieved and added to
your key pair automatically depending on the settings your
administrator has configured. In this case, continue with Step c.
If you do not have automatic certificate retrieval configured, you can
retrieve your certificate and add it to your keyring manually. To do this,
follow these steps:
a. In PGPkeys, select the PGP key for which you made the certificate
request.
b. On the Server menu, s elect Retrieve Certificate.
PGP contacts the CA server and automatically retrieves your new
X.509 certi ficate and adds it to your PGP key.
c. If you are running PGPnet, set this certificate as your X.509
authentication key in PGPnet (View—>Options—>
Authentication).
IMPORTANT: When you add or change information in your
key pair, always update it on the key server so that your most
currentkeycanbe available to anyone. See“Updatingyourkey
on a key server” on page 88 for instructions.
80 PGP Freeware
Page 81

Splitting and rejoining keys
Any private key can be split into shares among multiple “shareholders” using
a cryptographic process known as Blakely-Shamir key splitting. This
technique is recommended for extremely high security keys. For example,
Network Associates keeps a corporate key split between multiple individuals.
Whenever we need to sign with that key, the shares of the key are rejoined
temporarily.
NOTE: Split keys are not compatible with versions of PGP Desktop
Security or PGP Freeware previ ous to 6.0, or with versions of PGP
e-Business Server or PGP Command Line products previous to 7.0.
Creating a split key
To split a key, select the key pair to be split and choose Share Split from the
Keys menu. You are then asked to set up how many different shares will be
required to rejoin the key. The shares are saved as files either encrypted to the
public key of a shareholder or encrypted conventionally if the shareholder has
no public key. After the key has been split, attempting to sign with it or
decrypt with it will automatically attempt to rejoin the key. For information
about rejoining a split key, see “Signing and decrypting files with a split key”
on page 110.
Managing Keys
To create a split key with multiple shares:
1. In PGPkeys, create a new key pair or select an existing key pair that you
want to split. To learn how to create a new key pair, see “Making a key
pair” on page 34.
2. On the Keys menu, click Share Split.
The Share Split dialog box opens.
3. Add shareholders to the key pair by dragging their keys from PGPkeys
to the Shareholder list in the Share Split dialog box.
To add a shareholder that does not have a public key, click Add in the
ShareSplitdialogbox,enter the persons name and thenallowtheperson
to type in their passphrase.
4. When all of the shareholders are listed, you can specify the number of
key shares that are necessary to decrypt or sign with this key.
User’s Guide 81
Page 82

Managing Keys
In Figure 4-12, for example, the total number of shares that make up the
Group Key is four and the total number of shares required to decrypt or
sign is three. This provides a buffer in the event that one of the
shareholders is unable to provide his or her key share or forgets the
passphrase.
Figure 4-12. Share Split dialog box
(Example)
By default, each shareholder is responsible for one share. To increase the
number of shares a shareholder possesses, click the name in the
shareholder’s list to display it in the text field below. Type the new
number of key shares or use the arrows to select a new amount.
5. Click Split Key.
A dialog box opens and prompts you to select a directory in which to
store the shares.
6. Select a location to store the key shares.
The Passphrase dialog box appears.
7. Enter the passphrase for the key you want to split and then click OK.
A confirmation dialog box opens.
82 PGP Freeware
Page 83

8. Click Yes to split the key.
The key is split and the shares are saved in the location you specified.
Each key share is saved with the shareholder’s name as the file name and
a .shf extension, as shown in the example below:
9. Distribute the key shares to the owners, then delete the local copies.
Once a key is split among multiple shareholders, attempting to sign or
decrypt with it will cause PGP to automatically attempt to rejoin the key.
To learn how to rejoin a split key to sign or decrypt files, see “Signing and
decrypting files with a split key” on page 110.
Rejoining split keys
Once a key is split among multiple shareholders, attempting to sign or decrypt
with it will cause PGP to automatically attempt to rejoin the key. There are two
ways to rejoin the key, locally and remotely.
Managing Keys
Rejoining key shares locally requires the shareholders presence at the
rejoining computer. Each shareholder is required to enter the passphrase for
their key share.
Rejoining key shares remotely requires the remote shareholders to
authenticate and decrypt their keys before sending them over the network.
PGP's Transport Layer Security (TLS) provides a secure link to transmit key
shares which allows multiple individuals in distant locations to securely sign
or decrypt w ith their key share.
IMPORTANT: Before receiving key shares over the network, you
should verify each shareholder’s fingerprint and sign their public key to
ensure that their authenticating key is legitimate. To learn how to verify
a key pair, see “Verify with a digital fingerprint” on page 51.
User’s Guide 83
Page 84

Managing Keys
To rejoin a split key:
1. Contact each shareholder of the split key. To rejoin key shares locally, the
shareholders of the key must be present.
To collect key shares over the network, ensure that the remote
shareholdershavePGPinstalledand are prepared to send their keyshare
file. Remote shareholders mus t have:
• their key share files and passwords
• a key pair (for authentication to the computer that is collecting the
key shares)
• a network connection
• the IP address or Domain Name of the computer that is collecting
the key shares
2. At the rejoining computer, use Windows Explorer to select the file(s) that
you want to sign or decrypt with the split key.
3. Right-click on the file(s) and select Sign or Decrypt from the PGP menu.
The PGP Enter Passphrase for SelectedKeydialog box appears with the
split key selected.
4. Click OK to reconstitute the selected key.
The Key Share Co llection dialog box appears, as shown in Figure 4-13.
84 PGP Freeware
Page 85

Figure 4-13. Key Share Collection dialog box
5. Do one of the following:
Managing Keys
• If you are collecting the key shares locally, click Select Share File
and then locate the share files associated with the split key. The
sharefilescanbecollectedfromtheharddrive,afloppydisk,ora
mounted drive. Continue with Step 6.
• If you are collecting key shares over the network,clickStart
Network.
The Passphrasedialog box opens. In the SigningKeybox, select the
key pair that you want to use for authentication to the remote
system and enter the passphrase. Click OK to prepare the computer
to receive the key shares.
The status of the transaction is displayed in the Network Shares
box. When the status changes to “Listening,” the PGP application is
ready to receive the key shares.
At this time, the shareholders must send their key shares. To learn
howtosendkeysharestotherejoiningcomputer,see “To send your
key share over the network:” on page 87.
When a share is received, the Remote Authentication dialog box
appears, as shown in Figure 4-14.
User’s Guide 85
Page 86

Managing Keys
Figure 4-14. Remote Authentication dialog box
If you have not signed the key that is being used to authenticate the
remote system, the key will be considered invalid. Although you
can rejoin the split key with an invalid authenticating key, it is not
recommended. You should verify each shareholder’s fingerprint
and si gn each shareholder’s public key to ensure that the
authenticating key is legitimate.
86 PGP Freeware
Click Confirm to accept the share file.
6. Continue collecting key shares until the value for Total Shares Collected
matches the value for Total Shares Neededin the Key Shares Collection
dialog box.
7. Click OK.
The file is signed or decrypted with the split key.
Page 87

Managing Keys
To send your key share over the network:
1. When you are contacted by the person who is rejoining the split key,
make sure that you have these items:
• your key share file and password
• your key pair (for authentication to the computer that is collecting
the key shares)
• a network connection
• the IP address or Domain Name of therejoiningcomputercollecting
the key shares
2. Select Send Key Shares on the PGPkeys File menu.
The Select Share File dialog box appears.
3. Locate your key share and then click Open.
The PGP Enter Passphrase dialog box appears.
4. EnteryourpassphraseandthenclickOK.
The Send Key Shares dialog box appears, as shown in Figure 4-15 on
page 87.
Figure 4-15. Send Key Shares dialog box
User’s Guide 87
Page 88

Managing Keys
5. Enter the IP address or the Domain Name of the rejoining computer in
the Remote Address text box, then cl ick Send Shares.
The status of the transaction is displayed in the Network Status box.
When the status changes to “Connected,” you are asked to authenticate
yourself to the rejoining computer.
The Remote Authentication dialog box appears asking you to confirm
that the remote computer is the one to whom you want to send your key
share.
6. Click Confirm to complete the transaction.
After the remote com puter receives your key shares and confirms the
transaction, a message box appears stating that the shares were
successfully sent.
7. Click OK.
8. Click Done in the Key Shares window when you have completed
sending your k ey share.
Updating your key on a key server
If you ever need to change your email address, or if you acquire new
signatures, all you have to do to replace your old key is send a new copy to the
server; the information is automatically updated. However, you should keep
in mind that public key servers are only capable of adding new information
and will not allow removal of user names or signatures from your key.
88 PGP Freeware
To remove signatures or user names from your key, see “Removing signatures
or user names associated with your key” on page 88 for instructions.
If your key is ever compromised, you can revoke it; this tells the world to no
longer tru st that version of your key. See “Revoking a key” on page 75 for
more details on how to revoke a k e y.
Removing signatures or user names associated with your key
At some point you may want to remove a subkey, a signature, or a user ID
associated with a particular key.
Public key servers are only capable of adding new information and will not
allow removal of user nam es or signatures from your key. To remove
signatures or user names associated with your public key, you must first
remove your key from the server, make the required change, then post
your key back on the server.
Page 89

Managing Keys
If your Server settings in the Options dialog box are configured to
synchronize keys with the key server when you add
names/photos/revokers to your key, your key is automatically updated
on the server. If, however, your keys do not automatically synchronize
with the server, follow the instructions outlined below to manually update
your key on the key server.
NOTE: When you delete a key, signature, or user name from a key, it is
removed and not recoverable. Signatures and user names can be added
again to a key, and an imported public key can be imported again to your
keyring. However, a private key that exists only on that keyring cannot
be created again, and all messages encrypted to its public key copies can
no longer be decrypted.
To remove signatures or user names from your key on a key server:
IMPORTANT:This procedure is for removing signatures or user names
associated with your key on LDAP key servers only. Additionally, the
key server must be configured to allow this action.
1. Open PGPkeys.
2. ChooseSearch from the Server menu or click in the PGPkeys menu.
The PGPkeys Search window appears.
3. Choose the server you want to search from the Search for Keys On
menu.
4. Specify your search criteria to locate your public key:
The default is User ID, but you can clickthearrowsto select Key ID, Key
Status, Key Type, Key Size, Creation Date, or Expiration Date.For
example, you mi ght search for all keys wi th the User ID of Fred.
5. To begin the search, click Search.
The resu lts of the search appear in the window.
6. Right-click on the key that you want to remove from the server, then
select Delete from the right-click menu.
The Passphrase dialog box appears.
7. Enter the passphrase for the key you want to remove from the server and
then click OK.
The Confirmation dialog box appears and the key is removed.
User’s Guide 89
Page 90

Managing Keys
8. Update your key (remove the unwanted signatures or user names).
9. Copy the updated key to the server (see “Placing your public key on a
key server” on page 45 for instructions).
If thekeyserverisconfiguredtosynchronizekeyswithotherkeyservers,
your key will be updated on the other servers automatically upon
synchronization.
WARNING: If you delete your key from a key server, you should
be aware that someone who has your public key on their keyring
can upl oad it to the server again. You should check the server
periodically to see if the key has reappeared—you may have to
delete your key from the server more than once.
Reconstructing your key
If you ever lose your private key or you forget your passphrase, there is no
way to recover from it unless you set up a key reconstruction policy, which
includes setting up a key reconstitution server and enabling this feature in
your PGP software. If this feature is enabled in your software, you would have
provided recovery information—five secret questions and answers—and
would have sent your key to the key reconstruction server. To learn how to
send your key to the reconstruction server, see “To send your key to a key
reconstruction server:” on page 4 3.
90 PGP Freeware
If you sent your key to a reconstruction server, you can restore your key pair
at any time as long as you have your public key and can answer at least three
of the five secret questions you created.
To reconstruct your key from a reconstruction server:
1. Open PGPkeys, then select the key that you want to reconstruct.
2. Select Reconstruct Key from the Key menu.
If the reconstruction server is a PGP key server, the Server User ID and
Password dialog box appears. Enter your user ID and password to log on
to the server.
3. Click OK.
The Key Reconstruction dialog box appears.
Page 91

Managing Keys
4. In the Key Reconstruction dialog box, enter answers in the Answer
boxes to their corresponding questions. Keep in mi nd that your answers
are case sensitive. You must be able to answer at least three questions to
restore your key.
You can use the Hide Answers checkbox to view or hide your answers.
5. Click OK to continue.
The PGP Enter Confirmed Passphrase dialog box appears.
6. In the Passphrase box, enter a new string of characters or words you
want to use as the new passphrase for your new key pair.
NOTE: Your passphrase should contain multiple words and may
include spaces, numbers, and punctuation characters. Choose
something that you can remember easily but that others won’t be
able to guess. The passphrase is case sensitive, meaning that it
distinguishes between uppercase and lowercase letters. The longer
your passphrase, and the greater the variety of characters it
contains, the more secure it is. Strong passphrases include upper
and lowercase letters, numbers, punctuation, and spaces but are
more likely to be forgotten. See “Creating a passphrasethatyouwill
remember” on page 40, for more information about choosing a
passphrase.
To confirm your entry, press the T
AB key to advance to the next line, then
enter the same passphrase again.
7. Click OK.
Your key pair is reconstituted and appears in PGPkeys.
User’s Guide 91
Page 92

Managing Keys
92 PGP Freeware
Page 93

Part III: Securing Your Files and Communications
• Chapter 5: Securing Email
• Chapter 6: Securing Files
• Chapter 7: Securing Your Instant
Messages
Page 94

Page 95

5Securing Email
PGP provides the means for you to securely communicate through your email
application with the use of the PGP plug-ins and utilities. This chapter
explains how to secure email messages you send to others and decrypt and
verify the messages others send to you.
Securing email communications
Sending email that is not encryptedis like sending a postcard: the message you
write can easily be read by a person in between you and the recipient.
PGP offers an easy way to secure your messages against unauthorized
reading. PGP also allows you to add your dig ital signatures to your messages
to guarantee their authenticity and data integrity. To secure your email, PGP
offers plug-ins to work along with your email applications and other utilities
that encrypt, sign, decrypt, and verify email text. The PGP email plug-ins are
available for seamless integration with Microsoft Exchange, Outlook and
Express, and QUALCOMM Eudora.
PGP/MIME
5
If you are using an email application with one of the plug-ins that supports the
PGP/MIME standard, and you are communicating with another user whose
email application also supports this standard, both of you can automatically
encrypt and decrypt your email messages and any attached files when you
send or retrieve your email. All you have to do is turn on the PGP/MIME
encryption and sign functions from the Email panel of the PGP Options
dialog box, which can be opened from PGPtray or within PGPkeys.
When you receive email from someone who uses the PGP/MIME feature, the
mail arrives with an icon in the message window indicating that it is
PGP/MIME encoded.
To decrypt the text and file attachments in PGP/MIME encapsulated email
and to verify any digital signatures, simply click the lock and quill icon.
Attachments are still encrypted i f PGP/MIME is not used, but the decryption
process is usually more involved for the recipient.
User’s Guide 95
Page 96

Securing Email
Encrypting and signing email
The quickest and easiest way to secure email communications is by using an
email application supported by the PGP plug-ins. If you are using an email
application that is not supported by the PGP plug-ins, you can encrypt, sign,
decrypt and verify the text of your email messages by usi ng PGPtray or
PGPtools.
Encrypting and signing email using the PGP plug-ins
Although the procedure varies slightly between different email applications,
you perform the encryption and signing process by clicking the appropriate
buttons in the application’s toolbar.
When you encrypt and sign with an email application that is supported by the
PGP plug-ins, you have two choices, depending on what type of email
application the recipient is using. If you are communicating with other PGP
users who have an email application that supports the PGP/MIME standard,
you can take advantage of a PGP/MIME feature to encrypt and sign your
emailmessagesandanyfileattachmentsautomaticallywhenyousendthem.
If you are communicating with someone who does not have a
PGP/MIME-compliant email application, you should encrypt your email with
PGP/MIME turned off to avoid any compatibility problems. Refer to Table
5-1, “PGP Plug-in Features,” for a list of plug-ins and their features.
96 PGP Freeware
TIP:Ifyoudidnotinstalltheemailplug-inthatyouwanttouse,youcan
run the PGP Setup Maintenance Utility to add additional PGP
components and plug-ins. See “Modifying your PGP Installation” in the
PGP Installation Guide for detailed instructions.
Page 97

Table 5-1. PGP Plug-in Features
Securing Email
Outlook
Express
PGP/MIME
Auto-decrypt
Encrypt HTML
Preserve text
formatting
Encrypt
attachments
Encrypt/Sign
defaults
Eudora Outlook
Yes No No
No Yes Yes
Yes Yes No
Yes Yes No
Yes Yes No
Yes Yes Yes
To encrypt and sign with supported email applications:
1. Use your email application to compose your email message as you
normally would.
TIP: If you are sending sensitive email, consider leaving your
subject line blank or creating a subject line that does not reveal the
contents of your encrypted message.
2. When you have finished composing the text of your email message,
click the envelope and lock icon ( ) to encrypt the text of your
message, then click the paper and pen icon ( ) to sign your message.
NOTE:Ifyouknowthat you are going to use PGP/MIME regularly,
you can leave this feature turned on by selecting the appropriate
settingsin the Email panel of the Options dialog box.
User’s Guide 97
Page 98

Securing Email
3. Send your message as you normally do.
If you have a copy of the public keys for every one of the recipients, the
appropriate keys are automatically used. However, if you specify a
recipient for whom there is no corresponding public key or one or more
of the keys have insufficient validity, the PGP RecipientSelectiondialog
box appears (Figure 5-1) so that you can specify the correct key.
You can force the PGP Recipient Selection dialog box to appear, even if
you have a valid copy of the public keys for every one of the recipients,
by holding down the
SHIFT KEY when you hit SEND. You should do this if
you want to use the Secure Viewer or Conventional Encrypt features and
you do not want your message to be sent automatically.
98 PGP Freeware
Encryption
options
Figure 5-1. PGP Recipient Selection window
4. Drag the public keys for those who are to receive a copy of the encrypt e d
email message into the Recipients list box. You can also double-click any
of the keys to move it from one area of the screen to the other.
The Validity icon indicates the minimum level of confidence that the
public keys in the Recipient list are valid. This validity is based on the
signatures associated with the key. See Chapter 4, “Managing Keys,” for
details.
Page 99

Securing Email
5. You can choose from the following encryption options depending on the
type of data you are encrypting:
• Secure Viewer. Selectthisoptionto protect the datafromTEMPEST
attacks upon decryption. If you select this option, the decrypted
data is displayed i n a special TEMPEST attack prevention font that
is unreadable to radiation capturing equipment, and cannot be
saved in decrypted format. For more information about TEMPEST
attacks, see the section on vulnerabilities in An Introduction to
Cryptography.
NOTE:The Secure Viewer optionmaynotbecompatible with
previous versions of PGP. Messages encrypted with this option
enabled can be decrypted by previous versions of PGP,
however this feature may be ignored.
• Conventional Encrypt. Select this option to use a common
passphrase instead of public key encryption. If you select this
option, the message is encrypted using a session key, which
encrypts (and decrypts) using a passphrase that you will be asked
to choose.
6. Click OK to encrypt and sign your mail.
If you have elected to sign the encrypted data, the Signing Key
Passphrase dialog box appears, requesting your passphrase before the
mail is sent.
7. EnteryourpassphraseandthenclickOK.
WARNING: If you do not send your email immediately but instead
storeitinyouroutbox,youshouldbeawarethatwhenusingsome
email applications the information is not encrypted until the email
is actually transmitted. Before queuing encrypted messages you
should check to see if your application does in fact encrypt the
messages in your outbox. If it does not, you can use PGPtray’s
Current Window option to encrypt your messages before queuing
them in the outbox.
User’s Guide 99
Page 100

Securing Email
Encrypting and signing email without PGP plug-in support
If your email application does not support the PGP plug-ins, you can use
PGPtray or PGPtools to encrypt the text of your message prior to sending it.
The easiest way to encrypt your message without the use of a PGP plug-in is
to use the Current Window options in PGPtray.
To encrypt and sign email without a PGP plug-in:
1. Use your email application to compose your email message as you
normally would.
TIP: If you are sending sensitive email, consider leaving your
subject line blank or creating a subject line that does not reveal the
contents of your encrypted message.
2. When you have finished composing the text of your email message, open
PGPtray and select Encrypt, Sign,orEncrypt & Sign from the Current
Window menu.
Encrypted text appears in your email message window.
3. Continue with Step 3 on page 98 to complete your encrypting and
signing task.
100 PGP Freeware
 Loading...