

Page 1

Pretty Good Privacy™
PGP for Personal Privacy, Version 5.0
For the Mac OS
User’s Guide
PGP
™, Inc.
Page 2

© 1997 by Pretty Good Privacy, Inc . All rights reserved.
5-97. Printed in the United Stat es of America.
PGP for Personal Privacy, Version 5.0
Record the serial number from your License Agreement in the space provided below:
Copyright © [1990], 1997 by Pretty Good Privacy, Inc. All Rights Reserved.
PGP, Pretty Good, and Pretty Good Privacy are registered trademarks of Pretty Good Privacy, Inc. All other
trademarks and registered trademarks are the property of their respective owners.
Pretty Good Privacy, Inc. may have patents and/or pending patent applications covering subject matter
in this document. The furnishing of this document or the software does not give you any license to these
patents.
PGP uses public key algorithms described in U.S. Paten t numbers 4,200,770, 4,218,582, 4,405,829, and
4,424,414, licensed exclusively by Public Key Partners.
PGP uses the IDEA cryptographic cipher described in U.S. Patent number 5,214,703 and is licensed from
Ascom Tech AG. IDEA
The compression code in PGP is by Mark Adler and Jean-loup Gailly, taken with permission from the free
Info-ZIP implementation.
LBalloonTracker is © 1996-1997 Corporate Software & Technologies Int. Inc. (CS&T). Permission is granted for use of LBalloonTracker free of charge, other than acknowledgement of Paul Lalonde and CS&T in
any program using LBalloonTracker (perhaps in an About box or in accompanying documentation).
is a trademark of As c o m T ec h , AG .
The software provided with this documentation is licensed to you for your individual use under the terms
of the End User License Agreement and Limited Warranty provided with the software. The information in
this document is subject to change without notice. Pretty Good Privacy, Inc. does not warrant that the information meets you requirements or that the information is free of errors. The information may include
technical inaccuracies or typographical errors. Changes may be made to the inf ormation and in corporated in new editions of this document, if and when made available by Pretty Good Privacy, Inc.
Export of this software and documentation may be subject to compliance with the rules and regulations
promulgated from time to time by the Bureau of Export Administration, U nited States Department of Commerce, which restrict the export and re-export of certain products and technical data.
PRETTY GOOD PRIVACY, INC.
2121 South El Camino Real, Suite 902
San Mateo, C A 94403
(415) 631-1747
(415) 572-1932 fax
info@pgp.com
http://www.pgp.com
Page 3

LIMITED WARRANTY. Pretty Good Privacy, Inc. warrants that the Softwarewill perform substantially in accordance with the written materials in this package for a period of 90 days from the date of original purchase.
Pretty Good Privacy, Inc.'s entire liability and yo ur exclusive remedy shall be, at Pret ty Good Privacy, Inc.'s
option, either (a) return of the purchase price paid for the license or (b) repair or replacement of the Software
that does not meet Pretty Good Privacy, Inc.'s limited warranty and which is returned at your expense to Pretty
Good Privacy, Inc. with a copy of your receipt. This limited warranty is void if failure of the Software has resulted from accident, abuse, or misapplication. Any repaired or repl ac ement Software will be warranted fo r
the remainder of the original warranty period or 30 days, whiche v er is lo nger.
IF THE SOFTWARE IS EXPORT CONTROLLED (SEE BELOW), THESE REMEDIES ARE NOT AVAILABLE OUTSIDE THE UNITED STATES OF AMERICA. NO OTHER WARRANTIES. EXCEPT FOR THE
WARRANTIES SET FORTH HEREIN, THE SOFTWARE AND DOCUMEN TATION ARE PROVIDED "AS IS"
AND PRETTY GOOD PRIVACY, INC. DISCLAIMS ALL OTHER WARRANTIES, EITHER EXPRESS OR IMPLIED, INCLUDING BUT NOT LIMITED TO IMPLIED WARRANTIES OF MERCHANTABILITY, FITNESS
FOR A PARTICULAR PURPOSE, CONFORMANCE WITH DESCRIPT ION, AND NON-INFRINGEMENT
OF THIRD PARTY RIGHTS. THIS LIMITED WARRANTY GIVES YOU SPECIFIC LEGAL RIGHTS. YOU
MAY HAVE OTHERS, WHICH VARY FROM STATE TO STATE. LIMITATION OF LIABILITY. PRETTY
GOOD PRIVACY, INC.'S CUMULATIVE LIABILITY TO YOU OR ANY OTHER PARTY FOR ANY LOSS OR
DAMAGES RESULTING FROM ANY CLAIMS, DEMANDS OR ACTIONS ARISING OUT OF OR RELATING
TO THIS AGREEMENT SHALL NOT EXCEED THE PURCHASE PRICE PAID FOR THE LICENSE. IN NO
EVENT SHALL PRETTY GOOD PRIVACY, INC. OR ITS SUPPLIERS BE LIABLE FOR ANY INDIRECT, INCIDENTAL, CONSEQUENTIAL, SPECIAL OR EXEMPLARY DAMAGES OR LOST PROFITS WHATSOEVER (INCLUDING, WITHOUT LIMITATION, DAMAGES FOR LOSS OF BUSINESS PROFITS, BUSINESS
INTERRUPTION, LOSS OF BUSINESS INFORMATION, OR OTHER PECUNIARY LOSS) ARISING OUT
OF THE USE OR INABILITY TO USE THE SOFTWARE, EVEN IF PRETTY GOOD PRIVACY, INC. HAS
BEEN ADVISED OF THE POSSIBILITY OF SUCH DAMAGES. BECAUSE SOME STATES DO NOT ALLOW
THE EXCLUSION OR LIMITATION OF LIABILITY FOR CONSEQUENTIAL OR INCIDENTAL DAMAGES,
THE ABOVE LIMITATION MAY NOT APPLY TO YOU.
This book was written by Mike Iannamico
special thanks to Gail Kesner Haspert
Page 4

Page 5

Contents
Table of Contents
Table of Contents . . . . . . . . . . . . . . . . . . . . . . . . . . . . . . . . . . . . . . . . . . . . . . v
Chapter 1: Introducing PGP for Personal Privacy . . . . . . . . . . . . . . . . . . . . . . . 1
A Quick Overview . . . . . . . . . . . . . . . . . . . . . . . . . . . . . . . . . . . . . . . . . . . . . .2
Create a Private and Public Key Pair . . . . . . . . . . . . . . . . . . . . . . . . . . . . . . . . . . . 3
Exchange Public Keys with Others . . . . . . . . . . . . . . . . . . . . . . . . . . . . . . . . . . . . . 3
Certify and Validate Your Keys . . . . . . . . . . . . . . . . . . . . . . . . . . . . . . . . . . . . . . . 3
Encrypt and Sign Your E-mail . . . . . . . . . . . . . . . . . . . . . . . . . . . . . . . . . . . . . . . . 4
Decrypt and Verify Your E-mail . . . . . . . . . . . . . . . . . . . . . . . . . . . . . . . . . . . . . . . 4
About This Manual . . . . . . . . . . . . . . . . . . . . . . . . . . . . . . . . . . . . . . . . . . . . . . . . 5
Chapter 2: Getting Started . . . . . . . . . . . . . . . . . . . . . . . . . . . . . . . . . . . . . . . 7
System Requirements . . . . . . . . . . . . . . . . . . . . . . . . . . . . . . . . . . . . . . . . . . . .7
Compatibility with Other Versions . . . . . . . . . . . . . . . . . . . . . . . . . . . . . . . . . . .7
Upgrading from a Previous Version . . . . . . . . . . . . . . . . . . . . . . . . . . . . . . . . .9
Installing PGP . . . . . . . . . . . . . . . . . . . . . . . . . . . . . . . . . . . . . . . . . . . . . . . . .9
Running PGP . . . . . . . . . . . . . . . . . . . . . . . . . . . . . . . . . . . . . . . . . . . . . . . . . .9
Using PGP from the PGPmenu . . . . . . . . . . . . . . . . . . . . . . . . . . . . . . . . . . . . . . . 10
Using PGP from Supported e-mail Applications . . . . . . . . . . . . . . . . . . . . . . . . . . . 12
Using PGP from the PGPtools Window . . . . . . . . . . . . . . . . . . . . . . . . . . . . . . . . . 13
Selecting Recipients . . . . . . . . . . . . . . . . . . . . . . . . . . . . . . . . . . . . . . . . . . . . . . . 14
PGP for Personal Privacy, Version 5.0 User’s Guide for the Mac OS v
Page 6

Taking Shortcuts . . . . . . . . . . . . . . . . . . . . . . . . . . . . . . . . . . . . . . . . . . . . . 15
Chapter 3: Making and Exchanging Keys . . . . . . . . . . . . . . . . . . . . . . . . . . . 17
Key Concepts . . . . . . . . . . . . . . . . . . . . . . . . . . . . . . . . . . . . . . . . . . . . . . . 17
Making a Key Pair . . . . . . . . . . . . . . . . . . . . . . . . . . . . . . . . . . . . . . . . . . . . 18
Protecting Your Keys . . . . . . . . . . . . . . . . . . . . . . . . . . . . . . . . . . . . . . . . . . 27
Distributing Your Public Key . . . . . . . . . . . . . . . . . . . . . . . . . . . . . . . . . . . . . 28
Making your Public Key Available Through a Key Server . . . . . . . . . . . . . . . . . . . . 28
Including your Public Key in an e-mail Message . . . . . . . . . . . . . . . . . . . . . . . . . . 30
Exporting your Public Key to a File . . . . . . . . . . . . . . . . . . . . . . . . . . . . . . . . . . . . 30
Obtaining the Public Keys of Others . . . . . . . . . . . . . . . . . . . . . . . . . . . . . . . 31
Getting Public Keys from a Key Server . . . . . . . . . . . . . . . . . . . . . . . . . . . . . . . . . 31
Adding Public Keys from e-mail Messages . . . . . . . . . . . . . . . . . . . . . . . . . . . . . . 32
Importing a Public Key from a File . . . . . . . . . . . . . . . . . . . . . . . . . . . . . . . . . . . . 33
Verifying the Authenticity of a Key . . . . . . . . . . . . . . . . . . . . . . . . . . . . . . . . 33
Chapter 4: Sending and Receiving Private E-mail. . . . . . . . . . . . . . . . . . . . . . 37
Encrypting and Signing E-mail . . . . . . . . . . . . . . . . . . . . . . . . . . . . . . . . . . . 37
Encrypting and Signing with Supported e-mail Applications . . . . . . . . . . . . . . . . . . 38
Encrypting and Signing with PGPmenu . . . . . . . . . . . . . . . . . . . . . . . . . . . . . . . . . 41
Encrypting and Signing from PGPtools . . . . . . . . . . . . . . . . . . . . . . . . . . . . . . . . . 44
Decrypting and Verifying E-mail . . . . . . . . . . . . . . . . . . . . . . . . . . . . . . . . . . 47
Decrypting and Verifying from Supported e-mail Applications . . . . . . . . . . . . . . . . 48
Decrypting and Verifying from PGPmenu . . . . . . . . . . . . . . . . . . . . . . . . . . . . . . . 51
Decrypting and Verifying from PGPtools . . . . . . . . . . . . . . . . . . . . . . . . . . . . . . . . 52
Chapter 5: Managing Keys And Setting Preferences. . . . . . . . . . . . . . . . . . . . 55
Managing Your Keys . . . . . . . . . . . . . . . . . . . . . . . . . . . . . . . . . . . . . . . . . . 55
The PGPkeys Window . . . . . . . . . . . . . . . . . . . . . . . . . . . . . . . . . . . . . . . . . . . . . 56
Examining a Key . . . . . . . . . . . . . . . . . . . . . . . . . . . . . . . . . . . . . . . . . . . . . . . . 58
vi Contents
Page 7

Getting Detailed Information About a Key . . . . . . . . . . . . . . . . . . . . . . . . . . . . . . . 60
Specifying a Default Key Pair . . . . . . . . . . . . . . . . . . . . . . . . . . . . . . . . . . . . . . . . 61
Adding a New User Name or Address . . . . . . . . . . . . . . . . . . . . . . . . . . . . . . . . . 62
Checking a Key’s Fingerprint . . . . . . . . . . . . . . . . . . . . . . . . . . . . . . . . . . . . . . . . 63
Signing Someone’s Public Key . . . . . . . . . . . . . . . . . . . . . . . . . . . . . . . . . . . . . . . 63
Granting Trust for Key Validations . . . . . . . . . . . . . . . . . . . . . . . . . . . . . . . . . . . . 64
Disabling and Enabling Keys . . . . . . . . . . . . . . . . . . . . . . . . . . . . . . . . . . . . . . . . 65
Deleting a Key or Signature . . . . . . . . . . . . . . . . . . . . . . . . . . . . . . . . . . . . . . . . . 66
Changing your Passphrase . . . . . . . . . . . . . . . . . . . . . . . . . . . . . . . . . . . . . . . . . 66
Importing and Exporting Keys . . . . . . . . . . . . . . . . . . . . . . . . . . . . . . . . . . . . . . . 67
Revoking a Key . . . . . . . . . . . . . . . . . . . . . . . . . . . . . . . . . . . . . . . . . . . . . . . . . . 69
Setting Your Preferences . . . . . . . . . . . . . . . . . . . . . . . . . . . . . . . . . . . . . . . . .70
General Preferences . . . . . . . . . . . . . . . . . . . . . . . . . . . . . . . . . . . . . . . . . . . . . . 71
Key Files Preferences . . . . . . . . . . . . . . . . . . . . . . . . . . . . . . . . . . . . . . . . . . . . . . 72
E-mail Preferences . . . . . . . . . . . . . . . . . . . . . . . . . . . . . . . . . . . . . . . . . . . . . . . . 73
PGPmenu Preferences . . . . . . . . . . . . . . . . . . . . . . . . . . . . . . . . . . . . . . . . . . . . . 75
Key Server Preferences . . . . . . . . . . . . . . . . . . . . . . . . . . . . . . . . . . . . . . . . . . . . 76
Chapter 6: Security Features and Vulnerabilities . . . . . . . . . . . . . . . . . . . . . . 77
Why I wrote PGP . . . . . . . . . . . . . . . . . . . . . . . . . . . . . . . . . . . . . . . . . . . . . . . . 77
Encryption Basics . . . . . . . . . . . . . . . . . . . . . . . . . . . . . . . . . . . . . . . . . . . . . . . . 82
Beware of Snake Oil . . . . . . . . . . . . . . . . . . . . . . . . . . . . . . . . . . . . . . . . . . . . . . 99
Vulnerabilities . . . . . . . . . . . . . . . . . . . . . . . . . . . . . . . . . . . . . . . . . . . . . . . . . . 104
Cryptanalysis . . . . . . . . . . . . . . . . . . . . . . . . . . . . . . . . . . . . . . . . . . . . . . . . . . 110
Recommended Introductory Readings . . . . . . . . . . . . . . . . . . . . . . . . . . . . . . . . . 111
Other Readings: . . . . . . . . . . . . . . . . . . . . . . . . . . . . . . . . . . . . . . . . . . . . . . . . 112
Glossary of Terms . . . . . . . . . . . . . . . . . . . . . . . . . . . . . . . . . . . . . . . . . . . 113
Index . . . . . . . . . . . . . . . . . . . . . . . . . . . . . . . . . . . . . . . . . . . . . . . . . . . . .117
PGP for Personal Privacy, Version 5.0 User’s Guide for the Mac OS vii
Page 8

viii Contents
Page 9

Chapter 1
Introducing PGP for Personal Privacy
With PGP™ for Personal Privacy, you can easily protect the privacy of
your e-mail messages and file attachments by encrypting them so that
only those with the proper authority can decipher the information. You
can also digitally sign the messages and files you exchange, which
ensures that they have come from the person who allegedly sent them
and that the information has not been tampered with in any way while
in transit.
Here are some of the features offered by PGP 5.0:
• Widely-trusted encryption and decryption incorporating maximumstrength cryptographic technologies
• Digital signature and verification for certifying messages and files
• Quick access to all functions from easily selectable menu items
• Integrated plug-in support for popular e-mail applications
• Implementation of PGP/MIME for quick encryption and decryption
of messages and file attachments when sendi ng and r ecei ving e-mai l
• Simple key generations with up to 4096-bit keys and support for
multiple key formats (RSA and DSS/Diffie-Hellman)
• Sophisticated key management with graphical representations of
key properties
PGP for Personal Privacy, Version 5.0 User’s Guide for the Mac OS 1
Page 10

• Integrated support for distributing and retrieving keys from public
key servers
NOTE:
If you are running the DSS/Diffi e-Hellman version of PGP for Person al
Privacy, it does not generate keys using the RSA algorithm nor does it
encrypt, decrypt, sign, or verify using RSA keys. If you find that you
need to generate keys or otherwise use the RSA algorithm, see the vendor from whom you bough t your PGP product.
The most convenient way to use PGP is through one of the popular email applications supported by the plug-ins. This allows you to encrypt
and sign as well as decrypt and verify your messages while you are
composing and reading your mail. In addition, if you are
communicating with another PGP user who is using an e-mail
application that adheres to the PGP/MIME standard, you can perform
all of the PGP functions on both your messages and any file attachments
by simply clicking a button when sending or receiving your e-mail.
If you are using an e-mail application that is not supported by the plugins, you can easily transfer the text of your e-mail messages to the
Clipboard and perform the necessary PGP functions from there.
A Quick Overview
PGP is based on a widely accepted encryption technology known as
“public key cryptography” in which two complementary keys are used
to maintain secure communications. One of the keys is a private key to
which only you have access and the other is a public key which you
freely exchange with other PGP users. Both your private and public keys
are stored in keyring files which are accessible from the PGPkeys
window in which you perform all your key management functions.
To send someone a private e-mail message, you use a copy of that
person’s public key to encrypt the information, which only they can
decipher by using their private key. Conversel y, when someone wants to
send you encrypted mail, they use a copy of your public key to encrypt
the data, which only you can decipher by using your private key.
You also use your private key to sign the e-mail you send to others. The
recipients can then use their copy of your public key to determine i f you
really sent the e-mail and whether it has been altered while in transit.
2 Chapter 1: Introducing PGP for Personal Privacy
Page 11

When someone sends you e-mail with their digital signature, you use a
copy of their public key to check the digital signature and to make sure
that no one has tampered with the contents.
With PGP you can easily create and manage your keys and access all of
the functions for encrypting and signing as well as decrypting and
verifying your e-mail messages and file attachments.
The following section provides a quick run-through of the procedures
you normally follow in the course of using PGP.
Create a Private and Public Key Pair
Before you can begin using PGP, you need to generate a key pair
consisting of a private key to which only you have access and a public
key that you can copy and make fr eely avail able to everyone with whom
you exchange e-mail. After you install PGP and have restarted your
computer, you can them run PGPkeys and create a new keypair.
Exchange Public Keys with Others
After you have created a key pair, you can begin corresponding with
other PGP users. To do so, you will need a copy of their public key and
they will need a copy of your public key. Since your public key is just a
block of text, it is really quite easy to trade keys with someone. You can
either include your public key in an e-mail message, copy it to a file or
you can post it on a public key server where anyone can get a copy when
they need it.
Certify and Validate Your Keys
Once you have a copy of someone’s public key, you can add it to your
public keyring. You should then check to make sure that the key has not
been tampered with and that it really belongs to the purported owner.
You do this by comparing the unique “fingerprint” on your copy of
someone’s public key to the fingerprint on their key. When you are sure
that you have a valid public key, you sign it to indicate that you feel the
key is safe to use. In addition, you can grant the owner of the key a lev el
of trust indicating how much confidence you have in them to vouch for
the authenticity of someone else’s public key.
PGP for Personal Privacy, Version 5.0 User’s Guide for the Mac OS 3
Page 12

Encrypt and Sign Your E-mail
After you have generated your key pair and have exchanged public
keys, you can begin encrypting and signing e-mail messages and file
attachments.
• If you are using an e-mail applicat ion supported by the plug-i ns, you
can encrypt and sign your messages by selecting the appropriate
options from your application’s tool bar. In addition, if you are
communicating with other PGP users who are using an e-mail
application that adheres to the PGP/MIME standard, you can
encrypt and sign messages as well as file attachments automatically
when you send your mail.
• If your e-mail application is not supported by the plug-ins, you can
use PGPmenu or PGPtools to encrypt your e-mail messages and file
attachments.
Decrypt and Verify Your E-mail
When someone sends you encrypted e-mail, you can unscramble its
contents and verify any appended signature to make sure that the data
originated with the alleged sender and that its contents have not been
altered.
• If you are using an e-mail application that is supported by the plugins, you can decrypt and verify your messages by selecting the
appropriate options from your application’s tool bar. In addition, if
your e-mail application supports the PGP/MIME standard, you can
decrypt and verify messages and file attachments sent using this
format by clicking on an icon when reading your mail.
• If your e-mail application is not supported by the plug-ins, you can
use PGPmenu or PGPtools to decrypt and verify your e-mail
messages and file attachments.
4 Chapter 1: Introducing PGP for Personal Privacy
Page 13

About This Manual
This manual is organized in the following manner:
Chapter 1
Describes the purpose of the program, delves into the concept of public
key encryption and digital signatures and provides a quick overview of
how you will use the program.
Chapter 2
Runs through the steps needed to install and run the PGP program with
a brief discussion of the main components and primary functions.
Chapter 3
Explains how to generate your private and public key pair and de scribes
the methods for exchanging, protecting and authenticating keys.
Chapter 4
Explains how to send and receive e-mail messages and file attachments
depending on the type of e-mail application you and the recipients of
your e-mail are using.
Chapter 5
Explains how to examine and alter a key’s attributes and how to
establish preferences for the PGP program.
Introducing PGP for Personal Privacy
Getting Started
Making and Exchanging Keys
Sending and Receiving Private e-mail
Managing Keys And Setting Preferences
Chapter 6
This chapter is provided by Phil Zimmermann. It describes the basic
concepts behind public key encryption and elaborates on some of the
vulnerabilities.
PGP for Personal Privacy, Version 5.0 User’s Guide for the Mac OS 5
Security Features and Vulnerabilities
Page 14

6 Chapter 1: Introducing PGP for Personal Privacy
Page 15

Chapter 2
Getting Started
This chapter explains how to run PGP and provides a quick
overview of the procedures you will normally follow in the course
of using the product. Based on this information, you will have a
fairly good understanding of how to use PGP which should be
especially appreciated by those who don’t want to read through
the entire manual before beginning to use the product.
System Requirements
• Macintosh II or later model with 68020 or above
• System software 7.5 or later
• 8 MB RAM
• 10 MB hard disk space
• 68K Macs must be running Apple’s CFM 68K 4.0 or above. The PGP
installer will install this if necessary.
Compatibility with Other Versions
PGP has gone through many revisions since it was released by Phil
Zimmermann as a freewar e pr oduct b ack in 1991, and it is estima ted that
there are now over 2 million copies in circulation. Although this version
of PGP represents a significant rewrite of the original program and
incorporates a completely new user interface, it has been designed to be
PGP for Personal Privacy, Version 5.0 User’s Guide for the Mac OS 7
Page 16

compatible with earlier versions of PGP. This means that you can
exchange secure e-mail with those who are still using these older
versions of the product:
PGP 2.6 (Released by MIT)
PGP 4.0 (Released by ViaCrypt)
PGP 4.5 (Released by PGP, Inc.)
Along with the new user interface and other improvements, one of the
distinct differences between this version of PGP and its predecessors is
the ability to generate a new type of key. In addition to the RSA keys
used by previous versions, PGP for Personal Privacy, Version 5.0 gives
you the option of using keys based on the DSS/Diffie-Hellman
encryption and digital signature technologies. Although the DSS/DiffieHellman keys are pr ovided as an alt ernative t o the traditiona l RSA keys,
you can take advantage of these newer keys only if you are exchanging
e-mail with another user who is using one of the newer versions of PGP
which is capable of recognizing these new keys.
Considering that it will take a while befor e the DSS/Dif fie-Hellman keys
gain widespread use in the user community, you will probably want to
reserve a set of RSA keys so that you can continue to communicate with
those who have earlier versions of PGP. If you are encrypting e-mail to
multiple recipients, where some have RSA keys and others have DSS/
Diffie-Hellman keys, the e-mail will be encrypted using the appropriate
type of key for each individual. However, in order for users of older
versions of PGP to handle “mixed” public key e-mail, they must
upgrade their versions of PGP.
Another improvement in this version of PGP is the implementation of
the PGP/MIME standard for some of the plug-ins that integrate PGP
functions directly into popular e-mail applications. If you are using an
application such as Eudora, you will be able to take advantage of this
emerging standard, which lets you encrypt and sign as well as decrypt
and verify your e-mail messages and file attachments automatically
when you send or receive e-mail. However, you should only send this
kind of e-mail to those who are also using PGP with an e-mail
application which adheres to the PGP/MIME standard.
8 Chapter 2: Getting Started
Page 17

Upgrading from a Previous Version
If you are upgrading from a previous version of PGP (from either PGP,
Inc. or ViaCrypt) you may want to remove the old program files before
installing PGP to free-up some disk space. However, you should be
careful not to delete the private and public keyring files used to store
any keys you have created or collected while using the previous versi on.
When you install PGP you are given the option of retaining your
existing private and public keyrings so you won’t have to go through the
trouble of importing all of your old keys. You must copy your old
keyring into the PGP keyrings folder to save them for future use.
Installing PGP
To Install PGP from a CD ROM
1. Start your Macintosh.
2. Insert the CD ROM.
3. Run the Installer.
4. Follow the on-screen prompts.
To Install PG P fr om PG P’s Web Site
1. Download the PGP program onto your computer’s hard drive.
2. Double-click the PGP installation program icon.
3. Follow the on-screen prompts.
Running PGP
PGP works on the data generated by other applications. As such, the
appropriate PGP functions are designed to be immediately available to
you based on the task you are performing at any given moment. There
are three primary ways to use PGP:
• From the PGPmenu
• From within supported e-mail applications
PGP for Personal Privacy, Version 5.0 User’s Guide for the Mac OS 9
Page 18
• From the PGPtools window
Using PGP from the PGPmenu
You can perform most PGP functions from the Finder or from within
most applications by choosing the appropriate options from the
PGPmenu icon in the menubar. This feature provides immediate access
to the PGP functions regardless of which application you are using and
is especially useful if you are using an e-mail application that is not
supported by the PGP plug-ins.
While using e-mail or other text-based applications, you can encrypt and
sign and decrypt and verify text by selecting the appropr iate options
from the pull-down menu. While using the Finder, you can encrypt and
sign and decrypt and verify files and even entire folders.
(If you cannot find this icon in one of your applicati ons, you need to add
the application from the PGPmenu pane of the Prefer ences dial og box in
the PGPkeys application).
Opening the PGPkeys Application
By choosing PGPkeys from the PGPmenu or from the PGP folder, you
open the PGPkeys window that shows the private and public key pairs
you have created for yourself as well as any publi c keys you have a dded
to your public keyring. (If you have not already created a new key pair,
the PGP Key Generation Wizard leads you through the steps necessary
to create a new key pair. However, before going through the process of
creating a new key pair, you should see Chapter 3 for complete details
regarding the various options.)
10 Chapter 2: Getting Started
Page 19

From the PGPkeys window you can create new key pairs and manage all
of your other keys. For instance, this is where you examine the attributes
associated with a particular key, specify how confident you are that the
key actually belongs to the alleged owner, and indicate how well you
trust that person to vouch for the authenticity of other user’s keys. For a
complete explanation of the key management functions you perform
from the PGPkeys window, see Chapter 5.
Setting Preferences
By choosing the Preferences option from the Edit menu in PGPkeys, you
can access the Preferences dialog box where you specify settings which
affect how PGP functions.
PGP for Personal Privacy, Version 5.0 User’s Guide for the Mac OS 11
Page 20
By clicking on the appropriate tab, you can advance to the preference
settings you want to modify. For a complete explanation of these
settings, see Chapter 5.
Getting Help
By choosing the PGP Help option when using PGPkeys or PGPtools
from the Apple Guide menu on the menu bar, you can access the PGP
help system which provides a general overview and instructions for all
of the procedures you are likely to perform.
Using PGP from Supported e-mail Applications
If you have one of the popular e-mail applica tions supported by the PGP
plug-ins, you can access the necessary PGP functions by clicking the
appropriate buttons in your application’s icon bar. For example, you
click the lock icon to indicate that you want to encrypt your message and
the quill icon to indicate that you want to sign it. You then send your
mail the way you normally do
.
When you receive e-mail from another PGP user, you decrypt the
message and verify the person’s digital signature.
To make things even simpler, if you are exchanging e-mail with another
party who is also using PGP and an e-mail application which adher es to
the PGP/MIME standard, both of you can automatically encrypt and
decrypt your e-mail messages and any attached files when you send or
12 Chapter 2: Getting Started
Page 21

retrieve your mail. All you have to do is turn on the PGP/MIME
encryption and signatory functions from the PGP Preferences dialog
box.
When you receive e-mail from someone who uses the PGP/MIME
feature, the mail arrives with an icon in the message window indicating
that it is PGP/MIME encoded.
When you receive PGP/MIME encapsulated mail, all you need do to
decrypt its contents is to double-click the lock icon and to verify
signatures, double-click the quill icon.
Using PGP from the PGPtools Window
If you are using an e-mail application which is not supported by the
plug-ins or if you want to perform PGP functions from within other
applications, you can encrypt and sign or decprypt and verify messages
and files directly from the PGPtools window. You open the PGPtools
window by several means:
• Open the PGP folder and double-click the PGPtools icon.
• Store an alias of PGPtools in the Apple menu, and select PGPtools
from that menu. You can also store an alias on your desktop. You
then double-click on the alias to open PGPtools.
PGP for Personal Privacy, Version 5.0 User’s Guide for the Mac OS 13
Page 22

When the PGPtools window appears, you can begin your encryption
work.
If you are working with text, you perform your encryption/decryption
and signature/verification functions by selecting the text then dragging
it onto the appropriate button in the PGPtools window.
If you are working with files, you can simply drag them to the
appropriate button where the function is performed.
Selecting Recipients
When you send e-mail to someone whose e-mail application is
supported by the PGP plug-ins, the recipient’s e-mail address
determines which keys to use when encrypting the contents. However , if
you enter a user name or e-mail address that does not corre spond to any
14 Chapter 2: Getting Started
Page 23
of the keys on your public keyring or if you are encrypting from
PGPmenu or PGPtools, you must manually select the recipient’s public
key from the Key Selection Dialog box.
All you need do to select a recipient’s public key is to drag the icon
representin g their key into the Recipient’s list box and then click OK. For
complete instructions on how to encrypt and sign and decrypt and
verify e-mail, see Chapter 4.
Taking Shortcuts
While you will find that PGP is quite easy to use, a number of shortcuts
are available to help you accomplish your encryption tasks even quicker.
You can drag a file containing a key into the PGPkeys window to add it
to your key ring. These keyboard shortcuts are shown on all of the PGP
menus and other shortcuts are described in their proper context
throughout this manual.
PGP for Personal Privacy, Version 5.0 User’s Guide for the Mac OS 15
Page 24

16 Chapter 2: Getting Started
Page 25

Chapter 3
Making and Exchanging Keys
This chapter describes how to generate the private and public key
pairs that you need to correspond with other PGP users. It also
explains how to distribute your public key and obtain the public
keys of others so that you can begin exchanging private and
certified e-mail.
Key Concepts
PGP is based on a widely accepted and highly trusted “public key
encryption” system by which you and other PGP users generate a key
pair consisting of a private key and a public key. As its name implies,
only you have access to your private key, but in order to correspond with
other PGP users, you need a copy of their public key and they need a
copy of your public key. You use your private key to sign the
messages and file attachments you send to others and to decrypt the
messages and files they send to you. Conversely, you use the public keys
of others to send them encrypted mail and to verify their digital
signatures.
e-mail
NOTE:
PGP for Personal Privacy, Version 5.0 User’s Guide for the Mac OS 17
Without going into too much technical detail, you might be interested to
know that it is not actually the content of the
using the public key encryption scheme. Instead, the data is encrypted
using a much faster single-key algorithm, and it is this single key that is
actually encrypted using the recipients public key. The recipient then
uses their private key to decry pt this k ey, which allows them to decipher
the encrypted data.
e-mail
that is encry pted
Page 26

Your private key is also used to sign the contents of a given
e-mail
message or file attachment. Anyone who has a copy of your public key
can check your digital signature to confirm that you are the originator of
the mail and that the contents have not been altered in any way during
transit. In the same way, if you want to verify somebody else’s digital
signature or check the integrity of the
e-mail
they send to you, then you
need a copy of their public key to do so.
This version of PGP supports two distinct types of keys—the RSA key
used in older versions of PGP and a new type of key called DSS/DiffieHellman which is based on the latest advancements in cryptographic
technologies. If you plan to exchange
e-mail
with someone who has
PGP for Personal Privacy, Version 5.0 or later, then you can take
advantage of the new DSS/Diffie-Hellman keys. However, if you are
corresponding with someone who is using a previous version of PGP,
you have to use the traditional RSA keys to communicate with them.
NOTE:
If you are upgrading from an earlier version of PGP, you have probably
already generated a private key and have distributed its matching public
key to those with whom you correspond. In this ca se you don’t have to
make a new key pair (as described in the nex t section). I f you ha ve existing
keys, you can copy them into your PGP keyrings folder after installation.
Making a Key Pair
Unless you have already done so while using another version of PGP,
the first thing you need to do before sendi ng or receiving encrypted and
certified
e-mail
a private key that only you possess and a public key that you freely
distribute to those with whom you correspond.
is create a new key pa ir. A key pair consists of two keys:
18 Chapter 3: Making and Exchanging Keys
Page 27
To Create a New Key Pair
1. Either choose the PGPkeys option from PGPmenu or double-click on
the PGPkeys icon from the program folder.
The PGPkeys window opens:
2. Choose New Key option from the Keys menu.
The Key Generation W iz ard pr ovides some intr oductory informa tion
on the first screen.
3. When you are through reading this information, click Next to
advance to the next dialog box.
PGP for Personal Privacy, Version 5.0 User’s Guide for the Mac OS 19
Page 28
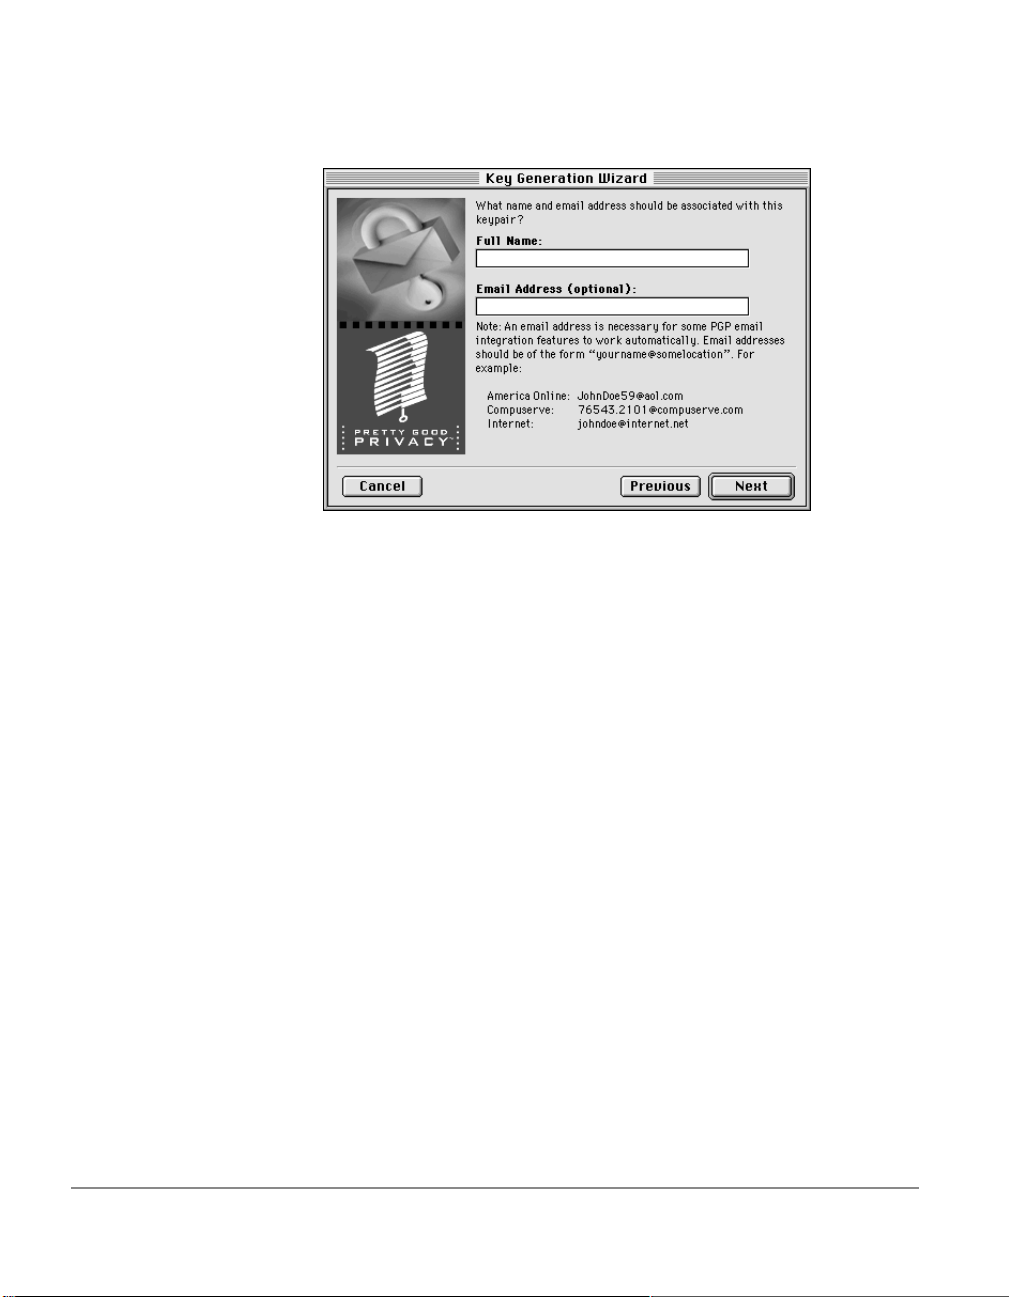
The Key Generation Wizard then asks you to enter your user name
and
e-mail
address.
4. Enter your name on the first line and your
second line.
It’s not absolutely necessary to enter your real name or even your
mail
address. However, using your real name makes it easier for
others to identify you as the owner of your public key. Also, by using
your correct
one of a plug-in feature that automatically looks-up the appropriate
key when you address mail to a particular recipient.
5. Click Next to advance to the next dialog box.
e-mail
address, you and others can take advantage of
e-mail
address on the
e-
20 Chapter 3: Making and Exchanging Keys
Page 29
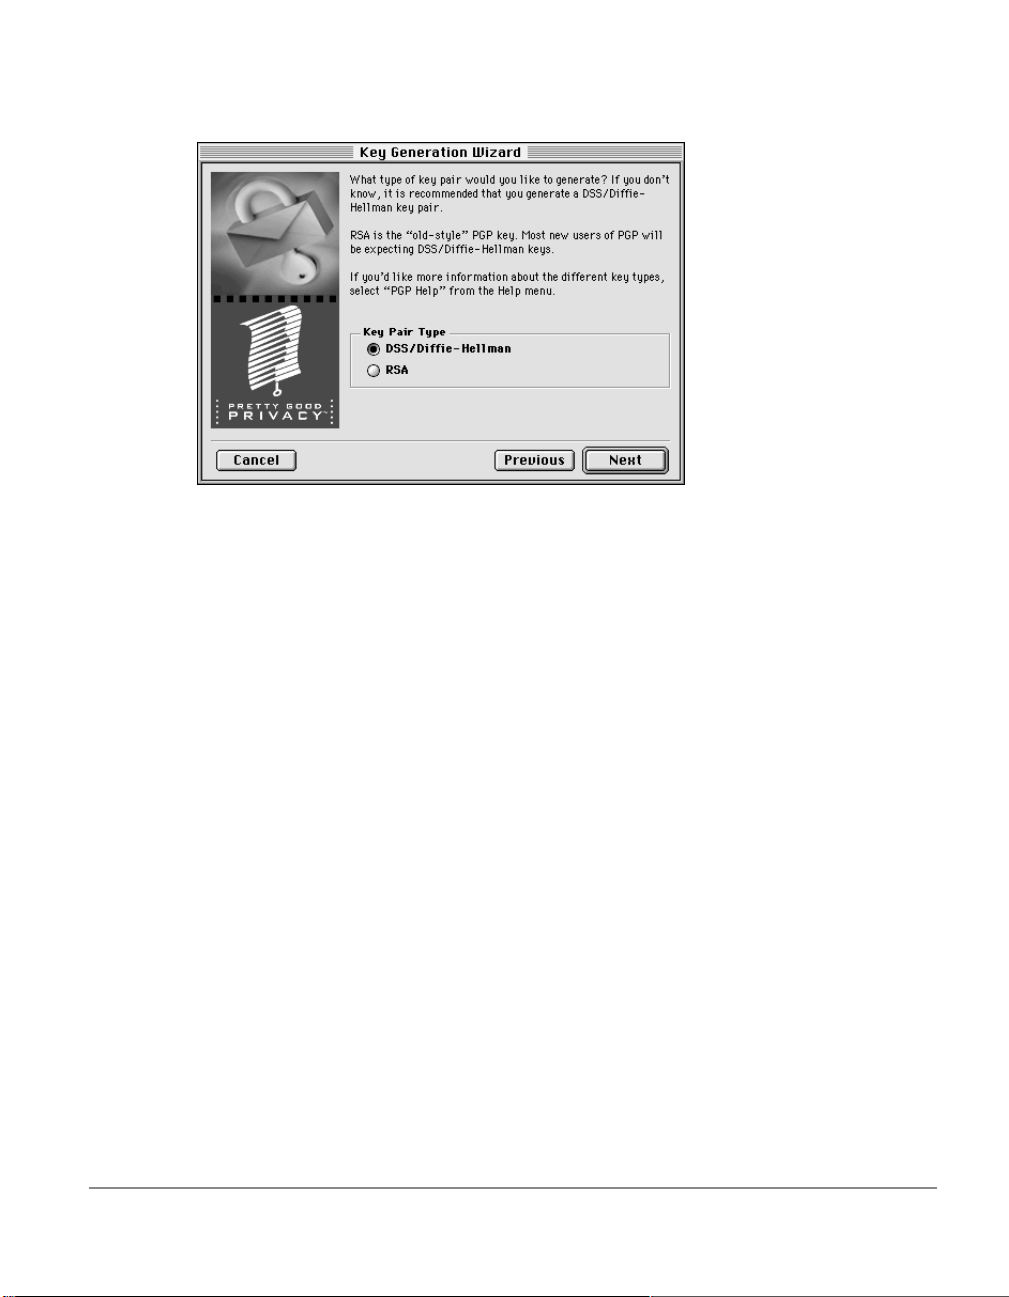
The Key Generation Wizard then asks you to choose a key type.
6. Select a key type, either DSS/Diffie-Hellman or RSA.
Earlier versions of PGP use an older technology referr ed to as RSA to
generate keys. Beginning with this version of PGP, you have the
option of creating a new type of key based on the newer DSS/DiffieHellman technology.
• If you plan to correspond with individuals who are still using the
older RSA keys, you will probably want to generate an RSA key
pair that is compatible with older versions of the program.
• If you plan to correspond with individuals who have the latest
version of PGP, you can take advantage of the new technology and
generate a pair of DSS/Diffie-Hellman keys.
• If you want to be able to exchange
should make a pair of RSA keys and a pair of DSS/Diffie-Hellman
keys and then use the appropriate set depending on the version of
PGP that is being used by the recipient.
7. Click Next to advance to the next dialog box.
PGP for Personal Privacy, Version 5.0 User’s Guide for the Mac OS 21
e-mail
with all PGP users, you
Page 30

The Key Generation Wizard asks you to specify a size for your new
keys.
8. Select a key size (from 768 to 3072 ) or enter any custom key size fr om
(from 512 to 4096).
The key size corresponds to the number of bits used to construct
your digital key. The larger the key, the less chance that someone will
ever be able to crack it, but the longer it will take to perform the
decryption and encryption process. You will need to strike a balance
between the convenience of performing PGP functions quickly with
a smaller key and the increased level of security provi ded by a larger
key. Unless you are exchanging extremely sensitive information that
is of enough interest that someone would be willing to mount an
expensive and time consuming cryptographic attack in order to r ead
it, you are probably safe using a key composed of 2048 bits.
NOTE:
When creating DSS/Diffie-Hellman keys, the size of the DSS portion of the key is limited to 1024 bits.
9. Click Next to advance to the next dialog box.
22 Chapter 3: Making and Exchanging Keys
Page 31

The Key Generation Wizard asks you to indicate when the key pair
should expire.
10.Indicate when you want your keys to expire. You can either go with
the default selection which is “never”, or you can enter a specific
number of days after which the keys will expire.
Once you create a key pair and have distributed your public key to
the world, you will probably continue to use the same keys fr om that
point on. However, under certain conditions, you may want to create
a special set of keys that you plan to use for only a limited period of
time. In this case, when the public key expires it can no longer be
used by someone to encrypt mail for you but it can still be used to
verify your digital signature. Similarly, when your private key
expires, it can still be used to decrypt mail that was sent to you
before your public key expired but can no longer be used to sign
mail for others.
11.Click Next to advance to the next dialog box.
PGP for Personal Privacy, Version 5.0 User’s Guide for the Mac OS 23
Page 32

The Key Generation Wizard asks you enter a passphrase.
12.In the “Passphrase” entry box, enter the string of characters or words
you want to use to gain exclusive access to your private keys. To
confirm your entry, press the Tab key to advance to the next line,
then enter the same passphrase again. You will notice that the
passphrase bar fills in to indicate the quality of the passphrase you
are entering .
Normally, as an added level of security, the characters you enter for
the passphrase do not appear on the screen. However, if you are sure
that no one is watching over your shoulder, and you would like to
see the characters of your passphrase as you type, clear the “Hide
Typing” check box.
TIP:
Your passphrase should contain multiple words and may include spaces,
numbers, and other printable characters. Choose something that you can
remember easily but that others won’t be able to guess, and keep in mind
that the passphrase is case sensitive. The longer your passphrase, and the
wider the variety of characters it contains, the more secure it is. Try to
include equal numbers of upper and lowercase alphabetic characters,
numbers, punctuation marks and so on.
13.Click Next to begin the key generation process.
24 Chapter 3: Making and Exchanging Keys
Page 33

The Key Generation Wizard indicates that it is busy generating your
key.
If you have entered an inadequate passphrase (less than 8
characters), a warning message appears before the keys are
generated and you have the choice of accepting the bad passphrase
or entering a more secure one before continuing.
If there is not enough random information upon which to build the
key, the PGP Random Data dialog box appears. As instructed on the
screen, move your mouse around and enter a series of random
keystrokes until the progress bar in the dialog box is completely
filled in. Your mouse movements and keystrokes generate random
information that is needed to create a unique key pair.
After the key generation process begins, it may take several minutes
to generate the keys, depending on the speed of your computer.
Eventually the Key Generation Wizard indicates that the key
generation process has completed.
14.Click Next to advance to the next dialog box.
PGP for Personal Privacy, Version 5.0 User’s Guide for the Mac OS 25
Page 34

The Key Generation Wizard indicates that you have successfully
generated a new key pair.
When the Key Generation process completes a pair of keys representing
your newly created keys appears in the PGPkeys window. You will
notice that the older RSA keys are blue and the newer DSS/DiffieHellman keys are yellow. At this point you can examine your keys by
checking their properties and the values associated with them; you may
also want to add other user names or
details on how to examine the pr operties associ ated with a key or how to
included additional user names or addresses, see Chapter 5.
e-mail
addresses. For complete
26 Chapter 3: Making and Exchanging Keys
Page 35

Protecting Your Keys
Once you have generated a set of keys with PGPkeys, it is wise to save a
backup copy of your keyring, and put them in a safe place just in case
something happens to the originals. In fact, when you close the PGPkeys
window after creating a new key pair, you are prompted to save a
backup copy:
Your private keys and your public keys are stored in separate keyring
files, which you can copy just like any other files to another location on
your hard drive or to a floppy disk. By default, the private keyring and
the public keyring are stored along with the other program files in the
PGP file directory, but you can save your backups in any location you
like.
When you specify that you want to save a backup copy of yo ur keys, the
Save As dialog box appears asking you to specify the location in which
to store a backup of your private and public keyring files.
Besides making backup copies of your keys, you should be especially
careful about where you store your private key. Even though your
private key is prote cted by a pass phrase that only you should know, it is
possible that someone could discover your passphrase and then use
PGP for Personal Privacy, Version 5.0 User’s Guide for the Mac OS 27
Page 36

your private key to decipher your
For instance, somebody could look over your shoulder and watch the
keystrokes you enter or intercept them on the network or even over the
airwaves.
To prevent anyone who might happen to get hold of your passphrase
from being able to use your private key, you should only store it on your
own computer. If your computer is attached to a network, you should
also make sure that your files are not automatically included in a
system-wide backup where others might gain access to your private key.
Given the ease with which computers are accessible over today’s
networks, if you are working with extremely sensitive information, you
may want to keep your private key on a floppy disk which you can
insert like an old fashioned key whenev er you want to read or sign your
private mail.
e-mail
or forge your digital signature.
Distributing Your Public Key
After you create your keys , you need to make them availabl e to others so
that they can send you encrypted
signature. You have several alternatives for distributing your public key:
• Make your public key available through a public key server
e-mail
and verify your digital
• Include your public key in an
• Export your public key or copy it to a text file
Since your public key is basically composed of a block of text, it is really
quite easy to make it available through a public key server, include it in
e-mail
an
use whatever method is most convenient to add your public key to their
public keyring.
message or export or copy it to a file. The recipient can then
e-mail
message
Making your Public Key Available Through a Key Server
Probably the best long-term and hassle-free method for making your
public key available is to place it on a public key server where anyone
can access it. By storing your publ ic key on a key server, people can send
e-mail
you
also relieves you and others from having to maintain a large number of
public keys that you rarely use.
28 Chapter 3: Making and Exchanging Keys
without having to explicitly request a copy of your key. It
Page 37

There are a number of key servers, such as those offered by PGP, Inc.
where you can make your public key available for anyone to access. It
doesn’t really matter which key server you use to initially submit your
public key, because once you submit your key to one server it is
automatically propagated to all the other major servers in the world.
Each site provides a slightly different interface for submitting a public
key, but the procedure basically requires you to copy the text content of
your key and then paste it into the proper place on the key server.
However, instead of going through the time-consuming proc ess of fi ring
up a browser and then contacting a public key server, with this version
of PGP you can immediately send or retrieve public keys from a server
whenever you create a new key or at any time ther eaf ter fr om within the
PGPkeys window.
To Send your Public Key to a Key Server
1. If you are not already connected to the Internet, do so now.
2. Open the PGPkeys window.
3. Select the icon that represents the publi c key you want to post on the
key server.
4. Choose Send Selected Keys from the Keyserver submenu of the
Keys menu.
After placing a copy of your public key on a key server, you can tell
those who want to send you encrypted mail or verify your digital
signature to get a copy of your key from the server. Even if you don’t
explicitly point someone to your public key, they can get a copy by
searching the key server for your name or
include the Web address for their public key in the footer of their
messages; with some e-mail applications, the re cipient can just doubleclick the address to access a copy of your key on the server.
If you ever need to change your
signatures, all you have to do to r eplac e your old key is send a new copy
to the server and the information is automatically updated. However,
you should be aware that while new information is added to a key on
the server, deleted information is not removed. This means that if you
delete a signature or user name, the key on the public server is not
updated to reflect these deletions.
PGP for Personal Privacy, Version 5.0 User’s Guide for the Mac OS 29
e-mail
e-mail
address or you acquire new
address. Many people
e-mail
Page 38

If your key is ever compromised, you can revoke your key which tells
the world to no longer trust that version of your key. (See Chapter 5 for
more details on how to revoke a key).
Including your Public Key in an e-mail Message
Another convenient method of delivering your public key to someone is
to include it along with your
To Include your Public Key in an e-mail Message
1. Open the PGPkeys window.
2. Select your key pair , then select the Copy option fr om the Edit menu .
e-mail
message.
3. Open the editor you use to compose your
cursor in the desired area, and then choose Paste from the Edit
menu. In some
from the PGPkeys window into the text of your
transfer the key information.
When you send someone your public key, be sure to sign the
That way, the recipient can verify your signature and be sure t hat no one
has tampered with the information along the way.
e-mail
applications, you can simply drag your key
e-mail
messages, place the
e-mail
message to
e-mail
.
Exportin g your Public Key to a File
Another method of distributing your public key is to copy it to a file and
then make this file available to the person with whom you want to
communicate. There are several ways to copy your public key to a file:
• Select the icon representing your key pair from the PGPkeys
window, then choose Export Keys from the Keys menu and enter the
name of the file where you want the key to be saved.
• Select the icon representing your key pair in the PGPkeys window,
choose Copy from the Edit menu and then choose Paste to insert the
key information into a text document.
ALERT
30 Chapter 3: Making and Exchanging Keys
If you are sending your key to colleagues who are using PCs, enter a
name of up to eight initial characters and three additional characters
for the file type extension (for example, e-mail.txt).
Page 39

Obtaining the Public Keys of Others
Just as you need to distribute your public key to those who want to send
you encrypted mail or to verify your digital signature, you need to
obtain the public keys of others so you can send them encrypted mail or
verify their digital signatures. You have several alternatives for
obtaining someone’s public key:
• Get the key from a public key server.
• Add the public key directly from an
• Import the public key from a file.
Since public keys are really just blocks of text, it is really quite easy to
add one to your keyring by importing it fr om a f ile or b y copying it f r om
e-mail
an
keyring. Here is an example of a public key block of text:
message or a key server and then pasting it into your public
e-mail
message.
Getting Public Keys from a Key Server
If the person to whom you want to send encrypted mail is an
experienced PGP user, chances are that they have placed a copy of their
public key on a key server. This makes it very convenient for you to get a
PGP for Personal Privacy, Version 5.0 User’s Guide for the Mac OS 31
Page 40

copy of their most up-to-date key whenever you want to send them mail
and also relieves you from having to store a lot of keys on your public
key ring.
There are a number of public key servers, suc h as the one maintained by
PGP, Inc., where you can locate the keys of most PGP users. If the
recipient has not pointed you to the Web address where their public key
is stored, you can access any key server and do a search for the user’s
name or
include the keys stored on all the other servers.
To Get Someone’s Public Key from a Key Server
1. Open the PGPkeys application from the PGPmenu item in the
2. Choose Find New Keys from the Keyserver submenu of the Keys
e-mail
menubar or by double-clicking the application icon in the Finder.
menu.
The “Search Keyserver” dialog box appears.
address, since all key servers are regularly updated to
3. Enter the
If a public key for the specified user is found, you are asked whether
you want to add it to your public keyring. When you add public
keys to your keyring, the keys will show up in the PGPkeys window
where you can examine them to make sure that they are valid.
e-mail
address or user name to locate the users public key.
Adding Public Keys from e-mail Messages
One convenient way to get a copy of someone’s public key is to have
them include it when they send you encrypted
mail
applications that is supported by the PGP plug-in, then adding the
sender’s public key to your public key ring can be accomplished by
simply clicking a button. For example, if you are using Eudora, and a
32 Chapter 3: Making and Exchanging Keys
e-mail
. If you have an
e-
Page 41

mail message arrives with a block of text containing someone’s public
key, you select PGP Add Keys from the message Plug-ins submenu in
the Edit menu.
If you are using an e-mail application that is not supported by the plugins, you can copy the block of text that represents the public key and
paste it into the PGPkeys window and thus add the key to your public
keyring.
Importing a Public Key from a File
Another method of obtaining someone’s public key is to have them save
it to a file from which you can import it or copy and paste it into your
public keyring. There are several methods of extracting someone’s
public key and adding it to your public keyring.
• Choose Import Keys from the Keys menu and then enter the name
of the file where the public key is stored.
• Open the text document where the public key is stored, select the
block of text representing the key, then choose Copy from the Edit
menu. Then, go to the PGPkeys window and choose Paste from the
Edit menu. The key will then show up as an icon in the PGPkeys
window.
Verifying the Authenticity of a Key
When you exchange keys with someone, it is sometimes hard to tell if
the key really belongs to that person. PGP provides a number of
safeguards by all owing you to chec k a key’ s authenticity, to vouch for its
integrity and to warn you if you are using a key that is not completely
trusted.
One of the major vulnerabilities of public key enrcryption systems is the
ability of some eavesdropper to mount a “man-i n-the-m iddle ” attac k by
replacing someone’s public key with one of their own. In this way they
can intercept any encrypted
using their own key, then encrypt it again with the person’s real key and
send it on to them as if nothing had ever happened. In fact, this could all
be done automatically through a sophisticated computer program that
stands in the middle and deciphers all of your correspondence.
PGP for Personal Privacy, Version 5.0 User’s Guide for the Mac OS 33
e-mail
intended for that person, decrypt it
Page 42

Based on this scenario, you and those with whom you exchange e-mail
need a way to determine whether you do indeed have legitimate copies
of each others keys. The only way to be complet ely sur e that a public key
actually belongs to a particular person is to have the owner copy it to a
diskette and then physically hand it to you. Since you are not always
within close enough proximity to personally hand a disk to someone,
you will generally exchange public keys via
public key server.
Even though these are somewhat less secure methods of exchanging
tamper-proof keys, you can still determine if a key really belongs to a
particular person by checking its digital fingerprint, a unique series of
numbers generated when the key is created. By comparing the
fingerprint on your copy of someone’s public key against the fingerprint
on their original key, you can be relatively sure that you do in fact have a
valid copy of their key.
The most definitive way to check a key’s fingerprint is to call the person
and have them read their fingerprint over the phone or have them give
you the key on a diskette in person.
Once you are absolutely convinced that you have a legitimate copy of
someone’s public key, you can then sign their key. By signing someone’s
public key with your private key, you are signifying to the world that you
are sure the key belongs to the alleged user. For instance, when you
create a new key, it is automatically certified with your own digital
signature, since it is a reasonably safe assumption that the person
creating the key is in fact the true owner. The reason for signing your
own key is to prevent anyone from modifying it which would
immediately invalidate your signature.
e-mail
or get them from a
PGP users often have other trusted users sign their public keys to further
attest to their authenticity. For instance, you might send a trusted
colleague a copy of your public key with a request that they certify and
return it so you can include their signature when you post your key on a
public key server. Now, when someone gets a copy of your public key,
they don’t necessarily have to check the key’s authenticity themselves,
but can instead rely on how well they trust the person who signed your
key. PGP provides the means for establishing this level of trust for each
of the public keys you add to your public keyring and shows the le vel of
trust associated with each key in the PGPkeys window. This means that
34 Chapter 3: Making and Exchanging Keys
Page 43

when you get a key from someone whose key is signed by a trusted
introducer, you can be fairly sure that the key belongs to the purported
user.
For details on how to sign keys and validate users, see Chapter 5.
PGP for Personal Privacy, Version 5.0 User’s Guide for the Mac OS 35
Page 44

36 Chapter 3: Making and Exchanging Keys
Page 45

Chapter 4
Sending and Receiving Private E-mail
This chapter explains how to encrypt and sign the e-mail you send
to others and decrypt and verify the e-mail others send to you.
Encrypting and Signing E-mail
The quickest and easiest way to encrypt and sign e-mail is with an
application supported by the PGP plug-ins. Although the procedure
varies slightly between different
encryption and signing process by clicking the appropriate buttons in
the application’s toolbar. In addition, if you are using an application
such as Eudora, that supports the PGP/MIME standard, you can
encrypt and sign your
when you send or receive your
e-mail
e-mail
messages as well as any file attachments
e-mail
applications, you perform the
.
If you are using an
plug-ins, you can encrypt and sign your
which is available in most popular text-based applications. When
accessing this menu from the Finder, you can encrypt and sign or
decrypt and verify files and even entire folders.
As an alternative to the other interfaces, you can also use the PGPtools
window to encrypt and sign text and files. When using this interface to
encrypt and sign text, you copy the text to the clipboard, perform the
desired operation by choosi ng the appropriate button and then copy the
contents back to your application. You can also encrypt and/or sign a
selected portion of text or even files by dragging them to t he appropriate
button.
PGP for Personal Privacy, Version 5.0 User’s Guide for the Mac OS 37
e-mail
application that is not supported by the PGP
e-mail
messages via PGPmenu
Page 46

NOTE:
If you do not se nd y our e mai l imm ediatel y but inste ad tempo rarily store
it in your outbox, you should be aware that when using some email
applications, the information will not be encrypted until the email is
actually transmitted. Befor e queu ing encrypted messages you sho uld
check to see if your application does in fact encrypt the messages in
your outbox. If it does not, you might want to consider encrypting the
message via the clipboard before queuing it in the outbox.
Encr yptin g and Signing with Supported e-mail Applications
When you are encrypting and signing with an e-mail application which
is supported by the PGP plug-ins, you have two choices depending on
what type of
e-mail
communicating with other PGP users who have an
that supports the PGP/MIME standard, you can take advantage of a
PGP/MIME feature to encrypt and sign your
file attachments automatically when you send them. If you are
communicating with someone who does not have a PGP/MIMEcompliant e-mail application, you should encrypt your messages and
file attachments with PGP/MIME turned off to avoid any compatibility
problems. You can turn this feature on and off by selecting the
appropriate options from the e-mail pane of the Preferences dialog box
application the recipient is using. If you are
e-mail
e-mail
application
messages and any
To Encrypt and Sign with Supported e-mail Applications
1. Use your e-mail application to compose your
e-mail
message just as
you normally would.
2. When you are finished composing the text of your
e-mail
message,
specify whether you want to encrypt and sign the text of your
message by clicking the encrypt and/or si gn buttons in the menuba r.
If you encrypt and sign your e-mail on a re gular basis, you can cr ea te
a stationary file with the encrypt and sign settings turned on. See the
manual or help system for information on how to set up a stationery
file.
38 Chapter 4: Sending and Receiving Private E-mail
Page 47

Encrypt button
Sign button
Sign
Encrypt
When you click one of these buttons, a c heck b ox appe ars next to the
selected buttons to indicate the operations you want to perform.
3. After composing your message, send your
e-mail
as you normally
do.
If you have elected to sign the encrypted data, the Passphrase dialog
box appears requesting your passphrase before the mail is sent.
4. Enter your passphrase and then click OK.
PGP for Personal Privacy, Version 5.0 User’s Guide for the Mac OS 39
Page 48

As long as you have a copy of the public keys for every one of the
recipients, the appropriate keys are used. However, if you specify a
recipient for whom there is no corresponding public key, the Key
Selection dialog box appears so you can specify the desired key.
5. Drag the public keys for those who are to receive a copy of the
encrypted
e-mail
message into the “Recipients” list box.
The “Validity” bar indicates the minimum level of confidence that
the public keys in the Recipient list are valid. This validity is based
on the signatures associated with the key and t he trust indicates how
well you can rely on the owner of the key to vouch for the
authenticity of another users key. See Chapter 5 for more details.
NOTE:
40 Chapter 4: Sending and Receiving Private E-mail
If you are not using PGP/MIME, you must encrypt any files you want to
send as attachments from the Finder before sending your message.
Page 49

Encrypting and Signing with PGPmenu
If you are using an
PGP plug-ins you can encrypt and sign your
can also encrypt files and entire directories while you are in the Finder.
NOTE
To Encrypt and Sign text with PGPmenu
1. If you want to encrypt text, use your application to compose your
text just as you normally would.
2. When you are through composing the text, click the desired
operation from the PGPmenu to encrypt and/or sign the message.
If PGPmenu does not show up in your application , you will need to add it from
the PGPmenu pane of the Preferences dialog box.
e-mail
application that is not yet supported by the
e-mail
with PGPmenu. Y ou
PGP for Personal Privacy, Version 5.0 User’s Guide for the Mac OS 41
Page 50

When you are encrypting, the Recipients dialog box appears.
3. Click and drag each of the public keys for those who are to receive a
copy of the encrypted
then click OK. The Validity and Trust bars indicate the level of
confidence that the public keys in the Recipient list are valid. This
validity is based on the signatures associated with the key and the
trust indicates how well you can rely on the owner of the key to
vouch for the authenticity of another users key. See Chapter 5 for
more details.
e-mail
message into the Recipients list box,
When you are signing, the Passphrase dialog box appears.
4. Enter your passphrase and click OK.
42 Chapter 4: Sending and Receiving Private E-mail
Page 51

5. Send your mail as you normally do.
To Encrypt and Sign Files with PGPmenu
1. While in the Finder, click the desired operation from the PGPmenu
to encrypt and/or sign a file or the contents of a folder.
When you are encrypting, the Recipients dialog box appears.
2. Click and drag each of the public keys for those who are to receive a
copy of the encrypted
then click OK. The Validity and Trust bars indicate the level of
confidence that the public keys in the Recipient list are valid. This
validity is based on who has signed the key and how trustworthy
PGP for Personal Privacy, Version 5.0 User’s Guide for the Mac OS 43
e-mail
message into the Recipients list box,
Page 52

you consider those users to vouch for the authenticity of the key. See
Chapter 5 for more details and Chapter 6 for a discussion of
Encryption Basics.
When you are signing, the Passphrase dialog box appears.
3. Enter your passphrase and click OK.
Encrypting and Signing from PGPtools
If you are using an
PGP plug-ins, you can encrypt and sign your
can also encrypt files.
To Encrypt and Sign Text from PGPtools
1. Use the editor supplied with your
ite word processing program to compose the message you want to
send.
2. When you are ready to send the message, select the text you want to
encrypt or choose Select All from the Edit menu available in most
applications.
3. Choose Copy from the Edit menu to copy the contents of your
message to the Clipboard.
You should note that anytime you copy or cut text in your
application, it is temporarily stored on the Clipboard.
e-mail
application that is not yet supported by the
e-mail
e-mail
application or your favor-
with PGPtools. You
44 Chapter 4: Sending and Receiving Private E-mail
Page 53

4. Open the PGPtools window and click Encrypt or Encrypt & Sign.
The Open dialog box appears:
5. Select the Use Clipboard button to specify that you want to encrypt
the text stored on the clipboard. The “Key Selection” dialog box
appears:
6. Click twice or drag the public keys for those who are to receive a
copy of the encrypted
PGP for Personal Privacy, Version 5.0 User’s Guide for the Mac OS 45
e-mail
message into the Recipients list box.
Page 54

The Validity and T r ust bars indicat e the minimum level of confidence
that the public keys in the Recipient list are valid. This validity is
based on the signatures associated with the key and the trust
indicates how well you can rely on the owner of the key to vouch for
the authenticity of another users key. See Chapter 5 for more details
7. Click OK when you have selected the appropriate users.
If you have elected to sign the message, the PGP Signing Passphrase
dialog box appears requesting your personal passphrase for your
default private key.
8. Enter your passphrase and click OK.
9. Return to your
from the Edit menu. This will copy the encrypted message back into
e-mail
your
10.Send your
To Encrypt and Sign Files from PGPtools
If you plan to send an encrypted file as an attachment with your
message, or if you just want to encrypt a file to protect it on your own
computer, you do so from PGPtools. Here are the steps you follow to
encrypt and/or sign a file from the desktop:
1. Start PGPtools.
2. When the PGPtools window appears, drag each file or files that you
want to encrypt onto the Encrypt or Encrypt & Sign button.
You can select multiple files, but you must encrypt and sign each of
them individually.
e-mail
application.
e-mail
application and choose the Paste command
to the intended recipient(s).
e-mail
46 Chapter 4: Sending and Receiving Private E-mail
Page 55

3. The “Recipients” dialog box appears where you can select the
recipient’s keys for the file you are encrypting or signing:
.
4. Select the public keys by clicking twice or dragging them to the
Recipients list, then click OK.
Your encrypted files will appear on the Desktop or in the folder in
which you were working as represented by the following icons..
detached signatureencrypted as textencrypted as binary
Decr ypting and Verifying E-mail
The quickest and easiest way to decrypt and verify the
you is with an application supported by the PGP plug-ins. Although the
procedure varies slightly between different
you are using an
e-mail
application supported by the plug-ins, you can
e-mail
perform the decryption and verification process by clicking a button in
your application’s toolbar. In addition, if you are using an application
PGP for Personal Privacy, Version 5.0 User’s Guide for the Mac OS 47
e-mail
sent to
applications, when
Page 56

that supports the PGP/MIME standard, you can decrypt and verify your
e-mail
in your message.
messages as well as any file attachments by just clicking an icon
If you are using an
plug-ins, you decrypt and verify your
Clipboard. Also, if your
must decrypt them separately from the Macintosh desktop.
e-mail
e-mail
application that is not supported by the PGP
e-mail
includes encrypted file attachments , you
messages via the
Decrypting and Verifying from Supported e-mail Applications
If you are communicating with other PGP users, and they have
encrypted and signed their mail using the PGP/MIME standard, a lock
icon will appear when you open your e-mail.
In this case, you can decrypt and verify the message and any attached
files by si mply double-clicking this icon.
48 Chapter 4: Sending and Receiving Private E-mail
Page 57

If you are receiving e-mail from someone who is not using a PGP/
MIME-compliant e-mail application, you will see a bock of encrypted
text.
In this case, you can decrypt the ciphertext by clicking the open
envelope icon in the message window. Also, if there are any encrypted
file attachments, you decrypt them from with the PGPtools application
or with PGPmenu from the Finder.
PGP for Personal Privacy, Version 5.0 User’s Guide for the Mac OS 49
Page 58

To Decrypt and Verify from Supported e-mail Applications
1. Open your
e-mail
message just as you normally do. If someone has
sent you mail using PGP/MIME, you will see the lock icon. Click on
the lock icon or the attached file. If the message was sent without
using PGP/MIME, then your message will contain the encrypted
text as well as any digital signature.
To decrypt and verify the contents of the
e-mail
message, click the
open lock button located in your application’s menubar.
decrypt and verify
.
The Enter Passphrase dialog box appears requesting that you enter
your passphrase:
2. Enter your passphrase and click OK.
50 Chapter 4: Sending and Receiving Private E-mail
Page 59

The message and any attachments are decrypted. If the message is
signed, a dialog box indicates whether the signature is valid.
3. At this point, you can save the message in its decrypted state, or you
can discard the changes and revert to the original encrypted version
so it remains secure.
Decrypting and Verifying from PGPmenu
If your
easily decrypt your
You can also decrypt and verify file attachments and even entire
directories when you are using PGPmenu from the Finder.
To Decrypt and Verify Text from PGPmenu
1. In the editor supplied with your
2. Choose Decrypt/Verify from PGPmenu. The PGP Enter Passphrase
3. Enter your passphrase and then click OK.
e-mail
encrypted text.
In most applications, choose Select All to highlight all of the text.
dialog box appears requesting that you enter your passphrase:
application is not supported by the PGP plug-ins, you can
e-mail
messages from the PGPmenu application.
e-mail
application select the
The message is decrypted. If there are any signatures, an attempt is
made to verify the signature a nd a r esults window indicates whether
the signature is valid.
4. At this point, you can save the message in its decrypted state or
discard the changes and revert to the original encrypted version so
that it remains secure.
PGP for Personal Privacy, Version 5.0 User’s Guide for the Mac OS 51
Page 60

To Decrypt and Verify Files from PGPmenu
e-mail
If the
verify the file using PGPmenu from the Finder
1. Select the files or folder containing the information you want to
decrypt.
2. From the PGPmenu, choose Decrypt/Verify. The PGP Enter
Passphrase dialog box appears requesting that you enter your
passphrase:
3. Enter your passphrase and then click OK.
The files are decrypted. If there are any signatures, an attempt is
made to verify the signature a nd a r esults window indicates whether
the signature(s) are valid.
you receive has file attachments, you must decrypt and
Decrypting and Verifying from PGPtools
To Decrypt and Verify Text from PGPtools
1. Select the encrypted text you want to decrypt and verify and copy it
to the clipboard.
2. Start PGPtools.
52 Chapter 4: Sending and Receiving Private E-mail
Page 61

3. When the PGPtools window appears, choose the Decrypt/Verify
button and you are asked to specify the source of the text. The
Decrypt/Verify Open dialog box appears:
4. Choose Use Clipboard. The Enter Passphrase dialog box appears:
5. Enter your passphrase. The encrypted text stored on the clipboard is
decrypted and is replaced in the clipboard.
6. Copy or save the decrypted text to a file.
7. Enter your passphrase and click OK.
To Decrypt and Verify Files from PGPtools
1. Start PGPtools.
2. When the PGPtools window appears, drag each file or files that you
want to decrypt onto the Decrypt/Verify button.
3. The Save Encrypted File As dialog box appears. Specify the location
and enter the name of the file where you want to save the decrypted
version of the file.
If you do not explicitly enter a name, the original file name is used.
PGP for Personal Privacy, Version 5.0 User’s Guide for the Mac OS 53
Page 62

4. Click the Save button to save the file.
5. The Enter Passphrase dialog box appears requesting that you enter
your passphrase:
6. Enter your passphrase and click OK.
The decrypted file is saved in the specified location. If there are any
signatures, an attempt is made to verify each signature and the
Verification Results dialog box indicates whether the signature is
valid.
54 Chapter 4: Sending and Receiving Private E-mail
Page 63

Chapter 5
Managing Keys And Setting Preferences
This chapter explains how to examine and manage the keys stored on
your digital keyrings. It also describes how to set your preferences to
suit your particular comp uting environment.
Managing Your Keys
The keys you create as well as those you collect fr om others are stored in
digital keyrings, which are essentially files stored on your hard drive or
on a floppy disk. Normally your private keys are stored in a file named
“PGP Private Keys” and your public keys are stored in another file
named “PGP Public Keys”. These files are usually located in the PGP
Keyrings folder. The following icons are used to represent your private
and public and keyring files, making them easy to distinguish when you
are browsing through your files.
Private Keyring Public Keyring
NOTE:
PGP for Personal Privacy, Version 5.0 User’s Guide for the Mac OS 55
In the event you have more than one key pair, or if you are not comfortable
storing your keys in the usual place, you can choose a different file name or
location.
Page 64

On occasion you may want to examine or change the attributes
associated with your keys. For instance, when you obtain someone’s
public key, you might want to identify its type (either RSA or DSS/
Diffie-Hellman), check its fi ngerpri nt, or determi ne its validity based on
any digital signatures included with the key. You may also want to sign
someone’s public key to indicate that you believe it is valid, assign a
level of trust to the key’s owner or change a passphrase for your private
key. You perform all of these key-management functions from the
PGPkeys window.
The PGPkeys Window
To open the PGPkeys window, choose PGPkeys from PGPmenu or
double-click the application icon in the program folder.
In the PGPkeys window you see the keys you have created for yourself
as well as any public keys you have added to your public keyring.
Double keys repr esent the private and public ke y pairs you have cr eat ed
for yourself and single keys represent the public keys you have collecte d
from others. If you have more than one type of key, you will notice the
RSA-type keys are blue and the DSS/Diffie-Hellman keys are gold.
By clicking the triangle control to the left of a key, you can expand the
entries to reveal the user ID and e-mail addresses for the owner of the
key as represented by the fi gure icons. By clicking the triangle control to
the left of a figure icon, you can see the signatur es of any users who have
certified the key, as represented by the quill icon. If you don’t want to
56 Chapter 5: Managing Keys And Setting
Page 65

click down through the various levels of information for each key,
simply select the keys of interest and then choose Expand Selection
from the Edit menu.
PGPkeys Icon Definition s
The following table shows all of the mini-icons used in the PGPkeys
window, along with a description of what they represent.
ICONS WHAT THEY REPRESENT
A pair of gold keys represents your DSS/Diffie-Hellman key pair. The
key pair consists of your private key and your public key.
A single gold key represents a DSS/Diffie-Hellman public key.
A pair of blue keys represents your RSA key pair. The key pair consists
of your private key and your public key.
A single blue key represents an RSA public key.
When a key or key pair is grayed-out, they are temporarily unavailable
for decrypting and signing. You can disable a key from the PGPkeys
window which prevents seldom used keys from clutering up the Key
Selection dialog box.
A key with a red line through it indicates that the key has been revoked.
Users revoke their keys wh en they ar e no lon ger valid o r hav e bee n compromized in some way. A key with a red X through it represents a corrupted or damaged key.
A key with a clock ind icat es t ha t the k e y h as e xpired. A key’s expiration
date is established when the key is created.
A smiley face represents the owner of the key and lists the user names
and e-mail addresses associated with the key.
PGP for Personal Privacy, Version 5.0 User’s Guide for the Mac OS 57
Page 66

ICONS WHAT THEY REPRESENT
A quill indicates the si gnatures from those PGP users who have vouched
for the authenticity of the key. A signature with a red line through it
indicates a revoked signature. A signature with a red X through it indicates a bad or invalid signature.
An empty bar indicates an invalid key or an untrusted user.
A half filled bar indicates a marginally valid key or marginally trusted
user.
A full bar indicates a completely valid key or a completely trusted user.
Examining a Key
Along the top of the PGPkeys window are labels that correspond to the
properties associated with each key.
Name Shows an iconic representation of the key along with
the user name and e-mail address of the owner.
Validity Indicates the level of confidence that the key actually
belongs to the alleged owner. The validity is based on
who has signed the key and how well you trust the
signer to vouch for the authenticity of a key. The public
keys you sign yourself have the highest level of validity,
based on the assumption that you will only sign someone’s key if you are totally convinced that it is valid.
The validity of any other keys, which you have not personally signed, depends on the level of trust you have
granted to any other users who have signed the key. If
there are no signatur es associated with the key, then it is
not considered valid and a message indicating this fact
appears whenever you use the key.
Trust Indicates the level of trust you have granted to the
owner of the key to serve as an intr oducer for the public
keys of others. This trust comes into play when you are
unable to verify the validity of someone’s public key for
58 Chapter 5: Managing Keys And Setting
Page 67

yourself and instead elect to rely on the judgement of
other users who have signed the key. When you create a
set of keys, they are considered implicitly trustworthy,
as represented by the striping in the trust and validity
bars. When you receive a public key from someone that
has been signed by another of the user’s keys on your
public keyring, the level of authenticity is based on the
trust you have granted to the owner of that key. You
assign a level of trust (either Complete, Marginal, or
Never) in the Information window.
Creation Shows the date when the key was originally created.
You can sometimes make an assumption about the
validity of a key based on how long it has been in circulation. If the key has been in use for a while, it is less
likely that someone will try to replace it because there
are many other copies in circulation.
Size Shows the number of bits used to construct the key.
Generally, the larger the key, the less chance that it will
ever be compromised. However, larger keys require
more time to encrypt and decrypt data than do smaller
keys. When you create a DSS/Diffie-Hellman key, there
is one number for the DSS portion and another number
for the Diffie-Hellman portion.
PGP for Personal Privacy, Version 5.0 User’s Guide for the Mac OS 59
Page 68

Getting Detailed Information About a Key
In addition to the general attributes shown in the PGPkeys window, you
can also examine and change other key properties. To access the
properties for a particular key, select the desired key and then choose
Info from the Keys menu.
Key ID A unique identifying number associated with each key.
This identification number is useful for distinguishing
between two keys that share the same user name and email address.
Created The date when the key was created.
Key Type The key type. This is either RSA or DSS/Diffie-Hell-
man.
Expires The date when the key expires. The owner specifies this
date when they create their keys and the value is usually set to Never. However, some keys are set to expire
on a particular date if the owner only wants them to be
used for a limited period of time.
Trust Model Indicates the validity of the key based on its certifica-
tion and the level of trust you have in the owner to
vouch for the authenticity of someone else’s public key.
You set the trust level by sliding the bar to the appropriate level (Complete, Marginal, or Never).
Fingerprint A unique identification number that is generated when
the key is created and is the primary means by which
you can check the authenticity of a key. The most fool-
60 Chapter 5: Managing Keys And Setting
Page 69

proof way to check a fingerprint is to have the owner
read their fingerprint over the phone so that you can
compare it with the fingerprint shown for your copy of
their public key. You can also check the authenticity of
someone’s key by comparing the fingerprint on your
copy of their public key to the one listed on a publ ic key
server since it is assumed that the owner periodically
checks to make sure that it remains valid.
Enabled Indicates whether the key is currently enabled or not.
When a key is disabled, it is dimmed in the PGPkeys
window and is not available for performing any PGP
functions. However, the key remains on your keyring
and you can enable it again if it becomes necessary. To
enable or disable a key, select or clear the Enabled check
box on the Information window.
Change Passphrase
Changes the passphrase for a private key. If you ever
decide that your passphrase is no longer a secret (perhaps you caught someone looking over your shoulder),
click this button to enter a new passphrase.
Specifying a Default Key Pair
When you create a new key pair, you will probably want to make it the
default key pair for future use. For instance, when you sign a message or
someone’s public key, your default key set is used. If you have more
than one set of keys, you may want to specifically designate one pair as
your default set. The current default key set is displayed in bold text to
distinguish these keys from your other keys.
To specify your default key pair
1. Select the set of keys you want designated as your default set.
2. Choose Set Default from the Keys menu.
The selected keys are bold, indicating that they are now designated
as your default key pair.
PGP for Personal Privacy, Version 5.0 User’s Guide for the Mac OS 61
Page 70

Adding a New User Name or Address
In some cases you may have more than one user name or e-mail address
for which you want to use the same set of keys. After initially creating a
new set of keys, you can then add alternate names and addresses to the
key. You can only add a new user name or email address on a key pair
that you have created yourself.
To add a new user name or address to an existing key
1. Select the key pair for which you want to add another user name or
address.
2. Choose Add Name from the Keys menu.
The PGP New User Name dialog box appears.
3. Enter the new name and email address in the appropriate fields.
4. Click OK after you have entered the new name and address.
The Enter Passphrase dialog box appears requesting that you enter
your passphrase.
5. Enter your passphrase, and then click OK.
62 Chapter 5: Managing Keys And Setting
Page 71

The new name is placed at the end of the list of names and addresses.
If you like, you designate this as your primary name and address by
selecting it and then choosing the Set Primary Na me option from the
Keys menu.
Checking a Key’s Fingerprint
It is often difficult to know for sure that a key belongs to a particular
individual unless that person physically hands their key to you on a
floppy disk. Since exchanging keys in this manner is not usually
practical, especially for users who are located many mi les apart, you can
use the unique fingerprint associated wit h each key to verify that the key
belongs to the alleged owner. There are several ways to check a keys
fingerprint, but the safest is to make a call to the person and have them
read the fingerprint to you over the phone. It is highly unlikely that
someone will be able to inter cept this random c all and imitate the person
on the other end. You can also compare the fingerprint on your copy of
someone’s public key to the fingerprint listed for their original key on a
public server.
To check a key’s fingerprint
1. Select the key for the fingerprint you want to check.
2. Choose Info from the Keys menu.
3. Note the fingerprint and use one of the previously described
methods to compare it to the original.
Signing Someone’s Public Key
When you create a set of keys, they are automatically signed using your
public key. Similarly, once you are sure that a key belongs the proper
individual, you can sign their public key, indicating that you are sure it is
a valid key.
1. Click on and select the key you want to sign.
2. Choose Sign from the Keys menu.
PGP for Personal Privacy, Version 5.0 User’s Guide for the Mac OS 63
Page 72

The PGPkeys alert box appears.
3. Click OK to indicate your certainty that the key does indeed belong
to the purported owner.
The Enter Passphrase dialog box appears.
4. Enter your passphrase, then click OK.
A quill icon associated with your user name is now included with
the public key that you just signed.
Granting Trust for Key Validations
Besides certifying that a key belongs to someone, you can assign a level
of trust to the user of the keys indicating how well you trust them to act
as an introducer to others whose keys you may get in the future. This
means that if you ever get a key from someone that has been signed by
an individual that you trust, the key is considered valid even though
you have not done the check yourself.
To grant trust for a key
1. Select the key for which you want to change the trust level.
2. Choose Info from the Keys menu.
64 Chapter 5: Managing Keys And Setting
Page 73

The Information window appears:.
3. Use the trust level sliding bar to choose the appropriate level of trust
for the key. You have a choice of Never, Marginal, or Complete.
4. Close the dialog box to accept the new setting.
Disabling and Enabling Keys
Sometimes you may want to temporarily disable a key. The ability to
disable keys is useful when you want to retain a public key for future
use, but you don’t want it cluttering up your recipient list every time
you send mail.
To disable a key
1. Select the key you want to disable.
2. Choose Info from the Keys menu.
3. Click the Enabled check box to clear it.
4. Close the dialog box to accept the new setting.
The key is dimmed and is temporarily unavailable for use.
To enable a key
1. Select the key you want to enable.
2. Choose Info from the Keys menu.
PGP for Personal Privacy, Version 5.0 User’s Guide for the Mac OS 65
Page 74

3. Click the Enabled check box to add a check mark.
4. Close the dialog box to accept the new setting.
The key becomes visible and can be used as before.
Deleting a Key or Signature
At some point you may want to remove a signature or user ID from a
particular key or even remove an entire key from your keyring.
To delete a key, user ID, or signature
1. Select the key or signature you want to delete.
2. Choose Clear from the Edit menu or press Delete.
Changing your Passphrase
Although it is a good idea to periodically change your passphrase, in
practice, most users tend to stick with something they are familiar with.
However, if the occasion ever arises that you need to change your
passphrase, you can easily do so.
To change your passphrase
1. Select the key pair for which you want to change the passphrase.
2. Choose Info from the Keys menu.
The Information window appears.
3. Click Change Passphrase.
66 Chapter 5: Managing Keys And Setting
Page 75

The change passphrase dialog box appears:
4. Enter your old passphrase in the top field and then press the Tab key
to advance to the next field.
5. Enter your new passphrase in the center dialog box then press the
Tab key to advance to the bottom field
6. Confirm your entry by entering your new passphrase again.
7. Click OK.
Importing and Exporting Keys
Although you often distribute your public key and obtain the public
keys of others by cutting and pasting the raw text from a public key
server, you can also exchange keys by importing and exporting them as
separate text files. For instance, someone could hand you a disk
containing their public key, or you might want to make your public key
available over an FTP server.
PGP for Personal Privacy, Version 5.0 User’s Guide for the Mac OS 67
Page 76

To import a key from a file
1. Choose Import Keys from the Keys menu.
The Import dialog box appears.
2. Select the file that contains the key you want to import, and then
click Open.
The imported key appears in the PGPkeys window, where you can
use it to encrypt data or verify someone’s digital signature.
To add a key from an e-mail message
If a colleague sends you an e-mail message with their key enclosed (as a
block of text) you can add it to your keyring.
1. With the e-mail message window open, open the PGPkeys window.
2. Tile the two windows so that you can see part of the PGPkeys
window behind the message window.
3. Select the key text−−including the START BLOCK and END BLOCK
texts. Drag the text onto the PGPkeys window.
4. The new key(s) will appear in the PGPkeys window.
To export a key to a file
1. Select the key you want to export to a file.
2. Choose Export Keys from the Keys menu.
68 Chapter 5: Managing Keys And Setting
Page 77

The Export dialog box appears.
3. Enter the name of the file where you want the key to be exported,
and then click Save.
The exported key is saved to the named file in the specified folder
location.
Revoking a Key
If the situation ever arises that you can no longer trust your pers onal key
pair, you can issue a revocation to the world telling everyone to stop
using your public key. The best way to circulate a revoked key is to place
it on a public key server.
To revoke a key
1. Select the key pair to revoke.
2. Choose Revoke from the Keys menu.
The Revocation Confirmation dialog box appears.
3. Click OK if you want to revoke this key.
PGP for Personal Privacy, Version 5.0 User’s Guide for the Mac OS 69
Page 78

The Enter Passphrase dialog box appears.
4. Enter your passphrase, and then click OK.
When you revoke a key, it is crossed out with a red line to indicate
that it is no longer valid.
It is possible that you might forget your passphrase someday. In that
case, you would never be able to use your key again, and you would
have no way of revoking your old key when you create a new one. To
safeguard against this possibility, you can create a revocation key by
making a copy of your key pair, revoking one copy then putting this in a
safe place. However, you should be very careful about where you store
the revoked version of your key. If someone were to get hold of the
revoked key, they could revoke your key and replace it with one of their
own making.
Setting Your Preferences
PGP is configured to accommodate the needs of most users, but you
have the option of adjusting some of the settings to suit your particular
computing environment. You specify these settings through the
Preferences dialog box, which you access by selecting the Preferences
option from the Edit menu in PGPkeys.
70 Chapter 5: Managing Keys And Setting
Page 79

General Preferences
You specify general encryption settings from the General pane.
Always Encrypt to Default Key
When this setting is selected, all the e-mail messages or
file attachments you encrypt with a recipient’s public
key are also enc rypted t o you using your default public
key. It is useful to leave this setting turned on so that
you have the option of decrypting the contents of any email you have previously sent.
Faster Key Generation
When this setting is selected, it requires less time to
generate a new DSS/Diffie-Hellman key pair. This process can be made faster by using a precalculated set of
prime numbers. Although it is extremely unlikely that
anyone could ever crack your key based on their
knowledge of these canned prime numbers, it may be
prudent to spend the extra time to create a set of keys
with the maximum level of security.
Show Recipients When Sending to Marginally Valid Keys
This setting specifies that you would like to be warned
whenever you are encrypting to a recipient for which
the validity is only marginally established.
PGP for Personal Privacy, Version 5.0 User’s Guide for the Mac OS 71
Page 80

Key Files Preferences
Click the Key Files tab, to advance to the pane in which you specify the
location of the keyrings used to store your private and public keys.
Set Public
Shows the current location and name of the file where
the PGP program expects to find your public keyring
file. If you plan to store your publi c keys i n a fi le with a
different name or in some other location, you specify
this information here.
Set Private
Shows the current location and name of the file where
the PGP program expects to find your private keyring
file. If you plan on storing your private keys in a file
with a different name or in some other location, you
specify this information here. Some users like to keep
their private keyring on a floppy disk, which they insert
like a key whenever they need to sign or decrypt mail.
72 Chapter 5: Managing Keys And Setting
Page 81

E-mail Preferences
Click the e-mail tab to advance to the pane where you specify certain
preferences that affect the way PGP functions are implemented for your
particular e-mail application. You should note that all of the selections
may not apply to your particular email application.
Use PGP/MIME Encryption
When this check box is selected, you do not have to go
through the trouble of explicitly turning on the PGP/
MIME feature every time you send e-mail. For instance,
if you are using Eudora, and you turn this setting on, all
of your e-mail messages and file attachments are automatically encrypted to the intended recipient. This setting has no effect on other encryptions you perform
from the Clipboard and should not be used if you plan
to send e-mail to r ecipients who use e-mail applicat ions
that are not supported by the PGP/MIME standard.
Use PGP/MIME Signing
When this check box is selected, you do not have to go
through the trouble of explicitly turning on the PGP/
MIME feature every time you send e-mail with an email application that supports this standard. For
instance, if you are using Eudora and you turn this setting on, all of your e-mail messages and file attachments automatically include your digital signatures.
This setting has no effect on other signatures you add
PGP for Personal Privacy, Version 5.0 User’s Guide for the Mac OS 73
Page 82

from the Clipboard and should not be used if you plan
to send e-mail to recipients who are using e-mail applications that do not support the PGP/MIME standard.
Cache Decryption Passphrase for [ ] Seconds
This setting specifies the amount of time (in seconds)
that your decryption passphrase is stored in your computer’s memory. If you regularly compose or read several e-mail messages in succession, then you may want
to increase the amount of time your passphrase is
cached so you don’t have to enter your passphrase over
and over again to get through all of your mail. However, you should be aware that the longer your passphrase is stored in your computers memory, the more
time a sophisticated snooper has to get hold of this
highly compromising bit of information. By default,
this setting is set to 120 seconds, which is probably sufficient to perform most of your PGP email functions
without having to enter your passphrase too many
times, but not long enough for someone to determine
your passphrase.
Cache Signing Passphrase for [ ] Seconds
This setting specifies the amount of time (in seconds)
that your signature passphrase is stored in your computer’s memory. If you regularly compose several email messages in succession, you may want to increase
the amount of time your passphrase is cached so you
don’t have to enter your passphrase over and over
again to get through all of your mail.
Word Wrap Clear-signed Messages at Column [ ]
This setting specifies the column number where a hard
carriage return is used to wrap the text in your digital
signature to the next line. This feature is necessary
because all applications do not handle word wrapping
in the same way, which could cause the lines in you digital signature to be broken up in a way that cannot be
read properly. By default, this setting is set to 70 which
prevents problems with most applications.
74 Chapter 5: Managing Keys And Setting
Page 83

PGPmenu Preferences
Click the PGPmenu tab to advance to the pane where you add and
remove PGPmenu for various applications.
Add... This option enables you to add the PGP icon to the
menu bar of the applications you select. For example,
click the Add button and add SimpleText to the application list. The PGP icon is added to the SimpleText menu
bar, enabling you to sign, encrypt, decrypt and verify
the selected text within the document.
The PGP icon is automatically available on the Finder
menu bar, enabling you to encrypt entire folders while
using the Finder. Simply select the folder you want to
encrypt, and select Encrypt from the PGPmenu.
Remove This option enables you to remove the PGP icon from
the menu bar of applications you have previously
selected.
PGP for Personal Privacy, Version 5.0 User’s Guide for the Mac OS 75
Page 84

Key Server Preferences
Click the Server tab to advance to the pane where you specify settings
for the key server you are using.
Key Server Name
Specifies the address for the public key server that is
used by PGP to send and retrieve public keys. If you
want to use an alternate key server and you are sure
that it supports the PGP key format, then you can enter
the address here.
Key Server Port
The port address for the public key server. Experienced
users can change this parameter if they want to use
some other public key server.
76 Chapter 5: Managing Keys And Setting
Page 85

Chapter 6
Security Features and Vulnerabilities
This chapter contains introductory and background information about
cryptography written by Phil Zimmermann.
"Whatever you do will be insignificant, but it is very important that you do it."
—Mahatma Gandhi.
Why I wrote PGP
It’s personal. It’s private. And it’s no one’s business but yours. You may be
planning a political campaign, discussing your taxes, or havi ng a secret
romance. Or you may be communicating with a political dissident in a
repressive country. Whatever it is, you don’t want your private electronic
mail (e-mail) or confidential documents read by anyone else. There’s
nothing wrong with asserting your privacy. Privacy is as apple-pie as the
Constitution.
The right to privacy is spread implicitly throughout the Bill of Rights. But
when the US Constitution was framed, the Founding Fathers saw no need
to explicitly spell out the right to a private conversation. That would have
been silly. Two h undred years ago, all conversations were private. If
someone else was within earshot, you could just go out behind the barn
and have your conversation there. No one could listen in without your
knowledge. The right to a private conversation was a natural right, not
just in a philosophical sense, but in a law-of-physics sense, given the
technology of the time.
But with the coming of the information age, starting with the invention of
the telephone, all that has changed. Now most of our conversations a re
conducted electronically. This allows our most intimate conversations to
PGP for Personal Privacy, Version 5.0 User’s Guide for the Mac OS 77
Page 86

be exposed without our knowledge. Cellular phone calls may be
monitored by anyone with a radio. Electronic mail, sent across the
Internet, is no more secure than cel lular phon e cal ls. E-m ail is ra pidly
replacing postal mail, becoming the norm for everyone, not the novelty it
was in the past. And e-mail can be routinely and automatically scanned
for interesting keywords, on a large scale, without detection. This is like
driftnet fishing.
Perhaps you think your e-mail is legitimate enough that encryption is
unwarranted. If you really are a law-abi din g citi zen with no thing to h ide,
then why don’t you always send your paper mail on postcards? Why not
submit to drug testing on demand? Why require a warrant for police
searches of your house? Are you trying to hide something? If you hide
your mail inside envelopes, does that mean you must be a subversiv e or a
drug dealer, or maybe a paranoid nut? Do law-abiding citizens have any
need to encrypt their e-mail?
What if everyone believed that law-abiding citizens sh ould use postcards
for their mail? If a nonconformist tried to assert his privac y by usin g an
envelope for his mail, it would draw suspicion. Perhaps the authorities
would open his mail to see what he’s hiding. Fortunately, we don’t live in
that kind of world, because everyone protects most of their mail with
envelopes. So no one draws suspicion by asserting their privacy with an
envelope. There’s safety in numbers. Analogously, it would be nice if
everyone routinely used encryption for all their e-mail, in nocent or not, so
that no one drew suspicion by asserting their e-mail privacy with
encryption. Think of it as a form of solidarity.
Until now, if the government wanted to violate the privacy of ordinary
citizens, they had to expend a certain amount of expense and labor to
intercept and steam open and read paper mail. Or they had to listen to and
possibly transcribe spoken telephone conversation, at least before
automatic voice recognition tech nology b ecame av ailable. This kind of
labor-intensive monitoring was not practical on a large scale. This was
only done in important cases when it seemed worthwhile.
Senate Bill 266, a 1991 omnibus anti-crime bill, had an unsett lin g measure
buried in it. If this non-binding resolution had become r eal law, it would
have forced manufacturers of secure communications equipment to insert
special “trap doors” in their products, so that the government can read
anyone’s encrypted messages. It reads: “It is the sense of Congr ess that
providers of electronic c ommunications services a nd manufac turers of
electronic communications service equipment shall ensur e that
78 Chapter 6: Security Features and Vulnerabilities
Page 87

communications systems permit the government to obtain the plain tex t
contents of voice, data, and other communications when appropriately
authorized by law.” It was this bill that led me to publish PGP
electronically for free that year, shortly before the measure was defeated
after rigorous protest fr om c ivil lib erta rians a nd industry groups.
The 1994 Digital Telephony bill mandated that phone companies install
remote wiretapping ports into their central office digita l switches, creating
a new technology infrastructur e for “point-and-click” wir etapping, so that
federal agents no longer have to go out and attach alligator clips to phone
lines. Now they’ll be able to sit in their headquarters in Washington and
listen in on your phone calls. Of course, the law still r equir es a court order
for a wiretap. But while technology infrastructures can persist for
generations, laws and policies can change overnight. Once a
communications infrastructur e opti mized for surveil lance becomes
entrenched, a shift in poli t ical condi tion s may lead to a buse of this n ewfound power. Political conditions may shift with the election of a new
government, or perhaps more abruptly from the bombing of a Federal
building.
A year after the 1994 Digital Telephony bill passed, the FBI disclosed plans
to require the phone companies to build into their infrastructure the
capacity to simultaneously wiretap one percent of all phone calls in all
major US cities. This would represent more than a thousandfold increase
over previous levels in the number of phones that could be wir etapped. In
previous years, there wer e on ly ab out 1000 court-ordered wiretaps in the
US per year , at the federal, state, and local levels combined. It's har d to see
how the government could even employ enough judges to sign enough
wiretap orders to wiretap 1% of all our phone calls, much less h ire en ough
federal agents to sit and listen to all that traffic in real time. The only
plausible way of processing that amount of traffic is a massive Orwellian
application of automated voice recognition technology to sift thr ough it
all, searching for inter estin g keywor ds or searching for a particular
speaker's voice. If the government doesn't find the target in the first 1%
sample, the wiretaps can be shifted over to a dif ferent 1% until the tar get is
found, or until everyone's phone line has been checked for subversive
traffic. The FBI says they need this capacity to plan for the futur e. This
plan sparked such outrage that it was defeated in Congress, at least this
time around, in 1995. But the mere fact that the FBI even asked f or these
broad powers is revealing of their agenda. And the defeat of this plan isn't
so reassuring when you consider that the 1994 Digital Telephony bill was
also defeated the first time it was intr oduced, i n 1993.
PGP for Personal Privacy, Version 5.0 User’s Guide for the Mac OS 79
Page 88

Advances in technology will not permit the maintenance of the status quo,
as far as privacy is concerned. The sta tus quo is unstable. If we do nothing,
new technologies will give the government new automatic surveill anc e
capabilities that Stalin could never have dr eamed of. The only way to hold
the line on privacy in the information age is strong cryptography.
You don’t have to distrust the government to want to use cryptography.
Your business can be wiretapped by business rivals, or gan ized c rime, or
foreign governments. The French government, for example, is notorious
for using its signals intelligence apparatus against US companies to h elp
French corporations get a competitive edge. Ir onicall y, US government
restrictions on cryptography have weakened US corporate defenses
against foreign in telli genc e and organized crime.
The government knows what a pivotal role cryptography is destined to
play in the power relationship with it s people. In April 1993, the Clinton
administration unveiled a bold new encryption policy in itia tive, whi ch
was under development at National Security Agency (NSA) since the start
of the Bush administration. The centerpiece of this initiative is a
government-built encryption device, called the “Cli pper” chip, containing
a new classified NSA encryption algorithm. The government has been
trying to encourage private industry to design it into all their secure
communication products, like secure phones, secure FAX, etc. AT&T has
put Clipper into their secure voice products. The catch: At the time of
manufacture, each Clipper chip will be loaded with its own unique key,
and the government gets to keep a copy, placed in escrow. Not to worry,
though—the government promises that they will use these keys to read
your traffic only “when duly authorized by law.” Of course, to make
Clipper completely effective, the next logical step would be to outlaw
other forms of cryptography.
The government initially claimed that using Cl ipper would be voluntary,
that no one would be forced to use it instead of other types of
cryptography. But the public reaction against the Clipper chip has been
strong, stronger than the government anticipated. The c omputer industry
has monolithically proclaimed its opposition to using Clipper. FBI director
Louis Freeh responded to a q uestion in a press conference in 1994 by
saying that if Clipper failed to gain public support, and FBI wir etaps were
shut out by non-government-controlled cryptography, his office would
have no choice but to seek legislative relief. Later, in the aftermath of the
Oklahoma City tragedy, Mr. Freeh testified before the Senate Judiciary
80 Chapter 6: Security Features and Vulnerabilities
Page 89

Committee that public availability of strong cryptography must be
curtailed by the government (although no one had suggested that
cryptography was used by the bombers).
The Electronic Privacy Inf ormation Center ( EPIC) obtained some
revealing documents under the Freedom of Information Act. In a “briefing
document” titled “Encryption: The Threat , Application s and Poten tia l
Solutions,” and sent to the National Securit y Council in February 1993, th e
FBI, NSA and Department of Justice (DOJ) concluded that:
“Technical solutions, such as they are, will only work if they are
incorporated into all encryption products. To ensure that this occurs,
legislation mandating the use of Government-approved encryption
products or adherence to Government encryption criteria is required.”
The government has a track record that does not inspir e confi dence that
they will never abuse our civil liberties. The FBI’s COINTELPRO pr ogram
targeted groups that opposed government policies. They spied on the
anti-war movement and the civil rights movement. They wi r etapped the
phone of Martin Luther King Jr. Nixon had his enemies list. And then
there was the Watergate mess.Congress now seems intent on passing laws
curtailing our civil liberties on the Internet. At no time i n the past ce ntury
has public distrust of the government been so broadly distribut ed across
the political spectrum, as it is today.
If we want to resist this unsettling trend in the government to outlaw
cryptography, one measure we can apply is to use cryptography as much
as we can now while it is still legal. When use of strong cryptography
becomes popular, it’s harder for the government to criminalize it. Thus,
using PGP is good for preserving democracy.
If privacy is outlawed, only outlaws will have privacy. Intelligence
agencies have access to good cryptographic technology. So do the big
arms and drug traffickers. But ordi nary people and grassroots political
organizations mostly ha ve n ot had ac cess to affordable “military grade”
public-key cryptographic technology. Until now.
PGP empowers people to take their privacy into their own hands. Ther e’ s
a growing social need for it. That’s why I cr eated it.
PGP for Personal Privacy, Version 5.0 User’s Guide for the Mac OS 81
Page 90

Encryption Basics
First, some elementary terminology. Suppose you want to send a message
to a colleague, whom we’ll call Alice, and you don’t want anyone but
Alice to be able to read it. As shown in Figure 1, you can encrypt, or
encipher the message, which means scrambling it up in a hopelessly
complicated way, rendering it unreadab le to anyone except you and Alice.
You supply a cryptographic key to encrypt the message, and Alice must
use the same key to decipher or decrypt it. At least that’s how it works in
conventional “secret-key” encryption.
A single key is used for both encryption and decryption. This means that
this key must be initially transmitted via secure channels so that both
parties can know it before encrypted messages can be sent over insec ure
channels. This may be inconvenient. If you have a secure channel for
exchanging keys, then why do you need cryptography in the first place?
How Public Key Cryptography Works
In public key cryptography, as shown in Figure 2, everyone has two
related complementary keys, a public key and a private ke y. Each key
unlocks the code that the other key makes. Knowing the public key does
not help you deduce the corresponding private key. The public key can be
published and widely disseminated across a communications network.
This protocol provides privacy without the need for the same kind of
secure channels that conventional secret key encryption requires.
82 Chapter 6: Security Features and Vulnerabilities
Page 91

Anyone can use a recipient’s public key to encrypt a message to that
person, and that recipient uses her own corresponding private key to
decrypt that message. No one but the recipient can decrypt it, because no
one else has access to that private key. Not even the person who encrypted
the message with the recipient’s public key can decrypt it.
How You r Fil e s a nd M e ss ag e s are Encrypted
Because the public key encryption algorithm is much slower than
conventional single-key encryption, encryption is better accomplished by
using the process shown in Figure 3.
PGP for Personal Privacy, Version 5.0 User’s Guide for the Mac OS 83
Page 92

A high-quality fast conventional secret-key encryption algorithm is used
to encipher the message. This original unencipher ed me ssage is c alled
“plaintext.” In a proces s in visib le to the user, a temporary random key,
created just for this one “session,” is used to conventionally encipher the
plaintext file. Then the recipient’s public key is used to encipher this
temporary random conventional key. This public-key-enciphered
conventional “session” key is sent along with the enciphered text (called
“ciphertext”) to the recipient.
The PGP Symmetric Algorithms
PGP offers a selection of diff erent secret-key algorithms to encrypt the
actual message. By secret key algorithm, we mean a conventional, or
symmetric, block cipher that uses the same key to both encrypt and
decrypt. The three symmetric block ciphers offered by PGP are CAST,
Triple-DES, and IDEA. They are not “home-grown” algorithms. They
were all developed by teams of cryptographers with distinguished
reputations.
84 Chapter 6: Security Features and Vulnerabilities
Page 93

For the cryptographically curious, all three ciphers operate on 64-bit
blocks of plaintext and ciphertext. CAST and IDEA have key sizes of 128
bits, while triple-DES uses a 168-bit key. Like Data Encryption Standard
(DES), any of these ciphers can be used in cipher feedback (CFB) and
cipher block chaining (CBC) modes. PGP uses them in 64-bit CFB mode.
I included the CAST encryption algorithm in PGP because it shows
promise as a good block cipher with a 128-bit key size, i t’s ve ry fast, and
it’s free. Its name is derived from the initials of its designers, Carlisle
Adams and Stafford Tavares of Northern Telecom (Nortel). Nortel has
applied for a patent for CAST, but they have made a commitment in
writing to make CAST available to anyone on a royalty-free basis. CAST
appears to exceptionally well-designed, by people with good reputations
in the field. The design is based on a very formal approach, with a number
of formally provable assertions that give good r e asons to believ e that it
probably requires key exhaustion to break its 128-bit key. CAST has no
weak or semiweak keys. There are strong arguments that CAST is
completely immune to both linear and differential cryptanalysis, the two
most powerful forms of cryptanalysis in the published literature, both of
which have been effectiv e in crackin g DES. Wh ile CAST is too new to
have developed a long track record, its formal design and the good
reputations of its designers will undoubtedly attract the attentions and
attempted cryptanalytic attacks of the rest of the academic cryptographic
community. I’m getting nearly the same preliminary gut feeling of
confidence from CAST that I got years ago fr om IDEA, the cipher I
selected for use in earlier versions of PGP. At that time, IDEA was also too
new to have a track record, but it has held up well.
The IDEA (International Data Encryption Algorithm) block cipher is
based on the design concept of “mixing operations from dif ferent
algebraic groups.” It was developed at ETH in Zurich by James L. Massey
and Xuejia Lai, and published in 1990. Early published papers on t he
algorithm called it IPES (Improved Pr oposed Encryption Standard), but
they later changed the name to IDEA. So far, IDEA has resisted attack
much better than other ciphers such as FEAL, REDOC-II, LOKI, Snefru
and Khafre. And IDEA is more resistant than DES to Biham and Shamir’s
highly successful differ ential cryptanalysis attack, as well as attacks from
linear cryptanalysis. As this cipher continues to attract attack efforts from
the most formidable quarters of the cryptanalytic world, confidence in
IDEA is growing with the passage of time. Sadly, the biggest obstacle to
PGP for Personal Privacy, Version 5.0 User’s Guide for the Mac OS 85
Page 94

IDEA ’s acc eptance as a standard has been the fac t that Ascom Systec holds
a patent on its design, and unlike DES and CAST, IDEA has not been
made available to everyone on a ro yalty-f ree basis.
As a hedge, PGP includes three-key triple-DES in its repertoire of
available block ciphers. The DES was developed by IBM in the mid-1970s.
While it has a good design, its 56-bit key size is too small by today’s
standards. Triple-DES is very strong, and has been well-studied for many
years, so it might be a safer bet than the newer ciphers such as CAST and
IDEA. Triple-DES is the DES applied three times to the sam e block of data,
using three different keys, except that the second DES operation is run
backwards, in decrypt mode. Although triple-DES is much slower than
either CAST or IDEA, speed is usually not critical for e-mail appli cations.
While triple-DES uses a key size of 168 bits, it appears to have an effective
key strength of at least 112 bits against an attacker with impossibly
immense data storage capacity to use in the attack. According to a paper
presented by Michael Weiner at Crypto96, any remotely plausible amount
of data storage available to the attacker would enable an attack that would
require about as much work as breaking a 129-bit key. Triple-DES is not
encumbered by any patents.
PGP public keys that were generated by PGP Version 5.0 or later have
information embedded in them that tells a sender what block ciphers are
understood by the recipient’s software, so that the sender’s software
knows which ciphers can be used to encrypt. DSS/Diffie-Hellman public
keys will accept CAST , IDEA, or triple-DES as the block cipher , with CAST
as the default selection. At present, for compatibility reasons, RSA keys do
not provide this feature. Only the IDEA cipher is used by PGP to send
messages to RSA keys, because older versions of PGP only supported
RSA and IDEA.
Data Compression
PGP normally compresses the plaintext bef o re encrypting it, because it’s
too late to compress the plaintext aft er it ha s been enc rypted; e ncrypted
data is incompressible. Data compr ession saves modem transmission time
and disk space and, more importantly, strengthens cryptographic security.
Most cryptanalysis techniques exploit r edundancies found in the plaintext
to crack the cipher. Data compression reduces this redundancy in the
plaintext, thereby greatly enhancing resistance to cryptanalysis. It takes
extra time to compress the plaintext, but fr om a sec urity point of view it’ s
worth it.
86 Chapter 6: Security Features and Vulnerabilities
Page 95

Files that are too short to compress, or that just don’t compress well, are
not compressed by PGP. In addition, the program recognizes files
produced by most popular compression programs, such as PKZIP, and
does not try to compress a file that has already been compressed.
For the technically curious, the program uses the freeware ZIP
compression routines written by Jean-Loup Gailly, Mark Adler, and
Richard B. Wales. This ZIP software uses compression algorithms that
are functionally equivalent to those used by PKWare’s PKZIP 2.x. This
ZIP compression software was selected for PGP mainly because it has a
really good compression ratio and because it’s fast.
About the Random Numbers used as Session Keys
PGP uses a cryptographically strong pseudo-random number generator
for creating temporary session keys.If this random seed file does not exist,
it is automatically created and seeded wi th tr uly ran dom numbers
derived from your random events gathered b y the PGP pr ogram fr om the
timing of your keystroke and mouse movements.
This generator reseeds the seed file each time it is used, by mixing in new
material partially derived from the time of day and other truly random
sources. It uses the conventional encryption algorithm as an engine for the
random number generator. The seed file contains both random seed
material and random key material used to key the conventional
encryption engine for the random generator.
This random seed file should be protected from di sclosure, to reduce the
risk of an attacker deriving your next or previous session keys. The
attacker would have a very hard time getting anything useful fr om
capturing this random seed file, because the file is cryptographically
laundered before and after each use. Nonetheless, it seems prudent to try
to keep it from falling into th e wrong hands. If possible, make the file
readable only by you. If this is not possible, do not let other people
indiscriminately copy disks from your computer.
How Decryption Works
As shown in Figure 4, the decryption process is just the r everse of
encryption. The recipient’s private key is used to recover the temporary
session key, and then that session key is used to run the fast conventional
secret-key algorithm to decipher the large c iphertext message.
PGP for Personal Privacy, Version 5.0 User’s Guide for the Mac OS 87
Page 96

How Digital Signatures Work
PGP uses digital signatures to provide message authent icati on. The
sender’s own private key can be used to encrypt a message digest, ther eby
“signing” the message. A messag e digest is a 160-bit or a 128-bit
cryptographically strong one-way hash function. It is somewhat
analogous to a “checksum” or CRC error checking code, in that it
compactly represents the message and is used to detec t changes in the
message. Unlike a CRC, however, it is believed to be computationally
infeasible for an attacker to devise a substitute message that would
produce an identical message digest. The message digest gets encrypted
by the sender’s private key, creating a digital signature of the message.
Figure 5 shows how a digital signature is generated.
88 Chapter 6: Security Features and Vulnerabilities
Page 97

The recipient (or anyone else) c an verif y the digital si gnat ure by using the
sender’s public key to decrypt it, as shown in Figure 6. This proves that
the sender was the true originator of the message, and that the message
has not been subsequently altered by anyone else, because the sender
alone possesses the private key that made that signature. For gery of a
signed message is not feasible, and the sender cannot later disavow his
signature.
PGP for Personal Privacy, Version 5.0 User’s Guide for the Mac OS 89
Page 98

About the Message Digest
The message digest is a compact (160-bit, or 128-bit) “disti llate” of your
message or file checksum. You can also think of it as a “fingerprint” of the
message or file. The message digest “represents” your message, such that
if the message were altered in any way, a different message digest would
be computed from it. This makes it possible to detect any changes made to
the message by a forger. A message digest is computed using a
cryptographically strong one-way hash function of the message. It should
be computationally infeasible for an attacker to devise a substitute
message that would produce an identic al message digest. In that r espect, a
message digest is much better than a checksum, because it is easy to
devise a different message t hat would pr oduce the same checksum. But
like a checksum, you can’t derive the original message fr om its mess age
digest.
The message digest algorithm now used in PGP (Version 5.0 and later) is
called SHA, which stands for Secure Hash Algorithm, designed by the
NSA for National Institute of Standards and Technology (NIST). SHA is a
90 Chapter 6: Security Features and Vulnerabilities
Page 99

160-bit hash algorithm. Some people might r egard an ything from t he NSA
with suspicion, because the NSA is in charge of interc epting
communications and breaking codes. But keep in mind that the NSA has
no interest in forging signatures, and the government would benefit from
a good unforgeable digital signature s tandard that would preclude
anyone from repudiating their signatur es. That has disti nct benefits for
law enforcement and intelligence gathering. Also, SHA has been
published in the open literature and has been extensively peer r eviewed
by most of the best cryptographers in the world who specialize in hash
functions, and the unanimous opinion is that SHA is extremely well
designed. It has some design innovations that overcome all the observed
weaknesses in message digest algorithms previously published by
academic cryptographers. All new versions of PGP use SHA as the
message digest algorithm for creating signatur es with the new DSS keys
that comply with the NIST Digital Signature Standard. For compatibility
reasons, new versions of PGP still use MD5 for RSA signatures, because
older versions of PGP used MD5 for RSA signatures.
The message digest algorithm used by older versions of PGP is the MD5
Message Digest Algorithm, placed in the public domain by RSA Data
Security, Inc. MD5 is a 128-bit hash algorithm. In 1996, MD5 was all b ut
broken by Hans Dobbertin, a German cryptographer. While MD5 was not
completely broken at that time, it was discovered to have such serious
weaknesses that no one should keep using it to generate signatures.
Further work in this area might completely break it, thus allowing
signatures to be for ged. If you don’t want to someday fi nd your PGP
digital signature on a for ged confess ion, you might be well advise d to
migrate to the new PGP DSS keys as your preferred method for making
digital signatures, because DSS uses SHA as its secur e hash al gorithm.
How to Protect Public Keys from Tampering
In a public key cryptosystem, you don’t have to protect public keys from
exposure. In fact, it’s better if they ar e widely dis seminated. But it’ s
important to protect public keys from tampering, to make sure that a
public key really belongs to whom it appears to belong to. This may be the
most important vulnerability of a public key cryptosystem. See
“Protecting Your Keys” in Chapter 3 for procedures. Let’s first look at a
potential disaster, then describe how to safely avoid it with PGP.
PGP for Personal Privacy, Version 5.0 User’s Guide for the Mac OS 91
Page 100

Suppose you want to send a private message to Alice. You download
Alice’s public key certificate fr om an elec tronic bulletin board system
(BBS). You encrypt your letter to Alice with this public key and send it to
her through the BBS’s e-mail facility.
Unfortunately, unbeknownst to you or Alice, another user named Charlie
has infiltrated the BBS and generated a public key of his own with Alice’s
user ID attached to it. He covertly substitutes his bogus key in place of
Alice’s real public key. You unwittingly use this bogus key belonging to
Charlie instead of Alice’s public key. All looks normal because this bogus
key has Alice’s user ID. Now Charlie can decipher the message intended
for Alice because he has the matching private key. He may even re-encrypt
the deciphered message with Alice’s r eal public key a nd send it on to her
so that no one suspects any wrongdoing. Furthermore, he can even make
apparently good signatures from Alice with this private key because
everyone will use the bogus public key to check Alice’s signatures.
The only way to prevent this disaster is to prev ent anyone from tampering
with public keys. If you got Alice’s public key directly from Alice, this is
no problem. But that may be diff icult i f Alice is a th ousand m iles away, or
is currently unreachable.
Perhaps you could get Alice’s public key fr om a mutually trusted friend
David, who knows he has a good copy of Alice’s public key. David could
sign Alice’s public key, vouching for the integrity of Alice’s public key.
David would create this signature with his own private key.
This would create a signed public key certificate, and would show that
Alice’s key had not been tampered with. This requires that you have a
known good copy of David’s public key to check his signature. Perhaps
David could provide Alice with a signed copy of your public key also.
David is thus serving as an “Introducer” b etween you an d Alice.
This signed public key certificate for Ali ce could be uploaded by Davi d or
Alice to the BBS, and you could download it later. You could then check
the signature via David’s public key and thus be assur ed that this is r eally
Alice’s public key. No impostor can fool you into accepting his own bogus
key as Alice’s because no one else can forge signatures made by Davi d.
A widely trusted person could even specialize in providing this service of
“introducing” users to each other by prov idin g signatures for their public
key certificates. This trusted person could be regarded as a “Certifying
Authority.” Any public key certificates bearing the Certifying Authority’s
signature could be trusted as truly belonging to whom they appear to
92 Chapter 6: Security Features and Vulnerabilities
 Loading...