

Page 1

®
Band-in-a-Box
Version 12 for Windows
®
Copyright PG Music Inc. 1989-2003. All rights reserved.
Page 2

PG Music Inc. License Agreement
CAREFULLY READ THE FOLLOWING TERMS AND CONDITIONS BEFORE COMPLETING
THE INSTALLATION OF THIS SOFTWARE. USAGE OF THE SOFTWARE INDICATES
YOUR ACCEPTANCE OF THE FOLLOWING TERMS AND CONDITIONS.
A. The program may only be used on a single machine.
B. You may transfer the program and license to another party if the other party agrees to accept
the terms of this Agreement. If you transfer the program, you must either transfer all copies,
whether in printed or machine readable form, to the same party, or, destroy all copies not
transferred. This includes all modifications and/or portions of the program merged into other
programs.
C. You may receive the program in more than one media. Regardless of the type or size of
media you receive, you may install or use the media on a single machine.
D. The program (including any images, “applets,” photographs, animations, video, audio, music,
and text incorporated into the program) is owned by PG Music Inc. or its suppliers, and is
protected by international copyright laws and international treaty provisions.
You may not use, copy, or transfer the program, or any copy, modification or merged portion of the
program, in whole or in part, except as expressly provided for in this license. If you transfer
possession of any copy, modification or merged portion of the program to another party, your license
is automatically terminated.
PG Music Inc.'s entire liability and your exclusive remedy shall be:
A. The replacement of any media not meeting PG Music Inc.'s “Limited Warranty,” which are
returned to PG Music Inc., or an authorized PG Music Inc. dealer, with a copy of your receipt.
B. If PG Music Inc. or the authorized dealer is unable to deliver replacement media which is free
of defects in materials or workmanship, you may terminate this agreement, and your money
will be refunded.
In no event will PG Music Inc. be liable to you for any damages, including but not limited to lost
profits, lost savings, or other incidental or consequential damages arising out of the use or the
inability to use such program, even if PG Music Inc. or an authorized PG Music Inc. dealer has been
advised of the possibility of such damages, or for any claim by any other party.
LIMITATION OF REMEDIES
Band-in-a-Box® is the registered trademark of PG Music Inc. in the United States, Canada and other
countries. Microsoft® and Windows® are either registered trademarks or trademarks of Microsoft
Corporation in the United States and/or other countries. Apple®, the Apple logo, Macintosh®,
Mac®, Power Mac®, QuickTime® and True Type® are trademarks of Apple Computer, Inc.,
registered in the U.S. and other countries. IBM® is the registered trademark of International
Business Machines Corporation
trademarks of their respective holders and should be noted as such.
Other brands and their products are trademarks or registered
.
LICENSE
TRADEMARKS
Printed in Canada
2
PG Music Inc. License Agreement
Page 3

Table of Contents
PG MUSIC INC. LICENSE AGREEMENT 2
TABLE OF CONTENTS 3
CHAPTER 1: INTRODUCTION 4
CHAPTER 2: SUMMARY OF NEW FEATURES 6
CHAPTER 3: QUICKSTART TUTORIAL 13
CHAPTER 4: MIDI FILE TO STYLE WIZARD 24
CHAPTER 5: GENERAL MIDI 2 (GM2) SUPPORT 32
CHAPTER 6: LOOPING/SONG NAVIGATION
ENHANCEMENTS 34
CHAPTER 7: BASS / GUITAR / FRETBOARDS 36
CHAPTER 8: HARMONY NOTATION DISPLAY
ENHANCEMENTS 38
CHAPTER 9: GUI ENHANCEMENTS 41
CHAPTER 10: NOTATION ENHANCEMENTS 43
CHAPTER 11: STYLE ENHANCEMENTS 45
CHAPTER 12: OTHER NEW FEATURES 48
KEYSTROKE COMMANDS - HOT KEYS 53
APPENDIX A: NEW STYLES AND ADD-ONS. 57
PG MUSIC INC. 61
INDEX 62
Table of Contents
3
Page 4

Chapter 1: Introduction
This documentation covers the new features in Band-in-a-Box Version 12.
9 Chapter 2 is a summary of the new features.
9 Chapter 3 is a Quick-Start Tutorial.
9 Chapters 4-12 and Appendix A describe the new features in detail.
The latest version of Band-in-a-Box adds 50 more features.
First off, you'll get the amazing new
automatically converts a MIDI file (.MID) to a Band-in-a-Box Style (*.STY).
This wizard has plenty of options so you can quickly make your own simple to
advanced styles from a MIDI file without any knowledge of the StyleMaker
required!
Twice as many instruments!
standard (GM2)
a-Box styles and songs
GM2 support adds 128 new instruments to Band-in-
. This
, including
many new and improved piano, organ, guitar, brass, and string sounds
We've made many new styles using the new instruments, and include updated
versions of previous styles.
You'll be hearing the new instruments with
many of your new and existing styles
Note: The included Roland VSC3 synth supports the new GM2 instruments, as do
most newer modules/sound cards. If yours doesn't, a similar instrument from the
existing 128 General MIDI sounds will be substituted.
enhanced the Guitar Window by adding fret display support for
We've
other instruments, including mandolin, ukulele, and banjo
authentic chord voicings and melody display on the fretboard for all of these
new instruments. The StyleMaker has been enhanced with support for GM2
instruments, so you can make styles that use the new instruments and have
correct instrument voicings displayed on the fretboard. We've also added an
option for standard
guitar chord diagrams
display, leadsheet, and printout. Choose from
Chord Diagrams.
Bass players will now see bass tablature and
the new
bass fretboard.
The program’s
user interface has been enhanced
program options and song settings, right mouse support, simplified menu,
additional
hot keys
and more.
All of the styles are enhanced!
in-a-Box style that we’ve made with the newest StyleMaker features including
guitar and other fretted instrument voicings, consistent volume levels, edited
4
“MIDI-file to Style Wizard,”
We've added support for
General MIDI 2
ukulele, mandolin, 12-string guitar plus
.
. You'll see
to be included in the notation
Folk, Pop, or Jazz Guitar
correctly displayed bass parts on
, with a
We've improved and updated
Chapter 1: Introduction
single dialog for all
EVERY
that
!
Band-
Page 5

patterns and more. Many of these styles and new demo songs are included
with your Band-in-a-Box version 12 upgrade.
There are many new options for song navigation during playback, including a
new “One-More-Time” feature that allows fine control over the song looping
during live performance. For example, as the song is playing you can get it to
endlessly loop the last or middle choruses with a simple hot key. Now you can
control when the song ends. If the “dance floor is full,” you can extend the song
for as long as you like, all without skipping a beat! This is also useful for home
practice, so that you can play “endless choruses” for soloing practice, and
conveniently navigate the song during playback.
You can now load and play an entire MIDI file in Band-in-a-Box, including
interpreting the Chords with the Chord Wizard.
Harmony notation display has been enhanced. Harmonies can now be
displayed on the leadsheet window (or printed) with separate notation tracks
for each harmony voice. View each harmony on a separate track, or view/print
a single harmony voice! Print harmony charts for your band, or use for sight
reading practice – to read and/or play a harmony voice along with the melody
that you're hearing.
And much more…
Important Note:
People familiar with the previous versions of Band-in-a-Box will be pleased to
know that we have kept the same functionality of our previous releases. The
new features are optional and don't interfere with familiar methods of using the
program. All songs, styles etc. are completely compatible with previous versions,
so that you can upgrade without losing any of your existing work.
Chapter 1: Introduction
5
Page 6

Chapter 2: Summary of New Features
The New Features in Band-in-a-Box Version 12...
MIDI File to Style Wizard
This automatically converts a MIDI file (.MID) to a Band-in-a-Box Style
(.STY). Simply open a MIDI file, select your options, and press “Save-As
Style.” With plenty of options, this wizard allows you to quickly make your
own simple or advanced styles from a standard MIDI file – without any
knowledge of the StyleMaker required! Novice users will appreciate the
automated option
users will appreciate the
from the MIDI file are included in the style, how many pattern variations, and
more.
“Twice as many instruments” - with General MIDI 2 support!
We've added support for General MIDI 2 standard (GM2). This GM2 support
adds 128 new instruments to Band-in-a-Box styles and songs, including ukulele,
mandolin, and 12-string guitar, plus many new and improved piano, organ,
guitar, brass, and string sounds! We've made many new styles using the new
instruments and also include updated versions of previous styles – you'll be
hearing the new instruments with many of your new and existing styles.
Note: The included Roland VSC3 synth supports the new GM2 instruments, as do
most newer modules/sound cards. If yours doesn't, a similar instrument from the
existing 128 General MIDI sounds will be substituted.
that “does everything” to make the style while advanced
custom options
to control (for example) which bars
Harmony Notation Display Enhancements
6
Chapter 2: Summary of New Features
Page 7

Harmonies can now be displayed on the leadsheet window (or printed) with
separate notation tracks for each harmony voice. View each harmony on a
separate track or view/print a single harmony voice! Print harmony charts for
your band or use for sight reading practice – to read and play any harmony
voice along with the melody that you're hearing.
Guitar Window enhancements
We've enhanced the Guitar Window by adding fret display support for other
instruments including mandolin, ukulele, and banjo. You'll see authentic chord
voicings and melody display on the fretboard for all of these new instruments.
The StyleMaker has been enhanced with support for the GM2 instruments, so
you can make styles that use the new instruments and have correct instrument
voicings displayed on the fretboard.
Guitar Chord Diagrams on the Notation
We've added an option for standard Guitar Chord diagrams to be included in the
notation display. Choose from Folk, Pop, or Jazz Guitar Chord Diagrams on the
notation, leadsheet, or printout.
Bass Part Enhancements
Bass players will now see bass tablature and correctly displayed bass parts on
the new bass fretboard.
Interface Enhancements
The program’s Graphical User Interface has been enhanced, with a single
dialog for all program options (hot key Ctrl+E) and song settings (Ctrl+N),
right mouse menu support, simplified menu, additional hot keys, and more.
The Main Menu has been simplified, with ½ as many menu items! A new
“Window” menu has been added and the “User” menu has been removed.
Menu functionality is the same, just easier to navigate. Right Mouse menu
support has been added. Right mouse click on the Chordsheet or notation
Chapter 2: Summary of New Features
7
Page 8

(press the right mouse button) and you'll see a menu of items available giving
faster access to common editing commands.
Styles Improved
All of the styles are enhanced!
Box style that we’ve made with the newest StyleMaker features including guitar
and other fretted instrument voicings, consistent volume levels, edited patterns,
and more.
Band-in-a-Box version 12 upgrade
Many of these styles and new demo songs are included with your
We've improved/updated
.
EVERY
Band-in-a-
Loop any Section of the song
You can now loop any section of the song
playback at the first loop point and play the looped section until stop is pressed
or looping is turned off. This feature is handy for looping a full chorus or other
section of a song for practice or performance. There's a useful “Play-Looped”
command that allows you to quickly play a looped section. (Simply highlight
the range of bars to loop, and then choose the “Play from loop” command in the
Loop Section Settings
dialog.)
. The program will then start
Song navigation options during playback
These features allow you to control song looping and navigation during live
performance or practice sessions. Options includes hot keys and buttons for
enabling/disabling loop, playing with last chorus looped, playing with middle
choruses looped, playing with middle and last choruses looped, jumping to last
chorus with no loop, and jumping to song ending with no loop. Example uses
include a student song practice with the “loop middle choruses” option so that
there will be endless choruses. Live performers can loop middle and last
choruses so that the music will continue while the dance floor is full, or jump to
the last chorus or ending if it's time for the tune to end!
Band-in-a-Box can load and play an entire MIDI file!
Now you can open an entire MIDI file into Band-in-a-Box. The chords will get
auto-interpreted by the Chord Wizard and the MIDI file will play and display on
the Melody track. A “Silent” style will be loaded so you'll only hear the MIDI
file.
8
Chapter 2: Summary of New Features
Page 9

Other Handy New Features include:
Visual Metronome during the whole song.
Change styles at any bar using the convenient StylePicker
window.
Bass player plays better “5ths” over some Jazz chords.
Band-in-a-Box’s bass player was playing some natural 5ths over some chords
like C7 altered or others. Now, after a discussion with some bass players, we've
improved Band-in-a-Box so that the bass part plays the #5 or b5 correctly on
these Jazz chords.
Part Markers are now written to the MIDI files.
These Band-in-a-Box part markers can be read by PowerTracks (and Band-in-aBox if re-importing the MIDI file with the Chord Wizard). Save a MIDI file in
Band-in-a-Box, and move it over to PowerTracks (version 8 or higher), you'll
now see the Part Markers (and chords) written on the Chords Window in
PowerTracks. Re-import the MIDI file into Band-in-a-Box with the Chord
Wizard and you'll also see the part markers in Band-in-a-Box.
Channel numbers are now displayable on the notation.
When editing notes, it is often helpful to see the channel number of each note.
Load Previous Style, Load Next Style.
This function, analogous to the Load Next Song function, loads in the previous
(or next) style. Styles are ordered alphabetically.
Chase Volumes.
Chase Volumes has been added for playback. For a file with Volume change
events (Controller 7) written into the Melody (or other tracks) – if the song is
played back from somewhere in the middle, the most recent volume control
information prior to the start of playback will get sent.
Multi-Track MIDI Drums.
Use this option to write MIDI files with a separate track for each drum
instrument.
Unmute Drums for Count-In.
There is now an option to hear the drum count-in even if the drums are muted or
disabled. Drummers who play along with Band-in-a-Box by muting the drum
track should find this feature useful.
Chapter 2: Summary of New Features
9
Page 10

Boot to Last Directory.
On program boot up, the current directory will get set to the last directory used
in the previous session. So if you were working in a previous session in a folder
called “c:\My Songs\My Ballads,” when you boot up the program it will be set
to load in songs from that folder when you press OPEN. This feature is
optional, and set in the item Opt. | Preferences | Prefs2 –“Boot up in directory
of the last session.”
StylePicker Enhancements.
- There is
number
The limit of number of styles has been increased (to 4,800)
-
accommodate the large number of third party styles developed for Band-ina-Box.
- The window size has been increased, providing
category descriptions
a new filter to display only the styles of a certain Styles Set
, as well as displaying the full descriptive name of the Styles Set.
to
more space for the
.
Notation Enhancements.
Guitar Chord Diagrams
-
printout for Folk, Pop, and Jazz voicings.
Boxes for Section text
-
- A Notation
in-red-as-the-song-is-playing
readers who like to read ahead).
Brackets (#) are now drawn around accidentals
-
courtesy, where no accidental is required.
Printing as Graphics has been enhanced with a “Copy-to-Clipboard”
-
option so that you can quickly paste into other applications.
For the leadsheet and printout
-
contains only 1 bar, it is drawn with a narrow width (previously it was
stretching the bar across the entire line).
Print Options has a “Style” button
-
full style name into the Style field.
option has been added to disable the highlighting-of-notes-
are available on the notation, leadsheet, or
are now thicker.
(so it won't be distracting to good sight-
after a bar line as a
, if the last line of the range printed out
– pressing this button will enter the
Descriptive Hints added throughout the program.
We've added much more detail to the yellow window flyby hints that appear
when you move over an item. Also added are many new hints for the dialog
boxes and various windows. You can set the hints to display none, basic, or
detailed information.
Direct Entry of Tempo and other settings.
You can now quickly enter a specific tempo for the song by clicking on the
tempo (hot key is
dialog will open up allowing you to type in a tempo. Similar
10
Ctrl+Alt+T
, or menu item Play |Tempo | Set Tempo…), and a
Chapter 2: Summary of New Features
dialogs are
Page 11

available to enter a value for Volume, Panning, Reverb, Chorus, and Bank
settings.
Master Volume Hot Keys.
Master Volume settings can now be made more quickly with added hot keys. If
you want to “turn it all up or down,” this can be done quickly with hot keys.
THRU Velocity boost.
A velocity boost can be applied to the THRU part.
Song Titles Dialog Editing.
The Song Titles window can now be updated from within the Song Titles dialog.
Scrolling Big Lyrics.
The Big Lyrics Window now scrolls a page at a time for easier reading of lyrics.
Custom File Dialog Enhancements.
Now there are hot keys for the Search Dialog (Alt+S), Favorite Folders
(Alt+F), and Font selection (Alt+N). Double clicking in the favorite directories
window now exits the dialog.
Quick Song Transpose (1 hot key).
Now you can transpose the entire song during playback (or while stopped) using
a single key. Transpose down 1 semitone (Ctrl+Alt+5), up one semitone
(Ctrl+Alt+6), or a specified # of semitones (Ctrl+Alt+7). Quick Transpose is
useful when accompanying a vocalist who requests a higher key, since you'll
instantly hear the song in the new key – even if the song is playing it will
continue in the new key. Use it during playback to modulate the song.
Audio Mute.
Now you can mute/un-mute the audio track in Band-in-a-Box. Choose AudioMute Audio to mute/un-mute the audio track.
New Hot Keys Added.
Examples include hot keys for Chord Builder (Ctrl+Shift+B), Song Settings
(Ctrl+N), Preferences (Ctrl+E), song transpose by +1/-1 (Ctrl+Alt+5, 6) and
many more. The TAB key now advances around the Chordsheet (like the
right cursor key), and Shift+TAB functions like the left cursor key. For
entering chords like “Cm+” you no longer have to type an uppercase for the
“+,” you can type the lowercase “=” and the program will enter a Cm+.
Shot/Held Chords Option Enhanced.
Normally, when a “shot” or a “held” chord is assigned, instruments that are
excluded from the shot/held chord play normally. Now there is an additional
option for those excluded instruments to stay silent. Velocity boosts for shots
and held chords are now settable. In previous versions, a shot or held chord
Chapter 2: Summary of New Features
11
Page 12

produced a (loud) velocity boost of 15-30. Now you can set the amount of
velocity boost, for the effect you want. Duration of “shots” is reduced to 60
ticks per beat. Previously the shots lasted as long as the typical 1-beat pattern,
which was often longer than 60 ticks.
Soloist “Note-Density” Option.
Now you can control the maximum number of notes per quarter note that the
soloist will use. For example, you can set a “Rock Guitar” Soloist to use
nothing shorter than 16
with bursts of 32
quarter notes or longer to help with sight-reading or student study. We've
already modified many of the soloists using this new setting, so your solos will
already sound better without you having to change this setting.
th
nd
notes. This would produce less “guitar hero” solos
notes etc. Or you could create a Jazz solo that uses only
Local On/Off Menu Commands.
Dedicated menu items added on GM Menu for “Turn Local OFF,” “Turn Local
ON,” and “When program quits, turn Local ON.”
Enhanced Screen Looping.
For the loop screen feature; if looping on the first line, Band-in-a-Box now
loops from bar 1 and does not include the lead-in.
MIDI Driver Dialog Improvements.
When visiting the MIDI Driver dialog, if the setup is panned to MONO, the
program offers to change it to stereo. Selecting a new drum kit from the
MIDI Driver dialog no longer changes your panning settings. Since most people
use stereo settings, this makes it easier to ensure that you are using stereo
settings. A new Drum kit is only installed if you specifically select a new Drum
kit in the MIDI Driver dialog.
Auto-Resume Play.
If playback is occurring when OPEN song is chosen, playback of the new song
will resume when the new song is loaded (so you don't have to press PLAY).
This works for other methods of song loading such as load next/previous Song.
Chord Wizard Enhancements.
Chord Wizard enhancements include recognizing more chord types and
additional options.
… and more!
12
Chapter 2: Summary of New Features
Page 13

Chapter 3: QuickStart Tutorial
QuickStart Tutorial for the Version 12 Upgrade.
new features in Version 12 of Band-in-a-Box are provided elsewhere. This
tutorial is a QuickStart tour of the new features in Version 12.
The full descriptions of the
Band-in-a-Box 12: Overview
Note: It is assumed that you are somewhat familiar with the previous release of
Band-in-a-Box.
Explore Band-in-a-Box Version 12
OK, let's begin to explore BB version 12.
the main screen of Version 12. Then we'll use the new “Style Wizard” to
convert a MIDI file to a Band-in-a-Box Style (*.STY).
Run the main program and look at the main screen.
program has been simplified.
There is a Window menu that launches the various windows in the program.
The User menu (abbreviation for User-Style) has been moved to the Styles
menu. The Styles menu now contains the StyleMaker menu items, including the
new Style Wizard (see below).
The Opt. | Preferences dialog now contains all of the user preferences, in a tab
style dialog. When the tabs are selected, if the options control a certain window,
Band-in-a-Box will launch the window if necessary, and then close the window
after the settings dialog has been exited.
First we'll take a quick tour around
The main menu of the
Ctrl+E
Press
These preferences apply to the whole program (not a single song).
Song Settings
The
similar tabs for the various settings that apply to the current song.
to launch the Preferences Dialog, and try out the various tabs.
dialog (Edit | Settings (for This Song)… or
Chapter 3: QuickStart Tutorial
Ctrl+N
) has
13
Page 14

Right click on the Chordsheet screen
(or Notation window) and a context
menu will appear. This is another way
to launch the Preferences dialog or
other items.
Look at the top of the main screen.
Up at the top left, there's a GM2 button. This allows you to select General MIDI
patches, as well as 128 additional General MIDI 2 patches. Also, the patch
number is displayed in the instrument list. In the example above, the instrument
displayed is Ukulele. The Ukulele patch is 25/ variation 1. The variation #
indicates that it is a GM2 patch.
Note: Not all synths/sound cards support GM2 yet. The Roland VSC3 Soft-synth
(included with Band-in-a-Box) does support GM2, as do the Roland Sound Canvas
series, and newer Yamaha XG units. Most sound cards don't support GM2 yet. If
your unit doesn't support GM2 (and you don't want to use the Roland VSC3), Band-ina-Box will substitute the closest patch. In the case of Ukulele, this would be “Nylon
String Guitar.” Set the Options-MIDI Driver-”GM2 Support” to indicate the type of
GM2 support that your system supports.
Pressing the [GM2] button
allows you to select a patch
using a menu that groups the
instruments by type (Pianos,
Guitars, etc.).
In this example, the Ukulele
is selected under the group
(Guitars). GM2 patches
appear in the list after the
regular GM patches.
14
Chapter 3: QuickStart Tutorial
Page 15

Find the new Loop Section Settings dialog and checkbox.
To the right of the song title, you'll see the “Loop Sec”
check box, and the Loop Section Settings dialog button
beside it.
The loop section checkbox turns the looping on/off.
The loop settings dialog button launches the Loop Section Settings
dialog, allowing you to set a range of bars to loop in Band-in-a-Box.
Let's quickly make a loop for bars 5-12, by first selecting bars 5-12 bars by
dragging the mouse.
Then press the loop button, and inside the Loop Section Settings dialog
press [Play from loop] and then [Close].
Now let's examine the new harmony display features. Load in the song
“Night_T.MGU.” This is a Jazz song. (Note: The melody of this song was
previously converted to a harmony using the Melody | Edit Melody Track |
Convert Harmony to Melody Track menu option.) So this song now contains a
harmony on the Melody part.
Open the notation window (Ctrl+W) and you'll see all 4 voices of the
harmony on the same treble clef.
Note: If your song has an Intro the opening bars of the Melody track will be
empty so you’ll have to scroll ahead to the start of the Melody.
Now open the leadsheet window. Band-in-a-Box now recognizes that
this is a harmony generated by Band-in-a-Box and displays each voice
on a separate track of the leadsheet.
Chapter 3: QuickStart Tutorial
15
Page 16

Four part Harmony display in Leadsheet Notation window.
For example, you can see the first Bb note has the other harmony voices playing
G (drop 2), F, and D.
Now open up the leadsheet options.
16
Chapter 3: QuickStart Tutorial
Page 17

Select Show Harmony Voice Æ“Voice 2,” and press OK. You'll now see just
voice 2 of the harmony. Play the song so that you can hear the harmony.
You will hear the “Voice 2” harmony along with the other harmonies. Return to
the Leadsheet Options and select Play Volume of Harmony Voice Æ “50%
solo.” Now you'll hear “Voice 2” played louder than the other harmony voices.
Similarly, you can remove the sound of the harmony by selecting Æ “Muted.”
Seeing the harmonies like this is great for sight reading practice, reading a voice
under a Melody.
Press the [Print] button to print out “Voice 2.” If needed, press the
Notation-Options-Transpose to first visually transpose the
instrument to Eb for an “Alto Sax” chart.
Now, let's check out some of the new “Bass Guitar” features. Continuing
with the “Night Trip” song, play the song and open up the Notation window
(Ctrl+W) and the Guitar window (Ctrl+Shift+G).
As the song is playing, press the [B] bass button
on the Guitar window.
You'll see the guitar fretboard has now changed to a bass fretboard. The bass
part is correctly displayed, and is fingered as a real bass player would do it!
There is also bass tablature displayed on the Notation. This can be printed out.
Chapter 3: QuickStart Tutorial
17
Page 18
You can view the bass fretboard for other tracks (except Guitar) in
the Guitar Settings dialog by choosing Bass in the Fretboard list.
Ukulele, Mandolin and Banjo fretboards may also be chosen from this dialog.
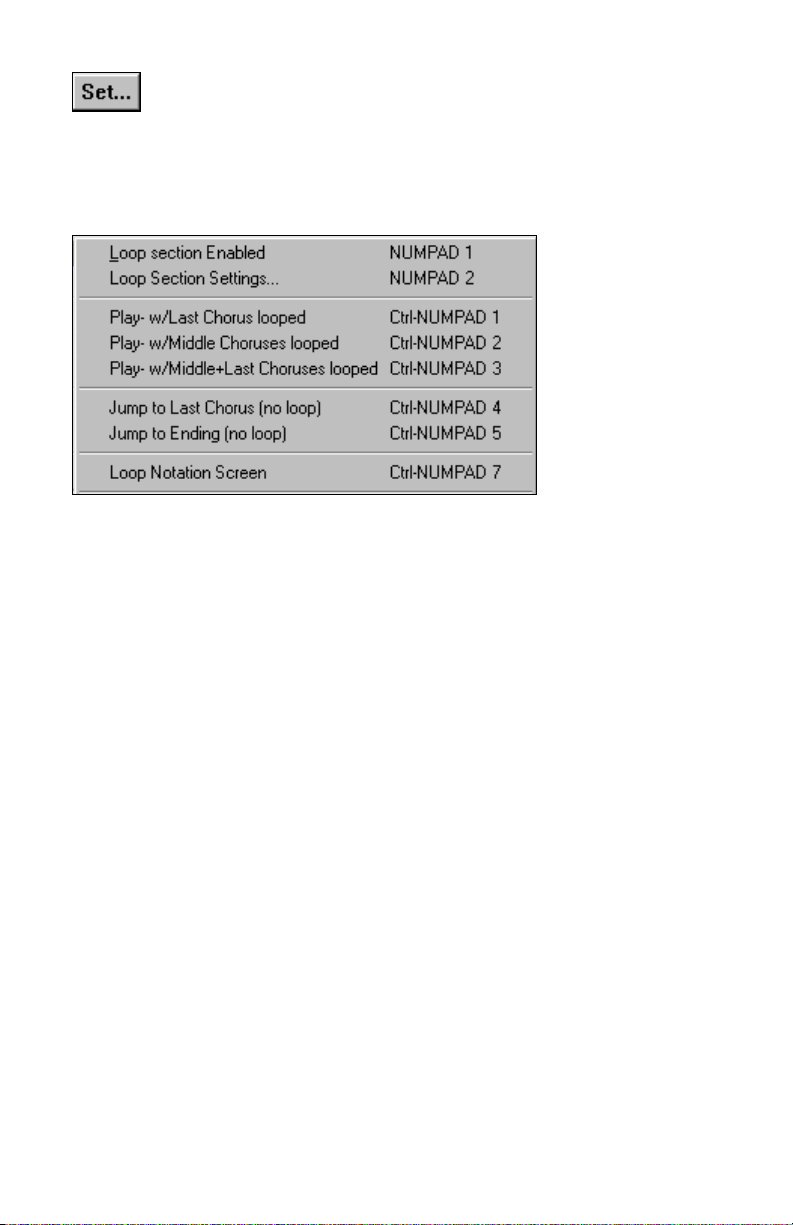
Look at the Play | Looping menu. There are several menu commands (and hot
keys) that allow you to control the song as it’s playing.
Examples of Song Navigation Hot Keys
- Loop Endless Middle Choruses. To practice a song, start it playing with
Ctrl+NUMPAD 2. The song will play and the Middle Choruses will loop
endlessly until the loop is turned off (NUMPAD 1). Example use: A
student practicing a Jazz song can press Ctrl+NUMPAD 2 at any time, and
the middle choruses will loop continuously for soloing.
- Loop Endless Last Choruses. Ctrl+NUMPAD 1 will trigger playback
and loop the last choruses. Example use: For live performance, pressing
Ctrl+NUMPAD 1 will insure that the song continues until the loop turns
off (NUMPAD 1).
- Ctrl+NUMPAD 4 jumps to the last chorus. Example use: For live
performance, if you'd like to end the song early, jump to the last chorus, or
directly to the ending.
- Ctrl+NUMPAD 5 jumps to the ending.
These song navigation commands can be done whether the song is stopped or
playing.
MIDI File to Style Wizard Tutorial.
Now let's work with the amazing new Style Wizard! This converts any MIDI
file to a Band-in-a-Box style. In this tutorial we're going to load in a Jazz Swing
MIDI file (Violet.MID) and convert it to a style - which we'll call Violet.STY.
18
Chapter 3: QuickStart Tutorial
Page 19

Note: Violet.MID is a Jazz Swing MIDI file that is included in your c:\bb folder. You
can use your own MIDI file in place of this if you'd prefer for this tutorial.
First, start with a new song (File | New) and then choose Styles | Style Wizard
(Alt+S W) to launch the Style Wizard. You'll see the following dialog.
The dialog is largely empty because we haven't chosen a MIDI file yet.
Press the [Open] button and load in the file c:\bb\violet.MID.
The Style Wizard now swings into action and does the following
automatically:
Chapter 3: QuickStart Tutorial
19
Page 20

1. The chords for the MIDI file are figured out and displayed on the
Chordsheet. They aren't perfect, but usually are more than 80%
accurate.
2. The “part markers” for the file are interpreted and displayed on the
Chordsheet. For Violet.MID, the Style Wizard has found the correct
part markers – by looking for drum fills and other signs of a part
change – and has assigned substyle “a” to all of them. We'll be
changing some of those part markers to “b” substyle later.
3.
The channels used in the MIDI file are displayed in the dialog,
with the patches used and # of notes played on each channel. (For
Violet.MID you can see that channels 2, 3, 4, 6, 7, and 10 are used.)
4.
The Style Wizard analyzes the parts and guesses at which
Band-in-a-Box part to use for each track. There are 5 possible Band-ina-Box parts in a style; Bass, Piano, Drums, Guitar, and Strings. In
Violet.MID, Band-in-a-Box has guessed perfectly and has assigned 5
instruments – not assigning a Band-in-a-Box part to the Melody.
5.
The Style Wizard suggests which
bars (“snapshots”) to include in the style. The suggested bars are bars
that contain all of the “BB Part” instruments. Usually you'll want to
customize these snapshot bars to control which bars get included in the
“a” or “b” substyle. In the Violet.MID style, the Style Wizard has
offered to include Bars 9-88 (inclusive) and wants to put them all on
the “a” substyle.
Note: If you “can't wait” and want to make a “quickie” style right now, just press
GENERATE STYLE, pick a name for the style, and that style will be made. You can
use it, or revisit the Style-Wizard to tweak it and make it again. By tweaking it (see
below) we can turn a good style into a great one and it’s fun too!
Continuing on, we want to make a great sounding style, so it is important that
we have the following two items correct:
20
Chapter 3: QuickStart Tutorial
Page 21

The “BB Parts” have to be correct. We can audition the
MIDI file by playing a loop and listening to the MIDI file
and muting channels by clicking on the “Channel”
1.
checkboxes. From that we can hear the individual parts and
assign them correctly as we would like them in the style.
From listening to the style (by playing the MIDI file inside the Style Wizard–
see below) we can tell which bars to use for the “a” and “b” substyle. Note:
Some of these settings have been entered automatically by the Style Wizard –
but you'll have to type in the data as below.
2.
The Snapshot
Bars should be correct for the “a” and “b” substyle. You need to tell the
program which bars to use for the “a” substyle and which for the “b”
substyle. The program makes an attempt to guess at this, but since MIDI
files can contain many different substyles (and a Band-in-a-Box style
allows only 2), you'll likely want control over these snapshots yourself.
Tip to help you choosing which bars to use:
To listen to the MIDI file, you can either
exit the Style Wizard dialog and just play
the song like any other Band-in-a-Box file,
or play a looped section inside the Style
Wizard using the [Play], [Stop], and “Loop
at Bar” settings. OK, the Style Wizard has already made the correct settings for
the “BB Parts” for us, so we don't need to make any changes there. Let's move
to the Snapshots section, and enter the bar numbers that correspond to the
substyles that we'd like for the Jazz tune. After listening to the tune, we notice
that there is a “2-feel” Jazz section, and a “4-in-the-bar” section. We'd want
those as “a” and “b” substyles, so we want to enter the bar #s that correspond to
these settings.
Chapter 3: QuickStart Tutorial
21
Page 22

In the Snapshots area of the Style Wizard:
- Enter “1-20” for the bars for the “A” Substyle.
- Enter “21-28, 37-68” for the “B” Substyle.
- Enter “12, 20” for the “A” Drum Fills.
- Enter “28, 36, 44, 52, 60, and 68” for the “B” Drum Fills.
Note: Of course you don't need to enter this much detail. You could just enter a
single range like 1-20 for the “a” substyle and make a quickie style. We're illustrating
“advanced” style-generation here.
Now we're ready!
Press [Generate NEW style…], choose a name for
your style, and the style will get made. Let's call it
Violet.STY.
Now to hear your style! You could play the style with any song of course, by
loading in a song and then loading in the Violet.STY It is easily available from
the favorite styles dialog (Shift+F9).
For this tutorial, load in the song V_TEST.MGU that we made for you. That's a
Jazz Swing song using different chords than Violet, and it uses the Violet.STY
(So you need to have made that style before you try to play the song or you'll get
a “Violet.STY not found” message.)
Before loading in the new song save the existing song. When Band-in-a-Box
saves a song that has an entire MIDI file on the Melody (or Soloist) tracks it
gives it a special extension… MGX. So you'll be saving the file as
Violet.MGX. You can revisit this file at a later date as it remembers all of the
settings in the Style Wizard that you've made so that you can resume your work
in tweaking your style.
Alternatively, if you'd prefer to play the Violet.STY style without loading in
another song, you can do it as follows. Since the Violet.MGX file currently has
the entire MIDI file on the Melody track the first thing we need to do is Mute
the Melody (Alt+9 or right-click on the Melody part at the top of the screen).
The next thing is the Enable the Style, by choosing Style | Style is Enabled so
that this item has a checkbox.
22
Chapter 3: QuickStart Tutorial
Page 23

So we've made our first style! In summary, making styles with the Style
Wizard is a process involving:
1. Loading a MIDI file into the Style Wizard.
2. Listening to the MIDI file by muting channels to identify parts.
3. Picking the channels to use for the BB Parts.
4. Picking the snapshot bars for the “a” and “b” substyle.
5. Pressing the [Generate NEW style…] button.
This is the end of the tutorial.
Thanks for taking the time to read this section. The next sections examine the
new features in detail.
_____________________________________________________
New! Styles Set #30: World Fretboards
The new Styles Set #30 comes with your upgrade to Band-in-a-Box Version 12.
These “World Fretboards” styles use the new intelligent chord fretboard display
in Band-in-a-Box 12.
BEEBROK4.STY Sparse guitar comping variation of BeeBRock.Sty.
BEEBROK5.STY Rock Blues var. of BeeBRock less varied guitar rhythm.
BIGBAND1.STY Medium Swing big band sound with Brass (fills & bg).
BLUGRAS5.STY Bluegrass style with a swing 16ths feel.
BO_D.STY Swing 16ths rhythm groove à la Bo.
CAMPFIRE.STY Easy “round the campfire” sing-along with strumming.
COZY_SW.STY Simple Jazz trio Swing style.
CREEDNCE.STY Loose 16ths Rock feel - in between straight and swing.
DIXIDUKE.STY Dixieland in the style of the Dukes and similar groups.
DREAM.STY Slow 50s Swing Ballad with rhythm section & strings.
DRUMSOLJ.STY Jazz Swing DRUMS ONLY. Use for inserting drum solos.
GOSSAMER.STY Slow, quiet, & peaceful style with even 8ths arpeggio feel.
HAWAISLO.STY Slow, easy, semi-even 8ths Pop Hawaiian strumming style.
J~BREEZY.STY Jazz swing, 5-inst. style, including brushes & slow strings.
J~GITWLZ.STY Variation of J!GITWLZ.STY, this version uses BRUSHES.
JAZFOURA.STY Variation of JazzFours.sty, with “trading” order changes.
JAZFOURB.STY Another variation of the “trading fours” order.
JAZFOURC.STY At “a” AND “b,” 4 bars DRUM SOLO - 4 bars BAND.
JOHNBAL.STY Slow even 8ths Pop-Rock with acoustic piano & strings.
JOHNNYH.STY 60s Pop-Country style à la JohnnyH. Almost-swung 8ths.
L~BOSA4U.STY Simple Bossa style with smooth syncopation. 3 insts.
LOTUS.STY Slow, tranquil, 3/4 time, even 8ths, New Age style.
MILITARY.STY Good for 60s Country historic battle-type tunes.
P_NEILD1.STY 70s Pop Rock swing with 4 to-the-bar guitar comping.
POP_SADE.STY 90s cool Pop-Jazz even 8ths. Vocal background at “b.”
ROKTRIO1.STY 80s-90s Rock trio with even 8ths feel. Strat 4-to the bar.
SWING~EZ.STY Swing style with 4 instruments and no piano.
UKE_FAST.STY Simple Swing 8ths campfire Ukulele.
… and more! (See Appendix A for full list.)
Chapter 3: QuickStart Tutorial
23
Page 24

Chapter 4: MIDI File to Style Wizard
Overview
MIDI file to Style Wizard
This automatically converts a MIDI file (.MID) to a Band-in-a-Box Style
(.STY). Simply open a MIDI file, select your options, and press “Save-As
Style.” With plenty of options this wizard allows you to quickly make your own
simple or advanced styles from a standard MIDI file – without any knowledge
of the StyleMaker required! Novice users will appreciate the automated option
that “does everything” to make the style while advanced users will appreciate
the custom options to control (for example) which bars from the MIDI file are
included in the style, how many pattern variations, and more.
First off, you should likely read the “Version 12 Tutorial” on making a style.
This tutorial gives a description of the process to make a style.
Also, make sure to watch the “Band-in-a-Box 12 New Features Video” on
making a style with the Style Wizard (this may be included with your Band-ina-Box 12 version).
In the tutorial, we saw that making styles with the Style Wizard is a process
involving:
1. Loading a MIDI file into the Style Wizard.
2. Listening to the MIDI file by muting channels to identify parts.
3. Picking the channels to use for the
Picking the snapshot bars
4.
5. Pressing the
This section will discuss the various items in the Style Wizard Dialog and the
Style Wizard Additional Settings.
The Style Wizard is used to generate a Band-in-a-Box Style from a MIDI file.
The Style Wizard does this by analyzing the file and creating patterns emulating
the notes and rhythms for the style. First off, you'd need to get a MIDI file to
use.
Important: You should use a MIDI file that you have composed and arranged – if not,
you need to first get permission of the composer and arranger before making a style
from the MIDI file.
[Generate NEW style…] button.
for the “a” and “b” substyle.
BB Parts
.
24
Chapter 4: MIDI File to Style Wizard
Page 25

Style Wizard Dialog
Open the Style Creation Wizard dialog from the Styles menu by choosing the
Style Wizard menu item. A quicker method is to use the hot keys Alt+S then W.
Once you open the dialog, you should select a MIDI file.
You'll then see the name of the
MIDI file in the MIDI file label. Once chosen, the Style Wizard will display the
channels, patches, and number of events in the “Tracks Area” of the Style
Wizard. It will look like this…
Here's a sample row from the Tracks Area.
This indicates that “Channel 2” is used in the file. The checkbox
indicates that it will sound when the [Play] button in the Style Wizard is
pressed. Deselecting this checkbox will mute the channel during
playback. Muting/Playing the channels is essential in auditioning the MIDI file
to determine which “BB Parts” to use, and what bars to use for “Snapshot bars.”
The “Channel selector” presets help with the selection of the
channels as described above.
The [None] button de-selects (mutes) all of the channels.
Chapter 4: MIDI File to Style Wizard
25
Page 26

The [All] button selects (plays) all of the channels.
The “Solo” button will “solo” the last channel that was pressed
before the solo button was pressed. So to solo a channel, press
the Channel Checkbox, then the SOLO button.
The “BB” part button selects all of the channels that are
currently selected as using the “BB Parts,” i.e., the drums/ bass/
piano/ guitar/ and strings (not the melody or “other”).
The “BB Part” section is the area that you choose which
channels to use for the “BB Parts” in your style. There
are 5 possible instruments in the style – drums, bass,
piano, guitar, and strings. Tracks that are not part of the
rhythm section (i.e. melody or soloist parts) or “extra”
instruments that you don't want to use in the style should
be assigned to a BB Part setting of None (----),
“Melody,” or “Other.”
The Style Wizard automatically sets these “BB Parts” for you, but you should
over-ride these settings to your choices that you'd like to use in the style. For
example, if the program has chosen an instrument for BB Part of strings, and
you don't want strings in the style, then change that BB Part setting to “----”
(none) or “Other.”
The Patch setting is the Patch (instrument) that
is found in the MIDI file, and it is the
suggested one to use in the style. You can
change the patch if you'd like to use a different
patch in the Style.
The #Notes column reports the number of notes that are
found on each channel. This is helpful information in
deciding which BB Parts to assign. For example, if
only 10 notes are used on the channel, it's unlikely that
the channel is playing much in the file, and shouldn't be
used as a BB Part in the style.
The [Auto-Set…] button instructs the Style Wizard to
re-make the settings for the Tracks Area and Snapshots
of the Style Wizard. The Auto-settings are already
invoked when you load a MIDI file, so you would
rarely need to press this button explicitly.
The [+] button beside the [Open] button also allows
loading of a MIDI file, but displays the Interpret
Chords from MIDI file dialog (the Chord Import
Wizard), to allow you to tweak settings controlling the
chord interpretation. For example, if the interpretation
26
Chapter 4: MIDI File to Style Wizard
Page 27

of the chords isn't accurate, you can use this button to
use different settings.
The [=] button will re-load a MIDI file that is already
on the Melody track. For example, if you've loaded in a
MIDI file to the Melody track (outside of the Style
Wizard), and would now like to make a style from it,
you just need to load in the MIDI file from the Melody
track to the style wizard. This won't cause an
interpretation of the Chords; it uses the current chords
on the Chordsheet.
Play Looped Sections
The [Play] and [Stop] buttons and “Loop at Bar” allows playback of a region of
the MIDI file. As you hear the playback, you audition various channels for the
style by using the “Channel” checkboxes to mute/un-mute tracks.
The “Loop at Bar” setting is the bar for the loop to begin. The # bars is the
number of bars for the loop following the “Loop at bar” setting.
Snapshot Regions
This area is for the “snapshots” for A substyle, B substyle, and A, B drum fills.
For the “A” substyle enter the range of bars that you would like to be included in
the “A” substyle. You can enter values separated by commas “1, 2, 4,” or
ranges “1-7, 9-14,” or combinations “1-4, 9, 11, 12-24.”
To determine which bar numbers to enter, you'll need to listen to the MIDI file,
either by using the PLAY/STOP buttons to loop a section or exiting the dialog
and playing the MIDI file (insuring that the Style is Disabled from the Styles
menu so that you only hear the MIDI file on the Melody track).
Pressing the [Auto-Generate Snapshot bars] button will generate a list of bar
numbers for the snapshots. This list is based on the part markers in the BB
Chapter 4: MIDI File to Style Wizard
27
Page 28

Chordsheet, so you should first exit the Style Wizard to insure that the part
markers are correct before pressing this button.
This is similar to the “Auto-generate snapshot bars,” except when
you select this button; a menu of choices will appear to allow
selection of all bars, or only bars that include all of the
instruments.
The [Clear] button removes the current snapshots from the
snapshot areas.
The “Add looped bars as a snapshot” adds the current looped area as a snapshot.
You can of course type the information directly into the snapshot areas.
The Defaults button sets the Style Wizard settings to their default
state, including the settings in the “More” Dialog.
The “Resolution” setting is set
automatically, and should be confirmed. It is set to Triplets for style with a
“shuffle” feel such as Jazz Swing or any style with a triplet feel to the 8
(or a swing feel to the 16
straight 8
th
notes or straight 16th notes.
th
notes). The other setting is Straight for styles with
th
notes
The Jazz checkbox setting is to indicate whether the style is a “Jazz” type style
with Jazz chords or a “Pop” type style with Pop chords.
The “Copy Melody to Melody
Track” is a utility function that should only be used when the style is “finished.”
Prior to executing this command, the Melody track contains the entire MIDI file
with all of the parts. This “MIDI-file-on-the-Melody-track” is used to create the
style. Once the style is created, you might want to extract the actual Melody
track from the MIDI file to put on the Melody track. The channels used are the
channels that have the BB Part set to “Melody.” When you do this command,
you get a chance to first save the MGX file (i.e. the file with the MIDI file on
the Melody track), so that you can revisit the file. This “Copy Melody to
Melody Track” is useful to audition your new style, because you can then hear
just the Melody along with your style.
“Copy Melody to Soloist track”
works in a similar way except that it doesn't erase the MIDI file part on the
Melody track.
28
Chapter 4: MIDI File to Style Wizard
Page 29

“Generate NEW style…” makes a new style. The
Style Creation Wizard dialog is exited, and a file
dialog allows you to pick a name for the style.
“Add to existing style...” allows you to add the
patterns to an existing style.
The [More] button launches the Style Wizard –
Advanced Settings and Preferences dialog.
Style Wizard “More…” Dialog
This dialog is launched from the [More…] button in the Style Wizard.
There are 2 sections to this dialog.
Advanced Instrument Settings
The advanced instrument settings allow settings for the instruments (drums /
bass / piano / guitar / strings) to be included in the style. The settings are:
The “Substyles” determines whether the instrument is included
in the “A,” “B,” or both “A&B” substyles. For example, if you
want to make a style that only uses the strings on the “B”
substyle, set the strings instrument part to “B” only.
The Voicings settings determine, for the various instruments:
Chapter 4: MIDI File to Style Wizard
29
Page 30

Drums (“voicings”): Whether the patterns
will use live or grid style patterns. Default
mode is “auto,” which normally uses live
patterns, but you can force it to use live or
grid style patterns. Live patterns have higher
resolution and can use more instruments, so in general are the better choice.
Bass (“voicings”) determine if the bass part
will use All notes / Scale tones only / Root
3rd, 5
th,7th
/ Root, 3rd, 5th / Root and 5
th
/ or just
the Root. The default is “Auto-select” which
usually allows all 12 semitones.
Piano, Guitar, and Strings Voicings
determine how the Piano patterns will be
voiced. The choices are Auto, Include Full
Voicings, and Tritones only (3
auto-setting usually uses the “Include full
rd/7ths
). The
voicings.” If the part uses 2-note chords, you should over-ride this setting to
“use tritones” so that the most important notes of the chord (the tritone) will get
included.
The Embellish checkbox determines if the patterns for
piano, guitar, and strings will be embellished. If
embellished, on a chord like D7 (in the key of C) 13ths,
9ths, and #11 notes might be added to embellish the chord.
A jazz piano style would likely use this.
The “Include Empty patterns Threshold” setting defaults to
None. Possible settings are None / 2 beat / 1 bar / 2 bars.
If set to none, the instrument will always play in the style,
if set to “1 bar” there will be “spaces of silence” up to 1
bar long (perhaps longer if chained together) in the style
for that instrument. So if an instrument is used sparsely in
a style, set this setting to something higher than none.
The Velocity Adjust will make an instrument louder or
softer in the style.
Auto-interpret MIDI file. (DEFAULT = YES)
When set, the Style-Wizard will set the channels, BB Parts, and snapshots for
you. Normally this setting should be left on.
30
Chapter 4: MIDI File to Style Wizard
Page 31

Delete existing patterns (when adding to the style). (DEFAULT = NO)
If this option is set when you create style patterns to add to an existing style, the
entire instrument will first be erased in the style for any instrument used in the
new style. When you generate a style by adding to an existing style, the
StyleMaker is then opened up, allowing you to pick a new name for the style (so
you don't overwrite the existing style).
# of Columns to leave unused in the style. (DEFAULT = 0)
If set to zero (the default), the Style Wizard can create the biggest style possible
– filling up the rows completely with patterns. But if you set this to a non-zero
value it will limit the # of patterns that can be made. Since there are 30 rows in
the StyleMaker, you can set this setting from 0 to 29.
The Style Wizard won't insert patterns unless they are unique compared to the
ones already entered. But (with this setting at the default of 8), after 8
duplicates of the same pattern, a 2
nd
pattern will get entered that is a duplicate of
another pattern. Setting this to zero would mean that every pattern would get
entered (regardless of whether it was unique); setting it to a high number like
200 would mean that only truly unique patterns are entered. To maintain the
correct balance in the style, since the maximum weight of a pattern in the
StyleMaker is 8, this setting should be left at 8 in most situations. If your style
is “filling up” all of the available columns, then set this to a higher number.
Chapter 4: MIDI File to Style Wizard
31
Page 32

Chapter 5: General MIDI 2 (GM2) Support
“Twice as many instruments” with General MIDI 2 support!
We've added support for General MIDI 2 standard (GM2). This GM2 support
adds 128 new instruments to Band-in-a-Box styles and songs, including ukulele,
mandolin, 12-string guitar plus many new and improved piano, organ, guitar,
brass, and string sounds! We've made many new styles using the new
instruments and also include updated versions of previous styles – you'll be
hearing the new instruments with many of your new and existing styles.
Note: The included Roland VSC3 synth supports the new GM2 instruments, as do
most newer modules/sound cards. If yours doesn't, a similar instrument from the
existing 128 General MIDI sounds will be substituted.
The type of GM2 support is set in the
MIDI Driver Setup
dialog (Opt. | MIDI
driver setup…). The choices are:
General MIDI 2 support:
-
If you're using the Roland VSC3, or a newer
Sound Canvas (i.e. newer than 1999, or newer than the Roland SC88), then
choose this GM2 support.
Roland GS (older Modules):
-
“Older” Sound Canvases (SC55/SC88)
support GS, but not GM2. The good news is that they have the same
patches available, just at different locations. So if you choose this option,
BB will find the patches at the “GS” locations instead of the “GM2”
locations. If you have a newer GS module like the SC8820, it supports both
GM2 and GS - you should likely choose GM2.
No GM2 support:
-
Most sound cards (Sound Blasters etc.) don't have GM2
support yet, so just support the 128 sounds. BB will use the closest
instrument in these cases.
You can select the GM2 patch using the GM2 button at the top left of the
screen. This shows a menu organized by instrument types (pianos,
guitars etc.).
32
Chapter 5: General MIDI 2 (GM2) Support
Page 33

Technical note: For a GM patch like Nylon Guitar the patch is 25. For a GM2 patch
like Ukulele, the patch is also 25, but it is accompanied by two bank settings; MSB
Bank Controller 0 setting of 121 and LSB Bank Controller 32 setting of 1.
When you select the instrument from this menu, it will make the bank settings
(Bank0 and LSB) for you. You can also change the bank #s directly, and the
patch in the box will change.
GM2 patches can also be selected elsewhere in the program, such as the Change
Patch at any bar dialog and the StyleMaker patch selection.
Chapter 5: General MIDI 2 (GM2) Support
33
Page 34

Chapter 6: Looping / Song Navigation
Enhancements
Loop any Section of the song.
You can now loop any section of the song. The program will then start playback
at the first loop point and play the looped section until stop is pressed or looping
is turned off. This feature is handy for looping a full chorus or other section of a
song for practice or performance.
Looping of a section of the song is enabled by the “LoopSec”
checkbox or with the keystroke
Open up the
Loop button, or pressing
dialog will then display.
There's a useful “Play from loop” command that allows you to quickly play a
looped section. Simply highlight the range of bars to loop on the Chordsheet,
NUMPAD 2
press
[Play from loop] button.
to open the
Loop Section Settings
Loop Section Settings
NUMPAD 1
dialog by clicking the
NUMPAD 2
dialog, and choose the
.
. The Loop settings
To enter settings manually in this dialog, you start by choosing either “Loop a
Single Screen of Notation” or “Loop Range of Bars.” If you want the custom
range of bars, then enter the starting “From Bar” number, the “Chorus #,” and
the “# bars” for the length of the looped section. You can then play the song
with the [Play from loop] and then [Close] the dialog.
34
Chapter 6: Looping / Song Navigation Enhancements
Page 35

Presets are available to set the loop
points to Intro, First / Middle /Last
Choruses, Ending, or All. As the
different buttons are selected you will
see the “Loop Range of Bars” settings
update. Hot keys are also available for
these, look in the Play menu under the
Looping submenu.
One More Time! (Song navigation during playback!)
The loop feature is useful for live performance (to shorten or lengthen the tune),
or to provide “endless choruses” of one tune when practicing. Either during
playback or when stopped, you can open the Loop dialog to quickly navigate
around the tune.
For example, if the song is playing and the “dance floor is humming” and you'd
like the last chorus of the song to loop endlessly, open the Loop Section
Settings dialog (NUMPAD 2), and click on the [Last] button. The song will
now continue playing and will loop the last chorus until you turn off looping
with NUMPAD 1. Similarly, to enable the “endless Choruses” for soloing
practice, open the dialog (NUMPAD 2) and click on [Middle].
There's a similar new feature called “Jump to” that allows you to jump to any
section of the song (intro / first chorus / middle choruses / last chorus / ending)
without looping. This is useful if the dance floor is “not humming,” and you
want to end the song by, for example, jumping to the ending or last chorus.
For live performers (or people in a hurry), there are even simpler “1 hand” hot
key commands to accomplish the entire process. Ctrl+NUMPAD 1 while a
song is playing (or stopped) will set the last chorus to loop endlessly and
NUMPAD 1 turns the loop off. If you press Ctrl+NUMPAD 1 to start the
song, it will start playback and set the looping up for the last chorus. If you
forget, you can still press the hot keys Ctrl+NUMPAD 1 as the song is playing
and the loop will get set up. Similar hot key commands are available for looping
the Middle choruses or Middle & Last chorus, and there are one-hand hot key
commands for jumping to the last chorus or ending to end the song early.
The Title bar at the top of the main screen indicates the looping status. If a song
has a looped section, this will be listed at the top of the screen (e.g. “Will loop
Middle Choruses” or “Currently looping Middle Choruses”). So you can tell
what is going to happen with the looping during a live performance.
Tip: If you're at home practicing a tune, start playback with Ctrl+NUMPAD 2, and the
song will play with endless middle choruses for soloing, until you press NUMPAD 1
(or Stop) to release the loop.
Chapter 6: Looping / Song Navigation Enhancements
35
Page 36

Chapter 7: Bass / Guitar / Fretboards
Guitar Window Enhancements
We've enhanced the Guitar Window by adding fret display support for other
instruments, including mandolin, ukulele and banjo. You'll see authentic chord
voicings and melody display on the fretboard for all of these new instruments.
The StyleMaker has been enhanced with support for the GM2 instruments, so
you can make styles that use the new instruments and have correct instrument
voicings displayed on the fretboard.
The ukulele, mandolin, and banjo display will mainly occur when you are
playing styles that have these instruments. Audition Styles Set #30 to listen to
these styles. For example, HAWAISLO.STY has a Ukulele. Go to the guitar,
piano, or strings track and view the Guitar fretboard – it will change to ukulele
when you are viewing a style with Ukulele.
You can force the Guitar Window to always display Ukulele (for Melodies etc.).
To do this, choose Window | Guitar Window and click on the [Set…] button to
open the
Bass, Ukulele, Mandolin, or Banjo. Or set the Melody | Track Type to Ukulele.
When this is done, the default fretboard display will become the one that you
have chosen, and it will only be overridden by a style containing another
fretboard type.
Guitar Settings
dialog. Use the Fretboard combo box to select Guitar,
The Guitar Tutor also works with
the new fretboard types. For
example, if you want to see Ukulele
chording to any song/ any style,
choose the Tutor and choose one of
the new options for ukulele,
mandolin, or banjo.
Guitar Chord Diagrams on the Notation
We've added an option for standard Guitar Chord diagrams to be included in the
notation display. Choose from Folk, Pop or Jazz Guitar Chord Diagrams (or
ukulele, mandolin or banjo) on the notation, leadsheet, or printout.
36
Chapter 7: Bass / Guitar / Fretboards
Page 37

To get the Chord Diagrams
displaying, go to the
Notation Window Options
dialog and choose the type
of Guitar Chord Diagrams
from the list.
You'll then see typical chord diagrams on the notation.
The fret #s are written at the top of the diagram. The
chord symbol is written above that (in a size 50% of
normal). The fret # of the root of the chord is written at
the left of the diagram.
Bass Part Enhancements
Bass players will now see bass tablature and correctly displayed Bass parts on
the new Bass fretboard. This happens automatically. To see the Bass part,
open the Guitar Window (Ctrl+Shift+G) and click on the [B] Bass part button.
The fretboard will then display the Bass part correctly, using intelligent
fingering typical of a real bass player. The notation will similarly show bass tab
when the Notation window bass track is selected.
The Melody or Soloist track can also be set to Bass Guitar display, by selecting
menu Melody | Track Type | Bass.
Chapter 7: Bass / Guitar / Fretboards
37
Page 38

Chapter 8: Harmony Notation Display
Enhancements
Harmony Notation Display Enhancements
Harmonies can now be displayed on the Leadsheet window (or printed) with
separate notation tracks for each harmony voice
separate track, or view/print a single harmony voice!
for your band
harmony voice along with the melody that you're hearing.
Now, let's examine the new harmony display features. Load in the song
“Night_T.MGU.” This is a Jazz song. The melody of this song was previously
converted to a harmony using the Melody | Edit | Convert Melody to Harmony
option, so this song now contains a harmony on the Melody part.
, or use for
Open the Notation window (
the harmony on the same treble clef.
sight reading practice
Ctrl+W
. View each harmony on a
Print harmony charts
– to read and play any
), and you'll see all four voices of
Four part harmony on single staff.
Now open the Leadsheet window. Band-in-a-Box now recognizes that
this is a harmony (generated by Band-in-a-Box), and displays each voice
on a separate track of the leadsheet.
38
Chapter 8: Harmony Notation Display Enhancements
Page 39

Four part harmony on four separate staves.
For example, you can see the first Bb note has the other harmony voices playing
G (drop 2), F, and D.
Now open up the Leadsheet Options.
- [Convert Harmony to track] will add a harmony to an existing Melody.
- [Remove] will remove the harmony from the track.
Chapter 8: Harmony Notation Display Enhancements
39
Page 40

- Split Harmonies to different tracks enables the splitting of the harmonies
to different tracks on the leadsheet.
- Show Harmony Voice allows you to select ALL tracks, which will cause
each track to display on a different track on the Leadsheet. Or select a
specific Voice to display only that voice. For example, if you choose
“Voice 2” and press OK, you'll now see just voice 2 of the harmony.
Play the song, so that you can hear the harmony.
You can control the volume of the selected harmony voice relative to the other
voices in the harmony.
The Play Volume of harmony voice setting can be set to:
- Normal Harmony plays as normal.
- Solo Only the selected voice will play.
- 50% Solo Selected voice is much louder than other voices.
- Quiet Selected Voice is much quieter than other voices.
- Muted Selected Voice is muted.
These settings are useful to sight-read along on harmonies, and learn to hear
inner voices of a harmony.
Press the [Print] button to print out “Voice 2.” If needed, press the
notation “Transpose Options” to first visually transpose the
instrument to Eb for an “Alto Sax” chart.
40
Chapter 8: Harmony Notation Display Enhancements
Page 41

Chapter 9: GUI Enhancements
Interface Enhancements
The program’s Graphical User Interface has been enhanced.
There is a single tab dialog for all program Preferences. Press the Preferences
button (new hot key is
the type of options that you want to set. These include options for General
Preferences / MIDI Driver / Channels / Record Filter / Colors / Patch Map /
Favorite Patches / Drum Kit / Notation / Leadsheet / Guitar / Big Piano / Audio /
Big Lyrics / Soloist / THRU Transpose.
Ctrl+E
Press
These preferences apply to the whole program (not a single song).
Song Settings
The
tabs for the various settings that apply to the current song.
to launch the
Ctrl+E
) to launch the dialog, and then choose the tab for
Preferences
dialog (Edit | Settings ( for This Song) or
Right mouse menu support has been added. Right
click on the chordsheet, and the right mouse menu
appears with options to:
Cut/ Copy/ Copy From To/ Paste/ Chord Builder/
Play Current Chord/ Chord Builder/ Bar Settings/
Song Settings/ Preferences.
dialog, and try out the various tabs.
Ctrl+N
) has similar
The main menu of the program has been simplified.
There is a Window menu that launches the various windows in the program.
Chapter 9: GUI Enhancements
41
Page 42

The User menu (abbreviation for User-Style) has been moved to the Styles
menu. The Styles menu now contains the StyleMaker menu items, including the
new Style Wizard.
Right click on the Chordsheet screen or Notation window and a context menu
appears. This is another way to launch the Preferences dialog or other items.
Descriptive Hints added throughout the program.
We've added much more detail to the yellow window flyby hints that appear
when you move over an item. Also added are many new hints for the dialog
boxes and various windows. You can set the hints to display none, basic or
detailed information.
On program boot up, the current directory will get set to the last directory
used in the previous session. This option is set in the Opt. | Preferences |
Prefs2 dialog.
Custom File Dialog Enhancements. The custom file dialog can be opened by
Ctrl+Shift+F3 or by F3 if you choose “Long Filenames – custom” in the
Options | Preferences | Prefs2 “Display Filenames:” selection box. Now there
are hot keys for the Search Dialog (Alt+S), Favorite Folders (Alt+F), and Font
selection (Alt+N). Double clicking in the favorite directories window now exits
the dialog.
Many new hot keys added.
Examples include hot keys for Chord Builder (Ctrl+Shift+B), Song Settings
(Ctrl+N), Preferences (Ctrl+E), song transpose by +1/-1 (Ctrl+Alt+ 5 or
Ctrl+Alt+ 6) and many more. The TAB key now advances around the
Chordsheet (like the right cursor key), and Shift+TAB functions like the left
cursor key. For entering chords like “Cm+” you no longer have to type an
uppercase for the “+” you can type the lowercase “=” and the program will enter
a Cm+.
42
Chapter 9: GUI Enhancements
Page 43

Chapter 10: Notation Enhancements
Guitar Chord Diagrams
leadsheet, or printout for Folk, Pop, and Jazz voicings.
red as the song is playing
like to read ahead. The “Highlight Playback notes in red” setting in the
Notation Window Options
Boxes for Section text
They are double thickness.
so it won't be distracting to good sight-readers who
dialog sets this.
Brackets (#) are now drawn around
accidentals
where no accidental is required.
are available on the notation,
are now thicker.
A Notation option has been added to
disable the highlighting of notes in
after a bar line as a courtesy,
Printing as Graphics has been enhanced with a “Copy-to-Clipboard”
option, so that you can quickly paste into other applications. To copy-toclipboard, choose Not’n | Print, then Print Preview and Copy-To-Clipboard.
You can then paste the bitmap into another application.
For the Leadsheet and printout
contains only 1 bar, it is drawn with a narrow width (previously it was stretching
the bar across the entire line).
, if the last line of the range printed out
Print Options has a “Style” button
pressing this button will enter the full style
name into the Style field.
Chapter 10: Notation Enhancements
–
43
Page 44

Channel numbers are now displayable on the
notation. When editing notes, it is often helpful to see
the channel number of each note. Now, by setting Note
Names to “Channel Numbers” in the Notation Window
Options dialog you'll see the channel number for each
note written into the note head of the notes. This is
useful (for example) when viewing an entire MIDI file that you've loaded onto
the Melody track, and want to examine the channel information, or for editing a
guitar track that uses channels 11 to 16.
44
Chapter 10: Notation Enhancements
Page 45

Chapter 11: Style Enhancements
Styles Improved
All of the styles are enhanced!
Box style that we’ve made with the newest StyleMaker features including guitar
and other fretted instrument voicings, consistent volume levels, edited patterns
and more.
Band-in-a-Box version 12 upgrade
Change styles at any bar using the convenient StylePicker Window
changing styles at any bar using the
previously the new style chosen would be chosen using the File | Open dialog
box. Now you can choose the style change using the StylePicker, which is much
easier. To do this, open the
press the [.STY] button, and choose your new style.
Note: You can still use the previous method with the old file-open style dialog. Press
the [Open…] button in the bar settings dialog to do this.
Many of these styles and new demo songs are included with your
We've improved/updated
.
Edit Settings for Current Bar
Edit Settings for Current Bar
EVERY
dialog (F5 key),
Band-in-a-
. When
dialog,
Enable/Disable Style
Enable/Disable the style.
When disabled, the name of the style will have an X at the beginning, which
indicates a disabled style. The disabled style won't sound or write any data to
the MIDI file. The most common use for disabling a style is when a MIDI file is
loaded to the Melody track. Then the style won't sound and conflict with the full
arrangement on the Melody track.
menu item. (
JazQuint style is disabled, as indicated by the X at the
start of the name.
Chapter 11: Style Enhancements
Alt+S E
) The Styles menu has an item to
45
Page 46

Load Previous Style, Load Next Style.
This function, analogous to the Load Next Song function, loads in the previous
(or next) style in alphabetical order of the file name. These functions are added
to the Styles menu, and accessible with the hot keys Ctrl+Alt+Shift+F8 (or
Alt+Shift+F8).
StylePicker Enhancements
The StylePicker window has been enhanced:
There is a new filter to display only the styles of a certain Styles Set number, as
well as displaying the name of the Styles Set. To select this, open the
StylePicker, and choose “Only Show Styles Set #.” When you pick Styles Set #,
you can then see only that Styles Set listed, regardless of the category you are in.
The limit of number of styles in the StylePicker has been increased to 4,800 to
accommodate the large number of third party styles developed for Band-in-a-
46
Chapter 11: Style Enhancements
Page 47

Box. The window size has been increased, providing more space for the
category descriptions.
Technical note: The configuration file saved is now called BBW.LSW instead of
BBW.LSV.
In the StyleMaker, deleting patterns no longer requires a confirmation “are you
sure” dialog. Just typing a zero or Delete will delete the pattern.
Chapter 11: Style Enhancements
47
Page 48

Chapter 12: Other New Features
Handy Song Transpose Options.
Quick (1 hot key) Song Transpose.
during playback (or while stopped) using a single key. Transpose down 1
semitone (
semitones (
menu. Quick Transpose is useful when accompanying a vocalist who requests a
higher key, since you'll instantly hear the song in the new key – even if the song
is playing it will continue in the new key. Or you can use it during playback to
modulate the song.
Hitting
more) transpose. Note that the transpose is not just a simple transposition of the
notes, it is a new arrangement based on the transposed chords so that
instruments stay within their correct range.
Tip: If the resultant melody isn't in the octave that you'd like transpose it down/up an
octave with Ctrl+Alt+1 or Ctrl+Alt+2 (Soloist is Ctrl+Alt+3 or Ctrl+Alt+4).
Band-in-a-Box can load and play an entire MIDI file!
Band-in-a-Box can load and play an entire MIDI file! Now you can open an
entire MIDI file into Band-in-a-Box. The chords will get auto-interpreted by the
Chord Wizard, and the MIDI file will play and display on the Melody track. A
“Silent” style will get loaded, so you'll just hear the MIDI file. To access this
feature, choose the Chord Wizard (File-Interpret Chords) and select “Open
entire MIDI file to Melody.”
Visual Metronome during the whole song
Ctrl+Alt+5
Ctrl+Alt+7
Ctrl+Alt 6
), up one semitone (
). These are also available from the Edit | Transpose
twice (or more) quickly will have the effect of a full tone (or
Now you can transpose the entire song
Ctrl+Alt+6
.
You can display a visual metronome onscreen during the entire song (or just the
lead-in). Choose the screen position (topright or center), and the size (up to near
full screen size). Also choose the visual
metronome pattern (1234, 1-3, 1---, or –2-
4). Seeing a visual metronome on-screen
is a great way for a student to learn to
keep on the beat, and with a settable size,
students can view this from across the
room. To set the visual metronome,
choose Opt. | Preferences and select the
type of Visual Metronome.
), or a specified number of
48
Chapter 12: Other New Features
Page 49

Option to hear the drum count-in even if the drums are muted or disabled.
Previously, when the drum track was muted (or disabled in a song), the count-in
drum click wouldn't play. Now there's an option to play the drum count-in in all
circumstances. Drummers who play along with BB by muting the drum track
should find this feature useful. To set this option, choose Opt. | Preferences and
set “Lead-in drum count if drums muted or disabled” to true (default is true).
Bass player plays better “5ths” over some Jazz chords. Band-in-a-Box’s
bass player was playing some natural 5ths over some chords like C7 altered or
others. Now, after a discussion with some bass players, we've improved Bandin-a-Box so that the bass part plays the #5 or b5 correctly on these Jazz chords.
Part Markers are now written to the MIDI files. These part markers can be
read by PowerTracks (and Band-in-a-Box if re-importing the MIDI file with the
Chord Wizard). Save a MIDI file in Band-in-a-Box, and move it over to
PowerTracks (version 8 or higher), you'll now see the Part Markers (and chords)
written on the Chords Window in PowerTracks. Re-import the MIDI file into
Band-in-a-Box with the Chord Wizard and you'll also see the part markers in
Band-in-a-Box.
Option to write MIDI file with separate tracks for each drum instrument.
To select this, generate the MIDI file (press the .MID button), and then select
the combo box “Type 1- separate drum tracks.”
“Chase Volumes” added for playback. For a file with Volume change events
(Controller 7) written into the Melody (or other tracks) – if the song is played
back from somewhere in the middle, the most recent volume control information
prior to the start of playback will get sent.
Direct Entry of Tempo and other settings.
You can now quickly enter a specific tempo for the song by clicking on the
tempo (hot key is Ctrl+Alt+T, or menu item Play | Tempo | Set Tempo…), and a
dialog will open up allowing you to type in a tempo. Similar dialogs are
available for Volume, Panning, Reverb, Chorus, and Bank settings.
Chapter 12: Other New Features
49
Page 50

Master Volume settings can now be made more quickly with hot keys.
If you want to “turn it all up or down,” this can be done quickly with hot keys.
Hot keys Ctrl+Alt+A (or Ctrl+Alt+S) will decrease (or increase) the master
volume setting by 5 and Ctrl+Alt+D launches a new dialog that allows a
number to be set for the master volume. Since Master Volume is a different
parameter than Volume, we have also added similar hot keys that control the
overall volume by reducing (or increasing) volumes on all parts by 5 to simulate
a Master Volume effect (especially useful for sound cards that don't support
Master Volume changes). These items are all available on the GM | Master
(Combo) Volume Adjust submenu, and also have hot keys as listed on the menu
(Ctrl+Alt+Shift Q, W, and E).
A THRU Velocity boost can be applied to the THRU part.
When playing along on a keyboard to the
Band-in-a-Box “band,” if the sound of your
keyboard is too quiet, and increasing the THRU Volume doesn't help enough,
using this option to boost to the THRU velocity will make your THRU playing
louder. (For example, non velocity sensitive keyboards are usually set to output
a quiet velocity of 64). To set this “THRU velocity boost,” open the MIDI
Channels dialog (Opt. | Preferences | Channels) and set “Boost THRU Velocity
by” to a value in the range of –127 to +127. (Default is 0.)
The Song Titles Window can be updated from within the song list dialog.
Press the “Rebuild List” button in the Select Song by Title
dialog. Also, if a Song List is rebuilt, the song list dialog
will automatically be launched when the list is rebuilt.
The Big Lyrics Window scrolls a page at a time for easier reading of lyrics.
Previously the lyrics would scroll on
every line. Many users pointed out that it
would be easier to read if they scrolled a page at a time, so we added this
feature. When the lyric cursor reaches the next-to-last line of the lyrics, it will
scroll to the top of the page, allowing uninterrupted reading of lyrics. This
option is settable in the Big Lyrics window options.
Audio Mute.
Now you can mute/un-mute the audio
track in Band-in-a-Box. Choose
Audio | Mute Audio to mute and unmute the audio track.
50
Chapter 12: Other New Features
Page 51

Shot/Held Chords option enhanced.
Normally, when a “shot” or a
“held” chord is assigned, the
instruments that are excluded
from the shot/held chord play
normally. Now there is an
additional option for those
excluded instruments to stay
silent. To set this, open the
chord options dialog, and select
a shot or held chord, and then
select “Excluded instrument(s) should rest.” This new option gives you the
ability to rest some instruments while others play the shot or held chord.
Velocity boosts for shots and held chords are now settable.
In previous versions, a shot
or held chord produced a
(loud) velocity boost of 15-
30. Now you can set the amount of velocity boost, so that the effect won't be so
loud. In Option | Preferences use the settings “Boost shots by” and “Boost
‘Holds’ by.” (Note that the style (StyleMaker) can override the velocity for the
pushes, and the drum velocity for shots/held chords and pushes is also set in the
StyleMaker.)
Duration of “shots” is reduced to 60 ticks per beat. Previously the shots lasted
as long as the typical 1-beat pattern, which was often longer than 60 ticks.
Soloist “Note-Density” option.
Now you can control the
maximum number of notes
per quarter note that the
soloist will use. For example, you can set a “Rock Guitar” Soloist to use
nothing shorter than 16
with bursts of 32
th
nd
notes. This would produce less “guitar hero” solos
notes etc. Or you could create a Jazz solo that uses only
quarter notes or longer to help with sight-reading or student study. We've
already modified many of the soloists using this new setting, so your solos will
already sound better without you having to change this setting.
Chapter 12: Other New Features
51
Page 52

Dedicated menu items added on GM Menu for “Turn Local ON,” “Turn
Local OFF,” and “When program quits, turn Local ON.”
“Local” refers to sounds
generated by playing on
an external MIDI
keyboard, if set to “off,”
Band-in-a-Box will play
the keyboard via the
THRU part, if set to ON,
both Band-in-a-Box and
the keyboard might be
playing the same THRU
part.
For the loop screen feature, if looping on the first line Band-in-a-Box now
loops from bar 1 and does not include the lead-in.
MIDI Driver dialog improvements.
When visiting the MIDI Driver
dialog, if the setup is panned to
MONO, the program offers to
change it to stereo. Selecting a
new drum kit from the MIDI
Driver dialog no longer changes
your panning settings. Since most
people use stereo settings, this
makes it easier to ensure that you
are using stereo settings.
A new Drum kit is only installed
if you specifically select a new Drum kit in the MIDI Driver dialog.
If playback is occurring when OPEN song is chosen, playback of the new song
will resume when the new song is loaded (so you don't have to press PLAY).
This works for other methods of song loading such as load next/previous Song.
Chord Wizard Enhancements, including recognizing more chord types and
additional options.
“MGX” file type added. When a MIDI file is loaded onto the Melody (or
Soloist) track, the Track Type for the Melody (or Soloist) gets set to MultiTrack. When the file is saved, the extension will be MGX, allowing you to
easily identify the BB songs that you have that contain entire MIDI files.
52
Chapter 12: Other New Features
Page 53

Songs will always be saved with last letter of extension “U,” regardless if
they are chosen with a Built-in style or not. For example, if you make a song,
and choose ZZJAZZ.STY as the style (i.e. one of the 24 built-in styles) previous
versions of BB would save the song as MySong.MG1 (the '1' indicates Style #1
– ZZJAZZ). Now it will be saved as MySong.MGU. Older songs loaded in
with .MG1 will still get re-saved as MG1 to prevent duplicate song files.
Tip: If you'd like Band-in-a-Box to save every song with a 'U' extension, including
loaded files already saved with a '1..9','A.. N' extension, then select the Option |
Preference | Prefs2 “Always save songs with 'U' extension” option.
“What add-ons do I have?...” dialog links to www.pgmusic.com/addons.htm
for a listing of newest add-ons.
… and much more!
________________________________________________________________
Keystroke Commands - Hot Keys
It’s often faster to use keystrokes instead of using the mouse. For example,
there are keystroke “hot keys” to mute instruments or to adjust volume, panning,
reverb, chorus, or bank of instruments.
Muting Parts
Alt+3 Mutes the Bass
Alt+4 Mutes the Piano
Alt+5 Mutes the Drums
Alt+6 Mutes the Guitar
Alt+7 Mutes the Soloist
Alt+8 Mutes the Strings
Alt+9 Mutes the Melody
Selecting Parts
Ctrl+3 Selects the Bass
Ctrl+4 Selects the Piano
Ctrl+5 Selects the Drums
Ctrl+6 Selects the Guitar
Ctrl+7 Selects the Soloist
Ctrl+8 Selects the Strings
Ctrl+9 Selects the Melody
Instrument Part Settings
Hold down Ctrl+Shift and the letter to change these instrument settings.
Q,W Decrease/Increase Volume
E,R Decrease/Increase Panning
T,Y Decrease/Increase Reverb
U,I Decrease/Increase Chorus
O,P Decrease/Increase Bank
Keystroke Commands - Hot Keys
53
Page 54

Use Ctrl+Shift together with the 1-9 and 0 keys on the keyboard to select
Favorite Instruments. For example, let’s change the Piano part to Rhodes Piano.
1. Press Ctrl+4 to select the Piano part.
2. Press Ctrl+Shift+2 to select the Favorite #2. That is Rhodes Piano.
Use Ctrl+Shift and the [-] and [=] keys to decrease/increase the patch by 1.
Volume Settings
Ctrl+Alt+Shift+R Set current part’s volume.
Ctrl+Alt+A Decrease master volume by 5.
Ctrl+Alt+S Increase master volume by 5.
Ctrl+Alt+D Set master volume.
Ctrl+Alt+Shift Q Reduce all part volumes by 5.
Ctrl+Alt+Shift W Increase all part volumes by 5.
Ctrl+Alt+Shift E Set all part volumes.
Looping/Song Navigation Keystrokes
NUMPAD 1 Toggle looping on/off.
NUMPAD 2 Open Loop Section Settings dialog.
Ctrl+NUMPAD 1 Play with last chorus looped.
Ctrl+NUMPAD 2 Play with middle choruses looped.
Ctrl+NUMPAD 3 Play with middle and last choruses looped.
Ctrl+NUMPAD 4 Jump to last chorus.
Ctrl+NUMPAD 5 Jump to ending.
Ctrl+NUMPAD 7 Loop Notation screen.
NUMPAD [DEL] Advances the notation, leadsheet, and guitar
window by one chord (i.e. one group of notes
at the same time).
NUMPAD [INS] Backs up the notation, leadsheet, and guitar
window by one chord.
Transpose Settings
Ctrl+Alt+1 Transpose Melody down one octave
Ctrl+Alt+2 Transpose Melody up one octave
Ctrl+Alt+3 Transpose Soloist down one octave
Ctrl+Alt+4 Transpose Soloist up one octave
Ctrl+Alt+5 Transpose down 1 semitone.
Ctrl+Alt+6 Transpose up 1 semitone.
Ctrl+Alt+7 Transpose setting dialog.
Custom File Open Dialog
Ctrl+Shift+F3 Load song with custom file dialog.
Alt+F In custom file dialog - Favorite Folders.
Alt+N In custom file dialog - Font selection.
Alt+S In custom file dialog - Search dialog.
54
Keystroke Commands - Hot Keys
Page 55

Windows
Ctrl+W
Ctrl+O
Alt+W
Ctrl+T
Ctrl+Shift+A
Ctrl+Shift+D
Ctrl+Shift+G
Ctrl+Shift+J
Ctrl+Shift+L
Ctrl+Shift+N
Drum Kit window.
Guitar window.
Toggle Notation and Chordsheet windows.
Movable Notation window.
Leadsheet window.
Put Notation/Chords at top of screen.
Audio Edit window.
Ear training window.
Big Lyrics window.
Big Piano window.
StyleMaker Hot Keys
F1, Shift+F1, Ctrl+F1
F2
Alt+F2
R or F3
<Spacebar> or F4
F8
F10
F6 or Shift+F6
Cursor Keys
Alt+F4
Help
Save style
Save style as ...
Record pattern
Play pattern
Play pattern on chord
Edit pattern options
Change instrument
Move around screen
Quit the StyleMaker
StyleMaker Drum Screen Hot Keys
F5
Bottom row (ZXCVBNM,. /)
F6
F10 or Alt+F4
Drum alternate notes
Drum note entry
Time base
Exit
Additional Keystrokes
There are additional keystrokes available. These keys are also listed on the pull
down menus beside the function. Remember also that hot keys may access any
function on the pull-down menu by pressing the
Menu followed by the underlined letter of the command. For example,
Alt+F+O
Note: It is necessary to tap the spacebar twice on the main screen to start playback
would access File | Open.
because entering chords can include a single spacebar. In the StyleMaker, you start
songs by hitting the spacebar once. In the Opt. | Preferences menus, there are other
ways that the SPACEBAR can be set to work.
Playing songs.
Stopping songs.
Help.
Record (melody or pattern).
Keystroke Commands - Hot Keys
Alt
key and the first letter of the
Spacebar
twice or F4
Spacebar or Esc
F1, Shift+F1, Ctrl+F1
R
55
Page 56

Record from any bar. R
Jukebox start/stop. F8
Save song. F2
Save song with patches. Alt+F2
Load song. F3
Load song using favorite song list. Shift+F3
Load song using titles window. Ctrl+F3
Load songs with melodies. Alt+F3
Load song with standard long file dialog. Alt+Shift+F3
Load next file (alphabetical by file name). Shift+F8
Load previous (alphabetical by file name). Ctrl+Shift+F8
Load next style. (in alphabetical order). Alt+Shift+F8
Load previous style. (in alphabetical order). Ctrl+Alt+Shift+F8
Enable/disable style. Alt+S then E
Launch MIDI File to Style Wizard. Alt+S then W
Load songs in current style. F7
Choose a user style. F9
Open StylePicker. Ctrl+F9
Select favorite styles. Shift+F9
Edit user style. Alt+F9
Edit current style. Ctrl+Shift+F9
Turn song Embellisher on/off. Ctrl+Alt+E
Import chords from MIDI file. Ctrl+Alt+I
Send GM mode on message. Ctrl+Alt+Q
Set tempo. Ctrl+Alt+T
Open the Preferences dialog. Ctrl+E
Open the Song Settings dialog. Ctrl+N
Launch Chord Builder. Ctrl+Shift+B
Edit current bar options. F5
Save MIDI file. F6
Quit the program. Alt+F4
56
Keystroke Commands - Hot Keys
Page 57

Appendix A: New Styles and Add-Ons.
Please see the on-line documentation for detailed descriptions of the Styles Sets.
For example, for Styles Set #30, see the file c:\bb\styles30\StyDsk30.DOC
• Styles Sets #0-29 are documented in the main (full) Band-in-Box manual.
• Styles Set #30 is included with an upgrade package to Version 12 of the
Band-in-a-Box program. It is not included with a first-time purchase of
the program.
• Styles Sets 0-3 are included with the Pro version of Band-in-a-Box.
• Other Styles Sets are sold separately as add-ons to Band-in-a-Box.
The StylePicker has full documentation of all Band-in-a-Box Styles Sets, and
you can select a filter for the Styles Set # at the bottom of the StylePicker dialog.
New! Styles Set #30: 28 World Fretboards Styles
PG Music answers your wishes with Styles Set 30 – “World Fretboards.” This
Styles Set covers a wide variety of genres with over 20 styles including New
Age, Hawaiian, Pop, Jazz-Pop, and Ethnic. Many of these styles utilize Bandin-a-Box version 12’s new intelligent chord fretboard display. You’ll see the
correct chord voicings for ukulele, banjo, mandolin, and violin for parts like the
melody, solo, and piano.
12ST&BAN.STY
BANJ&MAN.STY
BEEBROK4.STY
BEEBROK5.STY
BIGBAND1.STY
BLUGRAS5.STY
BO_D.STY
CAMPFIRE.STY
COZY_SW.STY
CREEDNCE.STY
DIXIDUKE.STY
DREAM.STY
DRUMSOLJ.STY
GOSSAMER.STY
HAWAISLO.STY
J~BREEZY.STY
J~GITWLZ.STY
JAZFOURA.STY
JAZFOURB.STY
JAZFOURC.STY
JOHNBAL.STY
JOHNNYH.STY
L~BOSA4U.STY
12 string guitar & banjo Country style.
Banjo & mandolin swing 16ths. Bass at "b."
Sparse guitar comping variation of BeeBRock.Sty.
Rock Blues var. of BeeBRock less varied guitar rhythm
Medium Swing big band sound with Brass (fills & bg).
Bluegrass style with a swing 16ths feel.
Swing 16ths rhythm groove à la Bo.
Easy “round the campfire” sing-along with strumming.
Simple Jazz trio Swing style.
Loose 16ths Rock feel - in between straight and swing.
Dixieland in the style of the Dukes and similar groups.
Slow 50s Swing Ballad with rhythm section & strings.
Jazz Swing DRUMS ONLY. Use for inserting drum solos.
Slow, quiet, & peaceful style with even 8ths arpeggio feel.
Slow, easy, semi-even 8ths Pop Hawaiian strumming style.
Jazz swing, 5-inst. style, including brushes & slow strings.
Variation of J!GITWLZ.STY, this version uses BRUSHES.
Variation of JazzFours.sty, with “trading” order changes.
Another variation of the “trading fours” order.
At “a” AND “b,” 4 bars DRUM SOLO - 4 bars BAND.
Slow even 8ths Pop-Rock with acoustic piano & strings.
60s Pop-Country style à la JohnnyH. Almost-swing 8ths.
Simple Bossa style with smooth syncopation. 3 insts.
Appendix A: New Styles and Add-Ons.
57
Page 58

LOTUS.STY
MANDOLIN.STY
MILITARY.STY
P_NEILD1.STY
POP_SADE.STY
SOLO_UKE.STY
ROKTRIO1.STY
SWING~EZ.STY
UKE&BASS.STY
UKE_FAST.STY
Slow, tranquil, 3/4 time, even 8ths, New Age style.
Mandolin & ac. bass in a swing 16ths feel.
Good for 60s Country historic battle-type tunes.
70s Pop Rock swing with 4 to-the-bar guitar comping.
90s cool Pop-Jazz even 8ths. Vocal background at “b.”
Solo ukulele - good for lots of tunes.
80s-90s Rock trio with even 8ths feel. Strat 4-to the bar.
Swing style with 4 instruments and no piano.
Simple swing ukulele style with bass at "b."
Simple Swing 8ths campfire Ukulele.
New! Styles Set #31: 20 Country Rock Styles
The gap between Country and Rock music styles has been narrowed by the
success of artists such as AaronT, B/Dunn, KennyC, MindyM, DixieC, ClayD,
SammyK, ClintB and many more. Add this popular genre of Med. Straight 8ths
grooves, Ballad tempos, Bluesy, Soulful and Barroom feels and kickin' uptempo rhythms to your collection of Band-in-a-Box Styles with Styles Set 31 Country Rock Styles.
C_AARON.STY
C_ANDY.STY
C_BILLY.STY
C_CLAY.STY
C_COLIN.STY
C_DARRYL.STY
C_ERIC.STY
C_HONKIN.STY
C_ISLAND.STY
C_KEITH.STY
C_KENNY.STY
C_KENNY2.STY
C_LONE.STY
C_MINDY.STY
C_PATTY.STY
C_PHIL.STY
C_SAMMY.STY
C_TOBY.STY
C_TRICK.STY
C_WARREN.STY
Med. straight 8ths Country-Rock à la AaronT, B/ Dunn.
Even 8ths med. Ballad Country-Rock à la Alabama, TimM.
Med. straight 8ths Country-Rock à la Eagles, Brooks/D.
Bluesy Country-Rock à la ClayD, SammyK.
Med. straight 8ths Country-Rock à la ColinR, Lonestar.
Up-tempo Country-Rock à la Eagles, ClintB.
Bluesy Country-Rock à la EricH, Tractors.
Barroom Country-Rock à la TimM, NealM.
Med. tempo Ballad C-Rock à la JimmyB, GeorgeS.
Up-tempo Country-Rock à la KeithU, NewGRl.
Soulful Country-Rock à la Eagles, Brooks/D.
Med. straight 8ths Country-Rock à la KennyC, Brooks/D.
Med. straight 8ths Country-Rock à la LittleT, PattyL.
Med. tempo Ballad Country à la MindyM, DixieC.
Med. straight 8ths Country-Rock à la PattyL, ClintB.
Ballad Country-Rock à la PhilV, ColinR.
Bluesy Country-Rock à la SammyK, HankW.
Med. tempo Country-Rock à la TobyK, GarthB.
Up-tempo Country-Rock à la TrickP, DixieC.
Med. straight 8ths Country-Rock WarrenBros, DiamondR.
New! Styles Set #32: 20 Alternative/Contemporary Rock
Styles
This Styles Set includes a broad spectrum of hip, contemporary Pop/Rock
grooves ranging from the commercially successful left-of-center Pop styles of
Alternative Rock to the down-tempo, Jazz–inflected Trip Hop. Influenced by
the styles of artist like S_Crow, Nelle, Pinc, K_Osbourne, Minem, Mobe, Blink,
A_Lavigne, J_Jackson, Crede, A_Keys, Our Lady Piece, and J_Lopez Styles Set
32 is a collective study of recent trends in popular music. Included Styles:
58
Appendix A: New Styles and Add-Ons.
Page 59

TripHop, AltRock, HipHop, RockTronica, PopBallad, Modern Rock, Soul
Groove, and Dance.
ALTROCK1.STY
ALTROCK2.STY
ALTROCK3.STY
ALTROCK4.STY
DANCE3.STY
DANCE4.STY
HIPHOP3.STY
HIPHOP4.STY
HIPHOP5.STY
HIPHOP6.STY
MODROK1.STY
MODROK2.STY
POPBALL2.STY
POPBALL3.STY
ROKTRON1.STY
ROKTRON2.ST
SOULGRV1.STY
SOULGRV2.STY
TRIPHOP1.STY
TRIPHOP2.STY
Alternative Contemporary Rock – even 8ths.
Hard Alt. Rock even 16ths starts with drums & organ.
16th note Alt. Rock style with bass & drums at “a.”
Medium even 8ths Alt. Rock style.
Bright even 8ths dance feel.
Bright Pop-Rock Dance.
Contemporary slower Swing 16ths Hip Hop feel.
Funky Swing 16th Hip Hop. 5 instruments.
Funky Swing 16ths Hip Hop style.
Bright Beat even 8ths Hip Hop.
Even 8ths modern Rock sound.
Modern Rock with 16th feel, pushes on “and of 2.”
Pop Ballad style with piano, quiet string pad.
Rock-Pop ballad with acoustic guitar strumming.
Bright Dance with Electronica aspects.
Up beat Electronica with Rock aspects.
Slow soulful pop groove.
Soulful slow groove.
Contemporary Rock (ev.16ths feel) w/Rap TR-808.
Contemporary Dance feel à la DestinysC & JanetJ.
Blues Piano Solos Volume 1
30 songs with great Blues piano solos, notation, and on-screen piano display.
Includes 30 full tunes with Pop/Rock/Jazz Blues piano solos in the style of the
great Blues pianists (Jelly Roll, DrJ, MontyA and more). What a great and fun
way to learn Blues piano soloing! Blues piano is at the heart of most popular
and Jazz styles, so mastering Blues piano soloing gives you a great foundation
for many styles of music. Includes comping examples along with easy, medium,
and difficult soloing styles. Let a master show you solos in the styles of the
"greats." All tunes are done in standard MIDI and Band-in-a-Box MGU formats
with either solo piano or a complete band arrangement (drums, bass, guitar, and
piano soloing). Slow the pieces down for in-depth study. Guitarists can also
display the solos on the guitar fretboard.
Note: this comes as a separate standalone full featured program, and includes the
same files in Band-in-a-Box format.
Blues Piano Utility Styles #33: Chicago Piano Blues Styles
These are Chicago Blues Piano styles that are included in the Blues Piano Solos
Volume 1. These styles are not available separately as a stand-alone Styles Set.
BLZTRIO1.STY
BLZTRIO2.STY This is a Swing 8ths minor key blues style.
BLZTRIO3.STY
BLZTRIO4.STY
An Organ-type Blues à la JimmyS, BookerT etc.
Strut-style à la RayCh & WyntonK.
Kansas City blues shuffle style.
Appendix A: New Styles and Add-Ons.
59
Page 60

BLZTRIO5.STY Modern Urban Blues shuffle Chicago style.
BLZTRIO6.STY Jazzy Blues Piano Swing 8ths feel à la NatC, GeneH.
BLZTRIO7.STY Old stride style in '2' à la TeddyW, RayBr.
BLZTRIO8.STY Fast 3/4 (like 6/8) Modern “cool” Modal jazz style.
BLZTRIO9.STY Fast Bebop Jazz Blues style.
BLZTRI10.STY A very slow 12/8 Jazz Blues - Chicago Style.
LHBLZ1.STY Slow left-hand piano in the style of CrippleC, CowCowD.
LHBOOG1.STY Chicago Blues Boogie style.
LHBOOG2.STY 8 to the bar straight 8ths LH boogie piano boogie style.
LHBOOG3.STY Chicago-Style Boogie Blues with typical left-hand pattern.
LHBOOG4.STY Left hand piano Chicago-Style Boogie.
LHBOOG5.STY 8 to the bar, straight 8ths boogie.
LHBOOG6.STY Slow 12/8 feel Chicago blues - LH piano boogie.
LHBOOG7.STY Classic left hand piano boogie woogie pattern, up tempo.
LHBOOG8.STY Hard Rockin' straight 8ths LH Boogie Blues style.
LHBOOG9.STY Left hand piano walking bass à la Monty A, DaveMcK.
MOJO2.STY Fast Mojo-style 24 bar blues à la OtisS, CharlesB, Muddy.
SLOBLZ1.STY Very Slow 12/8 Chicago Blues style.
STRIDE2.STY 40's style slow Stride blues à la EarlH, FatsW, TeddyW.
60
Appendix A: New Styles and Add-Ons.
Page 61

PG Music Inc.
Band-in-a-Box® is copyrighted and
is the property of PG Music Inc.
All rights reserved.
Address for Correspondence:
PG MUSIC INC.
29 Cadillac Avenue
Victoria, BC V8Z 1T3
Canada
Contacts
Phone:
E-mail:
toll free 1-800-268-6272, 1-888-PG-MUSIC
info@pgmusic.com
Or 1-250-475-2874
Fax:
toll free 1-888-475-1444
Or 1-250-475-2937
Visit our Internet web page at www.pgmusic.com
Technical Support:
Phone:
E-mail:
1-250-475-2708
support@pgmusic.com
Live Internet Chat:
:
www.pgmusic.com
PG Music Inc.
61
Page 62

Index
add-ons, 53, 57
audible drum count-in, 49
audio mute, 50
Band-in-a-Box
main screen, 13
banjo fretboard, 18, 36
Bass
altered 5ths, 49
bass guitar fretboard, 17, 18, 36
bass tablature, 37
Big Lyrics page scroll, 50
Blues Piano Solos, 59
chase volumes, 49
Chord Wizard, 52
Chordsheet
right mouse click, 42
Compatibility, 5
Copyright, 61
Custom File dialog, 42
Descriptive hints, 42
options, 42
Drums
count-in, 49
separate tracks, 49
filter styles, 46
fretboards, 36
General MIDI 2, 32
GM2, 32
bank settings, 33
patches, 32
Roland VSC3, 32
settings, 32
GM2 button, 14, 32
GM2 patches, 14
Guitar chord diagrams, 36
Guitar tutor, 36
Harmony
print voice, 17
separate tracks, 15
voice volume, 17
harmony tracks, 15
62
Held chords
options, 51
velocity boost, 51
hot keys, 53
hot keys added, 42
Introduction, 4
Jump to, 35
keystroke list, 53
Leadsheet
harmony tracks, 15
Harmony volume, 17
print voice, 17
show Harmony voice, 17
Leadsheet options, 39
convert harmony, 39
Harmony display, 39
Harmony volume, 40
print harmony, 40
License, 2
live looping, 35
load next style, 46
load previous style, 46
Local OFF, 52
Local ON, 52
long file names, 42
Loop button, 34
loop screen, 52
loop section, 15
Loop Section, 34
button, 34
checkbox, 34
enable, 34
jump to, 35
live performance, 35
looping status, 35
Presets, 35
settings, 34
loop section menu, 18
looping status, 35
mandolin fretboard, 18, 36
Master Volume, 50
Index
Page 63

Menus
right mouse click, 41
Styles, 42
Window, 41
MGU files, 53
MGX files, 52
MIDI File to Style Wizard, 24
MIDI files, 48
mute audio, 50
New features
Audio Mute, 11
Auto-resume play, 12
Bass 5ths, 8
Bass fretboard, 7
Big lyrics scroll, 11
Boot to…, 10
Change styles, 8
Chase volumes, 9
Chord Wizard, 12
Custom file dialog, 11
Descriptive hints, 10
Direct entry dialogs, 10
Enhanced styles, 8
Fretboards, 7
GM2 support, 6
GUI, 7
Guitar chord diagrams, 7
Harmony notation, 7
Hot Keys, 11
Live navigation, 8
Load styles, 8
Local On/Off, 12
Loop section, 8
Master volume keys, 11
MIDI drivers, 12
MIDI File Style Wizard, 6
MIDI part markers, 8
Multitrack MIDI drums, 9
Notation enhancements, 10
Note channels, 8
Play MIDI files, 8
Quick Transpose, 11
Screen looping, 12
Shot/Hold options, 12
Solo density, 12
StylePicker enhancements, 10
Thru boost, 11
Titles dialog edits, 11
Unmute drum count-in, 9
User interface, 7
Visual metronome, 8
Notation
channel numbers, 44
copy graphics to clipboard, 43
courtesy brackets, 43
guitar chord diagrams, 43
note highlight option, 43
right mouse click, 42
Style button, 43
text boxes, 43
number of styles, 46
Part markers
MIDI files, 49
PG Music Inc.
contacts, 61
mailing address, 61
technical support, 61
Play from loop, 34
play MIDI files, 48
Preferences, 41
boot up, 42
Preferences, 13
Previous versions, 5
print Harmony voice, 17
Print voice, 40
Quick Transpose, 48
QuickStart, 13
resume play, 52
right mouse click, 41, 42
Roland VSC3, 6
Shots
duration, 51
options, 51
velocity boost, 51
Show Harmony voice, 17
Soloist note density, 51
song navigation, 18
song settings, 13
Index
63
Page 64

Song settings, 41
song titles rebuild, 50
song transpose, 48
stereo settings, 52
Style Wizard
advanced settings, 29
Auto-intepret, 30
Auto-Set, 26
BB parts, 20, 26
channels, 20
copy Melody, 28
dialog, 25
hot keys, 25
More… button, 29
part markers, 20
patch, 26
play controls, 21
play loop, 27
snapshot regions, 27
snapshots, 20, 21
Tracks area, 25
tutorial, 18
voicings, 29
Style Wizard, 24
StyleMaker
hot keys, 55
StylePicker, 45
StylePicker limit, 46
Styles
change with StylePicker, 45
disable, 45
enable, 45
filter, 46
limit, 46
load next, 46
load previous, 46
new features, 45
Styles menu, 13
Styles Set #30
World Fretboards, 23
Styles Sets, 57
#30 – World Fretboards, 57
#31 – Country Rock, 58
#32 – Alternative/Contemporary
Rock, 58
tempo entry, 49
third party styles, 47
Thru velocity boost, 50
Trademarks, 2
Tutorial, 13
ukulele fretboard, 18, 36
unmute drum count-in, 49
visual metronome, 48
Window menu, 13
64
Index
 Loading...