


 Loading...
Version 2020 for Windows®
User’s Guide
Copyright PG Music Inc.1989-2020. All rights reserved.
PG Music Inc. License Agreement
CAREFULLY READ THE FOLLOWING TERMS AND CONDITIONS BEFORE COMPLETING THE INSTALLATION OF THIS SOFTWARE. USAGE OF THE SOFTWARE INDICATES YOUR ACCEPTANCE OF THE FOLLOWING TERMS AND CONDITIONS.
LICENSE
A.The program may only be used on a single machine.
B.You may transfer the program and license to another party if the other party agrees to accept the terms of this Agreement. If you transfer the program, you must either transfer all copies, whether in printed or machine readable form, to the same party, or, destroy all copies not transferred. This includes all modifications and/or portions of the program merged into other programs.
C.You may receive the program in more than one media. Regardless of the type or size of media you receive, you may install or use the media on a single machine.
D.The program (including any images, “applets,” photographs, animations, video, audio, music, and text incorporated into the program) is owned by PG Music Inc. or its suppliers, and is protected by international copyright laws and international treaty provisions.
You may not use, copy, or transfer the program, or any copy, modification or merged portion of the program, in whole or in part, except as expressly provided for in this license. If you transfer possession of any copy, modification or merged portion of the program to another party, your license is automatically terminated.
Some programs such as Band-in-a-Box® have a “server” function (including BandInABoxServer.exe program) to connect to a “Client” (mobile client version of Band-in-a-Box® on iPhone or other mobile device). You are only licensed to connect the Server function (including BandInABoxServer.exe program) to Clients where you own or have properly licensed both the Client and Server software that is being connected, not to clients or Server software owned/licensed by third parties. The preceding also applies to any other PG Music products (RealBand etc.) with a similar type of connection between a Server program and a Client.
LIMITATION OF REMEDIES
PG Music Inc.’s entire liability and your exclusive remedy shall be:
A.The replacement of any media not meeting PG Music Inc.’s “Limited Warranty,” which are returned to PG Music Inc., or an authorized PG Music Inc. dealer, with a copy of your receipt.
B.If PG Music Inc. or the authorized dealer is unable to deliver replacement media which is free of defects in materials or workmanship, you may terminate this agreement, and your money will be refunded.
In no event will PG Music Inc. be liable to you for any damages, including but not limited to lost profits, lost savings, or other incidental or consequential damages arising out of the use or the inability to use such program, even if PG Music Inc. or an authorized PG Music Inc. dealer has been advised of the possibility of such damages, or for any claim by any other party.
NOTICE TO CUSTOMERS
The following paragraph applies to the video join tool (vjt.exe, vjt_ffmpeg.exe, and other files in the \Data\VJT folder) that may be included with this installation. Notice Required for the License Granted under Articles 2.1 and 2.6 and for Sales to Codec Licensee Customer(s). As a condition of the license granted under Article 2.6 and the license granted to a Codec Licensee to make Sales to Codec Licensee Customer(s), Licensee agrees to provide any party that receives an AVC Product from Licensee exercising such license rights the following notice: THIS PRODUCT IS LICENSED UNDER THE AVC PATENT PORTFOLIO LICENSE. SUCH LICENSE EXTENDS TO THIS PRODUCT ONLY AND ONLY TO THE EXTENT OF OTHER NOTICES WHICH MAY BE INCLUDED HEREIN. THE LICENSE DOES NOT EXTEND TO ANY OTHER PRODUCT REGARDLESS OF WHETHER SUCH PRODUCT IS INCLUDED WITH THIS LICENSED PRODUCT IN A SINGLE ARTICLE. THIS PRODUCT IS LICENSED UNDER THE AVC PATENT PORTFOLIO LICENSE FOR THE PERSONAL USE OF A CONSUMER OR OTHER USES IN WHICH IT DOES NOT RECEIVE REMUNERATION TO (i) ENCODE VIDEO IN COMPLIANCE WITH THE AVC STANDARD (“AVC VIDEO”) AND/OR (ii) DECODE AVC VIDEO THAT WAS ENCODED BY A CONSUMER ENGAGED IN A PERSONAL ACTIVITY AND/OR WAS OBTAINED FROM A VIDEO PROVIDER LICENSED TO PROVIDE AVC VIDEO. NO LICENSE IS GRANTED OR SHALL BE IMPLIED FOR ANY OTHER USE. ADDITIONAL INFORMATION MAY BE OBTAINED FROM MPEG LA, L.L.C. SEE HTTPS://WWW.MPEGLA.COM.
The following paragraph applies to the video join tool (vjt.exe, vjt_ffmpeg.exe and other files in the \Data\VJT folder ) that may be included with this installation. Video Join Tool "VJT" is hereby licensed to the End-user as a limited, non-exclusive, nontransferable license to run one copy of the object code version of the x264 Software on one machine, device, or instrument solely as integrated into the Integrated Product. If the Integrated Product is licensed for concurrent or network use, the End-User may not allow more than the maximum number of authorized users to access and use the x264 Software concurrently. The End-User may only make copies of the Integrated Product only for backup and archival purposes. The End-User is Prohibited from: (a) copying the Integrated Product and/or x264 Software onto any public or distributed network; (b) using the x264 Software to operate in or as a time-sharing, outsourcing, service bureau, application service provider or managed service provider environment; (c) using the x264 Software as a standalone application or any other purpose than as integrated into the Integrated
2 |
PG Music Inc. License Agreement |
Product; (d) changing any proprietary rights notices which appear in the x264 Software or the Integrated Product; or (e) modifying the x264 Software. The End-User may transfer the license granted by the EULA only if (a) End-User complies with any transfer terms imposed by Licensee and delivers all copies of the Integrated Product to the transferee along with the EULA;
(b) transferee accepts the terms and conditions of the EULA as a condition to any transfer; and (c) the End-User’s license to use the Integrated Product terminates upon transfer. The End-User must comply with all applicable export laws and regulations. If the EULA is ever terminated, the End-User is required to immediately destroy all copies of the Integrated Product and x264 Software upon termination of the EULA.
This program may include video join tool (vjt.exe, vjt_ffmpeg.exe and other files in the \Data\VJT folder). The program uses FFmpeg under the LGPLv2.1, which can be seen here: https://www.gnu.org/licenses/old-licenses/lgpl-2.1.html. FFmpeg software is not owned by PG Music and information on ownership can be found at www.ffmpeg.org.
TRADEMARKS
Band-in-a-Box®, Band-in-a-Box for Bozos®, CloudTracks®, GuitarStar®, JazzU®, PG Music®, PowerTracks Pro®, RealBand®, RealDrums®, RealStyles®, and RealTracks® are either the trademarks or registered trademarks of PG Music Inc. in the United States, Canada, and other countries. Microsoft® and Windows® are either registered trademarks or trademarks of Microsoft Corporation in the United States and/or other countries. Apple®, the Apple logo, iPad™, iPhone®, iPod touch®, Leopard®, Macintosh®, Mac®, Panther®, Power Mac®, QuickTime®, Snow Leopard®, Tiger®, and TrueType® are trademarks of Apple Computer, Inc., registered in the U.S. and other countries. IBM® is the registered trademark of International Business Machines Corporation. Roland® and “Roland” Logo, DIROL® and “EDIROL” Logo, GS® and “GS” Logo, are registered trademarks and “MIDI2” Logo, EDIROL Virtual Sound Canvas Multi Pack, VSC-MP1™ are trademarks of Roland Corporation. Steinberg and ASIO are trademarks of Steinberg Media Technologies AG. VST is a registered trademark of Steinberg Media Technologies AG. Amplitube® and SampleTank® are registered trademarks of IK Multimedia Production srl. Fretlight® is a registered trademark of Optek Music Systems, Inc. Other brands and their products are trademarks or registered trademarks of their respective holders and should be noted as such.
PATENTS
Band-in-a-Box® is protected under US Patents 5990407, 8097801, 8581085, and 8680387. The TC-Helicon Harmony feature in Band-in-a-Box® and PowerTracks Pro® Audio is protected under US Patents 5567901, 5641926, 5986198, 34583, 296.80.173.9, PI9603819.5, 0368046, 0750776, 6,046,395, and patents pending.
Band-in-a-Box®, RealBand®, and other PG Music software uses “élastique Pro V3 by zplane.development” as a time and pitch stretching engine, “élastique Tune V1 by zplane.development” as a monophonic pitch editing engine, and “Harmony addon V1 by zplane.development” for the élastique Tune Engine.
Some audio conversions use libsndfile. Libsndfile is licensed under LPGL. BeStPlain chord font - © 2016 by Bernhard Steuber CDS Design GmbH http://cdsdesign.de. RealScore and BigBand chord fonts - Copyright © 2014 by Nor Eddine Bahha https://norfonts.ma.
Printed in Canada
PG Music Inc. License Agreement |
3 |
Table of Contents |
|
PG MUSIC INC. LICENSE AGREEMENT ............................................................................................................. |
2 |
TABLE OF CONTENTS............................................................................................................................................. |
4 |
CHAPTER 1: WELCOME TO BAND-IN-A-BOX®! ............................................................................................... |
8 |
INSTALLING BAND-IN-A-BOX FOR WINDOWS® ........................................................................................................... |
9 |
MIDI SETUP ............................................................................................................................................................... |
9 |
AUDIO SETUP............................................................................................................................................................ |
15 |
CHAPTER 2: QUICKSTART .................................................................................................................................. |
20 |
STEP 1 – TYPING IN THE CHORDS.............................................................................................................................. |
20 |
STEP 2 – CHOOSING A STYLE .................................................................................................................................... |
20 |
STEP 3 – PLAY YOUR SONG!...................................................................................................................................... |
21 |
CHAPTER 3: BAND-IN-A-BOX 2020..................................................................................................................... |
23 |
BAND-IN-A-BOX 2020 FOR WINDOWS IS HERE! ........................................................................................................ |
23 |
BAND-IN-A-BOX 2020 FEATURES AND ADDITIONS................................................................................................... |
23 |
SUMMARY OF NEW FEATURES.................................................................................................................................. |
23 |
INTRODUCTION TO BAND-IN-A-BOX 2020 ................................................................................................................ |
26 |
CHAPTER 4: THE MAIN SCREEN ....................................................................................................................... |
43 |
MAIN SCREEN OVERVIEW......................................................................................................................................... |
43 |
STATUS BAR ............................................................................................................................................................. |
44 |
TRACK BUTTONS ...................................................................................................................................................... |
44 |
[?] BUTTON - FEATURE BROWSER............................................................................................................................. |
48 |
TOOLBARS ................................................................................................................................................................ |
49 |
PROGRESS BAR ......................................................................................................................................................... |
56 |
MIXER ...................................................................................................................................................................... |
56 |
CHORD SHEET AREA................................................................................................................................................. |
60 |
CHAPTER 5: PLAYING SONGS............................................................................................................................ |
67 |
OPENING FILES ......................................................................................................................................................... |
67 |
GLOBAL SONG OVERRIDES ....................................................................................................................................... |
77 |
CHANGING THE STYLE.............................................................................................................................................. |
78 |
PLAYING/PAUSING/STOPPING SONGS ....................................................................................................................... |
83 |
CHANGING MIDI INSTRUMENT................................................................................................................................. |
92 |
ADDING REAL INSTRUMENTS – REALDRUMS AND REALTRACKS............................................................................. |
99 |
ADDING MIDI SUPERTRACKS ................................................................................................................................ |
102 |
FREEZING TRACKS.................................................................................................................................................. |
104 |
NON-CONCERT VISUAL TRANSPOSE....................................................................................................................... |
105 |
THE GUITAR WINDOW ............................................................................................................................................ |
106 |
BIG PIANO WINDOW ............................................................................................................................................... |
111 |
THE CONDUCTOR.................................................................................................................................................... |
112 |
THE JUKEBOX ......................................................................................................................................................... |
116 |
CHAPTER 6: MAKING SONGS ........................................................................................................................... |
118 |
MAKE YOUR OWN SONGS ...................................................................................................................................... |
118 |
CHORD ENTRY........................................................................................................................................................ |
122 |
BREAKS - RESTS, SHOTS, AND HELD CHORDS ........................................................................................................ |
128 |
ADDING REPEATS AND 1ST/2ND ENDINGS .............................................................................................................. |
130 |
PART MARKERS, SUBSTYLES, AND SONG FORM ..................................................................................................... |
132 |
APPLYING STYLES .................................................................................................................................................. |
135 |
ADDING MIDI SUPERTRACKS ................................................................................................................................ |
150 |
USING REALTRACKS IN SONGS............................................................................................................................... |
152 |
USERTRACKS.......................................................................................................................................................... |
158 |
USING REALDRUMS IN SONGS ................................................................................................................................ |
159 |
ASSIGNING CUSTOM MIDI TRACKS........................................................................................................................ |
163 |
ADDING LOOPS TO TRACKS .................................................................................................................................... |
164 |
4 |
Table of Contents |
ADDING BAR-BASED LYRICS.................................................................................................................................. |
166 |
ADDING MELODY – MIDI AND/OR AUDIO .............................................................................................................. |
168 |
IMPORTING A MIDI FILE......................................................................................................................................... |
174 |
ADDING SOLO - “THE SOLOIST” ............................................................................................................................. |
174 |
AUTOMATIC SONGS - “THE MELODIST”.................................................................................................................. |
178 |
SONG EDITING FEATURES....................................................................................................................................... |
179 |
VIEW AND PRINT NOTATION................................................................................................................................... |
188 |
LEAD SHEET NOTATION WINDOW .......................................................................................................................... |
192 |
PRINTING ................................................................................................................................................................ |
194 |
DIGITAL AUDIO FEATURES ..................................................................................................................................... |
198 |
THE MEDLEY MAKER ............................................................................................................................................. |
200 |
SAVING SONGS ....................................................................................................................................................... |
201 |
SAVING YOUR CONFIGURATION.............................................................................................................................. |
215 |
CHAPTER 7: REALTRACKS AND REALDRUMS ........................................................................................... |
217 |
REALTRACKS.......................................................................................................................................................... |
217 |
REALDRUMS........................................................................................................................................................... |
239 |
USERTRACKS.......................................................................................................................................................... |
249 |
AUDIO CONTROLS FOR REALTRACKS AND REALDRUMS........................................................................................ |
253 |
CHAPTER 8: NOTATION AND PRINTING....................................................................................................... |
256 |
EXPLORING THE NOTATION WINDOW..................................................................................................................... |
256 |
STANDARD NOTATION MODE ................................................................................................................................. |
259 |
EDITABLE NOTATION MODE................................................................................................................................... |
262 |
STAFF ROLL NOTATION MODE ............................................................................................................................... |
270 |
NOTATION WINDOW OPTIONS ................................................................................................................................ |
270 |
LEAD SHEET WINDOW ............................................................................................................................................ |
278 |
LYRICS.................................................................................................................................................................... |
284 |
PRINTING ................................................................................................................................................................ |
289 |
CHAPTER 9: AUTOMATIC MUSIC FEATURES ............................................................................................. |
297 |
AUTOMATIC MEDLEYS - “THE MEDLEY MAKER”................................................................................................... |
297 |
AUTOMATIC SONGS - “THE MELODIST”.................................................................................................................. |
298 |
AUTOMATIC INTRO - SONG INTROS......................................................................................................................... |
301 |
AUTOMATIC SONG TITLE GENERATION .................................................................................................................. |
301 |
AUTOMATIC SOUND TRACK GENERATOR - “SOUNDTRACK”.................................................................................. |
302 |
AUTOMATIC SOLO GENERATION – “THE SOLOIST” ................................................................................................ |
303 |
AUTO PIANO HAND-SPLITTING ............................................................................................................................... |
310 |
AUTOMATIC GUITAR SOLOS – “THE GUITARIST” ................................................................................................... |
311 |
AUTOMATIC EMBELLISHMENTS – “THE EMBELLISHER” ......................................................................................... |
313 |
CHAPTER 10: WORKING WITH MIDI ............................................................................................................. |
317 |
RECORDING LIVE IN REAL TIME ............................................................................................................................. |
317 |
ENTERING NOTES MANUALLY................................................................................................................................ |
318 |
RECORDING WITH THE PLAY ALONG WIZARD FEATURE......................................................................................... |
318 |
MELODY/SOLOIST SEQUENCER............................................................................................................................... |
320 |
IMPORTING MIDI FILES .......................................................................................................................................... |
322 |
ADDITIONAL OPTIONS FOR MELODY/SOLOIST TRACK............................................................................................ |
324 |
EDITING THE MELODY TRACK ................................................................................................................................ |
325 |
PIANO ROLL WINDOW ............................................................................................................................................ |
327 |
CHAPTER 11: WORKING WITH AUDIO.......................................................................................................... |
338 |
ABOUT BAND-IN-A-BOX AUDIO FILES ................................................................................................................... |
338 |
AUDIO TRACK......................................................................................................................................................... |
339 |
RECORDING AUDIO................................................................................................................................................. |
340 |
PLAYING THE AUDIO .............................................................................................................................................. |
343 |
CONVERTING AUDIO CHANNELS ............................................................................................................................ |
343 |
GENERATING SYNTHETIC VOCAL ........................................................................................................................... |
343 |
EDITING THE AUDIO................................................................................................................................................ |
344 |
Table of Contents |
5 |
AUDIO HARMONIES (BUILT-IN) .............................................................................................................................. |
348 |
AUDIO HARMONIES (TC-HELICON) ........................................................................................................................ |
351 |
APPLYING AUDIO PLUG-INS ................................................................................................................................... |
357 |
READING THE AUDIO AND MIDI TRACKS INTO OTHER PROGRAMS........................................................................ |
360 |
CHAPTER 12: WIZARDS, TUTORS, AND FUN................................................................................................ |
361 |
VIDEO WINDOW...................................................................................................................................................... |
361 |
“WOODSHED” TEMPO FEATURE ............................................................................................................................. |
362 |
AUDIO CHORD WIZARD (STAND-ALONE) ............................................................................................................... |
363 |
AUDIO CHORD WIZARD (BUILT-IN) ........................................................................................................................ |
372 |
MIDI FILE CHORD INTERPRETATION WIZARD........................................................................................................ |
374 |
PRACTICE WINDOW ................................................................................................................................................ |
378 |
EAR TRAINING TUTOR ............................................................................................................................................ |
380 |
EAR TRAINING GAMES ........................................................................................................................................... |
382 |
VOCAL WIZARD...................................................................................................................................................... |
384 |
REHARMONIST (CHORDS FOR A MELODY).............................................................................................................. |
386 |
CHORD SUBSTITUTION WIZARD.............................................................................................................................. |
387 |
CHORD BUILDER..................................................................................................................................................... |
389 |
RHYTHM GUITAR CHORD TUTOR ........................................................................................................................... |
391 |
CHORD “BREAKS” .................................................................................................................................................. |
393 |
SCALE WIZARD....................................................................................................................................................... |
393 |
CHAPTER 13: TOOLS, UTILITIES, AND APPS ............................................................................................... |
395 |
DOWNLOAD MANAGER........................................................................................................................................... |
395 |
BB REMOTE............................................................................................................................................................ |
396 |
DAW PLUG-IN MODE............................................................................................................................................. |
399 |
FIND FILE................................................................................................................................................................ |
401 |
COYOTEWT............................................................................................................................................................ |
402 |
FRETLIGHT® SUPPORT ............................................................................................................................................. |
405 |
TRANZPORT® SUPPORT - WIRELESS REMOTE CONTROL......................................................................................... |
405 |
GUITAR/BASS TUNER ............................................................................................................................................. |
407 |
MASTER TUNING .................................................................................................................................................... |
407 |
DYNAMIC 3D DRUM KIT WINDOW ......................................................................................................................... |
408 |
MIDI MONITOR ...................................................................................................................................................... |
410 |
EVENT LIST EDITOR................................................................................................................................................ |
412 |
PG VINYL DIRECTX PLUG-IN................................................................................................................................. |
414 |
PG RTA DIRECTX PLUG-IN ................................................................................................................................... |
418 |
PG VOCAL REMOVER PLUG-IN............................................................................................................................... |
419 |
BAND-IN-A-BOX FOR IPHONE ................................................................................................................................. |
420 |
CHAPTER 14: USER PROGRAMMABLE FUNCTIONS ................................................................................. |
424 |
THE STYLEMAKER ................................................................................................................................................. |
424 |
MIDI FILE TO STYLE WIZARD ................................................................................................................................ |
451 |
MAKING REALDRUMS STYLES ............................................................................................................................... |
455 |
THE HARMONY MAKER .......................................................................................................................................... |
473 |
THE SOLOIST MAKER.............................................................................................................................................. |
476 |
THE MELODIST MAKER .......................................................................................................................................... |
481 |
THE GUITARIST MAKER.......................................................................................................................................... |
484 |
CHAPTER 15: REFERENCE ................................................................................................................................ |
487 |
BAND-IN-A-BOX MENU DESCRIPTIONS .................................................................................................................. |
487 |
FILE MENU ............................................................................................................................................................. |
487 |
EDIT MENU............................................................................................................................................................. |
493 |
OPTIONS MENU....................................................................................................................................................... |
498 |
PLAY MENU............................................................................................................................................................ |
533 |
MELODY MENU ...................................................................................................................................................... |
535 |
SOLOIST MENU ....................................................................................................................................................... |
541 |
AUDIO MENU.......................................................................................................................................................... |
545 |
HARMONY MENU.................................................................................................................................................... |
547 |
6 |
Table of Contents |
WINDOW MENU ...................................................................................................................................................... |
549 |
HELP MENU ............................................................................................................................................................ |
552 |
SHORTCUTS: KEYSTROKE COMMANDS - HOT KEYS ............................................................................................... |
556 |
CHORD LIST............................................................................................................................................................ |
560 |
BAND-IN-A-BOX FILES AND FOLDERS .................................................................................................................... |
561 |
PG MUSIC INC. ...................................................................................................................................................... |
563 |
APPENDIX A: REALTRACKS SETS .................................................................................................................. |
564 |
APPENDIX B: MIDI SUPERTRACKS SETS ...................................................................................................... |
602 |
INDEX....................................................................................................................................................................... |
607 |
PG MUSIC REGISTRATION FORM................................................................................................................... |
615 |
Table of Contents |
7 |

Chapter 1: Welcome to Band-in-a-Box®!
Congratulations on your purchase of Band-in-a-Box, the favorite of musicians, students, and songwriters everywhere. Get ready to have fun!
What is Band-in-a-Box?
Band-in-a-Box is an intelligent automatic accompaniment program for your multimedia computer.
You can hear and play along to many song ideas and go from “nothing” to “something” in a very short period of time with Band-in-a-Box as your “on demand” backup band.
Band-in-a-Box is so easy to use!
Just type in the chords for any song using standard chord symbols (like C, Fm7, or C13b9), choose the style you’d like, and Band-in-a-Box does the rest, automatically generating a complete professional-quality arrangement of piano, bass, drums, guitar, and strings or horns in a wide variety of popular styles plus live audio tracks with RealDrums and RealTracks.
And that’s not all...
Band-in-a-Box is a powerful and creative music composition tool for exploring and developing musical ideas with near-instantaneous feedback. Over the years many features have been added to Band-in-a-Box – Notation and Lyrics, Piano Roll, 16-channel MIDI multi-tracks, harmonization, the StyleMaker and StylePicker, a live performance Conductor window, Medley Maker, and 24 –substyle Multistyles. The Soloist and the Melodist are popular “intelligent” features that generate professional solos or even create whole new songs from scratch. RealDrums add the human element of a live drummer while RealTracks add even more live session musicians, bringing the entire Band-in-a-Box arrangement to life. You can even record your own UserTracks and Band-in-a- Box will play them just like RealTracks! Or use the MIDI SuperTracks for MIDI tracks with a “real feel” that you can edit and arrange. The Audio Chord Wizard has the amazing ability to analyze, extract, and show the chords from audio recordings on-screen and then write them to the Band-in-a-Box Chord Sheet.
The inclusion of digital audio features makes Band-in-a-Box the perfect tool for creating, playing, and recording your music with MIDI, vocals, and acoustic instruments. Band-in-a-Box for Windows® can also record an acoustic instrument or voice to add to the composition, with processing through its own DirectX audio effects. Its built-in TC Helicon audio harmonies will turn your audio track into multiple harmony parts or adjust its pitch, with vibrato and scooping effects for up to sixteen realistic choral parts. Use the Mixer window to select parts, set levels, and create a polished final mix.
You can print out your finished creation with lyrics, chords, repeats and endings, DC markings, and codas, or save it as a graphics file for web publication or to e-mail to a friend. And when you are ready to let others hear your composition, you can burn it directly to an audio CD. Or save your composition as a Windows® Media File (or in any other compressed formats you have) for a file that’s “Internet ready.”
You will have even more fun making automatic medleys, playing your favorite song lists in the Band-in-a-Box Jukebox, and singing along to your Karaoke files with CDG graphics.
Let’s get started!
This is a comprehensive guide to the program, including information not included in the printed manual. We will begin with the easy installation and setup procedure.
8 |
Chapter 1: Welcome to Band-in-a-Box! |

Installing Band-in-a-Box for Windows®
Minimum System Requirements
Windows® XP / Vista / 7 / 8 / 8.1 / 10 (32 or 64-bit) Minimum 1 GB RAM (2 GB+ recommended)
Minimum 1.0 GHz processor (2 GHz+ multicore recommended)
1 GB free Hard Disk space for a minimal install. More space is required for RealTracks, depending on which package you buy.
-RealTracks & RealDrums: ~100-400 MB per set
-Pro RealCombos: ~18 GB
-MegaPAK RealCombos: ~28 GB
-Full UltraPAK/UltraPAK+ when installed to internal hard drive: ~120 GB (another ~100 GB is required for the installation files when downloading the UltraPAK or UltraPAK+)
-Hard Drive versions of the UltraPAK, UltraPAK+, or Audiophile Edition do not require any hard disk space when run directly from the external hard drive they are shipped on.
1024x768 screen resolution (1360x768+ recommended) DVD drive for the DVD version of the MegaPAK or Pro.
USB port for the USB flash drive version of the MegaPAK or Pro.
USB port for the USB hard drive version of the UltraPAK, UltraPAK+, or Audiophile Edition.
A MIDI sound source is required. This could be a sound card, a MIDI keyboard, MIDI sound module, or software synthesizer.
Internet connection recommended for activation and updates.
Installing the Program
Use one of the following methods to install the program files into the Band-in-a-Box directory. By default, this directory is C:\bb, but you may choose another location. If you have a previous version of Band-in-a-Box installed on your computer, you should install the files to your existing Band-in-a-Box directory.
Installing from the Downloaded Installer Files
If you ordered the e-delivery, download all installer files from the link provided. Double-click on each file to run the installation program.
Installing from the DVD
Insert the DVD into the DVD drive. In a few seconds, a browser window will open with a list of the DVD contents. If it does not open, access your DVD drive from the Windows® Explorer. Double-click on SETUP.EXE to run the installation program.
Installing from the USB Flash Drive
Connect the USB flash drive to the USB port. The Windows® AutoPlay should open the drive and show you the contents. If the drive does not automatically open, find the drive in the Windows® Explorer and double-click on the flash drive icon to open it. Double-click on a setup file to run the installation program.
Installing from the USB Hard Drive
Larger versions of Band-in-a-Box ship on portable USB hard drives. You can run Band-in-a-Box and RealBand directly from the hard drive by using the program shortcuts. Before you use the programs, you should double-click on Setup.exe. This will set up any files that need to be installed/registered on your computer.
Note: Before unplugging the hard drive from your computer, make sure it is not in use, then click on the “Safely Remove Hardware” icon in your taskbar. When you plug the drive in, Windows® may prompt you to select an appropriate action - if so, select “Open folder to view files.”
MIDI Setup
Band-in-a-Box uses the multimedia drivers for your MIDI interface and/or sound card that are supported by the Windows® operating system. To get sound playback you need to have a MIDI (and audio - for songs with digital audio, RealDrums, and RealTracks) driver installed.
Chapter 1: Welcome to Band-in-a-Box! |
9 |

To start using the program you will need to make sure that your MIDI interface, audio driver, and Windows® sound source are installed and configured.
Run the program by double-clicking the program icon.
To check your MIDI driver setup, press the [MIDI] toolbar icon and select the menu item MIDI/Audio Drivers Setup. This will open the MIDI/Audio Drivers Setup dialog. You can also go to Options |
MIDI/Audio Driver Setup to open this dialog.
Select a MIDI Output Driver to use for MIDI sound playback and optionally a MIDI Input Driver if you are using an external MIDI controller keyboard or guitar. If the setup is panned to mono, the program offers to change it to stereo.
Perhaps the easiest way to configure Band-in-a-Box is to press the [Run Driver Wizard] button in the MIDI/Audio Drivers Setup dialog.
The MIDI Output Driver Wizard dialog will take you step-by-step through the process of auditioning and selecting an appropriate driver. This assumes that the appropriate Windows® sound drivers are installed and correctly configured.
Output to Software Synthesizers (DXi and VSTi)
Software synthesizers allow Band-in-a-Box to play high quality sounds directly through your computer sound card, without requiring any external MIDI hardware. Most new software synthesizers are released as “plug-ins,” so they will work in a standard way with many programs. Connecting Band-in-a-Box to the software synth as a plug-in
10 |
Chapter 1: Welcome to Band-in-a-Box! |
provides several advantages over the previous method of connecting as a MIDI driver. The plug-in allows Band-in- a-Box to merge/sync in any existing audio file (vocals etc.) with the synth output. You can also directly render your performance to a .WAV file using the plug-in. Sampler-based synths allow you to assemble a huge, customized library of instrument samples to use with Band-in-a-Box.
The current DXi or VSTi synth name is displayed in the button that launches the VST/DXi settings.
DirectX Instrument Synthesizer (DXi plug-in) Support
To use DXi with Band-in-a-Box, you should think of the DXi as a type of “MIDI Output Driver.” As such, you either go to the menu Options | MIDI/Audio Driver Setup or click on [Prefs] [MIDI Driver] and select the “Use DXi Synth” checkbox. When you do this, you can select the type of DXi to use (from a list of installed DXi, if any), and also will see a panel display of the DXi that allows you to make settings directly for your DXi synth.
The DXi will convert the MIDI information to audio, which Band-in-a-Box will playback through your sound card to audio speakers.
You can select DirectX DXi Software Synthesizers as the MIDI destination, and also apply DirectX Audio plug-ins to the Band-in-a-Box audio track.
Check the Use VST/DXi Synth checkbox to enable DXi playback. While using DXi or VSTi, all playback information is routed to the DXi/VSTi, including the option to route the Thru track from your MIDI keyboard to the DXi/VSTi synth.
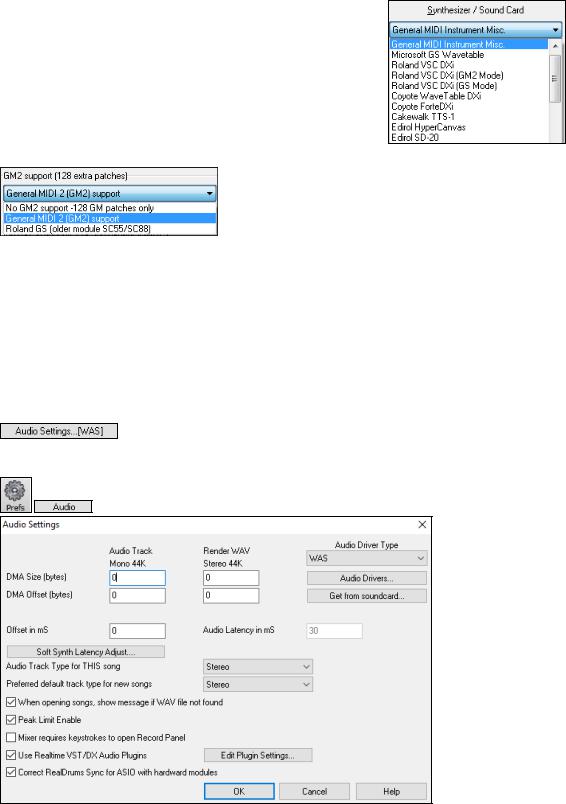
Note: To use this option, you must have a polyphonic DXi synthesizer installed on your computer, such as the CoyoteWT. It will also be most convenient if your DXi synthesizer can use General MIDI or GM2 patches.
To select the DXi synthesizer, click on the [VST/DXi Synth Settings] button, which will open the VST/DX Synths/Plugins window.
Select your desired DXi synth in the top plug-in Insert Slot 1.
To apply DirectX audio plug-ins to the synth, insert DX audio plug-ins to Insert Slots 2, 3, or 4. This can be useful to add EQ, Reverb, Compression, or Peak Limiting plug-ins, if the “raw sound” of the synthesizer needs sweetening.
VSTi Instrument Synthesizer (VST plug-in)
To add VSTi synthesizer plug-ins use the plug-in menu on the top synthesizer slot.
VST plug-ins appear at the bottom of the plug-in list below the DirectX plug-ins. VST plug-ins and synthesizers have the text <VST> prefixed to the name of the plug-in or synthesizer.
To select a VST plug-in for the first time, select the “Add VST plug-in...” item at the bottom of the plug-in Menu. Select a VST plug-in .dll file in the following Select a VST plug-in dialog, and it is added to the plug-in list. After you add each VST, the plug-in is permanently added to the list. You only have to add each plug-in one time.
Note: Some VST host programs scan for all available plug-ins every time they start up. We decided not to use that method, because the scanning can take a long time if there are many plug-ins on your system. Additionally, a badly written or corrupt plug-in could cause program malfunctions. Therefore, we feel the method of selecting only the plug-ins you wish to use is both safer and faster.
VST/VSTi Additional Panel Controls
VST is necessarily different from DirectX/DXi, and some extra controls are available for VST plug-ins. DirectX/DXi plug-ins save their presets to the Windows® Registry and only one setting is “alive” at a time.
VST/VSTi plug-ins save their presets to disk files. VST/VSTi plug-ins contain a bank of presets in memory. You can switch between presets while editing, and each edited preset is remembered in the current bank. If you save the
Chapter 1: Welcome to Band-in-a-Box! |
11 |

bank, it will save all the presets you have edited. You can save individual presets, or you can build a custom group by loading individual preset files into different preset slots, and then save the new group file.
Note: Some very nice plug-ins, including some advanced synthesizer plug-ins, may only have one preset, but that single preset can be a doozy containing many settings. Even with single-preset plug-ins, you can Save/Load Presets or Banks.
Presets and Groups
Load Preset: A preset contains settings to a single slot. VST presets are stored in .fxp files; DirectX presets are stored in the registry.
Save Preset: Save the currently selected Preset. VST/VSTi preset files use the “.fxp” extension. Delete Preset: Delete a saved preset from the selection list.
Load Group: A group is a .tgs (Trans Group Settings) file from the C:\bb\DX Settings folder. Load an entire group of presets for all slots.
Save Group: This saves all plugin settings for all slots of a track to a .tgs (Trans Group Settings) file in the
C:\bb\DX Settings folder.
VST Generic User Interface
VST/VSTi plug-ins are not required to have a fancy graphic control panel. There are many “faceless” VST plug-ins which have many adjustable parameters, but no fancy control panel. When you open such a plug-in, the control panel will look like this example. Band-in-a-Box presents one “generic” slider for each adjustable parameter in the plug-in.
Parameter Name: Simply the name of each adjustable parameter. Value Slider: Move the slider to adjust the parameter value
Value Indication Text: Displays the value of the slider, as interpreted by the plug-in. In this example, Parameter 0: Bright is interpreted as an ON/OFF switch, but Parameter 1: Volume is interpreted as a value from 0 to 10.
Options: Remove VST Plug-In (from list)
12 |
Chapter 1: Welcome to Band-in-a-Box! |

This feature allows the removal of unwanted plug-ins from the Band-in-a-Box VST/VSTi plug-in lists.
Support for 64-bit VST Plugins using jBridge
You can use your 64-bit VST plugins and VSTi instruments with Band-in-a-Box, using jBridge. Since Band-in-a- Box has built-in support for jBridge, you just use your plugins as you normally would, by selecting 32- or 64-bit plugins within Band-in-a-Box. (JBridge is a third-party product. You can purchase jBridge from PG Music.)
To use 64-bit plugins with Band-in-a-Box, you:
1.Get and install jBridge,
2.Select and use your 64- or 32-bit plugins within Band-in-a-Box, without any further setup or configuration!
VSTSynthFont64
The 64-bit version of Band-in-a-Box allows you to use the VSTSynthFont64 as the General MIDI (GM) synth.
To use it, go to the menu Options | MIDI/Audio Driver Setup to open the MIDI/Audio Drivers Setup dialog and press the [VSTi/DXi Synth Settings] button.
Then, in the VST/DX Synths/Plugin window choose the “VSTSynthFont64” from the list of available plugins.
Chapter 1: Welcome to Band-in-a-Box! |
13 |

With the VSTSynthFont64, you can use any GM soundfont or DLS files, including larger ones over 2 GB.
When the VSTSynthFont64ynth is selected, its name shows in the [VSTi/DXi Synth Settings] button.
Driver Latency
Software synthesizers have some inherent latency, which is the delay between the time a note is played and it is processed by the computer. Older soft synths had noticeable latency, whereas a VSTi/DXi synth using ASIO drivers has very little. This setting is used to synchronize the visual display (notation, chords, virtual piano etc.) with the sound you hear.
Band-in-a-Box automatically sets the latency for VSTi/DXi and some other soft synths.
The [Latency Adjust…] button opens the Soft Synth Latency Adjust dialog where you can manually adjust the latency.
Alternate Patch Maps
You can choose the patch map (instrument list) that matches your synthesizer keyboard or sound module. Original equipment sound cards or integrated sound chips are General MIDI (GM) compatible.
14 |
Chapter 1: Welcome to Band-in-a-Box! |
We have made preset drum/patch files for many synthesizers and sound cards. If your synth is not listed, you should use the General MIDI Instrument Misc. patch kit (default).
You can probably omit this step unless you are using an old synth that is not General MIDI compatible. If your non-GM synthesizer or sound card is not listed, you can easily make your own patch map with the [Patch Map] button in Options | Preferences.
General MIDI 2 (GM2) Support
General MIDI 2 patches are supported for 128 additional instruments. The type of GM2 support is set in this dialog.
The GM2 support choices are:
-General MIDI 2 support: If you’re using a newer Sound Canvas (i.e. newer than 1999, or newer than the Roland SC88), then choose this GM2 support.
-Roland GS (older Modules): “Older” Sound Canvases (SC55/SC88) support GS, but not GM2. The good news is that they have the same patches available, just at different locations. So, if you choose this option, Band-in-a- Box will find the patches at the “GS” locations instead of the “GM2” locations. If you have a newer GS module like the SC8820, it supports both GM2 and GS - you should likely choose GM2.
-No GM2 support: Some sound cards don’t have GM2 support but they do support the original 128 General MIDI sounds. Band-in-a-Box will use the closest instrument in these cases.
Audio Setup
The [Audio Settings] button in the MIDI/Audio Drivers Setup displays the current audio driver and status (WAS/MME/ASIO).
Band-in-a-Box performs the audio setup automatically using the installed system audio components.
To restore or modify this setup, click on the [Prefs] button and then click on the [Audio] tab to launch the Audio Settings dialog.
Audio Driver Type
Chapter 1: Welcome to Band-in-a-Box! |
15 |

MME is the default audio driver type that is used in Windows®. MME is good, but there is latency (delay) associated with MME drivers.
ASIO is a faster audio driver developed by Steinberg. It has much lower latency than ordinary MME drivers do.
WAS (Windows® Audio Session) is an alternative driver to MME and ASIO and has ultra-low latency.
Windows® Audio Session (WAS)
Band-in-a-Box supports Windows® Audio Session (WAS) driver, an alternative to ASIO (a driver with low latency, but usually can be used by one program at a time) or MME (an older driver with worse latency). The WAS driver has ultra-low latency (< 25 ms on a typical Windows® PC), so audio operations like playing or sending out information via MIDI happen with no noticeable delay.
When you boot up Band-in-a-Box, it will be already set to use the WAS driver. If you want to change the settings, open the Windows Audio Devices dialog.
The dialog will open if you press the [Audio Drivers] button in the Audio Settings dialog when the “WAS” is selected for the audio driver type.
Input Device
This is the audio input device that will be used for recording a voice or an instrument. If you have multiple devices installed in your system, you can choose a device from the list.
Output Device
This is the audio output device that will be used for playing sound. If you have multiple devices installed in your system, you can choose a device from the list.
Use Default Device
If this option is enabled, the playback or recording device selected as the default device in your Windows® Sound Control Panel will be used.
Resampling Quality
You can choose a quality level for resampling. “Low” will improve performance if necessary, but “High” will sound best.
Exclusive mode
Use the exclusive mode if you want Band-in-a-Box to take full control over the audio device(s). In this mode, other applications might not be able to use the audio devices, so we recommend you do not use this mode.
Output always on
If this is enabled, sound will always be sent to the device. If this is disabled, sound will be sent to the device only when the song is playing. Enable this option if you want MIDI plugins to work when the song is not playing.
16 |
Chapter 1: Welcome to Band-in-a-Box! |

Latency in MS
This is the delay between when sound is sent from Band-in-a-Box and when you actually hear it by the audio device. Increase this setting if you are hearing sound glitches during playback.
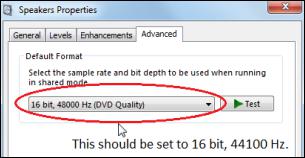
[Open Windows Sound Control Panel]
This button will open the Windows® Sound Control Panel. You can change your device settings by clicking on [Properties] > [Advanced]. For the “Default Format,” a setting of 16 bit, 44100 Hz is best for Band-in-a-Box.
ASIO Audio/Software Synth Drivers
ASIO drivers allows for much lower latency than ordinary MME drivers do.
Note: Most low-end sound cards do not include an ASIO driver, so you may not have an ASIO driver yet. In this case, you need to get an ASIO driver from the Internet.
This ASIO Audio Drivers dialog lets you choose an ASIO driver. You can arrive at this dialog in 3 different ways:
1.If you haven’t used ASIO drivers, but Band-in-a-Box detected them, and you answered “Yes” when Band-in-a- Box asked if you want to use an ASIO driver.
2.If, within the Audio Settings, you change the “Audio Driver Type” from MME to ASIO.
3.If the “Audio Driver Type” is already set to ASIO, but you later press the [Audio Drivers…] button in the Audio Settings.
The Select one ASIO Driver list box lets you select an ASIO driver to use. You can only select one ASIO driver at a time.
Once you have selected an ASIO driver, you will see the Input Port and Output Port list boxes filled with your driver’s input and output ports. By default, the first of each will be selected. You are allowed to select different ports (but only one input and one output port at a time can be selected). The ports you selected will be available for output within Band-in-a-Box. If you do not hear input or output, then you may need to try different ports than the defaults. You may need to read your sound card’s instructions to determine the correct ports to use.
Tip: The ASIO4All driver sometimes cannot connect if the Microsoft GS Wavetable synth is being used as a driver. So, if this happens, you will get a message that ASIO will be silent, and the solution is to de-select the ASIO4All driver.
The [ASIO Driver’s Control Panel] button launches the Control Panel for your driver. This usually lets you adjust the latency by letting you choose different buffer sizes in milliseconds. Some drivers might let you choose the buffer size in samples, which is less convenient than milliseconds. The smaller the buffer size, the lower the latency, and the faster the response. Smaller buffers require more CPU power and if you hear dropouts or artifacts, you may need to increase the buffer size. See the Understanding Latency section that follows.
Since many ASIO drivers do not support multiple sample rates, Band-in-a-Box has a built-in resampler which lets you play and record songs that have a different sampling rate than the rate(s) directly supported by your ASIO driver. For example, if the driver does not support 44.1K sampling rate, but supports 48K, then Band-in-a-Box will use the resampler to convert to 48K when playing back, and to convert FROM 48K when recording. The Resampler
Chapter 1: Welcome to Band-in-a-Box! |
17 |

Quality combo lets you choose Fast, Good, Better, or Best. Fast is the quickest but is the lowest of the four levels of quality. Best is the slowest (uses more CPU time), but the most transparent and accurate quality.
The [ASIO Driver’s Control Panel] button launches a settings dialog specifically provided by your driver manufacturer. This usually lets you adjust the latency, and usually you will have a choice between buffer sizes in milliseconds. See the following section on Understanding Latency.
Show Warning for Untested Soundcard Formats is an optional setting that shows a warning if your ASIO driver format has not been tested in Band-in-a-Box. It does not necessarily mean your driver will not work.
The Driver Info field shows various characteristics of your driver. The Name is the driver’s name.
The Version is the version number of your driver.
Input Channels is the total number of mono input channels that your sound card has.
Note: Band-in-a-Box groups each Input and Output channel into a stereo pair.
Output Channels is the total number of mono output channels that your sound card has.
The Allowed Sample Rates field shows the sample rates are allowed by your sound card’s ASIO driver. Band-in-a- Box has a built-in resampler which lets you play and record files that aren’t directly supported by your ASIO driver.
The Buffer Sizes In Samples shows the range of allowed buffer sizes. The “Pref” is the preferred size, and this is the size that Band-in-a-Box uses. Your driver may alter the preferred size if you’ve launched the ASIO Driver Control Panel and have selected a new buffer size from within the driver’s Control Panel. If your driver changes the preferred size, then Band-in-a-Box will be aware of the new preferred size.
Understanding Latency
Latency is based on the buffer sizes. The smaller the buffer sizes the lower the latency. Lower latency allows you to hear mixer volume changes very quickly, as well as hear MIDI thru echoed out via a DXi soft synth practically in real time. The latency, in MS is determined by the buffer size in samples, as well as the driver’s sampling rate.
Note: If your ASIO driver’s control panel lets you select the buffer size in MS, then you don’t have to pay much attention to the part of discussion below about converting samples to MS.
Converting Samples to MS: For example, suppose the driver’s sample rate is 48K. A 48K sampling rate means that it is playing at 48,000 samples per second. If the buffer size were 48000 samples, then the latency would be 1 second, or 1000ms (which is very large and slow, and usually not allowed in ASIO). If the buffer size were 4800 samples, which is 1/10 second, then the latency would be 100ms. If the buffer size were 2400 samples, which is 1/20 second, the latency would be 50 ms. If the buffer size were 240 samples, which is 1/200 second, the latency would be a mere 5ms which is incredibly low and very fast.
Normally, you can change your driver’s latency by pressing the Launch ASIO Driver’s Control Panel button. Normally, the driver specifies the buffer sizes in milliseconds which is equal to the latency.
Low latency is faster and more responsive but uses more CPU power.
Depending on the speed of your computer, you may find that the playback has dropouts, clicks/pops, or other artifacts if you set the buffer sizes too small. This is because smaller buffers use more CPU power and if your computer can’t handle the low latency you will hear artifacts. If this happens, you would need to use larger buffer sizes. You may need to experiment to find what works well. You may be able to use smaller buffers with songs that don’t have a lot of tracks and effects but may find that you need to use larger buffers with songs that have more tracks and use more effects. This is because more tracks and more effects use more CPU power, which leaves less CPU power available for the audio routines to keep up with lower latencies.
Sample Rate Detection Warning
Windows 7 has a peculiar issue where if you choose Windows® Start button - Control Panel - “Sound,” right-click on your output device, choose “Properties” and then “Advanced,” you can see the default format. It should be 16 bit 44100. Unfortunately, some apps change this setting without your knowledge. When it is set like this, all of your audio gets “resampled” and this can create obvious audible artifacts and make some things sound “bad.”
18 |
Chapter 1: Welcome to Band-in-a-Box! |
Band-in-a-Box detects this setting when you exit the
MIDI/Audio Drivers Setup dialog, and will give you a notification about it, and that’s a clue for you to visit this dialog and set it back to 44100.
Have fun!
Chapter 1: Welcome to Band-in-a-Box! |
19 |
Chapter 2: QuickStart
Creating music with Band-in-a-Box is as easy as 1-2-3! Here’s how.
Step 1 – Typing in the Chords
There are numerous ways of entering chords into Band-in-a-Box; we will discuss the two most common methods.
1.Using the Computer Keyboard
2.Playing directly on a MIDI Controller Keyboard
On the main screen of the program, you will see an area called the Chord Sheet.
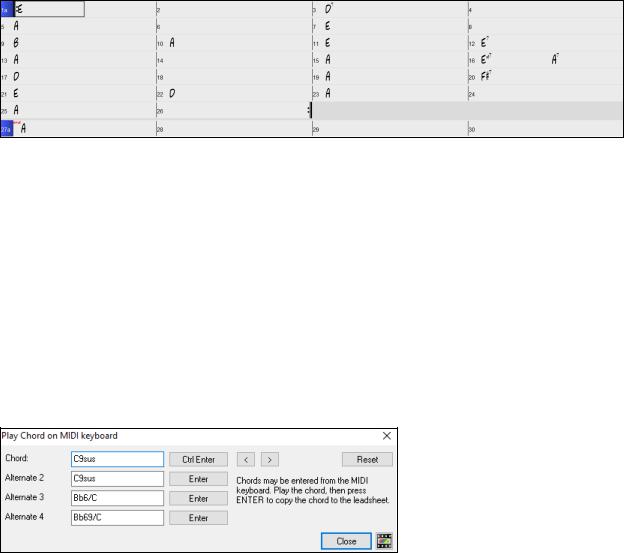
Each of the numbered cells on the Chord Sheet represents a bar. In this example, we see that there is an E chord in the first bar of this song, an A chord in bar 5, and later in the song, an E7 in bar 12. Notice the box in the first half of bar 1. This is the highlight cell, and it represents the bar you are currently working on. You can move the highlight cell around using the cursor keys or click on any bar with the mouse.
Enter Chords Using the Computer Keyboard
To enter a specific chord, move the highlight cell to where you want to place the chord. For example, to add (or change) a chord in bar 10, you would highlight bar 10 on the Chord Sheet. Next, type in your chords. If you want an A chord at bar 10, type the A key on your keyboard, and press Enter. Notice that when you use the Enter key, the highlight cell moves to the second half of the bar. You could then enter another chord at beat 3. Chords names are normally typed using standard chord symbols (like C or Fm7 or Bb7 or Bb13#9/E), but you can enter them in other chord formats like Roman Numerals, Nashville Notation, Solfeggio, and Fixed Do (popular in Italy and Europe).
Enter Chords Using a MIDI Controller Keyboard
If you have a MIDI controller keyboard, you can use it to enter chords into Band-in-a-Box. Play a chord on your MIDI keyboard, and then type Ctrl+Enter. The chord will be entered into the Chord Sheet at the current highlight cell position. Another method allows you to choose alternate chords. From the Window | MIDI Chord Detection menu item, you will see this window:
When you play chords, Band-in-a-Box shows you the chord name and suggests alternates that you can choose from. Typing Ctrl+Enter enters the first selection and advances the highlight cell by ½ bar. To place an alternate chord in the Chord Sheet, click on the [Enter] button beside the chord you want.
Step 2 – Choosing a Style
Band-in-a-Box creates backing arrangements based on the chords you type in, playing them in a particular style.
What’s a Style?
A style is a set of rules that determine how Band-in-a-Box creates music using your chords. There is a huge collection of styles in all musical genres, with both RealTracks audio and MIDI.
20 |
Chapter 2: QuickStart |
Opening a Style
You can open a style using the [Style] button. This is a split button, with the top half being the default function, and the bottom half listing different methods to load a style and allows you to set the default.
Selecting a Style using the StylePicker
The StylePicker window lists all styles with full information. It has a great filter feature for finding a perfect style for your song by selecting elements such as time signature, feel, or tempo, or by simply typing in a familiar song title.
You can browse styles by sorting columns or hear an “instant” preview by double-clicking on the list. If style has both MIDI and RealDrums available, you can hear both, and choose which one you want. This makes it much faster to find the style that fits your song.
Tip: You can quickly launch the StylePicker by S+return or control+F9 keys.
Step 3 – Play your song!
To play your song you will need to tell Band-in-a-Box how long the song is, how many times to play it through, in what key, and how fast.
Chapter 2: QuickStart |
21 |
Framing the Song
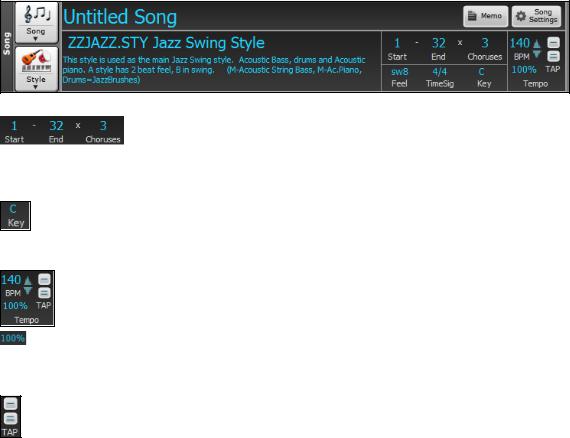
Setting the Chorus
To tell Band-in-a-Box where to start and end the song, locate the framing buttons. There are three of them, one each for Beginning of Chorus, End of Chorus, and Number of Choruses. In the example shown, the chorus starts at bar 1, ends on bar 32, and is going to play 3 times.
Setting the Key
The Key button is used to set the key or to change it and transpose the song. When you press it, you see 2 columns of keys. The first column will set the key AND transpose the song; the second will just set the key signature.
Setting the Tempo
The Tempo Control shows the current song tempo. Left-click on the up/down arrows to change the tempo by +/- 5 beats per minute. Right-click to change it by +/- 1 bpm. Tempos can also be typed in directly.
This button allows you to quickly set the relative tempo. Click on the button and choose a percentage or use the Custom Tempo % menu item to set any value between 1% and 800%. 1% would be 1/100 of the original tempo and 800% would be 8 times the original tempo. Hot keys are available: Ctrl - (minus key) for half speed and Ctrl = for normal speed.
Use the Tap tempo buttons to count and set a tempo. Tap the [-] button in tempo four times to set the tempo. It will appear in the tempo box. Tap the [=] button to count-in the song and start playback at the tapped tempo. As you tap more than 4 times, the accuracy will improve (through averaging) and you can continue to tap until the target tempo has been reached. For example, in a 4/4/ style, once you tap 4 times a tempo will be set. But you can keep tapping and the tempo will change every beat, based on the average tempo that you have typed.
Shortcuts for song formatting
Typing special words, instead of chord names, will make the following settings:
begin<Enter> |
sets the beginning of the chorus to the current bar |
chorusend<Enter> |
sets the end of the song to the current bar |
end<Enter> |
sets the end of the chorus to the current bar |
tkc<Enter> |
sets key signature to C, tkbb would set it to Bb |
trc<Enter> |
transposes song to key of C |
t125<Enter> |
sets tempo to 125 |
Press Play
When you’re ready, just press the [Play] button or the F4 function key and Band-in-a-Box will immediately generate and play a professional arrangement of your song using the settings and the style you selected. You can double-click on any bar in the Chord Sheet, including the tag or ending, to start playback from that bar.
More fun with Band-in-a-Box…
That’s how easy it is to start creating music with Band-in-a-Box, but it’s just the beginning. Band-in-a-Box is jampacked with features, helpers, and user options, so read on and keep having fun!
22 |
Chapter 2: QuickStart |
Chapter 3: Band-in-a-Box 2020
Band-in-a-Box 2020 for Windows is here!
Band-in-a-Box 2020 for Windows® is here!
We’ve been busy and added 50 new features and an amazing collection of new content, including 202 RealTracks (double the 101 that we’ve often released in the past), new RealStyles, MIDI SuperTracks, Instrumental Studies, RealDrums transcriptions, Xtra Styles PAK 8, and more!
We have Bonus PAKs with 40 RealTracks in addition to the 202 new RealTracks, so in total an amazing 242 new RealTracks are available! The Bonus PAKs also include 5 new Instrumental Studies sets with 3 sets featuring Nashville guitar legend Johnny Hiland, and two sets focusing on soloing studies for rhythm changes and jazz blues. There are also 15 new MIDI SuperTracks, 280 new RealDrums transcriptions, and new “Look Ma! More MIDI!” sets with 30 new MIDI styles.
In addition, there are over 250 new RealStyles that use the new RealTracks. These include great Americana, Gospel Vocals, new Blues with Johnny Hiland and Sol Philcox, Country Pollwinners, Bossa Flute/Horn sections, Jazz Blues and Rhythm Changes, British and Hazy 60s guitars, Modern Funk, Island Grooves with steel drum and marimba, Singer-Songwriter, and more! Plus, we’ve made a new Xtra Styles PAK 8 with 162 Xtra styles. (Xtra styles are styles based on previously released RealTracks.)
Band-in-a-Box 2020 Features and Additions
There are over 50 new features in Band-in-a-Box 2020! There are enhancements to RealTracks (Smoother Sounding Vocal RealTracks, RealTracks Thickening, “Find-a-Sub” RealTracks and MultiRiffs). Most RealDrums now have RealCharts (with accurate Drum Notation). There’s a new RealTracks Artist Browser to find info/bios/links/lists of RealTracks on all the artists. A new Feature Browser allows the new or “forgetful” user to easily find and use most features/hotkeys/docs from a single window. Equalize Tempo allows changing a recorded rubato song to a fixed tempo. Enhanced audio time/pitch stretching (Elastique included. There are
SongPicker enhancements, Bass/Drums or Drums only Auto-Intros, 3,400 titles added, MusicXML enhancements, “Left-Handed” and “Student View” guitar, Drag and Drop enhancements, Audio Chord Wizard Multi-Window Display and more!
Band-in-a-Box 2020 DAW Plugin
There are over 40 enhancements to the Band-in-a-Box DAW Plugin, including Audio Harmonies (apply to any DAW audio track, 1-4 voices, using intelligent BIAB harmonies with passing tones). New features allow Customizing Tracks, Bar and Song settings. RealTracks, RealDrums sound improvements (gap filling, thickening), enhancements or reading/writing more data types to/from BIAB song files and much more!
RealBand 2020
There are over 20 additions to RealBand, including intelligent Audio-Harmonies (1-4 voice), Scrub Mode, mixer enhancements, open MusicXML .musicxml and .xml, easier transpose, RealTracks, RealDrums sound improvements and more!
And of course, the Band-in-a-Box program, DAW Plugin, and RealBand can all use the new RealTracks, RealDrums, MIDI and style content.
Summary of New Features
We’ve added over 50 new features to Band-in-a-Box 2020, including...
Feature Browser
Clicking on the small [?] button at the top of the screen or the [?] button on the toolbar opens the Feature Browser. This dialog lists many features in Band-in-a-Box and allows you to browse them, find the feature by text filter, read descriptions about the feature, find how to launch the feature, access to the online information or video about the feature, and do more. The dialog also opens by pressing the / Enter keys on the Chord Sheet.
This dialog helps in the following situations.
-You know about a feature but don’t know how to find it. Just type a part of the feature name and you’ll see the hotkeys, menu, and toolbar info on how to launch it. For example, if you want to launch the Chord Builder but don’t know how to do it, type “builder” in the text filter, and you will quickly find the Chord Builder.
Chapter 3: Band-in-a-Box 2020 |
23 |
-You are exploring available features for Band-in-a-Box. For example, if you are a guitar player, type the word “guitar” and you’ll see what’s available.
-You prefer “one-stop-shopping” and would like to launch features from the same dialog.
-You are learning the program and like to browse or watch videos about topics you’re interested in.
-You can’t remember hotkeys and want to review them.
“Find-a-Sub” RealTracks
Musicians with bands are familiar with the need to “find a sub” when you’re looking for a replacement. In Band-in- a-Box, “Find-a-Sub” means to find a different RealTracks that is the most similar in sound (genre, feel, tempo, and time signature). This helps to “freshen up” or vary the sound of an arrangement and allows you to explore different sounds for the band.
MultiRiffs
MultiRiffs is a popular feature that has been available in RealBand and the Band-in-a-Box DAW Plugin. Now it is available in Band-in-a-Box. It allows you to quickly generate 7 variations of riffs from the same RealTracks for either a portion of the song or the whole song.
RealTracks Thickening and Panning
When you select multiple RealTracks on the same track and have them play simultaneously, the followings are possible.
-The RealTracks can be the same but will play differently on each sub-track.
-You can set the stereo panning (-64 to +64) for each sub-track.
Left-Handed and Student View Guitar Window
The Guitar window has been remade and now supports the left-handed (in addition to right-handed) guitar and student view. The student view is the view a student (or YouTube video watcher) would have of the (right-handed) guitar facing him with the head at the right and low notes at the top. There’s also a left-handed student view, so all 4 possible views are supported.
Equalize Audio Tempo
If you have an audio file that wasn’t recorded at a fixed tempo, you can change so that the tempos in the audio are all at the same. We call this an “equalization” of the tempos.
Built-in Audio Chord Wizard Enhancements
-The built-in Audio Chord Wizard is now accessible from the [Audio Chord Wizard] button.
-The Audio Edit window now displays chords and tempos for each bar. They are shown when the Audio Chord Wizard mode is active so that you can see the tempo for each bar as you set the bar lines.
-Multi-window display. This gives the Audio Chord Wizard a multi-window view so that you can see and edit both the Audio Edit window and the Chords Sheet at the same time. This display is best viewed with a small toolbar mode. This allows you to see the chords as they are being interpreted by the wizard.
-The Audio Chord Wizard can send the transcribed MIDI notes to the Soloist track for further analysis by the user (via Piano Roll or Notation window). Note that this is a “snapshot” view every 8th note of the pitches present, not an attempt at polyphonic transcription. To use this feature, enable the “MIDI to Soloist” check box.
Selectable Render Bit Depth and Sample Rate
-The Render to Audio File dialog now has settings for bit depth (16, 24, 32 bit) and sample rate (44.1, 48, 96 kHz).
-The settings are also accessible from the Drop Station via dragging and dropping to the [+] button.
Drag and Drop from Mixer
You can now drag track labels from the Mixer and drop them to the Drop Station to render audio or MIDI files.
Drag & Drop Files to Band-in-a-Box
You can drop many file types onto the Band-in-a-Box screen and they will be loaded into the program, either as a new file or added to the current song. File types include Band-in-a-Box songs (.SGU/.MGU), MIDI (.MID), and audio (.WAV/.M4A/.MP3). Simply drag the file and drop it anywhere on the Band-in-a-Box screen, including various windows.
SongPicker Enhancements
The SongPicker now builds faster for large song lists (>30K and up to 60,000 songs).
24 |
Chapter 3: Band-in-a-Box 2020 |
The [Song] button (or the [Open] button) now has 3 additional menu items to launch the SongPicker.
-Open SongPicker in Current Folder: This opens the SongPicker in the current folder of the last loaded song.
-Open SongPicker in Home Folder: This opens the SongPicker in the home folder, which is C:\bb\My Songs or as set in the SongPicker.
-Open SongPicker in Favorite Folder: This launches the Favorite Folder dialog which allows you to choose any previously used folder where a song was loaded from, and then open the SongPicker in that folder.
In the SongPicker, there is a new “Open in Home” option. If this is enabled, the SongPicker will always open in the home folder instead of the current folder when you press the default [Song] button to open the SongPicker.
Searching for songs matching a chord progression or melody has been enhanced. There are three new checkboxes: “Key must match exactly,” “Chord Extension must match exactly”, and “Time Signature must match.”
Bass/Drums or Drums only Auto-Intros
When you automatically generate an intro for a song, you can now specify if you want the “whole band” or “drums only” or “bass and drums only” to play.
Custom style settings don’t interfere with song settings
If you have customized track settings of a song (e.g. by overriding the settings in a style and putting a different RealTracks), the program will now ignore the settings in the style that might affect the sound (such as custom panning, reverb, double-time, etc.).
Tracks that have been customized are indicated by an ‘=’ in the track name.
Select “Best” RealTracks Dialog Enhancements
-The dialog can now change its list based on the type without leaving the dialog.
-RealTracks “subs” filter is available.
-Three filters have been added for Instrument, Instrument Family, and Custom Instrument Range. (These are present in all RealTracks selection dialogs.)
-There is a new [Artist Bio] button. Pressing this button will open the Artist Browser, which shows more info for RealTracks artists.
Drums Quicklist Dialog Enhancements
-The dialog is now resizable. You can change the size by dragging the dialog border.
-An [Artist Bio] button has been added. Pressing this button will open the Artist Browser, which shows more info for RealDrums artists.
Artist Browser
Clicking on the artist bio in the RealTracks/RealDrums Picker or the [Artist Bio] button in other RealTracks/RealDrums selection dialogs will open the new Artist Browser dialog.
-It lists all artists and the instruments they play.
-It shows the total number of artists.
-You can read the biography of the artist.
-A text filter if available.
-The [More Info] button will launch the PG Music web page.
-The [OK - Show Artist RealTracks] button will go back to the RealTracks/RealDrums selection dialog and list all the RealTracks/RealDrums that the selected artist plays.
Auto-updating for new content at bootup
When new contents (styles, RealTracks, or RealDrums) have been added to your Band-in-a-Box, it will detect this at bootup and display a message. If you respond YES, the StylePicker will open and rebuild the list of the styles, RealTracks, and RealDrums.
Enhanced stretching and Audio Harmonies
The latest version 3.3.0 of Elastique and 1.04 of Harmony from zplane.de are included.
Song Titles Browser has 3,400 more titles
We’ve added 3,400 more song titles including requests from users, so there are now 14,000 titles.
Auto-set key signature option and reminder
Chapter 3: Band-in-a-Box 2020 |
25 |

New songs start out in the key of C. If you have typed chords in Ab, for example, but forget to set the key signature when you try to save the song, a green message will appear on the bottom right of the screen, offering to correct the time signature to Ab. If you click on it, the time signature will be set. This feature is also available with the key signature button on the toolbar.
Notation Enhancements
-The “N” mode (keystroke notation entry) now has “M” to enter an additional note a third above and “R” to enter a rest.
-The Section Text and Bar Lyrics layer display on the Lead Sheet and printout when the Fake Sheet mode is on.
MusicXML Enhancements
-Additional file types are supported, such as .mxl (a compressed format) and .musicxml, in addition to the existing
.xml support.
-When you load a MusicXML file, if the source track is drums, the track type of the destination track (Melody or Soloist) will be automatically set to Drums.
-Hammer-on/pull-off are now saved to MusicXML.
Improved note overlap removal, with option to specify channel match
This feature is accessed from main menu Melody | Edit Melody Track | Quantize, Time Adjust | Eliminate Note Overlap. In the dialog that appears, you’ll see a new option to treat each channel as a separate track for purposes of eliminating note overlap. So, for example, a MIDI guitar file with 6 different channels will have note overlapped on a string by string basis.
…and more!
Introduction to Band-in-a-Box 2020
Let’s take a closer look at the great new features in Band-in-a-Box 2020!
Feature Browser
The small [?] button at the top of the screen (or the [?] toolbar button) opens the Feature Browser. This dialog lists many features in Band-in-a-Box and allows you to browse them, find the feature by text filter, read descriptions about the feature, find how to launch the feature, access to the online information or video about the feature, and do more. This dialog also opens by pressing the / Enter keys on the Chord Sheet.
In this dialog, you will see:
-Text filter.
-Info on how to launch the feature from the toolbar, menu, hotkeys and/or other means.
26 |
Chapter 3: Band-in-a-Box 2020 |

-Memo with description about the feature.
-[Manual] button that links to online information about the feature.
-[Video] button to launch a video. (Tip: over 80 topics have videos, and you can type the word “video” in the filter to find them.)
-A graphic showing the feature.
-[Do It] button that will launch the feature.
This dialog helps in the following situations.
-You know about a feature but don’t know how to find it. Just type a part of the feature name and you’ll see the hotkeys, menu, and toolbar info on how to launch it. For example, if you want to launch the Chord Builder but don’t know how to do it, type “builder” in the text filter, and you will quickly find the Chord Builder.
-You are exploring available features for Band-in-a-Box. For example, if you are a guitar player, type the word “guitar” and you’ll see what’s available.
-You prefer “one-stop-shopping” and would like to launch features from the same dialog.
-You are learning the program and like to browse or watch videos about topics you’re interested in.
-You can’t remember hotkeys and want to review them.
“Find-a-Sub” RealTracks
Musicians with bands are familiar with the need to “find a sub” when you’re looking for a replacement. In Band-in- a-Box, “Find-a-Sub” means to find a different RealTracks that is the most similar in sound (genre, feel, tempo, and time signature). This helps to “freshen up” or vary the sound of an arrangement and allows you to explore different sounds for the band.
To find a sub for a RealTracks, if the RealTracks to be subbed is on a track, right-click (or double-click) on the track radio button, and then go to Select RealTracks | Find Best Sub.
You will then see the Find a Sub dialog, which lists the RealTracks that would work best as a sub, sorted from best to worst. You can double-click on the list to audition, and when you find one you like, press OK.
Chapter 3: Band-in-a-Box 2020 |
27 |

If you don’t have a RealTracks already on the track, go to Select RealTracks | Select Best “All” RealTracks.
In the dialog that opens, select a RealTracks that you want to sub, and enable the “List best subs for the current RealTracks” checkbox.
This will sort the list showing you the best subs. Select a RealTrack from the list and press OK.
28 |
Chapter 3: Band-in-a-Box 2020 |

MultiRiffs
MultiRiffs is a popular feature that has been available in RealBand and the Band-in-a-Box DAW Plugin. Now it is available in Band-in-a-Box. It allows you to quickly generate 7 variations of riffs from the same RealTracks for either a portion of the song or the whole song. Once the tracks are generated, the 7 files are saved as .WAV files and can be accessed from the Drop Station (noted by the green highlight of the [WAV] box).
To use the feature, click on a track radio button at the top of the screen, either one with the instrument you want to use for the MultiRiffs or a blank track. Then right-click (or double-click) on it and go to Select RealTracks | Generate MultiRiffs (for whole/part of song).
Tip: The Add extra bar before and after the MultiRiff menu item adds an extra bar before the riff begins to ensure that the riffs with “pickup” (early) notes will be heard. It does not add an extra bar at the end of the riff unless there are trailing notes.
You will then see a dialog with a list of available RealTracks. Select a RealTrack and press OK. If there is one already on the track, it will be the default option in the dialog and you can just press OK.
Chapter 3: Band-in-a-Box 2020 |
29 |

Then choose the range of the song or the whole song, and press OK.
The MultiRiffs will then be generated.
Tip: If you highlight the region in the Chord Sheet before using this feature, that region will be automatically set.
They show up as 7 different tracks, numbered from 1 to 7.
They are rendered as WAV files and are ready to be dragged from the Dropbox to the Explorer or dropped into your DAW program.
Or you can just find them in your C:\bb\DragDrop folder.
30 |
Chapter 3: Band-in-a-Box 2020 |
Loading...