

Page 1

®
Veerrssiioonn 22001111 ffoorr
V
Wiinnddoo
W
wss
w
© Copyright PG Music Inc.1989-2011. All rights reserved.
Page 2

PG Music Inc. License Agreement
CAREFULLY READ THE FOLLOWING TERMS AND CONDITIONS BEFORE COMPLETING THE INSTALLATION OF
THIS SOFTWARE. USAGE OF THE SOFTWARE INDICATES YOUR ACCEPTANCE OF THE FOLLOWING TERMS
AND CONDITIONS.
LICENSE
A. The program may only be used on a single machine.
B. You may transfer the program and license to another party if the other party agrees to accept the terms of this
Agreement. If you transfer the program, you must either transfer all copies, whether in printed or machine readable
form, to the same party, or, destroy all copies not transferred. This includes all modifications and/or portions of the
program merged into other programs.
C. You may receive the program in more than one media. Regardless of the type or size of media you receive, you may
install or use the media on a single machine.
D. The program (including any images, “applets,” photographs, animations, video, audio, music, and text incorporated
into the program) is owned by PG Music Inc. or its suppliers, and is protected by international copyright laws and
international treaty provisions.
You may not use, copy, or transfer the program, or any copy, modification or merged portion of the program, in whole or in part,
except as expressly provided for in this license. If you transfer possession of any copy, modification or merged portion of the
program to another party, your license is automatically terminated.
Some programs such as Band-in-a-Box have a “Server” function (including BandInABoxServer.exe program) to connect to a
“Client” (mobile client version of Band-in-a-Box on iPhone or other mobile device). You are only licensed to connect the Server
function (including BandInABoxServer.exe program) to Clients where you own or have properly licensed both the Client and
Server software that is being connected, not to clients or Server software owned/licensed by third parties. The preceding also
applies to any other PG Music products (RealBand etc.) with a similar type of connection between a Server program and a Client.
LIMITATION OF REMEDIES
PG Music Inc.’s entire liability and your exclusive remedy shall be:
A. The replacement of any media not meeting PG Music Inc.’s “Limited Warranty,” which are returned to PG Music Inc.,
or an authorized PG Music Inc. dealer, with a copy of your receipt.
B. If PG Music Inc. or the authorized dealer is unable to deliver replacement media which is free of defects in materials or
workmanship, you may terminate this agreement, and your money will be refunded.
In no event will PG Music Inc. be liable to you for any damages, including but not limited to lost profits, lost savings, or other
incidental or consequential damages arising out of the use or the inability to use such program, even if PG Music Inc. or an
authorized PG Music Inc. dealer has been advised of the possibility of such damages, or for any claim by any other party.
TRADEMARKS
Band-in-a-Box®,
Pro®, RealBand®, RealDrums®, and RealTracks® are either the trademarks or registered trademarks of PG Music Inc. in the
United States, Canada, and other countries. Microsoft® and Windows® are either registered trademarks or trademarks of
Microsoft Corporation in the United States and/or other countries. Apple®, the Apple logo, iPad™, iPhone®, iPod touch®,
Leopard®, Macintosh®, Mac®, Panther®, Power Mac®, QuickTime®, Snow Leopard®, Tiger®, and TrueType® are
trademarks of Apple Computer, Inc., registered in the U.S. and other countries. IBM® is the registered trademark of
International Business Machines Corporation. Roland® and “Roland” Logo, EDIROL® and “EDIROL” Logo, GS® and “GS”
Logo, are registered trademarks and “MIDI2” Logo, EDIROL Virtual Sound Canvas Multi Pack, VSC-MP1™ are trademarks of
Roland Corporation. ASIO is a trademark and software of Steinberg Media Technologies GmbH. VST is a trademark of
Steinberg Media Technologies GmbH. Other brands and their products are trademarks or registered trademarks of their
respective holders and should be noted as such.
Band-in-a-Box is protected under US Patent 5990407. The TC-Helicon Harmony feature in Band-in-a-Box and PowerTracks Pro
Audio is protected under US Patents 5567901, 5641926, 5986198, 34583, 296.80.173.9, PI9603819.5, 0368046, 0750776,
6,046,395, and patents pending.
Band-in-a-Box for Bozos®, CloudTracks™, CopyMe®, GuitarStar®, JazzU®, PG Music®, PowerTracks
PATENTS
Printed in Canada
2
PG Music Inc. License Agreement
Page 3

Table of Contents
PG MUSIC INC. LICENSE AGREEMENT.............................................................................................................2
TABLE OF CONTENTS ............................................................................................................................................3
CHAPTER 1: WELCOME TO BAND-IN-A-BOX!...............................................................................................12
WHAT IS BAND-IN-A-BOX?......................................................................................................................................12
INSTALLING BAND-IN-A-BOX FOR WINDOWS ..........................................................................................................13
Minimum System Requirements...........................................................................................................................13
Installing the Program.........................................................................................................................................13
Band-in-a-Box External Hard Drives..................................................................................................................13
MIDI SETUP.............................................................................................................................................................14
Output to Software Synthesizers (DXi and VSTi).................................................................................................15
AUDIO SETUP ...........................................................................................................................................................19
ASIO Audio/Software Synth Drivers....................................................................................................................19
Understanding Latency........................................................................................................................................21
CHAPTER 2: QUICKSTART..................................................................................................................................23
STEP 1 – TYPING IN THE CHORDS .............................................................................................................................23
STEP 2 – CHOOSING A STYLE....................................................................................................................................26
STEP 3 – PLAY YOUR SONG!......................................................................................................................................28
CHAPTER 3: BAND-IN-A-BOX 2011 ....................................................................................................................29
50 NEW FEATURES!..................................................................................................................................................29
101 NEW REALTRACKS............................................................................................................................................32
More about RealTracks ....................................................................................................................................... 35
QUICKSTART TUTORIAL FOR BAND-IN-A-BOX 2011 FOR WINDOWS........................................................................35
NOW LET’S TAKE A QUICK TOUR AROUND THE PROGRAM......................................................................................36
Open up the StylePicker.......................................................................................................................................36
NOW LET’S MAKE A SOLOIST MEDLEY....................................................................................................................37
CHAPTER 4: THE MAIN SCREEN.......................................................................................................................39
MAIN SCREEN OVERVIEW ........................................................................................................................................39
Personalizing the Main Screen............................................................................................................................40
Descriptive Hints.................................................................................................................................................41
Options and Utilities............................................................................................................................................42
STATUS BAR.............................................................................................................................................................42
SYNTH WINDOW / PIANO KEYBOARD.......................................................................................................................42
Toolbars...............................................................................................................................................................46
Floating Toolbars................................................................................................................................................48
TITLE WINDOW ........................................................................................................................................................50
CHORDSHEET AREA .................................................................................................................................................52
Chord Entry.........................................................................................................................................................53
Chordsheet Options.............................................................................................................................................53
Part Markers........................................................................................................................................................54
MultiStyles...........................................................................................................................................................55
Play Selected Area as a Loop..............................................................................................................................55
CHAPTER 5: PLAYING SONGS IN BAND-IN-A-BOX......................................................................................56
OPENING FILES.........................................................................................................................................................56
Find File...................................................................................................................... ........................................56
File Associations..................................................................................................................................................57
Table of Contents
3
Page 4

Open File Dialog.................................................................................................................................................57
Custom File Selection Dialog..............................................................................................................................57
Favorite Songs (and Styles).................................................................................................................................58
GLOBAL SONG OVERRIDES ......................................................................................................................................59
LOADING AND PLAYING BAND-IN-A-BOX SONGS ....................................................................................................60
The SongPicker....................................................................................................................................................61
Change the Style.................................................................................................................................................. 64
Make a MultiStyle Song.......................................................................................................................................65
SETTINGS FOR PLAYBACK ........................................................................................................................................65
Patch Changes.....................................................................................................................................................66
General MIDI 2 support......................................................................................................................................66
Additional Patches...............................................................................................................................................67
CHANGING VOLUME, PANNING, REVERB, CHORUS, BANK.......................................................................................69
PLAYING/PAUSING/STOPPING SONGS .......................................................................................................................69
Lead-In Counts and Metronome..........................................................................................................................70
Slide Tracks.........................................................................................................................................................70
Play Selected Area as a Loop..............................................................................................................................71
Loop any Section of the song...............................................................................................................................71
“Conductor”- Live Looping/Playback control....................................................................................................73
Play along with your MIDI Controller Keyboard...............................................................................................73
Play Along with the Wizard.................................................................................................................................73
MIDI Normalize...................................................................................................................................................74
Outputting MIDI to an External Device..............................................................................................................74
ADD REAL INSTRUMENTS – REALDRUMS AND REALTRACKS ..................................................................................74
RealDrums...........................................................................................................................................................74
RealTracks...........................................................................................................................................................76
FREEZE TRACKS .......................................................................................................................................................78
THE GUITAR WINDOW .............................................................................................................................................79
Launching the Guitar Window.............................................................................................................................79
Guitar Window Toolbar.......................................................................................................................................83
BIG PIANO WINDOW.................................................................................................................................................83
THE CONDUCTOR .....................................................................................................................................................84
THE JUKEBOX...........................................................................................................................................................88
Jukebox Options ..................................................................................................................................................89
MEDLEY MAKER ......................................................................................................................................................91
CHAPTER 6: MAKING SONGS IN BAND-IN-A-BOX .......................................................................................92
MAKE YOUR OWN SONGS........................................................................................................................................ 92
Getting Started.....................................................................................................................................................92
Setting the tempo .................................................................................................................................................92
“Framing” the Song............................................................................................................................................92
CHORD ENTRY .........................................................................................................................................................93
Computer Keyboard Entry...................................................................................................................................93
Audio Chord Wizard (Chords from MP3) ...........................................................................................................94
Copy and Pasting Section of Chords...................................................................................................................94
Deleting Chords...................................................................................................................................................96
Previewing Chords..............................................................................................................................................96
Support for other chord display types..................................................................................................................96
Advanced Chord Entry and Editing Features......................................................................................................97
BREAKS - RESTS, SHOTS, AND HELD CHORDS..........................................................................................................98
Chord Options .....................................................................................................................................................99
PART MARKERS AND SUBSTYLES.............................................................................................................................99
Part Markers........................................................................................................................................................99
MultiStyles.........................................................................................................................................................100
APPLYING STYLES..................................................................................................................................................102
The StylePicker Window....................................................................................................................................103
4
Table of Contents
Page 5

StylePicker Filters .............................................................................................................................................103
Categories..........................................................................................................................................................105
StylePicker Column Headings...........................................................................................................................106
Adding RealDrums Styles..................................................................................................................................107
StylePicker Editor..............................................................................................................................................108
Favorite Styles Button........................................................................................................................................112
Style Aliases Dialog...........................................................................................................................................112
Using MultiStyles...............................................................................................................................................114
USING REALTRACKS AND REALDRUMS IN SONGS .................................................................................................115
Using RealTracks in Songs - Assign RealTracks to Track Dialog.....................................................................115
Using RealDrums in Songs................................................................................................................................117
ARRANGING YOUR SONG .......................................................................................................................................120
Setting the tempo ...............................................................................................................................................120
“Framing” the Song..........................................................................................................................................120
Song Settings Dialog..........................................................................................................................................120
Repeats and Endings..........................................................................................................................................124
ADD A MELODY – MIDI AND/OR AUDIO................................................................................................................124
Record a MIDI Melody......................................................................................................................................124
Sequencer Mode ................................................................................................................................................125
Record a Live Audio Track................................................................................................................................126
Opening and Importing Audio Files..................................................................................................................128
Harmonize the MIDI Melody.............................................................................................................................129
Play Along with the Wizard...............................................................................................................................132
IMPORT A MIDI FILE..............................................................................................................................................133
MIDI File Chord Interpretation Wizard............................................................................................................133
ADD A SOLO - “THE SOLOIST”................................................................................................................................134
AUTOMATIC SONGS - “THE MELODIST”.................................................................................................................136
Launching the Melodist.....................................................................................................................................136
EDIT FUNCTIONS ....................................................................................................................................................137
Edit Dialogs.......................................................................................................................................................142
PIANO ROLL WINDOW............................................................................................................................................146
Track Selection..................................................................................................................................................146
Keyboard Pitch Panel........................................................................................................................................147
Note Panel.........................................................................................................................................................147
Graphic Event Panel..........................................................................................................................................147
Chord Ruler and Note Time Ruler Panel...........................................................................................................149
Note Editing.......................................................................................................................................................150
Right-Click Contextual Menu............................................................................................................................151
Horizontal Scroll Bar, [+] and [-] Buttons.......................................................................................................153
Vertical Scroll Bar, [+] and [-] Buttons............................................................................................................153
Zoom Buttons.....................................................................................................................................................153
VIEW AND PRINT NOTATION ..................................................................................................................................153
Standard Notation Window................................................................................................................................154
Editable Notation Mode.....................................................................................................................................154
Staff Roll Notation Mode...................................................................................................................................156
Adding Note-Based Lyrics to Your Song ...........................................................................................................156
LEAD SHEET NOTATION WINDOW..........................................................................................................................157
Launching the Lead Sheet Window....................................................................................................................157
Multiple Tracks of Notation...............................................................................................................................158
Multiple lines of Lyrics on Fake Sheet...............................................................................................................158
Lead Sheet “Lyric Text Block”..........................................................................................................................159
Lead Sheet Printing...........................................................................................................................................160
Multi-Channel Notation (Sequencer Mode).......................................................................................................161
DIGITAL AUDIO FEATURES.....................................................................................................................................163
Audio Chord Wizard (Chords from MP3) .........................................................................................................163
Add Audio Harmonies........................................................................................................................................166
Table of Contents
5
Page 6

Audio Reverb .....................................................................................................................................................167
More Audio Effects............................................................................................................................................168
THE MEDLEY MAKER.............................................................................................................................................168
SAVING SONGS.......................................................................................................................................................169
Saving MIDI and Karaoke Files........................................................................................................................171
SAVING AUDIO FILES .............................................................................................................................................175
SAVE YOUR CONFIGURATION .................................................................................................................................176
BURN YOUR OWN AUDIO-CD................................................................................................................................177
Congratulations!................................................................................................................................................177
CHAPTER 7: REALTRACKS AND REALDRUMS...........................................................................................178
REALTRACKS .........................................................................................................................................................178
What are RealTracks?.......................................................................................................................................178
REALTRACKS SETTINGS.........................................................................................................................................178
USING REALTRACKS..............................................................................................................................................183
Freeze Tracks ....................................................................................................................................................187
Using RealTracks in Styles................................................................................................................................188
Using RealTracks in Solos.................................................................................................................................188
Saving Your RealTracks ....................................................................................................................................189
REALDRUMS .......................................................................................................................................................... 189
How Do RealDrums Work?...............................................................................................................................190
RealDrums Settings ........................................................................................................................................... 190
RealDrums Picker – Assign RealDrums to Songs .............................................................................................192
AUDIO CONTROLS FOR REALTRACKS AND REALDRUMS .......................................................................................196
Tone Control......................................................................................................................................................196
Audio Reverb Control........................................................................................................................................196
REVERB SETTINGS..................................................................................................................................................197
Reverb Parameters............................................................................................................................................197
Saving Settings to Presets..................................................................................................................................198
Auto Reverb .......................................................................................................................................................198
CHAPTER 8: NOTATION AND PRINTING......................................................................................................199
Exploring the Notation Window ........................................................................................................................199
STANDARD NOTATION WINDOW ............................................................................................................................200
Right-click menu for Standard Notation............................................................................................................201
Keystroke Commands ........................................................................................................................................201
EDITABLE NOTATION MODE ..................................................................................................................................202
Right-click Editable Notation menu...................................................................................................................204
Editing Note Values...........................................................................................................................................206
STAFF ROLL NOTATION MODE...............................................................................................................................207
NOTATION WINDOW OPTIONS................................................................................................................................208
Notation Settings................................................................................................................................................213
Display Patch Names on Notation.....................................................................................................................214
Keystroke Note Editing......................................................................................................................................216
Section Text for Notation...................................................................................................................................217
Scrub Mode on Notation....................................................................................................................................217
LEAD SHEET WINDOW ...........................................................................................................................................218
Lead Sheet Options Dialog................................................................................................................................219
Fake Sheet Mode ...............................................................................................................................................222
Multiple lines of Lyrics on Fake Sheet...............................................................................................................222
Lead Sheet Memo...............................................................................................................................................223
Harmony Notation Display................................................................................................................................224
Multi-Channel Notation (Sequencer Mode).......................................................................................................225
LYRICS ...................................................................................................................................................................225
Note-based Lyrics..............................................................................................................................................226
Lyric Document Window ...................................................................................................................................228
6
Table of Contents
Page 7

Big Lyrics (Karaoke) Window...........................................................................................................................229
PRINTING................................................................................................................................................................231
Print Options ..................................................................................................................................................... 231
Print Preview.....................................................................................................................................................234
Print Multiple Songs..........................................................................................................................................237
CHAPTER 9: AUTOMATIC MUSIC FEATURES.............................................................................................240
AUTOMATIC MEDLEYS - “THE MEDLEY MAKER”..................................................................................................240
AUTOMATIC SONGS – “THE MELODIST” ................................................................................................................241
Automatic Intro – Song Intros ...........................................................................................................................244
Automatic Song Title Generation ......................................................................................................................245
AUTOMATIC SOUND TRACK GENERATOR - “SOUNDTRACK” .................................................................................245
AUTOMATIC SOLO GENERATION – “THE SOLOIST”................................................................................................247
RealTracks.........................................................................................................................................................248
Melody Influenced Solos....................................................................................................................................250
Using the Soloist Feature..................................................................................................................................252
Soloist Maker.....................................................................................................................................................253
AUTO PIANO HAND-SPLITTING...............................................................................................................................255
Piano Track (Notation Options)........................................................................................................................255
Melody and Soloist Tracks.................................................................................................................................255
AUTOMATIC GUITAR SOLOS – “THE GUITARIST”...................................................................................................256
AUTOMATIC EMBELLISHMENTS – “THE EMBELLISHER”.........................................................................................259
Overview............................................................................................................................................................259
Using The Embellisher ......................................................................................................................................259
Embellisher Settings..........................................................................................................................................260
CHAPTER 10: WORKING WITH MIDI.............................................................................................................263
RECORDING LIVE IN REAL TIME.............................................................................................................................263
Count-In and Metronome Options.....................................................................................................................264
Recording to an external sequencer ..................................................................................................................264
ENTERING NOTES MANUALLY ...............................................................................................................................264
RECORDING WITH THE WIZARD FEATURE ..............................................................................................................265
Melody Wizard...................................................................................................................................................265
MELODY/SOLOIST SEQUENCER ..............................................................................................................................266
IMPORT A BAND-IN-A-BOX SONG...........................................................................................................................269
IMPORTING MIDI FILES..........................................................................................................................................270
Importing MIDI Files to the Melody or Soloist Tracks .....................................................................................270
Import to the Melody with the MIDI Chord Wizard..........................................................................................271
Additional Options for Melody/Soloist Track....................................................................................................271
EDITING THE MELODY TRACK................................................................................................................................272
Event List Editor................................................................................................................................................272
Event List Filter.................................................................................................................................................273
Notation Window Editing ..................................................................................................................................274
Piano Roll Window Editing...............................................................................................................................275
CHAPTER 11: WORKING WITH AUDIO .........................................................................................................278
ABOUT BAND-IN-A-BOX AUDIO FILES...................................................................................................................278
AUDIO TRACK ........................................................................................................................................................278
Audio Playback Settings....................................................................................................................................278
PG Music Reverb...............................................................................................................................................279
Import Audio File to Audio Track......................................................................................................................280
Audio Offset.......................................................................................................................................................281
RECORD AUDIO......................................................................................................................................................282
Audio VU meters................................................................................................................................................283
Punch-In Recording...........................................................................................................................................284
PLAYING THE AUDIO FILE......................................................................................................................................285
Table of Contents
7
Page 8

EDIT THE AUDIO FILE.............................................................................................................................................285
Audio Edit Window Toolbar..............................................................................................................................286
Non-Destructive Audio Track Editing ...............................................................................................................286
AUDIO HARMONIES................................................................................................................................................286
Audio Harmonies Tutorial.................................................................................................................................286
Choir Effect........................................................................................................................................................290
Audio Harmonies Pitch Styles (automatic “Vibrato” and “Scooping”)...........................................................290
Pitch Styles Preset Details (one per voice)........................................................................................................291
APPLYING AUDIO PLUG-INS...................................................................................................................................292
Direct-X or VST Plug-ins...................................................................................................................................292
Reading the Audio and MIDI tracks into other programs................................................................................. 294
RENDERING AUDIO FILES.......................................................................................................................................295
Rendering WAV Files ........................................................................................................................................295
Rendering in Other Audio Formats...................................................................................................................297
BURN YOUR OWN AUDIO-CD.................................................................................................................................299
CHAPTER 12: WIZARDS, TUTORS, AND FUN ...............................................................................................303
AUDIO CHORD WIZARD (“CHORDS FROM MP3”)...................................................................................................303
Chordsheet Overview.........................................................................................................................................303
Opening Files ....................................................................................................................................................304
Audio Chord Wizard Window............................................................................................................................305
Primary Program Controls................................................................................................................................305
Chord Detection ................................................................................................................................................306
Keyboard Shortcuts ........................................................................................................................................... 307
Special Cases.....................................................................................................................................................308
Bad Initial Tempo Estimates..............................................................................................................................308
Odd Length Bars and Drastic Tempo Changes.................................................................................................310
Notes Display.....................................................................................................................................................311
Display Controls................................................................................................................................................311
MIDI FILE CHORD INTERPRETATION WIZARD .......................................................................................................313
Importing Chords ..............................................................................................................................................314
Importing Part of a MIDI file or re-doing a section of the Chordsheet)...........................................................317
Other Settings for the Chord Wizard.................................................................................................................317
PRACTICE WINDOW................................................................................................................................................318
EAR TRAINING TUTOR............................................................................................................................................320
Interval Tutor.....................................................................................................................................................320
Chord Tutor.......................................................................................................................................................321
EAR TRAINING GAMES ...........................................................................................................................................323
Pitch Invasion....................................................................................................................................................323
Music Replay.....................................................................................................................................................324
VOCAL WIZARD .....................................................................................................................................................325
REHARMONIST (CHORDS FOR A MELODY)..............................................................................................................327
Generate Chords for a Melody..........................................................................................................................327
CHORD SUBSTITUTION WIZARD .............................................................................................................................329
Chord Substitution Dialog.................................................................................................................................330
CHORD BUILDER ....................................................................................................................................................332
RHYTHM GUITAR CHORD TUTOR ...........................................................................................................................333
CHORD “BREAKS”..................................................................................................................................................334
MIDI FILE TO STYLE WIZARD................................................................................................................................334
Using the MIDI File to Style Wizard.................................................................................................................335
Advanced Settings and Preferences...................................................................................................................337
REPEATS AND ENDINGS WIZARD............................................................................................................................ 340
Tutorial..............................................................................................................................................................340
CHAPTER 13: TOOLS AND UTILITIES............................................................................................................344
DAW PLUG-IN MODE ............................................................................................................................................344
8
Table of Contents
Page 9

Plug-In Options .................................................................................................................................................345
FIND FILE ...............................................................................................................................................................346
ROLAND VSC3 VIRTUAL SOUND CANVAS.............................................................................................................347
COYOTEWT ...........................................................................................................................................................347
Coyote WT Overview.........................................................................................................................................348
TRANZPORT SUPPORT - WIRELESS REMOTE CONTROL ..........................................................................................350
Using TranzPort with Band-in-a-Box................................................................................................................350
GUITAR/BASS TUNER.............................................................................................................................................352
Master Tuning....................................................................................................................................................352
DYNAMIC 3D DRUM KIT WINDOW.........................................................................................................................353
Drum Display ....................................................................................................................................................353
Control Buttons:................................................................................................................................................354
Computer “QWERTY” Keys..............................................................................................................................354
Numeric keypad.................................................................................................................................................354
Multi - Note Instruments....................................................................................................................................354
Settings Dialog ..................................................................................................................................................355
MIDI MONITOR......................................................................................................................................................356
MIDI Monitor- Main Window............................................................................................................................356
Display Filter.....................................................................................................................................................357
SOUND BLASTER SUPPORT.....................................................................................................................................358
AWE 32/64 editor ..............................................................................................................................................358
EVENT LIST EDITOR ...............................................................................................................................................358
Event List Filter.................................................................................................................................................359
PG VINYL DIRECTX PLUG-IN.................................................................................................................................360
PG Vinyl Tool Features.....................................................................................................................................360
PG RTA DIRECTX PLUG-IN................................................................................................................................... 364
Control Descriptions .........................................................................................................................................364
PG VOCAL REMOVER PLUG-IN ..............................................................................................................................365
Operation........................................................................................................................................................... 365
CHAPTER 14: USER PROGRAMMABLE FUNCTIONS.................................................................................367
THE STYLEMAKER.................................................................................................................................................367
StyleMaker Toolbar Buttons..............................................................................................................................370
Exploring the StyleMaker..................................................................................................................................371
Drum Patterns ...................................................................................................................................................371
RealDrums Styles...............................................................................................................................................374
Bass Patterns.....................................................................................................................................................375
Piano, Guitar, and String Patterns....................................................................................................................381
Guitar Styles with the StyleMaker .....................................................................................................................383
Miscellaneous Style Settings..............................................................................................................................388
More Settings (for Rests, Pushes, RealTracks)..................................................................................................390
Assign Instruments to Style Dialog Box.............................................................................................................392
Advanced Editing Of Patterns...........................................................................................................................393
Style Log Options...............................................................................................................................................394
Alternatives to Recording Patterns....................................................................................................................395
Editing Patterns.................................................................................................................................................398
Using the MIDI File to Style Wizard.................................................................................................................398
Advanced Settings and Preferences...................................................................................................................400
MAKING REALDRUMS STYLES...............................................................................................................................403
Introduction to RealDrums................................................................................................................................403
Making A RealDrums Style Using An Existing Template..................................................................................404
Elements of RealDrums Styles...........................................................................................................................407
Elements of the Text File ...................................................................................................................................408
Pattern Definition..............................................................................................................................................411
Shots Definition .................................................................................................................................................416
Additional Entries in the Text File.....................................................................................................................417
Table of Contents
9
Page 10

Alternate Styles & Expanded/Reduced Styles....................................................................................................418
Testing Your RealDrums Style...........................................................................................................................419
Using your RealDrums style in Band-in-a-Box.................................................................................................421
THE HARMONY MAKER..........................................................................................................................................421
THE SOLOIST MAKER .............................................................................................................................................425
THE MELODIST MAKER..........................................................................................................................................429
THE GUITARIST MAKER .........................................................................................................................................431
CHAPTER 15: REFERENCE................................................................................................................................435
BAND-IN-A-BOX MENU DESCRIPTIONS..................................................................................................................435
FILE MENU.............................................................................................................................................................435
EDIT MENU ............................................................................................................................................................439
STYLES MENU........................................................................................................................................................446
OPT. MENU.............................................................................................................................................................448
Preferences….....................................................................................................................................................451
Preferences Buttons...........................................................................................................................................453
Display Options.................................................................................................................................................453
Arrangement Options.........................................................................................................................................455
Count-in and Metronome Options.....................................................................................................................457
MIDI File Options.............................................................................................................................................459
MIDI Driver Setup.............................................................................................................................................460
MIDI Options.....................................................................................................................................................462
MIDI Settings.....................................................................................................................................................463
Harmony............................................................................................................................................................464
Soloist................................................................................................................................................................464
Colors................................................................................................................................................................465
Patch Map .........................................................................................................................................................466
Drum Kit............................................................................................................................................................467
Favorite Instruments..........................................................................................................................................468
Output Chords on Channel................................................................................................................................469
Transpose ..........................................................................................................................................................470
Record Filter......................................................................................................................................................470
Notation.............................................................................................................................................................471
Lead Sheet Options............................................................................................................................................471
Audio Settings....................................................................................................................................................472
Guitar Settings...................................................................................................................................................475
Big Piano Settings ............................................................................................................. ................................476
Lyric Window Options.......................................................................................................................................477
Overrides...........................................................................................................................................................478
RealDrums.........................................................................................................................................................479
RealTracks.........................................................................................................................................................481
Tranzport...........................................................................................................................................................485
Practice..............................................................................................................................................................486
Reverb................................................................................................................................................................487
DAW Plugin.......................................................................................................................................................488
PLAY MENU ...........................................................................................................................................................490
LYRICS MENU ........................................................................................................................................................492
MELODY MENU......................................................................................................................................................494
SOLOIST MENU.......................................................................................................................................................500
Utilities ..............................................................................................................................................................503
AUDIO MENU .........................................................................................................................................................506
GM MENU..............................................................................................................................................................509
HARMONY MENU ...................................................................................................................................................512
NOTATION MENU ...................................................................................................................................................514
WINDOW MENU .....................................................................................................................................................515
HELP MENU............................................................................................................................................................520
10
Table of Contents
Page 11

SHORTCUTS: KEYSTROKE COMMANDS - HOT KEYS ...............................................................................................522
Quick Song Settings...........................................................................................................................................522
Quick-Load Songs and Styles ............................................................................................................................522
Keystroke Commands ........................................................................................................................................522
Muting Parts......................................................................................................................................................522
Selecting Parts...................................................................................................................................................522
Instrument Part Settings....................................................................................................................................522
Volume Settings .................................................................................................................................................523
Looping / Song Navigation Keystrokes..............................................................................................................523
Transpose Settings.............................................................................................................................................523
Custom File Open Dialog..................................................................................................................................523
Windows ............................................................................................................................................................523
StyleMaker Hot Keys .........................................................................................................................................524
StyleMaker Drum Screen Hot Keys...................................................................................................................524
Additional Keystrokes........................................................................................................................................524
CHORD LIST ...........................................................................................................................................................525
BAND-IN-A-BOX FILES ...........................................................................................................................................526
Essential Program Files....................................................................................................................................526
PG MUSIC INC.......................................................................................................................................................528
APPENDIX: REALTRACKS SETS.....................................................................................................................529
INDEX ......................................................................................................................................................................541
PG MUSIC REGISTRATION FORM ..................................................................................................................551
How To Register................................................................................................................................................551
Chapter 1: Welcome to Band-in-a-Box!
11
Page 12

Chapter 1: Welcome to Band-in-a-Box!
Congratulations on your purchase of Band-in-a-Box, the favorite of musicians, students, and songwriters
everywhere. Get ready to have fun!
What is Band-in-a-Box?
Band-in-a-Box is an intelligent automatic accompaniment program for
your multimedia computer.
You can hear and play along to many song ideas and go from “nothing”
to “something” in a very short period of time with Band-in-a-Box as
your “on demand” backup band.
Band-in-a-Box is so easy to use!
Just type in the chords for any song using standard chord symbols (like C, Fm7, or C13b9), choose the
style you’d like, and Band-in-a-Box does the rest, automatically generating a complete professionalquality arrangement of piano, bass, drums, guitar, and strings or horns in a wide variety of popular styles
plus live audio tracks with RealDrums and RealTracks.
And that’s not all...
Band-in-a-Box is a powerful and creative music composition tool for exploring and developing musical
ideas with near-instantaneous feedback. Over the years many features have been added to Band-in-a-Box
– Notation and Lyrics, Piano Roll, 16-channel MIDI MultiTracks, Harmonization, the StyleMaker and
StylePicker, a live performance Conductor window, Medley Maker, and 24 –substyle Multistyles. The
Soloist and the Melodist are popular “intelligent” features that generate professional solos or even create
whole new songs from scratch. RealDrums adds the human element of a live drummer while RealTracks
add even more live session musicians, bringing the entire Band-in-a-Box arrangement to life. The Audio
Chord Wizard has the amazing ability to analyze, extract, and show the chords from audio recordings onscreen and then write them to the Band-in-a-Box chordsheet.
The inclusion of digital audio features makes Band-in-a-Box the perfect tool for creating, playing, and
recording your music with MIDI, vocals, and acoustic instruments. Band-in-a-Box for Windows can also
record an acoustic instrument or voice to add to the composition, with processing through its own DirectX
audio effects. Its built-in TC Helicon audio harmonies will turn your audio track into multiple harmony
parts or adjust its pitch, with vibrato and scooping effects for up to sixteen realistic choral parts.
You can print out your finished creation with lyrics, chords, repeats and endings, DC markings and codas,
or save it as a graphics file for web publication or to e-mail to a friend. And when you're ready to let
others hear your composition, you can burn it directly to an audio CD. Or save your composition as a
Windows Media File (or in any other compressed formats you have) for a file that’s “Internet ready.”
You’ll have even more fun making automatic medleys, playing your favorite song lists in the Band-in-aBox Jukebox, and singing along to your Karaoke files with CDG graphics.
Let’s get started!
This is a comprehensive guide to the program, including information not included the printed manual.
We’ll begin with the easy installation and setup procedure.
12
Chapter 1: Welcome to Band-in-a-Box!
Page 13

Installing Band-in-a-Box for Windows®
Minimum System Requirements
- Windows® 9x/ME/NT/2000/XP/Vista/7.
- 256 MB of available RAM.
- Digital audio features require a Pentium-class system.
- Minimum 400 MB available hard drive space. More space is require d fo r Real Drums, about 1 GB per set.
- RealTracks (included with Band-in-a-Box) requires 2.5 GB of free hard disk space.
- Band-in-a-Box is fully functional with or without RealTracks and RealDrums.
- A MIDI sound source is required. This could be a sound card, a MIDI keyboard, MIDI sound module, or
software synthesizer. Band-in-a-Box comes with both the DXi and VST versions of the high quality Roland
VSC (Virtual Sound Canvas) software synthesizer.
Installing the Program
Use any of the following three methods to install the program files into the Band-in-a-Box directory. By default this
directory is C:\bb; you may choose another location.
Method 1 – Auto Run.
1. Insert the program CD-ROM into the CD drive.
2. In a few seconds, a browser window will open with a list of the CD contents.
3. Double click on SETUP.EXE to run the installation program.
Method 2 – My Computer.
1. Insert the program CD-ROM into the CD drive.
Access your CD-ROM drive from the Windows desktop by double clicking on the My Computer icon.
2.
Then, double-click on the CD-ROM drive icon and double-click again on the SETUP.EXE program found in
3.
the root or main folder of the CD-ROM.
Method 3 – Start Menu.
1. Insert the program CD-ROM into the CD drive.
2. From the Windows [Start] button select Run.
3. Type D:\SETUP in the “Open:” command line box. If your CD-ROM drive uses another drive letter type the
appropriate letter, for example E:\SETUP.
4. If you don’t know the drive letter for your CD-ROM you can use the [Browse…] button to find it.
SETUP.EXE will copy all of the program files to your Band-in-a-Box subdirectory (usually C:\bb) and install icons
to a Band-in-a-Box program group. Click on the Band-in-a-Box icon or launch bbw.exe to open the program and
configure the setup.
Band-in-a-Box External Hard Drives
Larger versions of Band-in-a-Box ship on portable USB hard drives. They in clude the entire Band-in-a-Box and
RealBand programs plus all RealTracks and RealDrums sets.
Hard Drive Setup
You can run Band-in-a-Box and RealBand directly from the hard drive by using the program shortcuts in the PG
Music folder. Before you use the programs, you should double-click on UltraPAK Setup.exe. This will set up any
files that need to be installed/registered on your computer. You only need to do this once.
Alternatively, you could copy the entire PG Music folder to another hard disk, and run Band-in-a-Box from there.
This is useful if you don't want to run the program directly from this hard disk, or if you want to make a backup.
Installing From the External Drive
You can also find the Band-in-a-Box installer in the Installers folder, however most people wouldn't use this file.
We have included it in case you would like to install Band-in-a-Box on your computer's hard drive the “traditional”
way. It is also useful if you want to upgrade a previous version of Band-in-a-Box that you already have installed.
We haven't included the large installer files for RealTracks and RealDrums. These files are all in the bb folder and
can be copied over manually if need be. Please see the “readme” files on the hard drive for more detailed
information.
Note: Before unplugging the hard drive from your computer, make sure it is not in use, then click the ‘Safely Remove
Hardware’ icon in your taskbar. When you plug the drive in, Windows may prompt you to select an appropriate action - if
so, select 'Open folder to view files'.
Chapter 1: Welcome to Band-in-a-Box!
13
Page 14

MIDI Setup
Band-in-a-Box uses the multimedia drivers for your MIDI interface and/or sound card that are supported by the
Windows operating system. To get sound playback you need to have a MIDI (and audio - for songs with digital
audio, RealDrums, and RealTracks) driver installed.
To start using the program you will need to make sure that your MIDI interface, audio driver, and Windows sound
source is installed and configured.
Run the program by double-clicking the
program icon. The first dialog you should
encounter is a MIDI Output Driver
message similar to this one:
The program sets your initial MIDI output
driver automatically. Note which driver
has been selected and press [OK] to
continue.
The next dialog you encounter is the MIDI/Audio Drivers Setup.
If the driver that was selected is not the best choice, simply make an alternate selection from the MIDI Driver
Setup dialog. Select a MIDI Output Driver to use for MIDI sound playback and optionally a MIDI Input Driver if
you are using an external MIDI controller keyboard or guitar. If the setup is panned to mono, the program offers to
change it to stereo.
Perhaps the easiest way to configure Band-in-a-Box is to pre ss the [Run Driver
Wizard..] button in the Opt. | MIDI driver setup window.
14
Chapter 1: Welcome to Band-in-a-Box!
Page 15

The MIDI Output Driver
Wizard dialog will take
you step-by-step through
the process of auditioning
and selecting an
appropriate driver. This
assumes that the
appropriate Windows
sound drivers are installed
and correctly configured.
Output to Software Synthesizers (DXi and VSTi)
Software synthesizers allow Band-in-a-Box to play high quality sounds directly through your computer sound card,
without requiring any external MIDI hardware. Most new software synthesizers are released as “plug-ins,” so they
will work in a standard way with many programs. Connecting Band-in-a-Box to the software synth as a plug-in
provides several advantages over the previous method of connecting as a MIDI driver. The plug-in allows Band-ina-Box to merge/synch in any existing audio file (vocals etc.) with the synth output. You can also directly render
your performance to a .WAV file using the plug-in. Sampler-based synths allow you to assemble a huge,
customized library of instrument samples to use with Band-in-a-Box.
The current DXi or VSTi synth name is displayed in the button that
launches the VST/DXi settings.
DirectX Instrument Synthesizer (DXi plug-in) Support
To use DXi with Band-in-a-Box, you should think of the DXi as a type of “MIDI Out Driver.” As such, you visit
either the Opt. | MIDI driver setup or click on [Pref] [MIDI Driver] and select the “Use DXi Synth” checkbox.
When you do this, you can select the type of DXi to use (from a list of installed DXi, if any), and also will see a
panel display of the DXi that allows you to make settings directly for your DXi synth.
The DXi will convert the MIDI information to audio, which Band-in-a-Box will playback through your sound card
to audio speakers.
You can select DirectX DXi Software Synthesizers as the MIDI destination, and also apply DirectX Audio plug-ins
to the Band-in-a-Box audio track.
Note: To use this option, you must have a polyphonic DXi synthesizer installed on your computer, such as the
Roland/Edirol VSC DXi. It will also be most convenient if your DXi synthesizer can use General MIDI or GM2 patches.
To select the DXi synthesizer, click the [DXi Synth Settings] button, which will open the DirectX Plugins window.
Check the Use DXi Synth checkbox to enable DXi playback. While using
DXi or VSTi, all playback information is routed to the DXi/VSTi, including
the option to route the THRU part from your MIDI keyboard to the DXi/VSTi
synth.
Chapter 1: Welcome to Band-in-a-Box!
15
Page 16
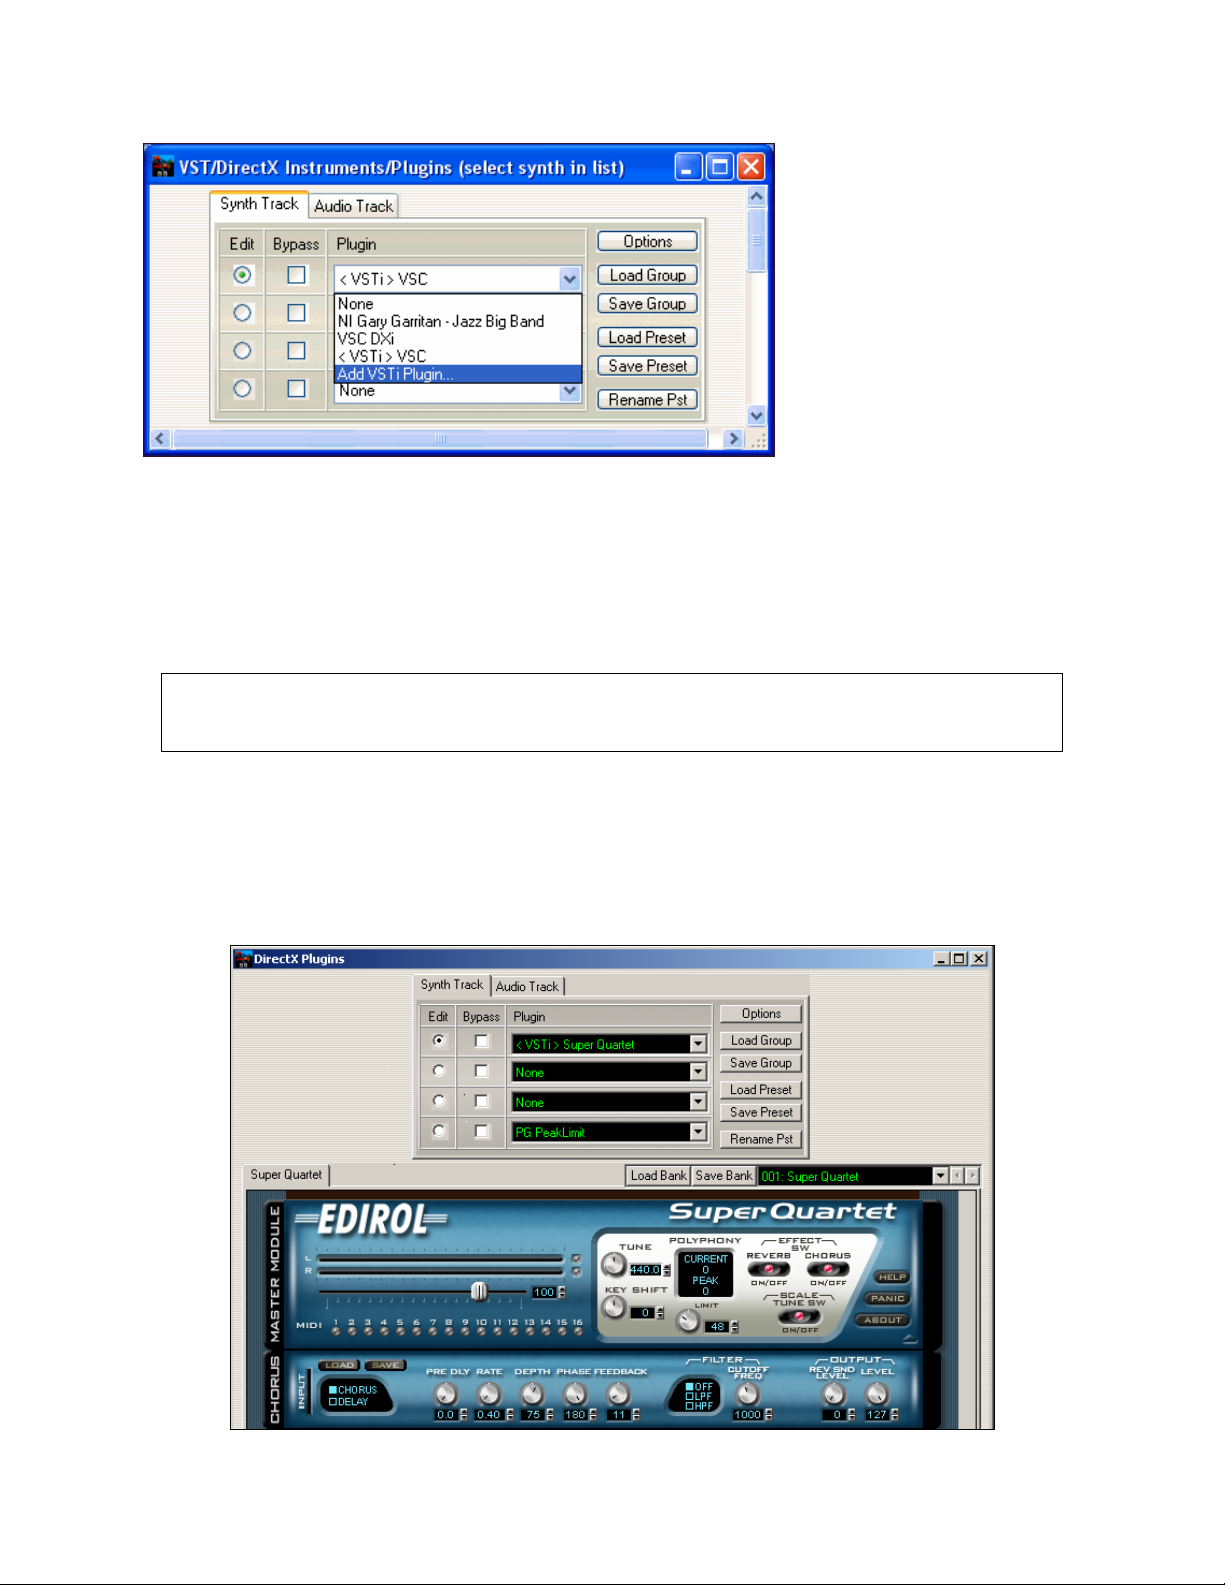
The Synth Track tab edits
Synthesizer settings, and the
Audio Track tab edits Band-in-aBox audio track DirectX plug-ins.
Select your desired DXi synth in
the top plug-in Insert Slot 1.
To apply DirectX audio plug-ins to
the synth, insert DX audio plug-ins
to Insert Slots 2, 3, or 4. This can
be useful to add EQ, Reverb,
Compression, or Peak Limiting
plug-ins, if the “raw sound” of the
synthesizer needs sweetening.
VSTi Instrument Synthesizer (VST plug-in)
To add VSTi synthesizer plug-ins, please make sure the Synth Track tab is selected, and use the plug-in menu on the
top synthesizer slot.
VST plug-ins appear at the bottom of the plug-in list below the DirectX plug-ins. VST plug-ins and synthesizers
have the text “<VST>“ prefixed to the name of the plug-in or synthesizer.
To select a VST plug-in for the first time, select the “Add VST plug-in...” item at the bottom of the plug-in Menu.
Select a VST plug-in .dll file in the following Select a VST plug-in dialog, and it is added to the plug-in list. After
you add each VST, the plug-in is permanently added to the list. You only have to add each plug-in one time.
Note: Some VST host programs scan for all available plug-ins every time they start up. We decided not to use that
method, because the scanning can take a long time if there are many plug-ins on your system. Additionally, a badly-written
or corrupt plug-in could cause program malfunctions. Therefore, we feel the method of selecting only the plug-ins you wish
to use is both safer and faster.
VST/VSTi Additional Panel Controls
VST is necessarily different from DirectX/DXi, and some extra controls are available for VST plug-ins.
DirectX/DXi plug-ins save their presets to the Windows Registry and only one setting is “alive” at a time.
VST/VSTi plug-ins save their presets to disk files. VST/VSTi plug-ins contain a bank of presets in memory. You
can switch between presets while editing, and each edited preset is remembered in the current bank. If you save the
bank, it will save all the presets you have edited. You can save individual presets, or you can build a custo m ban k
by loading individual preset files into different preset slots, and then save the new bank file.
16
Chapter 1: Welcome to Band-in-a-Box!
Page 17

Select Preset Menu
Select a preset. You can also use the small Right/Left arrow buttons to step forward/backwards through the presets
one at a time, to audition each preset.
Note: Some very nice plug-ins, including some advanced synthesizer plug-ins, may only have one preset, but that single
preset can be a doozy containing many settings. Even with single-preset plug-ins, you can Save/Load Presets or Banks.
Rename Pst: Rename the currently selected Preset (in the plug-in's memory).
Save Preset: Save the currently selected Preset. VST/VSTi preset files use the “.fxp” extension.
Load Preset: A Select Preset To Replace dialog appears where you should pick which preset in memory to
replace. Then select the desired Preset file in the following File dialog.
Save Bank: Save a Bank file of all the current presets in the plug-in. VST/VSTi bank files u se the “.fxb” extension.
Load Bank: Load an entire bank of presets. Different plug-ins have different bank sizes. One plug-in might
contain 10 presets in a bank, but another plug-in might have 128 presets in a bank.
VST Generic User Interface
VST/VSTi plug-ins are not required to have a fancy graphic control panel. There are many “faceless” VST plug-ins
which have many adjustable parameters, but no fancy control panel. When you open such a plug-in, the control
panel will look like this example. Band-in-a-Box presents one “generic” slider for each adjustable parameter in the
plug-in.
Parameter Name: Simply the name of each adjustable parameter.
Value Slider: Move the slider to adjust the parameter value
Value Indication Text: Displays the value of the slider, as interpreted by the plug-in. In the above example,
Parameter 0: Bright is interpreted as an ON/OFF switch, but Parameter 1: Volume is interpreted as a value from 0 to
10.
Options: Remove VST Plug-In (from list)
This feature allows the removal of unwanted plug-ins from the Band-in-a-Box VST/VSTi plug-in lists.
Chapter 1: Welcome to Band-in-a-Box!
17
Page 18
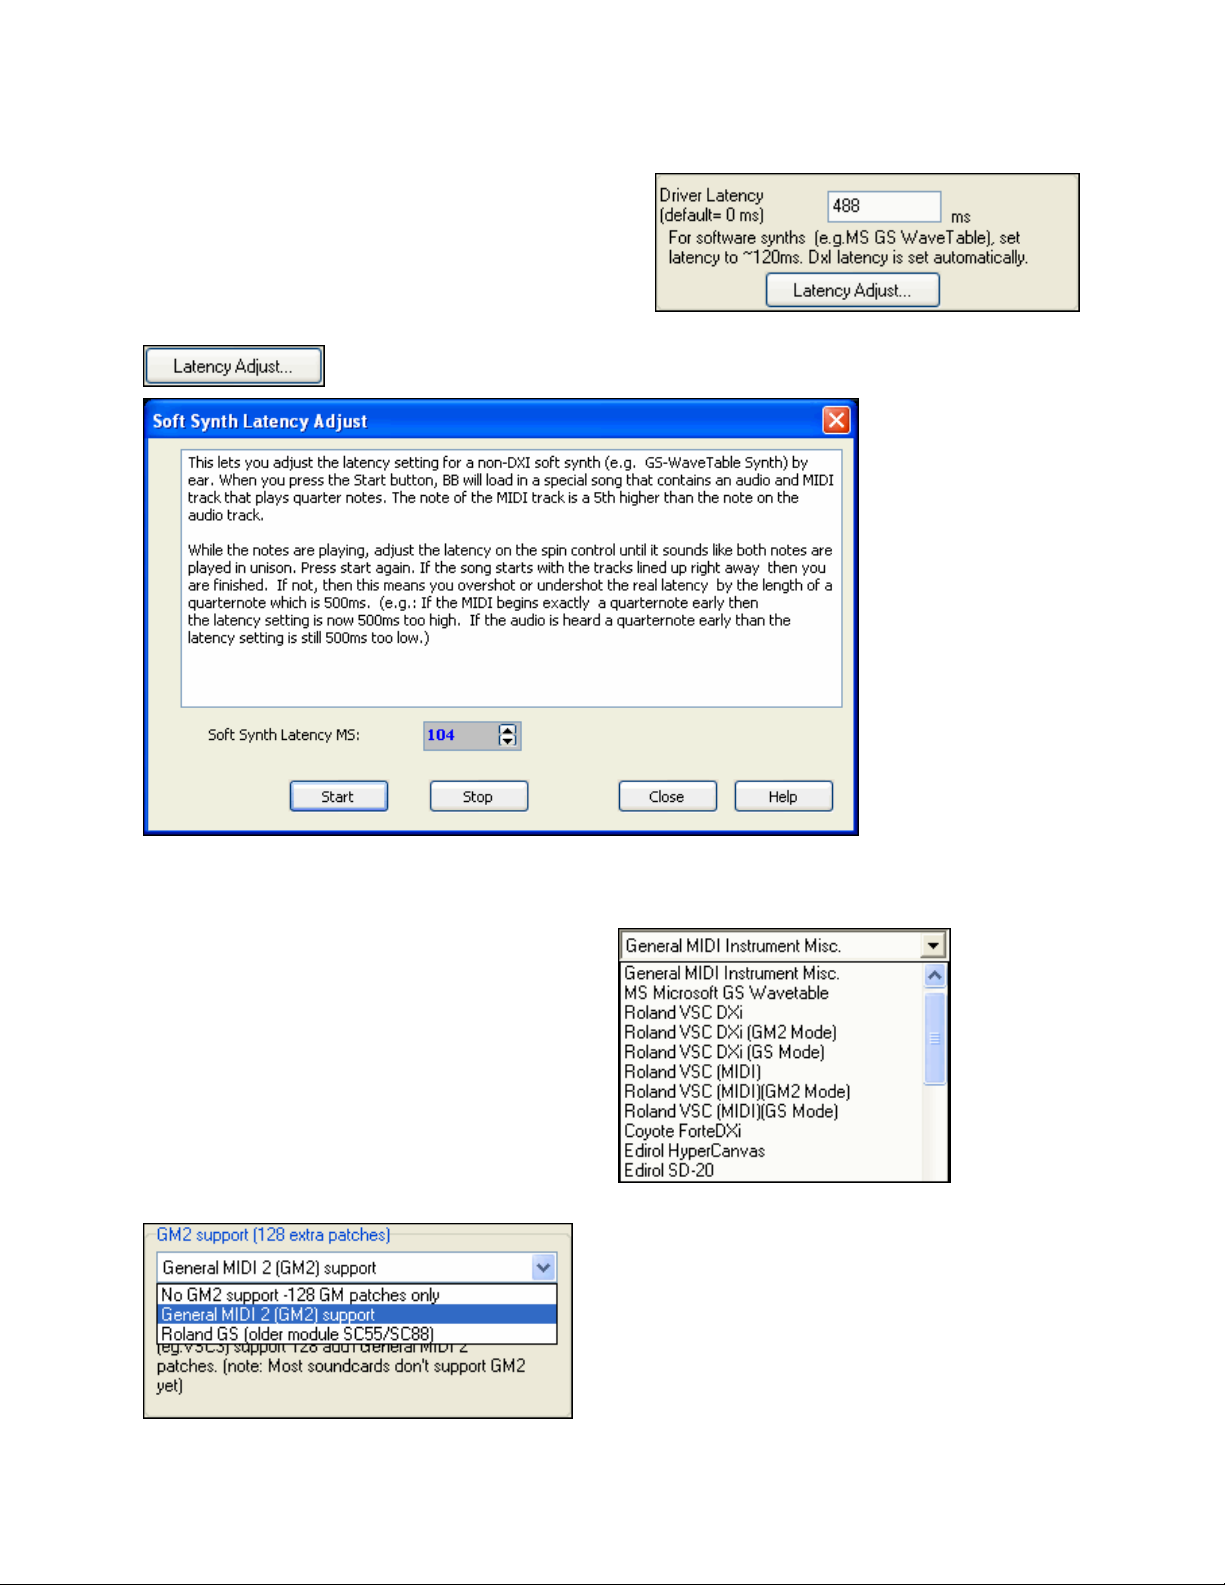
Driver Latency
Software synthesizers have some inherent latency, which is
the delay between the time a note is played and it is
processed by the computer. Older softsynt hs had noticeable
latency, whereas a DXi synth using ASIO drivers has very
little. This setting is used to synchronize the visual disp lay
(notation, chords, virtual piano etc.) with the sound you hear.
Band-in-a-Box automatically sets the latency for DXi and some other softsynths.
The [Latency Adjust…] button opens the SoftSynth Latency Adjust dialog where you
can manually adjust the latency.
Alternate Patch Maps
You can choose the patch map (instrument list) that matches your synthesizer keyboard or sound module. Original
equipment sound cards or integrated sound chips are General MIDI (GM) compatible.
We have made preset drum/patch files for many
synthesizers and sound cards including the Roland VSC
and VSC DXi.
If your synth is not listed you should use the General
MIDI Instrument Misc. patch kit (default).
You can probably omit this step unless you're using an
old synth that is not General MIDI compatible. If your
non-GM synthesizer or sound card is not listed you can
easily make your own patch map with the [Patch Map]
button in Opt. | Preferences.
General MIDI 2 (GM2) Support
General MIDI 2 patches are supported for 128 additional
instruments. The type of GM2 support is set in this dialog.
18
Chapter 1: Welcome to Band-in-a-Box!
Page 19

The choices are:
- General MIDI 2 support: If you're using the Roland VSC 3, o r a newer Sound Canvas (i.e. newer than
1999, or newer than the Roland SC88), then choose this GM2 support.
- Roland GS (older Modules): “Older” Sound Can vases (SC55/SC88) support GS, but not GM2. The good
news is that they have the same patches available, just at different locations. So if you choose this option,
Band-in-a-Box will find the patches at the “GS” locations instead of the “GM2” locations. If you have a
newer GS module like the SC8820, it supports both GM2 and GS - you should likely choose GM2.
- No GM2 support: Some sound cards don't have GM2 support but they do support the original 128
General MIDI sounds. Band-in-a-Box will use the closest instrument in these cases.
Audio Setup
The [Audio Settings] button in the MIDI/Audio Drivers Setup displays the
current audio driver and status, MME/ASIO/ASIO Always On. Band-in-a-Box performs the audio setup
automatically using the installed system audio components
To restore or modify this set up click on the Preferences button and then select the
[Audio] button to launch the Audio Settings dialog.
To reset the default MME driver settings click on [Get from soundcard…] and
Band-in-a-Box will analyze the sound card and enter the correct audio settings.
If your computer has ASIO capability you can use these drivers instead of the default MME drivers.
ASIO Audio/Software Synth Drivers
By using an ASIO audio driver, software synths like the Roland VSC (DXi or VSC) will play with almost no
latency (delay is only 5-10ms). So you’ll hear the sounds instantly, and be able to play along using MIDI Thru with
the same ultra-low latency.
Chapter 1: Welcome to Band-in-a-Box!
19
Page 20
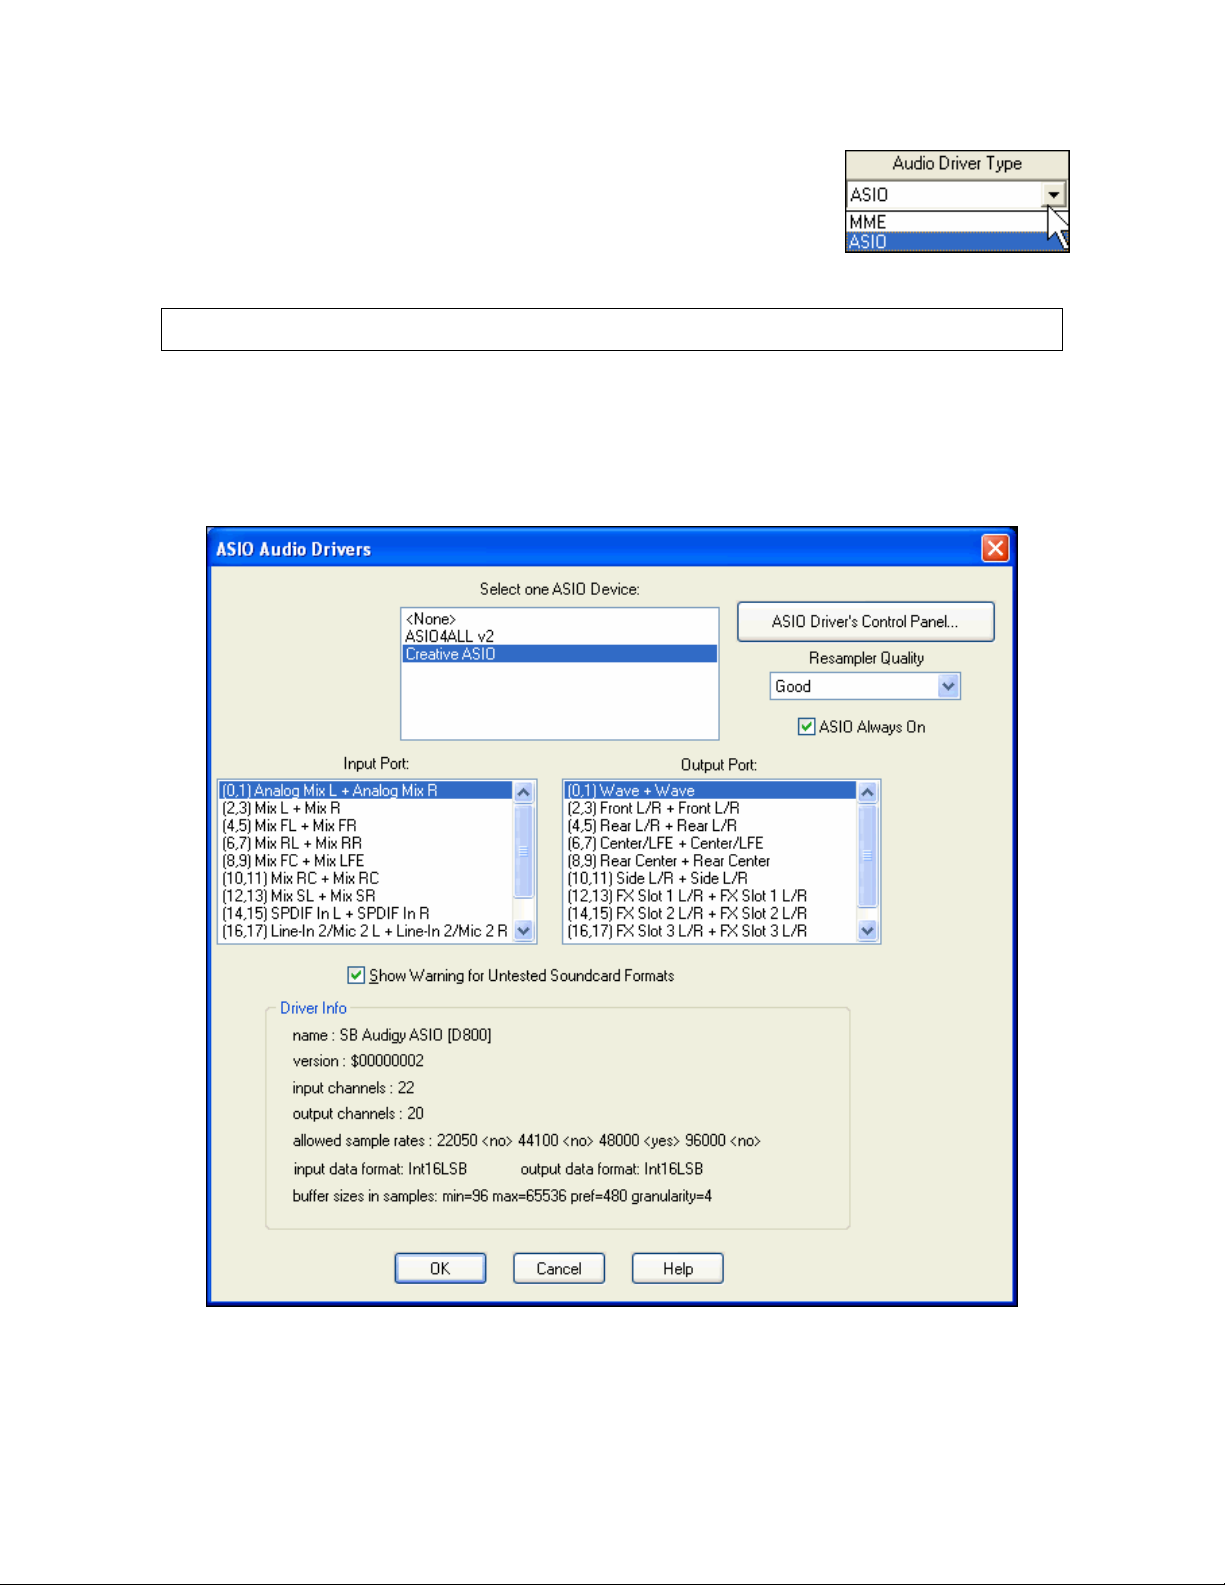
On the Preferences [Audio] tab, you’ll see the following options for “Audio Driver
Type,” MME or ASIO.
MME is the default Windows audio driver type. MME is good, but there is latency
(delay) associated with MME drivers.
For this reason, Steinberg developed a faster type of audio driver system, called
ASIO. It allows for much lower latency than ordinary MME drivers do.
Note: Many OEM or value sound cards do not include an ASIO driver, so you may not have an ASIO driver yet. In this
case, you’ll need to get an ASIO driver from the Internet.
This ASIO Audio Drivers dialog lets you choose an ASIO driver. You can arrive at this dialog in 3 different ways:
1) If you haven’t used ASIO drivers, but Band-in-a-Box detected them, and you answered “Yes” when Band-
in-a-Box asked if you want to use an ASIO driver.
2) If, within the Audio Settings, you change the “Audio Driver Type” from MME to ASIO.
3) If the ‘Audio Driver Type’ is already set to ASIO, but you later press the [Audio Drivers…] button in the
Audio Settings.
The Select one ASIO Driver list box lets you select an ASIO driver to use. You can only select one ASIO driver at
a time.
Once you have selected an ASIO driver, you will see the Input Port and Output Port list boxes filled with your
driver’s input and output ports. By default, the first of each will be selected. You are allowed to select different
ports (but only one input and one output port at a time can be selected). The ports you selected will be available for
20
Chapter 1: Welcome to Band-in-a-Box!
Page 21

output within Band-in-a-Box. If you do not hear input or output, th en you may need to try different ports than the
defaults. You may need to read your sound card’s instructions to determine the correct ports to use.
Tip: The ASIO4All driver sometimes cannot connect if the Microsoft GS Wavetable synth is being used as a driver. So if
this happens, you will get a message that ASIO will be silent, and the solution is to de-select the ASIO4All driver.
The ASIO Driver’s Control Panel button launches the Control Panel for your driver. This usually lets you adjust the
latency by letting you choose different buffer sizes in milliseconds. Some drivers might let you choose the buffer
size in samples, which is less convenient than milliseconds. The smaller the buffer size, the lower the latency, and
the faster the response. Smaller buffers require more CPU power and if you hear dropouts or artifacts, you may
need to increase the buffer size. See the Understanding Latency section that follows.
Since many ASIO drivers do not support multiple sample rates, Band-in-a-Box has a built-in resampler which lets
you play and record songs that have a different sampling rate than the rate(s) directly supported by your ASIO
driver. For example, if the driver does not support 44.1K sampling rate, but supports 48K, then Band-in-a-Box will
use the resampler to convert to 48K when playing back, and to convert FROM 48K when recording. The
Resampler Quality combo lets you choose Fast, Good, Better, or Best. Fast is the quickest, but is the lowest of the
four levels of quality. Best is the slowest (uses more CPU time), but the most transparent and accurate quality.
The ASIO Driver’s Control Panel button launches a settings dialog specifically provided by your driver
manufacturer. This usually lets you adjust the latency, and usually you will have a choice between buffer sizes in
milliseconds. See the following section on Understanding Latency.
Show Warning for Untested Soundcard Formats is an optional setting that shows a warning if your ASIO driver
format has not been tested in Band-in-a-Box. This message does not necessarily mean your driver will not work,
and it can be disabled if you want.
The Driver Info field shows various characteristics of your driver.
The Name is the driver’s name.
The Version is the version number of your driver.
Input Channels is the total number of mono input channels that your sound card has. (Note: Band-in-a-Box groups
each into a stereo pair.)
Output Channels is the total number of mono output channels that your sound card has. (Note: Band-in-a-Box
groups each port into a stereo pair.)
The Allowed Sample Rates field shows the sample rates are allowed by your sound card’s ASIO driver. Band-in-a-
Box has a built-in resampler which lets you play and record files that aren’t directly supported by your ASIO driver.
The Buffer Sizes In Samples shows the range of allowed buffer sizes. The “Pref” is the preferred size, and this is
the size that Band-in-a-Box uses. Your driver may alter the preferred size if you’ve launched the ASIO Driver
Control Panel and have selected a new buffer size from within the driver’s Control Panel. If your driver changes the
preferred size, then Band-in-a-Box will be aware of the new preferred size.
Understanding Latency
Latency is based on the buffer sizes. The smaller the buffer sizes the lower the latency. Lower latency allows you
to hear mixer volume changes very quickly, as well as hear MIDI thru echoed out via a DXi soft synth practically in
real time. The latency, in MS is determined by the buffer size in samples, as well as the driver’s sampling rate.
Note: If your ASIO driver’s control panel lets you select the buffer size in MS, then you don’t have to pay much attention to
the part of discussion below about converting samples to MS.
Converting Samples to MS: For example, suppose the driver’s sample rate is 48K. A 48K sampling rate means
that it is playing at 48,000 samples per second. If the buffer size were 48000 samples, then the latency would be 1
second, or 1000ms (which is very large and slow, and usually not allowed in ASIO). If the buffer size were 4800
samples, which is 1/10
1/20 second, the latency would be 50 ms. If the buffer size were 240 samples, which is 1/200
second, then the latency would be 100ms. If the buffer size were 2400 samples, which is
second, the latency
would be a mere 5ms which is incredibly low and very fast.
Normally, you can change your driver’s latency by pressing the Launch ASIO Driver’s Control Panel button.
Normally, the driver specifies the buffer sizes in milliseconds which is equal to the latency.
Low latency is faster and more responsive, but uses more CPU power.
Chapter 1: Welcome to Band-in-a-Box!
21
Page 22

Depending on the speed of your computer, you may find that the playback has dropouts, clicks/pops, or other
artifacts if you set the buffer sizes too small. This is because smaller buffers use more CPU power and if your
computer can’t handle the low latency you will hear artifacts. If this happens, you would need to use larger buffer
sizes. You may need to experiment to find what works well. You may be able to use smaller buffers with songs that
don’t have a lot of tracks and effects, but may find that you need to use larger buffers with songs that have more
tracks and use more effects. This is because more tracks and more effects use more CPU power, which leaves less
CPU power available for the audio routines to keep up with lower latencies.
Now you’re ready to have fun with Band-in-a-Box!
22
Chapter 1: Welcome to Band-in-a-Box!
Page 23
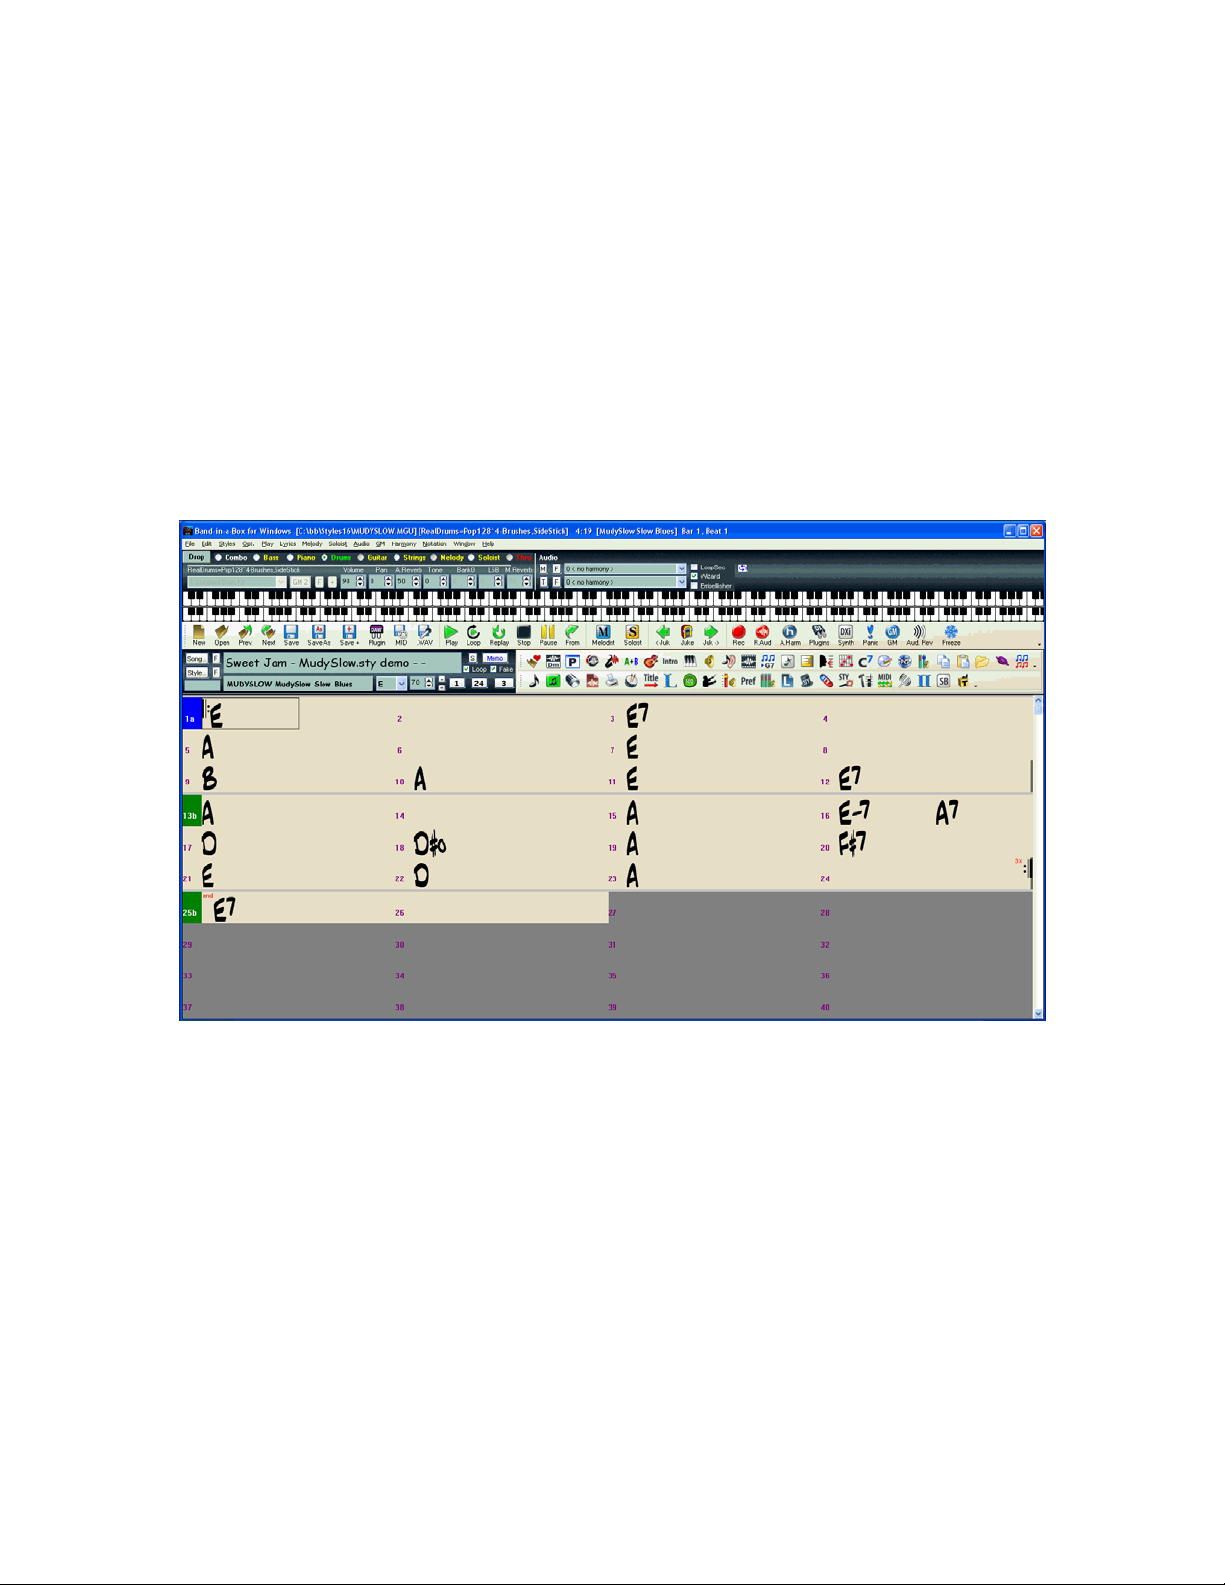
Chapter 2: QuickStart
Creating music with Band-in-a-Box is as easy as 1-2-3! In this chapter, you’ll see how easy it is to get started with
Band-in-a-Box.
Step 1 – Typing in the Chords
There are numerous ways of entering chords into Band-in-a-Box, we’ll discuss six of them:
1. Using the computer keyboard.
2. Playing directly on a MIDI controller keyboard.
3. Using the Chord Builder feature.
4. Importing chords from a MIDI file.
5. Importing chords from an audio file (WAV, MP3, WMA, WMV) with the Audio Chord Wizard.
6. Loading an existing Band-in-a-Box format song.
On the main screen of the program, you’ll see an area called the chordsheet.
Band-in-a-Box main screen showing chordsheet.
Each of the numbered cells on the chordsheet represents a bar. In this example, we see that there is an E chord in
the first bar of this song, an A chord in bar 5, and later in the song, an E7 in bar 12. Notice the box in the first half
of bar 1. This is the highlight cell, and it represents the bar you are currently working on. You can move the
highlight cell around using the cursor keys, or click on any bar with the mouse.
Enter Chords Using the Computer Keyboard
To enter a specific chord, move the highlight cell to where you want to place the chord. For example, to add (or
change) a chord in bar 10, you would highlight bar 10 on the chordsheet. Next, type in your chords. If you want an
A chord at bar 10, type the A key on your keyboard, and press [Enter]. Notice that when you use the enter key, the
highlight cell moves to the second half of the bar. You could then enter another chord at beat 3. Chords names are
normally typed using standard chord symbols (like C or Fm7 or Bb7 or Bb13#9/E), but you can enter them in any of
the supported chord symbol display formats like Roman Numerals, Nashville Notation, Solfeggio, and Fixed Do
(popular in Italy and other parts of Europe).
Enter Chords Using a MIDI Controller Keyboard
If you have a MIDI controller keyboard, you can use it to enter chords into Band-in-a-Box. Play a chord on your
MIDI keyboard, and then type Ctrl+Enter. The chord will be entered into the chordsheet at the current highlight
Chapter 2: QuickStart
23
Page 24
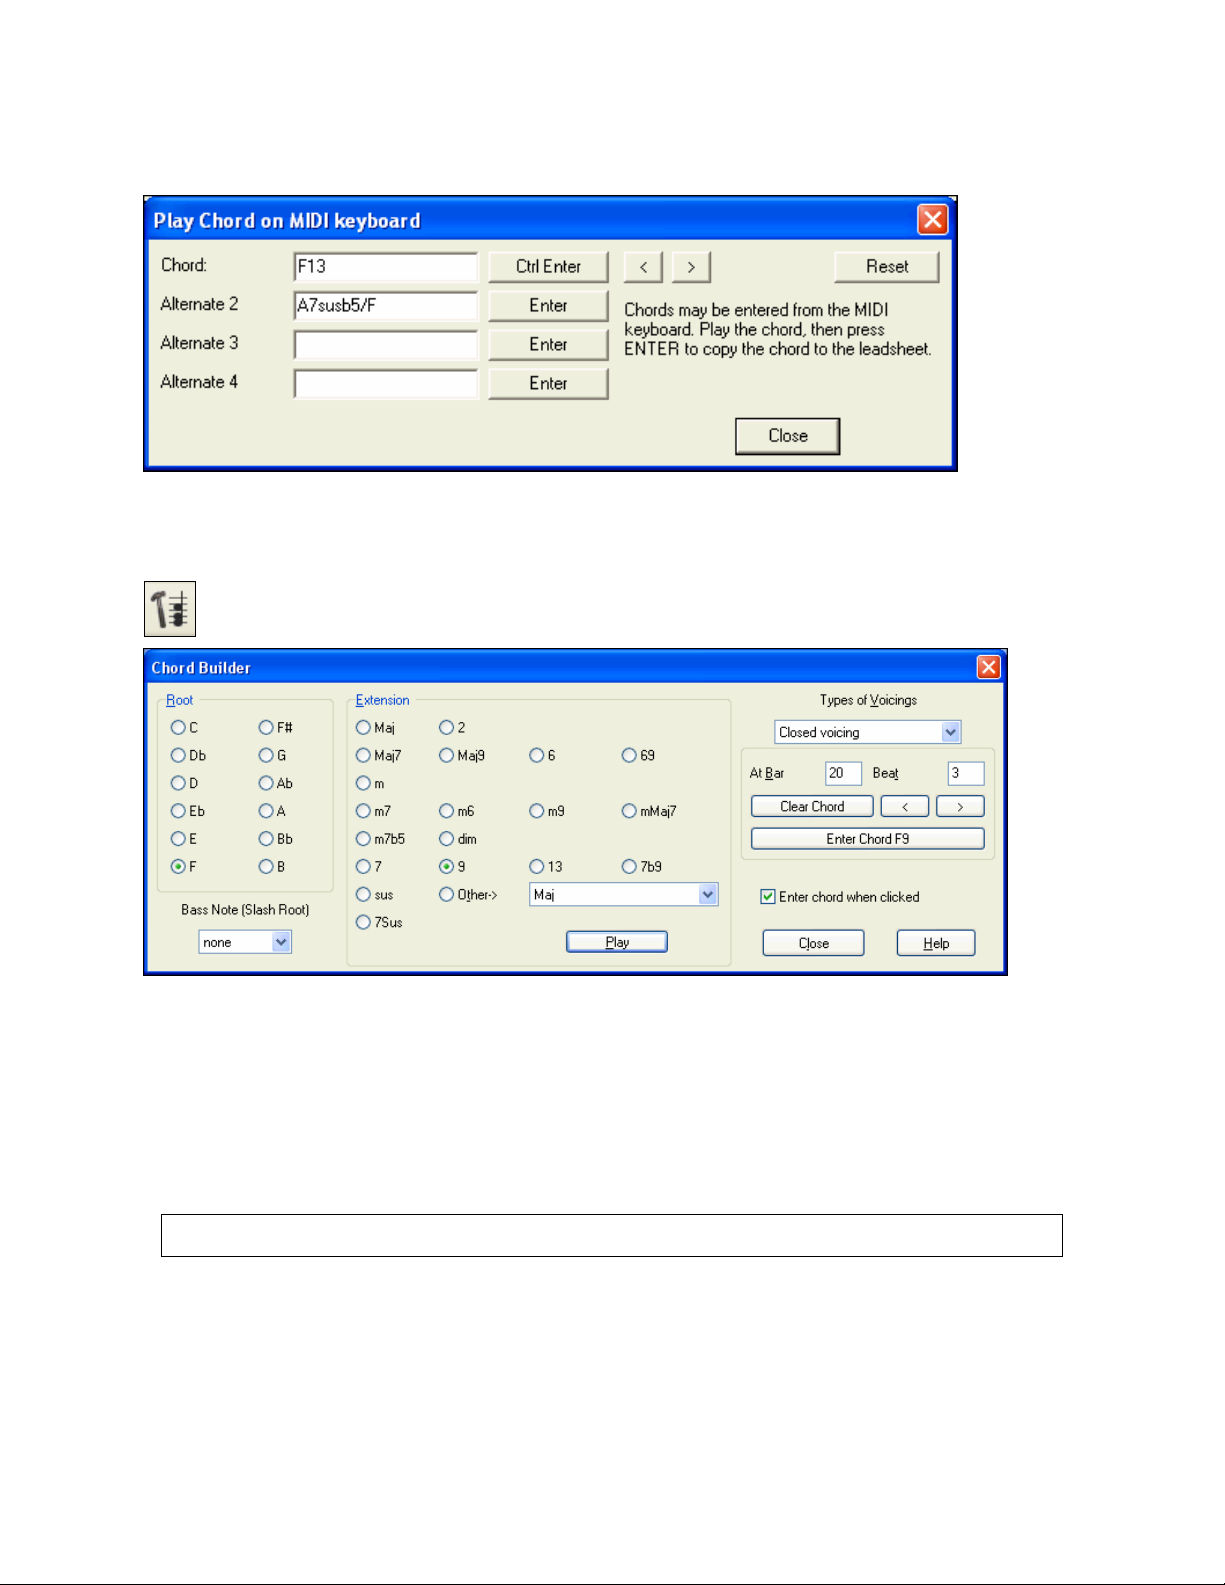
cell position. Another method allows you to choose alternate chords. From the Window | MIDI Chord Detection
menu item, you’ll see this window:
When you play chords, Band-in-a-Box shows you the chord name and suggests alternates that you can choose from.
Typing Ctrl+Enter enters the first selection, and advances the highlight cell by ½ bar. To place an alternate chord
in the chordsheet click on the [Enter] button beside the chord you want.
Enter Chords Using the Chord Builder
Press the Chord Builder button. This opens the Chord Builder dialog with a list of chord roots and their
extensions.
To enter a chord at the current bar, select the chord root from the left pane, and then the extension on the right pane.
The chord will play. Pressing [Enter Chord ] or using the arrow keys will enter the chord and advance the
highlight cell to the next half bar. There is also an option to “Enter chord when clicked.”
Import Chords from a MIDI File
You can have Band-in-a-Box import chords from an existing MIDI file. Choose I mp ort C hords from MIDI File on
the File menu.
When the dialog opens, press the [Open (Change)…] button to choose a MIDI file that you want Band-in-a-Box to
interpret the chords from. To help Band-in-a-Box interpret the chords better, you should choose a genre (Preset) for
the song. Choose from among such genres as Pop, Rock, or Jazz Standard.
Tip: It helps if you’ve previously listened to the MIDI file, in order that you can choose a genre most appropriate to the
song.
24
Chapter 2: QuickStart
Page 25

Import Chords from the Audio Chord Wizard
The Audio Chord Wizard is the amazing feature that automatically figures out the chords from
MP3 files (or other audio files like WAV, WMA, and audio CD etc.).
Chapter 2: QuickStart
25
Page 26

You can make adjustments for the start of bar 1 and individual bar lines and also mark sections of the song using
part markers, and the sections will begin on a new line with a line space between so they are clearly seen. Chords
can be edited with a right-mouse click on the chord symbol. Edited chords are colored blue.
Send the chords to Band-in-a-Box to make your own arrangement, transpose to
your key, and print your own lead sheet for the song with chords, melody, and
lyrics.
Loading an existing Band-in-a-Box format Song
Press the [Song] button to launch the SongPicker, which lists up to 10,000 songs in any folder. Songs
can be sorted and filtered by various criteria such as alphabetically, by title or by style.
The first time you use this button, Band-in-a-Box will offer to build a song list for you. We’ve included many
demonstration songs; they are listed in the song list.
You could also load a pre-existing song by using the File | Open menu item, or by typing [F3], which will launch
the BB File open dialog. Songs usually load a Style, which we’ll learn about in the next section.
Step 2 – Choosing a Style
Band-in-a-Box creates backing arrangements based on the chords you type in, playing them in a particular style.
What’s a Style?
A style is a set of rules that determine how Band-in-a-Box creates music using your chords. By adjusting the rules,
we have created hundreds of styles for everything from Country to Bebop, such as Jazz Swing, Blues Shuffle, Hip
Hop, Country 4/4, Pop Ballad, Waltz, and Medium Rock to name just a few. If you don’t find a pre-made style that
suits your tastes, create one from scratch using the StyleMaker. There’s a “how-to” section on custom Styles in this
manual.
Four Fast Ways To Pick A Style
Method 1:
The StylePicker window assists your selection with its categorized list, columns of information, detailed
descriptions, preview, search, and filter features. Select the [Style] button or type
Ctrl+F9 on your computer. Mouse over the column headings to see tooltips about the information listed.
Select a Set or genre from the left pane, and choose the specific style on the right pane. There are Memos and
examples for each of the Styles.
With so many styles to choose from, the filter is an indispensable tool for narrowing your
search. Styles can be filtered by almost any attribute you can think of, such as feel,
26
Chapter 2: QuickStart
Page 27

tempo, number of instruments, RealTracks artist, style set number, etc.
Method 2:
To make a quick selection, go to the Styles menu and choose from among the 24 “built-in” generic styles. This list
provides a convenient way to choose from among the most popular music genres.
Method 3: Styles that you’ve used previously show up in the Recently Played Styles list. Choose this with the [F]
button next to the [Style] button in the song title window, from the Styles menu, or by typing Shift+F9 on your
computer keyboard.
You can also create lists of Favorite Styles and select them by clicking on the “Favorites” radio button.
Method 4:
To open a user style from disk, you can just type the F9 key. You will be presented with an Open File dialog from
which you can select a specific style. Alternately you can select the Styles menu item Open a User Style from disk.
Chapter 2: QuickStart
27
Page 28

Step 3 – Play your song!
You’ve entered chords on the chordsheet and chosen a style. Now it’s time to play the song! You’ll need to tell
Band-in-a-Box how long your song is, how many times to play it through, in what key, and how fast.
Framing the Song
To tell Band-in-a-Box where to start and end the song, take a look at the middle of the main screen.
Locate the framing buttons. There are three of them, one each for Beginning of Chorus, End of Chorus, and
Number of Choruses. In the example above, the chorus starts at bar 1, ends on bar 32, and is going to play 3 times.
(Or right-click on the Chordsheet (or Notation) window to quickly set Chorus Begin, Chorus End, or Song Ending.)
Setting the Key
In the example above the key is set to C. However, you can set this to any key. In our first view of the chordsheet
the Blues song was in the key of E. If you do change the key, Band-in-a-Box will offer to transpose the chordsheet
for you.
Setting the Tempo
If you know the tempo value of your song, you can enter it in the tempo box. The song example above has a tempo
of 120. There is an even faster way to enter a tempo. Locate the minus sign key [-] and the equal sign key [=] in the
number row of your computer keyboard, they are usually next to each other. If you tap the minus sign key 4 times at
your tempo, Band-in-a-Box will set the tempo automatically for you. If you tap the equal sign key four times, Bandin-a-Box will set the tempo and begin song playback at the tempo you tapped.
Shortcuts for song formatting
Typing special words, instead of chord names, will make the following settings:
begin + Enter sets the beginning of the chorus to the current bar
chorusend + Enter sets the end of the chorus to the current bar
end + Enter sets the end of the song to the current bar
tkc + Enter sets key signature to c, tkbb would set it to bb
trc + Enter transposes song to key of C
t125 + Enter sets tempo to 125
More fun with Band-in-a-Box…
That’s how easy it is to start creating music with Band-in-a-Box, but it’s just the beginning. Band-in-a-Box is jampacked with features, helpers, and user options, so read on and kee p ha vi n g fun!
28
Chapter 2: QuickStart
Page 29

Chapter 3: Band-in-a-Box 2011
50 New Features!
The new features in Band-in-a-Box 2011 for Windows are…
We’ve made big improvements to the sounds of the RealTracks, so that they sound more natural over a much
wider range of tempos with the élastique Pro V2 time stretching engine by zplane.development. These
improvements are built-in, so there’s nothing you need to do to get them working. Your existing songs will just
“sound better” over a much wider range of tempos. Please watch the demo videos for audio examples of the
improvements.
We’ve made the size of the RealTracks much smaller so that they now only take up 30% of the space that they
used to. After you install the program, you can run the feature in the RealTracks Settings dialog (Preferences),
which will shrink the size of your RealTracks folders. The previous Band-in-a-Box 2010.5 “Everything Pak” had
100GB of RealTracks; this now shrinks to 30GB. The Audiophile version also shrinks by 70%, so that it is only
30% of the previous size. And the audio fidelity is improved, since it sounds better over a much wider range of
tempos with the élastique Pro V2 time stretching engine!
We’ve made an iPhone
version works by connecting to your Windows desktop version of Band-in-a-Box 2011 and allows you to generate,
play, and save songs on your iPhone
quality RealTracks sound.
If you have a copy of Band-in-a-Box 2011 for Windows
• Quickly transfer your existing library of songs from BB Desktop to BB iPhone, including chordsheets and audio
(M4A). See the chordsheets and play the songs anytime on your iPhone, without re-connecting to the Band-ina-Box desktop.
• Enter songs from scratch on your BB iPhone by typing in chord symbols to the song.
• Generate audio on your BB iPhone for the songs by pressing play. The songs play on the iPhone and are stored
on the iPhone as M4A files. This connects across your home network (LAN) or the Internet (from anywhere) to
your desktop version of Band-in-a-Box.
• Send songs from BB iPhone to BB Desktop.
• The iPhone version communicates with Band-in-a-Box for Windows using a utility program called Band-in-a-
Box Server (c:\bb\bbhelper\BandinaBoxServer.exe). This program runs in the system tray (lower right of
Windows taskbar).
• The iPhone version will see the “BB2Go” folder (c:\bb\BB2Go). Any Band-in-a-Box songs that you put in this
folder are visible to the BB iPhone. You can send files back and forth from BB iPhone to Band-in-a-Box for
Windows, and the files go to the BB2Go folder.
• You can add audio to the Band-in-a-Box files in the BB2Go folder from the Band-in-a-Box Windows menu
with the BB2Go command, and select the files that you want to have MP4/M4A audio added. You can also
generate the audio from the iPhone version.
Note that these features require QuickTime® for Windows® to be installed, which you can download from www.apple.com.
®
version of Band-in-a-Box, available from the Apple App Store. The Band-in-a-Box iPhone
®
, iPod touch®, or iPad
™
. And your iPhone generated songs have the same high
®
, then with the Band-in-a-Box iPhone version you can:
More documentation for the BB iPhone version is available at http://www.pgmusic.com/help100/.
We’ve added a huge number of new RealTracks (101), with great new Jazz, Pop, and Country Styles.
33 New Jazz RealTracks! These include:
• Jazz Swing Piano comping and soloing with NY Jazz great Mike LeDonne.
• Vibes Swing/Bossa comping and soloing with Steve Nelson.
• Gypsy Jazz: John Jorgenson (guitar), Gonzalo Bergara (guitar), Tim Kliphuis (violin), Simon Planting (bass),
and Rick Reed (drums).
• Smooth Jazz Piano Soloing from Jeff Lorber.
• Smooth Jazz Guitar with Dwight Sills.
• Swing Jazz Guitar with Oliver Gannon.
Chapter 3: Band-in-a-Box 2011
29
Page 30

… and existing Jazz RealTracks have been enhanced with more natural phrasing (more pushes), better playing over
non-Jazz chords (triads), RealCharts notation for some Acoustic Bass parts, and options for “simpler” playing in
some RealTracks. See below for details.
35 New Pop/Rock/Folk RealTracks! These include:
• Celtic (Irish) Jigs and Reels: Guitar, Piano, Bass, Bodhran (percussion).
• Reggae: Guitar, Organ, Bass, Drums.
• Calypso: Guitars (2), Accordion, Bass, Drums.
• Pop Waltz, Hard Rock Waltz, and more.
• Brent Mason Pop/Rock Guitar Soloing (3 styles).
33 New Country RealTracks! These include:
• Praise and Worship: Styles: “Shining” and “Uplifting” - 14 RealTracks (Piano, Synth, Bass, Guitar, Drums).
• Brent Mason Pop/Rock Guitar Soloing (4 styles).
• Tex Mex Styles: “2-beat” and “Country” (Accordion, Bass, Guitar, Drums).
Existing Jazz RealTracks are enhanced.
• Phrasing is improved, with more pushes to sound more natural.
• Playing over non-Jazz chords (triads) is improved.
• RealCharts notation, bass tab, and on-screen bass fretboard now displays for some of the Jazz Swing Acoustic
Bass RealTracks.
• Some styles have better playing over m6 and 6th chords (e.g. the new Gypsy Jazz styles).
• Some RealTracks have a “simpler” variation with less complex playing (e.g. Acoustic Bass Jazz Swing).
Change of RealTracks Styles at any Bar. With previous versions of Band-in-a-Box, you were limited to one
RealTracks style per song. Now you can change styles with RealTracks at any bar. Just select the style in the Edit |
Edit Settings for Current Bar dialog. For example, switch from Jazz Swing to Bossa style at any bar.
MultiStyles (with up to 16 substyles) can now be made with RealTracks.
Change of individual RealTracks instrument can be added to any track at any bar. You can insert a specific
RealTracks instrument at any bar to create a customized performance.
Soloist “Medleys,” where the RealTracks is made to switch instruments every “N” bars or every chorus. For
example, you can add a Bluegrass Medley Soloist that switches between solos from Mandolin, Guitar, Banjo, and
Fiddle every 4 bars. Or a Jazz Medley Soloist that switches between Alto Sax, Trumpet, Piano, and Guitar solos
every chorus. Or insert “Silence” as one of the instruments, which allows you to play your own instrument. Use the
pre-existing Soloist Medleys that we make by simply choosing a RealTracks, or create a custom one yourself on any
track.
Multiple RealTracks at the same time on the same track. You can add up to 10 RealTracks to play
simultaneously on the same track. This is useful if you want to generate a lot of RealTracks, the theoretical limit
would be 7 tracks x 10 per track = 70 RealTracks instruments playing at the same time.
Re-Generate part of a Soloist track, without erasing the existing part. This allows you to customize your
Soloist track by regenerating parts of the solo with the same or different RealTracks. For example, generate a 4-bar
clarinet solo at bar 9. Then generate an 8-bar flute solo at bar 49. The file plays back with both solos intact.
Options to auto-replace MIDI styles with RealTracks styles. If you have made a lot of songs using older MIDI
styles, and would prefer that they play with RealTracks, you can now do this easily by selecting the menu option
Styles | Auto Replace MIDI styles with RealTracks. Then, if you have the needed RealTracks installed, your MIDI
style will be intelligently replaced with a RealTracks style. There is also a manual option to do this on as-needed
basis, disable the feature for a certain song, or to reverse it if you prefer the MIDI style.
“Triple-Time” RealTracks have been added. These allow you to use fast waltz RealTracks as slow 4/4
RealTracks (with a 12/8 feel). We have made some new 12/8 RealStyles that use this feature.
RealTracks can be made as Half-Time/Double-Time/Triple-Time, so it is easier to select them, and they show up
in the RealTracks Picker with tempos indicating when they can be used. For example, Alto Sax, tempo 140 will also
show up in the RealTracks picker as Alto Sax, tempo 70 [Double-Time] so you can easily choose it.
Any RealTracks can be made as a “Bluesy” RealTracks by selecting this checkbox in the RealTracks Picker.
“Bluesy” RealTracks will play more using blues scales (e.g. Bb note on a C chord).
30
Chapter 3: Band-in-a-Box 2011
Page 31

RealTracks sound more “musical” when stretched to extreme tempos. In addition to the major audio
improvements when tempo is stretched by élastique Pro V2, the RealTracks soloists sound more musical when
stretched to extreme tempos. This is because musicians tend to play more ahead/behind the beat at slower/faster
tempos. This is a done automatically.
New “Practicing” Feature: Change tempo of all loaded songs by X. When this is set, song tempo will be
increased (or decreased) by the specified amount, allowing you to “bump up” all of your tempos easily when
practicing lots of songs, or in a jukebox mode.
Option to change all songs in a folder to your Default Mix. This would insure that all of your songs have the
same mix of Volume, Reverb, and Pan settings.
®
MP4 and M4A files are now supported. MP4 and M4A files are the popular high-quality format used by Apple
in iTunes
®
. These MP4/M4A features require QuickTime® for Windows® to be installed from www.apple.com.
• You can open MP4/M4A files in Band-in-a-Box using File | Open.
• You can save (render) files as MP4/M4A using Drag-and-drop (DAW) from the Combo button to the
Windows desktop (or to the Drop button at the top left of the Band-in-a-Box main screen). You can also save
from the SoundTrack window, or the Render to Audio dialog (.WAV button).
Scales Wizard added. When students are practicing Jazz tunes, it is helpful to see the scales that are used for each
chord. The Scale Wizard allows you to easily generate these scales, which appear as notation on the Soloist track.
Options include Instrument Range, Patch Selection, Jazzy Mode (will use Lydian dominant scales for some 7
th
chords), and Diatonic Mode (keeps scales relative to the song key). Menu items on the Soloist menu allow you to
generate scales for a certain song, or generate them for all l oade d songs. View the scales in the notation or the onscreen guitar and piano.
StylePicker Enhancements
New StylePicker Filters show you only the styles that match your search terms. These help you to select the style
that you want, by allowing you to specify:
• Even/Swing feel,
• 8ths/16ths,
• tempo range,
• # of instruments,
• specific instruments (e.g. styles with “Banjo”),
• specific RealTracks Artists,
• RealDrums Artists,
• Real styles or MIDI styles.
For example, if you are searching for a Jazz Ballad style that is all RealTracks, has bass, drums, and guitar, works
for a tempo of 60, with Swing 8ths you can set this filter and then only see styles that match these criteria, instead of
a list of thousands of styles.
New StylePicker Columns added
• # of instruments in style, e.g. 4.
• Whether any required RealTracks, RealDrums are not installed, e.g. NA.
• Whether a RealTracks substitute for a MIDI style is available, e.g. sub.
The StylePicker display is wider on bigger monitors.
Auto-Generated style memo added for each style. This lists names of all instruments, # of instruments,
RealTracks/RealDrums used, whether any required RealTracks or RealDrums are missing, and more.
Example Memo:
_BOSAMDF.STY. Bossa Med slow FreeComp Gt (110RS)
All RealTracks. Trio.
RD: BossaTerryClarke^1-Brushes , Terry Clarke
RT921: Bass, Acoustic, Bossa Ev 110, Neil Swainson
RT923: Guitar, Electric, Rhythm BossaFreeComp Ev 110, Oliver Gannon
Other New Features include:
Chapter 3: Band-in-a-Box 2011
31
Page 32

Easier Entry of Guitar Notation on Notation Window. If you hold down the number keys 1-6 as you click on a
note, then the note will get inserted on MIDI channels 11 to 16, which are the guitar strings from high E to low E. If
you also hold down the Q key, the note gets inserted as a bend. You can also click on notes on the guitar to insert
guitar notation when in Editable Notation mode.
RealCharts Notation and the Guitar fretboard are improved for some guitar styles (e.g. Brent Mason). Now you can
see bends in blue on the guitar fretboard.
RealDrums pushes are quieter, and RealDrums pushes and shots velocities are now adjustable in the RealDrums
Settings dialog.
You can now get a list printed out of current contents of the RealTracks Picker dialog. Hold the Shift key and press
the [Update] button.
Playing from a certain bar in a certain chorus is faster, as the right-click menu now shows the chorus options without
a submenu.
The Select Soloist dialog has a [Show All] button that removes any filters.
The Soloist Editor dialog now allows editing of many RealTracks parameters.
On the first run of Band-in-a-Box, the program will auto-hook up to Coyote Wavetable, without requiring the user to
visit the MIDI Drivers dialog.
Audio-related “BT0” files are no longer generated (which was a time consuming procedure when using the audio
track, or Audio Chord Wizard). Now “BT1” files get generated, which are generated very quickly.
Render options for individual wave files. Instead of always making stereo files, there is an option to match the
stereo/mono type of the original RealTracks file.
101 New RealTracks
RealTracks Set 102: Uptempo Reggae
Bass, Electric, Reggae Ev16 100
Guitar, Electric, Rhythm Reggae Ev16 100
Organ, B3, Rhythm Reggae Ev16 100
Piano, Acoustic, Rhythm Reggae Ev16 100
Drums, ReggaeClassic
RealTracks Set 103: Slow Groovin' Reggae
Bass, Electric, ReggaeSlow Sw 075
Guitar, Electric, Rhythm ReggaeSlow Sw 075
Organ, B3, Rhythm ReggaeSlow Sw 075
Piano, Acoustic, Rhythm ReggaeSlow Sw 075
Drums, ReggaeClassic
RealTracks Set 104: Celtic Jigs & Reels
Bass, Acoustic, CelticJig Sw 110
Bass, Acoustic, CelticReel Ev16 110
Guitar, Acoustic, Rhythm CelticJig Ev16 110
Guitar, Acoustic, Rhythm CelticReel Ev16 110
Piano, Acoustic, Rhythm CapeBretonJig Sw 110
Piano, Acoustic, Rhythm CapeBretonReel Ev16 110
Drums, CelticBodhranReel
Drums, CelticBodhranJig
RealTracks Set 105: Brent Mason Rock Soloing
Guitar, Electric, Soloist RockBallad Ev 065
Guitar, Electric, Soloist RockMedium Ev 120
Guitar, Electric, Soloist RockUpbeat Ev 140
RealTracks Set 106: Calypso Pop
Accordion, Rhythm PopCalypso Ev 100
32
Chapter 3: Band-in-a-Box 2011
Page 33

Bass, Electric, PopCalypso Ev 100
Guitar, Acoustic, Rhythm PopCalypso Ev 100
Guitar, Electric, Rhythm PopCalypso Ev 100
Guitar, High-Strung Acoustic, Rhythm PopCalypso Ev 100
Drums, PopCalypso^
RealTracks Set 107: Medium Pop Waltz
Bass, Electric, PopWaltz Ev 120
Fiddle, Background PopWaltz Ev 120
Fiddle, Background PopWaltz Ev 120%%(Outside)
Guitar, Acoustic, Fingerpicking PopWaltz Ev 120
Guitar, Acoustic, Strumming PopWaltz Ev 120
Guitar, Electric, Rhythm PopWaltzGrittyArp Ev 120
Guitar, Electric, Rhythm PopWaltzGrittyHeld Ev 120
Guitar, Electric, Rhythm PopWaltzGrittyA-B Ev 120
Mandolin, Rhythm PopWaltz Ev 120
Pedal Steel, Rhythm PopWaltz Ev 120
Piano, Acoustic, Rhythm PopWaltz Ev 120
Drums, PopRockWaltzEv^
RealTracks Set 108: More Rockin' Bass
Bass, Electric, HardRockWaltz Ev 140
Bass, Electric, ModernRnBRock Ev 065
Bass, Electric, NorthernRock Sw16 075
Bass, Electric, PopRockWaltz Ev 140
RealTracks Set 109: Gypsy Jazz - Fast Swing
Bass, Acoustic, GypsyJazzFast Sw 250
Bass, Acoustic, GypsyJazzFast Sw 250%%('A' Only)
Bass, Acoustic, GypsyJazzFast Sw 250%%('B' Only)
Fiddle, Soloist GypsyJazzFast Sw 220
Guitar, Acoustic, Rhythm GypsyJazzFast Sw 250
Guitar, Acoustic, Rhythm GypsyJazzFastCrisp Sw 220
Guitar, Acoustic, Soloist GypsyJazzFastCrisp Sw 220
Guitar, Acoustic, Soloist GypsyJazzFastSwingWarm Sw 220
Drums, GypsyJazzSwing
RealTracks Set 110: Gypsy Jazz - Ballad
Bass, Acoustic, GypsyJazzBallad Sw 110
Bass, Acoustic, GypsyJazzBallad Sw 110%%('A' Only)
Bass, Acoustic, GypsyJazzBallad Sw 110%%('B' Only)
Fiddle, Soloist GypsyJazzBallad Sw 110
Guitar, Acoustic, Rhythm GypsyJazzBalladCrisp Sw 110
Guitar, Acoustic, Rhythm GypsyJazzBalladSoft Sw 110
Guitar, Acoustic, Soloist GypsyJazzBalladCrisp Sw 110
Guitar, Acoustic, Soloist GypsyJazzBalladWarm Sw 110
Drums, GypsyJazzSwing
RealTracks Set 111: Jazz Vibes - Comping
Vibes, Rhythm Bossa Ev 085
Vibes, Rhythm Bossa Ev 140
Vibes, Rhythm Jazz Sw 110
Vibes, Rhythm Jazz Sw 140
Chapter 3: Band-in-a-Box 2011
33
Page 34

Vibes, Rhythm JazzBallad Sw 060
RealTracks Set 112: Jazz Vibes - Soloing
Vibes, Soloist Bossa Ev 140
Vibes, Soloist Jazz Sw 110
Vibes, Soloist Jazz Sw 140
Vibes, Soloist JazzBallad Sw 060
RealTracks Set 113: Smooth Jazz - Cool Guitar and Electric Piano
Guitar, Electric, Rhythm SmoothJazzCool Sw16 075
Guitar, Electric, Soloist SmoothJazzCool Sw16 100
Piano, Electric, Soloist SmoothJazzCool chorus Sw16 075
Piano, Electric, Soloist SmoothJazzCool delay Sw16 075
Piano, Electric, Soloist SmoothJazzCool dry Sw16 075
RealTracks Set 114: Smooth Jazz - Poppy Guitar and Electric Piano
Guitar, Electric, Rhythm SmoothJazzPoppy Ev16 090
Guitar, Electric, Soloist SmoothJazzPoppy Ev16 090
Piano, Electric, Soloist SmoothJazzPoppy chorus Ev16 090
Piano, Electric, Soloist SmoothJazzPoppy delay Ev16 090
Piano, Electric, Soloist SmoothJazzPoppy dry Ev16 090
RealTracks Set 115: Mike LeDonne's Swingin' Jazz Piano
Piano, Acoustic, Rhythm JazzBalladLeDonne Sw 060
Piano, Acoustic, Rhythm JazzLeDonne Sw 110
Piano, Acoustic, Rhythm JazzLeDonne Sw 140
Piano, Acoustic, Soloist JazzBalladLeDonne Sw 060
Piano, Acoustic, Soloist JazzLeDonne Sw 110
Piano, Acoustic, Soloist JazzLeDonne Sw 140
RealTracks Set 116: Praise & Worship - Shining 8ths
Bass, Electric, PopShiningHeld Ev 120
Bass, Electric, PopShiningSync Ev 120
Bass, Electric, PopShiningA-B Ev 120
Guitar, Electric, Rhythm PopShiningGritty Ev 120
Guitar, Electric, Rhythm PopShiningRock8ths Ev 120
Guitar, Electric, Rhythm PopShiningRockSync Ev 120
Guitar, Electric, Rhythm PopShiningRockA-B Ev 120
Guitar, Electric, Soloist PopShining Ev 120
Piano, Acoustic, Rhythm PopShiningHeld Ev 120
Piano, Acoustic, Rhythm PopShiningSync Ev 120
Piano, Acoustic, Rhythm PopShiningA-B Ev 120
Synth Pad, PopShiningA Ev 120
Synth Pad, PopShiningB Ev 120
Synth Pad, PopShiningA-B Ev 120
Drums, PraiseWorshipShine^
RealTracks Set 117: Praise & Worship - Uplifting 16ths
Bass, Electric, PopUplift Ev16 120
Guitar, Electric, Rhythm PopUpliftGritty Ev16 120
Guitar, Electric, Rhythm PopUpliftMutedA Ev16 120
Guitar, Electric, Rhythm PopUpliftMutedSync Ev16 120
Guitar, Electric, Rhythm PopUpliftMutedA-B Ev16 120
Guitar, Electric, Soloist PopUplift Ev16 120
34
Chapter 3: Band-in-a-Box 2011
Page 35

Piano, Acoustic, Rhythm PopUpliftHeld Ev16 120
Piano, Acoustic, Rhythm PopUpliftPulsing Ev16 120
Piano, Acoustic, Rhythm PopUpliftA-B Ev16 120
Synth Pad, PopUplift Ev 120
Drums, PraiseWorshipUptempo16ths^
RealTracks Set 118:Brent Mason Country Soloing
Guitar, Electric, Soloist CountryBoogie Sw 140
Guitar, Electric, Soloist CountryFastPickin Ev 140
Guitar, Electric, Soloist CountryShuffle Sw 120
Guitar, Electric, Soloist CountryWaltz Sw 085
RealTracks Set 119: TexMex 2-Beat
Accordion, Rhythm TexMex2Beat Ev 120
Bass, Electric, TexMex2Beat Ev 120
Drums, TexMex2Beat
Guitar, Electric, Rhythm TexMex2BeatComp Ev 120
Guitar, Electric, Rhythm TexMex2BeatMelodic Ev 120
Guitar, Electric, Rhythm TexMex2BeatA-B Ev 120
RealTracks Set 120: TexMex Country
Accordion, Rhythm TexMexCountry Ev 120
Bass, Electric, TexMexCountry Ev 120
Drums, TexMexCountry^
Guitar, Electric, Rhythm TexMexCountry Ev 120
RealTracks Set 121: More Country Banjo, Fiddle & Steel
Banjo, Rhythm, ModernCountrySync Ev16 100
Fiddle, Background WesternSwing Sw 165
Guitar, Resonator, Background BluegrassWaltz Ev 140
Pedal Steel, Rhythm CountryWaltz Sw 140
More about RealTracks
See the Appendix for a list of all RealTracks sets, and for full descriptions please go to www.pgmusic.com and see
the RealTracks page,
more new releases.
http://www.pgmusic.com/products_realtracks.htm. While you’re there be sure to check for
QuickStart Tutorial for Band-in-a-Box 2011 for Windows
Welcome to BB 2011 for Windows! We’ve been working hard on new features. This tutorial will be a quick tour
around the program, to show you some of the newest features. This tutorial assumes that you are already familiar
with previous versions of Band-in-a-B ox .
First off, we’ve made big improvements to the sounds of RealTracks and RealDrums. They sound much better over
a wider range of tempos. To hear the improvements, load in a song with RealTracks (there are lots in the Real
Tracks Demos folder). Start the song playing, and then change the tempo as the song plays. Notice how the sound
is much more natural over a wide range of tempos.
Next, if you have an iPhone, you get the Band-in-a-Box iPhone app, and use it along with BB 2011. To do this, go
the App Store, and download the Band-in-a-Box app.
Then, on the Windows desktop machine, make sure that the Band-in-a-Box Server app is running. If it is running,
you will see its icon (a musical note) in the system tray, and when you mouse over, it will say Band-in-a-Box
Server. If it isn’t running, then run Band-in-a-Box, choose menu-Windows-BB2Go, and choose “Run Band-in-aBox Server Now.” If you have Firewall or Anti-Virus programs, they will likely produce some warning when the
server is run for the first time. This is because the Server contacts a program (iPhone BB) outside of your computer.
So ignore the warnings, and reply ‘yes’ if it asks you to grant permissions to Band-in-a-Box Server.
Chapter 3: Band-in-a-Box 2011
35
Page 36

Then, you can run the BB iPhone app, on the iPhone BB, choose File-Server to connect with the desktop Server
program, and then you’re in business! You can then transfer songs from BB desktop (in c:\bb\bb2Go folder), and
generate songs on the iPhone. More details and videos at
Now let’s check out some of the new RealTracks. To do this, open files from the RealTracks – Demos folder.
There are now 121 sets of RealTracks, with the newest 101 RealTracks found in sets 102 to 121. So load in demo
songs from folders with names like c:\bb\RealTracks – Demos\RealTracks102 Demos.
Rock/Pop/Folk fans should try out the 102-108 set demos, with great guitar soloing from Nashville’s guitar legend
Brent Mason. And we have Celtic reel and jig styles.
Jazz fans should make sure to check out sets 109 to 115. These include new Jazz Piano files from NY pianist Mike
LeDonne, and the vibes from Steve Nelson. Also check out the Gypsy Jazz Styles, with great guitar, violin, bass,
and drums tracks.
Country fans should try out the demos from sets 116 to 121. These include Praise and Worship styles, TexMex,
and great country guitar soloing from Brent Mason.
www.pgmusic.com/help100
Now Let’s take a Quick Tour Around the Program.
Open up the StylePicker.
This is where you choose styles. You will notice that there are some changes.
The top category lists All available styles. Choose this, so you see all styles.
Let’s try this out, by searching for styles that use RealTracks that may work over a slow tempo Jazz Ballad, and also
contain Guitar.
Press the [Filter] button.
In the Style Filter dialog, select the parameters for this Jazz style, which would be: 8ths notes, swing feel, tempo =
65, and then set the genre to Jazz.
Then press OK, and the list will now only be styles that you are looking for - namely slow ballads that contain
guitar, and are RealStyles!
On the StylePicker, you will notice some other improvements.
There are column heading with descriptive fly-by hints about the columns.
There is a Filter available now, that lets you narrow down your search for styles.
36
Chapter 3: Band-in-a-Box 2011
Page 37

There is a style memo for each style, that lists the instruments used, and whether the needed RealTracks are present.
New Columns in the StylePicker show you how the # of instruments in each style, as well as whether all needed
RealTracks for a style are present.
The Filter button (as you’ve already seen), as well as the “Show All” button that clears the Filter.
Now let’s shift gears, and load in a MIDI song from the c:\bb\styles00 folder. Load in the song. This is an old song
that uses a MIDI Jazz Swing style ZZJAZZ.
You will then see this yellow message.
This tells you that you can easily switch this to RealTracks.
|
Press the RealTracks button, and choose “Find a RealTracks Replacement For this style” – you will then get the
_JAZFRED.STY loaded in, which is a RealTracks replacement.
Now Let’s Make a Soloist Medley
A Soloist Medley is when the soloists are changing during the song. When band members are soloing, they
typically change every N bars, or every chorus. So let’s try out one of the Soloist Medleys th at comes up Band-in-aBox, and then we will make a custom one.
Continuing with the song that we just loaded in, let’s add a Medley Soloist to the Strings Track.
Press the RealTracks Picker dialog, and then select the Strings Track.
Now type a filter with the word “Medley” so that we only see Medleys.
Sort them by tempo. Pick one that works at our song tempo of 140.
Choose
#1323. This has a Medley of Sax, Trombone, Trumpet, and Clarinet. It will change instruments every 8 bars.
Now play the song.
Mute the Melody (Alt 9), or right click on Melody to do this.
Chapter 3: Band-in-a-Box 2011
37
Page 38

You will hear the Medley play now, with the instruments changing. But what if you want different instruments, or
changing instruments at different intervals? Let’s change them to every 4 bars, and add a Guitar solo instead of the
Clarinet solo.
Revisit the RealTracks Picker dialog.
Highlight the strings track, and press the Medley button at the top
right of the screen.
In the dialog that appears, change the frequency to every 4 bars, and then click on the clarinet, and change this to a
guitar (to quickly find guitar in the list, type in “Guitar, Electric” and the list will get filtered, and you can find
Soloist 765 Guitar, Jazz.
Replace the second soloist (Trombone) with “Silence” which is the second RealTracks in the list. This will provide
some space for you to solo with the group.
Press OK, and answer YES that you want to override. You will then see the custom medley that you have made!
This custom medley is saved with the song.
That concludes our tour around the new features of 2011. Have fun!
38
Chapter 3: Band-in-a-Box 2011
Page 39

Chapter 4: The Main Screen
Main Screen Overview
Band-in-a-Box supports Windows themes. It will use the current theme that you have selected in the Windows
Control Panel to use for windows and dialog s.
The main screen gives direct access to the major features and program settings of Band-in-a-Box for ease and
convenience during a session.
There are five different areas on the main screen.
1 →
2 →
3 →
4 →
5 →
The main screen of Band-in-a-Box with a new, blank song.
1. The Status Bar is used to show program running status messages and path names of the currently loaded song.
2. The Synth Window is the area between the Menu Bar and the Piano Keyboard where Instruments patches are
set and levels are adjusted. It also includes buttons for adding harmonies to the Melody, Thru, or Soloist parts.
3. The Tool Bar area under the Piano Keyboard has buttons for direct access to important program features and
menus. Hold the mouse cursor on any button to see a pop-up hint that describes its function.
4. The Title Window shares the Tool Bar area. In addition to the song title, it includes all the other settings for
the song such as its Key Signature, Tempo, and Chorus settings. To the right of the Title Window are two
floating, dockable toolbars that can be configured by the user.
5. The Chordsheet Area occupies the lower part of the screen. Chord changes for the song are typed into the
numbered bars (cells) in the sheet. Part markers (a, b, through x) are entered here to switch between up to 24
Band-in-a-Box substyles. Double lines are drawn on the chordsheet at the bar before a part marker. Repeats
and endings are also shown.
The Band-in-a-Box window is sizable.
When the window size changes the Chordsheet, Notation, and other windows redraw in proportion to the new size.
This allows you to have Band-in-a-Box open as a small window on screen with other programs, and you still see a
full chordsheet. The screen size is remembered between sessions.
To resize the Window, first un-maximize it.
Then use the sizing control at the bottom right. The various Band-in-a-Box windows will scale as
you do this. Band-in-a-Box will remember the position and size of the window between sessions.
Chapter 4: The Main Screen
39
Page 40

Alert messages
You’ll see that many Band-in-a-Box messages appear as “yellow alerts” at the top right of screen . That wa y you
don’t have to respond to the message, interrupting work flow.
Personalizing the Main Screen
Band-in-a-Box gives you many options to personalize the main screen.
Screen Layout
The Chordsheet area (or Notation Screen) can be placed at the top of the screen if desired by selecting the “Put
Notation/Chords on Top” from the Window menu or by pressing Ctrl+T. (This is reversed by selecting the same
option.)
Display Options
Go to Opt. | Preferences or click on the [Pref] button to open the Preferences dialog. Then click on the [Display]
button to open the Display Options dialog where you can select a toolbar mode, show or hide the on-screen piano,
pick a song title font and set options for the chordsheet display including the number of rows to display for the main
chordsheet, the font to use, and the font size too. This allows you to read the chordsheet window from “across the
room.”
If you choose a Custom font, you can choose the size as well. Choose a preset font, and the size will be set
automatically to fit into the height of the row. Choose Jazz Symbols to see shorthand Jazz chord symbols in the
chordsheet and notation. To revert to the “old look” that used a small System font, and lots of rows, you can choose
that as the type of font “Small font (system).”
Whenever a new section occurs (a part marker) you have the option to start the new section on a new line and draw a
grey line above to clearly mark the new section. A section can be just 2 bars long. With this Section Paragraphs
feature you’ll see each section on a new line so that the form of the song is easy to see.
Transpose visually transposes the chordsheet and notation a number of semitones, e.g. +14 for tenor sax.
40
Chapter 4: The Main Screen
Page 41

Color Schemes
You can choose from several color sets using the 256-color palette in Windows. Choose from pre-made color
schemes or make your own. To change the color scheme, select Opt. | Preferences from the main screen, and then
click on the [Colors] button in the Preferences dialog to launch the Color Selection dialog.
To select a pre-made color scheme, press the [Import..] button and choose from the list of schemes. Select [OK] to
make the changes permanent. Use the [Export..] button to save and share your customized color s chemes.
To make your own color scheme, click on the name of the element you wish to change (Chord Area, List Box, etc.),
then click on the [Choose…] button to bring up the Windows Color palette and click on the color you desire.
Descriptive Hints
The pop-up hints make it “too easy” to become a power user. They are comprehensive fly-by hints that appear when
you move over an item, including hints for the dialog boxes and various windows.
Go to Opt. | Preferences or select the [Pref] button to open the Preferences dialog and set the type of
hints to display, the time delay, and duration. Set a longer delay if you find that the hints are popping up
too often and getting in your way.
Chapter 4: The Main Screen
41
Page 42

Options and Utilities
These settings are found in the Opt. menu and the Opt. | Utilities submenu.
Language Selection
This item in the Opt. menu allows you to change language from English to another language for display. If there are
other languages supported by your version of Band-in-a-Box, then they will display in this dialog box. The new
language will be displayed the next time Band-in-a-Box is launched.
Edit Chord Shortcuts file (shortcut.txt)
Add your own chord shortcuts. Have you found a chord that Band-in-a-Box doesn't recognize? If so, you can make
a text file called \bb\shortcut.txt for your own shortcuts. (Note that this file doesn't ship with Band-in-a-Box or it
would overwrite your file!) The file \bb\pgshortc.txt is only for shortcuts supplied by PG Music.
Refresh Chord Shortcuts…
When you have saved your shortcuts file click on Refres h C hord Shortcuts… to start using them. Changes to your
chord shortcuts won’t take effect until you choose this command.
Status Bar
name of the open song is identified in the status bar at the top of the screen. The full file name and path name
The
are shown, as well as audio track information if present, the length of the song in minutes and seconds, and the
current position of the highlight cell. Other “running status” messages such as Soloist Generation and Song
Generation display in the status bar.
The status bar changes during playback to show additional information like the current bar and chorus location and
the current style. The on-screen file name includes “*” when a file has been changed.
Status bar during playback.
Taskbar hint
The entire song name displays in the taskbar hint when Band-in-a-Box is
minimized. This is useful to find the name of a song when Band-in-a-Box is
playing in the background.
Synth Window / Piano Keyboard
The Piano Keyboard:
This keyboard displays the notes (in different col ors ) t hat are bei n g pl ay ed by all instr u ments on various parts of the
piano keyboard during playback (except drums). The MIDI Thru/Soloist is also displayed on the piano key b oar d.
On the top row, guitar (green), melody (red), and soloist (pink) are displayed.
On the bottom row, bass (brown), piano (blue), and strings (grey) are displayed.
Instruments and Parts:
42
Chapter 4: The Main Screen
Page 43

Part Settings: The Bass/Drum/Piano/Guitar/Strings/Melody/Soloist and Thru buttons refer to instrument parts.
The MIDI parts in use for the current song and style are shown in yellow, RealTracks and RealDrums are colored
green. When a RealTracks part is underlined it has RealCharts notation or tablature that displays in the Notation
window and also on the piano keyboard or guitar fretboard. Parts that are not used are in white. The names of
muted parts display in red.
To change a setting for one of the parts you need to do the following:
- Select the part by mouse clicking on the part name, or on the button immediately
to the left of the part name.
- Change the desired parameter to affect the new setting.
Right click or double click on a part name for a menu of more settings and actions for the selected part.
- You can Mute or Solo the individual part.
- Assign RealTracks generates the part as a RealTrack using any available RealTracks instrument.
- The RealTrack can be regenerated.
- An individual MIDI part can be rendered into a WAV file and saved in the location you select as a file named in
the format “Untitled Song BBGuitar_MIDI_SingleRender.WAV”
- Set Track offset allows the track to moved ahead or behind by +/- 1000 ticks (at a resolution of 120 PPQ).
- Erase Track removes either the MIDI data or RealTracks audio from the track.
- Freeze the track if you do not want the part regenerated on each play. Tracks can be unfrozen.
Instruments - Choosing
The instrument panel allows you to change the instrument for any part:
- Clicking on the drop-down arrow produces an instrument list that you can choose from by highlighting and
clicking on the desired instrument name.
- Clicking the [F] button produces a representative list of predefined favorite instruments that you can choose
from.
The [GM2] button lets you select patches from a list of both General MIDI and General MIDI 2 patches
if your system supports GM2.
Clicking on the instrument panel [+] button produces a comprehensive list of ALL of the patches
available for your synthesizer, including ones on higher banks (if applicable). This list displays
your patch names by name, where the patch is located (patch #, bank) and lets you pick them from an easily
customizable list.
Combo Settings
Chapter 4: The Main Screen
43
Page 44

When the combo button is selected you can choose one of your ten favorite preset instrument combos.
The patches are set from the [Fav. Patches] button in the Preferences. For example, you could setup Combo #1 to
be an Acoustic Jazz combo which would send out patches like Acoustic Bass, Acoustic Piano, Acoustic Guitar,
Flute, etc.
When a Combo is selected changes to volume, reverb, etc. will apply to all parts. Right-click on the Combo radio
button to open a menu of commands that apply to the entire combo.
Mute will mute all parts.
Save all tracks as WAV file will render the tracks together into one wave file or render them as individual wave files.
Song has changed, needs regeneration will regenerate a new arrangement for all parts.
You can Render Song to Audio Track, which mutes the individual tracks and plays the rendered audio wave, or you
can Un-Render Song from Audio Track, which will erase the audio track and play the individual tracks again .
The Freeze and Un-freezecommands apply to all tracks.
If you like the current mix (of volumes, panning, reverb), and you want this applied as a default for all songs, you
can choose Save Current Mix as Default. Load Default Mix restores the default mix you have saved, and Reset Mix
sets the mix back to “factory defaults.”
Drop Panel
The [Drop] button is used to drag and drop tracks from Band-in-a-Box to Digital Audio
Workstations that don’t support direct drag and drop. Many DAWs will allow you to do this
directly, but, if your sequencer does not support the direct drop of a track that is not yet generated, you can drag
from a radio button (Combo, Bass, Piano, etc.) to the Drop panel. When the button turns bright green the track has
been generated and is ready to drag from the [Drop] button to your DAW.
Audio
The Audio Playback settings dialog makes it easy to mute, solo, or
change the volume of the audio track, similar to the control of the
other instrument parts in Band-in-Box. There are also Tone and
Reverb controls for RealTracks. Click on the “Audio” label on-screen
to open this dialog.
Master Reverb and Tone can be set by clicking the Combo button,
and then using the Audio Reverb and Tone controls.
44
Chapter 4: The Main Screen
Page 45

Harmony
The Harmony area displays the current Melody and Thru Harmony.
At the top right, you'll see the harmony boxes for the Melody and the Thru/Soloist.
The [M] button is for Melody harmony--pressing the [M] button
produces a list of harmonies you can choose from.
In this case it's set to SuperSax for a Big Band Sax-section harmony.
This button permanently writes the generated harmony to the Melody track.
Once converted, set the harmony to none to prevent a “harmony-on-harmony” effect.
The [No harmony] button disables the harmony for the song. The keystrokes Shift+F10 also allow
or disable the Melody harmony.
Tip: You can also search for a harmony by a keyword (i.e. typing in the first few letters of a harmony name) in either the
Harmonies or Favorite Harmonies dialog.
Pressing the [F] button produces a list of your favorites; the
50 most recently loaded harmonies.
The [T] button is for Thru/Soloist harmony. Either your live
part or the Soloist will be harmonized in real time--in this
case using George Shearing Quintet type harmony (piano,
vibes and guitar). Pressing the [F] button produces a list of
your favorites (the 50 most recently loaded harmonies).
Pressing the Shift+F11 keys toggles the Thru harm ony on
and off.
Chapter 4: The Main Screen
45
Page 46

Loop Section Settings
The loop button launches the Loop Section Settings dialog, allowing you to set a range of bars to loop in
Band-in-a-Box.
The “LoopSec/LoopScn” checkbox turns the Loop Section on/off. When it shows “LoopSec” a
selected range of bars repeats in an endless loop. “LoopScn” indicates a screen of notation is looping.
The selection of “range of bars” or “screen” is made in the dialog
The Wizard and Embellisher
The Wizard is an intelligent play along feature that uses your QWERTY keyboard as a
substitute for an external MIDI piano-style keyboard or optionally works with a conn ected external MIDI keyboard
on the Thru channel. Toggle this checkbox “on” to play along with Band-in-a-Box. The bottom row of the
computer keyboard plays chord tones, the second row plays passing tones - you play any key in either row and never
make a mistake!
and legato, as well as adding grace notes, additional notes, and “turns.” It is turned on and off by the Embellisher
checkbox on the main screen.
During playback, the Melody Embellisher changes timing of notes, durations, velocities,
Embellisher settings are accessed from the menu item Melody | Embellisher or the Embellisher button
on the toolbar.
Toolbars
The main toolbar extends the full width of the screen. (It is divided in two here.)
The [New] button clears the Chordsheet to start a new song. Band-in-a-Box reminds you to save your
work before it erases the chords.
The [Open] button is used to open (load) songs into the program from a standard Windows Open File
dialog.
Use the [Prev.] button to immediately open the previous song in the same folder (in alphabetical order)
without going through the usual file opening process.
Use the [Next] button to instantly open the next song in the same folder (in alphabetical order) without
going through the usual file opening process.
The [Save] button saves the song to disk with the standard Windows Save As dialog.
This saves the song, allowing you to choose or confirm the name and location for the file save.
The [Save +] button opens the Assign Instruments and Harmonies to Song dialog where custom
patches, harmonies, and other settings can be permanently saved with the song.
Click on the [Plugin] button to start the DAW plug-in mode and select plug-in settings for dragging and
dropping tracks to your favorite digital audio workstation.
46
The [.MID] button allows you to make a Standard MIDI File and save it to disk as a file with extension
.MID or to the Windows Clipboard with type “Standard MIDI File.” Type 0 and Type 1 MIDI files are
supported, or you can also choose to save the song as a Karaoke file with the .KAR extension.
Chapter 4: The Main Screen
Page 47

This is the “Render to WAV file” button, which will convert (render) your MIDI arrangement to an audio
wave file. It includes a batch render feature to convert an entire folder of songs in a single operation.
Transport Controls
These buttons are like the transport controls on a CD player or a media player.
[Play] button generates a new arrangement and plays the song.
[Loop] plays the selected (highlighted) section of the chordsheet in a loop.
[Replay] plays the song from the beginning without creating a new arrangement.
[Stop] button stops the song or the Jukebox from playing.
[Pause] button pauses the song during playback.
[From] button is used to play a song starting anywhere in the song, including tags or endings. This feature is also
available from the right-click menu in the Chordsheet.
The [Melodist] button opens the Generate Chords and/or Melody dialog, where you can choose
the type (or genre) of Melodist you wish to have generate a complete new song with chord changes
and melody as well as an improvised solo and an original song title.
The [Soloist] button opens the Select Soloist Dialog, where you can choose the Soloist you wish to
have play over any given chord changes.
The [Juke] button is used to start or stop the Jukebox. The [Õ] and [Ö] arrow keys
are used to move to either the previous or next song in the Jukebox.
The [Rec.] button is to record a song from the beginning. The music that you play in to the computer
will then be stored on the Melody track. The “R” key is the keyboard equivalent.
The [R. Aud] button launches the Record Audio dialog for live audio recording.
You can make yourself sound like a 5 piece vocal group or a 16-voice choir! Record a vocal part,
and add a 4 part audio harmony. Press the audio harmony button on screen to do this.
Band-in-a-Box supports DirectX and VST audio plug-ins – you can apply them directly to the digital
audio track. Use the cool PG Music plug-ins provided, or any other DirectX and VST plug-ins that
you have.
This allows you to select and configure DXi (DirectX instruments) or VSTi software synthesizers.
The “Use DXi Synth” checkbox must be selected in the MIDI Driver Setup dialog.
Sends out an “all notes off” message to your MIDI or software synthesizer, so it can function as a
“panic” button to stop a hung or stuck note.
This button resets General MIDI devices by sending a GM mode On message and then setting up the
Band-in-a-Box patches.
Opens the PG Music Reverb window where the type of audio reverb is selected. Preset reverb
settings are available, or custom settings can be applied and saved.
This opens a list of tracks with the option to freeze or unfreeze all tracks or just freeze individual
tracks. Frozen tracks play without regenerating for faster pl ay back.
Chapter 4: The Main Screen
47
Page 48

Floating Toolbars
Use the Favorite Folders button to select a folder from previously used folders. Shift-click on this
button to choose any folder.
Open an audio file (WAV, WMA, MP3) and the Audio Chord Wizard will automatically figure out
the chords.
The Practice Window is where many of the features and add-on programs useful for learning can
be launched.
This opens a menu with selections for the RealDrums Picker and RealDrums Preferences
(settings).
This opens a menu with selections for the RealTracks Picker, RealTracks Preferences (settings),
and a command to ‘Select better RealTracks” for the song tempo.
The Medley Maker allows you to quickly make a medley out of existing Band-in-a-Box songs.
The guitar button launches a guitar fretboard window that displays guitar notes as music is playing.
The [Intro] allows you to generate and insert an intro into a song with a “press of the button.”
The Big Piano button launches a Big Piano window. It will display the notes to any track (except
drums) as the music is playing.
This launches the applet for your sound card mixer. Use the mixer to make global settings to your
sound card's input and output options.
The Ear Training button opens the Ear Training window that plays chord types and intervals for
you to improve your playing-by-ear.
The SoundTrack feature allows you to generate music of fixed length for backgrounds in videos,
corporate presentations, jingles, etc.
The Reharmonist creates a chord progression based only on the melody. It can also reharmonize
existing chord progressions.
The grace note button opens the Melody Embellisher dialog for customizing the Melody
Embellisher.
st
This button allows you to enter repeats, 1
Auto-Find feature enters them automatically.
and 2nd endings, DS al coda, DC al coda and more. The
The Vocal Wizard selects and transposes the song to the best key for a singer’s vocal range.
Press the Guitar Chord button to launch the Generate Guitar Chord Solo dialog.
This button launches the Chord Options dialog box, which allows you to add chord pushes, rests,
shots, and held chords for any given bar.
You can convert your composition to an audio CD. Press the CD button to burn a CD with the
built-in CD burner program.
This button connects to the
www.pgmusic.com web site.
If you have a Sound Blaster card, this button runs the Creative Mixer.
These are Copy and Paste buttons for chords or notes. They copy to the Windows
clipboard, and paste from the clipboard.
48
Chapter 4: The Main Screen
Page 49

The Folder button allows you to change song and style folders or directories from within the
program.
Launches the Pitch Invasion game that helps to develop perfect pitch as you shoot down “alien”
notes invading from above.
Launches the Music Replay game that develops pitch, rhythm, and melody recognition by
replaying what the program plays.
This button opens the Notation window, where you can enter chords and lyrics, edit notation, and
view MIDI notation.
The Lead Sheet notation is a full-screen notation window with optional Fake Sheet mode that
shows 1
st
and 2nd endings, repeats, and codas.
Launches the Piano Roll window for editing the Melody or Soloist tracks in a piano roll format,
including graphic controller editing.
The Audio Edit window displays a graphical waveform and allows editing. Hold Shift when
pressing to open a moveable window.
Use the Print button to launch the Print Options dialog, which allows you to print Lead Sheet or
Fake Sheet style notation.
The Drum button launches an animated Drum Kit window. Press it to launch this fully functional
(and fun) GM-MIDI “virtual” drum kit.
The Song Title button generates a song title for the current song. Each time it is pressed a new title
is generated.
This button opens the Big Lyrics window for full screen “Karaoke-style” scrolling lyrics.
Runs the Sequencer for control of multi-channel Melody or Soloist tracks. Each track can record
up to 16 separate channels.
The Conductor window allows live, real time QWERTY keyboard or MIDI control of the song as
it is playing.
This button opens the Windows Recording mixer where you set your recording inputs. Select
Microphone or Line-in to record audio.
The [Pref] button will bring up a dialog box where you can set various settings all at once and
access most of the program options.
The Audio VU meters display the input volume for audio recording and the output volume for
audio playback.
There’s a Lyric Document window so you can easily copy and paste lyrics to and from your
favorite word processor. The lyrics will then display in the Big Lyrics window.
The StyleMaker button opens the current style in the StyleMaker, allowing you to edit the style by
editing the patterns.
This button opens the “Hybrid Styles” feature that allows you to create a new style by using
instrument parts from up to five different styles.
This opens the Style Creation Wizard dialog, where Band-in-a-Box will automatically convert a
MIDI file into a Band-in-a-Box style.
This is the Chord Builder button. Chords may be heard and entered to the chordsheet by clicking
in this dialog.
The MIDI Monitor button launches a MIDI Monitor that displays the MIDI Data flowing in and
out of your computer/synth.
Chapter 4: The Main Screen
49
Page 50

The tuner button opens the Guitar Tuner so you can tune a guitar or other instrument that is
plugged into the sound card.
This button toggles the chord display among standard (CMaj7), Roman Numeral (I
Maj7
), Solfeggio (Do
(1
Maj7
) and Fixed Do.
maj7
), Nashville
The SB button opens the Sound Blaster control panel, but only if you use a Sound Blaster card.
Sound fonts are loaded in the control panel.
This runs the stand-alone Title Generator program, which will generate and print 50 new song titles
at a time.
Title Window
The Title window shows the basic information about the current song at a glance - its title, style, key, tempo, and the
length and number of choruses. It also gives quick access to the Song List, the StylePicker, Memos, and Song
Settings.
The [Song] button launches the Load Song by Full Titles dialog box.
The [F] favorites button opens either a list of favorites or 150 recently played songs.
The [Style] button launches the StylePicker window. This window offers detailed information about
each style.
The [F] favorites button either a list of favorites or 150 recently played styles.
The names of the last five songs are listed at the bottom
of the File menu, and are numbered from 0 to 4.
Note: Pressing Shift+F3 on your computer keyboard
will bring up a list of the last 150 songs that you’ve
loaded.
The Song Title window allows you to enter the name of a song.
Click in the box with your mouse to start an insertion cursor and type in the name of your song. The title is
automatically included when the song is printed.
Style Display Window
This window displays the current style in use. Both the name of the
style file and the long name are shown. Mouse over the style to see the
full name
or right mouse-click on the style name for a menu of style utilities. These include choosing and changing styles as
well as playing the demo song for the currently loaded style. A right click also brings up the style memo at the same
time.
50
Chapter 4: The Main Screen
Page 51

Key Signature
The key signature of the song is displayed on the main screen under the title. To change the key, click
on the key signature to choose a new key from the dropdown list box. Band-in-a-
Box then asks you if you would like to transpose the song or not. Press [Yes] to confirm, or [No] to leave the
melody and chords untransposed (only the key signature will change). An instance where you would say “no” is
where you have entered a song without first setting the key signa ture and you want to apply the correct key
signature.
Tempo Control
The current tempo displays in the Title window, with controls for easy tempo settings and
adjustments.
Click the mouse on the spin control arrows to raise or lower the tempo in by 5 bpm (beats per minute) at a
time. Use a right mouse click on the tempo arrows to change the tempo by 1 bpm at a time.
Tap the = (equal sign) key on the number row of your computer keyboard for 4 beats to set the tempo and
start the playback immediately at that tempo. Or click the [=] button on the screen with your mouse pointer.
Tap the – (minus sign) key on the number row of your computer keyboard for 4 beats to set the tempo. Or
click the [-] button on the screen with your mouse pointer.
Chorus Control
The Chorus Control buttons are used to set the overall format of your song.
Chorus Begin button: Click on the Chorus Begin Button to select the first bar of the chorus. The Bar
number that you select is displayed.
Chorus End button: Click on the Chorus End Button to select the last bar of the chorus. The Bar number
that you select is displayed.
The number of choruses possible for a tune is 40. Click on the chorus button and choose how many
choruses you require.
As the song is playing the current chorus is displayed at in the chorus button. 2/3 shows that the second of
three choruses is playing.
If you change the number of choruses, Band-in-a-Box will offer to fill up or remove choruses of the Melody track to
match the new number of choruses.
Title window checkboxes
When the loop checkbox in the Title window is checked, the song plays endlessly until stopped by
the Esc key, the space bar, or the [Stop] button.
st
Enables fake sheet mode for the chordsheet with 1
and 2nd endings and repeats. Right click to
auto-detect repeats.
Press the [S] button, or choose Edit | Settings (for This Song)… to select additional settings for the
current song.
The [Memo] button allows you to put in a memo to a song. You can type in a memo or you can
paste text from the Windows clipboard.
The song memo has a “Close w/play” option to close the memo automatically when Play is pressed, and not reopen
when Stop is pressed. This setting, in combination with the “Auto-open” setting, ensures that the memo opens when
the song opens but closes during playback. The font for the song memo is size selectable.
Automatic Memo-Generation
The Song memo has a “summary” checkbox. If selected, you’ll see an additional window that automatically
displays a full summary of the song (title/tempo/patches used in the song), as well as other special features, like
substyle patch changes or harmonies.
Chapter 4: The Main Screen
51
Page 52

The Auto-generated song memo says if RealDrums come from the song or style.
Chordsheet Area
Chords, rests, shots, holds, and part markers are entered in the Chordsheet.
The chordsheet can be viewed in the full linear view showing all bars, or optionally in fake sheet view that shows 1
nd
endings and repeat signs. Another option shows b ars past the end of the song in gray.
and 2
In the Chordsheet, typing special words, instead of chord names, will make the following settings:
begin + Enter sets the beginning of the chorus to the current bar
end + Enter sets the end of the song to the current bar
chorusend + Enter sets the end of the chorus to the current bar
tkc + Enter sets key signature to C, tkbb would set it to Bb
trc + Enter transposes song to key of C
t125 + Enter sets tempo to 125
You can quick-load a song by typing only. In chord entry mode type the word “Song” followed by a file name, or
partial file name, and the song will get loaded in. For example, type c:\a\MySong.sgu to load in that exact song
name. Type “bossa” to load in the first song with bossa in the name AFTER the current song name, in the current
folder.
Quick-load a style by typing only “style” followed by a style name, e.g., stylezzbossa<Enter> will load in
zzbossa.sty.
st
52
Chapter 4: The Main Screen
Page 53

Chord Entry
The basic way of entering a song into Band-in-a-Box is to type in the chords to the song on the chordsheet
(worksheet). The arrow keys move the active (highlighted) cell around in the chordsheet. The Enter key advances
to the next ½ bar. Chords can be entered from the QWERTY keyboard or an external MIDI keyboard (see Window
| MIDI Chord Detection…).
Chords are typed in using any of the supported ch ord symbol displays:
1. Standard chord symbols (e.g., C or Fm7 or Bb7 or Bb13#9/E).
Maj7
).
maj7
).
Maj7
).
2. Roman numerals (I
3. Nashville Notation (1
4. Solfeggio (Do
5. Fixed Do. In Italy and other parts of Europe, chords like C7 are always referred to by the Solfeggio name (Do7
for C7) regardless of the key signature.
Notes: It is not necessary to type upper or lower case. The program will sort this out for you. Any chord may be entered
with an alternate root (“Slash Chord”) e.g.: C7/E = C7 with E bass. Separate chords with commas to enter 2 chords in a 2
beat cell, e.g., Dm, G7
Shortcut Chords:
If you enter a lot of songs, you'll appreciate these shortcut keys.
- J = Maj7
- H = m7b5 (H stands for Half diminished)
- D = dim
- S = Sus
Example: To type CMaj7, just type CJ (it will be entered as CMaj7)
Add your own chord shortcuts.
You can make your own shortcuts text file and name it \bb\shortcut.txt. This allows you to add new chord shortcuts.
(Note that this file doesn't ship with Band-in-a-Box or it would overwrite your file.)
If you find a chord that Band-in-a-Box won't accept like Csus2 (it expects C2), you can enter this on a single line
(without the quotes) “Csus2@C2.” Then Band-in-a-Box will enter the chord C2 if you type in Csus2.
Chordsheet Options
You can set up the chordsheet with your own preferences. Go to Opt. | Preferences or choose the [Pref]
toolbar button to open the Preferences, and click on the [Display] button to open the Display Options.
In the Chordsheet area of the Display Options you can pick a chordsheet font and the number of rows to display, or
set an option to automatically adjust the number of rows to display.
Whenever a new section occurs (a part marker) you have the option to start the new section on a new line and draw a
grey line above to clearly mark the new section. Sections can be as little as 2 bars long.
The “Extra line space between sections” setting determines the amount of space (in pixels) to add on a new line
when there is a part marker.
Transpose Chordsheet option
The “Transpose” option is also
found in the Display Options
dialog. It is useful for nonconcert pitch instruments like
Tenor Saxophone. This option is
also available on the Notation
window.
If a Chordsheet or Notation
window transpose setting is in
effect, a yellow hint message
opens on boot up as a reminder.
Chapter 4: The Main Screen
53
Page 54

When the chordsheet is transposed, you can type in chords in the transposed key, and they will show up as you have
entered them, instead of requiring you to enter the chords in the concert key.
To try this out, go to [Prefs] and click on [Display] to open the Display Options dialog. For the “Transpose”
setting, choose “Alto Sax +9.” Then type in a chord, like Am7, and it will show up as Am7 without requiring you to
enter it in the concert key.
Part Markers
be placed at the beginning of any bar.
Double lines are drawn on the chordsheet at the bar before a part marker.
54
Part Markers are placed on the chordsheet to indicate a new part of the song, to insert a
substyle change, or to insert drum fills. They typically occur every 8 bars or so, but may
Chapter 4: The Main Screen
7
Page 55

Section Paragraphs
When you’re reading a book, a new section begins on a new line, with space between. Band-in-a-Box does that for
chords too. Whenever a new section occurs (a part marker), we start the new section on a new line and draw a grey
line above to clearly mark the new section. A section can be as short as 2 bars. You’ll see each section on a new
line so that the form of the song is easier to see. The feature is configurable and optional.
MultiStyles
Band-in-a-Box MultiStyles are styles that can have up to 24 substyles; original Band-in-a-Box
styles had two substyles, “a” and “b.” Band-in-a-Box MultiStyles typically have four substyles,
but may have up to twenty-four, selected by using part markers “a” through “x.”
You can easily make your own MultiStyles, either from scratch, or combining parts from existing styles to make a
MultiStyle. For example, if you have 10 favorite Country styles, you can quickly make a single MultiStyle that has
20 substyles available within the same song.
Play Selected Area as a Loop
To use this function, select a region on the Chordsheet.
Click on the [Loop] button, Shift+click on the [Play] button, or press F10 (Play Selected Area as Loop)
and the program will play a selected region, and loop the selection. For example, you can select bars 19
and 20, and then press F10, and bars 19 and 20 will play looped.
Chapter 4: The Main Screen
55
Page 56

Chapter 5: Playing Songs in Band-in-a-Box
Opening Files
The SongPicker is the commonly used feature for finding and opening Band-in-a-Box song files, but
Band-in-a-Box also has helpful features for locating and opening all types of music files.
Find File
So many files, so little time? The Find File feature is a “Swiss Army Knife” that allows you to find a Band-in-a-Box
song (or any file that Band-in-a-Box can open), including filtering by words found in the file name or any text in the
file.
The File song files dialog opens from the File menu with the command Find File. For example, you can
- get a listing of all Band-in-a-Box songs on your PC with the word “Blues” in the title.
- get a listing of all Band-in-a-Box songs in the BB folder with the word “Reggae” in them. This produces a list of
over 50 songs in the MegaPAK so you can quickly choose from them and know that, if you’re a reggae lover, you
haven’t missed out on any Band-in-a-Box songs/styles with Reggae. A similar listing for “Blu es” reports 454
files.
The listing stays between sessions, so you can then take your time to explore all the files that Band-in-a-Box offers
matching your find term.
56
Chapter 5: Playing Songs in Band-in-a-Box
Page 57

File Associations
Go to the menu item File | File Utilities to associate the file types for Band-in-a-Box songs and styles in Windows.
Once set, this means that you can double click on a song or style and Band-in-a-Box will open up with that song or
style.
Choose the menu items File | File Utilities | Associate File types (songs, styles) with Windows… to associate the
Band-in-a-Box file types, and Remove File Associations (songs, styles) with Windows… to remove the associations.
Open File Dialog
The Open File dialog is opened with the Open toolbar button, the menu command File | Open, or the F3
function key. It shows and opens all available file types (MGU, WAV, WMA, MP3, MID, KAR, CDG,
and CDA). And it remembers your preference, so you can restrict it to a certain file type.
If MySong.MGU is loaded, and a same named audio file (MySong.WMA, MySong.MP3, MySong.WAV, etc.) is
present, Band-in-a-Box will open the audio file to the audio track. This allows third parties to make audio files with
chords in them, by making a MySong.MGU and MySong.MP3 pair of files, which will load into Band-in-a-Box, yet
will have the audio compressed to take up little disk space. For example, make a teaching set of trombone files for
Band-in-a-Box, with audio trombone track, and Band-in-a-Box file with chords, all fitting in a small file size.
Custom File Selection Dialog
The custom Open File dialog opens if you press Ctrl+Shift+F3 to load a song. You can make it the default dialog
if you go to Opt. | Preferences and select “Use custom filename dialog” under the
Environment Options in the Preferences dialog. Then the [Open] button, or the menu command File |
Open, or the F3 key will launch the custom Open File dialog. The custom Open File dialog has several
advantages over the traditional Windows dialogs:
- The window is much bigger than the traditional one, allowing more room.
- There is a selectable font size and typeface.
- You can adjust the widths of the various columns.
- The Window remembers your settings.
- There are tabs at the top that allow sorting by name, date etc.
- Additional information is displayed (file size, time of file).
- You can open a song without typing the extension. For example, to open the song MySong.MGU you just have
to type MySong, without MGU.
Chapter 5: Playing Songs in Band-in-a-Box
57
Page 58

The Font Selection button lets you pick a font, size, and style for the dialog from any of the fonts
installed in Windows.
The Search button allows you to search for a file by its name or part of a name.
The Favorite Folders button remembers the last few directories that you've used, allowing you to easily
change between directories.
Favorite Folders
The menu command File | Favorite Folders launches the Favorite Folders dialog with a list of recently used
folders. To open a song using this dialog you first select the folder from the list, and then you can directly open the
song from that folder. This allows you to quickly find a song in another folder.
Hold the Shift key as you click the [Open] button. This will launch the Favorite Folders dialog,
allowing you to pick the folder. This saves you the time needed to navigate through the Explorer-style
folder choice, which can be time consuming if you’re hopping back and forth between folders.
Similarly, Shift-clicking on the [Save As] button will allow you to choose a favorite folder prior to
seeing the Save As dialog.
Favorite Songs (and Styles)
There’s a dialog for these favorites with separate lists of Recently Played and Favorite songs or styles. There are 2
tabs in this dialog, showing you both recently used songs/styles, and a list of “favorites” that you select as a favorite
songs or styles.
The [F] button launches the dialog.
58
Chapter 5: Playing Songs in Band-in-a-Box
Page 59

The “Favorites” and “Recently Played” Radio buttons toggle between a list of your recently played songs (or styles),
and your favorite songs (or styles).
Favorite Song/Style lists can be edited, sorted, saved/loaded, and used with the jukebox. You can add an unlimited
# of favorites.
The favorites list will start off as an empty one. But you can add songs as your favorites, by
clicking the Add Favorite button (this button is also found in the StylePicker).
You can make a new list of songs for a set by using the [Clear] button followed by the [Append], [Insert], and
[Delete] buttons to add songs.
You can save and load sets of favorites or recently played songs (or styles).
Once you have the set, you can press the [Juke...] button. This will play the set file in order, not randomly. It will
start from the currently selected song.
The [Sort] button sorts the list alphabetically.
When “Save As” is used to save a song with a different name the new name will be added to the Recently Played
song dialog.
Technical Note: The list of songs/style favorites is stored in a text file called SongFavorites.txt (or StyleFavorites.txt) in the
BB folder.
Favorite Styles in the StylePicker
In the StylePicker, an “F” appears beside the name of any style that is a favorite. The favorite styles are the ones
that you’ve identified as favorites, either by pressing the [Add Favorite] button in the Favorite Styles dialog, or the
similar button in this StylePicker dialog.
You can make any style a favorite by clicking the [Add Favorite] button. If you want to remove it, click the button
again.
“Only Show favorites” will only show the favorite styles in any list that you have opened.
Global Song Overrides
Global overrides are found in Preferences [Overrides], which allow you to set
Similar overrides are available to see which other information gets loaded from a file, such as patches, harmonies,
volume/reverb/chorus/panning/banks. For example, you can set every song to load with looping ON, and don’t load
any reverb settings from songs.
For example, if you want every song loaded to have looping set to on, then set “Always set loop to ON.”
But if you are going out on a playing job, and don’t want any songs to loop, then set it to “Always set loop to OFF.”
If you want the settings to work the same way they did in previous versions, use the “As set in the song” setting, or
press the [Defaults] button.
the overall song looping (always OFF, always ON, or as set in the song).
Chapter 5: Playing Songs in Band-in-a-Box
59
Page 60

If this is not selected, notation symbols (slurs, staccato, crescendos) will
not be loaded from the song.
The “Defaults for new songs” are settings from the Song Settings dialog.
When “Vary Style in Middle Choruses” is selected (default) the song will play in substyle B throughout the middle
choruses, playing substyle A for the first and last choruses only. If this setting is not selected the substyle changes
will follow the part markers entered on the chordsheet.
When “Allow Embellishment of Chords” is selected (default) Jazz styles can play embellished chords. For example,
C7 might play as C13 or C7b9 for a more authentic sound.
The [Pop/Country] preset button turns both of these settings off for a typical Pop or
County arrangement that follows part markers and does not embellish chords.
The [Jazz] preset button turns both of these settings on for a typical Jazz arrangement to
support soloing over the middle choruses and allow Jazz chord embellishments.
Loading and Playing Band-in-a-Box Songs
Band-in-a-Box supports most popular song formats in addition to its own native song files. It will open most audio
file formats, and its powerful Audio Chord Wizard feature will interpret the chords from an audio file and write
them to a Band-in-a-Box song file. You can also play karaoke files, including Karaoke MP3/CDG files with
scrolling graphical lyrics, in Band-in-a-Box.
You can quick-load a song by typing only. In chord entry mode type the word “Song” followed by a file name, or
partial file name, and the song will get loaded in. For example, type c:\a\MySong.sgu to load in that exact song
name. Type “bossa” to load in the first song with bossa in the name AFTER the current song name, in the current
folder.
60
Chapter 5: Playing Songs in Band-in-a-Box
Page 61

In this section we will explain how to load and play existing Band-in-a-Box song files.
Open any song file with the familiar Windows-style d ialog box, just like any other file on your
disk. Or use the Find File feature (File | Find File) to filter files by words found in the file name or
any text in the file.
Start song playback.
The [Loop] button plays the highlighted section of the chordsheet or notation in an endless loop.
Click and drag the mouse to highlight a section of bars to loop.
Replays the song without regenerating the tracks, so the current arrangement is preserved. (Save the
song to a MIDI file to permanently save the arrangement.)
Stop song playback.
Pause playback with the [Pause] button; resume by pressing it again.
Jump to any bar in the song. Press the [From] button to choose which chorus and bar number to
jump to.
The SongPicker
song list of c:\bb, it can include songs in subfolders like c:\bb\styles34. You can lock the SongPicker to always open
in the same folder and use the same list to keep track of all songs on your disk.
The first time that you select the [Song] button Band-in-a-Box automatically writes the song list. The current folder
name is displayed in the title bar, with the total # of songs displayed. The Song List generation has a [Cancel]
button so that it can be interrupted.
indicates that it is sorted in descending order.
Filter
Use the filter to search by column, song title, file name, or style.
The [Song] button opens the SongPicker window, a resizable window that lists all of the songs in
the current directory and, optionally, its subdirectories. For example, if you get a
From then on, the SongPicker opens when
the button is pressed and songs can be
selected by title from the alphabetical list.
Songs can be sorted by any of the column
headings, like Song Title, File Name, Style,
Tempo, etc., by clicking the mouse on the
heading at the top of the column.
Either a plus (+) or minus (-) sign will appear beside the selected column heading. A plus
sign indicates that the column is sorted in ascending order; a minus sign
Chapter 5: Playing Songs in Band-in-a-Box
61
Page 62

Folder Settings
The folder settings are at the bottom of the SongPicker.
The Current Folder name is displayed.
The folder can be changed, either by:
1.
2.
3.
4.
Selecting the new folder.
Choosing a folder from recently used favorites folder.
Changing the current folder to the BB home folder.
Going “up” a folder (e.g. from c:\bb\styles to c:\bb).
When the new folder is chosen, the song list for that folder will be displayed. The song list may need to be rebuilt;
the program will do that automatically.
If the “Always open in this folder” item is selected, the song picker
will always open up in the specified folder. So if you put all of your
songs in c:\songs, you can make the SongPicker always open to the c:\so ngs folder.
If “Include Subfolders” is selected, the SongPicker list will contain songs
from the folder and any subfolders. So if you have subfolders to c:\songs
like c:\songs\country and c:\songs\jazz, you can see/search them all in the same SongPicker dialog.
Tip: If you choose c:\ as your folder, the SongPicker would find every Band-in-a-Box file on your hard drive and display it in
the SongPicker. You might instead find it easier to put all of your songs within a folder like c:\songs, and have various
subfolders to that. And then set the SongPicker to always open up in the c:\songs folder. Then you’ll have access to all of
your songs easily.
Choose a song from the Favorite Songs dialog.
Open a song (or any media type) using the Open File dialog.
Find a song using the Find song files… dialog.
Copy the song list to the Windows clipboard where it can be pasted into any
word processing program and printed.
Search for song by keyword will find the search term if it is present in any field.
The filter (upper right) can also be used to search the song list.
Search Again repeats the previous search starting from the current point.
[Rebuild List] will exit the dialog and build or rebuild the song list file by
loading in all of the songs in the directory. It will then launch the SongPicker
dialog with the updated information.
Exports the list as a Comma Separated Value text file that can be opened by
spreadsheets.
Click here to change the fonts in the SongPicker window.
62
Chapter 5: Playing Songs in Band-in-a-Box
Page 63

The SongPicker lists if any RealDrums or RealTracks were not found, in a separate column (“d” indicates missing
RealDrums and “t” indicates missing RealTracks). If you want to disable this feature, you can make a file named
c:\bb\AlsoReadStylesWithSongListBuildUp_False.txt (contents irrelevant).
Check “Play when chosen” to automatically play the selected song.
Once you’ve loaded a song you’ll see the chords on-screen in the chordsheet so you can follow the chord changes
and play along with the band.
You can double click on any bar to start playback at that location. There is also an option in th e Preferences dialog
to start and stop playback with the spacebar. The spacebar or double click can be used on an ending bar (or a bar in
the tag), and it will play from the ending (or tag).
There are right mouse menu options on the Chordsheet. They give quick access to frequently used edit functions
and features including “Play from bar and chorus #.”
Chapter 5: Playing Songs in Band-in-a-Box
63
Page 64

Change the Style
Try different styles by clicking on the [Style] button to choose from a list of the styles available
in the StylePicker window. Styles that have the same feel (triplets, eighths,
sixteenths) and a similar tempo range to the current prototype will be indicated with an (*) asterisk. Styles with a (^)
caret have a similar feel but a different tempo range.
Band-in-a-Box StylePicker window.
RealStyles and Styles with RealTracks
RealStyles are Band-in-a-Box styles that use RealTracks only. There is a separate category in the StylePicker for
RealStyles.
It also lists Styles with RealTracks, a blend of MIDI tracks and
RealTracks, with subsets for different musical genres. The
style names for RealStyles are prefaced by an underscore, _.
Style names for Styles with RealTracks are prefaced by an
equals sign, =.
Styles with RealDrums
64
Chapter 5: Playing Songs in Band-in-a-Box
Page 65

You can select RealDrums styles within the StylePicker. Highlight a
MIDI style that you like, and press the RealDrums [Best] button, to see
a list of the most compatible RealDrums styles for that style, or the
[RealDrums] button to select from all available RealDrums.
You can also change the style at any bar in the song, so you could use a
few similar styles to add variety while keeping the same feel. This is
done in the Edit Settings for Current Bar dialog, which opens with
either the F5 function key or the Edit | Settings for Current Bar menu
command.
In the style change dialog (F5 and
others) you can audition the style that
you are considering.
This dialog can also be opened
with the [Bar Settings] button in the
Song Settings dialog.
Make a MultiStyle Song
If you have a song, you can also use more than 2 substyles for that song. For example, let’s say we have a song that
is a Bossa Nova and you want to have a Jazz Swing section. Rather than finding a MultiStyle that has this exact
combination, we can make one, in the song, for this song only as follows:
Load a song like c:\bb\styles0\zzbossa.mg4
Right click on a bar number, and choose “Define c/d.”
Then choose ZZJAZZ.STY from the StylePicker.
You will then see that there are 4 substyles now, a, b, c, d. You can use the “d” substyle for Jazz Swing walking
bass, since it is the same as the “b” substyle from ZZJAZZ.
Load the song c:\bb\Tutorial BB 2008\ “Demo of MultiStyle in song only Bossa 2 Jazz.MG4” and you can see the
finished result. This song switches styles using part markers.
Note: The RealDrums will play for all of the styles if you have enabled RealDrums and “Substitute RealDrums for \ MIDI
drums” in the RealDrums Settings dialog.
Settings for Playback
You’ll find the Synth window at the top of the screen. Select an instrument part by clicking its name. The dot in
the radio button beside the name indicates the selected part. Any changes to the Instrument, Volume, Pan, Audio
Reverb, Tone, Bank, or MIDI Reverb will apply to that part.
Chapter 5: Playing Songs in Band-in-a-Box
65
Page 66

The Band-in-a-Box Synth window controls instrument settings.
Patch Changes
Patch changes are embedded in the Band-in-a-Box styles and these patches are loaded with songs by default. They
can be disabled in the MIDI Options dialog found in the Preferences. Alternate patches can be saved with a song
(Alt+F2).
Change the instrument patch by scrolling through the 128 General MIDI instrument names in the Instrument box,
even while the song is playing.
General MIDI 2 support
General MIDI 2 standard (GM2) adds 128 new instruments to Band-in-a-Box styles and songs, including ukulele,
mandolin, 12-string guitar plus many new and improved piano, organ, guitar, brass, and string sounds.
Note: The included Roland VSC3 synth supports the new GM2 instruments, as do many newer modules/sound cards. If
yours doesn't, a similar instrument from the existing 128 General MIDI sounds will be substituted.
The type of GM2 support is set in the MIDI Driver Setup dialog (Opt. | MIDI driver setup…). The choices are:
- General MIDI 2 support: If you're using the Roland VSC3, or a newer Sound Canvas then choose this GM2
support.
- Roland GS (older Modules): “Older” Sound Canvases (SC55/SC88) support GS, but not GM2. The good
news is that they have the same patches available, just at different locations. So if you choose this option,
Band-in-a-Box will find the patches at the “GS” locations instead of the “GM2” locations. If you have a newer
GS module like the SC8820 that supports both GM2 and GS you should likely choose GM2.
- No GM2 support: Most sound cards don't hav e GM2 support yet, so just support the original 128 General
MIDI sounds. Band-in-a-Box will use the closest instrument in these cases.
You can select the GM2 patch using the GM2 button next to the Instrument box. This shows a menu
organized by instrument types.
Technical note: For a GM patch like Nylon Guitar the patch is 25. For a GM2 patch like Ukulele, the patch is also 25, but it
is accompanied by two bank settings, MSB Bank Controller 0 setting of 121 and LSB Bank Controller 32 setting of 1.
66
Chapter 5: Playing Songs in Band-in-a-Box
Page 67

When you select the instrument from this menu, it will make the bank settings (Bank0 and LSB) for you. You can
also change the bank #s directly, and the patch in the box will change. GM2 patches can also be selected elsewhere
in the program, such as the Edit Settings for Current Bar dialog and the StyleMaker.
Additional Patches
A “patch” is a MIDI instrument name. Examples of patches are Acoustic Bass, Electric Piano and Violin. Patches
are used to emulate real instruments through MIDI playback. Band-in-a-Box defaults to using the standard bank of
General MIDI patches used by all MIDI manufacturers, but many MIDI synthesizers and sound cards have
additional patches available as alternatives to the basic GM list. These sounds are typically found on higher banks
in memor y.
Patches on Higher Banks Dialog
This displays your patch names by name and lets you pick them from an easily customizable list. You've
probably got great sounds on higher banks -- now you can find and use them easily!
Clicking on the [+] button opens the Patches on Higher Banks dialog for easy access to patches on all other banks
as well as General MIDI.
To narrow your sound search you can do one or all of the following:
- Open the patch list and select an instrument (i.e. Electric Bass, Acoustic Piano, etc.)
- Click on the “Include Family” checkbox to have other offerings of similar type shown. (i.e., all bass family
patches, all keyboard family patches, etc.)
- Find a patch by keyword by clicking the [Search…] button and typing some letters that you know are in the
name (e.g., “mando” will find your mandolin patch and any others containing “mando”).
Chapter 5: Playing Songs in Band-in-a-Box
67
Page 68

Click on this button to go to the PG Music web page where you can
download more patch files from
http://www.pgmusic.com/support_miscellaneous.htm.
Converting Synthesizer Patch Lists in Band-in-a-Box
Band-in-a-Box can read a patch file list generated by PowerTracks Pro Audio or Cakewalk, and convert it to a .PAT
file for use in Band-in-a-Box.
Converting PowerTracks patch list to Band-in-a-Box .Pat files.
PowerTracks stores its patch lists in a single file, called PATCHES.INI. This file contains all of the patch lists for
the synths supported by PowerTracks. Band-in-a-Box stores the patch list for each synth in a separate file, with an
extension of .PAT.
To convert a PowerTracks patch file to a Band-in-a-Box Patch file, you will be choosing the c:\pt\ptw\patches.ini,
and then choosing th e synth that you want to convert to a .PAT file.
Press the [+] button to the right of the Instrument name on the
main Band-in-a-Box screen.
This will open the Patches on Higher Banks dialog.
Note: If a .PAT file has not been previously selected, a File Open dialog will appear. Select a .PAT file from the \bb
directory to launch the Patches on Higher Banks dialog.
Press the [Open INI/INS…] button to launch the Open File dialog.
Choose the file c:\pt\patches.INI.
You’ll then see a menu of synths stored in the patches.INI file. Select
one to convert. Create a name for the .PAT file (e.g. My Patch
List.PAT) and save it to c:\bb.
Converting a Cakewalk .Ins file to a Band-in-a-Box .Pat file.
68
Chapter 5: Playing Songs in Band-in-a-Box
Page 69

This is done using the same process described above for PowerTracks, except that you open the individual .INS file
instead of a PATCHES.INI file. For example, if you have a Cakewalk file called “My Synth.INS” you would select
this file name. You would then save that converted list to c:\bb\My Synth.PAT.
Solo an Instrument Part
While listening to Band-in-a-Box, you can easily solo (isolate) a certain part by holding the Control key and mouse
clicking (left or right) on the instrument at the top of the screen. For example, if you want to hear only the Piano
part, Control-Click on the Piano part. If you want to use hot keys for this, you can press Alt+2 (Mute-All) and then
Alt+4 (Unmute Piano).
Mute All Parts
To mute/unmute all parts as the song is playing, simply press Alt+2 or right-click on the “Combo” radio buttons at
the top of the screen.
Changing Volume, Panning, Reverb, Chorus, Bank
To change the Volume, Panning, Reverb, Chorus, or Bank of a part, click on the desired part to change.
The names of MIDI instrument parts that are playing are colored yellow. If the part name is white when the song is
playing it means that the instrument is not present. A red instrument part name means that the part is muted.
Green instrument names indicate RealTracks and RealDrums. (Underlined parts have RealChart notation.)
Then click on the spin control arrow keys to increase or decrease the setting.
- The left mouse button increases/decreases by 5 at a time.
- The right mouse button increases/decreases by 1 at a time.
You can also click directly on the number field to open a dialog and type the value in directly.
Chase Volumes.
For a file with Volume change events (Controller 7) written into the Melody (or other tracks) – if the song is played
back from somewhere in the middle, the most recent volume setting prior to the start of playback will be sent.
Solo an Instrument Part
While listening to Band-in-a-Box, you can easily solo (isolate) a certain part by holding the Ctrl key and mouse
clicking (left or right) on the instrument at the top of the screen. For example, if you want to hear only the Piano
part, Ctrl+click on the Piano part. If you want to use hot keys for this, you can press Alt+2 (Mute-All) and then
Alt-+4 (Unmute Piano).
Muting Instruments
To mute/unmute all parts as the song is playing, simply press Alt+2 or right-click on the “Combo” radio buttons at
the top of the screen.
To mute an instrument click on the name of the desired part with the right mouse button. Click again to unmute.
When the part is successfully muted, the instrument name will turn to red in color, indicating that the part is muted.
Right mouse-click on “Combo” to mute/unmute all instruments at the same time.
Playing/Pausing/Stopping Songs
Use the tool bar buttons to control the playback of your song in Band-in-a-Box.
Play song Loop selection Replay song Stop playback Pause (Hold) Play from any bar
You can also use the Play menu commands or keystrokes.
Chapter 5: Playing Songs in Band-in-a-Box
69
Page 70

You can double click on any bar to start playback at that location. There is also an option in th e Preferences dialog
to start and stop playback with the spacebar. The spacebar or double click can be used on an ending bar (or a bar in
the tag), and it will play from the ending (or tag).
Lead-In Counts and Metronome
These settings are made in the Preferences dialog. Click on the [Count-in/Met.]
button to open the Count-in and Metronome Options.
The default count-in is two bars, but there is an option to shorten it to a 1 bar lead-in.
You can select any drum instrument for the count-in and choose different count-in rhythms (e.g. Tap on 2 and 4
instead of 1-2-3-4).
The Smart Lead-in feature avoids playing the count-in drum sound during a Melody pickup.
There's an option to play the drum count-in in all circumstances, useful when the style doesn’t have drums or for
drummers who play along with Band-in-a-Box by muting the drum track.
You can display the Visible Metronome on-screen during the entire song
(or just the lead-in). Choose the screen position, the size (up to near full
screen size), and the visual metronome pattern. The on-screen
metronome is a great way for a student to learn to keep on the beat, and
with a settable size, students can view this from across the room.
The Audible Metronome can be set to sound
“During record,” during “Record and Play,” or
“None” - turned off entirely.
Slide Tracks
This is a menu command (Play | Slide Tracks…) that allows you to move any of the Bass, Drums, Piano, Guitar,
Strings, Melody, or Soloist tracks ahead or behind by a definable amount. For example, slide the Bass track a little
ahead of the rest of the band to make the bass player “drive the band.”
To slide tracks, select the Slide Tracks option from the Play menu. The values are measured in “ticks-per-beat” with
120 ticks being the equivalent of a quarter note. The musically useful range is from -10 to 10.
70
Chapter 5: Playing Songs in Band-in-a-Box
Page 71

Allow Any Slides
If you want the slides to occur, then set this to YES.
Humanize Slides
If set to YES, the slides will be humanized to slide the track a different amount for each note. The amount varies
from 0 ticks (none) to the slide setting for the instrument.
- Press the [Default] button to fill the tracks with default slide values.
- Press the [Zeros] button to 'zero-out' the slide values for all tracks.
- Press the [Update] button to affect your changes and hear the result instantly.
Tip: A track that always plays notes early by a certain amount tends to sound out of time, whereas humanizing the slide
makes the track sounds more alive.
Play Selected Area as a Loop
Click on the [Loop] button, Shift-click on the [Play] button, or press F10 (Play Selected Area as Loop)
and the program will play a selected region, and loop the selection. For example, you can select bars 10
and 11, and then press F10, and bars 10 and 11 will play looped.
To use this function, select a region on the Chordsheet.
Choose Play | Play (loop) Highlighted Section (or press F10).
The selected region will then play, and continues looping until STOP is pressed.
Loop any Section of the song.
You can loop any section of the song. The program will then start playback at the first loop point and play the
looped section until stopped.
Looping of a section of the song is enabled by the “LoopSec/ LoopScn” checkbox or with the
keystroke NUMPAD 1.
Open up the Loop Section Settings dialog by clicking the Loop button, or pressing NUMPAD 2. The Loop
settings dialog will then display.
The “Play within loop” command allows you to quickly play a looped section. Highlight the range of bars to loop
on the Chordsheet, press NUMPAD 2 to open the Loop Section Settings dialog, and click the [Play within loop]
button.
Chapter 5: Playing Songs in Band-in-a-Box
71
Page 72

To enter settings manually in this dialog, you start by choosing either “Loop a Single Screen of Notation” or “Loop
Range of Bars.”
“Loop a Single Screen of Notation” (Ctrl+NUMPAD 7) loops a single screen of notation at the current song
location. The length of the loop is determined by the number of “Bars/Screen” specified in the Notation Window
Options.
Select “Loop Range of Bars” if you want a custom range of bars, then enter the starting “From Bar” number, the
“Chorus #,” and the “# bars” for the length of the looped section. You can then play the song with the [Play within
loop] button and then [Close] the dialog.
Presets are available to set the loop points to Introduction, First / Middle /Last Choruses or First & Middle, Middle
& Last combinations, Ending, or All.
As the different buttons are selected you will see the
“Loop Range of Bars” settings update.
Hot keys are also available for these, look in the Play
menu under the Looping submenu.
Loop Keystroke Commands (useful for live performance)
NUMPAD 1
NUMPAD 2
Ctrl+NUMPAD 1
Ctrl+NUMPAD 2
Ctrl+NUMPAD 3
Ctrl+NUMPAD 4
Ctrl+NUMPAD 5
Ctrl+NUMPAD 7
NUMPAD [DEL]
NUMPAD [INS]
Toggle looping on/off.
Open Loop Section Settings dialog.
Play with last chorus looped.
Play with middle choruses looped.
Play with middle and last choruses looped.
Jump to last chorus.
Jump to ending.
Loop Notation screen.
Advances the notation, lead sheet, and guitar window by one chord (gr oup of notes).
Backs up the notation, lead sheet, and guitar window by one chord.
Notebook users should set “Simulate NUMPAD Keys” to “ON” in the Preferences dialog, then use the regular
number keys to trigger looping.
The Title bar at the top of the main screen indicates the looping status. If a song has a looped section, this will be
listed at the top of the screen (e.g. “Will loop Middle Choruses” or “Currently looping Middle Choruses”). So you
can tell what is going to happen with the looping during a live performance.
72
Chapter 5: Playing Songs in Band-in-a-Box
Page 73

“Conductor”- Live Looping/Playback control.
As the song is playing, many “single key” hot keys are now available to control the playback and looping
of the song.
Play along with your MIDI Controller Keyboard
If you have an external MIDI keyboard controller connected to your computer system, you can use the MIDI THRU
features to play along with the program.
When playing along on a keyboard to the Band-in-a-Box “band,” if the sound
of your
keyboard is too quiet and increasing the THRU Volume doesn't help enough, use this option to boost the THRU
velocity and make your playing on the THRU channel louder. To set this “THRU velocity boo st,” open the MIDI
Settings dialog (Opt. | Preferences | Channels). Click on the [Options] button and set “Boost THRU Velocity by”
to a value in the range of –127 to +127 in the MIDI Options dialog. (Default is 0.)
Harmonize your play along part by pressing the [T] button in the Synth window to choose a harmony,
just as you would for the Melody.
Play Along with the Wizard
The Wizard is an intelligent play along feature that is controlled with the bottom two rows of your computer’s
QWERTY keyboard or your connected MIDI keyboard. The bottom row of keys plays chord tones; the second row
plays passing tones. You play any key in either row and never make a mistake! The Wizard keys are active during
playback.
In the Play menu, toggle Wizard uses “Smart” notes to “off” (unchecked) to have the Wizard provide you access to
the chromatic scale. Toggle it “on” to have access only to the notes based on the chord/key of the song.
Also, the Wizard works with the harmony feature, so you can play along live in 4-part saxophone harmony for
example.
MIDI Keyboard Wizard
By turning on this Wizard setting in the Opt. | Preferences Transpose dialog, notes
played on a
Chapter 5: Playing Songs in Band-in-a-Box
73
Page 74

Thru channel MIDI keyboard will be played through the Wizard. C, E, G, and Bb will be mapped to chord tones
while D, F, A, and B will be passing tones.
Changing Instruments / Settings for the Wizard
As a play along instrument, the Wizard uses the Thru instrument part. To change the instrument patch, volume,
reverb, etc. for the Wizard select the Thru instrument in the synth window.
MIDI Normalize
If performing a live set, or at a jam session, it helps to have the volume of all of the songs be similar. Now, with a
MIDI Normalize feature, you can level the volumes to a setting in the program options. For example, you can set all
volumes to be 70 and the program will make each song play within those levels. This is done in the Preferences
[Arrange] tab.
When you have set the normalize to “on” the title window at the top of
the screen reports that Normalization is set to 70, and that the velocity of
the currently playing song has been increased from 49 to 70.
The normalization will affect bass, drums, piano, guitar and strings. If you select the “Including melody and
Soloist” option, the normalization will also affect the Melody and Soloist parts.
Outputting MIDI to an External Device
Some external music hardware devices require chords played in root position to drive them in real time.
An example of this is the Digitech Vocalist. It will let you sing into a microphone and harmonize your voice
according to the chords that are input to the device. Band-in-a-Box has the capability of outputting a separate
channel with the chords in root position to support such external devices automatically.
There are also settings such as complexity of chords, output channel, velocity, and note range. It will also drive
“Real time Arrangers” like the Roland RA series. The best way to accomplish this is to access the Opt. |
Preferences and select the [OutputCh.] button. You will then be given a window like this:
Click on the [Vocalist] button if
you have such a device connected
to your MIDI system. Band-in-aBox will then send it the
appropriate chord information
automatically as your song is
playing (e.g., root position triads).
Add Real Instruments – RealDrums and RealTracks
Your songs, styles, and solos can use live audio tracks recorded by studio musicians. These live recordings can be
substituted for the Band-in-a-Box tracks in the RealDrums Settings or RealTracks Settings dialo gs.
RealDrums
There are several ways to hear RealDrums with new or existing Band-in-a-Box songs.
We provide many styles that already have RealDrums. These styles can be identified by the style name beginning
with a minus sign. For example “-ZZJAZZ.STY” is a version of the ZZJAZZ.STY that uses RealDrums.
74
Chapter 5: Playing Songs in Band-in-a-Box
Page 75

Styles (.STY) can have RealDrums (e.g. “–ZZJAZZ.STY”).
This setting is found in the StyleMaker’s Misc. Style
Settings dialog.
You can set the RealDrum style inside the StyleMaker, by pressing the [Misc] button, and then typing
the name of the RealDrum style.
RealDrums can be substituted for MIDI drums on existing styles in the RealDrums
Settings dialog, which opens with Ctrl+click on the RealDrums toolbar button or with
the [RealDrums] button in the Preferences dialog.
With “Enable RealDrums” checked RealDrums may be used rather than MIDI. There is
also a hot key combination to turn RealDrums on/off (Ctrl+Shift+F6).
The hot keys also work while the song is playing.
This will substitute RealDrums for MIDI styles. You can change the setting from 1 to 5.
If set to 1, almost all MIDI drums will get substituted by RealDrums. If set to 5, only RealDrum styles that match
the style perfectly will get substituted.
Technical note: The text file a_pgmusic.ds provided by PG Music controls this, and users can make other files MySubs.ds
if they make their own RealDrums styles.
Individual songs can have RealDrums assigned to them. You can set the desired style in the RealDrums Settings
dialog with the “For this song only, use this RealDrum style” setting. This will let the current song use the specific
RealDrums style.
The [RD] button opens the RealDrums Picker where you select the specific RealDrums style that you
would like to assign to your song.
You can also open the RealDrums Picker directly from the toolbar with the RealDrums button.
Chapter 5: Playing Songs in Band-in-a-Box
75
Page 76

RealDrums are normally saved with songs, unless you have unchecked “Save all Settings with Songs” in the Assign
Instruments and Harmonies to Song dialog. In that case, you can select and save a RealDrums style with your
song by going to File | Save Song with Patches & Harmony (Alt+F2) to assign a RealDrums style.
The Edit Settings for bar… dialog (F5 key) lets you use multiple
RealDrums styles within a song - either using the RealDrums from a
Band-in-a-Box style or specifying a RealDrums style to use at a particular bar.
RealTracks
What are RealTracks?
Just as RealDrums replace the MIDI drum track with live audio recordings of top session drummers, RealTracks add
“Real” instruments recorded by top studio players and recording artists. These tracks replace the MIDI track for that
instrument, and can be controlled just like the MIDI instrument (volume changes, muting, etc.). Best of all, they
follow the chord progression that you have entered, so that you hear an authentic audio accompaniment to your
song. These are not “samples,” but are full recordings, lasting from 1 to 8 bars at a time, playing along in perfect
sync with the other Band-in-a-Box tracks. RealTracks can be built in to the style, and would replace the Bass,
Guitar, Piano, or Strings part, or they can be generated to the Soloist (or Melody) track using the Soloist feature.
We include a selection of Pop, Jazz, and Country RealTracks Combos with Band-in-a-Box Pro. Many more
RealTracks are available as separate add-ons, or bundled into the various Band-in-a-Box PAKs for better value.
Using RealTracks in Songs - Assign RealTracks to Track Dialog
The Assign RealTracks to Track dialog assigns a RealTracks instrument to any of the Band-in-a-Box instrumental
tracks. It also shows any RealTracks that are assigned to Band-in-a-Box tracks.
Note: RealTracks can either be assigned from the style or from the song. This dialog allows you to assign the ones in the song.
This dialog is launched by
1.
Clicking on the RealTracks toolbar button and selecting RealTracks Picker Dialog.
2. Right-clicking or double clicking on an instrument name at the top of the Band-in-a-Box main screen and
choosing Assign RealTracks in the menu.
- or -
3. Press the [Assign to Track…] button in the RealTracks Settings dialog.
76
Chapter 5: Playing Songs in Band-in-a-Box
Page 77

The dialog allows you to assign a specific RealTracks instruments to a track in a song. It also displays any
RealTracks that are currently assigned to each track.
Tip: RealTracks in styles are assigned in the StyleMaker. Press the [Misc.] button or use the StyleMaker menu command
Style | Misc. Settings to go to the Misc. Style Settings dialog, then click on the [More] button for the More Settings dialog.
To use the dialog, first select the track that
you want to assign. Then, select the
RealTracks that you want in the list below it.
Chapter 5: Playing Songs in Band-in-a-Box
77
Page 78

Freeze Tracks
Freezing (locking) MIDI or RealTracks/RealDrums
Any track can be frozen (MIDI or RealTracks). When frozen, it won’t get changed or re-generated. This saves time
when replaying previous songs, and allows you to freeze an arrangement that you like. If you freeze the whole song,
you don’t have to wait at all for the song to regenerate. Next time you play, it is ready to go.
You can make frozen tracks by pressing the Freeze button (snowflake) on the toolbar, and then choosing which
tracks that you want to freeze or unfreeze.
There are a number of reasons that you would freeze a track.
Reasons to Freeze a RealTracks track (audio):
- Frozen tracks will play back instantly, not requiring time to generate.
- They play back the same way each time, so if you like a solo, you can “freeze it.”
- If you send a song to a friend as “frozen,” they will hear the same performance.
- For the Soloist track, if you generate a solo, it can now be saved (by freezing the track).
Reasons to Freeze a MIDI track:
- You can edit the MIDI data, to customize the performance to match a certain song, and this will be saved. Use
the Notation window or Piano Roll to edit the track.
More reasons to freeze any track:
- Frozen tracks play back instantly, without requiring time to regenerate.
- They play back the same way each time.
- You can change the chord progression of the song, and have one part playing a different chord progression than
the rest of the band. For example, type a “blowing” chord progression, generate a solo, freeze the solo track,
then type a normal chord progression and generate the rest of the instruments (bass/guitar etc.) that will play the
normal changes.
- Have different instruments play different styles. For example, the Bass could be generated using Reggae, then
Frozen, and then the rest of the instruments generated using a Techno style.
Un-Freezing a Track(s)
This is also done for the Freeze button. Choose a frozen track to un-freeze it, or choose “Un-Freeze all tracks.”
78
Chapter 5: Playing Songs in Band-in-a-Box
Page 79

Forcing Generation of a Song that is Frozen
Band-in-a-Box won’t touch tracks that are frozen. But if you want to change that, without having to Un-Freeze the
tracks, you can do this easily.
Hold down the Shift key as you press the [Play] button (the fly-by hint will remind you of that), or choose the menu
command Play | Generate (even if tracks are frozen).
When you do this, the song will regenerate, the tracks will get rewritten, and the song will stay frozen. So if you’re
freezing songs to get the instant playback with RealTracks, but get tired of the “same-old” frozen arrangement, just
press Shift+Play, generate a new arrangement, and press Save. Then the new “fresh-frozen” arrangement will play
instantly, even with many RealTracks.
Tip: Obviously you wouldn’t use this feature to force regeneration of a frozen song if you have made custom edits to the
song that you don’t want to lose, unless you’ve saved the song and have a backup copy.
Editing and Saving Tracks
MIDI tracks for bass, drums, piano, guitar and strings can be edited and saved with the file. If you freeze a track,
edits can be still made to it, because it is only frozen from Band-in-a-Box making changes to it (you can still edit it).
The MIDI track will be saved to the file. So you can customize the bass part to match a certain song, and save it
with a frozen bass part, so that Band-in-a-Box won’t overwrite your edits. This includes RealCharts – if you wanted
to edit the notation of a RealTracks solo for example.
To edit a MIDI track (bass, drums, piano, guitar, strings), or the MIDI part of a RealTracks that has a RealChart
(MIDI transcribed solo), simply open up the Notation window (or Piano Roll window), and click on the track and
edit it. Make sure to Freeze the track by pressing the Freeze button and choosing Freeze for that track, or rightclicking on the instrument at the top of the screen and choosing Freeze. Now your edited tracks will save with the
song.
The Guitar Window
This is a window for guitar and bass players! The on-screen fretboard displays any track on guitar, bass, mandolin,
ukulele, or banjo. This feature has many option such as auto-setting of correct positions, notes named on-screen,
auto-octave adjust to play in selected position, and a resizable guitar fretboard.
Launching the Guitar Window
To launch the Guitar window, press the Guitar Button, or Ctrl+Shift+G, or choose the Window | Guitar
Window menu item.
Chapter 5: Playing Songs in Band-in-a-Box
79
Page 80

Notice the various areas of the Guitar window.
- The top title bar states the key of the song is Cm, the Melody track is the track displayed, and the guitar is at the
th
position.
8
- The fretboard is displayed with the highest notes of the guitar at the top, and the open position of the guitar on
the left.
- There are names for the open strings displayed on the left (E B G D A E).
- There are fret positions marked at the bottom of the fretboard. You can mouse click on these positions to
change the current fret position.
- There are Note Names displayed for two positions on the guitar fretboard. One of the positions is the scale
beginning with the third of the scale on the lowest string. In the key of F, this is the 5th position beginning on
an A note (the third of the scale). Because it begins on the third of the scale, this position is referred to as the
Phrygian Position (since an A Phrygian scale is the same as an F scale). Similarly, the other popular scale is the
scale beginning on the 6th of the scale, in the key of F, this is up at the 10th position, and is called the Aeolian
Position.
- There are note names displayed in color, with ellipses around the notes that are in the scale. The root note of
the scale is highlighted in red, the third and fifth of the scale are in purple, and the rest of the scale tones are
circled in gray.
- Pitch bends show up on the Guitar Fretboard. As the pitch bend occurs, a blue line moves along the string in
real time, illustrating the height of the pitch bend. Load in the c:\bb\Tutorial\Pitch Bend demo song. You’ll
then see pitch bends written as a blue color moving along the string.
Automatic Settings for Guitar Display
Band-in-a-Box does a lot of things automatically on the Guitar window to ensure that the notes are displayed
intelligently on a guitar fretboard. These include:
- Automatically setting the two positions that will display the note names based on the key.
- Auto-Scanning the track to be played, and adjusting the display octave on the guitar fretboard to ensure that the
best octave is picked to minimize the number of notes that will be outside of the current position displayed on
the fretboard.
- After Auto-scanning the track, the best position for displaying the music on the guitar is determined. This is
always one of the two positions, Aeolian or Phrygian, though you may over-ride this by clicking on any fret
position.
- Color-coding note displays. In addition to the note names being outlined in the colors, when the note is played
it is highlighted in green if it is a scale note and yellow if it is an out-of-scale note.
Alternate Guitar Tunings
The Guitar window supports alternate tunings, including DADGAD, Drop D, Double Drop D, Open G, and 11
others. You can also select “Nashville High Strung” tunings, which tune certain strings up an octave. These tunings
are supported in Styles, Chord Diagrams, Guitar Tutor, Notation, Tab, and Printout. Learn how to play these
tunings by watching the on-screen Guitar Fretboard or Notation/Tab window. Easily change any style to use the
alternate tuning that you want.
In this discussion, we’ll be referring to DADGAD tuning, a popular alternate tuning. The same reasoning applies to
all of the other alternate tunings available.
There are four ways you can use Band-in-a-Box playing in DADGAD (or any alternate) tunings.
1. See any Melody (or Soloist track) displayed in DADGAD tuning. This will display on the guitar fretboard,
tab, and printout.
2. See guitar parts (chording etc.) in DADGAD tuning, using correct chord shapes. For this, choose a style
that has DADGAD tuning, and vi ew the guitar part.
3. Use the Guitar Tutor, to view DADGAD chording for any style.
4. View guitar chord diagrams in DADGAD tuning, by setting the Notation Window Options “Guitar
Chord” to “DADGAD.”
80
Chapter 5: Playing Songs in Band-in-a-Box
Page 81

Guitar Fretboard
To see the guitar neck displayed in DADGAD, choose Melody | Track Type | Guitar – DADGAD Tuning.
When you open up the Guitar window and choose the Melody track, you’ll see the DADGAD tuning.
Chapter 5: Playing Songs in Band-in-a-Box
81
Page 82

Any melody will now display in the chosen tuning. Similarly, you can set the Soloist track to an alternate guitar
tuning with the Soloist | Track Type menu.
The Guitar track (or Piano, Strings) is controlled by the style, and will only reflect the type of tuning stored in the
style. Load in some alternate tuning styles included in Styles Set #44 – Requested 4 to see the chording on the
guitar track in alternate tunings. Another way to see the guitar play chords in alternate tunings is to use the “Guitar
Tutor.”
Select DADGAD tuning, and enable guitar Tutor.
Now, during playback, you will see guitar chords on the guitar fretboard in DADGAD tuning.
82
Chapter 5: Playing Songs in Band-in-a-Box
Page 83

The examples above are for DADGAD tuning, but apply similarly to all 11 alternate tunings included.
Some of the tunings are “Nashville High Strung.” These tuning have the lowest 3 strings tuned up an octave, to
achieve a close sound. So a DADGAD High Strung tuning would have the lowest 3 strings “DAD” tuned up an
octave. Listen to some style examples that use this tuning.
One of the tutors uses 3 note Jazz voicings to simulate the famous BigBand chord guitar comping styles. If you use this tutor you'll only see 3 notes in the chords of course. Since it
sometimes helps to see the entire 4 chord voicing in this case, there is the option to show the muted note as well.
The Tutor normally just shows the guitar part without
writing it to any track. If you want to see the track in notation copy it to the Melody or Soloist track.
Guitar Window Toolbar
At the bottom of the Guitar window is the toolbar.
The [Set…] button opens the Guitar Settings dialog, which allows you to set the guitar
numeric keypad and will advance or go back one chord at a time, leaving the chord displayed on the guitar.
This is the name of the current note that the mouse is over. If you click on the guitar at that position, the
note will sound.
If the Notation Window is open (in Editable Notation or Staff Roll mode), that note will get inserted on the notation
at the current position on the timeline – you can disable that option to insert notes.
In the diagram here, the Melody track is the current track, and it has a red rectangle around it to indicate this.
To get to the Soloist track, you would click on the [S] button or use the hotkey Ctrl+F5, which toggles between the
Melody and the Soloist. Similarly, you can display other tracks like Bass, Piano, or Strings.
options.
These buttons will chord step advance, or note-step advance. The chord step advance is the
most commonly used function. It is also accessible by the hotkeys Ins and Del on the
When you open the Guitar Window, the first thing you'll want to do is choose the track
that you want to display. Usually this will be a Melody track or a Soloist track.
The “position” button. This toggles between the two popular positions displayed with note names.
There is a Guitar Tutor button.
Generate a guitar chord solo based on the existing Melody track using correct guitar fret positions.
guitar chord changes to a different voicing, cycling through the available 5-10 voicings possible for each chord.
(Some notes won't have any chord voicings, for example a C# note on a Cmaj7 chord, because it is always a passing
tone.)
When you have a note or chord highlighted press the [Ch- ] or [Ch+] (insert guitar chord) button on the
guitar, or 7 or 8 on the NUMPAD keypad. Each time you press the [Ch-] or [Ch+] you'll see that the
In a similar manner, you can convert a chord to a guitar note using the insert guitar note button.
Pressing the [N+] (or 3 or 4 on the NUMPAD keypad) repeatedly cycles through playing the
same note on all 6 strings.
Big Piano Window
The Big Piano window can display the notes of any track on a resizable piano keyboard. You can also set the range
of the piano and number of octaves to display. Additionally, you can display notes names or guide notes --showing
the scale notes of the current key. Notes can be displayed using a different color for each note. There's an “AutoOctave” setting that will scan the track to be displayed and auto-size the piano to the largest size that would display
all of the notes. This 'Big Piano' makes it easier to learn piano parts from within Band-in-a-Box.
The Big Piano window is launched (or closed) by pressing the piano icon on the toolbar at the right-middle
of the screen, or by pressing Ctrl+Shift+N, or choosing Window | Big Piano Window.
Chapter 5: Playing Songs in Band-in-a-Box
83
Page 84

- The default settings for this feature can be customized by pressing the [Settings…] button.
- The Big Piano window displays a single track on the piano.
- The piano can be resized by dragging the bottom of the window to enlarge it vertically.
- The key of the song is displayed at the top.
- The range of the piano is set automatically (based on the actual notes in the track) to show the largest possible
piano).
- The notes of the scale are circled on the piano, with the note names included.
- The root of the scale is colored in red. As the song plays, scale tones are colored green; other notes are colored
yellow.
- The name of the note that the mouse cursor is over is highlighted at the top of the window. Clicking on the Big
Piano plays a note (using the Thru part) and this can be recorded or sent to the Notation window when entering
notation. You can select the track to use by clicking the [B|D|P|G|S|M|S] line of buttons.
- RealTracks (and MIDI style) piano parts that are on the piano track will appear with hands-split (right hand in
red, left hand in blue) in the Big Piano window
The Conductor
The Conductor provides live looping and playback control. As the song is playing, there are options to allow
control the flow of playback by one of three methods:
1. Conductor window
2. QWERTY hot keys
3. MIDI keyboard
Many “single key” hot keys are available to control the playback and looping of the song. For example, pressing the
“4” key will insure that the middle chorus is the next one played, and pressing the “S” key will insure that th e
middle section is looped. This would be useful to extend a song that has the last chorus playing. Custom loop
points can also be set for each song. These settings are ideal for live performance, or “jam sessions” where you
aren’t entering new Band-in-a-Box songs, but want full control of the playback. These loops happen seamlessly at
the end of the chorus, so are suitable for the “dance floor .” In addition, you can control Band-in-a-Box from a
standard MIDI keyboard, pressing MIDI keys corresponds to program functions. For example, load the next song,
play/pause/tempo adjust/change thru patch/jump to middle choruses/open the notatio n or lead sheet window – all
from your MIDI keyboard!
The Conductor is launched with the Conductor button on the toolbar, or the tilde (~) hot key, or menu
option Window | Conductor Window.
84
Chapter 5: Playing Songs in Band-in-a-Box
Page 85

You must enable the QWERTY keys to be active for the Conductor during
playback. This is done by selecting the “Enable Control by QWERTY keys”
checkbox on the Conductor window.
If you want to control the Conductor using the MIDI keyboard, you need to
enable this by selecting the checkbox “Enable control by MIDI keyboard.” When this setting is enabled, any MIDI
input will be interpreted as a hot key for the Conductor, and you won’t hear MIDI thru.
If you’d like the ability to switch your MIDI keyboard
between Conductor mode and regular playing mode, you can do this using the lowest “A-natural” MIDI note on
your keyboard. This is A1 on an 88-note keyboard. Note A1 will turn the Conductor off, Bb1 turns it on, and B1
will toggle the Conductor on only when the Bb1 note is held down. If you don’t have an 88-note keyboard, you can
set the octave setting to a number higher than 1, for example if you set it to “3,” then notes A3/Bb3/B3 will turn the
Conductor Off/On/Toggled.
Using the Conductor QWERTY or MIDI keys, you can:
- define and jump to up to 10 user defined sections in the song,
- jump back 1 bar/4 bars/# of bars/screen/part/chorus/section,
- jump ahead 1 bar/4 bars/# of bars/screen/part/ c ho r us/ sect ion ,
- LOOP 1 bar/4 bars/# of bars/screen/part/chorus/sect i on,
- Pause/stop the song.
In addition, using the MIDI keyboard, you can also use the Conductor to:
A1 (note#21)Turn MIDI Conductor OFF
Bb1 Turn MIDI Conductor ON
B1 Turn MIDI Conductor ON only as note is held down
Here are the various functions available using the Conductor. The MIDI key and QWERTY hot key are shown.
C3 Normal Tempo Ctrl =
Chapter 5: Playing Songs in Band-in-a-Box
85
Page 86

C# Half Speed Tempo Ctrl D3 Quarter Speed Tempo
Eb3 Eighth Speed Tempo
E3 Loop Section Enabled NUMPAD 1
F3 Play with last chorus looped Ctrl-NUMPAD 1
F#3 Play with middle choruses looped Ctrl-NUMPAD 2
G3 Play with middle and last choruses looped Ctrl-NU MPAD 3
G#3 Jump to last chorus (no loop) Ctrl-NUMPAD 4
A3 Jump to ending (no loop) Ctrl-NUMPAD 5
Bb3 Loop notation screen
B3 Decrease Tempo by 1 Shift [
C4(48) Increase Tempo by 1 Shift ]
Db4 Decrease Tempo by 5 [
D4 Increase Tempo by 5 ]
Eb4 Tap tempo - (press 4 times)
E4 Tap Tempo and play = (press 4 times)
F4 Play F4
F#4 Stop Escape
G4 Pause Backspace (or Ctrl H)
G#4 Replay Ctrl A
A4 MIDI Panic F12
Bb4 Previous Song Ctrl-Shift-F8
B4 Next Song Shift-F8
C5(60) This is a control character for THRU patches. When C5 is held down, pressing MIDI notes 61/62
decrease/increase the THRU patch by one, and 63-72 change THRU patches to Favorite patches.
Db5 Open Notation Window Ctrl-W
D5 Lead sheet Window Alt-W
Eb5 Reduce All Volumes by 5 Ctrl-Alt-Shift-Q
E5 Increase all Volumes by 5 Ctrl-Alt-Shift-W
F5 ALL Mute/Unmute Alt-2
F#5 Bass Mute/Unmute Alt-3
G5 Piano Mute/Unmute Alt-4
G#5 Drums/Unmute Alt-5
A5 Guitar Mute/Unmute Alt-6
Bb5 Strings Mute/Unmute Alt-7
B5 Melody/Unmute Alt-9
C6 Soloist Mute/Unmute Alt-8
Db6 THRU Mute/Unmute Alt 0
D6 Audio Mute
F6 to D7 Jump to Sections 1-10 of the song 1-9 and 0
Eb7 Loop Current Chorus a
E7 Loop Current Section s
F7 Loop Current Bar z
F#7 Loop Current 4 Bars x
86
Chapter 5: Playing Songs in Band-in-a-Box
Page 87

G7 Loop current Part c
Ab7 Looping ON, previous setting v
A7 Looping OFF b
Bb7 Go Back 1 Chorus Ctrl a
B7 Go Back 1 Section Ctrl s
C8 Go Back 1 Screen Ctrl d
Db8 Go Back 1 Bar Ctrl z
D8 Go Back 4 Bars Ctrl x
Eb8 Go Back 1 Part marker Ctrl c
E8 Go Ahead 1 Chorus Shift A
F8 Go Ahead 1 Section Shift S
F#8 Go Ahead 1 Screen Shift D
G8 Go Ahead 1 Bar Shift Z
Ab8 Go Ahead 4 Bars Shift X
A8 Go Ahead 1 Part marker Shift C
Customizing the Sections
Sections: This allows you to define up to 10 points in the song that are sections. By default, the following sections
are defined for each song.
- Section 1: Start of song
- Section 2: Intro
- Section 3: First Chorus
- Section 4 :Middle Chorus (i.e. start of chorus #2)
- Section 5: Last Chorus
- Section 6: Ending
- Sections 7-10 are user definable. To do this, type in any bar # using the bar/chorus format (e.g. 21/2 would
be bar 21, chorus 2).
If you prefer to enter custom values for the section numbers, you can do this if you check the “custom” checkbox,
and then type in up to 10 bar numbers for each section.
The section numbers are saved with the song. Once you have defined the sections, you can jump to a certain section
of the song as the song is playing, simply by:
1. Pressing the 1-9 or 0 key on the QWERTY keyboard or,
2. Opening the Conductor window (~ hot key) and clicking on the section button or,
3. Pressing MIDI keys 77-86 (F6 to D7) corresponding to sections 1-10.
Mode (when to do the action).
Chapter 5: Playing Songs in Band-in-a-Box
87
Page 88

By pressing a QWERTY hot key prior to an action, you can control when the action will take place. If no mode hot
key is pressed prior to an action, the default mode will occur.
The default is set in the “Default Mode for section change” or “Default
Mode for going back or ahead” combo box.
For example, by default, the section change will occur as soon as you
press the key, and it will go to the equivalent place in the bar immediately
before the beginning of the target section (so that the music stays in time,
and the next section begins at the end of the bar). But you can change the default for the action to take place at the
end of the current bar or current part marker etc.
Example uses of the Conductor:
In this example, we don’t have custom sections set, so the default sections apply (middle chorus = section 4 etc.).
- Jump to the start of middle choruses during playback (press “4”).
- Loop the middle chorus (press S, which is Loop Section).
- Jump to the end of the song (press 6).
- Pause the song (Backspace).
- Go back 1 chorus (Ctrl a).
- Go ahead 1 chorus (Shift A).
At the end of the current chorus, go back 1 section, press Y then Ctrl S.
Note: Pressing the Y sets the mode to do the action at the end of the current chorus
These actions can also be done with the MIDI keyboard. See the MIDI keyboard mapping diagram for details.
Example using the MIDI keyboard. Assume Charlie is a piano player who uses his MIDI keyboard with Band-in-
a-Box, and would like to play his keyboard, but also use it to control Band-in-a-Box.
He sets the conductor to allow his MIDI keyboard lowest notes A/Bb/B to turn the Conductor mode
OFF/ON/Toggled-when held.
When he turns it off (low A note), he can play his keyboard normally.
If he wants to pause the song, he holds down the low B3 note as he presses the MIDI key for pause, which is G4.
The song will pause, and the conductor mode turns off as he lets go of the B3 key, and he can resume his piano
playing. If Charlie didn’t plan on using the MIDI keyboard for piano playing, he could leave it in conductor mode
by turning it on with the A3 key.
The Jukebox
Use the
play all or the songs in a folder. The Õ Juk button plays the previous song in the
The Jukebox will continue to play while you move to other Windows programs, providing continuous background
music.
Click the [Juke] button to open the Options for Juke Box dialog.
88
directory; the Juk Ö button plays the next song in alphabetical order.
Jukebox for continuous playback of a whole list of Band-in-a-Box song s or to
Chapter 5: Playing Songs in Band-in-a-Box
Page 89

Jukebox Options
Only Play song with melodies: If set to YES, the program plays only songs with melodies, that is, songs with an
.MG? file extension. If NO, the Jukebox will include ALL songs in the subdirectory.
Change Melody instrument: If you set this option to “Yes,” then the program will randomly change the melody
instrument among your favorite 10 Melody instruments.
Random order Playback: If set to “Yes,” the songs will be played in random order (though not repeating a song).
If set to “No,” the songs will be played in the order they are listed in the subdirectory.
Hide Titles (until title clicked): This feature is used to play the “Guess the Song” game. When set to “Yes,” the
titles are hidden till you click the title box.
Audible Count-in Click: While listening to the Jukebox, you might not want to hear the Count-in Click. If set to
“No” you won't hear the count-in click.
Harmony Settings: Set the Change Harmony box to true/enabled if you would like harmonies in a given number
range to be randomly assigned for use with the Melody and Soloist/Thru tracks (if applicable to the song).
Generate Solos: Set this option to “On” to permit the Soloist to play a Solo over all the songs selected for Jukebox
Playback.
1. Change to this directory by loading/opening a song from the c:\bb\solodemo directory.
2. Instead of playing the song you have loaded, press the [Juke] button.
3. Ensure that the Generate Solos checkbox is set to “Yes.”
4. Select [PLAY JUKE BOX]. The Soloist Select Dialog will pop up with a suggestion to use a Soloist for the
first song in the Jukebox list. This is normal. Press [OK] to accept the Soloist suggestion. (The Jukebox will
not bother you with the Select Soloist dialog again; it will simply choose an appropriate Soloist for any given
song in the Jukebox song list.)
Chapter 5: Playing Songs in Band-in-a-Box
89
Page 90

Preview:
The Jukebox Preview mode will optionally play
just one chorus of each song, or play a set
number of bars of each song (e.g. 8 bars).
To access this, press the [Juke] button, and select the Preview checkbox. Set the # of bars to use for the preview, a
setting of 99 plays one chorus of each song.
Delay between songs: The user can set a selectable time delay (in seconds) between songs.
Note: To manually start playback of each song in the jukebox list, set “Pause Play Until MIDI or Key received” to On
(checked) in the Preferences dialog. At the end of each song the jukebox will load the next song in the list and then pause
until playback is started by sending a MIDI note or a computer keystroke.
Check “Loop Jukebox at end” for continuous jukebox play rather than stopping at the end
of the list.
Change Directory:
You can change the directory before starting the Juke Box with the [Change Directory]
button. You can also type a folder name directly, instead of using the folder dialog.
In the main screen, click on the [F] button to open the Favorite Songs list and make your own
custom set lists for the Jukebox.
- Use the [Clear] button to blank the list.
- Songs can be added or removed from the list with the [Insert], [Append], and [Delete] buttons. [Add
Fav] also adds a song to the Favorite Songs list.
- Use the [Save Set..] button to save the list of selected songs.
- The [Load Set] button loads a saved list of songs.
- The [Juke..] button plays through the list of songs automatically, like a jukebox.
This is a great feature for saving a list of current song projects, or for performing a live set with Band-in-a-Box
accompaniment.
90
Chapter 5: Playing Songs in Band-in-a-Box
Page 91

Medley Maker
Would you like to make a medley of various Band-in-a-Box songs (MGU) using Band-in-a-Box? This is easily
done with the Medley Maker. Inside the Medley Maker, simply select the songs that you want, and Band-in-a-Box
will make the medley for you. A medley is not simply joining songs together. A good medley uses a “transition”
area between songs to introduce the new style, key, and tempo. The Medley Maker automatically creates a nice
transition area for you, writing in chords that would smoothly modulate to the next song, style, key, and tempo!
To open the Medley Maker, click on the [A+B] button on the toolbar or choose File | Medley Maker. This
launches the Medley Maker dialog.
Chapter 5: Playing Songs in Band-in-a-Box
91
Page 92

Chapter 6: Making Songs in Band-in-a-Box
Make Your Own Songs
Now that you’ve seen how much fun it is to play music with Band-in-a-Box, we’ll show you how easy it is to make
songs of your own. This section gives you step-by-step instructions from star t to finish.
Getting Started
Clear the Chordsheet
Click on the [New] button to blank the Chordsheet.
Name the Song
Enter the title of the song by clicking in the title area and typing in the name.
Choose a Key
You can use the special operators “tk” and “tr” to set or transpose a key signature.
Typing tkc plus the Enter key will set the key of the song to C. Typing tkbb sets it to Bb. Note that this sets the
key signature but does not transpose the song.
The “tr” operator sets the key signature and transposes the song. Typing trf and pressing Enter would transpose the
song to the key of F, typing trab would transpose the song to Ab.
Another way to set a key signature is to click on the Key Select List and choose the key of your song.
It's easy to change the key by simply selecting another key from the list. Click on “YES” when the
program asks, “OK to transpose WorkSheet” and Band-in-a-Box will automatically transpose the
entire song into the chosen key.
You can have multiple keys in a song by changing the key signature in the Edit Settings for bar
dialog (F5 function key). The new key signature is shown on notation.
Setting the tempo
The tempo is displayed under the title. You can quickly enter a specific tempo for the song by typing the letter “t”
together with the tempo and pressing the Enter key. For example, type t140 and Enter to set the tempo of the song
to 140.
Click on the tempo box (hot key is Ctrl+Alt+T, or menu item Play | Tempo | Set Tempo…), and a dialog will open
up allowing you to type in a tempo.
When choosing File | New the tempo will be set to the best tempo for the current style. The tempo for this style is
160 beats per minute (bpm).
Click the mouse on the arrow buttons to adjust the tempo.
- LEFT mouse click to change by 5 beats per minute at a time.
- RIGHT mouse click to change by 1 beat per minute at a time.
Tap the tempo
Not sure of the tempo for your song? Tap it in real time on either the minus [-] key or the equals [=] key on your
computer keyboard. Four taps on the minus key sets the tempo, four taps on the equals key sets the tempo and starts
the song playing. You can also click the mouse on the on-screen [-] and [=] buttons to the right of the tempo box.
“Framing” the Song
Framing a song designates the first and last bars of each chorus and the number of choruses Band-in-a-Box will play
before playing the standard 2 bar ending.
You can type special words to set the beginning and end of the chorus, and the end of the song.
92
Chapter 6: Making Songs in Band-in-a-Box
Page 93

begin + Enter
chorusend + Enter
end + Enter
- sets the beginning of the chorus to the current bar
- sets the end of the chorus to the current bar
- sets the end of the song to the current bar
Another option is to right-click a bar in the chordsheet to set it as the beginning or end of the chorus or the end of the
song from the settings in the context menu. For
example, these settings are available with a right-click
on bar 16.
For this song, bar one is the first bar of the chorus and bar 32 is the last bar of the chorus.
The chorus will play three times, jumping to the two bar ending the third time throu gh.
With the “Loop” checkbox enabled th e entire song will keep repeating until stopped.
(This is a different feature from the “LoopSec” checkbox, which loops a selected section of the song.) The “Fake”
checkbox is for a “fake sheet” style of chordsheet display with 1
The [S] button opens the Song Settings dialog for additional settings such as endings, tags, style variations,
pushes, rests, and chord embellishments.
st
and 2nd endings and repeats.
Chord Entry
Computer Keyboard Entry
The most common way of entering the chords for a song in Band-in-a-Box is by typing them in from the computer
keyboard. Up to 4 chords per bar may be entered.
Chords are commonly typed-in using standard chord symbols (like C or Fm7 or Bb7 or Bb13#9/E), but you can
enter them in any of the supported chord symbol display formats - Roman Numerals, Nashville Notation, Solfeggio,
and Fixed Do.
Tip: To view a list of chords recognized by Band-in-a-Box refer to the Chord List topic in the Help file.
To start typing in chords:
- Go to the top (Bar 1) of the chordsheet. The Home key will go directly there.
- Blank the Chordsheet (if necessary) by clicking on the [New] button.
This is the chord highlight cell. Chords will be entered wherever this is placed. You may
move this around by cursor keys, the Enter key, or a mouse pointer click.
The chord highlight bar moves 2 beats at a time (½ a bar). When you have the chord highlight cell over the area that
you want to enter a chord, you simply type the name of the chord you would like to see there.
For example, type c6 to get the C6 chord. Note that you should never have to use the Shift key, as Band-in-a-Box
will sort this out for you.
- Use b for a flat, e.g. Ab7.
- Use 3 for a sharp #, e.g. for F#7 type f37.
- Use / for slash chords with alternate roots, e.g. C7/E (C7 w/E bass). A chord like Gm7b5/Db will display
correctly using a Db instead of a Gm7b5/C#, since Band-in-a-Box bases it on a Gm scale.
- Use a comma to separate the ½ bar, enabling you to enter 2 chords in a cell. In the example below, we would
type Ab9,G9 to get the 2 chords in the cell on beat 3 and 4 of bar 2.
The sequence of keystrokes to enter all these chords above would be:
HOME c6>am7>dm7>ab9,g9>c6/e>>a739
Note: We're able to type A7#9 as “a739” because Band-in-a-Box knows to use the uppercase of the 3, which is #. The >
indicates a carriage return, or the Enter key.
Chapter 6: Making Songs in Band-in-a-Box
93
Page 94

An option (in Prefs-Display) for “11th chords” allows display of “9sus” chords as “11”
(e.g., Bb11 instead of Bb9sus). This only affects how the chord is displayed, not how it is stored, and you can type
either C11 or C9sus to enter the same chord.
Press Ctrl+F2 or right click on a chord, and an Edit control allows you
to see and edit the current chords.
Enter Chords From MIDI Keyboard
You can also enter chords from an external MIDI keyboard using the Window | MIDI chord detection… feature.
Play the chord on the keyboard, then press Ctrl+Enter to insert the chord into the chordsheet on the first beat of the
current chord cell, i.e., beat 1 or beat 3 of the bar. Use Ctrl+Shift+Enter to insert the chord on the next beat, i.e.,
beat 2 or beat 4 of the bar.
Import a Band-in-a-Box Song
Easily import part or all of an existing Band-in-a-Box song to your current song, with op tions to specify source and
destination range, type of information to import (chords, melody, lyrics, etc.) and more. Choose File | Import Song.
In the Import Band-in-a-Box Song dialog, choose the range that you want to import (Import from Bar and # of
bars), and the destination bar (Import to Bar). You can also choose which information to import, and the insert
mode (Insert/Overwrite).
Audio Chord Wizard (Chords from MP3)
This feature analyzes a WAV, WMA, MP3, WMV, or CDA audio file and imports it to Band-in-a-Box.
The Audio Chord Wizard is fully described in the Tutors, Wizards, and Fun chapter.
It works out the tempo, bar lines, and chord changes so you can easily make your favorite files into Band-in-a-Box
songs.
Copy and Pasting Section of Chords
Copying of sections or selections can be done using drag-and-drop, simply drag regions around the chordsheet to
quickly rearrange your song. Hold down the Ctrl key for finer control about insert/overwrite etc.
94
Chapter 6: Making Songs in Band-in-a-Box
Page 95

For example, if you have an 8-bar section at bar 9:
To copy it to bar 23, and insert the 8 bars at that location drag the bar # and drop it at bar 23.
To copy it to bar 23, and OVERWRITE the 8 bars at that location hold down the Ctrl
key, and drag the bar # and drop it at bar 23. In the dialog that appears, just press OK.
<Ctrl>
Another way to copy chords is to launch the Copy Chords and/or melody dialog by pressing Alt+C.
This allows you to copy chords/ melody/ soloist/ lyrics for a range of bars by entering the From and To locations and
the number of bars to copy. Select the checkboxes for the items you want to include in the copy.
Insert Bars at destination
If selected prior to the Copy bars will be inserted onto the Chordsheet at the destination chosen.
# of times to repeat copy
If set to more than one, multiple copies will be made, optionally with transpositions on each copy. These are all
applied to the first chorus only.
With each copy, transpose ___ semitones
If more than one copy is selected, this will transpose the song with each copy. This is most useful when wanting to
learn a short phrase (“riff”) in different keys, or modulating a section of a song.
Random # of semitones
This will transpose the copy a random transposition and would be useful for advanced students who are trying to
master a riff or phrase in all keys.
Copy 1st Chorus to whole song
If set, this will apply any of the copying commands in this dialog to all choruses of the song, not just chorus #1.
This button toggles between [Show More] and [Show Less], depending on whether just the
basic functions or all Copy functions are displayed.
Copying chords to the clipboard.
Select the region to copy. To select a region of the Chordsheet (or the Notation or Audio Edit window), you can
Shift+click on the end point to easily select a large area.
- Click on the starting bar.
- Shift+click on the ending bar.
Another way to select a region is by dragging the mouse over it. Place the mouse cursor at the bar to begin the
selection. Then, holding down the left mouse button, drag the mouse over the region. As you do this you will see
that the region will be inverted (white characters on a black background). When you have selected the proper region
of chords to copy, then
- copy the selected (blackened) region to the clipboard
- click on the Copy button or choose Copy from the Edit menu.
Pasting chords to another section of the chordsheet.
Chapter 6: Making Songs in Band-in-a-Box
95
Page 96

Assuming you have already copied some chords to the clipboard you then paste them into the chordsheet by:
1. Move the highlight cell to the bar to begin the paste of chords.
2. Click on the Paste button or choose Paste from the Edit menu.
Tip: Remember that the copied section remains in the clipboard and can be repeatedly used. Example: If you're inputting a
song with verse, verse, bridge, verse you can just copy the first verse to the clipboard, and then repeatedly paste in the
other verses. The information on the clipboard remains intact even if you load in a new song, which means you can copy
and paste between songs.
Copy, Repeat X times, with Transpose.
The Edit | Copy From.. To.. menu command opens the Copy Chords and/or melody dialog, which has additional
fields allowing you to define the number of times to repeat each copy and define the number of semitones you
transpose. For example, you could have a 16 bar section, copy it 3 times with a semitone transpose each time. Or,
take a single 4 bar phrase, and copy it 11 times, transposing up a 4th each time, generating the same 4 bar phrase in
all 12 keys.
Deleting Chords
The chords at the current location of the highlight cell are cleared by the Delete key, the Windows “Cut” command,
or by typing a comma and pressing Enter.
Deletion of chords over a range of bars can be done by selecting the range and pressing the Delete key on your
computer keyboard. No confirmation di alog is required.
Previewing Chords
This feature allows you to hear chords as you to type them in. After you type a chord name onto the Chordsheet (or
notation window), press the Shift+Enter keys. This enters the chord onto the chordsheet and then plays the chord
for you, using the patches on the Piano part and Bass Part. You can also listen to a chord that has already been
entered, by just pressing the Shift+Enter keys after moving to that bar with the chord. If there is no chord entered
at that bar, you will hear the last chord that was entered.
You can right-mouse click on the chordsheet and choose Chord Sett i ngs to launch the Chord Options dialog, and
then press the [Preview] button to hear the current chord in the Chord Options Dialog.
The [Clear All] button erases all Rests/Shots/Pushes/Pedal Bass from a song.
Support for other chord display types
You can enter or display chords in Roman Numeral notation, Nashville notation, Solfeggio, or Fixed Do notation.
96
Chapter 6: Making Songs in Band-in-a-Box
Page 97

For example, the chord Gm7 in the key of F would be displayed as IIm7 in Roman Numeral Notation, 2m7 in
Nashville Notation, and Rem7 in Solfeggio.
“Fixed Do” Notation
In Italy and other parts of Europe, chords like C7 are always referred to by the
Solfeggio name (“Do 7” for C7) regardless of the key signature.
These systems are very useful for learning or analyzing tunes, since they are independent of the key signature. You
can take an existing song, and print it out in Roman numeral notation, so you can study the chord progression. You
can also type a chord in these systems, like “4” which will enter the 4 chord in the current key.
You can switch among any of these systems by pressing the Roman Numeral button on the right side of the
screen to toggle among the various settings.
The Roman numeral and other nonstandard displays use superscript for the chord display when in the Notation
window (or when printing out). Therefore, the alternative chord symbol displays are best viewed in the Notation
window.
Tip: Print out a song in Nashville Notation or Roman numeral notation. Then, learn the song this way, i.e. 1
m7b5 67b9
3
the 1 chord to the 4 chord, so you can easily play it in the key of Bb, for example.
. You'll soon discover that it is much easier to play the song in any key. Since you know the song goes from
maj7
4maj7
Advanced Chord Entry and Editing Features
“Nudge” Chords feature allows moving a range of chords by a number of bars/beats.
For example, let’s say that you have entered a complete song chord progression, and you then realize that all of the
chords starting at bar 23 are 1 beat too late (maybe due to a time signature change). You can move all of the chords
1 beat earlier, by setting the nudge at bar 23, beat 1, and duration of the nudge to -1 (minus 1) beats.
You can nudge chords and/or Melody/Soloist parts.
A “Fold” routine converts a song with a single large chorus to multiple
smaller choruses, with optional tag ending.
Chapter 6: Making Songs in Band-in-a-Box
97
Page 98

A Search/Replace Chords feature will search and replace chords, including
support for asterisks (*) as wildcards. Search and Replace can be used with
Roman numerals or numbers for chord names. So you can replace the V chord with V7, or the 5m chord to 5m7.
Since these are remembered between songs, this feature is useful if you are changing multiple songs.
A “Simpler Jazz” option will simplify chords like C13#11#5 to simply C9.
Breaks - Rests, Shots, and Held Chords
Breaks are points in a song when one or more of the instruments rests, plays a shot, or holds a chord.
- Rests can specify any, some, or all instruments to rest at any bar. For example, you could rest all instruments
except the bass for the first 4 bars, and then add the piano for 4 bars, and then add the entire band for the rest of
the song. You may optionally disable the rests in the middle or final choruses (e.g., where you would likely
have a solo, and rests may not be appropriate).
- Shots can specify certain instruments play a “shot,” where the chord is played and then a rest follows. For
example the song “Rock Around The Clock” has a shot on beat 1 followed by a rest for 2 bars. The duration of
“shots” is 60 ticks per beat.
- Held chords specify that certain instruments hold a chord sustained for a certain number of bars. For example,
you can have the bass and piano hold a chord sustained while the drums continue to play a pattern
A chord can be specified as a REST by adding a period after the chord.
indicates a C chord that is a REST.
indicates a C chord that is a SHOT.
indicates a C chord that is a HELD CHORD.
Selecting BREAKS for different instruments.
You can specify that some instruments not be affected by the rhythm break.
The coded names for the instruments are:
B for Bass, D for Drums, P for Piano, G for Guitar, and S for Strings
To type a rest for all instruments on a C chord type
To exempt instruments, add their letters following the break. For example,
C.
C.bd will put a rest on all instruments EXCEPT the bass and drums.
To indicate a held chord for all instruments except the piano, type
Breaks can also be set in the Chord Options dialog.
98
Chapter 6: Making Songs in Band-in-a-Box
C...p
Page 99

Chord Options
Chord options include rests, pushes, and pedal bass. The Chord Options dialog opens with the C7 toolbar
button, or from the right-click contextual menu in the Chordsheet.
Normally, when a “shot” or a “held” chord is assigned,
the instruments that are excluded from the shot/held
chord play normally.
There is an additional option for those excluded
instruments to stay silent. To set this, open the chord
options dialog, and select a shot or held chord, and
then select “Excluded instrument(s) should rest.”
This option gives you the ability to rest some
instruments while others play the shot or held chord.
Other settings for how chords play are made in the Edit
menu. You can choose Edit | Settings (for This Song) to
open the Song Settings dialog and set the rests (breaks) to
happen only in the first, middle, or last choruses.
There are also settings to allow pushes, pedal bass, and
chord embellishment.
Pushes
”Pushes” (also called anticipations) are chords that are played before the beat. For example, in Jazz Swing, the
piano player often “pushes” a chord change by playing the chord an eighth note before the beat. To execute a
“push,” you can use either keystrokes or open the Chord options dialog box by right mouse clicking on a given
chord.
To use keystrokes :
Type the caret symbol [^] before the chord. The caret symbol is located above the numeral 6 on your computer
keyboard.
Type a single caret to get a chord an eighth note before the beat, e.g., ^C7
Type a double caret to get a chord a sixteenth note before the beat, e.g., ^^C7
In Jazz styles (and other triplet feels), the chord will be pushed by a triplet, regardless of whether there is a single or
double caret (^^).
Velocity Boosts for Pushes, Shots, and Held Chords
You can set the amount of velocity boost, so that
the effect won't be too loud.
In the Preferences dialog (Opt. | Preferences) click
on the [Arrange] button to open the Arrangement
Options. Then type in the amount of velocity
boost for pushes, shots, and holds.
The style can override the velocity for the pushes,
and drum velocity for shots, held chords, and pushes is also set in the StyleMaker.
Part Markers and Substyles
Part Markers
beginning of any bar.
Part Markers are placed on the chordsheet to indicate a new part of the song, to insert a substyle
change, or to insert drum fills. They typically occur every 8 bars or so, but may be placed at the
Chapter 6: Making Songs in Band-in-a-Box
99
Page 100

Double lines are drawn on the chordsheet at the bar before a part marker.
Section Paragraphs
When you’re reading a book, a new section begins on a new line, with space between. Band-in-a-Box does that for
chords too. Whenever a new section occurs (a part marker), we start the new section on a new line and draw a grey
line above to clearly mark the new section. Sections can be as short as 2 bars. You’ll see each section on a new line
so that the form of the song is easier to see. The feature is configurable and optional.
MultiStyles
Band-in-a-Box MultiStyles are styles that can have up to 24 substyles; original Band-in-a-Box
styles had two substyles, “a” and “b.” Band-in-a-Box MultiStyles typically have four substyles,
but may have up to twenty-four, selected by using part markers “a” through “x.”
You can easily make your own MultiStyles, either from scratch, or combining parts from existing styles to make a
MultiStyle. For example, if you have 10 favorite Country styles, you can quickly make a single MultiStyle that has
20 substyles available within the same song.
Changing Substyles
to
Most of these MultiStyles that we’ve made have 4 substyles, conforming to the following pop song format:
Substyle
Substyle
Substyle “c” is usually used for the intro or for an opening verse or pre-verse.
Substyle “d” is usually used for a break or interlude.
||
Double lines are drawn on the chordsheet at the bar before a part marker.
You can see the MultiStyle markers on the chordsheet.
“a” is usually used for the verse of a song.
“b” is usually used for the “b-section” or the chorus, and for soloing in the middle choruses.
Each style has “a” and “b” substyles. Band-in-a-Box Multistyles also have “c”
and “d” substyles, and could have from “a” to “x” for a total of up to twenty-four.
100
Chapter 6: Making Songs in Band-in-a-Box
 Loading...