

Page 1
P3PC-2262-03EN
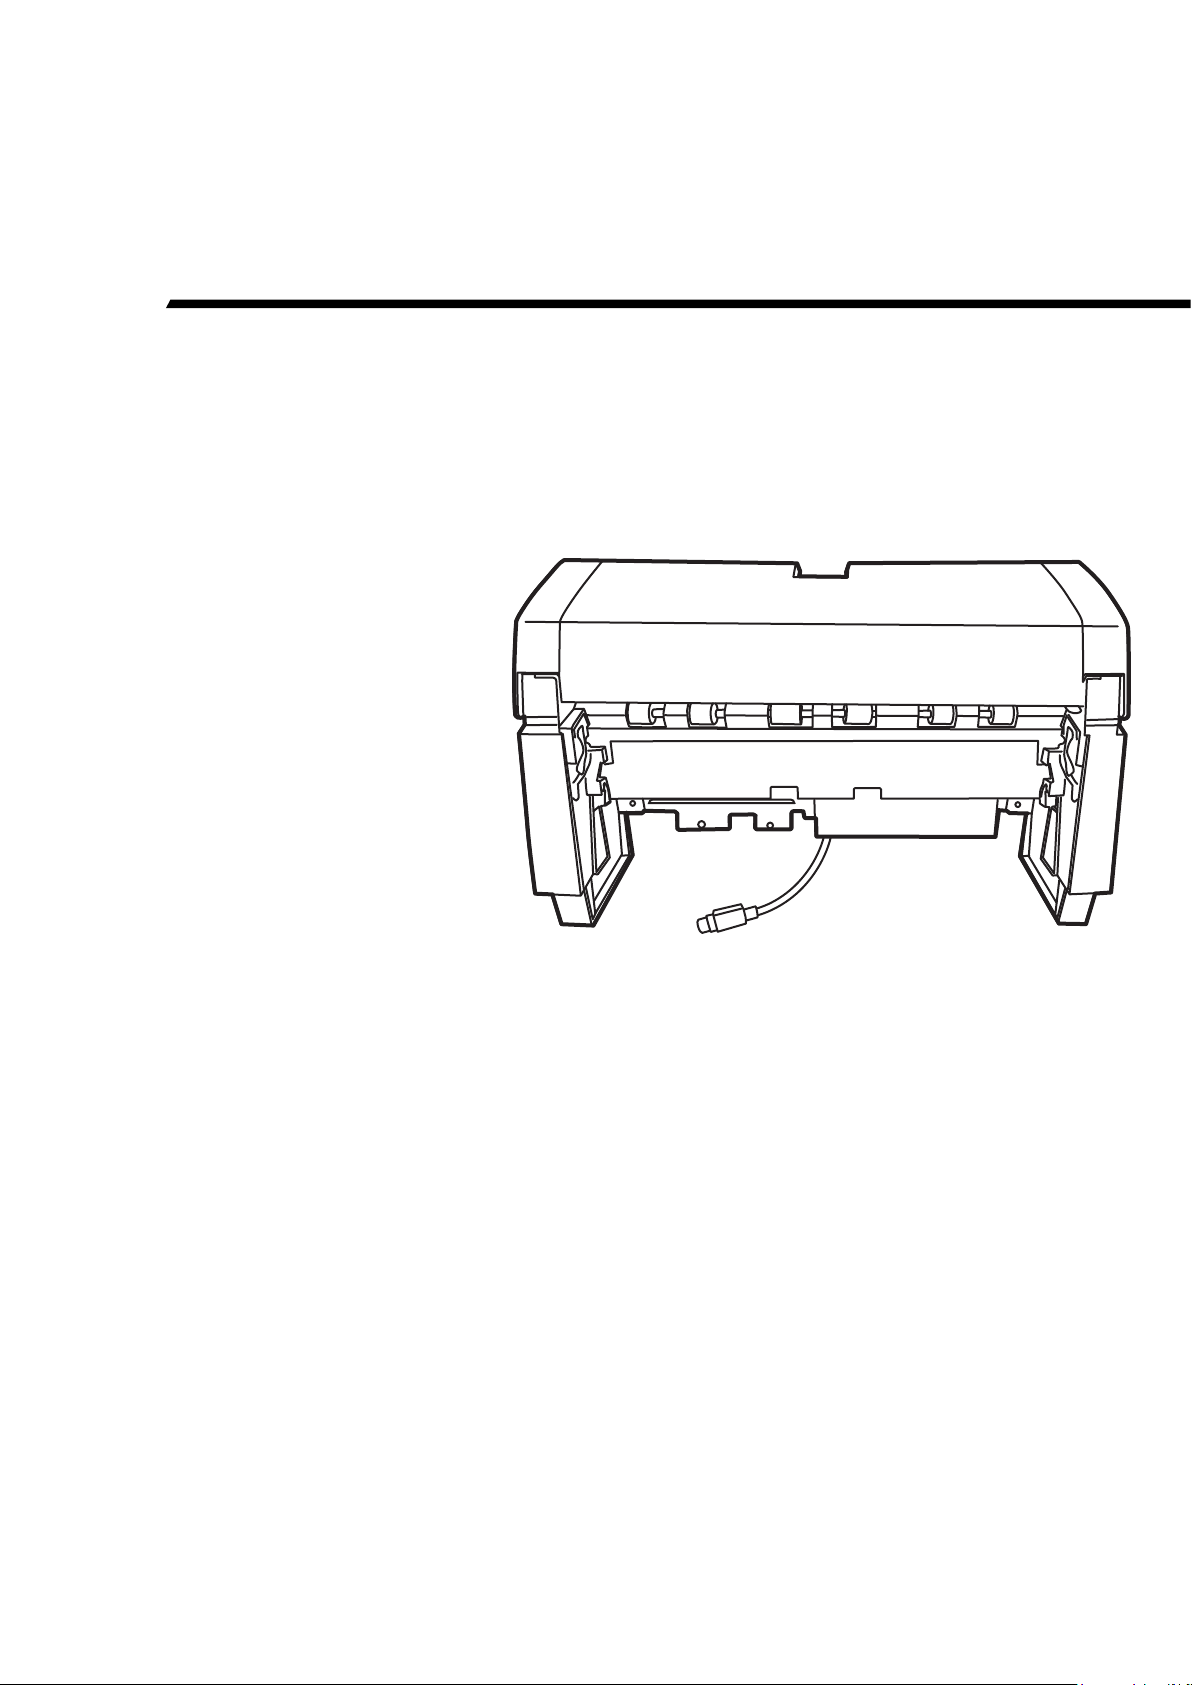
fi-667PR Imprinter
Operator’s Guide
Page 2

Contents
Introduction ................................................................................................................................................. 1
1. Preparations ............................................................................................................................................ 5
1.1. Inspect the Package Contents ..................................................................................................................... 5
1.2. Names of Component Parts ......................................................................................................................... 5
2. Installation ............................................................................................................................................... 7
2.1. Installing the Imprinter ................................................................................................................................. 7
2.2. Installing the Print Cartridge ....................................................................................................................... 9
2.3. Operating Test ............................................................................................................................................ 10
3. Basic Operation ..................................................................................................................................... 11
3.1. Positioning the Print Cartridge ................................................................................................................... 11
3.2. How to Use the Paper Guides ..................................................................................................................... 11
3.3. Print Setup .................................................................................................................................................. 12
3.4. Replacing the Print Cartridge .................................................................................................................... 12
3.5. Removing Jammed Documents ................................................................................................................ 14
4. Daily Care .............................................................................................................................................. 15
4.1. Cleaning the Print Cartridge ...................................................................................................................... 15
4.2. Cleaning the Imprinter ............................................................................................................................... 15
4.3. Cleaning the Rollers ................................................................................................................................... 16
4.4. Removing the Imprinter ............................................................................................................................. 16
5. Error Messages ..................................................................................................................................... 17
6. Specifications ....................................................................................................................................... 19
© PFU LIMITED 2008-2015.
The contents of this manual are subject to change without notice.
This manual may not be reproduced, adapted or translated without prior written permission.
READ ALL OF THIS MANUAL CAREFULLY BEFORE USING THIS PRODUCT. IF THIS PRODUCT IS NOT USED
CORRECTLY, UNEXPECTED INJURY MAY BE CAUSED TO USERS OR BYSTANDERS.
While all efforts have been made to ensure the accuracy of all information in this manual, PFU LIMITED assumes no
liability to any party for any damage caused by errors or omissions or by statements of any kind in this manual, its
updates or supplements, whether such errors are omissions or statements resulting from negligence, accidents, or any
other cause.
PFU LIMITED further assumes no liability arising from the application or use of any product or system described herein;
nor any liability for incidental or consequential damages arising from the use of this manual.
PFU LIMITED disclaims all warranties regarding the information contained herein, whether expressed, implied, or
statutory.
PFU LIMITED assumes no liability for incidental or consequential damages arising from the use of this product, and any
claims by a third party.
Page 3

Introduction
Product
Indication
®
(64-bit)
Windows Server
®
Windows
7 Ultimate (32/64-bit)
Windows 7 (*1)
Windows Server
2012 (*1)
(64-bit)
Windows Server
Windows
®
8 (32/64-bit)
Windows
8 Enterprise (32/64-bit)
Windows 8 (*1)
®
Windows
8.1 Enterprise (32/64-bit)
Windows 8.1 (*1)
Thank you for purchasing the fi-667PR Imprinter option for
the fi-6670 / fi-6670A Color Image Scanner.
This guide explains how to install and use the imprinter.
(For further details about the functions and operations of the
fi-6670 / fi-6670A Image Scanner, refer to the “Image
Scanner Operator’s Guide” provided by the SETUP
DVD-ROM bundled with fi-6670 / fi-6670A.)
This guide also contains other important information, such
as procedures for replacement of consumables. Keep this
guide in a convenient and safe place so that you can refer to
it whenever necessary.
We hope this manual will be helpful in your future use of the
fi-667PR Imprinter.
Manufacturer
PFU LIMITED
YOKOHAMA i-MARK PLACE, 4-4-5 Minatomirai,
Nishi-ku, Yokohama, Kanagawa 220-8567, Japan
Trademarks
Microsoft, Windows and Windows Server are either
registered trademarks or trademarks of Microsoft
Corporation in the United States and/or other countries.
PaperStream is a registered trademark of PFU LIMITED in
Japan.
Other company names and product names are the registered
trademarks or trademarks of the respective companies.
Regulatory Information
FCC declaration
This equipment has been tested and found to comply with
the limits for a Class B digital device, pursuant to Part 15 of
the FCC Rules. These limits are designed to provide
reasonable protection against harmful interference in a
residential installation. This equipment generates, uses, and
can radiate radio frequency energy and, if not installed and
used in accordance with the instruction manual, may cause
harmful interference to radio communications. However,
there is no guarantee that interference will not occur in a
particular installation. If this equipment does cause harmful
interference to radio or television reception, which can be
determined by turning the equipment off and on, the user is
encouraged to try to correct the interference by one or more
of the following measures:
- Reorient or relocate the receiving antenna.
- Increase the separation between the equipment and
receiver.
- Connect the equipment into an outlet on a circuit
different from that to which the receiver is located.
- Consult your dealer or an experienced radio/TV
technician.
FCC warning: Changes or modifications not expressly
approved by the party responsible for compliance could
void the user’s authority to operate the equipment.
How Trademarks Are Indicated In This
Manual
References to operating systems (OS) are indicated as
follows:
Windows Server
(32/64-bit)
Windows Server
Windows
Windows
Windows
Windows Server® 2012 Standard (64-bit)
Windows Server® 2012 R2 Standard
Windows
Windows
Windows
*1: Where there is no distinction between the different
®
®
®
®
®
®
®
versions of the above operating system, the general term
"Windows" is used.
2008 Standard
®
2008 R2 Standard
7 Home Premium (32/64-bit)
7 Professional (32/64-bit)
7 Enterprise (32/64-bit)
8 Pro (32/64-bit)
8.1 (32/64-bit)
8.1 Pro (32/64-bit)
2008 (*1)
2012 R2 (*1)
Canadian DOC Regulations
This digital apparatus does not exceed the Class B limit for
radio noise emissions from digital apparatus set out in the
Radio interference Regulations of the Canadian Department
of Communications.
This Class B digital apparatus complies with Canadian
ICES-003.
Le présent appareil numérique n'émet pas de parasites
radioélectriques dépassant les limites applicables aux
appareils numériques de la classe B, limites prescrites dans
le Règlement pour le brouillage radioélectrique qui fut dicté
par le Ministère des Communications du Canada.
Cet appareil numérique de la classe B est conforme à la
norme NMB-003 du Canada.
Bescheinigung des Herstellers /
Importeurs
Für den fi-667PR wird folgendes bescheinigt:
• In Übereinsstimmung mit den Bestimmungen der
EN45014(CE) funkentstört
• Maschinenlärminformationsverordnung 3. GPSGV:
Der höchste Schalldruckpegel beträgt 70 dB (A) oder
weniger, gemäß EN ISO 7779.
Dieses Gerät wurde nicht für die Benutzung in
unmittelbarer Umgebung starker Lichtquellen (z. B.
Projektoren) konzipiert.
fi-667PR Imprinter Operator’s Guide | 1
Page 4
Use in High-Safety Applications
Make sure to ground the device.
WARNING
CAUTION
WARNING
This product has been designed and manufactured on the
assumption that it will be used in office, personal, domestic,
regular industrial, and general-purpose applications. It has
not been designed and manufactured for use in applications
(simply called "high-safety applications" from here on) that
directly involve danger to life and health when a high
degree of safety is required, for example, in the control of
nuclear reactions at nuclear power facilities, automatic
flight control of aircraft, air traffic control, operation control
in mass-transport systems, medical equipment for
sustaining life, and missile firing control in weapons
systems, and when provisionally the safety in question is
not ensured. The user should use this product with adopting
measures for ensuring safety in such high-safety
applications. PFU LIMITED assumes no liability
whatsoever for damages arising from use of this product by
the user in high-safety applications, and for any claims or
compensation for damages by the user or a third party.
Screen Examples in This Manual
Microsoft product screenshots are reprinted with
permission from Microsoft Corporation. The screen
examples in this manual are subject to change without
notice in the interest of product improvement.
If the actual screen differs from the screen examples in this
manual, operate by following the actual displayed screen
while referring to the user’s manual of the scanner
application you are using.
The screen examples used in this manual are of the
PaperStream IP (TWAIN) driver.
The screenshots used in this manual are of Windows 7. The
windows that appear and the operations differ by the
operating system. Also note that with some scanner models,
the screens and operations may differ from this manual
when you update the PaperStream IP (TWAIN) driver. In
that case, refer to the manual provided upon updating the
driver.
About Maintenance
Conventions
Warning Indications Used in This Manual
This indication alerts operators to an
operation that, if not strictly observed, may
Symbols Used in This Manual
This manual, in addition to the above warning indications,
uses the following symbols in its explanations.
result in severe injury or death.
This indication alerts operators to an
operation that, if not strictly observed, may
result in safety hazards to personnel or
damage to equipment.
This symbol alerts operators to particularly
important information. Be sure to read this
information.
This symbol alerts operators to helpful advice
regarding operation.
A TRIANGLE symbol indicates that special care
and attention are required.
The drawing inside the triangle shows the specific
caution.
A CIRCLE with a diagonal line inside indicates an
action that users may not perform.
The drawing inside or under the circle shows the
specific action that is not allowed.
Outline characters on a colored background show
instructions users should follow.
It may also include the drawing that shows the
specific instruction.
The user must not perform repairs on this product.
Contact the store where you purchased the scanner or an
authorized FUJITSU Image Scanner service provider to
have repairs made on this product.
Safety Precautions
FOLLOW THESE INSTRUCTIONS AND BE SURE TO
HEED ALL WARNINGS AND CAUTIONS DESCRIBED
BELOW.
Do not damage the AC cable.
A damaged AC cable may cause fire or electric shock.
Do not place heavy objects on AC cables, or pull,
bend, twist, heat, damage or modify AC cables.
Do not use damaged AC cables or power plugs, or
install any cables or power plugs to loose wall
sockets.
Use only specified AC cables and connector
cables.
Use only specified AC cables and connector cables.
Failure to use the correct cables might cause electric
shock and/or device failure.
Please don’t use the AC cable provided with this
device for other devices, since this might cause
device failure and other troubles or an electric shock.
Make sure to ground the device to avoid electric
shock.
Be sure to ground the device before plugging into a
power outlet.
Unplug from the outlet before removing the ground
connection.
2 |
Page 5
Use this device only at the indicated power
voltage. Do not connect to multiple-power
Wipe any dust from the power plug.
Do not install the device in locations that has oil
Do not use the device if you smell a strange
Turn the scanner OFF if it is damaged.
Do not put liquids or foreign objects inside the
Unplug the scanner when a trouble occurs.
Do not use aerosol sprays near the device.
Do not touch the heated section for a long time.
Do not cover the scanner with something during
strips.
Use this device only at the indicated power voltage
and current. Improper power voltage and current
might cause fire or electric shock. Do not connect to
multiple-power strips.
Do not touch the AC cable with wet hands.
Do not touch the power plug with wet hands. Doing so
might cause electric shock.
Wipe off any dust from metal parts on the power plug
or metal fittings with a soft, dry cloth. Accumulated
dust might cause fire or electric shock.
smoke, steam, humidity, and dust.
Do not install the imprinter in locations subject to oil
smoke, steam, humidity, and dust. Doing so might
cause a fire or electric shock.
odor.
If you detect heat coming from the device or detect
smoke, strange smells or noises, immediately turn off
the scanner and then disconnect its power plug. Make
sure that any smoke coming from it has stopped,
before contacting the store where you bought the
scanner or an authorized FUJITSU scanner service
provider.
Do not use any aerosol sprays or alcohol based
sprays to clean the device.
Dust blown up by strong air from the spray may enter
the inside of the device. This may cause the device to
fail or malfunction.
Sparks, caused by static electricity, generated when
blowing off dust and dirt from the outside of the device
may cause a fire.
Do not place the scanner within the reach of
small children.
To avoid injuries, do not place the scanner in an area
where small children may be able to reach.
Do not touch the heated section such as the bottom of
the scanner for a long time. Doing so may cause a
low-temperature burn on your skin.
its operation.
Do not use the scanner while covered with a blanket,
etc. Doing so may raise the hot air inside and cause a
fire.
Do not use the scanner where it gets wet.
Do not use the scanner at a place such as a
bathroom, shower room, or swimming pool where it
may easily get wet. Doing so might cause electric
shock or fire.
If the device is damaged for any reason, turn the
scanner off and unplug the power cable. Contact the
store where you purchased the scanner or an
authorized FUJITSU scanner service provider.
imprinter.
● Do not insert or drop metal objects in to the device.
● Do not scan wet documents or documents with
paper clips or staples.
● Do not splash or allow the device to get wet.
● If foreign objects (water, small metal objects,
liquids, etc.) get inside the device, immediately
turn off the scanner and disconnect the power plug
from the power outlet. Then, contact the store
where you bought the scanner or an authorized
FUJITSU scanner service provider. Pay particular
attention to this warning in households where
there are small children.
Immediately unplug the scanner when a trouble
occurs.
Never cut the ground connection until the scanner is
unplugged from the power outlet.
Do not touch the inside of the device unless
necessary.
Do not take apart or modify the device. The inside of
the device contains high-voltage components.
Touching these components might cause electric
shock or fire.
fi-667PR Imprinter Operator’s Guide | 3
Page 6
Do not install the device on unstable surfaces.
Firmly insert the power plug.
Do not block the ventilation ports.
Before moving the device, disconnect the
Avoid any contact when device is in use.
Do not install the device in the direct sunlight.
Handle documents carefully.
CAUTION
The following describes important cautions.
Make sure that the device is installed on a flat, level
surface and that none of its parts extend beyond the
surface top, such as a desk or table. Do not install
the device on unstable surfaces. Install the device
on a level surface that is free of vibration to prevent
it from falling.
Install the imprinter on a strong surface that will
support the weight of the imprinter and other
devices.
Firmly insert the power plug as far it can go into the
power outlet.
Do not block the ventilation ports. Blocking the
ventilation ports generates heat inside of device,
which may result in fire or device failure.
Do not place heavy objects or climb on top of
the imprinter.
Do not place heavy objects on the device or use the
device's surface top to perform other work.
Improper installation might cause injuries and
device failure.
Do not use the device immediately after
moving it from a cold place into a warm room.
Do not use the device immediately after moving it
from a cold place into a warm room. Condensation
may occur, which might lead to scanning errors. Let
the device dry about one or two hours before you
use it.
When handling documents, be careful not to cut your
fingers with them.
Do not make the scanner wet while carrying it
outside.
When carrying the scanner outside while it is raining
or snowing, pay special attention so the scanner
does not get wet.
power plug from the power outlet.
Do not move the device with the power and
interface cables connected as this can damage the
cables, which can later cause fire, electric shock as
well as injury.
Before moving the device, be sure to disconnect the
power plug from the power outlet, and all other data
cables.
Make sure that the floor is free of any obstructions.
Protect the device from static electricity.
Install the device away from strong magnetic fields
and other sources of electronic noise. Also, protect
the device against any static electricity, which can
cause the device to malfunction.
Avoid touching any device mechanism during
scanning since this may cause injuries.
Disconnect the power plug from the power
outlet when the device is not used for a long
period of time.
When the device is not going to be used for a long
period of time, be sure to disconnect the power plug
from the power outlet for safety.
Do not install the device under direct sunlight or
near heating apparatus. Doing so might cause
excessive heat to build up inside the device, which
can cause device trouble or even fire. Install the
device in a well-ventilated location.
4 |
Page 7
1. Preparations
Lever
Lift the lever to detach the
Imprinter from the
EXT cable
Print Cartridge Cover
Fix Claw
Screw
Print section
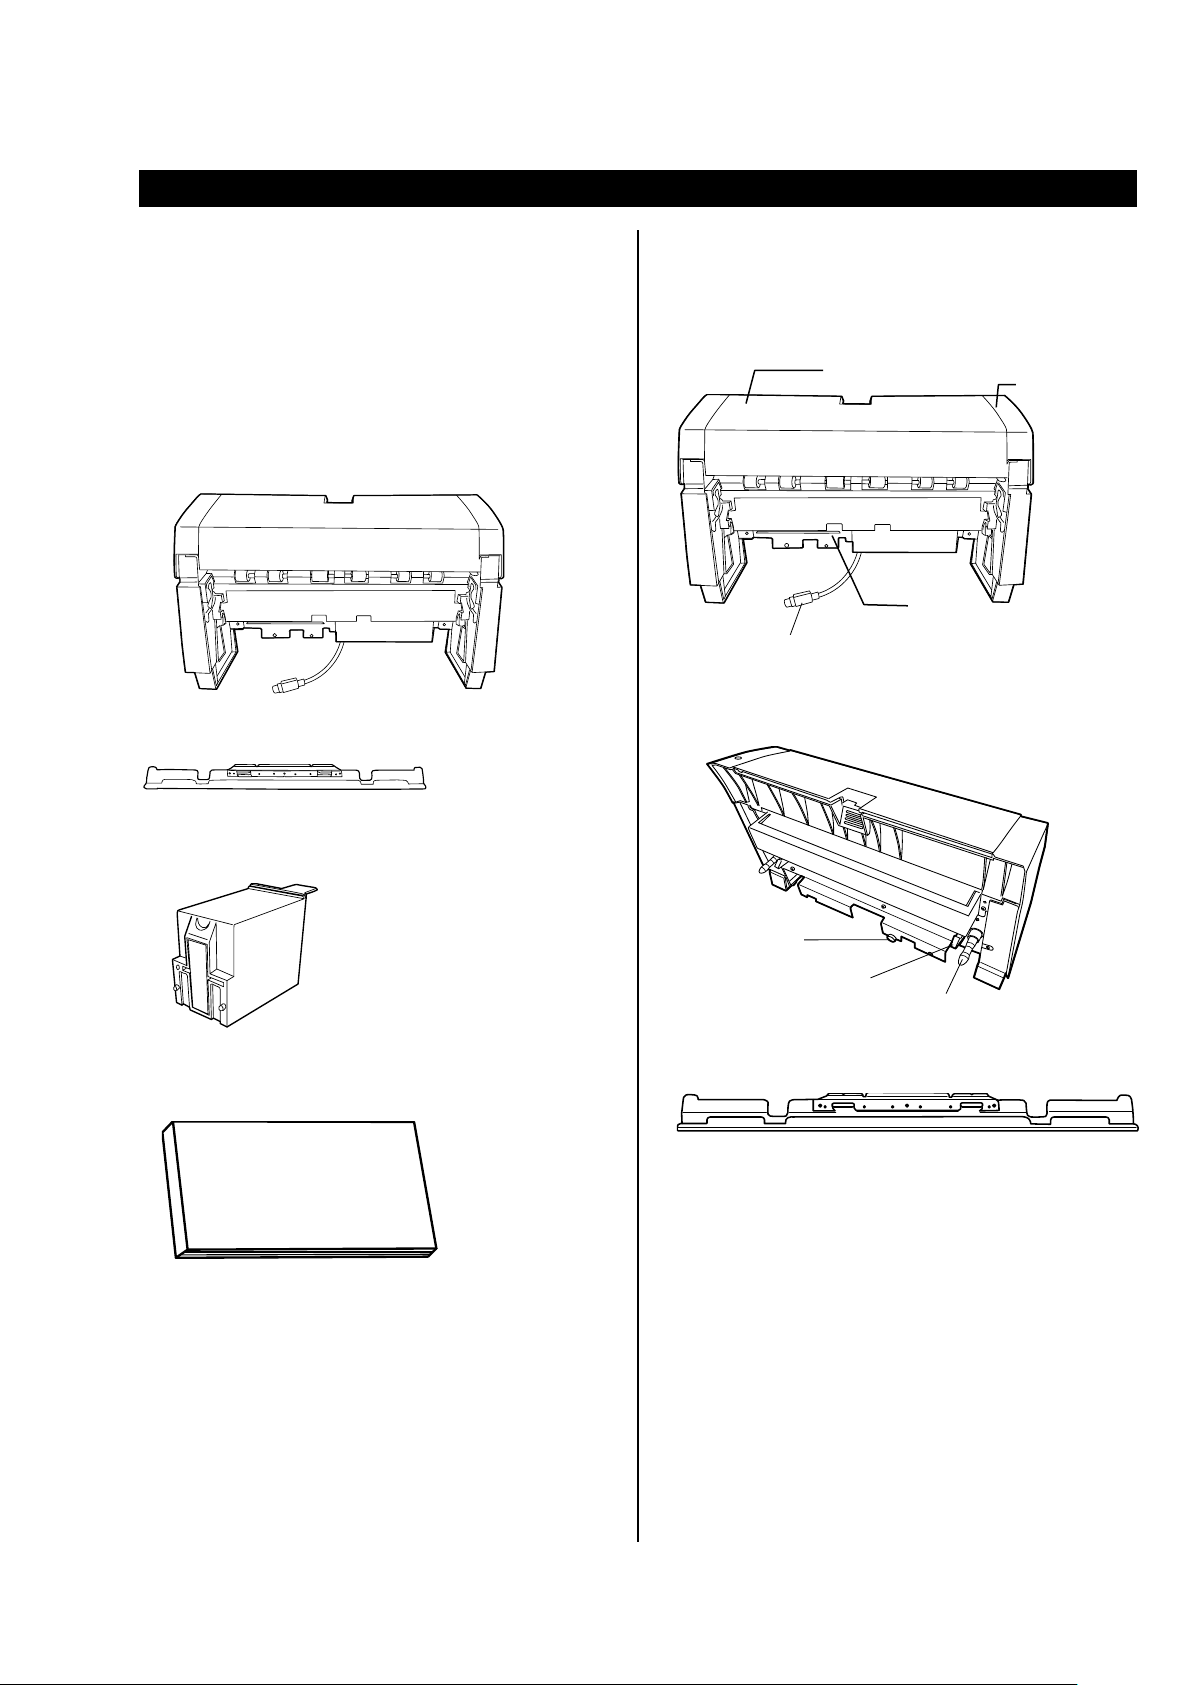
1.1. Inspect the Package Contents
1.2. Names of Component Parts
Make sure that all items shown below are included in the
package.
If anything is missing or damaged, contact your FUJITSU
scanner dealer or an authorized FUJITSU scanner service
provider.
Imprinter (×1)
Attachment Guide (×1)
Print Cartridge (×1)
<Imprinter Unit>
Front Side
scanner.
Rear Side
Operator’s Guide (×1)
Connecting Pin
<Attachment Guide>
fi-667PR Imprinter Operator’s Guide | 5
Page 8
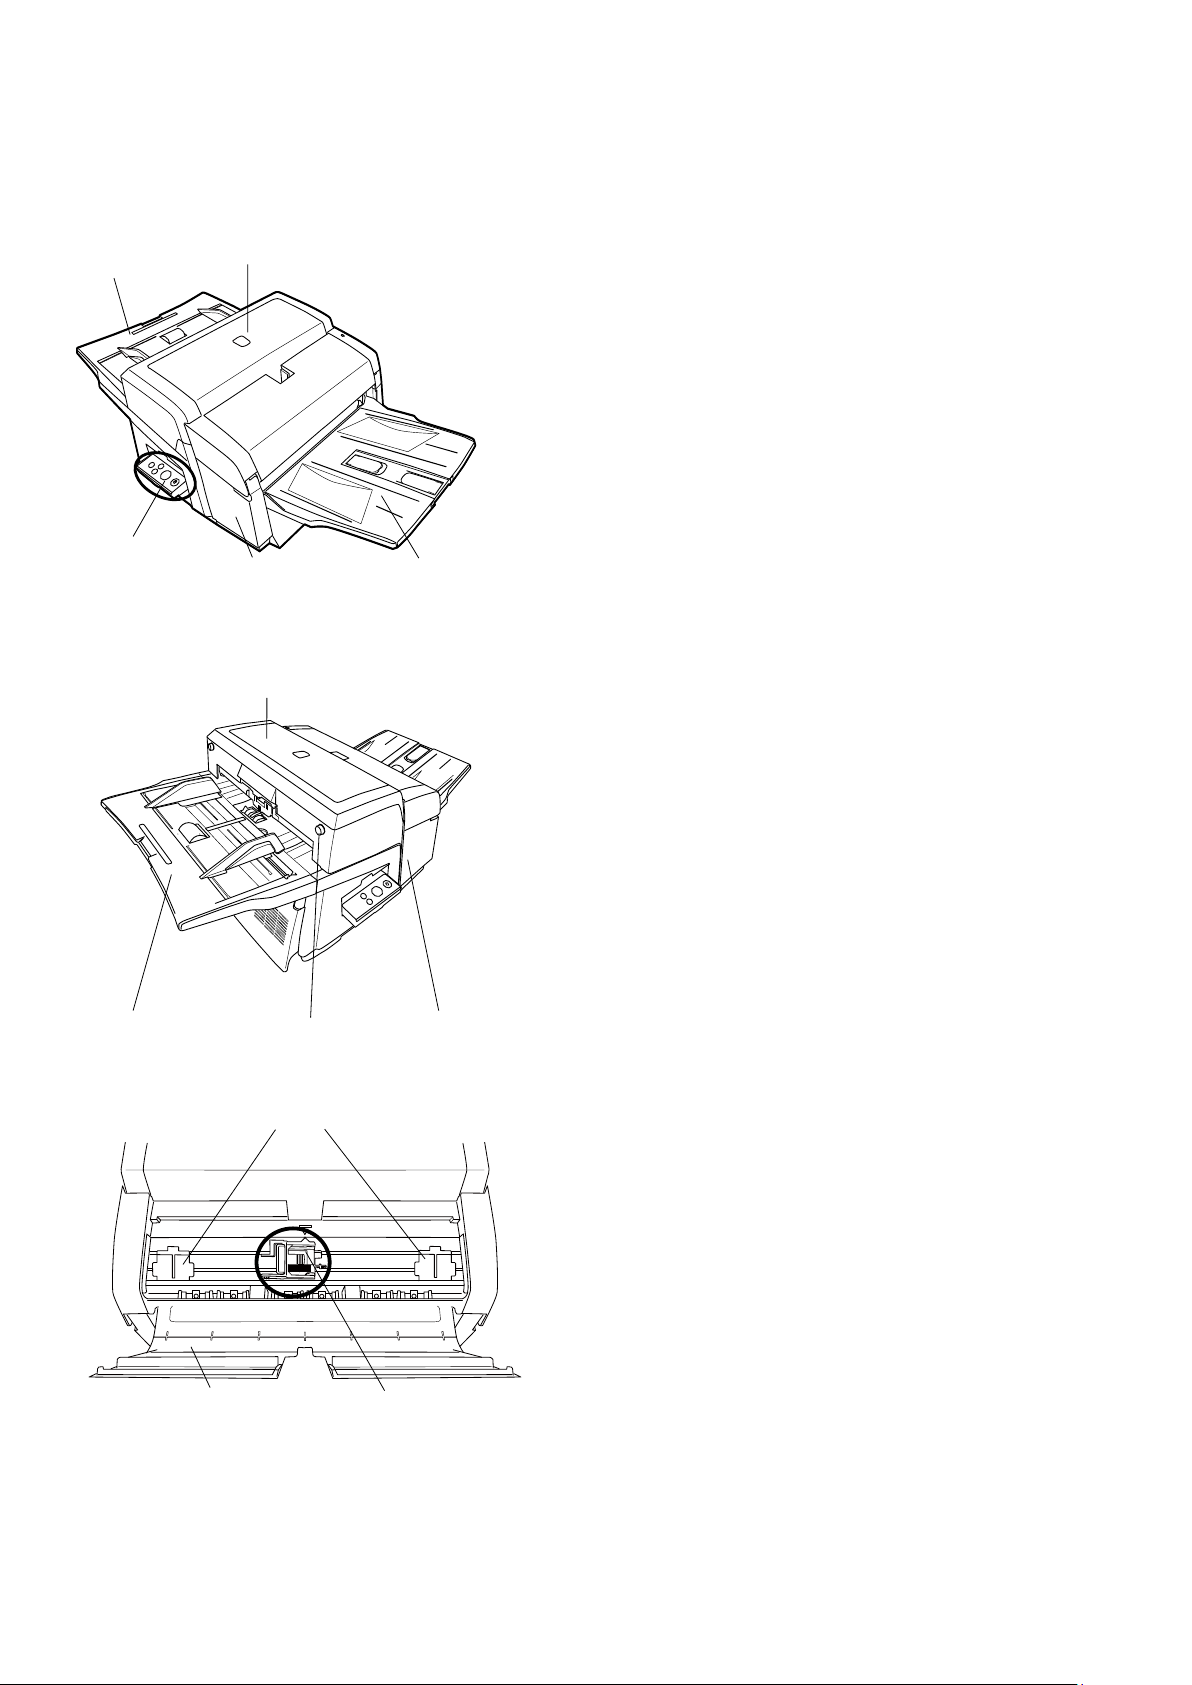
<Imprinter with Scanner Installed>
ADF (Automatic Document Feeder)
Operator Panel
ADF Paper Chute
Imprinter
Stacker
ADF Paper Chute
ADF Open Button
ADF (Automatic Document Feeder)
Imprinter
Paper Guide
Print Cartridge Holder
Print Cartridge Cover
Front Side
Rear Side
<Inside of the Imprinter>
6 |
Page 9
2. Installation
Attachment Guide
ADF
Shaft
Scanner
ADF
Shaft
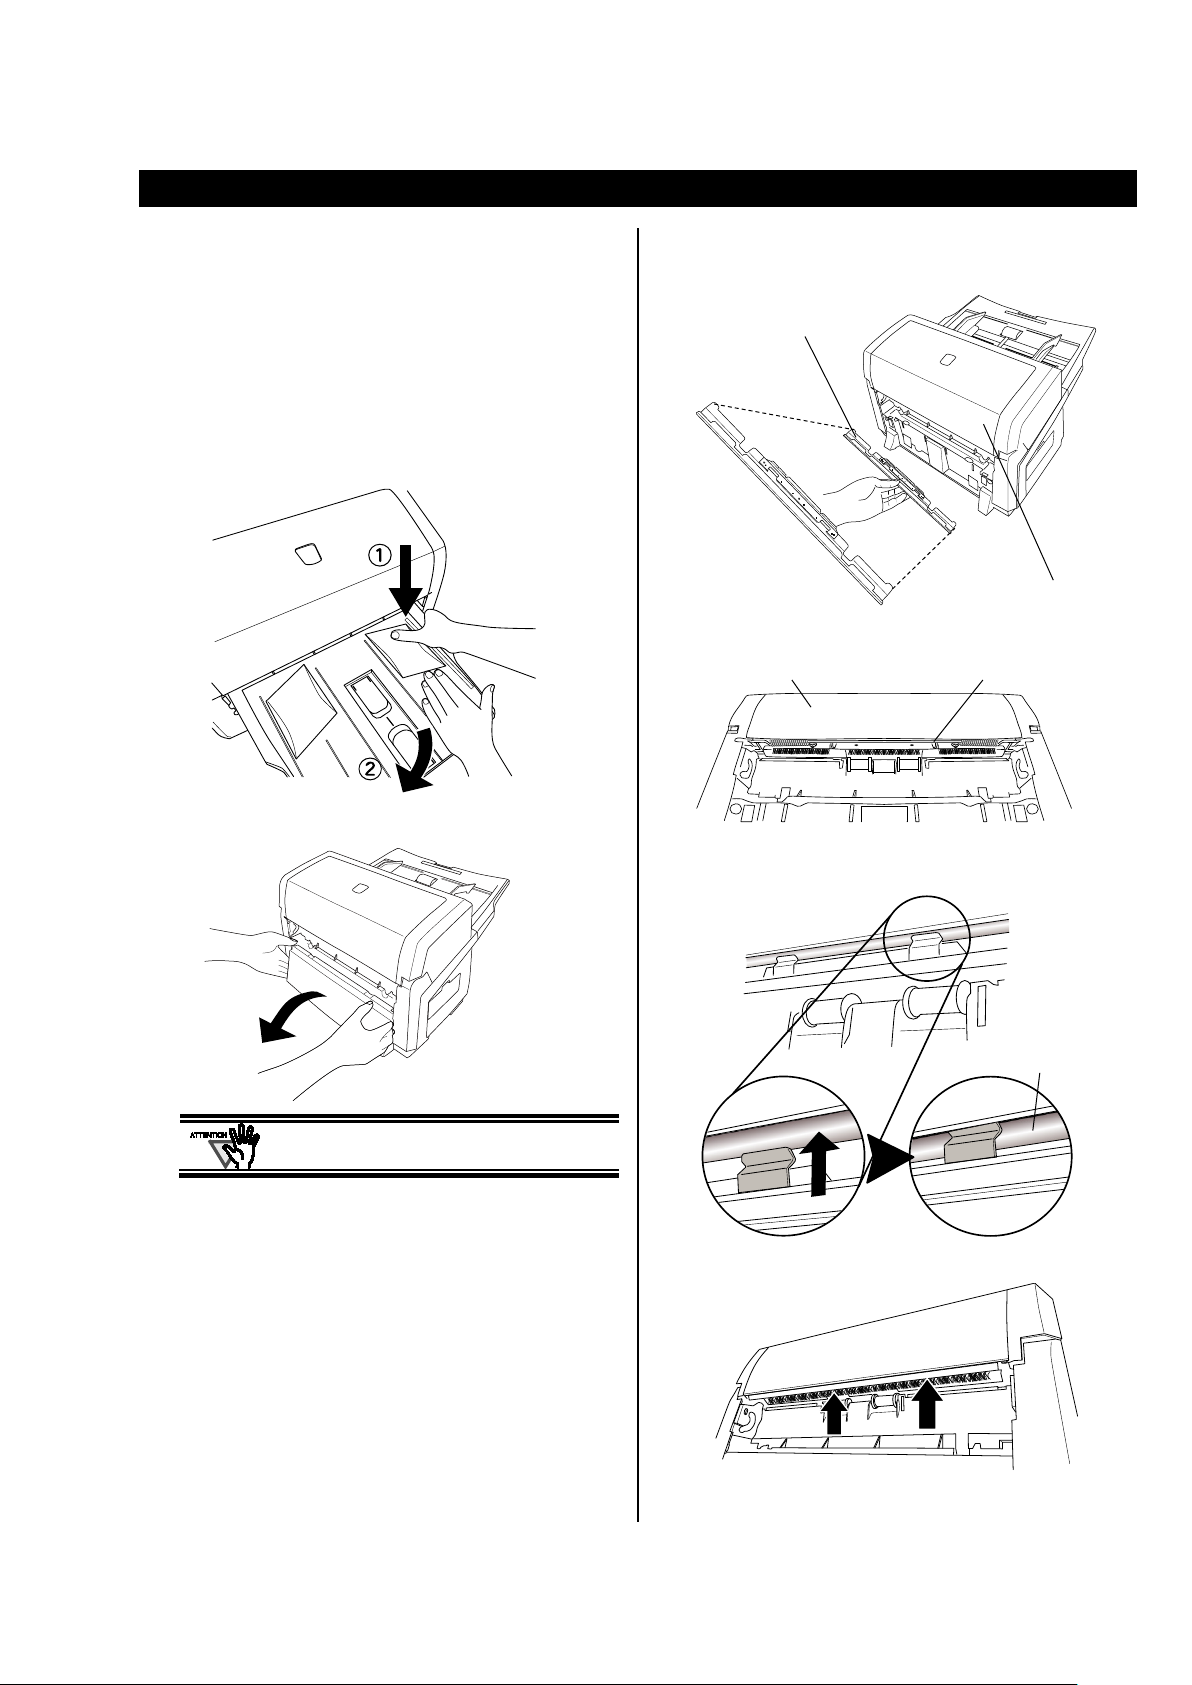
2.1. Installing the Imprinter
Install the imprinter as follows:
1. Switch off the scanner and disconnect the
electrical power cable.
2. Remove the Stacker from the scanner.
Slowly push down the Stacker as shown below until the
connecting protrusion is unhooked.
Pull the Stacker towards the arrow direction to release it.
4. Install the imprinter to the scanner.
Check the insertion direction of the Attachment Guide.
Check the Shaft from below.
3. Remove the cover located under the stacker.
You must remove the stacker and cover
before installing the imprinter to the scanner.
Locate the Attachment Guide along the Shaft.
Push up the Attachment Guide.
fi-667PR Imprinter Operator’s Guide | 7
Page 10
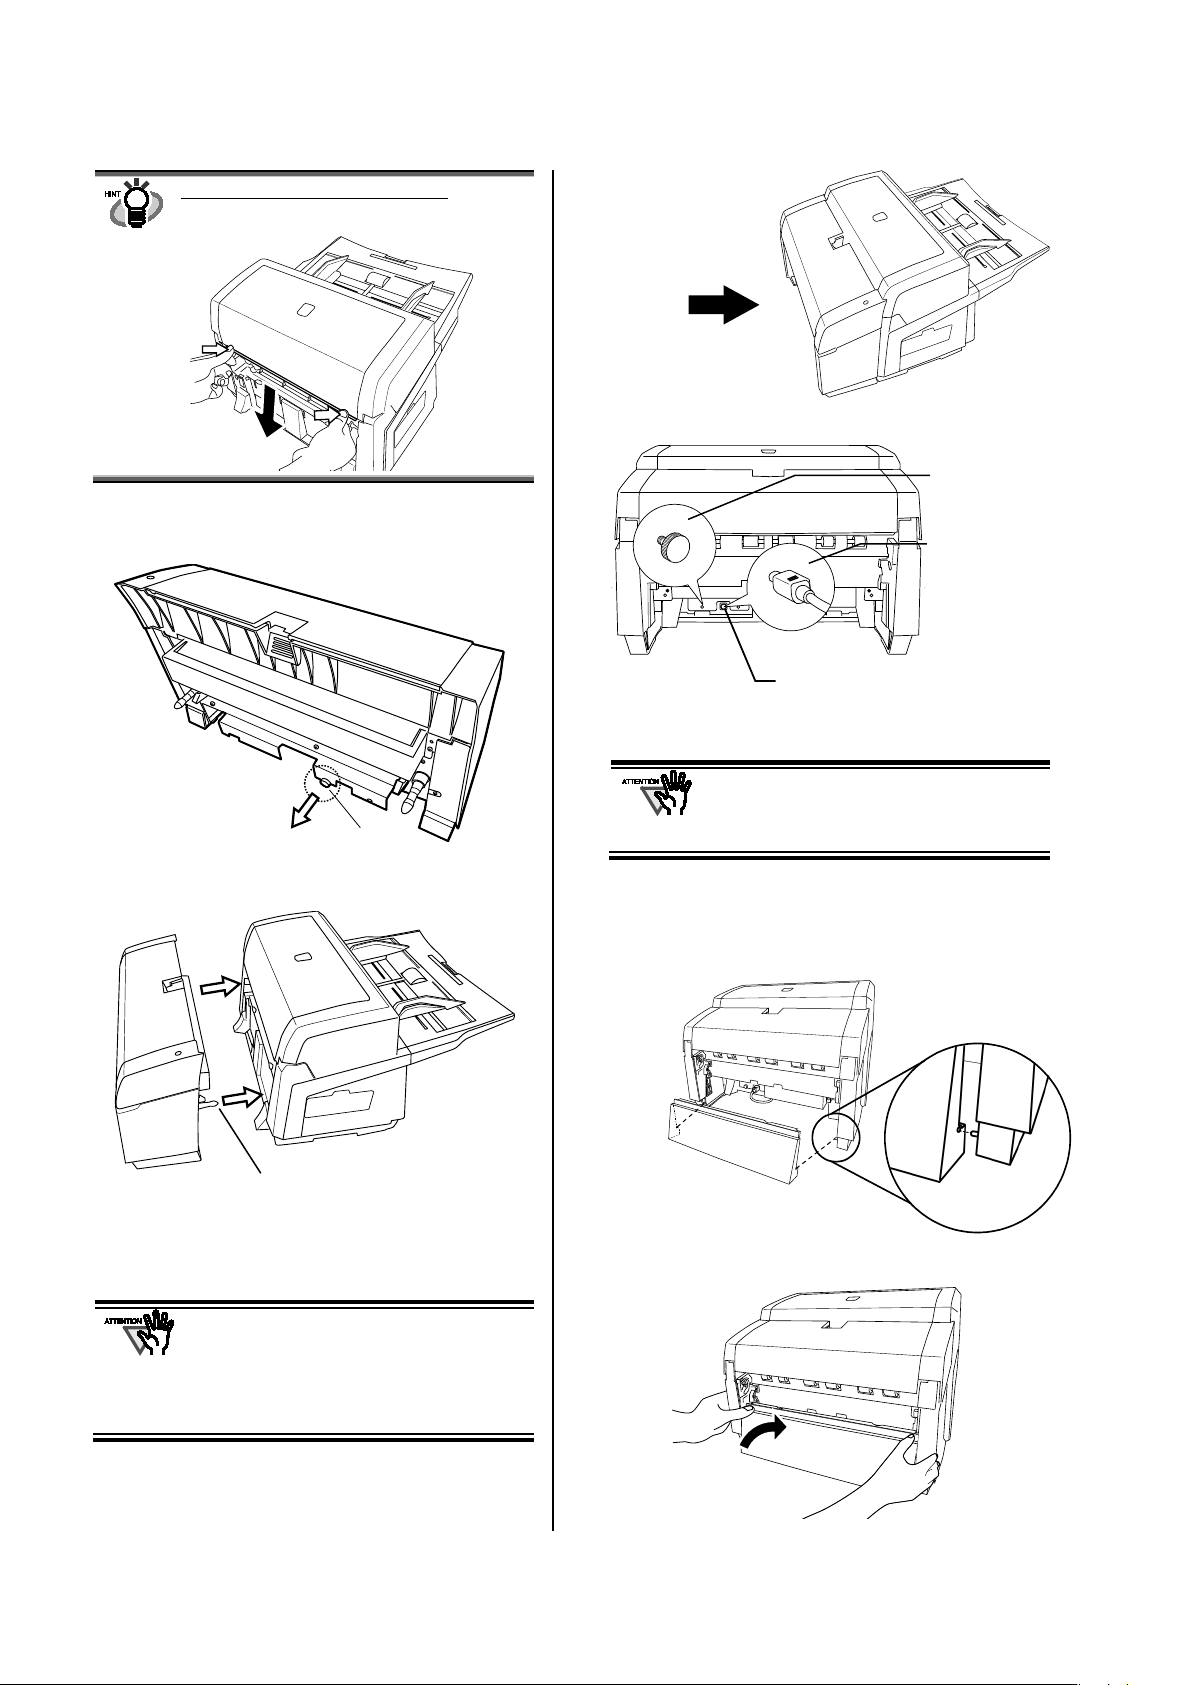
UHow to remove the Attachment Guide
Screw
Connecting Pin
See the imprinter in
Screw
EXT Cable
Pressing your fingers on the Attachment Guide,
slide it down and out to remove.
5. Remove the attached screw from the imprinter’s
rear portion.
this direction.
7. Attach the Screw to fix the imprinter. (1 position)
8. Connect the EXT Cable to the EXT connecter on
the rear side of the scanner.
6. Install the imprinter to the scanner.
To install the imprinter to the scanner, insert the
connecting pins located on the imprinter’s rear
component into the scanner’s round holes.
● Hold the bottom of the imprinter whenever
lifting it up.
● Attach the imprinter firmly on to the scanner.
(→ Confirm that the imprinter does not
separate from the scanner when pulled.)
● Be careful not to pinch your fingers.
The imprinter will not work if the EXT cable is
not connected to the scanner. Scanning when
the EXT cable is not connected can cause
documents to jam inside the imprinter.
9. Replace the cover (removed in Step 3) to the
imprinter.
Hook the cover onto the imprinter by fitting the cover's
lower side slots to the corresponding protrusions on each
side of the imprinter.
Pushing on the upper part of the cover, fix it to the
imprinter.
8 |
Page 11
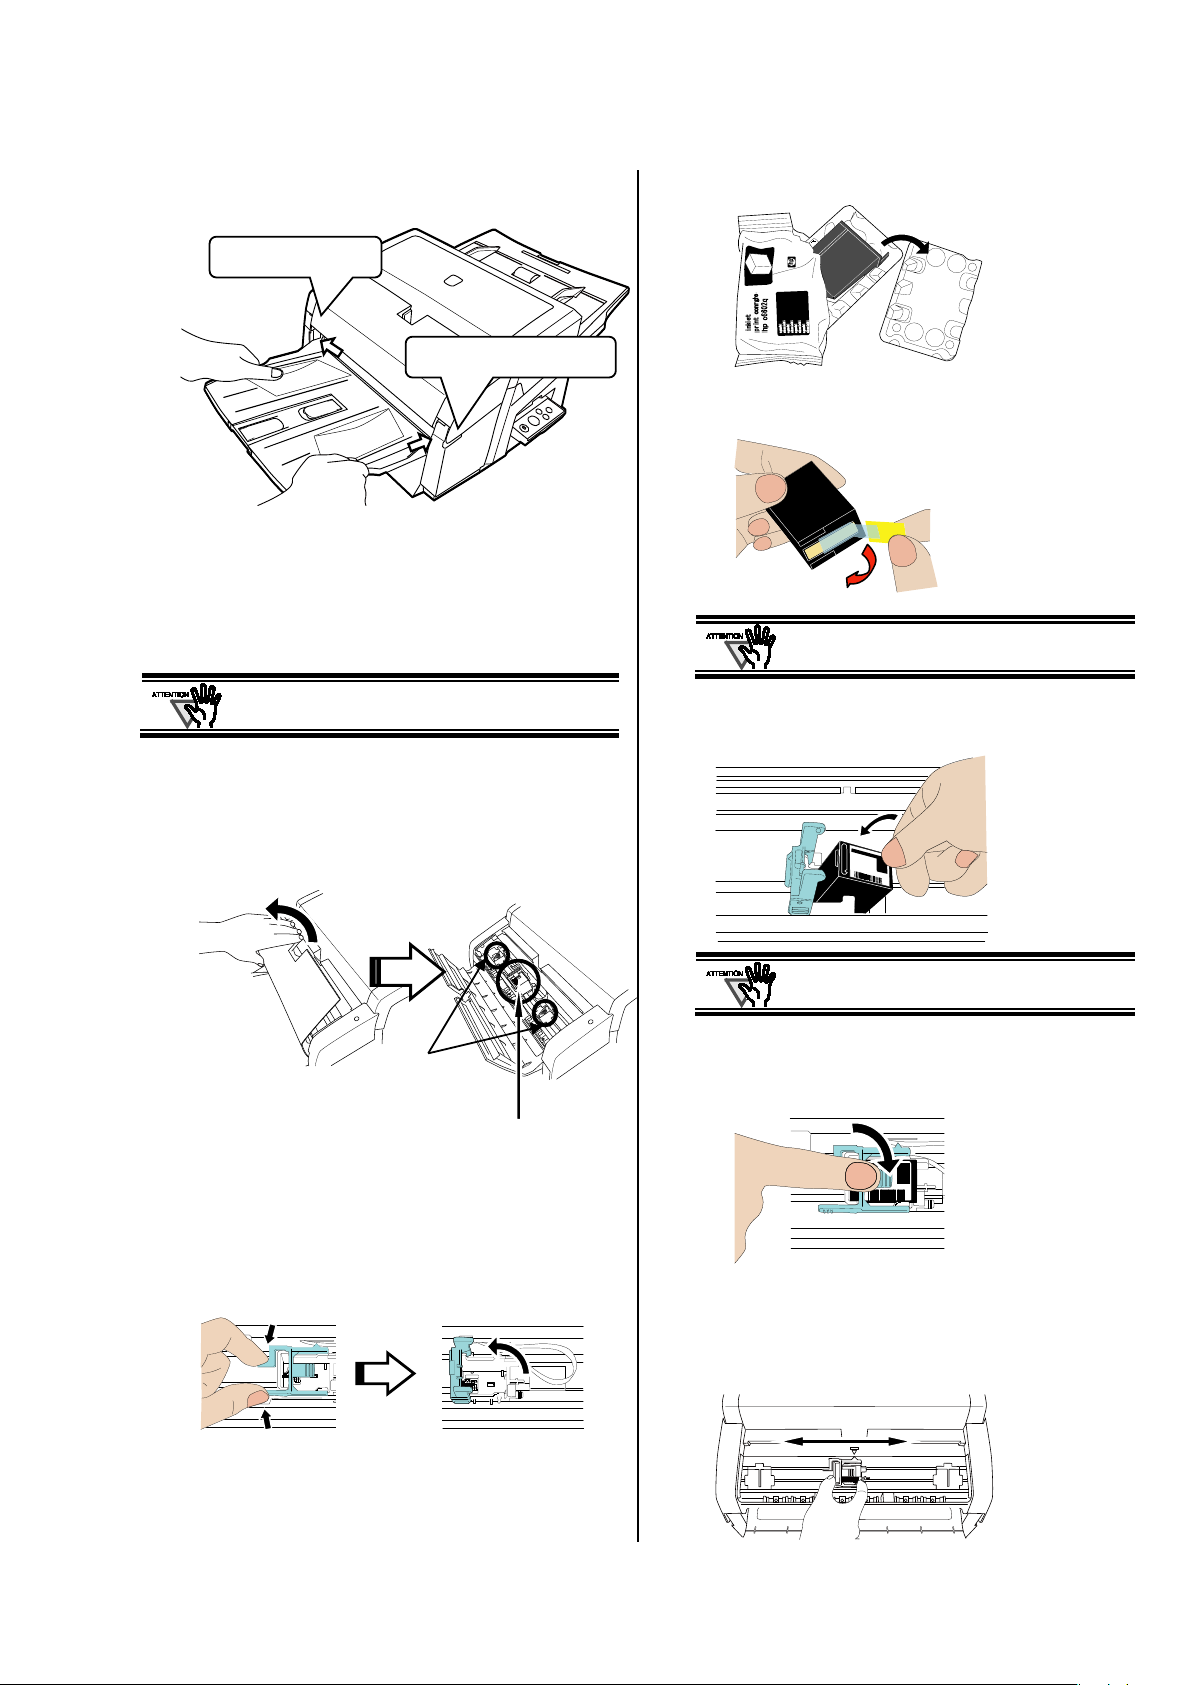
10. Replace the Stacker (re moved in Step 2) into the
Insert one end.
Insert the next end.
Print Cartridge Holder
Paper Guides
imprinter.
5. Remove the new print cartridge from its pouch.
6. Remove the protection tape from the print
cartridge.
11. Connect the power cable to the scanner.
2.2. Installing the Print Cartridge
Mount the print cartridge as follows:
When installing or replacing the print cartridge, be
careful not to insert it out of place.
1. Confirm that the scanner is turned off.
2. To open the print cartridge cover, grasp and pull
open the center of the cover turning it towards
you, as shown below.
Do not touch the metal part of the cartridge or
put the tape back on again.
7. Insert the print cartridge into the holder as shown
below with its tab pointing to the right.
Be careful not to let the print cartridge touch or
catch on to the print circuit film.
8. Lower the locking lever of the Print Cartridge
Holder until it locks in and fixes the cartridge in
place.
3. Remove the packing tape from the Print Cartridge
4. Open the Print Cartridge Holder by pinching and
Holder and the Paper Guides.
lifting up its locking lever with your fingers, as
shown below.
9. Position the Print Cartridge Holder along where
the document will pass through.
The print will be located on the page properly for
your application.
fi-667PR Imprinter Operator’s Guide | 9
Page 12
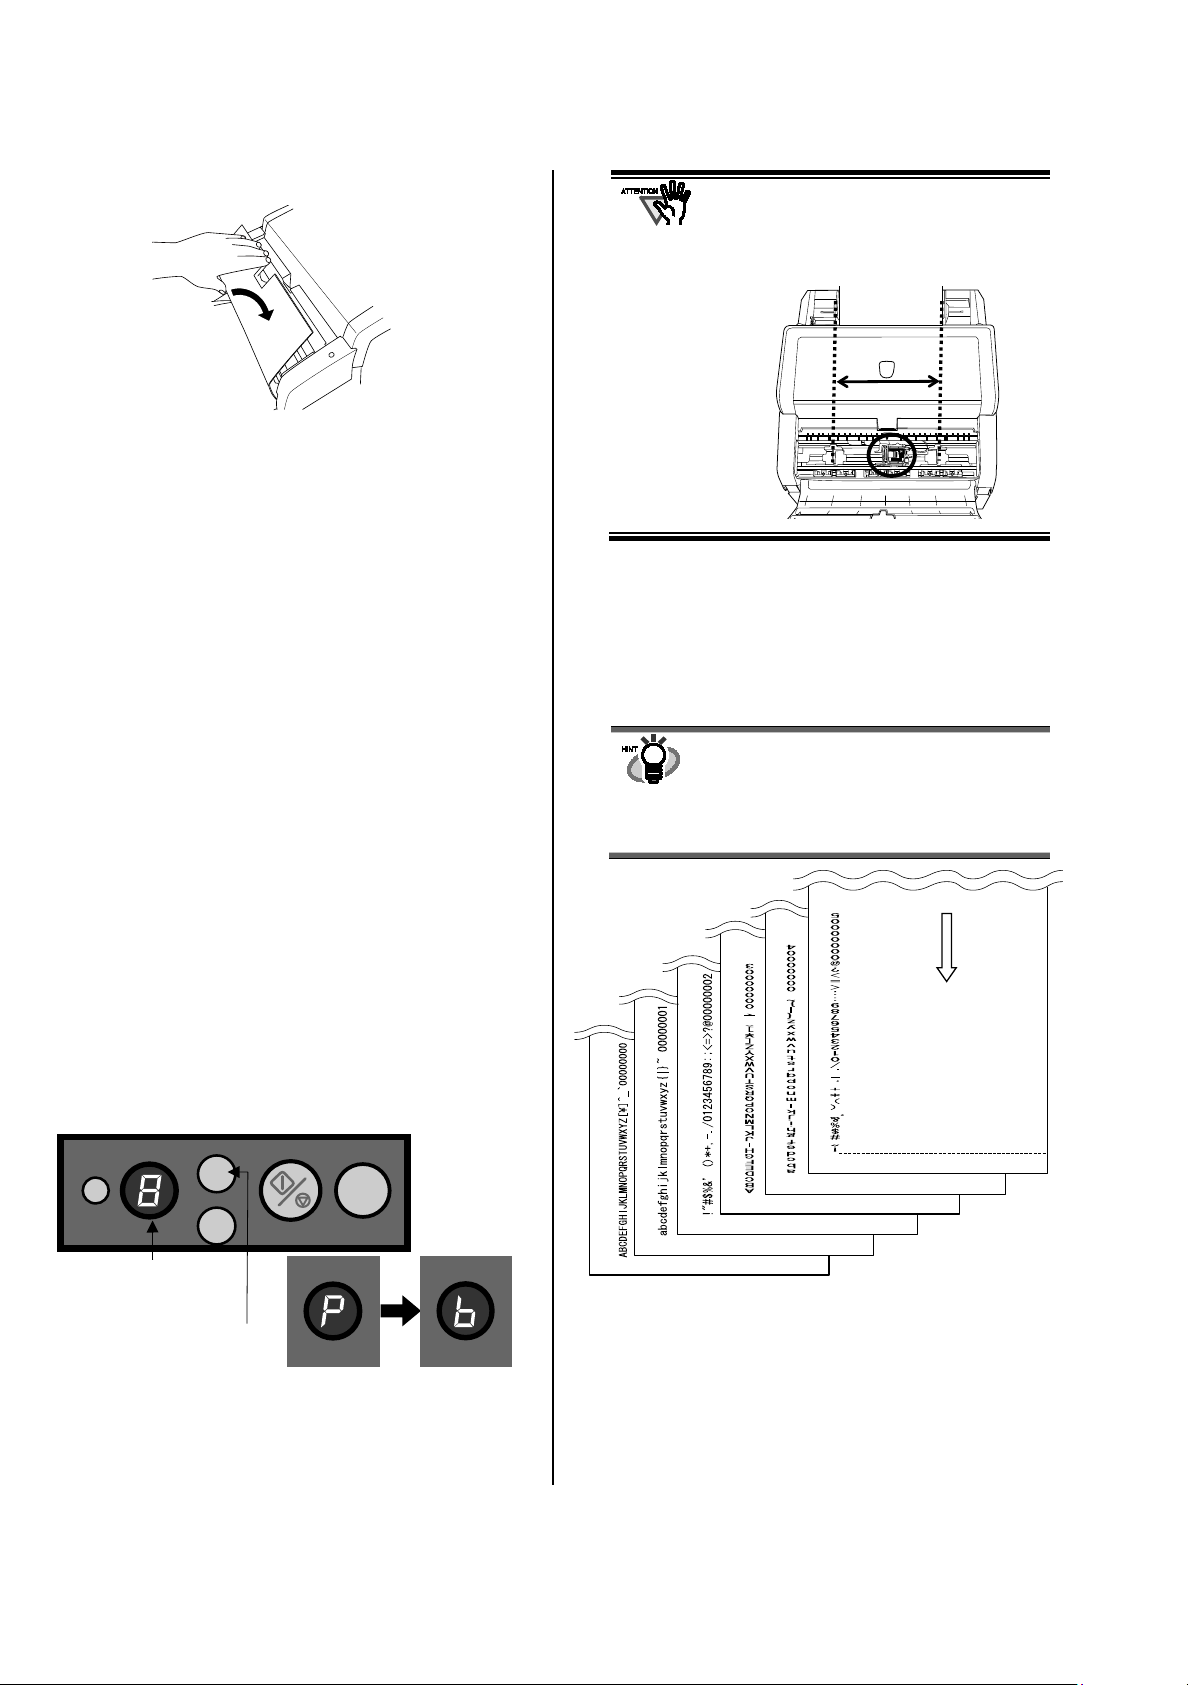
10. Close the Print Cartridge Cover.
● Use A4 or Letter size paper. If the size is
Check
Function
Send to
Scan/Stop
Power
Function Number
[Function] button
5mm
Feeding direction
Print Test Pattern (Sample)
2.3. Operating Test
smaller than A4 or Letter, printing may not
successfully complete.
● Confirm that the Print Cartridge is
positioned within the document width.
After installing the print cartridge, test to see if printing can
be performed on the Offline Print Test mode.
There are six patterns for printing test. One pattern is printed
on a sheet of paper.
Test pattern 1 (Horizontal):
ABCDEFGHIJKLMNOPQRSTUVWXYZ[\]^_`00000000
Test pattern 2 (Horizontal):
abcdefghijklmnopqrstuvwxyz{|}~ 00000000
Test pattern 3 (Horizontal):
Test pattern 4(Vertical):
Test pattern 5 (Vertical):
Test pattern 6 (Vertical):
’ ()*+,-./0123456789:;<=>?@00000000
!”#$%&
ABCDEFGHIJKLMNOPQRSTUVWXYZ[\]^_`00000000
abcdefghijklmnopqrstuvwxyz{|}~ 00000000
!”#$%&
’ ()*+,-./0123456789:;<=>?@00000000
Perform the tests as following the procedure below.
1. While pressing the [Function] button on the
operator panel, switch on the scanner.
Continue pressing on the [Function] button.
2. Release the [Function] button when the Function
Number Display changes from [P] to [b].
4. Press the [Scan / Stop] button to test.
Paper will feed into the ADF, and the imprinter will
print out the Print Test Characters starting at 5mm
from the paper’s edge. (The range of error is
±4 mm.)
5. To print the next pattern, return to Step 4.
Every single press of the [Scan / Stop] button
prints one test pattern.
The test print repeats test patterns from 1 through
6.
The numbering data portion "00000000" changes
from 0 with increments of 1.
Display
3. Place blank documents on the ADF Paper Chute.
To continue all the test patterns, place six sheets or
more of documents.
10 |
6. To stop Offline Print Test mode, turn off the
scanner by pressing the [Power] button for two
seconds or longer.
Page 13
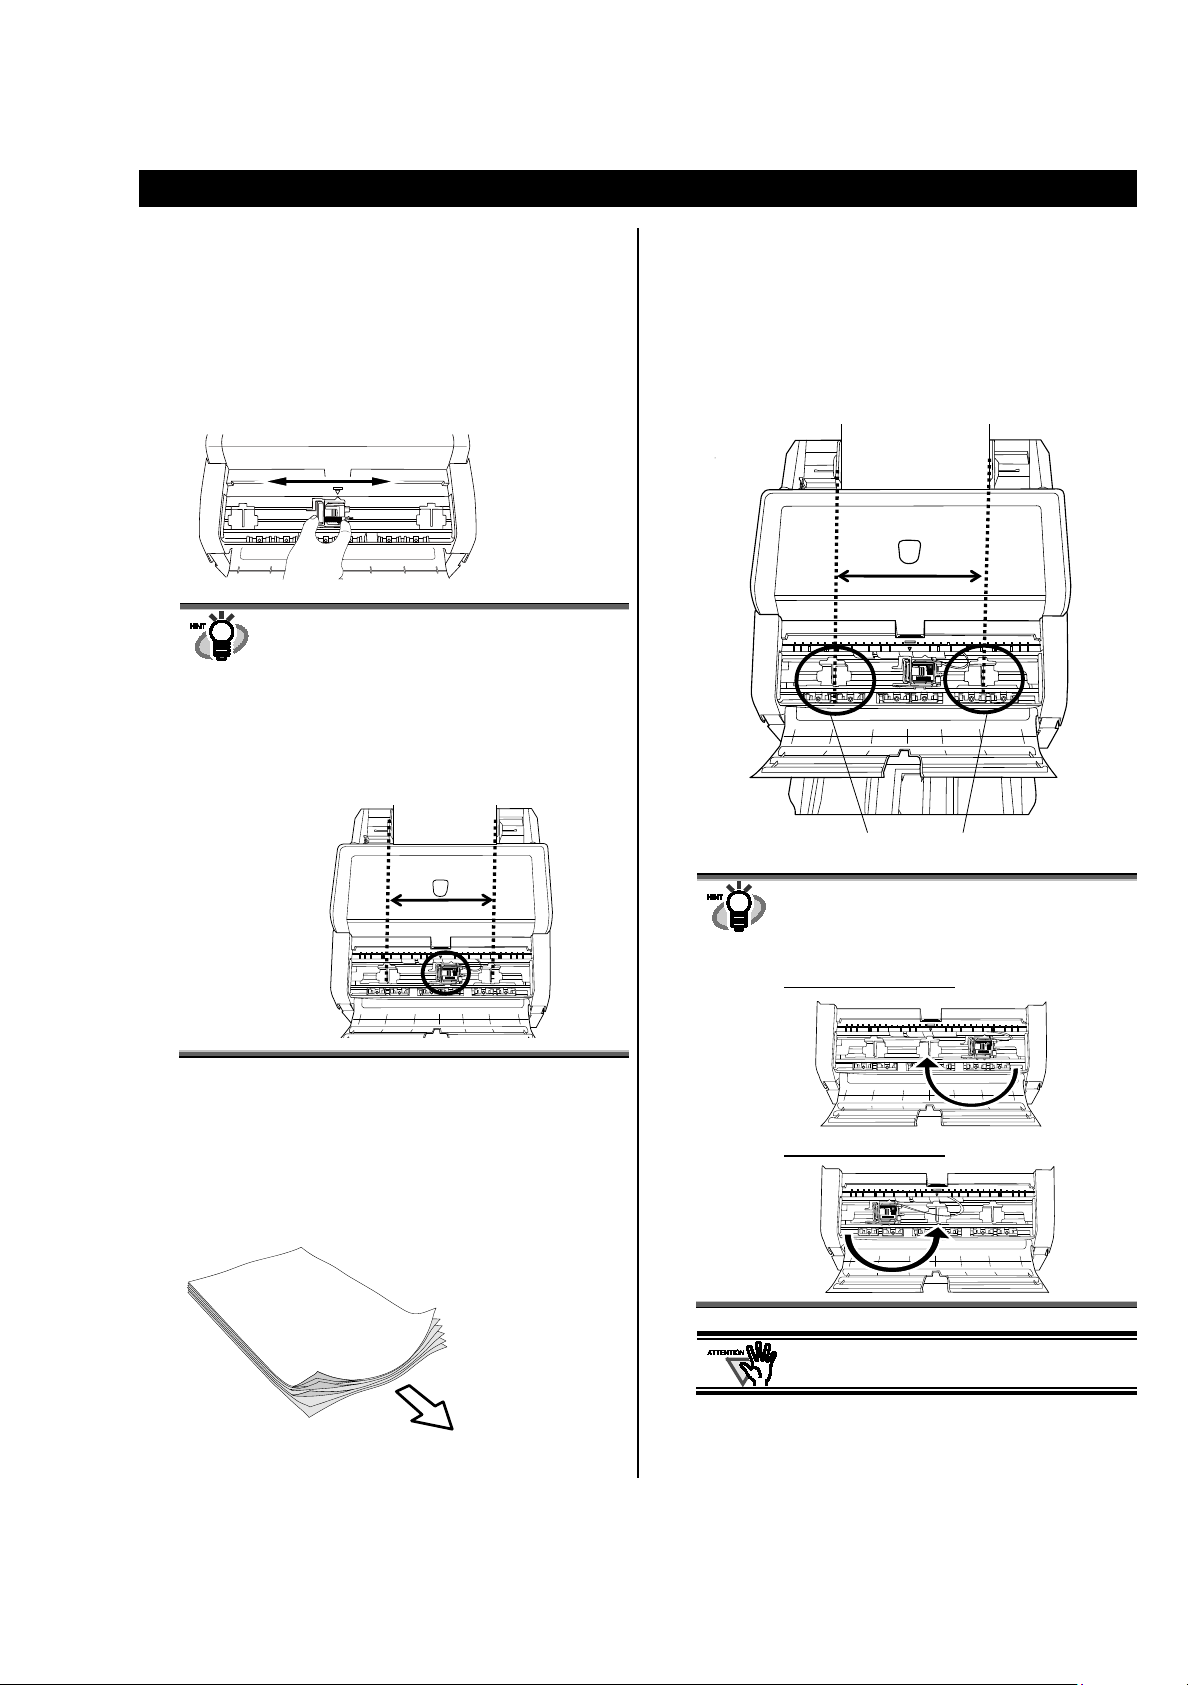
3. Basic Operation
Feed direction
Paper Guide
3.1. Positioning the Print Cartridge
To Position the print cartridge for printing:
1. Open the Print Cartridge Cover.
2. Hold the Print Cartridge Holder, as below, and
slide it to the left or right within the document
width to set it at a suitable print starting position.
Place the Paper Guides at the ends where the paper edges
will pass through.
1. Insert the document in the scanner.
2. Open the Print Cartridge Cover.
3. Slide the Paper Guides to the left and right edges
of the paper.
● The triangle-shaped protrusion on the locking
lever of the Print Cartridge Holder indicates
the current print position on the page.
● In the upper back of the Print Cartridge Holder
are the document size markings; use them to
adjust for paper sizes and printing positions.
● Put the actual document in the ADF and
confirm that the print cartridge is positioned
within the document’s width.
3.2. How to Use the Paper Guides
When you wish to print on a section near the
edge of wide paper, remove the Paper Guide in
order to open space for the Print Cartridge, and
attach the removed guide in the center.
UFor Right- Edge Printing
UFor Left- Edge Printing
Use the Paper Guides to prevent against paper jams due to
curling of the edges, as shown below.
Be careful not to let the Paper Guide touch or
catch onto the print circuit film.
fi-667PR Imprinter Operator’s Guide | 11
Page 14
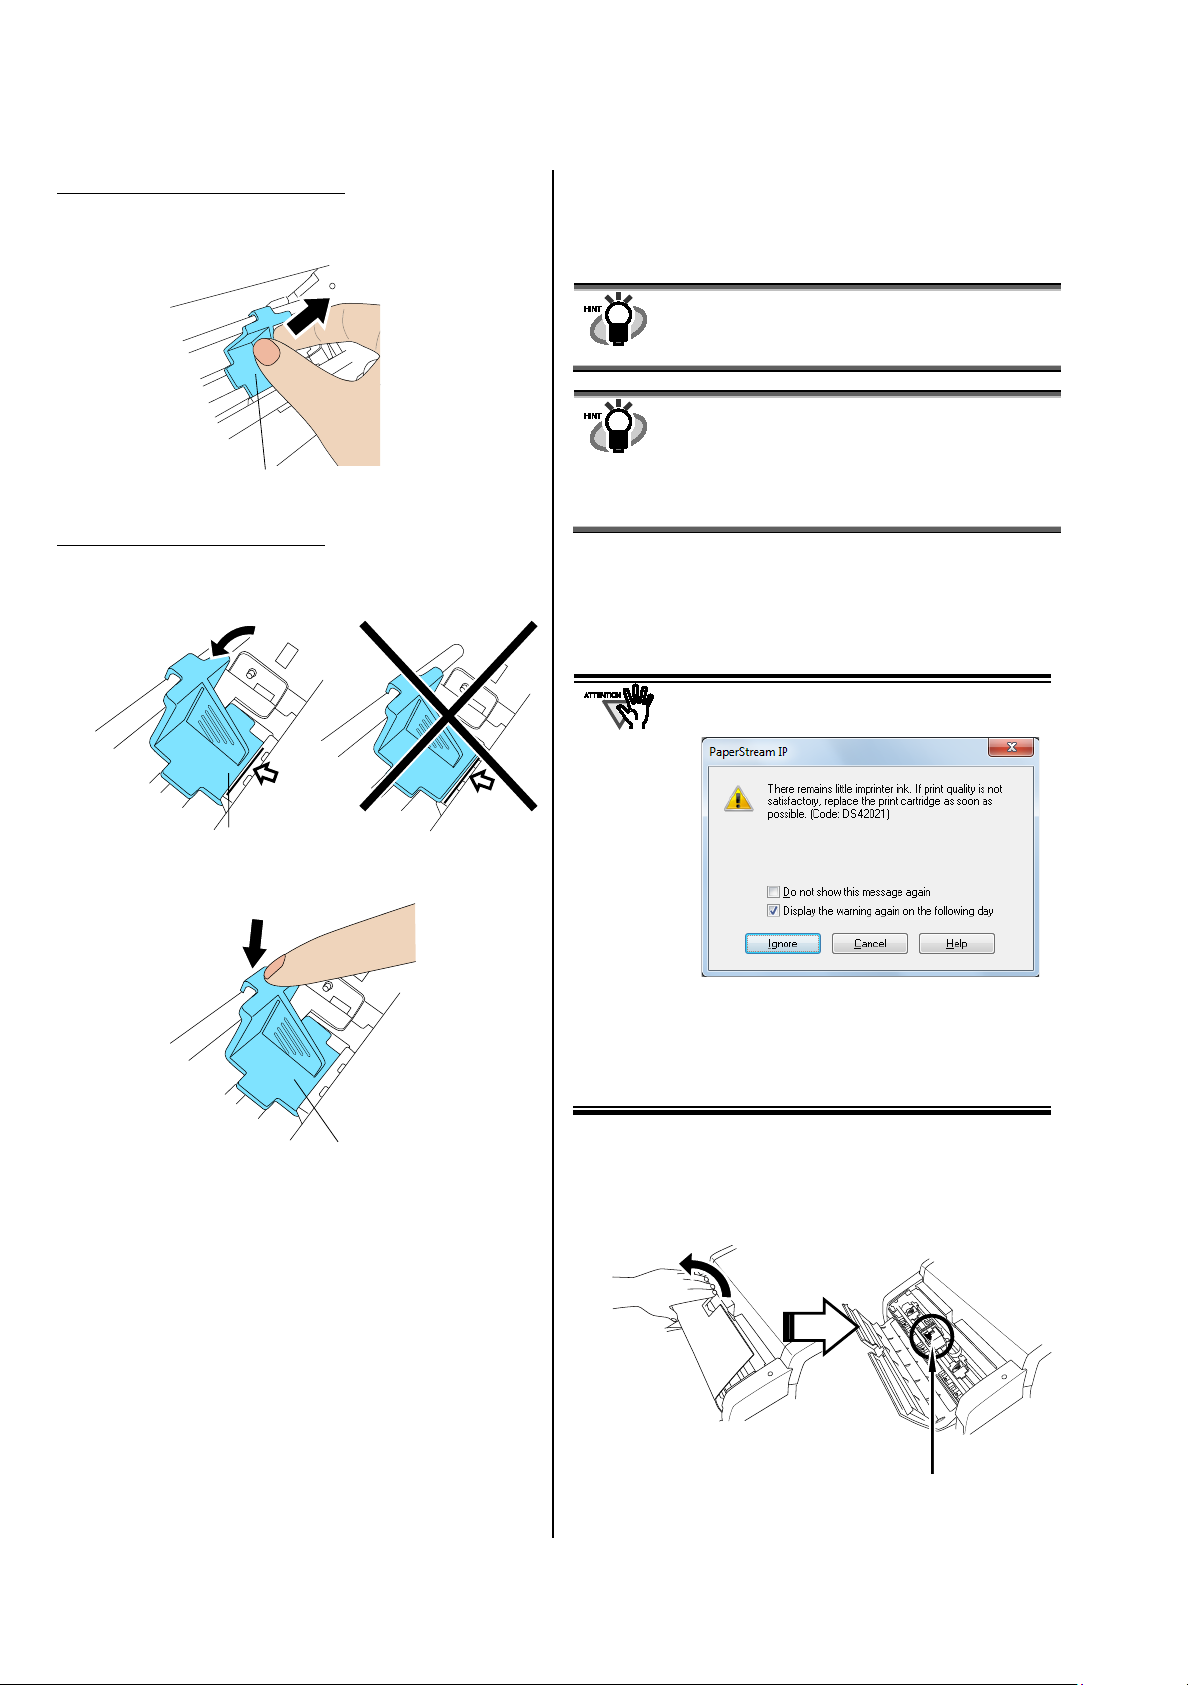
UTo Remove the Paper Guides
How to run the scanner driver differs depending on the
application being used.
Available items are:
Paper Guide
Paper Guide
Paper Guide
Print Cartridge Holder
Pressing and holding together with your fingers, as below,
lift up and pull away the guide.
UTo Attach the Paper Guides
1. Put the Paper Guides in place as in the picture on
the left.
3.3. Print Setup
You can configure settings for the imprinter by using the
scanner driver dialog box.
application.
For details, refer to the manual or help of the
● Print starting point (Y offset)
● Font orientation/ width
● Strings definition (Max. 43 characters)
● Counter Setup (column, add/subtract, step)
For details, refer to the PaperStream IP Help.
U
3.4. Replacing the Print Cartridge
Replace the Print Cartridge as follows:
● When the following message appears, replace
the Print Cartridge as soon as possible.
2. Push in the top portion of the guide to fit tightly.
If you continue to print without replacing the
cartridge, your print output will continue to
appear lighter and lighter.
● When installing or replacing the print cartridge,
be careful not to insert it out of place.
1. Turn off the scanner.
2. Open the Print Cartridge Cover by grasping its
center and turning it towards you, as shown
below.
12 |
Page 15
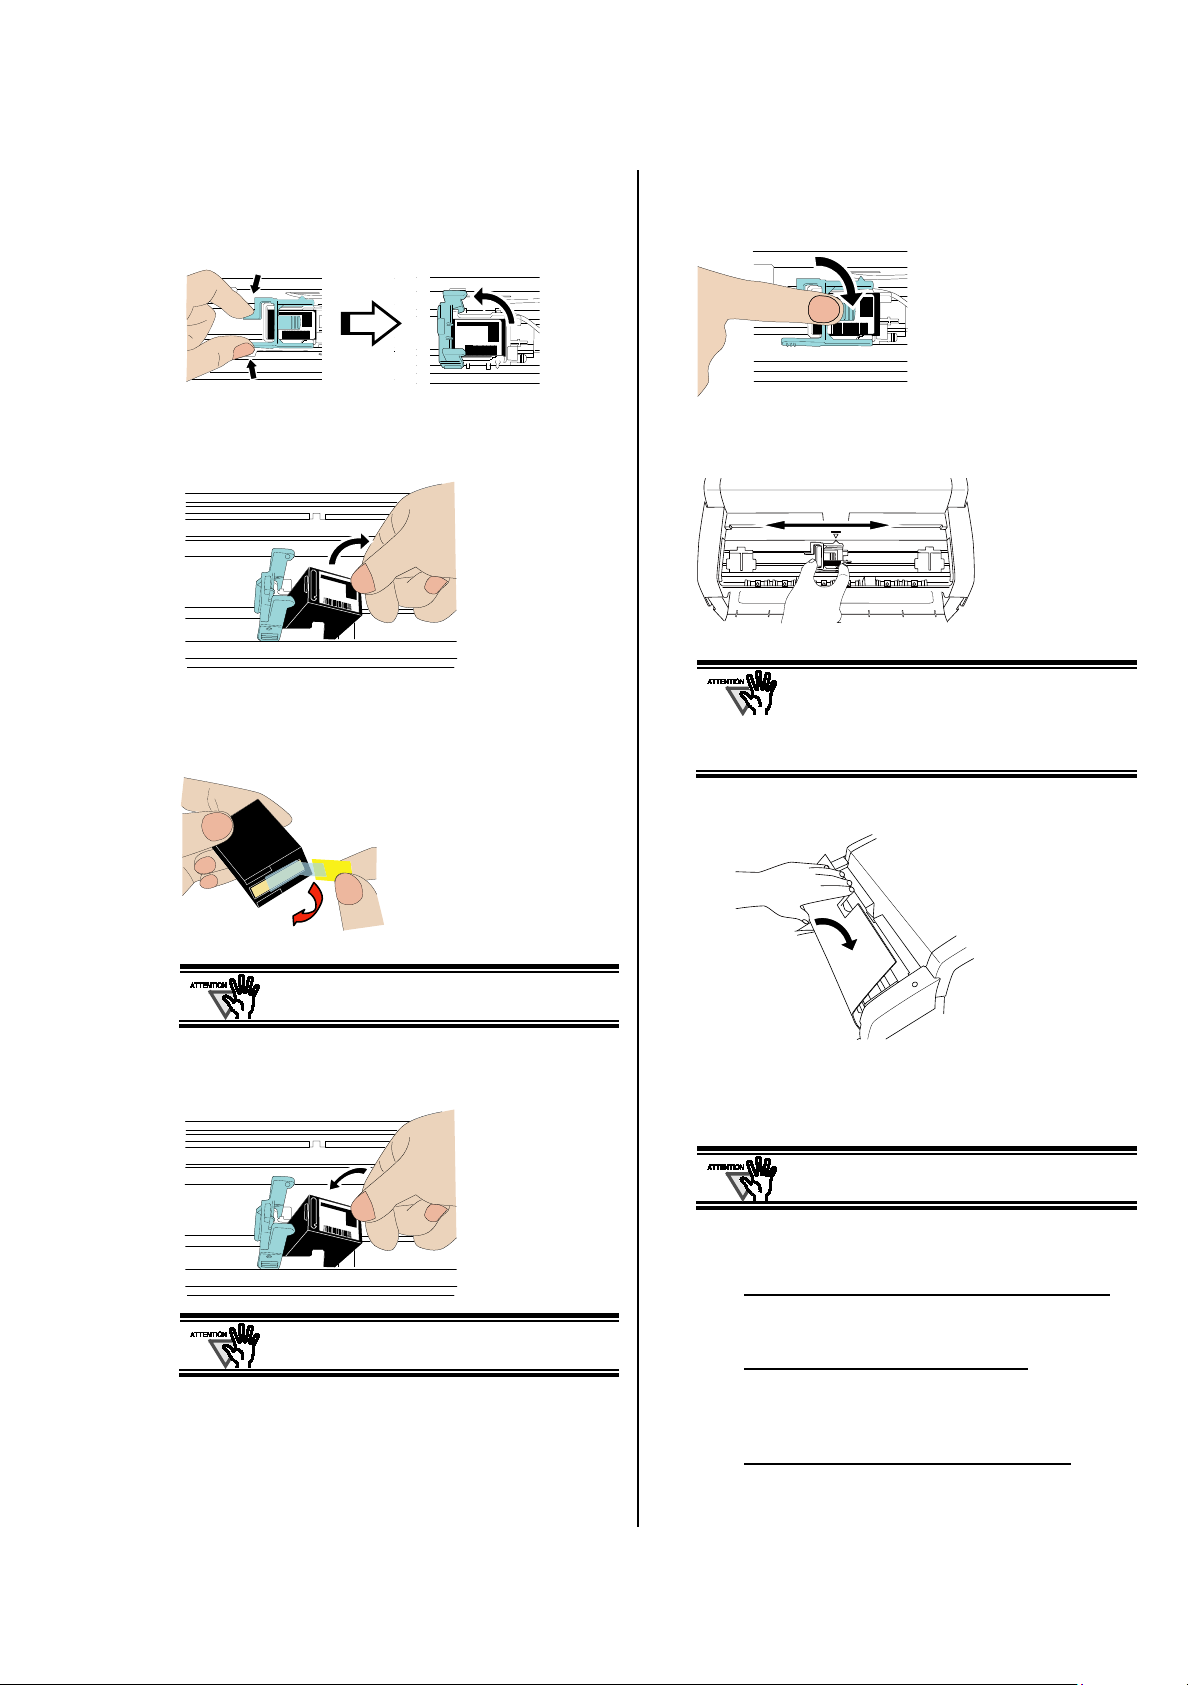
3. Open the Print Cartridge Holder by slightly
pinching and lifting up its locking lever with your
finger as shown below.
7. Lower the locking lever of the Print Cartridge
Holder until it locks in and fixes the cartridge in
place.
4. Remove the old Print Cartridge from the Print
Cartridge Holder.
5. Take the new Print Cartridge out of its pouch and
detach the protection tape from the Print
Cartridge.
Do not touch the metal part of the cartridge nor
put the tape back again.
6. Place the Print Cartridge into the holder as shown
below with its tab pointing to the right.
8. Position the Print Cartridge Holder along where
the document will pass through.
Be sure to position the print cartridge to have
enough space from the document edge.
If you position the Print Cartridge too close to
the document edge, printing may be
performed out of the document width.
9. Close the Print Cartridge Cover.
10. Turn on the scanner.
11. Reset the Remaining Ink Counter.
You must reset the Remaining Ink Counter
whenever you replace the print cartridge.
1) Display the [Software Operation Panel] dialog
box.
Be careful not to let the print cartridge touch or
catch on to the print circuit film.
Windows Server 2008/Windows 7 or earlier
Click [Start] menu → [All Programs] → [fi Series]
→ [Software Operation Panel].
Windows Server 2012/Windows 8
Right-click the Start screen, and select [All apps]
on the app bar → [Software Operation Panel]
under [fi Series].
Windows Server 2012 R2/Windows 8.1
Click [] on the lower left side of the Start screen
→ [Software Operation Panel] under [fi Series].
To display [], move the mouse cursor.
fi-667PR Imprinter Operator’s Guide | 13
Page 16
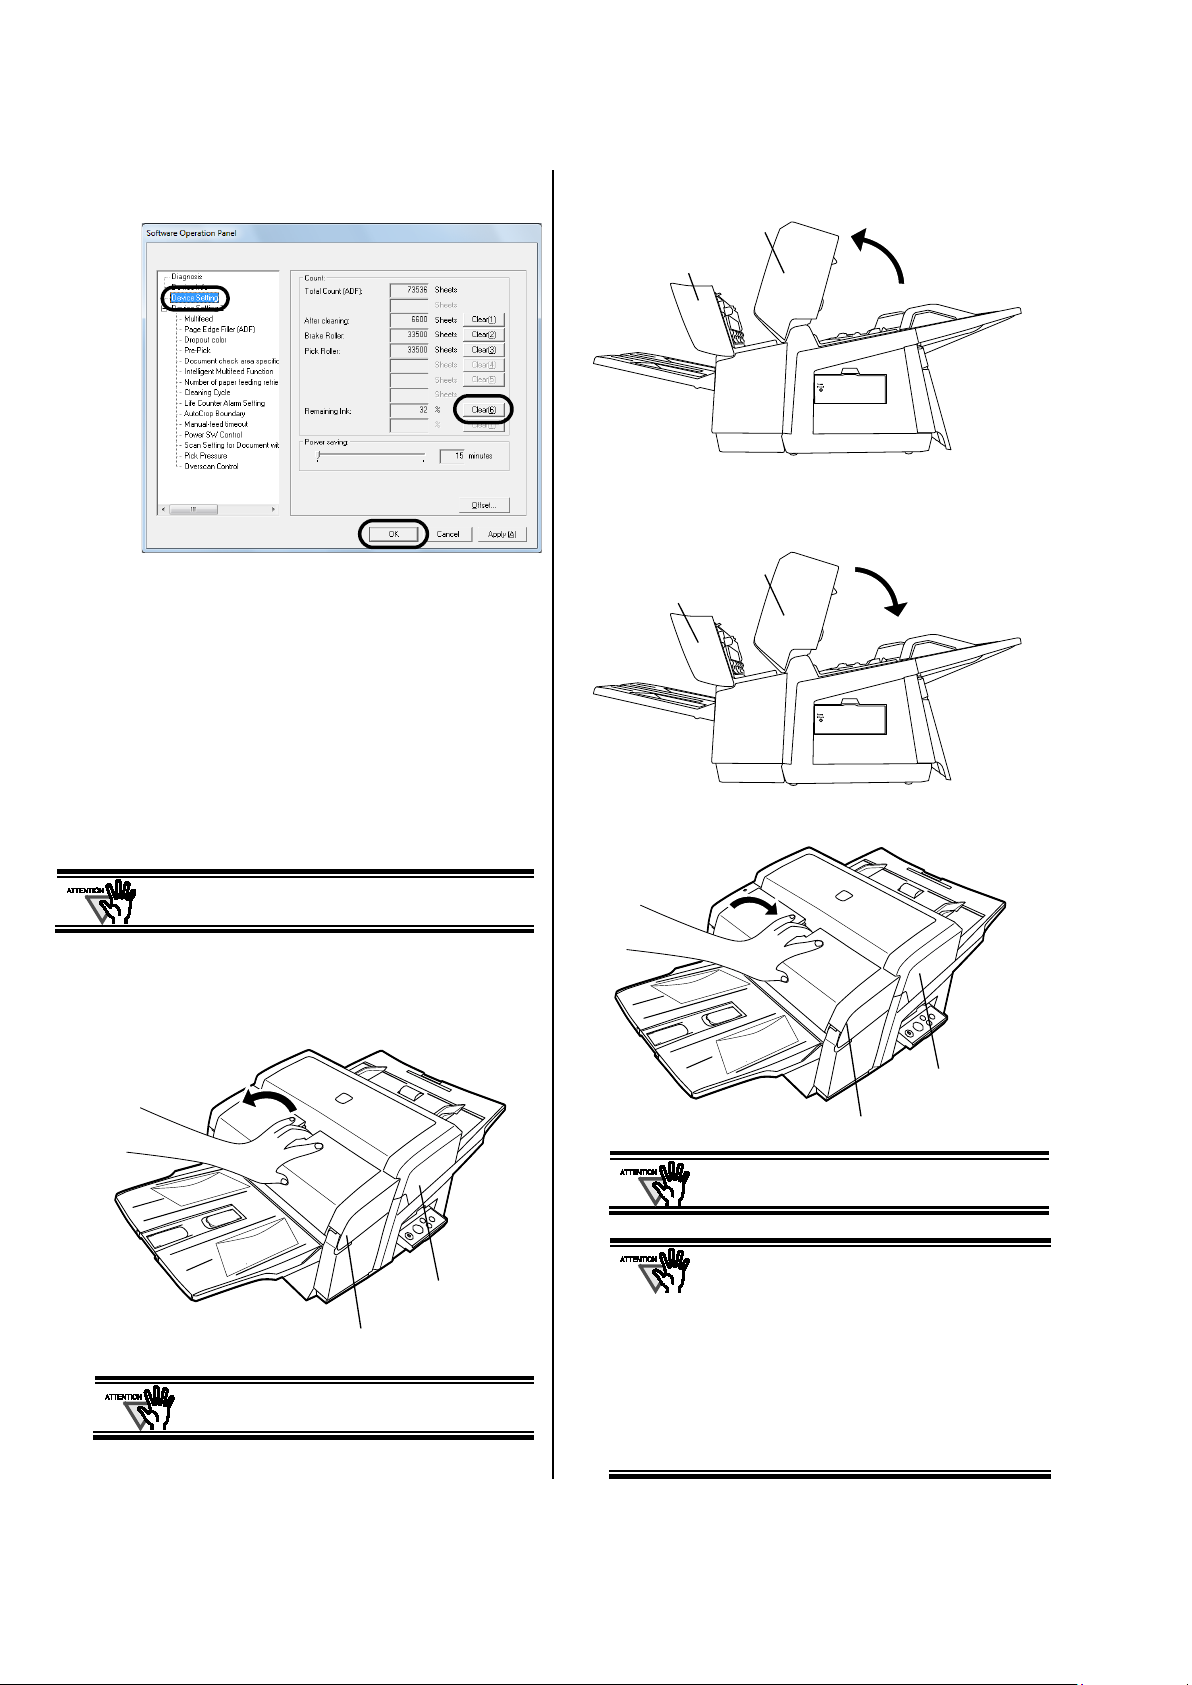
2) Click [Device Setting] from left side list in the
ADF
Print section
Print section
ADF
ADF
Print section
ADF
Print section
wi ndow.
3. Open the ADF.
3) Click the [Clear] button for [Remaining Ink].
The value of the [Remaining Ink] counter is
set to100.
4) Click the [OK] button on the [Software Operation
Panel] window.
3.5. Removing Jammed Documents
Remove jammed documents sheets as follows:
Do not forcefully pull out the documents pages.
1. Remove the documents on the ADF Paper
Chute.
2. Grab center of the Print section, pull it open by
turning it towards you.
4. Carefully remove all the jammed documents.
5. Close the ADF.
6. Close the Print section.
14 |
Be sure that the ADF is closed first before
closing the Print section.
● Do not move the imprinter and scanner
while printing. Printing may distort.
● When not using the imprinter for a long
time, please remove the print cartridge from
the imprinter and store it.
To open the ADF, first open the Print section
before proceeding.
● Ink is consumed every time at the initial
start-up of the imprinter though no printing
is performed.
● Do not move the scanner with the imprinter
already installed. The imprinter may
become damaged.
Page 17
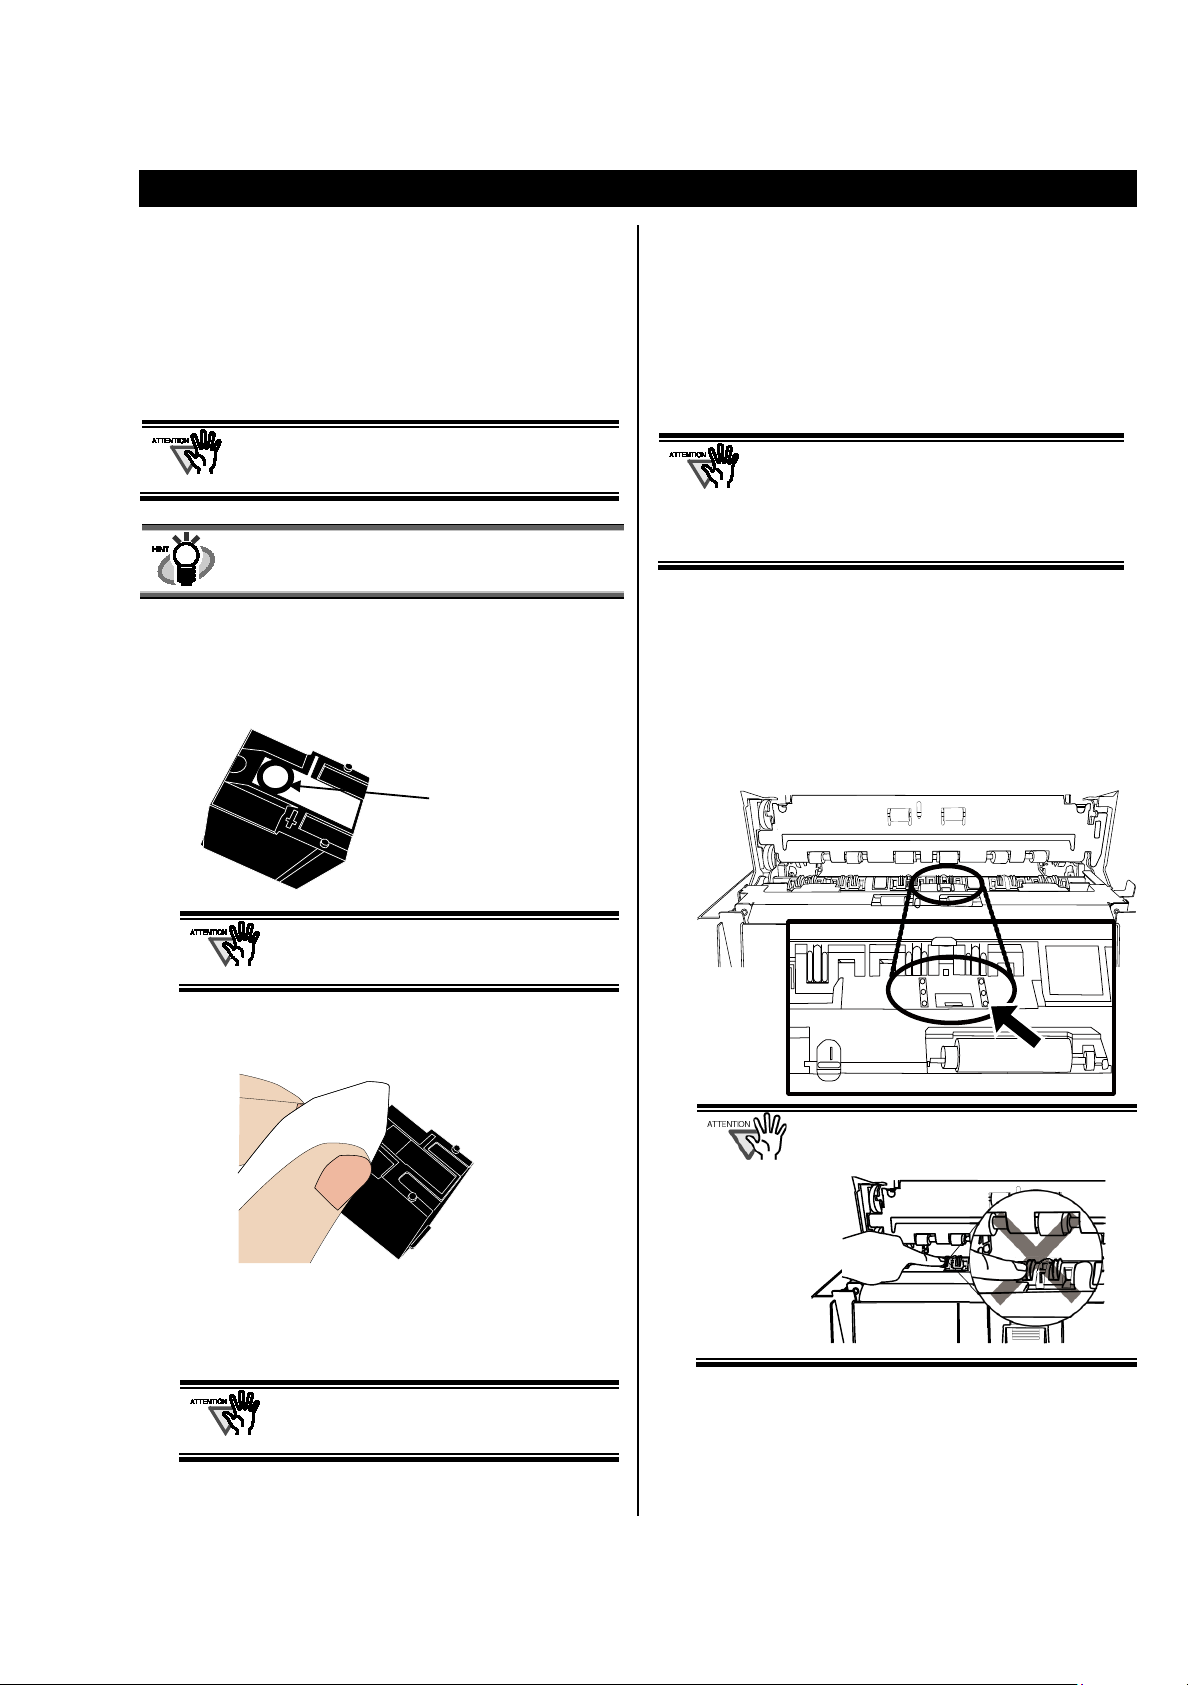
4. Daily Care
cartridge.
Nozzle plate
4.1. Cleaning the Print Cartridge
Poor quality prints can occur due to blocked ink emission
holes in the nozzle. Leaving the imprinter unused for long
periods can also cause emission holes to become blocked.
When the emission holes are blocked, clean the nozzle
surface of the print cartridge.
For cleaning, use a dry lint-free cloth (DO NOT use
tissue), and gently wipe any dirt and stains off the
nozzle’s surface.
If the ink emission holes are still blocked after
cleaning the print cartridge, replace it with a new
1. Turn off the scanner.
2. Remove the Print Cartridge.
(Refer to “
XX3.4. Replacing the Print CartridgeXX”)
4.2. Cleaning the Imprinter
After frequent use, ink will begin to accumulate or stick to
the base of the imprinter, which can soil printouts. Always
maintain the imprinter base clean.
To assure high quality print outs and long use of the
imprinter, adopt a daily maintenance procedure as given
below.
● When cleaning, gently wipe off dust on the
imprinter base with an absorbent item that
can remove the ink.
● If the ink is dried, gently wipe it with a
moistened cloth. (Since the ink is water
soluble, it can be cleaned away with water.)
1. Turn off the scanner.
2. Open the Print Cartridge Cover and remove the
print cartridge.
(Refer to “
XX3.4. Replacing the Print CartridgeXX”)
3. Open the Print section.
4. Wipe off any dirt or dust on the base surface of
the Print Cartridge Holder with a lint-free cloth.
When cleaning, be careful not to touch the
nozzle plate or the contact parts of the
cartridge directly by hand.
3. Gently wipe any dirt and stains off the nozzle
plate.
4. Make sure that all dirt and stains are removed,
before installing the Print Cartridge.
(Refer to “
XX3.4. Replacing the Print CartridgeXX”)
When installing or replacing the print
cartridge, be careful not to insert it out of
place.
When cleaning, be careful not to touch the
metal wheels located behind the upper rollers
in the print section.
5. Check that the dirt is wiped off, and then close the
Print section.
6. Reinstall the print cartridge and close the Print
Cartridge Cover.
(Refer to “
XX3.4. Replacing the Print CartridgeXX”)
fi-667PR Imprinter Operator’s Guide | 15
Page 18
4.3. Cleaning the Rollers
Print section
Print section
4.4. Removing the Imprinter
When ink or dust from paper is stuck on the feed roller
surfaces, documents may not feed smoothly. To prevent
feed problems, clean the roller surfaces regularly.
Recommended cleaning cycle is every 5,000 sheets.
Actual cleaning cycle may be shorter depending on
usage and documents.
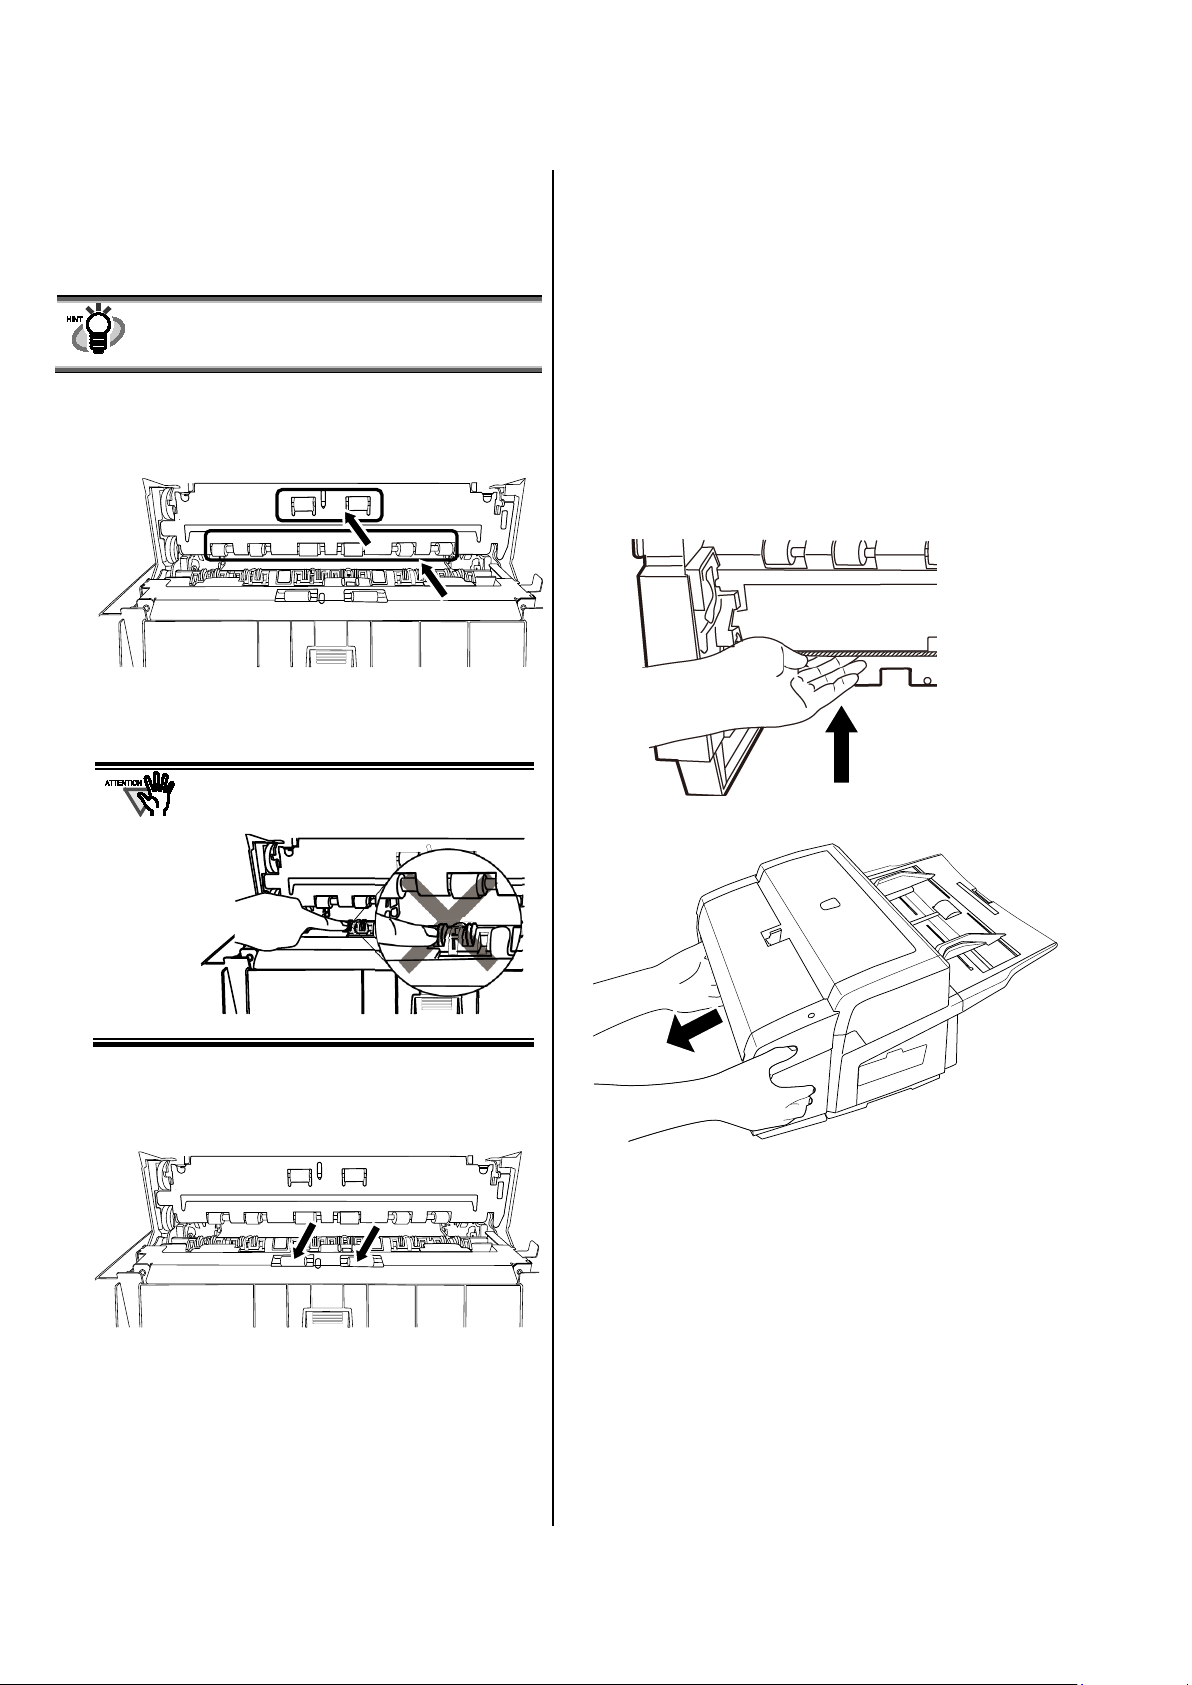
1. Open the Print section.
2. Clean the eight rubber rollers.
Clean the rubber rollers located as shown below.
Rotate the rollers with your fingers gently and wipe off
any dirt or dust from the roller surface with a lint-free
cloth.
When cleaning, be careful not to touch the
metal wheels located behind the upper rollers
on the print section.
When removing the imprinter from the scanner, refer to
XX2.1. Installing the ImprinterXX” and remove as follows:
“
1. Remove the Stacker from the imprinter.
2. Remove the cover located under the Stacker
from the imprinter.
3. Disconnect the EXT cable from the EXT
connector of the scanner.
4. Remove the screw that connects the scanner to
the imprinter.
5. Push up the lever located at bottom left of the
imprinter.
6. Remove the imprinter as shown below.
3. Clean the tow plastic rollers.
Clean the two black plastic rollers located inside the
Print section.
Rotate the rollers with your fingers gently and wipe
off any dirt or dust from the roller surface with a
lint-free cloth.
4. Confirm that all dirt and dust have been removed
from the rollers. Close the Print section.
16 |
7. Remove the Attachment Guide from the scanner.
(Refer to “
XXHow to remove the Attachment GuideXX” (P.XX8XX))
8. Replace the cover, which is removed in Step 2, to
the scanner.
9. Replace the Stacker, removed in Step 1, to the
scanner.
Page 19
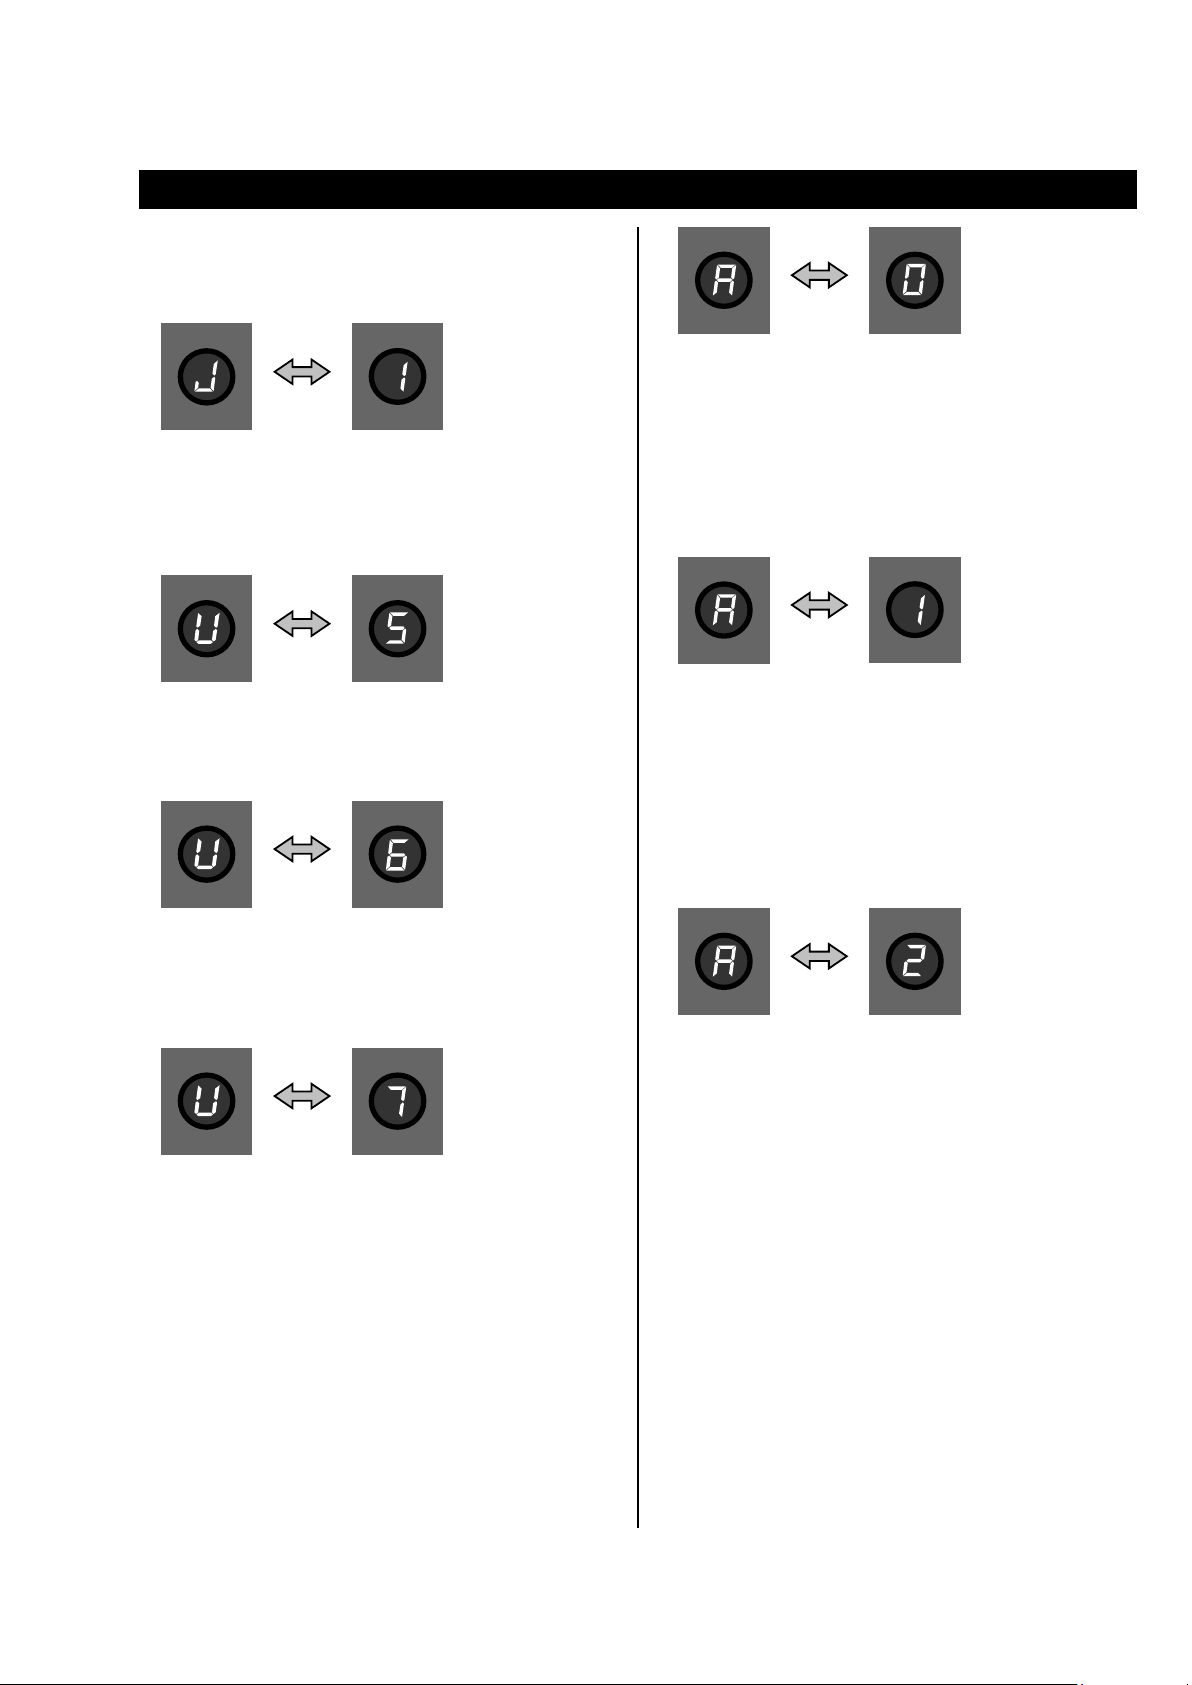
5. Error Messages
The following numbers or letters on the Function
Number Display indicates a malfunction in the
imprinter.
Description :
How to solve :
Description :
How to solve :
Description :
How to solve :
Description :
How to solve :
Document jammed in the imprinter.
Remove the jammed documents referring
to “XX3.5. Removing Jammed
Documents
XX”.
The print section of the imprinter or ADF
is open.
Close the print section or ADF firmly.
The print cartridge is not installed.
Open the print cartridge cover and confirm
that the print cartridge is installed
correctly.
The printing area specified is outside the
printable area of document. Confirm the
print cartridge position, or confirm the
print starting position in the scanner
driver.
If the print cartridge is set outside the
printable area (width-wise) of document,
move it to a correct position so it will pass
through within the document width.
If the printed text is not within the
printable area (long-wise) of document,
change the print starting position and/or
the number of letters in the scanner driver
so the text will be within the printable
area.
Description :
How to solve :
Description :
How to solve :
Description :
How to solve :
The imprinter control board has an error.
Turn off the scanner. After confirming
that the EXT Cable is connected
properly, turn it on again. (If the problem
occurs again, contact the store where you
purchased the imprinter or contact an
authorized FUJITSU scanner service
provider.)
A communication timeout occurred in
the imprinter.
Turn off the scanner. After confirming
that the EXT Cable is connected
properly, turn it on again. (If the
problem occurs again, contact the store
where you purchased the imprinter or
contact an authorized FUJITSU scanner
service provider.)
A problem occurred to the ink head of
the imprinter.
Turn off the scanner. After confirming
that the EXT Cable is connected
properly, turn it on again. (If the
problem occurs again, contact the store
where you purchased the imprinter or
contact an authorized FUJITSU scanner
service provider.)
fi-667PR Imprinter Operator’s Guide | 17
Page 20
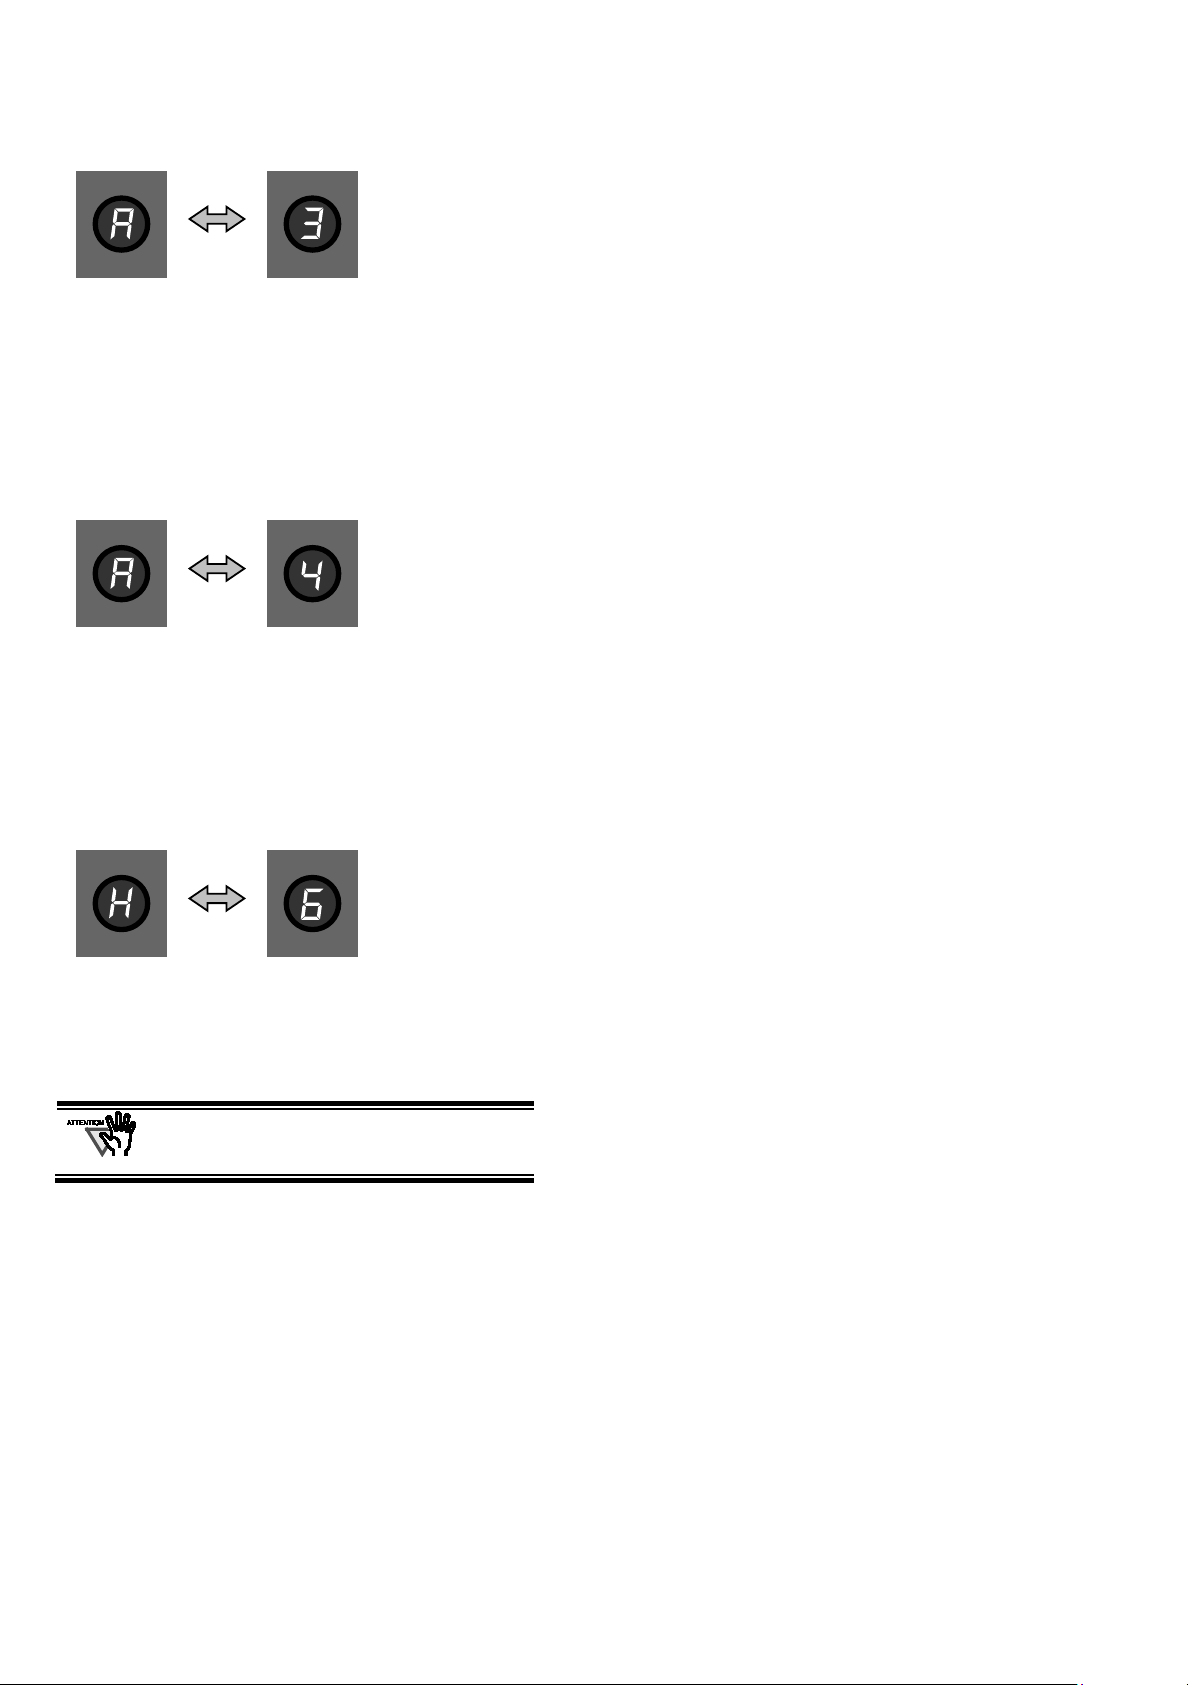
Description :
How to solve :
Description :
How to solve :
The built-in memory (EEPROM) of the
imprinter has an error.
Turn off the scanner. After confirming
that the EXT Cable is connected
properly, turn it on again. (If the
problem occurs again, contact the store
where you purchased the imprinter or
contact an authorized FUJITSU scanner
service provider.)
The imprinter's ROM has an error.
Turn off the scanner. After confirming
that the EXT Cable is connected
properly, turn it on again. (If the
problem occurs again, contact the store
where you purchased the imprinter or
contact an authorized FUJITSU
scanner service provider.)
Description :
How to solve :
The imprinter's circuitry has an error.
Contact the store where you purchased
the imprinter or contact an authorized
FUJITSU scanner service provider.
For other errors, refer to “Image Scanner
Operator’s Guide” provided by the SETUP
DVD-ROM bundled with fi-6670 / fi-6670A.
18 |
Page 21
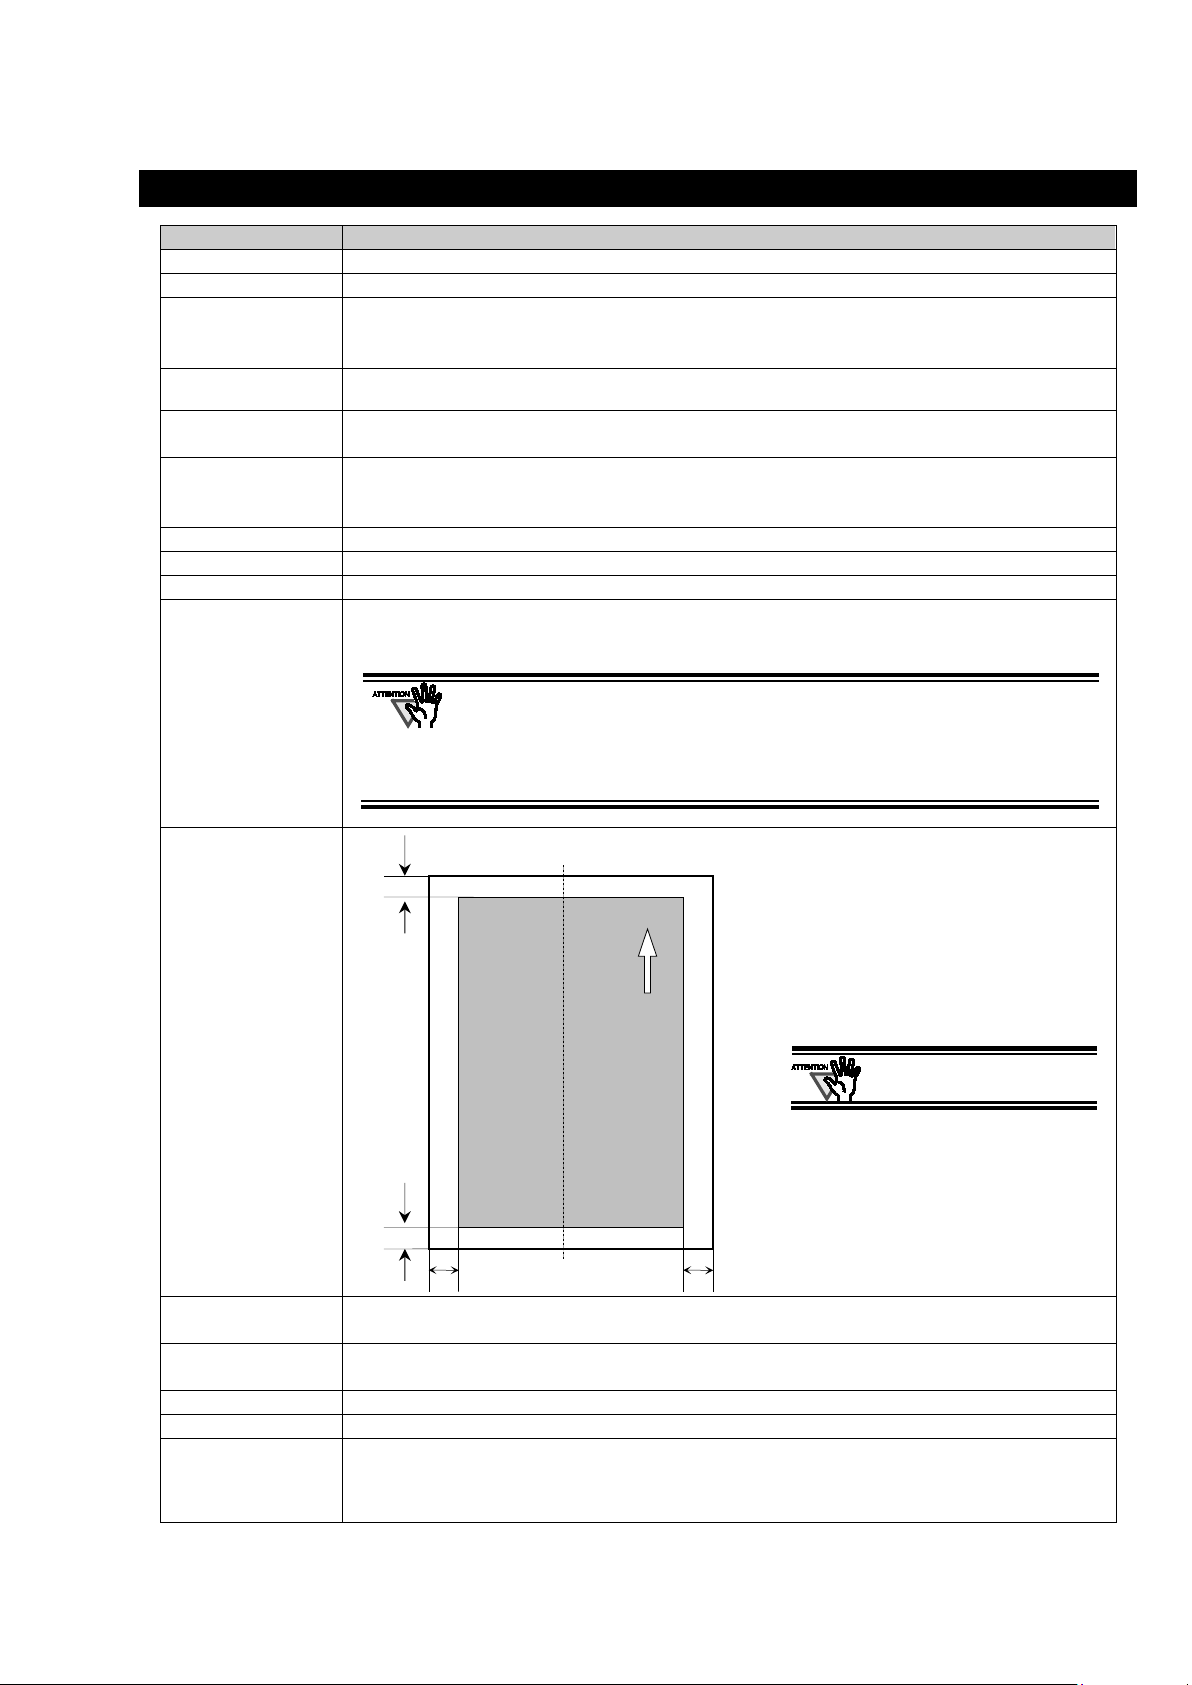
6. Specifications
Item
Specification
Printing Method
Thermal inkjet printing
Print Timing
Post printing
Printing Characters
Alphabet : A to Z, a to z
Symbols : ! ” $ # % & ’ ( ) * + , - . / : ; < = > ? @ [ \ ] ^ _` { | } ~
Maximum number of
characters per line
Maximum 43 characters
Print orientation
Normal : 0º, 180º (horizontal), 90º, 270º (vertical)
Narrow : 0º, 180º (horizontal)
Character size
Normal : Height 2.91mm × width 2.82mm / 0.1146 × 0.1110 inch (horizontal orientation),
Narrow : Height 2.91mm × width 2.12mm / 0.1146 × 0.0835 inch (horizontal orientation)
Character pitch
Normal :3.53mm / 0.139 inch, Narrow : 2.54mm / 0.100 inch
Font Style
Regular, Bold
Character width
Normal, Narrow
Document that can
Documents supported by fi-6670 / fi-6670A
●
Printing area
Accuracy of
Printing position
±4 mm from the starting point for feeding direction
Dimension
Without scanner : 416(W) × 157(D) × 252(H) mm / 16.39(W) × 6.18(D) × 9.92(H) inches
With scanner : 432(W) × 749(D) × 300(H) mm / 17.02(W) × 29.51(D) × 11.81(H) inches
Weigh t
5 kg (11.02 lbs)
Ambient condition
Temperature: 10 to 35ºC (50 to 95ºF), Humidity: 20 to 80%
Consumable
Print Cartridge (P/N: CA00050-0262)
Replacement cycle : 4,000,000 characters or six months after opening
A=5mm
A B C
D
Printing Area
Feed direction
Numeric Characters : 0, 1 to 9
Height 2.82mm × width 2.91mm / 0.1110 × 0.1146 inch (vertical orientation)
be scanned
For the details, please refer to “Image Scanner Operator’s Guide” – “2.2 ADF-Loaded
Documents”
Documents with glossy surface such as thermal paper, thermal transfer paper,
coated paper, and art paper take longer time for the ink to dry and may cause poor
print quality. The imprinter must be cleaned more frequently if you use these types of
papers.
● Very thick paper or plastic document cannot be scanned when the imprinter is
installed.
B=5mm
C=5mm
D=5mm
(0.20 inch)
(Back side)
Do not print less than 5mm of
the page margins.
The printable number of characters: 4,000,000 characters (May decrease depending on the
font selection)
fi-667PR Imprinter Operator’s Guide | 19
 Loading...