

Page 1

AS700 PRESSURE SEALER
Contents
Machine Specifiaction Sheet
Section 1 Technical Specification
Section 2 Description of Operation
Section 3 Diagram of Parts
Section 4 Control Panel
Section 5 Operating Overview
Operating Instructions
Section 6 Setting up the Machine
6.1 Loading the Paper Hopper
6.2 Setting the Fold Plates
6.2.1 Fold Plate 1
6.2.2 Fold Plate 2
6.2.3 Using the No-Fold Guide
6.2.4 Fold Options
6.3 Double Document Calibration
Section 7 Handfeed Option
Section 8 Operator Maintenance
8.1 Cleaning the Fold Rollers
8.2 Cleaning the Sensors
8.3 Clearing Paper Jams
Section 9 Operator's Troubleshooting Guide
Section 10 Error Messages
Page 1
Issue 1 Apr 2002
Page 2

MACHINE SPECIFICATION SHEET
1. CAUTION: In order to ensure correct safety and operation, this machine must be
installed and maintained by an authorised Service Engineer.
2. CAUTION: Should any cover or safety interlock be damaged, the machine must not
be used until service repairs have been completed.
3. CAUTION: This machine must be grounded. Wire colors in the power cord are:
110-120V 220-240V Connect to:
Green Green/Yellow Ground (Earth)
White Blue Neutral
Black Brown Live (Line)
4. CAUTION: This machine must not be used if the power cord is damaged. It must be
replaced with a similar power cord:
UK Part no. 141-162-210
EURO Part no. 141-162-311
US Part no. 141-162-321
5. CAUTION: For continued protection against risk of fire, replace with the same type
and rating of fuse. The fuse rating and type for this machine is:
110-120V T6.3A 250V Part no. 141-135-106
220-240V T3.15A 250V Part no. 141-135-103
6. Model Details:
Model name: Desktop Pressure Sealer
Model number:4040/4060
Input voltage: 110-120V @ 60Hz 220-240V @ 50Hz
Input current: 3 Amps 1.5 Amps
Input power: 360 Watts 360 Watts
Sound output: 75dBa 75dBa
(measured at 1 meter from the cover and 1.6 meters from the ground)
Weight: 158lbs (72kg) - unpackaged
Lifting or handling must only be carried out by competent persons using appropriate means.
7. The use for the machine is pressure sealing documents.
Distributor and Service contact:
Page 1a
Issue 1 Apr 2002
Page 3

DONNEES TECHNIQUES DE LA MACHINE
1. ATTENTION: Afin de garantir un fonctionnement en toute sécurité, cette machine
doit être installée et entretenue par un technicien agréé.
2. ATTENTION: Si le couvercle ou le mécanisme de blocage de sécurité est endom-
magé, ne pas utiliser la machine tant que les réparations n’ont pas été
effectuées.
3. ATTENTION: Cette machine doit être raccordée à la terre. Les fils de couleur du
câble d’alimentation sont:
110-120V 220-240V Connecté:
Vert Vert/Jaune à la terre (masse).
Blanc Bleu au neutre.
Noir Brun à la tension.
4. ATTENTION: Cette machine ne doit pas être utilisée si le câble d’alimentation est
endommagé. Il y a lieu de le remplacer par un câble similaire:
UK N° de pièce 162-210
EURO N° de pièce 162-311
US N° de pièce 162-321
5. ATTENTION: Pour ne pas compromettre la protection contre les risques d’incendie,
remplacer par un fusible de même type at de mêmes caractéristiques
nominales:
110-120V T6.3A 250V N° de pièce 135-106
220-240V T3.15A 250V N° de pièce 135-103
6. Spécifications:
Nom du modèle: Desktop Pressure Sealer
Numéro du modèle: 4040/4060
T ension d’entrée: 110-120V à 60Hz 220-240V à 50 Hz
Courant d’entrée: 3A 1,5A
Puissance d’entrée: 360W 360W
Niveau de bruit: 75 dBA 75 dBA
(mesuré en insérant un seule feuille dans une env eloppe à une distance
de 1 mètre du capot le plus proche et à 1,6 mètre du sol).
Poids: 72kg (158lbs) déballée
Le levage ou la manipulation de la machine ne peut être effectué que par des personnes qualifiées utilisant l’outillage approprié.
7. Cette machine est conçue tout spécialement pour fermer avec la pression les documents.
Page 1aPage 1b
Issue 1 Apr 2002
Page 4
AS700 PRESSURE SEALER
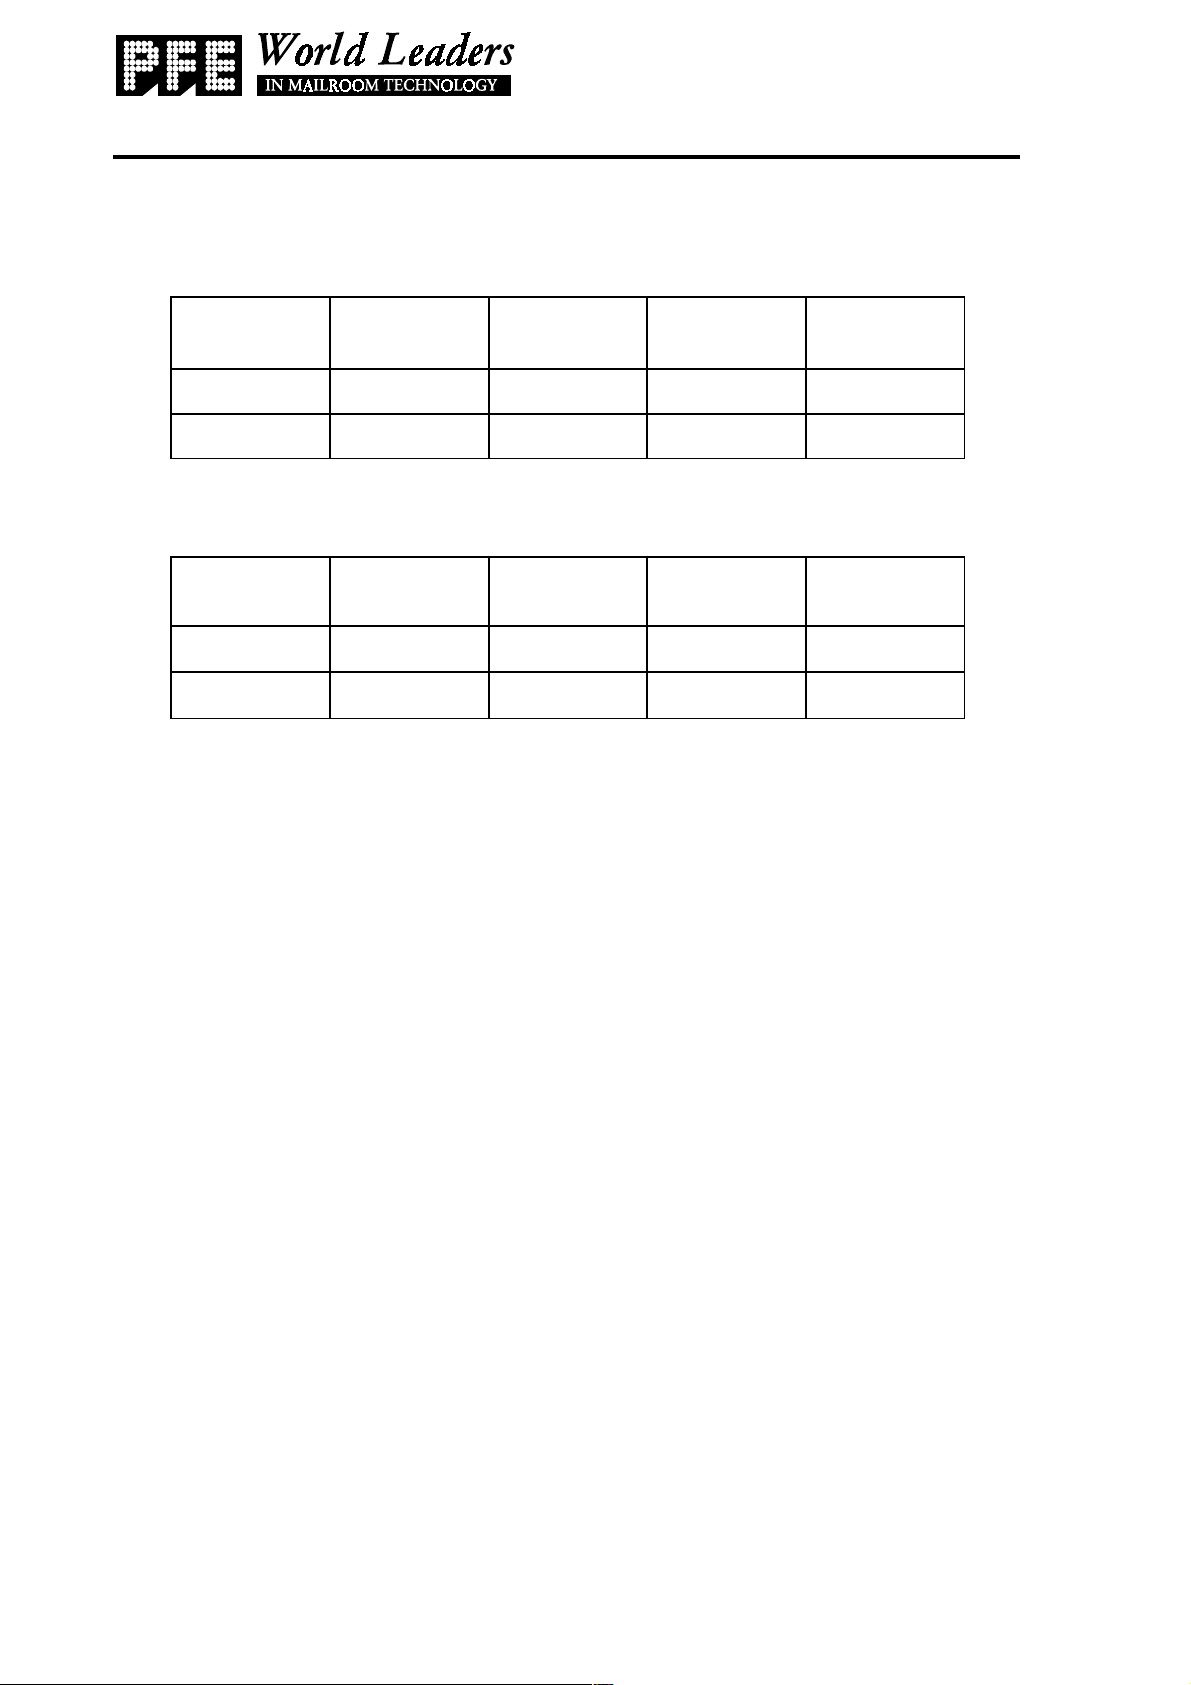
MIN. FORM
LENGTH
MAX. FORM
LENGTH
MIN. FORM
WIDTH
MAX. FORM
WIDTH
US
7"
14"4"9.5"
EUROPEAN
178mm
356mm
102mm
241mm
MIN. FOLD
LENGTH 1
MAX. FOLD
LENGTH 1
MIN. FOLD
LENGTH 2
MAX. FOLD
LENGTH 2
US
2.3"
11"
3.1"
5.5"
EUROPEAN
60mm
281mm
81mm
140mm
SECTION 1 TECHNICAL SPECIFICATION
Form Size:
Fold Lengths:
Operating Instructions
Facilities for single fold and for hand-folded seal-only.
Paper Weight:
Max. 120gsm (32lbs bond), Min. 90gsm (24lbs bond).
Hopper Capacity:
Up to 250 sheets
Form Type:
Pressure seal forms with 'fold assist' perforations.
Issue 1 Apr 2002
Page 2
Page 5

AS700 PRESSURE SEALER
Volume:
Up to: 100,000 documents/month
Speed:
6000 forms per hour (A4)
Physical Dimensions:
Length: 390mm (15.5"), tray retracted
535mm (21"), tray extended
Width: 470mm (18.5")
Height: 465mm (18.5") to top of hopper tray
Operating Instructions
Footprint: 345mm (13.5") long x 470mm (18.5") wide
Electrical:
Voltage: 240V @ 50Hz 110V @ 60Hz
Current: 1.5A 3A
Power: 400W 400W
Noise Output:
75dbA at 1m from nearest cover at 1.6m height
Page 3
Issue 1 Apr 2002
Page 6

AS700 PRESSURE SEALER
SECTION 2 DESCRIPTION OF OPERATION
The function of the AS700 Desktop Pressure Sealer is to draw unfolded forms
from a stack, fold them either once or twice, seal the cohesive edges and place them
into a receiving tray. Forms can be 'C', 'Z' or 'V' (eccentric 'C' or eccentric 'Z' fold), and
there is also a handfeed facility to seal pre-folded forms; this feature may also be used
to seal a diverted form.
Prior to use for the first time, or after a change of form type the machine can be
calibrated to detect double documents. Subsequently, if more than one form is fed
(eg. two together), these will be diverted into a tray in the top of the machine before
reaching the sealing rollers. The form used for calibration will also be diverted into
this tray (which allows checking of folds and ensures that only a single document was
fed).
A jog facility is provided, which operates the machine in short 'spurts' in order to
help clear forms through the paper path. The area in which the form stops is
highlighted on the control panel; this will be accompanied by an error number, the
description of which may be referenced by using the look-up table in Section 10 of
this document. The display also indicates the forms count when the machine is
running; the counter may be reset to zero at any time, eg. when starting a new job.
Operating Instructions
Issue 1 Apr 2002
Page 4
Page 7
AS700 PRESSURE SEALER
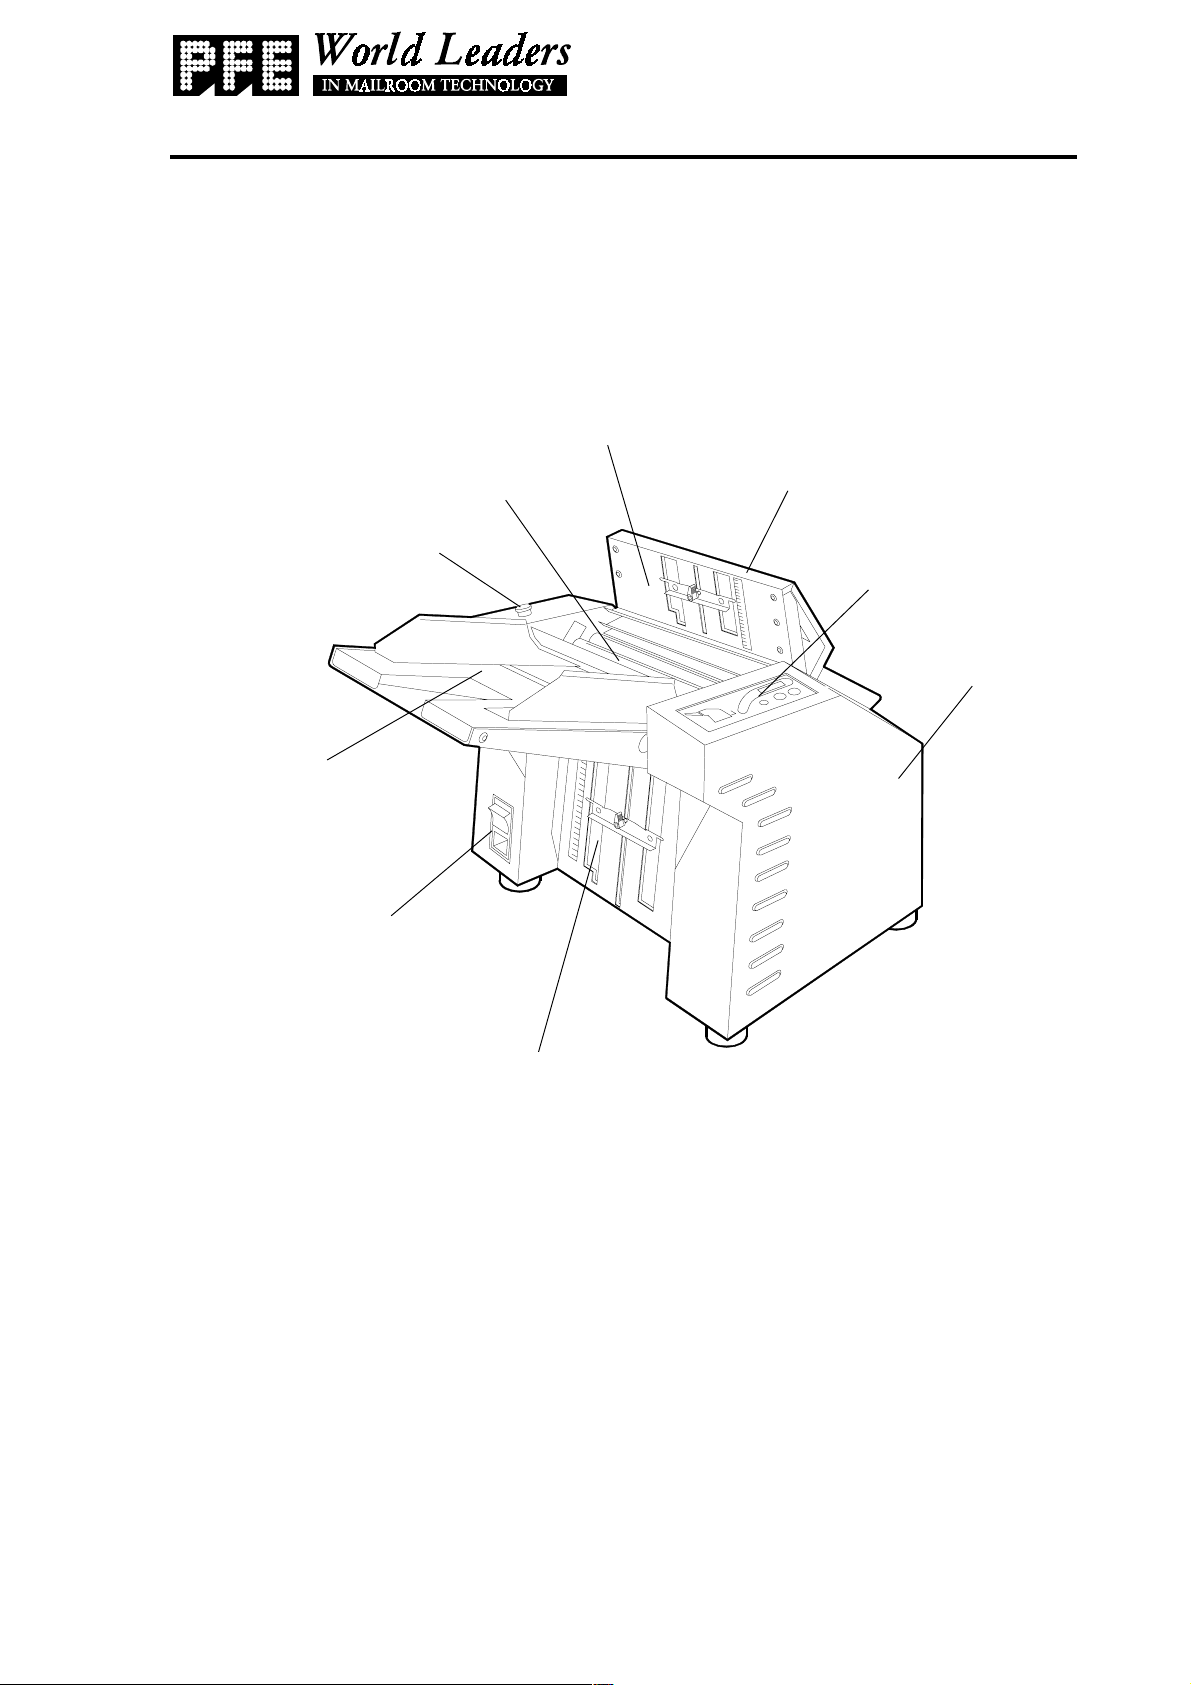
SECTION 3 DIAGRAM OF PARTS
Shown below are the main sections of the AS700 Desktop Pressure Sealer.
Fold plate 2
Operating Instructions
Emergency stop
button
Paper hopper
On/Off
Switch
Fold rollers
Top cover
Control panel
Receiving tray
Fold plate 1
Page 5
Issue 1 Apr 2002
Page 8
AS700 PRESSURE SEALER
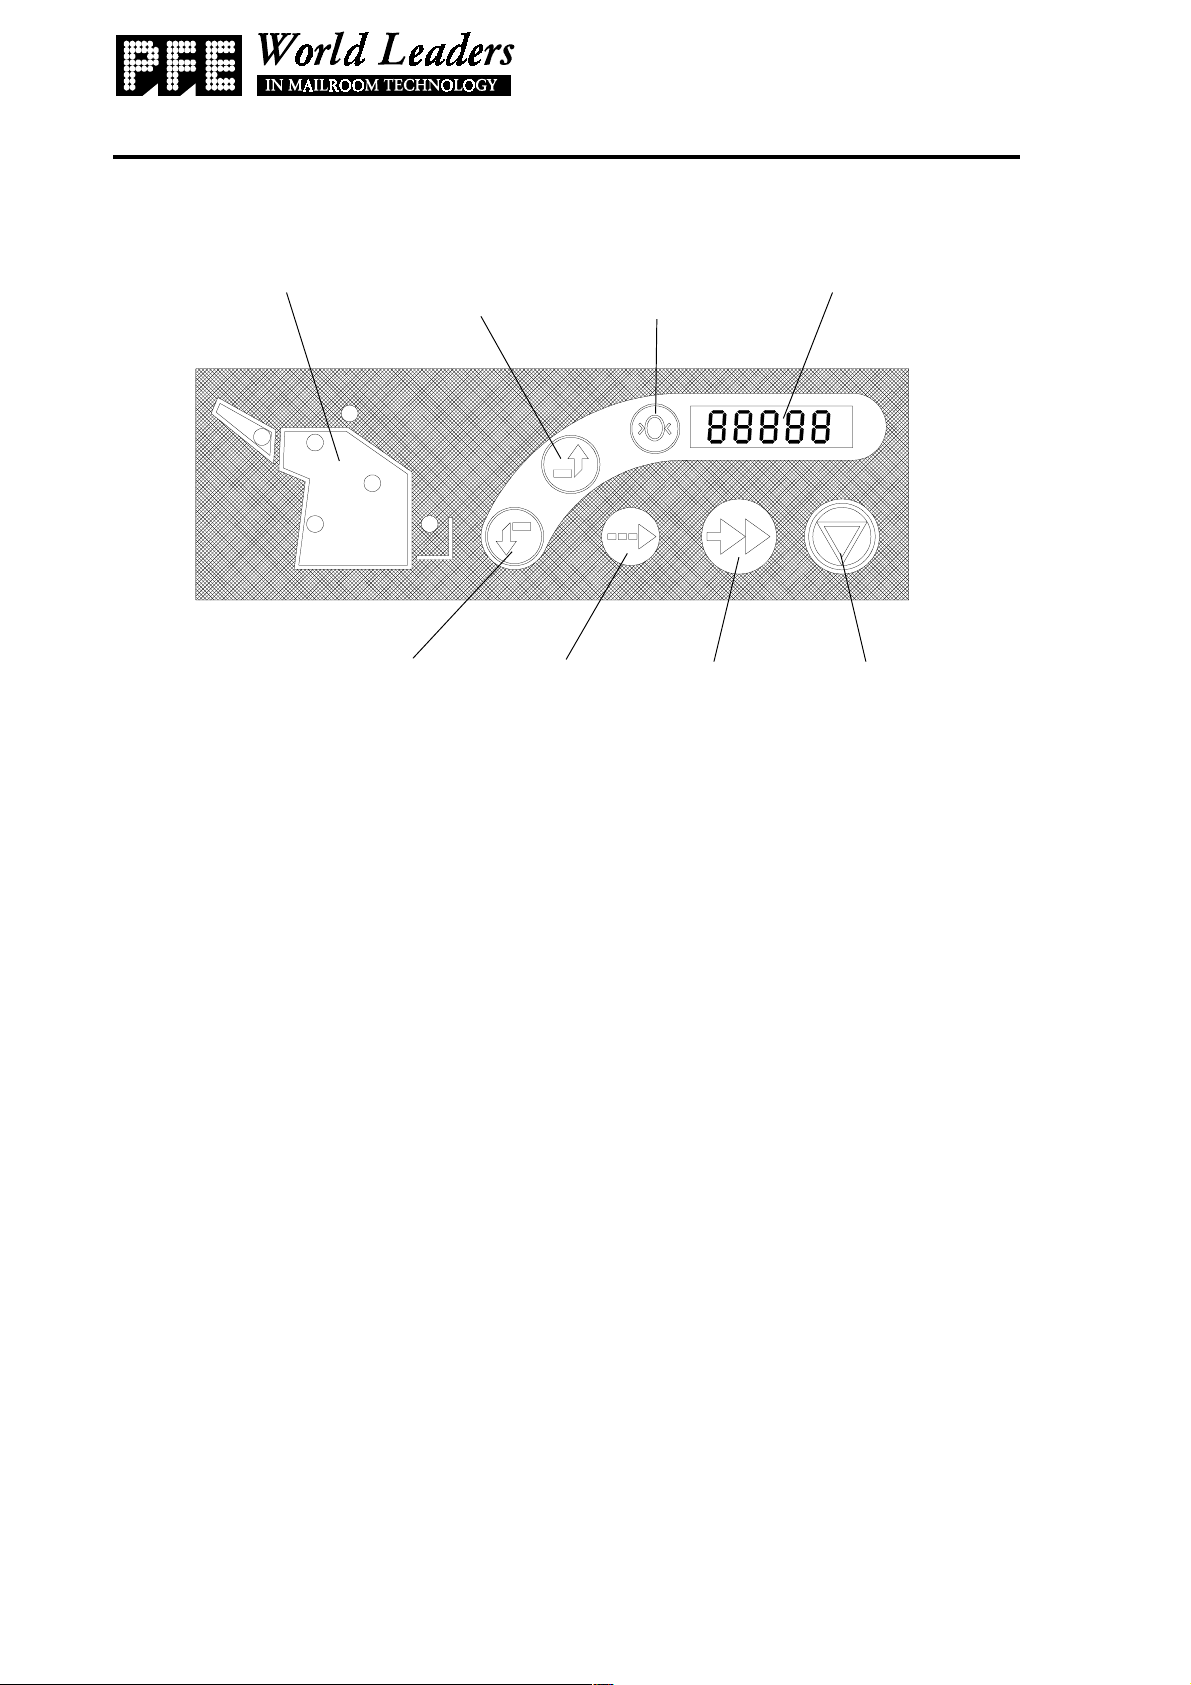
SECTION 4 CONTROL PANEL
Operating Instructions
Machine map Calibration
Hand feed
button
Button/Item Description
Button/Item Function
button
Zero reset
button
Jog button Run button Stop button
Display
Machine map: Indicates the position of a paper jam, and also
highlights the paper path.
Calibration button: Calibrates a form for doubles detection and
places it into the tray in the top cover.
Zero reset button: Sets the forms count on the display to zero.
Display: Indicates forms count and error codes (see
Section 10 for error code look-up table).
Hand feed button: Allows operator to insert pre-folded forms for
seal only. Waits for 30 seconds for input.
Jog button: Operates machine in short 'spurts' to help clear
forms from the paper path.
Run Button: Starts machine operating.
Stop button: Stops machine operating. Press once to stop at
the end of the current cycle. Press again to shut
down the machine.
Issue 1 Apr 2002
Page 6
Page 9

AS700 PRESSURE SEALER
SECTION 5 OPERATING OVERVIEW
Shown below is an operating summary of the machine. Further details may be
found in the section indicated.
ACTION SECTION
5.1 Plug in the machine and switch on. 3
5.2 Load paper into the paper hopper. 6.1
5.3 Extend the receiving tray. This may be set
to accommodate the size of the folded form. n/a
5.4 Set the fold plates to the required positions. 6.2
Operating Instructions
5.5 Calibrate for double document (only required
once, or if the paper type changes). Check that
only one form has been fed. 6.3
5.6 Press the Run button to begin operating. Press
the Stop button once to feed through the current
form and then stop - the motor will continue
running. Press the Stop button again to stop the motor. 4
5.7 When finished, switch off the machine. 3
NOTE
TO STOP THE MACHINE IN AN EMERGENCY, PRESS
THE RED BUTTON ON THE TOP OF THE SIDE
COVER OPPOSITE THE CONTROL PANEL
Page 7
Issue 1 Apr 2002
Page 10
AS700 PRESSURE SEALER
SECTION 6 SET UP
Operating Instructions
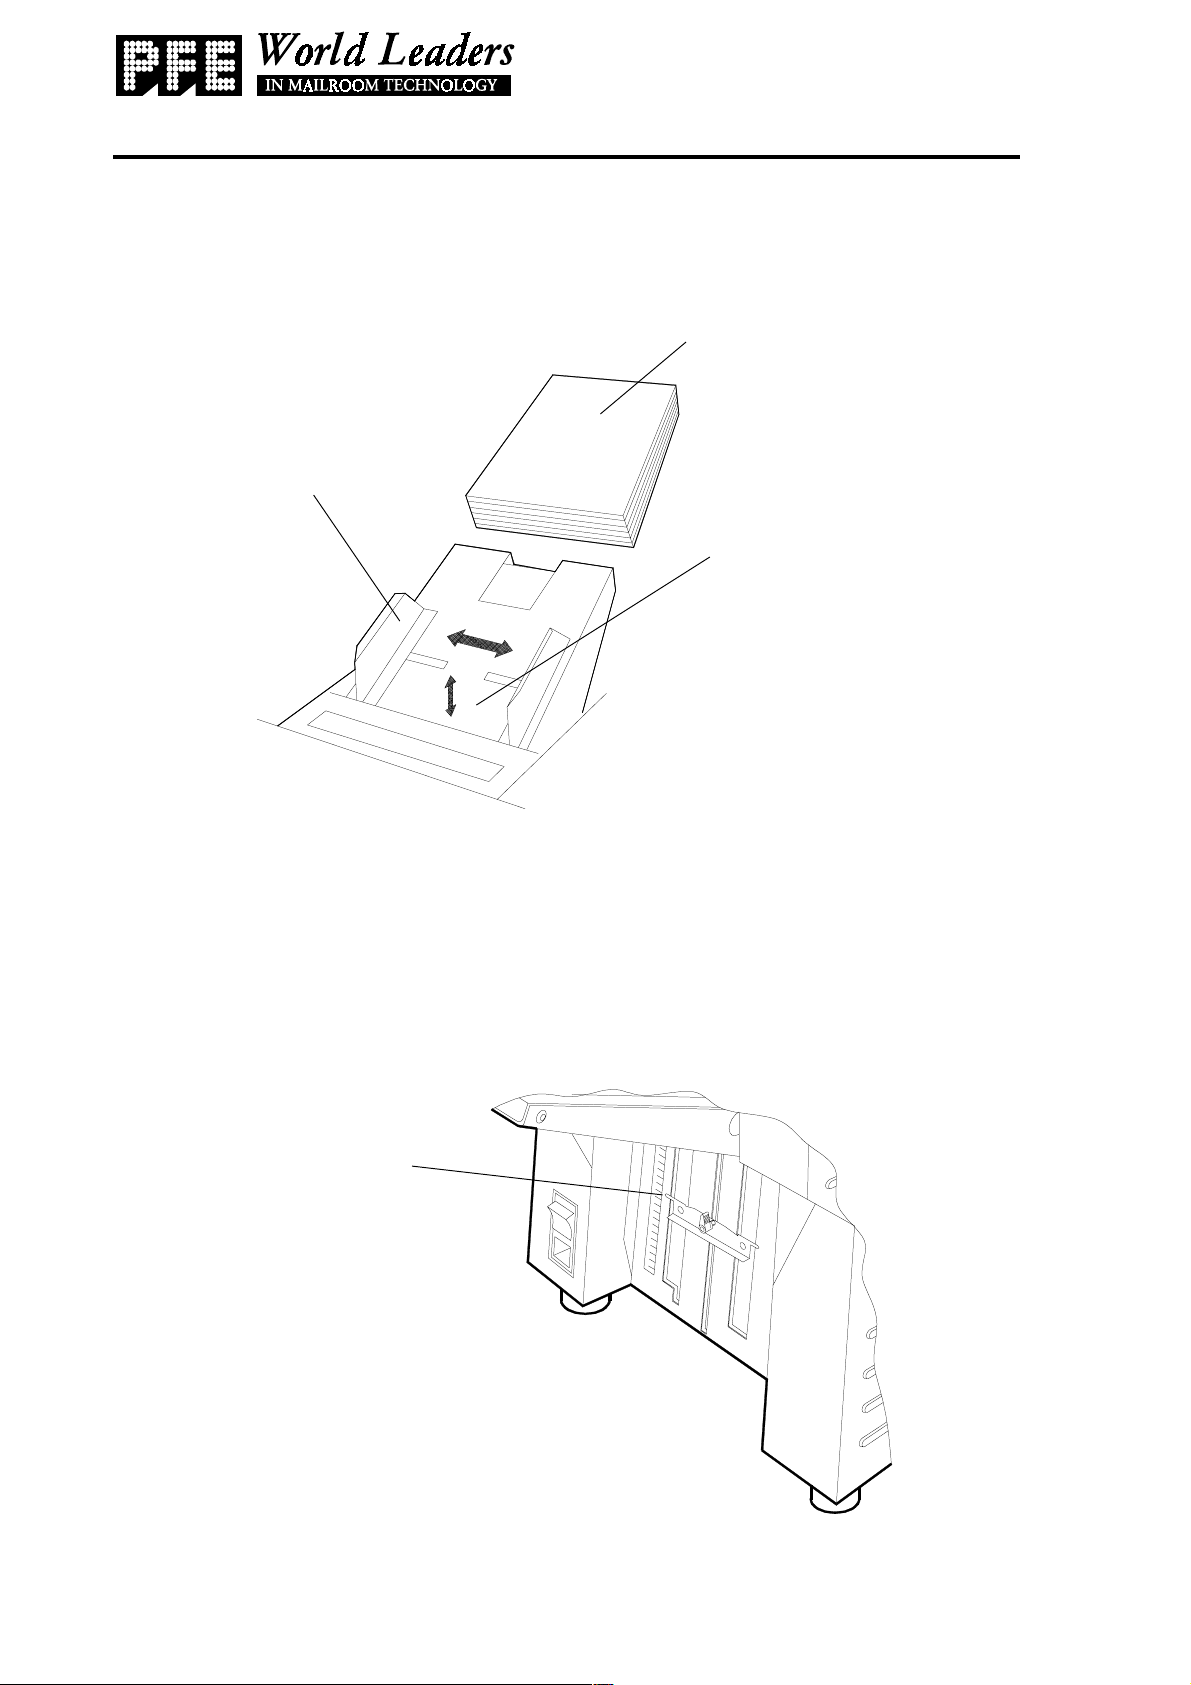
6.1 LOADING THE PAPER HOPPER
2. Adjust the width of the
side guides to give 1-2mm
(approx, 1/16") clearance
on each side.
1. Fan a stack of forms
(max. 250) and align the
edges.
3. Press down on the tray
and load the forms. Ensure
the leading edges are
contacting the chassis.
4. Gently release the tray.
6.2 SETTING THE FOLD PLATES
There are 2 fold plates, allowing 'C' (or letter) fold or 'Z' (accordian) fold, either
equal of eccentric. Fold plate 1 is located under the hopper tray and fold plate 2 is
accessed by raising the top cover. If a single ('V') fold only is required, either equal or
eccentric, a no-fold guide is fitted to fold plate 2. See also section 6.2.4 for details on
fold options.
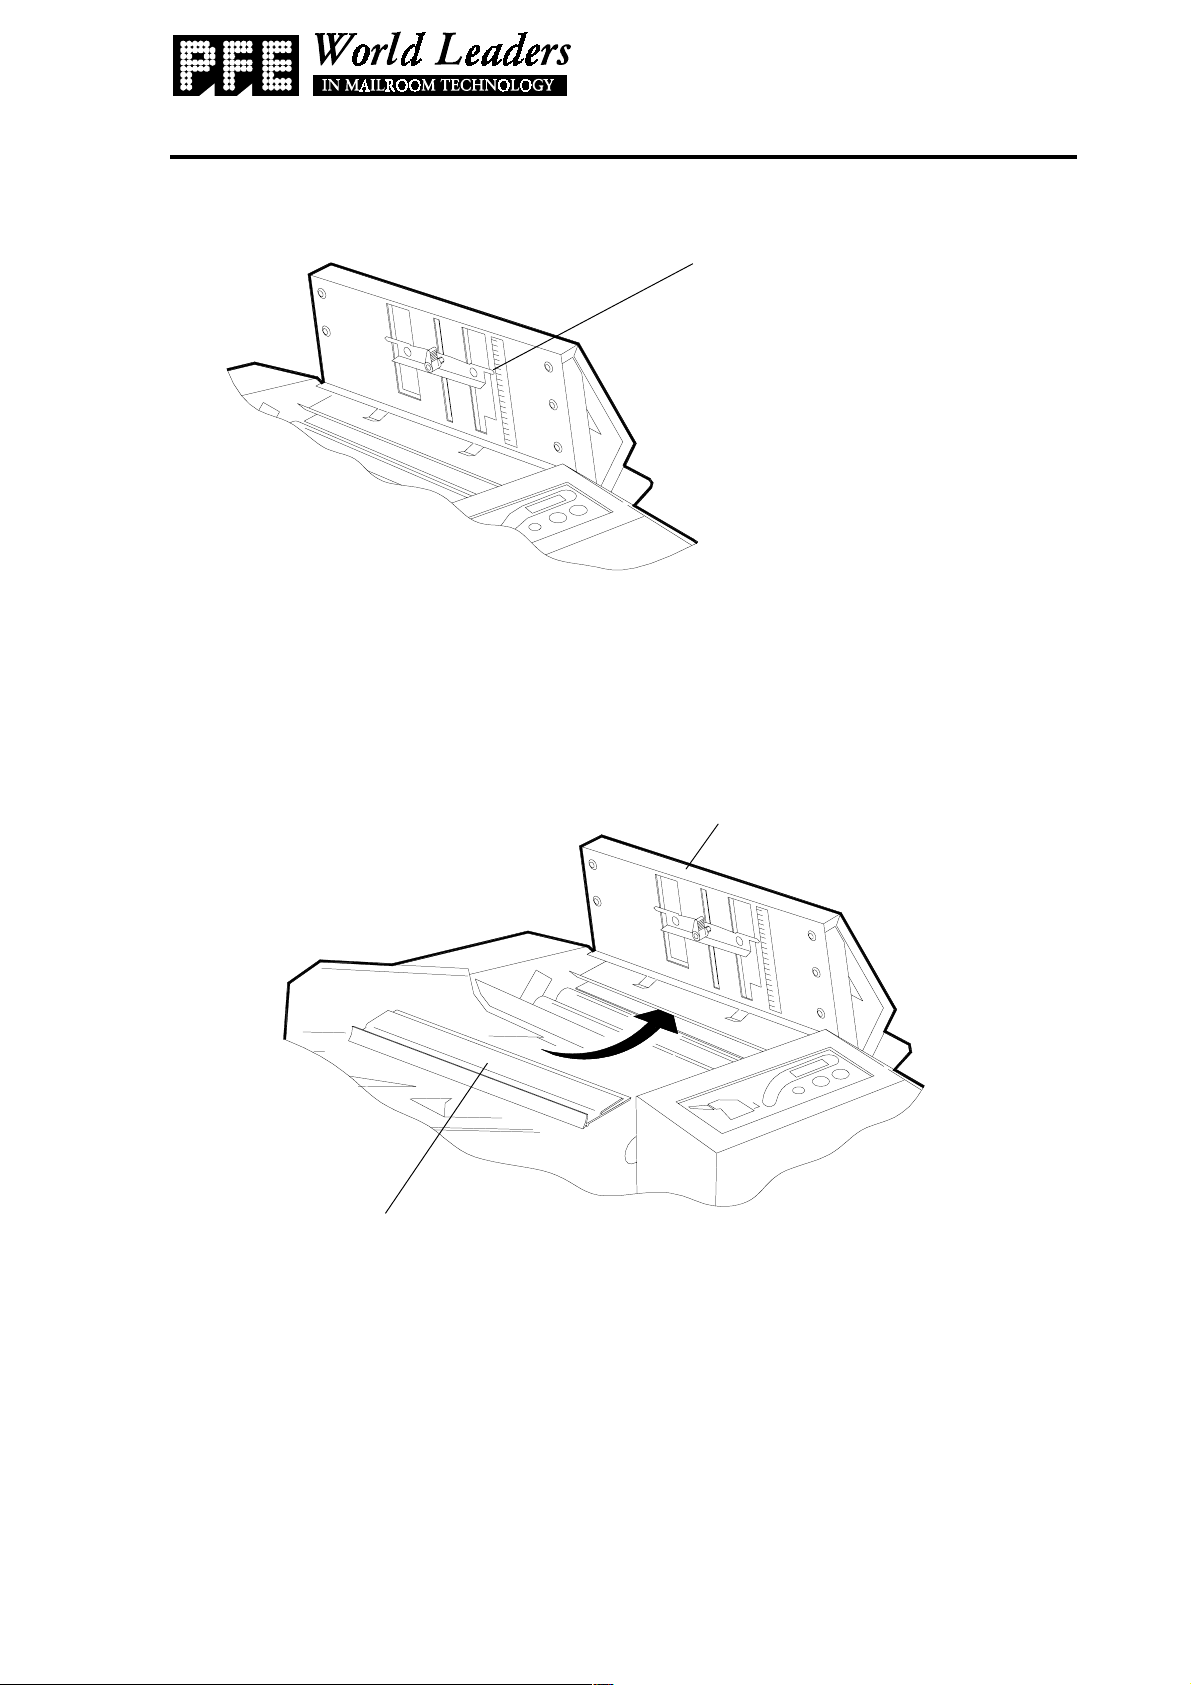
6.2.1 Fold Plate 1
Loosen the knob and
adjust the stop so that
the pointer aligns with
the measurement of the
1st. fold (see section
6.2.4). Retighten the
knob.
Issue 1 Apr 2002
Page 8
Page 11
AS700 PRESSURE SEALER
6.2.2 Fold Plate 2
6.2.3 Using the No-Fold Guide
If a single fold is being used, the green no-fold guide must be inserted into fold
plate 2. Also see section 6.2.4 for fold options.
Operating Instructions
Raise the top cover to gain
access to the fold plate. Loosen
the knob and adjust the stop so
that the pointer aligns with the
measurement of the 2nd. fold
(see section 6.2.4). Retighten
the knob and close the cover.
2. Remove the green no-fold guide
from its stored position and insert it into
the gap shown until the lip contacts the
lower edge of the fold plate. Note its
orientation.
3. Close the top cover. The machine
is now set up for single fold.
1. Raise the top cover.
When single fold is no
longer required, remember
to replace the guide in its
stored position.
Page 9
Issue 1 Apr 2002
Page 12
AS700 PRESSURE SEALER
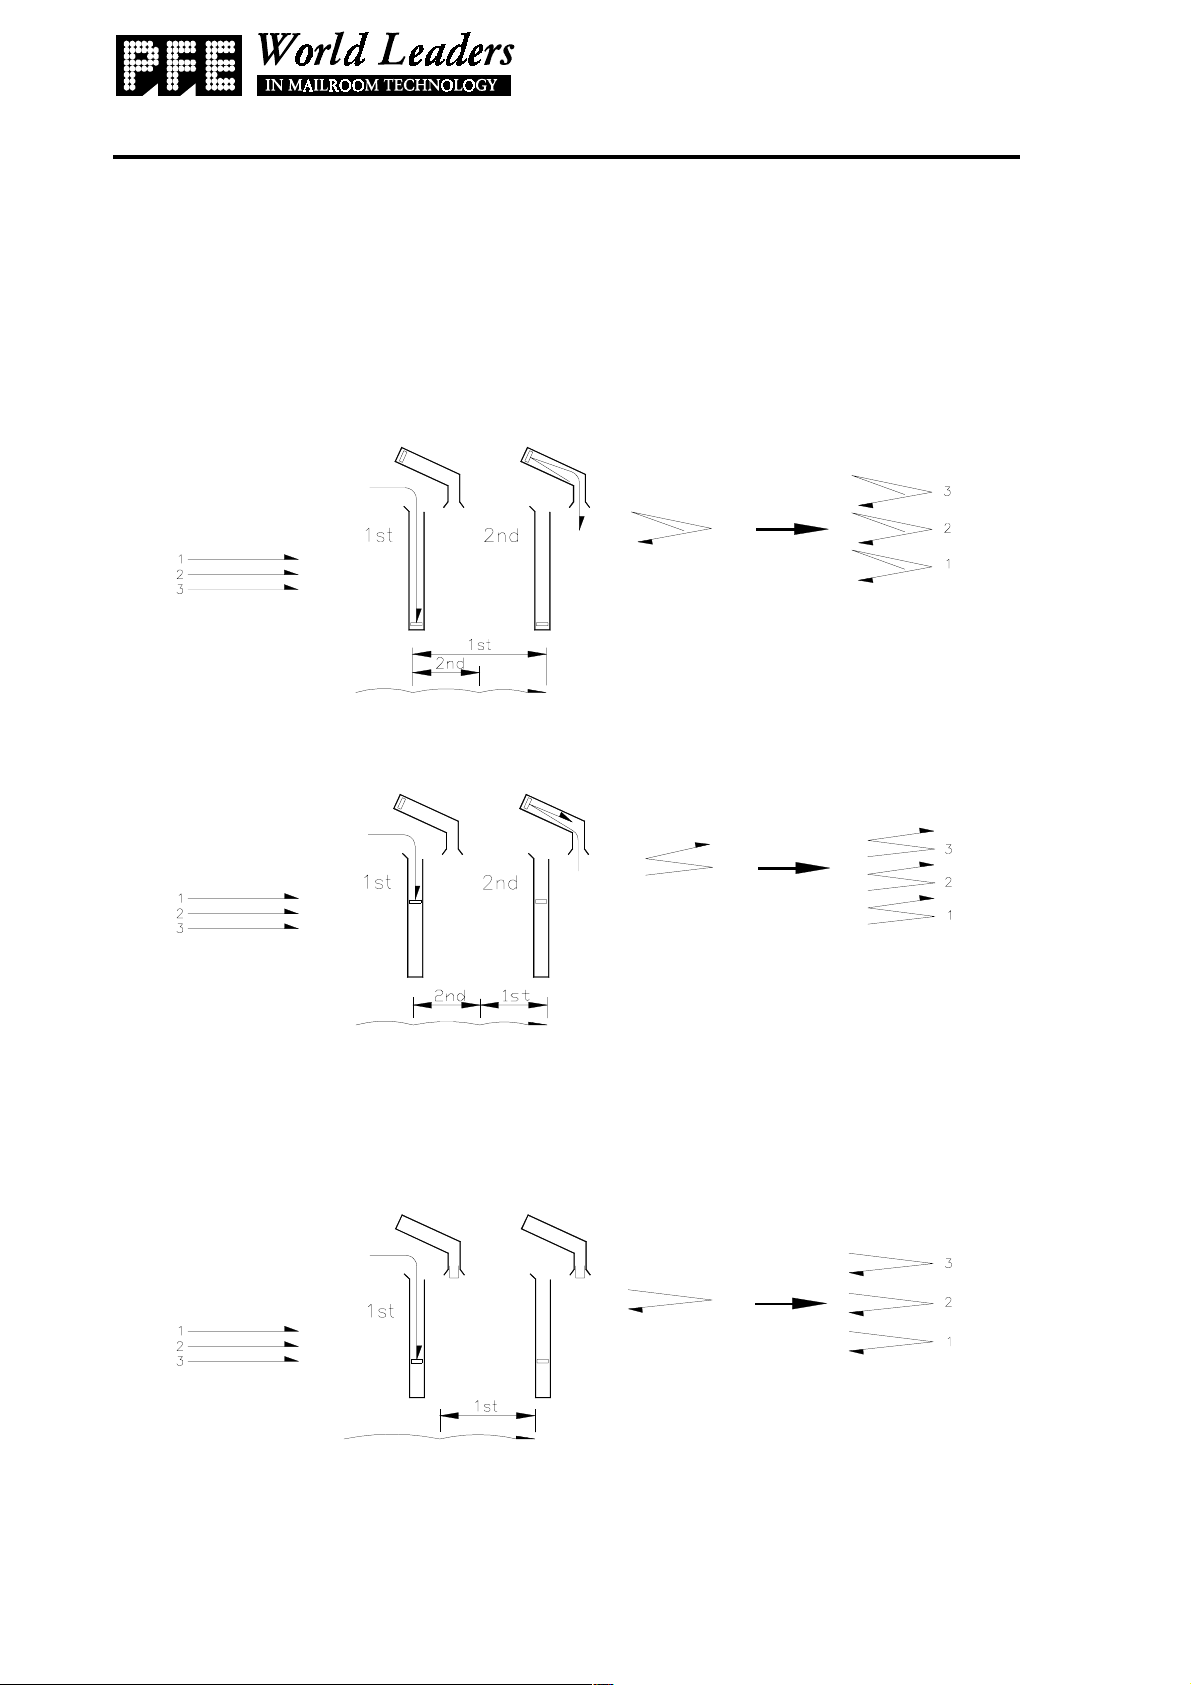
6.2.4 Fold Options
Indicated below are the three types of fold which may be used. Use the arrow
as a guide to which way the paper should be stacked on the tray; normally the
address will be on the same side and at the same end as the arrow. Use the ruler on
the top cover for measuring the folds.
Letter (or Wallet/'C') Fold
Operating Instructions
Accordian (or 'Z') Fold
Single (or Half/'V') Fold
This requires the use of the no-fold guide - see
section 6.2.3 on the previous page for details.
Also see the following page for a list of frequently used form sizes.
Issue 1 Apr 2002
Page 10
Page 13
Page 11
FOLD STYLE
V 11" 5 1/2" N/A 5 1/2" Address Panel Up & Trailing 5 1/2" Blocked Up
V 11" 5 1/2" N/A 5 1/2" Address Panel Up & Leading 5 1/2" Blocked Down
Z 11" 3 2/3" 3 2/3" 3 2/3" Address Panel Up & Leading 3 2/3" 3 2/3" Up
Z 11" 3 2/3" 3 2/3" 3 2/3" Address Panel Down & Trailing 3 2/3" 3 2/3" Down
C 11" 3 11/16"3 11/16" 3 5/8"
Eccentric C 11" 3 3/4" 3 3/4" 3 7/16"
Eccentric Z 11" 4 1/4" 4 1/4" 2 1/2" Address Panel Down & Trailing 4 1/4" 4 1/4" Down
Eccentric Z 11" 2 1/2" 4 1/4" 4 1/4" Address Panel Up & Leading 2 1/2" 4 1/4" Up
Z 14" 4 2/3" 4 2/3" 4 2/3" Address Panel Up & Leading 4 2/3" 4 2/3" Up
Z 14" 4 2/3" 4 2/3" 4 2/3" Address Panel Down & Trailing 4 2/3" 4 2/3" Down
Eccentric Z 14" 3 1/2" 5 1/4" 5 1/4" Address Panel Up & Leading 3 1/2" 5 1/4" Up
Eccentric Z 14" 5 1/4" 5 1/4" 3 1/2" Address Panel Down & Trailing 5 1/4" 5 1/4" Down
FORM
DEPTH
TOP
PANEL
MID.
PANEL
BOT.
PANEL
FORMS LOADED INTO HOPPER
Address Panel Up - Internal Panel
Trailing
Address Panel Up - Internal Panel
Trailing
FOLD
PLATE
1
7 3/8" 3 11/16" Up
7 9/16"3 13/16" Down
FOLD
PLATE
2
FINAL
ADDRES
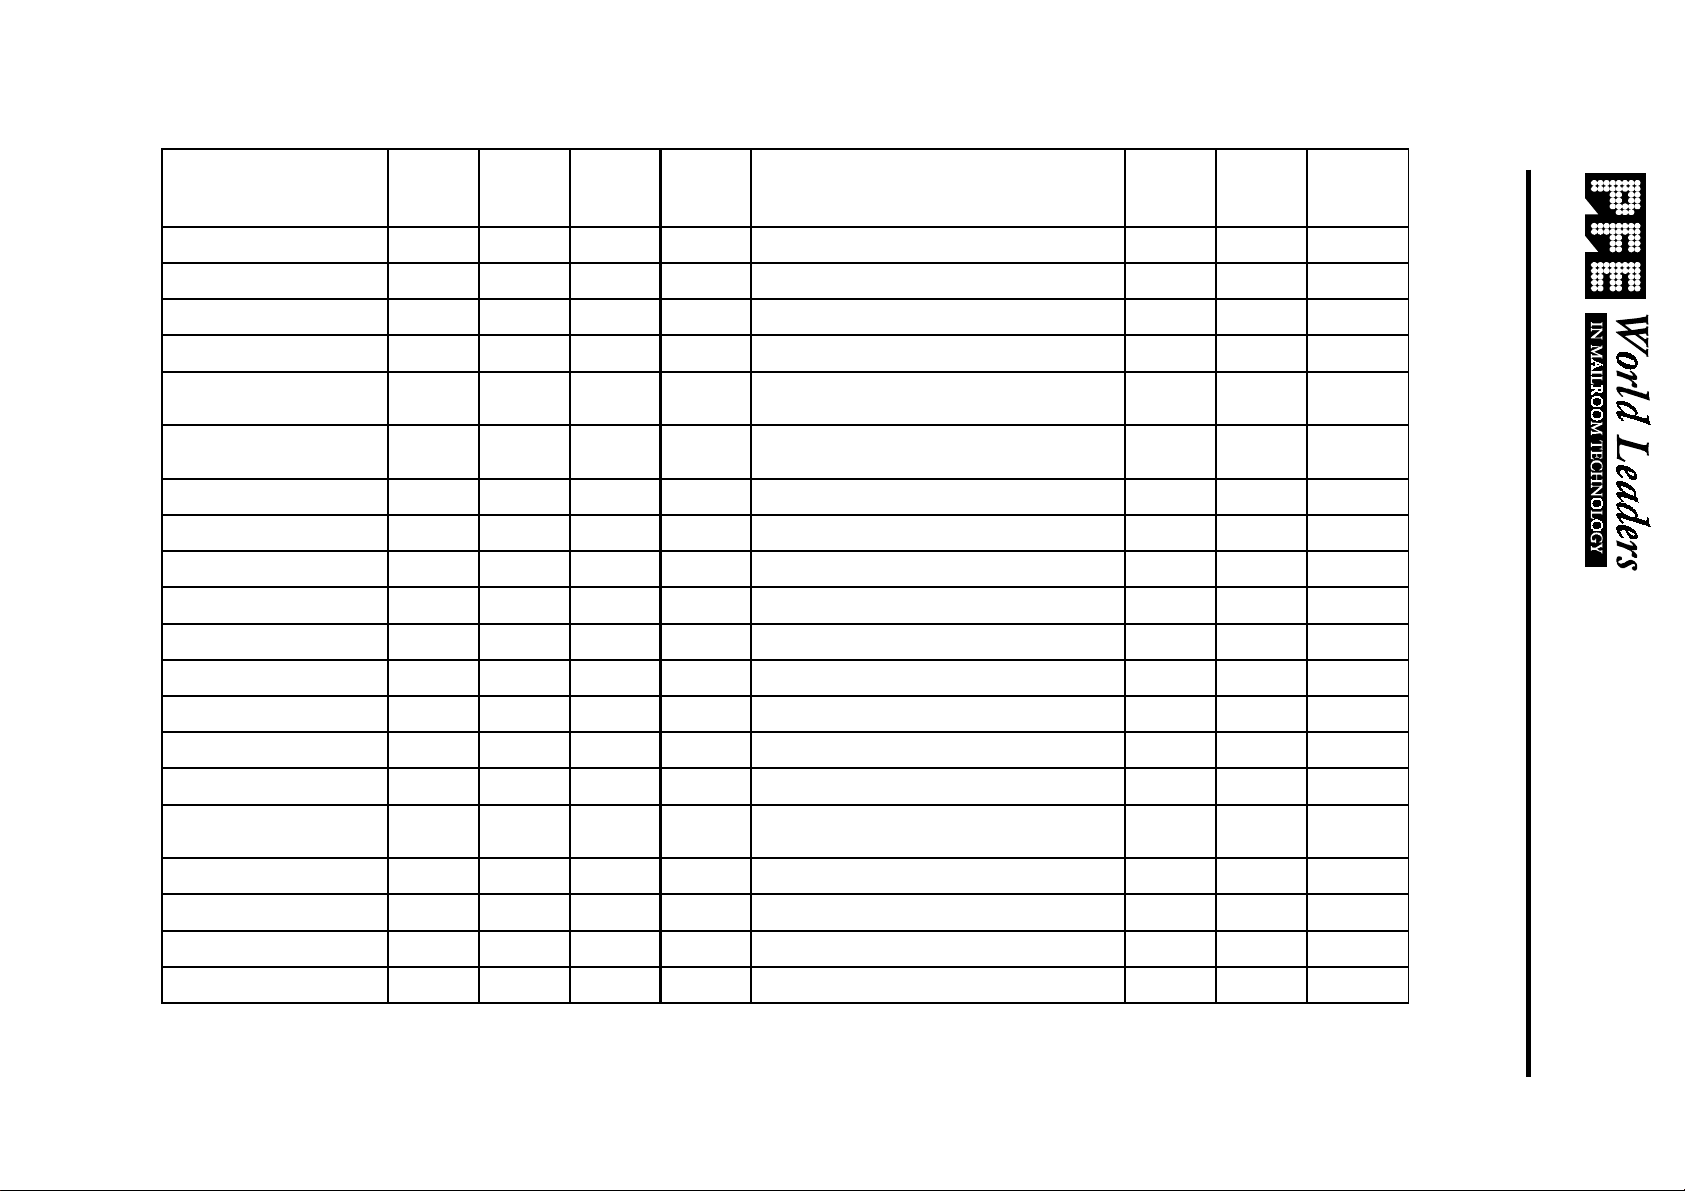
Frequently used Form Sizes
The list shown below indicates the Fold Plate settings for some typical folded forms.
AS700 PRESSURE SEALER
Eccentric Z 14" 3" 5 1/2" 5 1/2" Address Panel Up & Leading 3" 5 1/2" Up
Eccentric Z 14" 5 1/2" 5 1/2" 3" Address Panel Down & Trailing 5 1/2" 5 1/2" Down
C 14" 4 11/16"4 11/16" 4 5/8"
Z - Return Envelope 14" 4 2/3" 4 2/3" 4 2/3" Address Panel Down & Trailing 4 2/3" 4 2/3" Down
Address Panel Up - Internal Panel
Trailing
9 3/8" 4 11/16" Up
Issue 1 Apr 2002
Z - Return Envelope 14" 4 2/3" 4 2/3" 4 2/3" Address Panel Up & Leading 4 2/3" 4 2/3" Up
- Ret. Env. (Xplo-97) 14" 4 3/8" 4 13/16"4 13/16" Address Panel Up & Leading 9 5/8" 4 13/16" Down
ouble V - Ret. Env. 14" 6 3/4" N/A 7 1/4" Address Panel Up & Leading 7 1/4" 3 5/8" Down
Notes:
Forms feed from Top of stack by Friction. First fold is Down the vertical plate. Second fold is Up
the vertical plate. There is No nesting feature.
Operating Instructions
1 JUN 97
Page 14
AS700 PRESSURE SEALER
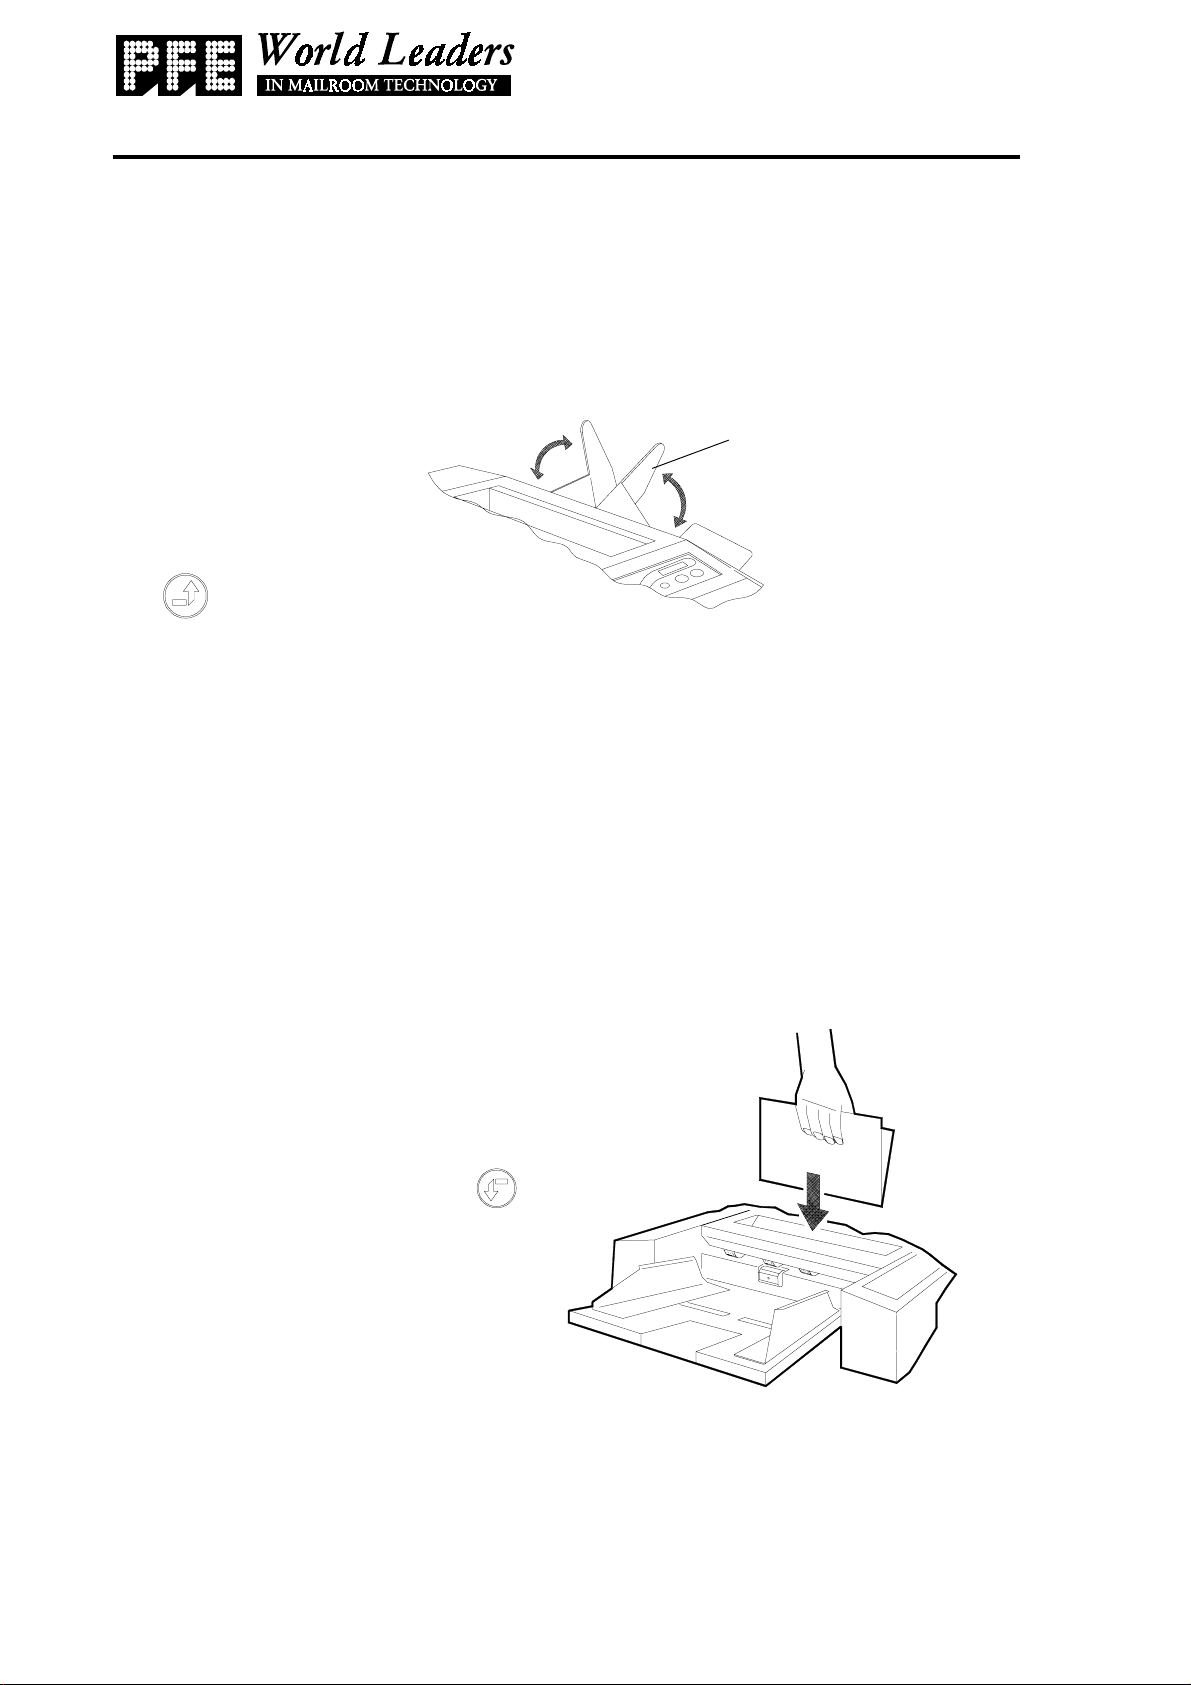
6.3 DOUBLE DOCUMENT CALIBRATION
The first time the machine is run (or if the paper type changes), the form must
be calibrated to measure its size and thickness. Thereafter, if two forms are fed at
the same time, they will be ejected into the top tray before reaching the sealing
rollers.
1. Ensure that the hopper tray is loaded (see section 6.1).
3. Press the calibration button
on the control panel.
A single folded document will be ejected into the top
tray. Check that it consists of only
one sheet.
Operating Instructions
2. Raise the two rests on
the top cover
4. The machine is now ready for use and need not be calibrated again unless the
size or thickness of the form used is changed. The two rests may be left in the raised
position to steady any further double documents that may be ejected.
SECTION 7 HANDFEED OPTION
If required the machine can operate in manual mode, allowing, for example a
single or small number of documents to be processed without setting up the rest of
the machine. This function may also be used for sealing diverted forms.
1. Pre-fold the document by hand to the
required fold lengths (see section 6.2.4 for
fold options), or remove the diverted form
from the diverter tray.
2. Press the handfeed button
on the control panel. The machine
will wait for up to 30 seconds for the
document to be fed.
3. Insert the folded document,
either way round and crease
downwards into the slot in the
top cover.
4. Press the button again for each document as required.
Issue 1 Apr 2002
Page 12
Page 15
AS700 PRESSURE SEALER
SECTION 8 OPERATOR MAINTENANCE
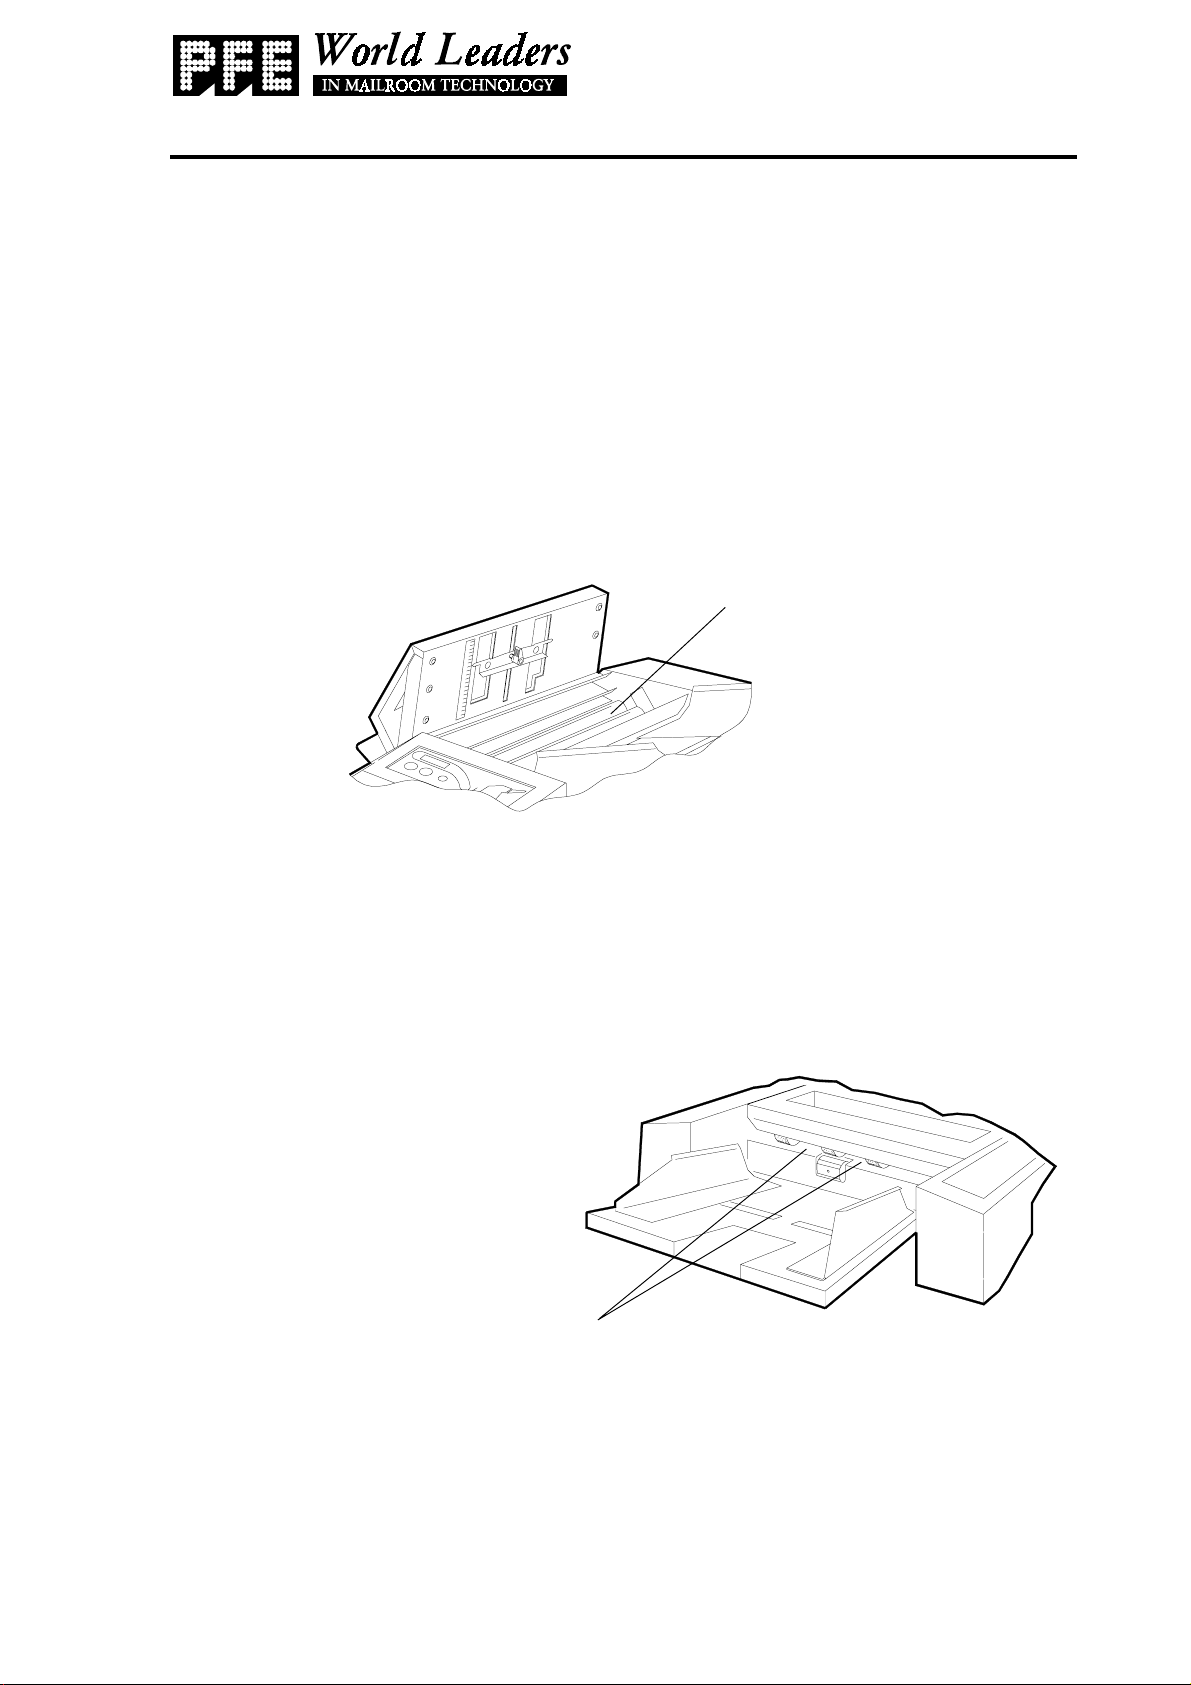
After a long period of use, dirt can build up on the fold rollers, and dust can
cause the sensors to become obscured. This will need to be cleaned off to ensure
reliable operation.
8.1 Cleaning the Fold Rollers
The fold rollers should be cleaned using a cloth and the supplied roller cleaning
fluid. Be sure the machine is disconnected from the power source first. To gain
access, raise the top cover and clean the full width and circumference of the three
rollers. Although difficult to roll, they may be rotated by hand.
Operating Instructions
Fold rollers
8.2 Cleaning the Sensors
The optical sensors on the machine consists of two halves, spaced slightly
apart. They should be cleaned using the supplied non-flammable airduster, ensuring
that both halves are cleaned.
Hold Point & Double Document Sensors
Raise the top cover and depress
the hopper tray (or remove the
hopper by pulling it off the pegs).
Direct the air jet in the gap shown,
in line with the sensors.
Page 13
contd.
Issue 1 Apr 2002
Page 16

AS700 PRESSURE SEALER
8.3 Clearing Paper Jams
If paper jams occur, they can usually be cleared by using the jog button
on the control panel. Jams are most likely to take place in the infeed or fold roller
areas, or in fold plate 1. Raise the top cover, and if the paper is visible and the jam is
obvious, remove the paper. If it cannot be dislodged, close the cover and press the
jog button, which will operate the machine in short bursts. Jams occurring in fold
plate 1 can be cleared by removing the fold plate - lift it upwards to clear the latches
and withdraw the form.
If the jam is internal (eg. in the sealer rollers), the button may have to be
pressed quite a few times to clear the paper. If all attempts to remove the paper fail,
the PFE Technical Support Department must be contacted (telephone +44 (0) 20 8502
1011 ext. 3010).
Operating Instructions
Issue 1 Apr 2002
Page 14
Page 17

AS700 PRESSURE SEALER
SECTION 9 OPERATOR'S TROUBLESHOOTING GUIDE
If problems occur, refer to the guide shown below before contacting the Technical
Support Department.
PROBLEM SUGGESTED CAUSE AND REMEDY
Operating Instructions
1. Machine will not run.
2. Forms not feeding, al-
though machine is running.
3. Forms feeding skewed.
4. Double documents occur-
ring frequently.
5. Jam occurring in folder
when machine is first run.
6. Forms keep stopping in
folder area.
7. Form doesn't exit first fold
plate.
8. Form exits through top tray
but is not a double document.
1. Ensure emergency stop button is not depressed.
2. Forms improperly loaded - ensure leading edges
are firmly against chassis bridge (see section 6.1).
3. Ensure hopper tray is properly inserted.
4. Paper type has been changed - recalibrate machine (see section 6.3).
5. Fold plates not set - see section 6.2.
6. Dirty fold rollers - clean (see section 8)
7. Plate is set too deep for form length - reset the
plate (see section 6.2).
8. Calibration or diverter fault - recalibrate first (see
section 6.3) and if this fails, contact the Technical
Support Department.
9. Forms not sealing, or
failing to seal completely.
10. 'Err11' or 'Err21' error
messages occurring.
9. i) Forms loaded wrong way up - turn over.
ii) Defective cohesive - check paper is within date
and test a sample using handfeed (see sec-
tion 7).
iii) Defective seal rollers - contact the Technical
Support Department.
10. Receiving tray full or not sufficiently extended.
Page 15
Issue 1 Apr 2002
Page 18

AS700 PRESSURE SEALER
Operating Instructions
SECTION 10 ERROR MESSAGES
If operating faults occur, an error code will appear on the control panel display, for example:
where 'No' = one of the numbers
indicated below.
ERROR No. MEANING ACTION TO TAKE
01
Hopper empty.
Refill hopper (sect. 6.1).
02
03
04
05
06
07
08
09
10
11
12
13
14
15
16
Paper jam at infeed.
Form didn't arrive at fold plate 1.
Paper jam at fold plate 1.
Unexpected form at fold plate 1.
Fold plate 1 blocked.
Form lost from fold plate 1.
Form didn't arrive at diverter.
Jam in divert tray.
Unexpected form at diverter.
Divert tray full.
Paper jam in fold rollers.
Paper jam in fold plate/rollers.
Unexpected form at fold sensor.
Form lost in fold plate/rollers.
Fold sensor blocked.
Clear jam (sect. 8.3).
See note at end.
Clear jam (sect. 8.3).
See note at end.
Remove blockage (sect. 8.3).
See note at end.
Check for jam, see note at end
Clear jam (sect. 8.3).
Diverter stuck - call Service.
Empty tray.
Clear jam (sect. 8.3).
Clear jam (sect. 8.3).
See note at end.
See note at end.
See note at end.
17
18
19
20
21
22
23
24
25,26,27 or 28
29
Note: if any of these error numbers occur, remove all paper from the machine and clear any
jams (section 8.3). Clean all sensors (section 8.2), reload the paper and run the machine
again. If the fault still occurs, contact the Service Department. The messages 'COVEr' and
'FPOUt' may also occur, indicating cover open or fold plate removed.
Possible jam in sealer rollers.
Receiving tray full.
Unexpected form at eject area.
Jam in sealer rollers.
Eject sensor blocked.
EPROM error.
Double document error.
Motor/clutch problem.
Lost document.
Undiverted double (too long).
Clear jam (sect. 8.3).
Empty tray.
See note at end.
Clear jam (sect. 8.3).
Clean sensor (sect. 8.2).
See note at end.
Clear all paper, recalibrate.
See note at end.
See note at end.
Open cover and clear double
Issue 1 Apr 2002
Page 16
 Loading...