

Page 1
performance
User’s Guide
TM
Page 2

This household sewing machine is designed to comply with IEC/EN 60335-2-28 and UL1594.
IMPORTANT SAFETY INSTRUCTIONS
When using an electrical appliance, basic safety precautions should always be followed, including
the following:
Read all instructions before using this household sewing machine. Keep the instructions at a
suitable place close to the machine. Make sure to hand them over if the machine is given to a third
party.
DANGER –TO REDUCE THE RISK OF ELECTRIC SHOCK:
• A sewing machine should never be left unattended when plugged in. The electrical socket, to
which the machine is plugged in should be easily accessible. Always unplug this sewing machine
from the electric outlet immediately after using and before cleaning, removing covers, lubricating
or when making any other user servicing adjustments mentioned in the instruction manual.
WARNING –TO REDUCE THE RISK OF BURNS, FIRE, ELECTRIC
SHOCK, OR INJURY TO PERSON:
• Do not allow to be used as a toy. Close attention is necessary when this sewing machine is used
by or near children.
• Use this sewing machine only for its intended use as described in this manual. Use only
attachments recommended by the manufacturer as contained in this manual.
• Never operate this sewing machine if it has a damaged cord or plug, if it is not working properly,
if it has been dropped or damaged, or dropped into water. Return the sewing machine to the
nearest authorized dealer or service center for examination, repair, electrical or mechanical
adjustment.
• Never operate the sewing machine with any air openings blocked. Keep ventilation openings of
the sewing machine and foot control free from the accumulation of lint, dust, and loose cloth.
• Keep fingers away from all moving parts. Special care is required around the sewing machine
needle.
• Always use the proper needle plate. The wrong plate can cause the needle to break.
• Do not use bent needles.
• Do not pull or push fabric while stitching. It may deflect the needle causing it to break.
• Wear safety glasses.
• Switch the sewing machine off (“0”) when making any adjustment in the needle area, such as
threading needle, changing needle, threading bobbin, or changing presser foot, etc.
• Never drop or insert any object into any opening.
• Do not use outdoors.
• Do not operate where aerosol (spray) products are being used or where oxygen is being
administrated.
• To disconnect, turn all controls to the off (“0”) position, then remove plug from outlet.
• Do not unplug by pulling on cord. To unplug, grasp the plug, not the cord.
• The foot control is used to operate the machine. Avoid placing other objects on the foot control.
• Do not use the machine if it is wet.
Page 3

• If the LED lamp is damaged or broken, it must be replaced by the manufacturer or its service
agent or a similarly qualified person, in order to avoid a hazard.
• If the cord connected with the foot control is damaged, it must be replaced by the manufacturer
or its service agent or a similarly qualified person, in order to avoid a hazard.
• This sewing machine is provided with double insulation. Use only identical replacement parts.
See instructions for Servicing of Double-Insulated Appliances.
SAVE THESE INSTRUCTIONS
FOR CENELEC COUNTRIES ONLY:
This appliance can be used by children aged from 8 years and above and persons with reduced
physical, sensory or mental capabilities or lack of experience and knowledge if they have been given
supervision or instruction concerning use of the appliance in a safe way and understand the
hazards involved. Children shall not play with the appliance. Cleaning and user maintenance shall
not be made by children without supervision.
The noise level under normal operating conditions is less than 80dB(A).
The machine must only be used with foot control of type FR5 manufactured by Shanghai Binao
Precision Mould Co., Ltd.
FOR NON CENELEC COUNTRIES:
This sewing machine is not intended for use by persons (including children) with reduced physical,
sensory or mental capabilities, or lack of experience and knowledge, unless they have been given
supervision or instruction concerning use of the sewing machine by a person responsible for their
safety. Children should be supervised to ensure that they do not play with the sewing machine.
The noise level under normal operating conditions is less than 80dB(A).
The machine must only be used with foot control of type FR5 manufactured by Shanghai Binao
Precision Mould Co., Ltd.
SERVICING OF DOUBLE INSULATED PRODUCTS
In a double-insulated product, two systems of insulation are provided instead of grounding. No
ground means is provided on a double-insulated product, nor should a means for grounding be
added to the product. Servicing of a double-insulated product requires extreme care and knowledge
of the system and should be done only by qualified service personnel. Replacement parts for a
double-insulated product must be identical to those parts in the product. A double-insulated
product is marked with the words ‘DOUBLE INSULATION’ or ‘DOUBLE INSULATED’.
Page 4

TABLE OF CONTENTS
1 Introduction ...............................................7
Machine Overview..........................................7
Front.............................................................7
Needle Area.................................................. 8
Right Side ..................................................... 8
Rear.............................................................. 8
Top...............................................................9
Accessory Tray..............................................9
Storing a Needle Plate.................................. 10
Function Buttons...........................................11
Presser Foot Up and Extra Lift...................... 11
Presser Foot Down and Pivot ....................... 11
Automatic Needle Threader ......................... 11
Cut Function ............................................... 12
Immediate Tie-Off ....................................... 12
Stitch Re-Start.............................................. 12
Needle Stop Up/Down ................................ 12
Start/Stop ................................................... 12
Reverse ....................................................... 12
Basic Gestures for the Multi-Touch
Screen ............................................................13
Accessories.................................................... 14
Included Accessories ................................... 14
Presser Feet ................................................... 15
Stitch Overview ............................................17
Utility Stitches ............................................. 17
Stitch Menu Overview ................................. 20
Alphabets ................................................... 20
2 Preparations ........................................... 21
Unpacking Machine ......................................21
Connect the Power Cord and Foot
Control ..........................................................21
Pack Away After Sewing .............................. 22
USB Ports ......................................................22
Using a USB device...................................... 22
Getting Started with WiFi and
mySewnet™ Cloud.........................................23
LED Lights .................................................... 23
Free Arm .......................................................23
Manual Thread Cutter ..................................23
Knee-Lift .......................................................24
Speed Control Lever .....................................24
Thread Sensor ...............................................24
Telescopic Thread Guide .............................. 25
Spool Pins......................................................26
Spool Caps .................................................... 26
Threads .........................................................27
Needles .........................................................28
Important Needle Information...................... 28
Changing the Needle .................................... 29
Threading......................................................30
Threading the Upper Thread ........................ 30
Automatic Needle Threader ......................... 32
Threading Tips and Hints ............................ 34
Threading for Twin Needle .......................... 35
Bobbin Winding ............................................ 37
Winding Through the Needle ....................... 38
Inserting the Bobbin...................................... 39
Changing the Bobbin Case............................40
IDT™ System (Integrated Dual Feed) ..........41
Engaging the IDT™ System.......................... 41
Disengaging the IDT™ System ..................... 41
Changing the Presser Foot ............................ 42
Remove Presser Foot.................................... 42
Attach Presser Foot ...................................... 42
Attaching the Sensormatic Buttonhole
Foot ...............................................................42
Changing to Straight Stitch Needle Plate .....43
3 The Multi-Touch Screen...................... 44
Multi-Touch Screen.......................................44
Gestures...................................................... 44
Start Page ......................................................45
Start Sewing ................................................ 45
Load From mySewnet™ ................................ 45
Open Help Center........................................ 45
mySewnet™ Blog..........................................45
Main Functions ............................................. 46
Save............................................................ 46
Home ......................................................... 46
Mode Switch ............................................... 46
Common Functions....................................... 46
OK.............................................................. 46
Cancel......................................................... 46
Touch & Hold ............................................. 46
Settings with Toggle Function ...................... 47
Help Center ................................................... 48
User’s Guide ............................................... 48
Getting Started ............................................ 48
Techniques and Tutorials ............................. 48
Sewing Instructions ..................................... 48
Stabilizer Guide........................................... 48
Settings.......................................................... 49
Sewing Settings ........................................... 49
Machine Settings ......................................... 52
WiFi Settings ............................................... 53
mySewnet™ Settings..................................... 53
Machine Information ................................... 53
Smart Toolbox ............................................... 54
Top Bar ..........................................................54
Help Center................................................. 54
Quick Help ................................................. 55
Main Menu ................................................. 55
Information Area ..........................................55
WiFi ........................................................... 56
mySewnet™ ................................................. 56
Recommendations ....................................... 56
Information................................................. 56
Page 5

Active Features............................................ 57
Menu Panel ...................................................57
Options Selected From the Menu Panel ......... 57
Toolbar .......................................................... 58
Customize Your Work Area ......................... 58
Full Screen View ........................................... 58
Base Bar .........................................................58
4 WiFi & mySewnet™ Services .............. 59
WiFi Introduction ......................................... 59
Getting Started With WiFi ............................ 59
Hidden Network ......................................... 59
Firmware Update Using WiFi ...................... 59
Firmware Update Using a USB Device......... 59
mySewnet™ Services ..................................... 60
mySewnet™ Account .................................... 60
mySewnet™ Cloud ....................................... 60
Used Space in mySewnet™ Cloud.................. 61
Installation of mySewnet™ cloud Sync
Tool for Computer ....................................... 61
mySewnet™ Portal........................................ 62
Troubleshooting Connectivity ......................62
5 Sewing....................................................... 64
Sewing Mode – Introduction ........................64
Sewing Mode – Overview ............................ 64
Getting Started with Sewing......................... 67
Load a Stitch From the Menu Panel............... 67
Select a Stitch From the Selection Menu......... 68
Load a Stitch from File Manager ................... 68
Sewing Recommendations............................ 69
Settings in Sewing Mode ..............................70
ActivStitch™ Technology ............................ 70
Automatic Presser Foot Lift .......................... 71
Automatic Thread Cutter ............................. 71
Free-Motion Options.................................... 71
Stitch Limiting Options ................................ 72
Needle Stop Position.................................... 73
Presser Foot Pressure ................................... 73
Options for Feed Dogs ................................. 73
Tie-Off Options ........................................... 73
Stitch Edit ......................................................74
Stitch Width ................................................ 74
Stitch Positioning......................................... 74
Stitch Length ............................................... 74
Stitch Density .............................................. 75
Mirroring .................................................... 75
Buttonhole Slit Length ................................. 75
Button Stitch Repetition ............................... 75
ActivStitch™ Technology ............................ 76
Free-Motion Options.....................................77
Dynamic Spring Foot 6D Free-Motion ........... 77
Spring Foot Free-Motion .............................. 77
Sensormatic Free-Motion.............................. 78
Tie-Off Options ............................................. 78
Stitch Repeat ................................................. 79
Save Stitch .....................................................80
Balance ..........................................................80
Sewing Programs ..........................................81
Tapering Stitches ......................................... 81
Taper Satin Stitch Exercise............................ 81
Stitch Repeat ............................................... 82
Patchwork Program ..................................... 82
Single Stitch Program................................... 82
Combining Programs................................... 82
Sewing Techniques .......................................83
Buttonholes................................................. 83
Sew On a Button.......................................... 84
Four Direction Sewing ................................. 84
Special Stitch Techniques.............................. 85
Ribbon Stitches............................................ 85
Stacking Stitches .......................................... 85
Floating Stitches .......................................... 86
Radiant Stitches ........................................... 87
Lace Edge Stitches ....................................... 87
Optional Feet Stitches .................................. 87
Pop-up Messages in Sewing ......................... 88
6 Sequence Creator ................................. 90
Sequence Creator — Introduction ................ 90
Sequence Creator – Overview....................... 91
Getting Started with Sequence Creator ........ 93
Load a Stitch ............................................... 93
Load a Font ................................................. 93
Adjust text and stitches ................................ 94
Delete a Stitch or Letter ................................ 94
Duplicate a Stitch or Letter ........................... 94
Replace a Stitch or Letter .............................. 94
Directional Stitches .......................................95
Sequence Commands....................................96
True Size........................................................96
Saving a Sequence......................................... 97
Sew Your Sequence.......................................97
Adjust the Entire Sequence...........................98
Using Sequence Creator in Sewing Mode ....98
Pop-up Messages in Sequence Creator.........99
7 Stitch Creator™ Feature .................. 100
Stitch Creator™ Feature – Introduction..... 100
Stitch Creator™ Feature – Overview ...........101
Getting Started with Stitch Creator™ ........ 102
Definition of a Stitch Point...........................102
Select Stitches/Stitch Points.........................102
Preview .....................................................103
Stitch Creator™ Edit Tools ........................ 103
Zoom.........................................................103
Move .........................................................103
Add a Stitch or Stitch Point .........................104
Duplicate Selected Stitch Point ....................104
Triple Stitch................................................104
Mirroring ...................................................104
Delete Selected Stitch Point .........................104
Edit a stitch made in Stitch Creator™........ 105
Load and Sew a Stitch................................. 105
Page 6

Saving a Stitch............................................. 105
Using Created Stitches in Sequence
Creator ........................................................ 105
Pop-up Messages in Stitch Creator™
Feature ........................................................ 105
8 Help Center .......................................... 106
Help Center – Introduction......................... 106
Help Center – Overview ............................. 106
User’s Guide ............................................... 107
Getting Started ............................................ 108
Techniques and Tutorials ........................... 109
Garment Techniques...................................109
Sewing Techniques .....................................110
Quilting Techniques ...................................110
Stabilizer Guide .......................................... 110
Projects ........................................................ 111
Project Viewer ............................................111
Video Player...............................................112
9 File Manager ........................................ 113
File Manager – Introduction ....................... 113
File Manager – Overview............................ 114
File Formats................................................. 116
Browse File Manager .................................. 116
Open a File or Folder .................................. 116
Multi-Select ................................................. 116
mySewnet™ Cloud Folder ........................... 116
USB Device.................................................. 116
List/Thumbnail View .................................117
Move up One Folder Level ..........................117
Organize...................................................... 117
Create New Folder......................................117
Rename a File or Folder ..............................117
Move a File or Folder ..................................117
Copy a File or Folder ..................................118
Delete a File or Folder .................................118
Pop-up Messages in File Manager.............. 118
WARNING –TO REDUCE THE RISK OF
BURNS, FIRE, ELECTRIC SHOCK, OR INJURY
TO PERSON: .............................................126
SAVE THESE INSTRUCTIONS ...................126
SERVICING OF DOUBLE INSULATED
PRODUCTS ...............................................127
Licenses ....................................................... 127
10 Maintenance ........................................ 120
Cleaning the Machine Exterior ................... 120
Removing the Needle Plate and Cleaning
the Bobbin Area .......................................... 120
Cleaning Under the Bobbin Area ............... 120
Replacing the Needle Plate ......................... 121
Troubleshooting.......................................... 121
Service .......................................................124
Non-Original Parts and Accessories .............124
Technical specification ................................ 124
11 IMPORTANT ......................................... 126
IMPORTANT SAFETY
INSTRUCTIONS ......................................... 126
DANGER –TO REDUCE THE RISK OF
ELECTRIC SHOCK:....................................126
Page 7
1 Introduction
1
2
3
4
5
6
7
8
9
10
6
11
6
12
13
14
15
16
17
18
19
20
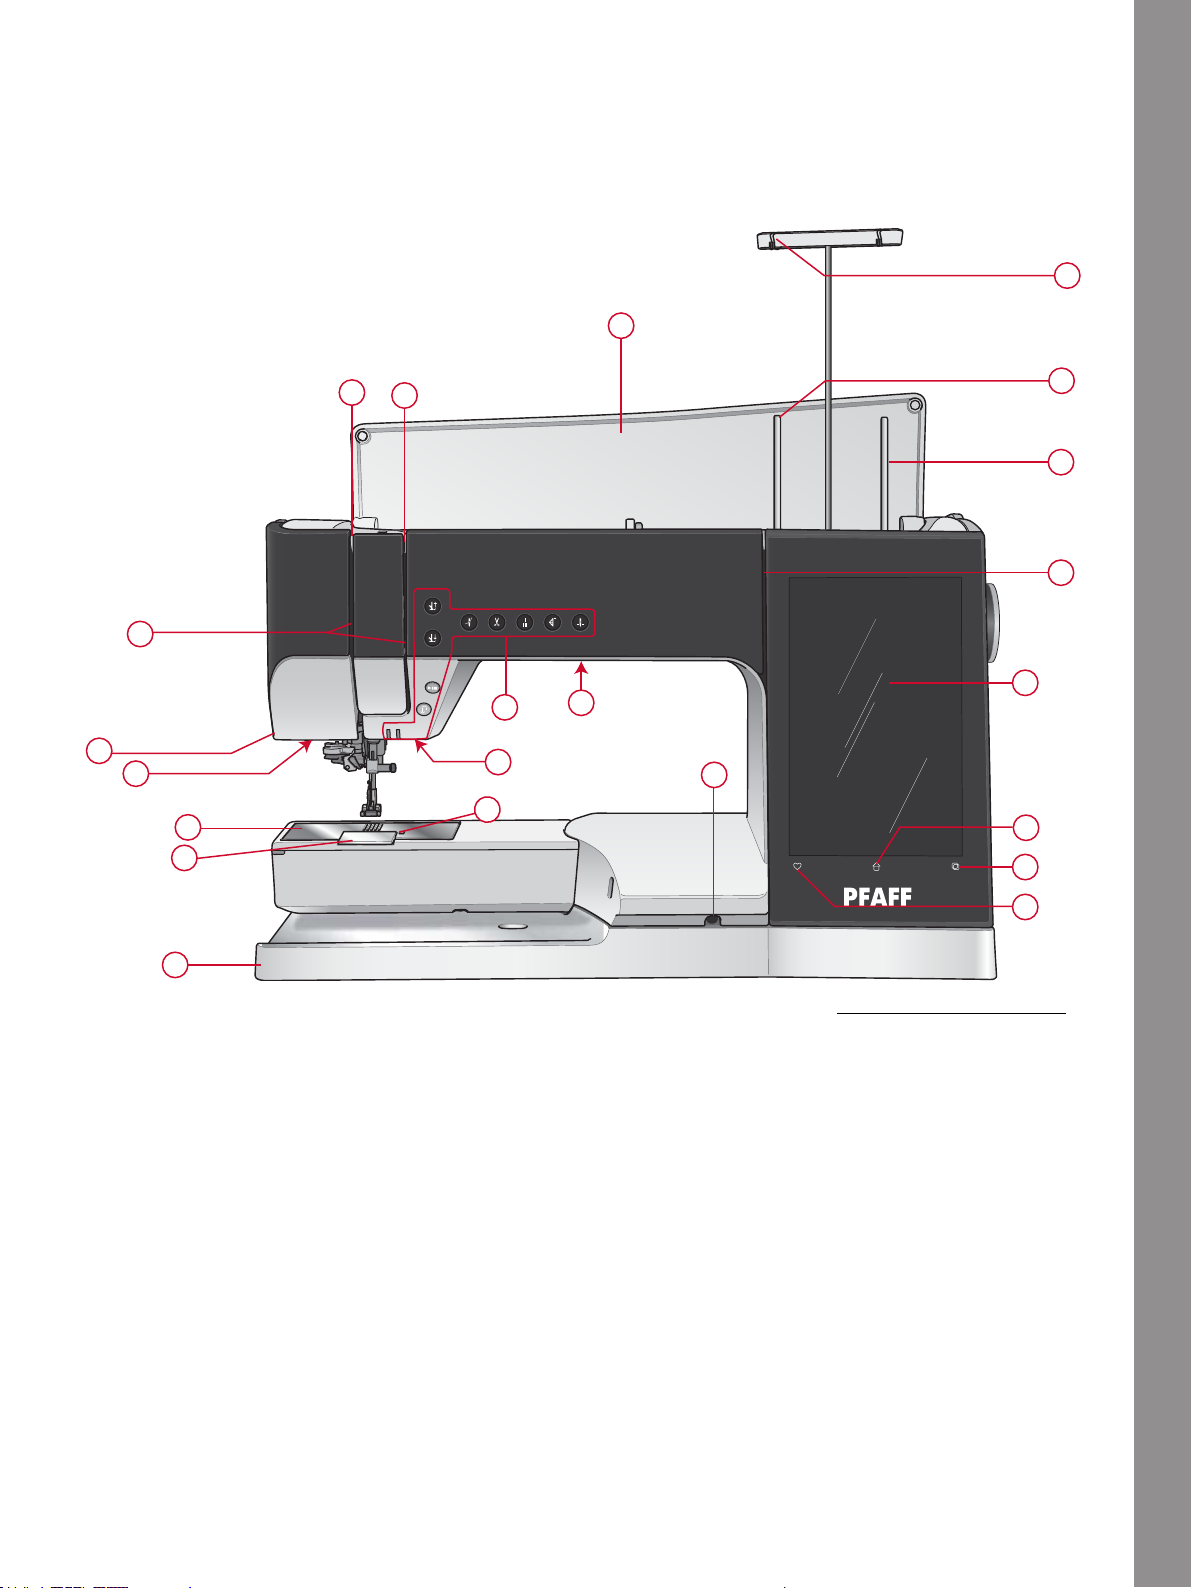
Machine Overview
Front
1. Lid
2. Thread tension discs
3. Thread take-up lever
4. Threading slot
5. Thread cutter
6. LED light
7. Needle plate
8. Bobbin cover
9. Bobbin cover release button
10. Base plate
Introduction
11. Function buttons, see Function Buttons, page 11 for
detailed description
12. Knee lifter socket
13. Save
14. Mode switch
15. Home
16. Multi-touch screen
17. Bobbin winding thread slot
18. Auxiliary spool pin
19. Main spool pin
20. Telescopic thread guide
7
Page 8
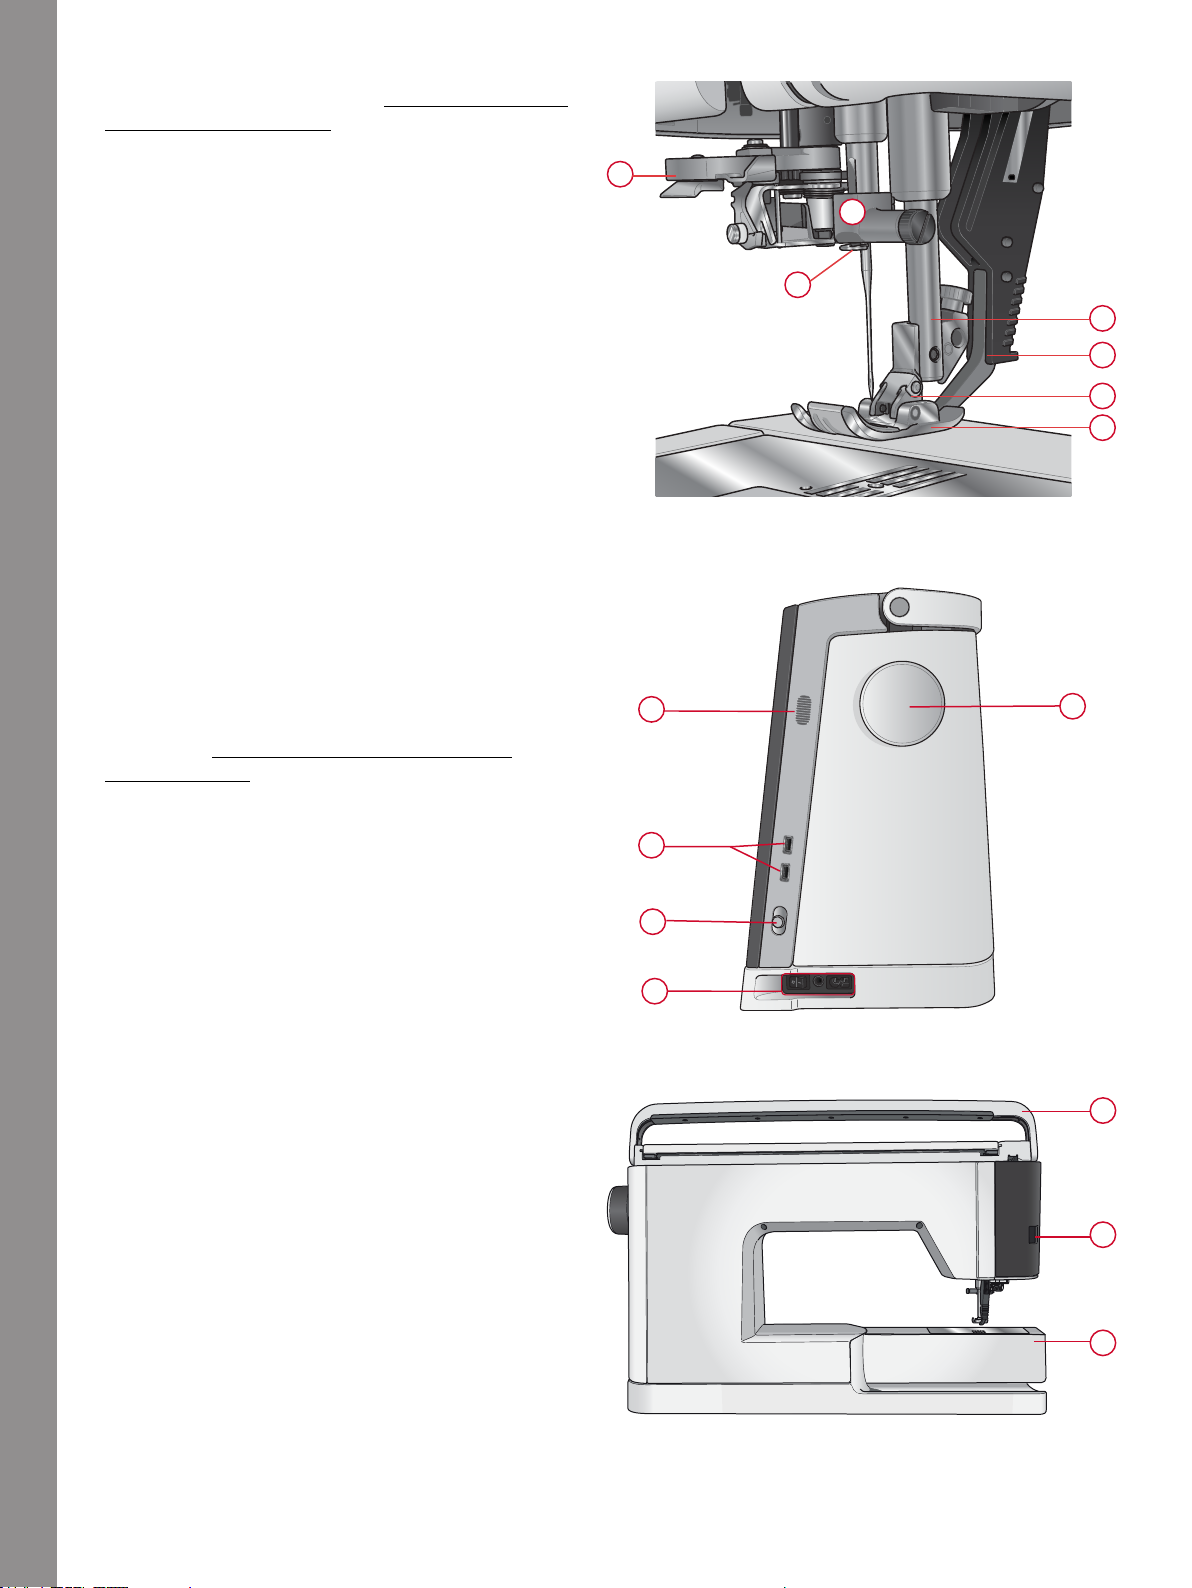
Needle Area
1
2
3
4
5
6
7
1
5
4
3
2
1
2
3
1. Automatic needle threader, see Using the Automatic
Needle Threader, page 33
2. Needle bar with needle clamp screw
3. Needle thread guide
4. Presser foot bar
5. IDT™
6. Presser foot ankle
7. Presser foot
Right Side
1. Handwheel
2. Speaker
3. Built-in USB ports
4. Speed control lever
5. ON/OFF switch, sockets for power cord and foot
control. See Connect the Power Cord and Foot
Control, page 21.
Introduction
Rear
1. Handle
2. Accessory socket
3. Free arm
8
Page 9
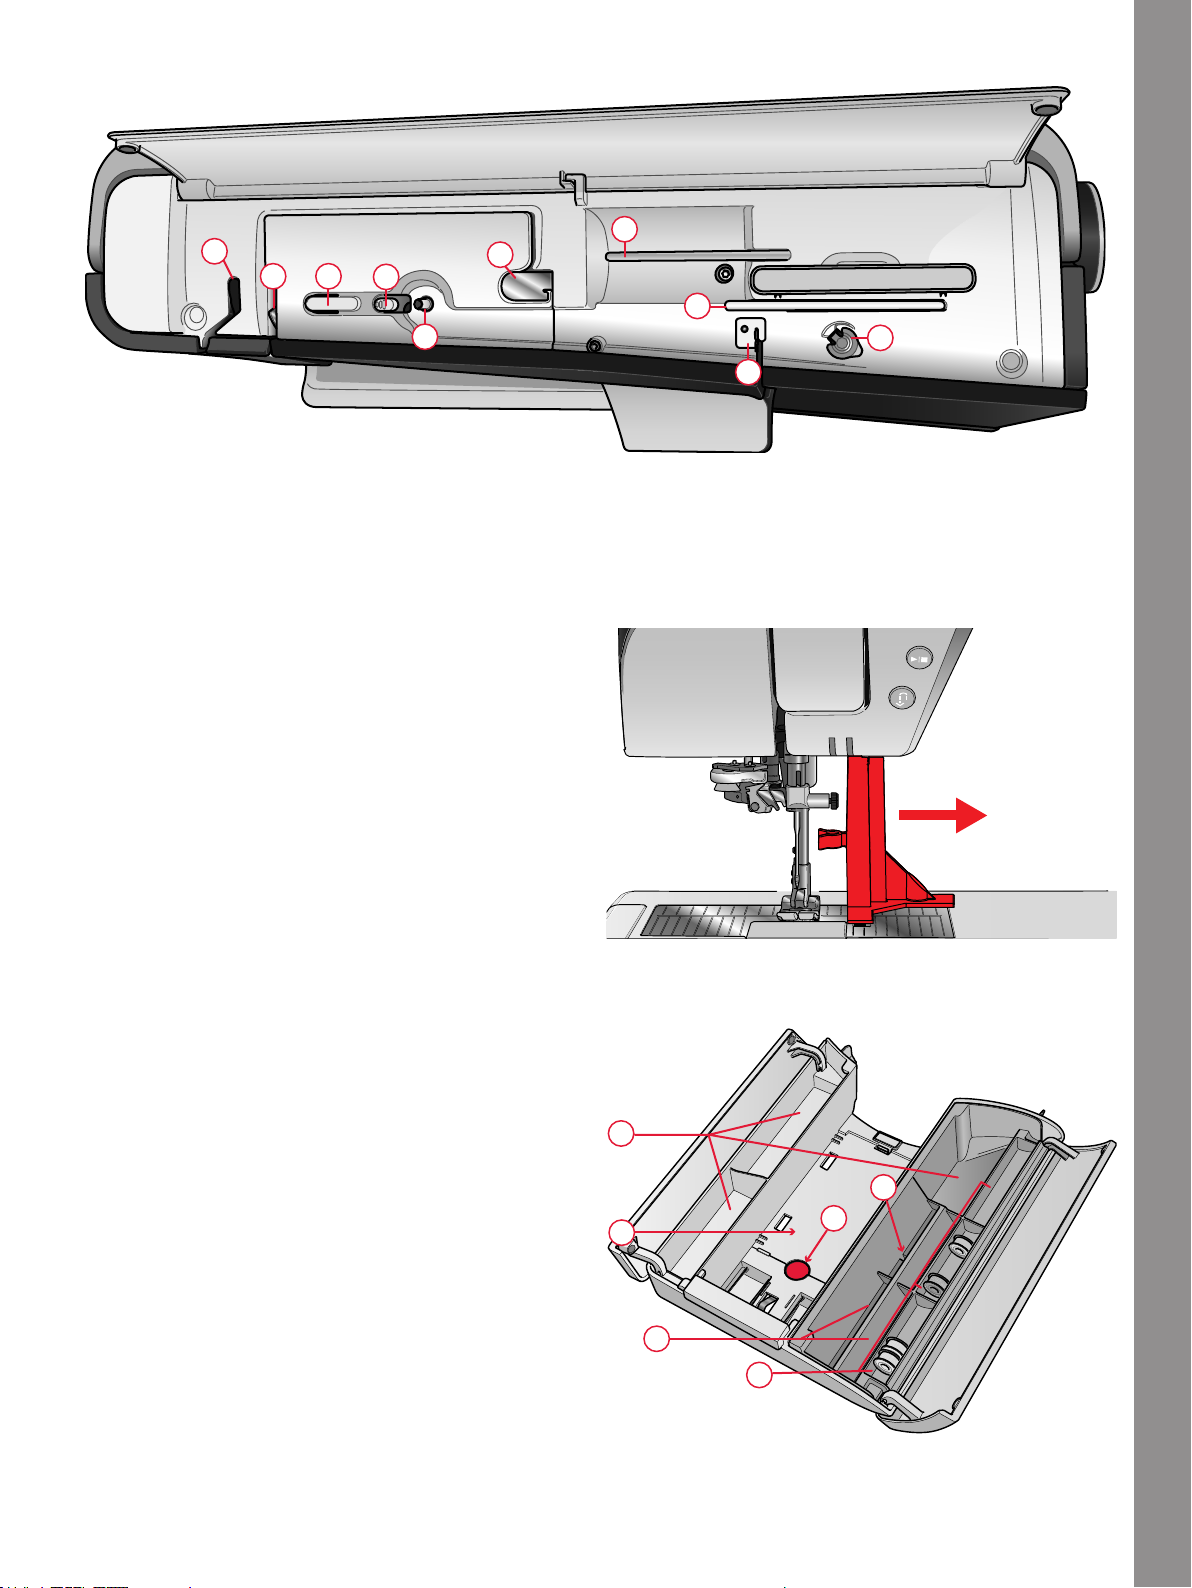
Top
2
3
4
5
6
7
8
10
9
1
2
3
4
5
1
6
1. Thread take-up lever
2. Thread tension discs
3. Thread cutter
4. Bobbin winder lever
5. Bobbin winder
6. Pre-tension thread guide
7. Main spool pin
8. Auxiliary spool pin
9. Bobbin winding thread guide
10. Thread tension disc for bobbin winding
Note: The machine is delivered with two red safety catches;
one attached to the presser foot bar and one in the accessory
tray. These should all be removed before sewing.
Introduction
Accessory Tray
The accessory tray features special compartments for
presser feet and bobbins, plus space for needles and
other accessories. Store the accessories in the tray so
they are easily accessible.
1. Space for accessories
2. Space for needle plate
3. Spaces for presser feet
4. Spaces for bobbins
5. Space with hole for 5M Manual Buttonhole Foot
6. Safety catch (remove before sewing)
9
Page 10
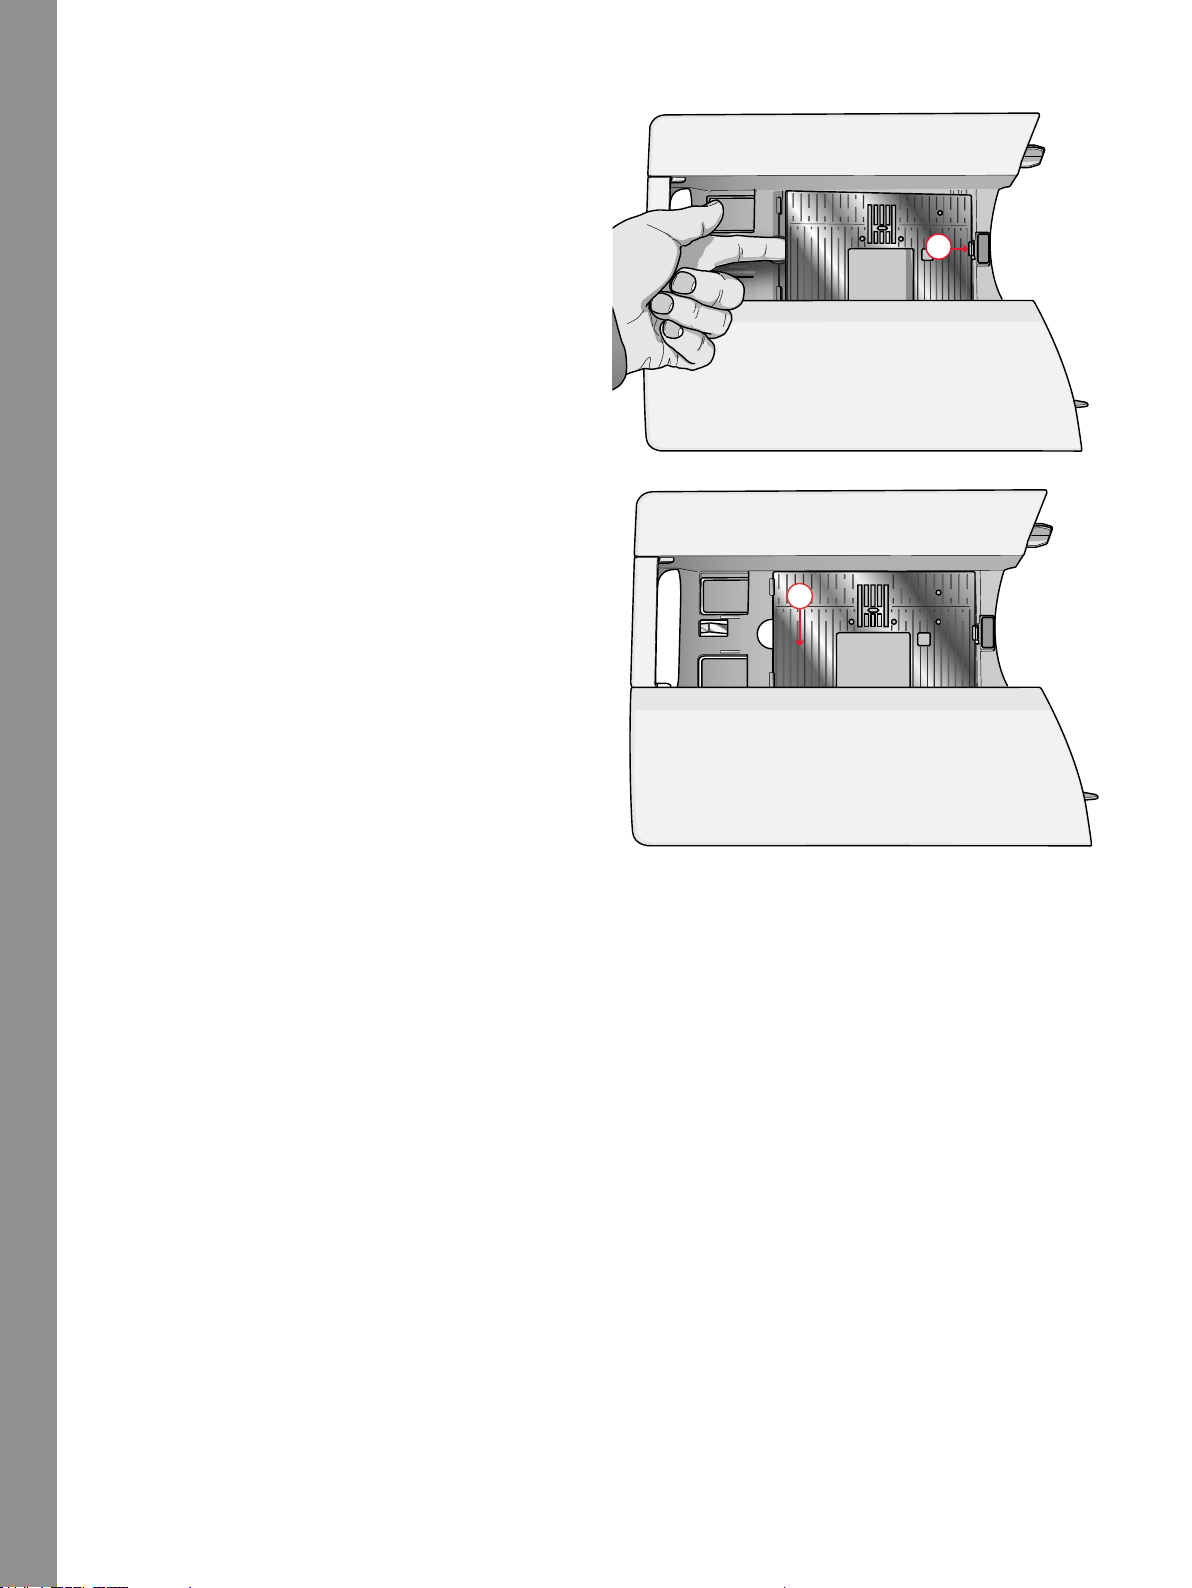
Storing a Needle Plate
B
A
Store the needle plate not in use in the bottom of your
accessory tray.
1. Insert the right side of the plate into spring on the
right side (A), push it slightly. Lay it down (B) so
that the needle plate snaps into place.
2. To remove the plate, place a finger into the hole by
the left side of the plate, push it to the right and then
lift the plate.
Introduction
10
Page 11
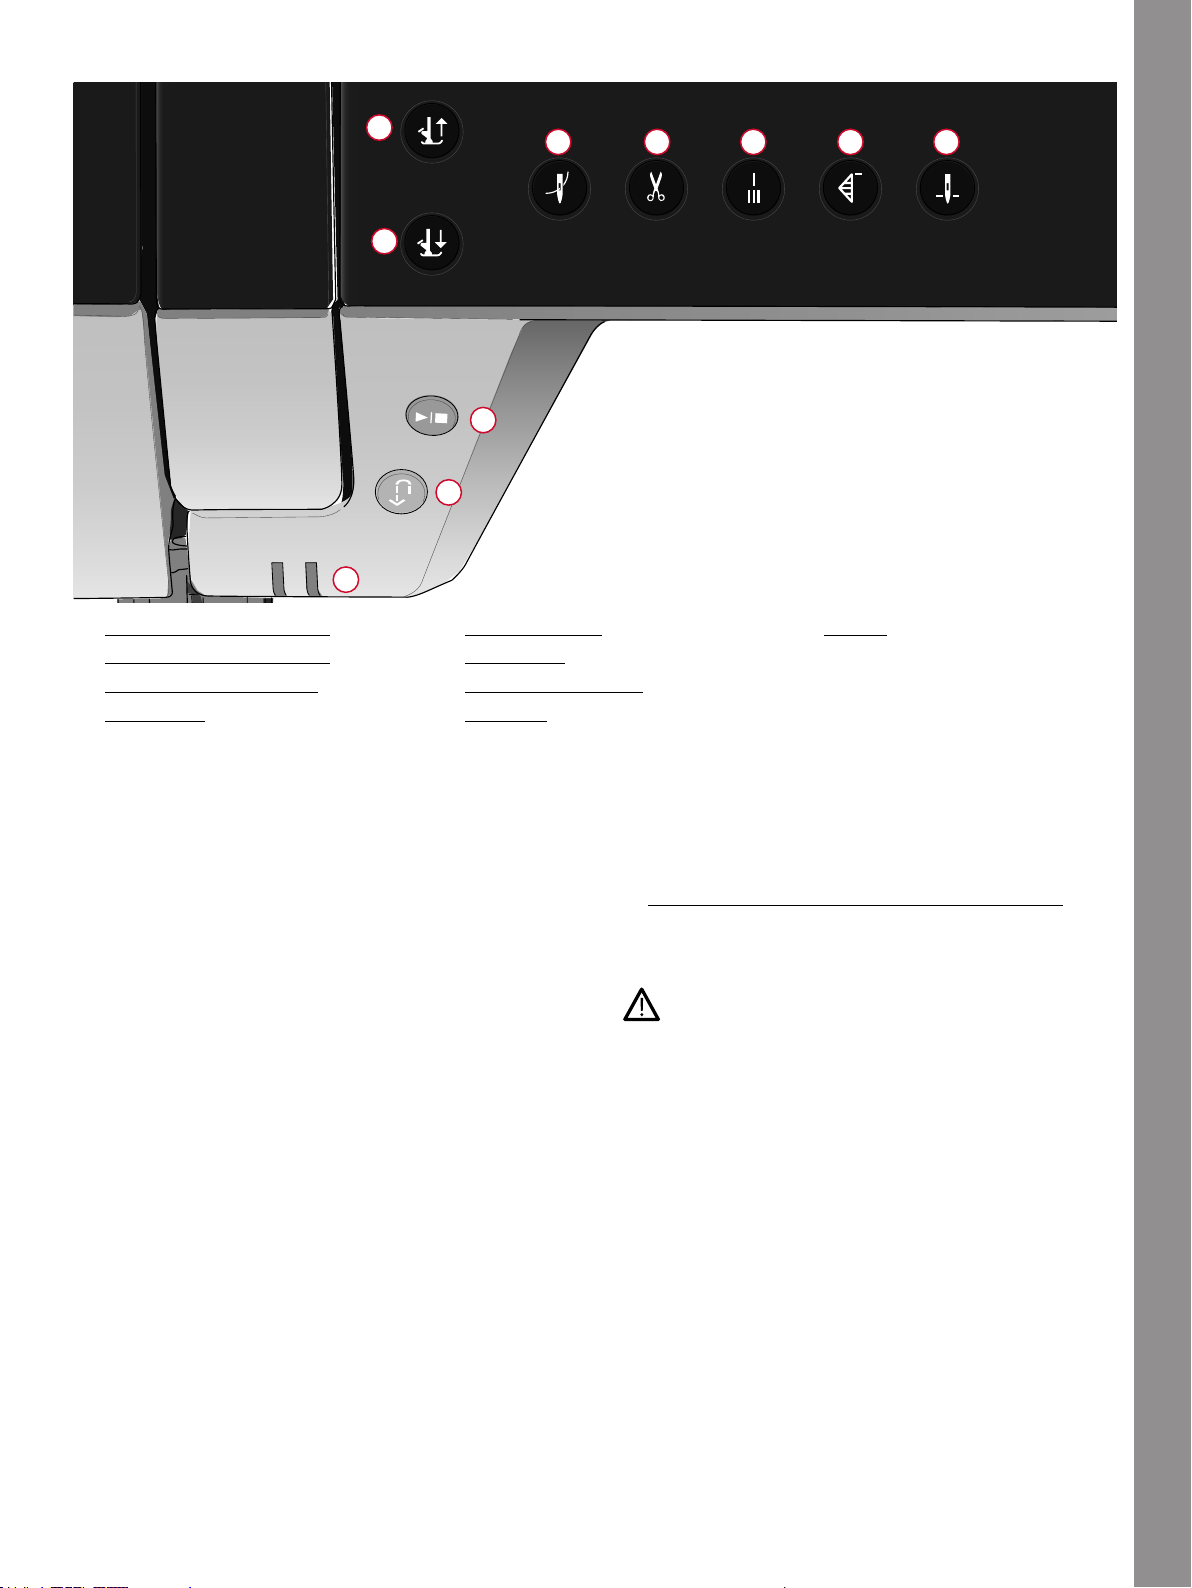
Function Buttons
2
3
4
5
6
8
9
7
1
10
1. Presser foot up and extra lift
2. Presser foot down and pivot
3. Automatic needle threader
4. Cut function
5. Immediate tie-off
6. Stitch restart
7. Needle stop up/down
8. Start/stop
Presser Foot Up and Extra Lift
Touch the presser foot up button once to raise the
presser foot. Touch again and the presser foot will raise
to extra lift position, and the feed teeth will be
automatically lowered to make it easier to get heavy
fabric under the presser foot.
Presser Foot Down and Pivot
The presser foot is lowered automatically when you start
sewing. To lower the presser foot before starting to sew,
touch the presser foot down and pivot button. The
presser foot will be completely lowered and the machine
9. Reverse
10. Indication Light
firmly holds the fabric. Touch presser foot down again to
go to pivot position.
Automatic Needle Threader
See Using the Automatic Needle Threader, page 33 to
learn how to place the thread for automatic needle
threading. When the thread is in place, touch this button
to thread the needle automatically.
To prevent damage to the automatic needle threader,
needle, presser foot or other attached accessories, read
the instructions carefully on how to use the
automatic needle threader before using it.
Introduction
11
Page 12
Cut Function
Touch the cut function button and your machine cuts
the upper and bobbin threads and raises the presser foot
and needle.
To cut threads at the end of a stitch or stitch sequence,
touch the cut function button while sewing. The
indicator light will intensify, alerting you that a cut is
requested. When the stitch or stitch sequence is
completed, your machine cuts the upper and bobbin
threads and raises the presser foot and needle.
Note: If automatic presser foot lift has been deselected in
temporary session settings the presser foot will not be raised
when using the cut function.
Some optional accessories are attached in the two
small circular holes in the needle plate just above the
bobbin cover. Do not use the cut function when an
accessory is attached in these holes as that may
interfere with the automatic thread cutter located
under the needle plate.
Immediate Tie-Off
Press immediate tie-off while sewing and your machine
sews a few tie-off stitches and stops automatically. By
touching the tie-off button once more while the action
indicator is lit, the function can be turned off.
Stitch Re-Start
When you stop sewing in the middle of a stitch, touch
stitch re-start to begin sewing at the beginning of the
stitch. The stitch or stitch sequence will remember any
Introduction
special settings you made.
Needle Stop Up/Down
Touch needle stop up/down to set the position of the
needle when you stop sewing. The needle will move up
or down when you touch the button. The indicator light
intensifies when needle stop down is set.
Tip: You can also tap the foot control to raise or lower the
needle once you stop sewing. Tapping the foot control does not
change the set stop position.
Start/Stop
Touch the start/stop button to start and stop the
machine sewing without using the foot control. Touch
start/stop to begin and touch again to stop.
Reverse
When reverse is active, the reverse indicator intensifies.
For permanent reverse, touch the reverse button once
before starting to sew. The reverse indicator will
intensify and the machine sews in reverse until you
touch the button again to cancel. If you press the reverse
button while sewing, the machine will sew in reverse for
as long as you keep the button pressed.
Reverse is also used when sewing manual buttonholes,
darning stitches and tapering stitches to step between
the parts of the stitch.
12
Page 13
Basic Gestures for the Multi-Touch Screen
Easily navigate on the multi-touch screen with the
gestures described below. For more detailed
information, see Multi-Touch Screen.
Touch
Touch once on a button or setting on the screen to select.
Touch & Hold
Touch once without releasing for a few seconds to touch
& hold. Used on some buttons and screen areas to
access more options.
Pinch/Stretch
Touch with two fingers at the same time and without
releasing increase/reduce the distance between the
fingers to stretch (zoom in) or pinch (zoom out).
Touch and Move
Touch once on e.g a window on your screen and,
without releasing, move your finger to a different
position on the screen.
Swipe
Touch, move and release your finger in a swift gesture
to swipe. Left-right/right-left swipe is used to scroll
between stitch menus. Top-bottom/bottom-top swipe is
used to scroll within a stitch menu.
Introduction
13
Page 14
Accessories
1 2 3 4
6
5
7
9
8
10
11
12
13
14
15
2
3
6
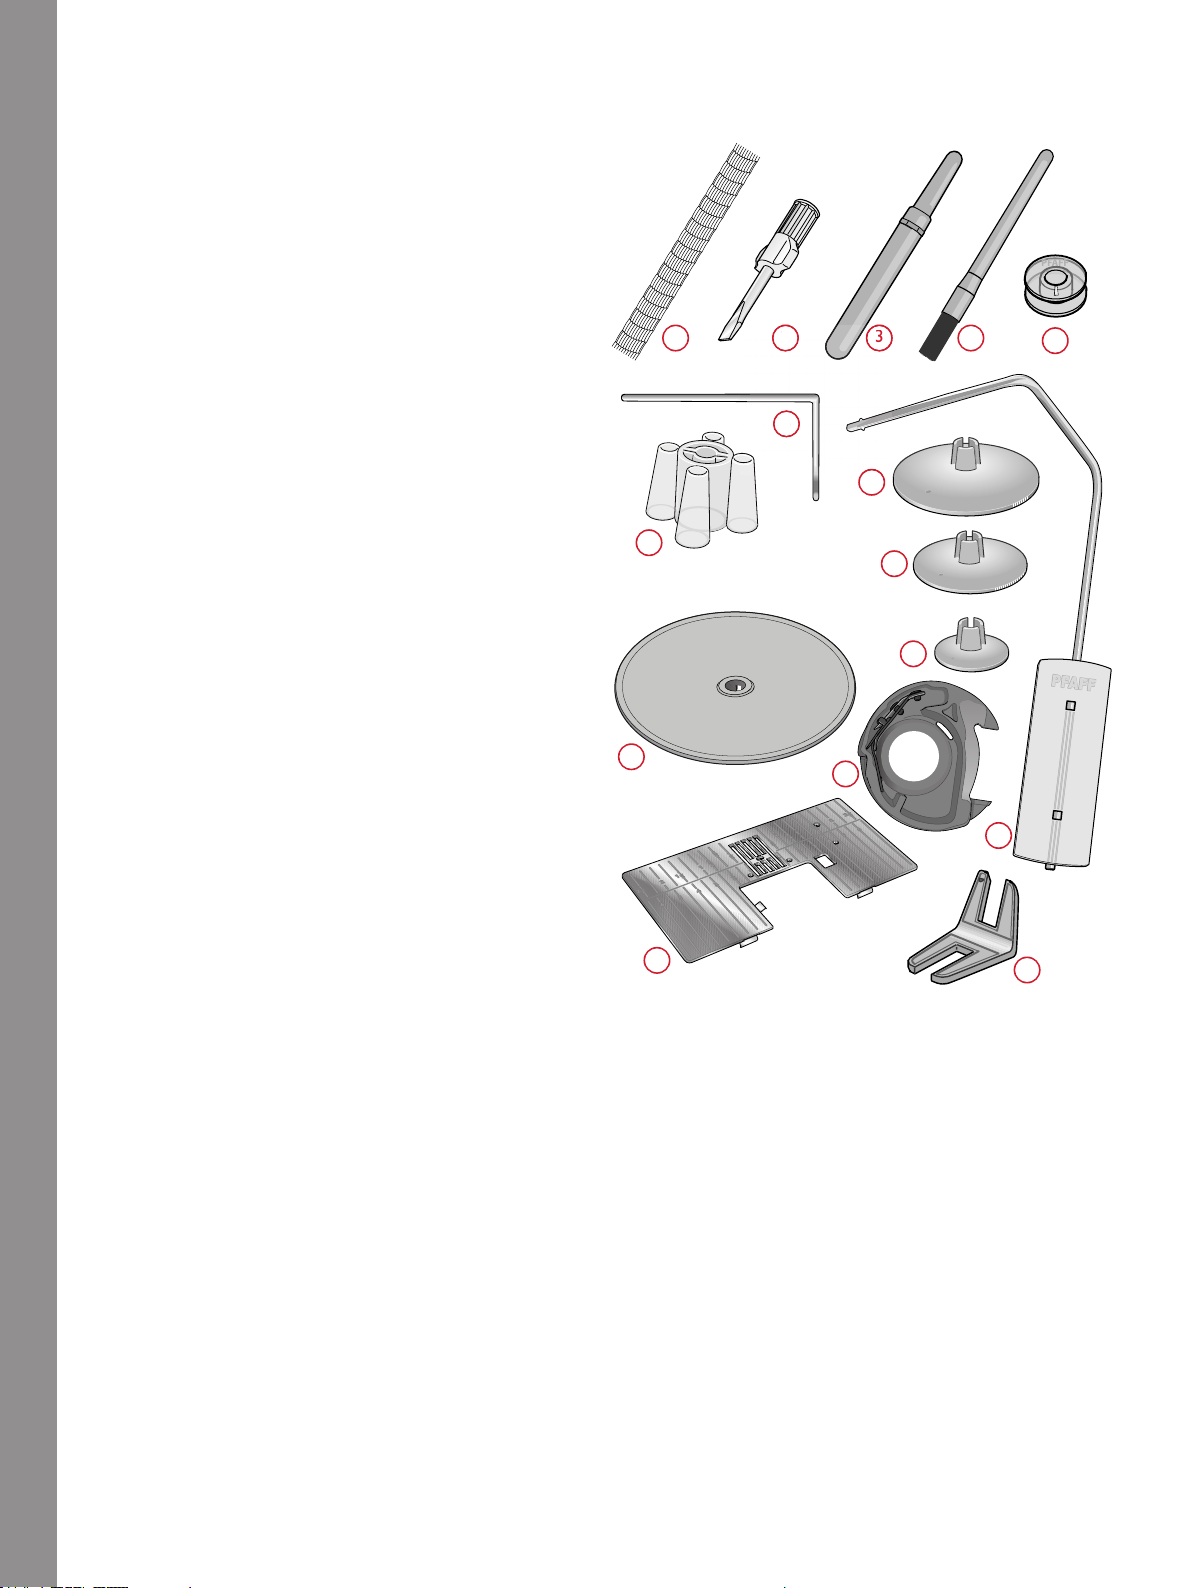
Included Accessories
1. Thread net (4)
2. Screwdriver
3. Seam ripper
4. Brush
5. Bobbins (6)
6. Edge/Quilting guide (used attached to presser foot
ankle)
7. Thread cone holder (2)
8. Spool cap, large (2)
9. Spool cap, medium (2)
10. Spool cap, small (2)
11. Large spool holder
12. Bobbin case for straight stitch left (black)
13. Knee lift
14. Straight Stitch Needle Plate
15. Multipurpose tool/Button reed
Included Accessories Not in Picture
Introduction
• Soft cover for machine
• Foot control
• Power cord
• Needles
14
Page 15
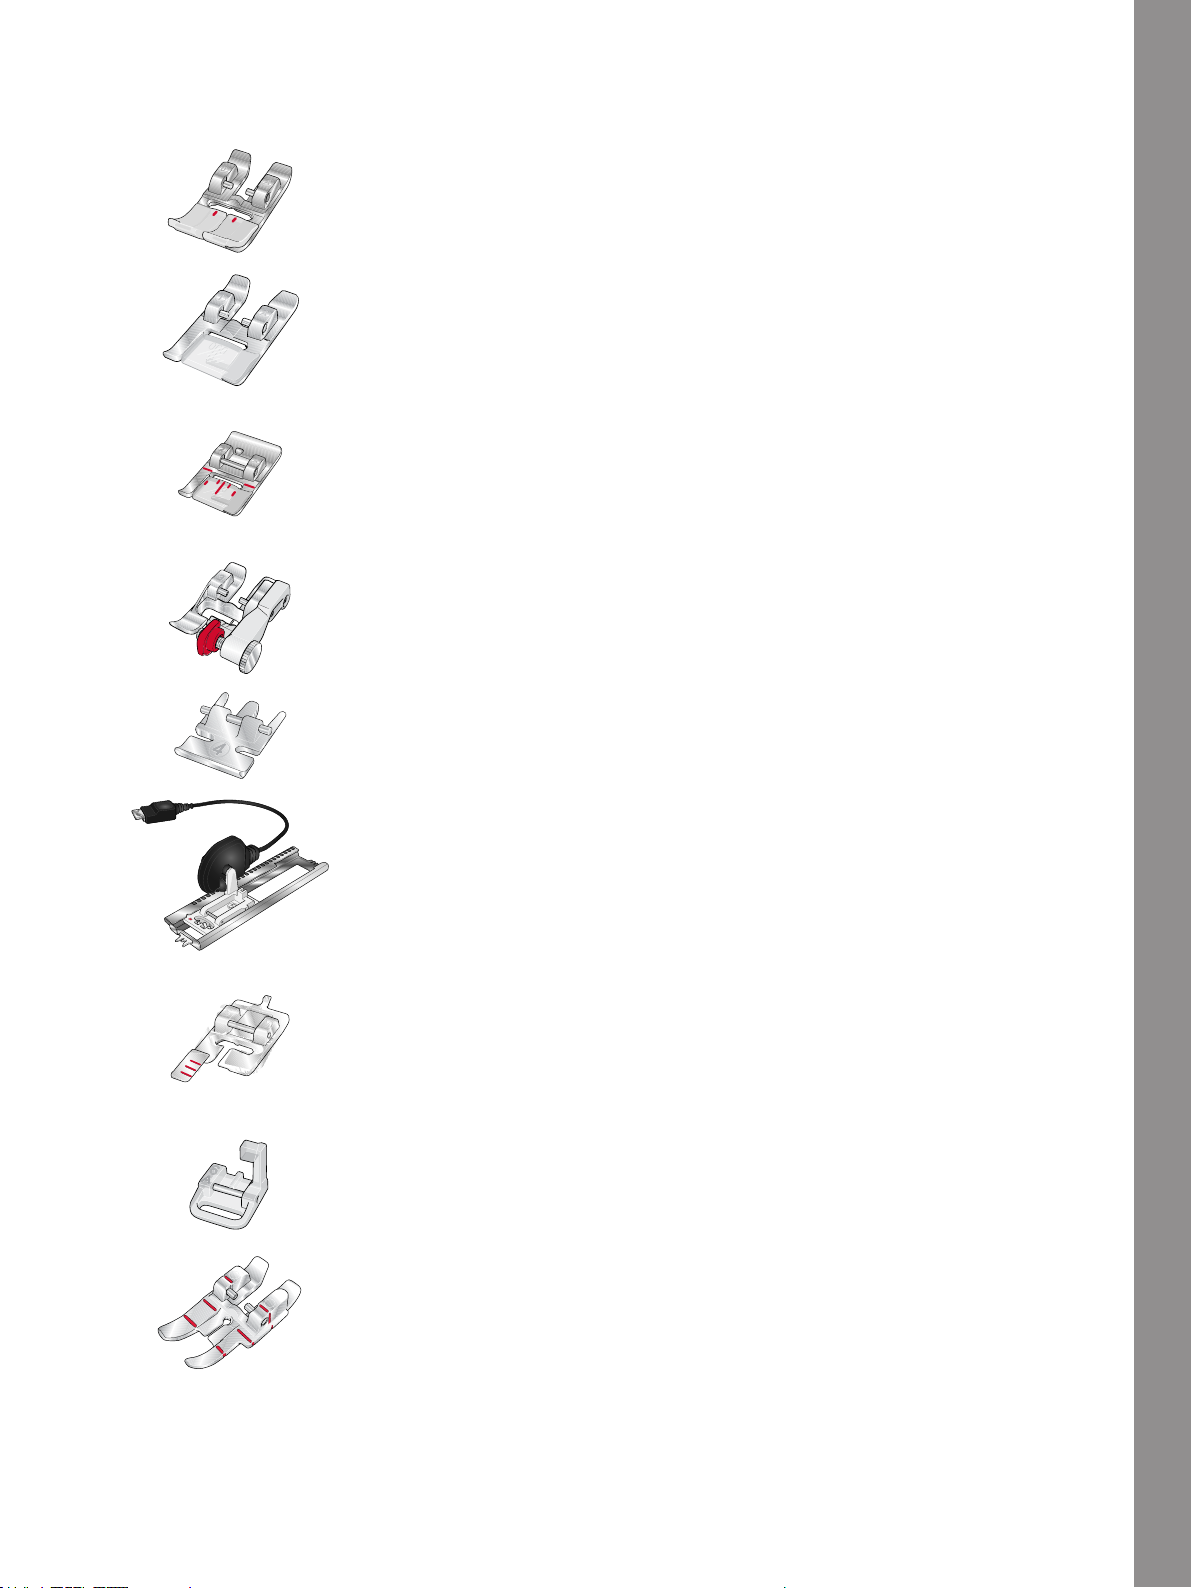
Presser Feet
Note: For the best sewing results, use only presser feet designed for and compatible with your performance icon™ machine.
OA -Standard Presser Foot for IDT™ System
(attached on the machine upon delivery)
This foot is used mainly for straight stitching and zigzag stitching with a stitch
length longer than 1.0 mm.
1A - Fancy Stitch Foot for IDT™ System
This foot is used for decorative stitches. The groove on the underside of the foot
is designed to flow smoothly over the stitches.
2A - Fancy Stitch Foot
When sewing decorative stitches or short zigzag stitches and other utility
stitches with less than 1.0mm stitch length, use this foot. The groove on the
underside of the foot is designed to flow smoothly over the stitches.
3 – Blindhem Foot for IDT™ System
This foot is used for blindhem stitches. The toe on the foot guides the fabric. The
red guide on the foot is designed to ride along the fold of the hem edge.
4 – Zipper Foot for IDT™ System
This foot can be snapped on either the right or the left of the needle, making it
easy to sew close to both sides of the zipper teeth. Move needle position to right
or left to sew closer to zipper teeth.
5A – Sensormatic Buttonhole Foot
When connected to the machine, the buttonhole is sewn in the length that has
been entered into the machine.
5M - Manual Buttonhole Foot
This foot is used for sewing manual buttonholes. Use the markings on the foot
to position the garment edge. The finger on the back of the foot holds cording
for corded buttonhole.
6A – Embroidery/Sensormatic Free Motion Foot
This foot is used for free motion sewing. This foot can also be used for darning.
¼″ Quilting Foot for IDT™ System
This foot is perfect for piecing and patchwork, especially when used in
conjunction with the straight stitch needle plate. The distance from the needle to
the outer edge of the right toe is ¼″ (6mm). The distance from the needle to the
inner edge of the right toe is ⅛″ (3mm).
Introduction
15
Page 16
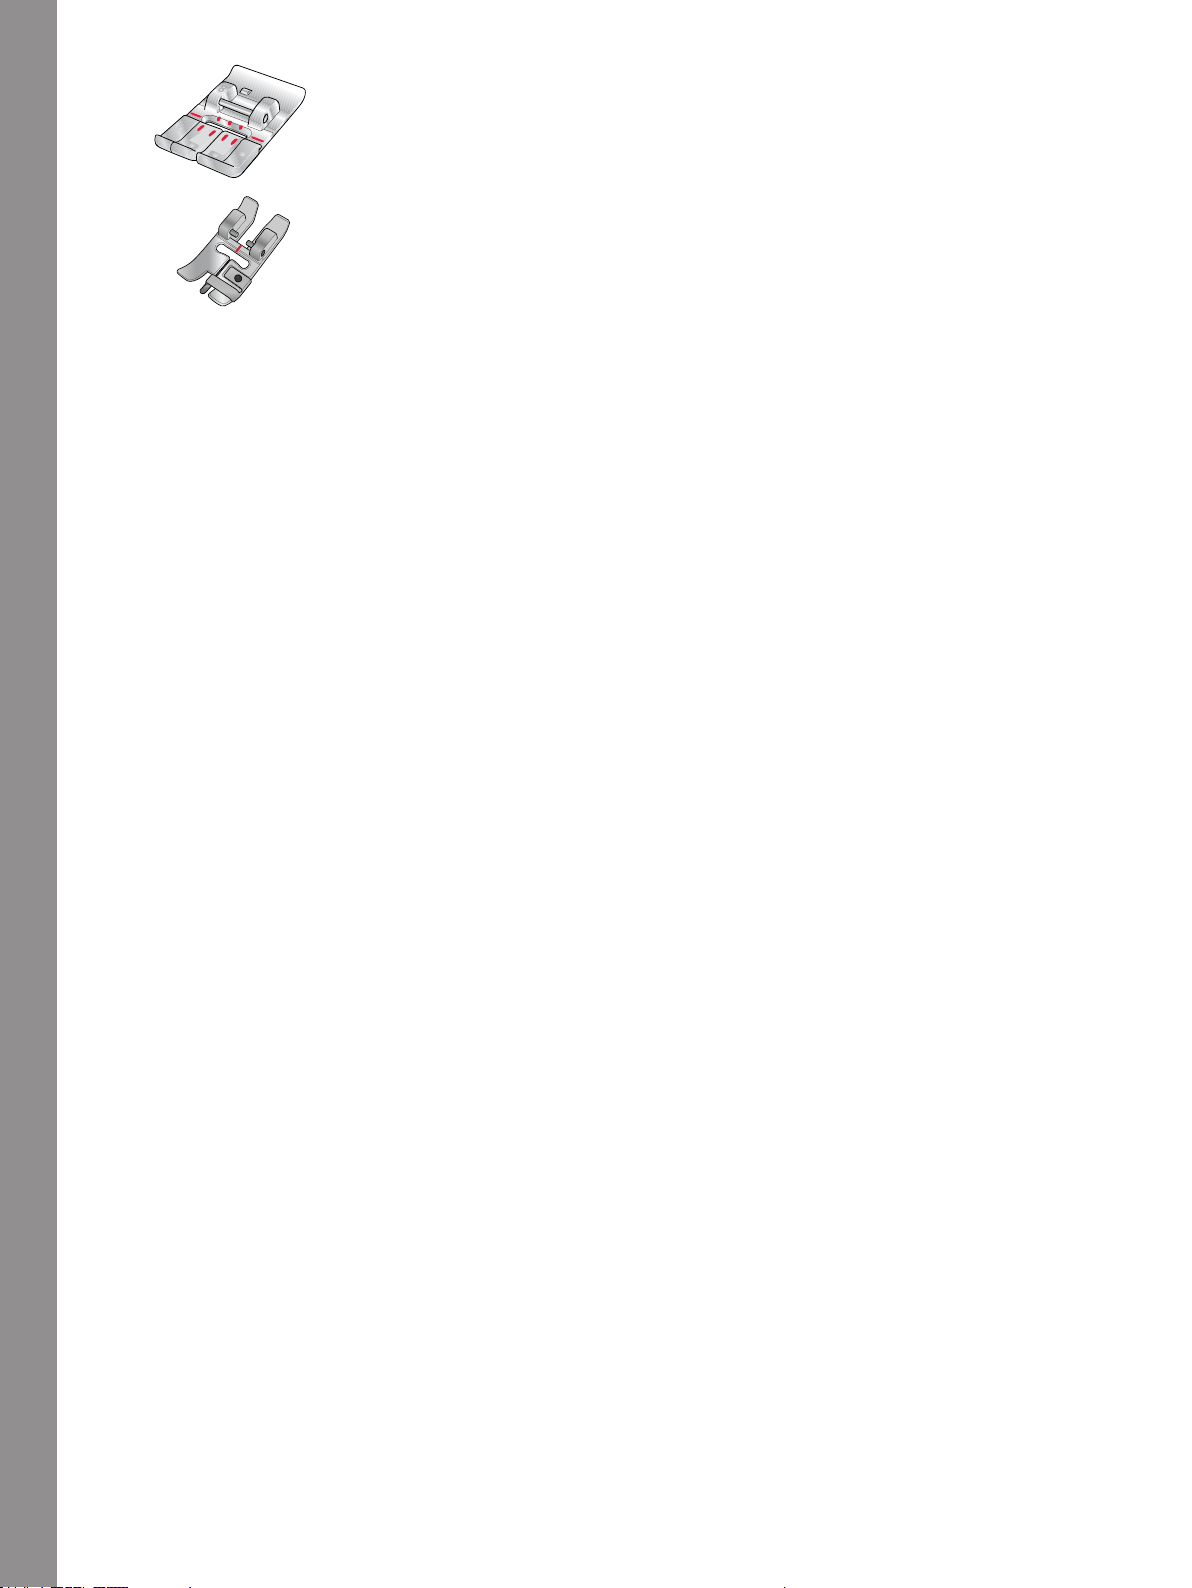
8 – Maxi Stitch Foot
This foot is used for side-motion stitches.
Bi Level Guide Foot for IDT™ System
The Bi Level Guide Foot is especially suitable for sewing the exclusive stitch
techniques such as Edge stitches and floating stitches. The underside of the
presser foot is designed to be higher on the right side, and has a guide in the
center, allowing the presserfoot to glide along a folded edge.
Introduction
16
Page 17

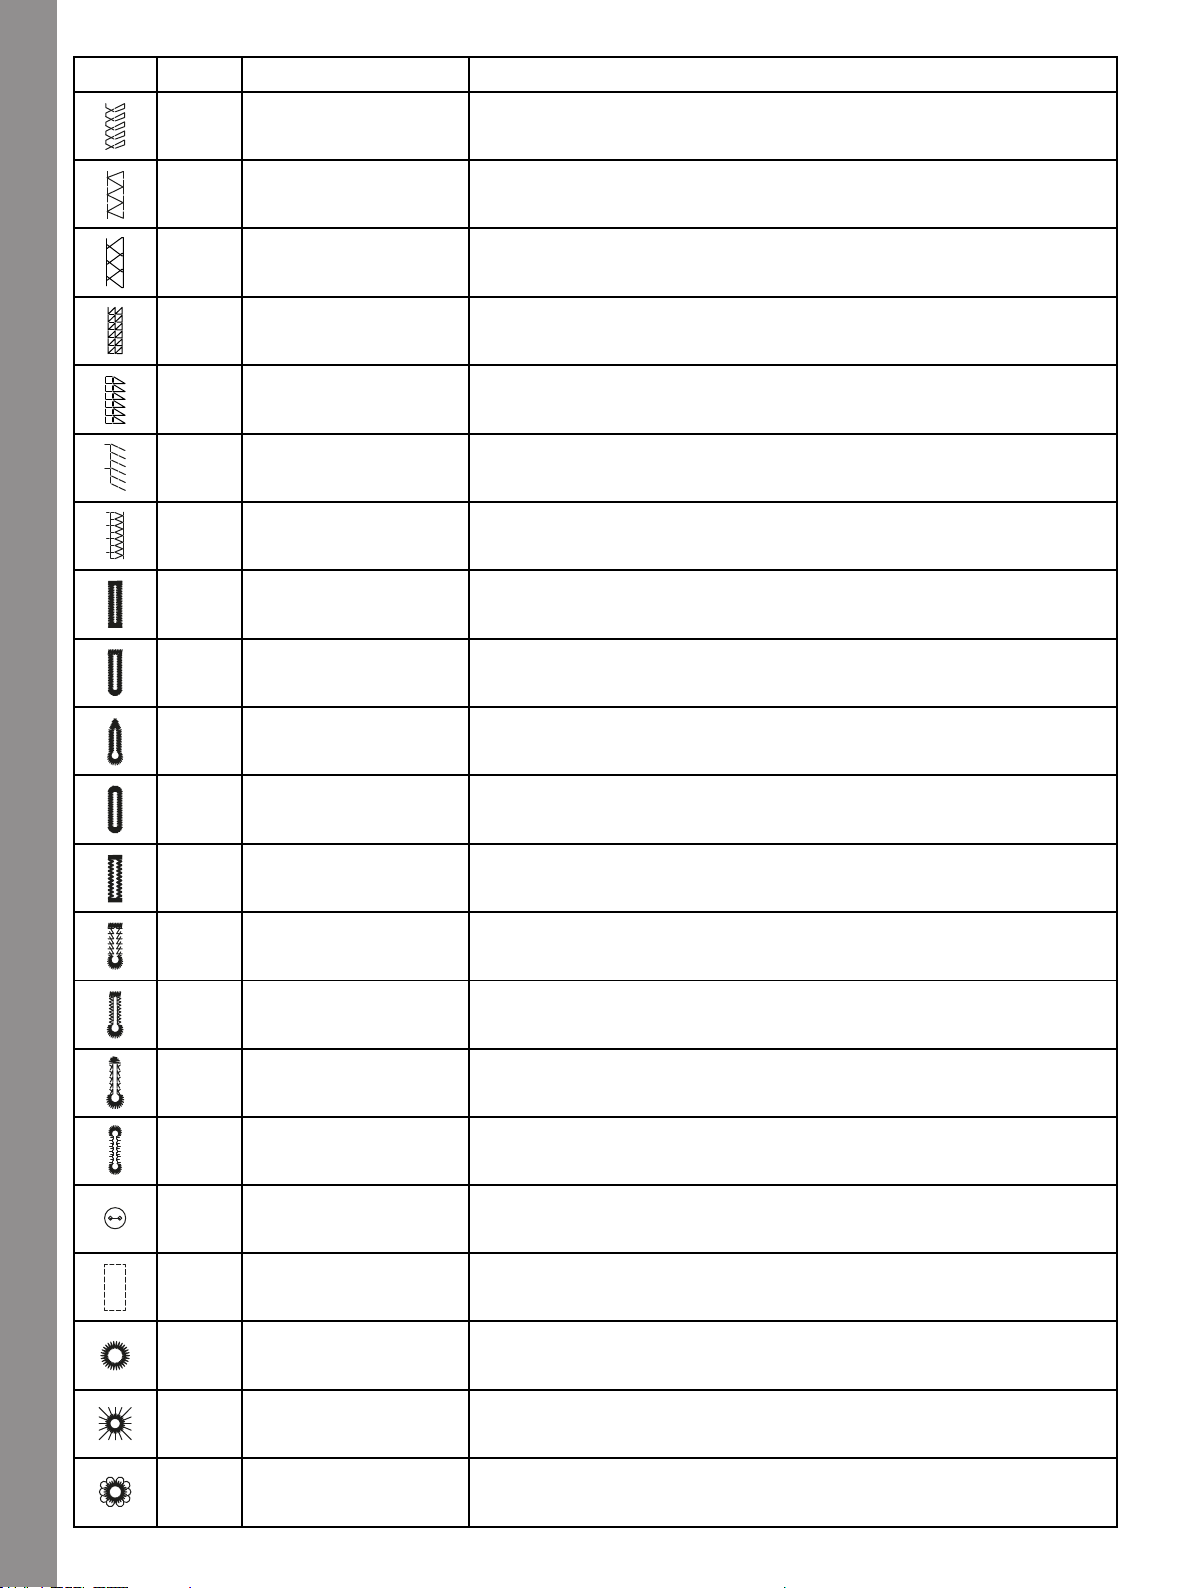
Stitch Overview
Utility Stitches
Stitch
№ Name
1.1.1
1.1.2
1.1.3
1.1.4
1.1.5
1.1.6
1.1.7
1.1.8
Straight stitch For seaming and topstitching.
Stretch triple straight
stitch
Stretch tricot stitch For sewing seams on stretch fabrics.
Basting stitch For all types of sewing.
Zigzag stitch For reinforcing seams, clean finish and stretch sewing.
Stretch triple zigzag
stitch
Three-step zigzag
stitch
Elastic stitch For stretch sewing, darning, patching and lace insertion.
Description
For reinforced seams and for top stitching.
Elastic stitch for decorative hems or topstitching.
For stretch sewing, darning, patching, edge finishing and decorative
sewing.
Introduction
1.1.9
1.1.10
1.1.11
1.1.12
1.1.13
1.1.14
1.1.15
1.1.16
1.2.1
Triple stretch stitch For stretch sewing, darning, patching, edge finishing and decorative
sewing.
Z-zigzag stitch For sewing appliqué.
Honeycomb stitch Decorative stitch for stretch fabrics and hems. Also used with elastic
thread in the bobbin.
Bridging stitch Joining fabrics and quilt batting, decorative stitch for quilting,
hemstitching.
Foundation elastic
stitch
Crosshem stitch Elastic decorative hem for stretch fabrics. Also suitable for joining
Blind hem stitch For sewing blind hems on woven fabrics.
Elastic blind hem stitch For sewing blind hems on stretch fabrics.
Closed overlock For sewing seams and overcasting stretch fabrics in one step.
Joining stitch for undergarments, terry cloth, leather, bulky fabrics
where overlapping the seams.
fabrics and quilt batting.
1.2.2
1.2.3
Elastic overcast For sewing seams and overcasting stretch fabrics in one step.
Overlock For sewing seams and overcasting stretch fabrics in one step.
17
Page 18
Stitch
№ Name
Description
1.2.4
1.2.5
1.2.6
1.2.7
1.2.8
1.2.9
1.2.10
1.3.1
1.3.2
Light knit fabric
patching
Closed overlock For patching, sewing hems, sewing seams and overcasting.
Closed overlock for
stretch
Mock cover hem Create the look of a serger cover hem for stretch fabrics.
Mock cover hem Create the look of a serger cover hem for stretch fabrics.
Open overlock blind
hem
Closed overlock blind
hem
Standard buttonhole Basic buttonhole for blouses, shirts and jackets. Also for pillowcases.
Rounded buttonhole
with crosswise tack
For patching and sewing hems in stretch fabrics.
For patching, sewing hems, sewing seams and overcasting in stretch
fabrics.
Create decorative overlock blind hem for woven fabrics.
Create decorative overlock blind hem for stretch fabrics.
Buttonhole for garments.
Introduction
1.3.3
1.3.4
1.3.5
1.3.6
1.3.7
1.3.8
1.3.9
1.3.10
1.3.11
Eyelet buttonhole with
pointed tack
Rounded buttonhole Buttonhole for light garments or jackets.
Stretch buttonhole Buttonhole for stretch fabrics.
Decorative eyelet
buttonhole
Decorative eyelet
buttonhole
Decorative eyelet
buttonhole
Decorative round
buttonhole
Button sewing
Bound buttonhole Foundation stitch for bound buttonhole.
Tailors buttonhole or decorative buttonhole.
Decorative buttonhole for jackets.
Decorative buttonhole for jackets.
Decorative heirloom buttonhole.
Decorative heirloom buttonhole.
For sewing on buttons or tacking.
18
1.4.1
1.4.2
1.4.3
Eyelet For belts, laces, heirloom sewing, etc.
Decorative Eyelet For belts, laces, heirloom sewing, etc.
Decorative Eyelet For belts, laces, heirloom sewing, etc.
Page 19
Stitch
№ Name
Description
1.4.4
1.4.5
1.4.6
1.4.7
1.4.8
1.4.9
1.4.10
Decorative Eyelet For belts, laces, heirloom sewing, etc.
Programmable darning
stitch
Programmable
reinforced darning
stitch
Bartack Reinforce pockets, shirt openings, belt loops as well as at lower end of
Denim bartack Reinforce pockets, shirt openings, belt loops as well as at lower end of
Decorative bartack Reinforce pockets, shirt openings, belt loops as well as at lower end of
Cross bartack Reinforce pockets, shirt openings and belt loops.
To darn or mend small holes, begin stitching over hole, touch reverse
for continuous darning and stop.
Darn and mend work clothes, jeans, table cloths and linen towels.
Stitch over hole, touch reverse for continuous darning and auto stop.
a zipper.
a zipper.
a zipper.
Introduction
19
Page 20

Stitch Menu Overview
There are several different stitch menus with stitches for all purposes. For detailed description of a stitch, use the
quick help function, see Quick Help.
Stitch Menu Name Sub Menus
1 — Utility Stitches
See also stitch table for
detailed descriptions.
2 — Quilt Stitches 1. Handlook quilt stitches
3 — Needle Art Stitches 1. Cross stitches
4 — Satin Stitches 1. Scallop edges
5 — Decorative Stitches 1. Leaves and flowers
6 — Miscellaneous Stitches 1. Bows and hearts
7 — Monogram Stitches
Introduction
1. Essential stitches
2. Overcast stitches
3. Buttonholes
4. Eyelets and darning stitches
2. Stippling stitches
3. Crazy patch stitches
2. Needlework stitches
3. Antique hand embroidery stitches
2. Satin elements
3. Borders
2. Art stitches
3. Ornamental stitches
4. Maxi art stitches
2. Animals
3. Fun stitches
1. Monogram 1
2. Monogram 2
8 — Stitch Techniques 1. Single ribbon stitches
2. Double ribbon stitches
3. Triple ribbon stitches
4. Stacking stitches
5. Floating stitches
6. Radiant stitches
7. Lace edge stitches
9 — Additional Stitches 1. Optional feet stitches
2. Four direction stitches
Alphabets
Stitch fonts are available in Block, Comic, Cyrillic, Grand,
Outline and Script alphabets.
20
Page 21

2 Preparations
1
2
3
Unpacking Machine
After lifting the machine out of the box and removing
all packing material and the plastic bag, wipe the
machine, particularly around the needle and needle
plate to remove any oil before sewing.
Note: Your performance icon™ machine is adjusted to
provide the best stitch result at normal room temperature.
Extreme hot and cold temperatures can affect the sewn results.
Connect the Power Cord and Foot Control
Among the accessories you will find the power cord and
the foot control.
Note: Before plugging in the foot control, check to ensure that
it is type "FR5" (see underside of foot control).
1. Pull out the cord from the foot control. Connect the
foot control cord to the front socket on the bottom
right side of the machine.
2. Connect the power cord to the rear socket on the
bottom right side of the machine. Plug the cord into
the wall socket.
3. Press the ON/OFF switch to "I" to turn on power
and light.
Preparations
For the USA and Canada
This sewing machine has a polarized plug (one blade
wider than the other). To reduce the risk of electric
shock, this plug is intended to fit in a polarized outlet
only one way. If the plug does not fit fully in the
outlet, reverse the plug. If it still does not fit, contact a
qualified electrician to install the proper outlet. Do
not modify the plug in any way.
21
Page 22
Pack Away After Sewing
1. Press the ON/OFF switch to "O".
2. Unplug the cord from the wall socket and then from
the machine.
3. Unplug the foot control cord from the machine. Pull
the cord gently and release. The cord will retract into
the foot control.
4. Place all accessories in the accessory tray. Slide the
tray on to the machine around the free arm.
5. Place the foot control in the space above the free arm.
6. Put on the soft cover.
Tip: The user’s guide and power cord can be stored in the back
pocket of the soft cover.
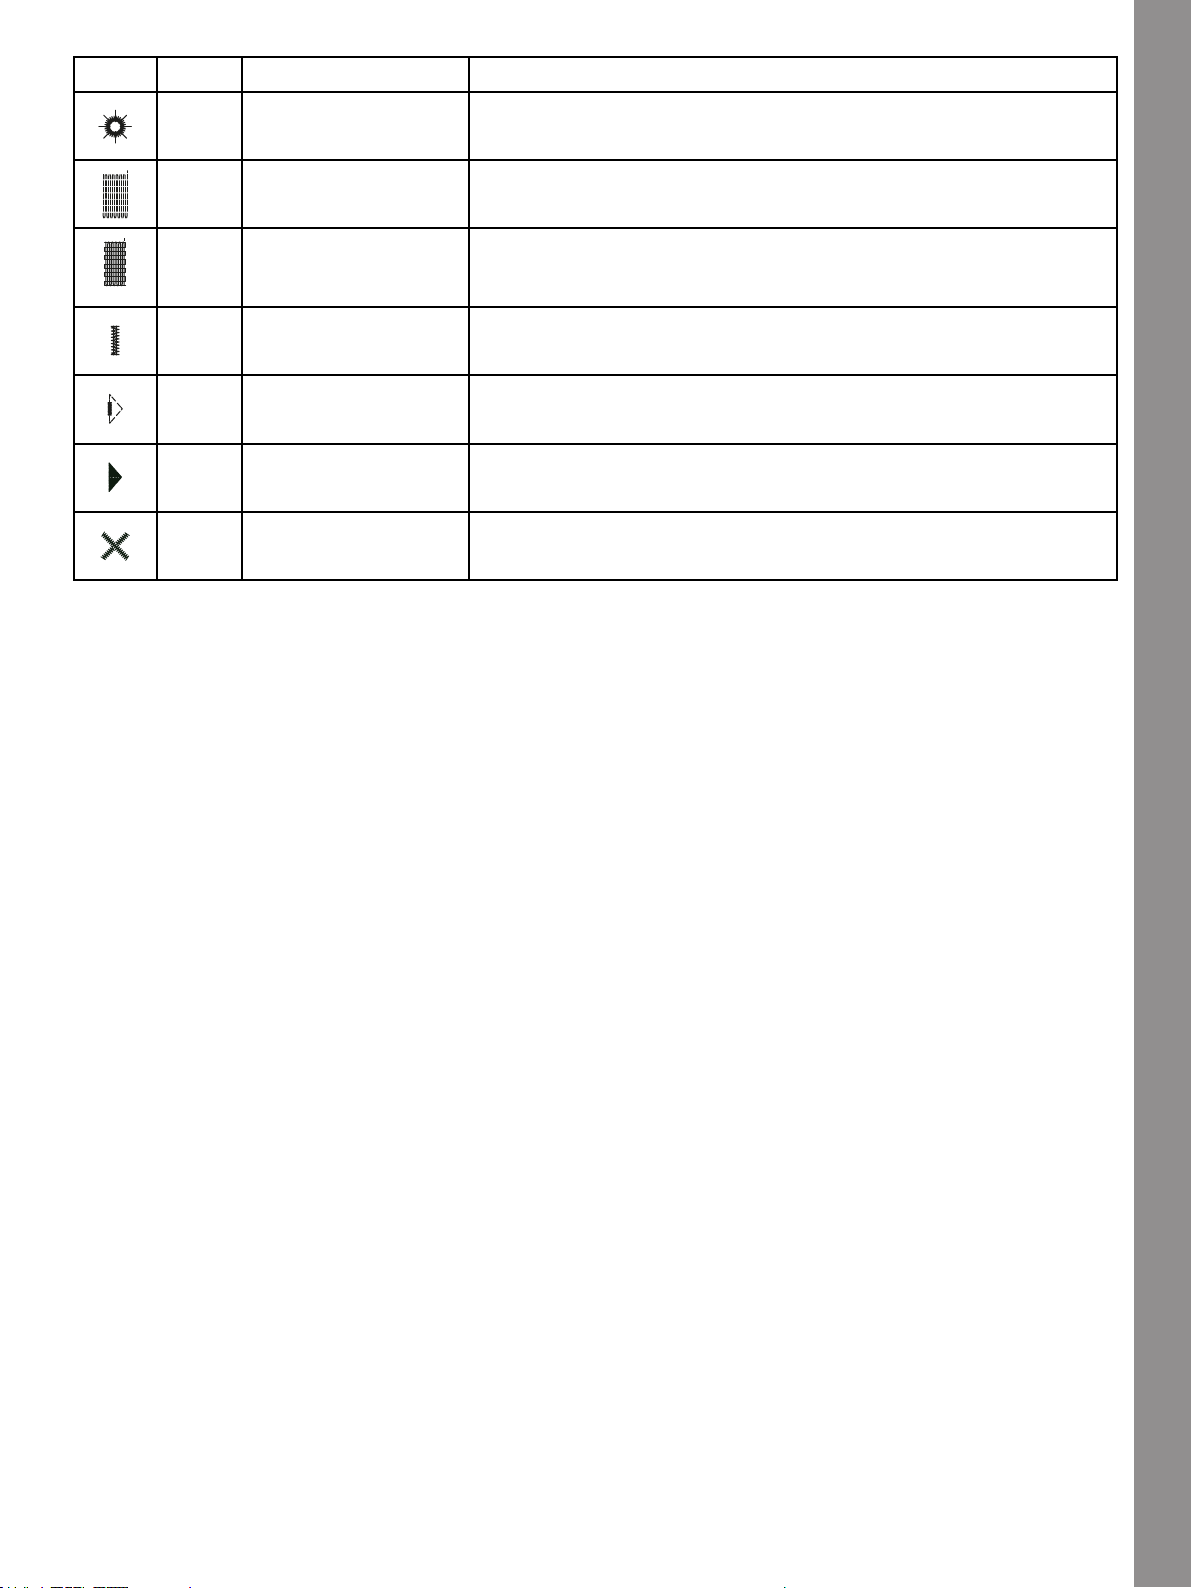
USB Ports
Your machine has two USB ports for connecting USB
devices such as a memory stick. USB plugs can only be
inserted one way – do not force them into the ports! To
remove, carefully pull the USB device out straight.
Note: Make sure that the USB stick you use has the format
FAT32.
Using a USB device
The external device button in file manager is only active
when a device is connected to a machine USB port.
Note: Do not remove the USB device if a loading spinner is
shown on the screen or while the file manager is shown.
Removing the device at that time can damage the files on your
Preparations
USB device.
22
Page 23
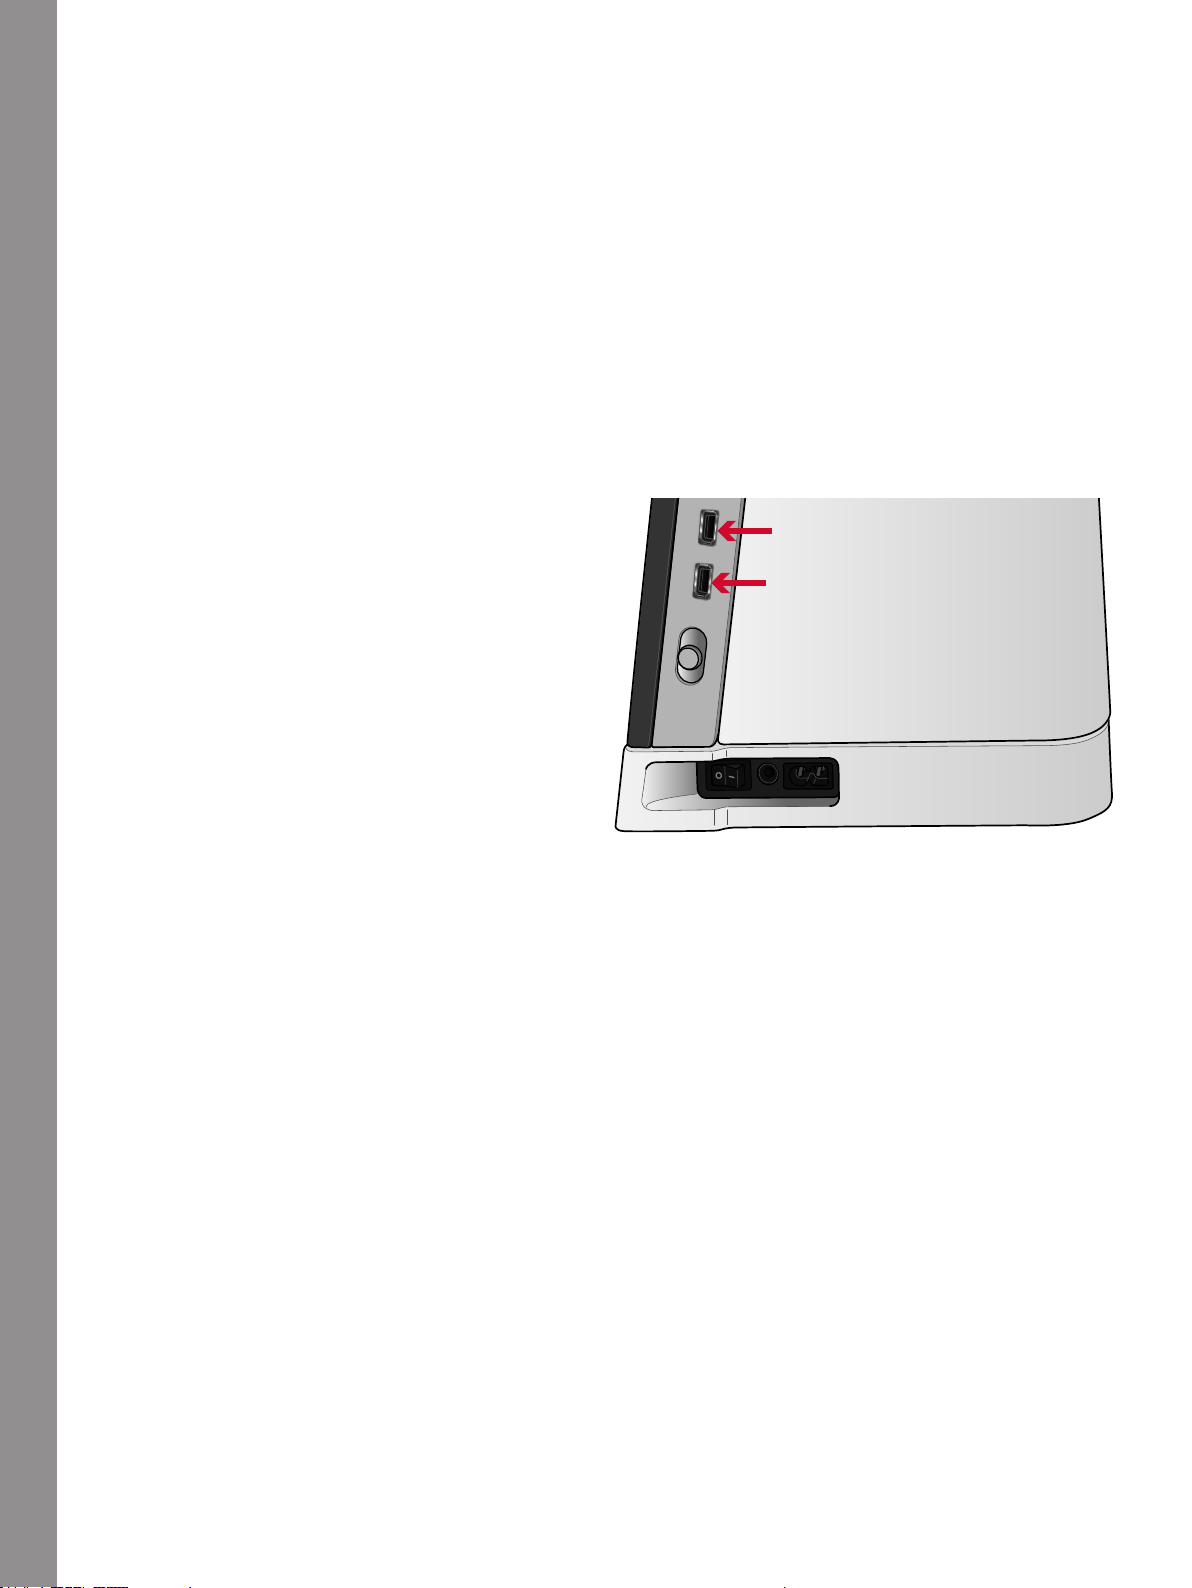
Getting Started with WiFi and mySewnet™ Cloud
Follow the steps below to connect your machine.
Connect to a Network with WiFi
Touch the WiFi button in the top left corner of the
screen. Select from the list of available networks. If your
network is password protected, you will be prompted to
enter the password to connect.
For more information, see WiFi Introduction.
Connect to mySewnet™ Cloud
When you have established a WiFi connection, touch the
mySewnet™ tab and touch the Sign in button. A web
view opens where you can log in. If you do not have a
user name and password, select Register to create an
account.
For more information, see mySewnet™ Cloud.
LED Lights
Your machine has LED lights which distribute the light
evenly over the sewing area and eliminate shadows.
You can adjust the brightness of the light in the settings
menu, see Machine Settings .
WiFi icon
mySewnet™ cloud icon
Preparations
Free Arm
To use the free arm, slide off the accessory tray. When
attached, a hook keeps the accessory tray locked to the
machine. Remove the tray by sliding it to the left.
Manual Thread Cutter
There are three manual thread cutters on your machine.
The first one is close to the bobbin winder spindle for
cutting the thread after winding. The thread can be cut
from sides.
The second one is next to the bobbin area for cutting the
bobbin thread after placing the bobbin in the machine.
The third one is on the left side of the machine for
manually cutting top and bobbin threads. Pull both
threads into the cutter from the back to the front and
pull down quickly.
23
Page 24
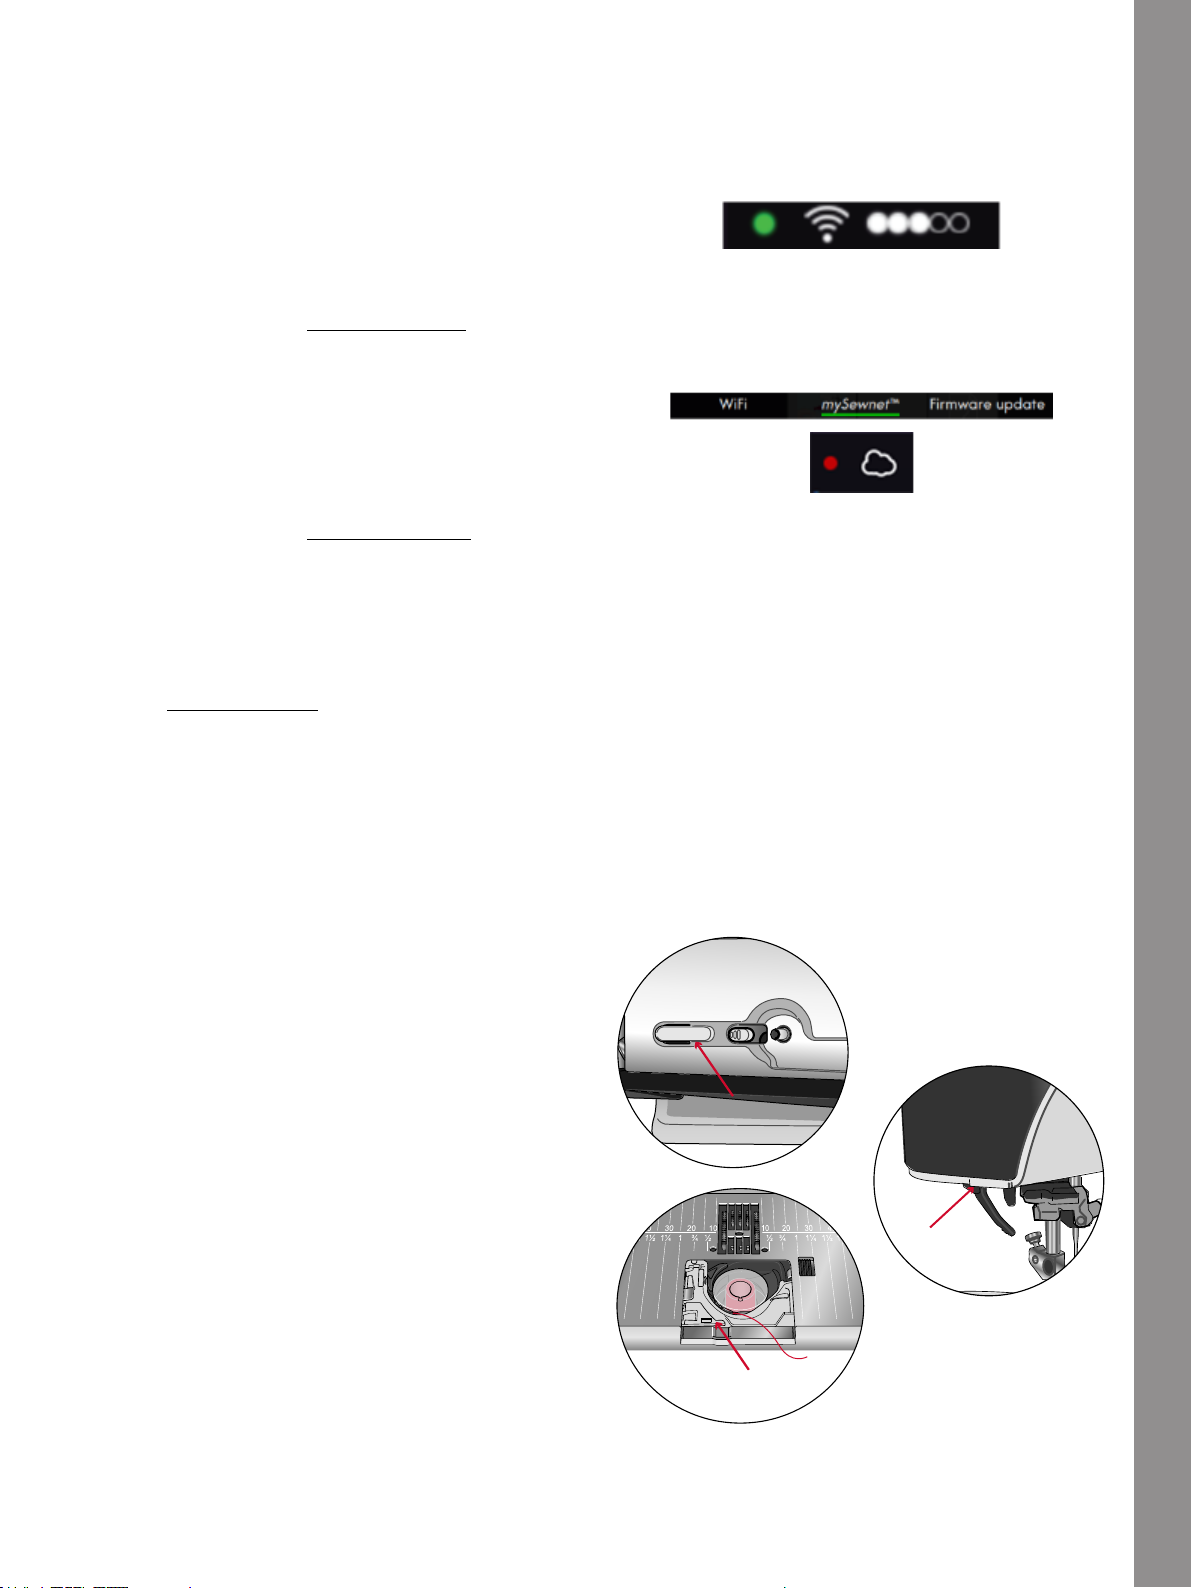
Knee-Lift
A
Your machine comes with an electronic knee-lifter that
allows you to lift the presserfoot with your knee. The
knee-lifter is very helpful when sewing, since it allows
you to handle the fabric with your hands while your
knee lifts the presser foot to the desired height.
Match the ribs on your knee-lifter with the notches in
the knee-lifter socket. Adjust the rectangular bar on the
knee-lift until it is positioned at a comfortable height for
you (A).
Move your knee lifter with your knee, and the presser
foot will raise. You can raise the presser foot to three
positions with your knee-lifter; pivot height, up, and
extra lift position. When moving the presser foot to the
extra lift position, the machine drops the feed teeth,
allowing you to easily place thick fabrics underneath the
presserfoot. The feed teeth will raise automatically
when you start to sew.
To remove the knee-lift, just pull it straight out of the
hole.
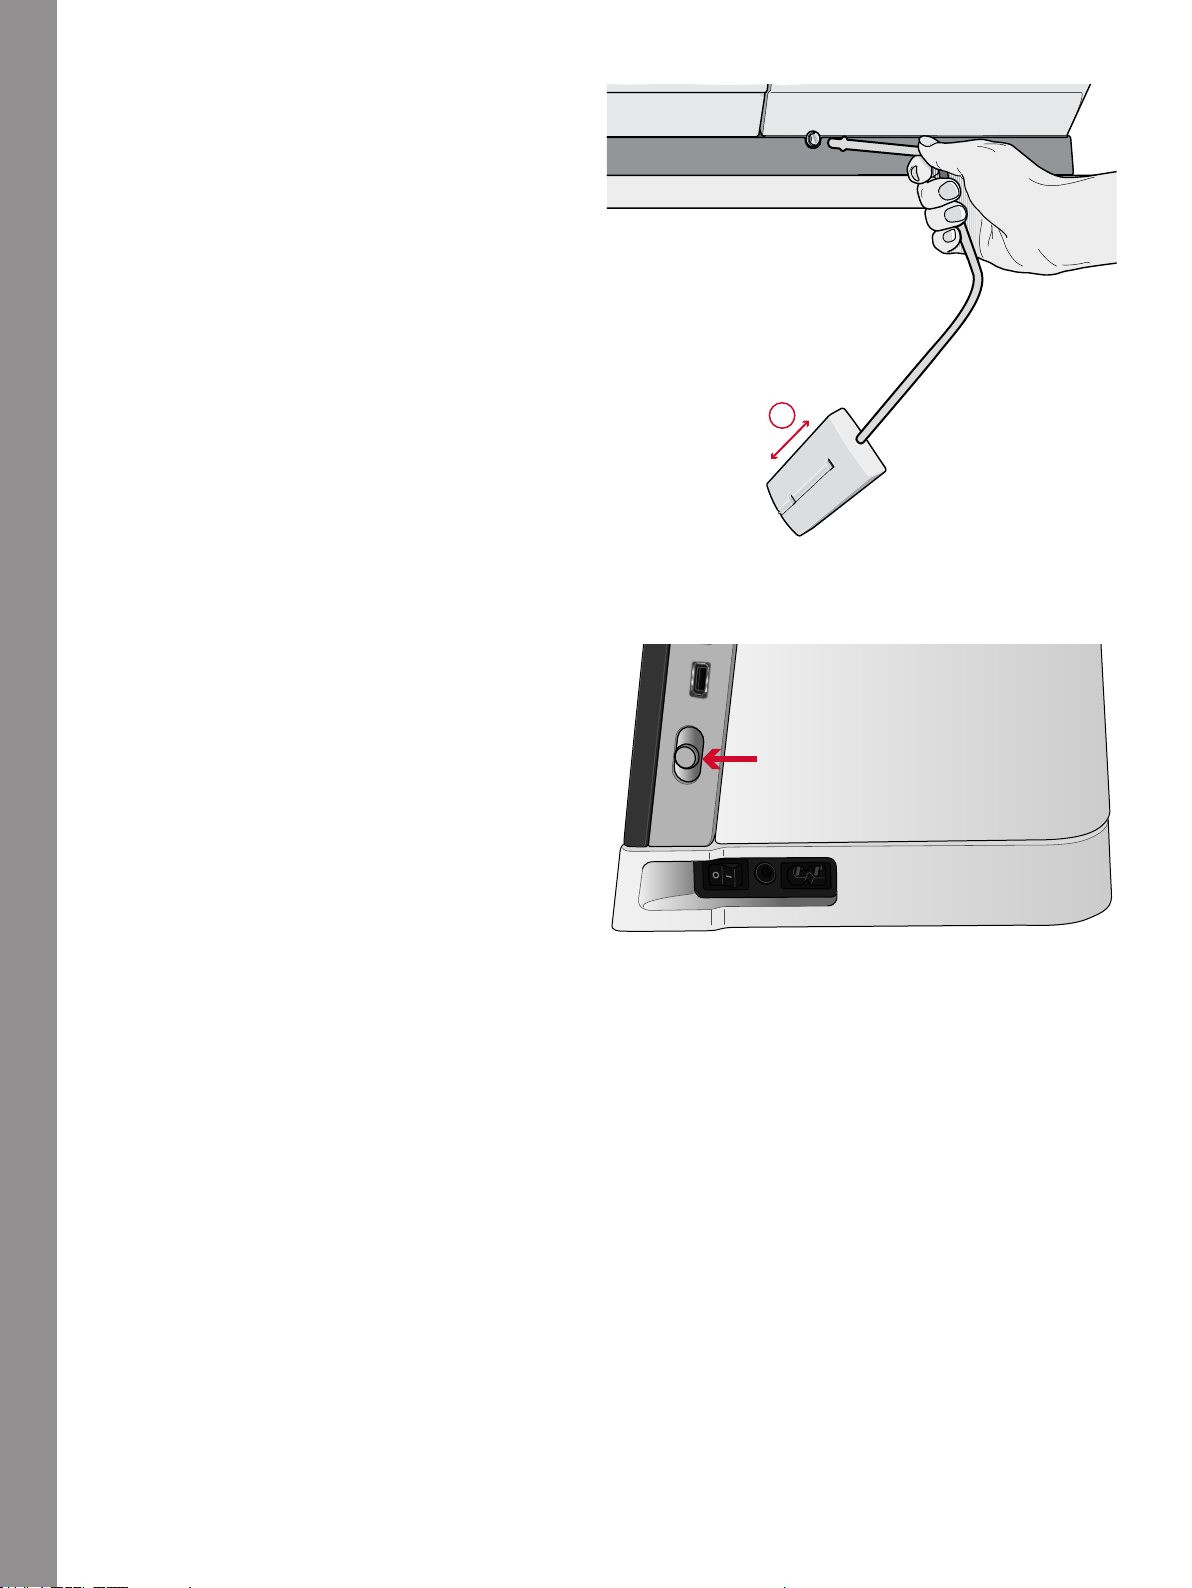
Speed Control Lever
The speed control lever sets the maximum sewing speed.
To increase sewing speed, slide the lever up, to decrease
sewing speed, slide the lever down.
A pop-up appears on screen when adjusting the slider,
indicating which speed level is set. The speed setting is
also shown in the information area.
Preparations
Thread Sensor
If the needle thread breaks or bobbin thread is running
low, the machine stops and a pop-up appears on the
screen.
If needle thread breaks: Remove the thread completely,
re-thread the machine and touch OK in the pop-up.
If bobbin thread is running low: You can continue
sewing without closing the pop-up before the bobbin
thread runs out completely. This gives you an
opportunity to plan where to stop and change the
bobbin. When the bobbin is replaced with a full one,
touch OK in the pop-up.
24
Page 25
Telescopic Thread Guide
The telescopic thread guide is always used when
threading your machine for sewing and bobbin winding.
The telescopic thread guide helps straighten the thread,
preventing it from tangling or breaking. The thread
guide together with the vertical spool pins make it
possible to successfully use very large thread cones.
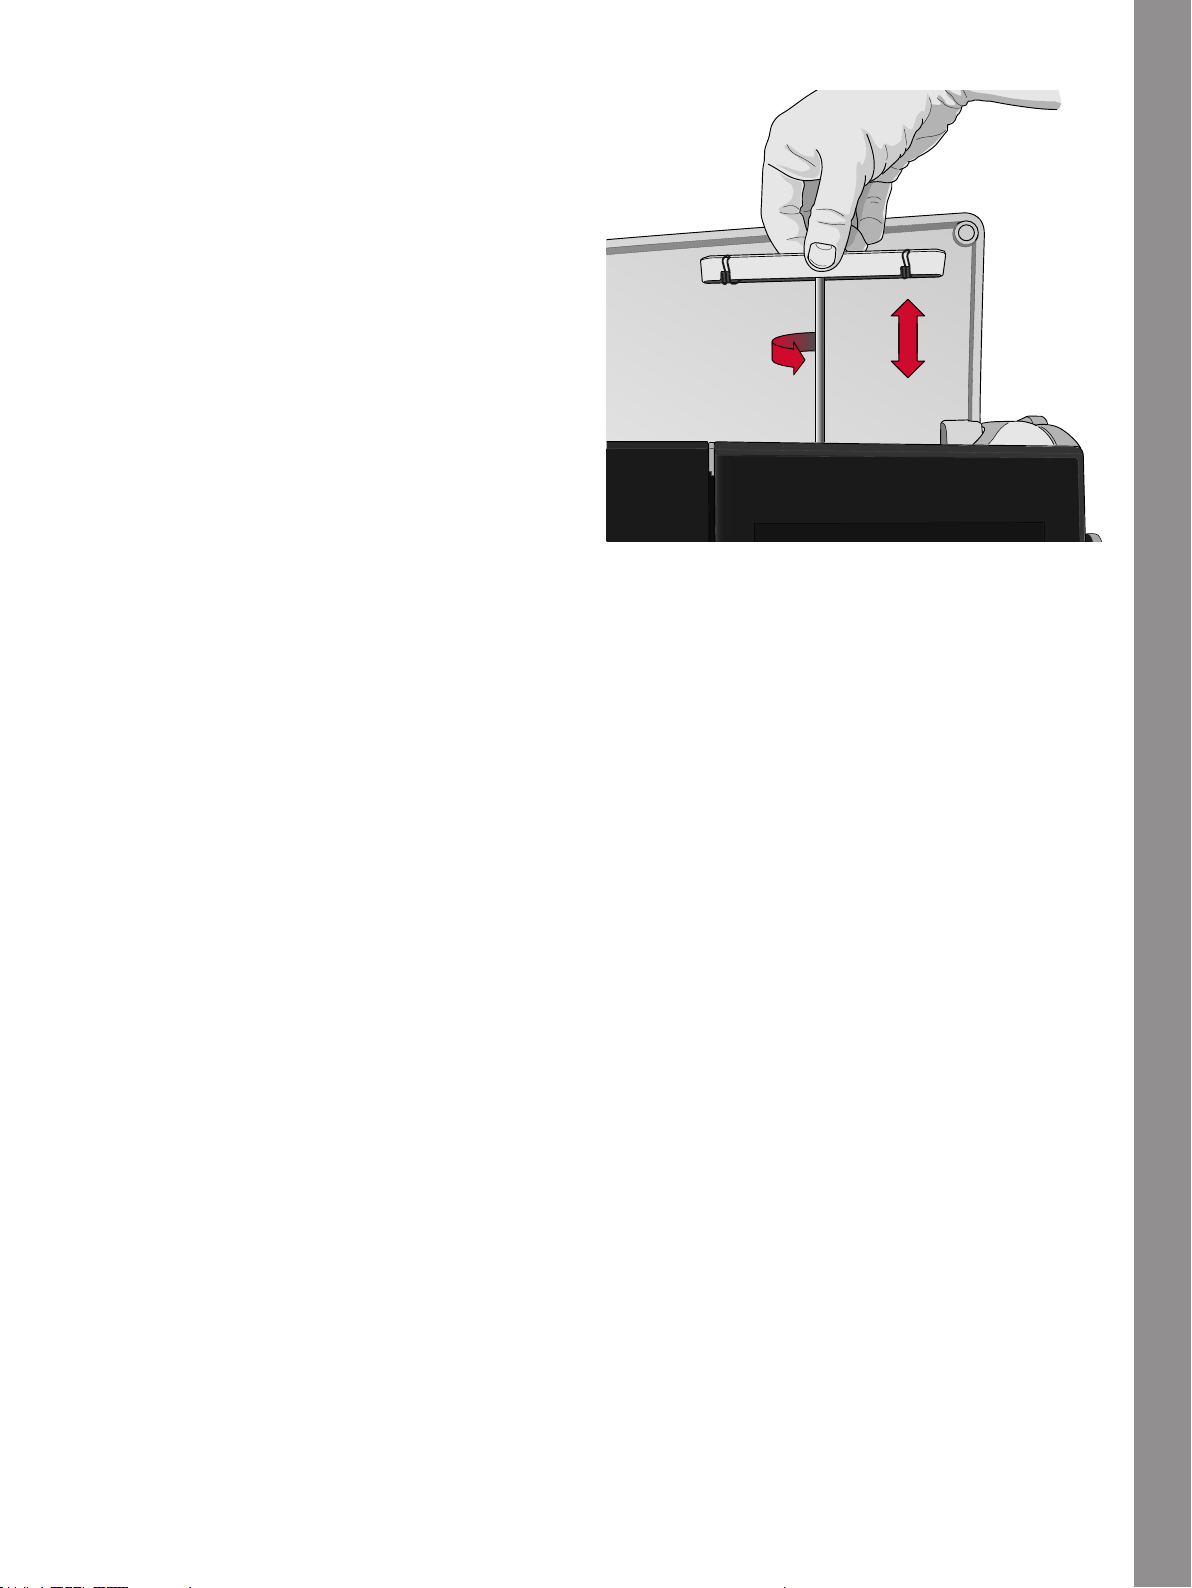
Extending and Retracting the Telescopic Thread Guide
Hold the telescopic thread guide as illustrated and pull
it straight up, turn it until it clicks into place.
To retract, hold the thread guide and push it straight
down.
Preparations
25
Page 26

Spool Pins
BA
Your machine has two spool pins; a main spool pin and
an auxiliary spool pin. The spool pins are designed for
all types of thread.
Use the main spool pin (A) when threading the upper
thread and for bobbin winding through the needle. For
regular sewing and embroidery thread, use the main
spool pin in vertical position. Place the spool pin in the
horizontal position if you want to keep the machine
threaded and close the lid when you have finished
sewing. Remember to place the spool pin back in the
vertical position when you start to sew again.
Note: Tilting the spool pins is not possible with large thread
spools or cones.
You may get better results if you tilt the spool pin to the
horizontal position when using small spools of specialty
thread. See Threading Tips and Hints, page 34.
Use the auxiliary spool pin (B) when winding a bobbin
from a second spool of thread or for a second spool
when sewing with a twin needle.
Main spool pin (A) and auxiliary spool pin (B)
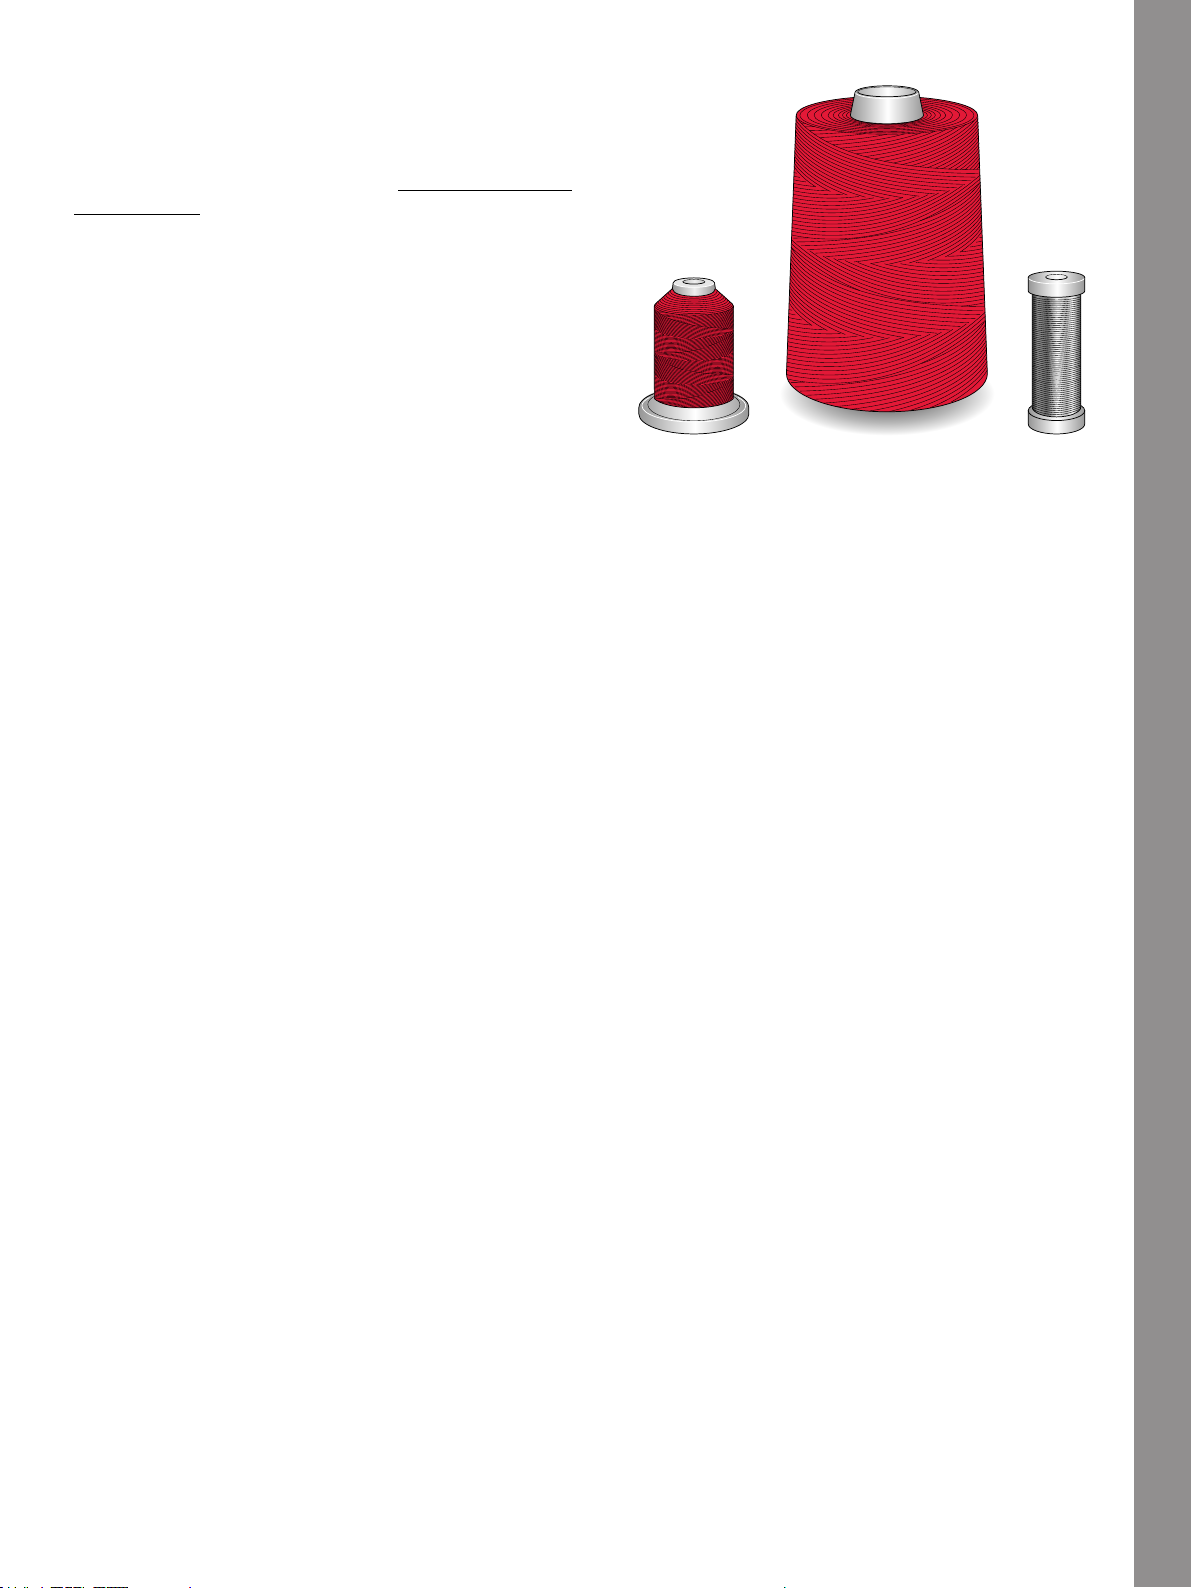
Spool Caps
Spool caps in three sizes are included with your
machine. For most types of thread spools, no spool cap
is needed except when the thread on the spool is
running low. If the thread is snagging on the top of the
thread spool, place a spool cap on top. Always use a
spool cap slightly larger than the thread spool to
Preparations
prevent the thread from snagging. The flat side of the
spool cap should be pressed firmly against the spool.
There should be no space between the spool cap and the
thread spool.
26
Page 27
Threads
There are many threads on the market today developed
for different purposes.
Your performance icon™ machine is designed for all
types of threads and spool sizes. See Threading Tips and
Hints, page 34 for information on achieving optimal
results with different types of thread and different
sizes/styles of thread spools.
All Purpose Sewing Thread
All purpose sewing thread is made of synthetic, cotton
or cotton covered polyester. This type of thread is used
for most sewing projects, including garments, home
decor, and quilting.
Decorative Thread
Decorative thread is made from a variety of fibers:
rayon, polyester, acrylic or metallic. These threads
create a smooth glossy appearance for decorative
stitching.
Decorative thread is not typically used in the bobbin
unless both sides of the project will be seen. A light
weight, bobbin thread is often used in the bobbin
instead. The lighter weight thread does not build up
under the stitches.
Note: When using a metallic or a flat film thread, you may
need to use a needle with a larger eye and lower the speed.
Preparations
Transparent Thread
Transparent thread, also called monofilament thread, is
a single clear synthetic thread. It is used for quilting and
other sewing techniques. When winding a bobbin, wind
at half speed and fill the bobbin half full.
27
Page 28
Needles
The sewing machine needle plays an important role in
successful sewing. Use only quality needles. We
recommend needles of system 130/705H. The needle
package included with your machine contains needles
of the most frequently used sizes.
Be sure to match the needle to the thread you are
using. Heavier threads require a needle with a larger
needle eye. If the needle eye is too small for the
thread the automatic needle threader may not work
properly.
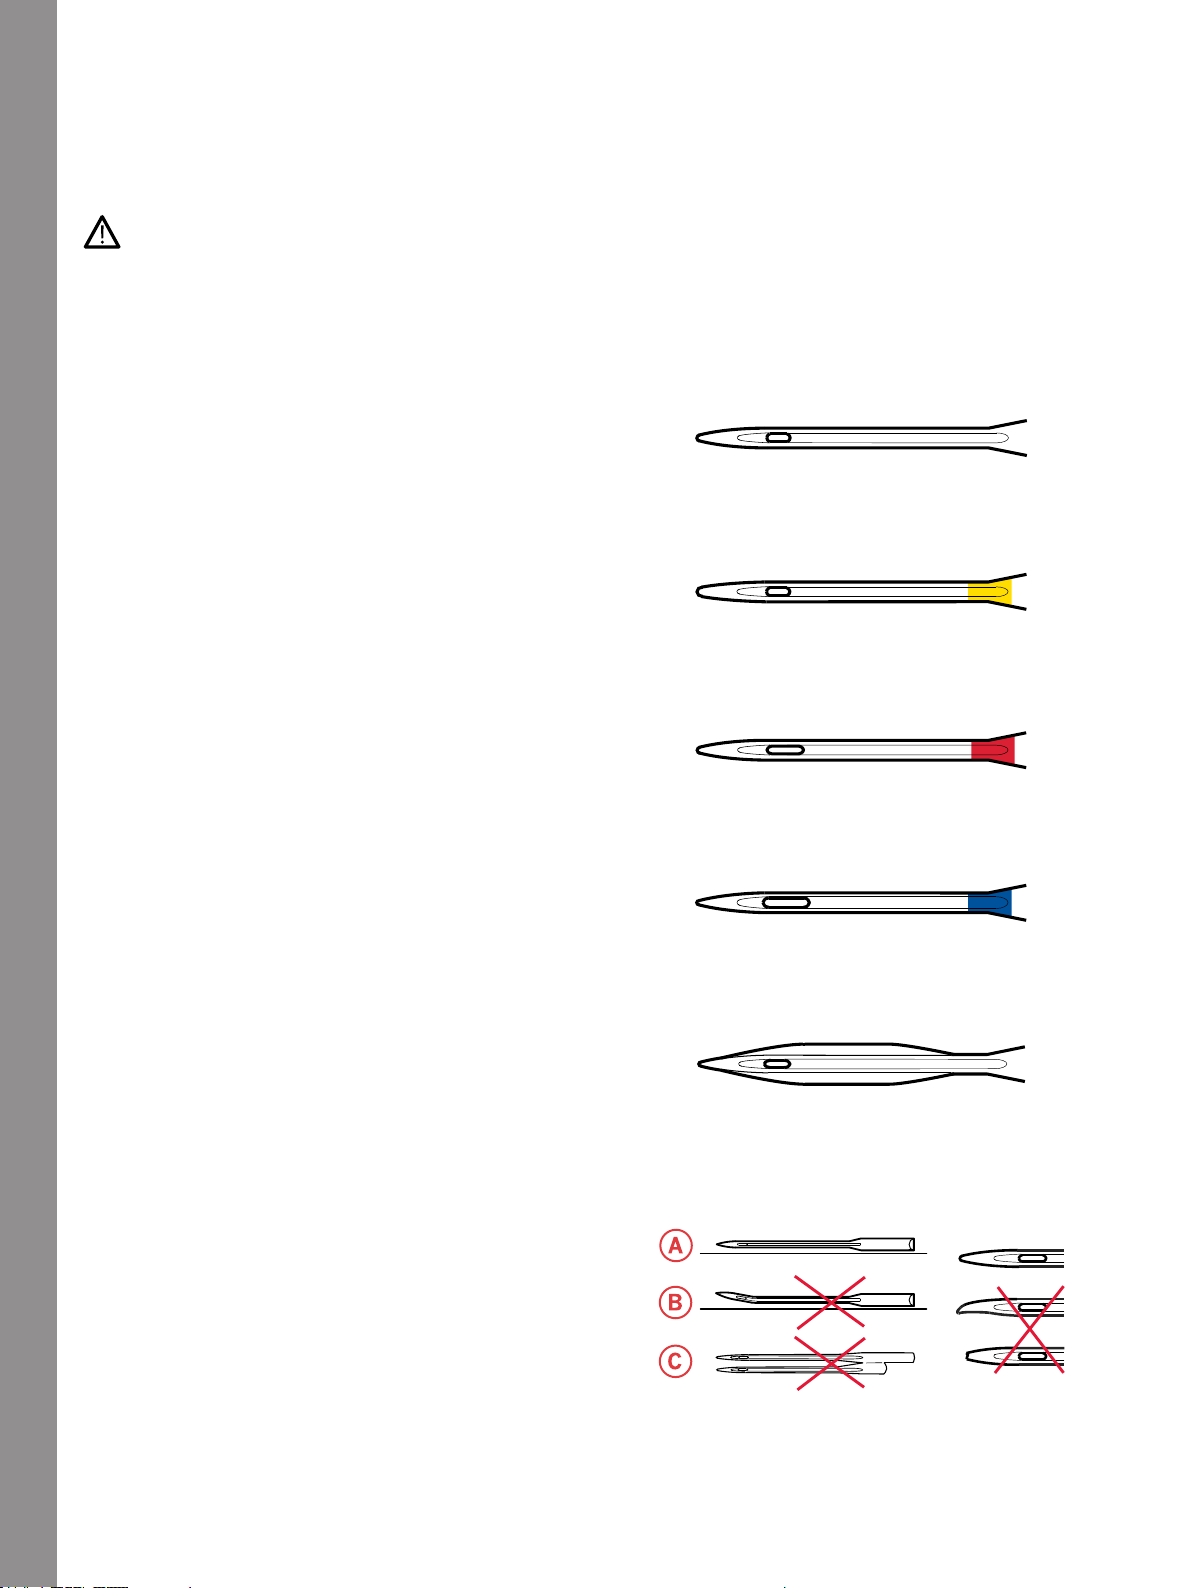
Universal Needle
Universal needles have a slightly rounded point and
come in a variety of sizes. For general sewing in a
variety of fabric types and weights.
Stretch Needle
Stretch needles have a special scarf to eliminate skipped
stitches when there is a flex in the fabric. For knits,
swimwear, fleece, synthetic suedes and leathers.
Embroidery Needle
Embroidery needles have a special scarf, a slightly
rounded point and a slightly larger eye to avoid damage
to thread and materials. Use with metallic and other
specialty threads for decorative sewing.
Denim Needle
Preparations
Denim needles have a sharp point to penetrate tightly
woven fabrics without deflecting the needle. For canvas,
denim, microfibers.
Wing Needle
Wing needles have wide wings on the side of the needle
to poke holes in the fabric when sewing entredeux and
other hemstitches on natural fiber fabrics.
Important Needle Information
Change the needle often. Always use a straight needle
with a sharp point (A).
A damaged needle (B) can cause skipped stitches,
breakage or snapping of the thread. It can also damage
the needle plate.
Do not use asymmetrical twin needles (C), they can
damage your sewing machine.
28
Page 29
Changing the Needle
A
1. Use the hole in the multipurpose tool to hold the
needle.
2. Loosen the needle screw.
3. Remove the needle.
4. Insert the new needle using the multipurpose tool.
Push the new needle upwards with the flat side
away from you until it will go no further.
It is very important that the needle is inserted
all the way in order for the automatic needle
threader to work properly.
5. Tighten the needle screw carefully.
Preparations
29
Page 30

Threading
A
Make sure that the presser foot and needle are in the up
position.
Threading the Upper Thread
For most regular thread qualities and spool sizes,
threading the upper thread from the main (left) spool
pin in the vertical position is recommended for optimal
sewing results.
If you experience problems with the thread or sewing
result, there are alternative ways to position the thread
spool. See Threading Tips and Hints, page 34.
1. Hold the telescopic thread guide and pull it straight
up until it clicks into place.
2. Raise both spool pins to vertical position. Place the
thread spool on the main spool pin (left).
Using both hands, place the thread behind the left
clip on the telescopic thread guide (A). The thread
should run from right to left.
Preparations
Note: When using thread cones, place a cone holder on the
spool pin before placing the thread cone. This prevents the
thread cone from wobbling.
Tip: When removing the thread cone from the spool pin, the
cone holder might become stuck inside the thread cone. Push
it out gently from the top.
30
Page 31

3. Hold the thread with two hands as illustrated. Floss
B
A
C
D
E
F
the thread under the thread guide (A) from front to
back. Pull thread back into and through threading
slot (B).
Note: Continue to hold the thread lightly next to the
thread guide (A) throughout the threading process. This
will create a bit of tension on the thread and ensure that
the thread is properly seated in the threading path.
4. Pull the thread between the thread tension discs (C).
Thread down through the right threading slot and
then upwards through the left threading slot. Bring
the thread from the right into the take-up lever (D)
until it clicks into place (E), and down in the left
threading slot to the last thread guide (F) just above
the needle.
5. Thread the needle using the automatic needle
threader or manually.
Before using the automatic needle threader,
carefully read the instructions and
recommendations, see Using the Automatic
Needle Threader, page 33.
Preparations
31
Page 32

Automatic Needle Threader
Selecting Correct Thread/Needle Combination
The combination of the thread weight and the needle size is extremely important when using the automatic needle
threader. Unsuitable combinations, such as using a heavy weight thread for a fine needle, may cause damage to the
needle threader.
Avoid using fine needles with heavy fabrics to reduce the risk of bending the needle. Using the automatic needle threader
with a bent needle may cause damage to the needle threader.
Fabric Thread Needle
Woven
light
Chiffon, organza,
batiste, challis, crepe
de chine, etc.
Light weight threads:
• fine cotton, polyester or silk sewing thread
• rayon embroidery thread
Universal 130/705H
70/10-80/12
Woven
medium
Woven
heavy
Stretch
light
Stretch
medium
Preparations
Stretch
heavy
Leather Suede and leather Medium weight threads:
Calico, quilting
fabrics, crepe,
broadcloth, velvet,
etc.
Denim, tweed,
canvas, terrycloth,
etc.
Tricot, single knit
jerseys, etc.
Sweater knits,
double knit, velour,
swimwear, etc.
Sweater knits, fleece,
etc.
Medium weight threads:
• fine/normal cotton or polyester sewing thread
• rayon embroidery thread
Medium/heavy weight threads:
• normal cotton or polyester sewing thread
• top stitching thread
• rayon embroidery thread
Light weight threads:
• fine cotton or polyester sewing thread
• rayon embroidery thread
Medium weight threads:
• normal cotton or polyester sewing thread
• rayon embroidery thread
Medium weight threads:
• normal cotton or polyester sewing thread
• rayon embroidery thread
• normal cotton or polyester sewing thread
• rayon embroidery thread
Universal 130/705H
80/12-90/14
Universal 130/705H
90/14-110/18
Stretch 130/705H-S
75/11
Stretch 130/705H-S
90/14
Stretch 130/705H-S
90/14
Stretch 130/705H-S
90/14
Vinyl Vinyl, faux leather
and suede
Note: Specialty fabrics and threads may require a special needle for best stitch results. Refer to your PFAFF® retailer for more
information on needle types and sizes for your sewing needs.
32
Medium weight threads:
• normal cotton or polyester sewing thread
• rayon embroidery thread
Universal 130/705H
80/12
Page 33

Using the Automatic Needle Threader
A
B
C
The needle threader allows you to thread the needle
automatically by simply touching a button.
Make sure that the needle is inserted correctly and
pushed up all the way into the needle clamp before
using the automatic needle threader. Check that the
needle is not damaged or bent, and make sure to
match the thread weight and needle size according to
our recommendations in Selecting Correct Thread/
Needle Combination, page 32.
1. Place the thread under the hook (A) and pull it
between the discs (B) until it “clicks” into place.
2. Pull the thread up to the sewing head thread cutter
and cut excess thread by pulling the thread from
back to front in the thread cutter (C).
3. Touch the automatic needle threader button. The
presser foot is automatically lowered during the
threading sequence, and will rise again when
threading is finished.
The needle threader is designed to be used with needles size 70-120. You cannot use the needle threader with needles
size 65 or smaller, wing needles, twin needles or triple needles.
Specialty threads such as invisible and other stretchy threads, metallic or flat metallic threads, and some heavy weight
threads may not be caught correctly by the hook on the automatic needle threader. If this happens, the needle will not
be threaded. Try using the automatic needle threader again or thread the needle manually.
When threading the needle manually, make sure that the needle is threaded from front to back.
The automatic needle threader cannot be used with all optional accessories available for your performance icon™
machine. To avoid damage to the needle threader and/or optional accessory we recommend using the automatic needle
threader before attaching the accessory or thread the needle manually.
Preparations
33
Page 34

Threading Tips and Hints
There are many threads on the market today developed for different purposes. The quality and structure of the thread
as well as the shape and size of the thread spool can affect the behavior of the thread. Threads can also behave
differently if the spool is full or nearly empty.
If experiencing problems, try the tips and hints below.
Note: Always test sew on a scrap piece of fabric to check the sewing result.
If the thread spool is pulled up on the spool pin
When the thread on the spool is running low, the thread
can snag on the edge of the spool and pull the spool up
on the spool pin. Place a spool cap on top of the thread
spool to keep it in place. Always use a spool cap slightly
larger than the thread spool to prevent the thread from
snagging. The flat side of the spool cap should be
pressed firmly against the spool. There should be no
space between the spool cap and the thread spool.
If the thread slides down on the standing thread spool
Preparations
If the thread is of a quality that unwinds easily and
slides down on the standing thread spool it can get
caught under the thread spool around the spool pin and
break. Place the large spool holder on the spool pin with
the flat side up before placing the thread spool.
If the thread spool has the same diameter as the large
spool holder, place a thread net as illustrated from
below over the spool before placing it on the spool pin.
Note: To prevent snagging or increased thread tension on the
thread, the thread net should cover the lower part of the thread
spool only, not the top where the thread spool narrows.
34
Page 35

If the thread tangles or curls when unwinding from the spool
B
A
B
A
For smaller spools of specialty thread, the main spool
pin can be used in tilted position, allowing the thread to
roll off the spool.
Place the thread spool on the spool pin. Do not place a
spool cap on top of the spool as it may prevent the spool
from rotating. Pull thread up to the telescopic thread
guide and thread as described under Threading the
Upper Thread, page 30.
Threading for Twin Needle
Replace the sewing needle with a twin needle. Make
sure that the presser foot and needle are in the up
position.
1. Raise both spool pins to vertical position. Place a
thread spool on each spool pin.
Using both hands, place the thread from the main
spool pin behind the left clip on the telescopic
thread guide (A), from right to left, and then place
the thread from the auxiliary spool pin behind the
right clip on the telescopic thread guide (B), from
right to left.
Note: Do not place the thread from the auxiliary spool
pin behind both clips on the telescopic thread guide, as
this will create too much thread tension.
Note: When using large thread cones on the auxiliary spool
pin, place the large spool holder with the flat side up and a
cone holder on the spool pin before adding the thread cone.
2. Hold both threads with two hands as illustrated.
Floss the threads under the thread guide (A) from
front to back. Pull the threads together back into
and through threading slot (B).
Note: Continue to hold the threads lightly next to the
thread guide (A) throughout the threading process. This
will create a bit of tension on the threads and ensure that
the threads are properly seated in the threading path.
Preparations
35
Page 36

3. Pull the threads between the thread tension discs
C
D
E
F
(C). Make sure that you place one thread to the left
and one to the right side of the tension discs.
Thread down through the right threading slot and
then upwards through the left threading slot. Bring
the threads from the right into the take-up lever (D)
until they click into place (E), and down in the left
threading slot. One thread should be placed inside
the needle thread guide (F) and the other one
outside. Make sure the threads do not become
twisted together.
4. Thread the twin needle manually.
Do not use the automatic needle threader for
twin needle!
Note: The weight and irregular surface of specialty
threads such as metallic increases the amount of friction
on the thread. By reducing the tension, the risk of needle
breakage and thread breakage is reduced.
Preparations
36
Page 37

Bobbin Winding
A
B
C
F E
D
All types of thread, including specialty threads such as
invisible or other stretchy threads, metallic or flat
metallic threads, should be wound directly from the
auxiliary spool pin without passing the needle and
presser foot.
Note: Always wind specialty threads at lower speed.
1. Place a thread spool on the auxiliary spool pin.
Using both hands, pull the thread behind the right
clip on the telescopic thread guide (A). The thread
should run from right to left.
2. Bring the thread through bobbin winding thread
tension guide (B) from back to front and to the left.
Bring the thread through bobbin winding thread
guide (C) as illustrated.
For some specialty threads, following the
normal threading path will result in a bobbin
that is wound too tight. If this happens, bypass
thread tension (B) to reduce the amount of
tension on the thread. Pull the thread from
thread guide (A) directly to the bobbin instead.
Preparations
3. Thread through the slot in the bobbin (D) from the
inside to the outside.
Place the bobbin on the bobbin spindle (C). The
bobbin only fits on one way, with the logo facing
out.
The bobbins included are designed especially
for your performance icon™ machine. Do not
use bobbins from other machine models.
4. Push the bobbin winding lever (E) towards the
bobbin. A pop-up appears on screen. To adjust
winding speed drag the slider. Hold the thread end
firmly when starting to wind. Touch the play
button in the popup window and let the thread
wind a few turns. Touch the pause icon and cut the
loose thread end close to the bobbin. Press play
again.
5. When the bobbin is full, the bobbin winding lever
will move back and the winding will stop
automatically. The pop-up message closes. Remove
the bobbin and cut the thread using the bobbin
winding thread cutter (F).
37
Page 38

Winding Through the Needle
A
B
CFE
D
When using the same thread in the needle and bobbin, it
is convenient to wind a new bobbin directly through the
needle without having to unthread/re-thread your
machine.
We do not recommend winding speciality threads
such as invisible or other stretchy threads, metallic
or flat metallic threads through the needle. Very
heavy and coarse threads should not be wound
through the needle either as the thread tension can
become too high, causing the needle to break. Wind
specialty threads as described under Bobbin
Winding, page 37.
1. Make sure that the presser foot and needle are in
the up position.
2. Thread the machine as described under Threading
the Upper Thread, page 30.
3. Pull the thread from the needle, under the presser
foot and up to the right.
Note: Always use a metal presser foot when bobbin
winding from the needle.
4. Use both hands to bring the thread through bobbin
winding thread guide (A), up through the
threading slot and from left to right through thread
guide (B).
5. Thread through the slot in the bobbin (D) from the
inside to the outside.
Place the bobbin on the bobbin spindle. The bobbin
only fits on one way, with the logo facing out.
Preparations
The bobbins included are designed especially
for your performance icon™ machine. Do not
use bobbins from other machine models.
6. Push the bobbin winding lever (E) towards the
bobbin. A pop-up appears on screen. To adjust
winding speed drag the slider. Hold the thread end
firmly when starting to wind. Touch the play
button in the popup window and let the thread
wind a few turns. Touch the pause icon and cut the
loose thread end close to the bobbin. Press play
again.
Note: Always use a metal presser foot.
7. When the bobbin is full, the bobbin winding lever
will move back and the winding will stop
automatically. The pop-up message closes. Remove
the bobbin and cut the thread using the bobbin
winding thread cutter (F). Cut the free thread end
close to the bobbin.
38
Page 39

Inserting the Bobbin
1 2
3
4
A
B
C
D
Use only the bobbins designed for your performance
icon™ machine.
1. Open the bobbin cover by pushing the release button
(A) to the right. Remove the cover.
2. Place the bobbin in the bobbin case. It drops in only
one way with the logo facing up. The bobbin will
then rotate counterclockwise when you pull the
thread.
3. Place your finger on the bobbin to keep it from
turning as you pull the thread firmly to the right and
then to the left into the tension spring (B) until it
“clicks” into place. Continue threading around (C)
and to the right of the thread cutter (D).
4. Replace the bobbin cover. Pull the thread to the left
to cut.
Preparations
39
Page 40

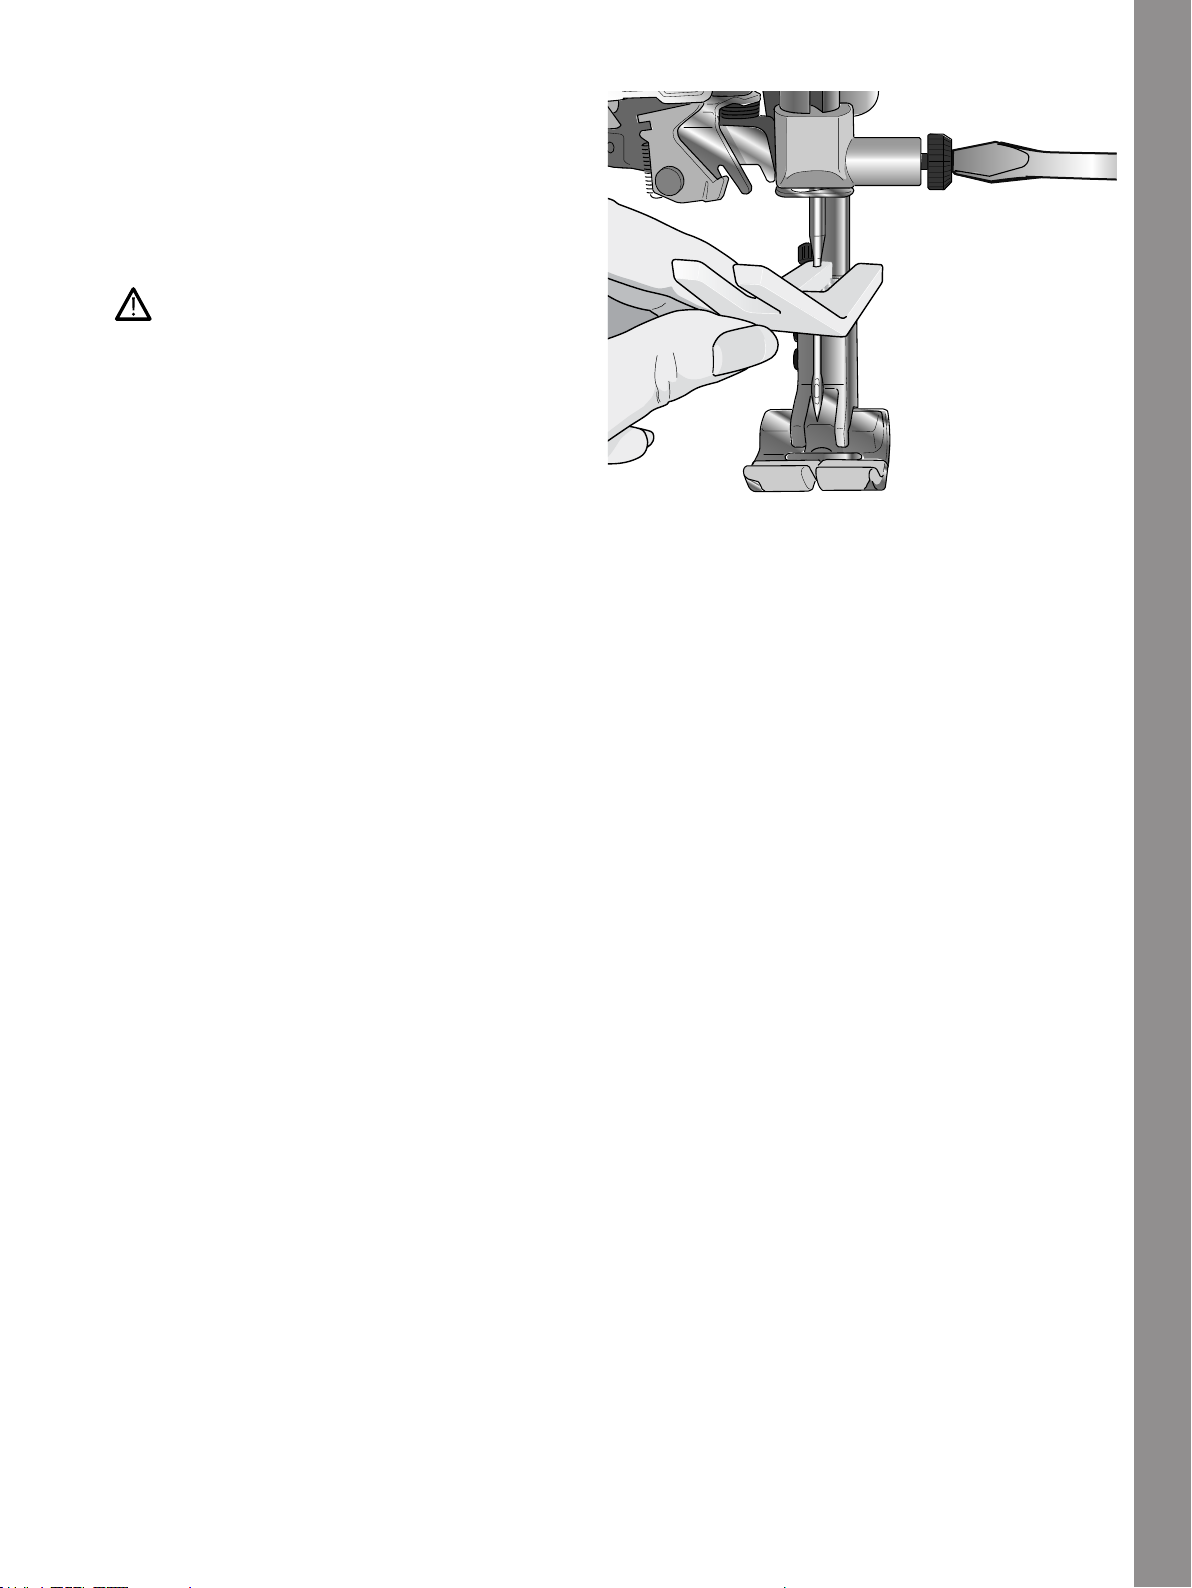
Changing the Bobbin Case
2
1
B
C
D
3
4
E
The performance icon™ comes with two different
bobbin cases. Bobbincase (1) is mounted on the machine
at delivery and is used for most sewing. The second
bobbin case (2), is the Straight Stitch Bobbin Case. This
bobbin case is recommended to use when sewing a
straight stitch that has moved its needle position to the
left. A symbol will be shown in the information area on
your screen when the Straight Stitch Bobbin Case is
recommended.
1. Remove the presser foot. Open the bobbin cover by
pushing the release button (A) to the right. Remove
the cover.
2. Place the screwdriver under the needle plate as
shown and gently turn the screwdriver to pop off
the needle plate.
3. Remove the bobbin case holder (B) covering the
front part of the bobbin case by lifting it up. Remove
the bobbin case (C) by lifting it up.
4. Replace the bobbin case (D) and place the bobbin
case holder (E) back in place. Attach the needle plate.
Preparations
40
Page 41

IDT™ System (Integrated Dual Feed)
A
For sewing any fabric precisely, the PFAFF®
performance icon™ machine provides the ideal
solution: the integrated dual feed, IDT™ system. As on
industrial machines, the IDT™ system feeds the fabric
from the top and bottom at the same time. The material
is fed precisely, eliminating puckering on seams in light
weight fabrics such as silk and rayon. The dual feed
action of the IDT™ system prevents layers from shifting
while sewing, keeping quilt layers aligned and ensuring
a more perfect match when sewing plaid or striped
fabrics.
Engaging the IDT™ System
Important: For all work with the IDT™ system, use
presser feet with the center back cut-out (A).
Raise the presser foot to extra high position. Press the
IDT™ system down until it engages.
Note: Your machine is equipped with an IDT™ sensor which
will alert you if you should engage the IDT™.
Disengaging the IDT™ System
Raise the presser foot. Hold the IDT™ system with two
fingers at the ribbed ankle. Pull the IDT™ system down,
then pull it away from you to release the IDT™ system
slowly upward.
Preparations
41
Page 42

Changing the Presser Foot
Remove Presser Foot
Press the presser foot downwards until it disengages
from the presser foot holder.
Attach Presser Foot
Line up the pins on the foot with the gap underneath
the presser foot holder. Press upwards until the foot
snaps into place.
You can also use the presser foot up/down buttons to
raise or lower the presser foot holder. Place the presser
foot under the presser foot holder, so that the pins of the
foot snap onto the presser foot holder when lowered.
Preparations
Attaching the Sensormatic Buttonhole Foot
1. Snap on the Sensormatic Buttonhole Foot.
2. Insert the plug, with the three dots facing out, into
the accessory socket at the back of the sewing head.
42
Page 43

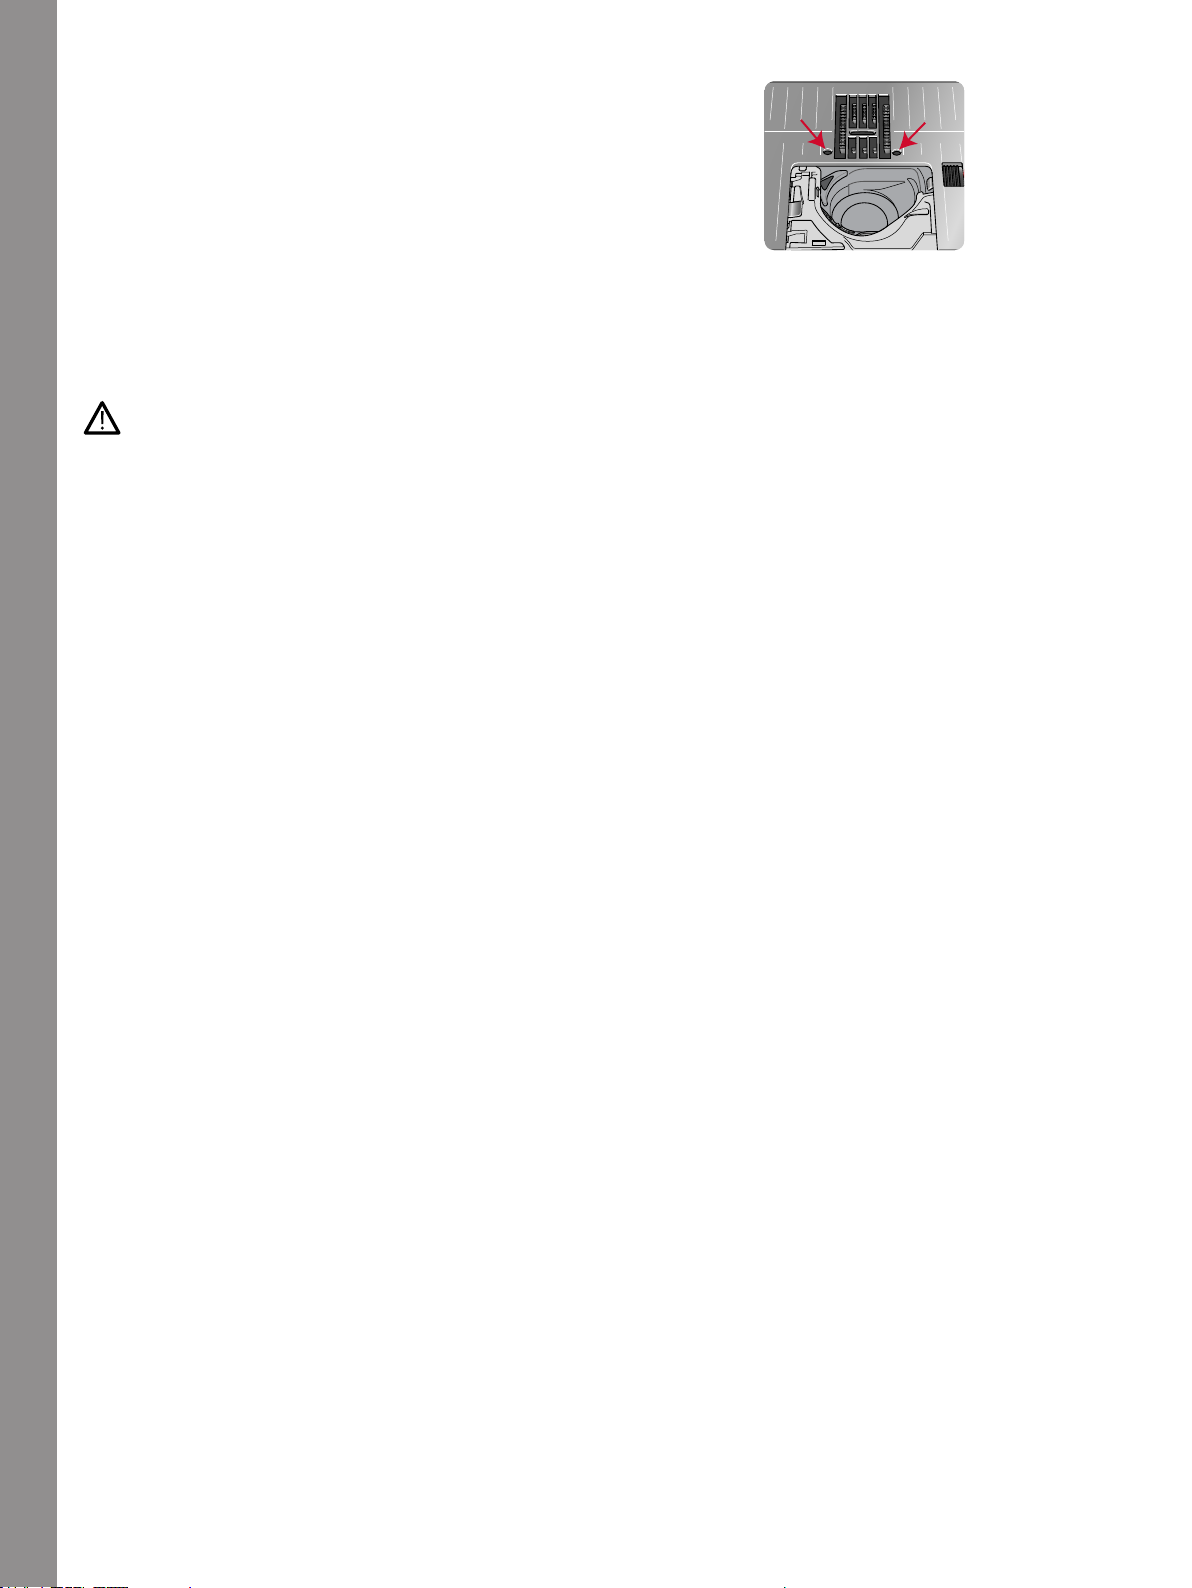
Changing to Straight Stitch Needle Plate
The Straight Stitch Needle Plate is used for certain
techniques in sewing mode, such as quilt piecing. The
smaller hole in the Straight Stitch Needle Plate supports
the fabric closer to the needle and helps prevent the
fabric from being pulled down into the bobbin area,
especially at the beginning and/or end of a seam.
1. Remove the presser foot. Open the bobbin cover by
pushing the release button (A) to the right. Remove
the cover.
2. Make sure that the feed teeth are lowered. Place the
screwdriver under the needle plate as shown and
gently turn the screwdriver to pop off the needle
plate.
Note: Lower the feed teeth by touching the presser foot up
and extra lift button.
Note: When changing the needle plate, clean any lint and
threads from the bobbin area.
3. With feed teeth lowered, position the Straight Stitch
Needle Plate so that it fits into the notches at the
back. Press the Straight Stitch Needle Plate down (B)
until it clicks into place. Replace the bobbin cover.
To prevent needle breakage or damage to the plate,
remove any accessory that is not compatible with the
Straight Stitch Needle Plate, such as twin needle.
Preparations
43
Page 44

3 The Multi-Touch Screen
Multi-Touch Screen
Your performance icon™ machine features a Multi-Touch Screen which is very easy to use. A few simple gestures –
touch, touch & hold, pinch/stretch, touch and move and swipe – are all you need to use the Multi-Touch Screen.
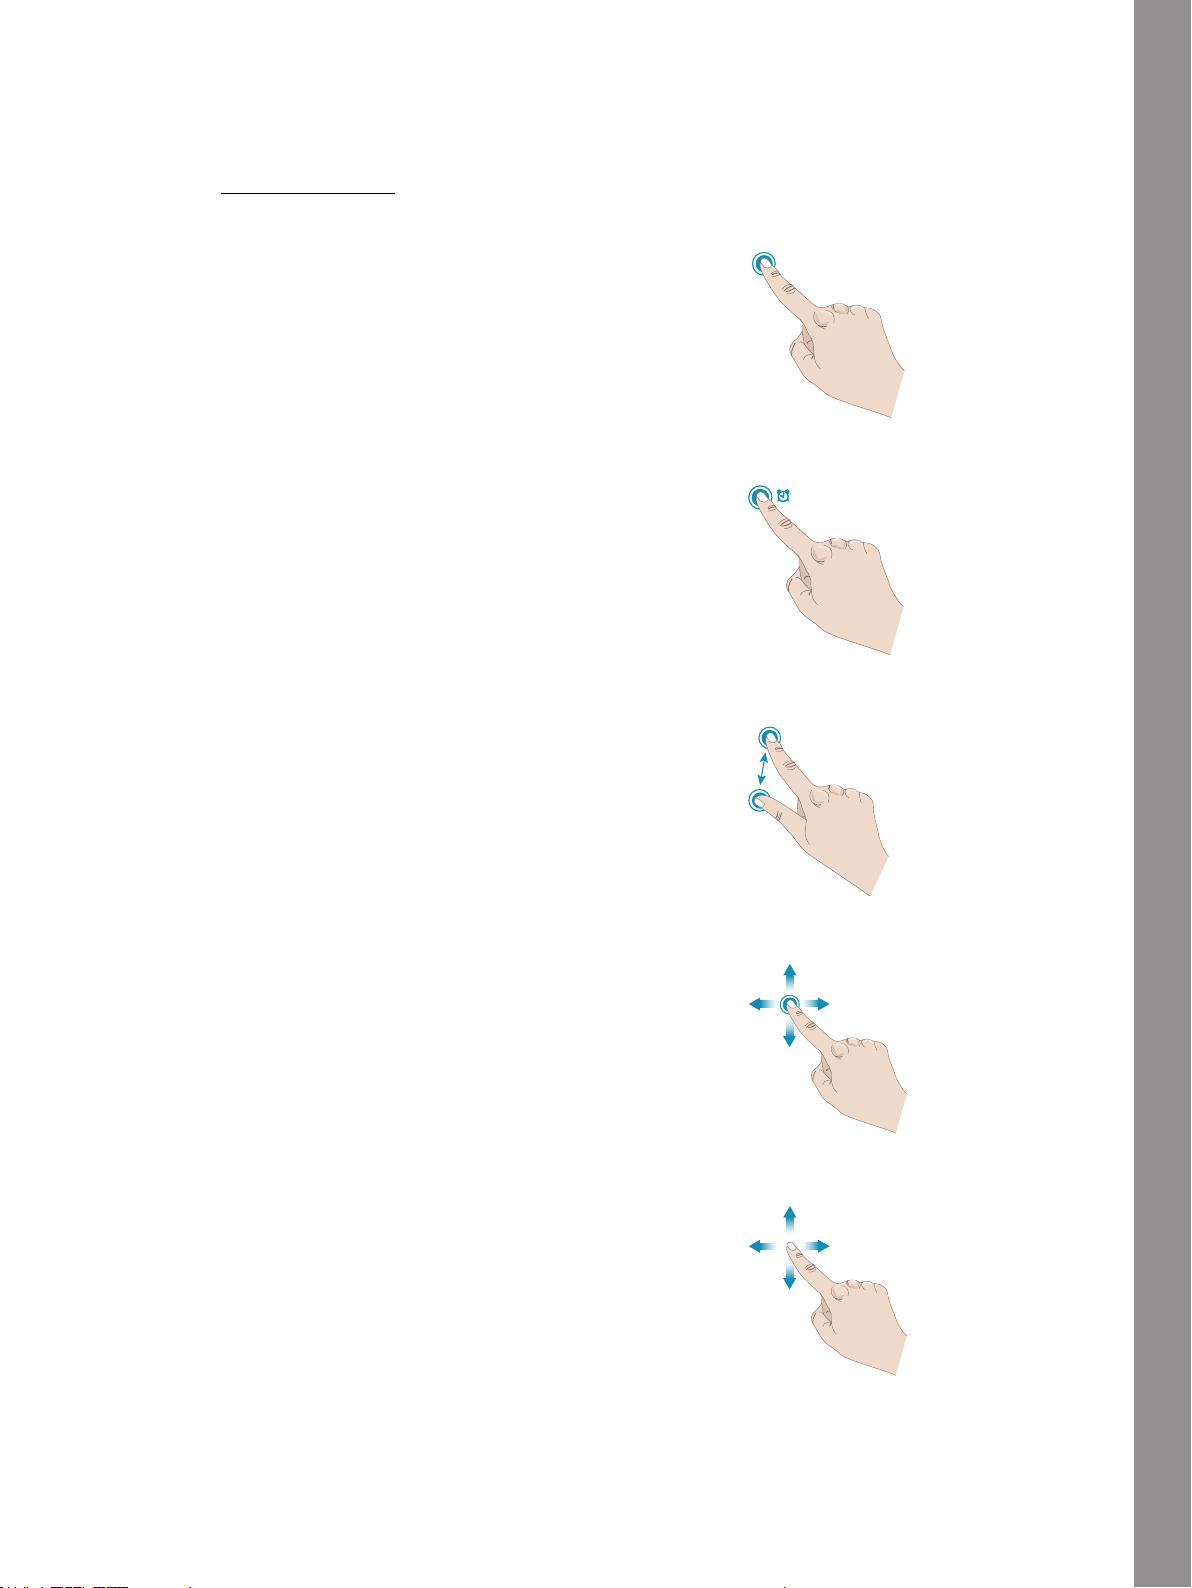
Gestures
Touch
Touch once on an icon or setting on the screen to select.
Touch & Hold
Touch once without releasing for a few seconds to touch
& hold. Used on some buttons and screen areas to
access more options.
Pinch/Stretch
Touch with two fingers at the same time and without
releasing increase/reduce the distance between the
The Multi-Touch Screen
fingers to stretch (zoom in) or pinch (zoom out).
This function is very useful when reading your user’s
guide to zoom in texts and pictures.
Touch and Move
Touch once and without releasing move your finger to a
different position on the screen to touch and move.
44
Page 45

Swipe
Touch, move and release your finger in a swift gesture
to swipe. Left-right/right-left swipe is used e.g. to scroll
between stitch menus. Top-bottom/bottom-top swipe is
used e.g. to scroll within a stitch menu.
Start Page
You can go to Sewing Mode directly from the Start Page.
The Start Page is shown every time you start your
performance icon™ machine. The Start Page is always
accessible through the Home button.
Start Sewing
Touch to open Sewing Mode. You can also touch & hold
to open the Selection Menu and select a stitch.
Read about how to get started sewing in the Sewing
chapter.
Load From mySewnet™
Touch Load from mySewnet™ to enter File Manager and
mySewnet™ cloud folder.
Read about mySewnet™ cloud folder in the File Manager
chapter.
Open Help Center
Touch to open the Help Center. This is where you will
find the built-in User's Guide, Getting Started,
Techniques and Tutorials, Sewing Instructions and
Stabilizer Guide.
Read about Help Center in the Help Center chapter.
Home button
The Multi-Touch Screen
mySewnet™ Blog
Touch this tab to open the mySewnet™ Blog where you
can view the latest product news, sewing intructions
and get inspiration!
Touch on a post to get more info on that specific project.
The machine needs to be connected to the internet to be
able to see the feed.
45
Page 46

Main Functions
The Main Functions; Save, Home and Mode Switch are
located just below the Multi-Touch Screen and are
always accessible.
Save
Touch to save your stitch or sequence at anytime.
Home
Touch to return to the Start Page.
Mode Switch
Touch to switch between Sewing Mode and to start a
new sewing session.
Common Functions
The following functions on the screen are used
frequently.
OK
The Multi-Touch Screen
Confirms changes and pop-up messages and returns to
previous window.
Cancel
Cancels changes and pop-up messages and returns to
previous window.
Touch & Hold
Some icons have additional functions, marked with an
arrow at the lower right corner. To access those
functions, touch & hold on the icon for a few seconds.
46
Page 47

Settings with Toggle Function
For some settings, two green dots are visible underneath
the settings icon. It means you can toggle between two
settings in the same control.
The Multi-Touch Screen
47
Page 48

Help Center
The Help Center is always close at hand. Touch the
Help Center icon to enter the User’s Guide, Getting
Started, Techniques and Tutorials, Sewing Instructions
and Stabilizer Guide.
User’s Guide
Touch to access your machines complete User's Guide.
The User's Guide contains all the information about
your performance icon™ sewing machine.
Getting Started
Touch to view Quick Start Guide. Some of the guides
will show animations.
Techniques and Tutorials
Touch to view projects that have a step-by-step
instruction on how to sew specific sewing techniques.
Sewing Instructions
Touch to view complete sewing instruction projects.
Stabilizer Guide
Touch to read instructions on how to use different
stabilizers.
The Multi-Touch Screen
48
Page 49

Settings
Here you will find tabs for Sewing Settings, Machine
Settings etc. Just swipe between the tabs and make
settings for your performance icon™ machine.
Sewing Settings
There are two ways to change your settings;
1. Default Settings:
Settings made in Default Settings will be saved, even
when turning your machine off. The Default Settings
becomes active when you start a new session or
restart your machine.
2. Temporary Settings:
Settings made in Temporary Settings will be reset at
the start of a new project in Help Center or start of a
new sewing session. When turning your machine off,
all changes made in Temporary Settings will be reset
to default.
ActivStitch™ Technology
When the ActivStitch™ technology feature is selected
your machine will automatically choose the best way to
control the upper thread, by thread metering or thread
tension, based on your selected stitch and settings.
Thread metering automatically and continuously
measures the fabric thickness to meter the correct
amount of thread for the selected stitch. When using
thread tension, the tension discs will keep the correct
amount of tension on the upper thread.
For best results we recommend you keep this setting
selected except when using specific accessories or
special techniques that do not support thread metering.
Deselect the ActivStitch™ technology feature in the
Temporary Settings to switch to thread tension. The
control for adjusting thread metering/thread tension ,
will change depending on the active stitch and whether
the ActivStitch™ technology feature is selected or not in
Temporary Settings.
Read about ActivStitch™ technology in the Sewing
chapter.
The Multi-Touch Screen
1. Default Settings in white colored check boxes
2. Temporary Settings in orange colored check boxes
Automatic Presser Foot Lift
When selected, the machine automatically raises the
presser foot in the following situations:
• When stopping with the needle in the down position
the presser foot will automatically raise to pivot
height.
• After a thread cut the presser foot will be raised to lift
position.
When deselected, the presser foot will stay lowered,
even if the machine stops with the needle in down
position.
49
Page 50

Automatic Thread Cutter
When selected, the threads are cut automatically in the
following situations:
• At cut commands in stitches and sequences.
• After sewing a single stitch e.g. a monogram or
eyelets.
If deselected, no automatic thread cut will be performed.
Note: Deselect when using optional accessories that are
attached in the two holes in the needle plate just above the
bobbin cover, to prevent damage to the automatic thread
cutter knife located under the needle plate.
Free-Motion Options
Choose between three Free-Motion Options; Dynamic
Spring Foot 6D Free-Motion, Spring Foot Free-Motion
and Sensormatic Free-Motion. When one of the FreeMotion Options is selected the corresponding FreeMotion mode will automatically be selected in the
Temporary Settings for all new projects or sewing
sessions.
It is recommended that you do not set an option for
free-motion in the Default Settings; touch the FreeMotion icon in Sewing Mode to choose a temporary
option instead.
For more information see the description in the FreeMotion Options in Sewing Mode.
Free-Motion Options
Stitch Limiting Options
Set the machine to Stitch Width Safety or select the size
of the twin needle to limit the stitch width and stitch
positioning. This will minimize the risk of breaking a
needle when sewing with accessories that do not allow
The Multi-Touch Screen
the use of the entire stitch width.
Needle Stop Position
When Up is selected your machine stops with the
needle up. When Down is selected your machine stops
with the needle down.
This setting can also be set by touching the Needle Up/
Down button on the front of the machine.
Presser Foot Pressure
In most cases, you do not need to adjust the presser foot
pressure. Specialty techniques may require an
adjustment. The higher the number the more pressure
on the fabric.
Stitch Limiting Options
Needle Stop Position
Presser Foot Pressure
50
Page 51

Options for Feed Dogs
When auto is selected (recommended) your machine
automatically raises or lowers the Feed Dogs,
depending on the stitch and other selected settings. For
example, the Feed Dogs are lowered when sewing on
buttons or when free-motion sewing.
Select Up and the Feed Dogs will be raised for all
sewing. Select Down and the Feed Dogs will be lowered
for all sewing.
Note: The machine will always lower the Feed Dogs
automatically when raising the presser foot to extra lift
position.
Note: The Feed Dogs options will automatically be reset to
auto at the start of a new project from the Help Center.
Tie-Off Options
These options let you program a Tie-Off at the
beginning and at the end of a stitch. It is also possible to
program a thread cut at the end of a stitch.
Note: For immediate Tie-Off, use the Tie-Off button, found on
the front of the machine.
1. Feed Dogs Lowered
2. Feed Dogs Up
Tie-Off Options
The Multi-Touch Screen
51
Page 52

Machine Settings
All settings made in the machine settings will be saved,
even when turning your machine off.
Language
Select your desired language. All texts in your machine
will be changed after restart.
Audio Volume
Change the audio volume using the slider bar. All
sounds in your machine will be affected when the audio
volume is changed. When the slider is all the way to the
left, the volume is muted.
Audio Repeat
When active, the signal for some warning alerts or
attention pop-up messages will be repeated in intervals
until the pop-up is closed.
Machine Nickname
Touch to select a nickname for your machine. This can
be useful when owning more than one machine, to
distinguish one machine from another when working in
mySewnet™. The name will be shown on the
screensaver.
Lock Screen
When selected, the screen is automatically locked
whenever it is inactive for ten seconds. A pop-up is
shown on the screen and the screen will remain locked
until you touch OK in the pop-up.
Units
The Multi-Touch Screen
Touch millimeter or inch to set the measurement unit
you prefer.
LED Work Light Brightness
Adjust the brightness of the LED lights to adapt to the
light conditions in your sewing room. Simply move the
slider to the right to make the LED lights brighter or to
the left to make them less bright.
Background Image
Customize your performance icon™ machine by
selecting the background image options.
52
Page 53

WiFi Settings
In WiFi settings you can activate/deactivate WiFi on
your machine, search for available networks and
connect. If connected to a network with Internet access
the latest firmware update will always be available.
When WiFi is connected and you have logged in to the
mySewnet™ cloud, all your saved files in the machine
will synchronize with the mySewnet™ cloud.
Read more about the WiFi connection in your machine
in the WiFi chapter.
mySewnet™ Settings
In the mySewnet™ Settings you can sign in to the
mySewnet™ cloud or, change the user. You will also be
able to create a new user. With a mySewnet™ account
you will be able to access all of the mySewnet™ services.
Read about mySewnet™ services.
Machine Information
Machine information contains technical machine
information such as: machine serial number, machine
MAC address and current firmware. In machine
information you can clear user account and files.
The Multi-Touch Screen
53
Page 54

Smart Toolbox
The Smart Toolbox is available in the sewing area.
Touch & hold anywhere in your work area to open the
Smart Toolbox and select the option you want.
The options included in the Smart Toolbox differ
depending on where they are used.
Top Bar
The Top Bar shows which mode you are in. It includes
The Multi-Touch Screen
the Help Center, Quick Help and Main Menu.
1. Help Center
2. Quick Help
3. Main Menu
Help Center
Touch the Help Center icon to enter the Help Center.
Here you will find the built-in User’s Guide, Getting
Started, Techniques and Tutorials, Sewing Instructions
and Stabilizer Guide. Read more in the Help Center
chapter.
54
Page 55

Quick Help
Touch the question mark icon to open Quick Help. The
icon becomes highlighted in green and flashes
indicating that Quick Help is active. Touch an icon or an
area on the screen you want information about. A popup will appear giving you a short text about the icon or
area. Touch OK to close the pop–up and exit Quick Help.
Some Quick Helps will refer to the Built-in User’s Guide
for more information. Touch the text to open the chapter
in the User’s Guide.
Main Menu
Touch Main Menu and select one of the tabs; Selection
Menu or File Manager.
Selection Menu
Touch the Selection Menu tab to open Select Stitch,
Select Design or Select Font.
File Manager
Touch the File Manager tab to open font files and stitch
files. Store your saved files in the mySewnet™ cloud
folder, or to a USB device connected to your machine.
Read about loading and organizing your saved stitches
and fonts in the File Manager chapter.
Information Area
The Information Area gives you information about your
WiFi, recommendations for your stitch, selected stitch
and activated features made in Temporary Settings.
Each menu in the Information Area can be collapsed
and expanded by touching the arrow.
You can hide the entire Information Area by swiping to
the left. Touch the information icon to show the
Information Area again.
The Multi-Touch Screen
1. WiFi Signal Strength
2. mySewnet™ cloud
3. Recommendations
4. Information
5. Active Features
55
Page 56

WiFi
Touch the WiFi icon to access the WiFi Settings. Select a
network from the list of available networks. If your
network is password protected, you will be prompted to
enter the password.
If you do not get any signal or have a low signal
strength see Troubleshooting.
Read about WiFi in your machine in the WiFi chapter.
mySewnet™
After connecting to WiFi, touch the mySewnet™ Settings
tab, or touch mySewnet™ cloud icon in the Information
Area. Sign in to mySewnet™ account or create a new
mySewnet™ account.
When signed in you will see how much available space
there is in the mySewnet™ cloud.
The synchronization status will be shown with a green
flashing dot in the Information Area.
If your machine can not connect to mySewnet™ cloud or
does not synchronize, see troubleshooting.
Read more about mySewnet™ cloud in the mySewnet™
chapter.
1. Indicates WiFi Status
2. WiFi
3. WiFi Signal Strength
4. Firmware Update
Waiting To Be Installed
5. Firmware Update
Available
6. Indicates mySewnet™
Status
7. mySewnet™ cloud
Recommendations
Recommendations are only available in Sewing Mode. It
The Multi-Touch Screen
shows recommendations for the selected stitch
regarding presser foot, IDT ™system, stitch plate,
bobbin case, and/or if stabilizer should be used. It also
shows if you need to change the bobbin case. The
Recommendations Menu can be both expanded and
collapsed by touching the arrow. It is also possible to
hide the entire information area by swiping to the left.
Note: Touch the Information icon to show the information
area again.
Information
Shows the selected stitch number and the speed setting
for selected stitch. The Information Menu can be
expanded and collapsed by touching the arrow. It is also
possible to hide the entire information area by swiping.
Note: Touch the information icon to show the Information
Area again.
56
Page 57

Active Features
This section shows activated features, such as Tie-Off
Options, needle down or changes you have made in the
Temporary Settings. The Active Features Menu can be
expanded and collapsed by touching the arrow. It is also
possible to hide the entire Information Area by swiping.
Note: Touch the Information icon to show the Information
Area again.
Menu Panel
The Menu Panel differs depending on which mode you
are in. The Menu Panel can be moved around on the
screen. Simply touch & hold on the colored panel top to
move the panel where you want it to be placed. Touch
an icon in the panel to open a menu.
Options Selected From the Menu Panel
Some menus contain more than is initially displayed.
Swipe to browse categories in the window and/or
expand the window to a size of your choice by touch
and drag the colored triangle, in the lower corner of the
window.
The Multi-Touch Screen
57
Page 58

Toolbar
The lower Toolbar will differ depending on which mode
you are in. Touch one of the icons to open it.
When you have activated a function, e.g. Tie-Off the
icon in the Toolbar will be highlighted and the active
function will be shown under Active Features.
Customize Your Work Area
The performance icon™ allows you to access the
functions you use the most by arranging them as you
desire on the screen. Touch the Detach icon to show
which controls that can be moved around. Touch & hold
the Move icon in the center until the control pop’s up.
Drag and drop it to desired location. Your machine will
remember your changes when turning your machine off.
Touch the x to close the control. To reset the Toolbar to
default, use Smart Toolbox and select Reset Toolbar.
1. Detach
2. Move
Full Screen View
Touch to toggle between full screen mode on/off.
The Multi-Touch Screen
Base Bar
Functions that open full screen windows are placed in the very bottom of the screen.
58
Page 59

4 WiFi & mySewnet™ Services
WiFi Introduction
Your performance icon™ machine features WiFi, which
makes it possible to connect your machine wireless to
the mySewnet™ services.
Getting Started With WiFi
Touch the WiFi icon in the Information Area to activate
WiFi. Select a network from the list of available networks.
If your network is password protected, you will be
prompted to enter the password in the pop-up to be able
to connect.
Touch the Information icon to open an information popup about the network. You can also see the signal
strength and if the network is password protected,
indicated with a closed padlock.
You can also connect to a network with WiFi in WiFi
Settings.
If you do not get any signal or have a low signal strength
see Troubleshooting.
Hidden Network
Touch Hidden Network to connect to a Hidden Network.
A pop-up will be shown on the screen where you can
enter the name of the hidden network.
will automatically search for an available Firmware
Update. If the machine has detected that there is a newer
firmware available, the firmware update icon will be
visible in the information area. Touch the icon to open a
pop-up to download and install the latest firmware. The
installation of the new firmware will be shown with a
green flashing dot in the Information Area.
If you choose to install the firmware later you will see a
yellow dot in the Information Area, reminding you
about the latest firmware ready to be installed.
When the update is completed the machine will restart
automatically. Check the firmware version number in
Settings, Machine Information.
Firmware Update Using a USB Device
Visit the PFAFF® website from your computer at
www.pfaff.com and find your machine. This is where
you will find any available updates.
You can also login to the mySewnet™ portal to find the
firmware update.
1. Download the update firmware zip file. Unzip the
file and copy the file (.clo) to a USB device.
Note: Do not change the name of the file or do not copy the
file into an existing folder on the USB device.
Note: Make sure that there is no old firmware update file (.
clo) on the USB stick when copying the new firmware
update file (.clo). The file name is not unique.
WiFi & mySewnet™ Services
Firmware Update Using WiFi
1. Firmware waiting to be downloaded. Only visible if you
have chosen to download it later.
2. New firmware update available.
Your performance icon™ is a modern, updateable
sewing machine. It is always recommended that you
install the latest firmware in your machine. Firmware
updates will always be to the benefit of the user and the
product.
To be able to get the latest firmware you need to connect
to a network using WiFi. When connected, your machine
2. Make sure that the machine is turned off. Connect
the USB device loaded with the new firmware
version to a USB port on your machine.
3. Press and hold the Reverse button, located on the
front of the machine, and turn on your machine with
the ON/OFF switch. Release the Reverse button
when an update icon is shown on the screen.
4. The firmware update will be verified and installed.
The machine may restart several times during the
update process. Do not turn off the machine.
5. When the update is completed the machine will
restart automatically. Check the software version
number in Settings, Machine Information.
59
Page 60

mySewnet™ Services
Your performance icon™ machine features the
mySewnet™ services which contains the following:
• mySewnet™ account – A personal login-based account
to access the different mySewnet™ services.
• mySewnet™ cloud – A cloud based service where you
will save and access your personal files from three
different places: the mySewnet™ cloud folder on the
machine, the mySewnet™ cloud sync tool on your
mySewnet™ Account
Start with registering a mySewnet™ account to be able to
use the mySewnet™ services. You can create your
account from mySewnet™ icon or in mySewnet™ settings.
Touch sign in and a pop-up will be opened where you
can choose to register a new mySewnet™ account.
A mySewnet™ account can also be created through the
mySewnet™ portal at pfaff.mysewnet.com.
computer and the mySewnet™ portal. From the
mySewnet™ cloud you will be able to view current
machine status through the SewNotice app.
• mySewnet™ portal – A website with different
mySewnet™ services such as register machines, edit
personal user profile and manage files in the
mySewnet™ cloud.
mySewnet™ Cloud
The mySewnet™ cloud is a service for hosting files in the
cloud that is available to all owners and users of a
mySewnet™ cloud featured machine such as your
performance icon™ machine. The mySewnet™ cloud
offers a simple way to manage and access personal files
from three different places: the mySewnet™ cloud folder
on the machine, the mySewnet™ cloud sync tool on your
computer and the mySewnet™ portal.
WiFi & mySewnet™ Services
• mySewnet™ cloud folder on the performance icon™
machine – In File Manager you will find the
mySewnet™ cloud folder where you store and
synchronize your files to the mySewnet™ cloud.
• mySewnet™ cloud sync tool on your computer –
Install the mySewnet™ cloud sync tool on your
computer to keep a local folder on your computer
synchronized with the mySewnet™ cloud.
• mySewnet™ portal – Manage the files in the
mySewnet™ cloud through an ordinary web browser.
The synchronization status will be shown with a green
flashing dot in the information area.
If your machine cannot connect to mySewnet™ cloud or
does not synchronize, see Troubleshooting.
60
Page 61

Used Space in mySewnet™ Cloud
The mySewnet™ cloud will store fonts, stitches and other
files from your machine.
Touch mySewnet™ on the topbar or go to mySewnet™
settings. When only a small amount of space is left, your
machine will alert you once. If you continue to fill the
space, it will not remind you again, until the space is
completely full. Delete or move files to a USB device to
free space.
Note: The mySewnet™ cloud space gets activated the first
time you sign in on your mySewnet™ account from the
machine.
Installation of mySewnet™ cloud Sync Tool for Computer
Install the mySewnet™ cloud sync tool to support
synchronization of a local folder on your computer with
the content stored in mySewnet™ cloud.
1. Download the synchronization tool to your computer
from the mySewnet™ portal at pfaff.mysewnet.com.
2. On your computer, double click on the file
mySewnetCloudSyncSetup.exe to run the setup
wizard. Go through the steps in the setup wizard to
install.
3. Once it is installed, you will see a mySewnet™ cloud
sync folder on your hard drive. Add, modify or
delete content in your mySewnet™ folder on your
computer in order to add, modify or delete content in
the mySewnet™ cloud folder on your performance
icon™ machine.
Signed in to mySewnet™ cloud.
Synchronizing files with the mySewnet™
cloud.
Not signed in to the mySewnet™ cloud
sync tool.
Cannot synchronize with the mySewnet™
cloud sync tool. Check the used space in
the mySewnet™ cloud.
WiFi & mySewnet™ Services
61
Page 62

Synchronize a File
Make sure that you are signed in to mySewnet™ account on your machine. Also make sure that the mySewnet™ cloud
sync tool is installed and running on your computer.
1. Drag and drop the file into the mySewnet™ cloud
folder on your computer.
2. The icon is shown as long as the synchronization is
progressing.
3. The icon means that your file has finished
synchronizing and is now available from
mySewnet™ cloud folder in file manager on your
performance icon™ machine and also in
mySewnet™ portal.
mySewnet™ Portal
The mySewnet™ portal is a personal web page with
access to the different mySewnet™ services. Login to the
mySewnet™ portal with your mySewnet™ account. You
can access the mySewnet™ portal at pfaff.mysewnet.com
to use the following services:
• My machines – Overview of your machines related
material such as user’s guide, sewing project
WiFi & mySewnet™ Services
inspiration, optional accessories information etc.
• My profile – Overview of your personal profile, with
contact information, e-mail subscriptions, interest
information and account details etc.
• mySewnet™ cloud – Possibility to manage your
personal files. The files are automatically
synchronized with the mySewnet™ cloud folder in the
performance icon™ machine and the mySewnet™
cloud sync tool.
Troubleshooting Connectivity
The Machine Cannot Connect to a WiFi Network
The machine will not connect to a WiFi network Make sure that WiFi is enabled on your machine. Touch
the WiFi icon in the Information Area to open WiFi
Settings.
Make sure that the machine detects a signal from your
WiFi network. If there is no signal, move the machine
closer to the WiFi router.
Make sure you have selected your WiFi network.
The machine has no Internet connection Make sure that your WiFi router has access to the
Internet.
The WiFi network is password protected Make sure that you have selected your WiFi network
and entered the correct password. If you do not know
the password, contact the administrator of your network.
62
Page 63

The Machine Cannot Synchronize with the mySewnet™ cloud
The machine cannot synchronize files with the
mySewnet™ cloud
Make sure that you have a working WiFi connection.
Make sure that you have signed in to your mySewnet™
account. New mySewnet™ accounts are registered in the
machine or at pfaff.mysewnet.com
Make sure that there is available space on the
mySewnet™ cloud.
If the mySewnet™ cloud is not accessible although you
have checked the WiFi connection, the server could
temporarily be unavailable. Please try again later.
WiFi & mySewnet™ Services
63
Page 64

5 Sewing
Sewing Mode – Introduction
In Sewing Mode you can select stitches, adjust and sew them. Use Stitch Creator™ feature and Sequence Creator to
create your own stitches and sequences. The selected stitch is shown in actual size in the stitch field.
Sewing Mode – Overview
Recommendations, Information and Active Features are shown under the expandable Information Area headings.
Sewing
64
Page 65

Sewing
1. Help Center
2. mySewnet™ cloud
3. WiFi Signal Strength
4. Sewing Recommendations
5. Information
6. Active Features
7. Stitch Repeat
8. Stitch Edit
65
Page 66

9. Settings
10. Stitch Creator™ feature
11. Sequence Creator
12. Balance Adjustments
13. Full Screen View
14. Tie-Off Options
15. Free-Motion Options
16. Tapering
17. mySewnet™ cloud folder
18. Load Stitch
19. Menu Panel
20. Quick Help
21. Main Menu
Sewing
66
Page 67

Getting Started with Sewing
Touch Start Sewing to enter the Sewing Mode. A
straight stitch is loaded by default. If you prefer, you
can set a different stitch to be the default stitch. Touch
Stitch Menu in the Menu Panel to load a new stitch. It is
also possible to enter Main Menu to load a stitch from
the Selection Menu tab.
Load a Stitch From the Menu Panel
Touch Load Stitch and select the desired stitch.
Available stitch categories are listed horizontally, swipe
to see more categories. Select a category by touching it
and then touch a subcategory to view the available
stitches. Touch a stitch to load it to Sewing Mode. The
select stitch window can be expanded if you touch and
drag the triangle in the lower corner. The entire Menu
Panel can be moved around on the screen, simply touch
& hold on the colored panel top to move it where you
want it to be placed.
Sewing
67
Page 68

Select a Stitch From the Selection Menu
Touch Main Menu to open the Selection Menu tab.
Available stitch categories are listed horizontally, swipe
to see more categories. Select a category by touching it
and then touch a subcategory to view the available
stitches. Touch a stitch to see a preview of the stitch
with a stitch description. Use the arrows in the preview
to step between the stitches in the selected subcategory.
Touch LOAD to open selected stitch in Sewing Mode.
Touch & hold on a stitch to load it directly to Sewing
Mode without the preview.
Sewing
Load a Stitch from File Manager
Touch Main Menu and select the File Manager tab to
access stitches that you have saved in your mySewnet™
cloud folder or on a USB device. Touch and hold on the
stitch file to load it.
Note: The mySewnet™ cloud folder is also accessible in the
Menu Panel.
68
Page 69

Sewing Recommendations
Recommendations are shown in the Information Area.
Your machine automatically gives you
recommendations depending on the selected stitch and
current setting.
The following recommendations can be shown:
Presser foot, IDT™ system and Stabilizer. The Straight
Stitch Needle Plate recommendation will be shown
when a Free-Motion Option is selected with a straight
stitch. The Straight Stitch Bobbin Case will be shown if
you move your straight stitch to the left.
We recommend that you use The Stabilizer Guide in the
Help Center for detailed information about the different
stabilizers.
1. Presser Foot Recommendation
2. IDT™ Recommendation
3. Stabilizer Recommendation
4. Straight Stitch Needle Plate
5. Straight Stitch Bobbin Case
Sewing
69
Page 70

Settings in Sewing Mode
There are two ways to change your settings.
1. Default Settings – Settings made in Default Settings
will be saved, even when turning your machine off.
2. Temporary Settings – Settings made in Temporary
Settings will be reset at the start of a new project in Help
Center or start of a new sewing session. When turning
your machine off, all changes made in Temporary
Settings will be reset to default.
Changes made in Temporary Settings are shown under
Active Features in the Information Area.
Sewing
ActivStitch™ Technology
When the ActivStitch™ technology feature is selected
your machine will automatically choose the best way to
control the upper thread, by thread metering or thread
tension, based on your selected stitch and settings.
Thread metering automatically and continuously
measures the fabric thickness to meter the correct
amount of thread for the selected stitch. When using
thread tension, the tension discs will keep the correct
amount of tension on the upper thread.
We recommend that you keep this setting selected
except when using specialty techniques or accessories
that do not support thread metering.
Deselect the ActivStitch™ technology feature in the
temporary settings to switch to thread tension. The
control for adjusting thread metering/thread tension,
will change depending on the active stitch and whether
the ActivStitch™ technology feature is selected or not in
temporary settings.
1. Default Settings in white colored check boxes
2. Temporary Settings in orange colored check boxes
1. Thread Tension
2. Thread Metering
70
Page 71

Automatic Presser Foot Lift
When selected, the machine automatically raises the
presser foot in the following situations:
• When stopping with the needle in down position the
presser foot will automatically raise to pivot height.
• After a thread cut the presser foot will be raised to lift
position.
When deselected, the presser foot will stay lowered,
even if the machine stops with the needle in down
position.
Automatic Thread Cutter
When selected, the threads are cut automatically in the
following situations:
• At cut commands in stitches and sequences.
• After sewing a single stitch e.g. a monogram or
eyelets.
If deselected, no automatic thread cut will be performed.
Note: Deselect when using optional accessories that are
attached in the two holes in the needle plate just above the
bobbin cover, to prevent damage to the automatic thread
cutter knife located under the needle plate.
Free-Motion Options
All stitches on your machine can be sewn in free-motion
mode to create fantastic effects. You can select between
three different Free-Motion Options. For all free-motion
sewing the Feed Dogs will lower automatically and the
fabric must be moved manually.
Free-Motion Options are accessible both in Settings and
if you touch Free-Motion icon in Sewing Mode. Your
Temporary Settings are shown under Active features in
the Information Area.
Note: Make sure that the IDT™ system is disengaged.
Sewing
Free-Motion Options
71
Page 72

Stitch Limiting Options
Set the machine to stitch width safety or select the size
of the twin needle to limit the stitch width and stitch
positioning. This will minimize the risk of breaking a
needle when sewing with accessories that do not allow
the use of the entire stitch width.
Stitch Width Safety
When selected, the machine will only allow a centered
straight stitch to prevent damage to the needle, presser
foot and needle plate. Select stitch width safety when
using an accessory that only supports a centered needle
position e.g. straight stitch presser foot. Stitch width
safety will automatically be selected when the Straight
Stitch Needle Plate is attached to the machine and
cannot be deselected as long as the Straight Stitch
Needle Plate is attached.
When the Straight Stitch Needle Plate is removed you
will be given the option to keep stitch width safety
selected or to deselect it. When stitch width safety is
activated all twin needle sizes will be disabled as they
cannot be used with stitch width safety.
Note: The setting is reset at the start of a new project in
Getting Started or a new sewing session. Always make sure to
remove any accessory that requires this setting or select the
setting again after starting a new project or session.
Stitch Width Safety
Twin Needle
When a twin needle size is selected, the stitch width and
stitch position of all stitches are limited according to the
Sewing
selected twin needle size to prevent damage to the
needle, presser foot and needle plate. In Sewing Mode
the Active Features will show that a twin needle is
selected. When a twin needle size is selected, the stitch
width safety will be disabled as it cannot be used with a
twin needle.
Note: The setting is reset at the start of a new project in
Getting Started or a new sewing session. Always make sure to
remove any accessory that requires this setting or select the
setting again after starting a new project.
Twin Needle
72
Page 73

Needle Stop Position
When Up is selected your machine stops with the
needle up. When Down is selected your machine stops
with the needle down. This setting can also be made by
touching the Needle Up/Down button on the front of
the machine.
Presser Foot Pressure
In most cases, you do not need to adjust the presser foot
pressure. Specialty techniques may require an
adjustment. The higher the number the more pressure
on the fabric.
Options for Feed Dogs
When Auto is selected (recommended) your machine
automatically raises or lowers the Feed Dogs,
depending on the stitch and other selected settings. For
example, the Feed Dogs are lowered when sewing on
buttons or when free-motion sewing.
Select Up and the Feed Dogs will be raised for all
sewing. Select Down and the Feed Dogs will be lowered
for all sewing.
Note: The machine will always lower the Feed Dogs
automatically when raising the presser foot to extra lift
position.
Needle Stop Position
Presser Foot Pressure
1. Feed Dogs Lowered
2. Feed Dogs Up
Sewing
Note: The Feed Dogs options will automatically be reset to
auto at the start of a new project from the Help Center.
Tie-Off Options
These options let you program a Tie-Off at the
beginning and at the end of a stitch. It is also possible to
program thread cut at the end of a stitch.
When touching the Tie-Off icon, three options open to
let you select different functions; Tie-Off Beginning, TieOff End and Thread Cut.
Touch Tie-Off to close Tie-Off Options window. Your
settings are shown under Active Features in the
Information Area.
Note: For immediate Tie-Off, use the Tie-Off button, found on
the front of the machine.
Tie-Off Options
73
Page 74

Stitch Edit
Touch Stitch Edit to open the control window for
adjusting selected stitch.
Touch Stitch Edit to close the control window.
Note: The Default Setting is always shown in white numbers.
The performance icon™ allows you to access the
functions you use the most by arranging them as you
desire on the sewing area. Touch the Detach icon to
show which controls that can be moved around. Touch
& hold the Move icon in the center until the control
pop’s up. Drag and drop it to desired location. Your
machine will remember your changes when turning
your machine off. Touch the x to close the control. To
reset the Toolbar to default, use Smart Toolbox and
select Reset Toolbar.
Stitch Width
Increase or decrease the stitch width using – and + in
the control. The number above the control shows stitch
width in mm.
Changed stitch position may limit the stitch width
adjustments.
Stitch Positioning
Sewing
On certain stitches with a width less than 9 mm it is
possible to change the stitch position. Use – to move the
stitch to the left and + to move the stitch to the right.
The number above the control shows the needle start
position in mm in relation to center needle position. The
machine has a maximum of 37 needle positions (for a
straight stitch).
The stitch position can only be changed to the limit of
the maximum stitch width. Changing the stitch
positioning will also limit the stitch width adjustments.
Stitch Length
Increase or decrease the stitch length using – and + in
the control. The number above the control shows the set
stitch length in mm. If lengthening a zigzag stitch or a
decorative stitch, the entire stitch will be stretched out.
If lengthening a stitch where the density can be adjusted,
the entire stitch will be longer but the density of the
satin stitches will remain the same.
74
Page 75

Stitch Density
The stitch density control adjusts the density (the
distance between the individual satin stitches that make
the entire stitch). The density does not affect the actual
length of the entire stitch.
Touch – to increase the density. Touch + to decrease the
density. The number above the control shows the
distance between satin stitches in mm.
Tip: Decrease the density to get different visual effects e.g.
when using speciality threads.
Mirroring
To mirror a stitch or stitch sequence sideways, touch
Mirror Side to Side. To mirror a stitch or stitch sequence
lengthwise, touch Mirror End to End.
Tip: Use the Smart Toolbox to open a shortcut for mirroring.
Note: Some stitches e.g. buttonholes cannot be mirrored.
1. Mirror Side to Side
2. Mirror End to End
Buttonhole Slit Length
Set the buttonhole slit length by using - to decrease and
+ to increase when sewing a buttonhole with the
Sensormatic Buttonhole Foot.
You can also sew a manual buttonhole, read about how
to sew a manual buttonhole and how to repeat a manual
buttonhole in the Sewing Techniques chapter.
Button Stitch Repetition
When sewing a button, you can set the number of stitch
repeats. Touch the – or + in the control to decrease or
increase the number of stitch repeats.
Sewing
75
Page 76

ActivStitch™ Technology
The ActivStitch™ technology feature has two ways to
control the needle thread: thread metering and thread
tension. To get the best sewing result it will
automatically use thread metering when possible.
Thread metering automatically and continuously
measures the fabric thickness to meter the correct
amount of thread for the selected stitch.
When thread tension is used, the tension discs will keep
the correct amount of tension on the upper thread. Some
special techniques may require the use of thread tension.
Deselect the ActivStitch™ technology feature in
Temporary Settings to ensure that thread tension is
engaged. When the ActivStitch™ technology feature is
selected the control visible in Sewing Mode will change
between thread metering and thread tension depending
on the current settings and the loaded stitch.
Use the thread metering/thread tension control to
adjust the balance between needle thread and bobbin
thread, e.g. decrease when using metallic thread and
increase when using heavy weight thread. Make a few
tests with different settings on a scrap piece of the fabric
you are going to use and check the balance between the
upper thread and the bobbin thread.
1. Thread tension
2. Thread metering
Note: When changing the value of the thread metering/thread
tension setting, the changes only affect the selected stitch.
Your changed settings will be reset to default when selecting
another stitch.
Tip: Increase the thread metering/thread tension setting for
best results when sewing on denim fabric with thick threads.
Sewing
Adjust Thread Tension/Thread Metering
For the best stitch appearance and durability make sure
the threads meet evenly between the two fabric layers.
If the bobbin thread is visible on the top side of the
fabric, the thread tension/thread metering is too tight.
Reduce the thread tension/thread metering.
If the upper thread is visible on the underside of the
fabric, the thread tension/thread metering is too loose.
Increase the thread tension/thread metering.
For decorative stitches and buttonholes the upper
thread should be visible on the underside of the fabric.
Make a few tests on a scrap piece of the fabric you are
going to use and check the tension.
Correct tension
Tension too tight
Tension too loose
76
Page 77

Free-Motion Options
All stitches on your machine can be sewn in free-motion
to create fantastic effects. Touch Free-Motion to open a
window where you can select between three different
Free-Motion Options. For all free-motion sewing the
Feed Dogs will lower automatically and the fabric must
be moved manually.
Touch Free-Motion to close the Free-Motion Options
window. Your settings are shown under Active features
in the Information Area.
Note: Make sure that the IDT™ system is disengaged.
Dynamic Spring Foot 6D Free-Motion
Activate to set the machine in Dynamic Spring Foot
Free-Motion mode for the Dynamic Spring Foot 6D
Free-Motion. The Dynamic Spring Foot measures the
fabric thickness and will raise and lower with each stitch
to hold the fabric on the needle plate while the stitch is
being formed.
Note: The Dynamic Spring Foot 6D is recommended for use
with straight stitch. Activate Stitch Width Safety in Settings.
Spring Foot Free-Motion
Activate to set the machine in Spring Foot Free-Motion
mode for optional spring feet. A spring foot will raise
and lower with each stitch to hold the fabric on the
needle plate while the stitch is being formed.
Note: Optional spring feet can be purchased at your local
authorized PFAFF® dealer.
Do not use a spring foot if Sensormatic Free-Motion
is activated, since the needle might damage the
presser foot.
Dynamic Spring Foot 6D Free-Motion
Sewing
77
Page 78

Sensormatic Free-Motion
Activate to set the machine in Sensormatic free-motion
mode for presser foot 6A or some other sensormatic foot,
e.g yarn couching etc.
When sewing free-motion at low speed the presser foot
will raise and lower with each stitch to hold the fabric
on the needle plate while the stitch is being formed. At
higher speed, the presser foot floats over the fabric
while sewing.
Skipped stitches can occur if your fabric moves up and
down with the needle as you are stitching. Lowering the
presser foot height will reduce the space between the
presser foot and the fabric and eliminate the skipped
stitches.
To adjust the presser foot height in Sensormatic freemotion mode, open the Free-Motion options window
and change presser foot height by touching + or — to
increase or decrease presser foot height.
Note: Be careful not to reduce the presser foot height too much.
The fabric must still move freely under the presser foot.
Tie-Off Options
These options allow you program Tie-Off at the
beginning and at the end of a stitch. It is also possible to
program Thread Cut at the end of a stitch.
When touching the Tie-Off icon, three options open to
let you select different functions; Tie-Off Beginning, TieOff End and Thread Cut.
Sewing
Touch Tie-Off to close Tie-Off options window. Your
settings are shown under Active features in the
information area.
Sensormatic Free-Motion Foot 6A
Note: For immediate Tie-Off, use the Tie-Off button, found on
the front of the machine.
Sewing with Tie-Off Options selected
• The Tie-Off Beginning will be performed as soon as
you start to sew.
• Press the Reverse button to perform Tie-Off End. The
action indicator lamp will be lit to indicate that the
machine will finish the stitch and do the Tie-Off.
• When a Thread Cut is programmed, the machine will
automatically cut the threads after performing a
stitch. The needle and presser foot will raise.
Note: Stop sewing and press the Reverse button twice to
activate reverse sewing. The reverse indicator lamp will be lit.
No Tie-Off will be performed.
Press the Reverse button when sewing in reverse to activate
Tie-Off End. The action indicator lamp will be lit.
To go back to sewing forward, stop sewing in reverse and
press the Reverse button. No Tie-Off will be performed.
Tie-Off button
Reverse button
78
Page 79

Stitch Repeat
Stitch Repeat makes it possible for you to program an
exact stitch length, it also lets you decide how many
repetitions of a stitch you want to sew.
Read about Stitch Repeat, Patchwork Program and
Single Stitch in the Stitch Repeat chapter.
Sewing
79
Page 80

Save Stitch
To save your file, touch the Save button, located below
the Multi-Touch Screen and a pop-up will appear on the
screen. In the Save pop-up you can choose to save your
file to the mySewnet™ Cloud folder or to a USB device.
Previously saved stitches, sequences and/or fonts are
shown. Name your file using the keyboard and touch
OK to confirm.
If you want to save to a folder, touch & hold on the
folder to open it, then name your file using the
keyboard and touch OK in the pop-up to confirm. To
create a new folder, simply touch Create New Folder,
name the folder with the keyboard and touch OK. Then
touch & hold on the folder to open it and save into the
new folder.
Touch the List and Thumbnail View icon to toggle
between showing the files in a list or as thumbnail icons.
In List View each file is shown with the file name and
file type. In Thumbnail View each file is shown with the
file name and a thumbnail image of the file.
To cancel the save process, close the pop-up window by
touching Close. The Save pop-up will close and you will
return to Sewing Mode.
Read about organizing your saved stitches in File
Manager.
Sewing
1. Save to mySewnet™
cloud Folder
2. Save to USB Device
3. Selection Area
4. File Name
5. Save Current State
Save button
6. OK
7. Close
8. Create New Folder
9. List and Thumbnail
View
Balance
When sewing on special fabrics or doing a special
technique, the balance may need to be adjusted.
Start by sewing the stitch on a piece of scrap fabric.
Touch Balance in the Base Bar to open the Balance
Adjustment window. Change the preview on the screen
to match your sewn sample by using the + and - in the
controls. When you sew again, the balance will be
corrected.
80
Page 81

Sewing Programs
These techniques may require some special presser feet
and accessories.
Tapering Stitches
The Tapering commands will be visible when a stitch
that can be tapered is selected. Touch the Tapering
menu to open a view of angles for beginning and end
tapers. Select an angle by touching it in the selection
area. The machine will sew the beginning tapered point
and then continue with the selected stitch. When the
desired length has been sewn, touch the Reverse button.
The stitch will taper to the end. Select taper Off to
remove any tapering at the beginning or end of the
stitch. If you select taper Off on both the beginning and
end, the stitch will be a regular stitch without tapering.
Note: The Tapering commands will not be visible if you select
e.g. a buttonhole.
Taper Satin Stitch Exercise
The Taper Stitch automatically tapers the satin stitch for
corners and points and can be used for satin stitch
lettering. Try the satin stitch exercise and stitch a corner
of the tapered satin stitch on a piece of stabilized fabric.
1. Select stitch 4.3.6 in menu 4 - satin stitches.
2. Open Tapering and select 45 degrees for both
beginning and end.
3. Activate Needle Stop Up/Down on your machine and
start to sew. The machine will sew the tapered point and
then continue with a satin stitch at the selected width.
4. When the satin stitch is as long as desired, touch the
Reverse button. This will start the end tapering.
5. Turn your fabric to continue with the next tapered
satin stitch.
Sewing
81
Page 82

Stitch Repeat
Stitch Repeat makes it possible for you to program an
exact seam length, it also lets you decide how many
repetitions of a stitch you want to sew.
Patchwork Program
The Patchwork Program makes it possible for you to
program an exact stitch length that can be sewn
repeatedly. This is very useful when quilting.
To program a stitch length, touch Stitch Repeat on the
Toolbar and select Patchwork Program. Sew your
desired stitch length and press the Reverse button while
sewing. The reverse indicator on the machine will be lit
until the last repetition of the stitch is finished. This will
set the length of the stitch.
Once you have set the length of a stitch, the Patchwork
Program is inactive. The Single Stitch program is now
activated instead. The programmed length of your
patchwork seam is shown in millimeters above the +/control. Adjust the length using the +/- controls.
Single Stitch Program
The Single Stitch Program lets you decide how many
repetitions of the stitch you want to sew. Touch Stitch
Repeat and select Single Stitch Program. Set the number
of repetitions using the +/-. The number of repetitions
are shown above the +/- and the estimated length of the
Sewing
repetitions is shown in the working area. The machine
will stop automatically when the repetitions are sewn.
Combining Programs
Combining Tapering and Patchwork Programs makes it
possible to repeat a tapered seam with the same length.
Activate tapering as described in Tapering. Sew your
desired length. When the Reverse button is pressed the
reverse indicator will increase the light until the end
taper and last repetition of the stitch is finished.
The seam is now programmed and the Single Stitch
Program is activated. When you start sewing again the
seam will automatically be repeated with the same
length.
The number of repetitions and estimated length in
millimeters is shown above the +/-. Adjust the length
using the +/-.
Note: The Tapering is included in the repetitions shown on
the screen.
82
Page 83

Sewing Techniques
These techniques may require some special presser feet
and accessories.
Buttonholes
Sensormatic Buttonhole
When you sew a buttonhole with the Sensormatic
Buttonhole Foot, adjust the slit length so that it is
slightly larger than the size of the button. You can
measure your button using the button ruler on the lid.
Set the slit length and make sure that the red arrow lines
up with the marking on the foot. Start sewing by
pressing the foot control or Start/Stop button. The
buttonhole will be completed automatically and the
threads are cut. You can repeat the buttonhole as many
times as you wish.
Manual Buttonhole
To sew a manual buttonhole, use presser foot 5M.
Sew the first column as long as you want the buttonhole.
Touch the Reverse button.
The machine sews the bartack and the second column.
When the columns are aligned, press the Reverse button
to sew the second bartack.
Sensormatic Buttonhole Foot
Presser Foot 5M
Sewing
Repeat a Manual Buttonhole
When you have adjusted your buttonhole, use the
Repeat Buttonhole icon to sew identical copies. As long
as that icon is selected, the machine will repeat the
buttonhole over and over again. The Repeat Buttonhole
icon is only visible when sewing a buttonhole manually.
To cancel the function just deselect the icon.
Corded Buttonhole
Corded buttonholes that are sewn with gimp threads
are more stable, durable and have a professional
appearance. Use pearl cotton or regular gimp thread.
1. Place the center of a length of gimp thread over the
metal bar extending from the center back of the Manual
Buttonhole Foot 5M. Pass the thread ends under the foot
to the front of the foot.
2. Snap on the Manual Buttonhole Foot 5M.
3. After completing the buttonhole, pull the ends of the
gimp thread until the loop of thread is hidden below the
buttonhole bartack.
4. Thread the gimp threads into a needle and pull them
to the wrong side of the garment. Tie the gimp threads
and cut of the excess thread.
1. Repeat Buttonhole
2. Buttonhole Start Position
3. Reverse
83
Page 84

Sew On a Button
To sew on a button, remove the presser foot and select
button sewing. The Feed Dogs will automatically be
lowered.
Place the button under the presser foot holder. Use the
Mirroring icon to make sure the holes in the button are
aligned with the swing of the needle and the width is
appropriate for the actual button. If needed change the
width between holes with the Width icons.
If needed, increase or decrease the number of stitches
that will fasten the button on the fabric, using the Stitch
Repetition icon. Start to sew. The machine will sew the
program for you.
Four Direction Sewing
Use the Four Direction stitches for sewing on patches
without having to turn your fabric or for decorative
stitch designs. When selecting a stitch in category 9 and
subcategory 2, the Four Direction stitch is loaded to
sewing mode.
The starting point is marked with an x in the stitch field.
To change direction touch one of the four stitches. When
the desired length is sewn in one direction, select the
new direction by touching one of the four directions.
Sewing
84
Page 85

Special Stitch Techniques
Special Stitch Technique stitches in your performance
icon™ machine includes stitches such as Ribbon,
Stacking, Floating, Radiant and Lace Edge stitches.
Ribbon Stitches
Add dimensional elements to your decorative stitching
with the beautiful Single, Double and Triple Ribbon
stitches in your machine. Narrow ribbons are woven
into these special stitches as you sew. 2-5 mm (approx.
⅛”-¼”) ribbons are recommended for single and double
ribbon stitches. For triple 2–10 mm (approx. ⅛-⅜”) For
best results, use stabilizer, appropriate for your fabric
type and weight, under your fabric to support your
stitching.
We recommend you to use Help Center and locate the
Ribbon Stitches Projects for instructions on how to sew
and automatically get the correct settings.
Stacking Stitches
Sew beautiful decorations in two colors using the
Stacking stitches. The Stacking stitches consist of pairs
of matching stitches that are designed to be sewn on top
of each other.
Sew the first stitch and then sew the second,
overlapping the first. Be sure to use the same starting
point for each.
Touch Quick Help and one of the Stacking stitches to
preview what the stitches look like when combined/
stacked.
Sewing
85
Page 86

Floating Stitches
Floating stitches create a special effect where the
connecting stitches are invisible. There are two different
ways to use this technique; the first technique is to sew
with the Bi-Level Guide Foot, a piece of stabilizer and
one piece of folded fabric. The second technique is to
sew two pieces of fabric together.
Sewn with the Bi-Level Guide Foot:
1. Fold the fabric, right sides together, and place the
stabilizer underneath, making sure it extends
outside the folded edge.
2. Attach the Bi-Level Guide Foot and engage the
IDT™. Let the folded edge follow the guide of the
foot.
3. Once finished, pull the fabric over.
Sewn with 1A foot:
1. Place two pieces of fabric, right sides together, and
place a stabilizer underneath.
2. Attach the 1A foot and engage the IDT™. Start to
sew using the desired seam allowance.
3. Once finished, pull the fabric flat.
Sewing
86
Page 87

Radiant Stitches
Radiant stitches are an Exclusive PFAFF®sewing
technique. These stitches have a built in stop allowing
you to sew a line of stitches in any shape. Make
beautiful necklines or pocketlines on garments.
1. Draw a line, using a marking pen, on your fabric
where you want the stitch to be placed. Attach the
2A foot.
2. Place the fabric and stabilizer underneath the presser
foot.
3. Activate Needle Down function.
4. Line up the center marking of the presser foot with
the drawn line.
5. Touch Start/Stop and sew until the machine stops.
The next time you touch Start/Stop the machine will
sew backwards.
6. Turn the fabric so that the two side markings on the
foot matches the drawn line. Touch Start/Stop and
sew until the machine stops.
7. Repeat step 4–6 until you have reached the desired
length.
Lace Edge Stitches
Sew beautiful Lace Edge stitches on your projects using
the Bi-Level Guide Foot and water soluble stabilizer.
1. Attach the Bi-Level Guide Foot and engage the
IDT™.
2. Fold the fabric and place water soluable stabilizer
underneath, making sure that the stabilizer extends
outside the folded fabric edge.
3. Let the folded fabric edge follow the guide of the
foot. Sew as long as you want the lace to be and
remove it from the sewing machine.
4. Dissolve the water soluable stabilizer in lukewarm
water.
Optional Feet Stitches
This subcategory includes special stitches for sewing
techniques such as candlewicking, beading stitches and
edge stitches. These techniques require special presser
feet and accessories.
Sewing
Note: Touch Quick Help and then touch the selected stitch in
the stitch selection area to find out which special presser foot
is required for that stitch.
Optional Feet Icon
87
Page 88

Pop-up Messages in Sewing
Bobbin Thread Low
When the bobbin thread is running low, a pop-up
message appears giving you notice that you will soon
need to replace the bobbin. If you want to continue
sewing without replacing the bobbin, touch the foot
control and do not close the pop-up.
When the bobbin is replaced with a full one, touch OK
in the pop-up.
Check Upper Thread
The machine stops automatically if the upper thread
runs out or breaks. Re-thread the upper thread, close the
pop-up message and start sewing.
Sewing
Remove Sensormatic Buttonhole Foot
The Sensormatic Buttonhole Foot needs to be removed
before doing any of the following:
• Sewing a stitch that is not a buttonhole.
• Sewing a buttonhole that can not be sewn with the
Sensormatic Buttonhole Foot.
• Sewing an adjusted buttonhole saved without the
Sensormatic Buttonhole Foot in the mySewnet™ cloud
folder.
88
Page 89

Cannot Use the Automatic Needle Threader
If using a twin needle, touch OK and thread it manually.
If using a regular needle, touch OK and deselect twin
needle in the settings. Press the Automatic Needle
Threader button again.
Twin Needle
The following pop-up message appears when you
choose a stitch not suitable for twin needle.
Stitch Width Safety
When Stitch Width Safety is activated, the following
pop-up message appears when you choose a stitch not
suitable for stitch width safety.
Attention!
If the machine stops and this pop-up appears on the
screen you need to stop sewing. Wait a moment and
touch OK when it is enabled. Check the needle size and
condition. Check for correct threading.
Sewing
89
Page 90

6 Sequence Creator
Sequence Creator — Introduction
In Sequence Creator, you can create and adjust a sequence of stitches. Combine various 9mm stitches, side–motion
stitches and stitch fonts from the machine, the mySewnet™ cloud or from a USB device. Stitches made in Stitch
Creator™ feature can also be inserted in a sequence. You can create sequences up to approximately 500mm (20”) long.
You can see how long your actual sequence is in the information area.
Sequence Creator
90
Page 91

Sequence Creator – Overview
Sequence Creator
1. Sign in to mySewnet™ cloud
2. WiFi signal strength
3. Length of Sequence
4. Step Between Stitches
5. Stitch Settings Window
6. Stitch Width
91
Page 92

7. Stitch Length
8. Stitch Settings
9. Keyboard
10. Cancel
11. OK
12. Full Screen View
13. True Size
14. Duplicate
15. Delete
16. Mirror End to End
17. Mirror Side to Side
18. Directional Stitches
19. Sequence Commands
20. Load from mySewnet™ cloud Folder
21. Load Font
22. Load Stitch
23. Menu Panel
Sequence Creator
92
Page 93

Getting Started with Sequence Creator
To start creating a sequence, select a desired stitch in the
Menu Panel and add it to the sequence. To create a
sequence from letters, select a desired font in the Menu
Panel and load it to the sequence. The active position is
marked by a cursor and the selected stitch or letter will
be marked in green. Only the selected stitch/stitches can
be adjusted. Inserted stitches will be placed at the cursor
position. Move the cursor through the sequence using
the arrows. The number of selected stitch and total
number of stitches in the sequence are shown between
the arrows. When sewing a sequence it is possible to
start sewing anywhere in the sequence. Use the arrows
to step through the sequence.
Load a Stitch
Move the cursor where you want to add a stitch. Touch
Load Stitch and select the desired stitch. Available stitch
categories are listed horizontally, swipe to see more
categories. Select a category by touching it and then
touch a subcategory to view the available stitches.
Touch a stitch to load it to Sewing Mode. The select
stitch window can be expanded if you touch and drag
the triangle in the lower corner. The entire Menu Panel
can be moved around on the screen, simply touch &
hold on the colored panel top to move it where you
want it to be placed. It will be placed at the cursor
position.
Sequence Creator
Load a Font
Move the cursor where you want to add a letter and
touch Load Font to select a desired font. Available fonts
are listed vertically, swipe to see more. Touch a font to
open a keyboard and touch the letters you want to add.
93
Page 94

Adjust text and stitches
You can mirror, adjust length and width or change the
density or position of the selected stitch. The
adjustments work just like in Sewing Mode.
Delete a Stitch or Letter
If you want to delete a stitch or letter, touch the stitch or
move the cursor to the stitch or letter you want to delete
and touch Delete. Touch & hold to delete the whole
sequence.
Duplicate a Stitch or Letter
To duplicate a stitch, move the cursor to the stitch you
want to duplicate. Touch the Duplicate icon to copy the
selected stitch.
Note: Make your adjustments on the stitch before duplicating
and the copied stitch includes the adjustments.
Touch & hold to get a pop-up where you can enter the
exact number of copies you want to insert.
1. Mirror Side to Side
2. Mirror End to End
3. Stitch Length
4. Stitch Width
Delete
Duplicate
Replace a Stitch or Letter
Sequence Creator
To replace a stitch; simply select it, touch Delete and
insert the new stitch.
It will be placed at the cursor position.
94
Page 95

Directional Stitches
Add Directional Stitches between stitches in a sequence.
These stitches makes it possible to move stitches in
various directions and you can create new shapes and
wider large-area borders.
Directional Stitches are straight stitches with a length of
approximately 1mm and can be used in 16 different
directions.
Touch Directional Stitches in the Menu Panel to access
different angles.
Touch the Directional Field to select which angle you
want to insert a stitch.
When the intended angle is selected, touch the insert
icon and one stitch will be inserted in the sequence at
the cursor position.
The Directional Stitch can be deleted, duplicated or
mirrored without closing the directional stitches pop-up.
Directional Stitches
Sequence Creator
95
Page 96

Sequence Commands
You can insert Tie-Off, Stop and Thread Cut commands
into the sequence. These commands will be included in
the sequence and will always be performed when
sewing it.
Use the Tie-Off command if you want a secure Tie-Off.
You can insert the Tie-Off commands anywhere in the
sequence.
Insert a Stop command if you want the machine to stop.
This is useful for example at the end of the sequence if
you want to sew it only once or to create a sequence in
several rows.
Insert a Thread Cut command if you want the machine
to Tie-Off and Cut the threads and raise the presser foot.
Move the cursor to the position where you want to add
a command. Select it and an icon will be added into the
sequence. This confirms that the command is inserted
and it also shows where the command will be
performed in the sequence.
Note: The commands will appear on the screen in the order
you program them.
1. Editable Stitch in Green
2. Tie-Off End
3. Cut Command
4. Sequence Commands
5. Tie-Off Beginning
True Size
Touch True Size if you want the sequence to return to
it’s original size.
Sequence Creator
96
Page 97

Saving a Sequence
To save your file, touch the Save button and a pop-up
will appear on the screen. In the save pop-up you can
choose to save the file to the mySewnet™ cloud folder or
to a USB device. Previously saved stitches, sequences
and/or fonts are shown. Name your file using the
keyboard and touch the OK button.
If you want to save to a folder, simply touch & hold on
the folder to open it, then name your file using the
keyboard and touch OK in the pop-up to save. To create
a new folder, simply touch the create new folder button,
name the folder using the keyboard and touch OK. Then
touch & hold on the folder to open it and save into the
new folder.
Touch List and Thumbnail View to toggle between
showing the files in a list or as thumbnail icons. In List
View each file is shown with the file name and file type.
In Thumbnail View each file is shown with file name
and a thumbnail image of the file.
To cancel the save process, close the pop-up window by
touching Close. The save pop-up will close and you will
return to Sequence Creator.
Learn how to organize your saved files in File Manager.
1. Save button
Sew Your Sequence
To sew your stitch sequence, load it to Sewing Mode by
touching OK in Sequence Creator.
1. Save to mySewnet™
2. Save To a USB Device
3. Selection Area
4. File Name
5. Save Current State
6. OK
7. Close
8. Create New Folder
9. Toggle Between List and
Thumbnail View
Sequence Creator
97
Page 98

Adjust the Entire Sequence
To adjust the entire sequence, enter sewing mode by
touching OK. Adjustments made in Sewing Mode will
affect the entire sequence. Read about Stitch Edit in the
Sewing chapter.
Using Sequence Creator in Sewing Mode
In Sewing Mode it is possible to start sewing anywhere
in the sequence. Use the arrows to step through the
sequence. In Sewing Mode you can edit your entire
sequence.
If you want to edit each stitch in the sequence loaded to
Sewing Mode touch the sequence and the Edit Sequence
will be highlighted. Touch to enter Sequence Creator
again. Make your adjustments and touch OK to load it to
Sewing Mode. Touch cancel to undo.
Note: Touch and hold in the stitch field area to open the Smart
Toolbox to access Edit in Sequence Creator.
Sequence Creator
98
Page 99

Pop-up Messages in Sequence Creator
Stitch Cannot be Added in Sequence
Some stitches are not possible to insert in a stitch
sequence, for example buttonholes and special stitch
menus such as 4-Way stitches.
Maximum Number of Stitches Has Been Reached
The stitch you are trying to add will make the stitch
sequence too long. Your stitch sequence can be up to
approximately 500 mm (20”) long and contain up to 199
stitches and commands. If the stitch sequence exceeds
the maximum length this pop-up message will appear.
Sequence Creator
99
Page 100

7 Stitch Creator™ Feature
Stitch Creator™ Feature – Introduction
In theStitch Creator™ feature, you can create completely new stitches and adjust every single stitch point. You can
create a stitch all on your own or alter already built–in stitches or letters.
The width of the stitch field is 9mm and maximum stitch length is 5mm. The grid and the vertical center line will help
you to create your stitch. Your stitch can be saved to the mySewnet™ cloud folder or to a USB device.
To open Stitch Creator™ feature, just touch the Stitch Creator™ feature icon.
Stitch Creator™ Feature
100
 Loading...