

Page 1
CD
-o
-,
I
-Il
0
-F,
B
Q
n
CD
CD
0
3
CD
C)
CD
Cj,
iI
.1
I
ik
1
I
IS
‘
.
S
J
Page 2

IMPORTANT
When
including
Read
all
using
instructions
an
the
electrical
following:
before
SAFETY
appliance,
using
basic
this
safety
household
INSTRUCTIONS
precautions
Sewing
should
machine.
always
be
followed,
Ak
DANGER
•
A
•
sewing
sewing
Always
machine
machine
unplug
WARNING
electric
•
Do
used
•
Use
attachments
•
Never
properly,
machine
or
mechanical
•
Never
openings
dust,
•
Keep
machine
•
Always
•
Do
not
•
Do
not
•
Switch
as
threading
•
Always
lubricating,
instruction
•
Never
•
Do
not
•
Do
not
administrated.
not
by
this
operate
operate
and
fingers
use
pull
the
unplug
drop
use
operate
allow
use
shock,
to
or
near
sewing
recommended
if
it
has
to
the
adjustment.
of
the
loose
away
needle.
the
bent
or
push
sewing
needle,
the
or
when
manual.
or
insert
outdoors.
where
-
from
before
be
children.
machine
this
been
nearest
the
sewing
Sewing
cloth.
from
proper
needles.
machine
sewing
To
should
the
relamping.
-
To
used
sewing
dropped
authorised
machine
all
needle
fabric
changing
making
any
object
aerosol
reduce
never
electric
reduce
or
injury
as
a
toy.
only
for
by
the
machine
or
machine
moving
plate.
while
stitching.
off
(“0”)
needle,
machine
any
other
into
(spray)
the
be
left
unattended
outlet
Replace
Close
attention
its
intended
manufacturer
if
it
has
damaged,
dealer
with
any
and
foot
parts.
The
wrong
when
threading
from
the
user
any
opening.
products
risk
immediately
bulb
with
the
or
controller
Special
It
making
risk
to
persons:
use
as
a
damaged
or
dropped
service
air
openings
care
plate
may
deflect
bobbin,
electrical
servicing
are
is
as
any
being
of
electric
when
plugged
after
same
type
of
necessary
described
contained
cord
into
center
adjustments
for
blocked.
free
from
is
required
can
cause
the
adjustment
or
outlet
used
needle
changing
using
and
rated
burns,
when
in
this
in
this
or
plug,
water.
examination,
Keep
the
accumulation
around
the
causing
in
when
removing
mentioned
or
where
in.
Always
before
5
this
manual.
manual.
if
it
Return
needle
the
presser
oxygen
shock:
unplug
cleaning.
Watt.
fire,
sewing
Use
is
not
working
the
repair;
ventilation
the
Sewing
to
break.
it
to
needle
foot,
covers,
in
the
is
machine
only
sewing
electrical
of
lint,
break.
area,
etc.
being
this
is
such
•
To
disconnect,
•
Do
not
SAVE
turn
unplug
by
THESE
all
controls
pulling
to
the
off
(“0”)
on
cord.
To
unplug,
position,
grasp
the
then
plug,
INSTRUCTIONS
remove
not
the
plug
cord.
from
outlet.
Page 3
Page 4
12345678
11
910
34
33
32
31
V
peiformance
2O4
a
12
3
15
16
i.
peJormance
2054
25
24
—
23
12
22
21
4
Page 5
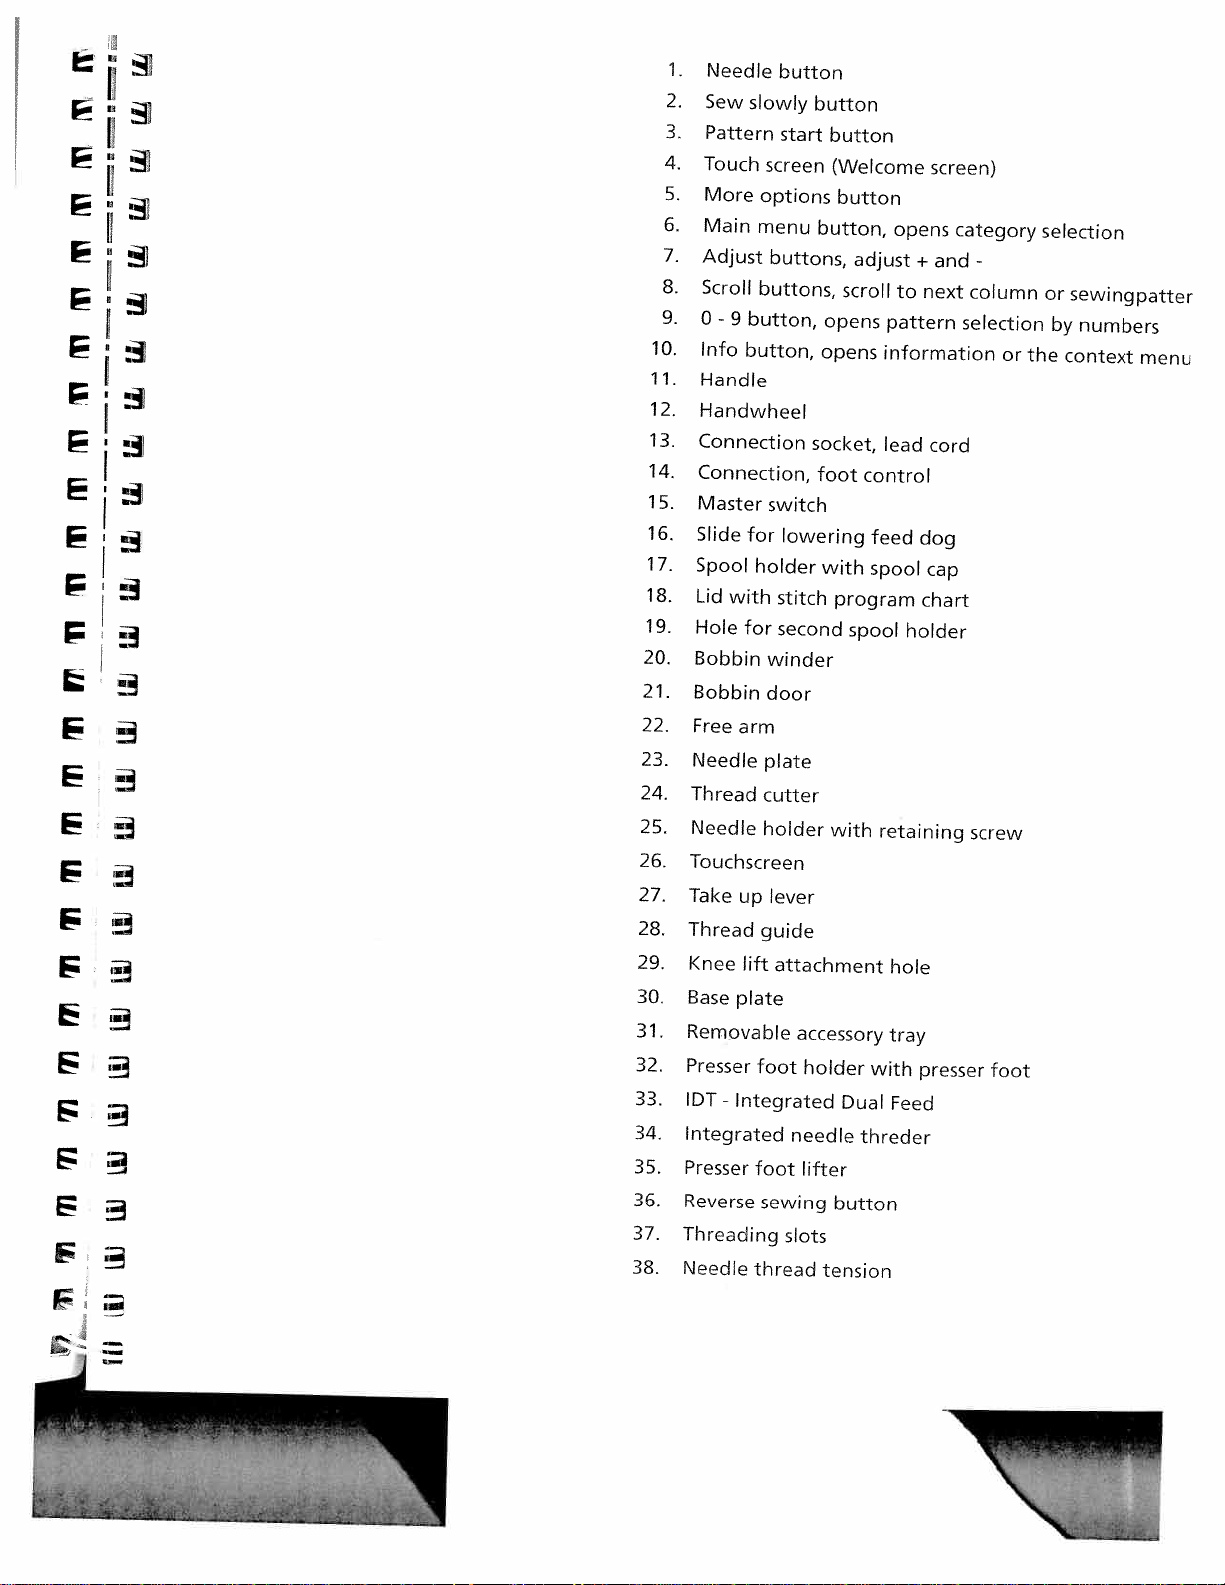
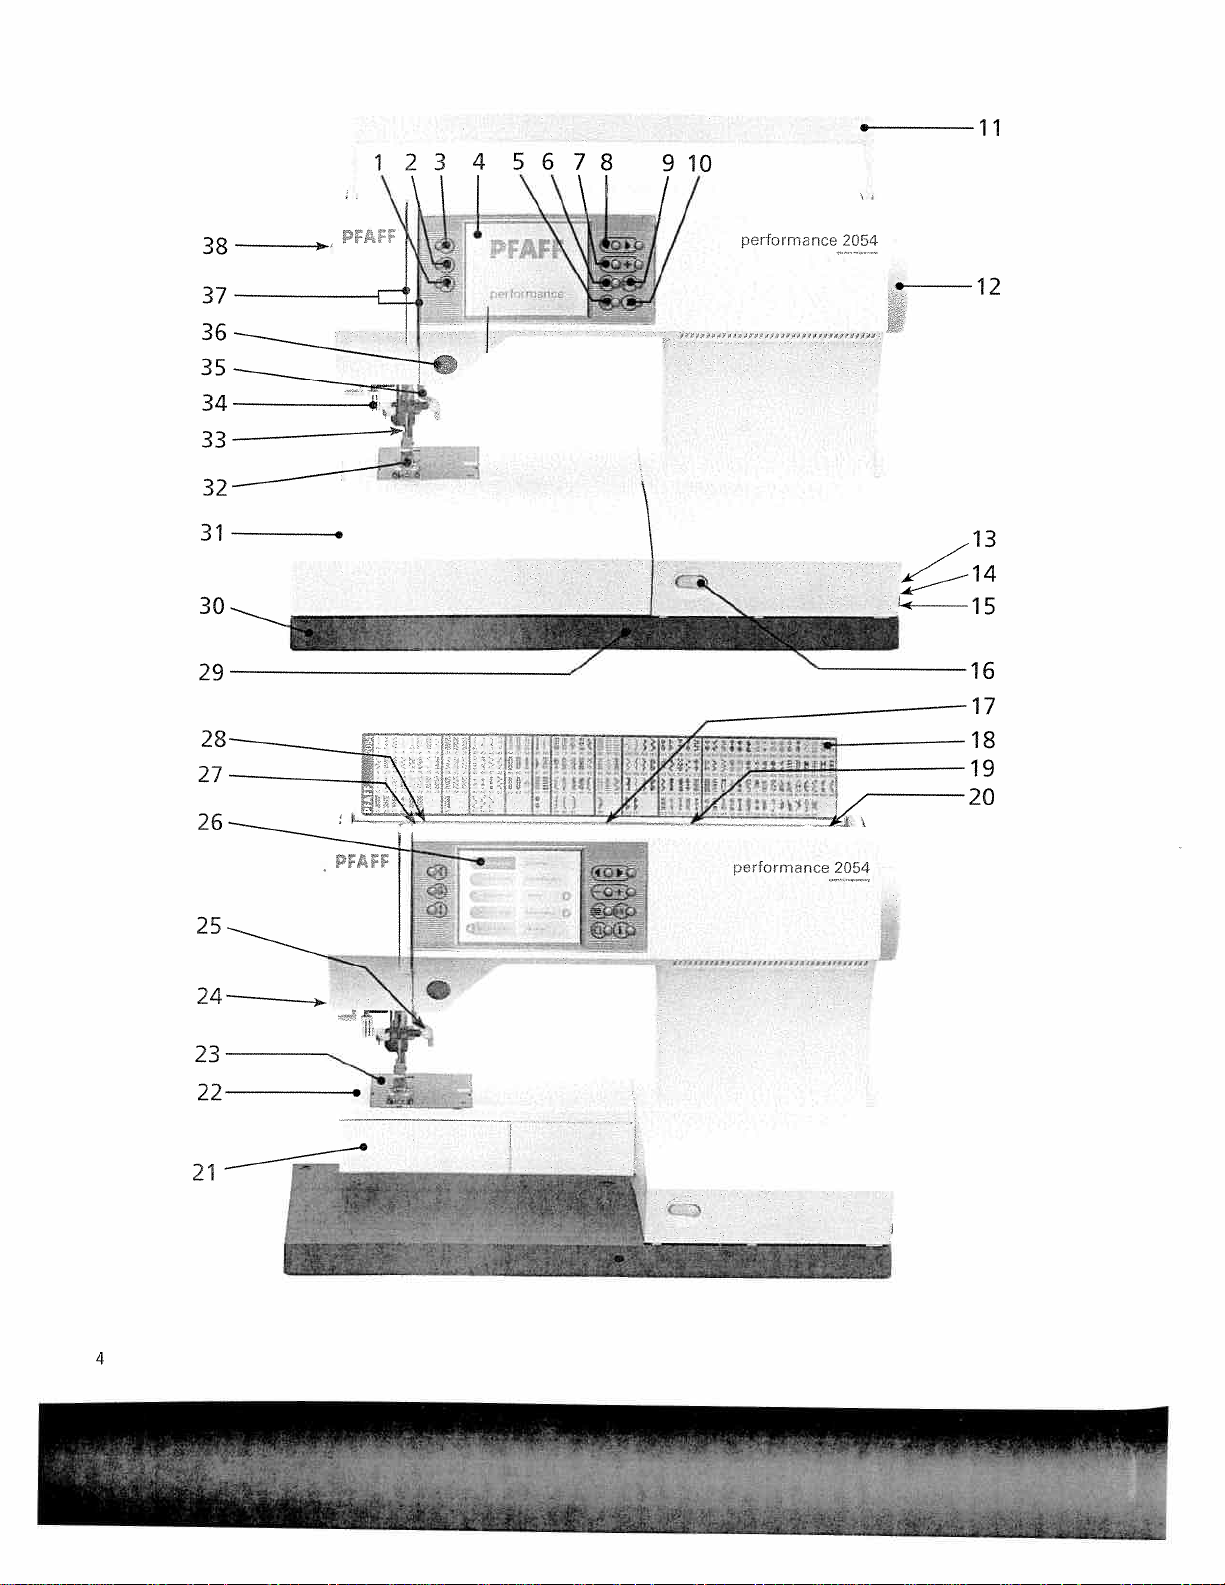
Needle
2.
Sew
3.
Pattern
4.
Touch
5.
More
6.
Main
7.
Adjust
8.
Scroll
9.
0
-
10.
Info
11.
Handle
12.
Handwheel
13.
Connection
14.
Connection,
15.
Master
16.
Slide
17.
Spool
18.
Lid
19.
Hole
20.
Bobbin
21.
Bobbin
22.
Free
23.
Needle
24.
Thread
25.
Needle
26,
Touchscreen
27.
Take
28.
Thread
29.
Knee
30.
Base
31.
Removable
32.
Presser
33.
IDT
34.
Integrated
35.
Presser
36.
Reverse
37.
Threading
38.
Needle
r-
—
slowly
screen
options
menu
buttons,
buttons,
9
button,
button,
switch
for
holder
with
for
winder
door
arm
plate
cutter
holder
up
lever
guide
lift
plate
foot
-
Integrated
foot
sewing
thread
button
button
start
button
(Welcome
button
button,
scroll
opens
opens
socket,
foot
lowering
with
stitch
program
second
with
attachment
accessory
holder
Dual
needle
lifter
button
slots
tension
adjust
pattern
information
lead
control
feed
spool
spool
retaining
hole
tray
with
threder
opens
+
to
holder
Feed
screen)
category
and
next
cord
dog
cap
chart
presser
column
selection
or
screw
foot
selection
or
by
the
context
sewingpatter
numbers
menu
Page 6

Stitch
Utility
stitches
chart
Stitch
No.
1
2
3
4
5
6
7
8
Description
Straight
needle
Stretch
stitch
positions
Zigzag
Elastic
perforations
Reverse
Shell-edging
Honeycomb
Elastic
perforation
positions
triple
with
stitch
stitch
straight
stitch
stitch
19
stitch
with
with
straight
needle
with
stitch
two
stitch
one
‘F
19
i!
>
-:
>
3
Application
For
all
increased
finishing
For
all
fabrics,
can
be
For
finishing
For
sewing
A
durable
stitch
sequences.
For
decorative
For
sewing
ornamental
For
sewing
mm
9
stitch
:‘
(%
I
4
straight
up
or
sewing
straight
e.g.
trouser
increased
seams,
on
reverse
on
hem
on
length.
c
5
stitch
to
6
stitch
up
elastic,
straight
See
hems
elastic
seams
elastic,
——
[
6
and
mm.
19
in
zippers.
and
seams,
to
6
mm
overcasting,
darning
stitch
particulary
thread,
(smocking
darning
topstitching
needle
topstitching
stitch.
positions
sportswear
for
decorative
appliqué
tears
Suitable
No
1.
on
overstitching
effect).
tears
<
>
<
1>
8
jobs,
and
stretch
and
d
>>>
<<‘C
9
jobs,
are
and
work
work,
applying
for
fabrics,
terry
applying
10
stitch
length
available,
particulary
wear.
stitching.
inserting
patches.
stitch
combinations
e.g.
cloth
patches.
11
can
on
Stitch
underwear.
seams
“Ic
<(
12
for
stretch
lace
and
be
edge
length
etc.
V
1
N
74
1
in
for
A
:
14
Width
to
mm
9
9
6
7
7
15!
up
9
Stretch
10
Purl
11
Faggoting
12
Decorative
13
Cross-hem
14
Stretch
15
Blindhem
6
stitch
triple
triple
stitch
stitch
stitch
stitch
zigzag
elastic
stitch
stitch
For
inserting
mely
durable
Particulary
For
joining
ching
effect.
For
overstitching
gathering
Provides
sportswear
For
sewing
ble
for
hem
For
securing
suitable
foundation
and
a
highly
and
elastic
finishing.
hems
elastic
seam
elastic
smocking.
elastic,
casuals.
tape
invisibly.
tape
for
for
in
sportswear
open-knit
appliqué
garments.
cords
decorative
on
sportswear
work
and
and
materials.)
thanks
Provides
wool
threads
seam
and
bathing
a
decorative
for
hem
bathing
to
its
stitch
as
well
finishing
suits.
suits.
(Extre
density.
hemstit-
as
for
on
Also
suita-
7
9
7
6
7
7
6
Page 7
%
r
/
?
A
f%
ISi
L.%.
&?
tJi
—
—
II!
3’
32
33
34
35
36
37
38
39
40
55
57
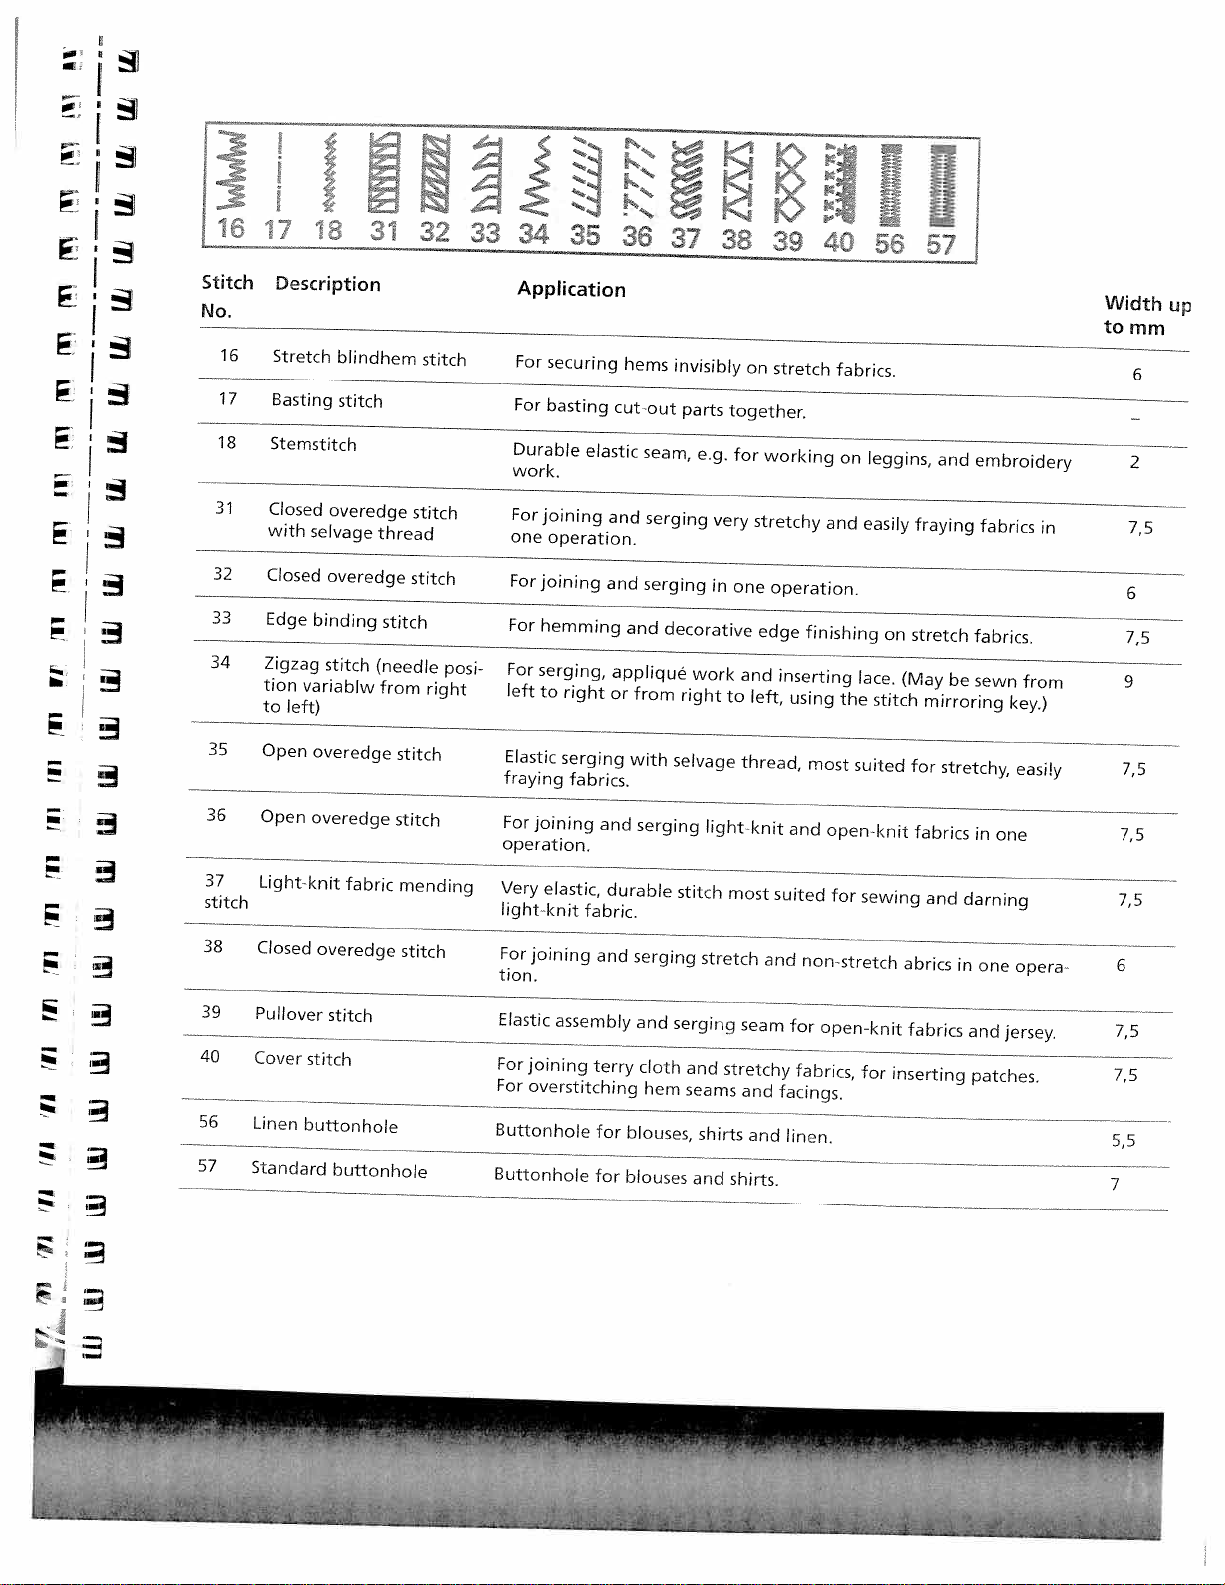
Stitch
No.
16
17
18
31
32
33
34
35
36
Description
Stretch
Basting
Stemstitch
Closed
with
selvage
Closed
Edge
binding
Zigzag
tion
variablw
to
left)
Open
overedge
Open
overedge
blindhem
stitch
overedge
overedge
stitch
stitch
thread
stitch
stitch
(needle
from
stitch
stitch
stitch
posi
right
Application
For
securing
For
basting
Durable
work.
For
joining
one
operation.
For
joining
For
hemming
For
serging,
left
to
right
Elastic
serging
fraying
For
joining
operation.
elastic
and
fabrics.
and
hems
cut-out
seam,
and
serging
serging
and
appliqué
or
from
with
serging
invisibly
parts
e.g.
very
in
decorative
work
right
selvage
light-knit
on
together.
for
working
stretchy
one
operation.
edge
and
to
left,
thread,
stretch
finishing
inserting
using
most
and
fabrics.
on
leggins,
and
easily
lace.
the
stitch
suited
open-knit
on
fraying
stretch
(May
mirroring
for
fabrics
and
embroidery
fabrics
fabrics.
be
sewn
stretchy,
in
one
from
key.)
easily
Width
to
in
up
mm
6
—
2
7,5
6
75
9
7,5
7,5
37
stitch
38
39
40
56
57
Light-knit
Closed
Pullover
Cover
Unen
Standard
fabric
overedge
stitch
stitch
buttonhole
buttonhole
mending
stitch
Very
elastic,
light-knit
For
joining
tion.
Elastic
For
joining
For
overstitching
durable
fabric.
and
assembly
terry
serging
and
cloth
hem
stitch
stretch
serging
and
seams
ButtonheforMouses,shtsandnen.
Buttonhole
for
blouses
and
most
and
seam
stretchy
and
shirts.
suited
non-stretch
for
fabrics,
facings.
for
sewing
open-knit
for
and
abrics
fabrics
inserting
darning
in
one
and
patches.
opera-
jersey.
6
75
75
—
Page 8
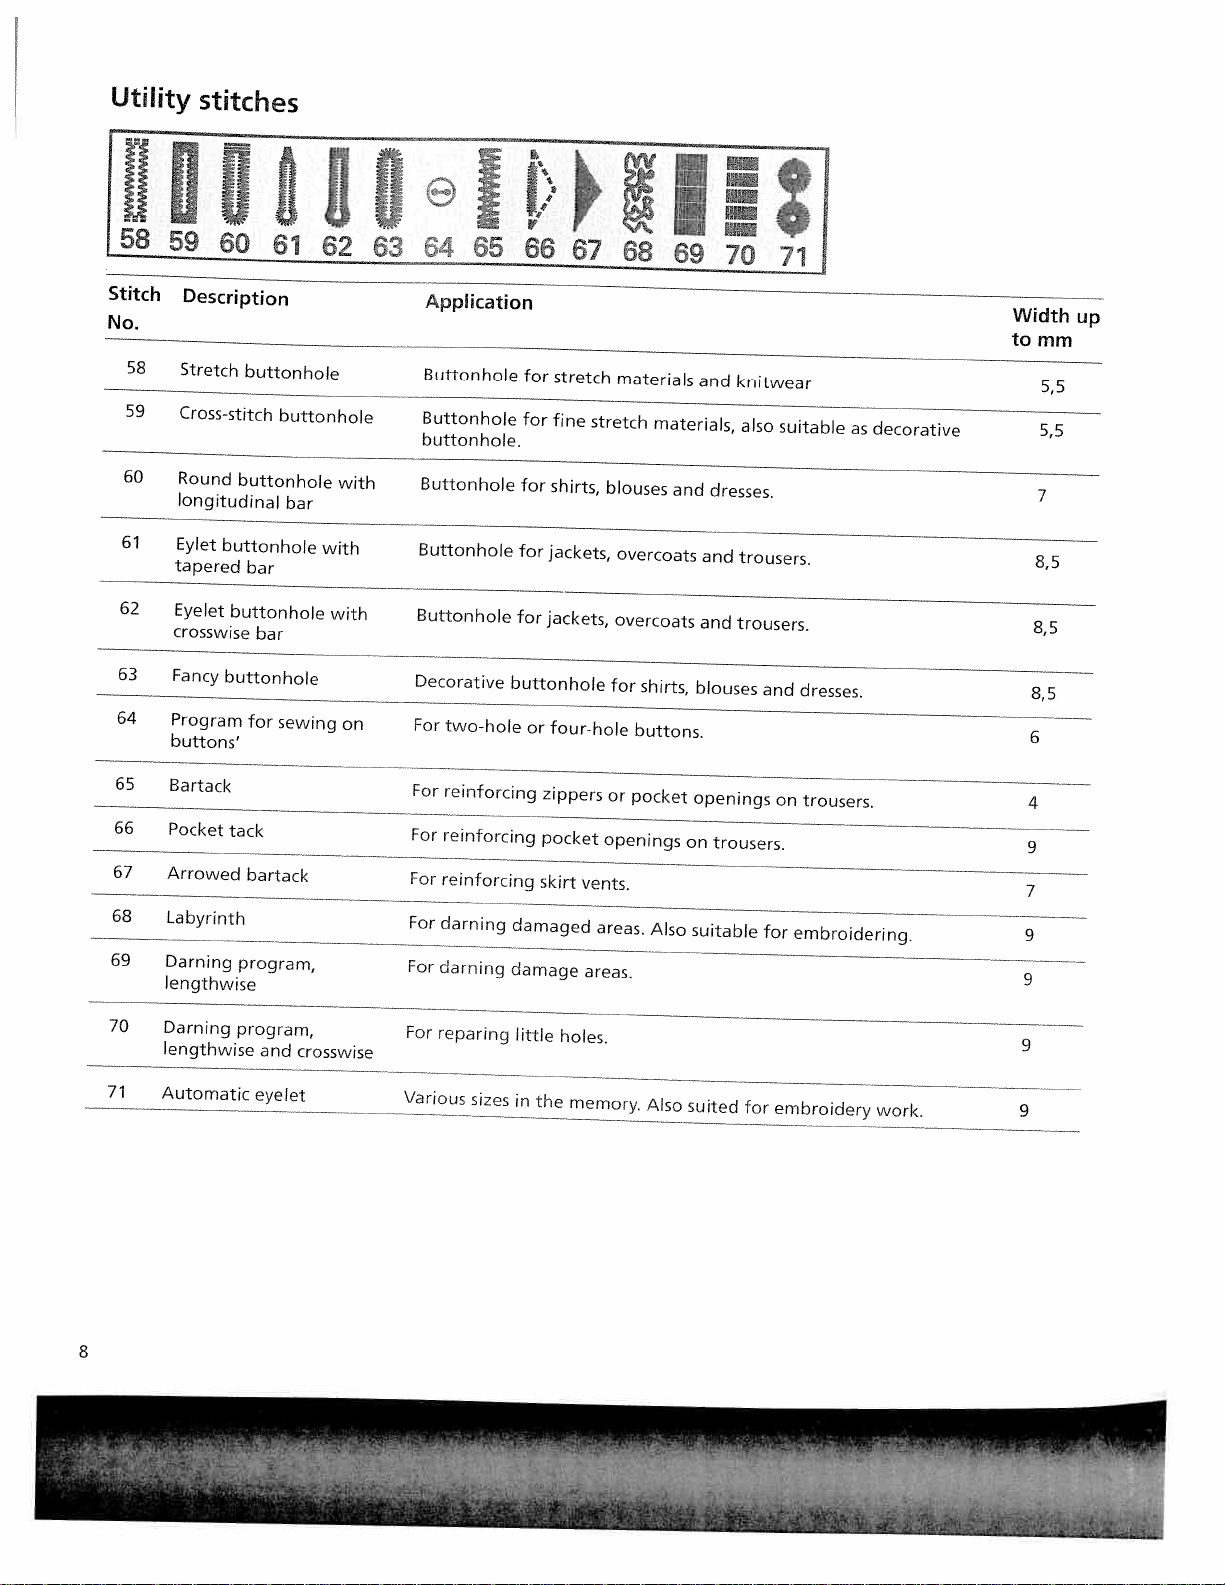
Utility
stitches
OOftROs1Di
58
59
60
61
62
63
465
66
67
68
69
70
71
Stitch
No.
58
59
60
61
62
63
64
65
66
67
68
69
Description
Stretch
Cross-stitch
Round
longitudinal
Eylet
buttonhole
tapered
Eyelet
crosswise
Fancy
buttonhole
Program
buttons’
Bartack
Pocket
tack
Arrowed
Labyrinth
Darning
lengthwise
buttonhole
buttonhole
buttonhole
bar
bar
buttonhole
bar
for
sewing
bartack
program,
with
with
with
on
Appication
Buttonhole
Buttonhole
button
Buttonhole
Buttonhole
Buttonhole
Decorative
For
two-hole
For
reinforcing
For
reinforcing
For
reinforcing
For
darning
For
darning
hole.
buttonhole
damage
for
stretch
for
fine
for
shirts,
for
jackets,
for
jackets,
or
four-hole
zippers
pocket
skirt
damaged
stretch
blouses
or
openings
vents.
areas.
areas.
materials
materials,
overcoats
overcoats
for
shirts,
buttons.
pocket
Also
and
and
and
and
blouses
openings
on
suitable
knitwear
also
dresses.
trousers.
trousers.
trousers.
suitable
and
dresses.
on
trousers.
for
embroidering.
as
decorative
Width
to
mm
5,5
7
8,5
8,5
8,5
6
4
9
7
9
9
up
70
Darning
lengthwise
71
Automatic
8
program,
and
eyelet
crosswise
For
reparing
Various
sizes
little
in
the
holes.
memory.
Also
suited
for
embroidery
work.
9
9
Page 9
C
P.
P.
P.
P.
Id,’
CD
9
J
I
It:j1
P.
P.
CD
0
Id,’
‘7
D’.
n
0
I
CD
3
CD
CD
vI
nTm
OJID
LLWLLLLLLLLLLLLLL1
t1
0
CD
1.0
1.0
ujuuu
U
cou
NV
w’Jw
f’
a
eeeee
1ff1ff
g
fl
Jfl
$h
aiUL
jA
aiIA
01
L
AJ
a
CD
VLdI
w.
.I’I1,
F44
Page 10
(D
0
CD
CD
VI
C
Page 11
in
in
iii
it
iii
in
a
ft
in
in
in
in
in
rn
ran
rn
Ti
i’ti
in
in
1’
Ti
n
rr
‘n
pyj
r
Page 12
Index
of
headings
Getting
Carrying
Lid
Electrical
Connecting
On
/
Off
Voltage
Accessory
Sewing
Preparing
for
bobbin
Winding
Winding
Inserting
Taking
Setting
Threading
Integrated
Changing
Winding
Threading
Changing
IDT
(Integrated
Lowering
Electronic
started
case
connection
switch
switch
tray
with
the
the
from
the
out
the
the
the
Needle
the
a
bobbin
the
the
the
knee
the
foot
free
machine
winding
bobbin
the
bobbin
bobbin
needle
needle
presser
twin
needle
Dual
feed
lift
control
arm
from
second
case
thread
Threader
foot
through
needle
Feed)
dog
the
spool
tension
the
spool
pin
needle
pin
27
28
29
29
30
32
33
21
22
22
23
24
25
page
16
16
17
17
17
17
18
19
19
20
Selecting
Selection
All
stitches
Selection
Direct
Exiting
The
The
Info
selection
a
Context
functions
system
Information
Sequences
Available
the
stitch
Creating
Editing
Saving
Creating
Opening
Alphabets
Creating
Edit
the
a
word
Stitch
a
a
Stitch
a
a
a
a
stitch
by
category
selection
by
number
sewing
menu
in
sewing
sequence
a
stitch
stitch
new
memory
word
sequence
sequence
menu
in
the
the
main
functions
sequence
sequence
Sequence
stitch
Sequence
menu
Context
menu
sequence
in
in
menu
43
43
43
43
43
43
44
44
46
47
page
50
50
52
52
53
53
54
55
55
Operating
performance
Instructions
performance
Function
Sewing
Altering
More
12
buttons
menu
the
options
your
on
2054
stitch
for
2054
operating
settings
sewing
your
Pfaff
36
36
38
39
page
Utility
Sewing
Straight
Basting
Top
stitching
Elastic
Blind
Zig
zag
Stretch
stitches
in
stitch
stitch
blind
hem
stitch
triple
zippers
-
-
-
No
hem
stitch
—
zig
No
3
No
stitch
—
zag
-
17
1
No
No
1
stitch
page
1
58
58
59
59
—
No
16
5
60
60
61
—
14
61
Page 13
I
‘
•
I
•
I
!
I
I
F
F
F
F
L
Elastic
Honeycomb
Stretch
Darning
stitch
triple
with
Sewing-on
Repairing
Overlock
Buttonholes
Sewing
Eyelets—No
Automatic
Free
Gathering
Gathering
on
motion
Decorative
specialty
Quilting
Free
Motion
Nostalgia
Home
Fashion
Eyelets
Hemstitching
Cross
Twin
Tapering
Appliqué
Decorating
Stitch
needle
designs
Accessories
Standard
and
Felling
Appliqué
Pintuck
presser
accessories
foot
foot
foot
—
No
stitch
straight
the
elastic
patches
tears
stitches
buttons
71
darning
darning
with
straight
with
elastic
sewing
techniques
Embroidery
/Heirloom
sewing
feet
4
—
—
—
—
No
stitch
No
No
No
threads
7
stitch
4
64
69
stitch
62
62
—
No
2
—
No
4
—
No
1
—
No
7
62
63
63
63
64
65
68
68
69
70
71
71
page
74
79
81
83
85
86
87
88
90
91
93
page
96
98
98
99
Pintuck
Cording
Gathering
Knit
Ruffle
Open
Quilting
Eyelet
Bridging
1/4
Quilting
Free
Bias
Pintuck
Decorative
Non-stick
7/9
Couching/Braiding
Circular
Fringe
Narrow
Triple
Fancy
blade
foot
foot
edge/piping/beading
r
toe
appliqué
guide
plate
guide
inch
Quilting
of
motion
binder
Foot
Stitch
Foot
Hole
Cord
Embroidery
Presser
Edge
needle
patterns
Stabilizer
Maintenance
Changing
Cleaning
Changing
Bulb
Sewing
Technical
Package
the
the
removal
proberns
data
contents
the
quilt
with
Foot
needle
light
fabric
with
Foot
Foot
with
foot
foot
Guide
with
Foot
with
with
bulb
and
foot
with
layers
IDT
Guide
twin
plate
their
foot
IDT
with
IDT
IDT
needles
solutions
IDT
IDT
Page 14

Pt
Page 15
Page 16
PFRFF
Carrying
Place
the
control
compartment
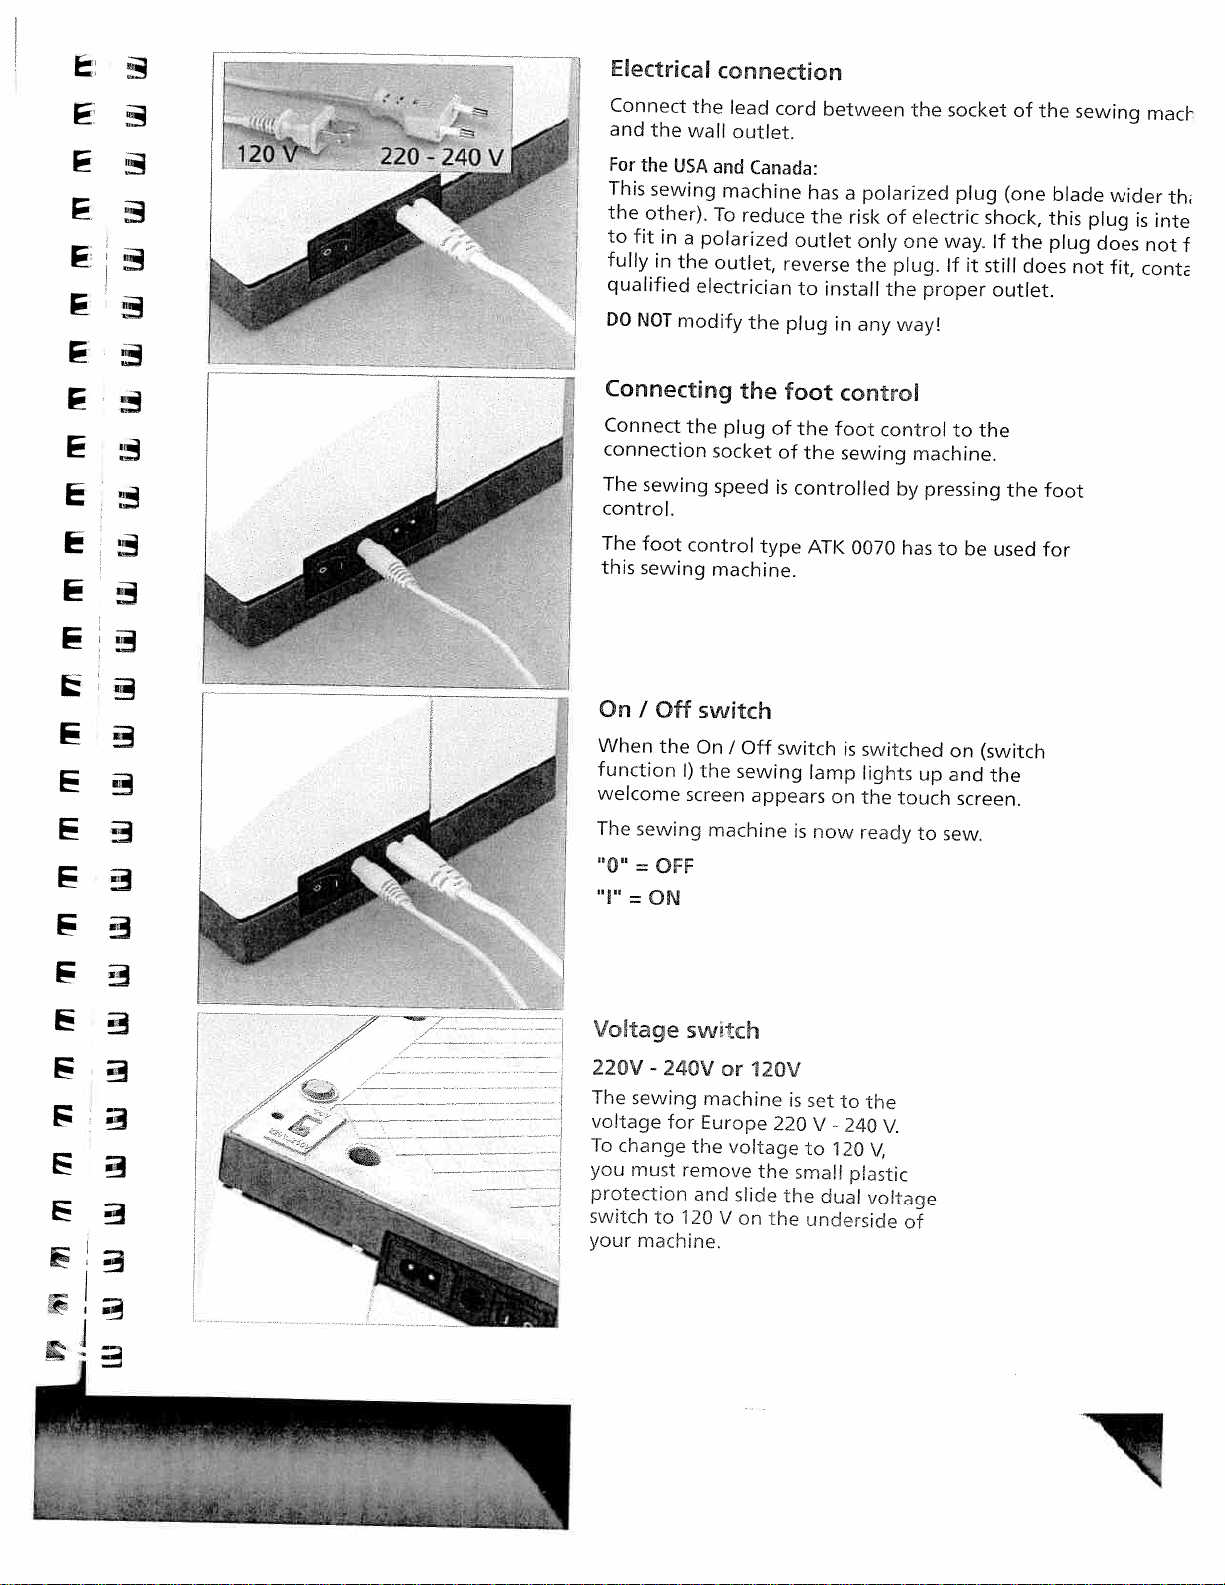
The
stitches
case
enclosed
and
of
lead
instruction
of
the
the
sewing
cord,
book
carrying
-
machine
‘
the
into
case.
fi
foot
the
jj
0
are
pL
illustrated
Lid
Open
the
lid
upwards.
L
I
F
on
the
inside
of
the
lid.
16
Page 17
vI
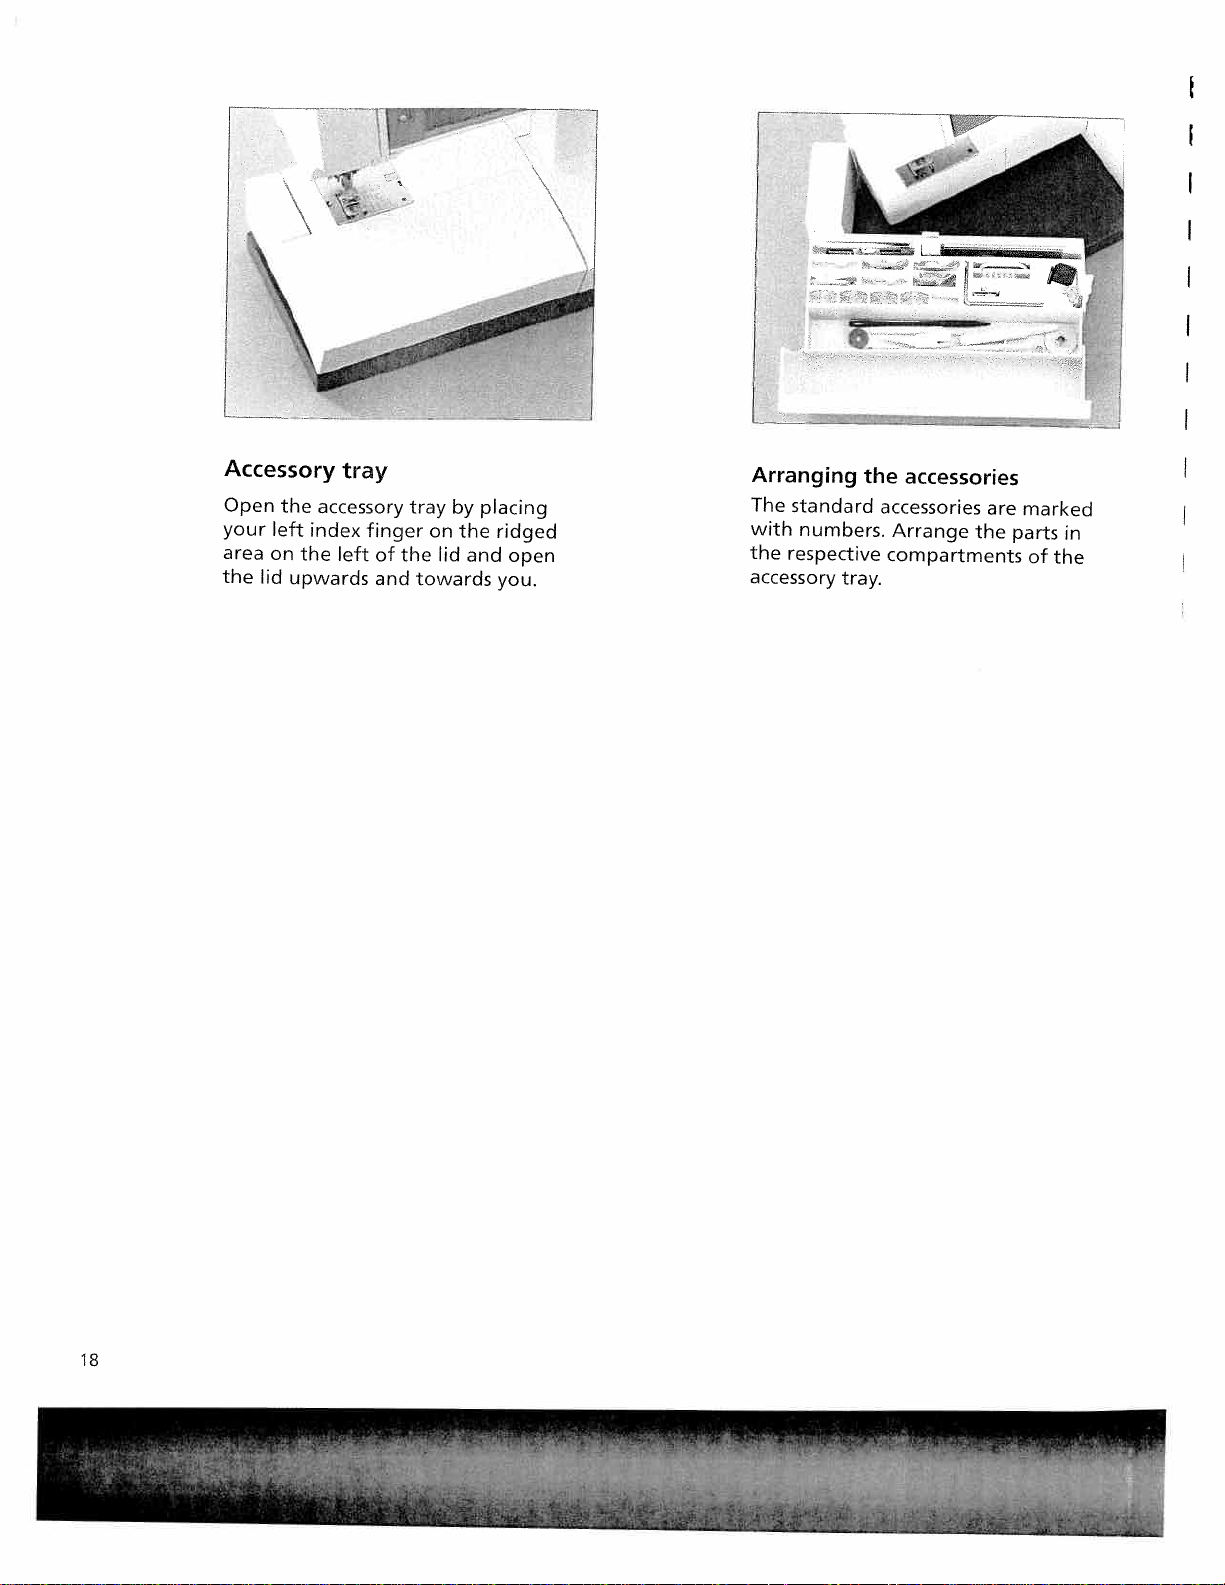
Electrkal
Connect
and
the
For
the
This
sewing
the
other),
to
fit
in
fully
in
qualified
DO
NOT
the
wall
USA
and
To
a
polarized
the
outlet,
electrician
modify
connection
lead
cord
outlet.
Canada:
machine
reduce
outlet
reverse
the
plug
between
has
the
to
install
a
risk
only
the
in
any
the
polarized
of
electric
one
plug.
the
wayl
socket
plug
way.
Ifitstill
proper
of
(one
shock,
If
the
outlet.
the
does
blade
this
plug
sewing
wider
plug
does
not
fit,
macb
is
not
cont
th
inte
f
Connecting
Connect
connection
I
The
sewing
control.
The
foot
this
sewing
On
I
Off
When
function
welcome
Er
The
the
sewing
=
OFF
=
ON
the
socket
speed
control
machine.
switch
On
I)
the
screen
machine
the
plug
Off
I
sewing
appears
foot
of
of
is
type
switch
control
the
foot
the
sewing
controlled
ATK
0070
is
lamp
on
is
now
control
by
has
switched
lights
the
touch
ready
to
machine.
pressing
be
to
on
up
and
screen.
to
sew.
the
the
used
(switch
the
foot
for
F
Voftage
swrch
220V-24OVorl2OV
The
sewing
/
—
voltage
To
change
you
must
protection
switch
your
machine.
for
to
machine
Europe
the
remove
and
120
V
voltage
the
slide
on
the
is
220
small
the
set
to
V
-
240
to
120
plastic
dual
underside
the
V.
V,
voltage
of
I
Page 18
L
—
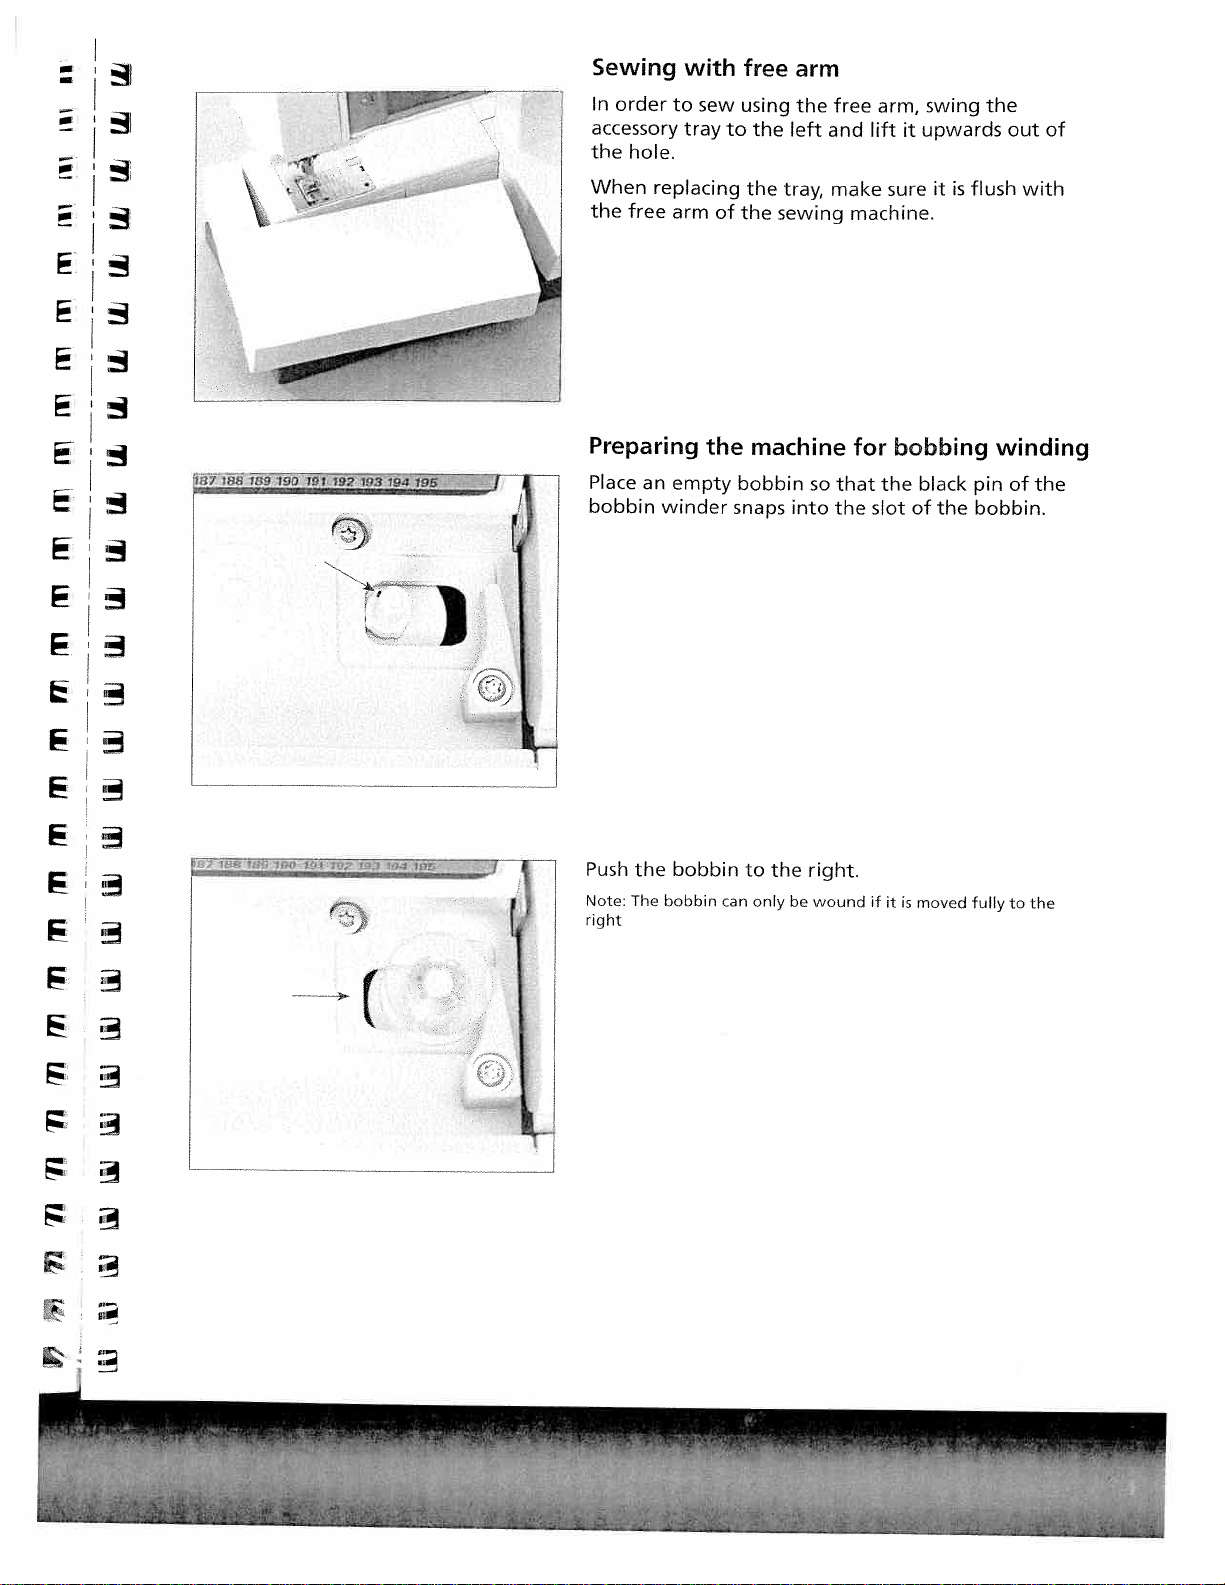
Accessory
Open
the
your
left
area
on
the
lid
upwards
tray
accessory
index
the
left
finger
of
and
tray
on
the
towards
lid
by
the
and
placing
ridged
open
you.
Arranging
The
standard
with
numbers.
the
respective
accessory
the
accessories
Arrange
compartments
tray.
accessories
are
the
marked
parts
of
in
the
18
Page 19
Sewing
1
order
0
0
0
In
accessory
the
When
the
hole.
replacing
free
with
to
tray
arm
sew
of
to
free
using
the
the
the
arm
the
left
tray,
sewing
free
and
make
machine.
arm,
it
lift
sureitis
swing
upwards
flush
the
out
of
with
E
E
Preparing
188
8)
189
190
191
192
193
194
195
Place
J
an
bobbin
Push
the
Note:
The
right
empty
winder
bobbin
bobbin
the
can
machine
bobbin
snaps
the
to
only
into
be
so
the
right.
wound
for
that
bobbing
the
slot
if
it
is
black
of
moved
the
winding
pin
of
bobbin.
fully
to
the
the
—i
dh
88
Page 20
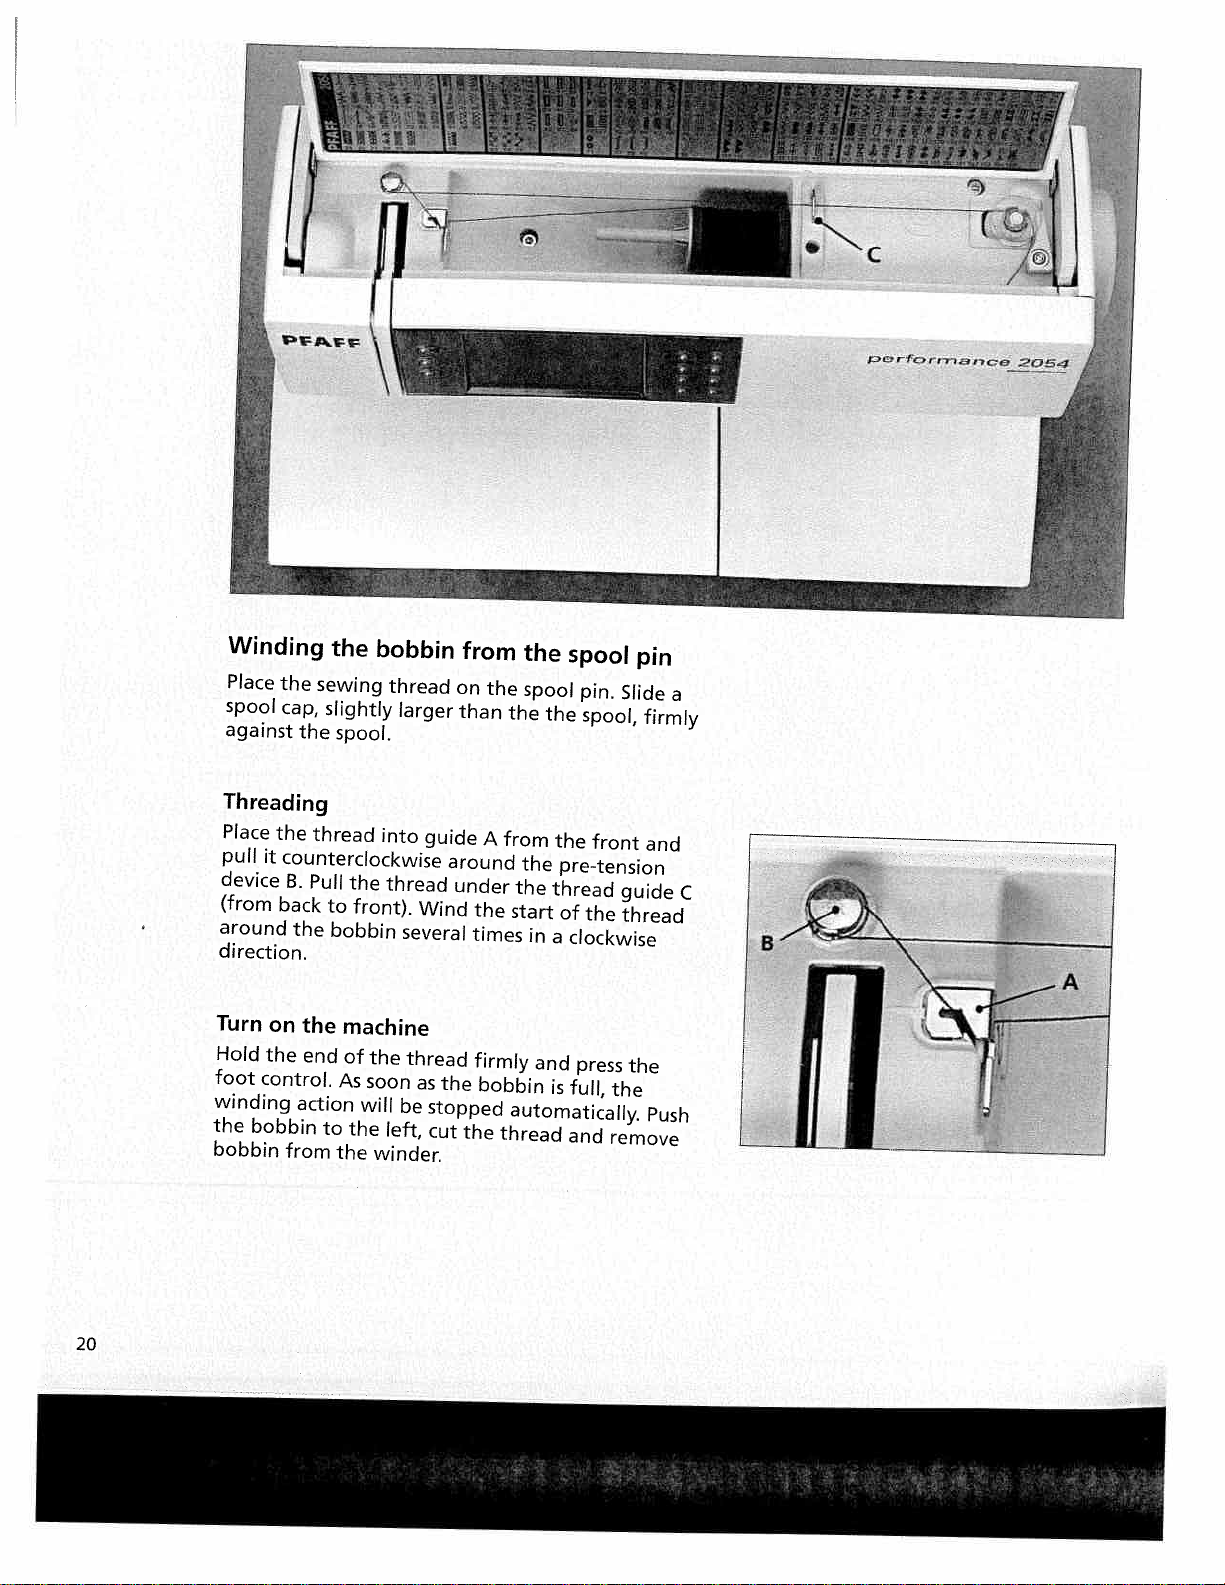
Winding
Place
the
spool
cap,
against
Threading
Place
the
pull
it
counterclockwise
device
(from
back
around
direction.
Turn
on
Hold
the
foot
control.
winding
the
bobbin
bobbin
from
the
B.
the
the
end
action
the
sewing
slightly
spool.
thread
Pull
to
bobbin
machine
of
As
to
the
bobbin
the
front).
the
soon
will
the
winder.
thread
larger
into
thread
several
thread
be
left,
guide
around
under
Wind
as
the
stopped
cut
from
on
than
the
times
firmly
bobbin
the
the
A
from
thread
the
spool
spool
pin.
the
the
spool,
the
front
the
pre-tension
the
thread
start
of
the
in
a
clockwise
and
press
is
full,
automatically.
and
pin
Slide
firmly
and
guide
thread
the
the
Push
remove
a
C
20
Page 21

r,fcrn,?O5a
E
F
F
F
FR
RR
Winding
Insert
the
Threading
Thread
Turn
on
Hold
the
control.
action
the
winder.
will
bobbin
as
the
end
As
from
second
shown
machine
of
soon
stop
automatically.
to
the
on
the
as
the
spooi
page
thread
the
left
second
pin
24.
bobbin
and
remove
in
the
firmly
is
Cut
spool
hole
and
full,
the
bobbin
pin
provided.
press
the
winding
thread,
the
from
foot
push
the
Page 22

Bobbin
Open
the
swinging
door
bobbin
it
open
door
towards
Taking
at
the
left
the
side
front
Lift
and
machine.
the
the
pull
empty
out
latch
the
Release
bobbin
the
of
the
bobbin
bobbin
bobbin
case
the
latch
out
of
out
the
case
case
of
and
bobbin
the
take
case.
Inserting
Insert
case.
When
through
spring
(see
arrow),
Check:
When
must
turn
Inserting
Lift
latch
fully
onto
Opening
face
upwards.
check:
Pull
bobbin
case
the
slot
B
until
clockwise.
the
E
pin
D
the
must
the
full
doing
you
and
of
bobbin
bobbin
bobbin
A,
then
it
rests
pull
bobbin
push
of
C
the
not
fall
so,
pull
under
in
the
thread,
the
the
bobbin
thread
out
in
the
the
the
case
bobbin
sewing
case
sharply.
of
the
bobbin
thread
tension
opening
the
bobbin
case
hook.
must
The
hook.
A
-B
22
Page 23

!
pFAFF
4
Setting
Set
the
using
the
The
normal
decorative
the
required
markings
setting
stitches,
needle
amount
thread
on
the
for
sewing
darning
the
of
tension
and
tension
needle
dial.
4
-
5.
is
buttonhole
thread
For
using
sewing
tension
3.
EI
FH
Thread
For
sure
balanced
meet
The
Bobbin
fabric:
The
thread
The
Top
fabric:
The
thread
The
For
thread
fabric.
tension
the
best
the
needle
with
between
following
thread
needle
tension
thread
threadisvisible
needle
tension
thread
decorative
should
stitch
one
the
is
thread
is
tension
thread
is
tension
stitches
be
appearance
and
bobbin
another,
two
valid
visible
is
tension
too
loose.
must
tension
too
tight.
must
visible
fabric
for
be
on
be
and
on
and
thread
i.e.
the
layers.
general
on
the
is
too
corrected.
the
underside
is
too
corrected.
buttonholes
the
underside
durability
tensions
threads
sewing
top
tight
loose
side
or
or
the
evenly
work:
the
of
the
top
of
make
are
of
the
bobbin
the
bobbin
the
Page 24
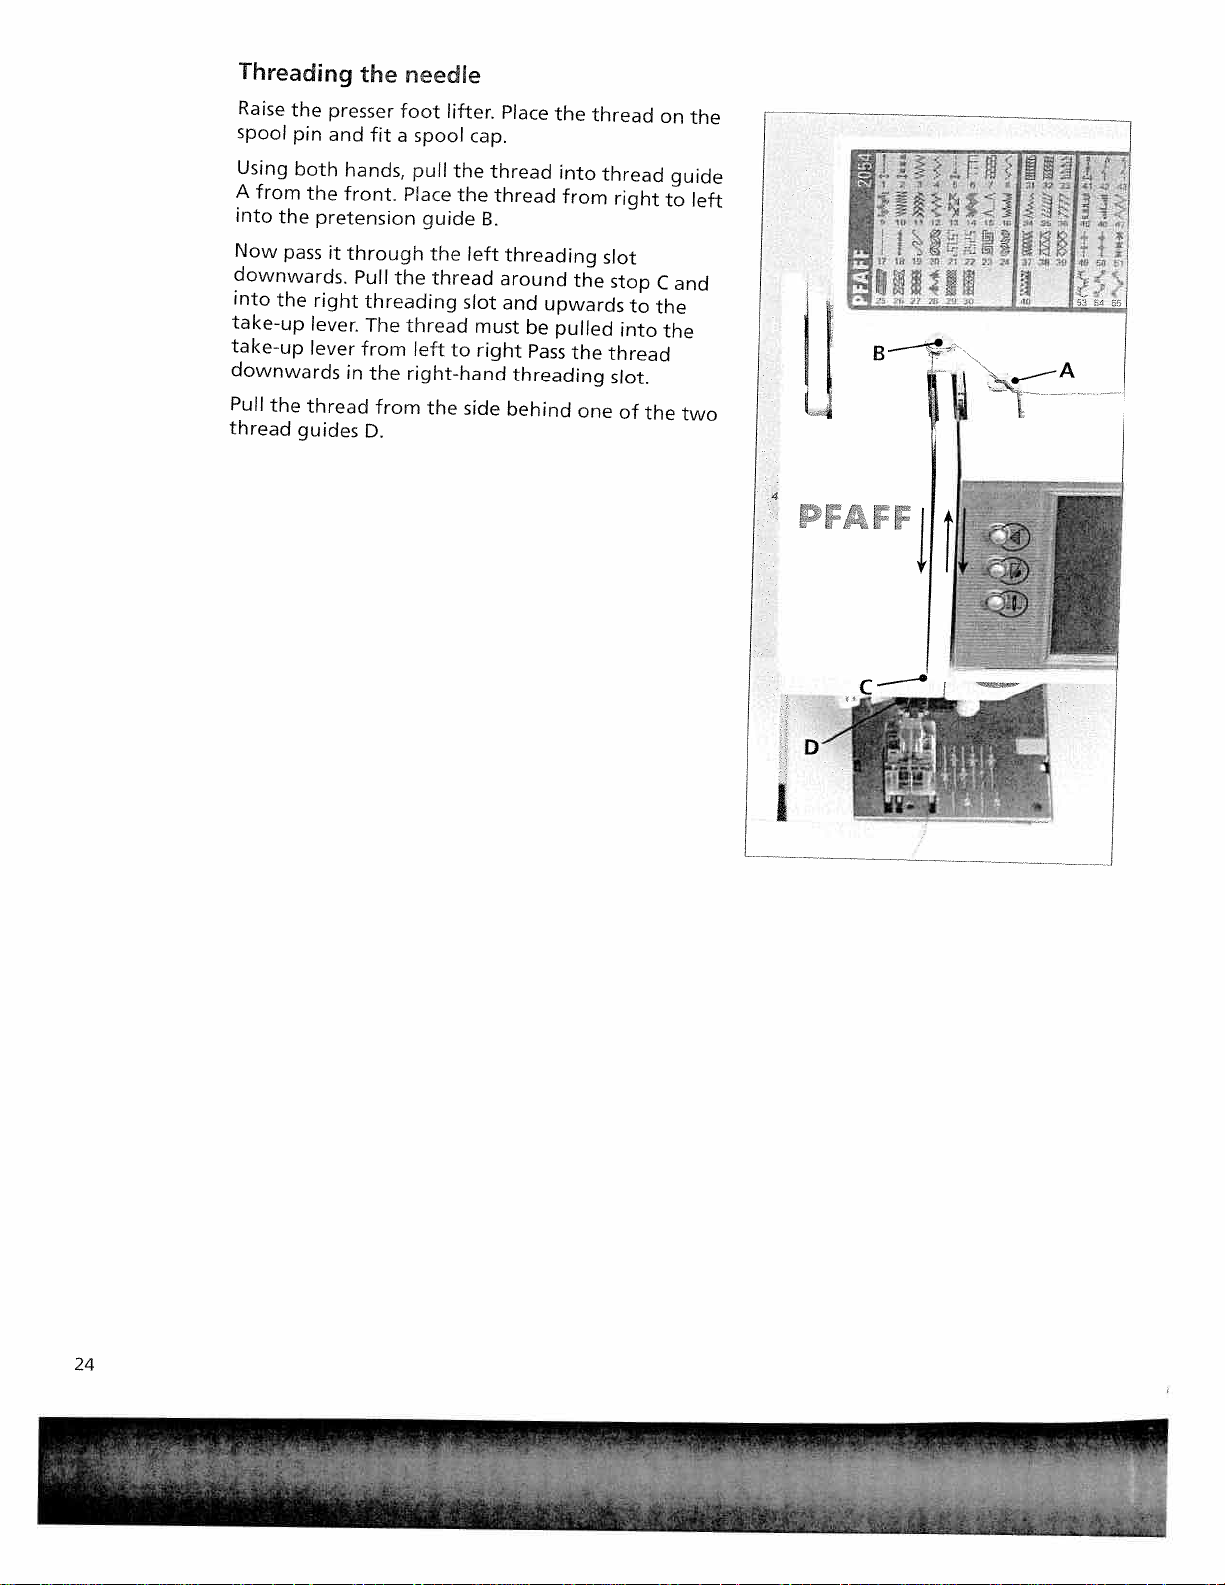
Threading
Raise
the
spool
pin
Using
both
A
from
into
the
Now
pass
downwards.
into
the
take-up
take-up
downwards
Pull
the
thread
guides
the
presser
and
hands,
the
front.
pretension
it
through
Pull
right
threading
lever.
The
lever
from
in
thread
D.
fit
the
from
foot
a
the
needle
lifter.
spool
cap.
pull
the
Place
the
guide
the
left
thread
slot
thread
left
to
right-hand
the
side
Place
thread
thread
B.
threading
around
and
must
right
behind
the
into
from
the
upwards
be
pulled
Pass
the
threading
thread
one
thread
right
slot
stop
to
into
thread
slot.
of
the
on
to
C
the
the
the
guide
left
and
two
TTTTT
[[7
I
I
!1LJ’
24
I
Page 25
-
—
—
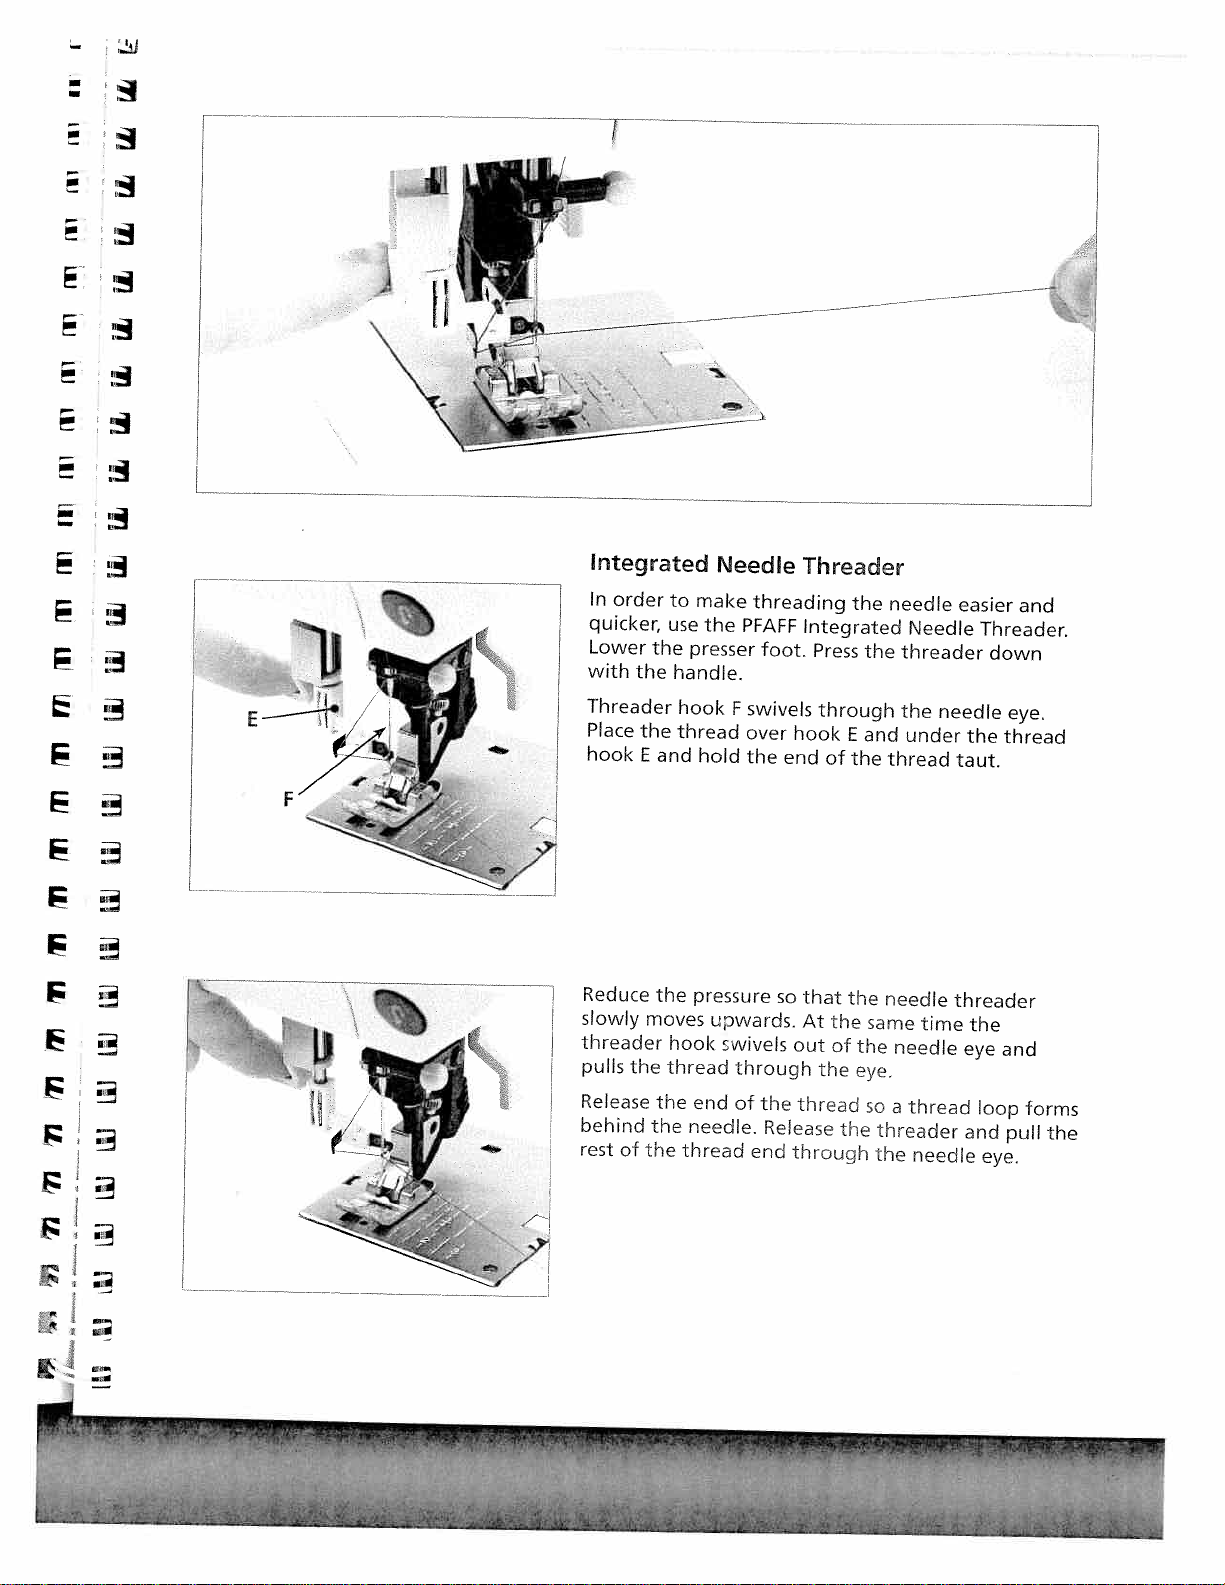
Integrated
In
order
quicker
Lower
with
Threader
Place
hook
the
the
E
the
and
to
make
use
the
presser
handle.
hook
thread
hold
Needle
threading
PFAFF
foot.
F
swivels
over
the
Threader
Integrated
Press
through
hook
end
of
the
E
the
the
and
needle
Needle
threader
the
under
thread
easier
needle
the
taut.
and
Threader.
down
eye.
thread
F
Reduce
slowly
threader
pulls
Release
behind
rest
the
of
the
moves
hook
thread
the
the
the
pressure
upwards.
end
needle.
thread
rvvivels
through
of
the
Release
end
so
that
At
out
thread
through
the
the
of
the
the
needle
same
the
eye.
so
threader
the
time
needle
a
thread
needle
threader
the
eye
and
loop
and
eye.
pull
forms
the
Page 26
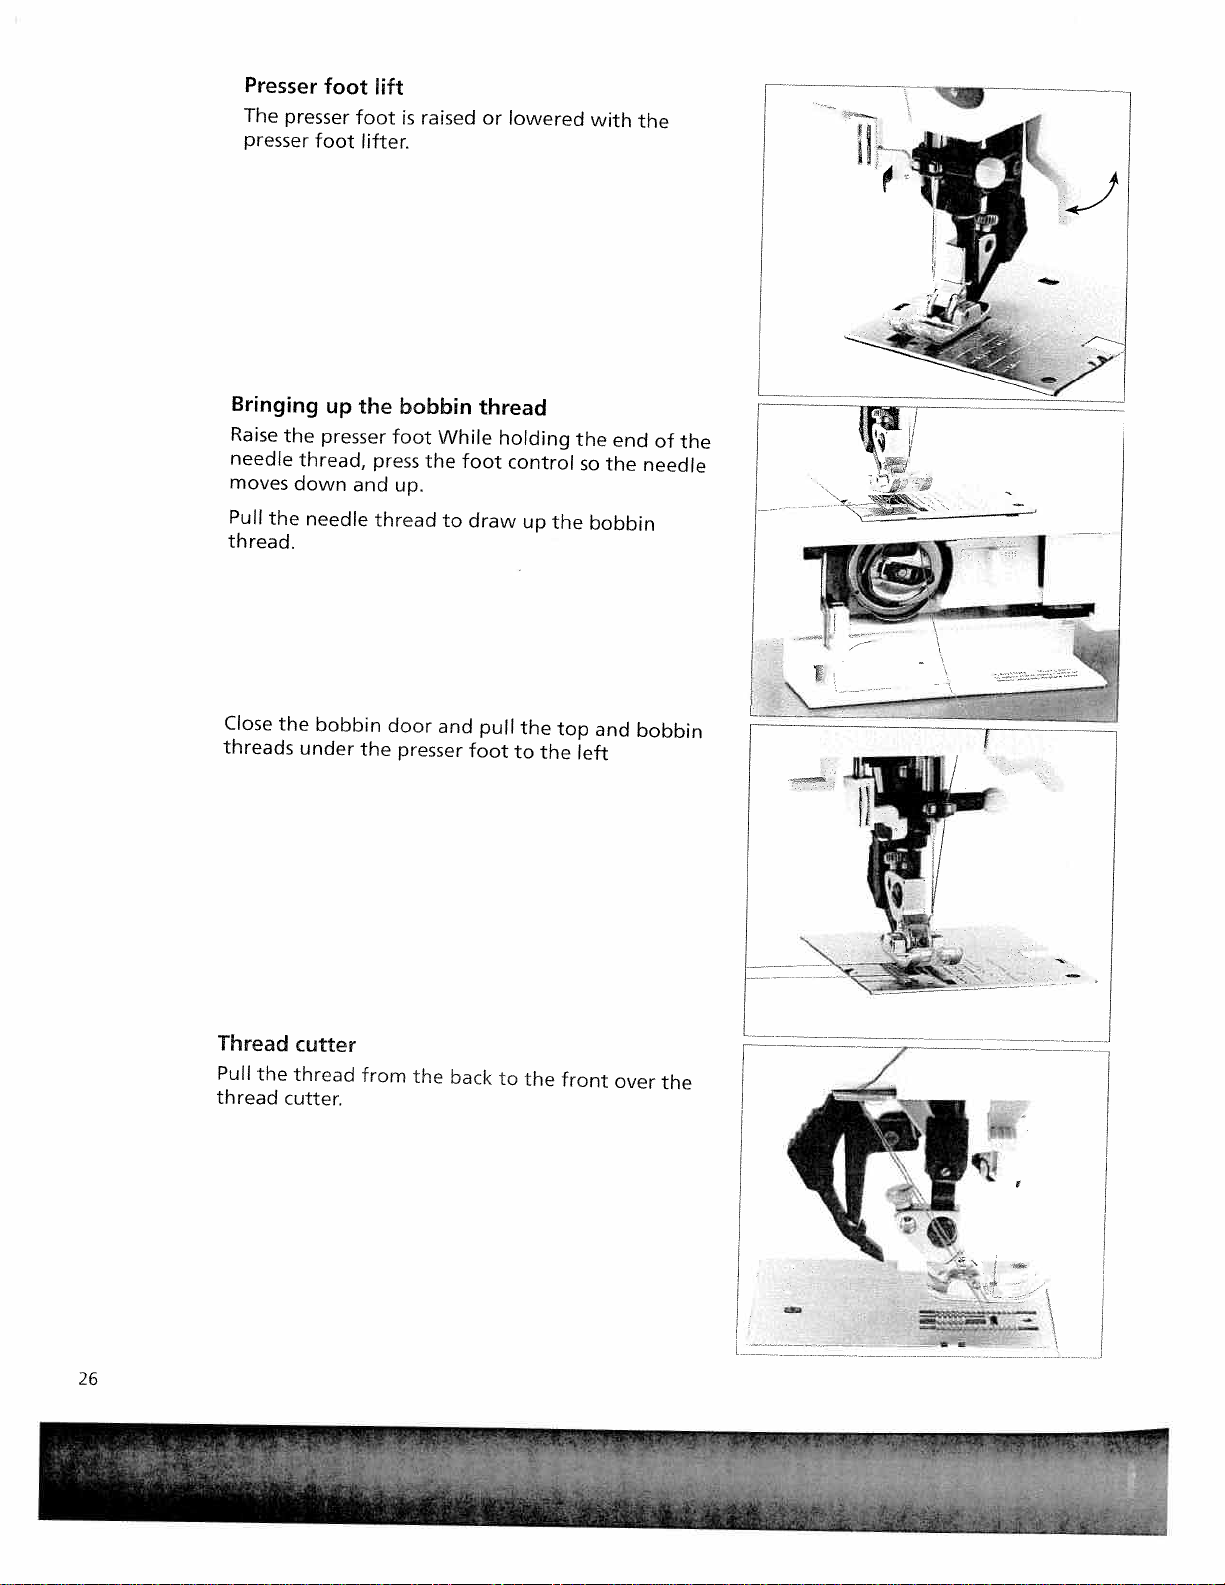
Presser
The
presser
presser
foot
foot
‘ift
foot
lifter.
is
raised
or
lowered
with
the
-‘-
Bringing
Raise
needle
moves
Pull
the
thread.
Close
threads
the
down
the
up
presser
thread,
needle
bobbin
under
the
and
the
bobbin
foot
press
up.
thread
door
presser
While
the
to
and
thread
foot
draw
pull
foot
holding
control
up
the
to
the
the
top
the
so
bobbin
and
left
the
end
of
needle
bobbin
the
ii
\
1
26
Thread
Pull
thread
the
cutter
thread
cutter.
from
the
back
to
the
front
over
the
V
4E
‘
4
Page 27
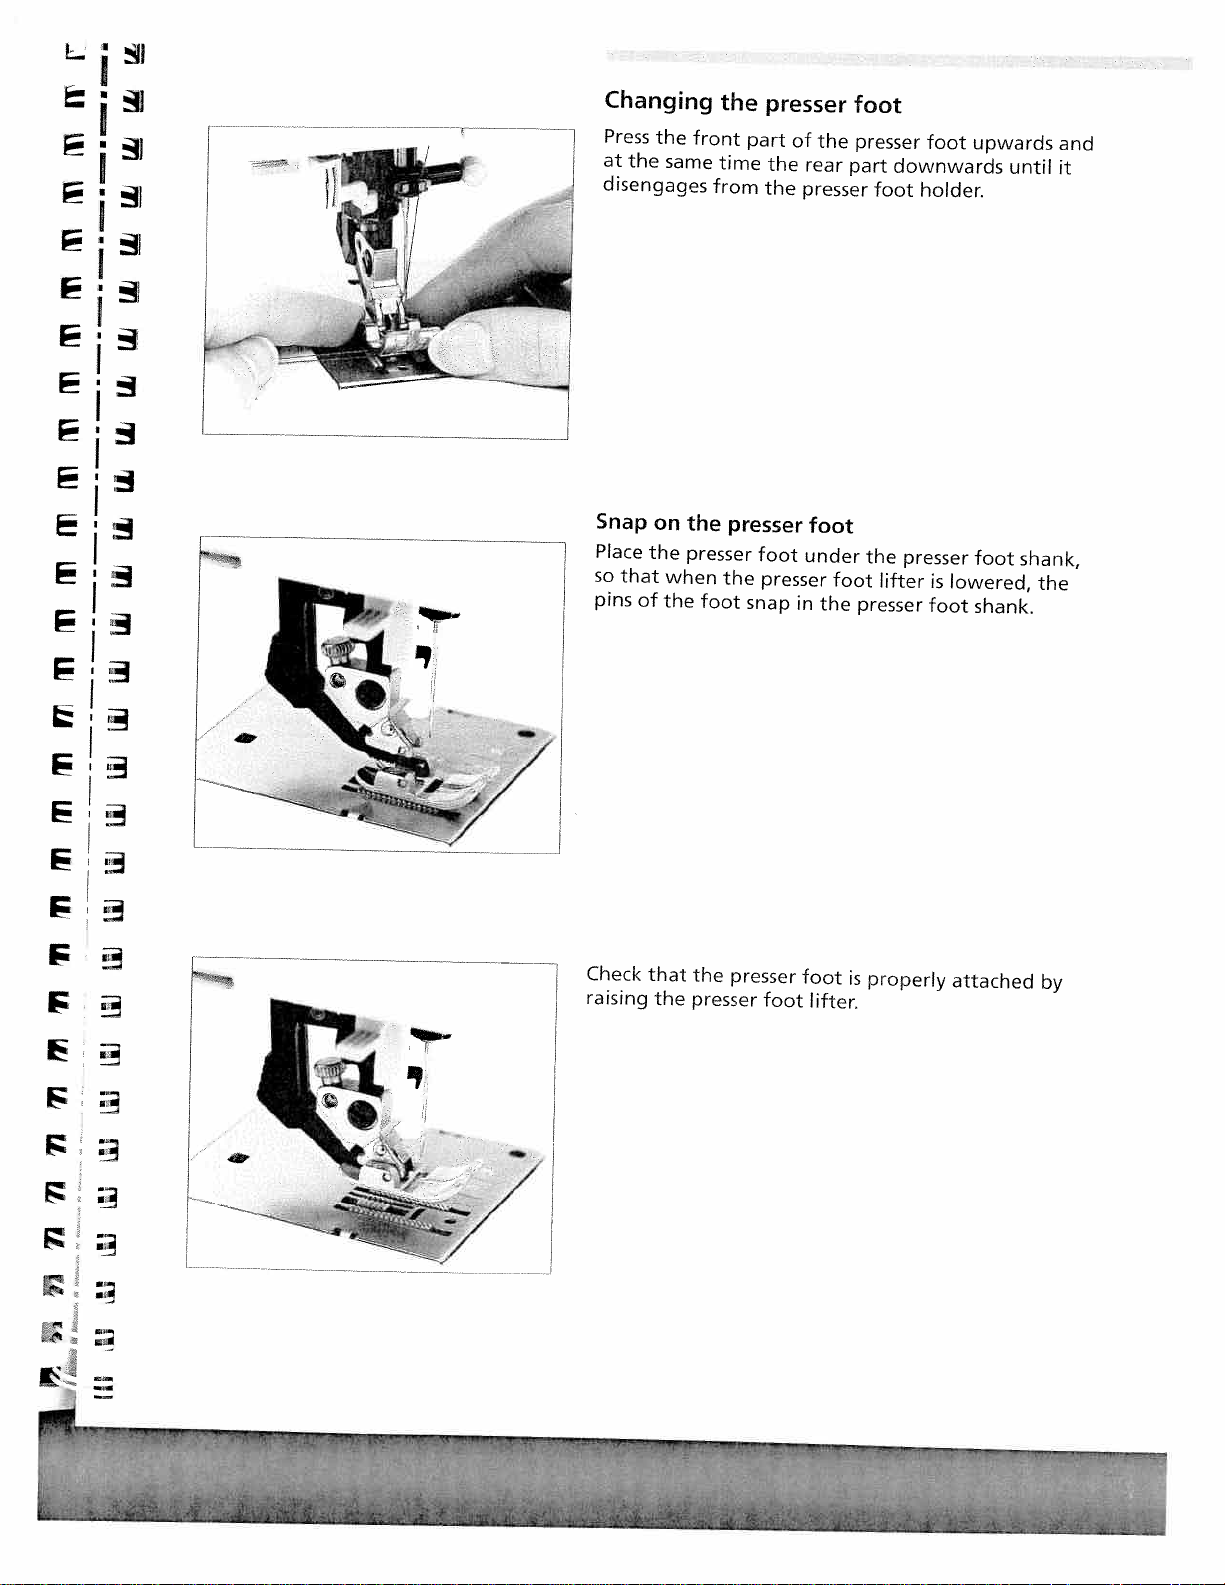
Snap
•
Place
so
pins
Changing
Press
the
at
the
same
disengages
on
the
that
when
of
the
the
front
time
from
the
presser
presser
the
foot
presser
part
the
the
foot
presser
snap
of
the
rear
presser
foot
under
in
the
part
foot
foot
presser
downwards
foot
the
lifter
presser
foot
holder.
presser
is
foot
upwards
foot
lowered,
shank.
until
shank,
the
and
it
11%
Check
that
the
presser
raising
.i
the
presser
foot
foot
lifter.
is
properly
attached
by
Page 28
L
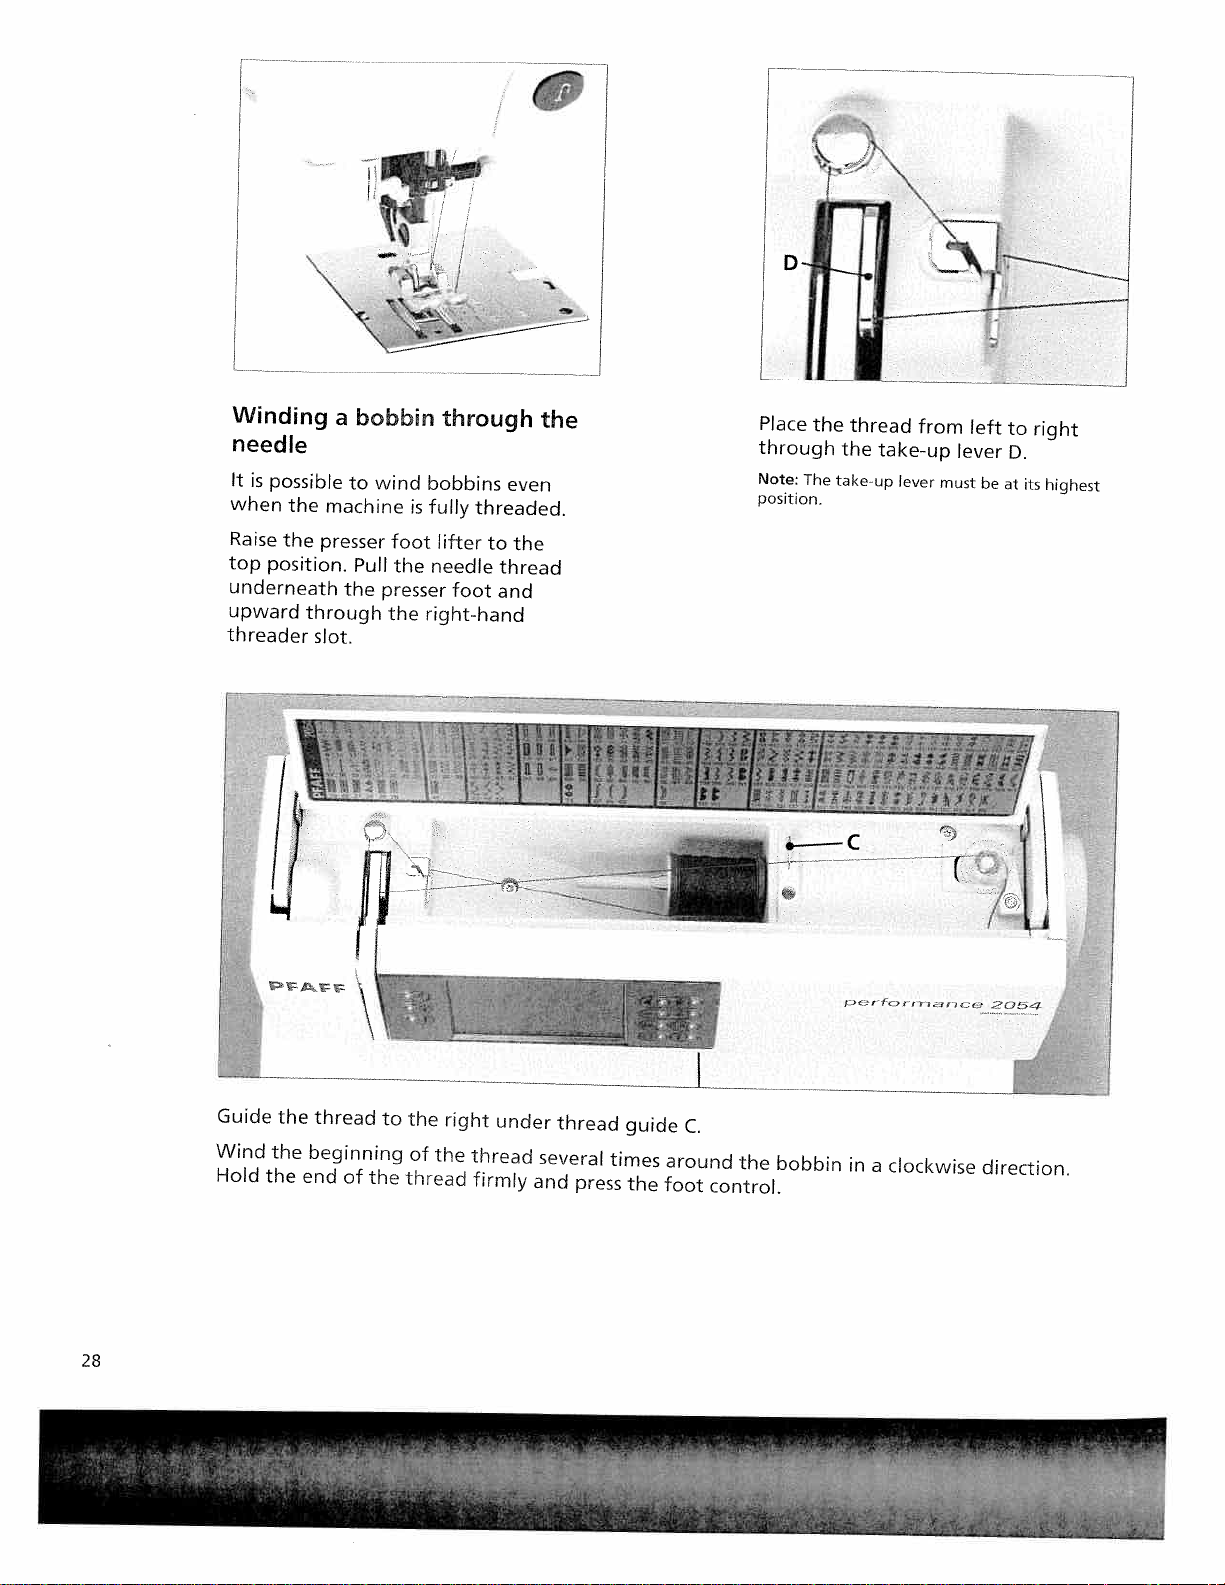
Winding
needle
It
is
possible
when
the
Raise
the
top
position.
underneath
upward
threader
a
to
machine
presser
the
through
slot.
—
bobbin
wind
foot
Pull
the
presser
the
-
through
bobbins
fully
is
lifter
needle
foot
right-hand
-—
even
threaded.
to
the
thread
and
—
—
the
—---
--—------—-———
Place
through
Note
posItion
—--
The
----—---
the
thread
the
take-up
from
take-up
ever
—
must
left
lever
be
at
to
D.
right
its
highest
$J(2
fCfl
rngnc(.
Guide
the
thread
Wind
the
beginning
Hold
the
end
28
of
the
to
the
of
the
thread
right
under
thread
firmly
thread
several
and
press
guide
times
the
C.
around
foot
the
control.
bobbin
in
a
clockwise
‘(jt,3
direction.
Page 29

F
Changing
Turn
off
To
remove:
the
needle
the
needie
downwards.
To
insert:
face
to
the
insert
the
will
go.
Hold
needle
screw
the
to
screw
The
rear.
needle,
the
machine.
Lower
its
flat
Lower
the
firmly.
need’e
the
highest
and
pull
side
pushing
needle
presser
position.
the
Aofthe
the
presser
it
and
foot
needle
needle
up
as
tighten
and
Loosen
out
must
foot
far
as
the
set
BA
and
it
F
F
F
F
F
F
ii
Threading
Replace
of
and
Continue
Pull
thread
Note:
thread
one
one
It
is
the
thread
the
not
the
sewing
on
each
thread
threading
needles.
possible
to
into
twin
needle
of
the
in
the
to
use
the
right
the
need’e
with
spool
usual
right
the
Integrated
side
a
pins.
of
manner,
guide
twin
When
tension
and
Needle
needle.
threading
disk
making
one
Threader
in
Insert
E.
sure
the
with
left
the
make
the
thread
twin
a
second
sure
threads
needle.
spool
to
do
guide
pass
pin
one
not
above
and
twist
place
thread
together.
the
to
needle,
one
the
spool
left
and
Page 30
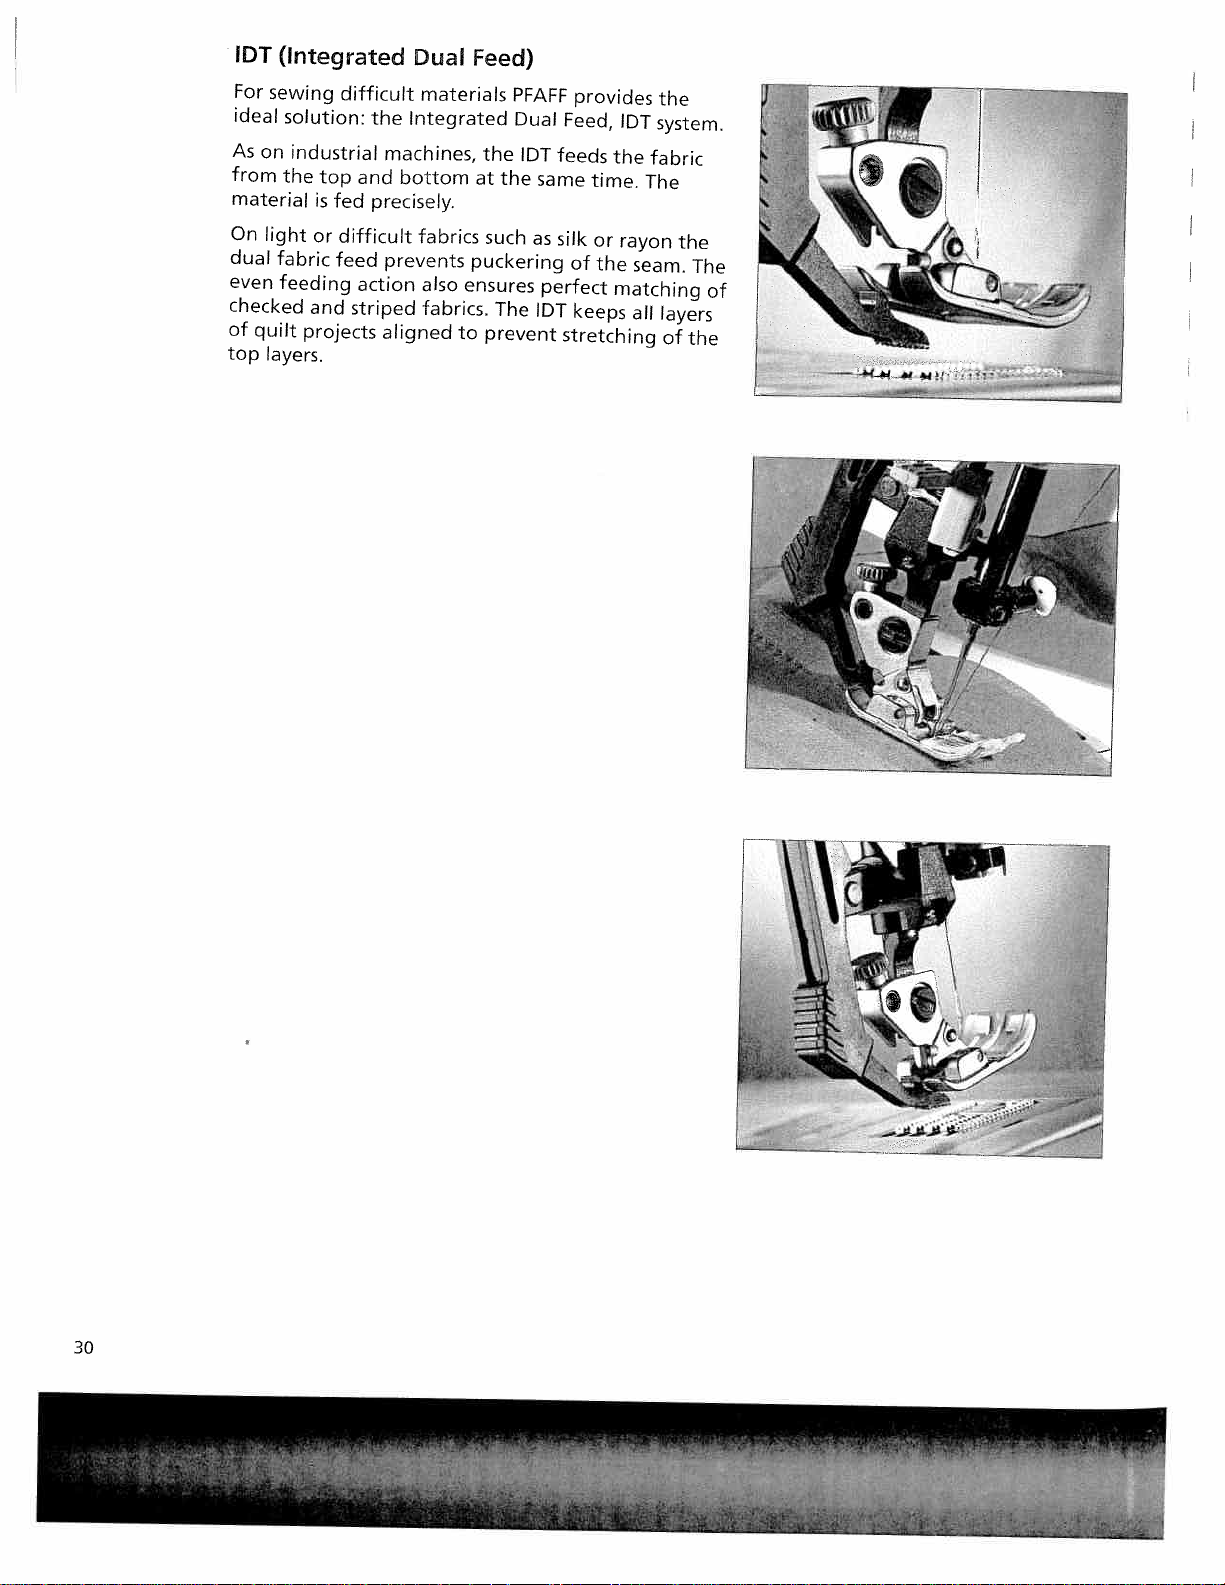
IDT
For
sewing
ideal
As
on
from
material
On
light
dual
fabric
even
checked
of
quilt
top
layers.
(Integrated
difficult
solution:
industrial
the
top
and
is
fed
or
difficult
feed
feeding
and
striped
projects
action
Duai
materials
Integrated
the
machines,
bottom
precisely.
fabrics
prevents
also
fabrics.
aligned
Feed)
the
the
at
such
puckering
ensures
The
to
prevent
PFAFF
Dual
IDT
feeds
same
as
silk
perfect
IDT
provides
Feed,
IDT
the
time.
or
rayon
of
the
matching
keeps
stretching
the
system.
fabric
The
seam.
all
layers
of
the
The
of
the
30
r
Page 31

Engaging
Important:
Dual
cut
out.
Raise
IDT
down
‘—
\
Feed,
the
the
For
use
presser
until
IDT
all
sewing
presser
foot.
it
engages.
feet
Press
with
with
the
the
the
black
IDT
center
-
Integrated
elbow
back
of
the
4jjE:
\
Stripes
to
Disengaging
Hold
the
black
Pull
the
IDT
and
release
and
the
even
down,
the
plaids
feed
the
elbow
IDT
of
IDT
then
slowly
match
the
of
the
back
perfectly
IDT.
IDT
away
upward.
with
due
two
from
fingers.
the
machine
Page 32

Lowering
For
certain
lowered.
Raise
the
To
bring
sewing
presser
the
the
feed
feed
work
foot
dog
dog
such
before
back
as
lowering
up
move
free-motion
the
the
slide
quilting
feed
to
dog.
the
or
Push
right.
darning
slide
the
feed
dog
has
to
be
A
to
the
left.
You
To
can
engage
also
14
the
lower
feed
the
dog
feed
move
dog
the
by
slide
opening
to
the
the
left.
hook
cover
and
-
moving
slide
H
B
to
the
right.
32
Page 33

i
I
1
Electronic
Your
Pfaff
lift
for
1.
Push
Note:
2.
Adjust
at
a
comfortable
If
you
•
Now
To
press
you
remove
knee
performance
regulating
the
knee
the
fiat
the
rectangular
the
can
guide
the
side
knee
knee
‘ift
the
lift
fully
must
height
the
lift,
presser
face
for
lift
fabric
pull
2054
into
upwards.
bar
to
the
foot
on
you.
with
it
provided
is
the
the
right,
gently
height.
provided
knee
the
both
out
with
hole
lift
presser
hands.
of
the
an
until
electronic
on
the
it
is
foot
hole.
machir
position
will
kn
raise
1.
ir
Ii
‘“‘
2.
0
‘3
Page 34

r1
--
Page 35

0
CD
U
—
0
I
CD
-o
SR
I.i
III
SI
0
3
n
CD
0
isa,
1”
i’
r’
ii
!Il
1fI
1
w
‘
4.
r
tt
‘I
t
(D
(D
z
€D
z
g3
(D
I
fP
4
I
Page 36

instructions
Pfaff
Turn
screen
menu,
menu
touching
Sewing
Touch
able
Touch
Pop-up
also
the
performance
on
your
to
stitch
is
visible.
the
functions
OR
to
select
esc
messages
close
the
foot
control.
machine
close
selection
appropriate
to
close
a
,
to
continue
messages
it,
Your
new
are
on
operating
andawelcome
Your
machine
menu,
Pfaff
for
the
a
window,
function.
without
closed
by
2054
is
sewing
performance
icon
on
machine
save
saving
simply
switching
your
always
menu
the
can
your
by
touching
on
screen
ready
2054
touch
be
individually
altered
any
the
appears.
to
or
stitch
is
operated
screen.
settings
settings.
the
function
Touch
sew
when
sequence
altered.
screen.
or
by
and
by
the
main
be
You
can
pressing
Function
::
Touch
or
Touch
Needle
Touch
in
to
you
manually
Yo
When
automatically
fabric
If
the
when
function
Press
Tip:
You
buttons
St[tch
Stitch
re-start
program
Sew
slow
Sew
up
that
slow
I
Needle
the
lower
position
set
whether
take
your
raise
ach[sembetween
you
press
icon
the
reverse
remains
again
can
pre
set
the
has
to
down
up
I
down
and
foot
the
presser
the
lowered
is
touched
button
active.
to
deactivate
presser
to
already
reduce
when
how
off
the
foot
again.
foot
return
sewing
to
far
foot
foot.
“No”,
contro
the
is
touched.
height
been
set
you
the
This
the
to
the
the
stop
presser
control.
“low”=3
again,
allows
needle
function.
in
the
start
started.
to
half
needle
sewing.
goes
But
context
foot
The
the
you
the
of
speed.
to
mm,
presser
to
menu.
a
stitch
automatically
A
window
is
raised
basic
setting
“medium”=6
foot
to
pivot
the
up
position,
needle
See
down
page
sequence
stop
opens
when
is
to
mm
is
turn
the
xx-yy
—
36
Page 37

F
F
F
F
E
Reverse
This
button
e
If
•
•
•
•
•
•
•
•
EE
Touch
for
action
selection
been
Info:
page
Touch
adjust
you
reverse
For
the
When
on
the
If
you
initiated
In
the
determine
you
If
determine
These
Selection
Sewing
numerical
Fonts.
been
Stitch
Function
Main
selection
I
I
I
I
I
I
I
sewing
has
press
for
permanent
machine
the
function
touch
have
via
Patchwork’,
the
are
programming
the
buttons
menus:
menus:
order.
Moves
actively
sequence:
field
has
added
actively
If
more
by
page
stitch
parameter
them
with
menu
this
button
several
this
button
as
long
reverse,
sews
screen.
activated
this
button.
length
length
Scrolls
Selects
the
stitch
selected.
Moves
been
to
selected.
than
one
with
field
buttons
the
to
of
all
stitches.
button
functions
as
you
in
reverse
is
activated,
the
“Tapering’
of
of
have
the
sequence
the
selected
stitch
information
this
buttons.
icon
Function
switch
while
sewing,
keep
press
this
until
tie-off
the
seams
the
length
the
buttonhole
several
by
column
next
stitch
for
sequence
or
stitch
field
back
the
button
the
button
you
press
reverse
a
program,
and
“Darning’
with
this
ofabuttonhole,
seam
functions
or
by
or
the
previous
cursor
sequence
changing
step
after
page
balance
buttons.
by
after
the
is
step
machine
pressed.
before
the
sewing
tie-off
button.
with
page
to
the
cursor
stitch.
a
preview
available,
on
to
sews
starting
button
arrow
at
the
programs,
you
this
select
stitch
input
after
Stitch
field
you
the
display
the
main
in
in
to
agair
appe
end
buttc
stit
a
field
the
ha
scr
rn
s
i:
ye
0-9
Opens
More
Opens
selected
Info
Opens
Touch
Touch
Button
the
stitch
options
the
more
stitch.
button
information
this
button
and
hold
selection
button
options
Context
I
the
or
to
context
open
button
by
window,
menu
the
until
number.
for
menu.
info
the
processing
menu.
contex
menu
modifyin
or
opens.
Page 38

Sewing
The
1.
2.
selecting
3.
Function
The
indicates
field
appear
Icon
m
+
Actively
sewing
Status
It
is
always
changing
Action
sequence
figure
appears
status
Inactive,
Active,
Active,
menu
menu
bar,
a
field,
the
and
field
in
the
when
the
but
the
selected,
is
where
active
sewing
where
action
changing
with
the
selected
in
the
the
function
can
not
function
divided
the
and
function.
the
field
function
upper
function
be
can
the
into
activated
is
automatically
chosen
activated
is
a
stitch.
buttons
left
corner
stitch
number.
field.
button
cannot
unactivated.
be
unactivated,
function
three
sewing
stitch
is
pressed.
be
selected.
is
selected.
sections.
is
by
and
of
the
In
More
functions
updated
displayed.
touching
parameter
function
Sequence
options
are
by
selecting
In
the
the
setting.
field
a
preview
window
shown.
stitch
screen
or
for
Aftering
OFor
buttons.
moves
left
in
Stitch
with
Stitch
pattern
Pattern
stitches,
increase
buttons.
Balance.
the6
Density.
edges
changing
the
straight
There
to
the
nine
width.
the
EZ
length.
with
scallop
or
buttons.
change
and
buttonholes,
the
stitch
stitch.
are
right
positions.
You
buttons.
You
the
length.
stitches
reduce
Fine
tune
the
patternlength
settings
Move
19
in
can
can
For
decorative
the
your
stitch
the
needle
nine
positions.
change
change
buttons.
and
length
stitch
with
or
needle
positions
the
the
stitches,
some
of
the
balance
density,
the
—Z
buttonhole
-
stitch
length
utility
stitch
of
positions
available.
The
needle
width
buttonholes,
stitches.
with
with
satin
buttons,
length
with
(max
(max
6
You
the
stitches,
without
the
+
The
moves
mm)
scallop
9
can
Lz.
needle
to
mm)
of
satin
the
the
38
Page 39

Side
side.
-
End
m
This
sequence
“m+”
An
adjustment
can
also
change
occurs
If
you
settings.
at
exit
to
Each
to
icon
icon.
be
takes
the
a
For
side
mirroring.
stitch
end
mirroring.
stores
menu
is
adjusted
place
next
screen,
aving
is
mirrored
the
stitch
appears
reflected
during
immediately,
repeat.
the
stitch
the
basic
Mirror
Mirror
immediately
stitches
individually.
stitches
in
stitch
a
automatically
sewing.
with
settings
settings,
With
all
are
pre
and
end
to
sequence.
by
actively
on
the
some
other
reset
set
itincontext
sequences
end.
The
selecting
screen.
Utility
stitches
to
the
side
stitch
All
settin
stitches
the
default
ment
to
ft
ft
chan
F
F
F
E
F
F
More
By
functions
functions
displayed
Icons
Ok
esc
{.
options
touching
in
OK.
saved.
window
further
Closing
modified
Tie
off
four
stitches.
usually
button
Tie
off
four
stitches.
end
function
Raise
at
the
automatically.
raised
If
the
raised
button
The
Needle
for
that
in
the
The
You
or
settings
without
at
after
is
touched.
at
presser
start
10.5
•
at
the
for
you
iEE
processing
can
the
status
More
More
can
also
another
settings
start.
This
a
new
end.
The
Touch
The
foot.
of
the
If
mm
when
and
end
is
pressed.
up
down
I
sewing
can
be
selected
bar.
options
options
press
dialogue
can
be
saving.
being
The
start
icon
stitch
end
the
machine
The
seam
this
function
icons
of
the
call
or
modifying
window
window
the
made.
You
saved.
of
is
only
is
of
the
Reverse
ties
machine
and
the
machine
are
seam
overrides
upadialogue
the
are
visible.
closes
foot
control.
window
close
a
window
the
seam
active
selected
raise
is
selected,
or
seam
button
off
will
it
active,
pattern
the
at
or
or
and
lower
at
stops.
the
Raise
the
window
stitch.
Selected
and
The
remains
or
stitch
the
start
when
stitch
to
trigger
stops.
end
the
presser
presser
when
presser
all
without
the
is
the
the
with
Only
functions
settings
More
open
is
tied
of
a
Stitch
tied
the
presser
of
the
foot
foot
Reverse
foot
furth
sewing
are
options
so
that
the
off
seam
re-stE
off
with
Tie
foot
seam
is
is
only
functi
are
wit[
an
off
alv
Page 40

Free
lowered
on
the
motion
automatically
foot
control.
sewing
When
to
the
activated
free
motion
the
presser
position
foot
by
is
stepping
Single
single
single
status
seam
Touch
the
number
screen.
Twin
width
It
remains
after
Touch
This
needle
pat
Programmable
length
length.
Press
it
will
sewn
this
function.
stitch.
stitches.You
stitch.
bar.
Tieoff
or
stitch.
)
needle
of
your
active
the
machine
the
icon
function
from
for
joining
the
reverse
be
tied
in
your
Pattern
The
a
little
of
repetitions
safety.
stitch
even
again
must
the
machine.
seam
button
off.
specified
and
can
also
number
automatically
is
longer
With
in
order
after
has
been
to
be
switched
length
together
All
subsequent
length
of
and
with
a
switched
switch
several
when
stitch
define
repetitions
window
a
c÷
this
function,
to
use
stitch
off
off
function.
you
seams
until
sequences
number
a
are
performed
appears,
confirm
a
twin
has
been
off
and
the
function.
when
Specify
pieces
reach
your
are
pat
is
pressed
can
displayed
you
needle.
changed,
you
of
fabric
now
be
sewn
of
stitches
at
the
to
by
touching
reduce
back
on
remove
particular
a
of
desired
automatically
to
deactivate
as
in
end
change
the
including
again.
the
equal
length,
as
the
of
twin
seam
a
the
the
It
Symmetrical
starts
mm.
IIi:
Symmetrical
starts
button
.
Asymmetrical
stitch
9
mm.
Dkt
Asymmetrical
starts
button
with
at
is
starts
at
is
0
(max)
touched.
with
(max)
touched.
tapering
mm
tapering
9
mm
tapering
0
tapering
9
mm
and
mm
It
It
and
stops
and
stops
(increase).
becomes
(reduce).
tapers
with
(increase).
and
becomes
(reduce).
tapers
with
wider
The
to
the
The
to
the
The
width
0
mm
needle
The
wider
0
mm
needle
width
until
width
width
it
when
in
until
when
in
of
reaches
of
the
the
of
of
the
the
the
the
it
the
zigzag
reverse
lower
the
reaches
zigzag
reverse
lower
zigzag
(max)
zigzag
position
stitch
9
stitch
position
(max)
stitch
40
Page 41

The
When
selection
the
menus
Welcome
screen
turned
is
off
the
main
menu
appears.
Note.
if
you
point,
this
opens.ifyou
more
the
machine
press
corresponding
the
press
the
the
starts
foot
foot
to
control
sewing
control
sew.
once
once
menu
at
UtiHty
stitches
Stitches
This
menu
a
variety
OVerCastrng
Stitches
This
menu
overcasting.
The
closed
overcasting
Antique
Stitches
This
patch
41
menu
quilting.
Crosstitches
1
-30
provides
sewing
31
-
provides
overedge
quift
-55
provides
40
in
one
stitches
selection
a
techniques.
selection
a
stitches
operation.
selection
a
stitch
of
all
of
stitch
canbeused
of
quilt
types
types
for
stitches
that
suitable
joining
suitable
you
and
can
for
for
use
qraz
fc
Stitches
72
-89
Pre-programmed
borders.
lndividual
designs.
Decorative
This
menu
They
are
sub-divided
stitches
includes
selection.
Hemstitches
Stitches
90
Scalloped
clothing.
Stitches
100-
allow
-
99
edging,
113
cross
cross
a
stitches
stitches
selection
into
four
you
to
for
sewing
allow
of
different
create
you
allow
you
decorative
heirloom
decorative
to
create
to
program
stitches.
categories
stitches.
edges
traditional
your
for
ease
on
table
owr
of
liner
Page 42

•
Satin
stitches
range
home.
Stitches
•
Decorative
which
ideal
for
three-dimensional
Stitches
Animal
garments.
Stitches
Buttonholes
of
options
114-
can
be
decorative
167
stitches
134-
have
133
stitches.
sewn
-188
which
195.
three-dimensional
a
for
embellishing
Stitches
individually
borders.
decorative
are
floral
are
especially
134-145
to
Stitches
stitches
patterns.
look
garments
are
create
146
which
Stitches
suitable
or
leaves
larger
-
166
can
for
that
items
are
189
offer
for
and
flowers
motifs.
pictorial
be
combined.
-
195
childrens
a
They
are
wide
the
are
or
Stitches
This
menu
and
one
designed
Darning
Stitches
This
menu
various
plackets/slit
The
fully
areas
and
Alphabets
This
menu
upper
Stitch
In
this
and
sequence
menu,
stitches.
56
-
64
provides
program
for
and
bartacks
65
-
71
provides
different
and
automatic
darning
provides
lower
you
a
specific
attaching
case
can
a
selection
for
sewing
a
selection
bartacks
darning
tears
a
selection
letters,
create
on
application
are
for
belt
programs
or
small
of
numbers
sewing
of
8
different
buttons.
and
of
bartacks,
reinforcing
loops.
holes.
various
sequences
fabric.
are
and
Each
darning
pocket
for
fonts.
symbols.
buttonhole
buttonhole
stitches,
corners,
repairing
One
font
from
the
styles
style
The
skirt
damaged
includes
machine’s
is
42
Page 43

0
C,,
r
DCD
-
0
0
-n
I
B
0
n
CD
cr
ml
I
1..
LI
J
Page 44

Selecting
There
are
a
several
stitch
waystoselect
a
stitch.
B
Selection
Touch
This
sewing.You
buttons.
You
stitch.
visible.
All
In
numerical
Touch
You
the
To
“Utility
category
can
When
stitches
this
menu,
“All
can
L
select
Selection
by
can
touch
order.
stitches”
browse
buttons.
stitch,
a
by
category
stitches”.
contains
browse
any
stitchtoselect
you
open
selection
all
stitches
in
through
touch
number
30
the
the
the
stitches
one
are
main
the
column
screen
displayed
menu.
menu
icon
for
that
atatime
and
it
the
one
that
are
open
most
one
page
suitable
important
after
stitch.
for
with
the
the
screen
another
atatime
utility
for
settings
in
pressir
by
that
an
B
B
B
B
B
B
B
B
B
B
Touch
Enter
delete
The
three
that
does
“Invalid
The
pop
Direct
When
pressing
through
Exiting
•
The
touching
•
Scroll
•
Touch
stitch
the
digits
not
stitch
up
selection
sewing
in
a
the
the
sewing
a
main
with
the
button
number
button
entered,
are
exist
number!”
message
fE
stitches
menu
(
the
number
open
to
deletes
is
entered,amessage
is
closed
menu,
buttons.
in
numerical
to
and
they
a
different
You
the
confirm
are
when
menu
can
twice.
arrow
called
be
buttons
selection
the
can
up
(ZZ.
button
selection
by
right
deleted
the
stitch
scroll
order.
again
by
touching
hand
from
displayed:
is
display
can
back
any
at
number
digit.
the
is
be
and
time
menu.
ok
more
If
left.
touched.
selected
forwards
by
than
Ifastitcl
by
Page 45

The
Context
Adjust
settings.
screen
All
Open
this
Press
If
subordinate
being
The
Windows
with
“context”
the
button
this
the
Context
saved.
functions
the
basic
contrast.
settings
You
can
Info
to
button
window
for
altering
various
menu
calibrate
Machine
menu
open
again
menu
in
the
icons
of
the
is
is
your
in
the
the
Settings
pressing
by
Context
close
to
closed
open,
Context
basic
the
machine,
touch
are
menu.
the
with
menuisclosed
the
settings
context
such
screen
not
the
menu.
the
menu
main
as
“Language”,
and
available
button
button
or
functions
menu.
adjust
from
Press
when
without
are
the
all
or
stitch
touch
menus.
and
a
settings
opened
hold
Language
In
this
menu,
performance
the
language
Audio
Different
when
You
an
can
icon
signal
screen
choose
and
Calibration
If
you
want
possible
There
1.
Touch
In
circle.
Fix
The
2.
If
you
Calibration
are
Context
“Calibration”
the
upper
Touch
the
two
calibration
When
press
to
(available
you
2054.
of
(available from
audio
signals
messages
to
one
to
adjust
do
it
two
possible
menu
left
the
following
display
switching
the
screen
from main
can
select
the
Touch
your
have
for
here.
(available
corner,asmall
area
opens
the
choice.
canbeheard when
appear.
two
pop-up
the
in
inside
on
button
messages.
sensitivity
ways
from
the
context
the
points
closes
the
as
automatically.
menu)
language
“Language
all
menus)
different
to
open
main
machine
circle
larger
the
same
after
finished
machine
you
switch
signals:
of
the
the
menu)
appears
circle
way.
of
your
selection”
you
touch
One
touch
screen
Calibration
settings
in
a
to
fix
calibration.
the
machine
Pfaff
icon.
when
screen.
menu.
larger,
the
icons
it
first
on
Touch
or
you
touch
is
flashing
point.
the
44
Page 46

Contrast
Adjust
available.
the
(available
touch
from
screen
all
so
menus)
the
graphics
are
easy
see
to
the
in
hg
F
E
F
F
F
F
F
Touch
Adjust
touchscreen.
close
Revert
pattern-
If
message
“Do
restore
Pattern
You
settings
(“custom
Show
You
toggle
Selection
Touch
diffrent
1.10memory
2.
the
you
can
can
memory
5
the
the
it
and
to
and
‘Revert
appears:
really
the
parameter
specify
are
setting”).
keyboard
specify
between
view
the
button
stitch
contrast.
contrast
Touch
save
original
sequence
to
want
original
whether
to
be
how
sequence
view,
view,
with
the
the
settings.
settings
menu)
original
to
settings?”
(available
discarded
“Do
(available
to
basic
(available
“Selection
memory
graphical
contrast
delete
not
choose
and
menus.
the
E.
(available
settings”
from
your
pattern
(“Back
save”
from
keyboard
from
view”
number
preview
use
or
window
iconistouched,
all
the
pattern-
to
is
the
alphabet
letters
view.
sequence
to
changes
default
in
toggle
are
of
the
outside
from
and
standard
menu)
the
select
showed
the
arrows
the
main-,
pattern
have
you
and
sequence
/orsewing
setting”),
setting.
“Alphabets
menu)
between
(Ml,
memories.
on
arrows
the
the
selectic
followirn
made
menu)
paramete
or
savec
menu”,
the
two
M2..).
to
ai
presserfoot
Raise
p
p
p
You
can
pre
set
the
following
“Display
Option
menu)
You
1.
the
You
2.
message
An
X
functions
All
specify
position
window
for
can
machine.
can
in
the
messages
switch
specify
appears.
icon
are
(available
that
every
positions
selection”is
off
whether
means
active
the
time
are
(available
the
that
as
from
presser
the
available:
the
messages
the
the
standard.
main-,
raises
needle
standard
from
that
machine
function
pattern-
automatically
down,
setting.
main-,
pattern-
automatically
should
switched
is
and
stop
sequence
to
a
selected.
is
and
sequenc
appear
when
on.
m
certair
ii
a
Page 47

Machine
This
function
test
(available
is
for
Pfaff
from
certified
main
menu)
service
technicians
only.
Version
The
current
here.
Software
This
function
Wekorne
The
welcome
can
be
on
/
off,
The
setting
Delete
This
function
settings.
If
the
appears:
pattern
Deete
This
function
Deete
This
function
(available
software
updates
screen
deactivated.
the
welcome
is
all
(available
Use
with
“Deleting
“Do
sequences?”
parameters
all
stitch
is
for
screen
made
will
memory”
you
deletes
sequences
deletes
from
main
version
(available
Pfaff
(available
that
Touch
screen
when
from
reset
your
care!
want
to
(available
all
all
menu)
certified
from
appears
the
is
the
main
performance
icon
delete
changed
stitch
number
main
from
service
main
when
button
active
context
menu)
touched,
is
the
from
pattern
parameters
(available
sequences.
your
in
menu)
technicians
menu)
the
‘Welcome
the
if
menu
settings
the
pattern
selection
from
machine
machine
screen”
button
is
closed.
following
parameters
in
all
sequence
is
only.
is
switched
is
highlighted.
to
default
menu)
stitches.
select
shown
to
toggle
message
plus
a/I
menu)
on
nfo
There
you;itcan
The
sewing,
accessories
An
buttons
Touch
open,
withasecond
Depending
may
46
system
is
info
“info”
the
appear
an
system
using
text
to
first
Info
be
cahed
the
and
may
browse
close
to
touch
touch.
on
when
in
different
system
upatany
includes
sewing
settings.
extend
through
the
closes
you
function
information
functions,
over
the
Info
sysTem.
the
v.ays.
in
your sewing
orne
by
on
recommendations
sm’erai
pages.
if
Context
the
cfo
pressing
preparing
paces.
the
menu;
ourton
machine
the
Use
Context
the
the
to
button.
the
machine
regarding
the
menu”
“info”
information
is
help
is
also
closed
for
Page 48

information
if
you
press
gives
you
the
in
the
foflowing
the
main
button
information:
menu
the
in
main
menu
the
info
system
nreathng
Threading
0
Winding
Winding
inserting
Touch
Graphics
Press
the
the
Information
press
If
you
system
Needle
IDT,
For
darning
gives
size/type
recommended
tapering,
program
Information
When
is
different
open,
you
an
sewing
the
top
the
needles.
the
bobbin.
through
the
bobbin.
desired
and
text
buttons
about
the
you
the
recommendation,
patchwork,
there
in
the
press
the
information
functions.
thread.
the
area.
will
to
individual
button
following
presser
is
more
window
needle.
describe
through
scroll
when
information:
foot
buttonhole
more
a
options
button
function.
the
multiple
patterns
stitchisselected
a
engage
to
and
upper
sewing,
detailed
window
when
the
opens
with
pages.
in
the
sewing
or
disengage
thread
information.
More
quilt
tension.
stitches
options
information
the
mem
info
the
and
windo
about
eight
oresser
sdtch
decrease
increase
ZL
areas
foot
sewing
program
buffers
neon
j
Raise
L
Free
Singe
i
1’
Twin
pat
Patchwork
are
modon
neeJi
There
•-1
:
Tapering
Tapering
Press
the
to
choose
cc
sc:o
from:
through
muitice
gages.
j
Page 49

I
I
I
I
I
I
I
I
I
I
48
I
F
F
F
I
£
Page 50

iw
I”
Ls
m1
ii
rN
(II
‘i
ill
111
l1
Ill
Ill
II
v)
— —
-
LI,
(D
(D
lii
Ill
II
II
IJI
Ill
fI
! !
!
Page 51

St[tch
Your
performance
stitch
and
stitch
sequences
overwrite
Up
to
99
memories.
sequences
2054
word
sequences
are
delete
or
stitches
or
stored
it.
letters
offers
in
can
and
you
the
be
the
memories
remain
stored
possibility
of
the
in
each
in
of
machine.
the
memory
of
storing
the
until
50
The
you
AvaiabIe
These
This
By
pressing
functions:
These
now
Creating
n
sewing
a
touching
stitch
The
permanent
When
the
display
This
add
insert
Touch
to
menu.
to
To
main
Note:
Touch
sewing
sewing
the
set
stitch
a
menu
m
can
memory.
stitch
includes
the
stitch
a
exit
to
sewing
function
the
the
sewn
be
is
stitch
throu
call
to
stitch
functions
functions
key
function
sequence
each
display
immediately
saved
preview
a
sequence.
the
shiches
up
sequence
is
you
stitch
changes
to
insertion
In
depend
determined
set
can
the
for
be
can
to
seouence,
field
To
delete
hat
you
ann
menu
stitch
the
on
by
following
the
entire
saved
the
stitch
can
and
which
a
button,
wish
to
returntothe
stitch
the
the
stitch
in
a
later
shows
selected
touch
in
add
sequence
type.
stitch
sewing
sequence.
stitch
sequence
be
every
stitch
the
sewing
main
menu.
type.
sequence
display.
stored
next
touch
open
to
sequence.
in
stitch
by
a
m.
the
so
Page 52

Selecting
are
There
sequence.
Selection
1.
Touch
stitch
a
If
example,
another
various
number
by
open
to
selected
is
buttonhole,
a
stitch
ways
the
that
select
to
selection
cannot
message
a
another
number
by
used
be
displayed.
is
stitch
stitch
in
in
menu.
stitch
the
sequence,
for
Selection
2.
Touch
3.
Touch
ZE
Selection
i
categories
selected.
selected
The
parameters
Touching
position
the
inserted
can
stitch
4.
Selection
Touching
settings.
the
same
If
changed
be
selected
The
sewing
Touch
position
Ifastitch
arrow
or
more
by
to
to
with
stitch
and
m
of
stitch.
be
by
the
stitch
immediately.
functions
m
to
of
the
sequence
appears
preceding
Stitch
browse
category
by
open
stitches
sewing
inserts
the
The
chosen.
repetition
m
stitch
insert
cursor.
on
selection
the
the
appears
the
cursor.
preview
inserts
istobe
appears
be
can
the
extends
the
pages.
stitches
stitch
be
can
in
functions
stitch
The
field
the
saved
in
changed.
stitch
left
border
keys.
in
sequence
entered
preview
the
can
into
cursor
remains
same
with
preview
the
into
more
over
of
the
be
the
jumps
stitch
changed
the
the
preview
selection
stitch
in
a
field
changed.
stitch
to
active
once
field
action
one
than
action
field.
menu.
sequence
all
and
sequence,
the
end
that
so
with
more
settings,
all
and
following
field
display
field,
Only
can
specific
following
the
of
new
a
the
these
settings
width,
indicating
same
can
the
be
and
an
one
LJ
iI
i€j
L
•
,
JWIIYL
Page 53

Editing
The
sequence
action
Touching
sequence
selected
behind
Select
the
entire
sequence
the
cursor
If
border
further
a
field
is
stitch
the
the
horizontal
of
stitches.
stitch
can
is
active.
moves
be
to
can
selected
entire
sequence
is
moved
the
display,
sequence
only
Activate
the
edited.
changed.
be
stitch,
sequence
selected
is
or
backwards
indicating
edited
be
cursor
All
at
by
vertical.
when
action
the
to
settings
Another
cursor
the
pushing
is
it
an
that
the
field
position
the
and
stitch
itself.
the
possible
arrow
the
machine
by
sewing
can
button.
mirror
so
appears
sequence
is
touching
where
functions
be
in
consists
idle
it.
the
inserted
When
the
whole
right
the
and
of
of
the
the
Saving
When
you
performance
ec
closes
ok
opens
stitch
The
selected.
appears:
you
Do
Ok
saves
esc
closes
The
without
a
Stitch
exit
without
an
sequence
an
If
want
the
the
key
saving.
the
2054
empty
occupied
overwrite
to
stitch
window
closes
Sequence
sequence
Stitch
you
if
asks
saving.
memory
automdticdily
is
memory
sequence.
so
stitch
the
want
The
so
this
another
sequence
menu
to
menu
main
can
it
saved
s&ected,
is
memory?
memory
with
your
say
selected.
be
memory
opens.
an
if
the
can
your
,
sequence.
empty
following
be
selected.
selection
Pfaff
memory
message
menu
is
52
Page 54

,4
—
huon
dialog
a
sequence.
buttons
active,
are
button
memory
touched,
is
stitch
occupied
the
the
sequence
touched
is
window
If
active
are
preview
the
in
ready
in
menu
touch
again
open
and
an
is
saved
saved
selected.
selected
the
numberl)
touched,
opens
(stitch
display
“New”
except
to
main
the
opens.
the
with
it
empty
sequence
stitch
memory
in
opens
touched
is
field.
create
menu
Memory
button,
the
stitch
is
dialog
a
is
create
to
sequence
the
main
to
for
new
a
“More
sequence
shown.
deleted
is
“New”,
the
.
The
stitch
pressed,
is
is
1
or
touch
window
new
opened.
is
deleted.
and
menu
Open’
stitch
stitch
actively
the
options”
display
opens:
an
and
sequences.
a
1,
The
stitch
new
Stitch
is
‘Delete”
stitch,
“Stitch
another
selection
empty
The
memory
“New”
“Open”
“Delete”
a
sequence
already
stitch
a
menu
sequence
is
and
memory
a
sequence”
sequence
memory
straight
that
touched,
is
stitch
is
field
is
full,
opens.
displayed
keys
memory
buttons”
is
sequence
touched,
actively
is
touched,
Creatng
the
I
I
I
I
If
memory
and
sequence
stitch
The
straight
buttons
All
sequence.
Opening
the
I
If
stitch
the
selected.
select
To
“Stitch
button.
an
If
opens.
If
a
If
empty
If
preview
If
Page 55

Aphabets
You
can
fonts
and
All
fonts
disengaged.
and
numbers.
Touch
switches
letter
the
is
write
an
save
it
should
automatically
to
be
All
fonts
The
‘Alphabets’
be
sewn,
sewn
Script
it
sequence
with
include
font
icon
the
to
must
entire
permanently
and
be
in
the
upper
also
select
stitch
sewn
words
of
performance
the
IDT
case
include
sequence
in
using
integrated
letters,
lower
a
font.
the
stitch
special
case
The
menu.
sequence
the
built
2054
Dual
letters.
machine
If
in
memory.
Feed
characters
only
one
menu.
Available
i5i
°
>
*
actively
jumps
forwards.
90
Size
with
A
selected
touching
Eraser.
field
and
mt
Save
button
functions
Upper
Lower
Special
Numbers
Letter
selected
5
characters
setting
EZ.
this
Deletes
then
the
button.
is
touched.
case
case
letter
characters
selection
button
character
button.
a
‘a
The
letter
buttons
one
further
selected
is
selected
stitch
after
Touch
is
Ifl’is
another.
on,
You
saved
in
character
automatically.
sequence
s
the
in
touched
If
can
non
stitch
from
this
menu
h
scroll
case
characters
is
touched,
and
sequence
the
the
opens
the
backwards
set
he
font
stitch
sequence
is
deleted
y”
when
are
selection
and
field
this
size
by
54
before
is
selected
whole
Mirror
the
sequence.
image
first
by
character
pushing
button
if
is
entered
the
toe
button
“mirror
or
is
actively
if
the
image’
whole
refers
selected
sequence
to
the
Page 56

Creatingaword
sequence
F
F
F
F
F
F
F
Touch
Select
When
by
default.
When
the
upper
Touch
see
page
Touch
If
you
sequence
of
the
cursor
Touch
The
stitch
character
The
•
Insertions
Touch
character
You
can
T]
The
When
for
If
one
individual
will
the
“Alphabets”
a
font.
the
menu
the
sequence
right
t
1*
45.
ok
enter
moves
display.
always
the
input
selection
ortosubsequently
selected
the
character
can
alter
font
the
the
entire
character
also
is
is
actively
corner.
to
choose
to
save
a
sequence
to
Any
selects
field
character
are made
chosen.
be
the
size
size
sequence.
character
be
savedinthis
font
is
icon
opened,
field
the
the
further
the
keys
selection
refers
set
is
selected
the
is
open,
selected.
the
desired
chosen
thatislonger
left,
and
stitch
last
j.
is
deleted.
after
sizebytouching
to
before
canbechanged.
size
in
the
capital
main
the
,
uppercase
character
the
The
chosen
character.
charcterinthe
than
small
a
willbeadded
entered
move
delete
field
characters
in
character.
the
or
insert
cursor
letters.
1
untilanew
menu.
button,
selection
fontisdisplayed
To
Show
font
input
the
input
arrow
cursortoselect
line.
The
to
select
characters.
n
J
90
and
are
entered,
following
size
appears
after
it.
and
set
,the
is
set.
is
selecte
field
keyboar
field.
field
the
on
the
the
cursor.
another
another
the
size
the
size
sizeofthe
characte
i
e
wi
is
F
m
letters
type.
can
a
is
word
touchel
opens
add
Edit
If
display
The
font
characters
You
instructions
and
entered
Touch
with
stitches,
under
sequence
in
the
displays
are shown
‘‘
to
leUers
“Saving
in
word
the
change
a
the
Stitch
sequence
word sequence.
in
the
action
the
sizeofthe
and
edt
sze.
SLch
Sequence”.
sequence
menu,
fieldinthe
T
0
the
individual
save
stitch
foflow
menu
sequen
selectea
selec
Page 57

56
Page 58

LLL
C
Vba
t1LiL
_
N
(0
J
C,
:T;t
CD
i
N
CD
V)
0
Z
2
0
2
0
D
3
0
2
N
(11
w
0)
C,
(0
0
0
2
0
0)
_)
CD
D
0
2
%.4
QO
-
Da)
a)
(•)
-f
0
I
0
2
a)
0
-‘
CD
00
Page 59

Straight
Stitch
stitch
position
the
edge
positions
button.
Tip:
Use
stitch
115
the
length
of
of
that
the
“needleup/
the
a
basic
can
straight
collar.
can
No
-
straight
increased
be
Your
be
down”
1
stitch
Pfaff
adjusted
button
stitch
up
sew
to
performance
with
to
in
to
easily
center
mm.
6
in
the
a
.
pivot
needle
Change
zipper
2054
icon
at
or
collar
position.
the
topstitch
has
and
points.
needle
needle
19
The
along
Sewing
are
There
included
For
all
the
of
on
ankle
zipper.
of
edge
available.
Note:Ifthe
right.
the
in
different
with
types
zipper.
the
Then
the
presser
If
the
zippers
your
zippers
of
The
or
left
the
set
zipper
foot
is
foot
-
ways
pattern
zipper
right,
needle
teeth
attached
is
attached
No
to
for
important
is
it
foot
depending
by
on
I
in
sew
best
can
position
using
the
on
the
left
zippers.
results.
to
be
snapped
on
so
of
one
right
needle
the
that
side,
sew
how
the
Follow
close
to
you
it
enters
19
the
needle
must
the
to
the
will
needle
must
be
moved
directions
the
teeth
presser
insert
close
positions
be
to
your
to
moved
the
foot
the
to
left.
58
Page 60

stitching
Top
The
I
I
I
I
straight
allowing
stitching.
top
determined
Use
the
guide
stitch
further
hole
A
and
you
stitch
to
The
by
marks
from
is
secured
-
guide
the
No
I
can
be
the
distance
needle
on
the
with
sewn
the
fabric
in
presser
between
positions.
needle
edge.
screw
set
different
19
foot
the
plate,
The
B.
along
rows
or
edge
needle
the
fabric
of
topstitching
the
edge
guide
positions
edge
guide
is
inserted
f
is
to
F
F
I
j
Basting
With
•
machine
for
•
Lower
•
Place
.
l
Sew
the
basting.
Tip:
No.1.
each
Light
stitch
one
rear.
fabrics
stitch
17
will
stitch.
the
the
stitch,
Continue
you
sew
feed
fabric
are
-
No
can
one
then
easier
stitch
dog
under
to
to
17
baste.
and
the
move
sew
baste
When
at
a
time.
disengage
presser
the
fabric
one
stitch
with
long
you
Press
foot.
straight
the
at
press
the
a
the
the
IDT.
required
time
stitches
foot
until
foot
(6
control,
control
amount
you
mm)
such
ac
I
fini
as
r
Page 61

Bhnd
The
blind
trousers
•
Finish
Fold
•
Fold
finished
project
•
Place
along
•
When
amount
adjust
stitch
hem
hem
and
the
and
the
the
edge
the
edge
that
stitch
home
edge
press
hem
edge
should
fabric
needle
of
fabric.
catches
stitch
the
back
extends
now
guide
guide
*
No
15
is
usedtomake
decorating.
of
the
hem.
hem
on itself
beyond
be
facing
under
the
A.
swings
If
the
Abyturning
the
hem
allowance
approximately
so
the
up.
presser
the
into
stitches
just
invisible
the
to
fold.
The
footsothat
folditshould
are
visible
adjusting
slightly
barely
hems
wrong
wrong
on
screw
on
side.
3/8’
(1
the
fold
catch
the
right
B,
until
showns.
skirts,
cm)
side
a
of
of
runs
small
side,
the
the
your
Elastic
The
elastic
fabrics,
hem
finish
Create
bhnd
because
is
finished
the
the
blind
raw
blind
hem
the
and
edge
hem
hem
stitch
stitch
zig
sewn
first
as
—
is
especially
zag
in
at
the
on
most
described
No
the
16
stitch
same
knits.
above.
suitable
lets
time.
the
There
for
stitch
is
stretchy
stretch.
no
need
to
The
Stitch
i5
Stitch
16
60
Page 62

E
edges
needle
stitch
can
pierces
the
be
edge
Zigzag
Raw
—I
the
overcasts
—
No
3
finished
fabric
the
of
the
easily
fabric
on
with
the
on
the
left
zigzag
right
swing
stitch
of
swing
the
3.
of
Make
needle
the
sure
anc
needl
F
F
F
F
F
,.:•:
:.:..:;.
:.
.:.,
-:.,::::::
::::;::
:::..:;:.:.
:.:
14
—
produces
be
width.
right
stabilizer
and
No
used
side,
a
for
or
under
highly
T-shirt
thread
the
elastic
hems
the
fabric
for
and
and
top
wi
wit
decora
on
stitch
stitch
denim.
correct
from
and
tension
stitch
can
the
sew.
triple
seam.
threads
hem
a
the
thread
needle
zigzag
zigzag
This
the
hem
thread
Stretch
:‘
.:
The
tripe
stretch
decorative
decorative
•
Fold
up
.
.,.:...
•
Topstitch
decorative
Use
lower
:::‘::::,..
Tip:
threads.
Page 63

Stretch
This
stitch
such
as
longer
19
needle
trip’e
under
the
positions
button.
is
used
stitch
straight
arm
length
for
and
that
sewing
crotch
required.
can
stitch
seams
seams.
be
—
No
where
The
Your
adjusted
2
strength
heavier
Pfaff
with
is
the
fabric,
performance
the
o.
needed,
2054
icon
the
has
and
L
E’astic
Use
•
•
•
•
•
stitch
To
create
Cut
Sew
Divide
Stretch
stitch
elastic
the
Honeycomb
The
honeycomb
very
suitable
4
the
the
to
ends
—
add
a
waistband,
to
comfortably
of
garment
elastic
stitch
stitch
for
childrens
No
elastic
the
4
to
—
is
elastic
edge
fit
No
an
clothes
to
finish
and
the
7
elastic
pajamas,
the
fit
around
together.
elastic
fabric.
and
and
skirts
top
edge
waist.
into
Sew
decorative
lingerie.
and
quarters.
on
elastic.
sportswear.
of
the
hem,
garment.
which
is
62
Page 64

__
4
—
No
tears
sew
covered.
holes,
area
Stitch
close
and
over
place
and
over
to
damaged
it
piece
a
of
the
damaged
the
stitching
the
with
same
areas.
several
of fabric
color
ar
on
tI
the
elastic
tears,
the
cut
side
with
area
of
stitching
larger
wrong
stitch
is
frayed
away
of
the
only
than
side
the
your
elastic
to repair
slightly
until
edges
the
of
the
excess
repair.
stitch
holes,
damaged,
well
it
is
small
or
damaged
fabric.
material
Darning
I
Use
•Ifthe
rows
•
For
slightly
on
then
back
Sewing-on
—
—
The
best
withanew
Cutapiece
way
patches
to
piece
of
repair
of
fabric
—
larger
fabric.
slight!y
No
4
holes
larger
damaged
the
patch
to
is
damaged
the
than
ar
area
hole.
e
the
along
reverse
area,
side
close
to
th
•
e
Stitch
with
Cut
the
the
away
fabric
elastic
the
patch,
stitch.
damaged
over
fabric
the
on
damaged
the
stitching.
a
the
frayed
piece
larger
sew
tears
side
and
over
under
edges
of
ensures
of
fabric
than
the
layed
the
the
damaed
or
small
tear.
The
perfect
underneath
damaged
piece
of
place
holes
underlayed
repair.
the
area.
area.
fabric
close
piece
a
fabric
damaged
to
fabric.
the
fabric
of
reinforces
It
stitching.
un
t
rnu
Repairing
tears,
On
reverse
the
workpiece
Lay
little
a
•
Now
Cut
Page 65

Overlock
For
elastic,
provide
layers
of
can
stretch
stitches
knits
a
selection
fabric
and
and
and
are
stretch
of
overlock
overcast
more
fabrics,
them
durable
your
stitches.
in
than
performance
These
one
operation.
standard
stitches
stitches.
2054
Join
These
multiple
stitches
Closed
This
fabrics
attaching
Open
The
open
fabrics
Tip:
Use
more
precisely
the
stitch
clears
the
Closed
If
you
this
stitch
against
overlock
stitch,
that
overlock
that
blind
width
raw
overlock
wish
further
in
a
fray
knit
cuffs
overlock
do
not
stitch
and
and
edge
to
sew
an
additional
fraying.
stitch
single
easily.
stitch
stitch
fray
foot
prevents
guide
of
the
stitch
a
operation,
The
and
collars
—
works
excessively.
No.
3
when
tunneling
of
the
fabric
with
fabric
edge
—
No
and
that
No
closed
36
sewing
foot
the
thread
38
to
well
of
to
edge
frays
suitable
is
overlock
garments.
when
overcast
the
seam
ensure
pin
of
thread
easily,
protects
that
the
for
is
Joining
seams,
at
wider
the
presser
—
select
also
right
No
the
sewing
a
or
This
stitch
swing
foot.
31
stitch
fabric
good
guides
and
serging
stitch
for
edge-finishing
the
of
31.
the
With
fabric
Adjust
needle
widths.
edge
I
-
-
Pullover
This
stitch
Garments
Tip:
To
prevent
twill
tape
64
in
stitch
can
can
the
the
seam.
be
be
—
used
joined
seam
No
from
39
for
open-knit
effortlessly
stretching
while
and
with
sewing,
heavy
this
knit
stitch.
overcast
fabrics.
a
woolen
thread
or
Page 66

Buttonho’es
There
and
2054.
are
Each
fabric
8
buttonhole
buttonhole
type.
styles
especially
is
built-in
to
adapted
your
for
Pfaff
a
performanc
particular
us
Your
performance
buttonhole
buttonhole
on
even
fabrics
and
Inserting
Push
the
(between
needle
covering
the
Slide
The
arm.
between
the
the
metal
the
plate.
the
guide
guide
the
guide
is
sized
difficult
most
heavy
sensormatic
part
two
white
The
dogs.
feed
towards
will
needle
2054
is
and
10
accurately.
knits.
of
the
arrows)
plastic
you
spring
plate
equipped
sensor
Beautiful
fabrics
buttonhole
buttonhole
the
on
part
untilitlies
slightly
rear
and
the
with
technology
buttonholes
as
such
guide
housing
extends
against
so
guide.
Sensormatic
the
to
velvet,
guide
into
the
at
over
that
ensure
can
plush,
slot
the
backofthe
needle
the
rearofthe
the
thereisa
that
be
knitted
small
eve
se
p1
Inserting
Attaching
“Changinu
(see
on
Snap
buttonhole
Use
Before
—
fronttothe
the
buttonhole
buttonhole
starting
second
sensormatic
presser
the
foot
No.
foot
sew,
to
red
buttonhole
foot
foot”
No.
5
to
pull
the
mark
No
5.
sew
5:
page
runner
guide
27).
buttonholes.
of
the
activates
foot
the
toward
senso
the
:
Page 67

Buttonhole
Buttonholes
columns
pearl
cotton
Insert
the
Place
the
extending
cord
ends
on
the
front
Snap
on
backward
Buttonhole
After
completing
the
loop
Thread
them
cut
off
the
to
the
with
that
are
more
or
Sensormatic
center
from
under
of
the
buttonhole
as
far
56,
of
thread
gimp
the
wrong
excess
are
stable,
regular
of
the
the
the
as
the
57,
58
the
is
cord
side
thread.
gimp
cord
sewn
gimp
buttonhole
length
a
center
foot
and
presser
foot.
second
or
59
buttonhole,
hidden
ends
of
with
durable
thread.
of
back
pull
foot.
Before
red
can
under
into
the
garment.
gimp
gimp
of
now
pull
a
hand
cord
and
professional
guide.
cord
the
up
into
starting
mark.
be
the
the
buttonhole
under
over
buttonhole
the
right
to
sewn.
ends
sewing
Tie
the
the
the
sew,
of
gimp
needle
gimp
satin
appearing.
metal
hook
foot.
Pass
and
left
pull
it
cord
bartack.
and
threads
stitch
Use
4.
the
guides
until
pull
and
Eyelet
Insert
length
center
foot
presser
Snap
second
Before
Sew
the
66
buttonhole
the
of
front
and
pull
foot.
on
the
red
starting
right
Sensormatic
gimp
cord
of
the
up
into
buttonhole
mark.
to
sew,
side
of
with
gmp
buttonhole
over
the
buttonhole
the
right
foot
press
the
buttonhole.
metal
and
the
cords
foot.
and
guide.
hook
Pass
left
pull
needle
Place
extending
the
guides
it
backward
down”
the
cord
on
center
from
ends
the
as
far
button.
under
back
as
of
the
of
the
L.
a
the
the
Page 68

After
the
pin.
the
gimp
machine
cords
down
sews
the
from
first
the
few
metal
stitches
hook
of
with
the
a
curved
straight
end
stitc
Warning:
surface!
Pull
the
just
in
gimp
cord
After
sewing
them
to
off
excess
The
round
Tip:
This
thread.
Buttonhole
Buttonholes
may
sometimes
because
presser
Fabrics
soluble
Buttonholes
inserted
Linen
weight
Buttonholes
diameter.
same
foot
that
buttonholes
thread
fabric/stabilizer
The
gimp
front
under
the
cord.
buttonhole
buttonhole
that
of
the
1A
shft
or
liahtweight
are
while
arc
is
It
presser
cord
of
the
the
the
curve,
vvrong
is
particularly
tips
are
not
bulk
with
or
particuiary
sewing
are
through
normally
important
foot
on
the
needle.
stitching.
side
with
to
be
feed
at
the
the
stretch
stabilizer,
(see
particularly
a
to
as
your
must
towards
left
Carefufly
hold
the
of
the
garment.
gimp
attractive
sewn
optimally
edge
Integrated
easily
sTable
“
Buttonholes,
topstitch
selected
alvvays
project.
not
gimp
cord
when
very
with
of
the
Dual
should
and
attractive
needle.
a
little
sew
be
the
sew
cords
is
close
the
fabric.
be
durable
test
a
raised
rear
the
Tie
sewn
sewn
to
buttonhole
Feed
reinforced
with
if
larger
from
until
curve,
into
needle
a
the
gimp
in
the
wth
heavier-weighi
a
reinforced
a
In
this
engaged.
if
gimp
a
girnp
you
use
than
buttonhole
the
fabric
the
guiding
cords
same
foot
case,
with
cord”).
heaviE
a
the
on
loop
and
way
edg
use
wa
cord
butto
i
thE
anc
i
th
Page 69

Sewing
With
Button
four-hole
•
Remove
the
Mark
•
the
Turn
•
the
•
Lower
by
the
needle
on
buttons.
the
IDT
is
the
marked
the
needle
the
shank
also
buttons
sewing
presser
disengaged.)
button
fabric.
handwheel
enters
presser
of
the
enters
—
program
foot
position
towards
left
the
foot
foot.
the
No
lifter.
right
64
64
and
on
hole
Turn
you
lower
your
you
The
hole
in
the
the
button
of
easily
can
the
feed
fabric.
position
and
button.
handwheel
button.
the
Place
will
sew
dog.
be
to
the
the
on
held
make
two
(Make
button
button
in
and
sure
place
sure
on
so
the
•
Continue
program
Tip!
use
Sewing
Attach
•
•
Leave
holes
Remove
•
•
Wrap
Tip!
use
the
the
optional
on
the
the
of
the
the
the
optional
sewing
for
you.
SewonButton
buttons
presser
feed
button
toothpick
stem
SewonButton
dogs
with
on
with
foot.
button.
the
shanks
lowered.
sew
and
and
sewing
Foot
pull
thread
Foot
The
to
sew
—
Place
itonas
the
to
sew
machine
optimal
64
No
toothpick
a
described
button
and
optimal
knot
will
buttons.
and
it.
buttons
complete
between
on
the
fabric
with
the
the
left.
apart.
shanks.
Eye’ets
stitch
To
68
—
No
eyelets
71
on
or linen
belt
a
items,
select
stitch
71,
Page 70

—
.
‘-I
69
and
at
be
70
damaged
the
required
finishes
saved.
is
repeated
areas
length.
sewing
as
of
often
the
fabric
darning
as
and
needed.
—
Automatic
Stitch69and
repairing
•
Stitch
I
•
•
•
The
Press
program
saved
tears.
over
the
darning
darning
is
70
the
reverse
and
the
for
damaged
length
No
strengthening
area
the
key;
darning
can
machine
length
now
!i
:
‘
I
a
.—
I
‘
I
Depending
slightly
balance
If
plus-section.
If
minus-section.
the
the
out
adjustment
pattern
pattern
on
of
the
typeoffabric,
squareS
capability.
shifts
this
shifts
this
You
way
way
can
you
you
the
straighten
have
have
darning
the
correct
to
correct
to
pattern
pattern
the
the
may
using
balance
balance
shift
the
‘it
in
the
r
in
the
Page 71

Free
Attach
highest
foot
together.
go
into
should
must
Lower
Hoop
Select
As
you
the
darning
Draw
the
threads
Repair
forwards
repair
motion
darning
position.
the
place
be
behind
the
your
the
straight
begin
up
the
the
damaged
and
area.
Insert
hole
itself
feed
project
sewing,
position.
bobbin
close
backwards
darning
foot
No.
With
the
of
the
around
the
needle
dog.
to
be
or
zigzag
the
threaad
to
the
area/hole
6.
Make
thumb
pin
presser
the
clamp/needle
repaired
darning
project
slightly
and
the
of
foot
presser
stitch.
and
and
by
sure
the
index
darning
holder.
bar.
inaround
Touch
foot
sew
a
continue
guiding
longer
needle
finger
press
foot
The
“C-shaped”
The
long,
se
screw.
embroidery
and
automatically
few
stitches
sewing.
the
fabric
than
the
is
at
as
far
select
to
evenly
length
its
the
darning
as
plastic
hoop.
engages
secure.
of
position
it
will
guide
arm
in
Clip
the
--__j
When
degrees
over
a
Tip:
Remember,
determined
more
consistent
to
appear
you
tear
on
and
by
have
will
you.
the
stitch
when
length
reverse
covered
over
produce
sewing
An
even,
of
side
the
with
medium-to
straight
of
the
a
stronger
stitch,
your
damaged
area
the
feed
Sewing
work.
again.
repair.
dogs
fast
area,
sewing
too
Darning
lowered,
speed
slowly
turn
the
in
will
may
the
stitch
both
allow
cause
fabric
directions
length
you
small
to
90
is
sew
knots
‘\
N
\N
N
‘
N
N
a
N
70
Page 72

‘-
i4(
t
1?t:
131
3Li3Lw
Gathering
A
straight
valances.
three
rows
Set
your
to
3.
Mark
along
the
beginning
Sew
foot
•
Gather
desired
•
Distribute
together
1
as
To
the
this
or
with
stitch
obtain
of
gathering
stitch
first
line.
2
more
a
guide.
the
fabric
fullness.
the
to
secure
straight
can
be
neat
length
gathering
Leave
and
rows
by
gathers
the
stitch
usedtogather
and
even
stitches.
6.0
mm.
to
lineonthe
about
4-5
end
of
of
stitching,
pulling
evenly
gathering.
the
the
gathers
seam.
and
No
sleeves,
Lower
inches
using
bobbin
knot
right
I
you
needle
side
(10-13
the
(bottom)
the
thread
cuffs,
should
thread
of
cm)
edge
skirts
sew
the
of
of
the
threads
ends
or
two
tensi
fabric.
threa(
pn
tc
F
Gathering
Gathering
elastic
necklines.
•
Mark
until
hand-wheel
position.
fr
around
Lower
the
threads
in
the
When
ends
determined
is
Secure
with
with
gathering
the
first
the
needle
Raise
the
the
elastic
to
stitching.
you
of
the
all
thread
elastic
seams
gathering
towards
back
presser
thread
fabric.
are
finished
elastic
by
e’astic
is
the
of
to
Make
the
ends.
thread
such
in
the
yourself
presser
the
foot
the
threads
amount
threads
particularly
is
bouse
as
row
middle
foot
needle,
and
sew
fabric.
sure
you
attaching
to
gather.
on
the
of
until
and
a
Continue
do
the
you
—
No
sleeves,
fabric.
the
the
place
few
not
The
pull
7
suitable
presser
needle
more
catch
elastic
on
waist
Sew
foot.
is
the
elastic
stitches
attaching
the
thread,
amount
the
elastic
for
seams
a
few
in
elastic
of
visible,
Turn
the
thread
to
elastic
pull
gather
thread.
or
stitch
th
lowe
secur
thr
on
Page 73

U
Page 74

a’
CD
0
a
00
1±2:,
CD
0s
(00
•r
3
WSAt
IL
0
n
fl
oz
I.-
,*
‘
Page 75

QuiWng
Patchwork
Patchwork
make
use
creative
Traditionally
ideas
performance
A
batting
Piedng
Cut
seam
templates.
together
The
darker
and
are
quicker
with
decorative
When
cushions,
quilt
out
seam
backing.
then
hobby.
can
consists
sandwiched
the
the
allowance
fabric
and
stitch
the
and
of
left-over
patchwork
be
realized
2054.
quNt
pieces
Snap
following
allowance
side.
In
together
sewn
more
41
using
thread
quilting
wearable
quilting
fabric.
in
three
of
between.
top
fabric
of
of
¼”
the
on
the
of
Baste
traditional
practical
monofilament
in
the
finished
is
art
are
was
much
a
layers,
mm)
(6
optional
design
quilts
the
quilts
hand
by
bobbin.
other
or
traditional
the
Over
sewn
shorter
two
your
for
should
1/4”
instructions
usually
are
completed
these
with
your
with
simply
smaller
hand.
by
layers
quilt
already
quilting
Pfaff
thread
bind
hand
years
time
top
pressed
quilt
three
small
the
projects.
craft
it
has
Today
with
your
fabric
of
using
included
be
foot,
piece
to
towards
to
top
layers
stitches.
performance
top
edges
and
on
techniques
developed
creative
your
Pfaff
with
a
templates.
Sew
the
quilt
the
batting
the
material
of
However,
2054,
regular
n]ake
or
layer
in
pieces
the
to
into
the
top.
it
or
of
A
it
e.g.
into
a
is
74
Page 76

LJ
Quift
Use
the
quilting.
straight
For
optimal
a
Straight
right
the
right
scant
Patch
Select
Select
touch
the
seam,
ready
size
together.
When
program
Piecing
¼”
Set
stitch
and
your
of
¼”
seam.
work
Straight
the
OK.
to
be
you
and
Quilting
your
Pfaff
and
quilt
piecing
Stitch
(1),
IDT
presser
program
Stitch
Patchwork
Now
sew
touch
the
sewn
again.
are finished
sew
the
foot
performance
engage
stitch
engaged.
foot
(1)
program
your
reverse
with
next
with
the
set
up
length
The
Moving
0.
and
set
seam
button.
Continue
this
seam
DT
as
IDT.
your
2.5,
fabric
up
in
the
length.
to
size,
length.
an
2054
Pfaff
Needle
needle
the
above.
as
more
When
The
sew
re-choose
pieces
guide
easy
for
center
performance
Position
should
position
options
you
get
seamisnow
the
fabric
the
for
optimal
needle
2054
4
to
the
meet
gives
menu
and
to
the
tied
off
pieces
Patchvvork
of
w
und
yo
t
en
ai
tb
Page 77

Stitch
in
the
Ditch
One way
is
using
Ditch
means
Set
your
length
optional
Begin
starting
—
about
pin
begin
To
continue
layers
keep
stitching
pattern
in
the
course
the
back.
using
Tip:
Try
straight
change
make
sure
stitch
Use
the
Pfaff
2.5,
by
on
quilt,
you
stitch
a
to
your
41
to
hold
stitch
following
Center
narrow
pin
basting
from
every
quilting,
out.
Starting
in
not
will
the
sew
can
one
to
add
quilting
stitching
to
make
quilt
the
the
in
the
performance
needle
edge
foot
your
the
middle
inches
6—8
start
from
Plan
place.
only
hold
back.
quilt
every
3
sew
more
of
the
Antique
interest
jeans
or
is
proper
stitch
your
top,
ditch
seams
position
for
quilt
of
sewing
which
the
You
—4
to create
Applique
your
to
needle
before
in
batting
method
2054
optimal
through
your
(15
from
the
quilt
do
inches
quilt,
when
ditch
the
the
in
with
and
quilt
—
20
middle
seams
not
to
a
quilt
using
sewing
you
look
and
of
quilting.
quilt
a
Straight
the
guiding.
all
and
cm).
middle
the
and
you
together
need
keep
more
stitches
monofilament
through
start
quilting
hand
backing
blocks.
Stitch
IDT
engaged.
with
layers
working
of
sewing
will
actually
it
will
follow
to
quilt
the
decorative
(41
55)
thick
your
sewn.
all
together
Stitching
(1),
safety
out.
the
quilt
out
will
follow.
also
every
in
place.
pattern
instead
thread
quilts.
piece.
in
stitch
Use
Place
and
help
create
seam
of
on
top.
Test
the
pins
Of
for
the
sew
the
a
This
the
to
Antique
Beutiful
stitched
hand
Antique
Pfaff
•
Use
contrast
•
Set
•
When
should
on
thus
tension
76
Crazy
invisible
the
you
only
of
top
produces
Quilt
Patch
look
quilt
(monofilament)
or
matching
needle
sew
see
the
as
needed
Stitches
quilting
be
can
stitches.
thread
stitch
the
your
fabric.
a
handstitched
to
was
accomplished
polyester
tension
on
the
bobbin
intermediate
The
produce
originally
thread
or
cotton
7-9.
to
three
thread.
appearance.
desired
the
faster
the
in
layers
Create
stitch
sewn
needle.
thread
Adjust
effect.
by
hand.
and
easier
in
of
your
the
stitch
disappears
your
Use
the
with
a
bobbin.
quilt,
pattern
needle
This
and
you
the
(
L.
Page 78

Tying
the
Quilt
—
a
quilt
Tying
together.
great
decorative
Choose
a
117or157.
Prepare
Engage
stitch
stitch
the
This
L
I
your
the
every
placement
back.
very
is
a
another
is
Previously
decorative
Set
up
quilt
Single
4”
3
simple
stitches
so
done
stitch
your
explained
as
Stitch
(7
—
that
and
way
2054
10
there
beautiful
to
hand,
by
will
that
that
as
Program
all
cm)
hold
a
is
explained
in
over
is
a
the
your
“tie”
forward
the
for
one
the
nice
way
quilt
Performance
your
in
Stitch
stitch.
quilt.
pattern
secure
to
top,
quilt
moving
the
the
in
Again
on
batting
2054
with
ease.
stitch,
information.
Ditch
methc
Now
sew
plan
front
the
quilt.
a
and
has
sud
this
you
an
Motion
I
Free
Free
Motion
together,
your
Set
(1)
foot.
Prepare
Practice
dog
Sewing
Begin
bobbin
next
:I4
/
II
(I
that
not
Tip:
way.
maLe
Pfaff
and
the
Pin
your
stippling
lowered,
is
withaconstant
near
thread
one
to
your
cross
the
Use
Quilting
The
your
stippling
Stippling
Stippling
also
it
but
performance
Free
Motion
baste
your
quilt
you
the
center
to
another
stitching
itself—but
Motion
Free
table
easier.
adds
quilt
as
on
move
the
creates
travel
Guide
and
not
texture
Program.
layers..
explained
scraps
the
speed
of
your
of
top
secure
to
griptohelp
Free
your
See
only
2054
of
the
scrolls
swivling
in
Motion
authorized
keeps
for
in
fabric
fabric
will
quilt.
quilt.
the
Guide
and
stippling
Attach
the
and
to
help
Take
threads.
and
move
the
top,
interest
the
Stitch
batting.
determine
keep
to
one
Take
swirls,
stitches
the
are
foot
Pfaff
batting
to
with
free
the
in
stitch
few
a
Now
The
all
quiltina
extra
dealer
your
a
motion
Ditch
When
the
the
stitches
and
stitches
move
stitching
over
more
accessories
purchase.
to
and
quilt.
Straight
meth
the
stitch
pull
right
the
shou
the
consister
bad
S
quilt
fe<
ler
ev
th
quil
quill
crea
Page 79

QuHt
Apphques
Appliques
way
are
is
to
There
together.
Set
your
stitch
length
the
Fuse
stabilizer
stitch.
edge
raw
Another
the
applique
First
prepare
piece
a
and
side
of
together.
position
outside
seam
1/8”
the
turn
the
Place
position,
Select
applique
the
horizontal
the
part
the
add
many
add
performance
0.4
applique
under
sure
Make
of
the
way
the
of
fabric
the
Use
and
edge
allowance
applique
applique
iron
18,
stitch
that
a
different
the
the
to
and
light
Straight
a
sew
with
it
with
part
will
special
applique
0.5,
-
piece
block.
stitch
the
applique.
an
add
sew
applique.
weight
and
fabric
the
¾”
a
and
right
on
down.
on
snap
the
of
keep
touch
ways
2054
stitch
to
applique
it
on
the
Stitch
seam.
side
the
applique
straight
the
the
the
to
for
width
the
Sew
mostly
with
Cut
iron
rough
and
clip
out.
quilt.
stitch
applique
your
to
stitch
to
block
satin
a
3
biock
around
on
to
the
the
on
(iron-on)
stitch
(1),
interfacing
Trim
curves.
into
Finger
When
foot
part
just
quilt.
appliques
before
stitch.
presser
6,
—
invisible
with
the
applique
the
quilt
a
applique
hand
applique
interfacing.
side
length
around
Slash
press
you
and
the
hand
of
catch
place.
in
the
Choose
foot
applique
finish
is
to
shape
Place
of
2.0,
together
applique
the
the
the
satisfied
are
around
sew
the
into
a
to
quilt
stitch
2.
web.
with
covering
—
the
stitch
out
the
interfacing
the
center
around
interfacing
applique.
applique
applique.
quilt.
is
Place
of
leaving
with
the
One
put
10,
the
edge
(44).
fabric
right
needle
edge
stitch.
satin
the
the
the
This
of
and
of
Let
is
78
Page 80

Free
With
is
possible
It
various
the
your
Motion
Motion
Free
Motion
to
typesofthreads
performance
Sewing
Sewing
Sewing
sew
just
2054.
by
sewing
as
You
you
you
that
in
can
would
are
a!so
can
different
create
draw
on
vary
the
with
market
the
the
directions
most
shade
fantastic
pencil,
a
today
patterns.
or
of
your
wo
using
and
FrE
Top
tension
Presser
Feed
dog
Stitch
length
width
Stitch
Fabric
Needle
Stitch
motion
Free
Thread
thread.
embroidery
into
drum
wooden
straight
the
From
now
along
hoop
mportant:
foot
size
your
You
a
ring
on,
Never
program
machine
use
the
bobbin
machine
bound
can
weight
round
hoop
stitchorthe
control
you
the
sewing
the
with
engage
2-3
Darning
Lowered
0
0-9
Cotton
90-100
Straight
Zig
On
with
same
zig
IDT
foot
type
stitch!
zag
good
a
thread
thread.
embroidery
with
tape
zag
stitch
the
speed
when
free
quality
and
fabric
for
Hoop
for
set
length.
creates
motion
cotton
bobbin
fabric
your
hoop.
better
a
stitch
the
The
stitch
the
embroidering.
synthetic
or
thread,
tight
can
You
grip.
length
movement
length.
or
use
Select
to
as
an
a
a
ei
0.
of
Page 81

Touch
function.
down
under
Make
to
the
one
When
the
topofthe
secure
sewing.
and
see
move
what
them.
Make
different
embroidery.
test
different
also
can
print,
embroidering.
stitches
Tip:
in
over
Drawastraight
hoop.
your
and
select
you
press
Darning/Quilting
needle.
sure
stitch.
Hold
the
threads
that
Experiment
complete
fabric.
Clip
it
steadily.
stitch
Try
different
threads,
paint
or
Finish
your
edges.
the
with
line
this
line
Keep
Darning/Quilting
control,
foot
the
position.
bobbin
the
Pull
threads
both
to
close
the
hold
you
sewing
directions
stitch
such
apply
as
willdowith
widths
variegated
fabric
shapes
embroidery
dissapering
air
water
or
with
the
a
parallel
activate
to
the
Place
thread
sewafew
and
fabric
the
on
hoop
different
shading
for
and
on
adding
by
frontofyour
presser
your
and
the
the
metallic
your
marking
machine.
free
the
foot
hooped
uptothe
stitches
continue
machine
patterns
lookofyour
effects.
threads.
fabric
free
motion
on
pen
motion
goes
fabric
to
bed
and
Also
before
the
fabric
You
S
S
“
..
.5.,
1
\
•r’:
55
S
5.
S
S
.
5-
.5
,
80
Page 82

—I
Nostagia
in
goes
Use
For
Needle
with
natural
and
standard
the
the
that
fine
sewing.
using
Wing
Sewing
woven
goes
Replace
that
92).
Thread
matches
holes
Tip:
Begin
while
Gimping
Gimping
sewing
hand,
only
not
handkerchiefs
your
up
Set
width
stitch
Use
Use
the
in
raised
the
your
cord.
a
the
slot
curves
texture
Tip:
Thread
matches
decorative
gimp
Tip:
Place
Create
/H&Hoom
wing
a
fiber
out
and
back
recommended
top
fabric
the
are
created
fabrics,
Use
the
texture
adds
over
time
save
and
performance
2.0,
hole
7/9
Performance
color
the
thread
fade
away
gimping
in
the
and
to
of
needle
and
place
wing
presser
cord
or
middle
your
needle
fabrics
the
forth
bottom
you
a
the
needle.
gimp
but
more.
foot
of
your
the
in
water
cord
swirls
creates
by
fabric.
with
into
presser
with
using.
are
not
and
Iightweignt
Slow
Sew
nostalgia
to
cord
that
add
with
foot
help
to
with
fabric
top
soluble
under
the
of
you
as
designs.
creating
wing
a
the
lightweight
the
tear
button
with
special
zig
a
IA,
guide
polyester
in
if
desired.)
pen
the
foot.
sew.
look
the
“holes”
needle.
holes
same
for
foot
(Remember
thread.)
stabilizer
away
to
projects.
performance
your
touch
stitch
zag
engaged.
IDT
cord
your
the
both
Use
your
mark
to
presser
Begin
Sewing
of
Choose
several
that
thread
you
reduce
Previously
to
cotton
or
top
crochet
pattern
foot,
sewing
over
(2),
“hemstitching”
where
the
any
stitch
times
stitch.
in
color
to
want
stitching.
under
speed
your
done
2054
tableclol
bags,
length
stitch
thread
bobbin.
and
cotton
you
before
the
over
the
the
cord
guiding
neec
(3,
see
by
will
that
as
cor
cor
adds
9
th
I
(
t
se’
Page 83

---I-’
9’
n
0
CD
0
CD
0
3
CD
C-)
CD
cD
‘
1
r*
jI:*!z,
J
I
‘
4I
Page 84

Tucks
Create
Pintucks.
Folded
create
Using
lines
line.
Set
your
length
Thread
your
Sew
with
fabric
Press
as
above.
Continue
Important!
to
double
you
make
Adjust
left
for
a
great
tucks
the
a
fade
3/4”
performance
2.0
both
fabric.
a
along
the
tuck
Sew
until
Always
the
them.
the
larger
tuck.
apart.
—
2.5,
top
center
the
amount
size
tucks
nostalgic
are
away
Fold
presser
right
to
one
the
all
sew
of
created
or
and
needle
next
tucks
tucks
of
fabric
the
or
wash
the
2054
foot
bobbin
side
side.
tuck
are
before
tuck
to
the
touch
by
folding
away
fabric
for
0,
with
straight
of
the
Now
in
sewn.
cutting
depending
by
adjusting
right
with
wrong
normal
IDT
presser
fold
the
Folded
fabric
fahric
engaged.
thread
stitch,
the
same
out
upon
for
smaller
pen,
sides
Straight
to
guiding
foot.
fabric
way
garment
how
the
tucks
and
mark
together
match
as
pieces.
many
needle
tucks.
or
straight
the
Stitch
the
the
Unfold
along
described
Tucks
tucks
position
twin
along
(1),
fold
the
the
and
needle
stitching
fabric
stitch
color
of
fabric.
next
above.
can
how
to
one
the
take
wide
to
with
of
line
up
the
Twin
Twin
needle
performance
Mark
the
Continue
feet
to
Tip:
use
the
page
xx-yy
Replace
Set
your
length
Thread
fabric.
to
other
Sew
sewn.
Use
place
thread
along
need’e
Pintucks
2054.
first
to
mark
easily
guide
optional
for
directions
the
standard
performance
2.5
—
3.0,
the
top
the
one
top
on
the
Pintucks
line
of
lines
Pintuck
presser
and
bobbin
extra
thread
the
first
line
are
stitching
your
using
sewing
2054
spool
other
of
created
or
use
rows
blade
the
for
foot
with
pin
in
one
side
stitching.
with
one
where
and
Pintuck
needle
normal
IDT
2,
for
side
of
by
placing
a
of
Pintuck
foot
with
disengaged.
thread
the
of
the
tension
Continue
fade
the
optional
needed.
feet
a
Straight
matching
second
the
tension
a
away
to
accentuate
2.0
top
disk.
twin
mm
Stitch
until
or
wash
Pfaff
twin
the
spool.
disk
all
needle
the
(1),
color
and
Pintucks
in
the
away
pen.
Pintuck
tucks.
See
needle.
stitch
of
Remember
the
are
82
Page 85

Home
Decorating
F
F
F
“Square”
Create
Choose
engaged.
Using
—
10
cm)
I
F
I
-
,/‘
5/8”
(4
Begin
an
opening
to
the
marking.
to
each
pillows
a
Straight
a
fade
from
cm)
sewing
3-4”
Pivot
corner.
PiNows
beautiful
away
each
from
around
on
one
mark
and
Stitch
or
corner
each
edge
along
continue
(1),
wash
corner
the
one
pillows.
stitch
away
and
diagonally
pillow
turn
to
edge.
to
marking
mark
with
the
sew
length
on
a
pillow.
Now
to
sew
the
each
and
5/8”
2.5,
pen,
mark.
(16
Continue
toward
other
presser
measure
edge.
mm)
3-4”
foot
Then
seam,
stitching
the
mark.
0,
3-4”
meas
lea
diagon
lD
(7
Do
L
I
I
Crss-Cross
Create
a
decorating
Tip:
or
ruffle.
Use
ruffle.
an
This
the
Piping
easy
criss-cross
item.
optional
and
attractive
piping
or
method
foot,
Ruffle
way
ruffler
will
or
to
add
shirring
start
and
interest
foot
to
stop
help
to
piping
any
create
home
your
or
pi
F
F
F
Create
foryourproject.
Begin
the
(in
I
I
project
the
ends
Place
and
2054
also
by
front
line)
start,
of
the
piping.
with
keeps
your
placing
with
at
simply
the
back
piping
project
the
the
piping
Sew,
IDT
the
your
piece.
project.
proper
place
perpendicular
of
the
making
makes
layers
or
ruffle
piping
seam
the
project
sewing
even.
Pin.
Continue
aliowance.
end
sure
6”
(16cm)
perpendicular
Curve
the
pinning
across
with
right
sides
to
catch
through
longer
piping
When
the
the
all
all
together
the
than
(make
to
become
the
piping
the
beginning,
piece.
layers.
layers
what
a
piping
with
Your
easy.
is
cross)
parall
around
is
making
the
perforrr
The
nee
wit[
bach
bI
fror
IL
Page 86

Env&ope
When
edge
that
the
back.
Cut
the
front,
width.
Tip:
Use
lOT
engaged
Press
under
stitch
(1),
from
the
Overlap
size
as
Tip:
Use
buttons
making
needs
piHow
creating
Finish
the
multiple
as
straight
folded
the
the
front.
Closure
piflows,
to
back
a
rectangle.
the
two
Zig
one
possible
2”
(5
edge
folded
and
the
be
6”
Zag
cm)
on
length
edges
sensormatic
hand
(16
cut
finish
on
rather
edges.
(4),
stitch
the
2.5,
the
to
than
sewn,
cm)
Cut
to
the
finished
presser
right
create
buttonholes
longer
the
length
edge.
side.
the
leaving
create
in
rectangle
1.0,
stitch
edge.
foot
pillow
to
an
one
0,
keep
an
opening
Envelope
direction
in
width
Stitch
IDT
back
the
half
across
5,0,
presser
with
engaged,
in
the
envelope
along
closure
than
a
straight
1
same
closed.
the
the
foot
1/2”
an
for
0,
84
Page 87

Fashion
1
French
Use
fabric
Set
2.0
Follow
I
Follow
With
(10
mm)
(3
sides
seam.
a
your
—
2.5,
the
mm)
of
French
that
The
Seams
Seam
frays.
performance
presser
the
pattern
the
directions
wrong
seam
of
the
fabric
the
fabric
raw
when
The
French
foot
instructions
below
sides
allowance.
seam
together,
edges
of
2054
0,
of
working
IDT
the
Trim
the
with
encases
seam
foraStraight
engaged.
on
create
to
fabric
together,
near
allowance.
press
and
fabric
are
how
the
the
Turn
then
now
lightweight,
fabric
the
Stitch
(1),
construct
to
seams.
sew
stitching
the
garment
sew
a
encased
see
edges.
stitch
the
with
leaving
1/4”
in
a
(6
the
throu
Iengt
garme
3/8”
1/8”
with
mm)
sean
ri
“flat”
One
of
the
construction
not
need
sportswear.
Tip:
Use
hem
presser
making
the
the
with
fabric
finish
the
garment
stitch
and
garment
the
underneath.
Choose
the
If
add
to
Sew
upper
Now
of
shirt
to
an
a
neck
the
fastest
37
sew
overlock
foot
t-shirt
the
construction
ways
technique.
be
gathered
for
decorative
a
from
the
stitch
and
IDT
with
band.
Sew
at
the
sleeve
as
needed
sleeves
in
one
down,
make
to
Use
this
eased.
or
hem
right
a
the
shoulder
on
sideofthe
(32,
36,
recommendation
ribbed
other
against
so
by
long
the
sewing
seam.
sleeve
a
when
tne
39)
band,
seam
the
Start
shirt
the
This
method
sleeve
garment.
to
sew
shoulder
and
the
feed
will
sleeveseam
at
blouse
or
top
and
Make
make
for
one
seam.
matching
teeth.
ease
the
of
the
works
garment
sure
the
the
shoulder
into
and
sleeve
is
the
sleeve
well
bottom.
to
catch
garment.
stitch.
Pin
the
the
Gently
the
garmen
the
edge.
“flat”
for
the
seam
sleav
notche
hold
sides
do
Tur
h
Us
KL
-J
/
Page 88

Twin
Twin
straight
be
used
connected
bottom
Replace
needle.
Set
your
length
Thread
thread
top
spool.
tension
disk.
Needle
needle
decorative
for
with
and
the
performance
2.5
—
the
top
matching
Remember
disk
Top
topstitching
knit
fabrics.
one
giving
standard
3.0,
and
a
presser
with
the
the
Stitching
is
great
topstitching.
The
bobbin
small
sewing
the
fabric.
to
other
amount
2054
for
foot
contrasting
place
thread
thread
Use
two
needle
normal
0,
iDT
one
when
Twin
straight
engaged.
the
top
on
you
needle
creating
of
stretch.
with
Straight
thread
extra
thread
the
want
stitches
a
a
4.0
and
spool
other
two
stitching
on
zig
zag
or
6.0
Stitch
the
pin
in
one
side
rows
top
on
mm
(1),
bobbin
for
side
of
the
can
the
of
also
are
the
twin
stitch
with
second
of
the
tension
Touch
limit
Begin
topstitch
Eyelets
Eyelet
popular
effects,
•
Remove
presser
•
Place
pin
plate
•
Mark
•
Tightly
•
With
center
eyelet
•
Lower
•
Draw
•
Stitch
important:
stitches
•
Secure
the
the
to
sewing
using
A
small
up
around
While
should
twin
stitch
sew.
ing.
for
foot
the
fits
down
on
hoop
of
plate.
the
the
be
with
width
Make
has
creating
the
the
presser
shank.
eyelet
into
at
you
fabric
the
scissors
the
marking
The
presser
bobbin
the
doing
very
a
few
needle
a
eyelet
plate
the
the
fabric.
fabric
so,
close
safety
and
sure
long
table
plate
foot,
middle
front.
where
snip
foot
thread
cut
with
turn
to
each
straight
prevent
to
tie
tradition
linens
use
onto
cut
to
one
and
push
must
lifter.
the
the
hoop
other.
stitches.
icon
off
and
and
a
screwdriver
the
needle
out
sew
or
two
fit
tightly
and
desired
with
and
needle
the
beginning
as
linen
garments.
various
of
the
the
of
the
fabric
hold
the
enter
breakage.
embroidery
stitches.
plate
needle
eyiets.
the
around
it
for
stitch.
fabric
the
to
making
fabric
over
the
slowly
twin
and
Achieve
remove
plate.
threads
the
the
pin.
first
and
needle
end
and
great
the
sure
Push
pin
few
evenly.
to
of
the
is
that
the
at
the
of
the
stitches.
The
Eyelet
plate
86
Page 89

•
S
E
E
Stitch
-
S
a)
S
s
-
b)
S
S
c)
examples
Select
the
stitch
reverse
Select
zigzag
Secure
Slowly
mirrored.
stitch
hoop.
width
stitch
stitch
with
stitch
no.
Then
to
button.
no.6
a
around
Secure
no.
few
for
34.
form
2
mm.
34,
with
eyelets
Stitch
a
Then
with
stitch
left
stitches
the
a
slowly
second
secure
needle
using
using
cut
few
stitches
and
circle
with
with
mirroring.
position,
the
reverse
elastic
using
evenly,
stitch
few
a
Finish
mm
2
blind
the
manually
no.
stitches
the
pattern
stitch
button.
stitch
reverse
34.
using
width.
no.
butto
turnir
Set
w
16,
tl
d)Usestitchno.ll7wfthastitchwidthof9mm.
Use
5
S
a
:
S
S
a
e)
f)
g)
stitch
petals.
Embroider
Then
stitch
Use
zigzag
few
straight
no.
with
around
stitch
stitches
115
stitch
with
the
no.3
no.
with
with
sVtch
a
cut
the
111
using
a
width
by
turning
zigzag
width
needle
of
of
in
9
the
stitch
to
6
right
mm.
hoop
no.
9
mm.
position.
Secure
steadily.
34,
Secure
after
mirror
wi
5
E
S
Hemstitching
-
5
-
5
—
—
-
—
—
——
This
With
much
by
changing
hemstitch
A
wing
required
.
wing
Hemstitching
cotton
I
If
you
threads
hemstitching
is
a
technique
your
more
needle
needle
fabrics
pull
you
Pfaff
quickly
the
effects.
(a
for
hemstitching
forms
will
from
additional
have
effects
everyone
performance
and
easily.
stitch
length
special
needle
work.
holes
which
be
most
successful
which
single
threads
pulled
as
out,
the
remaining
recognizes
2054,
you
With
ten
and
width,
with
When
are
typical
on
threads
and
sew
you
will
as
embroidered
can
special
you
a
wide,
entering
for
relatively
can
along
achieve
threads
produce
hemstitch
hemstitches
can
create
winglike
the
fabric
hemstitching.
coarse
be
easily
the
edges
even
more
are
bundled.
by
variati
shaft)
the
linen
pulled.
close
beatr
har
an(
is
tc
La
s
—
asaasa
-
ti
aapaa&,sfla
r
—
-
—-
itt-s
Page 90

Hemstftching
Stitch
93,
98
For
these
stitches
without
Stitch
Tip:
neatly
If
no.
you
bunch
pulling
99
use
the
the
and
can
“sew
threads.
stftches
99.
use
threads.
also
be
slow”
wing
function,
used
needle
for
curved
the
size
needle
100,
edging
will
130/705
and
evenly
enter
H
hem
Wing,
securing.
the
fabric
and
•
*
V
C
V
*
—
Sat
s
•Saa
—
.
•
,
S
•t*,t
—
4
—
e
“Ladder”
Stitch
•
Pull
as
•
Sew
When
both
Tip:
If
neatly
Making
This
seam
table
Needle
Stitch
•
ron
•
Pull
Using
When
hem
no.
out
when
along
you
bundle
linen,
size
92,
the
one
one
doing
and
hemstitching
90,
91,
threads
hemstitching
both
doing
this,
sides
close
use
the
“sew
the
threads.
a
hem
provides
napkins
80,
130/705
94
and
97.
hem
folding
or
more
of
the
this,
bundle
92,
94,
from
fabric
the
to
the
slow”
function
w[th
a
a
perfect
or
towels.
H
twice
of
the
hemstitches,
the
needle
the
pulled
97.
the
fabric
by
hand.
edges
needle
edges,
hemsttch
edge
to
threads
must
threads
with
must
thus
the
fVsh
mark
just
sew
until
any
enter
bundling
needle
the
above
along
enter
to
a
desired
of
will
seam
to
hemstitching
desired
the
the
the
the
the
evenly
the
right
left.
above
pulled
the
width.
hem.
pulled
width,
threads.
enter
threads.
side
the
stitches.
threads
the
fabric
work
of
the
same
on
and
on
I/.
.
I
88
Page 91

S
Cross
No
other
term
“needlework”
2054
and
embroidery
quickly.
stitch
borders
stitches
table
linens,
Tips
for
Always
functions.
Stitch
embroidery
its
wide
technique
Whether
these
look
towels
cross
work
or
create
stitch
using
technique
cross-stitching.
as
range
can
you
select
handsewn
or
clothes.
sewing:
the
of
your
cross
be
one
“sew
is
sutcOeS
created
of
own
and
slow”
closely
as
With
this
remarkably
pre-programmed
the
combination
lend
distinctive
a
and
“needle
associated
your
Pfaff
traditional
easily
with
with
perform
and
cross
the
cross
character
up/down”
th
t
Attach
adapted
Sew
cross
These
suitable
machine
change
Sew
and
Combine
achieve
Enter
succession.
Please
When
respective
on
to
marked
cross
these
the
the
programs
cross
note:
combining
right
right.
decorative
to
stitch
for
borders.
with
these
stitch
stitch
the
individual
large
areas
combinations
cross-stitch
can
The
by
a
circle
the
size
consist
optimum
settings
borders
with
of
cross
always
starting
an
foot
of
borders
of
They
stitch
as
needed.
32-89
cross
cross
into
stitches,
are
irnpotant.
be
and
a
dot
no.
2A.
the
cross
with
small
cross
have
been
length
stitches
stitch
different
the
combined
end
on
the
Its
red
guide-grooves
stitches.
72-81
stitches
pre-programmed
and
width.
using
or
beautiful
memories
start
and
A
cross
with
a
points
stitch
of
lid.
and
However,
your
imagination
borders.
end
points
stitch
that
cross-stitch
the
cross
are
and
stitches
are
especiall
into
thc
you
sew
the
of
the
finishe
that
st
ex
t
a
H
Page 92

Twin
Stitch
needle
threads
To
sew
For
the
Touch
width
This
will
decorative
close
the
The
twin
been
changed,
back
on.
remove
To
turn
(See
page
needle
beautiful
sewing
in
matching
with
default
a
little
can
be
limit
stitches.Touch
dialogue
needle
The
the
twin
the
function
29
is
the
2.5
set
the
even
twin
for
sewing
effects
twin
function
needle
threading.)
when
particularly
colors.
needle,
mm
longer
with
the
stitch
window.
after
needle
off,
twin
and
width
the
remains
the
function
from
touch
sewing
effective
touch
needle
dialogue
a
buttons.
the
so
screen
active
machine
the
machine.
.
with
if
touch
needle
or
step
has
must
Confirm
the
you
ii
window
is
on
even
been
be
turned
with
twin
use
quickly.
not
the
when
swithed
needle.
decorative
opens.
The
broken
foot
the
off
when
ok
Twin
sewing
on
control
stitch
off
needle
to
has
and
you
90
Page 93

-
I
I
I
i
I
I
I
•
—
I
I
Tapering
The
tapering
creative
three-dimensional
When
decreased
In
position
In
while
reverse
and
Tip:
Symetricaf
touched.
ideas
tapering
stitch
no.
so
stitch
no.
the
left
the
borders
Select
needle
Symmetrical
starts
with
Symmetrical
stitch
starts
the
needle
during
3
that
34,
needle
(asymmetric
program
into
the
and
you
the
position
stop
stitch
tapering
0
mm
tapering
at
up
in
the
for
action
appearance,
stitch
sewingto
10,
the
can
create
right
changes;
position;
down
when
3
and
and
becomes
mm
to
9
lower
zigzag
the
create
and
width
create
stitch
position
this
tapers).
tapering.
10
(increase).
(decrease).
and
position
which
of
the
symmetric
width
satin
of
using
stitch
wider
tapers
when
stitch
allows
stitcheswith
are
very
zig
zag
is
altered
points
the
The
The
the
is
(symmetric
needle
mirror
most
width
until
width
to
0
the
an
easy
stitch
or
asymmetric
from
remains
key
suited
of
it
reaches
of
mm
and
reverse
you
attractive,
to
sew.
is
increasec
center
you
for
the
zigzag
the
stops
button
to
put
tapers).
consta
can
corner
mm.
9
zigzag
yc
tap
ne
wil
is
j
I
I
Asymmetnc
U
Asymmetrical
Asymmetrical
‘i
Use
to
other
tapenng
reverse
direction.
tapering
tapering
the
needle
StItLfl
(increase).
(decrease).
position.
z
4
Width
Width
The
0
9
corner
mm
mm
to9
to
is
0
turned
mm.
mm.
in
Page 94

Automatic
tapering
Symmetric
increasing
Select
zig
width
zag
stitch
starts
is
Reducing
Press
the
mm.
The
pivot
the
and
the
stitch
If
you
touch
Asymmetric
Select
stitch
taper,
the
no.
from
reached.
the
width
reverse
machine
fabric
width
taper,
no.
stitch
width
3
or
Stitch
button.
stops
to
r
the
34
10
0
mm
stitch
increases.
taper
Stitch
and
no.
3
and
and
the
desred
The
with
the
begns
no.
proceed
or
pre:s
becomes
wchh
the
corner.
34
es
he
stitch
of
needle
Press
with
described
wider
the
in
the
the
button.
until
length.
zig
the
foot
preset
above.
zag
fabric
Touch
the
is
reduced
and
control
stitch
preset
you
again,
width.
.
The
stitch
to
can
0
Decorative
For
beutiful
This
buttonhole
Tip:
to
create
Rayon
thread
Select
stitch
Touch
according
•
Touch
Set
the
Sew
the
the
reverse
Turn
the
and
press
width
•
Turn
the
Touch
described
decorative
the
on
no.
needle
stitch
first
fabric
the
to
0
fabric
reverse
above.
buttonhole
suitable
is
decorative
top
and
change
34.
stop
to
the
tnickness
andtouch
width
buttonhole
button.
90°
reverse
mm.
90°
turn
button
tour
down
to
The
and
again
the
for
color
color
6
mm.
side
machir.n
sew
button
and
fabdc
and
of
hoies.
terry
buttonhole
ar
-‘.!
proorarn
ynur
in
t
the
aCan:
sf
any
oth
pivot.
m
ed
rack.
hc
length,
or
as
the
abric
desired
ces
ne
second
he
for
pictured,
presser
length
the
Sew
machine
secood
select
decorating
sew
with
foot
and
width
to
about
1/4
reduces
buttonhole
bartac
stitch
0
34.
jackets.
decorative
lift
touch
mm.
(6
mm)
the
side.
as
V
92
Page 95

I
Appliqués
using
different
You
can
sew
The
special
satin
a
keeps
stitch
the
shape.
Snap
on
Transfer
-
remember
mirror
Iron
the
fabric.
Place
the
Stitch
narrow,
a
9.2
to
appliqué
TiP:
ta
caper
increments
are
easily
fabrics
a
perfect
cutout
zigzag
appliqué
the
your
that
image.
paper-backed
Cut
the
appliqué
around
satin-stitch
0.6
mm.
to
prevent
is
requiicd
wth
the
created
on
to
in
applique
pattern
any
motif
all
appliqués
Make
you
-1+
keya(see
and
satin
the
feed
place
foot.
to
letters
out
pieces
zigzag,
sure
fraying.
can
and
prints
stitch
unde:scJe
snroco.y
so
yo
the
or
web
to
and
on
wth
the
narrow
Tapeiinp,
produce
you
with
can
paper
numbers
tne
pull
base
stitch
stitch
the
page
create
the
allows
under
easily
side
wrong
off
the
fabric
r’pplique
width
covers
satin
stitch
91).
beautiful
a
many
optional
the
the
stitch
of
the
have
side
paper.
arid
stitch
2
-
the
zigzag
extra
foot.
fusible
to
of
iron
mm,
4
outer
effect.
different
applique
thickness
Fusible
around
webbir
be
drawn
the
appliqu
securely.
44)
(No.
stitch
edge
0.5
in
mm
the
or
By
lool
to
c
w
as
t
Icr
01
&
kJ
Page 96

Page 97

VI
CD
VP,
0
VP,
7i1rJfliT
D
CD
is
0
CD
VI
4
—
-.--—
S1
I
V”i
D.
I
-U
0,
Q)
IWJ
C
a
=
CD
C
a
CD
CD
CD
flu)
O
CD
.
0
—hO
C0CD
1
CD
CD
-I,
-4’
CD
O,
(D
:
1
.
::
‘!fl!!
I
-L
:
-n
0
CD
r
—
0
‘
r+
CD
-‘
0
CDO
-
T
D
0
C
-I
CD
a
—‘
-I
OOOOQó
CD
CD
CD
Page 98

Standard
and
accessodes
presser
feet
Standard
nrescer
foot
No.
CA
Fancy
(for
Fancy
(not
Blind
diai
fo
sf
stitch
s:
dual
d
feed)
tc
foot
and
foot
feed)
overlock
No.
No.
IA
2A
foot
No.
2
3
96
Zfp3er
Btrt&wc
rr
cJgpesserootNo,4
e
u
,&.
Page 99

i
i1
Darning
Roll
hemmer
foot
No.
No,
6
7
!
I
I
-
Edge
guide
ensormatc
Styhs
Second
S€am
Bru3h
riper
spoo
No.
8
buttonhoie
koer
guce
o.
10
I
Page 100

FeNing
Flat
felled
as
jeans
and
shirts
these
a
contrasting
widths.
Snap
Place
•
Overlap
(1
•
Place
The
•
Sew
•
Separate
foot.
edge.
seams
-
1.5
fabric
along
The
foot
seams
seams.
are
on
the
the
the
cm).
this
the
Pull
hem
are
Seams
more
durable
particularly
color.
The
felling
fabrics
raw
wrong
edge
overlapping
must
be
the
folded
fabric
is
turned
the
two
particularly
sportswear
on
with
decorative
felling
foot
to
sides
of
the
edge
placed
edge
and
feed
by
fabric
layers
strong
and
and
technique.
this
using
by
footisavailable
the
presser
together.
lower
fabric
over
the
tongue
fully
under
with
a
straight
the
extending
the
foot
and
taut
during
are
children’s
a
foot
by
the
presser
stitch.
is
stitched
commonly
You
sewing
in
two
shank.
about
of
the
hem
sewing.
weai
can
thread
3/8
foot.
into
along
known
blouses
make
different
“
to
felling
the
of
5/8
foot.
felling
the
Felling
Stitch:
Stitch
Tension:
Foot,
1
length:
1-5
6,5
mm
3
820219-096
Appliqué
Appliqués
By
using
new
designs.
which
satin
•
•
•
•
o
has
stitch.
Snap
Transfer
paper-backed
have
Iron
fabric.
Position
fabric.
Place
Stitch
that
occurs
are
different
a
on
to
be
the
Cut
a
stabilizer
all
the
later.
foot
easily
Sew
special
the
your
drawn
fusible
out
and
edges
needle
sewn
materials
dense
cutout
appliqué
drafted
webbing.
as
paperbacked
your
press
under
with
sews
satin
foot.
pattern
mirror
appliqué
your
a
narrow
over
and
always
and
patterns
stitches
the
on
Remember
images.
webbing
and
appliqué
your
work
the
produce
with
underside
to
the
peel
pieces
area.
satin
stitch
outer
paper
that
edge
you
the
on
the
in
can
to
side
any
to
paper
place
zigzag.
so
a
beautiful
create
appliqué
feed
over
of
letters
the
appliqué
from
on
Make
that
no
a
fusible,
or
your
fraying
effect.
countless
foot,
the
the
numbers
the
back.
base
sure
Applique
Stitch:
Stitch
Stitch
Tension:
-
Foot
3
length:
width:
2
8202111-096
0.35
1.5
2
-
3
98
 Loading...