

Page 1
The real passion for sewing!
Owner’s manual
Page 2

This household sewing machine is designed to comply with IEC/EN 60335-2-28 and UL1594
IMPORTANT SAFETY INSTRUCTIONS
When using an electrical appliance, basic safety precautions should always be followed, including the following:
Read all instructions before using this household sewing machine.
DANGER - To reduce the risk of electric shock:
• A sewing machine should never be left unattended when plugged in. Always unplug this sewing machine from
the electric outlet immediately after using and before cleaning.
• Always unplug before relamping. Replace bulb with same type rated 5 Watt.
WARNING - To reduce the risk of burns, fire, electric
shock, or injury to persons:
• Do not allow to be used as a toy. Close attention is necessary when this sewing machine is used by or near
children or infirm person.
• Use this sewing machine only for its intended use as described in this manual. Use only attachments
recommended by the manufacturer as contained in this manual.
• Never operate this sewing machine if it has a damaged cord or plug, if it is not working properly, if it has been
dropped or damaged, or dropped into water. Return the sewing machine to the nearest authorized dealer or
service center for examination, repair, electrical or mechanical adjustment.
• Never operate the sewing machine with any air openings blocked. Keep ventilation openings of the sewing
machine and foot controller free from the accumulation of lint, dust, and loose cloth.
• Keep fingers away from all moving parts. Special care is required around the sewing machine needle.
• Always use the proper needle plate. The wrong plate can cause the needle to break.
• Do not use bent needles.
• Do not pull or push fabric while stitching. It may deflect the needle causing it to break.
• Switch the sewing machine off (“0”) when making any adjustment in the needle area, such as threading needle,
changing needle, threading bobbin, or changing presser foot, etc.
• Always unplug the sewing machine from the electrical outlet when removing covers, lubricating, or when
making any other user servicing adjustments mentioned in the instruction manual.
• Never drop or insert any object into any opening.
• Do not use outdoors.
• Do not operate where aerosol (spray) products are being used or where oxygen is being administrated.
• To disconnect, turn all controls to the off (“0”) position, then remove plug from outlet.
• Do not unplug by pulling on cord. To unplug, grasp the plug, not the cord.
SAVE THESE INSTRUCTIONS
Page 3
Congratulations!
Congratulations on purchasing your new PFAFF® performance™
2058! Pfaff performance 2058 is the perfect companion for those
who love to sew. It’s ease of use and unlimited features will free
your creative engergies and turn your ideas into reality.
Before you start, please spend some time reading these operating
instructions. You will soon discover how easy it is to use your Pfaff
performance 2058.
Give free rein to your imagination and discover your own passion
for sewing together with one of the greatest sewing machines in the
world - performance 2058 from Pfaff.
Page 4

1:4
Table of content
1
2
3
4
Introduction
Overview of your machine 1:9
Standard presser feet and accessories 1:10
Stitch chart 1:12
Lid 1:17
Carrying case 1:17
Sewing with free arm 1:17
Accessory tray 1:18
Preparations
Voltage switch 2:2
Electrical connection 2:2
Connecting the foot control 2:
2
On/off switch 2:2
Presser foot lift 2:3
Changing the presser foot 2:3
The IDT (Integrated Dual Feed) 2:
4
Lowering the feed dogs 2:5
Bobbin winding 2:6
Inserting the bobbin and bobbin case 2:9
Threading your machine 2:10
Integrated needle threader 2:11
Bringing up the bobbin thread 2:12
Thread cutter 2:12
Changing the needle 2:13
Threading the twin needle 2:13
Correct thread tension - How to get it 2:14
Electronic knee lift 2:15
Operating your performance
Operating your machine 3:2
Function buttons 3:2
Main menu 3:4
Selection menus 3:4
Selecting a stitch 3:6
Sewing menu 3:7
Altering the stitch settings 3:7
More options for sewing 3:
9
Context menu 3:11
Info system 3:15
Utility sewing
Getting started 4:2
Straight stitch - No 1 4:3
Sewing in zippers - No 1 4:3
Three-step zigzag stitch - No 4 4:3
Topstitching - No 1 4:4
Basting stitch - No 17 4:4
Gathering with straight stitch - No 1 4:4
Blindhem stitch - No 15 4:5
Stretch Blindhem stitch - No 16 4:5
Rolled hem with straight stitch - No 1 4:5
Overlock stitches 4:6
Buttonholes 4:7
Sewing on buttons - No 60 4:10
Eyelets - No 59 4:10
Automatic darning - No 74 and 75 4:11
Free motion darning - No 1 and 3 4:12
Page 5

1:5
5
6
7
8
Decorative sewing
General notes on decorative sewing 5:2
Combined borders 5:2
Twin needle sewing 5:3
Cross stitch 5:3
Tapering 5:4
Quilting 5:5
Free-motion sewing 5:9
Nostalgia/Heirloom 5:10
Stitch sequences
Stitch sequences 6:2
Creating a new stitch sequence 6:
3
Altering the settings of a selected stitch 6:4
Editing a stitch sequence 6:4
Saving a stitch sequence 6:5
Alphabets 6:6
Creating an alphabet sequence 6:
7
Combine alphabet and stitch sequences 6:7
Stitch Creator
Stitch Creator 7:2
Creating a new stitch 7:4
Add excisting stitches 7:4
Editing a stitch 7:5
Saving a stitch 7:6
Sewing a stitch 7:6
Maintenance
Changing the needle plate 8:2
Cleaning 8:2
Changing the lightbulb 8:3
Sewing problems and their solutions 8:4
Index 8:6
Technical data 8:
11
Package contents 8:
11
Intellectual property 8:11
Table of content
Page 6

1:6
Some fabrics have a lot of excess dye which can cause discoloration
on other fabric but also on your sewing machine. This discoloring
may be very difficult or impossible to remove.
Fleece and denim fabric, especially red and blue, often contain a lot
of excess dye.
If you suspect that your fabric/ready-to-wear garment contains
a lot of excess dye, always pre-wash it before sewing to avoid the
discoloring.
Page 7

Introduction
Page 8
1
2
3
4
5
6
7
8
9
10
11
12
13
14
15
16
17
18
19
20
21
22
23
24
25
26
27
28
29
30
31
33
32
34
35
36
37
1:8
Page 9

1:9
Introduction
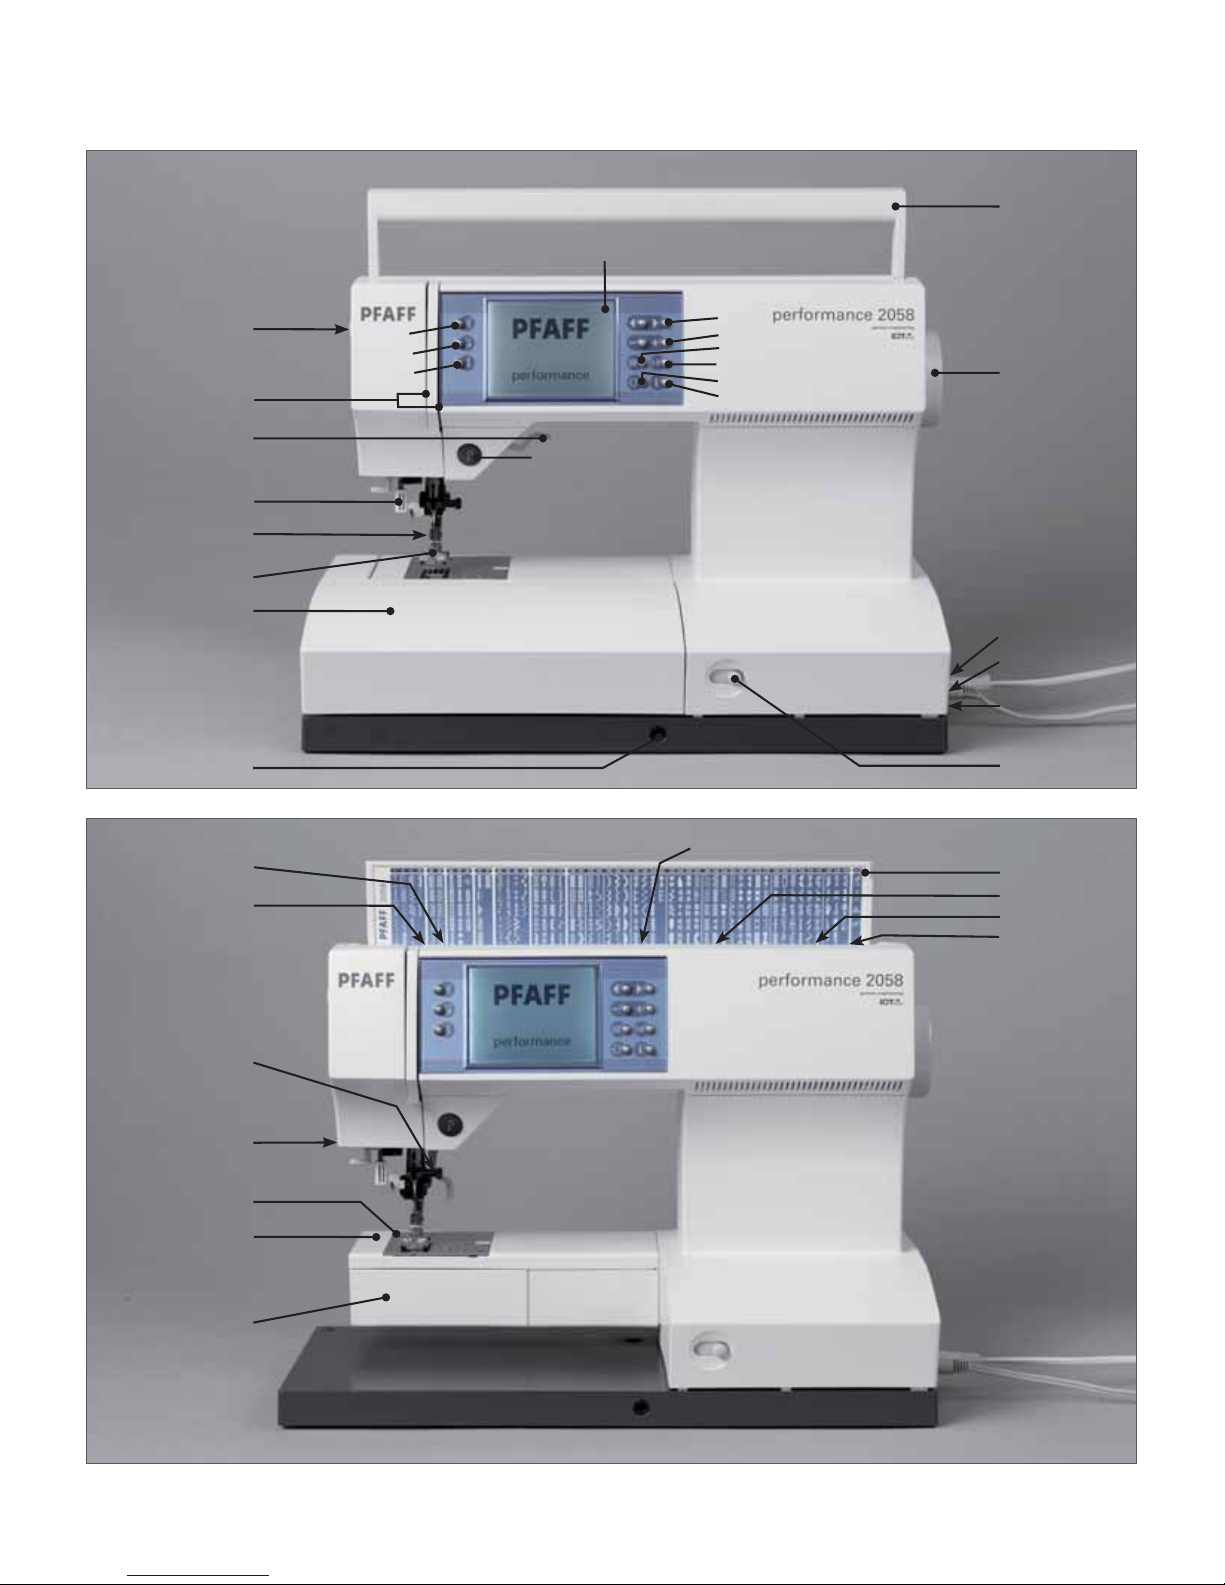
Overview of your machine
1. Pattern restart button
2. Sew slow button
3. Needle up/down button
4. Scroll buttons
5. Function field buttons
6. Main menu button
7. Selection by number button
8. More options button
9. Info button/Context menu
10. Reverse sewing button
11. Touch screen
12. Handle
13. Handwheel
14. Connection socket, lead cord
15. Connection socket, foot control
16. On/off switch
17. Slide for lowering the feed dogs
18. Spool holder with spool cap
19. Lid with stitch chart
20. Hole for second spool holder
21. Thread cutter for bobbin winding
22. Bobbin winder
23. Bobbin door
24. Free arm
25. Needle plate
26. Thread cutter
27. Needle holder with retaining screw
28. Take-up lever
29. Thread guide
30. Knee lift attachment hole
31. Removable accessory tray
32. Presser foot holder with presser foot
33. IDT - Integrated Dual Feed
34. Integrated needle threader
35. Presser foot lifter
36. Threading slots
37. Needle thread tension
Page 10
1:10
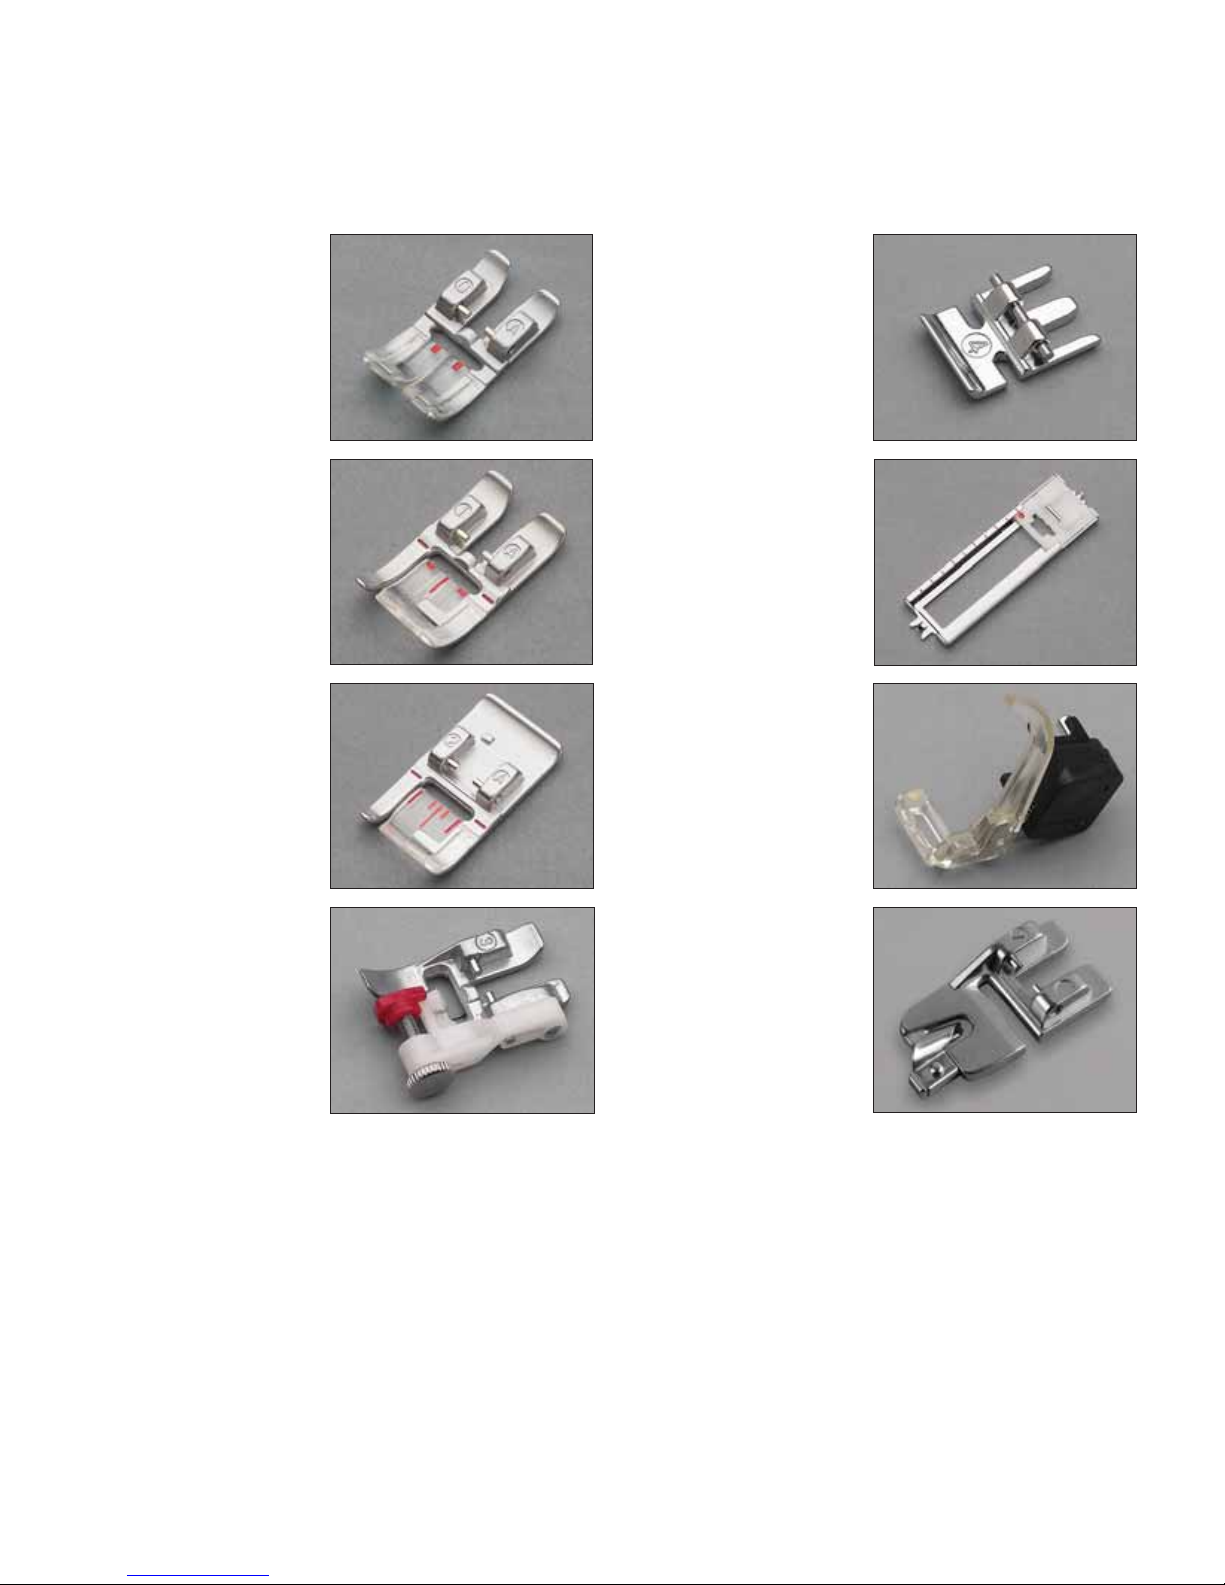
Standard presser feet and accessories
Rolled hem foot 3 mm
with IDT, No. 7
Darning foot, No. 6
Blindhem and overlock
foot with IDT, No. 3
Standard presser foot
with IDT, No. 0A
(attached on the machine
upon delivery)
Fancy stitch foot with
IDT, No. 1A
Fancy stitch foot, No. 2A
Zipper foot with IDT,
No. 4
Buttonhole foot, No. 5A
Page 11

1.
2.
3.
4.
5.
6.
10.9.8.7.
1:11
Introduction
Sensormatic buttonhole guide, No. 10
Edge guide
Bulb remover/Needle plate changer
1. Bobbins
2. Spool cap medium (attached on the
machine upon delivery)
3. Spool cap small
4. Spool cap large
5. Needle box
6. Felt pad
7. Stylus
8. Second spool holder
9. Seam ripper
10.
Brush
Page 12
1:12
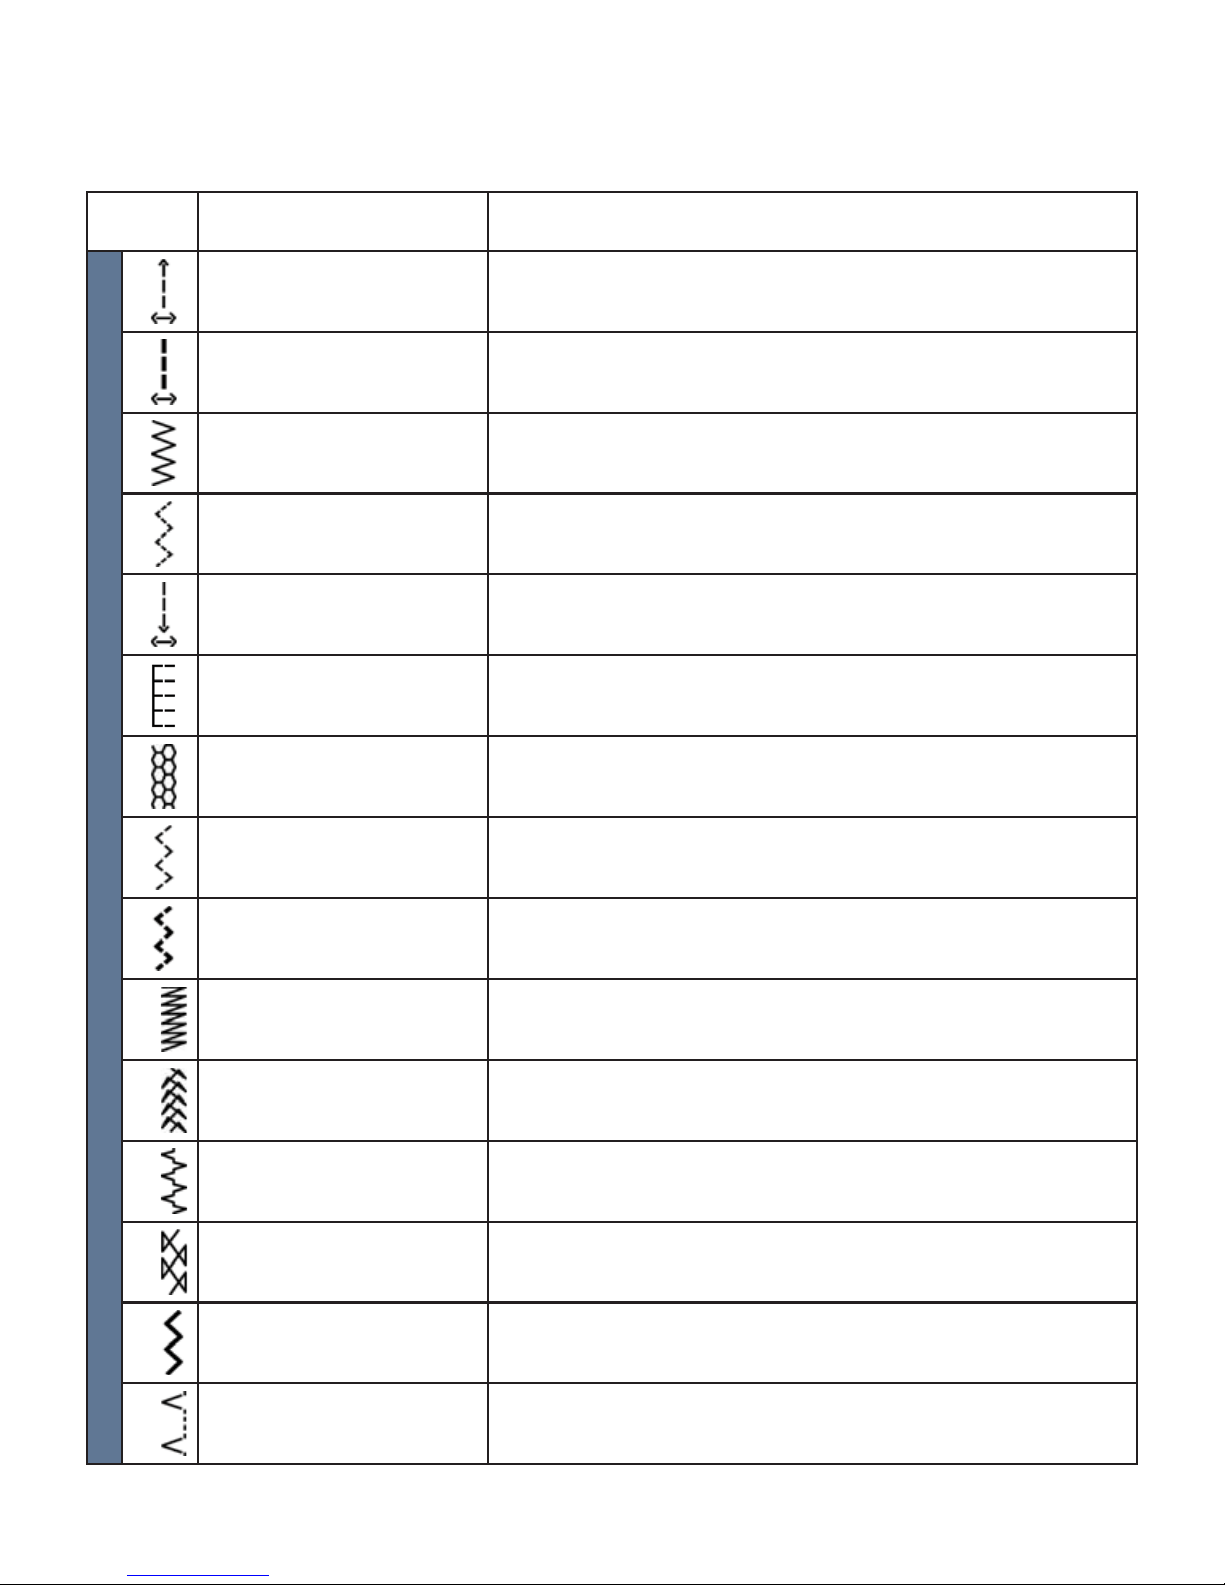
Stitch chart
Stitch Description Application
Utility stitches
1.
Straight stitch with 19 needle
positions
For all straight stitch and topstitching jobs. Stitch length can be
increased up to 6mm. 19 needle positions are available, for edge
finishing or sewing in zippers.
2.
Stretch triple straight stitch
with 19 needle positions
For reinforced seams, particulary on stretch fabrics, e.g. trouser
seams, sportswear and work wear. Stitch length can be increased up
to 6mm for decorative topstitching.
3.
Zigzag stitch For finishing seams, appliqué work, inserting lace etc.
4.
Three-step zigzag stitch Strong stitch for seam finishes, overcasting, sewing on elastic,
darning tears and applying patches.
5.
Straight stitch reverse Program permanent reverse for decorative sequences. 19 needle
positions are available.
6.
Elastic overcast stitch Use to seam and overcast on woven and stretch fabrics.
7.
Honeycomb stitch Elastic, decorative stitch for ornamental hem finishing on stretch
fabric and decorative elastic application.
8.
Elastic stitch Strong stitch for seam finishes, sewing on elastic, darning tears and
applying patches.
9.
Triple stretch stitch For sewing elastic on sportswear or swimwear. (Extremely durable
seam for open-knit materials).
10.
Z-Zigzag stitch For finishing seams, inserting lace and particulary suitable for
appliqué work thanks to its stitch density.
11.
Bridging stitch For bridging, decorative hemstitching and crazy quilting.
12.
Foundation elastic stitch For joining overlapped seams on bulky fabrics such as leathers and
terry cloth.
13.
Cross hem stitch Provides a highly elastic, decorative seam for hems on sportswear
and casual wear.
14.
Stretch triple zigzag stitch Elastic stitch for decorative hems and topstitching.
15.
Blindhem stitch For securing hems invisibly on woven fabrics.
Page 13
1:13
Introduction
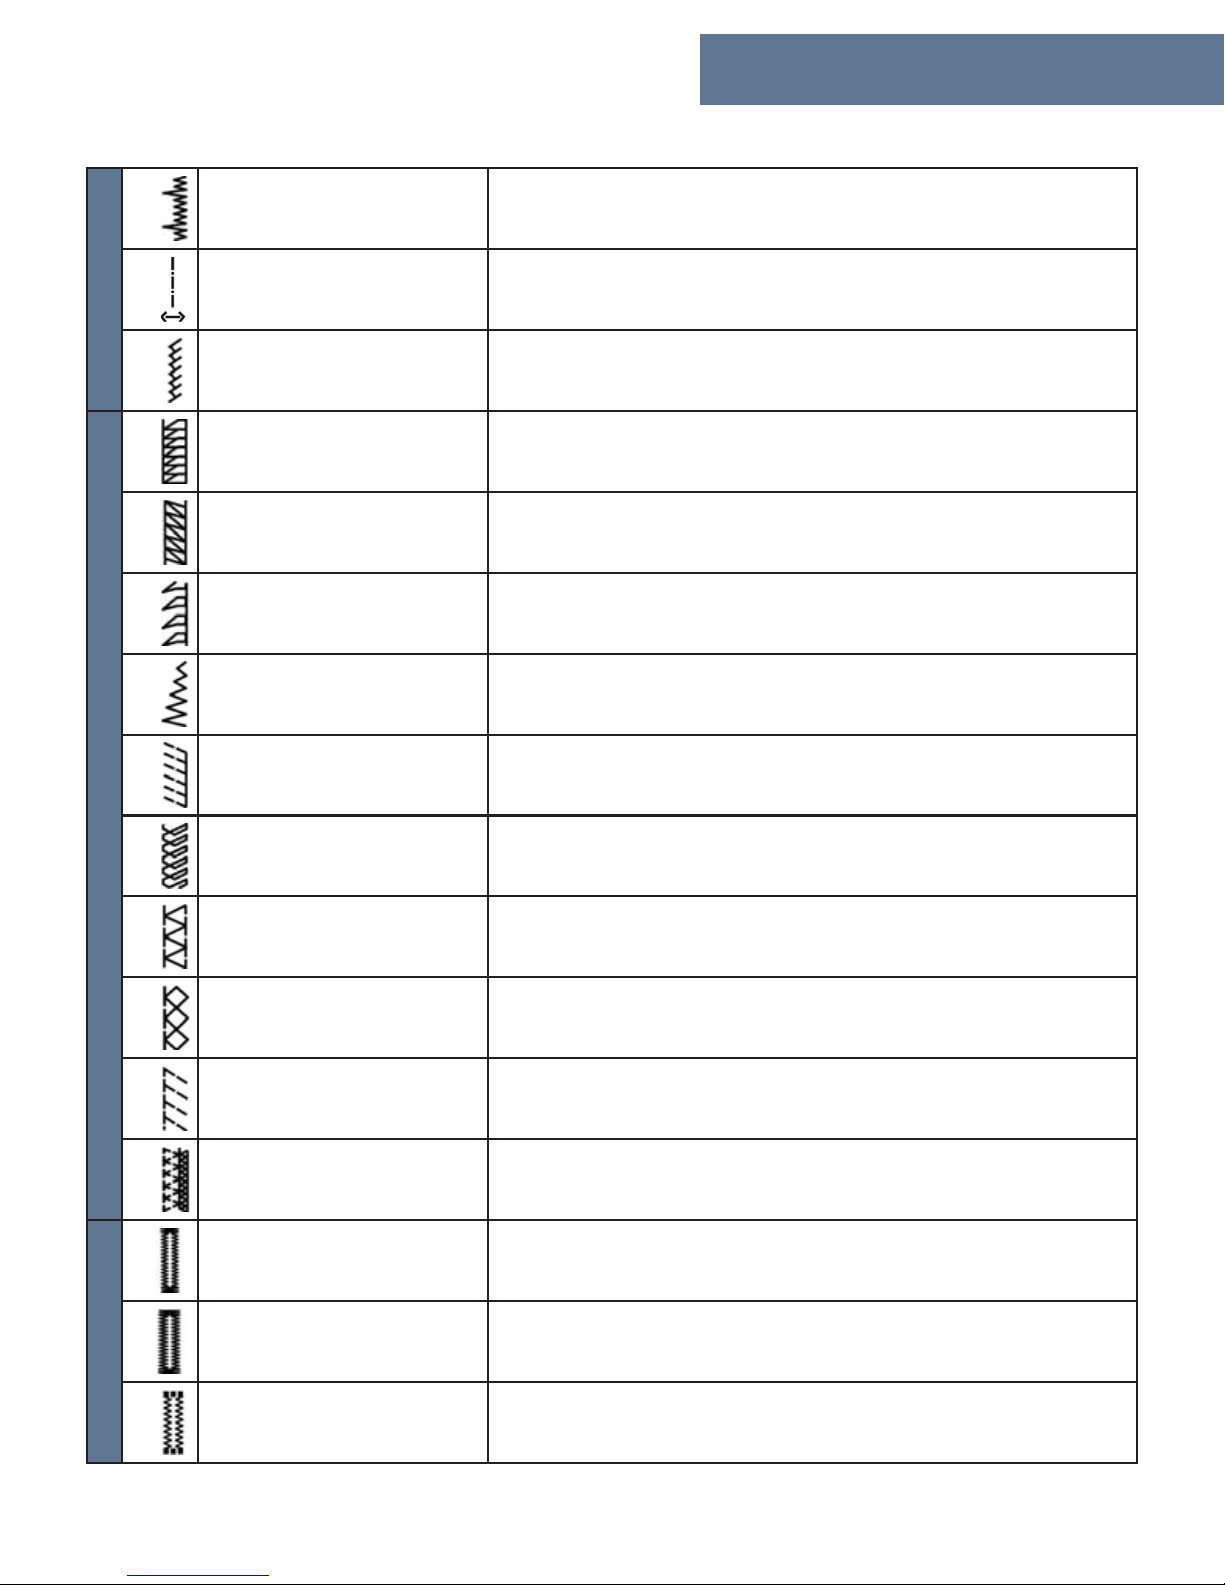
16.
Elastic blindhem stitch For securing hems invisibly and finishing the edge on stretch fabrics.
17.
Basting stitch For basting project pieces together. 19 needle positions are available.
18.
Lightning stretch stitch For joining light weight stretch fabrics and decorative embellishment.
Overlock stitches
30.
Closed overlock stitch For joining and overcasting stretch fabrics in one operation. The
closed seam prevents fabric edges from fraying.
31.
Closed overlock stitch For joining and overcasting in one operation.
32.
Open overlock stitch For joining and overcasting stretch fabrics in one operation.
33.
Zigzag stitch, right or left
needle position.
For appliqué, couching over cords and creating eyelets.
34.
Overlock stitch For joining and overcasting stretch fabrics in one operation.
35.
Light-knit fabric patching
stitch
Use to mend light jersey knits. Also for a decorative hem and
neckling finish.
36.
Closed overlock stitch For joining and overcasting stretch fabrics in one operation.
37.
Stretch knit overlock stitch Join and overcast open knit fabrics and jersey.
38.
Standard overlock stitch For joining and overcasting stretch fabrics in one operation.
39.
Reinforced overlock stitch For joining and overcasting fabrics. The knited edge reinforces and
prevents fraying on the raw edge.
Buttonholes
50.
Linen buttonhole Buttonhole for blouses, shirts and linen.
51.
Standard buttonhole Basic buttonhole for blouses and shirts, jackets and pillow closures.
52.
Stretch buttonhole Buttonhole for stretch fabrics.
Page 14
1:14
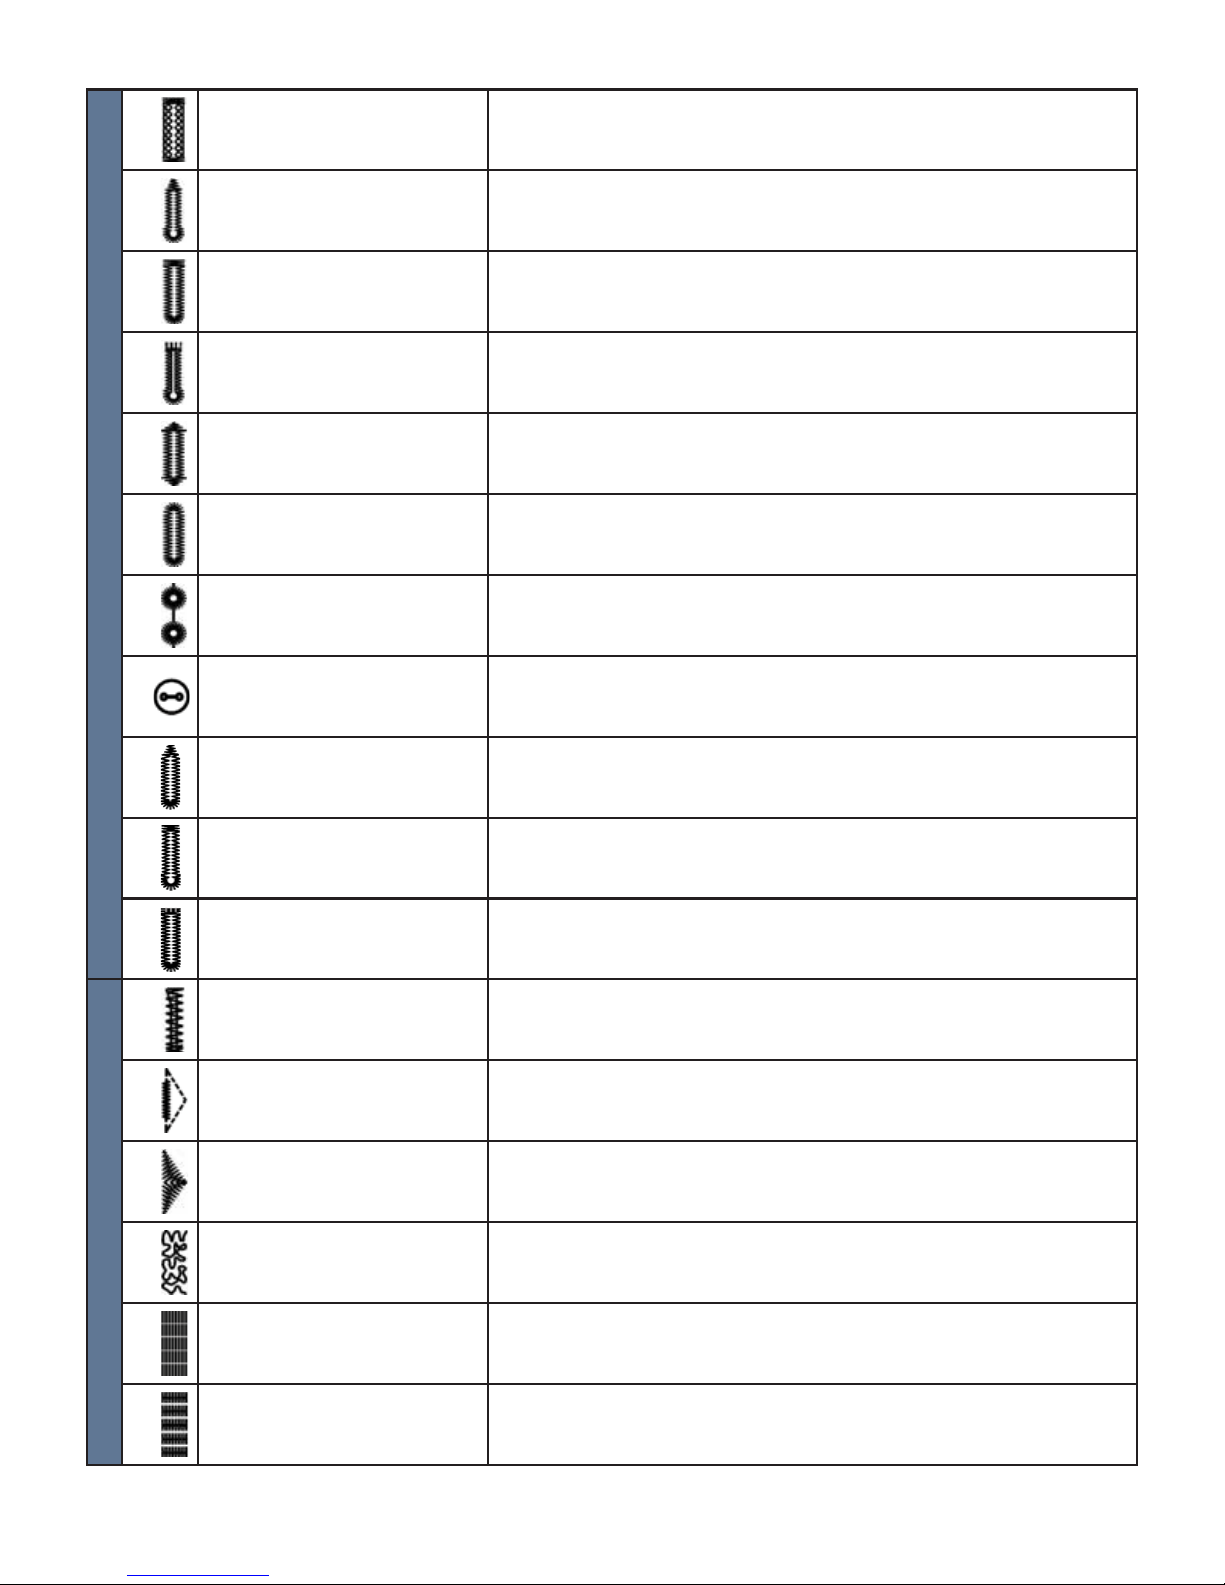
Buttonholes
53.
Cross stitch buttonhole Decorative buttonhole for jackets and for embellishing other
garments.
54.
Eyelet buttonhole with
pointed bartack
Professional tailor’s buttonhole for denim jackets and trousers.
55.
Rounded buttonhole with
lengthwise tack
Buttonhole for shirts, jackets and trousers.
56.
Professional eyelet
buttonhole
Buttonhole for denim jackets and trousers. Or as a decorative effect
for kitchen or shower curtains. Add rings through the buttonholes to
hang the curtains.
57.
Decorative buttonhole with
triangle tack
Decorative buttonhole for jackets and for embellishing other
garments.
58.
Round ends buttonhole Use for light weight garments or jackets.
59.
Eyelet Create eyelets for garments and home textiles. Also great for
decorating nostalgia projects.
60.
Button sewing program For applying two-hole or four-hole buttons.
61.
Rounded buttonhole with
pointed bartack
Buttonhole for shirts, jackets and trousers.
62.
Eyelet buttonhole with
lengthwise bartack
Professional tailor's buttonhole, for denim jackets and trousers. Or
as a decorative effect for kitchen and shower curtains. Add rings
through the buttonholes to hang the curtains.
63.
Rounded end buttonhole
with crosswise tack
Buttonhole for shirts, jackets and trousers.
Darning and bartack
70.
Bartack For applying belt loops and reinforcing pockets.
71.
Denim bartack Decorative bartack for trousers and skirt pockets.
72.
Decorative bartack Decorative bartack for trousers and for reinforcing skirt vents.
73.
Stippling stitch Use for quilting and as a darning stitch for mending rips and tears.
74.
Programmable darning stitch For darning damaged areas.
75.
Programmable reinforced
darning stitch
For darning and repairing damaged areas. Reinforced by horizontal
stitches.
Page 15
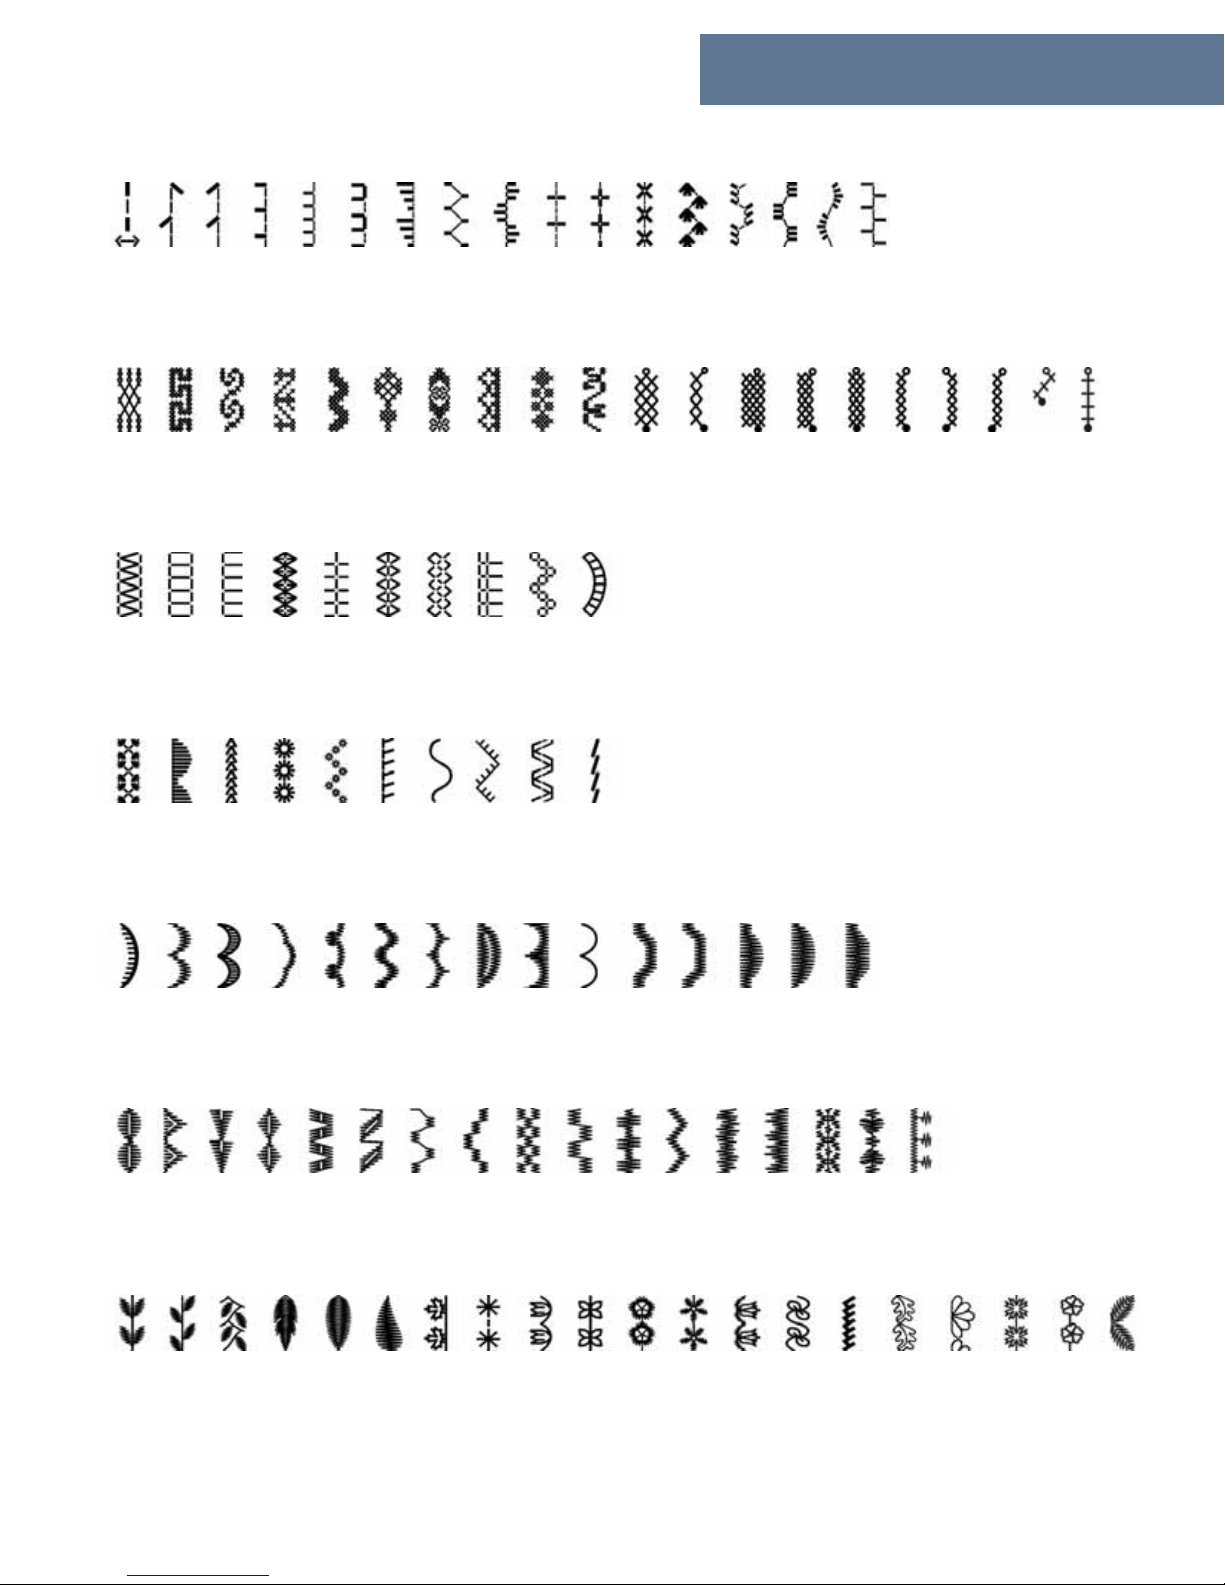
80 81 82 83 84 85 86 87 88 89 90 91 92 93 94 95 96
100 101 102 103 104 105 106 107 108 109 110 111 112 113 114 115 116 117 118 119
130 131 132 133 134 135 136 137 138 139
140 141 142 143 144 145 146 147 148 149
160 161 162 163 164 165 166 167 168 169 170 171 172 173 174
190 191 192 193 194 195 196 197 198 199 200 201 202 203 204 205 206
220 221 222 223 224 225 226 227 228 229 230 231 232 233 234 235 236 237 238 239
1:15
Introduction
Antique quilting
Cross stitches
Hem stitches
Antiqe hand embroidery stitches
Scallop edges
Satin stitches
Leaves and flowers
Page 16
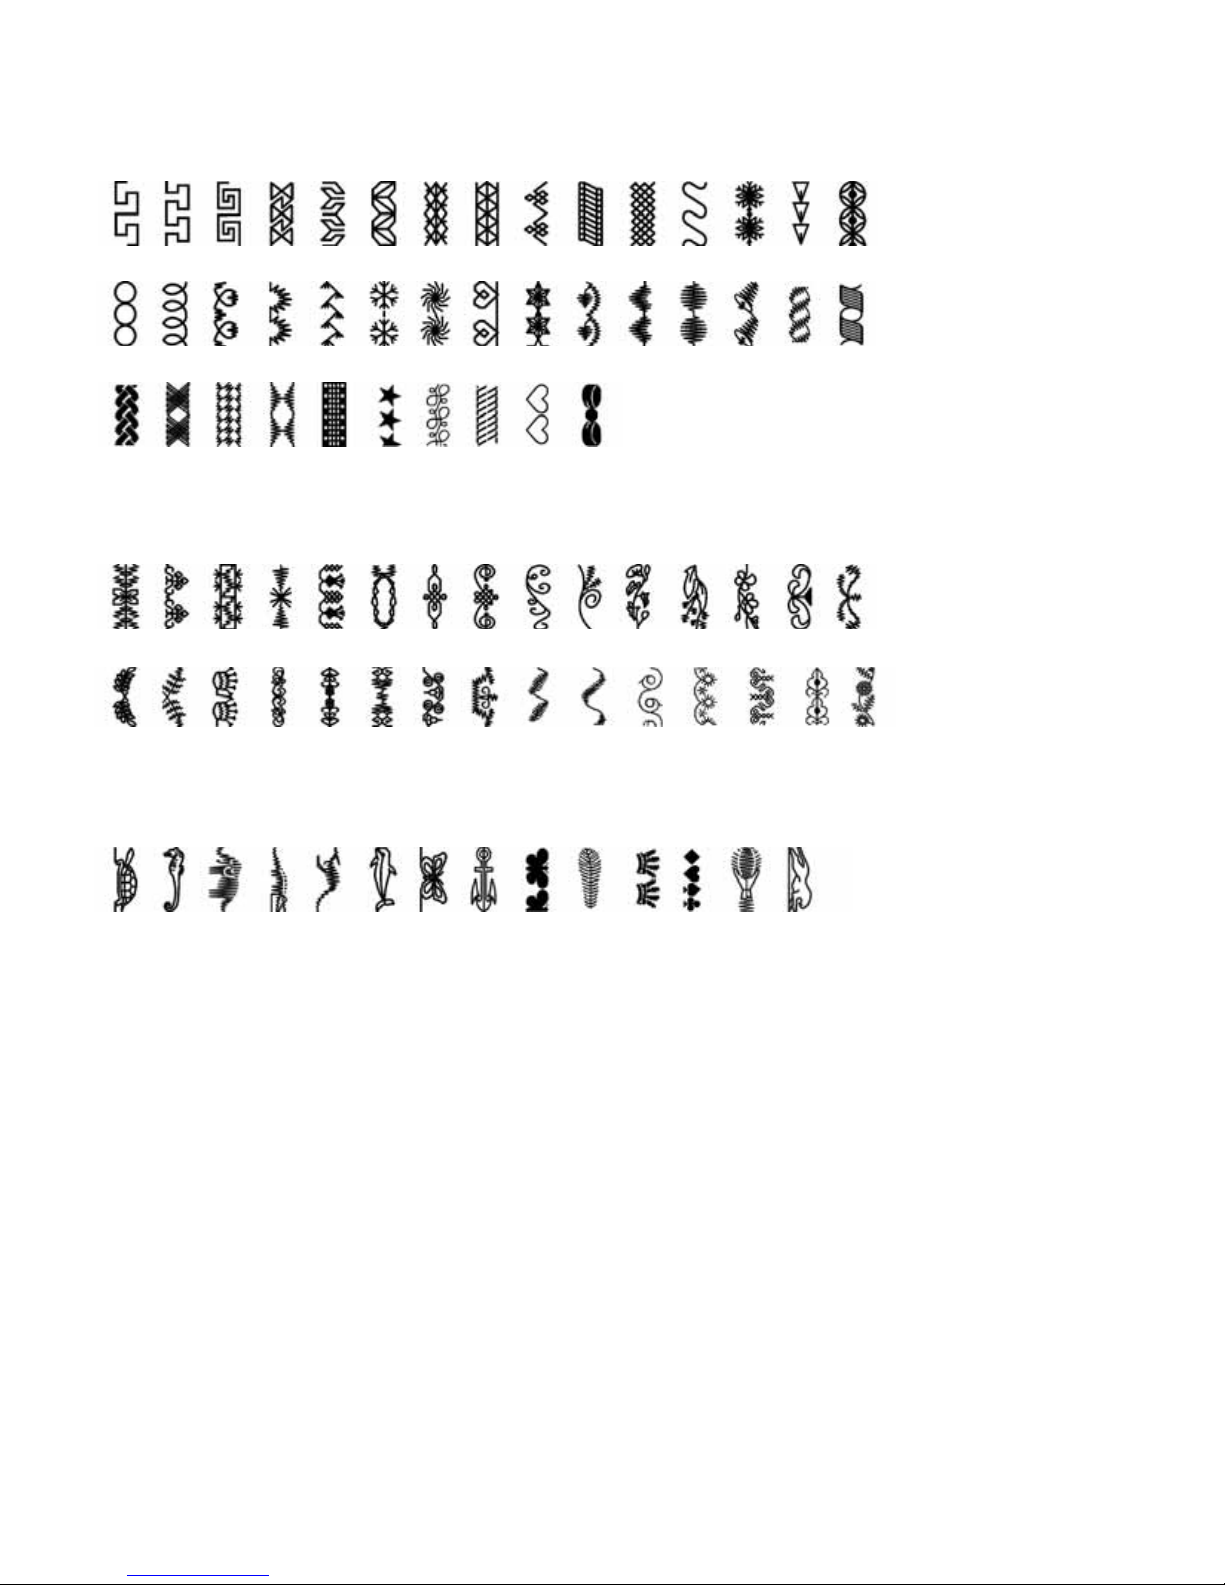
240 241 242 243 244 245 246 247 248 249 250 251 252 253 254
255 256 257 258 259 260 261 262 263 264 265 266 267 268 269
270 271 272 273 274 275 276 277 278 279
290 291 292 293 294 295 296 297 298 299 300 301 302 303 304
305 306 307 308 309 310 311 312 313 314 315 316 317 318 319
330 331 332 333 334 335 336 337 338 339 340 341 342 343
1:16
Art stitches
Ornamental stitches
Fun stitches
Page 17

1:17
Introduction
Lid
Lift the lid to open. All stitches are displayed on the inside of the lid.
Sewing with free arm
In order to sew using the free arm, swing the accessory tray to the left
and lift it up out of the hole.
When replacing the accessory tray, insert the pin into the hole and
swing the tray to the right to close until it is flush with the free arm of
the sewing machine.
Carrying case
Use the hard carrying case to protect your machine when transporting
it. The machine’s integrated handle can be accessed through a slot in
the top back of the case. There is a convenient storage compartment to
hold the lead cord, foot control and instruction book.
Page 18
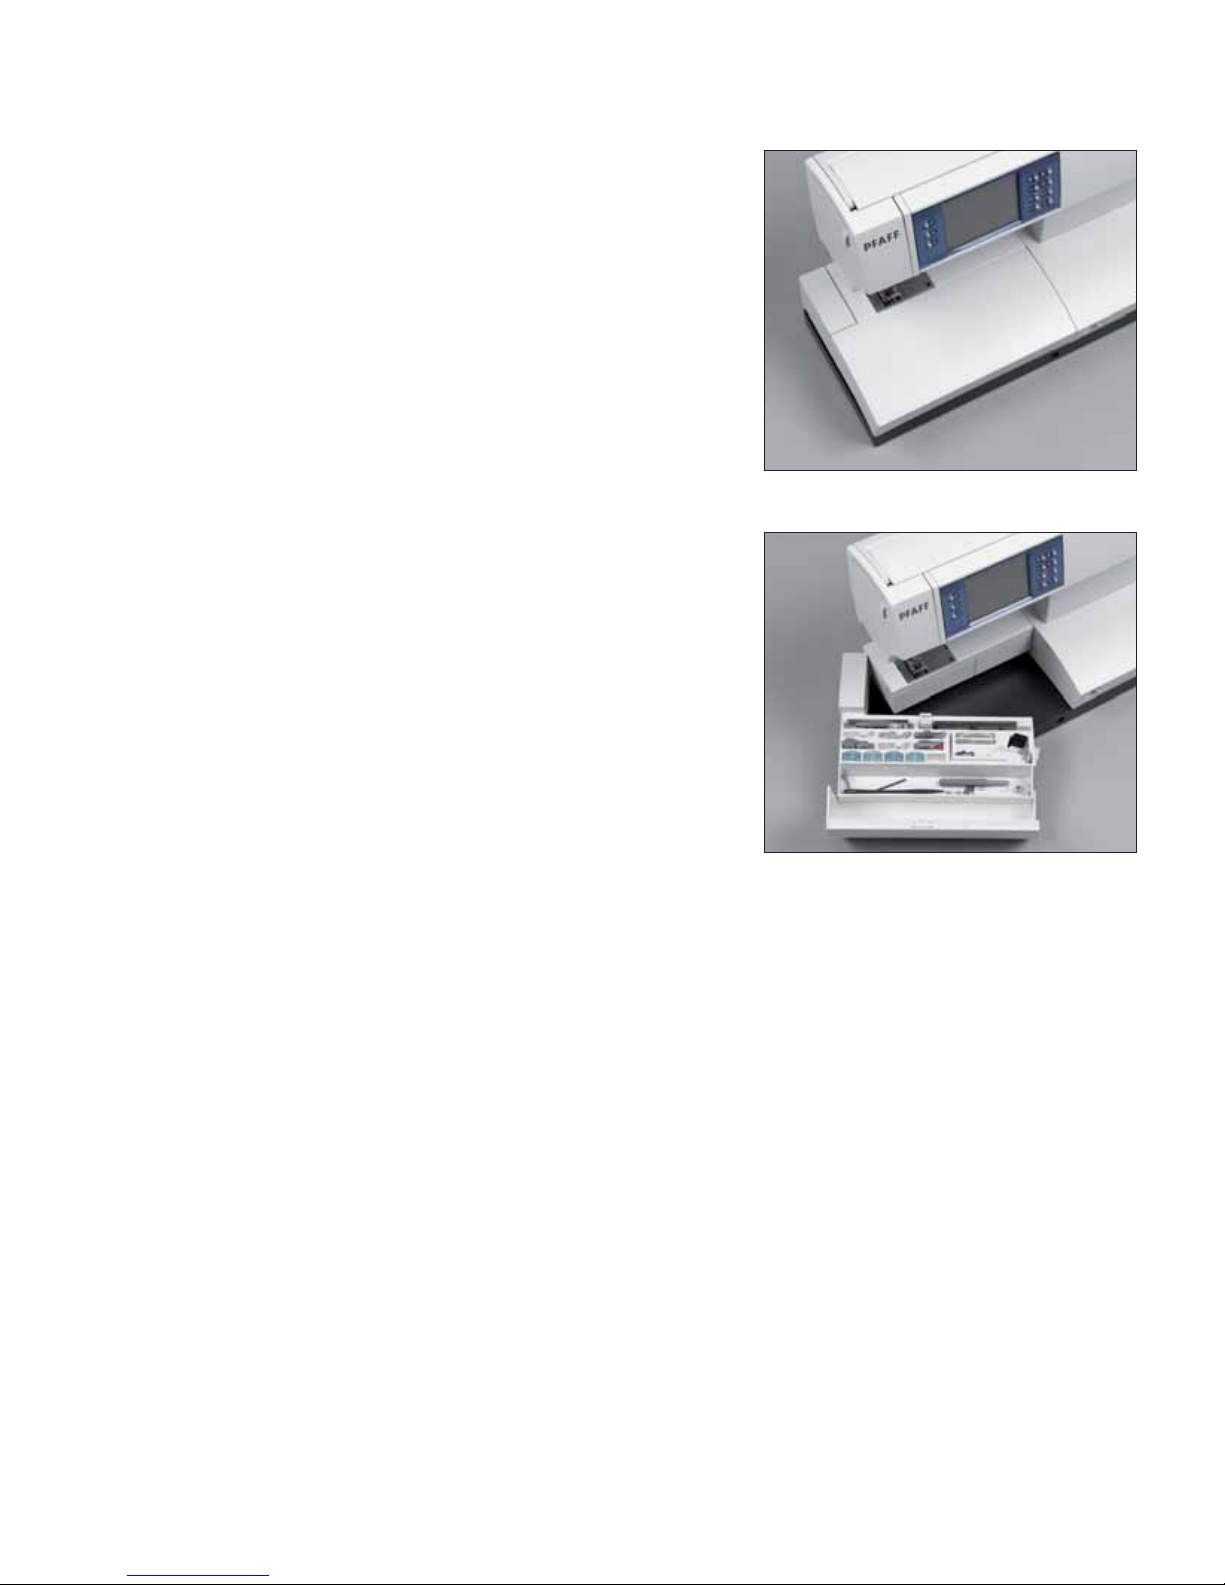
1:18
Accessory tray
Open the accessory tray by placing your left index finger on the ridged
area to the left side of the lid and pull it towards you.
Arranging the accessories
The standard accessory feet are marked with numbers. Arrange the
feet in the respective numbered compartments of the accessory tray.
Put the remaining accessories in the open spots like the picture to the
right shows.
Page 19
Preparations
Page 20

2:2
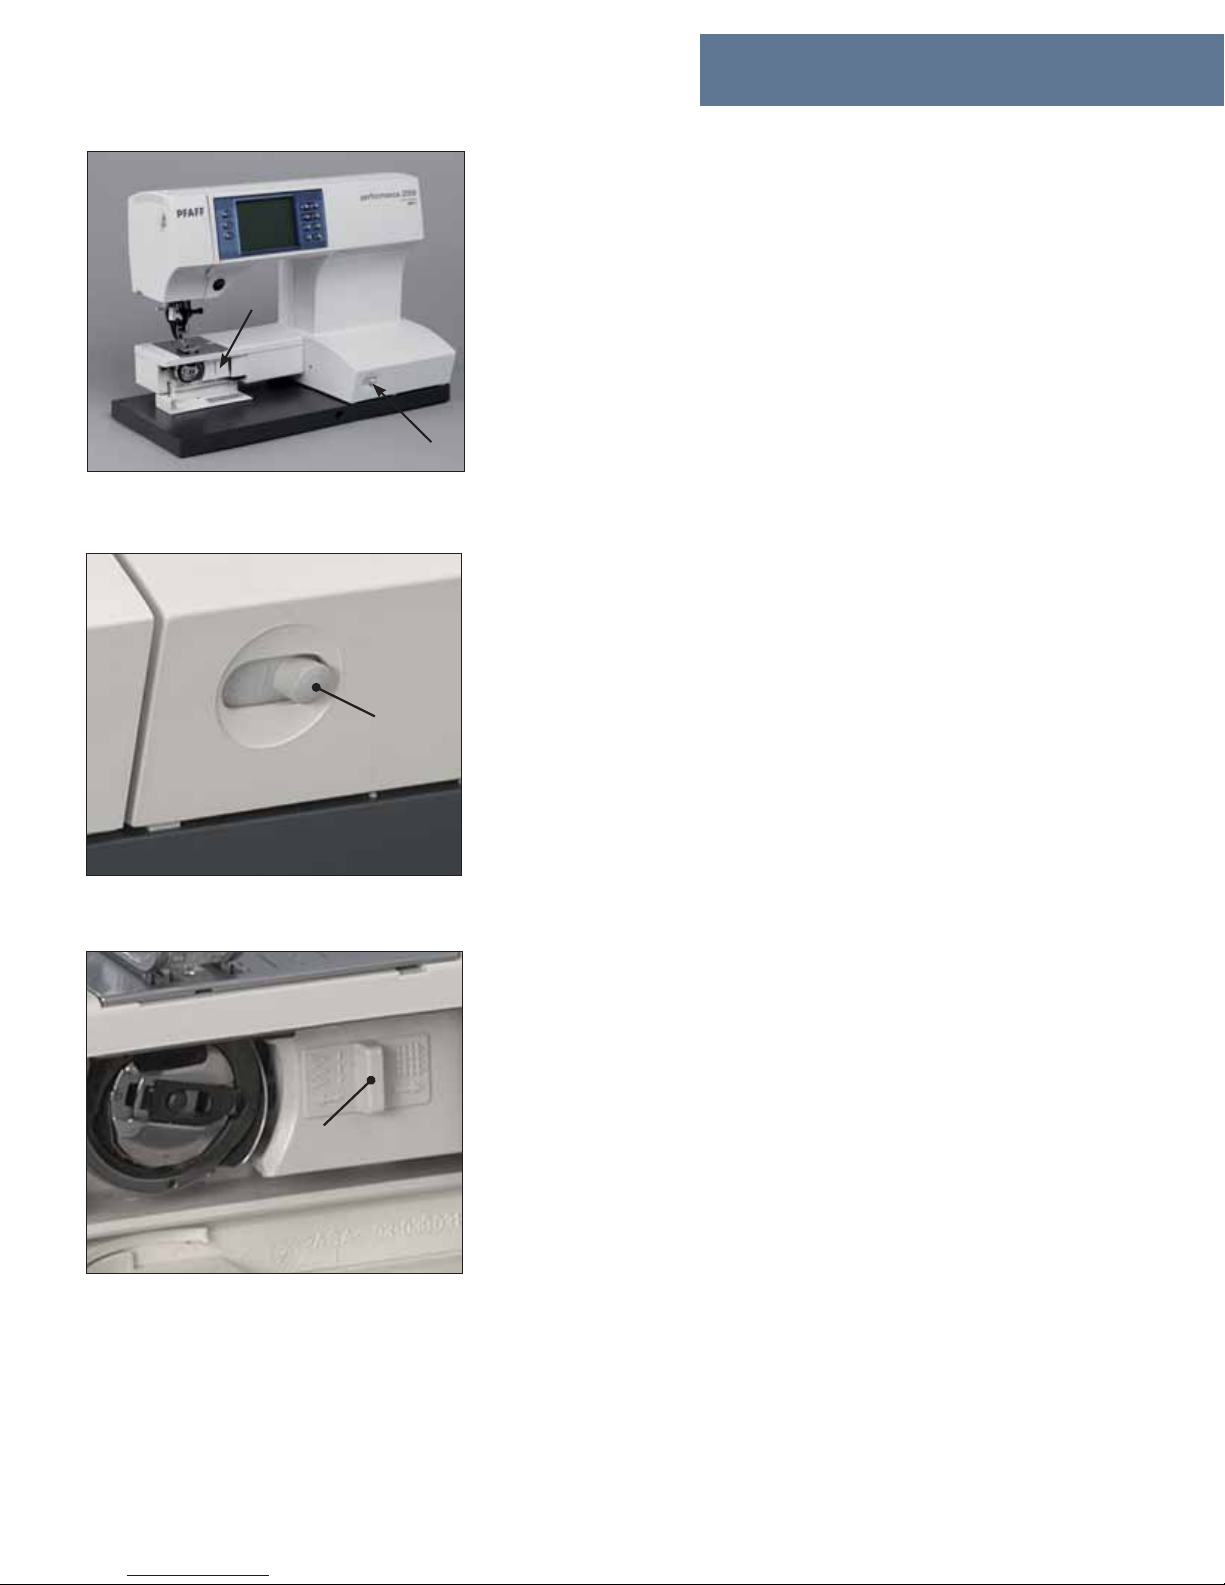
Voltage switch
220V - 240V / 120V
The sewing machine is set to the voltage 220 V - 240 V. To change the
voltage to 120 V (US/Canada), you must set the voltage switch on the
underside of the machine to 120 V.
If you are unsure of the correct voltage for your country, please check
with your authorized Pfaff dealer before plugging in your machine.
On/off switch
When the on/off switch is switched on (switch function I) the sewing
lightbulb lights up and the welcome screen appears on the touch
screen.
The sewing machine is now ready to function.
”0” = OFF
”I” = ON
Connecting the foot control
Connect the plug of the foot control to the connection socket of the
sewing machine.
The sewing speed is controlled by pressing the foot control.
The foot control type AT 0070 must be used for this sewing machine.
Electrical connection
Connect the lead cord between the socket of the sewing machine and
the wall outlet.
For the USA and Canada:
This sewing machine has a polarized plug (one blade wider than
the other). To reduce the risk of electric shock, this plug is intended
to fit in a polarized outlet only one way. If the plug does not fit
fully in the outlet, reverse the plug. If it still does not fit, contact a
qualified electrician to install the proper outlet.
DO NOT modify the plug in any way!
Page 21
2:3
Preparations
Changing the presser foot
Turn off the on/off switch
Snap off the presser foot
Press the front part of the presser foot up and, at the same time the rear
part down until it disengages from the presser foot holder.
Presser foot lift
The presser foot is raised manually by swinging the presser foot lift up
to the right. It is lowered by swinging it down to the left. See page 3:9
on how to raise and lower your presser foot automatically.
Check that the presser foot is properly attached by raising the presser
foot lift.
Snap on the presser foot
Place the presser foot under the presser foot holder, so that when the
presser foot lift is lowered the pins of the foot snap onto the presser
foot holder.
Page 22
2:4
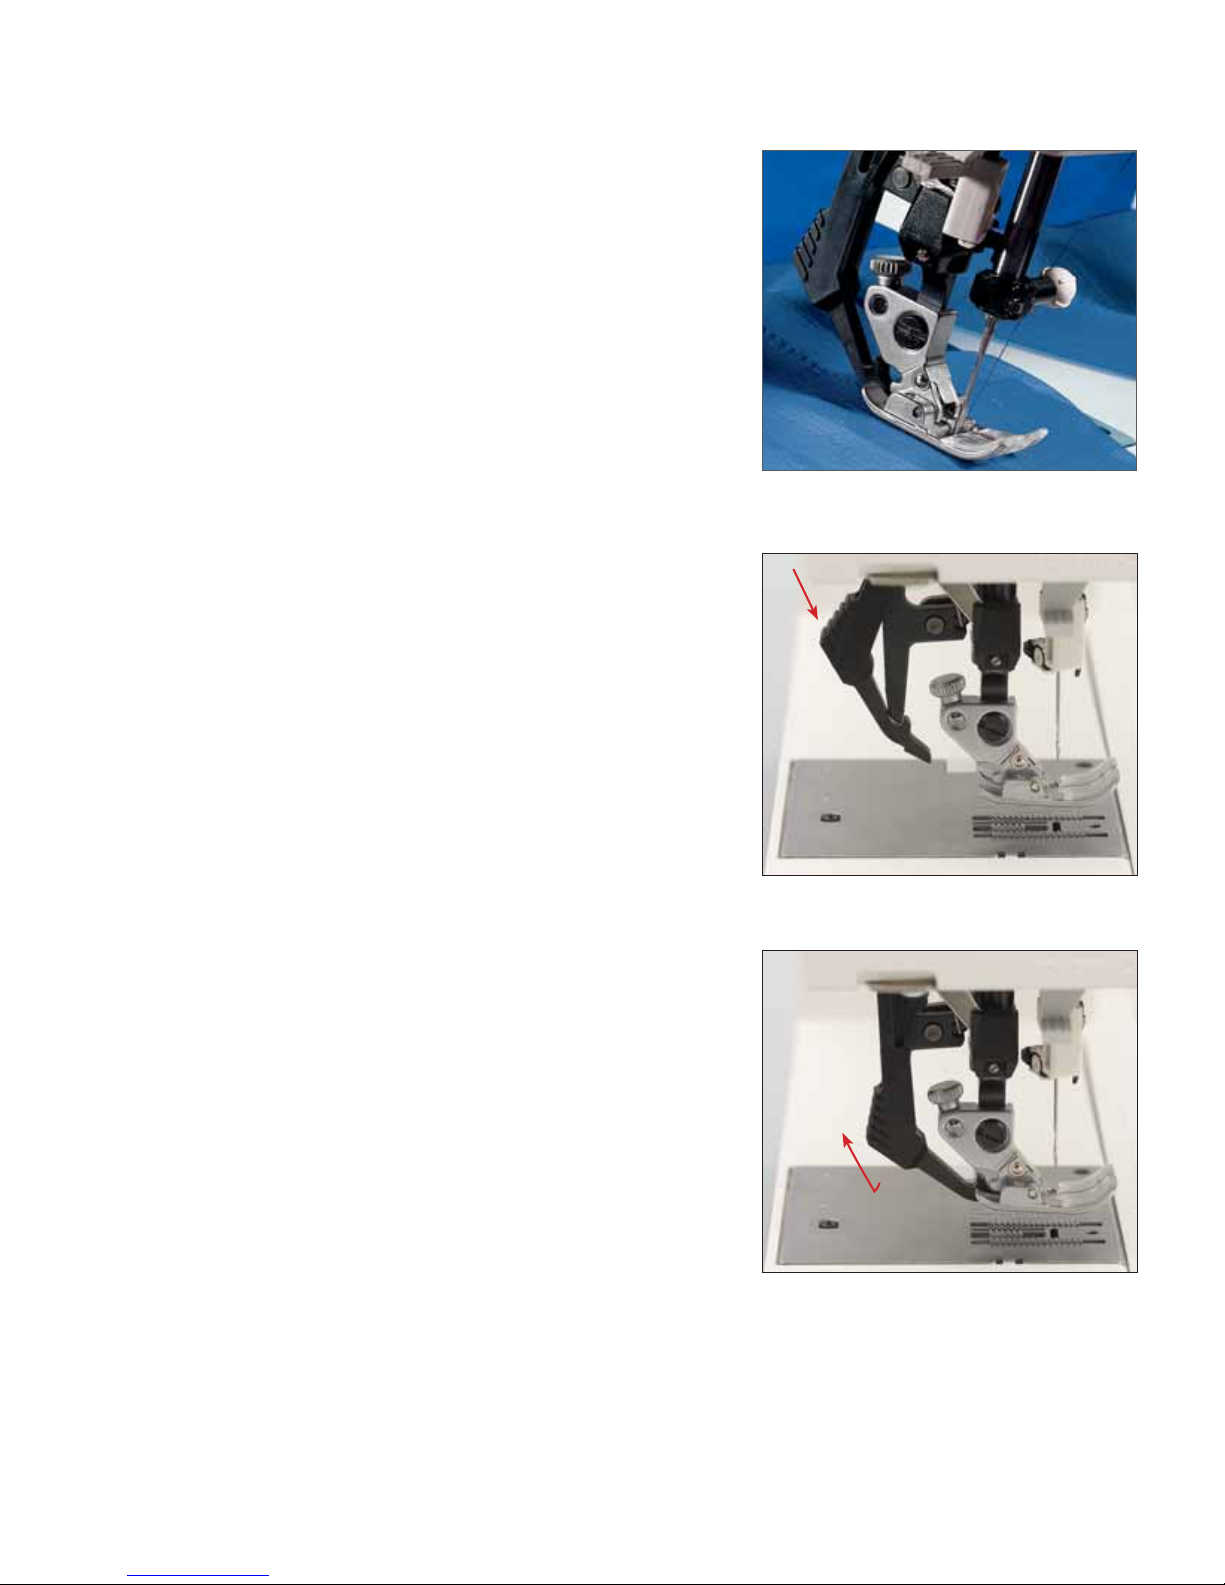
The IDT (Integrated Dual Feed)
For sewing any fabric precisely Pfaff provides the ideal solution: the
Integrated Dual Feed, IDT system.
As on industrial machines, the IDT feeds the fabric from the top and
bottom at the same time at the same stitch length. The fabric is fed
precisely.
On light fabrics such as silk or rayon the dual feed prevents puckering
of the seam.
The even feeding action also ensures perfect matching of checked and
striped fabrics. The IDT keeps all layers of quilt projects aligned to
prevent stretching of the top layers.
Disengaging the IDT
Raise the presser foot. Hold the IDT with two fingers on either side
of the black ribbed elbow. Press the IDT down, then release it slowly
guiding it back and up away from you.
Engaging the IDT
Raise the presser foot. Press the IDT down until it engages.
Important: For all work with the Integrated Dual Feed IDT, use
presser feet with the center back cut-out.
Page 23
2:5
A
B
A
B
Preparations
Lowering the feed dogs
For certain sewing work such as free-motion quilting, embroidery or
darning, the feed dogs must be lowered. On your sewing machine
there are two different methods for lowering the feed dogs, one on the
outside of the machine and one inside the bobbin door.
For either method:
Raise the presser foot before lowering the feed dogs. Push slide A or B
to the left.
To bring the feed dogs back up move the slide to the right.
Page 24
2:6
C
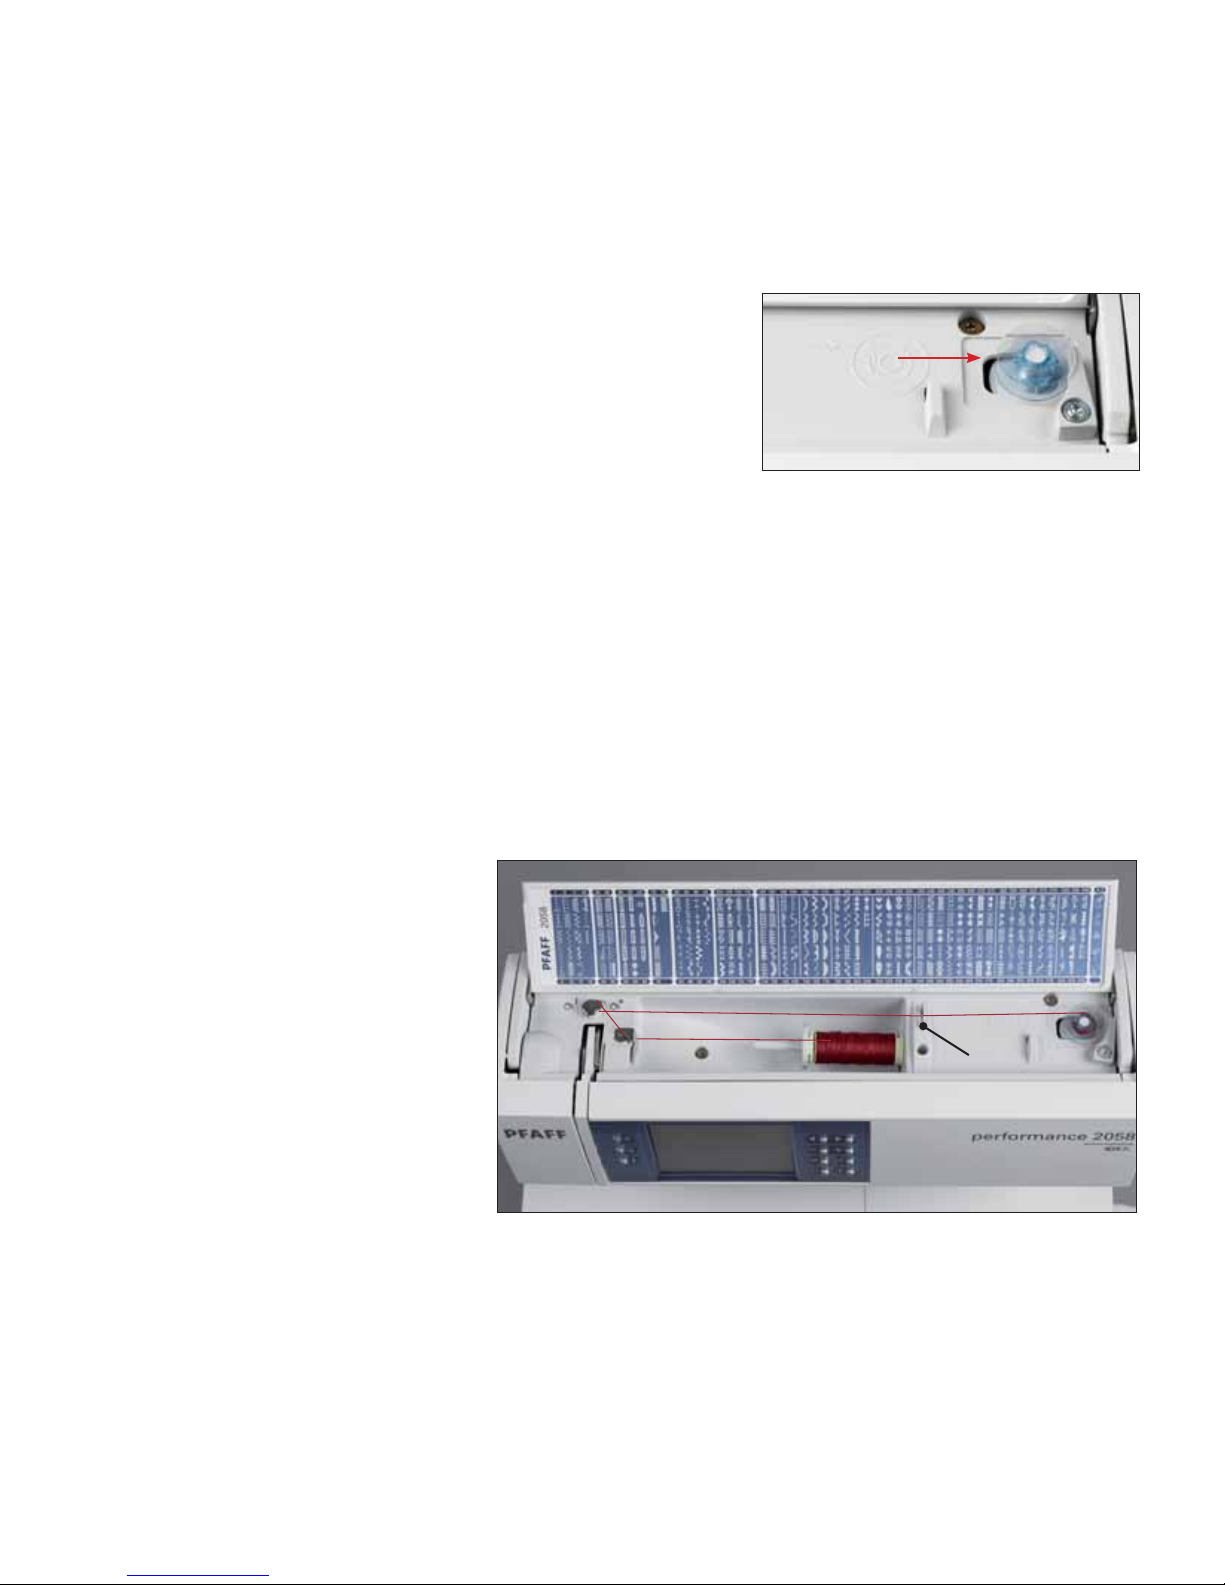
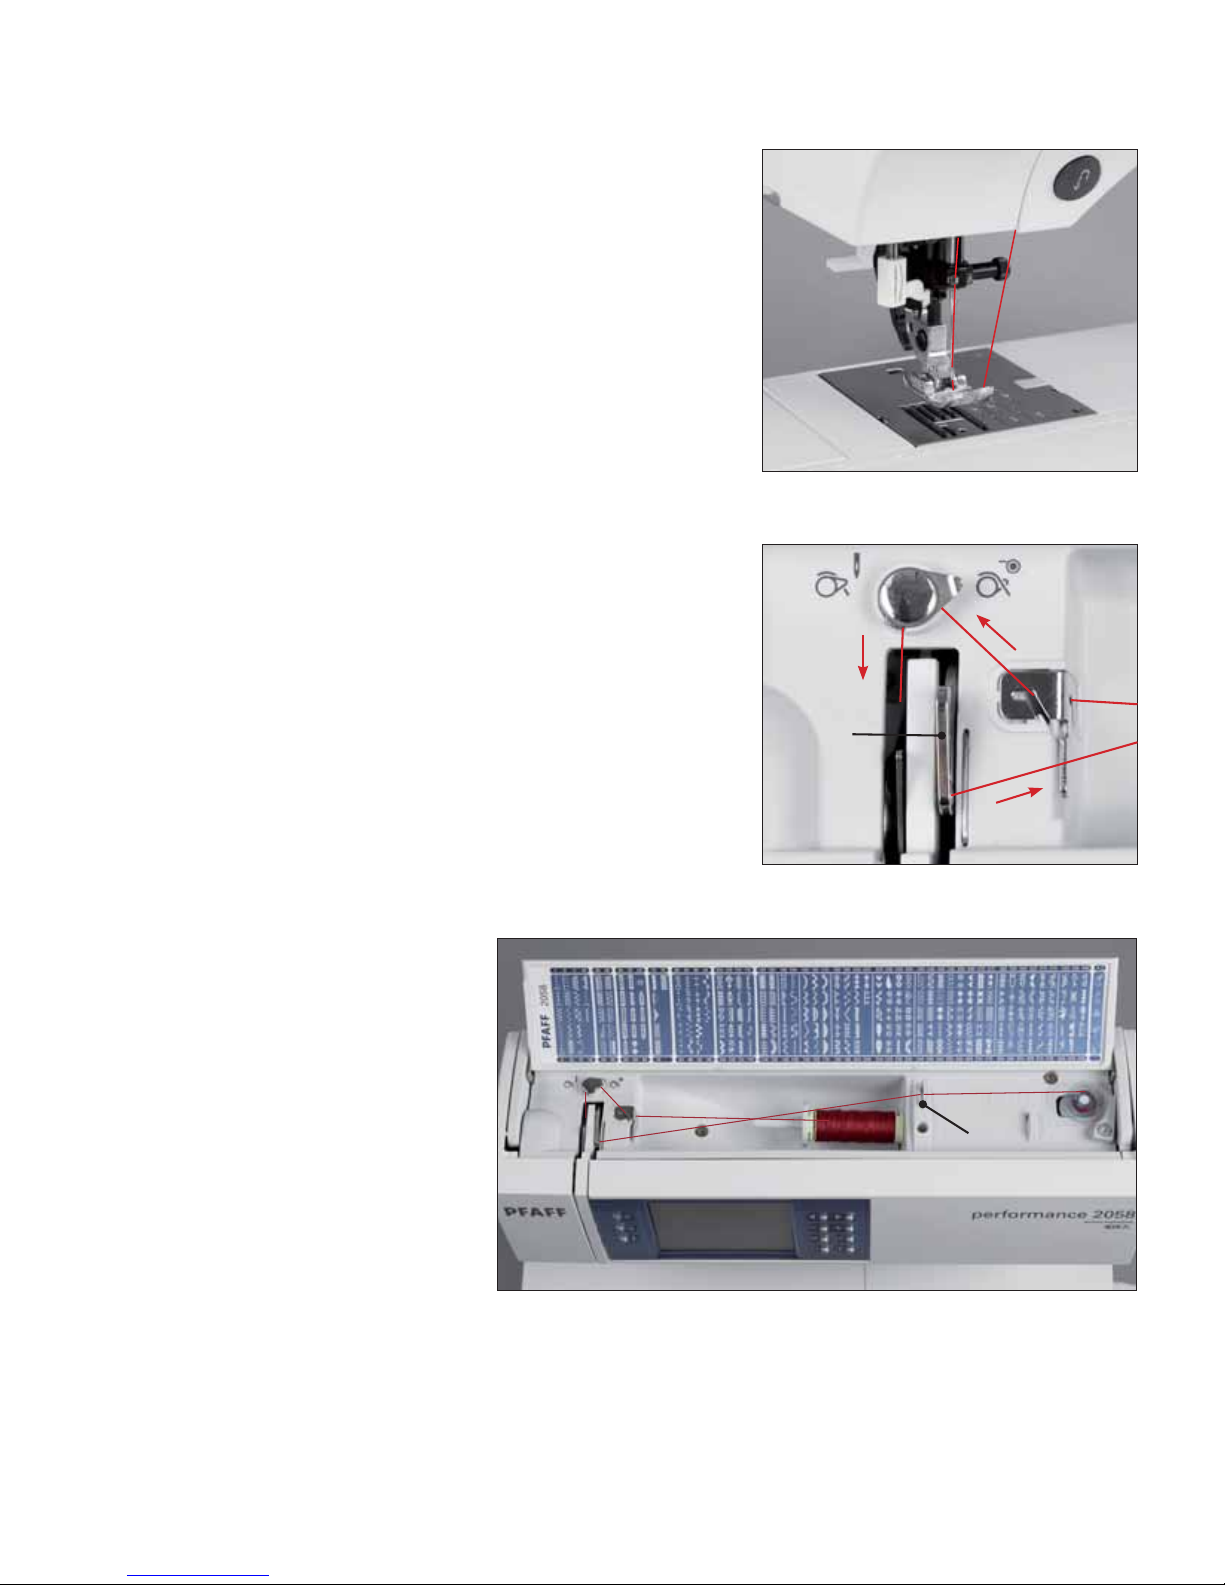
Bobbin winding
Preparing the machine for bobbin winding
Place an empty blue bobbin on the bobbin winder aligning the small
rectangular hole on the bottom side of the bobbin with the small
white pin of the bobbin winder. The Pfaff logo is facing up.
Push the bobbin to the right.
Note: The bobbin can only be wound if it is moved fully to the
right.
Winding the bobbin from the spool pin
Place the sewing thread on the spool
pin. Slide a spool cap firmly against the
spool. Three different spools caps to
accomodate any type of thread spool are
included with your machine. Choose a
spool cap that is the same size or slightly
larger in diameter than the spool.
Page 25
2:7
A
B
Preparations
Threading
Place the thread into guide A from front to back and pull it counterclockwise ABOVE the pre-tension disc B. Pull the thread under the
thread guide C from back to front (see page 2:6). Wind the thread tail
around the bobbin several times in a clockwise direction.
Winding
Turn on the machine. Hold the end of the thread firmly and press the
foot control. As soon as the bobbin is full the winding action will stop
automatically. Push the bobbin to the left, cut the thread and remove
the bobbin from the winder.
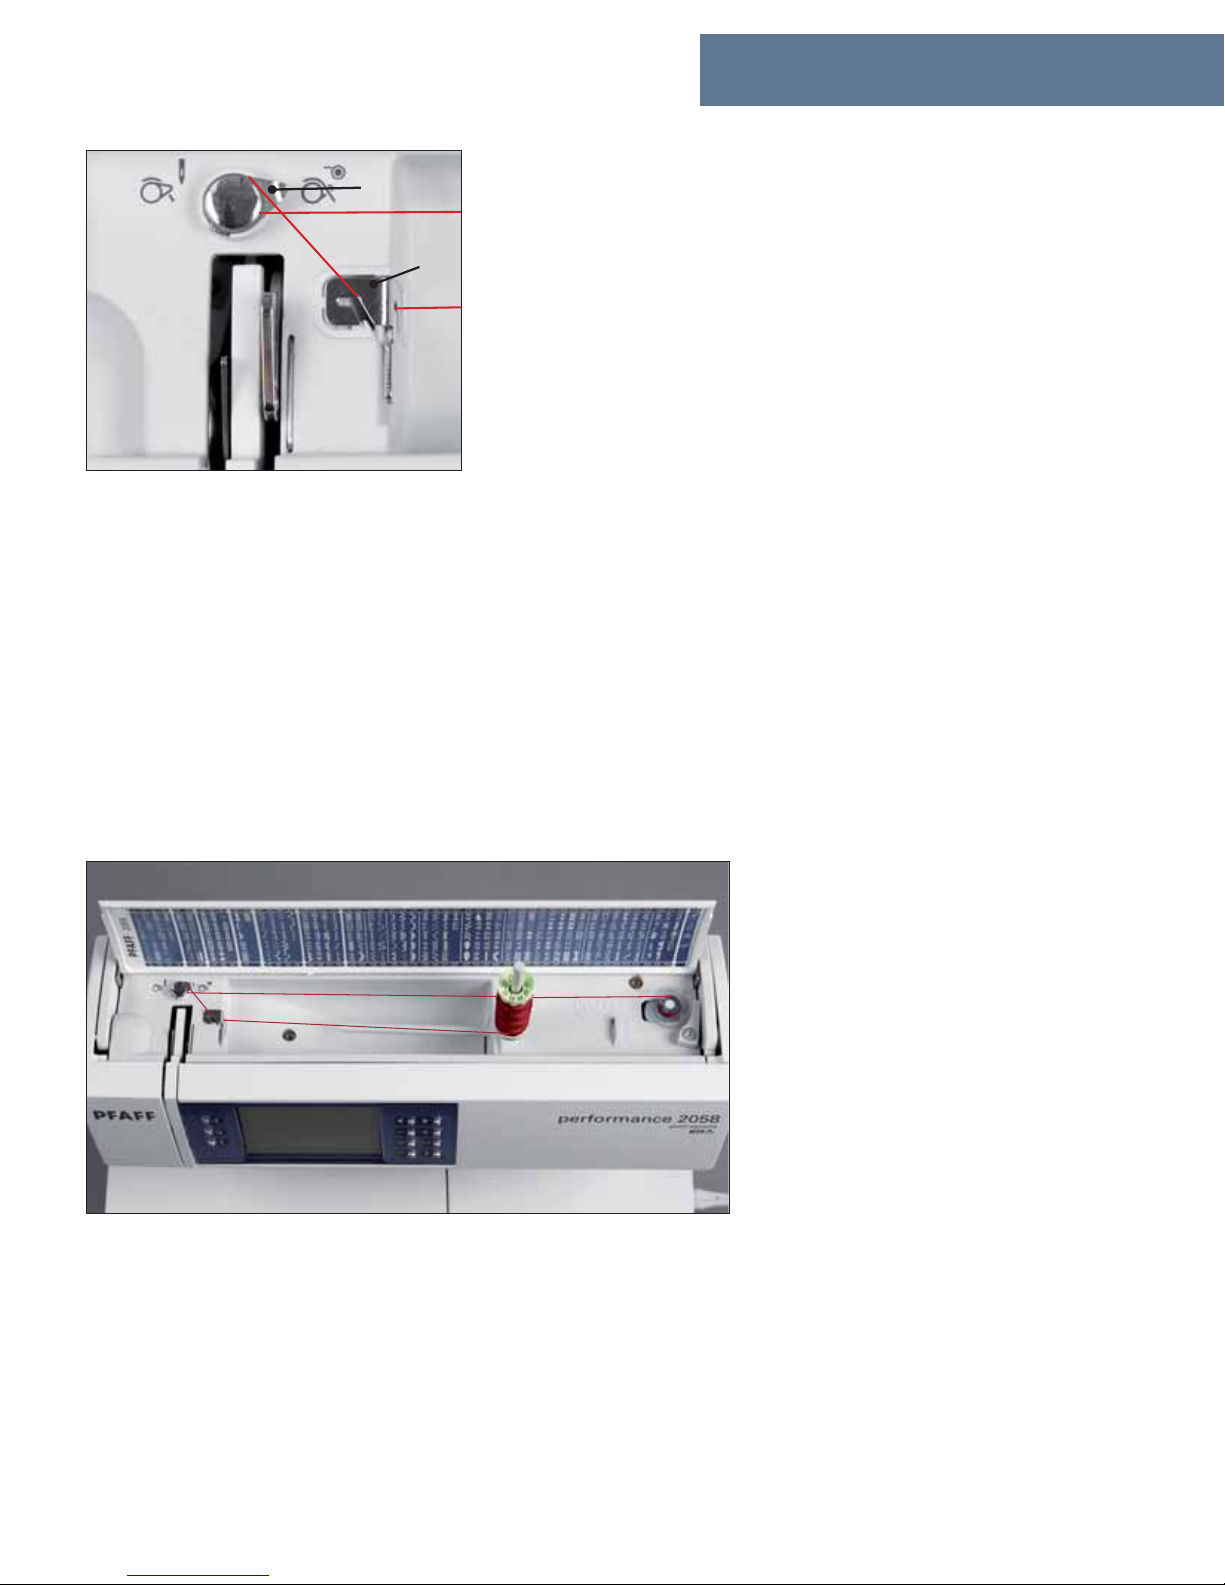
Winding from the second spool pin
Insert the second spool pin in the hole
provided. Place the sewing thread on the
second spool pin.
Thread and wind in the same way as
shown above.
Page 26
2:8
D
C
Winding the bobbin through the needle
It is possible to wind the bobbin even when the machine is threaded.
Raise the presser foot to the up position. Pull the needle thread
underneath the presser foot and up through the right-hand threading
slot.
Pull the thread under the thread guide C
(from back to front).
Place an empty blue bobbin on the bobbin
winder aligning the small rectangular
hole on the bottom side of the bobbin
with the small white pin of the bobbin
winder. The Pfaff logo is facing up.
Wind the thread tail clockwise several
times around the bobbin. Turn on the
machine. Hold the thread tail firmly and
press the foot control.
As soon as the bobbin is full the winding
action will be stopped automatically.
Push the bobbin to the left, cut the thread
and remove the bobbin from the winder.
Pull the thread from left to right through the take-up lever D.
Important: The take-up lever must be at its highest position.
Page 27
2:9
A
B
Preparations
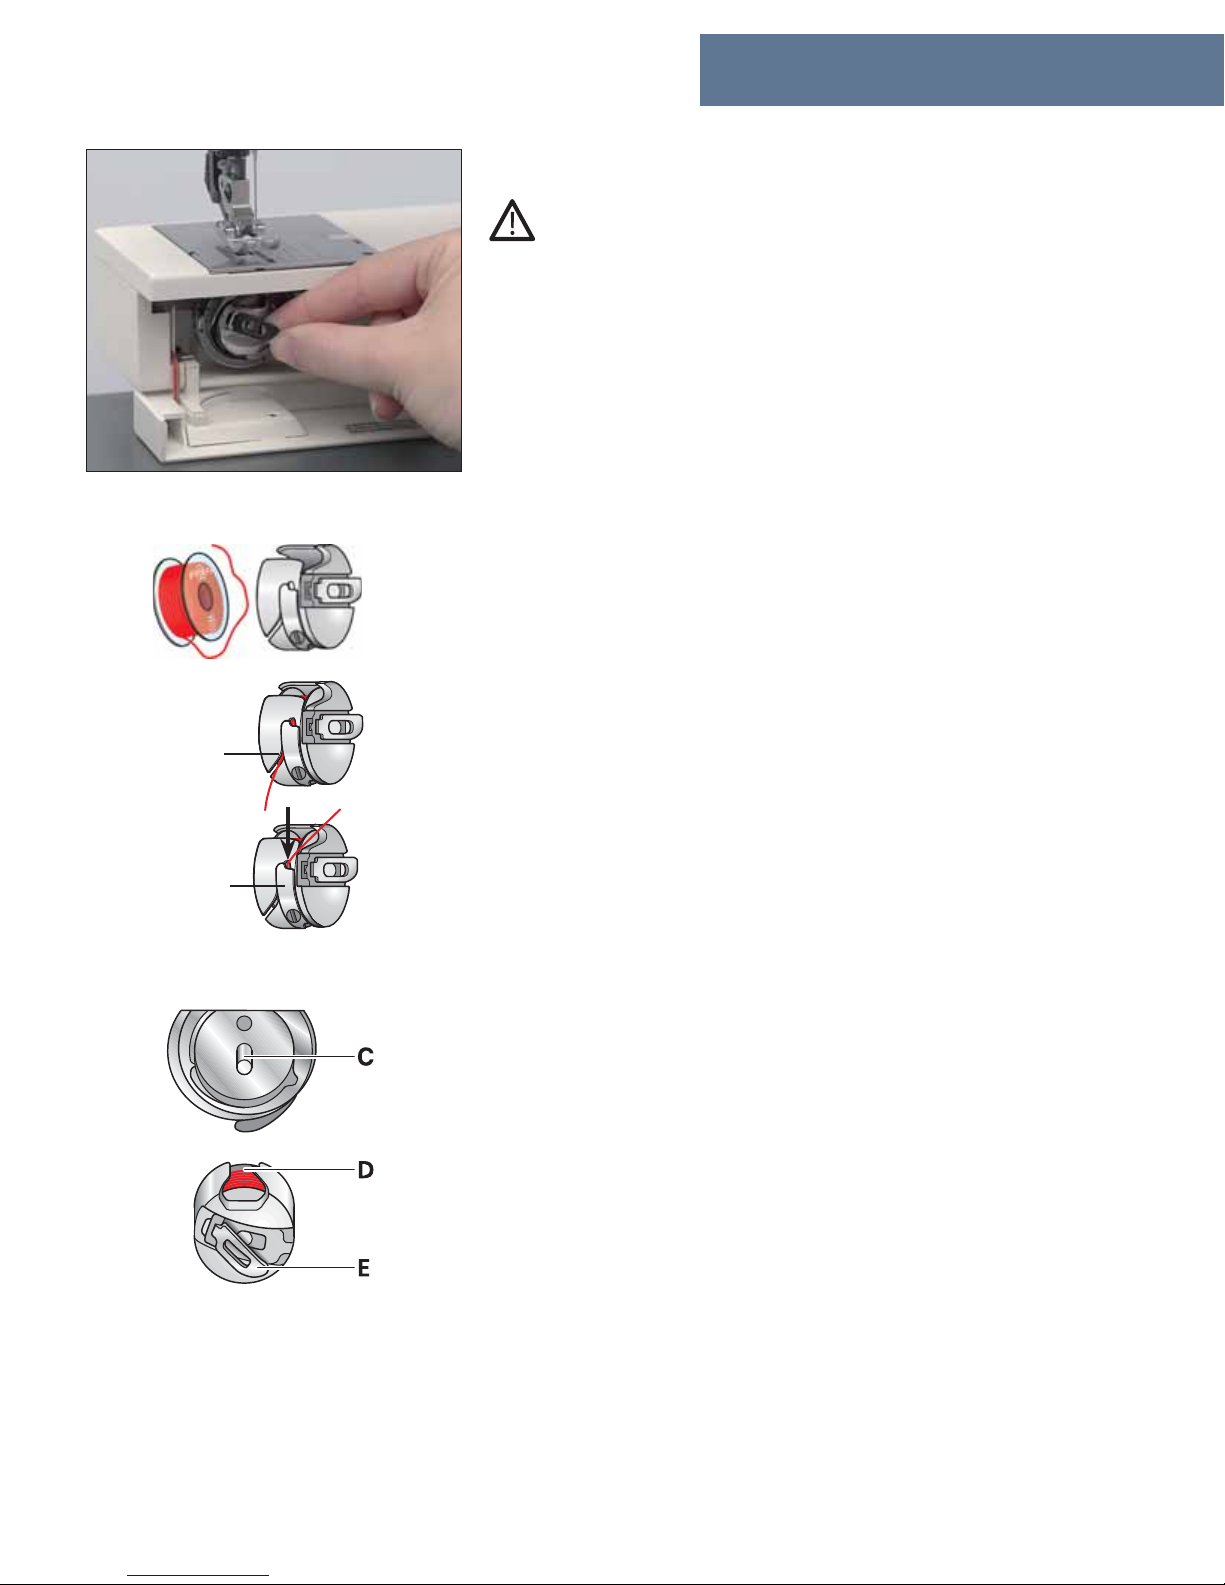
Inserting the bobbin and bobbin case
Turn off the on/off switch
Swing away the accessory tray to see the bobbin door. Open it by
pulling it towards you.
Lift the latch of the bobbin case and pull the bobbin case out of the
machine. Release the latch and take the empty bobbin out of the
bobbin case.
Inserting the bobbin case
Lift latch E and push the bobbin case fully onto pin C of the sewing
hook. Opening D of the bobbin case must face up.
Check: Pull the bobbin thread sharply. The bobbin case must not
fall out of the hook.
Inserting the bobbin
Insert the full bobbin (with the Pfaff logo facing towards the bobbin
case) in the bobbin case. When doing so, pull the thread through slot
A, then under tension spring B until it rests in the opening (see arrow).
Check: Hold the bobbin case with the bobbin facing towards you.
When you pull the thread, the bobbin must turn clockwise.
Page 28
2:10
A
B
D
F
C
E
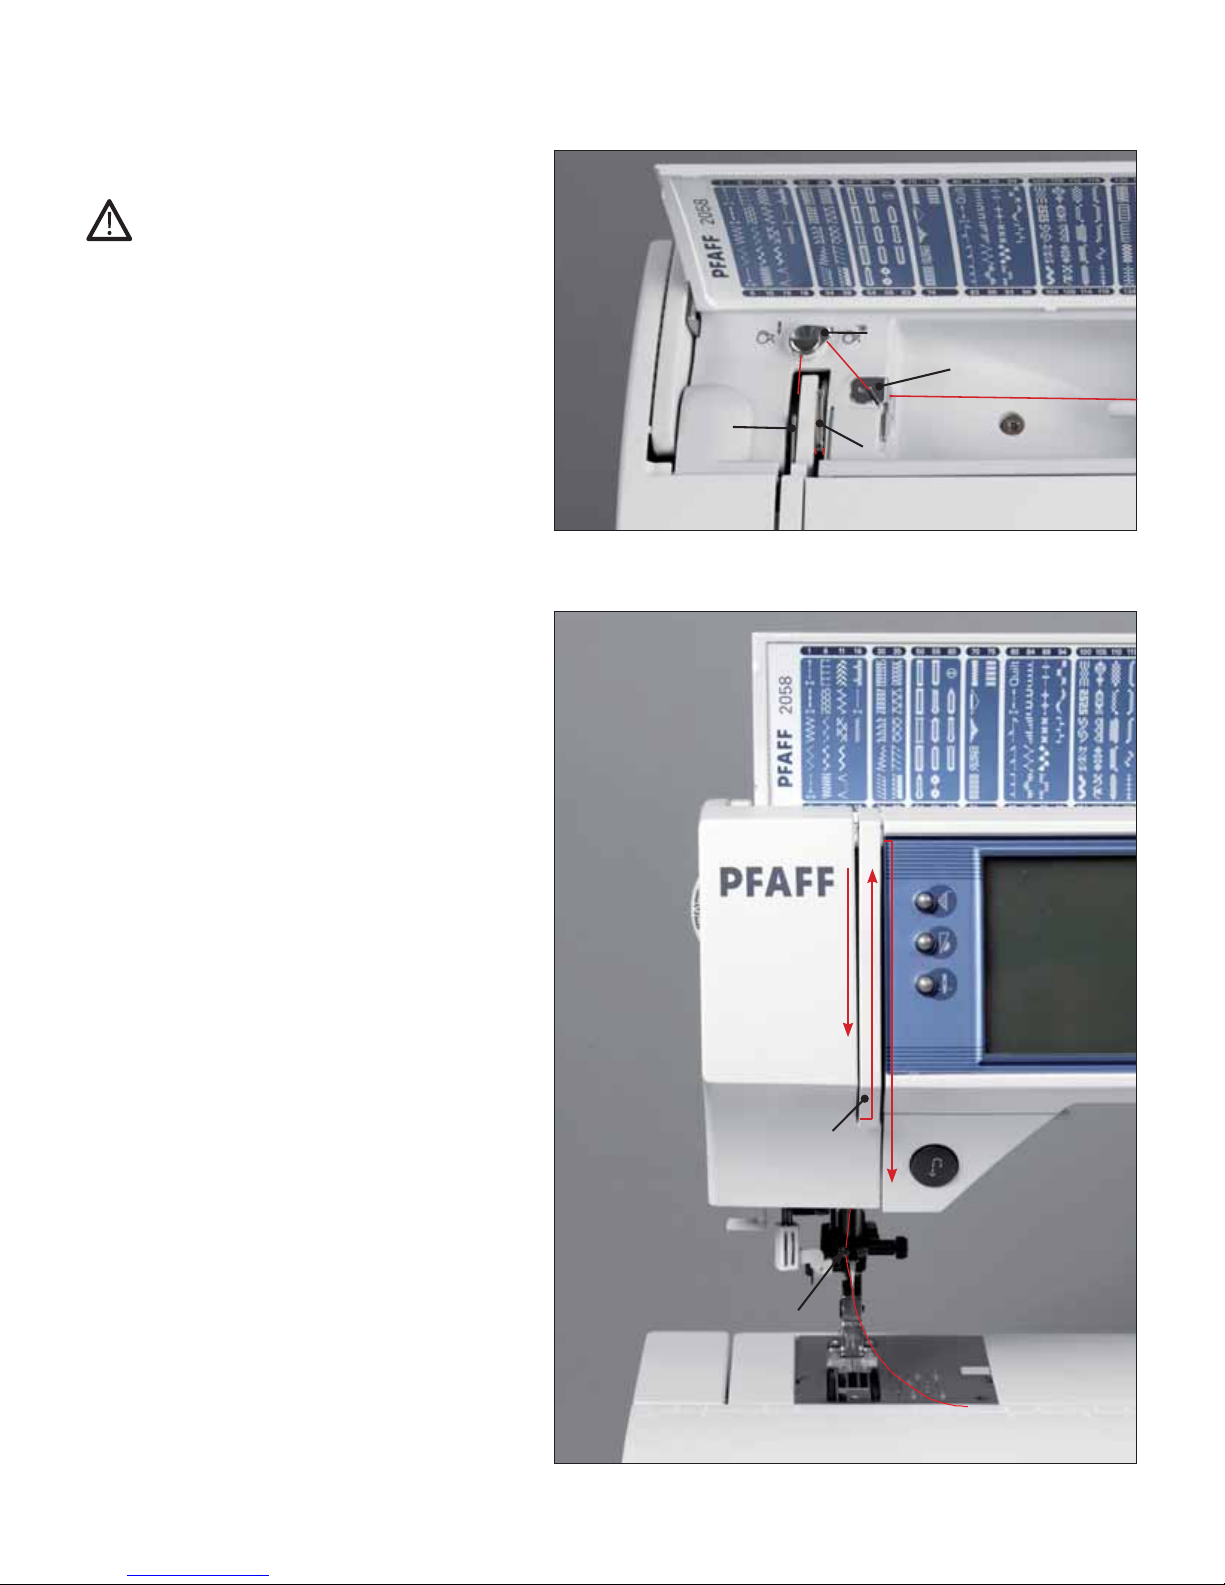
Threading your machine
Turn off the on/off switch
Raise the presser foot. Place the thread on the
spool pin and fit a spool cap, either the same
size or slightly larger than the spool, on top of
the spool.
Using both hands, pull the thread into thread
guide A from the front.
Place the thread from the right underneath the
pre-tension disc B.
Now pass it through the tension disk C in the
left threading slot.
Pull the thread down, around the stop D, into
the right threading slot and up to the take-up
lever E. The thread must be pulled into the takeup lever from left to right.
Pass the thread down in the right-hand
threading slot.
Pull the thread from the side behind the left
thread guide F.
Page 29

2:11
F
E
Preparations
Integrated needle threader
In order to make threading the needle easier and quicker, use the Pfaff
Integrated needle threader. Lower the presser foot. Pull the threader
lever straight down with the handle.
Reduce the pressure so the needle threader slowly moves upwards.
At the same time the threader hook swivels out of the needle eye and
pulls the thread through the eye.
Release the end of the thread so a thread loop forms behind the needle.
Release the threader and pull the rest of the thread end through the
needle eye.
Threader hook F swivels through the needle eye. Bring the thread
around hook E and back across the front of the needle eye. Hold the
end of the thread taut and slide it up to catch the threader hook F.
Page 30
2:12
Bringing up the bobbin thread
Raise the presser foot. While holding the end of the needle thread,
press the foot control so the needle moves down and up one time.
Pull the needle thread to draw up the bobbin thread.
Thread cutter
Pull the threads from the back to the front over the thread cutter.
Close the bobbin door and pull the top and bobbin threads under the
presser foot to the left.
Page 31

2:13
C
Preparations
Changing the needle
Turn off the on/off switch
To remove: Lower the presser foot and set the needle to its highest
position. Loosen the needle screw and pull down on the needle to
remove.
To insert: The flat side of the needle must face to the rear. Keep the
presser foot down and insert the needle, pushing it up as far as it will
go. Hold the needle and tighten the needle screw firmly.
Threading the twin needle
Turn off the on/off switch
Replace the sewing needle with a twin needle. Insert the second spool
pin and place one spool of thread on each of the spool pins. On the
vertical spool pin, place a spool cap and a felt pad underneath the
spool of thread.
When threading make sure to pass one thread to the left and one
thread to the right side of tension disk C.
Continue threading in the usual manner, making sure the threads do
not twist together.
Pull one thread into the right thread guide above the needle, and the
other thread into the left. Thread the needles.
Note: It is not possible to use the Integrated Needle Threader with a
twin needle.
Page 32

2:14
Correct thread tension - How to get it
Set the required amount of the needle thread tension using the
markings on the tension dial.
The normal thread tension for sewing is 4 - 5. For decorative stitches,
darning or sewing buttonholes, the normal setting should be 3.
The information system of your sewing machine gives you
recommendations on the touch screen for the correct needle thread
tension for each stitch (see ”Information in the sewing menu” page
3:15).
Thread tension
For the best stitch appearance and durability make sure the needle and
bobbin thread tensions are balanced with one another, i.e. the threads
evenly meet between the two fabric layers.
The following is valid for general sewing work:
Bobbin thread is visible on the top side of the fabric:
The needle thread tension is too tight.
The needle thread tension must be reduced.
Top thread is visible on the underside of the fabric:
The needle thread tension is too loose.
The needle thread tension must be increased.
Note: For decorative stitches and buttonholes the top thread should
be visible on the underside of the fabric.
Page 33

2:15
Preparations
Electronic knee lift
Your sewing machine comes with an electronic
knee lift for regulating the presser foot height. It
is useful when you need both of your hands to
guide the fabric.
1. Push the knee lift, with the flat side facing
up, into the hole on the front baseplate of
your machine.
2. Adjust the rectangular bar on the knee lift
until it is positioned at a comfortable height
for you.
If you press the knee lift to the right, the presser
foot will raise. Now you can guide the fabric
with both hands.
To remove the knee lift, pull it gently straight
out of the hole.
Page 34

Page 35

Operating your
performance 2058
Page 36

1
4
3
2
5
6
7
8
9
3:2
Operating your machine
Your sewing machine is easily operated by using the touch screen and
the function buttons, located on the front of your machine.
When you turn on your machine a welcome text appears on the
display. Touch the screen to enter the main menu.
The machine is now ready to sew and you can start selecting stitches,
adjusting settings, activating sewing functions and creating your own
stitches and stitch sequences.
When you touch the display, your sewing machine can help with popup messages and with the information system. Pop-up messages are
closed simply by touching the message on the screen or pressing the
foot control.
Function buttons
1. Pattern restart
Press pattern restart to return to the starting point of a stitch or stitch
sequence.
2. Sew slow
Sew slow can be activated when you are in a sewing menu for a
selected stitch. The function reduces sewing to half speed. An icon on
the status bar indicates that the function is activated. Press the button
again to deactivate the function.
3. Needle up/down
Needle up/down can be activated when you are in a sewing menu
for a selected stitch. Press the button to set the needle to automatically
stay in the down position when you stop sewing. A window opens to
set whether and how high the presser foot will raise when you take
your foot off the foot control. You can choose between ”No”, ”low”
(3mm), ”medium” (6mm) and ”high” (9mm). When you press the foot
control again the presser foot is automatically lowered. This function is
great for pivoting your fabric. An icon on the status bar indicates that
the function is activated. Press the needle up/down button again to
deactivate the function.
Check: If the screen is too dark or too
light, you need to adjust the contrast.
See page 3:12 for instructions.
Page 37

3:3
Operating your performance 2058
Note: The needle height can also change with a short tapping on
the foot-control.
4. Scroll buttons
These buttons have following functions:
• In the selection menu: Scroll through stitches and sequences by
column or page.
• In the sewing menu: Select the next or the previous stitch in
numerical order.
• In the stitch sequence menu: Move the cursor in the action field or
scroll through the stitches in the preview field.
• In the stitch creator menu: Move the selection point in the
workspace stitch by stitch.
• In the information system: Scroll through multiple pages.
5. Function field buttons
Touch stitch parameter icons (width, length, balance) and adjust the
settings with these buttons.
6. Main menu button
Press this button to go back to the main menu. Sometimes you may
need to press the button more than once to close all open windows.
7. Selection by number button
Open the stitch selection by number.
8. More options button
Open the more options window for processing or modifying a selected
stitch.
9. Info button/Context menu
Press the button once to open the info system. Long touch the button
to open the context menu.
10. Reverse sewing
This button has the following functions:
• Quick reverse: Press the button while sewing. The machine sews in
reverse for as long as you hold the button.
• Permanent reverse: Press the button before starting to sew. The
machine sews in reverse until you press the button again. When the
function is activated, a reverse sewing arrow appears on the touch
screen.
• If you have activated the tie-off program, tie-off at the end is
initiated via this button.
• In the ”patchwork”, ”tapering” and ”darning” programs, you
determine the length of the seams with this button.
• When you are programming a buttonhole, you determine the
length of the buttonhole seam with this button.
10
Page 38

6
3:4
Main menu
When you have turned on your machine and touched the welcome
screen the main menu appears. From here you enter the selection
menus to select stitches by category or create your own stitches and
stitch sequences. When you touch any of the icons on the screen new
windows are opened for each menu. You can always go back to the
main menu by pressing the main menu button (6).
Selection menus
Utility stitches
Stitches 1-18
This menu provides a selection of stitch types that you can use for a
variety of sewing techniques.
Overlock stitches
Stitches 30-39
This menu provides a selection of all stitch types suitable for
overcasting or joining and overcasting in one operation.
Antique quilt stitches
Stitches 80-96
This menu provides a selection of quilt stitches suitable for crazy patch
quilting.
Cross stitches
Stitches 100-119
Pre-programmed cross stitches allow you to create traditional borders.
Individual cross stitches (110-119) allow you to program your own
designs.
Page 39

3:5
Operating your performance 2058
Decorative stitches
This menu includes a selection of decorative stitches suitable for
embellishing garments or items for the home.
They are sub-divided into eight different categories for ease of
selection.
• Hemstitches. Stitches 130-139.
• Antique hand embroidery stitches. Stitches 140-149.
• Scallop edges. Stitches 160-174.
• Satin stitches. Stitches 190-206.
• Leaves and flowers. Stitches 220-239.
• Art stitches. Stitches 240-279.
• Ornamental stitches. Stitches 290-319.
• Fun stitches. Stitches 330-343.
Buttonholes
Stitches 50-63
This menu provides a selection of 12 different buttonhole styles,
one automatic eyelet and one program for sewing on buttons. Each
buttonhole style is designed for a specific application and fabric.
Darning and bartacks
Stitches 70-75
This menu provides a selection of bartacks and darning stitches. The
various bartacks are for reinforcing pocket corners, skirt plackets/slits
and attaching belt loops. The fully automatic darning programs are for
repairing damaged areas and darning tears or small holes.
Alphabets
This menu provides a selection of four fonts: Script, Block, Outline and
Cursive. The alphabets include numbers and symbols. The Script and
Block alphabets include lower case letters.
Stitch sequence
In this menu you can store your own stitch sequences. Select an empty
M-memory to create and store a new stitch sequence, or a full memory
to use or overwrite an already stored sequence. Your sewing machine
can store up to 50 sequences.
Stitch Creator
In this menu you can customize, create and store your own stitches.
Select an empty S-memory to create and store a new stitch, or a full
memory to use or overwrite an already stored stitch. Your sewing
machine can store up to 30 stitches created in Stitch Creator.
Page 40

3:6
Selecting a stitch
There are several ways to select a stitch:
Selection by category
Touch ”Utility stitches” from the main menu.
This category contains 18 stitches that are suitable for utility sewing.
You can browse one page at a time with the scroll buttons (4) or by
touching the scroll bar (A) on the screen.
By pressing the scroll buttons (4) or by touching the scroll bar (A) on
the screen you can continue to browse through all stitches.
You select a stitch by touching it on the screen and the sewing menu
opens for that stitch.
Selection by number
Press the selection by number button (7) to call up a stitch by number.
A pop-up will open with a number pad.
Enter the stitch number and confirm by touching ”ok”.
The eraser icon (B) deletes the right hand digit. If a stitch number that
does not exist is entered, a pop-up message is displayed:
”Invalid stitch number!”
Touch the pop-up message to close it.
Direct selection
When you are in the sewing menu for your selected stitch you can use
the scroll buttons (4) to select a different stitch. Scroll back and forth
through the stitches in numerical order. After the last stitch you will
find stitches created and stored in Stitch Creator.
B
A
Page 41

1
2
3
4
1
2
3
5
3:7
Operating your performance 2058
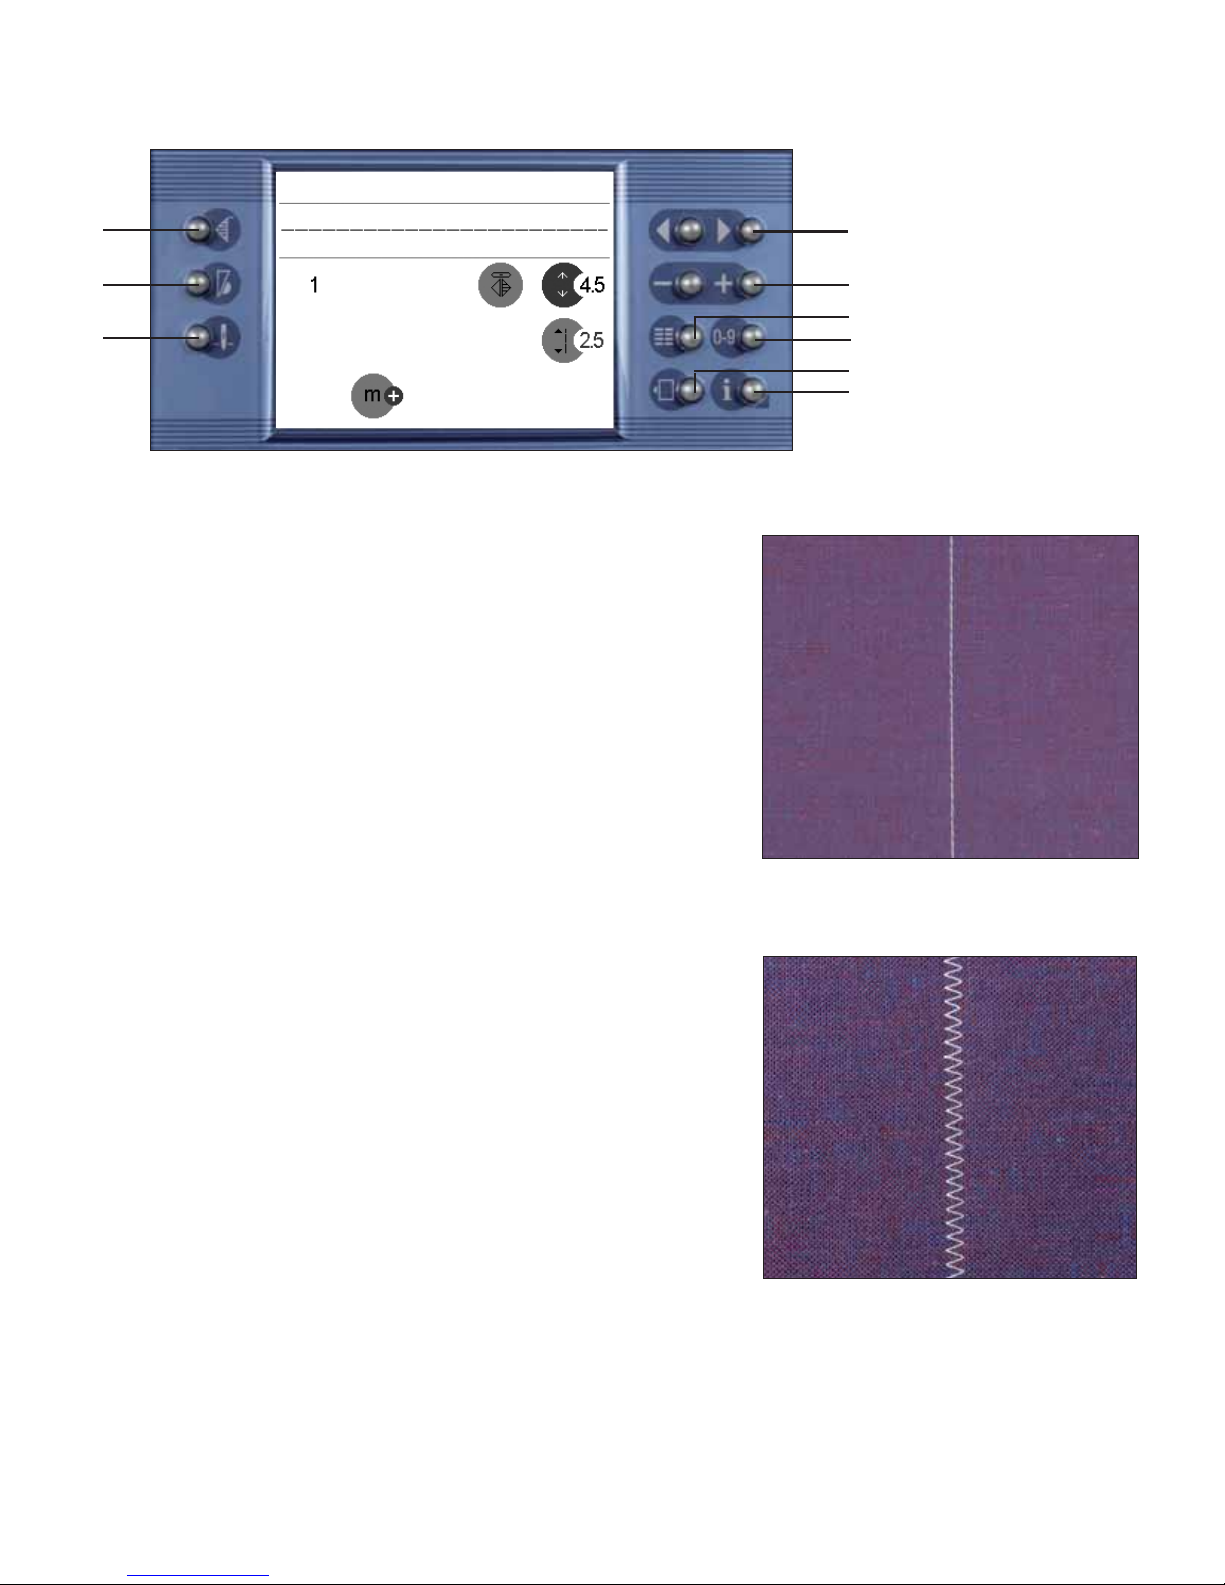
Sewing menu
The sewing menu is divided into three sections:
1. Status bar, where the activated sewing functions are shown. The
status bar is always active and automatically updated when a
function is activated or deactivated.
2. Action field, where the selected stitch is displayed.
3. Function field, with sewing functions and stitch parameter settings.
The figure in the upper left corner of the function field indicates the
selected stitch number.
Icon status
1. Inactive, the function can not be activated.
2. Active, the function can not be deactivated.
3. Inactive, the function can be activated.
4. Active, the function is selected and can be deactivated.
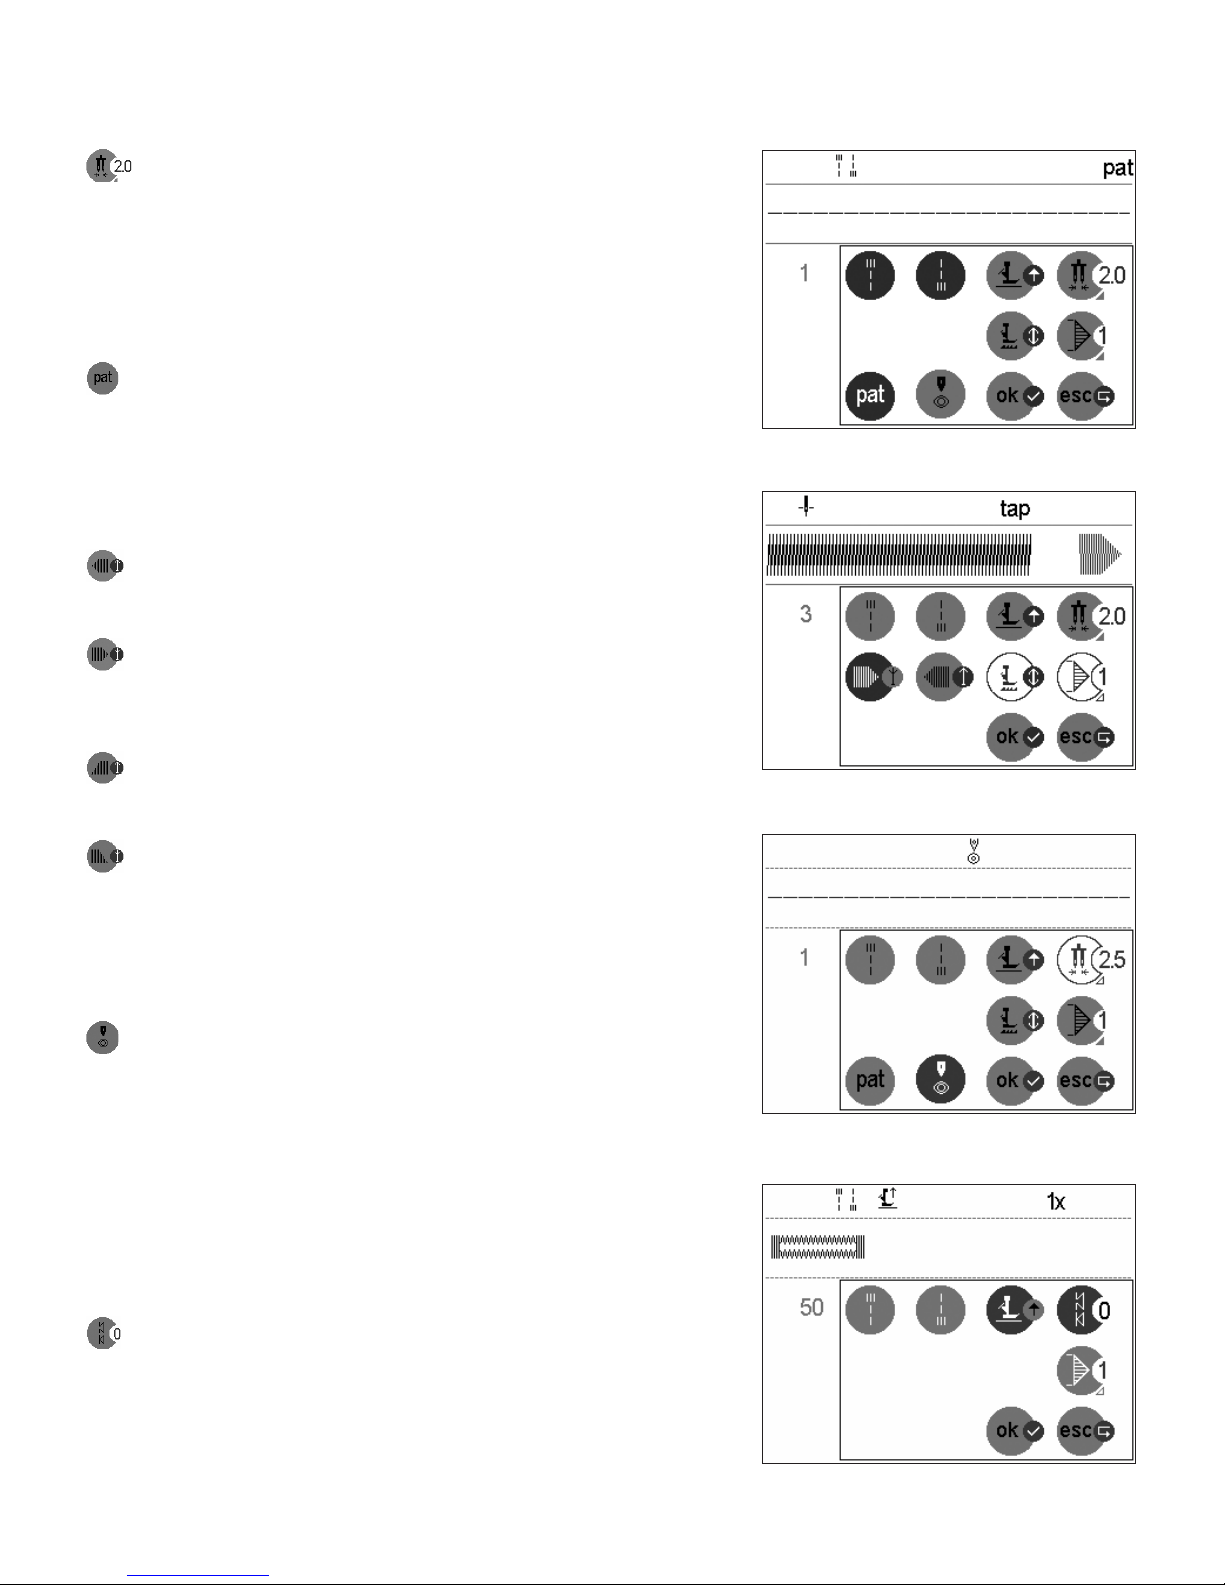
Altering the stitch settings
Needle position. For straight stitches. Touch the icon and move
the needle position with the function field buttons (5). There are 19
needle positions available. The + button moves the needle in nine
steps to the right. The - button moves the needle in nine steps to the
left.
Stitch width. Touch the icon and change the stitch width with the
function field buttons (5).
Stitch length. Touch the icon and change the length of the stitch
with the function field buttons (5).
Pattern length. For decorative stitches, buttonholes, satin stitches,
scalloped edges and some utility stitches. Touch the icon and
increase or reduce the length of the stitch with the function field
buttons (5).
Balance. Touch the icon and fine tune the stitch balance with the
function field buttons (5).
Density. For satin stitches, scalloped edges and buttonholes.
Touch the icon and change the stitch density with the function
field buttons (5), without changing the length of the pattern or
buttonhole.
Side to side mirroring. Touch the icon to mirror a stitch or a
sequence side to side.
End to end mirroring. Touch the icon to mirror a stitch or a
sequence end to end.
Add a stitch to a sequence. The stitch sequence menu appears
automatically by touching the icon.
Page 42

3:8
For buttonhole and darning programs. In the darning programs
(no. 74-75) the function is automatically activated. Use the reverse
button (10) to determine the length of the first seam. The following
seams will automatically be sewn in the same length.
Finish buttonholes manually. Use the function if the sensormatic
buttonhole guide has not been inserted.
If the settings are changed the font turns italic and a small arrow above
or below the figures indicates if the settings are increased or decreased.
Note: If you exit a sewing menu, the settings are reset to default.
For saving your own settings go to ”Stitch parameters” in the
context menu (see page 3:13).
Buttonhole programs
Use the buttonhole foot no. 5A and the sensormatic buttonhole guide
no. 10 to sew perfect buttonholes on all kinds of fabric. See page 4:7
for instructions on changing to the buttonhole foot and inserting the
sensormatic buttonhole guide.
Buttonholes can be sewn in three different ways:
1. Enter the length directly on the screen in mm (recommended).
Touch the pattern length icon and set the size of the buttonhole slit
with the function field buttons (5). The buttonhole will be sewn
automatically to fit the button.
2. Length setting while sewing
. Touch the ”prog” icon. Sew the
forward buttonhole seam and press the reverse button (10) when
you have reached the correct buttonhole size. A mark appears
in the ”prog” icon. The rest of the buttonhole will be finished
automatically. The mark in the icon means that the buttonhole is
automatically saved and can be repeated as many times as you
wish. To program a different buttonhole length, without leaving the
menu, you must first touch the ”prog” icon to remove the mark and
then sew the new buttonhole. Touch the ”prog” icon once more to
deactivate and be able to choose other functions.
Note: If the sensormatic buttonhole guide has not been inserted you
will have to finish the buttonhole manually by pressing the reverse
button (10).
3. Finish buttonholes manually. If the sensormatic buttonhole guide
has not been inserted the buttonhole can be finished manually.
Activate ”man” by touching the icon. The forward buttonhole
column will be sewn in the length you enter on the screen. The
reverse buttonhole column will be finished after you have pressed
the reverse button (10). When the buttonhole is finished, touch
Page 43

3:9
Operating your performance 2058
the ”man” icon again and a mark will appear. This means the
buttonhole is saved and you can repeat the buttonhole in the same
size automatically. Touch the ”man” icon once more to deactivate
the function.
Note: If you find that the buttonhole columns don’t look the same
you can change the balance of the buttonhole. Touch the balance
icon in the more options window (8) and change the left column
with the function field buttons (5), touching + to open the density
and - to lessen the density.
More options for sewing
By touching the more options button (8) you can call up a dialog
window with more functions for processing or modifying a stitch.
Only sewing functions that can be used with the stitch are visible.
Activated functions are displayed in the status bar.
Icons in the more options window
Ok. Saves all the settings and closes the more options window.
You can also press the foot control to save without closing the more
options window and be able to make further settings.
Escape. Closes the window without the modified settings being
saved.
Tie off at start. The start of the stitch is tied off with four stitches.
Tie off at end. The end of the stitch is tied off with four stitches.
Touch the reverse button (10) to trigger the function. The machine
ties off and stops.
Raise presser foot. The machine will automatically raise the
presser foot when the machine stops and lower it when you start
sewing again. If both the presser foot raise and tie off at end
functions are activated, the presser foot is only raised when the
seam has been tied off.
Note: The settings of the presser foot in the needle up/down
function override the raise presser foot function (see page 3:2).
Free-motion sewing. Activate the free-motion program to make
sure that the tension is engaged and the presser foot height
automatically adjusts providing free fabric movement while
creating a perfect stitch.
Single stitch. A stitch or a stitch sequence can be sewn as a single
stitch. You can also set a single stitch to be repeated a number of
times. Long touch the icon until a window appears. Change the
number of repetitions with the function field buttons (5), confirm
by touching the window. You can repeat a single stitch up to 99
times. The number of repetitions are displayed in the status bar.
Tie-off is automatically performed at the beginning and at the end
of the stitch.
Page 44
3:10
Twin needle safety. With this function, you reduce the width of
your stitch in order to use a twin needle. To set the correct needle
spacing of your twin needle, long touch the icon until a window
appears. Set the needle spacing with the function field buttons (5)
and confirm by touching the window. The function remains active
even after a stitch has been changed, including after the machine
has been switched off and on. Touch the icon again to deactivate
the function.
Programmable seam length function for straight stitch. Specify a
particular seam length for joining together several pieces of fabric
of equal length. Tie-off is automatically activated. Press the reverse
button (10) when you reach your desired length, the machine ties
off and stops. All subsequent seams are now automatically sewn in
your specified length until you deactivate the function by touching
the icon again.
Symmetrical tapering, increase. For zigzag stitch no. 3. The width
of the zigzag stitch starts with 0mm and becomes wider until it
reaches the selected maximum stitch width.
Symmetrical tapering, reduce. For zigzag stitch no. 3. The width
of the zigzag stitch starts at the selected maximum stitch width and
tapers to 0mm when the reverse button (10) is pressed. It stops with
the needle in the down position.
Asymmetrical tapering, increase. For zigzag stitch no. 33. The
width of the zigzag stitch starts with 0mm and becomes wider until
it reaches the selected maximum stitch width.
Asymmetrical tapering, reduce. For zigzag stitch no. 33. The
width of the zigzag stitch starts at the selected maximum stitch
width and tapers to 0mm when the reverse button (10) is pressed. It
stops with the needle in the down position.
Note: See page 5:4 for further instructions on using the tapering
function
Straight stitch safety. Select this function when using a straight
stitch needle plate and/or a straight stitch presser foot to lock the
center needle position (4.5mm) for all straight stitches to prevent
damage to the needle, presser foot or needle plate. This function
remains active even after a stitch has been changed, including after
the machine has been switched off and on. To sew with a stitch that
is not supported by the straight stitch safety the function must be
deactivated. Touch the icon again to deactivate the function and go
back to normal sewing.
Note: Twin needle and straight stitch safety cannot be used at the
same time.
Balance for buttonholes. Touch the icon and fine tune the stitch
balance with the function field buttons (5).
Page 45

3:11
Operating your performance 2058
Context menu
In the context menu you can alter the basic settings or functions for the
sewing machine. Long touch the info button (9) to open the context
menu. Press this button again to close the menu. The menu will also
close when a dialogue window has been confirmed with ”ok” or ”esc”.
If the context menu is closed with the info button when a sub window
is open, the settings will not be saved.
The context menu offers specific functions for each menu. Some of the
functions are available from all menus.
Select language (Available from main menu)
With this function you select the language of your sewing machine.
Touch ”Select language”, to open the language selection window,
and touch the language of your choice. The window closes when a
language has been selected.
Audio signal (Available from all menus)
With this function you can choose an audio signal to be heard when
you touch icons, press buttons and when pop-up messages appear.
Touch ”Press button” to turn on or off the audio signal for icons and
buttons. Touch ”Message texts” to turn on or off the audio signal
for pop-up messages. If the audio signal is activated the icon is
highlighted. Touch ”ok” to save your settings.
Options for messages (Available from main, sewing, sequence and
stitch creator menus)
In this menu you can switch off the warning message that
automatically appears in the machine when the bobbin thread is
running out. You can also specify whether the machine should stop
when the warning appears. An X means that the function is switched
on. All functions are active as default. Touch “ok” to save your
settings.
Page 46

3:12
Calibration (Available from main menu)
If you touch an icon on the touch screen and it does not respond,
or the function next to it is activated instead, the screen needs to be
calibrated.
Touch ”Calibration” and three circles appear in three of the corners.
The circle in the upper left corner is flashing. Touch the area inside the
flashing circle with your stylus until you hear a beep, to fix the first
point. Fix the two following points in the same way. The calibration
display closes after finished calibration.
To cancel the calibration press the info button (9).
If the calibration fails, a pop-up message appears: ”Entry cannot be
accepted!”. In this case the calibration needs to be done again.
Welcome screen (Available from main menu)
The welcome screen that appears when the machine is switched on
can be deactivated. Touch the icon ”Welcome screen” to toggle on/off.
The context menu closes automatically when you touch the icon. If
the welcome screen is activated the icon is highlighted in the context
menu.
Raise presser foot (Available from main, sewing, sequence and stitch
creator menus)
You can preset the presser foot to raise automatically to a certain
position every time needle up/down is activated.
”Display window selection” is the standard setting. With this setting a
selection window for the presser foot will appear every time you press
the needle up/down button (3), see page 3:2.
Contrast (Available from all menus)
In this menu you can adjust the contrast of the touch screen. Use the
function field buttons (5) or the arrows on the screen to adjust the
contrast setting between 0-30. Touch the contrast window, outside the
arrows to close the menu and save the settings.
Page 47

3:13
Operating your performance 2058
Stitch parameters (Available from sewing menu)
The stitch parameter function in your sewing machine lets you store
your favorite settings for each stitch. You can adjust a stitch for a
specific fabric or application or just save the stitch settings you like to
use.
You can always go back to default settings without losing your saved
favorite settings. The saved settings can be deleted or overwritten with
new settings.
The stitch parameter window is divided into three sections. In the top
section (A), you select what kind of settings you want to save or delete,
stitch parameters or sewing functions.
Sewing functions are:
Tie-off
Presser foot raise
Mirroring
Single stitch
Programmable seam
length
Stitch parameters are:
Needle position
Stitch length
Stitch width
Pattern length
Stitch balance
Stitch density
In the left section (B), you decide if you want to use your own stored
settings (custom setting) or the default settings.
In the right section (C), you choose to save new settings as custom, or
delete previously saved settings.
Save your favorite settings:
Select the stitch you wish to use and adjust the settings of the stitch in
the sewing menu. Long touch the info button (9) to open the context
menu. Touch ”Stitch parameters”. Select the stitch parameter icon or
the sewing function icon or both, in the top section (A), depending on
what kind of settings you want to save. An X appears in the selected
icon. Touch the save icon in the right section (B), to save the settings
as custom. The window closes, your favorite settings are stored in the
machine and automatically activated.
Note: If you want to delete previously saved settings you can either
touch the delete icon or overwrite the old settings by saving new
settings.
Use custom or default settings:
Select the stitch you wish to use. Long touch the info button (9) to open
the context menu. Touch ”Stitch parameters” in the context menu. The
stitch parameter window opens. Touch the icon for custom setting in
the left section (B), to use your own stored settings for the stitch, or the
icon for default setting, to use the default setting. The window closes
when you have made your selection.
A
B
C
Page 48

3:14
Revert to original settings (Available from main and stitch selection
menus)
This function will revert all custom settings for all stitches to the
default settings, without deleting them. If the icon is touched the
machine asks if you want to revert the settings. Touch “ok” or “esc” to
confirm or reject.
Note: If you revert to original settings you can still go back and
reactivate the saved custom settings of your stitches in the stitch
parameter window, see page 3:13.
Delete all (Available from main menu)
This function will delete all your stored sequences and created stitches
plus all your custom stitch settings. If the icon is touched, a dialogue
window appears: ”Do you want to delete all stitch parameters plus
all stitch sequences plus all created stitches?” Touch ”ok” or ”esc” to
confirm or reject.
Delete all parameters (Available from all stitch selection menus)
This function deletes all custom settings for all stitches. If the icon
is touched, a dialogue window appears: ”Do you want to delete the
parameters of all stitches?” Touch ”ok” or ”esc” to confirm or reject.
Delete all stitch sequences (Available from sequence memory
selection menu)
This function deletes all stored stitch sequences. If the icon is touched,
a dialogue window appears: ”Do you want to delete all stitch
sequences?” Touch ”ok” or ”esc” to confirm or reject.
Delete all created stitches (Available from stitch creator memory
selection menu)
This function deletes all stitches created and stored in the stitch creator
memory. If the icon is touched, a dialogue window appears: ”Do you
want to delete all created stitches?” Touch ”ok” or ”esc” to confirm or
reject.
Machine test (Available from main menu)
This function is for Pfaff certified service technicians only.
Version (Available from main menu)
The current software version number in your machine is shown here.
Page 49

3:15
Operating your performance 2058
Info system
Your sewing machine has an info system function to help you using
the machine. The function can be called up at any time by pressing the
info button (9). The info system includes instructions on preparing the
machine for sewing, information on using the sewing functions and
recommendations regarding accessories and settings. You get different
information depending on in which menu you are when you press the
button.
Info texts may extend over several pages. The numbers in the upper
right corner show the current page number and the total amount of
pages that the selected info text extends over. Use the scroll buttons (4)
to browse through the pages.
Press the info button (9) again to close the info system.
Information in the main menu
If you press the info button (9) in the main menu the info system gives
you the following information:
• Threading the top thread
• Threading the needle
• Bobbin winding
• Bobbin winding through the needle
• Inserting a bobbin
Touch the icon for the desired information. Press the scroll buttons (4)
to scroll through multiple pages.
Information about a stitch in the sewing menu
If you press the info button (9) when in a sewing menu the info system
gives you the following information:
• Needle size/type recommendation
• IDT engaged or disengaged
• Recommended presser foot
• Recommended needle thread tension
For tapering, patchwork, buttonhole sewing, quilt stitches and the
darning program the information is more detailed.
Page 50

3:16
Information in the more options window
When you press the info button (9) in the more options window you
get information about the different sewing functions.
The following functions are described:
• Tie-off
• Free-motion sewing
• Raise presser foot
• Single stitch
• Twin needle
• Patchwork program
• Tapering
• Straight stitch safety
Touch the icon for each function to read the information. Press the
scroll buttons (4) to browse through multiple pages.
Page 51

Utility Sewing
Page 52
1
4
3
2
5
6
7
8
9
4:2
Getting started
To begin sewing on your new sewing machine, do a straight stitch
first.
When you turn on your machine a welcome text appears on the
display. Tap the foot control and the straight stitch is automatically
selected. Take a piece of fabric, fold it and place it under the presser
foot. Engage the IDT. Line up the edges of your fabric with your
preferred seam allowance. When you begin to sew the presser foot is
lowered automatically. If you want to sew longer or shorter stitches,
change the stitch length by touching the stitch length icon on the
screen and pressing the function field buttons (5). You will see the
length of your stitch on the display.
To sew a zigzag stitch, press the right scroll button (4) twice and you
will see the zigzag stitch no. 3 on the display. Take another piece of
fabric and place it under the presser foot. Line up the edges of your
fabric with your preferred seam allowance. When your begin to sew
the presser foot is lowered automatically. To change the width of the
stitch touch the stitch width icon on the screen and press the function
field buttons (5). The width of your stitch will be shown on the display.
Page 53

4:3
Utility Sewing
Straight stitch - No 1
Stitch no. 1 is the basic straight stitch in center needle position. The
stitch length can be increased up to 6mm. Your sewing machine has 19
needle positions that can be adjusted by the needle position icon and
function field buttons (5).
Change the needle position of the straight stitch to sew in a zipper or
topstitch along the edge of a collar.
Use the needle up/down button (3) to easily pivot at collar points.
Sewing in zippers - No 1
There are different ways to sew in zippers. Follow the directions
included with your pattern for best results.
The zipper foot can be snapped to the presser foot ankle on the left or
right, depending on how you will insert your zipper.
Important: If the presser foot is attached on the right side, the
needle must be moved to the right. If the foot is attached on the left,
the needle must be moved to the left.
For all types of zippers it is important to sew close to the teeth of the
zipper. Set the needle position so it enters close to the edge of the
zipper teeth by using one of the 19 needle positions available.
Three-step zigzag stitch - No 4
Stitch no. 4 can be used to overcast raw edges. Make sure the needle
pierces the fabric on the left side and overcasts the edge on the right
side.
Stitch no. 4 can also be used as an elastic stitch to add stretch to
pajamas, skirts and sportswear seams.
Page 54

B
A
4:4
Topstitching - No 1
The straight stitch can be sewn in 19 different needle positions
allowing you to guide the presser foot along the fabric edge for
topstitching. The distance between the rows of topstitching is
determined by the needle positions.
Use the guide marks on the needle plate, or the edge guide to topstitch
further from the fabric edge. The edge guide is inserted into hole A
and is secured with set screw B.
Basting stitch - No 17
With stitch no. 17 you can baste. When you press the foot control, the
machine will sew one stitch at a time. Press the foot control again for
each stitch. Your sewing machine has 19 needle positions that can be
adjusted with the needle position icon and function field buttons (5).
• Lower the feed dogs and disengage the IDT.
• Place the fabric under the presser foot.
• Sew one stitch, then move the fabric the required amount to the
rear. Continue to sew one stitch at a time until you finish basting.
Tip: Light fabrics are easier to baste with long straight stitches
(6mm) using stitch no. 1, letting the machine feed your fabric.
Gathering with straight stitch - No 1
A straight stitch can be used to gather your fabric when making
sleeves, cuffs, skirts or valances. To obtain neat and even gathers you
should sew two or three rows of gathering stitches.
• Set your stitch length to 6.0mm. Lower the needle thread tension to
3.
• Mark the first gathering line on the right side of the fabric. Sew
along this line. Leave about 4 - 5 inches (10-13 cm) of thread at the
beginning and end of the seam.
• Sew 1 or 2 more rows of stitching, using the edge of the presser foot
as a guide.
• Gather the fabric by pulling the bobbin (bottom) threads to the
desired fullness.
• Distribute the gathers evenly and knot the thread ends together to
secure the gathering.
Page 55

B
A
4:5
Utility Sewing
Blindhem stitch - No 15
The blindhem stitch is used to make invisible hems on skirts, trousers
and home dec projects.
• Finish the edge of the hem.
• Fold and press the hem allowance to the wrong side.
• Fold the hem back on itself so approximately 3/8” (1 cm) of the
finished edge extends beyond the fold. The wrong side of your
project should now be facing up.
• Place the fabric under the presser foot so that the fold runs along
edge guide A.
• When the needle swings into the fold it should catch a small
amount of fabric. If the stitches are visible on the right side, adjust
edge guide A by turning adjusting screw B, until the stitch that
catches the hem just barely shows.
Stretch blindhem stitch - No 16
The stretch blindhem stitch is especially suitable for stretchy fabrics,
because the zigzag in the stitch lets the seam stretch. The hem is
finished and sewn at the same time. There is no need to finish the raw
edge first on most knits.
Create the blindhem as described above.
Rolled hem with straight stitch - No 1
Use the rolled hem foot no. 7 to finish the edges of blouses, scarves,
or ruffles without having to iron the edges beforehand. Hemming
prevents the edges from fraying and produces a neat and durable edge
finish.
• Double-fold the fabric edge (about 1/8 inch / 3mm per fold).
• Place the folded fabric edge under the rolled hem foot and sew a
few stitches to secure.
• Turn the hand wheel towards you until the needle is at its lowest
point. Raise the presser foot and slide the fabric into the scroll of the
foot.
• While sewing, guide the fabric edge evenly into the foot. When rollhemming, make sure the raw edge of the fabric butts against the
left edge of the opening in the rolled hem foot. Be careful that the
fabric does not run underneath the right side of the presser foot.
Page 56

4:6
Overlock stitches
For elastic, knits and stretch fabrics, your sewing machine provides
a selection of overlock stitches. These stitches join multiple layers of
fabric and overcast them in one operation. These stitches can stretch
and are more durable than standard stitches.
Closed overlock stitch - No 31
When sewing fabrics that fray easily select stitch 31. With this stitch an
additional edge thread protects the fabric edge against further fraying.
Closed overlock stitch - No 36
This stitch is suitable for sewing a hem on your garment. Use foot no.
0 or 3.
Fold your fabric 3/8” (1 cm) and stitch the closed overlock on the
right side of the folded fabric. When you have finished, cut away the
unnecessary fabric.
Stretch knit overlock stitch - No 37
This stitch can be used for open-knit and heavy knit fabrics. Garment
seams can be joined effortlessly with this stitch.
Tip: Use Blindhem foot No. 3 when sewing overcast seams. This
guides the fabric more precisely and prevents tunneling of the seam
at wider stitch widths. Adjust the stitch width and guide of the foot
to ensure that the right swing of the needle clears the raw edge of
the fabric and the pin of the presser foot.
Overlock stitch - No 38
The overlock stitch no. 38 can be used for joining or edge-finishing
fabrics that do not fray excessively.
Page 57

4:7
Utility Sewing
Buttonholes
There are 12 buttonhole styles built-in to your sewing machine. Each
buttonhole is especially adapted for a particular use and fabric type.
Your sewing machine is equipped with the sensormatic buttonhole
guide and sensor technology to ensure that every buttonhole is sized
accurately. Beautiful buttonholes can be sewn on even the most
difficult fabrics like velvet or heavy knits.
See page 3:8 for instructions on how to program the size of your
buttonhole.
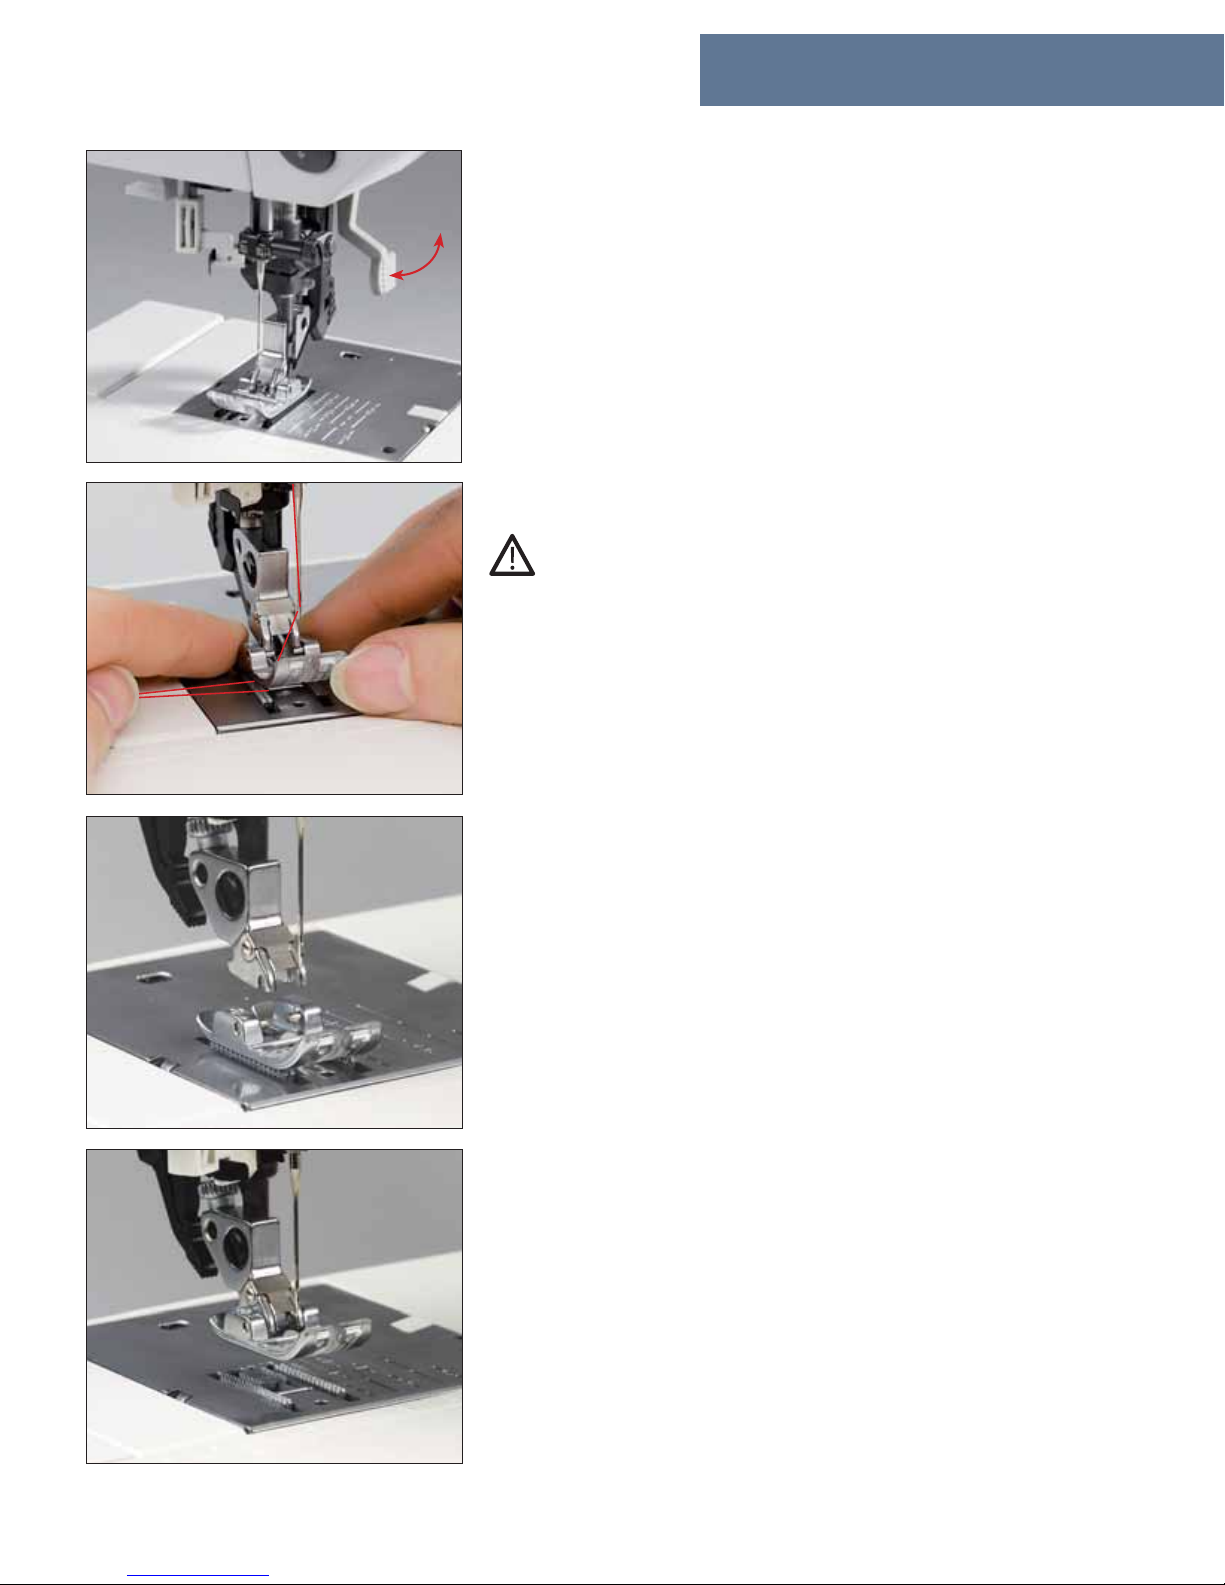
Inserting the sensormatic buttonhole guide
Push the metal part of the sensormatic buttonhole guide into the slot
under the two arrows at the back of the needle plate. The white plastic
part goes over the needle plate, covering the feed dogs.
Slide the guide towards you until there is a small gap between the
needle plate and the guide as shown in the picture.
Inserting the sensormatic buttonhole guide activates the sensor.
Attaching buttonhole foot - No. 5A
Attach buttonhole foot No. 5A to sew buttonholes (see ”Changing the
presser foot” on page 2:3).
Before starting to sew, pull the slide of the foot towards you until the
red arrow matches the second red mark.
Page 58

4:8
Buttonhole with gimp cord
Buttonholes that are sewn with gimp cord under the satin stitch
columns are more stable, durable and professional looking. Use pearl
cotton or regular gimp thread.
• Insert the sensormatic buttonhole guide.
• Place the center of a length of gimp cord over the metal hook
extending from the center back of the buttonhole foot. Pass the cord
ends under the foot and pull up into the right and left guides on the
front of the presser foot.
• Snap on the buttonhole foot. Before starting to sew, move the foot
to align the arrow with the second red mark. Buttonholes 50, 51, 52
or 53 work well for this technique. Follow the instructions on page
3:8 of how to program the size of your buttonhole.
• After completing the buttonhole, pull the ends of gimp cord until
the loop of thread is hidden under the buttonhole bartack.
• Thread the gimp cord ends into a hand sewing needle and pull
them to the wrong side of the garment. Tie the gimp threads and
cut off the excess thread.
Eyelet buttonhole with gimp cords
• Insert the sensormatic buttonhole guide. Place the center of a length
of gimp cord over the metal hook extending from the center front
of the buttonhole foot. Pass the cord ends under the foot and pull
them up into the right and left guides on the back of the presser
foot.
• Snap on the buttonhole foot and pull the slide of the foot towards
you until the back white part of the foot touches the back of the
slide. The red arrow will match the first red mark. Before starting
to sew, press the needle up/down button (3). See page 3:8 for
instructions on how to program the size of your buttonhole.
Page 59

4:9
Utility Sewing
• Sew the right side of the buttonhole.
• After the machine sews the first few stitches of the curved end pull
the gimp cords out of the metal hook with a straight stitch pin.
Warning: Do not lift the presser foot from the fabric surface!
• Gently pull the gimp cord on the left towards the rear until the loop
is just in front of the needle. Carefully sew the curve, guiding the
gimp cord under the stitching.
• After sewing the left side of the buttonhole, thread the gimp cords
into a hand sewing needle and pull them to the wrong side of the
garment. Tie the gimp cords and cut off excess cord.
The round buttonhole with gimp cord is sewn in the same way.
Tip: This buttonhole is particularly attractive when sewn with a
heavier-weight thread.
Buttonhole tips
• Buttonholes that are to be sewn very close to a reinforced edge,
may sometimes not feed optimally with the buttonhole foot because
of the bulk at the edge of the fabric. In this case, use presser foot 1A
with the Integrated Dual Feed engaged.
• Buttonholes should always be stabilized before sewing.
• Fabrics that shift or stretch easily should be reinforced with watersoluble or lightweight stabilizer.
• Buttonholes are particularly stable and durable if a gimp cord is
inserted while sewing.
• Linen buttonholes are particularly attractive if you use a heavierweight thread and a topstitch needle.
• Buttonholes are normally selected a little larger than the button
diameter. It is important to always sew a test buttonhole on the
same fabric/stabilizer as your project to be sure that you have
selected the correct size.
Page 60

4:10
Sewing on buttons - No 60
The Button sewing program no. 60 allows you to sew on two and four
hole buttons easily.
• Remove the presser foot and lower the feed dogs. (Make sure the
IDT is disengaged).
• Mark the button position on your fabric. Place the button on the
marked fabric.
• Turn the handwheel towards you and position the button so the
needle enters the left hole in the button.
• Lower the presser foot lift. The button will be held in place by the
shank of the foot. Turn the handwheel to make sure the needle also
enters the right hole of the button.
• Continue sewing on the button. The machine will complete the
program and stop.
Tip: You can also use a sew on button foot available from your
authorized Pfaff dealer as an optional accessory.
Eyelets - No 59
To stitch eyelets on a belt or linen items, select stitch no. 59.
Select the single stitch function in the more options window (8) to sew
one eyelet at a time.
Page 61

4:11
Utility Sewing
Automatic darning - No 74 and 75
Stitches no. 74 and 75 is for strengthening damaged areas of fabric and
repairing tears.
• Stitch over the damaged area a little longer than your tear.
• Press the reverse button (10); the machine finishes sewing the
darning program and the darning length is saved.
The saved darning length can now be repeated as often as needed.
Depending on the type of fabric, the darning pattern may shift slightly
out of square. You can straighten the pattern using the balance
adjustment capability.
Touch the balance icon and fine tune the stitch balance with the
function field buttons (5).
Note: To give the best strength to the darning stitch it should be
slightly out of square.
To straighten a pattern that shifts this way, correct the balance in the
plus-section.
To straighten a pattern that shifts this way, correct the balance in the
minus-section.
Page 62

A
B
4:12
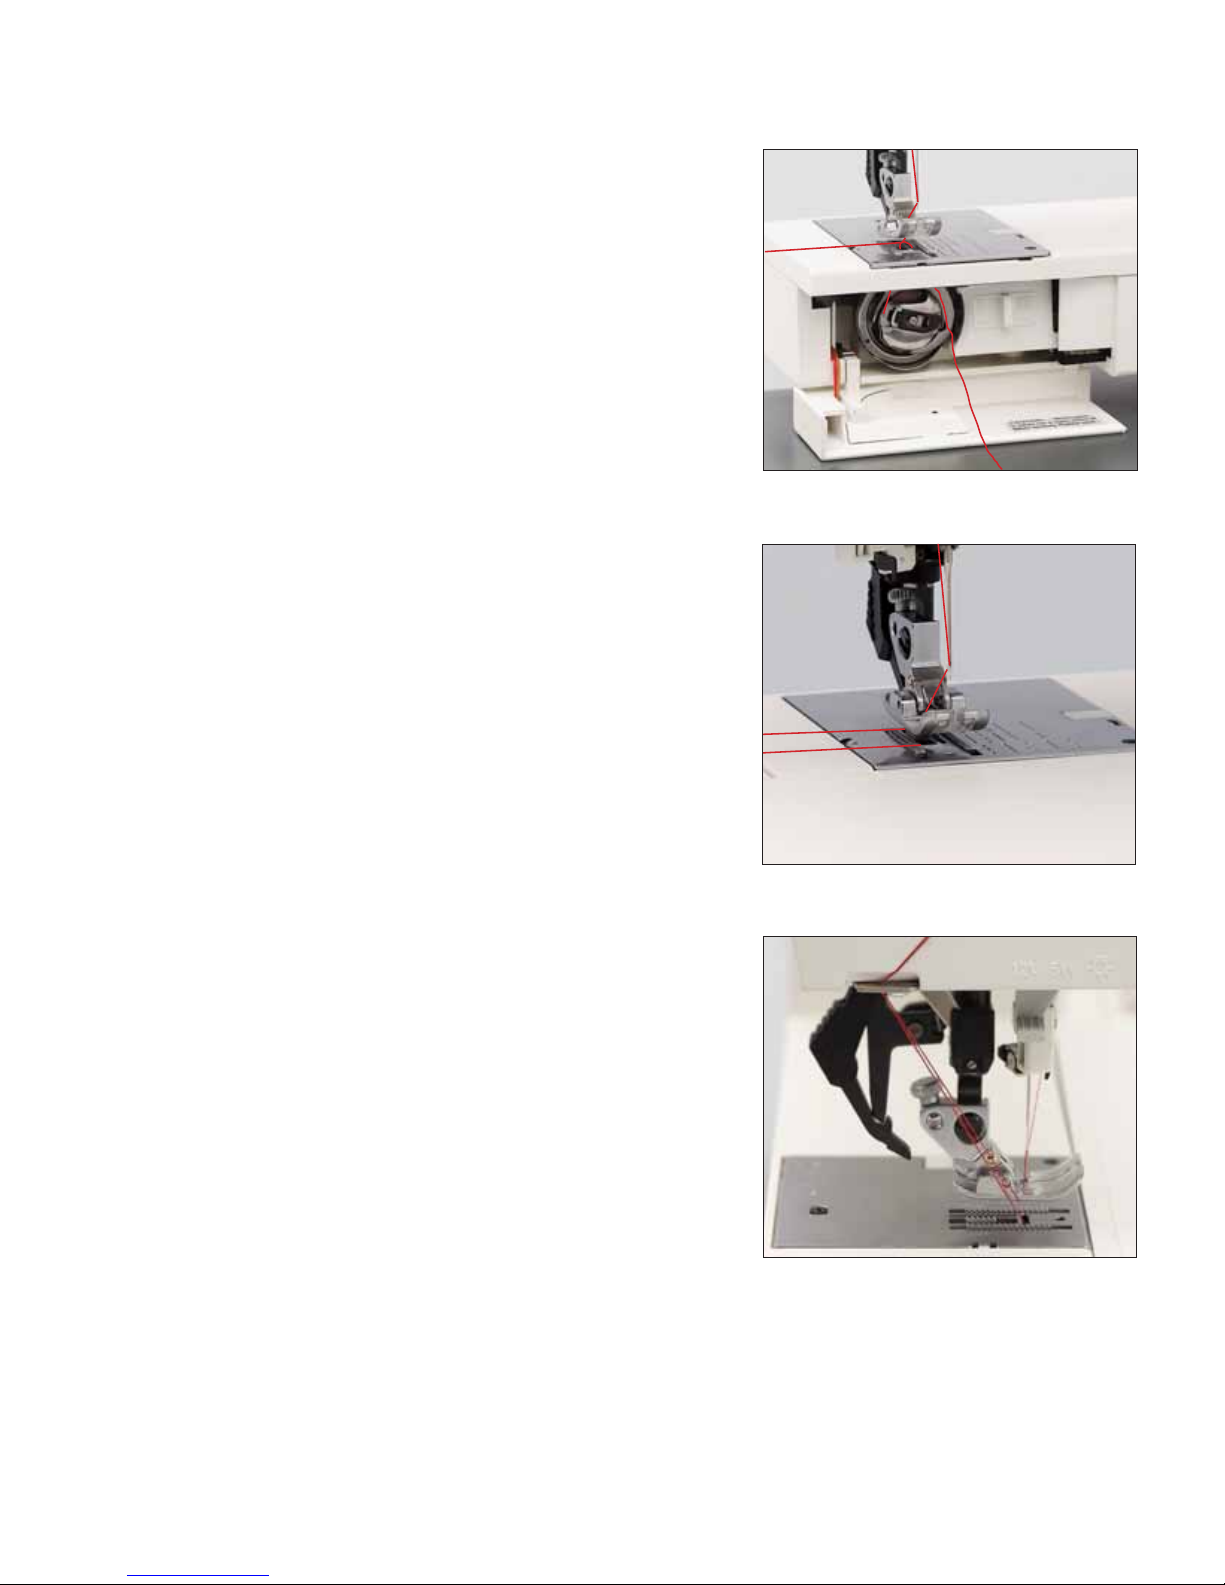
Free-motion darning – No 1 and 3
• Remove the standard presser foot. Make sure the needle is at its
highest position. Carefully loosen the screw (A) until the cross hole
(B) is accessible. Squeeze the darning foot gently together and guide
the pin of the foot into the cross hole of the presser foot holder as
far as it will go. The black “C-shaped” guide should place itself
around the presser bar. The long, plastic arm must be behind the
needle set screw. Tighten the screw (A).
• Lower the feed dogs. Hoop your project to be repaired in a round
embroidery hoop.
• Select straight stitch no. 1 or zigzag stitch no. 3. Select the freemotion sewing icon in the more options window (8). As you begin
sewing, the darning foot automatically engages in the darning
position.
• Draw up the bobbin thread and sew a few stitches to secure. Cut
the threads close to the project and continue sewing.
• Repair the damaged area/hole by guiding the fabric evenly
forwards and backwards slightly longer than the length of the
repair area.
• When you have covered the damaged area, turn the fabric 90
degrees and stitch over the area again. Darning in both directions
over a tear will produce a stronger repair.
• To remove the darning foot loosen the screw (A), squeeze the foot
together and pull it out to the right. Tighten the screw (A).
Tip: Remember, when sewing with the feed dogs lowered, the
stitch length is determined by you. An even, medium-to-fast
sewing speed will allow you to sew a more consistent length of
straight stitch. Sewing too slowly may cause small knots to appear
on the reverse side of your work.
Page 63
Decorative Sewing
Page 64

1
4
3
2
5
6
7
8
9
5:2
General notes on decorative sewing
To enhance your own home textiles or garments your sewing machine
offers you a wide variety of fancy and decorative stitches. Create a
greater variety of embellishments by combining different patterns,
colors and sizes. Use specialty decorative threads to enhance the lovely
stitching.
Always use stabilizers under fabric when sewing decorative stitches.
Properly stabilizing your fabric will help eliminate distortion of your
decorative stitches.
The following recommendations apply to all decorative sewing:
• Rayon embroidery threads give shiny, smooth stitching results and
come in many colors and weights.
• The stitch length and width can be altered as desired.
• Your sewing results will be much prettier if your tension is set to a
lower setting.
• Presser foot no. 1 (for IDT) and no. 2 (without IDT) are
recommended for decorative work. We recommend presser foot no.
2 for heavier fabrics and threads.
Combined borders
Create borders of any width by combining different decorative
stitches. Place stabilizer under fabric. Use the edge of your foot as a
guide while you are sewing.
Mark the center of your fabric with a fabric marking pen/pencil. Sew
stitch no. 197; stitch width 6mm along your line. Mirror the stitch.
Position your fabric even with the top of the first row of stitching. Sew
the second row of stitching directly across from the first.
Sew stitch no. 3; stitch length 0.2mm and stitch no. 166 along each side
of your center embroidery. Your completed border should now have
six rows of decorative stitching.
Page 65

5:3
Decorative Sewing
Twin needle sewing
Decorative effects can be achieved using a twin needle. The picture
shows what beautiful borders can be created with just a little
imagination! Twin needle sewing is particularly effective if you use
decorative sewing threads in matching colors.
• Change and thread the needle. See page 2:13 for how to thread a
twin needle.
• Choose the stitch you would like to sew with the twin needle.
• Select the twin needle function by touching the twin needle icon in
the more options window (8).
• To change the stitch width, long touch the twin needle icon and
a pop-up window opens. The needle width can be set with the
function field buttons (5). This will limit the stitch width so the
needle is not broken on decorative stitches. Touch the screen or step
on the foot control to close the dialogue window.
The twin needle function remains active if the stitch has been changed,
or after the machine has been turned off and back on. The twin needle
function must be turned off when you remove the twin needle from
the machine.
To turn the function off, touch the twin needle icon and confirm by
touching ”ok”.
Cross stitch
No other embroidery technique is as closely associated with the term
”needlework” as cross stitching. With your sewing machine and its
wide range of cross stitches this traditional embroidery technique
can be created remarkably easily and quickly. Whether you select
one of the pre-programmed cross stitch borders or create your own
combination with the cross stitches these look handsewn and lend a
distinctive character to table linens, towels or clothes.
Tips for cross stitch sewing:
• Always work using the ”sew slow” and ”needle up/down”
functions.
• Attach decorative foot no. 2A. Its red guide-markings are exactly
equal to the size of the cross stitches.
Note: When combining cross stitches, the start and end points of
the respective cross-stitch are important. A cross stitch that finishes
on the right can always be combined with a cross-stitch that starts
to the right. The starting and end points of the cross stitches are
marked by a circle and a dot on the stitch lid.
Page 66

5:4
Tapering
The tapering program for the zigzag stitch allows you to create stitches
with an attractive, three-dimensional appearance, which are very easy
to sew. Tapering increases or decreases the width of the zigzag stitch
during sewing to create symmetric or asymmetric tapers.
In stitch no. 3, the stitch width is altered from center needle position so
you can create satin points (symmetric tapers).
In stitch no. 33, the right position of the needle remains constant while
the left position changes; using the mirroring function you can reverse
the needle position; this stitch is most suited for corners and borders
(asymmetric tapers).
Tip: Activate needle up/down (3) when tapering
Symmetrical tapering stitch 3
Symmetrical tapering, increase. The width of the zigzag starts
with 0mm and becomes wider until it reaches 9mm.
Symmetrical tapering, decrease. The width of the zigzag stitch
starts at up to 9mm and tapers to 0mm and stops with the needle in
the lower position when the reverse button (10) is pressed.
Asymmetrical tapering stitch 33
Asymmetrical tapering, increase. Width 0mm to 9mm.
Asymmetrical tapering, decrease. Width 9mm to 0mm.
Automatic tapering stitch 3 or 33
Increase width
• Select stitch no. 3 for symmetric tapering or stitch 33, for asymetric
tapering.
• Open the more options menu (8). Activate the automatic increase
tapering function and start sewing. The zigzag starts from 0mm
and becomes wider until the preset stitch width is reached. If you
still have the more options menu open you can see that the increase
icon is automatically deactivated and the decrease icon is activated.
Stitch the desired length.
Decrease width
• Press the reverse button (10). The width of the zigzag is reduced
to 0mm. The machine stops with the needle down and you can
pivot the fabric to stitch the corner. In the more options menu the
increase icon is activated again.
• Press the foot control again, and the stitch width increases.
You can also touch the tapering decrease icon, to start sewing with the
preset stitch width and decrease.
Touch the active tapering icon to inactivate the tapering function.
Note: Depending on the type of fabric,
you might need to adjust the stitch to get
a perfect angle. Touch the balance icon
and fine tune using the function field
buttons (5).
Page 67

5:5
Decorative Sewing
Quilting
Quilting and patchwork are traditional techniques to make use of leftover fabric. Over the years it has developed into a creative hobby.
Traditionally patchwork was sewn by hand. Today your creative ideas
can be realized in a much shorter time with your sewing machine.
A quilt consists of three layers, two layers of fabric with a layer of
batting sandwiched between.
Patchwork program
With the patchwork program you can program the machine to stop
sewing at a specific length. This is very useful when piecing the same
size fabric pieces.
For 1/4” quilt seams set up your sewing machine with straight stitch
(no. 1), stitch length 2.5mm, needle position 4 to the right and your IDT
engaged.
Select the patchwork program in the more options menu (8) and touch
”ok”. Now sew your seam length. When you get to the end of the
seam, press the reverse button (10). The seam is now tied off and can
be repeated automatically. Simply begin to sew again and the same
size seam length will be sewn.
When you are finished with this size, re-choose the patchwork
program. The new seam length will now be programmed
automatically.
Antique Quilt Stitches
With the Pfaff Antique quilt stitches (80-96) you can easily create a
beautiful hand stitched look for your Crazy Patch quilting.
Thread the needle with an invisible (monofilament) thread. Use a
contrast or matching polyester or cotton thread in the bobbin. Set the
needle thread tension to 7-9.
When you sew the stitch on the three layers of your quilt, you should
only see your bobbin thread on top of the fabric. The intermediate
stitch disappears and thus produces a handstitched appearance.
Adjust your needle thread tension as needed to produce the desired
effect.
Note: For a decorative look, thread your needle with rayon thread
and your bobbin with a light weight cotton thread. Set the needle
thread tension to 2-3.
Page 68

5:6
Stitch-in-the-Ditch
One way to hold the quilt top, batting and back all together is using
the ”Stitch-in-the-Ditch” method of quilting. Stitching-in-the-ditch
means stitching in the seams in the quilt blocks.
• Set your sewing machine with a straight stitch (no. 1), stitch length
2.5mm, center needle position and the IDT engaged. Use the
optional narrow edge foot or the optional Stitch-in-ditch foot for
optimal guiding.
• Prepare your quilt by pin basting through all layers with safety pins
– starting from the middle of your quilt and working out. Place a
pin about every 6 – 8 inches (15 – 20 cm).
• To begin quilting, start sewing from the middle of the quilt and
continue out. Starting from the middle and sewing out will help
keep layers in place. Plan which seams you will actually stitch in.
This stitching will not only hold the quilt together it will also create
the pattern on the quilt back. You do not need to follow every seam
in the quilt, sew every 3 – 4 inches to keep the quilt in place. Of
course you can sew more to create a more decorative pattern for the
back.
Change to a quilting or jeans needle when sewing through thick quilts.
Test sew to make sure your stitching looks the way you want before
you start quilting your piece.
Tying the Quilt
Tying a quilt is another very simple and beatutiful way to hold the
quilt top, batting and back together. Previously done by hand, your
sewing machine has great decorative stitches that will “tie” your quilt
with ease.
• Choose a decorative stitch that is a forward moving stitch, such as
193 or 265.
• Set up your sewing machine as explained in the display info.
• Prepare your quilt by pin basting through all layers with safety pins
– starting from the middle of your quilt and working out. Place a
pin about every 6 – 8 inches (15 – 20 cm).
• Engage the single stitch function for one stitch. Now sew this stitch
every 3 – 4” (7 – 10 cm) all over the quilt. Again plan your stitch
placement so that there is a nice pattern on the front and the back.
Your machine will stitch one complete stitch, tie-off and raise the
presser foot so you can easily move your quilt from location to
location.
Page 69

5:7
Decorative Sewing
Quilt Appliqués
Appliqués add a special touch to your quilt. There are many different
ways to stitch appliqués to a quilt. One way is to add the appliqué to
the block before the quilt is put together.
• Set your sewing machine for a satin stitch. Choose stitch no. 10,
stitch length 0.4 - 0.5mm, stitch width 3 – 6mm, presser foot 2.
• Fuse the appliqué piece to the block with invisible web.
• Place stabilizer under the block and sew around the appliqué with
the satin stitch. Make sure the stitch is mostly sewn on the appliqué
– covering the raw edge of the appliqué.
Another way to add an appliqué to a quilt is to finish the edge of the
appliqué and sew it on with the hand appliqué stitches no. 83 or 84.
First prepare the appliqué:
• Cut the appliqué shape out of fabric and a piece of lightweight iron
on interfacing.
• Place the right side of the fabric and the rough (iron-on) side of the
interfacing together.
• Use a straight stitch (no. 1), stitch length 2.0mm, center needle
position and sew the fabric and interfacing together around the
outside edge with a 1/4” seam.
• Trim around the appliqué leaving 1/8” seam allowance and clip
into curves. Slash the interfacing, turn the appliqué right side out.
• Finger press the appliqué and place it on the quilt. When you are
satisfied with the position, iron it in place.
Select stitch no. 83 or 84, snap on the optional appliqué foot and sew
around the edge of the appliqué with the straight part of the hand
appliqué stitch. Let the horizontal part of the stitch just catch into the
appliqué. This is the part that will keep the appliqué in place.
Page 70

5:8
Free-motion stippling
Free-motion stippling not only keeps the top, batting and back
together, but it also adds texture and design to your quilt.
• Set your sewing machine for stippling with a straight stitch (no. 1)
and the free-motion program.
• Attach the darning foot No. 6 or the optional Open-toe Free-motion
foot.
• Pin baste your quilt layers.
• Prepare your quilt by pin basting through all layers with safety pins
– starting from the middle of your quilt and working out. Place a
pin about every 10 – 12 inches (25 – 30 cm).
• Practice stippling on scraps of fabric and batting. When the feed
dogs are lowered, you move the fabric to determine the stitch
length. Sewing with a constant speed will help to keep the stitches
even. Begin near the center of your quilt. Take one stitch and pull
the bobbin thread to the top of the quilt. Take a few stitches right
next to one another to secure the threads. Now move the quilt so
that your stitching creates scrolls and swirls. The stitching should
not cross itself – but travel in swivling stitches all over the quilt.
Tip: Use the Free-motion guide grip to help move the quilt in a
more consistent way. The Quilting table and Open-toe Free-Motion
foot are extra accessories created to make your stippling easier. See
your authorized Pfaff dealer to purchase.
Page 71

5:9
Decorative Sewing
Free-motion sewing
With Free-motion sewing you can create the most fantastic work. It
is possible to sew just as you would draw with a pencil, using the
various types of threads that are on the market today and your sewing
machine. You can also vary the shade of your Free-motion sewing by
sewing in different directions or patterns.
Top tension: 2-3
Presser foot: Darning foot, No. 6, or the optional Open-toe Free-
motion foot.
Feed dogs: Lowered
Needle size: 90-100
Stitch: Straight stitch/Zigzag
Tip: Use the optional Open-toe Free-motion foot for easier viewing
when stitching.
Important: Never engage the IDT when free-motion embroidering.
Thread your machine with a good quality cotton or Rayon thread. You
can use the same thread for bobbin thread, or an embroidery weight
bobbin thread.
Hoop your fabric tight as a drum into a round machine embroidery
hoop. You can use a wooden ring hoop bound with bias binding for a
better grip.
Select either the straight stitch or the zigzag. From now on, you control
the stitch length. The movement of the hoop along with the sewing
speed creates the stitch length. Sewing too slowly may cause small
knots to appear on the reverse side of your work.
Touch the free-motion sewing icon in the more options menu
(8). When pressing the foot control the presser foot is lowered
automatically into the free-motion/darning position.
Lower the feed dogs and place your hooped fabric under the needle.
Make one complete stitch. Pull the bobbin thread up to the top of the
fabric. Hold both threads and sew a few stitches to secure them. Clip
the threads close to the fabric and continue sewing.
Make sure that you hold the hoop on the machine bed and move it
steadily. Experiment sewing different patterns and see what different
stitch directions will do with the look of your embroidery. Try
different stitch widths for shading effects. Also test different threads,
such as variegated and metallic threads. You can also print, paint or
apply fabric shapes on your fabric before embroidering. Finish your
embroidery by adding free-motion stitches over the edges.
Tip: Draw a straight line with a water or air dissapering marking
pen on the fabric in your hoop. Keep this line parallel with the front
of your machine.
Page 72

5:10
Nostalgia/Heirloom
Wing needle
Sewing with a wing needle (a special needle with a wide, wing-like
shaft) creates the look of hemstitching in woven natural fiber fabrics by
creating “holes” where the needle goes in and out of the fabric.
• Replace the standard needle with a wing needle.
• Choose any stitch that goes back and forth into the same holes
several times (130 - 139). Use the recommended presser foot for that
stitch.
• Thread the top and bottom with lightweight thread in color that
matches the fabric you are using (remember you want to see the
holes that are created and not the thread).
Tip: For fine fabrics, place a lightweight tear away stabilizer under
stitching.
• Begin sewing. Use the sew slow button (2) to reduce your speed
while using the wing needle.
Hemstitching
This is a technique everyone recognizes as embroidered by hand.
With your sewing machine, you can produce hemstitching much more
quickly and easily. With ten special hemstitches and by changing the
stitch length and width, you can create variated hemstitch effects.
A wing needle is required for hemstitching work. When entering the
fabric the wing needle forms holes which are typical for hemstitching.
Hemstitching will be most successful on relatively coarse linen and
cotton fabrics from which single threads can be easily pulled.
If you pull additional threads and sew along the edges close to the
threads you have pulled out, you will achieve even more beautiful
hemstitching effects as the remaining threads are bundled.
Page 73

Stitch sequences
Page 74

1
4
3
2
5
6
7
8
9
6:2
Stitch sequences
Your sewing machine stores stitch and alphabet sequences in the
memories of the machine. The sequence is stored and remains in the
memory until you overwrite or delete it. You can store up to 99 stitches
or letters in each of the 50 M-memories.
Open the stitch sequence menu
There are two ways to enter the stitch sequence menu:
1. When you are in the sewing menu for a stitch you can save the
stitch to a sequence by touching m+. The display immediately
changes to the stitch sequence menu and you can add more stitches
to your sequence.
2. Touch ”Stitch sequence” in the main menu. The display changes to
the sequence selection menu. Touch one of the empty M-memories
to open the stitch sequence menu and start to create your sequence.
If you touch a memory with an already stored sequence you can
either choose to create a new sequence (and overwrite the old one),
open the already stored sequence (to edit or use it) or delete the
stored sequence.
Page 75

A
B
CD
F
E
6:3
Stitch sequences
Creating a new stitch sequence
In the stitch sequence menu you can see the selected stitch in the
preview field (A). To insert the stitch to a sequence touch the icon m+.
The stitch is added to the action field (B), to the right of the cursor (D).
To delete a stitch from the action field touch m-. The stitch to the left of
the cursor is deleted.
If you want to insert or delete a stitch before an already added stitch,
activate the action field (B) by touching it and use the scroll buttons (4)
to move the cursor (D) to the wanted position. You can also touch any
stitch in the sequence to select it and position the cursor to the right of
the selected stitch. The numbers (E) show the position of the selected
stitch out of the total number of stitches in your sequence.
If a stitch sequence extends over more than one display width, an
arrow appears (C) on the left or right border of the action field,
indicating one or more preceding pages.
Select stitches to a sequence
There are several ways to call up stitches that you wish to add in the
stitch sequence:
1. Selection by scroll buttons. Activate the preview field (A), by
touching it. Use the scroll buttons (4) to browse through all stitches,
including stitches created and stored in Stitch Creator. To insert a
stitch to the sequence touch m+.
2. Selection by repetition. Touching m+ once again inserts the same
stitch once more with the same settings. If you wish to insert
the same stitch but with changed settings, you can either do the
changes to the stitch before inserting the stitch with m+ or after you
have inserted the stitch by selecting it in the sequence.
3. Selection by number. Press the selection by number button (7) to
open the selection by number keypad. Enter the number of the
stitch you wish to use and touch ”ok”. Touch m+ to insert the
stitch to the sequence.
If you select a stitch that cannot be used in a stitch sequence a pop-
up message is displayed: ”This stitch cannot be used!” Close the
pop-up window by touching it.
4. Selection by category. Touch the stitch selection menu icon (F) to
open the stitch selection menu. Only categories with stitches that
can be used in a stitch sequence are available. Choose a category
and then the stitch you wish to use. Touch m+ to insert the stitch to
the sequence.
From here you can also insert stitches created and stored in Stitch
Creator. Choose ”Stitch Creator sts.” and then touch the stitch you
wish to insert. Touch m+ to insert the stitch to the sequence.
Note: The eyelet stitch, no. 59 and the stippling stitch no. 73, can
be used in stitch sequences but cannot be selected by category
since the buttonhole and the darning and bartack categories are
unavailable. To select stitch no. 59 or 73, use one of the other
methods mentioned above.
Page 76

A
B
6:4
Altering the settings of a selected stitch
If the preview field (A) is active you can alter the settings of a single
stitch before it is added to a sequence. Activate the preview field (A)
by touching it.
The functions that can be used when altering the settings are displayed
on the screen. Depending on the stitch type different functions are
available for each stitch.
Select the functions you wish to use by touching the icons on the
screen.
Editing a stitch sequence
To edit a stitch sequence the action field (B) must be active. Activate
the action field (B) by touching it.
Alter the settings of a single stitch in a sequence
Select the stitch you wish to alter by touching it. You can also select
the stitch by moving the cursor to the wanted position with the scroll
buttons (4).
When the stitch is selected you can choose which functions you wish
to use by touching the icons on the screen. Depending on the stitch
type different functions are available for each stitch.
Adding sewing functions to a sequence
You can also use the sewing function buttons and the functions
available in the more options window (8) to set sewing functions for a
stitch sequence.
Page 77
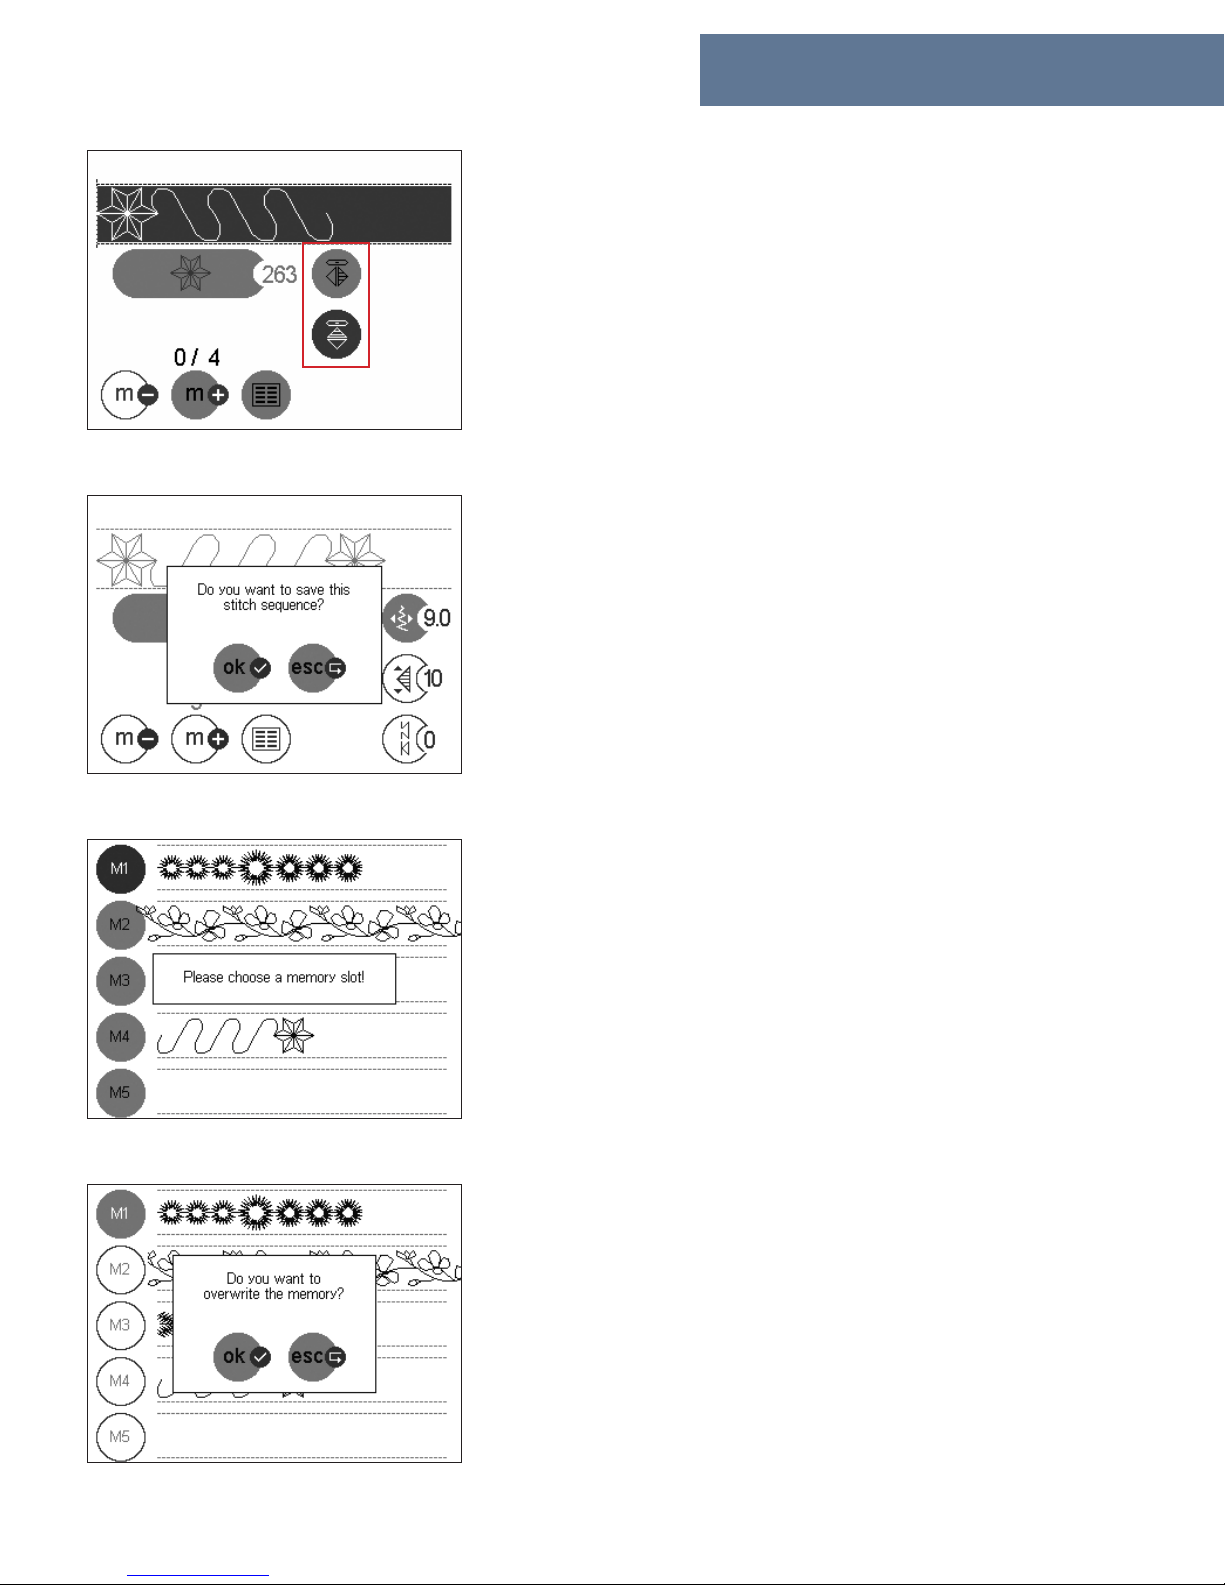
6:5
Stitch sequences
Mirroring a stitch sequence
Select the entire sequence by pressing the pattern restart button (1).
When the entire sequence is selected it is possible to mirror the whole
sequence horizontal or vertical by touching the mirroring icons.
Saving a stitch sequence
When you have created a new stitch sequence and exit the stitch
sequence menu with the main menu button (6), your sewing machine
asks if you want to save your sequence.
”esc” closes without saving. The main menu opens.
”ok” opens the sequence selection menu so you can select a memory
slot. The following message appears: ”Please choose a memory slot”.
Note: When you save an edited sequence that has already been
stored in a memory the changes will be saved to the old sequence
and you will not need to choose a new memory slot.
Close the pop-up window by touching it and select a memory slot.
The stitch sequence is automatically saved if an empty memory is
selected. If an occupied memory is selected, the following message
appears:
”Do you want to overwrite this memory?”
”ok” saves the stitch sequence.
”esc” closes the window so another memory can be selected.
The main menu button (6) closes the memory view without saving.
Page 78
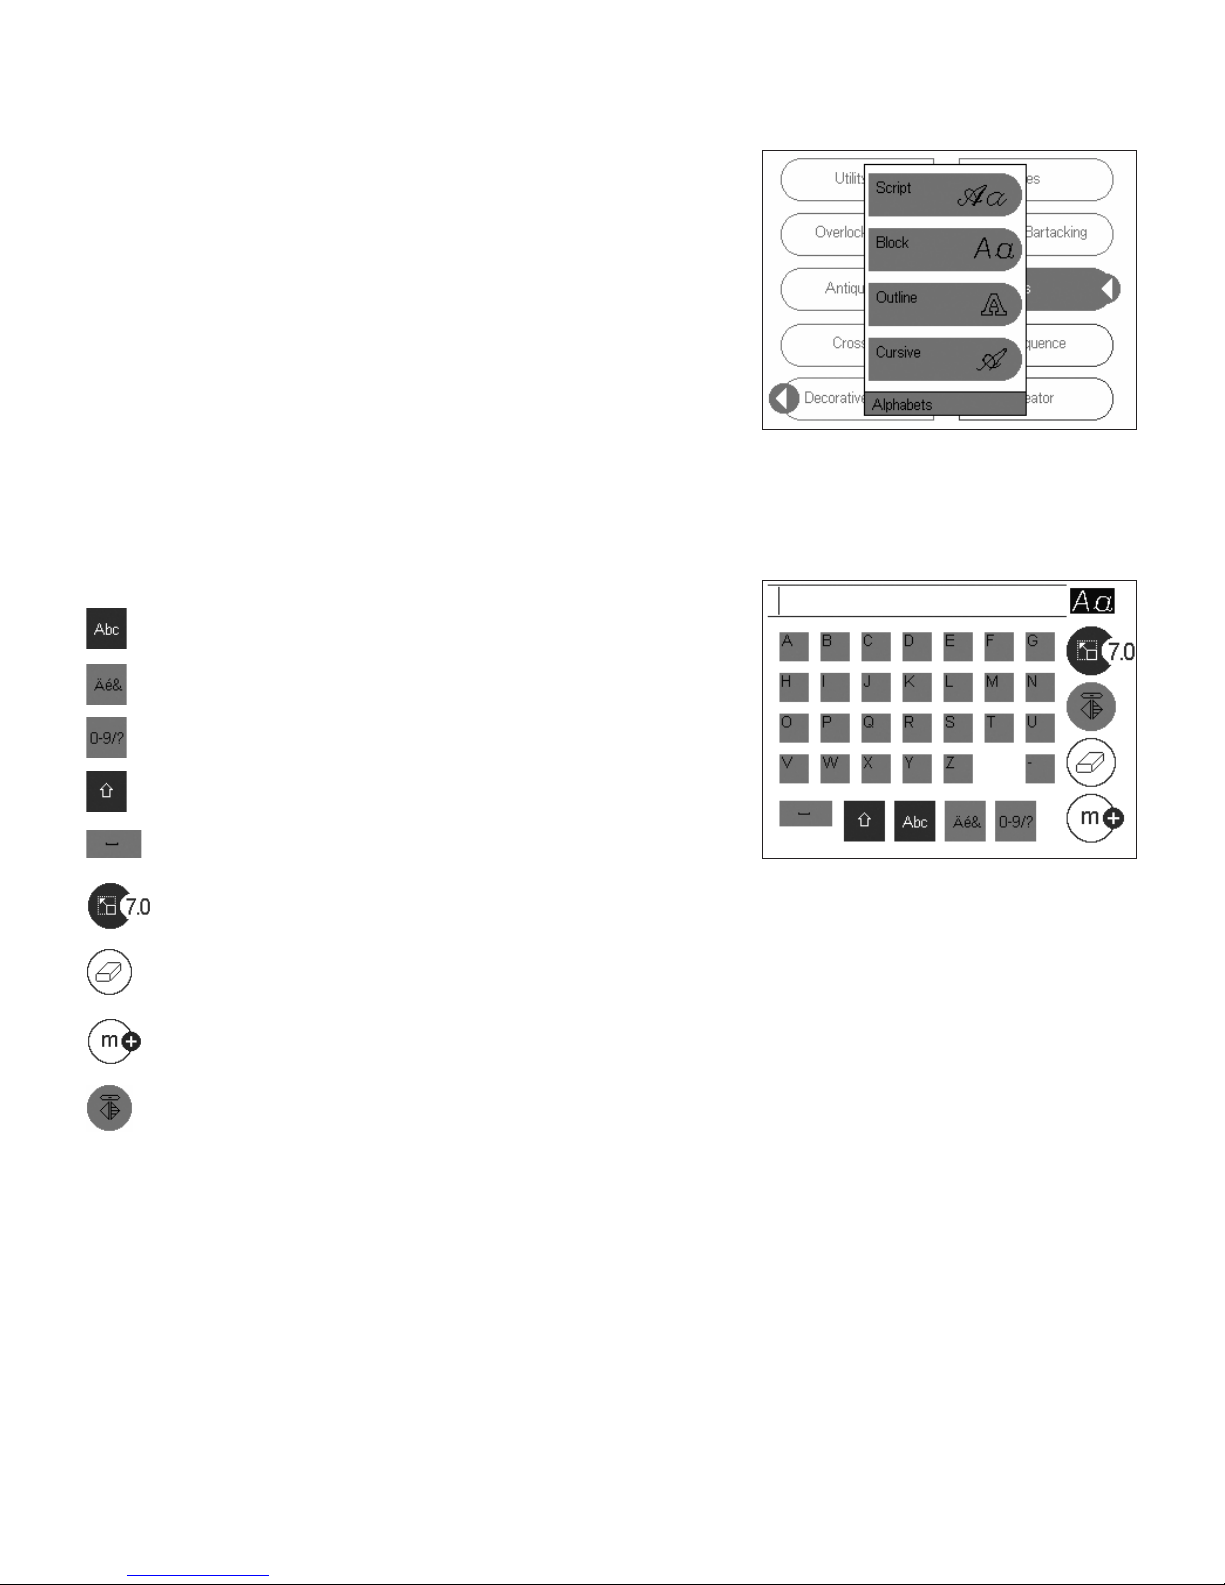
6:6
Alphabets
Your sewing machine can sew entire sequences of letters and words
using any of the alphabets in the machine. All alphabets include
uppercase letters, special characters and numbers. The Block and the
Script alphabets also include lower case letters.
The alphabet sequences are created in the alphabet sequence menu and
added to the stitch sequence menu. The alphabets can be combined
with stitches and permanently stored in the memory.
Even if only one letter is to be sewn, it must be added to the stitch
sequence menu.
Note: All fonts should be sewn with the IDT - Integrated Dual Feed
disengaged.
Functions in the alphabet sequence menu
Standard alphabet
Special characters
Numbers and special characters
Shift lock. Toggle between upper and lower case letters.
Space
Size setting. Touch this icon and set the font size by pressing
the function field buttons (5).
Eraser. Deletes a selected character from the font input field.
Save to a sequence. Inserts the alphabet sequence in the stitch
sequence menu.
Mirror. Mirrors a selected character side to side.
Page 79

6:7
Stitch sequences
Creating an alphabet sequence
Touch the ”Alphabets” icon in the main menu. The alphabet menu
opens. Select one of the fonts by touching it. This opens the alphabet
sequence menu where you can start typing in your alphabet sequence.
The standard alphabet and upper case letters are selected by default.
Touch shift to switch to lower case letters (only for the block and script
alphabets).
Use the keyboard to type in letters and words in the font input field. If
you enter a sequence that is longer than the input field, the sequence
moves to the left, and a small arrow appears on the left border.
Any further stitches will be added to the right of the selected character.
The selection square always moves to the last entered character. Use
the scroll buttons (4) to move the selection square to another character
and be able to subsequently delete or insert characters.
Delete selected characters by touching the eraser icon.
You can alter the font size by touching the size setting icon and using
the function field buttons (5). The font size refers to capital letters.
When the size is set before characters are entered, the size setting
applies to the entire sequence. If one character is selected the size
setting applies to the selected character and all following characters,
until a new size is set.
The change in size is not reflected on the screen until you insert the
sequence in the stitch sequence menu.
When you are satisfied with your alphabet sequence, touch m+ to
insert it in the stitch sequence menu. In the stitch sequence menu you
can change more settings, edit the alphabet sequence or combine it
with stitches.
Combine alphabet and stitch sequences
If m+ is touched in the alphabet sequence menu, the sequence is
inserted in the stitch sequence menu.
The alphabet sequence is shown in the action field in the selected font
type and size. Follow the previous instructions in this chapter on how
to add stitches, editing the sequences, use sewing functions and saving
stitch sequences.
Page 80

Page 81
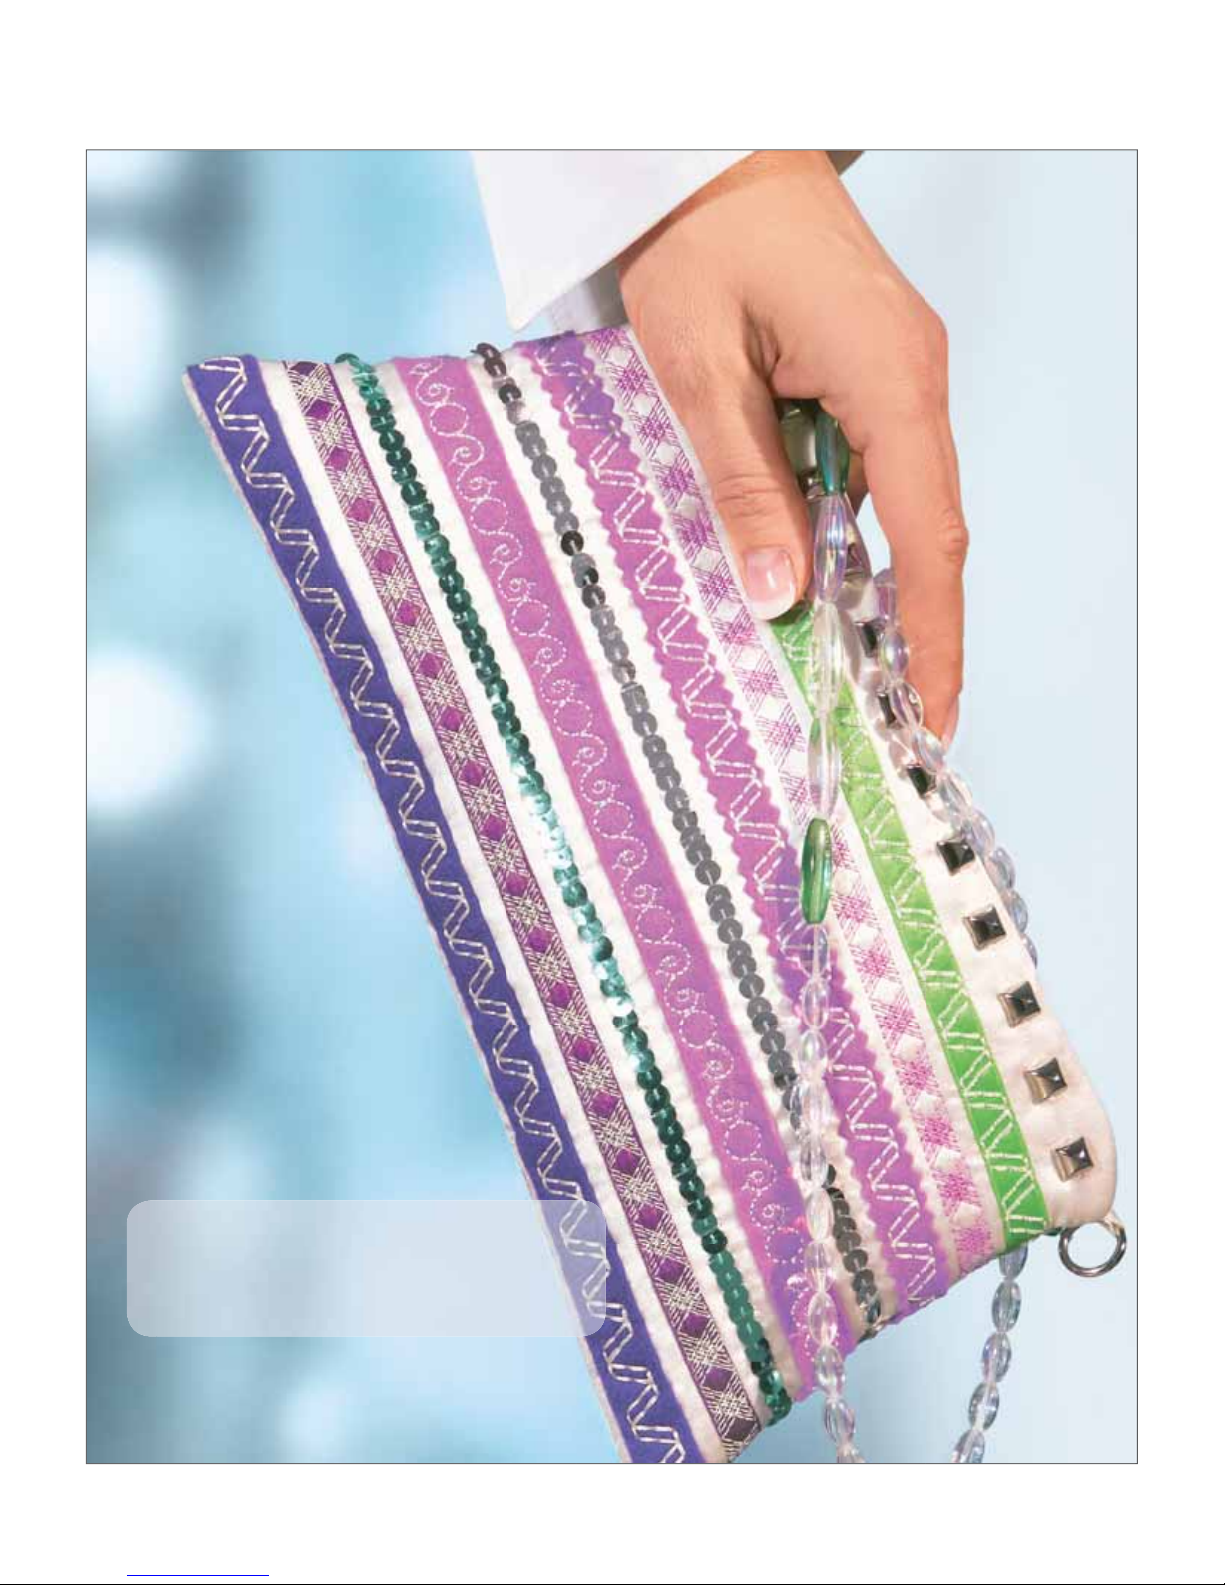
Stitch Creator
Page 82

B
A
C
D
E
E
1
4
3
2
5
6
7
8
9
7:2
Stitch Creator
With Stitch Creator you can customize and create your own stitches.
You can add, erase, move and combine stitches directly on screen.
Create a stitch of individually designed stitches or by using the 9mm
stitches and alphabets. Your created stitch is stored and remains in the
memory of the machine until you overwrite or delete it. You can store
30 stitches created with Stitch Creator in your sewing machine, each of
them containing up to 999 stitch points.
Open the stitch creator menu
To open the stitch creator menu touch ”Stitch Creator” from the main
menu. Touch one of the empty S-memories to start to create your
stitch. If you touch a memory with an already stored stitch you can
either choose to create a new stitch (and overwrite the old one), open
the already stored stitch (to edit or use it) or delete the stored stitch.
The Stitch Creator workspace
When you open Stitch Creator you have a workspace (C) on the
screen. The workspace equals 9mm stitch width. In the middle of the
workspace is a horizontal dotted line (A) that indicates the center of
the stitch, with 4.5mm stitch width on each side. To help you position
your stitches there is a grid with 1mm spacing. A square point
indicates the current selected stitch point (D). A stitch point is where
the needle goes through the fabric and the stitches are connected.
The numbers below the workspace (B) show your number of selected
stitches (1) / actual marked stitch point 46 / total amount of stitch
points in the stitch 46.
Scroll bars (E) appear on the screen if you zoom in or if your stitch
extends over more than one display width for moving your workspace
both horizontally and vertically.
Page 83

7:3
Stitch Creator
Functions in the stitch creator menu
Eraser. Touch this icon to delete one or more selected stitch points.
Stitch selection menu. Touch this icon to open the stitch selection
menu. Here you can add stitches that are already stored in your
machine including previously created stitches.
New stitch point. Touch this icon to add a new stitch point. If you
have selected several stitch points a copy of the selected stitches
will be added.
Select stitch point. Touch this icon to select several stitch points by
using the scroll buttons (4). Long touch the icon to select all stitch
points. The selected stitches become thicker on the screen. Touch
the icon again to deselect the stitch points.
Start sewing. Touch this icon to open the stitch in the sewing
menu where you can see the whole stitch and sew it.
Note: You cannot sew your stitch in the edit mode.
Side to side mirroring. Touch this icon to mirror one or more
selected stitch points side to side.
End to end mirroring. Touch this icon to mirror the selected stitch
points end to end.
Stitch point position adjustment. Touch the icon to adjust the
vertical position of the selected stitch point(s) by using the function
field buttons (5). If you change the position of a single stitch point
up or down you automatically change the stitch width.
Note: The icon shows the numbers 0-9. This is the vertical position
of the selected stitch point in the workspace.
Stitch length adjustment. Touch this icon to adjust the stitch
length for the selected stitch by using the function field buttons (5).
This icon is not active if more than one stitch point are selected.
Note: If the number on the icon is negative it means that the stitch
is sewn in reverse. The possible values are -6.0 to 6.0mm.
More options in the stitch creator menu
The following functions are available when you press the more options
button (8) in the stitch creator menu:
Zoom in. Touch this icon to enlarge the the representation in four
steps, 150 %, 200 %, 250 % and 300 %. Scroll bars for moving the
workspace appear on the screen.
Zoom out. This icon is only active if you have enlarged the
representation. Touch the icon to reduce the representation in four
steps.
Page 84

A
7:4
Creating a new stitch
When you open the stitch creator menu the workspace is empty. A
dotted line indicates the middle of the workspace.
Placing single stitch points
Touch the new stitch point icon (A) to place the starting point. A
square point indicates the current selected stitch point.
Touch the new stitch point icon (A) again and you have now created
a new stitch. For each new stitch you want to create, simply touch the
new stitch point icon (A) again.
Note: The position and length settings remain so that the next stitch
you place has the same settings as the stitch before. To change the
settings for a stitch point use the stitch length adjustment and stitch
point position icons (see next page).
To delete the selected stitch point(s) touch the eraser icon.
Add existing stitches
With Stitch Creator you can also edit and combine stitches that are
already stored in your machine.
There are two ways to call up stitches that you wish to edit in Stitch
Creator:
1. Selection by category. Touch the stitch selection menu icon to open
the stitch selection menu. Only categories with stitches that can be
used in Stitch Creator are available. Choose a category and then the
stitch you wish to use.
From here you can also add stitches that are previously created and
stored in Stitch Creator. Choose ”Stitch Creator sts.” and then the
stitch you wish to add.
Note: The eyelet stitch, no. 59 and the stippling stitch no. 73, can be
used in Stitch Creator but cannot be selected by category since the
buttonhole and the darning and bartack categories are unavailable.
To select stitch no. 59 or 73 use the selection by number method
described below.
2. Selection by number. Press the selection by number button (7).
Enter the number of the stitch you wish to add and touch ”ok”. If
you select a stitch that cannot be used in Stitch Creator a pop-up
message is displayed. Touch the pop-up message to close it and
choose another stitch.
When you call up a stitch an adjustment window opens for the
selected stitch. From here you can alter the settings of the entire
stitch before you add it to Stitch Creator. The functions that can be
used when altering the settings are displayed on the screen. Different
functions are available for each stitch. Select the functions you wish to
use by touching the icons on the screen.
Page 85

5
7:5
Stitch Creator
Touch s+ to add the stitch to Stitch Creator. The stitch appears
individually on the workspace and is automatically selected. Touch
the select stitch point icon to deselect the stitch. You can now edit
every single stitch point of the stitch to make your own version of it or
combine it with other stitches.
Editing a stitch
With Stitch Creator you can select and edit single stitch points of your
stitch. Use the scroll buttons (4) to move the selection point stitch by
stitch through your entire stitch. Press the left scroll button to get from
the first stitch point of your stitch to the last and vice versa.
To select several stitch points touch the select stitch point icon and use
the scroll buttons (4). Long touch the icon if you wish to select all stitch
points. The selected stitches become thicker on the screen. Touch the
icon again to deselect the stitch points.
Moving single stitch points
With your stylus you can move the selected stitch point(s) directly
on the workspace. Simply touch the desired position of the current
selected stitch point to move it. This will also change the stitch width
and stitch length of the selected stitch.
Note: If several stitch points are selected you can only move them
vertically in the workspace.
Another way to move the selected stitch point(s) and for fine
adjustments is to use the stitch point position and stitch length
adjustment icons.
With the stitch point position adjustment icon you can change the
position of a selected stitch point up and down in the workspace.
Touch the icon and make the adjustment by using the function field
buttons (5). If you change the position of a single stitch point up or
down you automatically change the stitch width.
With the stitch length adjustment icon you can change the stitch length
of a selected stitch. Touch the icon and make the adjustment by using
the function field buttons (5). The stitch length can be set from -6 to
6mm. This icon is not active if more than one stitch point is selected.
Mirroring the stitch points
Select one or more stitch points. Touch the end to end or side to side
mirroring icon to mirror the stitch point(s) end to end or side to side.
Changing the whole stitch in the sewing menu
You can also alter the settings of the entire stitch in the sewing menu
before you sew it (see page 3:7). Touch the start sewing icon to open
the stitch in the sewing menu.
Page 86

Saving a stitch
When you have created a new stitch and exit the stitch creator menu
with the main menu button (6) your sewing machine asks you if you
want to save your stitch.
”esc” closes without saving. The main menu opens.
”ok” closes and saves your stitch. The main menu opens.
Note: If you touch the start sewing icon you can sew your stitch
without saving it first.
Sewing a stitch
To open your stitch in the sewing menu touch the start sewing icon. In
this menu you can see a whole sequence of your stitch and sew it. You
can also alter the stitch settings for your entire stitch before you sew it,
see page 3:7.
Touch the main menu button (6) to close the sewing menu and return
to the stitch creator menu for further editing or to save your stitch.
A stitch that has been stored in Stitch Creator can also be selected
directly when you are in the sewing menu by scrolling through all
stitches with the scroll buttons (4). You will find the stitch creator
stitches after the last stitch.
7:6
Page 87

Maintenance
Page 88

8:2
Changing the needle plate
Turn off the on/off switch
Removal
Raise the presser foot. Position the needle plate changer (bulb
remover) as shown and press the needle plate up on the right, then on
the left. It can now be easily removed.
Replacing
Place the needle plate against the rear edge of the cut-out then press
down at the front until you hear it snap in place. Before you start
sewing, check that the needle plate is lying flush with the bed of your
free arm.
Tip: Lower the feed dogs to make removing the needle plate easier.
Cleaning
Turn off the on/off switch
Remove the needle plate and lower the feed dogs. Clean the feed dogs
and hook area with the brush.
Clean the sewing machine after every 10 - 15 hours of operation.
Cleaning the display
Wipe the display with a soft, lint-free dry cloth. DO NOT use
aggressive cleansers or solvents!
Page 89

8:3
Maintenance
Changing the lightbulb
Turn off the on/off switch
Disconnect the lead cord and the foot control plug from the machine.
Remove the accessory tray. The lightbulb is located inside the sewing
machine near the needle threader.
Bulb removal
Push the bulb remover, as shown in the figure, up as far as it will go.
Turn the bulb half a rotation clockwise and remove the bulb.
Insertion of the bulb
Important: Use lightbulb as indicated on the left side of the
machine, 12V max 5W.
Insert the lightbulb in the bulb remover.
Guide the bulb into the diagonal lightbulb holder and turn it until the
pins of the bulb engage.
Push the bulb upward in the holder as far as it will go and turn it half
a rotation in a counter-clockwise direction. Remove the bulb changer
from the bulb.
New lightbulbs can be purchased from your authorized Pfaff dealer.
Page 90

8:4
Sewing problems and their solutions
Problem/Cause Remedy
The machine skips stitches
The needle is not properly inserted. Push needle fully up. Flat side facing the back.
Wrong needle is in use. Use needle system 130/705 H.
Needle is bent or blunt. Insert a new needle.
The machine is not properly threaded. Check how the machine is threaded.
Needle is too small for thread. Use a larger needle.
Needle thread breaks
See reasons above. See above.
Thread tension is too tight. Adjust thread tension.
Thread is poor, has slubs in it or has become dry after
overlong storage.
Only use good quality threads.
Thread is too thick. Use needle with large eye (system 130 N).
Needle breaks off
Needle is not pushed completely in. Insert new needle and push completely in.
Needle is bent. Insert a new needle.
Needle is too thick or too thin. Change the needle.
Needle is bent, and has hit the needle plate because
you are pulling or pushing the fabric.
Only guide the fabric lightly.
The bobbin case is not properly inserted. When you insert the bobbin case, push it fully into the stop. Pull
lightly on the end of the thread to make sure bobbin case is secure.
The seam is sewn unevenly
The tension needs adjusting. Check needle thread tension.
Thread is too thick, stubbed or hard. Only use good quality threads.
The bobbin thread is unevenly wound. Do not wind thread by hand. Make sure thread is pulled solidly into
bobbin tension spring. Check bobbin threading path.
Thread loops at top or underside of fabric
Re-thread machine, making sure the presser foot is raised to its
highest position as you thread. This ensures that the needle thread is
securely in thread tension system.
Page 91
8:5
Maintenance
Problem/Cause Remedy
The machine does not feed or feeds irregulary
Sewing lint has collected between the feed dogs. Remove needle plate, remove lint with brush.
Feed dogs are lowered. Raise feed dogs.
The machine is running with difficulty
There are thread remnants in the hook. Remove the threads.
The machine does not sew the selected stitch
Select the desired stitch again. Switch off the machine, wait
10 seconds and switch on again.
Display incorrect or no display
When static electricity is being discharged some segments of
the display may fail.
Switch off the machine on completion of the sewing
operation and then turn it back on again after approx. 10
seconds. Select the desired stitch again.
The contrast on the display may be disturbed when the
machine is cleaned or is transported (display is illegible or
dark).
Set the contrast using the contrast adjustment.
If problems remain, contact an authorized Pfaff dealer.
Have your sewing machine serviced regularly by your authorized Pfaff dealer.
When leaving the machine, even for only a short time, switch off. This is very important if there are any children
nearby.
Non-original Parts and Accessories
The warranty does not cover any defect or damage caused by use of non-original accessories or parts.
Page 92

8:6
Buttonholes 1:13–1:14, 3:5, 4:7–4:9
Inserting the sensormatic
buttonhole guide 4:7
programming
3:8-3:9
tips 4:9
with gimp cord 4:8
Buttonhole foot 1:10, 4:7–4:9
attaching 4:7
Buttons
sewing on 4:10
Button sewing program
1:14
C
Calibration 3:12
Carrying case 1:17
Changing the lightbulb
8:3
Changing the needle 2:13
Changing the needle plate 8:2
Changing the presser foot 2:3
Cleaning
8:2
Closed overlock stitch
1:13, 4:6
Combined borders 5:2
Combine alphabet and stitch sequences 6:7
Connecting the foot control
2:2
Context menu 3:3,
3:11–3:14
Contrast 3:12
Cross hem stitch 1:12
Cross stitches 1:15, 3:4, 5:3
Cross stitch buttonhole 1:14
D
Darning 1:14, 3:5
automatic
3:8, 4:11
free-motion 4:12
Darning foot 1:10
A
Accessories 1:10
Accessory tray 1:18
Action field 3:7
Arranging the accessories
1:18
Alphabets
3:5, 6:6–6:7
Alphabet sequence 6:7
Alphabet sequence menu 6:6
Antique hand embroidery stitches
1:15, 3:5
Antique quilt stitches 1:15, 3:4, 5:5
Appliqués 5:7
Art stitches 1:16, 3:5
Audio signal
3:11
Automatic darning 4:11
B
Balance 3:7, 3:10, 4:11
Bartack 1:14, 3:5
Basting stitch 1:13, 4:4
Blindhem and overlock foot 1:10
Blindhem stitch
1:12, 4:5
Bobbin 1:11,
2:9
Bobbin case 2:9
Bobbin winding 2:6–2:8
from the second spool pin
2:7
from the spool pin
2:6
through the needle
2:8
Borders 5:2
Bridging stitch
1:12
Bringing up the bobbin thread 2:12
Brush 1:11
Bulb remover/Needle plate changer 1:11
Index
Page 93

8:7
Decorative bartack 1:14
Decorative buttonhole with triangle tack 1:14
Decorative sewing 5:2-5:10
Decorative stitches
1:15-1:16, 3:5
Delete all 3:14
Delete all created stitches 3:14
Delete all parameters 3:14
Delete all stitch sequences
3:14
Denim bartack 1:14
Density 3:7
Disengaging the IDT
2:4
E
Edge guide 1:11
Elastic blindhem stitch 1:13
Elastic overcast stitch
1:12
Elastic stitch 1:12
Electrical connection 2:2
Electronic knee lift 2:15
Engaging the IDT 2:4
Eyelets
1:14, 4:10
buttonhole with gimp cords 4:8-4:9
Eyelet buttonhole with lenthwise bartack 1:14
Eyelet buttonhole with pointed bartack
1:14
F
Fancy stitch foot 1:10
Fancy stitch foot with IDT 1:10
Feed dogs 2:5
Felt pad 1:11
Foundation elastic stitch
1:12
Free arm 1:17
Free-motion darning 4:12
Free-motion guide grip 5:8
Free-motion sewing
3:9, 4:12, 5:9
Free-motion stippling 5:8
Function buttons
3:2–3:3
Function field 3:7
Function field buttons
3:3
Fun stitches 1:16, 3:5
G
Gathering 4:4
H
Heirloom 5:10
Hemstitching 5:10
Hem stitches
1:15, 3:5
Honeycomb stitch 1:12
I
Icon status 3:7
IDT - Integrated Dual Feed 2:4
Info button 3:3
Info system
3:15–3:16
Inserting the bobbin and bobbin case
2:9
Integrated needle threader 2:11
K
Knee lift 2:15
Index
Page 94

8:8
Ornamental stitches 1:16, 3:5
Overlock stitches 1:13, 3:4, 4:6
Overview of your machine 1:9
P
Package contents 8:10
Patchwork program 5:5
Pattern length 3:7
Pattern restart 3:2
Presser feet 1:10
Presser foot lift
2:3
Presser foot raise
3:2, 3:9, 3:12
Problems and solutions
8:4–8:5
Professional eyelet buttonhole 1:14
Programmable darning stitch 1:14
Programmable reinforced darning stitch
1:14
Programmable seam length 3:10
Q
Quilt Appliques 5:7
Quilting 5:5-5:8
stitches
1:15, 3:4, 5:5
R
Raise presser foot 3:2, 3:9, 3:12
Reinforced overlock stitch 1:13
Reverse sewing
3:3
Revert to original settings
3:14
Rolled hem 4:5
Rolled hem foot with IDT 1:10, 4:5
Rounded buttonhole with crosswise tack 1:14
Rounded buttonhole with lengthwise tack
1:14
L
Language 3:11
Leaves and flowers 1:15, 3:5
Lid
1:17
Light-knit fabric patching stitch 1:13
Lightning stretch stitch 1:13
Lightbulb
8:3
Linen buttonhole 1:13
Lowering the feed dogs 2:5
M
Machine test 3:14
Maintenance 8:1–8:5
Main menu 3:4
Main menu button
3:3
Mirroring 3:7, 6:5, 7:5
More options menu
3:9–3:10
More options button 3:3
N
Needle box 1:11
Needle plate, changing 8:2
Needle position 3:7
Needle up/down 3:2
Nostalgia 5:10
O
On/off switch 2:2
Open overlock stitch 1:13
Options for messages 3:11
Page 95

8:9
Stitch length 3:7
Stitch parameters 3:13
Stitch point 7:2
mirroring 7:5
moving 7:5
placing 7:4
Stitch sequences
3:5, 6:2–6:8
Add a stitch to a sequence 3:7
Adding sewing functions 6
:4
Altering the settings 6
:4
Creating a new sequence 6
:3
Editing 6
:4
Mirroring 6
:5
Saving 6
:5
Select stitches 6
:3
Stitch sequence menu 6:2
Stitch settings 3:7–3:8
Stitch width 3:7
Straight stitch 1:12, 4:3
Straight stitch reverse 1:12
Straight stitch safety 3:10
Stretch blindhem stitch 4:5
Stretch buttonhole
1:13
Stretch knit overlock stitch
1:13, 4:6
Stretch triple straight stitch 1:12
Stretch triple zigzag stitch 1:12
Stylus 1:11
T
Tapering 3:10, 5:4
Technical data
8:10
Threading the twin needle 2:13
Threading your machine 2:10–2:12
Thread cutter
2:12
Thread tension
2:14
Three-step zigzag stitch 1:12, 4:3
Rounded buttonhole with pointed bartack 1:14
Round ends buttonhole
1:14
S
Satin stitches 1:15, 3:5
Scallop edges 1:15, 3:5
Scroll buttons 3:3
Seam ripper 1:11
Second spool holder 1:11
Selecting a stitch
3:6
Selection by number button 3:3
Selection menus
3:4–3:5
Sensormatic buttonhole guide 1:11
Inserting 4:7
Sewing menu
3:7
Sew slow 3:2
Single stitch
3:9
Spool cap 1:11,
2:10
Standard buttonhole
1:13
Standard overlock stitch 1:13
Standard presser feet and accessories 1:10-1:11
Standard presser foot with IDT 1:10
Status bar 3:7
Stippling stitch
1:14
Stitch balance
3:7, 3:10, 4:11
Stitch chart
1:12
Stitch Creator 3:5, 7:2-7:6
Add stitches 7:4-7:5
Alter the settings 7:4-7:5
Creating a new stitch 7:4
Editing 7:5
Saving 7:6
Sewing 7:6
Workspace 7:2
Stitch creator menu 7:2-7:3
Stitch-in-the-Ditch 5:6
Index
Page 96

8:10
Tie-off 3:9
Top stitching 4:4
Touch screen
3:2
Cleaning
8:2
Calibration
3:12
Contrast
3:12
Triple stretch stitch 1:12
Twin needle safety 3:10
Twin needle sewing 5:3
Tying the Quilt 5:6
U
Utility sewing 4:2-4:12
Utility stitches 1:12–1:13, 3:4, 4:3–4:5
V
Version 3:14
Voltage switch 2:2
W
Welcome screen 3:12
Wing Needle 5:10
Z
Z-Zigzag stitch 1:12
Zigzag stitch
1:12
Zigzag stitch, right or left needle position 1:13
Zippers 4:3
Zipper foot with IDT 1:10
Page 97
Please note that on disposal, this product must be
safely recycled in accordance with relevant National
legislation relating to electrical/electronic products.
If in doubt please contact your retailer for guidance
Technical data
Dimensions (w x h x d) 408 x 290 x 187mm
Weight 8.3 kg
Nominal voltage (reversible) 220-240V/120V
Power consumption 85 W
Sewing lamp 12 V/5 W
Sewing speed max. 950 stitches/min
min. 80 stitches/min
Stitching width 0 ... 9mm
Stitching length 0 ... 6mm
Presser foot lift 8mm
Max. presser foot height 10.5mm
Needle system 130/705 H
Package contents
Sewing machine
Carrying case
Foot control
Lead cord
Accessories
Instruction manual
Intellectual property
PFAFF, PERFORMANCE and IDT (image) are registered
trademarks or trademarks of VSM Group AB.
We reserve the right to change the machine equipment and
the assortment of accessories without prior notice, or make
modifications to the performance or design.
Such modifications, however, will always be to the benefit of
the user and the product.
Page 98

• 413 11 66 - 26D • Inhouse production • © 2007 VSM Group AB • All statements valid at time of printing • Printed in Sweden on environmental friendly paper •
VSM Group AB • SE-561 84 Huskvarna • SWEDEN
www.pfaff.com
The real passion
for sewing!
 Loading...