

Page 1

Owner’s Manual
Page 2

Table of Contents
Placing your machine on the carriage ...........................................................3
Remove the packing attached to your machine ...........................................3
Light Fixture ....................................................................................................4
Your Thread Stand ..........................................................................................5
Belt guard .........................................................................................................6
Attaching your handle bars with controllers .................................................7
Connecting your Mega Quilter 18x8 to your carriage assembly (deck) and
Controls on the handles ..................................................................................8
What is the Tension Release Lever?...............................................................9
How Do I Adjust the Height of the Hopping Foot? ......................................9
Routine Cleaning and Oiling.........................................................................11
Bobbin Winder and Bobbins ........................................................................12
Machine Part Names ......................................................................................15
The Control Unit ............................................................................................16
Threading Overview .....................................................................................17
How Do I Thread the Machine? ...................................................................17
How Do I Change the Needle? ......................................................................20
How Do I Make Adjustments to Make the Perfect Stitch? ........................21
Tension, Tension, Tension..............................................................................22
Trouble Shooting Checklist
Check spring replacement / Tension Knob .................................................24
Timing of your Machine ................................................................................26
2
Page 3
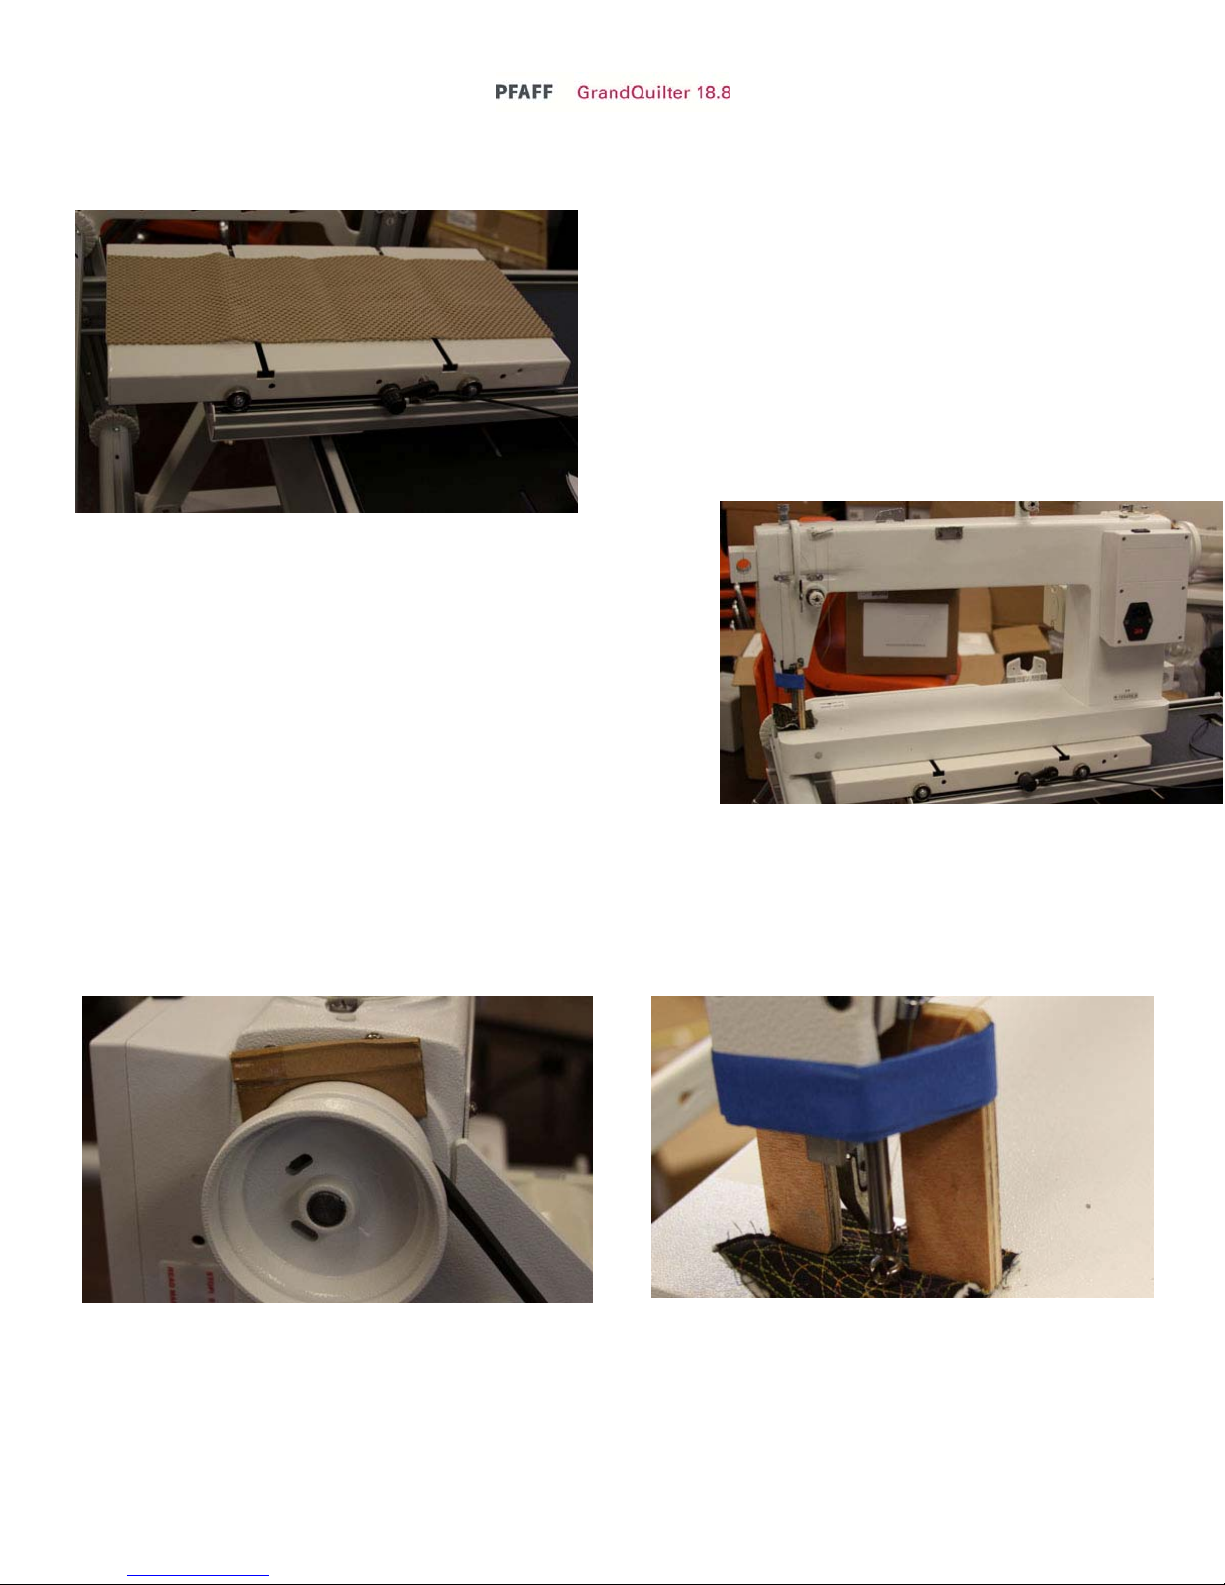
Placing your machine on the carriage.
Prior to placing the machine on the carriage ensure that
you have the encoders attached to the carriage.
You will find a rubber mat shipped with your machine to
help keep the machine from slipping on the metal
surface.
Place the mat on the carriage before placing your
machine on the carriage.
When you place the machine on the carriage you want to ensure
that you center the machine on the carriage.
Carefully place the machine on the carriage. Be ready for it to
roll one way or another as the frame may not be level when you
place the machine on there and you want to control the roll to
prevent the machine from rolling to fast and falling off the
frame.
Remove the packing attached to your machine.
Remove the cardboard between the hand wheel and the machine and the piece of wood next to the needle and
save these pieces along with the box in case you should ever need to ship this machine.
3
Page 4
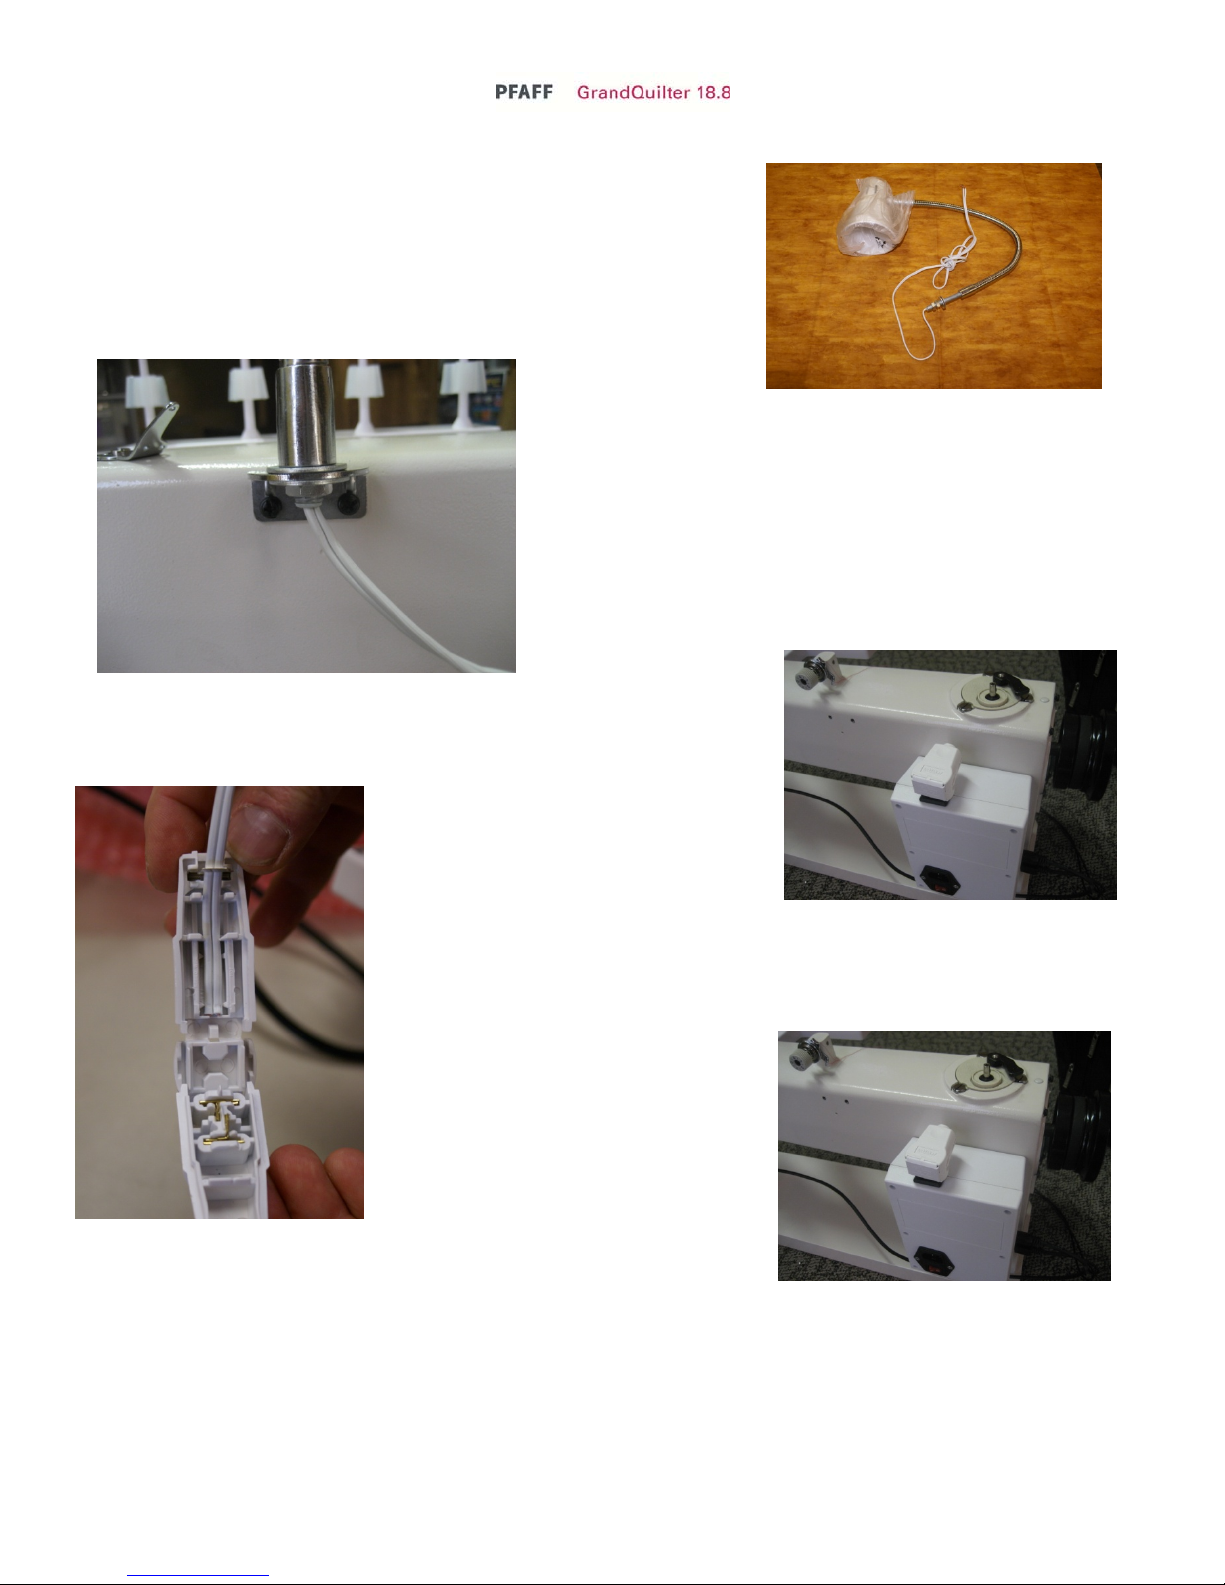
Light Fixture
To add your light fixture to your machine,
Step 1. Loosen the nuts so that you can slide the lamp fixture into the
space provided on the machine in the lamp support bracket.
Step 2. Tighten the nuts on the base of the lamp to secure the
lamp to the lamp support bracket on the side of your machine.
Step 3. Measure the cord so that you have enough to reach the
outlet on top of the power box on your machine.
Step 4. Trim the cord flush. You don’t need to strip the ends
with the plug we provide.
Step 5. Find the plug which is shipped with your accessories.
Step 6. Open your plug by pulling on
the silver tab and open the plug. Trim
the wires flush with enough to reach the outlet on the top of the power box.
Lay the wires in the space provided in the plug and close the plug. Caution
before you close, make sure that you do not have any wires crossed as this will
create a short.
With the cord in place, plug in your lamp.
4
Page 5
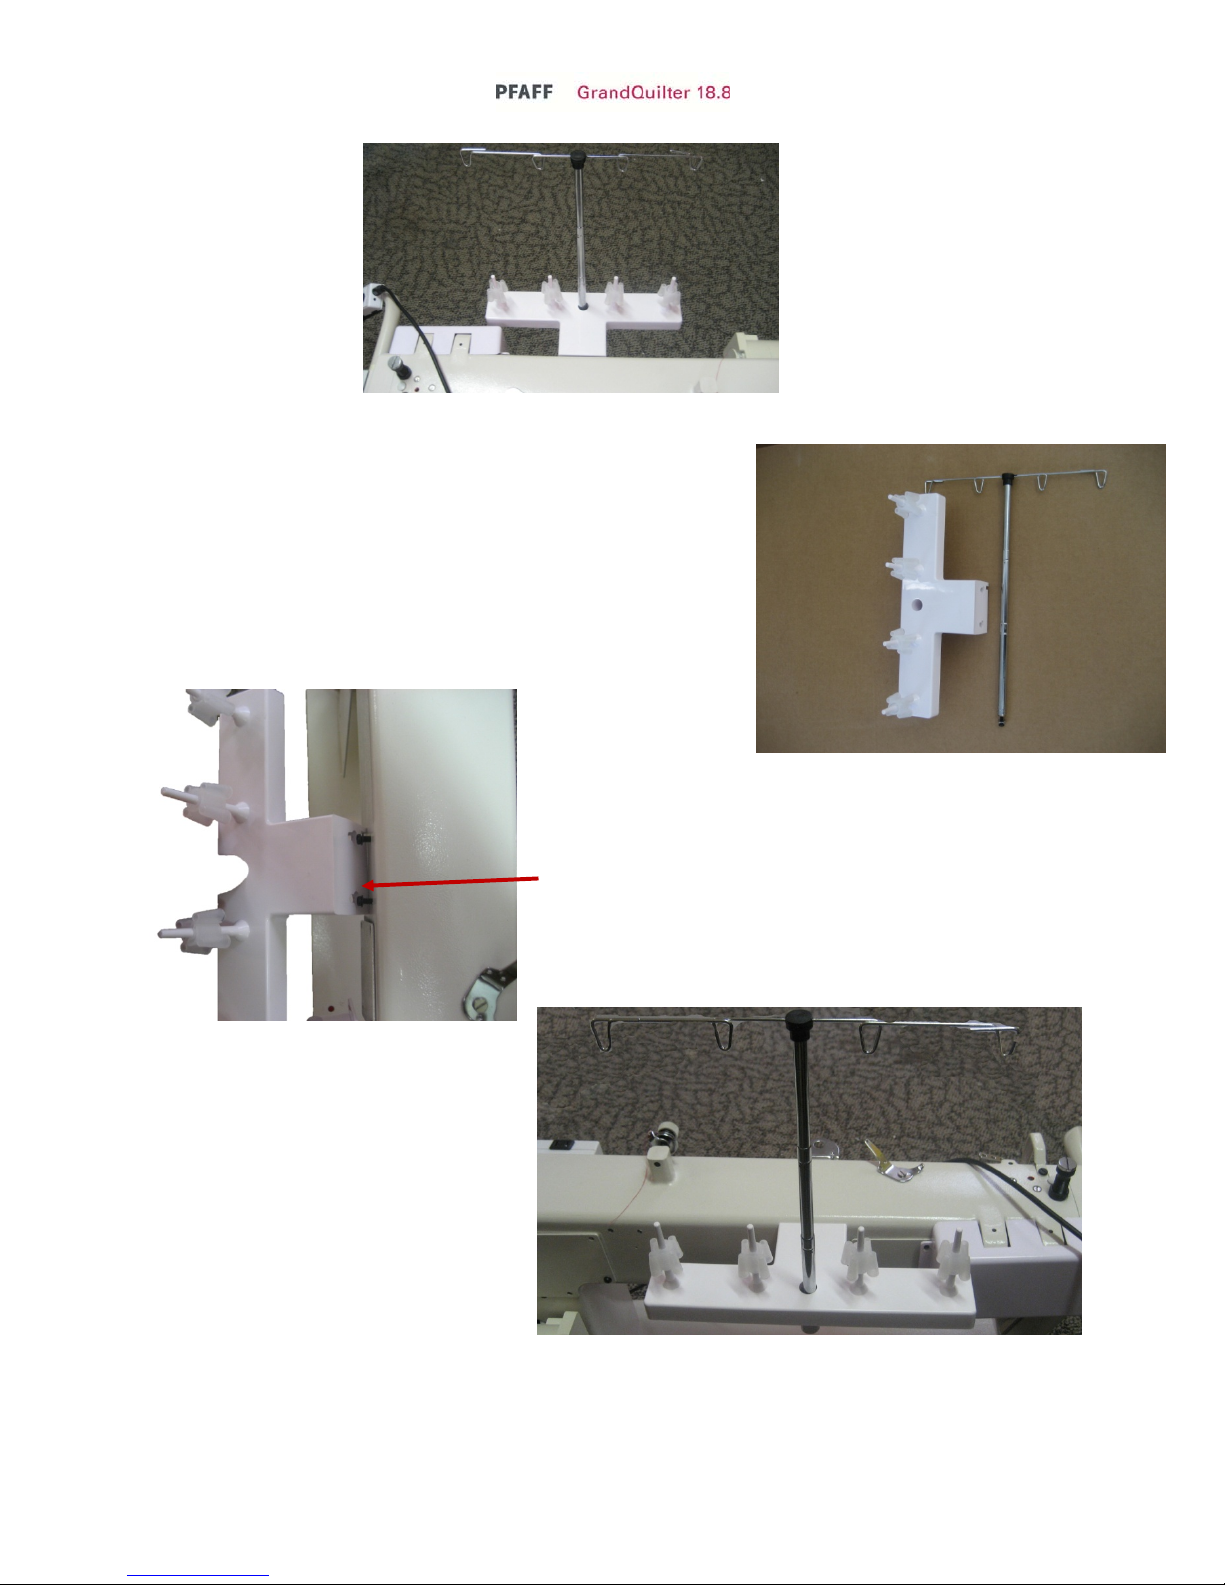
Your Thread Stand
Your Grand Quilter 18.8 comes with a four spool thread stand.
Some assembly required.
You will need to attach your thread stand to the side of your
machine with the two screws provided.
On the side of the machine you will see two screws where you
will place the base of the thread stand.
On the side of the thread stand you will see where to connect.
Now you can insert the thread tree into the
holder on the thread stand.
5
Page 6
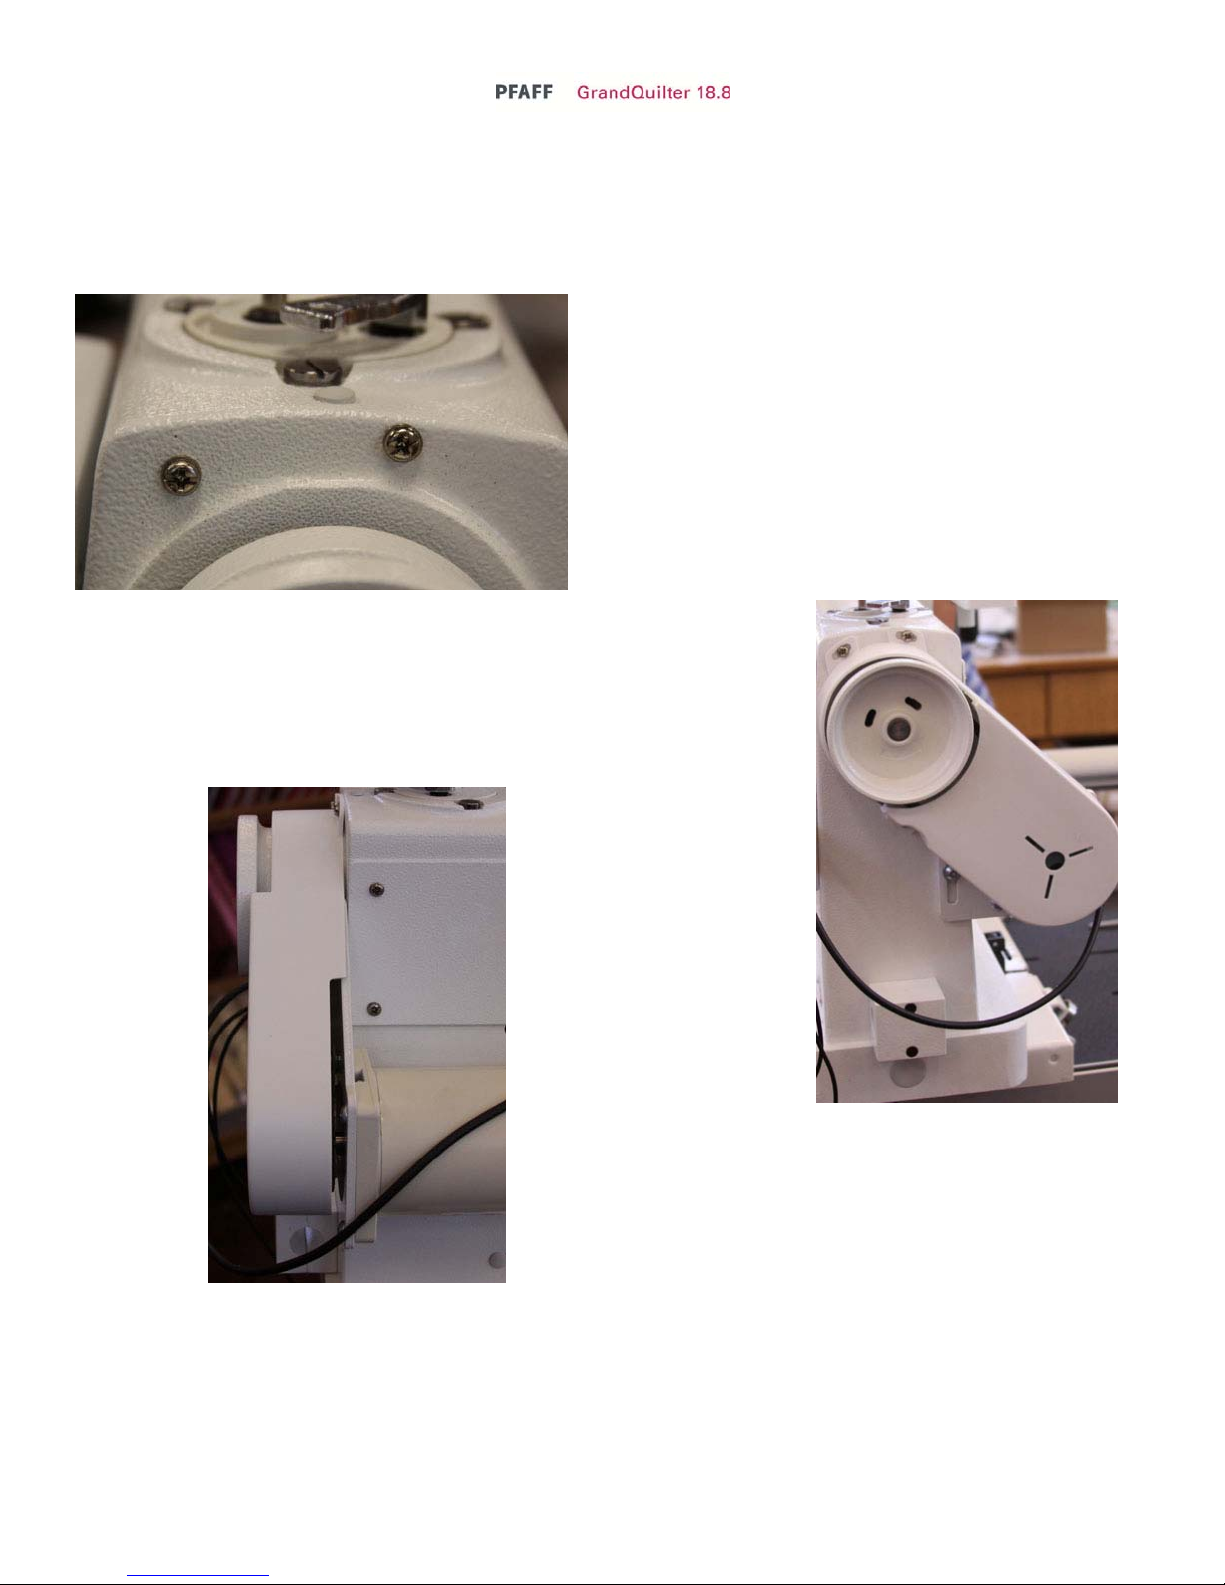
Belt guard
Your machine comes with a belt guard to prevent damage to your motor sensor and protect you from getting
caught in the belt. In the box you will find the plastic cover and attached to the machine are the screws used to
hold the belt guard in place.
Step 1. Locate the screws on the machine there are two
above the hand wheel and one can be found below the
hand wheel.
Step 2. Remove the three screws.
Step 3. Locate the belt guard and position over the hand
wheel and the motor.
Step 4. Replace the three screws so that they hold the belt guard in place.
This photo shows the belt guard in place and how it
protects the motor sensor and the belt.
6
Page 7
Attaching your handle bars with controllers
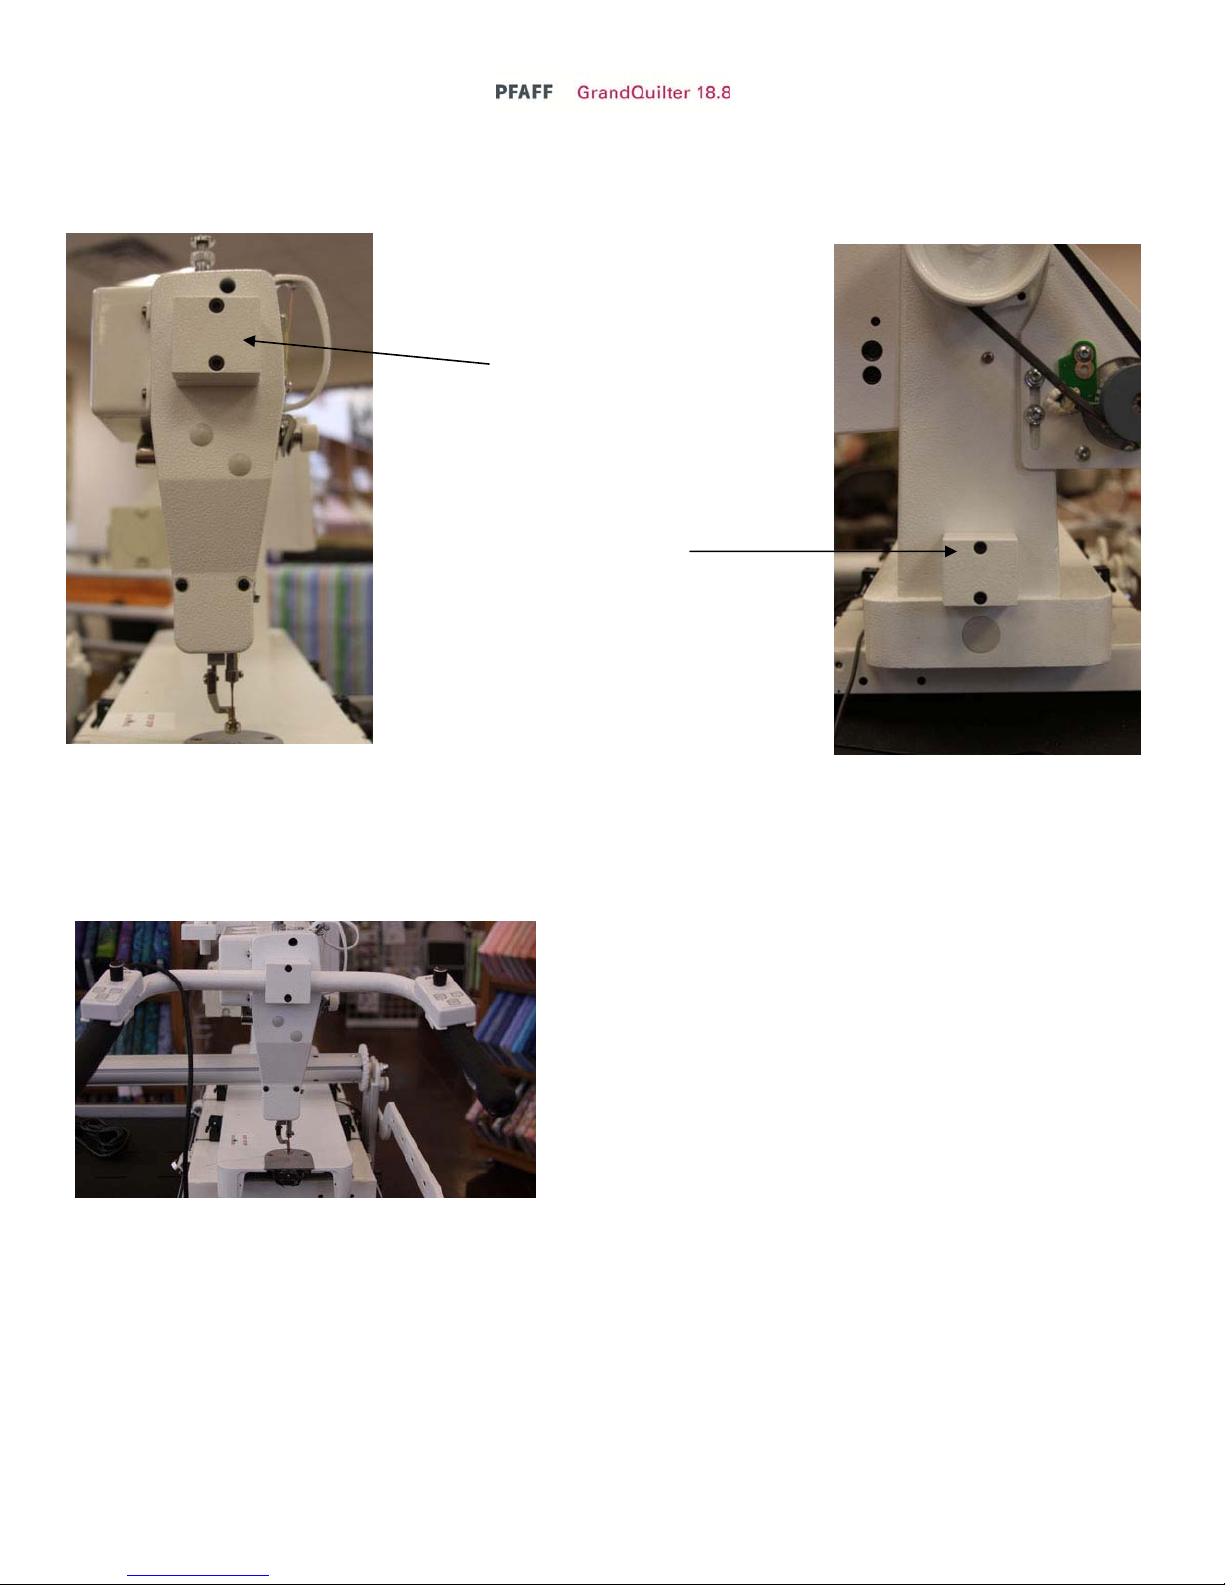
There are two locations where you can connect your handle bars with controllers to your Mega Quilter 18x8.
These photos show the block that will hold
the handle bars in place on your Mega
Quilter 18x8.
This block is on the front of
the machine or the needle side of the
machine and is used for free motion
quilting.
This block is on the back of the
Machine or the motor side of the machine
and is used when following a pantograph
with the laser light.
Step 1. Remove the two hex screws from the block using the allen wrench provided in your accessory bag.
As you remove the screws the front of the block will come off.
Step 2. Locate your handles which have the controllers attached and also have a 9 pin cable attached to the left
controller.
Step 3. Center the handles on the block and place the front
part of the block back in place and put the screws in. As you
get to the point of the screws being tight ensure that they are
angled good for you.
If you need to adjust the angle of the handles you can loosen
the screws and move the handles up and down to help with
your comfort.
7
Page 8
Connecting your Grand Quilter 18.8 to your Carriage Assembly (Deck) and
Controls on the Handles
For one year after the purchase of the Pfaff GrandQuilter 18.8 longarm sewing machine, we will
repair or replace (at our option), without any cost to you for either parts or labor, any machine
or part that proves to be defective in materials or workmanship.
Any cables that the Purchaser needs to connect must be connected with care. Careless
connection or disconnection may result in damage to the cables and/or components that the
cables are connected to. Such damage is not covered under warranty.
Your Carriage Assembly (Deck) comes without the encoders and cables connected. You will have a sheet with
your machine to show how to attach these encoders so that the stitch regulations will work. This cable is routed
to the power box of your machine and plugged into the receptacle on the back of the power box.
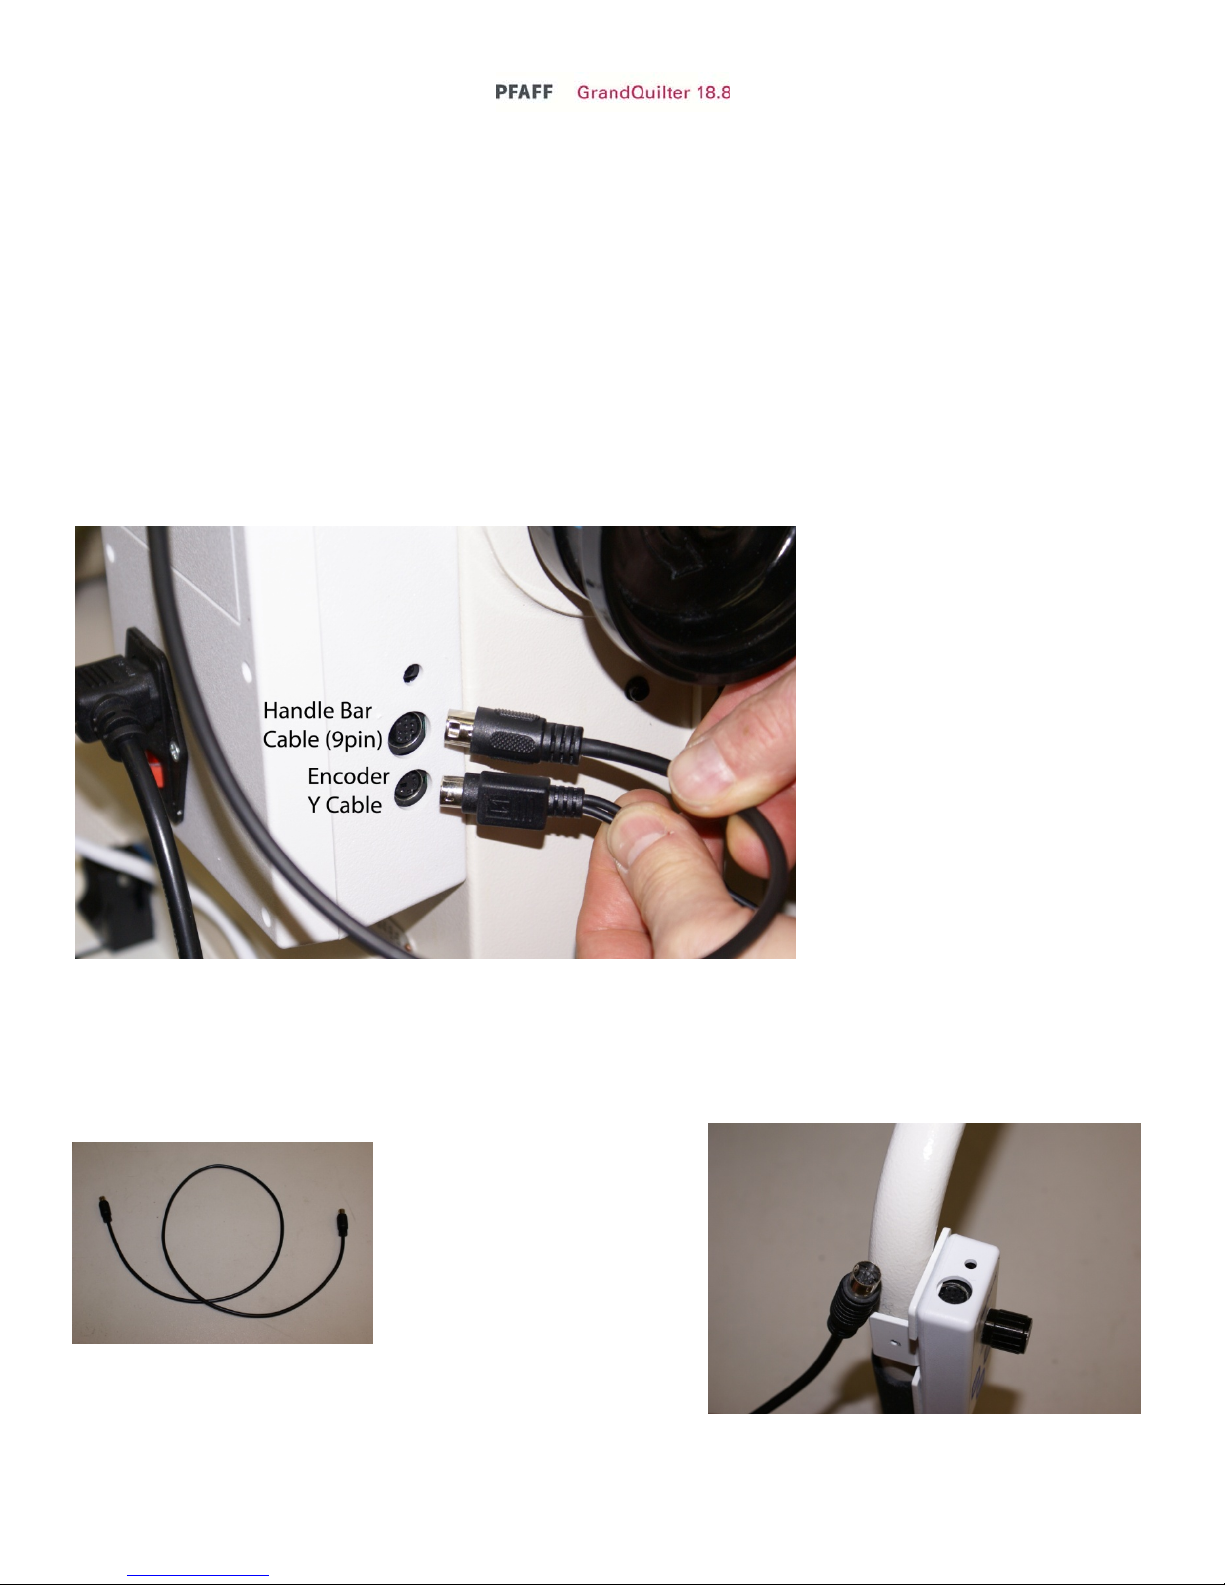
This is looking at the back of your
machine. You can see the three
connecting receptacles in the back
of the machine. The bottom one is
for your Carriage Assembly
(deck). The next one up is for
your controls from the handle bars.
The top one is not used at this
time.
Your left and right controls on your handle bar have a cable that runs through the handle bar to connect the two
controllers. You will need to use the supplied Handle Bar Cable (9 pin) to connect your left handle controller to
connector on the back of the power box.
The Handle Bar Cable (9 pin)
Your Handle Bar Cable (9
pin) Cable connects to the
Controller on the Left handle.
Note this Handle Bar (9 pin) only connects to this left
controller.
8
Page 9

What is the Tension Release Lever?
The tension release lever raises the hopping foot and releases the
tension on the thread.
You can watch the tension disc plates open as you lift the lever.
NEVER start sewing with the lever up.
Because there is no tension on the thread the bottom stitches will
be huge loops.
How Do I Adjust the Height of the Hopping Foot for Thicker or Thinner
Batting
This is where you adjust the hopping foot for thicker or thinner batting.
Simply loosen the screw and adjust the foot to the level that clears the
fabric when moving the machine around. You need to have about 1
thin dimes worth of space between the bottom of the foot and the fabric
or base of the machine.
You also have the ability to adjust the walking of the machine. The walking of the machine is how much
movement is in the foot.
?
First remove this cover from the side of your machine.
9
Page 10
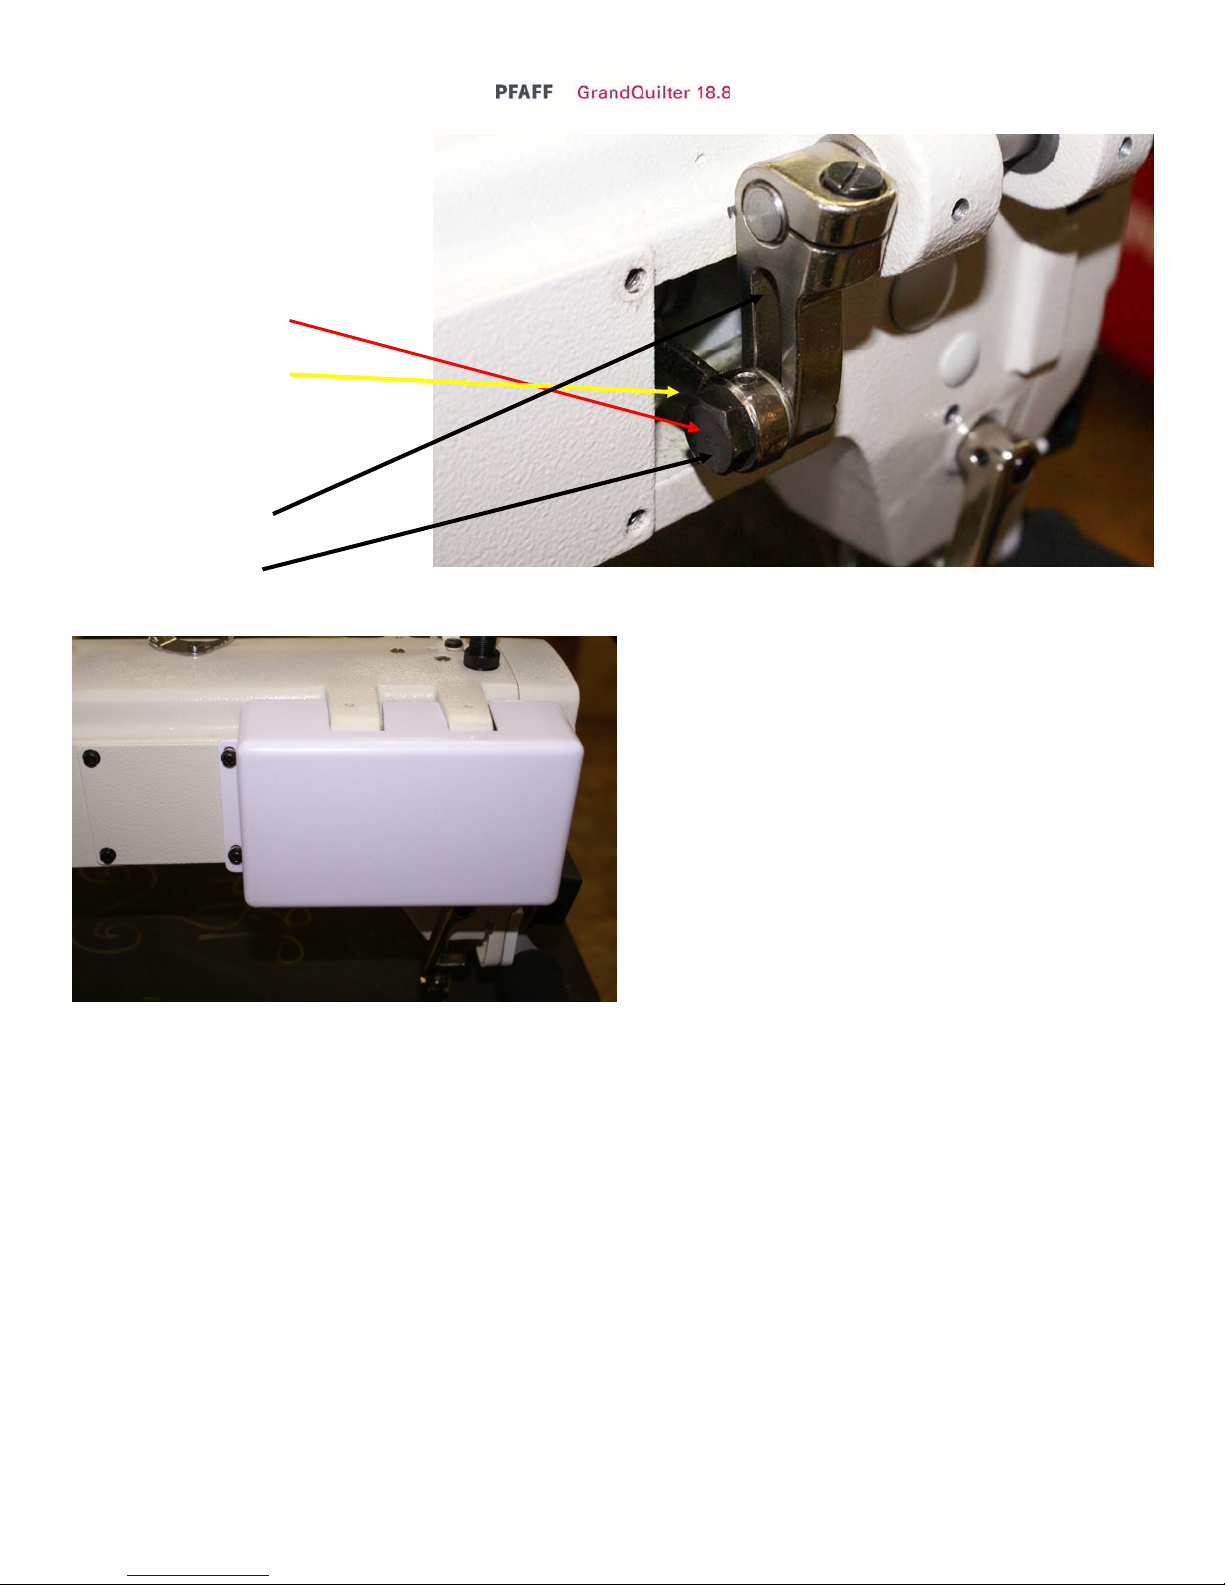
Next you will adjust the walk by
loosing this bolt so that you can
move this part up and down.
Loosen this bolt here
To move this arm up.
Note: (Machine is shipped with
this in the lowest position.)
More Walk (higher)
Less Walk (lower)
Replace the side cover after you tighten the bolt.
10
Page 11
Routine Cleaning and Oiling
Routine cleaning and oiling is very important to the longevity of your quilting machine. Brush out the fuzz
from around the hook and foot. Change your needle regularly to avoid thread breakage, tension problems and
needle breakage. A worn needle can mean skipped stitches, shredded thread and a weakening of the needle
itself. These things can lead to stitch quality issues.
Lint has a tendency to build up in the bobbin case. A tiny amount of lint can cause poor stitches. Check the
bobbin case each time you change the bobbin to keep it clean. We suggest using a soft bristle brush to wipe out
the bobbin case and the bobbin area. Canned air only blows the lint around. By using a soft bristle brush you
collect the dust on the brush. Occasionally, place a drop of machine oil on a cotton swab to wipe out the bobbin
case.
Keep your table clean of dust and oil. Clean the bars and carriage deck regularly for smooth movement.
Oiling is extremely important to the longevity of your quilting machine. Failure to oil your machine regularly
can void your warranty.
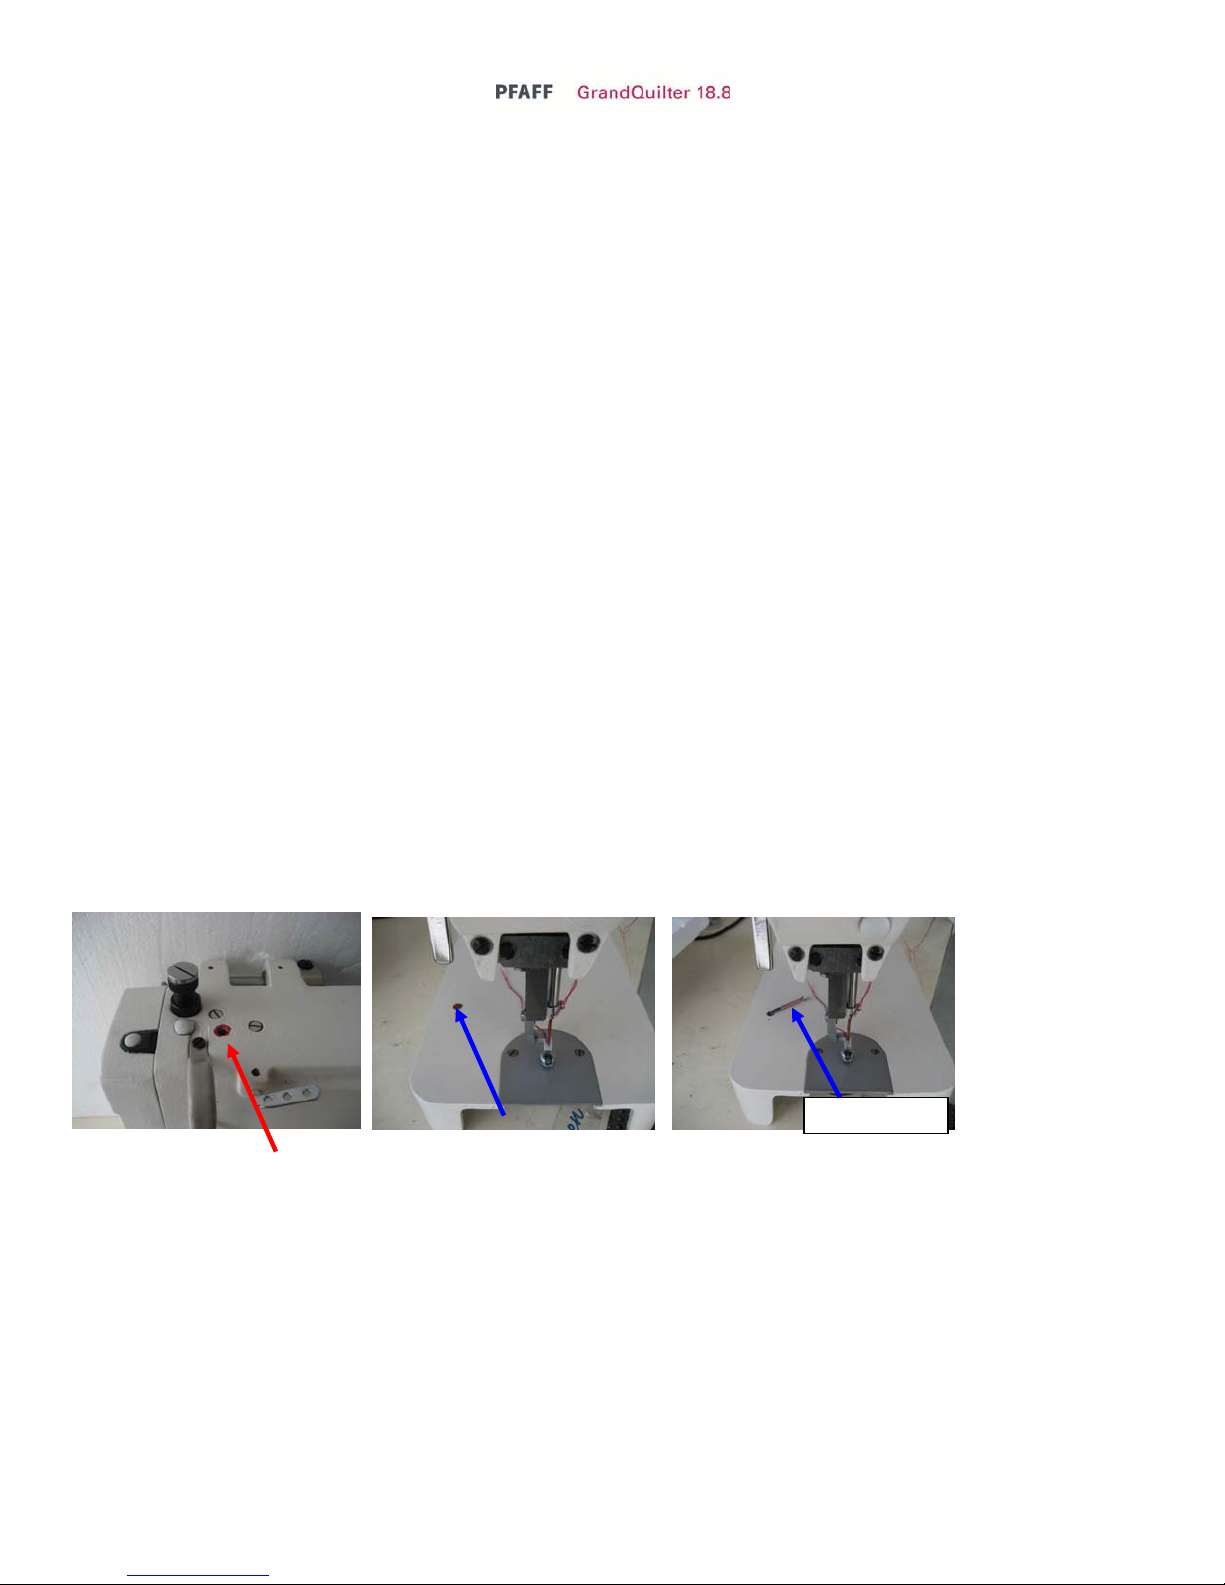
The one oiling spot marked with red arrow is marked with red paint on your machine. An oil bottle is included
with your machine. The one oiling spot marked with a blue arrow contains a dip stick. Remove the dip stick by
lifting it up with a finger nail or screw driver. Place drops of oil in this hole.
Recommended oiling: After every finished quilt place 3 to 4 drops of oil in the indicated spot. At this
time make sure oil is present on dip stick. If not add 3-4 more drops of oil. Run machine to lubricate. For
correct oil, when you are out of oil please purchase from Grand Quilter 18.8. (Note: the machine pictured here
is before complete assembly from factory; your machine has more components attached.)
Oil Dip Stick
Oil point top of machine Oil Reservoir with dip stick Oil Reservoir with dip stick removed
11
Page 12
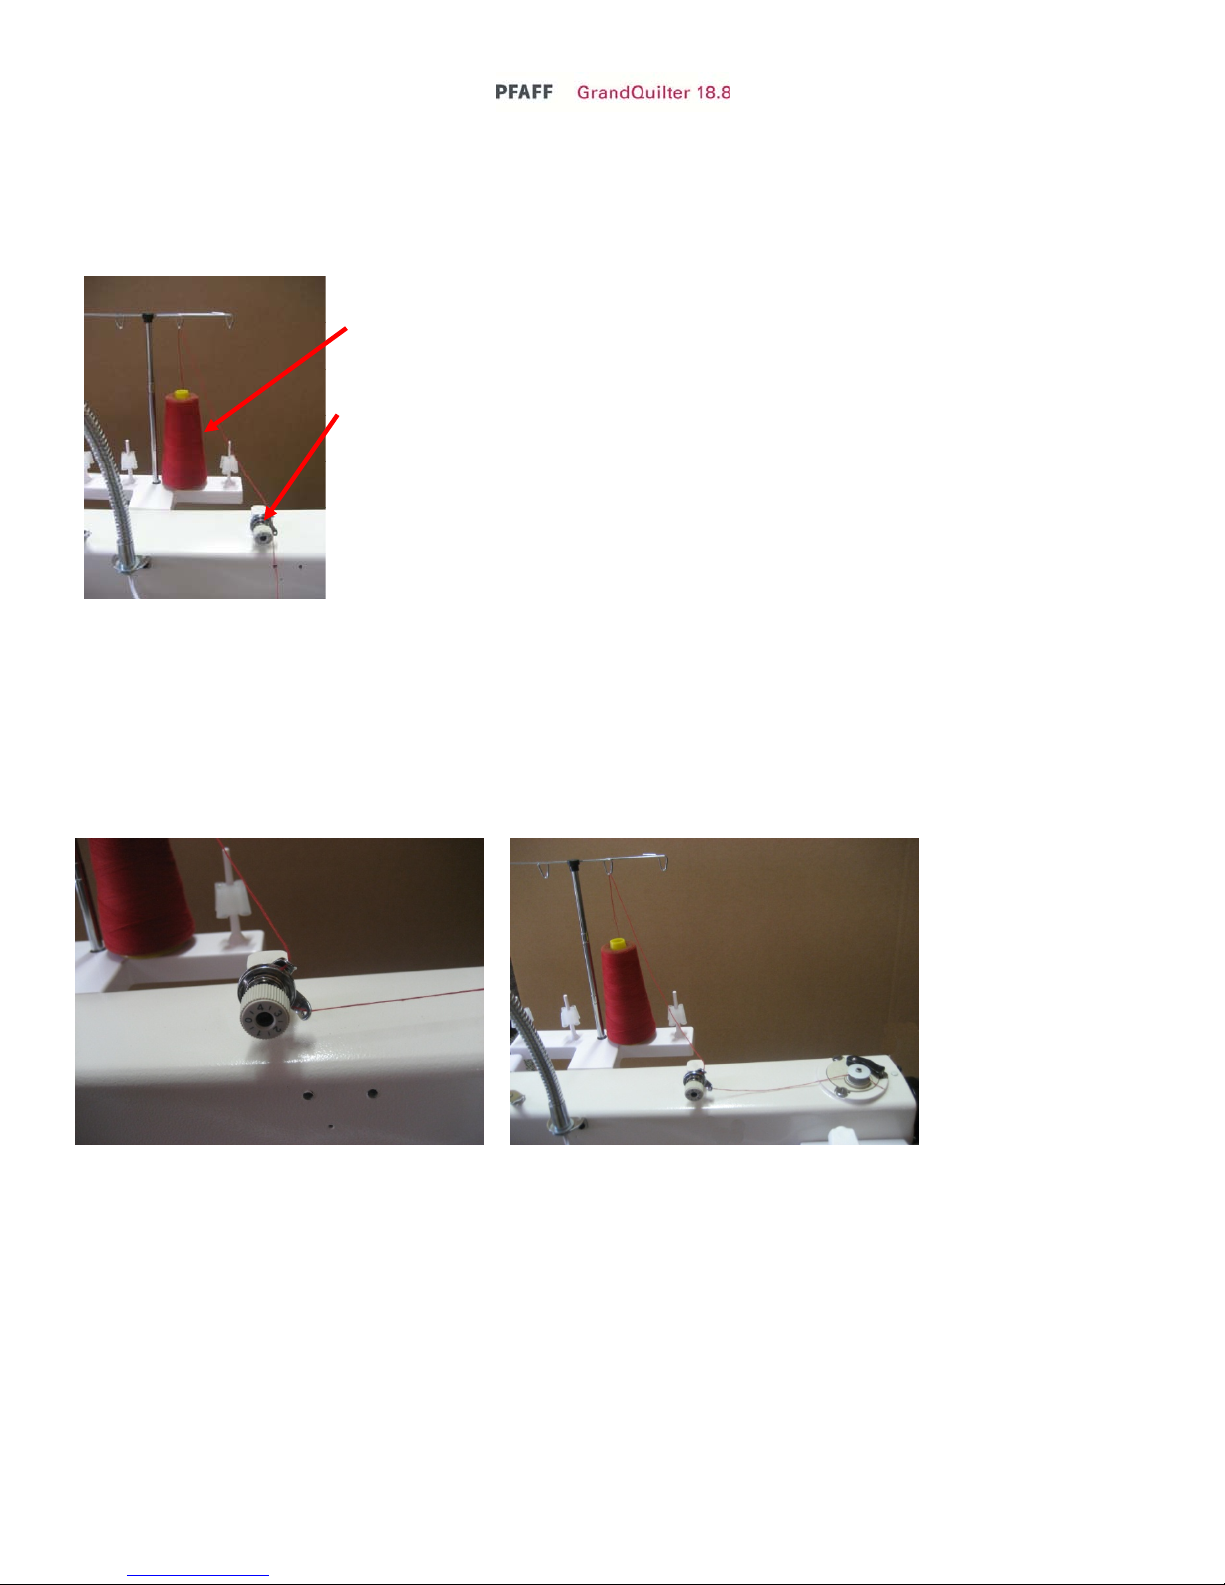
Bobbin Winder and Bobbins
A bobbin winder is included with your machine. The thread on a properly wound bobbin should be snug and
have even layers of thread. A sloppy or mushy wound bobbin will result in poor stitch quality.
Bobbin Thread
Bobbin Thread Guide
How do I wind a Bobbin?
1. Insert an empty bobbin on the bobbin winder spindle.
2. Place a cone of thread on the holder.
3. Bring the thread up through the guide over the cone of thread.
4. Insert the thread through the top guide hole then around the tension disk and through the bottom thread
guide.
12
Page 13
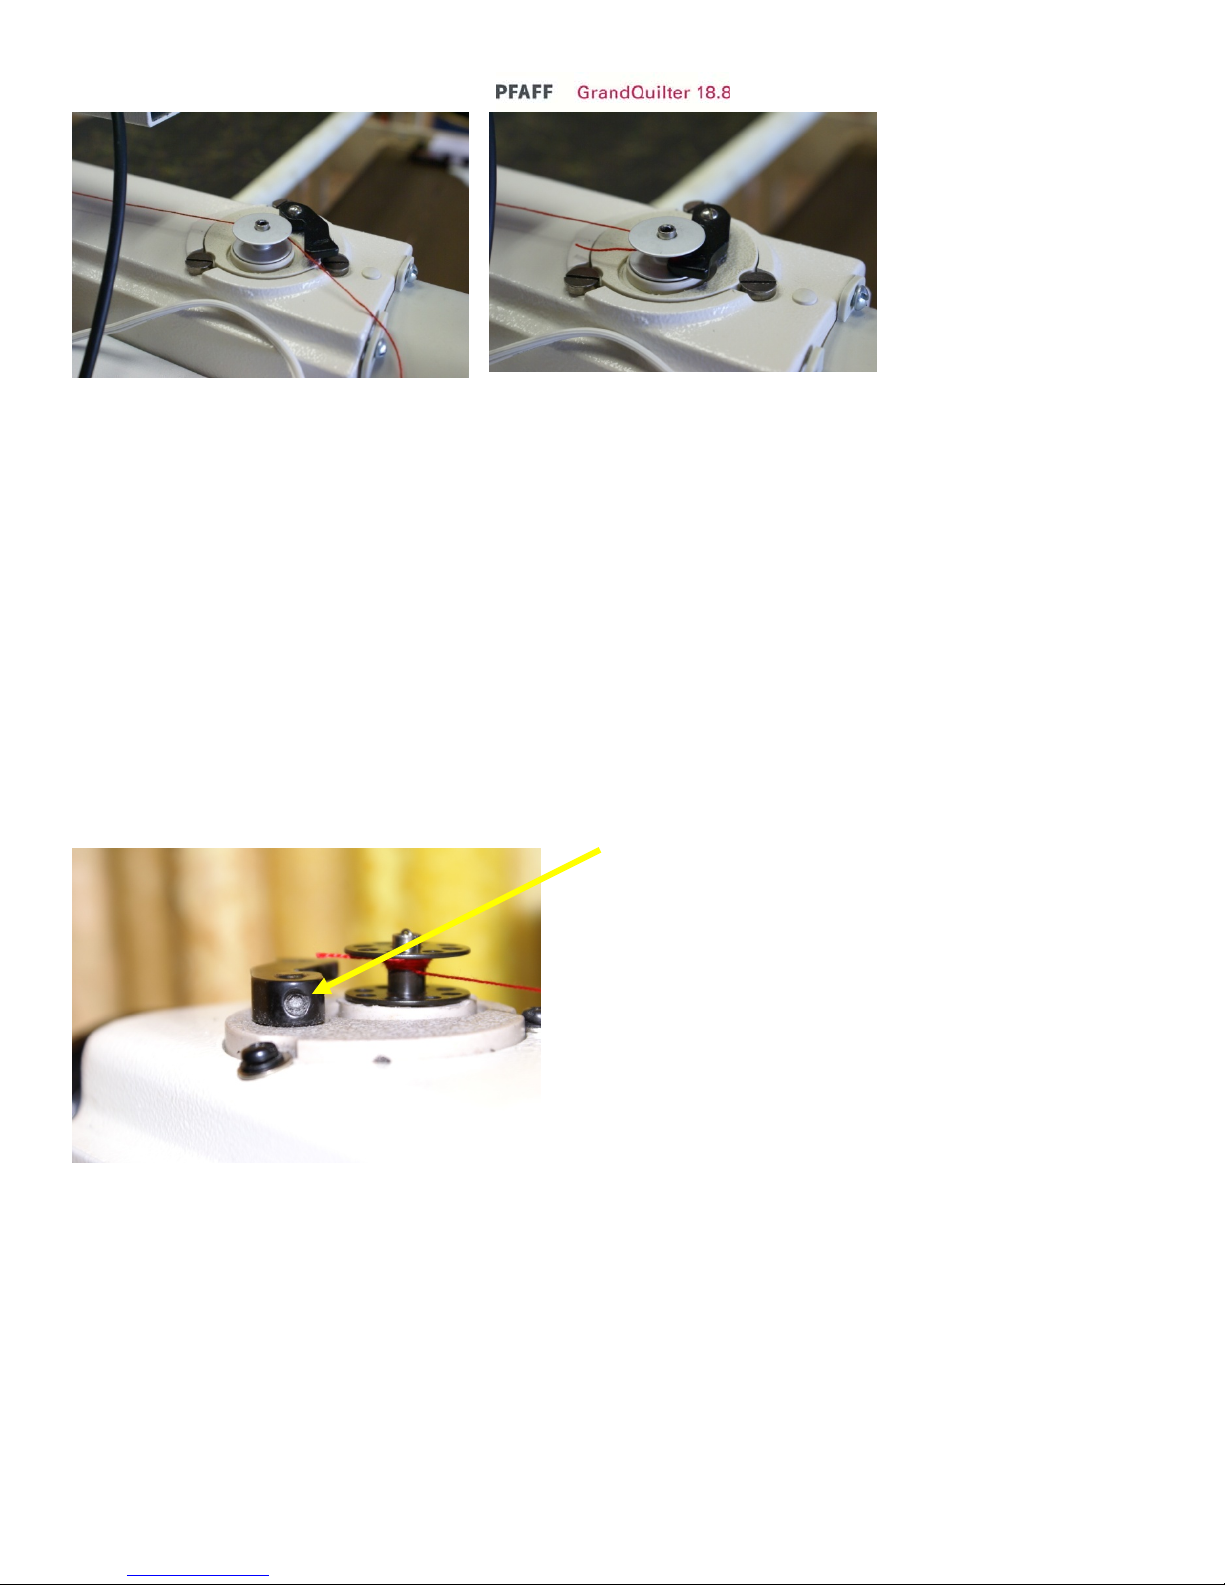
5. Wrap the thread around the bobbin clockwise three or four times
6. Push trip mechanism forward until it snaps into position
7. Bobbin winder will start winding the bobbin once you press the start/stop key. You can quilt while your
bobbin is winding. Once it is full it will stop.
8. If you wind your bobbin only (When not quilting) ensure that you do not have thread in the needle to
prevent jams. Also remove the bobbin and bobbin case to prevent damage.
The bobbin will fill until the trip mechanism is pushed out by the thread. It will then disengage the wheel. The
bobbin should fill to just below the rim. Having the bobbin too full will cause tension problems.
Bobbing Fill Mechanism
This picture is provided for your reference should you need to make an adjustment to your bobbin fill
mechanism. Never adjust unless you are told to do so by our technicians.
13
Page 14
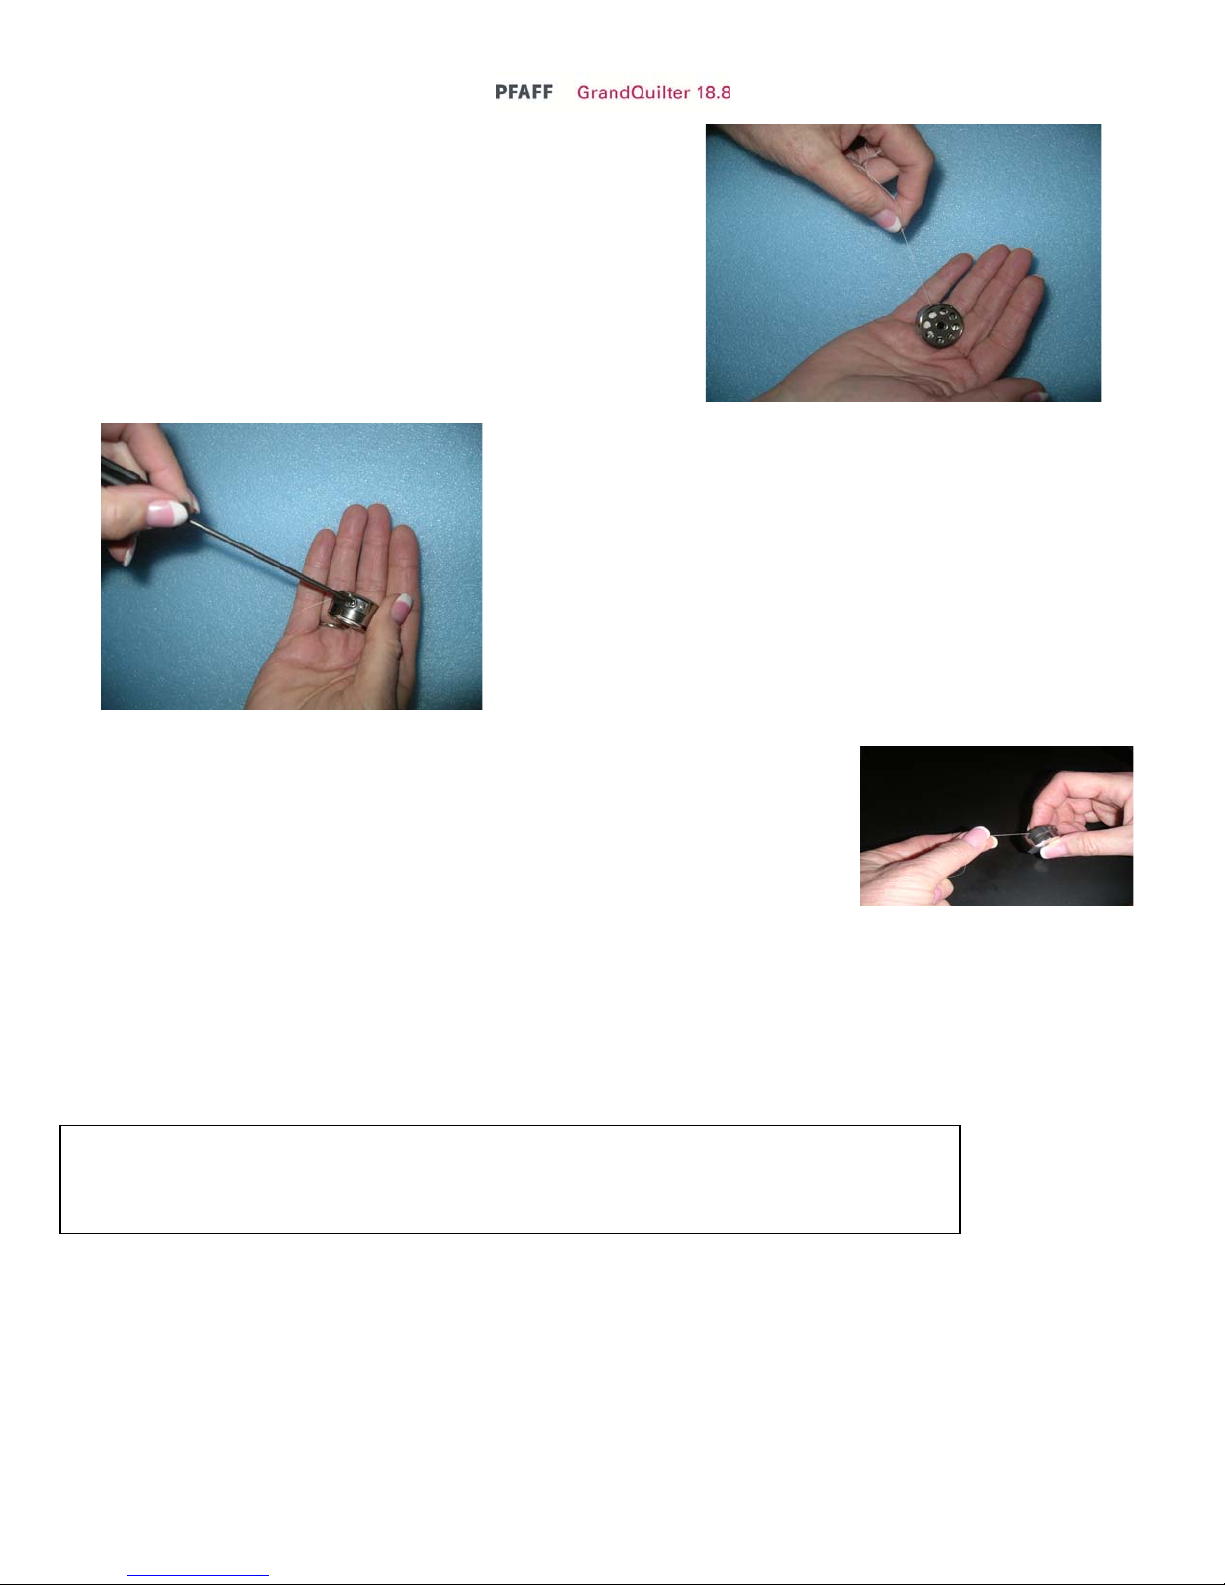
Check the tension of the bobbin by holding the loaded bobbin
case in one hand. With one hand under the bobbin case, hold
the tail of thread and watch as the thread flows out of the
bobbin case. A slight bounce should cause the bobbin case to
slide down the thread. If the thread slides out of the case as
you pick it up, it needs more tension. If it barely moves
down the thread or doesn’t move at all, it needs less tension.
Use a small screwdriver to turn the largest set screw on the
bobbin case to adjust tension. Make very, very small adjustments.
Be very careful not to remove the screw as it is very small and
difficult to find if lost. Remember, righty (clockwise) tighty, lefty
(counter clockwise) loosey.
To place the bobbin into the machine:
1. Insert the bobbin into the bobbin case.
2. Holding the bobbin case pull the thread through the slot.
3. Draw the thread down and under the spring, making sure the thread is
in the highest position of the bobbin case.
4. Place the bobbin case in the machine. Always listen for the pop as it
engages in the machine.
We suggest using a soft bristle brush to wipe out the bobbin case and the bobbin area. Canned air only blows
the lint around. By using the soft bristle brush you collect the dust on the brush.
Each day before you start quilting, unthread your machine past the take up lever and remove the bobbin case,
place a small drop of oil in the bobbin hook area before you begin quilting. This will clean out the fuzz and lint.
Place a drop of oil in the bobbin hook area. Turn your machine on to run at the slowest setting.
TIP: Lint has a tendency to build up in the bobbin case especially with cotton threads. A
tiny amount of lint can cause a huge headache! Check the bobbin each time you change it
to keep it clean.
14
Page 15
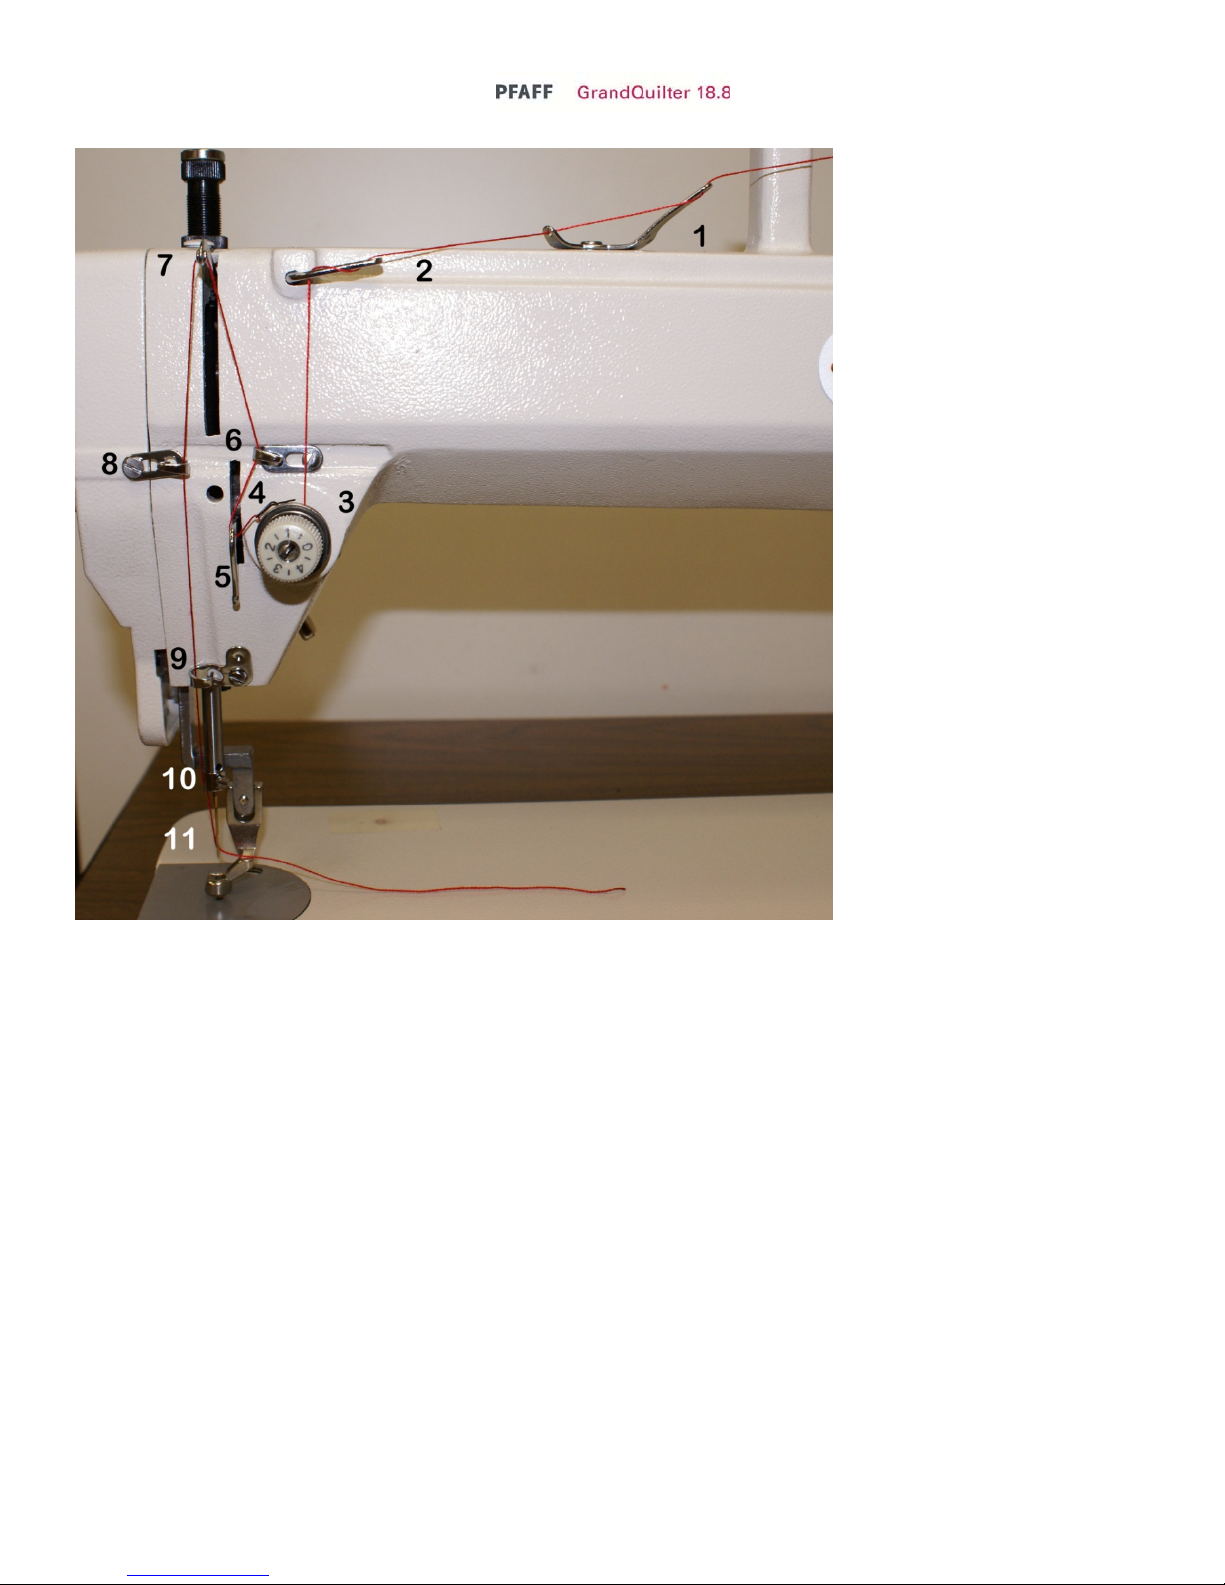
Machine Part Names
( Please note: the takeup lever guard has been removed for a clear view for pictures only. Never run the machine without the guard in place, extreme
head injury may occur. This guard is not a handle. Do not place your hand in this area, your fingers will get pinched)
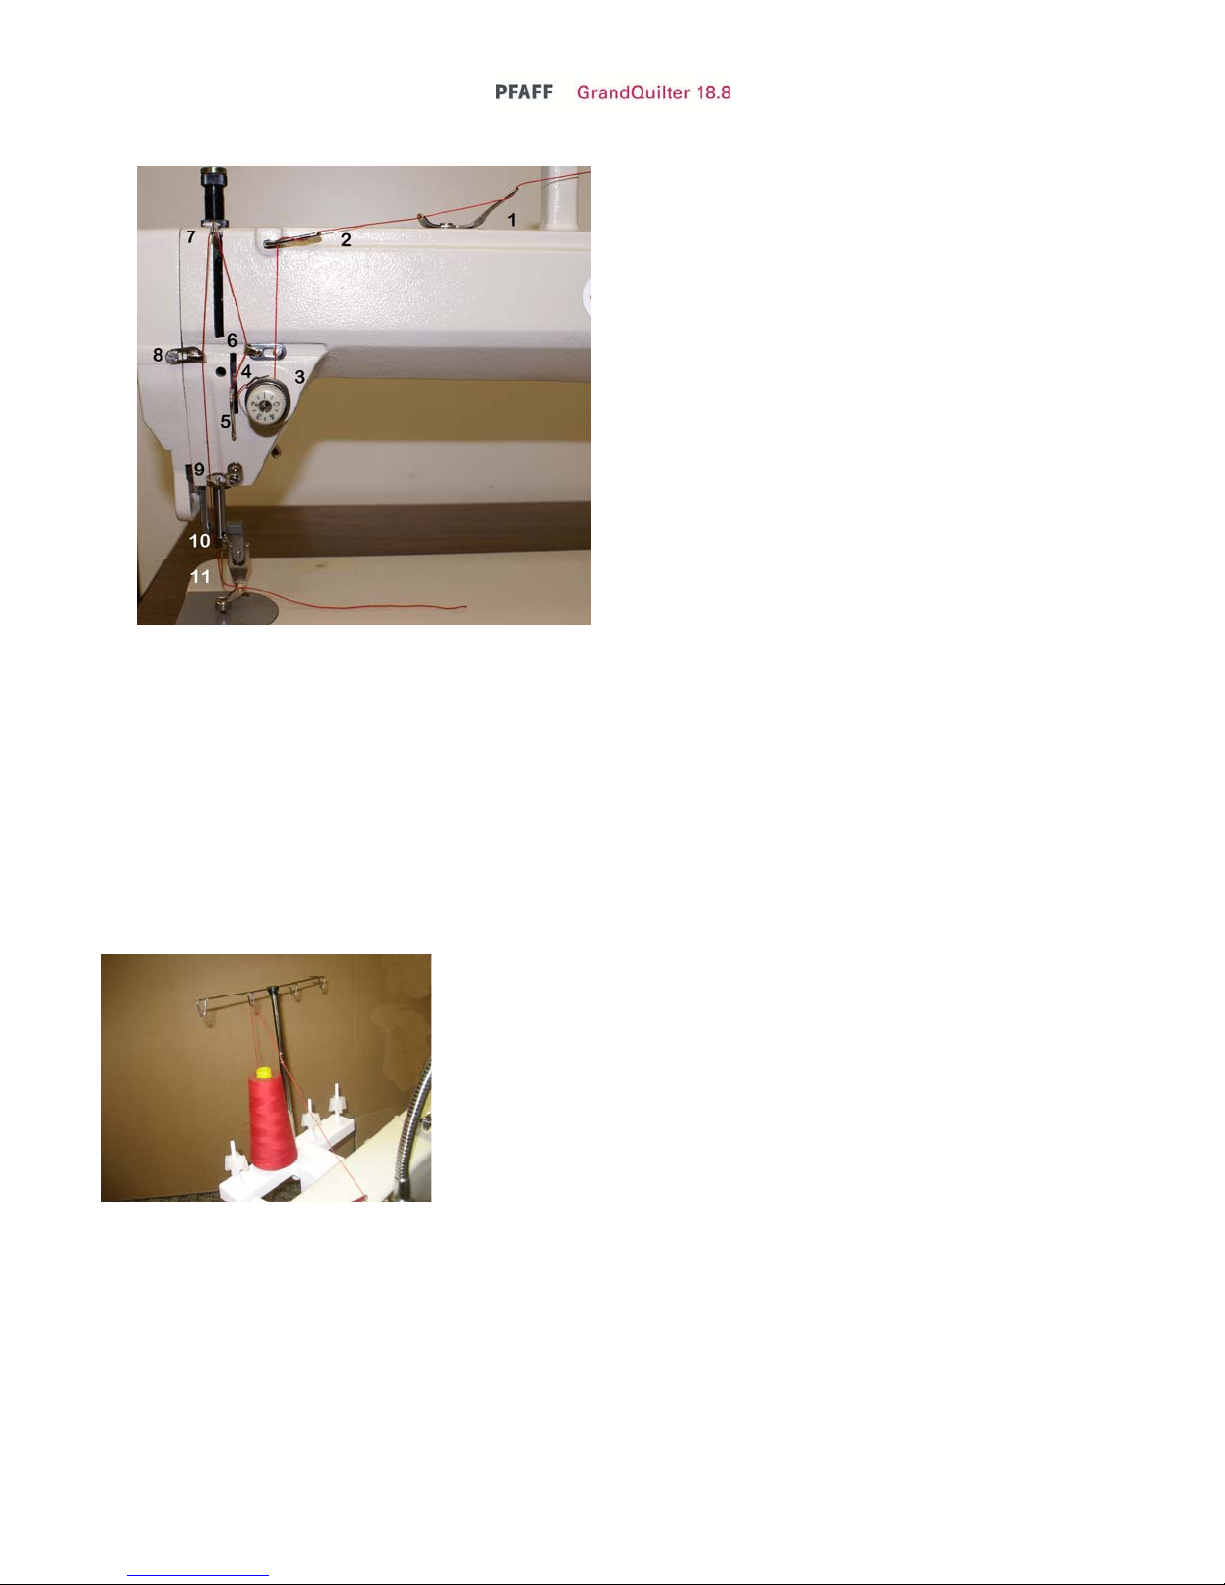
This is a diagram of the side of your long arm machine. The front of the machine faces the belly bar. The back
of your machine has the electrical outlet and stitch regulator plugs. The numbers have been assigned in
threading order.
1. Upper Thread Guide
(note some machines do not have this)
2. Three Hole Thread Guide
3. Tension Disc
4. Check Spring
5. Silver Angle Bracket
6. Thread Guide
7. Take Up Lever
8. Thread Guide
9. Thread Guide
10. Thread Eyelet Above the Needle
11. Needle
15
Page 16
The Control Unit
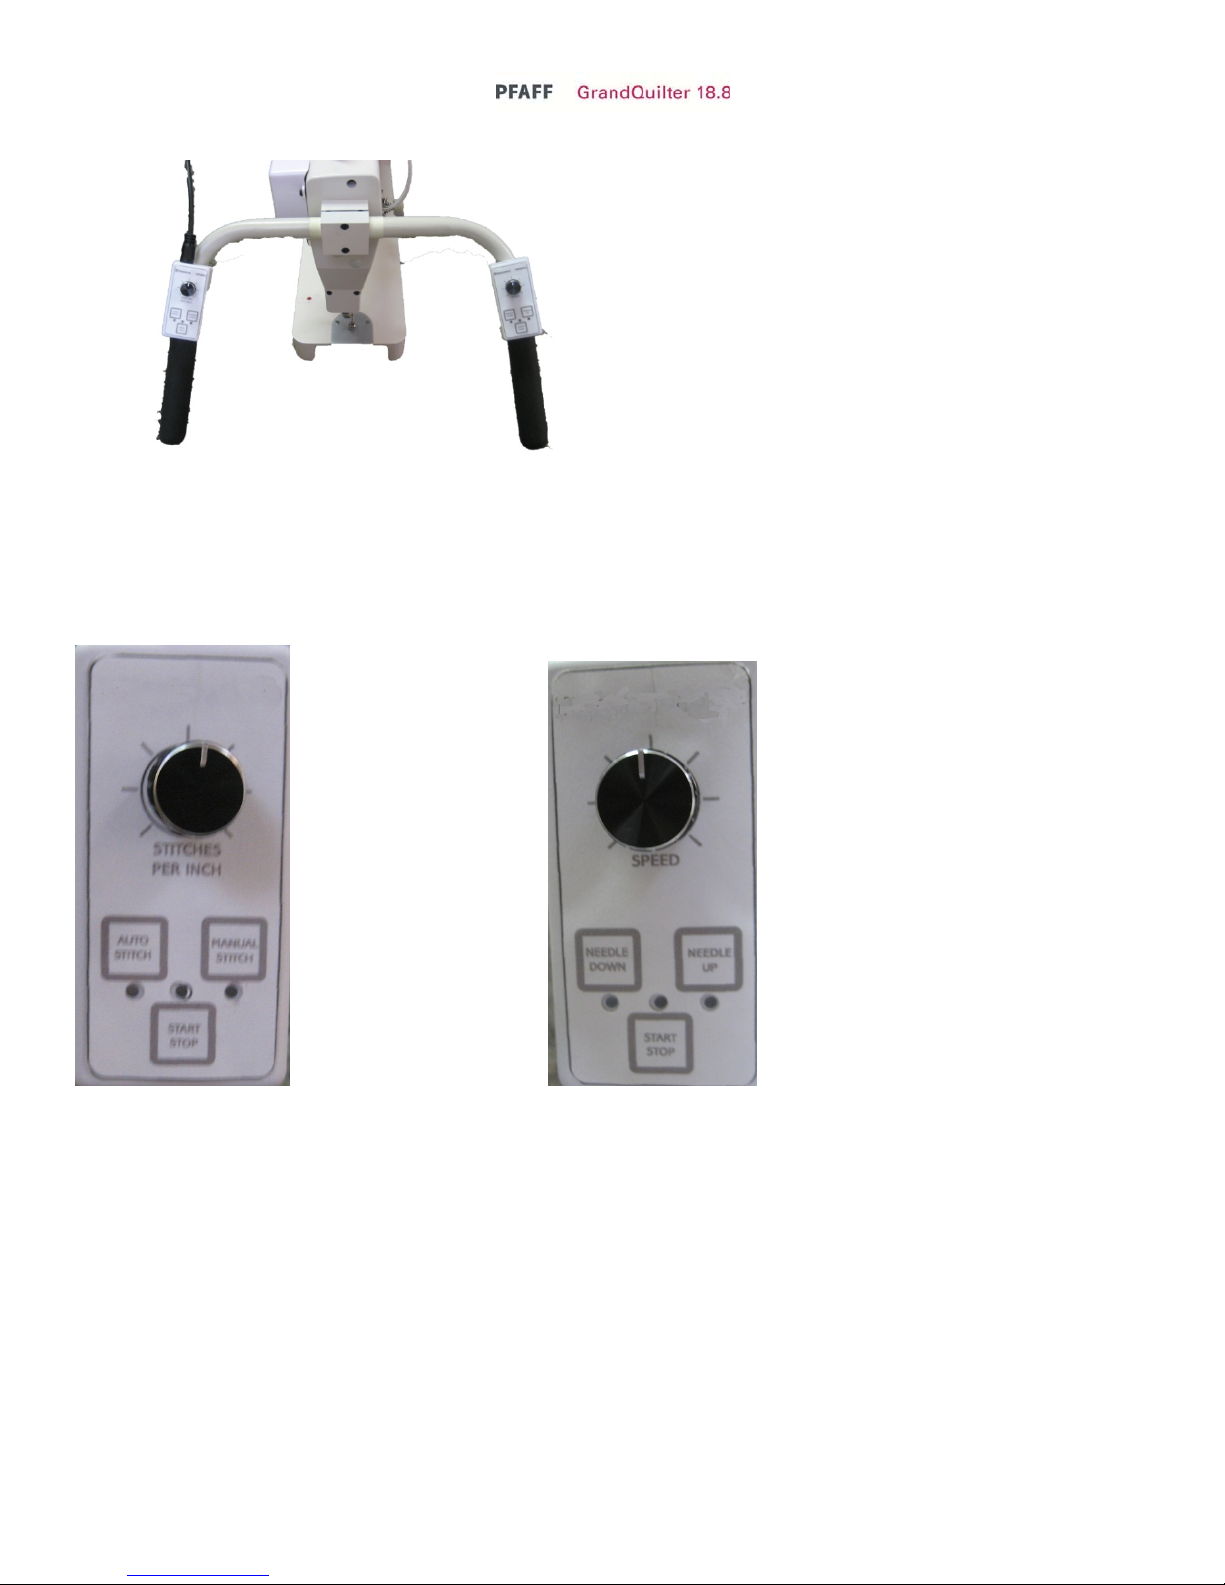
The control unit is shown here. To activate the Auto Stitch
Press the Auto Stitch Button and ensure that the light under
the button is on. Now to start press the start/stop button this
can be found on either controller. As the machine is moved
movement is detected and the speed of the machine will
adjust to keep the stitch length constant. The dial on the left
side is for the stitch length adjustment. To activate the
manual stitch, press the manual stitch button and ensure that
the light under the button is lit. Now press the start/stop button on either controller to start. This keeps the
machine speed constant. The dial on the right controller sets the machine speed. YOU ONLY USE ONE
MODE OR THE OTHER. The needle position sets your machine to stop with the needle up or down. For a
single stitch press the button that has a light under it lit and the machine will complete one full turn. So if the
needle up is on you can press the needle up and it will cycle and you can now pull you bobbin thread to the top.
Left controller with Auto Stitch Right controller with needle
(stitch regulation) and Manual up and needle down. Knob
Stitch Knob adjust stitches per adjust speed when in manual
Inch in Auto Stitch. Stitch.
Both controllers have a start stop button.
16
Page 17
Threading Overview
Please note: the takeup lever guard has been removed for a clear view for pictures only.
Never run the machine without the guard in place, extreme head injury may occur. This
guard is not a handle. Keep your hands clear as you will get pinched if your fingers get
in this area.
How Do I Thread the Machine?
Figure 1
thread. Make sure the eyelet is directly above the
thread cone. Figure 1
Figure 1
1. Place a cone of thread on the thread holder.
2. Pull thread through eyelet above the cone of
17
Page 18
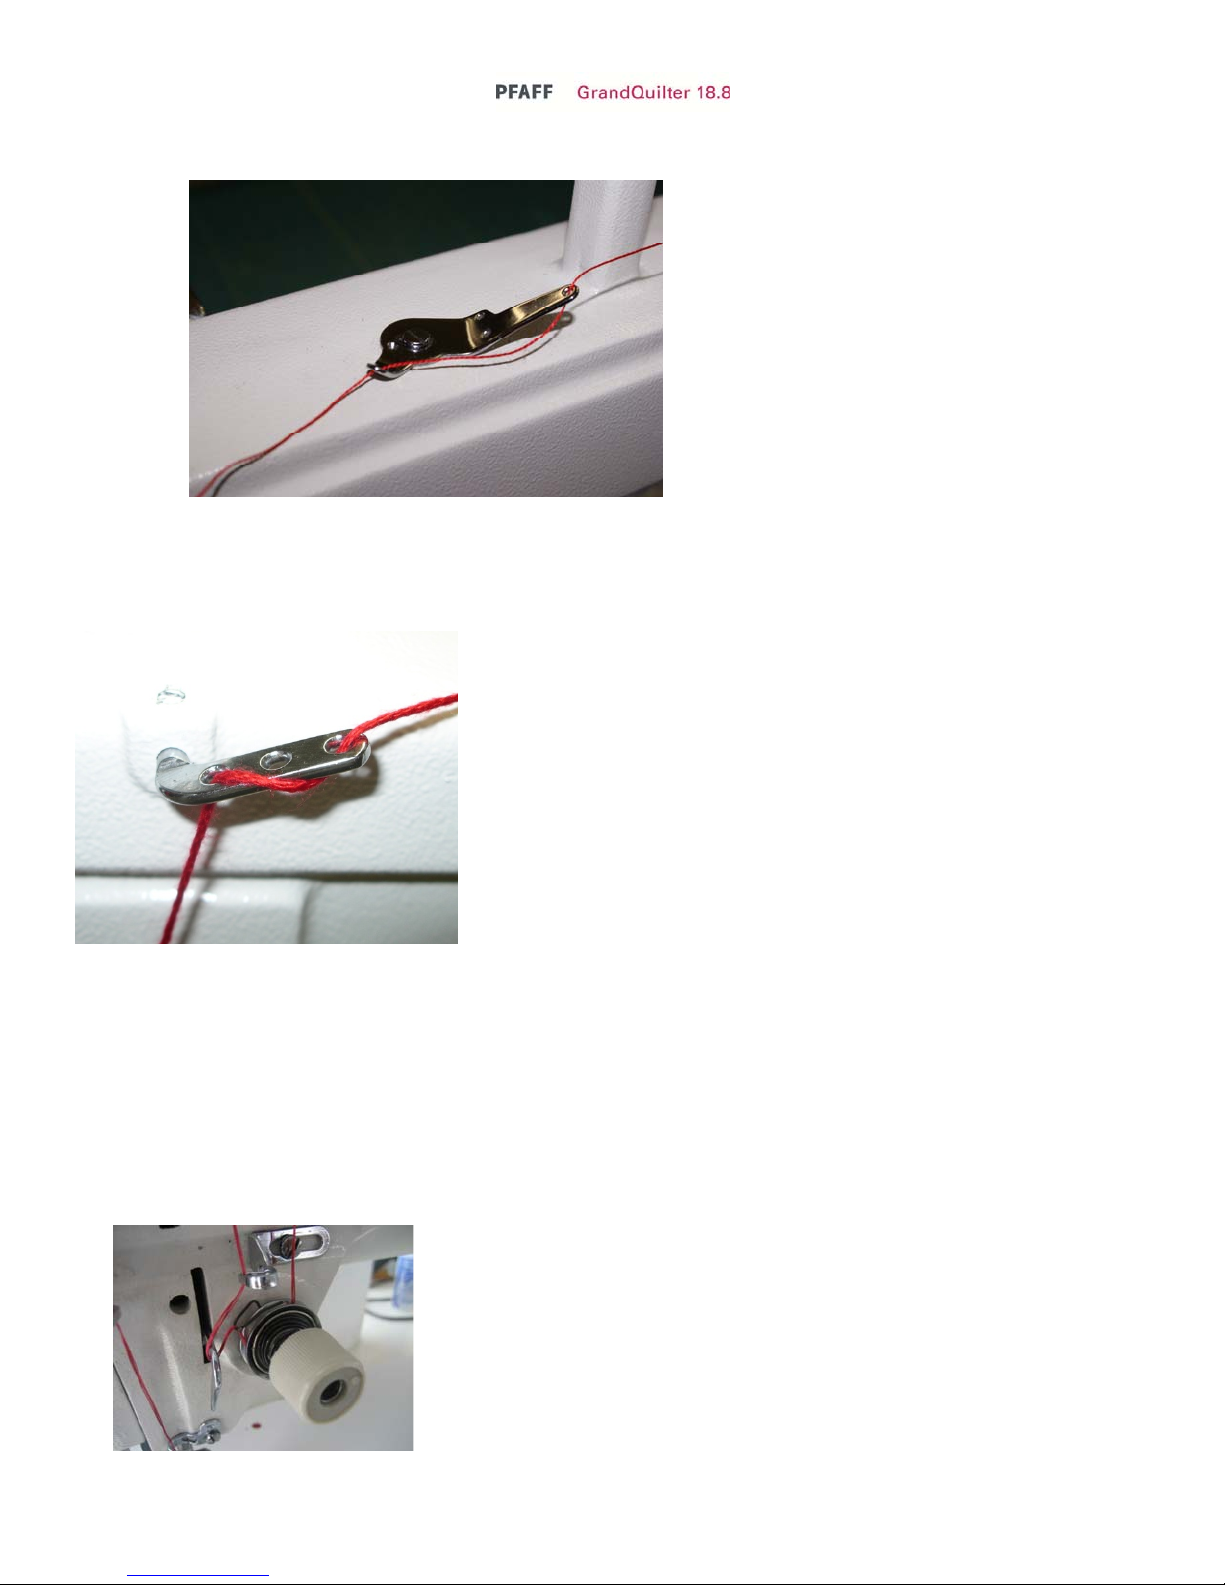
3. Thread upper thread guide as
shown in picture. Figure 2
4. Weave thread as shown on
three hole thread guide.
Figure 3
Figure 2
Figure 3
5. Take thread between the two tension discs from back to
front all the way around. Up and over the check spring. Be
sure the thread is going between the discs and go far enough to
catch the check spring. The check spring should come down
as you pull thread. Pull thread tightly to ensure the thread is in
the tension disk. Figure 4
Figure 4
18
Page 19
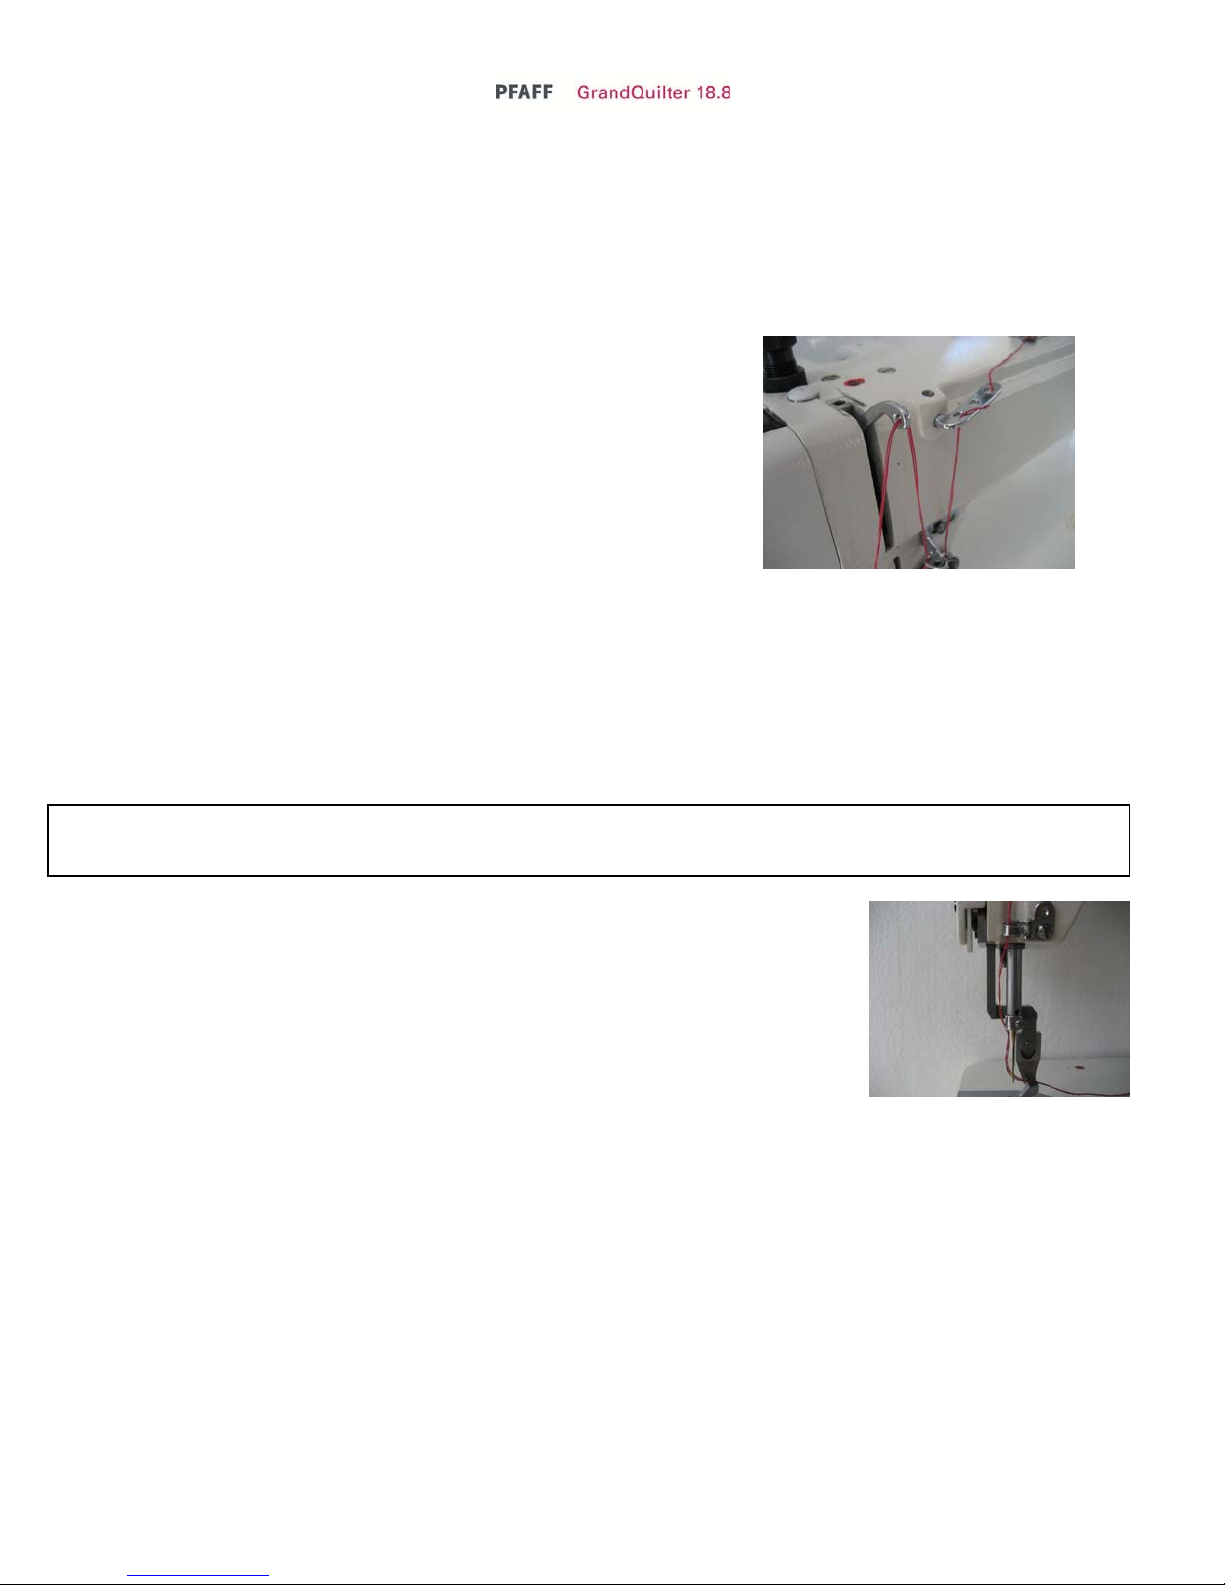
6. Thread runs under silver angle bracket. See picture for details. Figure 4
7. Bring the thread up through the thread guide just
above the check spring. Figure 4
Takeup lever guard removed for photos only.
Never run the machine without the guard in
place, extreme head injury may occur. This
guard is not a handle keep your hand clear as
your fingers can get pinched.
8. Take thread through the take up lever from back to
front. Figure 5
9. Bring the thread down through the two thread
guides on the left side.
Figure 5
TIP: Use a dental floss threader to thread the guide directly above the needle. The threader will also
thread your needle.
10. Bring the thread through the thread eyelet directly
above the needle. Figure 6
11. Thread the needle front to back. Figure 6
Figure 6
19
Page 20
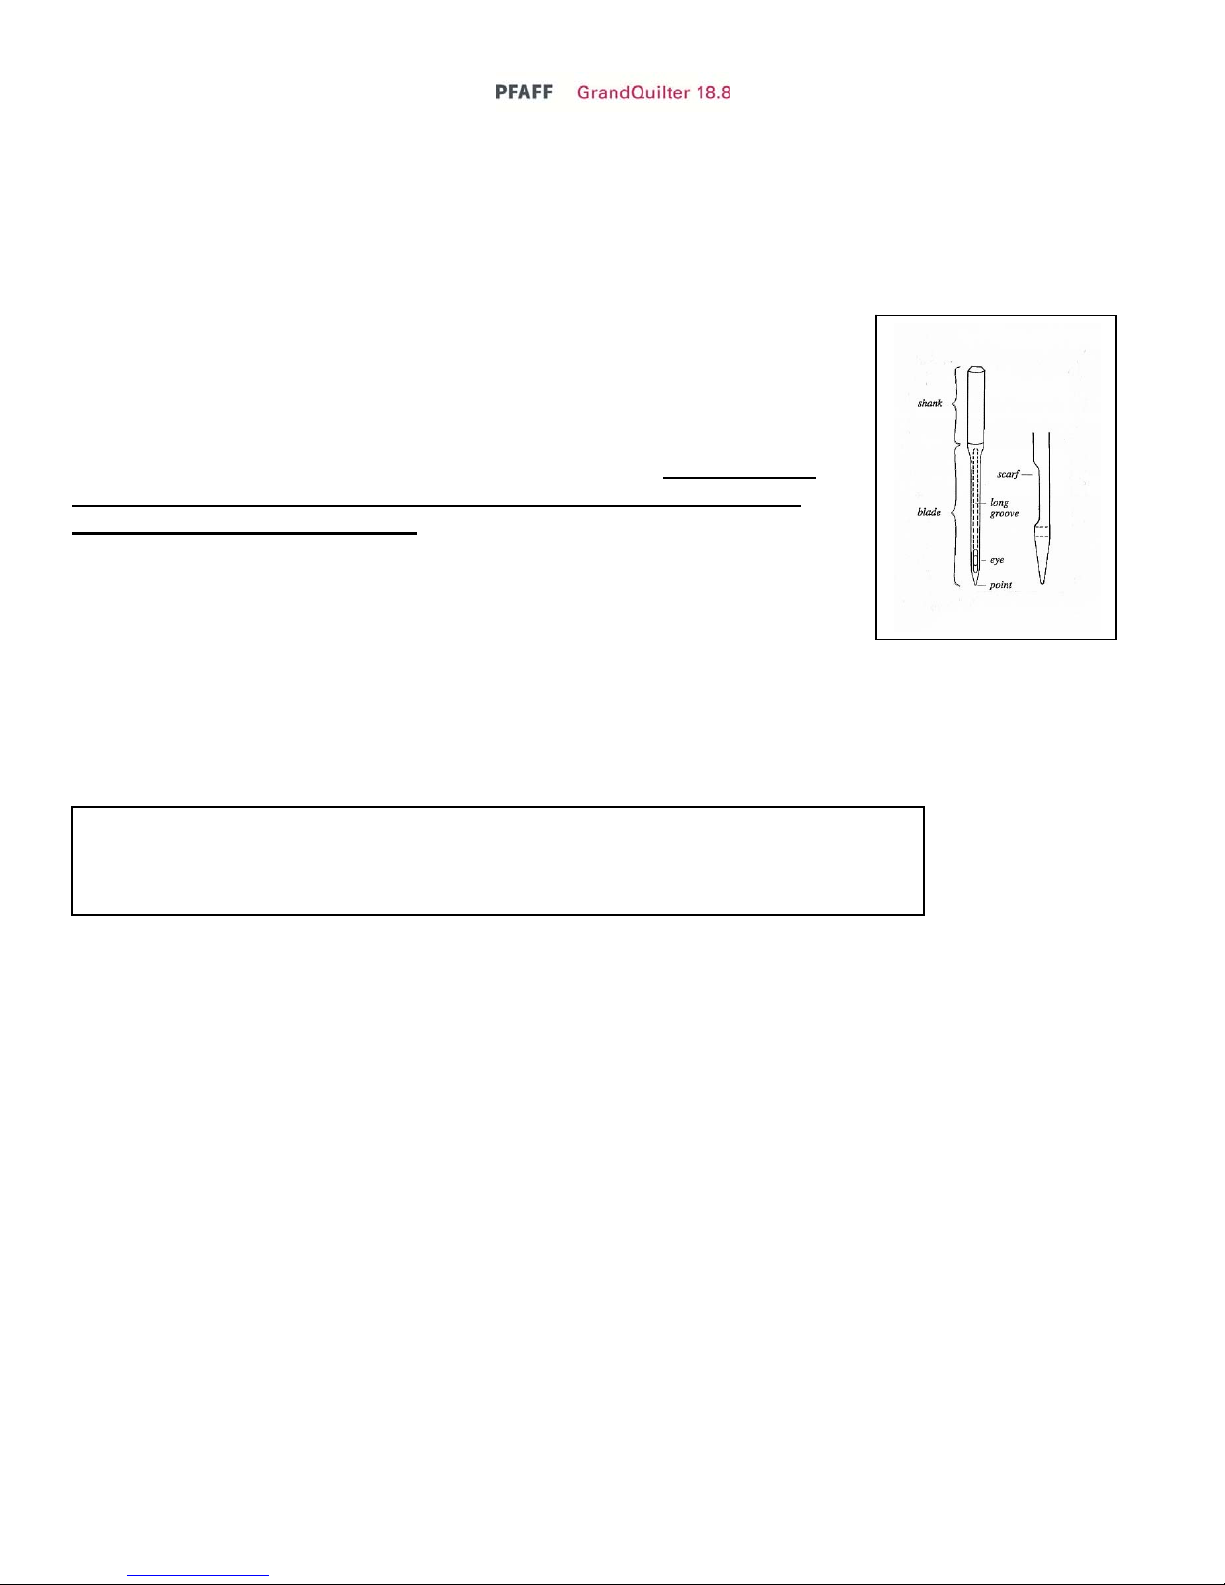
How Do I Change the Needle?
A 134RSAN needle (size 18) will be installed on your Grand Quilter 18.8 from the factory. When it is time to
replace the needle you can easily install one. Be sure the power switch is off on the machine. Remove the
bobbin case.
To remove the needle use the smaller teal colored screwdriver included with your
machine. Loosen the screw just above the thread guide on the needle bar; the
needle should fall out as you loosen the screw.
Look closely at the needle. Your home sewing machine needle shank (top of the
needle) has a flat side. The top of the long arm machine needle is round. On the
point end of the needle there is a scarf, or notch, in one side. The scarf must
face the back of your machine. The long groove at the eye of the needle
faces you as you insert the needle.
Why does the scarf go to the back of the machine?
When the needle goes down through the fabric into the bobbin case, the hook
comes around behind the needle to pick up the thread. The scarf has to be there
to provide a way for the hook to get between the needle and the thread in order to pick up the thread.
Place the new needle up in the slot, making sure the needle is up in the needle bar as far up as it will go. Make
sure the scarf is facing the back of your machine. Tighten the screw on the needle bar while holding the needle
up.
TIP: Use the old needle to hold the new needle in place while you tighten the screw.
By placing the point of the old needle into the eye of the new needle you can see how
straight you are placing the scarf of the needle.
wheel a complete turn making sure the needle goes down in the center of the throat plate and the hook in the
bobbin area rotates with the needle smoothly. Put the needle down as far as possible. In the bobbin area, you
should be able to see you the eye of the needle. When the hook rotates it picks up the thread at the back of the
needle then the top thread pulls the bobbin thread up to create a stitch. The scarf must face the back of your
machine.
Before you turn your
machine on go to the
back of the machine
and turn the hand
20
Page 21

How Do I Make Adjustments to Make the Perfect Stitch?
Understanding how your long arm machine makes a stitch will help you make the proper adjustments to make
the perfect stitch. The technique all long arm machines use to make a stitch is basically opposite of the home
sewing machine. The home sewing machine is designed to press together two layers of fabric and sew while
the fabric is held in place by the presser foot. Long arm machines are designed to press and sew multiple layers
together while the machine head is moving. The difference is that there is practically no needle deflection on a
standard sewing machine and a large amount of needle deflection on the long arm. The higher the tension, the
more the needle will deflect. Another cause for the needle to deflect on a standard machine is the type of fabric
being sewn. A tightly woven fabric tends to force the needle in different directions as it penetrates the fabric.
This type of deflection depends greatly on the type of needle and type of point you use, such as a ball point or
sharp point.
Needle deflection, what is needle deflection? What causes needle deflection? How is needle deflection
related to the stitches on my quilt?
On a long arm quilting machine a stitch is mechanically created the same as a home sewing machine except the
quilter is the feed dog moving the machine head over the fabric. The hopping foot presses the fabric together
tighter and quicker than a home sewing machine presser foot because the fabric must be able to slide between
the foot and the needle plate as the machine is sewing. This means that the machine is moving while the needle
is in the fabric. The worst thing for a needle is to be in the fabric while the machine is moving which bends the
needle, creating needle deflection.
Good stitches will interlock in the batting between the quilt top and backing. In real life, this goal is rarely
achieved. For this reason, you need to be aware that you will have “pokies” if you use different colors of thread
on top and in the bobbin. Pokies are where you can see tiny dots of the contrasting thread where the bobbin
catches the top thread. If there is slightly more tension on the top than on the bottom, then you will see the
pokies on the top side of the quilt. If the greater tension is on the bobbin, then you will see the pokies on the
back of the quilt. If the pokies are objectionable to you, use the same color thread on both top and bottom.
Tip: A general rule of thumb is that if the stitch looks bad on the top it is the
bottom tension. If the stitch looks bad on the bottom is the upper tension. The upper
and lower threads play tug of war with each other.
21
Page 22

Tension, tension, tension… This probably causes more problems than anything else. You need correct tension
on the top and bottom threads but you also must have correct tension on the quilt held between the bars. You
should be able to gently rock the belly bar where the backing fabric is attached. This allows enough movement
of your quilt layers for the needle to penetrate and make good stitches.
Before you start making adjustments to your machine ask yourself, “What changed?” If your machine was
stitching great and all of a sudden it has loopies on the back or puckers, “What changed?” Did you just change
the bobbin? Did you just lift the take up bar? Did you lower the take up bar after finishing your last quilt? Did
you recently change the needle? Did you just roll the quilt?
If the take up bar with the quilted portion of your quilt is too high, it will result in poor stitch quality. You need
a finger tip space between the quilt and the machine bed. Higher will result in poor stitch quality. Lower and
the quilt will create a drag on your machine’s movement.
Look at your bobbin, a sloppily wound bobbin will not create a good stitch. Make sure that the threads on the
bobbin are snug and evenly wound. Check to see if there is a piece of lint in the bobbin case.
Tension Trouble shooting checklist
Is the side tension lever down?
Have I oiled my machine regularly?
Is the quilt too tight on the frame?
Is the thread coming off the cone freely?
Has your thread jumped out of the tension discs?
Check your threading. Has anything been missed or has the thread flipped itself around something,
increasing your tension?
Is the hopping foot too high or too low?
Is your take up bar too high? Did you lower the take up bar after your last quilt?
Do you need to change your needle?
Is your needle in properly?
Top Thread Breaking
Check to see that your thread is coming off the spool freely. The thread guide is centered over the spool
and has not developed any burrs or catches.
Check to see if the thread has looped itself around the spool pin.
Check to see if the needle is in correctly, with the scarf facing the back of the machine.
Have you recently changed the needle? Is it as high as it will go in the needle bar?
The Stitch Regulator does not keep up with me? Just like driving your car you need to make controlled starts
and stops, practice being consistent in your movements.
Eyelashes
Eyelashes on the back of the quilt can be caused by too little top tension. Turn the thread tension disk
clockwise ¼ turn. Make small adjustments. Repeat until stitch quality is good. Remember the upper and lower
thread play tug of war with each other.
Loose Top Stitch
Is the tension lever handle down? It lowers the hopping foot and applies the tension disk.
Is the bobbin thread inserted in the slot of the bobbin case?
Adjust the tension disk small turns clock wise. Repeat until stitch quality if good.
22
Page 23

Quilt Top Puckers
Is your backing fabric stretched too tight? While the backing fabric needs to lie flat and without wrinkles,
stretching it too tight can make the quilt top pucker. After stitching and releasing the backing fabric the top will
pucker.
The top tension is too tight. Adjust the tension disc small turns counter clockwise. Repeat until stitch quality is
good.
Stitches are Skipped
Skipped stitches leave needle holes without thread while large and small stitches in regulated mode means the
encoders are not picking-up the signal of your movements because of lint or thread stopping or slowing the
reading.
First, check to see that your machine is threaded correctly. Look at the check spring, does the thread lay in the
check spring? When properly threaded the check spring will move up and down as the machine is stitching and
the thread is flowing freely.
Check the needle. Be sure it is all the way up into the shaft and the scarf is toward the back. If it has been used
for some time, replace the needle. A blunt needle will make a popping sound as it penetrates the quilt
sandwich.
Machine Drags Making it Difficult to Move
Check to make sure the quilt on the take up bar is not dragging on the bed of the machine. A finger tip distance
between the take up bar and the bed of the machine is all that is necessary. Elevating the take up bar too high
can cause loopies on the back. Look for lint or thread that might be snagging as you move the machine.
Difficult to Control the Movement of the Machine
Check for lint or other debris on the track and bars. Sometimes the smallest pieces of thread create the biggest
headaches.
23
Page 24
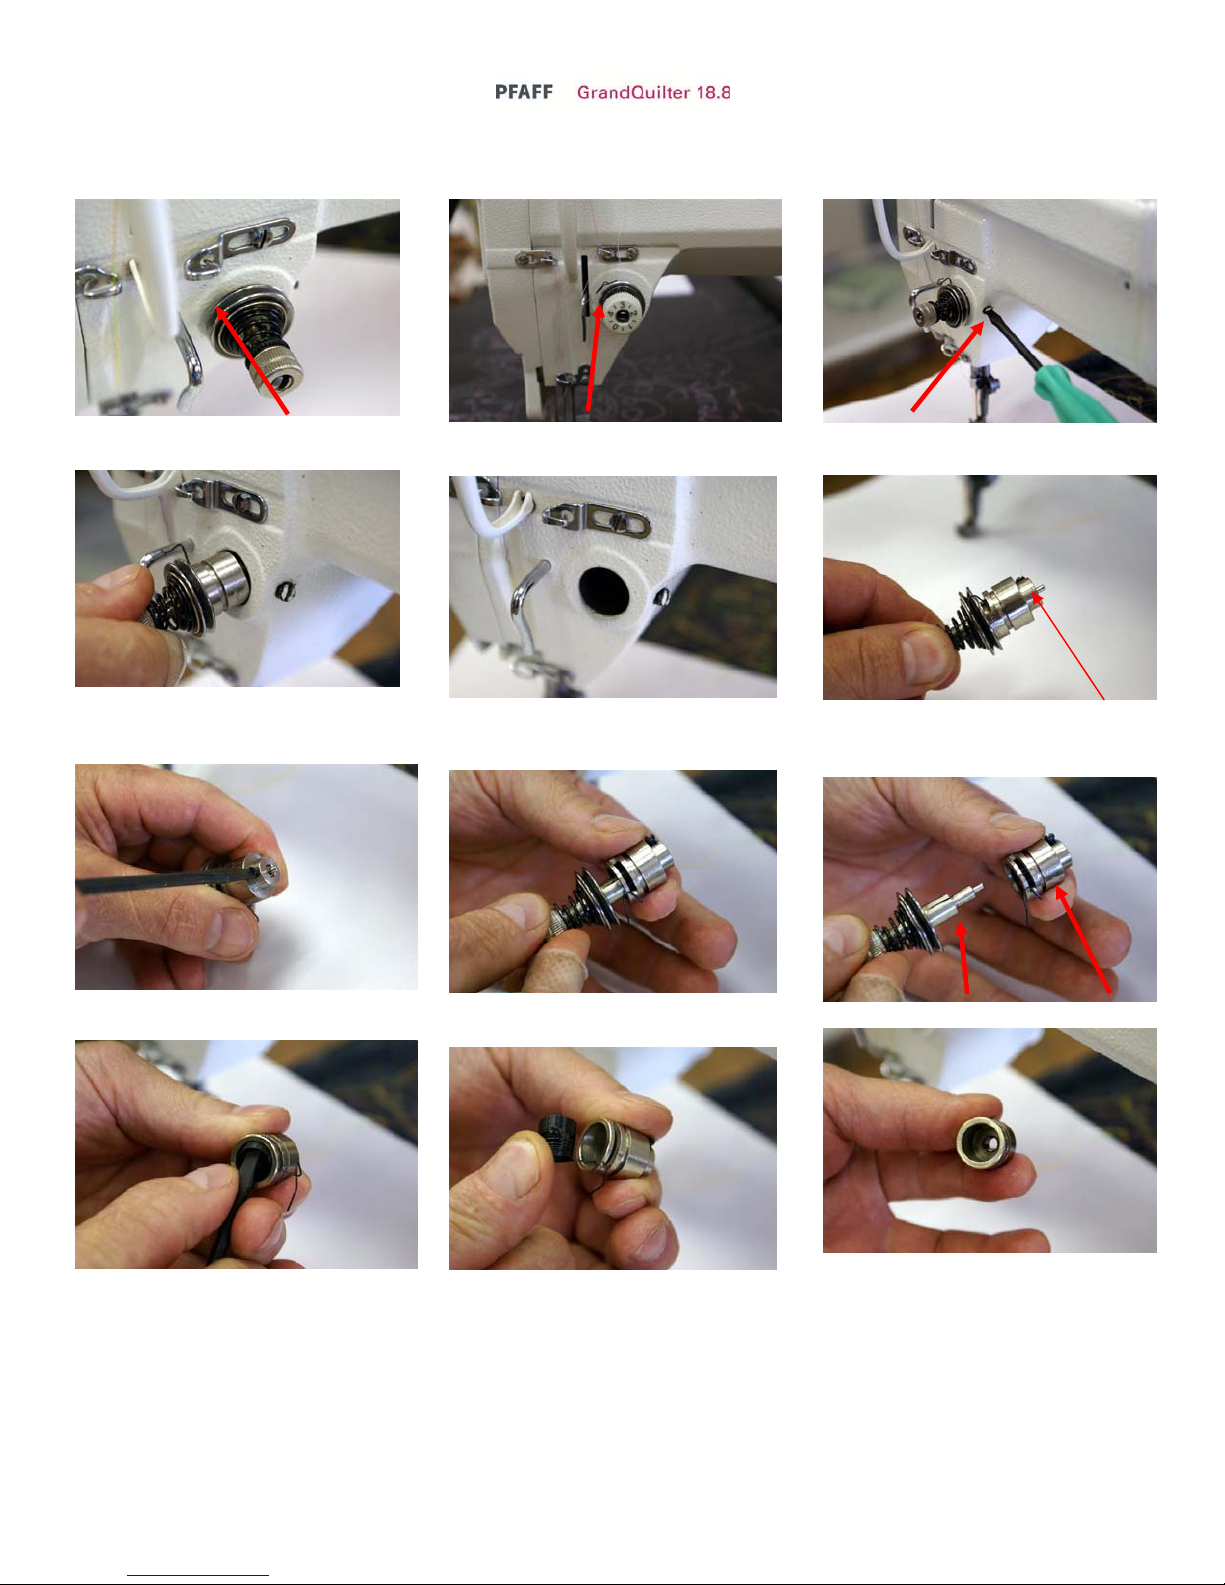
Check spring replacement/Tension Knob
Fig 1: Tension Assembly with
broken Spring (old tension knob)
Fig 4: Remove assembly from
machine. Be careful of release pin (see
fig 6)
Fig 7: Loosen screw only
DO NOT REMOVE
Fig 2: Tension Assembly with
good spring (new Tension knob)
Fig 5: Machine with tension
assembly removed
Fig 8: Remove tension assembly
from barrel
Fig 3:
loosen only
Screw on inside of machine
DO NOT REMOVE
Fig 6: Tension assembly out of
machine DO NOT LOOSE PIN
Fig 9: Tension assembly, Barrel
Fig 10: Remove spring
24
Fig 11: Spring removal
Fig 12: Spring removed
Page 25
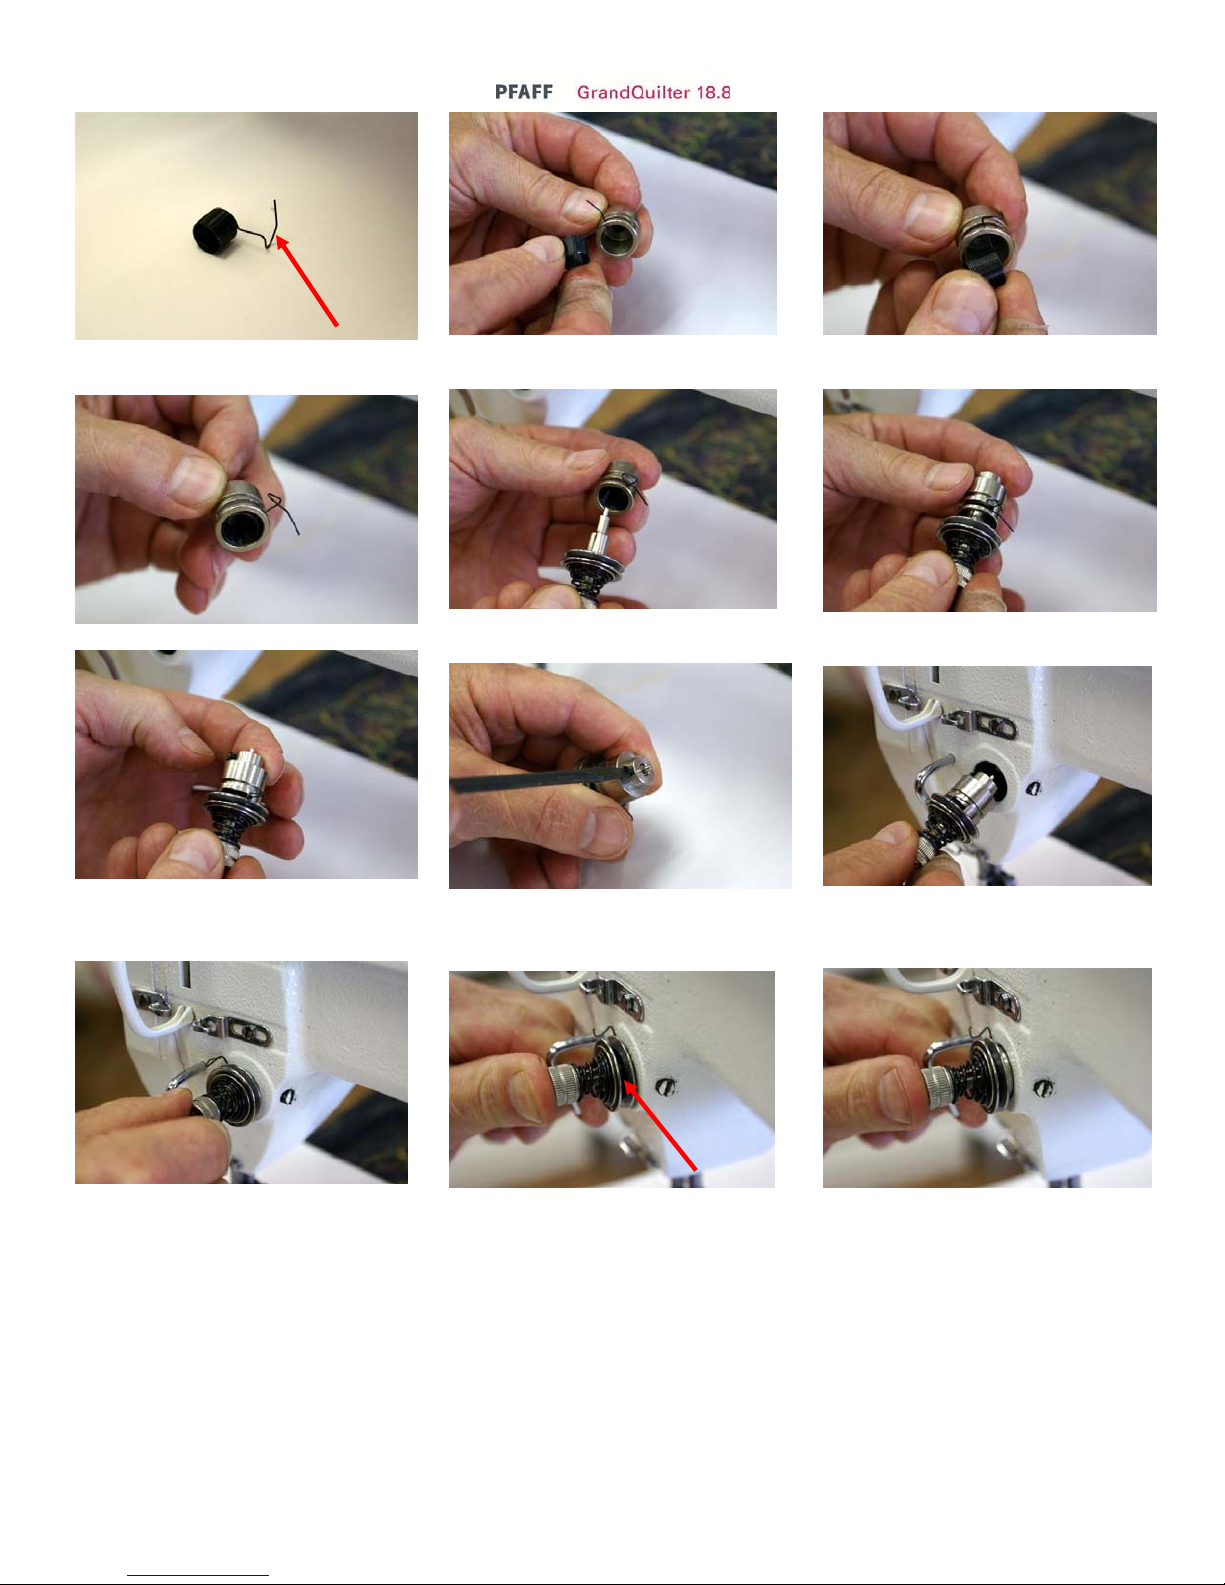
Fig 13: New Spring, This is
what was broken
Fig 16: New spring in place
Fig 19: give the tension assembly
a twist until you feel resistance on
the check spring
Fig 14: Insert New Spring
Fig 17: Insert the tension
assembly back in barrel
Fig 20: Tighten screw. Make
sure pin is still there
Fig 15: Twist while inserting
new spring
Fig 18: Insure that you are all the
way in
Fig 21: Place the assembly back
into your machine
Fig 22: Once in ensure that your
check spring is at 11:00
26 for correct placement)
(refer to fig
25
Fig 23: Press in and notice the
tension disk opens
Fig 24: Release and the disk will
close; this is the proper place for
your tension assembly
Page 26
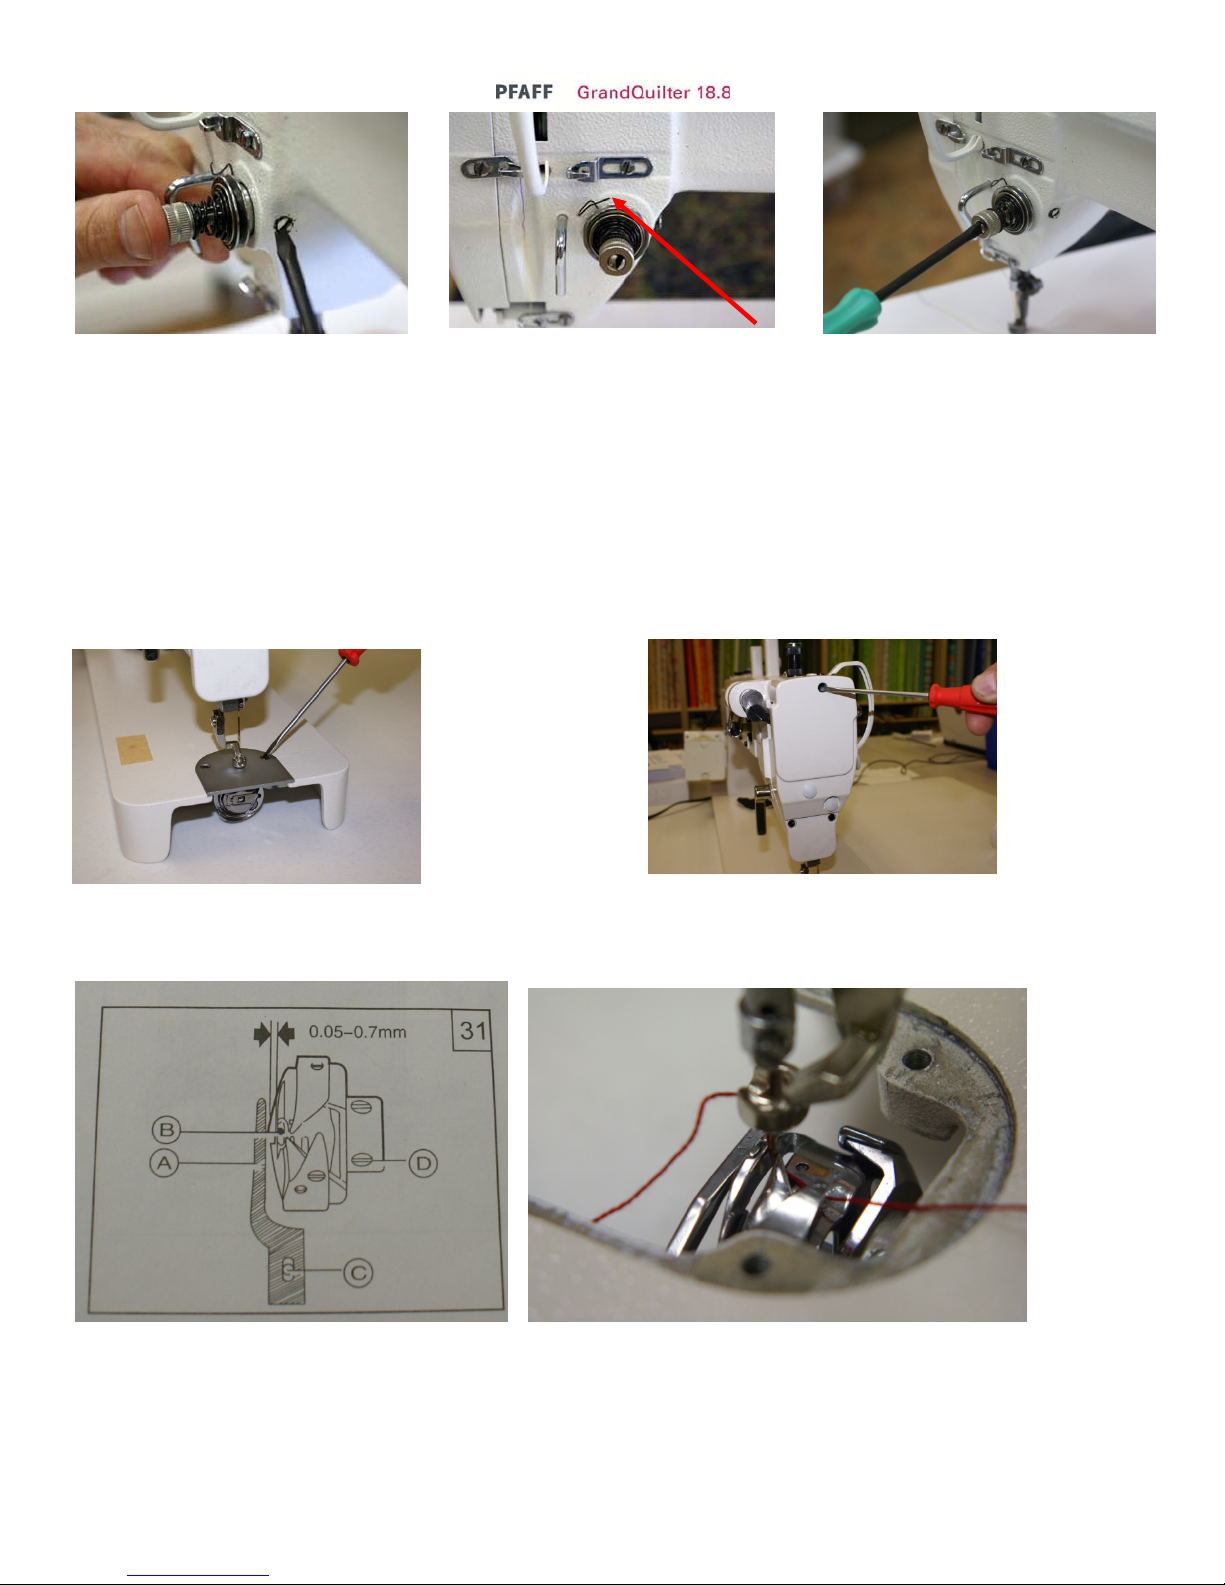
Fig 27: For fine adjustment of
check spring insert screwdriver
turn clockwise for more tension
Fig 25: Tighten screw on your
machine.
Fig 26: Tension assembly back in
place with new check spring at
11:00
Timing between needle and rotating hook
Remove the two needle plate screws You will also need to remove the three
from your machine. Face plate screws
The protecting flange of the position bracket A should be engaged in the notch B of the bobbin case holder. D
is set screw to adjust hook timing. (Photo on the right is actual machine as shown in Drawing)
Drawing and photo show correct timing.
26
Page 27
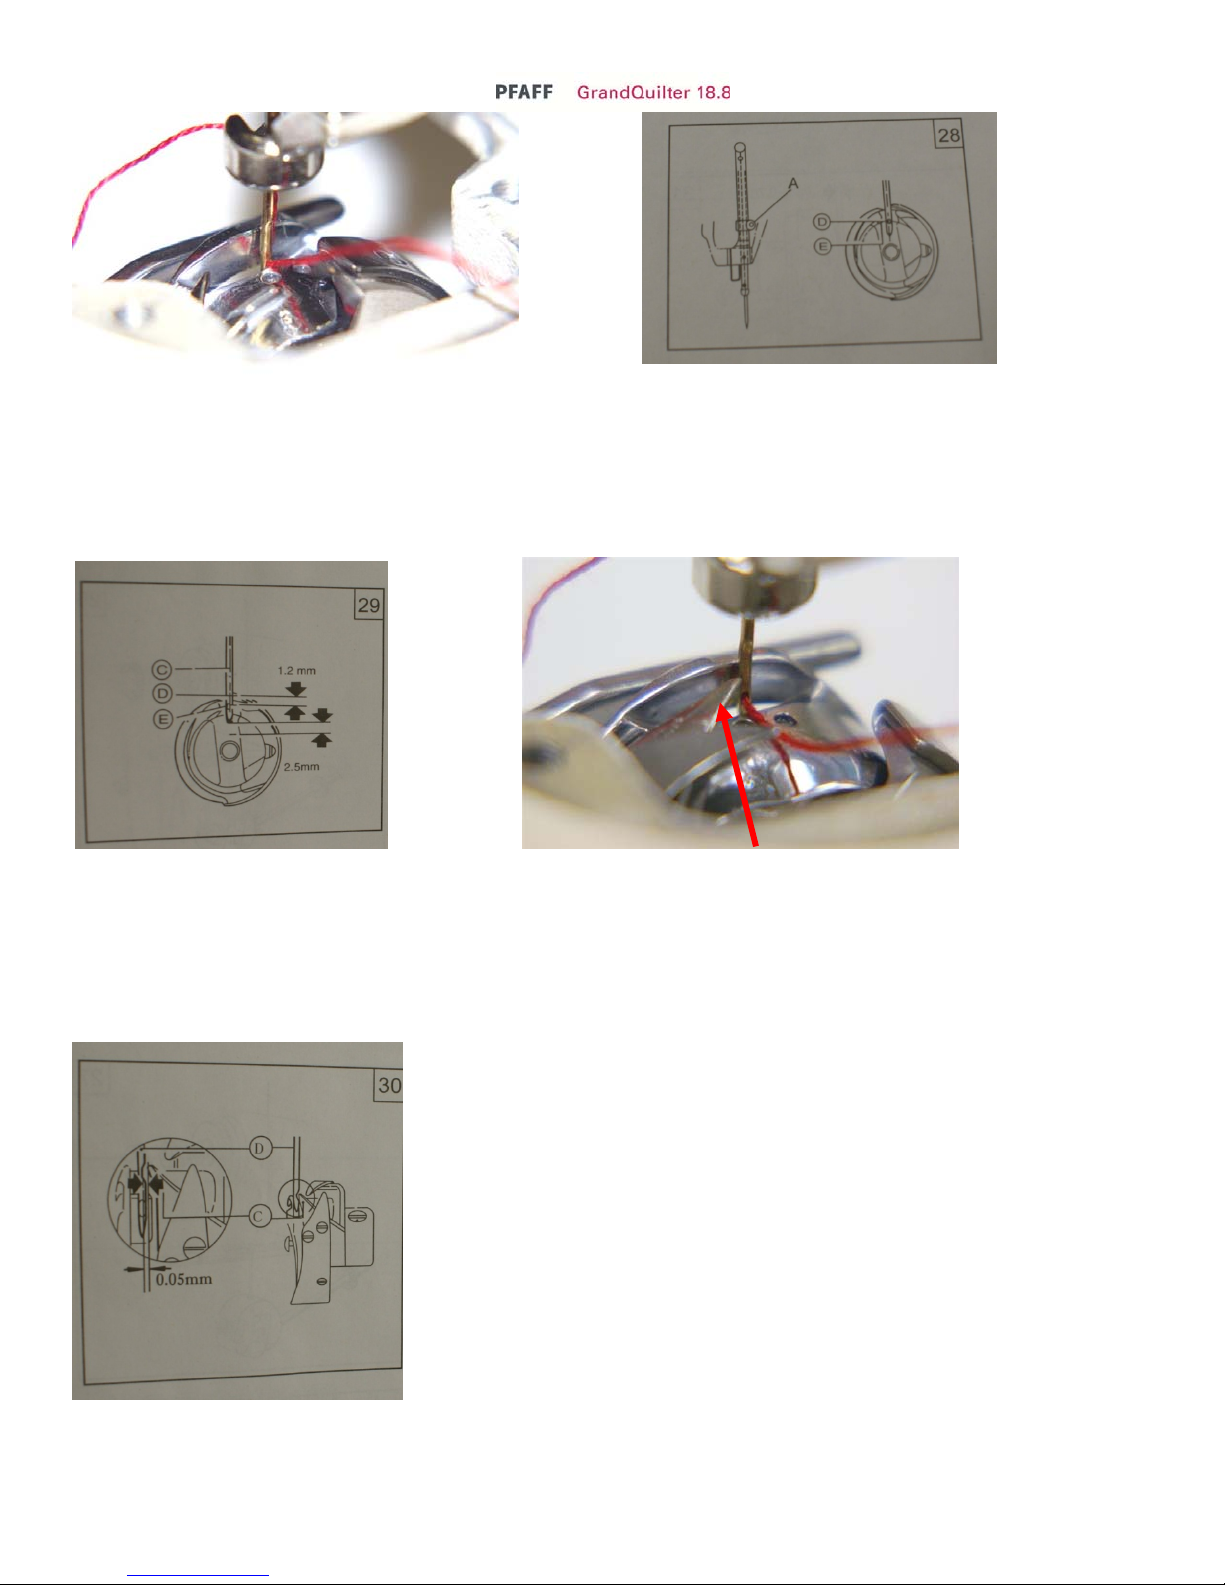
Turn the hand wheel to locate the needle at it’s Loosen Needle bar connecting screw A.
lowest position. Note: correct needle position is This will allow you to raise and lower
when you can see a small portion of the eye of needle bar for correct location. Note:
the needle. This picture shows correct location. Check all photos before making any adjustments
Hook Point
Adjusting rotating hook point timing with needle This picture shows needle bar and hook point at the
Turn the hand wheel counter clockwise to locate proper location. After needle bar rise.
needle to its lowest position. At lowest position Note if hook point is not in this location reference
turn hand wheel to raise needle 2.5 mm (1/8” ) drawing 31 loosen screw D there are three screws.
Hook point should be just above eye of needle. At this point the rotating hook can be moved freely
On its shaft. To locate proper timing.
When adjusting the rotating hook point timing also note that clearance
between notch bottom of needle D and hook point C must be maintained.
Hook can not rub against needle. Also see drawing 31 for better view
27
Page 28

28
 Loading...