

Page 1

-918/55
Supplement to the instruction
and adjustment manual for the
PFAFF 487, 489 and 5487
296-12-18 647/002
Betriebsanleitung engl. 06.2009
Page 2

The reprinting, copying or translation of PFAFF Instruction Manuals, whether in whole or
in part, is only permitted with our previous authorization and with written reference to the
source.
PFAFF Industriesysteme
und Maschinen AG
Hans-Geiger-Str. 12 - IG Nord
D-67661 Kaiserslautern
Page 3

Index
Contents ..................................................................................Page
1 Proper use............................................................................................................................. 5
2 Controls ................................................................................................................................ 6
2.01 Knee Switch ........................................................................................................................... 6
2.02 Control panel .......................................................................................................................... 6
2.03 Keyboard ................................................................................................................................7
3 Installation and commissioning ......................................................................................... 9
3.01 Connecting the plug-in connections and earth cables ........................................................... 9
3.02 Basic position of the machine drive unit .............................................................................. 10
3.02.01 With control unit P320 ED ................................................................................................... 10
3.02.02 With control unit P323 MS .................................................................................................. 12
4 Preparation ......................................................................................................................... 13
4.01 Selecting the program number ............................................................................................ 13
4.02 Inputting fullness ................................................................................................................. 14
4.03 Entering / altering the code number .................................................................................... 15
4.04 Adjusting the control panel .................................................................................................. 17
5 Sewing ................................................................................................................................ 18
5.01 Manual sewing..................................................................................................................... 18
5.01.01 Entering the seam start and seam end in manual sewing mode ........................................ 20
5.02 Sewing with fi xed programs ................................................................................................21
5.03 Programmed sewing ............................................................................................................23
5.03.01 Program interruption ............................................................................................................ 25
5.04 Error messages .................................................................................................................... 25
6 Input .................................................................................................................................... 26
6.01 Seam program input ............................................................................................................ 27
6.01.01 Basic settings for seam program input ................................................................................ 27
6.01.02 Seam program input with the "Creating/adjusting a program" functionen" .......................... 29
6.01.03 Seam program input with the "Creating/adjusting a program" function ............................... 31
6.01.04 Entering the functions at the beginning of the seam during seam programming ...................33
6.01.05 Entering the functions at the end of seam section during seam programming................... 34
6.02 Examples of how to create a seam program .......................................................................36
6.02.01 Example of a seam program input with the "creating/adjusting a program" function ..........36
6.02.02 Example of a seam program input using the "teach-in" function .......................................... 39
6.03 Seam program administration .............................................................................................. 41
7 Adjustment differing from the basic machine ................................................................. 43
7.01 Basic setting of the differential adjustment device .............................................................. 43
7.02 Parameter settings ............................................................................................................... 44
7.02.01 Overview of the parameter functions ..................................................................................44
7.02.02 Example of a parameter input .............................................................................................. 45
7.03 List of parameters ................................................................................................................ 46
Page 4

Index
Contents ..................................................................................Page
7.04 Sewing motor errors ............................................................................................................48
7.05 Explanation of the error messages ...................................................................................... 49
7.06 Table of inputs ...................................................................................................................... 50
7.07 Table of outputs ...................................................................................................................50
7.08 Service menu .......................................................................................................................51
7.09 Carry out a cold start ........................................................................................................... 52
7.10 Internet update of the machine software ............................................................................53
8 Circuit diagrams ................................................................................................................ 54
Page 5

Proper use
1 Proper use
The PFAFF 487-918/55, 489-918/55 and the PFAFF 5487-918/55 are single-needle,
ultra-high-speed sewing machines with programmable fullness control.
The PFAFF 487-918/55 and the 489-918/55 are used to sew lockstitch seams in
industry.
The PFAFF 5487-918/55 is used to sew two-thread chain stitch seams in industry.
Any and all uses of this machine which have not been approved of by the
manufacturer are considered to be inappropriate! The manufacturer cannot be
held liable for any damage caused by the inappropriate use of the machine!
The appropriate use of the machine includes the observance of all operational,
adjustment, maintenance and repair measures required by the manufacturer!
5
Page 6
Controls
2 GB
max.
2 Controls
2
.01 Knee Switch
Manual sewing:
By operating knee switch ● 1 it is possi-
ble to alternate between two pre-set
amounts of fullness.
Programmed sewing:
By operating knee switch ● 1 the amounts
of fullness are changed according to the
program selected.
1
Fig. 2 - 01
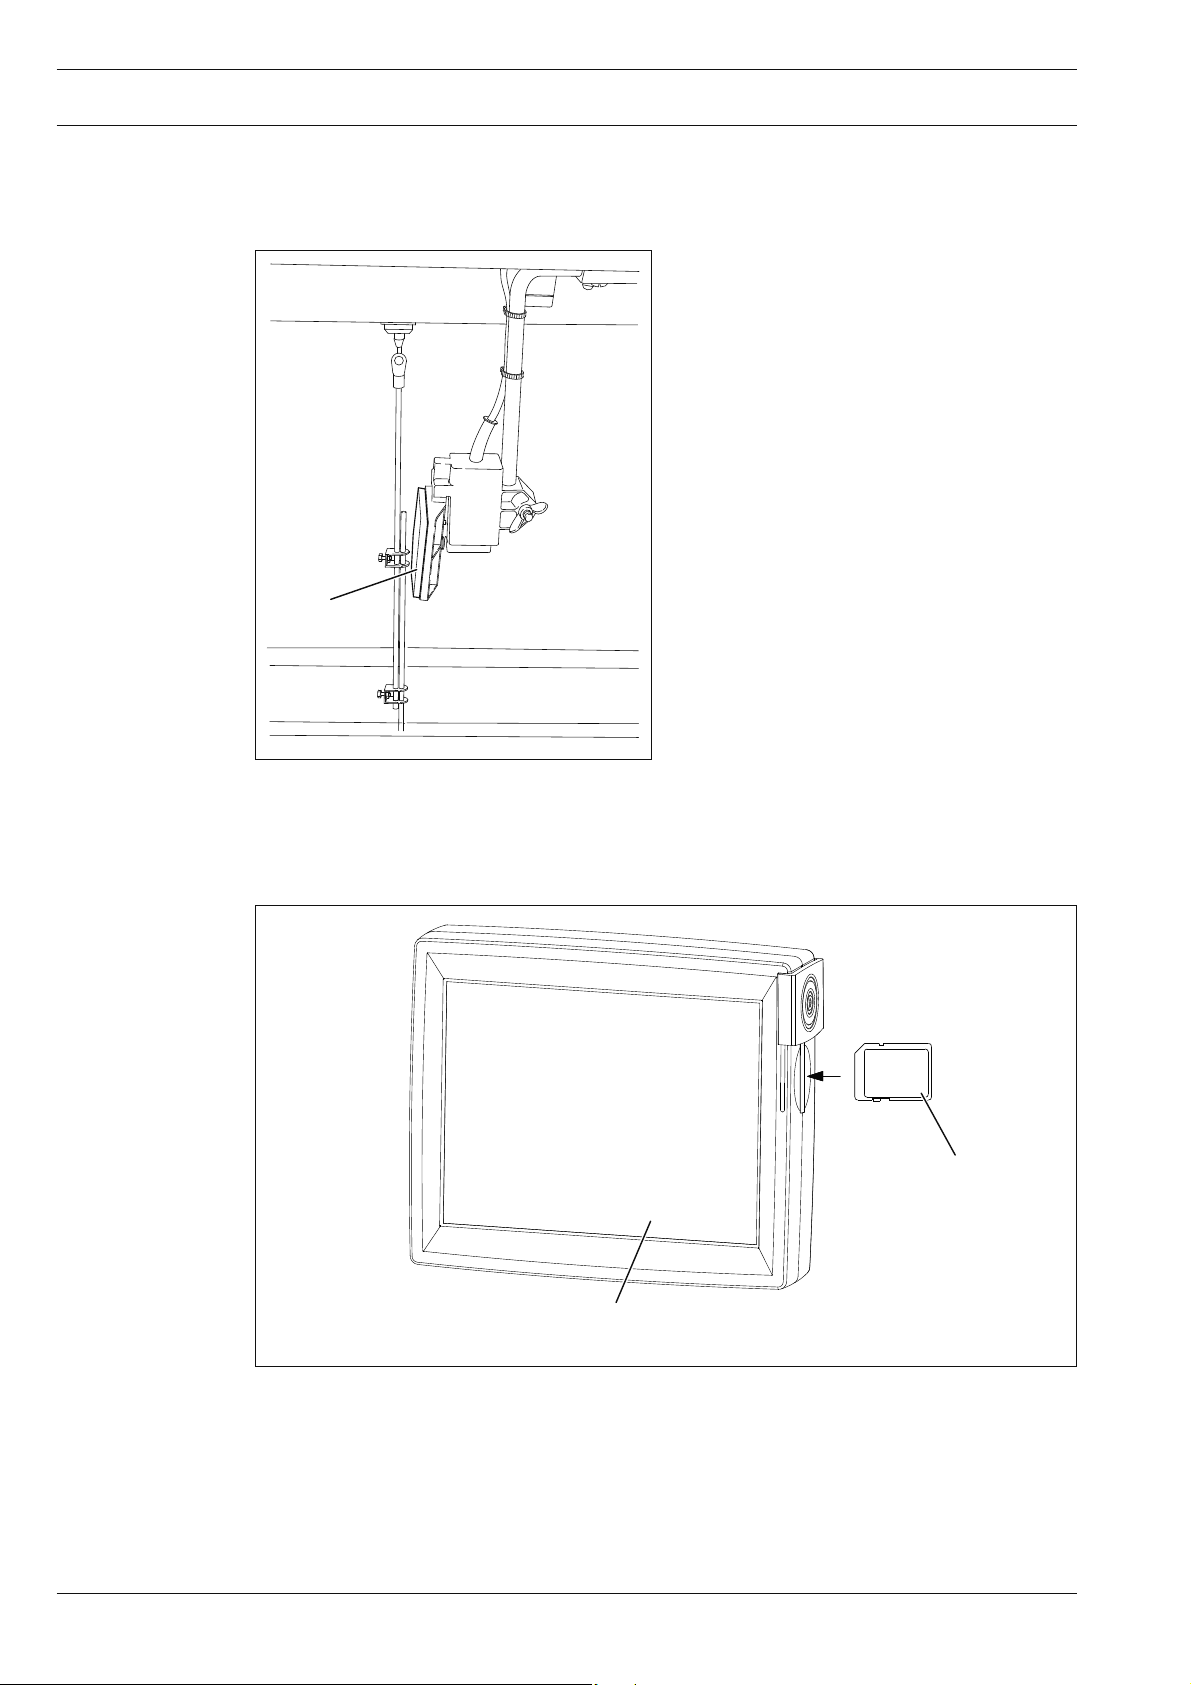
2.02 Control panel
2
1
Fig. 2 - 02
The current operating conditions are displayed on control panel 1. Operation takes place in a
constant dialogue between the control unit and the operator. For this purpose, depending on
the operating condition of the machine, different symbols and/or texts are displayed. If the
symbols or texts are framed, these show functions which can be selected by pressing the
appropriate position on the monitor. By pressing the corresponding function this is carried
out or switched on or off immediately, or a further menu appears, e.g. for entering a value.
6
Page 7
Controls
Activated functions are shown with inverted symbols. Unframed symbols or texts are only
used for display purposes and cannot be selected by pressing.
To read sewing programs or install machine software, use the sd-card 2 in the control
panel.
Description of the functions
Normal symbol = function switched off (inactive)
Inverted symbol = function switched on (active)
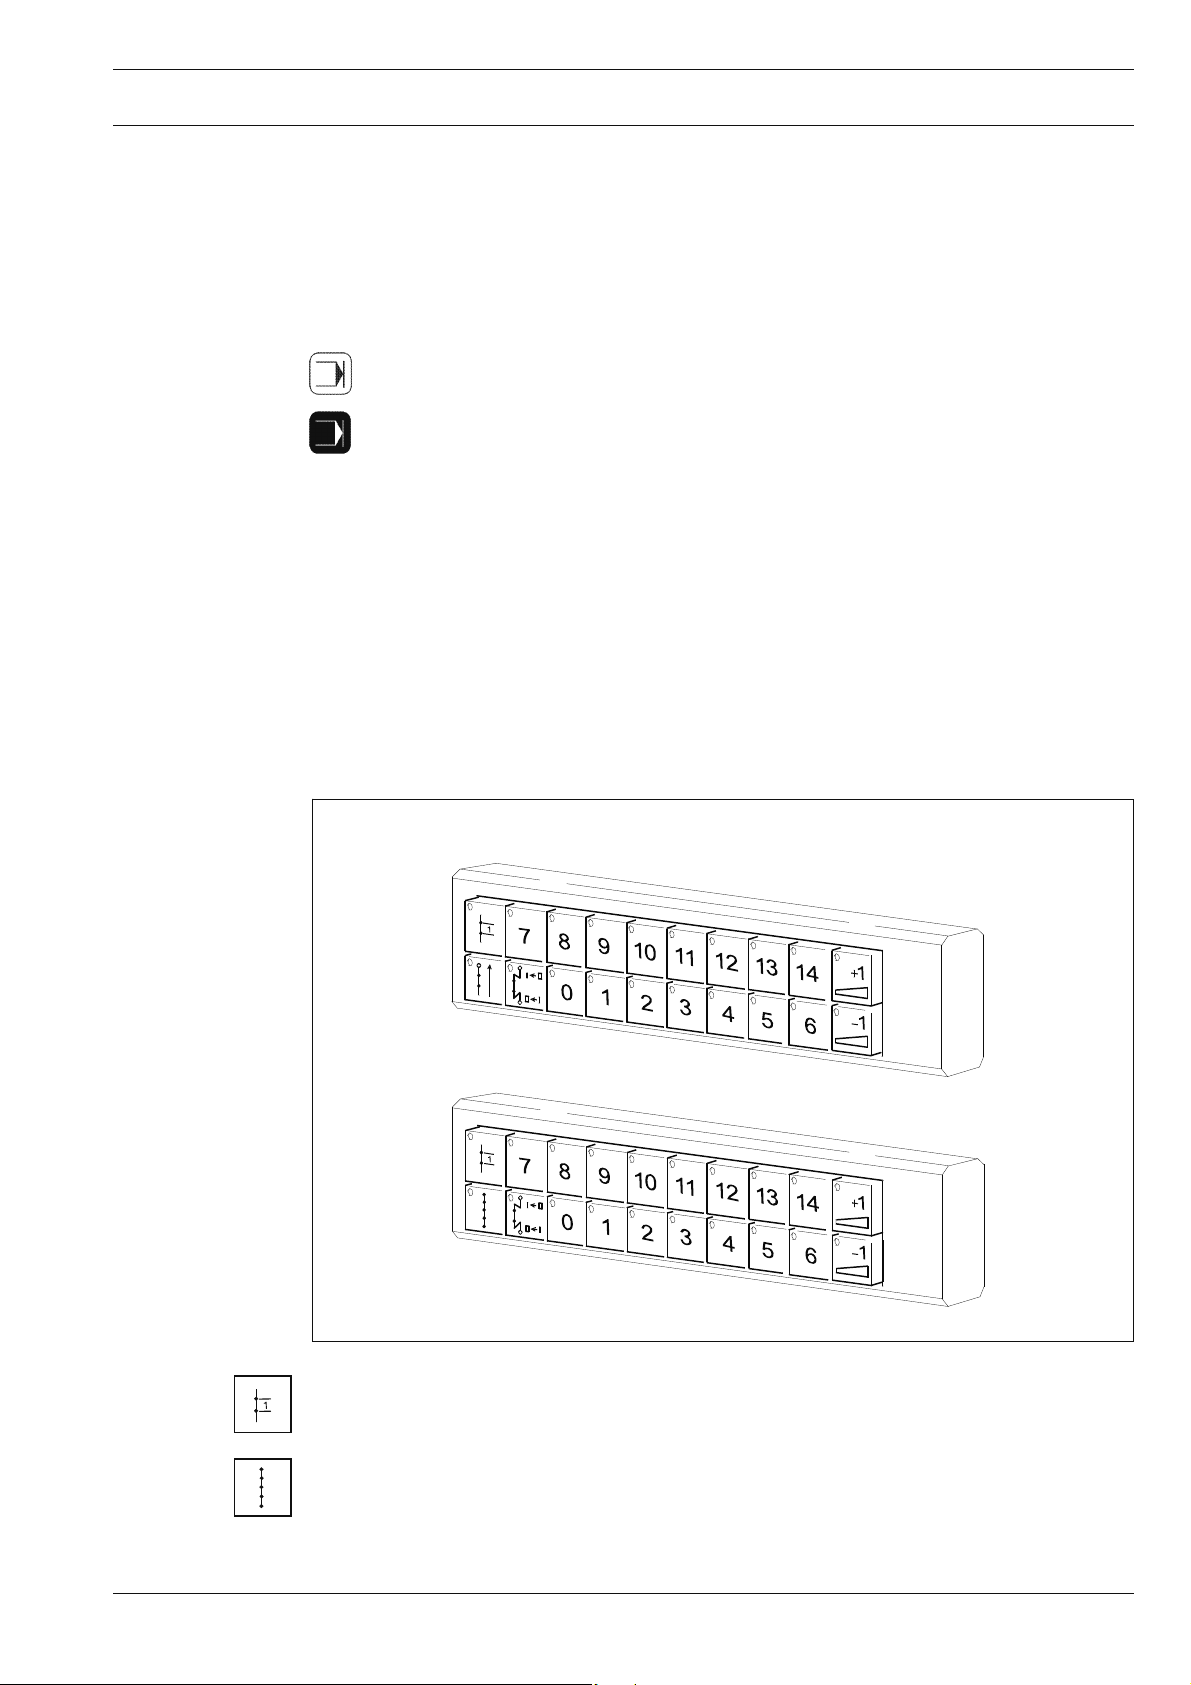
2.03 Keyboard
The keyboard is used for the quick operation of the machine during sewing and when selecting the fullness. With the corresponding LED of the 20 keys, active key functions are displayed (Function active = LED lit).
PFAFF 487-918/55, 489-918/55
PFAFF 5487-918/55
Fig. 2 - 03
Single stitch
If the single stitch key is pressed, the machine sews a single stitch. ●
Stitch condensation
(only on the PFAFF 5487)
The stitch condensation is switched on and off by pressing a key. ●
(When programming the seam: Sew the seam section with condensed stitches)
7
Page 8

Controls
Reverse sewing direction (only on the PFAFF 487), 489
As long as the reverse sewing key is pressed, the machine sews in reverse. For the pro- ●
gramming and learning functions, the relevant seam section is programmed "in reverse".
Bartack suppression
If the bartack function is activated, by pressing this key once the next bartack and by ●
pressing it twice the next two bartacks are not sewn.
Correction value + / correction value -
If this key is pressed, the fullness value is increased or reduced in ● 2 steps. Fullness va-
lue 0 is not corrected. To make this possible, a correction value different to 0 must be
entered in parameter 209.
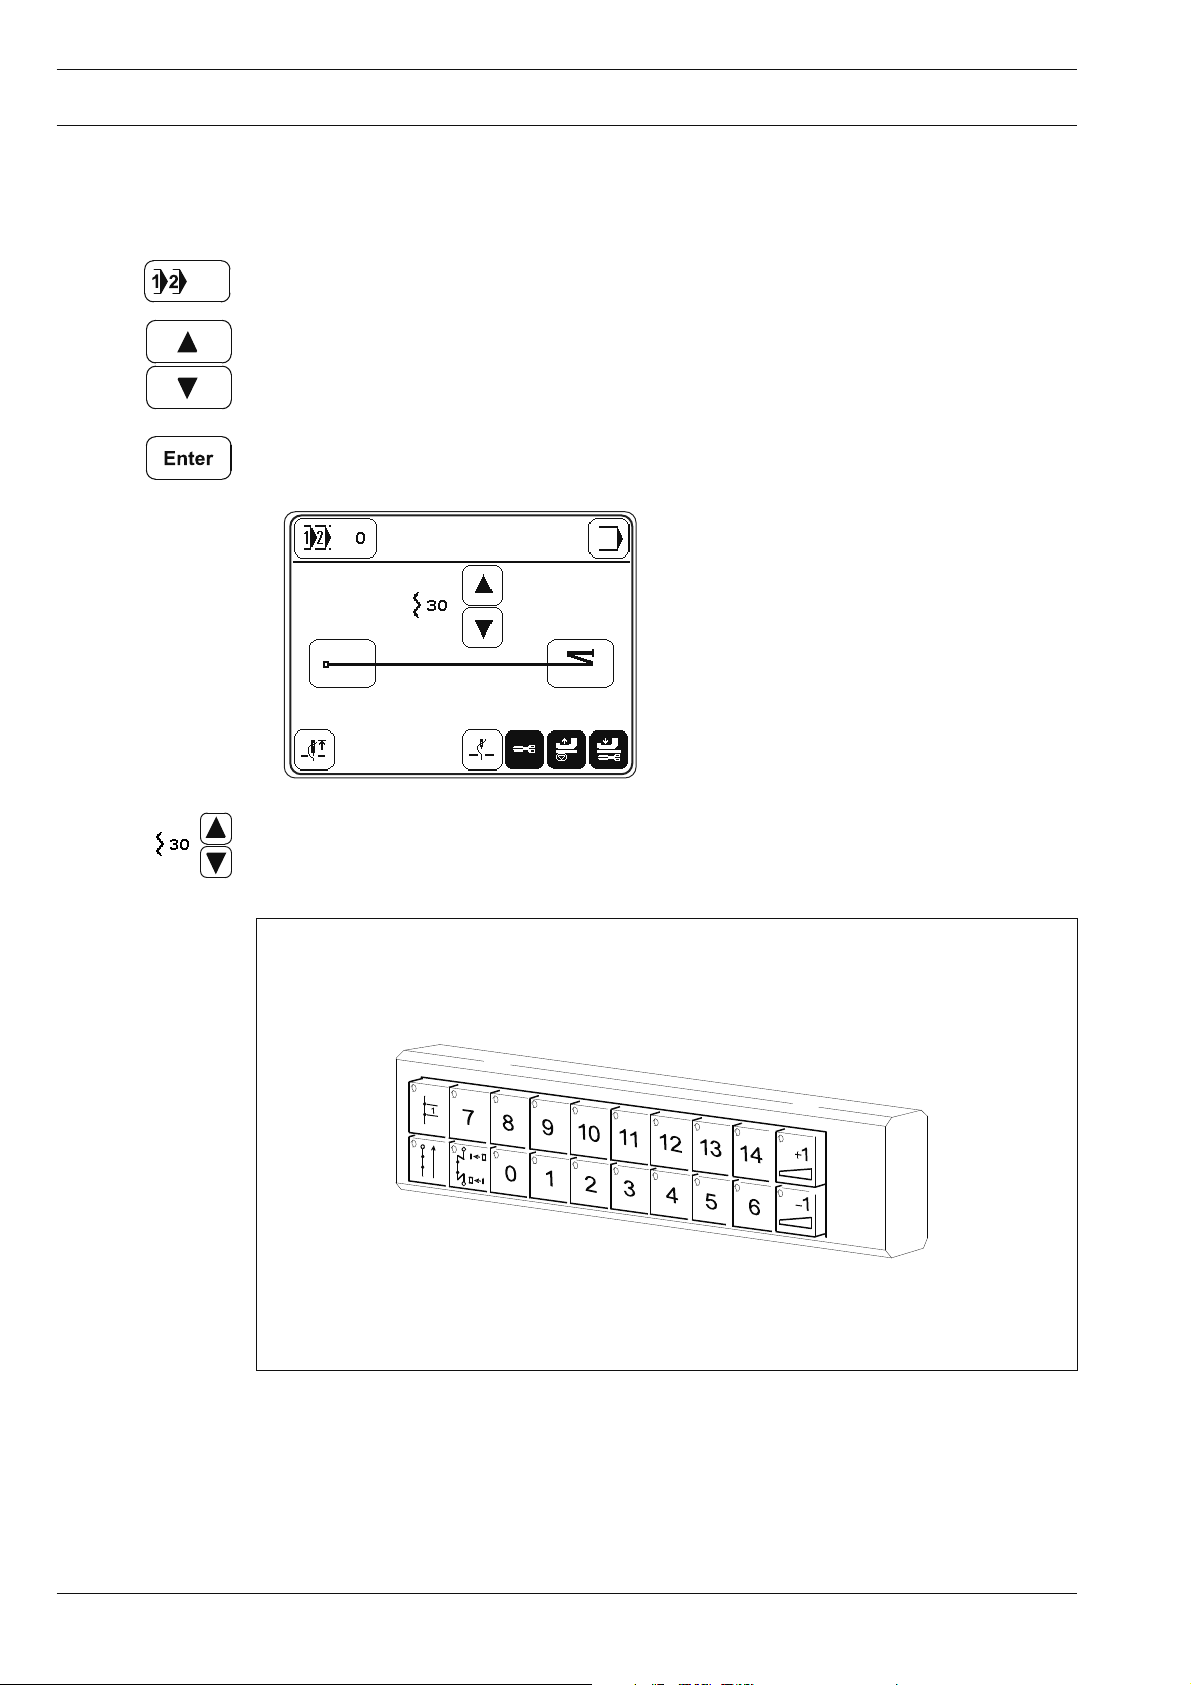
Number keys 0 - 14
The previously allocated amount of fullness is called up by pressing a key. ●
When two neighbouring number keys are pressed simultaneously, the corresponding
average value is selected.
In the manual sewing mode, the fullness can be allocated to the individual keys. The ●
current fullness value (which can be set on the touch-screen) is allocated to a key if it is
pressed for a long time (>3s). A bleep signalizes that the value has been saved.
Following values are pre-set and can be altered as described above.
Key 0: No fullness will be applied.
Key 14: Maximum fullness is selected.
The fullness values are designed for a basic stitch length of 2.5 mm. When se-
wing with shorter stitch lengths, the gathering intensity is increased, with lon-
ger stitch lengths it is reduced accordingly.
8
Page 9
Installation and commissioning
3 Installation and commissioning
The machine must only be mounted and commissioned by qualifi ed personnel!
All relevant safety regulations are to be observed!
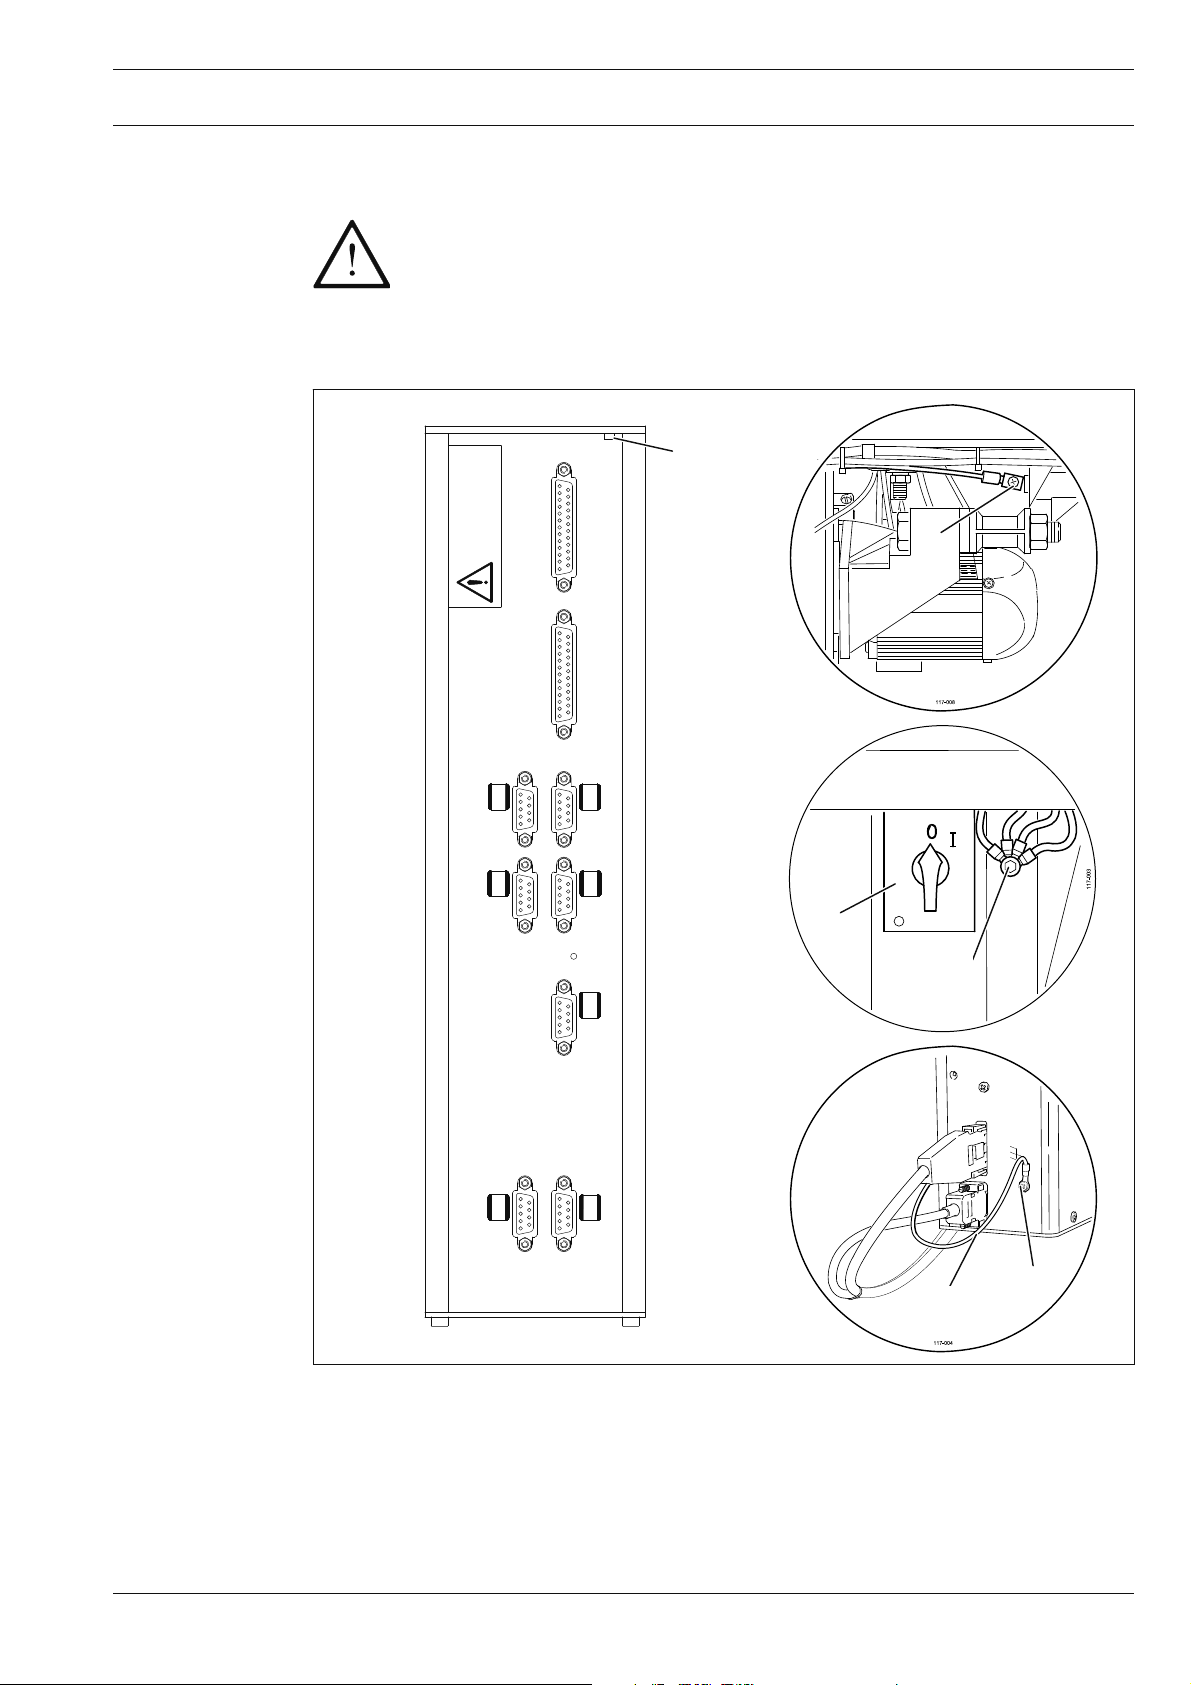
3.01 Connecting the plug-in connections and earth cables
C
ACHTUNG
ATTENTION
Vertauschungsgefahr
Danger of exchange
SSI
X1/B
Sollwertgeber
X11/B
Ausgänge
Eingänge
X13
X5
RS 232
X1/A
CAN-BUS
X11/A
Fadenwächter
X15
D
1
A
SM1
X4/B
SM2
X4/A
B
2
Fig. 3 - 01
Connect all plugs as labelled to the control box . ●
Screw the earth cable from the sewing head to earth point ● A.
With an earth cable connect earth point ● C and D to earth point A.
Screw the earth cable from the main switch ● 1 to earth point A.
Screw the earth cable ● 2 from the motor to earth point B.
9
Page 10
Installation and commissioning
3.02 Basic position of the machine drive unit
3
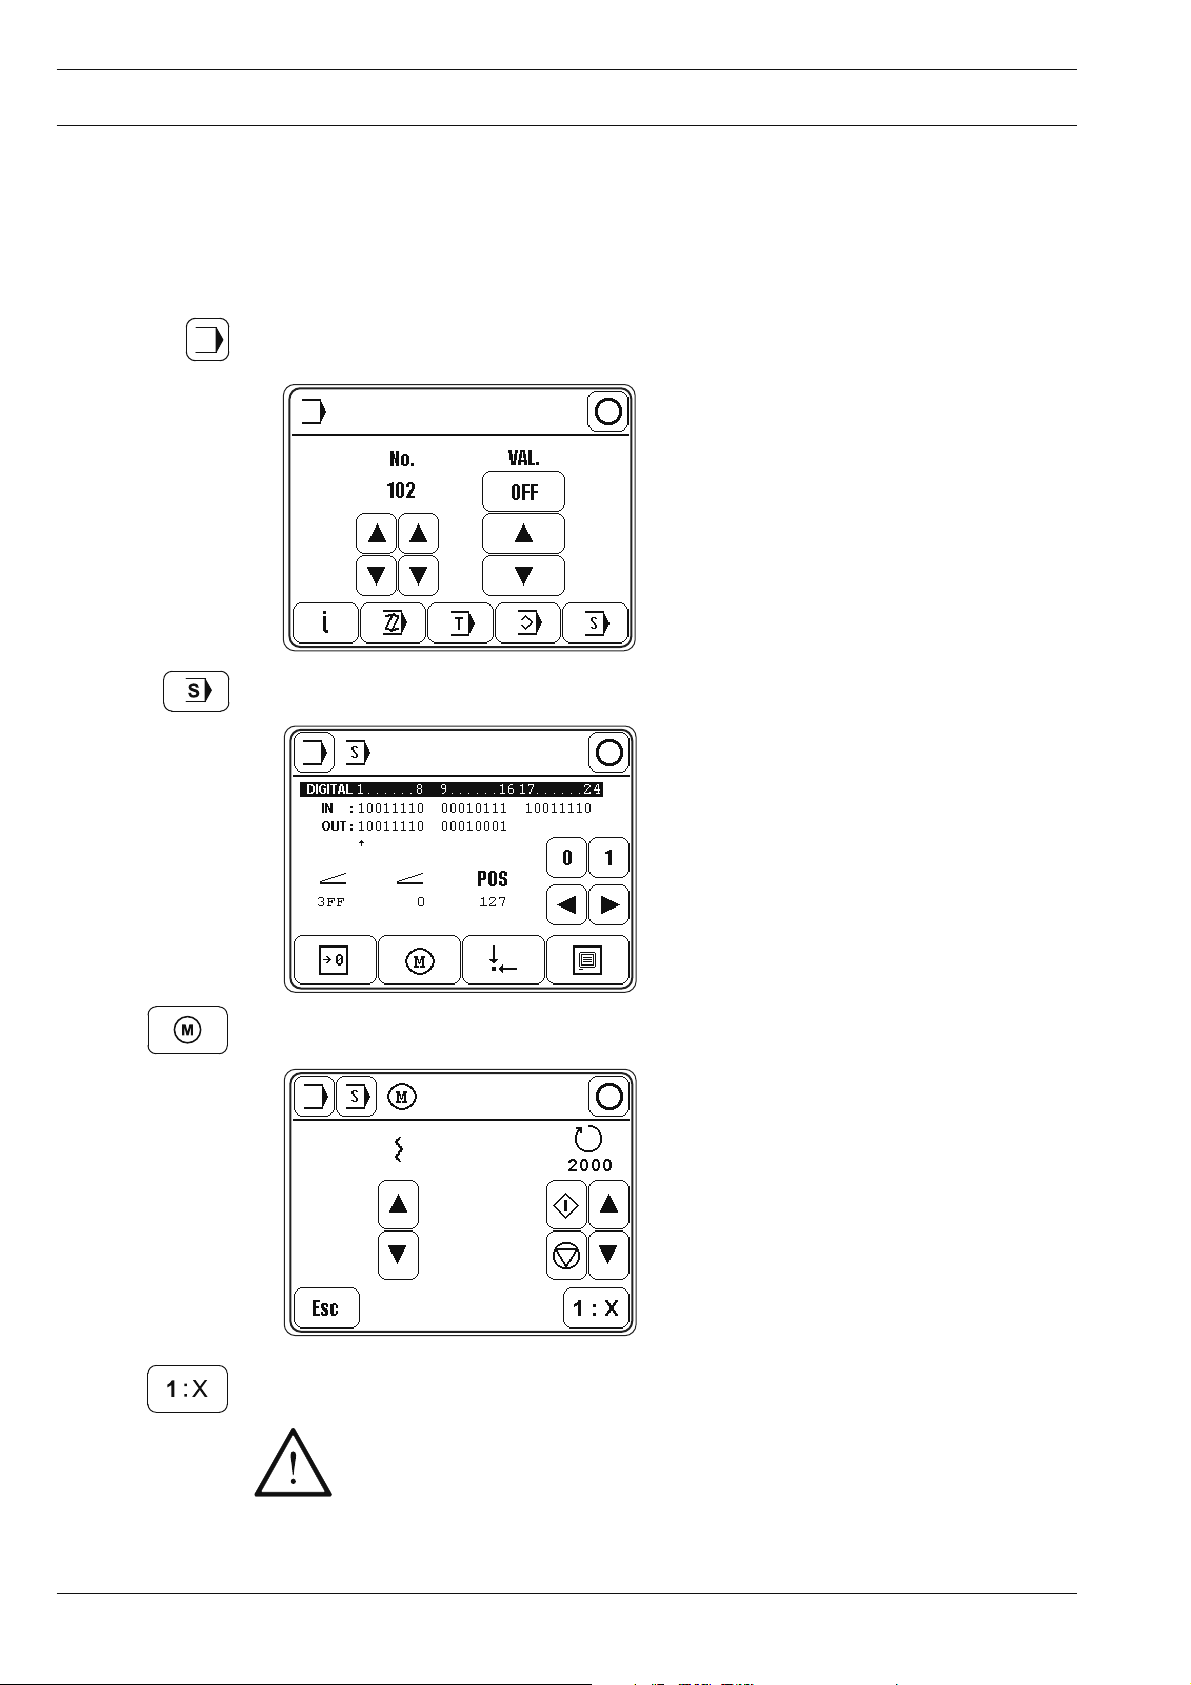
.02.01 With control unit P320 ED
Switch on the machine. ●
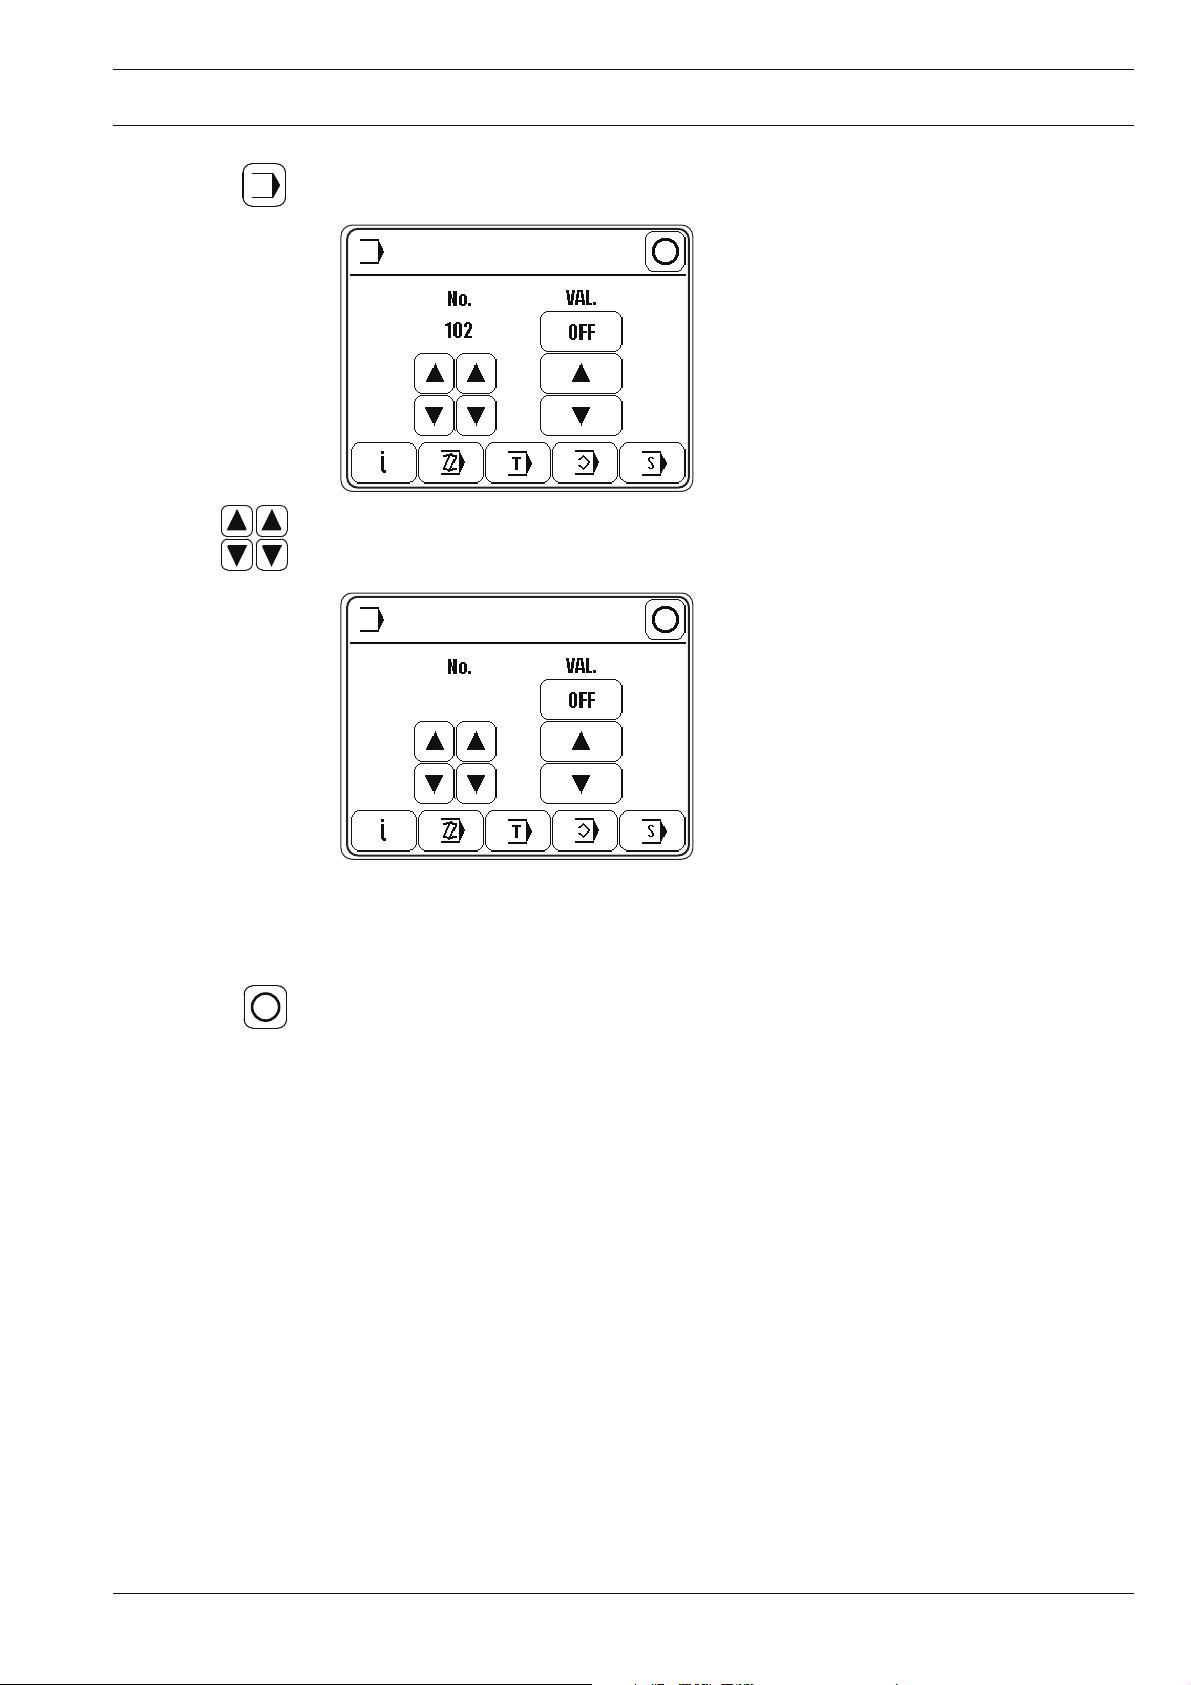
Call up the input mode. ●
Call up the service function. ●
Call up the motor service function. ●
10
Press this key for the machine to learn the transmission ratio. ●
Attention!
After this key has been operated, the machine sews 3 stitches at a speed of
approx. 360 rpm.
Page 11
Installation and commissioning
Call up the input mode. ●
Call up parameter " ● 301".
301
Turn the balance wheel in the direction of rotation until the needle point, descending ●
from above, is fl ush with the top edge of the needle plate.
Conclude the input. ●
Switch off the machine. ●
11
Page 12
Installation and commissioning
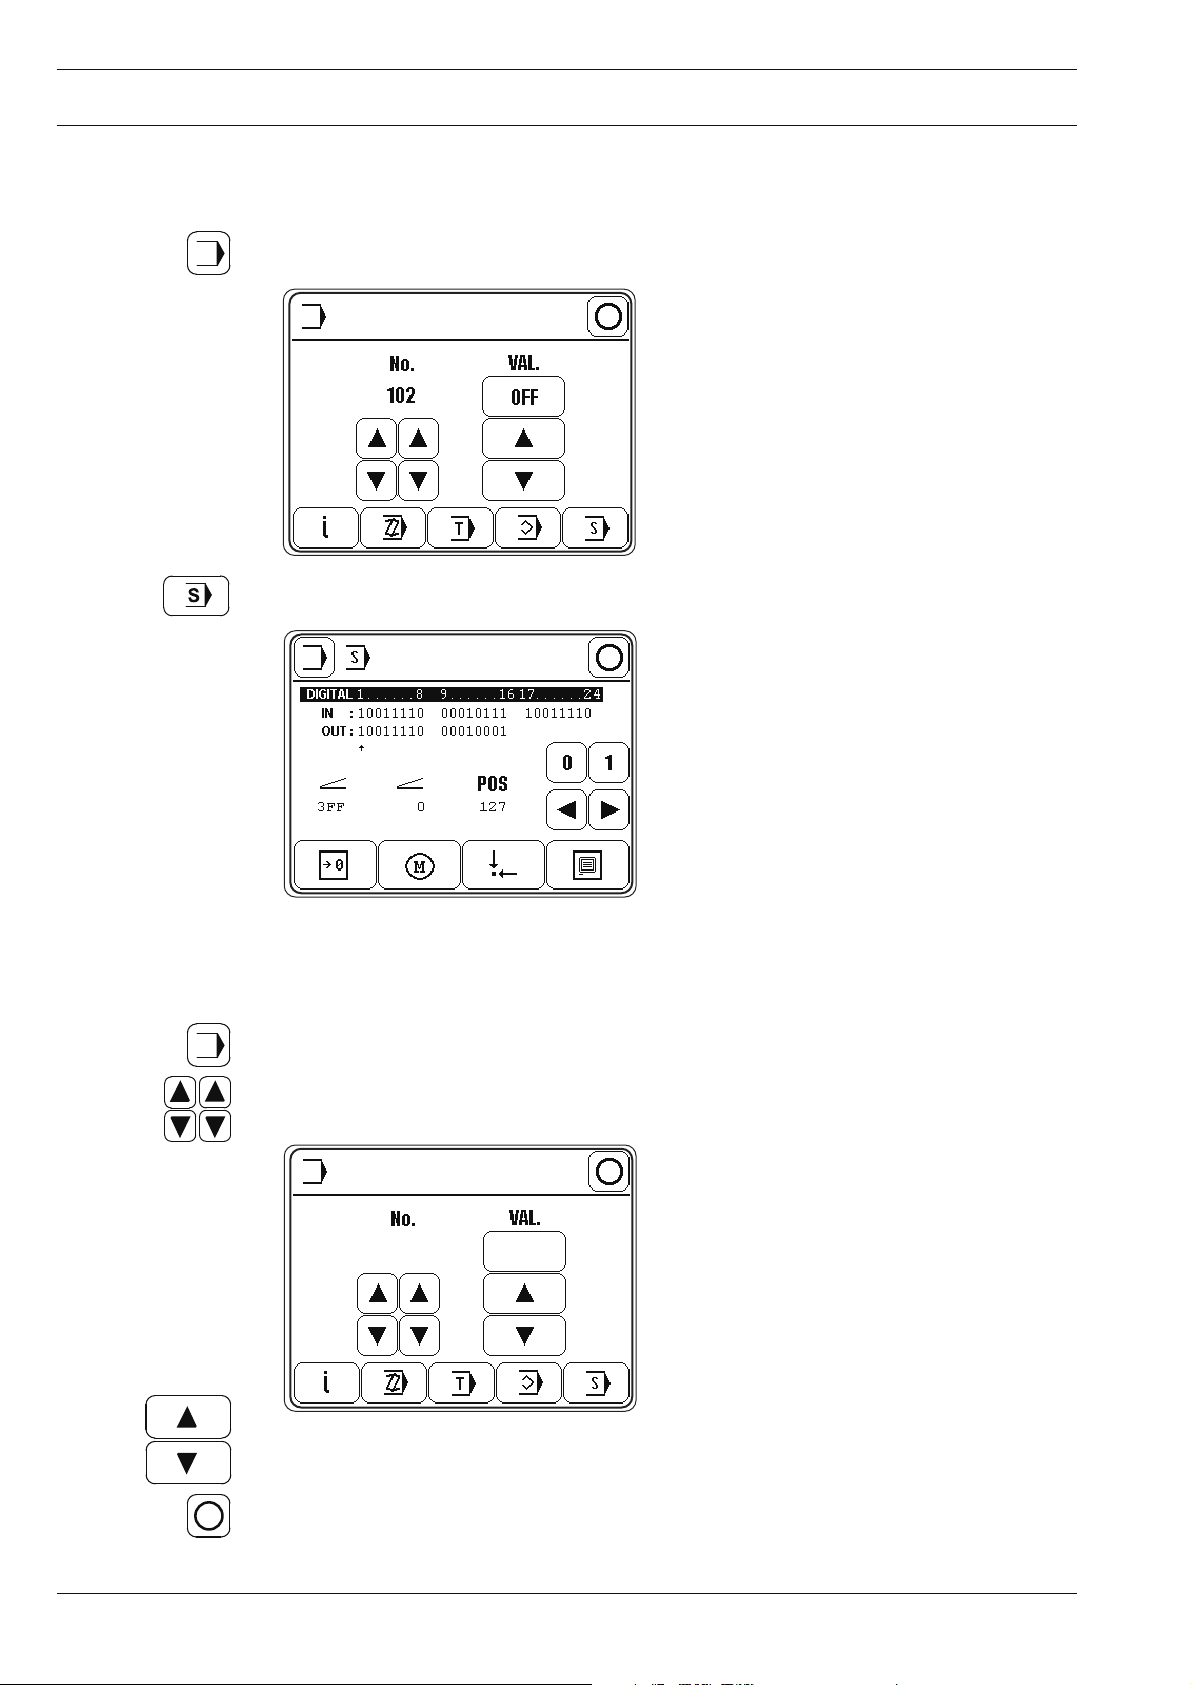
3.02.02 With control unit P323 MS
Switch on the machine. ●
Call up the input mode. ●
Call up the service function. ●
By turning the balance wheel in the sewing direction, ascertain the number of incre- ●
ments per turn (this maximum value appears under "POS" in the display before the reading jumps back to "0".
Call up the input mode. ●
Call up parameter " ● 721".
721
Enter the calculated max. value. ●
127
12
Conclude the input. ●
Switch off the machine. ●
Page 13
Preparation
4 Preparation
All regulations and instructions in this Instruction Manual are to be observed!
Special attention is to be paid to the safety regulations!
All preparation work is only to be carried out by appropriately trained personnel.
4.01 Selecting the program number
Switch on the machine. ●
Call up the program number input menu. ●
Select the desired program number. ●
Confi rm the selection and quit the selection menu. ●
The sewing method is determined by the program number selected,
see Chapter 5 Sewing.
Program number 0: Manual sewing
Program number 1 and 2: Sewing with fi xed programs
Program number 3 to 49: Programmed sewing
13
Page 14
Preparation
4.02 Inputting fullness
Switch on the machine. ●
Call up the program number input menu. ●
Select program number " ● 0"..
Confi rm the selection and quit the selection menu. ●
Enter the desired value with the appropriate arrow keys. ●
Fig. 4 - 01
If necessary, allocate the current fullness amount to one of the number keys ( ● 0-14) on
the keyboard. To do so, press the required key until a beep is heard.
14
Page 15
Preparation
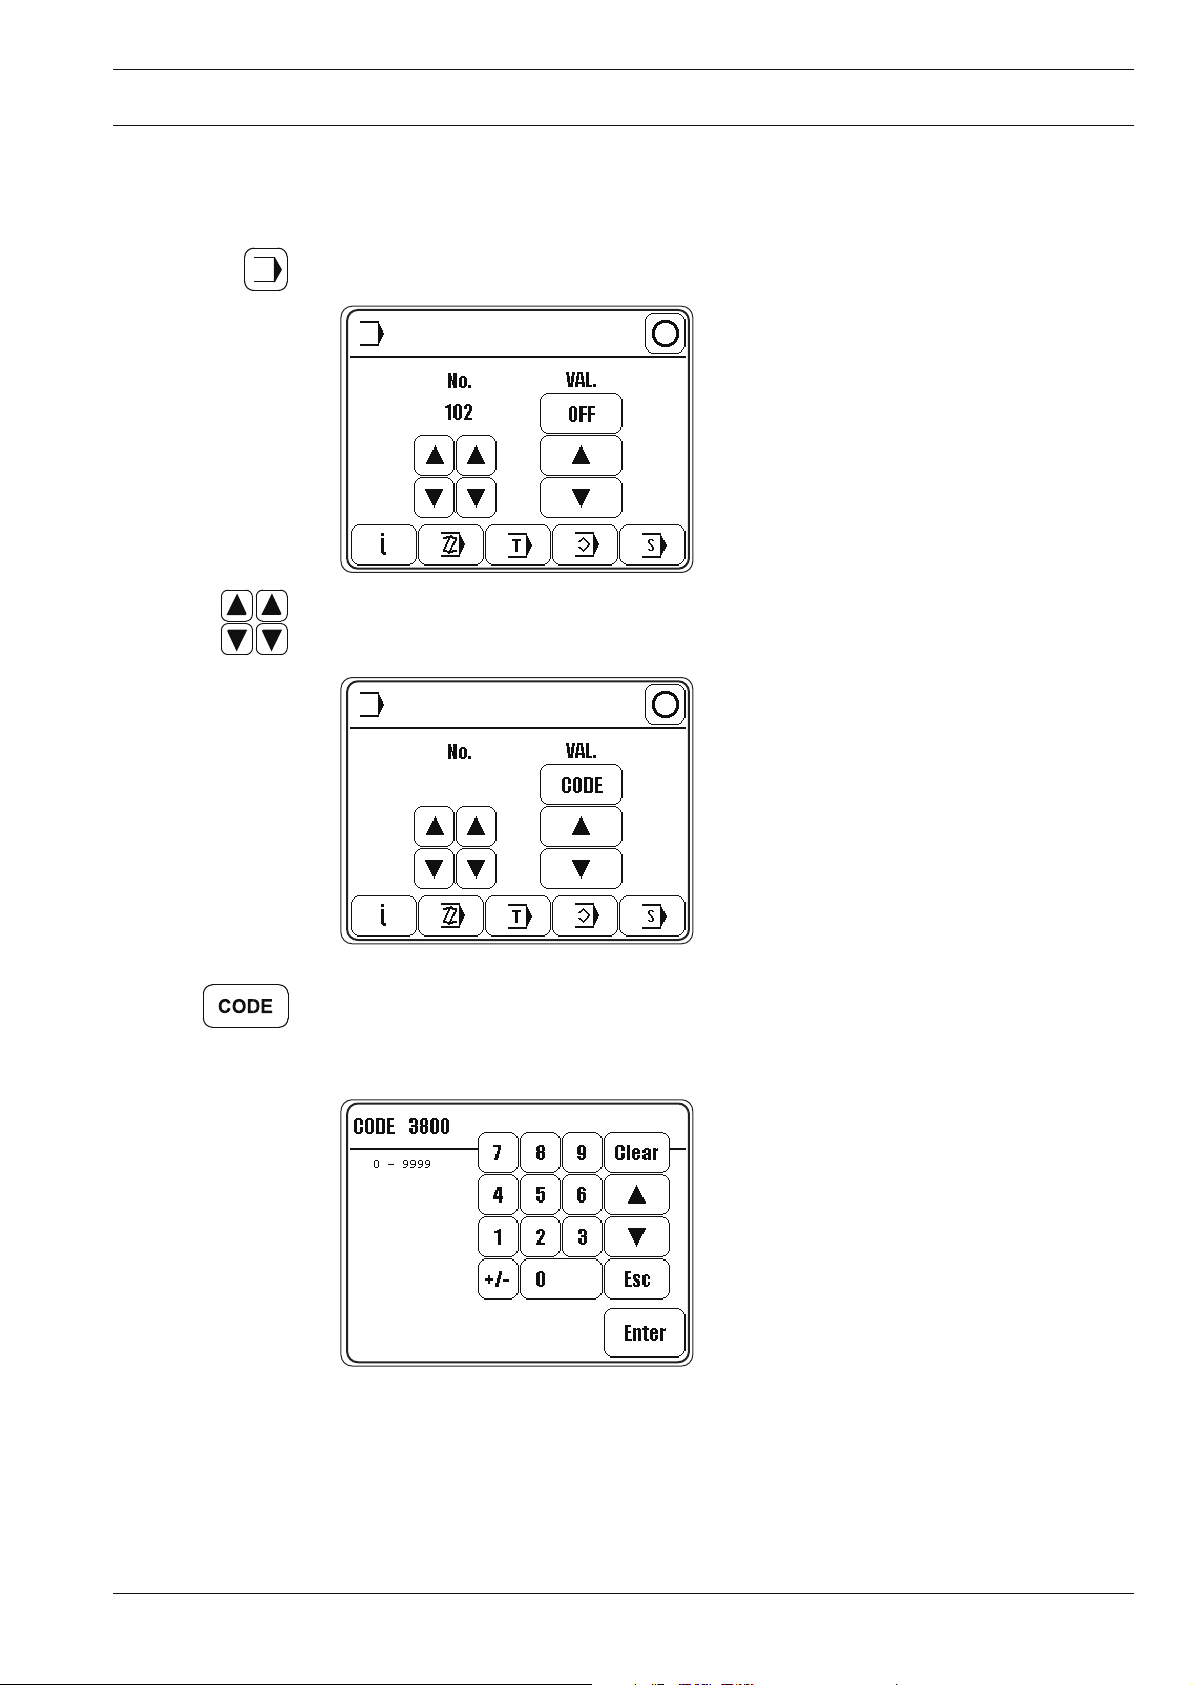
4.03 Entering / altering the code number
Switch on the machine. ●
Call up the input mode. ●
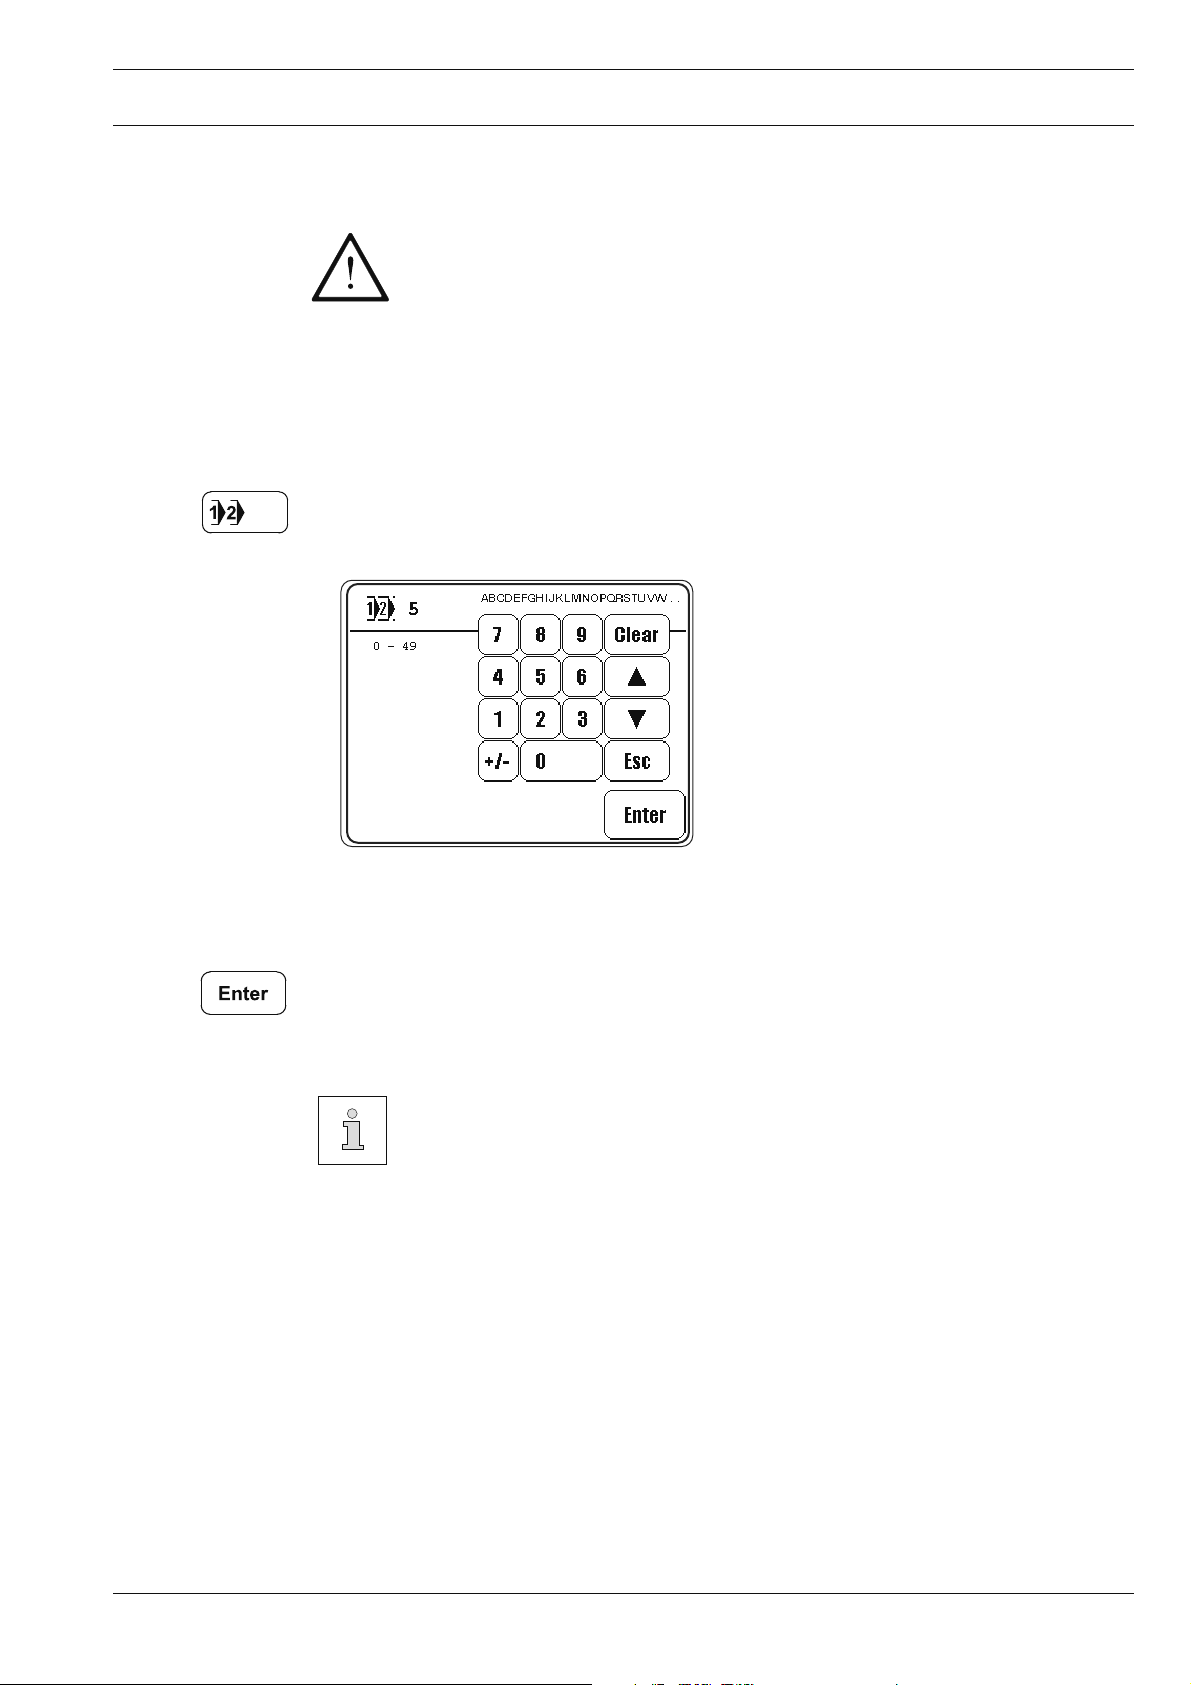
Select parameter " ● 800".
800
Select the code number input menu. ●
Enter the code number on the number keys (factory code setting is " ● 3800").
15
Page 16
Preparation
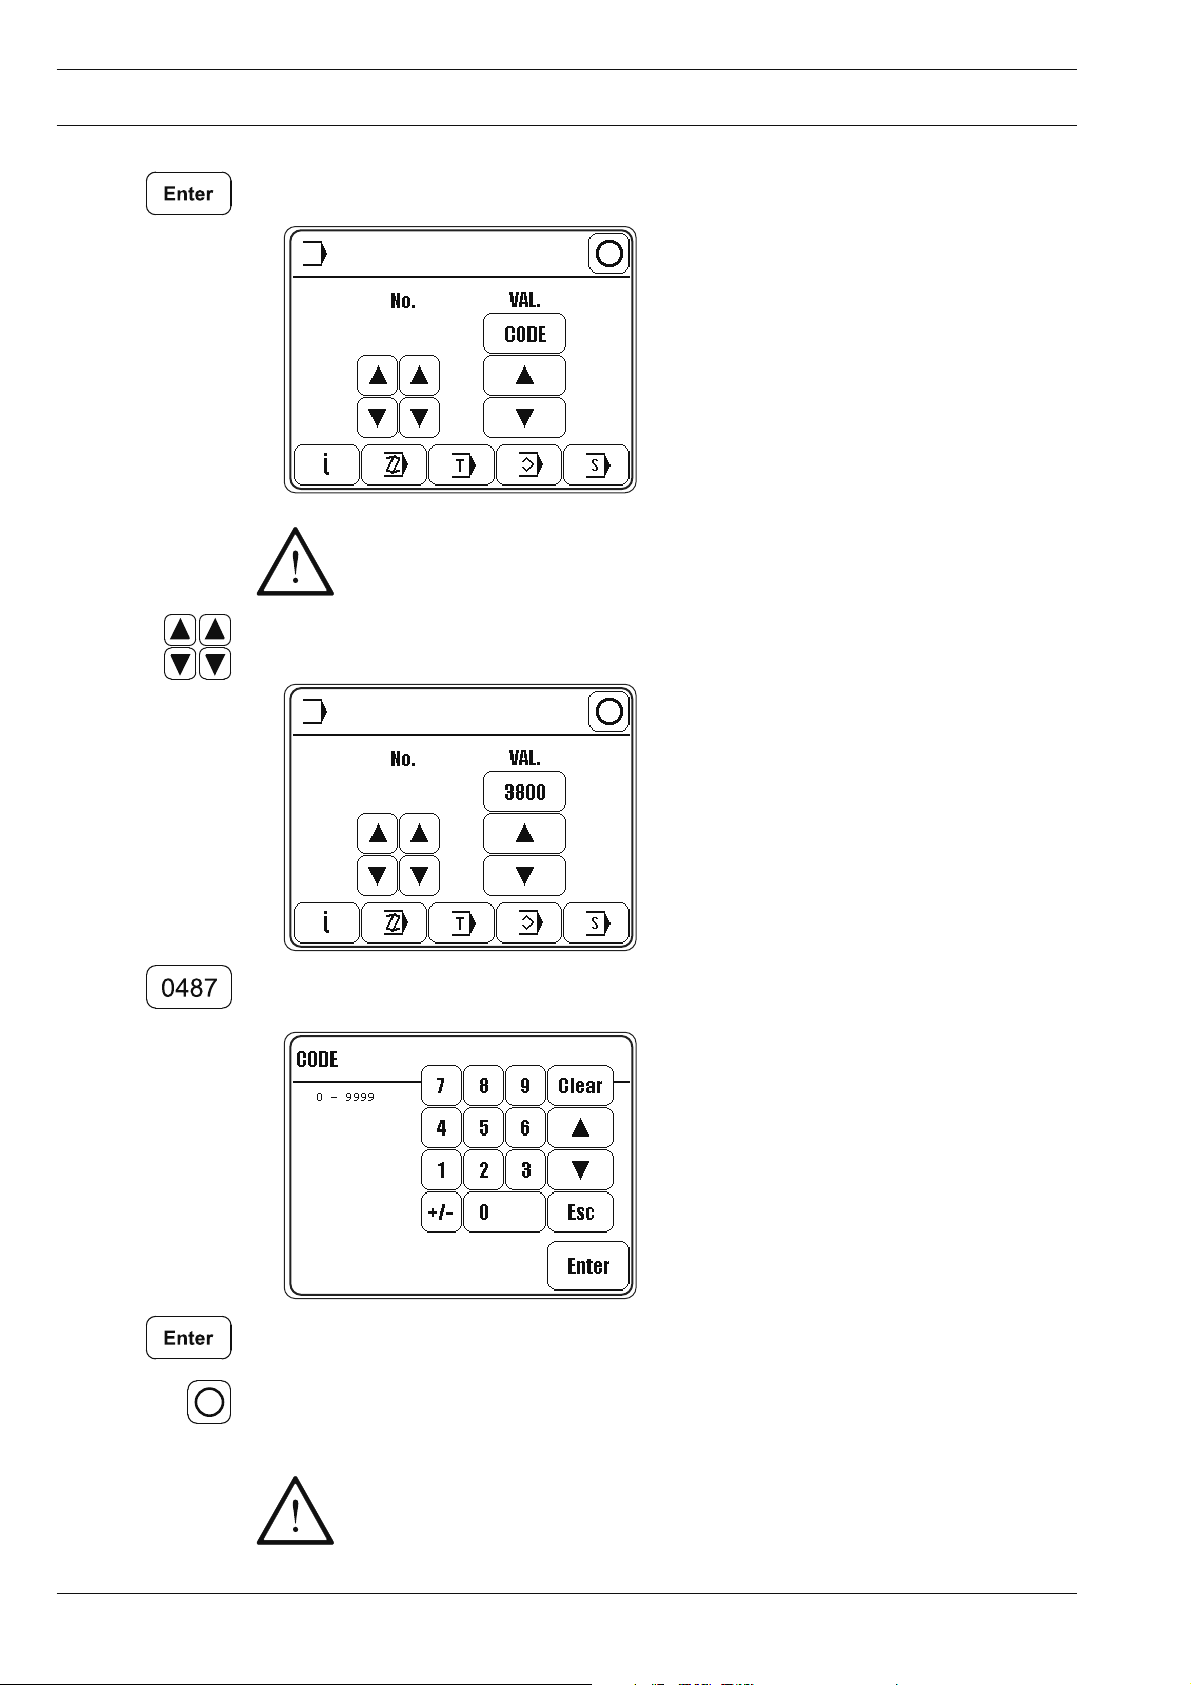
Take over the code number entered. ●
800
The code input remains stored until the machine is switched off at the main
switch. As long as the machine is not switched off, all parameters are freely ac-
cessible without having to enter the code number again.
Select parameter " ● 810"
800
Call up the code number input menu and enter the desired code number. ●
0487
Take over the new code number. ●
16
Conclude input. ●
Do not forget the code!
Without the appropriate code, the protected functions cannot be called up!
Help is then only possible through PFAFF service staff.
Page 17
Preparation
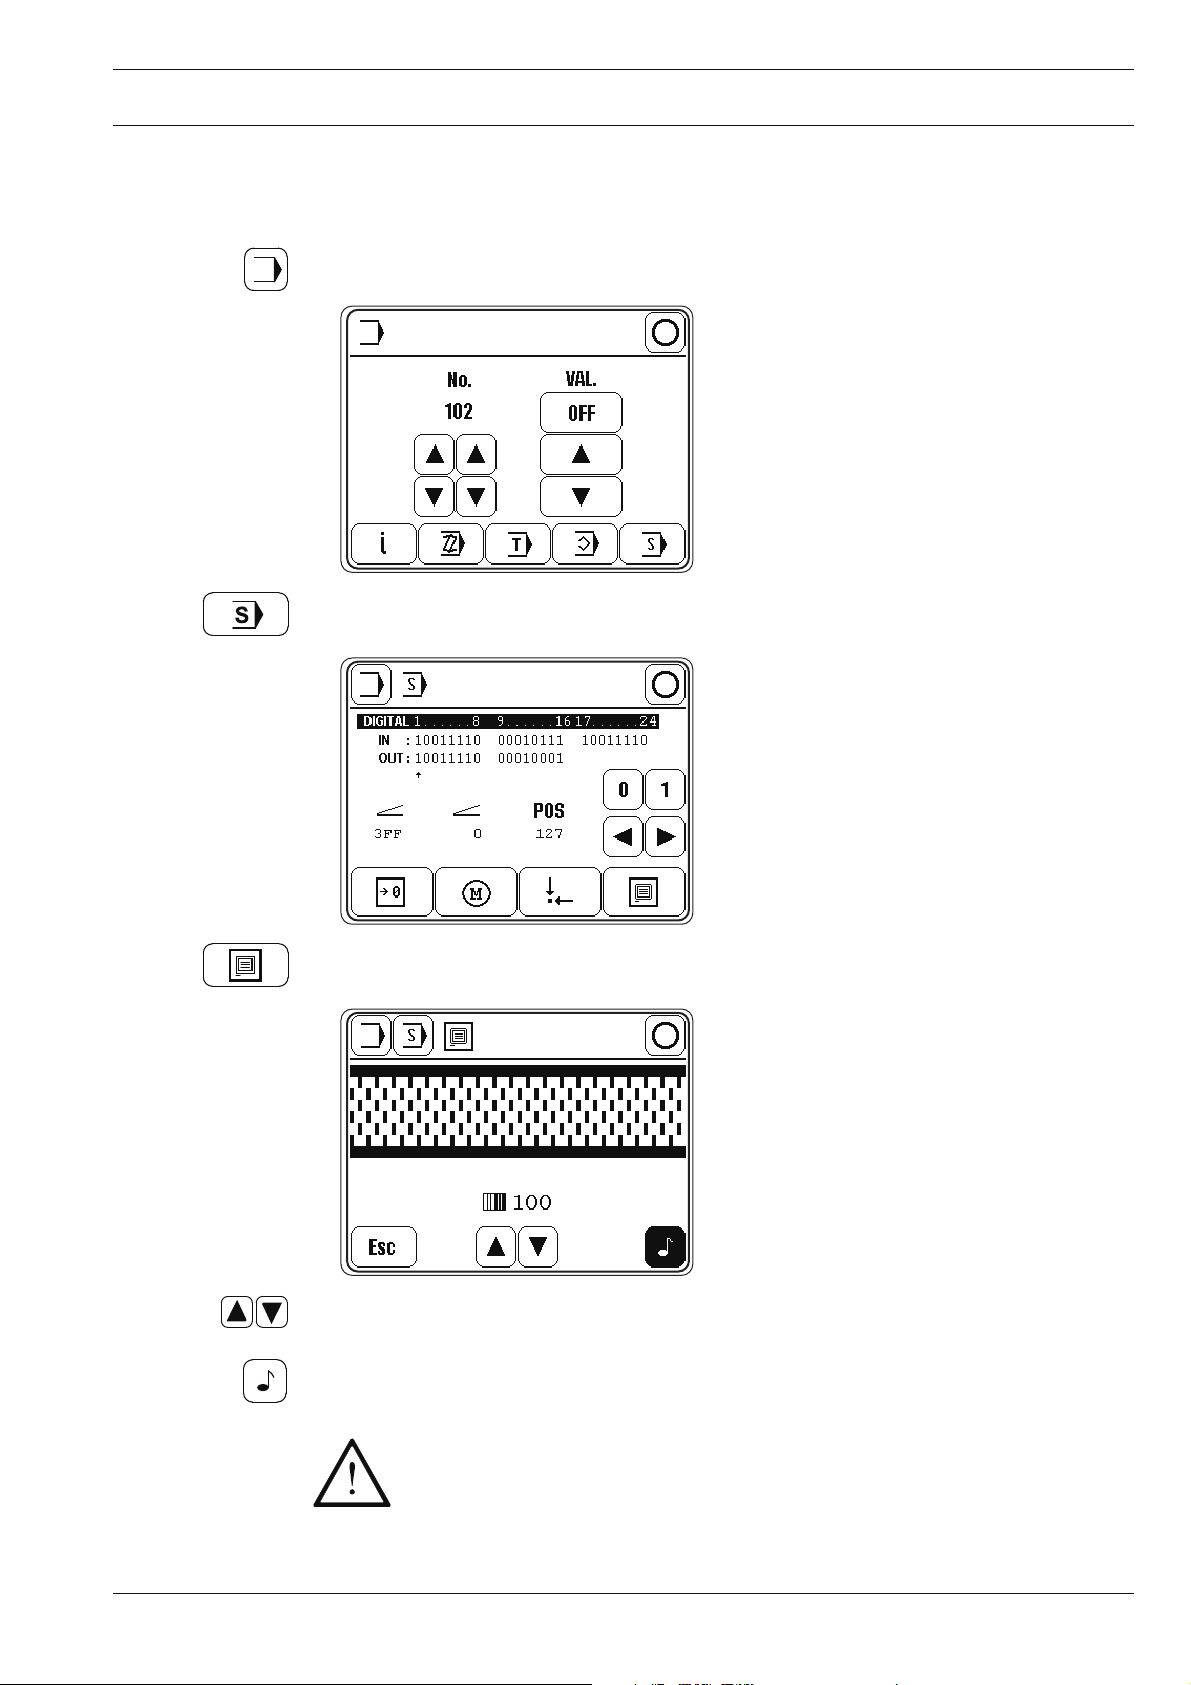
4.04 Adjusting the control panel
Switch on the machine. ●
Call up the input mode. ●
Select the service menu. ●
Select control panel functions. ●
Change the display contrast. ●
Switch the key tone off or on. ●
Never reduce the display contrast to the extent, that the display can no longer
be read!
17
Page 18
Sewing
5 Sewing
5.01 Manual sewing
In the sewing mode all relevant settings for the sewing operation are displayed on the
screen and can be altered with the corresponding functions.
In the sewing mode a difference is made between manual sewing, sewing with fi xed pro-
grams and programmed sewing.
The selection is made with the corresponding program number:
0: Manual sewing
1 and 2: Sewing with fi xed programs
3 to 49: Programmed sewing
(with up to 15 seam sections for both the left and right seam)
In the manual sewing mode the fullness values are displayed on the control panel and can
be altered directly by using appropriate function, just as the functions at the beginning and
the end of the seam and the needle and sewing foot positions.
Switch on the machine and select program number "0", see Chapter 4.01 Selecting the pro-
gram number.
18
Explanation of the functions
Program selection
This opens the menu for entering the program number, see Chapter 4.01 Selecting the program number.
Input mode
Exit the sewing mode and select the input mode.
Fullness
Alters the value for fullness, see Chapter 4.02 Inputting fullness
Seam start
Opens the menu for entering the functions at the beginning of the seam, see Chapter
5.01.01 Entering the seam start and seam end functions in the manual sewing mode.
Page 19

Sewing
Seam end
Opens the menu for entering the functions at the end of the seam, see Chapter 5.01.01 Entering the seam start and seam end functions in the manual sewing mode.
Needle raised
Moves the needle to its highest position
Needle position raised
When this function is activated, the needle moves to its highest position after sewing stops.
Thread trimming
When the function is activated, enables thread trimming with the pedal function.
Sewing foot raised
When this function is activated, the sewing foot is raised after sewing stops.
Sewing foot lowered after thread trimming
When this function is activated, the sewing foot is not raised after thread trimming.
Sewing is carried out with the pedal functions. ●
19
Page 20

Sewing
5.01.01 Entering the seam start and seam end in manual sewing mode
After the appropriate function has been selected, the menu for entering the value for con-
densed stitches or for backtacks appears.
PFAFF 487, 489 PFAFF 5487
PFAFF 487 ● , 489
Switch on the single start backtack function and call up the menu for entering the values.
(1 – 9 stitches can be entered).
or
Switch on the double start backtack function and call up the menu for entering the values. ●
(1 – 9 stitches can be entered).
PFAFF 5487 ●
Switch on the condensed stitches function and call up the menu for entering the values.
(1 – 30 stitches can be entered).
In each case change the number of stitches for the condensed stitches or the number of ●
backtack stitches with the appropriate arrow keys.
Change the value for the maximum speed during the condensed stitches or backtacking ●
operation (100 – 1500 spm can be entered).
Choose whether the condensed stitches or the backtacking operation at the beginning of ●
the seam should be carried out at a fi xed speed (normal symbol) or at a pedal-controlled
speed (inverse symbol).
Conclude the input. ●
20
In the manual sewing mode, the functions for the seam end are entered in the same way ●
as those for the seam start.
Page 21

Sewing
5.02 Sewing with fi xed programs
Fixed programs are stored under the program numbers 1 and 2.
The fi xed programs are used for the quick and easy production of seams with different
amounts of fullness. When sewing with fi xed programs, 2 or 3 seam sections are sewn af-
ter each other. With the knee switch it is possible to move to the next section. The fi xed pro-
grams are designed as cyclic running programs, i.e. at the end of the last seam section, the
machine moves back to the fi rst seam section. The fullness value can be selected for each
seam section, the settings for needle and foot positions apply to all sections and can be alte-
red at any time with the appropriate function.
The fullness values are designed for a basic stitch length of 2.5 mm. When se-
wing with shorter stitch lengths, the gathering intensity is increased, with lon-
ger stitch lengths it is reduced accordingly.
Switch on the machine and select program number " ● 1" or "2", see Chapter 4.01 Selecting
the program number.
Explanation of the displays and functions
Program selection
This opens the menu for entering the program number, see Chapter 4.01 Selecting the
program number.
Seam section
Shows the number of seam sections in the sewing program.
Input mode
Exit the sewing mode and select the input mode.
Fullness
Alters the fullness value, see Chapter 4.02 Inputting fullness.
Seam start
Opens the menu for entering the functions at the beginning of the seam, see Chapter
5.01.01 Entering the seam start and seam end functions in the manual sewing mode.
Seam end
Opens the menu for entering the functions at the end of the seam, see Chapter 5.01.01 Entering the seam start and seam end functions in the manual sewing mode.
21
Page 22

Sewing
Needle raised
Moves the needle to its highest position
Needle position raised
When this function is activated, the needle moves to its highest position after sewing stops.
Thread trimming
When the function is activated, enables thread trimming with the pedal function.
Sewing foot raised
When this function is activated, the sewing foot is raised after sewing stops.
Sewing foot lowered after thread trimming
When this function is activated, the sewing foot is not raised after thread trimming.
Sewing is carried out with the pedal functions. ●
22
Page 23

Sewing
5.03 Programmed sewing
With the program numbers 3 - 49 it is possible to call up previously programmed seams. In
programmed sewing all seam sections for pre-gathering a sleeve are set in one seam pro-
gram. The information about the seam program, such as program number, number of pro-
grammed seam sections, programmed comments is displayed.
For better orientation a seam sketch is shown with the programmed seam sections. The
seam start, seam end, the seam sections already sewn, the current seam section and the
seam sections still to be sewn are illustrated by symbols and different types of lines with dif-
ferent thicknesses. For the current seam section the corresponding parameters for seam
section number, fullness with fullness adjustment and the number of stitches (length of
seam section) are displayed. To control the seam sequence, the current seam (left or right
seam) and the automatic changeover from left to right seam can be switched over or swit-
ched on.
Switch on the machine, select the desired program number from " ● 3" to "49", see
Chapter 4.01 Selecting the program number.
Explanation of the displays and functions
Program selection
This opens the menu for entering the program number, see Chapter 4.01 Selecting the program number.
Seam section right/left
Shows the number of seam sections in the seam program for the right/left sleeve seam.
Input mode
Exit the sewing mode and select the input mode.
Fullness
Shows the current fullness value.
Current seam section
Shows the current seam section.
23
Page 24

Sewing
Current seam
This function is used to select and display the current seam (right/left).
Automatic seam change
When this function is activated, the machine changes automatically from the right to left seam.
Needle raised
Moves the needle to its highest position
Program interruption
Interrupts the program sequence, see Chapter 5.03.01 Program interruption
Thread trimming
When the function is activated, enables thread trimming with the pedal function.
Sewing foot raised
When this function is activated, the sewing foot is raised after sewing stops.
Sewing foot lowered after thread trimming
When this function is activated, the sewing foot is not raised after thread trimming.
Sewing is carried out with the pedal functions. ●
24
Page 25

Sewing
5.03.01 Program interruption
With the "program interruption" function the programmed seam sequence is interrupted ●
(e.g. if the thread breaks).
Interrupt program sequence. ●
If necessary, tact forwards or backwards through the sections of the seam program. ●
If necessary, change the values and carry out the other functions as in manual sewing, ●
see Chapter 10.01 Manual sewing.
If necessary, call up programmed sewing again.. ●
5.04 Error messages
If an error occurs, the text "ERROR" appears on the display, together with an error code. An
error message is caused by incorrect settings, defective elements or seam programs and by
overload conditions.
For an explanation of the error codes see Chapter 7.05 Explanation of the error messages.
Eliminate the error. ●
Confi rm error elimination. ●
25
Page 26

Input
6 Input
In the input mode the functions parameter input, information, creating/adjusting a sewing
program, teach-in, program administration and service are available.
Switch on the machine. ●
Call up the input mode. ●
Explanation of the functions
Sewing mode
Quit the input mode and call up the sewing mode.
Parameter selection
Select the hundred and unit fi gures of the desired parameters, see Chapter 7.02.02 Example of a parameter input.
Altering the parameter value
Change the value of the selected parameter, see Chapter 7.02.02 Example of a parameter
input.
Software information
Calls up information about the current machine software.
Creating/adjusting a program
Opens the menu for entering or altering a seam program, see Chapter 6.01.02 Seam program input with the "Creating/adjusting a program" function.
Teach In
Opens the menu for entering seam programs after sewing a sample, see Chapter 6.01.03
Seam program input with the "Teach in" function.
26
Program administration
Opens the menu for seam program administration, see Chapter 6.03 Seam program administration.
Service
Opens the service menu, see Chapter 7.08 Service menu.
Page 27

Input
6.01 Seam program input
Seam programs can be created by entering parameters in the "Creating/adjusting a seam
program" function, or by sewing a sample with the "Teach in" function.
Irrespective of which function is being used, fi rst of all it is necessary to select the program
number and the basic settings of the seam program, which is to be sewn.
6.01.01 Basic settings for seam program input
The basic settings in the "creating/adjusting a program" and the "teach-in" functions are the
same.
Switch on the machine. ●
Call up the input mode. ●
Call up the "Creating/adjusting a seam program" or the "Teach in" function. ●
If necessary, change the selected program number and confi rm the selection. ●
If applicable, enter or change a comment. ●
27
Page 28

Input
Set the seam type (by pressing the appropriate symbol several times until the appropria- ●
te seam type is displayed).
Description of the symbols:
Sewing program with left and right seam, beginning with the right seam.
Sewing program with left seam only.
Sewing program with right seam only.
Sewing program with left and right seam, beginning with the left seam.
Conclude the input of the basic settings and change to the seam section input, see Chap- ●
ter 6.01.02 Seam program input with the "Creating/adjusting a program" function or
Chapter 6.01.03 Seam program input with the "Teach in" function.
The input can also be concluded by calling up the sewing mode. In this case
the seam program input is concluded and the machine changes to programmed
sewing.
28
Page 29

Input
6.01.02 Seam program input with the "Creating/adjusting a program" functionen"
With this function the seam program is entered by entering or changing the appropriate va-
lues on the control panel. This type of seam program input is particularly suitable for adjus-
ting existing seam programs.
Switch on the machine. ●
Call up the input mode. ●
Call up the "creating/adjusting a program" function. ●
Carry out the basic settings and conclude with the "Enter" function, see Chapter ● 6.01.01
Basic settings for seam program input.
Alter the fullness, see Chapter ● 4.02 Inputting fullness.
Alter the maximum speed for the current seam section. ●
These functions are used to scroll through the current seam program. ●
The current seam section is displayed accordingly, in addition to all the other current
values.
Enter the seam start functions, see Chapter ● 6.01.04 Entering the functions at the be-
ginning of the seam during seam programming.
Enter the functions for the end of the seam section, see Chapter ● 6
end of the seam section when programming the seam.
Select a seam type ●
It is only possible to select the right or left seam, if the seam type "right and left seam"
was selected in the basic setting, see Chapter 6.01.01 Basic settings for seam program
input.
.01.05 Entering the
29
Page 30

Input
If necessary, insert the seam section. ●
The current seam section is copied and all following seam sections are set one place
back.
If necessary, delete the current seam section. ●
If necessary, conclude the input of the current seam and store the parameter for the ●
other seam in the reverse order (mirror seam).
Set the seam end or program end. ●
If entering only one seam (only the right or only the left seam) the program end is set in
the desired seam section.
In the same way as the program end, the seam end is set when entering the right and
left seam. The seam end is set in the fi rst seam and the program end in the second
seam.
Conclude the input of the fi rst seam section and change to the next seam section. ●
Conclude the input and change to the input of the basic settings. ●
Conclude the input and change to programmed sewing. ●
30
Page 31

Input
6.01.03 Seam program input with the "Creating/adjusting a program" function
With this function the seam program is entered by sewing a sample. A new program is al-
ways created, i.e. if an existing program is selected, this will be overwritten.
Switch on the machine. ●
Call up the input mode. ●
Call up the "teach-in" function. ●
Carry out the basic settings and conclude with the "Enter" function, see Chapter ● 6.01.01
Basic settings for seam program input.
Before sewing starts the following displays and functions appear on the screen.
Enter the seam start functions, see Chapter ● 6.01.04 Entering the functions at the be-
ginning of the seam during seam programming.
Enter the fullness, see Chapter ● 4.02 Input
Enter the maximum speed for the current seam section. ●
Sew the fi rst seam section using the pedal function. ●
The number of stitches in the current seam section is counted and shown on the display.
After sewing starts, the following displays and functions are shown on the screen.
ting fullness.
31
Page 32

Input
By pressing Enter the seam section end is defi ned by stitch counting. ●
By operating the pedal in position "- ● 2", the seam section is ended by pedal operation
By operating the knee switch, the seam section is ended by knee switch operation, see ●
Chapter 2.01 Knee switch.
After the function has been called up, additional inputs can be made for the seam section ●
end or incorrect inputs can be corrected, see Chapter 6.01.05 End of seam section in-
put during seam programming.
Condensed stitches defi ned during the input of the functions for the end of the
seam section, will be carried out after the seam program input has been concluded. Up to 30 stitches will be sewn! Danger of injury in the needle area!
Set the seam end or program end. ●
If entering only one seam (only the right or only the left seam) the program end is set in
the desired seam section.
In the same way as the program end, the seam end is set when entering the right and
left seam. The seam end is set in the fi rst seam and the program end in the second
seam.
Conclude the input. ●
Conclude the input and change to the input of the basic settings. ●
Conclude the input and change to programmed sewing. ●
32
Page 33

Input
6.01.04 Entering the functions at the beginning of the seam during seam programming
After the appropriate function has been called up, the menu for entering the value of the
placement stitch appears. To begin with the condensed stitches function is not activated.
PFAFF 487, 489 PFAFF 5487
PFAFF 487 ● , 489
Switch on the single start backtack function and call up the menu for entering the values.
(1 – 9 stitches can be entered).
or
Switch on the double start backtack function and call up the menu for entering the values. ●
(1 – 9 stitches can be entered).
PFAFF 5487 ●
Switch on the condensed stitches function and call up the menu for entering the values.
(1 – 30 stitches can be entered).
In each case change the number of stitches for the condensed stitches or the number of ●
backtack stitches with the appropriate arrow keys.
Change the value for the maximum speed during the condensed stitches or backtacking ●
operation (100 – 1500 spm can be entered).
Choose whether the condensed stitches or the backtacking operation at the beginning of ●
the seam should be carried out at a fi xed speed (normal symbol) or at a pedal-controlled
speed (inverse symbol).
If necessary, sew the seam section in reverse (with activated function). ●
Conclude the input. ●
33
Page 34

Input
6.01.05 Entering the functions at the end of seam section during seam programming
After the appropriate function has been called up, the menu for entering the functions and
values for the end of the seam section without condensed stitches appears.
PFAFF 487, 489 PFAFF 5487
PFAFF 487 ● , 489
Switch on the single end backtack function and call up the menu for entering the values.
(1 – 9 stitches can be entered).
or
Switch on the double end backtack function and call up the menu for entering the values. ●
(1 – 9 stitches can be entered).
PFAFF 5487 ●
Switch on the condensed stitches function and call up the menu for entering the values.
(1 – 30 stitches can be entered).
In each case change the number of stitches for the condensed stitches or the number of ●
backtack stitches with the appropriate arrow keys.
Change the value for the maximum speed during the condensed stitches or backtacking ●
operation (100 – 1500 spm can be entered).
Switch the function for changing to the next seam section by pedal on or off. ●
Switch the function for changing to the next seam section by knee switch on or off. ●
Enter or change (with the number keys or arrow keys) the number of stitches for the ●
seam section.
34
Execute or do not execute the automatic sewing stop function at the end of the seam ●
section.
Switch the "sewing foot raised" function on or off, see Chapter ● 5.01 Manual Sewing.
Page 35

Input
Switch the "thread trimming" function on or off, see Chapter ● 5.01 Manual Sewing.
Switch the "needle raised" function on or off, see Chapter ● 5.01 Manual Sewing.
Conclude the input and change to programmed sewing. ●
It is not possible to set every combination of functions.
All the activated functions are shown as inverse symbols.
35
Page 36

Input
6.02 Examples of how to create a seam program
6
.02.01 Example of a seam program input with the "creating/adjusting a program"
function
The program to be created should
- have 3 seam sections and
- be stored under the program number "4" with the comment "PROG".
Seam area 1
Number of stitches: 40
Fullness: 0
Seam area 2
End with knee switch
Fullness: 20
Seam area 3
Without stitch count
End with pedal position "-2"
Fullness: 0
Switch on the machine. ●
Call up the input mode. ●
Call up the "creating/adjusting a seam program" function and enter program number " ● 4".
36
Set the seam type (right seam) by pressing until the appropriate symbol appears. ●
Call up the menu for comment input. ●
Enter the comment "PROG" with the keyboard and number panel. ●
Conclude the comment input. ●
Change to the input of the fi rst seam section. ●
Page 37

Input
0
Enter the value " ● 0" for the fullness.
Call up the menu for the input of the end of the seam section. ●
Switch on the stitch count function to change to the next seam section, and set value " ● 40"
for the number of stitches.
Conclude the input of the end of the seam section. ●
Change to the input of the second seam section. ●
Enter the value " ● 20" for the fullness.
Call up the menu for the input of the end of the seam section. ●
Switch on the function for changing to the next seam section with the knee switch. ●
37
Page 38

Input
Conclude the input of the end of the seam section. ●
Change to the input of the third seam section. ●
Enter the value " ● 0" for the fullness.
Call up the menu for the input of the end of the seam section. ●
Switch on the function for changing to the next seam section by pedal. ●
Switch on the "thread trimming" function. ●
Switch on the "sewing foot raised" function. ●
Conclude the input. ●
38
Page 39

Input
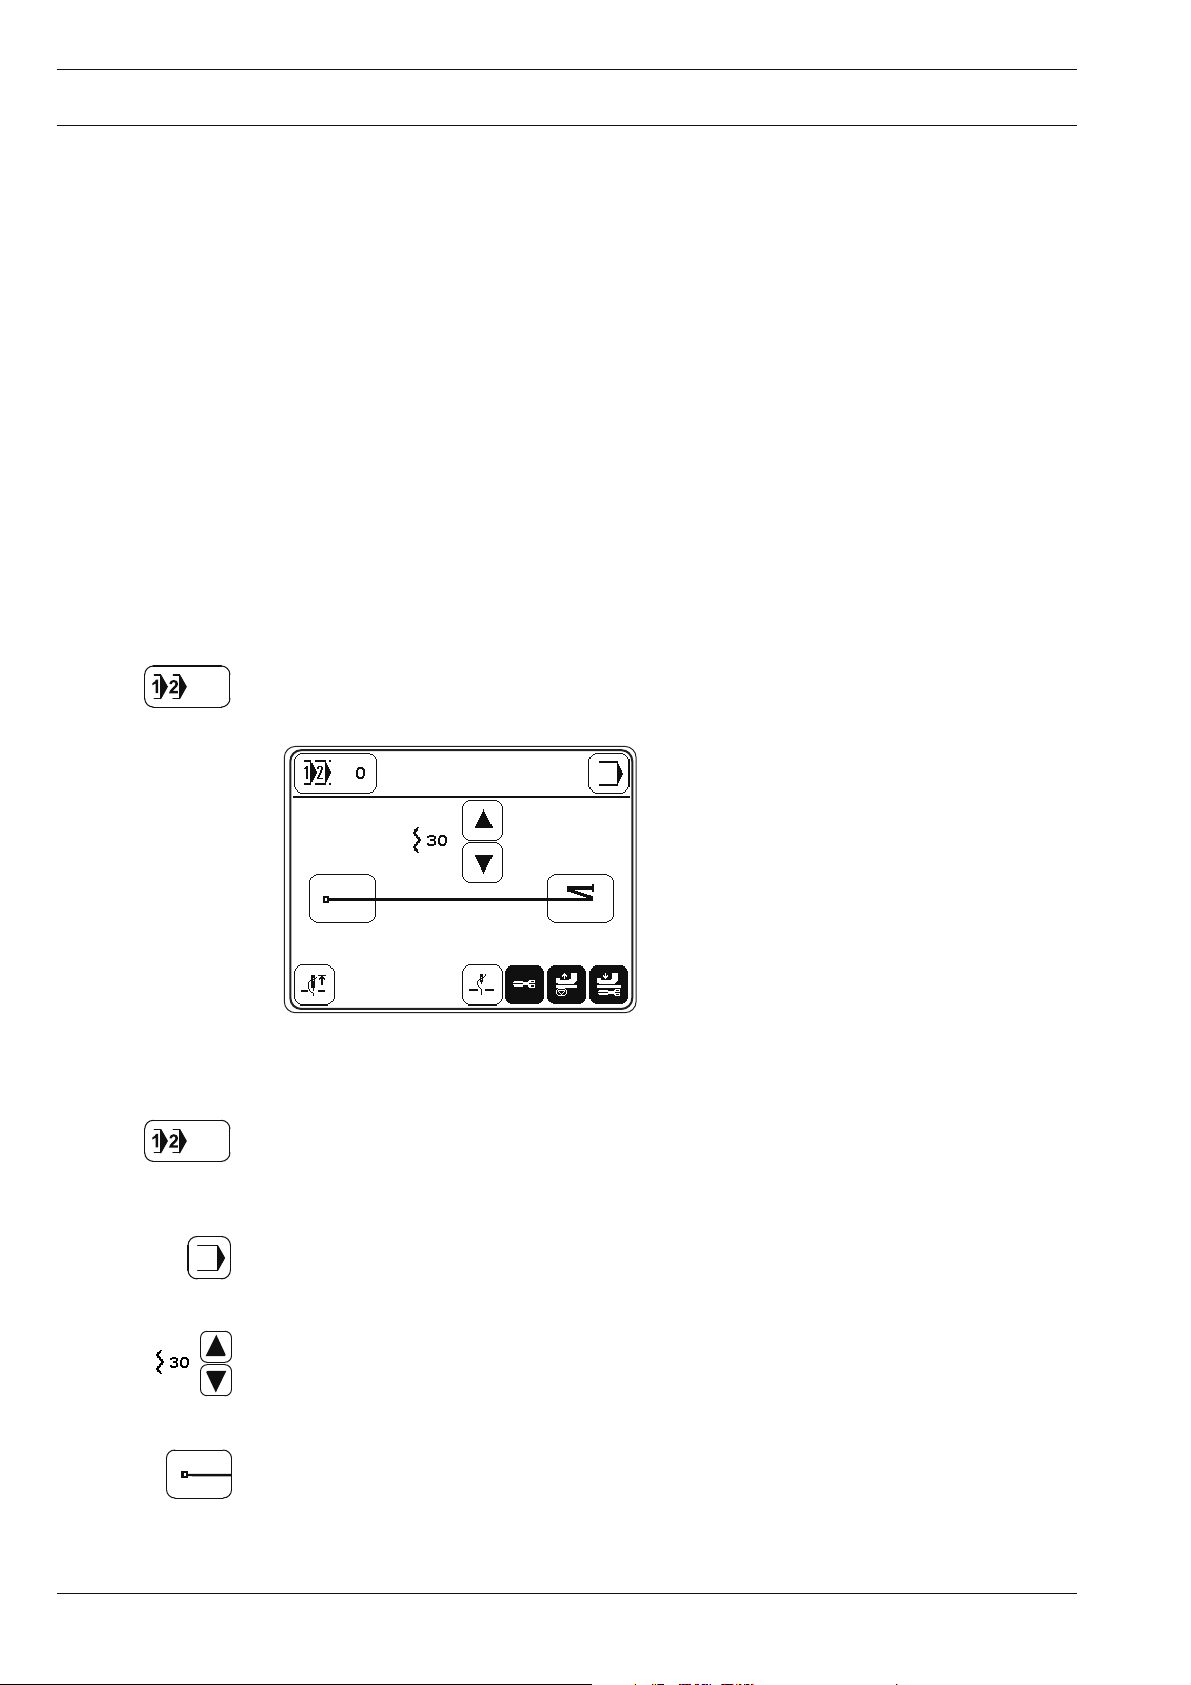
6.02.02 Example of a seam program input using the "teach-in" function
The program to be created should
- have 3 seam sections and
- be stored under the program number "11 " with the comment "TEACH".
Seam area 1
Learn number of stitches
Fullness: 0
Seam area 2
End with knee switch
Fullness: 30
Seam area 3
Without stitch count
End with pedal position "-2"
Fullness: 0
Switch on the machine. ●
Call up the input mode. ●
Call up the "teach-in" function and enter program number " ● 11 ".
Set the seam type (right seam) by pressing until the appropriate symbol appears. ●
Call up the menu for comment input. ●
Enter the comment "TEACH" with the keyboard and number panel. ●
Conclude the comment input. ●
Change to the input of the fi rst seam section. ●
39
Page 40

Input
Enter the value " ● 0" for the fullness.
Sew the fi rst seam section using the pedal function. ●
Change to the input of the second seam section. ●
Enter the value " ● 30" for the fullness.
Operate the knee switch ●
Conclude the input of the end of the seam section. ●
Use the pedal function to sew the second seam section. ●
Operate the knee switch ●
Change to the input of the third seam section. ●
40
Enter the value " ● 0" for the fullness.
Conclude the input. ●
Page 41

Input
6.03 Seam program administration
In the program administration the seam programs deposited in the machine memory and
the SD-Card can be deleted and copied. The left side of the display shows the programs in
machine memory. The right side of the display shows the programs on the SD-Card. Selec-
ted programs are red marked. With the MDAT-function the machine confi guration can be co-
pied or deleted. The Format-function formats the SD-Card. Further actions are shown in a
dialog window.
After SD-Card insertion it takes up to 20s until the card is detected.
Switch on the machine. ●
Call up the input mode. ●
Call up program administration. ●
Read SD-Card and machine memory again. ●
Explanation of the functions
Input mode
Calls up the basic display for the input mode.
Sewing mode
Quit input mode and call up sewing mode.
Program selection
After the program administration has been selected, at least one seam program is always
marked. Using the arrow functions, the desired seam program can be selected. With the
*-function and the arrow functions a seam program block can be marked. By pressing the
*.function again, the block function is deactivated.
Copy
Selected seam programs are copied from/to SD-Card.
Delete
Selected seam programs are deleted.
41
Page 42

Input
Dialog window
The dialog window shows questions and additional buttons for the answers.
Enter button
Enter button
Yes for one seam program.
All button
Yes for one or all marked seam programs.
Esc button
No for one or all marked seam programs.
Next button
No for one seam program.
Machine confi guration
With the MDAT-function the machine confi guration can be copied to/from SD-Card or can be
deleted on the SD-Card (fi lename: MDAT).
Format SD-Card
The Format-function formats the SD-Card.
If the SD-Card is not readable, it is new formatted. If the SD-Card is readable and the directory \P487 for the 487-machine exists then all seam programs and the machine confi guration
(MDAT) are deleted in this directory.
If the directory \P487 for the 487-machine does not exist, only the directory \P487 is created.
So all other fi les and directories on the SD-Card are not corrupted.
It is recommended to use SD-Cards with a maximum capacity of 2 GB.
42
Page 43

Adjustment
7 Adjustment differing from the basic machine
7
.01 Basic setting of the differential adjustment device
Requirement
With the fullness set at "0", the stitch length at "2.5" and the adjustment gauge 5 fi tted,
the roller 2 should be touching pressure sleeve 4.
1
Fig. 7 - 01
Switch on the machine. ●
Press key " ● 0" on keyboard 1 (LED must light up).
Switch off the machine. ●
Adjust roller ● 2 (screw 3) according to the requirement.
2
5
3
4
43
Page 44

Adjustment
7.02 Parameter settings
7
.02.01 Overview of the parameter functions
After the machine has been switched on, by pressing the appropriate function the input
mode is called up, in which the individual parameters can be called up directly. With a code it
is possible to protect all or individual parameter groups against unauthorised access.
Select parameter group
100 Operator level
200 Mechanic level
300 Sewing motor positions
400 Times
500 Counters and speeds
700 Sewing motor
800 Access rights
44
Page 45

Adjustment
7.02.02 Example of a parameter input
Switch on the machine. ●
Call up the input mode. ●
e.g. call up parameter " ● 11 3 " (switch beep tone for section change on/off)
e.g. switch beep tone on (value "ON"). ●
Conclude the input. ●
45
Page 46

Adjustment
7.03 List of parameters
Group
Parameter
1
102 Reversing
The operator has free access to the "100" parameters. Parameters "200" - "800"
can only be changed after entering a code number and may only be changed by
authorised personnel.
Description
OFF - ON OFF
Setting range
Set value
113 Beep tone for section change
114 Max. speed forwards at each pedal positio
2
201 Machine confi guration
9 = 487-918/15
10 = 5487-918/15
11 = 489-918/15
209 Fullness adjustment value (keyboard)
212 Not speed variation with change of fullness
213 program interruption with pedal-position -2
3
301 Position
"Needle point at top edge needle plate"
(P320ED)
302 Position "take-up lever t.d.c."
487, 489
5487
303 Position "needle lowered"
487, 489
5487
OFF - ON OFF
OFF - ON OFF
0 - 9 0
OFF - ON OFF
OFF - ON OFF
0 - 127 0
0 - 127
113
107
0 - 127 0
24
60
46
ev
ersing position
304
4
401 Delay time "lift foot" (s)
402 Start delay after "lower foot" (s)
403 Thread cutting time (on the 5487)
404 Time for cleaning thread monitor (s)
501 Maximum speed
5
504 Speed soft start
505 Soft start stitches
R
487, 489
5487
0 - 127 113
0,01s - 1,5s 0,02s
0,01s - 1,5s 0,15s
0,01s - 0,2s 0,15s
0,01s - 1,5s 0,25s
100 - 5500
4800
5500
100 - 5500 1500
0 - 15 0
Page 47

Adjustment
Group
Parameter
Description
701 P-quota speed controller
7
Setting range
0 - 50 16
Set value
702 I-quota speed controller
703 P-quota position controller
704 D-quota position controller
705 Time for position controller
706 P-quota position controller for rest brake
707 D-quota position controller for rest brake
708 Maximum moment for rest brake
709 Minimum machine speed
710 Maximum machine speed
487, 489
5487
Maximum motor speed
1
71
487, 489
5487
712
713 Acceleration ramp
Positioning speed
0 - 100 50
0 - 50 40
0 - 100 40
0 - 100 25
0 - 50 25
0 - 50 15
0 - 100 0
3 - 64 6
1 - 55 0
42
55
1 - 55 0
42
55
3 - 25 18
0 - 50 35
714 Brake ramp
715 Reference position
716 Time-out
717 Starting current motor
718 Anti-vibration fi lter
719 Rotation direction allocation
720 Reference position correction
721 Number of increments per revolution
(Read maximum value in Service and enter here)
- P323 MS
0 - 50 30
0 - 127 20
0 - 255 40
3 - 10 8
1 - 10 6
0 - 1 0
0 - 127 64
101 - 149 127
47
Page 48

Adjustment
Group
Parameter
Description
801 Right of access function group 100
8
Setting range
0 - 1 0
Set value
802 Right of access function group 200
803 Right of access function group 300
804 Right of access function group 400
805 Right of access function group 500
806 Right of access service
807 Right of access function group 700
808 Right of access function group 800
809 Right of access program creation
810 Enter access code
7.04 Sewing motor errors
Message Description
33
34 Brake path too short *
35
36
37
64
65
66
68
69 No increments *
70
71
73 Disturbed motor running *
74
75 Regulator blocked *
170 Invalid transmission *
171 Invalid zero point *
173
175
222
▲
P320 ED, * P323 MS
Invalid parameter value
Communication error with limit control ▲*
Switch on sequence not ready ▲*
Too many commands
Mains off during initialisation
Overcurrent directly after mains on
Short circuit ▲*
Overcurrent during operation
Motor stalling
No incremental plug ▲*
Incremental transmitter missing for speed increase/reduction
Motor blocked on fi rst stitch
Starting error
Time-out monitoring
0 - 1 1
0 - 1 1
0 - 1 1
0 - 1 1
0 - 1 1
0 - 1 1
0 - 1 1
0 - 1 1
0 - 9999 3800
▲
▲
▲
▲
*
▲
*
▲
*
▲
▲
▲
*
▲
*
48
Page 49

Adjustment
7.05 Explanation of the error messages
Message Description
E001 System error
E002 Sewing motor E002/BB/xxx
BB = 20: Time-out
02: Position forwards
03: Position in reverse
05: Position by shortest path
09: Write parameter
10: Speed
0A: Reset stitch counter
0B: Stop after xxx stitches
30: Time-out for increasing speed
31: Time-out for uncertain positioning
32: Time-out for time-out command
33: Time-out for deleting errors
34: Time-out for emergency stop
35: Time-out for writing parameters
36: Time-out for resetting stitch counter
37: Time-out for stop command after x stitches
38: Time-out for initialization
xxx = error bytes of sewing motor control unit (see list "Motor Errors")
E003 Section
E004 End of section
E005 Pedal activated when machine switched on
E006 Keyboard (CAN)
E007 End of ramp
E008 Reference for fullness adjustment not found
1: When moving towards sensor
2: When moving away from sensor
E011 Stepping motor stepping frequency too high
E012 not assigned
E014 Incorrect program number (larger than 49)
E015 Incorrect seam section number
E016 Memory full
E017 not assigned
E018 not assigned
E020 not assigned
E021 Power supply unit overloaded (24V)
E022 Mains voltage
E023 Power supply 24V too low
E024 Error at CAN interface
49
Page 50

Adjustment
7.06 Table of inputs
E1: not assigned
E2: not assignedi
E3: not assigned
E4: Start inhibitor
E5: not assigned
E6: Knee switch
E7: not assigned
E8: not assigned
E9: not assigned
E10: not assigned
E11: not assigned
E12: not assigned
E13: not assigned
E14: not assigned
E15: not assigned
E16: Reference for fullness adjustment
7.07 Table of outputs
O1: Raise sewing foot (O1.1 and O1.2)
O2: Thread trimmer (O2.1 and O2.2)
O3: not assigned
O4: not assigned
O5: Backtacking device (only 487, 489)
O6: Condensed stitches (only 5487)
O7: not assigned
O8: not assigned
O9: not assigned
O10: not assigned
O11: not assigned
O12: not assigned
O13: not assigned
O14: not assigned
O15: not assigned
O16: not assigned
50
Page 51

Adjustment
7.08 Service menu
Switch on the machine. ●
Call up the input mode. ●
Call up the service menu. ●
Explanation of the functions
Input mode
Quit the service menu and call up the input
Sewing mode
Quit the service menu and call up the sewing mode.
Set/reset outputs
Use the arrow functions to select the desired output and set "function 1" or reset
"function 2".
Cold start
See Chapter 7.09 Carry out a cold start.
Motors
After this function has been called up, the stepping motors for fullness and for the sewing
motor can be moved.
Basic position of the stepping motor
After this function has been called up, the basic position of the fullness stepping motor can
be changed.
Learning speed increase (in Motor menu)
Press this key to learn the speed increase function on machines with the control unit
P320ED. For this purpose the sewing drive sews 3 stitches at a speed of 360 min-1.
Control panel
See Chapter 4.04 Adjusting the control panel.
51
Page 52

Adjustment
7.09 Carry out a cold start
Switch on the machine. ●
Call up the input mode. ●
Call up the service menu. ●
Carry out a cold start. ●
After a cold start all programmed values are set back to their status at the time
of delivery.
All sewing programs are also deleted.
52
Page 53

Adjustment
7.10 Internet update of the machine software
The machine software can be updated with PFAFF fl ash programming. For this purpose the
PFP boot program and the appropriate control software for the machine type must be in-
stalled on a PC. To transfer the data to the machine, the PC and the machine control unit
must be connected with an appropriate null modem cable ( part no. 91-291 998-91 ).
The PFP boot program and the control software of the machine type
can be downloaded from the PFAFF-homepage using the following path:
www.pfaff-industrial.de/pfaff/de/service/downloads
To update the machine software carry out the following steps:
While the machine software is being updated, no setting up, maintenance or
adjustment work may be carried out on the machine!
Switch off the machine. ●
Connect the PC (serial interface or ap- ●
propriate USB-adapter) and the machine
control unit (RS232). To do so disconnect
the plug of the control panel.
Fig. 7 - 08
During the up-dating procedure the machine must not be switched off. ●
When the update has been completed, switch off the machine and end the PFP boot pro- ●
gram.
End the connection between the PC and the machine control unit and reconnect the con- ●
trol panel to the machine control unit.
Switch on the machine. ●
A plausibility control is carried out and, if necessary, a cold start. ●
Switch on the PC and start the PFP boot ●
program.
1
Select the machine type. ●
Press the "programming" button. ●
Hold down boot key ● 1 and switch on the
machine.
Press the "OK" button. ●
The software update is carried out, the ●
update progress is shown on the bar
display of thePFP boot program.
More information and assistance is at your disposal in the fi le "PFPHILFE.TXT",
which can be called up from the PFP boot program by pressing the "help" but-
ton.
53
Page 54

Circuit diagrams
14 Stromlaufpläne
8 Circuit diagrams
8
.01 Reference list for circuit diagrams 91-191 525-95
A1 Controller Quick P 320MS
A2 Control panel (BDF T1)
A3 Keyboard
A14 Sewing head identifi cation (OTE)
H1 Sewing lamp
M1 Sewing motor
M3 Stepping motor fullness adjustment (SM1)
Q1 Main switch
S6 Knee switch (program switching)
S17 Pedal speed control unit
S18 Sychronizer PD3
X1 Mains plug
X1A RS232 – interface 1 Control panel BDF T1
X1B VSS OTE (Sewing head identifi cation)
X3 Incremental transmitter (control unit)
XR3 Incremental transmitter (sewing motor)
XS3 Sychronizer PD3
X4B Stepping motor fullness (SM1)
X5 Inputs
X8 Sewing motor
X11A CAN interface (Keyboard)
X11B Pedal speed control unit
X13 Outputs
X21 Stepping motor fullness (SM1) )
X22 Keyboard
X36 Knee switch (program switching)
X46 Initiator reference (SM1)
X51 Y1 -910/.. Automatic presser foot lift
X52 Y2 -900/.. Thread trimmer
X55 Y5 -911/.. Backtacking unit
54
Y1 -910/.. Automatic presser foot lift
Y2 -900/.. Thread trimmer
Y5 -911/.. Backtacking unit
Page 55

91-191 525-95 Part 1 Version 20.09.07 Circuit diagrams
8.01.02 Circuit diagrams 91-191 525-95
P320 ED
P323 MS
55
Page 56

Circuit diagrams Version 20.09.07 91-191 525-95 Part 2
P320 ED
P323 MS
56
Page 57

91-191 525-95 Part 3 Version 20.09.07 Circuit diagrams
P320 ED
P323 MS
57
Page 58

Circuit diagrams Version 20.09.07 91-191 525-95 Part 4
P320 ED
P323 MS
58
Page 59

Note
Page 60

PFAFF Industriesysteme
und Maschinen AG
Hans-Geiger-Str. 12 - IG Nord
D-67661 Kaiserslautern
Phone: +49 - 6301 3205 - 0
Fax: +49 - 6301 3205 1386
E-mail: info@pfaff-industrial.com
Hotlines:
Technical ser vice: +49 - 175/2243-101
Application consultance: +49 - 175/2243-102
Spare-parts hotline: +49 - 175/2243-103
Printed in Germany
© PFAFF Industriesysteme und Maschinen AG 2009, PFAFF is the exclusive trademark of VSM Group AB.PFAFF Industriesysteme und Maschinen AG is an authorized licensee of the PFAFF trademark.
 Loading...