


HANDBOOK
PEUGEOT EXPERT
PEUGEOT TRAVELLER
Access to the Handbook
From the appropriate Store, download the Scan MyPeugeot
APP smartphone application.
Then select:
- the vehicle,
- the issue period corresponding to the date of 1
vehicle.
Download the content of the vehicle's Handbook.
st
registration of your
The Handbook is available on the PEUGEOT website, in
the ‘MY PEUGEOT’ section or at the following address:
http://public.servicebox.peugeot.com/APddb/
Select:
- the language,
- the vehicle, its body style,
- the issue period of your handbook corresponding to the date of 1
registration of your vehicle.
Access to the Handbook.
This symbol indicates the latest
information available.
st
Welcome
Thank you for choosing a Peugeot Expert or a Peugeot Traveller.
Your vehicle will be fitted with only some of the equipment described in
this document, depending on its trim level, version and the specification
for the country in which it was sold.
The descriptions and illustrations are given as indications only.
Automobiles PEUGEOT reserves the right to modify the technical
specifications, equipment and accessories without having to update this
edition of the guide.
If ownership of your vehicle is transferred, please ensure this
Handbook is passed on to the new owner.
All of the operating instructions and recommendations are provided
in detail there to make the most of your vehicle. It is strongly
recommended that you familiarise yourself with it as well as the
Maintenance and Warranty Guide, which provides information about
the warranties, servicing and roadside assistance associated with the
vehicle.
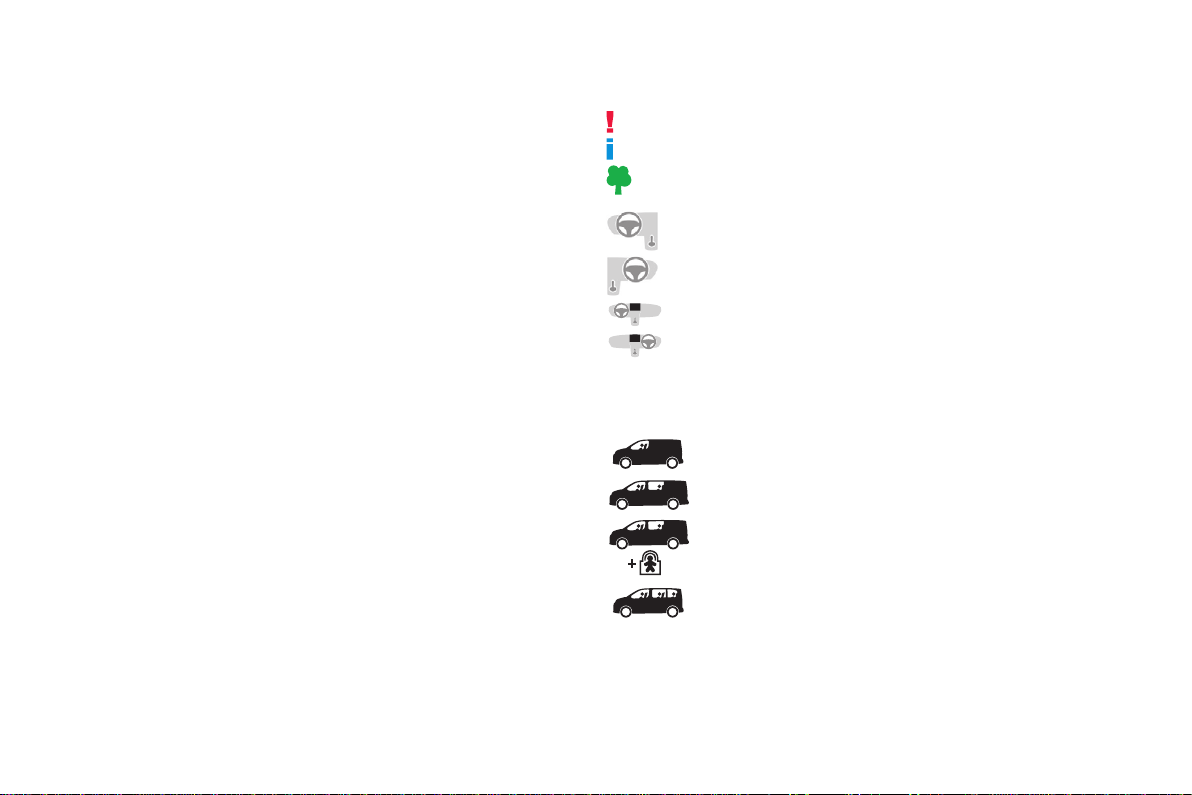
Key
Safety warning
Additional information
Contributes to the protection of the environment
Left-hand drive vehicle
Right-hand drive vehicle
Location of the equipment/button described with a black area
Key
This key allows the special features of the vehicle to be identified:
Van
Crew cab with mechanical child lock
Crew cab with electrical child lock
Combi, Business, Active, Allure, Business VIP
Contents
Overview
Instruments and controls 4
Labels 5
Eco-driving
.
.
Instruments
Instrument Panel 9
Warning and indicator lamps 10
Indicators 23
Distance recorders 27
Lighting dimmer 27
Trip computer 28
Setting the time and date 29
Access
Electronic key with remote control function
and built-in key, 31
Unlocking/Complete or selective unlocking 33
Back-up procedures 38
Central locking / unlocking 41
Electric sliding side door(s) 43
General recommendations
for the sliding side doors 45
Hands-free sliding side door(s) 47
Side-hinged rear doors 49
Tailgate 50
Tailgate rear screen 50
Alarm 51
Electric windows 53
Ease of use and comfort
Correct driving position 54
Front seats 54
2-seat front bench seat 56
Steering wheel adjustment 58
Mirrors 59
Moduwork 60
Precautions for the seats and bench seats 63
Fixed one-piece bench seat 64
Fixed rear seat and bench seat 66
Rear seat and bench seat on rails 68
Individual rear seat(s) on rails 71
Crew cab, xed 73
Crew cab, folding 74
Interior ttings 75
Loading area ttings 79
Seating area ttings 81
Panoramic sunroof 82
Retractable sliding table 83
Heating and Ventilation 86
Heating 87
Manual air conditioning 87
Dual-zone automatic air conditioning 88
Recirculation of interior air 90
Front demisting - defrosting 90
Rear screen and/or door mirrors
demisting - defrosting 91
Rear heating - air conditioning 92
Additional Heating / Ventilation 92
Courtesy lamp(s) 95
Lighting and visibility
Lighting control stalk 97
Direction indicators 98
Daytime running lamps/Sidelamps 99
Automatic illumination of headlamps 99
Guide-me-home and welcome lighting 99
Cornering lighting 100
Automatic headlamp dipping 101
Manual headlamp beam height adjustment 102
Interior ambient lighting 102
Wiper control stalk 103
Automatic wiping 104
Changing a wiper blade 106
Safety
General safety recommendations 107
Hazard warning lamps 108
Emergency or assistance call 108
Audible warning 109
Electronic stability control (ESC) 109
Advanced Grip Control 112
Seat belts 113
Airbags 117
Child seats 120
Deactivating the front passenger airbag 122
ISOFIX child seats 129
Manual child lock 136
Electric child lock 136
Child lock on rear windows 137
2
Contents
.
Driving Practical information
Driving recommendations 138
Starting/switching o the engine 140
Parking brake 144
Hill star t assist 144
5-speed manual gearbox 145
6-speed manual gearbox 145
Gear eciency indicator 146
Automatic gearbox 146
Electronic gearbox 150
Stop & Start 152
Tyre under-ination detection 154
Driving and manoeuvring aids - General
recommendations 156
Head-up display 158
Memorising speeds 159
Speed Limit recognition
and recommendation 160
Speed limiter 162
Cruise control - particular
recommendations 164
Cruise control 165
Adaptive Cruise Control 167
Active Safety Brake with Distance Alert and
Intelligent emergency braking assistance 171
Lane departure warning system 174
Fatigue detection system 175
Blind Spot Detection 176
Parking sensors 178
Reversing camera, interior mirror 180
Visiopark 1 180
Compatibility of fuels 185
Refuelling 185
Diesel misfuel prevention 187
Snow chains 187
Towing device 188
Energy economy mode 189
Roof bars/Roof rack 189
Bonnet 19 0
Engine 191
Checking levels 191
Checks 19 4
®
AdBlue
(BlueHDi) 196
Advice on care 199
In the event of a breakdown
Warning triangle 200
Running out of fuel (Diesel) 200
Tool box 201
Temporary puncture repair kit 202
Spare wheel 206
Changing a bulb 211
Changing a fuse 217
12 V battery 219
Towing 222
Technical data
Engine technical data and towed loads 224
Dimensions 228
Identication markings 231
Alphabetical index
Audio equipment and telematics
Bluetooth audio system
PEUGEOT Connect Radio
PEUGEOT Connect Nav
.
.
Access to additional videos
bit.ly/helpPSA
3
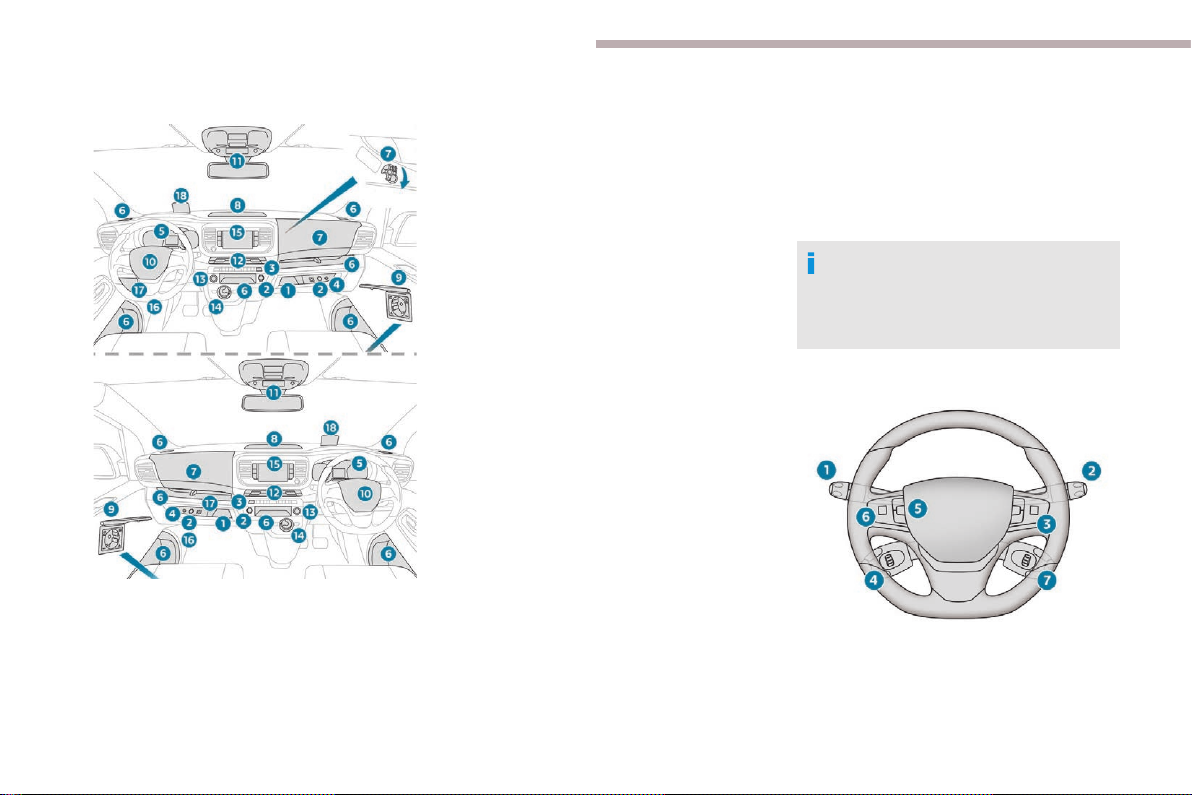
Overview
Instruments and controls
1. Glove box
Deactivation of the front passenger airbag
(inside the glove box)
2. 12 V accessory socket (120 W)
Observe the maximum power rating to
avoid damaging the accessory
3. USB socket
4. JACK socket
5. Instrument panel
6. Storage compartments
Cup or can holder
7. Cooled glove box (if the vehicle is so
equipped)
Via a ventilation nozzle, if opened, engine
running and air conditioning on
8. Upper glove box
9. 220 V accessory socket (150 W, if the
vehicle is so equipped)
Observe the maximum power rating to
avoid damaging the accessory.
10. Horn
11. Courtesy lamp
Warning lamp display for seat belts and
front passenger airbag
Interior rear view mirror
Surveillance mirror
Emergency and assistance call buttons
12. Heating
Manual air conditioning
Dual-zone automatic air conditioning
Front demisting - defrosting
Rear screen demisting – defrosting
13. "START/STOP" button
14. Gearbox
15. Monochrome screen with audio system
Touch screen with PEUGEOT Connect
Radio or PEUGEOT Connect Nav
16. Bonnet release
17. Dashboard fuses
18. Head-up display
Depending on the vehicle's equipment,
the storage compartments may be open
or closed. This configuration is shown for
illustrative purposes.
Steering mounted controls
1. External lighting/direction indicator
controls
2. Wiper/screenwash/trip computer controls
3. Audio system adjustment controls
(depending on version)
4
.Overview
4. Controls for speed limiter/cruise control/
adaptive cruise control
5. Instrument panel display mode selection
wheel
6. Voice synthesis control (depending on
version)
Volume adjustment (depending on
version)
7. Audio system adjustment controls
(depending on version)
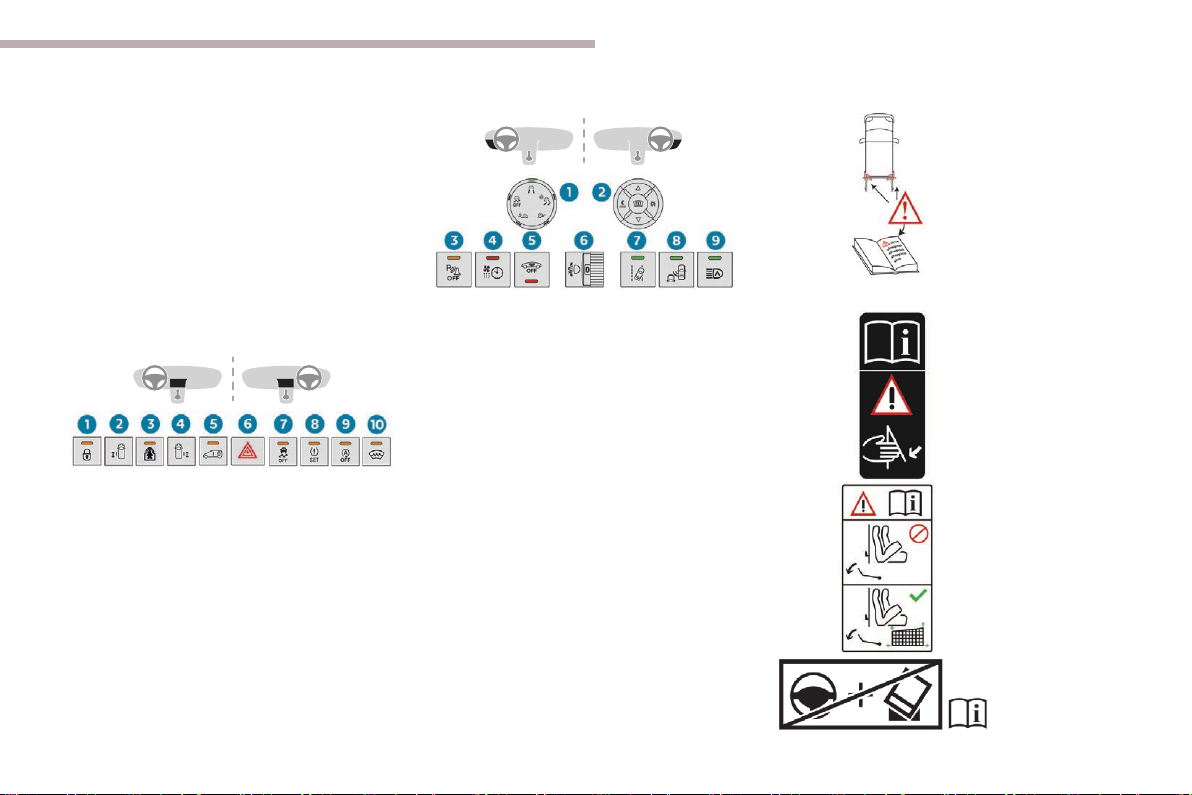
Central switch panel
1. Locking/unlocking from the inside
2. Left-hand electric sliding side door
3. Electric child lock
4. Right-hand electric sliding side door
5. Cab/loading area selectivity
6. Hazard warning lamps
7. DSC/ASR system
8. Tyre under-inflation detection
9. Stop & Start
10. Heated windscreen
Side control bar
1. Grip control
2. Head-up display
3. Parking sensors
4. Additional Heating / Ventilation
5. Alarm
6. Manual headlamp beam height
adjustment
7. Lane departure warning system
8. Blind spot monitoring system
9. Automatic headlamp dipping
Labels
Side-hinged rear doors section.
Moduwork section.
5

Overview
Rear seat and bench seat on rails section.
Precautions for the seats and bench seats
section.
Additional heating/ventilation section.
Deactivating the front passenger airbag
section.
ISOFIX child seats section.
Manual child lock section.
Bonnet section.
12 V battery section.
Temporary puncture repair kit, Spare wheel
and Identification markings sections.
Retractable sliding table section.
6

Eco-driving
Eco-driving is a range of everyday practices that allow the motorist to optimise their fuel consumption and CO
emissions.
2
Eco-dri ving
.
Optimise the use of your
gearbox
With a manual gearbox, move off gently and
change up without waiting. While accelerating,
change up early.
With an electronic gearbox, favour automatic
mode, without pressing the accelerator pedal
heavily or suddenly.
With an automatic gearbox, favour automatic
mode, without pressing the accelerator pedal
heavily or suddenly.
The gear efficiency indicator invites you to
engage the most suitable gear: as soon as the
indication is displayed in the instrument panel,
follow it straight away.
With an electronic gearbox, this indicator
appears only in manual mode.
With an automatic gearbox, this indicator
appears only in manual mode.
Drive smoothly
Maintain a safe distance between vehicles,
use engine braking rather than the brake
pedal and press the accelerator gradually.
These practices contribute towards a
reduction in fuel consumption and CO
emissions and also help to reduce the
background traffic noise.
If your vehicle has the steering-mounted
"CRUISE" control, make use of cruise control
at speeds above 25 mph (40 km/h) when the
traffic is flowing well.
2
Be procient in the use of
electrical equipment
Before moving off, if the passenger
compartment is too warm, ventilate it by
opening the windows and air vents before
using the air conditioning.
Above 31 mph (50 km/h), close the windows
and leave the air vents open.
Consider using equipment that can help
keep the temperature in the passenger
compartment down (sunroof blind and window
blinds, etc.).
Unless it has automatic regulation, switch off
the air conditioning as soon as the desired
temperature has been reached.
Switch of f the demisting and defrosting
controls, if these are not automatically
managed.
Switch of f the heated seat as soon as
possible.
Switch of f the headlamps and front foglamps
when the visibility conditions do not require
their use.
Avoid running the engine before moving off,
particularly in winter; your vehicle will warm up
much faster while driving.
As a passenger, avoid connecting your
multimedia devices (film, music, video game,
etc.) to contribute towards reducing the
consumption of electrical energy, and so of
fuel.
Disconnect all portable devices before leaving
the vehicle.
7

Eco-dri ving
Limit the causes of excess
consumption
Spread loads throughout the vehicle; place
the heaviest items in the boot, as close as
possible to the rear seats.
Limit the loads carried in the vehicle and
reduce wind resistance (roof bars, roof rack,
bicycle carrier, trailer, etc.). Preferably, use a
roof box.
Remove roof bars and roof racks after use.
At the end of winter, remove snow tyres and
refit the summer tyres.
Comply with servicing
instructions
Check the tyre pressures regularly, when cold,
referring to the label in the door aperture,
driver's side.
Carry out this check in particular:
- before a long journey,
- at each change of season,
- after a long period out of use.
Do not forget the spare wheel and the tyres on
any trailer or caravan.
Have your vehicle serviced regularly (engine
oil, oil filter, air filter, cabin filter, etc.) and
observe the schedule of operations in the
manufacturer's service schedule.
With a BlueHDi Diesel engine, if the SCR
system is faulty, your vehicle becomes
polluting. Visit a PEUGEOT dealer or a
qualified workshop as soon as possible to
bring your vehicle’s nitrogen oxides emissions
back in line with the regulations.
When filling the tank, do not continue after the
rd
3
cut-off of the nozzle to avoid overflow.
You will only see the fuel consumption
of your new vehicle settle down to a
consistent average after the first 1,900 miles
(3,000 kilometres).
8
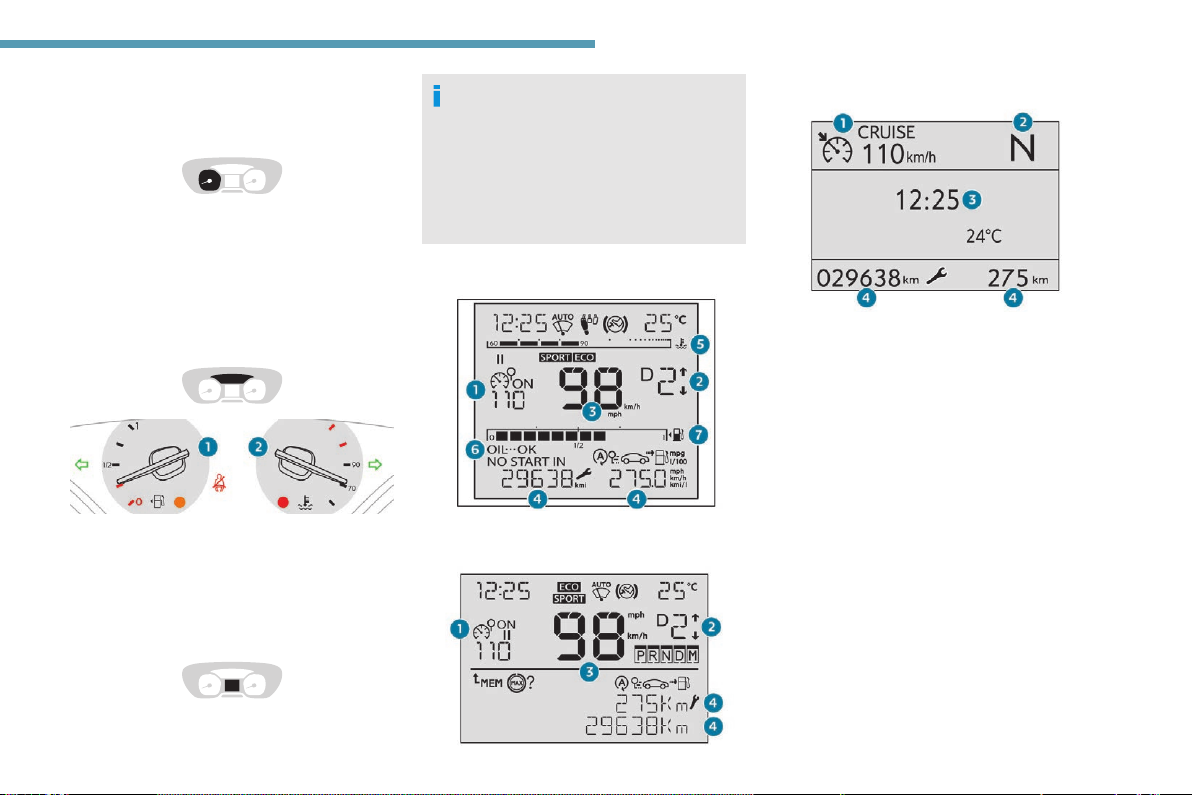
Instruments
Instrument panel
Speedometer
Analogue speedometer (mph or km/h).
Indicators with LCD text or
matrix instrument panel
1. Fuel gauge.
2. Engine coolant temperature gauge.
Display screen
When travelling abroad, it may be
necessary to change the units of distance:
the display of road speed must be in the
official units (miles or km) for the country.
The change of units is done via the screen
configuration menu, with the vehicle
stationary.
With LCD instrument panel
With LCD text instrument panel
With matrix instrument panel
1
1. Cruise control or speed limiter settings.
2. Gear efficiency indicator.
Gear with an automatic or electronic
gearbox.
3. Digital speedometer (mph or km/h) with
LCD and LCD text instrument panel.
Display area with matrix instrument
panel: aler t or function status message,
trip computer, digital speedometer (mph
or km/h), etc.
4. Service indicator, then total distance
recorder (miles or km), trip distance
recorder (miles or km).
Display zone with LCD text instrument
panel: aler t or function status message,
trip computer, etc.
5. Engine coolant temperature gauge.
6. Engine oil level indicator.
7. Fuel gauge.
9
Instruments
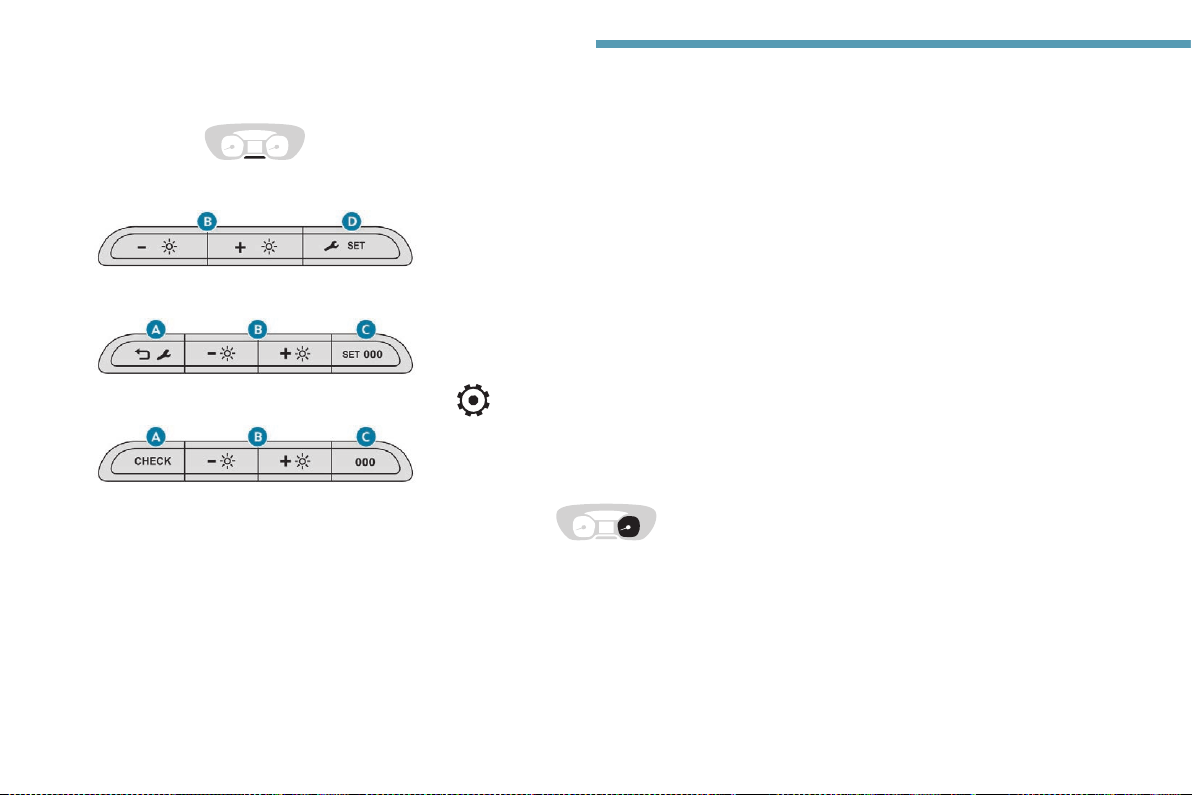
Control buttons
With LCD instrument panel
With LCD text instrument panel
With matrix instrument panel
A. Resetting the service indicator.
Temporary reminder of servicing
information or the remaining range with
the AdBlue
Depending on version: go back up a level,
cancel the current operation.
B. General lighting dimmer.
Depending on version: movements in a
menu, a list; changing a value.
®
system.
C. Resetting the trip distance recorder.
Depending on version: enter the
configuration menu (long press), confirm
a choice (short press).
D. Reminder of servicing information or the
remaining range with the SCR system
and the AdBlue
Reset the function selected (service
indicator or trip recorder).
Depending on version: enter the
configuration menu (long press), confirm
a choice (short press).
With the touch screen, it is also
possible to modify the lighting
dimmer.
®
.
Rev counter
Rev counter (x 1000 rpm).
Warning and indicator lamps
Displayed as symbols, the warning and
indicator lamps inform the driver of the
occurrence of a malfunction (warning lamps) or
of the operating status of a system (operation
or deactivation indicator lamps). Certain lamps
light up in two ways (fixed or flashing) and/or in
several colours.
Associated warnings
The illumination of a lamp may be accompanied
by an audible signal and/or a message
displayed in a screen.
Relating the type of alert to the operating status
of the vehicle allows you to determine whether
the situation is normal or whether a fault has
occurred: refer to the description of each lamp
for further information.
When the ignition is switched on
Certain red or orange warning lamps come on
for a few seconds when the ignition is switched
on. These warning lamps should go off as soon
as the engine is started.
For more information on a system or a function,
refer to the corresponding section.
10

Instruments
Persistent warning lamp
When the engine is running or the vehicle is
being driven, the illumination of a red or orange
warning lamp indicates a fault that needs
further investigation, using any associated
message and the description of the warning
lamp in the documentation.
Where a warning lamp remains lit
The references (1) (2) and (3) in the warning
and indicator lamp description indicate whether
you should contact a qualified professional
in addition to the immediate recommended
actions.
(1 ): You must stop as soon as it is safe to
do so and switch off the ignition.
(2): Contact a PEUGEOT dealer or a qualified
workshop.
(3): Go to a PEUGEOT dealer or a qualified
workshop.
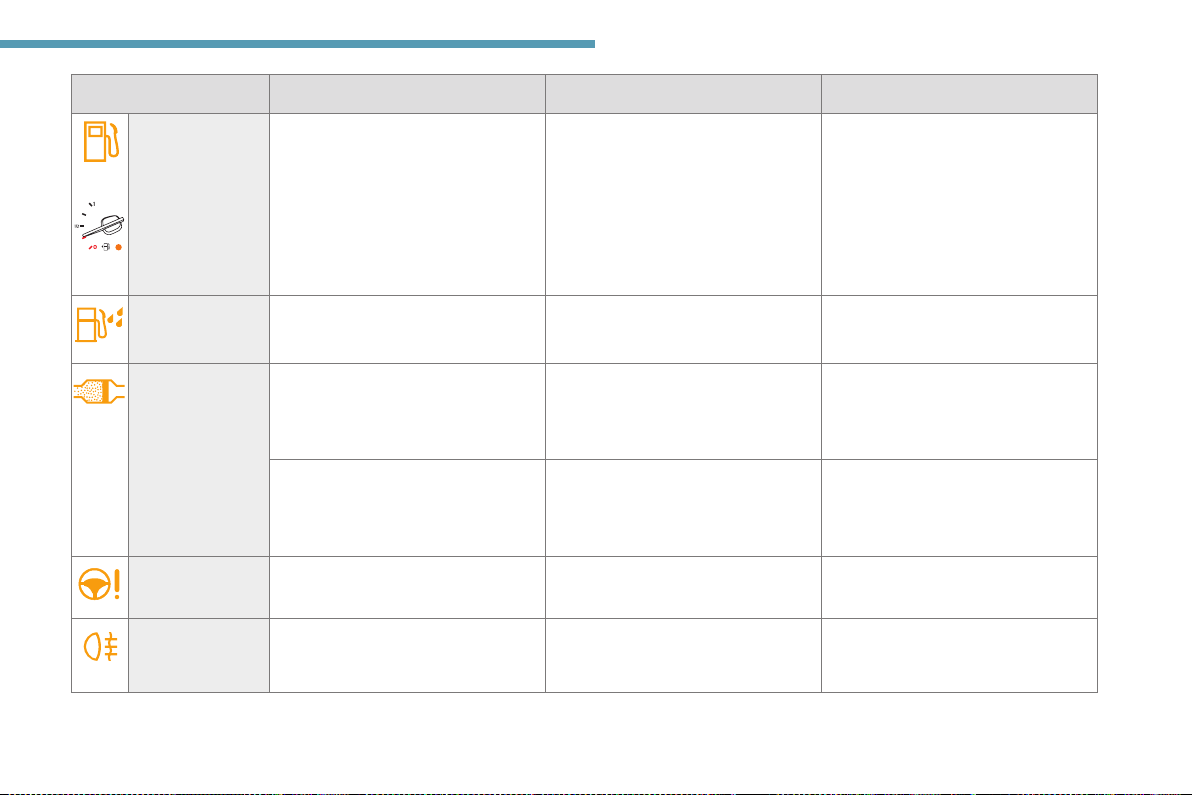
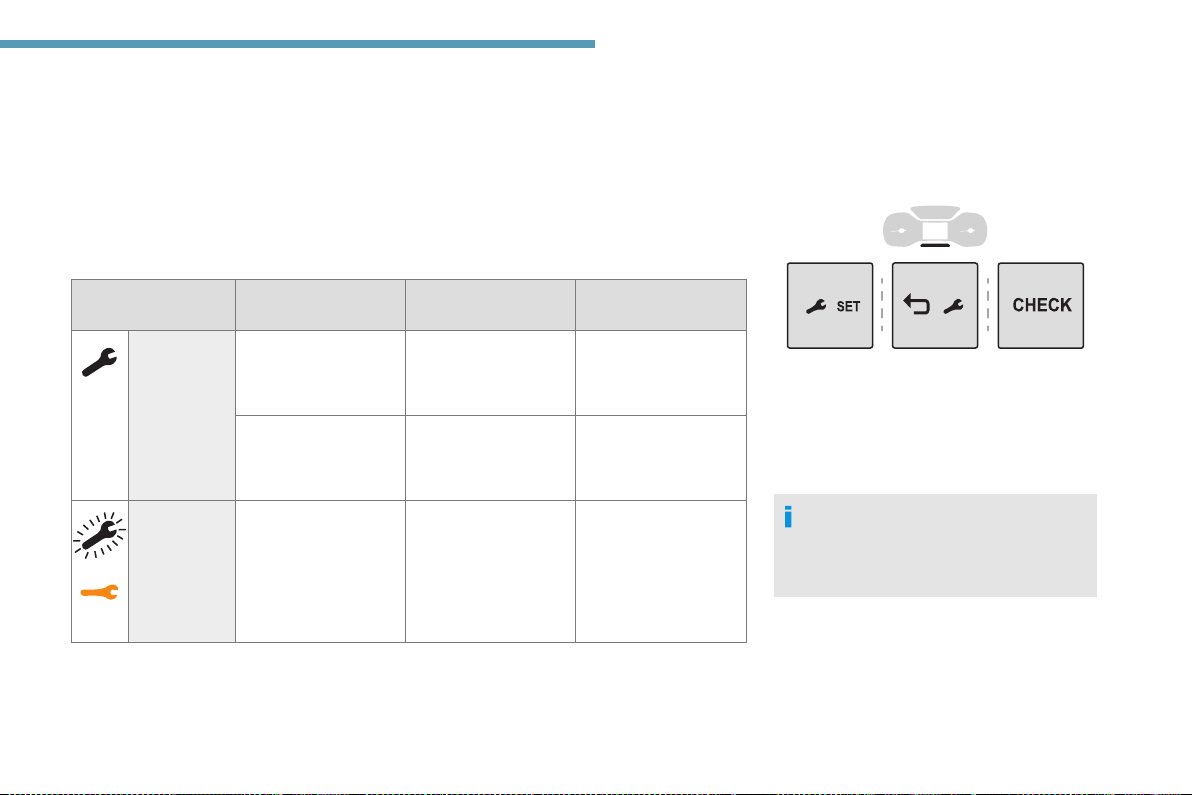
List of warning and indicator lamps
Warning / indicator lamp State Cause Actions / Observations
Red warning/indicator lamps
STOP Fixed, associated with
Engine oil
pressure
Brakes Fixed. The brake fluid level has dropped
another warning lamp,
accompanied by the
display of a message
and an audible signal.
Fixed. There is a fault with the engine
Indicates a serious fault with the
engine, braking system, power
steering, automatic gearbox or a
major electrical fault.
lubrication system.
significantly.
Carry out (1) and then (2).
Carry out (1) and then (2).
Carry out (1), then top up with brake fluid that complies
with the manufacturer's recommendations. If the
problem persists, carry out (2).
1
11

Instruments
Warning / indicator lamp State Cause Actions / Observations
Brakes Fixed, associated with
the ABS warning lamp.
+
The electronic brake force distribution
(EBFD) system has a fault.
Carry out (1) and then (2).
12
Parking brake Fixed. The parking brake is applied or not
Maximum
engine coolant
temperature
or
Battery charge Fixed. The battery charging circuit has a
Seat belts
not fastened/
unfastened
Door open Fixed, associated with
Fixed (warning
lamp or LED), and
needle in the red
zone (depending on
version).
Fixed or flashing,
accompanied by an
increasing audible
signal.
a message identifying
the access.
An audible signal
supplements the alert
if the speed is higher
than 6 mph (10 km/h).
properly released.
The temperature of the cooling
system is too high.
fault (dirty or loose terminals, slack or
cut alternator belt, etc.).
A seat belt has not been fastened or
has been unfastened (depending on
version).
A door, the boot, the tailgate or
the tailgate screen is still open
(depending on version).
Carry out (1), then wait until the engine has cooled
down before topping up the coolant, if necessary. If
the problem persists, carry out (2).
Clean and retighten the terminals. If the warning lamp
does not go off when the engine is started, carry
out (2).
Close the access.
If your vehicle is equipped with a right-hand hinged
door, its opening will not be indicated by this warning
lamp.

Instruments
Warning / indicator lamp State Cause Actions / Observations
Orange warning/indicator lamps
Anti-lock
Braking System
(ABS)
Service Temporarily on,
+
(1 ): You must stop as soon as it is safe to
do so and switch off the ignition.
Fixed. The anti-lock braking system has a
accompanied by the
display of a message.
Fixed, accompanied
by the display of a
message.
Service warning lamp
fixed and service
spanner flashing then
fixed.
fault.
One or more minor faults have been
detected for which there is no specific
warning lamp.
One or more major faults have been
detected for which there is no specific
warning lamp.
The servicing interval has been
exceeded.
(2): Contact a PEUGEOT dealer or a qualified
workshop.
The vehicle retains conventional braking.
Drive carefully at reduced speed, then carry out (3).
Identify the cause of the fault using the message
displayed in the instrument panel.
You can deal with certain anomalies yourself, for
example an open door or the start of saturation of the
particle filter.
For any other problems, such as a fault with the tyre
under-inflation detection system, carry out (3).
Identify the cause of the anomaly using the message
displayed in the instrument panel, then carry out (3).
The vehicle must be ser viced as soon as possible.
Only with BlueHDi Diesel engines.
(3): Go to a PEUGEOT dealer or a qualified
workshop.
1
13
Instruments
Warning / indicator lamp State Cause Actions / Observations
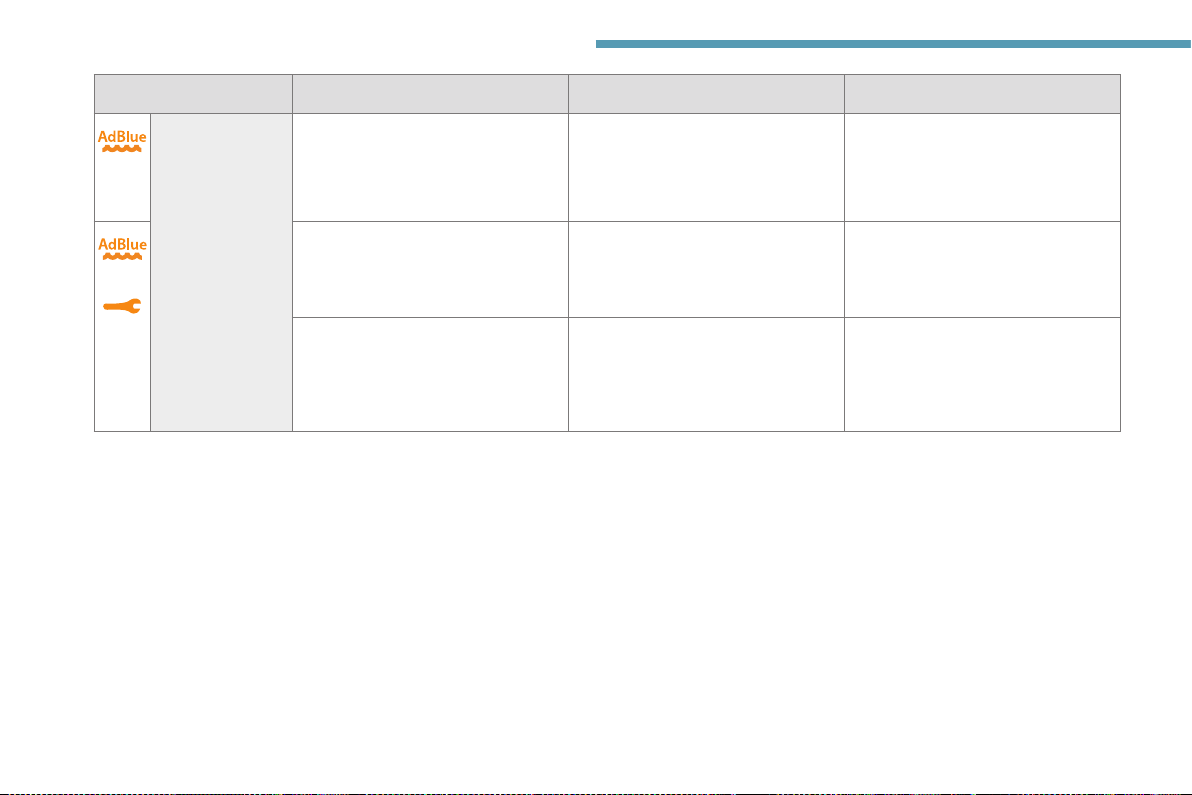
AdBlue
(E uro 6.1)
®
Fixed, on switching on the ignition,
accompanied by an audible signal and
a message indicating the remaining
The remaining driving range is
between 1,500 and 375 miles (2,400
and 600 km).
Top up the AdBlue
possible, or carry out (3).
®
as soon as
driving range.
14
®
AdBlue
warning lamp flashing
and Service warning lamp fixed,
+
accompanied by an audible signal and
a message indicating the remaining
driving range.
®
AdBlue
warning lamp flashing
and Service warning lamp fixed,
accompanied by an audible signal and
a message indicating that starting is
prevented.
(1 ): You must stop as soon as it is safe to
do so and switch off the ignition.
The driving range is less than 375
miles (600 km).
The AdBlue
®
tank is empty: the
starting prevention system required
by legislation prevents starting of the
engine.
(2): Contact a PEUGEOT dealer or a qualified
workshop.
®
You must top up the AdBlue
to avoid
a breakdown, or carry out (3).
To restart the engine, top up the
®
AdBlue
or carr y out (2).
It is essential to add at least 5 litres of
®
AdBlue
to its tank.
(3): Go to a PEUGEOT dealer or a qualified
workshop.

Instruments
Warning / indicator lamp State Cause Actions / Observations
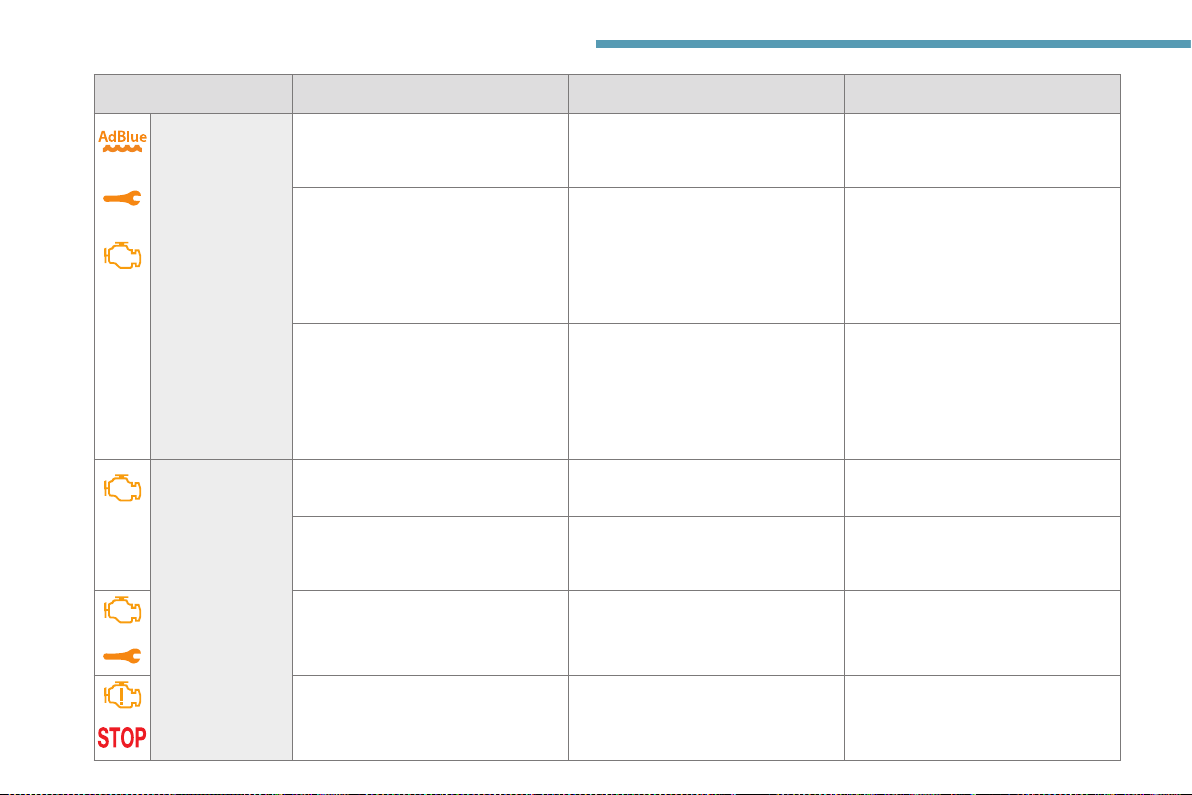
AdBlue
(Euro 6.2)
®
On for around 30 seconds when
starting the vehicle, accompanied by
a message indicating the remaining
driving range.
Fixed, on switching on the ignition,
accompanied by an audible signal and
a message indicating the remaining
driving range.
Flashing, accompanied by an audible
signal and a message indicating the
remaining driving range.
Flashing, accompanied by an audible
signal and a message indicating that
starting is prevented.
The remaining driving range is
between 1,500 and 500 miles (2,400
and 800 km).
The remaining driving range is
between 500 and 62 miles (800 and
100 km).
The driving range is less than 62 miles
(100 km).
The AdBlue
starting prevention system required
by legislation prevents starting of the
engine.
®
tank is empty: the
Top up the AdBlue
As soon as possible, top up with
®
AdBlue
or carr y out (3).
You must top up the AdBlue
starting being prevented, or carry
out (3).
To restart the engine, top up the
®
AdBlue
or carr y out (2).
It is essential to add at least 5 litres of
®
AdBlue
to its tank.
®
.
®
to avoid
1
15
Instruments
Warning / indicator lamp State Cause Actions / Observations
SCR emissions
control system
+
+
Fixed when the ignition is switched on,
accompanied by an audible signal and
a message.
®
AdBlue
warning lamp flashing, on
switching on the ignition, associated
with the fixed Service and Engine
self-diagnostic warning lamps,
accompanied by an audible signal and
a message indicating the remaining
A fault with the SCR emissions control
system has been detected.
Depending on the message displayed,
you can continue driving for up to
685 miles (1,100 km) before the
engine starting prevention system is
triggered.
This aler t disappears once the
exhaust emissions return to normal
levels.
Carry out (3) as soon as possible to
avoid starting being prevented.
driving range.
®
AdBlue
warning lamp flashing, on
switching on the ignition, associated
with the fixed Service and Engine
self-diagnostic warning lamps,
accompanied by an audible signal and
An engine immobiliser prevents
the engine from restarting (over
the authorised driving limit after
confirmation of a fault with the
emissions control system).
To start the engine, carry out (2).
a message.
16
+
+
Engine selfdiagnosis
system
Flashing. The engine management system has
a fault.
Fixed. The emission control system has a
fault.
Fixed. A minor engine fault has been
detected.
Fixed. A major engine fault has been
detected.
There is a risk that the catalytic
converter will be destroyed.
Carry out (2) without fail.
The warning lamp should go off when
the engine is started.
Carry out (3) quickly.
Carry out (3).
Carry out (1) and then (2).
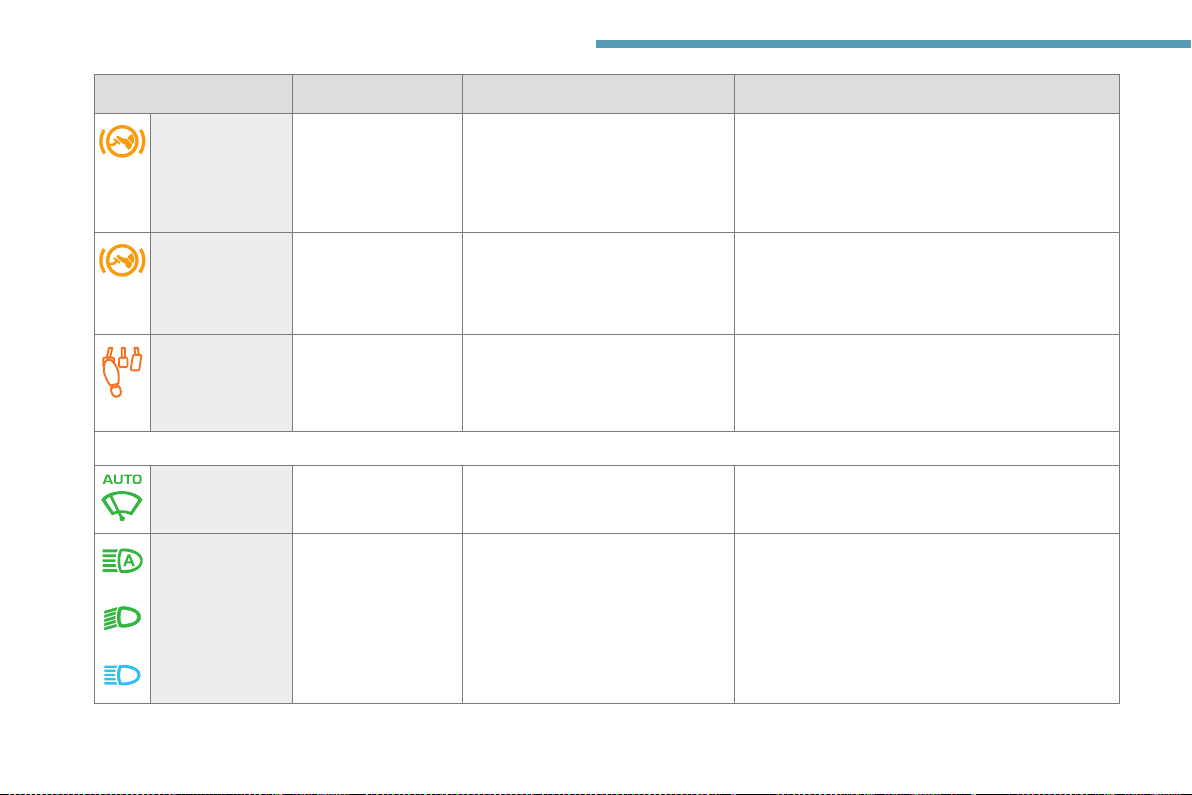
Instruments
Warning / indicator lamp State Cause Actions / Observations
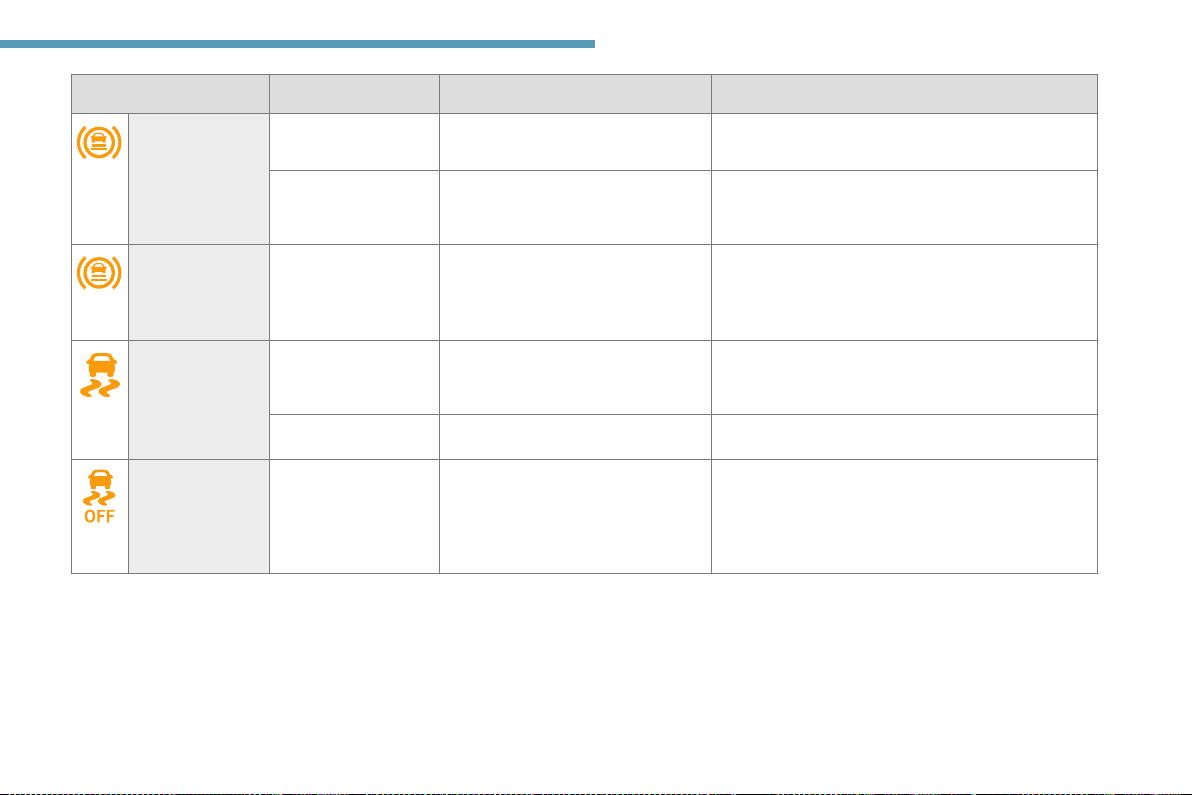
Distance alert /
Active Safety
Brake
Distance alert /
Active Safety
Brake
Dynamic
stability control
(DSC) and antislip regulation
(ASR)
Dynamic
stability control
(DSC)/Anti-slip
regulation (ASR)
(1 ): You must stop as soon as it is safe to
do so and switch off the ignition.
Flashing. The system is operating. The vehicle brakes briefly so as to reduce the speed of
Fixed, accompanied
by a message and an
audible signal.
Fixed, accompanied
by the display of a
message.
Flashing. The DSC/ASR adjustment is
Fixed. The DSC/ASR system has a fault. Carry out (3).
Fixed. The system is deactivated. The DSC/ASR system is reactivated automatically
The system has a fault. Carry out (3).
The system has been deactivated,
via the vehicle configuration menu.
activated if there is a loss of grip or
trajectory.
(2): Contact a PEUGEOT dealer or a qualified
workshop.
frontal collision with the vehicle ahead.
when the vehicle is started, and from around 31 mph
(50 km/h).
Below 31 mph (50 km/h), you can reactivate it
manually.
(3): Go to a PEUGEOT dealer or a qualified
workshop.
1
17
Instruments
Warning / indicator lamp State Cause Actions / Observations
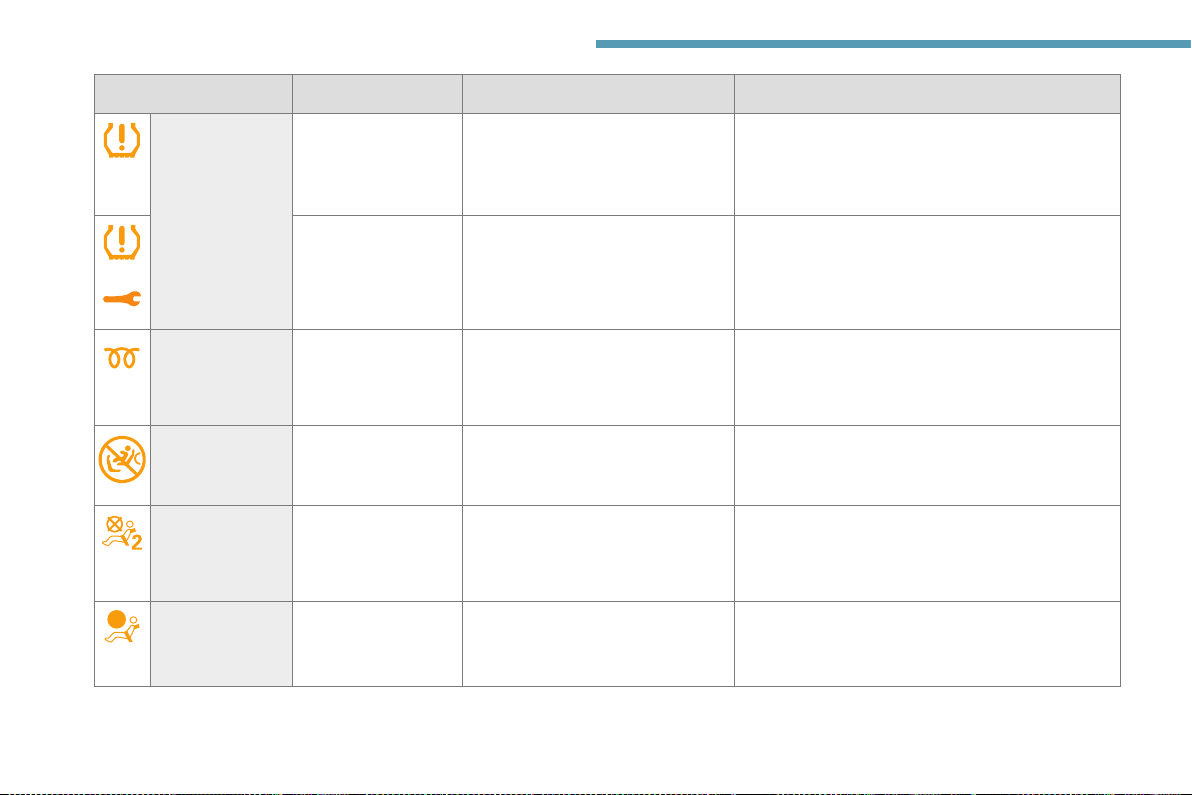
Under-inflation Fixed, accompanied
by an audible signal
and a message.
The pressure in one or more tyres is
too low.
Check the pressure of the tyres as soon as possible.
Reinitialise the detection system after adjusting the
pressure.
18
Under-inflation
warning lamp flashing
+
Diesel engine
pre-heating
Front passenger
airbag (ON)
Front passenger
airbag(OFF)
Airbags Fixed. One of the airbags or seat belt
then fixed and Service
warning lamp fixed.
Temporarily on. When switching on the ignition, if the
Fixed. The front passenger airbag is
Fixed. The front passenger airbag is
The system is faulty: tyre pressures
are no longer monitored.
weather conditions and the engine
temperature make it necessary.
activated.
The control is in the "ON" position.
deactivated.
The control is in the "OFF" position.
pretensioners is faulty.
Under-inflation detection is no longer assured.
As soon as possible, check the pressure of the tyres
and carry out (3).
Wait until the warning lamp goes off before starting.
If the engine does not start, switch the ignition off and
then on, wait until the indicator lamp goes off again,
then start the engine.
In this case, do NOT install a "rear ward facing"
child seat on the front passenger seat - Risk of
serious injury!
You can install a "rearward facing" child seat, unless
there is a fault with the airbags (airbag warning lamp
on).
Carry out (3).
Instruments
Warning / indicator lamp State Cause Actions / Observations
Low fuel level Fixed (warning lamp or LED) and
or
Presence of
water in Diesel
filter
Particle filter
(Diesel)
Power steering Fixed. The power steering has a fault. Drive carefully at moderate speed,
Rear foglamp Fixed. The rear foglamp is lit.
needle in the red zone (depending on
version), accompanied by an audible
signal and a message.
The audible signal and the message
are repeated with increasing
frequency as the level drops towards
zero.
Fixed (with LCD instrument panel). The Diesel filter contains water. Risk of damage to the injection
Fixed, accompanied by an audible
signal and a message about the risk of
particle filter blockage.
Fixed, accompanied by an audible
signal and a message signalling that
the additive level in the particle filter
is too low.
When it first comes on, there remains
less than 8 litres of fuel in the tank.
This indicates that the particle filter is
beginning to saturate.
This indicates that the level in the
additive tank is low.
Refuel without delay to avoid running
out of fuel.
Never drive until completely empty,
as this could damage the emissions
control and injection systems.
system: carry out (2) without delay.
As soon as the traffic conditions
permit, regenerate the filter by driving
at a speed of at least 37 mph (60
km/h) until the warning lamp goes off.
Carry out (3).
then carry out (3).
1
(1 ): You must stop as soon as it is safe to
do so and switch off the ignition.
(2): Contact a PEUGEOT dealer or a qualified
workshop.
(3): Go to a PEUGEOT dealer or a qualified
workshop.
19
Instruments
Warning / indicator lamp State Cause Actions / Observations
Foot on the
brake
Fixed. Omission or insufficient pressure on
the brake pedal.
With an automatic gearbox, with the engine running,
before releasing the parking brake, to move out of
position P.
With an electronic gearbox, with the lever in
position N, to start the engine.
20
Foot on the
brake
Foot on the
clutch
Flashing. With an electronic gearbox, the clutch
Fixed. Stop & Start: the change to START
Green warning/indicator lamps
+
or
Automatic
wiping
Automatic
Headlamp
Dipping
Fixed. Automatic windscreen wiping is
Fixed. The function has been activated in
Use the brake pedal and/or the parking brake.
will overheat if you hold the vehicle
on a slope using the accelerator for
too long.
Fully depress the clutch pedal.
mode is rejected because the clutch
pedal is not fully depressed.
activated.
the touch screen (Driving / Vehicle
menu).
The lighting control stalk is in the
"AUTO" position.
Instruments
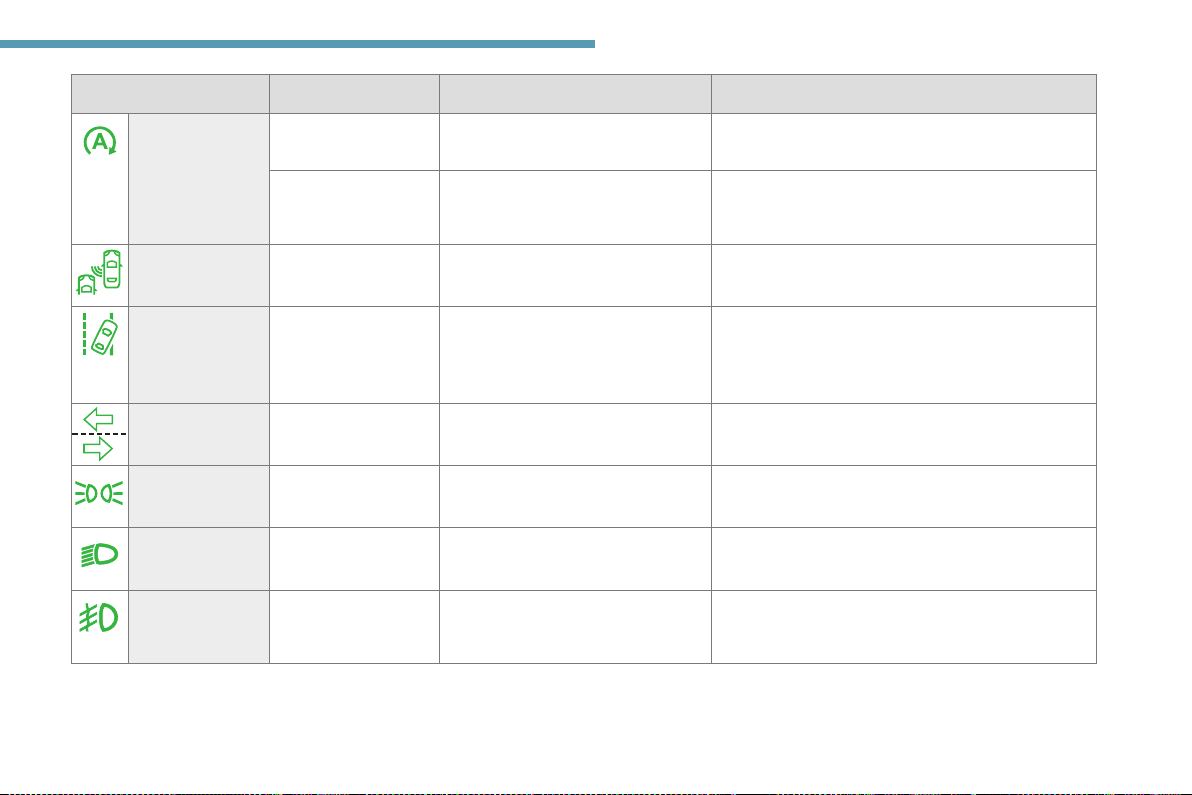
Warning / indicator lamp State Cause Actions / Observations
Stop & Start Fixed. When the vehicle stops the Stop
Indicator flashing
temporarily.
Blind spot
monitoring
Lane departure
warning system
Direction
indicators
Sidelamps Fixed. The lamps are lit.
Dipped beam
headlamps
Front foglamps Fixed. The front foglamps are lit.
Fixed. The function has been activated.
Flashing,
accompanied by an
audible signal.
Flashing with audible
signal.
Fixed. The lamps are lit.
& Start puts the engine into STOP
mode.
STOP mode is momentarily
unavailable or START mode is
automatically triggered.
A line is being crossed, right-hand
side (or left-hand side).
The direction indicators are on.
Turn the steering wheel in the opposite direction to
return to the correct trajectory.
1
21
Instruments
Warning / indicator lamp State Cause Actions / Observations
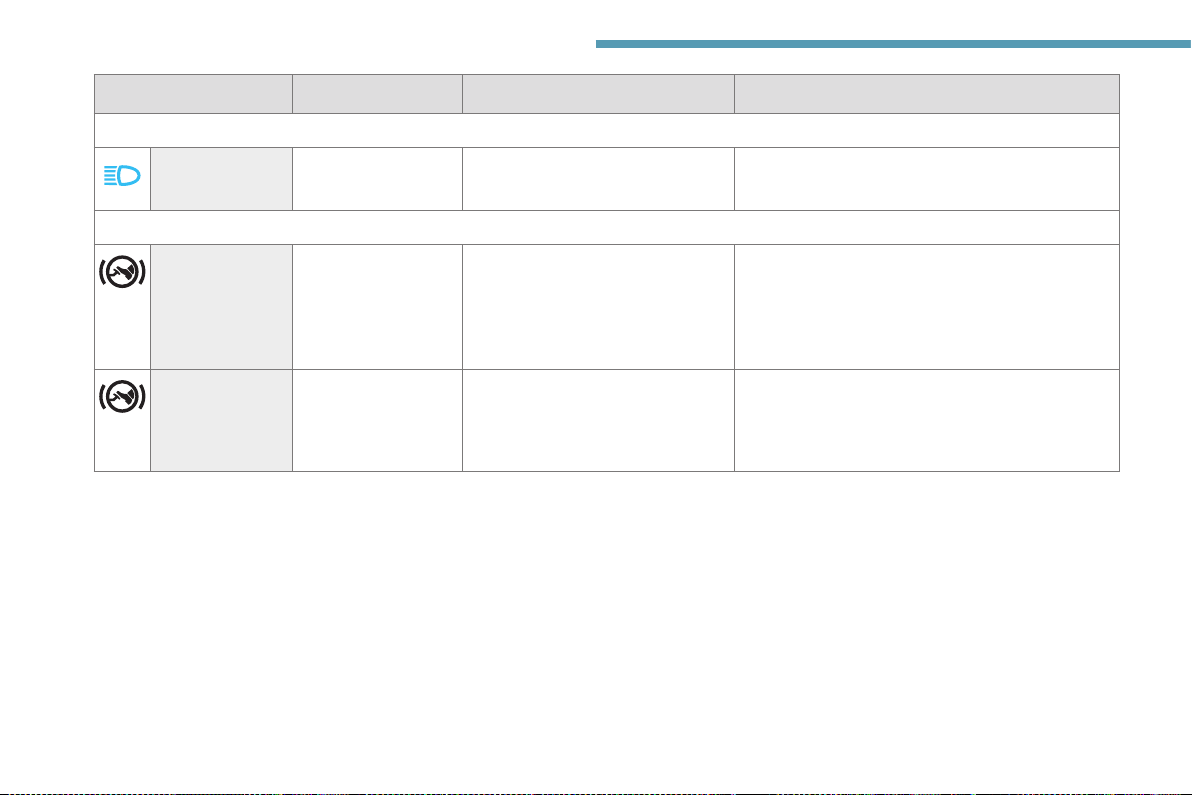
Blue warning/indicator lamps
Main beam
headlamps
Fixed. The main beams are on.
Black/white warning lamps
Foot on the
brake
Fixed. Omission or insufficient pressure on
the brake pedal.
With an automatic gearbox, with the engine running,
before releasing the parking brake, to move out of
position P.
With an electronic gearbox, with the lever in
position N, to start the engine.
22
Foot on the
brake
Flashing. With an electronic gearbox, the clutch
will overheat if you hold the vehicle
on a slope using the accelerator for
too long.
Use the brake pedal and/or the parking brake.
Instruments
Indicators
Service indicator
The service indicator is displayed on the instrument panel. Depending on the vehicle version:
- the distance recorder display line indicates the distance remaining before the next service is
due, or the distance travelled since it was due preceded by the sign “-”.
- an alert message indicates the distance remaining, as well as the period before the next service
is due or how long it is overdue.
Warning / indicator
lamp
Service
spanner
Service
spanner
flashing
+
State Cause
Lights up temporarily
when the ignition is
switched on.
Fixed, when the
ignition is switched on.
Flashing then fixed,
when the ignition is
switched on.
(With BlueHDi Diesel
engines, associated
with the Service
warning lamp).
Between 620 and
1,860 miles (1,000
and 3,000 km) remain
before the next service
is due.
The service is due in
less than 620 miles
(1,000 km).
The servicing interval
has been exceeded.
Actions /
Observations
Have your vehicle
serviced very soon.
Have your vehicle
serviced as soon as
possible.
Resetting the service indicator
1
The service indicator must be reset after each
service.
F Switch off the ignition.
F Press this button and keep it pressed.
F Switch on the ignition; the distance recorder
display begins a countdown.
F When the display shows =0, release the
button; the spanner disappears.
If it is necessary to disconnect the battery
after this operation, lock the vehicle and
wait at least 5 minutes for the reset to be
registered.
Retrieving the service information
The service information can be accessed at
any time.
F Press this button.
The service information is displayed for a few
seconds, then disappears.
23
Instruments
The distance indicated (in miles or
kilometres) is calculated according to the
distance covered and the time elapsed
since the last service.
The alert may be triggered close to a due
date.
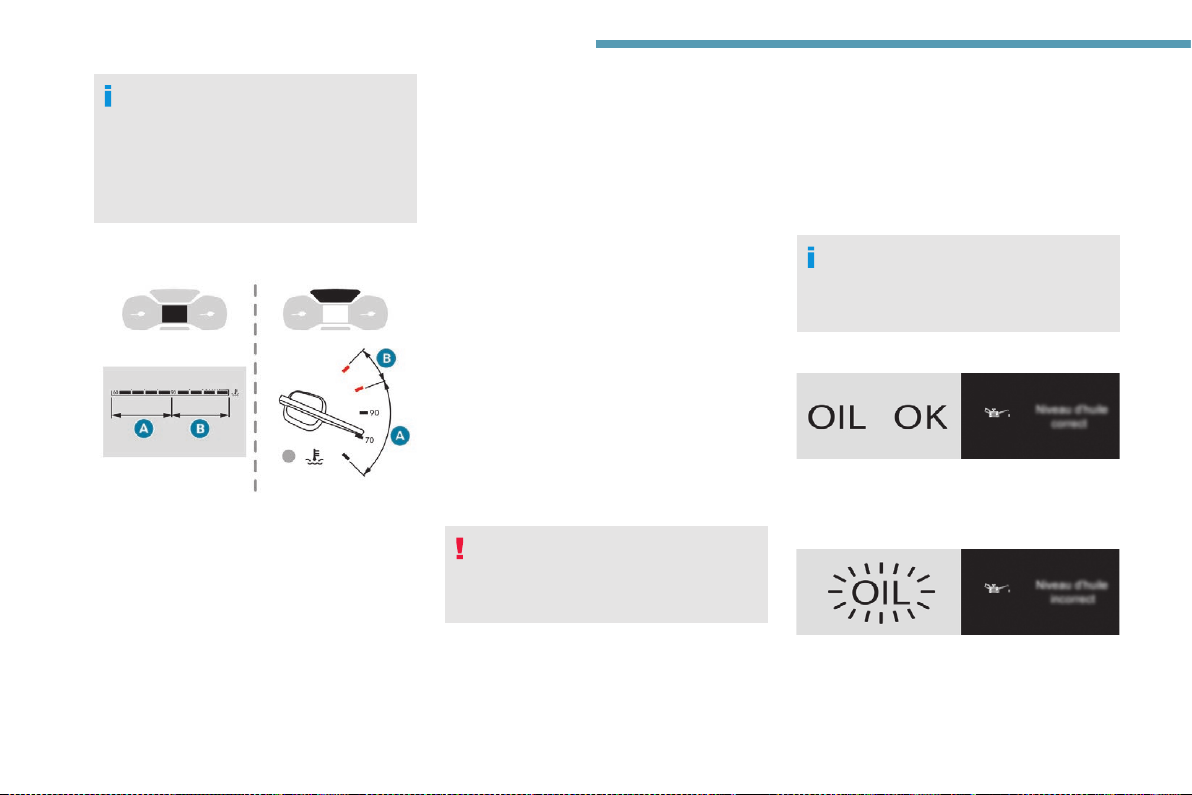
Engine coolant temperature
With the engine running, when the needle or
bar graph (depending on version) is:
- in zone A, the temperature of the engine
coolant is correct,
- in zone B, the temperature of the engine
coolant is too high; the maximum
temperature and central STOP warning
lamps come on, accompanied by an audible
signal and a warning message.
You must stop the vehicle as soon as it is
safe to do so.
Wait a few minutes before switching off the
engine.
Contact a PEUGEOT dealer or a qualified
workshop.
Checking
After driving for a few minutes, the temperature
and pressure in the cooling system increase.
To top up the level:
F wait at least one hour for the engine to cool,
F unscrew the cap by two turns to allow the
pressure to drop,
F when the pressure has dropped, remove the
cap,
F top up the level to the "MAX" mark.
For more information on Checking levels,
refer to the corresponding section.
Be aware of the risk of scalding when
topping up the coolant. Do not fill above
the maximum level (indicated on the
reservoir).
Engine oil level indicator
On versions fitted with an electric oil level
indicator, the state of the engine oil level is
displayed in the instrument panel for a few
seconds when the ignition is switched on, at
the same time as the ser vicing information.
The level read will only be correct if
the vehicle is on level ground and the
engine has been stopped for more than
30 minutes.
Oil level correct
This is indicated by a message in the
instrument panel.
Oil level incorrect
This is indicated by a message in the
instrument panel.
If the low oil level is confirmed by a check using
the dipstick, the level must be topped up to
avoid damage to the engine.
24
Instruments
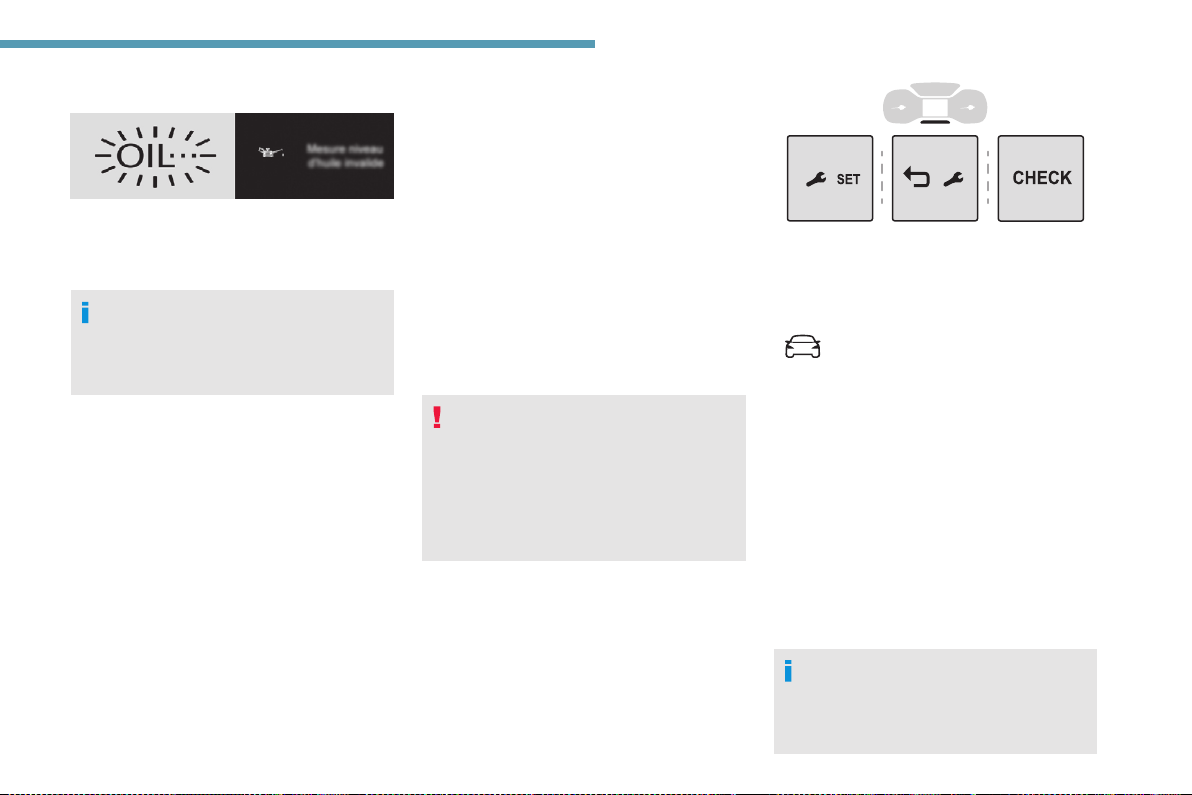
Oil level indicator fault
This is indicated by a message on the
instrument panel. Contact a PEUGEOT dealer
or a qualified workshop.
To locate the dipstick and the oil filler
cap for the Diesel engine, refer to the
corresponding section.
AdBlue® range indicators
(BlueHDi)
The Diesel BlueHDi engines are equipped with
a system that associates the SCR (Selective
Catalytic Reduction) emissions control system
and the Diesel particle filter (DPF) for the
treatment of exhaust gases. They cannot
function without AdBlue
When the level of AdBlue
reserve level (between 1,500 miles and 0
miles (2,400 and 0 km)), a warning lamp lights
up when the ignition is switched on and an
estimate of the distance that can be travelled
before engine starting is prevented is displayed
in the instrument panel.
The engine starting prevention system
required by regulations is activated
automatically once the AdBlue
empty. It is then no longer possible to
start the engine until the minimum level of
®
AdBlue
has been topped up.
Manual display of the range
While the range is greater than 1,500 miles
(2,400 km), it is not displayed automatically.
®
fluid.
®
falls below the
®
tank is
F Press this button to temporarily display the
driving range.
With touch screen
You can access this information via
the "Driving/Vehicle" menu.
Actions required related to a lack
of AdBlue
The following warning lamps light up when the
quantity of AdBlue® is lower than the reserve
level corresponding to a range of 1,500 miles
(2,40 0 km).
Together with the warning lamps, messages
regularly remind you of the need to top up to
avoid engine starting being prevented. Refer to
the Warning and indicator lamps section for
details of the messages displayed.
For more information on AdBlue
(BlueHDi engines), and in particular on
topping up, refer to the corresponding
section.
®
®
1
25
Instruments
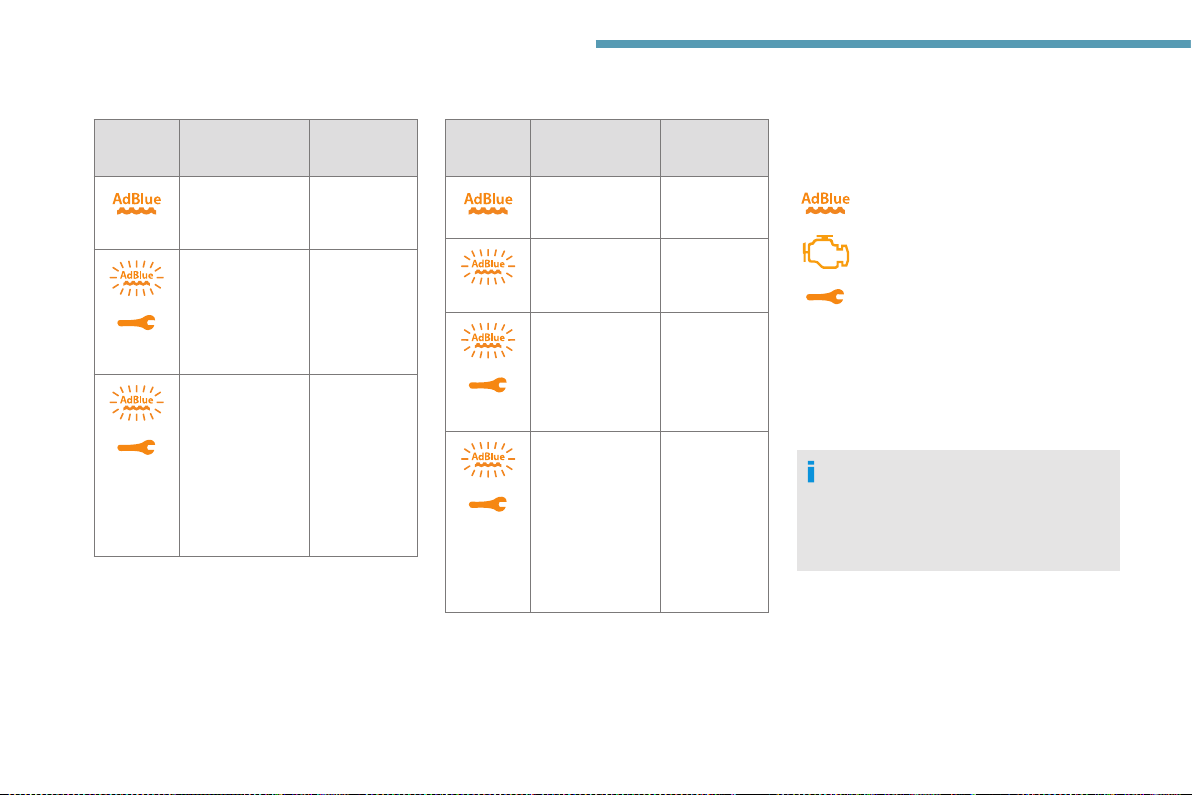
With BlueHDi (Euro 6.1) engines
Warning/
indicator
lamps lit
Action
Top up as soon
as possible.
A top-up is
vital, there is
the risk that the
engine will be
prevented from
starting.
To be able
to restart the
engine, add at
least 5 litres of
®
AdBlue
to its
tank.
Remaining
range
Between
1,500 and
375 miles (2,400
and 600 km)
Between 375
and 0 miles
(600 and
0 km)
0 miles (km)
With BlueHDi (Euro 6.2) engines
Warning/
indicator
lamps lit
Action
Top up.
Top up as soon
as possible.
A top-up is
vital, there is
the risk that the
engine will be
prevented from
starting.
To be able
to restart the
engine, add at
least 5 litres of
®
AdBlue
to its
tank.
Remaining
range
Between 1,500 and
500 miles (2,400
and 800 km)
Between 500
and 62 miles
(800 and
100 km)
Between 62
and 0 miles
(100 and
0 km)
0 miles (km)
Malfunction of the SCR
emissions control system
Malfunction detection
If a malfunction is detected, these
warning lamps come on, accompanied
by an audible signal and the display
of an "Emissions fault" or "NO START
IN" message.
The alert is triggered while driving as soon
as the fault is detected for the first time, then
when switching on the ignition for subsequent
journeys, while the fault persists.
If it is a temporary fault, the alert
disappears during the next journey,
after self-diagnostic checks of the SCR
emissions control system.
Malfunction conrmed during
the permitted driving phase
(between 685 and 0 miles (1,100
and 0 km))
If the warning lamp is still on after 31 miles
(50 km) of driving, the fault in the SCR system
is confirmed.
26
Instruments
The AdBlue warning lamp flashes,
accompanied by the display of a message
("Emissions fault: Starting prevented in X
miles" or "NO START IN X miles") indicating
the remaining range in miles or kilometres.
While driving, the message is displayed every
30 seconds. The alert is repeated when
switching on the ignition.
You can continue driving for up to 685 miles
(1,100 km) before the engine starting
prevention system is triggered.
Have the system checked by a PEUGEOT
dealer or a qualified workshop as soon as
possible.
Starting prevented
Every time the ignition is switched on, the
message "Emissions fault: Starting prevented"
or "NO START IN" is displayed.
To be able to restart the engine, call on a
PEUGEOT dealer or a qualified workshop.
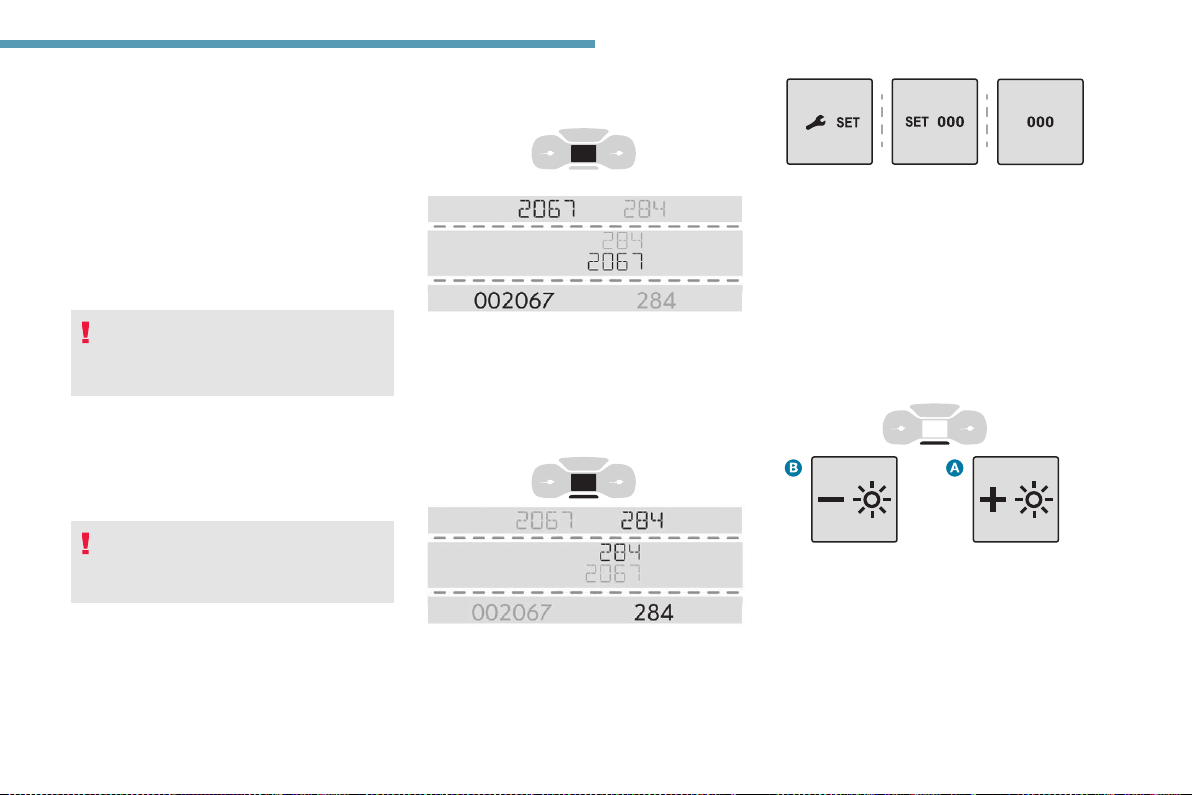
Distance recorders
The total and trip distances are displayed for
thirty seconds when the ignition is switched off,
when the driver's door is opened and when the
vehicle is locked or unlocked.
Total distance recorder
It measures the total distance travelled by the
vehicle since its first registration.
Trip distance recorder
It measures the distance travelled since it was
reset by the driver.
1
F With the ignition on, press this button until
zeros appear.
Lighting dimmer
This system allows the brightness of the
instruments and controls to be adjusted to suit
the ambient light level.
With buttons
With the lamps on, press button A to increase
the brightness of the lighting or button B to
reduce it.
Release the button when the desired level of
brightness is reached.
27
Instruments
28
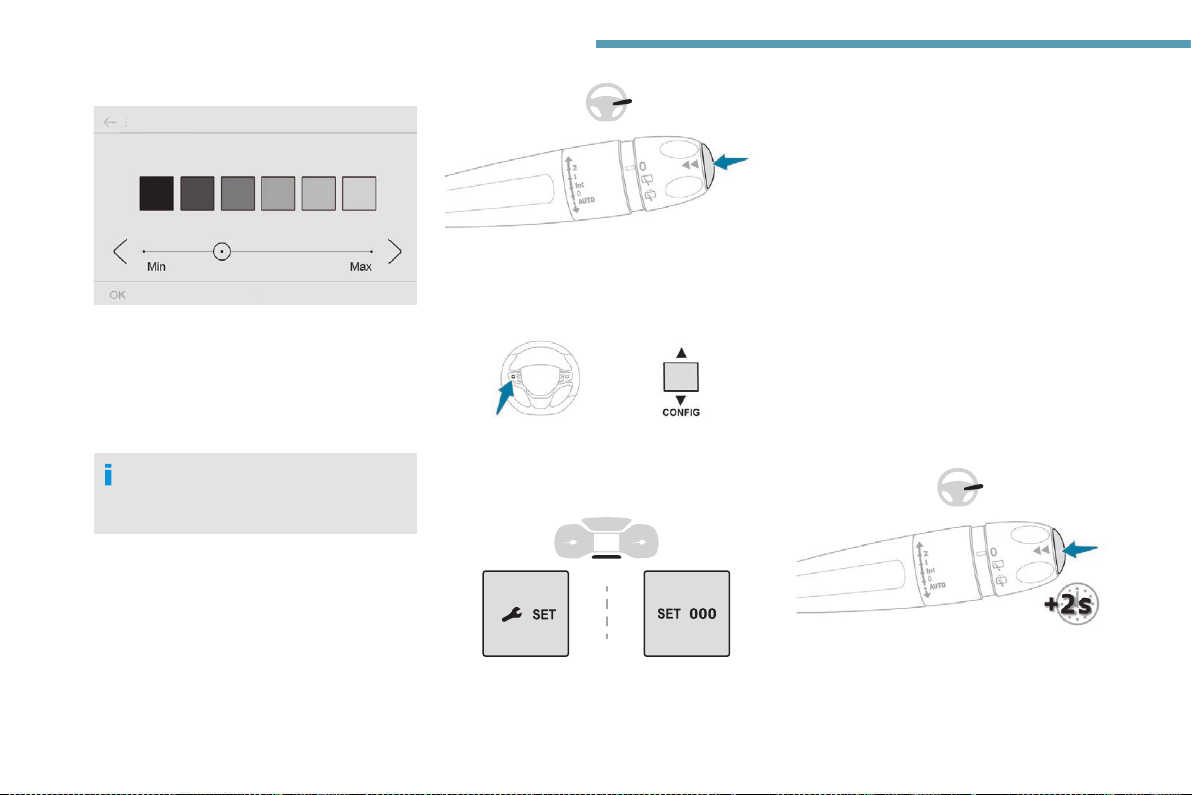
With touch screen
F In the Settings menu, select "Brightness".
Or select "OPTIONS", "Screen configuration"
then "Brightness".
F Adjust the brightness by pressing the
arrows or moving the slider.
The brightness can be adjusted differently
for day mode and night mode.
Trip computer
Information displayed about the current journey
(range, fuel consumption, average speed, etc.).
Display of information
To display the various trip computer tabs in
succession:
F Press this button, located on the end of the
wiper control stalk.
With steering mounted controls
F Press the knob on the steering wheel.
On the instrument panel
F Press this button.
The current information is then displayed:
- the range,
- the current fuel consumption,
- the Stop & Star t time counter,
- the trip "1" followed (depending on version)
by trip "2" with: the average speed, the
average fuel consumption and the distance
travelled for each trip.
Trip s "1" and "2" are independent but their use
is identical.
For example, trip "1" can be used for daily
figures and trip "2" for monthly figures.
Reset trip
The reset is performed when the trip is
displayed.
F Press the button located on the end of
the wiper control stalk for more than
2 seconds.

Instruments
F Press the knob on the steering wheel for
more than 2 seconds.
F Press this button for more than 2 seconds.
A few definitions
Range
(miles or km)
The distance which can still be
travelled with the fuel remaining in
the tank (depending on the average
fuel consumption over the last few
miles (kilometres) travelled).
This value may vary following a change in
the style of driving or the terrain, resulting
in a significant change in the current fuel
consumption.
When the range falls below 19 miles (30 km),
dashes are displayed.
After filling with at least 5 litres of fuel, the
range is recalculated and is displayed if it
exceeds 62 miles (100 km).
If dashes instead of figures continue to be
displayed when driving, contact a PEUGEOT
dealer or a qualified workshop.
Current fuel consumption
(mpg or l/100 km or km/l)
Calculated during the last few
seconds.
This function is only displayed from 19 mph
(30 km/h).
Average fuel consumption
(mpg or l/100 km or km/l)
Calculated since the last trip
computer reset.
Average speed
(mph or km/h)
Calculated since the last trip
computer reset.
Distance travelled
(miles or km)
Calculated since the last trip
computer reset.
Stop & Start time counter
(minutes/seconds or hours/minutes)
If your vehicle is fitted with Stop & Start, a time
counter calculates the time spent in STOP
mode during a journey.
It resets to zero every time the ignition is
switched on.
Setting the time and date
Without audio system
1
29

Instruments
The date and time can be adjusted in the
instrument panel display.
F Hold this button down.
F Press one of these buttons to
select the setting to be changed.
F Press this button briefly to
confirm.
F Press one of these buttons to
change the setting and confirm
again to register the change.
With audio system
F Press the MENU button for access to the
main menu.
F Press the "7" or "8" button to select the
"Personalisation-configuration" menu,
then confirm by pressing the OK button.
F Press the "5" or "6" button to select the
Display configuration menu, then confirm
by pressing the OKbutton.
F Press the "5" or "6" and "7" or "8" buttons
to adjust the date and time values, then
confirm by pressing the OK button.
With PEUGEOT Connect
Radio
F Select the Settings menu in
the upper banner of the touch
screen.
F Select "System configuration".
F Select "Date and time".
F Select "Date" or "Time".
F Choose the display formats.
F Change the date and/or time using the
numeric keypad.
F Confirm with "OK".
With PEUGEOT Connect
Nav
Setting of the time and date is only available if
synchronisation with the GPS is deactivated.
F Select the Settings menu in the
bar of the touch screen.
F Press the "OPTIONS" button to go to the
secondary page.
F Select "Set time-date".
F Set the date and/or time using the numeric
keypad.
F Confirm with "OK".
Additional settings
You can choose:
- To change the time zone.
- To change the display format of the date
and time (12h/24h).
- To activate or deactivate the summer time
management function (+1 hour).
- To activate or deactivate the
synchronisation with the GPS (UTC).
The system does not automatically
manage the change between winter and
summer time (depending on the country
of sale).
30
F Select the "Date" or "Time" tab.

Access
Electronic key with remote
control function and builtin key,
If one of the doors or the boot is still open
or if the electronic key for the Keyless
Entry and Starting system has been left
inside the vehicle, the central locking does
not take place.
However, if the vehicle has an alarm, it will
be activated after 45 seconds.
If the vehicle is unlocked and there is no
action at the doors or boot, the vehicle will
automatically lock itself again after about
30 seconds. If the vehicle has an alarm, it
will also be reactivated automatically.
The automatic folding and unfolding of
the door mirrors can be deactivated by a
PEUGEOT dealer or a qualified workshop.
As a safety measure, never leave the
vehicle without taking the electronic key
for the Keyless Entry and Starting system
with you, even for a short period.
Be aware of the risk of theft when the key
is in one of the defined zones with the
vehicle unlocked.
If a door is not properly closed
(except the right-hand door with sidehinged rear doors):
- vehicle stationary and engine
running, this warning lamp
comes on, accompanied by an
alert message for a few seconds,
- vehicle moving (speed above
6 mph (10 km/h)), this warning
lamp comes on, accompanied
by an audible signal and an alert
message for a few seconds.
Remote control key
This allows the central locking or unlocking of
the vehicle using the door lock or remotely.
It also allows the vehicle to be located, the fuel
filler cap to be removed and refitted and the
engine to be started or switched off, as well as
providing protection against theft.
2
The remote control buttons are not active
with the ignition switched on.
Unfolding/Folding the key
F Press this button to unfold or fold the key.
If this button is not pressed, there is a risk
of damaging the remote control.
Keyless Entry and Starting
This allows the remote central locking or
unlocking of the vehicle.
It is also used to locate and start the vehicle, as
well as providing protection against theft.
31

Access
Integral key
This is used to lock and unlock the vehicle
when the remote control cannot operate:
- cell battery flat, vehicle battery discharged
or disconnected, etc.
- vehicle located in an area with strong
electromagnetic signals.
F Keep this button 1 pulled while removing
key 2 from the housing.
If the alarm is activated, the audible signal
triggered on opening a door with the key
(integral with the remote control) will stop
when the ignition is switched on.
"Keyless Entry and Starting" on
your person
It allows the unlocking, locking and starting of
the vehicle, while carrying the remote control
on your person in the recognition zone "A".
In the ignition on (accessories) position,
with the "START/STOP" button, the
hands-free function is deactivated and it is
impossible to open the doors.
For more information on Starting/
switching off the engine, Keyless Entry
and Starting and in particular the "ignition
on" position, refer to the corresponding
section.
Locating your vehicle
This function allows you to identify your vehicle
from a distance, with the vehicle locked.
F Press this button.
The cour tesy lamps come on and the direction
indicators flash for around 10 seconds.
Remote operation of
lighting
If fitted to the vehicle.
A short press on this button switches
on the lighting remotely (lighting of
sidelamps, dipped beam headlamps
and number plate lamps).
A second press on the button before
the end of the timed period cancels
the remote lighting.
32

Access
Advice
Remote control
The high frequency remote control is a
sensitive system; do not operate it while
it is in your pocket as there is a possibility
that it may unlock the vehicle, without you
being aware of it.
Do not press the remote control buttons
when out of range of the vehicle: risk of
making it inoperable. It would then be
necessary to reinitialise it.
The remote control does not operate when
the key is in the ignition switch, even when
the ignition is switched off.
Anti-theft protection
Do not make modifications to the
electronic engine immobiliser system; this
could cause malfunctions.
For vehicles with a key ignition switch,
do not forget to remove the key and turn
the steering wheel to engage the steering
lock.
Locking the vehicle
Driving with the doors locked could make
it more difficult for the emergency services
to enter the vehicle in an emergency.
As a safety precaution (with children on
board), remove the key from the ignition
or take the electronic key with you when
leaving the vehicle, even for a short time.
Purchasing a second-hand vehicle
Have the key codes memorised by a
PEUGEOT dealer, to ensure that the
received keys are the only ones which can
start the vehicle.
Accumulations (water, dust, grime, salt,
etc.) on the inner surface of the door
handle may affect detection.
If cleaning the inner surface of the door
handle using a cloth does not restore
detection, contact a PEUGEOT dealer or a
qualified workshop.
A sudden splash of water (stream of water,
high pressure jet washer, etc.) may be
identified by the system as the desire to
open the vehicle.
Unlocking/Complete or selective unlocking
What is the purpose of
complete or selective
unlocking?
Complete unlocking unlocks all the vehicle’s
doors (front, side and rear).
Selective unlocking unlocks either the cab
doors, or the doors of the loading area (side
and rear).
2
33

Access
The separation of the cab and loading
area unlocking is a security measure.
It is used to prevent access to the part
of the vehicle in which the driver is not
present.
Activation/Deactivation
F To activate selective unlocking
between cab and loading area
or to deactivate this selectivity
and return to complete
unlocking, switch the ignition on
and press this button for more
than two seconds.
An audible signal and, depending on
equipment, the display of a message, confirm
that the request has been acknowledged.
By default, selectivity between cab and
loading area is activated.
Unlocking/Complete
unlocking
Unlocking is signalled by rapid flashing of
the direction indicators for a few seconds.
Depending on version, the door mirrors
unfold and the alarm is deactivated.
With the key
F To completely unlock the vehicle, turn the
key in the driver's door lock towards the
front of the vehicle.
If fitted to the vehicle, the alarm is not
deactivated. Opening a door will trigger the
alarm, which can be stopped by switching the
ignition on.
With the remote control
F Depending on equipment, press
one of these buttons to unlock
the vehicle.
Using the remote control with
electric sliding side door(s)
F To fully unlock the vehicle and
open the side door, press and
hold this button until the door has
opened.
With the Keyless Entry and
Starting on your person
To unlock the vehicle, the remote control must
be in recognition zone A.
F To completely unlock the vehicle, pass
your hand behind one of the door handles
(front door(s), manual sliding side door(s)
or left-hand side-hinged door) then pull the
handle to open the corresponding door.
34

Access
With electric sliding side door(s)
F With the Keyless Entry and Starting on
your person, run your hand behind the door
handle to unlock the vehicle, then pull and
release the handle. This action also triggers
the opening of the corresponding door.
With tailgate
F With the Keyless Entry and Starting on
your person, to unlock the vehicle, pull the
tailgate handle then raise it to open.
With a tailgate opening rear screen
F With the Keyless Entry and Starting device
on your person, to unlock the vehicle, press
the tailgate opening rear screen unlocking
control. The screen partly opens; raise it to
open it fully.
Selective unlocking
Unlocking is signalled by rapid flashing of
the direction indicators for a few seconds.
Depending on version, the door mirrors
unfold and the alarm is deactivated.
With the remote control
F To unlock the cabin doors alone,
press this button once.
F To unlock the side and rear doors
of the loading area, press this
button a second time.
If the vehicle is fitted with this function:
F Press this button to unlock the
loading area only.
Using the remote control with
electric sliding side door(s)
F To unlock the loading area alone
without opening the side door,
press the relevant door button or
keep the button pressed down to
open the door.
2
35

Access
36
With Keyless Entry and Starting
on your person
F To unlock the cabin alone, pass your hand
behind a handle of the front left or right
doors, then pull the handle to open the door.
The door locking state of the loading area
remains unchanged.
F To unlock the loading area alone,
the remote control on your person in
recognition zone A, B or C, pass your
hand behind a handle of the front left or
right doors, then pull the handle to open the
corresponding door.
Depending on the version, the door
mirrors unfold only when the cabin is
unlocked, the alarm is deactivated.
With electric sliding side door(s)
F With Keyless Entry and Starting "on your
person", pass your hand behind the door
handle of a front door to unlock the vehicle,
then pull and release the handle. This
operation also causes the corresponding
door to be opened.
With tailgate
F With Keyless Entry and Starting "on your
person", pull the tailgate handle and lift it to
unlock the loading area.
Unlocking is signalled by rapid flashing of
the direction indicators for a few seconds.
Locking
With the key
F To lock the vehicle completely, turn the key
in the driver's door lock towards the rear of
the vehicle.
If the vehicle has an alarm, this will not be
activated.
With the remote control
F To lock the vehicle completely,
press this button.

Access
With the Keyless Entry and
Starting on your person
To lock the vehicle the remote control must be
in recognition zone A.
F To lock the vehicle, press on the markings
of one of the door handles (front door(s),
manual sliding side door(s) or left-hand
side-hinged door).
With electric sliding side door(s)
F With the Keyless Entry and Starting on your
person, to lock the vehicle completely,
press on the markings of one of the front
door handles.
With tailgate
F With the Keyless Entry and Starting on
your person, to lock the vehicle, press the
tailgate locking control.
If the vehicle is so equipped,
pressing and holding the locking
controls closes the windows. The
window stops immediately once
the control is released.
Ensure that no person or object prevents
the correct closing of the windows.
Be particularly aware of children when
operating the windows.
If the vehicle is not fitted with an
alarm, locking is signalled by the fixed
illumination of the direction indicators for
about two seconds.
Depending on the version, the door
mirrors fold at the same time.
Driving with the doors locked could make
it more difficult for the emergency services
to enter the vehicle in an emergency.
As a safety measure, never leave the
vehicle without taking the remote control
with you, even for a short time.
Deadlocking
Deadlocking deactivates the exterior
and interior door controls, as well as the
central locking button on the dashboard.
The horn remains operational.
You must therefore never leave anyone
inside the vehicle when it is deadlocked.
With the key
F To deadlock the vehicle, turn the key in the
driver's door lock towards the rear of the
vehicle.
F Then within five seconds, turn the key
towards the rear again.
With the remote control
F To deadlock the vehicle, press
this button.
F Then within five seconds after
locking, press this button again.
Depending on version, the electric door
mirrors fold at the same time.
2
37

Access
If the vehicle is not fitted with an alarm,
deadlocking is confirmed by fixed
illumination of the direction indicators for
about two seconds.
With the Keyless Entry and
Starting on your person
To lock the vehicle the remote control must be
in recognition zone A.
F To completely lock the vehicle, press on
the markings of one of the door handles
(front door(s), manual sliding side door(s) or
left-hand side-hinged door).
F To deadlock the vehicle, press the marking
again within five seconds.
With electric sliding side door(s)
F With the Keyless Entry and Starting on
your person, to completely lock the vehicle
press on the markings of one of the front
door handles.
F To deadlock the vehicle, press the markings
again within five seconds.
With tailgate
F With the Keyless Entry and Starting on your
person, to completely lock the vehicle,
press the tailgate locking control.
F To deadlock the vehicle, press the control
again within five seconds.
If the vehicle is not fitted with an alarm,
deadlocking is confirmed by fixed
illumination of the direction indicators for
about two seconds.
Back-up procedures
Lost keys, remote control,
electronic key
Visit a PEUGEOT dealer with the vehicle's
registration certificate, a personal identification
document and, if possible, the label bearing the
key code.
The PEUGEOT dealer will be able to retrieve
the key code and the transponder code
required to order a new key.
Total unlocking/locking of
the vehicle with the key
Use these procedures in the following cases:
- remote control cell battery flat,
- remote control fault,
- vehicle in an area subject to strong
electromagnetic interference.
In the first case, you can also replace the
remote control cell battery.
In the second case, you can also reinitialise the
remote control.
Refer to the corresponding sections.
F Insert the key in the door lock.
F Turn the key towards the front/rear to lock/
unlock the vehicle.
38

Access
F To deadlock it, turn the key towards the
rear again within 5 seconds of locking
(confirmed by the temporary lighting of the
direction indicators).
If the vehicle is fitted with an alarm, this
function will not be activated when locking
with the key.
If the alarm is activated, the siren sounds
on opening the door; switch on the ignition
to stop it.
If unlocking using the key in the lock
takes place after locking using the
remote control or the Keyless Entry
and Starting, all of the accesses are
unlocked.
If unlocking using the key in the lock
takes place after locking using the
key, only the doors are unlocked (front
doors, sliding side doors(s)). The hinged
doors and the tailgate are not unlocked.
Switching on the ignition unlocks them.
Central locking not
functioning
Use these procedures in the following cases:
- central locking fault,
- battery disconnected or discharged.
In the event of a malfunction with the
central locking system, the battery must
be disconnected to lock the boot and thus
ensure that the vehicle is locked fully.
Driver's door
F Turn the key towards the rear of the vehicle
to lock it, or towards the front to unlock it.
Front passenger door and sliding
side door
Unlocking
F Pull the interior door opening handle.
Locking
F Open the door.
F For the side door, check that the child
lock is not on. Refer to the corresponding
section.
Front passenger door
Sliding side door
F Remove the black cap on the edge of the
door, using the key.
F Insert the key in the aperture without forcing
it, then without turning it, move the latch
sideways towards the inside of the door.
F Remove the key and refit the black cap.
F Close the doors and check from the outside
that the vehicle is locked.
Side-hinged doors
Unlocking
F Use the interior opening handle.
Locking
F If the vehicle is so equipped, check that the
electric child lock is not on.
F Open the left-hand side-hinged door.
2
39

Access
F Insert the key into the latch aperture on the
edge of the door (without forcing), then slide
the assembly upward.
F Remove the key.
F Close the door and check from the outside
that it has locked correctly.
Unlocking the tailgate
F From inside the vehicle, insert a small
screwdriver into hole A of the lock to unlock
the tailgate.
F Move the latch to the left.
If the fault persists after closing again, the
tailgate will remain locked.
Changing the battery
If the battery is discharged,
this warning lamp comes on,
accompanied by an audible signal
and the display of a message.
Without Keyless Entry and Starting
Battery ref.: CR1620/3 Volts.
With Keyless Entry and Starting
Battery ref.: CR2032/3 Volts.
F Unclip the cover by inserting a small
screwdriver in the slot and raise the cover.
F Remove the discharged battery from its
housing.
F Insert the new battery, observing the
polarity, and clip the cover onto the housing.
F Reinitialise the remote control.
For more information on Reinitialising the
remote control, refer to the corresponding
section.
Do not throw remote control batteries
away as they contain metals which are
harmful to the environment. Take them
to an approved collection point.
Reinitialising the remote
control
Following replacement of the battery or in
the event of a remote control fault, it may be
necessary to reinitialise the remote control.
If the problem persists, contact a
PEUGEOT dealer or a qualified workshop
as soon as possible.
40

Access
Without Keyless Entry and
Starting
F Switch off the ignition.
F Return the key to position 2 (Ignition on).
F Immediately press the closed padlock
button for a few seconds.
F Switch off the ignition and remove the key
from the switch.
The remote control is now fully operational
again.
With Keyless Entry and Starting
F Insert the mechanical key (integral with
the remote control) in the lock to open the
vehicle.=
F Place the electronic key against the back-up
reader on the steering column and hold it
there until the ignition is switched on.
F Switch on the ignition by pressing the
"START/STOP" button.
F With a manual gearbox, place the
gear lever in neutral then fully depress
the clutch pedal.
F With an automatic gearbox, from
mode P, fully depress the brake pedal.
F With an electronic gearbox, from
mode N, fully depress the brake pedal.
If the fault persists after reinitialisation, contact
a PEUGEOT dealer or a qualified workshop
without delay.
Central locking / unlocking
Manual
2
F Press this button to operate the central
locking of the vehicle (doors, tailgate or
side-hinged doors) from inside the vehicle.
The indicator lamp in the button comes on.
F Pressing the button again unlocks the
vehicle completely. The indicator lamp in
the button goes off.
The indicator lamp also goes off when
unlocking one or more doors.
The central locking does not take place if
one of the doors is open.
41

Access
When locking/deadlocking from the
outside
When the vehicle is locked or deadlocked
from the outside, the indicator lamp
flashes and the button is inoperative.
F After normal locking, pull one of the
interior door controls to unlock the
vehicle.
F After deadlocking, it is necessary to
use the remote control, Keyless Entry
and Starting or the integral key to
unlock the vehicle.
Driving with the doors locked could make
it more difficult for the emergency services
to enter the vehicle in an emergency.
When carrying large objects
with the tailgate or sidehinged doors open, press
the button to lock just the
cab doors.
When carrying large objects
with the tailgate or sidehinged doors open, press
the button to lock just the
front and rear doors (sliding
side door).
When locking from inside, the door mirrors
do not fold.
If one of the doors is open, the central
locking from the inside does not function.
This is signalled by a mechanical noise
from the locks.
If the tailgate or the side-hinged doors are
open, only the other doors are locked. The
indicator lamp in the button remains off.
Automatic (anti-intrusion
security)
The doors and the tailgate or the side-hinged
doors can lock automatically while driving
(speed above 6 mph (10 km/h)).
To deactivate/reactivate this function (activated
by default):
F Press the button until an audible signal is
heard and/or a message appears in the
screen.
Locking / unlocking the
loading area
This button is unavailable if the vehicle
has been locked or deadlocked from
outside (using the key, remote control or
Keyless Entr y and Starting, depending on
equipment) or if one of the doors is still
open.
42

Access
Automatic
The loading area is always locked when
driving.
To deactivate the automatic locking
function, go to a PEUGEOT dealer or a
qualified workshop.
Manual
F With complete unlocking
activated, press this button to
lock (indicator lamp comes on)/
unlock (indicator lamp goes off)
the vehicle.
F With selective unlocking
activated, press this button to
lock (indicator lamp comes on)/
unlock (indicator lamp goes off)
the loading area.
Driving with the doors locked could make
it more difficult for the emergency services
to enter the vehicle in an emergency.
The indicator lamp goes off when
unlocking one or more doors of the
loading area.
With the ignition off and the vehicle fully
locked, the indicator lamp goes off for
energy economy reasons.
Electric sliding side door(s)
The exterior and interior door handles and the
interior buttons allow the electrically powered
movement of the door to be started.
Opening and closing of the doors is
accompanied by an audible signal.
Opening
With the exterior or interior
handle
F With the door unlocked, pull and release the
handle to start the opening of the door. Pull
the handle again to reverse its movement.
With the remote control
2
F With the door unlocked, press
and hold this button until the
respective sliding side door has
opened.
F Press this button again to
reverse the movement of the
door.
The remote control buttons are not active
with the ignition switched on.
43

Access
Using the button(s) on the door
pillar
Using the button(s) at the front
F With complete unlocking activated and the
child lock deactivated, to unlock the vehicle
and start the opening of a door, press the
button for the corresponding door.
F With selective unlocking activated, to
unlock just the loading area and start the
opening of a door, press the button for the
corresponding door.
F In both cases, pressing the button again
reverses the movement of the door.
Closing
With the exterior handle
F Pull and release the handle to start the
closing of the door. Pull again to reverse the
movement.
With the remote control
F Press and hold this button until
the respective sliding door has
closed. Press it again to reverse
the movement.
The remote control buttons are not active
with the ignition switched on.
With the button(s) on the door
pillar
With the button(s) at the front
F To start the closing of a door, press the
button for the corresponding door. Pressing
it again reverses the movement.
44

Access
The button is not operational and pressing
it results in an audible signal, if the speed
of the vehicle is above 20 mph (30 km/h).
The button(s) at the front or on the door
pillar is not operational and pressing it
results in an audible signal, if:
- the vehicle is moving,
- the child lock is on (activated) (for the
buttons on the door pillars),
- the vehicle has been locked or
deadlocked from outside (using
the key, remote control or Keyless
Entry and Starting, depending on
equipment).
The button for the left-hand door is not
operational and pressing it results in an
audible signal if the fuel filler flap is open.
General recommendations for the sliding side doors
The doors must only be operated when
the vehicle is stationary.
For your safety and for that of your
passengers, as well as for correct
operation of the doors, you are strongly
advised not to drive with a door open.
Always check that it is safe to operate the
door and in particular, be sure not to leave
children or animals near the door controls
without supervision.
The audible warning, the illumination
of the "door open" warning lamp and
the message on the screen are there to
remind you. Contact a PEUGEOT dealer
or a qualified workshop to have this
warning deactivated.
Lock the vehicle when using an automatic
car wash.
Before opening or closing or performing
any movement of the doors, ensure that
no person, animal or object is in the
window frame or could block the desired
movement, inside or outside the vehicle.
If this advice is not followed, injuries or
damage may occur if a part of the body or
an object is trapped or caught.
The doors cannot be opened electrically
above 2 mph (3 km/h ):
- However, if the doors remained open
when starting, the speed must fall
below 19 mph (30 km/h) before they
can be closed.
- Any attempt to open a door electrically
using the interior handle while driving
results in it only being possible to open
the door manually.
- In this case, the audible warning will be
given, accompanied by the illumination
of the "door open" warning lamp and
the message on the screen. To release
the door and be able to operate it
again, it is necessary to stop the
vehicle.
2
45

Access
Take care not to block the guide space
on the floor to allow the door to slide
correctly.
As a safety measure and for functional
reasons, do not drive with the sliding side
door open.
The electric controls are inhibited in the
event of an impact. Manual opening and
closing remain possible.
While starting the engine, the movement
of a door is interrupted and continues
once the engine is running.
Depending on the engine, if the
door is closed and an attempt
is made to open it in Stop mode
of Stop & Start, the door opens
partially and stops. In Start mode,
when the engine restarts, the
door continues its movement.
To hold the sliding side door in the open
position, open the door fully to engage the
locking device (located at the bottom of
the door).
Doors and their obstruction Safety/Obstacle detection
with electric door(s)
When open, a door projects beyond the body.
Be sure to take this into account when parking
alongside a wall, a post or a high kerb, etc.
When open, a door never projects beyond
the rear bumper.
The obstacle detection system is triggered
when the moving door encounters an obstacle
with a certain level of physical resistance. If an
obstacle is detected:
- while the door is closing, the door stops
then opens fully.
- while the door is opening, the door stops
then closes.
- twice in succession during a movement
of the door, the door will no longer close
electrically (uninitialisation).
On a steep slope: a safety system slows down
the movement of the door.
In all cases, wait a few seconds before
operating the door (closing or opening).
Close the door manually for safety reasons.
Then reinitialise the door.
46

Access
Reinitialising electric doors
If electrical operations no longer work:
F Fully close the door(s) manually.
F Fully open the door(s) electrically.
F Close the door(s) electrically.
On completion of this procedure, electric
operation of the doors is restored.
However, if a problem persists following this
procedure, contact a PEUGEOT dealer or a
qualified workshop.
On a steep slope
It is possible to open and close the doors
electrically on slopes of up to a 20% gradient.
If the vehicle is on a slope, with the front of the
vehicle facing up the slope, open the door with
care. The door may open more quickly due to
the incline.
On a steep slope, guide the side door manually
to help it to close.
If your vehicle is on a slope, with the front of the
vehicle facing down the slope, the door may not
stay open and may close violently with the risk
of injury.
In the case of a steep slope, the door
may be driven by its own weight and
as a consequence may open or close
violently.
There would not be time for action at the
electric controls to take effect.
There would not be time for the
obstacle detection system to react.
Take care not to leave the vehicle on a
steep slope with the door(s) open without
supervision. If this advice is not followed,
injuries or damage may occur if a person
or an object is trapped or caught.
Hands-free sliding side door(s)
Opening/Closing
2
With a movement of your foot while keeping
the remote control on your person in the
recognition zone A, the system unlocks and
opens the sliding side door or closes and locks
it.
The remote control must be located at the rear
of the vehicle, at least about 30 cm but no more
than about 2 m from the vehicle.
The automatic locking after closing the
door can be programmed in the vehicle
configuration menu.
47

Access
Before making the movement with your
foot, ensure that you are steady and well
positioned, so that you do not lose your
balance (rain, snow, ice, mud, etc.).
Take care not to touch the exhaust tailpipe
when making the movement with your foot
- risk of burns.
F Put your foot beneath the corner of the rear
bumper, then move the foot at normal speed
with a sweeping side movement.
The sensor detects the foot approaching and
leaving and triggers the opening or closing of
the side door.
Make the movement without interruption
and do not repeat it immediately
afterwards or several times.
If the door does not open, wait about
2 seconds before trying again.
Do not keep the foot in the air.
Confirmation that the door is going to
open or close is signalled by the direction
indicators flashing for a few seconds,
accompanied by an audible signal.
The movement of the door is reversed
if the movement of the foot takes place
during the manoeuvre.
If the vehicle is so equipped, the electric
door mirrors fold/unfold on locking/
unlocking the vehicle.
Automatic locking
The vehicle locks itself following the hands-free
closing of the sliding door.
If your vehicle is not fitted with an alarm,
locking is confirmed by fixed illumination
of the direction indicators for about two
seconds.
Depending on your version, the door
mirrors fold at the same time.
Activation/Deactivation
With audio system or touch
screen
By default, hands-free access is activated.
The "Hands-Free Tailgate Access"
function or automatic vehicle locking
when the sliding door is closed is
activated and deactivated via the
vehicle configuration menu.
Operating fault
An audible signal repeated three times
indicates a fault with the system.
Contact a PEUGEOT dealer or a qualified
workshop to have the system checked.
48

Access
If the "Hands-free access self-locking"
option is selected in the vehicle menu and
after closing the door, make sure that the
vehicle is locked.
This is because locking will not take place:
- if the ignition is on,
- if one of the doors or the tailgate is
open,
- if a "Keyless Entry and Starting"
remote control is inside the vehicle.
If a number of actions with your foot have
no effect, wait a few seconds before
starting again.
The system is automatically deactivated in
heavy rain or with accumulations of snow.
If it does not work, make sure that the
remote control is not exposed to a
source of electromagnetic interference
(smartphone, etc.).
Operation may be affected if using a
prosthetic leg.
This system may not work correctly if the
vehicle is fitted with a towing device.
The side door may open or close
erratically if:
- the vehicle is fitted with a towball,
- a trailer is being hitched or unhitched,
- a bicycle carrier is being attached or
detached,
- bicycles are being loaded or unloaded
on a bicycle carrier,
- something is being placed or lifted
behind the vehicle,
- an animal approaches the bumper,
- the vehicle is being washed,
- your vehicle is being serviced,
- a wheel is being changed.
To avoid unwanted operation, keep the
key away from the detection zone (also
from the boot’s interior sides) or deactivate
the function in the vehicle configuration
menu.
Ensure that no person or object could
prevent the correct opening or closing of
the doors.
Be aware of children when operating the
doors.
Side-hinged rear doors
2
F After first opening the left-hand door, pull
the lever A towards you to open the righthand door.
Closing
F First close the right-hand door, then the left-
hand door.
If the left-hand door is closed
first, a buffer stop located on
the edge of the right-hand
door prevents it closing.
If the left-hand side-hinged door is not fully
closed, the "door open" warning lamp comes
on (the right-hand door is not detected). For
more information on the list of warning and
indicator lamps and in particular the door open
warning, refer to the corresponding section.
49

Access
50
Opening to approximately 180°
If fitted to the vehicle, a check strap system
allows the doors to be opened from about 90°
to about 180°.
F Pull the yellow control when the door is
open.
The check strap will engage again
automatically on closing.
When parked with the rear
doors open to 90°, the doors
conceal the rear lamps. To
signal the vehicle's position
to other road users driving in
the same direction who may
not have seen the stopped
vehicle, use a warning
triangle or other device
required by the legislation in
your country.
Tailgate
Opening
F After unlocking the vehicle, pull the handle,
then raise the tailgate.
Closing
F Lower the tailgate using the interior grab
handle, then lock it.
If the tailgate is not properly closed, the
"door open" warning lamp comes on. For
more information on the list of warning and
indicator lamps, and in particular the door
open warning, refer to the corresponding
section.
In the event of a fault or difficulties felt in
manoeuvring the tailgate when opening
or closing it, have it quickly checked by a
PEUGEOT dealer or a qualified workshop
to stop this issue getting worse and so
as to not cause the tailgate to drop, and
serious injuries.
Tailgate rear screen
The opening rear screen allows you to access
the rear of the vehicle directly, without having to
open the tailgate.
Opening
After unlocking the vehicle, press this control
and lift the rear screen to open it.
Closing
Close the rear screen by pressing the centre of
the glass until it is fully closed.
If the tailgate rear screen is not properly
closed, the "door open" warning lamp comes
on. For more information on the list of warning
and indicator lamps and in particular the
door open warning, refer to the corresponding
section.
The tailgate and rear screen cannot
both be open at the same time, to avoid
damaging them.

Access
Alarm
(Depending on version)
System which protects and provides a deterrent
against theft and break-ins.
Exterior perimeter monitoring
The system checks for opening of the vehicle.
The alarm is triggered if anyone tries, for
example, to open a door, the boot or the
bonnet.
Interior volumetric monitoring
The system only checks for the
variation in volume inside the cab.
The alarm is triggered if anyone
breaks a window or enters the
vehicle's cab but will not be
triggered if someone enters the
loading area.
The system checks for any
variation in the volume in the
passenger compartment.
The alarm is triggered if anyone
breaks a window, enters the
passenger compartment or moves
inside the vehicle.
Self-protection function
The system checks for the putting out of
service of its components.
The alarm is triggered if the battery, the central
control or the siren wiring is put out of service
or damaged.
For all work on the alarm system, contact
a PEUGEOT dealer or a qualified
workshop.
If your vehicle is fitted with Additional
Heating / Ventilation, volumetric
monitoring is not compatible with this
system.
For more information on Additional
Heating / Ventilation, refer to the
corresponding section.
Locking the vehicle with full
alarm system
Activation
F Turn the ignition off and exit the vehicle.
F Lock or deadlock the vehicle
using the remote control or the
"Keyless Entry and Starting"
system.
When the monitoring system is active, the
indicator lamp in the button flashes once per
second and the direction indicators come on for
about 2 seconds.
The exterior perimeter monitoring is activated
after 5 seconds and the interior volumetric
monitoring after 45 seconds.
If an opening (door, tailgate or hinged
doors, bonnet, etc.) is incorrectly closed,
the vehicle is not locked, but the exterior
perimeter monitoring will be activated
after 45 seconds, at the same time as the
interior volumetric monitoring.
Deactivation
F Press the remote control
unlocking button.
or
F Unlock the vehicle with the "Keyless Entry
and Starting" system.
The monitoring system is deactivated: the
indicator lamp in the button goes off and the
direction indicators flash for about 2 seconds.
2
51

Access
52
If the vehicle automatically locks itself
again (as happens if a door or the boot
is not opened within 30 seconds of
unlocking), the monitoring system is
automatically reactivated.
Triggering of the alarm
This is indicated by sounding of the siren
and flashing of the direction indicators for 30
seconds.
The monitoring functions remain active until
the alarm has been triggered ten times in
succession.
When the vehicle is unlocked, rapid flashing of
the indicator lamp in the button indicates that
the alarm was triggered during your absence.
When the ignition is switched on, this flashing
stops immediately.
Locking the vehicle
with exterior perimeter
monitoring only
Deactivate the interior volumetric monitoring
to avoid unwanted triggering of the alarm in
certain cases such as:
- leaving a pet in the vehicle,
- leaving a window partially open,
- washing your vehicle,
- changing a wheel,
- having your vehicle towed,
- transport by ship.
Deactivating the interior
volumetric monitoring
F Switch off the ignition and within 10 seconds
press the alarm button until the indicator
lamp is on fixed.
F Get out of the vehicle.
F Immediately lock the vehicle using the
remote control or the "Keyless Entry and
Starting" system.
Only the exterior perimeter monitoring is
activated; the red indicator lamp in the button
flashes every second.
To take effect, this deactivation must be
carried out after each time the ignition is
switched off.
Reactivating the interior
volumetric monitoring
F Deactivate the exterior perimeter monitoring
by unlocking the vehicle using the remote
control or the "Keyless Entry and Starting"
system.
F Reactivate the alarm system normally.
Locking the vehicle without
activating the alarm
F Lock or deadlock the vehicle using the key
(integral to the remote control) in the driver's
door lock.
Failure of the remote
control
To deactivate the monitoring functions:
F unlock the vehicle using the key (integral to
the remote control) in the driver's door lock,
F Open the door; this sets off the alarm.
F Upon switching on the ignition the alarm
stops. The button indicator lamp goes off.
Operating fault
When the ignition is switched on, fixed
illumination of the indicator lamp in the button
indicates a fault with the system.
Have it checked by a PEUGEOT dealer or a
qualified workshop.
Automatic activation
(Depending on country of sale)
The system is activated automatically 2 minutes
after the last door or the boot is closed.
F To avoid triggering the alarm on entering
the vehicle, first press the unlocking button
on the remote control or unlock the vehicle
using the “Keyless Entry and Starting”
system.

Access
Electric windows
1. Left-hand electric window control.
2. Right-hand electric window control.
Manual mode
Press or pull the control, without going past the
point of resistance. The window stops as soon
as the control is released.
Automatic mode
Press or pull the control fully, beyond the point
of resistance. The window opens or closes
completely when the control is released.
Pressing the control again stops the movement
of the window.
The electrical functions of the electric windows
are deactivated:
- approximately 45 seconds after the ignition
is switched off,
- after one of the front doors is opened, if the
ignition is off.
Safety anti-pinch
If your vehicle is fitted with the safety anti-pinch
function, when the window rises and meets an
obstacle, it stops and partially lowers.
In the event of unwanted opening of the window
on closing, press the control until the window
opens completely. Within 4 seconds, pull the
control until the window closes.
The safety anti-pinch does not operate while
doing this.
Reinitialising the electric
windows
Following reconnection of the battery, or if
the windows move abnormally, the anti-pinch
function must be reinitialised.
The safety anti-pinch function is not active
during these operations.
For each of the windows:
F Lower the window fully, then raise it; it will
rise in steps of a few centimetres each time
the control is pressed. Repeat the operation
until the window is fully closed.
F Continue to pull the switch for at least one
second after reaching the window closed
position.
If an electric window meets an obstacle
during operation, the movement of the
window must be reversed. To do this,
press the switch concerned.
When the driver operates the passenger
electric window switch, it is important
to ensure that nothing can prevent the
window from closing properly.
Be particularly aware of children when
operating the windows.
2
53

Ease of use and comfort
Correct driving position
Before taking to the road and to make the most
of the ergonomic layout of the instruments and
controls, carry out these adjustments in the
following order:
- the height of the head restraint,
- the seat backrest angle,
- the seat cushion height,
- the longitudinal position of the seat,
- the height and reach of the steering wheel,
- the rear view mirror and door mirrors.
Once these adjustments have been made,
check the instrument panel can be viewed
correctly from your driving position.
Manually-adjusted front
seats
For more information on the Seat belts,
refer to the corresponding section.
Longitudinal
F Raise the control bar and slide the seat
forwards or backwards.
Before moving the seat backwards,
ensure that there is nothing that might
prevent the full travel of the seat.
There is a risk of trapping or pinching
passengers if present in the rear seats
or jamming the seat if large objects are
placed on the floor behind the seat.
Height
F Pull the control upwards to raise the seat
or push it downwards to lower it until the
desired position is obtained.
Backrest angle
F Depending on equipment, turn the knob or
pull the control fully up and tilt the backrest
forward or backward to adjust it.
54

Ease of use and comfort
Lumbar
F Turn the knob manually to obtain the
desired level of lumbar support.
Table position for the
driver's and/or the front
passenger seat backrest
On the front passenger side, this position
allows long objects to be carried.
On the driver's side, this position allows rear
passengers to be helped out of the vehicle (by
the emergency services).
Check that there is no object that could
interfere with the movement of a seat,
both above and below.
F Place the head restraint in the low position,
and if fitted to your vehicle, raise the
armrest and fold the table on the back of the
seat.
Deactivation of the passenger front airbag
is recommended.
F Pull the control fully up and tip the backrest
forward.
To return to the normal position, pull the
control up to release the backrest, then pull the
backrest up to its raised position.
When sharp deceleration occurs, objects
placed on the folded backrest may be
thrown around the vehicle.
Electric front seat
To avoid discharging the battery, carry
out these adjustments with the engine
running.
For more information on the Seat belts,
refer to the corresponding section.
Longitudinal
F Push the control forwards or rearwards to
slide the seat.
Before moving the seat backwards,
ensure that there is nothing that might
prevent the full travel of the seat.
There is a risk of trapping or pinching
passengers if present in the rear seats
or jamming the seat if large objects are
placed on the floor behind the seat.
3
55

Ease of use and comfort
Seat cushion height
F Tilt the control upwards or downwards to
obtain the desired height.
Backrest angle
F Tilt the control forwards or rearwards to
adjust the angle of the backrest.
Head restraint height
adjustment
If fitted to your vehicle.
F To raise it, pull it upwards as far as possible
(notch).
F To remove it, press the lug A and pull it
upwards.
F To put it back in place, engage the head
restraint rods in the openings keeping them
in line with the seat backrest.
F To lower it, press the lug A and push down
on the head restraint at the same time.
The head restraint has a frame with
notches which prevents it from lowering;
this is a safety device in case of impact.
The adjustment is correct when the
upper edge of the head restraint is
level with the top of the head.
Never drive with the head restraints
removed; they must be fitted and correctly
adjusted.
2-seat front bench seat
If fitted in the vehicle, this is fixed and has a
seat belt built into the backrest for the seat next
to the driver’s seat.
For more information on the Seat belts,
refer to the corresponding section.
Under-seat storage
56

Ease of use and comfort
If the vehicle is so equipped, a storage space is
provided under the seat.
F Pull the strap towards you to tip the seat
cushion.
Armrest
The armrest has notches.
F Pull the armrest fully up
F Lower it fully down.
F Raise the armrest to the desired position.
Heated seat and bench
seat
If fitted to the vehicle.
F With the engine running, use the adjustment
wheel to switch on and select the desired
level of heating from 0 (off) to 3 (h igh).
Prolonged use of the heated seats is not
recommended for those with sensitive
skin.
There is a risk of burns for people whose
perception of heat is impaired (illness,
taking medication, etc.).
To keep the heated pad intact and to
prevent a short circuit:
- do not place sharp or heavy objects on
the seat,
- do not kneel or stand on the seat,
- do not spill liquids onto the seat,
- never use the heating function if the
seat is wet.
Do not use the function when the seat is
not occupied.
Reduce the intensity of the heating as
soon as possible.
When the seat and passenger
compartment have reached an adequate
temperature, stop the function; reducing
the consumption of electrical current
reduces fuel consumption.
3
57

Ease of use and comfort
58
Electric lumbar
adjustment
F Press the control to obtain the desired
lumbar support.
Massage function
This function provides lumbar massage to the
persons in front; it only operates when the
engine is running as well as in the STOP mode
of the Stop & Start system.
Activation/Deactivation
F Press this button to activate/
deactivate the function.
Upon activation, the indicator lamp comes on.
The massage function is activated for a period
of one hour.
During this time, massage is performed in
6 cycles of 10 minutes (6 minutes of massage
followed by a 4-minute break).
After one hour, the function is deactivated; the
indicator lamp goes off.
Adjustment of intensity
Press this button to adjust the
intensity of the massage.
Two levels of massage are available.
Steering wheel adjustment
F When stationary, lower the control lever to
release the steering wheel.
F Adjust the height and reach.
F Pull the control lever to lock the steering
wheel.
As a safety precaution, these operations
must only be carried out while the vehicle
is stationary.

Ease of use and comfort
Mirrors
Door mirrors
Manual adjustment
Move the lever in any of the four directions to
adjust it.
When the vehicle is parked, the door mirrors
can be folded in manually.
If the mirror unit has come out of its initial
position, with the vehicle stationary, push it
back into place manually or use the control.
There is no risk of breakage, even in frosty
weather.
Electric adjustment
F Move control A to the right or to the left to
select the corresponding mirror.
F Move control B in any of the four directions
to adjust.
F Return control A to the central position.
As a safety measure, the mirrors should
be adjusted to reduce the blind spots.
The objects obser ved are, in reality, closer
than they appear.
Take this into account in order to
correctly judge the distance of vehicles
approaching from behind.
Manual folding
You can manually fold the mirrors (parking
obstruction, narrow garage, etc.)
F Turn the mirror towards the vehicle.
Electric folding
If your vehicle is fitted with this function, the
mirrors can be folded electrically from the
inside, with the vehicle parked and the ignition
on:
F Place control A in the centre
position.
F Pull control A back.
From the outside, lock the vehicle using the
remote control or the key.
Electric unfolding
The electric unfolding of the mirrors is via
the remote control or the key when unlocking
the vehicle. Unless folding was selected with
control A, pull the control back again to the
central position.
The folding / unfolding on locking /
unlocking can be deactivated. Contact a
PEUGEOT dealer or a qualified workshop.
If necessary, it is possible to fold the
mirrors manually.
3
59

Ease of use and comfort
60
Heated mirrors
F Press this button.
For more information on Rear screen
demisting - defrosting, refer to the
corresponding section.
Rear view mirror
Equipped with an anti-dazzle system, which
darkens the mirror glass and reduces the
nuisance to the driver caused by the sun,
headlamps from other vehicles, etc.
Manual model
Adjustment
F Adjust the mirror so that the glass is
directed correctly in the "day" position.
Day/night position
F Pull the lever to change to the "night" anti-
dazzle position.
F Push the lever to change to the normal
"day" position.
Automatic "electrochrome"
model
This system automatically and progressively
changes between day and night use by means
of a sensor measuring the light coming from the
rear of the vehicle.
In order to ensure optimum visibility during
your manoeuvres, the mirror lightens
automatically when reverse gear is
engaged.
Moduwork
The outer seat cushion of the bench seat can
be folded onto the backrest to create a loading
area inside the cab.
A removable flap on the partition can be
removed to allow long objects to be loaded.
When the flap is removed, it is possible
to load long objects underneath the outer
seat.

Ease of use and comfort
Removable flap (type 1)
Removing the ap
F While holding the flap with one hand, turn
the control at the top of the flap with the
other hand to release it.
F Lower the flap to remove it from its housing.
F Stow it behind the driver’s seat, clipping it
into the attachment lugs.
F Turn the control at the top of the flap to lock
it.
Putting the ap back on
F Offer up the tilted flap, yellow hinges
pointing downwards.
F Put the hinges in their housings then press
down fully (to avoid vibrations).
F With one hand, lift the flap to close it again,
then with the other hand, turn the control at
the top of the flap to lock it.
Removable flap (type 2)
The flap is kept in the closed or open position
with magnets located at each end position.
Folding seat cushion
Raising the seat cushion
3
F With one hand, pull the strap firmly for ward
to unlock the seat cushion.
F A ram lifts the seat cushion against the
backrest.
Never put your hand
underneath the seat cushion
to guide it upwards, as you
could get your fingers trapped.
Only the strap must be used.
F To open or close the flap, slide it to the left
or right.
61

Ease of use and comfort
When the side seat is up
and the flap is removed,
you must install the antislip net.
Refer to the Anti-slip net
section.
Lowering the seat cushion
F To put the seat cushion back in place, press
firmly on the top of the seat with one hand
to lower the seat cushion until it locks into
the seat position.
Ensure that no object or passenger feet
could obstruct the anchorage points
or prevent the correct latching of the
assembly.
Anti-slip net
Installing the net
F Put the first fastener into the upper cut-
out 1, located beneath the folded seat
cushion. Keep the fastener pressed against
the structure, then turn it a quarter turn (in a
clockwise direction) to lock it.
F Put the second fastener into the lower
cut-out 2, located on the seat base. Keep
the fastener pressed against the structure,
then turn it a quarter turn (in a clockwise
direction) to lock it.
62
F Remove the anti-slip net.
F Secure the first hook to the ring 3 located in
the glove box.
F Secure the second hook to the ring 4
located on the floor.

Ease of use and comfort
Removing the net
F Release the hooks from the rings 4 and 3.
F Remove the lower fastener 2 then the upper
fastener 1, turning them by a quarter turn
backwards to unlock them.
Make sure that the size, shape and
volume of the loads carried are compatible
with the highway code and safety
regulations and do not impair the driver’s
field of vision.
All loads must be appropriately secured
to prevent or minimise displacement and
prevent injury.
Install the anti-slip net (supplied with the
vehicle) every time that the seat is raised
and the partition flap removed.
Never use the net for any other purposes.
Regularly check the condition of the
anti-slip net. As soon as signs of wear or
tear appear, contact a PEUGEOT dealer
to have it replaced by an anti-slip net
that meets the specifications required by
PEUGEOT for the vehicle.
Always fit the removable flap back into
place when you are not carrying any long
loads.
"Swivelling writing table"
If the vehicle is so equipped, the central seat
cushion of the bench seat can be tilted to form
a swivelling working table top, thus creating a
mobile desk (with the vehicle stationary).
F Pull the handle located at the top of the
backrest cushion.
Never use the table while the vehicle is
moving.
Any object on the table will become a
dangerous projectile that could cause
injury in the event of sudden braking or
collision.
Central seat cushion
storage
3
Precautions for the seats and bench seats
Do not remove a head restraint without storing
it and securing it to a support.
Ensure that the passengers can always access
the seat belts and fasten them easily.
A passenger must not take their seat without
adjusting the seat's head restraint correctly and
adjusting and fastening their seat belt.
Ensure that no object or passenger feet
could obstruct the anchorage points
or prevent the correct latching of the
assembly.
63

Ease of use and comfort
If removing and storing seats and bench
seats out of the vehicle, ensure that they
are placed in a clean area, so as to avoid
introducing any foreign bodies into the
mechanisms.
The seats and bench seats are not
designed for any other use than in
the vehicle. They are equipped with
mechanisms and features that may be
damaged if used improperly or if dropped.
Loading luggage or objects
behind the row 3 seat and
bench seat
When driving, it is prohibited to have a
passenger:
- in rows 2 and 3, in the outer right-hand
seat, if the bench seat is in the fully folded
position,
- in the centre seat if the outer right-hand seat
is in the fully folded position,
- in row 3 if the backrest in front (row 2) is in
the table position,
- in row 3 if the seat /bench seat in front (row
2) is in the fully folded position.
Fixed one-piece bench seat
The different levels of equipment and settings
described hereafter vary according to the
version and the configuration of the vehicle.
The bench seat has a one-piece backrest that
may be fixed or folding (table position).
For more information on the Seat belts,
refer to the corresponding section.
64
If you want to load luggage onto the backrests
in row 3 while in the table position, the
backrests in row 2 must also be in the table
position.

Ease of use and comfort
Access to row 3
F Using the handle, release the rear feet then
tip the seat forward.
F To return the seat, tip the bench towards the
rear until the feet lock into place..
It is not necessary to fold the backrest
(table position) to tip the bench seat for
access to row 3.
Folding the backrest to the
table position
F Put the head restraints in the low position.
F From the rear, lower the handle to release
the backrest.
F From the front, raise the handle to release
the backrest.
F Fold the backrest onto the cushion.
F To return the backrest to its normal position,
raise the handle and pull the backrest up.
Do not leave objects (such as a bag or
toys) on the cushion when folding the
backrest.
Tilting
F If your vehicle has the facility, place the
backrest in the table position.
F Using the handle, release the rear feet then
tip the seat forward.
F To return the seat, tip the bench towards the
rear until the feet lock into place..
Removing
F If the vehicle is so equipped, place the
backrest in the table position.
F Tip the bench seat.
3
F Release the front feet using the handles.
F Disengage the bench seat from its
anchorages.
F Remove the bench seat.
Refitting
F Check that there is no object obstructing the
anchorages and preventing the feet locking
into place.
65

Ease of use and comfort
F Engage the front feet in the anchorages on
the floor (as shown above).
F Lock the front feet using the handles.
F Tip the bench seat backwards until the rear
feet lock into place.
Be careful of passengers' feet when
tipping.
F If the vehicle is so equipped, pull the control
and raise the backrest (from the rear, lower
the handle).
Check that the seat has correctly locked
on the floor when returned to the seating
position.
Fixed rear seat and bench seat
The different levels of equipment and settings
described hereafter vary according to the
version and the configuration of the vehicle.
The seat has a backrest that may be fixed or
folding (table position).
The bench seat has a one-piece backrest that
may be fixed or folding (table position).
For more information on the Seat belts,
refer to the corresponding section.
Access to row 3
(example for an individual seat)
F Using the handle, release the rear feet then
tip the seat forward.
F To return the seat to the normal position,
tip the seat backwards until the rear feet
engage in their anchorages.
It is not necessary to fold the backrest
(table position) to tip the bench seat and
so access row 3.
66

Ease of use and comfort
Folding the backrest to the
table position
F Put the head restraints in the low position.
F From the rear, lower the handle to release
the backrest.
F From the front, raise the handle to release
the backrest.
F Fold the backrest onto the cushion.
F To return the backrest to the normal
position, raise the handle and pull the
backrest up (from the rear, lower the
handle).
Do not leave objects (such as a bag or
toys) on the cushion when folding the
backrest.
Tilting
(example of an individual seat)
F If your vehicle has the facility, place the
backrest in the table position.
F Using the handle, release the rear feet then
tip the seat forward.
F To return the seat to the normal position,
unfold the seat backwards until the rear feet
engage in their anchorages.
Removing
(example of an individual seat)
F Tip the seat.
F Release the front feet using the handles.
F Disengage the seat from its anchorages.
F Remove the seat through the side door for
row 2 or from the rear for row 3.
Refitting
(example of an individual seat)
F Check that there is no object obstructing the
anchorages and preventing the feet locking
into place.
F Engage the front feet in the anchorages on
the floor (as shown above).
F Lock the front feet using the handles.
3
67

Ease of use and comfort
F Tip the seat backwards until the rear feet
lock into place.
Be careful of passengers' feet when tipping.
F If the vehicle is so equipped, pull the control
and raise the backrest (from the rear, lower
the handle).
Check that the seat is correctly locked
on the floor when returned to the seating
position.
Rear seat and bench seat on rails
Active, Allure, Business VIP
The different levels of equipment and settings
described hereafter vary according to the
version and the configuration of the vehicle.
F To recline the backrest, pull the control
upwards (from the rear, lower the handle).
F Release the control when the desired
position is reached.
Moving forward or
backward
(example for an individual seat)
The individual seat is always on the right-hand
side and the bench seat on the left-hand side
(facing forward).
The bench seat has two independent
backrests.
For more information on the Seat belts,
refer to the corresponding section.
68
Adjusting the angle of the
backrest
The reclining backrest can be adjusted to
several positions.
Two controls are provided for moving the seat
forward and backward:

Ease of use and comfort
F From the rear, pull the strap without going
beyond the point of resistance and push the
seat forward or pull it backward.
F From the front, raise the control and slide
the seat forward or backward.
Moving the seat along the
full length of the rail
F Place the seat backrest in the table position.
F Slide the seat by pulling on the front control
or rear strap.
Folding the backrest to the
table position
(example for an individual seat)
F Put the head restraints in the low position.
F From the rear, lower the handle to release
the backrest.
F From the front, raise the handle to release
the backrest.
F Fold the backrest onto the cushion.
Do not leave objects (such as a bag or
toys) on the cushion when folding the
backrest.
Returning the backrest
to the normal position
(between the markings)
3
To return the backrest to the normal position,
the seat must be positioned between the
markings.
The arrow must not be outside the markings.
69

Ease of use and comfort
F Use the front control to move the seat so
that it is between the markings.
Removing
(example of an individual seat)
F Move the seat forward for access to the
strap.
F Fold the backrest to the table position
F Remove the seat through the side door for
row 2 or through the rear for row 3.
Refitting
Before refitting the seat or bench seat in
the vehicle, pull the strap fully to ensure
that the latching mechanism has engaged.
Do not use the strap to lift the seat or
bench seat.
(example of an individual seat)
F Check that nothing is obstructing the rails.
F Place the front part of the guides on the
rails.
F Tip the seat to align the rear of the guides in
the rails.
F Slide the seat forwards or backwards until it
engages in the notches.
F Raise the backrest.
Check that the seat has correctly locked
on the floor when returned to the seating
position.
70
F From the rear, pull the strap fully to release
the anchorages and tip the seat forwards to
place it in the vertical position.

Ease of use and comfort
Individual rear seat(s) on rails
Allure, Business VIP
The different levels of equipment and settings
described hereafter vary according to the
version and the configuration of the vehicle.
The individual seat is fitted with a three-point
inertia reel seat belt.
It can be placed facing forward or rearward
facing.
If there is a rearward facing individual
seat in row 2, ensure that the seat in row
1 (driver or passenger) is not too far back,
in order to avoid contact between the two
seats.
This could cause significant wear of the
parts in contact.
For more information on the Seat belts,
refer to the corresponding section.
Armrest(s)
The armrest has notches.
F Pull the armrest fully
up.
F Lower it fully.
F Raise the armrest to
the desired notched
position.
Adjusting the angle of the
backrest
The backrest can be adjusted to several
positions.
F To recline the backrest, pull the control
upwards (from the rear, lower the handle).
F Release the control when the desired
position is reached.
Moving forward or
backward
3
Two controls are provided for moving the seat
forward and backward:
F From the rear, pull the strap without going
beyond the point of resistance and push the
seat forward or pull it backward.
F From the front, raise the control and slide
the seat forward or backward.
71

Ease of use and comfort
Folding the backrest to the
table position
Ensure that nothing (examples: bag, case,
toy, folding and sliding table) is interfering
with the operation to fold the backrest.
F Put the head restraints in the low position.
F From the rear, lower the handle to release
the backrest.
F From the front, raise the handle to release
the backrest.
F Fold the backrest onto the cushion.
Removing
F Move the seat forwards for access to the
strap.
F Fold the backrest to the table position.
F From the rear, pull the strap beyond
the point of resistance to release the
anchorages and tip the seat for wards to
place it in the vertical position.
F Remove the seat through the side door for
row 2 or through the rear for row 3.
Changing the direction of
the seat
When the seat is removed, your can rotate it
by 180°.
Refitting
Before refitting the seat in the vehicle, pull
the strap fully to ensure that the latching
mechanism has engaged.
72
Do not use the strap to lift the seat.

Ease of use and comfort
F Check that nothing is obstructing the rails.
F Fit the front part on the rails.
F Tip the seat to align the rear of the guides in
the rails.
F Slide the seat forwards or backwards until it
engages in the notches.
F Raise the backrest.
Check that the seat has correctly locked
on the floor when returned to the seating
position.
Crew cab, xed
It comprises a fixed bench seat, seat belts,
storage compartments (depending on
equipment) and side windows.
It is separated from the loading area by a highstrength partition offering comfort and safety.
Rear bench seat
This ergonomic bench seat has three seats.
The two outer seats are fitted with ISOFIX
mountings.
For more information on the ISOFIX
mountings, refer to the corresponding
section.
Storage compartment
If applicable, a storage compartment is
available at the front, underneath the bench
seat.
Under seat cushion storage
wells
3
If the vehicle is so equipped, they are located
underneath the centre and outer left-hand
seats.
To gain access to it from the cab, tip the
required seat forwards.
73

Ease of use and comfort
Depending on the country of sale, the wells can
be dismantled and removed through the rear so
that bulky objects can be stowed underneath
the bench seat.
Do not attach anything to the cab fixing
structure.
Do not exceed the number of passengers
indicated on the registration certificate.
In the rear, the loading area is intended
for carrying goods only.
You are advised to place the goods or
heavy objects as far forwards as possible
in the loading area (towards the cab) and
secure them by means of straps using the
stowing rings on the floor.
The rear seat belt frames are not designed
to secure the load being carried.
Crew cab, folding
It comprises a folding bench seat, seat belts
and side windows.
It is separated from the loading area by a
bench seat with a high-strength partition
offering comfort and safety.
Folded position
F Using one hand only, pull up one of the
straps A to fold the bench seat.
F Using the handle B, guide the movement
of the bench seat until it locks in the folded
position.
Bench seat position
F To put the bench seat back in place, pull
the strap C to unlock the bench seat, then
release the strap.
F Then, using only the handle B, guide the
descent of the backrest to tip the assembly
until it locks in the bench seat position.
74

Ease of use and comfort
Never put your hand underneath the
bench seat to guide it downwards, as you
could get your fingers trapped.
Ensure there are no objects or feet
beneath the bench seat or obstructing
the anchorage system, preventing the
assembly from being correctly locked.
Do not attach anything to the cab fixing
structure.
Do not exceed the number of passengers
indicated on the registration certificate.
In the rear, the load space is intended for
carrying goods only.
It is recommended to place goods or
heavy objects as far forwards as possible
in the load space (towards the cab) and
secure them by means of straps using the
stowing rings on the floor.
The rear seat belt frames are not designed
to secure the load being carried.
Interior ttings
Mats
Fitting
When fitting the mat for the first time, on the
driver's side, use only the fixings provided in
the wallet attached.
Removing/retting
F To remove it on the driver's side, move the
seat fully back and turn the fixings by a
quarter turn.
F To refit it, position the mat and refit the
fixings by turning them by a quarter turn.
To avoid any risk of jamming the pedals:
- only use mats which are suited to the
fixings already present in the vehicle;
these fixings must be used,
- never fit one mat on top of another.
The use of mats not approved by
PEUGEOT may interfere with access to
the pedals and hinder the operation of the
cruise control/speed limiter.
The mats approved by PEUGEOT have
two fixings located below the seat.
In rows 2 and 3
3
75

Ease of use and comfort
Use the Velcro to connect the transverse mats
in row 2 with the longitudinal mats in rows 2
and 3.
Glove box
It houses the front passenger airbag
deactivation switch and can hold a bottle of
water, the vehicle's handbook pack, etc.
Never drive with the glove box (if
equipped) open when a passenger is
sitting at the front. It may cause injury
during sharp deceleration.
Storage compartment
This can hold a bottle of water, the vehicle's
documentation, etc.
F To open the storage compar tment, press
the left-hand end of the control and guide
the lid to its open position notch.
If your vehicle is so equipped, it is lit when the
lid is opened.
When driving, keep the storage
compartment closed. Otherwise, there is a
risk of injury in the event of an accident or
sudden braking.
Depending on the country of
sale, with air conditioning, it
gives access to the ventilation
nozzle, delivering the same airconditioned air as the vents in
the passenger compartment.
Front door storage pockets
Liquids carried in an open vessel (e.g.
a cup or mug) could be spilt, presenting
a risk of damage on contact with the
controls in the dashboard and centre
console. Be careful.
Upper glove box
This is located in the dashboard, behind the
steering wheel.
Press the control to open the lid (depending on
version) then guide it to its fully open position.
To close it, guide the lid then press the centre
gently.
Any liquid which could spill risks causing
an electrical short circuit and therefore a
potential fire.
"Aircraft" type tables
76
Fitted to the back of each front seat, these can
be used to put objects on.

Ease of use and comfort
F To use the table, lower it fully until it locks in
the low position.
F To store it, raise the table, passing the point
of resistance, to the high position.
On the passenger side, do not forget to
fold it before placing the seat in the "table"
position.
Do not place hard or heavy objects on
the table. They could become dangerous
projectiles in the event of emergency
braking or impact.
For more information on the Front seats
and, in particular, the "table" position of
the backrest, refer to the corresponding
section.
12 V socket(s)
Depending on version.
F To connect a 12 V accessory (maximum
power: 120 Watts), lift the cover and plug in
a suitable adapter.
Observe the maximum power rating to
avoid damaging the accessory.
The connection of an electrical device
not approved by PEUGEOT, such as a
USB charger, may adversely affect the
operation of vehicle electrical systems,
causing faults such as poor telephone
reception or interference with displays in
the screens.
3
USB socket
It allows the connection of a portable device or
a USB memory stick.
It reads the audio files which are sent to your
audio system and played via the vehicle's
speakers.
It is also possible to manage these files using
the steering mounted controls or the audio
system.
77

Ease of use and comfort
78
When the USB socket is used, the
portable device charges automatically.
While charging, a message is displayed
if the power consumption of the portable
device exceeds the amperage supplied by
the vehicle.
For more information on the use of this
equipment, refer to the Audio equipment
and telematics section.
JACK socket
This allows the connection of a portable device
for listening to audio files via the vehicle's
speakers.
The files are managed using the portable
device.
For more details on how to use this
equipment, refer to the Audio equipment
and telematics section.
220 V socket
If your vehicle is so equipped, a 220 V/50 Hz
socket (maximum power: 150 W) is located
underneath the front right-hand seat and is
therefore accessible from the second row.
It operates with the engine running, as well as
in STOP mode of Stop & Start.
F Raise the cover.
F Check that the indicator lamp is on in green.
F Connect your multimedia or other electrical
device (telephone charger, laptop computer,
CD-DVD player, bottle warmer, etc.).
In the event of a fault, the warning lamp flashes
green.
Have it checked by a PEUGEOT dealer or a
qualified workshop.
Connect only one device at a time to the
socket (no extension lead or multi-socket
connector).
Connect only devices with class II
insulation (shown on the device).
Do not use a device with a metal case.
As a safety measure, when electrical
consumption is high and when required by
the vehicle's electrical system (particular
weather conditions, electrical overload,
etc.), the current supply to the socket will
be cut off; the green indicator lamp goes
off.
Luggage retaining net
Attached to the stowing rings on the rear floor,
it allows objects to be held down.

Ease of use and comfort
As a safety measure in the event of
sudden braking, it is recommended that
heavy objects are placed on the floor as
close as possible to the backrest of the
seat(s) or bench seat.
Load space cover
F To remove it, raise it.
F To install it, insert the guides into their
housings.
When sharp deceleration occurs, objects
placed on the load space cover can turn
into projectiles.
Loading area ttings
Stowing rings
Use the stowing rings on the rear floor to
secure your loads.
As a safety precaution in case of sharp braking,
you are advised to place heavy objects as far
forwards towards the cab as possible.
It is recommended that the load be secured
firmly using the stowing rings on the floor.
Load restraint
On the floor, behind the front seats, a
vertical partition protects the driver and front
passengers against the risk of load movement.
3
79

Ease of use and comfort
Steel or glass partitions separate the loading
area from the cab.
Recommendations on
loading
The weight of the load must comply with
the Gross Train Weight (GTW).
For more information on Engine
technical data and towed loads, refer to
the corresponding section.
If you are using a carrying system (roof
bars/roof rack), comply with the maximum
loads associated with this system.
For more information on Roof bars/Roof
rack, refer to the corresponding section.
Make sure that the size, shape and
volume of the loads carried are compatible
with the highway code and safety
regulations and do not impair the driver’s
field of vision.
The load must be evenly distributed in the
loading area so as not to interfere with
driving the vehicle.
Place the load close to the side panels,
or even push it against the side panels
between the wheel arches.
However, it is recommended that heavy
objects are placed as close to the cab as
possible as a precaution in case of sharp
braking.
Firmly secure all parts of the load using
the stowing rings on the floor of the
loading area.
For more information on the Interior
fittingsand in particular on the stowing
rings, refer to the corresponding section.
To avoid the risk of injury or accident, the
load must be made stable so that it cannot
slide, tip over, fall or be thrown. To do this,
use only retaining straps that conform to
current standards (DIN for example).
For more information on putting straps
in place, refer to the manufacturer’s user
guide.
There must not be any empty space
between the components of the load.
To prevent the load sliding, there must not
be any empty space between the load and
the panels of the vehicle.
As well as the straps, optimise the stability
of the load with stable handling equipment
(wedges, rigid blocks of wood or padding).
When washing your vehicle, never clean
the inside directly using a water jet.
80

Ease of use and comfort
Seating area ttings
High load retaining net
This allows the use of the entire loading
capacity, up to the roof:
- behind the front seats in row 1, when the
rear seats (and bench seats) in rows 2 and 3
are folded or removed,
- behind the rear seats (and bench seats)
in row 2, when the rear seats (and bench
seats) in row 3 are folded or removed.
Upper xings
F Unclip the anchorage cover in the roof on
each side.
Lower xings (behind row 1)
If your vehicle has fixed one-piece bench seats
or seats and bench seats:
F On each side in row 2, insert the fixings in
the floor anchorages (as shown above).
If your vehicle has seats and bench seats or
individual seats on rails:
F On each side in row 2, insert the fixings
in the floor anchorages then turn them a
quarter turn to lock them in place (as shown
above).
Place them as close as possible to the end of
the rail.
Lower xings (behind row 2)
3
F Use the stowing rings.
Fit the net
Unclip the upper fixing covers and secure the
lower fixings (as previously described).
F Fold (table position) the seats and bench
seats in rows 2 and 3 (according to
equipment).
F Close the rear heating and air conditioning
vents (depending on the equipment you
have).
F Unroll the high load retaining net.
81

Ease of use and comfort
F Position the net upper fixings in the
corresponding anchorages in the roof (first
one side, then the other).
F Fully extend the straps.
F On each side, attach the bottom fixings of
the net to the lower anchorages (behind row
1) or in the stowing rings (behind row 2).
F Tension the straps to extend the net.
F Check that the net is attached securely and
properly extended.
Never use the ISOFIX ring provided for
fixing the strap of a child seat with Top
Tether.
Rear windows in row 2
If the vehicle is so equipped, the side windows
of row 2 can be opened.
While driving, the windows must be closed or
secured at one of the notches.
F Squeeze the two controls then move the
window sideways.
For more information on the Child
lock for rear windows, refer to the
corresponding section.
Side blinds
Fitted to the windows in row 2, they protect the
passenger compartment from the sun's rays.
F Pull the tab A and anchor the blind on the
hook B.
Always guide the blind slowly using the
tab, both up and down.
Panoramic sunroof
This is equipped with two manual and
independent blinds, which improve thermal and
acoustic comfort.
Blinds
Opening/Closing
F Take one of the blinds by its grip and push
it back or pull it forwards to the desired
position.
82

Ease of use and comfort
Retractable sliding table
Allure, Business VIP
It comprises a closed central storage space
with a lid. Unfolded, it provides a table with
two tops on which objects can be placed. The
central area includes two cup holders and can
also be used to place small objects (credit card,
pen, etc.).
The assembly is mounted on a runner allowing
it to be positioned either in row 2 or row 3.
Storage
F Slide back the cover for access to 11 litres
of storage space.
The storage space can only support a
maximum weight of 3 kg; do not exceed
this maximum load in use.
Moving forward or
backward
F Release the control when it is in the desired
position.
F Check that the table is secured on the
runner. If this is not the case, move the
assembly slightly to the next notch on the
runn er.
You can move the table in both the open
and stowed position. However, to ensure
safety, it is advised that you handle the
assembly in the stowed position.
For the table to run smoothly, ensure that
no objects are blocking the space used by
the runner on the floor.
Before manoeuvring the table, check that
there is nothing on the table.
Unfolding
3
F Lift the control (without going beyond the
point of resistance) and slide the assembly
forwards or backwards.
F Operate the control on the top and pull the
table assembly up until it clicks into place.
83

Ease of use and comfort
F Pull each table top fully up then pivot them
on each side into the horizontal position.
Folding
F Raise each table top, going beyond the
point of resistance, to the vertical position.
F Push each table top down into its housing
until it clicks into place.
F Push the control then tip the table assembly
downward until it clicks into place.
Before stowing the table tops, check that
they are clear. Before tipping the assembly
down, check that the two table tops have
clicked home in the low position and that
there is nothing in the cup holder area
(such as a can or pen).
Cup holders
Two cups or cans and small objects (such as
a credit card, portable ashtray or pen) can be
carried in the middle of the unfolded table.
Liquids carried in an open vessel (a cup
or mug) could be spilt, presenting a risk.
Be careful.
Never use the table in this position while
the vehicle is being driven.
Removal
F Raise the control fully to release the
anchorages and tip the table assembly
forward.
F Remove the table assembly through the
sliding door in row 2.
Check that there is nothing in the space
around the runner on the floor, so that the
table disengages cleanly.
Changing the direction
With the table removed, you can turn it 180°.
Remove a seat to make this easier.
Refitting
F Check that there is no object obstructing the
runner and preventing locking.
84

Be careful of passengers' feet when
manoeuvring the assembly.
Ease of use and comfort
F Check that the control is in the high position
(locking mechanism engaged). Otherwise,
lift the control as far as it can go to engage
the mechanism.
F Place the front of the table on the runner.
F Taking care not to interfere with the control,
tip the assembly down at the rear until it
clicks into place.
F Check that the assembly is locked in the
runner. If this is not the case, move the
assembly slightly to the next notch on the
runn er.
Otherwise there is a risk of injury in the
event of an accident or sudden braking.
F Release the control until the guide latches
in the runner.
Storage off the runner
If removing and storing the table out of
the vehicle, ensure that it is placed in a
clean area, so as to avoid introducing any
foreign bodies into the mechanisms.
The table must be placed outside the
vehicle on a flat and level surface, resting
on the guide so as not to damage visible
parts.
Caution, when out of the
vehicle, the table leans to
the right or left when put
down.
Incorrect use of the table could cause
serious injury.
Never use the table in the open or
unfolded position while the vehicle is
in motion. Any object on the table will
become a dangerous projectile in the
event of sudden braking.
Ensure that the table is correctly stowed in
the low position before moving off.
Never use the table tops as seats or lean
on them.
A label affixed to the side of the table
gives a reminder of this.
Never place hot objects such as
saucepans or frying pans on the table, as
you risk damaging its surface (risk of fire).
With the table deployed, each top can
bear a maximum load of 10 kg. If you
do not observe this load limit, you risk
damaging a part of or the whole table.
Never raise the table when it is between
individual seats; this risks damaging the
table tops.
3
85

Ease of use and comfort
To move the table or an individual seat
forwards or backwards, make sure that
the seat's backrest is upright and the table
is stowed.
When stowing the table tops, never put
your hand in the sliding area, you may
get your fingers trapped. Use the handle
provided.
Heating and Ventilation
Advice
Using the ventilation and air
conditioning system
F To ensure that the air is distributed
evenly, keep the external air intake
grilles at the base of the windscreen,
the nozzles, the vents, the air outlets
and the air extractor in the boot free
from obstructions.
F Do not cover the sunshine sensor,
located on the dashboard; this is used
for regulation of the automatic air
conditioning system.
F Operate the air conditioning system for
at least 5 to 10 minutes once or twice
a month to keep it in perfect working
orde r.
F If the system does not produce cold air,
switch it off and contact a PEUGEOT
dealer or a qualified workshop.
When towing the maximum load on a
steep gradient in high temperatures,
switching off the air conditioning increases
the available engine power and so
improves the towing ability.
Avoid driving for too long with the
ventilation off or with prolonged operation
of the recirculation of interior air - risk of
misting and deterioration of the air quality!
If the interior temperature is very high
after the vehicle has stood for a long
time in the sunshine, air the passenger
compartment for a few moments.
Put the air flow control at a setting high
enough to quickly change the air in the
passenger compartment.
The condensation created by the air
conditioning results in a discharge of
water under the vehicle which is perfectly
normal.
86

Ease of use and comfort
Servicing the ventilation and air
conditioning system
F Ensure that the cabin filter is in good
condition and have the filter elements
replaced regularly.
It is recommend to use a combined
passenger compartment filter. Thanks to
its special active additive, it contributes
to the purification of the air breathed by
the occupants and the cleanliness of the
passenger compartment (reduction of
allergic symptoms, bad odours and greasy
deposits).
F To ensure correct operation of the air
conditioning system, have it checked
according to the recommendations in
the Maintenance and Warranty Guide.
Contains fluorinated greenhouse gas
R134A
Depending on version and country
of sale, the air conditioning system
contains fluorinated greenhouse
gas R134A. Gas charge: 0.5 kg (+/-
0.025 kg), GWP index 1,430 t (equivalent
in CO
: 0.751 t).
2
Stop & Start
The heating and air conditioning systems
only work when the engine is running.
Temporarily deactivate the Stop &
Start system to maintain a comfortable
temperature in the passenger
compartment.
For more information on Stop & Start,
refer to the corresponding section.
Heating
Manual air conditioning
The air conditioning system only operates with
the engine running.
1. Temperature.
2. Air flow.
3. Air distribution
4. Recirculation of interior air.
5. Air conditioning on/off.
Air flow
F Turn the thumbwheel 2 to obtain a
comfortable air flow.
If you place the air flow control to the
minimum position (off), the temperature
in the vehicle will no longer be controlled.
A slight air flow can still be felt however,
resulting from the forward movement of
the vehicle.
Temperature
F Turn the thumbwheel 1 from "LO" (cold) to
"HI" (hot) to adjust the temperature to your
requirements.
Air distribution
F Press button 3 successively to direct the air
flow towards:
- the windscreen, the side windows and the
footwells,
- the footwells.
- the central vents, the side vents and the
footwells,
- the windscreen, the side windows, the
central vents, the side vents and the
footwells,
3
87

Ease of use and comfort
- the central and side vents,
- the windscreen and side windows
(demisting or defrosting).
Air conditioning
With the engine running, the air conditioning is
designed to operate effectively in all seasons,
with the windows closed.
It allows you:
- in summer, to lower the temperature,
- to increase the effectiveness of the
demisting in winter, above 3°C.
On/o
F Press button 5 to activate/deactivate the air
conditioning system.
When the air conditioning is in operation, to
cool the air more quickly, you can use interior
air recirculation for a few moments by pressing
button 4. Then return to the intake of exterior
air.
The air conditioning does not operate
when the air flow adjustment is set to off.
Switching the system off may result in
some discomfort (humidity, misting).
Dual-zone automatic air conditioning
1. Temperature.
2. Air flow.
3. Air distribution.
4. Recirculation of interior air.
5. Air conditioning on/off.
6. Automatic comfort mode.
7. Visibility programme.
8. "Mono" function or Rear heating and air
conditioning on/off (depending on version).
Automatic comfort mode
F Press the "AUTO" button 6 succ essively.
The active mode appears in the display screen,
as described below:
Provides soft and quiet operation by
limiting air flow.
Offers the best compromise between
a comfor table temperature and quiet
operation.
Provides dynamic and effective air
flow.
When the engine is cold, the air flow will
only reach its optimum level gradually
to prevent too much cold air being
distributed.
In cold weather, it favours the distribution
of warm air to the windscreen, the side
windows and the footwells only.
Manual mode
It is possible to make a different choice
from that offered by the system by changing
a setting. The other functions will still be
managed automatically.
As soon as a setting is changed, the "AUTO"
symbol disappears.
Deactivating the system
F Press button 2 "-" until the fan symbol
disappears.
This action switches off all of the functions of
the system.
Temperature is no longer controlled. A slight air
flow can still be felt, however, resulting from the
forward movement of the vehicle.
F Press button 2 "+" to switch the system on
again.
88

Ease of use and comfort
Temperature
The driver and front passenger can each set
the temperature to suit their requirements.
The value shown on the display is a level
of comfort, not a temperature in Celsius or
Fahrenheit.
F Push button 1 down to decrease the value
or up to increase it.
A setting of around 21 provides optimum
comfort. Depending on your requirements,
a setting between 18 and 24 is normal.
In addition, it is recommended that you
avoid a left/right setting difference of more
than 3.
On entering the vehicle, if the interior
temperature is much colder or warmer
than the comfort value setting, there is no
need to alter the value displayed in order
to reach the required level of comfort. The
system compensates automatically and
corrects the temperature difference as
quickly as possible.
For maximum cooling or heating of the
passenger compartment, it is possible
to exceed the minimum value 14 or the
maximum value 28.
F Push button 1 down until "LO" is
displayed or up until "HI" is displayed.
"Mono" function
The comfort setting for the passenger's side
can be indexed to the driver's comfort setting
(mono-zone).
F Press the corresponding button 8
to activate/deactivate the function.
The indicator lamp in the button is on
when the function is activated.
The function is deactivated automatically if a
passenger uses the temperature control.
Rear heating - air
conditioning
F Press the corresponding button 8
to activate/deactivate the function.
For more information, refer to the Rear
heating - air conditioning section.
Visibility programme
F Press button 7 "Visibility" to demist or
defrost the windscreen and side windows
more quickly.
The system automatically manages the air
conditioning, air flow and air intake, and
provides optimum distribution towards the
windscreen and side windows.
F Press button 7 "Visibility" again to stop the
programme.
Or
F Press button 6 "AUTO" to return to the
automatic comfort programme.
Air conditioning
With the engine running, the air conditioning is
designed to operate effectively in all seasons,
with the windows closed.
It is used to:
- lower the temperature in summer,
- increase the effectiveness of the demisting
in winter, above 3°C.
On/o
F Press button 5 to activate/deactivate the air
conditioning system.
3
89

Ease of use and comfort
90
When the air conditioning is in operation, to
cool the air more quickly, you can use interior
air recirculation for a few moments by pressing
button 4. Then return to the intake of exterior
air.
The air conditioning does not operate
when the air flow adjustment is set to off.
Switching the system off may result in
some discomfort (humidity, misting).
Air distribution
F Press button 3 successively to direct the air
flow towards:
- the windscreen, the side windows and the
footwells,
- the footwells.
- the central vents, the side vents and the
footwells,
- the windscreen, the side windows, the
central vents, the side vents and the
footwells,
- the central and side vents,
- the windscreen and side windows
(demisting or defrosting).
Air flow
F Press buttons 2 to increase/decrease the air
flow.
The symbol for air flow (a fan) appears. It is
filled in or emptied progressively according to
the value requested.
Recirculation of interior air
The intake of exterior air prevents the formation
of mist on the windscreen and side windows.
Recirculation of the interior air isolates the
passenger compartment from exterior odours
and fumes.
This allows hot or cold air to be delivered more
quickly when required.
F Press button 4 to recirculate the
interior air/permit the intake of
exterior air.
When the interior air recirculation is active, the
symbol appears or the indicator lamp comes on
(depending on version).
Avoid prolonged use of recirculation
of the interior air - risk of misting and
deterioration of air quality!
Front demisting defrosting
These markings on the control
panel indicate the positioning of
the controls for rapid demisting or
defrosting of the windscreen and
side windows.
Heating or manual air
conditioning
F Put the air flow, temperature and distribution
controls to the appropriately marked
position.
F For air conditioning, press this
button; its indicator lamp comes
on.

Ease of use and comfort
Dual-zone automatic air
conditioning
F Press this button to demist or
defrost the windscreen and side
windows as quickly as possible.
The system automatically manages the air
conditioning, air flow and air intake, and
provides optimum distribution towards the
windscreen and side windows.
F To turn it off, press this button
again or press “AUTO”.
The system is reactivated with the values prior
to the deactivation.
Heated windscreen and
washer jets
Depending on country of sale.
This function heats the windscreen and washer
jets under cold conditions.
In area 1, the heating frees the wiper blades
from the windscreen when they are stuck by
snow or ice.
In area 2, the heating improves visibility by
avoiding the accumulation of snow when the
wipers are operating.
Switching on
F With the engine running, press this button;
its indicator lamp comes on.
The period of operation depends on the
exterior temperature.
Pressing this button again switches the function
off; its indicator lamp goes off.
Rear screen and/or
door mirrors demisting defrosting
On/O
F Press this button to switch on/off the
defrosting of the rear screen and door
mirrors (if the vehicle is so equipped).
The indicator lamp in the button is on when the
function is activated.
Demisting/defrosting switches off automatically
to prevent an excessive consumption of
current.
3
91

Ease of use and comfort
Switch of f the defrosting as soon as
it is no longer necessary, as reducing
the consumption of electrical current
reduces fuel consumption.
Demisting and defrosting only operates
with the engine running.
Rear heating - air conditioning
If the vehicle is fitted with a rear air conditioning
unit, located in the roof, this system allows the
distribution of air conditioned and heated air via
a distribution rail and individual outlets.
Air flow
F Turn the dial to increase or
decrease the air flow.
Comfort temperature
- Turn the thumbwheel from blue
(cold) to red (hot) to modulate
the temperature to your liking.
This control simultaneously adjusts the
temperature and the location of the air delivery:
- blue: the air is delivered mainly at roof level,
- red: the air is delivered mainly by the vent
located in row 3 on the right.
Activation/Deactivation
Depending on version, this button is accessible
at the front, from the automatic dual-zone air
conditioning control panel.
F Press this button to activate/
deactivate the operation of the
rear controls.
Additional Heating / Ventilation
92

Ease of use and comfort
Heating
This is an additional and separate system
which heats the passenger compartment and
improves defrosting performance.
This indicator lamp is lit while the
system is programmed or set in
operation remotely via the remote
control.
It flashes during the whole duration
of the heating and goes off at the end
of the heating cycle or when stopped
using the remote control.
Ventilation
This system allows ventilation of the passenger
compartment with exterior air to improve the
temperature experienced on entering the
vehicle in summer.
Programming
With PEUGEOT Connect Nav, use the remote
control to start/stop the additional heating.
With a Bluetooth
Connect Radio, use the remote control to start/
stop the additional heating and/or adjust the
preheating times.
®
audio system or PEUGEOT
With Bluetooth® audio system
F Press the MENU button to
access the main menu.
F Select "Pre-heat. / Pre-ventil. ".
F Select "Activation " and, if necessary for
programming, select "Parameters ".
F Select "Heating " to heat the engine and
passenger compartment or "Ventilation " to
ventilate the passenger compartment.
F Select:
st
- the 1
clock to programme/memorise
the time at which the pre-heating
temperature will be reached,
nd
- the 2
clock to programme/memorise
a second time at which the pre-heating
temperature will be reached,
Using these two clocks and depending on
the season you can, for example, select
one or the other start time.
A message in the screen confirms your
choice.
With PEUGEOT Connect Radio
Press Applications to display the
primary page.
Then press "Programmable
heating/ventilation".
F Select the "Status" tab to activate/
deactivate the system.
F Select the "Other settings" tab to choose
"Heating" to heat the engine and passenger
compartment or "Ventilation" to ventilate
the passenger compartment.
F Then programme/preset the time at which
the pre-heating temperature will be reached
for each selection.
Press this button to save.
With PEUGEOT Connect Nav
F Press the "Applications" menu.
3
F Press the "Vehicle Apps" tab.
93

Ease of use and comfort
F Press "Temperature
programming".
F Press the "Status" tab to activate/deactivate
the system.
F Press the "Parameters" tab to select
"Heating" mode to heat the engine and
passenger compartment or "Ventilation"
mode to ventilate the passenger
compartment.
F Then programme/preset the activation time
for each selection.
F Press "OK" to confirm.
Long range remote control
This enables you to switch the heating in
the passenger compartment on or off from a
distance.
The range of the remote control is about
0.6 miles (1 km) in open country.
Switching on
F Pressing and holding this button
starts the heating immediately
(confirmed by the temporary
illumination of the green
indicator lamp).
Switching o
F Pressing and holding this button
stops the heating immediately
(confirmed by the temporary
illumination of the red indicator
lamp).
The indicator lamp in the remote control flashes
for about 2 seconds if the vehicle has not
received the signal.
Then repeat the command after having
changed location.
Changing the battery
If the indicator lamp in the remote control
becomes orange, the state of charge of the
battery is low.
If the indicator lamp is not on, the battery is
discharged.
F Use a coin to unscrew the cap and replace
the battery.
Do not throw remote control batteries
away as they contain metals which are
harmful to the environment. Take them
to an approved collection point.
The maximum heating period is about
45 minutes depending on the climatic
conditions.
The ventilation is activated provided that
the battery is suf ficiently charged.
The heating is activated provided that:
- the fuel and the battery charge levels
are sufficient,
- the engine has been started since the
previous heating cycle.
94

Ease of use and comfort
The programmable heating is supplied by
the vehicle's fuel tank. Before use, ensure
that there is enough fuel left in the tank.
If the fuel in the tank is at the reserve
level, it is strongly recommended not to
programme the heating.
The additional heating must always be
switched off while refuelling to avoid any
risk of fire or explosion.
To avoid the risks of poisoning or
asphyxia, the programmable heating must
not be used, even for short periods, in a
closed environment such as a garage or
workshop which is not equipped with an
exhaust gas extraction system.
Do not park the vehicle on a flammable
surface (dry grass, fallen leaves, paper,
etc.) - risk of fire!
Glazed surfaces such as the rear screen
or windscreen can become very hot in
places.
Never put objects on these surfaces;
never touch these surfaces - risk of burns!
Independent additional
heating
Depending on the country of sale, this is an
additional and independent system which heats
the hot water circuit of the Diesel engine to
improve comfort and to raise the temperature
of the cold engine. It improves demisting and
defrosting performance. With the engine idling
or the vehicle stationary, it is normal to notice a
high-pitched whistling and some emissions of
smoke or odour.
The temperature near the heating system must
not exceed 120°C. A higher temperature (e.g. in
a paint oven) could damage the components of
electronic circuits.
The additional heating is supplied by the
vehicle's fuel tank. Make sure that the low fuel
warning lamp is not on.
To avoid the risks of poisoning or
suffocation, the additional heating must
not be used, even for short periods, in a
closed environment such as a garage or
workshop which is not equipped with an
exhaust gas extraction system.
Do not park the vehicle on a flammable
surface (for example: dry grass, fallen
leaves, paper, etc.) - risk of fire!
Have the additional heating checked at
least once a year, at the beginning of
winter.
For maintenance and repairs, you must
only contact a PEUGEOT dealer or a
qualified workshop.
Courtesy lamp(s)
Front: comes on when one of
the front or rear doors is opened
(sliding side door and depending
on equipment, left-hand sidehinged door or tailgate).
Rear or row 2 and row 3: comes
on when one of the rear doors
is opened (sliding side door
and depending on equipment,
left-hand side-hinged door or
tailgate).
3
95

Ease of use and comfort
Front
Permanently on, ignition on.
Permanently off.
Rear
Automatic switching on/off
The front courtesy lamp comes on when the
key is removed from the ignition switch.
All of the courtesy lamps come on when
the vehicle is unlocked, when one of the
corresponding doors is opened and when
locating the vehicle using the remote control.
They go off gradually after the ignition is
switched on and when the vehicle is locked.
Take care not to put anything in contact
with the courtesy lamp.
Individual reading lamp
If fitted to the vehicle, these are
switched on and off by means of a
manual switch.
With the ignition on, operate the
corresponding switch.
96
Take care not to put anything in contact
with the courtesy lamp.

Lighting and visibility
Lighting control stalk
In some weather conditions (e.g. low
temperature or humidity), the presence
of misting on the internal surface of the
glass of the headlamps and rear lamps is
normal; it disappears after the lamps have
been on for a few minutes.
Travelling abroad
If using your vehicle in a country that
drives on the other side of the road, the
headlamps must be adjusted to avoid
dazzling on-coming drivers.
Contact a PEUGEOT dealer or a qualified
workshop.
Main lighting
Automatic illumination of headlamps/
Daytime running lamps.
Sidelamps only.
Dipped or main beam headlamps.
Operation of the selected lighting is
confirmed by the illumination of the
corresponding indicator lamp.
Headlamp dipping
Pull the stalk to switch between dipped and
main beam headlamps.
In the lighting off and sidelamps modes, the
driver can switch on the main beam headlamps
temporarily ("headlamp flash") by maintaining a
pull on the stalk.
Without AUTO lighting
With AUTO lighting
Fog light selection ring
With rear foglamp only
It operates with the sidelamps on.
F Turn the ring forwards to switch it on and
backwards to switch it off.
When the lighting is switched off automatically
(version with AUTO lighting), the foglamp and
the dipped beam headlamps will remain on.
4
Lighting off (ignition off)/ Daytime
running lamps (engine running).
97

Lighting and visibility
With front and rear foglamps
They operate with the dipped beam
headlamps on, in manual or auto
mode.
Turn and release the ring:
F once forwards to switch on the front
foglamps and then a second time for the
rear foglamps.
F once backwards to switch off the rear
foglamps and then a second time for the
front foglamps.
If the lighting is switched off automatically (with
AUTO model) or the dipped beam headlamps
are switched off manually, the foglamps and
sidelamps will remain on.
F Turn the ring backwards to switch the
foglamps off; the sidelamps will then switch
off.
When the lighting is left on
An audible signal when a front door is
opened warns the driver that the vehicle's
exterior lighting is on, with the ignition off
and in manual lighting mode.
In this case, switching off the lighting
stops the audible signal.
The lighting goes off when you switch off
the ignition, but you can always switch it
on again using the lighting control stalk.
In good or rainy weather, by both day and
night, use of the front foglamps and the
rear foglamps are prohibited. In these
situations, the power of their beams may
dazzle other drivers. They should only be
used in fog or falling snow.
In these weather conditions, it is your
responsibility to switch on the foglamps
and dipped headlamps manually as the
sunshine sensor may detect sufficient
light.
Switch of f the front and rear foglamps
when they are no longer necessary.
Direction indicators
F Left or right: lower or raise the lighting
control stalk, beyond the point of resistance.
If you forget to cancel the direction
indicators for more than 20 seconds, the
volume of the audible signal will increase if
the speed is above 50 mph (80 km/h).
Three ashes
F Press briefly upwards or downwards,
without going beyond the point of
resistance; the direction indicators will flash
3 times.
98
 Loading...