

Peugeot 206 CC 2006 Owner's Manual

4 -
Familiarisation
01-01-2006
Familiarisation
11 Steering lock
5
-
1 Side windows demisting vents
2 Adjustable side vent
3 Passenger air bag
4 Windscreen demisting vents
5 Multifunction display
6 Central locking control*
7 Hazard warning lights switch /
central locking control
8 Instrument panel lighting
rheostat
9 Lights and direction indicators
stalks
10 Steering wheel height
adjustment control
12 Windscreen wash/wipe / trip
computer stalk
13 Driver’s air bag
Horn
14 Audio equipment control stalk
15 Headlamp height adjustment
16 Passenger air bag disarming
switch*
17 Alarm button*
18 Dynamic stability control (ESP/
ASR) button
19 Storage compartment
20 Fuse box
21 Gear lever
22 Lighter
23 Electric retractable roof control
25 Electric mirror switches
26 Handbrake
27 Front ashtray
28 Heating / ventilation / air
conditioning controls
Rear screen and mirrors
demisting
29 Audio RD3
30 Adjustable central vents
31 Glove box
32 Bonnet opening control
01-01-2006
24 Electric window switches
* According to country.
Familiarisation
7
-
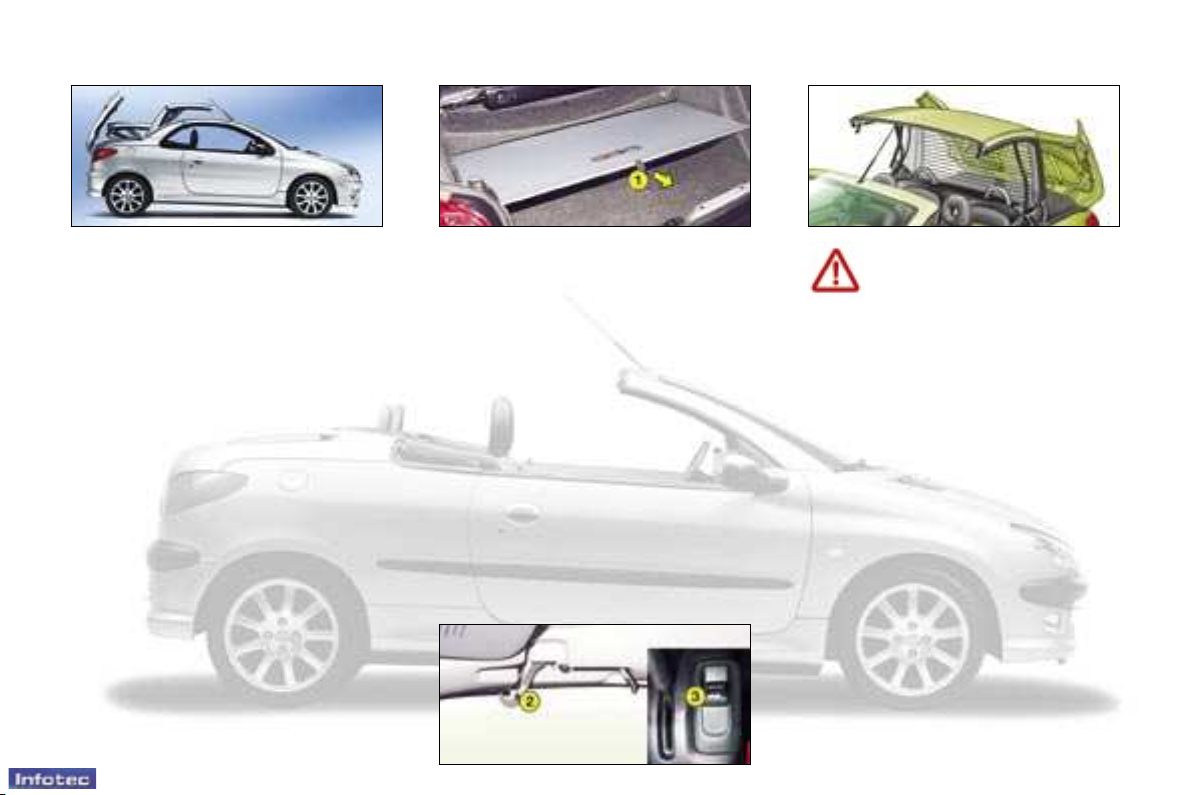
THE ELECTRIC
RETRACTABLE ROOF
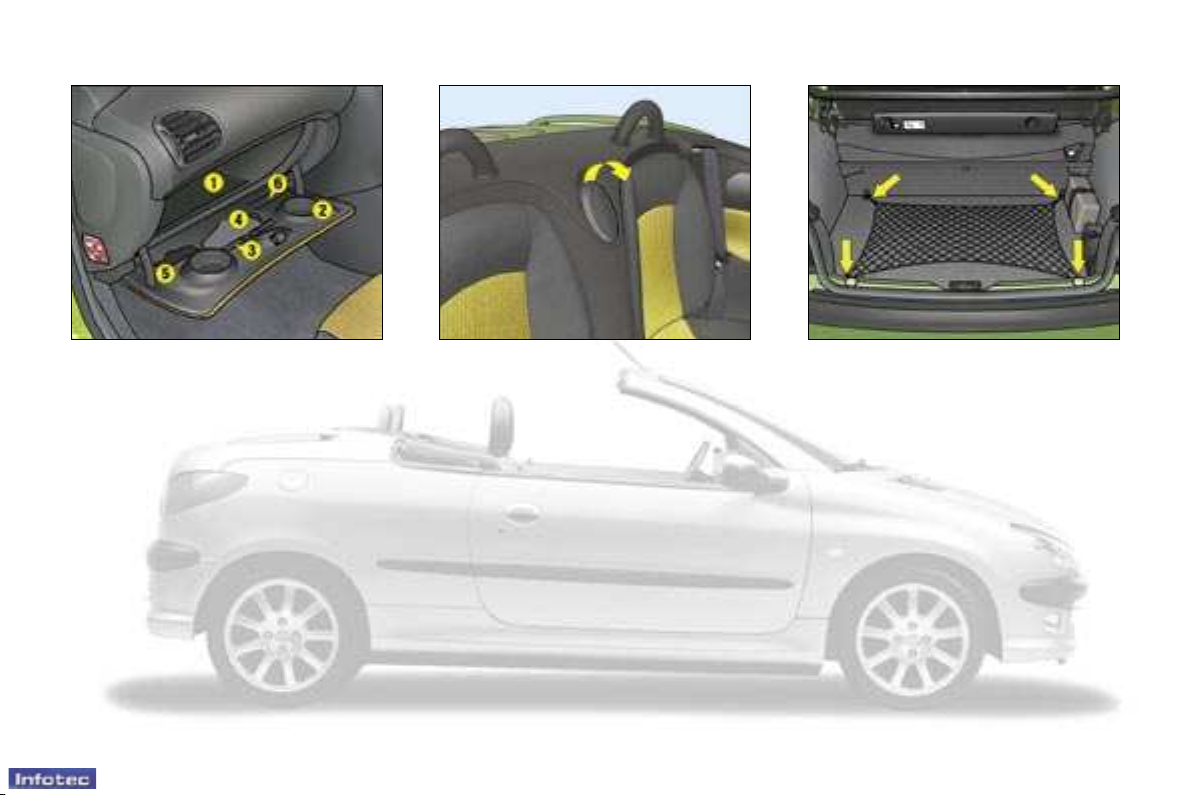
Opening the roof
Park the vehicle on level ground.
• Ensure that the screen 1 is hooked
on (nothing must be placed on the
screen; if there is luggage in the
boot, it must not cause the screen
to lift up).
• Check that there are no objects on
the rear shelf.
• Close the boot correctly.
• When stationary, with the
handbrake applied, turn the ignition
key to the Running position (2nd
notch).
• Completely release the two hooks
2; this operation is validated by an
audible signal.
• Pull button 3 until you hear a signal
which confirms that the roof opening
operation is complete.
• Note: during this operation, the
windows open.
01-01-2006
Closing the roof
• Ensure that the screen 1 is hooked
on.
• Close the boot correctly.
• When stationary, with the
handbrake applied, turn the ignition
key to the Running position (2nd
notch).
• Press button 3 until you hear a
signal which confirms that the roof
closing operation is complete.
• Only then, lock the two hooks 2.
• Note: the window control switches
become operational again after the
roof manoeuvre.
The roof must not be
operated when a loaded
luggage carrier is fitted on
the boot lid.
During roof opening or closing
operations, to avoid risk of injury,
ensure that no-one is in the proximity
of the moving parts.
Never switch the ignition off during
roof manoeuvres.
Never release button 3 for more
than five minutes when the roof is
in an intermediate position (neither
completely open nor completely
closed).
However, if there is any danger,
release the control switch; the
operation will stop instantly. You
can resume the cycle until the
audible signal ceases.
68

Familiarisation
11
-
Park: to immobilise the vehicle
and to start the engine, handbrake
applied or released.
Reverse: to reverse (select this
position, vehicle stationary, engine at
idle).
Neutral: to start the engine and to
park, handbrake applied.
If position N is engaged inadvertently
while driving, let the engine return to
idle before engaging position D to
accelerate.
Drive: to drive, in automatic mode.
Manual: to select the gears.
S : sport programme.
: snow programme.
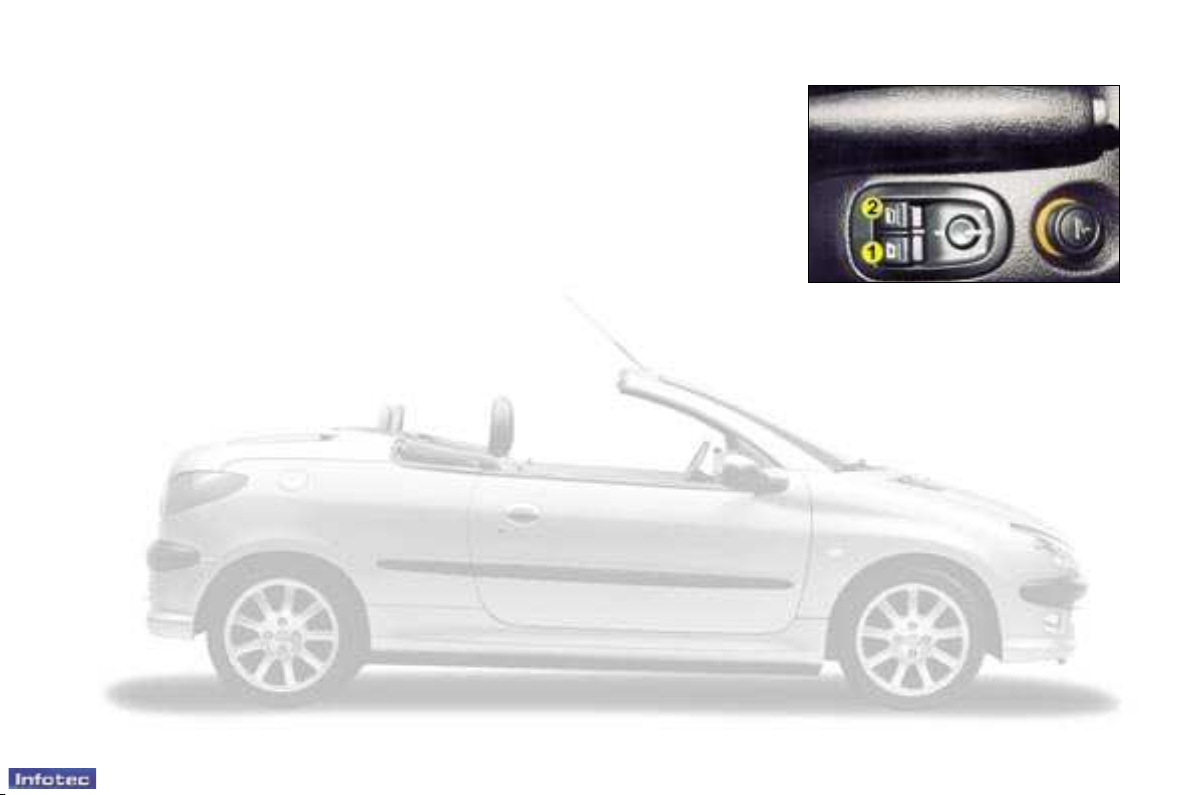
ELECTRIC WINDOWS
1- Driver’s electric window
switch
2- Passenger’s electric window
switch
These control the front window and
the rear quarter panel window on
their respective sides.
Manual operation
Press the switch (to open) or pull it (to
close) without going beyond the point
of resistance. The window stops as
soon as the switch is released.
The rear quarter panel window can
only open when the front window is
completely open, after being inactive
for one second.
Automatic operation
Pressing the switch triggers complete
opening or closing of the window, a
second press stops the movement.
An extended press controls the
movement of the window which is
interrupted if you release the switch.
Maintained pressure or a second
press triggers the opening or closing
of the rear quarter panel window.
Notes: Only the front window on the
driver’s side closes automatically
(engine running or vehicle moving),
when the rear quarter panel window
is closed.
The electric window switches do not
operate during operation of the roof.
01-01-2006
78
74

10 -
Familiarisation
ELECTRIC MIRRORS
Turn knob 3 to the right or to the left
to select the corresponding mirror.
Move knob 3 in all four directions to
adjust.
Electrically folding mirrors
With the ignition on, turn knob
position A.
3 to
STEERING WHEEL HEIGHT
ADJUSTMENT
When stationary, lower the lever to
release the steering wheel.
Adjust to the required height and
raise the lever to lock the steering
wheel.
“PORSCHE TIPTRONIC
SYSTEM” AUTOMATIC
GEARBOX
The four-speed automatic gearbox
offers the choice between the comfort
of fully automatic gear changing,
enhanced by a sport programme
and a snow programme, or manual
gear changing.
Position selection grid
Move the lever in the grid to select
a position.
The indicator light for the position
selected comes on on the
instrument panel display.
01-01-2006
75
Familiarisation
63
: this symbol invites you to refer to the pages which provide details of this function.
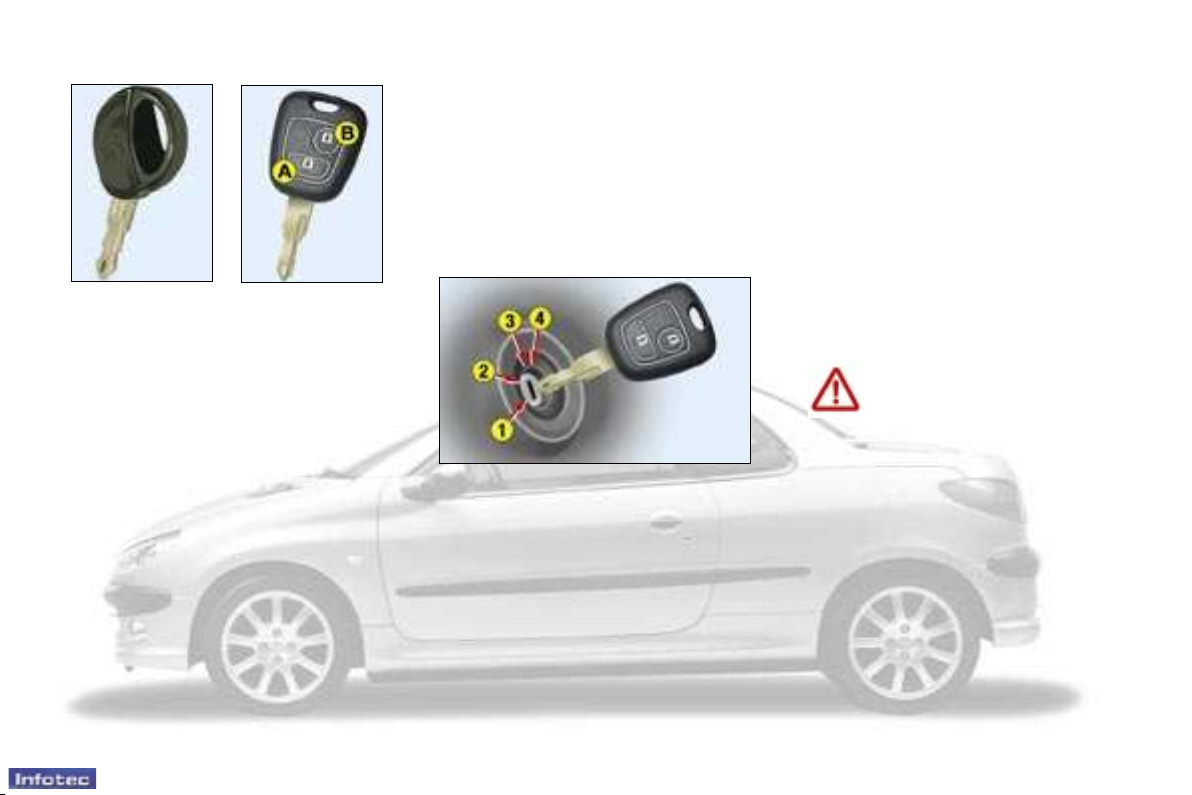
STARTING
The four positions of the key in
the ignition:
1 - STOP position:
the ignition is off.
2 - 1st notch, Accessories
position:
the ignition is off but the
accessories can be used.
3 - 2nd notch, Running position:
the ignition is on.
4 - Starting position:
operates the starter.
6 -
This is confirmed by the fixed
lighting of the direction indicators for
approximately two seconds.
Pressing button B allows you to
unlock the doors alone.
This is confirmed by the rapid
flashing of the direction indicators for
approximately two seconds.
THE KEYS
The keys operate independently the
locks for the doors, the boot (opening),
the fuel filler flap, the steering lock,
the glove box, the passenger air bag
disarming switch and switch on the
ignition.
Locking and unlocking
From the driver’s door, the keys allow
you to:
- simultaneously lock the doors and
the boot,
- simultaneously unlock the doors
alone.
You can only unlock the boot by
using the boot lock.
The remote control
Pressing button A allows you to
lock the doors and boot by remote
control.
01-01-2006
Steering lock
Before starting, unlock the steering
if necessary, by gently turning the
steering wheel at the same time as
you turn the key.
It is advisable to press the clutch
pedal while operating the starter to
make starting easier.
Starting the engine
Do not press the accelerator.
Operate the starter, without releasing
the key, until the engine turns.
Never race a cold engine.
Never run the engine in an
enclosed space.
Do not make any modifica-
tions to the steering lock.
12 -
Familiarisation
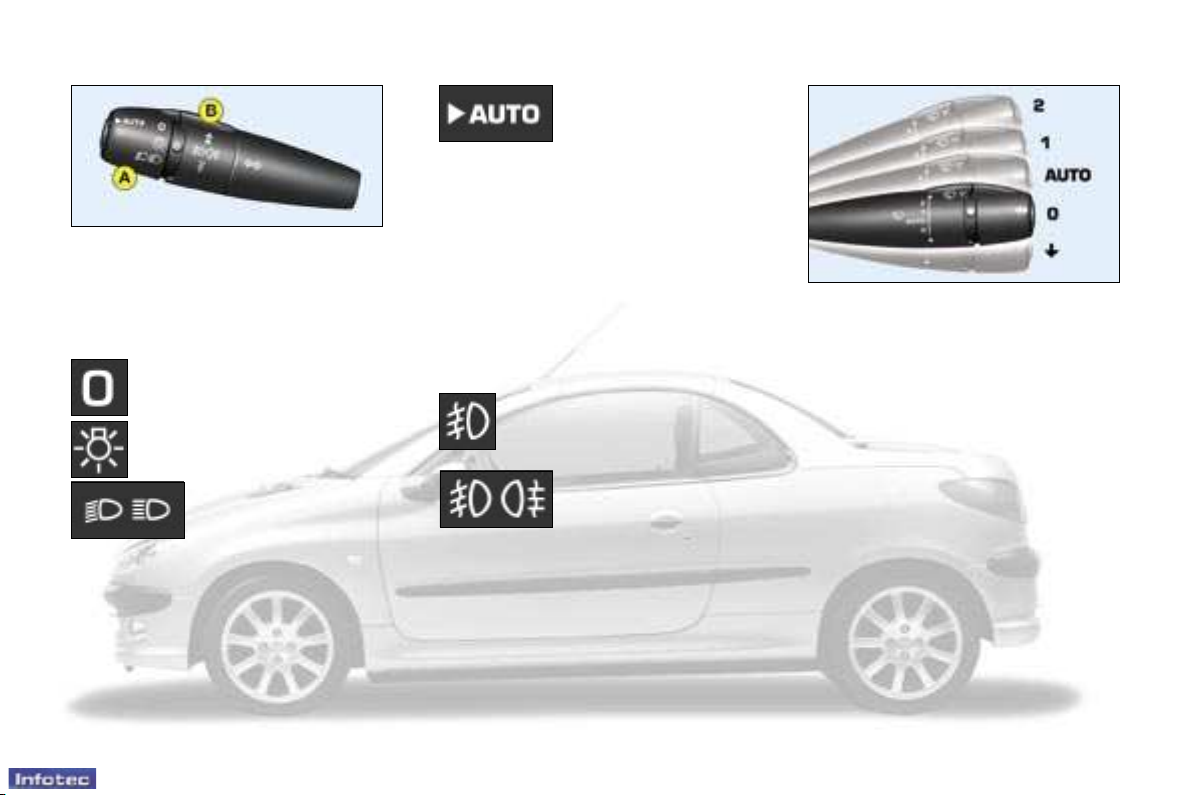
STEERING WHEEL
CONTROLS
Lights stalk
Front and rear lights (ring A)
Lights off
Side lights
Dipped / main beam
headlamps
Automatic lighting of
headlamps
Automatic lighting of headlamps
To activate or deactivate the function,
place the key in the accessories
position, the lights stalk in position
AUTO/0 and press the end of the
stalk for more than four seconds.
Front / rear fog lamps (ring B)
Front fog lamps (1st rotation
of the ring forwards)
Front and rear fog
lamps (2nd rotation of
the ring forwards)
Windscreen wipers
2 Fast wipe
1 Normal wipe
l Intermittent wipe
or
AUTO Automatic wipe
0 Off
Single wipe
Automatic wipe
In the AUTO position, the wiper
operates automatically and adjusts
its speed to the intensity of the
rainfall.
Windscreen wash
Pull the windscreen wiper stalk
towards you.
01-01-2006
70 72
Familiarisation
13
-
GLOVE BOX
1 - Storage compartment for the
folder containing the vehicle
documents.
2 - Can holder.
3 - Pen holder.
4 - Storage compartment for
spectacles.
5 - Storage compartment for maps.
6 - Storage compartment for coins.
01-01-2006
BOTTLE HOLDER
To open, pull the top of the cover.
LUGGAGE RETAINING NET
Use the four lashing rings located on
the boot floor to secure the luggage
retaining net.
77
Familiarisation
8 -
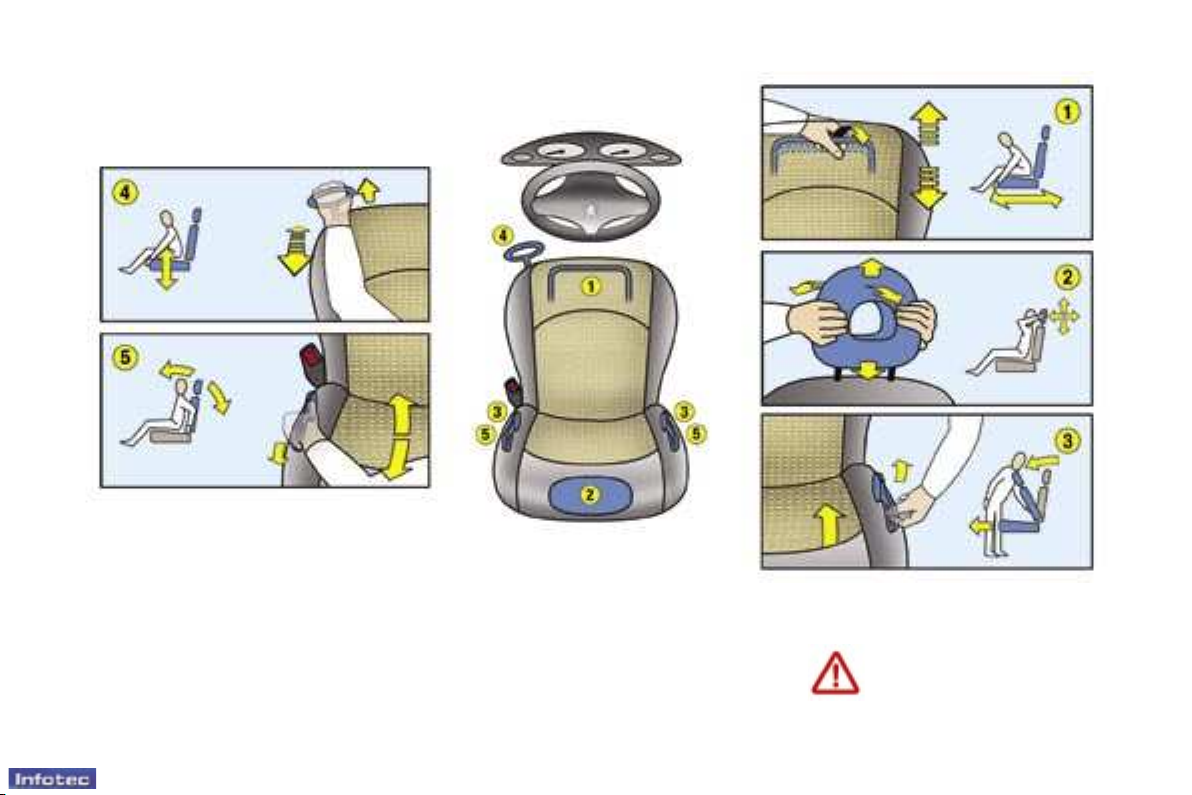
FRONT SEATS
1 - Forwards/backwards adjustment
2 - Head restraint height and angle
adjustment
3 - Access to rear seats
01-01-2006
4 - Driver’s seat height adjustment
5 - Seat back angle adjustment
Never drive with the head
restraints removed.
56
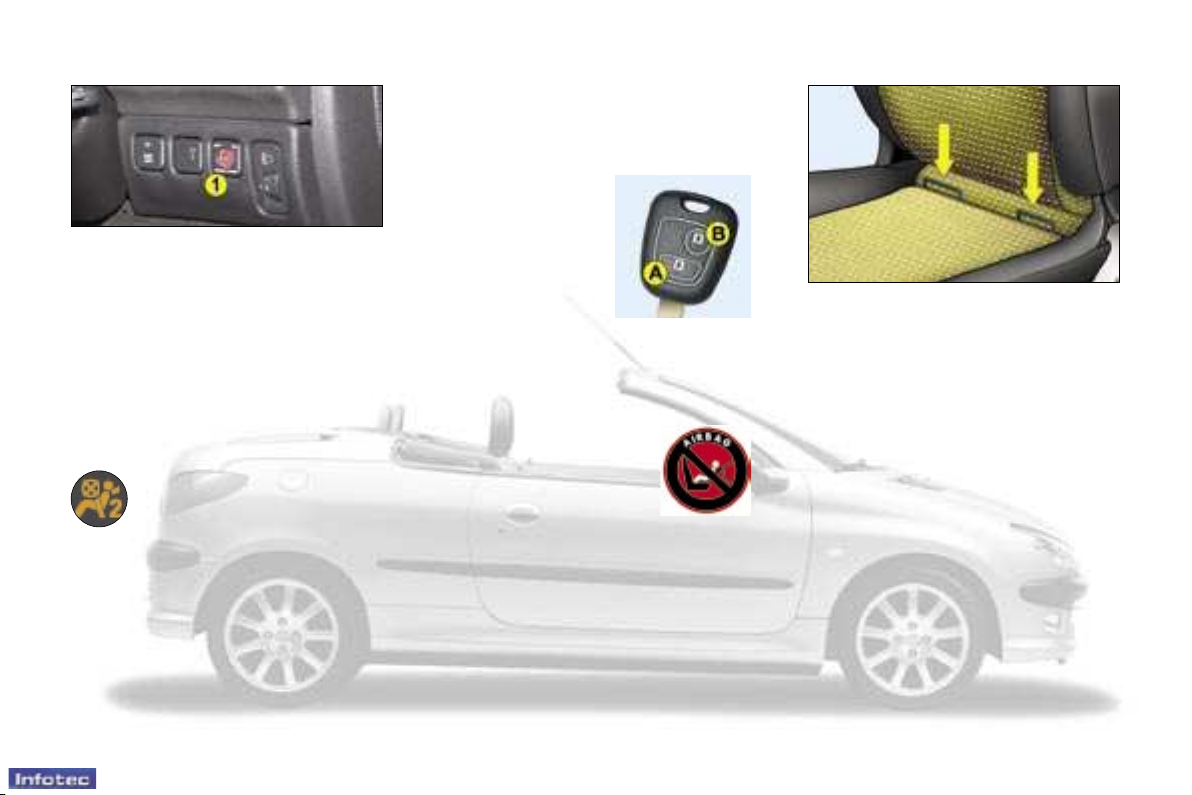
FRONT AIR BAGS
Disarming the passenger air bag*
Insert the ignition key in the switch 1
and turn it to:
- the ON position; the passenger air
bag is armed,
-
the OFF position; the passenger air
bag is disarmed.
Operating check
With the ignition on (2nd
notch), illumination of this
warning light, accompanied
by a message on the
indicates that the passenger air bag
is disarmed (switch in the “OFF”
position).
The warning light remains on
throughout the period of disarming.
multifunction display,
Precautions regarding the
passenger air bag
Vehicle fitted with a passenger air
bag disarming switch:
- disarm the air
bag if you install a
rearwards-facing
child seat,
- arm the air bag
for an adult passenger.
Vehicle not fitted with a passenger air
bag disarming switch:
- do not install a rearwards-facing child seat
on the front passenger
seat.
Never place your feet or any object
on the fascia panel.
Familiarisation
‘’ISOFIX’’ MOUNTINGS
Available on the front passenger
seat, Isofix mountings allow fitting
of a special child seat sold by
PEUGEOT dealers.
The locks incorporated in the child
seat fit onto the ‘Isofix’ mountings,
ensuring reliable, safe and fast
fitting. The child seat must be fitted
in the rearwards-facing position for
children weighing less than 13 kg (in
this event it is essential to disarm
the passenger air bag).
Follow the instructions for fitting
the child seat in the manufacturer’s
installation guide.
9
-
01-01-2006
83 62
* According to country.
Familiarisation
14 -
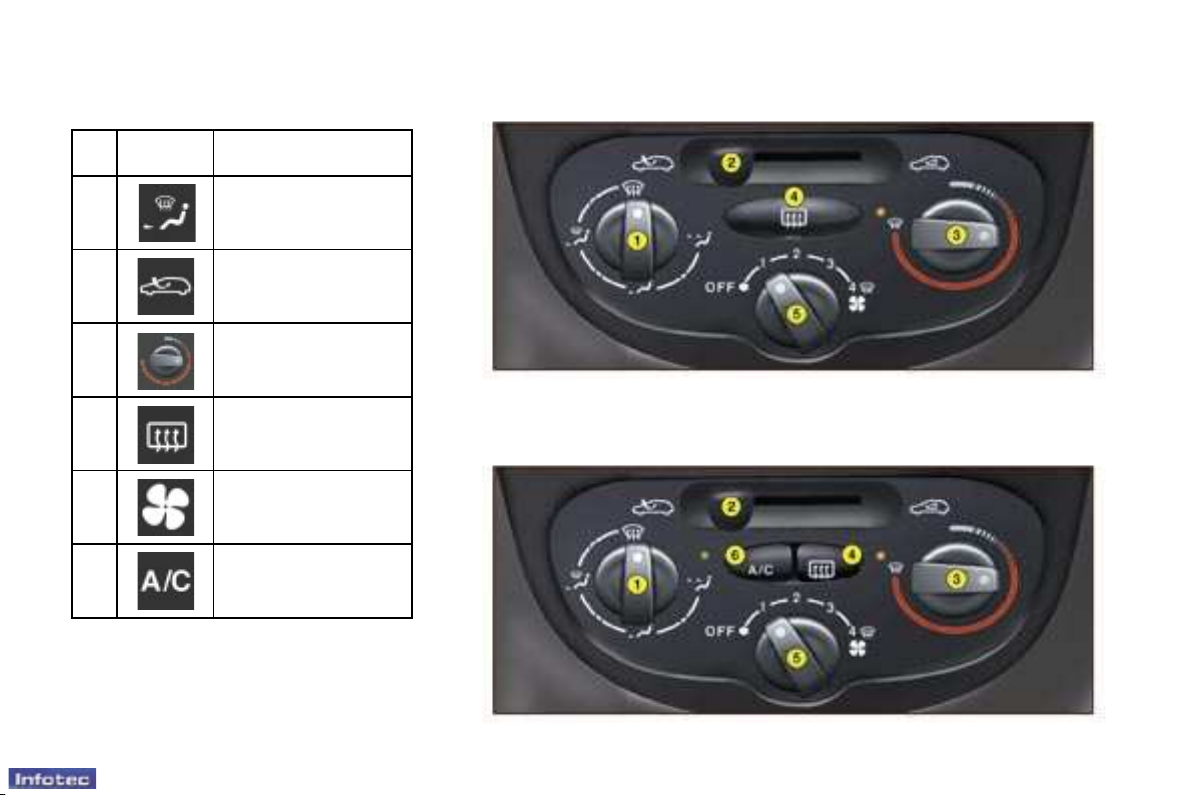
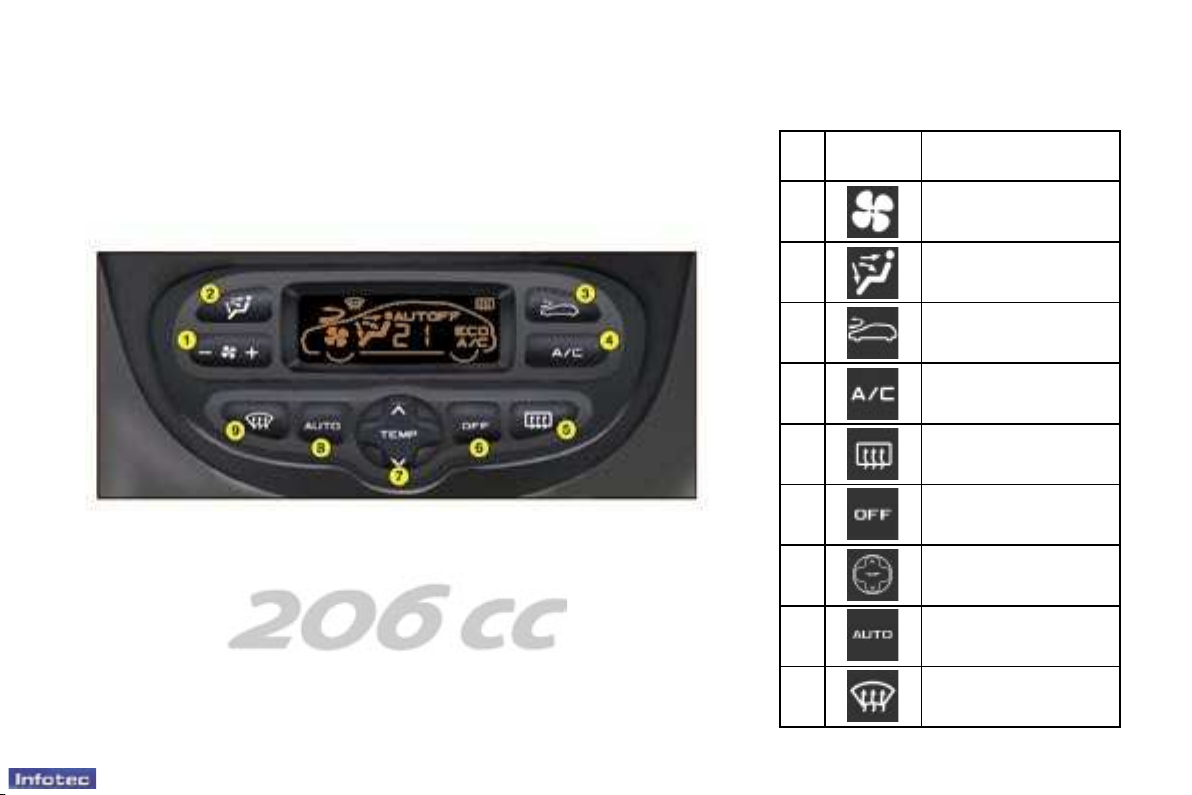
HEATING /
AIR CONDITIONING
N° Symbol Function
1
2 Air intake control.
3
4
5 Air flow adjustment.
6
01-01-2006
Air distribution
adjustment.
Temperature
adjustment.
Demisting the rear
screen and the
mirrors.
Air conditioning
control
51
52
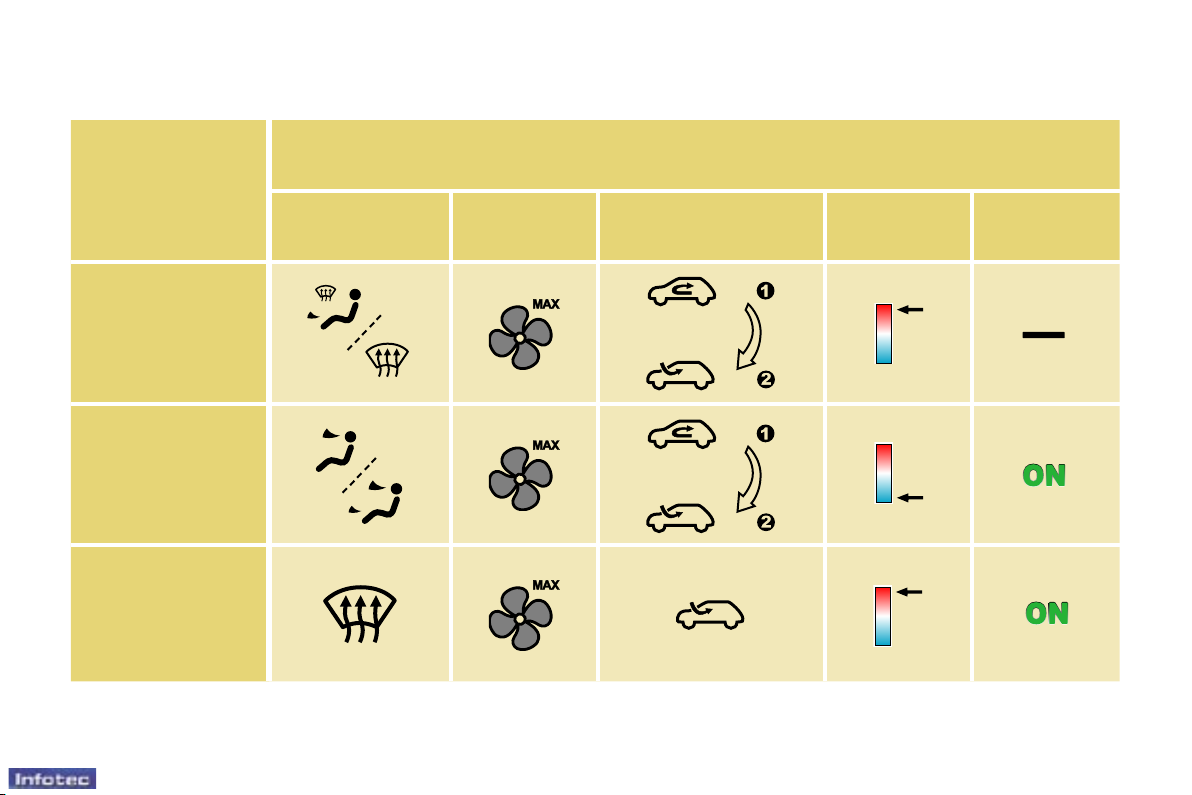
RECOMMENDED INTERIOR SETTINGS
I require...
Air distribution Air flow
HOT
COLD
DEMISTING
DE-ICING
Heating or Manual air conditioning
Air recirculation /
Intake of exterior air
Familiarisation
Temperature Manual AC
15
-
01-01-2006
Familiarisation
16 -
AUTOMATIC AIR CONDITIONING
N° Symbol Function
1 Air flow adjustment.
Note: in the cabriolet version, system performance may be reduced.
01-01-2006
54
2
3 Air intake control.
4
5
6 Switching off.
7
8
9
Air distribution
adjustment.
Air conditioning
control.
Demisting the rear
screen and the
mirrors.
Temperature
adjustment.
Automatic comfort
programme.
Automatic visibility
programme.

10 -
Familiarisation
ELECTRIC MIRRORS
Turn knob 3 to the right or to the left
to select the corresponding mirror.
Move knob 3 in all four directions to
adjust.
Electrically folding mirrors
With the ignition on, turn knob
position A.
3 to
STEERING WHEEL HEIGHT
ADJUSTMENT
When stationary, lower the lever to
release the steering wheel.
Adjust to the required height and
raise the lever to lock the steering
wheel.
“PORSCHE TIPTRONIC
SYSTEM” AUTOMATIC
GEARBOX
The four-speed automatic gearbox
offers the choice between the comfort
of fully automatic gear changing,
enhanced by a sport programme
and a snow programme, or manual
gear changing.
Position selection grid
Move the lever in the grid to select
a position.
The indicator light for the position
selected comes on on the
instrument panel display.
01-01-2006
75
Familiarisation
11
-
Park: to immobilise the vehicle
and to start the engine, handbrake
applied or released.
Reverse: to reverse (select this
position, vehicle stationary, engine at
idle).
Neutral: to start the engine and to
park, handbrake applied.
If position N is engaged inadvertently
while driving, let the engine return to
idle before engaging position D to
accelerate.
Drive: to drive, in automatic mode.
Manual: to select the gears.
S : sport programme.
: snow programme.
ELECTRIC WINDOWS
1- Driver’s electric window
switch
2- Passenger’s electric window
switch
These control the front window and
the rear quarter panel window on
their respective sides.
Manual operation
Press the switch (to open) or pull it (to
close) without going beyond the point
of resistance. The window stops as
soon as the switch is released.
The rear quarter panel window can
only open when the front window is
completely open, after being inactive
for one second.
Automatic operation
Pressing the switch triggers complete
opening or closing of the window, a
second press stops the movement.
An extended press controls the
movement of the window which is
interrupted if you release the switch.
Maintained pressure or a second
press triggers the opening or closing
of the rear quarter panel window.
Notes: Only the front window on the
driver’s side closes automatically
(engine running or vehicle moving),
when the rear quarter panel window
is closed.
The electric window switches do not
operate during operation of the roof.
01-01-2006
78
74
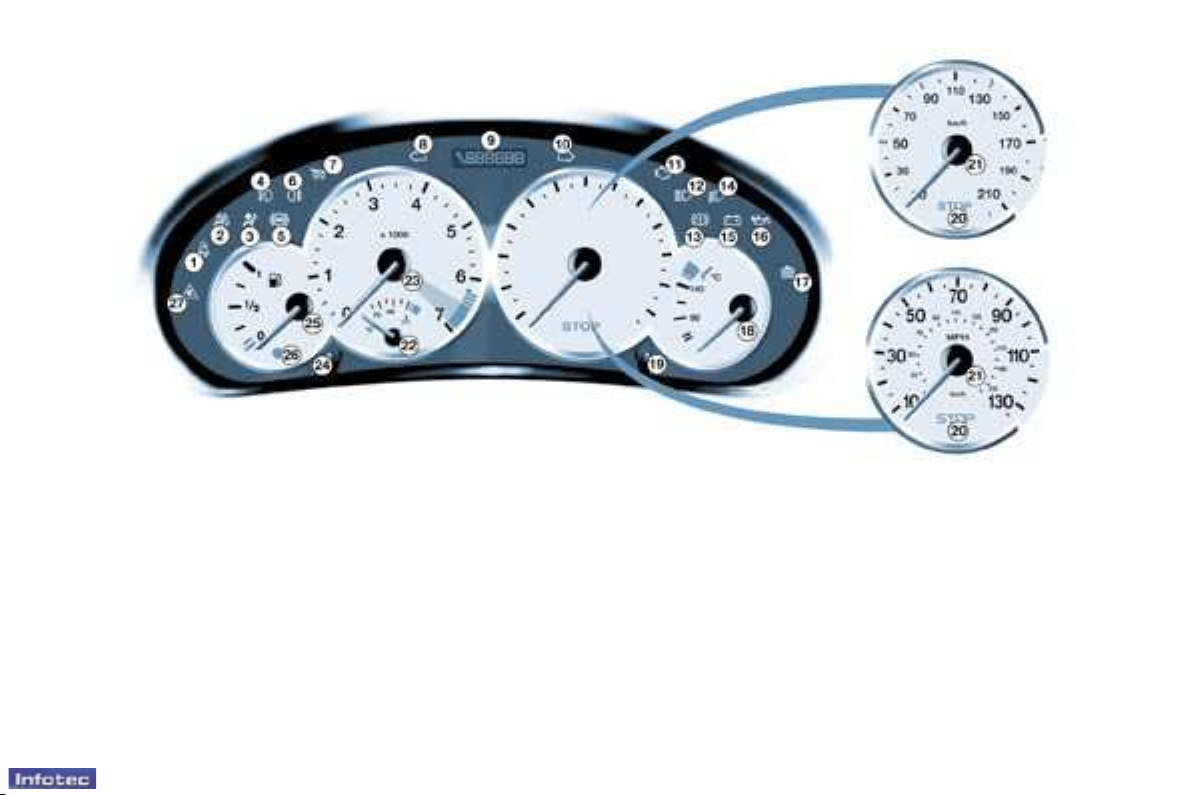
1. Seat belt not fastened warning
light*
2. Passenger air bag disarmed
warning light*
3. Air bags warning light
4. Front fog lamps indicator light
5. Anti-lock braking system (ABS)
warning light
6. Rear fog lamp indicator light
7. Diesel pre-heat warning light
8. Left-hand direction indicator
9. Total distance recorder, service
indicator and engine oil level
indicator
10. Right-hand direction indicator
11. Emission control warning light
12. Main beam headlamps indicator
light
13. Handbrake, low brake fluid
level and electronic brake force
distribution warning light
14. Dipped beam headlamps
indicator light
15. Battery charge warning light
16. Engine oil pressure and
temperature warning light
17. Coolant low level warning light
(Diesel)
18. Engine oil temperature indicator
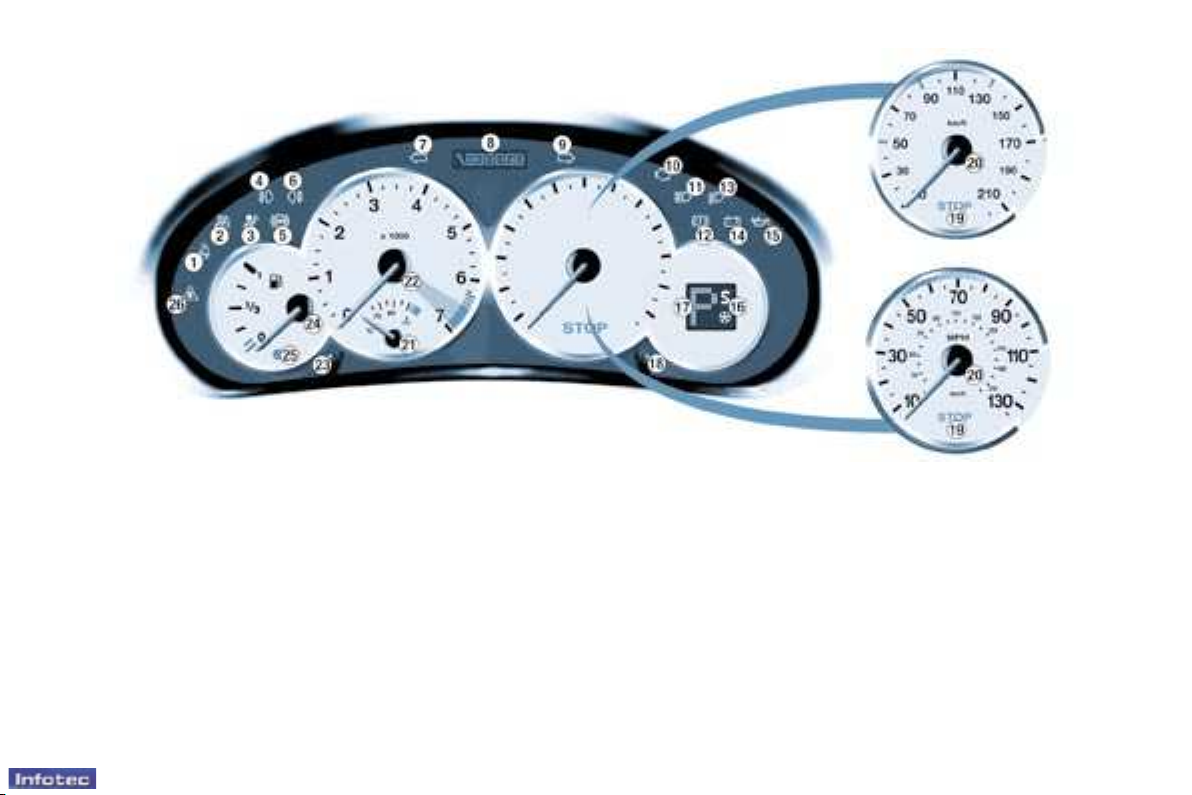
INSTRUMENT DIALS: PETROL - DIESEL MANUAL GEARBOX
01-01-2006
Instruments and controls
19. Total distance recorder button
20. Central (STOP) warning light
21. Speedometer
22. Coolant temperature indicator
23. Rev counter
24. Lighting rheostat button
25. Fuel level indicator
26. Low fuel level warning light
27. Dynamic stability control (ESP/
ASR) warning light
* According to country.
-
17
Instruments and controls
1. Seat belt not fastened warning
light*
2. Passenger air bag disarmed
indicator light*
3. Front and side air bags warning
light
4. Front fog lamps indicator light
5. Anti-lock braking system (ABS)
warning light
6. Rear fog lamp indicator light
7. Left-hand direction indicator
8. Total distance recorder, service
indicator and engine oil level
indicator
9. Right-hand direction indicator
10. Emission control warning light
11. Main beam headlamps
12. Handbrake, brake fluid level
and electronic brake force
distribution warning light
13. Dipped beam headlamps
14. Battery charge warning light
15. Engine oil pressure and
temperature warning light
16. Operating programmes
17. Gear lever position indicator
18. Total distance recorder button
INSTRUMENT DIALS: AUTOMATIC GEARBOX
18 -
01-01-2006
19. Central (STOP) warning light
20. Speedometer
21. Coolant temperature indicator
22. Rev counter
23. Lighting rheostat button
24. Fuel gauge
25. Low fuel level warning light
26. Dynamic stability control (ESP/
ASR) warning light
* According to country.
Instruments and controls
-
19
WARNING LIGHTS
A permanently lit warning light
or one flashing, with the engine
running, indicates an operating
fault of the unit concerned.
The illumination of certain warning
lights may be accompanied by
an audible signal and a message
on the multifunction display. Do
not ignore this warning: consult
a PEUGEOT dealer as soon as
possible.
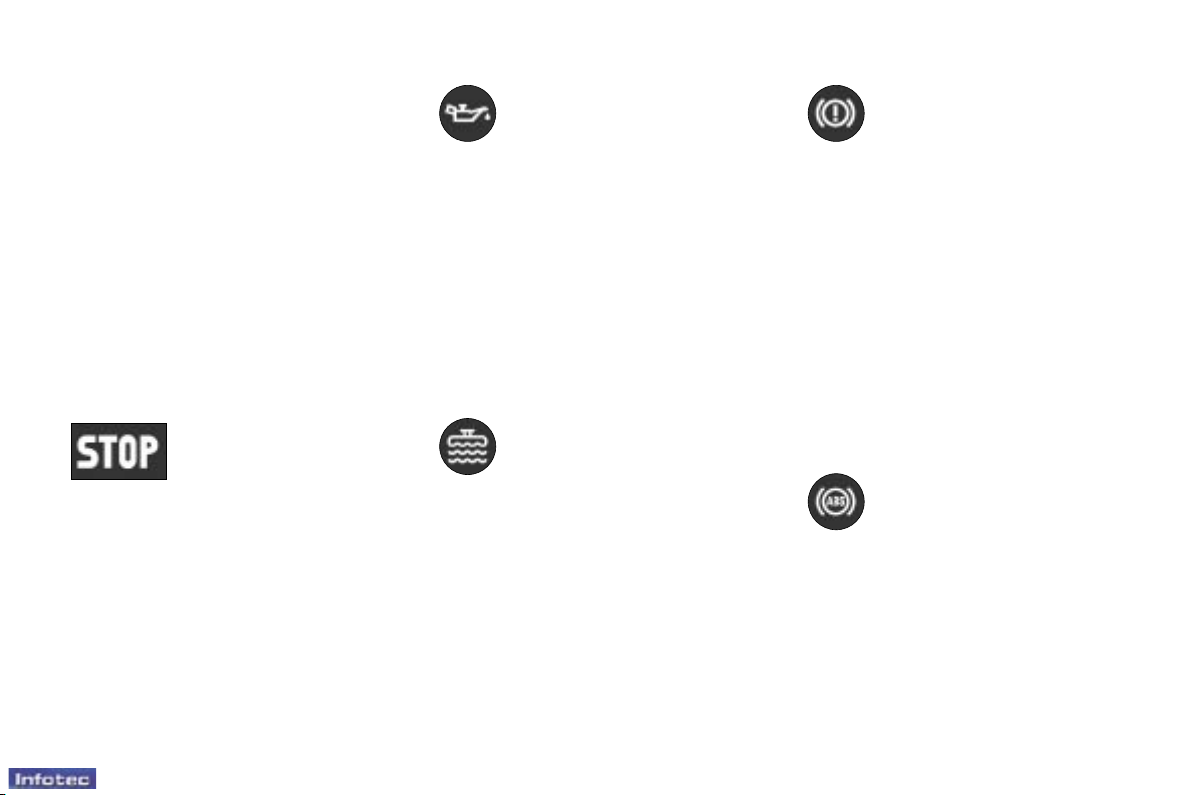
If the central STOP warning light
comes on when you are driving,
stop your vehicle immediately,
where it is safe to do so.
Central (STOP)
warning light
Linked to the warning
lights:
- engine oil pressure and
temperature,
- low coolant level,
- handbrake,
- low brake fluid level,
- electronic brake force distribution
system fault.
Linked to the coolant temperature
indicator.
You must stop if the light flashes
with the engine running.
Consult a PEUGEOT dealer.
01-01-2006
Engine oil pressure
and temperature
warning light
Linked to the central (STOP) warning
light.
You must stop.
This warning light indicates one of
the following:
- insufficient oil pressure,
- a lack of oil in the lubrication circuit.
Top up the level.
- an oil temperature which is too high.
The warning light is acompanied by
an audible signal. To lower the oil
temperature, reduce your speed.
Consult a PEUGEOT dealer.
Diesel engine low
coolant level warning
light
Linked to the central (STOP) warning
light.
You must stop.
Wait for the engine to cool before
topping up the level.
The cooling circuit is pressurised.
In the event of breakdown and to
prevent any risk of burns, unscrew
the cap by two turns to allow the
pressure to drop.
When the pressure has dropped,
remove the cap and top up the level.
Consult a PEUGEOT dealer.
Handbrake, low
brake fluid and
Electronic Brake Force
Distribution system
fault warning light
Linked to the central (STOP) warning
light.
This indicates one of the following:
- that the handbrake is applied or not
fully released,
- an excessive drop in brake fluid
level (if the warning light remains
on even when the handbrake is
released).
- a fault in the Electronic Brake Force
Distribution system, if lit at the same
time as the ABS warning light.
You must stop.
Consult a PEUGEOT dealer.
Anti-lock braking
system (ABS) warning
light
This comes on for a few seconds
each time the ignition is switched
on.
If the warning light remains on or
comes on above 8 mph (12 km/h),
this indicates an ABS malfunction.
However, the vehicle retains
conventional servo-assisted braking.
Illumination of this warning light, accompanied by an audible signal and a
message on the multi-function display,
indicates a fault in the ABS system.
Consult a PEUGEOT dealer.
Instruments and controls
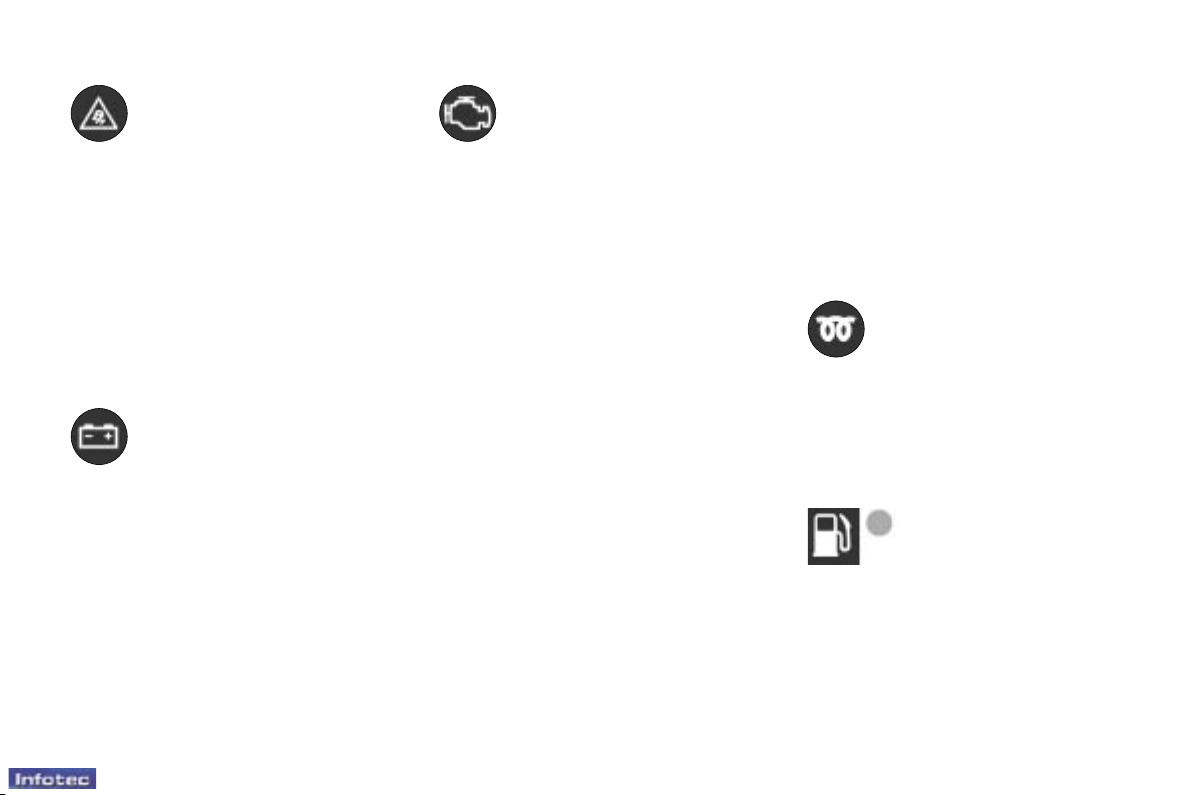
20 -
Dynamic stability
control system (ESP/
ASR) warning light
This comes on for a few seconds
each time the ignition is switched
on.
With the engine running and when
the vehicle is moving, it comes on if
the system is activated.
It lights permanently, accompanied
by a message on the multifunction
display, when the system is
disarmed.
If the warning light remains lit with the
engine running and when the vehicle
is moving, consult a PEUGEOT
dealer.
Battery charge warning
light
This indicates one of the
following:
- faulty operation of the charging
circuit,
- slack battery or starter terminals,
- a cut or slack alternator belt,
- an alternator failure.
Consult a PEUGEOT dealer.
Emission control
warning light
(according to version)
This comes on for a few seconds
each time the ignition is switched
on.
If it comes on with the engine running,
this indicates incorrect operation of
the injection, ignition or emission
control system.
If the warning light flashes, there
is a risk of damage to the catalytic
converter on petrol engines.
Consult a PEUGEOT dealer.
PEF saturation warning
(Diesel)
An audible signal and a message
on the multifunction display indicate
clogging of the diesel filter (PEF),
this is the beginning of saturation
of the particle emission filter due
to exceptionally prolonged urban
driving conditions: low speed, long
traffic jams, ...
In order to regenerate the filter, you
are advised to drive at a speed of
40 mph (60 km/h) or above as soon
as possible when traffic conditions
permit for at least five minutes, until
the message disappears. If this fault
persists, consult a PEUGEOT dealer
as soon as possible.
Diesel additive level warning
An audible signal and a message
on the multifunction display indicate
a low diesel additive level. This
additive must be topped up, consult
a PEUGEOT dealer as soon as
possible.
Diesel engine pre-heat
warning light
Wait until the warning light
goes out before starting the
engine.
If the temperature is high enough,
the warning light comes on for less
than one second. You can start the
engine without waiting.
Low fuel level
warning light
comes on, you have enough fuel
to drive at least 30 miles (50 km).
The tank capacity is approximately
47 litres.
When this light first
01-01-2006
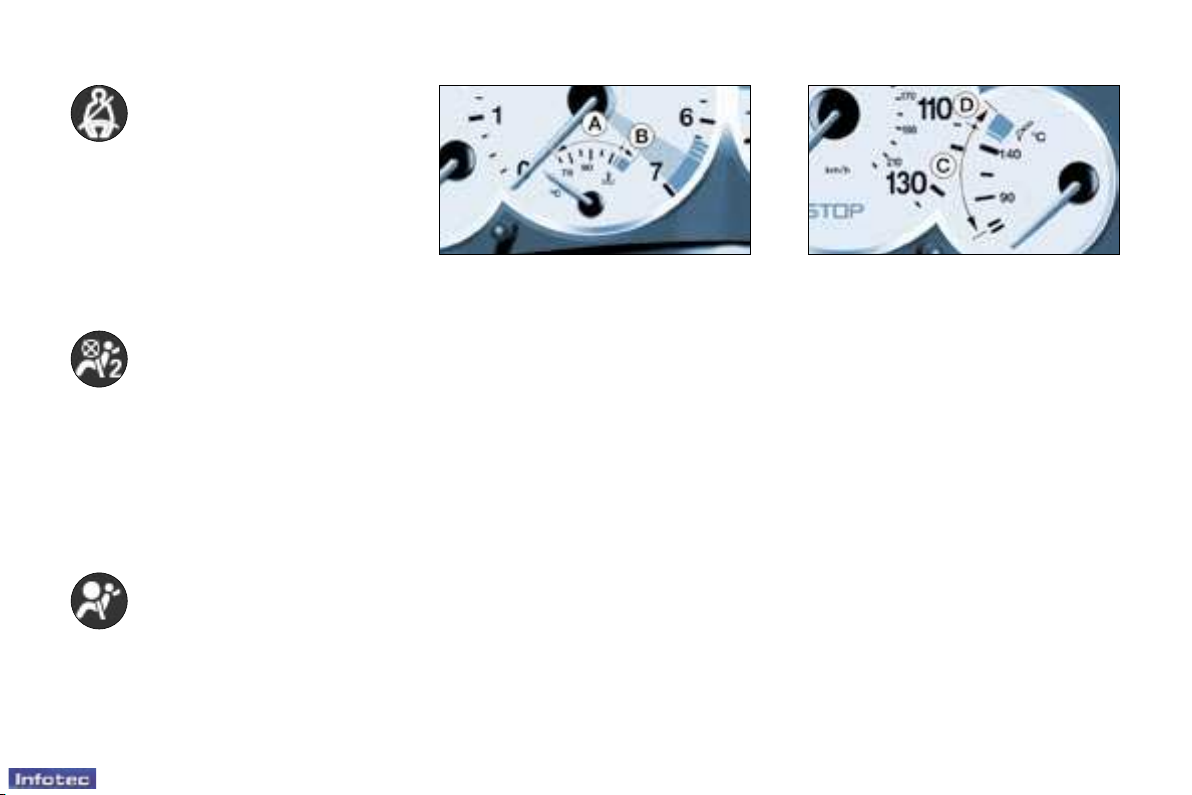
Seat belt not fastened
warning light*
When the ignition is switched
on, this indicator light comes
on if the driver has not fastened his
seat belt.
Above 12 mph (20 km/h), the warning
light flashes for about two minutes
accompanied by an increasingly
audible signal and a message on the
multifunction display. This warning
light remains lit until the driver’s seat
belt is fastened.
Passenger air bag
disarmed warning
light*
Illumination of this warning light
accompanied by a message on the
multi-function display, indicates that
the passenger air bag is disarmed.
The warning light remains lit as
long as the passenger air bag is
disarmed.
Always consult a PEUGEOT dealer if
the warning light flashes.
Air bags warning light
The light will come on for
a few seconds when the
ignition is switched on.
With the engine running, illumination
of this warning light, accompanied by
an audible signal and a message on
the multi-function display, indicates a
fault in the air bags.
Consult a PEUGEOT dealer.
01-01-2006
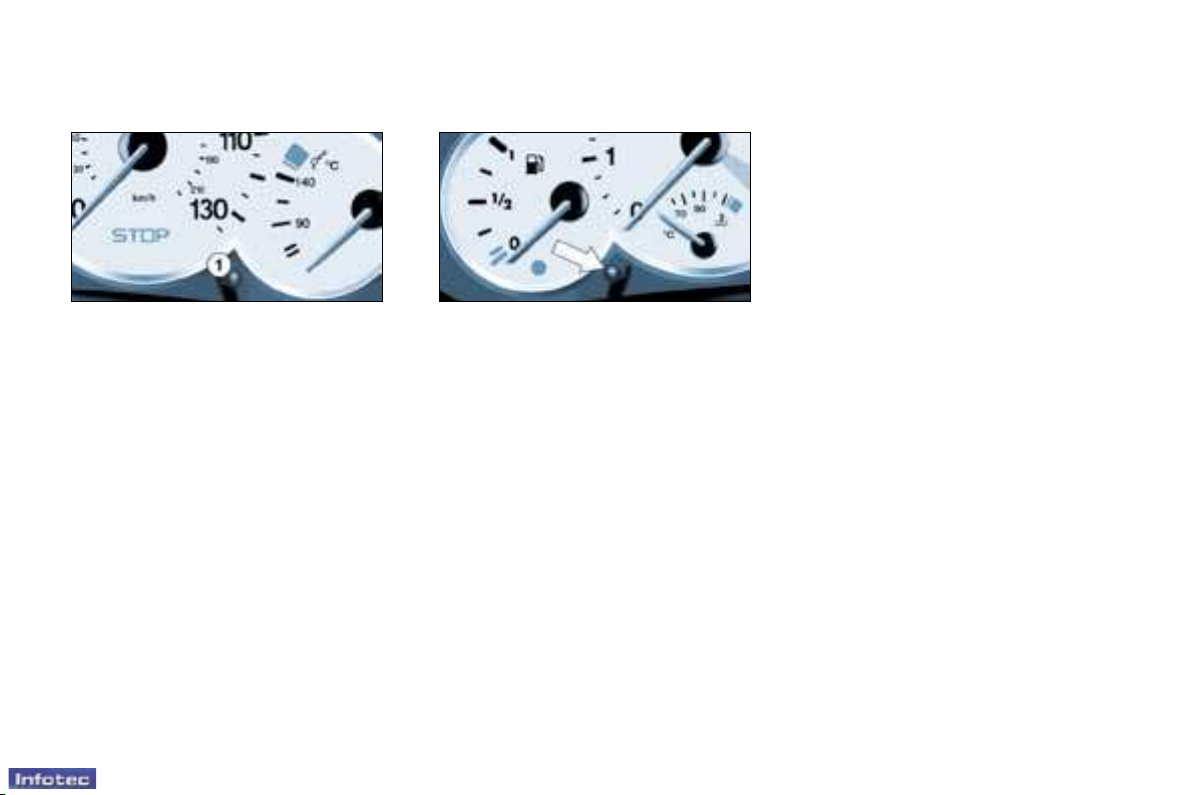
Coolant temperature indicator
- needle in zone (A), the temperature
is correct,
- needle in zone (B), the temperature
is too high. The central STOP
warning light flashes.
You must stop.
Consult a PEUGEOT dealer.
* According to country.
Instruments and controls
Engine oil temperature
indicator
With the engine running, this indicates
the oil temperature:
- needle in zone (C), the temperature
is correct,
- needle in zone (D), the temperature
is too high. To lower the oil
temperature, reduce your speed.
-
21

Seat belt not fastened
warning light*
When the ignition is switched
on, this indicator light comes
on if the driver has not fastened his
seat belt.
Above 12 mph (20 km/h), the warning
light flashes for about two minutes
accompanied by an increasingly
audible signal and a message on the
multifunction display. This warning
light remains lit until the driver’s seat
belt is fastened.
Passenger air bag
disarmed warning
light*
Illumination of this warning light
accompanied by a message on the
multi-function display, indicates that
the passenger air bag is disarmed.
The warning light remains lit as
long as the passenger air bag is
disarmed.
Always consult a PEUGEOT dealer if
the warning light flashes.
Air bags warning light
The light will come on for
a few seconds when the
ignition is switched on.
With the engine running, illumination
of this warning light, accompanied by
an audible signal and a message on
the multi-function display, indicates a
fault in the air bags.
Consult a PEUGEOT dealer.
01-01-2006
Coolant temperature indicator
- needle in zone (A), the temperature
is correct,
- needle in zone (B), the temperature
is too high. The central STOP
warning light flashes.
You must stop.
Consult a PEUGEOT dealer.
* According to country.
Instruments and controls
Engine oil temperature
indicator
With the engine running, this indicates
the oil temperature:
- needle in zone (C), the temperature
is correct,
- needle in zone (D), the temperature
is too high. To lower the oil
temperature, reduce your speed.
-
21
Instruments and controls
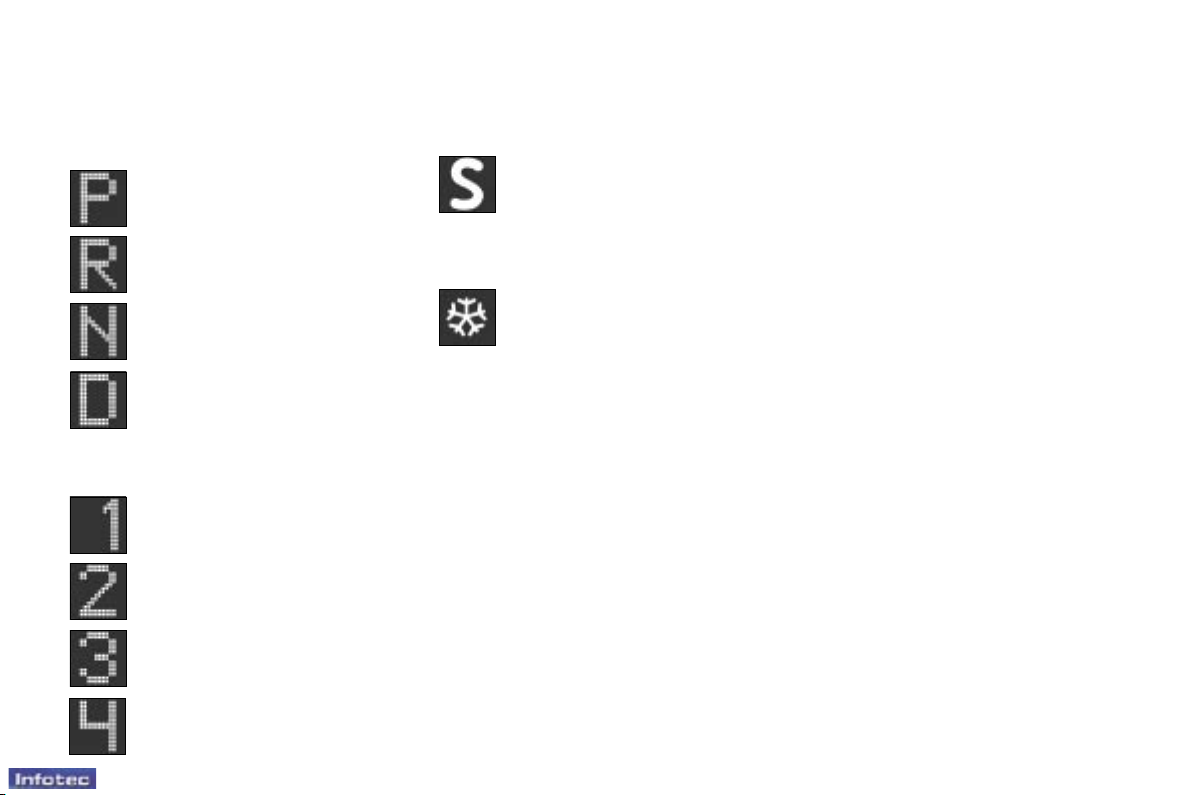
Manual mode:
1st gear engaged
2nd gear engaged
3rd gear engaged
4th gear engaged
22 -
Display screen showing the
positions of the automatic
gearbox selector lever
Park
Reverse
Neutral
Drive
Automatic gearbox indicator
lights
“SPORT” Indicator light
This comes on when the
“SPORT” programme is
selected.
“SNOW” Indicator light
This comes on when the
“SNOW” programme is
selected.
Operating abnormality
If the Sport and Snow indicator lights
flash, accompanied by an audible
signal and a message on the multifunction diplay, consult a PEUGEOT
dealer.
01-01-2006
Instruments and controls
-
23
INSTRUMENT PANEL
DISPLAY
After switching on the ignition, three
functions are shown in succession:
- service indicator,
- engine oil level indicator,
- total distance recorder, it remains
displayed for 30 seconds when the
ignition is switched off, on opening
the driver’s door, as well as on
locking and unlocking the vehicle.
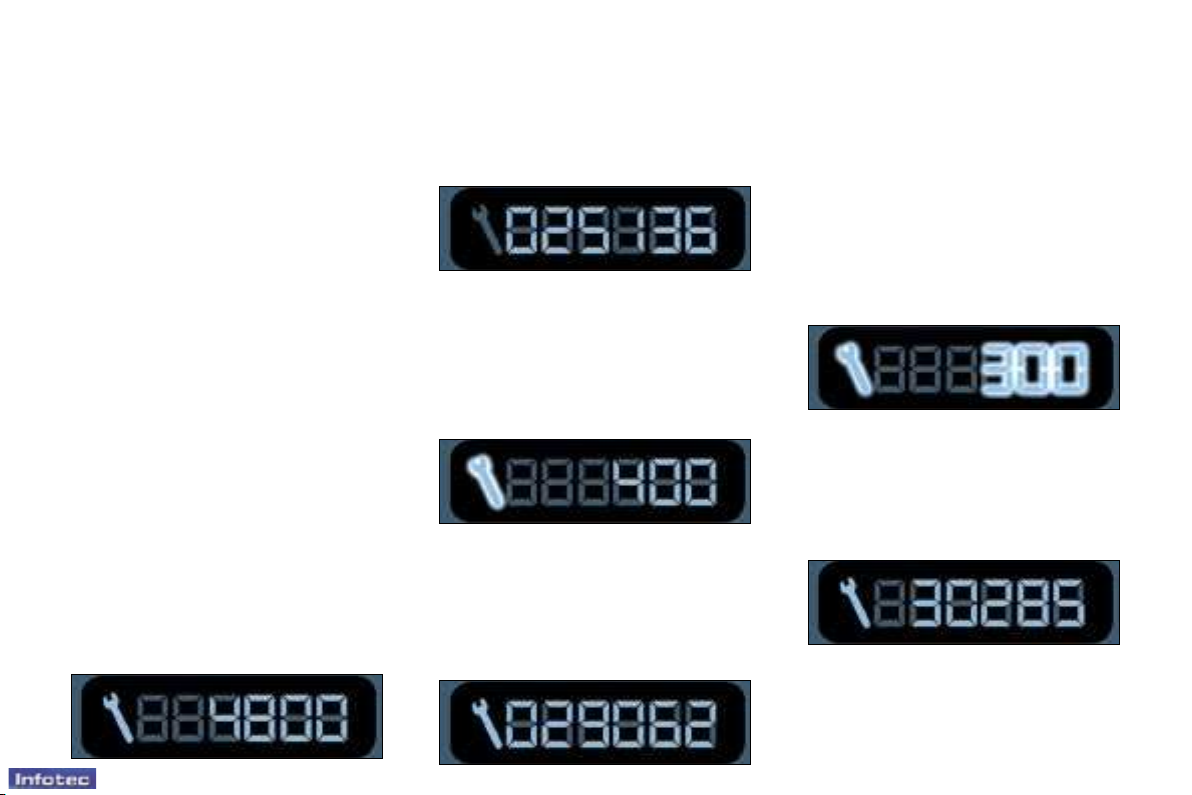
Service indicator
This is a visual reminder of when
the next service is due. This service
is to be carried out according to the
manufacturer’s servicing schedule.
Operation
As soon as the ignition is switched
on and for 5 seconds, the spanner
symbolising ‘’service operation’’ is lit.
The trip recorder display shows the
distance remaining (in round figures)
before the next service.
Example: 4,800 miles/km remain
before the next service is due.
When the ignition comes on and for
5 seconds the display indicates:
5 seconds after the ignition is
switched on, the total distance
recorder resumes normal operation
and the display shows the total or trip
distances.
The distance remaining before
the next service is less than
500 miles (1,000 km).
Example: 400 miles (900 km) remain
before the next service is due.
When switching on the ignition and
for 5 seconds, the display shows:
5 seconds after the ignition is
switched on, the total distance
recorder resumes normal operation
and the symbol remains lit.
This indicates that a service should
be carried out shortly. The display
shows the total or trip distances.
The service is overdue.
Each time the ignition is switched on
and for 5 seconds, the symbol and
the excess distance flash.
Example: the service is overdue by
300 miles/km. The service should be
carried out very shortly.
When the ignition is switched on and
for 5 seconds, the display shows:
5 seconds after the ignition is switched
on, the total distance recorder
resumes normal operation and the
symbol remains lit. The display
shows the total or trip distances.
Note: the service spanner lights
if the two-year interval has been
exceeded*.
01-01-2006
* According to country.
Instruments and controls
24 -
Resetting the service indicator
Your PEUGEOT dealer carries out
this operation after each service.
The reset procedure is as follows:
- Switch off the ignition.
- Press and hold button 1.
- Switch on the ignition.
The display begins a 10 second
countdown.
- Keep button 1 pressed for 10 seconds.
The display shows [=0] and the
service symbol disappears.
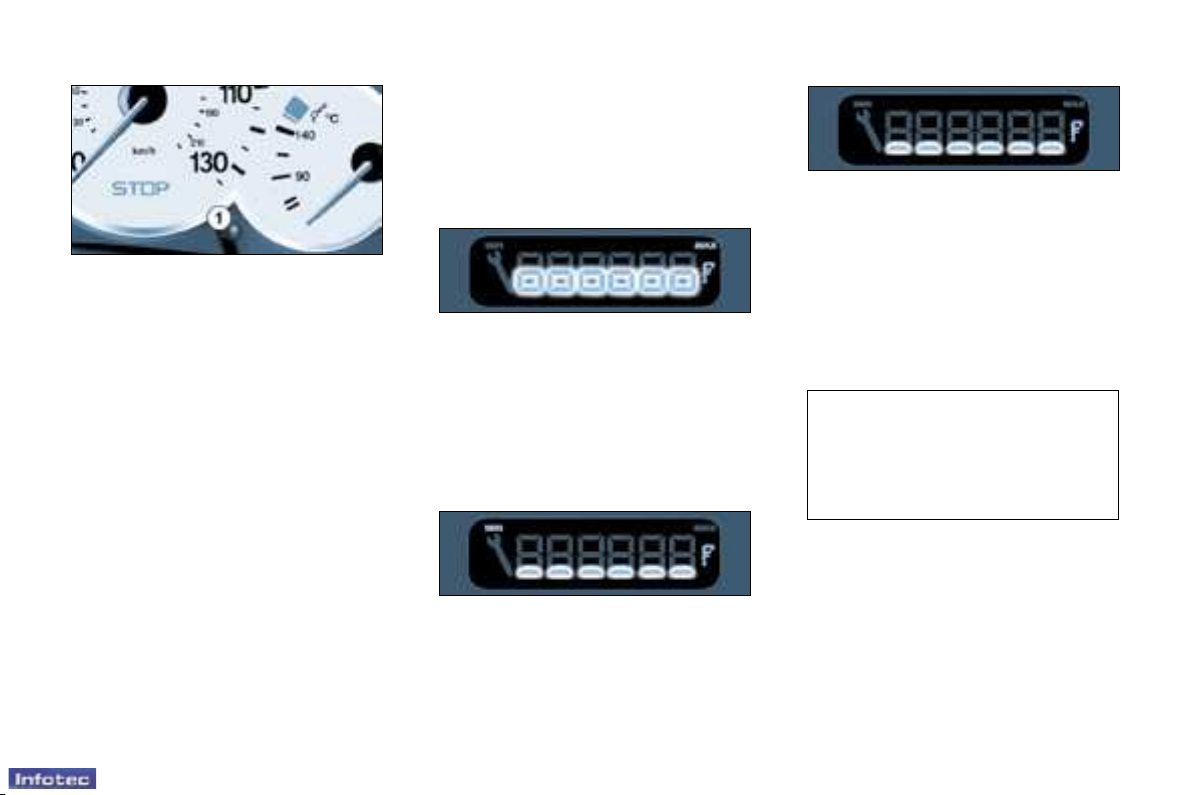
Engine oil level indicator
When the ignition is switched on,
the engine oil level is indicated for
approximately 10 seconds, after the
service information.
Surplus of oil
Flashing of the six squares and
displaying of "max" indicate a surplus
of oil which could damage the
engine.
If the surplus of oil is confirmed by
a check using the dipstick, contact a
PEUGEOT dealer without delay.
Oil level gauge fault
Flashing of the six segments indicates
a malfunction of the oil level gauge.
There is a risk of damage to the
engine.
Contact a PEUGEOT dealer.
The level read on the gauge will
only be correct if the vehicle
is on level ground and the
engine has been off for more
than 10 minutes.
01-01-2006
Lack of oil
Flashing of the six segments and
displaying of "min" indicate a lack of
oil which could damage the engine.
If the lack of oil is confirmed by a
check using the dipstick, it is essential
that the level is topped up.
Instruments and controls
-
25
Total distance recorder
Briefly pressing button 1 alternates
between the total and trip distance
displays.
To reset the trip recorder to zero,
when it is displayed press button 1
until zeros appear.
LIGHTING RHEOSTAT
With the lights on, press the button
to vary the intensity of the lighting of
the instruments and controls. When
the lighting reaches the minimum (or
maximum) setting, release the button
then press it again to increase (or
reduce) the brightness.
As soon as the lighting is of the
required brightness, release the
button.
01-01-2006
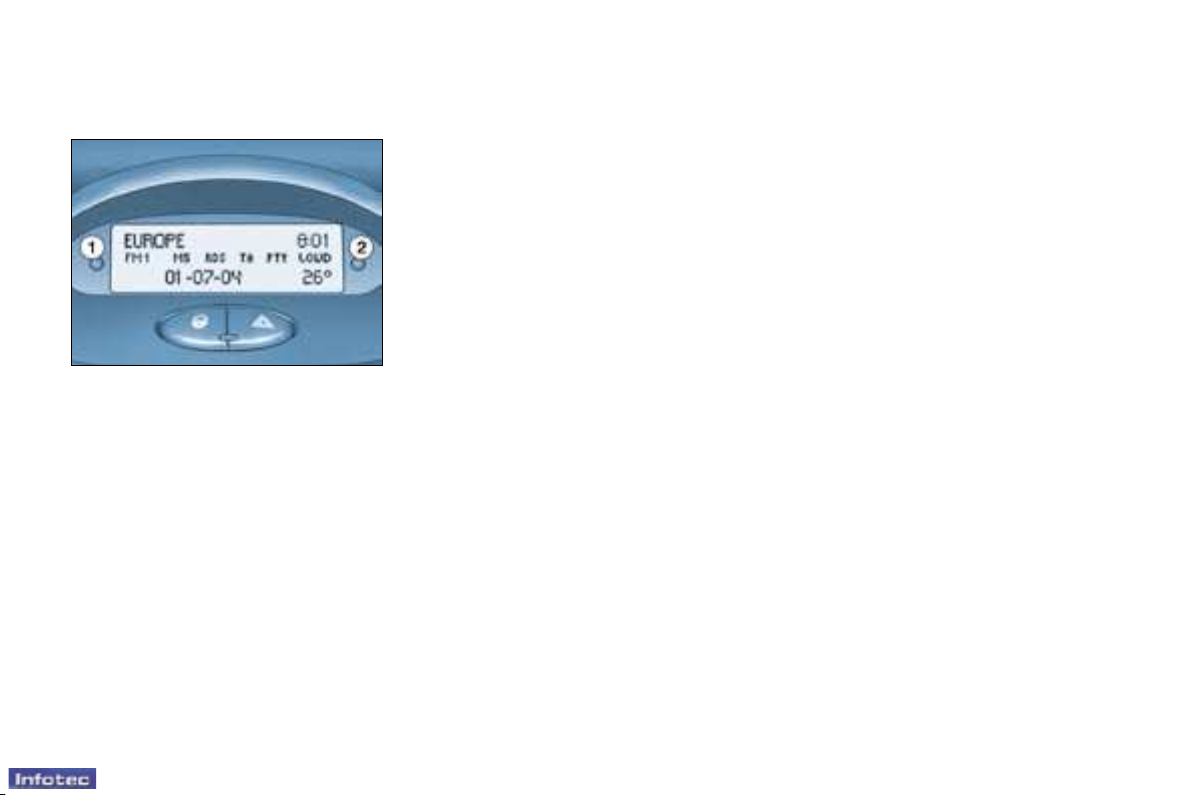
Multifunction displays
26 -
MONOCHROME DISPLAY B
This enables the following information
to be displayed:
- the time,
- the date,
- the outside temperature (this
flashes when there is a risk of ice),
- the radio displays,
- the status of the doors. The display
shows you, by means of a graphic,
whether a door is open,
- the warning messages (e.g. “battery
charge fault’’) or information
messages (e.g. “fuel level low’’),
displayed temporarily, can be
cleared by pressing button 1 or 2,
- the trip computer.
Setting the parameters
Press button 1 for two seconds to
access the settings. The information
flashes to show it is ready to be
modified.
Then, individual presses on button 1
allow you to scroll through the various
data in the following sequence:
- language in which the information
is displayed,
- unit of distance (kms or miles),
- unit of temperature (degrees
Celsius or Fahrenheit),
- time format (12 then 24 hour
mode),
- hour,
- minutes,
- year,
- month,
- day.
Pressing button 2 allows you to
change the information selected.
Maintain the pressure for rapid
scrolling.
After 7 seconds without operation, the
screen returns to the normal display
and the modified data is recorded.
01-01-2006
Multifunction displays
-
27
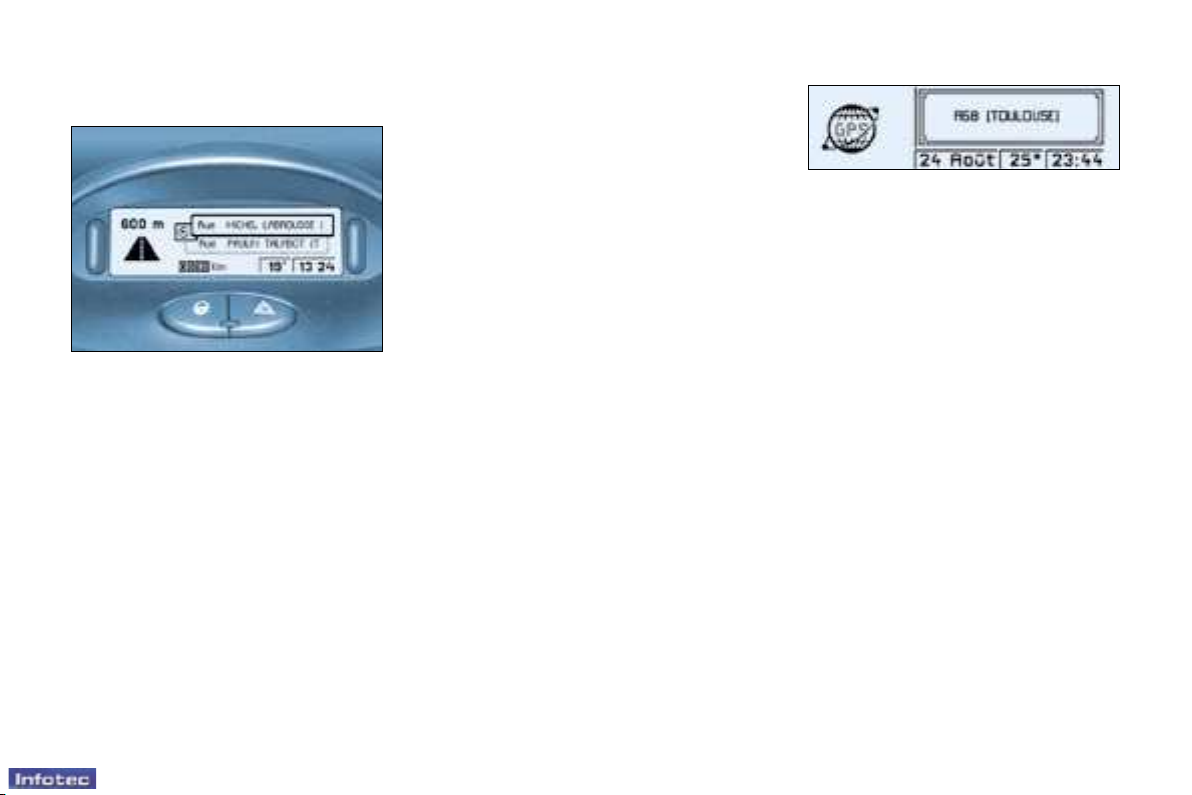
DISPLAY C
This enables the following information
to be displayed:
- the time,
- the date,
- the outside temperature (this
flashes when there is a risk of ice),
- the radio displays,
- the status of the doors. The display
shows you, by means of a graphic,
whether a door is open,
- the warning messages are
displayed temporarily (e.g. “low fuel
level’’) and can be cleared using
the remote control,
- the trip computer (see corresponding
section),
- the satellite navigation system (see
corresponding section).
Setting the parameters
The remote control allows you to
access the settings. Accessing
the different menus is described in
the section “Satellite Navigation
System”.
Permanent Localisation
This function displays the name of the
street in which the vehicle is located
when guidance is inactive.
Press the button “mod” of the remote
control, to display the name of the
street in which you are located.
In order to “zoom” to see the
information more clearly, press the
right arrow of the remote control.
IMPORTANT : the CD-Rom
containing the map data must be
present in the drive.
01-01-2006
28 -
Multifunction displays
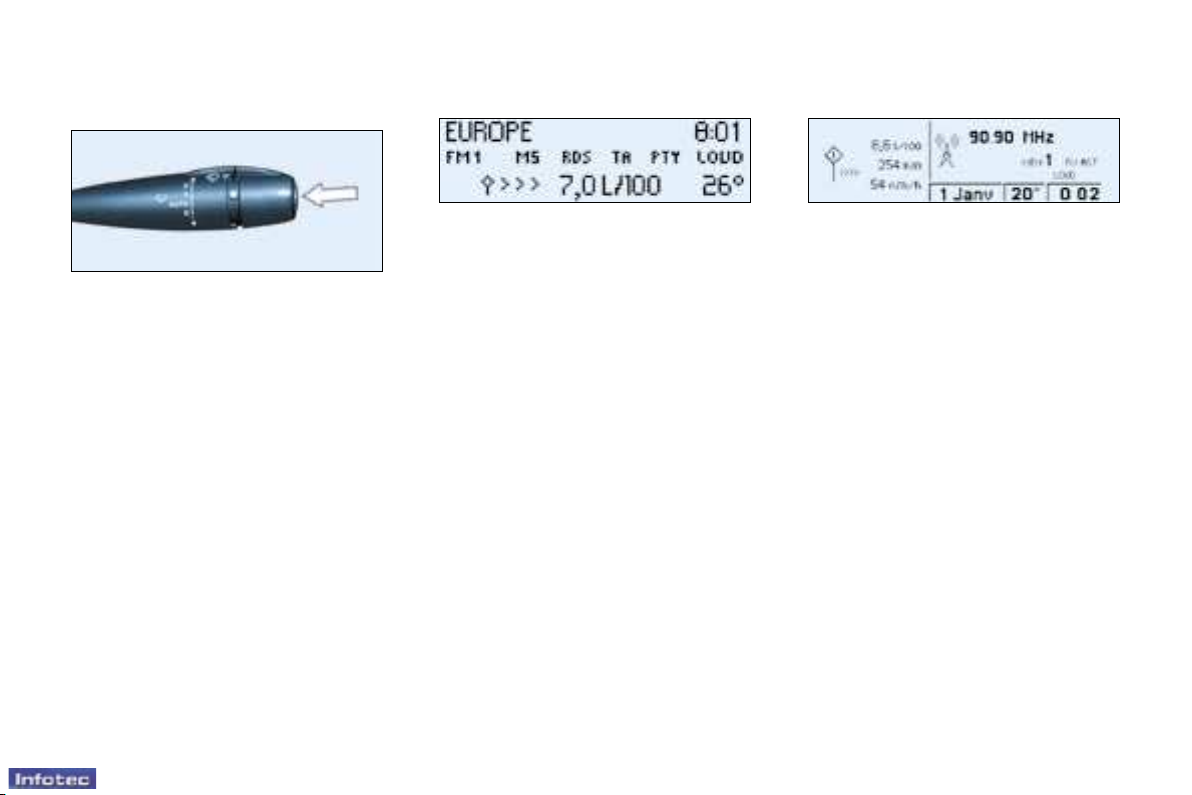
TRIP COMPUTER
Pressing the button on the end of
the wash/wipe stalk enables the
following data to be displayed:
Display B
- the range
- the distance travelled
- the average consumption
- the current consumption
- the average speed
Zero reset
Press the stalk for more than two
seconds.
Display C
- the current consumption and the
range,
- the average consumption, the
distance travelled and the average
speed calculated over a period
"1",
- the average consumption, the
distance travelled and the average
speed calculated over a period
"2".
Periods "1" and "2" are defined by
the frequency of the zero reset. They
allow, for instance, daily calculations
over period "1" and monthly
calculations over period "2".
Zero reset
When the required period is
displayed, press the stalk for more
than two seconds.
01-01-2006
Multifunction displays
-
29
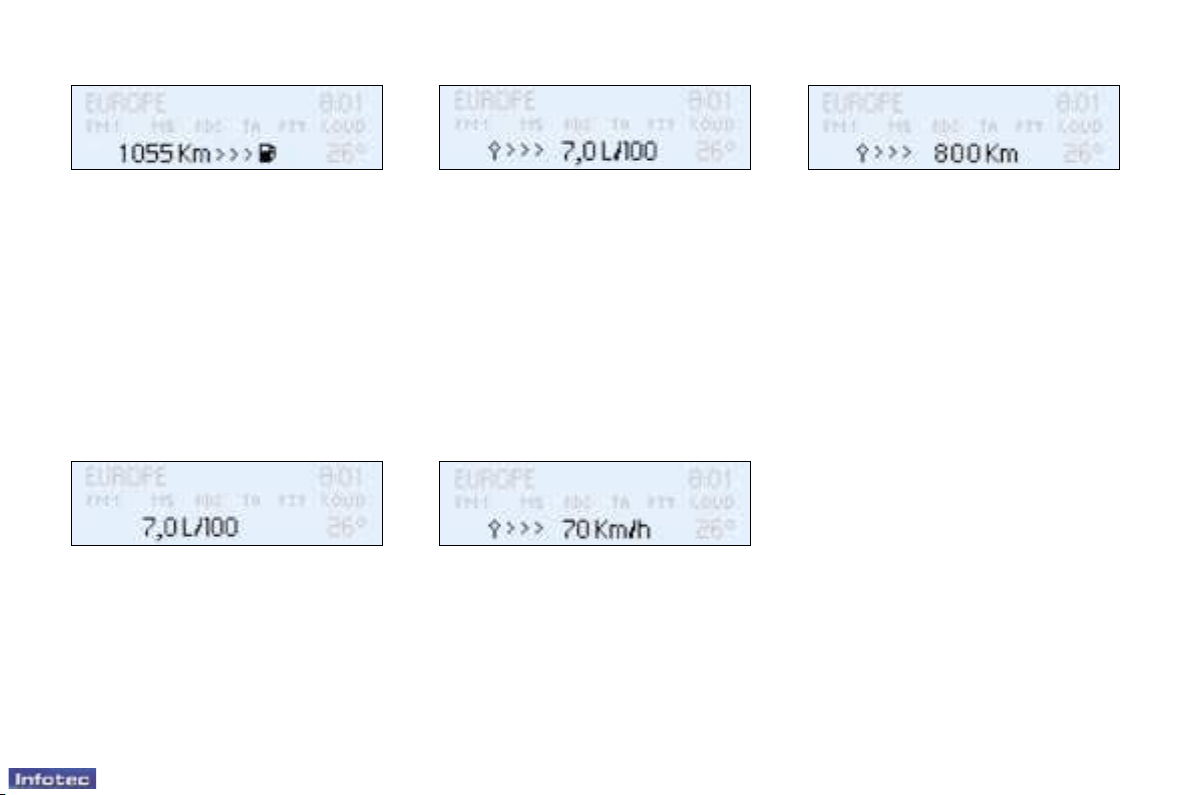
Range
The display shows the distance that
can still be covered with the fuel
remaining in the tank.
Note: this figure may rise if there
is a change in driving style or road
surface, causing a significant drop in
current fuel consumption.
If there are less than 3 litres of fuel in
the tank, only three segments will be
displayed.
Current fuel consumption
This gives the fuel consumption
recorded during the last two seconds.
This function is only displayed when
the vehicle is travelling at more than
12 m.p.h. (20 km/h).
Average consumption
This is the ratio between the amount
of fuel consumed and the distance
travelled since the computer was last
reset to zero.
Average speed
This is obtained by dividing the
distance travelled by the period of
time the vehicle has been in use (with
the ignition on), since the computer
was last reset to zero.
Distance travelled
This shows the distance travelled
since the computer was last reset to
zero.
After the trip computer has been reset
to zero, the range data becomes
meaningful only after the vehicle has
been in use for a certain period.
If horizontal segments are displayed
instead of figures when driving,
contact a PEUGEOT dealer.
01-01-2006
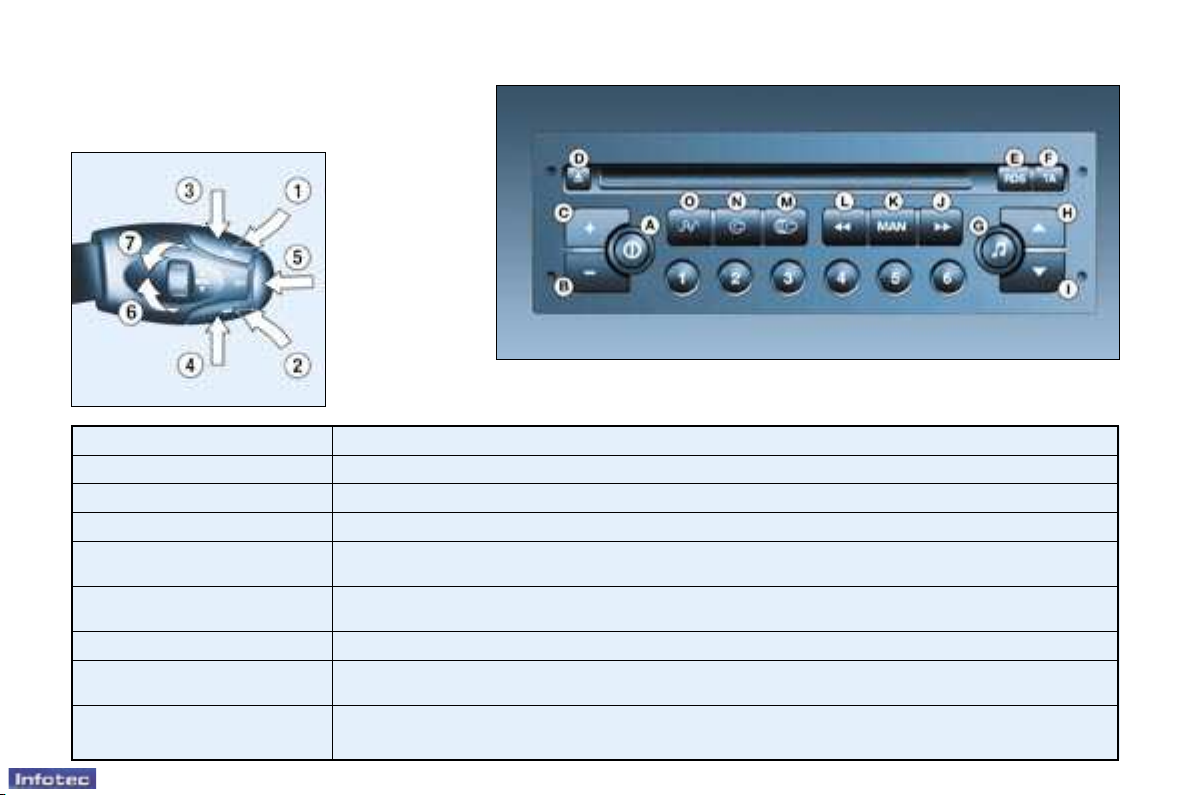
Audio equipment and telematics
Stalk movement Function
1 - Press (behind) Increase volume
2 - Press (behind) Decrease volume
1 + 2 - Simultaneous presss Sound cut-off (mute); restoring of the sound by pressing any button
3 - Press
Automatic search of higher frequencies (radio)
Selection of the next track (CD)
4 - Press
Automatic search of lower frequencies (radio)
Selection of the previous track (CD)
5 - Press the end Change of source (radio/CD/CD changer)
6 - Rotation
(clockwise)
Selection of next station stored in memory (radio) -
Selection of following CD
7 - Rotation
(anti-clockwise)
Selection of previous station stored in memory (radio) -
Selection of previous CD
30 -
AUDIO RD3
01-01-2006
 Loading...