

Peugeot 206 2003 Owner Manual

YOUR 206 AT A GLANCE
1
Each model may only be fitted with some of the equipment shown, according to its specification and the
technical requirements in the country of first registration of the vehicle.
206 SW: version available according to country.
Pages
Seats 72 - 81
Instruments and controls 28 - 29
Control panel 35 - 71, 93 - 94
Mirrors 96
Pages
Checks 111 - 118
Access 83 - 88
Changing a wheel 119 - 122, 151
Changing a bulb 123 - 127
24-02-2003
2
YOUR 206 AT A GLANCE
24-02-2003
24-02-2003
3
YOUR 206 AT A GLANCE
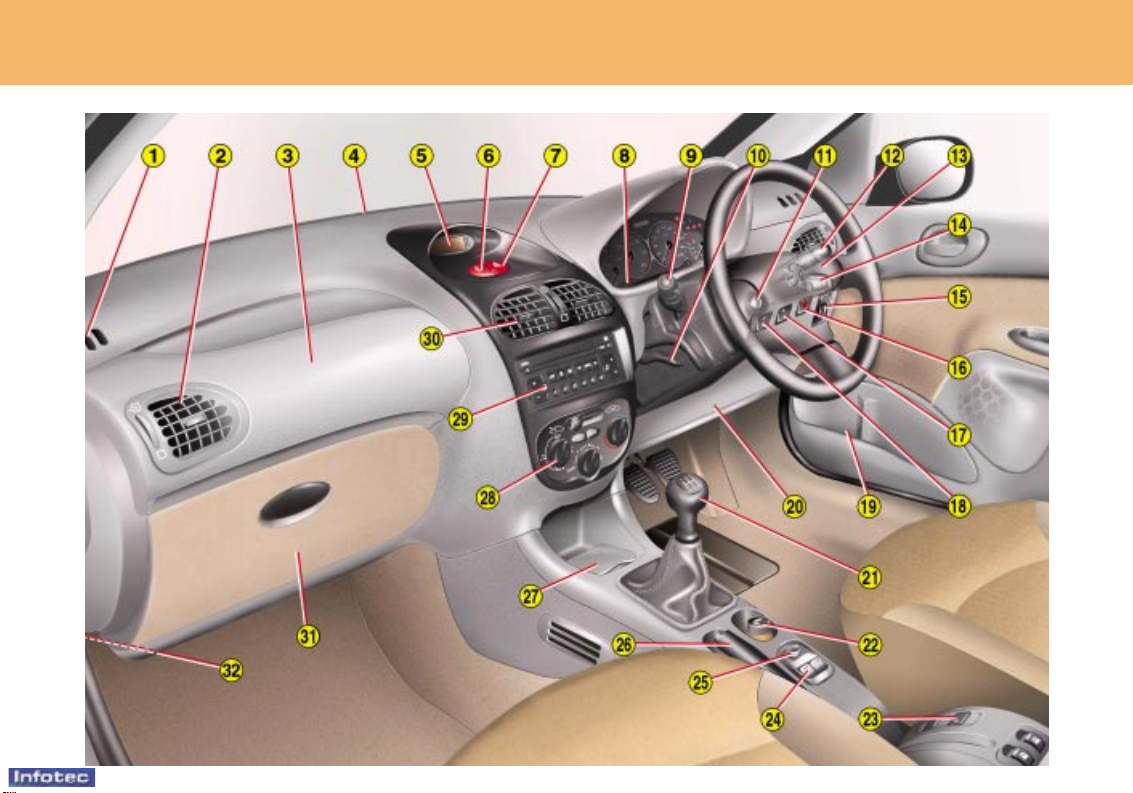
1 Side window demisting
vents
2 Adjustable side vent
3 Passenger air bag
4 Windscreen demisting
vents
5 Multifunction display
6 Central locking switch
7 Hazard warning
lights switch
8 Instrument dials lighting
rheostat
9 Lights and direction
indicators stalk
10 Steering wheel height
adjustment control
11 Steering lock
12 Windscreen wiper
stalk
13 Driver's air bag
Horn
14 Audio equipment
remote control
15 Headlamp height
adjustment
16 Passenger air bag
disarming switch*
17 Rear window
locking switch
18 Dynamic stability control
(ESP/ASR) button
19 Storage compartment
20 Fuse box
21 Gear lever
22 Lighter
23 Alarm button
24 Front electric window
switches
25 Electric mirrors switch
26 Handbrake
27 Front ashtray
28 Controls for heating,
ventilation, air conditioning
and heated rear screen
and mirrors
29 Audio equipment
30 Adjustable centre vents
31 Glove box
32 Bonnet opening control
* According to destination.

Tonneau
To install:
➜ position (1) one end of the tonneau roller in one of the two
supports,
➜ compress (2) the opposite end of the roller and position it,
➜ release it (3) so that it engages,
➜ unroll (4) the tonneau to the boot pillars,
➜ insert the tonneau guides in the rails on the pillars.
To remove:
➜ remove the tonneau guides from the rails on
the pillars,
➜ return the tonneau to its roller, compress it and
remove it from its support.
Rear seats
➜ Lift the front of the seat cushion 1,
➜ Tilt the seat cushion 1 against the
front seats,
➜ Position the seat belt under the belt
holder 2,
➜
Pull control 3 to unlock the seat back 4,
➜ Remove or lower the head restraint,
➜ Tilt the seat back 4.
When refitting, take care not to
trap the seat belts.
103
76
10
YOUR 206 AT A GLANCE
24-02-2003
24-02-2003
YOUR 206 IN DETAIL
100
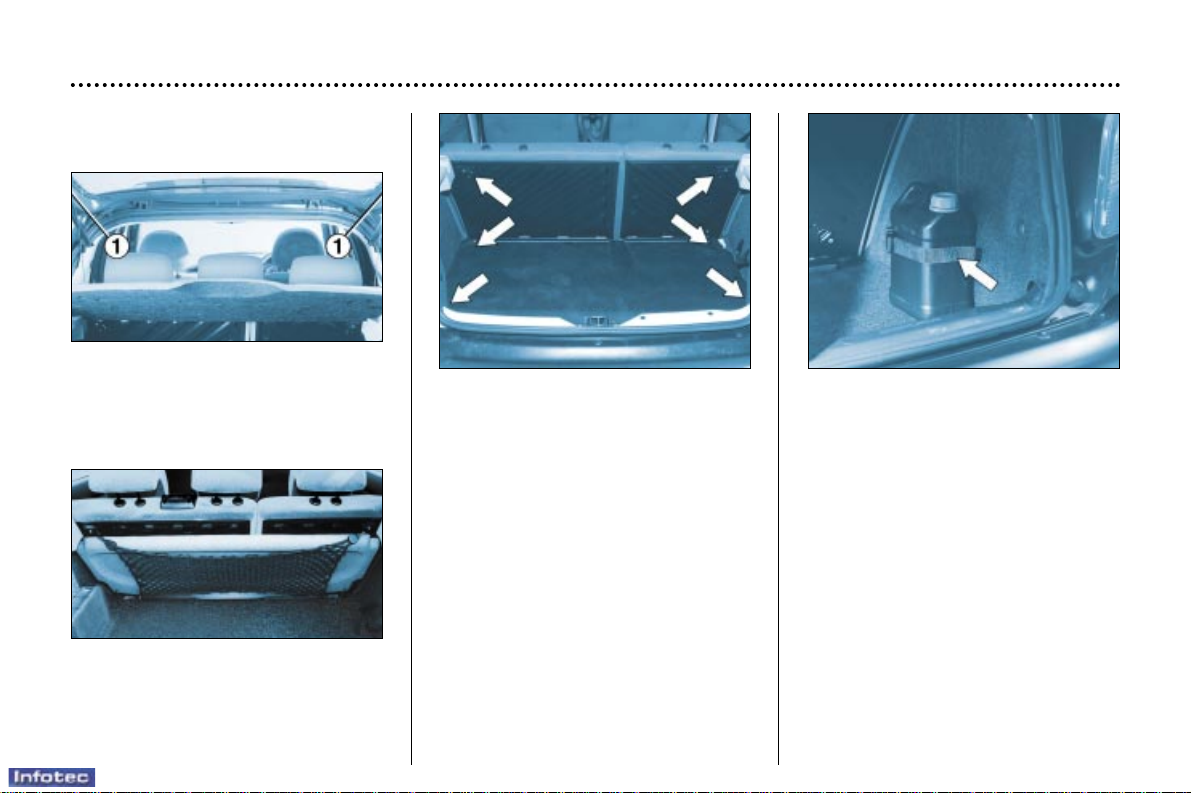
Stowing rings
Use the stowing rings on the boot
floor and on the back of the rear seat
to secure your luggage.
Luggage retaining net
Hooked onto the stowing rings, this
enables your luggage to be secured.
BOOT LAYOUT (SALOON)
Retaining strap
A strap secured to the side of the
boot enables you to secure various
objects (cans, first aid kit etc.).
Rear parcel shelf
To remove the shelf:
– unhook the two strings 1,
– slightly raise the shelf, then
remove it.
There are several options for storing
the shelf:
– either behind the front seats,
– or behind the rear seat using the
luggage retaining net,
– or flat in the boot.
24-02-2003
YOUR 206 IN DETAIL
102

24-02-2003
YOUR 206 IN DETAIL
103
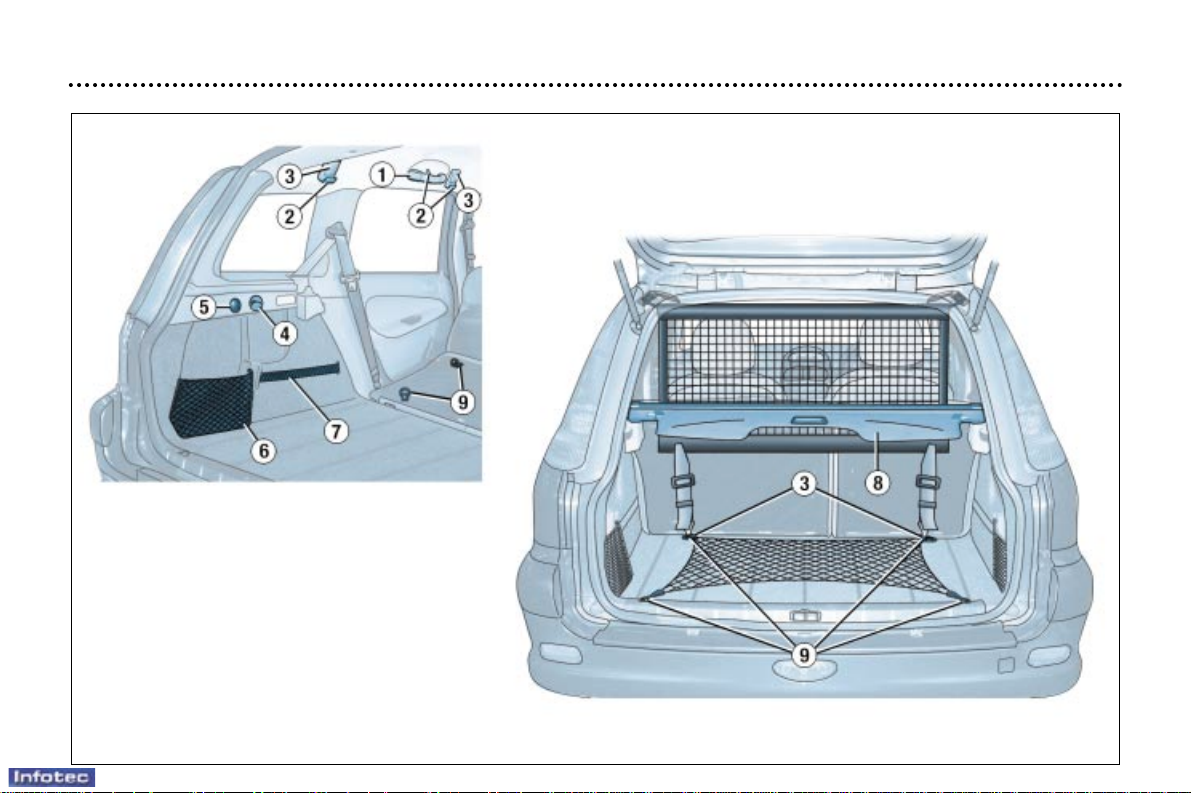
BOOT LAYOUT (206 SW)
1. Grab handles and coat hooks
2. Coat hooks
There are six hooks to accommodate coats.
3. High load retaining net fastenings
The high load retaining net can be installed behind the front seats or behind the rear seat.
Open the covers of the corresponding upper fastenings.
Install one end of the metal bar in one of the two fastenings, compress the bar, then install the other end and release.
Secure the two net strap hooks behind the front seats, with the rear seat folded down, or in the stowing rings on the floor.
The rings are located directly below the corresponding upper fastenings.
Pull the two straps taut.
4. Hooks
There are two side hooks on which to hang light bags.
5. 12 V Socket for accessories
This is a 12 volt socket (lighter type) installed on the the rear left trim and supplied from the accessories position
(1st notch).
6. Storage nets
There are two nets (which cannot be removed) which can contain the luggage retaining net, a first aid kit etc.
7. Retaining straps
There are two straps for securing various objects: cans etc.
8. Tonneau
Note: release the rear seat back to make installation and removal of the tonneau easier.
To install it:
– position one end of the tonneau roller in one of the two supports,
– compress the opposite end of the roller and position it,
– release it to allow it to engage,
– unroll the tonneau as far as the boot pillars,
– insert the tonneau guides in the rails in the pillars.
To remove it:
– remove the tonneau guides from the pillar rails,
– return the tonneau into its roller, compress it and remove it from its support.
9. Stowing rings
There are eight stowing rings for securing the luggage retaining net: four on the rear seat back and four on the boot floor
(two of which are under the carpet, at the far end of the boot).
Warning triangle
The tailgate has a location intended for a warning triangle.
24-02-2003
YOUR 206 IN DETAIL
104
AUTOMATIC AUTOADAPTIVE GEARBOX
Moving Off
To move off, move the selector lever to position N or P. Press the brake to exit
position P.
Stopped or parked
Always leave the lever in position P when you get out of your vehicle.
If not, a buzzer will sound when you open the driver's door.
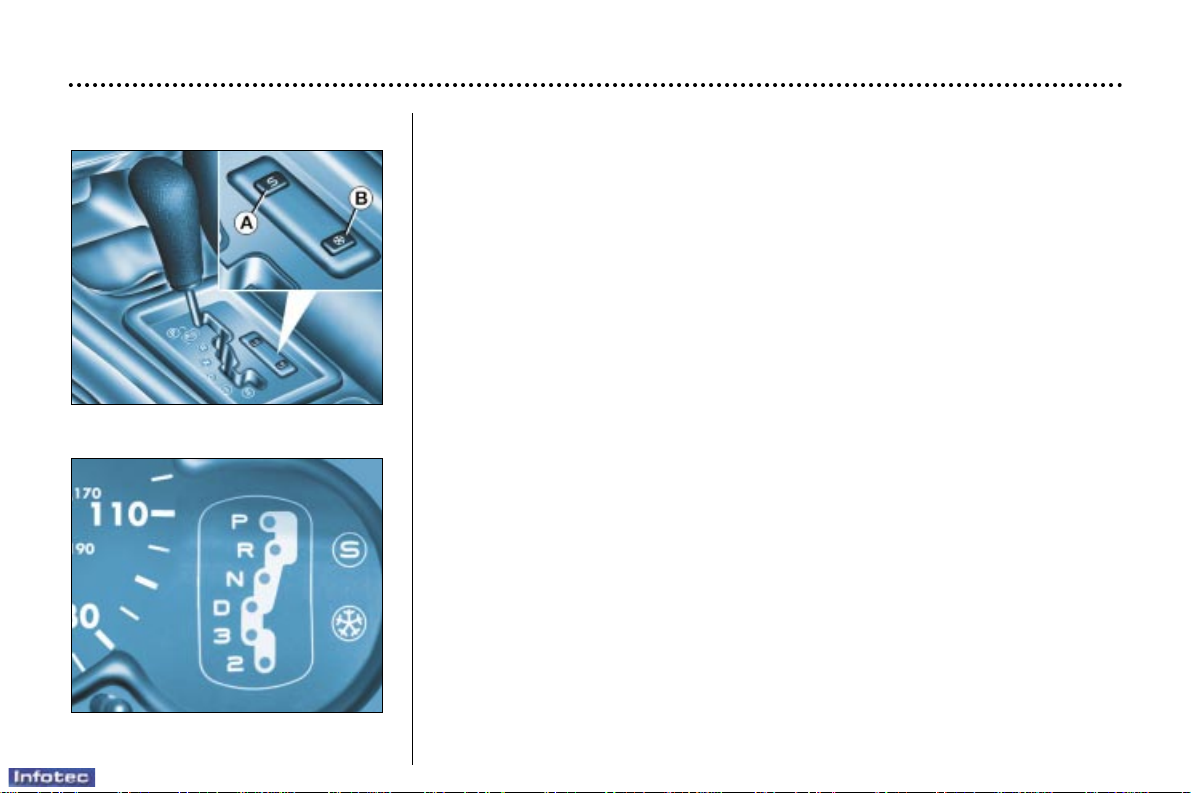
Positions of the selector lever
These positions are displayed on the instrument panel.
P. Park: use with the handbrake.
R. Reverse: this must only be engaged when the vehicle is stationary, engine
at idle.
N. Neutral: if N is engaged by mistake while the car is moving, allow the
engine to return to idle before engaging a new forward gear.
D. Drive: in this position, the four gears change automatically. The gear
change points vary depending on the programme selected.
3. Automatic changing of the first three gears only.
Select this position when you notice frequent changes between third and
fourth gear (town driving or on winding roads).
2 Automatic changing of the first two gears only.
This position is particularly suitable for mountain roads, when going uphill
(to make the best use of the engine's power) or downhill (engine braking).
24-02-2003
YOUR 206 IN DETAIL
105
Operating programmes
Y ou have a choice of three operating
programmes:
– Autoadaptive (normal).
– Sport.
– Snow.
One press on button A or B will
select Sport or Snow respectively.
The selection is displayed on the
instrument panel. Pressing the button a second time will return to the
autoadaptive (normal) programme.
Autoadaptive programme
(normal)
Gear changes are carried out on the
basis of various parameters, such
as:
– driving style,
– road characteristics,
– vehicle load.
The gearbox selects the most suit-
able programme from those in the
memory for the current driving conditions.
Sport programme
The Sport programme automatically
favours more dynamic driving.
Snow Programme
In position D, the Snow programme
provides smooth driving suited to
slippery roads in order to improve
traction and stability. Starting is in
2nd gear and changing down is at
low engine speeds.
Special operating features
– During prolonged braking, the
gearbox changes down automatically, so as to provide efficient
engine braking.
– If you take your foot off the accel-
erator suddenly (when you are
taken by surprise, for example),
the gearbox will not change up, so
as to improve safety.
– When the engine is cold, the gear-
box automatically selects a special programme that enables the
engine to reach its ideal temperature more quickly in order to
decrease pollution.
Kickdown
For immediate maximum acceleration without touching the gear lever,
press the accelerator pedal down as
far as it will go. The gearbox will
change down automatically or stay
in the gear selected, up to maximum
engine speed.
Any disruption of the system is signalled by the
simultaneous flashing of
the Sport and Snow
lights on the instrument panel. In
such a case, the gearbox will operate in downgrade mode. You may
feel a substantial knock when
reverse is selected from P to R or
N to R (without any risk of damage
to the gearbox).
Do not exceed 100km/h.
Contact a PEUGEOT dealer with-
out delay.
When the engine is idling with the
car in gear, the car will move even
without you accelerating.
Do not accelerate while a gear is
being selected, when the vehicle is
stationary.
When stationary, have your foot on
the brake pedal when selecting a
gear.
Do not accelerate in gear with the
brakes on.
If work needs to be done with the
engine running, apply the handbrake and select position P.
Do not change down to brake on
slippery roads.
Never select position N when the
vehicle is moving.
Never engage P or R unless the
vehicle is stationary.
Do not leave children inside the
vehicle unsupervised when the
engine is running.
24-02-2003
YOUR 206 IN DETAIL
106
The normal operation of the ABS
may make itself felt by slight
vibrations of the brake pedal.
In emergency braking, press
very firmly without releasing
the pressure.
THE ABS ANTI-LOCK
BRAKING SYSTEM
The ABS system with Electronic
Brake Force Distribution (EBFD)
increases the stability and manoeuvrabilty of your vehicle, particularly
on poor or slippery road surfaces.
Note: when replacing wheels (tyres
and rims), ensure that they are
approved.
The anti-lock braking system comes
into operation automatically when
there is a risk of wheel lock.
Lighting of this warning
lamp, accompanied by an
audible signal and the mes-
sage "Braking fault" on
the multifunction display, indicates a
malfunction of the electronic brake
force distribution which could result
in loss of control of the vehicle when
braking.
Stop immediately.
Contact a PEUGEOT dealer.
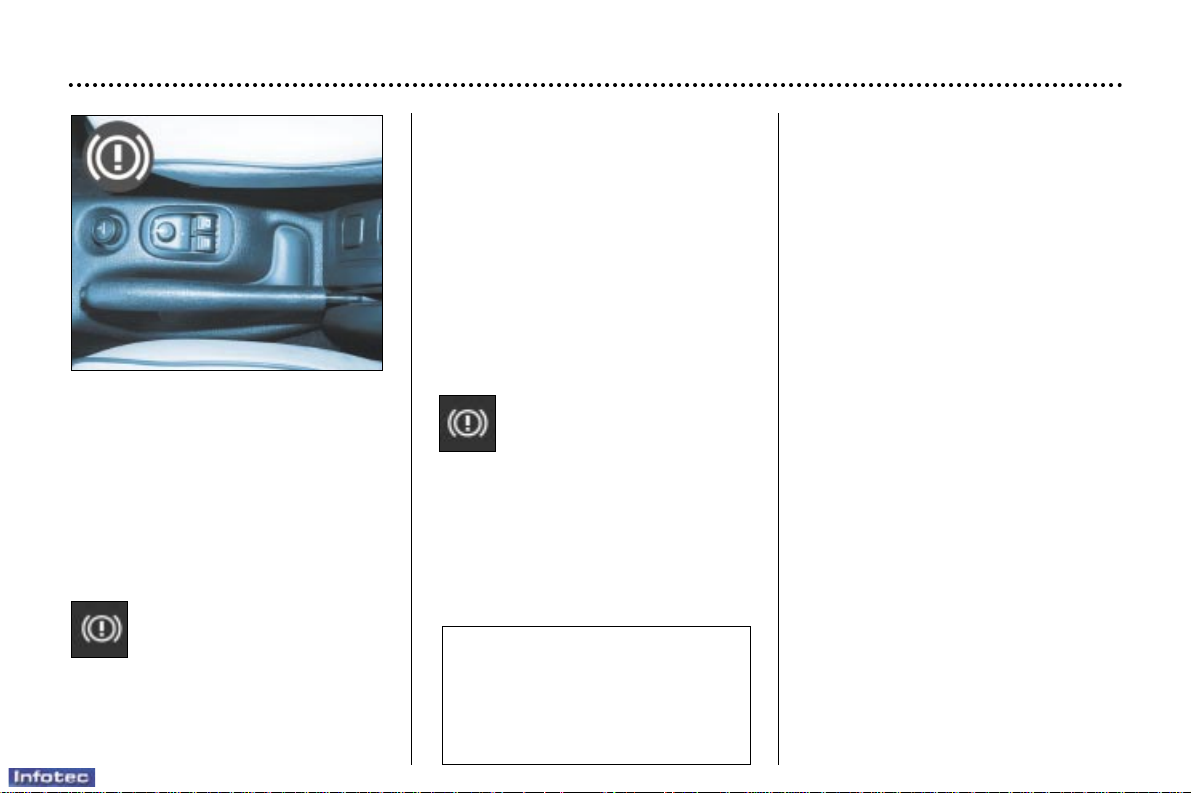
HANDBRAKE
Applying
When parking, pull the handbrake to
immobilise your vehicle.
Releasing
Pull the handle and press the button
to release the handbrake.
Illumination of this warning
light and of the STOP warn-
ing light, accompanied by an
audible signal (at 10 km/h)
and the message "handbrake on" on
the multifunction display, indicates that
the handbrake is still applied or has
not been released fully.
EMERGENCY BRAKING
ASSISTANCE SYSTEM
In an emergency, this system
enables the optimum braking pressure to be reached more quickly,
thus reducing the stopping distance.
It is triggered according to the speed
of activation of the brake pedal. The
effect of this is a reduction in the
resistance of the pedal and an
increase in braking efficiency.
24-02-2003
The ESP system offers
exceptional safety in normal driving, but this
should not encourage the
driver to take extra risks
or drive at high speed.
The correct functioning of this sys-
tem depends on observation of the
manufacturer's recommendations
regarding wheels (tyres and rims),
the braking components and the
electronic components, as well as
the PEUGEOT assembly and
operation procedures.
After an impact, have the system
checked by a PEUGEOT dealer.
YOUR 206 IN DETAIL
107
TRACTION CONTROL (ASR)
AND DYNAMIC STABILITY
CONTROL (ESP)
These systems are linked and complement the ABS.
The ASR system optimises drive to
prevent the wheels skidding, by acting on the brakes of the drive wheels
and on the engine. It also allows the
directional stability of the vehicle to
be improved on acceleration.
If there is a variation between the trajectory followed by the vehicle and
that required by the driver, the ESP
system automatically acts on the
engine and the brake of one or more
wheels, in order to put the vehicle
back on course.
Disarming the ASR/ESP
systems
In exceptional conditions (starting a
vehicle which is bogged down, stuck
in snow, on soft ground), it may be
advisable to disarm the ASR and
ESP systems, so that the wheels can
move freely and regain grip.
☞ Press the "ESP OFF" switch,
located under the steering wheel to
the right.
The switch lights up and the
warning light comes on: the
ASR and ESP systems no
longer have any effect on
the engine operation.
These are triggered again:
☞ automatically if the ignition is
switched off,
☞ automatically above 30 m.ph.
(50 km/h),
☞ manually by pressing the switch
again.
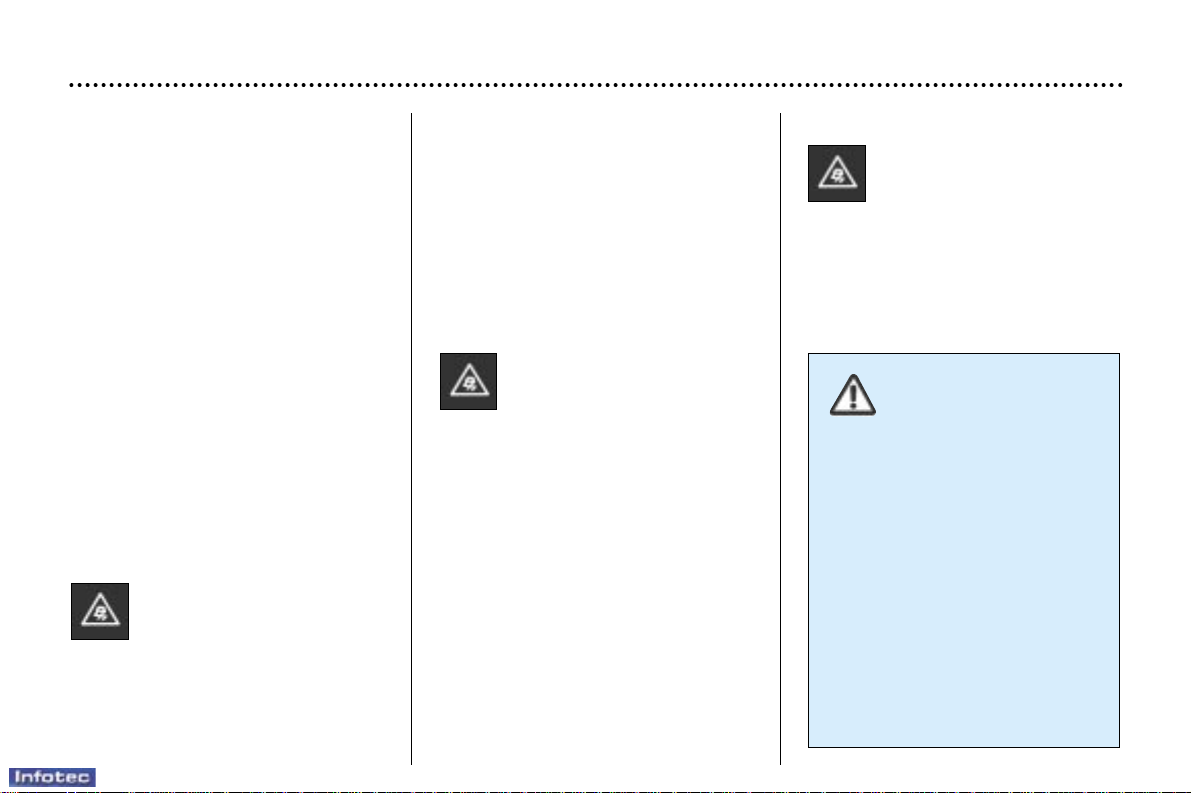
Operation of the ASR and ESP
systems
When one of these two systems is operating, this light
flashes.
Operating check
When a malfunction of the
systems occurs, the switch
light flashes and the warning
light comes on, accompanied
by an audible signal and the
message "ESP/ASR system not
operational" on the multifunction display.
Contact a PEUGEOT dealer to have
the system checked.
24-02-2003
YOUR 206 IN DETAIL
108
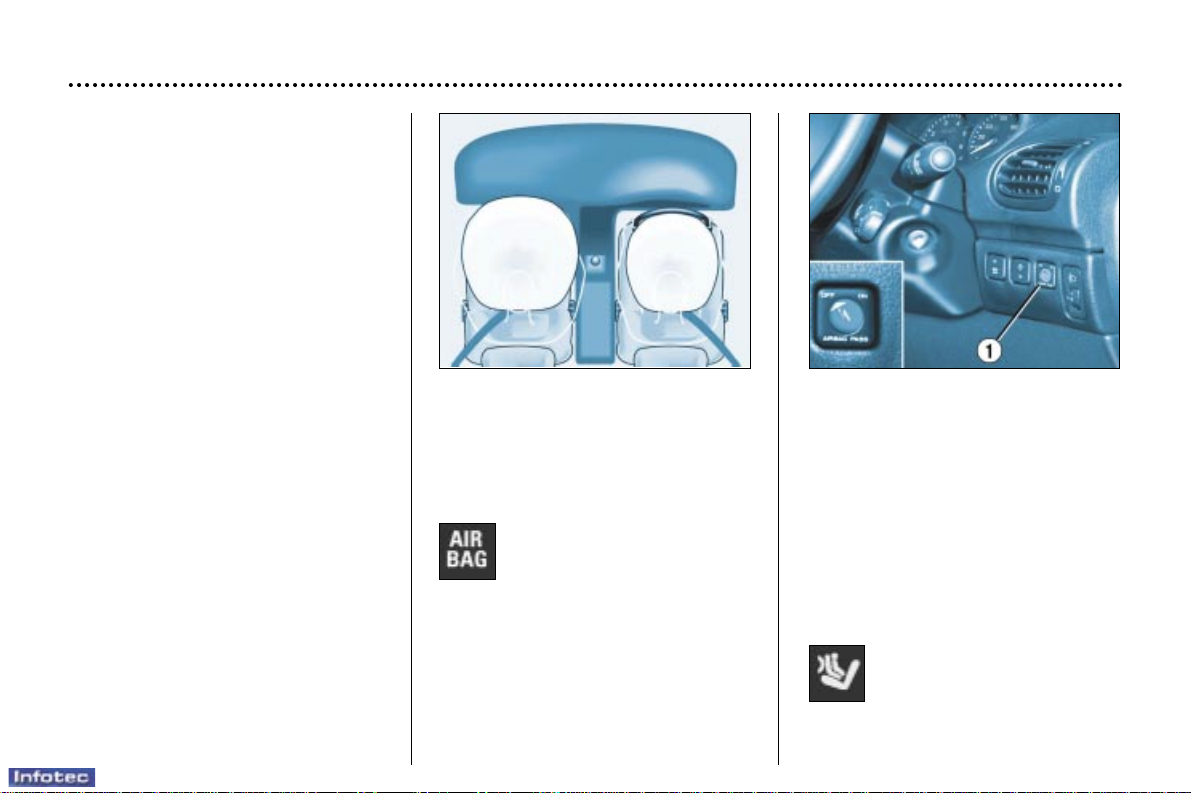
FRONT AIR BAGS
These are folded in the centre of the
steering wheel for the driver and in
the fascia for the front passenger.
They are deployed simultaneously,
except in cases where the air bag is
disarmed.
Front air bag malfunction
If this warning light comes
on, accompanied by a
buzzer and the message
"Air bag fault" on the multifunction
display, contact a PEUGEOT dealer
to have the system checked.
AIR BAGS
The air bags have been designed to
maximise the safety of the occupants in the event of serious collisions; they work in conjunction with
the force limiting seat belts.
In the event of a serious collision,
the electronic detectors record and
analyse any abrupt deceleration of
the vehicle: if the triggering threshold is reached, the air bags inflate
instantly and protect the occupants
of the vehicle.
Immediately after the impact, the air
bags deflate rapidly, so that they do
not hinder the visibility of the occupants nor their possible exit from the
vehicle.
The air bags will not be deployed in
collisions which are not serious, for
which the seat belt is sufficient to
provide maximum protection. The
seriousness of the collision depends
on the nature of the obstacle and the
speed of the vehicle at the moment
of impact.
Air bags only operate when the
ignition is switched on.
Note: the gas escaping from the air
bags can be a minor irritant.
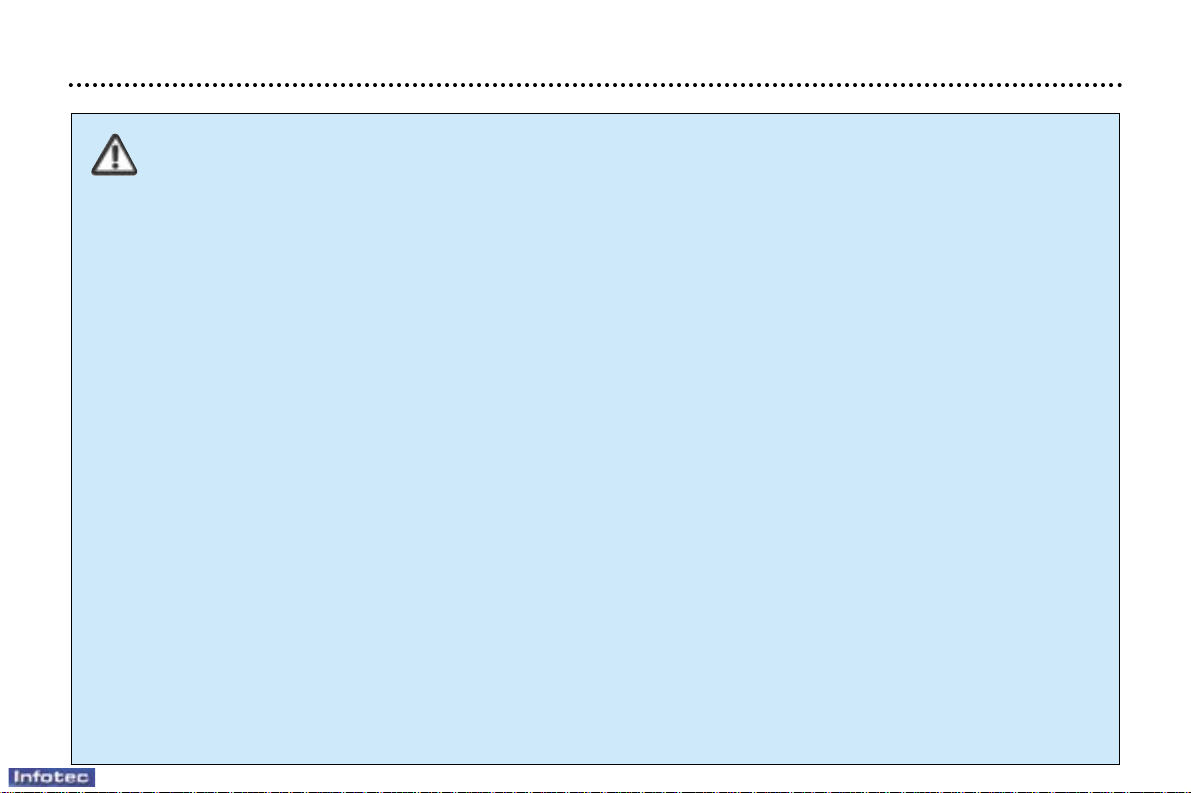
Disarming the passenger
air bag*
To ensure the s
afety of your child, it
is essential to disarm the passenger
air bag when you install a rear-facing
child seat on the front passenger
seat.
☞ With the ignition switched off,
insert the key into the passenger
air bag disarming switch 1, turn it
to the "OFF" position, then
remove the key keeping the slot
in this position.
The air bag warning light on the
instrument panel is lit throughout the disarming process.
* According to destination.

24-02-2003
YOUR 206 IN DETAIL
109
In the "OFF" position, the passenger air bag will not be triggered in
the event of an impact.
As soon as the child seat is
removed, turn the air bag slot to the
"ON" position to re-activate the air
bag and thus ensure the safety of
your passenger in the event of an
impact.
Operating check
This is confirmed by an indicator
light, accompanied by an audible
signal and a message on the multifunction display.
With the ignition on (2nd notch), illumination of this warning light accompanied by an audible signal and the
message "Passenger air bag dis-
armed" on the multifunction display,
indicates that the passenger air bag
is disarmed (switch in the "OFF"
position).
SIDE AIR BAGS
These are incorporated into the
frame of the front seat back, on the
door side.
They are deployed independently of
each other depending on which side
the collision occurs, in collisions
which could cause injury to the
chest, the abdomen or the head.
Operating check
This is confirmed by a light on the
instrument panel.
It comes on for 6 seconds, each time
the ignition is switched on.
If the indicator light:
– does not light up when the ignition
is switched on, or,
– does not go out after 6 seconds,
or,
– flashes for 5 minutes then stays
on.
Contact a PEUGEOT dealer.
24-02-2003
YOUR 206 IN DETAIL
110
For the front and side air bags to be fully effective, observe the following safety rules:
• Wear a correctly adjusted seat belt.
• Sit in a normal upright position (passengers must not place their feet on the fascia).
• Ensure there is nothing between the occupants of the front seats and the air bags.
This could hamper the operation of the air bags or injure the occupants.
• All work on the air bag system is strictly forbidden unless it is carried out by qualified personnel of the PEUGEOT
network.
• After an accident or if the vehicle has been stolen or broken into, have the air bag systems checked.
• The air bag systems have been designed to be fully operational for 10 years after the vehicle has been registered. For
greater safety, have them checked by a PEUGEOT dealer within ten years following the initial purchase of the
vehicle.
Front air bags
• Do not drive holding the steering wheel by its spokes or resting your hands on the centre part of the wheel.
• Never remove or pierce the steering wheel or hit it violently.
• Smoke as little as possible; deployment of the air bags can cause burns or the risk of injury from a cigarette or pipe.
Side air bags
• Do not fix or glue anything to the front seat backs. This could cause injury to the chest or arms when the side air bag
inflates.
• Do not sit with the upper part of the body any nearer to the door than necessary.
• Use only approved covers on the front seats. Contact your PEUGEOT dealer.

24-02-2003
YOUR 206 IN DETAIL
109
In the "OFF" position, the passenger air bag will not be triggered in
the event of an impact.
As soon as the child seat is
removed, turn the air bag slot to the
"ON" position to re-activate the air
bag and thus ensure the safety of
your passenger in the event of an
impact.
Operating check
This is confirmed by an indicator
light, accompanied by an audible
signal and a message on the multifunction display.
With the ignition on (2nd notch), illumination of this warning light accompanied by an audible signal and the
message "Passenger air bag dis-
armed" on the multifunction display,
indicates that the passenger air bag
is disarmed (switch in the "OFF"
position).
SIDE AIR BAGS
These are incorporated into the
frame of the front seat back, on the
door side.
They are deployed independently of
each other depending on which side
the collision occurs, in collisions
which could cause injury to the
chest, the abdomen or the head.
Operating check
This is confirmed by a light on the
instrument panel.
It comes on for 6 seconds, each time
the ignition is switched on.
If the indicator light:
– does not light up when the ignition
is switched on, or,
– does not go out after 6 seconds,
or,
– flashes for 5 minutes then stays
on.
Contact a PEUGEOT dealer.

24-02-2003
YOUR 206 IN DETAIL
110
For the front and side air bags to be fully effective, observe the following safety rules:
• Wear a correctly adjusted seat belt.
• Sit in a normal upright position (passengers must not place their feet on the fascia).
• Ensure there is nothing between the occupants of the front seats and the air bags.
This could hamper the operation of the air bags or injure the occupants.
• All work on the air bag system is strictly forbidden unless it is carried out by qualified personnel of the PEUGEOT
network.
• After an accident or if the vehicle has been stolen or broken into, have the air bag systems checked.
• The air bag systems have been designed to be fully operational for 10 years after the vehicle has been registered. For
greater safety, have them checked by a PEUGEOT dealer within ten years following the initial purchase of the
vehicle.
Front air bags
• Do not drive holding the steering wheel by its spokes or resting your hands on the centre part of the wheel.
• Never remove or pierce the steering wheel or hit it violently.
• Smoke as little as possible; deployment of the air bags can cause burns or the risk of injury from a cigarette or pipe.
Side air bags
• Do not fix or glue anything to the front seat backs. This could cause injury to the chest or arms when the side air bag
inflates.
• Do not sit with the upper part of the body any nearer to the door than necessary.
• Use only approved covers on the front seats. Contact your PEUGEOT dealer.

24-02-2003
66
68
YOUR 206 AT A GLANCE
11
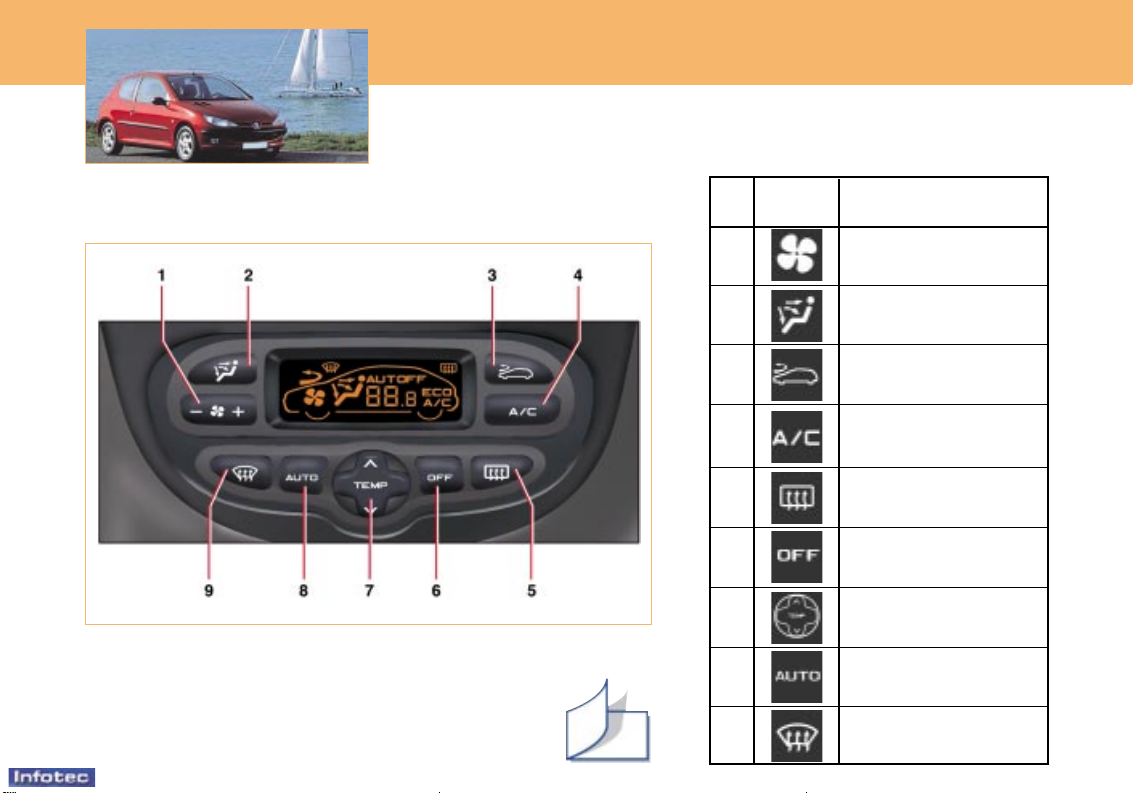
N° Symbol Function
HEATING/AIR CONDITIONING
Setting the air
distribution.
1
Air intake control.2
Temperature
adjustment.
3
Demisting the rear
screen and mirrors.
4
Air flow adjustment.5
Air conditioning
control.
6
24-02-2003
PRACTICAL INFORMATION
111
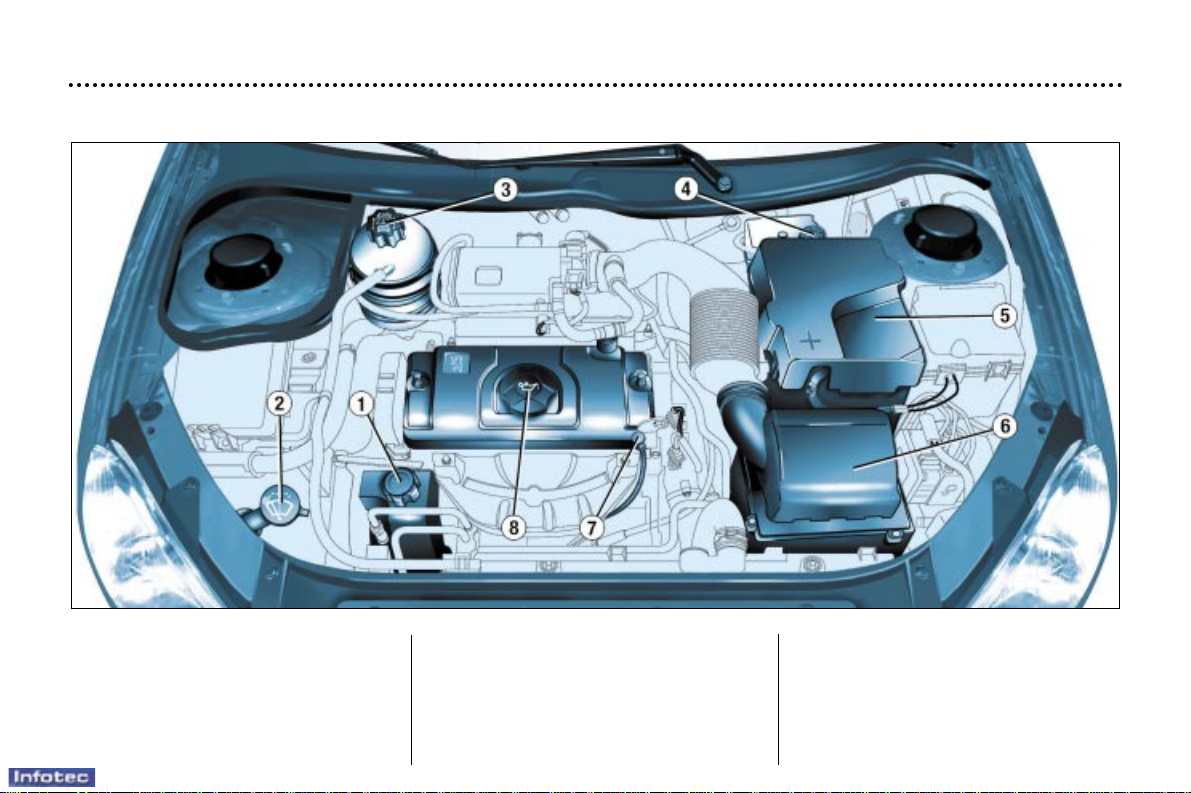
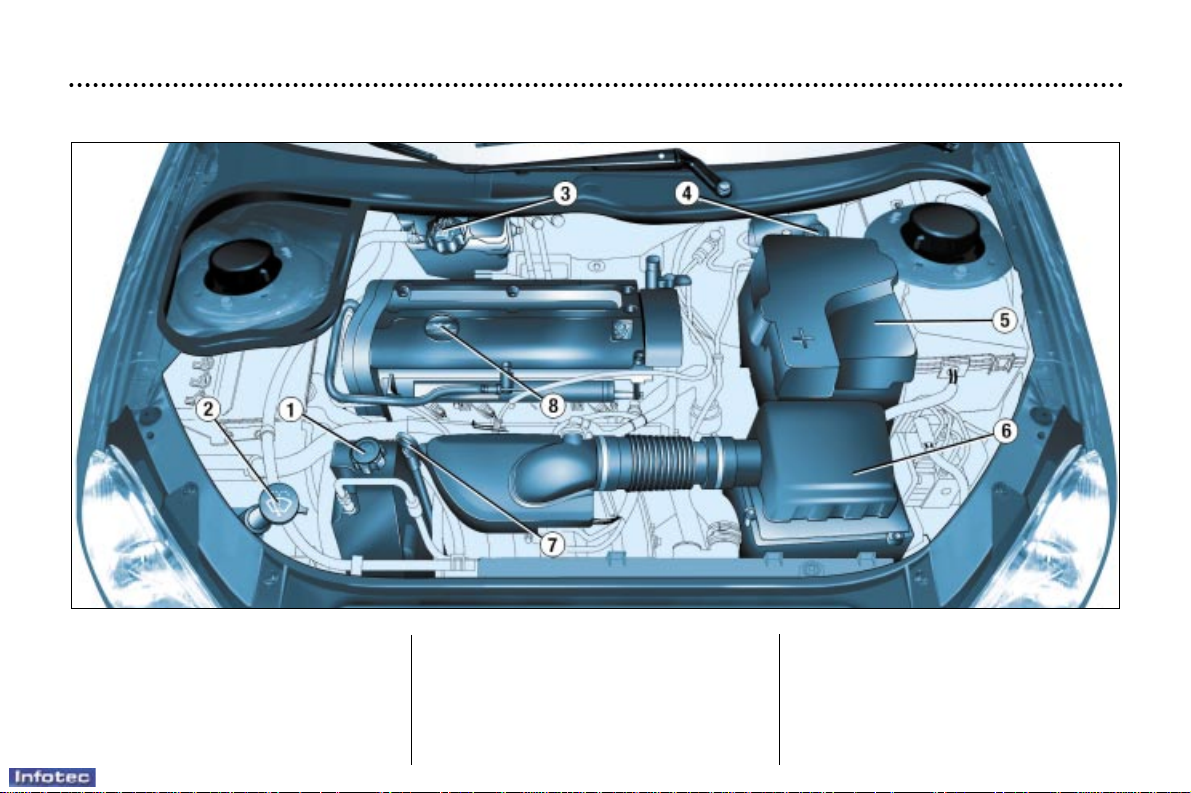
1. Power steering reservoir
2. Windscreen wash reservoir
3. Coolant reservoir
4. Brake fluid reservoir
5. Battery
6. Air filter
7. Dipstick
8. Engine oil filler cap
1.1 litre, 1.4 litre ENGINE
24-02-2003
PRACTICAL INFORMATION
112
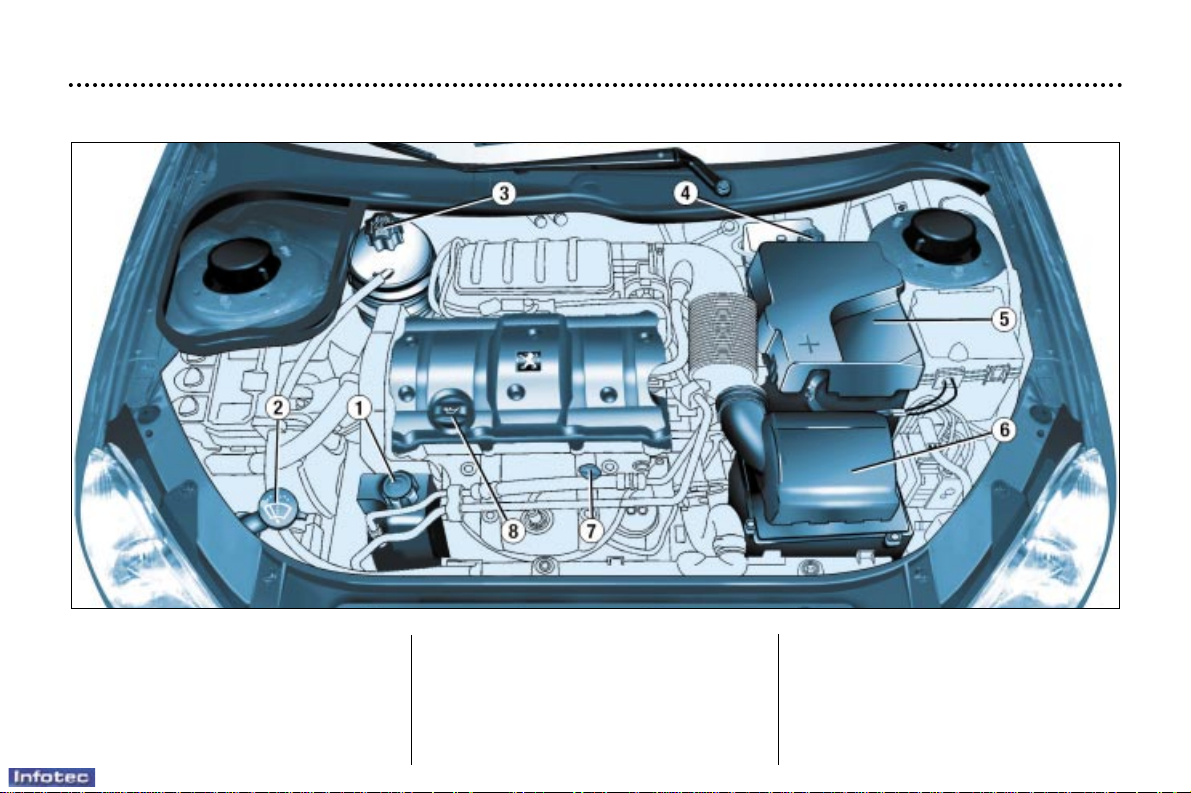
1. Power steering reservoir
2. Windscreen wash reservoir
3. Coolant reservoir
4. Brake fluid reservoir
5. Battery
6. Air filter
7. Dipstick
8. Engine oil filler cap
1.6 litre 16V ENGINE
24-02-2003
PRACTICAL INFORMATION
113
1. Power steering reservoir
2. Windscreen wash reservoir
3. Coolant reservoir
4. Brake fluid reservoir
5. Battery
6. Air filter
7. Dipstick
8. Engine oil filler cap
2 litre 16V ENGINE
24-02-2003
PRACTICAL INFORMATION
114
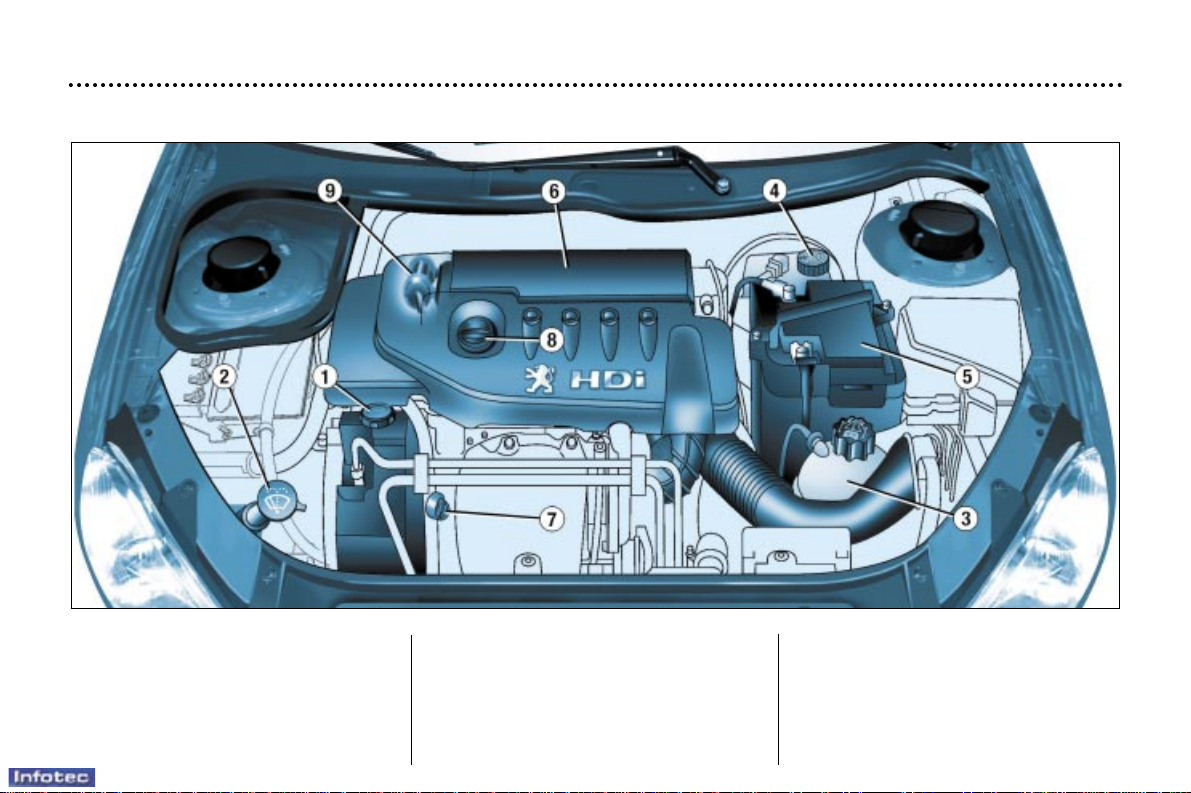
1. Power steering reservoir
2. Windscreen wash reservoir
3. Coolant reservoir
4. Brake fluid reservoir
5. Battery
6. Air filter
7. Dipstick
8. Engine oil filler cap
9. Priming pump
1.4 litre turbo diesel HDI ENGINE

24-02-2003
PRACTICAL INFORMATION
116
1. Power steering reservoir
2. Windscreen wash reservoir
3. Coolant reservoir
4. Brake fluid reservoir
5. Battery
6. Air filter
7. Dipstick
8. Engine oil filler cap
2 litre turbo Diesel HDI ENGINE
24-02-2003
PRACTICAL INFORMATION
117
CHECKING LEVELS
Engine
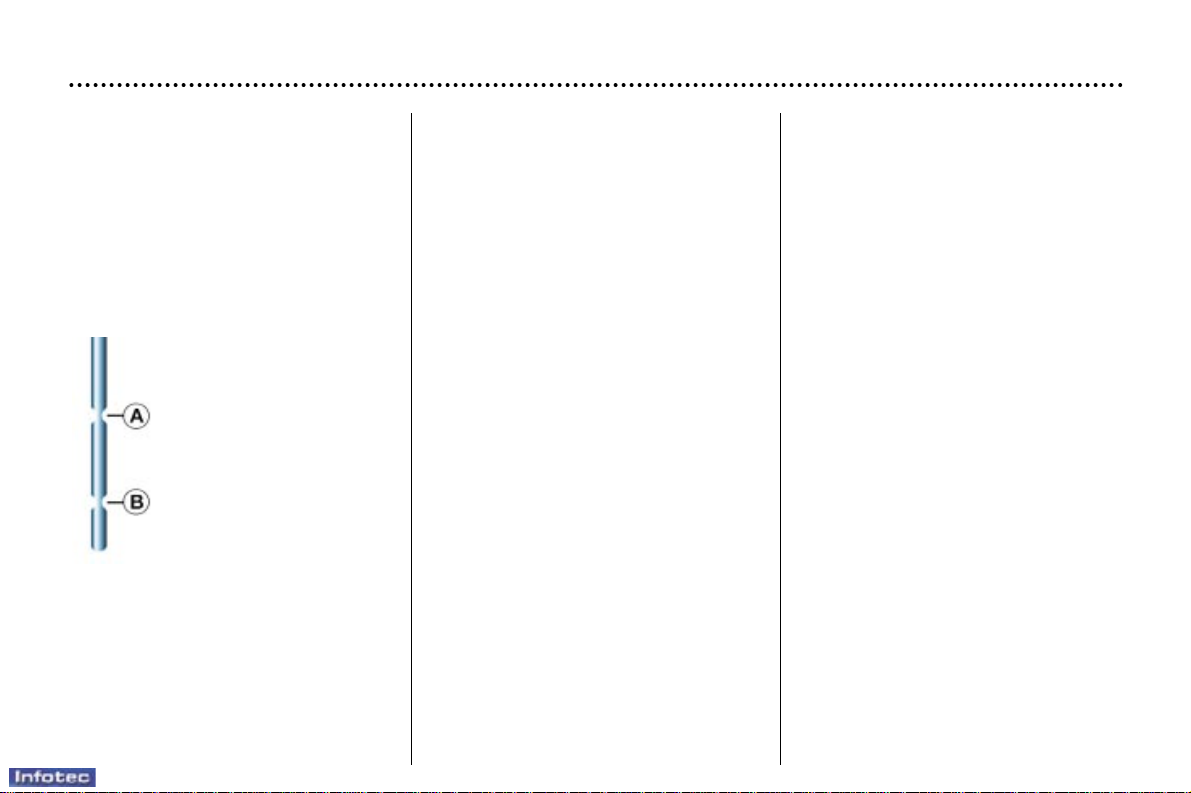
Oil level check
Carry out this check regularly and
top up between oil changes; the
maximum consumption is 0.5 litre
per 600 miles (1 000 km).
The check must be carried out with
the vehicle level and the engine
cold.
There are two level
marks on the dipstick:
A = maximum.
B = minimum.
Viscosity grade selection
The oil selected must always meet
the manufacturer's requirements.
Oil filter
Change the cartridge regularly in
accordance with the recommendations of the servicing schedule.
Used oil
Avoid any prolonged contact of used
oil with the skin.
Do not discard used oil down drains
or onto the ground.
To maintain the reliability of the
engines and emission control systems, the use of additives in the oil is
prohibited.
Brake fluid reservoir
– the level must always be above
the DANGER mark on the tank.
– in the event of a significant drop in
the level, contact a PEUGEOT
dealer immediately.
Fluid change
– always to be carried out at the inter-
vals given in the manufacturer's
servicing schedule.
– use fluids approved by the manu-
facturer which comply with DOT4
standard.
Coolant reservoir
Use a coolant approved by the manufacturer.
When the engine is warm, the coolant
temperature is controlled by the fan.
This may operate with the ignition key
removed. Therefore, as the cooling
circuit is pressurised, wait at least an
hour after switching off the engine
before carrying out any work.
In the event of a breakdown and to
avoid any risk of burns, unscrew the
cap two turns to let the pressure drop.
When the pressure has dropped,
remove the cap and top up the level.
Oil change: in accordance with the
manufacturer's servicing schedule.
– Dipstick: never exceed the maxi-
mum mark A.
– Instrument panel gauge.

24-02-2003
PRACTICAL INFORMATION
118
Power steering reservoir
Open the reservoir, with the engine
cold. The level should always be
above the MINI mark, close to the
MAXI mark.
Manual gearbox
This does not need an oil change.
Check the level according to the
manufacturer's servicing schedule.
Windscreen wash reservoir
For best quality cleaning and for your
safety, we recommend that you use
products approved by PEUGEOT
(capacity 2.8 litres).
Air filter
Regular replacement of the filter element is essential. If you drive in very
dusty conditions, change it twice as
often.
Battery
At the start of winter, have your battery
checked by a PEUGEOT dealer.
Brake pads
Brake pad wear depends on the
style of driving, in particular for vehicles which are used in town, for
short journeys. It may be necessary
to check the thickness of the pads
even between services.
Autoadaptive automatic gearbox
This does not need an oil change:
have the level checked by a
PEUGEOT dealer according to the
manufacturer's servicing schedule.
Only use products
approved by PEUGEOT.
To ensure best per-
formance from components as important as the power
steering and the braking system,
PEUGEOT selects and offers
quite specific products.
RUNNING OUT OF FUEL
(DIESEL)
If you should run out of fuel, it is
necessary to re-prime the circuit:
1.4 litre HDI engine
– fill the fuel tank with at least five
litres of diesel,
– operate the manual re-priming
pump, until fuel appears in the
transparent pipe under the bonnet,
– operate the starter until the
engine starts.

24-02-2003
PRACTICAL INFORMATION
119
CHANGING A WHEEL
(saloon)
Parking the vehicle
– If possible, park the vehicle on
level, stable and non-slippery
ground.
– Apply the handbrake, engage first
or reverse gear (position P for the
automatic gearbox).
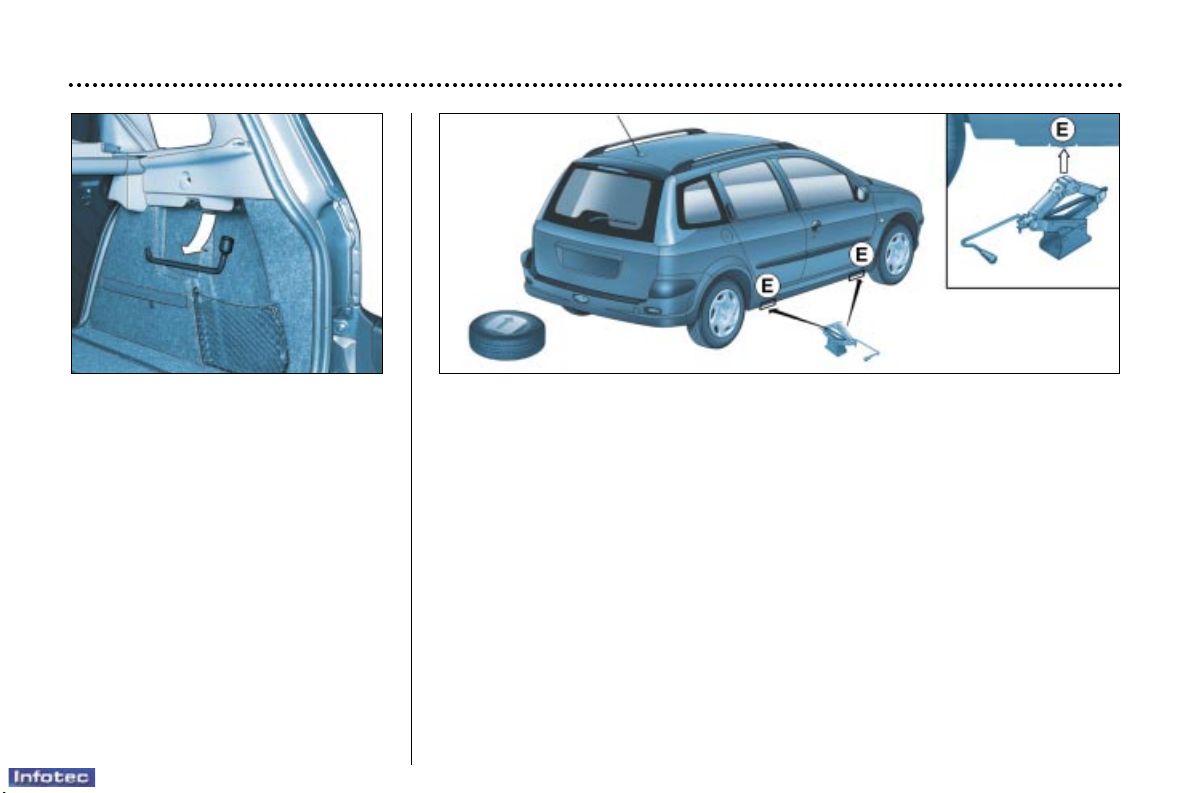
Access to the spare wheel and
the jack
The wheel is located outside the
vehicle, under the boot, supported
by a metal carrier.
– Remove the wheelbrace 1,
secured on the rear right inner
panel of the boot.
– Using the wheelbrace 1, slacken the spare wheel carrier retaining bolt, located
inside the boot under the carpet.
– Lift the carrier to release the hook rearwards, then lower it.
– Remove the jack storage box 2 located in the spare wheel.
Removing a wheel
– Chock the rear of the wheel diagonally opposite the wheel to be changed,
using the jack storage box.
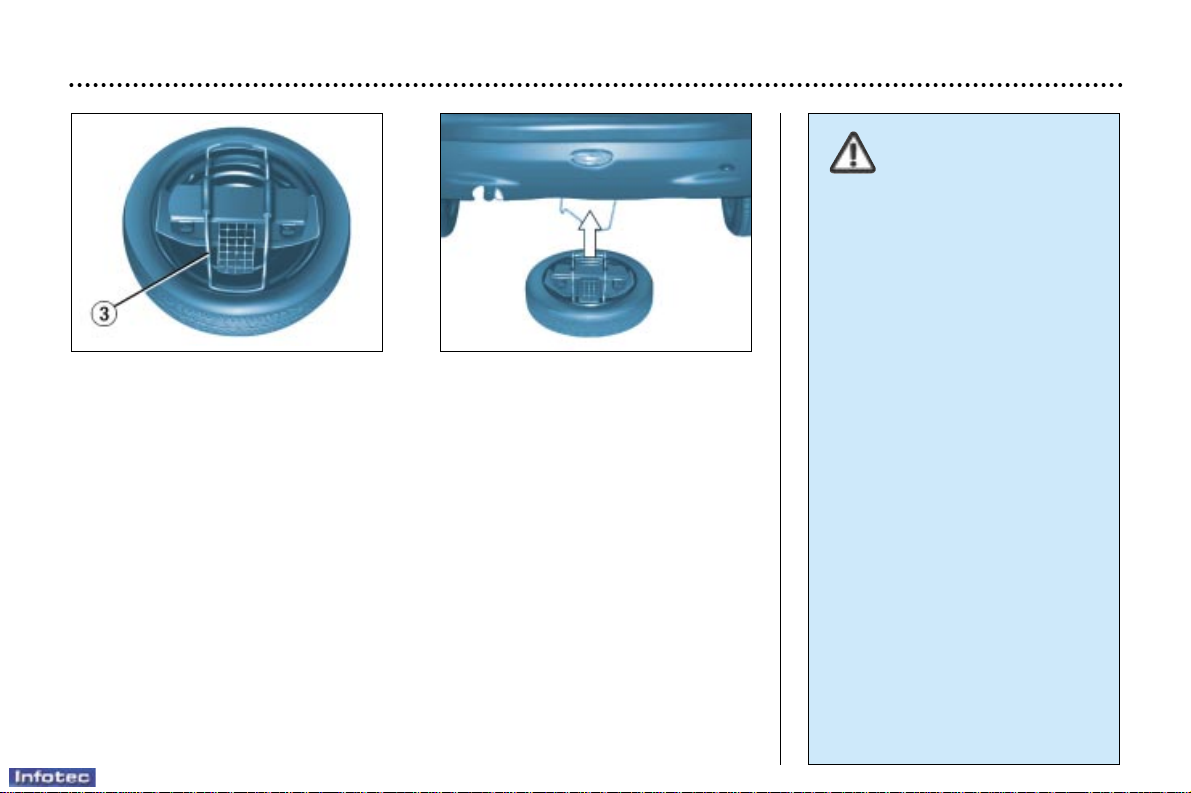
– Remove the wheel trim using the wheelbrace, by pulling at the valve passage
hole.
– Slacken the wheel bolts.
– Place the jack under the locating point on the sub-frame E that is closest to
the wheel to be changed. Ensure that the entire surface of the jack base plate
is in contact with the ground.
– Extend the jack, completely unscrew the bolts and remove the wheel.
24-02-2003
PRACTICAL INFORMATION
121
Refitting the wheel
– After positioning the wheel, lightly pre-tighten the bolts using the wheelbrace.
– Compress the jack and release it.
– Fully tighten the bolts using the wheelbrace.
– Replace the trim except in the case of a space-saver spare wheel, starting at
the valve passage hole, and press it on using the palm of the hand.
Note: If the vehicle is fitted in production with a wheel anti-theft lock, the trim cap
on the anti-theft bolt is in two parts.
Replacing the wheel in the carrier
– Replace the jack storage box in the wheel.
– Replace the support spacer 3 by clipping it to the space-saving spare wheel.
– Replace the wheel in the carrier directing the spacer 3 along the centre line of
the vehicle, with the opening towards the front as shown in the diagram above
(for a space-saving spare wheel only).
– Lift the wheel then the carrier and reposition the hook.
– Do not forget to fully tighten the spare wheel carrier retaining bolt.
– Stow the wheelbrace.
For your safety, always
change a wheel:
– on level, stable and non slippery
ground,
– with the handbrake applied,
– with first or reverse gear
engaged,
– with the vehicle chocked using
the jack storage box,
– never go underneath a vehicle
raised using a jack (use an axle
stand).
After changing the wheel
– Have the tightening of the bolts
and the pressure of the spare
tyre checked as soon as possi-
ble by a PEUGEOT dealer.
– Have the punctured tyre
repaired and replace it on the
vehicle as soon as possible.
– The space-saver spare wheel
fitted with a 115/70R15 tyre
must only be used temporarily:
–inflation pressure: 4.2 bars
(60 p.s.i.),
–maximum speed: 80 km/h.
24-02-2003
PRACTICAL INFORMATION
122
SPECIAL FEATURES OF
ALLOY WHEELS
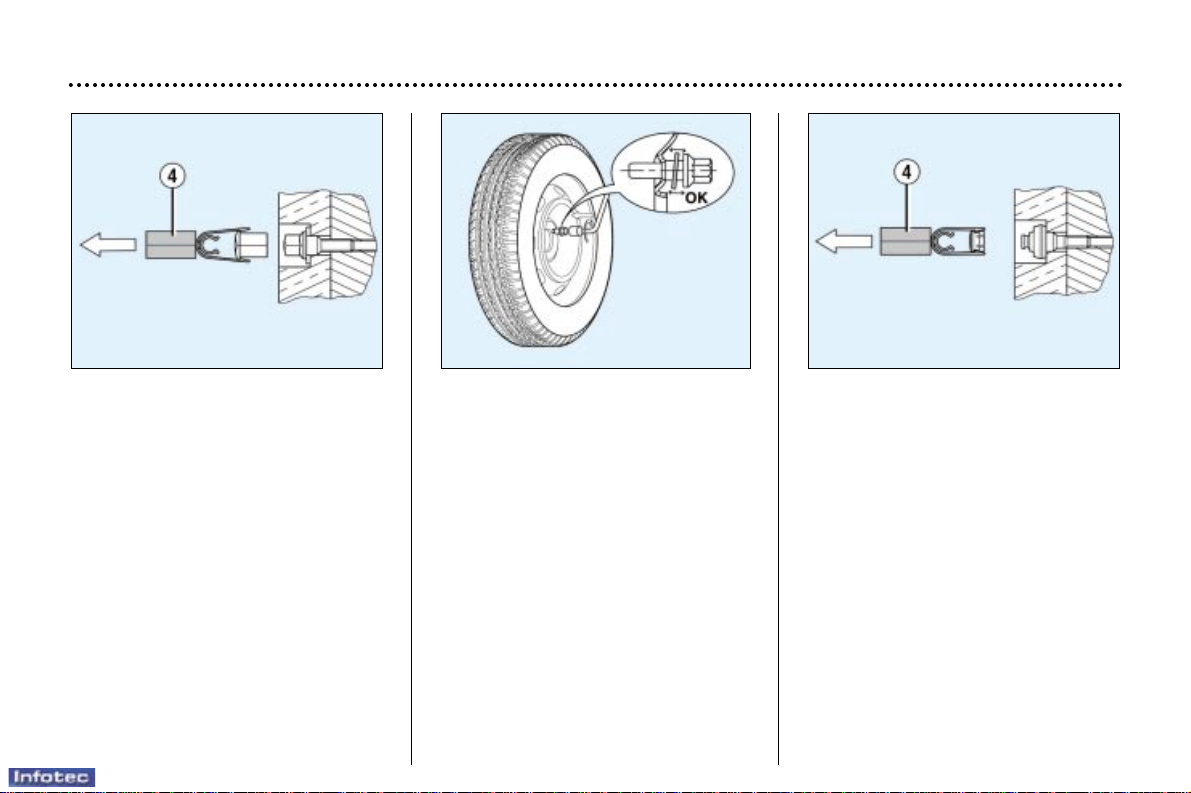
Bolt covers
Alloy wheel bolts are covered by
chrome trims.
Use the yellow tool 4 to remove the
trims before slackening the bolts.
Tool 4 is located:
– on the saloon, on the rear right
inner panel of the boot,
– on the 206 SW, in the jack storage
compartment.
Fitting the spare wheel
If your vehicle is equipped with a
steel spare wheel, when fitting it, it is
normal to notice that the bolt washers
do not come into contact with the
rim. The spare wheel is secured by
the cone-shape of each bolt.
Fitting snow tyres
If you fit snow tyres that are mounted on steel rims onto your vehicle, it
is essential that you use special
bolts available from your PEUGEOT
dealer.
Anti-theft bolt*
If your wheels are fitted with an antitheft bolt (one per wheel), the
chrome trim and then the plastic
cover must be removed, using tool
4, before it is unscrewed using one
of the two anti-theft sockets (which
were given to you on delivery of your
vehicle along with the duplicate keys
and the confidential card) and the
wheelbrace 1.
Note: make a careful note of the
code number engraved on the top of
the anti-theft socket. This will enable
you to obtain a duplicate anti-theft
socket from your PEUGEOT dealer.
* According to model and destination.
24-02-2003
70
YOUR 206 AT A GLANCE
12
N° Symbol Function
AUTOMA TIC AIR CONDITIONING
Air flow adjustment.
Setting the air
distribution.
1
2
3
4
5
6
7
8
9
Air intake control.
Air conditioning
control.
Switching off.
Demisting the rear
screen and mirrors.
Temperature
adjustment.
Automatic comfort
programme.
Automatic visibility
programme.
24-02-2003
PRACTICAL INFORMATION
120
CHANGING A WHEEL
(206 SW)
Parking the vehicle
– If possible, park the vehicle on
level, stable and non-slippery
ground.
– Apply the handbrake, engage first
or reverse gear, (position P for the
automatic gearbox).
Access to the spare wheel and
the jack
The wheel is located outside the
vehicle, under the boot, supported
by a metal carrier.
– Remove the wheelbrace 1
secured under the right-hand boot
trim.
– Using the wheelbrace 1, slacken the spare wheel carrier retaining bolt located
inside the boot under the carpet.
– Lift the carrier to release the hook rearwards, then lower it.
– Remove the jack storage box 2 located in the spare wheel.
Removing a wheel
– Chock the rear of the wheel diagonally opposite the wheel to be changed,
using the collapsible chock located in jack storage box.
– Remove the wheel trim using the wheelbrace, by pulling at the valve passage
hole.
– Slacken the wheel bolts.
– Place the jack under the locating point on the sub-frame E that is closest to
the wheel to be changed. Ensure that the entire surface of the jack base plate
is in contact with the ground.
– Extend the jack, completely unscrew the bolts and remove the wheel.
 Loading...