

Petsafe Staywell, Staywell Pet Door Installation Manual

Infra-Red Cat Flap
Installation Guide
Guide Infrarouge
D'Installation D'Aileron
De Chat
Guía Infrarroja De la
Instalación De la Aleta
Del Gato

PetSafe®is proud to provide you with this Staywell Pet Door. Staywell was
recently acquired by PetSafe®and has over 30 years of experience in making
the highest quality pet door. You can contact the PetSafe
®
Customer Care
center at 1-800-732-2677 or visit our web-site at www.petsafe.net for support or
questions.
PetSafe
®
est fier de vous fournir cette porte d'animal de compagnie de
Staywell. Staywell a été récemment acquis par PetSafe®et a sur 30 ans
d'expérience en faisant la porte d'animal de compagnie de la plus haute
qualité. Vous pouvez entrer en contact avec le centre de soin de client de
PetSafe
®
à 1-800-732-2677 ou visiter nos sites Web à www.petsafe.net pour
l'appui ou les questions.
PetSafe
®
es orgulloso proveer de usted esta puerta del animal doméstico de
Staywell. Staywell fue adquirido por PetSafe
®
y tiene recientemente sobre 30
años de experiencia en la fabricación de la puerta del animal doméstico de la
calidad más alta. Usted puede entrar en contacto con el centro del cuidado del
cliente de PetSafe
®
en 1-800-732-2677 o visitar nuestros Web site en
www.petsafe.net para la ayuda o las preguntas.

3
You are now the proud owner of a PetSafe®Infra Red pet door. We hope that you and your
pet will enjoy the freedom that this pet door brings to both of you.
Infra red signals are electromagnetic rays having a wavelength lower than that of visible light
and cannot therefore be seen. Your pet collar key transmits a digital coded infra red signal
which is decoded when the key comes within range of your pet door permitting only pets
with keys of same code to enter the house. There is a choice of four codes for dogs and four
codes for cats, each color coded.
The range of the key is dependent on the reflection off the immediate surrounds
such as your pet's fur, the floor, the pet door and other walls or surfaces. Infra red
signals cannot pass through walls or most other objects but our patented
reflection system will give you approximately 6 In (15cm) of range for the cat door
key. However the better the reflective surfaces around your pet door, the larger the
range of the collar key. Strong sunlight will affect the range of the collar key. It is
strongly recommended not to fit the pet door where it is exposed to strong
sunlight conditions. The optional cat door tunnel should always be fitted when
installing the Infra Red cat door.
Use the recommended batteries and install them correctly in the key housing and
the pet door. In normal conditions the collar key batteries should last one year. The
dog door has a manual switch to save battery power when the door is not in use.
Your dog door batteries will last approximately three months on continuous power.
The cat door batteries will last approximately one year. The cat door has an
optional power adapter kit.
When setting the relatch timer or programming new keys, follow the instruction guide but if
you get into difficulties remove one of the pet door batteries and after a minute start again
from the beginning.
The pet door autotunes to the first key presented to it. Once that color coded key is placed
in the memory no other color coded key will be recognized by the pet door. If you have
more than one pet, you will need to purchase more keys of the same color code and if you
lose a key, buy a replacement of the same color. If it is a different color you will need to
remove the batteries from the door for a minute and autotune again.
The relatch timer can be set for between 2 and 20 seconds. If your pet travels through the
pet door at speed you should set a short time but a timid or older pet may be quite slow and
a longer reset time would be appropriate. After setting the timer do not forget to press the
manual button twice to get back to automatic mode. When the door is in automatic mode,
the latch is normally in the locked position. If the door latch is open, a further push of the
manual button is required to set automatic mode.
BEFORE INSTALLING YOUR CAT FLAP PLEASE READ THE
FOLLOWING STEP-BY-STEP INSTRUCTIONS CAREFULLY.
TOOLS REQUIRED
• Pencil
• Ruler
• Jig or Keyhole Saw
• Drill
• Set Square
• Screwdriver
• Tape measure
• Glue
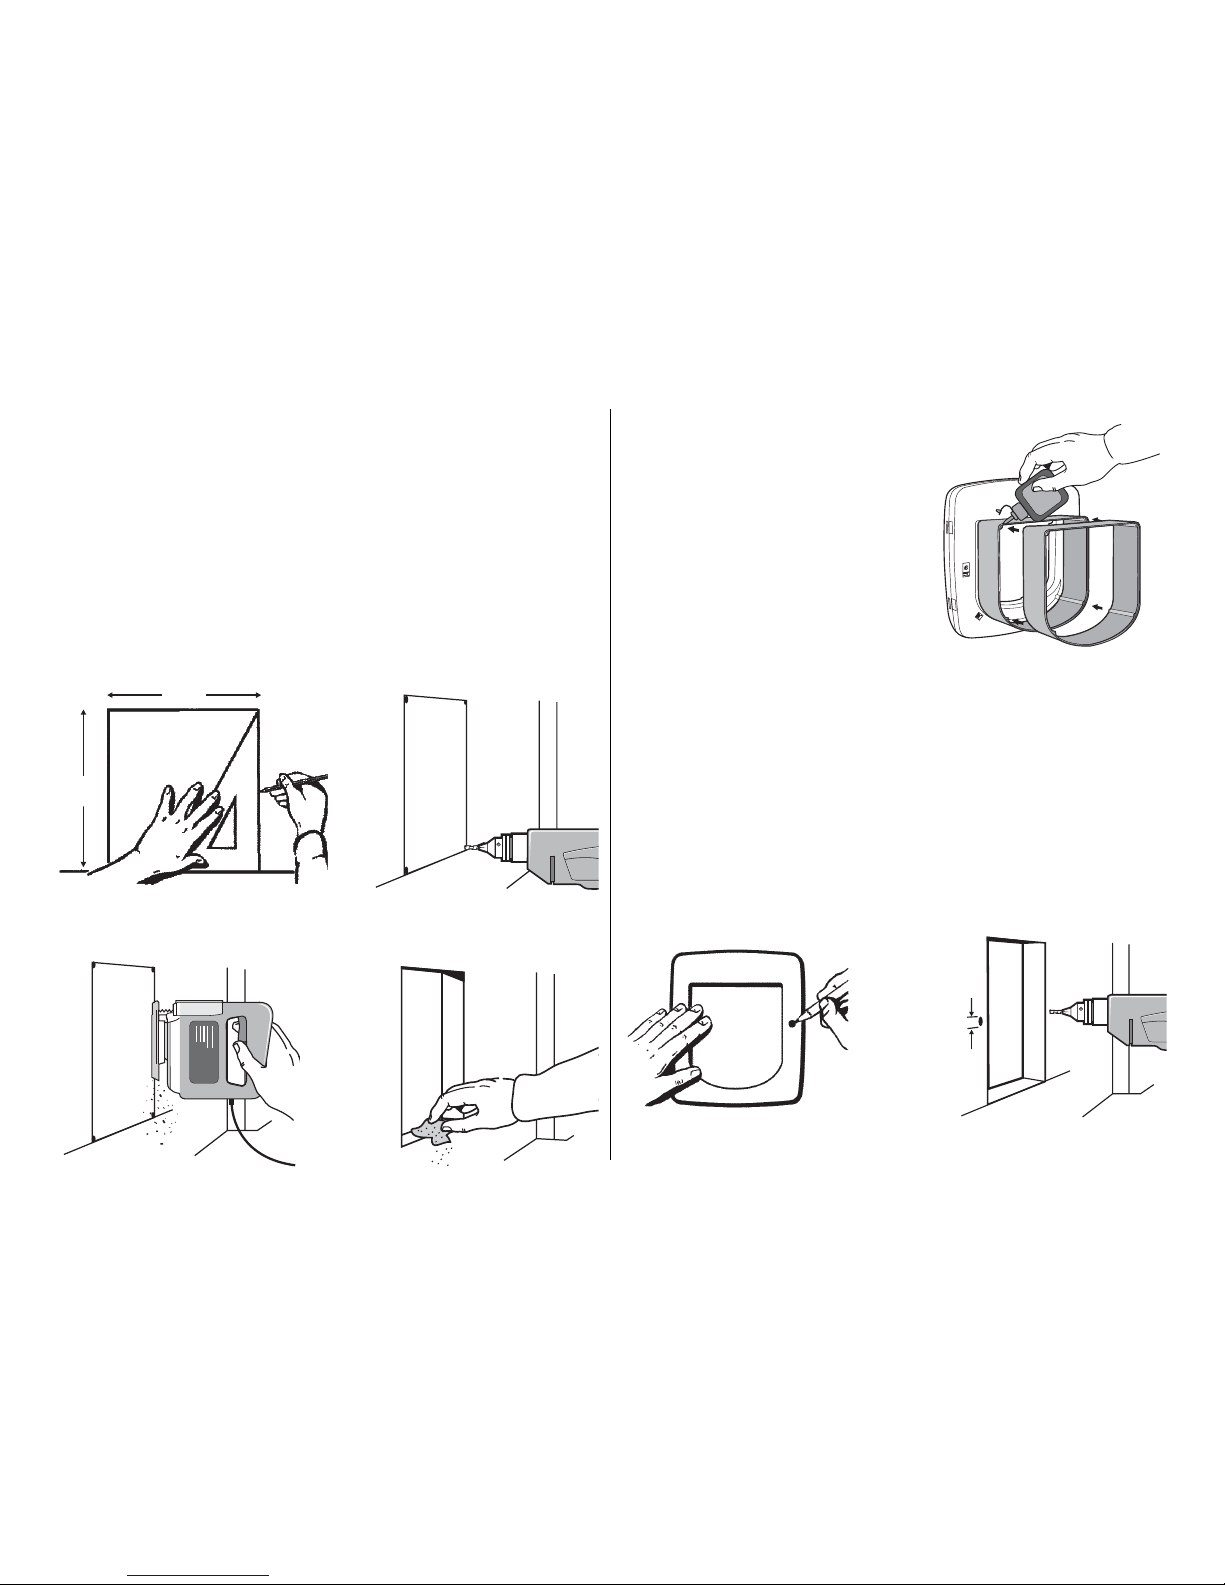
MEASUREMENT AND MARKING
Measure the belly height of your cat. This is usually 100-150mm
(4-6”) (Fig. 1).
Mark this measurement on the outside of your door and draw a straight
horizontal line 168mm (61/2”) (Fig. 2).
168mm
(6
1
/2")
FIG. 1 FIG. 2
100mm-150
mm
(4"-6")
4
CUTTING A HOLE FOR YOUR CAT FLAP
Using the horizontal line as the starting point, draw a square 168mm wide
(61/2”) x 175mm high (63/4”) (Fig 3).
Drill holes at each corner (Fig. 4).
Cut along the lines using a jig saw (Fig. 5).
Smooth out the rough edges (Fig. 6).
FIG. 4
FIG. 5
FIG. 6
175mm
(6
3
/4")
168mm
(6
1
/2")
FIG. 3
Tunnels (Optional)
The cat flap is designed to fit any depth
of hole. It is recommended that the
tunnels be glued on to the frame
(Fig. 7). Simply attach tunnels to the
required depth.
To purchase additional tunnels contact
the Customer Care Center at
1-800-732-2677
FITTING YOUR CAT FLAP
Your Petsafe cat flap is fitted with the red 4 way lock on the inside of
your door.
Place the cat flap in the hole and mark screw holes in the outside cover
in pencil. (Fig. 8).
Remove the cat flap and drill the holes with a 4.5mm (3/16”) drill bit
(Fig. 9).
FIG. 7
FIG. 8
4.5mm
(3/16")
FIG. 9
5
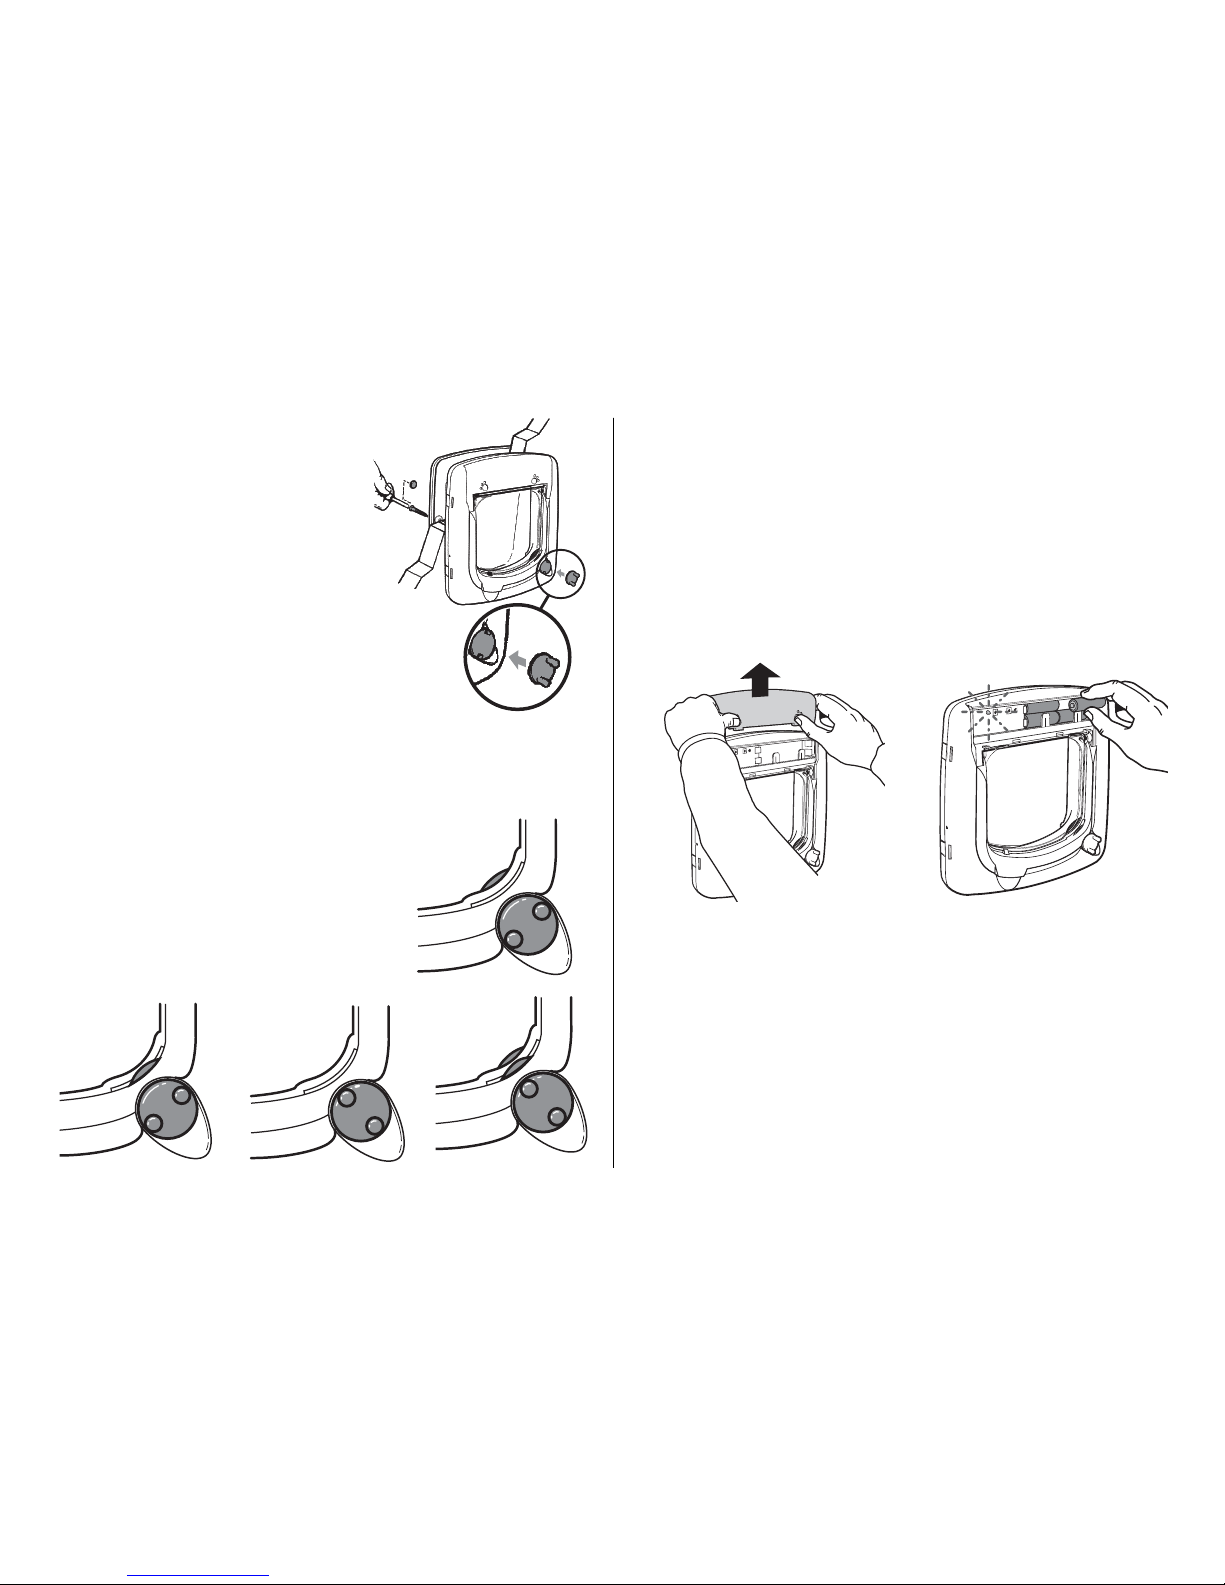
Screw into place and if needed cut
the screws down to size and file to
ensure no sharp edges.
Cover the screw holes with the
blanking plugs supplied to ensure a
neat finish (Fig. 10).
Push fit the 4-way locking handle into
place (Fig. 10).
Your Petsafe cat flap is now ready to
use.
USING YOUR 4-WAY LOCKING SYSTEM
The 4-way lock allows you to control your cat’s access in and out of your
home.
In only (Fig. 13)
Out only (Fig. 14)
In or Out (Fig. 15)
Fully locked (Fig. 16)
FIG. 10
FIG. 15
FIG. 16
FIG. 13
FIG. 14
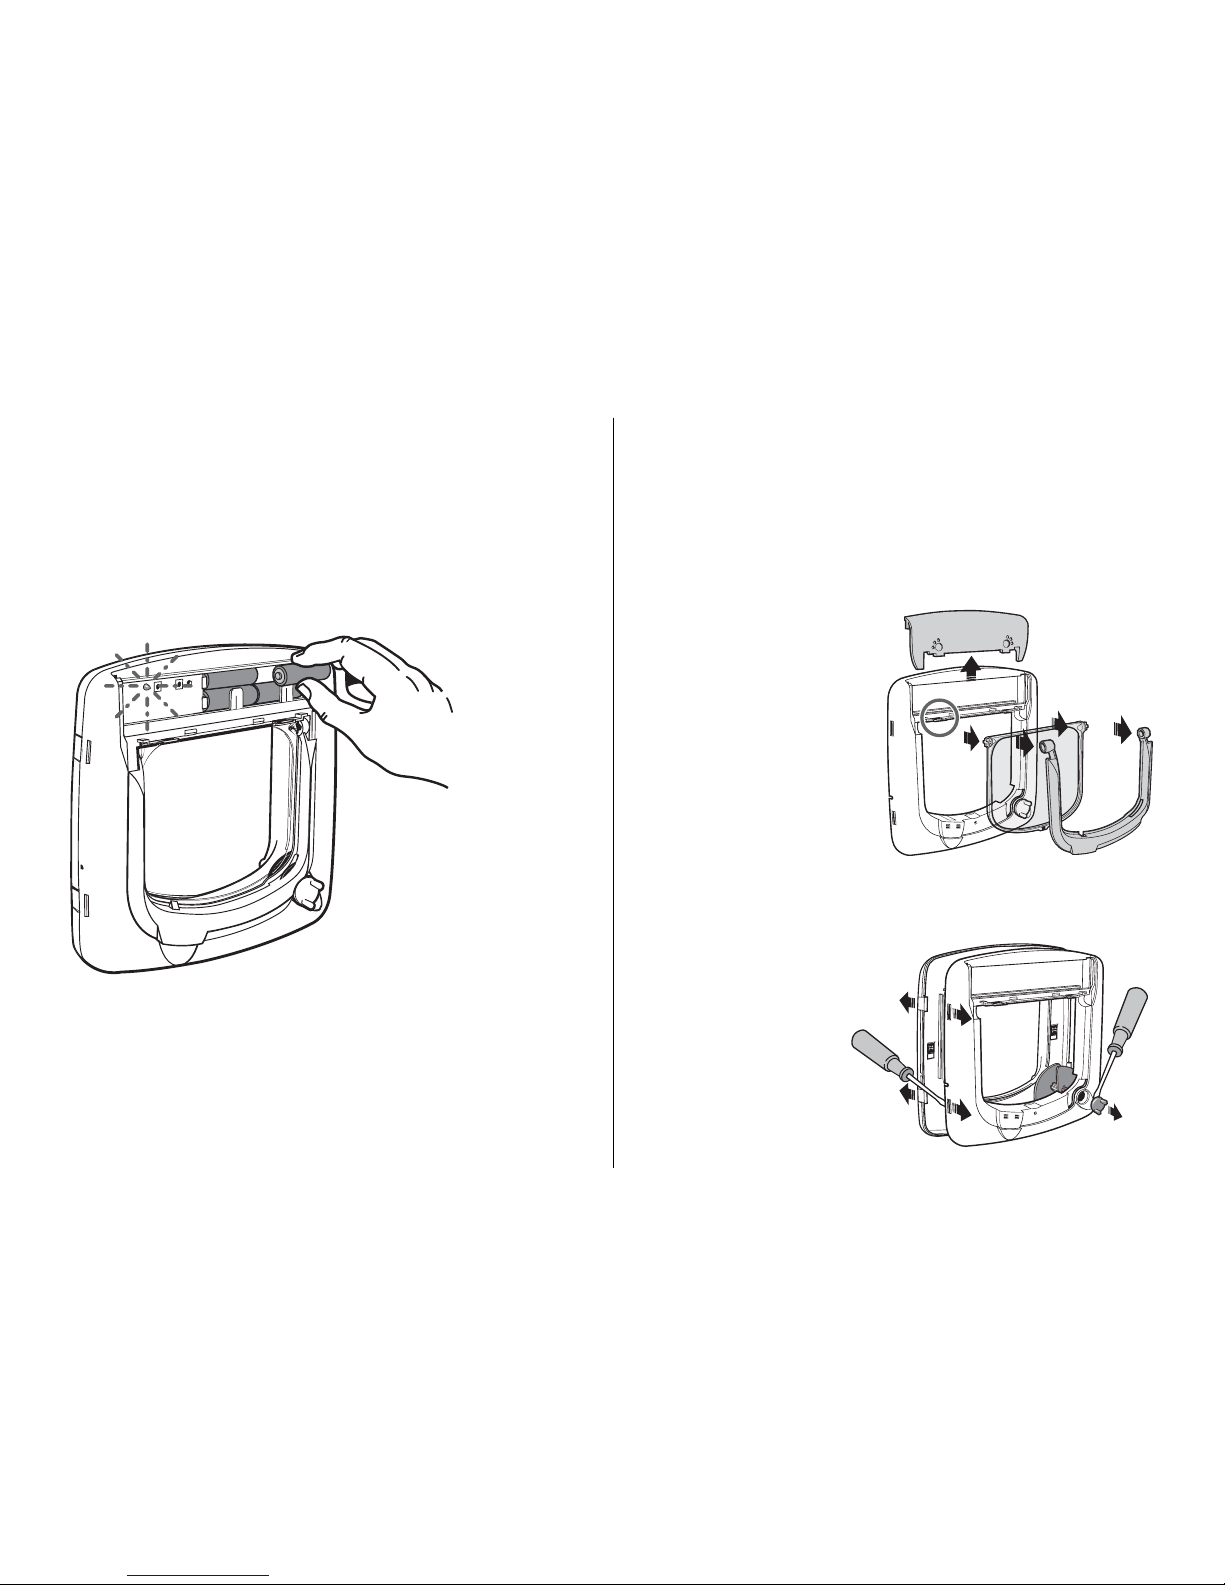
POWERING THE INFRA RED UNIT
Remove the hinge cover by pushing in the direction of the arrow
(Fig. 17).
Place 4 x AA 1.5V Alkaline Long Life batteries in position (Fig. 18).
Batteries should be replaced every 12 months. Do not use rechargeable
batteries
After you have powered the cat flap it emits a low tone beep indicating
the cat flap is ready for programming. In addition to the beep the red LED
will flash.
FIG. 17 FIG. 18
6
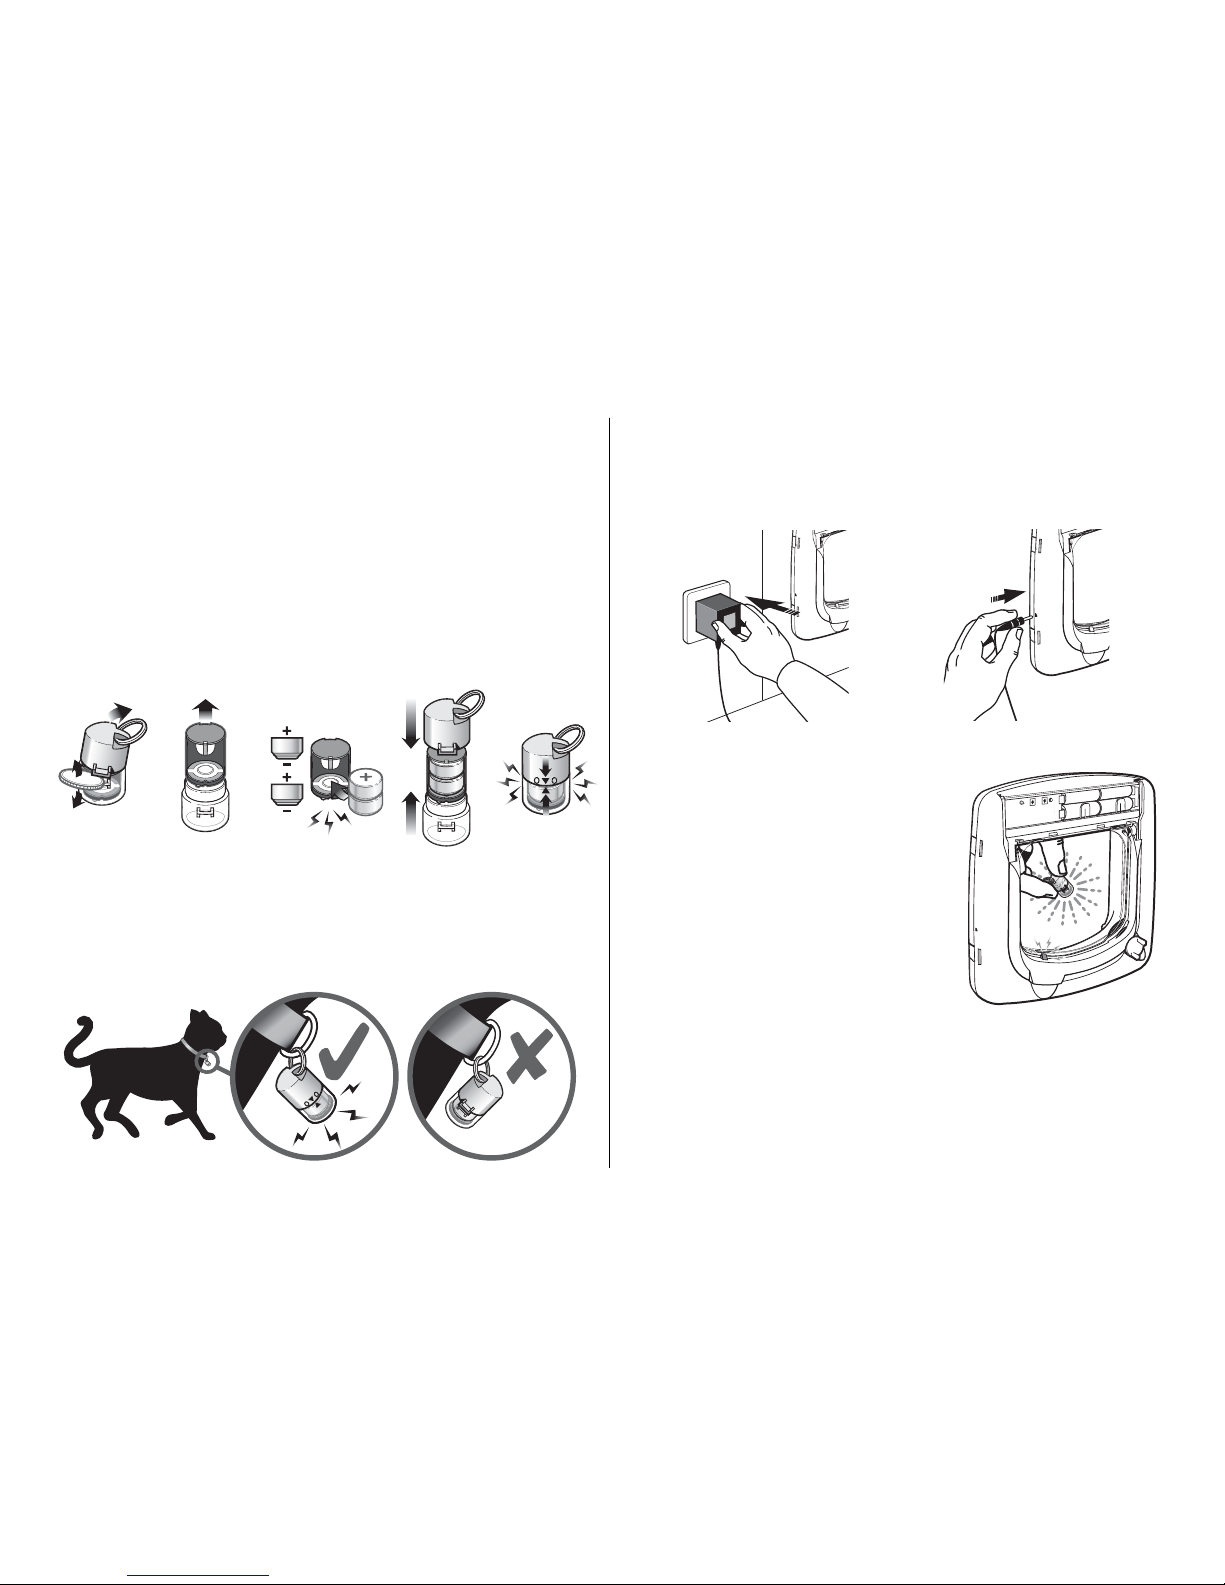
POWERING THE KEY
Open the collar key by twisting a coin between the two flanges (Fig. 19).
Remove battery holder (Fig. 20).
Place 2 x SR44, LR44 or D357 coin cells into the battery holder. The collar key
LED will flash 3 times indicating that the key is active (Fig. 21).
Replace battery holder into the clear base. Replace colored cap by clipping
the two halves of the key together, ensuring that the green pcb board is
visible through the clear base. (Fig.22).
The key will continue to flash at 2 minute intervals (Fig. 25).
Battery should be replaced every 12 months or when the LED stops
flashing.
ATTACHING THE KEY
The key must be attached to the collar so that it hangs forwards (Fig. 24).
FIG. 24
FIG. 19
FIG. 20 FIG. 21
FIG. 22 FIG. 23
POWER ADAPTER (OPTIONAL)
Plug adapter into a household electric socket (Fig. 25).
Place the jack plug into the socket at the side of the cat flap (Fig. 26).
PROGRAMMING YOUR CAT FLAP
After powering the cat flap and the collar
key, approach the flap with the key. The
red LED will stop flashing and the unit will
emit a high pitched beep. Your cat flap is
now programmed to recognize the collar
key (Fig. 27).
If you have more than one cat, you will
need to purchase collar keys of the same
color code.
The color codes available are:
Green, Yellow, Blue and Pink.
If your cat loses a collar key, you must
purchase a collar key of the same color or reprogram the cat flap with
another color coded key.
To reprogram the cat flap, please disconnect the batteries for
approximately one minute.
The latch will not relock until the cat key is out of range of the door.
FIG. 27
FIG. 25
FIG. 26
7
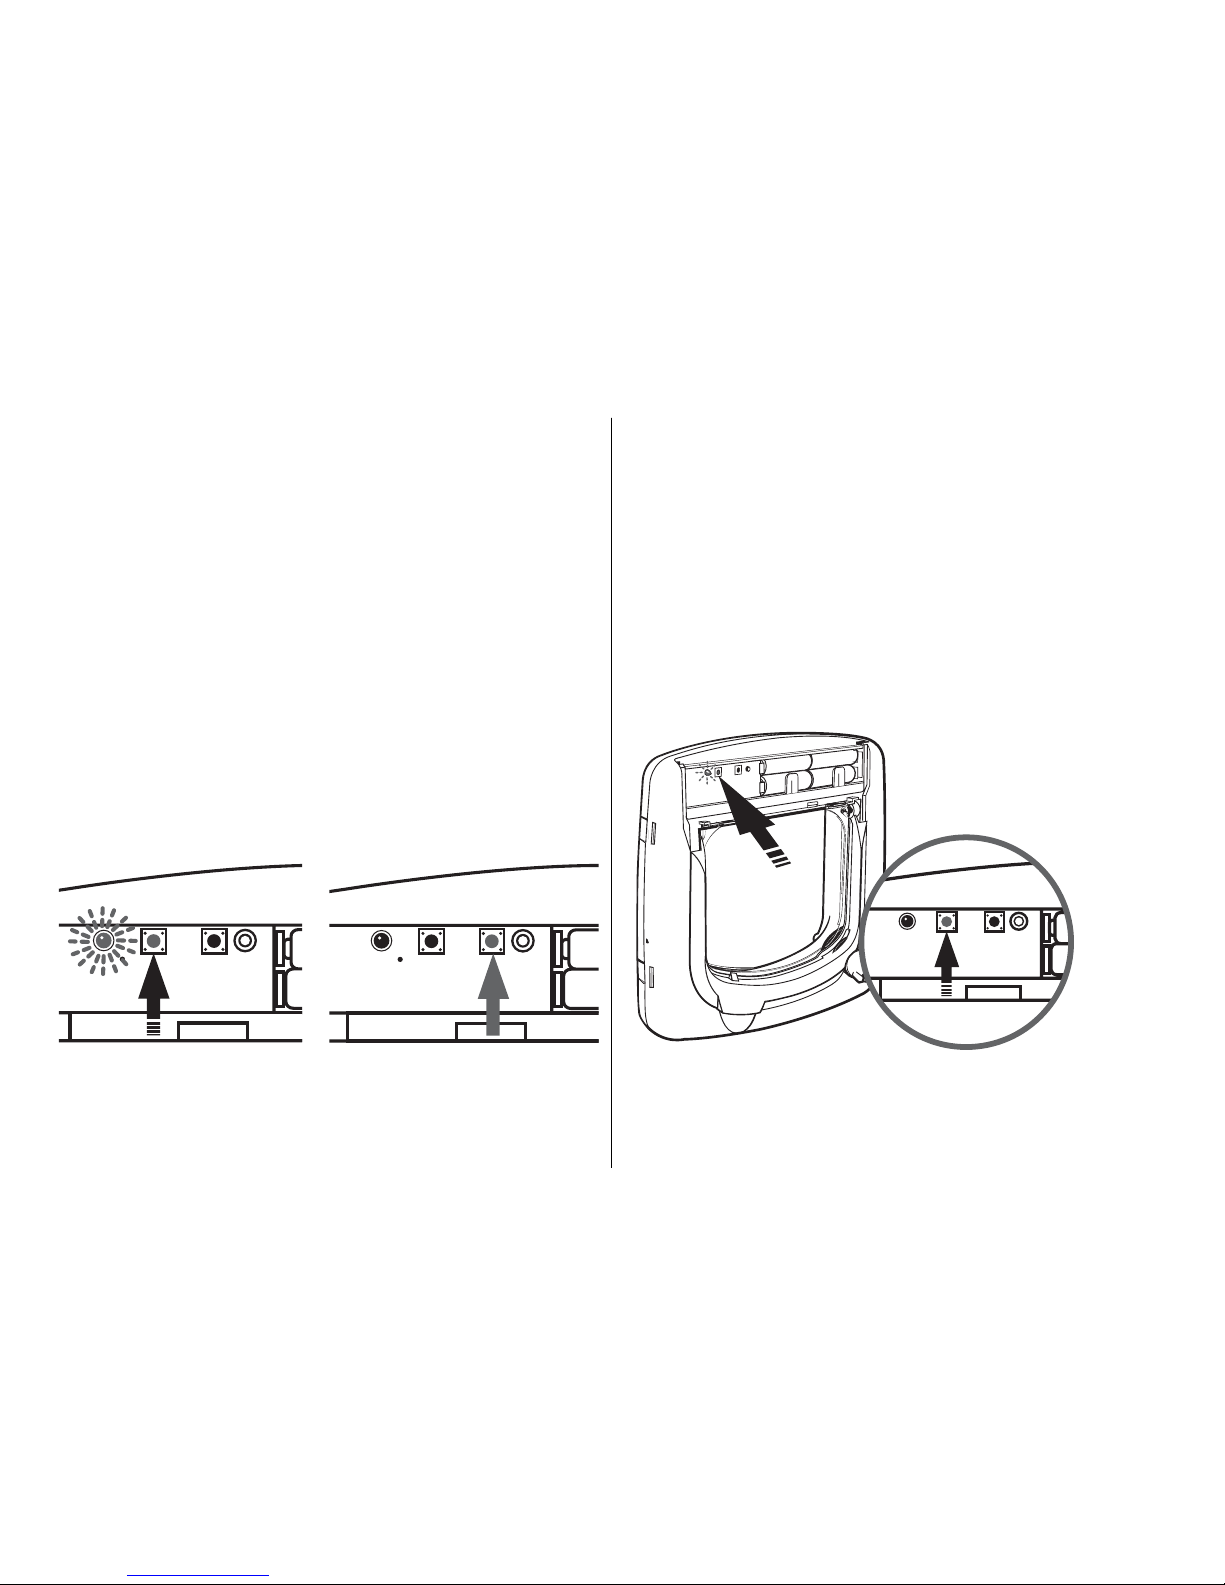
TO SET RE-LATCH TIME
The latch on your cat flap has been factory set to re-latch after 2
seconds. The time can be set between 2 and 20 seconds. The period
that you set the re-latch time will depend on your own cat and your
personal preference.
Remove the hinge cover. Press the manual button (Fig. 28), the LED will
flash and the latch will open. Press the timer button within 2 seconds
(Fig. 29). Each press of the timer button will increase the re-latch time by
one second (Fig. 29). Each time the button is pressed the cat flap will
emit a high beep. Once the time out reaches 20 seconds the timer
reverts to 2 seconds and emits a low beep.
The cat flap will automatically return to manual mode after 2 seconds or
by pressing the manual button (Fig. 29). Press the manual button again to
return to automatic mode and the LED will flash and the latch will re-lock.
FIG. 29FIG. 28
MANUAL OPERATION
If you do not wish to use the electronic latch the cat flap can be placed
in manual mode.
Remove the hinge cover. Press the manual button once (Fig. 30) and the
latch will unlock and the LED flashes.
To place the cat flap in automatic mode press the manual button. The
latch will lock and the LED flashes.
Please note that manual mode can only be activated when the cat flap is
powered and programmed.
FIG. 30
8
CLEANING YOUR CAT FLAP
Your cat flap is constructed in the highest quality material with a
toughened flap and has been designed to last for many years. To
maintain its appearance, occasional wiping with a damp cloth is all that is
necessary.
CLEANING THE INFRA RED LENS
For best performance wipe the
lens clean every 4 weeks with a
soft cloth (see circle on
Fig. 32).
BROKEN AND
DAMAGED PARTS
In the event of a broken or
damaged part, your cat flap has
been designed to ensure that
you can replace all parts. In
particular, the flap can be
simply replaced by removing
the removable hinge cover and
inserting a new flap (Fig. 32).
To replace any other part,
please remove the red
handle before dismantling
the cat flap (Fig. 33).
FIG. 32
FIG. 33
LOW BATTERY POWER
When the batteries are starting to run low the cat flap will warn you by
emitting a beep every 2 minutes. The LED will flash continually.
Remove the old batteries and insert the new batteries (Fig. 31). Your cat
flap will need reprogramming. Follow instructions for “Programming Your
Cat Flap”.
LOW COLLAR KEY BATTERY POWER
As the power in your collar key batteries runs low you will notice a loss
of range as your cat approaches the door. Eventually the battery power
will become so low that the cat door will not open. To restore power,
replace the two batteries in the collar key and refer to "Powering the
Key".
FIG. 31
9
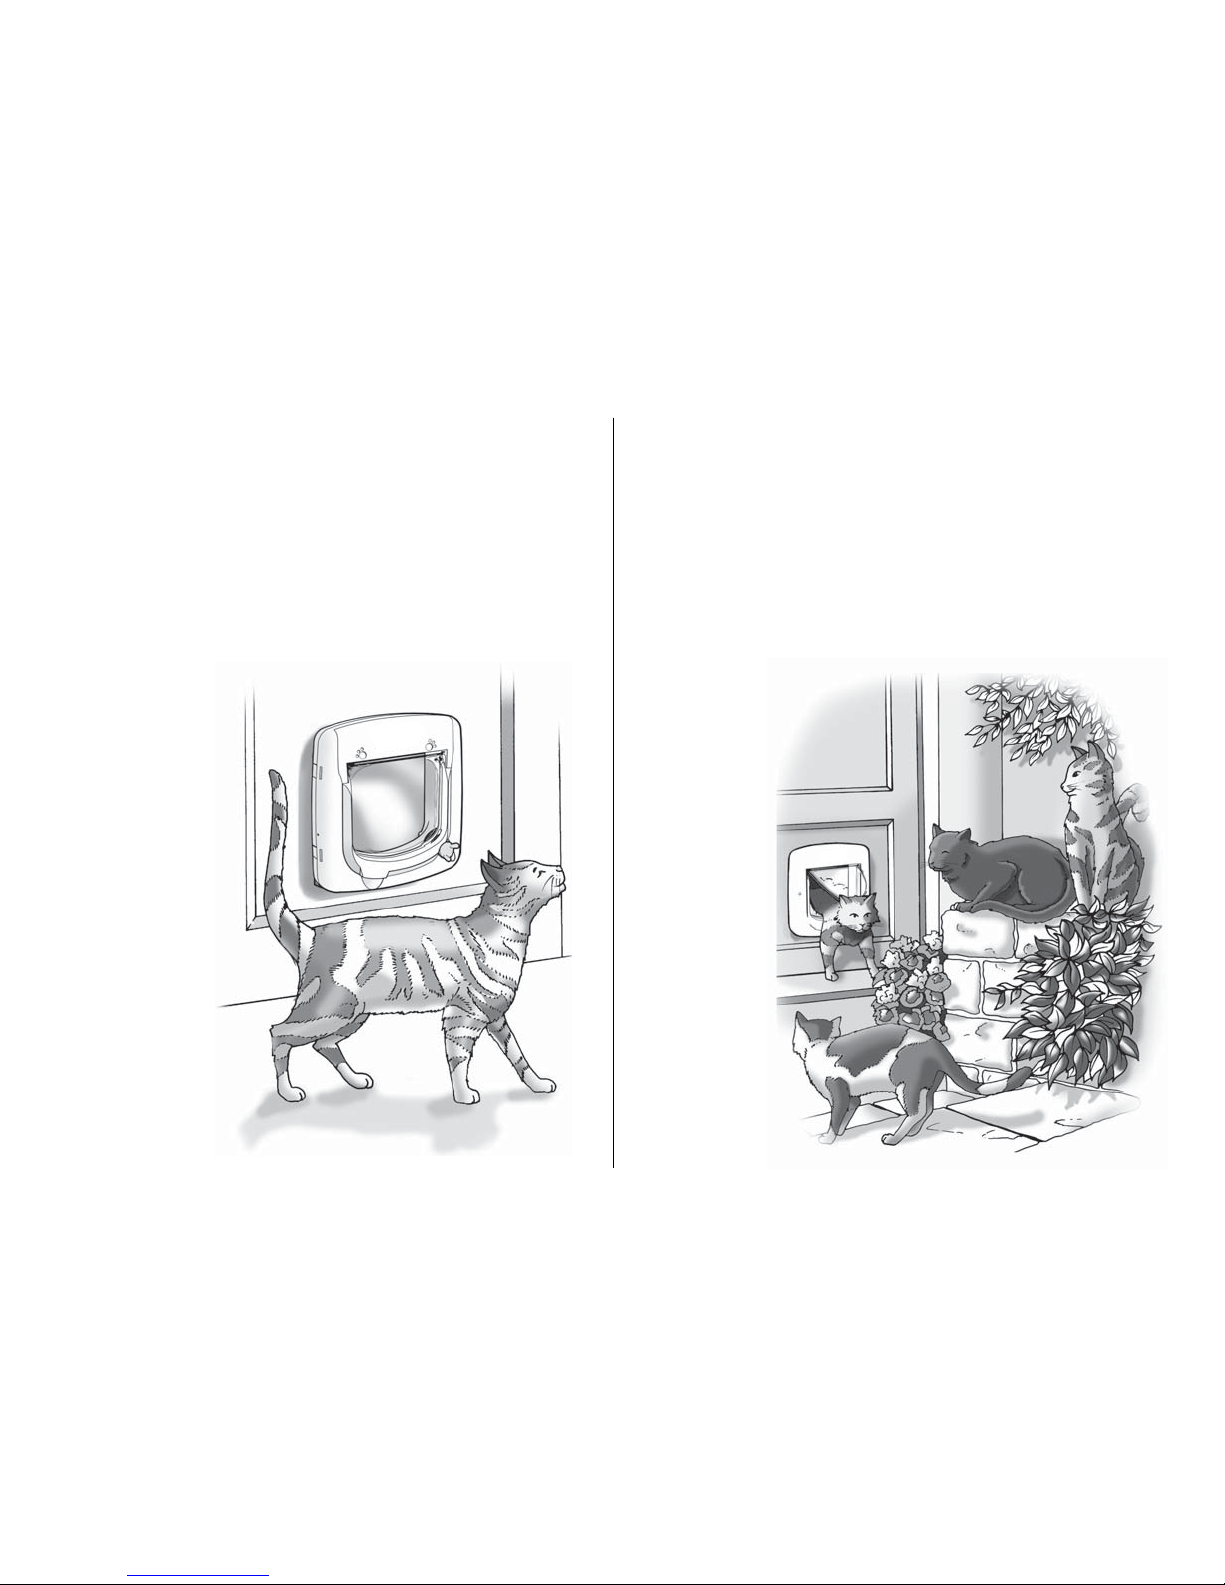
TRAINING YOUR CAT TO USE YOUR PETSAFE®CAT FLAP
Most cats will learn to use your cat flap almost at once but there are a
few which may be a little nervous at first. The following tips, provided by
a well-known consultant in animal behavior, will help your pet to take full
advantage of the outdoor freedom and indoor comfort – which you want
for your cat – and which your new pet door provides.
The most important rule is to be patient with your cat. Don’t be in a hurry.
Let your animal work out for itself that it can go in and out of doors. Don’t
force it through the flap or it may become frightened.
Many cat owners install pet doors when they move. If this applies to you,
make sure your
animal is familiar
with his or her
surroundings before
you fit the pet door.
Take it on
supervised trips
outdoors on a leash,
and make sure it
also feels secure
and comfortable in
its new indoor
environment. Cats
can develop longlasting fears in
unfamiliar
surroundings.
Once you have installed your pet door leave it propped open for some
time. You can do this with a piece of wood or by attaching a clothes peg
to the top of one side of the flap, while it is open. Make sure that the
fixing is secure so that the flaps cannot fall down accidentally. Let your
cat become familiar with it and go in and out freely.
Establish a motive for your cat to use the door. The obvious one is food.
First feed the cat near the door, inside and then near the door outside.
Repeat as often as you need to. Most cats, especially kittens, also have a
strong urge for freedom, perhaps to hunt. Cats are also social creatures –
they enjoy the company of other cats. This can be another reason for
them to explore outside.
It is a good idea
not to use the lock
for your pet door
until your cat is
thoroughly familiar
with using the
door. Your cat may
become confused
as to why you
have installed it.
 Loading...