

Petsafe Petporte smart flap, Staywell Microchip User Manual
Microchip
User’s Guide
Användarhandbok
Käyttöopas
Bruksanvisning
Please read this entire guide before installation.
Läs hela den här handboken före installation.
Lue tämä opas kokonaan ennen tuotteen asennusta.
Les hele bruksanvisningen før du begynner å installere.
First Edition

Explanation of Attention Words and Symbols used in this guide
This is the safety alert symbol. It is used to alert you to potential personal injury hazards. Obey all safety messages that
follow this symbol to avoid possible injury or death.
WARNING
CAUTION
NOTICE
WARNING indicates a hazardous situation which, if not avoided, could result in death or serious injury.
CAUTION, used with the safety alert symbol, indicates a hazardous situation which, if not avoided, could result in minor
or moderate injury.
NOTICE is used to address practices not related to personal injury.
_______________________________________________________________________________________
WARNING
CAUTION
When children are present in the home, it is important to consider the pet door during child proofi ng activities, the pet
door may be misused by a child resulting in the child accessing potential hazards that may be on the other side of the pet
door. Purchasers/Homeowners with swimming pools should ensure that the pet door is monitored at all times and that the
swimming pool has adequate barriers to entry. If a new hazard is created inside or outside of your home, which may be
accessed through the pet door, Radio Systems
remove the pet door. The closing panel or lock, if applicable, is provided for aesthetic and energy effi ciency purposes and
is not intended as a security device. Radio Systems
this product accepts full responsibility for oversight of the opening it creates.
• Power Tools. Risk of severe injury; follow all safety instructions for your power tools.
• Be sure to always wear your safety goggles.
The user, prior to installation, must become familiar with all building codes that may affect the installation of the pet door and
determine, along with a licensed contractor, its suitability in a given installation. This pet door is not a fi re door. It is important
for the owner and contractor to consider any risks that may be present inside or outside of the pet door, and any risks that
may be created by subsequent changes to your property and how they may relate to the existence and use, including
misuse of the pet door.
®
Corporation recommends that you properly guard access to the hazard or
®
Corporation will not be liable for unintended use and the purchaser of
NOTICE
• Keep these instructions with important papers; be sure to transfer these instructions to the new owner of the property.
• Please read these instructions fully prior to forming or modifying an opening in your selected door or wall. We strongly
recommend that your Petporte smart fl ap
that it works with the microchip in your cat fi rst.
• We do not accept responsibility for incorrect operation of the unit should modifi cations be made to the antenna coil. Under
no circumstances should you alter or adjust the windings of the antenna coil.
• This unit only operates properly when outside temperatures are greater than -15° C and less than 55° C (greater than 5° F
and less than 131° F).
• Installation in a Metal Door: Prior to installation it is recommended to check if the Petporte smart fl ap
with your metal door. To do this, hold the assembled and programmed Petporte smart fl ap
your cat up to porch. If the lock releases, the door will function properly when installed.
®
is assembled, powered up and programmed for your cat and a check made
®
will operate properly
®
up to the metal door and bring
2
Your Staywell® Pet Door...
Thank you for choosing Staywell® by PetSafe®. Our mission is to be the most trusted brand in the pet ownership experience. We want
to ensure your pet’s safety by providing you with the products and techniques to create the most comfortable lifestyle for your pet. If
you have any questions, please contact the Customer Care Centre. For a listing of Customer Care Centre telephone numbers, visit our
website at www.petsafe.net.
To get the most protection out of your warranty, please register your product within 30 days at www.petsafe.net. By registering and
keeping your receipt, you will enjoy the product’s full warranty and should you ever need to call the Customer Care Centre, we will be
able to help you faster. Most importantly, Staywell
warranty information is available online at www.petsafe.net.
®
by PetSafe® will never give or sell your valuable information to anyone. Complete
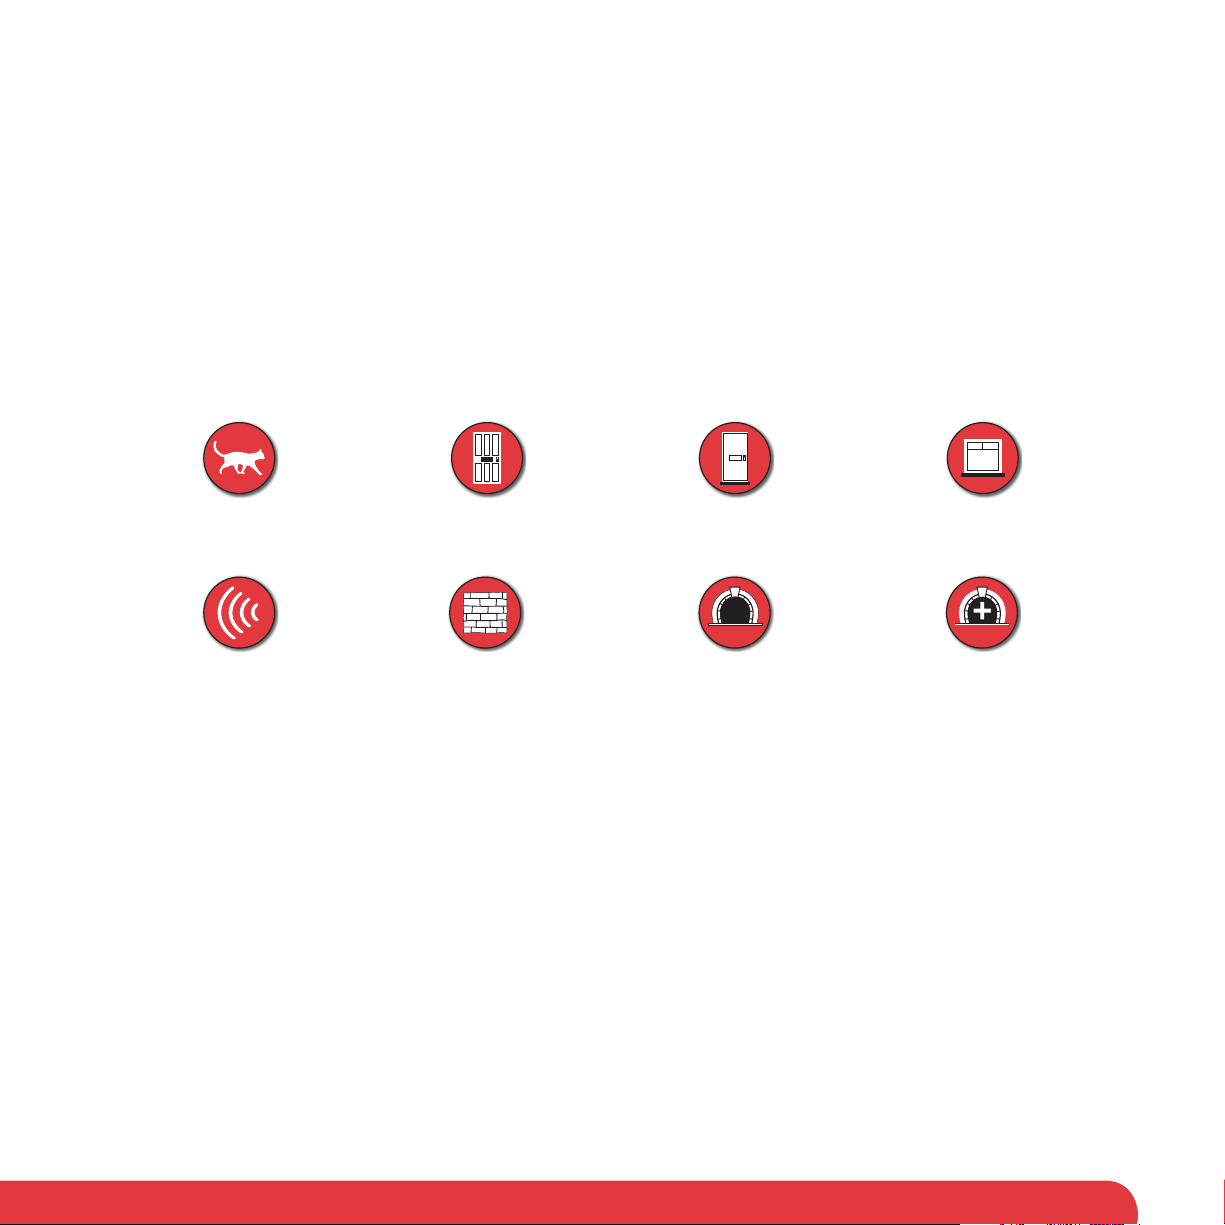
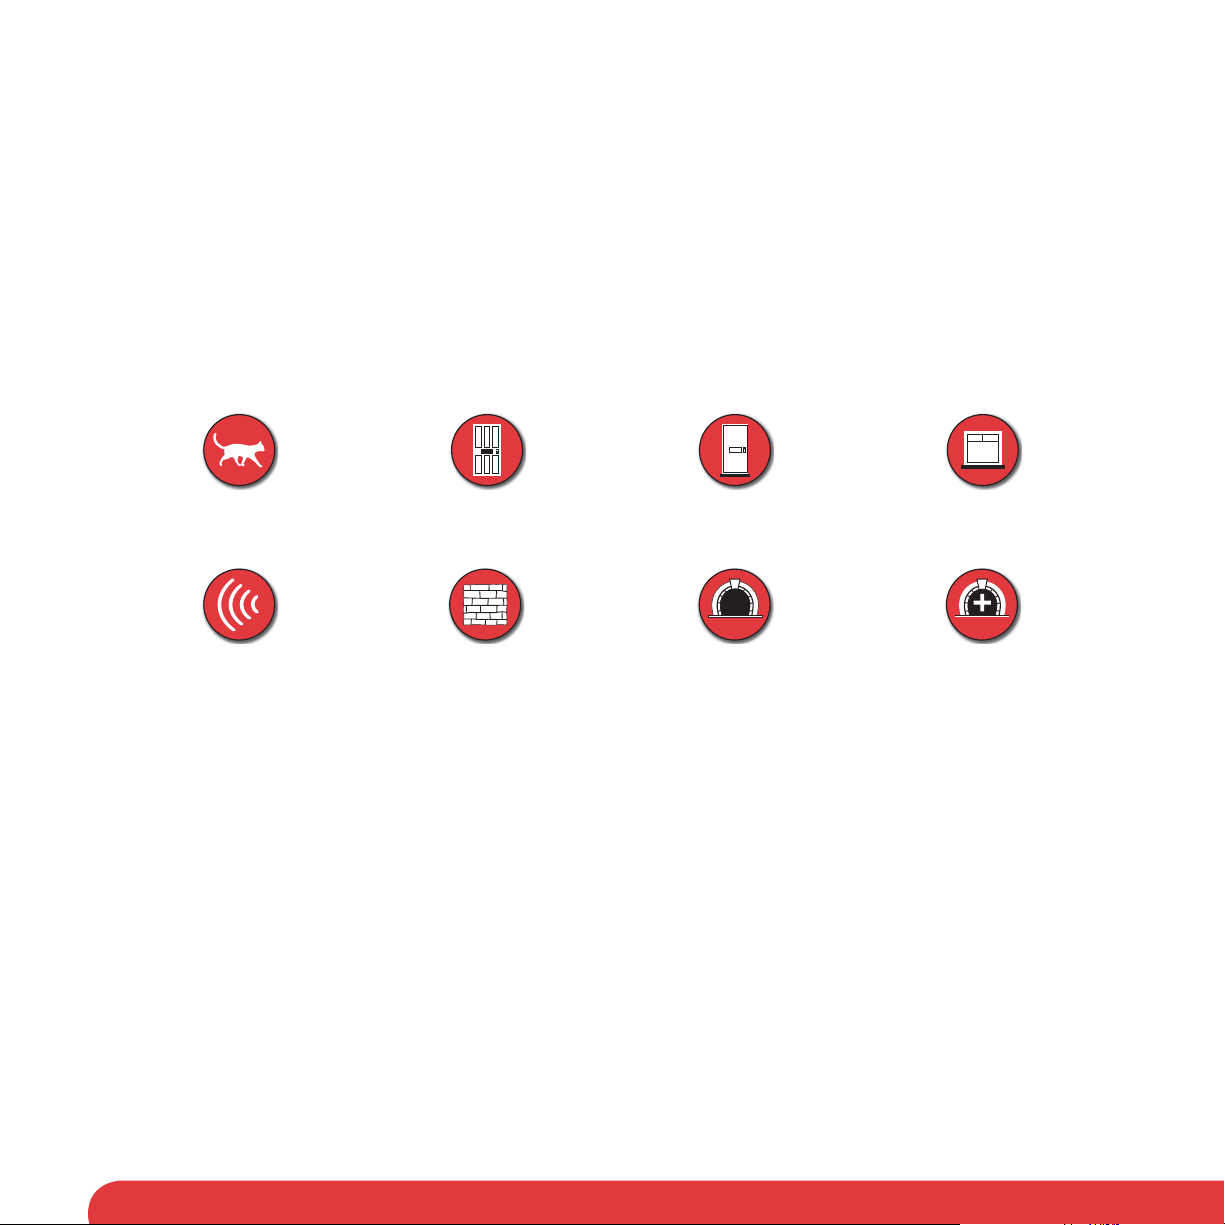
Cat
Fits wooden doors
Fits PVC/uPVC/metal
Fits glass windows & doors,
single and double glazed*
Microchip
R.F.I.D.
†
Fits brick walls
Optional tunnel included is
suitable for most thickness
Additional tunnel extensions
available
of doors
All Staywell® by Petsafe® Microchip Cat Flaps are suitable to fi t any door or partition although additional materials and competent DIY
skills may be required.
Note: This cat fl ap is designed as a retrofi t for Staywell
required. Minor adjustments to the cut-out are needed.
* It is not possible to cut holes in toughened glass or double glazed units except at the time of manufacture. Please consult a glazier.
† Microchip R.F.I.D. (Radio Frequency Identifi cation)
®
by PetSafe® 300, 400, 500 and 900 series cat fl aps. Some simple DIY skills are
3

Table of Contents
Included with the Petporte smart fl ap® ................................................................................................................. 5
Tools Required ........................................................................................................................................................ 6
How it Works .......................................................................................................................................................... 6
®
Petporte smart fl ap
Programming Cats Into the Petporte smart fl ap® ................................................................................................ 7
Checklist for all installations ................................................................................................................................... 8
Measurement and Marking ................................................................................................................................... 8
Petporte smart fl ap® Installation Into a Non-Glass Door ..................................................................................... 9
Petporte smart fl ap® Installation Into Glass Doors or Windows .......................................................................... 9
Petporte smart fl ap® Installation into Walls ......................................................................................................... 10
Assembly Instructions .......................................................................................................................................... 10
Petporte smart fl ap® Quick Guide ....................................................................................................................... 13
Extended Modes - Quick Guide ......................................................................................................................... 14
Operating Modes ................................................................................................................................................. 15
Extended Modes .................................................................................................................................................. 16
LED Indicator - Quick Guide ............................................................................................................................... 18
Battery Backup Facility ........................................................................................................................................18
Training Your Cat to Use the Cat Flap ................................................................................................................. 19
Accessories .......................................................................................................................................................... 19
Cleaning the Cat Flap .......................................................................................................................................... 19
Disable the Cat Flap ............................................................................................................................................19
Battery Disposal ................................................................................................................................................... 20
Important recycling advice ..................................................................................................................................20
Compliance .......................................................................................................................................................... 20
Terms of Use and Limitation of Liability .............................................................................................................. 20
Svenska ............................................................................................................................................................... 21
Suomi ................................................................................................................................................................... 40
Norsk ................................................................................................................................................................... 59
Assembly (For Testing Purposes Prior to Installation) ....................................................... 7
4
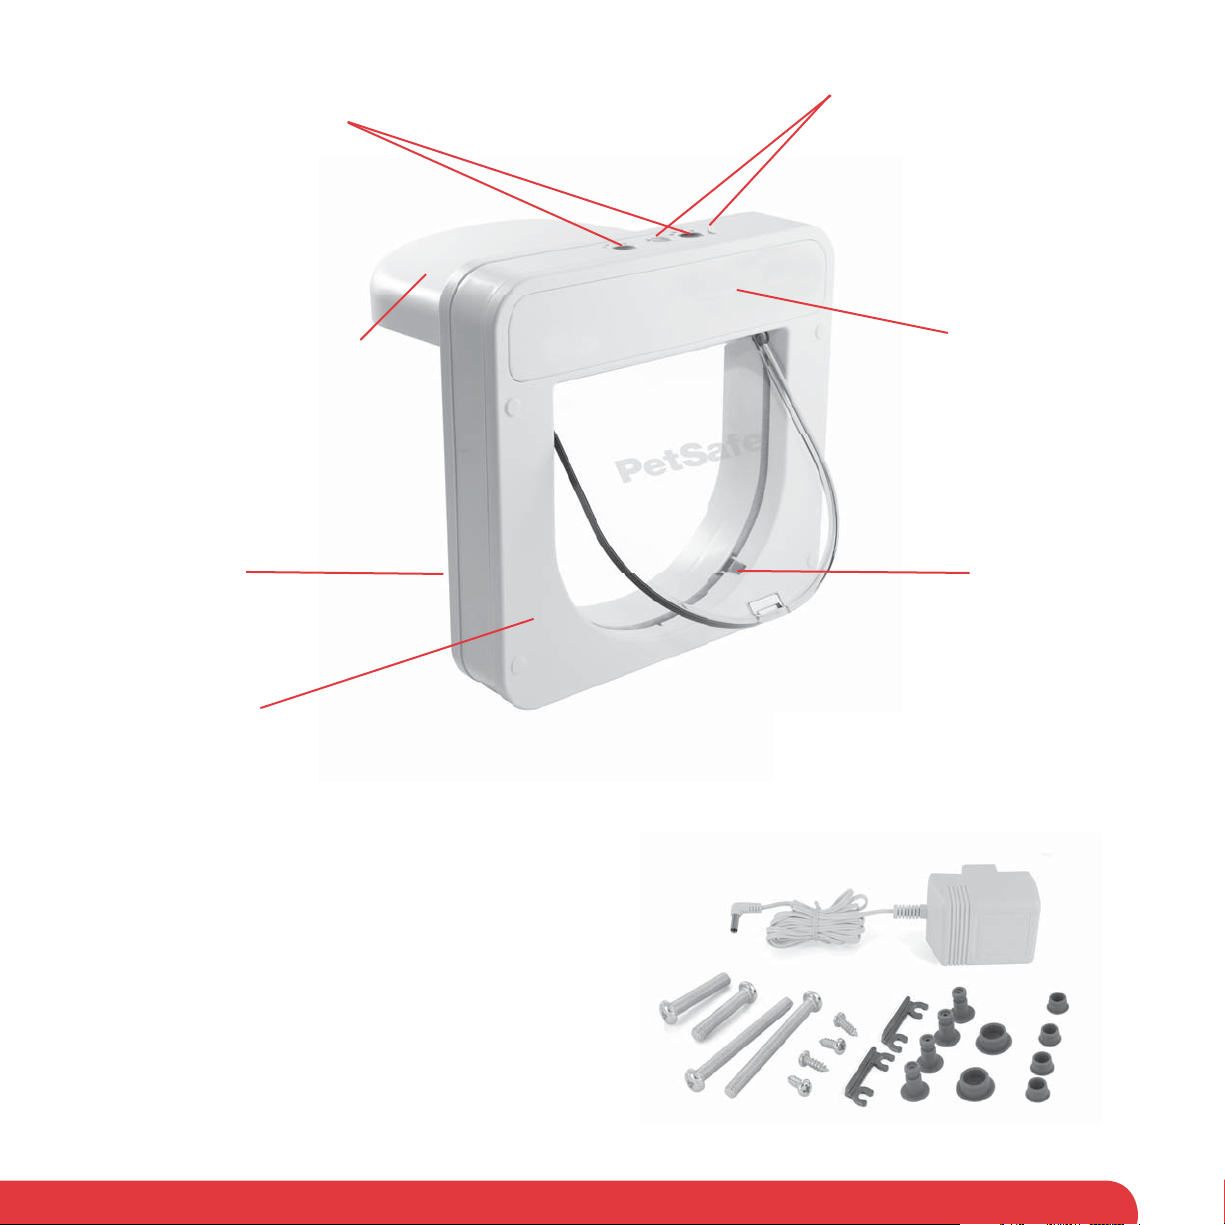
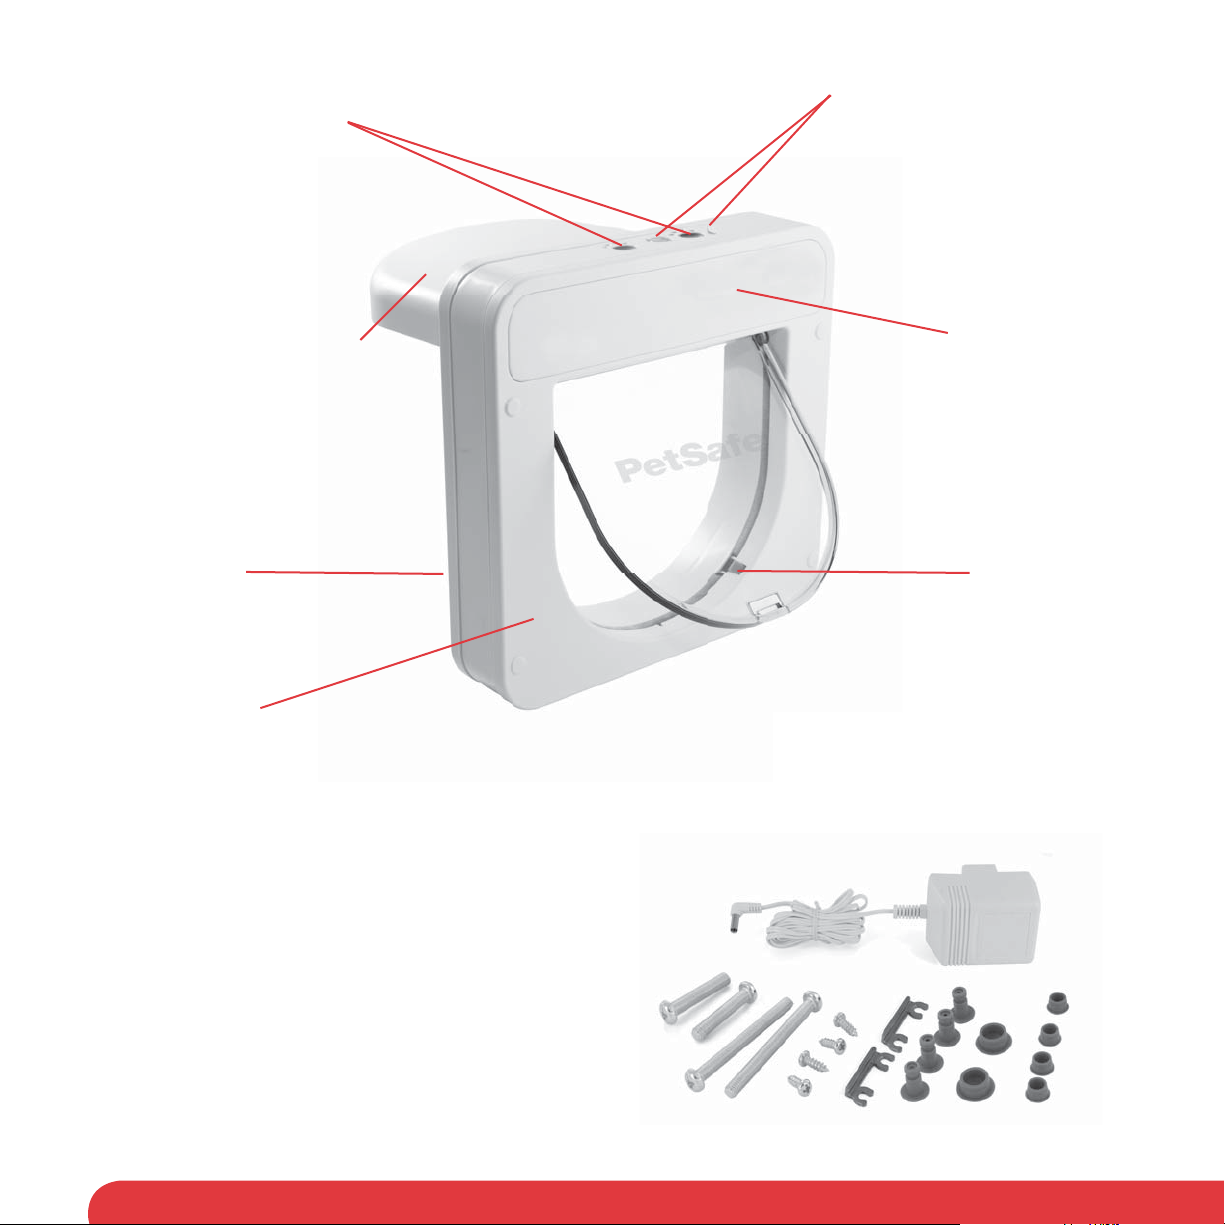
Program buttons
(Red & Green paw shaped)
LED Indicator Lights (Cat / Moon)
InsideOutside
Porch with Microchip scanner
Green - In Lock Red - Out Lock
Large Cover Plate
Small Cover plate
Included with the Petporte smart fl ap® :
Cutting Template
Power Supply
2 - Large M6 Screws
4 - Self-Tapping Fixing Screws
2 - Horseshoe Clips
4 - Mushroom Pins
2 - Large Blanking Plugs
4 - Small Blanking Plugs
2 - Small M6 Screws (For installation into glass doors or windows)
5
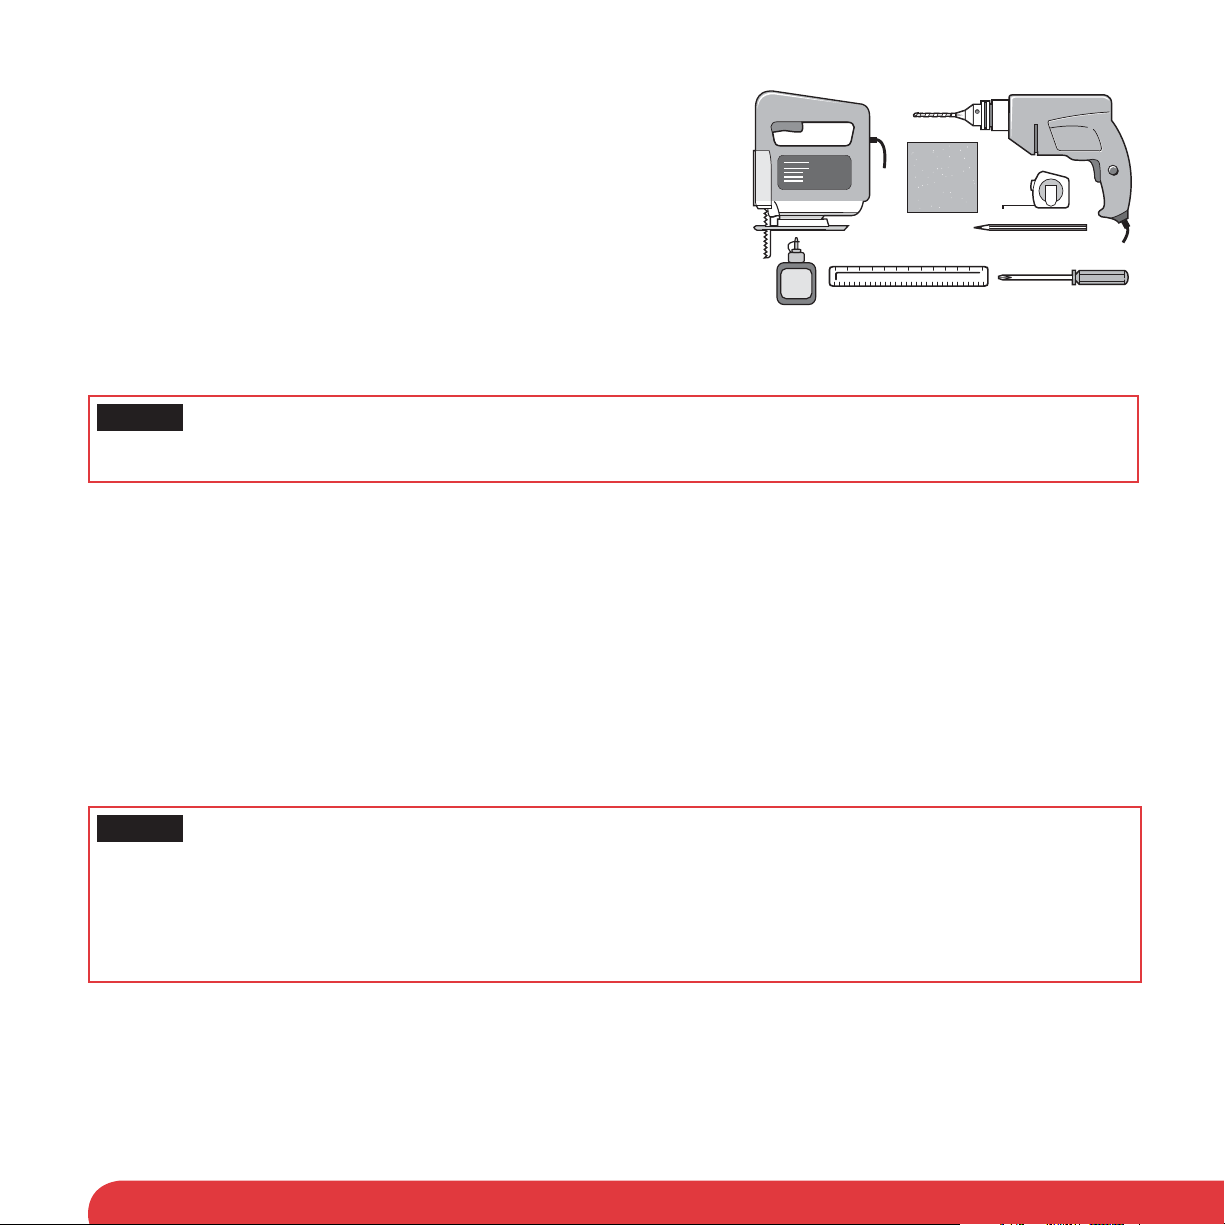
Tools required
• Pencil • Screwdriver
• Ruler • Tape measure
• Jig or Keyhole Saw • Glue
• Electric Drill • Sand paper
• 7 mm Drill bit
During installation great care must be taken using drills or other cutting equipment. If you are at all in doubt then please hire the
services of a qualifi ed professional to fi t the cat fl ap for you.
NOTICE
responsibility for damage caused to doors or walls in the forming or modifi cation of such openings or any costs associated with the
repair or reinstatement of doors or walls.
We do not accept any responsibility for openings that are formed or modifi ed in doors or walls. We do not accept any
How it Works
Your Petporte smart fl ap® Microchip Cat Flap has been designed to allow your animals easy access to the outside world whilst keeping
other troublesome cats out of your house. The Petporte smart fl ap® cat fl aps do not require your animals to wear collars or accessories.
The Petporte smart fl ap
implanted in your animal. Whenever your cat passes under the porch of the cat fl ap, the system scans the unique number and, if that
number matches the number already programmed in for that cat, it will unlock the cat fl ap and allow the animal to enter. If the animal
has not been programmed into the system then the number scanned will not match and the cat fl ap will remain locked preventing
access to your property.
If you are not sure whether your cat has a microchip, then just ask your vet to scan for it. The Petporte smart fl ap
read the most common type of microchip, the FDX-B (15 digit): it will not read other types of microchips. If you are not sure what
type of microchip your cat has, then please either ask your vet or visit www.petsafe.net and navigate to our Chip Checker microchip
compatibility checker to verify that your microchip is compatible.
NOTICE
We strongly recommend that your Petporte smart fl ap
made that it works with the microchip in your cat fi rst.
Installation in a Metal Door: Prior to installation it is recommended to check if the Petporte smart fl ap
your metal door. To do this, hold the assembled and programmed Petporte smart fl ap® up to the metal door and bring your cat
up to porch. If the lock releases, the door will function properly when installed.
Please read these instructions fully prior to forming or modifying an opening in your selected door or wall.
®
Microchip Cat Flap reads the unique identifi cation number stored on your cat’s microchip that your vet has
®
is designed to
®
is assembled, powered up and programmed for your cat and a check
®
will operate properly with
Whilst the Petporte smart fl ap® works with the most common microchips used in the United Kingdom and Europe (FDX–B 15 digit
microchips) there are a small number of cats that have microchips without the necessary range to reliably operate the Petporte smart
fl a p®. Occasionally microchips migrate to positions within the cat that the scanner cannot read reliably. In these cases the Petporte
smart fl ap® can only be used as a cat fl ap without the selective entry. Therefore, before the Petporte smart fl ap® is actually fi tted to the
selected door or wall we strongly advise you that your Petporte smart fl ap® unit should be assembled, powered up, programmed for
your cat and that you have ensured that the unit will work with the microchip in your animal at the same distance as your cat will be
approaching the Petporte smart fl ap
®
when it is installed.
6

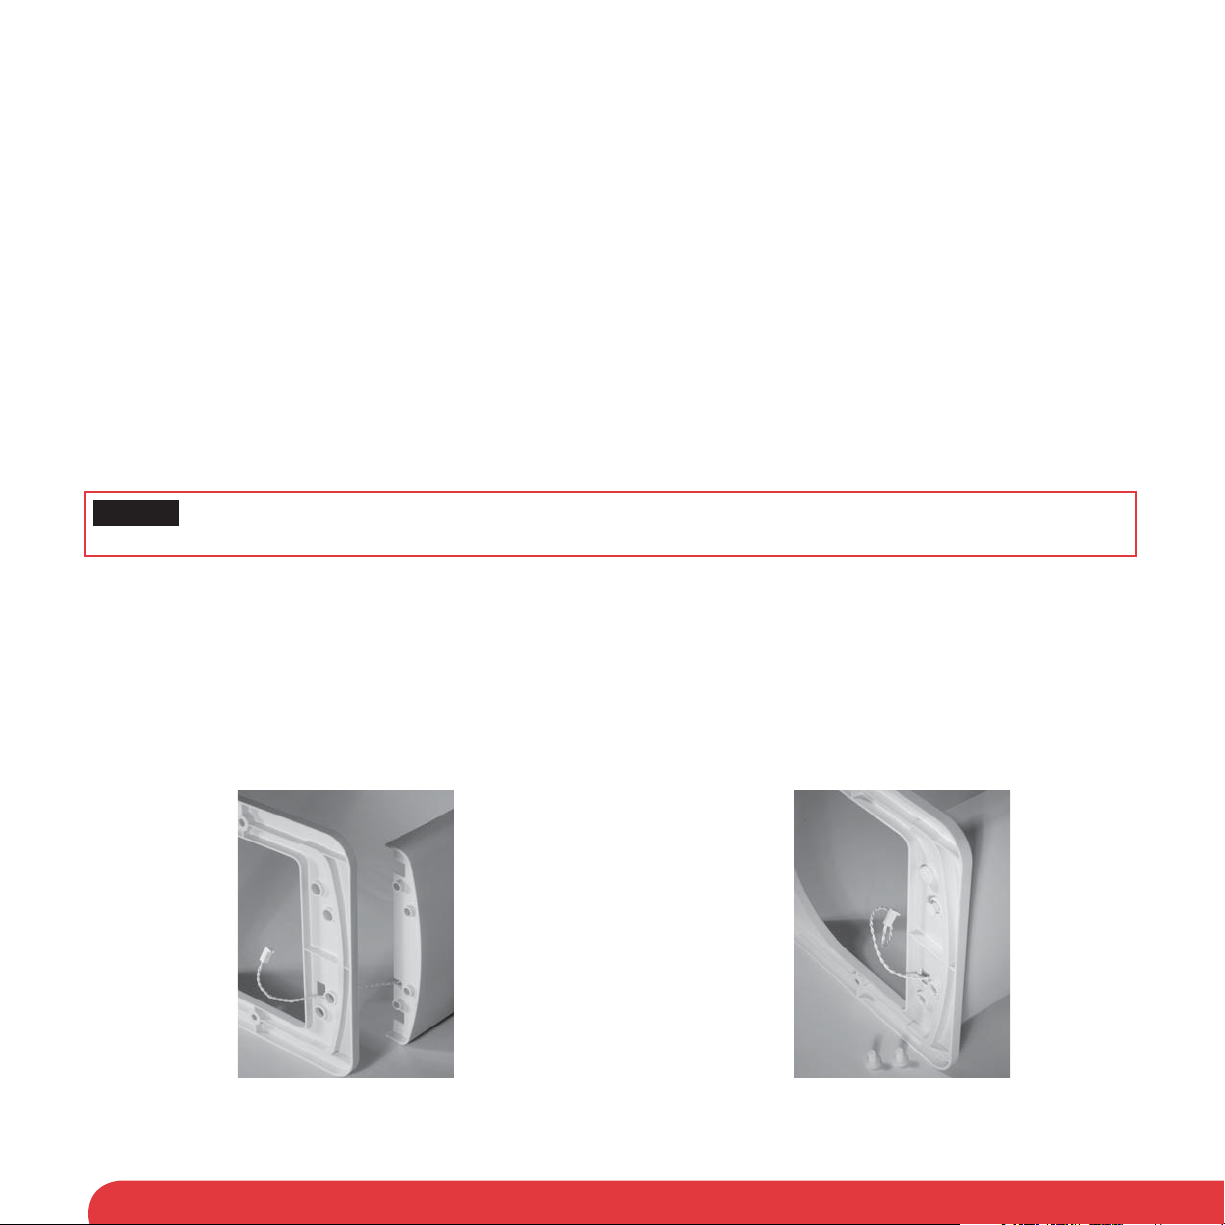
Petporte smart fl ap® Assembly (For Testing Purposes Prior to Installation)
Important: Before assembling or disassembling the unit, always ensure that the power is turned off and any installed
battery is removed. (see Figures on page 10-12)
1. Offer the porch up to the front of the exterior section of the cat fl ap (see Figure 1), ensuring that the wire and connector pass through the battery
compartments on the porch and exterior sections.
2. Insert the four plastic “mushroom” pins through the holes on the reverse side of the exterior section of the Petporte smart fl a p® and through the
porch (see Figure 2).
3. From the inside of the porch, secure the plastic “mushroom” pins in place with the “horseshoe” clips (see Figure 3).
4. Next, remove the Extension Tunnel from the interior section and remove the four self-tapping fi xing screws from the large cover plate separating it
from the main unit (see Figure 4).
5. Remove the transparent door fl ap.
6. Feed the Porch Cable from the porch and through the battery compartment on the interior section (see Figure 5). Mount the exterior section with
attached porch over the tunnel molding on the interior section.
7. Temporarily attach the external and interior sections using the two supplied M6 screws through the exterior section and loosely screw into the
interior section (see Figure 6a).
8. Connect the porch wire and connector onto the electronics board. Any excess cable should be routed to the right of the battery compartment
(see Figure 6b).
9. Attach the low voltage power cable to the power connector on the left of the electronics board and route the cable along the cable guides
so that the wire passes through one of the slots at the bottom of the Petporte smart fl ap® (see Figure 7). Do not plug in or turn on the power.
Alternatively, or in addition to the power cable, attach a 9-volt PP3 battery and insert into the battery compartment below the electronics board.
10. Replace the transparent door fl ap ensuring that the ridge around the door is inward facing.
11. Place the large cover plate over the interior section and loosely screw in place using the four self tapping screws for testing purposes (see Figure 8).
12. If not already in position click the small cover plate in place over the battery compartment (see Figure 9).
13. Power up your Petporte smart fl ap® by plugging in and/or turning on the mains supply or temporarily activate the battery by gently pushing the
transparent door fl ap against the green lock to activate a switch. There will be a small mechanical click. Only use the power supply included
with the product. Using an unauthorised power supply will invalidate your guarantee and may damage the cat fl ap.
14. Now please refer to the programming instructions (below) to record your cat’s microchip number into your Petporte smart fl ap®. Once your cat
is programmed you need to ensure that the Petporte smart fl ap® can reliably read the microchip at the distance that your cat will approach it
when installed. Repeat this for all of your cats that you want to be programmed in (see Figure 10a and 10b).
_______________________________________________________________________________________
Programming Cats Into the Petporte smart fl ap®
Because your Petporte smart fl ap® is initially supplied unprogrammed, when it is fi rst powered both the green and red lights will fl ash to indicate that
there are no animals programmed in the unit. The door locks will also open, allowing free access for any animal to enter or exit. When programming
the Petporte smart fl ap® with an animal for the fi rst time or if you exceed the programming time, ensure that your pet is nearby as you have 30
seconds in which to introduce the animal to the scanner (porch). You may wish to enlist the help of another person, as cats are naturally suspicious
of anything new!
Press and hold the Green Button for about 10 seconds until the green light stays illuminated and then release the Green Button. A beep should
sound and the red light should stop fl ashing with only the green light left fl ashing. You now have 30 seconds to pass the cat underneath the porch.
There is no need to post the cat through the Petporte smart fl ap
implanted between the shoulder blades of the animal; it is that part of the animal that needs to be under the porch area in order to program the
unique identifi cation number for that animal. Once the microchip has been successfully scanned, the Petporte smart fl ap® will beep three times. The
green light will stop fl ashing, and the green lock will come up to its locked position.
If this procedure fails the fi rst time or if you exceed the programming time, simply repeat the process.You will need to program the unit with each of
your cats by using this method. Your Petporte smart fl ap
Only once you are completely satisfi ed that your Petporte smart fl ap
Petporte smart fl ap
®
.
®
as this can lead to unnecessary stress for the animal. Microchips are normally
®
can be programmed with up to 25 cats.
®
works with all your cats’ microchips, prepare to install your
7

Checklist for all installations:
Before positioning the Petporte smart fl ap® it is important to consider the following points.
If fi tted into a door: Will any of the components of the Petporte smart fl ap® be obstructed by the door opening and closing?
If fi tted into a wall: Are there any objects such as doors that could open on to the Petporte smart fl ap® once it is fi tted?
Where is the closest power outlet? Your Petporte smart fl ap® is supplied with a low voltage power supply that has a 2.5 m (8’)
electrical cable. If your nearest power outlet is more than 2.2 m (7’) away then you will require an Extension Lead. Please refer to
the Accessories section for information on purchasing a 5 m Extension Lead.
Battery operation alone. For reliable and fast operation we recommend the use of the external power supply included with the
Petporte smart fl ap®. However, an optional 9-volt PP3 battery may be plugged in so that during power cuts your cat will still be
able to use the cat fl ap. We recommend the use of a good quality non-rechargeable lithium battery in order to give the longest
battery life. Please note that there are certain options that are not available when the Petporte smart fl ap® is powered by batteries:
Automatic Night Mode and Wall Installations.
When the Petporte smart fl ap
microchip and therefore will normally register and unlock the cat fl ap before your cat is at the transparent door fl ap. When using
batteries, your cat will need to push the transparent door fl ap in order to activate the microchip scanner. If your cat just sits outside
the cat fl ap then it will not activate the scanner and will not allow access.
Extension tunnels for doors over 52 mm (2.05”) thick and walls. Please note that the Petporte smart fl ap® comes with an
extension tunnel to fi t doors up to 52 mm (2.05”) thick. If your installation requires a tunnel longer than this, extra tunnel sections,
each providing 40 mm (1.6”) of additional length, are available . Please refer to the Accessories section for information on
purchasing additional Extension Tunnels. Extension Tunnels can be stacked together by glueing and pushing them together.
Is there a large step down from your door? The ideal height of the cat fl ap is such that the base of the unit is at the same height
as your cat’s stomach. However, due to door construction, it may not always be possible to mount any cat fl ap this low and in
these circumstances it is recommended that the Petporte smart fl ap® should be installed as low down on the door as is possible. If
necessary, a little step can be installed which will help reduce the distance from the scanner porch to the cat’s microchip (as long
as it is not going to become a tripping hazard for people).
If there is an existing opening in your door, is it greater than 212 mm (8 3/8”) diameter (circular) or 171 mm wide X 180 mm
tall? If an existing opening in your door or wall is greater than these dimensions, then it is acceptable to fi t the Petporte smart fl a p®,
providing the indoor and outdoor cover plates cover the opening. If the opening is larger than the indoor and outdoor cover plates,
the Petporte smart fl ap® may be fi tted by replacing the door panel or constructing panels to cover the existing opening so that a
smaller opening can be cut.
_______________________________________________________________________________________
®
is being powered by the external power supply, the scanner is scanning all the time for your cat’s
Measurement and marking
Measure the belly height of your cat. This is usually 100 mm -150 mm
(4” - 6”) (Figure A).
Mark this measurement on the outside of your door and draw a
straight horizontal line 171 mm (6 3/4”) (Figure B).
Please bear in mind that this line will eventually be the bottom of the
hole you will cut in your door and that the frame of the cat fl ap will be
slightly lower. If necessary, this line may have to be raised slightly to
account for this.
8
Fig. A
Fig. B
(x)
(x)

Petporte smart fl ap® Installation Into a Non-Glass Door
1. Attach the supplied Cutting Template to the outside of your door in the selected position ensuring that it is the right way up and is level.
2. Drill the two holes with a 7 mm (9/32”)-diameter drill bit as marked on the Cutting Template into the house door.
3. Cut out the large hole as marked on the Cutting Template by the dashed line. When cutting this hole, keep to the outside of the
dashed line to ensure that there is clearance for the Extension Tunnel.
4. Clean the area from any dust, dirt, or debris.
Note: Follow Steps 5-9 if you completed the assembly instructions (for testing) on page 7.
5. If the low voltage power supply is plugged in to the mains, unplug it.
6. Remove the interior four self-tapping fi xing screws, the large interior cover plate, and transparent door.
7. Remove the two M6 screws, which hold the exterior and the interior sections together.
8. Remove the battery, if attached.
9. Unplug the porch cable connector from the electronics board.
10. Mount the interior section through the hole with any additional Extension Tunnel sections that are required. (see Figure 11)
11. Feed the Porch Cable from the porch and external section through the door and through the rectangular opening on the interior
section. Mount the exterior section on the outside of the door over the Extension Tunnel.
12. Put the supplied M6 screws through the exterior section and screw into the interior section. Please note depending on the
thickness of your door you may need to cut the screw length down.
13. Push the Porch Cable connector onto the electronics board. Any excess cable must be routed to the right of the battery
compartment. Ensure the cable does not lay on top of the electronics board. (see Figure 12a and 12b)
14. If you require an extension lead, then plug it into the electronics board rather than the power supply. The provided power supply
then connects in the extension lead.
15. If you do not require an extension lead, attach the power cable to the power connector on the electronics board. Route the cable
along the cable guides so that the wire passes through one of the slots at the bottom of the cat fl ap closest to the power supply.
16. Replace the transparent door fl ap ensuring that the ridge around the door is facing inward.
17. Reattach the interior large cover plate using the four self tapping fi xing screws.
18. If a battery is to be used as an alternative or in addition to the power supply then attach a 9-volt PP3 battery and insert into the
battery compartment within the internal section. Click the small cover plate into place over the battery compartment.
19. When the installation of your Petporte smart fl ap® is completed, place the two blanking plugs over the screws on the exterior frame
and the four blanking plugs on the interior frame. (Figure 13)
20. If you select not to use the Petporte smart fl ap® utilising battery power alone, plug in the power supply. Your Petporte smart fl ap® is
now ready to use.
_______________________________________________________________________________________
Petporte smart fl ap® Installation Into Glass Doors or Windows
The Petporte smart fl ap® is also designed for installation into glass and requires a circular hole of diameter 212 mm (8 3/8”). Working
with glass is a skilled job and should be carried out by a professional glazier. Your glazier will need to cut a circular hole of diameter
212 mm (8 3/8”) as per the glass template. If you are in any doubt then please consult with your glazier about the fi tting of the
Petporte smart fl ap®. Once a suitable opening is formed, then install cat fl ap as described for a non-glass door beginning with step 5.
Note: Two, small M6 screws have been included.
.
9
Petporte smart fl ap® Installation into Walls
Wall fi xing screws are not provided with this catfl ap as the type needed will vary greatly depending on the wall construction. Various fi xing types are
available from hardware and D.I.Y. stores depending on the wall construction: chemifi x bolts and nuts, screws fi xed into inter-set or plastic rawl plugs,
nylon self drill or polytoggle.
1. An opening must be formed in the wall at the appropriate height and size for your cat to be scanned, based on the Cutting Template provided. The
opening should be formed by a qualifi ed builder avoiding utility supplies and not damaging the integrity of buildings damp-proof courses.
The principle difference between fi tting the Petporte smart fl ap
to the wall.
2. To fi x the interior section to the wall utilise the four, 5 mm diameter holes in the corners of the interior section that are accessible with the large
interior cover plate removed.
3. To fi x the exterior section to the wall utilise the two, 6 mm diameter holes in the sides of the exterior section that support the porch.
®
The Petporte smart fl ap
individual tunnel providing 40 mm additional length. These are not provided with the Petporte smart fl ap® because wall thicknesses vary. Some
consumers prefer to form their own tunnels by using marine grade plywood or other materials.
Please refer to the Accessories section of this guide for information on purchasing additional Extension Tunnels.
comes with a single Extension Tunnel that provides 52 mm length. Extra Extension Tunnels can be purchased, with each
®
through a wall and a door is the method of fi xing the interior and exterior sections
NOTICE
Under no circumstances should you alter or adjust the windings of the antenna coil.
We do not accept responsibility for incorrect operation of the unit should modifi cations be made to the antenna coil.
_______________________________________________________________________________________
Assembly Instructions
Fig. 1 Fig. 2
10
Pass the porch cable from the
porch through the small rectangular
opening in the exterior section.
Pass the four “mushrooms” pins
through the back of the exterior
section into the porch.
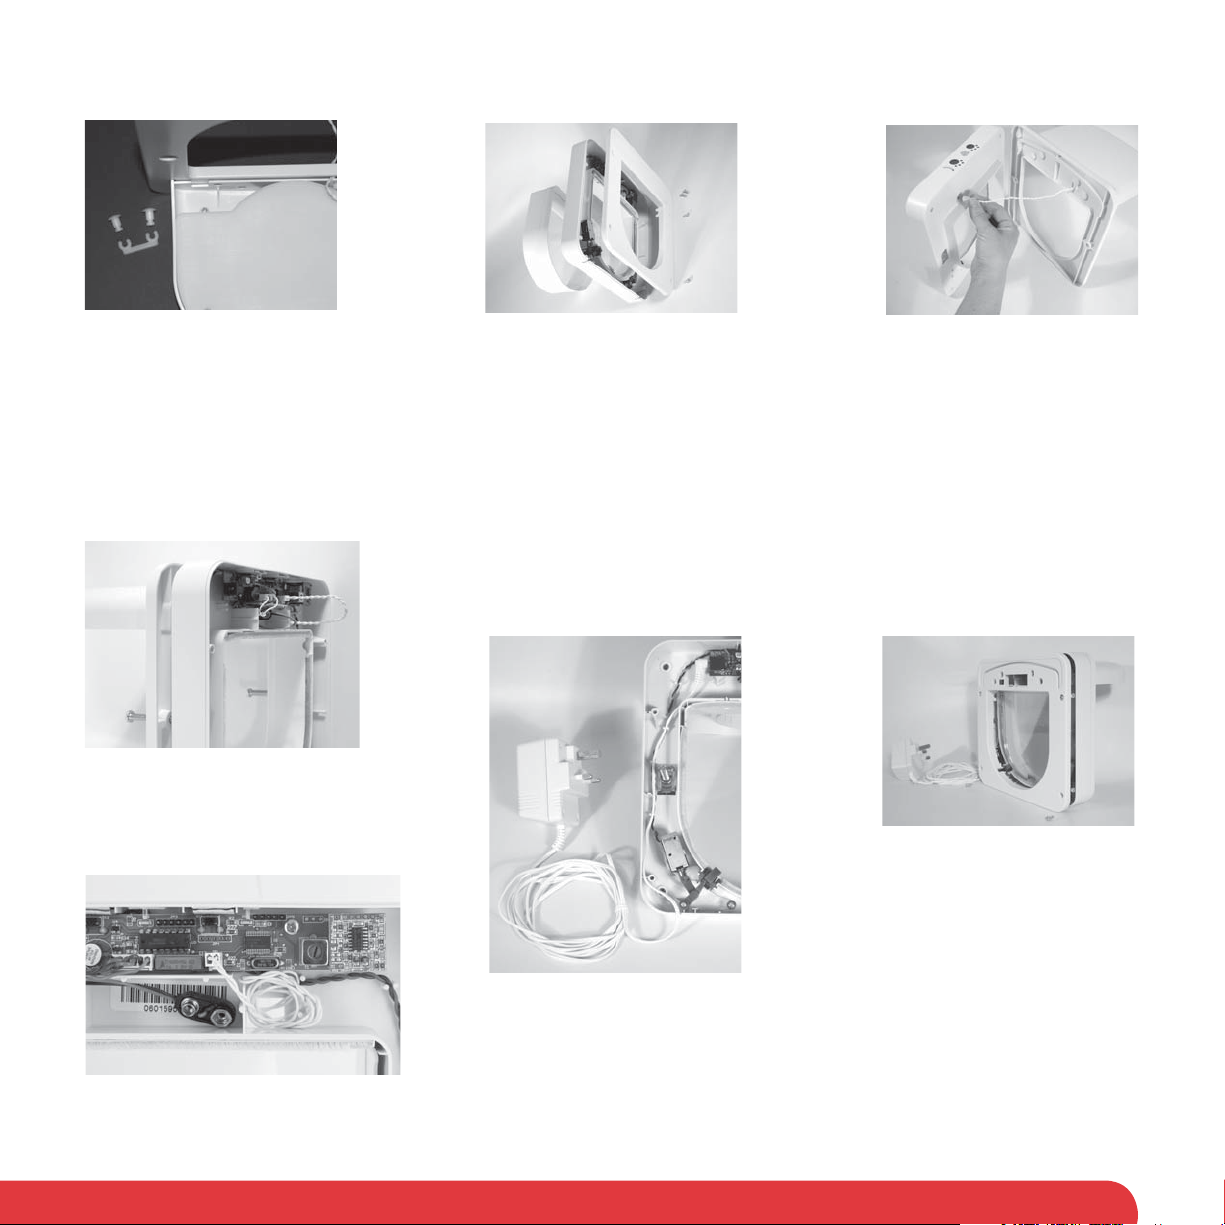
Fig. 3 Fig. 4
Fig. 5
Attach the “horseshoe” clips to
the four “mushrooms” pins on the
underside of the porch.
Fig. 6a
Temporarily attach the porch and
exterior section to the interior
section with the two M6 screws.
Fig. 6b
Remove the extension tunnel
from the interior section. Loosen
the four self-tapping fi xing
screws from the interior section
and remove the large cover
plate.
Pass the porch cable from the
porch and exterior section through
the rectangular opening in the
interior section.
Fig. 7 Fig. 8
Replace the large cover plate
to the interior section and
temporarily secure with the four
self-tapping fi xing screws.
Attach the porch cable to the
electronics board as shown. Any excess
cable must be routed to the right of the
battery compartment.
Attach the low voltage power
supply connector to the
electronics board and pass
the power cable through the
clips and out the opening at the
bottom of the interior section.
11
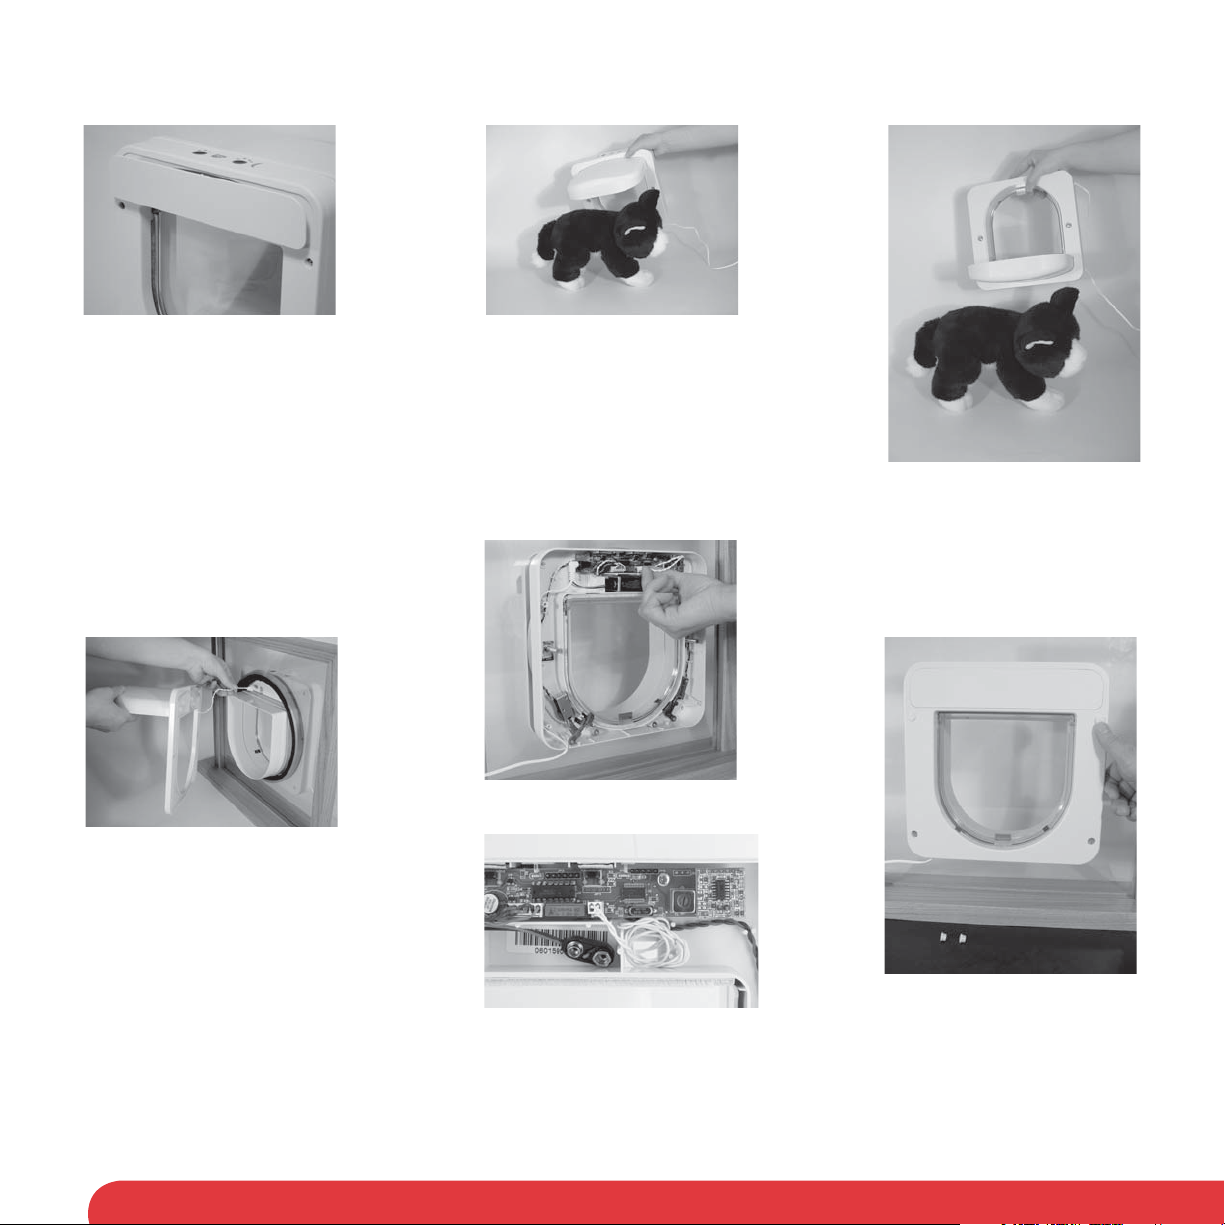
Fig. 9 Fig. 10a Fig. 10b
Click the small cover plate back
over the interior section.
Fig. 11
When fi tting the Petporte
smart fl ap
offer the interior section with
Extension Tunnel if needed up
to the opening. Next pass the
porch cable from the porch
and exterior section through
the rectangular opening in the
interior section.
®
into an opening
Power up the Petporte smart
fl a p®, program in your cat as
shown on page 7, and pass the
Petporte smart fl ap® over your cat
at a distance that your cat would
normally approach it to check
that will work for your cat.
Fig. 12a
Fig. 12b
Attach the porch cable to the
electronics board and hold the
exterior and interior sections
together using the two M6 screws.
Tighten the screws to hold the
Petporte smart fl ap® in the desired
position within the opening.
Alternatively you can hold
the Petporte smart fl ap
an inverted orientation for the
purpose of programming your
cat’s microchip.
®
in
Fig. 13
Once positioned, attach the large
cover plate and secure with the four
self-tapping fi xing screws. Click in
place the small cover plate. Place
all of the blanking plugs, four small
ones for the self-tapping fi xing screws
and two large blanking plugs for the
M6 screws. Finally, power up your
Petporte smart fl ap
®
.
12

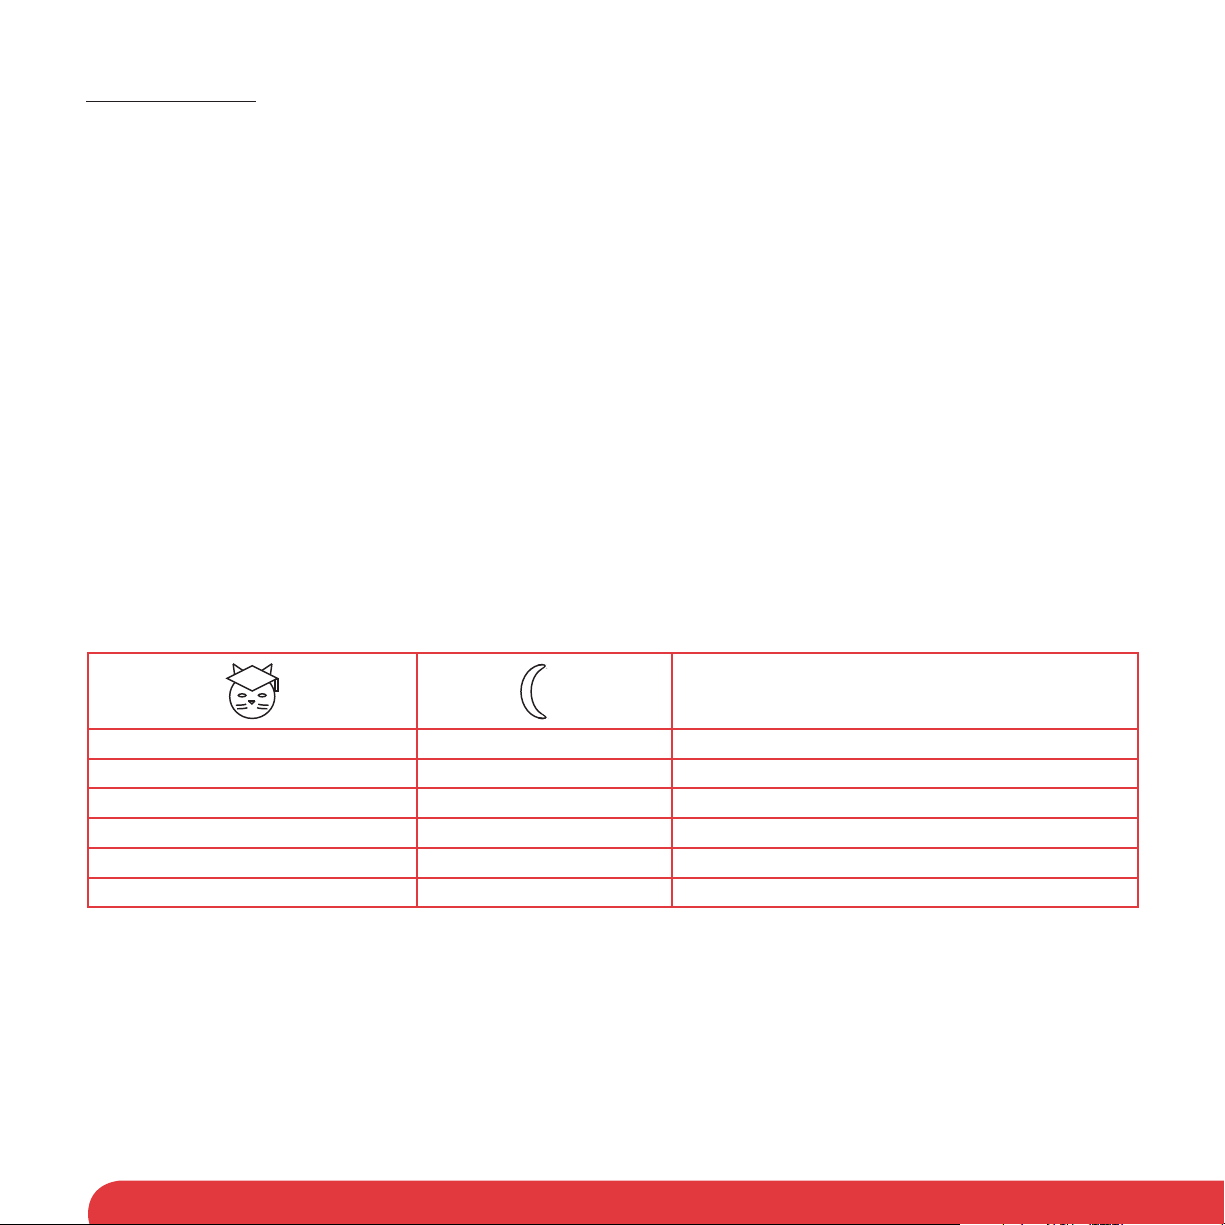
Petporte smart fl ap® Quick Guide
Function Button Activation Mode Button Function
Normal Mode
Night Mode (Timer Mode)
Vet Mode
Program Entry
Extended Modes
Key Pad Lock
Erase Mode
Reset to Normal Mode
This is the default mode on powering up
and requires no button activation.
Press the Red Button for
less than 2 seconds
Press the Red Button for
more than 2 seconds
Press and hold the Green Button for
more than 10 seconds
Press and hold both the Red and Green
Buttons for more than 2 seconds
Press and hold the Red Button for
more than 30 seconds
Press and hold both the Red and Green
Buttons for more than 30 seconds
Press and hold the Green Button for
more than 30 seconds
The red light will illuminate.
In Night Mode: During the hours of
darkness, the green light will illuminate.
The unit will not allow the cat to exit. At
dawn, the green light will extinguish and
the lock opens and the cat can go outside
again until dusk.
In Timer Mode: The unit will Lock and
Unlock at specifi c programmed times of day.
The red light will then fl ash and the unit
will not allow any cats to go out.
The green light will fl ash and you then
have 30 seconds in which to program
your cat by passing the animal under
the porch.
The unit will emit a long beep indicating
that the extended modes are now
available and the green light will be lit.
(See the Extended Modes - Quick Guide
on page 14)
The unit will emit a series of beeps
indicating the unit is now locked.
The unit will emit a series of short beeps
followed by a long beep. Both lights
should now be fl ashing.
Note: Once the unit’s memory has been
erased, it will have to be re-programmed
before further use!
The unit will emit a series of short beeps
followed by a long beep. Both lights
should extinguish. Hold both buttons
down simultaneously for more than 30
seconds and UPON RELEASE the unit
emits a long beep.
13

Extended Modes - Quick Guide
Please see page 16 for a full explanation of each Extended Mode.
Press and hold both the Red and Green Buttons simultaneously for more than 2 seconds and then release to enter the Extended Mode menu.
When in Extended Modes, the green light illuminates and you start in Exit Mode. Modes are selected by pressing the Red Button to go
“up” a mode and the Green Button to go “down” a mode. The current mode is indicated by a number of beeps. When you are in the
mode you require a quick press of both buttons simultaneously will activate that mode.
No. of Beeps Mode Function
1
2
3
4
5
6
7
Exit Mode Cancels the extended mode option system and returns the Petporte smart
Open Mode The green light will fl ash and the green lock will lower allowing any cat
Silent Mode The audible beep will no longer sound when your cat is recognised by the
®
fl a p
to a normal mode of operation.
access through the Petporte smart fl ap
Petporte smart fl ap
®
.
®
.
Set Light Level Mode Sets the desired light level for which the cat fl ap will lock and unlock during
Night Mode operation.
Lock Return Time The default time for your Petporte smart fl ap
®
’s locks to return to their
locked positions after your cat’s microchip has been recognised is 4
seconds. However, should you have a particularly timid cat, or if your cat is
frequently chased by other cats, the lock return time can be lengthened or
shortened.
Low Battery Lock State If, when the Petporte smart fl ap
charge runs low, the Petporte smart fl ap
®
is running in battery mode, the battery
®
has a built in option to allow the
locks to be set at a specifi ed open or closed position.
Timer Mode Sets the specifi c times of day for which the cat fl ap will lock and unlock
during Night Mode operation.
14

Operating Modes
Normal Mode
This is the default mode on powering the cat fl ap and will allow only your cat(s) to enter.
Night Mode
For a variety of reasons, many pet owners prefer their animals not to go outside at night. The Petporte smart fl ap
whereby it will automatically prevent your pet from going outside during hours of darkness and the cat fl ap will automatically unlock
when daylight dawns. If your pet is already outside when darkness falls, the system will still allow the animal to enter.
The Night Mode also allows pet owners to set the specifi c time of day that they want the unit to lock and unlock (Timer Mode).
To employ this mode, press the Red button for less than 2 seconds and then release it. The unit will beep and the red light will illuminate to inform you that it is in Night Mode (Timer Mode).
• At the pre-set LOCK time or when darkness falls, the green light will illuminate, indicating that the cat fl ap will be locked.
• At the pre-set UNLOCK time or when dawn arrives, the green light will extinguish, indicating that the cat fl ap will be unlocked.
Note: Night mode can take up to 30 seconds to start functioning.
Vet Mode
If you are intending to take your pet to the vet, or just want it to stay inside, then the Petporte smart fl ap
®
provides a mode whereby
your cat can enter but will not be allowed out again.
To employ this mode, press the Red Button for 5 seconds, or until the red light begins to fl ash, and then release it. The unit will then
beep and the red light will start to fl ash, indicating that the cat fl ap is locked and your cat cannot go out.
To exit this mode, press the Red Button again for 5 seconds, or until the red light begins to fl ash, and then release it. The unit will
beep again and the red light will extinguish.
Extended Modes
The Petporte smart fl ap
®
has a number of extended modes that allow you to customise the Petporte smart fl ap® to suit your individual needs.
For information on how to use the Extended Modes please see the Extended Modes section on page 16 of this user guide.
Key Pad Lock
If you wish to lock the buttons on your Petporte smart fl ap
®
(this is helpful in preventing children from adjusting the modes), press
and hold the Red Button for 30 seconds. The unit should begin to beep repeatedly. Release the Red Button and the unit will be set
to Key Pad Lock.
To re-enable the button controls and disable the Key Pad Lock, repeat the above process.
Erase Mode
If you wish to erase all programmed animal identifi cation numbers from the system’s memory, please use the following procedure.
However, it must be noted that once the memory has been erased, you will have to re-program the unit with any animals that are to
use the cat fl ap. Therefore, please ensure that you really wish to erase the memory before proceeding.
To erase all microchip numbers, press and hold both the Red and Green Buttons for 30 seconds. The unit should begin to beep
repeatedly. Release both the Red and Green buttons and the unit should emit a long beep and both lights should begin to fl ash,
indicating that the memory has been erased.
Note: Once the unit’s memory has been erased, it will have to be re-programmed before further use!
Reset to Normal Mode
Should you wish to reset your Petporte smart fl ap
®
back to its Normal Mode and exit modes such as Night Mode, Vet Mode or
Open Mode, please use the following procedure.
Press and hold the Green Button for more than 30 seconds, or until the unit emits a series of short beeps, before releasing the
button. The unit should emit a long beep and all lights should extinguish, indicating the Petporte smart fl ap
Mode of operation. Returning to Normal Mode will not erase your cat’s programmed microchip numbers or the variable functions
available in the Extended Modes.
®
provides a mode
®
is in it’s Normal
15

Extended Modes
The Petporte smart fl ap®’s “extended mode” system gives you the opportunity to tailor the Petporte smart fl ap® to your individual
requirements.
To enter the Extended Modes menu, press both the Red and Green Buttons simultaneously for 2 seconds, or until both lights begin
to fl ash, and then release them. The Petporte smart fl ap
now entered the fi rst of the Extended Mode menu options.
When in “extended mode”, the modes are selected by pressing the Red Button to go “up” a mode and the Green Button to go
“Down” a mode. The current mode is indicated by a number of beeps. When you are in the mode you require, a quick press
of both buttons simultaneously will activate that mode. See page 14 for a table of available extended modes. If no buttons are
pressed within a 20 second period, the Petporte smart fl ap
gone back to its normal mode of operation.
Exit Mode (leave Extended Modes) - 1 Beep
This is the fi rst mode in the Extended Mode menu. It is indicated by a single audible beep. This option simply cancels the “extended mode” and puts the Petporte smart fl ap® back into a normal mode of operation. To activate Exit Mode, quickly press both Red
and Green buttons simultaneously.
Open Mode - 2 Beeps
In the unlikely event that you wish to have the Petporte smart fl ap® open to allow any animal entry, the Petporte smart fl ap® provides a mode whereby any animal (be it microchipped or not) can enter through the Petporte smart fl ap®. Enter the extended
modes by pushing the Red and Green buttons simultaneously for more than 2 seconds then push the red button once to enter
Open Mode which will be indicated by 2 beeps. Then, to activate Open Mode and exit the extended modes quickly press both Red
and Green buttons simultaneously.
When Open Mode is activated the unit will emit a long beep and the green light should fl ash to show the unit is in Open Mode.
To de-activate Open Mode, activate the Open Mode once more. The unit will again emit a long beep and the green light should
extinguish, indicating the Petporte smart fl ap
®
has returned to a normal mode of operation.
®
should beep and the green light will come on to inform you that you have
®
will beep and the green light will extinguish, indicating that the unit has
Silent Mode 3 - Beeps
Each time that a recognised animal enters or leaves via the Petporte smart fl ap
®
the unit will emit a short beep. To silence this beep,
activate the Silent Mode. Enter the Extended Modes by pushing the Red and Green buttons simultaneously for more than 2 seconds
then push the red button once (the unit will emit 2 beeps) then again to enter Silent Mode which will be indicated by 3 beeps. Then to
activate silent mode and exit the extended modes quickly press both buttons simultaneously. A short beep should be heard, following
®
which no further beeps will be emitted whenever your pet enters or exits the Petporte smart fl ap
.
To turn the beep back on, activate the Silent Mode once more. The unit will again emit a short beep, following which a short beep will
®
be emitted whenever your pet enters or exits the Petporte smart fl ap
Set Light Level Mode - 4 Beeps
When the Petporte smart fl ap
locks the Petporte smart fl ap
®
is set to Night Mode the light sensor detects a pre-determined level of ambient light and locks or un-
®
accordingly.
.
If you wish to alter when the Petporte smart fl ap® locks or unlocks in Night mode, simply activate the Set Light Level mode, in the
morning or evening, when the outside light is enough for your cat to be safely outside. Make sure that your indoor lights are switched
off when you re-set the light level; otherwise they may infl uence the light sensor. Enter the Extended Modes by pressing the Red and
Green buttons simultaneously for more than 2 seconds, then press the red button once (the unit will beep twice), then press the red
button again (the unit will beep 3 times) then press the red button once again and the unit will beep 4 times as you enter Set Light
Level Mode. To select the current light level, at which you want the door to lock or unlock, press the Red and Green buttons simultaneously. The unit will emit a beep and exit the Extended Modes.
16

You must now activate Night Mode so that the unit recognizes the light levels that you have programmed and locks or unlocks
appropriately. To activate Night Mode, press the Red button for less than 2 seconds.
Note: The light level setting will remain in memory even if you lose power to your Petporte smart fl ap
®
. The light sensor will be affected
by internal lights, external security lights or street lights.
Lock Return Time - 5 Beeps
The default time for your Petporte smart fl ap
®
’s locks to return to their locked positions after your cat’s microchip has been recognised
is 4 seconds. However, should you have a particularly timid cat, or if your cat is frequently chased by other cats, the lock return time
can be lengthened or shortened by the following procedure.
Enter the Extended Modes by pushing the Red and Green buttons simultaneously for more than 2 seconds, then press the red button
once (the unit will beep twice) then again (the unit will beep three times) then again (the unit will beep four times) the once again and
the unit will beep 5 times and you have arrived at Lock Return Mode. To enter the Lock Return Mode press both buttons simultaneously,
the green light will stay on and the red light will fl ash. Press and hold the Green Button for the desired lockout time of between 1 and 25
seconds before releasing. During this period an audible beep will sound for the duration of the button press, until the Green Button is
released. On releasing the Green Button the Petporte smart fl ap
Low Battery Lock State - 6 Beeps
If, when the Petporte smart fl ap
®
is running in battery mode, the battery charge runs low, the Petporte smart fl ap® has a built in option
®
will return to its normal mode of operation.
to allow the locks to be set at a specifi ed open or closed position.
This option, for example, will allow the green lock to be open or locked when the battery is low, allowing or preventing any animal ac-
cess inside the house through the Petporte smart fl ap
allowing or preventing any animal access outside the house through the Petporte smart fl ap
®
. Likewise, the red lock can be set to be open or locked when the battery is low,
®
. Enter the Extended Modes by pushing
the Red and Green buttons simultaneously for more than 2 seconds, then press the red button once (the unit will beep twice) then
again (the unit will beep three times) then again (the unit will beep four times) then again (the unit will beep fi ve times) then once again
and the unit will beep 6 times and you have arrived at Low Battery Lock State Mode. To enter Low Battery Lock State Mode, press
both Red and Green buttons simultaneously, the green light will stay illuminated and the unit will emit a beep.
Pressing the Green Button will toggle the green lock state between open and closed, while pressing the Red Button toggles the red
lock state between open and closed.
When both red and green locks are in the required position, a quick press of both Red and Green Buttons simultaneously will result in
a short beep sounding and the Petporte smart fl ap
®
will exit the Extended Modes menu and return to its normal mode of operation.
Timer Mode – 7 Beeps
When the Petporte smart fl ap
®
is set to Night Mode, you can also determine the time of day at which you want the cat fl ap to lock or
unlock by using the Timer Mode. The Timer Mode is offered as an alternative to the “Set the Light Level Mode” which is determined
by the ambient light around the door.
To set the UNLOCK time: This function needs to be carried out at the time of day when you wish the unit to OPEN and remain UNLOCKED.
Enter the Extended Modes by pushing the Red and Green buttons simultaneously for more than 2 seconds, then press the red button
once (the unit will beep twice) then again (the unit will beep three times) then again (the unit will beep four times) then again (the unit
will beep fi ve times) then once again (the unit will beep six times) then once again and the unit will beep 7 times and you have arrived
at Timer Mode. To enter Timer Mode, press both Red and Green buttons simultaneously, the green light will stay illuminated and the
red light will fl ash.
Pressing and releasing the Green button quickly will set the UNLOCK time. On releasing the Green button the Petporte smart fl ap
®
will return to its normal mode of operation.
17
To set the LOCK time: This function needs to be carried out at the time of day when you wish the unit to CLOSE and remain LOCKED.
Enter the Extended Modes by pushing the Red and Green buttons simultaneously for more than 2 seconds, then press the red button
once (the unit will beep twice) then again (the unit will beep three times) then again (the unit will beep four times) then again (the unit
will beep fi ve times) then once again (the unit will beep six times) then once again and the unit will beep 7 times and you have arrived
at Timer Mode. To enter Timer Mode, press both Red and Green buttons simultaneously, the green light will stay illuminated and the
red light will fl ash.
Pressing and releasing the Red button quickly will set the LOCK time. On releasing the Red Button the Petporte smart fl ap
to its normal mode of operation.
You must now activate Night Mode so that the unit recognizes the UNLOCK and LOCK times that you have programmed. To
activate Night Mode, press the Red button for less than 2 seconds.
Note:
1. The Timer Mode will only function when the unit is powered through the external power supply included with this unit. The Timer
Mode is not available when the unit enters battery backup mode.
2. In the event of a power cut, you will need to reset the unlock and lock times.
3. The Timer Mode supersedes the light level detector. The unit will no longer read the ambient light levels to decide if the unit should
be locked or unlocked.
®
will return
LED Indicator - Quick Guide
Explanation of LED Indicators:
Function
Flash Flash Power on but nothing programmed
Off Off Normal Operating Mode
Off (Day) / On (Night) On Night Mode (Timer Mode)
Off Flash Vet Mode
Flash Off Open Mode
On Flash Battery Level Low
Battery Backup Facility
Your Petporte smart fl ap® has the facility to fi t a backup battery, ensuring your cat can still have access to your house in the event of a
power cut on the low voltage power supply.
To install batteries, remove the small cover plate with a screw driver and attach a 9-volt PP3 battery to the connecting snaps. Push
battery into the battery compartment and snap the small cover plate back in place.
Please note that the following functions are currently unavailable with your Petporte smart fl ap
1. Wall Mounting - Currently the Petporte smart fl ap
2. Night Mode - Currently Night Mode is unavailable when the unit enters battery backup mode.
®
Battery Backup Facility is unable to function on a wall fi tted unit.
18
®
, when the unit is being operated by battery alone:

Training your cat to use the cat fl ap
Most cats will learn to use the cat fl ap almost at once but there are a few who may be a little nervous at fi rst. The following tips will help your
pet to take full advantage of the outdoor freedom and indoor comfort – which you want for your cat – and which your new cat fl ap provides.
The most important rule is to be patient with your cat. Don’t be in a hurry. Let your cat work out for itself that it can go in and out of doors.
Don’t force it through the fl ap or it may become frightened.
Many cat owners install cat fl aps when they move house. If this applies to you, make sure that your cat is familiar with his or her surroundings
before you fi t the cat fl ap. Take it on supervised trips outdoors on a lead and make sure it also feels secure and comfortable in its new indoor
environment. Cats can develop long lasting fears in unfamiliar surroundings.
Once you have installed your cat fl ap, leave the fl ap open for some time. You can do this by using a long strip of masking tape; open the fl ap
and use the tape to keep it held open by fi xing the other end of the tape to the surface above. Make sure that the fi xing is secure so that the
fl ap can not fall down accidentally. Let your cat become familiar with it and go in and out freely.
Establish a motive for your cat to use the door. A good one is food. First feed the cat near the door, inside and then near the door outside.
Repeat as often as you need to. Most cats, especially kittens, also have a strong urge for freedom, perhaps to hunt. Cats are also social
creatures – they enjoy the company of other cats. This can be another reason for them to explore outside.
®
There are some cats however, who can take a little longer to become more confi dent and familiar with the Petporte smart fl ap
tions. Use a favourite treat to coax your cat towards and through the cat fl ap and reward them when they get it right. Once your cat is com-
fortable coming through the cat fl ap, you should remove the masking tape and lower the cat fl ap.
door func-
Accessories
To purchase additional accessories for your Petporte smart fl ap®, visit our website at www.petsafe.net to locate a retailer near you and
for a listing of Customer Care Centre telephone numbers in your area.
PAC19-12596 Extension Tunnel - White
PAC19-12597 Extension Tunnel - Brown
PAC19-12741 Replacement Flap
PAC19-12753 5 m Extension Lead - Black
PAC19-12598 5 m Extension Lead - White
MPA00-12867 Power Supply - United Kingdom - White
MPA00-12868 Power Supply - Europe - White
MPA00-12869 Power Supply - United Kingdom - Black
MPA00-12870 Power Supply - Europe - Black
MPA00-12766 Hardware Kit
Cleaning the Cat Flap
Your cat fl ap is constructed of the highest quality material with a toughened fl ap and has been designed to last for many years. To
maintain its appearance, occasional wiping with a damp cloth is all that is necessary.
Note: Never use household polish as this may damage the product.
Disable the Cat Flap
If you no longer require the unit to function, the following procedure will allow you to lock the fl ap and turn off the unit completely.
If a battery is installed in the unit, remove the battery. Put the unit into a Normal Operating Mode so that the green lock is up; use the
Extended Modes - Exit Mode function if necessary. Then, activate the Vet Mode, so the red lock is up by pressing the Red Button for 5
seconds. Next, remove the power adapter and/or extension leads. Both of the locks will stay up and hold the fl ap into a locked position.
19

Battery Disposal
Separate collection of spent batteries is required in many regions; check the regulations in your area before discarding spent
batteries. This device operates on one 9 Volt alkaline battery (PP3/IEC 6LR61). Replace only with equivalent battery. To remove
battery from this device; remove the small cover plate with a screwdriver and separate the battery from the connecting snaps.
Important recycling advice
Please respect the Waste Electrical and Electrical Equipment regulations in your country. This equipment must be recycled. If you no
longer require this equipment, do not place it in the normal municipal waste system. Please return it to where it was purchased in order
that it can be placed in our recycling system. If this is not possible, please contact our Customer Care Centre for further information.
Compliance
Hereby, Radio Systems® Corporation, declares that this Microchip Petporte smart fl ap® Cat Flap is in compliance with the essential requirements and other
relevant provisions of Directive 1999/5/EC (R&TTE). Unauthorised changes or modifi cations to the equipment that are not approved by Radio Systems
Corporation are in violation of EU regulations, could void the user’s authority to operate the equipment, and void the warranty.
The Declaration of Conformity can be found at: http://www.petsafe.net/customercare/eu_docs.php.
Australia
This device complies with the applicable EMC requirements specifi ed by the ACMA (Australian Communications and
Media Authority).
®
Terms of Use and Limitation of Liability
1. Terms of Use
Use of this Product is subject to your acceptance without modifi cation of the terms, conditions and notices contained herein. Use of this Product implies
acceptance of all such terms, conditions and notices. If you do not wish to accept these terms, conditions and notices, please return the Product, unused,
in its original packaging and at your own cost and risk to the relevant customer care centre together with proof of purchase for a full refund.
2. Proper Use
This Product is designed for use with pets where training is desired. The specifi c temperament or size/weight of your pet may not be suitable for this
Product (please refer to this Operating Guide for details). Radio Systems
and accepts no liability for determining suitability in individual cases. If you are unsure whether this Product is appropriate for your pet, please consult
your veterinarian or certifi ed trainer prior to use. Proper use includes, without limitation, reviewing the entire Operating Guide and any specifi c Caution
statements.
3. No Unlawful or Prohibited Use
This Product is designed for use with pets only. This pet training device is not intended to harm, injure or provoke. Using this Product in a way that is not
intended could result in violation of Federal, State or local laws.
4. Limitation of Liability
In no event shall Radio Systems
damage and/or (ii) any loss or damages whatsoever arising out of or connected with the misuse of this Product. The Purchaser assumes all risks and
liability from the use of this Product to the fullest extent permissible by law. For the avoidance of doubt, nothing in this clause 4 shall limit Radio Systems
Corporation’s liability for human death or personal injury or fraud or fraudulent misrepresentation.
5. Modifi cation of Terms and Conditions
Radio Systems
have been notifi ed to you prior to your use of this Product, they shall be binding on you as if incorporated herein.
®
Corporation reserves the right to change the terms, conditions and notices governing this Product from time to time. If such changes
®
Corporation or any of its associated companies be liable for (i) any indirect, punitive, incidental, special or consequential
®
Corporation recommends that this Product is not used if your pet is aggressive
®
20

Svenska
Förklaring av varningar och symboler som används i denna guide
Detta är symbolen för en säkerhetsvarning. Den används för att varna dig för risker för potentiella personskador. Lyd alla
säkerhetsmeddelanden som följer på denna symbol för att undvika eventuella skador eller dödsfall.
VARNING
FÖRSIKTIGHET
OBS!
WARNING anger en potentiellt farlig situation som kan resultera i dödsfall eller allvarliga skador om den inte undviks.
FÖRSIKTIGHET används med symbolen för säkerhetsvarning och anger en farlig situation som kan resultera i lindriga
eller mindre allvarliga skador om den inte undviks.
OBS! används för att rikta uppmärksamheten på metoder som inte är relaterade till personskador.
_______________________________________________________________________________________
När barn fi nns i hemmet är det viktigt att beakta husdjursdörren när det gäller barnets säkerhet. Husdjursdörren kan
VARNING
FÖRSIKTIGHET
missbrukas av ett barn vilket leder till att barnet når eventuella risker som kan fi nnas på andra sidan av husdjursdörren.
Köpare/husägare med simbassänger ska se till att husdjursdörren övervakas hela tiden och att simbassängen har tillräckliga
inträdeshinder. Om en ny risk uppstår inom eller utanför ditt hem, som kan nås via husdjursdörren, rekommenderar
Radio Systems
panelen eller låset, om tillämpligt, är tillhandahållet i estetiskt syfte och för energieffektivitet och är inte avsett som en
säkerhetsanordning. Radio Systems
påtar sig fullt ansvar för tillsyn av öppningen den skapar.
• Elverktyg. Risk för allvarlig skada; Följ alla säkerhetsföreskrifter för dina elverktyg.
• Se till att alltid bära skyddsglasögon.
Användaren måste före installationen bekanta sig med alla byggnormer som kan påverka installationen av husdjursdörren
och, tillsammans med en licensierad entreprenör, avgöra dess lämplighet i en viss installation. Husdjursdörren är inte en
branddörr. Det är viktigt för ägaren och entreprenören att överväga eventuella risker som kan fi nnas innanför eller utanför
husdjursdörren och eventuella risker som kan uppkomma genom senare ändringar av din fastighet och hur de påverka
förekomst och användning, inklusive felaktig användning av husdjursdörren.
®
Corporation att du skyddar åtkomsten till faran ordentligt eller tar bort husdjursdörren. Den stängande
®
Corporation ansvarar inte för ej avsedd användning och köparen av denna produkt
OBS!
• Behåll dessa instruktioner bland viktiga dokument. Se till att överlämna dessa instruktioner till fastighetens nya ägare.
• Läs dessa instruktioner helt innan du gör eller ändrar en öppning i din valda dörr eller vägg. Vi rekommenderar starkt
att din Petporte smart fl ap® sätts ihop, strömsätts och programmeras för din katt och att en kontroll först görs av att den
fungerar med mikrochipet i din katt.
• Vi accepterar inte ansvar för felaktig användning av enheten om ändringar görs på antennspolen. Du får inte under några
omständigheter ändra eller justera antennspolens lindningar.
• Denna enhet fungerar korrekt bara när utomhustemperaturen är högre än -15° C och lägre än 55° C (högre än 5° F och
lägre än 131° F).
• Installation i en metalldörr: Före installationen rekommenderas det att kontrollera om Petporte smart fl ap
fungera bra med din metalldörr. För att göra detta, håll upp den ihopsatta och programmerade Petporte smart fl ap
metalldörren och ta din katt till portalen. Om låset öppnas kommer dörren att fungera korrekt när den installeras.
®
kommer att
®
mot
21
Din Staywell® husdjursdörr...
Tack för att du valt Staywell® av PetSafe®. Vår mission är att vara det mest betrodda varumärket för husdjursägare. Vi vill säkerställa
ditt husdjurs säkerhet genom att ge dig de produkter och tekniker som skapar den mest bekväma livsstilen för ditt husdjur. Om du har
frågor, vänligen kontakta kundtjänst. För en förteckning över telefonnummer till kundtjänst, besök vår webbplats på www.petsafe.net.
För att få ut mest skydd av din garanti, kan du registrera din produkt inom 30 dagar på www.petsafe.net. Genom att registrera och
behålla ditt kvitto kommer du att få fullständig produktgaranti och om du skulle behöva ringa till kundtjänst kommer vi att kunna hjälpa
dig snabbare. Först och främst kommer Staywell
garantiinformation fi nns online på www.petsafe.net.
®
av PetSafe® aldrig att ge bort eller sälja din värdefulla information till någon. Fullständig
Katt
Passar trädörrar
Passar PVC/uPVC/metall
Passar fönster och
glasdörrar, med enkla och
dubbla glas*
Mikrochip
R.F.I.D.
†
Passar tegelväggar
Den inkluderade valfria tunneln
passar dörrar av de fl esta
Ytterligare tunnelförläng-
ningar fi nns tillgängliga
tjocklekar
Alla Staywell® av Petsafe® kattluckor med mikrochip är lämpliga att passa varje dörr eller vägg, men ytterligare material och kompetens för att utföra arbetet kan krävas.
Obs! Denna kattlucka är utformad som en uppgradering för Staywell
Vissa enkla färdigheter för att utföra arbetet krävs. Mindre justeringar av öppningen behövs.
* Det är inte möjligt att skära hål i härdat glas eller dubbelglasade enheter utom vid tillverkningen. Konsultera en glasmästare.
† Mikrochip R.F.I.D. (radiofrekvensidentifi kation)
®
av PetSafe® kattluckor i 300-, 400-, 500- och 900-serien.
22

Innehållsförteckning
Inkluderat med Petporte smart fl ap® .......................................................................................................24
Nödvändiga verktyg ................................................................................................................................25
Så här fungerar den ................................................................................................................................25
®
Ihopsättning av Petporte smart fl ap
Programmera in katter i Petporte smart fl ap® .........................................................................................26
Checklista för alla installationer ...............................................................................................................27
Mätning och märkning ............................................................................................................................27
Installation av Petporte smart fl ap® i en dörr som inte är av glas ...........................................................28
Installation av Petporte smart fl ap® i glasdörrar eller fönster ..................................................................28
Installation av Petporte smart fl ap® i väggar ...........................................................................................29
Anvisningar för ihopsättning ...................................................................................................................29
Snabbguide till Petporte smart fl ap® .......................................................................................................32
Utökade lägen - Snabbguide ..................................................................................................................33
Funktionslägen ........................................................................................................................................34
Utökade lägen .........................................................................................................................................35
Lysdiodsindikator - Snabbguide .............................................................................................................37
Batteribackup ..........................................................................................................................................37
Träna din katt att använda kattluckan .....................................................................................................38
Tillbehör ...................................................................................................................................................38
Rengöra kattluckan .................................................................................................................................38
Inaktivera kattluckan ................................................................................................................................38
Kassering av batterier .............................................................................................................................39
Viktig information angående återvinning .................................................................................................39
Överensstämmelsenivå ...........................................................................................................................39
Användarvillkor och ansvarsbegränsning ...............................................................................................39
(i testsyfte före installation) ..........................................................26
23
Programknappar
(röd & grön, tassformade)
Lysdiodsindikatorer (katt/måne)
InomhusUtomhus
Portal med
mikrochipscanner
Grön Ingångslås
Stor täckplatta
Inkluderat med Petporte smart fl ap® :
Skärmall
Nätaggregat
2 - Stora M6-skruvar
4 - Självgängande fästskruvar
2 - U-klämmor
4 - Svampstift
2 - Stora blindpluggar
4 - Små blindpluggar
2 - Små M6-skruvar (för installation i glasdörrar eller fönster)
Liten täckplatta
Röd Utgångslås
24
 Loading...