

Page 1

500 Series
Infra-red
4 Way Locking Deluxe Cat Flap
Staywell Pet Door - The user’s guide
Chatière Staywell - Guide de l’utilisateur
Staywell huisdierenluik - Gebruiksaanwijzingen
Staywell Haustiertür - Benutzerhandbuch
Porticina Staywell per animali domestici - Guida per l’utente
Puerta para mascota de Staywell - Guía del usuario
Seventh Edition
Page 2
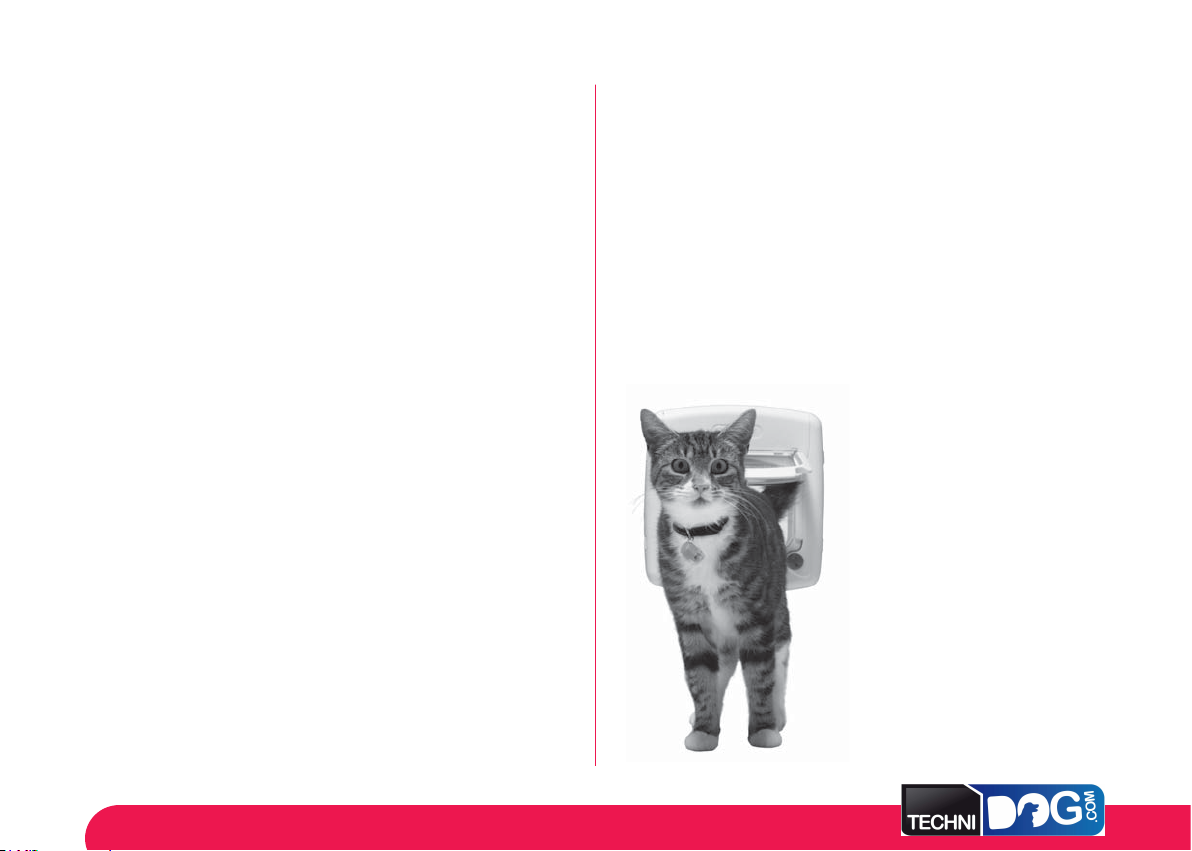
Your Staywell Pet Door...
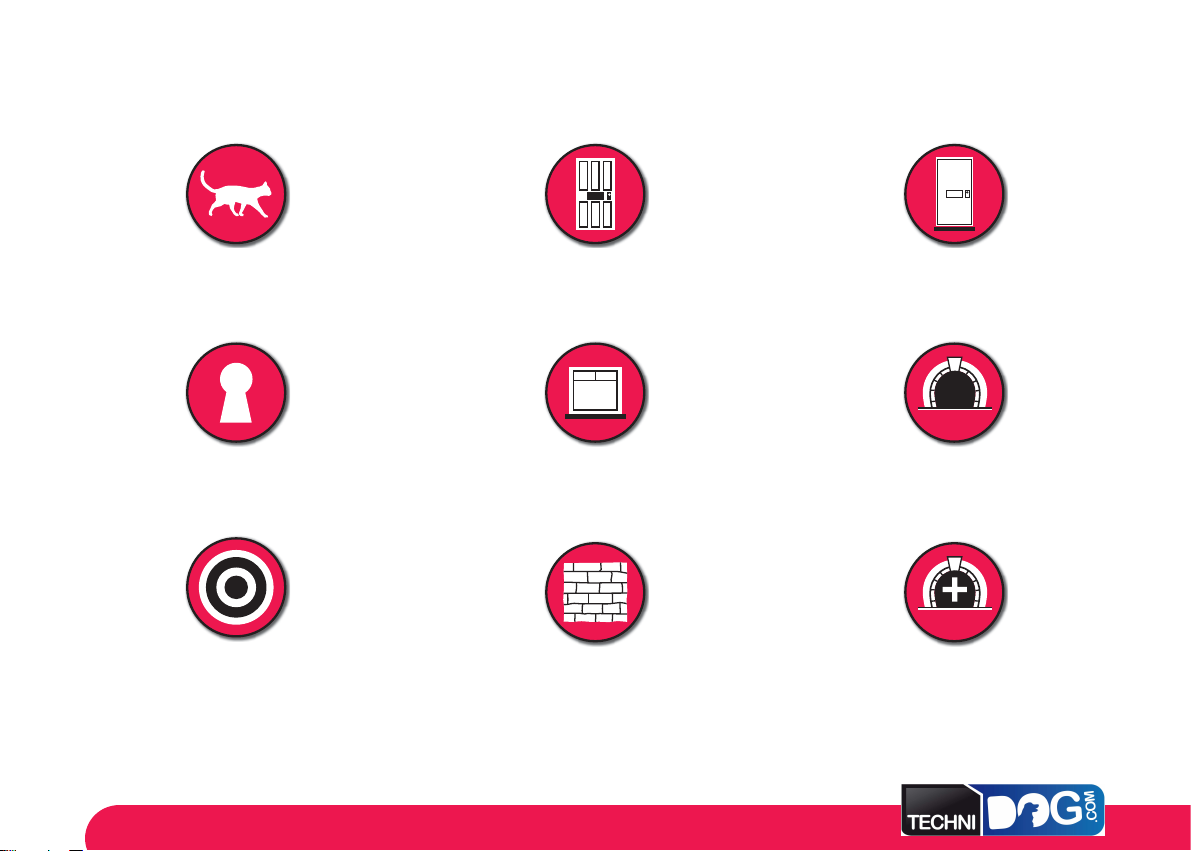
Cat
4 way locking system
Fits wooden doors
Fits glass windows & doors,
single and double glazed*
Infra-red
All Staywell pet doors are suitable to fi t any door, wall or partition although additional materials and competent DIY skills may be required.
* It is not possible to cut holes in toughened glass or double glazed units except at the time of manufacture. Please consult a glazier.
1
Fits brick walls
Fits PVC/uPVC/metal
Optional tunnel included is suitable
for most thickness of doors
Additional tunnel extensions
available
Page 3
Before installing your cat fl ap please
read the following step-by-step
instructions carefully.
FIG.1 FIG.2
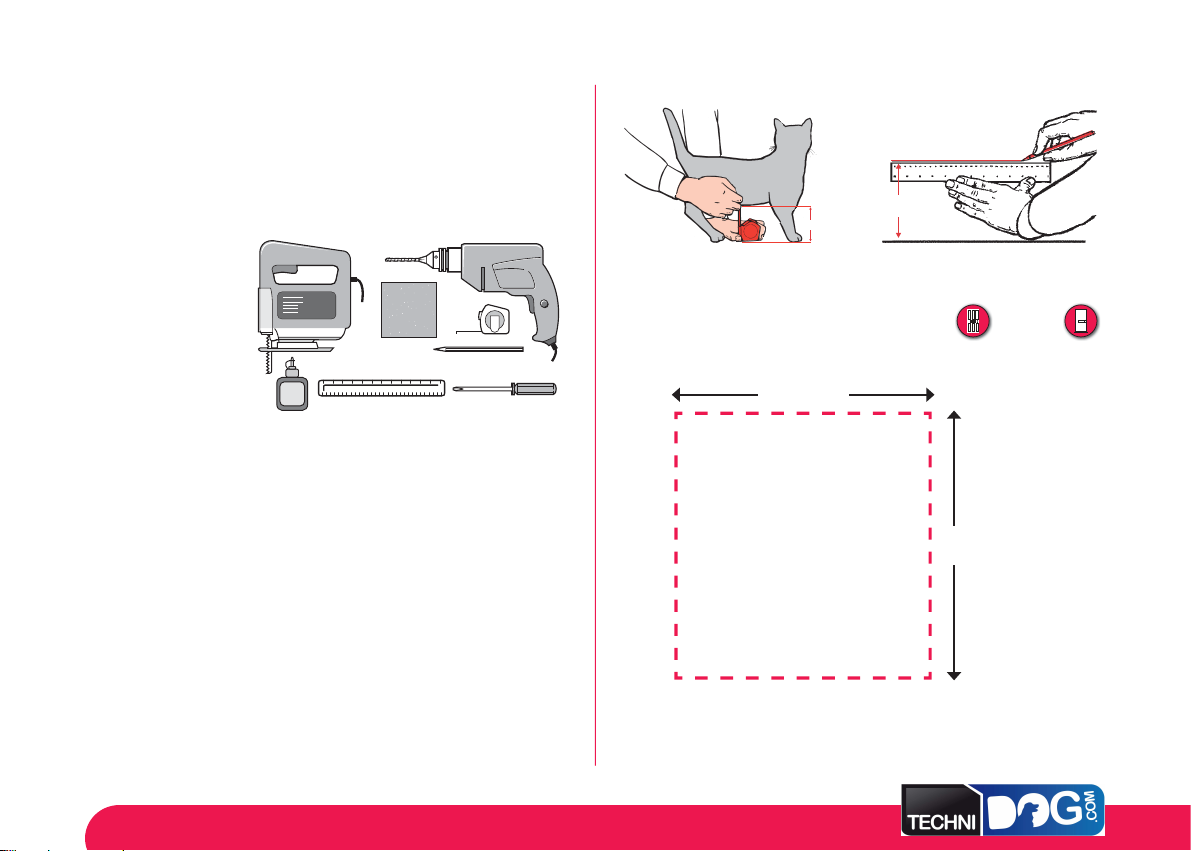
Tools required
• Pencil
• Ruler
• Jig or Keyhole Saw
• Drill
• Screwdriver
• Tape measure
• Glue
• Sand paper
Measurement and marking
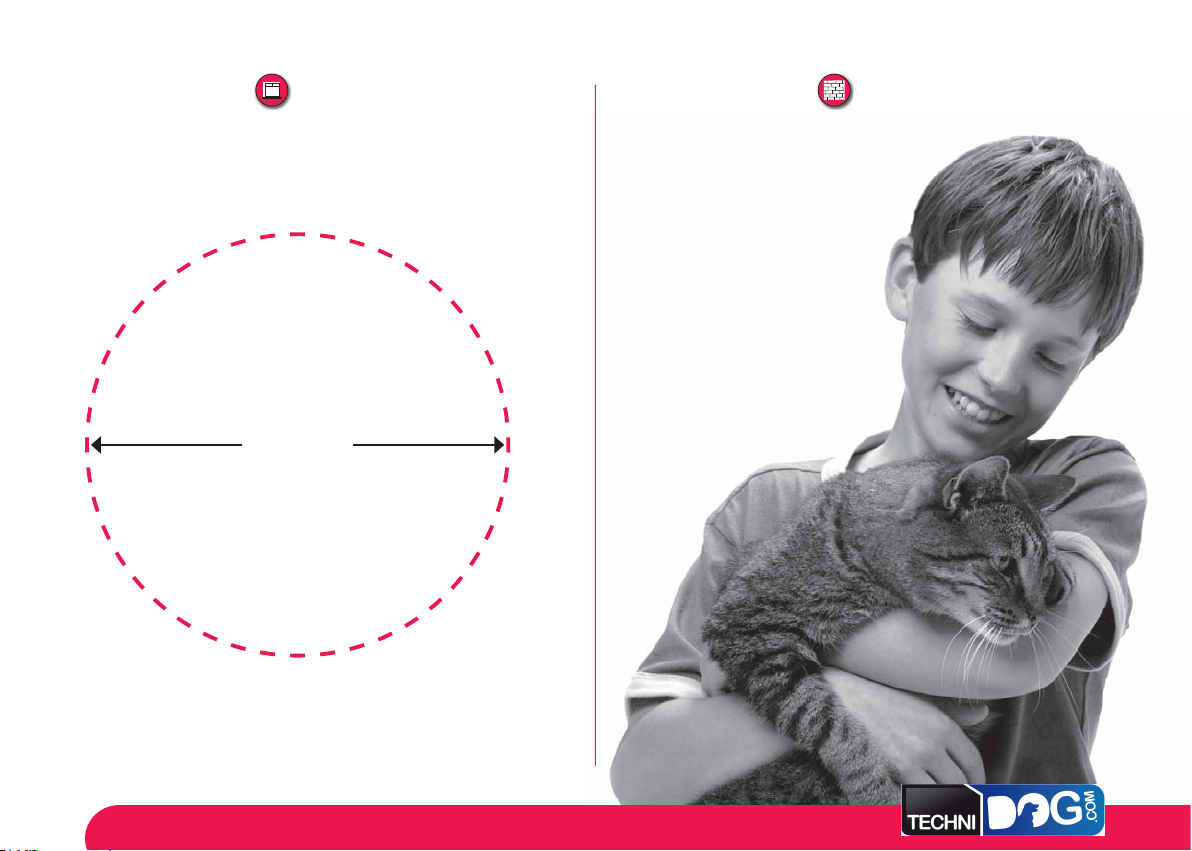
Measure the belly height of your cat. This is usually 100 -150mm (4-6”) (Fig. 1).
Mark this measurement on the outside of your door and draw a straight
horizontal line 168mm (61/2”) (Fig. 2).
Please bear in mind that this line will eventually be the bottom of the hole
you will cut in your door and that the frame of the cat fl ap will be slightly
lower. If necessary, this line may have to be raised slightly to account for this.
X
X
Cutting a hole for your cat fl ap
a) In Wood and PVC/uPVC/Metal
The cat fl ap requires a square cut-out of 175mm x 168mm (63/4” x 61/2”). (Fig. 3).
FIG.3
Not to scale - for best results you should refer
to the enclosed cutting template.
168mm (61/2”)
Wooden doors PVC/uPVC/Metal
175mm
3
/4”)
(6
2
Page 4

Glass windows & doors,
b) In Glass
* It is not possible to cut holes in toughened glass or double glazed
units except at the time of manufacture. Please consult a glazier.
The cat fl ap requires a circular cut out with a diameter of 212mm (83/8”).
(Fig. 4).
FIG.4
single and double glazed*
212mm (83/8”)
c) In Walls
Follow the instructions for “Wood and PVC/
uPVC/Metal”, by using the enclosed
cutting template. Please note that
additional tools, materials and
competent DIY skills may be
required.
Fits brick walls
Not to scale - for best results you should refer
your glazier to the enclosed cutting template.
3
Page 5
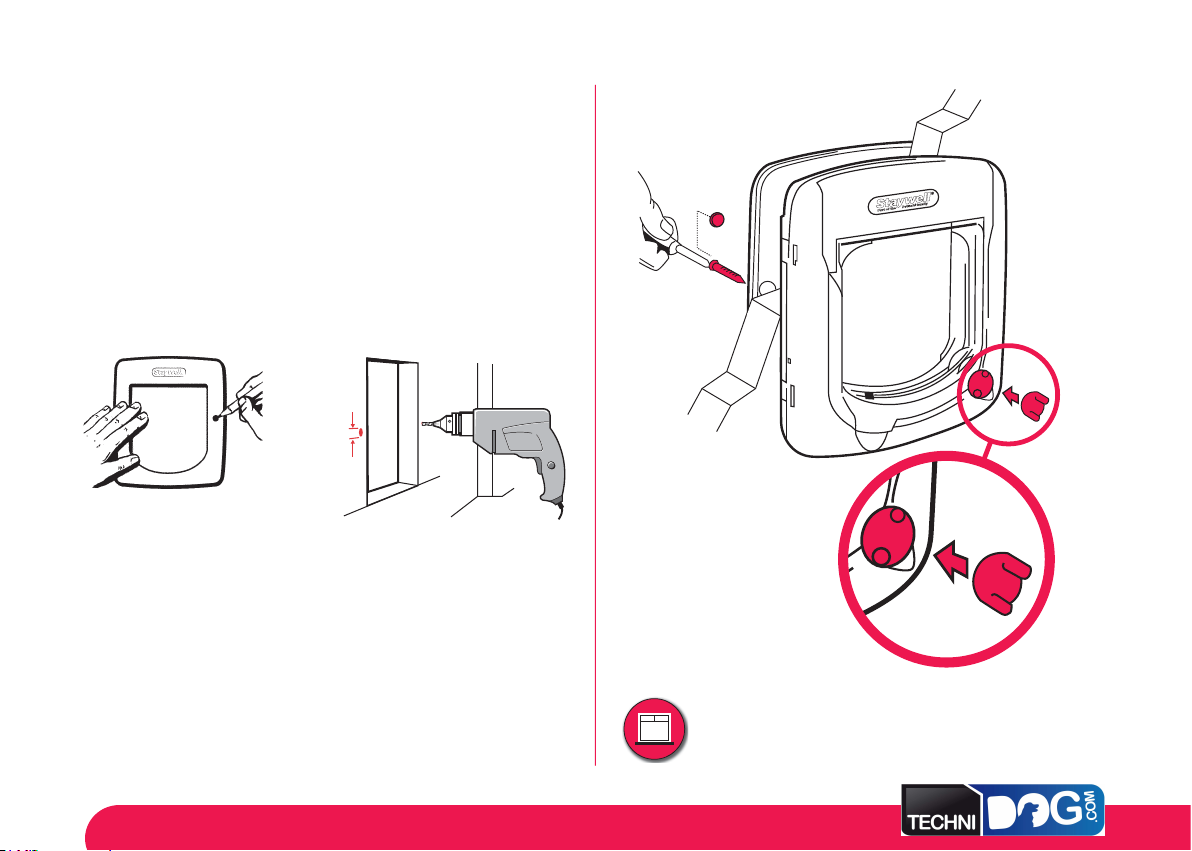
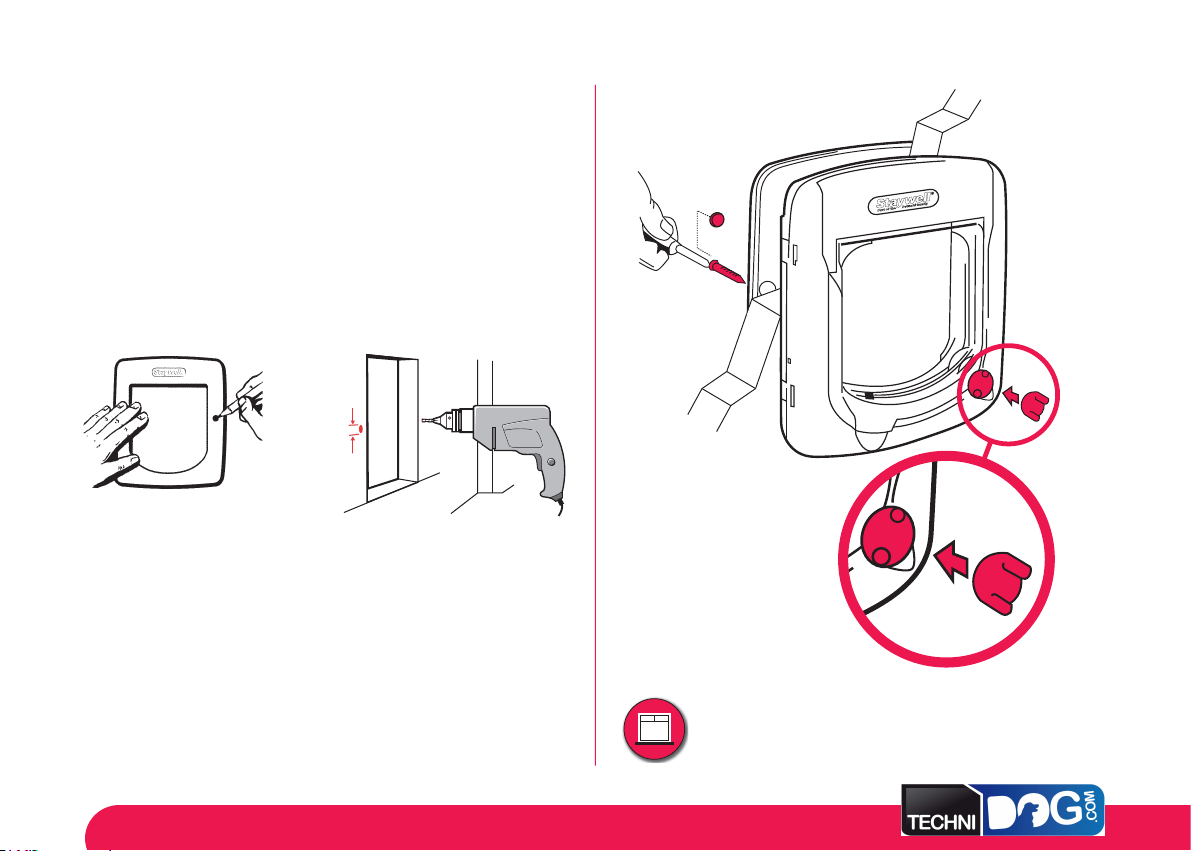
Fitting your cat fl ap
Your Staywell cat flap is fitted with the red 4 way lock on the inside of your house.
Temporarily place the cat fl ap in the hole and position the outside cover on
the outside of the house. From the outside mark screw holes through the
holes in the outside cover. (Fig 5.).
3
Remove the cat fl ap and drill the holes with a 4.5mm (
FIG.5 FIG.6
NN
Replace the cat fl ap in the hole and from the outside screw into place. (Fig. 7).
If the screws are too long they may need to be cut down to match the
depth of your door. Using over long screws may damage the cat fl ap. The
screws should be removed from the cat fl ap before cutting. File down to
ensure there are no sharp edges.
/16”) drill bit (Fig. 6).
FIG.7
Push fi t the 4 way locking turning dial into place (Fig. 7).
Finally, cover the screw holes with the blanking plugs on the outside frame
to ensure a neat fi nish (Fig. 7).
4
If fi tting into glass, the cat fl ap is ‘clamped’ to the glass
using two screws from the outside of the house.
Page 6

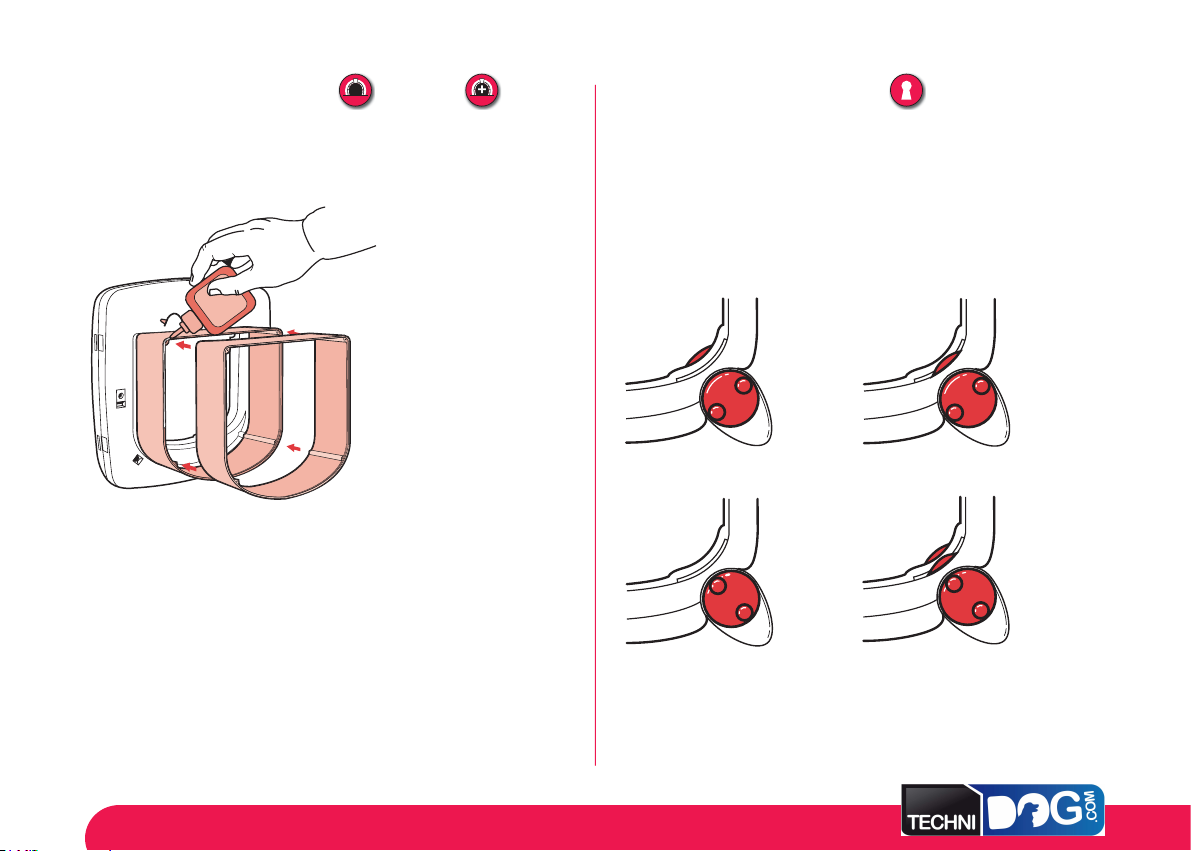
Tunnels (optional)
Optional tunnel included
Additional tunnel
extensions available
Using the 4 way lock
4 way locking system
The cat fl ap is designed to fi t any depth of hole. It is recommended that
the tunnels be glued on to the frame and each other. (Fig. 8).
FIG.8
7
One tunnel is supplied with the cat fl ap which is 47mm (1
purchase additional tunnels at the same depth and to make up the
depth of the hole in your wall, visit the Staywell website -
www.staywell.co.uk
/8”). To
Your Staywell cat fl ap is now ready to use.
The 4 way lock allows you to control your cat’s access in and out of
your home.
It is a good idea not to use the 4 way lock until your pet is thoroughly
familiar with using the door. Your pet may become confused as to why
you have installed it.
• In only • Out only
• In or Out • Fully locked
5
Page 7
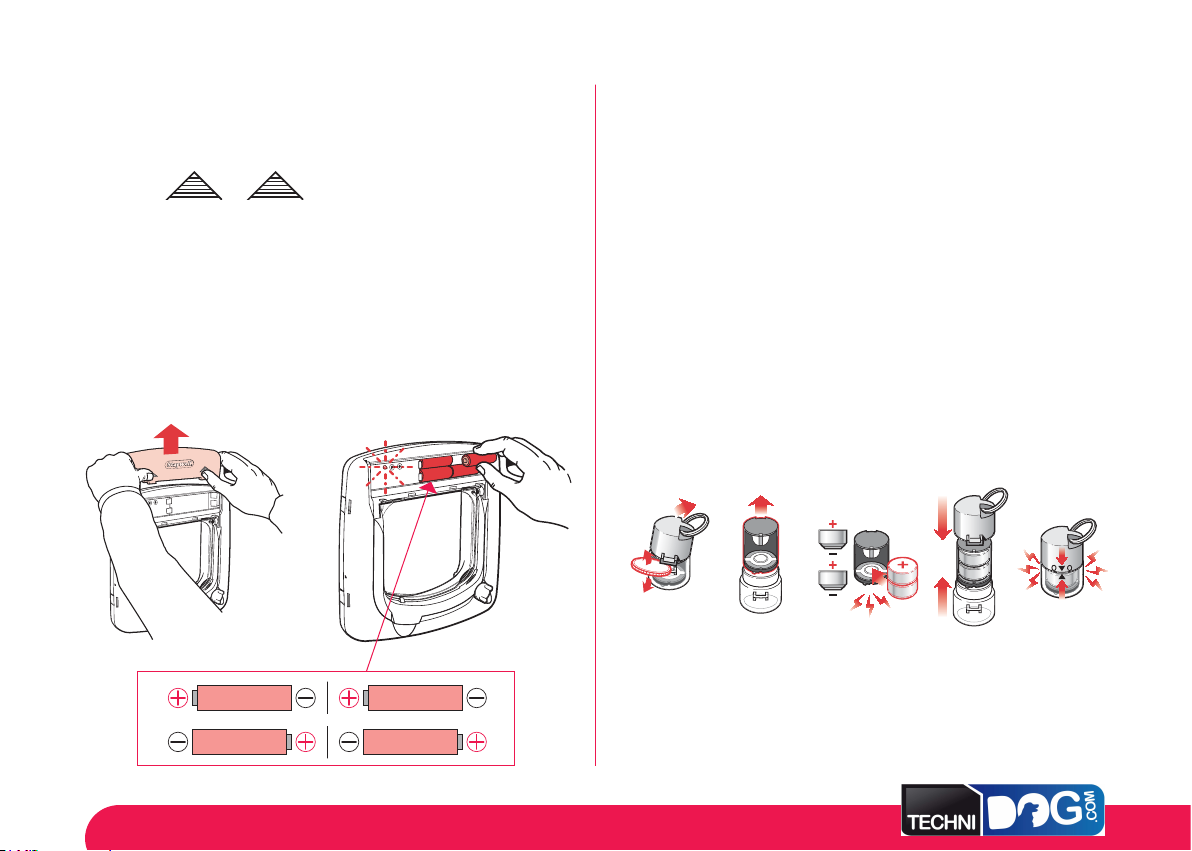
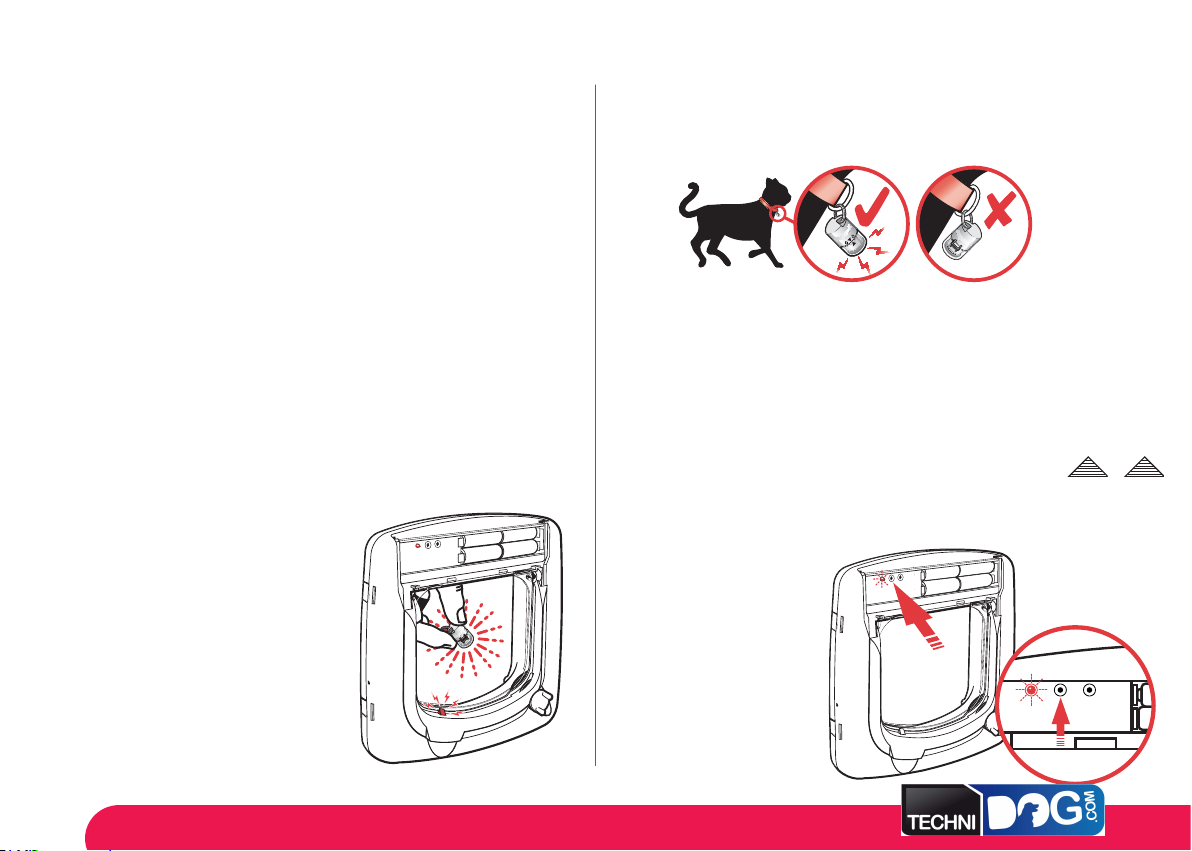
Powering the Infra-red cat fl ap
Powering the Infra-red key
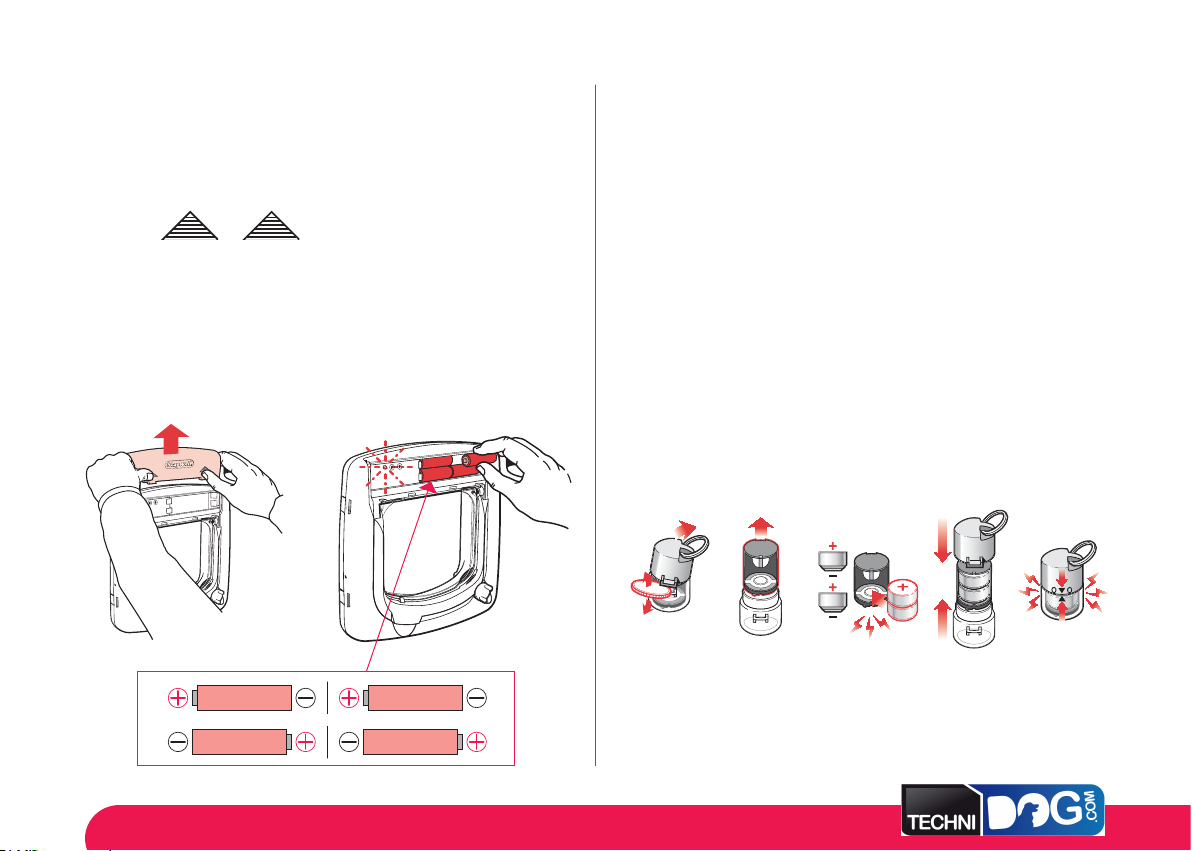
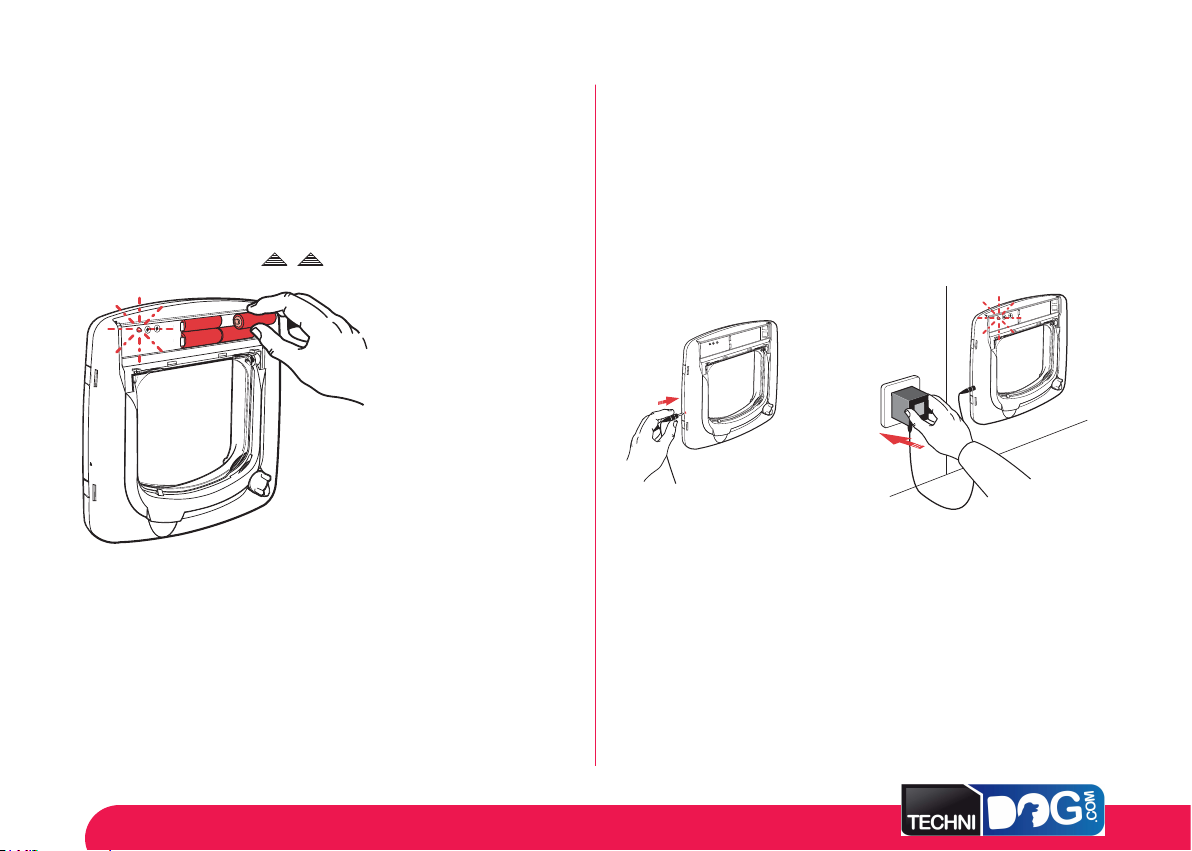
Remove the battery cover by pushing fi rmly in the direction of the arrows.
(Fig. 9).
Place 4 x AA 1.5V Alkaline Long Life batteries in position. (Fig. 10).
Batteries should be replaced every 3-6 months. Do not use
rechargeable batteries.
After you have powered the cat fl ap it emits a low tone bleep indicating the
cat fl ap is ready for programming. In addition to the bleep the red LED will fl
(Fig. 10).
FIG.9 FIG.10
ash.
Open the collar key by twisting a coin between the two fl anges (Fig. 11).
Remove battery holder (Fig. 12).
Place 2 x SR44, LR44 or D357 coin cell batteries into the battery holder.
The collar key LED will fl ash 3 times indicating that the key is active (Fig. 13).
Replace battery holder into the clear base. Replace coloured cap by
clipping the two halves of the key together, ensuring that the green PCB
board is visible through the clear base. (Fig. 14).
The key will continue to fl ash at 2 minute intervals (Fig. 15).
FIG. 11 FIG. 12 FIG. 13 FIG. 14 FIG. 15
Batteries should be replaced every 3-6 months or when the
LED stops fl ashing.
6
Page 8
Programming the Infra-red cat fl ap
Attaching the Infra-red collar key
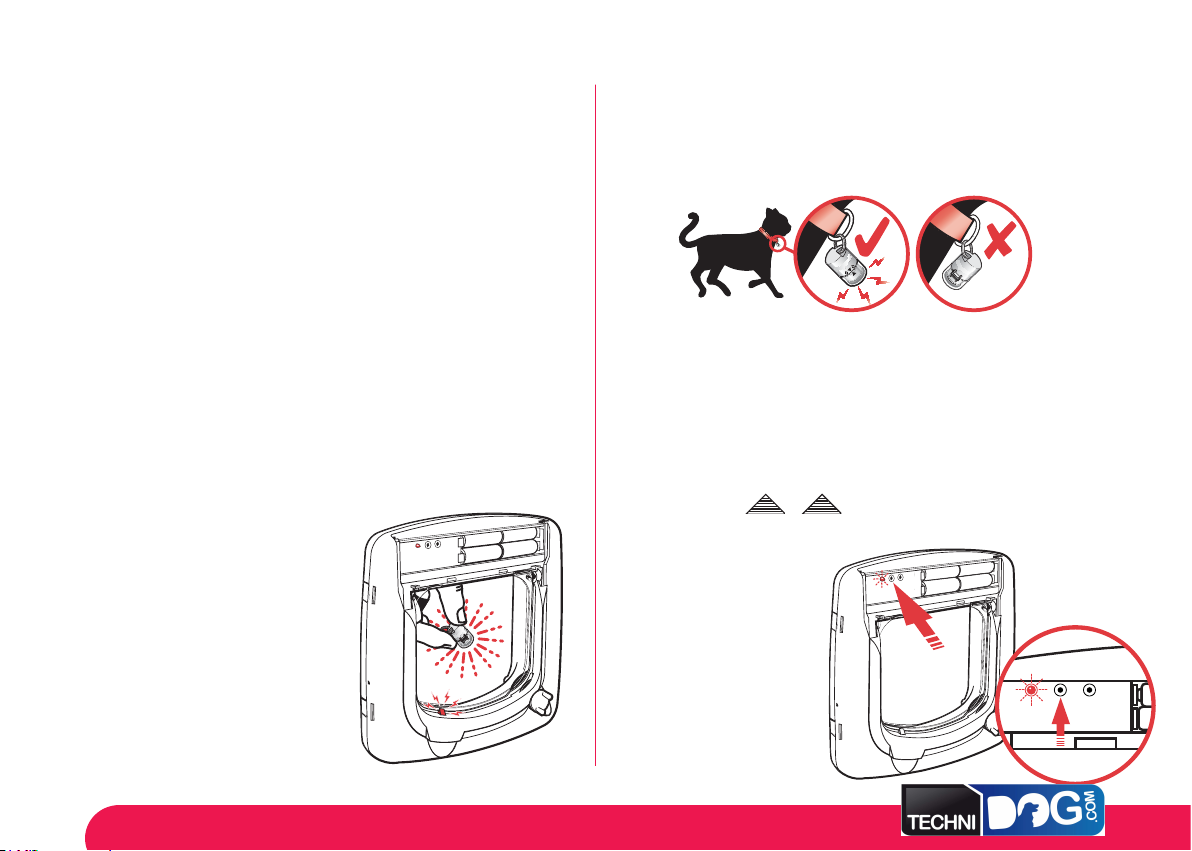
After powering the cat fl ap and the collar key, approach the cat fl ap with the
collar key. The red LED will stop fl ashing and the unit will emit a high pitched
bleep.
Your cat fl ap is now programmed to recognise the collar key and the latch
mechanism will be activated everytime you approach the cat fl ap with the
collar key. (Fig. 16). The latch will not relock until the collar key is out of
range of the cat fl ap.
If you have more than one cat, you will need to purchase collar keys of the
same colour code.
The colour codes available are: Green, Yellow, Blue and Pink. Extra
keys can be purchased from the Staywell website -
www.staywell.co.uk
If your cat loses a collar key, you
must purchase a replacement of the
same colour
different colour, you must reprogramme
the cat fl ap with that new colour.
To reprogramme the cat fl ap,
disconnect the batteries for
approximately three minutes and
follow the steps outlined on the
previous page and as above.
. If you purchase a
FIG.16
The key must be attached to the collar so that it hangs forwards (Fig. 17).
FIG. 17
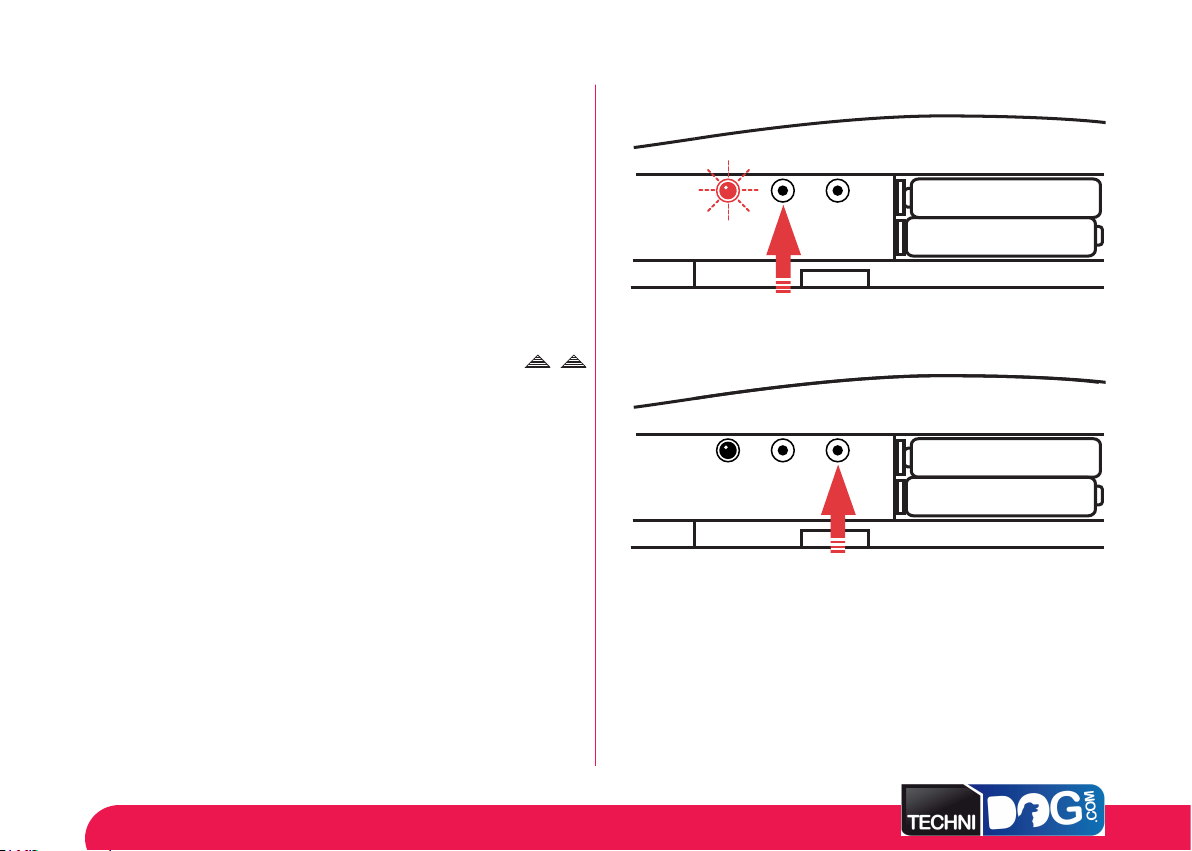
Manual operation
Please note, this feature CANNOT be used until the cat fl ap has
been fully powered and programmed. If you do not wish to use the
electronic latch the cat fl ap can be placed in manual mode.
Remove the battery cover by pushing in the direction of the arrows.
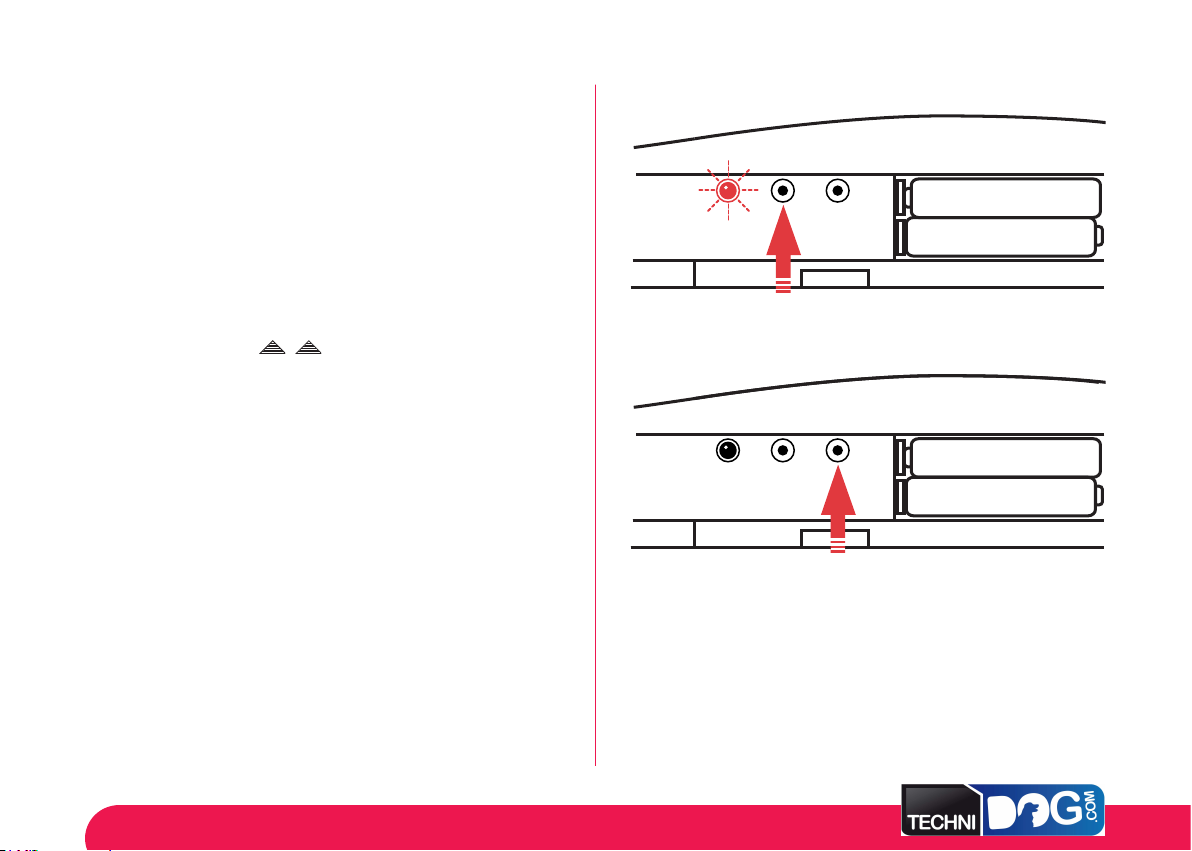
Press the manual button once (Fig. 18). and the latch will unlock and the
LED fl ashes. The cat fl ap is now in manual mode.
To place the cat fl ap back in
automatic mode press the
manual button. The latch will
relock and the LED fl ashes.
The cat fl ap is now back
in automatic mode.
FIG. 18
7
Page 9
Setting the re-latch time
Please note, this feature CANNOT be used until the cat fl ap has
been fully powered and programmed.
The re-latch time is the length of time that it takes for the latch to lock after
it has been activated and the key has been removed from range. The latch
on your cat fl ap has been factory set to re-latch after 2 seconds. The time
can be set between 2 and 20 seconds. The period that you set the re-latch
time will depend on your own cat and your personal preference.
FIG. 19
Remove the battery cover by pushing in the direction of the arrows.
Press the manual button once. (Fig. 19). The LED will fl ash and the latch will
open. The cat fl ap is effectively in manual mode. Press the timer button
within 2 seconds (Fig. 20). Each press of the timer button will increase the
re-latch time by one second. Each time the button is pressed the cat fl ap
will emit a high pitched bleep. Once the time out reaches 20 seconds the
timer reverts to 2 seconds, emits a low tone bleep and the cycle starts again.
Once the desired amount of seconds has been selected, wait 2 seconds
for the cat fl ap to return to manual mode (there is nothing to indicate this
as the latch will remain open). Press the manual button again to return to
automatic mode (Fig. 19). The LED will fl ash and the latch will re-lock. The
selected re-latch time is in use.
To extend or reduce the selected re-latch time, simply repeat the steps
above. For example: If a re-latch time of 5 seconds has been selected,
the fi rst high pitched bleep changes the setting to 6 seconds, the second
high pitched bleep to 7 seconds and so on.
8
FIG. 20
Page 10
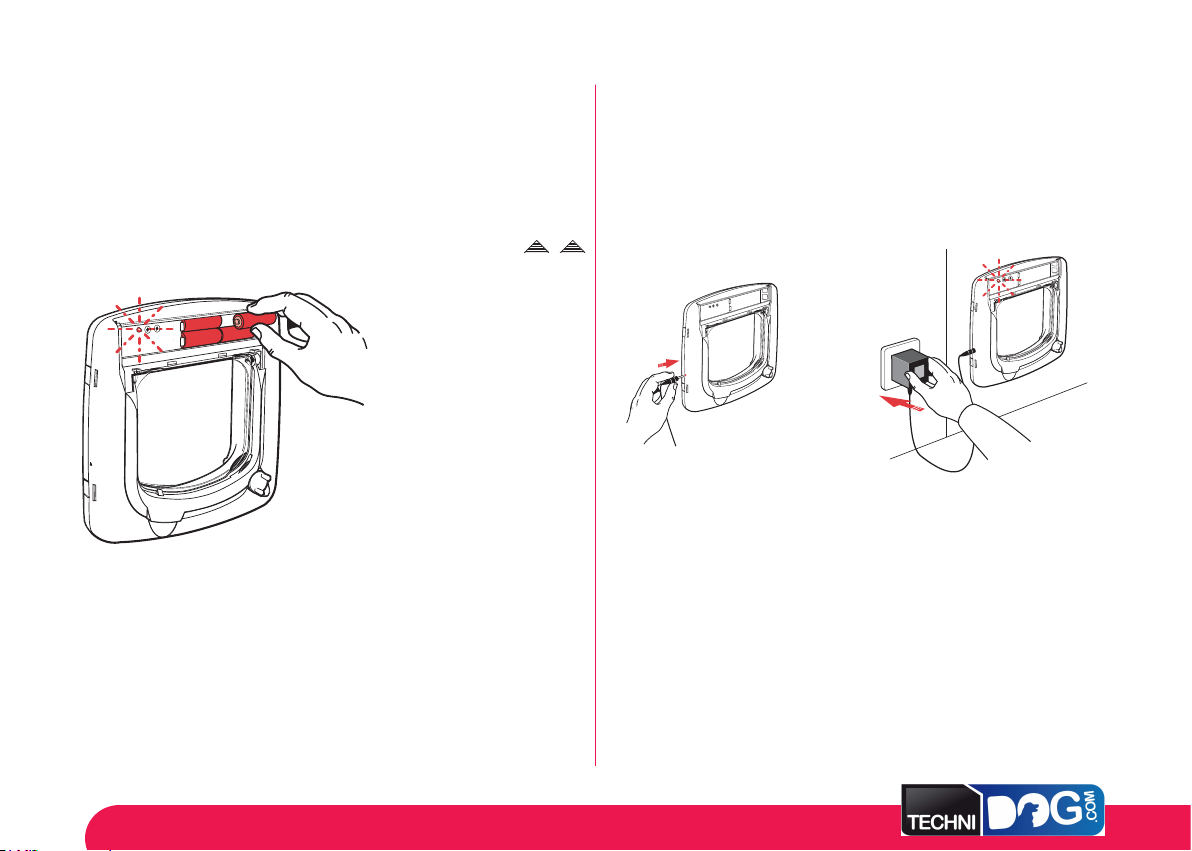
Low battery power
Mains power adaptor (optional)
Cat fl ap
When the batteries are starting to run low the cat fl ap will warn you by
emitting a bleep every 2 minutes. The LED will fl ash continually.
Remove the battery cover by pushing in the direction of the arrows.
FIG. 21
Remove the old batteries
and insert 4 x new AA 1.5V
Alkaline Long Life batteries.
(Fig. 21). Replace battery
cover. Your cat fl ap will
need reprogramming.
Follow instructions for
“Programming the Infra-red
cat fl ap”.
Collar key
As the power in the collar key batteries runs low you will notice a loss
of range as your cat approaches the door. Eventually the battery power
will become so low that the cat door will not open and the LED will stop
fl ashing. To restore power, replace the two batteries in the collar key and
refer to “Powering the Infra-red key”.
A mains power transformer kit can be purchased from the Staywell
website - www.staywell.co.uk. Instructions are provided explaining how
to install. Once installed, place the jack plug into the socket at the side
of the cat fl ap (Fig. 22). Plug adaptor into a household electric socket
(Fig. 23).
FIG. 22 FIG. 23
Batteries can be left installed as a back-up power supply. If you are
powering the cat fl ap with the mains power adaptor, and there have been
no batteries installed, you will need to program your cat fl
instructions for “Programming the Infra-red cat fl ap”.
ap. Follow
9
Page 11

Training your cat to use the cat fl ap
Most cats will learn to use the cat fl ap almost at once but there are a few
who may be a little nervous at fi rst. The following tips will help your pet to
take full advantage of the outdoor freedom and indoor comfort – which
you want for your cat – and which your new cat fl ap provides.
The most important rule is to be patient with your cat. Don’t be in a hurry.
Let your cat work out for itself that it can go in and out of doors. Don’t
force it through the fl ap or it may become frightened.
Many cat owners install cat fl aps when they move house. If this applies
to you, make sure that your cat is familiar with his or her surroundings
before you fi t the cat fl ap. Take it on supervised trips outdoors on a
leash and make sure it also feels secure and comfortable in its new
indoor environment. Cats can develop long lasting fears in unfamiliar
surroundings.
Once you have installed your cat fl ap, leave the fl ap open for some time.
You can do this by using a long strip of masking tape; open the fl ap and
use the tape to keep it held open by fi xing the other end of the tape to the
surface above. Make sure that the fi xing is secure so that the fl ap can not
fall down accidentally. Let your cat become familiar with it and go in and
out freely.
Establish a motive for your cat to use the door. A good one is food. First
feed the cat near the door, inside and then near the door outside. Repeat
as often as you need to. Most cats, especially kittens, also have a strong
urge for freedom, perhaps to hunt. Cats are also social creatures – they
enjoy the company of other cats. This can be another reason for them to
explore outside.
If this is something new to your cat, it may take some patience to teach
your cat how to use it. When your cat makes progress, give them a lot of
praise - they’ve earned it.
Training your cat to use the Infra-red
collar key
Before allowing your cat to use the
cat fl ap, it is wise to acquaint your
self with the operation of the Infrared lock. You fi rstly need to power
up both the cat fl ap and the collar
key and then program the Infra-red
collar key to the cat fl ap.
From the outside of the house take
the ‘powered’ and ‘programmed’
collar key in your hand and then
move it towards the cat fl ap. You
should hear the lock mechanism
“click” and see the red latch drop
down inside the cat fl ap.
10
Page 12
The latch will remain inside the cat fl ap until the key is moved away from
the cat fl ap where it will return to the locked position. (Please note that the
Infra-red collar key is required only to enter the cat fl
Only when the cat is comfortable going in and out of the cat fl ap whilst the
fl ap has been propped open, (in line with the general training tips in the
previous section) should you fi t the collar key onto your cat’s collar. When
fi xing the collar to your cat, ensure that the clear base of the key (through
which you should see the green PCB) is pointing forwards and away from
the cat. This is to ensure that the Infra-red beam can reach the sensor on
the cat fl ap.
Due to the generous range of the Infra-red collar key, most cats will have
no problem learning how the cat fl ap is activated and how to gain entry.
There are some cats however, who can take a little longer to become more
confi dent and familiar with the Infra-red functions. Use a favourite treat to
coax your cat towards and through the cat fl ap and reward them when
they get it right.
If your cat has only just become familiar with the using a cat fl ap, it may
take some patience to teach your cat how it the Infra-red function works.
When your cat makes progress, give them a lot of praise. Keep repeating
the exercise until your cat can come through the cat fl ap comfortably.
ap.)
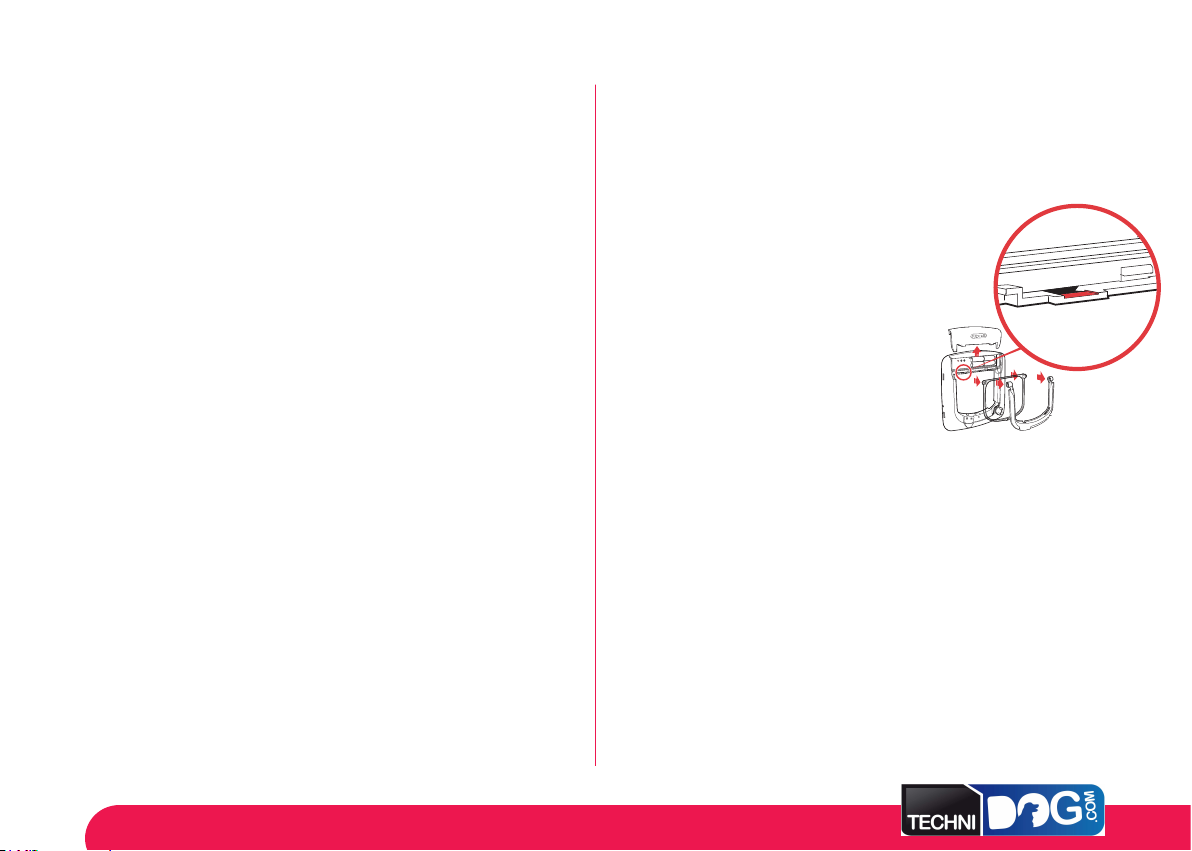
Cleaning the cat fl ap
Your cat fl ap is constructed in the highest quality material with a
toughened fl ap and has been designed to last for many years.
To maintain its appearance, occasional wiping with a damp cloth is
all that is necessary.
Cleaning the Infra-red lens
For best performance wipe the lens clean every
4 weeks with a soft cloth (Fig. 24).
3 Year Warranty
Your Staywell product is provided with a three year warranty. Warranty
covers the replacement of parts, or at the Company’s discretion the
replacement of a complete product. Warranty only covers manufacturing
defects and does not cover consumer misuse or damage.
In the event that a warranty claim is necessary, please contact Staywell
Customer Care. Please only return goods for inspection on the
authorisation of a Customer Care Representative who will advise you of
the procedures.
Register your warranty now - www.staywell.co.uk
FIG. 24
11
Page 13
Customer Care
CUSTOMER CARE
UK:
Republic
of Ireland:
Northern
Ireland:
0800 046 1414
353 (0) 58 44 988
44 (0) 28 8776 9327
How to dispose of your Infra-red cat
fl ap safely
Important recycling advice
Please respect the Waste Electrical and Electrical Equipment regulations in
your country. This equipment must be recycled. If you no longer require this
equipment, do not place it in the normal municipal waste system. Please return it to
where it was purchased in order that it can be placed in our recycling system. If this is
not possible, please contact Staywell Customer Care for further information.
Battery Disposal
Separate collection of spent batteries is required in many regions; check the
regulations in your area before discarding spent batteries. Please see page 6
for instructions on how to remove the batteries from these devices for separate disposal.
The cat fl ap operates on 4 batteries of the type AA/LR6, 1.5 V, alkaline manganese, with
a 1200 m Ah capacity. Replace only with equivalent batteries. The collar key operates on
3 batteries of the type D357, LR44 or SR44, 1.5 V, alkaline button cell with a 150 m Ah
capacity. Replace only with equivalent batteries.
Compliance
This equipment has been tested and found to comply with the EU
Electromagnetic Compatibility and Low Voltage Directives. Unauthorised
changes or modifi cations to the equipment that are not approved by Radio Systems
Corporation are in violation of EU regulations, could void the user’s authority to operate
the equipment, and void the warranty.
The Declaration of Conformity can be found at:
http://www.petsafe.net/customercare/eu_docs.php
®
www.staywell.co.uk
12
Page 14

FR
Votre chatière Staywell...
Chat
Système de verrouillage à
4 positions
Infrarouge
Les chatières Staywell s’adaptent à toutes les portes, à tous les murs et à toutes les cloisons, bien que du matériel supplémentaire et des compétences en bricolage se révèlent peut-être nécessaires..
* Il n’est pas possible de découper du verre trempé ou un double vitrage sauf au moment de la fabrication. Veuillez consulter un vitrier.
13
Convient aux portes en bois
Convient aux fenêtres et aux
portes en verre à simple ou
à double vitrage*
Convient aux murs en
briques
Convient au PVC, au PVC
rigide et au métal
Le tunnel inclus convient à la
majorité des épaisseurs de portes
Extensions de tunnels
supplémentaires disponibles
Page 15

Avant d’installer la chatière, veuillez
lire attentivement les instructions
suivantes étape par étape.
FIG. 1 FIG. 2
Outils nécessaires
• Crayon
• Règle
• Scie sauteuse ou scie
à guichet
• Perceuse
• Tournevis
• Ruban à mesurer
• Colle
• Papier abrasif
Mesure et marquage
Mesurez la hauteur de votre chat au niveau du ventre. Elle est en générale
comprise entre 100 et 150 mm (de 4 à 6 po) (Fig. 1).
Mesurez cette hauteur sur votre porte et tracez une ligne horizontale de
168 mm (6 1/2 po) (Fig. 2)
Gardez à l’esprit que cette ligne correspondra en fait à la limite inférieure
du trou que vous allez découper dans la porte et que l’encadrement de la
trappe sera situé légèrement plus bas. En cas de besoin, il est peut-être
nécessaire de tracer la ligne plus haut en prenant en compte l’encadrement.
X
X
Découper un trou pour la chatière
a) Dans le bois, le PVC, le PVC
rigide et le métal
Il s’agit de découper un trou carré de 175 mm x 168 mm
(6 pi 3/4 po x 6 pi 1/2 po). (Fig. 3)
FIG. 3
Le schéma n’est pas à l’échelle; pour de
meilleurs résultats, consultez le modèle de
découpage inclus.
168mm (61/2”)
175mm
3
/4”)
(6
Portes en bois
PVC, PVC rigide
ou métal
14
Page 16
Fenêtres et portes en verre à
b) Dans le verre
* Il n’est pas possible de découper du verre trempé ou un double
vitrage sauf au moment de la fabrication. Veuillez consulter un vitrier.
Il s’agit de découper un cercle de 212 mm de diamètre (8 pi 3/8 po).
(Fig. 4)
FIG. 4
simple ou double vitrage*
212mm (83/8”)
c) Dans les murs
Suivez les mêmes instructions que pour
le bois, le PVC, le PVC rigide et le
métal en vous servant du modèle de
découpage inclus. Veuillez noter
que des outils et du matériel
complémentaires, ainsi que
des compétences en bricolage
se révèleront peut-être
nécessaires.
Convient aux murs en
briques
Le schéma n’est pas à l’échelle; pour de
meilleurs résultats, montrez le modèle de
découpage inclus à votre vitrier.
15
Page 17
Mise en place de votre chatière
Votre chatière Staywell se met en place à l’aide des verrous rouges
à 4 positions sur le côté intérieur de votre maison.
Mettez la trappe dans le trou pendant quelques instants et positionnez
le couvercle externe sur le côté extérieur de la maison. Depuis l’extérieur,
faites une marque à l’emplacement des trous de vis sur la porte à travers
les trous du couvercle extérieur. (Fig. 5)
3
Retirez la trappe et percez les trous à l’aide d’un foret de 4,5 mm (
(Fig. 6).
NN
FIG. 5 FIG. 6
Remettez la trappe en place dans le trou et vissez-la depuis l’extérieur. (Fig. 7).
Si les vis sont trop longues, il sera peut-être nécessaire de les couper pour
qu’elles correspondent à la profondeur de votre porte. L’utilisation de vis
trop longues pourrait abîmer la chatière. En cas de besoin, il faut retirer les
vis de la chatière avant de les couper. Limez la pointe des vis pour qu’elles
ne soient pas coupantes.
Mettez le cadran circulaire du vérouillage à 4 directions en place (Fig. 7).
Recouvrez ensuite les trous des vis à l’aide des bouchons d’obturation sur
l’encadrement extérieur pour un fi ni soigneux (Fig. 7).
/16 po)
FIG. 7
Pour les portes en verre, la trappe se fi xe sur le verre à
l’aide de deux vis depuis l’extérieur de la maison.
16
Page 18
Tunnels (facultatifs)
La trappe est conçue pour s’adapter à toutes les profondeurs de trou. Il
est recommandé de coller les tunnels ensemble et à l’encadrement.
(Fig. 8).
Tunnel facultatif
inclus
Extensions de tunnels
supplémentaires
disponibles
Système de verrouillage à
Utilisation du
4 positions
système de verrouillage à 4 positions
Le verrou à 4 positions vous permet de contrôler l’accès de votre animal à
votre maison.
FIG. 8
7
Un tunnel est fourni avec la trappe et mesure 47 mm (1
souhaitez acheter des tunnels de la même profondeur s’adaptant à la
profondeur du trou dans votre mur, consultez le site Web de Staywell,
www.staywell.co.uk
/8 po). Si vous
Votre chatière Staywell est maintenant
prête à l’emploi.
Il est préférable de ne pas utiliser le système de verrouillage à 4 positions
tant que votre animal ne s’est pas habitué à la chatière. Votre animal
risquerait de ne pas comprendre pourquoi vous avez installé la chatière.
• Entrée uniquement
• Entrée ou sortie • Verrouillée
• Sortie uniquement
17
Page 19
Mise en marche de la chatière à
infrarouge
Mise en marche de l’émetteur à
infrarouge
Retirez le couvercle du compartiment des piles en poussant fermement
dans le sens des fl èches.
(Fig. 9).
Placez 4 piles alcalines AA de longue durée d’1,5 V. (Fig. 10).
Les piles doivent être remplacées tous les 3-6 mois. N’utilisez pas de
piles rechargeables.
Lorsque la chatière est allumée, elle émet un bip grave indiquant qu’elle
est prête à être programmée. En même temps que le bip, le voyant lumineux
rouge clignote. (Fig. 10).
FIG. 9 FIG. 10
Ouvrez l’émetteur en insérant une pièce entre les deux brides (Fig. 11).
Retirez le compartiment à piles (Fig. 12).
Placez 2 piles SR44, LR44 ou D357 dans le compartiment à piles. Le
voyant lumineux du collier émetteur clignote 3 fois, ce qui indique que
l’émetteur est actif (Fig. 13).
Remettez le compartiment à piles dans la base transparente. Replacez
le bouchon de couleur en emboîtant les deux parties de l’émetteur et en
vous assurant que la carte de circuit imprimé verte soit visible à travers la
base transparente. (Fig. 14).
L’émetteur continuera de clignoter toutes les deux minutes (Fig. 15).
FIG. 11 FIG. 12 FIG. 13 FIG. 14 FIG. 15
Les piles doivent être remplacées tous les 3-6 mois ou lorsque le
voyant lumineux s’arrête de clignoter.
18
Page 20
Programmation de la chatière à
infrarouge
Mise en place du collier émetteur à
infrarouge
Après avoir mis la chatière et le collier émetteur sous tension, approchez de
la chatière en tenant le collier émetteur. Le voyant lumineux rouge arrêtera
de clignoter et l’unité émettra un bip aigu.
Votre chatière est maintenant programmée pour reconnaître le collier émetteur,
et le mécanisme du verrou sera activé à chaque fois que vous approcherez de
la chatière en tenant le collier émetteur. (Fig. 16). Le verrou se refermera une
fois que le collier émetteur se trouvera hors de portée de la chatière.
Si vous avez plusieurs chats, vous devrez acheter plusieurs colliers
émetteurs du même code de couleur.
Voici les codes de couleur disponibles : vert, jaune, bleu et rose. Vous
pouvez acheter des émetteurs supplémentaires sur le site Web de
Staywell, www.staywell.co.uk
Si votre chat perd l’émetteur, vous
devez acheter un émetteur de
rechange de la même couleur. Si
vous achetez un émetteur de couleur
différente, vous devrez reprogrammer l a
chatière par rapport à ce nouveau
code de couleur.
Pour reprogrammer la chatière,
retirez les piles pendant environ
trois minutes, puis suivez les étapes
indiquées à la page précédente et
ci-dessus.
FIG. 16
L’émetteur doit être attaché au collier de façon à ce qu’il pointe vers
l’avant (Fig. 17).
FIG 17
Fonctionnement manuel
Veuillez noter que cette fonctionnalité NE PEUT PAS être utilisée
tant que la chatière n’a pas été mise sous tension et programmée.
Si vous ne souhaitez pas utiliser le verrou électronique, la chatière peut
être mise en mode manuel.
Retirez le couvercle du compartiment des piles en poussant fermement dans
le sens des fl èches. Appuyez une fois sur le bouton de mode
manuel (fi g. 18); le verrou se débloque et le voyant lumineux clignote. La
chatière est maintenant en
mode manuel.
Pour remettre la chatière
en mode automatique,
appuyez sur le bouton de
mode manuel. Le verrou
se bloque à nouveau et le
voyant lumineux clignote. La
chatière est de nouveau
en mode automatique.
FIG. 18
19
Page 21
Réglage de la durée du reverrouillage
Veuillez noter que cette fonctionnalité NE PEUT PAS être utilisée
tant que la chatière n’a pas été mise sous tension et programmée.
La durée de reverrouillage représente la durée nécessaire au verrou pour
se rebloquer après avoir été activé et une fois que l’émetteur est hors de
portée. Le verrou de votre chatière a été réglé en usine pour se rebloquer
après 2 secondes. La durée peut être réglée entre 2 et 20 secondes.
La durée de reverrouillage dépend de votre chat et de vos préférences
personnelles.
Retirez le couvercle du compartiment des piles en poussant fermement
dans le sens des fl
mode manuel. (Fig. 19). Le voyant lumineux clignote et le verrou
s’ouvre. La chatière est maintenant en mode manuel. Appuyez sur le
bouton du temporisateur dans un délai de 2 secondes (Fig. 20). À
chaque fois que vous appuyez sur le bouton du temporisateur, la durée de
reverrouillage augmente d’une seconde. À chaque fois que vous appuyez
sur le bouton, la chatière émet un bip aigu. Une fois que le temporisateur
atteint 20 secondes, il revient à 2 secondes, émet un bip grave et le cycle
recommence.
Une fois que vous avez choisi le nombre de secondes désiré, attendez
2 secondes pour que la chatière revienne en mode manuel (rien
n’indiquera cela étant donné que le verrou restera ouvert). Appuyez
encore une fois sur le bouton de mode manuel pour revenir en mode
automatique (fi g. 19). Le voyant lumineux clignote et le verrou se
rebloque. La durée de reverrouillage sélectionnée est effective.
Pour allonger ou réduire la durée de reverrouillage, recommencez
simplement les étapes ci-dessus. Par exemple : Si vous avez choisi
une durée de reverrouillage de 5 secondes, le premier bip aigu porte ce
réglage à 6 secondes, le second bip à 7 secondes et ainsi de suite.
èches. Appuyez une fois sur le bouton de
FIG. 19
FIG. 20
20
Page 22
Niveau des piles faible
Chatière
Lorsque les piles s’affaiblissent, la chatière vous avertit en émettant un bip
toutes les 2 minutes. Le voyant lumineux clignote de façon continue.
Retirez le couvercle du compartiment des piles en poussant fermement
dans le sens des fl èches.
FIG. 21
Collier émetteur
Lorsque le niveau des piles devient faible, vous remarquerez une perte
de la portée de l’émetteur lorsque votre chat s’approche de la chatière.
Ensuite, la puissance de la pile sera tellement faible que la trappe de
s’ouvrira plus et que le voyant lumineux ne clignotera plus. Remplacez
alors les piles du collier émetteur et reportez-vous à la section « Mise en
marche de l’émetteur à infrarouge ».
Retirez les anciennes piles
et placez 4 nouvelles piles
alcalines AA de longue
durée d’1,5 V. (Fig. 21).
Remettez le couvercle
du compartiment à piles.
Il faudra reprogrammer
votre chatière. Suivez les
instructions de la section
« Programmation de la
chatière à infrarouge ».
Adaptateur de secteur électrique
(facultatif)
Vous pouvez acheter un transformateur de secteur électrique sur le site
Web de Staywell, www.staywell.co.uk; vous y trouverez également des
instructions concernant l’installation. Une fois celle-ci terminée, mettez
la fi che mâle dans la prise à côté de la chatière (Fig. 22).
l’adaptateur dans une prise électrique de la maison (Fig. 23).
FIG. 22 FIG. 23
Vous pouvez laisser les piles en tant qu’alimentation électrique de secours.
Si la chatière fonctionne grâce à I’adaptateur de secteur électrique et sans
qu’aucune pile n’ait été installée, vous devrez programmer votre chatière.
Suivez les instructions de la section « Programmation de la chatière à
infrarouge ».
Branchez
21
Page 23
Entraîner votre chat à utiliser la
chatière
La plupart des animaux apprennent à utiliser la chatière pesque
immédiatement, mais certains peuvent être nerveux au début. Les
conseils suivants aideront votre animal à profi ter de sa liberté à se rendre
dehors et du confort de votre maison, une souplesse que vous voulez
offrir à votre animal et que votre nouvelle chatière vous apporte.
La règle d’or consiste à se montrer patient avec votre animal. Ne soyez
pas pressé. Laissez à votre animal le temps de comprendre qu’il peut
entrer et sortir. Ne le forcez pas à passer par la trappe car cela risque de
l’effrayer.
la chatière à l’intérieur de la maison, et ensuite à l’extérieur près de la
chatière. Recommencez aussi souvent que nécessaire. La plupart des
chats, particulièrement les chatons, ont un fort besoin de liberté, peut-être
même de fortes envies de chasser. Ils sont également très sociables et
apprécient la compagnie des autres chats. C’est une autre bonne raison
pour eux d’aller explorer ce qui se trouve à l’extérieur de la maison.
Si votre animal utilise la chatière pour la première fois, il faudra faire
preuve de patience pour lui apprendre à l’utiliser. Lorsque votre animal fait
des progrès, fl attez-le parce qu’il le mérite!
Entraîner votre chat à utiliser le collier
émetteur à infrarouge
De nombreux propriétaires d’animaux installent une chatière lorsqu’ils
déménagent. Si c’est votre cas, assurez-vous que votre animal a eu le
temps de se familiariser avec son nouvel environnement avant de mettre
la chatière en place. Amenez votre animal dehors en le surveillant et en le
gardant en laisse, et assurez-vous qu’il se sent également en sécurité et
à l’aise dans sa nouvelle maison. Les chats peuvent tout particulièrement
développer des peurs à long terme dans un environnement étranger.
Une fois que vous avez installé la chatière, laissez la trappe ouverte
pendant un certain temps. Pour ce faire, vous pouvez utiliser une longue
bande de ruban-cache; ouvrez la trappe et utilisez le ruban pour la
maintenir ouverte en collant l’autre extrémité du ruban à la surface audessus de la chatière. Assurez-vous que la trappe est bien attachée et
qu’elle ne tombera pas accidentellement. Laissez votre chat se familiariser
avec la chatière en entrant et en sortant librement.
Encouragez votre chat à utiliser la chatière. La nourriture constitue une
bonne motivation. Commencez par donner à manger au chat près de
22
Avant de laisser votre chat utiliser
la chatière, il est préférable de
vous habituer au fonctionnement
du verrou à infrarouge. Vous
devez d’abord mettre en marche
la chatière et le collier émetteur et
programmer ensuite l’émetteur à
infrarouge par rapport à la trappe.
Depuis l’extérieur de la maison,
prenez le collier émetteur allumé
et programmé dans votre main
et approchez-le de la chatière.
Vous devriez entendre le déclic du
mécanisme de verrouillage et voir le
verrou rouge descendre à l’intérieur
de la chatière.
Page 24

Le verrou restera à l’intérieur de la chatière jusqu’à ce que l’émetteur
s’éloigne de celle-ci; la chatière se remettra à ce moment-là en position
fermée. (veuillez noter que le collier émetteur à infrarouge est uniquement
requis pour entrer par la chatière).
Une fois que votre chat sera habitué à sortir de la maison et à entrer
dans celle-ci par la chatière laissée ouverte (conformément aux conseils
d’entraînement de la partie précédente), vous pourrez attacher l’émetteur
au collier de votre chat. Lorsque vous attachez le collier à votre chat,
assurez-vous que la base transparente de l’émetteur (à travers lequel vous
pouvez voir la carte de circuit imprimé verte) est orientée vers l’avant et
non pas vers le chat. De cette façon, le rayon à infrarouge pourra atteindre
le capteur de la chatière.
Grâce à la longue portée du collier émetteur à infrarouge, la plupart
des chats ne rencontreront aucun problème pour comprendre le
fonctionnement de la chatière et la façon d’entrer dans la maison. Certains
chats auront cependant besoin de plus de temps pour faire confi ance
au système et pour se familiariser avec le fonctionnement à infrarouge.
Servez-vous de la friandise préférée de votre chat pour l’encourager à
entrer et à sortir par la chatière et pour le récompenser lorsqu’il réussit.
Si votre chat vient juste de se familiariser avec l’utilisation de la chatière,
il faudra se montrer patient avant de lui montrer comment fonctionne
la trappe magnétique. Lorsque votre animal fait des progrès, fl attez-le.
Recommencez l’exercice jusqu’à ce que votre chat se sente à l’aise pour
passer par la chatière.
Nettoyage de la trappe
Votre chatière a été fabriquée à partir des matériaux de la meilleure qualité
et elle comporte une trappe renforcée; le tout a été conçu pour durer de
nombreuses années.
Pour conserver son apparence, il vous suffi t de l’essuyer régulièrement à
l’aide
d’un chiffon humide.
Nettoyage de la lentille à
infrarouge
Pour de meilleurs résultats, essuyez la lentille
toutes les 4 semaines à l’aide d’un chiffon doux
(Fig. 24).
FIG. 24
Garantie de 3 ans
Votre produit Staywell est accompagné d’une garantie de trois ans. Cette
garantie couvre l’échange des pièces, ou le remplacement du produit en
totalité, à la discrétion de la société. La garantie couvre uniquement les
défauts de fabrication mais ne couvre pas la mauvaise utilisation par le
consommateur ou les dégâts causés par celui-ci.
Dans l’éventualité où une réclamation au titre de la garantie s’avère
nécessaire, veuillez entrer en contact avec le service à la clientèle de
Staywell. Veuillez renvoyer les marchandises à contrôler uniquement avec
l’autorisation d’un représentant du service à la clientèle qui vous indiquera
la marche à suivre.
Activez votre garantie dès maintenant sur www.
staywell.co.uk
23
Page 25

Service Clientèle
SERVICE CLIENTÈLE
00 800 18 18 20 20
Comment éliminer vous chatière à
infrarouge en toute sécurité
Conseil important concernant le recyclage
Veuillez respecter les réglementations concernant les déchets électriques et
les déchets de matériel électrique en vigueur dans votre pays. Cet équipement
doit être recyclé. Si vous ne souhaitez plus utiliser cet équipement, ne le jetez pas selon
le système normal de déchets urbains de votre municipalité. Veuillez le renvoyer là
où vous l’avez acheté de façon à ce qu’il soit recyclé par nos soins. Si cela n’est pas
possible, veuillez entrer en contact avec le service à la clientèle de Staywell pour de plus
amples renseignements.
Mise au rebut des piles usagées
La collecte séparée des piles usagées est obligatoire dans de nombreux
endroits. Veuillez vous renseigner auprès des autorités locales avant de les
jeter pour connaître la procédure à suivre. Veuillez suivre les instructions fournies à la
page 18 pour retirer les piles de ces appareils avant leur collecte. La porte chatière est
alimentée par quatre piles alcalines au manganèse de 1,5 V, de type AA/LR6, d’une
capacité de 1200 mAh. Utiliser exclusivement le même type de piles. Le collier clé
fonctionne avec 3 piles boutons alcalines de 1,5 V, de type D357, LR44 ou SR44, d’une
capacité de 150 mAh. Utiliser exclusivement le même type de piles.
Conformité
Cet équipement a été testé et il est conforme à la directive européenne
applicable à la compatibilité électromagnétique pour la basse tension. Les modifi
cations de l’équipement non approuvées par Radio Systems
une infraction à la directive européenne, et pourraient annuler le droit de l’acheteur à
utiliser cet appareil, ainsi que la garantie.
MD
Corporation constituent
www.staywell.co.uk
24
Vous trouverez la déclaration de conformité à l’adresse
http://www.petsafe.net/customercare/eu_docs.php
Page 26

NL
Uw Staywell huisdierenluik...
Kat
vergrendelslot met 4 standen
Infrarood
Alle Staywell huisdierenluiken zijn geschikt voor alle deuren, wanden of scheidingsmuren hoewel aanvullende materialen en een goede doe-het-zelf kennis voor de montage nodig kunnen zijn.
* Gaten kunnen alleen in gehard of dubbel glas geboord worden ten tijde van de fabricage. Neem a.u.b. contact op met een glaszetter.
25
Geschikt voor houten deuren
Geschikt voor glazen ramen
en deuren, met enkele of
dubbele beglazing*
Geschikt voor bakstenen
muren
Geschikt voor PVC/uPVC/
metaal
Optionele tunnel is geschikt voor
meeste deurdiktes
Aanvullende verlengstukken
voor tunnel zijn leverbaar
Page 27

Lees de volgende stap-voor-stap
instructies aandachtig door voor u uw
kattenluik installeert.
AFB.1 AFB.2
Vereist gereedschap
• Potlood
• Liniaal
• Decoupeerzaag of
sleutelgatzaag
• Boormachine
• Schroevendraaier
• Meetlint
• Lijm
• Schuurpapier
Afmeting en aftekening
Meet de buikhoogte van uw huisdier. Deze is gewoonlijk 100 -150mm (4-6”)
(Afb. 1).
Markeer deze hoogte aan de buitenkant van uw deuren teken een rechte,
horizontale lijn van 168mm (61/2”) (Afb. 2).
Gebruik de horizontale lijn als uitgangspunt en denk erom dat de frame van
het kattenluik iets lager bevestigt zal worden. Deze lijn kan, indien nodig, iets
hoger worden afgetekend.
X
X
Een gat voor huisdierenluik boren
175mm
3
/4”)
(6
Houten deuren
a) In hout en PVC/uPVC/metaal
Voor het bevestigen van het luik maakt u een vierkante uitsnijding van
175mm x 168mm (6
AFB.3
Niet schatten - voor beste resultaten maak
gebruik van de bijgesloten sjabloon.
3
/4” x 61/2”). (Afb. 3).
168mm (61/2”)
PVC/uPVC/
metaal
26
Page 28

Glazen ramen en deuren, enkele en
b) In glas
* Gaten kunnen alleen in gehard of dubbel glas geboord worden ten
tijde van de fabricage. Neem a.u.b. contact op met een glaszetter.
Voor het bevestigen van het kattenluik maakt u een ronde uitsnijding met
een diameter van 212mm (8
AFB.4
dubbele beglazing*
3
/8”). (Afb. 4).
212mm (83/8”)
Geschikt voor bakste-
c) In muren
Volg de instructies voor “Hout en PVC/
uPVC/Metaal” en maak gebruik van
de bijgesloten uitsnijdsjabloon.
Vergeet a.u.b. niet dat aanvullend
gereedschap, materialen als ook
een goede doe-het-zelf kennis
voor dit werk nodig kunnen zijn.
nen muren
Niet schatten - voor beste resultaten maak
gebruik van de bijgesloten sjabloon.
27
Page 29

Montage van huisdierenluik
Uw Staywell kattenluik wordt met de rode 4 standen vergrendelslot
aan de binnenkant van uw huisdeur bevestigd.
Plaats de fl ap tijdelijk in het gat en bevestig vervolgens de buitenframe
aan de buitenkant van het huis. Markeer met een potlood de punten aan
de buitenkant van de deur waar de schroeven in moeten komen. (Afb. 5)
Verwijder de fl ap en boor alle gaatjes met een 4,5mm (3/16”) boorijzer (Afb. 6).
AFB.5 AFB.6
NN
Breng de fl ap terug in het gat en bevestig deze aan de buitenkant, zodat het
stevig vastzit. (Afb. 7). Indien de schroeven te lang zijn zullen ze ingekort
moeten worden zodat ze in het uitgesneden gat passen en niet uitsteken.
Te lange schroeven kunnen het kattenluik beschadigen. Indien de
schroeven ingekort moeten worden, dient u ze eerst uit het kattenluik te
verwijderen. Vijl de scherpe kanten weg.
AFB.7
Plaats de 4 standen slot in zijn plaats (Afb. 7).
Tot slot, bedek de schroefgaten met de bijgeleverde dopjes voor een nette
afwerking (Afb. 7).
28
Als de deur van glas is moet het kattenluik met twee
schroeven aan de buitenkant van de deur ‘vastgeklemd’
worden.
Page 30

Optionele tunnel
Tunnels (optioneel)
De fl ap is geschikt voor het plaatsen in alle gaten, ongeacht de diepte. Wij
raden u aan om de tunnels in het frame en aan elkaar te lijmen. (Afb. 8).
meegeleverd
Aanvullende verlengstukken voor tunnel
zijn leverbaar
vergrendelslot met 4
Het gebruik van 4
standen
standen vergrendelslot
De 4 standen slot zorgt ervoor dat u kunt controleren wanneer uw kat in en
uit het huis loopt.
AFB.8
7
De fl ap wordt geleverd met één tunnel van 47mm (1
het bestellen van extra tunnels of voor het bepalen hoe diep het gat in
uw muur moet zijn, bezoek Staywell website -
www.staywell.co.uk
/8”) diepte. Voor
Uw Staywell kattenluik is nu klaar voor
gebruik.
Wij raden u aan om geen gebruik te maken van de 4 standen slot zolang
uw huisdier nog niet gewend is geraakt aan het gebruik van het luik. Uw
huisdier zou door het instaleren van dit luik in de war kunnen raken.
• Alleen in • Alleen uit
• In of uit • Volledig afgesloten
29
Page 31

Het opladen van het infrarode
kattenluik
Vervang de batterijdeksel door stevig te duwen in de richting waar de
pijlen naar wijzen.
(Afb. 9).
Plaats 4 x AA 1,5V Alkaline Long Life batterijen. (Afb. 10).
Batterijen moeten elke 3-6 maanden worden vervangen. Gebruik geen
oplaadbare batterijen.
Nadat het kattenluik opgeladen is hoort u een zachte toon; dat betekent
dat het kattenluik klaar is voor programmering. Naast het piepgeluid gaat het
rode LED-lampje fl
itsen. (Afb. 10).
Het opladen van de infrarode sleutel
Open de halsbandsleutel met behulp van een muntje (Afb. 11).
Vervang batterijhouder (Afb. 12).
Leg 2 x SR44, LR44 of D357 Coin Cell knoopbatterijen in de batterijhouder
in. Het LED-lampje op de halsbandsleutel zal 3 keer knipperen om aan te
geven dat de sleutel actief is (Afb. 13).
Leg de batterijhouder in de positie terug. Plaats het gekleurde kapje terug
door twee helften van de sleutel in elkaar te zetten en controleer daarbij of
het groene PCB-bord zichtbaar is. (Afb. 14).
De sleutel blijft om de 2 minuten knipperen (Afb. 15).
AFB.9 AFB.10
30
AFB. 11 AFB. 12 AFB. 13 AFB. 14 AFB. 15
Batterijen moeten elke 3-6 maanden worden vervangen, of wanneer
het LED-lampje niet meer knippert.
Page 32

Het instellen van het infrarode
kattenluik
Breng het opgeladen kattenluik en de halsbandsleutel naar het kattenluik
toe. De rode LED-lamp knippert niet meer en u hoort een scherpe pieptoon.
Uw kattenluik is nu geprogrammeerd om de halssleutel te herkennen en
het veerslotmechanisme zal geactiveerd worden elke keer wanneer de
halsbandsleutel zich dichtbij het kattenluik bevindt. (Afb. 16). Het veerslot zal
niet sluiten zolang de halsbandsleutel zich binnen de straalruimte van het
kattenluik bevindt.
Indien u meer katten hebt zult u meer halsbandsleutels met dezelfde
kleurencode moeten aanschaffen.
De beschikbare kleurencodes zijn: Groen, Geel, Blauw en Roze. Extra
sleutels kunnen worden besteld via de Staywell website -
www.staywell.co.uk
Als uw kat haar halsbandsleutel kwijtraakt, moet u een vervangende
halsbandsleutel kopen, in
dezelfde kleur. Als u de
halsbandsleutel koopt die
een andere kleur heeft, moet u deze
opnieuw programmeren zodat het
kattenluik ingesteld wordt op nieuwe
kleur.
Indien het kattenluik opnieuw
geprogrammeerd moet worden,
dient u de batterijen gedurende
ongeveer drie minuten uit te halen en
de hierboven omschreven stappen
te volgen.
Het vastmaken van de infrarode
halsbandsleutel
De sleutel moet zodanig worden geplaatst dat deze naar voren hangt (Afb. 17).
AFB. 17
Handmatige operatie
Let op - deze functie WERKT NIET zolang het kattenluik niet volledig
is opgeladen en geprogrammeerd. Indien u het elektronische slot niet
wilt gebruiken kunt u het kattenluik instellen voor handmatig gebruik.
Vervang het batterijdeksel door stevig te duwen in de richting waar
de pijlen naar wijzen. Druk een keer op de knop voor
handmatig gebruik (Afb. 18). Het slot gaat open en het LED-lampje fl itst.
Het kattenluik is nu ingesteld op handmatige modus.
AFB. 18
Als u het kattenluik weer in
automatische modus wilt
terugzetten, druk op de
knop ‘handmatig’. Het slot
gaat sluiten en het LEDlampje fl itst. Het kattenluik
is nu teruggezet in
automatische modus.
31
Page 33

Instellen van hersluittijd.
Let op - deze functie WERKT NIET zolang het kattenluik niet volledig
is opgeladen en geprogrammeerd.
De hersluittijd is de tijd die nodig is voor de slot om te gaan sluiten nadat
deze geactiveerd is en de slot zich niet meer binnen het stralingsbereik
bevindt. Het slot van uw kattenluik is tijdens de productie ingesteld om
te hersluiten na 2 seconden. De tijd kan ingesteld worden op 2 tot 20
seconden. De hersluittijd die u wilt instellen is afhankelijk van uw eigen kat
en uw persoonlijke voorkeur.
Vervang het batterijdeksel door stevig te duwen in de richting waar de
pijlen naar wijzen. Druk een keer op de knop voor handmatig
gebruik. (Afb. 19). Het LED-lampje fl itst en het slot opent. Het kattenluik
is nu ingesteld op handmatige modus. Druk gedurende 2 seconden
op de timerknop Afb. 20). Met iedere druk op de timerknop verlengt u de
hersluittijd met één seconde. Iedere keer wanneer u op de knop drukt is
een scherpe pieptoon hoorbaar. Wanneer de 20 seconden tijd is bereikt
gaat de timer terug naar 2 seconden, gaat een zacht piepgeluid over en de
cyclus begint opnieuw.
Nadat u de gewenste hersluittijd heeft ingesteld, wacht 2 seconden af
totdat het kattenluik teruggaat naar handmatige modus (dit wordt op geen
enkele wijze aangegeven daar dat de slot open blijft). Druk nogmaals op
de knop ‘handmatig’ om terug te gaan naar automatische modus (Afb.
19). Het LED-lampje fl itst en het slot zal opnieuw sluiten. De ingestelde
hersluittijd is in gebruik genomen.
Voor het verlengen of verkorten van de ingestelde hersluittijd dient u de
bovenstaande stappen te herhalen. Bijvoorbeeld: Als de hersluittijd van
5 seconden is ingesteld, zal het eerstvolgende scherpe piepgeluid de
instelling wijzigen in 6 seconden, het tweede scherpe piepgeluid wijzigt de
instelling in 7 seconden, enz.
AFB. 19
AFB. 20
32
Page 34

Laag batterijvermogen
Stroomadapter (optioneel)
Kattenluik
Wanneer de batterijen bijna leeg zijn zal het kattenluik een
waarschuwingspiep om de 2 minuten uitzenden. Het LED-lampje fl itst
continu.
Vervang het batterijdeksel door stevig te duwen in de richting waar de
pijlen naar wijzen.
AFB. 21
Vervang oude batterijen
en steek 4 nieuwe AA 1,5V
Alkaline Long Life batterijen
in. (Afb. 21). Plaats het
batterijdeksel terug. Uw
kattenluik moet opnieuw
worden geprogrammeerd.
Volg de instructies uit
“Het programmeren van
infrarood kattenluik”.
Halsbandsleutel
Als de batterij in de halsbandsleutel bijna leeg is geraakt zult u een
lager stralingsbereik merken wanneer uw kat naar de deur loopt. Het
kan uiteindelijk voorkomen dat uw kat het kattenluik niet kan openen
en het LED-lampje fl itst niet meer. Vervang twee batterijen in de
halsbandsleutel en volg de aanwijzingen uit “Het opladen van de infrarode
halsbandsleutel” om dit te op te lossen.
Een stroomtransformator kit kan worden besteld via de Staywell website
- www.staywell.co.uk. Instructies m.b.t. de installatie worden meegeleverd.
Nadat de installatie voltooid is steek de stekker in het stopcontact aan de
zijkant van het kattenluik in (Afb. 22) Steek de adapter in een elektrische
wandcontactdoos (Afb. 23).
AFB. 22 AFB. 23
U kunt de batterijen in laten staan als een back-up stroomvoorziening.
Indien u uw kattenluik via de stroomadapter oplaadt zonder dat er
batterijen zich in de batterijhouder bevinden zult u het kattenluik moeten
programmeren. V
kattenluik”.
olg de instructies uit “Het programmeren van infrarood
33
Page 35

Het trainen van kat hoe ze het
kattenluik moet gebruiken
Meeste katten zullen meteen leren hoe zo’n luik werkt maar sommigen
kunnen in het begin toch wat nerveuzer reageren. De volgende tips
kunnen u helpen bij het leren van uw huisdier om de vrijheid buitenshuis
evenals het gemak binnenshuis ten volle te benutten; dit is iets wat u aan
uw kat wilt bieden en dit kattenluik helpt u daarbij.
De meest belangrijke regel is dat u geduld moet hebben met uw kat.
Haast u zich niet. Laat uw kat zelf doorkrijgen dat het via het luik in en uit
het huis kan lopen. Dwing het dier niet om door het luik te lopen omdat het
hierdoor kan schrikken.
Kattenluiken worden vaak na de verhuizing door hun baasjes gemonteerd.
Als dit het geval is bij u, verzeker u dan, voordat u het kattenluik gaat
plaatsen, dat uw kat eerst de omgeving heeft verkend en zich daarin veilig
begint te voelen. Laat uw huisdier eerst aangelijnd uit en wees verzekerd
dat het dier zich ook binnenshuis veilig en gemakkelijk voelt, Katten
kunnen een langdurige angst voor een onbekende omgeving ontwikkelen.
Wanneer u het kattenluik eenmaal hebt gemonteerd, laat het een tijdje
open staan. U kunt dit doen door gebruik te maken van een lange strip of
afplakband; open de klep, til deze omhoog en bevestig deze vervolgens
met het uiteinde van het afplakband zodat het niet dichtklapt. Verzekert
u dat de klep stevig is vastgeplakt en niet per ongeluk kan dichtklappen.
Laat uw kat aan het luik wennen en ongestoord naar buiten of naar binnen
lopen
Geef uw kat een motief om van het luik gebruik te gaan maken. In geval
van katten is het eten een heel goed motief. Voer uw kat eerst dichtbij
de deur binnenshuis en daarna dichtbij de deur buitenshuis. Herhaal dit
zolang het nodig is. Meeste katten, vooral poezen, hebben een grote
drang naar vrijheid - waarschijnlijk om te jagen. Katten zijn ook heel
sociaal - ze genieten van het gezelschap van andere katten. Dit kan voor
een kat een andere reden zijn om de omgeving te gaan verkennen.
Als dit nieuw voor uw kat is, kan het een tijd duren voordat het dier
daaraan gewend is geraakt. Wees niet te zuinig met uw beloning wanneer
u merkt dat uw kat vooruitgang maakt - zij heeft het wel verdiend!
Het trainen van uw kat hoe ze een
infrarode halsbandsleutel moet
gebruiken
Het is raadzaam om eerst zelf na
te gaan hoe de infrarode sleutel
functioneert voor u uw kat laat
gebruik maken van het luik. U moet
eerst zowel het kattenluik als de
halsbandsleutel opladen voordat u
de infrarode halsbandsleutel en het
kattenluik op elkaar afstemt.
Ga buiten het huis staan en beweeg
de ‘opgeladen’ en ‘afgestemde’
halsbandsleutel naar het kattenluik
toe. U hoort een klikgeluid van het
sluitmechanisme en ziet hoe het
rode veerslot die zich binnen in het
luik bevindt naar beneden zakt.
34
Page 36

De veerslot blijft binnen het kattenluik totdat de sleutel van het kattenluik is
verwijderd waarna deze weer in de gesloten stand is teruggekomen. (Let
op - de infrarode halsbandsleutel is alleen nodig om in het huis te komen).
Bevestig de halsbandsleutel niet om uw kat’s hals voordat zij volledig
vertrouwd is geraakt aan het duwen van het fl
naar buiten te gaan, conform algemene tips voor het leren omgaan met
het kattenluik uit het vorige hoofdstuk). Wanneer u de halsband om uw
kat’s hals wilt bevestigen, zorg ervoor dat het gedeelte ervan (waardoor
u de groene PCB kunt zien) naar voren wijst en in de tegenovergestelde
richting van uw kat. Dit is belangrijk zodat de infrarode straal de sensor op
het kattenluik kan bereiken.
Doordat de reikwijdte van de infrarode halsbandstraal groot is zullen
meeste katten probleemloos leren hoe ze het kattenluik moeten activeren
om binnen het huis te komen. T
tijd nodig om gewend re raken aan de infrarode functies. Gebruik uw kat’s
favoriete traktatie om haar over te halen om gebruik te maken van het
kattenluik en beloon uw kat wanneer zij dit op de juiste manier doet.
Als uw kat het alleen heeft geleerd hoe zij het kattenluik moet gebruiken
zult u misschien iets meer geduld moeten opbrengen om haar te leren
hoe de infrarode functie in elkaar zit. Wees niet te zuinig met uw beloning
wanneer u merkt dat uw kat vooruitgang maakt, geef hem veel beloning.
Blijf deze oefeningen herhalen totdat uw kat volledig gewend is geraakt
aan het kattenluik.
och is er voor sommige katten iets meer
ap om binnen te komen en
Het schoonmaken van uw kattenluik
Uw kattenluik is opgebouwd uit de beste materialen, uitgerust met een
verharde klep en is ontworpen voor duurzaam gebruik.
Voor goed onderhoud is het schoonmaken met een vochtig doek alles dat
u moet doen.
Het schoonmaken van de
infrarode lens
Maak de lens om de 4 weken schoon met een
zacht doek (Afb. 24).
3 jaar garantie
Staywell producten worden geleverd met een
3-jarige garantie. De garantie dekt de vervanging van onderdelen of,
naar goeddunken van de fabrikant, de vervanging van het hele product.
De garantie beperkt zich tot het dekken van schade die gevolg is van
fabricagefout en dekt geen schade ontstaan door ruw en/of verkeerd
gebruik.
In het geval van een garantieclaim neem a.u.b contact op met Staywell
Klantenservice. Stuur geen producten terug voor inspectie indien u
geen toestemming daarvoor hebt gekregen van een geautoriseerde
vertegenwoordiger van Klantenservice die u zal adviseren over de nodige
procedures.
Registreer uw garantie nu - www.staywell.co.uk
AFB. 24
35
Page 37

Klantenservice
KLANTENSERVICE
00 800 18 18 20 20
www.staywell.co.uk
Hoe ruimt u uw infrarood kattenluik
veilig op?
Belangrijk recyclingadvies
Voor het veilig opruimen van kattenluiken neem a.u.b. de regels m.b.t. het
veilig opruimen van elektrisch afval en elektrische apparaten in acht die in uw
land van kracht zijn. Deze producten moeten worden gerecycled. Indien u dit product
niet meer nodig heeft gooi het niet als gemeentelijk afval weg. Breng het product terug
naar de winkel terug zodat het terechtkomt in ons recyclingsysteem. Als dit voor u niet
mogelijk is neem voor meer informatie contact op met Staywell klantenservice.
Batterij wegdoen
Apart verzamelen van lege batterijen is in vele regio’s verplicht; raadpleeg de
regels die in uw regio gelden voordat u een lege batterij weggooit. Zie pagina
30 voor instructies voor het verwijderen van batterijen uit het product zodat deze apart
weggegooid kunnen worden. Het kattenluik werkt op 4 batterijen van het type AA/LR6,
1,5 V, alkalinemangaan, met een capaciteit van 1200 mAh. Gebruik alleen deze soort
batterij als vervanging van een lege batterij. De halsbandsleutel werkt op 3 batterijen
van het type D357, LR44 of SR44, 1,5 V, alkaline knoopbatterij met een capaciteit van
150 mAh. Gebruik alleen deze soort batterij als vervanging van een lege batterij.
Reguleringer
Dit product is getest en het voldoet aan de toepasselijke Europese richtlijnen
betreffende elektromagnetische compatibiliteit en de Laagspanningsrichtlijn
Onrechtmatig aanbrengen van wijzigingen of aanpassingen aan de uitrusting, die niet
goedgekeurd zijn door Radio Systems
richtlijnen betreffende elektromagnetische compatibiliteit en kunnen het recht van de
gebruiker op het gebruik van de uitrusting evenals de garantie op het productongeldig
maken. De Verklaring van conformiteit kunt u nalezen op:
http://www.petsafe.net/customercare/eu_docs.php
®
Corporation, zijn in strijd met de Europese
36
Page 38

DE
Ihre Staywell-Haustiertüre...
Katze
Vierwege-Schließsystem
Infrarot
Alle Staywell-Haustiertüren eignen sich für jede Türe, Wand oder Abtrennung; eventuell können jedoch zusätzliche Materialien und kompetente Heimwerkerfähigkeiten er forderlich sein.
* Es ist nicht möglich, Löcher in gehärtete oder Doppelglasscheiben zu schneiden, außer zur Zeit der Herstellung. Wenden Sie sich bitte an einen Glaser.
37
Für Holztüren geeignet
Für einzelne und doppelte
Glasfenster & -türen
geeignet*
Für Ziegelwände geeignet
Für PVC/PVC-U/Metall
geeignet
Mitgelieferter Tunnel für die meisten
Türdicken geeignet
Weitere Tunnelverlängerungen
erhältlich
Page 39

Bitte lesen Sie sich vor dem Einbau
Ihrer Katzenklappe die folgenden
schrittweisen Anweisungen sorgfältig
durch.
Benötigte Werkzeuge
• Bleistift
• Lineal
• Bogen- oder Stichsäge
• Bohrer
• Schraubendreher
• Maßband
• Klebstoff
• Schleifpapier
Messung und Markierung
Messen Sie die Bauchhöhe Ihrer Katze. Normalerweise ist dies 100 -150
mm (4-6 Zoll) (Abb. 1).
Markieren Sie diese Messung an der Außenseite Ihrer Türe und ziehen Sie
eine gerade, horizontale Linie, 168 mm (61/2 Zoll) lang (Abb. 2).
Achten Sie bitte darauf, dass diese Linie schlussendlich die untere Kante
des Lochs in Ihrer Tür bilden und dass der Rahmen der Katzenklappe leicht
darunter liegen wird. Falls nötig, muss diese Linie eventuell leicht erhöht
werden, um dies zu berücksichtigen.
ABB.1 ABB.2
X
X
So schneiden Sie ein Loch für die
Katzenklappe
a) Für Holz und PVC/PVC-U/Metall
Für die Katzenklappe ist ein rechteckiger Ausschnitt von 175 mm x 168
3
mm (6
/4 Zoll x 61/2 Zoll) nötig. (Abb. 3).
ABB.3
Nicht maßstabgetreu - für optimale Resultate
sollten Sie die beiliegende Schneidevorlage
heranziehen.
168mm (61/2”)
175mm
3
(6
Holztüren
/4”)
PVC/PVC-U/
Metall
38
Page 40

Einzelne und doppelte
b) Für Glas
* Es ist nicht möglich, Löcher in gehärtete oder Doppelglasscheiben
zu schneiden, außer zur Zeit der Herstellung. Wenden Sie sich bitte
an einen Glaser.
Für die Katzenklappe ist ein kreisförmiger Ausschnitt mit einem
Durchmesser von 212 mm (8
ABB.4
Glasfenster & -türen*
3
/8 Zoll) nötig. (Abb. 4).
212mm (83/8”)
c) Für Wände
Folgen Sie den Anweisungen für „Holz
und PVC/PVC-U/Metall“ indem Sie
die beiliegende Schneidevorlage
benutzen. Bitte beachten Sie, dass
eventuell zusätzliche Werkzeuge,
Materialien und kompetente
Heimwerkerfähigkeiten nötig
sein könnten.
Für Ziegelwände geeignet
Nicht maßstabgetreu - für optimale Resultate
sollten Sie Ihren Glaser an die beiliegende
Schneidevorlage verweisen.
39
Page 41

Einbau Ihrer Katzenklappe
Ihre Staywell-Katzenklappe wird mit dem roten Vierwegeschloss ins
Hausinnere weisend eingesetzt.
Setzen Sie die Katzenklappe vorübergehend in das Loch ein und
positionieren Sie die Außenklappe an der Außenseite des Hauses.
Markieren Sie von außen die Löcher für die Schrauben durch die Löcher in
der Außenklappe. (Abb. 5).
Entfernen Sie die Katzenklappe und bohren Sie die Löcher mit einem 4,5
3
mm (
/16 Zoll) Bohrer (Abb. 6).
ABB.5 ABB.6
NN
Setzen Sie die Katzenklappe wieder in das Loch ein und schrauben Sie sie von
der Außenseite fest. (Abb. 7). Falls die Schrauben zu lang sind, müssen
sie eventuell auf die Tiefe Ihrer Türe zugeschnitten werden. Überlange
Schrauben können die Katzenklappe beschädigen. Die Schrauben sollten
vor dem Zuschneiden aus der Katzenklappe entfernt werden. Scharfe
Kanten sollten abgefeilt werden.
Setzen Sie den Drehknopf zum Einstellen des Vierwegeschlosses ein (Abb. 7).
Decken Sie für ein angenehmes Erscheinungsbild zum Abschluss die
Schraubenlöcher mit den Verschlussstopfen am äußeren Rahmen ab
(Abb. 7).
ABB.7
W
ird die Katzenklappe in Glas eingebaut, so wird sie
mittels zwei Schrauben von der Außenseite des Hauses
aus in das Glas „eingespannt“.
40
Page 42

Optionaler Tunnel wird
Tunnel (optional)
Die Katzenklappe ist so ausgelegt, dass sie in Löcher jeder Tiefe passt.
Es wird empfohlen, die Tunnel an den Rahmen und aneinander zu kleben.
(Abb. 8).
mitgeliefert
Weitere Tunnel-verlängerungen erhältlich
Benutzung des
Vierwege-Schließsystem
Vierwegeschlosses
Das Vierwegeschloss ermöglicht es Ihnen, das Ein- und Ausgehen
Ihrer Katze zu kontrollieren.
ABB.8
7
Mit der Katzenklappe wird ein 47 mm (1
mitgeliefert. Um zusätzliche Tunnel derselben Tiefe zu erwerben und
die Tiefe des Lochs in Ihrer Wand auszugleichen, besuchen Sie die
Website von Staywell: www.staywell.co.uk
/8 Zoll) langer Tunnel
Ihre Staywell-Katzenklappe ist nun
gebrauchsfertig.
Es wird nicht empfohlen, das Vierwegeschloss zu benutzen, bevor Ihr Tier
sich völlig an die Benutzung der Türe gewöhnt hat. Ansonsten könnte Ihr
Tier in Verwirrung über diese Einrichtung geraten.
• Nur ein • Nur aus
• Ein oder aus
• Voll verschlossen
41
Page 43

Aufl aden der Infrarot-Katzenklappe
Aufl aden des Infrarotschlüssels
Nehmen Sie den Batteriedeckel ab, indem Sie fest in Richtung der Pfeile
drücken.
(Abb. 9).
Legen Sie 4 x AA 1,5V langlebige Alkalibatterien ein. (Abb. 10).
Die Batterien sollten alle 3-6 Monate ersetzt werden. Verwenden Sie
keine wiederaufl adbaren Batterien.
Nach dem Aufl aden der Katzenklappe zeigt sie durch einen leisen Piepton
an, dass
sie nun programmierbereit ist. Zusätzlich zum Piepton blinkt nun auch
die rote LED-Anzeige. (Abb. 10).
ABB.9 ABB.10
Öffnen Sie den Halsbandschlüssel durch Drehen einer Münze zwischen
den beiden Flanschen (Abb. 11).
Nehmen Sie das Batteriefach ab (Abb. 12).
Setzen Sie 2 x SR44, LR44 oder D357 Zellbatterien in das Batteriefach ein.
Die Halsbandschlüssel-LED zeigt durch 3-maliges Aufblinken an, dass der
Schlüssel nun aktiv ist (Abb. 13).
Setzen Sie das Batteriefach wieder in das durchsichtige Unterteil ein.
Setzen Sie die farbige Verschlusskappe wieder auf, indem Sie die beiden
Hälften des Schlüssels zusammendrücken. Achten Sie darauf, dass die
grüne Leiterplatte durch das durchsichtige Unterteil sichtbar ist. (Abb. 14).
Der Schlüssel blinkt weiterhin in 2-minütigen Intervallen auf (Abb. 15).
ABB. 11 ABB. 12 ABB. 13 ABB. 14 ABB. 15
Die Batterien sollten entweder alle 3-6 Monate oder wenn die LEDAnzeige aufhört zu blinken ersetzt werden.
42
Page 44

Programmieren der
Infrarot-Katzenklappe
Nachdem Sie die Katzenklappe und den Halsbandschlüssel aufgeladen
haben, nähern Sie sich der Katzenklappe mit dem Halsbandschlüssel.
Die rote LED-Anzeige hört auf zu blinken, und die Einheit gibt einen hohen
Piepton von sich.
Die Katzenklappe ist nun auf Erkennung des Halsbandschlüssels
programmiert, und der Entriegelungsmechanismus wird jedesmal aktiviert,
wenn Sie sich der Katzenklappe mit dem Halsbandschlüssel nähern.
(Abb. 16). Die Verriegelung wird erst wieder verschlossen, wenn der
Halsbandschlüssel außer Reichweite der Katzenklappe ist.
Wenn Sie mehr als eine Katze haben, müssen Sie mehrere
Halsbandschlüssel mit demselben Farbcode kaufen.
Die erhältlichen Farbcodes sind: grün, gelb, blau und pink.
Zusätzliche Schlüssel können auf der W
werden: www.staywell.co.uk
Sollte Ihre Katze einen Halsbandschlüssel verlieren,
Ersatzschlüssel derselben Farbe
erwerben. W
kaufen, müssen Sie die Katzenklappe
auf diesen neuen Farbcode
programmieren.
Um die Katzenklappe
umzuprogrammieren, entfernen Sie
die Batterien für etwa drei Minuten
und folgen Sie dann den Schritten
auf der vorhergehenden Seite und
oben.
enn Sie eine andere Farbe
ebsite von Staywell bestellt
müssen Sie einen
ABB.16
Befestigung des InfrarotHalsbandschlüssels
Der Schlüssel muss so am Halsband befestigt werden, dass er nach
vorne hängt (Abb. 17).
ABB. 17
Manuelle Bedienung
Bitte beachten: Diese Funktion KANN NICHT benutzt werden, bevor
die Katzenklappe voll aufgeladen und programmiert ist. Wenn Sie die
elektronische Verriegelung nicht benutzen wollen, kann die Katzenklappe
auch auf manuellen Modus eingestellt werden.
Nehmen Sie den Batteriedeckel ab, indem Sie in Richtung der Pfeile
drücken. Drücken Sie einmal auf den Knopf für manuelle
Bedienung (Abb. 18); das Schloss wird entriegelt und die LED-Anzeige
blinkt auf. Die Katzenklappe ist nun im manuellen Modus.
ABB
Drücken Sie den ManuellKnopf, um die Katzenklappe
wieder in den automatischen
Modus zu versetzen.
Das Schloss wird wieder
verriegelt und die LEDAnzeige blinkt auf. Die
Katzenklappe befi ndet
sich nun wieder im
automatischen Modus.
. 18
43
Page 45

Einstellen der Wiederverriegelungszeit
Bitte beachten: Diese Funktion KANN NICHT benutzt werden, bevor
die Katzenklappe voll aufgeladen und programmiert ist.
Die W
iederverriegelungszeit ist die Zeit, die das Schloss benötigt,
um sich nach seiner Aktivierung und nachdem der Schlüssel außer
Reichweite bewegt wurde wieder zu verriegeln. Die Verriegelung an Ihrer
Katzenklappe ist ab Werk auf Verschluss nach 2 Sekunden eingestellt.
Diese Zeit kann zwischen 2 und 20 Sekunden verstellt werden. Die von
Ihnen gewählte Einstellungszeit hängt von Ihrer eigenen Katze und Ihren
persönlichen Vorlieben ab.
Nehmen Sie den Batteriedeckel ab, indem Sie in Richtung der Pfeile
drücken. Drücken Sie einmal auf den Knopf für manuelle
Bedienung. (Abb. 19). Die LED-Anzeige blinkt und die Verriegelung öffnet
sich. Die Katzenklappe ist nun effektiv im manuellen Modus. Drücken
Sie den Zeitschalterknopf innerhalb von 2 Sekunden (Abb. 20). Jedes
Drücken des Zeitschalterknopfes erhöht die Zeit bis zur Wiederverriegelung
um eine Sekunde. Bei jedem Drücken des Knopfes gibt die Katzenklappe
einen hohen Piepton von sich. Wenn 20 Sekunden erreicht werden, kehrt
der Zeitschalter wieder zu 2 Sekunden zurück, gibt einen leisen Piepton von
sich und der Kreislauf beginnt von neuem.
Wenn Sie die gewünschte Sekundenanzahl erreicht haben, warten Sie 2
Sekunden, bis die Katzenklappe in den manuellen Modus zurückgekehrt
ist (dies wird nicht angezeigt, da das Schloss weiterhin offen bleibt).
Drücken Sie wieder auf den Knopf für manuelle Bedienung, um zum
automatischen Modus zurückzukehren (Abb. 19). Die LED-Anzeige
blinkt und die Verriegelung verschließt sich wieder. Die gewählte
Wiederverriegelungszeit ist nun aktiv.
Um die gewählte Wiederverriegelungszeit zu verlängern oder zu verkürzen,
wiederholen Sie einfach die Schritte oben. Zum Beispiel: Wenn die gewählte
Wiederverriegelungszeit 5 Sekunden beträgt, so ändert der erste hohe Piepton
die Einstellung auf 6 Sekunden, der zweite auf 7 Sekunden, und so weiter.
ABB. 19
ABB. 20
44
Page 46

Schwache Batterie
Netzstromadapter (optional)
Katzenklappe
Wenn die Batterien schwächer werden, werden Sie von der Katzenklappe
durch einen Piepton alle 2 Minuten gewarnt. Die LED-Anzeige blinkt
ständig.
Nehmen Sie den Batteriedeckel ab, indem Sie in Richtung der Pfeile
drücken.
ABB. 21
Entnehmen Sie die alten
Batterien und setzen
Sie 4 x neue AA 1,5V
langlebige Alkalibatterien
ein. (Abb. 21). Setzen Sie
den Batteriedeckel wieder
auf. Ihre Katzenklappe
muss neu programmiert
werden. Folgen Sie
den Anweisungen zum
„Programmieren der
Infrarot-Katzenklappe“.
Halsbandschlüssel
Wenn die Energie in den Batterien des Halsbandschlüssels abnimmt,
werden Sie eine verringerte Reichweite bemerken, wenn Ihre Katze sich
der Tür nähert. Schlußendlich werden die Batterien so schwach, dass die
Katzenklappe sich nicht öffnet und die LED-Anzeige aufhört zu blinken.
Tauschen Sie die zwei Batterien im Halsbandschlüssel aus und folgen Sie
den Anweisungen in „Aufl aden des Infrarotschlüssels“.
Ein Netzstromadapterkit ist auf der Staywell-Website erhältlich:
www.staywell.co.uk. Dort fi nden Sie auch Installationsanweisungen.
Stecken Sie nach der Installation den Stecker in die Buchse seitlich an
der Katzenklappe (Abb. 22). Stecken Sie den Adapter in eine elektrische
Steckdose (Abb. 23).
ABB. 22 ABB. 23
Die Batterien können als Notstromversorgung eingesetzt bleiben. Falls
Sie die Katzenklappe mittels des Netzstromadapters aufl aden und keine
Batterien eingesetzt sind, müssen Sie Ihre Katzenklappe programmieren.
Folgen Sie den Anweisungen zum „Programmieren der Infrarot
Katzenklappe“.
-
45
Page 47

So trainieren Sie Ihre Katze zum
Benutzen der Katzenklappe
Die meisten Katzen lernen fast sofort die Katzenklappe zu benutzen,
doch manche können anfangs etwas nervös sein. Die folgenden Tipps
helfen Ihrem Haustier dabei, sowohl die Vorteile des freien Zugangs nach
draußen als auch der Annehmlichkeiten des Hauses, die Sie für Ihre Katze
wollen und die Ihre neue Katzenklappe ermöglicht, voll zu nutzen.
Die wichtigste Regel dabei ist Geduld mit Ihrer Katze zu haben. Drängen
Sie Ihre Katze nicht. Lassen Sie sie selbst herausfi nden, dass sie vom
Haus ins Freie und umgekehrt kann. Schieben Sie sie nicht mit Gewalt
durch die Klappe - sie könnte Angst davor bekommen.
Viele Katzenbesitzer installieren eine Katzenklappe, wenn sie umziehen.
Falls dies auf Sie zutrifft, sorgen Sie dafür, dass Ihre Katze mit ihrer
Umgebung vertraut ist, bevor Sie die Katzenklappe einbauen. Nehmen
Sie die Katze an der Leine und unter Aufsicht zum Schnuppern mit ins
Freie und sorgen Sie auch dafür, dass sie sich in ihrer neuen Umgebung
im Haus sicher und wohl fühlt. Katzen können in ungewohnter Umgebung
lang anhaltende Ängste entwickeln.
Nachdem Sie die Katzenklappe eingebaut haben, lassen Sie die Klappe
für einige Zeit offen. Dies erreichen Sie mit einem langen Streifen
Kantenklebeband. Öffnen Sie die Klappe und halten Sie sie mit dem
Klebeband offen, indem Sie das andere Ende des Klebebands an der
darüber liegenden Oberfl äche fi xieren. Achten Sie darauf, dass die Klappe
sicher befestigt ist und nicht unbeabsichtigt zufallen kann. Lassen Sie Ihre
Katze sich damit vertraut machen und frei ein und ausgehen.
Geben Sie Ihrer Katze ein Motiv, die Tür zu benutzen. Futter eignet sich
gut dafür. Füttern Sie die Katze erst drinnen nahe der Tür und dann
draußen nahe der Tür. Wiederholen Sie dies so oft wie nötig. Die meisten
Katzen, besonders Kätzchen, haben auch einen starken Freiheitsbzw. Jagddrang. Außerdem sind Katzen soziale Geschöpfe, die die
Gesellschaft anderer Katzen genießen. Dies kann ein weiterer Grund sein,
aus dem sie gerne das Freie erforschen werden.
Falls die Tür Ihrer Katze neu ist, ist eventuell etwas Geduld nötig um ihr
deren Gebrauch beizubringen. Loben Sie Ihre Katze ausführlich, wenn sie
Fortschritte macht - sie hat es verdient!
So trainieren Sie Ihre Katze
zum Benutzen des InfrarotHalsbandschlüssels
Bevor Sie Ihre Katze die Katzenklappe benutzen lassen, sollten Sie
sich mit der Bedienung des
Infrarotschlosses vertraut machen.
Zuerst müssen die Katzenklappe
und der Halsbandschlüssel
aufgeladen und dann der
Infrarot-Halsbandschlüssel auf
die Katzenklappe programmiert
werden.
Nehmen Sie an der Außenseite
des Hauses den „geladenen“
und „programmierten“
Halsbandschlüssel in die Hand und
bewegen Sie ihn dann in Richtung
der Katzenklappe. Sie sollten den
Verschlussmechanismus „klicken“
hören und sehen, wie die rote
Verriegelung in die Katzenklappe
zurücktritt.
46
Page 48

Die Verriegelung bleibt solange in der Katzenklappe, bis der Schlüssel von
der Katzenklappe fort bewegt wird und diese sich wieder verriegelt. (Bitte
achten Sie darauf, dass der Infrarot-Halsbandschlüssel nur zum Eingehen
durch die Katzenklappe nötig ist).
Erst wenn die Katze sich an das Ein- und Ausgehen durch die aufgestützte
Klappe gewöhnt hat (entsprechend den allgemeinen Trainingsim vorangehendem Abschnitt), sollten Sie den Halsbandschlüssel an
das Halsband Ihrer Katze hängen. Achten Sie beim Befestigen des
Halsbandes darauf, dass das durchsichtige Unterteil des Schlüssels
(durch das Sie die grüne Leiterplatte sehen sollten) nach vorne und weg
von der Katze weist. Dadurch wird sichergestellt, dass der Infrarotstrahl
den Sensor an der Katzenklappe erreichen kann.
Aufgrund der großen Reichweite des Infrarot-Halsbandschlüssels lernen
die meisten Katzen problemlos, wie die Katzenklappe aktiviert wird und
wie sie hindurchkönnen. Bei manchen Katzen kann es jedoch etwas
länger dauern, bis sie mit den Infrarotfunktionen vertraut sind. Locken
Sie Ihre Katze mit einem Lieblingshappen durch die Katzenklappe und
belohnen Sie sie, wenn sie es richtig macht.
Falls Ihre Katze sich eben erst an das Benutzen einer Katzenklappe
gewöhnt hat, kann etwas Geduld nötig sein, um ihr die Funktionsweise
des Infrarotstrahls beizubringen. Loben Sie Ihre Katze ausführlich, wenn
sie Fortschritte macht. Wiederholen Sie diese Übung, bis Ihre Katze ohne
Zögern durch die Katzenklappe kommt.
Tipps
Reinigung der Katzenklappe
Ihre Katzenklappe ist aus Material der besten Qualität gefertigt, verfügt
über eine gehärtete Klappe und wurde für viele Jahre Haltbarkeit
ausgelegt.
Um ihre Erscheinung aufrecht zu erhalten, genügt ein
gelegentliches Abwischen mit einem feuchten Tuch.
Reinigung der Infrarotlinse
Um die beste Leistung zu erzielen, wischen Sie
die Linse alle 4 Wochen mit einem weichen Tuch
ab (Abb. 24).
ABB. 24
3 Jahre Garantie
Ihr Staywell-Produkt verfügt über eine drei Jahre gültige Garantie. Die
Garantie deckt den Austausch einzelner Teile bzw. im Ermessen der
Firma den Austausch eines ganzen Produkts. Die Garantie deckt lediglich
Herstellungsfehler, nicht aber Missbrauch oder Beschädigung durch den
Benutzer.
Falls ein Garantieanspruch nötig werden sollte, wenden Sie sich bitte
an den Kundendienst von Staywell. Bitte schicken Sie Produkte nur
auf Anweisung eines Kundenbetreuers, der Sie über die jeweilige
Verfahrensweise informiert, zur Inspektion zurück.
Melden Sie Ihre Garantie jetzt an www.staywell.co.uk
47
Page 49

Kundenbetreuung
KUNDENBETREUUNG
00 800 18 18 20 20
Sichere Entsorgung Ihrer InfrarotKatzenklappe
Wichtige Entsorgungshinweise
Bitte halten Sie sich an die Entsorgungsvorschriften für elektrische Geräte
Ihres Landes. Dieses Gerät muss recycelt werden. Falls Sie dieses Gerät nicht
länger benötigen, entsorgen Sie es nicht im normalen Müll. Schicken Sie es bitte zur
ordnungsgemäßen Entsorgung dorthin zurück, wo Sie es erworben haben. Sollte dies
nicht möglich sein, wenden Sie sich bitte an den Kundendienst von Staywell.
Entsorgung der Batterie
In vielen Regionen ist es erforderlich, leere Batterien gesondert zu entsorgen.
Bitte holen Sie sich hierzu zuerst die Richtlinien Ihres Gebiets ein, bevor Sie die leeren
Batterien entsorgen. Eine Anleitung zur Entfernung der Batterien aus diesen Geräten zur
gesonderten Entsorgung fi nden Sie auf Seite 42. Die Katzenklappe wird mit 4 Batterien
vom Typ AA/LR6, 1,5 V, Alkali-Mangan und einer Kapazität von 1200 mAh betrieben.
Verwenden Sie nur entsprechende Ersatzbatterien. Der Halsbandschlüssel wird mit 2
Batterien vom Typ LR44 oder SR44, 1,5 V, Alkali-Knopfzelle und einer Kapazität von 150
mAh. Verwenden Sie nur entsprechende Ersatzbatterien.
Einhaltung
Dieses Gerät wurde getestet und stimmt erwiesenermaßen mit den
entsprechenden EU-Richtlinien für elektromagnetische Kompatibilität und
Niederspannung. Nicht autorisierte Änderungen oder Modifi zierungen an diesem
Gerät, die nicht von der Radio Systems
die Richtlinien der EU und können die Berechtigung des Benutzers zur Bedienung des
Gerätes sowie die Garantie ungültig machen.
Die Konformitätserklärung fi nden Sie unter:
http://www.petsafe.net/customercare/eu_docs.php
®
Corporation bewilligt wurden, verstoßen gegen
www.staywell.co.uk
48
Page 50

Porticina Staywell per animali domestici ...
IT
Gatto
Sistema di serratura a 4
modalità
A infrarossi
Tutte le porticine Staywell per animali domestici si possono montare su quasiasi porta, muro o divisorio, anche se potrebbero essere necessari materiali e competenze “fai da te” ulteriori.
* Non si può praticare l’apertura nel vetro temprato o sulle por te a doppio vetro se non al momento della fabbricazione del pannello di vetro. È un lavoro che va affi dato ad un vetraio.
49
Adatta per porte di legno
Adatta per porte e fi nestre
di vetro, a singolo o doppio
vetro*
Adatto per muri di mattoni
Adatta per PVC/uPVC/
metallo
Il tunnel opzionale in dotazione è
adatto per la maggior parte degli
spessori delle porte
Sono disponibili prolunghe
del tunnel addizionali
Page 51

Prima di installare la gattaiola,
leggere attentamente le seguenti
istruzioni passo passo.
FIG.1 FIG.2
Attrezzi necessari
• Matita
• Righello
• Seghetto da Traforo
o Gattuccio
• Trapano
• Cacciavite
• Metro
• Colla
• Carta vetrata
Misurazioni e tracciatura
Misurare l’altezza del vostro animale in corrispondenza della pancia.
Normalmente è compresa tra 100 e 150 mm (4-6”) (Fig. 1).
Segnare questa altezza sul lato esterno della porta tracciando una riga
dritta orizzontale di 168mm (6 1/2”) (Fig. 2).
Si consideri che questa riga andrà a corrispondere con la parte inferiore del
foro praticato nella porta e che la cornice della gattaiola sarà leggermente
più in basso. Se necessario, questa riga potrebbe dover essere leggermente
spostata in alto in considerazione di ciò.
X
X
Come praticare l’apertura per la
gattaiola
175mm
3
/4”)
(6
Porte di legno
a) Per legno e PVC/uPVC/metallo
Per costruire la porticina bisogna praticare un’apertura quadrata con
diametro di 175mm x 168mm (6
FIG.3
Non in scala - consultare la sagoma
dell’apertura da praticare in dotazione per
ottenere dei buoni risultati.
168mm (61/2”)
3
/4” x 61/2”). (Fig. 3).
PVC/uPVC/
metallo
50
Page 52

b) Per vetro
* Non si può praticare l’apertura nel vetro temprato o sulle porte a
doppio vetro se non al momento della fabbricazione del pannello di
vetro. È un lavoro che va affi dato a un vetraio
Per costruire la gattaiola bisogna praticare un’apertura circolare con
diametro di 212 mm (8
FIG.4
Porte e fi nestre di vetro, a
singolo o doppio vetro*
3
/8”). (Fig. 4).
212mm (83/8”)
c) Per muri
Seguire le istruzione per “Legno e PVC/
uPVC/metallo” usando la sagoma
dell’apertura da praticare in dotazione.
Si noti che potrebbero essere
necessari altri attrezzi, materiali e
competenza nel “fai da te”.
Adatto per muri di mattoni
Non in scala - per ottenere buoni risultati
far consultare la sagoma dell’apertura da
praticare in dotazione ad un vetraio.
51
Page 53

Montaggio della gattaiola
La gattaiola Staywell è dotata di serrature rosse a 4 modalità situate
all’interno della casa.
Collocare temporaneamente la gattaiola nell’apertura e mettere il
coperchio esterno fuori dell’abitazione. Dall’esterno, segnare la posizione
dei fori per le viti attraverso i fori sul coperchio esterno. (Fig. 5).
Togliere la gattaiola e praticare i fori con una punta da trapano di 4,5 mm
3
/16”) (Fig. 6).
(
FIG.5 FIG.6
NN
Riposizionare la gattaiola nell’apertura e dall’esterno inserire le viti. (Fig. 7).
Se le viti sono troppo lunghe, vanno accorciate per essere a livello della
porta. L’uso di viti troppo lunghe può danneggiare la gattaiola. Le viti
devono essere tolte dalla gattaiola prima di tagliarle. Limare per garantire
che non rimangano bordi taglienti.
FIG.7
Montare a spinta la manopola girevole della serratura a 4 modalità (Fig. 7).
Infi ne, coprire i fori per le viti con gli otturatori sulla cornice esterna per
garantire una perfetta rifi nitura (Fig. 7).
52
Se montata su vetro, la gattaiola viene ‘fi ssata’ al vetro
usando due viti dall’esterno della casa.
Page 54

Tunnel opzionale in
Tunnel (opzionali)
La gattaiola è predisposta per essere montata su aperture di qualsiasi
profondità. Si raccomanda che i tunnel siano incollati sulla cornice e l’uno
all’altro. (Fig. 8).
dotazione
Sono disponibili
prolunghe del tunnel
addizionali
Sistema di serratura a
Come usare la
4 modalità
serratura a 4 modalità
La serratura a 4 modalità consente di controllare come il gatto entra ed
esce dalla casa.
FIG.8
In dotazione con la gattaiola c’è un tunnel di 47mm (1
acquistare tunnel addizionali della stessa profondità e al fi ne di
compensare la profondità dell’apertura nel muro, visitate il sito web
Staywell - www.staywell.co.uk
7
/8”). Per
La gattaiola Staywell è ora pronta per
l’uso.
Finché l’animale non ha imparato a utilizzare lo sportello senza problemi,
potrebbe essere meglio non usare la serratura a 4 modalità, perché
potrebbe essere confuso sulla ragione per cui lo si è installato.
• Solo ingresso
• Ingresso o uscita • Chiusura totale
• Solo uscita
53
Page 55

Alimentazione della gattaiola a
infrarossi
Togliere il coperchio della batteria spingendo nella direzione indicata dalle
frecce.
(Fig. 9).
Alimentazione della chiave a infrarossi
Aprire la chiave da collare facendo leva tra le due metà con una moneta
(Fig. 11).
Estrarre il portabatteria (Fig. 12).
Inserire 4 batterie AA alcaline a lunga durata da 1,5V. (Fig. 10).
Le batterie vanno sostituite ogni 3-6 mesi. Non usare batterie
ricaricabili.
Quando vengono inserite le batterie, la gattaiola emette un lieve bip
sonoro per indicare che è pronta per essere programmata. Oltre al bip
sonoro lampeggia anche la spia luminosa rossa. (Fig. 10).
FIG.9 FIG.1
0
Inserire 2 batterie a bottone SR44, LR44 o D357 nel portabatteria. Il LED
della chiave del collare lampeggerà 3 volte indicando che la chiave è attiva
(Fig. 13).
Riporre il portabatteria nella base trasparente. Ricollocare il tappo colorato
ricongiungendo le due metà della chiave: assicurarsi che la scheda PCB
verde sia visibile attraverso la base trasparente. (Fig. 14).
La chiave continuerà a lampeggiare ad intervalli di 2 minuti (Fig. 15).
FIG. 11 FIG. 12 FIG. 13 FIG. 14 FIG. 15
Le batterie vanno sostituite ogni 3-6 mesi o quando il LED smette di
lampeggiare.
54
Page 56

Programmazione della gattaiola a
infrarossi
Dopo aver alimentato l’unità e la chiave da collare, avvicinare la chiave alla
gattaiola. La spia luminosa rossa smetterà di lampeggiare e l’unità emetterà
un forte bip sonoro.
La gattaiola sarà così programmata per riconoscere la chiave da collare e
il meccanismo della serratura sarà attivato ogni volta che ci si avvicina alla
gattaiola con la chiave. (Fig. 16). La serratura non si richiuderà fi nché la
chiave da collare non sarà fuori campo della gattaiola.
Se si ha più di un gatto sarà necessario acquistare altre chiavi da collare
dello stesso codice cromatico.
I codici cromatici disponibili sono: nero, rosso, bianco e marrone. Si
possono acquistare chiavi di riserva presso il sito web Staywell -
www.staywell.co.uk
Se il gatto dovesse perdere la chiave
da collare bisogna ricordarsi di
acquistare una chiave
dello stesso colore. Se se ne
acquista un
di colore diverso, bisogna riprogrammare
la gattaiola con il nuovo colore.
Per riprogrammare la gattaiola
scollegare le batterie per circa tre
minuti e seguire le fasi descritte nella
pagina precedente e sopra.
a
FIG.16
Come appendere la chiave a infrarossi
Quando è appesa al collare, la chiave deve essere rivolta in avanti
(Fig. 17).
FIG. 17
Funzionamento manuale
Si noti che questa funzionalità NON sarà disponibile fi ntanto che la
gattaiola non è stata adeguatamente alimentata e programmata. Se
si desidera usare la serratura elettronica, la gattaiola può essere impostata
in modalità manuale.
Togliere il coperchio della batteria spingendo nella direzione indicata dalle
frecce. Premere il pulsante manuale una volta (Fig. 18).
Lampeggerà la spia luminosa mentre si apre la serratura. La gattaiola è
ora in modalità manuale.
FIG. 18
Per re-impostare la gattaiola
in modalità automatica
premere il pulsante manuale.
Lampeggerà la spia
luminosa mentre si richiude
la serratura. La gattaiola è
ora di nuovo in modalità
automatica.
55
Page 57

Come impostare l’intervallo di
richiusura
Si noti che questa funzionalità NON sarà disponibile fi ntanto che la
gattaiola non è stata adeguatamente alimentata e programmata.
L’intervallo di richiusura è la quantità di tempo impiegata dalla serratura
per richiudersi dopo l’attivazione e dopo che la chiave è fuori campo. La
serratura della gattaiola è stata impostata in modo da richiudersi dopo
2 secondi. L’intervallo di richiusura può essere impostato tra i 2 e i 20
secondi e l’impostazione dipende dal gatto e dalle preferenze dell’utente.
FIG. 19
Togliere il coperchio della batteria spingendo nella direzione indicata dalle
frecce. Premere il pulsante manuale una volta. (Fig. 19). Si
vedrà lampeggiare la spia luminosa e si aprirà la serratura. La gattaiola
ritorna in modalità manuale. Premere il tasto temporizzatore entro
2 secondi (Fig. 20). Ogni volta che si preme questo pulsante l’intervallo
di richiusura aumenta di un secondo e la gattaiola emette un forte bip
sonoro. Dopo 20 secondi il temporizzatore ritorna a 2 secondi, emette un
lieve bip sonoro e il ciclo ricomincia.
Una volta selezionata la quantità di tempo desiderata, attendere 2 secondi
e la gattaiola tornerà alla modalità manuale (non c’è alcuna indicazione
che la serratura rimarrà aperta). Premere di nuovo il pulsante manuale per
ripristinare la modalità automatica (Fig. 19). Si vedrà lampeggiare la spia
luminosa e si richiuderà la serratura. L’intervallo di richiusura selezionato
è attivo.
Per aumentare o ridurre l’intervallo di richiusura selezionato, basta ripetere
le fasi di cui sopra. Per esempio: se si è selezionato un intervallo di
richiusura di 5 secondi, il primo forte bip sonoro cambierà l’impostazione a
6 secondi, il secondo a 7 secondi e così via.
56
FIG. 20
Page 58

Bassa carica della batteria
Adattatore di rete (opzionale)
Gattaiola
La gattaiola segnala la carica bassa delle batterie emettendo un bip ogni 2
minuti e facendo lampeggiare continuamente la spia luminosa.
Togliere il coperchio della batteria spingendo nella direzione indicata dalle
frecce.
FIG. 21
Togliere le batterie
vecchie e inserire 4
batterie alcaline nuove di
lunga durata AA da 1,5V.
(Fig. 21). Ricollocare il
coperchio della batteria.
La gattaiola dovrà
essere riprogrammata
seguendo le istruzioni per
la “Programmazione della
gattaiola ad infrarossi”.
Chiave da collare
L’esaurimento delle batterie nella chiave da collare è indicato dalla
riduzione progressiva del campo di azione della chiave quando il gatto si
avvicina alla porta. Alla fi ne la carica sarà così bassa che la porta non si
aprirà. Per ripristinare l’alimentazione, basterà sostituire le due batterie
nella chiave da collare e consultare la sezione “Alimentazione della chiave
a infrarossi”.
Si può acquistare un kit per un trasformatore di rete sul sito web Staywell
- www.staywell.co.uk. Nel kit forniamo istruzioni che spiegano come
installarlo. Una volta installato, inserire lo spinotto nella presa sul lato della
gattaiola (Fig. 22). Collegare l’adattatore a una presa di rete domestica
(Fig. 23).
FIG. 22 FIG. 23
Le batterie possono essere lasciate come alimentazione di riserva. Se si
alimenta la gattaiola con l’adattatore di rete, e le batterie non sono state
installate, bisognerà programmare la gattaiola seguendo le istruzioni per la
“Programmazione della gattaiola ad infrarossi”.
57
Page 59

Come addestrare il vostro gatto a
usare la gattaiola
Nonostante la maggior parte dei gatti impari quasi subito ad utilizzare la
gattaiola, alcuni animali possono inizialmente reagire con nervosismo e
diffi denza. I consigli seguenti consentiranno al vostro animale di uscire
in giardino per giocare e rientrare per ritrovare la comodità dell’ambiente
domestico - che ciascuno vuole per il proprio gatto – e che sarà garantito
dalle vostre nuove gattaiole.
La regola più importante da seguire è quella di essere pazienti con il
proprio gatto, senza avere fretta. Lasciate che sia il vostro gatto a capire
che può uscire e rientrare liberamente. Non costringere l’animale ad
attraversare la porta basculante per evitare che possa spaventarsi.
Molti proprietari di gatti montano le gattaiole quando traslocano. Se
questo è il caso, accertatevi che il vostro gatto si familiarizzi con i dintorni
prima di montare la gattaiola. Portatelo a fare delle passeggiate fuori al
guinzaglio e accertatevi che si senta a proprio agio e confortevole nel
nuovo ambiente domestico. I gatti possono sviluppare delle fobie relative
ai luoghi che non conoscono.
Una volta installata la gattaiola, lasciate lo sportello aperto per un po’ di
tempo. Lo si può fare usando una lunga striscia di nastro adesivo; aprite
lo sportello e usate il nastro per tenerlo aperto fi ssando un’estremità del
nastro alla superfi cie superiore. Accertatevi che aderisca bene e che lo
sportello non si abbassi accidentalmente. Lasciate che il gatto acquisti
familiarità ed entri ed esca liberamente.
quante volte vi paia necessario. La maggior parte dei gatti, e specialmente
i gattini, hanno anche un forte desiderio di libertà, a volte per andare a
caccia. I gatti sono anche animali socievoli e gradiscono la compagnia di
altri gatti. Una ragione per esplorare l’esterno può essere proprio questa.
Se è una cosa nuova per il vostro gatto, potrebbe volerci un po’ di
pazienza per insegnargli ad usarla. Quando il vostro gatto fa progressi,
bisogna elogiarlo molto - se lo è meritato!
Come addestrare il gatto ad usare la
chiave magnetica da collare
Prima di consentire al gatto di usare la gattaiola, è meglio familiarizzarsi
con il funzionamento della serratura ad infrarossi. Dopo aver alimentato
l’unità e la chiave da collare,
programmare la chiave da collare
ad infrarossi avvicinandola alla
gattaiola.
Dall’esterno della casa prendere
in mano la chiave da collare
‘alimentata’ e ‘programmata’
e avvicinarla alla gattaiola. Si
dovrebbe sentire un clic della
serratura e vedere la discesa della
serratura rossa all’interno della
gattaiola.
Trovate un motivo per fare usare lo sportello al gatto, per esempio per
ottenere del cibo. Prima date da mangiare al gatto vicino allo sportello
dentro casa, e poi vicino allo sportello fuori casa. Ripetete l’operazione
58
Page 60

La serratura rimarrà all’interno della gattaiola fi nché la chiave non sarà
allontanata dalla gattaiola tornando alla posizione di chiusura. (Si noti
che la chiave da collare a infrarossi è necessaria solo per entrare nella
gattaiola).
Soltanto quando il gatto è a suo agio nell’entrare ed uscire dalla gattaiola,
quando lo sportello è stato aperto a mano (in linea con le istruzioni
generali per l’addestramento di cui sopra), si può attaccare la chiave al
collare del gatto. Appendendo la chiave al collare del gatto, assicuratevi
che la base trasparente della chiave (attraverso la quale dovrebbe essere
visibile la scheda PCB verde) sia rivolta in avanti rispetto al gatto. Questo
servirà ad assicurare che i raggi infrarossi potranno raggiungere il sensore
situato sulla gattaiola.
Grazie all’abbondante campo della chiave da collare a infrarossi, la
maggior parte dei gatti non avrà alcun problema ad imparare come
attivare la gattaiola e come entrare. Alcuni gatti, tuttavia, avranno bisogno
di più tempo per prendere agio e familiarità con le funzionalità dei raggi
infrarossi. Usate un bocconcino prelibato per attrarre il gatto e farlo entrare
nella gattaiola: dategli un premio quando lo fa bene.
Se l’uso della gattaiola è una cosa nuova per il vostro gatto, potrebbe
volerci un po’ di pazienza per insegnargli ad capire il funzionamento
dell’apparecchiatura ad infrarossi. Quando il vostro gatto fa progressi,
bisogna elogiarlo molto! Ripetete l’operazione fi nché il gatto non è in
grado di passare per la gattaiola a proprio agio.
Pulizia della gattaiola
La vostra gattaiola è realizzata nella termoplastica della migliore qualità,
con uno sportello in acrilico rinforzato, ed è stata studiata per durare per
molti anni.
Per conservarla in bell’aspetto è suffi ciente passarla di tanto
in con un panno umido.
Pulizia della lente a
infrarossi
Per garantirne il funzionamento pulire la lente
ogni 4 settimane con un panno morbido
(Fig. 24).
FIG. 24
Garanzia di 3 anni
Il vostro prodotto Staywell è fornito con una garanzia di tre anni. La
garanzia copre la sostituzione delle parti, o a discrezione dell’azienda, la
sostituzione dell’intero prodotto. La garanzia copre gli eventuali guasti
dovuti alla difettosità dei componenti e esclude il malfunzionamento
dovuto all’uso improprio o al danneggiamento.
Nel caso in cui sia necessario presentare una richiesta di garanzia, si
prega di contattare il Servizio Assistenza Staywell. Si prega di restituire i
prodotti per un’ispezione solo dietro autorizzazione di un Rappresentante
del Servizio Assistenza che vi avviserà delle procedure da seguire.
Compilate il modulo di registrazione oggi stesso www.staywell.co.uk
59
Page 61

Assistenza Cliente
Come procedere allo smaltimento
in tutta sicurezza della gattaiola a
infrarossi
Importante avviso per il riciclaggio
Si prega di rispettare le norme per lo smaltimento di rifi uti elettrici e di dispositivi
elettrici del paese di residenza. Questo dispositivo deve essere riciclato. Se
l’utente non ha più bisogno di questo dispositivo, non deve gettarlo nella spazzatura
regolare del comune. Bisogna riportare il dispositivo al negozio d’acquisto perché
possa essere smaltito nel nostro sistema di riciclaggio. Se non fosse possibile, vi
preghiamo di contattare il Servizio Assistenza della Staywell per ulteriori informazioni.
ASSISTENZA
CLIENTE
32 (0) 26 55 95 95
www.staywell.co.uk
60
Smaltimento delle batterie
La raccolta differenziata delle batterie esauste è obbligatoria in molte
giurisdizioni; verifi cate la normativa vigente nella vostra zona di residenza prima di
smaltire le batterie esauste. Leggete le informazioni riportate a pagina 54 che illustrano
come estrarre le batterie dal prodotto per destinarle alla raccolta differenziata. Lo
sportello per il gatto funziona con 4 batterie di tipo AA/LR6, 1.5 V, alcaline manganese,
con capacità 1200 m Ah. Sostituire solo con batterie equivalenti. La chiave del collare
funziona con 3 batterie di tipo D357, LR44 o SR44, 1.5 V, cella a bottone alcalina con
capacità 150 m Ah. Sostituire solo con batterie equivalenti.
Conformità
Questo dispositivo è stato testato e risulta conforme alle direttive europee
Compatibilità Elettromagnetica e Bassa Tensione. Modifi che o cambiamenti al dispositivo
non autorizzati, non approvati dalla Radio Systems
potrebbero invalidare l’autorità dell’utente a utilizzare il dispositivo e potrebbero invalidare
la garanzia.
La Dichiarazione di conformità è consultabile all’indirizzo:
http://www.petsafe.net/customercare/eu_docs.php
®
Corporation, violano le norme EU,
Page 62

ES
Su puerta para mascota de Staywell...
Gato
Sistema de cerradura
de 4 sentidos
Infrarrojo
Todas las puertas para mascota de Staywell se pueden instalar en todo tipo de puerta, pared o tabique, aunque a lo mejor se necesiten materiales adicionales además de aptitudes para el bricolaje.
* Salvo durante la fabricación, es imposible hacer agujeros en vidrio templado o en cristal doble. Por favor, consulte con un cristalero.
61
Puede instalarse en puertas
de madera
Puede instalarse en puertas
y ventanas de vidrio o cristal
sencillo o doble*
Puede instalarse en paredes
de ladrillo
Puede instalarse en PVC/
uPVC/metal
El túnel opcional adjunto es apto
para puertas de casi todo grosor
Se ofrecen extensiones para
el túnel adicionales
Page 63

Antes de instalar la gatera, por favor
lea detenidamente las siguientes
instrucciones detalladas paso a paso.
FIG. 1 FIG. 2
Se necesitan las siguientes herramientas:
• un lapicero
• una regla
• una sierra de vaivén o
de pelo
• una taladradora
• un destornillador
• un metro
• pegamento
• papel de lija
Cómo medir y marcar la posición de la
gatera
Mida la altura del suelo a la panza de su gato. Por lo general, suele ser de 100
a 150 mm (4”-6”). (Fig. 1)
Con un lapicero, marque esta medida en la parte exterior de la puerta y
trace una línea recta horizontal de 168 mm (6
Por favor tenga en cuenta que esta línea indica dónde quedará la base del
agujero que usted va a recortar en la puerta y que el marco de la gatera
quedará un poco más abajo. Por esta razón, a lo mejor tiene que trazar esta
línea un poco más arriba, si es necesario.
1
/2”) (Fig. 2)
X
X
Cómo recortar el agujero para la gatera
175mm
3
/4”)
(6
Puertas de
madera
a) En madera y PVC/uPVC/metal
Para la gatera, usted necesita recortar un cuadrado de 175 mm x 168 mm
3
/4” x 61/2”). (Fig. 3)
(6
FIG. 3
168mm (61/2”)
Este dibujo no está a escala. Para obtener
los mejores resultados, debe consultar la
plantilla adjunta para recortar el agujero.
PVC/uPVC/metal
62
Page 64

Puertas y ventanas de vidrio o cristal
b) En vidrio
* Salvo durante la fabricación, es imposible hacer agujeros en vidrio
templado o en cristal doble. Por favor, consulte con un cristalero.
Para la gatera, usted necesita recortar un círculo con un diámetro de 212
3
/8”). (Fig. 4)
mm (8
FIG. 4
sencillo o doble*
212mm (83/8”)
Puede instalarse en paredes
c) En paredes
Siga las instrucciones para “Madera y
PVC/uPVC/Metal” y use la plantilla
adjunta para recortar el agujero.
Por favor, tenga en cuenta que a
lo mejor se necesitan materiales
o herramientas adicionales,
además de aptitudes para el
bricolaje.
de ladrillo
Este dibujo no está a escala. Para obtener
los mejores resultados, debe consultar con
un cristalero y enseñarle la plantilla adjunta
para recortar el agujero.
63
Page 65

Cómo instalar la gatera
La gatera de Staywell se instala con las cerraduras rojas de cuatro
sentidos en la parte interior de su casa.
Coloque la tapa de afuera en el exterior de la casa y la gatera
temporalmente en el agujero. Desde la parte de afuera, marque en la
puerta donde quedarán los huecos para los tornillos, usando la tapa de
afuera como plantilla. (Fig. 5)
Quite la gatera y taladre los agujeros para los tornillos con una broca de
3
4.5 mm (
FIG. 5 FIG. 6
Coloque de nuevo la gatera en el agujero y atorníllela en su sitio, desde afuera.
(Fig. 7)
Quizá tenga que cortar los tornillos a la medida si los tornillos sobrepasan
el grosor de la puerta. Si utiliza tornillos demasiados largos, puede dañar
la gatera. Antes de cortar los tornillos, debe sacarlos de la gatera. Lime
las puntas de los tornillos para asegurarse de que no queden asperezas.
Meta a presión el mecanismo de cerradura de cuatro sentidos en su sitio.
(Fig. 7)
Finalmente, remate el marco de afuera con tacos para tapar los huecos
de los tornillos. (Fig. 7)
/16”). (Fig. 6)
NN
FIG. 7
Si instala la gatera en vidrio, la gatera se sujeta al vidrio
con dos tornillos por la parte exterior.
64
Page 66

Cómo instalar el
túnel (opcional)
Incluye túnel opcional
Se ofrecen extensiones para el túnel
adicionales
Cómo utilizar la cerradura
de 4 sentidos
Sistema de cerradura
de 4 sentidos
Se ha diseñado la gatera para instalarse en agujeros de cualquier
profundidad. Se recomienda que el túnel se pegue al marco y, si se
utilizan dos, que se peguen el uno al otro (Fig. 8)
7
La gatera cuenta con un túnel de 47 mm (1
túneles adicionales, de la misma anchura, para agujeros de cualquier
profundidad, por el portal de Staywell:
www.staywell.co.uk
/8”). Puede comprar
Ya la gatera de Staywell está lista para su
uso.
La cerradura de cuatro sentidos le permite controlar el acceso de su gato
a su casa.
Se recomienda no usar la cerradura de cuatro sentidos hasta que su
mascota sepa usar bien la puerta. Puede que su mascota no entienda
el porqué la instaló.
• Sólo para entrar • Sólo para salir
• Para salir o entrar • Completamente cerrada
65
Page 67

Cómo programar la gatera infrarroja
Cómo cargar la llave infrarroja
Deslice la tapadera de la caja de pilas, empujándola con fi rmeza hacia
arriba, tal como indican las fl echas.
(Fig. 9)
Coloque en su sitio cuatro pilas alcalinas, tamaño AA 1.5V. (Fig. 10)
Se debería reemplazar las pilas cada 3-6 meses. No utilice pilas
recargables.
Al estar cargada, la gatera emite un pitido bajo que indica que está lista
para programar. Además del pitido, el diodo rojo LED empezará a destellar.
(Fig. 10)
FIG. 9 FIG. 10
Abra la llave para collar girando una moneda entre los dos rebordes.
(Fig. 11)
Quite la caja de pilas. (Fig. 12)
Coloque dos pilas redondas de SR44, LR44 o D357 en la caja de pilas. El
diodo LED de la llave para collar destellará tres veces, señalando que la llave
está activa. (Fig. 13)
Reemplace la caja de pilas en la base transparente. Junte de nuevo
ambas partes, el capuchón coloreado y la base transparente. Asegúrese
de que la placa verde PCB se vea a través de la base transparente.
(Fig. 14)
La llave seguirá destellando cada dos minutos. (Fig. 15)
FIG. 11 FIG. 12 FIG. 13 FIG. 14 FIG. 15
Se debería reemplazar las pilas cada 3-6 meses, o cuando el diodo
LED deje de destellar
.
66
Page 68

Cómo programar la puerta infrarroja
Cómo colgar la llave infrarroja
para gato
Después de cargar la gatera y la llave para collar, acerque la llave a la
puerta. El diodo LED dejará de destellar y la puerta emitirá un pitido alto.
Su gatera ya está programada para reconocer la llave para collar; cada vez
que la llave para collar se acerque a la gatera, se activarán los cerrojos de
bloqueo. (Fig. 16) Los cerrojos no volverán a cerrarse hasta que la llave no
salga del alcance del sensor en la gatera.
Si tiene más de un gato, necesitará comprar llaves para collar adicionales,
del mismo código de color.
Los códigos de color disponibles son: verde, amarillo, azul y rosa Las
llaves adicionales se pueden comprar por el portal de Staywell,
www.staywell.co.uk
FIG. 16
Si se le pierde la llave, debe comprar
otra del mismo color Si compra
una llave d
reprogramar la gatera con ese nuevo
color.
Para reprogramar la gatera,
desconecte las pilas,
aproximadamente tres minutos y
siga los pasos detallados arriba y en
la página anterior.
e diferente color, deberá
Debe colgar la llave en el collar de manera que quede mirando hacia
adelante. (Fig. 17)
FIG. 17
Cómo funciona en modo manual
Por favor,tenga en cuenta que NO se puede usar esta característica
hasta que la gatera no esté completamente cargada y programada
Si no desea utilizar los cerrojos de bloqueo, puede poner la gatera en
funcionamiento manual.
Deslice la tapadera de la caja de pilas, empujándola con fi rmeza
hacia arriba, tal como indican las fl echas. Dé al botón manual una vez,
(Fig. 18) y los cerrojos se abrirán y el diodo LED destellará. Ahora la
gatera está en funcionamiento manual.
FIG. 18
Para volver al
funcionamiento automático,
dé otra vez al botón
manual. El pestillo volverá
a cerrarse y el diodo LED
destellará. Ahora la gatera
está en funcionamiento
automático de nuevo.
67
Page 69

Cómo ajustar el temporizador del
pestillo
Por favor, tenga en cuenta que NO se puede usar esta
característica hasta que la gatera no esté completamente cargada
y programada
El temporizador marca el tiempo en que tardan los cerrojos en cerrarse de
nuevo, después de activarse y de alejarse la llave del alcance del sensor
En la fábrica, el temporizador se puso para que los cerrojos en la puerta
saltasen a los dos segundos. Puede ajustar el temporizador para que
salten los cerrojos entre dos y 20 segundos. El tiempo que usted decida
para .el temporizador depende de su perro y de su preferencia
Deslice la tapadera de la caja de pilas, empujándola con fi rmeza hacia
arriba, tal como indican las fl echas. Dé al botón manual una
vez. (Fig. 19) El diodo LED destellará y el pestillo se abrirá. Ahora la gatera
está en funcionamiento manual. Dé al botón temporizador antes de
que pasen 2 segundos (Fig. 20) Cada vez que da al botón temporizador,
le aumenta un segundo al tiempo que tardan en saltar el pestillo. Cada
vez que da al botón, la gatera emitirá un pitido alto. Al llegar a los 20
segundos, el temporizador vuelve a marcar 2 segundos, emite un pitido
bajo,y el ciclo se repite.
Una vez que haya llegado al tiempo deseado, espere dos segundos para
que la gatera vuelva al modo manual (no hay nada que indique esto, ya que
los cerrojos quedarán en posición abierta). Dé al botón manual otra vez para
volver al modo automático. (Fig. 19) El diodo LED destellará y el pestillo se
cerrará. Ya ha puesto el temporizador con el tiempo seleccionado.
Para aumentar o reducir el tiempo del temporizador, simplemente repita
estos últimos pasos. Por ejemplo: Si ha puesto el temporizador para cinco
segundos, el primer pitido alto cambia el tiempo a seis segundos, y el
siguiente pitido alto a siete segundos, etc.
.
FIG. 19
FIG. 20
68
Page 70

Cómo cambiar las pilas
Adaptador de corriente externa
La gatera
Al agotarse las pilas, la gatera emitirá un pitido cada dos minutos. El
diodo LED destellará continuamente.
Deslice la tapadera de la caja de pilas, empujándola con fi rmeza hacia
arriba, tal como indican las fl echas.
FIG. 21
Quite las pilas gastadas y
coloque cuatro pilas de
alcalina nuevas, tamaño
AA 1.5V de larga duración.
(Fig. 21) Vuelva a colocar
la tapadera. Necesitará
reprogramar la gatera.
Siga las instrucciones
“Cómo programar la gatera
infrarroja”.
Llave para collar
Al agotarse las pilas, notará, que cuando se acerca su gato a la puerta, la
llave para collar tiene menos alcance. Finalmente, las pilas perderán tanta
fuerza que la gatera no se abrirá y el diodo LED dejará de destellar. Para
restaurar fuerza, reemplace las pilas en la llave para collar y consulte la
sección “Cómo cargar la llave infrarroja”.
(opcional)
Se puede comprar un transformador de corriente externa por el portal de
Staywell, www.staywell.co.uk. El juego incluye las instrucciones para la
instalación. Una vez instalado, enchufe el transformador en la toma que se
encuentra en la parte inferior de la gatera. (Fig. 22) Enchufe el adaptador
en la toma de la pared. (Fig. 23)
FIG. 22 FIG. 23
Puede dejar las pilas instaladas como fuente de corriente de reserva.
Si usa el adaptador de corriente externa, y no tiene pilas instaladas,
necesitará programar la gatera. Siga las instrucciones “Cómo programar
la gatera infrarroja”.
69
Page 71

Cómo enseñar a su gato a utilizar la
gatera
los gatitos, sienten un impulso grande de escapar, quizá para cazar. Los
gatos son animales sociales y disfrutan de estar con otros gatos. Ésta
también puede ser una razón para que salgan afuera a explorar.
La mayoría de los gatos aprenden a utilizar la gatera casi de inmediato.
Pero algunos gatos pueden sentirse nerviosos al principio. Los siguientes
consejos prácticos ayudarán a que su mascota pueda aprovechar la
libertad que ofrece el aire libre y la comodidad que ofrece su casa: algo
que usted quiere para su gato y que le brinda la gatera.
Lo más importante es tener paciencia con su gato. No tenga prisa. Deje
que su gato descubra por sí mismo que puede salir y entrar por la gatera.
No lo obligue a salir por la puerta, ya que le puede dar miedo.
Muchos amos de gatos instalan gateras al mudarse a una casa nueva.
Si este es su caso, asegúrese de que su gato conozca bien su nuevo
entorno antes de instalar la gatera. Sáquelo a pasear con correa por
el nuevo vecindario. Asegúrese también de que se encuentre seguro
y cómodo en la nueva casa. Los gatos pueden desarrollar un sentido
duradero de temor si se encuentran en lugares desconocidos.
Una vez que haya instalado la gatera, déjela abierta por un tiempo. Para
dejarla abierta, fi je el postigo a la pared de arriba con una tira de cinta
adhesiva. Asegúrese de que el postigo quede bien sujeto a la pared, y no
se caiga sin querer. Deje que su gato se acostumbre a la gatera y que
entre y salga libremente.
Déle a su gato un motivo para que use la puerta. Un buen motivo puede
ser la comida. Déle de comer al gato primero en la casa, cerca de la
puerta; luego al aire libre, también cerca de la puerta. Repita este paso
las veces que sean necesarias. La mayoría de los gatos, especialmente
El enseñar a su gato cómo usar la gatera puede tomar mucha paciencia,
especialmente si la puerta es algo nuevo para él. Cada vez que su gato
avance al usar la gatera, elógielo por sus esfuerzos, ¡se lo merece!
Cómo enseñar a su gato a utilizar la
llave infrarroja para collar
Le conviene aprender como
funciona la cerradura infrarroja,
antes de dejar que su gato use la
gatera. Primero, tendrá que cargar
la gatera y la llave para collar. A
continuación, tendrá que programar
la llave infrarroja para collar con la
gatera.
Desde afuera, y con la llave ya
“cargada” y “programada” en
la mano, acérquela a la gatera.
Escuchará al mecanismo de
cerradura hacer “click” y verá
el pestillo rojo caer dentro de la
gatera.
70
Page 72

El pestillo se quedará dentro de la gatera hasta que la llave se aleje;
cuando esto ocurra, el pestillo volverá a cerrarse. (Por favor tenga en
cuenta que la llave infrarroja sólo se necesita para poder entrar por la
gatera).
No debe colgar la llave en el collar de su gato hasta que el gato no se
encuentre cómodo entrando y saliendo por la gatera en posición abierta
(así como se describe en la sección anterior de consejos prácticos). Al
ponerle el collar al gato, asegúrese de que la base transparente de la
llave (por la cual se verá la placa de circuito impreso (PCB) verde) quede
mirando hacia afuera, y no hacia el gato. Esto asegurará que el rayo
infrarrojo llegue al sensor, que se encuentra en la gatera.
La mayoría de los gatos no tendrán problema alguno en aprender cómo
activar la gatera y en entrar a la casa, ya que el alcance de la llave
infrarroja es muy amplia. Sin embargo, algunos gatos pueden tardar más
que otros en acostumbrarse al y sentirse seguros con el funcionamiento
del sistema infrarrojo. Intente persuadir al gato que se acerque y entre por
la gatera con un capricho. Si lo consigue, prémialo.
T
iene que tener paciencia hasta que su gato se familiarice con el
funcionamiento de la gatera infrarroja, especialmente si acaba de
acostumbrarse a una gatera normal. Cada vez que su gato avance al
usar la gatera, elógielo por sus esfuerzos, ¡se lo merece! Repita este
ejercicio hasta que su gato pueda entrar con facilidad por la gatera.
Cómo limpiar la gatera
La gatera se ha construido con materiales de la más alta calidad y cuenta
con un postigo templado, diseñado para que dure muchos años.
Sólo se necesita pasar un trapo húmedo de vez en cuando,
para mantener el buen aspecto del postigo.
Cómo limpiar la lente
infrarroja
Limpie la lente cada cuatro semanas con un
trapo suave, para el mejor rendimiento. (Fig. 24)
FIG. 24
FIG. 24
Garantía de 3 años
Este producto de Staywell cuenta con una garantía de tres (3) años. La
garantía cubre el reemplazo de piezas o, a discreción de la compañía,
el reemplazo completo del producto. La garantía se limita solamente a
defectos de fabricación y no incluye daños por maltrato del consumidor.
En caso de que se necesite presentar una reclamación bajo garantía,
por favor póngase en contacto con el Servicio de atención al cliente
de Staywell. Por favor, solamente devuelva mercancía, para realizar
una inspección, con la autorización de un representante de servicio de
atención al cliente, quien le indicará los pasos a seguir.
Registre su garantía ahora en www.staywell.co.uk
71
Page 73

Atención al Cliente
Cómo desechar la gatera infrarroja de
manera segura.
Aviso importante de reciclaje
Por favor respete la regulación de su país sobre Residuos de Aparatos Eléctricos
y Electrónicos. Este equipo se debe reciclar. Si ya no requiere este equipo, no lo
introduzca en el sistema de desechos normal del municipio. Por favor, devuélvalo al lugar
dónde lo compró, para que se puede introducir en nuestro sistema de reciclaje. Si esto
no es posible, por favor póngase en contacto con el Servicio de atención al cliente de
Staywell para más información.
ATENCIÓN
AL CLIENTE
00 800 18 18 20 20
www.staywell.co.uk
72
Eliminación de pilas
En muchas regiones, se exige recoger por separado las pilas gastadas. Antes
de desechar las pilas, consulte las regulaciones vigentes en su zona. Sírvase consultar
en la página 66 las instrucciones sobre cómo retirar las pilas de estos dispositivos, para
desecharlas por separado. La gatera funciona con 4 pilas alcalinas de manganeso,
de 1.5 V, tipo AA/LR6, con 1200 mAh de capacidad. Sustitúyalas solamente por pilas
equivalentes. La llave del collar funciona con 3 pilas alcalinas tipo botón, de 1.5 V, tipo
D357, LR44 o SR44, con 150 mAh de capacidad. Sustitúyalas solamente por pilas
equivalentes.
Cumplimiento
Este equipo ha sido sometido a pruebas y ha demostrado cumplir con las principales
normas de compatibilidad electromagnética y de bajo voltaje. El hacer cambios o
modifi caciones al equipo sin la autorización de Radio Systems
una infracción de los reglamentos sobre de la Unión Europea y puede invalidar el
derecho del usuario a manejar el equipo, y anular la garantía.
La Declaración de conformidad se encuentra en:
http://www.petsafe.net/customercare/eu_docs.php
®
Corporation constituye
Page 74

73
Page 75

74
Page 76

All Staywell pet doors are suitable for any door, wall or partition although additional materials may be required. This product is designed for the convenience of you and your pet and has built in security features to
reduce the risk of other animals entering your home. It is not possible to fully guarantee the exclusion of all other animals in all circumstances. Radio Systems Corporation will not accept liability for any damage or
Les chatières Staywell s’adaptent à toutes les portes, à tous les murs et à toutes les cloisons, bien que du matériel supplémentaire se révèlera peut-être nécessaire. Ce produit a été conçu pour votre confort et pour
celui de votre animal et il est équipé d’un système de sécurité intégré visant à réduire les risques de voir un animal étranger entrer dans votre maison. Il n’est pas possible de garantir en totalité l’exclusion de tous les
autres animaux en toutes circonstances. Radio Systems Corporation n’assumera pas la responsabilité des dégâts ou des dérangements causés par un animal indésirable qui se serait introduit dans votre maison.
Alle Staywell huisdierenluiken zijn geschikt voor alle deuren, wanden of scheidingsmuren hoewel aanvullende materialen voor de montage nodig kunnen zijn. Dit product is ontworpen met als uitgangspunt uw
gebruikersgemak en het gemak van uw huisdier en is bedoeld om te helpen zwerfdieren buiten te houden. Het is niet mogelijk volledig te garanderen dat alle andere dieren onder alle omstandigheden buitengesloten
blijven. Radio Systems Corporation aanvaardt geen aansprakelijkheid voor schade, verlies of ongemak veroorzaakt door ongewenste dieren die uw huis binnengekomen kunnen zijn. Conform geldige normen voor
Alle Staywell-Haustiertüren eignen sich für jede Türe, Wand oder Abtrennung; eventuell können jedoch zusätzliche Materialien erforderlich sein. Dieses Produkt wurde für Ihren Nutzen und den Ihres Haustieres
entwickelt und verfügt über integrierte Sicherheitsfunktionen, um das Risiko eines Eindringens anderer Tiere in Ihr Haus zu reduzieren. Es ist jedoch nicht möglich, den Ausschluss aller anderen Tiere unter allen
Umständen zu garantieren. Radio Systems Corporation übernimmt keinerlei Haftung für Schäden oder Unannehmlichkeiten, die durch ungewolltes Eindringen von Tieren in Ihr Haus verursacht werden. Gemäß den
Tutte le porticine Staywell per animali domestici si possono montare su quasiasi porta, muro o divisorio, anche se potrebbero essere necessari materiali ulteriori. Questo prodotto è studiato per la convenienza
vostra e del vostro animale e incorpora funzioni di sicurezza per ridurre il rischio che altri animali entrino in casa vostra. Non è possibile garantire completamente l’esclusione di tutti gli altri animali in qualsiasi
circostanza. Radio Systems Corporation non accetta alcuna responsabilità per danni o incomodi causati da animali esterni che possano avere accesso alla vostra abitazione. In conformità agli standard riconosciuti
Todas la puertas para mascota de Staywell se pueden instalar en todo tipo de puerta, pared o tabique, aunque a lo mejor se necesiten materiales adicionales además de aptitudes para el bricolaje. Este producto
se ha diseñado para su comodidad y la comodidad de su mascota y cuenta con detalles de seguridad para impedir que entren en su casa otros animales. Es imposible garantizar totalmente que, en todo caso, no
entren animales no deseados por la gatera. Radio Systems Corporation no aceptará responsabilidad alguna por daños o por molestias causados por animales no deseados que entren en su casa por la puerta para
inconvenience caused by unwanted animals who may gain access to your home. In keeping with accepted standards of parental care children should be supervised at all times.
Conformément aux normes admises en termes de devoir parental, les enfants doivent être surveillés à tout moment.
ouderlijke zorg moet er geschikt toezicht van kleine kinderen te alle tijden worden toegepast.
anerkannten Normen der elterlichen Aufsicht sollten Kinder jederzeit beaufsichtigt werden.
di genitorialità, i bambini devono essere tenuti sotto controllo in ogni momento.
mascota. De acuerdo con los estándares generalmente aceptados, se requiere la supervisión de un adulto si hay niños alrededor.
Radio Systems Corporation
10427 Electric Avenue, Knoxville, TN 37932 USA
©2008 Radio Systems Corporation
www.petsafe.net www.staywell.co.uk
400-912-19 PATENTED WORLDWIDE
 Loading...