

Petsafe Staywell 200 Series Installation Manual
Puerta Staywell
Porta Staywell
Staywell
Installation Guide
Guide d’installation
Montagehandleiding
Manual de instalación
Manuale di installazione
Montageanleitung
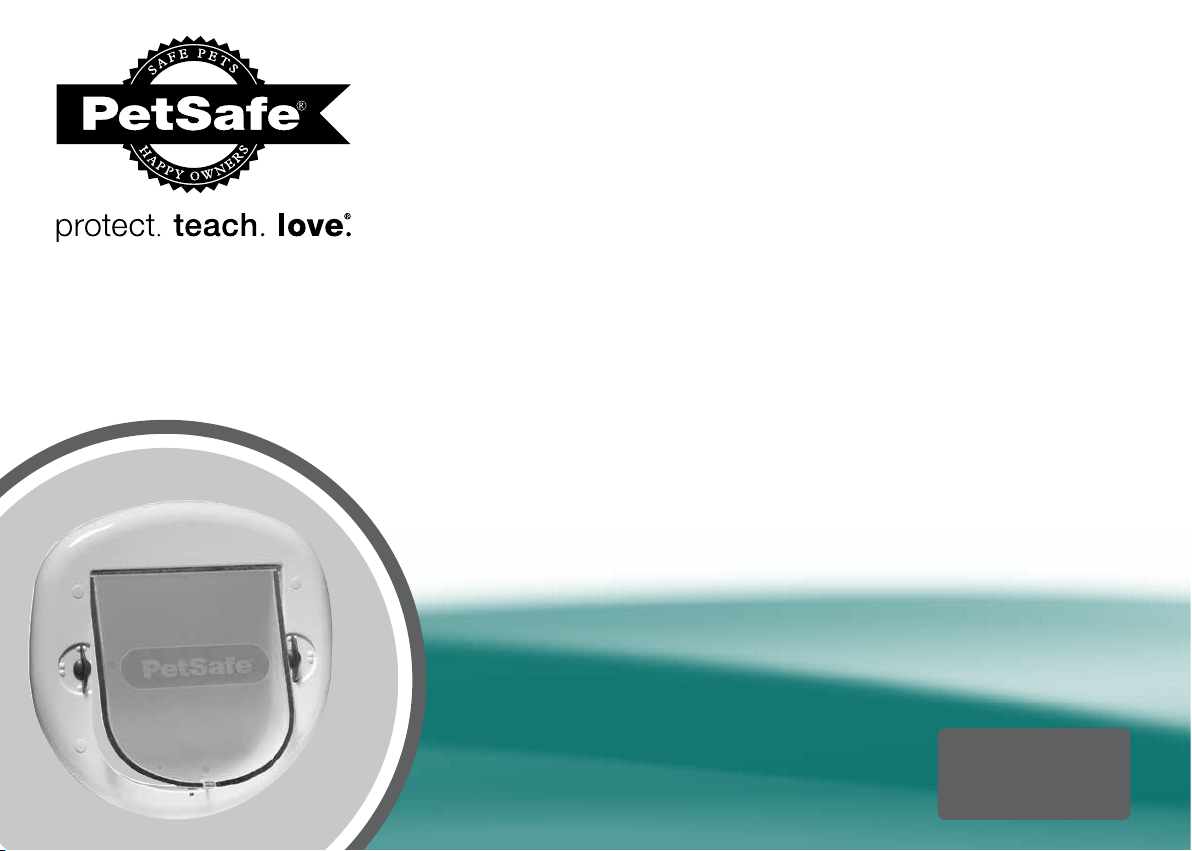
Staywell® Big Cat / Small Dog Pet Door
®
Porte Staywell
Staywell
®
para gatos grandes y perros pequeños
®
per gatti di taglia grande e cani di taglia piccola
®
Grosse Katze/kleiner Hund Haustiertuere
pour gros chats et petits chiens
®
Grote kat / kleine hond luik
Please read this entire guide before beginning
Veuillez lire ce manuel en entier avant de commencer
Gelieve deze gids volledig door te lezen voordat u begint
Por favor, lea detenidamente este manual antes de empezar
Si prega di leggere attentamente la guida al uso prima di utilizzare il collare
Bitte lesen Sie die gesamte Betriebsanleitung vor dem Train
200
Series
Série
Serie
Serie
Serie
Serie
Hereinafter Radio Systems Corporation, Radio Systems PetSafe Europe
Ltd., Radio Systems Australia Pty Ltd. and any other affiliate or Brand
of Radio Systems Corporation may be referred to collectively as
ENFRES
“We” or “Us”.
IMPORTANT SAFETY INFORMATION
Explanation of Attention Words and Symbols used
in this guide
This is the safety alert symbol. It is used to alert
you to potential personal injury hazards. Obey all
NL
safety messages that follow this symbol to avoid
possible injury or death.
WARNING indicates a hazardous situation
which, if not avoided, could result in death or
serious injury.
CAUTION, used with the safety alert symbol,
indicates a hazardous situation which, if not
avoided, could result in minor or moderate injury.
IT
NOTICE is used to address practices not related
to personal injury.
DE
•When children are present in the home, it is important to
may be misused by a child resulting in the child accessing potential hazards that may be
on the other side of the pet door. Purchasers/Homeowners with swimming pools should
ensure that the pet door is monitored at all times and that the swimming pool has
adequate barriers to entry. If a new hazard is created inside or outside of your home,
which may be accessed through the pet door, Radio Systems
that you properly guard access to the hazard or remove the pet door. The closing panel
or lock, if applicable, is provided for aesthetic and energy efficiency purposes and is not
intended as a security device. Radio Systems Corporation will not be liable for
unintended use and the purchaser of this product accepts full responsibility for oversight
of the opening it creates.
•Power Tools. Risk of severe injury; follow all safety instructions for power tools. Be sure to
always wear proper safety equipment.
determine, along with a licensed contractor, its suitability in a given installation. This pet
door is not a fire door. It is important for the owner and contractor to consider any risks
that may be present inside or outside of the pet door, and any risks that may be created
by subsequent changes to your property and how they may relate to the existence and
use, including misuse of the pet door.
•Be sure to use heavy scissors for cutting the tunnel extension pieces.
•If cutting a metal surface, be aware of sharp edges to prevent injury.
•If homeowner’s door or other application is not level, the pet door must be marked level
to swing properly.
•When applying cutting template there should be a minimum of 75 mm between
the bottom and sides of the door and the outer edge of the template to maintain the
structural integrity of the door.
•Use a manual screwdriver to tighten screws. Do not overtighten. Overtightening can
warp the pet door frame.
•It is not possible to cut holes in tempered or double pane glass except at the time of
manufacture. Consult a professional glazier or glass manufacturer to install the pet door
in a glass door or window.
consider the pet door during child proofing activities, the pet door
Corporation recommends
•The user, prior to installation, must become familiar with all
building codes that may affect the installation of the pet door and
•Keep these instructions with important papers; be sure to transfer these
instructions to the new owner of the property.
2
www.petsafe.net
Your PetSafe® Pet Door...
EN
Thank you for choosing PetSafe® Brand. Our mission is to be the most
trusted brands in the pet ownership experience. We want to ensure your
pet’s safety by providing you with the products and techniques to create
the most comfortable lifestyle for your pet. If you have any questions,
please contact the Customer Care Centre. For a listing of Customer Care
Centre telephone numbers, visit our website at www.petsafe.net.
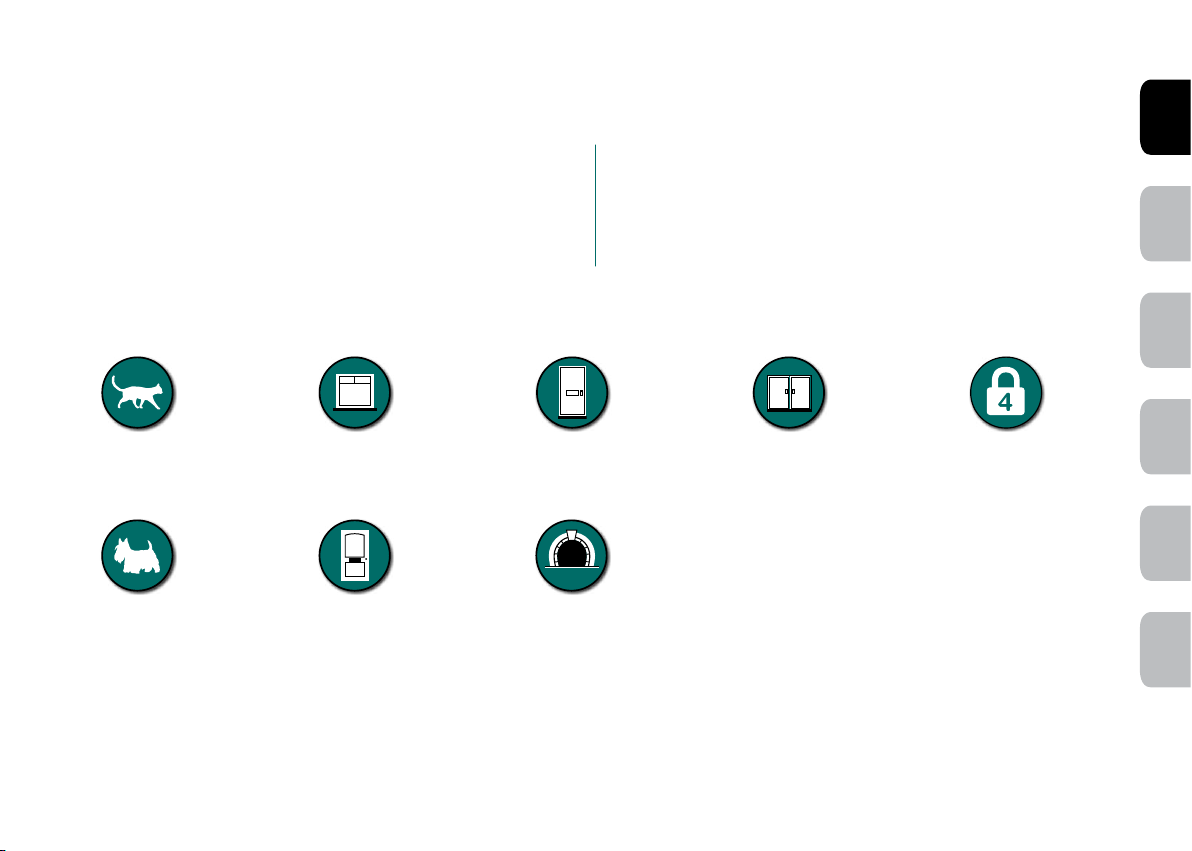
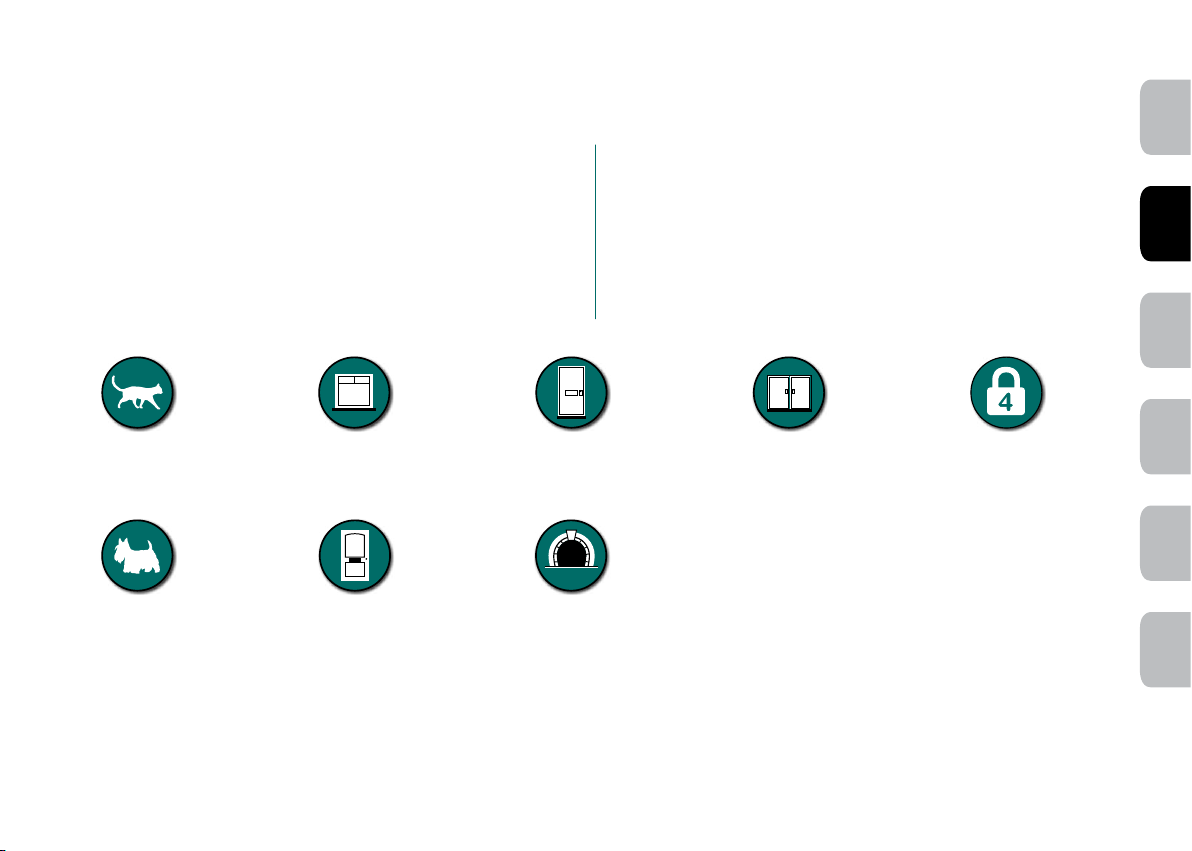
Cat
and double glazed*
Small Dog
Fits wooden doors
Tunnel included is
suitable for most
thickness of doors
To get the most protection out of your warranty, please register your
product within 30 days at www.petsafe.net. By registering and
keeping your receipt, you will enjoy the product’s full warranty and
should you ever need to call the Customer Care Centre, we will be able
to help you faster. Most importantly, PetSafe
your valuable information to anyone. Complete warranty information is
available online at www.petsafe.net.
Fits patio/sliding doors*Fits PVC/uPVC/metalFits glass windows & doors, single
®
will never give or sell
4-way locking system
FR
ES
DEITNL
All PetSafe® pet doors are suitable to fit any door or partition although additional materials and competent DIY skills may be required.
* It is not possible to cut holes in toughened glass or double glazed units except at the time of manufacture. Please consult a glazier.
Replacement flaps available online
3
Before installing your pet door
ENFRES
please read the following step-bystep instructions carefully.
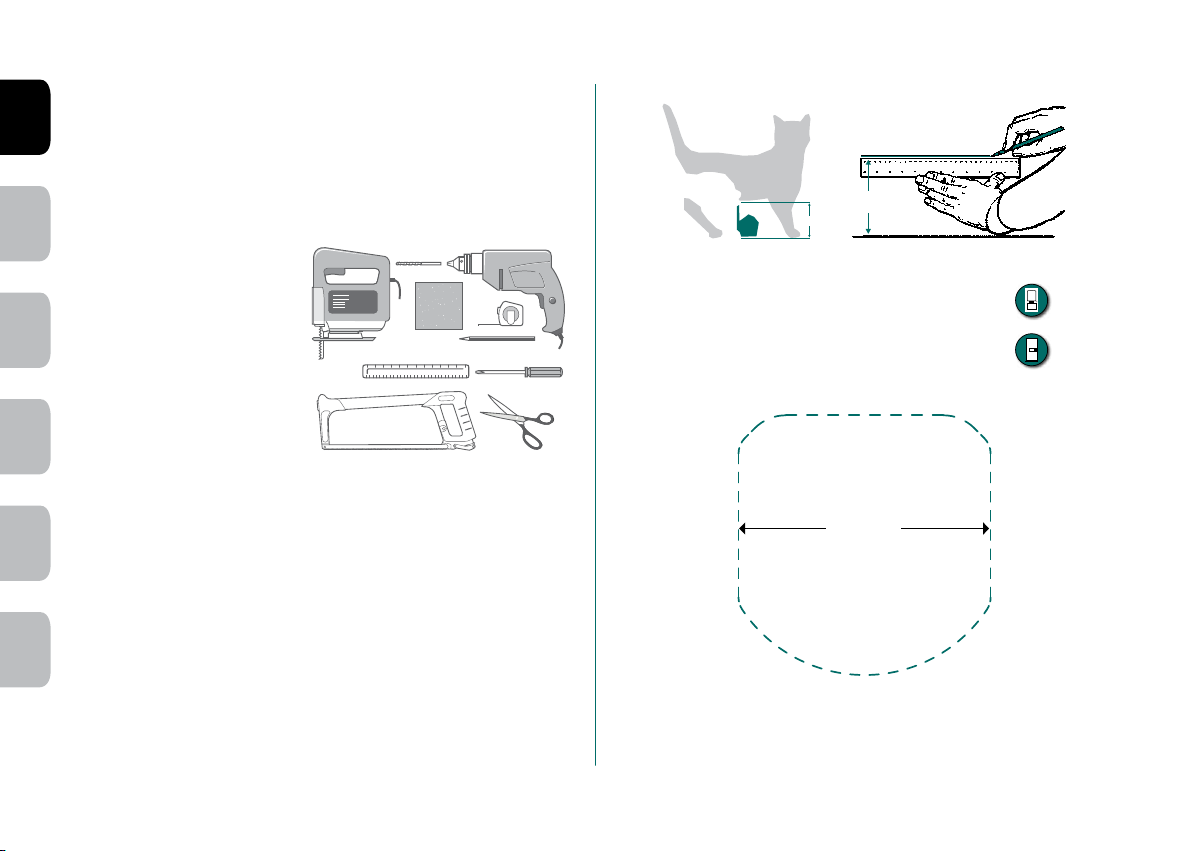
Tools required
• Pencil
• Ruler
• Jig or Keyhole Saw
• Drill
• 13 mm (
• Screwdriver
NL
• Tape measure
• Sand paper
• Scissors
• Hacksaw or screw cutter
• Silicone adhesive (optional)
• Duct tape (optional)
1
/2”) drill bit
FIG. 1 FIG. 2
(x)
(x)
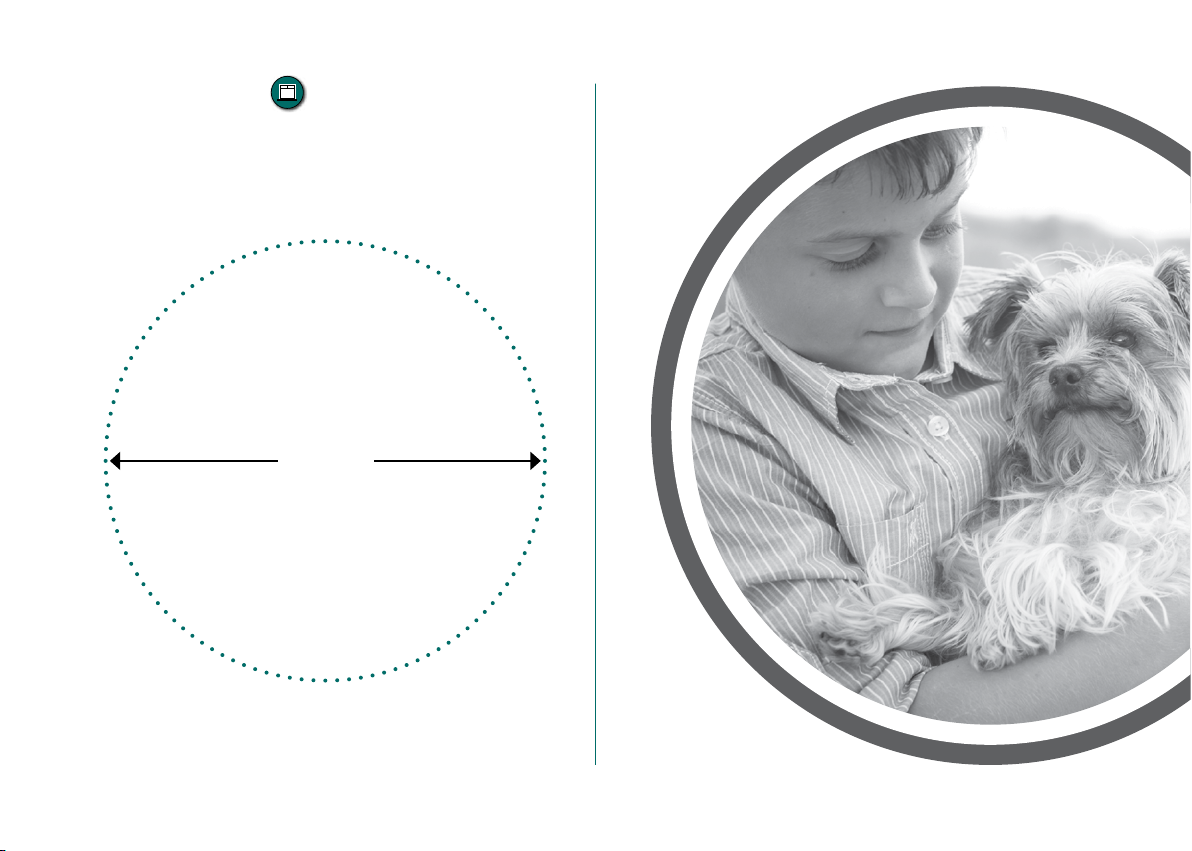
Cutting a hole for your pet door
a) In Wood and PVC/uPVC/Metal
The pet door requires a cut-out with
a width of 228 mm (Fig. 3).
FIG. 3
Wooden doors
PVC/uPVC/Metal
Measurement and marking
IT
Measure the belly height of your pet (x). This is usually 100 mm to 150 mm (
Mark this measurement on the outside of your door and draw a straight
horizontal line (Fig. 2).
Please bear in mind that this line is eventually where the
bottom of the hole you cut in your door will be. The frame of
DE
the pet door will be slightly lower. If necessary, this line may
have to be raised slightly to account for this.
When applying cutting template there should be a minimum of 75 mm
between the bottom and sides of the door and the outer edge of the
cutting template to maintain the structural integrity of the door.
4
228 mm
Fig.1).
Not to scale - for best results you should
refer to the enclosed cutting template.
www.petsafe.net

b) In Glass
* It is not possible to cut holes in toughened glass or double glazed units
except at the time of manufacture. Please consult a glazier.
The pet door requires a circular cut-out with a diameter of
263 mm(Fig. 4).
FIG. 4
Glass windows & doors, single and double glazed*
263 mm
Not to scale - for best results you should refer
your glazier to the enclosed cutting template.
Replacement flaps available online
5
c) In Patio/Sliding Doors
* It is not possible to cut holes in toughened glass or double glazed
ENFRES
units except at the time of manufacture. Please consult a glazier.
Follow the instructions for “Glass” by referring your glazier to the
enclosed cutting template.
The position that the pet door is fitted will depend on the way your
patio/sliding doors open.
Example only:
Patio/sliding doors*
Select the right fitting for YOUR patio/sliding doors:
NL
IT
DE
Fixed panel
6
Outside of house
Pet door
(external frame)
Pet door
(internal frame)
Inside of house
Moving/
sliding panel
www.petsafe.net
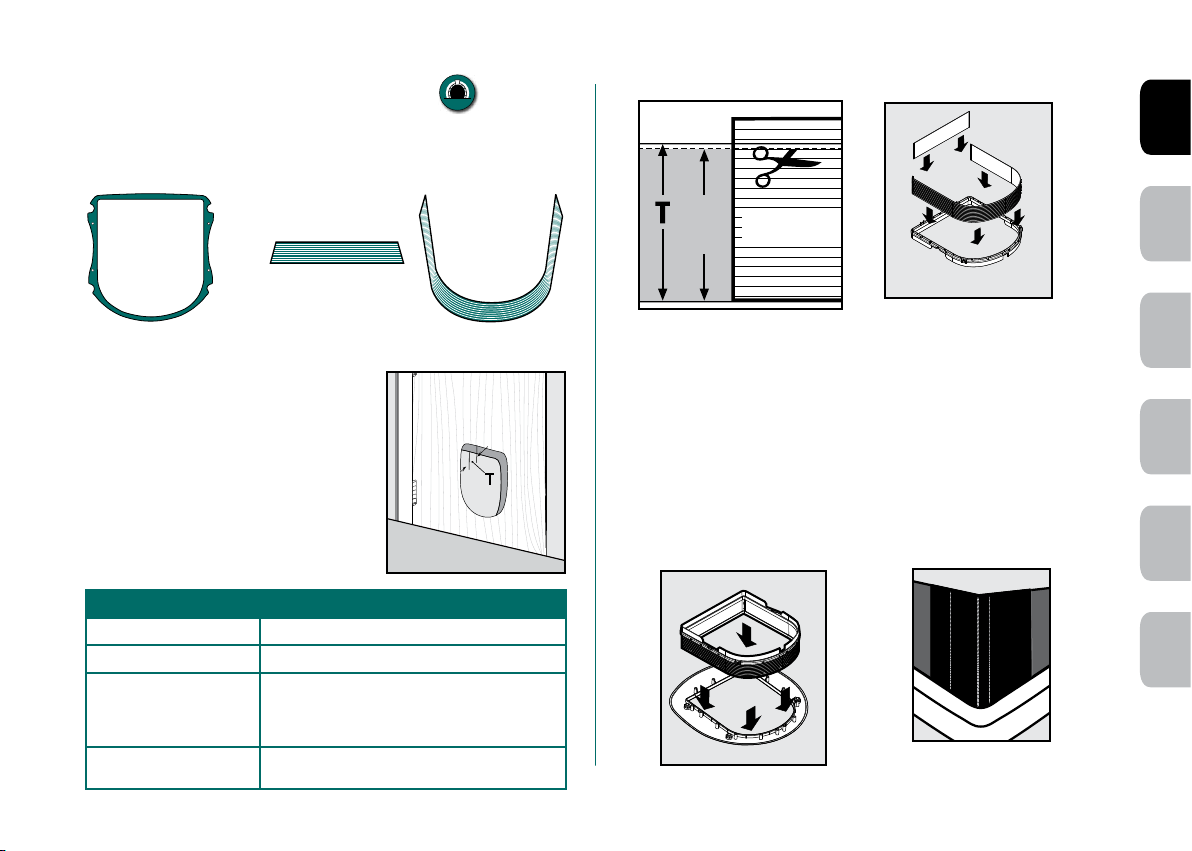
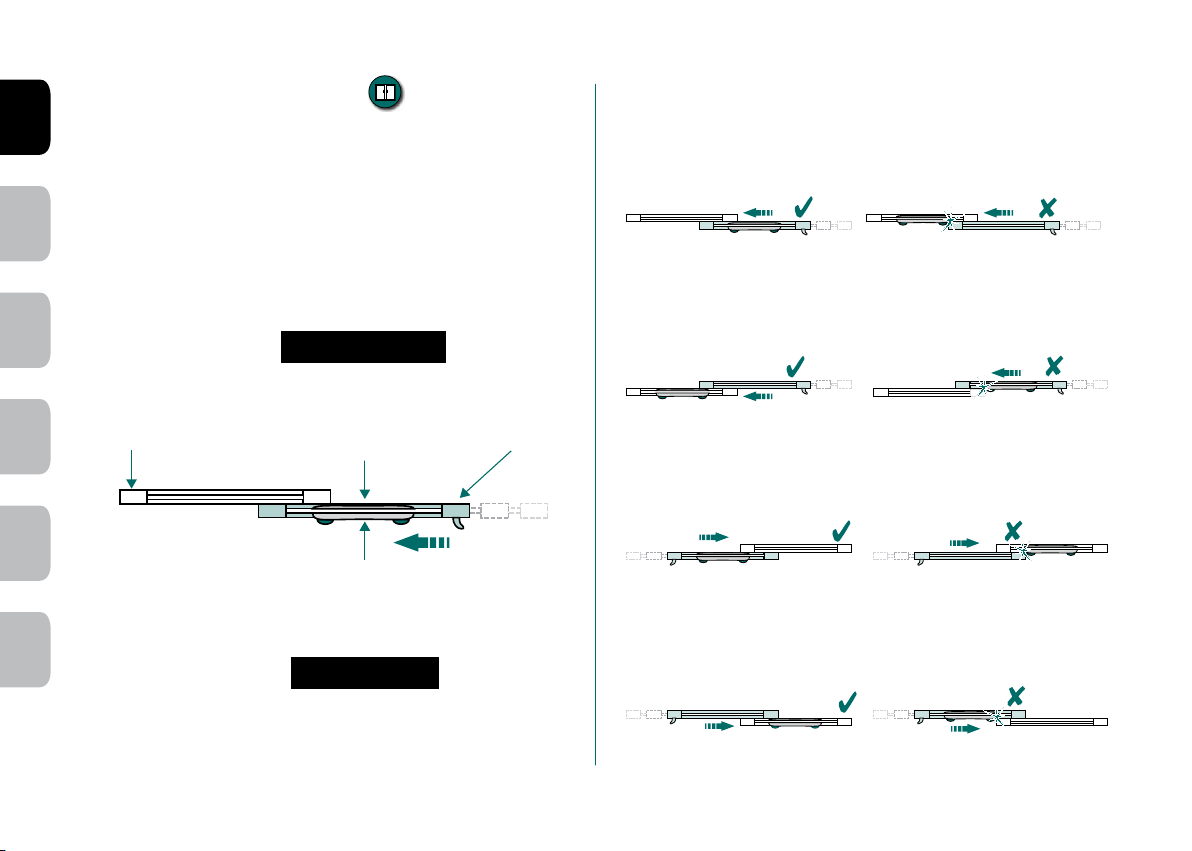
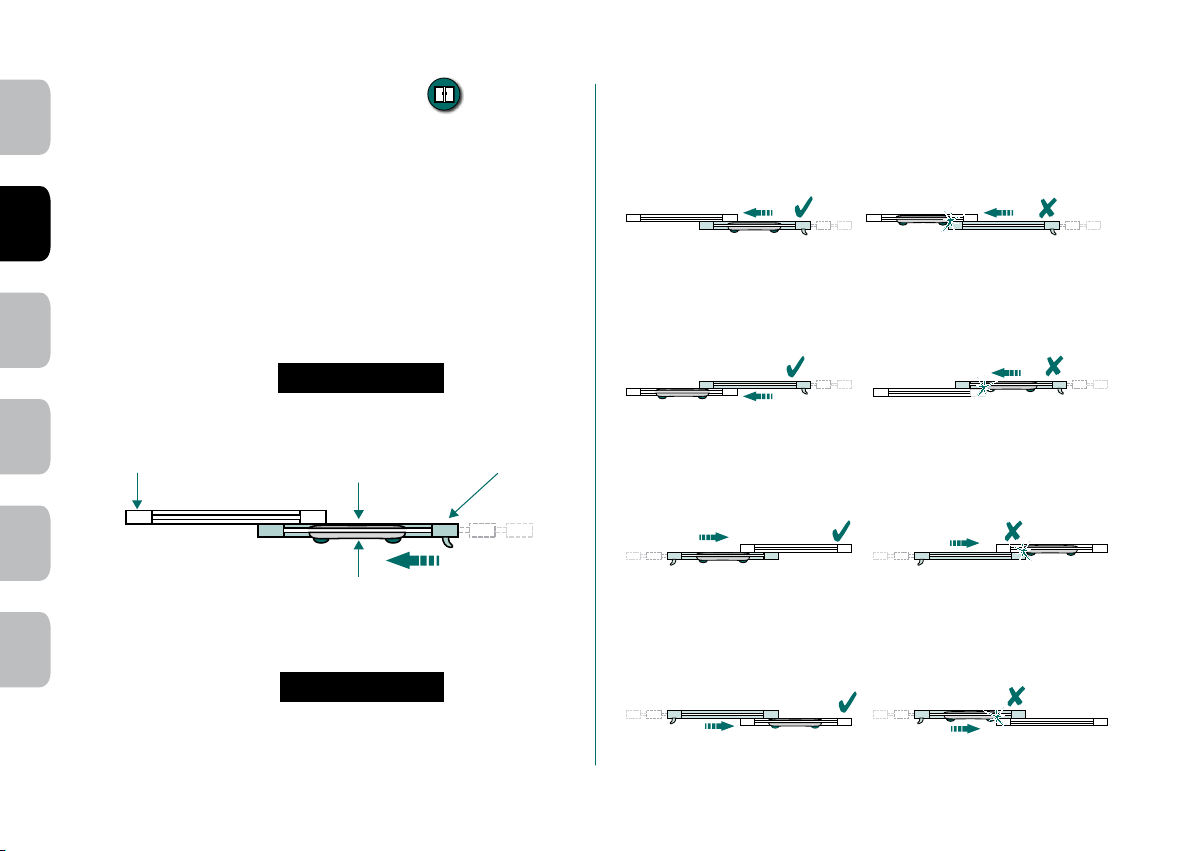
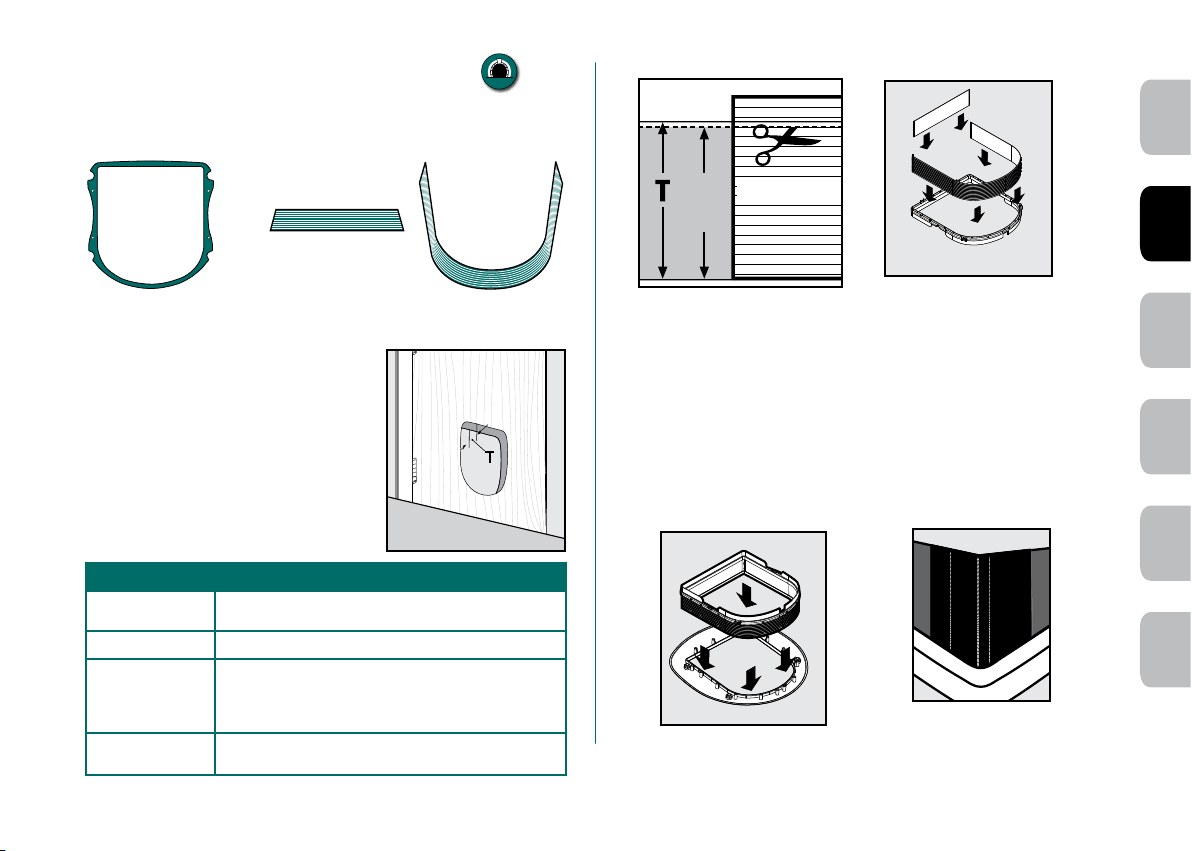
Optional Tunnel Fitting
Optional tunnel
If required, the optional tunnel should be fitted at this stage. Use the
tunnel to bridge the gap between the external and internal frames to
a short extension for your pet door.
form
FIG. 6
FIG. 7
EN
Tunnel Template
Tunnel
Extension Pieces Short and Long
FIG. 5
Measure the thickest part (T) of your cutout. Note this measurement (Fig. 5).
Depending on the thickness of your door,
you may not need the tunnel template and
tunnel extension pieces or the tunnel
extension pieces may need to be trimmed
for your installation. Use the “Tunnel
Extension Pieces Cutting Guide” (Chart 1)
to determine this.
CHART 1
Tunnel Extension Pieces Cutting Guide
Cut-Out Thickness (T) Tunnel Extension Pieces Cutting Instructions
5 mm to13 mm DO NOT use tunnel extension pieces
If cut-out thickness (T) does not line up with a groove
13 mm to 44 mm
44 mm to 51 mm
on the tunnel extension then cut to next groove that is
smaller than the cut-out thickness (T) (See Fig. 6). Use
tunneltemplate and tunnel extension pieces.
No cutting of tunnel extension pieces is needed. Use
tunneltemplate and tunnel extension pieces.
and tunnel template.
cut to
next
Tunnel Extension
smaller
line
Pieces
Insert the long tunnel extension into channel of “U”-shaped section of
tunnel template. Insert the short tunnel extension into channel of straight
section of tunnel template (Fig. 7).
Turn over assembled tunnel and insert tunnel extension pieces of
assembled tunnel between frame posts and lip on flap opening of
external frame (frame without the flap). Tunnel template should be facing
up (Fig. 8).
OPTIONAL: Use duct tape in the corners of tunnel extension pieces to
help secure in place and to improve weather resistance (Fig. 9).
FIG. 8
FIG. 9
FR
ES
DEITNL
Replacement flaps available online
7
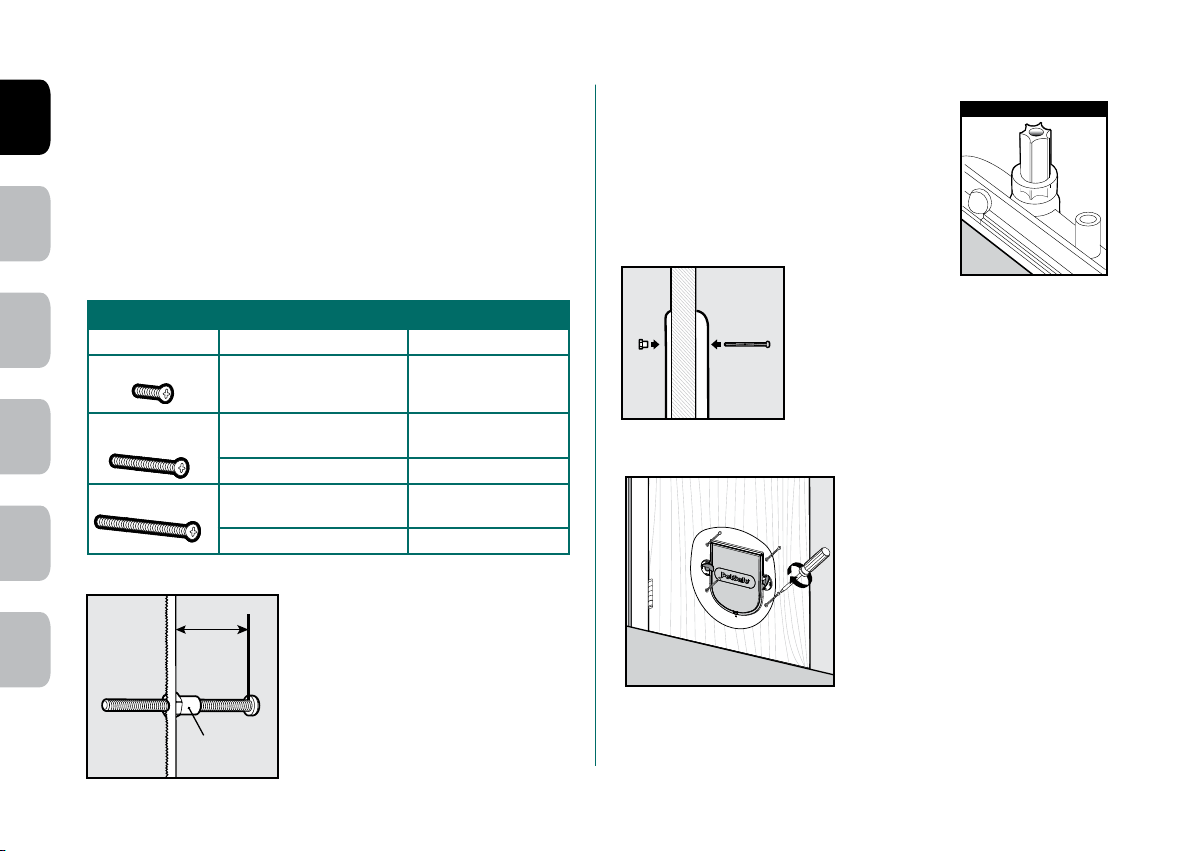
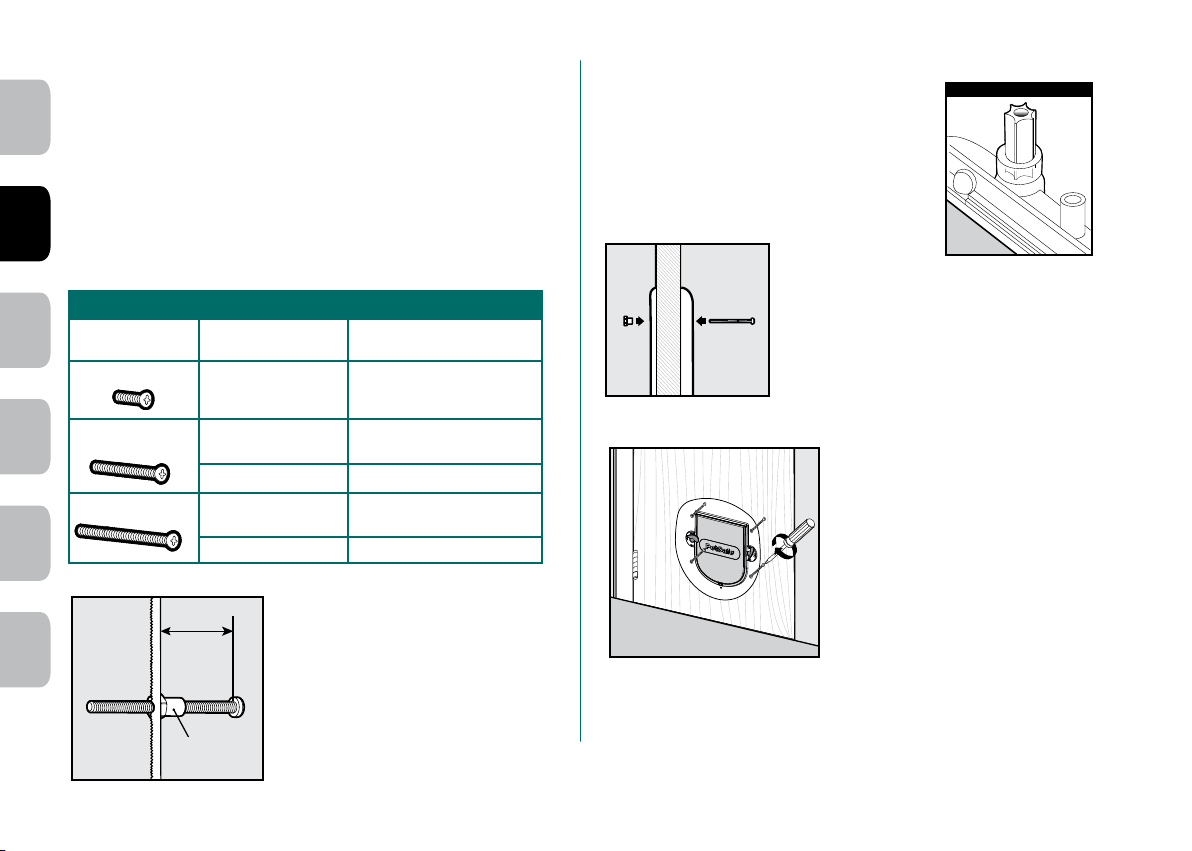
Fitting your pet door
Your PetSafe® pet door is fitted with the red 4-way locks on
ENFRES
the inside of your house.
Before installing the pet door, you need to determine which screw length
is needed for your installation. Depending on your door thickness, the
screws may need to be trimmed with a hacksaw or screw cutter. If the
screws are too long, the blanking plugs will not fit. Use the “Screw
Selection Guide” (Chart 2) to select which screw to use and if it needs to
be trimmed for your installation.
CHART 2
Screw Selection Guide
Screw Length Cut-Out Thickness (T) Trimming Instructions
NL
15 mm screw 5 mm to 14 mm
37 mm screw 14 mm to 27 mm
53 mm screw
IT
FIG. 10
DE
T+
27 mm to 36 mm
36 mm to 43 mm Trim screw to door thickness
to
51 mm No trimming needed.
43 mm
To trim screw, insert binder post onto end
of screw to protect thread. Using the
(8mm)
binder post as a guide, cut screw to
correct length with a hacksaw or screw
cutter (Fig. 10). After cutting to length,
remove the binder post to clean screw
Binder
Post
threads. Repeat process with
remainingscrews.
No trimming needed.
Trim screw to door thickness
8 mm
(T) +
No trimming needed.
8 mm
(T) +
(Fig. 10).
(Fig. 10).
OPTIONAL: If the door cut-out thickness (T) is
25 mm or more, insert the screw guides into the
FIG. 11
OPTIONAL
screw holes on the backside of the internal
frame (frame with flap and 4-way locks)
(Fig. 11). The screw guides help guide the
screws through the screw holes from the internal
frame to the externalframe.
FIG. 12
Place external frame
(with assembled
tunnel if needed for your installation) into
cut-out. Next, place internal frame into cut-out
aligning with external frame. Insert binder
posts into screw holes in external frame from
back of door (Fig. 12). Hold binder post in
place and insert appropriate length screw into
screw holes in internal frame.
FIG. 13
Helpful Tip: Look through screw
holes to help align internal and
externalframes.
Use a screwdriver to evenly tighten
screws throughout frame (Fig. 13).
After tightening screws, check to make
sure flap swings freely and moves back
to the center to meet magnet on bottom
of internal frame. It may be necessary
to adjust screws to make sure frames
cover cut-out and the flap swings freely.
NOTICE: Use a manual screwdriver to tighten screws. Do not
overtighten. Overtightening can warp the pet door frame.
8
www.petsafe.net

FIG. 14
Insert blanking plugs into screw holes in internal
and external frames for a polished look (Fig. 14).
Blanking
Plug
OPTIONAL: Apply silicone adhesive inside
threshold where frames, tunnel extension pieces,
and tunnel template meet for weather resistance.
EN
FR
Using the 4-way
4-way locking system
locking system
Your PetSafe® pet door is fitted with the red 4-way locks on
the inside of your house.
The 4-way locks allow you to control your pet’s access in and out of
your home.
It is a good idea not to use the 4-way locks until your pet is thoroughly
familiar with using the door. Your pet may become confused as to why
you have installed it.
Replacement flaps available online
• Out only • In only
ES
DEITNL
• In or out • Fully locked
9

Training your pet to use the
ENFRES
pet door
Most pets will learn to use the pet door almost at once but there are a few
who may be a little nervous at first. The following tips will help your pet to
take full advantage of the outdoor freedom and indoor comfort - which
you want for your pet – and which your new pet door provides.
The most important rule is to be patient with your pet. Don’t be in a hurry.
Let your pet work out for itself that it can go in and out of doors. Don’t
force it through the flap or it may become frightened.
Many pet owners install pet doors when they move house. If this applies
to you, make sure that your pet is familiar with his or her surroundings
NL
before you fit the pet door. Take it on supervised trips outdoors on a lead
and make sure it also feels secure and comfortable in its new indoor
environment. Cats especially can develop long lasting fears in
unfamiliar surroundings.
Once you have installed your pet door, leave the flap open for some
time. You can do this by using a long strip of masking tape; open the flap
and use the tape to keep it held open by fixing the other end of the tape
to the surface above. Make sure that the fixing is secure so that the flap
can not fall down accidentally. Let your pet become familiar with it and
go in and out freely.
IT
Establish a motive for your pet to use the door. For cats, a good one
is food. First feed the cat near the door, inside and then near the door
outside. Repeat as often as you need to. Most cats, especially kittens,
also have a strong urge for freedom, perhaps to hunt. Cats are also social
creatures - they enjoy the company of other cats. This can be another
DE
reason for them to explore outside.
appropriately. Repeat several times congratulating the dog every time he
uses the pet door.
If this is something new to your pet, it may take some patience to teach
your pet how to use it. When your pet makes progress give them a lot of
praise - they’ve earned it!
Replacement Flap Fitting
Instructions
1. From the inside of the house, ensure that the 4-way locks are in the off
position (to allow entry and exit).
2. Firmly but carefully, prise the hinges on the flap from the inside of the
frame. You may find it easier to remove the pet door from your door to
do this. If so, you should remove the blanking plugs to reveal the screws
and binder posts, which you should unscrew. Once removed, the inside
frame will come away from your door and the flap can be removed.
3. Insert the new flap into the inside frame ensuring that the word PetSafe
reads from left to right.
4. If necessary, reposition the pet door frames, into the hole in your door
and use the screws and binder posts to clamp and secure firmly back
into place. Be careful not to overtighten the screws. Re-cover the screw
holes with the blanking plugs.
5. Finally, reposition the 4-way locks to the desired setting.
Replacement flaps are available online at www.petsafe.net or by
contacting the Customer Care Centre. For a listing of Customer Care
Centre telephone numbers, visit our website at www.petsafe.net.
®
Dogs can be trained to use the pet door in a matter of hours. Dogs
respond to encouragement, repetition and especially play, so why
not use the door as part of a game? E.g. throwing a ball through the
pet door. Pat and congratulate the dog when the pet door is used
10
www.petsafe.net

Cleaning the pet door
Your pet door is constructed in the highest quality material with a
toughened flap and has been designed to last for many years.
To maintain its appearance, occasional wiping with a damp cloth
is all that is necessary.
Warranty
Three Year Non-Transferrable Limited Warranty
This Product has the benefit of a limited manufacturer’s warranty.
Complete details of the warranty applicable to this Product and its terms
can be found at www.petsafe.net and/ or are available by contacting
your local Customer Care Centre.
• Radio Systems PetSafe Europe Ltd, 2nd Floor, Elgee Building,
Market Square, Dundalk, Co. Louth, Ireland
• Radio Systems Corporation, 10427 PetSafe Way, Knoxville, TN
37932 USA
Australia/New Zealand – In compliance with the Australian
Consumer Law, Warranties Against Defects, effective January 1, 2012,
warranty details of this Product are as follows: Radio Systems Australia
Pty Ltd. (hereinafter referred to as “Radio Systems”) warrants to the
original retail purchaser, and not any other purchaser or subsequent
owner, that its Product, when subject to normal and proper residential
use, will be free from defects in material or workmanship for a period
of three (3) years from the purchase date. An “original retail consumer
purchaser” is a person or entity who originally purchases the Product,
or a gift recipient of a new Product that is unopened and in its original
packaging. When serviced by Radio Systems Customer Service, Radio
Systems covers labour and parts for the first three years of ownership;
after the first three years, a service or upgrade charge will apply relative
to replacement of the Product with new or refurbished items at Radio
Systems’ sole discretion.
The limited warranty is non-transferable and shall automatically terminate
if the original retail consumer purchaser resells the Radio Systems Product
or transfers the property on which the Radio Systems Product is installed.
This Limited Warranty excludes accidental damage due to dog chews;
lightning damage; or neglect, alteration, and misuse. Consumers who
purchase products outside of Australia, New Zealand, or from an
unauthorised dealer will need to return the Product to the original place of
purchase for any warranty issues.
Pease note that Radio Systems does not provide refunds, replacements,
or upgrades for change of mind, or for any other reason outside of these
Warranty terms.
Claims Procedure: Any claim made under this Warranty should be made
directly to Radio Systems Australia Pty Ltd. Customer Care Centre at:
Radio Systems Australia Pty Ltd.
PO Box 7266, Gold Coast Mail Centre QLD 9726, Australia
Australia Residents: 1800 786 608
New Zealand Residents: 0800 543 054
Email: info@petsafeaustralia.com.au
To file a claim, a proof of purchase must be provided. Without a proof
of purchase, Radio Systems will not repair or replace faulty components.
Radio Systems requests the Consumer to contact the Radio Systems
Customer Care Centre to obtain a Warranty Return number, prior
to sending the Product. Failure to do so may delay in the repair or
replacement of the Product.
If the Product is deemed to be faulty within 30 days from date of original
purchase, Radio Systems will organise for a replacement to be sent in
advance of returning the faulty Product. A Post Bag will be included with
the replacement Product for the return of the faulty Product. The Product
must be returned within 7 days of receiving the replacement. If the Product
is deemed to be faulty after 30 days from the date of original purchase,
the consumer will be required to return the Product to Radio Systems at the
consumer’s own expense. Radio Systems will test and replace the faulty
unit or its components and return to the consumer free of charge, provided
the Product is within its said warranty period. This warranty is in addition
to other rights and remedies available to you under the law. Radio
EN
FR
ES
DEITNL
Replacement flaps available online
11

Systems goods come with guarantees that cannot be excluded under the
Australia Consumer Law. You are entitled to a replacement or refund for a
major failure and for compensation for any other reasonably foreseeable
ENFRES
loss or damage. You are also entitled to have the goods repaired or
replaced if the goods fail to be of acceptable quality and the failure does
not amount to a major failure.
Should you have any queries or require any further information, please
contact our Customer Care Centre on 1800 786 608 (Australia) or 0800
543 054 (New Zealand).
Terms of Use and Limitation
ofLiability
NL
1. Terms of Use
Use of this Product is subject to your acceptance without modification of
the terms, conditions and notices contained herein. Use of this Product
implies acceptance of all such terms, conditions and notices. If you do
not wish to accept these terms, conditions and notices, please return the
Product, unused, in its original packaging and at your own cost and risk
to the relevant customer care centre together with proof of purchase for a
full refund.
IT
2. Proper Use
This Product is designed for use with pets where training is desired. The
specific temperament or size/weight of your pet may not be suitable
for this Product (please refer to this Installation Guide for details). Radio
Systems Corporation recommends that this Product is not used if your
pet is aggressive and accepts no liability for determining suitability in
DE
individual cases. If you are unsure whether this Product is appropriate for
your pet, please consult your veterinarian or certified trainer prior to use.
Proper use includes, without limitation, reviewing the entire Operating
Guide and any specific safety information statements.
3. No Unlawful or Prohibited Use
This Product is designed for use with pets only. This pet training device is
not intended to harm, injure or provoke. Using this Product in a way that
is not intended could result in violation of Federal, State or local laws.
4. Limitation of Liability
In no event shall Radio Systems Corporation or any of its associated
companies be liable for (i) any indirect, punitive, incidental, special or
consequential damage and/or (ii) any loss or damages whatsoever
arising out of or connected with the misuse of this Product. The Purchaser
assumes all risks and liability from the use of this Product to the fullest
extent permissible by law.
5. Modification of Terms and Conditions
Radio Systems Corporation reserves the right to change the terms,
conditions and notices governing this Product from time to time. If such
changes have been notified to you prior to your use of this Product, they
shall be binding on you as if incorporated herein.
12
www.petsafe.net

13
Radio Systems Corporation, Radio Systems PetSafe Europe Ltd., Radio
Systems Australia Pty Ltd. et tout autre filière ou marque de Radio Systems
Corporation peuvent-être collectivement désignées par « nous » à partir
ENFRES
de la lecture de ce document.
CONSIGNES DE SÉCURITÉ IMPORTANTES
Description des termes et symboles utilisés dans ce manuel
Ce symbole est une alerte de sécurité.
Il est utilisé pour vous alerter des
risques de blessures. Veuillez respec-
NL
IT
REMARQUE
DE
ter tous les messages de sécurité qui
suivent ce symbole pour éviter tout
risque de blessure ou de décès.
AVERTISSEMENT indique une situation dangereuse qui, si elle n'est pas
évitée, pourrait entraîner la mort ou
des blessures graves.
ATTENTION, utilisé avec un symbole
d'alerte de sécurité, indique une
situation dangereuse qui, si elle n'est
pas évitée, pourrait entraîner des
blessures légères à modérées.
AVIS, indique les pratiques qui ne
sont pas relatives aux
blessures corporelles.
•Si vous avez des enfants, veillez à ne pas oublier
domestiques. De fait, les enfants pourraient faire mauvais usage de la porte pour
animaux et s’exposer ainsi à certains dangers se trouvant à l’extérieur de celle-ci. Les
propriétaires de piscines doivent être particulièrement vigilants et doivent veiller à
surveiller en permanence l’utilisation qui est faite de la porte pour animaux. L’acheteur
veillera également à correctement sécuriser l’accès à sa piscine au moyen de
barrières adéquates. Si une nouvelle situation pouvant constituer un danger devait se
présenter, tant à l’intérieur ou à l’extérieur de votre maison, à laquelle l’enfant pourrait
être exposé à cause de la porte pour animaux, Radio Systems Corporation
recommande vivement que vous preniez toutes les mesures nécessaires pour en
sécuriser l’accès ou que vous retiriez la porte pour animaux. Le panneau de fermeture
ou le verrou disponibles sur certains modèles de portes pour animaux sont conçus à
des fins purement esthétiques et d’économie d’énergie. Ils ne peuvent être considérés
comme des systèmes de sécurité. Radio Systems Corporation ne pourra être tenu
responsable si ce produit devait être utilisé à des fins autres que celles auxquelles il est
destiné. L’acheteur s’engage à utiliser ce produit en bon père de famille.
• Outils électriques. Risque de blessure grave; Veuillez respecter toutes les consignes de
sécurité pour vos outils électriques. Assurez-vous de toujours porter les équipements
de sécurité adéquats.
s’appliquer à l’installation d’une telle porte dans son logement. Il veillera en outre à
s’assurer auprès d’un entrepreneur agréé de l’opportunité du placement d’une telle
porte dans un lieu donné. La porte pour animaux domestiques n’est pas une porte
coupe-feu. Par ailleurs, le propriétaire et l’entrepreneur veilleront à prendre en
considération tout risque existant tant à l’intérieur qu’à l’extérieur de la porte pour
animaux, tout risque susceptible d’apparaître lors de transformations futures de la
propriété, et à envisager les conséquences sur ces risques de la présence et
l’utilisation, correcte ou non, de la porte pour animaux domestiques.
• Utilisez une paire de ciseaux solides pour le découpage de l’extension de tunnel.
• Si vous découpez une surface métallique, faites attention aux rebords tranchants afin
d’éviter toute blessure.
REMARQUE
•Si la porte du propriétaire ou toute autre partie impliquée n’est pas de niveau, la
•Lorsque vous fixez le gabarit de découpe, un espace d’au moins 75 mm doit être
•Utilisez un tournevis manuel pour serrer les vis. Ne serrez pas de manière excessive.
•Il est impossible de découper des trous dans un verre double épaisseur ou un verre
•Conservez ces instructions et transférez-les à son nouveau propriétaire, le
cas échéant.
chatière doit l’être afin de pouvoir se rabattre correctement.
présent entre le bas et les côtés de la porte et le coin supérieur extérieur du gabarit;
cela permet de maintenir l’intégrité structurelle de la porte.
Un serrage excessif pourrait déformer le cadre de la chatière.
trempé, excepté au moment de sa fabrication. Consultez un vitrier professionnel ou un
fabricant de verre pour poser la chatière dans une porte en verre ou une fenêtre.
de bien sécuriser la porte pour animaux
•Avant d’installer la porte pour animaux, l’utilisateur veillera
à bien prendre connaissance des restrictions qui pourraient
14
www.petsafe.net
Votre chatière PetSafe®...
EN
Merci d’avoir choisi PetSafe®. Notre objectif est d’être reconnus comme
les marques la plus fiable par les propriétaires d’animaux. Notre volonté
est de garantir la sécurité de votre animal en mettant à votre disposition
des produits et des techniques susceptibles de lui assurerle style de vie
le plus confortable. Nous voulons garantir la sécurité de votre animal en
vous donnant les outils et les techniques nécessaires à un dressage réussi.
Pour connaître les numéros de téléphone du Service clientèle, visitez
notre site Internet www.petsafe.net.
Chat
Convient aux fenêtres et aux
portes en verre à simple
Convient au PVC, au
PVC rigide et au métal
ou à double vitrage*
Petit chien
Convient aux portes
en bois
Le tunnel inclus convient à la majorité
des épaisseurs de portes
Pour bénéficier pleinement de notre garantie, veuillez enregistrer votre
article dans les 30 jours sur le site www.petsafe.net. Grâce à cet
enregistrement et en conservant le reçu, votre produit sera totalement
couvert par notre garantie. Si vous avez la moindre question, veuillez
contacter notre Service clientèle, nous serons heureux de vous aider.
Enfin, vous pouvez avoir la certitude que PetSafe
jamais les informations personnelles de ses clients à des tiers. Une
description complète de la garantie est disponible sur le site
Internet www.petsafe.net.
Convient aux portes coulissantes
ou panoramiques*
®
ne communiqué
Système de verrouillage
à 4 positions
FR
ES
DEITNL
Les chatières PetSafe® s’adaptent à toutes les portes et à toutes les cloisons, bien que des matériaux supplémentaires et des compétences en bricolage se révèleront peut-être nécessaires.
* Il n’est pas possible de découper du verre trempé ou un double vitrage sauf au moment de la fabrication. Veuillez consulter un vitrier.
Battants de rechange disponibles sur notre site internet
15
Avant d’installer la chatière, veuillez
ENFRES
lire attentivement les instructions
étape par étape suivantes.
FIG. 1 FIG. 2
Outils nécessaires
• Crayon
• Règle
• Scie sauteuse ou
scie à guichet
• Perceuse
• Foret de 13 mm (
• Tournevis
NL
• Ruban à mesurer
• Papier abrasif
• Ciseaux
• Scie à métaux ou
pince coupe vis
• Adhésif en silicone (en option)
• Ruban adhésif (en option)
1
/2”)
Mesure et marquage
IT
Mesurez la hauteur de votre animal au niveau du ventre (x). Elle est en
général comprise entre 100 mm et 150 mm (Fig. 1).
Mesurez cette hauteur sur votre porte et tracez une ligne horizontale (Fig. 2).
Gardez à l’esprit que cette ligne correspondra en fait à la
limite inférieure du trou que vous allez découper dans la
porte. L’encadrement de la chatière sera situé un peu plus
DE
bas. En cas de besoin, il est peut-être nécessaire de tracer la
ligne plus haut en prenant en compte l’encadrement.
Lorsque vous fixez les instructions de découpage, un espace d’au moins
75 mm doit être présent entre le bas et les côtés de la porte et le coin
supérieur extérieur des instructions de découpage; cela permet de
maintenir l’intégrité structurelle de la porte.
(x)
(x)
Découper un trou pour
la chatière
Portes en bois
PVC, PVC rigide ou métal
a) Dans le bois, le PVC, le PVC
rigide et le métal
La chatière nécessite une ouverture d’une largeur de 228 mm. (Fig. 3).
FIG.3
Le schéma n’est pas à l’échelle; pour de
meilleurs résultats, consultez les instructions
de découpage inclus.
228 mm
16
www.petsafe.net
b) Dans le verre
* Il n’est pas possible de découper du verre trempé ou du double
vitrage sauf au moment de la fabrication. Veuillez consulter un vitrier.
Pour installer la chatière, il faut découper un cercle de 263 mm de
diamètre (Fig. 4).
FIG. 4
Fenêtres et portes en verre, simple ou double vitrage*
263 mm
Le schéma n’est pas à l’échelle; pour de
meilleurs résultats, montrez les instructions de
découpage inclus à votre vitrier.
Battants de rechange disponibles sur notre site internet
17
c) Dans les portes coulissantes
ou panoramiques
ENFRES
* Il n’est pas possible de découper du verre trempé ou un double
vitrage sauf au moment de la fabrication. Veuillez consulter un vitrier.
Suivez les mêmes instructions que pour le verre en montrant le modèle de
découpage inclus à votre vitrier.
La position de la chatière dépend du sens dans lequel s’ouvrent vos
portes coulissantes ou panoramiques.
Exemple :
NL
Extérieur de la maison
Portes coulissantes ou
panoramiques*
Choisissez la forme adaptée à VOTRE porte coulissante
oupanoramique :
IT
DE
18
Partie fixe
Chatière
(encadrement extérieur)
Chatière
(encadrement intérieur)
Intérieur de la maison
Partie movile/
coulissante
www.petsafe.net
Montage du tunnel facultatif
Tunnel facultatif
En cas de besoin, le tunnel facultatif peut être encastré à ce moment-là.
Utiliser le tunnel entre les cadres avant et arrière ou pour former une petite
extension de la chatière.
L’extension de
tunnel –
Modèle de tunnel
Mesurez la partie la plus épaisse (T) de
Courte et longue
FIG. 5
votre découpe. Notez cette mesure (Fig. 5).
Selon l’épaisseur de votre porte, il se peut
que vous n’ayez pas besoin d’utiliser le
modèle de tunnel et l’extension de tunnel ou
peut-être vous faudra-t-il juste découper
l’extension de tunnel afin qu’elles s’adaptent
à votre installation. Afin le déterminer,
utilisez le «Guide de découpage l’extension
de tunnel» (Tableau 1).
TABLEAU 1
Guide de découpage de l’extension de tunnel
Épaisseur de la
découpe (T)
5 mm à13 mm NE PAS utiliser l’extension de tunnel et le modèle de tunnel.
13 mm à 44 mm
44 mm à 51 mm
Instructions de découpage de l’extension de tunnel
(T)
Si l’épaisseur de la découpe
de l’extension de tunnel, découpez à la prochaine rainure plus
petite que l’épaisseur de la découpe
modèle de tunnel et l’extension de tunnel.
Aucune découpe de l’extension de tunnel n’est nécessaire. Utilisez
le modèle de tunnel et l’extension de tunnel.
ne s’aligne pas avec une rainure
(T)
(Voir Fig. 6). Utilisez le
FIG. 6
Coupez à la
prochaine
ligne la plus
petite
L’extension de tunnel
FIG. 7
Insérez l’extension de tunnel longue dans la glissière en forme de «U»
du modèle de tunnel. Insérez l’extension de tunnel courte dans la glissière
rectiligne du modèle de tunnel (Fig. 7).
Retournez le tunnel ainsi assemblé et insérez l’extension de tunnel
du tunnel assemblé entre les tenons et la bordure du rabat du cadre
externe (cadre sans le rabat). Le modèle de tunnel doit être dirigé vers le
haut(Fig. 8).
FACULTATIF : Utilisez du ruban adhésif dans les coins de l’extension
de tunnel pour les maintenir et améliorer leur résistance aux
intempéries(Fig. 9).
FIG. 8
FIG. 9
EN
FR
ES
DEITNL
Battants de rechange disponibles sur notre site internet
19
Mettre en place la chatière
Votre chatière PetSafe® se met en place à l’aide des verrous
rouges à 4 positions sur le côté intérieur de votre maison.
ENFRES
Avant d’installer la chatière, vous devez déterminer quelle longueur de
vis convient à votre installation. Selon l’épaisseur de votre porte, il faudra
peut-être raccourcir les vis à l’aide d’une scie à métaux ou d’un outil de
coupe. Si les vis sont trop longues, les bouchons d’obturation ne
s’ajusteront pas correctement. Utilisez le “Guide de sélection des vis”
(Tableau 2) pour sélectionner les vis à utiliser et déterminer si elles
doivent être raccourcies pour correspondre à votre installation.
TABLEAU 2
Guide de sélection des vis
Longueur de
NL
la vis
Vis de 15 mm 5 mm à 14 mm
Vis de 37 mm 14 mm à 27 mm Raccourcir la vis selon l’épaisseur de
Vis de 53 mm
IT
FIG. 10
DE
Épaisseur de la
découpe (T)
27 mm à 36 mm
36 mm à 43 mm
43 mm
(8mm)
T+
Douille
Instructions de coupe
Aucune coupe requise.
(T)
+ 8 mm
(T)
+ 8 mm
(Fig. 10).
(Fig. 10).
la porte
Aucune coupe requise.
Raccourcir la vis selon l’épaisseur de
la porte
à
51 mm Aucune coupe requise.
Pour couper une vis, insérez la douille
dans l’extrémité de la vis afin de protéger
le filetage. En utilisant la douille comme
guide, coupez la vis à la bonne longueur
à l’aide d’une scie à métaux (Fig. 10).
Après avoir coupé à la bonne longueur,
retirez la douille pour nettoyer le filetage
des vis. Répétez le processus pour les
visrestantes.
FACULTATIF : Si l’épaisseur de la découpe de
votre porte (T) est de 25 mm ou plus, insérez les
FIG. 11
FACULTATIF
guides de vis dans les trous de vis à l’arrière du
cadre intérieur (cadre avec rabat et système de
verrouillage à 4 positions) (Fig. 11). Les guides
de vis permettent de guider les vis à travers les
trous de vis depuis le cadre intérieur jusqu’au
cadre extérieur.
FIG. 12
Placez le cadre
extérieur (avec le
tunnel assemblé,
si requis par votre installation) dans
l’ouverture. Placez ensuite le cadre intérieur
dans l’ouverture en l’alignant avec le cadre
extérieur. Insérez les douilles dans les trous
de vis du cadre extérieur à partir de l’arrière
de la porte (Fig. 12). Maintenez la douille et
insérez la vis de longueur adaptée dans les
trous de vis du cadre intérieur.
FIG. 13
Astuce utile : Regardez au travers
des trous de vis pour vous aidez à
aligner les cadres intérieur et extérieur.
Utilisez un tournevis pour serrer les
vis de façon homogène sur tout le
cadre (Fig. 13). Après avoir serré les
vis, vérifiez le tout pour vous assurer
que le rabat pivote librement et
revient bien au centre où il doit buter
contre l’aimant situé en bas du cadre
intérieur. Il se peut que vous ayez à
régler les vis pour faire en sorte que
les cadres couvrent bien l’ouverture créée dans la porte et que le rabat
pivotelibrement.
AVIS: Utilisez un tournevis manuel pour serrer les vis. Ne
serrez pas de manière excessive. Un serrage excessif pourrait
déformer le cadre de la chatière.
20
www.petsafe.net
 Loading...